Embed Size (px)
Citation preview

Using vRealize Code StreamvRealize Code Stream 2.1
This document supports the version of each product listed andsupports all subsequent versions until the document isreplaced by a new edition. To check for more recent editions ofthis document, see http://www.vmware.com/support/pubs.
EN-002153-00

Using vRealize Code Stream
2 VMware, Inc.
You can find the most up-to-date technical documentation on the VMware Web site at:
http://www.vmware.com/support/
The VMware Web site also provides the latest product updates.
If you have comments about this documentation, submit your feedback to:
Copyright © 2016 VMware, Inc. All rights reserved. Copyright and trademark information.
VMware, Inc.3401 Hillview Ave.Palo Alto, CA 94304www.vmware.com
Contents
Using vRealize Code Stream 5
1 Introducing vRealize Code Stream 7
Core Architectural Principles 8Roles and Responsibilities of Personas 9Integrating vRealize Code Stream with External Systems 10Key Release Automation Concepts 11
2 Using Release Automation 13
Modeling a Release Pipeline Checklist 13
3 Managing Release Automation 57
Clone a Task 57Delete a Task or a Cloned Task 58Copy a Release Pipeline 58Delete a Release Pipeline 58
4 Viewing Pipeline Execution Reports 59
View the Success Rate of the Executed Pipelines 59View Failed Pipelines 59
5 Working with the Release Dashboard 61
View the Release Status 61
6 vRealize Code Stream Execution Engine and Plug-in Framework 63
Troubleshooting the Execution Engine 63
7 vRealize Code Stream REST API and Example Scripts 65
Exporting a Release Pipeline 65Import a Release Pipeline 67Java Code to Run a Release Pipeline 68Example Script to Run a Release Pipeline 74
Index 77
VMware, Inc. 3

Using vRealize Code Stream
4 VMware, Inc.

Using vRealize Code Stream
Using vRealize Code Stream provides information about how to automate the release of applications,frequently while using existing tools in the build, development, test, provisioning, and monitoringenvironments.
Intended AudienceThis information is intended for anyone who wants to automate the release of applications in variousdevelopment environments. The information is written for experienced developers and operation teamswho are familiar with release automation.
VMware Technical Publications GlossaryVMware Technical Publications provides a glossary of terms that might be unfamiliar to you. For definitionsof terms as they are used in VMware technical documentation, go to http://www.vmware.com/support/pubs.
VMware, Inc. 5

Using vRealize Code Stream
6 VMware, Inc.
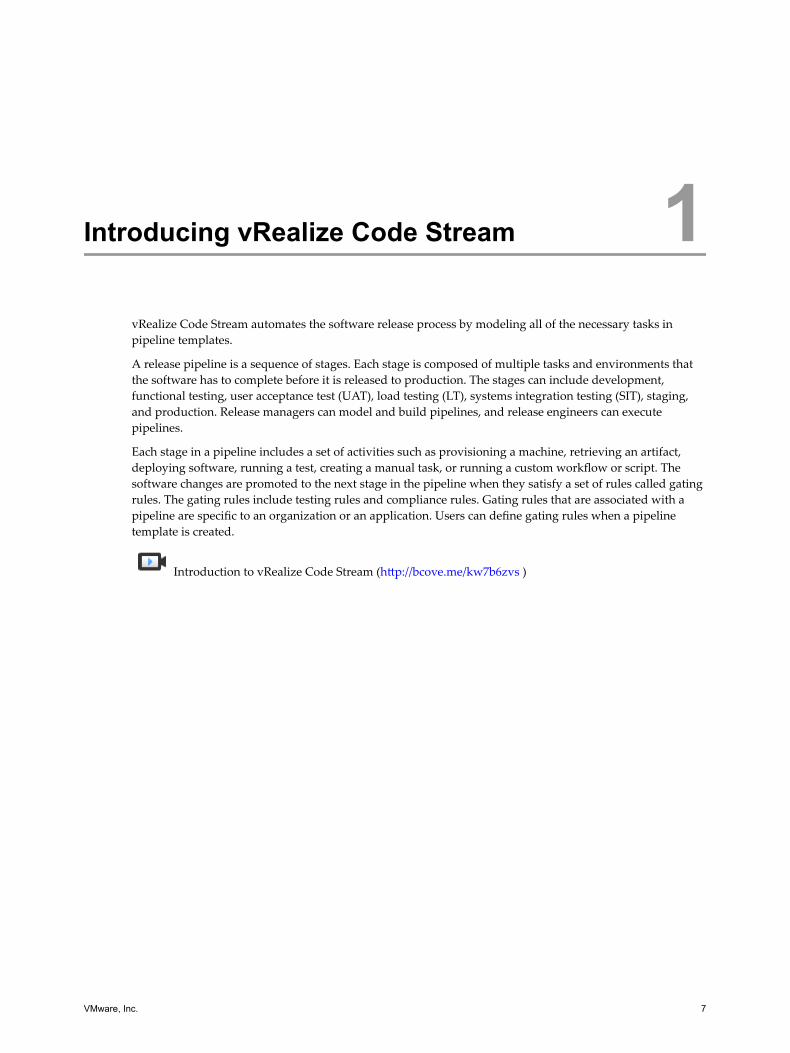
Introducing vRealize Code Stream 1vRealize Code Stream automates the software release process by modeling all of the necessary tasks inpipeline templates.
A release pipeline is a sequence of stages. Each stage is composed of multiple tasks and environments thatthe software has to complete before it is released to production. The stages can include development,functional testing, user acceptance test (UAT), load testing (LT), systems integration testing (SIT), staging,and production. Release managers can model and build pipelines, and release engineers can executepipelines.
Each stage in a pipeline includes a set of activities such as provisioning a machine, retrieving an artifact,deploying software, running a test, creating a manual task, or running a custom workflow or script. Thesoftware changes are promoted to the next stage in the pipeline when they satisfy a set of rules called gatingrules. The gating rules include testing rules and compliance rules. Gating rules that are associated with apipeline are specific to an organization or an application. Users can define gating rules when a pipelinetemplate is created.
Introduction to vRealize Code Stream (http://bcove.me/kw7b6zvs )
VMware, Inc. 7
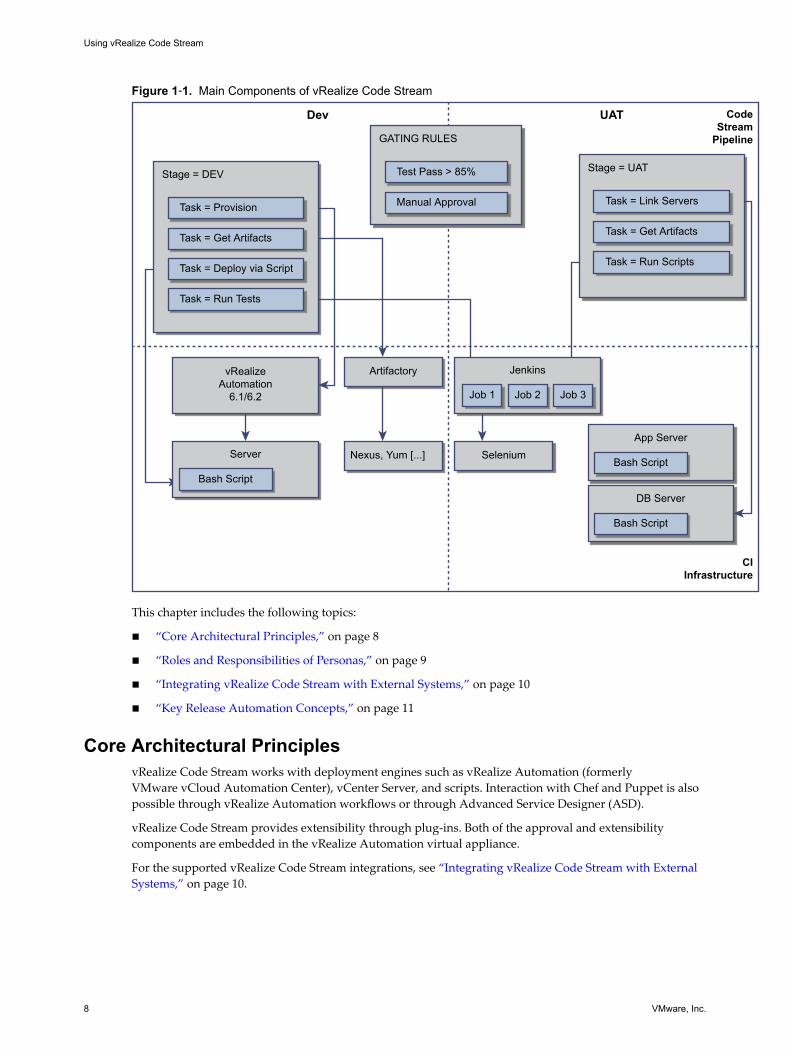
Figure 1‑1. Main Components of vRealize Code Stream
Task = Provision
Task = Get Artifacts
Task = Deploy via Script
Task = Run Tests
Stage = DEV
vRealizeAutomation
6.1/6.2
Server
Bash Script
Artifactory
Nexus, Yum [...]
Task = Link Servers
Task = Get Artifacts
Task = Run Scripts
Stage = UATTest Pass > 85%
Manual Approval
GATING RULES
DB Server
Bash Script
App Server
Bash Script
Jenkins
Job 1 Job 2 Job 3
Selenium
Dev UAT CodeStream
Pipeline
CIInfrastructure
This chapter includes the following topics:
n “Core Architectural Principles,” on page 8
n “Roles and Responsibilities of Personas,” on page 9
n “Integrating vRealize Code Stream with External Systems,” on page 10
n “Key Release Automation Concepts,” on page 11
Core Architectural PrinciplesvRealize Code Stream works with deployment engines such as vRealize Automation (formerlyVMware vCloud Automation Center), vCenter Server, and scripts. Interaction with Chef and Puppet is alsopossible through vRealize Automation workflows or through Advanced Service Designer (ASD).
vRealize Code Stream provides extensibility through plug-ins. Both of the approval and extensibilitycomponents are embedded in the vRealize Automation virtual appliance.
For the supported vRealize Code Stream integrations, see “Integrating vRealize Code Stream with ExternalSystems,” on page 10.
Using vRealize Code Stream
8 VMware, Inc.
Deployment EnginesvRealize Code Stream integrates with a number of provisioning and deployment solutions includingvRealize Automation. It can also trigger scripts or vRealize Orchestrator workflows. Support for otherprovisioning solutions is delivered by plug-ins that VMware, partners, or users publish.
Testing FrameworksvRealize Code Stream integrates with Jenkins to trigger Jenkins jobs, including test routines through plug-inframework.
A Jenkins job can run test cases that are configured for an application. The Test Acceptance Thresholdworkflow in the gating rule verifies the results of the Jenkins job and returns the response to thevRealize Code Stream server. Based on the results of the test and the gating rules that have been defined, thebuild either proceeds to the next stage of the release pipeline or it fails.
vRealize Code Stream also integrates with Bamboo and Team Foundation Server.
Approval SystemsvRealize Code Stream uses vRealize Orchestrator plug-ins for integration with approval systems. Manualapproval tasks can be created within the vRealize Automation inbox. vRealize Code Stream can alsointegrate with BMC Remedy ITSM, HP Service Manager, ServiceNow, and other ticketing systems. Theapproval systems integration requires downloading and installing the appropriate vRealize Orchestratorplug-in from the VMware Solution Exchange.
Roles and Responsibilities of PersonasA tenant administrator can assign the release manager, release engineer, and the release dashboard userroles, which are an integral part of release automation.
These roles have various responsibilities when they interact with the product. For information onconfiguring additional tenants, see Installation and Configuration guide.
The following table lists the roles and responsibilities of the personas.
Table 1‑1. Roles and Responsibilities in vRealize Code Stream
Role Responsibility
Release Manager n View, create, delete, update and publish a dashboardn Set default dashboard for all usersn View, create, delete and update an endpointn View, create, execute, update, and delete a release pipelinen View release pipeline detailsn Perform artifact management administration task
Release Engineer n View, create, update, delete a private dashboardn Execute a release pipelinen View endpointn View details of a release pipelinen View release pipeline executionn Perform artifact management administration task
Chapter 1 Introducing vRealize Code Stream
VMware, Inc. 9
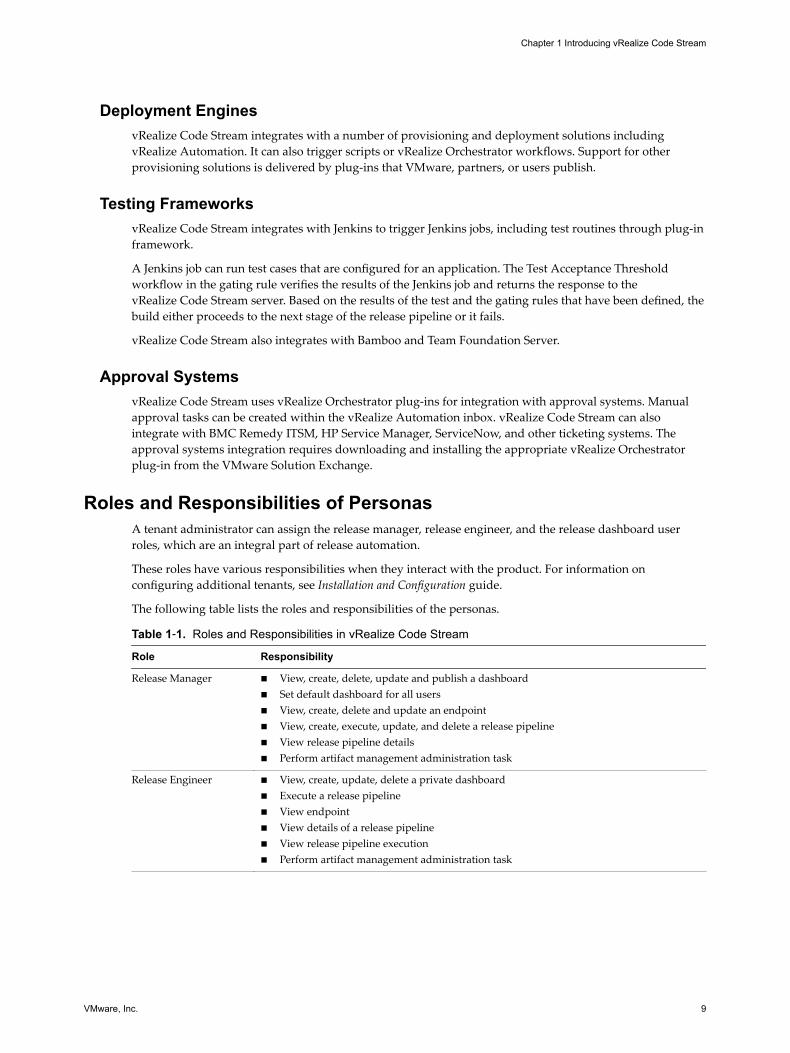
Integrating vRealize Code Stream with External SystemsvRealize Code Stream includes an extensibility framework that supports modular integrations with externalsystems, without changing the core platform.
Based on the type of external system, different mechanisms are recommended.
Figure 1‑2. Supported Integration with External Systems
Release Pipeline IntegrationsRelease pipeline templates support various tasks that can trigger actions in a wide category of systems suchas continuous integration, testing frameworks, or defect tracking systems.
Integrations such Atlassian Bamboo, Jenkins, Microsoft Team Foundation Server, Pivotal Cloud Foundry,and Bugzilla are supported natively. Others plug-ins can also be integrated by creating custom workflowsusing a vRealize Orchestrator.
System Category Integration Mechanism
Repository JFrog Artifactory
Continuous Integration n Atlassian Bamboon Jenkinsn Pipelinesn Microsoft Team Foundation Server
Provisioning and configuration management n Pivotal Cloud Foundryn Scriptn vRealize Automation 6n vRealize Automation 7
Testing frameworks n Atlassian Bamboon Jenkinsn Microsoft Team Foundation Server
Using vRealize Code Stream
10 VMware, Inc.
System Category Integration Mechanism
Defect tracking systems n Bugzillan JIRA
vRealize Orchestrator custom workflow is offered as a vRealize Code Stream plug-in. Other integrationssuch as Chef, Puppet and JetBrains TeamCity can be done using vRealize Orchestrator workflow.
You can download vRealize Orchestrator plug-ins from the VMware Solution Exchange. The Artifactoryplug-ins are available on the JFrog Web site.
Key Release Automation ConceptsUse the following definitions to help you understand the release pipeline modeling and the artifactmanagement workflow.
artifact A script or the output of a build process. The script can be deployed orupgraded in a given stage.
Artifact types can be configuration files, application bits, or third-partysoftware.
artifact management A service that manages the artifacts over a range of local and remoterepositories.
For example, managing a WAR file stored in the Maven repository.
gating rule A set of rules that must be completed before the software changes arepromoted and the next set of tasks starts in the subsequent stage.
The gating rules include testing rules and compliance rules. Gating rules thatare associated with a pipeline are specific to an organization andapplications.
endpoint A plug-in scenario that captures specific configurations of a provider.
pipeline A collection of all the stages or environments in which a software change hasto pass through independently before it is released into production.
For example, development, test, user acceptance test, load test, staging, andproduction.
provider Service providers such as Jenkins, Bamboo, Bugzilla, Pivotal Cloud Foundry,and JIRA that support various tasks.
stage Every stage in the pipeline defines a set of activities.
For example, deploy, test, approval through gating rules, and custom tasks.
task An activity in a given stage.
For example, provision the machines, resolve the artifact, deploy the artifact,run the test, and so on.
Opening the port in a firewall is a manual task.
reports The reports display pipeline success and failure rate over a period of time.
Chapter 1 Introducing vRealize Code Stream
VMware, Inc. 11

Using vRealize Code Stream
12 VMware, Inc.
Using Release Automation 2The software development life cycle includes work phases before it moves to production. As the softwarechanges move closer to production, the quality checks and approval policies become stringent. This processis enforced to ensure that no disruptions occur in the production environment.
vRealize Code Stream enables central IT to host and manage new application workloads being driven bylines of business and development operation teams. Application teams can independently usevRealize Code Stream to automate and streamline their software release process while continuing to usetheir preferred provisioning and deployment tools.
vRealize Code Stream also enables applications or operations teams to model their software release processin a release pipeline. A release pipeline is a sequence of stages where each stage is composed of multipletasks and environments that the software has to pass through before it is released to production. The stagescan include development, functional testing, user acceptance test, load testing, systems integration testing,staging, and production.
In each stage, teams might also use different kinds of development and management tools. Using differenttools results in needing to build a product that is extensible and that can integrate easily with a variety ofexisting tools. To satisfy this need for flexibility, vRealize Code Stream offers a model-driven, open, andextensible architecture. With its catalog of plug-ins, you can integrate with existing tools, including buildand integration systems, testing frameworks, provisioning, deployment engines, change managementsystems, and so on.
Each stage in a pipeline includes a set of activities such as provisioning a machine, retrieving an artifact,deploying software, running a test, creating a manual task, or running a custom workflow or script. Thesoftware changes are promoted to the next stage in the pipeline when they satisfy a set of rules called gatingrules. The gating rules include testing rules and compliance rules. Gating rules that are associated with apipeline are specific to an organization or an application. Users can define gating rules when a pipelinetemplate is created.
Modeling a Release Pipeline ChecklistA release pipeline is a collection of stages where each stage represents a deployment environment. Forexample, the development, test, user acceptance test (UAT), load test (LT), systems integration testing (SIT),and staging environments that a software change has to pass through independently before it is released.
Sample Release Pipeline with Stages
VMware, Inc. 13

The number of stages and configuration of each of these stages varies based on the application, and whetherthe release is major, minor, patch, or organization release policies.
Modeling a Release Pipeline Template (http://bcove.me/zgy163u6 ).
To track your work as you complete the modeling tasks, complete the tasks in the order they are given.
1 Create a Release Pipeline on page 15You can create, edit, view, copy, and delete the release pipeline. You can have multiple stages for asingle release pipeline.
2 Configure a Bamboo Task on page 17When you register a Bamboo Server endpoint, you connect to a Bamboo server to start a build planfrom a release pipeline. You can configure multiple artifacts from a particular plan.
3 Configure a Bugzilla Task on page 19You can execute a pipeline task which creates a Bugzilla task. You can use the output properties of theBugzilla task in subsequent tasks in a release pipeline.
4 Configure a Cloud Foundry Server Task on page 22You can use the Cloud Foundry Server task to model a pipeline task connecting to the target CloudFoundry server instance to deploy, scale, start, stop, and delete an application . You can also bind andunbind services to an application.
5 Add a Custom Service Blueprint Task on page 25You can add a Custom Service Blueprint task to add a XaaS blueprint. A service blueprint task allowsyou invoke a plug-in available in the vRealize Automation service catalog from a release pipeline. Youcan publish a predefined workflow from vRealize Orchestrator to the vRealize Automation servicecatalog.
6 Configure a Jenkins Task on page 29You can use a test task to test a deployment. When you register a Jenkins Server endpoint, you connectto a Jenkins server to start a build job from a release pipeline.
Using vRealize Code Stream
14 VMware, Inc.

7 Configure a JIRA Task on page 31You can create and update JIRA issues in a release pipeline.
8 Add a Script Task on page 33You can use a custom script task to configure bash or powershell scripts and run scripts on any Linuxor Windows machine. After the script runs, you can monitor the script progress and capture the scriptresponse, which you can pass as input to other release pipeline tasks.
9 Configure a Team Foundation Server Task on page 39You can use the Team Foundation Server task to connect to the Team Foundation Server and invokeconfigured build and test jobs.
10 Add a VMware Repository Solution Task on page 41An artifact task lets you search for artifacts from Artifactory and the Artifactory in turn connects witha variety of repositories such as Nexus and Yum.
11 Add a vRealize Automation Task on page 46A provision task provisions machines. You can register a vRealize Automation 6.x or 7.x instance withvRealize Code Stream to provision infrastructure in a specific environment.
12 Create a Nested Pipeline on page 49You can model a complex pipeline and execute the pipeline in a modular manner by invokingpipelines within pipelines. You can also view the result of the nested pipeline execution.
13 Configure a Custom Task on page 51A custom task allows any custom activity that you can start with a vRealize Orchestrator workflow orscript. This activity can also be a manual approval.
14 Configure Gating Rules on page 53Gating rules are a set of criteria that each stage must pass to proceed to the subsequent stage. You canconfigure gating rules based on your requirement for a pipeline.
15 Activate and Run a Release Pipeline on page 54You can run a release pipeline that is activated. After you activate the release pipeline, pipelinemodeling is complete and you can run it.
Create a Release PipelineYou can create, edit, view, copy, and delete the release pipeline. You can have multiple stages for a singlerelease pipeline.
These pipelines form a single application or a module. You can model a pipeline with multiple stages andtasks in a stage. You can use each to depict the release cycle for an application or a module.
Plug-ins can use binding variables as part of input configurations. These variables are replaced at runtimewith the values where they are placed.
The shared pipeline variable is always preceded by the binding variable. For example, ${pipeline.PipelineVariable}.
Prerequisites
n Verify that you have available predefined vRealize Automation blueprints, workflows, scripts, or testjobs that perform tasks that the pipelines trigger.
n Verify that the artifacts in the Artifactory server repository are prepopulated so that you can use theArtifact Management capabilities.
n Verify that the applicable plug-ins and endpoints are registered. See the Installation and Configurationguide.
Chapter 2 Using Release Automation
VMware, Inc. 15

n Familiarize yourself with the input and output details required to create tasks.
Procedure
1 Select Code Stream > Pipelines.
2 Click Add to create a pipeline.
3 Enter a name and description for the pipeline.
4 Click Add to define the input properties for the pipeline.
These properties are required only if you want to pass certain parameters at the time of triggering apipeline run. You can reference these parameter values across all stages during modeling. The run timevalues are applied during the pipeline run.
Option Description
Name Enter a property name.
Description Enter a description for the property.
Value Enter a property value.For example, ABC-876541.
5 (Optional) Select the first check box if you want this pipeline to run concurrently.
The pipeline model reuses the same set of virtual machines to deploy a software change. The concurrentrun overwrites the deployed change.
6 (Optional) Select the second check box and provide the Socialcast Webhook Name and SocialcastWebhook URL to post updates to Socialcast.
The Socialcast updates are useful to collaborate among team members working on releases and to trackpipeline execution status such as pipeline execution start, pause, resume, cancellation, failure, andcompletion. A new pipeline execution creates a new status message on the Socialcast group and thesubsequent statuses of the execution are posted as comments to the message. You can engage yourselfin individual threads by adding comments and track the progress of a pipeline execution.
The name of the Webhook you provide is the name of the group created for communication inSocialcast.
You can locate the Webhook URL by navigating to Socialcast > Configured Group > Integrations >Codestream > Add > Step 5.
Note You must have an administrator privilege for the group configured on Socialcast to add theintegration and copy the Webhook URL.
7 Add the email addresses of recipients who receive event notifications during the pipeline execution.
The email addresses are for the users who have access to the same vRealize Automation appliance.
8 Enter the applicable tags.
A tag is useful in grouping pipeline models or runs.
For example, you can use a tag to filter a pipeline model or run view.
9 Click Stages to continue pipeline creation.
10 Click Add Stage to add multiple stages to this pipeline.
11 Double-click the default stage name and enter a name.
For example, you can create development, test, QE, and production stages.
Using vRealize Code Stream
16 VMware, Inc.
12 (Optional) Select a stage and drag it to a different place in this pipeline.
For example, if your pipeline consists of development, test, and QE stages, you can move the test stageafter the QE stage.
13 Click Save as Draft to save the pipeline.
14 Create tasks for every pipeline stage.
You can add multiple tasks to a stage and model tasks within a stage to run in parallel. You can dragand drop tasks to run in parallel. Running a parallel task is limited only within a stage. The Artifact,Custom, Deploy, Provision, and Test tasks are supported. Certain tasks might depend on tasks thatprecede them in the workflow. You can drag tasks up or down depending on the workflow. Tasks arerun sequentially or in parallel depending on how you have modelled the tasks within a stage. You canconfigure a task's input to depend on the output from an earlier task. When you add parallel tasks in asingle group and configure the task's input to depend on the output from an earlier task, the variablesfrom the output of the earlier task belonging to the previous group is always considered.
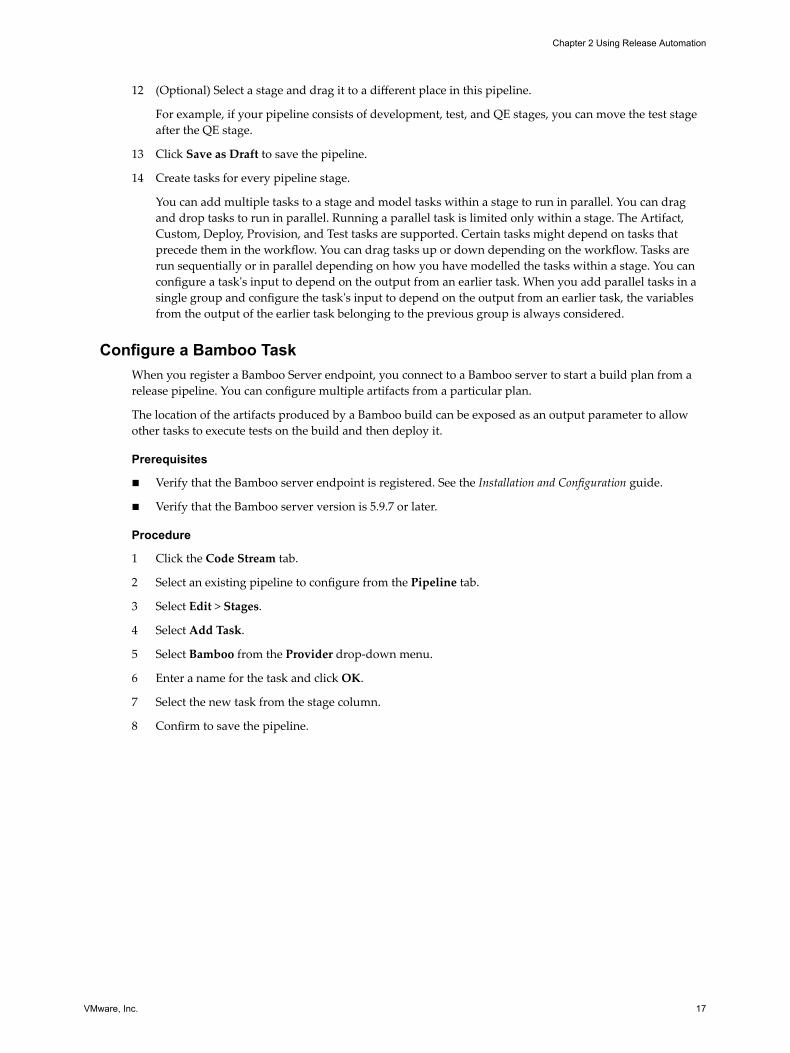
Configure a Bamboo TaskWhen you register a Bamboo Server endpoint, you connect to a Bamboo server to start a build plan from arelease pipeline. You can configure multiple artifacts from a particular plan.
The location of the artifacts produced by a Bamboo build can be exposed as an output parameter to allowother tasks to execute tests on the build and then deploy it.
Prerequisites
n Verify that the Bamboo server endpoint is registered. See the Installation and Configuration guide.
n Verify that the Bamboo server version is 5.9.7 or later.
Procedure
1 Click the Code Stream tab.
2 Select an existing pipeline to configure from the Pipeline tab.
3 Select Edit > Stages.
4 Select Add Task.
5 Select Bamboo from the Provider drop-down menu.
6 Enter a name for the task and click OK.
7 Select the new task from the stage column.
8 Confirm to save the pipeline.
Chapter 2 Using Release Automation
VMware, Inc. 17

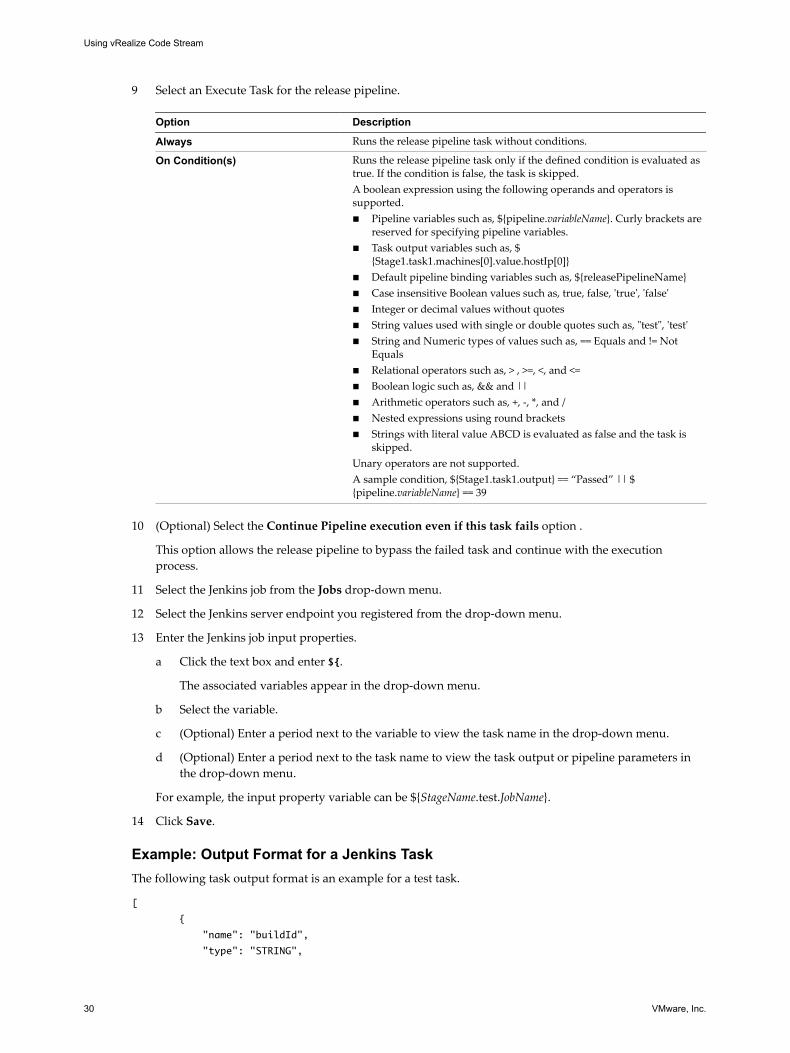
9 Select an Execute Task for the release pipeline.
Option Description
Always Runs the release pipeline task without conditions.
On Condition(s) Runs the release pipeline task only if the defined condition is evaluated astrue. If the condition is false, the task is skipped.A boolean expression using the following operands and operators issupported.n Pipeline variables such as, ${pipeline.variableName}. Curly brackets are
reserved for specifying pipeline variables.n Task output variables such as, $
{Stage1.task1.machines[0].value.hostIp[0]}n Default pipeline binding variables such as, ${releasePipelineName}n Case insensitive Boolean values such as, true, false, 'true', 'false'n Integer or decimal values without quotesn String values used with single or double quotes such as, "test", 'test'n String and Numeric types of values such as, == Equals and != Not
Equalsn Relational operators such as, > , >=, <, and <=n Boolean logic such as, && and ||n Arithmetic operators such as, +, -, *, and /n Nested expressions using round bracketsn Strings with literal value ABCD is evaluated as false and the task is
skipped.Unary operators are not supported.A sample condition, ${Stage1.task1.output} == “Passed” || ${pipeline.variableName} == 39
10 (Optional) Select the Continue Pipeline execution even if this task fails option .
This option allows the release pipeline to bypass the failed task and continue with the executionprocess.
11 Select the endpoint, project, and the Bamboo plan.
12 Enter the Bamboo plan input properties.
13 Click Save.
Example: Output Format for a Bamboo TaskThe following task output format is an example for a Bamboo task.
[
{
"name": "planKey",
"type": "String",
"value": “SAM-S2P1”
},
{
"name": "resultUrl",
"type": "String",
"value": “http://xx.xxx.xx.xx:xxxx/browse/SAM-S2P1-101”
},
{
"name": "buildNumber",
"type": "String",
"value": 101
},
Using vRealize Code Stream
18 VMware, Inc.

{
"name": "buildTestSummary",
"type": "String",
"value": “4 passed”
},
{
"name": "triggerReason",
"type": "String",
"value": “Manual run by <USER>”
},
{
"name": "successfulTestCount",
"type": "String",
"value": 0
},
{
"name": "failedTestCount",
"type": "String",
"value": 0
},
{
"name": "skippedTestCount",
"type": "String",
"value": 0
}
]
Configure a Bugzilla TaskYou can execute a pipeline task which creates a Bugzilla task. You can use the output properties of theBugzilla task in subsequent tasks in a release pipeline.
You can export and import a pipeline model containing a Bugzilla task.
Prerequisites
n Verify that the Bugzila server endpoint is registered. See the Installation and Configuration guide.
n Verify that the Bugzilla server version is 5.0.1 or later.
Procedure
1 Click the Code Stream tab.
2 Select an existing pipeline to configure from the Pipeline tab.
3 Select Edit > Stages.
4 Select Add Task.
5 Select Bugzilla from the Provider drop-down menu.
6 Enter a name for the task and click OK.
7 Select the new task from the stage column.
8 Confirm to save the pipeline.
Chapter 2 Using Release Automation
VMware, Inc. 19

9 Select an Execute Task for the release pipeline.
Option Description
Always Runs the release pipeline task without conditions.
On Condition(s) Runs the release pipeline task only if the defined condition is evaluated astrue. If the condition is false, the task is skipped.A boolean expression using the following operands and operators issupported.n Pipeline variables such as, ${pipeline.variableName}. Curly brackets are
reserved for specifying pipeline variables.n Task output variables such as, $
{Stage1.task1.machines[0].value.hostIp[0]}n Default pipeline binding variables such as, ${releasePipelineName}n Case insensitive Boolean values such as, true, false, 'true', 'false'n Integer or decimal values without quotesn String values used with single or double quotes such as, "test", 'test'n String and Numeric types of values such as, == Equals and != Not
Equalsn Relational operators such as, > , >=, <, and <=n Boolean logic such as, && and ||n Arithmetic operators such as, +, -, *, and /n Nested expressions using round bracketsn Strings with literal value ABCD is evaluated as false and the task is
skipped.Unary operators are not supported.A sample condition, ${Stage1.task1.output} == “Passed” || ${pipeline.variableName} == 39
10 (Optional) Select the Continue Pipeline execution even if this task fails option .
This option allows the release pipeline to bypass the failed task and continue with the executionprocess.
11 Select the Bugzilla endpoint from the Endpoint drop-down menu.
12 Select the action you want to perform.
You can create or update a bug.
Example: Output Format for a Bugzilla TaskThe following task output format is an example for a Bugzilla task.
[
{
"name": "id",
"type": "INTEGER",
"description": "Bug ID",
"value": "153"
},
{
"name": "bugURL",
"type": "STRING",
"description": "BugUrl",
"value": "http://bugzilla.example.com/show_bug.cgi?id=153"
},
{
"name": "status",
"type": "STRING",
Using vRealize Code Stream
20 VMware, Inc.
"description": "Bug Status",
"value": "RESOLVED"
},
{
"name": "product",
"type": "STRING",
"description": "Product the bug is filed under",
"value": "vRealize Code Stream"
},
{
"name": "assigned_to",
"type": "String",
"description": "Bug Assignee",
"value": "[email protected]"
}
]
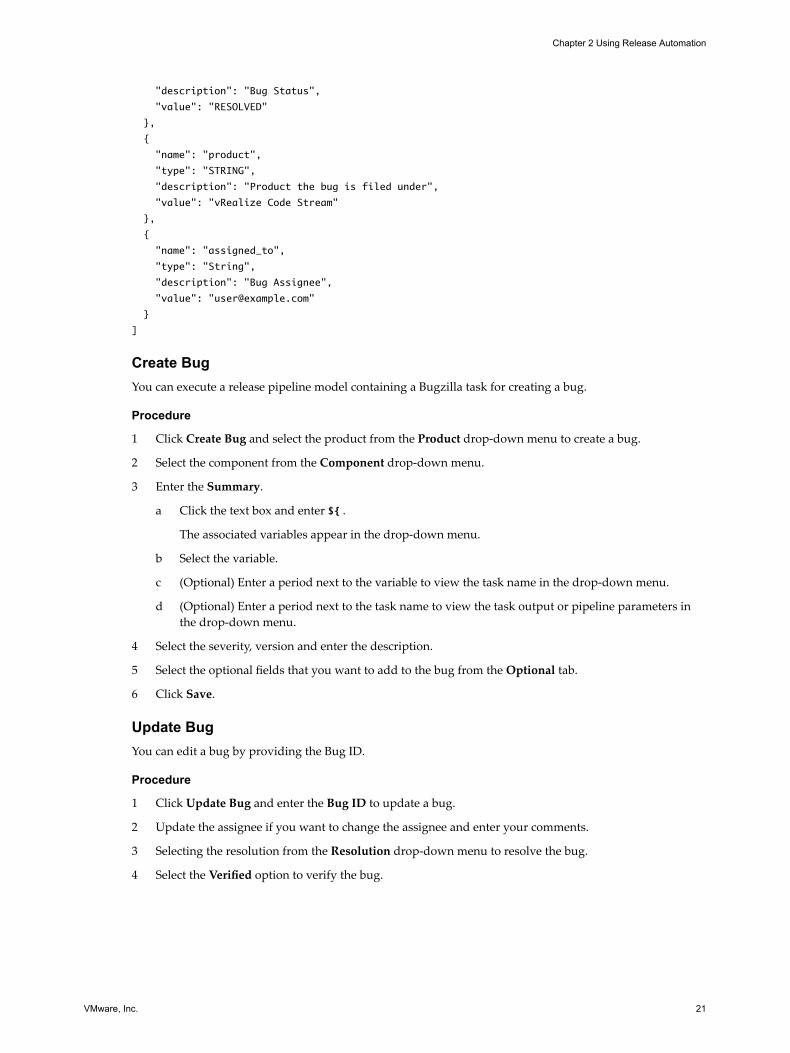
Create BugYou can execute a release pipeline model containing a Bugzilla task for creating a bug.
Procedure
1 Click Create Bug and select the product from the Product drop-down menu to create a bug.
2 Select the component from the Component drop-down menu.
3 Enter the Summary.
a Click the text box and enter ${ .
The associated variables appear in the drop-down menu.
b Select the variable.
c (Optional) Enter a period next to the variable to view the task name in the drop-down menu.
d (Optional) Enter a period next to the task name to view the task output or pipeline parameters inthe drop-down menu.
4 Select the severity, version and enter the description.
5 Select the optional fields that you want to add to the bug from the Optional tab.
6 Click Save.
Update BugYou can edit a bug by providing the Bug ID.
Procedure
1 Click Update Bug and enter the Bug ID to update a bug.
2 Update the assignee if you want to change the assignee and enter your comments.
3 Selecting the resolution from the Resolution drop-down menu to resolve the bug.
4 Select the Verified option to verify the bug.
Chapter 2 Using Release Automation
VMware, Inc. 21

Configure a Cloud Foundry Server TaskYou can use the Cloud Foundry Server task to model a pipeline task connecting to the target Cloud Foundryserver instance to deploy, scale, start, stop, and delete an application . You can also bind and unbind servicesto an application.
Prerequisites
n Verify that the Cloud Foundry Server endpoint is registered. See the Installation and Configuration guide.
Procedure
1 Click the Code Stream tab.
2 Select an existing pipeline to configure from the Pipeline tab.
3 Select Edit > Stages.
4 Select Add Task.
5 Select Cloud Foundry from the Provider drop-down menu.
6 Enter a name for the task and click OK.
7 Select the new task from the stage column.
8 Confirm to save the pipeline.
9 Select an Execute Task for the release pipeline.
Option Description
Always Runs the release pipeline task without conditions.
On Condition(s) Runs the release pipeline task only if the defined condition is evaluated astrue. If the condition is false, the task is skipped.A boolean expression using the following operands and operators issupported.n Pipeline variables such as, ${pipeline.variableName}. Curly brackets are
reserved for specifying pipeline variables.n Task output variables such as, $
{Stage1.task1.machines[0].value.hostIp[0]}n Default pipeline binding variables such as, ${releasePipelineName}n Case insensitive Boolean values such as, true, false, 'true', 'false'n Integer or decimal values without quotesn String values used with single or double quotes such as, "test", 'test'n String and Numeric types of values such as, == Equals and != Not
Equalsn Relational operators such as, > , >=, <, and <=n Boolean logic such as, && and ||n Arithmetic operators such as, +, -, *, and /n Nested expressions using round bracketsn Strings with literal value ABCD is evaluated as false and the task is
skipped.Unary operators are not supported.A sample condition, ${Stage1.task1.output} == “Passed” || ${pipeline.variableName} == 39
10 (Optional) Select the Continue Pipeline execution even if this task fails option .
This option allows the release pipeline to bypass the failed task and continue with the executionprocess.
Using vRealize Code Stream
22 VMware, Inc.
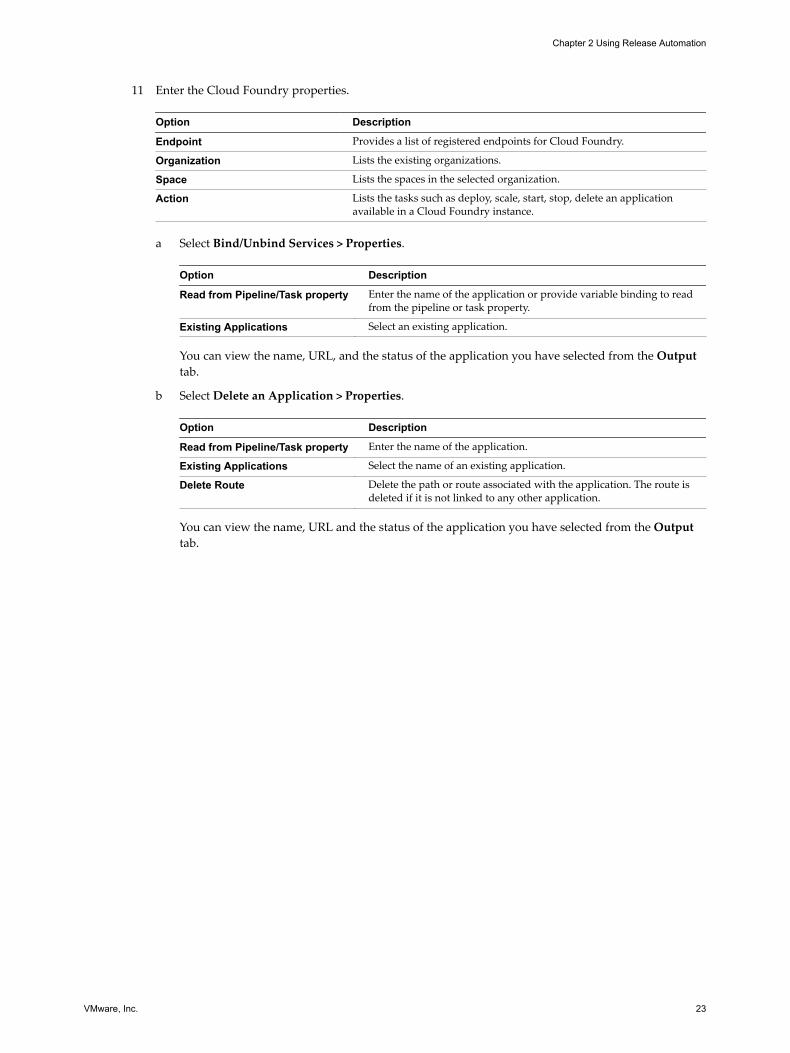
11 Enter the Cloud Foundry properties.
Option Description
Endpoint Provides a list of registered endpoints for Cloud Foundry.
Organization Lists the existing organizations.
Space Lists the spaces in the selected organization.
Action Lists the tasks such as deploy, scale, start, stop, delete an applicationavailable in a Cloud Foundry instance.
a Select Bind/Unbind Services > Properties.
Option Description
Read from Pipeline/Task property Enter the name of the application or provide variable binding to readfrom the pipeline or task property.
Existing Applications Select an existing application. You can view the name, URL, and the status of the application you have selected from the Outputtab.
b Select Delete an Application > Properties.
Option Description
Read from Pipeline/Task property Enter the name of the application.
Existing Applications Select the name of an existing application.
Delete Route Delete the path or route associated with the application. The route isdeleted if it is not linked to any other application.
You can view the name, URL and the status of the application you have selected from the Outputtab.
Chapter 2 Using Release Automation
VMware, Inc. 23
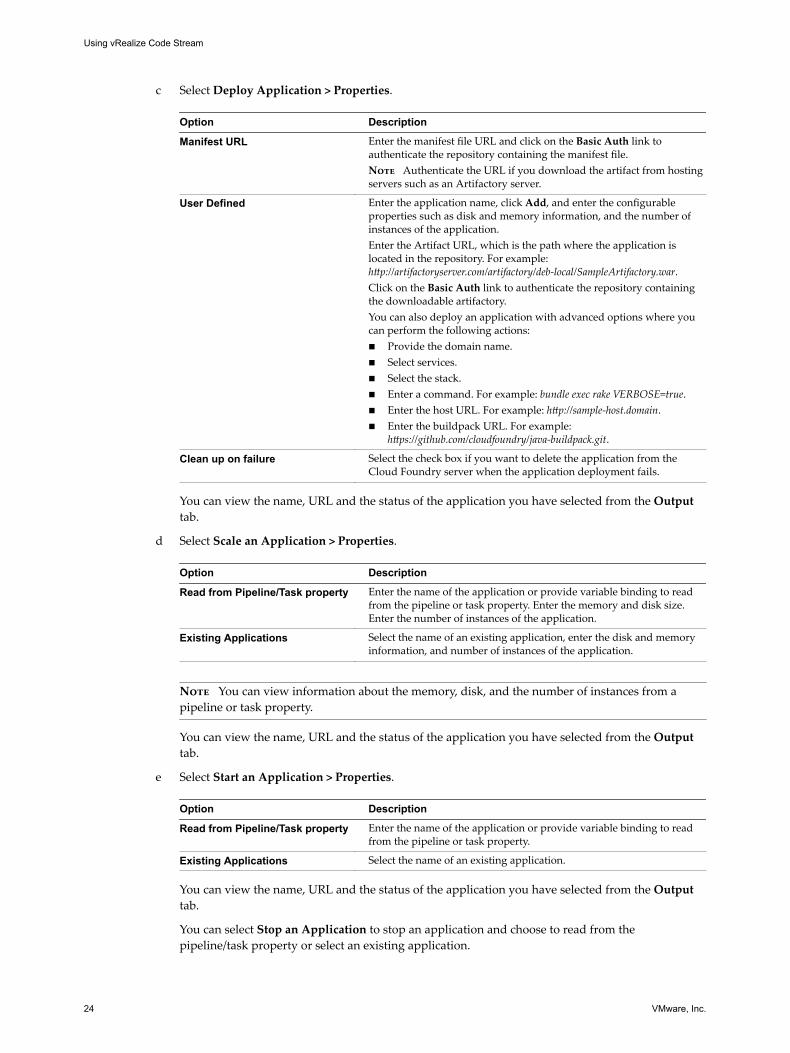
c Select Deploy Application > Properties.
Option Description
Manifest URL Enter the manifest file URL and click on the Basic Auth link toauthenticate the repository containing the manifest file.Note Authenticate the URL if you download the artifact from hostingservers such as an Artifactory server.
User Defined Enter the application name, click Add, and enter the configurableproperties such as disk and memory information, and the number ofinstances of the application.Enter the Artifact URL, which is the path where the application islocated in the repository. For example:http://artifactoryserver.com/artifactory/deb-local/SampleArtifactory.war.Click on the Basic Auth link to authenticate the repository containingthe downloadable artifactory.You can also deploy an application with advanced options where youcan perform the following actions:n Provide the domain name.n Select services.n Select the stack.n Enter a command. For example: bundle exec rake VERBOSE=true.n Enter the host URL. For example: http://sample-host.domain.n Enter the buildpack URL. For example:
https://github.com/cloudfoundry/java-buildpack.git.
Clean up on failure Select the check box if you want to delete the application from theCloud Foundry server when the application deployment fails.
You can view the name, URL and the status of the application you have selected from the Outputtab.
d Select Scale an Application > Properties.
Option Description
Read from Pipeline/Task property Enter the name of the application or provide variable binding to readfrom the pipeline or task property. Enter the memory and disk size.Enter the number of instances of the application.
Existing Applications Select the name of an existing application, enter the disk and memoryinformation, and number of instances of the application.
Note You can view information about the memory, disk, and the number of instances from apipeline or task property.
You can view the name, URL and the status of the application you have selected from the Outputtab.
e Select Start an Application > Properties.
Option Description
Read from Pipeline/Task property Enter the name of the application or provide variable binding to readfrom the pipeline or task property.
Existing Applications Select the name of an existing application. You can view the name, URL and the status of the application you have selected from the Outputtab.
You can select Stop an Application to stop an application and choose to read from thepipeline/task property or select an existing application.
Using vRealize Code Stream
24 VMware, Inc.

12 Click Save.
Example: Task Output Format for a Cloud Foundry ServerThe following task output format is an example for a Cloud Foundry Server task to scale, bind, unbind, stop,start, and delete an application. The output contains status of only one application.
[
{
"name": "detailedStatus",
"type": "JSON",
"value": {
" sample-iot-app": {
"status": "SUCCESS",
"displayStatus": "Success",
"appName": " sample-iot-app",
"appUrl": "sample-iot-app.cf.vca10.pivotal.io",
}
}
}
]
The following task output format is an example for a Cloud Foundry Server task to deploy an application.The output contains status of more than one application.
[
{
"name": "detailedStatus",
"type": "JSON",
"value": {
"sample-iot-app": {
"status": "SUCCESS",
"displayStatus": "Success",
"appName": "sample-iot-app",
"appUrl": "sample-iot-app.cf.vca10.pivotal.io"
},
"sample-schedule-app": {
"status": " SUCCESS ",
"displayStatus": " Success ",
"appName": "sample-schedule-app",
"appUrl": " sample-schedule-app.cf.vca10.pivotal.io"
}
}
}
]
Add a Custom Service Blueprint TaskYou can add a Custom Service Blueprint task to add a XaaS blueprint. A service blueprint task allows youinvoke a plug-in available in the vRealize Automation service catalog from a release pipeline. You canpublish a predefined workflow from vRealize Orchestrator to the vRealize Automation service catalog.
The service blueprint task has the following limitations.
n When there are multiple tabs in the service blueprint task form only the active tab is validated, whenyou save the task.
n String type output parameter values of published catalog items are supported.
Chapter 2 Using Release Automation
VMware, Inc. 25
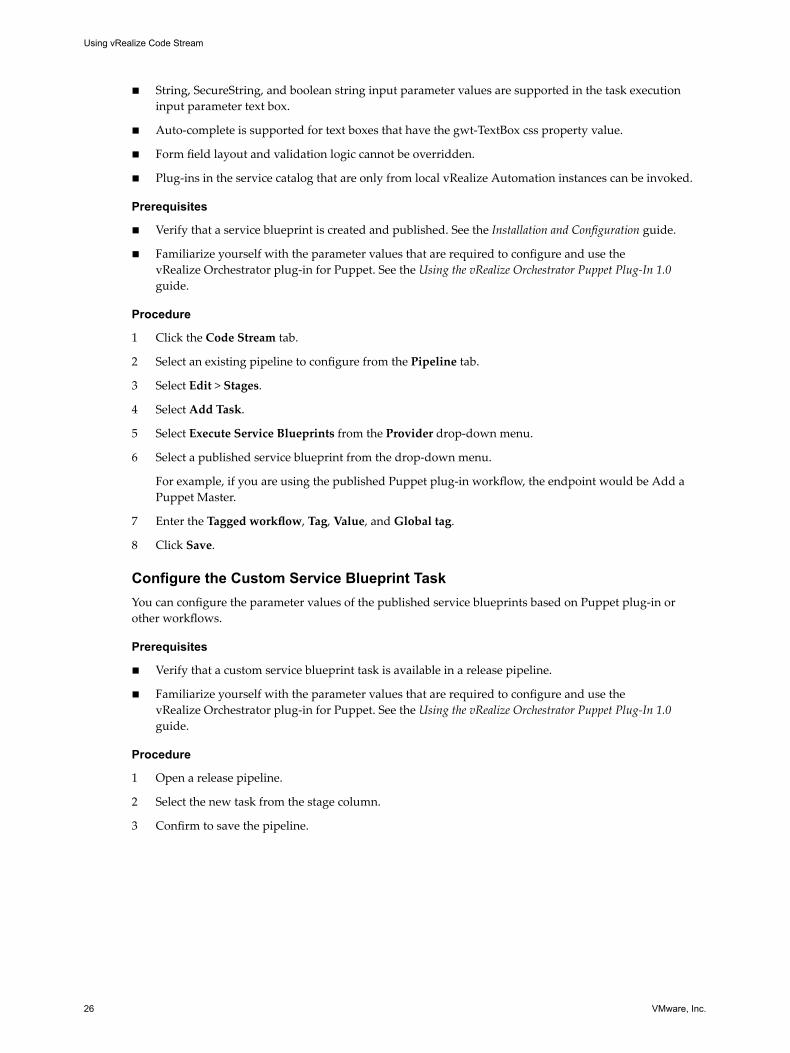
n String, SecureString, and boolean string input parameter values are supported in the task executioninput parameter text box.
n Auto-complete is supported for text boxes that have the gwt-TextBox css property value.
n Form field layout and validation logic cannot be overridden.
n Plug-ins in the service catalog that are only from local vRealize Automation instances can be invoked.
Prerequisites
n Verify that a service blueprint is created and published. See the Installation and Configuration guide.
n Familiarize yourself with the parameter values that are required to configure and use thevRealize Orchestrator plug-in for Puppet. See the Using the vRealize Orchestrator Puppet Plug-In 1.0guide.
Procedure
1 Click the Code Stream tab.
2 Select an existing pipeline to configure from the Pipeline tab.
3 Select Edit > Stages.
4 Select Add Task.
5 Select Execute Service Blueprints from the Provider drop-down menu.
6 Select a published service blueprint from the drop-down menu.
For example, if you are using the published Puppet plug-in workflow, the endpoint would be Add aPuppet Master.
7 Enter the Tagged workflow, Tag, Value, and Global tag.
8 Click Save.
Configure the Custom Service Blueprint TaskYou can configure the parameter values of the published service blueprints based on Puppet plug-in orother workflows.
Prerequisites
n Verify that a custom service blueprint task is available in a release pipeline.
n Familiarize yourself with the parameter values that are required to configure and use thevRealize Orchestrator plug-in for Puppet. See the Using the vRealize Orchestrator Puppet Plug-In 1.0guide.
Procedure
1 Open a release pipeline.
2 Select the new task from the stage column.
3 Confirm to save the pipeline.
Using vRealize Code Stream
26 VMware, Inc.
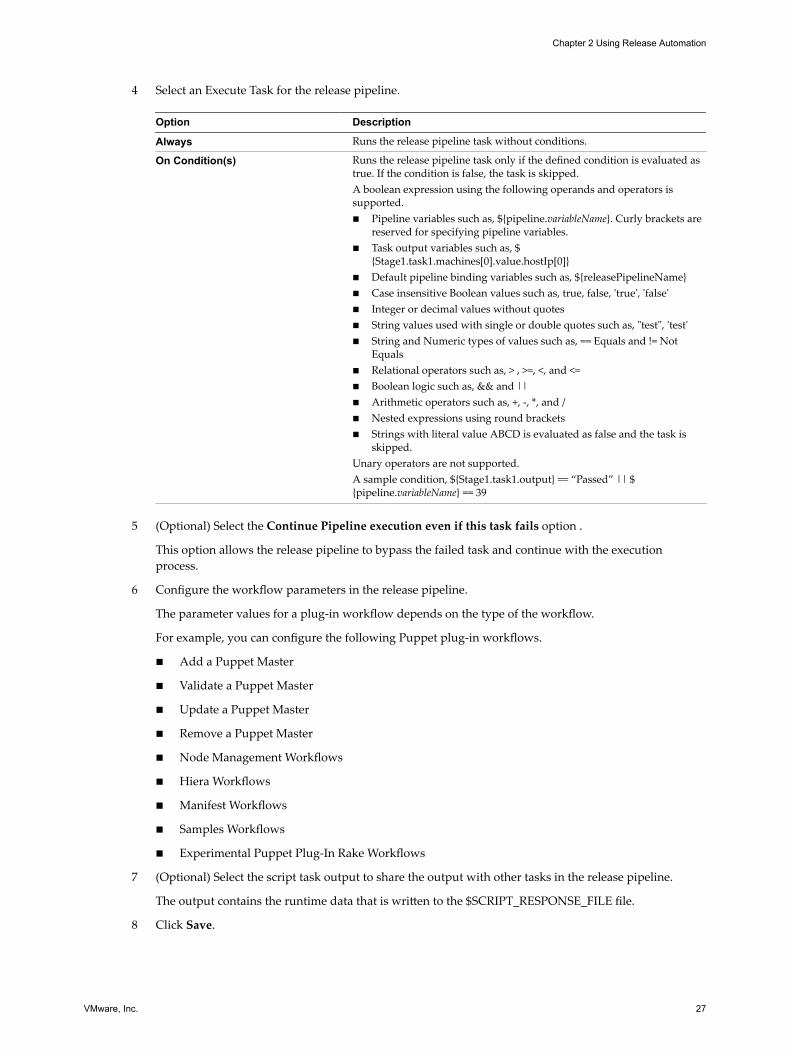
4 Select an Execute Task for the release pipeline.
Option Description
Always Runs the release pipeline task without conditions.
On Condition(s) Runs the release pipeline task only if the defined condition is evaluated astrue. If the condition is false, the task is skipped.A boolean expression using the following operands and operators issupported.n Pipeline variables such as, ${pipeline.variableName}. Curly brackets are
reserved for specifying pipeline variables.n Task output variables such as, $
{Stage1.task1.machines[0].value.hostIp[0]}n Default pipeline binding variables such as, ${releasePipelineName}n Case insensitive Boolean values such as, true, false, 'true', 'false'n Integer or decimal values without quotesn String values used with single or double quotes such as, "test", 'test'n String and Numeric types of values such as, == Equals and != Not
Equalsn Relational operators such as, > , >=, <, and <=n Boolean logic such as, && and ||n Arithmetic operators such as, +, -, *, and /n Nested expressions using round bracketsn Strings with literal value ABCD is evaluated as false and the task is
skipped.Unary operators are not supported.A sample condition, ${Stage1.task1.output} == “Passed” || ${pipeline.variableName} == 39
5 (Optional) Select the Continue Pipeline execution even if this task fails option .
This option allows the release pipeline to bypass the failed task and continue with the executionprocess.
6 Configure the workflow parameters in the release pipeline.
The parameter values for a plug-in workflow depends on the type of the workflow.
For example, you can configure the following Puppet plug-in workflows.
n Add a Puppet Master
n Validate a Puppet Master
n Update a Puppet Master
n Remove a Puppet Master
n Node Management Workflows
n Hiera Workflows
n Manifest Workflows
n Samples Workflows
n Experimental Puppet Plug-In Rake Workflows
7 (Optional) Select the script task output to share the output with other tasks in the release pipeline.
The output contains the runtime data that is written to the $SCRIPT_RESPONSE_FILE file.
8 Click Save.
Chapter 2 Using Release Automation
VMware, Inc. 27

Example: Task Output Format for a Custom Service Blueprint
The following task output format is an example for a custom service blueprint task.
[
{
"description": "master",
"name": "master",
"value": "",
"type": "Puppet:Master"
},
{
"description": "workflowExecutionId",
"name": "workflowExecutionId",
"value": "8af0d1274f72d384014fb05beec144a9",
"type": "STRING"
},
{
"description": "workflowId",
"name": "workflowId",
"value": "0ddc5db0-2c43-46af-93cd-b3507fb0fc5b",
"type": "STRING"
},
{
"description": "__asd_requestedBy",
"name": "__asd_requestedBy",
"value": "[email protected]",
"type": "STRING"
},
{
"description": "__asd_requestedFor",
"name": "__asd_requestedFor",
"value": "[email protected]",
"type": "STRING"
},
{
"description": "workflowName",
"name": "workflowName",
"value": "Add a Puppet Master",
"type": "STRING"
},
{
"description": "__asd_tenantRef",
"name": "__asd_tenantRef",
"value": "qe",
"type": "STRING"
},
{
"description": "__asd_subtenantRef",
"name": "__asd_subtenantRef",
"value": "4f9adef5-f09e-408b-8427-57cbc18e8e90",
"type": "STRING"
},
{
"description": "__asd_catalogRequestId",
"name": "__asd_catalogRequestId",
Using vRealize Code Stream
28 VMware, Inc.
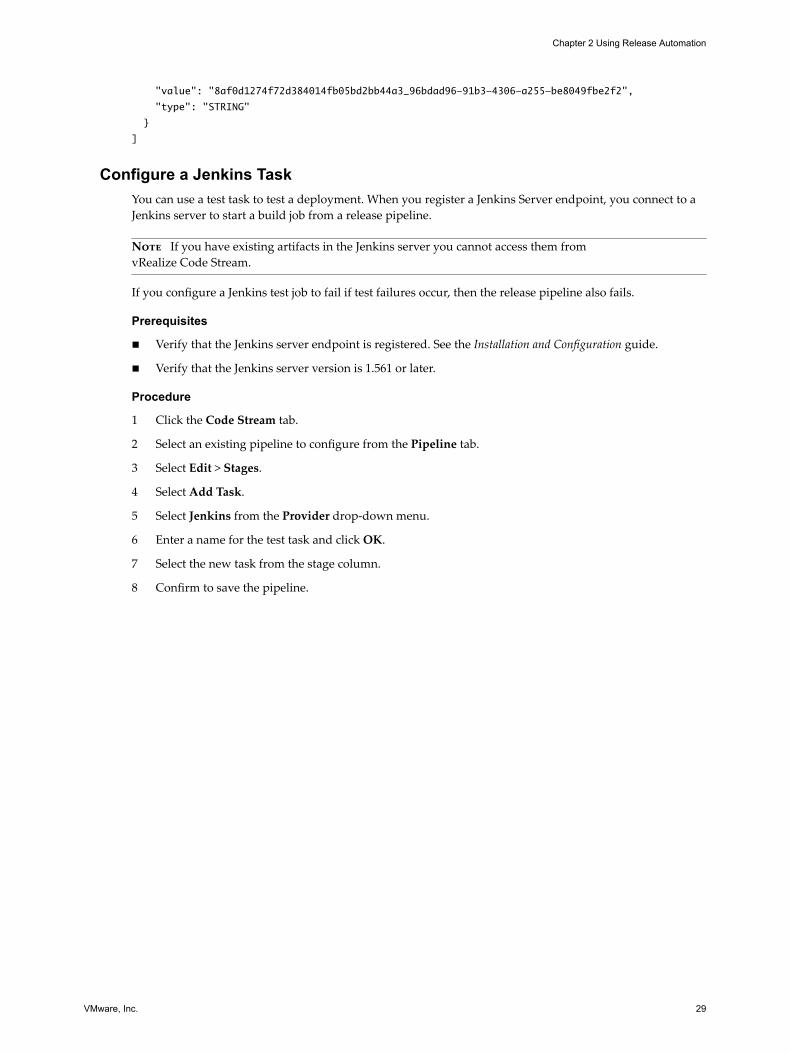
"value": "8af0d1274f72d384014fb05bd2bb44a3_96bdad96-91b3-4306-a255-be8049fbe2f2",
"type": "STRING"
}
]
Configure a Jenkins TaskYou can use a test task to test a deployment. When you register a Jenkins Server endpoint, you connect to aJenkins server to start a build job from a release pipeline.
Note If you have existing artifacts in the Jenkins server you cannot access them fromvRealize Code Stream.
If you configure a Jenkins test job to fail if test failures occur, then the release pipeline also fails.
Prerequisites
n Verify that the Jenkins server endpoint is registered. See the Installation and Configuration guide.
n Verify that the Jenkins server version is 1.561 or later.
Procedure
1 Click the Code Stream tab.
2 Select an existing pipeline to configure from the Pipeline tab.
3 Select Edit > Stages.
4 Select Add Task.
5 Select Jenkins from the Provider drop-down menu.
6 Enter a name for the test task and click OK.
7 Select the new task from the stage column.
8 Confirm to save the pipeline.
Chapter 2 Using Release Automation
VMware, Inc. 29
9 Select an Execute Task for the release pipeline.
Option Description
Always Runs the release pipeline task without conditions.
On Condition(s) Runs the release pipeline task only if the defined condition is evaluated astrue. If the condition is false, the task is skipped.A boolean expression using the following operands and operators issupported.n Pipeline variables such as, ${pipeline.variableName}. Curly brackets are
reserved for specifying pipeline variables.n Task output variables such as, $
{Stage1.task1.machines[0].value.hostIp[0]}n Default pipeline binding variables such as, ${releasePipelineName}n Case insensitive Boolean values such as, true, false, 'true', 'false'n Integer or decimal values without quotesn String values used with single or double quotes such as, "test", 'test'n String and Numeric types of values such as, == Equals and != Not
Equalsn Relational operators such as, > , >=, <, and <=n Boolean logic such as, && and ||n Arithmetic operators such as, +, -, *, and /n Nested expressions using round bracketsn Strings with literal value ABCD is evaluated as false and the task is
skipped.Unary operators are not supported.A sample condition, ${Stage1.task1.output} == “Passed” || ${pipeline.variableName} == 39
10 (Optional) Select the Continue Pipeline execution even if this task fails option .
This option allows the release pipeline to bypass the failed task and continue with the executionprocess.
11 Select the Jenkins job from the Jobs drop-down menu.
12 Select the Jenkins server endpoint you registered from the drop-down menu.
13 Enter the Jenkins job input properties.
a Click the text box and enter ${.
The associated variables appear in the drop-down menu.
b Select the variable.
c (Optional) Enter a period next to the variable to view the task name in the drop-down menu.
d (Optional) Enter a period next to the task name to view the task output or pipeline parameters inthe drop-down menu.
For example, the input property variable can be ${StageName.test.JobName}.
14 Click Save.
Example: Output Format for a Jenkins TaskThe following task output format is an example for a test task.
[
{
"name": "buildId",
"type": "STRING",
Using vRealize Code Stream
30 VMware, Inc.

"description": "Build Id",
"value": "4"
},
{
"name": "jobUrl",
"type": "STRING",
"description": "Job Url",
"value": "http://198.51.100.13:8080/job/dummy/4"
},
{
"name": "estimatedDuration",
"type": "NUMBER",
"description": "Estimation time to complete the build",
"value": "2332343"
},
{
"name": "jobName",
"type": "STRING",
"description": "Job Name",
"value": "dummy"
},
{
"name": "testResult",
"type": "JSON",
"description": "Job Name",
"value": {
"totalCount": 40,
"skipCount": 0,
"failureCount": 0,
"successCount": 40
}
}
]
Configure a JIRA TaskYou can create and update JIRA issues in a release pipeline.
You can create and update JIRA issues in a release pipeline.
Prerequisites
n Verify that the JIRA server endpoint is registered. See the Installation and Configuration guide.
n Verify that the JIRA server version is 6.3 or later.
Procedure
1 Click the Code Stream tab.
2 Select an existing pipeline to configure from the Pipeline tab.
3 Select Edit > Stages.
4 Select Add Task.
5 Select JIRA from the Provider drop-down menu.
6 Enter a name for the task and click OK.
7 Select the new task from the stage column.
Chapter 2 Using Release Automation
VMware, Inc. 31
8 Confirm to save the pipeline.
9 Click the task you created.
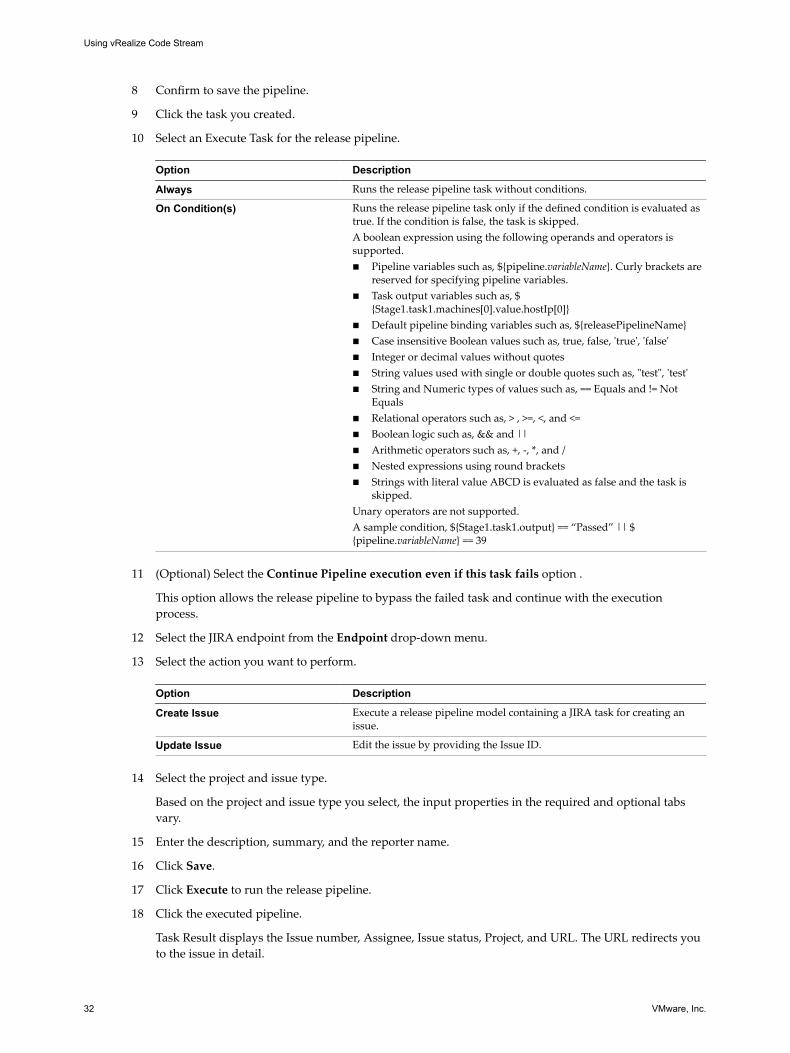
10 Select an Execute Task for the release pipeline.
Option Description
Always Runs the release pipeline task without conditions.
On Condition(s) Runs the release pipeline task only if the defined condition is evaluated astrue. If the condition is false, the task is skipped.A boolean expression using the following operands and operators issupported.n Pipeline variables such as, ${pipeline.variableName}. Curly brackets are
reserved for specifying pipeline variables.n Task output variables such as, $
{Stage1.task1.machines[0].value.hostIp[0]}n Default pipeline binding variables such as, ${releasePipelineName}n Case insensitive Boolean values such as, true, false, 'true', 'false'n Integer or decimal values without quotesn String values used with single or double quotes such as, "test", 'test'n String and Numeric types of values such as, == Equals and != Not
Equalsn Relational operators such as, > , >=, <, and <=n Boolean logic such as, && and ||n Arithmetic operators such as, +, -, *, and /n Nested expressions using round bracketsn Strings with literal value ABCD is evaluated as false and the task is
skipped.Unary operators are not supported.A sample condition, ${Stage1.task1.output} == “Passed” || ${pipeline.variableName} == 39
11 (Optional) Select the Continue Pipeline execution even if this task fails option .
This option allows the release pipeline to bypass the failed task and continue with the executionprocess.
12 Select the JIRA endpoint from the Endpoint drop-down menu.
13 Select the action you want to perform.
Option Description
Create Issue Execute a release pipeline model containing a JIRA task for creating anissue.
Update Issue Edit the issue by providing the Issue ID.
14 Select the project and issue type.
Based on the project and issue type you select, the input properties in the required and optional tabsvary.
15 Enter the description, summary, and the reporter name.
16 Click Save.
17 Click Execute to run the release pipeline.
18 Click the executed pipeline.
Task Result displays the Issue number, Assignee, Issue status, Project, and URL. The URL redirects youto the issue in detail.
Using vRealize Code Stream
32 VMware, Inc.

19 Enter the JIRA issue number to update the existing issue.
You can also select assignee, transition, resolution (if configured), and enter your comments.
20 Click Save.
Example: Output Format for a JIRA TaskThe following task output format is an example for a test task.
[
{
"name": "issueNumber",
"type": "String",
"description": "Issue Number",
"value": "VSD-1"
},
{
"name": "assignee",
"type": "String",
"description": "Assignee",
"value": "jiraadmin"
},
{
"name": "issueStatus",
"type": "String",
"description": "Issue Status",
"value": "Resolved"
},
{
"name": "project",
"type": "String",
"description": "Project",
"value": "Project-1"
}
]
Add a Script TaskYou can use a custom script task to configure bash or powershell scripts and run scripts on any Linux orWindows machine. After the script runs, you can monitor the script progress and capture the scriptresponse, which you can pass as input to other release pipeline tasks.
Prerequisites
n Verify that you defined and configured the plug-ins. An instance of this plug-in must be created invRealize Orchestrator to enable the plug-ins in the pipeline. See the Installation and Configuration guide.
n Verify the following for Bash script orchestration:
n SSH service is configured on the Linux host.
n Verify SSHD configuration MaxSessions is 50.
n Verify the following for Powershell script orchestration:
n Winrm service is configured on the Windows host.
n Verify winrm is configured for MaxShellsPerUser and MaxMemoryPerShellMB.
Chapter 2 Using Release Automation
VMware, Inc. 33
Procedure
1 Click the Code Stream tab.
2 Select an existing pipeline to configure from the Pipeline tab.
3 Select Edit > Stages.
4 Select Add Task.
5 Select Script from the Provider drop-down menu.
6 Enter a name for this custom task and click OK.
7 Select the new task from the stage column.
8 Confirm to save the pipeline.
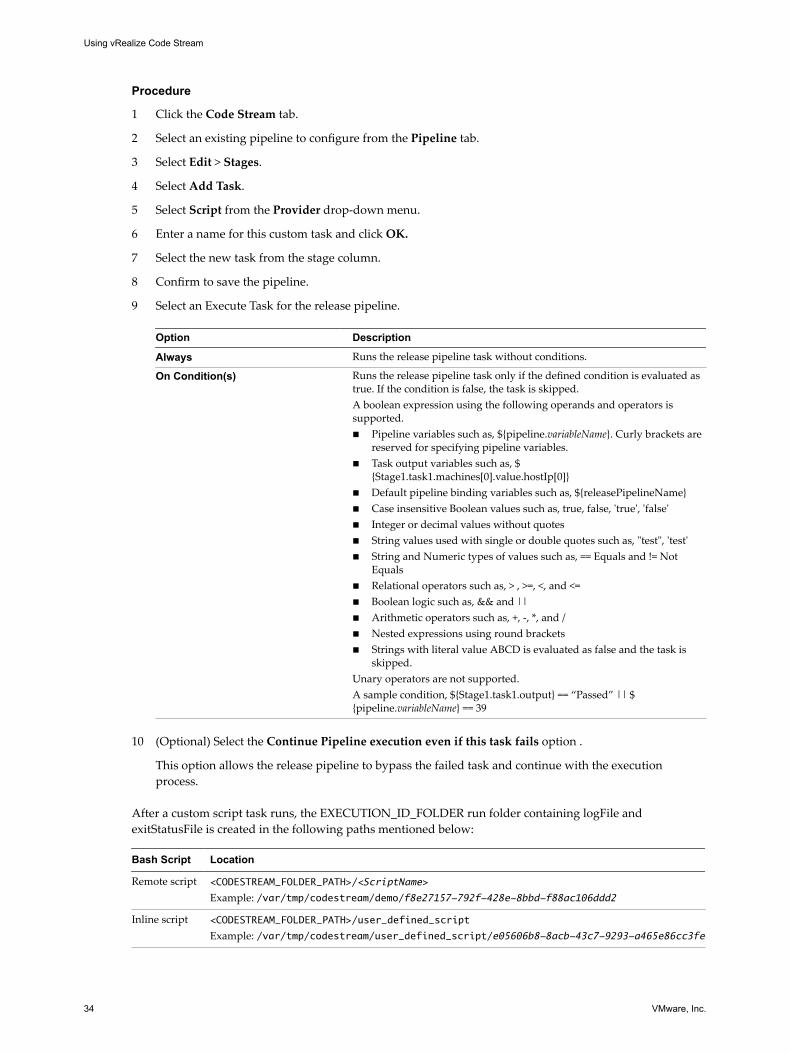
9 Select an Execute Task for the release pipeline.
Option Description
Always Runs the release pipeline task without conditions.
On Condition(s) Runs the release pipeline task only if the defined condition is evaluated astrue. If the condition is false, the task is skipped.A boolean expression using the following operands and operators issupported.n Pipeline variables such as, ${pipeline.variableName}. Curly brackets are
reserved for specifying pipeline variables.n Task output variables such as, $
{Stage1.task1.machines[0].value.hostIp[0]}n Default pipeline binding variables such as, ${releasePipelineName}n Case insensitive Boolean values such as, true, false, 'true', 'false'n Integer or decimal values without quotesn String values used with single or double quotes such as, "test", 'test'n String and Numeric types of values such as, == Equals and != Not
Equalsn Relational operators such as, > , >=, <, and <=n Boolean logic such as, && and ||n Arithmetic operators such as, +, -, *, and /n Nested expressions using round bracketsn Strings with literal value ABCD is evaluated as false and the task is
skipped.Unary operators are not supported.A sample condition, ${Stage1.task1.output} == “Passed” || ${pipeline.variableName} == 39
10 (Optional) Select the Continue Pipeline execution even if this task fails option .
This option allows the release pipeline to bypass the failed task and continue with the executionprocess.
After a custom script task runs, the EXECUTION_ID_FOLDER run folder containing logFile andexitStatusFile is created in the following paths mentioned below:
Bash Script Location
Remote script <CODESTREAM_FOLDER_PATH>/<ScriptName>
Example: /var/tmp/codestream/demo/f8e27157-792f-428e-8bbd-f88ac106ddd2
Inline script <CODESTREAM_FOLDER_PATH>/user_defined_script
Example: /var/tmp/codestream/user_defined_script/e05606b8-8acb-43c7-9293-a465e86cc3fe
Using vRealize Code Stream
34 VMware, Inc.

PowershellScript Location
Remotescript
<CODESTREAM_FOLDER_PATH>/<ScriptName>
Example: C:\Users\fritz\AppData\Local\Temp\codestream\demo\f8e27157-792f-428e-8bbd-f88ac106ddd2
Inlinescript
<CODESTREAM_FOLDER_PATH>/user_defined_script
Example:C:\Users\fritz\AppData\Local\Temp\codestream\user_defined_script\e05606b8-8acb-43c7-9293-a465e86cc3fe
Following are the Script plugin system properties, which can be configured on the vRealize Code Streamappliance:
Table 2‑1. Bash Script
Property Name Descriptiton Default Value
fms.bundle.script.bash.codestream.folder
Configure path for codestreamfolder where script executionfolder will be created.
/var/tmp/codestream/
fms.bundle.script.bash.log.snippet.lines
Configure number of lines forthe log snippet displayed inscript response.
50
fms.bundle.script.bash.log.snippet.line.length
Configure the maximumcharacters per log line afterwhich the log will be truncated.
1024
fms.bundle.script.bash.upload.chunk.bytes
For inline script, the data isuploaded in chunks and thisproperty is used to configurechunk size.
1024 * 50
Table 2‑2. Powershell Script
Property Name Descriptiton Default Value
fms.bundle.script.powershell.codestream.folder
Configure path for codestreamfolder where script executionfolder will be created.
C:\Users\<User_Name>\AppData\Local\Temp\codestream\
fms.bundle.script.powershell.log.snippet.lines
Configure number of lines forthe log snippet displayed inscript response.
50
fms.bundle.script.powershell.log.snippet.line.length
Configure the maximumcharacters per log line afterwhich the log will be truncated.
1024
fms.bundle.script.powershell.upload.chunk.bytes
For inline script, the data isuploaded in chunks and thisproperty is used to configurechunk size.
1024 * 50
Configure the General TabA script task allows you to configure input variables for a script as a simple key-value pair. The variablename should match the variable being used in the script when you configure a general input variable tocustomize the script.
Pipeline variables are runtime variables that are output from a previous task and are available forconsumption by other tasks. The jayway/JsonPath property format is supported.
Chapter 2 Using Release Automation
VMware, Inc. 35
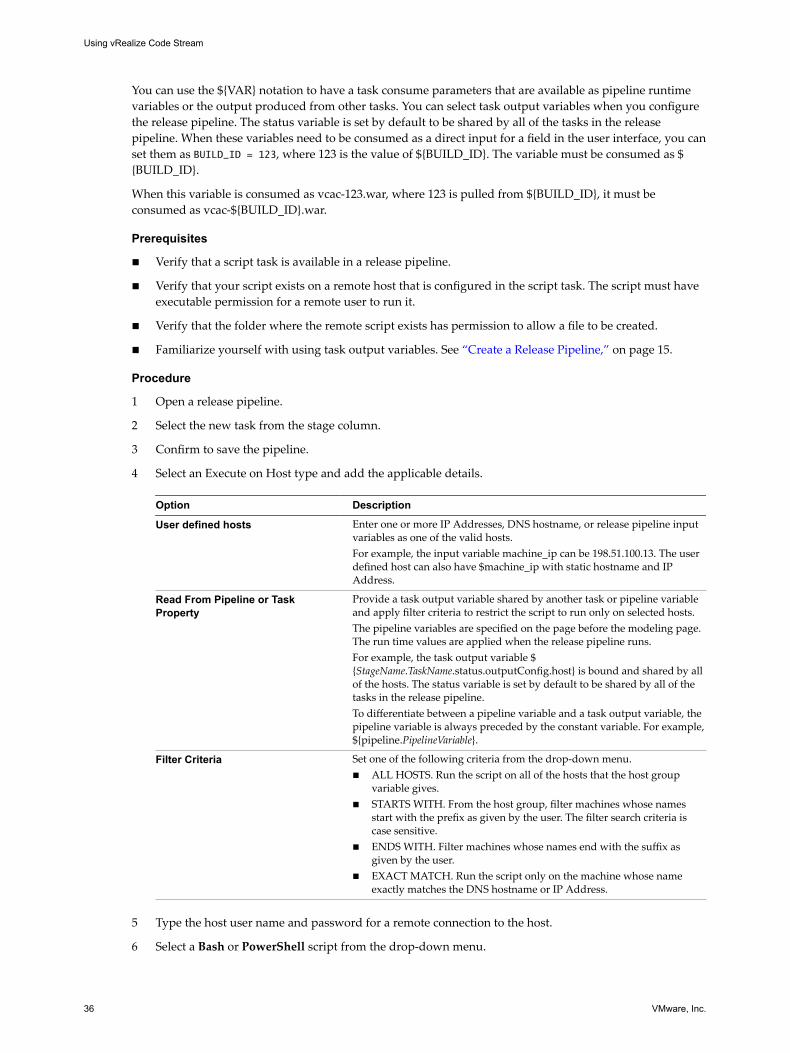
You can use the ${VAR} notation to have a task consume parameters that are available as pipeline runtimevariables or the output produced from other tasks. You can select task output variables when you configurethe release pipeline. The status variable is set by default to be shared by all of the tasks in the releasepipeline. When these variables need to be consumed as a direct input for a field in the user interface, you canset them as BUILD_ID = 123, where 123 is the value of ${BUILD_ID}. The variable must be consumed as ${BUILD_ID}.
When this variable is consumed as vcac-123.war, where 123 is pulled from ${BUILD_ID}, it must beconsumed as vcac-${BUILD_ID}.war.
Prerequisites
n Verify that a script task is available in a release pipeline.
n Verify that your script exists on a remote host that is configured in the script task. The script must haveexecutable permission for a remote user to run it.
n Verify that the folder where the remote script exists has permission to allow a file to be created.
n Familiarize yourself with using task output variables. See “Create a Release Pipeline,” on page 15.
Procedure
1 Open a release pipeline.
2 Select the new task from the stage column.
3 Confirm to save the pipeline.
4 Select an Execute on Host type and add the applicable details.
Option Description
User defined hosts Enter one or more IP Addresses, DNS hostname, or release pipeline inputvariables as one of the valid hosts.For example, the input variable machine_ip can be 198.51.100.13. The userdefined host can also have $machine_ip with static hostname and IPAddress.
Read From Pipeline or TaskProperty
Provide a task output variable shared by another task or pipeline variableand apply filter criteria to restrict the script to run only on selected hosts.The pipeline variables are specified on the page before the modeling page.The run time values are applied when the release pipeline runs.For example, the task output variable ${StageName.TaskName.status.outputConfig.host} is bound and shared by allof the hosts. The status variable is set by default to be shared by all of thetasks in the release pipeline.To differentiate between a pipeline variable and a task output variable, thepipeline variable is always preceded by the constant variable. For example,${pipeline.PipelineVariable}.
Filter Criteria Set one of the following criteria from the drop-down menu.n ALL HOSTS. Run the script on all of the hosts that the host group
variable gives.n STARTS WITH. From the host group, filter machines whose names
start with the prefix as given by the user. The filter search criteria iscase sensitive.
n ENDS WITH. Filter machines whose names end with the suffix asgiven by the user.
n EXACT MATCH. Run the script only on the machine whose nameexactly matches the DNS hostname or IP Address.
5 Type the host user name and password for a remote connection to the host.
6 Select a Bash or PowerShell script from the drop-down menu.
Using vRealize Code Stream
36 VMware, Inc.
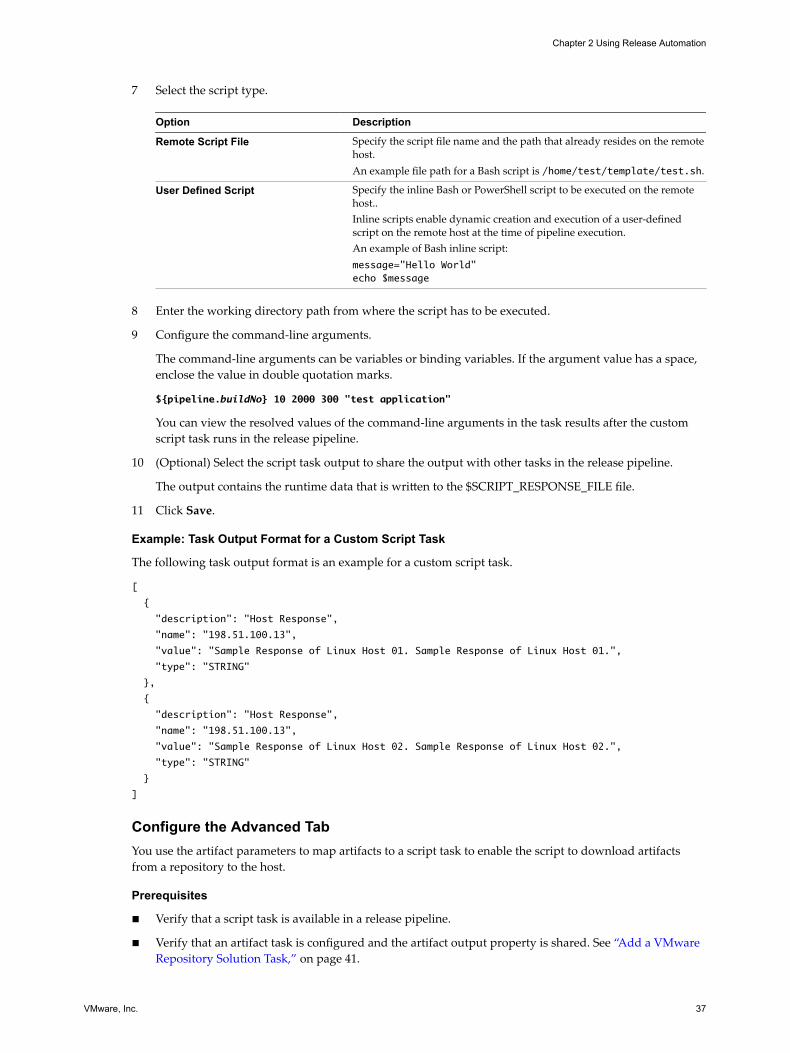
7 Select the script type.
Option Description
Remote Script File Specify the script file name and the path that already resides on the remotehost.An example file path for a Bash script is /home/test/template/test.sh.
User Defined Script Specify the inline Bash or PowerShell script to be executed on the remotehost..Inline scripts enable dynamic creation and execution of a user-definedscript on the remote host at the time of pipeline execution.An example of Bash inline script:message="Hello World"echo $message
8 Enter the working directory path from where the script has to be executed.
9 Configure the command-line arguments.
The command-line arguments can be variables or binding variables. If the argument value has a space,enclose the value in double quotation marks.
${pipeline.buildNo} 10 2000 300 "test application"
You can view the resolved values of the command-line arguments in the task results after the customscript task runs in the release pipeline.
10 (Optional) Select the script task output to share the output with other tasks in the release pipeline.
The output contains the runtime data that is written to the $SCRIPT_RESPONSE_FILE file.
11 Click Save.
Example: Task Output Format for a Custom Script Task
The following task output format is an example for a custom script task.
[
{
"description": "Host Response",
"name": "198.51.100.13",
"value": "Sample Response of Linux Host 01. Sample Response of Linux Host 01.",
"type": "STRING"
},
{
"description": "Host Response",
"name": "198.51.100.13",
"value": "Sample Response of Linux Host 02. Sample Response of Linux Host 02.",
"type": "STRING"
}
]
Configure the Advanced TabYou use the artifact parameters to map artifacts to a script task to enable the script to download artifactsfrom a repository to the host.
Prerequisites
n Verify that a script task is available in a release pipeline.
n Verify that an artifact task is configured and the artifact output property is shared. See “Add a VMwareRepository Solution Task,” on page 41.
Chapter 2 Using Release Automation
VMware, Inc. 37

Procedure
1 Open a release pipeline.
2 Select the script task from the stage column.
3 Click the Advanced tab.
4 Type the artifact group variable.
${StageName.TaskName.ARTIFACT_OUTPUT}
This variable is generated as part of the artifact output from the existing artifact task.
An example of an artifact group variable, ${Dev.Artifact.ARTIFACT_OUTPUT}.
5 Click Add to define the Artifact input parameters.
Option Description
Parameter Name Name of the Shell variable referring to an artifact in the script.An example parameter name is artifact_config.
Parameter Value Artifact name defined in the artifact group.An example parameter value is CodeStream_JAR.
6 Select Download URL or Repository URL from the drop-down menu.
The script calls the download URL or the repository URL for an artifact by mapping an artifact inputproperty.
7 Click Add to define the Other input.
Option Description
Parameter Name Name of the other Shell variable defined in the script.An example parameter name is portNumber or buidID.
Parameter Value Value for the Shell variable.An example parameter value is 800.
8 Click Save.
Example: Example Scripts for a Custom Script Task
The following example shows a script that configures a vRealize Automation application.
$ cat configureAppServer.sh
echo "Configure app server";
echo "VCAC Application Download URL: $VCAC_APP_DOWNLOAD_URL";
wget -O $VCAC_APP_DOWNLOAD_URL
echo "Configuring VCAC application";
echo "Starting application on port: $APLICATION_PORT";
MACHINE_IP = ifconfig | sed -En 's/127.0.0.1//;s/.*inet (addr:)?(([0-9]*\.)(3)[0-9]*).*/\2/p'
printf "Application URL: $MACHINE_IP:$APPLICATION_PORT/vcac/" > $SCRIPT_RESPONSE_FILE
The script refers to the VCAC_APP_DOWNLOAD_URL environment variable to determine what version ofthe VCAC artifact to download from the repository. The artifact input parameter to the script should be theVCAC_APP_DOWNLOAD_URL parameter.
wget -O VCAC_APP_DOWNLOAD_URL
echo "Configuring VCAC application";
Using vRealize Code Stream
38 VMware, Inc.

For the script to be able to share data with other release pipeline tasks, the contents must be written in aresponse file. The response file contents are stored in the script output variable.
MACHINE_IP = ifconfig | sed -En 's/127.0.0.1//;s/.*inet (addr:)?(([0-9]*\.){3}[0-9]*).*/\2/p'
printf "Application URL: $MACHINE_IP/vcac/" > $SCRIPT_RESPONSE_FILE
Configure a Team Foundation Server TaskYou can use the Team Foundation Server task to connect to the Team Foundation Server and invokeconfigured build and test jobs.
Prerequisites
n Verify that the Team Foundation Server endpoint is registered. See the Installation and Configurationguide.
n Verify that the Team Foundation Server project collection, team projects, and build definitions areconfigured.
Procedure
1 Click the Code Stream tab.
2 Select an existing pipeline to configure from the Pipeline tab.
3 Select Edit > Stages.
4 Select Add Task.
5 Select Team Foundation Server from the Provider drop-down menu.
6 Enter a name for the custom task and click OK.
7 Select the new task from the stage column.
8 Confirm to save the pipeline.
Chapter 2 Using Release Automation
VMware, Inc. 39
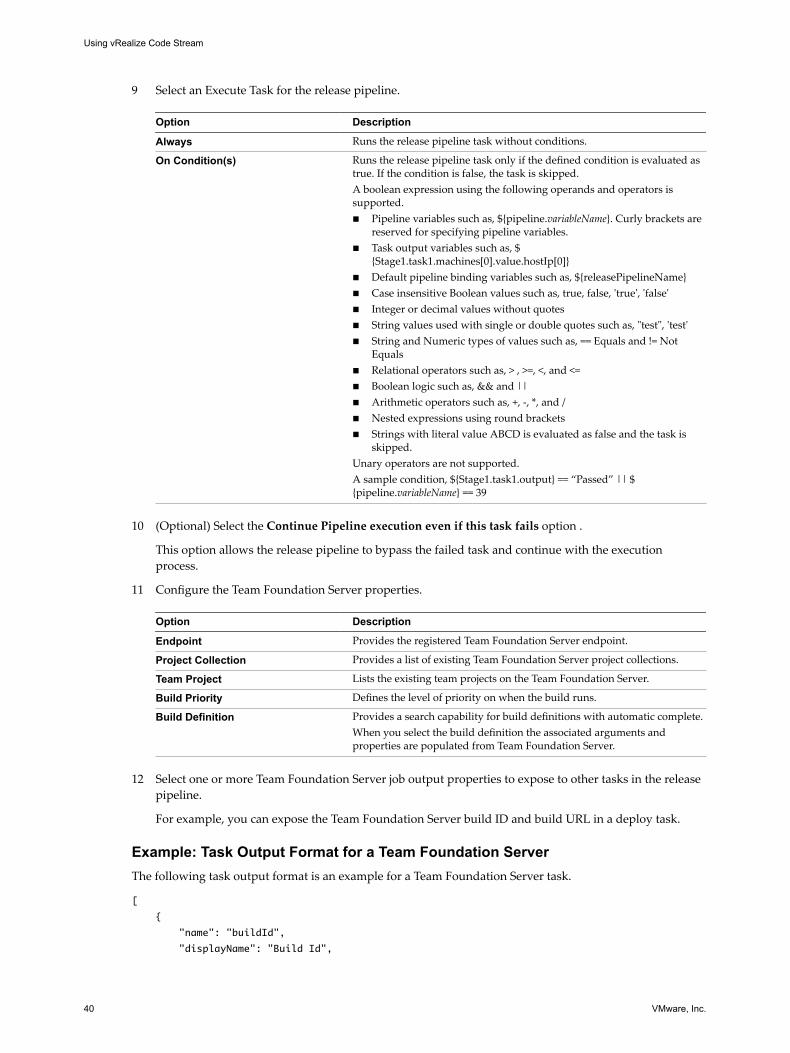
9 Select an Execute Task for the release pipeline.
Option Description
Always Runs the release pipeline task without conditions.
On Condition(s) Runs the release pipeline task only if the defined condition is evaluated astrue. If the condition is false, the task is skipped.A boolean expression using the following operands and operators issupported.n Pipeline variables such as, ${pipeline.variableName}. Curly brackets are
reserved for specifying pipeline variables.n Task output variables such as, $
{Stage1.task1.machines[0].value.hostIp[0]}n Default pipeline binding variables such as, ${releasePipelineName}n Case insensitive Boolean values such as, true, false, 'true', 'false'n Integer or decimal values without quotesn String values used with single or double quotes such as, "test", 'test'n String and Numeric types of values such as, == Equals and != Not
Equalsn Relational operators such as, > , >=, <, and <=n Boolean logic such as, && and ||n Arithmetic operators such as, +, -, *, and /n Nested expressions using round bracketsn Strings with literal value ABCD is evaluated as false and the task is
skipped.Unary operators are not supported.A sample condition, ${Stage1.task1.output} == “Passed” || ${pipeline.variableName} == 39
10 (Optional) Select the Continue Pipeline execution even if this task fails option .
This option allows the release pipeline to bypass the failed task and continue with the executionprocess.
11 Configure the Team Foundation Server properties.
Option Description
Endpoint Provides the registered Team Foundation Server endpoint.
Project Collection Provides a list of existing Team Foundation Server project collections.
Team Project Lists the existing team projects on the Team Foundation Server.
Build Priority Defines the level of priority on when the build runs.
Build Definition Provides a search capability for build definitions with automatic complete.When you select the build definition the associated arguments andproperties are populated from Team Foundation Server.
12 Select one or more Team Foundation Server job output properties to expose to other tasks in the release
pipeline.
For example, you can expose the Team Foundation Server build ID and build URL in a deploy task.
Example: Task Output Format for a Team Foundation ServerThe following task output format is an example for a Team Foundation Server task.
[
{
"name": "buildId",
"displayName": "Build Id",
Using vRealize Code Stream
40 VMware, Inc.

"value": "823",
"displayValue": null
},
{
"name": "dropLocation",
"displayName": "Drop Location",
"value": "#/70869/drop",
"displayValue": null
},
{
"name": "logUrl",
"displayName": "Build Summary Url",
"value":
"http://19.126.10.35:8080/tfs/TFSTestCollection/ConsoleApplication/_build#buildUri=vstfs:///Buil
d/Build/893&_a=summary",
"displayValue":
"http://19.126.10.35:8080/tfs/TFSTestCollection/ConsoleApplication/summary"
},
{
"name": "buildUrl",
"displayName": "Build Summary Url",
"value":
"http://19.126.10.35:8080/tfs/TFSTestCollection/ConsoleApplication/_build#buildUri=vstfs:///Buil
d/Build/893&_a=summary",
"displayValue":
"http://19.126.10.35:8080/tfs/TFSTestCollection/ConsoleApplication/summary"
},
{
"name": "failedTestsCount",
"displayName": "Number Of Failed Tests",
"value": "3",
"displayValue": null
}
]
Add a VMware Repository Solution TaskAn artifact task lets you search for artifacts from Artifactory and the Artifactory in turn connects with avariety of repositories such as Nexus and Yum.
You can search artifacts from Artifactory and the Artifactory in turn acts as an interface with a variety ofrepositories such as Nexus and Yum. When you include an artifact task in a stage, you can run a pipelineexecution every time you develop new code that affects that artifact. The search output parameter fromvaried source repositories is always the same, which includes a repository name, a download URL, and sizeinformation, if available.
Prerequisites
n Verify that a pipeline is available. See “Create a Release Pipeline,” on page 15.
n Verify that an Artifactory server is registered. See the Installation and Configuration guide.
Procedure
1 Click the Code Stream tab.
2 Select an existing pipeline to configure from the Pipeline tab.
3 Select Edit > Stages.
Chapter 2 Using Release Automation
VMware, Inc. 41

4 Select Add Task.
5 Select the VMware Repository Solution from the Provider drop-down menu.
6 Enter an artifact task name and click OK.
7 Select the new task from the stage column.
8 Confirm to save the pipeline.
9 Select an Execute Task for the release pipeline.
Option Description
Always Runs the release pipeline task without conditions.
On Condition(s) Runs the release pipeline task only if the defined condition is evaluated astrue. If the condition is false, the task is skipped.A boolean expression using the following operands and operators issupported.n Pipeline variables such as, ${pipeline.variableName}. Curly brackets are
reserved for specifying pipeline variables.n Task output variables such as, $
{Stage1.task1.machines[0].value.hostIp[0]}n Default pipeline binding variables such as, ${releasePipelineName}n Case insensitive Boolean values such as, true, false, 'true', 'false'n Integer or decimal values without quotesn String values used with single or double quotes such as, "test", 'test'n String and Numeric types of values such as, == Equals and != Not
Equalsn Relational operators such as, > , >=, <, and <=n Boolean logic such as, && and ||n Arithmetic operators such as, +, -, *, and /n Nested expressions using round bracketsn Strings with literal value ABCD is evaluated as false and the task is
skipped.Unary operators are not supported.A sample condition, ${Stage1.task1.output} == “Passed” || ${pipeline.variableName} == 39
10 (Optional) Select the Continue Pipeline execution even if this task fails option .
This option allows the release pipeline to bypass the failed task and continue with the executionprocess.
Search Artifacts from the Artifactory RepositoryYou can enter a few search parameters to locate and filter the pertinent artifacts from the Artifcatoryrepository.
Prerequisites
Verify that you have an existing artifact task. See “Add a VMware Repository Solution Task,” on page 41.
Procedure
1 Open an existing artifact task.
2 Select Add By Search.
3 Select a repository from the drop-down menu.
Using vRealize Code Stream
42 VMware, Inc.

4 Determine a search type and add the search parameters.
The search type depends on your repository and artifact.
For example, you can use the gavc search type to search for the Maven artifacts.
Search Type Description and Sample Search Parameters
gavc Provide a group ID, artifact ID, version ID, or classifier parameters for thesearch on local repositories.Note On remote repositories the search requires a group ID, artifact ID,and version ID. You can not use the wild card character asterisk (*) as asearch parameter.n The group ID is the organization that published the artifact.
For example, org.springframework.n The artifact ID is the identifier of the artifact.
For example, travel.n The version ID parameter supports the LATEST and version-
SNAPSHOT keywords.
For example, enter 4.1-SNAPSHOT to get the snapshot of a version.The classifier is optional and supports the wild card character asterisk (*).For example, release*, *release*, or *.When you start a gavc search type from an Artifactory repository, thesearch result displays all of the files with the same artifact name anddifferent extensions. You can narrow the search results with the patternsearch type instead.
pattern Provide the artifact name or path parameters for the search on localrepositories.Note On remote repositories the search requires the complete artifactpath. The artifact name is optional.n The name parameter supports the wild card character asterisk (*).
For example, test*, test.*, *.jar, or *.n The path parameter supports the wild card character asterisk (*) for
local repositories.
For example, path/*/release searches under the path directory inthe /test/release and /dev/release folders for the artifacts only in thosefolders.
Each wildcard (*) represents one level in the folder structure.
Chapter 2 Using Release Automation
VMware, Inc. 43

Search Type Description and Sample Search Parameters
properties Defined in the Artifactory server to tag artifacts with custom userproperties.These properties can be any string values. An artifact can have multipleproperties and these properties can have multiple values. You can usethese properties instead of the actual group ID, version, or specific path tolocate an artifact in the repository.For example, the Property field can be artifactory.licenses and the Valuefield can be BSD .Note The properties search function does not work on remoterepositories. You can cache artifacts or locally tag the artifacts to use thissearch function.
build You can not create an artifact in the Artifactory user interface. You mustpush a build from your CI server to the Artifactory user interface.n The build Name is the name of the job that is run on your CI system.
For example, Jenkins-release.n The build Number supports the LATEST or a build status keyword .
For example, you can search for builds with the Prod status.n The name lets you filter an artifact from the list of artifacts in a specific
build.
For example, public-API.jar or public-*.jarNote The build search function does not work on remoterepositories.
5 Enter a temporary value in the Value text box if you use a variable as a search parameter and click
Search.
The variable is applied during the artifact configuration for the property and the temporary value isignored.
For example, for a gavc search type, if you use ${LATEST} as the version variable, which could bedifferent when you run the pipeline, you must add the current version, such as 2.1 in the temporaryvalue .
If the search shows that an artifact does not exist, verify that the search parameters are accurate.
6 Select one or more artifacts from the search results and click Add.
7 Click Validate to verify that the artifact exists in the repository.
If a variable is assigned as an artifact property, then the validation fails. You can replace the variablewith an artifact property value and validate.
8 Select one or more artifact output properties to expose to other tasks in the pipeline.
For example, you can select to expose the artifact output and the status results in a custom task.
9 Click Save.
Add Artifacts by Name to the Artifact TaskYou can specify the name of an artifact and provide the property values for the artifact task.
Prerequisites
Verify that you have an existing artifact task. See “Add a VMware Repository Solution Task,” on page 41.
Procedure
1 Open an existing artifact task.
2 Select Add By Name.
Using vRealize Code Stream
44 VMware, Inc.
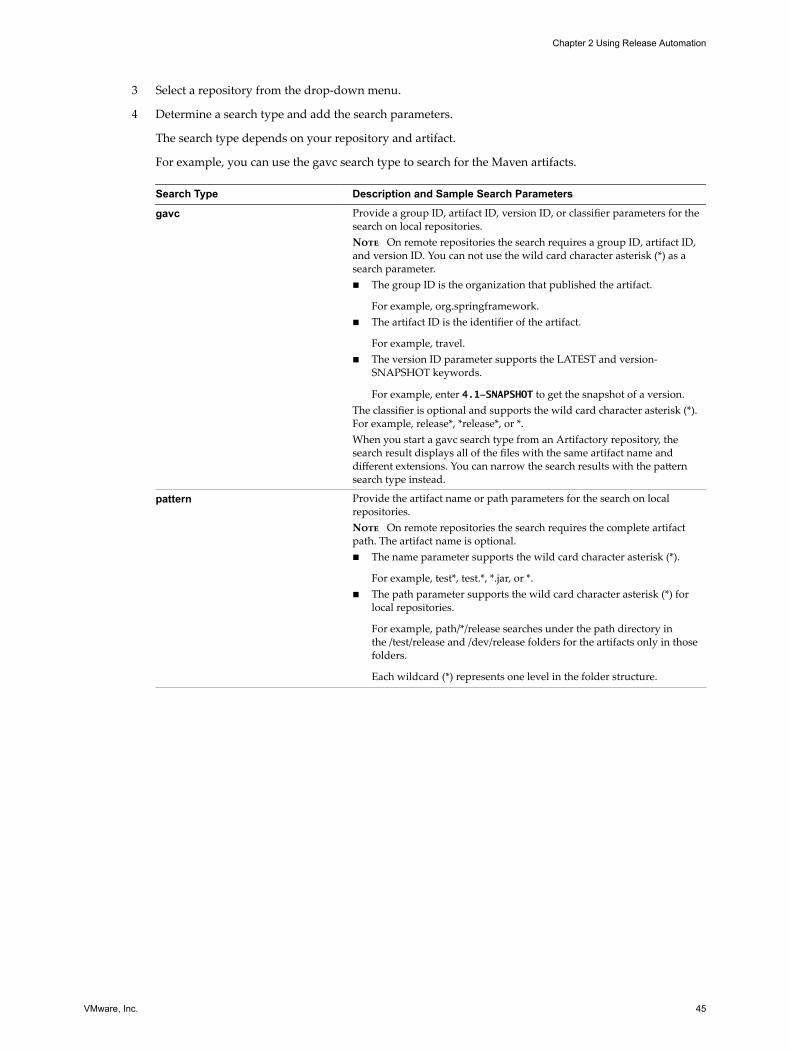
3 Select a repository from the drop-down menu.
4 Determine a search type and add the search parameters.
The search type depends on your repository and artifact.
For example, you can use the gavc search type to search for the Maven artifacts.
Search Type Description and Sample Search Parameters
gavc Provide a group ID, artifact ID, version ID, or classifier parameters for thesearch on local repositories.Note On remote repositories the search requires a group ID, artifact ID,and version ID. You can not use the wild card character asterisk (*) as asearch parameter.n The group ID is the organization that published the artifact.
For example, org.springframework.n The artifact ID is the identifier of the artifact.
For example, travel.n The version ID parameter supports the LATEST and version-
SNAPSHOT keywords.
For example, enter 4.1-SNAPSHOT to get the snapshot of a version.The classifier is optional and supports the wild card character asterisk (*).For example, release*, *release*, or *.When you start a gavc search type from an Artifactory repository, thesearch result displays all of the files with the same artifact name anddifferent extensions. You can narrow the search results with the patternsearch type instead.
pattern Provide the artifact name or path parameters for the search on localrepositories.Note On remote repositories the search requires the complete artifactpath. The artifact name is optional.n The name parameter supports the wild card character asterisk (*).
For example, test*, test.*, *.jar, or *.n The path parameter supports the wild card character asterisk (*) for
local repositories.
For example, path/*/release searches under the path directory inthe /test/release and /dev/release folders for the artifacts only in thosefolders.
Each wildcard (*) represents one level in the folder structure.
Chapter 2 Using Release Automation
VMware, Inc. 45

Search Type Description and Sample Search Parameters
properties Defined in the Artifactory server to tag artifacts with custom userproperties.These properties can be any string values. An artifact can have multipleproperties and these properties can have multiple values. You can usethese properties instead of the actual group ID, version, or specific path tolocate an artifact in the repository.For example, the Property field can be artifactory.licenses and the Valuefield can be BSD .Note The properties search function does not work on remoterepositories. You can cache artifacts or locally tag the artifacts to use thissearch function.
build You can not create an artifact in the Artifactory user interface. You mustpush a build from your CI server to the Artifactory user interface.n The build Name is the name of the job that is run on your CI system.
For example, Jenkins-release.n The build Number supports the LATEST or a build status keyword .
For example, you can search for builds with the Prod status.n The name lets you filter an artifact from the list of artifacts in a specific
build.
For example, public-API.jar or public-*.jarNote The build search function does not work on remoterepositories.
5 Enter the artifact name and click Add.
6 Click Validate to verify that the artifact exists in the repository.
If a variable is assigned as an artifact property, then the validation fails. You can replace the variablewith an artifact property value and validate.
7 Select one or more artifact output properties to expose to other tasks in the pipeline.
For example, you can select to expose the artifact output and the status results in a custom task.
8 Click Save.
Add a vRealize Automation TaskA provision task provisions machines. You can register a vRealize Automation 6.x or 7.x instance withvRealize Code Stream to provision infrastructure in a specific environment.
vRealize Code Stream can also start multiple vRealize Automation instances. You can create machines froma single machine blueprint for a provision task. The task output is an array of machines.
Prerequisites
n Verify that the vRealize Automation server endpoint is registered. See the Installation and Configurationguide.
n Verify that you completed the following tasks in vRealize Automation 6.2.x or 7.x to add an endpoint invRealize Code Stream.
n Choosing an Endpoint Scenario see IaaS Configuration for Virtual Platforms.
n Create a Fabric Group see IaaS Configuration for Virtual Platforms.
n Create a Business Group see IaaS Configuration for Virtual Platforms.
n Create a Reservation see IaaS Configuration for Virtual Platforms.
n Create a Reservation Policy see IaaS Configuration for Physical Machines.
Using vRealize Code Stream
46 VMware, Inc.

n Create a Network Profile see IaaS Integration for Multi-Machine Services.
n Create a Blueprint see IaaS Configuration for Virtual Platforms.
n Publish a Blueprint see IaaS Configuration for Virtual Platforms.
n Verify that the vRealize Automation catalog item is assigned to a service.
The service must be added to the entitlement for the Business group proxy user.
Procedure
1 Click the Code Stream tab.
2 Select an existing pipeline to configure from the Pipeline tab.
3 Select Edit > Stages.
4 Select Add Task.
5 Select vRealize Automation 6 from the Provider drop-down menu.
6 Select vRealize Automation server endpoint you registered.
7 Enter a name for the provision task and click OK.
8 Select the new task from the stage column.
9 Confirm to save the pipeline.
10 Select an Execute Task for the release pipeline.
Option Description
Always Runs the release pipeline task without conditions.
On Condition(s) Runs the release pipeline task only if the defined condition is evaluated astrue. If the condition is false, the task is skipped.A boolean expression using the following operands and operators issupported.n Pipeline variables such as, ${pipeline.variableName}. Curly brackets are
reserved for specifying pipeline variables.n Task output variables such as, $
{Stage1.task1.machines[0].value.hostIp[0]}n Default pipeline binding variables such as, ${releasePipelineName}n Case insensitive Boolean values such as, true, false, 'true', 'false'n Integer or decimal values without quotesn String values used with single or double quotes such as, "test", 'test'n String and Numeric types of values such as, == Equals and != Not
Equalsn Relational operators such as, > , >=, <, and <=n Boolean logic such as, && and ||n Arithmetic operators such as, +, -, *, and /n Nested expressions using round bracketsn Strings with literal value ABCD is evaluated as false and the task is
skipped.Unary operators are not supported.A sample condition, ${Stage1.task1.output} == “Passed” || ${pipeline.variableName} == 39
11 (Optional) Select the Continue Pipeline execution even if this task fails option .
This option allows the release pipeline to bypass the failed task and continue with the executionprocess.
12 Select the endpoint from the Endpoint drop-down menu.
Chapter 2 Using Release Automation
VMware, Inc. 47

13 Select the published vRealize Automation blueprint from the Blueprint drop-down menu.
14 Enter the machine properties.
Option Description
Number of /Machines Enter the number of machines to be provisioned and the configurationdetails.
Lease (Days) and other machinedetails
Enter the Lease (Days), Number of CPUs, Memory, Storage values, andDescription.Note An existing machine blueprint configuration can overwrite thevalues specified here.
Owner Select Logged In User to allow the user currently logged in to run therelease pipeline.Select Enter Owner or Bind to allow a different user to log in, configurethe machine, and provision it when the release pipeline is run. You mustenter the login credential information of that user.
15 (Optional) Select to share the machine output information with other tasks during the release pipeline
execution.
This output contains details of the machines successfully provisioned by this task. You can use thisvariable in succeeding tasks to retrieve the machine details.
16 Click Save.
Example: Task Output Format for a vRealize Automation TaskThe following task output format is an example for a provisioning task.
[
{
"name": "vcac-prov01",
"value": {
"memory": 1024,
"machineId": "f9ee3f71-c5d0-4138-9520-24e15e376d13",
"hostIp": ["10.72.12.56"],
"cpu": 1,
"endLease": 1410478627000,
"storageSize": 4,
"startLease": 1410392227000,
"blueprintId":" f9ee3f71-c5d0-4138-3476-24e15e376f36",
"provider":"iaas-service"
},
"type": "MACHINE"
}
]
Request a Machine BlueprintYou can request blueprints and customize machine components to provision a machine or a stack ofmachines.
You can modify the properties for blueprints configured in vRealize Automation and view the task results.
Using vRealize Code Stream
48 VMware, Inc.

Prerequisites
You need to install and configure the vRealize Automation IaaS feature and create a blueprint for yourvSphere machine component.
Note vRealize Automation 6.x and 7.x are supported and you can select separate tasks and configuredistinct endpoints in the vRealize Automation Properties pane when you configure the task.
Procedure
1 Click the Code Stream tab.
2 Select an existing pipeline to configure from the Pipeline tab.
3 Select Edit > Stages.
4 Select a task and select vRealize Automation 7 from the Provider drop-down menu.
5 Select the endpoint and the blueprint to view the components.
The catalog API provides all component information, which you can modify after logging in tovRealize Automation. You can set constraints or machine resource information such as number of CPUsand storage. You can also choose to display or hide any custom property in the request form and submitthe changes to the blueprint. If you modify any information in vRealize Automation, a messagedisplays to indicate that you modified the blueprint.
6 Click the General tab and provide the number of deployments and the number of lease days.
7 Click the Advanced tab to provision the selected blueprint.
The vRealize Automation API provides an instance of the blueprint. You can view all components of theblueprint, configuration items, and data nodes. The input property of the available fields such asmachine components is validated.
8 Select Save, activate the pipeline, and click Execute.
You can view the status and details of the request on the vRealize Automation Request tab while theserver processes your request.
9 After the pipeline execution is complete, select the task to view the output property.
The Machines output property displays all the output properties of the machines provisioned in theblueprint, and the Resources output property displays all resources provisioned by the request.
Create a Nested PipelineYou can model a complex pipeline and execute the pipeline in a modular manner by invoking pipelineswithin pipelines. You can also view the result of the nested pipeline execution.
The nested pipelines allow you to model complex release pipelines by managing pipelines as tasks.
Prerequisites
Verify that you have available predefined release pipelines.
Procedure
1 Create a master release pipeline.
2 Add a stage or add multiple stages to this pipeline and include tasks.
3 Add a new task, select vRealize Code Stream as the provider and enter the name of the task.
4 Select the new task from the stage column.
5 Confirm to save the pipeline.
Chapter 2 Using Release Automation
VMware, Inc. 49

6 Select an Execute Task for the release pipeline.
Option Description
Always Runs the release pipeline task without conditions.
On Condition(s) Runs the release pipeline task only if the defined condition is evaluated astrue. If the condition is false, the task is skipped.A boolean expression using the following operands and operators issupported.n Pipeline variables such as, ${pipeline.variableName}. Curly brackets are
reserved for specifying pipeline variables.n Task output variables such as, $
{Stage1.task1.machines[0].value.hostIp[0]}n Default pipeline binding variables such as, ${releasePipelineName}n Case insensitive Boolean values such as, true, false, 'true', 'false'n Integer or decimal values without quotesn String values used with single or double quotes such as, "test", 'test'n String and Numeric types of values such as, == Equals and != Not
Equalsn Relational operators such as, > , >=, <, and <=n Boolean logic such as, && and ||n Arithmetic operators such as, +, -, *, and /n Nested expressions using round bracketsn Strings with literal value ABCD is evaluated as false and the task is
skipped.Unary operators are not supported.A sample condition, ${Stage1.task1.output} == “Passed” || ${pipeline.variableName} == 39
7 (Optional) Select the Continue Pipeline execution even if this task fails option .
This option allows the release pipeline to bypass the failed task and continue with the executionprocess.
8 Click the task you created.
9 Select the pipeline from the Pipeline drop-down menu to configure the selected pipeline as a task.
You can override the input parameters to enable the child pipeline to run with the new values instead ofthe configured values.
10 Click the Output tab, select the output properties that you want to publish and provide the custom aliasname.
Only the values that you select for publishing are considered in the master pipeline execution.
11 Click Save.
12 Repeat steps 3-5 to configure pipelines for each task.
13 Click Execute to run the master release pipeline.
14 Click the Pipeline Executions tab.
The status of each invoked pipeline is displayed.
15 Select the master release pipeline and click the task to view the details of the pipeline task.
16 Click the Pipeline Detail button to view the details of the task modeled in the pipeline.
You can also view the details in the Dashboard tab.
Using vRealize Code Stream
50 VMware, Inc.

Configure a Custom TaskA custom task allows any custom activity that you can start with a vRealize Orchestrator workflow or script.This activity can also be a manual approval.
Prerequisites
Verify that you created a workflow and tagged it with the CUSTOM keyword in the vRealize OrchestratorWorkflow Designer.
Procedure
1 Click the Code Stream tab.
2 Select an existing pipeline to configure from the Pipeline tab.
3 Select Edit > Stages.
4 Select Add Task.
5 Select Add Task.
6 Select Custom from the Category drop-down menu.
7 Select Custom Workflow from the Provider drop-down menu.
8 Enter a name for the custom task and click OK.
9 Select the new task from the stage column.
10 Confirm to save the pipeline.
11 Select the Workflow Name from the drop-down menu.
12 Enter the Input Parameters.
For example, enter vsphere.local\administrators for the Task Group DN Name and enter the taskdetails.
13 Click Save.
Example: Task Output Format for a Custom Workflow TaskThe following task output format is an example for a custom workflow task.
[{
"name": "result",
"type": "STRING",
"description": "Result of workflow run.",
"value": ""
},
{
"name": "message",
"type": "STRING",
"description": "Message",
"value": ""
}]
Chapter 2 Using Release Automation
VMware, Inc. 51
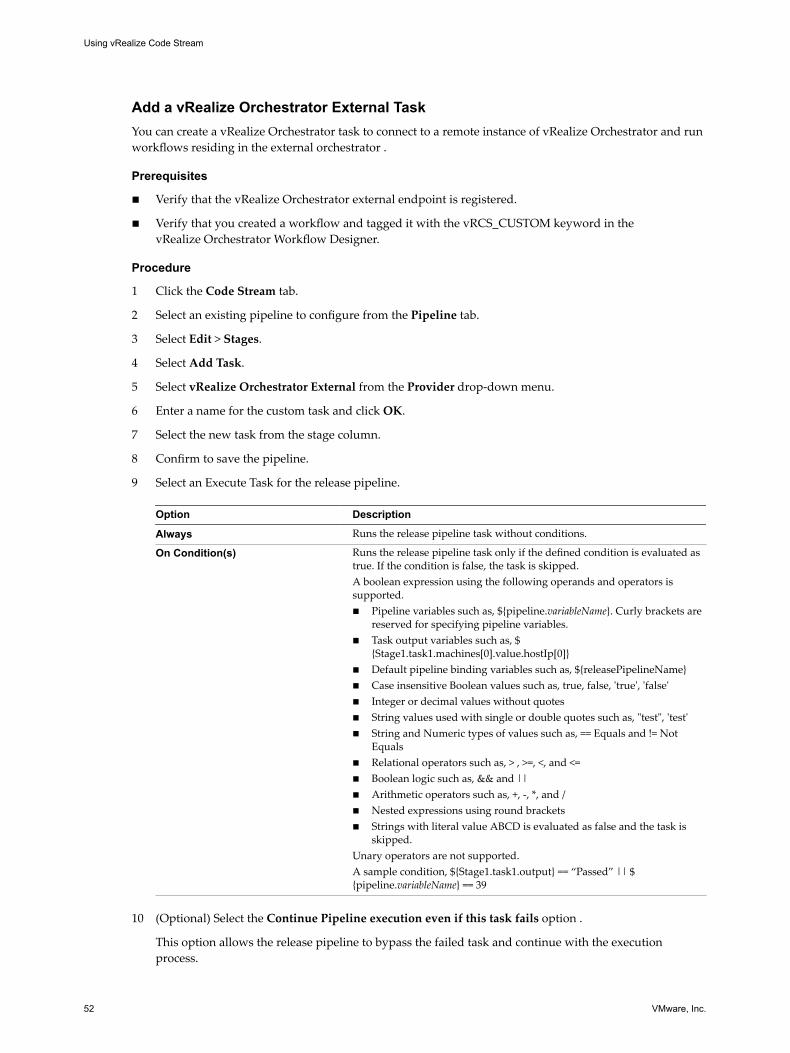
Add a vRealize Orchestrator External TaskYou can create a vRealize Orchestrator task to connect to a remote instance of vRealize Orchestrator and runworkflows residing in the external orchestrator .
Prerequisites
n Verify that the vRealize Orchestrator external endpoint is registered.
n Verify that you created a workflow and tagged it with the vRCS_CUSTOM keyword in thevRealize Orchestrator Workflow Designer.
Procedure
1 Click the Code Stream tab.
2 Select an existing pipeline to configure from the Pipeline tab.
3 Select Edit > Stages.
4 Select Add Task.
5 Select vRealize Orchestrator External from the Provider drop-down menu.
6 Enter a name for the custom task and click OK.
7 Select the new task from the stage column.
8 Confirm to save the pipeline.
9 Select an Execute Task for the release pipeline.
Option Description
Always Runs the release pipeline task without conditions.
On Condition(s) Runs the release pipeline task only if the defined condition is evaluated astrue. If the condition is false, the task is skipped.A boolean expression using the following operands and operators issupported.n Pipeline variables such as, ${pipeline.variableName}. Curly brackets are
reserved for specifying pipeline variables.n Task output variables such as, $
{Stage1.task1.machines[0].value.hostIp[0]}n Default pipeline binding variables such as, ${releasePipelineName}n Case insensitive Boolean values such as, true, false, 'true', 'false'n Integer or decimal values without quotesn String values used with single or double quotes such as, "test", 'test'n String and Numeric types of values such as, == Equals and != Not
Equalsn Relational operators such as, > , >=, <, and <=n Boolean logic such as, && and ||n Arithmetic operators such as, +, -, *, and /n Nested expressions using round bracketsn Strings with literal value ABCD is evaluated as false and the task is
skipped.Unary operators are not supported.A sample condition, ${Stage1.task1.output} == “Passed” || ${pipeline.variableName} == 39
10 (Optional) Select the Continue Pipeline execution even if this task fails option .
This option allows the release pipeline to bypass the failed task and continue with the executionprocess.
Using vRealize Code Stream
52 VMware, Inc.

11 Select the endpoint from the Endpoint drop-down menu.
12 Select the Workflow from the drop-down menu and provide the values for the input parameters.
13 Click Save.
Example: Task Output Format for a vRealize Orchestrator External Task
The following task output format is an example for a custom workflow task.
[{
"name": "result",
"type": "STRING",
"description": "Result of workflow run.",
"value": ""
},
{
"name": "message",
"type": "STRING",
"description": "Message",
"value": ""
}]
Configure Gating RulesGating rules are a set of criteria that each stage must pass to proceed to the subsequent stage. You canconfigure gating rules based on your requirement for a pipeline.
If the gating rule is not configured, then the process proceeds to the next stage regardless of the outcome oftasks in the current stage. The workflows are tagged as vRCS_GATING_RULE and are listed in the drop-down menu.
A workflow is depicted as a sequence of operations. The workflow consists of an orchestrated andrepeatable pattern of business activity enabled by the systematic organization of resources into processesthat transform materials, provide services, or process information.
The default workflows are Approval and Test Acceptance Threshold. For information on how you canregister vRO workflow for a gating rule, see Installation and Configuration guide.
Table 2‑3. Default Workflows
Workflow Description
Approval This workflow is tagged with a vRCS_GATING_RULE tag.You must provide the approval group DN value and theapproval message for a stage to continue or stop. Theappropriate user receives an email to approve or reject thisworkflow. After the user submits or rejects the notificationthat appears in My Inbox, the workflow either continues orstops.
Test Acceptance Threshold This workflow is tagged with a vRCS_GATING_RULE tag.You must provide the threshold percentage value and thetest result for a task to succeed the gating rule to the nextlevel. This workflow accepts the test result from a Jenkinstest task. Based on the configured threshold for passed testscriteria, it allows the pipeline run to proceed to thesubsequent stage.
Prerequisites
n Verify that the last task of a stage is a test, custom script, or custom workflow.
Chapter 2 Using Release Automation
VMware, Inc. 53

n Verify that a custom script output is converted to create a JSON and then passed to the gating rule.
The Jenkins output can be passed directly to the gating rule, as the following example shows.
{
"totalCount": 40,
"skipCount": 0,
"failureCount": 0,
"successCount": 40
}
Procedure
1 Click the Code Stream tab.
2 Select an existing pipeline to configure from the Pipeline tab.
3 Select Edit > Stages.
4
Click the Gating Rule icon ( ) next to a stage.
5 Select If outcome of a vRealize Orchestrator workflow is successful to create the gating rule.
6 Select the appropriate workflow from the drop-down menu.
a Enter the approval group DN value, vsphere.local\administrators, in the Approval text box.
You can also edit the approval message. DN is any valid DN name that is configured in the identitystore tied to vRealize Automation.
b Enter the threshold percentage and the test result value in the Test Acceptance Threshold text box.
7 Click Save.
Activate and Run a Release PipelineYou can run a release pipeline that is activated. After you activate the release pipeline, pipeline modeling iscomplete and you can run it.
You can view a release pipeline run on the Pipeline Executions tab. The draft state signifies that the ReleaseManager is still modeling the release pipeline.
Multilevel information is provided during the release pipeline run.
n Level 1.Status at release pipeline level which is the description of the current activity.
n Level 2. Status at the task or stage level that displays the current task progress and the executed taskstatus.
n Level 3. Provides detailed information at task level.
Prerequisites
n Verify that a release pipeline is created in a draft state. See “Create a Release Pipeline,” on page 15.
n Verify that predefined vRealize Automation blueprints, workflows, and scripts are created, and test jobsthat perform tasks that the pipeline can trigger.
n Verify that artifacts are available in the Artifactory server repository to use the vRealize Code StreamArtifact Management capabilities.
Procedure
1 Click the Code Stream tab.
2 Select an existing pipeline to configure from the Pipeline tab.
Using vRealize Code Stream
54 VMware, Inc.

3 Click Activate to create a vRealize Orchestrator workflow.
Every time a pipeline is activated, a new version of the pipeline is created.
A list of the available pipelines appears.
4 Select the pipeline.
5 Click Execute.
The Execute Pipeline dialog box appears.
6 Enter the description and properties.
7 Click OK to run a release pipeline.
Note If you are running a pipeline with Team Foundation Server 2015 (TFS), you can cancel thepipeline execution and view the status of the configured build in the server. If you are running apipeline with TFS 2013 and cancel the pipeline execution, the pipeline is marked as cancelled, but theconfigured build in the TFS server will still display the status of the pipeline as completed.
Chapter 2 Using Release Automation
VMware, Inc. 55

Using vRealize Code Stream
56 VMware, Inc.
Managing Release Automation 3After you execute a release pipeline, you can monitor the status from the Dashboard home page. You canalso delete a task, duplicate a pipeline, or delete a pipeline from the Code Stream tab.
This chapter includes the following topics:
n “Clone a Task,” on page 57
n “Delete a Task or a Cloned Task,” on page 58
n “Copy a Release Pipeline,” on page 58
n “Delete a Release Pipeline,” on page 58
Clone a TaskYou can include multiple tasks with the same configuration in your pipeline by creating a task and cloningit. You can place the cloned task in the same stage or move it to a different stage of the pipeline.
You cannot have multiple cloned tasks with the same name in a stage.
Prerequisites
Verify that you have an existing task. See “Create a Release Pipeline,” on page 15.
Procedure
1 Click the Code Stream tab.
2 Select an existing pipeline to configure from the Pipeline tab.
3 Select Edit > Stages.
4 Click the gear icon ( ) next to the task in a stage.
5 Click Clone.
A clone task appears in the stage.
6 Drag the cloned task to another stage or place it in the same stage.
You can reorganize the order of the cloned task in a stage.
7 Confirm to save the pipeline.
VMware, Inc. 57

Delete a Task or a Cloned TaskYou can delete any task or cloned task in a stage that is not required in the pipeline. Deleting a task mightaffect the subsequent tasks that refer to the output of that task.
Prerequisites
Verify that you have an existing task. See “Create a Release Pipeline,” on page 15.
Procedure
1 Click the Code Stream tab.
2 Select an existing pipeline to configure from the Pipeline tab.
3 Select Edit > Stages.
4 Click the gear icon ( ) next to the task in a stage.
5 Click Delete.
Copy a Release PipelineCopying or cloning a release pipeline creates the replica of a release pipeline with a different release pipelinename. This replication creates a release pipeline without affecting the existing release pipeline model. Theconfiguration of the source and target release pipelines does not change.
Prerequisites
Verify that you have created a release pipeline. See “Create a Release Pipeline,” on page 15.
Procedure
1 Select the pipeline to copy on the Pipelines tab.
2 Click Copy.
The Copy Pipeline window appears.
3 Enter an appropriate name for the release pipeline replica.
4 Enter the description for the release pipeline .
5 Click OK.
A copy of the release pipeline is created and is listed on the Pipelines tab. You can edit this releasepipeline to make further modifications.
Delete a Release PipelineDeleting a release pipeline removes the pipeline from the pipeline model.
Prerequisites
Verify that you have an existing release pipeline. See “Create a Release Pipeline,” on page 15.
Procedure
1 Select the pipeline to delete on the Pipelines tab.
2 Click Delete.
A confirmation message appears.
3 Click Yes to delete the selected release pipeline.
Using vRealize Code Stream
58 VMware, Inc.

Viewing Pipeline Execution Reports 4You can determine key business metrics for your application release by viewing the reports of thesuccessfully executed release pipelines and analyzing the failed pipelines.
This chapter includes the following topics:
n “View the Success Rate of the Executed Pipelines,” on page 59
n “View Failed Pipelines,” on page 59
View the Success Rate of the Executed PipelinesYou can view a consolidated report of release pipeline executions displayed at predefined intervals toindicate the tasks that fail and make informed decisions about the release progress.
Procedure
1 Select Code Stream > Reports.
2 Select Pipeline success Rate from the Report drop-down menu.
3 Select the executed pipeline from the Pipeline drop-down menu.
4 Select the duration of time from the Time drop-down menu to view the reports for the selected timeperiod.
5 Click View to view a pie chart with execution details of the selected pipeline.
You can click the green sector to view the pipelines successfully executed. You can also view the inputparameters, status, and execution start time for each execution displayed in the table. You can click thered sector of the pie chart to determine the failed pipeline executions. The failure message containingfailed stage, failed task and reason for failure is displayed in the corresponding table.
6 Click the Clear Selection link to reset your selection .
View Failed PipelinesYou can analyze and determine the details of the top five failed tasks or five most failed tasks correspondingto top five failed stages in a release pipeline for the selected time period. You can also determine thefrequency of failures.
Procedure
1 Select Code Stream > Reports.
2 Select Pipeline Failure Analysis from the Reports drop-down menu.
3 Select the pipeline from the Pipeline drop-down menu.
VMware, Inc. 59

4 Select the duration of time from the Time drop-down menu to view the reports for the selected timeperiod.
5 Click View to view bar charts and the reasons for failure.
6 Click the bar representing the failed stage to view the corresponding top five failed tasks.
7 Click the bar representing the failed task to view the time of failure and corresponding failuremessages.
8 Click the Clear Selection link to reset your selection .
Using vRealize Code Stream
60 VMware, Inc.

Working with the Release Dashboard 5The release dashboard provides an end-to-end status summary of executions of one or more masterpipelines. You can customize your selection and save your preference to view the status on subsequentlogin.
The dashboard provides a summary of the pipeline details, and the status of the related machines andartifacts. You can view each artifact in the pipeline and associated pipelines to verify that the pipeline didnot fail because of that artifact. You can select one or more input parameters for the selected pipelines on thedashboard to understand the context of a specific execution. The dashboard remains private until youpublish your dashboard. You must have the role of a Release Manager to publish a dashboard and save it asa default dashboard for other users.
Release EngineerAs a Release Engineer, you can :
n create a dashboard that is displayed in My dashboard.
n set a default dashboard.
n modify or delete dashboards.
Release ManagerAs a Release Manager, you can:
n create a dashboard that is displayed in My dashboard.
n set a default dashboard.
n modify or delete dashboards.
n publish a dashboard to other users in the tenant, which is displayed under Published dashboard andmake the dashboard as default dashboard to the user.
View the Release StatusYou can view the details of execution of any task from the dashboard, and then execute failed or canceledpipelines from the pipeline execution.
The dashboard displays the execution date, detailed status, overall status, execution ID, and comments of arelease pipeline.
Procedure
1 Select Code Stream > Dashboard > NEW.
VMware, Inc. 61
2 Enter the Name of the dashboard.
3 Select the pipeline from the Add pipeline to Dashboard drop-down menu.
4 Click Save.
You can now view the dashboard and publish it to other users based on your role.
5 Click the status button in the Detailed Status column to view the task result.
Each button represents the task in a stage. If you have multiple stages, the buttons are separated by agating rule icon.
6 Click MODIFY and select the Publish check box to publish the dashboard for all users to view thedashboard.
You can select multiple pipelines and add them to your dashboard using the Add pipeline toDashboard option and delete the pipelines using the REMOVE GRID option. You can also make thepublished dashboard a default dashboard by selecting the Tenant Default check box. If you select theTenant Default check box, the selected dashboard is published.
7 (Optional) Click the drop-down arrow in any column header to customize your view for each releasepipeline.
8 Click Save to save your dashboard.
Using vRealize Code Stream
62 VMware, Inc.

vRealize Code Stream ExecutionEngine and Plug-in Framework 6
The vRealize Code Stream execution engine enables integrations with various external systems through aplug-in framework. The execution engine saves endpoint settings and is used during pipeline modeling toquery external systems for available options, and during pipeline executions to execute commands onexternal systems.
The execution engine runs as a Linux service named tekton-server on the virtual appliance (VA).
Troubleshooting the Execution EngineYou can access plug-in logs, perform backup, and restore execution engine runtime data and endpointsettings.
You can access the execution engine and plug-in logs from /var/log/vmware/tekton.
If you want to backup and restore vRealize Code Stream execution engine runtime data and endpointsettings, use the location /storage/db/tekton/9000.
If you are unable to view the providers in the Provider drop-down menu, perform the following:
Procedure
1 Ensure that the execution engine is running.
2 Execute the following on the console of the server:
a service tekton-server status to check the status of the service.
b service tekton-server restart to restart the service.
VMware, Inc. 63

Using vRealize Code Stream
64 VMware, Inc.

vRealize Code Stream REST API andExample Scripts 7
You can use REST APIs to import and export release pipeline models between vRealize Code Streamappliances.
A pipeline exported from versions 2.0 and 2.1 can be imported to 2.1. You can also use the provided examplescripts to run a release pipeline.
For more information on supported API, open the URL https://<VA-IP>/component-registry/services/docs andselect release-management from the drop-down menu.
This chapter includes the following topics:
n “Exporting a Release Pipeline,” on page 65
n “Import a Release Pipeline,” on page 67
n “Java Code to Run a Release Pipeline,” on page 68
n “Example Script to Run a Release Pipeline,” on page 74
Exporting a Release PipelineYou can export and later import a release pipeline model so that users do not have to recreate an existingrelease pipeline.
When you use a REST API to export a release pipeline model, the latest version of the model is exported.
Note You can export the release pipeline model by specifying the release pipeline name.
HTTP MethodGET
URI Syntax/release-management-service/api/release-pipelines/{ReleasePipelineName}?action=export
ResponseThe release pipeline model can be exported to an XML format by specifying the HTTP Accept Header asapplication/xml. JSON (application/json) is the default response format.
VMware, Inc. 65

The password value is removed during the export process.
{
"metadata": {
"pluginInstances": {
"instance": [
]
}
},
"model": {
"name": "export",
"modelVersion": "2.1",
"notificationList": "",
"version": 1,
"tags": {
"tag": [
]
},
"pipelineParams": {
"property": [
]
},
"stages": {
"stage": [{
"name": "Stage0",
"index": 0,
"tasks": {
"task": [{
"index": 0,
"name": "sample-task",
"plugin": {
"provider": "vrcs.jenkins:build_job",
"category": "ALL"
},
"inputProperties": {
"property": [{
"name": "jobName",
"type": "String",
"value": "sample",
"description": "jobName",
"additional": false
}, {
"name": "jobParameters",
"type": "JSON[]",
"value": "[]",
"description": "jobParameters",
"additional": false
}, {
"name": "jenkinsServer",
"type": "vrcs.jenkins:JenkinsServer",
"value": "${racks['vrcs.jenkins:JenkinsServer@sample-jenkins-
endpoint']}",
"description": "jenkinsServer",
Using vRealize Code Stream
66 VMware, Inc.
"additional": false
}]
},
"outputProperties": {
"property": []
},
"conditionalExpression": "",
"continueOnFailure": false,
"dependsOn": [
]
}]
}
}]
},
"concurrentExecutionsSupported": true
}
}
Import a Release PipelineYou can import a release pipeline model to avoid recreating a release pipeline.
Pipelines exported from vRealize Code Stream 2.0 and 2.1 appliances can be imported.
If the release pipeline is using configured endpoint, configured them on the appliance before you import therelease pipeline. If an endpoint is not configured on the appliance, you receive an error message.
HTTP MethodPOST
URI Syntax/release-management-service/api/release-pipelines?action=import&overwrite=false
The overwrite value is set to false by default and is optional. When the overwrite value is set to true, theimported release pipeline model overwrites the existing pipeline with the same name.
ResponseThe imported release pipeline model can be in the XML or JSON format depending on whether the HTTPContent-Type header is set to application/json or application/xml.
The imported pipeline is always in the draft state.
<release-pipeline-import-response>
<id>da6019bf-eee2-483d-87b3-2d7752289dda</id>
<status>rp01 import successful</status>
<release-pipeline-import-response>
Chapter 7 vRealize Code Stream REST API and Example Scripts
VMware, Inc. 67
Existing Release Pipeline Name ResponseThe imported release pipeline model name exists.
<errors>
<error code="18142">
<message>Importing Release pipeline failed.</message>
<systemMessage>The pipeline name Sample Pipeline already exists. Please rename the
pipeline or use the overwrite option</systemMessage>
</error>
</errors>
Java Code to Run a Release PipelineYou can use Java code to query and run release pipelines programmatically. The Java code must bepackaged with open source dependencies.
Example Java Scriptpackage samples;
import com.google.gson.Gson;
import org.apache.http.Header;
import org.apache.http.HttpResponse;
import org.apache.http.client.HttpClient;
import org.apache.http.client.methods.HttpGet;
import org.apache.http.client.methods.HttpPost;
import org.apache.http.conn.ClientConnectionManager;
import org.apache.http.conn.scheme.Scheme;
import org.apache.http.conn.scheme.SchemeRegistry;
import org.apache.http.conn.ssl.SSLSocketFactory;
import org.apache.http.conn.ssl.TrustStrategy;
import org.apache.http.entity.StringEntity;
import org.apache.http.impl.client.DefaultHttpClient;
import org.apache.http.impl.conn.BasicClientConnectionManager;
import org.apache.http.message.BasicHeader;
import org.apache.http.protocol.HTTP;
import java.io.BufferedReader;
import java.io.InputStream;
import java.io.InputStreamReader;
import java.security.cert.CertificateException;
import java.security.cert.X509Certificate;
import java.util.ArrayList;
import java.util.List;
/**
* Sample Java class to invoke REST APIs on Release pipeline
*
*/
public class PipelineApiHelper {
private String username;
private String password;
private String tenant;
Using vRealize Code Stream
68 VMware, Inc.

private String serverHost;
private Gson gson = new Gson();
private static String FETCH_TOKEN_URL_TEMPLATE = "https://%s/identity/api/tokens";
private static String TRIGGER_EXECUTION_URL_TEMPLATE = "https://%s/release-management-
service/api/release-pipelines/%s/executions";
private static String FETCH_PIPELINE_INFO_URL_TEMPLATE = "https://%s/release-management-
service/api/release-pipelines?name=%s";
private static ClientConnectionManager connectionManager;
/**
* Sample helper class to fetch pipeline info and trigger an execution
*
* @param serverhost Code Stream server host name
* @param username login credentials
* @param password login credentials
* @param tenant tenant id for the user
*/
public PipelineApiHelper(String serverhost, String username, String password, String tenant) {
this.username = username;
this.password = password;
this.tenant = tenant;
this.serverHost = serverhost;
}
/**
* Trigger a pipeline execution
*
* @param pipelineName name of the pipeline to execute
* @param pipelineParamsJson JSON string for the pipeline execution
* pipeline param JSON is the input required for the pipeline execution.
* for a single pipeline parameter 'token', the JSON input would look like:
* Eg: {"description":"test run","pipelineParams":
[{"name":"token","type":"STRING","value":"4321"}]}
*/
public void triggerPipelineExecution(String pipelineName, String pipelineParamsJson) {
//A SSO token is required to make any calls to the Code Stream server. Token can be obtained
easily by passing the credentials as follows
final String token = fetchToken();
List<Header> headers = getCommonHeaders();
headers.add( new BasicHeader("Authorization", "Bearer " + token));
try {
//fetch the pipeline id
InputStream pipelineRespStream = getRequest(String.format(FETCH_PIPELINE_INFO_URL_TEMPLATE,
serverHost, pipelineName),
headers);
BufferedReader bufferedReader = new BufferedReader(new InputStreamReader(pipelineRespStream));
//response contains the pipeline info (containing the id)
PipelineInfoWrapper pInfo = gson.fromJson(bufferedReader, PipelineInfoWrapper.class);
//trigger the pipeline execution with the pipeline id and pipeline params
InputStream is = postRequest(String.format(TRIGGER_EXECUTION_URL_TEMPLATE, serverHost,
pInfo.getContent().get(0).getId()),
Chapter 7 vRealize Code Stream REST API and Example Scripts
VMware, Inc. 69

headers,
pipelineParamsJson);
bufferedReader.close();
bufferedReader = new BufferedReader(new InputStreamReader(is));
String response;
System.out.println("Response:");
while ((response = bufferedReader.readLine()) != null) {
System.out.print(response);
}
System.out.println("===============================================================");
} catch (Exception ex) {
System.out.println("Error triggering pipeline: " + ex.getMessage());
}
System.out.println("Pipeline execution triggered !");
}
/**
* Fetch SSO Token from Identity server
* @return token
*/
private String fetchToken() {
//POST username,password,tenant to fetch token API
TokenRequest tokenRequest = new TokenRequest();
tokenRequest.setUsername(username);
tokenRequest.setPassword(password);
tokenRequest.setTenant(tenant);
String token = null;
try {
InputStream is = postRequest(String.format(FETCH_TOKEN_URL_TEMPLATE, serverHost),
getCommonHeaders(),
gson.toJson(tokenRequest));
BufferedReader bufferedReader = new BufferedReader(new InputStreamReader(is));
TokenResponse tokenResponse = gson.fromJson(bufferedReader, TokenResponse.class);
if (tokenResponse != null) {
token = tokenResponse.getId();
}
} catch (Exception ex) {
System.out.println("Error fetching token: " + ex.getMessage());
}
return token;
}
/**
* Construct the common headers required for the API calls
*
* @return
*/
private List<Header> getCommonHeaders() {
List<Header> headers = new ArrayList<Header>(){{
add(new BasicHeader(HTTP.CONTENT_TYPE, "application/json"));
add(new BasicHeader("Accept", "application/json"));
}};
Using vRealize Code Stream
70 VMware, Inc.

return headers;
}
/**
* Helper method for Http POST request
* @param url
* @param headers
* @param requestBody
* @return
* @throws Exception
*/
private InputStream postRequest(String url, List<Header> headers, String requestBody) throws
Exception {
HttpClient httpClient = new DefaultHttpClient(getConnManager());
HttpPost post = new HttpPost(url);
post.setEntity(new StringEntity(requestBody));
Header[] headersArray = headers.toArray(new Header[headers.size()]);
post.setHeaders(headersArray);
HttpResponse response = httpClient.execute(post);
if (null != response && response.getStatusLine().getStatusCode()/100 == 2) {
return response.getEntity().getContent();
} else {
return null;
}
}
/**
* Helper method for http GET request
* @param url
* @param headers
* @return
* @throws Exception
*/
private InputStream getRequest(String url, List<Header> headers) throws Exception {
HttpClient httpClient = new DefaultHttpClient(getConnManager());
HttpGet get = new HttpGet(url);
Header[] headersArray = headers.toArray(new Header[headers.size()]);
get.setHeaders(headersArray);
HttpResponse response = httpClient.execute(get);
if (null != response && response.getStatusLine().getStatusCode()/100 == 2) {
return response.getEntity().getContent();
} else {
return null;
}
}
/**
* Construct a connection manager
* Note: This sample method ignores the SSL certificates. Ignoring them may not be something that
you intend.
* @return
* @throws Exception
Chapter 7 vRealize Code Stream REST API and Example Scripts
VMware, Inc. 71

*/
private static ClientConnectionManager getConnManager() throws Exception {
if (connectionManager == null) {
SSLSocketFactory sslSocketFactory = new SSLSocketFactory(new TrustStrategy() {
public boolean isTrusted(
final X509Certificate[] chain, String authType) throws CertificateException {
return true;
}
});
Scheme httpsScheme = new Scheme("https", 443, sslSocketFactory);
SchemeRegistry schemeRegistry = new SchemeRegistry();
schemeRegistry.register(httpsScheme);
connectionManager = new BasicClientConnectionManager(schemeRegistry);
}
return connectionManager;
}
public static void main(String[] args) {
PipelineApiHelper helper = new PipelineApiHelper("test.com", "[email protected]", "password",
"sample");
helper.triggerPipelineExecution("PipelineName", "{\"id\":\"\",\"description\":\"test
run\",\"pipelineParams\":[{\"name\":\"token\",\"type\":\"STRING\",\"value\":\"4321\"}]}");
}
}
class TokenResponse {
String expires;
String id;
String tenant;
public String getId() {
return id;
}
public String getExpires() {
return expires;
}
public String getTenant() {
return tenant;
}
public void setExpires(String expires) {
this.expires = expires;
}
public void setId(String id) {
this.id = id;
}
public void setTenant(String tenant) {
this.tenant = tenant;
}
}
Using vRealize Code Stream
72 VMware, Inc.

class TokenRequest {
String username;
String password;
String tenant;
public String getUsername() {
return username;
}
public void setUsername(String username) {
this.username = username;
}
public String getPassword() {
return password;
}
public void setPassword(String password) {
this.password = password;
}
public String getTenant() {
return tenant;
}
public void setTenant(String tenant) {
this.tenant = tenant;
}
}
class PipelineInfoWrapper {
List<PipelineInfo> content;
public List<PipelineInfo> getContent() {
return content;
}
public void setContent(List<PipelineInfo> content) {
this.content = content;
}
}
class PipelineInfo {
String id;
public String getId() {
return id;
}
public void setId(String id) {
this.id = id;
}
}
Chapter 7 vRealize Code Stream REST API and Example Scripts
VMware, Inc. 73

Example Script to Run a Release PipelineYou can use the example script to query and run release pipelines programmatically. The script code has nodependencies.
Example Script#!/bin/bash
echo "#### Sample script to query and trigger a pipeline execution ####"
#Server host address refers to the host on which Code Stream server is setup. Eg:
codestream.abc.com
read -p "vRealize Code Stream Server Host: " server_host
#user name and password with which you login on Code Stream server Eg: [email protected]
read -p "Username: " username
read -p "Password: " password
#tenant name can be obtained from your system administrator if not known already
read -p "Tenant: " tenant
echo "-------------------------------------------------------"
#fetch the pipeline details and subsequently trigger an execution
#enter the pipeline name for which you want to trigger an execution
read -p "Release pipeline name:" pipeline_name
#pipeline param JSON is the input required for the pipeline execution. for a single pipeline
parameter 'token', the JSON input would look like:
# Eg: {"description":"test run","pipelineParams":
[{"name":"token","type":"STRING","value":"4321"}]}
read -p "Enter the pipeline param JSON:" pipeline_params
#A SSO token is required to make any calls to the Code Stream server. Token can be obtained
easily by passing the credentials as follows
host_url="https://$server_host/identity/api/tokens"
response=$(curl -s -X POST -H 'Content-Type: application/json' -H 'Accept: application/json' --
insecure -d '{"username": "'"$username"'", "password": "'"$password"'", "tenant":
"'"$tenant"'"}' $host_url)
#token can be extracted from the JSON response as follows
token=`echo $response | sed -n 's/.*"id":"\([^}]*\)",.*}/\1/p'`
#with the token obtained, subsequent calls can be made to the code stream server (a token has an
expiry so renewal might be required if the same token is reused beyond expiry)
pipeline_fetch_url="https://$server_host/release-management-service/api/release-pipelines?name=
$pipeline_name"
response=$(curl -s -X GET -H "Content-Type: application/json" -H "Accept: application/json" -H
"Authorization: Bearer $token" -k $pipeline_fetch_url)
pipeline_id=`echo $response | sed -n 's/.*"id":"\([^"]*\)",.*stages.*/\1/p'`
#echo "pipeline id: $pipeline_id"
#with the pipeline id, an execution can be triggered as follows
execute_pipeline_url="https://$server_host/release-management-service/api/release-
pipelines/$pipeline_id/executions"
Using vRealize Code Stream
74 VMware, Inc.

echo "executing pipeline:$pipeline_name :[$pipeline_id]"
response=$(curl -s -X POST -H "Content-Type: application/json" -H "Accept: application/json" -H
"Authorization: Bearer $token" -k -d "$pipeline_params" $execute_pipeline_url)
echo "Response to execute pipeline => $response"
Chapter 7 vRealize Code Stream REST API and Example Scripts
VMware, Inc. 75

Using vRealize Code Stream
76 VMware, Inc.

Index
Aactivate and execute a pipeline 54add pipeline 15advanced tab, configuring 37API
exporting release pipeline 65importing release pipeline 67
approval systems 8architectural principles 8artifact task, adding 41artifact
searching 42searching by name 44
automate, releasing applications 5
Bbamboo 17bamboo result 17blueprints
customizing 48requesting 48
bugzilla 19Bugzilla bug 21
Cchecklist 13cloning pipelines 58cloning task 57Cloud Foundry Server, configuring 22configuring custom task 51continuous integration 10copying pipelines 58core principles 8create pipeline 15custom script task
adding 33configuring 35, 37running 54
custom service blueprintadding 25configuring 26
Ddashboard, dashboard 61defect tracking system 10deleting cloned task 58
deleting release pipelines 58deleting task 58deployment engines 8
Eexample script, using 65execution engine 63extensibility 10external system, integrating 10
Ffailure analysis 59
Ggating rules 53general tab, configuring 35
JJIRA 31
Kkey concepts 11
Mmachine components
customizing 48requesting 48
manually approve 51
Nnested pipeline 49
Ppipeline execution 54plugin framework 63provisioning machines 46provisioning task 46
Rrelease automation 13, 57release pipeline checklist 13removing cloned task 58removing release pipelines 58removing task 58reports 59responsibilities, personas 9
VMware, Inc. 77

REST API, using 65roles, personas 9
Sscript, running release pipeline 74script Java, running release pipeline 68set of criteria 53success rate 59
TTeam Foundation Server, configuring 39testing frameworks 8testing result 29testing task 29
Uupdate bug 21using release automation 13
VvRealize Orchestrator 52vRealize Code Stream, introducing 7
Using vRealize Code Stream
78 VMware, Inc.