Embed Size (px)
Citation preview
Using VMware View Client for LinuxMay 2012
View Client for Linux
This document supports the version of each product listed andsupports all subsequent versions until the document is replacedby a new edition. To check for more recent editions of thisdocument, see http://www.vmware.com/support/pubs.
EN-000780-01
Using VMware View Client for Linux
2 VMware, Inc.
You can find the most up-to-date technical documentation on the VMware Web site at:
http://www.vmware.com/support/
The VMware Web site also provides the latest product updates.
If you have comments about this documentation, submit your feedback to:
Copyright © 2012 VMware, Inc. All rights reserved. This product is protected by U.S. and international copyright and intellectualproperty laws. VMware products are covered by one or more patents listed at http://www.vmware.com/go/patents.
VMware is a registered trademark or trademark of VMware, Inc. in the United States and/or other jurisdictions. All other marksand names mentioned herein may be trademarks of their respective companies.
VMware, Inc.3401 Hillview Ave.Palo Alto, CA 94304www.vmware.com
Contents
1 Using VMware View Client for Linux 5
Installation and Configuration 6System Requirements for Linux Clients 6Supported View Desktop Operating Systems 7Preparing View Connection Server for View Client 7Install View Client for Linux 7Configuring Certificate Checking for End Users 8Enabling FIPS Mode on the Client 9Configuring the PCoIP Client-Side Image Cache 9
Managing Server Connections and Desktops 10Log In to a View Desktop for the First Time 11Certificate Checking Modes for View Client 12Switch Desktops 13Log Off or Disconnect from a Desktop 13Roll Back a Desktop 14
Using a Microsoft Windows Desktop on a Linux System 15Feature Support Matrix 15Internationalization 15Keyboards and Monitors 16Copying and Pasting Text 16
Troubleshooting View Client 17Reset a Desktop 17Uninstalling View Client 17
View Client Command Usage and Configuration Settings 17View Client Exit Codes 23Redirecting a USB Device to a Remote Desktop 24
Index 27
VMware, Inc. 3

Using VMware View Client for Linux
4 VMware, Inc.

Using VMware View Client for Linux 1This guide, Using VMware View Client for Linux, provides information about installing and using VMwareView™ software on a Linux client system to connect to a View desktop in the datacenter.
The information in this document includes system requirements and instructions for installing and usingView Client for Linux.
This information is intended for administrators who need to set up a VMware View deployment that includesLinux client systems. The information is written for experienced system administrators who are familiar withvirtual machine technology and datacenter operations.
NOTE This document pertains to the View Client for Linux that VMware makes available on Ubuntu. Inaddition, several VMware partners offer thin client devices for VMware View deployments. The features thatare available for each thin client device, and the operating systems supported, are determined by the vendorand model and the configuration that an enterprise chooses to use. For information about the vendors andmodels for thin client devices, see the VMware Compatibility Guide, available on the VMware Web site.
n Installation and Configuration on page 6Setting up a View deployment for Linux clients involves meeting the system requirements for Linuxclients, downloading and installing View Client for Linux, and configuring security and performancesettings on the Linux client systems.
n Managing Server Connections and Desktops on page 10Use View Client to connect to View Connection Server or a security server and log in to or off of a Viewdesktop. For troubleshooting purposes, you can also reset a View desktop assigned to you and roll backa desktop you checked out.
n Using a Microsoft Windows Desktop on a Linux System on page 15View Client for Linux supports some of the features included in View Client for Windows.
n Troubleshooting View Client on page 17You can solve most problems with View Client by resetting the desktop or by reinstalling the VMwareView Client.
n View Client Command Usage and Configuration Settings on page 17You can configure View Client using command-line options or equivalent properties in a configurationfile.
VMware, Inc. 5

Installation and ConfigurationSetting up a View deployment for Linux clients involves meeting the system requirements for Linux clients,downloading and installing View Client for Linux, and configuring security and performance settings on theLinux client systems.
n System Requirements for Linux Clients on page 6You can install View Client for Linux on PCs that use the Ubuntu Linux 10.04 or 10.10 operating system.
n Supported View Desktop Operating Systems on page 7Administrators create virtual machines with a guest operating system and install View Agent in the guestoperating system. End users can log in to these virtual machines from a client device.
n Preparing View Connection Server for View Client on page 7Administrators must perform specific tasks to enable end users to connect to View desktops.
n Install View Client for Linux on page 7End users open View Client to connect to virtual desktops from a physical machine. View Client forLinux runs on Ubuntu 10.04 or 10.10 systems, and you install it by using the Synaptic Package Manager.
n Configuring Certificate Checking for End Users on page 8Administrators can configure the certificate verification mode so that, for example, full verification isalways performed.
n Enabling FIPS Mode on the Client on page 9You can set a configuration property so that the client uses only FIPS (Federal Information ProcessingStandard) 140-2 approved cryptographic algorithms and protocols to establish a remote PCoIPconnection.
n Configuring the PCoIP Client-Side Image Cache on page 9PCoIP client-side image caching stores image content on the client to avoid retransmission. This featureis enabled by default to reduce bandwidth usage.
System Requirements for Linux ClientsYou can install View Client for Linux on PCs that use the Ubuntu Linux 10.04 or 10.10 operating system.
The Linux PC or laptop on which you install View Client, and the peripherals it uses, must meet certain systemrequirements.
Model Intel-based desktop or laptop computer
Memory At least 2GB of RAM
Operating systems 32-bit Ubuntu Linux 10.04 or 10.10
View Connection Server,Security Server, andView Agent
4.6.1 or later
If client systems connect from outside the corporate firewall, VMwarerecommends that you use a security server. With a security server, clientsystems will not require a VPN connection.
Display protocol forVMware View
PCoIP or RDP
Hardware Requirementsfor PCoIP
n x86-based processor with SSE2 extensions, with a 800MHz or higherprocessor speed.
Using VMware View Client for Linux
6 VMware, Inc.
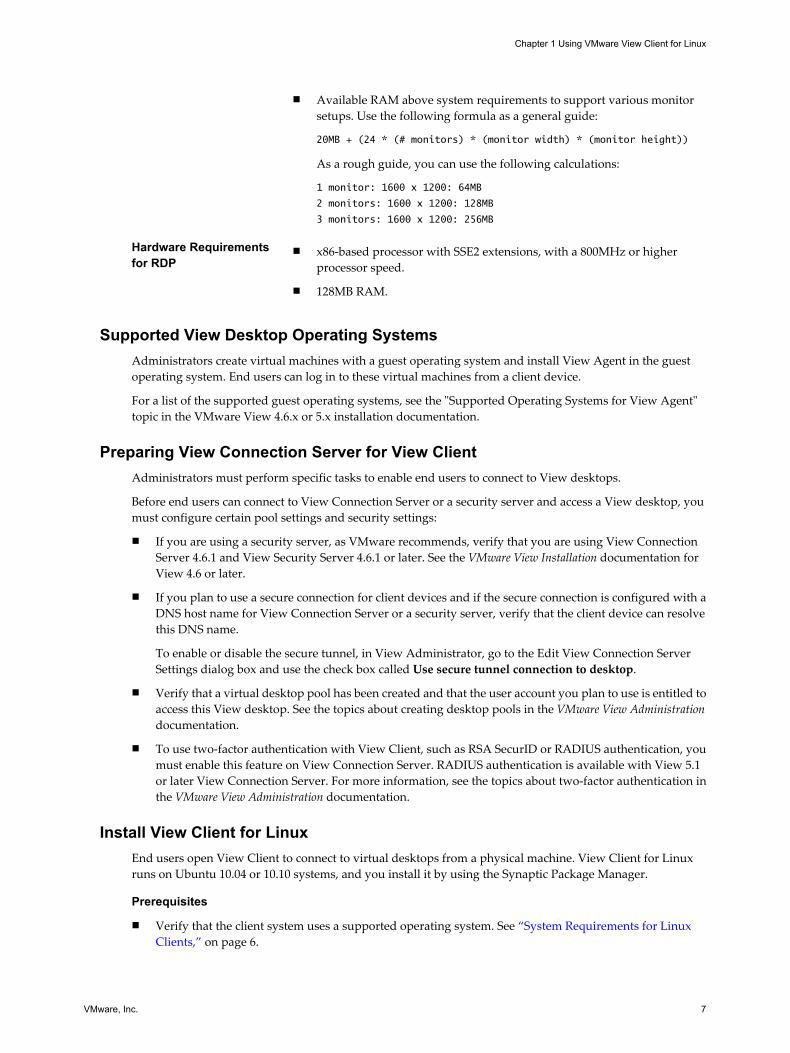
n Available RAM above system requirements to support various monitorsetups. Use the following formula as a general guide:
20MB + (24 * (# monitors) * (monitor width) * (monitor height))
As a rough guide, you can use the following calculations:
1 monitor: 1600 x 1200: 64MB
2 monitors: 1600 x 1200: 128MB
3 monitors: 1600 x 1200: 256MB
Hardware Requirementsfor RDP
n x86-based processor with SSE2 extensions, with a 800MHz or higherprocessor speed.
n 128MB RAM.
Supported View Desktop Operating SystemsAdministrators create virtual machines with a guest operating system and install View Agent in the guestoperating system. End users can log in to these virtual machines from a client device.
For a list of the supported guest operating systems, see the "Supported Operating Systems for View Agent"topic in the VMware View 4.6.x or 5.x installation documentation.
Preparing View Connection Server for View ClientAdministrators must perform specific tasks to enable end users to connect to View desktops.
Before end users can connect to View Connection Server or a security server and access a View desktop, youmust configure certain pool settings and security settings:
n If you are using a security server, as VMware recommends, verify that you are using View ConnectionServer 4.6.1 and View Security Server 4.6.1 or later. See the VMware View Installation documentation forView 4.6 or later.
n If you plan to use a secure connection for client devices and if the secure connection is configured with aDNS host name for View Connection Server or a security server, verify that the client device can resolvethis DNS name.
To enable or disable the secure tunnel, in View Administrator, go to the Edit View Connection ServerSettings dialog box and use the check box called Use secure tunnel connection to desktop.
n Verify that a virtual desktop pool has been created and that the user account you plan to use is entitled toaccess this View desktop. See the topics about creating desktop pools in the VMware View Administrationdocumentation.
n To use two-factor authentication with View Client, such as RSA SecurID or RADIUS authentication, youmust enable this feature on View Connection Server. RADIUS authentication is available with View 5.1or later View Connection Server. For more information, see the topics about two-factor authentication inthe VMware View Administration documentation.
Install View Client for LinuxEnd users open View Client to connect to virtual desktops from a physical machine. View Client for Linuxruns on Ubuntu 10.04 or 10.10 systems, and you install it by using the Synaptic Package Manager.
Prerequisites
n Verify that the client system uses a supported operating system. See “System Requirements for LinuxClients,” on page 6.
Chapter 1 Using VMware View Client for Linux
VMware, Inc. 7
n Verify that you can log in as an administrator on the client system.
n If you plan to use the RDP display protocol to connect to a View desktop, verify that you have theappropriate RDP client installed. See “System Requirements for Linux Clients,” on page 6.
Procedure
1 On your Linux laptop or PC, enable Canonical Partners.
a From the Ubuntu menu bar, select System > Administration > Update Manager.
b Click the Settings button and supply the password for performing administrative tasks.
c In the Software Sources dialog box, click the Other Software tab and select the Canonical Partnerscheck box to select the archive for software that Canonical packages for their partners.
d Click Close and follow the instructions to update the package list.
2 From the Ubuntu menu bar, select System > Administration > Synaptic Package Manager.
3 Click Search and search for vmware.
4 In the list of packages returned, select the check box next to vmware-view-client and select Mark forInstallation.
Do not select the check box for the open client.
5 Click Apply in the toolbar.
VMware View Client for Linux is installed.
6 To determine that installation succeeded, verify that the VMware View application icon appears in theApplications > Internet menu.
What to do next
Start View Client and verify that you can log in to the correct virtual desktop. See “Log In to a View Desktopfor the First Time,” on page 11.
Configuring Certificate Checking for End UsersAdministrators can configure the certificate verification mode so that, for example, full verification is alwaysperformed.
Certificate checking occurs for SSL connections between View Connection Server and View Client.Administrators can configure the verification mode to use one of the following strategies:
n End users are allowed to choose the verification mode. The rest of this list describes the three verificationmodes.
n (No verification) No certificate checks are performed.
n (Warn) End users are warned if a self-signed certificate is being presented by the server. Users can choosewhether or not to allow this type of connection.
n (Full security) Full verification is performed and connections that do not pass full verification are rejected.
For details about the types of verification checks performed, see “Certificate Checking Modes for ViewClient,” on page 12.
Use the view.sslVerificationMode property to set the default verification mode:
n 1 implements Full Verification.
n 2 implements Warn If the Connection May Be Insecure.
n 3 implements No Verification Performed.
Using VMware View Client for Linux
8 VMware, Inc.
To configure the mode so that end users cannot change the mode, set the view.allowSslVerificationModeproperty to "False" in the /etc/vmware/view-mandatory-config file on the client system. See “View ClientCommand Usage and Configuration Settings,” on page 17.
Enabling FIPS Mode on the ClientYou can set a configuration property so that the client uses only FIPS (Federal Information Processing Standard)140-2 approved cryptographic algorithms and protocols to establish a remote PCoIP connection.
This setting applies to both server and client. You can configure either endpoint or both endpoints to operatein FIPS mode. Configuring a single endpoint to operate in FIPS mode limits the encryption algorithms that areavailable for session negotiation.
IMPORTANT If you enable FIPS mode on one endpoint but the other endpoint does not support cryptographicalgorithms that are approved by FIPS 140-2, the connection will fail.
When this setting is disabled or not configured, FIPS mode is not used.
Setting the Configuration PropertyTo enable or disable FIPS mode, you can set the pcoip.enable_fips_mode property. Setting the property to1 turns on FIPS mode, and setting the property to 0 turns off FIPS mode. For example, the following settingturns on FIPS mode:
pcoip.enable_fips_mode = 1
Use a space before and after the equals (=) sign.
You can set this property in any of several files. When View Client starts up, the setting is processed fromvarious locations in the following order:
1 /etc/teradici/pcoip_admin_defaults.conf
2 ~/.pcoip.rc
3 /etc/teradici/pcoip_admin.conf
If a setting is defined in multiple locations, the value that is used is the value from the last file read.
Configuring the PCoIP Client-Side Image CachePCoIP client-side image caching stores image content on the client to avoid retransmission. This feature isenabled by default to reduce bandwidth usage.
IMPORTANT This feature is available only when the version of View Agent and View Connection Server is View5.0 or later.
The PCoIP image cache captures spatial, as well as temporal, redundancy. For example, when you scroll downthrough a PDF document, new content appears from the bottom of the window and the oldest contentdisappears from the top of the window. All the other content remains constant and moves upward. The PCoIPimage cache is capable of detecting this spatial and temporal redundancy.
Because during scrolling, the display information sent to the client device is primarily a sequence of cacheindices, using the image cache saves a significant amount of bandwidth. This efficient scrolling has benefitsboth on the LAN and over the WAN.
n On the LAN, where bandwidth is relatively unconstrained, using client-side image caching deliverssignificant bandwidth savings.
Chapter 1 Using VMware View Client for Linux
VMware, Inc. 9
n Over the WAN, to stay within the available bandwidth constraints, scrolling performance is oftendegraded unless client-side caching is used. In this situation, client-side caching can save bandwidth andensure a smooth, highly responsive scrolling experience.
By default this feature is enabled, so that the client stores portions of the display that were previouslytransmitted. The default cache size is 250MB. You can configure the client image cache size, from a minimumof 50MB to a maximum of 300MB. A larger cache size reduces bandwidth usage but requires more memoryon the client. A smaller cache size requires more bandwidth usage. For example, a thin client with little memoryrequires a smaller cache size.
Setting the Configuration PropertyTo configure the cache size, you can set the pcoip.image_cache_size_mb property. For example, thefollowing setting configures the cache size to be 50MB:
pcoip.image_cache_size_mb = 50
Use a space before and after the equals (=) sign. If you specify a number less than 50, the number is convertedto 50. If you specify a number larger than 300, the number is converted to 300.
You can set this property in any of several files. When View Client starts up, the setting is processed fromvarious locations in the following order:
1 /etc/teradici/pcoip_admin_defaults.conf
2 ~/.pcoip.rc
3 /etc/teradici/pcoip_admin.conf
If a setting is defined in multiple locations, the value that is used is the value from the last file read.
NOTE You can set the following property to display a visual indication that the image cache is working:
pcoip.show_image_cache_hits = 1
With this configuration, for every tile (32 x 32 pixels) in an image that comes from the image cache, you cansee a rectangle around the tile.
Managing Server Connections and DesktopsUse View Client to connect to View Connection Server or a security server and log in to or off of a View desktop.For troubleshooting purposes, you can also reset a View desktop assigned to you and roll back a desktop youchecked out.
Depending on how the administrator configures policies for View desktops, end users might be able to performmany operations on their desktops.
n Log In to a View Desktop for the First Time on page 11Before you have end users access their virtual desktops, test that you can log in to a virtual desktop fromthe client system.
n Certificate Checking Modes for View Client on page 12Administrators and sometimes end users can configure whether client connections are rejected if any orsome server certificate checks fail.
n Switch Desktops on page 13If you are connected to a desktop, you can switch to another desktop.
n Log Off or Disconnect from a Desktop on page 13If you disconnect from a View desktop without logging off, applications remain open.
Using VMware View Client for Linux
10 VMware, Inc.
n Roll Back a Desktop on page 14Rolling back discards changes made to a virtual desktop that you checked out for use in local mode ona Windows PC or laptop.
Log In to a View Desktop for the First TimeBefore you have end users access their virtual desktops, test that you can log in to a virtual desktop from theclient system.
Prerequisites
n Obtain the credentials that you need to log in, such as Active Directory user name and password, RSASecurID user name and passcode, or RADIUS authentication user name and passcode.
n Obtain the domain name for logging in.
n Perform the administrative tasks described in “Preparing View Connection Server for View Client,” onpage 7.
n If you are outside the corporate network and are not using a security server to access the virtual desktop,verify that your client device is set up to use a VPN connection and turn that connection on.
IMPORTANT VMware recommends using a security server rather than a VPN.
n Verify that you have the fully qualified domain name (FQDN) of the server that provides access to thevirtual desktop. You also need the port number if the port is not 443.
n If you plan to use the RDP display protocol to connect to a View desktop, verify that the AllowDirectRDPView Agent group policy setting is enabled.
n If your administrator has allowed it, you can configure the certificate checking mode for the SSL certificatethat the View server presents. See “Certificate Checking Modes for View Client,” on page 12.
Procedure
1 Either open a terminal window and enter vmware-view or select Applications > Internet > VMware ViewClient from the Ubuntu menu bar.
2 Enter the server name and a port number if required, and click Continue.
An example using a nondefault port is view.company.com:1443.
3 If you are prompted for RSA SecurID credentials or RADIUS authentication credentials, enter the username and passcode and click Continue.
4 Enter your user name and password, select a domain, and click OK.
You might see a message that you must confirm before the login dialog box appears.
5 If the desktop security indicator turns red and a warning message appears, respond to the prompt.
Usually, this warning means that View Connection Server did not send a certificate thumbprint to theclient. The thumbprint is a hash of the certificate public key and is used as an abbreviation of the publickey. View Connection Server 4.6.1, 5.0.1 and later versions send thumbprint information, but earlierversions do not.
Chapter 1 Using VMware View Client for Linux
VMware, Inc. 11
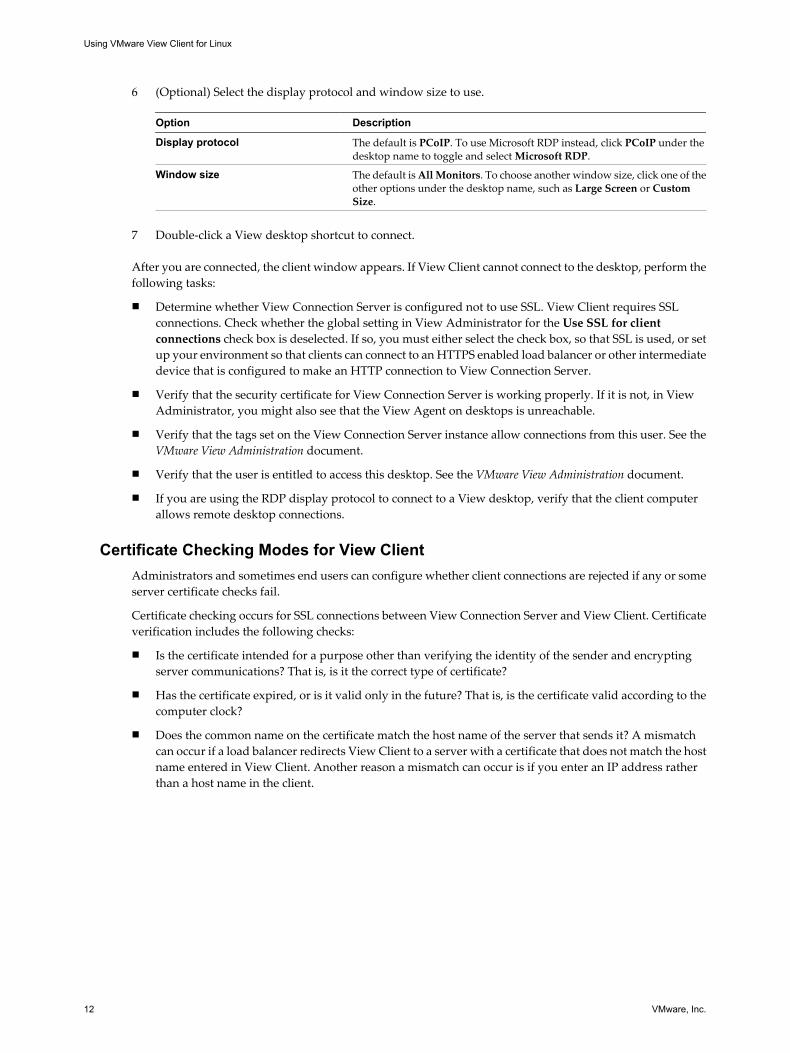
6 (Optional) Select the display protocol and window size to use.
Option Description
Display protocol The default is PCoIP. To use Microsoft RDP instead, click PCoIP under thedesktop name to toggle and select Microsoft RDP.
Window size The default is All Monitors. To choose another window size, click one of theother options under the desktop name, such as Large Screen or CustomSize.
7 Double-click a View desktop shortcut to connect.
After you are connected, the client window appears. If View Client cannot connect to the desktop, perform thefollowing tasks:
n Determine whether View Connection Server is configured not to use SSL. View Client requires SSLconnections. Check whether the global setting in View Administrator for the Use SSL for clientconnections check box is deselected. If so, you must either select the check box, so that SSL is used, or setup your environment so that clients can connect to an HTTPS enabled load balancer or other intermediatedevice that is configured to make an HTTP connection to View Connection Server.
n Verify that the security certificate for View Connection Server is working properly. If it is not, in ViewAdministrator, you might also see that the View Agent on desktops is unreachable.
n Verify that the tags set on the View Connection Server instance allow connections from this user. See theVMware View Administration document.
n Verify that the user is entitled to access this desktop. See the VMware View Administration document.
n If you are using the RDP display protocol to connect to a View desktop, verify that the client computerallows remote desktop connections.
Certificate Checking Modes for View ClientAdministrators and sometimes end users can configure whether client connections are rejected if any or someserver certificate checks fail.
Certificate checking occurs for SSL connections between View Connection Server and View Client. Certificateverification includes the following checks:
n Is the certificate intended for a purpose other than verifying the identity of the sender and encryptingserver communications? That is, is it the correct type of certificate?
n Has the certificate expired, or is it valid only in the future? That is, is the certificate valid according to thecomputer clock?
n Does the common name on the certificate match the host name of the server that sends it? A mismatchcan occur if a load balancer redirects View Client to a server with a certificate that does not match the hostname entered in View Client. Another reason a mismatch can occur is if you enter an IP address ratherthan a host name in the client.
Using VMware View Client for Linux
12 VMware, Inc.
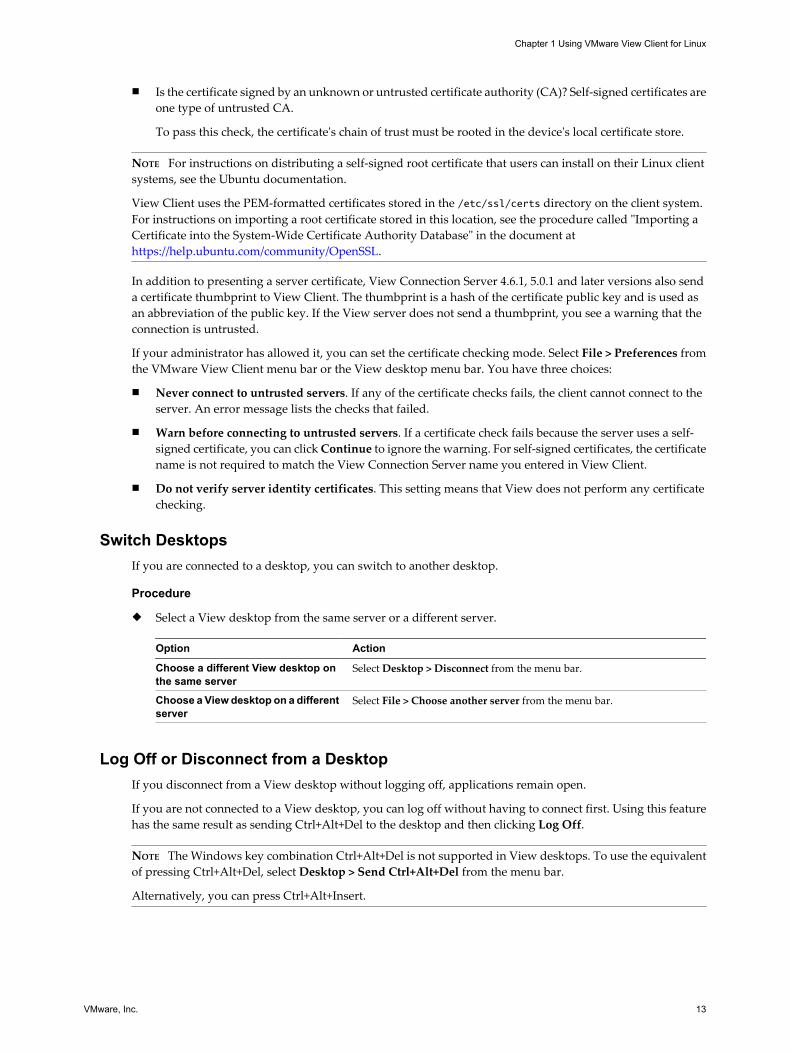
n Is the certificate signed by an unknown or untrusted certificate authority (CA)? Self-signed certificates areone type of untrusted CA.
To pass this check, the certificate's chain of trust must be rooted in the device's local certificate store.
NOTE For instructions on distributing a self-signed root certificate that users can install on their Linux clientsystems, see the Ubuntu documentation.
View Client uses the PEM-formatted certificates stored in the /etc/ssl/certs directory on the client system.For instructions on importing a root certificate stored in this location, see the procedure called "Importing aCertificate into the System-Wide Certificate Authority Database" in the document at https://help.ubuntu.com/community/OpenSSL.
In addition to presenting a server certificate, View Connection Server 4.6.1, 5.0.1 and later versions also senda certificate thumbprint to View Client. The thumbprint is a hash of the certificate public key and is used asan abbreviation of the public key. If the View server does not send a thumbprint, you see a warning that theconnection is untrusted.
If your administrator has allowed it, you can set the certificate checking mode. Select File > Preferences fromthe VMware View Client menu bar or the View desktop menu bar. You have three choices:
n Never connect to untrusted servers. If any of the certificate checks fails, the client cannot connect to theserver. An error message lists the checks that failed.
n Warn before connecting to untrusted servers. If a certificate check fails because the server uses a self-signed certificate, you can click Continue to ignore the warning. For self-signed certificates, the certificatename is not required to match the View Connection Server name you entered in View Client.
n Do not verify server identity certificates. This setting means that View does not perform any certificatechecking.
Switch DesktopsIf you are connected to a desktop, you can switch to another desktop.
Procedure
u Select a View desktop from the same server or a different server.
Option Action
Choose a different View desktop onthe same server
Select Desktop > Disconnect from the menu bar.
Choose a View desktop on a differentserver
Select File > Choose another server from the menu bar.
Log Off or Disconnect from a DesktopIf you disconnect from a View desktop without logging off, applications remain open.
If you are not connected to a View desktop, you can log off without having to connect first. Using this featurehas the same result as sending Ctrl+Alt+Del to the desktop and then clicking Log Off.
NOTE The Windows key combination Ctrl+Alt+Del is not supported in View desktops. To use the equivalentof pressing Ctrl+Alt+Del, select Desktop > Send Ctrl+Alt+Del from the menu bar.
Alternatively, you can press Ctrl+Alt+Insert.
Chapter 1 Using VMware View Client for Linux
VMware, Inc. 13

Procedure
n Disconnect without logging off.
Option Action
Also quit View Client Click the Close button in the corner of the window or select File > Quit fromthe menu bar.
Choose a different View desktop onthe same server
Select Desktop > Disconnect from the menu bar.
Choose a View desktop on a differentserver
Select File > Choose another server from the menu bar.
NOTE Your View administrator can configure your desktop to automatically log off when disconnected.In that case, any open programs in your desktop are stopped.
n Log off and disconnect.
Option Action
From within the desktop OS Use the Windows Start menu to log off.
From the menu bar Select Desktop > Disconnect and Log off.If you use this procedure, files that are open on the View desktop will beclosed without being saved first.
n Log off when you are not connected to a View desktop.
a From the Home screen with desktop shortcuts, select the desktop and select Desktop > Log off fromthe menu bar.
b If prompted, supply credentials for accessing the View desktop.
If you use this procedure, files that are open on the View desktop will be closed without being saved first.
Roll Back a DesktopRolling back discards changes made to a virtual desktop that you checked out for use in local mode on aWindows PC or laptop.
You can roll back a View desktop only if your View administrator has enabled this feature and only if youchecked out the desktop.
CAUTION If changes were made to the local mode desktop and those changes were not replicated back to theView server before rolling back, the changes are lost.
Prerequisites
n Obtain the credentials that you need to log in, such as Active Directory user name and password, RSASecurID user name and passcode, or RADIUS authentication user name and passcode.
n Back up the desktop to the server to preserve data or files.
You can use View Administrator to replicate data to the server, or, if the policy is set to allow it, you canuse View Client with Local Mode on the Windows client where the desktop is currently checked out.
Using VMware View Client for Linux
14 VMware, Inc.
Procedure
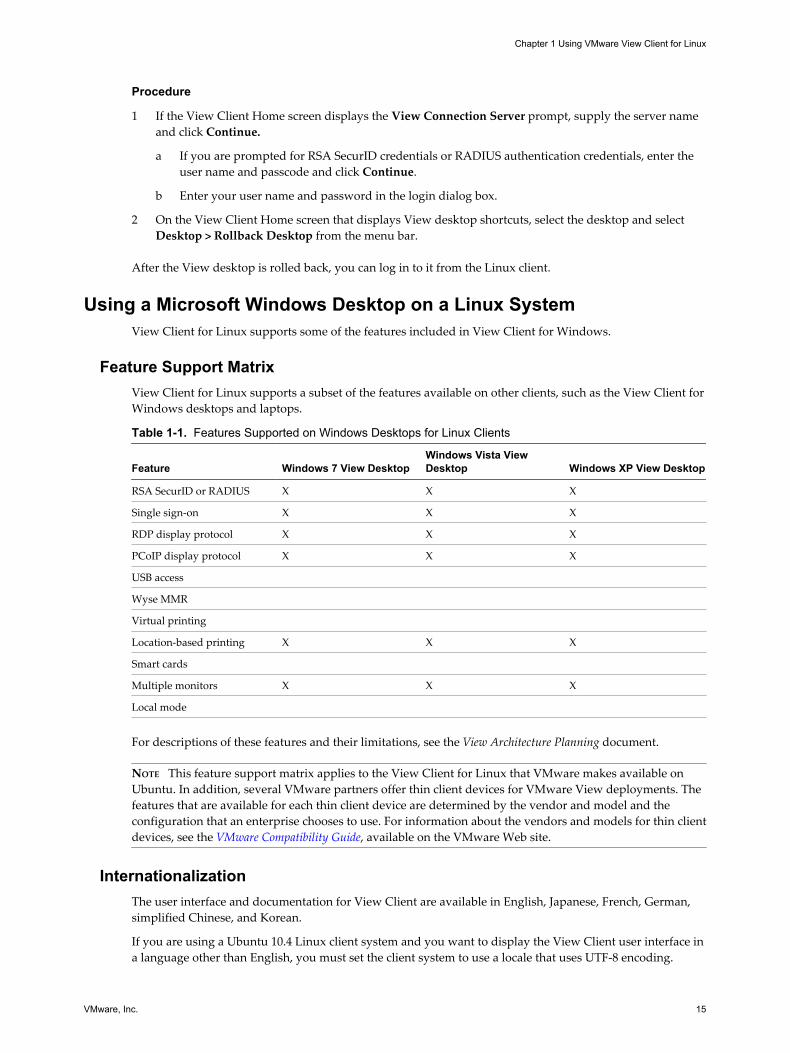
1 If the View Client Home screen displays the View Connection Server prompt, supply the server nameand click Continue.
a If you are prompted for RSA SecurID credentials or RADIUS authentication credentials, enter theuser name and passcode and click Continue.
b Enter your user name and password in the login dialog box.
2 On the View Client Home screen that displays View desktop shortcuts, select the desktop and selectDesktop > Rollback Desktop from the menu bar.
After the View desktop is rolled back, you can log in to it from the Linux client.
Using a Microsoft Windows Desktop on a Linux SystemView Client for Linux supports some of the features included in View Client for Windows.
Feature Support MatrixView Client for Linux supports a subset of the features available on other clients, such as the View Client forWindows desktops and laptops.
Table 1-1. Features Supported on Windows Desktops for Linux Clients
Feature Windows 7 View DesktopWindows Vista ViewDesktop Windows XP View Desktop
RSA SecurID or RADIUS X X X
Single sign-on X X X
RDP display protocol X X X
PCoIP display protocol X X X
USB access
Wyse MMR
Virtual printing
Location-based printing X X X
Smart cards
Multiple monitors X X X
Local mode
For descriptions of these features and their limitations, see the View Architecture Planning document.
NOTE This feature support matrix applies to the View Client for Linux that VMware makes available onUbuntu. In addition, several VMware partners offer thin client devices for VMware View deployments. Thefeatures that are available for each thin client device are determined by the vendor and model and theconfiguration that an enterprise chooses to use. For information about the vendors and models for thin clientdevices, see the VMware Compatibility Guide, available on the VMware Web site.
InternationalizationThe user interface and documentation for View Client are available in English, Japanese, French, German,simplified Chinese, and Korean.
If you are using a Ubuntu 10.4 Linux client system and you want to display the View Client user interface ina language other than English, you must set the client system to use a locale that uses UTF-8 encoding.
Chapter 1 Using VMware View Client for Linux
VMware, Inc. 15
Keyboards and MonitorsYou can use multiple monitors and all types of keyboards with a View desktop. Certain settings ensure thebest possible user experience.
Best Practices for Using Multiple MonitorsFollowing are recommendations for successfully using multiple monitors with a View desktop:
n With PCoIP, you can use up to four monitors if you have enough video RAM.
To use more than two monitors to display your View desktop on a Ubuntu client system, you mustconfigure the kernel.xhmmax setting correctly. Use the following formula:
max horizontal resolution X max vertical resolution X max number of monitors X 4
For example, manually setting kernel.shmmax to 65536000 allows you to use four monitors with a screenresolution of 2560x1600.
n With RDP, the display can only be shown in span mode. To use span mode to stretch the display acrossmultiple monitors correctly, the monitors must be the same height.
Screen ResolutionConsider the following guidelines when setting screen resolutions:
n If you open a View desktop on a secondary monitor and then change the screen resolution on that monitor,the View desktop moves to the primary monitor.
n With PCoIP, if you have multiple monitors, you can adjust the resolution for each monitor separately,with a resolution of up to 2560x1600 per display.
n With RDP, if you have multiple monitors, you cannot adjust the resolution for each monitor separately,and the display is stretched across the monitors if the monitors are all the same height.
Keyboard LimitationsFor the most part, keyboards work as well with a View desktop as they do with a physical computer. Followingis a list of the limitations you might encounter, depending on the type of peripherals and software on yourclient system:
n Some multimedia keys on a multimedia keyboard might not work. For example, the Music key and MyComputer key might not work.
n If you connect to a desktop using RDP and if you have the Fluxbox window manager, if a screen saver isrunning in the View desktop, after a period of inactivity, the keyboard might stop working.
Regardless of which window manager you use, VMware recommends turning off the screen saver in aView desktop and not specifying a sleep timer.
Copying and Pasting TextYou can copy and paste text from you client system to a remote View desktop. If your administrator enablesthe feature, you can also copy and paste text from a View desktop to your client system or between two Viewdesktops. Some restrictions apply.
If you use the PCoIP display protocol and you are using a View 5.x or later View desktop, your Viewadministrator can set this feature so that copy and paste operations are allowed only from your client systemto a View desktop, or only from a View desktop to your client system, or both, or neither.
Using VMware View Client for Linux
16 VMware, Inc.
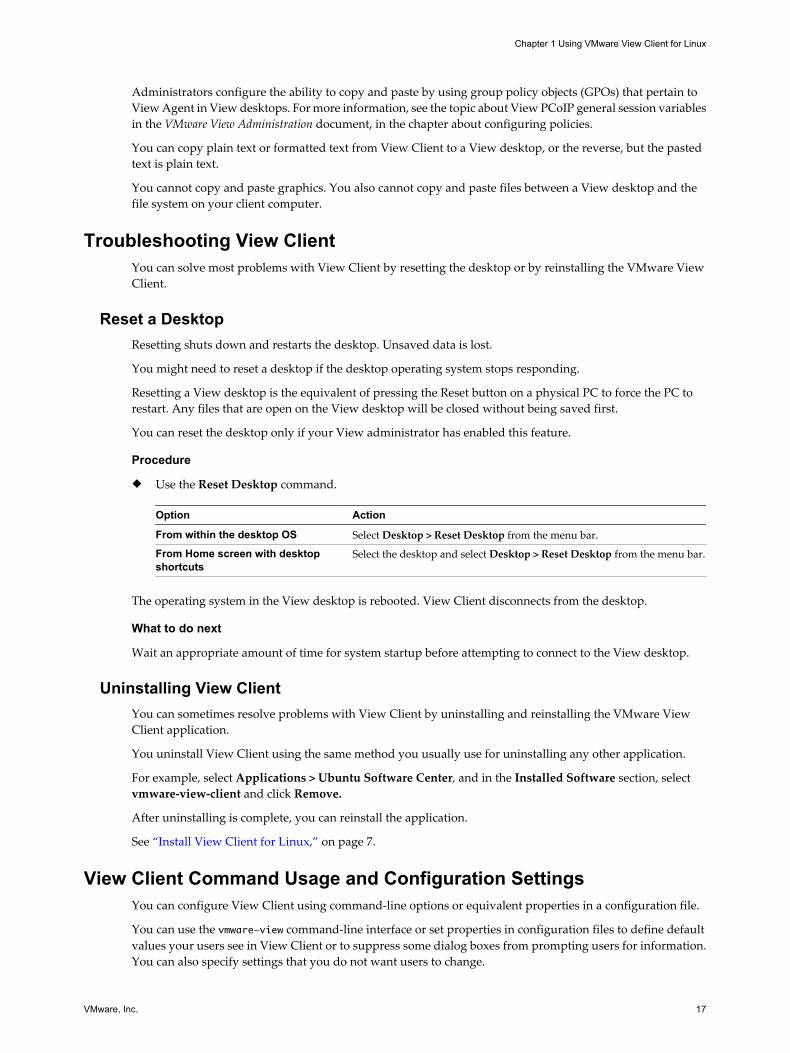
Administrators configure the ability to copy and paste by using group policy objects (GPOs) that pertain toView Agent in View desktops. For more information, see the topic about View PCoIP general session variablesin the VMware View Administration document, in the chapter about configuring policies.
You can copy plain text or formatted text from View Client to a View desktop, or the reverse, but the pastedtext is plain text.
You cannot copy and paste graphics. You also cannot copy and paste files between a View desktop and thefile system on your client computer.
Troubleshooting View ClientYou can solve most problems with View Client by resetting the desktop or by reinstalling the VMware ViewClient.
Reset a DesktopResetting shuts down and restarts the desktop. Unsaved data is lost.
You might need to reset a desktop if the desktop operating system stops responding.
Resetting a View desktop is the equivalent of pressing the Reset button on a physical PC to force the PC torestart. Any files that are open on the View desktop will be closed without being saved first.
You can reset the desktop only if your View administrator has enabled this feature.
Procedure
u Use the Reset Desktop command.
Option Action
From within the desktop OS Select Desktop > Reset Desktop from the menu bar.
From Home screen with desktopshortcuts
Select the desktop and select Desktop > Reset Desktop from the menu bar.
The operating system in the View desktop is rebooted. View Client disconnects from the desktop.
What to do next
Wait an appropriate amount of time for system startup before attempting to connect to the View desktop.
Uninstalling View ClientYou can sometimes resolve problems with View Client by uninstalling and reinstalling the VMware ViewClient application.
You uninstall View Client using the same method you usually use for uninstalling any other application.
For example, select Applications > Ubuntu Software Center, and in the Installed Software section, selectvmware-view-client and click Remove.
After uninstalling is complete, you can reinstall the application.
See “Install View Client for Linux,” on page 7.
View Client Command Usage and Configuration SettingsYou can configure View Client using command-line options or equivalent properties in a configuration file.
You can use the vmware-view command-line interface or set properties in configuration files to define defaultvalues your users see in View Client or to suppress some dialog boxes from prompting users for information.You can also specify settings that you do not want users to change.
Chapter 1 Using VMware View Client for Linux
VMware, Inc. 17

Processing Order for Configuration SettingsWhen View Client starts up, configuration settings are processed from various locations in the following order:
1 /etc/vmware/view-default-config
2 ~/.vmware/view-preferences
3 Command-line arguments
4 /etc/vmware/view-mandatory-config
If a setting is defined in multiple locations, the value that is used is the value from the last file or command-line option read. For example, to specify settings that override users' preferences, set properties inthe /etc/vmware/view-mandatory-config file.
To set default values that users can change, use the /etc/vmware/view-default-config file. After users changea setting, when they exit View Client, any changed settings are saved in the ~/.vmware/view-preferences file.
Properties That Prevent Users from Changing DefaultsFor each property, you can set a corresponding view.allow property that controls whether users are allowedto change the setting. For example, if you set the view.allowDefaultBroker property to "FALSE" inthe /etc/vmware/view-mandatory-config file, users will not be able to change the name in the Server Namefield when they use View Client.
Syntax for Using the Command-Line InterfaceUse the following form of the vmware-view command from a terminal window.
vmware-view [command-line-option [argument]] ...
By default, the vmware-view command is located in the /usr/bin directory.
You can use either the short form or the long form of the option name, although not all options have a shortform. For example, to specify the domain you can use either -d (short form) or --domainName= (long form).You might choose to use the long form to make a script more human-readable.
You can use the --help option to get a list of command-line options and usage information.
IMPORTANT If you need to use a proxy, use the following syntax:
http_proxy=proxy_server_URL:port https_proxy=proxy_server_URL:port vmware-view options
This workaround is required because you must clear the environment variables that were previously set forthe proxy. If you do not perform this action, the proxy exception setting does not take effect in View Client.You configure a proxy exception for the View Connection Server instance.
View Client Configuration SettingsFor your convenience, almost all configuration settings have both a key=value property and a correspondingcommand-line option name. For a few settings, there is a command-line option but no corresponding propertyyou can set in a configuration file. For a few other settings, you must set a property because no command-lineoption is available.
IMPORTANT Some command-line options and configuration keys, such as the ones for USB redirection andMMR, are available only with the version of View Client provided by third-party vendors. For moreinformation about these partners, see the VMware Compatibility Guide.
Using VMware View Client for Linux
18 VMware, Inc.
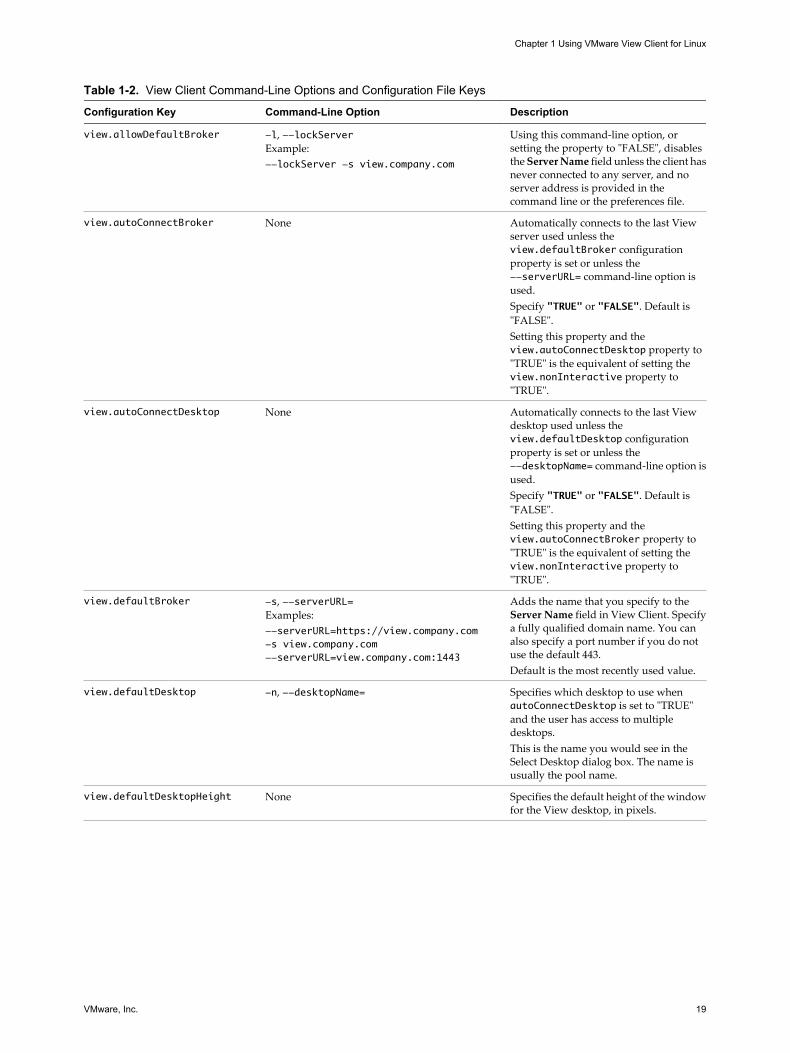
Table 1-2. View Client Command-Line Options and Configuration File Keys
Configuration Key Command-Line Option Description
view.allowDefaultBroker -l, --lockServerExample:--lockServer -s view.company.com
Using this command-line option, orsetting the property to "FALSE", disablesthe Server Name field unless the client hasnever connected to any server, and noserver address is provided in thecommand line or the preferences file.
view.autoConnectBroker None Automatically connects to the last Viewserver used unless theview.defaultBroker configurationproperty is set or unless the--serverURL= command-line option isused.Specify "TRUE" or "FALSE". Default is"FALSE".Setting this property and theview.autoConnectDesktop property to"TRUE" is the equivalent of setting theview.nonInteractive property to"TRUE".
view.autoConnectDesktop None Automatically connects to the last Viewdesktop used unless theview.defaultDesktop configurationproperty is set or unless the--desktopName= command-line option isused.Specify "TRUE" or "FALSE". Default is"FALSE".Setting this property and theview.autoConnectBroker property to"TRUE" is the equivalent of setting theview.nonInteractive property to"TRUE".
view.defaultBroker -s, --serverURL=Examples:--serverURL=https://view.company.com-s view.company.com--serverURL=view.company.com:1443
Adds the name that you specify to theServer Name field in View Client. Specifya fully qualified domain name. You canalso specify a port number if you do notuse the default 443.Default is the most recently used value.
view.defaultDesktop -n, --desktopName= Specifies which desktop to use whenautoConnectDesktop is set to "TRUE"and the user has access to multipledesktops.This is the name you would see in theSelect Desktop dialog box. The name isusually the pool name.
view.defaultDesktopHeight None Specifies the default height of the windowfor the View desktop, in pixels.
Chapter 1 Using VMware View Client for Linux
VMware, Inc. 19
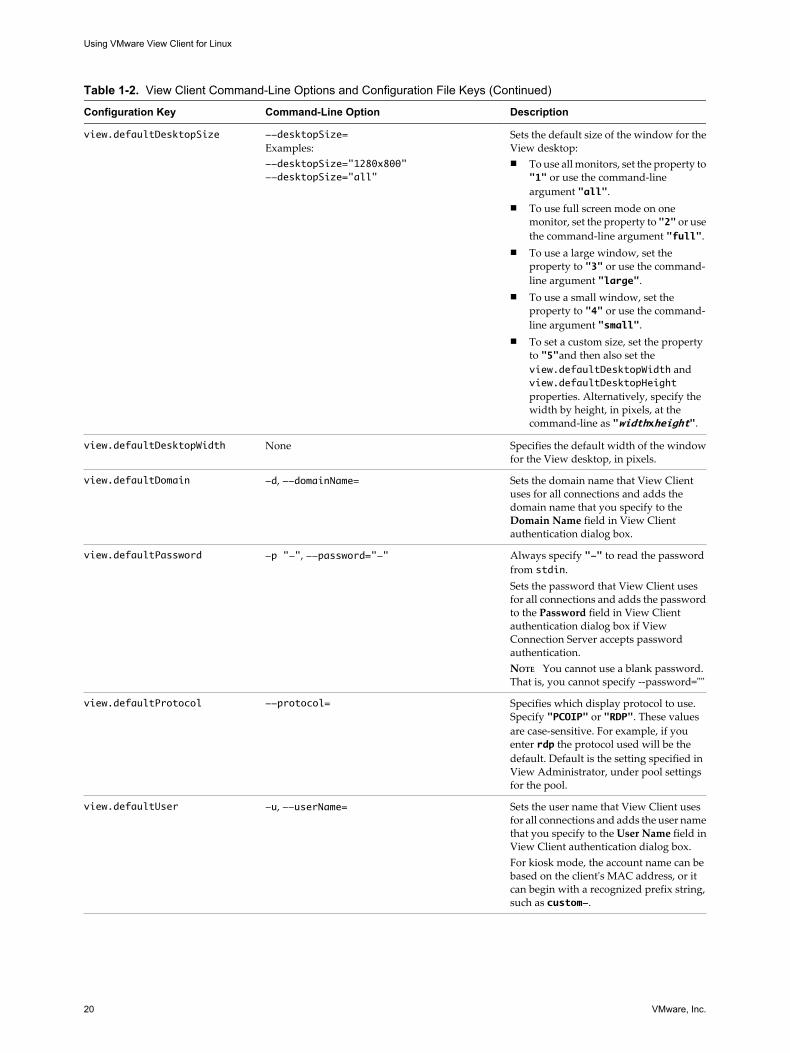
Table 1-2. View Client Command-Line Options and Configuration File Keys (Continued)
Configuration Key Command-Line Option Description
view.defaultDesktopSize --desktopSize=Examples:--desktopSize="1280x800"--desktopSize="all"
Sets the default size of the window for theView desktop:n To use all monitors, set the property to
"1" or use the command-lineargument "all".
n To use full screen mode on onemonitor, set the property to "2" or usethe command-line argument "full".
n To use a large window, set theproperty to "3" or use the command-line argument "large".
n To use a small window, set theproperty to "4" or use the command-line argument "small".
n To set a custom size, set the propertyto "5"and then also set theview.defaultDesktopWidth andview.defaultDesktopHeightproperties. Alternatively, specify thewidth by height, in pixels, at thecommand-line as "widthxheight".
view.defaultDesktopWidth None Specifies the default width of the windowfor the View desktop, in pixels.
view.defaultDomain -d, --domainName= Sets the domain name that View Clientuses for all connections and adds thedomain name that you specify to theDomain Name field in View Clientauthentication dialog box.
view.defaultPassword -p "-", --password="-" Always specify "-" to read the passwordfrom stdin.Sets the password that View Client usesfor all connections and adds the passwordto the Password field in View Clientauthentication dialog box if ViewConnection Server accepts passwordauthentication.NOTE You cannot use a blank password.That is, you cannot specify --password=""
view.defaultProtocol --protocol= Specifies which display protocol to use.Specify "PCOIP" or "RDP". These valuesare case-sensitive. For example, if youenter rdp the protocol used will be thedefault. Default is the setting specified inView Administrator, under pool settingsfor the pool.
view.defaultUser -u, --userName= Sets the user name that View Client usesfor all connections and adds the user namethat you specify to the User Name field inView Client authentication dialog box.For kiosk mode, the account name can bebased on the client's MAC address, or itcan begin with a recognized prefix string,such as custom-.
Using VMware View Client for Linux
20 VMware, Inc.
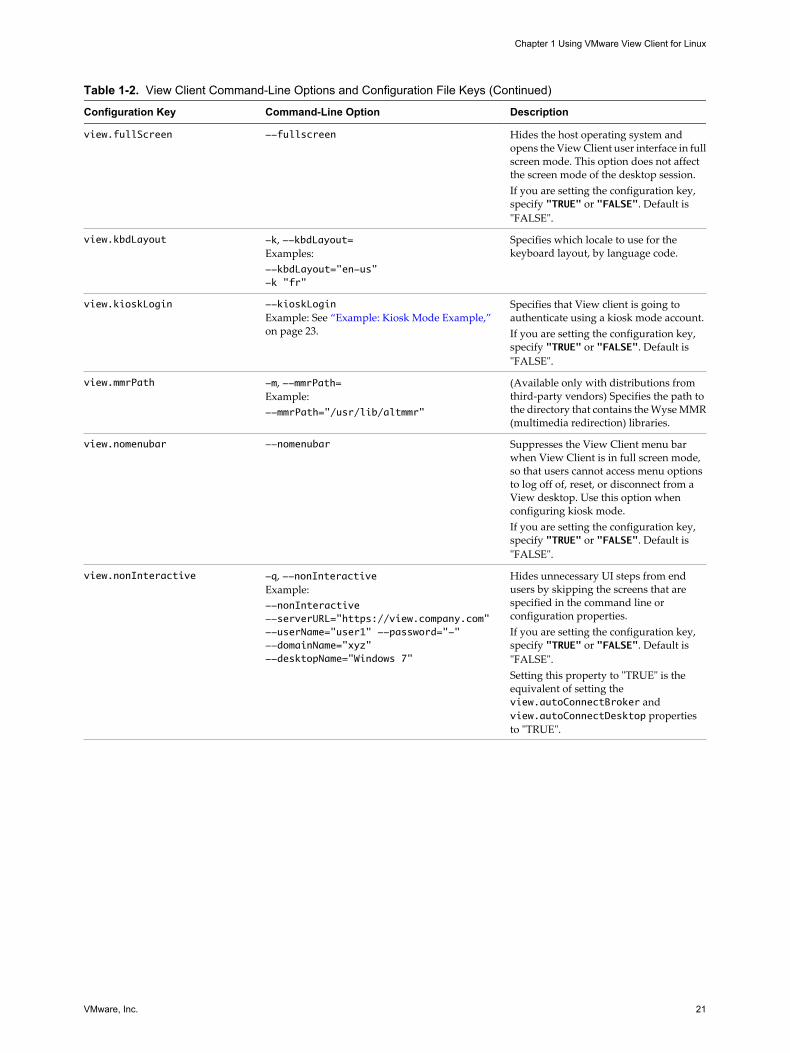
Table 1-2. View Client Command-Line Options and Configuration File Keys (Continued)
Configuration Key Command-Line Option Description
view.fullScreen --fullscreen Hides the host operating system andopens the View Client user interface in fullscreen mode. This option does not affectthe screen mode of the desktop session.If you are setting the configuration key,specify "TRUE" or "FALSE". Default is"FALSE".
view.kbdLayout -k, --kbdLayout=Examples:--kbdLayout="en-us"-k "fr"
Specifies which locale to use for thekeyboard layout, by language code.
view.kioskLogin --kioskLoginExample: See “Example: Kiosk Mode Example,”on page 23.
Specifies that View client is going toauthenticate using a kiosk mode account.If you are setting the configuration key,specify "TRUE" or "FALSE". Default is"FALSE".
view.mmrPath -m, --mmrPath=Example:--mmrPath="/usr/lib/altmmr"
(Available only with distributions fromthird-party vendors) Specifies the path tothe directory that contains the Wyse MMR(multimedia redirection) libraries.
view.nomenubar --nomenubar Suppresses the View Client menu barwhen View Client is in full screen mode,so that users cannot access menu optionsto log off of, reset, or disconnect from aView desktop. Use this option whenconfiguring kiosk mode.If you are setting the configuration key,specify "TRUE" or "FALSE". Default is"FALSE".
view.nonInteractive -q, --nonInteractiveExample:--nonInteractive--serverURL="https://view.company.com" --userName="user1" --password="-" --domainName="xyz" --desktopName="Windows 7"
Hides unnecessary UI steps from endusers by skipping the screens that arespecified in the command line orconfiguration properties.If you are setting the configuration key,specify "TRUE" or "FALSE". Default is"FALSE".Setting this property to "TRUE" is theequivalent of setting theview.autoConnectBroker andview.autoConnectDesktop propertiesto "TRUE".
Chapter 1 Using VMware View Client for Linux
VMware, Inc. 21

Table 1-2. View Client Command-Line Options and Configuration File Keys (Continued)
Configuration Key Command-Line Option Description
view.once --once Specifies that you do not want View Clientto retry connecting in the case of an erroroccurring.Use --once if you want to obtain a similarworkflow to the View 4.6 client. Thisoption will force the View client to exitafter the user disconnects or logs off froma desktop.You should usually specify this option ifyou use kiosk mode, and use the exit codeto handle the error. Otherwise, you mightfind it difficult to kill the vmware-viewprocess remotely.If you are setting the configuration key,specify "TRUE" or "FALSE". Default is"FALSE".
view.rdesktopOptions --rdesktopOptions=Example:--rdesktopOptions="-f -m"
(Available if you use the Microsoft RDPdisplay protocol) Specifies command-lineoptions to forward to the rdesktopapplication. For information aboutrdesktop options, see the rdesktopdocumentation.
None -r, --redirect=Example:--redirect="sound:off"
(Available if you use the Microsoft RDPdisplay protocol) Specifies a local devicethat you want rdesktop to redirect to theView desktop.Specify the device information that youwant to pass to the -r option of rdesktop.You can set multiple device options in asingle command.
view.sslVerificationMode None Sets the server certificate verificationmode.Specify "1" to reject connections when thecertificate fails any of the verificationchecks, "2" to warn but allow connectionsthat use a self-signed certificate, or "3" toallow unverifiable connections. If youspecify "3" no verification checks areperformed. Default is "2".
None --printEnvironmentInfoExample:--printEnvironmentInfo -s view.company.com
Displays information about theenvironment of a client device, includingits IP address, MAC address, machinename, and domain name.For kiosk mode, you can create an accountfor the client based on the MAC address.To display the MAC address, you mustuse this option with the -s option.
None --usb= (Available only with distributions fromthird-party vendors) Specifies whichoptions to use for USB redirection.See“Redirecting a USB Device to a RemoteDesktop,” on page 24.
None --version Displays version information about ViewClient.
Using VMware View Client for Linux
22 VMware, Inc.
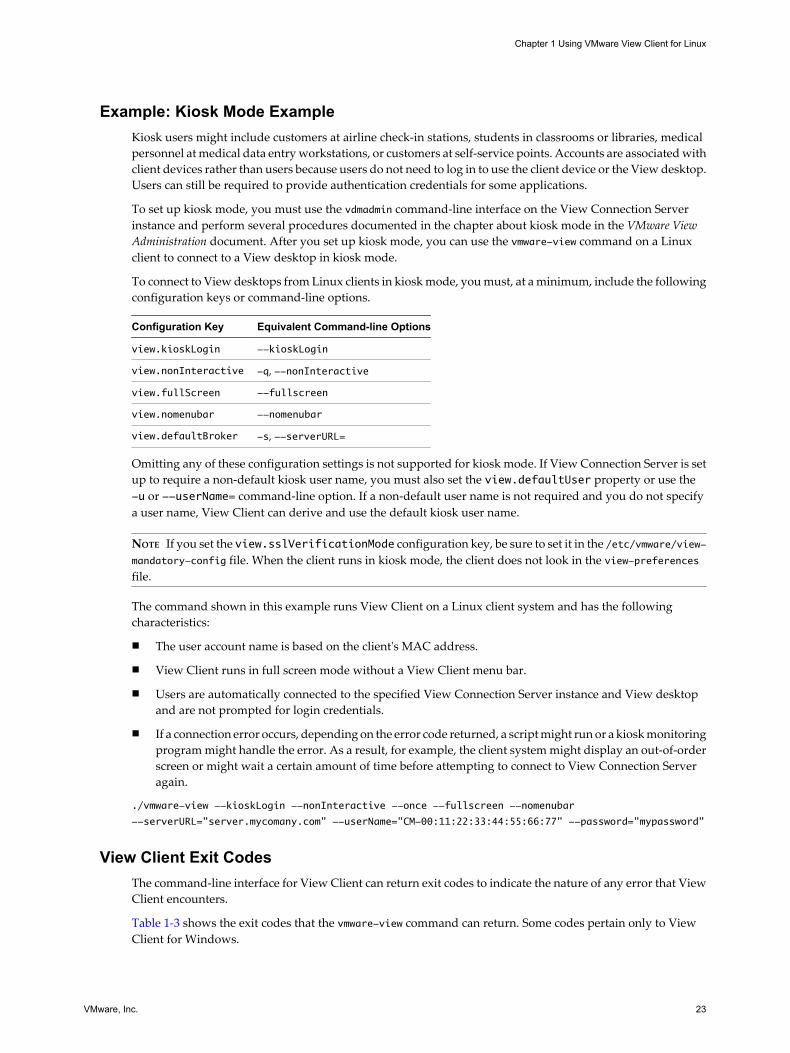
Example: Kiosk Mode ExampleKiosk users might include customers at airline check-in stations, students in classrooms or libraries, medicalpersonnel at medical data entry workstations, or customers at self-service points. Accounts are associated withclient devices rather than users because users do not need to log in to use the client device or the View desktop.Users can still be required to provide authentication credentials for some applications.
To set up kiosk mode, you must use the vdmadmin command-line interface on the View Connection Serverinstance and perform several procedures documented in the chapter about kiosk mode in the VMware ViewAdministration document. After you set up kiosk mode, you can use the vmware-view command on a Linuxclient to connect to a View desktop in kiosk mode.
To connect to View desktops from Linux clients in kiosk mode, you must, at a minimum, include the followingconfiguration keys or command-line options.
Configuration Key Equivalent Command-line Options
view.kioskLogin --kioskLogin
view.nonInteractive -q, --nonInteractive
view.fullScreen --fullscreen
view.nomenubar --nomenubar
view.defaultBroker -s, --serverURL=
Omitting any of these configuration settings is not supported for kiosk mode. If View Connection Server is setup to require a non-default kiosk user name, you must also set the view.defaultUser property or use the-u or --userName= command-line option. If a non-default user name is not required and you do not specifya user name, View Client can derive and use the default kiosk user name.
NOTE If you set the view.sslVerificationMode configuration key, be sure to set it in the /etc/vmware/view-mandatory-config file. When the client runs in kiosk mode, the client does not look in the view-preferencesfile.
The command shown in this example runs View Client on a Linux client system and has the followingcharacteristics:
n The user account name is based on the client's MAC address.
n View Client runs in full screen mode without a View Client menu bar.
n Users are automatically connected to the specified View Connection Server instance and View desktopand are not prompted for login credentials.
n If a connection error occurs, depending on the error code returned, a script might run or a kiosk monitoringprogram might handle the error. As a result, for example, the client system might display an out-of-orderscreen or might wait a certain amount of time before attempting to connect to View Connection Serveragain.
./vmware-view --kioskLogin --nonInteractive --once --fullscreen --nomenubar
--serverURL="server.mycomany.com" --userName="CM-00:11:22:33:44:55:66:77" --password="mypassword"
View Client Exit CodesThe command-line interface for View Client can return exit codes to indicate the nature of any error that ViewClient encounters.
Table 1-3 shows the exit codes that the vmware-view command can return. Some codes pertain only to ViewClient for Windows.
Chapter 1 Using VMware View Client for Linux
VMware, Inc. 23
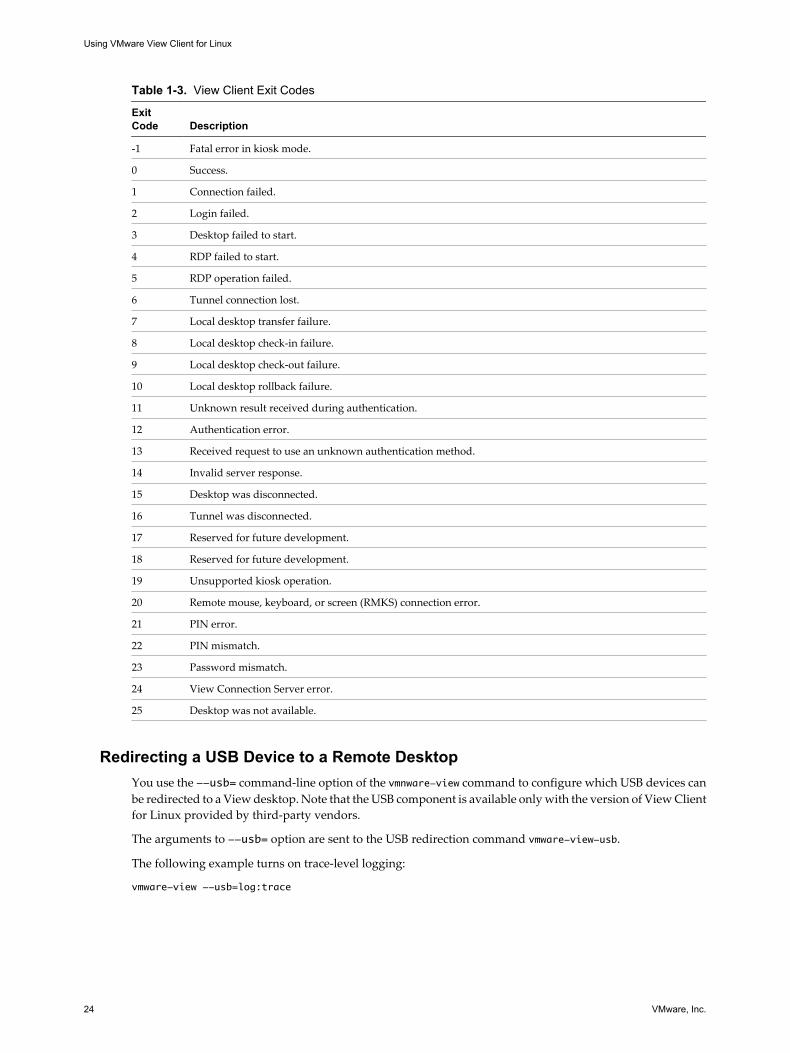
Table 1-3. View Client Exit Codes
ExitCode Description
-1 Fatal error in kiosk mode.
0 Success.
1 Connection failed.
2 Login failed.
3 Desktop failed to start.
4 RDP failed to start.
5 RDP operation failed.
6 Tunnel connection lost.
7 Local desktop transfer failure.
8 Local desktop check-in failure.
9 Local desktop check-out failure.
10 Local desktop rollback failure.
11 Unknown result received during authentication.
12 Authentication error.
13 Received request to use an unknown authentication method.
14 Invalid server response.
15 Desktop was disconnected.
16 Tunnel was disconnected.
17 Reserved for future development.
18 Reserved for future development.
19 Unsupported kiosk operation.
20 Remote mouse, keyboard, or screen (RMKS) connection error.
21 PIN error.
22 PIN mismatch.
23 Password mismatch.
24 View Connection Server error.
25 Desktop was not available.
Redirecting a USB Device to a Remote DesktopYou use the --usb= command-line option of the vmnware-view command to configure which USB devices canbe redirected to a View desktop. Note that the USB component is available only with the version of View Clientfor Linux provided by third-party vendors.
The arguments to --usb= option are sent to the USB redirection command vmware-view-usb.
The following example turns on trace-level logging:
vmware-view --usb=log:trace
Using VMware View Client for Linux
24 VMware, Inc.
You can specify multiple instances of the --usb option for each vmware-view-usb option that you want toset. The following example turns on debug-level logging and excludes a device that is specified by its ID:
vmware-view --usb=log:debug
--usb=exid:vid0012pid0034
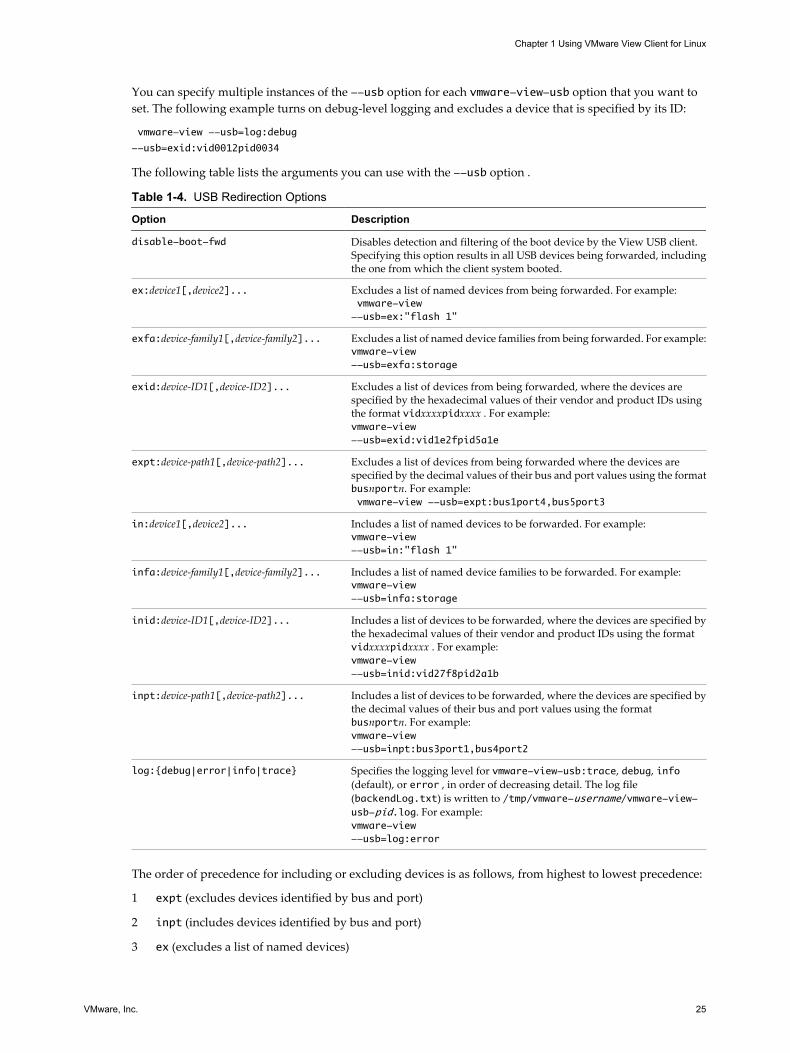
The following table lists the arguments you can use with the --usb option .
Table 1-4. USB Redirection Options
Option Description
disable-boot-fwd Disables detection and filtering of the boot device by the View USB client.Specifying this option results in all USB devices being forwarded, includingthe one from which the client system booted.
ex:device1[,device2]... Excludes a list of named devices from being forwarded. For example: vmware-view--usb=ex:"flash 1"
exfa:device-family1[,device-family2]... Excludes a list of named device families from being forwarded. For example:vmware-view--usb=exfa:storage
exid:device-ID1[,device-ID2]... Excludes a list of devices from being forwarded, where the devices arespecified by the hexadecimal values of their vendor and product IDs usingthe format vidxxxxpidxxxx . For example:vmware-view--usb=exid:vid1e2fpid5a1e
expt:device-path1[,device-path2]... Excludes a list of devices from being forwarded where the devices arespecified by the decimal values of their bus and port values using the formatbusnportn. For example: vmware-view --usb=expt:bus1port4,bus5port3
in:device1[,device2]... Includes a list of named devices to be forwarded. For example:vmware-view--usb=in:"flash 1"
infa:device-family1[,device-family2]... Includes a list of named device families to be forwarded. For example:vmware-view--usb=infa:storage
inid:device-ID1[,device-ID2]... Includes a list of devices to be forwarded, where the devices are specified bythe hexadecimal values of their vendor and product IDs using the formatvidxxxxpidxxxx . For example:vmware-view--usb=inid:vid27f8pid2a1b
inpt:device-path1[,device-path2]... Includes a list of devices to be forwarded, where the devices are specified bythe decimal values of their bus and port values using the formatbusnportn. For example:vmware-view--usb=inpt:bus3port1,bus4port2
log:{debug|error|info|trace} Specifies the logging level for vmware-view-usb:trace, debug, info(default), or error , in order of decreasing detail. The log file(backendLog.txt) is written to /tmp/vmware-username/vmware-view-usb-pid.log. For example:vmware-view--usb=log:error
The order of precedence for including or excluding devices is as follows, from highest to lowest precedence:
1 expt (excludes devices identified by bus and port)
2 inpt (includes devices identified by bus and port)
3 ex (excludes a list of named devices)
Chapter 1 Using VMware View Client for Linux
VMware, Inc. 25
4 in (includes a list of named devices)
5 exid (excludes devices identified by vendor and product ID)
6 inid (includes devices identified by vendor and product ID)
7 exfa (excludes a list of named device families)
8 infa (includes a list of named device families)
The following example excludes all storage family devices apart from one device that is specified by its ID:
vmware-view --usb=exfa:storage
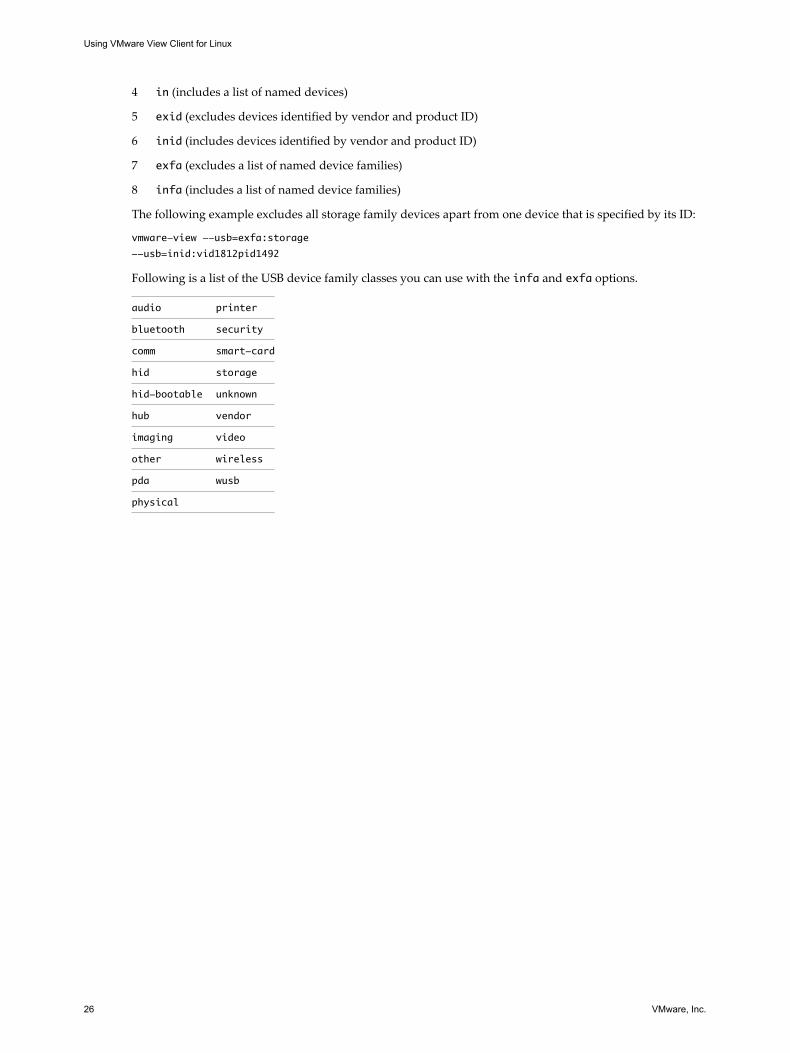
--usb=inid:vid1812pid1492
Following is a list of the USB device family classes you can use with the infa and exfa options. audio printer
bluetooth security
comm smart-card
hid storage
hid-bootable unknown
hub vendor
imaging video
other wireless
pda wusb
physical
Using VMware View Client for Linux
26 VMware, Inc.
Index
Ccaching, client-side image 9Canonical 7certificates, ignoring problems 8, 12client image cache 9command-line interface 17configuration properties 17copying text 16Ctrl+Alt+Delete 13
Ddesktop
log off from 13reset 17roll back 14switch 13
devices, USB 24disconnecting from a View desktop 13
Ffeature support matrix, for Linux 15FIPS mode 9forwarding USB devices 24
Hhardware requirements, for Linux systems 6
Iimage cache, client 9installation instructions 7
Kkeyboards 16
LLinux, installing View Client on 6log off 13logging, for USB devices 24logging in to a View desktop 11
Mmonitors 16
Ooperating systems, supported on View Agent 7
Ppasting text 16PCoIP client image cache 9prerequisites for client devices 7proxy settings 17
Rredirection, USB 24reset desktop 17roll back a View desktop 14
Sscreen resolution 16security servers 7Send Ctrl+Alt+Del menu command 13server certificate verification 8server connections 10SSL certificates, verifying 8switch desktops 13system requirements, for Linux 6
Ttext, copying 16
UUbuntu 7uninstalling View Client 17UPNs, View Client 11USB redirection 24
Vverification modes for certificate checking 8View Agent, installation requirements 7View Client
disconnect from a desktop 13setup for Linux clients 6starting 11system requirements for Linux 6troubleshooting 17
View Client for Linux, installing 7View Connection Server 7View desktop, roll back 14vmware-view command-line interface 17
Wwswc command, exit codes 23
VMware, Inc. 27

Using VMware View Client for Linux
28 VMware, Inc.