Embed Size (px)
Citation preview
Using VFP to Create CHM Files
From Word Documents
Doug Hennig
Stonefield Systems Group Inc.
1112 Winnipeg Street, Suite 200
Regina, SK Canada S4R 1J6
Voice: 306-586-3341
Fax: 306-586-5080
Email: [email protected]
Web: http://www.stonefield.com
http://www.stonefieldquery.com
Overview
Tools like the Microsoft HTML Help Workshop or West Wind HTML Help Builder can
make short work of generating an HTML Help (CHM) file. However, what if you're not
starting from scratch but from a set of existing Word documents? This session discusses
the basics of generating CHM files, covers the tasks necessary to create CHM files from
Word documents, and presents a set of tools that automates the process.
Introduction
I normally use HTML Help Builder from West Wind Technologies to create HTML Help
(CHM) files for the applications I create. HTML Help Builder provides a complete
environment for creating CHM files, including topic editing and management, HTML
generation, and CHM compilation (using the Microsoft HTML Help compiler). However,
I’ve come across one situation where using HTML Help Builder would actually cause
more work than it would save: when the source documents already exist as Word files.
Yes, HTML Help Builder supports drag and drop from Word, but when you’ve got
dozens or even hundreds of documents, that approach just isn’t viable. A case in point: I
(along with Tamar Granor, Della Martin, and Ted Roche) recently finished “The Hacker’s
Guide to Visual FoxPro 7.0” (known to millions as “HackFox”), from Hentzenwerke
Publishing. Besides writing, I was also responsible for creating the CHM file. Given that
there were over 900 Word documents as the starting point, and several CHM files would
be created (a beta version, several release candidates, and the final copy), I needed to
automate the process.
Even if the source documents aren’t already in Word, there are several reasons you might
want to use Word rather than HTML Help Builder to create the CHM file. First, Word
provides a better editing environment, since it’s a full-featured word processor rather than
just a simple text editor. For example, spell and grammar checking and tracking
document changes, tasks commonly used in creating these types of documents, are built
into Word. Second, the authors of the documents will undoubtedly be more familiar with
and more comfortable using Word. Third, you may want both printed and online
documentation. If you create the topics in HTML Help Builder, your ability to create
printed documentation is quite limited.
I’ve actually been through this before. Several years ago, I had a client, a union of credit
unions, that wanted to distribute a “model” policy handbook to member credit unions.
The members needed a way to customize the model to produce their specific handbook.
They wanted to use Word to do the customization but have the final results in the form of
a CHM file because of the advantages HTML Help offers: a single, compressed, easily
distributed file, and automatic table of contents, index, and search features (something
that would be a pain to build for a set of Word or HTML documents). The process I
created for them was similar to the one I used for HackFox, although the code is much
more refined now.
There are two main tasks in generating a CHM file from a set of Word documents. The
first step, converting the Word documents to HTML, requires a fair bit of work. The
second step, generating the CHM file from the HTML documents, is much simpler.

Step 1: Converting Word Documents to HTML
You’re probably thinking, “Well, this ought to be a simple task. After all, Word can
generate HTML files with the flick of the mouse.” Sure it can. Let’s take a look at the
HTML it generates.
Here’s the start of the HTML file Word generated from this document:
<html xmlns:v="urn:schemas-microsoft-com:vml"
xmlns:o="urn:schemas-microsoft-com:office:office"
xmlns:w="urn:schemas-microsoft-com:office:word"
xmlns="http://www.w3.org/TR/REC-html40">
<head>
<meta http-equiv=Content-Type content="text/html;
charset=windows-1252">
<meta name=ProgId content=Word.Document>
<meta name=Generator content="Microsoft Word 9">
<meta name=Originator content="Microsoft Word 9">
<link rel=File-List href="./html_files/filelist.xml">
<link rel=Edit-Time-Data href="./html_files/editdata.
mso">
<title>Using VFP to Create CHM Files From Word Documents
</title>
<!--[if gte mso 9]><xml>
<o:DocumentProperties>
<o:Author>Doug Hennig</o:Author>
<o:Template>ft951021.dot</o:Template>
<o:LastAuthor>Doug Hennig</o:LastAuthor>
This stuff goes on for pages and pages before you see the actual text of the document. In
fact, by my count, there are 48,788 characters before the start of my text! Of course, the
amount of that preamble varies with the document; it depends on how complex the
document is and how many styles are defined.
Now let’s look at what the actual text looks like. Here’s what the first sentence of the first
bullet point in the next section looks like:
<p class=bulletfirst><![if !supportLists]><span style='font-family:Symbol'>·<span
style='font:7.0pt "Times New Roman"'>
</span></span><![endif]>Convert all the Word documents in a specified directory
to HTML files in a different directory.
HTML supports bulleted paragraphs using <UL> and <LI> tags. What the heck is all the
<
in Word. I also may want the printed document to use Times New Roman but have the
CHM use Tahoma or Verdana, which is easier to read on-screen. Unfortunately, it’s not
that easy to change this in the generated HTML. So, one of the things I want to do is strip
all the styles out of the HTML Word generates and attach my own cascading style sheet
(CSS).
Stripping for Fun and Profit
To automate the process of stripping all the crap, er, extraneous stuff, from the HTML
Word generates, I created a set of classes, a couple of process tables, and a driver program
to handle this task. Let’s start with the driver program, PROCESS.PRG.
Here’s the overall flow of what this program does:
Convert all the Word documents in a specified directory to HTML files in a
different directory. By separating these files into separate directories, we can
quickly delete all the generated HTML files if we need to start the process over
without having worry about deleting the source Word documents. Also, if we
want to fine-tune the stripping process, we can skip the HTML generation step
(which is the most time-consuming part) and just reprocess the HTML files.
Strip the unwanted stuff from the HTML files, resulting in files in yet another
directory. Rather than hard-coding it, a table specifies the stuff we’re going to
look for and remove. Again, generating separate files rather than overwriting the
files Word created allows us to re-run the process without having Word regenerate
the HTML files.
Perform additional, customized, processing on the HTML files. Having used this
process on several projects, I’ve discovered that different sets of files have
different processing requirements. For example, most topics in HackFox have a
“see also” section of other topics that need to be linked to the appropriate HTML
files. In converting FoxTalk articles I’ve written, I needed to remove the
publishing directives from the start of the text. So, this step is data-driven: it uses
a table that specifies all the additional processing to be done.
Notice a similarity in these steps? Take a bunch of files, do something to each one, and
send the output to another file. The Iterator design pattern seems like a perfect fit here.
We’ll have an object that will iterate through a set of files and call another object to
process each one in some way.
FileIterator, in ASSEMBLE.VCX, is based on Custom. It has cDirectory, cFileSkeleton,
and aExclude properties in which you specify the source directory, the file skeleton for
the set of files to process, and the extension of any to be excluded (for example,
cFileSkeleton might contain “*.*” and aExclude might contain “GIF”, “JPG”, and “TIF”,
so all files except graphic files will be processed). The cWriteDir property contains the
name of the directory where the output files should be placed. Because a lot of files will
be processed, I don’t want to be interrupted with dialogs when processing errors occur, so
the cLogFile property allows me to specify a file to write errors to. Reviewing this file at
the end of the process is important to see which Word documents need to be corrected or
which processes need to be tweaked to handle unexpected issues. The GetFiles method
populates the aFiles array property with the files to iterate; it uses ADIR() with the
cDirectory and cFileSkeleton properties to fill an initial list, then removes any files whose
extension is found in the aExclude property, and sorts the resulting array.
The Process method iterates through the files specified in the aFiles array, calling the
ProcessFile method on each one to perform the process. It displays a progress meter with
a Cancel button (instantiated from the SFProgressForm class in SFTHERM.VCX into the
oTherm property) so we can monitor the progress of the process and cancel it if
necessary. Here’s the code:
lparameters tcTitle
local lcPath, ;
llReturn, ;
lnI, ;
lcFile
private plCancel
with This
* Use the same directory for writing files to if it isn't
* specified.
.cWriteDir = iif(empty(.cWriteDir), .cDirectory, ;
.cWriteDir)
* Create a thermometer object.
.nFiles = alen(.aFiles, 1)
lcPath = sys(16)
lcPath = addbs(justpath(substr(lcPath, ;
at(' ', lcPath, 2) + 1)))
.oTherm = newobject('SFProgressForm', ;
lcPath + 'SFTherm.vcx')
.oTherm.SetMaximum(.nFiles)
.oTherm.SetTitle(tcTitle)
.oTherm.cCancelProperty = 'plCancel'
* Process each file. If something went wrong, write the
* error to the log file and flag that we'll return .F.,
* but keep processing. If the user clicked the Cancel
* button in the thermometer, stop processing.
llReturn = .T.
plCancel = .F.
for lnI = 1 to .nFiles
lcFile = .aFiles[lnI, 1]
.cErrorMessage = ''
do case
case not .ProcessFile(lcFile)
strtofile(.cErrorMessage, .cLogFile, .T.)
llReturn = .F.
case plCancel
llReturn = .F.
exit
endcase
.oTherm.Update(lnI, 'Processing ' + lcFile + '...')
next lnI
endwith
return llReturn
The ProcessFile method, called from Process, processes a single file by calling the
ProcessFile method of another object, a reference to which is stored in the oProcess
property. If something went wrong, the cErrorMessage property of the process object is
written to our cErrorMessage property, along with the file name and a carriage return and
line feed (ccCRLF, a constant defined in ASSEMBLE.H). This method returns whether
the process succeeded or not.
lparameters tcFile
local llReturn
with This
llReturn = .oProcess.ProcessFile(.cDirectory + ;
tcFile, .cWriteDir + tcFile)
if not llReturn
.cErrorMessage = tcFile + ': ' + ;
.oProcess.cErrorMessage + ccCRLF
endif not llReturn
endwith
return llReturn
Here’s how PROCESS.PRG uses the FileIterator object to convert the Word documents
to HTML files. It collaborates with a GenerateHTML object, which we’ll look at next.
tlNoGenerateHTML is a parameter passed to PROCESS.PRG; pass .T. to not generate
HTML from Word documents, such as when you just want to re-run the HTML cleanup
steps. lcWordDocs, lcHTMLDir, and lcLogFile contain the directory for the Word
documents, the directory where the HTML files should be written, and the name of the
log file that errors should be written to, respectively.
if not tlNoGenerateHTML
loIterator = createobject('FileIterator')
with loIterator
.oProcess = createobject('GenerateHTML')
.cDirectory = lcWordDocs
.cWriteDir = lcHTMLDir
.cLogFile = lcLogFile
.GetFiles()
.Process('Converting Word docs to HTML...')
endwith
endif not tlNoGenerateHTML
Generating HTML
Before we look at GenerateHTML, let’s look at its parent class, ProcessBaseClass, which
is the parent class for all of the processing objects we’ll use. ProcessBaseClass has a
ProcessFile method that accepts the name of the input and output files, reads the contents
of the input file into a variable, calls the Process method (abstract in this class) to do the
actual processing of the contents, and writes the results to the output file. It returns .T. if
the process succeeded; if not, the cErrorMessage property contains the reason it failed.
lparameters tcInputFile, ;
tcOutputFile
local lcFile, ;
llReturn, ;
lcStream, ;
lcResult
with This
* Blank the error message so we don't use one from a
* previous file.
.cErrorMessage = ''
* Ensure the file exists.
.cFile = tcInputFile
lcFile = justfname(tcInputFile)
llReturn = file(tcInputFile)
* Read the contents of the file and process it.
if llReturn
lcStream = filetostr(tcInputFile)
lcResult = .Process(lcStream)
strtofile(lcResult, tcOutputFile)
* The file wasn't found, so set the error message.
else
.cErrorMessage = 'File not found'
endif llReturn
* Include any error occurrence in the return value.
llReturn = llReturn and not .lErrorOccurred
endwith
return llReturn
You may be wondering why ProcessFile reads the contents of the file itself and passes it
to Process rather than just passing the file name and having Process do the reading and
writing. The reason is that we’ll later see a use for doing multiple processes on the same
file, and rather than constantly reading from and writing to disk, we’ll just have multiple
objects process a text stream and write the final results out. Like ProcessFile, the
ProcessStream method calls Process to do the dirty work, but it expects to be passed a
text stream rather than file names, and returns the processed stream.
lparameters tcInput
local lcResult
with This
* Blank the error message so we don't use one from a
* previous file.
.cErrorMessage = ''
* Process the input stream and return the result.
lcResult = .Process(tcInput)
endwith
return lcResult
As I mentioned, the GenerateHTML class is a subclass of ProcessBaseClass. It’ll
automate Word to generate HTML for a specific file. Its Init method instantiates Word
into the oWord property and its Destroy method closes Word. Since we don’t want
ProcessFile to do its normal behavior (read the contents of the Word file into a variable),
this method is overwritten. It tells Word to open the specified input file and save it as
HTML to the specified output file (wdFormatHTML is a constant defined in
ASSEMBLE.H that contains the value the SaveAs method should be passed to save as
HTML). If the specified file isn’t a Word file (the FileIterator class may be processing
everything in one directory, including graphic files linked to the Word documents), we’ll
simply copy it to the output directory.
lparameters tcInputFile, ;
tcOutputFile
local llReturn, ;
loDocument
with This
* Just copy graphic and HTML files to the output
* directory.
if inlist(upper(justext(tcInputFile)), 'JPG', 'GIF', ;
'BMP', 'TIF', 'HTM', 'HTML')
copy file (tcInputFile) to (tcOutputFile)
llReturn = .T.
* Open the file, save it as HTML, and close it.
else
loDocument = .oWord.Documents.Open(tcInputFile)
llReturn = not .lErrorOccurred
if llReturn
loDocument.Revisions.AcceptAll()
.cFile = lower(forceext(tcOutputFile, 'html'))
loDocument.SaveAs(.cFile, wdFormatHTML)
loDocument.Close()
llReturn = not .lErrorOccurred
endif llReturn
endif inlist(upper(justext(tcInputFile)) ...
endwith
return llReturn
Speaking of graphic files, here are a couple of tips when you’re creating the Word
documents. First, don’t embed a graphic file in the document; instead, link it. The HTML
generated for an embedded graphic is ugly and requires a bunch of files in a subdirectory
that Word creates. If you link it, Word generates a simple IMG tag, much as you would if
you created the HTML manually. Second, to minimize pathing issues, copy the graphic
files into the same directory as the Word documents before you link them. Word use
relative paths to the image files in the links, and unless you use the exact same relative
directory structure for the HTML files that you did for the Word documents, the links
won’t work.
Garbage Removal
Once the HTML files have been created from the Word documents, the next step is to
remove the unwanted HTML and XML from the files. We’ll again use a FileIterator
object to do the work, although we’ll instantiate a new one because we’re working with a
different directory and a different set of files. The process object associated with the
iterator is a ReplaceText object. Its job is to look for one string in a text stream and
replace it with another string. Actually, it can handle more than one search-and-replace
set of strings at a time; the AddSearchAndReplace method accepts a pair of strings and
adds them to the aReplace array property, and the Process method goes through all the
pairs in that array. We’ll look at ReplaceText in a moment.
Rather than hard-coding the list of things to clean up in a Word-generated HTML
document, I decided to data-drive it. SAR.DBF contains four columns: ORDER (which
specifies the order in which to process the table), SEARCHFOR (the string to search for),
REPLACE (the string to replace it with), and COMMENT (comments about what this
replacement accomplishes). We won’t look at all the records in SAR.DBF, but Table 1
shows a few of them.
Searchfor Replace Comments
<html*> <html> Remove styles in <HTML> tags
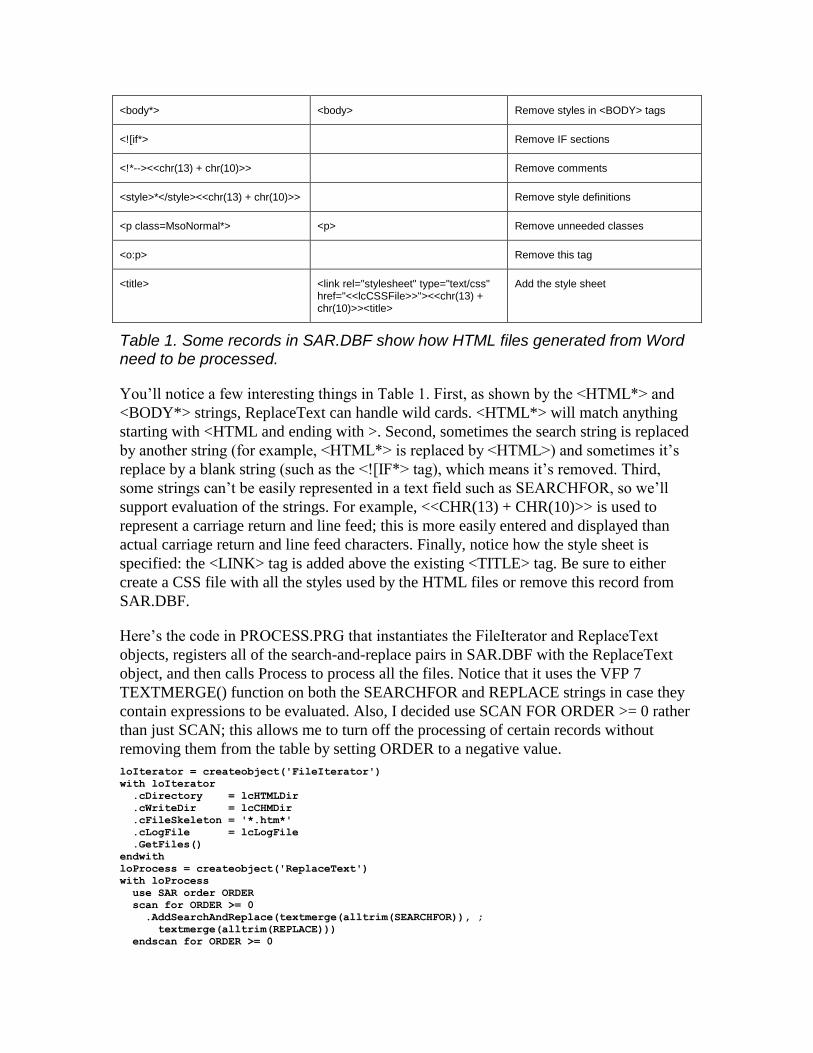
<body*> <body> Remove styles in <BODY> tags
<
use
endwith
loIterator.oProcess = loProcess
loIterator.Process('Cleaning up HTML docs...')
Like the other process classes, ReplaceText is a subclass of ProcessBaseClass. We won’t
look at its entire Process method, just the pertinent parts. It goes through every pair of
strings in the aReplace array and for each one, figures out what it’s supposed to search
for. This isn’t entirely straightforward because of the * wild card character: if we have
one, we’ll go through the text stream (stored in the variable lcString), using the VFP 7
STREXTRACT() function to find the next occurrence of the search string, until there
aren’t any more. Notice this code checks LEN(lcSearch) > 0 rather than NOT
EMPTY(lcSearch), because EMPTY() returns .T. for valid search strings like a carriage
return and line feed. Also notice the comment in the code about the use of AT() as a
workaround for a VFP bug regarding ATC().
lcSearch = .aReplace[lnI, 1]
lnWildCardPos = at('*', lcSearch)
if lnWildCardPos > 0
lcBegin = left(lcSearch, lnWildCardPos - 1)
lcEnd = substr(lcSearch, lnWildCardPos + 1)
endif lnWildCardPos > 0
lnLastPos = 0
do while len(lcSearch) > 0
* If we have a wild card character, we'll find the actual
* text first.
if lnWildCardPos > 0
lcSearch = strextract(lcString, lcBegin, lcEnd, 1, 1)
if len(lcSearch) > 0
lcSearch = lcBegin + lcSearch + lcEnd
endif len(lcSearch) > 0
endif lnWildCardPos > 0
* Now that we know what to search for, try to find it
* using a case-insensitive search. Note the use of AT()
* if ATC() fails because of a bug: if the search string
* is too large, ATC() returns 0 but AT() works OK.
if len(lcSearch) > 0
lnPos = atc(lcSearch, lcString)
llFound = lnPos > 0
if lnPos = 0
lnPos = at(upper(lcSearch), upper(lcString))
llFound = lnPos > 0
endif lnPos = 0
else
llFound = .F.
endif len(lcSearch) > 0
At the end of this code, llFound is .T. if the search string was found within the text
stream, and lcSearch may be empty if there are no further occurrences of the wild card
text to search for. The rest of the code is simple: it uses STRTRAN() to do a case-
insensitive replacement of the search string with the replacement using the new “flags”
parameter added in VFP 7:
lcString = strtran(lcString, lcSearch, lcReplace, -1, ;
-1, 1)
Additional Processing
OK, so far we’ve generated HTML files from the Word documents and stripped
unnecessary HTML and XML from the files. The last step is to do some additional
processing on the HTML files. Because this processing will vary from project to project,
it’s data-driven using PROCESS.DBF. Because there may be multiple processes to
perform, we’ll use a FileIteratorMultipleProcess object to do the file iteration. This
subclass of FileIterator uses an aProcesses array to hold the process objects rather than a
single oProcess property. It also calls the ProcessStream method of each process object
rather than ProcessFile, so each file is read from and written to disk only once, regardless
of the number of processes involved.
PROCESS.DBF has six columns: ORDER (which specifies the order in which to process
the table; like SAR.DBF, a negative number skips the record), CLASS and LIBRARY
(which contain the name of the process class and the VCX file it’s contained it), TITLE
(the title for the progress meter), CODE (any VFP code that should be executed, using the
VFP 7 EXECSCRIPT() function, as part of the setup for the process), and COMMENT
(comments about what this process accomplishes). Some of the processes that might be
specified in this table include image processing (the IMG tags generated by Word contain
some unneeded attributes and may not always reference image files properly), table
processing (table-related tags, such as <TABLE> and <TD>, contain style information
better specified in a CSS file, and borders are specified in the <TD> tags rather than the
usual <TABLE> tag), preformatted text processing (these sections can really be ugly with
the default HTML generated by Word, especially after the other stuff has been stripped
out), hyperlink processing (adding a TARGET=_BLANK attribute to hyperlink tags so
the Web pages appear in a browser window rather than in the CHM window), and bullet
processing (as we saw earlier, Word insists on using indented text and manually inserted
bullet characters rather than <UL> and <LI> tags). I’ve created a set of classes for the
more common processing, including FixBullets, FixHyperlinks, FixImages,
FixPreformatted, and FixTables. To create your own processing classes, first figure out
what you need to do by examining the HTML files after all the other processing is done,
decide what needs to be changes and how to change it, create a subclass of either
ProcessBaseClass or ReplaceText, and create a record for the process class in
PROCESS.DBF. OK, that’s pretty vague <g>, but it’s hard to be specific. Look at the
classes I created for ideas about how you might do this.
Here’s the code in PROCESS.PRG that instantiates the process classes specified in the
PROCESS table, registers them with the FileIteratorMultipleProcess object, and then
calls the Process method to process all the HTML files:
loIterator = createobject('FileIteratorMultipleProcess')
with loIterator
.cDirectory = lcCHMDir
.cFileSkeleton = '*.htm*'
.cLogFile = lcLogFile
.GetFiles()
select 0
use PROCESSES order ORDER
count for ORDER >= 0 to lnProcesses
dimension .aProcesses[lnProcesses]
lnProcess = 0
scan for ORDER >= 0
lnProcess = lnProcess + 1
loProcess = newobject(alltrim(CLASS), ;
alltrim(LIBRARY))
loProcess.cTitle = alltrim(TITLE)
if not empty(CODE)
execscript(CODE, loProcess)
endif not empty(CODE)
.aProcesses[lnProcess] = loProcess
endscan for ORDER >= 0
use
.Process('Additional processing...')
endwith
Check it Out
Whew! That was a lot to cover. There were quite a few classes to do all the work of
converting Word documents to acceptable (both in terms of appearance and size) HTML
documents. So you can test how this works, the source code files accompanying this
document include the source Word documents for all of my FoxTalk articles from 2000, a
CSS file to make the HTML look nice, customized SAR.DBF and PROCESS.DBF, and
some classes in FOXTALK.VCX to do additional processing (for example, images in the
source documents are neither linked nor embedded, but instead referenced by publisher
directives, so FixFoxTalkImages replaces these directives with the appropriate <IMG>
tags).
To run the process, unzip the source code file so that directory structures are preserved,
and DO FOXTALKMAIN.PRG in the FoxTalk directory (it just calls PROCESS.PRG in
the Process directory, passing the appropriate parameters). It’ll process the Word
documents in the WordDocs subdirectory and when all the processing is done, you’ll find
HTMLDocs and HTMLHelp subdirectories. HTMLDocs contains the initial files
generated from Word (check them out in Notepad to see all the stuff Word inserted) and
HTMLHelp contains the final files (including image and CSS files). Compare the sizes of
the files in HTMLDocs and HTMLHelp and view them in your browser to see how the
appearance was changed as well.
Step 2: Generating the CHM
While looking at the processes to create a CHM file, we’ll discuss the various files used
to create the CHM file. We’ll only look at certain things and not all of the options
available. For detailed information on CHM files, download the HTML Help
documentation from the MSDN Web site (go to http://msdn.microsoft.com, search for
“HTML Help”, select the Microsoft HTML Help Downloads page from the list of
matches, and select the HTML Help Authoring Guide on that page).
There are only two components to the tools we’ll look at for this step:
CREATECHM.PRG, which does the work, and CONTENTS.DBF, which defines how to
generate the CHM file. Before we examine CREATECHM.PRG, let’s look at
CONTENTS.DBF.
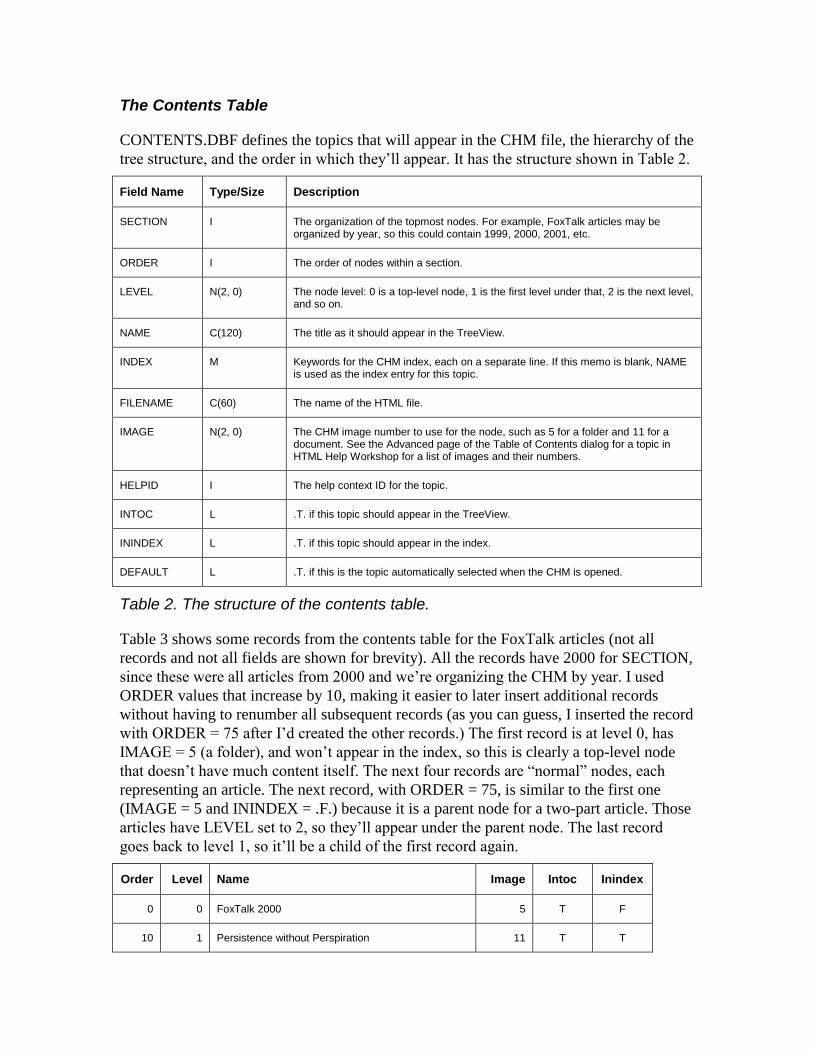
The Contents Table
CONTENTS.DBF defines the topics that will appear in the CHM file, the hierarchy of the
tree structure, and the order in which they’ll appear. It has the structure shown in Table 2.
Field Name Type/Size Description
SECTION I The organization of the topmost nodes. For example, FoxTalk articles may be organized by year, so this could contain 1999, 2000, 2001, etc.
ORDER I The order of nodes within a section.
LEVEL N(2, 0) The node level: 0 is a top-level node, 1 is the first level under that, 2 is the next level, and so on.
NAME C(120) The title as it should appear in the TreeView.
INDEX M Keywords for the CHM index, each on a separate line. If this memo is blank, NAME is used as the index entry for this topic.
FILENAME C(60) The name of the HTML file.
IMAGE N(2, 0) The CHM image number to use for the node, such as 5 for a folder and 11 for a document. See the Advanced page of the Table of Contents dialog for a topic in HTML Help Workshop for a list of images and their numbers.
HELPID I The help context ID for the topic.
INTOC L .T. if this topic should appear in the TreeView.
ININDEX L .T. if this topic should appear in the index.
DEFAULT L .T. if this is the topic automatically selected when the CHM is opened.
Table 2. The structure of the contents table.
Table 3 shows some records from the contents table for the FoxTalk articles (not all
records and not all fields are shown for brevity). All the records have 2000 for SECTION,
since these were all articles from 2000 and we’re organizing the CHM by year. I used
ORDER values that increase by 10, making it easier to later insert additional records
without having to renumber all subsequent records (as you can guess, I inserted the record
with ORDER = 75 after I’d created the other records.) The first record is at level 0, has
IMAGE = 5 (a folder), and won’t appear in the index, so this is clearly a top-level node
that doesn’t have much content itself. The next four records are “normal” nodes, each
representing an article. The next record, with ORDER = 75, is similar to the first one
(IMAGE = 5 and ININDEX = .F.) because it is a parent node for a two-part article. Those
articles have LEVEL set to 2, so they’ll appear under the parent node. The last record
goes back to level 1, so it’ll be a child of the first record again.
Order Level Name Image Intoc Inindex
0 0 FoxTalk 2000 5 T F
10 1 Persistence without Perspiration 11 T T
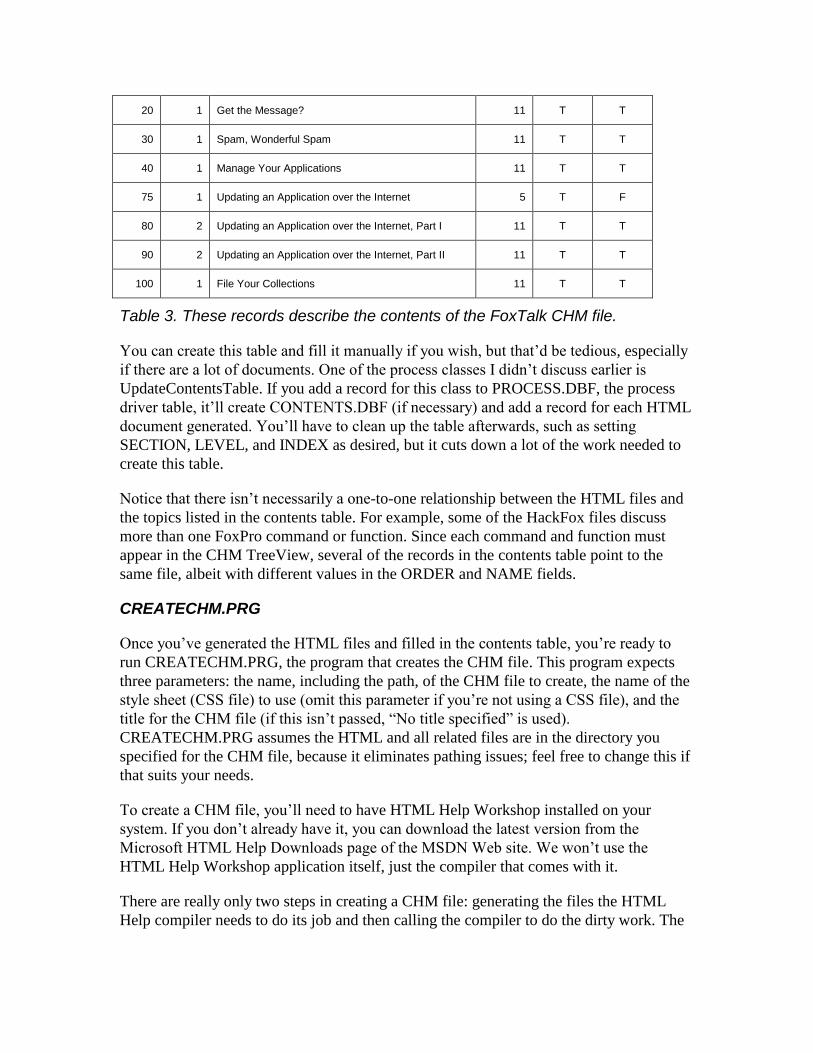
20 1 Get the Message? 11 T T
30 1 Spam, Wonderful Spam 11 T T
40 1 Manage Your Applications 11 T T
75 1 Updating an Application over the Internet 5 T F
80 2 Updating an Application over the Internet, Part I 11 T T
90 2 Updating an Application over the Internet, Part II 11 T T
100 1 File Your Collections 11 T T
Table 3. These records describe the contents of the FoxTalk CHM file.
You can create this table and fill it manually if you wish, but that’d be tedious, especially
if there are a lot of documents. One of the process classes I didn’t discuss earlier is
UpdateContentsTable. If you add a record for this class to PROCESS.DBF, the process
driver table, it’ll create CONTENTS.DBF (if necessary) and add a record for each HTML
document generated. You’ll have to clean up the table afterwards, such as setting
SECTION, LEVEL, and INDEX as desired, but it cuts down a lot of the work needed to
create this table.
Notice that there isn’t necessarily a one-to-one relationship between the HTML files and
the topics listed in the contents table. For example, some of the HackFox files discuss
more than one FoxPro command or function. Since each command and function must
appear in the CHM TreeView, several of the records in the contents table point to the
same file, albeit with different values in the ORDER and NAME fields.
CREATECHM.PRG
Once you’ve generated the HTML files and filled in the contents table, you’re ready to
run CREATECHM.PRG, the program that creates the CHM file. This program expects
three parameters: the name, including the path, of the CHM file to create, the name of the
style sheet (CSS file) to use (omit this parameter if you’re not using a CSS file), and the
title for the CHM file (if this isn’t passed, “No title specified” is used).
CREATECHM.PRG assumes the HTML and all related files are in the directory you
specified for the CHM file, because it eliminates pathing issues; feel free to change this if
that suits your needs.
To create a CHM file, you’ll need to have HTML Help Workshop installed on your
system. If you don’t already have it, you can download the latest version from the
Microsoft HTML Help Downloads page of the MSDN Web site. We won’t use the
HTML Help Workshop application itself, just the compiler that comes with it.
There are really only two steps in creating a CHM file: generating the files the HTML
Help compiler needs to do its job and then calling the compiler to do the dirty work. The
compiler needs at least four control files: a project file, an include file, a contents file, and
an index file.
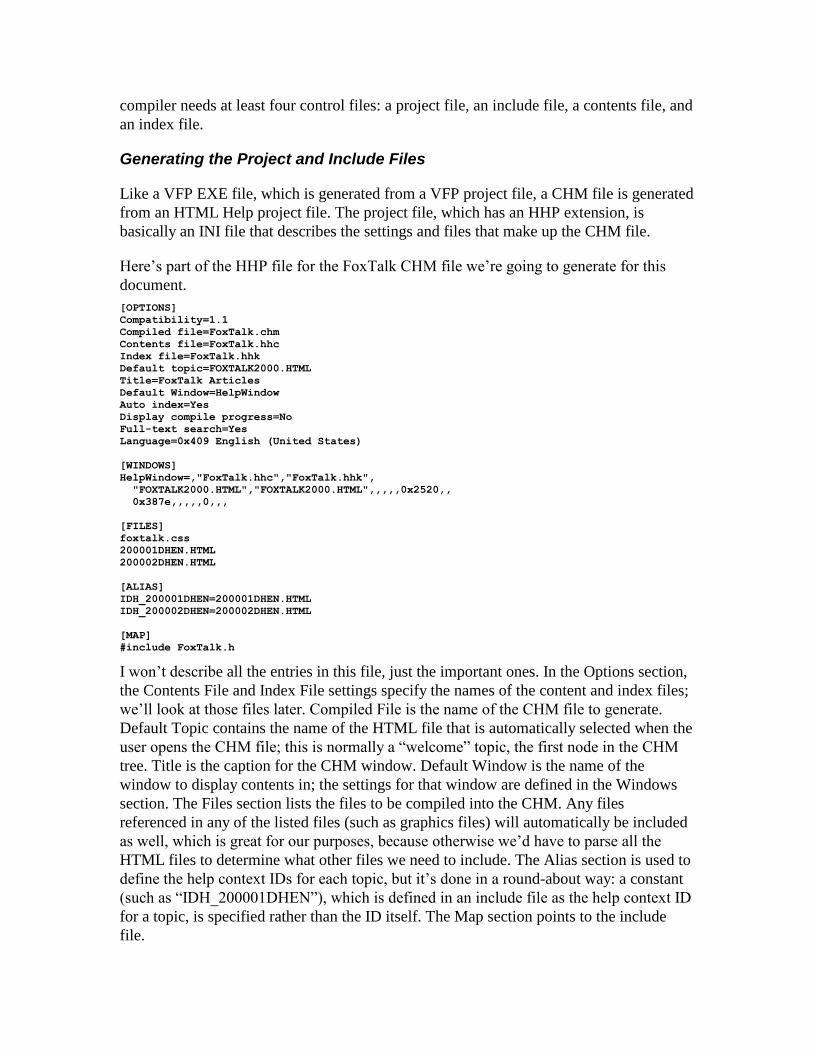
Generating the Project and Include Files
Like a VFP EXE file, which is generated from a VFP project file, a CHM file is generated
from an HTML Help project file. The project file, which has an HHP extension, is
basically an INI file that describes the settings and files that make up the CHM file.
Here’s part of the HHP file for the FoxTalk CHM file we’re going to generate for this
document.
[OPTIONS]
Compatibility=1.1
Compiled file=FoxTalk.chm
Contents file=FoxTalk.hhc
Index file=FoxTalk.hhk
Default topic=FOXTALK2000.HTML
Title=FoxTalk Articles
Default Window=HelpWindow
Auto index=Yes
Display compile progress=No
Full-text search=Yes
Language=0x409 English (United States)
[WINDOWS]
HelpWindow=,"FoxTalk.hhc","FoxTalk.hhk",
"FOXTALK2000.HTML","FOXTALK2000.HTML",,,,,0x2520,,
0x387e,,,,,0,,,
[FILES]
foxtalk.css
200001DHEN.HTML
200002DHEN.HTML
[ALIAS]
IDH_200001DHEN=200001DHEN.HTML
IDH_200002DHEN=200002DHEN.HTML
[MAP]
#include FoxTalk.h
I won’t describe all the entries in this file, just the important ones. In the Options section,
the Contents File and Index File settings specify the names of the content and index files;
we’ll look at those files later. Compiled File is the name of the CHM file to generate.
Default Topic contains the name of the HTML file that is automatically selected when the
user opens the CHM file; this is normally a “welcome” topic, the first node in the CHM
tree. Title is the caption for the CHM window. Default Window is the name of the
window to display contents in; the settings for that window are defined in the Windows
section. The Files section lists the files to be compiled into the CHM. Any files
referenced in any of the listed files (such as graphics files) will automatically be included
as well, which is great for our purposes, because otherwise we’d have to parse all the
HTML files to determine what other files we need to include. The Alias section is used to
define the help context IDs for each topic, but it’s done in a round-about way: a constant
(such as “IDH_200001DHEN”), which is defined in an include file as the help context ID
for a topic, is specified rather than the ID itself. The Map section points to the include
file.
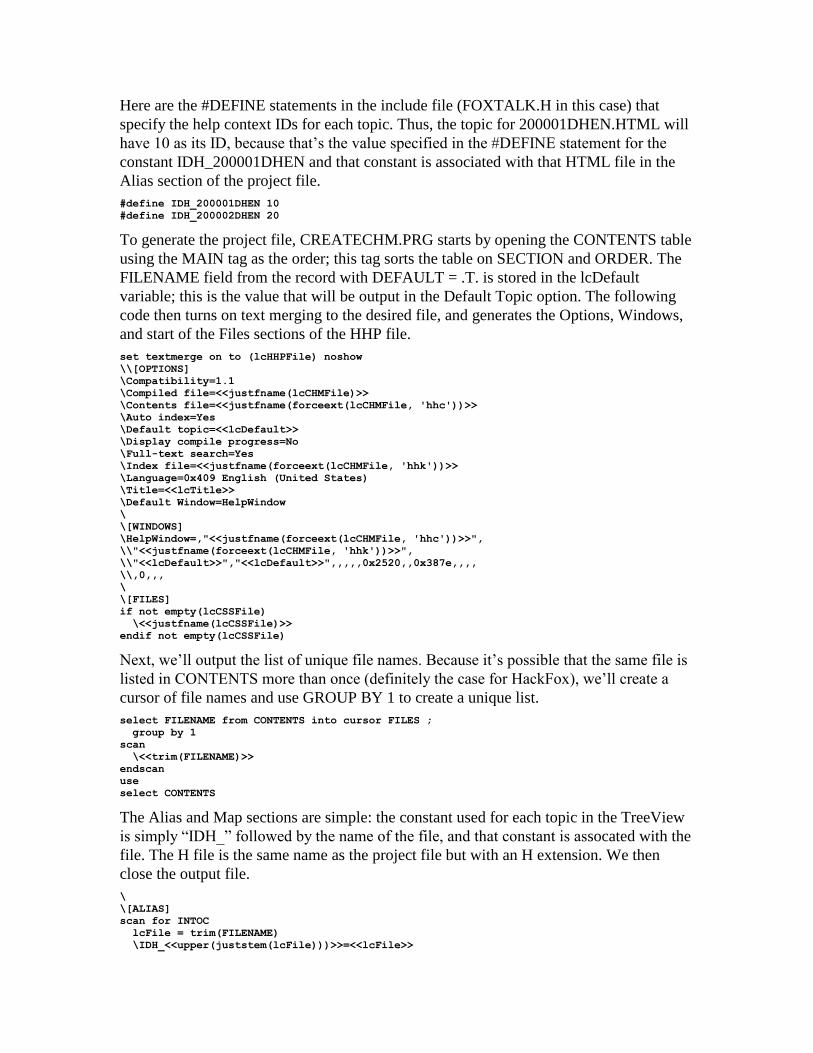
Here are the #DEFINE statements in the include file (FOXTALK.H in this case) that
specify the help context IDs for each topic. Thus, the topic for 200001DHEN.HTML will
have 10 as its ID, because that’s the value specified in the #DEFINE statement for the
constant IDH_200001DHEN and that constant is associated with that HTML file in the
Alias section of the project file.
#define IDH_200001DHEN 10
#define IDH_200002DHEN 20
To generate the project file, CREATECHM.PRG starts by opening the CONTENTS table
using the MAIN tag as the order; this tag sorts the table on SECTION and ORDER. The
FILENAME field from the record with DEFAULT = .T. is stored in the lcDefault
variable; this is the value that will be output in the Default Topic option. The following
code then turns on text merging to the desired file, and generates the Options, Windows,
and start of the Files sections of the HHP file.
set textmerge on to (lcHHPFile) noshow
\\[OPTIONS]
\Compatibility=1.1
\Compiled file=<<justfname(lcCHMFile)>>
\Contents file=<<justfname(forceext(lcCHMFile, 'hhc'))>>
\Auto index=Yes
\Default topic=<<lcDefault>>
\Display compile progress=No
\Full-text search=Yes
\Index file=<<justfname(forceext(lcCHMFile, 'hhk'))>>
\Language=0x409 English (United States)
\Title=<<lcTitle>>
\Default Window=HelpWindow
\
\[WINDOWS]
\HelpWindow=,"<<justfname(forceext(lcCHMFile, 'hhc'))>>",
\\"<<justfname(forceext(lcCHMFile, 'hhk'))>>",
\\"<<lcDefault>>","<<lcDefault>>",,,,,0x2520,,0x387e,,,,
\\,0,,,
\
\[FILES]
if not empty(lcCSSFile)
\<<justfname(lcCSSFile)>>
endif not empty(lcCSSFile)
Next, we’ll output the list of unique file names. Because it’s possible that the same file is
listed in CONTENTS more than once (definitely the case for HackFox), we’ll create a
cursor of file names and use GROUP BY 1 to create a unique list.
select FILENAME from CONTENTS into cursor FILES ;
group by 1
scan
\<<trim(FILENAME)>>
endscan
use
select CONTENTS
The Alias and Map sections are simple: the constant used for each topic in the TreeView
is simply “IDH_” followed by the name of the file, and that constant is assocated with the
file. The H file is the same name as the project file but with an H extension. We then
close the output file.
\
\[ALIAS]
scan for INTOC
lcFile = trim(FILENAME)
\IDH_<<upper(juststem(lcFile)))>>=<<lcFile>>
endscan for INTOC
\
\[MAP]
\#include <<justfname(lcHFile)>>
set textmerge to
The code to generate the include file is very simple: start text merging, output the
#DEFINE statement for each topic that specifies the constant and the help context ID, and
close the file.
set textmerge on to (lcHFile) noshow
scan for INTOC
lcFile = trim(FILENAME)
\\#define IDH_<<upper(juststem(lcFile)))>> <<HELPID>>
\
endscan for INTOC
set textmerge to
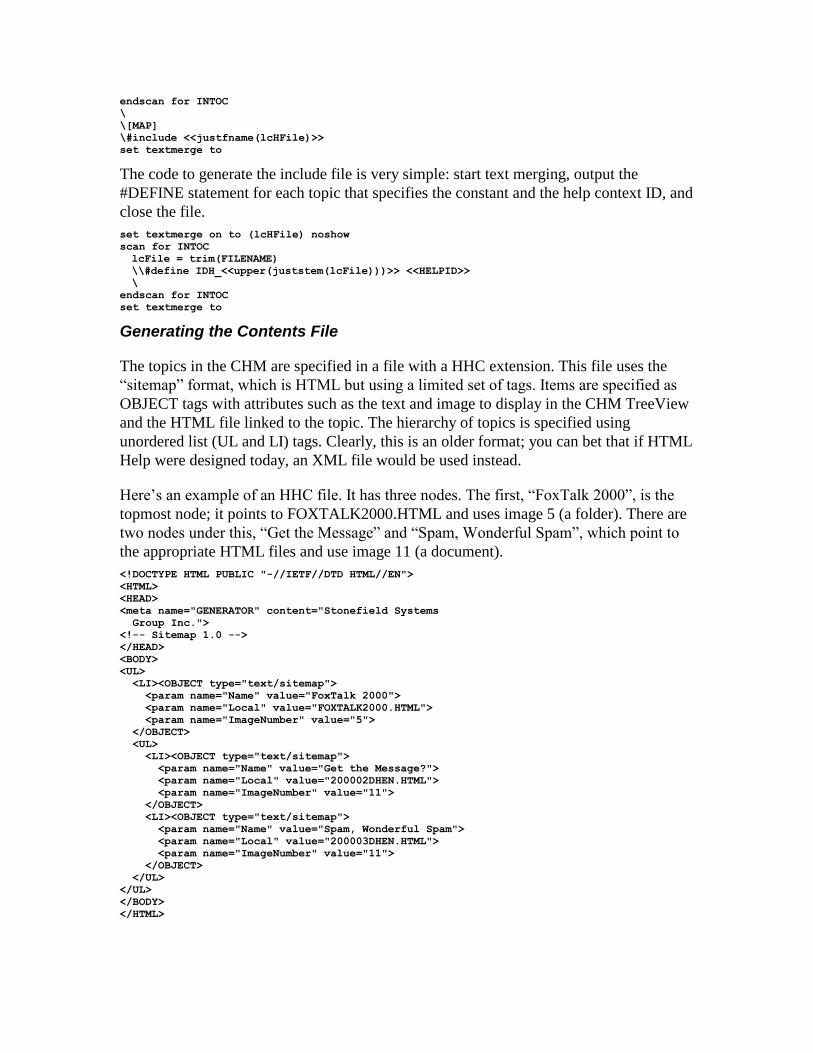
Generating the Contents File
The topics in the CHM are specified in a file with a HHC extension. This file uses the
“sitemap” format, which is HTML but using a limited set of tags. Items are specified as
OBJECT tags with attributes such as the text and image to display in the CHM TreeView
and the HTML file linked to the topic. The hierarchy of topics is specified using
unordered list (UL and LI) tags. Clearly, this is an older format; you can bet that if HTML
Help were designed today, an XML file would be used instead.
Here’s an example of an HHC file. It has three nodes. The first, “FoxTalk 2000”, is the
topmost node; it points to FOXTALK2000.HTML and uses image 5 (a folder). There are
two nodes under this, “Get the Message” and “Spam, Wonderful Spam”, which point to
the appropriate HTML files and use image 11 (a document).
<!DOCTYPE HTML PUBLIC "-//IETF//DTD HTML//EN">
<HTML>
<HEAD>
<meta name="GENERATOR" content="Stonefield Systems
Group Inc.">
<!-- Sitemap 1.0 -->
</HEAD>
<BODY>
<UL>
<LI><OBJECT type="text/sitemap">
<param name="Name" value="FoxTalk 2000">
<param name="Local" value="FOXTALK2000.HTML">
<param name="ImageNumber" value="5">
</OBJECT>
<UL>
<LI><OBJECT type="text/sitemap">
<param name="Name" value="Get the Message?">
<param name="Local" value="200002DHEN.HTML">
<param name="ImageNumber" value="11">
</OBJECT>
<LI><OBJECT type="text/sitemap">
<param name="Name" value="Spam, Wonderful Spam">
<param name="Local" value="200003DHEN.HTML">
<param name="ImageNumber" value="11">
</OBJECT>
</UL>
</UL>
</BODY>
</HTML>
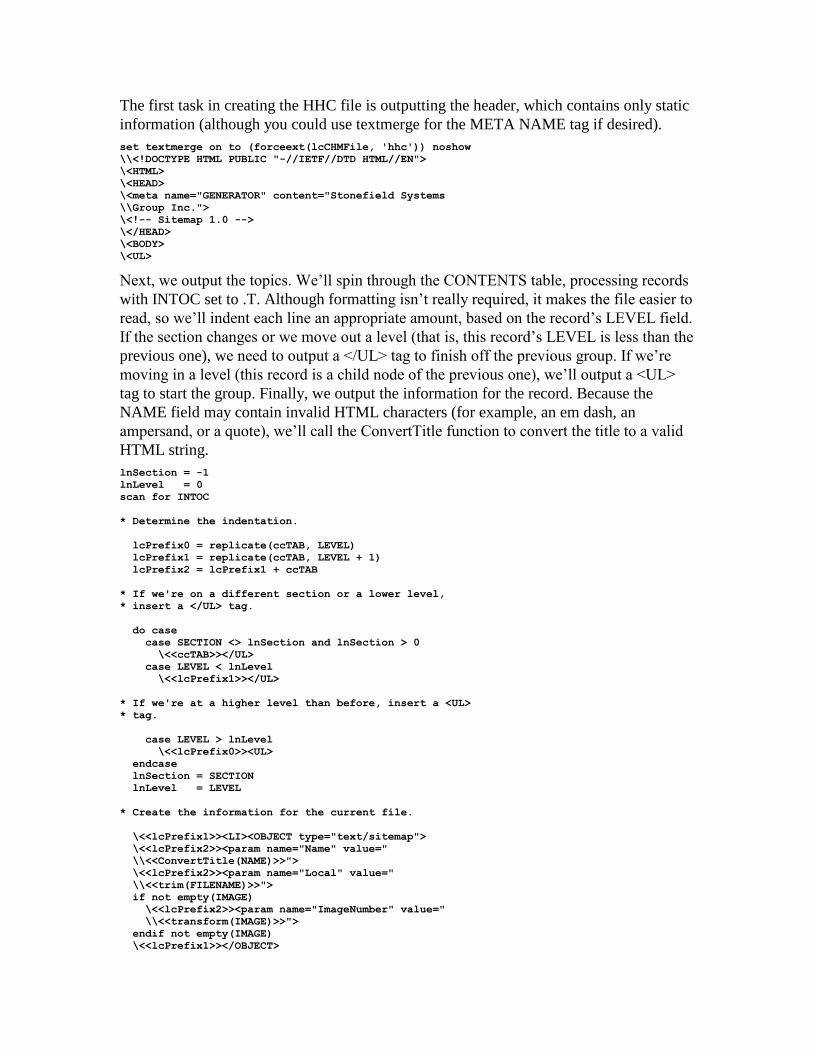
The first task in creating the HHC file is outputting the header, which contains only static
information (although you could use textmerge for the META NAME tag if desired).
set textmerge on to (forceext(lcCHMFile, 'hhc')) noshow
\\<!DOCTYPE HTML PUBLIC "-//IETF//DTD HTML//EN">
\<HTML>
\<HEAD>
\<meta name="GENERATOR" content="Stonefield Systems
\\Group Inc.">
\<!-- Sitemap 1.0 -->
\</HEAD>
\<BODY>
\<UL>
Next, we output the topics. We’ll spin through the CONTENTS table, processing records
with INTOC set to .T. Although formatting isn’t really required, it makes the file easier to
read, so we’ll indent each line an appropriate amount, based on the record’s LEVEL field.
If the section changes or we move out a level (that is, this record’s LEVEL is less than the
previous one), we need to output a </UL> tag to finish off the previous group. If we’re
moving in a level (this record is a child node of the previous one), we’ll output a <UL>
tag to start the group. Finally, we output the information for the record. Because the
NAME field may contain invalid HTML characters (for example, an em dash, an
ampersand, or a quote), we’ll call the ConvertTitle function to convert the title to a valid
HTML string.
lnSection = -1
lnLevel = 0
scan for INTOC
* Determine the indentation.
lcPrefix0 = replicate(ccTAB, LEVEL)
lcPrefix1 = replicate(ccTAB, LEVEL + 1)
lcPrefix2 = lcPrefix1 + ccTAB
* If we're on a different section or a lower level,
* insert a </UL> tag.
do case
case SECTION <> lnSection and lnSection > 0
\<<ccTAB>></UL>
case LEVEL < lnLevel
\<<lcPrefix1>></UL>
* If we're at a higher level than before, insert a <UL>
* tag.
case LEVEL > lnLevel
\<<lcPrefix0>><UL>
endcase
lnSection = SECTION
lnLevel = LEVEL
* Create the information for the current file.
\<<lcPrefix1>><LI><OBJECT type="text/sitemap">
\<<lcPrefix2>><param name="Name" value="
\\<<ConvertTitle(NAME)>>">
\<<lcPrefix2>><param name="Local" value="
\\<<trim(FILENAME)>>">
if not empty(IMAGE)
\<<lcPrefix2>><param name="ImageNumber" value="
\\<<transform(IMAGE)>>">
endif not empty(IMAGE)
\<<lcPrefix1>></OBJECT>
endscan for INTOC
The last step is to output the closing tags and close the HHC file.
\<<ccTAB>></UL>
\</UL>
\</BODY>
\</HTML>
\
set textmerge to
Here’s the code for the ConvertTitle function. It uses STRTRAN() to convert invalid
HTML characters to their valid equivalents (for example, “&” is converted to “&”).
This routine doesn’t handle all such characters, only the specific ones I’ve used in the
titles of documents I’ve written. Be sure to modify this routine as necessary for your
titles.
function ConvertTitle(tcTitle)
local lcTitle
lcTitle = strtran(trim(tcTitle), '&', '&')
lcTitle = strtran(lcTitle, '"', '"')
lcTitle = strtran(lcTitle, chr(151), '--')
return lcTitle
Generating the Index File
The keywords for the CHM file index are specified in an HHK file. Like the contents file,
this file is in “sitemap” format. Each keyword is specified in an OBJECT tag, with
attributes that indicate the keyword and the HTML file linked to it.
Here’s an example of an HHK file. Notice that the structure is simpler than that of an
HHC file; there are no hierarchies. Notice also that there are two, identical, PARAM
NAME = “Name” tags for each entry. Although only one is required to generate a CHM
file, it looks cleaner in HTML Help Workshop if both appear; without the second one,
you’ll see “Untitled” in the entry for that keyword. There are four index entries in this
file. The first two point to the same file, 200001DHEN.HTML. The last two point to
different files, but they have the same index keyword, so when you select this keyword in
the CHM file, a dialog will appear listing the titles of the two documents so you can
select one.
<!DOCTYPE HTML PUBLIC "-//IETF//DTD HTML//EN">
<HTML>
<HEAD>
<meta name="GENERATOR" content="Stonefield Systems
Group Inc.">
<!-- Sitemap 1.0 -->
</HEAD>
<BODY>
<UL>
<LI><OBJECT type="text/sitemap">
<param name="Name" value="persist">
<param name="Name" value="persist">
<param name="Local" value="200001DHEN.HTML">
</OBJECT>
<LI><OBJECT type="text/sitemap">
<param name="Name" value="form position">
<param name="Name" value="form position">
<param name="Local" value="200001DHEN.HTML">
</OBJECT>
<LI><OBJECT type="text/sitemap">
<param name="Name" value="email">
<param name="Name" value="email">
<param name="Local" value="200002DHEN.HTML">
</OBJECT>
<LI><OBJECT type="text/sitemap">
<param name="Name" value="email">
<param name="Name" value="email">
<param name="Local" value="200003DHEN.HTML">
</OBJECT>
</UL>
</BODY>
</HTML>
The first task in creating the HHK file is outputting the header. Except for the name of the
file we’re outputting to, this code is identical to that for the HHC file, so I won’t bother
showing it.
Next, we output the index information. We’ll only process records in the CONTENTS
table that should appear in the index (ININDEX is .T.). If the INDEX memo field is
empty, we’ll use the topic title as the index entry. Otherwise, we’ll use each of the
keywords in INDEX. For each index entry, we’ll output the keyword (using ConvertTitle
to ensure it’s a valid HTML string) and the file it links to.
scan for ININDEX
lcFile = trim(FILENAME)
if empty(INDEX)
lnTopics = 1
dimension laTopics[1]
laTopics[1] = trim(NAME)
else
lnTopics = alines(laTopics, INDEX)
endif empty(INDEX)
lcPrefix1 = ccTAB
lcPrefix2 = ccTAB + ccTAB
for lnI = 1 to lnTopics
lcKeyword = ConvertTitle(laTopics[lnI])
\<<lcPrefix1>><LI><OBJECT type="text/sitemap">
\<<lcPrefix2>><param name="Name" value="
\\<<lcKeyword>>">
\<<lcPrefix2>><param name="Name" value="
\\<<lcKeyword>>">
\<<lcPrefix2>><param name="Local" value="
\\<<lcFile>>">
\<<lcPrefix1>></OBJECT>
next lnI
endscan for ININDEX
Finally, we’ll output the closing tags and close the HHK file; I won’t show this code since
it’s very similar to that for the HHC file.
Compiling the CHM File
Now that we have the HTML Help project files created, generating the CHM file is easy:
we simply run the HTML Help Workshop compiler, HHC.EXE, and pass it the name of
the HHP file. Rather than hard-coding the location of the EXE, we’ll read the location of
HTML Help Workshop from the Windows Registry using the Registry class that comes
with VFP. We’ll have the compiler send any messages to a log file, LOG.TXT, so we can
review it after the compilation is done. One issue: unless you’ve changed it, the
FOXRUN file in the VFP home directory, which tells VFP what to do when it encounters
the RUN command, points to COMMAND.COM. Since that command interpreter can’t
handle long file names, we’ll need to convert long names to short (DOS 8.3 style) file
names. The ShortPath function, which uses the GetShortPathName Windows API
function, takes care of that. After calling the HTML Help Compiler, we’ll display the
CHM file using the ShellExecute Windows API function.
loRegistry = newobject('Registry', ;
home() + 'FFC\Registry.vcx')
lcPath = ''
llGotPath = loRegistry.GetRegKey('Path', @lcPath, ;
'Software\Microsoft\Windows\CurrentVersion\' + ;
'App Paths\hhw.exe', HKEY_LOCAL_MACHINE) = 0
if llGotPath
lcPath = ShortPath(forcepath('hhc.exe', lcPath))
erase log.txt
run &lcPath &lcHHPFile > log.txt
if file('log.txt')
modify file log.txt nowait
else
erase log.txt
endif file('log.txt')
else
messagebox('Cannot locate HTML Help Workshop')
endif llGotPath
* Display the CHM file if it was created.
if file(lcCHMFile)
declare integer ShellExecute in SHELL32.DLL ;
integer nWinHandle, string cOperation, ;
string cFileName, string cParameters, ;
string cDirectory, integer nShowWindow
ShellExecute(0, 'Open', lcCHMFile, '', '', 1)
endif file(lcCHMFile)
Here’s the code for the ShortPath function:
function ShortPath(tcPath)
local lcPath, ;
lnLength, ;
lcBuffer, ;
lnResult
declare integer GetShortPathName in Win32API ;
string @lpszLongPath, string @lpszShortPath, ;
integer cchBuffer
lcPath = tcPath
lnLength = 260
lcBuffer = space(lnLength)
lnResult = GetShortPathName(@lcPath, @lcBuffer, lnLength)
return iif(lnResult = 0, '', left(lcBuffer, lnResult))
Check it Out
To generate a CHM file containing my FoxTalk articles from 2000, run
FOXTALKMAIN.PRG. It will first generate the HTML files from the Word documents
(you can comment out this line if you’ve already done that step) and then create the CHM
file and open it. Look at the Contents page to see how it’s organized; it should match the
layout described in the contents table. Notice the keywords listed in the Index page; they
came from the INDEX memo in the contents table. Try searching for a keyword, such as
“email”.
Summary
Generating a CHM file from a set of Word documents is easy, although it does require
some setup work on your part. You have to decide what processes to apply to the Word
documents when the HTML files are generated and you have to fill in the contents table
so these utilities know how to generate the CHM file. However, once that’s done, it only
take a few moments to do the actual work. Enjoy!
Doug Hennig is a partner with Stonefield Systems Group Inc. He is the author of the award-winning Stonefield
Database Toolkit (SDT), co-author of Stonefield Query, co-author of “What’s New in Visual FoxPro 7.0” and “The
Hacker’s Guide to Visual FoxPro 7.0”, both from Hentzenwerke Publishing, and author of “The Visual FoxPro Data
Dictionary” in Pinnacle Publishing’s Pros Talk Visual FoxPro series. He was the technical editor of “The Hacker’s
Guide to Visual FoxPro 6.0” and “The Fundamentals”, both from Hentzenwerke Publishing. He also writes a monthly
column, “Resuable Tools”, in FoxTalk. Doug has spoken at every Microsoft FoxPro Developers Conference (DevCon)
since 1997 and at user groups and developer conferences all over North America. He is a Microsoft Most Valuable
Professional (MVP) and Certified Professional (MCP). Web: www.stonefield.com and www.stonefieldquery.com.
Email: [email protected]