Embed Size (px)
Citation preview
Using the Intel® Software License Manager
User's Guide
Copyright © 2002–2012 Intel Corporation
All Rights Reserved
Document Number: 251879-014US
Revision: 2.1
World Wide Web: http://www.intel.com/
Document Number: 251879-014US

Using the Intel® Software License Manager
2 Document Number: 251879-014US
Legal Information INFORMATION IN THIS DOCUMENT IS PROVIDED IN CONNECTION WITH INTEL(R) PRODUCTS. NO LICENSE, EXPRESS OR IMPLIED, BY ESTOPPEL OR OTHERWISE, TO ANY INTELLECTUAL PROPERTY RIGHTS IS GRANTED BY THIS DOCUMENT. EXCEPT AS PROVIDED IN INTEL'S TERMS AND CONDITIONS OF SALE FOR SUCH PRODUCTS, INTEL ASSUMES NO LIABILITY WHATSOEVER, AND INTEL DISCLAIMS ANY EXPRESS OR IMPLIED WARRANTY, RELATING TO SALE AND/OR USE OF INTEL PRODUCTS INCLUDING LIABILITY OR WARRANTIES RELATING TO FITNESS FOR A PARTICULAR PURPOSE, MERCHANTABILITY, OR INFRINGEMENT OF ANY PATENT, COPYRIGHT OR OTHER INTELLECTUAL PROPERTY RIGHT. UNLESS OTHERWISE AGREED IN WRITING BY INTEL, THE INTEL PRODUCTS ARE NOT DESIGNED NOR INTENDED FOR ANY APPLICATION IN WHICH THE FAILURE OF THE INTEL PRODUCT COULD CREATE A SITUATION WHERE PERSONAL INJURY OR DEATH MAY OCCUR. Intel may make changes to specifications and product descriptions at any time, without notice. Designers must not rely on the absence or characteristics of any features or instructions marked "reserved" or "undefined." Intel reserves these for future definition and shall have no responsibility whatsoever for conflicts or incompatibilities arising from future changes to them. The information here is subject to change without notice. Do not finalize a design with this information. The products described in this document may contain design defects or errors known as errata which may cause the product to deviate from published specifications. Current characterized errata are available on request. Contact your local Intel sales office or your distributor to obtain the latest specifications and before placing your product order. Copies of documents which have an order number and are referenced in this document, or other Intel literature, may be obtained by calling 1-800-548-4725, or by visiting Intel's Web Site (http://www.intel.com/). Intel processor numbers are not a measure of performance. Processor numbers differentiate features within each processor family, not across different processor families. See http://www.intel.com/products/processor_number for details. Intel, Intel logo, Itanium, and VTune are trademarks of Intel Corporation in the U.S. and other countries. * Other names and brands may be claimed as the property of others. Copyright (C) 2002-2012, Intel Corporation. All rights reserved.
About this Guide
User's Guide 3
Contents
1 About this Guide ........................................................................................................... 5
1.1 Related Publications........................................................................................ 5
1.2 Conventions and Symbols ............................................................................ 6
2 About the Intel® Software License Manager .................................................... 7
2.1 Supported Platforms ....................................................................................... 7
2.2 License Types .................................................................................................... 8
2.2.1 Node-Locked License Configuration .......................................... 9
2.2.2 Floating License Configuration .................................................... 9
2.2.3 Sample License File ....................................................................... 10
2.3 Technical Support .......................................................................................... 10
3 Installing the Intel® Software License Manager ........................................... 12
3.1 Identifying the Host Name and Host ID ............................................... 12
3.1.1 Microsoft Windows* ...................................................................... 12
3.1.2 Linux* ................................................................................................. 13
3.1.3 OS X* on Intel® Architecture ................................................... 13
3.2 Registering Your Product Serial Number .............................................. 14
3.3 Changing Server/Host Data for Your Product License .................... 15
3.4 Redundant License Host Servers ............................................................. 16
3.5 Downloads and Installs ............................................................................... 17
3.5.1 Product File Downloads ................................................................ 17
3.5.2 Intel® Software License Manager downloads .................... 17
3.5.3 Starting the Intel® Software License Manager on
Windows ............................................................................................ 18
3.5.4 Installing the Intel® Software License Manager on
Linux* and OS X* .......................................................................... 19
3.5.5 Starting the Intel® Software License Manager automatically on Linux* after reboot ..................................... 19
3.5.6 Verifying the Intel® Software License Manager on Linux* and OS X* .......................................................................... 20
3.5.7 Compatible Versions of Intel® Software License Manager and Vendor Daemons ................................................................... 20
3.5.8 Shutting Down or Removing the Intel® Software License
Manager on Linux* and OS X* ................................................. 20
4 Using the Client Application for the First Time ............................................... 21
4.1 Installing the Client Application ............................................................... 21
Using the Intel® Software License Manager
4 Document Number: 251879-014US
4.2 Setting the INTEL_LICENSE_FILE Environment Variable............... 22
4.2.1 Counted Licenses and Alternatives ......................................... 23
4.2.2 How to Specify Ports for License Servers ............................. 23
4.3 Combining Multiple License Files ............................................................. 24
4.3.1 Criteria for Combining License Files ....................................... 24
4.3.2 Instructions for Combining License Files .............................. 24
4.3.3 Examples ........................................................................................... 26
4.4 License Seat Check-out and Check-in ................................................... 29
4.4.1 License Seat Allocation Overview ............................................ 29
4.4.2 Allocation status ............................................................................. 30
5 Troubleshooting .......................................................................................................... 31
5.1 Where to Start ................................................................................................ 31
5.2 Creating Debug Logs for License Checkout Issues ........................... 31
5.3 Information Needed for Support Requests .......................................... 33
5.3.1 Client Information .......................................................................... 33
5.3.2 Intel Software License Manager Information ...................... 33
5.4 Common Issues .............................................................................................. 34
5.4.1 License Checkout Failing Due to Terminal Server Client or Remote Desktop Connection on Windows* .................... 34
5.4.2 Client and Server Not Able to Connect Due to Windows Firewall ............................................................................................... 34
6 Checklist for Intel® Software License Manager Server/Client
Installation .................................................................................................................... 36
6.1 License Host Server System Checklist .................................................. 36
6.2 Client Systems Checklist ............................................................................ 39
7 Appendices .................................................................................................................... 41
7.1 Appendix A: Latest Revision of User’s Guide ...................................... 41
7.2 Appendix B: Troubleshooting Guide ....................................................... 42

About this Guide
User's Guide 5
1 About this Guide This guide helps you get started using the Intel® Software License Manager with your Intel® Software Development Product. This guide contains the following chapters and appendices:
1: About This Guide – Describes the contents of this guide, related publications, and conventions used in this guide. 2: About the Intel® Software License Manager – Describes the supported platforms, license types, and how to obtain technical support. 3: Installing the Intel® Software License Manager – Describes the necessary steps in identifying host name and host id, registering your product serial number, downloading and installing the product, using the product for the first time and troubleshooting. 4: Using the Client Application for the First Time – Describes how to set up the client application and use it for the first time. 5: Troubleshooting – Explains how to create a debug log, how to open a support request, and addresses common issues and how to fix them. 6: Checklist – Order of steps for Intel® Software License Manager server/client installation. Appendices – Contains flowcharts showing troubleshooting steps.
1.1 Related Publications For information on FLEXlm* and FlexNet* software created by Flexera Software, see http://www.flexerasoftware.com. For information on Intel® Software Development
Products, see http://developer.intel.com/software/products. More information about Intel® Software Development Product licenses and their usage is available in the knowledgebase at http://software.intel.com/en-us/articles/intel-
software-development-products-download-registration-licensing-kb-home/.
Using the Intel® Software License Manager
6 Document Number: 251879-014US
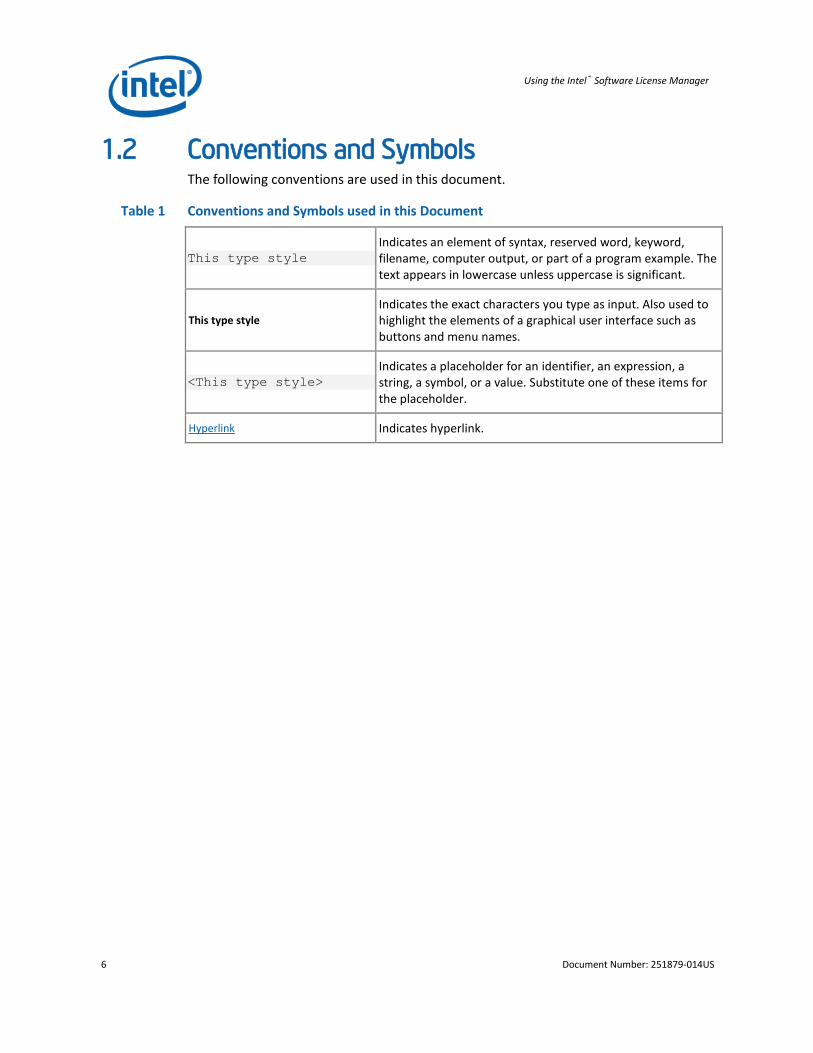
1.2 Conventions and Symbols The following conventions are used in this document.
Table 1 Conventions and Symbols used in this Document
This type style
Indicates an element of syntax, reserved word, keyword, filename, computer output, or part of a program example. The text appears in lowercase unless uppercase is significant.
This type style
Indicates the exact characters you type as input. Also used to highlight the elements of a graphical user interface such as buttons and menu names.
<This type style>
Indicates a placeholder for an identifier, an expression, a string, a symbol, or a value. Substitute one of these items for the placeholder.
Hyperlink Indicates hyperlink.
About the Intel® Software License Manager
User's Guide 7
2 About the Intel® Software License
Manager The Intel® Software License Manager is a collection of software components that helps you manage your license file in a multiple-user environment. Before you can use Intel® Software Development Products, you must have the correct license installed for the Intel products. The Intel® Software License Manager can be downloaded separately from your product if you purchased a floating or counted node-locked license. This document describes the installation and use of the Intel® Software License Manager for supported platforms.
Counting and controlling the number of concurrent users of a software product is the primary function of the Intel® Software License Manager. You only need the Intel® Software License Manager when you have a floating or counted node-locked license (see License Types). For other license types, you need to install the license file, but not the Intel® Software License Manager. See your product documentation for more information on installing the license file.
2.1 Supported Platforms The Intel® Software License Manager is supported on the following platforms:
Microsoft Windows* for IA-32, Intel® 64, and IA-64 architectures
Linux* IA-32 and Intel® 64 LSB (Linux Standards Based) compliant architectures
Linux* IA-64 architecture on Red Hat* Enterprise Linux* 4
OS X* IA-32 and Intel® 64 architectures
More information about downloading the Intel® Software License Manager license server that best matches your license host server OS can be found in the Intel®
Software License Manager downloads section of this guide.
NOTE: The minimum LSB 3 requirement for installing and using the Intel® Software License Manager is that the shared object ld-lsb.so.3 (32-bit systems) or ld-lsb-x86-64.so.3 (64-bit systems) is located in /lib (32-bit) or /lib64 (64-bit).
Please refer to the installation section to setup the shared library if it's not in place on your system.
You can run the Intel® Software License Manager on any supported platform, with Windows*, Linux*, or OS X* applications running on separate network nodes. For example, you can install the Intel® Software License Manager and license file on a

Using the Intel® Software License Manager
8 Document Number: 251879-014US
Linux* operating system to manage floating licenses for Windows*, Linux*, or OS X* applications.
2.2 License Types Before installing the Intel® Software License Manager, you should be familiar with the different license types and how they are used with Intel® Software Development Products. License types supported by the Intel® Software License Manager are:
Floating License (counted)
Node-Locked License (counted or uncounted)
Single-User License (uncounted)
Only counted license types require the Intel® Software License Manager. Node-locked and floating license types are used in multiple-user environments, and the Intel® Software License Manager monitors the number of concurrent users permitted in the license file. For example, if your license permits 20 users, then the Intel® Software License Manager “checks out” a license to the first 20 users. Whenever the license count is less than 20, other licensed users may check out a license from the Intel® Software License Manager to run their application.
The differences between node-locked and floating license types are:
With node-locked license types, users access the Intel® Software Development Product using an account on a central (node-locked) system on which both the Intel® Software Development Product and the Intel® Software License Manager are installed. The Intel® Software Development Products are not installed on remote systems. For example, a user might use a remote login program, such as Telnet or an SSH client, to log into an account on the central system and use the command-line window to run the Intel® Software Development Product on the node-locked system. Also, Windows* Terminal Server* and related X-window capabilities allow more than command-line window use.
With floating license types, users access the Intel® Software Development Product on their local system, while the license use is controlled by one central system running the Intel® Software License Manager.

About the Intel® Software License Manager
User's Guide 9
2.2.1 Node-Locked License Configuration There are two versions of the node-locked license:
Counted – the license limits the number of concurrent users.
Uncounted – the number of concurrent users or running application instances is not limited by the license file. Please refer to the End User License Agreement during the installation of your Intel® product for usage policy.
In both cases, only the node running the application and Intel® Software License Manager needs a license file. Consider the example illustrated in the following table:
Node Operating System
Applications Intel® Software License Manager
License File
A Linux Intel® C++ Compiler for Linux* Intel® Fortran Compiler for Linux*
X X
In this example, the Intel® C++ Compiler for Linux*, the Intel® Fortran Compiler for Linux*, the Intel® Software License Manager, and license file all run on Node A. Anyone on the network who can connect to Node A may run either application, as long as a license is available.
2.2.2 Floating License Configuration With a floating license you can manage, from a single node, applications running on different nodes. Consider the example illustrated in the table below:
Node Operating System
Application Intel® Software License Manager
License File
A Linux X X
B Windows Intel® C++ Compiler for Windows* X
C Linux Intel® C++ Compiler for Linux* Intel® Fortran Compiler for Linux*
X
D Linux Intel® Fortran Compiler for Linux* X
E OS X* Intel® C++ Compiler for OS X* X
In the example above, the Intel® Software License Manager, running on Node A, counts the number of licenses in use. The license file on each node must have identical
SERVER and VENDOR line information.
Using the Intel® Software License Manager
10 Document Number: 251879-014US
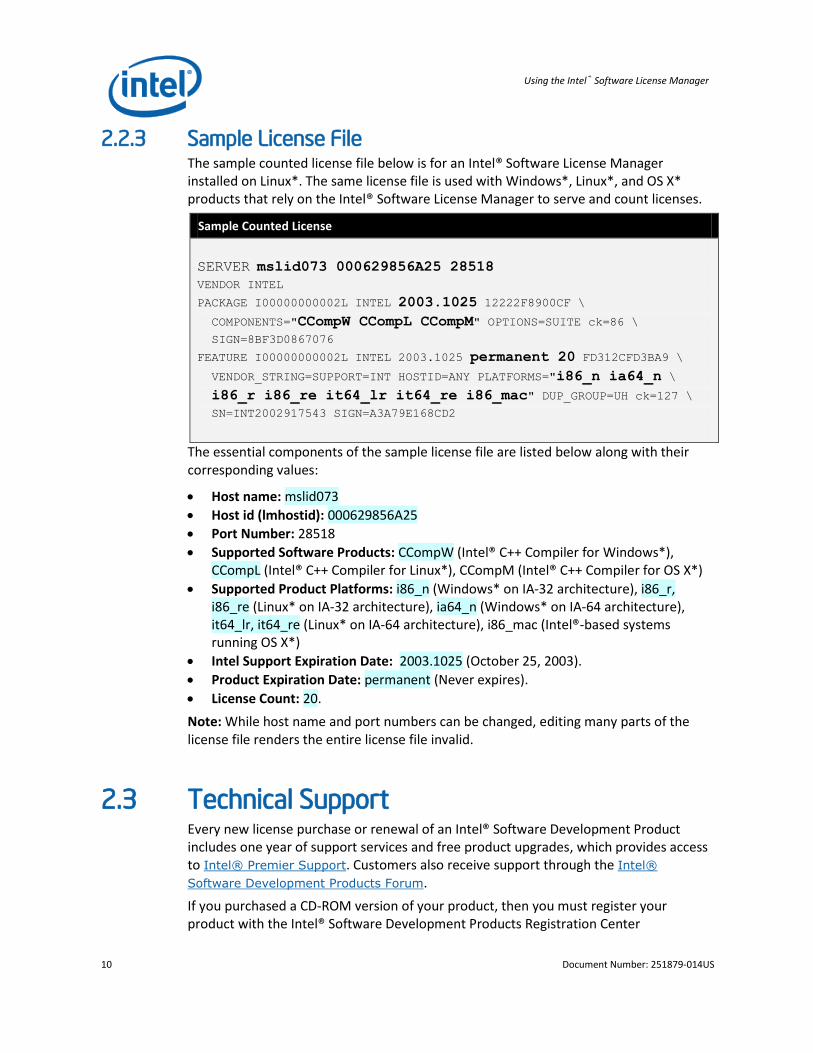
2.2.3 Sample License File The sample counted license file below is for an Intel® Software License Manager installed on Linux*. The same license file is used with Windows*, Linux*, and OS X* products that rely on the Intel® Software License Manager to serve and count licenses.
Sample Counted License
SERVER mslid073 000629856A25 28518
VENDOR INTEL
PACKAGE I00000000002L INTEL 2003.1025 12222F8900CF \
COMPONENTS="CCompW CCompL CCompM" OPTIONS=SUITE ck=86 \
SIGN=8BF3D0867076
FEATURE I00000000002L INTEL 2003.1025 permanent 20 FD312CFD3BA9 \
VENDOR_STRING=SUPPORT=INT HOSTID=ANY PLATFORMS="i86_n ia64_n \
i86_r i86_re it64_lr it64_re i86_mac" DUP_GROUP=UH ck=127 \
SN=INT2002917543 SIGN=A3A79E168CD2
The essential components of the sample license file are listed below along with their corresponding values:
Host name: mslid073
Host id (lmhostid): 000629856A25
Port Number: 28518
Supported Software Products: CCompW (Intel® C++ Compiler for Windows*), CCompL (Intel® C++ Compiler for Linux*), CCompM (Intel® C++ Compiler for OS X*)
Supported Product Platforms: i86_n (Windows* on IA-32 architecture), i86_r, i86_re (Linux* on IA-32 architecture), ia64_n (Windows* on IA-64 architecture), it64_lr, it64_re (Linux* on IA-64 architecture), i86_mac (Intel®-based systems running OS X*)
Intel Support Expiration Date: 2003.1025 (October 25, 2003).
Product Expiration Date: permanent (Never expires).
License Count: 20.
Note: While host name and port numbers can be changed, editing many parts of the license file renders the entire license file invalid.
2.3 Technical Support Every new license purchase or renewal of an Intel® Software Development Product includes one year of support services and free product upgrades, which provides access to Intel® Premier Support. Customers also receive support through the Intel®
Software Development Products Forum.
If you purchased a CD-ROM version of your product, then you must register your product with the Intel® Software Development Products Registration Center
About the Intel® Software License Manager
User's Guide 11
(https://registrationcenter.intel.com/) to activate your access to Intel® Premier Support (https://premier.intel.com/) or the Intel® Software Development Products Forum (http://software.intel.com/en-us/forums/). All license types for the eligible products listed above, except the noncommercial-use license, qualify for Intel® Premier Support accounts.

Using the Intel® Software License Manager
12 Document Number: 251879-014US
3 Installing the Intel® Software License
Manager You only need to install the Intel® Software License Manager if you are using a floating or counted node-locked license (see License Types). Once you have purchased an Intel® Software Development Product, follow these steps to install the Intel® Software License Manager and invoke your product:
1. Identify host name and host id
2. Register your product serial number
3. Download and install the product
3.1 Identifying the Host Name and Host ID The host name and host ID are system-level identifiers on supported platforms that are used in the license file to identify the node on which you plan to install the Intel® Software License Manager and license file. To enable you to obtain a counted license, these unique values must be available when you register your product. For node-locked licenses, you will also need the host name and host id of the node from which your applications will run (if different from the node for the Intel® Software License Manager). Follow these directions to obtain the host name and host id for each supported platform:
3.1.1 Microsoft Windows* 1. From the Start menu, click Run...
2. Type cmd in the Open: field, then click OK.
3. Type ipconfig /all at the command prompt, and press Enter.
In the resulting output, host name is the value that corresponds to Host Name, and
host id is the value that corresponds to Physical Address.
For example, if the output of ipconfig /all included the following:
Host Name . . . . . . . : mycomputer
. . .
Physical Address . . . . : 00-06-29-CF-74-AA
then host name is mycomputer and the host ID is 00-06-29-CF-74-AA.
Installing the Intel® Software License Manager
User's Guide 13
3.1.2 Linux* 1. Run the hostname command to display the host name.
2. Run the command /sbin/ifconfig eth0 to display the hardware address.
For example, if the /sbin/ifconfig eth0 command returns
HWaddr 00:D0:B7:A8:80:AA, then the host ID is 00:D0:B7:A8:80:AA.
It is strongly recommended that users run the lmhostid utility to obtain the hostid value required to generate counted licenses. The lmhostid utility can be found in the install location where the Intel® Software License Manager is installed.
3.1.3 OS X* on Intel® Architecture 1. Run the hostname command to display the host name.
2. Run the command /sbin/ifconfig en0 ether to display the hardware address.
The following is an example of an address that could be returned by this command:
en0:
flags=8863<UP,BROADCAST,SMART,RUNNING,SIMPLEX,MULTICAST>
mtu 1500 ether 00:13:20:60:23:4f
It is strongly recommended that users run the lmhostid utility to obtain the hostid value required to generate counted licenses. The lmhostid utility is installed in the same location as the Intel® Software License Manager.
Using the Intel® Software License Manager
14 Document Number: 251879-014US
3.2 Registering Your Product Serial Number Next, register each product serial number at the Intel® Software Development Products Registration Center (https://registrationcenter.intel.com/). The registration process is required for the following reasons:
For electronically-transferred products, registration is the only means to obtain the required license file and download location for the software.
For boxed (CD-ROM) products, registration is the only means to activate Intel® Premier Support and receive product updates. Note: CD-ROM products are encoded with a Single-User license. Therefore, they cannot be used with the Intel® Software License Manager.
For counted licenses, registration is the process by which the host name and host id are sent to the Intel® Software Development Products Registration Center
(https://registrationcenter.intel.com/) for license creation.
If you intend to install and configure three redundant license host servers, you must specify the host name and host id for each of your license host server systems when you register your floating or node-locked license(s). If you have three license host servers specified, at least two of them must be running and accessible from your client systems at all times.
To change your license host server information in your floating or node-locked license, i.e. when you need to move your license host server to a new system, please follow the instructions in the next section (Changing Server/Host Data for
Your Product License).
Go to the Intel® Software Development Products Registration Center and complete each step. If you do not have an existing Intel® Premier Support account for your product, click on Register for Intel® Premier Support on the screen thanking you for registration.
Installing the Intel® Software License Manager
User's Guide 15
3.3 Changing Server/Host Data for Your Product
License
Note: If your floating or node-locked licenses are active, you may make changes to the host id information for your licenses. If your floating or node-locked licenses have expired support, you must submit an issue to Intel® Premier Support or to the Downloads, Licensing and Registration User Forum to request that an Intel Support Engineer modify your license host id information.
1. Login to the Intel® Software Development Products Registration Center (https://registrationcenter.intel.com/) by clicking the Registered Users Login button in the lower section of the web page and entering your Login ID and Password on the next page. You will see a list of all products you have registered.
2. On the My Products page, for each product you have registered, you will see the product name, component names, links to the latest versions available for download and posted date of the version available for download. [Note: Expired registrations are shown only if you check the Show Expired Registrations check box at the top of the page.]
3. Click on any of the product names to see your product subscription history. This includes serial number and support status with license expiration date. You will also be provided with links to manage the license information and links to renew your subscriptions. [Note: Expired serial numbers can be viewed by checking the Show Expired Serial Numbers check box on the top right corner of this page.]
4. Click on the Manage link for the serial number you wish to change.
5. You will be provided with the license file information page. Click on the Modify Host Information link at the bottom of this page.
6. Enter the new server/host information and click Submit. If you do not get any errors, click on Resend license file to my email. You will receive your new license file via email shortly.
7. After you receive your updated .lic license file, you must replace the old license file with the new one on your license host server system(s). If you use a combined license file (see the Combining Multiple License Files section in this user guide), you must update your combined license file with the new license information.
8. After your new license file or updated combined license file is on your license host server system(s), you must restart your license host server process on the license host server system(s) so your new license file or updated combined license file will be re-read.
For more information, please see http://software.intel.com/en-
us/articles/change--serverhost-data-node-locked-or-floating-license/.
Using the Intel® Software License Manager
16 Document Number: 251879-014US
3.4 Redundant License Host Servers
Intel software product licenses can support up to three redundant license host server systems. Please follow the steps below to ensure your floating licenses and your license host server systems have been properly set up for the multiple license server configuration.
1. Please ensure that your host ids and host names are unique for the three servers. Using a duplicate host name and host ID will not allow the license file to generate successfully during registration.
2. If you intend to install and configure three redundant license host servers, you must specify the host name and host id for each of your license host server systems when you register your floating or node-locked license(s).
3. Please double-check that all your floating or node-locked licenses are registered for the same three unique, correct host names/host ids. If you need to update any of your floating or node-locked licenses to correct the host names/host ids, please follow the instructions in the previous section (Changing Server/Host Data for Your
Product License). You must also follow these instructions when you move one or more of your license host servers to a new system.
4. Please make sure at least two license host servers are up and running when the license is checked out from the client system. That is to say, the Intel® Software License Manager should be started by selecting the right license file(s) on at least two license host servers where it is installed.
Note: If your floating or node-locked licenses are active, you may make changes to the host id information for your licenses. If your floating or node-locked licenses have expired support, you must submit an issue to Intel® Premier Support or to the Downloads, Licensing and Registration User Forum to request that an Intel Support Engineer modify your license host id information.
5. If you are using a three-server redundant configuration then at least two must be up and running to make a “quorum” and permit licenses to be checked out. If you do not intend to have all three of the servers running at all times, we recommend using a single license server instead of a three-way redundant license server configuration.
Installing the Intel® Software License Manager
User's Guide 17
6. If you have only one server running of the three servers keyed into the license, you will likely see the -97 error (see below) for "vendor daemon is down", so you also check that the daemon is running on each server system.
FCompW: The desired vendor daemon is down
a) Check the lmgrd log file, or
b) Try the lmreread command:
Feature: FCompW
Vendor:Host: sl-ecs-snag-01
License path: 28518@sl-ecs-snag-
01;C:\PROGRA~2\Intel\Compiler\
Fortran\100~1.026\Ia32\Bin\*.lic
FLEXlm error: -97,121
3.5 Downloads and Installs
3.5.1 Product File Downloads After you register your product serial number, you will receive e-mail instructions to download your Intel® Software Development Product. Obtain your product download by going to the URL included in the instructions.
If you have a current product license, you can download any version of the software, and if your current product license is entitled to Intel® Premier Support, you have access to submit questions through the Intel® Premier Support system.
Once the support period has expired, downloads are only available to you for product versions with a Build Date on or before your license Support Expiration date.
After downloading your product, begin by unpacking the installation program, if necessary. See the product Release Notes for installation details. When you begin the product installation, you will need to identify the location of the license file you received with your product. The installation will proceed only if you have a valid license file.
3.5.2 Intel® Software License Manager downloads If you are using counted licenses, you will also be required to install Intel® Software License Manager. Do not use the Intel® Software License Manager for uncounted (Single User) licenses – only for floating and node-locked licenses (see License Types).
Remember that the OS of the server system where the Intel® Software License Manager is installed is irrelevant to the OS for the license(s) it supports. So the Intel® Software License Manager can be installed on Windows*, Linux*, or OS X* machines regardless of the OS for each of your floating and node-locked Intel® Software Development Product licenses.
Using the Intel® Software License Manager
18 Document Number: 251879-014US
You can download the Intel® Software License Manager from Intel® Software Development Products Registration Center by following these steps:
1. Login to the Intel® Software Development Products Registration Center at https://registrationcenter.intel.com/.
2. Select Search for older versions.
3. Select Intel® Software License Manager from the product list.
4. Select the appropriate operating system from the dropdown list.
5. Click on the hyperlink for the license server file you want to download.
You must download the Intel® Software License Manager server corresponding to the operating system where you are planning to install it, not for the operating system where you are planning to run the client applications (Intel® Software Development Products) Products). For example, you can install the license server on a OS X* system to manage Intel product license seats for Windows*, Linux* and/or OS X* software products.
The most recent version of the User Guide for the Intel® Software License Manager is also available from the web site.
For more information about downloading the Intel® Software License Manager, see the Intel® Software License Manager Servers knowledgebase article.
3.5.3 Starting the Intel® Software License Manager on Windows 1. Download the Intel® Software License Manager for Windows* that matches your
environment (w_isl_server_<ver>_<architecture>.exe).
2. Run the self-extracting executable downloaded in the previous step.
3. Provide the path to the license file during the installation of Intel® Software License Manager.
4. Finish the installation process. The license manager should start automatically as a service.
If you do not have a license file during the installation process, you can still install the license server by checking the option to install without a license file. After installing the Intel® Software License Manager without the license file, you must start the license server before running your product. Follow these steps to start the Intel® Software License Manager on Windows*: 1. From the Windows* Start menu, select Programs > Intel® Software Development
Products > Intel(R) Software License Manager > Configure Intel(R) Software License Manager.
2. Select the license file. 3. Click Apply and close the window. Note: You will also be required to follow the above steps if you wish to restart the license server with a different license file.
Installing the Intel® Software License Manager
User's Guide 19
3.5.4 Installing the Intel® Software License Manager on Linux* and OS X* Follow the steps below to install the software for the Intel® Software License Manager on Linux* or OS X* systems:
1. Place the downloaded package
<l|m>_isl_server_<ver>_<architecture>.tar.gz in the directory to which you wish to extract its files. This need not be the same location in which you plan to install the Intel® Software License Manager files.
2. Extract the files from the package with the following command: tar -zxvf <l|m>_isl_server_<ver>_<architecture>.tar.gz This command extracts the files and prepares you for installation.
3. Use the cd command to move to the flexlm/ directory created by the above step.
4. Run the Install_INTEL script and follow the directions to install and configure the Intel® Software License Manager.
5. To run the license server, the user must have executable access to the binary files lmgrd and INTEL. If executable access gets lost during extraction and/or copying from a Windows* system, you can use a command like one of the two listed below to set executable access for the file:
chmod 775 /flexlm/INTEL
or
chmod +x "`pwd`/flexlm/lmgrd"
or
chmod +x "$(pwd)/flexlm/lmgrd" (non-csh)
3.5.5 Starting the Intel® Software License Manager automatically on Linux* after reboot To set up the Intel® Software License Manager to start automatically follow the steps below:
For Linux*, add the following steps to the system startup files (for example, /etc/init.d/rcX.d directories, where X is 1, 2, 3, or 5) to ensure that the Intel® Software License Manager server starts after reboot. It is important that the network has been initialized before the license server is started. Ensure that there is a white space (“ ”) between each argument. It is not necessary for server startup be done as root.
1. cd <server-directory>
2. `pwd`/lmgrd –c `pwd`/<licensefile> -l `pwd`/<log file>
or
$(pwd)/lmgrd –c $(pwd)/<licensefile> -l $(pwd)/<log file>
(non-csh)
Using the Intel® Software License Manager
20 Document Number: 251879-014US
Ensure that the change directory is set to the one created in Step 1 above. The -c <license file> should point to the license file copied to the server directory from the registration e-mail. Use the full path to the license file, including the full license file name.
The -l <log file> will capture information that will be useful for debugging unanticipated server or license check-out problems. Use the full path where the log file should be created, including the log file filename.
3.5.6 Verifying the Intel® Software License Manager on Linux* and OS X* Follow these steps to verify that the Intel® Software License Manager is running on Linux* or OS X* systems:
1. Use the cd command to move to the <server-directory>.
2. Execute the command lmstat –c <license file>. Use the full path to the license file, including the full license filename.
3.5.7 Compatible Versions of Intel® Software License Manager and Vendor Daemons In a complex installation of multiple FLEXlm* and/or FlexNet Publisher* licensed
products, which include daemons from different vendors, a single lmgrd is used to manage the use of all licensed products. You can use any lmgrd whose product version
(lmgrd -v) is greater than or equal to all of the vendor daemons’ product versions. If your lmgrd version is less than any of the vendor daemons’ versions, server startup failures may result.
3.5.8 Shutting Down or Removing the Intel® Software License Manager on Linux* and OS X* To shut down or remove the Intel® Software License Manager from Linux* or OS X* systems, follow these steps:
1. Use the cd command to move to the <server-directory>.
2. Execute the command:
lmdown –c <license file> (use the full path)
3. Killing the lmgrd and INTEL processes is not recommended. However, if lmdown cannot successfully shut down the Intel® Software License Manager, you may need to kill those processes.
4. To permanently remove the Intel® Software License Manager, delete the lines that were added to the system startup files (for example, /etc/init.d/rcX.d directories, where X is 1, 2, 3, or 5). This step only applies to some Linux* systems.

Using the Client Application for the First Time
User's Guide 21
4 Using the Client Application for the
First Time You must complete the following steps to use the Intel® Software License Manager for the first time:
1. Install the client application
2. Set the INTEL_LICENSE_FILE environment variable
3. Combine multiple license files
4.1 Installing the Client Application If you are using counted licenses, you can install the client application without starting the Intel® Software License Manager server by providing the full path to the complete license file during the installation process. The complete license file includes:
SERVER line(s)
VENDOR line
PACKAGE line(s)
FEATURE/INCREMENT line(s) When using a license file to install a client application, you should put the license file into the default license folder for the operating system on which you are installing.
Windows*: C:\Program Files\Common Files\Intel\Licenses Linux*: /opt/intel/licenses/ OS X*: /Users/Shared/Library/Application Support/Intel/Licenses/
Note: You need a complete license file residing on the client system or access to a running license server during the process of installing a client application. You cannot use the port@host mechanism or the USE_SERVER mechanism during the installation of a client application unless the license server is running.

Using the Intel® Software License Manager
22 Document Number: 251879-014US
4.2 Setting the INTEL_LICENSE_FILE Environment
Variable Once you have installed the Intel® Software License Manager license server and installed the client application, the INTEL_LICENSE_FILE environment variable must be set. Most Intel® Software Development Products have an environment variables file (e.g. iccvars.sh for the Intel C++ Compiler for Linux*) that can be run to set up the INTEL_LICENSE_FILE variable correctly. This environment variable must be set for proper authentication of the product license file.
Other ways to set up the INTEL_LICENSE_FILE environment variable:
On Windows follow these steps, or the equivalent:
1. Click Start > Settings > Control Panel > System > Advanced > Environment Variables
2. Under system variables click New.
3. Enter INTEL_LICENSE_FILE in the text box for Variable Name.
4. In the Variable Value text box, input the full path to the folder where one or more licenses reside. You may provide multiple path values separated by semicolons “;”.
5. Click OK > OK > OK.
On Linux* and OS X* systems, the commands used to set the environment variables depend on the shell.
Bash shell, Bourne shell (sh), and Korn shell (ksh) use the export and assignment commands: $ export INTEL_LICENSE_FILE=</path/to/license/file> where, </path/to/license/file> should be the folder in which one or more license files reside. You can provide multiple path values to the
INTEL_LICENSE_FILE variable by using “:” as a separator. For example, $ export
INTEL_LICENSE_FILE=/opt/intel/licenses:$HOME/intel/licens
es
C shell, use the setenv command: % setenv INTEL_LICENSE_FILE </path/to/license/file>
Using the Client Application for the First Time
User's Guide 23
4.2.1 Counted Licenses and Alternatives If the Intel® Software Development Product you are using is enabled for counted licenses, which require a license server, you do not need to use the exact copy of the counted license on the local system from which you run the Intel software product; there are two alternatives:
Alternative 1 USE_SERVER mechanism for counted licenses: on the systems from which you will execute Intel® Software Development Products, you can use a license file with the USE_SERVER directive. The license file would be in the following format:
SERVER <server name> <hostid> <port>
USE_SERVER
where <server name>, <hostid>, and <port> all come from the SERVER line in the license file which was used to install the license server. The INTEL_LICENSE_FILE environment variable should point to the license file.
Alternative 2 port@host mechanism for counted licenses: on the systems from which you will execute Intel® Software Development Products, you can set the INTEL_LICENSE_FILE variable to port@host. The host and port information
are in the SERVER line in the license file used to install the Intel® Software License Manager server. Note: The port@host mechanism does not work if you use it in a license file
instead of setting the INTEL_LICENSE_FILE environment variable to port@host.
4.2.2 How to Specify Ports for License Servers Intel’s license files specify two ports:
1. SERVER <host_name> <host_id> <port1>
2. VENDOR INTEL port=<port2>
Typically, Intel specifies port1 to 28518 and port2 is omitted, which causes the system to randomly assign the second port. You may specify port2 to a fixed value so that you can open that port through any firewalls between the client application and the server system running the Intel® Software License Manager. When changing either port, you must ensure:
The port numbers in all license files match on both the license host server and client systems.
The license server is restarted to read the updates.
The INTEL_LICENSE_FILE environment variable on the client systems is pointing to the correctly updated license file or port@host.
You may need to add a port exception to allow the FlexNet Publisher* license server daemon, the Intel® Software License Manager vendor daemon, and the application
Using the Intel® Software License Manager
24 Document Number: 251879-014US
using these daemons to communicate. See the Add a Port Exception section of this document for more information.
4.3 Combining Multiple License Files
4.3.1 Criteria for Combining License Files Your product’s license file(s) define the license server(s) by host name and hostid in the SERVER line(s) in the license file. License files may be combined provided they meet the following criteria:
1. The number of SERVER lines in each license file is the same. 2. The hostid fields of SERVER lines in each license file match. Note: You are not required to combine compatible license files. There is no performance or system-load penalty for not combining the files. Some possible reasons license files may not be compatible are:
License files are set up to run on different server machines, so hostids are different.
One file is set up for a single server (has only one SERVER line), the other is set up
for a three-server redundant license server (has multiple SERVER lines). For further information on using redundant servers, see Redundant License Host
Servers and the information at http://software.intel.com/en-
us/articles/redundancy-server-notes/.
4.3.2 Instructions for Combining License Files Combine multiple license server files into a single license file by performing these steps: 1. Concatenate the files.
2. Remove the duplicate SERVER and VENDOR lines. Note: The expiration dates can be different and the number of seats can be different in license files but the lmhostid and hostname values in the license files should be the same.
If you are combining multiple counted license files for a single product, you need to make sure that following additional requirements are being met:
Only one license file has a FEATURE line and all other license files have
INCREMENT lines (see example below on how File0001.lic and File0002.lic were combined into a single license file File0003.lic).
If this requirement is met, you can simply concatenate the license files and remove the duplicate SERVER and VENDOR lines by making sure that the license with the FEATURE line is the first key in the combined license file and licenses with INCREMENT lines follow it (File0003.lic).
Using the Client Application for the First Time
User's Guide 25
Or, all the license files of the same product have INCREMENT lines instead of FEATURE lines (see below how File0004.lic and File0005.lic were combined into a single license file File0006.lic).
If this requirement is met, you can simply concatenate the license files and remove the duplicate SERVER and VENDOR lines (File0006.lic).
If you are combining multiple counted license files where each counted license file is for a unique product, you can simply concatenate them and remove the duplicate SERVER and VENDOR lines.
Note: If you update your license file, be sure to do the following:
Verify that the license files on the client systems are the same as the license file on the license host server.
Restart the Intel® Software License Manager license server to force it to read the updated license file.
Verify that the INTEL_LICENSE_FILE environment variable is pointing to
the right license file or the correct port@host settings.

Using the Intel® Software License Manager
26 Document Number: 251879-014US
4.3.3 Examples Examples are provided below for demonstration purposes only.
In the example below, both the File0001.lic and File0002.lic are for Intel® C++ Compiler for Windows. File0001.lic has FEATURE line and is for 20 seats while File0002.lic has INCREMENT line and has 20 seats. You can merge these two license files into a single license file File0003.lic which can serve 40 seats.
File0001.lic SERVER svr025.testserver.com 832d87d8 28518
SERVER svr026.testserver.com 832d7b86 28518
SERVER svr027.testserver.com 832d895e 28518
VENDOR INTEL <path to the vendor daemon options file (optional)>
PACKAGE I0000000000001 INTEL 2004.1003 2279DFB555D4 \
COMPONENTS=CCompW OPTIONS=SUITE ck=88 SIGN=F452A16CA51C
FEATURE I0000000000001 INTEL 2004.1003 permanent 20 2C55559573D2 \
VENDOR_STRING=SUPPORT=COM HOSTID=ANY \
PLATFORMS="i86_n ia64_n" DUP_GROUP=UH ck=92 SN=SMSA35123769 \
SIGN=E7EDE36EB6AE
File0002.lic SERVER svr025.testserver.com 832d87d8 28518
SERVER svr026.testserver.com 832d7b86 28518
SERVER svr027.testserver.com 832d895e 28518
VENDOR INTEL <path to the vendor daemon options file (optional)>
PACKAGE I0000000000001 INTEL 2004.1003 2279DFB555D4 \
COMPONENTS=CCompW OPTIONS=SUITE ck=88 SIGN=F452A16CA51C
INCREMENT I0000000000001 INTEL 2004.1003 permanent 20 \
2C55559573D2 VENDOR_STRING=SUPPORT=COM HOSTID=ANY \
PLATFORMS="i86_n ia64_n" DUP_GROUP=UH ck=92 SN=SMSA37693512 \
SIGN= EB6AE E7EDE36
File0003.lic - Combined single file for Intel® C++ Compiler for Windows SERVER svr025.testserver.com 832d87d8 28518
SERVER svr026.testserver.com 832d7b86 28518
SERVER svr027.testserver.com 832d895e 28518
VENDOR INTEL <path to the vendor daemon options file (optional)>
PACKAGE I0000000000001 INTEL 2004.1003 2279DFB555D4 \
COMPONENTS=CCompW OPTIONS=SUITE ck=88 SIGN=F452A16CA51C
FEATURE I0000000000001 INTEL 2004.1003 permanent 20 2C55559573D2 \
VENDOR_STRING=SUPPORT=COM HOSTID=ANY PLATFORMS="i86_n ia64_n" \
DUP_GROUP=UH ck=92 SN=SMSA35123769 SIGN=E7EDE36EB6AE
PACKAGE I0000000000001 INTEL 2004.1003 2279DFB555D4 \
COMPONENTS=CCompW OPTIONS=SUITE ck=88 SIGN=F452A16CA51C
INCREMENT I0000000000001 INTEL 2004.1003 permanent 20 \
2C55559573D2 VENDOR_STRING=SUPPORT=COM HOSTID=ANY \
PLATFORMS="i86_n ia64_n" DUP_GROUP=UH ck=92 \
SN=SMSA376935123769 SIGN= EB6AE E7EDE36

Using the Client Application for the First Time
User's Guide 27
In the next example, both the File0004.lic and File0005.lic are for Intel® Visual Fortran Compiler for Windows. Notice that both File0004.lic and File0005.lic have INCREMENT lines (no FEATURE lines) and are for 20 seats. You can merge these two license files into a single license file File0006.lic which can serve 40 seats.
File0004.lic SERVER svr025.testserver.com 832d87d8 28518
SERVER svr026.testserver.com 832d7b86 28518
SERVER svr027.testserver.com 832d895e 28518
VENDOR INTEL <path to the vendor daemon options file (optional)>
PACKAGE I0000000000001 INTEL 2004.1003 2279DFB555D4 \
COMPONENTS=FCompW OPTIONS=SUITE ck=88 SIGN=F452A16CA51C
INCREMENT I0000000000001 INTEL 2004.1003 permanent 20 2C55559573D2 \
VENDOR_STRING=SUPPORT=COM HOSTID=ANY PLATFORMS="i86_n ia64_n" \
DUP_GROUP=UH ck=92 SN=SMSA12373569 SIGN=DE36EE7EB6AE
File0005.lic SERVER svr025.testserver.com 832d87d8 28518
SERVER svr026.testserver.com 832d7b86 28518
SERVER svr027.testserver.com 832d895e 28518
VENDOR INTEL <path to the vendor daemon options file (optional)>
PACKAGE I0000000000001 INTEL 2004.1003 2279DFB555D4 \
COMPONENTS=FCompW OPTIONS=SUITE ck=88 SIGN=F452A16CA51C
INCREMENT I0000000000001 INTEL 2004.1003 permanent 20 2C55559573D2 \
VENDOR_STRING=SUPPORT=COM HOSTID=ANY PLATFORMS="i86_n ia64_n" \
DUP_GROUP=UH ck=92 SN=SMSA35912376 SIGN=E7EEDE36EB6A
File0006.lic - Combined single file for Intel® Visual Fortran Compiler for Windows SERVER svr025.testserver.com 832d87d8 28518
SERVER svr026.testserver.com 832d7b86 28518
SERVER svr027.testserver.com 832d895e 28518
VENDOR INTEL <path to the vendor daemon options file (optional)>
PACKAGE I0000000000001 INTEL 2004.1003 2279DFB555D4 \
COMPONENTS=FCompW OPTIONS=SUITE ck=88 SIGN=F452A16CA51C
INCREMENT I0000000000001 INTEL 2004.1003 permanent 20 2C55559573D2 \
VENDOR_STRING=SUPPORT=COM HOSTID=ANY PLATFORMS="i86_n ia64_n" \
DUP_GROUP=UH ck=92 SN=SMSA12373569 SIGN=DE36EE7EB6AE
PACKAGE I0000000000001 INTEL 2004.1003 2279DFB555D4 \
COMPONENTS=FCompW OPTIONS=SUITE ck=88 SIGN=F452A16CA51C
INCREMENT I0000000000001 INTEL 2004.1003 permanent 20 2C55559573D2 \
VENDOR_STRING=SUPPORT=COM HOSTID=ANY PLATFORMS="i86_n ia64_n" \
DUP_GROUP=UH ck=92 SN=SMSA35912376 SIGN=E7EEDE36EB6A
Using the Intel® Software License Manager
28 Document Number: 251879-014US
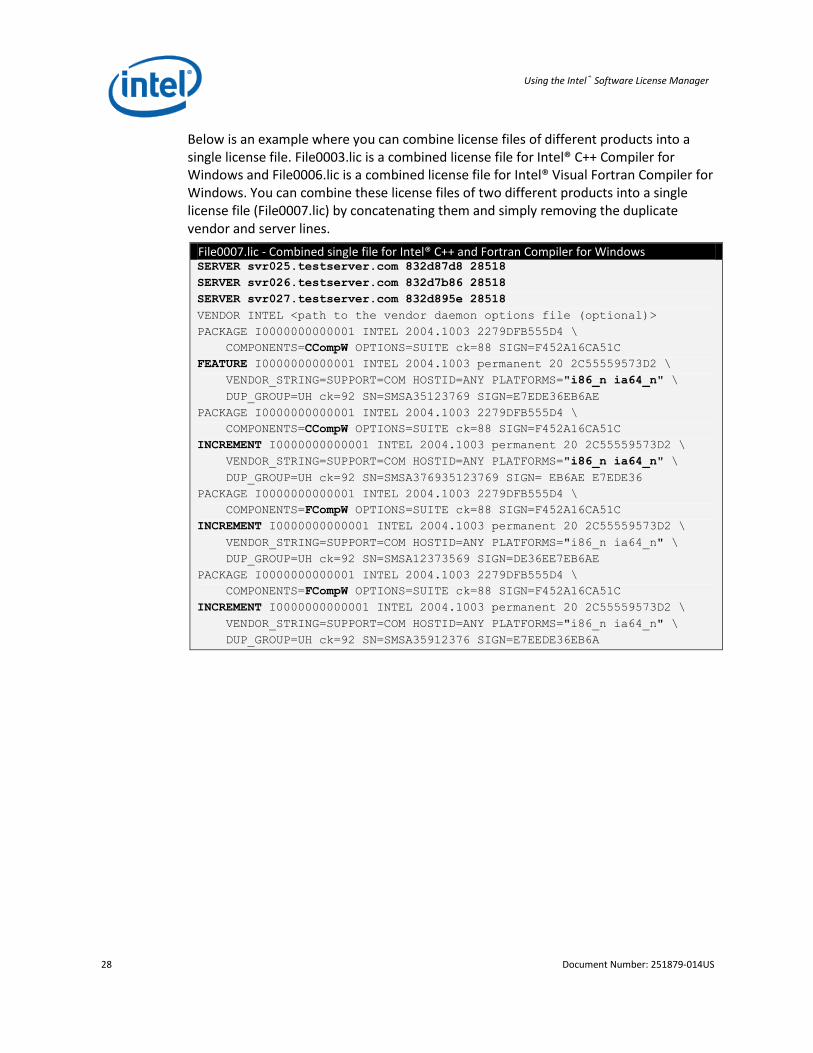
Below is an example where you can combine license files of different products into a single license file. File0003.lic is a combined license file for Intel® C++ Compiler for Windows and File0006.lic is a combined license file for Intel® Visual Fortran Compiler for Windows. You can combine these license files of two different products into a single license file (File0007.lic) by concatenating them and simply removing the duplicate vendor and server lines.
File0007.lic - Combined single file for Intel® C++ and Fortran Compiler for Windows SERVER svr025.testserver.com 832d87d8 28518
SERVER svr026.testserver.com 832d7b86 28518
SERVER svr027.testserver.com 832d895e 28518
VENDOR INTEL <path to the vendor daemon options file (optional)>
PACKAGE I0000000000001 INTEL 2004.1003 2279DFB555D4 \
COMPONENTS=CCompW OPTIONS=SUITE ck=88 SIGN=F452A16CA51C
FEATURE I0000000000001 INTEL 2004.1003 permanent 20 2C55559573D2 \
VENDOR_STRING=SUPPORT=COM HOSTID=ANY PLATFORMS="i86_n ia64_n" \
DUP_GROUP=UH ck=92 SN=SMSA35123769 SIGN=E7EDE36EB6AE
PACKAGE I0000000000001 INTEL 2004.1003 2279DFB555D4 \
COMPONENTS=CCompW OPTIONS=SUITE ck=88 SIGN=F452A16CA51C
INCREMENT I0000000000001 INTEL 2004.1003 permanent 20 2C55559573D2 \
VENDOR_STRING=SUPPORT=COM HOSTID=ANY PLATFORMS="i86_n ia64_n" \
DUP_GROUP=UH ck=92 SN=SMSA376935123769 SIGN= EB6AE E7EDE36
PACKAGE I0000000000001 INTEL 2004.1003 2279DFB555D4 \
COMPONENTS=FCompW OPTIONS=SUITE ck=88 SIGN=F452A16CA51C
INCREMENT I0000000000001 INTEL 2004.1003 permanent 20 2C55559573D2 \
VENDOR_STRING=SUPPORT=COM HOSTID=ANY PLATFORMS="i86_n ia64_n" \
DUP_GROUP=UH ck=92 SN=SMSA12373569 SIGN=DE36EE7EB6AE
PACKAGE I0000000000001 INTEL 2004.1003 2279DFB555D4 \
COMPONENTS=FCompW OPTIONS=SUITE ck=88 SIGN=F452A16CA51C
INCREMENT I0000000000001 INTEL 2004.1003 permanent 20 2C55559573D2 \
VENDOR_STRING=SUPPORT=COM HOSTID=ANY PLATFORMS="i86_n ia64_n" \
DUP_GROUP=UH ck=92 SN=SMSA35912376 SIGN=E7EEDE36EB6A
Using the Client Application for the First Time
User's Guide 29
4.4 License Seat Check-out and Check-in
4.4.1 License Seat Allocation Overview
For an Intel® compiler product, the license seat is checked out (allocated) as soon as the compiler or debugger is started; and returned when the compiler or debugger work is “done”.
Note: For performance libraries (Intel® Integrated Performance Primitives, Intel® Threading Building Blocks, and Intel® Math Kernel Library), and some other Intel® Software Development Products, license check-out is only done during product installation.
All floating license seats are available on a first-come first-served basis for check-out by any number of products installed on client systems that have been configured to check-out floating license seats from the license host server system.
However, if all license seats are allocated for the requested product, additional users are forced to wait for one of the client systems to release a floating license seat. This is automatically done in our products, and means that some users may experience delays if all license seats are simultaneously allocated. The wait time for a license seat is forever, until a license seat is available, and is not configurable by end users.
When all license seats are allocated, a new license check-out request will retry every 30 seconds until a license seat is available to be allocated to the request. A delay that results from the wait for a license seat may appear to the end user that the product is hung or that performance has suddenly degraded.
Using the Intel® Software License Manager
30 Document Number: 251879-014US
4.4.2 Allocation status To determine how many floating license seats are checked-out, use the command lmstat in one of the following ways: On the license host server system, execute one of the following commands:
Linux*
lmstat -a -c <license file>
Windows*
lmutil lmstat –a –c <license file>
license file is the full path including filename to the floating license file. On the client system, execute one of the following commands:
Linux*
lmstat -a
Windows*
lmutil lmstat –a
Sample lmstat Output The following is an example output of the lmstat command from a Linux* server running Intel® Software License Manager. The output includes information about the total number of licenses issued and total number in use.
$ ./lmstat –a
lmstat - Copyright (c) 1989-2003 by Macrovision
Corporation. All rights reserved.
Flexible License Manager status on Wed 6/16/2010 02:11
License server status: 28518@spd16
License file(s) on spd16:
/tmp/jsmith/bin/flexlm_ia32_RH8/spd16.lic:
spd16: license server UP (MASTER) v9.2
Vendor daemon status (on spd16):
INTEL: UP v9.2
Feature usage info:
Users of I00000000000000000080000000000: (Total of 2
licenses issued; Total of 0 licenses in use)
Users of FCompL: (Total of 2 licenses issued; Total of 0
licenses in use)

Troubleshooting
User's Guide 31
5 Troubleshooting This chapter explains how to generate debug logs, lists the information you should provide when opening a support request, and provides solutions for some common problems.
5.1 Where to Start You may visit the Getting-Started Support Page first to search for an answer to your license manager problem. If you don’t find a solution, continue on with the next section.
5.2 Creating Debug Logs for License Checkout
Issues If your licensing does not work properly, review the previous sections to verify the installation. If the problem persists after you verify correct installation, you should open a support case with Intel® Premier Support or the Intel® Software Development
Products Download, Registration & Licensing User Forum.
In preparation for opening the support case, set the environment variable INTEL_LMD_DEBUG to 1 and execute the product (see Setting Environment
Variables). Doing so generates detailed information on the licensing failure. Please provide this information when filing a support issue. A product support engineer will then work closely with you to resolve the outstanding issue.
If you are running a command-line application on Windows*, set the debugging environment variable to the appropriate value on the command line. For example:
SET INTEL_LMD_DEBUG=1
View the current value of an environment variable. For example: SET INTEL_LMD_DEBUG returns INTEL_LMD_DEBUG=1 Set the environment variable to a file name. For example: SET INTEL_LMD_DEBUG="C:\temp\LicenseCheckout.log" If the license debugging information is no longer needed, you can turn it off with the following command: SET INTEL_LMD_DEBUG="" or unset INTEL_LMD_DEBUG
Note: It is very important that you unset this debugging environment variable once your issue has been resolved or once you have submitted the support request. Not doing so will result in slower performance when the client application is running. Every time you

Using the Intel® Software License Manager
32 Document Number: 251879-014US
submit a license checkout log, you must make sure that the old log is deleted and the new log has been created before it is attached to your support request.
If you are running a GUI application on Windows*, set the debugging environment variable to the appropriate value by following the steps below:
1. Click Start > Settings > Control Panel > System > Advanced > Environment Variables.
2. Under system variables click New.
3. Enter INTEL_LMD_DEBUG in the text box for Variable Name.
4. In the Variable Value text box, input the full path to the log file in which you would like to capture the results. For example C:\temp\LicenseCheckout.log.
5. Click OK > OK > OK.
Note: It is very important that you unset this debugging environment variable once your issue has been resolved or once you have submitted the support request. Not doing so will result in slower performance when the client application is running. Every time you submit a license checkout log, you must make sure that the old log is deleted and the new log has been created before it is attached to your support request.
On Linux* or OS X* systems, the commands used depend on the shell in use.
With the bash shell, Bourne shell (sh), and Korn shell (ksh), use the export command and assignment command to set the environment variable: $ export INTEL_LMD_DEBUG=1
Alternatively, you can set the INTEL_LMD_DEBUG environment variable to a file name. For example, export INTEL_LMD_DEBUG="/tmp/licensecheckout.log"
To remove the association of an environment variable and an external file with the Bourne, Korn, or bash shell, use the unset command: $ unset INTEL_LMD_DEBUG
With the C Shell, use the setenv command to set an environment variable: % setenv INTEL_LMD_DEBUG 1
To remove the association of an environment variable and an external file with the
C shell, use the unsetenv command: % unsetenv INTEL_LMD_DEBUG
Note: It is very important that you unset this debugging environment variable once your issue has been resolved or once you have submitted the support request. Not doing so will result in slower performance when the client application is running. Every time you submit a license checkout log, you must make sure that the old log is deleted and the new log has been created before it is attached to your support request.
Troubleshooting
User's Guide 33
5.3 Information Needed for Support Requests When opening a support request, you should provide the following information to the support team:
Client Information Intel Software License Manager Information
5.3.1 Client Information
Package ID of the product. This is the name of the file you downloaded and installed.
Name of client application with all parameters.
Operating system, architecture, kernel, glibc, and any service packs installed on the client system.
Values to which the LM_LICENSE_FILE and INTEL_LICENSE_FILE environment variables are set.
A copy of all license files used on the client system. It is important to copy the license files themselves rather than copy/pasting the contents as this can mask other potential problems with the files.
On Linux* or OS X*, set INTEL_LMD_DEBUG to /tmp/licensecheckout.log and on Windows*, set INTEL_LMD_DEBUG to
C:\temp\licensecheckout.log and run the client. Once the client finishes
execution, attach the licensecheckout.log to the support issue.
If you are opening a support request about a segmentation fault issue, attach the stack dump.
5.3.2 Intel Software License Manager Information This section is applicable only if you are using counted licenses.
Operating system, architecture, kernel, glibc, and any service packs installed on the system on which the Intel® Software License Manager server is installed.
The Intel® Software License Manager server file name that you downloaded and installed
A copy of the server log file at one of the following locations, depending on your operating system:
Windows*: <install drive>:\program files\common files\intel\flexlm\iflexlmlog.txt Linux * or OS X*: <install location of servers>/lmgrd.log
A copy of the license file you used to start the server. It is important to copy the license files themselves rather than copy/pasting the contents as this can mask other potential problems with the files.
Using the Intel® Software License Manager
34 Document Number: 251879-014US
Values to which the LM_LICENSE_FILE and INTEL_LICENSE_FILE environment variables are set.
5.4 Common Issues This section contains descriptions of two common issues and provides solutions to those issues.
5.4.1 License Checkout Failing Due to Terminal Server Client or Remote Desktop Connection on Windows* Problem: You cannot use client applications on Windows* from a remote desktop connection or terminal server client to checkout a license.
Solution: Using new client applications on Windows* with an old license may prevent the license checkout mechanism from working. You may, therefore, see the following
error message: Terminal Server remote client not allowed.
If you see this message, please contact the support team to obtain a new license file that allows you to use Windows*-based products from a remote desktop connection or terminal server. Please note that this message applies to new Windows*-based products only and applies to uncounted licenses, also known as single user licenses.
5.4.2 Client and Server Not Able to Connect Due to Windows Firewall Problem: The firewall for Windows* XP with Service Pack 2 or above prevents the client application from connecting to the Intel® Software License Manager server on Windows* XP. Solutions: Windows* XP with Service Pack 2 or above comes with a firewall which is turned on by default. If the firewall is turned on your FlexNet Publisher* license server daemon and Intel® Software License Manager license server vendor daemon may stop functioning. You can find more information about the firewall at msdn.microsoft.com. There are two methods to make the FlexNet Publisher* license server daemon and the Intel® Software License Manager license server vendor daemon function properly.
5.4.2.1 Add a Program Exception in Windows* XP
Add a program exception to allow the FlexNet Publisher* license server daemon and the Intel® Software License Manager license server vendor daemon to use required ports. You must execute both step 4 and step 5. Failure to do so causes the FlexNet Publisher* license server not to work. 1. Click Start >Run. Type Wscui.cpl, and click OK. 2. In the Windows* Security Center window, click Windows* Firewall. 3. Click on the Exceptions tab and click Add Program.
Troubleshooting
User's Guide 35
4. In the list of programs, look for lmgrd.exe. a. If lmgrd.exe is in the list of programs, select it and click OK. b. If lmgrd.exe is not in the list of programs, click Browse to locate it in
C:\Program Files\Common Files\Intel\FLEXlm. c. Select lmgrd.exe. Click Open and OK.
5. In the list of programs, look for INTEL.exe. a. If INTEL.exe is in the list of programs, select it and click OK. b. If INTEL.exe is not in the list of programs, click Browse to locate it in
C:\Program Files\Common Files\Intel\FLEXlm. c. Select INTEL.exe. Click Open and OK.
5.4.2.2 Add a Port Exception in Windows* XP
Add a port exception to allow the FlexNet Publisher* license server daemon, Intel® Software License Manager license server vendor daemon, and application using these daemons to communicate. You must execute both step 4 and step 5. Failure to do so causes the FlexNet Publisher* license server not to work. 1. Click Start > Run. Type Wscui.cpl and click OK. 2. In the Windows* Security Center window, click Windows* Firewall. 3. Click on the Exceptions tab and click Add Port. 4. In the dialog box, enter Intel(R) Software License Manager Vendor
Daemon in the Name field. 5. Enter the TCP/IP port number of the INTEL vendor daemon in the Port number
field.
a. This is the port number specified on the VENDOR line of the license file. b. You can also obtain the port number from the log file IFLEXLmLog.txt in the
C:\Program Files\Common Files\Intel\LicenseServer folder in a line like this:
INTEL using TCP-port <port>
6. Click OK. 7. Click Add Port again. 8. In the dialog box, enter FlexNet Publisher License Server Daemon
(lmgrd.exe) in the Name field. 9. Enter the TCP/IP port number of the FlexNet Publisher* license server daemon in
the Port number field. a. This is the port number specified on the SERVER line of the license file. b. You can also obtain the port number from the log file IFLEXLmLog.txt in the
C:\Program Files\Common Files\Intel\LicenseServer folder in a line like this:
lmgrd using tcp-port <port>
10. Click OK.
Using the Intel® Software License Manager
36 Document Number: 251879-014US
6 Checklist for Intel® Software License
Manager Server/Client Installation Note: Many of the following steps should be repeated when a floating product license is renewed or added to an existing set of floating licenses and when a combined license file is updated.
6.1 License Host Server System Checklist
Your Status
Step Task Description For more information
1 Download the latest Intel® Software License Manager User Guide
http://software.intel.com/en-
us/articles/license-manager-for-flexlm-users-guide
2 Download the Intel® Software License Manager that best matches your license host server OS and platform
http://software.intel.com/en-us/articles/performance-tools-for-software-developers-intel-flexlm-license-servers/
3 Verify your license host server machine’s host name and host id. If you are using three redundant license host server systems, verify the host name and host id for all three machines.
http://software.intel.com/en-us/articles/how-to-find-host-id-for-floating-licenses/
4 Verify your floating licenses are registered with the correct host name and host id specified. If you are using three redundant license host server systems, verify all three host names and host ids are specified for each floating license.
Log in to the Intel® Software Development Products Registration Center at https://registrationcenter.intel.com/
5 If any of your floating licenses http://software.intel.com/en-
us/articles/change--serverhost-data-
Checklist for Intel® Software License Manager Server/Client Installation
User's Guide 37
have incorrect or out-of-date host name or host id information, follow the instructions in the user guide to correct the information in the floating license(s) and obtain updated license file(s).
node-locked-or-floating-license/
6 If you wish to combine you floating license files into one file, follow the instruction in the Combining Multiple License Files section of this user guide.
http://software.intel.com/en-
us/articles/how-do-i-combine-multiple-license-files/
Your Status
Step Task Description For more information
7 Verify that all individual floating license files or the combined license file resides on your license host server system. Ensure there are no Single User, evaluation, or Beta licenses residing in the Intel license folder on your license host server system.
On Linux*: /opt/intel/flexlm/
On OS X*: /opt/intel.flexlm/
On Windows*: C:\Program Files\Common Files\Intel\LicenseServer\
8 If you have specified three redundant license host server systems in your floating licenses, at least two of the three redundant license hosts servers must be up and running at all times.
http://software.intel.com/en-
us/articles/redundancy-server-notes/
9 Install your Intel® Software License Manager server binary on your license host server system. If you have specified three redundant license host server systems in your floating licenses, complete all three license host server installations.
Follow the instructions in Chapter 3:
Installing the Intel® Software License
Manager.
10 Start your license host server process by following the
If you are using Windows* Vista, Windows* 7, or Windows* Server
Using the Intel® Software License Manager
38 Document Number: 251879-014US
instructions in Chapter 3:
Installing the Intel® Software
License Manager.
2008 system, please see the information at http://software.intel.com/en-us/articles/installing-license-server-on-
vista/.
11 Ensure your license server is running using the lmstat command.
http://software.intel.com/en-us/articles/when-is-a-floating-license-seat-checked-out-and-checked-in/

Checklist for Intel® Software License Manager Server/Client Installation
User's Guide 39
6.2 Client Systems Checklist
Your Status
Step Task Description For more information
1 Download the latest Intel® Software License Manager User Guide
http://software.intel.com/en-us/articles/license-manager-for-flexlm-
users-guide
2 Install the Intel® Software Development Products your users will be running on each client system. If using a copy of the complete server license file to install the product, you need to use an exact copy and place it in the default license file folder.
Follow the instructions for installing a client product in the Installing the
Client Application section of the user guide.
3 Set the INTEL_LICENSE_FILE environment variable on each client system.
http://software.intel.com/en-us/articles/how-to-set-intel_license_file-environment-variable/
4 Launch your Intel® Software Development Product.
If problems occur with floating license seat check-out, please follow the steps in Chapter 5: Troubleshooting of the user guide to capture a debug log and submit an issue. Be sure to include:
1. OS and architecture for your license host server system(s)
2. The name of the specific Intel® Software License Manager package you downloaded and installed.
3. The serial number for the floating license you are using.
4. The environment variable settings for INTEL_LICENSE_FILE and LM_LICENSE_FILE.
5. A copy of each floating license file you are using.
6. The combined license file (if applicable).
Using the Intel® Software License Manager
40 Document Number: 251879-014US
7. Host server name and host id for all license host servers.
8. Captured output of lmstat command.
9. License server and client-side debug logs

Appendices
User's Guide 41
7 Appendices
7.1 Appendix A: Latest Revision of User’s Guide The latest information about the Intel® Software License Manager and use of FlexNet Publisher* in Intel® Software Development Products can be found at:
http://software.intel.com/en-us/articles/license-manager-for-flexlm-users-guide/
Using the Intel® Software License Manager
42 Document Number: 251879-014US
7.2 Appendix B: Troubleshooting Guide Step 1. Identify the OS and architecture for installing the Intel® Software License Manager.
a. Choose a system and OS where you would like to install the Intel® Software License Manager. You must
choose an operating system and architecture combination listed in the Supported Platforms section of the user guide. Note: Make sure you have downloaded the latest version of the user guide from
http://software.intel.com/en-us/articles/license-manager-for-flexlm-users-guide. 1. Determine the license server OS.
2. Determine the host name and host id of your license server system. Refer to Installing the Intel®
Software License Manager in the user guide. Note: It is very important that the host id is accurate. If it is not accurate, the license file will not work.
Step 2. Register your serial number at the Intel® Software Development Products Registration Center.
a. Go to https://registrationcenter.intel.com/. b. Register your serial number using the host name and host id from the previous step. c. Receive the license file as an attachment via email from the Intel® Software Development Products
Registration Center
Step 3. Verify the validity of the license file for the system where you intend to install the Intel® Software License Manager. a. Note: This step needs to be executed on the system where you intend to install the license server. b. The server’s host id and hostname (collected in Step 1 above) should match the information in the license
file. The following optional steps may help ensure you have a valid license file:
1. Install Intel® Software License Manager without specifying a license file. (Refer to Installing the
Intel® Software License Manager in the user guide for further information about downloading and installing the license server).
2. Run the lmhostid command (on Windows*, use lmutil lmhostid). 3. Compare the output with the SERVER line in your license file.
4. If the host id values do not match, follow the instructions in the Changing Server/Host Data for
Your Product License section to obtain a corrected license file.
Step 4. Combine multiple license files into one license file.
a. See the section Combining Multiple License Files in the user guide for further details.
Step 5. Download and Install the Intel® Software License Manager. a. Log in to the Intel® Software Development Products Registration Center at
https://registrationcenter.intel.com, click the Product Downloads link, and download the license server for your operating system and architecture as determined in Step 1.
b. On Linux* or OS X*, you must unpack the .tar.gz file. c. Execute the license server install program to install the license server. On Linux* and OS X*, this is a script.
On Windows*, it is a self-extracting executable. (Refer to the Installing the Intel® Software License
Manager chapter of the user guide for detailed instructions). Provide the combined license file from Step 4 above or a single counted license to the license server install as applicable.
d. Verify the license server is running using the lmstat command (on Windows*, use lmutil lmstat). These command binaries are available in the folder where you installed Intel® Software License Manager.
e. Open and read the license server log file. 1. For Linux* and OS X*, the license server log file (lmgrd.log) can be found in the license server
install location. 2. For Windows*, the license server log file is C:\Program Files\Common
Files\Intel\LicenseServer\IFLEXlmLog.txt. f. If you see any issues in the log file that you are unable to resolve on your own, submit a support request.
1. Attach the log file. 2. Attach the license file used to start the Intel® Software License Manager.
Appendices
User's Guide 43
Step 6. Start the license server with the license file (if you installed the license server without the license file).
Note: If you successfully started the license server in Step 5, you should skip this step.
For Linux* or OS X*: a. Copy the license file from either Step 4 if you combined licenses or the file your received from the Intel®
Software Development Products Registration Center in Step 2 into the license server install location. b. Change directory to the location where the license server is installed. (e.g. cd <install-directory>).
c. Run the command `pwd`/lmgrd –c `pwd`/server.lic –l `pwd`/lmgrd.log. d. Open and read the license server log file (lmgrd.log).
For Windows*: a. Copy the license file from either Step 4 if you combined licenses or the file your received from the Intel®
Software Development Products Registration Center in Step 2 into C:\Program Files\Common
Files\Intel\Licenses. b. Click on Start > Programs > Intel(R) Software Development Products > Intel(R) Software License Manager >
Configure Intel(R) Software License Manager. c. Browse to the server license that was copied into C:\Program Files\Common
Files\Intel\Licenses in Step 6a. d. Open and read the license server log file (C:\Program Files\Common
Files\Intel\LicenseServer\IFLEXlmLog.txt).
For all supported operating systems: e. If you see any issues in the log file that you are unable to resolve on your own, submit a support request.
1. Attach the log file. 2. Attach the license file used to start the Intel® Software License Manager.
Step 7. Configure the client systems before installing client applications. a. Ensure the client system has access to the license server or a copy of the floating license used to install the
Intel® Software License Manager. b. If you wish to use a license file rather than the port@host mechanism, copy the floating license file from Step
2 or Step 4, as applicable, to the client system in the one of the following locations: For Linux*: /opt/intel/licenses
For OS X*: /Users/Shared/Library/Application Support/Intel/Licenses For Windows*: C:\Program Files\Common Files\Intel\Licenses
c. Set the INTEL_LICENSE_FILE environment variable to point to the server using the port@host format or to the license file copied in Step 7b above.
d. Verify that any firewall allows communication between the client and server systems. See the
Troubleshooting chapter of the user guide for more details.
Step 8. Install the client application and make sure license checkout is successful. a. Install the client software. b. If installation fails, set the environment variable INTEL_LMD_DEBUG to <temp-directory-
location>/LicenseCheckout.log and run the install again. c. Search for the string “checkout: environment” in the LicenseCheckout.log created in the previous
step. d. Review the list of licenses and the order used. e. Verify the valid floating license is in the list. f. Look for error messages and correct if possible. g. If you are unable to solve any issues on your own, submit a support request according to the instructions in
the Support Requests section of the user guide.
Step 9. Make sure the product works.