Embed Size (px)
Citation preview

Using the 3270 Terminal Emulator
Part Number 9300677, Revision ANovember, 1998
Network Computing Devices, Inc.
350 North Bernardo Avenue
Mountain View, California 94043
Telephone (650) 694-0650
FAX (650) 961-7711

CopyrightsCopyright © 1998 by Network Computing Devices, Inc. The information contained in this
document is subject to change without notice. Network Computing Devices, Inc. shall not be liable
for errors contained herein or for incidental or consequential damages in connection with the
furnishing, performance, or use of this material. This document contains information which is
protected by copyright. All rights are reserved. No part of this document may be photocopied,
reproduced, or translated to another language without the prior written consent of Network
Computing Devices, Inc.
Trademarks
Network Computing Devices, PC-Xware, and XRemote are registered trademarks of Network
Computing Devices, Inc. Explora, HMX, Marathon, NCDware, ThinSTAR, and WinCenter are
trademarks of Network Computing Devices, Inc.
PostScript, Display PostScript, FrameMaker, and Adobe are trademarks of Adobe Systems
Incorporated.
MetaFrame and WinFrame are trademarks of Citrix Systems, Inc.
UNIX is a registered trademark in the United States and other countries licensed exclusively
through X/Open Company Limited.
X Window System is a trademark of X Consortium, Inc.
Windows 95, Windows NT, and Windows Terminal Server are trademarks of Microsoft
Corporation. Windows and Microsoft are registered trademarks of Microsoft Corporation.
Other trademarks and service marks are the trademarks and service marks of their respective
companies.
All terms mentioned in this book that are known to be trademarks or service marks have been
appropriately capitalized. NCD cannot attest to the accuracy of this information. Use of a term in
this book should not be regarded as affecting the validity of any trademark or service mark.
Revision History
Revision history of this document:Part Number Revision Date Description9300677 Rev A November, 1998 Added NCDware 5.1 features
9300380 Rev A December, 1995 Added NCDware 4.1 and 3.5 features
9300359 Rev A July, 1995 Changed binding; no technical changes.
9300281 Rev A April, 1994 Initial publication of guide.

Before You Begin
Intended AudienceThis document is for system administrators who install and
maintain NCD terminals and for users of the 3270 emulator
and the Keymap Editor.
Using this ManualThe following table lists the most commonly performed tasks
described in this manual.
To Perform this Task... See...
Getting a general description of
emulator and Keymap Editor features
Chapter 1, Introduction
Setting up terminals to run the emulator Chapter 2, Preparing Terminals and Hosts for
Emulator Use
Installing NCDware NCDware Release Notes and the NCDware CD
insert
Getting information about basic
emulator usage
Chapter 3, Getting Started with Emulator Usage
Starting an application Chapter 3, Getting Started with Emulator Usage
Customizing emulator windows Chapter 4, Using and Customizing the 3270
Emulator
Configuring the 3270 Host Chooser Chapter 4, Using and Customizing the 3270
Emulator
Before You Begin iii

Using the Keymap Editor Chapter 4, Using and Customizing the 3270
Emulator
Using the 3287 print emulator and
printing from 3270 emulator menus
Chapter 4, Using and Customizing the 3270
Emulator
Creating customized menus for starting
applications and configuring the
window manager to start automatically
Chapter 5, Using and Customizing the Local NCD
Window Manager
Customizing application sessions using
either record and play back macros or
the EHLLAPI programmatic interface
Chapter 6, Application Programming Interface
Methods
Finding the reason for an error message
or contact NCD Technical Support
Chapter 7, Troubleshooting
Finding reference information about
emulator menus
Appendix A
Finding reference information about
emulator command-line options and X
resources
Appendix B
Finding man pages for the 3270
emulator, the 3287 print emulator, and
the Keymap Editor
Man pages are installed when you install
NCDware
Finding definitions of words and
concepts
Glossary
To Perform this Task... See...
iv Before You Begin

Text ConventionsThis document uses the following conventions:
Ctrl-Z indicates that you should press two keys at the
same time; in this case the Ctrl key and Z.
⇒ indicates movement through menus. For
example, the phrase “In the Console, select
Statistics ⇒ Show Version” means that you
display the Statistics menu and select the
Show Version menu item.
bold indicates a directory, file, or remote
configuration parameter, such as /tftpboot, or
boot-automatically.
bold italic indicates a variable or a utility, such as Xncdxxxwhere xxx indicates the variable portion.
italic indicates emphasis or the name of a
publication, such as Using the 3270 TerminalEmulator.
courier indicates information displayed on the screen
or entries in a file.
boldcourier
indicates information you should type.
Before You Begin v

Where to Find More InformationFor a list of publications about using NCDware and NCD
terminals, see the NCDware Release Notes or the Roadmapaccompanying your software.
NCD Technical Support is another source of information and
help. For instructions on how to reach Technical Support, see
Chapter 7.
For sources of information about the X Window System, see
the Bibliography.
Comments on the ManualYou can send comments, suggestions, or questions about this
document to the NCD Technical Publications Department by
Internet e-mail. Write to [email protected].
vi Before You Begin

Contents
Chapter 1 Introduction
NCD Terminals and the 3270 Emulator 1-1
Features of the 3270 Emulator 1-2
Color Modes, Case Modes, and Extended Attributes 1-2
Easy Access to Emulator Features 1-2
Ease of Administration 1-4
Easy, Flexible Keyboard Use 1-4
Local Window Management 1-5
Application Programming Interface 1-5
Record and Playback Macros 1-5
EHLLAPI 1-5
3270 Features Not Included 1-5
Chapter 2 Preparing Terminals and Hosts for Emulator Use
Supported Terminals and Memory Requirements 2-1
License Requirements 2-1
Terminal Setup and Network Connection 2-1
X Server Installation 2-2
Host Computer Connection 2-3
Connection Methods 2-3
Host Configuration 2-4
Terminal Configuration for Connecting to a 3270 Host 2-5
vii

Contents
Configuring a Terminal for TN3270 2-5
Configuring a Terminal for BrxPU2.1 2-6
Chapter 3 Getting Started with Emulator Usage
Using the Mouse 3-1
Booting the Terminal 3-2
Starting the Emulator 3-3
The 3270 Terminal Emulator Window 3-4
Starting and Using the Local NCD Window Manager 3-8
Connecting to a Host Computer 3-10
Using Basic Emulator Features 3-12
If the Application Requires a Light Pen 3-12
Using the Key Pad for IBM Key Functions 3-12
Changing the Color Mode 3-13
Changing the Case of Text 3-14
Using Cut/Copy and Paste 3-15
Printing an Emulator Window 3-16
Using Terminal Hardware and Software Controls 3-17
Reconnecting to the Host 3-18
Disconnecting from the Host 3-18
Terminating the Emulator 3-18
Chapter 4 Using and Customizing the 3270 Emulator
Guidelines for Accessing Files 4-1
Methods of Starting the Emulator 4-2
Starting an Emulator from a Command Line 4-2
Starting a Standard TN3270 Connection 4-2
Starting a BrxPU2.1 Connection 4-2
Starting an Emulator for Use with IBM Graphics
viii

Contents
Applications 4-3
Starting an Emulator Automatically 4-4
Using XDM (X Display Manager) 4-4
Using Remote Configuration 4-5
Starting an Emulator from a Window Manager Menu 4-5
From the Default Window Manager Menu 4-5
Starting an Emulator from a Custom Window ManagerMenu 4-5
Methods of Customizing the Emulator 4-6
Options Menu 4-6
Configuring the Emulator with X Resources 4-6
Using Resource Files 4-7
Using Remote Configuration 4-7
Configuring the Emulator with Command-Line Options 4-8
Customizing the 3270 Host Chooser and Emulator 4-9
Configuring the 3270 Host Chooser 4-9
Using the Remote Configuration File 4-9
Using the Setup Menus 4-10
Creating a Named Version (Instance) of an Emulator 4-10
Changing Colors and Color Modes 4-11
Changing the Color Mode 4-11
Changing Colors 4-12
Changing and Adding Fonts 4-12
Removing the Menu Bar from the Emulator 4-13
Changing the Case Mode 4-13
Specifying the 3278 Model Type 4-13
Specifying Initial Size and Placement of the EmulatorWindow 4-14
Window Placement 4-14
ix

Contents
Window Size 4-15
Starting the Emulator as an Icon 4-15
Changing the Window or Icon Title 4-15
Working with Keyboards 4-16
About NCD Keyboards 4-16
Using the Keymap Editor 4-17
About the Keymap Editor 4-17
Starting the Keymap Editor 4-18
Keymap Editor Window and Menus 4-19
Basic Mode—Mapping the Keyboard 4-21
Writing a Keymap to a File and Applying a Keymap to aWindow 4-22
Importing a Keymap from a File or Window 4-24
Using Advanced Mode 4-25
Quitting the Keymap Editor 4-28
Alternative Ways of Changing Keymaps 4-28
Using Translations 4-28
Using xmodmap 4-29
Default 3270 Emulator Keymap 4-29
Using an Alternative ASCII/EBCDIC Conversion Table 4-33
Specifying an Alternate Conversion Table 4-33
Conversion File Format 4-33
Setting Up Print Services 4-35
Connecting a Printer to the Terminal 4-35
Cabling 4-35
Configuring the Terminal for Printing 4-35
Using the 3287 Print Emulator 4-36
Starting the Print Emulator 4-37
Terminating the Print Emulator 4-39
Printing Window Contents 4-39
x

Contents
Using the Setup Menus 4-40
Using a Remote Configuration File 4-41
Specifying a Local Printer 4-42
Specifying a Remote Printer 4-42
Chapter 5 Using and Customizing the Local NCD WindowManager
Starting the Local Window Manager 5-1
Starting the Window Manager from a Command Line 5-1
Using the ncdrunwm Utility 5-2
Using the ncdlaunchd Utility 5-2
Starting the Window Manager Automatically 5-2
Using an XDM Startup File 5-3
Using Remote Configuration 5-3
Using and Configuring Root Menus 5-3
The Default Root Menu 5-3
Configuring Custom Menus 5-4
Shutting Down the Window Manager 5-5
Performing Window Manager Operations 5-6
Minimizing a Window (Turning it into an Icon) 5-7
Restoring a Window from an Icon (Deiconifying) 5-8
Maximizing a Window 5-8
Resizing a Window 5-8
Moving a Window or an Icon 5-9
Raising or Lowering a Window 5-9
Closing a Window or an Icon 5-10
Chapter 6 Application Programming Interface Methods
Record and Playback Macros 6-1
Enabling and Disabling the Macro Feature 6-2
xi
Contents
Recording and Naming a Macro 6-2
Saving Macros in Files and Placing them in the Run MacrosMenu 6-2
Playing a Macro 6-3
Stopping a Macro 6-3
Renaming Macros 6-3
Preparing to Use EHLLAPI 6-3
Chapter 7 Troubleshooting
Error Messages Produced by ncd3270 7-1
Message Format and Severity Levels 7-1
List of Error Messages 7-2
Contacting Technical Support 7-16
Sending E-Mail or Faxes to Technical Support 7-16
Using the Web 7-17
Phoning Technical Support 7-17
Information to Provide 7-17
Appendix A Emulator Menus
File Menu A-1
Options Menu A-2
Color Mode Options A-2
Case Mode Options A-2
Light Pen Option A-3
Cut/Copy and Paste Options A-3
Keys Menu A-4
Macros Menu A-4
Appendix B Emulator Options and X Resources
Command-Line Options B-1
xii

Contents
X Resources B-6
Bibliography
Index
xiii

Contents
xiv

1 Introduction
This chapter introduces NCD terminals and ncd3270, NCD’s
3270 terminal emulator.
NCD Terminals and the 3270 EmulatorAn NCD terminal consists of a bit-mapped graphical display
monitor, a keyboard and mouse for user input, and a base
containing processors that run the X server (the software that
controls terminal hardware and communicates with the
network). NCD terminals permit quick and easy connection to
Ethernet or Token-Ring networks.
Terminals running ncd3270 provide access to applications on
IBM mainframes (and on other hosts that run IBM software)
while allowing simultaneous access to applications running
on UNIX systems and on Microsoft Windows NT systems.
Each application displays in its own window.
The ncd3270 emulator is a local X client (application program)
that is integrated into the X server. The local client echoes
keystrokes to the display and performs locally all of the
functions normally performed by a 3278 terminal.
Users of traditional 3278 terminals see a recognizable interface
and easy-to-use features. Using a mouse and pulldown
menus, users can open multiple 3270 windows (up to 16 at a
time) and set options for each window.
System administrators can arrange for emulator windows to
open automatically when the terminal starts, customize
emulator windows, and configure menus for selecting
multiple customized emulator windows or other applications.
Besides the 3270 terminal emulator, NCDware includes a local
VT320 terminal emulator.
Introduction 1-1

Features of the 3270 Emulator
Features of the 3270 EmulatorThis section describes features of the NCD 3270 terminal
emulator.
Color Modes, Case Modes, and Extended AttributesThe NCD 3270 terminal emulator is fully compatible with IBM
3278 terminals, including:
❏ Extended attributes: blinking, reverse video, and
underlining
❏ Full-color mode (8 and 16 colors), base-color mode, and
monochrome or reverse video
❏ Full choice of colors
❏ Mixed-case and uppercase mode
Easy Access to Emulator FeaturesThe 3270 emulator offers users easy access to its features:
❏ 3179 emulation (accessed through a separate Console
menu item from the standard version of the 3270
emulator) for IBM mainframe graphics (Graphical Data
Display Manager) applications
❏ Cut-and-paste or copy-and-paste within a 3270 emulator
window, between 3270 emulator windows, and between
a 3270 window and other programs. The user can cut or
copy and paste by line, by input fields, or by rectangular
regions of the window.
❏ A mouse-activated Key Pad that allows easy access to
IBM keyboard functions from any NCD keyboard
❏ Optional 3270 keyboard
❏ Menu access to record and playback macros for
mainframe application session management
❏ Simple terminal configuration for EHLLAPI usage
❏ An enhanced local status line (operator information
area), displaying the status of the host connection,
including error codes and other information that appears
in a 3278 terminal’s status line
1-2 Introduction

Features of the 3270 Emulator
❏ System request and attention key for session switching
and requesting an LU (logical unit) session from the
mainframe
❏ Dynamic resizing of fonts. An emulator window of any
size always contains a properly scaled, full 3270 display
screen. Each emulator window represents a full terminal
session, whether it is full screen or some other size.
❏ 3270 Host Chooser for easy selection of application hosts
❏ Pulldown menus for access and print options, including:
— Connection, reconnection, and disconnection fromapplication hosts
— 3278 model selection (2, 3, 4, and 5)
— Printing the window contents to a local or remoteASCII, Postscript, or Windows NT Postscript printer
❏ Pulldown menus for changing window options:
— Cut-and-paste or copy-and-paste styles
— Color modes
— Case modes
— Light pen (using the mouse as a light pen selector)
❏ Pulldown menus for the Key Pad and Keymap Editor
❏ 3287 emulator, including window access for printer
selection and process termination, for printing from a
mainframe to a printer on a local or a remote terminal
Introduction 1-3

Features of the 3270 Emulator
Ease of AdministrationFeatures that make the 3270 emulator easy to manage are:
❏ Built-in network interfaces for Ethernet or Token-Ring
networks and direct connection through the Telnet 3270
protocol or the Brixton PU2.1 SNA protocol over TCP/IP
❏ Booting from a network host or a local PC card
❏ Configurable 3270 Host Chooser
❏ Custom application menus through a local or a host-
based window manager
❏ Dynamic and permanent keyboard remapping
❏ Ability to start the emulator from menus, command
lines, and terminal configuration files
❏ Complete configurability through command-line options
and X resources
Easy, Flexible Keyboard UseWhen the emulator starts, it automatically maps IBM functions
to any NCD keyboard. Users can access IBM keyboard
functions from the keyboard or from the Key Pad.
An optional 3270 Lexmark keyboard makes the user interface
more comfortable for users of traditional 3278 terminals. This
is the same keyboard used by IBM for its 3270-style terminals.
The Keymap Editor provides a graphical method of assigning
3270 functions to any keyboard keys. You remap the keyboard
through simple drag-and-drop operations with the mouse. An
advanced mode offers complete flexibility and custom
functions by providing a graphical interface to the complete X
Window System key translation facility.
Keymap information can be maintained in files and applied to
emulator windows automatically when the window opens.
This allows key layouts to be customized per application, per
user, and per site.
You can apply existing Brixton keymap files (version 1.2 only)
to your emulator windows.
1-4 Introduction

Features of the 3270 Emulator
Local Window ManagementThe local NCD Window Manager (ncdwm) allows the user to
manipulate multiple windows (resizing, moving, raising, and
lowering). If you prefer, you can run your customary host-
based window manager. You can use local Motif Window
Manager if you have a license for it.
Using a local window manager or a host-based window
manager, you can configure custom menus to offer users easy
access to applications.
Application Programming InterfaceRecord and Playback Macros
To simplify management of mainframe application sessions,
the 3270 emulator includes a macro language, accessible
through the Macro menu, for recording and playing back
sessions.
Chapter 6, Application Programming Interface Methods
describes record and playback macros.
EHLLAPIEHLLAPI (Extended High-Level Language Application
Program Interface) is a programmatic interface to IBM host
applications for 3270 terminals, used for writing emulator
drivers in the C programming language.
Chapter 6 describes how to configure the terminal for
EHLLAPI usage. The Brixton EHLLAPI Programmatic InterfaceManual describes EHLLAPI usage in detail.
3270 Features Not IncludedThe ncd3270 terminal emulator does not include file transfer
through the emulator.
Introduction 1-5

Features of the 3270 Emulator
1-6 Introduction

2 Preparing Terminals and Hosts for EmulatorUse
This chapter contains information about the following system
administration tasks:
❏ Making sure your terminals have sufficient memory to
run the 3270 terminal emulator; you need the NCDwareRelease Notes for this task
❏ Licensing each terminal for 3270 emulation
❏ Setting up terminals and connecting them to an Ethernet
or Token-Ring network
❏ Installing X servers on a network host accessible to the
terminals and configuring terminals; you need the
NCDware CD insert for this task
❏ Making sure that terminals can communicate with hosts
Supported Terminals and Memory RequirementsThe NCDware Release Notes list the minimum terminal
memory requirements.
License RequirementsA 3270 license is required for each terminal running the
ncd3270 emulator. Only one license is required per terminal,
no matter how many emulator windows are opened.
Terminal Setup and Network ConnectionMake sure your terminals are set up and attached to an
Ethernet or Token-Ring network as described in the hardware
booklet included with each terminal.
Preparing Terminals and Hosts for Emulator Use 2-1

X Server Installation
X Server InstallationYou must have X servers installed on a network host before
the terminal can boot (start up). See the NCDware Release Notesfor descriptions of the X server and requirements for
installation hosts. See the NCDware CD insert for software
installation instructions.
You must install an X server on a host computer whether you
intend to boot from the network or from a PC card.
The installation host must have the following protocol(s)
enabled for downloading a server to the terminal or copying a
server to a PC card:
❏ The usual protocol for downloading a server is TFTP
(Trivial File Transfer Protocol). Terminals with Boot
Monitor Version 2.6 or later can use NFS (Network File
System) as well as TFTP for downloading a server.
❏ The protocols for copying a server from the installation
host to a terminal’s PC card are TFTP or NFS.
2-2 Preparing Terminals and Hosts for Emulator Use

Host Computer Connection
Host Computer ConnectionTN3270The TN3270 protocol is defined in thepublic domain, and products arewidely available (for example,Brixton’s BrxTN3270 Server).
The 3270 emulator uses the TN3270 protocol or the BrxPU2.1
SNA (Systems Network Architecture) protocol over TCP/IP to
access applications running on a mainframe or midrange
application host.
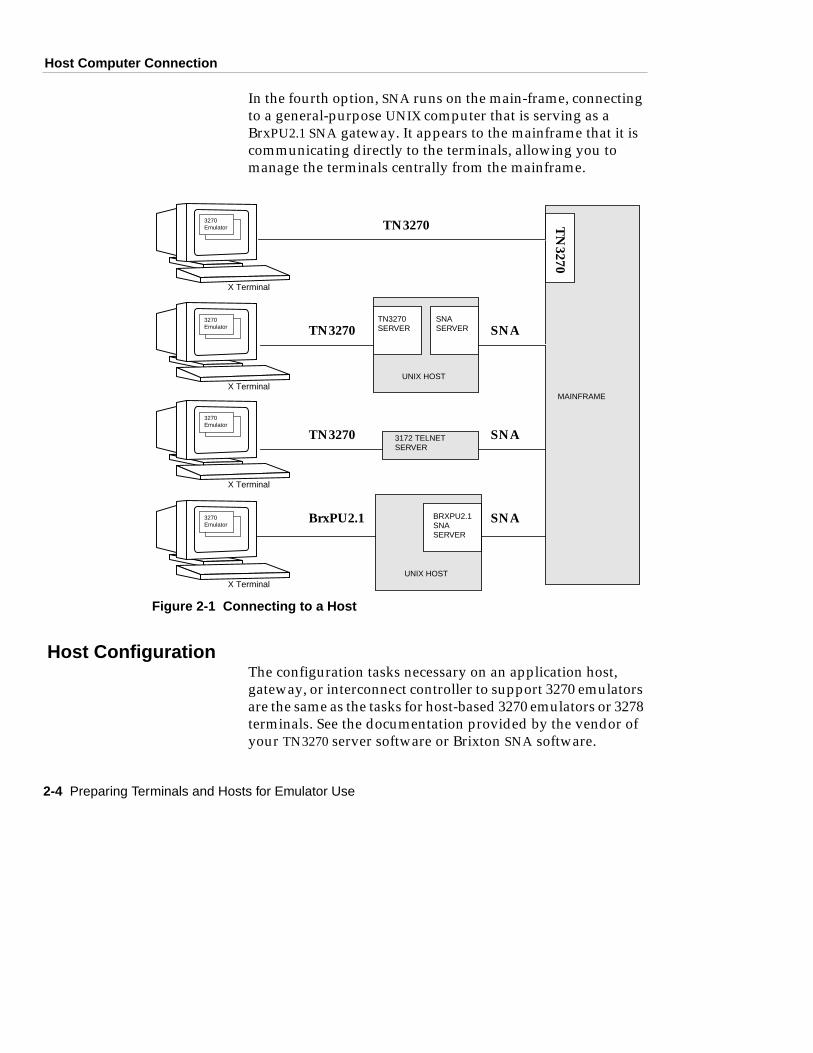
Connection MethodsThere are four ways of connecting to an application host to
run 3270 applications (Figure 2-1):
❏ The terminal connects directly to an application host on
an Ethernet or Token-Ring network running TCP/IP. The
application host must be running TCP/IP and TN3270.
For example, you can connect directly to an application
host running MVS TCP/IP.
BrxPU2.1Brixton’s PU2.1 SNA gatewaysoftware, providing a physicalconnection to the SNA network.
❏ The terminal connects to a general-purpose UNIX host
computer (for example, an IBM RS/6000) on an Ethernet
or Token-Ring network running TCP/IP. This host must
be configured to serve as an SNA gateway and must run
Brixton’s BrxPU2.1 SNA software. In addition, the
terminal must be configured for the BrxPU2.1 connection.
❏ The terminal connects to a general-purpose UNIX host
computer (for example, an IBM RS/6000) on an Ethernet
or Token-Ring network running TCP/IP and TN3270. This
host (or another) can also be running the SNA gateway,
such as the BrxPU2.1 server.
❏ The terminal connects to a special-purpose TELNET
server host, such as an IBM 3172 LAN controller, on an
Ethernet or Token-Ring network running TCP/IP.
In the first three connection options, the TN3270 server runs on
the mainframe or on another host serving as an SNA gateway
to the mainframe. A gateway host can be a general-purpose
UNIX computer or a special-purpose host, such as an IBM 3172
LAN controller. The gateway converts SNA to TCP/IP.
Preparing Terminals and Hosts for Emulator Use 2-3
Host Computer Connection
In the fourth option, SNA runs on the main-frame, connecting
to a general-purpose UNIX computer that is serving as a
BrxPU2.1 SNA gateway. It appears to the mainframe that it is
communicating directly to the terminals, allowing you to
manage the terminals centrally from the mainframe.
Host ConfigurationThe configuration tasks necessary on an application host,
gateway, or interconnect controller to support 3270 emulators
are the same as the tasks for host-based 3270 emulators or 3278
terminals. See the documentation provided by the vendor of
your TN3270 server software or Brixton SNA software.
Figure 2-1 Connecting to a Host
TN3270
TN3270
TN
3270
MAINFRAME
UNIX HOST
SNATN3270SERVER
SNASERVER
X Terminal
3270Emulator
X Terminal
3270Emulator
TN3270 3172 TELNETSERVER
SNA
X Terminal
3270Emulator
UNIX HOST
BRXPU2.1SNASERVER
SNABrxPU2.1
X Terminal
3270Emulator
2-4 Preparing Terminals and Hosts for Emulator Use

Terminal Configuration for Connecting to a 3270 Host
Terminal Configuration for Connecting to a 3270 HostTipIf you do not know how to boot theterminal, use the mouse, or accessthe NCDware Console, see theinstructions in Chapter 3.
To configure a terminal to connect to a 3270 application host,
you may need to alter the default terminal configuration to
establish the connection. The configuration steps include
specifying:
❏ The protocol to use for connecting to the host
❏ The host to which the terminal should seek a connection
❏ The port to use for connecting to the host
If you are not familiar with methods of configuring terminals,
see the NCDware System Administrator’s Guide for more
information.
Configuring a Terminal for TN3270To connect to the host via TN3270 over TCP/IP, you do not
need to alter the protocol specification. The default
configuration uses TN3270.
The default settings establish a TN3270 connection via port
number 23.
TipTo specify the default host in a remoteconfiguration file, use the ncd3270-tn-default-host parameter.
To specify an application host to which the terminal connects
by default:
1. Select Setup ⇒ Change Setup Parameters ⇒ 3270
Terminal Emulation ⇒ TN3270 Default Host.
2. Click in the TN3270 Default Host field, delete the
existing entry if there is one, and type the name or IP
address of the host to which you want to connect.
3. Click Apply to apply the change for the current session.
TipTo specify the default port in a remoteconfiguration file, use the ncd3270-tn-default-port parameter.
To change the port used for the TN3270 connection:
1. Select Setup ⇒ Change Setup Parameters ⇒ 3270
Terminal Emulation ⇒ TN3270 Default tcp Port.
2. Click in the TN3270 Default tcp Port field and type the
port number you want to use.
3. Click Apply to apply the change for the current session.
Preparing Terminals and Hosts for Emulator Use 2-5

Terminal Configuration for Connecting to a 3270 Host
Configuring a Terminal for BrxPU2.1TipTo specify the default protocol in aremote configuration file, use thencd3270-default-protocolparameter.
To connect to the host via the BrxPU2.1 SNA protocol over
TCP/IP, you must specify BrxPU2.1 as the default protocol to
use:
1. Select Setup ⇒ Change Setup Parameters ⇒ 3270
Terminal Emulation ⇒ NCD3270 Default Protocol.
2. Select PU2.1 from the NCD3270 Default Protocol drop-
down list.
3. Click Apply to apply the change for the current session.
TipTo specify the default host in a remoteconfiguration file, use the ncd3270-pu21-default-host parameter.
To specify the application host to which the terminal connects
by default:
1. Select Setup ⇒ Change Setup Parameters ⇒ 3270
Terminal Emulation ⇒ PU2.1 Default Host.
2. Click in the PU2.1 Default Host field, delete the existing
entry if there is one, and type the name or IP address of
the application host to which you want to connect.
3. Click Apply to apply the change for the current session.
TipTo specify the default port in a remoteconfiguration file, use the ncd3270-pu21-default-port parameter.
The default port is 5020. To change the port used for the
BrxPU2.1 connection:
1. Select Setup ⇒ Change Setup Parameters ⇒ 3270
Terminal Emulation ⇒ PU2.1 Default tcp Port.
2. Click in the PU2.1 Default tcp Port field and type the
port number you want to use.
3. Click Apply to apply the change for the current session.
2-6 Preparing Terminals and Hosts for Emulator Use

3 Getting Started with Emulator Usage
This section describes how to get the 3270 emulator running and
connected to the application host.
The major steps are:
❏ Booting the terminal
❏ Starting the 3270 emulator
❏ Starting the local window manager (optional)
❏ Connecting to a host computer
❏ Using basic emulator and terminal features
❏ Disconnecting from the mainframe when you are finished
with the application
❏ Terminating the 3270 emulator
Using the MouseMany of the procedures in this manual require the use of the
mouse. Table 3-1 describes the different types of mouse actions.
Use mouse button 1 unless another button is specified. Mouse
button 1 is the left mouse button unless the mouse has been
reconfigured.
Table 3-1 Mouse Actions
Action Description
Click Move the mouse so the pointer is on the area you want to affect. Quickly press
and release a button.
For example, when using a window manager, clicking the left button in a
window is the default method to specify the active window. The active window is
the window that receives your input.
Double click Click a mouse button twice quickly.
Getting Started with Emulator Usage 3-1

Booting the Terminal
Booting the TerminalBooting the terminal causes the X server to be loaded and executed.
To boot (start up) an NCD terminal:
1. If the terminal is turned off, turn on the power switch.
2. If the terminal is already turned on, use the Console’s Rebootcommand:
a. To display the Console window (Figure 3-1), press theSetup key. For NCD keyboards without a Setup key, use thekey combinations listed in Table 3-2.
b. Select Reboot from the Console menu. In the Console menu
bar, click Console; then click Reboot .
c. A small Reboot window appears. Click OK.
3. The screen turns black and numerous messages appear.
4. A background pattern or color appears on the screen.
Depending upon how your terminal is configured, you may
see one or more windows on the screen.
Press Press a mouse button and hold it down for a while before releasing it.
Drag Press a mouse button and move the mouse while holding the button down.
For example, dragging is used with a window manager to move a window to a
new location.
Release Remove your finger from a mouse button to complete the action.
Table 3-1 Mouse Actions (Continued)
Action Description
Figure 3-1 Console Window
MessagesHide Box
Menu Bar
3-2 Getting Started with Emulator Usage

Starting the Emulator
5. If a login window appears, you can log in as you normally
would.
Starting the EmulatorTo start the NCD 3270 emulator:
1. If the Console window is not on the screen, press the Setup
key or the Setup key equivalent listed in Table 3-2.
2. Click Terminals in the Console menu bar to display the
Terminals menu.
3. Start a 3270 terminal emulator:
— Click New 3270 to start a standard 3270 emulator window
— Click New 3179G to start a 3270 emulator window for use
with host IBM mainframe graphics applications (GDDM)
A 3270 emulation window appears.
Table 3-2 Setup Key Equivalents
Keyboard Key Combinations
Sun Type-4-compatible Press the Alt Graph key and the
Help Setup key simultaneously.
VT220-style Press the Compose key and the F3
key simultaneously.
108-key-style Press the Alt key and the F3 key
simultaneously.
122-key 3270-compatible Press the Alt key and the Alt-ExSel
key simultaneously.
Windows 95-compatible Press the Pause key.
Getting Started with Emulator Usage 3-3

The 3270 Terminal Emulator Window
The 3270 Terminal Emulator WindowA typical emulator window is shown in Figure 3-2.
The window’s parts are:
❏ The window frame running all around the window includes
the title bar, window border, and buttons.
The frame is not part of the emulator; it is provided by another
program, called a window manager. Most users of terminals
use a window manager to manipulate the multiple windows
that may appear on their screens.
If the window manager is not already running, see “Starting
and Using the Local NCD Window Manager” on page 3-8.
❏ The menu bar offers menus from which to select emulator
operations and options.
Figure 3-2 3270 Emulator Window
Emulator Menu Bar
Matte
Emulation Screen
Operator Information Area
Window Frame
Window Frame
3-4 Getting Started with Emulator Usage

The 3270 Terminal Emulator Window
❏ The matte surrounds the emulation screen. The matte varies in
size depending on the 3278 emulation model, the dimensions
of the window, and the available font sizes.
❏ The emulation screen displays the data transmitted by host
applications and accepts your keyboard input.
❏ The operator information area (also called the status line)
displays the status of the network connection and the local
status of the emulator.
The operator information area in Figure 3-2 shows that the
emulator is currently connected to a TN3270 server, keyboard
input is enabled, and the cursor is at column 30 in row 14. The
emulator is waiting for input, is not in insert mode, and is
connected to port 5500 on the host called hansen.
Figure 3-3 shows the fields in the operator information area
for a TN3270 connection.
Figure 3-3 Operator Information Area Fields for a TN3270 Connection
Host and Port
Cursor LocationHost Connection Status
Wait
Input Status
Insert Mode
Insert hansen:5500 14 30Connected
Getting Started with Emulator Usage 3-5
The 3270 Terminal Emulator Window
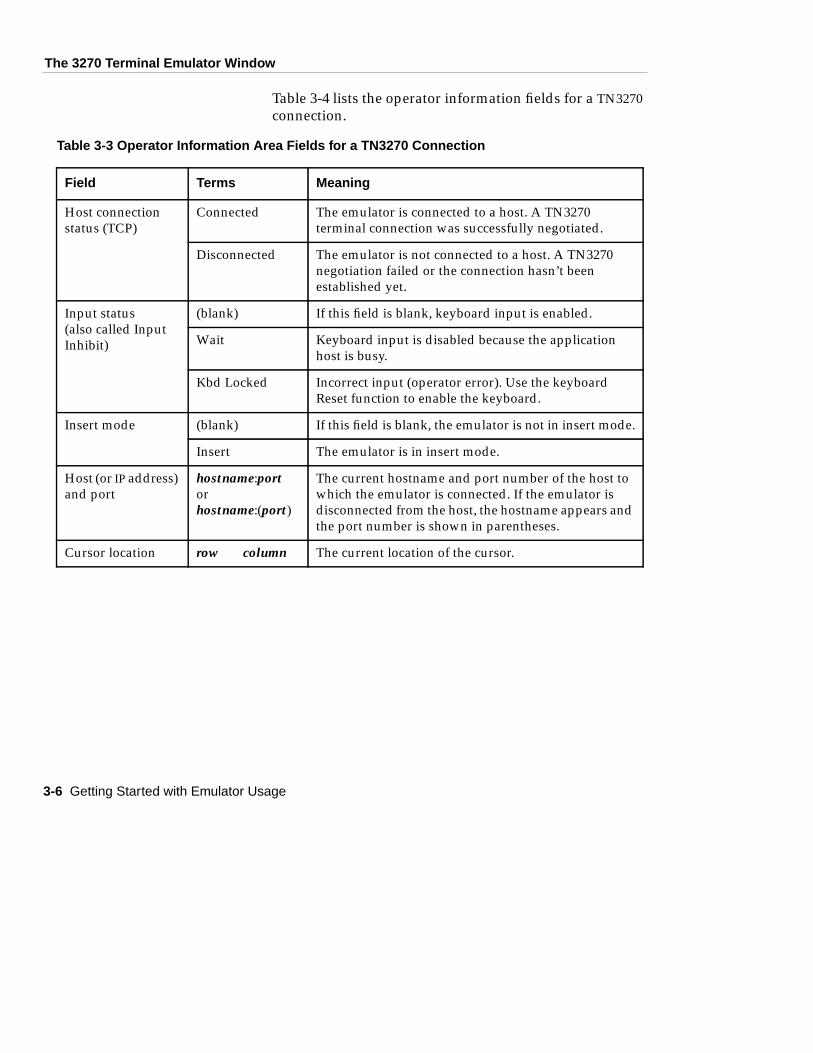
Table 3-4 lists the operator information fields for a TN3270
connection.
Table 3-3 Operator Information Area Fields for a TN3270 Connection
Field Terms Meaning
Host connection
status (TCP)
Connected The emulator is connected to a host. A TN3270
terminal connection was successfully negotiated.
Disconnected The emulator is not connected to a host. A TN3270
negotiation failed or the connection hasn’t been
established yet.
Input status
(also called Input
Inhibit)
(blank) If this field is blank, keyboard input is enabled.
Wait Keyboard input is disabled because the application
host is busy.
Kbd Locked Incorrect input (operator error). Use the keyboard
Reset function to enable the keyboard.
Insert mode (blank) If this field is blank, the emulator is not in insert mode.
Insert The emulator is in insert mode.
Host (or IP address)
and port
hostname:portor
hostname:(port)
The current hostname and port number of the host to
which the emulator is connected. If the emulator is
disconnected from the host, the hostname appears and
the port number is shown in parentheses.
Cursor location row column The current location of the cursor.
3-6 Getting Started with Emulator Usage

The 3270 Terminal Emulator Window
Table 3-4 lists the operator information fields for a BrxPU2.1 SNA
connection.
Table 3-4 Operator Information Area Fields for a BrxPU2.1 SNA Connection
Field Terms Meaning
Status Inactive LU The SSCP (System Services Control Point)-LU session
has not been established by the host.
System Operator The SSCP-LU session owns the terminal display.
My Job The LU-LU session owns the display; the terminal
display is connected to the operator’s application
program.
Unowned The LU-LU session owns the display.
Disconnected The BrxPU2.1 SNA connection has not been
established.
Keyboard Input
Readiness
Blank Keyboard input is enabled.
Wait Keyboard input is disabled
Terminal Insert
Modes
Blank The emulator is not in insert mode.
Insert The emulator is in insert mode.
LU (EHLLAPI
session name)
LU_number Displays the current logical unit. If an EHLLAPI
session has been established, the session name is
displayed in parentheses following the LU.
PU PU_number Displays the current physical unit name.
Port port_number Displays the current PU port number.
Cursor row column Displays the current location of the cursor.
Getting Started with Emulator Usage 3-7

Starting and Using the Local NCD Window Manager
Starting and Using the Local NCD Window ManagerIf you are running multiple 3270 emulators or running other
applications besides the emulator, a window manager is essential.
For example, if a window manager is running, you can stack
windows, move them around, resize them, and iconify them (turn
them into tiny representations of windows called icons).
NCDware includes the local NCD Window Manager, which runs in
the terminal and provides all normal window manager functions
plus a default menu for starting other local clients.
You can quickly tell if a window manager is running by the
appearance of the windows on the screen. The window manager
adds a title bar and borders to each window.
If the local NCD Window Manager is not already running, select
Console ⇒ WindowMgr ⇒ NCD Window Manager.
To move a window into the foreground, place the mouse pointer in
the window’s title bar (rectangular area containing a title) and click
the left button. For other window operations, see Figure 3-4.
For more information about using the window manager, see
“Performing Window Manager Operations” on page 5-6.
3-8 Getting Started with Emulator Usage

Starting and Using the Local NCD Window Manager
Figure 3-4 Window Manager Operations—Mouse Method
Drag a corner or border to resize thewindow. Click a corner or border to bringthe window into the foreground or send itbehind other windows.
The title bar identifies the application running in thewindow. Click the left mouse button on the title bar tobring the window into the foreground. Click the rightmouse button to send it behind all other windows.
Click the menu button once todisplay the Window menu .Double click to terminate theemulator and close the window.
An icon. Double click it to convert it backinto a normal window. Click once on theicon to display the Window menu.
The area inside the bordersis under the control of theapplication program and iswhere the applicationreceives its input.
Click the maximizebutton once to expandthe window to cover theentire screen. Click itagain to restore thewindow’s original size.
Click the minimizebutton once to replacethe window with an icon.
Getting Started with Emulator Usage 3-9

Connecting to a Host Computer
Connecting to a Host ComputerThis section explains how to connect to a host computer by
selecting a host from the 3270 Host Chooser or entering the host’s
data in the Chooser. To connect to a host computer by entering its
data in the Chooser, you need the following information:
❏ The protocol by which you are connecting to the host
computer. You may be using TN3270 or BrxPU2.1.
❏ The name or IP address of the host to which the terminal is
connected. Depending upon how the terminal is connected,
the host may be a mainframe or another computer functioning
as a gateway to the mainframe.
❏ If you are not using the default port number, you also need a
TCP port number:
— If you are connecting to a Brixton TN3270 server, the default
port number is 5030. The default for many other TN3270
servers is 23.
— If you are connecting to a BrxPU2.1 gateway, the default port
number is 5020.
❏ The model (type of 3278 terminal to be emulated). The
emulated models are:
Table 3-5 3278 Models
Model Columns Rows
2 (default) 80 24
3 80 32
4 80 43
5 132 27
3-10 Getting Started with Emulator Usage

Connecting to a Host Computer
Complete these steps to connect to a host computer:
1. The 3270 Host Chooser is displayed when the emulator starts
(Figure 3-5).
2. Select a host from the 3270 Host Chooser or enter the host
data:
To select a host from the chooser:
a. Double click one of the hosts listed in the chooser window.
b. The chooser disappears, and the emulator connects to the
host.
To enter host data:
a. Double click in the Host: field and type the name or IP
address of the host to which the terminal is connected.
You may need to ask your system administrator for this
information and for the port number referred to in the next
step.
b. Double click in the Port: field and type the port number.
TipChanging the model afterconnecting to the mainframedisconnects you from themainframe.
c. If the model number displayed is not the model you want,
click in the Model field to display all of the available
models. Click the correct model number.
d. If the protocol displayed is not what you need, click in the
Protocol field to display the pulldown menu. Select the
correct protocol.
Figure 3-5 3270 Host Chooser
Getting Started with Emulator Usage 3-11

Using Basic Emulator Features
e. Click OK. The 3270 Host Chooser disappears, and the
emulator connects to the host.
3. When the emulator connects to the host, a login screen
appears in the 3270 window.
4. Click in the 3270 input area.
5. Log in and start the application just as you would on a 3270
terminal.
6. To redisplay the 3270 Host Chooser, click File in the menu
bar, and click New Connection .
Using Basic Emulator FeaturesThis section covers basic emulator usage.
If the Application Requires a Light PenIf your application requires a light pen, display the emulator’s
Options menu and select Light Pen:
TipUsing the mouse as a light penin one 3270 emulator windowdoes not affect mouse usagein other 3270 windows or inother applications.
1. Click Options in the menu bar.
2. Click Light Pen . The pointer changes to a pen shape.
3. The left mouse button now functions as a light pen. To select a
field, place the pointer in the field and click.
4. To deselect Light Pen and return the mouse to its normal
functions, repeat steps 1 and 2.
Using the Key Pad for IBM Key FunctionsYou can use IBM function keys from the keyboard or by using the
mouse and Key Pad. Use the Key Pad if:
❏ You don’t know which keys correspond to the IBM functions
you need, or
❏ You prefer to use key functions from a menu using the mouse
3-12 Getting Started with Emulator Usage
Using Basic Emulator Features
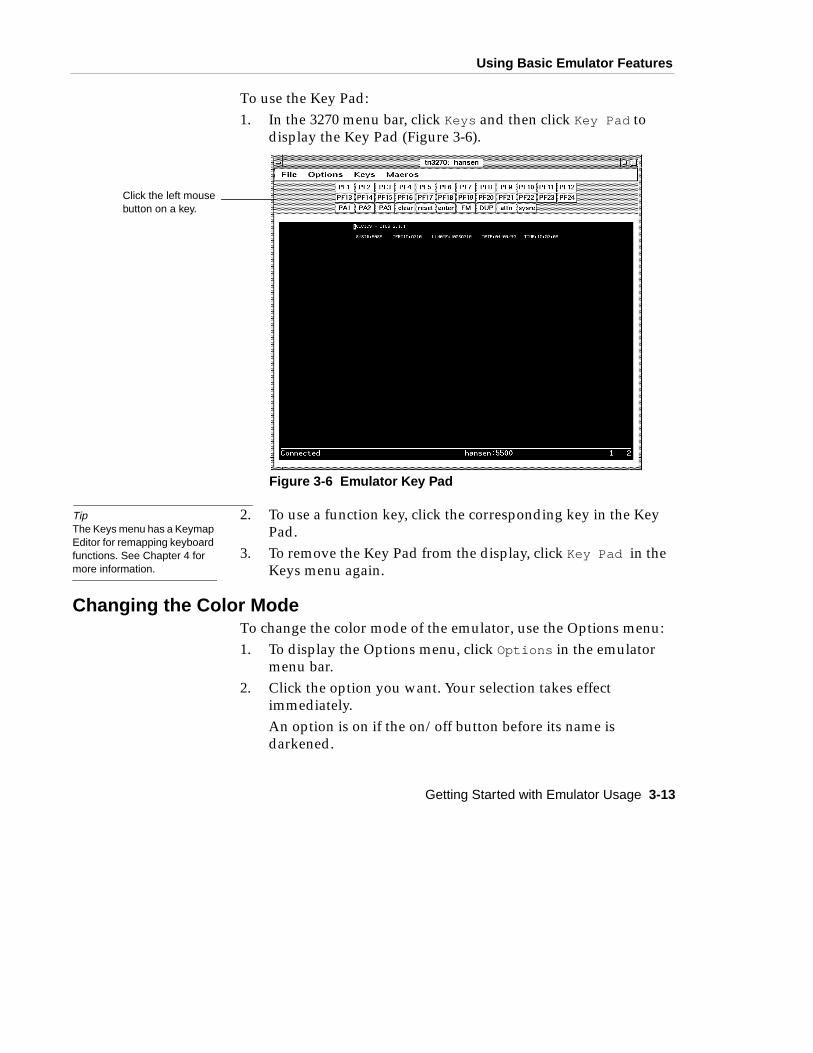
To use the Key Pad:
1. In the 3270 menu bar, click Keys and then click Key Pad to
display the Key Pad (Figure 3-6).
TipThe Keys menu has a KeymapEditor for remapping keyboardfunctions. See Chapter 4 formore information.
2. To use a function key, click the corresponding key in the Key
Pad.
3. To remove the Key Pad from the display, click Key Pad in the
Keys menu again.
Changing the Color ModeTo change the color mode of the emulator, use the Options menu:
1. To display the Options menu, click Options in the emulator
menu bar.
2. Click the option you want. Your selection takes effect
immediately.
An option is on if the on/off button before its name is
darkened.
Figure 3-6 Emulator Key Pad
Click the left mousebutton on a key.
Getting Started with Emulator Usage 3-13

Using Basic Emulator Features
Option selections do not affect the connection between the host and
the emulator.
The following options define the color mode and reverse or normal
video. Only one of these options can be in effect at any one time.
❏ Full Color
When this button is selected, terminals use IBM full-color
mode. This is the default mode.
❏ Base Color
When this button is selected, terminals use IBM base-color
mode. Unless the emulator has been customized to use
different colors, the application displays in green and white.
❏ Monochrome
Use monochrome mode, which is green. Highlight fields are
displayed in boldface.
❏ Reverse Video
If you select reverse video, the foreground and background
colors are reversed.
Changing the Case of TextThe emulator can display text in mixed uppercase and lowercase or
all capitals.
❏ Mixed Case
When selected, the emulator displays text in mixed uppercase
and lowercase. This is the default mode.
❏ Uppercase
When selected, the emulator displays text in uppercase only.
3-14 Getting Started with Emulator Usage

Using Basic Emulator Features
Using Cut/Copy and PasteYou can use the mouse to select data from the display, copy or cut
the data, and paste the data in a different place. Data cut or copied
from a 3270 emulator window can be pasted into the same window,
another 3270 window, or the window of almost any other
application you may be using.
TipYou cannot cut and paste orcopy and paste if the mouse isin light pen mode.
In the Options menu, select one of the following:
❏ Select Input Fields
When this option is selected, you can cut or copy characters
from data entry fields only. Each field is treated as a separate
line. A single field spanning multiple lines is treated as
multiple lines.
Use this mode to transfer fields from one emulator window to
another or to capture only the input field data.
When this mode is in effect, the pointer changes to a hand
shape while you are making a selection.
❏ Select Whole Lines
When this option is selected, you can cut or copy characters
across entire lines; that is you can select any amount of data,
from one character to multiple lines. This is the normal X
Window System cut/copy mode. This is the default mode.
When this mode is in effect, the pointer has an arrow shape
while you are making a selection.
❏ Select Rectangle
The selection area is always a rectangle.
When this mode is in effect, the pointer changes to a cross
shape while you are making a selection.
Follow these steps to copy and paste or cut and paste window data:
TipThere is only one storage areafor cut or copied data (called abuffer). If you select one set ofcharacters and select anotherset before pasting the first, thefirst set is lost.
1. To select data, position the pointer and press the left mouse
button. While holding the button down, drag the pointer to
the final character in your selection.
2. To adjust the size of the selected area, position the pointer at
the beginning or end of the selection and press the right
Getting Started with Emulator Usage 3-15

Using Basic Emulator Features
mouse button. While holding the button down, drag the
pointer to make the desired adjustment.
TipShift-PF3 is the default keycombination. Your systemadministrator may havereassigned this (and otherfunctions) to different keys.
3. To cut the selected data from the display, press the cut key
combination Shift-PF3. When using a key combination, press
and hold down the first key and tap the second key.
Unless you use the cut key combination, the data is copied,
not cut.
4. To paste the cut or copied data, move the pointer to the
location where you want the paste to begin and press the
middle mouse button.
Printing an Emulator WindowYou can print the contents of a local terminal window to a local
printer attached to the terminal’s parallel or serial port, to remote
printers attached to other NCD terminals, or to other network
printers.
To print the contents of the current window to the default printer,
select Print Screen from the File menu in the Terminal Emulator
window.
To select a different printer:
1. Display the File menu in the terminal emulator window.
2. Click Select Printer... . The Select Printer window appears
(Figure 3-7).
3. Select a printer from the list. The default is the first printer on
the list.
4. Click OK to accept the selected printer.
3-16 Getting Started with Emulator Usage

Using Basic Emulator Features
5. To print the contents of the current screen to the printer you
just selected, select Print Screen from the File menu.
Using Terminal Hardware and Software ControlsThe following terminal controls are different from those on ASCII
terminals:
❏ Brightness and contrast controls—The brightness and contrast
knobs are located in different places on each monitor. See the
hardware booklet included with your monitor.
❏ Audible alarm—A terminal’s alarm, a beeping sound, is
controlled through the terminal’s Console window. Click
Setup ⇒ Change User Preferences ⇒ Bell. Drag the sliders to
change the bell volume. When satisfied with the bell volume,
click Apply in the lower left corner of the User Preferences
window.
❏ Power on/off switch—The power switch is located in
different places on each terminal model. See the hardware
setup sheet or hardware booklet included with your terminal.
❏ Screen locking—Controlled through the terminal’s Console.
Click Utilities ⇒ Lock Screen. Enter a password and click OK.
❏ Power-on light—An LED located on the front of a terminal’s
base. A blinking power-on light indicates a hardware
problem.
Figure 3-7 Select Printer Window
ncd1.abc.comncd1.abc.com
Getting Started with Emulator Usage 3-17

Reconnecting to the Host
❏ Test hardware—The terminal automatically tests its hardware
when it is powered on or rebooted.
Reconnecting to the HostIf you accidentally disconnect from the host, you can reconnect to
the same host and port by selecting Reconnect from the File menu:
1. Click File in the menu bar.
2. Click Reconnect .
Disconnecting from the HostWhen you have finished your session with the host, complete these
steps to terminate the session:
1. Click the File menu in the menu bar.
2. Click Close Connection .
3. The operator information area changes from Connected to
Disconnected .
Terminating the EmulatorTo exit from the 3270 emulator, complete these steps in each
emulator window:
1. Click the File menu in the menu bar.
2. Click Quit .
3. The 3270 emulator window disappears from the display.
You can also terminate the emulator by double clicking on the
button in the upper left corner of the window manager frame.
3-18 Getting Started with Emulator Usage

4 Using and Customizing the 3270 Emulator
This chapter describes the more advanced topics usually
performed by a system administrator:
❏ Accessing files used by the terminal
❏ Methods of starting the emulator
❏ Methods of customizing the emulator
❏ Emulator options you may wish to change
❏ Using the Keymap Editor to remap IBM keyboard
functions or add custom translations to keys
❏ Using the 3287 print emulator process
Guidelines for Accessing FilesFiles that the terminal or 3270 emulator accesses from a host
must be accessible through the terminal’s file service table.
With only the default configuration, terminals can access files
located on the boot host and possibly on other hosts that you
have designated as file servers. For files located on other
hosts, you must add the hosts and other information to the file
service table.
You can view and configure the file service table through the
Console (Setup ⇒ Change Setup Parameters ⇒ File Service) or
through remote configuration. You can change the table
permanently (retain the changes after the terminal reboots) by
editing the remote configuration file or writing to the remote
configuration file from Change Setup Parameters.
For information about configuring file access, see the
NCDware System Administrator’s Guide:
❏ For accessing files located on UNIX hosts, see Chapter 3.
❏ For accessing files located on Windows NT hosts, see the
NCDware System Administrator’s Guide.
Using and Customizing the 3270 Emulator 4-1

Methods of Starting the Emulator
Methods of Starting the EmulatorThis section describes methods other than the Console for
starting the emulator. Chapter 3, Getting Started with
Emulator Usage, describes how to start the emulator from the
Console.
Starting an Emulator from a Command LineTip
Terminal emulator commands shouldusually be run in the background(using the ampersand [&] at the end ofthe command line).
To start a 3270 terminal emulator from a command line (or
from within a script), use an rsh or remsh command with the
local client command. NCD X servers include a version of the
rshd daemon for starting local clients on the local terminal or
remote terminals.
Starting a Standard TN3270 ConnectionThe command-line syntax to start a basic TN3270 emulator is:
rsh term_hostname tn3270 [ options ]
For example:
% rsh ncdu100 tn3270 &
where:
See Appendix B or the ncd3270 man page for information about
all command-line options and associated X resources.
Starting a BrxPU2.1 ConnectionTo start an emulator over a BrxPU2.1 connection from the
command line, use the -pu21 option. For example:
% rsh ncdu100 tn3270 -pu21 -tcpport 5500 &
where:
ncdu100 is the hostname of the terminal. If you are not
running a name service on the network, use the
terminal’s IP address instead of its hostname.
tn3270 is the command to start the emulator.
ncdu100 is the hostname of the terminal. If you are not
running a name service on the network, use the
terminal’s IP address instead of its hostname.
4-2 Using and Customizing the 3270 Emulator
Methods of Starting the Emulator
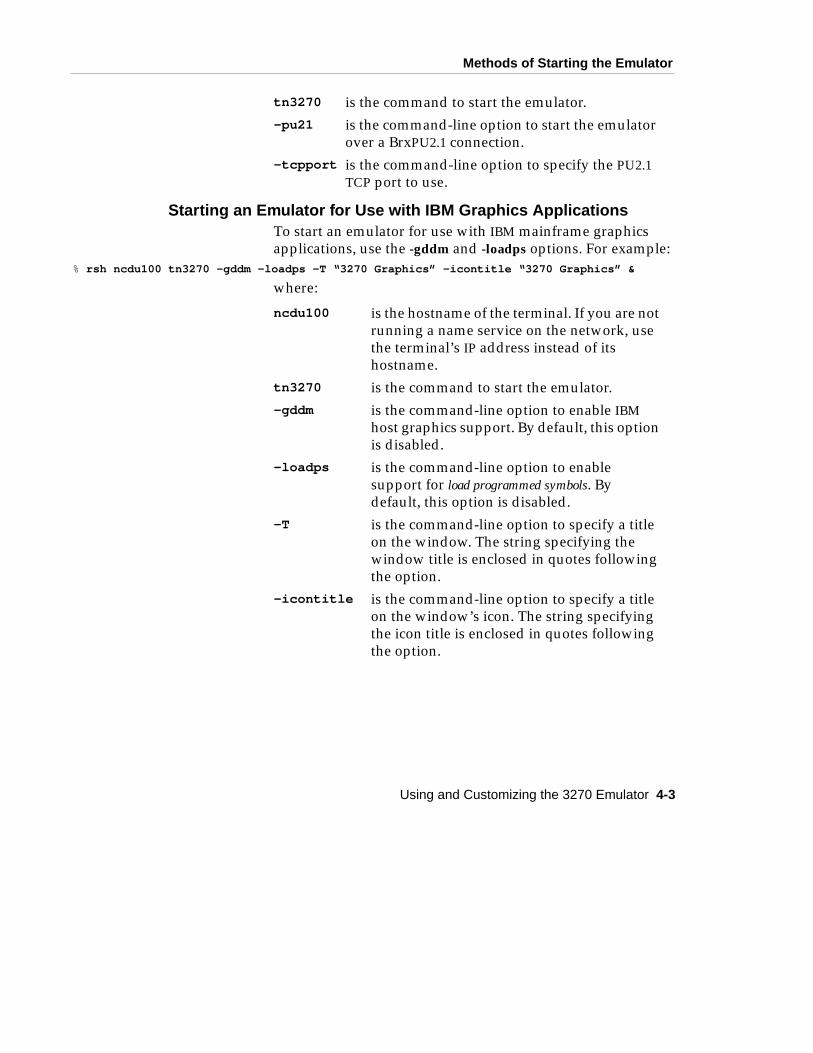
Starting an Emulator for Use with IBM Graphics ApplicationsTo start an emulator for use with IBM mainframe graphics
applications, use the -gddm and -loadps options. For example:
% rsh ncdu100 tn3270 -gddm -loadps -T “3270 Graphics” -icontitle “3270 Graphics” &
where:
tn3270 is the command to start the emulator.
-pu21 is the command-line option to start the emulator
over a BrxPU2.1 connection.
-tcpport is the command-line option to specify the PU2.1
TCP port to use.
ncdu100 is the hostname of the terminal. If you are not
running a name service on the network, use
the terminal’s IP address instead of its
hostname.
tn3270 is the command to start the emulator.
-gddm is the command-line option to enable IBM
host graphics support. By default, this option
is disabled.
-loadps is the command-line option to enable
support for load programmed symbols. By
default, this option is disabled.
-T is the command-line option to specify a title
on the window. The string specifying the
window title is enclosed in quotes following
the option.
-icontitle is the command-line option to specify a title
on the window’s icon. The string specifying
the icon title is enclosed in quotes following
the option.
Using and Customizing the 3270 Emulator 4-3

Methods of Starting the Emulator
Starting an Emulator AutomaticallyYou can configure a terminal to display a 3270 emulator
window automatically when the terminal reboots or resets.
The X server resets when the user logs out or the last
remaining client terminates.
Using XDM (X Display Manager)
See the NCDware SystemAdministrator’s Guide for completeinformation about setting up and usingXDM.
If you are using XDM to manage user sessions, you can place
one or more emulator command lines in a system-wide or
individual startup file (Xsession or .xsession). When the user
logs in, commands in the file are executed.
The command lines follow the same syntax as the command
line shown in “Starting an Emulator from a Command Line”
on page 4-2.
TipXDM automatically sets the terminal’sDISPLAY variable. This variable tellsthe X server where to display itsoutput.
Figure 4-1 shows a short example startup file for the C shell.
Besides displaying an emulator window, this file sets this
DISPLAY, loads X resources (for configuring the 3270
emulator and other clients) from the user’s .Xdefaults file,
starts an xterm terminal emulator window for starting UNIX
applications, displays a clock, and finally starts the local
window manager.
#! /bin/cshsetenv DISPLAYHOST ‘echo $DISPLAY | sed -e ’s/:0//’‘/usr/bin/X11/xrdb -display $DISPLAY -load $HOME/.Xdefaults/usr/bin/X11/xterm -title "rudyard" -sb -wf &xclock &rsh ncdu100 tn3270 &/usr/local/bin/X11/ncdrunwm
Figure 4-1 Sample Startup File
4-4 Using and Customizing the 3270 Emulator

Methods of Starting the Emulator
Using Remote Configuration
See the NCDware SystemAdministrator’s Guide for moreinformation about remoteconfiguration files.
To start an emulator through remote configuration, add a
command to the exec-startup-commands table in a remote
configuration file. You can use remote configuration files to
configure a single terminal or a group of terminals. When a
terminal boots, the parameter settings are loaded into the X
server before applications start.
For example:
exec-startup-commands = { {"tn3270 -h eagle -n 5500"} }
By default, the exec-startup-commands table contains
commands for starting the Console and the XDM Login
Chooser.
If you configured terminals when you installed X servers,
remote configuration files were created. You can edit one or
more of these files to add emulator commands to the exec-startup-commands parameter or create a new file.
Starting an Emulator from a Window Manager MenuThis section introduces window manager menus. For more
information about window manager menus, see “Using and
Configuring Root Menus” on page 5-3.
From the Default Window Manager MenuIf you have not defined window manager menus and attached
them to the mouse buttons, any mouse button not attached to
a custom menu displays a default menu.
To start ncd3270 from the default window manager menu, the
user clicks any mouse button on the root window and selects
Start 3270 or Start 3179G from the menu that appears.
Starting an Emulator from a Custom Window Manager MenuYou can place commands for starting emulators and other
applications into menus defined in window manager
configuration files. These menus are displayed on the root
window and the user displays a menu by clicking a mouse
Using and Customizing the 3270 Emulator 4-5

Methods of Customizing the Emulator
button on the root window. An application starts when the
user clicks on its menu item.
Commands in menu configuration files follow the same
syntax as the interactive command line shown in “Starting an
Emulator from a Command Line” on page 4-2.
Methods of Customizing the EmulatorYou can customize the emulator by:
❏ Changing the settings in the emulator’s Options menu
❏ Changing X resource settings
❏ Setting command-line options
These methods are explained in the following subsections.
Options MenuChapter 3 and Appendix A describethe Options menu for configuring theemulator.
The Options menu allows you to configure emulators that are
running, but the settings are not permanent. You must
reconfigure every emulator each time you start it. Command-
line options and X resources offer more permanent ways of
configuring emulators and additional configurable attributes.
Configuring the Emulator with X ResourcesX resourcesVariables for changing the behavior orappearance of a client. Resourcesmay take a numeric or string value ortake a “true” or “false” value (Booleanresources).
Like most X clients, you can customize local clients such as the
3270 emulator using X resources. All of the resources for the
emulator are listed in alphabetical order in Appendix B and in
the man page.
You can set X resources in special resource files or through
terminal remote configuration files. The variables for any
number of different clients (X applications) can be set in one
file and the file can have any name.
Before a local client can use resource settings, they must be
loaded into the X server. Resources loaded after a client starts
do not affect the client’s characteristics. Once X resource
settings are loaded into the X server, they affect every instance
of the emulator (for a way around this limitation, see
4-6 Using and Customizing the 3270 Emulator
Methods of Customizing the Emulator
“Creating a Named Version (Instance) of an Emulator” on
page 4-10).
A basic resource setting consists of the resource name of the
client, followed by a period or asterisk and a variable name.
Then comes a colon and white space followed by the value of
the variable:
resource name* attribute: value
The resource name of the client is usually the same as the
client’s name; the resource name for the 3270 emulator is
ncd3270.
TipThe command-line options describedin the “Configuring the Emulator withCommand-Line Options” on page 4-8take precedence over resourcesettings. Most X resources havecorresponding command-line options.
For example, the following resource settings change the
default port number for all emulator windows to 5500, change
the display mode to reverse video, remove the emulator menu
bar, and place the title WordProcessor in the emulator window
title bar:
ncd3270*portNumber: 5500ncd3270*reverseVideoMode: truencd3270*noMenuBarMode: truencd3270*title: WordProcessor
Using Resource Files
TipYou can put 3270 resources into a file,then name the file in the resourcencd3270*xdefaultsFile: file . Specifythe xdefaultsFile resource using oneof the standard methods: xrdb or astandard resource file.
You can set resources in files that take effect system-wide or
establish resource files for individual users.
Resources set in resource files must be loaded into the server
using the xrdb(1) client. Normally, you run xrdb from an XDM
startup file so that resources are loaded into the server before
client programs start.
Using Remote Configuration
TipIf you are using XDM or a sessionmanager such as the DECwindowssession manager, do not use remoteconfiguration files to set resources.The manager programs delete anyresources already set. Use resourcefiles instead, as described in thepreceding section.
You can set X resources in a terminal remote configuration
file, either a file that configures an individual terminal or a file
affecting a group of terminals. When the terminal boots, the
resources and other parameter settings are loaded into the
server before any clients start.
To put 3270 resources (and resources for other local clients) in
remote configuration files, use the xserver-initial-x-resourcesparameter. Write the resources as a single string, surrounded
Using and Customizing the 3270 Emulator 4-7

Methods of Customizing the Emulator
by quotes, and escape all special characters with a backslash.
(such as the end-of-line character).
For example:
xserver-initial-x-resources = { {“ncd3270*portNumber: 5500\n\ ncd3270*reverseVideoMode: true\n\ ncd3270*noMenuBarMode: true\n\ ncd3270*title: Word Processor” } }
Configuring the Emulator with Command-Line OptionsIf you are starting an emulator from a command line, you may
want to use command-line options to configure it.
You can use command-line options as your sole method of
configuring the emulator or you can use options along with X
resources. Command-line options override the corresponding
X resource settings.
The syntax of an emulator command line with options is:
rsh terminal_hostname tn3270 [ option ... ]
For example:
rsh ncdu100 tn3270 -s -b
All of the command-line options for the 3270 emulator are
listed in alphabetical order in Appendix B and in the man
page. Most command-line options have corresponding X
resources.
4-8 Using and Customizing the 3270 Emulator

Customizing the 3270 Host Chooser and Emulator
Customizing the 3270 Host Chooser and EmulatorThis section provides information about the following:
❏ Configuring the 3270 Host Chooser
❏ Creating a named instance of an emulator
❏ Changing colors and color modes
❏ Changing and adding fonts
❏ Removing the menu bar
❏ Changing the case mode
❏ Specifying the model type
❏ Specifying the initial size and placement of the emulator
❏ Changing the window or icon title
The methods for making these and other changes are
described in the previous section.
The section, “Working with Keyboards” on page 4-16
describes procedures for creating and using a custom keymap
or custom ASCII-to-EBCDIC conversion table.
Configuring the 3270 Host ChooserYou can specify hosts to list in the 3270 Host Chooser in a
remote configuration file or in the Console’s Setup menus.
Using the Remote Configuration File1. Open the configuration file or create a new file using a
text editor.
2. Configure the ncd3270-default-hosts parameter. If there is
already a table in the file, edit the table. Otherwise, add a
table to the file. Table 4-1 lists the fields in the table. For
example:
ncd3270-default-hosts = {
{telnet eagle 23 model-4 "Accounting Machine" }
{telnet kestrel 23 model-2 "Sys Admin. Machine" } }
3. When you reboot the terminal and start an emulator,
your entries are displayed in the host chooser.
Using and Customizing the 3270 Emulator 4-9

Customizing the 3270 Host Chooser and Emulator
Using the Setup Menus
TipTo use this configuration method, theterminal must be correctly configuredto write configuration changes to ahost-based remote configuration file.See the NCDware SystemAdministrator’s Guide for moreinformation.
1. In the Console menu bar, click Setup ⇒ Change Setup
Parameters ⇒ 3270 Terminal Emulation.
2. In the Default Hosts box, click New. Edit the resulting
default insertion as necessary. If you need to delete an
entry, click Delete . The fields are the same as those listed
in Table 4-1.
3. Click the Apply field at the bottom of the Change Setup
Parameters window.
4. When you reboot the terminal and start an emulator,
your entries are displayed in the 3270 Host Chooser.
Creating a Named Version (Instance) of an EmulatorBy naming versions (in the X Window System, these are called
instances) of the emulator, you can create one or more
emulators that look and behave differently from the default
while retaining the option to use your default emulator. This
is because resources set for a particular emulator instance do
not affect any other emulators that you start. For example, you
can display one emulator without the menu bar, while leaving
Table 4-1 ncd3270-default-hosts Table
Field Possible Values Result
protocol telnet or pu2.1 Protocol used by the emulator to connect to the host.
host hostnameor IP address
Name or IP address of the host where the TN3270 server
software or the BrxPU2.1 gateway software is running.
port TCP port number TCP port number used by the TN3270 server or BrxPU2.1
gateway.
model model-2, model-
3, model-4, or
model-5
3278 model being emulated.
description string Description of the host or service.
4-10 Using and Customizing the 3270 Emulator

Customizing the 3270 Host Chooser and Emulator
the menu bar on all other emulator windows, or change colors
so one emulator can be distinguished quickly from the others.
Creating a named instance involves setting resources under a
special class name and specifying this name while starting the
emulator.
For example, the emulator started with this command:
rsh ncdu100 tn3270 -name Editor_3270
uses resources set under the class name Editor_3270.
TipThe emulator started under the nameEditor_3270 does not use resourcesset under the resource namencd3270.
Some example resources for this class name are:
Editor_3270*portNumber: 5500Editor_3270*reverseVideoMode: trueEditor_3270*noMenuBarMode: trueEditor_3270*title: WordProcessor
Changing Colors and Color ModesYou can change both the color mode and the colors displayed
on the screen.
Changing the Color ModeThe default color mode of the 3270 emulator is full color with
a black background. You can change the color mode or video
mode using X resources or command-line options.
Monochrome Mode or Reverse VideoTo change the display of a color terminal to monochrome
mode, use the -m command-line option or set the monoModeresource to “true.” Monochrome is usually white text on a
black background.
To change the display to reverse video when in monochrome
mode, use the -r command-line option or set the
reverseVideoMode resource to “true.”
Base Color ModeTo change the display to base-color (two-color) mode, use the
-b command-line option or set the baseColorMode resource to
“true.”
The default colors are green and white.
Using and Customizing the 3270 Emulator 4-11
Customizing the 3270 Host Chooser and Emulator
Changing ColorsThe options and resources for setting colors (listed in
Appendix B) refer to colors in two ways:
❏ Brixton color-ids, which are predefined colors that
correspond to default color definitions. This information
may be useful if you previously used the Brixton host-
based 3270 terminal emulator.
❏ X Window System colors, which you can specify as
predefined color names or a hexadecimal numbers that
control the intensity of the three colors in the RGB color
model (red, green, and blue). You can find a list of many
color names in the /usr/lib/X11/rgb.txt file. The colors listed
in this file are identified by descriptive names and
decimal numbers that specify the amount of red, green,
and blue in each color.
Appendix B lists the command-line options and resources for
all of the IBM colors for full-color mode and base-color mode
and for the foreground and background in monochrome
mode.
Generally, to change a color, substitute a color name from the
rgb.txt file for the default. For example:
rsh ncdu100 tn3270 -ibmRed IndianRed
or
ncd3270*ibmRed: IndianRed
You can also redefine the background color, which is black by
default, using the -ibmBackground command-line option or
ibmBackground resource. This variable controls the
background in all color modes.
Changing and Adding FontsSee the NCDware SystemAdministrator’s Guide for informationabout font names and the fontsincluded with NCDware.
The font sets used by the emulator are called font pools. The
normal font pool defines the appearance of characters in the
main emulator screen, and the OIA (operator information
area) font pool defines characters in the operator information
area.
4-12 Using and Customizing the 3270 Emulator

Customizing the 3270 Host Chooser and Emulator
TipThe default ASCII-to-EBCDICconversion tables expect the entireISO-8859-1 character set. If yousubstitute non-ISO fonts for thedefault fonts, you may need to usedifferent ASCII-to-EBCDICconversion tables. The problem is thatthe non-standard ASCII charactersmay be in different places in the table.See “Using an AlternativeASCII/EBCDIC Conversion Table” onpage 4-33 for information aboutspecifying an alternative table andstructuring conversion files.
The emulator’s default fonts are the X server’s built-in fonts.
There are twelve default font sizes. The emulator selects a font
size for the display on a best fit basis, determined by the size of
the window.
You can specify different fonts for the emulator window and
operator information area or add more fonts to the pool. The
emulator can use any fixed-width X font.
To change the fonts in a font pool, use the fontPoolNormalresource for the main window and fontPoolOIA for the
operator information area. The font names can be aliases or
full XLFD font names.
Removing the Menu Bar from the EmulatorA menu bar is displayed at the top of an emulator window by
default. If you do not want the menu bar displayed, use the
-noMbar command-line option or set the nomenuBarModeoption to “true.”
Changing the Case ModeBy default, the emulator displays in mixed lowercase and
uppercase characters. To change to all uppercase (capital)
letters, use the -s command-line option or set the
monoCaseMode resource to “true.”
Specifying the 3278 Model TypeThe model type determines how many lines and columns
appear in the emulator window. The default is model 2, in
which 24 lines and 80 columns are displayed. To change the
default to a different model, use the -S command-line option
or modelType resource.
The valid model types are:
2 24 lines and 80 columns
3 32 lines and 80 columns
4 43 lines and 80 columns
5 27 lines and 132 columns
Using and Customizing the 3270 Emulator 4-13

Customizing the 3270 Host Chooser and Emulator
Specifying Initial Size and Placement of the Emulator WindowThe size and initial placement of a window is determined by
its geometry specification. A geometry specification has the
following components: width, height, and location of the
window relative to the horizontal and vertical edges of the
screen. The formal definition of the specification is a string in
the following format:
width × height ± x_offset ± y_offset
The width, height, and offsets are specified in pixels or dots
(smallest element of a display surface that can be addressed by
a program). You can specify any or all of the elements in a
geometry string; missing elements are supplied from the
window’s default specifications.
Window PlacementThe offsets specify the x and y coordinates at which the
window should be displayed.
To place a window in any of the corners of the screen, use the
following coordinates:
To place a window someplace other than a corner, specify the
location as an offset from the corner. For example, to start a
window at the location ten pixels from the top of the screen
and ten pixels from the left side of the screen and use the
default window size:
rsh ncdu100 tn3270 -geometry +10+10
or
ncd3270*geometry: +10+10
+0+0 Places the window at the upper left corner of the
screen.
+0-0 Places the window at the lower left corner of the
screen.
-0+0 Places the window at the upper right corner of
the screen.
-0-0 Places the window at the lower right corner of
the screen.
4-14 Using and Customizing the 3270 Emulator
Customizing the 3270 Host Chooser and Emulator
By default, the first emulator window opens at +90+112.
Subsequent windows open at an offset to this location, so that
windows overlap but their title bars are all visible.
Window SizeBecause monitors vary in the number of pixels displayed per
inch, the displayed size of a window with the same
dimensions is different on different monitors. This attribute of
a monitor is expressed as dpi (dots per inch), and can be found
in the hardware booklet or hardware sheet that came with
your monitor.
For example, to open a window 800 pixels by 1000 pixels at an
offset from the upper left corner of the screen:
rsh ncdu100 tn3270 -geometry 800x1000+10+10
or
ncd3270*geometry: 800x1000+10+10
The default 3270 emulator window is 830 pixels in width by
610 pixels in height.
Starting the Emulator as an IconTo start the emulator as an icon instead of a window, use the
-iconic option. For example:
rsh ncdu100 tn3270 -iconic
Changing the Window or Icon TitleThe default title that appears in an emulator window’s title
bar is tn3270: host, where host is the name or IP address of the
host to which the emulator is connected.
You can specify a different title for the window using a
command-line option or resource. For example:
rsh ncdu100 tn3270 -T "Forms Review"
or
ncd3270*title: "Forms Review"
The default title that appears underneath an emulator
window’s icon is host, where host is the name or IP address of
the host to which the emulator is connected.
Using and Customizing the 3270 Emulator 4-15

Working with Keyboards
You can specify a different title for the icon using a command-
line option or resource. For example:
rsh ncdu100 tn3270 -icontitle "Forms Review"
or
ncd3270*icontitle: "Forms Review"
Working with KeyboardsThis section describes:
❏ Basic information about NCD keyboards
❏ Using the Keymap Editor to remap the keyboard
❏ Alternative methods of remapping the keyboard
❏ The default 3270 emulator keymap
❏ Using alternative ASCII-to-EBCDIC conversion tables
For information about using the Key Pad for selecting IBM
functions, see “Using the Key Pad for IBM Key Functions” on
page 3-12.
About NCD KeyboardsWhen the 3270 emulator starts, it automatically senses the
NCD-supported keyboard attached to the terminal and reads
the keymap for that keyboard. The emulator automatically
configures the keyboard to offer all of the IBM 3278 keyboard
functions.
See the NCDware SystemAdministrator’s Guide for informationabout setting the keyboard version.
If you are not using the US English version of an NCD
keyboard, you must specify which version you are using for
the X server to correctly interpret key presses. You can specify
the language in the Boot Monitor before the terminal loads the
X server, in the Console (Setup ⇒ Change Setup Parameters ⇒Input Devices), or through remote configuration (xserver-keyboard-type).
4-16 Using and Customizing the 3270 Emulator

Working with Keyboards
Using the Keymap EditorThis section provides a description of the Keymap Editor and
instructions for the following procedures:
❏ Starting the Keymap Editor
❏ Remapping the basic IBM functions
❏ Saving a keymap to a file or applying a keymap to an
open window
❏ Reading a keymap from a file or from an open window
❏ Remapping the keyboard using the full set of X key
translations
About the Keymap EditorThe Keymap Editor is a local client that provides a simple way
to edit translations (functions assigned to keyboard keys) for
a single client, such as ncdterm or ncd3270. If you want to
redefine a keymap for all clients, you need to use xmodmap(see “Alternative Ways of Changing Keymaps” on page 4-28).
Each key on a keyboard has a default action associated with it.
For example, when you press an alphabetic or numeric key,
the character printed on the key cap (key label) displays on the
screen. Other keys perform a function instead of displaying a
character. For example, an IBM 3270 keyboard has keys
labelled with such actions as Clear and Insert. All of the
functions associated with a keyboard comprise its keymap.
NCD’s Keymap Editor local client displays a layout of a
keyboard that has keys labelled with their keycaps and the
IBM functions assigned to them. The Keymap Editor also
allows you to change the functions (actions or translations)
assigned to keyboard keys. For example, on the UNIX-style
97-key keyboard, the Cut action occurs when you press the
PF3 key. Using the Keymap Editor, you can simply click the
word Cut and drag it to another key.
The Keymap Editor can also be used to remap the keyboard
for the VT320-style NCD Terminal Emulator (ncdterm), used
for LAT, Telnet, CTerm, and serial connections.
Using and Customizing the 3270 Emulator 4-17
Working with Keyboards
The Keymap Editor offers two modes of operation:
❏ Basic mode—In basic mode you can reassign any of the
actions associated with 3270 or VT320 terminal
emulation. For example, in a VT320 window, you can
assign the terminal bell to a key so that pressing the key
in a VT320 window rings the bell. In a 3270 window, you
might want to assign the tab function to a different key.
❏ Advanced mode—Advanced mode provides a full
graphical interface for X keyboard translations. For
example, in advanced mode you can assign multiple
actions to a single key.
Starting the Keymap EditorThe Keymap Editor is a local client. You can start it in different
ways:
❏ To start the Keymap Editor from the Console, select
Keymap Editor from the Terminals menu.
❏ To start the Keymap Editor from an emulator window,
select Keymap Editor from the window’s Keys menu.
❏ To start the Keymap Editor from a command line, follow
the directions in “Methods of Starting the Emulator” on
page 4-2. Instead of the emulator command, use the
keymap_editor command to start the Keymap Editor. See
the man page for the command-line options.
❏ To start the Keymap Editor from the default window
manager menu, click any mouse button on the root
window and select the Keymap Editor from the menu
that appears. This menu appears only if you have not
defined other window manager menus and attached
them to the mouse buttons.
4-18 Using and Customizing the 3270 Emulator

Working with Keyboards
Keymap Editor Window and MenusFigure 4-2 shows a typical initial display for the Keymap
Editor.
Keyboard Layout
TipIf you start the Keymap Editor from theConsole, no functions are displayedbecause there is no keymapavailable. Select Read Translationsfrom the Keymap Editor’s File menu toimport functions from an open 3270window.
The keyboard layout initially displayed is for the keyboard
attached to your terminal.
The keyboard layout shows the keycaps (the legends printed
on the keys) plus the names of any IBM function(s) associated
with a key.
Although the keyboard layout shows only the US English
version of a keyboard, every keypress on the keyboard shows
up in the layout. This allows you to map actions to the correct
keys no matter which keyboard version you are using.
Figure 4-2 Keymap Editor Window—in Basic Mode
Menu Bar
Action List (list of all ofthe IBM actions)
Trash Can (for deletingan action from a key)
Keyboard Name
Keyboard Layout
Using and Customizing the 3270 Emulator 4-19

Working with Keyboards
Keycap SectionsEach keycap in the layout has three sections. For keys other
than the alphabetic keys, the first section shows the result of
pressing the key along with the Shift key, and the middle
section shows the result of pressing the key alone. The third
section shows the result of pressing the key along with the
Control key.
The File and Edit MenusThe File menu offers the functions for writing keymaps to
files, importing them, and quitting from the Keymap Editor.
(See “Writing a Keymap to a File and Applying a Keymap to a
Window” on page 4-22 and “Importing a Keymap from a File
or Window” on page 4-24.) The Edit menu offers the functions
for changing the order of translations. (See “Using Advanced
Mode” on page 4-25.)
The View, Keyboards, and Help MenusThe View menu offers options for displaying only the
keycaps, only the translations, or both keycaps and
translations. The View menu also allows you to move between
the basic and advanced modes.
The Keyboards menu displays the layouts of all the NCD
keyboards supported by the Keymap Editor.
The Help menu offers two kinds of help:
❏ Show Help Text displays quick reference information for
basic or advanced mode. To see all of the help text, put
the pointer on the button in the scroll bar at the right of
the help window and drag it up or down.
❏ Show Help Key displays each keycap (next to the trash
can) as you press the key on the keyboard layout (by
clicking on the keycap). This is useful for reading longer
key actions that do not fit on the keyboard layout.
Key plus Control Key (Control-3)
Key plus Shift Key (Shift-3)
Key alone (3)
Figure 4-3 Keymap Editor—Key Sections
4-20 Using and Customizing the 3270 Emulator

Working with Keyboards
Basic Mode—Mapping the KeyboardUse the following directions to remap the keyboard in the
Keymap Editor’s basic mode.
The changes you make to the keymap only last as long as the
emulator window is open. Once you close the window and
exit from the emulator, the emulator reverts to its default
keymap. “Writing a Keymap to a File and Applying a Keymap
to a Window” on page 4-22 explains how to save a map and
apply it to an emulator window manually or automatically.
Using the MouseThe following directions use mouse button 1 (usually the left
button) to select and move actions. An action is a function
assigned to key, such as cutting the selected text. (“Starting the
Emulator” on page 3-3 gives details about mouse usage.)
Removing an Action from a KeyTo remove an action from a key:
1. Click the action.
2. Holding down the mouse button, drag the action to the
trash can.
3. Release the mouse button.
Moving an Action from One Key to AnotherTo move an action to a key:
1. Click the action.
2. Holding down the mouse button, drag the action to the
desired section of another key.
3. Release the mouse button.
Assigning an Action from the Action ListActions are displayed in the Action List on the Keymap
Editor window (Figure 4-4).
For an explanation of the actions, see “Default 3270 Emulator
Keymap” on page 4-29.
Using and Customizing the 3270 Emulator 4-21

Working with Keyboards
To assign an action from the Action List to a key:
1. To see more actions in the Action List , drag the slider in
the scroll bar.
2. Click the desired action in the Action List .
3. Holding down the mouse button, drag the action to the
destination key and section.
4. Release the mouse button.
Copying an Action from One Key to AnotherTo copy an action from one key to another:
1. Press the Shift key while clicking on the action.
2. Holding down the mouse button, drag the action to a
key.
3. Release the mouse button.
After copying, both keys have the same action.
Writing a Keymap to a File and Applying a Keymap to a WindowFunctions to write a keymap to a file and apply it to a window
are available in both basic and advanced modes.
To write or apply translations, select Write Translationsfrom the File menu. The Write Translations window
appears (Figure 4-5).
Writing a Keymap to a FileYou can write a keymap to a file and then apply this file to an
open 3270 window or apply the file when starting the
emulator from a command line.
Scroll Bar
Figure 4-4 Keymap Editor—Action List
Slider
4-22 Using and Customizing the 3270 Emulator

Working with Keyboards
TipTo write to a file that resides on a hostcomputer, there must be an entry forthe file system in the terminal’s fileservice table. See “Guidelines forAccessing Files” on page 4-1.
To write a keymap to a file:
1. Display the Write Translations window (Figure 4-5)
by selecting Write Translations from the File menu.
2. To write the currently displayed keymap to a file, click
Translation file and type the complete pathname of
the file.
3. Click OK.
4. The resulting file is a list of optional modifiers, keysyms,
and actions. For example:
<Key>KP_Enter: Enter()Ctrl<Key>4: onecharacter(0x4A)
Applying Keymaps to Windows on the DesktopKeymap changes do not affect windows on the desktop until
you explicitly apply the keymap to the windows.
To apply the current keymap to the original window (the
window from which you started the Keymap Editor),
complete these steps.
1. Click Original Application Window in the WriteTranslations window.
2. Click OK.
Figure 4-5 Keymap Editor—Write Translations Window
Using and Customizing the 3270 Emulator 4-23

Working with Keyboards
To apply the current keymap to all open 3270 or VT320
windows, complete the following steps. Windows that you
open after applying the keymap do not inherit the new
keymap.
1. Click All Application Windows of Class in the WriteTranslations window.
2. Fill in the Class: field:
— For 3270 windows, type Ncd3270 . This is the defaultso it may already be filled in. The current keymap isapplied to all open 3270 emulator windows.
— For VT320 windows, type NCDterm. The currentkeymap is applied to all open VT320 emulatorwindows.
— In other contexts, the instance name overrides theclass name.
3. Click OK.
Importing a Keymap from a File or WindowThis function is available in both basic and advanced modes.
You can import a keymap from a file into the Keymap Editor,
and you can import a keymap from an open 3270 or VT320
window.
To display the Read Translations window (Figure 4-6) ,
select Read Translations from the File menu. When you
read translations, the keymap is displayed in the keyboard
layout and the Action List is filled in. In advanced mode, the
Translations list is also filled in.
Importing a Keymap Editor File
TipTo import files from a host computer,there must be an entry for the filesystem in the terminal’s file servicetable. See “Guidelines for AccessingFiles” on page 4-1.
To import a keymap file created by the Keymap Editor:
1. Click Translation file in the Read Translationswindow.
2. Type the full pathname of the keymap file.
3. Click OK.
4-24 Using and Customizing the 3270 Emulator

Working with Keyboards
Importing a Brixton Keymap FileTo import a keymap from a version 1.2 Brixton keymap file:
1. Click Brixton (‘brxkeMap’)file in the ReadTranslations window.
2. Type the full pathname of the file.
Importing a Keymap from a WindowTo import a keymap from an open 3270 or VT320 window:
1. Click Application Window .
2. Click OK.
3. Click the window from which you want to read
translations.
Using Advanced ModeAdvanced mode (Figure 4-7) allows complete graphical
editing of keyboard translations. To enter advanced mode,
select Advanced Mode from the View menu.
See an X Window System reference,such as Volume Four of the O’Reilly &Associates Guides, X ToolkitIntrinsics Programming Manual, for acomplete description of keytranslations.
The subject of X translations is complex, and the following
descriptions and instructions do not attempt to provide a
complete description of the process of creating translations.
Advanced Mode MenusAdvanced mode offers the same File, View, and Keyboards
menus as basic mode. The added functions in the Edit menu
change the order of translations in the Translations list. They
Figure 4-6 Keymap Editor—Read Translations Window
Using and Customizing the 3270 Emulator 4-25

Working with Keyboards
are explained in “Changing the Order of Translations” on
page 4-28.
To display quick reference information, select Show HelpText from the Help menu.
The Parts of a TranslationA translation has three parts:
❏ An action or action sequence
❏ Optional modifiers
❏ A key
Displays translations for one keyat a time, as you press a key,instead of displaying all of thetranslations
Figure 4-7 Keymap Editor Window—in Advanced Mode
Action List (all of the actions associatedwith 3270 or VT320 emulation)
Modifiers
KeyboardLayout
Translations List (all ofthe translations in the fileor window).
Function keys for adding,replacing, and deleting inthe Translations list.
Menu Bar
4-26 Using and Customizing the 3270 Emulator

Working with Keyboards
Figure 4-8 is an enlarged view of the modifiers section in the
advanced mode window and explains the functions of the
various modifiers.
Creating a TranslationTo create a new translation:
1. Select the desired action(s) from the Action List or type
the action(s) in the Action: field.
2. Select the desired modifier(s). Figure 4-8 explains the
modifier selections.
3. Click New. The translation is added to the Translationslist.
Replacing a TranslationTo replace a translation:
1. Select a translation from the Translations list. The
translation appears in the Action: field.
2. Make desired modifications by editing the Action: field
or selecting modifiers from the modifier list (Figure 4-8)
and actions from the Action List .
3. Click Replace .
This selection specifies that themodifiers in the Translation List (and noothers) must be present. The translationis prefaced by an exclamation mark (!).
These selections addmodifier key(s) to thetranslation.
These selections specifythat the selected modifier isnot part of the translation.
This selection specifies a casedistinction; for example, a andA are not treated identically.The translation is prefaced bya colon (:).
Figure 4-8 Keymap Editor—Translation Modifiers
Using and Customizing the 3270 Emulator 4-27

Working with Keyboards
Deleting a TranslationTo delete a translation:
1. Select a translation from the Translations list.
2. Click Delete .
Changing the Order of TranslationsTo change the order of translations:
1. Select a translation from the Translations list.
2. From the Edit menu, select Cut or Copy.
3. Select another translation and select Paste Before or
Paste After from the Edit menu.
Quitting the Keymap EditorTo quit the Keymap Editor, select Quit from the File menu. To
retain your current keymap, be sure to apply the keymap to a
window or save it in a file before quitting.
Alternative Ways of Changing KeymapsInstead of using the Keymap Editor, you can use the general X
Window System methods of redefining the keymap:
❏ Using translations to redefine the keymap for specific
clients
❏ Using xmodmap to redefine the keymap for all clients
Using TranslationsYou can put your key translations into an X resources file, into
the xserver-initial-x-resources remote configuration parameter,
or specify a translations file in an emulator command line.
Specifying Keymaps in an Emulator Command LineTo apply a keymap file to an emulator started with a
command line (whether the command line is used in a remote
configuration file, window manager menu, or startup file), use
the -transfile filename option.
To apply a Brixton version 1.2 keymap file, use the -k option
instead.
4-28 Using and Customizing the 3270 Emulator

Working with Keyboards
Specifying a Translation in an Emulator Command LineYou can use the -trans option to specify a translation directly;
for example:
rsh ncd01 tn3270 -trans "<Key>KP_Enter:Enter()"
Do not specify multiple translations or include spaces in the
translation.
Specifying Translations Using X resourcesTo apply a Brixton version 1.2 keymap to the 3270 emulator
through resource settings, use the kbdMapFilename resource
to specify the name of the Brixton keymap file.
To apply other translations to the 3270 emulator use the
translations resource followed by a list of translations. For
example:
ncd3270*translations: <Key>KP_Enter:Enter() \n\ Ctrl<Key>4:onecharacter(0x4A)
Using Remote ConfigurationFor information about putting key translations into the
xserver-initial-x-resources parameter, see the NCDware SystemAdministrator’s Guide.
Using xmodmap
See the NCDware SystemAdministrator’s Guide for informationabout how to create xmodmap filesand invoke xmodmap .
Another method of reassigning keys is provided by the
xmodmap X client. This client modifies the default keyboard
mapping by executing a file containing the desired
definitions. Unlike translations, however, xmodmap changes
apply to all clients. An xmodmap command is usually executed
from within an XDM startup file.
Default 3270 Emulator KeymapTable 4-2 lists the keyboard functions necessary for 3270
operations and the corresponding keysyms (key symbol). Each
physical key is associated with a keysym, and the keysym
name represents the keycap. By default, if you press the key or
key combination corresponding to the keysym, the action
listed in the table occurs.
Using and Customizing the 3270 Emulator 4-29

Working with Keyboards
The following notes explain the table entries:
❏ To use a key combination, press and hold down the first
key listed, then type the next key(s).
❏ Keys prefaced by KP indicate a key in the numeric key
pad section of the keyboard.
❏ AID stands for Attention Identifier key.
❏ The functions assigned to the PF1 through PF24 keys
vary according to the application program running in the
emulator window.
❏ Up, Down, Right, and Left refer to the arrow keys.
❏ To quickly locate a given IBM action on an NCD
keyboard, view the keyboard layout using the Keymap
Editor.
Table 4-2 Default Key Translations
Action Result Keysym
Enter Perform the 3270 enter AID KP_Enter
Clear Perform the 3270 clear AID Ctrl-c or KP_F4
Reset Perform the 3270 terminal reset function Ctrl-r
Btab Move the cursor to the previous input field Shift-Tab
Tab Move the cursor to the next input field Tab
Home Move the cursor to the home (first) input field Shift-Up
Newln Move the cursor to the first input field on the
next line
Return
Del Delete the character in the current cursor
position
Delete
Left Move the cursor one position to the left BackSpace
Right Move the cursor one position to the right Right
Up Move the cursor one position up Up
Down Move the cursor one position down Down
4-30 Using and Customizing the 3270 Emulator

Working with Keyboards
Dup Duplicate field Shift-KP_F1
Fm Field mark Shift-KP_F1
Ein Erase all the input fields Shift-Delete
Eeof Erase from current cursor position to end of
field
Escape
Ins Toggle insert mode Linefeed
Cut Delete the selected text Shift-KP_F3
ToggleMbar Toggle the display of the menu bar Shift-KP_F4
onecharacter Enter the EBCDIC character specified. This
function is used to enter characters required
by the application, but may not be on the
keyboard.
Ctrl-4: the cent sign (¢)
Ctrl-6: the not sign (¬)
Ctrl-backslash: the broken bar.
The functions of the following Attention Identifier (AID) keys depend upon the operating system
and the application running in the emulator window.
PA-1 Perform the 3270 program attention AID Ctrl-1 or KP_F1
PA-2 Perform the 3270 program attention AID Ctrl-2 or KP_F2
PA-3 Perform the 3270 program attention AID Ctrl-3 or KP_F3
The functions of the following Attention Identifier (AID) keys depend upon the application
running in the emulator window.
PF1 Perform the 3270 PF1 AID F1
PF2 Perform the 3270 PF2 AID F2
PF3 Perform the 3270 PF3 AID F3
PF4 Perform the 3270 PF4 AID F4
PF5 Perform the 3270 PF5 AID F5
PF6 Perform the 3270 PF6 AID F6
Table 4-2 Default Key Translations (Continued)
Action Result Keysym
Using and Customizing the 3270 Emulator 4-31

Working with Keyboards
PF7 Perform the 3270 PF7 AID F7
PF8 Perform the 3270 PF8 AID F8
PF9 Perform the 3270 PF9 AID F9
PF10 Perform the 3270 PF10 AID F10
PF11 Perform the 3270 PF11 AID F11
PF12 Perform the 3270 PF12 AID F12
PF13 Perform the 3270 PF13 AID Shift-F1
PF14 Perform the 3270 PF14 AID Shift-F2
PF15 Perform the 3270 PF15 AID Shift-F3
PF16 Perform the 3270 PF16 AID Shift-F4
PF17 Perform the 3270 PF17 AID Shift-F5
PF18 Perform the 3270 PF18 AID Shift-F6
PF19 Perform the 3270 PF19 AID Shift-F7
PF20 Perform the 3270 PF20 AID Shift-F8
PF21 Perform the 3270 PF21 AID Shift-F9
PF22 Perform the 3270 PF22 AID Shift-F10
PF23 Perform the 3270 PF23 AID Shift-F11
PF24 Perform the 3270 PF24 AID Shift-F12
Table 4-2 Default Key Translations (Continued)
Action Result Keysym
4-32 Using and Customizing the 3270 Emulator

Working with Keyboards
Using an Alternative ASCII/EBCDIC Conversion TableThe 3270 emulator converts user input from ASCII to EBCDIC
and application output from EBCDIC to ASCII.
Specifying an Alternate Conversion TableThe emulator’s built-in conversion table is for US English
keyboards. If you are using a different version of a keyboard,
you must specify a conversion file containing a table
configured for your language.
The NCDware distribution includes conversion tables for
English, Spanish, German, and French. The installation
program places the tables in the boot directory in the 3270kbdssubdirectory.
To specify a conversion file, use the -a command-line option or
the asciiEbcdicTableFilename resource. For example:
rsh ncdu100 tn3270 -a SpanishTableorncd3270*asciiEBCdicTableFilename: SpanishTable
The -A option (asciiEbcdicTableFilenameAndDump resource)
performs the same function as -a, with the added feature of
displaying the table in the Console Messages area.
Conversion File FormatA conversion file consists of 512 hexadecimal numbers
separated by white space. A # character (pound sign) indicates
that the remaining part of the line is a comment. An example
ASCII-to-EBCDIC conversion file is shown in Figure 4-9.
The first 256 characters in the file define the EBCDIC-to-ASCII
conversion. The emulator determines the translation of an
EBCDIC character by using the character’s EBCDIC code point
as an index from the start of the first set of 256 characters.
The second 256 characters define the ASCII-to-EBCDIC
conversion. The emulator determines the translation of an
ASCII character by using the character’s ASCII numeric code as
an index from the start of the second set of 256 characters.
Non-mapped characters in the ASCII-to-EBCDIC translation
table should map to the nul character (0x00).
Using and Customizing the 3270 Emulator 4-33

Working with Keyboards
# Spanish Translation Tables# EBCDIC to ASCII20 20 20 20 20 20 20 20 20 20 20 20 0a 0d 20 20 # 00-0f20 20 20 20 20 0a 20 20 20 20 20 20 20 20 20 20 # 10-1f
20 20 20 20 20 20 20 20 20 20 20 20 20 20 20 20 # 20-2f
20 20 20 20 20 20 20 20 20 20 20 20 20 20 20 20 # 30-3f
20 20 20 20 E0 E1 20 20 E7 20 5B 2E 3C 28 2B 7C # 40-4f
20 E9 20 20 E8 ED 20 EF 20 26 5D 24 2A 29 3B AC # 50-5f
2D 2F 20 20 C0 C1 20 20 20 20 F1 2C 25 5F 3E 3F # 60-6f
20 C9 20 20 C8 CD 20 CE 20 60 3A BA D1 27 3D 22 # 70-7f
20 61 62 63 64 65 66 67 68 69 20 20 20 20 20 20 # 80-8f
20 6A 6B 6C 6D 6E 6F 70 71 72 AA 20 20 20 20 20 # 90-9f
20 7E 73 74 75 76 77 78 79 7A A1 BF 20 20 20 20 # a0-af
20 20 20 B7 20 20 20 20 20 20 5E 21 20 20 B4 20 # b0-bf
7B 41 42 43 44 45 46 47 48 49 20 20 20 F2 F3 20 # c0-cf
7D 4A 4B 4C 4D 4E 4F 50 51 52 20 20 FC 20 FA 20 # d0-df
5C 20 53 54 55 56 57 58 59 5A 20 20 20 D2 D3 20 # e0-ef
30 31 32 33 34 35 36 37 38 39 20 20 DC 20 DA 20 # f0-ff
# ASCII to EBCDIC
00 01 02 03 04 05 06 07 08 09 1e 0b 0c 0d 0e 0f # 00-0f
00 01 02 03 04 05 06 07 08 09 0a 0b 0c 0d 0e 0f # 10-1f
40 BB 7F 00 5B 6C 59 7D 4D 5D 5C 4E 6B 60 4B 61 # 20-2f
F0 F1 F2 F3 F4 F5 F6 F7 F8 F9 7A 5E 4C 7E 6E 6F # 30-3f
7C C1 C2 C3 C4 C5 C6 C7 C8 C9 D1 D2 D3 D4 D5 D6 # 40-4f
D7 D8 D9 E2 E3 E4 E5 E6 E7 E8 E9 4A E0 5A BA 6D # 50-5f
79 81 82 83 84 85 86 87 88 89 91 92 93 94 95 96 # 60-6f
97 98 99 A2 A3 A4 A5 A6 A7 A8 A9 C0 4F D0 A1 00 # 70-7f
00 00 00 00 00 00 00 00 00 00 00 00 00 00 00 00 # 80-8f
00 00 00 00 00 00 00 00 00 00 00 00 00 00 00 00 # 90-9f
00 AA 00 00 00 00 00 00 00 00 9A 00 5F 00 00 00 # a0-af
00 00 00 00 BE 00 00 B3 00 00 7B 00 00 00 00 AB # b0-bf
64 65 00 00 00 00 00 00 74 71 00 00 00 75 00 77 # c0-cf
00 7C ED EE 00 00 00 00 00 00 FE 00 FC 00 00 00 # d0-df
00 6A CD CE 00 00 00 00 00 00 DE 00 DC 00 00 00 # f0-ff
Figure 4-9 Spanish ASCII-to-EBCDIC Conversion File
4-34 Using and Customizing the 3270 Emulator

Setting Up Print Services
Setting Up Print ServicesYou can print output from applications by using the NCD 3287
print emulator, and you can print the emulator window
contents using the NCD print table for local clients.
The emulator can print to a local printer attached to the
terminal or to remote printers.
If you are attaching a local printer, see the following section,
“Connecting a Printer to the Terminal”. For directions on
using the print emulator, see “Using the 3287 Print Emulator”
on page 4-36. For information on printing window contents,
see “Printing Window Contents” on page 4-39.
Connecting a Printer to the TerminalIf you are connecting a printer to an NCD terminal’s serial or
parallel port, follow the directions in this section for cabling
and for configuring the terminal. Refer to your printer manual
and terminal hardware booklet to determine which type of
interface is supported on your hardware.
CablingFor a serial port connection, use a null modem cable
(DTE-to-DTE).
For a parallel port connection, use a cable equipped with a
DB-25 connector on one end and a Centronics parallel
interface on the other.
Configuring the Terminal for PrintingTerminal configuration for communicating with the printer
and host differs depending on whether the printer is attached
by a serial or a parallel port.
Using and Customizing the 3270 Emulator 4-35

Setting Up Print Services
Configuring Serial Port Communication
TipTo specify serial communicationcharacteristics in a remoteconfiguration file, use the serial-interfaces-table parameter. Thedefault settings in the serial-daemons-table parameter areacceptable. See the NCDwareSystem Administrator’s Guide formore information.
To configure serial port communication:
1. Select Setup ⇒ Change Setup Parameters ⇒ Serial ⇒Serial Interfaces Table.
2. To enable the serial port for printing:
— To print immediately, use the Current Port Usefield. Click the existing value under Current PortUse to display a popup list of values. Select either
Printer or Serial Daemon .
— To print after setting the communication parameters
and rebooting the terminal, use the Port Use atBoot field. Click the existing value under Port Useat Boot to display a popup list of values. Select
either Printer or Serial Daemon .
3. Click Apply to apply the changes.
4. The values listed in the Serial Daemons Table (Setup
⇒ Change Setup Parameters ⇒ Serial ⇒ Serial Daemons
Table) configure communication between the terminal
and the host. Except for the Enable LAT Service field,
which you should set to “true,” for most sites, the
defaults are acceptable.
Configuring Parallel Port Communication
TipTo specify parallel communicationcharacteristics in a remoteconfiguration file, use the parallel-daemons-table parameter. See theNCDware System Administrator’sGuide for more information.
The Parallel Daemons Table (Setup ⇒ Change Setup
Parameters ⇒ Parallel ⇒ Parallel Daemons Table) controls
communication between the terminal and the host through
the parallel port. Except for the Enable LAT Service field,
which you should set to “true,” the defaults in the table are
acceptable.
Using the 3287 Print EmulatorThe NCD 3287 print emulator is a local client for printing from
a mainframe to a printer attached to the local terminal or a
remote terminal via the serial or parallel port. The client,
called ncd3287, requires a BrxPU2.1 connection to the host.
4-36 Using and Customizing the 3270 Emulator

Setting Up Print Services
ncd3287 emulates LU Type 1 (SCS) and LU Type 3 (DCS)
printers. Many ncd3287 clients may be invoked at once, each
controlling a single printer.
Notencd3287 does not support use of thefollowing command-line options usedin the Brixton product: -c, -s, -d, and-f.
ncd3287 is a version of Brx3287, the Brixton 3287 print emulator
process that has been customized for running on X terminals.
Unlike the Brixton version, ncd3287 includes a window with
menus and X resources for specifying printer and terminal
configuration.
Note The 3287 print emulator does not support
PostScript printing.
To use ncd3287, you need to:
1. Connect the printer to the terminal and configure the
terminal to communicate over serial or parallel lines
with printer and host. See “Connecting a Printer to the
Terminal” on page 4-35.
2. Find out which host the Brixton PU2.1 server is running
on; you need the name of this host to start the print
emulator. See the Brixton documentation.
3. Start the print emulator. See the following section,
“Starting the Print Emulator”.
Starting the Print Emulator
TipThe LU (logical unit) and PU (physicalunit) names must be listed in the SNAserver’s configuration file. See theBrixton SNA documentation for moreinformation about SNA serverconfiguration.
You start the print emulator by invoking ncd3287 from a
command line or from a startup script. To invoke ncd3287, use
an rsh or remsh command.
For example:
% rsh ncd222 ncd3287 -h kestrel &
where:
ncd222 is the hostname of the terminal. If you are not
running a name service on the network, use the
terminal’s IP address instead of its hostname.
ncd3287 is the command to start the print emulator.
Using and Customizing the 3270 Emulator 4-37

Setting Up Print Services
TipFor a complete list of command-lineoptions and resources, see thencd3287 man page.
In this example, a small window with a plaid background,
entitled NCD3287, appears on ncd222. The ncd3287 process runs
on the terminal named ncd222, sending print output from
3270 applications via the BrxPU2.1 gateway named kestrel to
the printer attached to ncd222. Because they are not specified
on the command line, the following defaults are used: 5020 for
the TCP/IP port for the BrxPU2.1 gateway, serial-line mode,
and serial port 1.
See the NCDware SystemAdministrator’s Guide for moreinformation about portconfiguration.
The following example enables serial mode printing from
serial port 2:
% rsh ncd222 ncd3287 -h kestrel -pm serial -pp 2 &
where, in addition to the commands and options described in
the preceding example:
The NCD3287 window’s root menu (accessed by clicking MB3
in the plaid background) provides a way of selecting a printer
after initialization has occurred.
You can start the print emulator process using the ncd3287command as described earlier in this chapter for the ncd3270command:
❏ From a command line (as in the previous example)
❏ From an XDM Xsession or .xsession startup file
❏ From the exec-startup-commands-table parameter
❏ From a custom-made window manager menu
-h is the command-line option for indicating that
the following string names the host running the
BrxPU2.1 SNA software.
kestrel is the hostname of the host running the BrxPU2.1
SNA software.
-pm is the default printing mode (“serial,” “parallel,” or
“remote”) at initialization.
-pp specifies which port to use. The possible values for
this option vary depending on the terminal
hardware.
4-38 Using and Customizing the 3270 Emulator

Setting Up Print Services
See “Methods of Starting the Emulator” on page 4-2 for more
information about using these methods.
Similarly, you can use the same methods for configuring the
ncd3287 client as described for ncd3270:
❏ Command-line options (as in the previous example)
❏ X resources set either in resource files or through
terminal remote configuration
See “Methods of Customizing the Emulator” on page 4-6 for
more information about using command-line options and
resources.
Terminating the Print EmulatorTo terminate the print emulator:
1. Press MB3 within the plaid background of the NCD3287
window to access the 3287 menu.
2. Select Exit .
Printing Window ContentsTipThe procedures in this section forsetting up printing services apply to allthe terminal emulators as well as theApplet Viewer and the NCD MosaicBrowser.
Users can print the contents of a window by using the Select
Printer and Print Screen commands in the emulator’s File
menu. When the Select Printer command is selected, the Select
Printer dialog box appears; the printers in the terminal’s print
table are displayed in the dialog box.
You can set up the print table for users to print to a local
printer attached to the terminal’s parallel or serial port, to
remote printers attached to other NCD terminals, or to other
network printers.
Remote printing uses the LPD protocol, and the terminal
sends a Postscript or ASCII data stream.
There may already be entries in the table. Some entries (for
printing to the terminal’s serial and parallel ports) appear
automatically. The entries for parallel ports appear when the
user selects a print command from the VT320 or 3270 terminal
emulator’s File menu. An entry for a serial port appears
automatically if the system administrator configures the serial
port for printing. Figure 4-10 shows two such entries. You can
Using and Customizing the 3270 Emulator 4-39

Setting Up Print Services
edit any entry, but changes affect all of the local clients that use
the print table. For more information about this topic, see the
NCDware System Administrator’s Guide.
You can add printers or edit existing entries in the local client
print table. You can configure the table in the Console Setup
menus or in a remote configuration file.
Using the Setup MenusTo configure the print table using the Setup menus:
1. From the Console, select Setup ⇒ Change Setup
Parameters ⇒ Print. The Lpr Servers table appears
(Figure 4-10).
2. Click New. A new entry appears in the table. and the Hosttext entry field appears.
For details about configuring an entry for a local or
remote printer, see “Specifying a Local Printer” on page
4-42 or “Specifying a Remote Printer” on page 4-42.
Figure 4-10 Printer Setup Window
ncd1.abc.comncd1.abc.com
4-40 Using and Customizing the 3270 Emulator

Setting Up Print Services
3. Type the name of the print server (the host to which the
printer is attached) in the Host field. The name must be
30 characters or less. The host may be a remote host
(either a different NCD terminal or other host) or the
local terminal.
4. Select the Queue Namefield in the Lpr Servers table. Type
the queue name in the Queue text entry box that appears.
5. Select the Datastream Type field in the Lpr Servers
table. From the pulldown menu that appears, select
ASCII, PostScript, or NT PostScript. The default setting is
ASCII.
6. Select the Description field in the Lpr Servers table.
Type the printer description in the Description text entry
box that appears.
Note Do not use curly brackets in a text field, such
as the Description field. Using curly brackets
in a remote configuration text field causes the
NCD terminal to panic.
7. If you want a banner page to appear on the printer, select
the Request Banner Page field. Click the RequestBanner Page option that appears.
Note The Request Banner Page option works for
remote LPD printing only.
To remove a printer:
1. Select any field in the Lpr Servers table.
2. Click Delete .
Using a Remote Configuration FileTo configure the print table in a remote configuration file, list
printers and their attributes in the print-lpr-servers remote
configuration parameter (Figure 4-11).
Using and Customizing the 3270 Emulator 4-41

Setting Up Print Services
Specifying a Local PrinterFor a local printer, the queue name can be parallel or serial,followed by a space, then the port number (1, 2, and so on); for
example parallel 1. The default port number is 1.
Note Use a space or a dash between the word
parallel or serial and the port number. Do not
use a colon.
The printer server name is the terminal’s host name.
There may already be entries in the table for the terminal’s
serial or parallel ports because these entries can appear in the
table automatically due to actions taken by the user in other
local clients. For more information, see the NCDware SystemAdministrator’s Guide.
For serial printing, the port must be configured for printing.
Specifying a Remote PrinterTo set up printing to a remote printer, you need the queue
name and hostname for the printer server.
If the printer is on a Windows NT system, set the printer type
field to “NT PostScript” (or “nt-postscript” in a remote
configuration file). The printer must be available through the
LPD protocol. See your host documentation for information
about using the LPD protocol.
If the printer is on a remote NCD terminal, the queue name is
rmt: followed by the serial port number. For example, the
queue name for serial port 1 is rmt:87.
print-lpr-servers = { { "flurry" "asc" ascii "Ascii on Flurry" true } { "flurry" "optps" postscript "Postscript on Flurry" false } { "172.20.10.69" "parallel 1" ascii "Local Serial ASCII" false } { "ntpc" "ntps" nt-postscript "NT Postscript" false }}
Figure 4-11 Listing Printers in the print-lpr-servers Configuration Parameter
DescriptionPrinter type ordata stream type
Banner pagePrint serverhost name
Printerqueue name
4-42 Using and Customizing the 3270 Emulator

5 Using and Customizing the Local NCDWindow Manager
This section describes:
❏ Alternative ways of starting the local window manager
❏ Root menus
❏ Alternative ways of shutting down the local window
manager
❏ Alternative ways of performing window manager
operations
TipThe emulator works with otherwindow managers, such as olwm ortwm , and you should be able to do theoperations described in this chapter.Consult your host computerdocumentation.
Illustrations and usage directions in this section apply to the
local and host-based versions of the NCD Window Manager
and the local Motif Window Manager.
“Starting and Using the Local NCD Window Manager” on
page 3-8 describes starting the window manager from the
Console menu bar and using the mouse for window manager
operations.
Starting the Local Window ManagerA drawback of starting the window manager from the
Console is that the window manager does not read a
configuration file. This means that the user has only the
default window manager root menu (shown in Table 5-1 on
page 5-4).
Starting the Window Manager from a Command LineThe following host-based utilities for starting the window
manager allow you to provide custom root window menus for
users.
The files you use to configure the menus are introduced in
“Using and Configuring Root Menus” on page 5-3.
Using and Customizing the Local NCD Window Manager 5-1

Starting the Local Window Manager
Binaries for these utilities are included in the NCDware
distribution. If a binary for your host is not included in the
distribution, visit the NCD web site or FTP site to see if there is
a binary for your host in the archive of utilities. You can also
call NCD Technical Support for help. See Chapter 7 for
information on contacting Technical Support.
Using the ncdrunwm UtilityNCDware includes a host-based utility, ncdrunwm, used to
start the local window manager from a command line. The
ncdrunwm command starts the local NCD Window Manager
and reads a window manager configuration file. Window
manager configuration files define from one to three root
window menus (see “Using and Configuring Root Menus” on
page 5-3).
To start the local window manager on the local terminal, type
the following command in a UNIX shell:
% ncdrunwm
Using the ncdlaunchd UtilityYou can still use ncdlaunchd, the older host-based utility, to
start the window manager with custom menus, but you must
use the new version provided in this release of NCDware. You
may wish to use ncdlaunchd if your startup files or terminal
remote configuration files already specify this utility.
Start the local window manager using an rsh command and
ncdlaunchd to read the window manager configuration file. If
you don’t care to use customized root window menus, you
need not start the launcher.
% rsh hostname wm% ncdlaunchd
Starting the Window Manager AutomaticallyYou can start the window manager automatically when the
user logs in from an XDM startup file or the remote
configuration file.
5-2 Using and Customizing the Local NCD Window Manager

Using and Configuring Root Menus
Using an XDM Startup FileTo start the local window manager automatically from an
XDM startup file (.xsession or Xsession), insert into the file the
command line(s) shown in the previous section.
Using Remote ConfigurationTo start the window manager automatically when the
terminal reboots, you can add the window manager
command to the exec-startup-commands table. When started in
this fashion, the window manager cannot read configuration
files to display customized menus.
For example, the following table entries start the local window
manager and a 3270 emulator window:
exec-startup-commands = { { wm } { tn3270 }}
Using and Configuring Root MenusThe NCD Window Manager provides a default root menu,
and you can configure your own custom menus.
The Default Root MenuThe default menu (displayed on the root window if no other
menu is configured) allows you to start local clients (see Table
5-1). For information about configuring the default root
window menu, see the NCDware System Administrator’s Guide.
Using and Customizing the Local NCD Window Manager 5-3

Using and Configuring Root Menus
Configuring Custom MenusYou can also configure custom menus. Depending upon how
you configure the menus, different types of root window
menus may be available and each mouse button may display
a different menu.
To display a root window menu and make a selection, follow
these steps:
1. Move the pointer to any area of the root window (the
background behind all other windows); the pointer
changes to an X.
2. Click any mouse button to display a menu.
3. Click on your selection in the menu.
Table 5-1 Default Root Window Menu
Root Window Menu Item Function
Show Console Displays the Console
Start Terminal Displays the Terminals Chooser for starting a VT320 terminal
emulation window
Start Dialer Displays the Dialer Port Chooser for connecting to a host using
a modem
Start 3270 Starts a 3270 emulation window
Start 3179G Starts a 3270 emulation window for running mainframe
graphics (GDDM) applications
Start Keymap Editor Starts the Keymap Editor
Show Version Displays information about terminal software and hardware
Show Memory Displays information about installed and free memory
Show X Connections Shows X clients connected to a terminal
Lock Screen Starts the screen locking utility
Setup User Preferences Starts the local client for configuring user preference items
Login Displays the Login Chooser
Logout Logs you out and ends the current session
Exit Window Manager Terminates the local window manager
5-4 Using and Customizing the Local NCD Window Manager

Shutting Down the Window Manager
4. If you decide not to make a selection, move the pointer to
the root window and click any button to remove the
menu.
See the NCDware SystemAdministrator’s Guide for moreinformation about ncdrunwm ,ncdlaunchd and structuring windowmanager configuration files.
If you use ncdrunwm or ncdlaunchd to start the window
manager, you can configure custom menus in a window
manager configuration file. By default, ncdrunwm or
ncdlaunchd looks first for a file called .launchrc in the user’s
home directory. If such a file does not exist, both programs
look for the following files in the order listed:
❏ .mwmrc in the user’s home directory
❏ /usr/lib/X11/system.launchrc system-wide file
❏ /usr/lib/X11/system.mwmrc system-wide file
You can also specify a different file by starting either program
with a command line that includes the -f filename option.
The following example shows one line from a window
manager configuration file. This line inserts a command for
starting an emulator from a root window menu:
"Local 3270" !"rsh ncdu100 tn3270 -display ncdu100:0 &"
In this example, Local 3270 appears in a root window menu.
When the user selects Local 3270 , the command following
the exclamation mark executes.
Note that you cannot simply insert this line into an empty
window manager configuration file. Other entries are
required.
Shutting Down the Window ManagerYou can shut down the window manager by deselecting it
from the Console’s WindowMgr menu. From the default
window manager menu, click on the root window and click
on Exit Window Manager .
Using and Customizing the Local NCD Window Manager 5-5

Performing Window Manager Operations
Performing Window Manager OperationsWindow manager operations can be performed in three
different ways (Table 5-2). The mouse method is the simplest.
To use the Window menu (shown in Table 5-3):
1. To display the menu from a window, click once with the
left mouse button on the dash in the left corner of the
window.
2. To display the menu from an icon, click once with the left
mouse button in the icon.
3. To make a selection, click any mouse button on your
selection.
4. To close the menu, click any mouse button on the root
window.
To use a keyboard shortcut (listed in Table 5-3), hold down the
first two keys in the Keyboard Shortcut column and press the
third.
Table 5-2 Window Manager Operations—Methods
Method General Description
Mouse method Place the pointer in a border or button and click a mouse button or
press a button and drag the mouse. The borders and buttons and their
associated functions are shown in Figure 3-4 on page 3-9.
Window menu method Select an operation from the Window menu. Some functions require
using the mouse. Window menu operations are shown in Table 5-3.
Keyboard method Press a two-key combination for each operation. Some functions
require the mouse. Keyboard method operations are shown in Table 5-
3.
5-6 Using and Customizing the Local NCD Window Manager

Performing Window Manager Operations
Minimizing a Window (Turning it into an Icon)To remove a window from the display without closing it, you
can replace it with a small representation, called an icon. The
icon appears at the edge of the screen. Any operation running
in the window continues, but you cannot enter input into an
icon; you must restore the window first.
To minimize a window:
Table 5-3 Window Menu and Keyboard Shortcuts
WindowMenu Item
KeyboardShortcut
What the Option Does
Restore Alt-Ctrl-F5 Returns the window to its previous size and location. Changes an
icon into a window.
Move Alt-Ctrl-F7 Moves the window to a new location on the screen. Requires use
of the mouse.
Size Alt-Ctrl-F8 Changes the size of the window. Requires use of the mouse.
Minimize Alt-Ctrl-F9 Replaces the window with a representative icon.
Maximize Alt-Ctrl-F10 Expands the window to cover the entire screen.
Lower Alt-Ctrl-F3 Moves the selected window to the bottom of the stack of windows
on the screen.
Close Alt-Ctrl-F4 Closes the window, terminating the program running in the
window.
Mouse method Click the minimize button (the smaller button in the top right corner of
the window).
Menu method Select Minimize from the Window menu.
Keyboard method Select the window and use the Alt-Ctrl-F9 keyboard shortcut.
Using and Customizing the Local NCD Window Manager 5-7

Performing Window Manager Operations
Restoring a Window from an Icon (Deiconifying)You must restore a window from its iconified state before you
can send input to the application.
To restore a window:
Maximizing a WindowMaximizing a window expands it to cover the entire screen,
obscuring any other windows or icons.
To maximize a window:
Resizing a WindowTo make a window a different size:
Mouse method Double click on the icon with the left mouse button.
Menu method Select Restore from the Window menu.
Keyboard method Select the window and use the Alt-Ctrl-F5 keyboard shortcut.
Mousemethod
Click the maximize button (the larger button in the top right corner of the
window).
Menu method Select Maximize from the Window menu.
Keyboard method Select the window and use the Alt-Ctrl-F10 keyboard shortcut.
Mousemethod
1. Place the pointer on a border or corner of the window you want to
resize.
2. Using the left mouse button, drag the border to the desired shape and
size.
3. Release the mouse button.
Menu method 1. Select Size from the Window menu.
2. Position the pointer on a border or corner.
3. Move the pointer to the new location of the border or corner.
4. Click any mouse button.
Keyboard method Select the window and use the Alt-Ctrl-F3 keyboard shortcut.
5-8 Using and Customizing the Local NCD Window Manager

Performing Window Manager Operations
As you resize a 3270 emulator window, the emulator selects a
font size proportional to the size of the window.
Moving a Window or an IconTo move a window or an icon to a different position on the
screen:
Raising or Lowering a WindowYou can raise windows that are overlapped by others and
send windows to the bottom of the stack when they are not in
use.
To raise a window:
To lower a window:
Mouse method 1. Position the pointer in the title bar.
2. Press and hold the left mouse button.
3. Drag the pointer to the new location.
4. Release the mouse button.
Menu method 1. Select Move from the Window menu.
2. Drag the outline box to the new location.
3. Click the left mouse button.
Keyboard method 1. Select the window.
2. Use the Alt-Ctrl-F7 keyboard shortcut.
3. Drag the outline box that appears to the new location.
4. Click the left mouse button.
Mousemethod
Click with the left mouse button in the title bar or border of the
window you want to raise.
Mouse method Click with the right mouse button in the title bar or border of the
window you want to lower.
Menu method Select Lower from the Window menu.
Keyboard method Select the window and use the Alt-Ctrl-F3 keyboard shortcut.
Using and Customizing the Local NCD Window Manager 5-9

Performing Window Manager Operations
Closing a Window or an IconTo close a window:
To close an icon:
Mouse method Double click on the menu button with the left mouse button.
Menu method Select Close from the Window menu.
Keyboard method Select the window and use the Alt-Ctrl-F4 keyboard shortcut.
Menu method Click the left mouse button on the icon and select Close from the
Window menu.
Keyboard method Select the icon and use the Alt-Ctrl-F4 keyboard shortcut.
5-10 Using and Customizing the Local NCD Window Manager

6 Application Programming Interface Methods
The NCD 3270 terminal emulator includes support for two
application programming interface methods to assist in
integrating terminal, UNIX workstation, and IBM mainframe
environments:
❏ 3270 application session record and playback macros
accessed through the 3270 terminal emulator’s Macros
menu (available over TN3270 connections)
❏ Support for Brixton System’s EHLLAPI (Extended High-
Level Language Application Program Interface)
See Brixton’s EHLLAPI: Program-matic Interface Manual for completedocumentation of EHLLAPI.
This chapter describes how to use record and playback
macros and how to configure the terminal for use of EHLLAPI.
Record and Playback MacrosThe record and playback macros, accessed through the
Macros menu, provide an easy method for recording a 3270
application session, saving the recording, and playing it back.
See the ncd3270 man page for acomplete list of keyboard translations.
Macros are composed of 3270 terminal emulator actions
recorded as the user supplies keyboard input. The 3270
actions recorded in a macro file are almost identical to Xt-style
translations for ncd3270.
The one difference is the 3270’s Pause() function. Pause (),
available only with macros, stops the macro to permit a user
to enter security-sensitive input such as a password. To restart
macro execution and recording, an Enter() action is needed.
Pause() is mapped to Alt-a by default and to the Pause key on
3270 keyboards.
Application Programming Interface Methods 6-1

Record and Playback Macros
The following is an example of a macro recorded by a user
logging into a mainframe application session. In this example,
cc1 is the macro name and a613 is the user’s identification.
“cc1”: String(icicics) Newln() Enter() Clear() String (ici3) Enter() String(a613)Tab() Pause() String(2) Enter() String(2) Tab() String(8) Enter()
Enabling and Disabling the Macro FeatureBy default, the record and playback feature is enabled and
accessible through the Macros menu on the 3270 terminal
emulator’s menu bar. To disable the Macros menu, set the
allowMacros resource to “false.” If you’re starting a terminal
emulator from a command line, use -macrosOff to disable the
Macros menu.
Recording and Naming a MacroTipsThe 3270 terminal emulator doesnot signal the beginning or endingof a recording session.
Trailing white space followingstrings is not recorded.
To begin recording a macro, select Macros ⇒ Start Recording
from the 3270 terminal emulator’s menu bar. As many as 32
subsequent keystrokes are recorded until you select Macros ⇒Stop Recording.
If you try to record more than 32 key hits, when the macro is
played back, the 33rd locks the keyboard. To successfully play
back more than 32 keystrokes, insert a Pause(). This flushes the
typeahead buffer, permitting you to play another 32
keystrokes.
To stop recording, select Stop Recording. A dialog box
appears to prompt you to name the macro.
After you name a macro, it is available by name from the
Macros ⇒ Run Macros pulldown menu.
Saving Macros in Files and Placing them in the Run Macros MenuTipBe sure to give each macro file aunique name. Macros ⇒ Read FromFile . . . does not confirm that a file isunique before running it.
To save a macro in a file, select Macros ⇒ Save to File. A dialog
box appears; enter the name of the macro.
To read a saved macro file at startup and place it in the Run
Macros pulldown menu, name the file containing the macro in
the macroFile resource.
“Playing a Macro” on page 6-3 describes two methods for
playing macros saved in files.
6-2 Application Programming Interface Methods

Preparing to Use EHLLAPI
Playing a MacroTipWhen reading and writing macros, thefile system in which the macro files arelocated must be accessible throughthe terminal’s File Service Table. Formore information about the FileService Table, see the NCDwareSystem Administrator’s Guide.
To play a macro:
❏ Select Macros ⇒ Run Macros.
A pulldown menu lists macros that were recorded
during the current session or read from files.
❏ Select Macros ⇒ Read from File.
A dialog box appears; type the name of the file
containing the macro.
Stopping a MacroTo stop a running macro, press the Reset key (Ctrl-R). (This
function is also available on the PF keypad.)
Renaming MacrosTo rename a macro, select Macros ⇒ Rename Macro. A dialog
box results, prompting you to select the name of the macro to
be renamed and provide a new name.
Preparing to Use EHLLAPITo use the Brixton EHLLAPI application programming
interface for 3270 application drivers, you must have Brixton’s
host-side EHLLAPI libraries for support of remote host
connections. Check with Brixton to find out what version you
need.
To configure the terminal for EHLLAPI use:
TipFor the current session, set the portnumber through Setup ⇒ ChangeSetup Parameters ⇒ 3270 TerminalEmulation ⇒ EHLLAPI A Default tcpPort.
1. Specify the default EHLLAPI A TCP port. In a remote
configuration file, use the ncd3270-ehllapia-default-portparameter to specify the EHLLAPI A default TCP port.
The default value is 5021.
2. Indicate to the EHLLAPI programs that ncd3270 is acting
as the EHLLAPI server by specifying the EHLLAPI session
name (A through H) on the command line or in the
ehllapiName resource.
Application Programming Interface Methods 6-3

Preparing to Use EHLLAPI
For example, from the command line:
% rsh ncdu100 tn3270 -pu21 -e A &
where:
tn 3270 is the command to start the terminal emulator.
-pu21 is the option to start a BrxPU2.1 connection.
-e is the option to specify the EHLLAPI session
name.
6-4 Application Programming Interface Methods

7 Troubleshooting
This section lists the error messages produced by the ncd3270client, their causes, and the actions to take (if any). Directions
are provided for contacting NCD Technical Support to get
help for other problems you may encounter.
Error Messages Produced by ncd3270NCDware reports information about actions of the X server.
As the server executes, each software module generates its
own messages and sends them to the built-in Diagnostic
daemon. The daemon stores messages in an internal buffer
and forwards them to the Console, where they appear in the
Console Messages hide box. If you are using a diagnostic log
file, messages are logged in the specified file.
See the NCDware SystemAdministrator’s Guide for informationabout setting up diagnostic logging.
Information reported in diagnostic messages includes
successful completion of user requests, unsuccessful attempts
to perform an action, and fatal errors that cause the ncd3270client to terminate.
Message Format and Severity LevelsHere is an example message and an explanation of its
components:
%NCD3270-I-B3270006, Quit (User requested termination).
%NCD3270 is the reporting module.
I shows that this is an informational message.
B3270006 is the message number. For more information,
look up the message number in “List of Error
Messages” on page 7-2.
Quit (User requested termination).
is the message text.
Troubleshooting 7-1

Error Messages Produced by ncd3270
All ncd3270 messages follow this format:
%MODULE-S- IDENT, message
The parts of a message are:
List of Error MessagesThis section lists messages produced by the ncd3270 local
client, in message number order.
When displayed, all of these messages start with%NCD3270followed by the severity indicator.
Many messages include variable text, for example, LU_name.
When the message is displayed, the variable is replaced by the
actual data, for example, the LU name.
The Explanation paragraph describes the reason for the
message and the effect on the local client.
%MODULE indicates the local client or other software
module that issued the message.
S is the level of severity:
I An informational message. The client has
performed its activities successfully.
W A warning message; an error from which
the client recovered. The client may have
completed some, but not all, of the
requested action. You may want to verify
the results to make sure they are correct.
E An error from which the client may not
recover. The client did not complete the
requested activity, but is attempting to
continue.
F An fatal (irrecoverable) error. The client did
not complete the requested activity, and the
client has terminated.
IDENT is the message number. All messages are listed in
the following section in message number order.
message is the message text.
7-2 Troubleshooting

Error Messages Produced by ncd3270
The User Action paragraph describes the action (if any) that the
user or system administrator should take when the message is
displayed. For some errors, you are advised to contact NCD
Technical Support. For information about contacting
Technical Support, see “Contacting Technical Support” on
page 7-16.
F-B3270003, Open LU= LU_name PU= PU_name Port= port_number Host= hostnamefailed. errno= UNIX_error_number brx_errno=Brixton_error_number
Severity: Fatal
Explanation: Socket connection attempt to the BrxPU2 server
failed. Possible reasons are:
1. The hostname is unknown.
2. The TCP/IP port number is not defined in the /etc/servicesfile.
3. The TCP/IP port number does not match between the
local system and the BrxPU2 server system.
User Action:
1. Verify the hostname of the BrxPU2 server system.
2. In the /etc/services file on the BrxPU2 system:
— Verify that the service name brx_pu2_espd is in thefile.
— Make sure that the port number assignment on thelocal system matches the server system.
Troubleshooting 7-3

Error Messages Produced by ncd3270
F-B3270005, Send Failed to PU2 Server, errno= UNIX_error_numberbrx_errno= Brixton_error_number
Severity: Fatal
Explanation: The connection to the PU2.1 server has failed.
User Action: Check to make sure that the server is running.
I-B3270006, Quit (User requested termination).
Severity: Informational
Explanation: The user terminated the local client.
User Action: None.
E-B3270008, Unknown LU= LU_name PU= PU_name Port= port_number
Severity: Error
Explanation: The specified LU, PU, or port is unknown or not
available.
User Action: Specify an alternate.
W-B3270120, Unable to allocate color color_number. Using White instead.
Severity: Warning
Explanation: The color map has been used up.
User Action: Terminate the client that is using up the color
map.
W-B3270121, Unable to allocate color color_number. Using Black instead.
Severity: Warning
Explanation: The color map has been used up.
User Action: Terminate the client that is using up the color
map.
7-4 Troubleshooting

Error Messages Produced by ncd3270
W-B3270130, Err in getservbyname () during opening of ehllapi forserver_name errno= error_number
Severity: Warning
Explanation: Specified server_name is not valid.
User Action: Use a valid server_name. Valid server_names are A
through H.
W-B3270132, Getting errno-EADDRINUSE from bind () during opening ofehllapi for errno =error_number.
Severity: Warning
Explanation: The EHLLAPI server is already in use.
User Action: Use another server. Valid server names are A
through H.
W-B3270133, Warning: Got error in setsockopt () during opening ofehllapi for server_name
Severity: Warning
Explanation: Internal error.
User Action: Notify NCD Technical Support.
W-B3270134, Error in bind () during opening of ehllapi for server_nameerrno= error_number
Severity: Warning
Explanation: Internal error.
User Action: Notify NCD Technical Support.
F-B3270150, Unable to load font font_name. Unable to continue.
Severity: Fatal
Explanation: The specified font could not be loaded, causing
the client to terminate.
User Action: Chose only fonts available to the X server. Use
the xlsfonts(1) utility to list the available fonts.
Troubleshooting 7-5

Error Messages Produced by ncd3270
W-B3270151, Font font_name could not be found. Font will not be used.
Severity: Warning
Explanation: When scanning the font pools at startup time,
the emulator could not find this font.
User Action: The specified font cannot be used. You must
choose a font available to the X server. Use the xlsfonts(1)
utility to list the available fonts.
W-B3270152, Font font_name is not fixed width. Font will not be used.
Severity: Warning
Explanation: When scanning the font pools at startup time,
the emulator determined that the specified font was not a
fixed-width font. Therefore, this font cannot be used.
User Action: Choose only fonts with fixed-widths (character
cells).
W-B3270153, In the font_pool_name font pool, font font_name_1 has sameheight and width as font font_name_2 and hence will not be used.
Severity: Warning
Explanation: font_name_1 duplicates the height and width of
existing font_name_2 in the named pool. font_name_1 is not
used.
User Action: Remove duplicate font_name_1 from the font
pool.
F-B3270200, Failure initializing applications display widgets.Unable to continue.
Severity: Fatal
Explanation: A preceding message was issued explaining why
the emulator failed. The reason for the failure is that the
server could not allocate sufficient memory.
User Action: Check the preceding message(s) for information
about why initialization is returning failure. It may be
necessary to install more memory in the terminal.
7-6 Troubleshooting

Error Messages Produced by ncd3270
F-B3270205, ehllapi name server_name is invalid.
Severity: Fatal
Explanation: EHLLAPI server name is invalid.
User Action: Select a valid server names. Valid server names
are A through H.
W-B3270206, asciiEbcdic Table filename not found. Default table will beused.
Severity: Warning
Explanation: The filename of the ASCII-to-EBCDIC conversion
table that was given in the command-line option or X
resource cannot be found or cannot be read. The emulator
uses its built-in default conversion table.
User Action: Specify an existing and valid ASCII-to-EBCDIC
conversion file in your command-line option or X resource.
F-B3270209, Unrecognized invocation line args: arguments.
Severity: Fatal
Explanation: Invalid options were given in the command-line
invoking the emulator. The emulator cannot run.
User Action: A usage listing of the most important command-
line options follows the message. This list should be adequate
for getting the emulator started. Consult Appendix B,
Emulator Options and X Resources for additional options.
F-B3270219, Unable to open keyboard map file filename.
Severity: Fatal
Explanation: The emulator was unable to open the specified
keyboard mapping file. The emulator cannot run.
User Action: Check the filename. Specify an existing or valid
keyboard mapping file.
Troubleshooting 7-7

Error Messages Produced by ncd3270
F-B3270220, I/O error in reading keyboard mapping file filename.
Severity: Fatal
Explanation: There was an error in an fread() call. The
emulator cannot run.
User Action: Check file integrity.
F-B3270221, File filename is not a valid keyboard map file. File notread in.
Severity: Fatal
Explanation: The specified file is not a validly formatted
keyboard map file. The emulator cannot run.
User Action: Specify a different file as the keyboard map file.
W-B3270222, The font_pool_name font pool already has limit of integerfonts, font font_name is being ignored.
Severity: Warning
Explanation: Too many fonts were specified in a resource or
command-line argument. Only the number of fonts specified
in the message can be used by the emulator.
User Action: Specify fewer fonts.
E-B3270a01, Unable to allocate Pixmap for internal versions of the 14standard GDDM fill patterns. Internal versions won’t be available.
Severity: Error
Explanation: The terminal ran out of memory.
User Action: Close applications to free memory or install
additional memory in the terminal.
7-8 Troubleshooting

Error Messages Produced by ncd3270
E-B3270a02, Can’t open file ‘ name’ for GDDM standard fill patternnumber pattern_number. Will use an internal version of that fillpattern.
Severity: Error
Explanation: The terminal cannot open the required file.
User Action: Check the Console Messages area for a more
detailed explanation of the problem. For more detailed
information in the Console, turn on Change Setup
Parameters ⇒ File Service ⇒ Extended Diagnostics. Check
Change Setup Parameters ⇒ File Service ⇒ File Service Table
to make sure the terminal has access to the requested file.
E-B3270a03, File ‘ name’ for GDDM standard fill pattern numberpattern_number is of invalid format. Will use internal version of thatfill pattern.
Severity: Error
Explanation: The file format is invalid.
User Action: Check the Brixton documentation for a
description of the required format.
E-B3270a04, Error in processing file ‘ name’ for GDDM standard fillpattern number pattern_number. Will use an internal version of that fillpattern.
Severity: Error
Explanation: A processing error occurred.
User Action: Check the file for format errors. Check the
Brixton documentation for a description of the required
format.
Troubleshooting 7-9

Error Messages Produced by ncd3270
E-B3270a05, Unable to allocate Pixmap for GDDM Image Data commands somust disable GDDM.
Severity: Error
Explanation: The terminal ran out of memory.
User Action: Close applications to free memory or install
additional memory in the terminal.
E-B3270a06, Unable to allocate any symbol storage for Load PS so mustdisable the Load PS structured field.
Severity: Error
Explanation: The terminal ran out of memory.
User Action: Close applications to free memory or install
additional memory in the terminal.
E-B3270a07, Unable to allocate pixel storage for internal versions ofthe 14 standard GDDM fill patterns so must disable GDDM.
Severity: Error
Explanation: The terminal ran out of memory.
User Action: Close applications to free memory or install
additional memory in the terminal.
E-B3270a08, Unable to allocate 3 planes of symbol storage for Load PSso can only support Single-plane Programmed Symbols.
Severity: Error
Explanation: The terminal ran out of memory.
User Action: Close applications to free memory or install
additional memory in the terminal.
7-10 Troubleshooting

Error Messages Produced by ncd3270
E-B3270a09, Unable to allocate Pixmap for painting Load PS symbols tothe text layer. Thus, when the graphics layer is non-empty,transparent Load PS text will not be visible on the text layer.
Severity: Error
Explanation: The terminal ran out of memory.
User Action: Close applications to free memory or install
additional memory in the terminal.
E-B3270a0a, Unable to allocate Pixmap for painting Load PS symbols tothe graphics layer. If used there, they will not be visible.
Severity: Error
Explanation: The terminal ran out of memory.
User Action: Close applications to free memory or install
additional memory in the terminal.
E-B3270a0c, In the font_pool font pool, font font_name exceeds max height( height) or width ( width) allowed when the Load Programmed Symbolsstructured field is enabled. Font will not be used.
Severity: Error
Explanation: The font exceeds the height or width parameters
permitted.
User Action: Use only fonts that match the specified height
and width in the default font pool path.
E-B3270a0d, Unable to allocate backing-store Pixmap for graphicslayer so will be unable to restore it at expose events.
Severity: Error
Explanation: The terminal ran out of memory.
User Action: Close applications to free memory or install
additional memory in the terminal.
Troubleshooting 7-11

Error Messages Produced by ncd3270
E-B3270a0e, GDDM ‘Direct” mode not enabled and couldn’t allocate aPixmap for graphics layer so must disable GDDM.
Severity: Error
Explanation: The terminal ran out of memory and the
graphics layer pixmap could not be allocated.
User Action: Close applications to free memory or install
additional memory in the terminal. You can also try using
GDDM in direct mode.
E-B3270a0f, Unable to allocate Pixmap for GDDM fill patterns fromLCID=0xf0. If used, they will not be visible.
Severity: Error
Explanation: The terminal ran out of memory.
User Action: Close applications to free memory or install
additional memory in the terminal.
E-B3270a10, Unable to allocate an XImage for installing internalversions of the 14 standard GDDM fill patterns so must disable GDDM.
Severity: Error
Explanation: The terminal ran out of memory.
User Action: Close applications to free memory or install
additional memory in the terminal.
E-B3270a11, Unable to allocate an XImage for a GDDM Image Data block.Block’s image data not drawn. Some or all future GDDM Image Data maybe similarly lost.
Severity: Error
Explanation: The terminal ran out of memory.
User Action: Close applications to free memory or install
additional memory in the terminal.
7-12 Troubleshooting

Error Messages Produced by ncd3270
F-B3274002, Unable to open X display X_display_name, possible lowmemory condition
Severity: Fatal
Explanation: The X display name was badly constructed, the
display name is unknown, you do not have access to the
specified display, or the terminal is low on available memory.
User Action: Check the display name in the -displaycommand-line option or the display X resource. If that seems
correct, run xhost on the target terminal to add your host
(terminal or other network host) to the list of accepted
machines. You can use xhost + or xhost + name where nameis the network name of your terminal or the terminal’s X
server access control parameters).
If the problem does not seem to be with the display name or
lack of access, and the terminal has enough free memory, try
setting the net-minimum-data-buffers parameter. Normally,
this parameter is not used because buffers are allocated
automatically as needed. You can specify up to 16,384 buffers.
B3274004, No main X window for program has been created. Unable tocontinue.
Severity: Fatal
Explanation: The emulator did not create a main window. The
emulator exits.
User Action: Notify NCD Technical Support.
F-B3274913, Printring: trailing %%
Severity: Fatal
Explanation: An internal error occurred.
User Action: Notify NCD Technical Support.
Troubleshooting 7-13

Error Messages Produced by ncd3270
F-B3274914, Printring: Unknown format character
Severity: Fatal
Explanation: An internal error occurred.
User Action: Notify NCD Technical Support.
F-B3274915, No room in buffer for terminal type
Severity: Fatal
Explanation: An internal error occurred.
User Action: Notify NCD Technical Support.
I-B3274916, Connection closed at user request. Host: hostname, Port:port_number
Severity: Informational
Explanation: The connection to the named host and port has
been closed.
User Action: No action necessary.
I-B3274917, Using Font: font_name for Default Screen.
Severity: Informational
Explanation: The font named is being used for the default
screen. The default screen is 3278 model 2.
User Action: No action necessary.
I-B3274918, Using Font: font_name for Alternate Screen.
Severity: Informational
Explanation: The font named is being used for the alternate
screen. The alternate screen is the 3278 model that you
selected.
User Action: No action necessary.
7-14 Troubleshooting

Error Messages Produced by ncd3270
I-B3274919, Using Font: font_name for Status Line.
Severity: Informational
Explanation: The named font is being used for the Operator
Information Area.
User Action: No action necessary.
I-B3274920, Using asciiEbcdic conversion file: filename.
Severity: Informational
Explanation: The named file was read and has replaced the
default ASCII-to-EBCDIC and EBCDIC-to-ASCII conversion
tables.
User Action: No action necessary.
I-B3274921, EBCDIC to ASCII Translation Table Dump.
Severity: Informational
Explanation: A dump of the EBCDIC-to-ASCII conversion
table follows.
User Action: Verify that the conversion table is correct.
I-B3274922, ASCII to EBCDIC Translation Table Dump.
Severity: Informational
Explanation: A dump of the ASCII-to-EBCDIC conversion
table follows.
User Action: Verify that the conversion table is correct
I-B3274923, Attn value is invalid, using default (1, BREAK)
Severity: Informational
Explanation: The specified -tnattn value is invalid.
User Action: Valid values are 0, 1, and 2. See the ncd3270 (1)
man page for more information.
Troubleshooting 7-15

Contacting Technical Support
I-B3274924, SysReq value is invalid, using default (3, TESTREQ)
Severity: Informational
Explanation: The specified -tnsysreq value is invalid.
User Action: Valid values are 0, 1, 2, and 3. See the ncd3270 (1)
man page for more information.
W-B3274925, Ignoring Programmed Symbols datastream, use -loadps
Severity: Warning
Explanation: The programmed symbols datastream is being
ignored.
User Action: Use the -loadps option.
W-B3274926, Ignoring Graphics datastream, use -gddm
Severity: Warning
Explanation: The graphics datastream is being ignored.
User Action: Use the -gddm option.
Contacting Technical SupportIf you encounter difficulties, you can send e-mail or a fax to
NCD Technical Support, contact them by phone, or use the
Web.
For information about services available from NCD Technical
Support, contact your NCD representative or send e-mail to
Sending E-Mail or Faxes to Technical SupportNCD Technical Support uses an automated system for e-mail.
Send e-mail to the Internet address [email protected], or send
a fax to (503) 641-2959. To ensure that your e-mail is answered
quickly, please provide as much as possible of the information
listed under “Information to Provide” on page 7-17.
7-16 Troubleshooting

Contacting Technical Support
Using the WebYou can also submit a request through NCD Web Services. Go
to http://www.ncd.com to reach the Service and Support
home page.
Phoning Technical SupportFrom the U.S. and Canada, you can phone (800) 800-9599 and
ask for Technical Support. International customers can phone
(503) 641-2200.
Be prepared to provide as much as possible of the information
listed in the following section.
Information to ProvideRegardless of the method you use to report the problem to
NCD, you must have the following information ready:
❏ Your name and title
❏ Company or organization
❏ Phone number
❏ FAX number
❏ E-mail address
❏ Billing address
❏ Shipping address
❏ For each hardware item:
— Serial number
— Description of the problem
— Type of warranty (Standard, Express, Extended,
Express Exchange, Out-of-Warranty)
❏ For a software problem:
— Problem type: question, enhancement, bug, crash, or
other
— Type of host and its OS release
— Window manager
— Boot Method: TFTP, NFS, PROM, PC card, or MOP
Troubleshooting 7-17

Contacting Technical Support
— Model of NCD terminal
— Amount of installed memory
— NCDware version
— NCDware Boot Monitor version
— Detailed problem description
— If the problem involves a third-party application, the
name of the application and which version you are
running
7-18 Troubleshooting

A Emulator Menus
The 3270 emulator menu bar provides four menus, described
in this appendix.
Note Menu selections displayed in a different color
from the others or grayed out are not
available.
File MenuThe File menu contains commands for printing, connecting to
a host, and terminating the emulator:
❏ Select Printer
Displays the Select Printer dialog box and allows you to
select a printer for printing from the emulator.
❏ Print Screen
Prints the contents of the current 3270 screen to the
printer selected in the Select Printer dialog box.
❏ Reconnect
Reconnects to the same host and port, in case you were
accidentally disconnected.
❏ New Connection
Displays the 3270 Host Chooser window. You can type a
host name and port number or select from hosts listed in
the chooser (requires configuring the terminal to display
a list of hosts).
❏ Close Connection
Closes the current host connection.
❏ Quit
Terminates the emulator and closes the window.
A-1

Options Menu
Options MenuColor mode, case, selector light pen, and cut/copy selection
can be customized using the Options menu. Changes made in
this fashion are not permanent; each time you start an emula-
tor, you must reconfigure it. The advantages of the Options
menu are:
❏ You can immediately change the attributes.
❏ The cut/copy selection and light pen options are
available only in the Options menu.
Color Mode OptionsThese options define the color mode (on color terminals) and
reverse or normal video:
❏ Full Color (the default mode)
The emulator uses IBM full-color mode.
❏ Base Color
The emulator uses IBM base-color mode. The defaults are
green and white.
❏ Monochrome
The emulator uses monochrome mode. The default is
green, and can be changed through X resources.
❏ Reverse Video
When selected, foreground and background colors are
reversed. When deselected, use normal foreground and
background colors.
Case Mode OptionsThese options define the case mode:
❏ Mixed Case (the default mode)
Text appears in mixed uppercase and lowercase
characters.
❏ Upper Case
Text appears in uppercase characters only.
A-2

Options Menu
Light Pen OptionThis option defines the mouse as a light pen:
❏ Light Pen
If selected, the left mouse button functions as a selector
light pen. Clicking the mouse button within a field that is
selectable using a light pen selects the field. Fields that
you can select with a light pen are designated by a ques-
tion mark (?). When selected, the field designator
changes to a greater-than sign (>).
Cut/Copy and Paste OptionsThe following options define the selection mode for the cut/
copy and paste functions. For information about using these
functions, see “Using Cut/Copy and Paste” on page 3-15.
❏ Select Input Fields
Only cuts or copies characters from data entry fields.
Each field is transmitted as a separate line. A field span-
ning multiple lines is transmitted as multiple lines.
When this option is selected, all other cut/copy options
are excluded.
Use this mode to transfer fields from one emulator
window to another or to capture only the input field
data.
❏ Select Whole Lines (the default mode)
Cuts or copies characters across entire lines. This is the
normal X window system cut/copy mode. In this mode,
field attribute bytes are translated to newlines.
❏ Select Rectangle
The selection area is always a rectangle.
❏ Graphics Cursor
Selected only when you connect to a graphics
application. Other menu items are not available when
the graphics cursor is enabled.
A-3

Keys Menu
Keys MenuThe Keys menu contains commands for displaying the Key
Pad and Keymap Editor.
❏ The Key Pad offers an alternative to the keyboard for
selecting IBM function keys. The user selects a function
key by clicking on the relevant button in the Key Pad
window.
❏ The Keymap Editor displays a layout of an NCD
keyboard, showing the location of the basic key actions
(in basic mode) or the key actions and translations (in
advanced mode) for 3270 or VT320 emulators. The editor
allows you to change the keymap.
Macros MenuThe Macros menu contains commands for recording and
playing back the 3270 terminal emulator actions occurring
during a 3270 application session.
❏ Start Recording
Starts recording 3270 terminal emulator actions.
❏ Stop Recording . . .
Stops recording terminal emulator actions; displays a
dialog box prompting you to enter a name for the macro.
❏ Rename Macro . . .
Displays a dialog box prompting you to rename a macro.
❏ Save to File . . .
Displays a dialog box prompting the user to name a file
to which a macro should be saved.
❏ Read From File . . .
Displays a dialog box prompting you to select a specific
macro file to be read.
❏ Run Macros . . .
Includes the macro file list in a pulldown menu.
A-4

Macros Menu
❏ Read from File . . .
Displays a dialog box in which you enter the name of a
file to play.
❏ Run Macros
Displays a pulldown menu listing all the macros that
have been recorded in the session or saved in files so that
you can select one to play.
A-5

Macros Menu
A-6

B Emulator Options and X Resources
The tables in this appendix list, in alphabetical order, all of the
emulator options you can set through the command line or X
resources. You can set most of the options using either
method.
Command-Line OptionsThis table lists command-line options for the 3270 terminal
emulator, tn3270.
Table B-1 Command-Line Options
Command-Line Option Function and ValuesCorrespondingResource (if any)
-a asciiebcdic Specifies an ASCII-to-EBCDIC conversion file. asciiEbcdicTableFilename
-A asciiebcdic Same as -a , but prints the ASCII-to-EBCDIC
conversion table to the Console.
asciiEbcdicTableFilenameAndDump
-b Puts the emulator into base-color (two-color)
mode. The defaults are green and white.
baseColorMode
-display dpy Specifies the display name of the terminal on
which the emulator should display its
window. dpy has the format hostname:0.
(none)
-e idname Names the EHLLAPI session identification, in
a range of A through H.
ehllapiName
-E Sets the terminal ID string transmitted during
terminal negotiation to “extended.” The
default terminal ID string is “IBM-3278-2-E.”
extendedMode
B-1

Command-Line Options
-gddm Enables IBM mainframe-style graphics
support (Graphical Data Display Manager).
The default is disabled.
gddmMode
-geometry geostror
=geostr
Specifies the geometry (height, width, and
placement on the screen) of the initial 3270
window.
geometry
-h host Specifies the host used when connecting. The
default is “local.”
hostname
-I termid-str Changes the terminal ID string transmitted
during negotiation with the TN3270 server.
The default is “IBM-3278-2,” which specifies
3278 model 2. Some implementations of the
TN3270 server may not work with the default
string, requiring that you set the extended
mode (-E option).
termid
-ibmBlue color Specifies the color for blue fields. The default
is “#a0a0ff.” This is Brixton color-id 1.
ibmBlue
-ibmRed color Specifies the color for red fields. The default is
“red.” This is Brixton color-id 2.
ibmRed
-ibmPink color Specifies the color for pink fields. The default
is “magenta.” This is Brixton color-id 3.
ibmPink
-ibmGreen color Specifies the color for green fields. The default
is “green.” This is Brixton color-id 4.
ibmGreen
-ibmTurq color Specifies the color for turquoise fields. The
default is “cyan.” This is Brixton color-id 5.
ibmTurq
-ibmYellow color Specifies the color for yellow fields. The
default is “yellow.” This is Brixton color-id 6.
ibmYellow
-ibmWhite color Specifies the color for white fields. The default
is “white.” This is Brixton color-id 7.
ibmWhite
Table B-1 Command-Line Options (Continued)
Command-Line Option Function and ValuesCorrespondingResource (if any)
B-2

Command-Line Options
-ibmBlack color Specifies the color for black fields. The default
is “black.” This is Brixton color-id 8.
ibmBlack
-ibmDeepBlue color Specifies the color for deep blue fields. The
default is “dark slate blue.” This is Brixton
color-id 9.
ibmDeepBlue
-ibmOrange color Specifies the color for orange fields. The
default is “orange.” This is Brixton color-id 10.
ibmOrange
-ibmPurple color Specifies the color for purple fields. The
default is “violet.” This is Brixton color-id 11.
ibmPurple
-ibmPaleGreen color Specifies the color for pale green fields. The
default is “pale green.” This is Brixton
color-id 12.
ibmPaleGreen
-ibmPaleTurq color Specifies the color for pale turquoise fields.
The default is “dark turquoise.” This is
Brixton color-id 13.
ibmPaleTurq
-ibmGray color Specifies the color for gray fields. The default
is “grey.” This is Brixton color-id 14.
ibmGray
-ibmWhiteFF color Specifies the color for white (0xFF) fields. The
default is “white.” This is Brixton color-id 15.
ibmWhiteFF
-ibmBackground color Specifies the color for the emulator
background. The default is “black.” This is
Brixton color-id 16.
ibmBackground
-iconic Starts the emulator in icon form. iconic
-icontitle title Specifies a string to be used as a title on the
window’s icon. The default is “tn3270.”
icontitle
-k brxkeMap Specifies a Brixton keymap file. Only version
1.2 keymap files can be read by the client.
kbdMapFilename
-lightpen Enables use of the mouse as a light pen. lightPen
Table B-1 Command-Line Options (Continued)
Command-Line Option Function and ValuesCorrespondingResource (if any)
B-3

Command-Line Options
-loadps Enables support for “load programmed
symbols.” The default is disabled.
loadpsMode
-m Puts the emulator into monochrome color
mode. Monochrome terminals always display
the emulator in black and white. For color
terminals, the default is green and black.
monoMode
-macrosOff Disables the Macros menu. By default, the
allowMacros resource, which enables the
Macros menu, is true.
(see allowMacrosand macroFile)
-n portNumber Specifies the port used when connecting.
The default is 23.
portNumber
-name resname Changes the resource name to resname. The
default resource name is “ncd3270.”
Allows you to identify an instance of an
emulator in order to specify resource values
associated with this instance.
(none)
-noMbar Starts the emulator without its menu bar. noMenuBarMode
-ph host:port Specifies the remote printer host and TCP/IP
port. Use the format host:port, where host is
the name of the remote terminal (and may not
contain a colon) and port is the TCP port
number of the printer port. Printing to
non-NCD hosts is unsupported. Use in
conjunction with -pm remote.
printerHost
-pm mode Specifies the default mode TN3270 uses for
sending print output. Permitted modes are
serial (the default), parallel, or remote.
-pm remote is used in conjunction with -phfor naming the remote host.
defaultPrintMode
-pp port Specifies the printer port number. printerPort
Table B-1 Command-Line Options (Continued)
Command-Line Option Function and ValuesCorrespondingResource (if any)
B-4

Command-Line Options
-pu21 Specifies that the host connection is via
BrxPU2.1. The default is false.
pu21
-P Displays the current ASCII-to-EBCDIC
conversion table in the Console Messages
area.
(none)
-r Puts the emulator into monochrome and
reverse-video color mode.
reverseVideoMode
-s Puts the emulator into uppercase mode. upperCaseMode
-S modelType Specifies the 3278 model type to use. The valid
model types are:
Model Type Rows and Columns2 (the default) 24 x 80
3 32 x 80
4 43 x 80
5 27 x 132
modelType
-T titleor
-title title
Change the window title to title. The default
title is “tn3270:host,” where host is the
hostname used in connecting to the TN3270
server.
title
-tcpport port For use with BrxPU2.1 connections only,
specifies the port to use to connect to the
BrxPU2.1 SNA server.
tcpport
-tn3270 Specifies that the host connection is via
TN3270. The default is true.
tn3270
-trans translation Specifies a translation directly. Surround the
translation with double quotes, do not specify
multiple translations, and do not include
spaces.
translations
-transfile filename Specifies a file containing keyboard
translations.
(none)
Table B-1 Command-Line Options (Continued)
Command-Line Option Function and ValuesCorrespondingResource (if any)
B-5

X Resources
X ResourcesThis table lists X resources for the 3270 terminal emulator.
-u Prints out the usage information and exits. (none)
-v Prints out the version information and exits. (none)
Table B-1 Command-Line Options (Continued)
Command-Line Option Function and ValuesCorrespondingResource (if any)
Table B-2 X Resources
Resource Function and ValuesCommand-LineOption (if any)
allowMacros Specifies that the Macros menu is enabled
by default.
(see -macrosOff)
asciiEbcdicTableFilename Specifies an ASCII-to-EBCDIC
conversion file.
-a asciiebcdic
asciiEbcdicTableFilenameAndDump Same as -a , but prints the
ASCII-to-EBCDIC conversion
table to the Console.
-A asciiebcdic
baseColorMode Puts the emulator into base-color (two-
color) mode. The defaults are green and
white.
The resource accepts true/false values. If
“true,” the emulator displays in base color
mode (two colors). The default is “false.”
-b
defaultPrintMode Specifies the default mode TN3270 uses for
sending print output. Permitted modes are
serial (the default), parallel, or remote.
When the value is remote, use in
conjunction with printerHost.
-pm
B-6

X Resources
ehllapiName Names the EHLLAPI session identification,
in a range of A through H.
-e identifier
extendedMode Sets the terminal ID string transmitted
during terminal negotiation to “extended.”
The default terminal ID string is
“IBM-3278-2-E.”
The resource has true/false values. If “true,”
extended mode terminal ID is negotiated
with the TN3270 server. The default is
“false.”
-E
fontPoolNormal Specifies the fonts for emulator text. The
default list is “5x8 6x9 6x10 6x12 6x13 7x13
7x14 8x13 8x16 9x15 10x20 12x24.”
(none)
fontPoolOIA Specifies the fonts for the operator
information area. The default list is “5x8 6x9
6x10 6x12 6x13 7x13 7x14 8x13 8x16 9x15
10x20 12x24.”
(none)
gddmMode Enables IBM mainframe-style graphics
support (Graphical Data Display Manager).
The default is disabled.
-gddm
geometry Specifies the geometry (height, width, and
placement on the screen) of the initial 3270
window.
-geometry geostror
=geostr
hostname Specifies the host used when connecting.
The default is “local.”
-h host
ibmBlue Specifies the color for blue fields. The
default is “#a0a0ff.” This is Brixton
color-id 1.
-ibmBlue color
ibmRed Specifies the color for red fields. The default
is “red.” This is Brixton color-id 2.
-ibmRed color
Table B-2 X Resources (Continued)
Resource Function and ValuesCommand-LineOption (if any)
B-7

X Resources
ibmPink Specifies the color for pink fields. The
default is “magenta.” This is Brixton
color-id 3.
-ibmPink color
ibmGreen Specifies the color for green fields. The
default is “green.” This is Brixton color-id 4.
-ibmGreen color
ibmTurq Specifies the color for turquoise fields. The
default is “cyan.” This is Brixton color-id 5.
-ibmTurq color
ibmYellow Specifies the color for yellow fields. The
default is “yellow.” This is Brixton
color-id 6.
-ibmYellow color
ibmWhite Specifies the color for white fields. The
default is “white.” This is Brixton color-id 7.
-ibmWhite color
ibmBlack Specifies the color for black fields. The
default is “black.” This is Brixton color-id 8.
-ibmBlack color
ibmDeepBlue Specifies the color for deep blue fields. The
default is “dark slate blue.” This is Brixton
color-id 9.
-ibmDeepBlue color
ibmOrange Specifies the color for orange fields. The
default is “orange.” This is Brixton
color-id 10.
-ibmOrange color
ibmPurple Specifies the color for purple fields. The
default is “violet.” This is Brixton
color-id 11.
-ibmPurple color
ibmPaleGreen Specifies the color for pale green fields. The
default is “pale green.” This is Brixton
color-id 12.
-ibmPaleGreen color
ibmPaleTurq Specifies the color for pale turquoise fields.
The default is “dark turquoise.” This is
Brixton color-id 13.
-ibmPaleTurq color
Table B-2 X Resources (Continued)
Resource Function and ValuesCommand-LineOption (if any)
B-8

X Resources
ibmGray Specifies the color for gray fields. The
default is “grey.” This is Brixton color-id 14.
-ibmGray color
ibmWhiteFF Specifies the color for white (0xFF) fields.
The default is “white.” This is Brixton
color-id 15.
-ibmWhiteFF color
ibmBackground Specifies the color for the emulator
background. The default is “black.” This is
Brixton color-id 16.
-ibmBackgroundcolor
iconic Iconify the window at startup. -iconic
icontitle Specifies a string to be used as a title on the
window’s icon. The default is “tn3270.”
-icontitle title
kbdMapFilename Specifies a Brixton keymap file. Only
version 1.2 keymap files can be read by the
client.
-k brxkeMap
loadpsMode Enables support for “load programmed
symbols.” The default is disabled.
-loadps
macroFile Specifies the default macro file to read and
use.
(none)
modelType Specifies the 3278 model type to use. The
valid model types are:
Model Type Rows and Columns2 (the default) 24 x 80
3 32 x 80
4 43 x 80
5 27 x 132
-S modelType
Table B-2 X Resources (Continued)
Resource Function and ValuesCommand-LineOption (if any)
B-9

X Resources
monoMode Puts the emulator into monochrome
(one-color) color mode. The default is green
(black background).
The resource has true/false values. If true,
the emulator displays in monochrome and
highlighted text displays in boldface. The
default is “false.”
-m
monoModeForeground Specifies the Brixton color id number to use
for the foreground in monochrome mode.
The default is “4,” which maps to the
ibmGreen option or resource.
(none)
monoModeBackground Specifies the Brixton color id number to use
for the background in monochrome mode.
The default is “16,” which maps to the
ibmBackground resource or option.
The default color is black.
(none)
noMenuBarMode Starts the emulator without its menu bar.
The resource has true/false values. If “true,”
the menu bar does not appear in the
emulator window. The default is “false.”
-noMbar
portNumber Specifies the port used when connecting.
The default is 23.
-n portNumber
printerHost Sends print output to a remote terminal’s
serial or parallel port. Use the format
host:port, where host is the name of the
remote terminal (and may not contain a
colon) and port is the TCP port number of
the printer port. Printing to non-NCD hosts
is unsupported. See also defaultPrintMode.
-ph
Table B-2 X Resources (Continued)
Resource Function and ValuesCommand-LineOption (if any)
B-10

X Resources
printerInit Specifies a string sent to initialize the
printer. Uses escape sequences or characters
recognized by the printer.
(none)
printerPort Specifies the port to use for printing. The
value is used in conjunction with the value
of defaultPrintMode. The default value is 1.
-pp
printerPostscript Specifies that the printer used is a Postscript
printer. The default is false.
(none)
pu21 Specifies that the host connection is via
BrxPU2.1. The default is false.
-pu21
reverseVideoMode Puts the emulator into monochrome and
reverse-video color mode.
The resource accepts true/false values. If
“true,” the emulator displays in
monochrome and reverse video. The default
is “false.”
-r
tcpport For use with BrxPU2.1 connections only,
specifies the port to use to connect to the
BrxPU2.1 SNA server.
-tcpport port
termid Changes the terminal ID string transmitted
during negotiation with the TN3270 server.
The default is “IBM-3278-2,” which specifies
3278 model 2.
Some implementations of the TN3270 server
may not work with the default string,
requiring that you set the extended mode
described above.
-I termid-str
title Change the window title to title. The
default title is “tn3270:host,” where host is
the hostname used in connecting to the
TN3270 server.
-T titleor
-title title
Table B-2 X Resources (Continued)
Resource Function and ValuesCommand-LineOption (if any)
B-11

X Resources
tn3270 Specifies that the host connection is via
TN3270. The default is true.
-tn3270
translations Specifies a list of key translations to use. (none, however
-transfile specifies a
key translation file)
upperCaseMode Puts the emulator into mono-case
(all capitals) mode.
The resource accepts true/false values. If
“true,” the emulator converts all text to
upper case. The default is “false.”
-s
Table B-2 X Resources (Continued)
Resource Function and ValuesCommand-LineOption (if any)
B-12

Glossary
This glossary defines terms used in this document.
3270 A coded character data stream used
by the ncd3270 local client. A family of
products that support a wide range of
display applications. The classic 3270
display system has three
components: a control unit, a display
station, and a printer.
AID key Attention Identifier key. A character
in the 3270 data stream that indicates
a user has pressed a key requiring
action by the system. Examples of
AID keys include the Enter, Print, PF,
and PA keys. The function of an AID
key depends upon the application the
user is running in the emulator
window.
application host An IBM mainframe or midrange
computer or other computer running
application programs to be displayed
on an NCD terminal.
ASCII American National Standard Code
for Information Interchange. A set of
binary numbers representing the
alphabet, punctuation, numerals, and
special symbols used in text
representation and communication
protocols.
Glossary-1

Boot Monitor PROM
Boot Monitor
PROM (Programmable Read-Only
Memory) in the terminal base that
contains the Boot Monitor, which is
firmware responsible for managing
the booting process.
Boot Monitor Setup A menu-style method of configuring
a terminal in the Boot Monitor before
booting the terminal.
booting The process a terminal goes through
when powered on or when executing
a reboot command. Consists of
loading and executing an X server
and may include other processes,
such as loading a configuration file
and starting clients.
Change Quick Setup Console menu selection for quick
terminal configuration.
Change Setup
Parameters
Console menu selection for all of the
terminal configuration parameters.
client An X Window System application
program. Most clients run on a host
computer. See also local client.
code memory In terminals that have separate code
and data memory, the memory used
for loading and executing the X
server. See also data memory.
compressed server A compressed NCD X server
designed to be copied to a terminal’s
PC card. Enables the terminal to boot
locally instead of booting over the
network.
Console The local client that provides a hide
box for displaying diagnostic
messages and a menu bar for
accessing other local clients.
Glossary-2

cursor Symbol that indicates where the next
character entered from the keyboard
appears on the screen. Contrast with
pointer.
data memory In terminals with separate data and
code memory, the memory used
mainly by clients. See also code
memory.
display name
DISPLAY variable
The name that tells X clients which
display to connect to, often stored in
the DISPLAY environment variable.
For NCD terminals, the display name
consists of the terminal’s hostname or
IP address followed by :0.
ESP board Ethernet/Serial/PC board. An NCD
terminal interface board that
incorporates two serial
communication channels, an Ethernet
interface, and a socket for a PC card.
Ethernet A popular local area network
protocol and a physical channel for
transmitting data.
font pool Collection of fonts for the emulator
window area or the operation
information area.
gateway A computer that attaches to two or
more networks and routes
information from one to another. A
gateway often translates from one
network protocol to another; for
example, from TCP/IP to SNA.
hide box In the Console, one of the small boxes
you click on to reveal additional
information.
Glossary-3

host computer Computer that provides services for
NCD terminals or provides
application programs to run on NCD
terminals.
icon Small symbol representing a window.
IP address Internet Protocol address. The 4-part
address assigned to all hosts
(including terminals) on a TCP/IP
network.
key action The result of pressing a keyboard key
with or without modifiers.
Key Pad Small emulator window in which
you can select IBM function keys by
using the mouse.
keycap The label printed on a keyboard key.
keymap A table that assigns a keysym (action
taken when a key is pressed) to each
key code (value assigned to each key)
on a keyboard.
Keymap Editor A local client for displaying keyboard
layouts and the actions associated
with each key, and for remapping the
keyboard for 3270 and VT320 local
terminal emulation windows. See alsokeymap_editor.
keymap_editor The command for invoking the
Keymap Editor. Can be used with rshand remsh and in the exec-startup-commands remote configuration
parameter.
keysym The default action taken by a
program when a physical key on a
keyboard is pressed. A well-known
code that corresponds to a keycap.
Glossary-4

local client An X Window System application
that runs in the terminal instead of on
a host computer. Local clients are part
of the X server.
LPR/LPD Line Printer Remote/Line Printing
Daemon for printing in mixed, multi-
platform environments.
modifier key Keyboard key that modifies the
action of another key (for example,
Shift, Control, and Alt).
MOP Maintenance Operations Protocol.
Used with ULTRIX hosts for address
resolution and server image
downloading.
Motif OSF/Motif. The Open Software
Foundation graphical user interface.
Used by the local NCD Window
Manager and other window
managers.
ncd3270 The local client that provides 3270
terminal emulation. Emulates IBM
3278 terminals for connecting to hosts
using the TCP/IP TN3270 protocol. Seealso tn3270.
ncdinstall Utility program for installing
NCDware on a UNIX host computer,
configuring terminals, and updating
host software to support NCD
terminals.
NCDware NCD’s software. Consists of the Boot
Monitor, X servers, and host-based
software.
Glossary-5

NFS Network File System. A protocol
developed by Sun Microsystems that
allows a set of computers to access
each other’s file systems as if they
were local. Used on NCD terminals to
load the X server, provide access to
font files, the color definition file, and
remote configuration files.
NVRAM Non-volatile random-access memory
used to store parameter settings in
NCD terminals when the power is off.
operator information
area
Last line of the emulator screen.
Displays status of the host connection
and local status of the emulator. Same
as status line.
PC card A small integrated circuit card
defined by the Personal Computer
Memory Card International
Association. The card provides local
memory for storing a terminal’s X
server, fonts, and configuration files.
pointer A device, such as a mouse, with
which the user communicates with
the X server. Also the symbol that
represents the device’s location on
the screen, such as an arrow. Contrast
with cursor.
port In TCP/IP, a number used to identify
applications.
PostScript A page description language that is
used for high-quality printing on
laser printers and other high-
resolution printing devices.
reboot Reload and re-execute the X server.
Equivalent to power-cycling the
terminal.
Glossary-6

remote configuration A method of configuring an NCD
terminal by downloading a file
containing operational parameters
from a host computer or interactively
accessing a terminal’s configuration
data through the network.
reset Re-initialize the X server by selecting
Logout from the Console’s Login
menu. Resetting restores settings not
saved in NVRAM or downloaded
from a remote configuration file to
their default state.
rgb.txt The X Window System color
definition file.
root window The window that fills the screen and
forms the background for all other
windows.
status line Last line of the emulator screen.
Displays status of the host connection
and local status of the emulator. Same
as operator information area.
TCP/IP Transmission Control Protocol/
Internet Protocol. A common name
for the Internet protocol family.
Telnet The Internet standard protocol and
an application program for remote
terminal connection service.
terminal emulator Software used in communication to
make a computer or terminal seem to
be the type expected by another
computer. For example, the NCD 3270
terminal emulator enables an NCD
terminal to pretend to be a
mainframe terminal by using the
procedures and codes expected by
the mainframe.
Glossary-7

TFTP Trivial File Transfer Protocol. The
Internet standard protocol for file
transfer. Supported on NCD terminals
for downloading X servers, and for
accessing font files, the color
definition file, and remote
configuration files.
tn3270 Command for invoking the 3270 local
client. This command can be used
with rsh or remsh and in the exec-startup-commands remote
configuration parameter.
TN3270 A TELNET protocol for use with 3270
applications.
TN3270 server A host computer running TN3270.
Token-Ring An IBM local area network
architecture.
translation A mapping between one or more
input events (such as key strokes and
mouse button clicks) and an action
performed by a program.
TRP board Token-Ring/PC. A terminal interface
board that incorporates a Token-Ring
connector and a socket for a PC card.
window A rectangular area on the screen
created by a client. Windows can be
manipulated by a window manager.
window manager A host-based or local client that
allows you to manipulate windows
on the display.
X resources Variables used to customize the
appearance or behavior of a client.
Most clients allow many of their
features to be customized.
Glossary-8

X server The software that operates NCD
terminals, providing display services
for clients and handling keyboard
and pointer input. The part of the X
Window System that runs in
terminals.
X terminal An intelligent terminal designed to
be used with the X Window System.
X Window System
(also called X)
A network-based graphical window
system developed at MIT to allow
users to run applications running on
multiple hosts. NCDware is an
optimized implementation of X.
.Xdefaults A file in a user’s home directory for
storing X resource settings.
XDM X Display Manager. A protocol and X
client that manages the user’s X
session from login to logout and can
be configured to start the initial
clients.
.xsession A file stored in the user’s home
directory that contains a script
executed by XDM at startup.
Xsession An XDM configuration file containing
the startup script used by all
terminals to manage the X session.
Glossary-9

Glossary-10

Bibliography
The following books describing the X Window System are
available at computer book stores:
❏ OSF/Motif User’s Guide, Release 1.2—Open Software
Foundation. Prentice-Hall.
❏ X: A guide For Users—Jerry D. Smith. PTR Prentice-Hall.
❏ X Window System User’s Guide—Valerie Quercia and Tim
O’Reilly. O’Reilly and Associates.
❏ Volume 3: X Window System User’s Guide—Valerie Quercia
and Tim O’Reilly. O’Reilly & Associates, Inc.
❏ Volume 4: X Toolkit Intrinsics Programming Manual—Adrian Nye and Tim O’Reilly. O’Reilly & Associates, Inc.
(Information about key translations).
❏ Volume 8: X Window System Administrator’s Guide—Linda
Mui and Eric Pearce. O’Reilly & Associates, Inc.
Biblio-1

Biblio-2

Index
Symbols& (ampersand) in UNIX shellcommands 4-2
Numerics3278 models 3-10, B-5, B-93287 print emulator, using 4-37 to 4-39
Aaccessing files 4-1AID keys 4-30application programming interface
C-language (EHLLAPI) 6-3 to 6-4scripting (record and playback
macros) 6-1 to 6-3ASCII-to-EBCDIC conversion table
description 4-33displaying B-1, B-5, B-6
audible alarm 3-17
BBase Color (Options menu) 3-14, A-2bell 3-17booting
from the network 2-2procedure for 3-2 to 3-3
brightness control 3-17Brixton color-ids 4-12Brixton keymap file 4-25, 4-29Brx3287
options not included in ncd3287 4-36BrxPU2.1
configuring terminal for 2-6definition 2-3
Ccase modes
changing 4-13command-line option for B-5in Options menu 3-14X resource for B-12
chooser, see host chooserclass name 4-11Close Connection (File menu) 3-18, A-1closing windows or icons 5-10color definition file 4-12color modes
command-line options for 4-11, B-4in Options menu 3-13 to 3-14X resources for 4-11, B-6, B-10 to B-11
colors, changing 4-12, B-2 to B-3, B-7 to B-9command-line options
how to use 4-8list of B-1 to B-6
Console(illustration) 3-2Messages hide box 7-1
contrast control 3-17controls and indicators 3-17 to 3-18conversion table, ASCII-to-EBCDIC 4-33 to
4-34custom menus 5-3 to 5-5customizing the emulator
cases 4-13, B-5, B-12colors and color modes 4-11 to 4-12, B-2 to
B-3, B-6 to B-10command-line options for (table) B-1 to
B-6configuring the host chooser 4-9 to 4-10
Index-1
Index
configuring the host connection 2-5creating a named instance 4-10 to 4-11fonts 4-12icon title 4-15methods for 4-6 to 4-8model type 4-13, B-5, B-9removing the menu bar 4-13, B-4, B-10window size and placement 4-14 to 4-15window title 4-15X resources for (table) B-6 to B-12
cut/copy and pastein Options menu A-3using 3-15 to 3-16
Ddisconnecting from the host 3-18display name B-1
EEHLLAPI 1-5emulator menus
File menu A-1Keys menu A-4Macros menu A-4Options menu A-2 to A-3removing menu bar B-4, B-10
emulator window(illustration) 3-4, 3-17closing 5-10customizing see customizing the emula-
tordescription 3-4 to 3-7iconifying 5-7maximizing 5-8moving 5-9raising or lowering 5-9resizing 5-8restoring from iconified state 5-8
error messages 7-1 to 7-16Ethernet 2-1exec-startup-commands 4-5exiting from the emulator 3-18
extended mode, specifying B-1, B-7
Ffeatures of ncd3270 1-2 to 1-5file access
prerequisites 4-1protocols for 2-2
File menu 3-11, A-1fonts
changing 4-12 to 4-13font pools 4-13specifying B-7
Full Color (Options menu) 3-14, A-2
Ggateway 2-3GDDM (Graphical Data Display Manager)
use 3-3, 4-3geometry, specifying 4-14 to 4-15, B-2, B-7graphics applications, emulator use
with 3-3, 4-3Graphics Cursor (Options menu) A-3
Hhost chooser
configuring 4-9using 3-11
host computersconnecting to 2-5, 3-10 to 3-12, B-2, B-7for installing NCD software 2-2
host connectiondisconnecting 3-18procedure 3-10reconnecting 3-18specifying type in the host chooser 3-11terminal configuration of 2-5types 2-3 to 2-4
Iicon
closing 5-10iconifying a window 5-7
Index-2

Index
starting the emulator as an icon B-3title 4-15
importing keymaps via the commandline B-5
KKey Pad
(illustration) 3-13using 3-12 to 3-13
Key Pad (Keys menu) A-4key translations and keymaps
ASCII-EBCDIC conversion 4-33changing through remote
configuration 4-29changing through the Keymap
Editor 4-17 to 4-28changing through X resources 4-29changing with xmodmap 4-29customizing 4-17 to 4-32default 4-29 to 4-32importing a Brixton keymap 4-29importing keymaps via the command
line 4-28keyboards
Brixton keymaps B-3, B-9keys for IBM functions 4-29 to 4-32non-English keyboards 4-16
Keymap Editoradvanced mode 4-25 to 4-28applying keymaps 4-22 to 4-24basic mode 4-21 to 4-25changing the order of translations 4-28creating a translation 4-27deleting a translation 4-28description 4-17Edit menu 4-28Help menu 4-20importing keymaps 4-24 to 4-25Keyboards menu 4-20keycap sections 4-20menus 4-20quitting 4-28
Read Translations window 4-24replacing a translation 4-27starting 4-18translation modifiers (illustration) 4-27View menu 4-20with ncdterm 4-17Write Translations window 4-22
Keymap Editor (Keys menu) A-4Keys menu A-4
Llicense required 2-1light pen 3-12, B-3Light Pen (Options menu) A-3local window manager
alternate methods of using 5-6 to 5-10basic usage 3-8 to 3-9custom menus 5-3 to 5-5default menu for starting local
clients 4-5, 5-3shutting down 5-5starting 5-1 to 5-3
Lock Screen utility 3-17lowering windows 5-9Lpr Servers (Change Setup
Parameters) 4-40
MMacros menu A-4memory requirements 2-1menu bar, emulator 3-4, 4-13, B-4, B-10menus
custom 5-3 to 5-5emulator 3-13 to 3-15, A-1 to A-4Keymap Editor 4-20local window manager default menu 5-3
messages from ncd3270 7-1 to 7-16Mixed Case (Options menu) 3-14, A-2models, 3278 3-10, 4-10, B-5, B-9Monochrome (Options menu) 3-14, A-2mouse
basic actions 3-1 to 3-2
Index-3

Index
cut/copy and paste operations 3-15Key Pad operations 3-12using as light pen 3-12, B-3window manager operations 3-9, 5-6 to
5-10moving windows 5-9
NNCD Technical Support 7-16ncd3270-default-hosts 4-9ncd3270-default-protocol 2-6ncd3270-pu21-default-host 2-6ncd3270-pu21-default-port 2-6ncd3270-tn-default-host 2-5ncd3270-tn-default-port 2-5ncd3287 print emulator 4-37ncdterm 4-17networks supported 2-1New Connection (File menu) A-1NFS (Network File System) 2-2
Oon/off switch 3-17operator information area 3-5 to 3-7Options menu 3-12 to 3-16, A-2 to A-3
Pparallel port
cable required for printerconnection 4-35
printing 4-36pointer
during cut/copy and pasteoperations 3-15
when using mouse as light pen 3-12port
default B-4, B-10specifying in command lines and
resources B-4, B-10specifying in the host chooser 3-11, 4-9 to
4-10power on/off switch 3-17
power-on light 3-17Print Screen (File Menu) 3-16, 4-39Print Screen (File menu) A-1printing
3287 print emulator 4-36 to 4-39cables required for terminal’s serial or
parallel port 4-35connecting a printer to terminal 4-35parallel port 4-36serial port configuration 4-36terminal port configuration 4-35window contents 3-16 to 3-17, 4-39 to 4-42
print-lpr-servers parameter 4-41
QQuit (File menu) 3-18, A-1quitting the emulator 3-18
Rraising windows 5-9Read From File (Macros menu) A-4Read from File (Macros menu) A-5Reconnect (File menu) 3-18, A-1reconnecting to the host 3-18record and playback macros
disabling 6-2using 6-1 to 6-3
remote configurationconfiguring the host chooser 4-9customizing the emulator 4-7setting key translations 4-29
remshcustomizing the emulator 4-8starting the emulator 4-2
Rename Macro (Macros menu) A-4resizing windows 5-8resources, see X resourcesReverse Video (Options menu) 3-14, A-2rgb.txt file 4-12rsh
customizing the emulator 4-8starting the emulator 4-2
Index-4

Index
Run Macros (Macros menu) A-4, A-5
SSave to File (Macros menu) A-4screen lock 3-17security lock 3-17Select Input Fields (Options menu) 3-15,
A-3Select Printer (File Menu) 3-16, 4-39, A-1Select Rectangle (Options menu) 3-15, A-3Select Whole Lines (Options menu) 3-15,
A-3serial port
cable required for printerconnection 4-35
printing 4-36serial-interfaces-table 4-36SNA gateway 2-3Start Recording (Macros menu) A-4starting the emulator
alternate methods 4-2 to 4-6at reset 4-4basic procedure 3-3 to 3-5
status line 3-5 to 3-7Stop Recording (Macros menu) A-4
TTCP/IP 2-3Technical Support 7-16Telnet port, specifying 4-10, B-4, B-10terminal configuration
BrxPU2.1 connection 2-6host connection 2-5 to 2-6TN3270 connection 2-5
terminal ID string B-1, B-2, B-11terminal memory requirements 2-1terminating the emulator 3-18test hardware function 3-18TN3270
configuring terminal for 2-5definition 2-3
tn3270 command
options 4-2 to 4-3, B-1 to B-6using 4-2 to 4-6, 4-8
Token-Ring 2-1translations (keyboard key)
defined 4-17see also Keymap Editor
troubleshooting 7-1 to 7-16
UUpper Case (Options menu) 3-14, A-2uppercase, setting through command line
or resource 4-13, B-5, B-12
Wwindow manager, see local window man-
agerwindows
closing 5-10icon title 4-3, 4-15iconifying 5-7 to 5-8initial size and placement 4-14 to 4-15,
B-2, B-7moving 5-9raising or lowering 5-9resizing 5-8title 4-3, 4-15
XX resource name, changing B-4X resources
3270 client resource name 4-7definition 4-6list of B-6 to B-12methods of setting 4-6 to 4-8
X serversabout 2-2downloading, protocols for 2-2installing 2-2methods of booting 2-2
XDM (X Display Manager) 4-4xmodmap 4-29xserver-initial-x-resources 4-7, 4-28
Index-5

Index
.xsession file, starting the emulator in 4-4Xsession file, starting the emulator in 4-4
Index-6