Embed Size (px)
Citation preview

1 Version 1
Using Sun ZFS Storage Appliance iSCSI LUNs in an Oracle Solaris Environment Updated May 2012; v1.2 By Andrew Ness
This article describes how to configure iSCSI LUNs in a Sun ZFS Storage Appliance and integrate them into an Oracle Solaris 10 or Oracle Solaris 11 environment.
Contents IntroductionConfiguring the Oracle Solaris iSCSI Initiator
Identifying the Host IQNSetting Up CHAP Authentication
Configuring the Sun ZFS Storage Appliance Using the Browser User InterfaceDefining an iSCSI Target GroupDefining an iSCSI InitiatorDefining the iSCSI Initiator GroupDefining a Sun ZFS Storage Appliance ProjectDefining a Sun ZFS Storage Appliance LUN
Configuring the Sun ZFS Storage Appliance Using the Command Line InterfaceDefining the iSCSI Target GroupDefining the iSCSI InitiatorDefining the iSCSI Initiator GroupDefining a Sun ZFS Storage Appliance ProjectDefining a Sun ZFS Storage Appliance LUN
Configuring the LUN for Use by the Oracle Solaris ServerConclusion
Introduction
Oracle Solaris 10 and Oracle Solaris 11 come supplied with a software iSCSI initiator package that you can configure to integrate iSCSI LUNs presented by the Sun ZFS Storage Appliance into the Oracle Solaris environment. This article describes how to install the Oracle Solaris iSCSI initiator and how to configure the Sun ZFS Storage Appliance to set up iSCSI LUNs for access by Oracle Solaris servers using either the browser user interface (BUI) or the command line interface (CLI) of the appliance.
This article assumes the following conditions:
• A known root password for the Sun ZFS Storage Appliance
• A known IP address or hostname of the Sun ZFS Storage Appliance
• A network used by the Sun ZFS Storage Appliance that is already configured
• Existing configured pools with sufficient free space available on the ZFS Storage Appliance
• A known root password for the Oracle Solaris server
2 Version 1
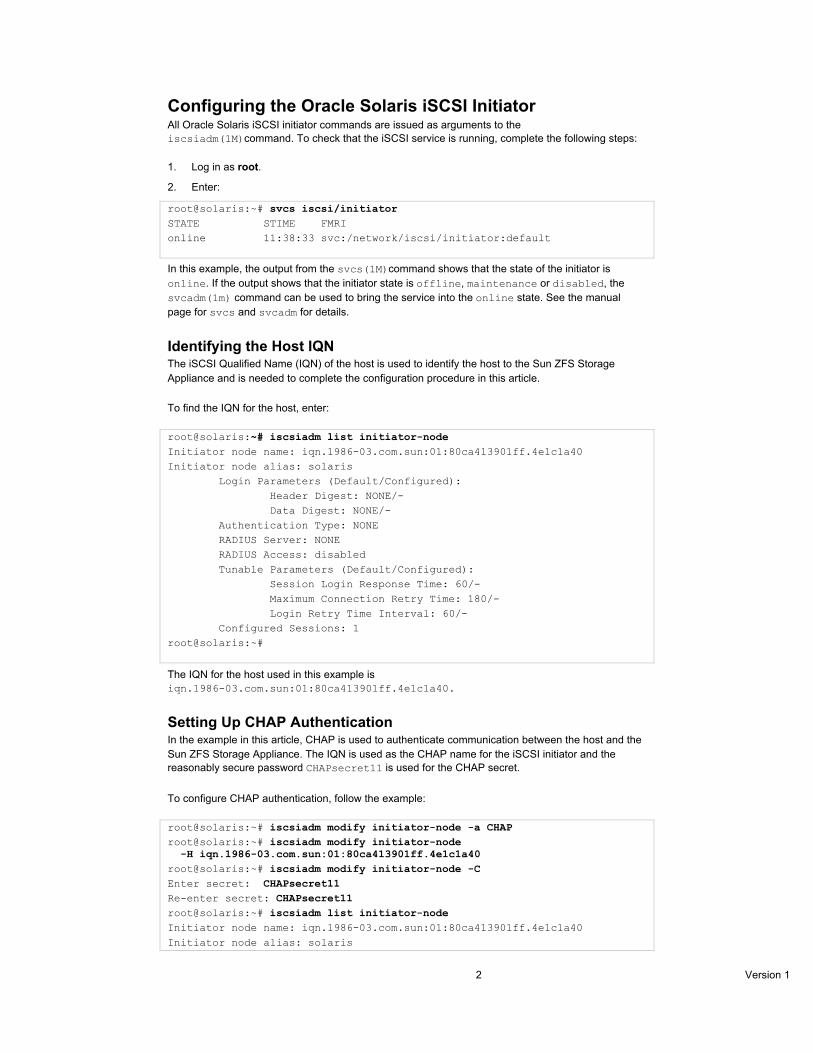
Configuring the Oracle Solaris iSCSI Initiator All Oracle Solaris iSCSI initiator commands are issued as arguments to the iscsiadm(1M)command. To check that the iSCSI service is running, complete the following steps:
1. Log in as root.
2. Enter:
root@solaris:~# svcs iscsi/initiator STATE STIME FMRI online 11:38:33 svc:/network/iscsi/initiator:default
In this example, the output from the svcs(1M)command shows that the state of the initiator is online. If the output shows that the initiator state is offline, maintenance or disabled, the svcadm(1m) command can be used to bring the service into the online state. See the manual page for svcs and svcadm for details.
Identifying the Host IQN The iSCSI Qualified Name (IQN) of the host is used to identify the host to the Sun ZFS Storage Appliance and is needed to complete the configuration procedure in this article.
To find the IQN for the host, enter:
root@solaris:~# iscsiadm list initiator-node Initiator node name: iqn.1986-03.com.sun:01:80ca413901ff.4e1c1a40 Initiator node alias: solaris Login Parameters (Default/Configured): Header Digest: NONE/- Data Digest: NONE/- Authentication Type: NONE RADIUS Server: NONE RADIUS Access: disabled Tunable Parameters (Default/Configured): Session Login Response Time: 60/- Maximum Connection Retry Time: 180/- Login Retry Time Interval: 60/- Configured Sessions: 1 root@solaris:~#
The IQN for the host used in this example is iqn.1986-03.com.sun:01:80ca413901ff.4e1c1a40.
Setting Up CHAP Authentication In the example in this article, CHAP is used to authenticate communication between the host and the Sun ZFS Storage Appliance. The IQN is used as the CHAP name for the iSCSI initiator and the reasonably secure password CHAPsecret11 is used for the CHAP secret.
To configure CHAP authentication, follow the example:
root@solaris:~# iscsiadm modify initiator-node -a CHAP root@solaris:~# iscsiadm modify initiator-node -H iqn.1986-03.com.sun:01:80ca413901ff.4e1c1a40 root@solaris:~# iscsiadm modify initiator-node -C Enter secret: CHAPsecret11 Re-enter secret: CHAPsecret11 root@solaris:~# iscsiadm list initiator-node Initiator node name: iqn.1986-03.com.sun:01:80ca413901ff.4e1c1a40 Initiator node alias: solaris
3 Version 1
Login Parameters (Default/Configured): Header Digest: NONE/- Data Digest: NONE/- Authentication Type: CHAP CHAP Name: iqn.1986-03.com.sun:01:80ca413901ff.4e1c1a40 RADIUS Server: NONE RADIUS Access: disabled Tunable Parameters (Default/Configured): Session Login Response Time: 60/- Maximum Connection Retry Time: 180/- Login Retry Time Interval: 60/- Configured Sessions: 1
Configuring the Sun ZFS Storage Appliance Using the Browser User Interface As a unified storage platform, the Sun ZFS Storage Appliance supports access to block-protocol LUNs using iSCSI and Fibre Channel protocols. This section describes how to use the Sun ZFS Storage Appliance BUI to configure the Sun ZFS Storage Appliance to recognize the Oracle Solaris host and present iSCSI LUNs to it.
To open the Sun ZFS Storage Appliance BUI:
1. Enter an address in the address field of a Web browser that includes the IP address or hostname of the Sun ZFS Storage Appliance:
https://<ip-address or hostname>:215
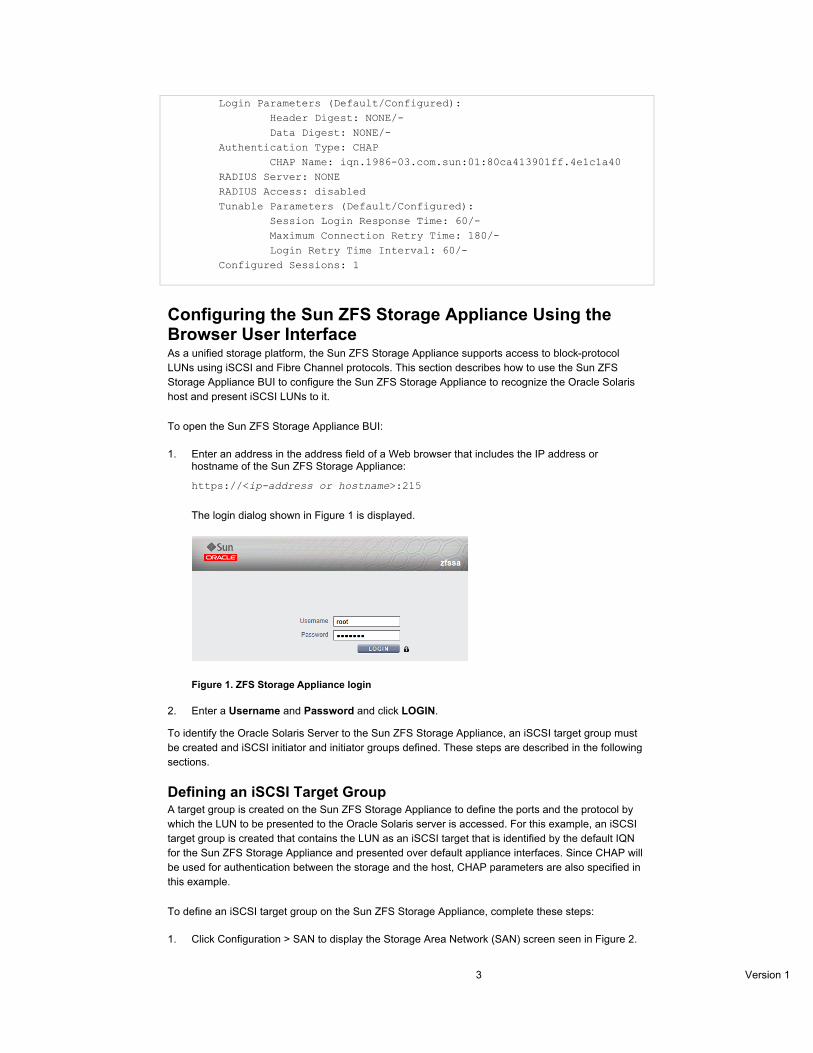
The login dialog shown in Figure 1 is displayed.
Figure 1. ZFS Storage Appliance login
2. Enter a Username and Password and click LOGIN.
To identify the Oracle Solaris Server to the Sun ZFS Storage Appliance, an iSCSI target group must be created and iSCSI initiator and initiator groups defined. These steps are described in the following sections.
Defining an iSCSI Target Group A target group is created on the Sun ZFS Storage Appliance to define the ports and the protocol by which the LUN to be presented to the Oracle Solaris server is accessed. For this example, an iSCSI target group is created that contains the LUN as an iSCSI target that is identified by the default IQN for the Sun ZFS Storage Appliance and presented over default appliance interfaces. Since CHAP will be used for authentication between the storage and the host, CHAP parameters are also specified in this example.
To define an iSCSI target group on the Sun ZFS Storage Appliance, complete these steps:
1. Click Configuration > SAN to display the Storage Area Network (SAN) screen seen in Figure 2.
4 Version 1
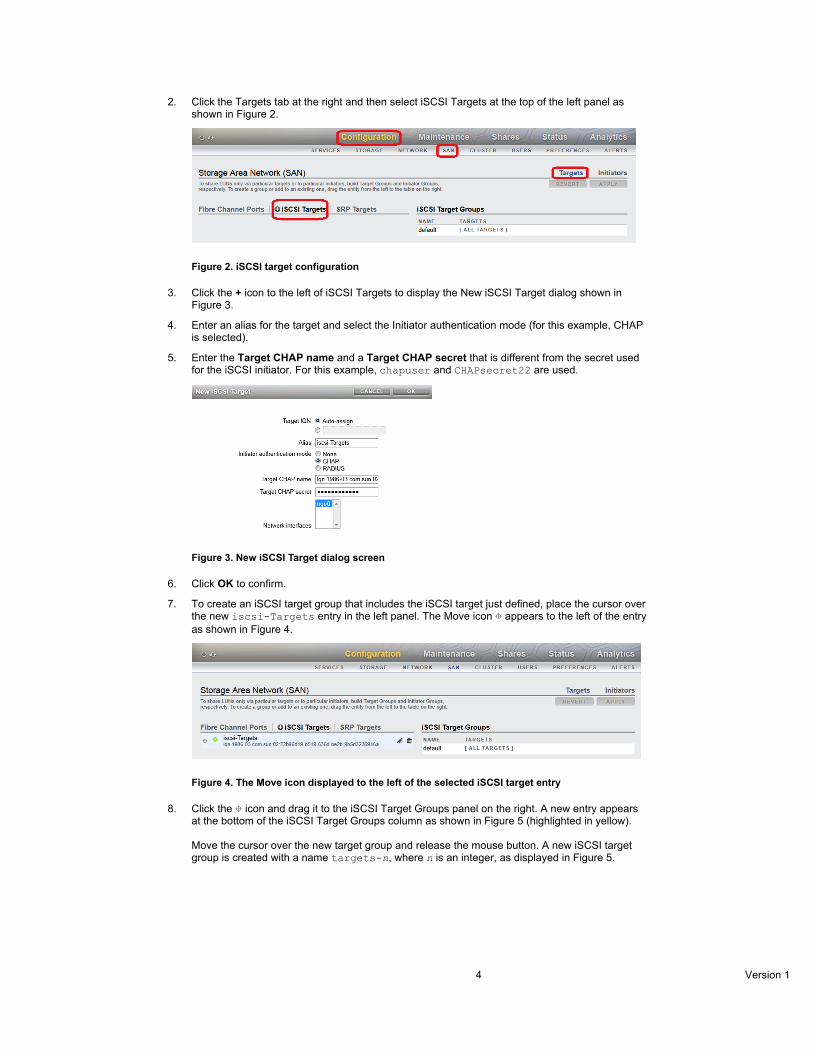
2. Click the Targets tab at the right and then select iSCSI Targets at the top of the left panel as shown in Figure 2.
Figure 2. iSCSI target configuration
3. Click the + icon to the left of iSCSI Targets to display the New iSCSI Target dialog shown in Figure 3.
4. Enter an alias for the target and select the Initiator authentication mode (for this example, CHAP is selected).
5. Enter the Target CHAP name and a Target CHAP secret that is different from the secret used for the iSCSI initiator. For this example, chapuser and CHAPsecret22 are used.
Figure 3. New iSCSI Target dialog screen
6. Click OK to confirm.
7. To create an iSCSI target group that includes the iSCSI target just defined, place the cursor over the new iscsi-Targets entry in the left panel. The Move icon appears to the left of the entry as shown in Figure 4.
Figure 4. The Move icon displayed to the left of the selected iSCSI target entry
8. Click the icon and drag it to the iSCSI Target Groups panel on the right. A new entry appears at the bottom of the iSCSI Target Groups column as shown in Figure 5 (highlighted in yellow). Move the cursor over the new target group and release the mouse button. A new iSCSI target group is created with a name targets-n, where n is an integer, as displayed in Figure 5.

5 Version 1
Figure 5. Creating the iSCSI target group
9. Move the cursor over the entry for the new target group. Two icons appear to the right of the target group box as shown in Figure 6.
Figure 6. Selecting the target group for editing
10. Click the Edit icon ( ) to display the dialog screen in Figure 7.
11. In the Name field, replace the default name with the name to be used for the iSCSI target group and click OK. For this example, the name iscsi-TG is used.
Figure 7. Renaming the iSCSI target group
12. Click APPLY. The changes are shown in the iSCSI Targets panel on the left in Figure 8.
Figure 8. New iSCSI target group with changes applied
Defining an iSCSI Initiator By defining an iSCSI initiator, you can allow access from one or more servers to particular volumes. You should configure access to volumes so that a minimum number of iSCSI initiators are allowed to access a particular volume. If more than one host can write to a given volume concurrently and a non-shared file system is used, inconsistencies may occur in file system caches on the hosts that can ultimately lead to corruption of the on-disk image. Typically, a single initiator is given access to a volume, unless you are using a specialized cluster file system.
6 Version 1
The iSCSI initiator serves to define the “host” to the Sun ZFS Storage Appliance. The iSCSI initiator definition contains the host IQN. To identify the Oracle Solaris server to the Sun ZFS Storage Appliance, you must register the Oracle Solaris iSCSI initiator IQN with the appliance by completing the following steps:
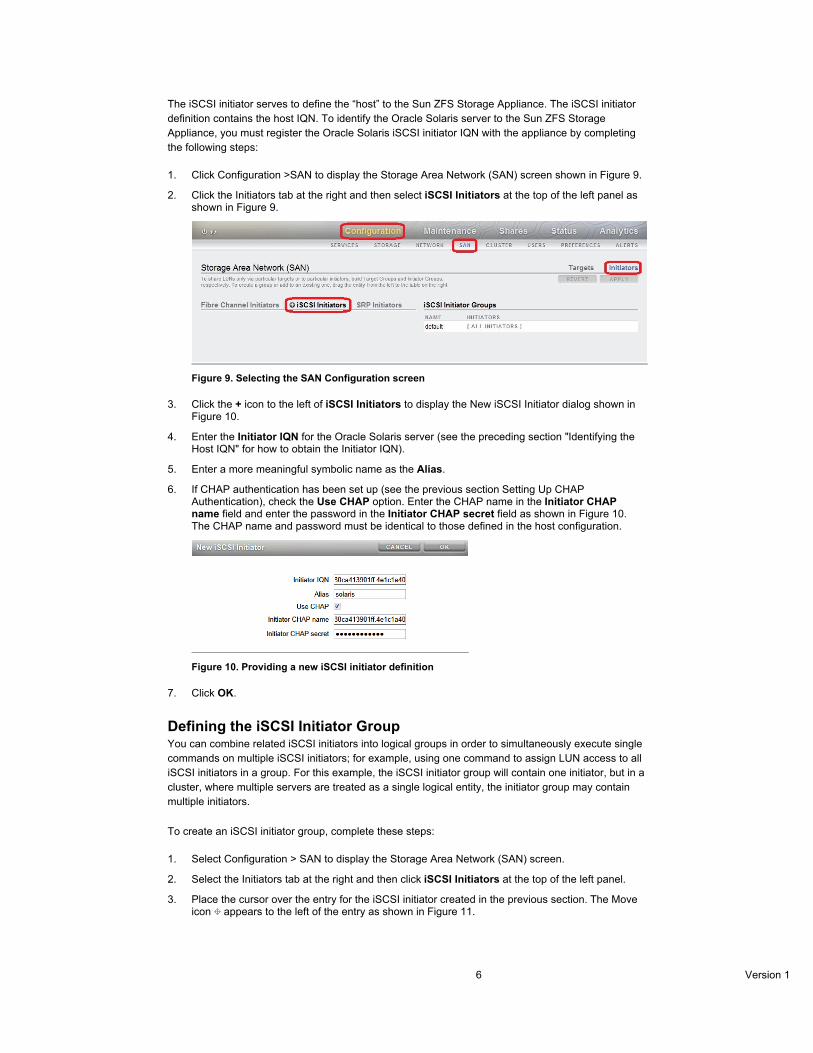
1. Click Configuration >SAN to display the Storage Area Network (SAN) screen shown in Figure 9.
2. Click the Initiators tab at the right and then select iSCSI Initiators at the top of the left panel as shown in Figure 9.
Figure 9. Selecting the SAN Configuration screen
3. Click the + icon to the left of iSCSI Initiators to display the New iSCSI Initiator dialog shown in Figure 10.
4. Enter the Initiator IQN for the Oracle Solaris server (see the preceding section "Identifying the Host IQN" for how to obtain the Initiator IQN).
5. Enter a more meaningful symbolic name as the Alias.
6. If CHAP authentication has been set up (see the previous section Setting Up CHAP Authentication), check the Use CHAP option. Enter the CHAP name in the Initiator CHAP name field and enter the password in the Initiator CHAP secret field as shown in Figure 10. The CHAP name and password must be identical to those defined in the host configuration.
Figure 10. Providing a new iSCSI initiator definition
7. Click OK.
Defining the iSCSI Initiator Group You can combine related iSCSI initiators into logical groups in order to simultaneously execute single commands on multiple iSCSI initiators; for example, using one command to assign LUN access to all iSCSI initiators in a group. For this example, the iSCSI initiator group will contain one initiator, but in a cluster, where multiple servers are treated as a single logical entity, the initiator group may contain multiple initiators.
To create an iSCSI initiator group, complete these steps:
1. Select Configuration > SAN to display the Storage Area Network (SAN) screen.
2. Select the Initiators tab at the right and then click iSCSI Initiators at the top of the left panel.
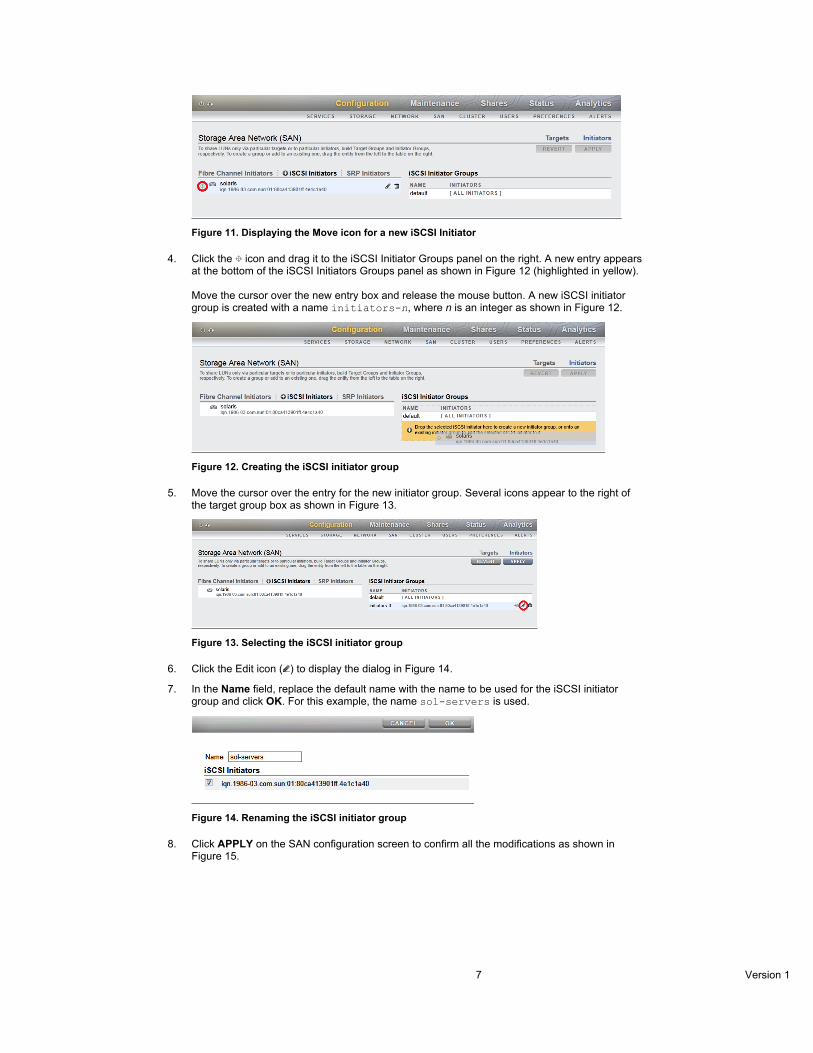
3. Place the cursor over the entry for the iSCSI initiator created in the previous section. The Move icon appears to the left of the entry as shown in Figure 11.
7 Version 1
Figure 11. Displaying the Move icon for a new iSCSI Initiator
4. Click the icon and drag it to the iSCSI Initiator Groups panel on the right. A new entry appears at the bottom of the iSCSI Initiators Groups panel as shown in Figure 12 (highlighted in yellow). Move the cursor over the new entry box and release the mouse button. A new iSCSI initiator group is created with a name initiators-n, where n is an integer as shown in Figure 12.
Figure 12. Creating the iSCSI initiator group
5. Move the cursor over the entry for the new initiator group. Several icons appear to the right of the target group box as shown in Figure 13.
Figure 13. Selecting the iSCSI initiator group
6. Click the Edit icon ( ) to display the dialog in Figure 14.
7. In the Name field, replace the default name with the name to be used for the iSCSI initiator group and click OK. For this example, the name sol-servers is used.
Figure 14. Renaming the iSCSI initiator group
8. Click APPLY on the SAN configuration screen to confirm all the modifications as shown in Figure 15.
8 Version 1
Figure 15. Completed iSCSI initiator and initiator group configurations
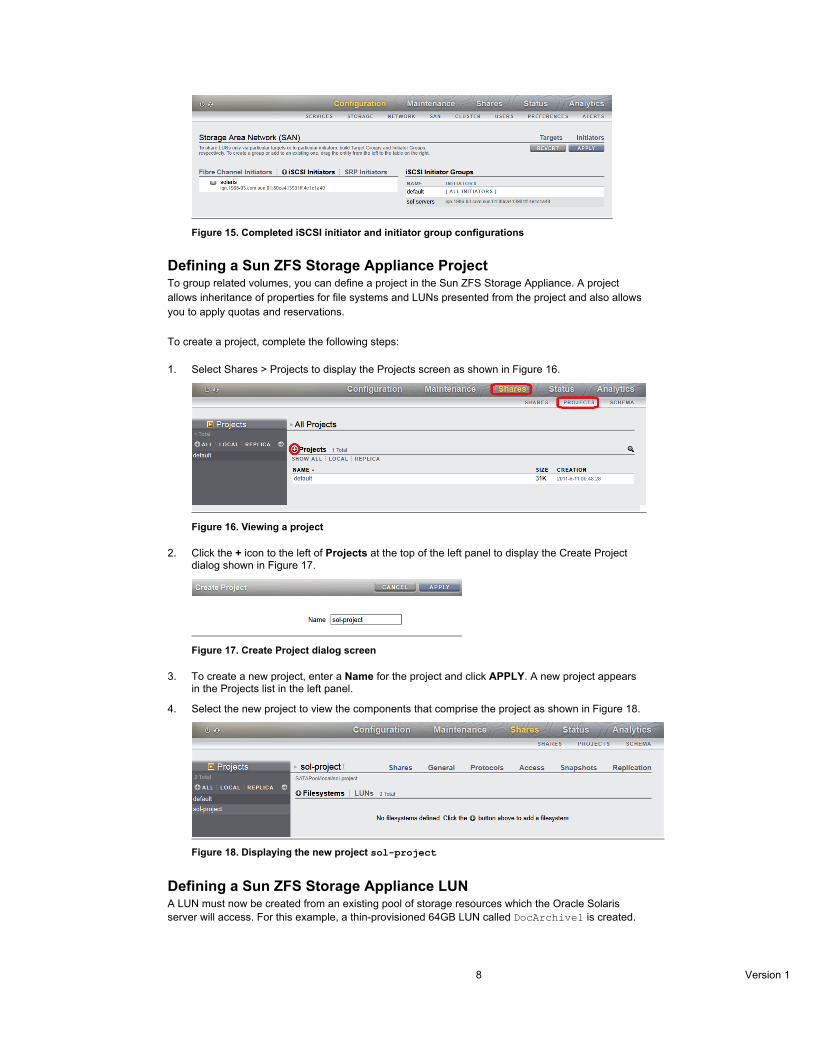
Defining a Sun ZFS Storage Appliance Project To group related volumes, you can define a project in the Sun ZFS Storage Appliance. A project allows inheritance of properties for file systems and LUNs presented from the project and also allows you to apply quotas and reservations.
To create a project, complete the following steps:
1. Select Shares > Projects to display the Projects screen as shown in Figure 16.
Figure 16. Viewing a project
2. Click the + icon to the left of Projects at the top of the left panel to display the Create Project dialog shown in Figure 17.
Figure 17. Create Project dialog screen
3. To create a new project, enter a Name for the project and click APPLY. A new project appears in the Projects list in the left panel.
4. Select the new project to view the components that comprise the project as shown in Figure 18.
Figure 18. Displaying the new project sol-project
Defining a Sun ZFS Storage Appliance LUN A LUN must now be created from an existing pool of storage resources which the Oracle Solaris server will access. For this example, a thin-provisioned 64GB LUN called DocArchive1 is created.
9 Version 1
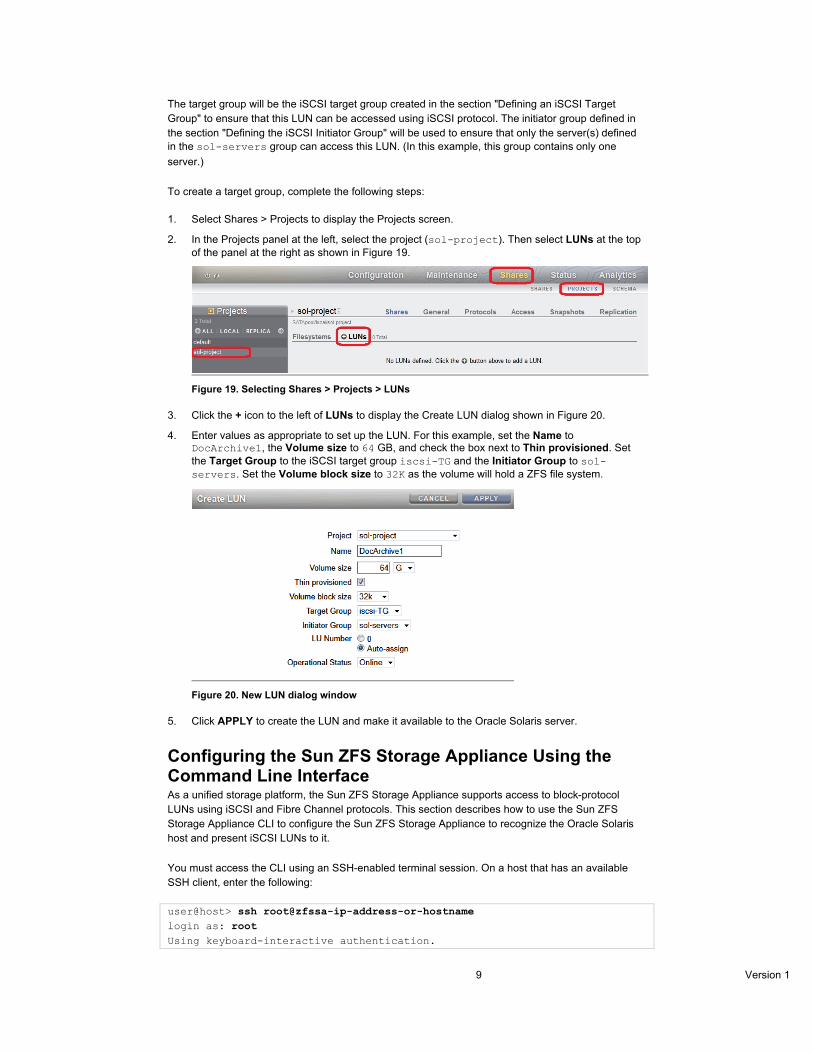
The target group will be the iSCSI target group created in the section "Defining an iSCSI Target Group" to ensure that this LUN can be accessed using iSCSI protocol. The initiator group defined in the section "Defining the iSCSI Initiator Group" will be used to ensure that only the server(s) defined in the sol-servers group can access this LUN. (In this example, this group contains only one server.)
To create a target group, complete the following steps:
1. Select Shares > Projects to display the Projects screen.
2. In the Projects panel at the left, select the project (sol-project). Then select LUNs at the top of the panel at the right as shown in Figure 19.
Figure 19. Selecting Shares > Projects > LUNs
3. Click the + icon to the left of LUNs to display the Create LUN dialog shown in Figure 20.
4. Enter values as appropriate to set up the LUN. For this example, set the Name to DocArchive1, the Volume size to 64 GB, and check the box next to Thin provisioned. Set the Target Group to the iSCSI target group iscsi-TG and the Initiator Group to sol-servers. Set the Volume block size to 32K as the volume will hold a ZFS file system.
Figure 20. New LUN dialog window
5. Click APPLY to create the LUN and make it available to the Oracle Solaris server.
Configuring the Sun ZFS Storage Appliance Using the Command Line Interface As a unified storage platform, the Sun ZFS Storage Appliance supports access to block-protocol LUNs using iSCSI and Fibre Channel protocols. This section describes how to use the Sun ZFS Storage Appliance CLI to configure the Sun ZFS Storage Appliance to recognize the Oracle Solaris host and present iSCSI LUNs to it.
You must access the CLI using an SSH-enabled terminal session. On a host that has an available SSH client, enter the following:
user@host> ssh root@zfssa-ip-address-or-hostname login as: root Using keyboard-interactive authentication.
10 Version 1
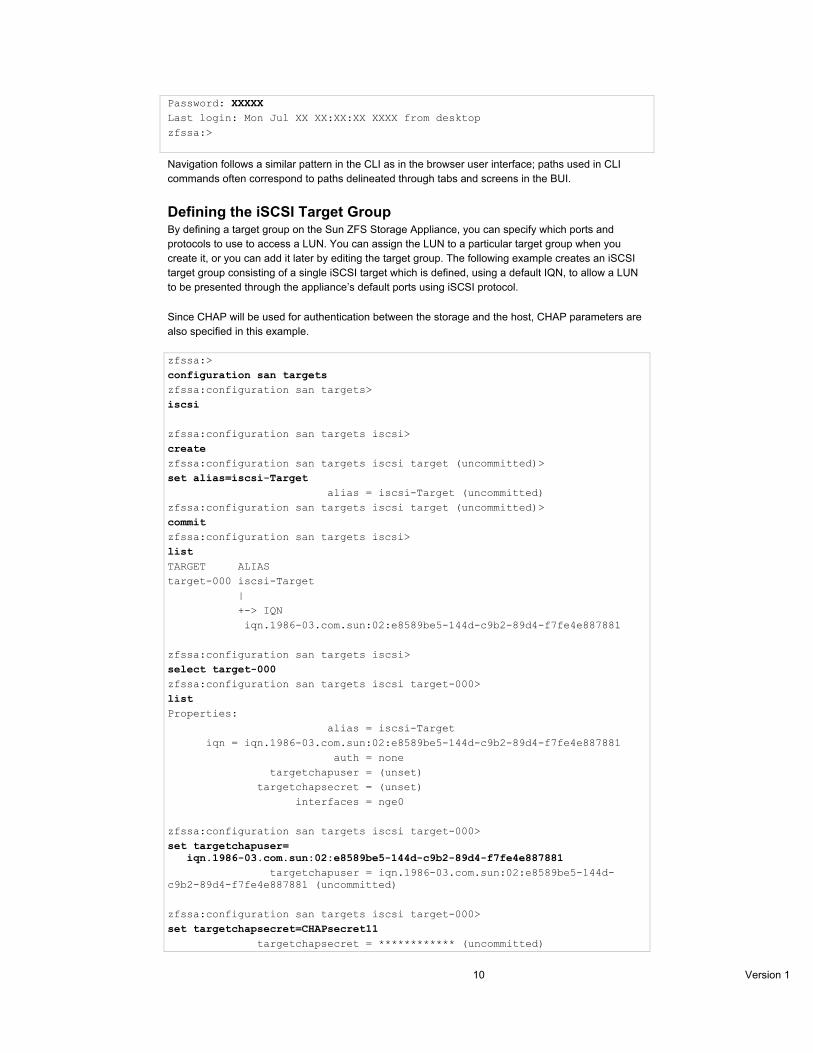
Password: XXXXX Last login: Mon Jul XX XX:XX:XX XXXX from desktop zfssa:>
Navigation follows a similar pattern in the CLI as in the browser user interface; paths used in CLI commands often correspond to paths delineated through tabs and screens in the BUI.
Defining the iSCSI Target Group By defining a target group on the Sun ZFS Storage Appliance, you can specify which ports and protocols to use to access a LUN. You can assign the LUN to a particular target group when you create it, or you can add it later by editing the target group. The following example creates an iSCSI target group consisting of a single iSCSI target which is defined, using a default IQN, to allow a LUN to be presented through the appliance’s default ports using iSCSI protocol.
Since CHAP will be used for authentication between the storage and the host, CHAP parameters are also specified in this example.
zfssa:> configuration san targets zfssa:configuration san targets> iscsi zfssa:configuration san targets iscsi> create zfssa:configuration san targets iscsi target (uncommitted)> set alias=iscsi-Target alias = iscsi-Target (uncommitted) zfssa:configuration san targets iscsi target (uncommitted)> commit zfssa:configuration san targets iscsi> list TARGET ALIAS target-000 iscsi-Target | +-> IQN iqn.1986-03.com.sun:02:e8589be5-144d-c9b2-89d4-f7fe4e887881 zfssa:configuration san targets iscsi> select target-000 zfssa:configuration san targets iscsi target-000> list Properties: alias = iscsi-Target iqn = iqn.1986-03.com.sun:02:e8589be5-144d-c9b2-89d4-f7fe4e887881 auth = none targetchapuser = (unset) targetchapsecret = (unset) interfaces = nge0 zfssa:configuration san targets iscsi target-000> set targetchapuser= iqn.1986-03.com.sun:02:e8589be5-144d-c9b2-89d4-f7fe4e887881 targetchapuser = iqn.1986-03.com.sun:02:e8589be5-144d-c9b2-89d4-f7fe4e887881 (uncommitted) zfssa:configuration san targets iscsi target-000> set targetchapsecret=CHAPsecret11 targetchapsecret = ************ (uncommitted)
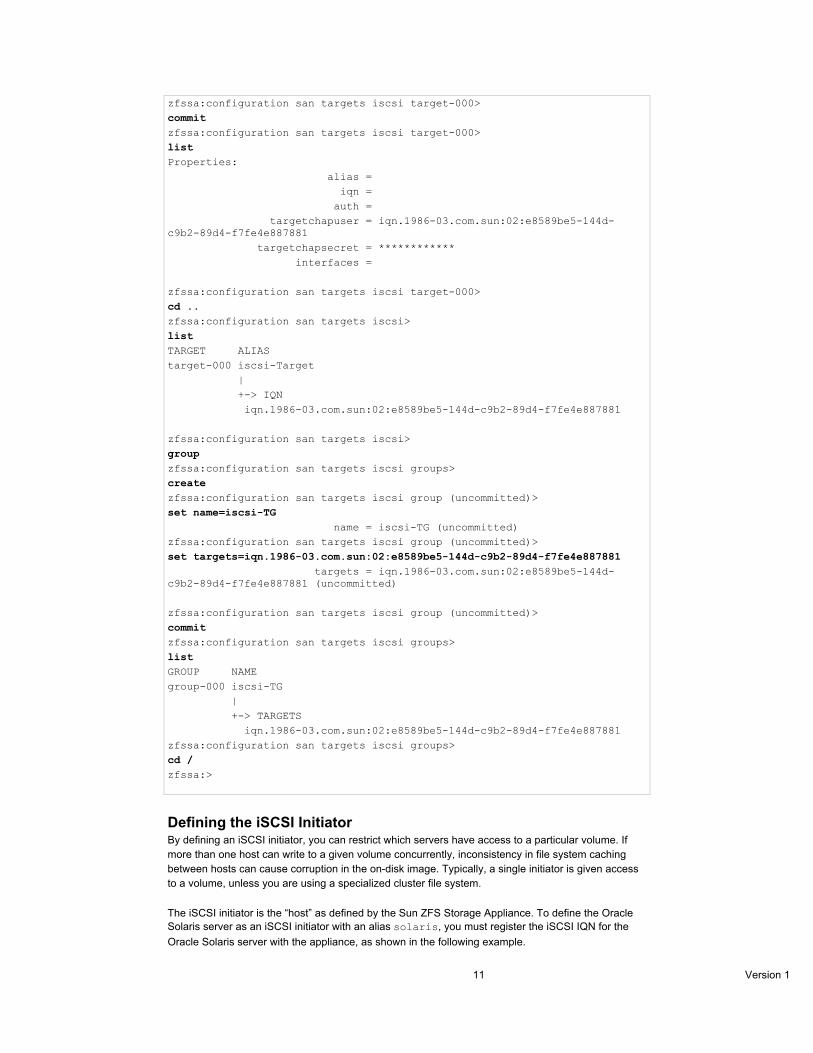
11 Version 1
zfssa:configuration san targets iscsi target-000> commit zfssa:configuration san targets iscsi target-000> list Properties: alias = iqn = auth = targetchapuser = iqn.1986-03.com.sun:02:e8589be5-144d-c9b2-89d4-f7fe4e887881 targetchapsecret = ************ interfaces = zfssa:configuration san targets iscsi target-000> cd .. zfssa:configuration san targets iscsi> list TARGET ALIAS target-000 iscsi-Target | +-> IQN iqn.1986-03.com.sun:02:e8589be5-144d-c9b2-89d4-f7fe4e887881 zfssa:configuration san targets iscsi> group zfssa:configuration san targets iscsi groups> create zfssa:configuration san targets iscsi group (uncommitted)> set name=iscsi-TG name = iscsi-TG (uncommitted) zfssa:configuration san targets iscsi group (uncommitted)> set targets=iqn.1986-03.com.sun:02:e8589be5-144d-c9b2-89d4-f7fe4e887881 targets = iqn.1986-03.com.sun:02:e8589be5-144d-c9b2-89d4-f7fe4e887881 (uncommitted) zfssa:configuration san targets iscsi group (uncommitted)> commit zfssa:configuration san targets iscsi groups> list GROUP NAME group-000 iscsi-TG | +-> TARGETS iqn.1986-03.com.sun:02:e8589be5-144d-c9b2-89d4-f7fe4e887881 zfssa:configuration san targets iscsi groups> cd / zfssa:>
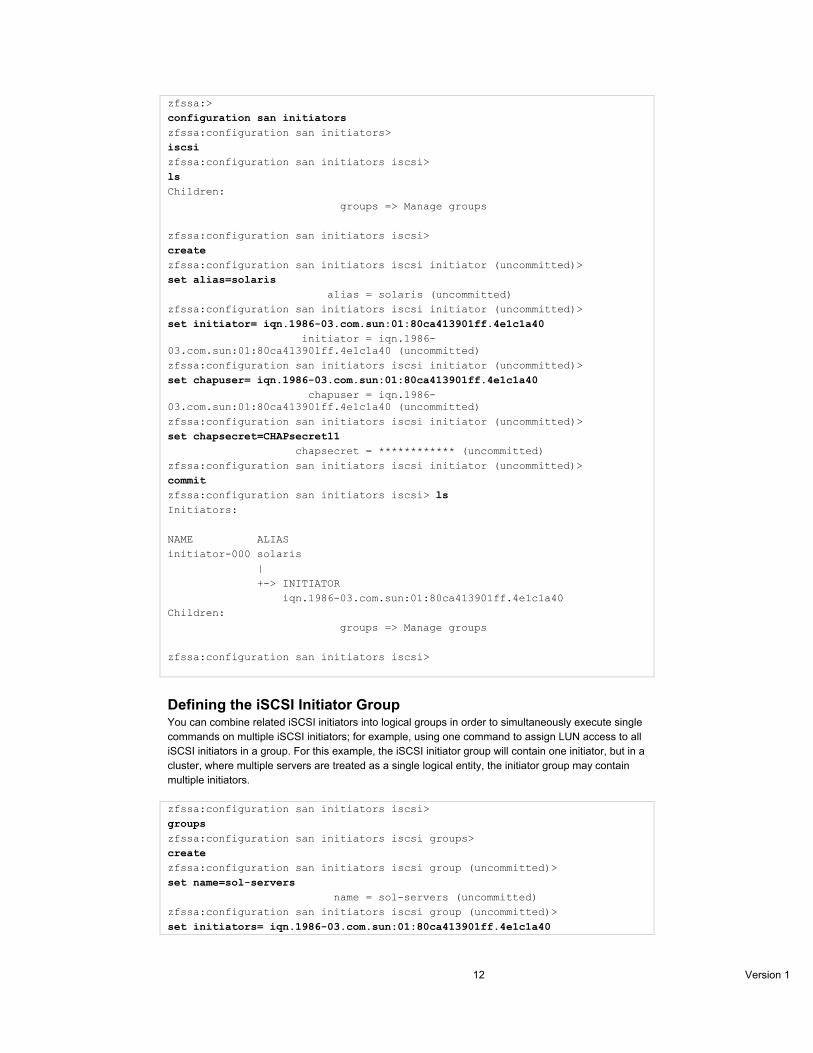
Defining the iSCSI Initiator By defining an iSCSI initiator, you can restrict which servers have access to a particular volume. If more than one host can write to a given volume concurrently, inconsistency in file system caching between hosts can cause corruption in the on-disk image. Typically, a single initiator is given access to a volume, unless you are using a specialized cluster file system.
The iSCSI initiator is the “host” as defined by the Sun ZFS Storage Appliance. To define the Oracle Solaris server as an iSCSI initiator with an alias solaris, you must register the iSCSI IQN for the Oracle Solaris server with the appliance, as shown in the following example.
12 Version 1
zfssa:> configuration san initiators zfssa:configuration san initiators> iscsi zfssa:configuration san initiators iscsi> ls Children: groups => Manage groups zfssa:configuration san initiators iscsi> create zfssa:configuration san initiators iscsi initiator (uncommitted)> set alias=solaris alias = solaris (uncommitted) zfssa:configuration san initiators iscsi initiator (uncommitted)> set initiator= iqn.1986-03.com.sun:01:80ca413901ff.4e1c1a40 initiator = iqn.1986-03.com.sun:01:80ca413901ff.4e1c1a40 (uncommitted) zfssa:configuration san initiators iscsi initiator (uncommitted)> set chapuser= iqn.1986-03.com.sun:01:80ca413901ff.4e1c1a40 chapuser = iqn.1986-03.com.sun:01:80ca413901ff.4e1c1a40 (uncommitted) zfssa:configuration san initiators iscsi initiator (uncommitted)> set chapsecret=CHAPsecret11 chapsecret = ************ (uncommitted) zfssa:configuration san initiators iscsi initiator (uncommitted)> commit zfssa:configuration san initiators iscsi> ls Initiators: NAME ALIAS initiator-000 solaris | +-> INITIATOR iqn.1986-03.com.sun:01:80ca413901ff.4e1c1a40 Children: groups => Manage groups zfssa:configuration san initiators iscsi>
Defining the iSCSI Initiator Group You can combine related iSCSI initiators into logical groups in order to simultaneously execute single commands on multiple iSCSI initiators; for example, using one command to assign LUN access to all iSCSI initiators in a group. For this example, the iSCSI initiator group will contain one initiator, but in a cluster, where multiple servers are treated as a single logical entity, the initiator group may contain multiple initiators.
zfssa:configuration san initiators iscsi> groups zfssa:configuration san initiators iscsi groups> create zfssa:configuration san initiators iscsi group (uncommitted)> set name=sol-servers name = sol-servers (uncommitted) zfssa:configuration san initiators iscsi group (uncommitted)> set initiators= iqn.1986-03.com.sun:01:80ca413901ff.4e1c1a40
13 Version 1
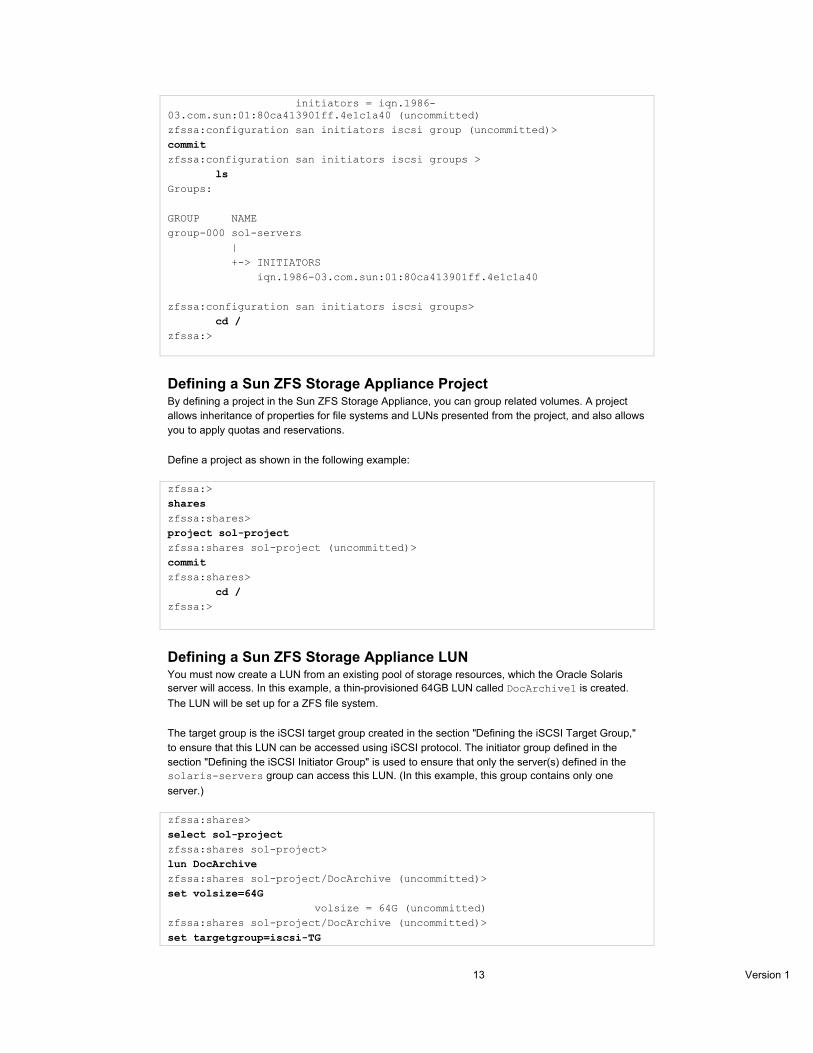
initiators = iqn.1986-03.com.sun:01:80ca413901ff.4e1c1a40 (uncommitted) zfssa:configuration san initiators iscsi group (uncommitted)> commit zfssa:configuration san initiators iscsi groups > ls Groups: GROUP NAME group-000 sol-servers | +-> INITIATORS iqn.1986-03.com.sun:01:80ca413901ff.4e1c1a40 zfssa:configuration san initiators iscsi groups> cd / zfssa:>
Defining a Sun ZFS Storage Appliance Project By defining a project in the Sun ZFS Storage Appliance, you can group related volumes. A project allows inheritance of properties for file systems and LUNs presented from the project, and also allows you to apply quotas and reservations.
Define a project as shown in the following example:
zfssa:> shares zfssa:shares> project sol-project zfssa:shares sol-project (uncommitted)> commit zfssa:shares> cd / zfssa:>
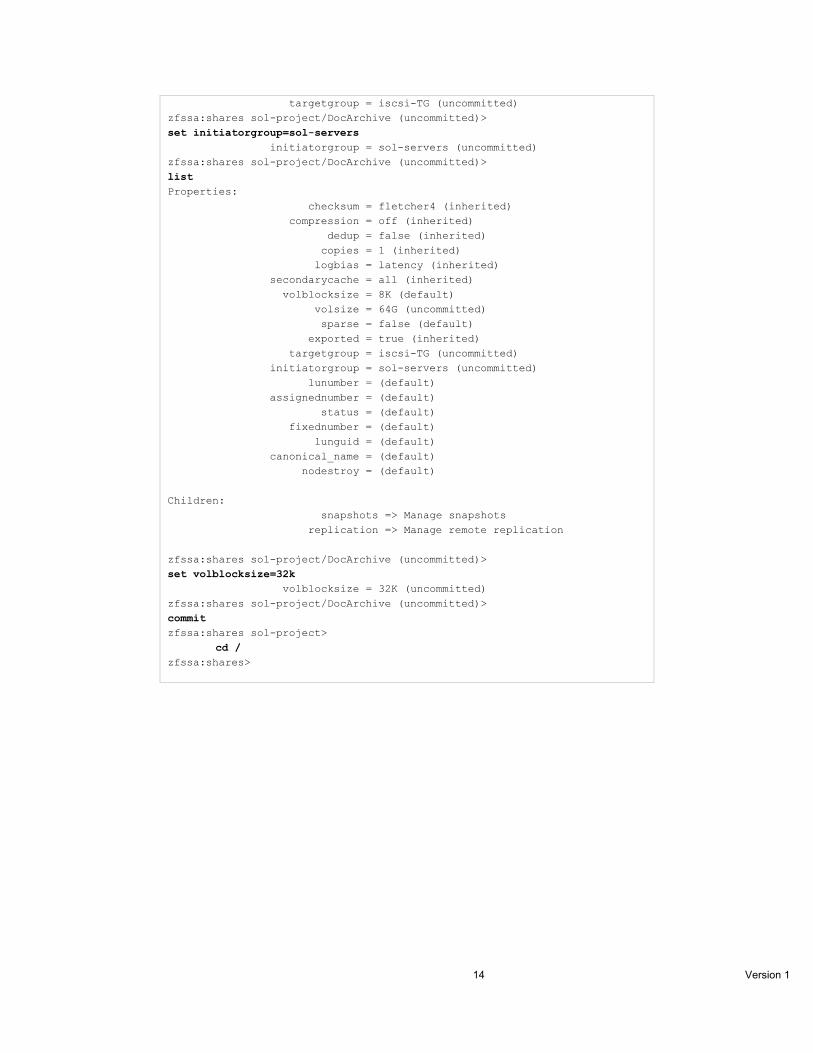
Defining a Sun ZFS Storage Appliance LUN You must now create a LUN from an existing pool of storage resources, which the Oracle Solaris server will access. In this example, a thin-provisioned 64GB LUN called DocArchive1 is created. The LUN will be set up for a ZFS file system.
The target group is the iSCSI target group created in the section "Defining the iSCSI Target Group," to ensure that this LUN can be accessed using iSCSI protocol. The initiator group defined in the section "Defining the iSCSI Initiator Group" is used to ensure that only the server(s) defined in the solaris-servers group can access this LUN. (In this example, this group contains only one server.)
zfssa:shares> select sol-project zfssa:shares sol-project> lun DocArchive zfssa:shares sol-project/DocArchive (uncommitted)> set volsize=64G volsize = 64G (uncommitted) zfssa:shares sol-project/DocArchive (uncommitted)> set targetgroup=iscsi-TG
14 Version 1
targetgroup = iscsi-TG (uncommitted) zfssa:shares sol-project/DocArchive (uncommitted)> set initiatorgroup=sol-servers initiatorgroup = sol-servers (uncommitted) zfssa:shares sol-project/DocArchive (uncommitted)> list Properties: checksum = fletcher4 (inherited) compression = off (inherited) dedup = false (inherited) copies = 1 (inherited) logbias = latency (inherited) secondarycache = all (inherited) volblocksize = 8K (default) volsize = 64G (uncommitted) sparse = false (default) exported = true (inherited) targetgroup = iscsi-TG (uncommitted) initiatorgroup = sol-servers (uncommitted) lunumber = (default) assignednumber = (default) status = (default) fixednumber = (default) lunguid = (default) canonical_name = (default) nodestroy = (default) Children: snapshots => Manage snapshots replication => Manage remote replication zfssa:shares sol-project/DocArchive (uncommitted)> set volblocksize=32k volblocksize = 32K (uncommitted) zfssa:shares sol-project/DocArchive (uncommitted)> commit zfssa:shares sol-project> cd / zfssa:shares>
15 Version 1
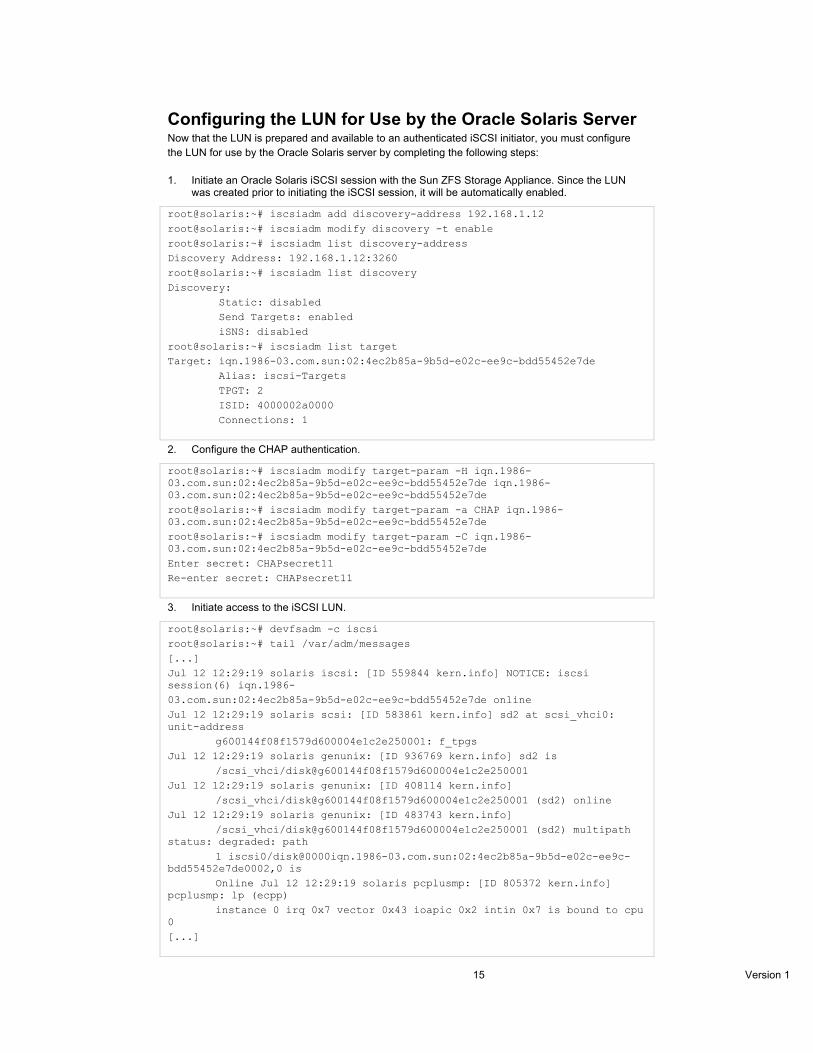
Configuring the LUN for Use by the Oracle Solaris Server Now that the LUN is prepared and available to an authenticated iSCSI initiator, you must configure the LUN for use by the Oracle Solaris server by completing the following steps:
1. Initiate an Oracle Solaris iSCSI session with the Sun ZFS Storage Appliance. Since the LUN was created prior to initiating the iSCSI session, it will be automatically enabled.
root@solaris:~# iscsiadm add discovery-address 192.168.1.12 root@solaris:~# iscsiadm modify discovery -t enable root@solaris:~# iscsiadm list discovery-address Discovery Address: 192.168.1.12:3260 root@solaris:~# iscsiadm list discovery Discovery: Static: disabled Send Targets: enabled iSNS: disabled root@solaris:~# iscsiadm list target Target: iqn.1986-03.com.sun:02:4ec2b85a-9b5d-e02c-ee9c-bdd55452e7de Alias: iscsi-Targets TPGT: 2 ISID: 4000002a0000 Connections: 1
2. Configure the CHAP authentication.
root@solaris:~# iscsiadm modify target-param -H iqn.1986-03.com.sun:02:4ec2b85a-9b5d-e02c-ee9c-bdd55452e7de iqn.1986-03.com.sun:02:4ec2b85a-9b5d-e02c-ee9c-bdd55452e7de root@solaris:~# iscsiadm modify target-param -a CHAP iqn.1986-03.com.sun:02:4ec2b85a-9b5d-e02c-ee9c-bdd55452e7de root@solaris:~# iscsiadm modify target-param -C iqn.1986-03.com.sun:02:4ec2b85a-9b5d-e02c-ee9c-bdd55452e7de Enter secret: CHAPsecret11 Re-enter secret: CHAPsecret11
3. Initiate access to the iSCSI LUN.
root@solaris:~# devfsadm -c iscsi root@solaris:~# tail /var/adm/messages [...] Jul 12 12:29:19 solaris iscsi: [ID 559844 kern.info] NOTICE: iscsi session(6) iqn.1986- 03.com.sun:02:4ec2b85a-9b5d-e02c-ee9c-bdd55452e7de online Jul 12 12:29:19 solaris scsi: [ID 583861 kern.info] sd2 at scsi_vhci0: unit-address g600144f08f1579d600004e1c2e250001: f_tpgs Jul 12 12:29:19 solaris genunix: [ID 936769 kern.info] sd2 is /scsi_vhci/disk@g600144f08f1579d600004e1c2e250001 Jul 12 12:29:19 solaris genunix: [ID 408114 kern.info] /scsi_vhci/disk@g600144f08f1579d600004e1c2e250001 (sd2) online Jul 12 12:29:19 solaris genunix: [ID 483743 kern.info] /scsi_vhci/disk@g600144f08f1579d600004e1c2e250001 (sd2) multipath status: degraded: path 1 iscsi0/[email protected]:02:4ec2b85a-9b5d-e02c-ee9c-bdd55452e7de0002,0 is Online Jul 12 12:29:19 solaris pcplusmp: [ID 805372 kern.info] pcplusmp: lp (ecpp) instance 0 irq 0x7 vector 0x43 ioapic 0x2 intin 0x7 is bound to cpu 0 [...]
16 Version 1
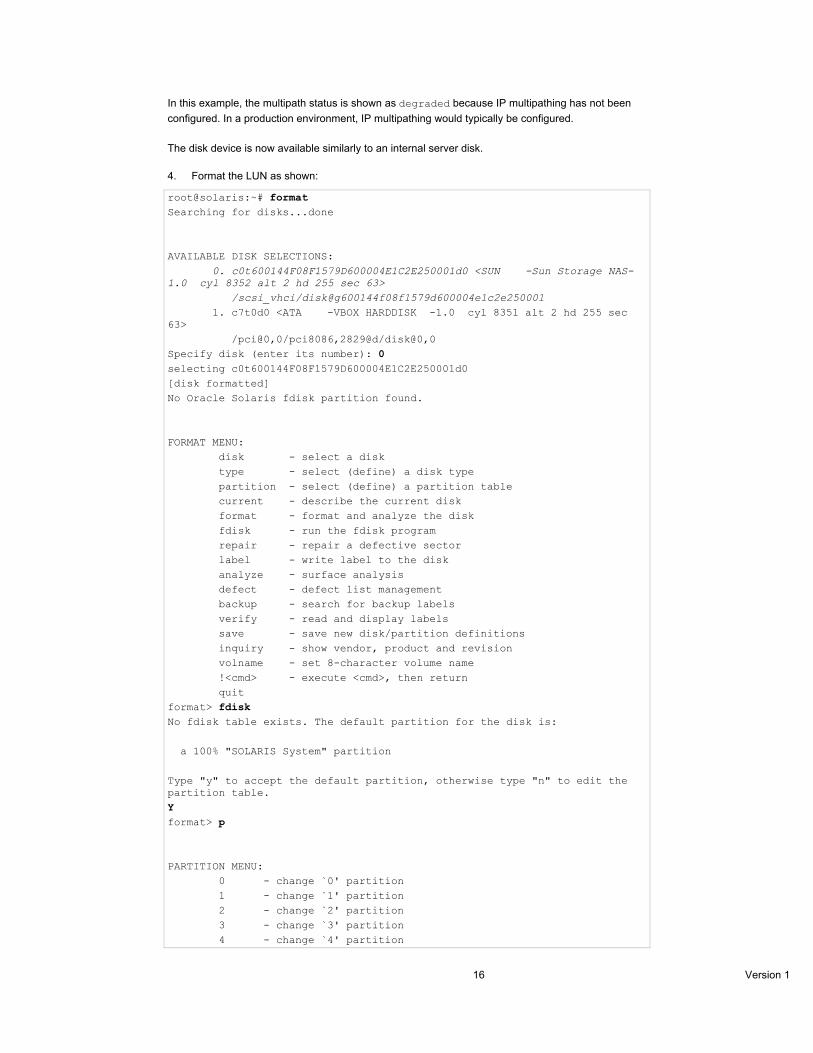
In this example, the multipath status is shown as degraded because IP multipathing has not been configured. In a production environment, IP multipathing would typically be configured.
The disk device is now available similarly to an internal server disk.
4. Format the LUN as shown:
root@solaris:~# format Searching for disks...done AVAILABLE DISK SELECTIONS: 0. c0t600144F08F1579D600004E1C2E250001d0 <SUN -Sun Storage NAS-1.0 cyl 8352 alt 2 hd 255 sec 63> /scsi_vhci/disk@g600144f08f1579d600004e1c2e250001 1. c7t0d0 <ATA -VBOX HARDDISK -1.0 cyl 8351 alt 2 hd 255 sec 63> /pci@0,0/pci8086,2829@d/disk@0,0 Specify disk (enter its number): 0 selecting c0t600144F08F1579D600004E1C2E250001d0 [disk formatted] No Oracle Solaris fdisk partition found. FORMAT MENU: disk - select a disk type - select (define) a disk type partition - select (define) a partition table current - describe the current disk format - format and analyze the disk fdisk - run the fdisk program repair - repair a defective sector label - write label to the disk analyze - surface analysis defect - defect list management backup - search for backup labels verify - read and display labels save - save new disk/partition definitions inquiry - show vendor, product and revision volname - set 8-character volume name !<cmd> - execute <cmd>, then return quit format> fdisk No fdisk table exists. The default partition for the disk is: a 100% "SOLARIS System" partition Type "y" to accept the default partition, otherwise type "n" to edit the partition table. Y format> p PARTITION MENU: 0 - change `0' partition 1 - change `1' partition 2 - change `2' partition 3 - change `3' partition 4 - change `4' partition
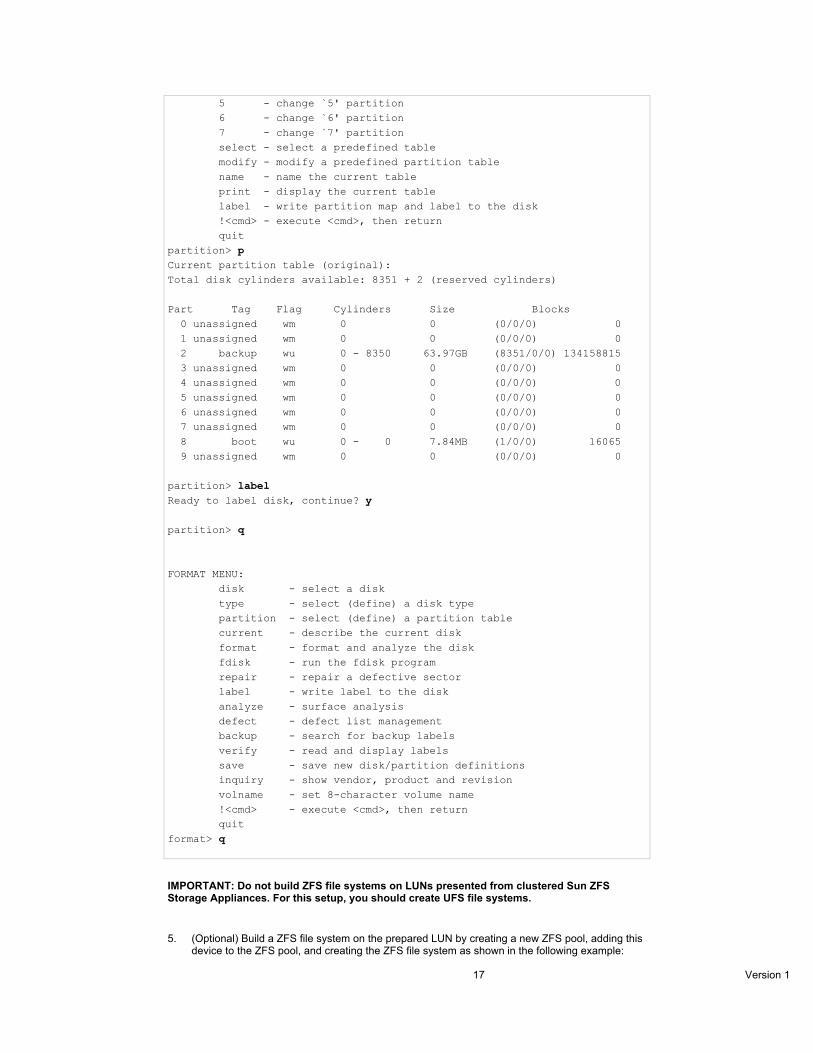
17 Version 1
5 - change `5' partition 6 - change `6' partition 7 - change `7' partition select - select a predefined table modify - modify a predefined partition table name - name the current table print - display the current table label - write partition map and label to the disk !<cmd> - execute <cmd>, then return quit partition> p Current partition table (original): Total disk cylinders available: 8351 + 2 (reserved cylinders) Part Tag Flag Cylinders Size Blocks 0 unassigned wm 0 0 (0/0/0) 0 1 unassigned wm 0 0 (0/0/0) 0 2 backup wu 0 - 8350 63.97GB (8351/0/0) 134158815 3 unassigned wm 0 0 (0/0/0) 0 4 unassigned wm 0 0 (0/0/0) 0 5 unassigned wm 0 0 (0/0/0) 0 6 unassigned wm 0 0 (0/0/0) 0 7 unassigned wm 0 0 (0/0/0) 0 8 boot wu 0 - 0 7.84MB (1/0/0) 16065 9 unassigned wm 0 0 (0/0/0) 0 partition> label Ready to label disk, continue? y partition> q FORMAT MENU: disk - select a disk type - select (define) a disk type partition - select (define) a partition table current - describe the current disk format - format and analyze the disk fdisk - run the fdisk program repair - repair a defective sector label - write label to the disk analyze - surface analysis defect - defect list management backup - search for backup labels verify - read and display labels save - save new disk/partition definitions inquiry - show vendor, product and revision volname - set 8-character volume name !<cmd> - execute <cmd>, then return quit format> q
IMPORTANT: Do not build ZFS file systems on LUNs presented from clustered Sun ZFS Storage Appliances. For this setup, you should create UFS file systems.
5. (Optional) Build a ZFS file system on the prepared LUN by creating a new ZFS pool, adding this device to the ZFS pool, and creating the ZFS file system as shown in the following example:
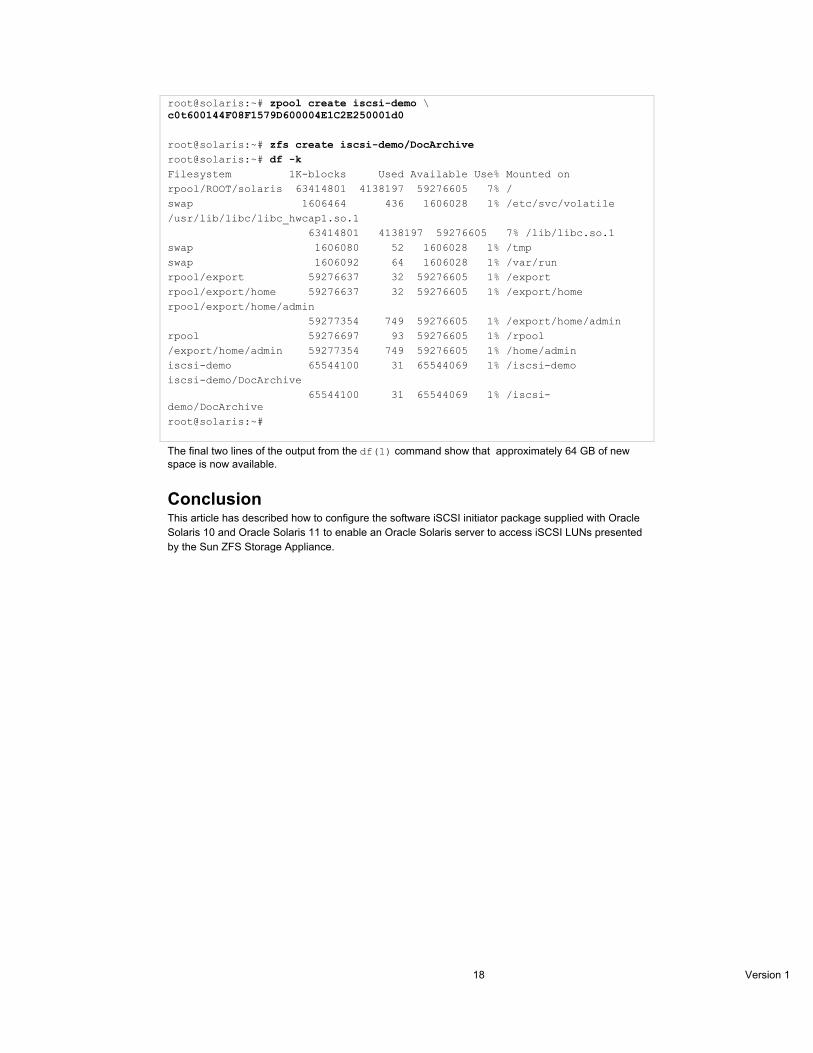
18 Version 1
root@solaris:~# zpool create iscsi-demo \ c0t600144F08F1579D600004E1C2E250001d0 root@solaris:~# zfs create iscsi-demo/DocArchive root@solaris:~# df -k Filesystem 1K-blocks Used Available Use% Mounted on rpool/ROOT/solaris 63414801 4138197 59276605 7% / swap 1606464 436 1606028 1% /etc/svc/volatile /usr/lib/libc/libc_hwcap1.so.1 63414801 4138197 59276605 7% /lib/libc.so.1 swap 1606080 52 1606028 1% /tmp swap 1606092 64 1606028 1% /var/run rpool/export 59276637 32 59276605 1% /export rpool/export/home 59276637 32 59276605 1% /export/home rpool/export/home/admin 59277354 749 59276605 1% /export/home/admin rpool 59276697 93 59276605 1% /rpool /export/home/admin 59277354 749 59276605 1% /home/admin iscsi-demo 65544100 31 65544069 1% /iscsi-demo iscsi-demo/DocArchive 65544100 31 65544069 1% /iscsi-demo/DocArchive root@solaris:~#
The final two lines of the output from the df(1) command show that approximately 64 GB of new space is now available.
Conclusion This article has described how to configure the software iSCSI initiator package supplied with Oracle Solaris 10 and Oracle Solaris 11 to enable an Oracle Solaris server to access iSCSI LUNs presented by the Sun ZFS Storage Appliance.


![Documentation Howto Create Iscsi Target From Zfs Volume [Wiki NAS4Free]](https://img.pdfslide.us/doc/110x75/577c78361a28abe0548f1c8a/documentation-howto-create-iscsi-target-from-zfs-volume-wiki-nas4free.jpg)