Embed Size (px)
Citation preview

Basics
Basics Chapter 3 Using SPIRIT Gmail
21
Using SPIRIT Gmail
Basics Chapter 3
Email addresses are provided for V-Campus users to use email. It is a Gmail-based Web email service called SPIRIT Gmail. You can access your mailbox from anywhere, anytime to send and receive email messages. This chapter explains how to use SPIRIT Gmail.
Basics
22
3-1 Using SPIRIT Gmail
■ Framework of email addresses ● Checking your email address
V-Campus provides every single user with a unique email address that uses a V-Campus ID. An email address identifies the user of email.
V-Campus combines a V-Campus ID with the domain name to provide an email address like the one below.
Example of an email address
[email protected] When you want to receive email messages from someone, tell that person your email address. The email address is like a name and address. If the correct email address is not specified, email messages will not be delivered to you.
Once you are ready to send email, you may want to check whether your email address is correct by sending an email message to yourself.
Basics
Basics Chapter 3 Using SPIRIT Gmail
23
■ Using SPIRIT Gmail "SPIRIT Gmail" is a Web email service of V-Campus. It is based on "Gmail," a product of Google Inc. of the U.S., and can be used with Rikkyo University's unique domain "rikkyo.ac.jp."
Since the service is configured to store emails in the mail server, you can check your mailbox and address book that remain the same regardless of where you access them. The capacity of the mail server is almost unlimited. If you have an enormous number of emails, you can easily search old messages for the one you want.
You can send and receive emails not only using your browser but also by using the email program on your PC.

Basics
24
■ Logging in to SPIRIT Gmail 1. Access the V-Campus home page, and click
[SPIRIT Gmail].
V-Campus SPIRIT top page: http://webmail.rikkyo.ac.jp/
2. When the login window appears, enter appropriate strings in [V-Campus
ID] and [パスワード](Password). Then, click [Sign In]. Authentication window that appears when you log in for the first time
When you attempt to use SPIRIT Mail for the first time, an authentication window appears where you are prompted to enter the displayed image as a character string. Enter the displayed character string, and then click [同意します。アカウントを作成します。](I agree and create an account.).
Basics
Basics Chapter 3 Using SPIRIT Gmail
25
■ Receiving and replying to emails 1. Log in to SPIRIT Gmail.
The window appears with the inbox opened.
* The email messages you have received are already in the inbox.
2. Click the email message you want to read.
* For each email message, the "sender," "subject," "part of the message," and "time sent" are displayed from left to right. Clicking any of these columns displays the main body of the email.
3. The main body of the email is displayed. To reply to the email, click
[返信](Reply).

Basics
26
4. Type your reply, and click [送信](Send).
Basics
Basics Chapter 3 Using SPIRIT Gmail
27
■ Creating and sending a new email message 1. Click [メールを作成](Create Email). 2. Type the recipient address in [To] and the subject of your email in
[件名](Subject). Enter your message, and then click [送信](Send).
* Immediately after your initial logon, the format for the message input field is set to "rich text." Some email programs cannot display email messages created in rich text format. Click the "text format" section, and change the setting.

Basics
28
■ Checking the recipient In addition to the [To] field, there are two other fields, [Cc] and [Bcc], for entering recipient addresses. Each of these fields is briefly described below.
To
Use this filed to enter the address of the recipient of the email. In [To], you can specify more than one email address. When specifying more than one email address, separate each of them by a comma (,).
Cc
Enter the address of a person who is not the primary recipient of the email but to whom you want the message delivered for reference purposes. The recipient specified in [To] will also see who is specified in [Cc] (to whom you are sending the email).
Bcc
Use this field to keep the recipients' addresses and names unknown to one another. Although this field is similar to [Cc], any address typed in [Bcc] cannot be seen by the people specified in [To] and [Cc], making it impossible for them to find out to whom you sent the email.
Basics
Basics Chapter 3 Using SPIRIT Gmail
29
● Displaying the recipient input fields
1. Open the email creation window. To use [Cc], select [Cc を追加](Add Cc) below the [To] field. To use [Bcc], select [Bcc を追加](Add Bcc).
2. The input field appears.
When adding Cc
When adding Bcc

Basics
30
3-2 Setting an email alias
■ About an email alias V-Campus provides an email address that uses a V-Campus ID. However, because an alphanumeric string like 00ab123x is difficult to remember and prone to be mistyped, you can assign another name that is easier to remember in place of such an alphanumeric string. This another easy-to-remember email account you assign is called an "email alias."
For example, a user can use his name "taro" as the email alias of V-Campus ID, converting the email account "[email protected]" to "[email protected]."
・Default email account (which uses the V-campus ID) 00ab123x @rikkyo.ac.jp
・Email alias taro @rikkyo.ac.jp
By setting multiple aliases for a single email account, you can use different email addresses, each intended for a specific situation or purpose.
Basics
Basics Chapter 3 Using SPIRIT Gmail
31
■ Adding an email alias 1. Access the V-Campus home page. Click [V-Campus IDについて](About
V-Campus ID) to open the menu. Then, click [V-Campusアカウント設定ログイン](Log in to set V-Campus account).
V-Campus Account Setting: https://idm.rikkyo.ac.jp/webmtn/LoginServlet
2. When the login window appears, enter appropriate strings in [V-Campus
ID] and [Password]. Then, click [ログイン](Login).

Basics
32
3. In the menu window, click [プロファイル編集](Edit Profile). 4. Click the [メールエイリアス rikkyo.ac.jp](Email Alias rikkyo.ac.jp) tab.
Type the desired email alias, and check the [有効](Enable) check box. Click the [SAVE] button.
Basics
Basics Chapter 3 Using SPIRIT Gmail
33
5. When the Web page displays a message, click the [OK] button. 6. The registration of the alias is complete. 7. Alias registration is complete.
* You cannot add an email alias that is already registered.
<Caution> Once you add an email alias, you cannot change or delete it. You can disable an email alias. In that case, however, that alias is no longer available and the maximum number of aliases you can add is reduced to four in order to prevent the disabled alias from being reused and causing improper message delivery.
* You can add up to five email aliases. The characters that you can use in an alias are limited
to "a" to "z ", "0" to "9," "_ " (underscore), ". " (dot), and "-" (hyphen). You cannot add an email alias that is already registered.

Basics
34
3-3 Using email (SPIRIT Gmail) more conveniently
■ Changing the sender address SPIRIT Gmail allows you to change the email address of the sender (your email address) to another address you possess when sending an email. Here is how you do this.
1. After logging in to SPIRIT Gmail, click [設定](Setting) and choose [メール
設定](Mail Setting). 2. Click the [アカウント](Account) tab and then [メールアドレスを追加](Add
Email Address).
Basics
Basics Chapter 3 Using SPIRIT Gmail
35
3. Another window opens. Enter another email address you want to use as the sender address, and then click [次のステップ](Next Step).
*Under normal circumstances, please check “Treat as Alias.” *Reference
When sending from Gmail using another email address, select [エイリアスとして扱いま
す] (Treat as Alias).
http://support.google.com/mail/bin/answer.py?hl=ja&answer=1710338&ctx=gmail
4. When the confirmation window appears, click [確認メールの送信](Send
Confirmation Email).

Basics
36
5. The confirmation code input window appears. Wait for a while without doing anything.
6. After several minutes, click [受信トレイ](Inbox) of the parent window to
check for new email messages. If you have an email message titled "Confirmation from Rikkyo University," click it to open the message.
* If the confirmation email message does not arrive within a reasonable amount of time, click [メールの再送信](Resend Email) in the [別のメールアドレスを追加](Adding Another Email Address) window.
Basics
Basics Chapter 3 Using SPIRIT Gmail
37
7. If you click the link provided in the email message or enter the confirmation code in the [別のメールアドレスを追加画面](Adding Another Email Address window), the added email address will be registered as the sender address.
8. The confirmation completion window appears. 9. Click [設定](Setting) in the upper right of the SPIRIT Mail window, and then
choose the [アカウント](Account) tab.
Basics
38
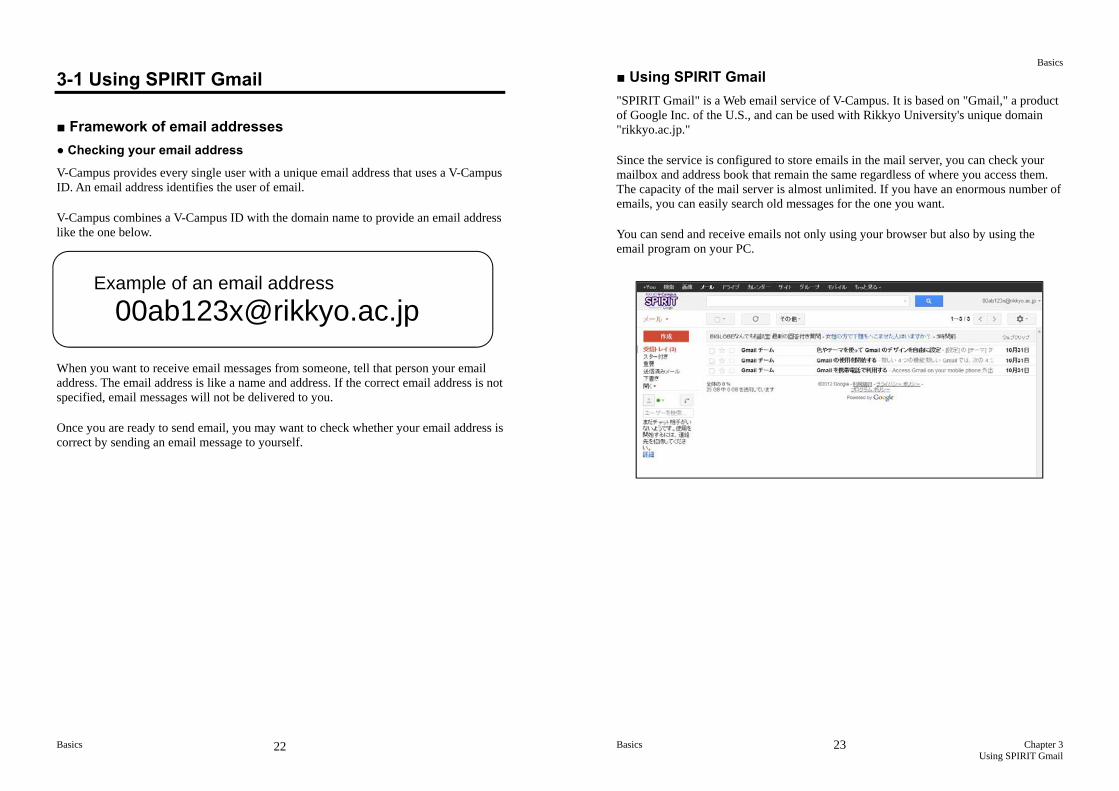
10. In [デフォルトの返信モードを選択](Select default reply mode), select [メールを受信したアドレスから返信する](Reply from the address used to receive email).
11. You can now select the added email address as the sender address when
creating a new email message or replying to a received email.
Basics
Basics Chapter 3 Using SPIRIT Gmail
39
■ Setting email forwarding SPIRIT Gmail allows you to forward incoming email messages to another email address.
1. After logging in to SPIRIT Gmail, click [設定](Setting) and choose [メール
設定](Mail Setting). 2. Click the [メール転送と POP/IMAP 設定](Email Forwarding and
POP/IMAP Setting) tab.

Basics
40
3. Click [転送先アドレスを追加](Add Forwarding Address), and enter the email address to which to forward email messages. Then, click [次へ] (Next).
4. Click the [続行](Continue). 5. An email message will be delivered to the forwarding address. If you click
the link provided in the email message or enter the confirmation code, the email address will be registered as the forwarding address.
6. Check the [受信メールを~](Forward incoming emails to) check box in the
setting window.
* Leave [立教大学のコピーを受信トレイに保存](Save Rikkyo University's copies to the inbox) unchanged.
Basics
Basics Chapter 3 Using SPIRIT Gmail
41
7. Click the [変更を保存](Save Changes).

Basics
42
■ Emergency Web email system for use in case of a SPIRIT Gmail failure Rikkyo University provides a Web email system for use in case of a SPIRIT Gmail failure or other emergency.
Go to the URL shown below, and log in using "V-Campus [email protected]" and your password.
Gmail for the emergency: https://www.google.com/gmail/
■ Using Help If you click [ヘルプ](Help) in the upper right of the window, the [ヘルプセンター] (Help Center) window of Google's Gmail will be displayed, which lets you view more detailed information about the use of email and other convenient ways to use the service.
Basics
Basics Chapter 3 Using SPIRIT Gmail
43
3-4 Checking on SPIRIT Gmail from a smartphone
"SPIRIT Gmail" allows you to check on your regular inbox from a smartphone while you are on the go or on the train.
■ Logging in to SPIRIT Gmail 1. Access the login window using the Internet service of your smartphone.
SPIRIT Gmail login window: http://webmail.rikkyo.ac.jp/ 2. When the [ログイン](Login) window appears, enter appropriate strings in
[V-Campus ID] and [Password]. Then, click [Sign In].
* Logging in to SPIRIT Gmail from a smartphone is the same as logging in from a PC. When you log in from a PC, the emails sent from your smartphone are also displayed in [送信済みメール](Sent Emails), and vice versa.
Basics
44
3-5 Using a mailing list
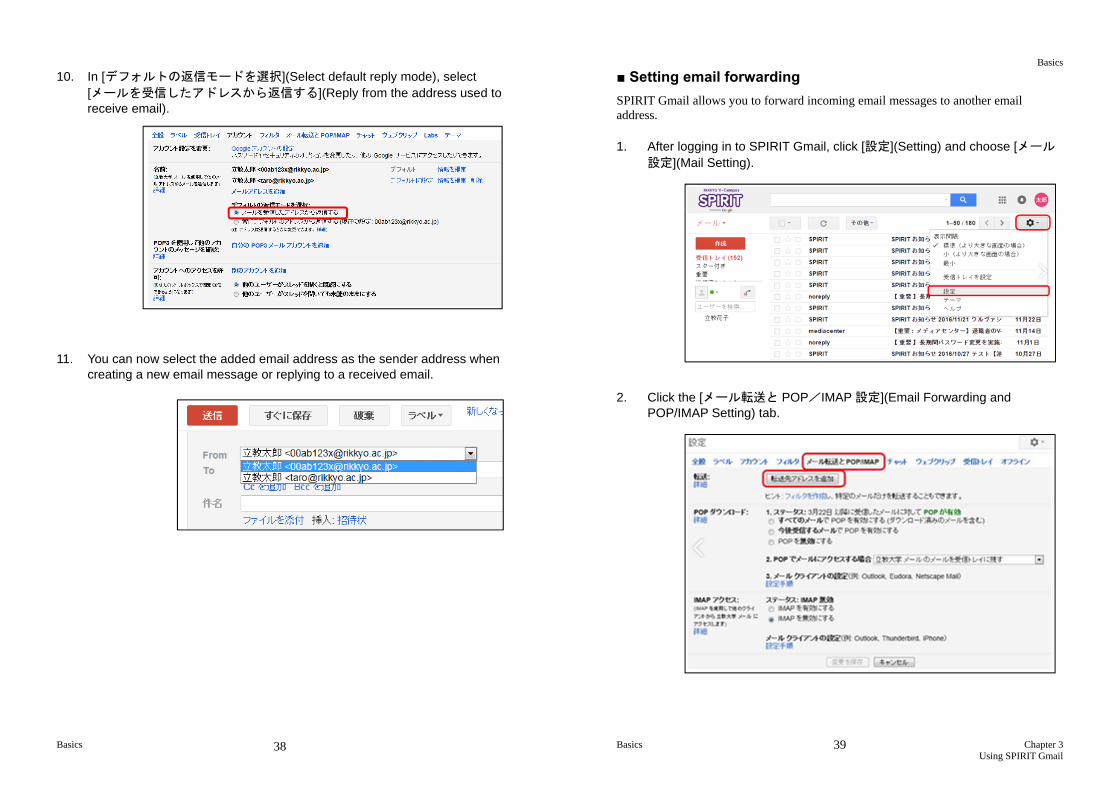
■ About a mailing list A "mailing list" is one of the ways to utilize the Internet by means of email. It refers to a mechanism whereby an identical email message can be delivered to multiple people.
With a mailing list, if someone sends an email message to a certain address, that message will be delivered to all the people who are registered in advance.
If someone sends a reply message to a mailing list, that message will also be delivered to all the registered people. Unlike in one-to-one email correspondence, multiple people can email one another. This is the most prominent feature of a mailing list.
While it is convenient, a mailing list, which sends a message to multiple people, has some rules to observe.
When you subscribe to a mailing list, keep in mind the rules described below. If you are the administrator of a mailing list, make sure that the other members observe these rules.
Basics
Basics Chapter 3 Using SPIRIT Gmail
45
■ Rules to observe when using a mailing list ● Avoid using file attachments unless necessary.
When sending a file attachment, you need to make sure that its format is available to the recipient. Also, an email message with a file attachment can be large in size, imposing a huge load on the mail system.
Send an email message with a file attachment to a mailing list only when necessary. Refrain from sending a large-size file.
● Make sure the recipient address is right.
A mailing list has many people on it. If you inadvertently send an email message intended for an individual to a mailing list, it may cause trouble not only to the intended recipient but also to the other members of the mailing list. Particularly, when replying to an individual on a mailing list, be careful not to send the reply message to the mailing list. When replying to an individual, choose [転送](Forward) and specify the recipient address.
● Give a title (subject).
Be sure to give a title (subject) to your email so that other people will find out what it is about without opening the message. Not only does this allow you to readily guess the content of a delivered email before actually reading it, but it also helps when you search previous email messages.
Whenever you reply to an email message, the string "Re:" or "Res:" is added to its title. Be careful about this because, if members reply to a single message repeatedly in a mailing list, its title becomes long and difficult to read.
Basics
46
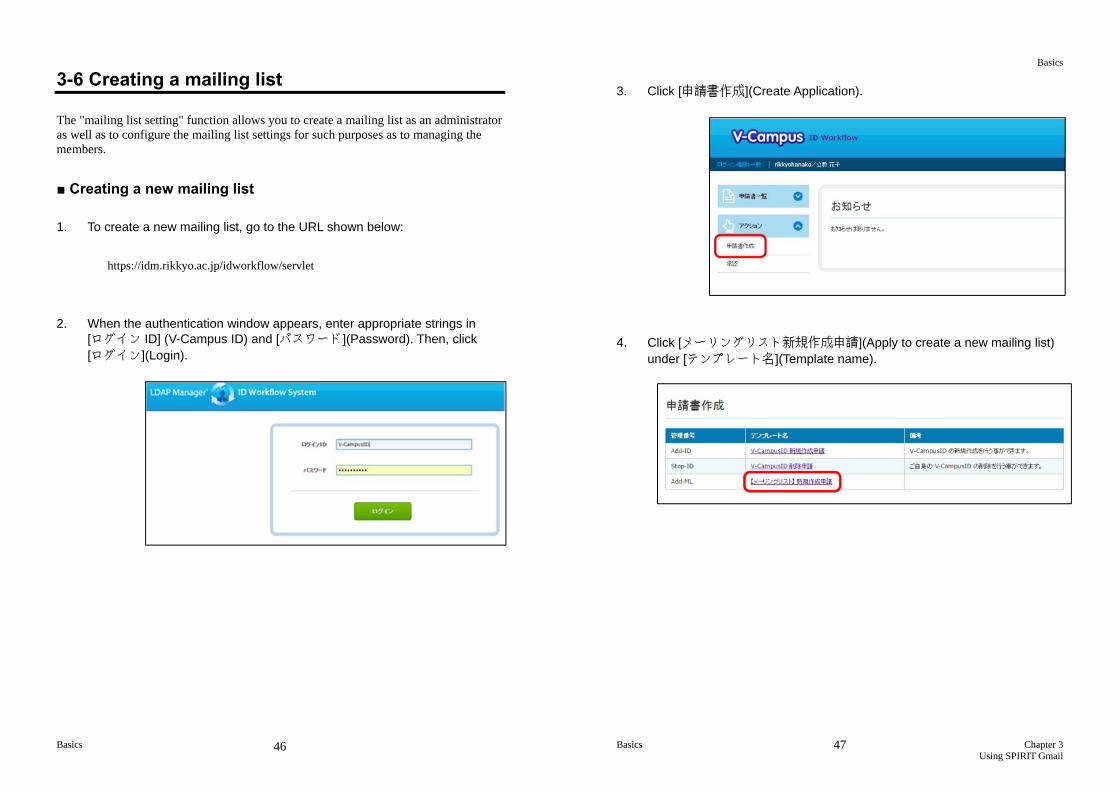
3-6 Creating a mailing list
The "mailing list setting" function allows you to create a mailing list as an administrator as well as to configure the mailing list settings for such purposes as to managing the members.
■ Creating a new mailing list 1. To create a new mailing list, go to the URL shown below:
https://idm.rikkyo.ac.jp/idworkflow/servlet 2. When the authentication window appears, enter appropriate strings in
[ログイン ID] (V-Campus ID) and [パスワード](Password). Then, click [ログイン](Login).
Basics
Basics Chapter 3 Using SPIRIT Gmail
47
3. Click [申請書作成](Create Application). 4. Click [メーリングリスト新規作成申請](Apply to create a new mailing list)
under [テンプレート名](Template name).

Basics
48
5. In the [メーリングリスト新規申請](New mailing list application) page, enter appropriate strings in [サブタイトル](Subtitle), [メーリングリスト
名](Mailing list name), [メーリングリストパスワード](Mailing list password), and [メーリングリスト管理者メールアドレス](Mailing list administrator's email address). Then, click [申請](Apply).
Basics
Basics Chapter 3 Using SPIRIT Gmail
49
■ Managing a mailing list You can register members for the created mailing list or delete members from it.
● Login 1. In the [メーリングリスト管理](Mailing list management) section of the
[メーリングリスト設定](Mailing list setting) window, enter the name of the mailing list you manage (that part before @). Then, click [該当する ML の
ページを開く](Open the corresponding ML page). 2. The [ログイン](login) window appears.

Basics
50
3. Log in by entering the password that you set when creating the mailing list. The [メーリングリスト管理](Mailing list management) window appears.
● Registering additional members 1. Click [会員管理](Member Management). 2. [会員リスト](Member List) and other additional menu items appear below
[会員管理](Member Management). Click [まとめて入会登録](Register Multiple Members at Once).
Basics
Basics Chapter 3 Using SPIRIT Gmail
51
3. The "registration" window appears. In the input field below [1 行に 1 アドレ
スを入力](Enter one address per row), enter the email address of each additional member you want to register. You can register multiple email addresses at once.
4. Click [変更を送信する](Submit Changes) at the bottom of the "registration"
window.
Basics
52
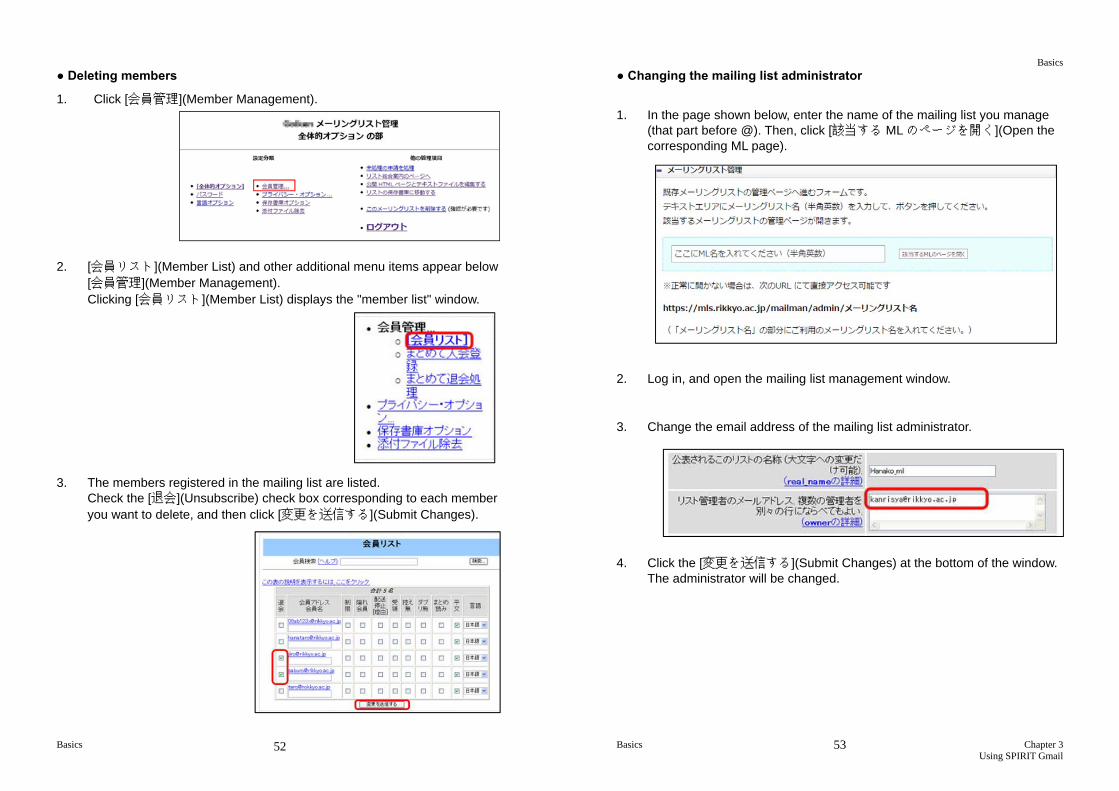
● Deleting members 1. Click [会員管理](Member Management). 2. [会員リスト](Member List) and other additional menu items appear below
[会員管理](Member Management). Clicking [会員リスト](Member List) displays the "member list" window.
3. The members registered in the mailing list are listed.
Check the [退会](Unsubscribe) check box corresponding to each member you want to delete, and then click [変更を送信する](Submit Changes).
Basics
Basics Chapter 3 Using SPIRIT Gmail
53
● Changing the mailing list administrator
1. In the page shown below, enter the name of the mailing list you manage
(that part before @). Then, click [該当する MLのページを開く](Open the corresponding ML page).
2. Log in, and open the mailing list management window. 3. Change the email address of the mailing list administrator. 4. Click the [変更を送信する](Submit Changes) at the bottom of the window.
The administrator will be changed.
Basics
54
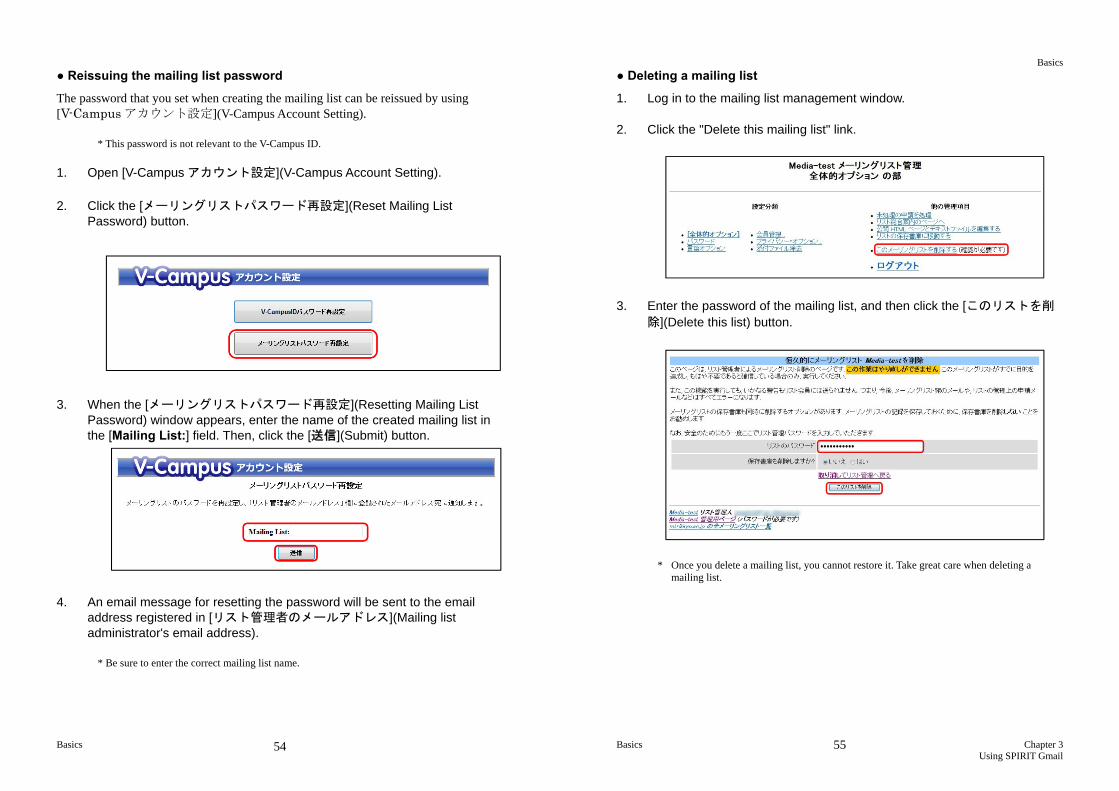
● Reissuing the mailing list password
The password that you set when creating the mailing list can be reissued by using [V-Campus アカウント設定](V-Campus Account Setting).
* This password is not relevant to the V-Campus ID.
1. Open [V-Campus アカウント設定](V-Campus Account Setting). 2. Click the [メーリングリストパスワード再設定](Reset Mailing List
Password) button. 3. When the [メーリングリストパスワード再設定](Resetting Mailing List
Password) window appears, enter the name of the created mailing list in the [Mailing List:] field. Then, click the [送信](Submit) button.
4. An email message for resetting the password will be sent to the email
address registered in [リスト管理者のメールアドレス](Mailing list administrator's email address).
* Be sure to enter the correct mailing list name.
Basics
Basics Chapter 3 Using SPIRIT Gmail
55
● Deleting a mailing list
1. Log in to the mailing list management window. 2. Click the "Delete this mailing list" link.
3. Enter the password of the mailing list, and then click the [このリストを削
除](Delete this list) button.
* Once you delete a mailing list, you cannot restore it. Take great care when deleting a mailing list.