Embed Size (px)
Citation preview
1
Using Reasoning Tools to Investigate How and Why Water Travels through the Water Cycle
A Unit Developed by
Brandy Thrasher Washington Middle School, Missoula, MT
and
Colleen Windell
Washington Middle School, Missoula, MT
October 2014
2
Table of Contents
Using Reasoning Tools to Investigate How and Why Water Travels through the Water Cycle ........................................................................................................................................................... 3 Lesson 1: The Water Cycle Big Picture ........................................................................................... 8
Lesson 2: Looking Closer at Evaporation ................................................................................... 17 Lesson 3: Condensation ................................................................................................................... 31
Lesson 4: Substances Moving with Water .................................................................................. 39
Summative Project ............................................................................................................................ 47
3
Using Reasoning Tools to Investigate How and Why Water Travels through the Water Cycle NGSS Connections This unit addresses the following NGSS CORE disciplinary ideas, scientific practices and crosscutting concepts. Core Disciplinary Ideas MS-ESS2-4 Develop a model to describe the cycling of water through Earth’s systems driven by energy from the sun and the force of gravity. Clarification Statement: Emphasis is on the ways water changes its state as it moves through the multiple pathways of the hydrologic cycle. Examples of models can be conceptual or physical. MS-PS1-2 Analyze and interpret data on the properties of substances before and after the substances interact to determine if a chemical reaction has occurred. Clarification Statement: Examples of reactions could include burning sugar or steel wool, fat reacting with sodium hydroxide, and mixing zinc with hydrogen chloride. MS-PS1-4 Develop a model that predicts and describes changes in particle motion, temperature, and state of a pure substance when thermal energy is added or removed. Statement: Emphasis is on qualitative molecular-level models of solids, liquids, and gases to show that adding or removing thermal energy increases or decreases kinetic energy of the particles until a change of state occurs. Examples of models could include drawings and diagrams. Examples of particles could include molecules or inert atoms. Examples of pure substances could include water, carbon dioxide, and helium. Crosscutting Concepts Scale, proportion and quantity: Time, space, and energy phenomena can be observed at various scales using models to study systems that are too large or too small System and System Models: Models can be used to represent systems and their interactions – such as inputs, processes and outputs – and energy, matter, and information flows within systems. Energy & Matter: Within a natural or designed system the transfer of energy drives the motion and/or cycling of matter. Cause and Effect: Cause and effect relationships may be used to predict phenomena in natural or designed systems.
4
Stability and Change: Explanations of stability and change in natural or designed systems can be constructed by examining the changes over time and forces at different scales. Scientific Practices Developing and using models Engaging in argument from evidence Obtaining, evaluating and communicating information Lesson 1: The Water Cycle Big Picture Driving Question: Where does water travel as it moves through the water cycle, and what causes it to move the way it does? Activity 1: (I-AIM: Question) Students create a model of the water cycle as they currently understand it. Students share their models with the class. Activity 2: (I-AIM Explore & Investigate) Have students use the online water cycle model at http://oceanservice.noaa.gov/education/pd/oceans_weather_climate/media/watercycle.swf After using the online model, have them update their water cycle models from the day before to include any new “places” that water can travel. Activity 3 (I-AIM Explain): Have students share their updated models with class. Show students the video from the National Science Foundation at https://www.youtube.com/watch?v=al-do-HGuIk. Again have students update their models after class discussion.. Activity 4 (I-AIM Explore and Investigate): Introduce the Pathways Tool and have students complete multiple pathways for water within the water cycle based on their prior understand and new found knowledge, including the information they learned using the online model from lesson 2 and the video from lesson 3. Activity 5 (I-AIM Apply): Students will present and defend their Pathways, engaging in scientific argumentation. They will also update and present their water cycle model to include more of the possible pathways. (Note --- The following lessons focus in on several particular pathways in the water cycle (i.e., focus on exploring and explaining phases for evaporation, condensation and substances moving with water). After completing lessons 2, 3 and 4, the unit can close with returning to an overall opportunity to “explain” the big picture of the water cycle.)
5
Lesson 2: Looking Closer at Evaporation Driving Question: What causes water to evaporate? Activity 1: (I-AIM: Question) Ask students to explain what causes water to evaporate using the Write, Pair, Share technique. Activity 2: (I-AIM: Explore & Investigate) As a class, brainstorm some ideas of what is needed to make water evaporate and what factors could affect the rate of evaporation. Explain to students that they are going to be doing a series of experiments in which they test some of these factors. Setup the experiments to sit overnight. (Note: This part could take several days depending on your classroom setup and how much time you want to spend allowing students to experiment. You could set up several experiments to run concurrently, or you could have students work on designing and testing their own experiments independently.) Have students gather the experimental data. As a class, discuss, analyze, and interpret the different data sets separately. Activity 3: (I-AIM: Explore & Investigate) Tell students that they are going to be mathematical model or simulation to look at water on the molecular scale to see if they can determine what is happening to water as it changes from liquid to gas. Have students explore the PhET simulation, States of Matter (http://phet.colorado.edu/en/simulation/states-of-matter ), focusing on the motion of the water molecules. After using the simulation, have students explain what they think is happening to the molecules of water that makes them change from a liquid to a gas. Activity 4: (I-AIM Explain) After using the simulation, have students explain what they think is happening to the molecules of water that makes them change from a liquid to a gas. After a class discussion, show the videos, http://www.youtube.com/watch?v=K1E7LFUf5zs, https://www.youtube.com/watch?v=wDYOtu6npNU, and http://www.youtube.com/watch?v=6anMpNZYpe0 , which will give students the scientific explanation of what causes water to evaporate. Activity 5: (I-AIM: Apply) Students apply their understanding of evaporation to plants. They will create a model that explains evapotranspiration. They will also watch a short video about evapotranspiration and its effect on the water cycle. https://www.youtube.com/watch?v=4765Sg2mKco Lesson 3: Condensation Driving Question: What is condensation and why does it happen? Activity 1: (I-AIM: Question) Ask students if they have every experienced various forms of condensation such as: The outside of a glass with lemonade getting wet when they drink it outside on a hot summer, the inside of a window “fogging” up in winter time, or
6
their glasses “fogging” up when they come inside to an air conditioned room after being outside in the summer? Students will then draw and explain what they think is occurring when such instances happen and share with the class. Activity 2: (I-AIM: Explore & Investigate) In small groups, students will investigate through experimentation where the water that condenses comes from. Students will follow the procedure to test two cups with ice, one of which is inserted into a plastic bag that prevents it from condensing as much water. Activity 3: (I-AIM: Explain) Have students watch the video at https://www.youtube.com/watch?v=hehXEYkDq_Y that explains what condensation is and how it occurs. Have students explore the PhET simulation, States of Matter (http://phet.colorado.edu/en/simulation/states-of-matter ), focusing on the motion of the water molecules so they can further connect that as thermal energy is removed the speed of molecules is reduced. Students will then go back to their drawings from activity one and update and add to them new ideas they have about condensation. Activity 4: (I-AIM Explore & Investigate) After using the simulation, have students explain what they think is happening to the molecules of water that makes them change from a liquid to a gas. Students will then investigate what causes the rate of condensation to change by testing various numbers of ice cubes with water to identify that a faster cooling rate will also increase condensation rates. Activity 5: (I-AIM: Apply) Students apply their understanding of condensation to the water cycle and other daily events. Students will begin by identifying places of evaporation on their water cycle drawings and using the Pathways tool. Students will then use the Drivers and Constraints tool to further explain not just where, but how and when condensation occurs and what some of the drivers and constraints are within the water cycle system. Lesson 4: Substances Moving With Water Driving Question: How do substances move or not move with water within the water cycle? Activity 1: (I-AIM: Question) Students will be asked to think about what they know/remember about mixing things together. Some examples you might get them started off with include: making chocolate milk, making cereal with milk, making lemonade with powder. Ask students to write down what they think a mixture is and what a solution is and if they think there are any differences and then students will share their initial ideas with the class. Activity 2: (I-AIM: Explore & Investigate) In small groups, students will investigate through experimentation various methods that separate or do not separate mixtures and
7
solutions including filtration, distillation and freezing. Students will be led to the conclusion that mixtures can be separated through basic filtration but solutions cannot. Activity 3: (I-AIM: Explain) Have students watch the video at https://www.youtube.com/watch?v=pnpmPDa3tb the differences between mixtures and solutions and how they can be separated . Students will then go back to their ideas from activity one and further explain mixtures and solutions. Students will then research activities (historically and/or contemporarily) that affect the local watershed and provide examples of substances that create mixtures and solutions and how they affect local water quality. Activity 4: (I-AIM Apply) Have students review the water cycle information at http://oceanservice.noaa.gov/education/pd/oceans_weather_climate/media/watercycle.swf as well as their pathways tools and drivers and constraints tools. Students will use all of this information to apply it to the Tracing Mixtures tool to consider where substances can move with water within the water cycle. Summative Project: The Water Cycle Big Picture Have students create a poster/model of the water cycle that incorporates many of the pathways, drivers and constraints that they learned about in these lessons. Students should also include pathways that add substances to water as it moves through the water cycle.
8
Lesson 1: The Water Cycle Big Picture Grade Level: 6-8 Time Needed: 4-5 days Lesson Overview: The focus of this series of lessons is for students to gain a deeper understanding of the hydrologic or water cycle, including the multiple pathways that water can take as it moves through the cycle. Driving Question: Where does water travel as it moves through the water cycle? Ideal Response: Water can take many, pathways as it moves through the hydrologic cycle, traveling through the atmosphere, across the landscape and under the ground. Disciplinary Core Ideas MS-ESS2-4: Develop a model to describe the cycling of water through Earth’s systems driven by energy from the sun and the force of gravity. Crosscutting Concepts Scale, proportion and quantity: Time, space, and energy phenomena can be observed at various scales using models to study systems that are too large or too small to observe firsthand. System and System Models: Models can be used to represent systems and their interactions – such as inputs, processes and outputs – and energy, matter, and information flows within systems. Energy & Matter: Within a natural or designed system the transfer of energy drives the motion and/or cycling of matter. Scientific Practices
• Developing models • Engaging in argument from evidence • Obtaining, evaluating and communicating information
Learning Goals KNOWING
• Students will know that water evaporates, condenses, precipitates and collects as it moves through the water cycle. This includes within animals and plants.
• Students will know that water can take more than one path as it cycles through the Earth’s atmosphere, biosphere and geosphere.
DOING • Students will be able to create and revise a model that traces water through
multiple pathways.
9
• Students will engage in scientific argumentation. • Students will obtain, evaluate and communicate information.
Language Learning Goals
• Acquire and accurately use grade-appropriate general academic and domain-specific words and phrases; gather vocabulary knowledge when considering a word or phrase important to comprehension or expression.
• Interpret information presented in diverse media and formats (e.g., visually, quantitatively, and orally) and explain how it contributes to a topic, text, or issue under study.
• Include multimedia components and visual displays in presentations to clarify information.
• Engage effectively in a range of collaborative discussions (one-on-one, in groups, and teacher-led) with diverse partners on grades 6-8 topics, texts, and issues, building on others’ ideas and expressing their own clearly.
• Delineate a speaker’s argument and specific claims, distinguishing claims that are supported by reasons and evidence from claims that are not.
Student Science Toolkits Students have experience with water in their everyday lives. They have all watched it rain/snow, experienced evaporation and condensation, but may not be familiar with the vocabulary or the drivers that make water move. These lessons will build upon prior knowledge and add both vocabulary and content. Materials Each student will need:
• Science notebook or journal (or paper to draw their model on) or blank water cycle picture
• Pencil • Several copies of the Pathways Tool • Argument cards
Each pair of students (or small group) will need: • One computer with access to the internet (or one teacher computer with internet
access and a projection device) Teacher will need:
• Computer with Internet access and projection device • Document camera
Preparation 1. Print enough copies of the Pathways Tool for each of your students to have at least
4 copies. 2. If you decide to use the blank water cycle picture with your students for the first
activity, make enough copies for each student.
10
3. Familiarize yourself with the online model used in Activity 2 http://oceanservice.noaa.gov/education/pd/oceans_weather_climate/media/watercycle.swf
4. If you are using a document camera to share students’ models, be sure that the needed software is loaded and that the camera works.
5. If your school does not allow streaming of videos or the bandwidth is insufficient to do this, you may want to download the National Science Foundation video on the water cycle found at: https://www.youtube.com/watch?v=al-do-HGuIkn
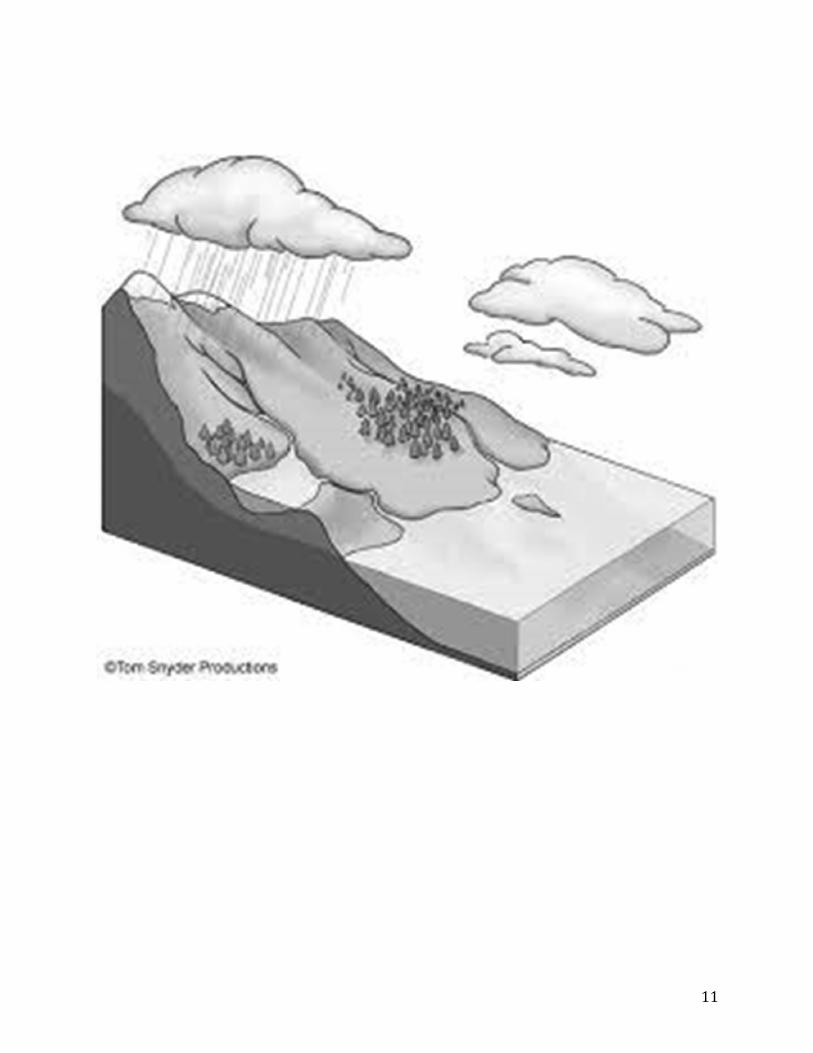
Activities Activity 1: What Is the Water Cycle? I-AIM Stage & Function: Question Procedure: 1. Ask students to think about what they know/remember about the water cycle. If your
students have constructed models before, have them create a conceptual model of their current understanding of the water cycle in their notebook/science journal. If your students are unfamiliar with what a model is, explain that a conceptual model is a diagram or picture that shows an event or system, in this case the water cycle. They should draw in different things in the water cycle, label them and then explain what that thing does. Hand out the blank water cycle picture. You may need to scaffold this with your students by taking one part of the water cycle, say precipitation, draw in some rain/snow, label it and write a brief explanation (e.g. water droplets fall from the cloud to the ocean.)
2. Allow students adequate time to draw or label their model. Circulate around the room to monitor students’ work. This will allow you to get a general idea of where your students are in their understanding of this concept.
3. Setup the document camera.
4. When students are done, either ask for volunteers or call on students that you noticed had legible models to present.
5. Have students explain their models to the class using the document camera.
6. Comment on particular parts of students’ models that demonstrate understanding.
7. Collect students’ models so that you can look at each student’s work.
11
12
Assessment: The models that students create are a formative assessment of their prior knowledge. You should look these over to see areas of misconceptions or naïve understanding. Accommodations/Adaptations: A copy of the blank model can be used with students who may need additional support/scaffolding, even if your students are familiar with models. Additionally, students don’t have to use the blank model if they do not wish. Since this is an assessment of prior knowledge, spelling and vocabulary are not to be counted against students, so second language learners and students with special needs don’t necessarily need additional support at this time. Activity 2. Exploring the Water Cycle I-AIM Stage and Function: Explore and Investigate Procedure: 1. Open the interactive water cycle model, NSTA Interactive: Water Cycle Pathways, at
http://oceanservice.noaa.gov/education/pd/oceans_weather_climate/media/watercycle.swf
2. Depending on your classroom setup and the availability of computers for students, you might want to load the watershed model used in this lesson before students get to class. For the best results, have students work in pairs or small groups on the computer. If a computer lab or laptops are not available, the teacher may project the model onto the board using his/her own computer and a projection device.
3. Start the activity by saying that students or the class is going to explore the water cycle using a mathematical model or simulation. Before allowing students to work independently, go through at least one pathway together.
4. Click on any one of the 13 options listed on the right side of the simulation. This is where the water droplet will start.
5. Point out to students that once they make their first selection, some of the options disappear. That is because water can only travel to certain places depending on where the water is. For example, if I select Glaciers/Ice Caps, I now only have 6 possible places I can go next.
6. On the board, keep track of the pathway that your class selects as you work your way through the cycle. Be sure to point out the description box at the bottom of the page. This will provide students with the process name.
13
7. Show students how to use the Back button and the Reset button to “undo” their last selection, or to start over with all 13 possibilities.
8. Allow students time to work in their small groups to explore the simulation. Have them keep track of the pathways they create in their science notebooks/journals. Suggest they follow a pathway for at least six stops.
9. Towards the end of the class period, pass back their water cycle models from the lesson before.
10. Give students time to update their models based on what they learned in the simulation. You might want to have students make their updates in a different colored pen so that you can easily tell what they added.
11. Collect the updated models to review/assess. Assessment: The updated models can be used for a formative assessment. Look at these and note any common misconceptions that students may have. A common error is that students think that water evaporates directly into clouds. Indicate to students if they need to revisit any part of the model from yesterday. Accommodations/Adaptations: Students will be working with partners or small groups. You can make accommodations by selecting the groups or partners. Also, you can provide additional scaffolding to individuals who need it while the rest of the class works independently. The names of the processes (evaporation, precipitation) are provided in the description box. This will help with second language learners and students who need other accommodations with language. Activity 3. Updating Students’ Water Cycle Models I-AIM Stage and Function: Explain Procedure: 1. Pass back students’ models from yesterday.
2. Start the class by having students share their updated models. Have the students
point out parts of their models that they added after using the online interactive model.
14
3. Allow students to add to their models if they learn any new parts of the water cycle after viewing other students’ models.
1. Show students the video on the water cycle from the National Science Foundation at https://www.youtube.com/watch?v=al-do-HGuIkn (6:46). Be sure to mention to students that not every single drop of water has always been here. H and O atoms can be combined into water molecules or broken apart and incorporated into other molecules during chemical processes such as photosynthesis and respiration. Also, mist and fog are not gaseous water. If you can see it, the water vapor has condensed to liquid water.
2. After viewing the video, discuss any parts of students’ models that they need to
correct or add to. You might want to create a “word wall” with the vocabulary introduced in the video. You can select which words you think students need to know and which words are nice to know (precipitation evaporation, condensation, transpiration [evapotranspiration], collection, stream flow, surface runoff, snow melt, interception, infiltration/percolation, groundwater discharge).
3. Allow time for students to make these revisions, Have students hand in their updated models.
Assessment: Again, the updated models can be used for a formative or summative assessment. Look at these and note any misconceptions that students may have. You may need to do a re-teach activity to individuals or small groups if students are missing major parts, such as evaporation, condensation, precipitation, transpiration and/or collection. If you are not using this as a summative assessment, you could have students share these with other students, having them critique or evaluate them. You will need to model appropriate ways to critique. Accommodations/Adaptations: You can provide support for second language learners and students with special needs by creating the word wall. You could provide a hard copy to these students that is edited that only includes the words that they have to know. Having the more difficult terms available on the board will still allow them the opportunity to use these terms if they choose. Activity 4. Using the Pathways Tool to Better Understand the Water Cycle (Part 1) I-AIM Stage and Function: Explore and Investigate Procedure: 1. Have the interactive model used in Activity 2 open on your computer.
http://oceanservice.noaa.gov/education/pd/oceans_weather_climate/media/watercyc
15
le.swf. If possible, you may want students to have access to the model as well, either in pairs or small groups.
2. Hand back students’ models. If you saw any areas of concern, these should be presented to the class to clear up any points that are not accurate.
3. If you had your students take notes about the pathways in Activity 2, you might want to have them get their notebooks/journals out.
4. Introduce the Pathways Tool by projecting it on the board and giving each student a double-sided copy.
5. Depending on the level of your students, you can use this tool in conjunction with the online model, their notes, or just from their memory.
6. Starting in the center of the Pathway Tool, have students decide where the water starts. For at least the first time using the tool, work together as a class to fill out the boxes.
7. Fill in the center box with the place the students suggest. If you want, you can select this in the online model so students can see the possible pathways.
8. Based on where water starts, say in a cloud, there are limited places the water can go next (atmosphere or precipitation). Select precipitation and have students fill in the next box (After). Students should write something like, “The water falls through the sky as precipitation.”
9. Continue filling out the next two boxes, either using the model or students’ notes.
10. Jump back to the center box, “Where is the water?” Have students suggest, using their notes what a logical pathway would be before it was at the center. This will be very difficult for some students. If you know that your students will struggle with this, make sure you don’t start with the first page on the model. Click at least three places before starting. That way you can use the back button to show students a pathway that moves backwards.
Activity 5. Using the Pathways Tool to Better Understand the Water Cycle (Part 2) I-AIM Stage and Function: Apply Procedure: 1. Once you have completed one Pathways Tool as a class, let students complete their
own Pathways Tool in pairs or small groups, either using the model or their notes.
16
2. Allow students to share their pathways with the class using the document camera.
3. If another student sees a pathway that they do not agree with, they can point this out. This will allow students an opportunity to practice their scientific argument skills. It helps if you give students sentence starters to help them tactfully disagree with someone. For example, you could have cards printed that say the following: “I don’t agree with your pathway when you said the water went from ______________ to ________________ because….” or “I don’t think that water can go from _______________ to _______________ because…” Students can then defend their claim (either one) using the online models as evidence.
4. Have students complete one Pathways Tool independently as either homework or an in class assignment. You will need to decide if you want them to do this with or without notes and/or the model. Have students turn this in.
5. Have students get out their water cycle model. Have them look these over, making corrections/updates after using the Pathways Tool. Students can present these to the class for review.
Assessment:
● You can use the homework/assignment as a formative assessment. Check to see that students are completing the Pathways Tool in a logical progression.
● You could use either a blank Pathways Tool or one that has the center box filled out as summative assessment later in the unit.
● The updated water cycle can also be used as either a formative or summative assessment.
Accommodations/Adaptations: Allowing students to use their notes or the model throughout the lesson will help students with special needs or second language learners. Encouraging students to rely on their memory or just their notes could accommodate your more advanced learners. Lesson Artifacts Blank copy of the water cycle (included in this lesson) Pathways Tool Bibliography/Sources Online water cycle model: NSTA Interactive: Water Cycle Pathways http://oceanservice.noaa.gov/education/pd/oceans_weather_climate/media/watercycle.swf Online video: The Water Cycle posted by the National Science Foundation https://www.youtube.com/watch?v=al-do-HGuIkn
17
Lesson 2: Looking Closer at Evaporation Grade Level: 6-8 Time Needed: 6-8 days Lesson Overview: Students will participate in a series of lessons that help them understand what happens to water as it evaporates. Driving Question: What causes water to evaporate and why does more water evaporate in some situations than in others? Ideal Response: When molecules at the surface of water gain enough energy, they are able to break away from other water molecules and change to water vapor. This process is known as evaporation. There are certain circumstances that will increase the evaporation rate, such as wind, temperature and surface area. Disciplinary Core Ideas MS-PS1-4: Develop a model that predicts and describes changes in particle motion, temperature, and state of a pure substance when thermal energy is added or removed. Statement: Emphasis is on qualitative molecular-level models of solids, liquids, and gases to show that adding or removing thermal energy increases or decreases kinetic energy of the particles until a change of state occurs. Examples of models could include drawings and diagrams. Examples of particles could include molecules or inert atoms. Examples of pure substances could include water, carbon dioxide, and helium. Crosscutting Concepts Scale, proportion and quantity: Time, space, and energy phenomena can be observed at various scales using models to study systems that are too large or too small to observe firsthand. System and System Models: Models can be used to represent systems and their interactions – such as inputs, processes and outputs – and energy, matter, and information flows within systems. Energy & Matter: Within a natural or designed system the transfer of energy drives the motion and/or cycling of matter. Cause and Effect: Cause and effect relationships may be used to predict phenomena in natural or designed systems.
18
Scientific Practices • Asking questions • Planning and carrying out investigations • Analyzing and interpreting data • Developing and using models
Learning Goals KNOWING
• Students will know that water needs energy (e.g. kinetic, thermal) to go from a liquid to a gas, which is known as evaporation.
• Students will know that evaporation occurs at or near the surface of water. • Students will learn that there are several factors that can affect the rate of
evaporation (e.g. temperature, amount of sunlight, wind, surface area, relative humidity).
DOING • Students will carry out an investigation to determine what factors cause and
affect evaporation. • Students will analyze and interpret data to determine what factors affect
evaporation. • Students will create a model of evapotranspiration.
Language Learning Goals
• Acquire and use accurate, grade-appropriate, general academic and domain-specific words and phrases; gather vocabulary knowledge when considering a word or phrase important to comprehension or expression.
• Interpret information presented in diverse media and formats (e.g., visual, quantitative, and oral) and explain how it contributes to a topic, text, or issue under study.
• Include multimedia components and visual displays in presentations to clarify information.
• Effectively engage in a range of collaborative discussions (one-on-one, in groups, and teacher-led) with diverse partners on grades 6-8 topics, texts, and issues, building on others’ ideas and expressing their own clearly.
Student Science Toolkits • Students are familiar with what happens to water when it boils, which is
connected to this lesson about evaporation. They can use this idea to help understand what is needed to make water evaporate.
• This lesson will build on students’ prior knowledge about water and the water cycle, especially the information they learned in the previous lesson about the water cycle.
Materials Each student will need:
19
• Science notebook or journal • Pencil • A copy of their water cycle from the previous lesson • Several copies of blank Drivers and Constraints Tool
Each pair of students (or small group) will need: • One computer with access to the Internet (or one teacher computer with Internet
access and a projection device) The class will need:
• Various containers for water (3 per group) • Graduated cylinders/beakers/measuring cups (these can be shared between
groups) • Ice water bath • Warming device (heater, heating pad) • Plastic bags • Potted plants (either 1 large for entire class or 1 medium plant per group) • Tape
Teacher will need: • Computer with Internet access and projection device • Document camera
Preparation 1. You will need to be sure that your computers can run the PhET simulation at
http://phet.colorado.edu/en/simulation/states-of-matter-basics. The programs on this site require Java, a free program that is available to download at https://www.java.com/en/
2. If your school’s bandwidth is not great or they block YouTube, you will want to download the following videos before Activity 4: http://www.youtube.com/watch?v=6anMpNZYpe0 http://www.youtube.com/watch?v=K1E7LFUf5zs https://www.youtube.com/watch?v=wDYOtu6npNU https://www.youtube.com/watch?v=4765Sg2mKco
3. You will need plants for Activity 5: Evapotranspiration. Depending on your resources, this can be done with one large plant to be viewed/used by the whole class, or several smaller plants (1-2 per group). You will need to place either a large branch with multiple leaves or a smaller plant in a plastic bag that is sealed shut with tape. The plant will need to sit for at least 24 hours for the best results. Make sure the plant(s) are well watered. You will want either a similar plant or part of the same plant that is not in a plastic bag for comparison. The leaves in the plastic bag will transpire and release water into the bag. The leaves that are not in the bag will remain dry (they will release water into the atmosphere).
Safety When using the heating pad or warm water baths, you will need to be sure that they are located in a safe place where they won’t be disturbed
20
Activities Activity 1: What Causes Evaporation? I-AIM Stage & Function: Question Procedure: 1. Remind students of the water cycle that they have been working with for the last
several days. Using a document camera, project one example of a water cycle on the board. Point out where evaporation is taking place within that model.
2. In their notebook or science journal, ask students to explain what they think causes water to evaporate. Allow time for students to work on their answers. They should share these either in pairs or small groups. Encourage students to add to or change their answers if someone in their group mentions something they did not think about.
3. Share these answers with the whole class.
4. Make a list of the proposed ideas on the board or a large piece of paper. Keep this list for the next activity.
Assessment: Use the answers students generate as a formative assessment. You are only accessing prior knowledge at this point to indicate where students have sound scientific ideas and where they may have naïve understanding. Accommodations/Adaptations: Since you are only accessing prior knowledge, you really don’t have to worry about accommodations too much. Having access to the models that they created in the prior lesson will help second language learners and those students who still may be struggling with the concept of the water cycle. Activity 2: Designing Experiments to Find the Causes of Evaporation I-AIM Stage and Function: Explore and Investigate NOTE: This lesson can be adapted to the constraints of your classroom. It can be stretched out for several days or done over a minimum of two days. You can limit the number of variables tested depending on your resources and room size. Procedure: 1. Using the list of possible causes of evaporation, tell students that they are going to
be planning and carrying out several investigations to determine which of the factors listed on the board cause evaporation. Note: You can limit students’ choices here by circling only the factors that are relevant or ones for which you have materials.
21
2. Depending on the experience of your students with planning their own investigation, you might want to model how to do this using temperature (thermal energy or heat) as the example. If your students have a great deal of experience with this already skip to step 11.
3. Tell students that you are going to create an investigation together that tests if different temperatures affect evaporation.
4. Explain that they need to come up with a question that will reflect what we are going to test. Either have students make suggestions or just model the correct question.
5. Using their science notebook/journal, have them write down the question or problem: How does temperature affect evaporation?
6. Have students write down a prediction and explanation. Encourage them to discuss this with their groups.
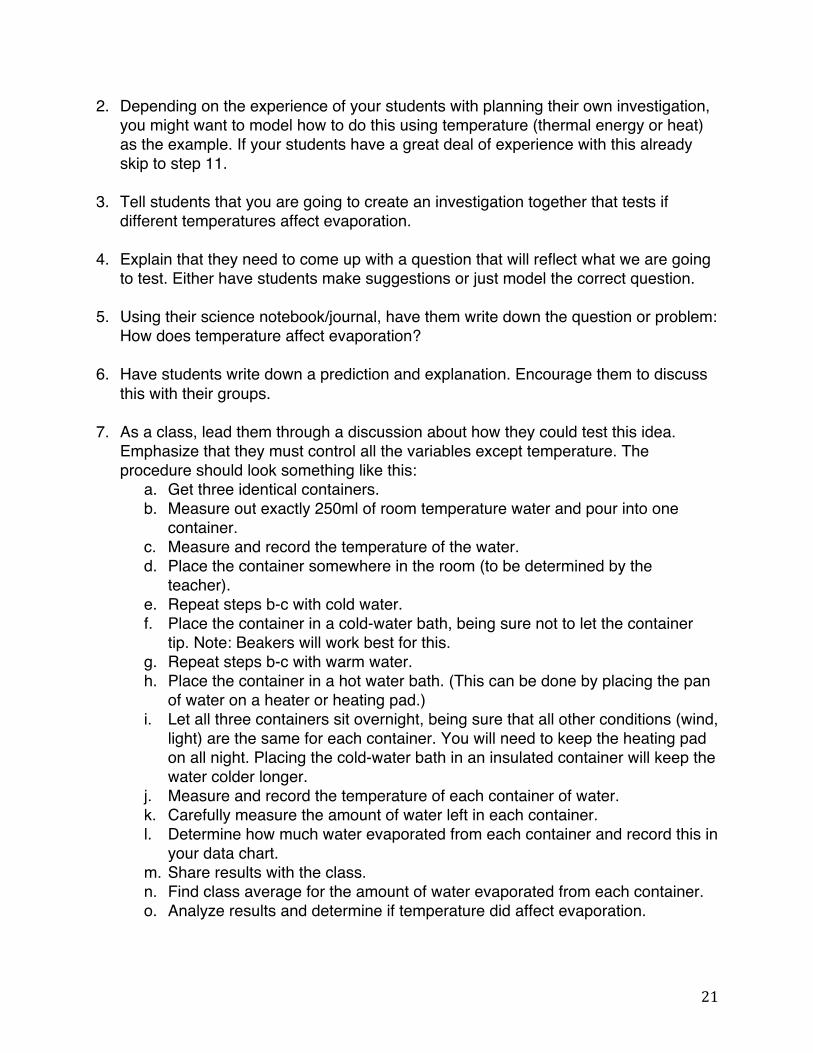
7. As a class, lead them through a discussion about how they could test this idea. Emphasize that they must control all the variables except temperature. The procedure should look something like this:
a. Get three identical containers. b. Measure out exactly 250ml of room temperature water and pour into one
container. c. Measure and record the temperature of the water. d. Place the container somewhere in the room (to be determined by the
teacher). e. Repeat steps b-c with cold water. f. Place the container in a cold-water bath, being sure not to let the container
tip. Note: Beakers will work best for this. g. Repeat steps b-c with warm water. h. Place the container in a hot water bath. (This can be done by placing the pan
of water on a heater or heating pad.) i. Let all three containers sit overnight, being sure that all other conditions (wind,
light) are the same for each container. You will need to keep the heating pad on all night. Placing the cold-water bath in an insulated container will keep the water colder longer.
j. Measure and record the temperature of each container of water. k. Carefully measure the amount of water left in each container. l. Determine how much water evaporated from each container and record this in
your data chart. m. Share results with the class. n. Find class average for the amount of water evaporated from each container. o. Analyze results and determine if temperature did affect evaporation.
22
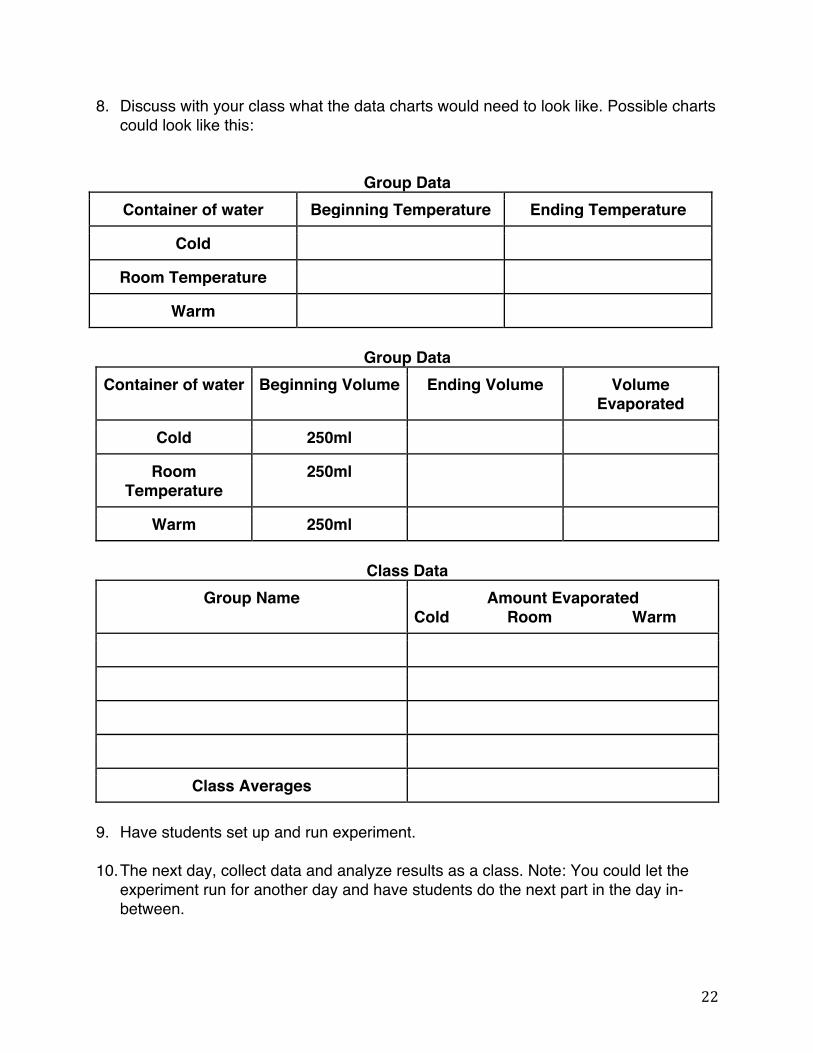
8. Discuss with your class what the data charts would need to look like. Possible charts could look like this:
Group Data Container of water Beginning Temperature Ending Temperature
Cold
Room Temperature
Warm
Group Data Container of water Beginning Volume Ending Volume Volume
Evaporated
Cold 250ml
Room Temperature
250ml
Warm 250ml
Class Data Group Name Amount Evaporated
Cold Room Warm
Class Averages
9. Have students set up and run experiment.
10. The next day, collect data and analyze results as a class. Note: You could let the experiment run for another day and have students do the next part in the day in-between.
23
11. Have students select a different variable to test. For simplicity sake, you might want to limit their options to light, wind and surface area. If students select light as an option to test, they will need to place one container under a strong light source and another near it, but shaded to keep the room temperature similar. The container in the light will get warmer because it is absorbing light energy and transferring it to thermal. Students should discover this during their experiment.
12. You can group students in predetermined groups and allow them to reach a consensus on what to test or allow them to form groups based on the variable they want to test. Either way, have the groups go through a similar process as described above to design their investigation. It is highly suggest that you have students check with you each step of the way.
13. Once students have come up with an acceptable plan, allow them to carry it out and
gather data. 14. Have students report their results and conclusions to the class. Assessments: You can assess one or both of the lab write ups, looking for things like completeness, accuracy and the validity of their conclusions. Accommodations/Adaptations: Depending on the level of your students, you can offer a variety of options for scaffolding. For students who are really struggling with written language, you could give them a blank lab sheet that they would only have to fill in. If electronic copies are available, you could give them an electronic copy, which they could edit to fit their needs on the second investigation. Activity 3: Using a Model to Understand Evaporation I-AIM Stage and Function: Explore and Investigate Procedure: 1. Review students’ findings from yesterday. Bring students back to the original
question of what causes water to evaporate. Have students summarize what they think could be the cause based on all the different experiments that they saw. Share these ideas with the class.
2. Explain to students that they will be using a mathematical model or computer simulation to explore what happens to the molecules of water as it is heated and cooled.
24
3. Break students into either pairs or groups of three depending on the number of computers you have. This can be done as a whole class lesson if individual computers are not available.
4. Have students get on the PhET website and open the States of Matter interactive at http://phet.colorado.edu/en/simulation/states-of-matter-basics. I would use the basic simulation for this activity. The default upon opening is for solid Argon.
5. Have students set the simulation for solid water.
6. You can have students proceed in a variety of ways. This can be done as a whole class activity with you leading students through the exploration, or you can have students work in pairs or small groups. You can give them just a basic prompt, such as, “As you explore this simulation, pay attention to how adding heat affects the molecules of water.” Or you could provide them with a worksheet that will guide them a little more. An example of a worksheet with answer key follows this lesson.
7. After students have had sufficient time to explore the simulation, have them write an explanation for how thermal energy or heat causes evaporation. These should be turned in to the teacher.
Assessment: You could use both the worksheet and their written explanation as a formative assessment. When looking at the written explanations, avoid “correcting” these. Ask questions and make comments where necessary, but mostly just note where students are in their understanding. Be sure that you take notes so that when it is time for the formal explanation, you know what areas students are still struggling with. Accommodations/Adaptations: Using the worksheet will help guide those students who need a little more direction. Students who need little guidance could work with just a prompt and write their findings in their notebooks. The whole class option could be used with younger grades or with students who are new to science inquiry.
25
Name ______________________
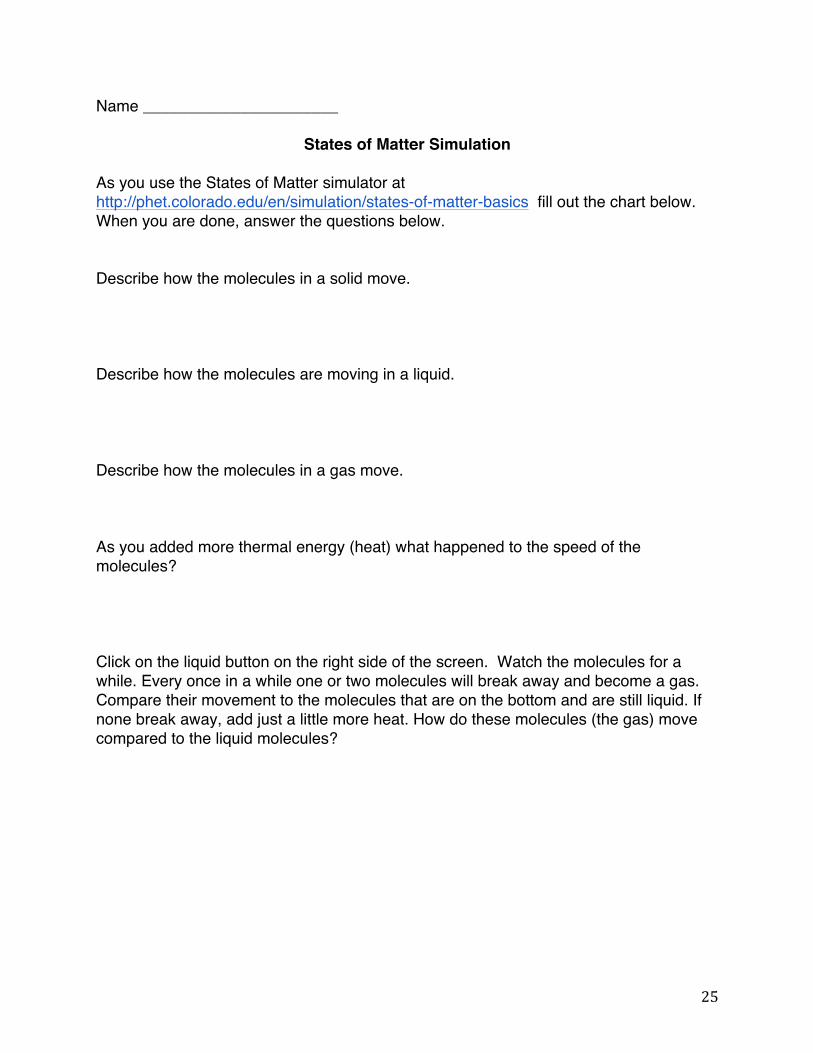
States of Matter Simulation As you use the States of Matter simulator at http://phet.colorado.edu/en/simulation/states-of-matter-basics fill out the chart below. When you are done, answer the questions below. Describe how the molecules in a solid move. Describe how the molecules are moving in a liquid. Describe how the molecules in a gas move. As you added more thermal energy (heat) what happened to the speed of the molecules? Click on the liquid button on the right side of the screen. Watch the molecules for a while. Every once in a while one or two molecules will break away and become a gas. Compare their movement to the molecules that are on the bottom and are still liquid. If none break away, add just a little more heat. How do these molecules (the gas) move compared to the liquid molecules?
26
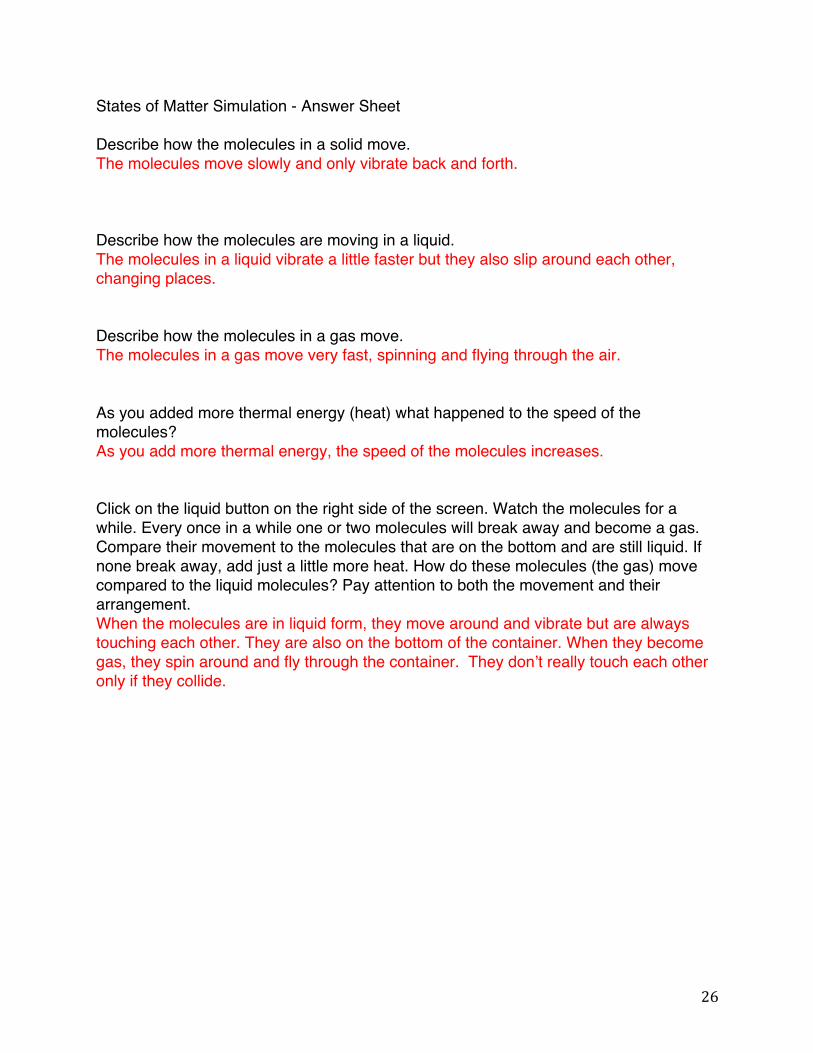
States of Matter Simulation - Answer Sheet Describe how the molecules in a solid move. The molecules move slowly and only vibrate back and forth. Describe how the molecules are moving in a liquid. The molecules in a liquid vibrate a little faster but they also slip around each other, changing places. Describe how the molecules in a gas move. The molecules in a gas move very fast, spinning and flying through the air. As you added more thermal energy (heat) what happened to the speed of the molecules? As you add more thermal energy, the speed of the molecules increases. Click on the liquid button on the right side of the screen. Watch the molecules for a while. Every once in a while one or two molecules will break away and become a gas. Compare their movement to the molecules that are on the bottom and are still liquid. If none break away, add just a little more heat. How do these molecules (the gas) move compared to the liquid molecules? Pay attention to both the movement and their arrangement. When the molecules are in liquid form, they move around and vibrate but are always touching each other. They are also on the bottom of the container. When they become gas, they spin around and fly through the container. They don’t really touch each other only if they collide.

27
Activity 4: The Cause of Evaporation I-AIM Stage and Function: Explain Procedure: 1. Pass back students’ explanations. 2. Have students get into different small groups than the ones they worked in yesterday
while using the PhET simulation. Have them share the explanations that they developed in yesterday’s lesson to their new groups, allowing them to make changes as they discuss. You could arrange the groups in such a way that students that have a deeper understanding are with those who do not.
3. Share these ideas as a class.
4. Tell students that they are going to watch two short videos that explain evaporation. Tell them to watch the video and pay attention to any similarities and differences between their explanation and the ones given in the video.
5. Show the video How Does a Liquid Become a Gas? at http://www.youtube.com/watch?v=K1E7LFUf5zs and Eureka! Episode 18, Evaporation and Condensation, at https://www.youtube.com/watch?v=wDYOtu6npNU.
6. After watching the movies, discuss any areas for which their explanations of evaporation were different than the one presented in the videos.
7. Ask students where the energy for evaporation comes from outside of our classroom. Students should give examples such as the thermal energy from the air, radiant energy from the sun, energy from the wind. This will help connect the results of the other experiments that students completed.
8. Just for fun, show them the video of water evaporating and then almost immediately condensing in super slow motion (Water Evaporation in Mid-air in Super Slow-Motion) at http://www.youtube.com/watch?v=6anMpNZYpe0.
9. Have students update their explanation and hand this in for an assessment.
10. Introduce the Drivers and Constraints Tool.
11. Talk about what the drivers for evaporation would be (thermal energy, radiant or light energy) and the constraints (things that would speed up or slow down evaporation). Connect this to the labs that they did in Activity 2. Some of the possible constraints would be temperature, wind, amount of water, surface area.
28
12. Using the surface of a lake as a starting point, work with students to fill out one Drivers and Constraints tool.
13. Working with a partner, have them complete several drivers and constraints with evaporation as the process.
14. Students should share these with the class (document camera), allowing others to comment on their tool. Try to pick examples where students show evaporation occurring in unusual places, such as when it is raining.
15. After students are done sharing, ask them to answer the original driving question; what causes evaporation (driver) and what can make it evaporate faster or slower (constraints)? Have them compare this to their original answer. Discuss.
Assessment: Have students update their explanation after watching the video clips and having the class summative assessment discussion. You can use their updated explanations as a formative assessment if you’d like. Use the completed Drivers and Constraints tool as a formative or summative assessment. Accommodations/Adaptations: Having students grouped in such a way that the more accomplished learners are with students who are having difficulty at the beginning of class will help students construct better explanations. Activity 5: Evapotranspiration I-AIM Stage and Function: Apply Note: You will need to have plants setup in advance for this lesson (see Preparation instructions). As mentioned earlier, this can be done with just one large plant that the whole class uses, or with as many as two small plants per group. Procedure: 1. Have students view the plastic bag around the leaves of the plant. They should
notice that there is some water inside of the bag. They should also check to see if the leaves that are not bagged are wet.
2. Have students discuss in their small groups how they think the water got into the bag. As a class, list these ideas on the board.
3. If no one suggests transpiration or even if they do, remind students of the water cycle. Show the video clip that was used in Lesson 1, Activity 3, (specifically: 4:50-5:45) to remind students what transpiration is.
29
4. Have students again discuss in their small groups what they think is happening in
the bag. Why is there water in the bag?
5. Have students create a model that explains their understanding of evapotranspiration. They should include why they think it turns back into liquid in the bag.
6. Have students predict what effect increased temperature, light and/or wind will have on evapotranspiration. They should write their ideas below their models. You might want to remind them of what happened in their experiments when you increased the temperature, amount of light and/or wind.
7. Have students share their ideas in small groups and with the class using the document camera.
8. Watch the 4 minute video, Weather Wise: Evapotranspiration at https://www.youtube.com/watch?v=4765Sg2mKco. Unlike many videos that focus on what is happening inside the plant (which is not the focus of this unit), this one focuses on how transpiration affects the atmosphere. I do have to caution you that the meteorologist is quite attractive, which may distract some viewers.
9. After watching the video, have students update their models to include the information in the film.
10. Have students hand in their updated models.
11. Have students get out their water cycle models from Lesson 1. Have students locate where evaporation and evapotranspiration are taking place in their model.
Assessment: Students’ updated models can be used as either a formative or summative assessment. Accommodations/Adaptations: Creating a word wall for all the drivers and constraints will help students who struggle with language. Having students work in pairs, especially ones that you preselect, will help less able learners. Lesson Artifacts Students will need their water cycles that they created in Lesson 1 Potentially a pre-written lab for struggling students or second language learners (See Activity 2)
30
Potentially a States Of Matter Simulation Sheet (see Activity 3) Blank Drivers and Constraints Tool Bibliography/Sources
● PhET simulation, States of Matter, found at http://phet.colorado.edu/en/simulation/states-of-matter-basics
● How Does a Liquid Become a Gas? at http://www.youtube.com/watch?v=K1E7LFUf5zs
● Eureka! Episode 18, Evaporation and Condensation, at https://www.youtube.com/watch?v=wDYOtu6npNU
● Water Evaporation in Mid-air in Super Slow-Motion at http://www.youtube.com/watch?v=6anMpNZYpe0
Weather Wise: Evapotranspiration at https://www.youtube.com/watch?v=4765Sg2mKco
31
Lesson 3: Condensation Grade Level: 6-8 Time Needed: 4-5 days Lesson Overview: The focus of this series of activities is for students to gain a deeper understanding of the process of condensation, factors that affect the rate of condensation, and how condensation plays a role in the water cycle, including the multiple pathways that lead to condensation of water. Driving Question: What is condensation and why does it happen? Ideal Response: Condensation is the reverse of evaporation and occurs when water vapor molecules cool, slow down and join together, changing states back into a liquid from a gas. Disciplinary Core Ideas MS-ESS2-4 Develop a model to describe the cycling of water through Earth’s systems driven by energy from the sun and the force of gravity. Crosscutting Concepts Scale, proportion and quantity: Time, space, and energy phenomena can be observed at various scales using models to study systems that are too large or too small System and System Models: Models can be used to represent systems and their interactions – such as inputs, processes and outputs – and energy, matter, and information flows within systems. Energy & Matter: Within a natural or designed system the transfer of energy drives the motion and/or cycling of matter. Scientific Practices
• Developing models • Engaging in argument from evidence • Obtaining, evaluating and communicating information
Learning Goals KNOWING • Students will know that condensation occurs when thermal energy is removed;
molecules slow and collect, changing states from a gas to a liquid. • Students will know that condensation increases when temperature decreases. • Students will identify where condensation occurs within the water cycle (e.g., on a
glass, in a cloud, as dew on grass, etc.). DOING
• Students will be able to investigate variables that increase condensation.
32
• Students will engage in scientific argumentation. • Students will obtain, evaluate and communicate information.
Language Learning Goals
• Acquire and use accurate, grade-appropriate general academic and domain-specific words and phrases; gather vocabulary knowledge when considering a word or phrase important to comprehension or expression.
• Interpret information presented in diverse media and formats (e.g., visual, quantitative, and oral) and explain how it contributes to a topic, text, or issue under study.
• Include multimedia components and visual displays in presentations to clarify information.
Student Science Toolkits Students have experience with condensation in their everyday life. They have all observed water collecting on the outside of a cold drink on warm day, fogging up windows, and dew that occurs outside, but may not be familiar with the vocabulary or the processes that cause condensation to occur. Materials Each student will need:
• Science notebook or journal to record initial ideas and observations • Pencil • Copies of the Pathways Tool • Copies of the Drivers and Constraints Tool
Each pair of students (or small group) will need: • Four clear plastic cups (two that are slightly smaller and will slide into larger cups • Large Ziploc bag (large enough to insert cups) • Two to three ice cubes • Access to hot tap water • Eyedropper • Small beakers for measuring condensation • Magnifying glass
Preparation 1. Review students’ previously completed Pathways Tools and information from Water
Cycle Big Picture lesson. 2. Print enough copies of the Pathway tool for each of your students to have two. 3. Familiarize yourself with the condensation experiments at
www.middleschoolchemistry.com/lessonplans/chapter2/lesson3 4. Gather student group lab materials (recommend two to three students per group). 5. Prepare way for students to respond to formative assessment question (document
camera, projector or student copies/lab notebooks).
33
6. Test and view PHET states of matter simulation at http://phet.colorado.edu/en/simulation/states-of-matter-basics
7. Test and view Bill Nye video clip on condensation and clouds at https://www.youtube.com/watch?v=hehXEYkDq_Y
Activities Activity 1: What is Condensation? I-AIM Stage & Function: Question Procedure: 1. Ask students to consider if they have experienced any of the following:
• The outside of a glass with lemonade getting wet when they drink it outside on a hot summer day.
• The inside of a window “fogging” up in wintertime. • Their glasses “fogging” up when they come inside to an air-conditioned room
after being outside in the summer.
2. Ask students to draw a picture and write an explanation about why they think one of the above situations occurs in their science notebook. Allow students adequate time to individually respond to the question posed. Circulate around the room to monitor students’ work. This will allow you to get a general idea of where your students are in their understanding of this concept.
3. Setup the document camera.
4. When students are done, either ask for volunteers or call on students that you noticed had legible models to present.
5. Have students explain their models to the class using the document camera.
6. Comment on particular parts of students’ models that demonstrate understanding. Collect students’ models so that you can look at each student’s work.
Assessment: The models that students create are a formative assessment of their prior knowledge. You should look these over to see areas of misconceptions or naïve understanding. It will also allow you to see which students have ideas about the molecular level of changes of state. Accommodations/Adaptations: • A basic drawing labeling one of the above situations can be used with students who
may need additional support/scaffolding. Additional prompting of other situations in which condensation occurs may also be beneficial to help students without much
34
background experience get started (e.g., dew on the grass in the morning, a mirror “fogging” up when showering, etc.).
• Students who already have a strong basic understanding of water in the air collecting can be prompted to consider why this occurs. (e.g., Where does the water come from? What causes it to condense?).
• Since this is an assessment of prior knowledge, spelling and vocabulary are not to be counted against students, so second language learners and students with special needs don’t necessarily need additional support at this time.
Activity 2: Exploring Condensation I-AIM Stage and Function: Explore and Investigate Procedure: 1. Distribute the following materials to each group of students (recommend students
work in pairs or groups of three): four clear plastic cups, eight to ten ice cubes, large Ziploc bag, magnifying glass.
2. Instruct students to get out their lab notebooks and create spaces to draw a picture of the experiment set up and record observations as they conduct the following experiment.
3. Students need to add an equal number of ice cubes to each of the slightly larger cups and then invert the smaller cups on top of each creating a mostly sealed environment. They need to quickly take one set of cups, put them into the Ziploc bag, get most of the air out of it and seal it. Allow students to draw a picture of their experiment and record observations about each cup set up for five to ten minutes.
4. Have students share their observations and ideas with at least one other group. Have students consider the following questions, keep in mind they should be able to support their ideas with evidence from their observations. • Does one of the cups have more moisture or water on the outside of it? If so,
which one? • Why do you think this happened? • Where do you think the water on the outside of the cup(s) came from? Why?
5. Have students revisit their initial ideas to the questions from yesterday’s activity and have them add to, change and update their ideas on what is occurring. Have groups of students share out, using the document camera, to explain, compare and contrast various ideas of the class. It may be useful to keep one class list of the various pieces of evidence and explanations that each group presents that can then be revisited later. Be sure to encourage students to provide evidence when giving their own explanations or challenging the explanations of other groups.
35
Assessment: The updated models can be used for a formative assessment. Look at these and note any common misconceptions that students may have. A common error is that students think that water seeps through the plastic gathering on the outside. Students should be able to discount this misconception by providing evidence that if this were true there should be water on the outside of both cups. Accommodations/Adaptations: Students will be working with partners or small groups. You can make accommodations by selecting the groups or partners. Also, you can provide additional scaffolding to individuals who need it while the rest of the class works independently. This may include pointing out some of the first basic observations students will be making or helping students identify variables that are different between the two situations to get them started. Activity 3: Water Molecules and Condensation I-AIM Stage and Function: Explain Procedure: 1. Have students revisit their ideas from the previous investigation and what they
provided as claims to what occurred and their reasoning.
2. Show students the short Bill Nye video clip on condensation at: https://www.youtube.com/watch?v=hehXEYkDq_Y Afterwards, have students discuss the following questions: • Where does the water that ends up on the outside of the cup come from? • Why doesn’t the cup in the bag get condensation on the outside of it? • What does the water vapor need in order to condensate? • How does the water get in the air in the first place?
3. Discuss students’ ideas to the above questions. Provide more information about how water gets into the air as water vapor (previous lesson on evaporation should be referenced) including everyday activities such as cooking, breathing, showering, etc.
4. Visit the simulation on states of matter (use the actual water molecules) to help further explain what happens at the molecular level at: http://phet.colorado.edu/en/simulation/states-of-matter-basics This should help students further relate that as molecules receive more thermal energy they move faster and farther apart as a gas and as they cool (thermal energy is removed) they slow and get closer together turning into a liquid.
5. Have students either modify their original drawing and description or recreate it explaining what condensation is and how it occurs. Have students who have a
36
strong understanding of the concept, including the basic molecular level, share their ideas with the class to help reinforce the initial situations that were considered after all drawings have been collected.
Assessment: Again, the updated models can be used for a formative or summative assessment. Look at these and note any misconceptions that students may still have. You may need to do a re-teach lesson to individuals or small groups if students are missing major parts. If you are not using this as a summative assessment, you could have students share these with other students, having them critique or evaluate them. You will need to model appropriate ways to critique. Accommodations/Adaptations: You can provide support for second language learners and students with special needs by creating a word wall. You could provide an edited hard copy to these students that only includes the words that they have to know. Having the more difficult terms available on the board will still allow them the opportunity to use these terms if they chose. Activity 4: Rates of Condensation I-AIM Stage and Function: Explore and Investigate Procedure: 1. Provide each group of students (recommend pairs or groups of three) with the
following materials: two clear plastic cups (same as one set from previous investigation), access to hot water, five to ten ice cubes, magnifying glass, eyedropper, small beaker.
2. Have students set up a spot in their science notebook to draw a diagram of their experiment, a place to record qualitative observations, and a data table to record the number of ice cubes used and the amount of condensation collected. As a driving question, ask students what variables they think affect the rate of condensation. Lead them to thinking about how temperature will affect condensation rates.
3. Instruct students to begin by putting ½ cup of hot water into the larger cup and then placing the smaller cup, inverted, over the top and to time it for two minutes. While timing it, students should record qualitative observations in their notebook. After the time is up, students should carefully move the cups over their beaker, and use their fingers and the eyedropper to collect as much of the condensed water into the beaker as possible so the amount can be measured in milliliters.
4. Have students repeat the process in step 3 but adding one ice cube to the top of the cup (on the outside top) each time until they have done it with at least three ice
37
cubes and feel they have enough data to answer the question and provide evidence to support their claim.
5. Have students share their data with the class compiling one large data table. The data should support that increased cooling increases the rate of condensation and the amount of condensation created in the two-minute test periods.
Activity 5: Using the Pathways Tool to Identify Examples of Condensation and the Drivers and Constraints Tool to Explain Condensation I-AIM Stage and Function: Apply Procedure: 1. Students will need to refer to the Pathways Tool they created in previous lessons.
Have them review the water cycle and places they have identified evaporation occurring.
2. Now ask students to identify places within the water cycle and on a new Pathways Tool that show the concept of condensation occurring as water travels along a particular path. Students should come up with examples of water vapor collection forming clouds and various forms of precipitation and dew due to a decrease in temperature and the collection of water vapor that has already accumulated in the air due to evaporation.
3. Review the Drivers and Constraints Tool.
4. Talk about what the drivers for condensation would be (removal of thermal energy) and the constraints (things that would speed up or slow down condensation, e.g., lack of sunlight). Connect this to the labs that they did in previous activities. Some of the possible constraints would be temperature, wind, amount of water vapor in the air, condensation nuclei.
5. Using the formation of clouds as a starting point, work with students to complete one Drivers and Constraints Tool.
6. Working with a partner, have them complete several drivers and constraints with condensation as the process (examples could include dew on the grass, condensation on windows, condensation on outside of glasses, frost, etc.)
7. Students should share these with the class (document camera), allowing others to comment on their tool. Students should also expand on their initial ideas connecting why condensation occurs where it does and when it does. For example, dew on the grass after a cool night.
38
Assessment:
● You can use the homework/assignment as a formative assessment. Check to see that students are completing the pathway in a logical progression.
● You could use either a blank Pathways Tool or one that has the center box filled out as summative assessment later in the unit.
Accommodations/Adaptations: Allowing students to use their notes or the model throughout the lesson will help students with special needs or second language learners. Encouraging students to rely on their memory or just their notes could accommodate your more advanced learners. A partially completed Pathways Tool could also assist students who struggle to begin the task. Lesson Artifacts Copy of the water cycle previously completed in lessons Pathways Tool Online videos cited previously Drivers and Constraints Tool Bibliography/Sources Middle School Chemistry Website: Changing States – Condensation: http://www.middleschoolchemistry.com/lessonplans/chapter2/lesson3 Online water Colorado State University Simulation: States of Matter: http://phet.colorado.edu/en/simulation/states-of-matter-basics Online video: Bill Nye Water Cycle: https://www.youtube.com/watch?v=hehXEYkDq_Y
39
Lesson 4: Substances Moving with Water Grade Level: 6-8 Time Needed: 6-7 days Lesson Overview: The focus of this series of lessons is for students to gain a deeper understanding of substances that can mix and/or dissolve into water (i.e., forming either a suspension or a solution) and how substances move within the water cycle. Driving Question: Why do substances move or not move with water within the water cycle? Ideal Response: There are multiple ways in which substances can move with water in the water cycle. This depends on a number of variables including whether a heterogeneous mixture (e.g., a suspension such as sand and water) or a homogenous solution (e.g., an evenly dispersed and dissolved solution such as salt and water) is created. Suspensions can be separated through basic filtration whereas homogenous solutions cannot be separated through filtration and instead can be separated through distillation (evaporation or freezing). Disciplinary Core Ideas MS-ESS2-4. Develop a model to describe the cycling of water through Earth’s systems driven by energy from the sun and the force of gravity. Crosscutting Concepts Scale, proportion and quantity: Time, space, and energy phenomena can be observed at various scales using models to study systems that are too large or too small System and System Models: Models can be used to represent systems and their interactions – such as inputs, processes and outputs – and energy, matter, and information flows within systems. Energy & Matter: Within a natural or designed system the transfer of energy drives the motion and/or cycling of matter. Scientific Practices
• Developing models • Engaging in argument from evidence • Obtaining, evaluating and communicating information
Learning Goals KNOWING
• Students will identify the differences between suspensions and solutions made with water.
40
• Students will know that suspensions can be separated through filtration and solutions can be separated through distillation.
• Students will identify when suspensions and solutions can be separated when water travels through various paths through the water cycle (i.e. evaporation).
DOING: • Students will be able to conduct experiments on filtration and distillation. • Students will engage in scientific argumentation. • Students will obtain, evaluating and communicate information. • Students will create various Tracing Mixtures tools to identify the separation of
suspensions and solutions within the water cycle. Language Learning Goals
• Acquire and use accurately grade-appropriate general academic and domain-specific words and phrases; gather vocabulary knowledge when considering a word or phrase important to comprehension or expression.
• Interpret information presented in diverse media and formats (e.g., visually, quantitatively, and orally) and explain how it contributes to a topic, text, or issue under study.
• Include multimedia components and visual displays in presentations to clarify information.
Student Science Toolkits Students have experience with water in their everyday life. They have all watched it rain/snow, experienced evaporation and condensation, but may not be familiar with the vocabulary or the drivers that make water move. Materials Each student will need:
• Science notebook or journal (or paper to draw their model on) or blank water cycle picture
• Pencil • Previously completed Pathways Tool • Three to four copies of Tracing Mixtures Tool for each pair of students • Tracing Mixtures Card sets per every two students (optional) • One computer per at least every two students • Articles on the history of your local watershed (optional if research by students is
not feasible) • Fertilizer Formative Assessment handout – one copy per student
Each pair of students (or small group) will need: • Four plastic cups • One large bowl • Saran wrap (enough to cover large bowl) • Small rock • 1/8 cup salt
41
• 1/8 cup cooking oil • Food coloring (3-4 drops) • Access to a freezer • ½ cup sand • Coffee filters (3-4)
Preparation 1. Familiarize yourself with separation methods and vocabulary related to mixtures at:
http://www.teachengineering.org/view_lesson.php?url=collection/cub_/lessons/cub_mix/cub_mix_lesson3.xml
2. If you are using a document camera to share students’ models, be sure that the needed software is loaded and that the camera works.
3. Familiarize yourself with the following video on suspensions and solutions: https://www.youtube.com/watch?v=pnpmPDa3tbM
Activities Activity 1: What is a Suspension and a Solution? I-AIM Stage & Function: Question Procedure: 1. Ask students to think about what they know/remember about mixing things together.
Some examples you might get them started off with include: making chocolate milk, making cereal with milk, making lemonade with powder. Ask students to write down what they think a suspension is and what a solution is and if they think there are any differences? Ask students to list other examples that fit their definition of suspensions and solutions. It is optional to have one example of each prepared and ready to mix to help support the discussion (perhaps chocolate milk for solution and some cereal and milk for suspension).
2. Allow students adequate time to respond to the initial prompt. Then ask students to share out their ideas and help point out some of the similarities and differences that students have about each, including some of the examples that they share. Then introduce the driving question: Why do substances move or not move with water within the water cycle?
3. Create two mixtures, one solution and one suspension (e.g., chocolate milk vs. cereal and milk). Ask students to write down what some similarities and differences they observe about these two examples might be. Next, ask students to write down ways in which they think these mixtures could be separated back into their original parts.
42
4. After giving students adequate time to write down their personal responses, again have them share out and record some of their additional ideas on large paper to come back to after their investigation.
Assessment: The responses that students create are a formative assessment of their prior knowledge. You should look these over to see areas of misconceptions or naïve understanding. This can be done through the class discussion, looking at students’ journals and going to each group during the investigation to further gather information about students’ ideas. Accommodations/Adaptations: Since this is an assessment of prior knowledge, spelling and vocabulary are not to be counted against students, so second language learners and students with special needs don’t necessarily need additional support at this time. Allowing students to think-pair-share will allow students who have limited background knowledge an opportunity to hear and consider ideas from other students. Activity 2: Exploring Mixtures I-AIM Stage and Function: Explore and Investigate Procedure: 1. Give the following materials to each group of students (recommend pairs or groups
of three: • 4 large plastic cups for creating mixtures • 4 smaller cups or bowls • 4 larger bowls • Saran wrap (enough to cover each bowl) • Small rock • 1/8 cup salt • 1/8 cup cooking oil • Food coloring (3-4 drops) • Access to a freezer • ½ cup sand • Coffee filters (3-4)
2. Instruct students to create the following four mixtures each with 1 – 1.5 cups of water
• Three to four drops of food coloring • ½ cups sand • 1/8 cup of cooking oil • 1/8 cup salt
43
3. Students will test separating each of the above four mixtures using the following processes. They should record their observations in a data table in their lab notebooks.
Filtration: Have students stir and then pour ¼ cup of each mixture through a coffee filter. (Students should find this separates the sand/water and oil/water suspensions but not the other solutions). Distillation: Have students pour ¼ cup of each mixture into larger bowls, then place empty smaller cup/bowl inside of larger bowl, cover each entirely with Saran wrap, and place a small rock over the center of smaller empty cup/bowl to create a way for the evaporating water to collect and drip into empty cup. Place in a warmer area or under a heat lamp to increase the rate of evaporation and distillation. (Students should find that this separates all the mixtures – solutions and suspensions - although it is not necessary for the sand and oil mixtures since the filtration method worked for them as well). Freezing: Have students freeze the leftover mixtures in each cup for a few hours. They should find that when frozen, each mixture also separates. 4. Have students share the data they have gathered and discuss why they think the
coffee filter method only worked for the sand and oil. Lead students to the idea of how suspensions and solutions are different. Mixtures in suspension can be separated through basic filtration while solutions cannot.
Assessment: Collect students’ data tables to assess completion of the investigation and identify whether they have obtained accurate results. Accommodations/Adaptations: Students will be working with partners or small groups. You can make accommodations by selecting the groups or partners. Also, you can provide additional scaffolding to individuals who need it while the rest of the class works independently. Activity 3: Suspensions & Solutions In Your Watershed I-AIM Stage and Function: Explain Procedure: 1. Show students the following video on mixtures and solutions:
https://www.youtube.com/watch?v=pnpmPDa3tbM
2. Have students go back and re-evaluate their initial ideas on mixtures including suspensions and solutions. Have students create a list of several new examples of
44
suspensions and solutions, which are both types of mixtures. Have students identify why each examples is placed into the suspension or solution category and have students identify how each type can be separated.
3. Have students begin investigating the history of your local watershed. Highlights you might want to lead them to may include things such as: mining; agriculture; construction of residential, commercial and transportation related structures; dams; and any other various topics that either have or are currently affecting the watershed.
4. Have students investigate how the above topics affect water quality. Things to include in their research may be: phosphates (often from detergents), nitrates (often from fertilizers), sediments (due to erosion), and other substances that can get mixed into the water. Also help students identify which substances form a suspension or solution with water.
Assessment: Collect students’ lists of suspensions and solutions to further identify whether students are understanding the definition of each and how each can be separated. Collect students’ research on history and pollution of your local watershed. Accommodations/Adaptations: Students will be working with partners or small groups. You can make accommodations by selecting the groups or partners. Also, you can provide additional scaffolding to individuals who need it while the rest of the class works independently. It may be helpful to provide specific topics to students who may need more scaffolding for the research component of this lesson. Activity 4: Using the Tracing Mixtures Tool to Better Understand How Substances Do and Do Not Move With Water I-AIM Stage and Function: Apply Procedure: 1. Have the interactive model used in the Water Cycle Big Picture lesson open on your
computer. http://oceanservice.noaa.gov/education/pd/oceans_weather_climate/media/watercycle.swf. If possible, you may want students to have access to the model as well, either in pairs or small groups to review from previous lessons.
2. Have students get out copies of the completed Pathways Tools from previous lessons to help get them thinking about various ways in which water can move throughout the water cycle. If you had your students take notes about the pathways in lesson 2, you might want to have them get their notebooks/journals out.

45
3. Have students complete the Fertilizer Formative Assessment handout. Give them
adequate time to record their ideas and share out where they think the fertilizer could go.
4. Introduce the Tracing Mixtures tool by projecting it on the board and giving each student a double-sided copy. Have students spread out the Tracing Mixtures card set and give them a few minutes to familiarize themselves with the options. Be sure to point out that there are several blank cards included in case students need to create some of their own.
5. Start in the center of the Tracing Mixtures tool under the column titled “Start Here: The Mixture” and select a substance that is mixed in the water. Example: Nitrates. Then select a card to indicate where the mixture is. Example: River.
6. Next work on the Tracing Back column. You may identify that the Nitrates came from a farm, the water came from snow on top of a mountain and that it got into the water from runoff. You would then identify this as a solution because the nitrates dissolve evenly throughout the water and cannot be easily separated through basic filtration.
7. Then move to the Tracing Forward column. Perhaps the water moves to a well. So, the substance would, yes, stay mixed with the water so the substance and water (solution) would end up in a faucet.
8. You may need to do additional examples or for the next one, perhaps identify what is mixed in the water and where the mixture is at, but allow students to fill in the rest of the tool. Once students have had adequate time to complete the next example you started with them, allow each group to share their ideas via the document camera.
9. During student sharing, have other groups evaluate whether they agree or disagree with tracing and whether each box is filled out correctly. Students should discuss their ideas until a consensus can be reached by providing evidence that supports the final answer.
10. Continue this process decreasing the amount of support you give each group as they are ready to fill in various Tracing Mixtures Tools on their own. At this point students should begin to make a list of various ways water moves within the water cycle and when substances will or will not move with the water.
Lesson Artifacts Tracing Mixtures with Water Tool Tracing Mixtures with Water Tool cards Fertilizer Formative Assessment Handout
46
Bibliography/Sources Online Suspensions & Solutions Lesson: Teach Engineering: http://www.teachengineering.org/view_lesson.php?url=collection/cub_/lessons/cub_mix/cub_mix_lesson3.xml Online video: Mixtures: Suspensions & Solutions by Brain Stew: https://www.youtube.com/watch?v=pnpmPDa3tbM
47
Summative Project This is the final project that will put all the concepts together for the water cycle unit. Students will be creating a large poster/model of the water cycle that includes drivers and constraints and substances that either move with water or don’t. This project is designed to have different scaffolding depending on the needs of your students. With students who need more support, provide them with pictures that they can cut and paste onto their poster. You will also need to specify how many different processes you want listed and how many examples of each. The process words can be typed up and given to students (those that need a great deal of support) or merely listed on the directions. Encourage students to use the models they created in the first lesson to help them get many of the possible pathways water can take, but they will need to add more to it to include the drivers and constraints. Students should also include places that substances can be added to water and where that water can go with the substances. They should explain how and where the water cycle can remove those substances as well. Depending on your classroom, you may or may not want to allow them to use their previously completed tools and pathways. Provide simple pictures for students to cut out similar to the ones below.

48
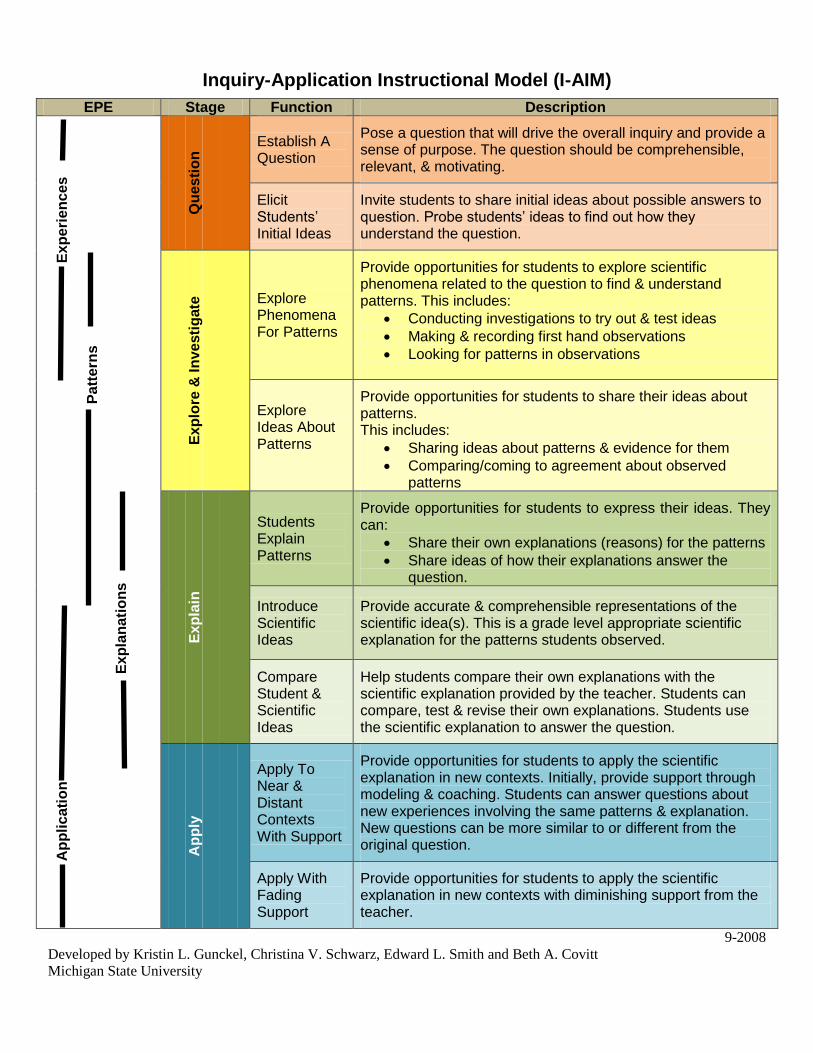
Inquiry-Application Instructional Model (I-AIM)
EPE Stage Function Description
Qu
es
tio
n
Establish A Question
Pose a question that will drive the overall inquiry and provide a sense of purpose. The question should be comprehensible, relevant, & motivating.
Elicit Students’ Initial Ideas
Invite students to share initial ideas about possible answers to question. Probe students’ ideas to find out how they understand the question.
Ex
plo
re &
In
ve
sti
gate
Explore Phenomena For Patterns
Provide opportunities for students to explore scientific phenomena related to the question to find & understand patterns. This includes:
Conducting investigations to try out & test ideas
Making & recording first hand observations
Looking for patterns in observations
Explore Ideas About Patterns
Provide opportunities for students to share their ideas about patterns. This includes:
Sharing ideas about patterns & evidence for them
Comparing/coming to agreement about observed patterns
Ex
pla
in
Students Explain Patterns
Provide opportunities for students to express their ideas. They can:
Share their own explanations (reasons) for the patterns
Share ideas of how their explanations answer the question.
Introduce Scientific Ideas
Provide accurate & comprehensible representations of the scientific idea(s). This is a grade level appropriate scientific explanation for the patterns students observed.
Compare Student & Scientific Ideas
Help students compare their own explanations with the scientific explanation provided by the teacher. Students can compare, test & revise their own explanations. Students use the scientific explanation to answer the question.
Ap
ply
Apply To Near & Distant Contexts With Support
Provide opportunities for students to apply the scientific explanation in new contexts. Initially, provide support through modeling & coaching. Students can answer questions about new experiences involving the same patterns & explanation. New questions can be more similar to or different from the original question.
Apply With Fading Support
Provide opportunities for students to apply the scientific explanation in new contexts with diminishing support from the teacher.
9-2008
Developed by Kristin L. Gunckel, Christina V. Schwarz, Edward L. Smith and Beth A. Covitt
Michigan State University
Ap
pli
cati
on
Pa
tte
rns
Ex
pla
na
tio
ns
Ex
pe
rie
nc
es