Embed Size (px)
Citation preview
Oracle® Fusion MiddlewareUsing Portals in Oracle WebCenter Portal
12c (12.2.1.4.0)E95539-01September 2019
Oracle Fusion Middleware Using Portals in Oracle WebCenter Portal, 12c (12.2.1.4.0)
E95539-01
Copyright © 2013, 2019, Oracle and/or its affiliates. All rights reserved.
Primary Author: Oracle Corporation
This software and related documentation are provided under a license agreement containing restrictions onuse and disclosure and are protected by intellectual property laws. Except as expressly permitted in yourlicense agreement or allowed by law, you may not use, copy, reproduce, translate, broadcast, modify,license, transmit, distribute, exhibit, perform, publish, or display any part, in any form, or by any means.Reverse engineering, disassembly, or decompilation of this software, unless required by law forinteroperability, is prohibited.
The information contained herein is subject to change without notice and is not warranted to be error-free. Ifyou find any errors, please report them to us in writing.
If this is software or related documentation that is delivered to the U.S. Government or anyone licensing it onbehalf of the U.S. Government, then the following notice is applicable:
U.S. GOVERNMENT END USERS: Oracle programs, including any operating system, integrated software,any programs installed on the hardware, and/or documentation, delivered to U.S. Government end users are"commercial computer software" pursuant to the applicable Federal Acquisition Regulation and agency-specific supplemental regulations. As such, use, duplication, disclosure, modification, and adaptation of theprograms, including any operating system, integrated software, any programs installed on the hardware,and/or documentation, shall be subject to license terms and license restrictions applicable to the programs.No other rights are granted to the U.S. Government.
This software or hardware is developed for general use in a variety of information management applications.It is not developed or intended for use in any inherently dangerous applications, including applications thatmay create a risk of personal injury. If you use this software or hardware in dangerous applications, then youshall be responsible to take all appropriate fail-safe, backup, redundancy, and other measures to ensure itssafe use. Oracle Corporation and its affiliates disclaim any liability for any damages caused by use of thissoftware or hardware in dangerous applications.
Oracle and Java are registered trademarks of Oracle and/or its affiliates. Other names may be trademarks oftheir respective owners.
Intel and Intel Xeon are trademarks or registered trademarks of Intel Corporation. All SPARC trademarks areused under license and are trademarks or registered trademarks of SPARC International, Inc. AMD, Opteron,the AMD logo, and the AMD Opteron logo are trademarks or registered trademarks of Advanced MicroDevices. UNIX is a registered trademark of The Open Group.
This software or hardware and documentation may provide access to or information about content, products,and services from third parties. Oracle Corporation and its affiliates are not responsible for and expresslydisclaim all warranties of any kind with respect to third-party content, products, and services unless otherwiseset forth in an applicable agreement between you and Oracle. Oracle Corporation and its affiliates will not beresponsible for any loss, costs, or damages incurred due to your access to or use of third-party content,products, or services, except as set forth in an applicable agreement between you and Oracle.
Contents
Preface
Audience xvii
Documentation Accessibility xvii
Related Documents xvii
Conventions xvii
Who's Who
Knowledge Worker xix
Application Specialist xx
Web Developer xxi
Developer xxii
System Administrator xxiii
Part I Getting Started
1 Introduction to WebCenter Portal
About This Guide 1-1
WebCenter Portal Concepts 1-1
What Is Oracle WebCenter Portal? 1-1
What Is a Portal? 1-3
What Is the Home Portal? 1-3
What Are Pages? 1-4
What Are Portal Components? 1-4
What Are Portal Tools and Services? 1-5
Basic WebCenter Portal Tasks 1-5
Where Do I Start? 1-5
Working with Portals and Pages 1-5
Connecting and Collaborating with Other Users 1-6
Adding Content to a Portal 1-6
Staying Informed 1-6
iii
Staying Organized 1-6
2 Exploring WebCenter Portal
Registering Yourself with WebCenter Portal 2-1
Working In the Portal Browser 2-5
Searching WebCenter Portal 2-5
Saving Favorite Web Pages 2-6
Working with Your Profile 2-6
Setting Preferences 2-6
Accessing WebCenter Portal Online Help 2-7
3 Searching for Information with Elasticsearch
About Searching in WebCenter Portal with Elasticsearch 3-1
Searching Using Elasticsearch 3-3
Running a Global Search with Elasticsearch 3-3
Running Faceted Searches to Narrow Results with Elasticsearch 3-4
Running Filtered Searches to Narrow Results with Elasticsearch 3-5
Running Sorted Searches to Organize Results with Elasticsearch 3-6
Searching Using Custom Attributes in Elasticsearch 3-7
Saving Search Results 3-8
Saving a Search 3-8
Running a Saved Search 3-10
Sharing a Saved Search 3-11
Viewing the List of Saved Searches in Your Portal 3-12
Personalizing a Saved Search 3-13
Deleting a Saved Search 3-14
4 Managing Your Profile
About Profiles 4-1
Viewing a Profile 4-2
Profile Popup 4-2
Profile Page 4-3
Organization View 4-6
Profile 4-6
Profile Gallery 4-7
Profile Snapshot 4-8
Editing Your Profile 4-9
Uploading and Updating a Personal Profile Picture 4-11
iv
Setting Profile Preferences 4-12
5 Setting Your Personal Preferences
Accessing the Preferences Pages 5-2
Choosing Your Preferred Display Language 5-3
Setting Date and Time Preferences 5-4
Setting Your Accessibility Options for WebCenter Portal 5-5
About Application Accessibility Options 5-6
Applying Accessibility Options 5-6
Changing the Look and Feel of Your View 5-7
Changing Your Application Password 5-7
Providing Login Information for External Applications 5-8
6 Using WebCenter Portal Impersonation
About WebCenter Portal Impersonation 6-1
Allowing an Impersonation Session 6-2
Initiating an Impersonation Session 6-4
Initiating an Impersonation Session Using the Impersonation Preferences Page 6-4
Initiating an Impersonation Session Using a Hot Key 6-5
Troubleshooting 6-6
Clicking Switch User Produces an Error 6-6
Clicking Stop Impersonation Produces an Error 6-7
Part II Working with Portals and Pages
7 Working In the Home Portal
About the Home Portal 7-1
How do I access the Home portal? 7-2
What You Can Do In the Home Portal 7-3
Opening a Page in the Home Portal 7-3
Customizing Your View of a Page in the Home Portal 7-4
About User Customizations on a Page 7-5
Rearranging Page Content 7-5
Removing Components from Your View of a Page 7-6
Resizing Components 7-7
Collapsing and Expanding Components 7-7
Resetting All of Your User Customizations on a Page in the Home Portal 7-8
Rearranging Page Order in the Home Portal 7-9
v
Showing or Hiding Pages in Your View of the Home Portal 7-10
8 Creating and Managing Personal Pages
About Personal Pages 8-1
Creating a Personal Page in the Home Portal 8-2
Setting Page Creation Defaults for Personal Pages 8-2
Creating a Personal Page 8-3
Changing the Layout of a Personal Page 8-5
Changing Display Options for a Personal Page 8-6
Adding or Modifying Parameters for a Personal Page 8-8
Managing Your Personal Pages 8-10
Setting Security for a Personal Page 8-12
Accessing Personal Page Security Using the Page Properties Dialog 8-12
Accessing Personal Page Security Using the Set Page Access Dialog 8-13
Setting Personal Page Security 8-14
Editing a Personal Page 8-17
Editing the Source of a Personal Page 8-17
Copying a Personal Page 8-18
Renaming a Personal Page 8-19
Sending Mail with a Link to a Personal Page 8-19
Viewing Information About a Personal Page 8-19
Deleting a Personal Page 8-20
9 Exploring Portals
About Portals 9-1
Interacting with Portals Before Logging In (Public User) 9-2
Viewing and Accessing Available Portals 9-2
Sending Mail to Portal Members or Managers 9-8
Viewing Information About a Portal 9-9
Publishing the Link to a Portal 9-11
Searching for a Portal 9-13
Joining a Portal 9-14
Joining a Portal (Registered WebCenter Portal User) 9-14
Joining a Portal (Unregistered WebCenter Portal User) 9-17
Searching in a Portal 9-19
Working with Pages in a Portal 9-19
Viewing a Page in a Portal 9-19
Creating, Editing, and Managing a Page in a Portal 9-19
Changing Your Role in a Portal 9-19
vi
Cancelling Your Portal Membership 9-22
Part III Connecting and Collaborating with Other Users
10
Managing Your Contacts
About Connections 10-1
Setting Connections Preferences 10-5
Viewing Another User's Profile 10-6
Viewing Connections 10-6
Viewing Your Connections 10-6
Searching Through Your Connections 10-7
Adding Contacts 10-7
Inviting Others to Connect 10-8
Viewing Invitations to Connect 10-9
Viewing Invitations You Have Sent 10-9
Viewing Invitations You Have Received 10-10
Responding to Invitations to Be a Connection 10-11
Removing Contacts 10-12
Creating and Managing Groups of Contacts 10-13
Creating a Connections List 10-13
Adding a Connection to a List 10-14
Removing a Connection from a List 10-16
Deleting a Connections List 10-17
11
Using Instant Messaging and Presence Viewer
About Instant Messaging and Presence 11-1
Identifying Your Preferred Instant Messaging Provider 11-3
Configuring Network Presence 11-4
Working with IMP Features 11-5
Viewing the Status of Other Users 11-5
Sending a Mail Message from the Presence Icon Menu 11-7
Sending an Instant Message from the Presence Icon Menu 11-7
12
Sending and Viewing Mail
About the Send Mail Feature 12-1
Configuring the Send Mail Feature 12-3
About Mail in WebCenter Portal 12-3
Selecting Your Preferred Mail Connection 12-5
vii
Working with Mail 12-6
Logging in to Mail 12-6
Personalizing Your View of Mail 12-7
Opening Mail Messages 12-8
Downloading Mail Attachments 12-9
Composing and Sending Mail Messages 12-10
Sending Mail with Attachments 12-12
Removing Attachments from the Add Attachment Window 12-14
Replying To and Forwarding Mail 12-15
Refreshing Mail 12-16
Deleting Mail 12-16
13
Working with Feedback and the Message Board
About Feedback 13-1
Setting Feedback Preferences 13-3
Viewing Feedback 13-4
Viewing Feedback You Have Posted or Received 13-4
Sorting and Filtering Feedback Posts 13-5
Hiding Feedback in Your Own View 13-6
Showing Hidden Feedback 13-7
Marking Feedback Received as Private 13-8
Posting Feedback 13-9
Deleting Feedback 13-11
About Messages 13-11
Setting Message Board Preferences 13-14
Viewing Messages 13-15
Viewing Messages Others Have Left for You 13-16
Viewing Messages Others Have Received 13-16
Viewing Messages Sent to a Selected Portal 13-16
Sorting and Filtering Message Board Messages 13-16
Hiding Messages in Your View of Message Board 13-18
Showing Hidden Messages 13-20
Posting Messages 13-21
Posting a Message Through Message Board 13-21
Posting a Private Message 13-22
Sharing a Private Message 13-23
Editing Messages 13-24
Deleting Messages 13-26
Enabling Other Users to Post Feedback and Messages for You 13-26
viii

14
Liking, Commenting On, and Sharing Items
About Liking Items 14-1
Liking Items 14-2
About Commenting on Items 14-2
Commenting on Items 14-3
About Sharing Items 14-4
Sharing Streamed Items with a Wider Audience 14-4
Reposting Streamed Items 14-5
Emailing Streamed Items 14-7
Sharing Messages, Files, and URLs 14-8
About Publisher 14-8
Publishing a Message 14-10
Sharing Files Through Publisher 14-12
Sharing Links Through Publisher 14-14
Deleting a Published Message 14-15
15
Viewing and Participating in Discussions
About Discussions 15-1
Working with Discussions 15-7
Creating and Managing Forum Topics and Replies 15-7
Posting a New Forum Topic 15-8
Replying to Topic Posts 15-10
Viewing Topic Posts and Replies 15-12
Editing Topics and Replies 15-13
Deleting Topic Posts and Replies 15-14
Selecting the Number of Topics or Forums to Display 15-16
Toggling Between Topic View Modes 15-17
Watching Forums and Topics 15-18
Adding a Discussion Forum or Topic to Your Watch List 15-18
Removing a Discussion Forum or Topic from a Watch List 15-20
Viewing Watched Forums and Topics from the Forums View 15-20
Showing and Hiding Additional Discussion Forum Information 15-21
Showing or Hiding Information in Forums View 15-21
Showing or Hiding Information in Popular Topics 15-22
Showing or Hiding Information in Recent Topics 15-23
Showing or Hiding Information in Watched Forums 15-24
Showing or Hiding Information in Watched Topics 15-24
Sending Mail from Discussion Topics 15-25
ix
Part IV Adding Content to a Portal
16
Introduction to Adding Content to a Portal
17
Contributing and Publishing Content
About Contributing and Publishing Content 17-1
Entering Contribution Mode 17-3
Contributing and Publishing an Image 17-5
Contributing and Publishing Rich Text 17-7
Contributing and Publishing Text with Predefined Formatting 17-9
Contributing and Publishing a Video 17-9
Adding a Hyperlink to an Image 17-11
Adding a Hyperlink to Rich Text 17-14
Contributing and Publishing Content in Different Languages 17-18
18
Adding and Managing Documents
About Adding and Managing Documents 18-2
Understanding the Content Manager Interface 18-3
Working with the Results List in Content Manager 18-6
Result Views 18-6
Managing the Results List 18-7
Searching Libraries, Folders, and Documents 18-8
Working with Libraries 18-9
Working with Folders and Files 18-10
Viewing Documents in Content Viewer 18-15
Working with Workflow-Enabled Content 18-16
Working with Desktop Integration 18-16
About Desktop Integration 18-17
Prerequisites for Desktop Integration 18-17
Working with Microsoft Office Integration 18-17
About Microsoft Office Integration 18-17
Opening and Editing a Microsoft Office File from WebCenter Portal 18-17
Working with Files in Microsoft Office 18-18
Working with Microsoft File Explorer Integration 18-19
Working with Email Client Integration 18-20
Working with Web Browser Search Integration 18-21
x
19
Working with Oracle Content and Experience Cloud
About Oracle Content and Experience Cloud 19-1
Using Oracle Content and Experience Cloud 19-2
20
Working with Wikis
About Wikis 20-2
Creating a Wiki 20-2
Creating a Wiki Page 20-3
Creating a Wiki Document Within a Wiki Page 20-4
Creating a Wiki Document Using the Wikis System Page 20-6
Editing a Wiki 20-8
Using the Rich Text Editor (RTE) 20-9
About the Rich Text Editor Tabbed Panes 20-12
About the Rich Text Editor Toolbar 20-13
Working with Tables in the Rich Text Editor 20-18
Editing Table Cells in the Rich Text Editor 20-21
Editing Table Rows in the Rich Text Editor 20-24
Editing Table Columns in the Rich Text Editor 20-25
Using the Keyboard in the Rich Text Editor 20-25
Exposing an Existing Wiki Document in the Portal Navigation 20-27
Exposing an Existing Wiki Document as a Wiki Page 20-27
Exposing an Existing Wiki Document Using Content Presenter 20-28
Managing Wiki Documents 20-29
21
Working with Blogs
About Blogs 21-2
Understanding the Blog Page Style 21-2
Creating a Blog Page 21-4
Working with Blog Posts 21-4
About Blog Posts 21-5
Viewing a Blog Post 21-6
Creating a Blog Post 21-7
Editing a Blog Post 21-10
Deleting a Blog Post 21-10
Part V Staying Informed
xi
22
Getting Notified When Things Change
About Subscriptions and Notifications 22-1
Establishing and Managing Your Messaging Channels and Filters 22-6
Accessing Messaging Configuration Settings 22-7
Establishing a Messaging Channel 22-8
Editing a Messaging Channel 22-9
Deleting a Messaging Channel 22-9
Creating and Applying Messaging Filters 22-9
Editing Messaging Filters 22-13
Deleting Messaging Filters 22-13
Subscribing to the Application, to Portals, and to Objects 22-13
Setting Application-Level Subscriptions 22-14
Setting Portal-Level Subscriptions 22-15
Subscribing to a Discussion Topic 22-17
Viewing and Cancelling Your Subscriptions 22-18
Viewing and Cancelling Application-Level Subscriptions 22-19
Viewing and Cancelling Portal- and Object-Level Subscriptions 22-19
23
Tracking Portal Activities
About the Activity Stream 23-1
Setting Activity Stream Preferences 23-7
Working with the Activity Stream 23-10
Selecting the People to Stream in an Activity Stream Instance 23-10
Selecting the Portals to Stream in an Activity Stream Viewer 23-11
Selecting the Categories to Stream in an Activity Stream Viewer 23-12
Hiding and Showing the Activities of a Selected User 23-12
Hiding the Activities of a Selected User 23-13
Showing the Activities of a Hidden User 23-13
Hiding and Showing the Activities of a Selected Portal 23-14
Hiding the Activities of a Selected Portal 23-15
Showing Hidden Portal Activities 23-16
Liking and Commenting On Activity Stream Items 23-16
Sharing Files and Other Objects Through an Activity Stream Item 23-17
24
Working with Announcements
About Announcements 24-1
Working with Announcements 24-2
Working with Announcements 24-4
Viewing Announcements 24-4
xii
Adjusting Your View of the Announcements 24-5
Creating an Announcement 24-7
Editing Announcements 24-10
Deleting an Announcement 24-11
Working with the Announcements - Quick View 24-12
Viewing Announcements in the Quick View 24-13
Managing Announcements in the Quick View 24-14
Sending Mail from an Announcement 24-15
Linking Announcements 24-17
Subscribing to Announcements Using RSS 24-18
25
Monitoring RSS Feeds
About RSS 25-1
RSS Icon 25-1
RSS Manager 25-2
Accessing the RSS Manager 25-2
Using the RSS Manager 25-3
RSS View 25-4
Obtaining Tool News Feeds 25-5
Obtaining the Discussion Forums News Feed 25-5
Obtaining a Discussion Forum News Feed from the RSS Manager 25-5
Obtaining a News Feed from the Discussions Page 25-7
Obtaining a News Feed from a Discussion Forums View 25-8
Obtaining List News Feeds 25-9
Obtaining a List News Feed from the RSS Manager 25-10
Obtaining a News Feed from the Lists Page 25-11
Obtaining a News Feed from Lists 25-12
Obtaining the Announcements News Feed 25-13
Obtaining an Announcements News Feed from the RSS Manager 25-14
Obtaining a News Feed from the Announcements Page 25-15
Obtaining a News Feed from the Announcements View 25-17
Refreshing RSS 25-18
Removing RSS Feeds 25-19
26
Working with Polls
Taking Polls 26-1
Working with Polls in the Polls Manager 26-2
Creating a Poll 26-2
Editing a Poll 26-7
xiii
Publishing a Poll 26-7
Closing a Poll 26-8
Analyzing the Results of a Poll 26-8
Deleting a Poll 26-9
Viewing Poll Results 26-9
Part VI Staying Organized
27
Managing Your Favorites
About Favorites 27-1
Accessing Your Favorites 27-2
Adding Favorites 27-2
Adding Favorites Folders 27-4
Managing Favorites in Preferences 27-5
Adding a Favorites Folder Using the Manage Favorites Page 27-6
Adding a Favorite Using the Manage Favorites Page 27-7
Editing Favorites and Favorites Folders 27-8
Rearranging Favorites and Favorites Folders 27-10
Searching for Favorites 27-11
Deleting Favorites and Favorites Folders 27-12
28
Working with Calendars and Events
About Events 28-1
Calendar Overlaying 28-2
Where to View Events 28-2
Integration of Calendars Events with Other Features 28-6
Working with Events 28-6
Accessing Your Personal Events 28-7
Viewing Events 28-10
Using the Calendar Interface 28-11
Viewing Event Details 28-14
Filtering Events by Category 28-14
Setting Display Preferences 28-15
Scheduling Events 28-19
Revising Scheduled Events 28-23
Cancelling Scheduled Events 28-25
Displaying Multiple Calendars Together 28-25
Displaying Additional Calendars 28-26
Editing Calendar Display Options 28-28
xiv
Subscribing to Events 28-29
29
Managing Your Notes
About Notes 29-1
Working with Notes 29-2
Creating a Note 29-2
Filtering and Clearing Notes Filters 29-3
Editing Note Details 29-4
Refreshing Your View of Notes 29-4
Deleting Notes 29-5
Linking Notes 29-5
30
Working with Lists
About Lists 30-1
Working with Lists Features 30-4
Viewing Lists 30-4
Creating and Managing Lists 30-5
Creating Lists 30-5
Editing List Structure 30-8
Copying a List 30-22
Deleting Lists 30-23
Adding and Managing List Data 30-24
Adding Data of a Given Data Type to a List 30-25
Editing List Data 30-34
Deleting List Rows 30-35
Refreshing List Data 30-36
Working with Links in Lists and List Rows 30-37
About Customizing Lists 30-37
Sorting List Data on a Column 30-38
Resizing List Columns 30-40
Changing Column Order on a List Instance 30-42
Hiding and Showing List Columns 30-43
Freezing a Column Position 30-45
Wrapping Column Data 30-46
Applying Color Banding to List Rows 30-46
Filtering List Data 30-48
Mailing a Link to a List to Other Users 30-53
Exporting a List and Importing a List from an Excel Spreadsheet 30-54
xv
31
Linking Information
About Links 31-1
Working with Links Features 31-3
Linking to Existing Assets 31-4
Opening the Links Dialog to Link to Existing Assets 31-4
Linking to an Existing Announcement 31-5
Linking to an Existing Discussion Forum Topic 31-7
Linking to an Existing Document 31-9
Linking to an Existing Event 31-11
Linking to New Assets 31-13
Opening the Links Dialog to Link to a New Asset 31-13
Adding and Linking to a Discussion Forum Topic 31-14
Adding and Linking to a Document 31-16
Adding and Linking to an Event 31-17
Adding and Linking to a Note 31-19
Linking to a Web Page 31-20
Accessing Link Targets 31-22
Deleting a Link 31-23
32
Working with Tags
About Tags 32-1
About the Tag Center 32-2
Tagging Portal Pages 32-3
Working with Tags in the Tag Center 32-4
Opening the Tag Center 32-5
Selecting Different Views and Arrangements of the Tag Cloud in the Tag Center 32-8
Selecting Different Views and Arrangements of Tagged Pages in the TagCenter 32-9
Refining the Display of Information in the Tag Center 32-10
Discovering Who Has Used a Tag in the Tag Center 32-11
Working with Tags in the Tags View 32-11
Viewing Tags in the Tags View 32-12
Sorting Tags in the Tags View 32-12
Filtering Tags in the Tags View 32-13
Renaming a Tag from the Tags View 32-13
Deleting a Tag in the Tags View 32-14
Working with the Tag Cloud and Tag Cloud Related Resources Views 32-15
Working with the Similarly Tagged Items View 32-16
xvi
Preface
This guide explains how to work with portals as a knowledge worker in WebCenterPortal. It provides instructions for tasks such as working in a personal environment inthe Home portal; working in a portal as a portal member; working with content; andsending and receiving instant messages with peers.
Topics:
• Audience
• Documentation Accessibility
• Related Documents
• Conventions
AudienceThis guide is intended for knowledge workers who consume or update informationpresented in portals built with Oracle WebCenter Portal. For a complete description ofthis role and other WebCenter Portal personas, see Who's Who.
Documentation AccessibilityFor information about Oracle's commitment to accessibility, visit the OracleAccessibility Program website at http://www.oracle.com/pls/topic/lookup?ctx=acc&id=docacc.
Access to Oracle Support
Oracle customers that have purchased support have access to electronic supportthrough My Oracle Support. For information, visit http://www.oracle.com/pls/topic/lookup?ctx=acc&id=info or visit http://www.oracle.com/pls/topic/lookup?ctx=acc&id=trsif you are hearing impaired.
Related DocumentsDocumentation for Oracle WebCenter Portal is available in the Oracle FusionMiddleware library on the Oracle Help Center.
ConventionsThe following text conventions are used in this document:
xvii
Convention Meaning
boldface Boldface type indicates graphical user interface elements associatedwith an action, or terms defined in text or the glossary.
italic Italic type indicates book titles, emphasis, or placeholder variables forwhich you supply particular values.
monospace Monospace type indicates commands within a paragraph, URLs, codein examples, text that appears on the screen, or text that you enter.
Preface
xviii
Who's Who
The WebCenter Portal documentation is organized so that the tasks in a particularguide address a specific user persona. Each persona is associated with a set of skillsrequired to work with WebCenter Portal, from basic to advanced.
This preface introduces you to the WebCenter Portal personas and describes theways in which they might interact with WebCenter Portal. Each persona is assigned adefault role provided out-of-the-box with WebCenter Portal. The default roles are givena unique set of permissions appropriate for the work that each persona will typicallydo. Note that you can modify these default roles or configure new roles to meet theunique needs of your organization.
The people who interact with WebCenter Portal typically work together as a team thatis comprised of the following personas:
• Knowledge Worker
• Application Specialist
• Web Developer
• Developer
• System Administrator
This guide is aimed at the knowledge worker persona.
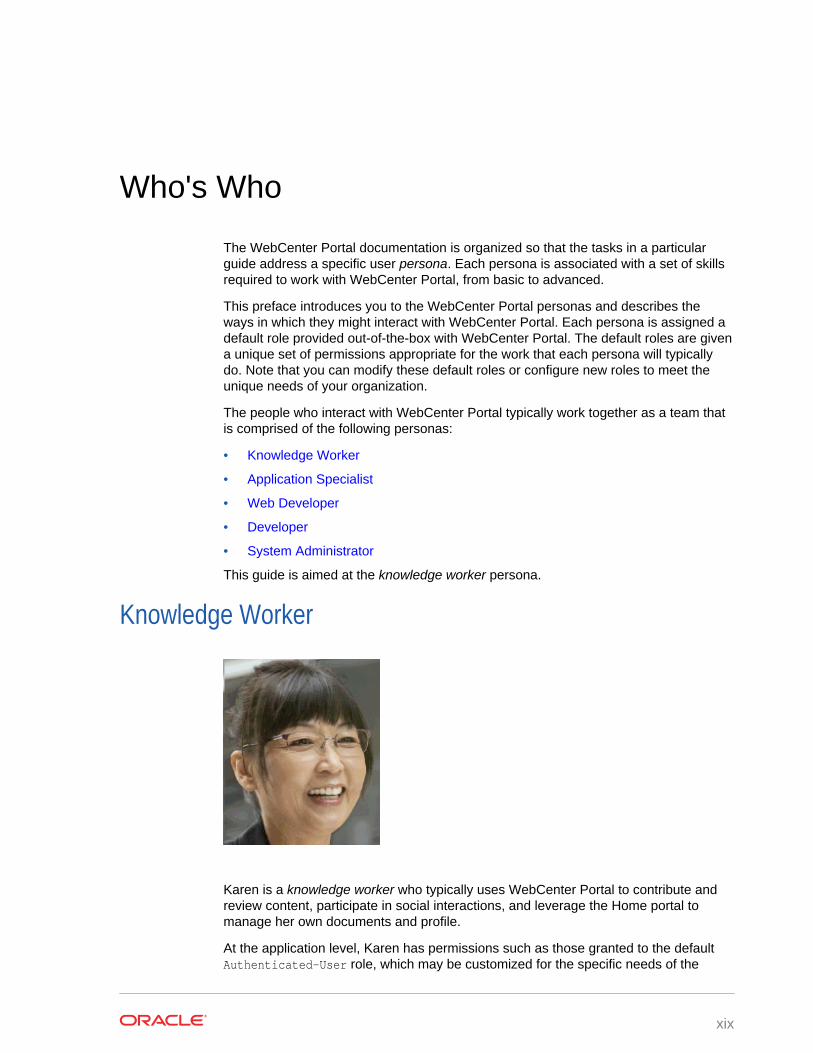
Knowledge Worker
Karen is a knowledge worker who typically uses WebCenter Portal to contribute andreview content, participate in social interactions, and leverage the Home portal tomanage her own documents and profile.
At the application level, Karen has permissions such as those granted to the defaultAuthenticated-User role, which may be customized for the specific needs of the
xix
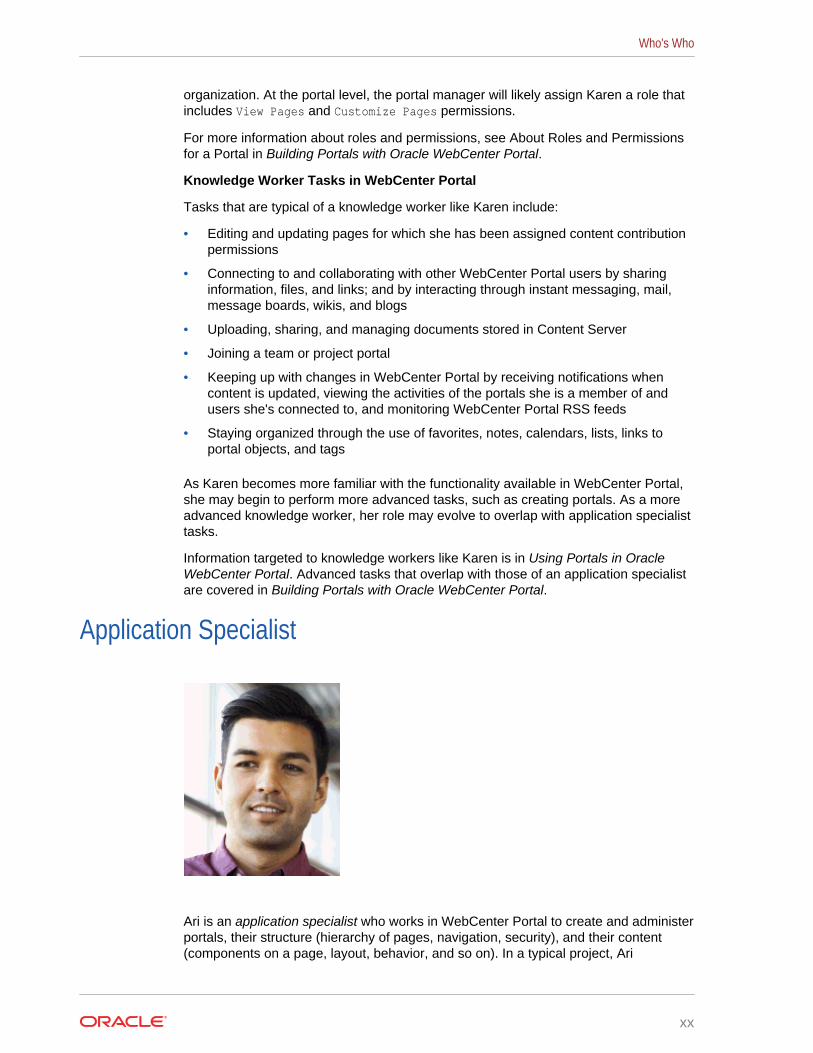
organization. At the portal level, the portal manager will likely assign Karen a role thatincludes View Pages and Customize Pages permissions.
For more information about roles and permissions, see About Roles and Permissionsfor a Portal in Building Portals with Oracle WebCenter Portal.
Knowledge Worker Tasks in WebCenter Portal
Tasks that are typical of a knowledge worker like Karen include:
• Editing and updating pages for which she has been assigned content contributionpermissions
• Connecting to and collaborating with other WebCenter Portal users by sharinginformation, files, and links; and by interacting through instant messaging, mail,message boards, wikis, and blogs
• Uploading, sharing, and managing documents stored in Content Server
• Joining a team or project portal
• Keeping up with changes in WebCenter Portal by receiving notifications whencontent is updated, viewing the activities of the portals she is a member of andusers she's connected to, and monitoring WebCenter Portal RSS feeds
• Staying organized through the use of favorites, notes, calendars, lists, links toportal objects, and tags
As Karen becomes more familiar with the functionality available in WebCenter Portal,she may begin to perform more advanced tasks, such as creating portals. As a moreadvanced knowledge worker, her role may evolve to overlap with application specialisttasks.
Information targeted to knowledge workers like Karen is in Using Portals in OracleWebCenter Portal. Advanced tasks that overlap with those of an application specialistare covered in Building Portals with Oracle WebCenter Portal.
Application Specialist
Ari is an application specialist who works in WebCenter Portal to create and administerportals, their structure (hierarchy of pages, navigation, security), and their content(components on a page, layout, behavior, and so on). In a typical project, Ari
Who's Who
xx
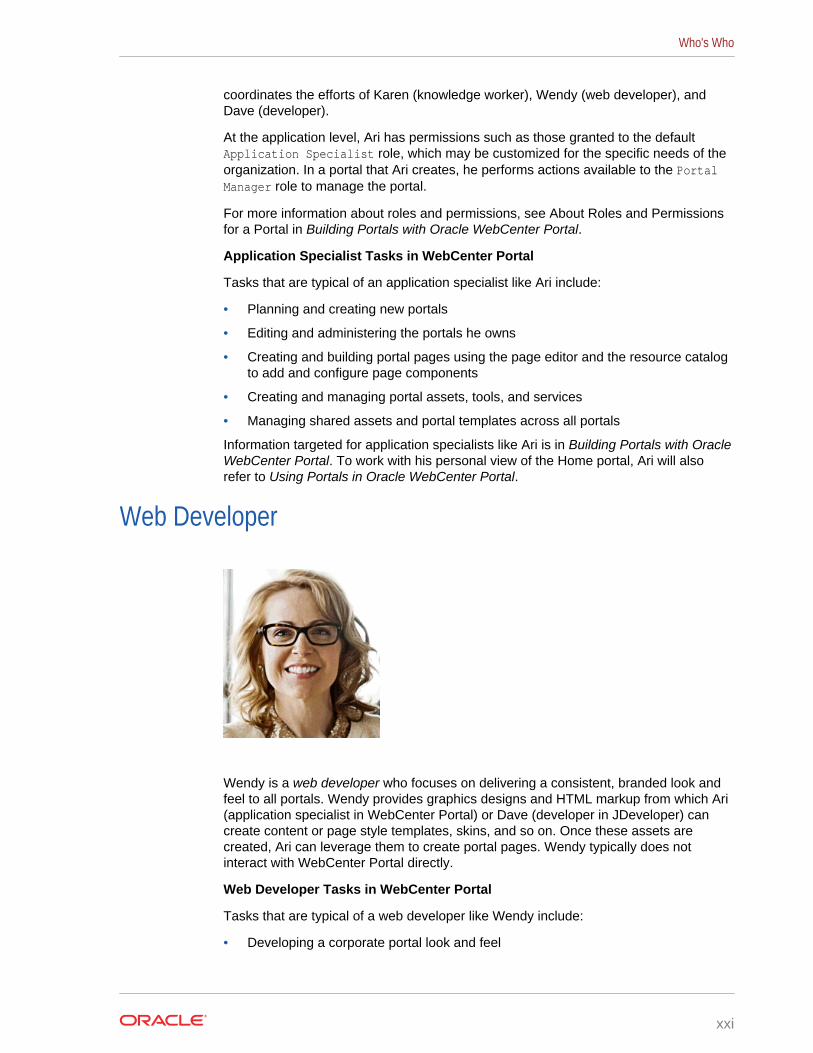
coordinates the efforts of Karen (knowledge worker), Wendy (web developer), andDave (developer).
At the application level, Ari has permissions such as those granted to the defaultApplication Specialist role, which may be customized for the specific needs of theorganization. In a portal that Ari creates, he performs actions available to the PortalManager role to manage the portal.
For more information about roles and permissions, see About Roles and Permissionsfor a Portal in Building Portals with Oracle WebCenter Portal.
Application Specialist Tasks in WebCenter Portal
Tasks that are typical of an application specialist like Ari include:
• Planning and creating new portals
• Editing and administering the portals he owns
• Creating and building portal pages using the page editor and the resource catalogto add and configure page components
• Creating and managing portal assets, tools, and services
• Managing shared assets and portal templates across all portals
Information targeted for application specialists like Ari is in Building Portals with OracleWebCenter Portal. To work with his personal view of the Home portal, Ari will alsorefer to Using Portals in Oracle WebCenter Portal.
Web Developer
Wendy is a web developer who focuses on delivering a consistent, branded look andfeel to all portals. Wendy provides graphics designs and HTML markup from which Ari(application specialist in WebCenter Portal) or Dave (developer in JDeveloper) cancreate content or page style templates, skins, and so on. Once these assets arecreated, Ari can leverage them to create portal pages. Wendy typically does notinteract with WebCenter Portal directly.
Web Developer Tasks in WebCenter Portal
Tasks that are typical of a web developer like Wendy include:
• Developing a corporate portal look and feel
Who's Who
xxi
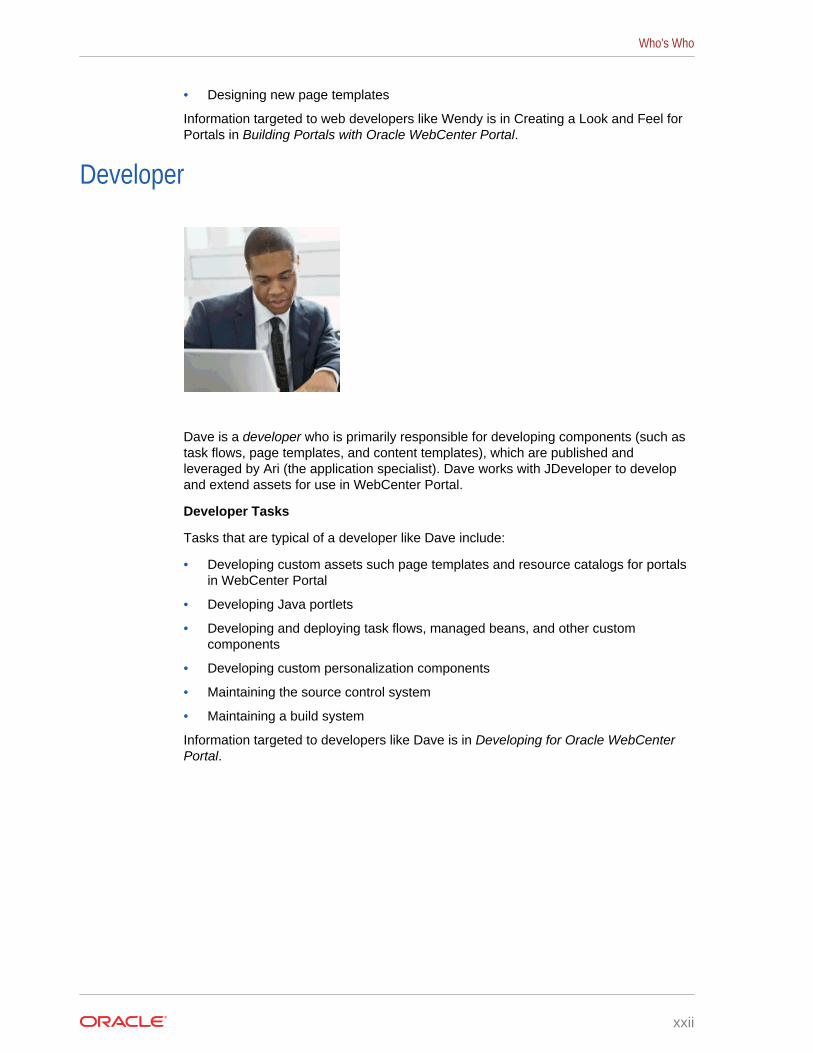
• Designing new page templates
Information targeted to web developers like Wendy is in Creating a Look and Feel forPortals in Building Portals with Oracle WebCenter Portal.
Developer
Dave is a developer who is primarily responsible for developing components (such astask flows, page templates, and content templates), which are published andleveraged by Ari (the application specialist). Dave works with JDeveloper to developand extend assets for use in WebCenter Portal.
Developer Tasks
Tasks that are typical of a developer like Dave include:
• Developing custom assets such page templates and resource catalogs for portalsin WebCenter Portal
• Developing Java portlets
• Developing and deploying task flows, managed beans, and other customcomponents
• Developing custom personalization components
• Maintaining the source control system
• Maintaining a build system
Information targeted to developers like Dave is in Developing for Oracle WebCenterPortal.
Who's Who
xxii
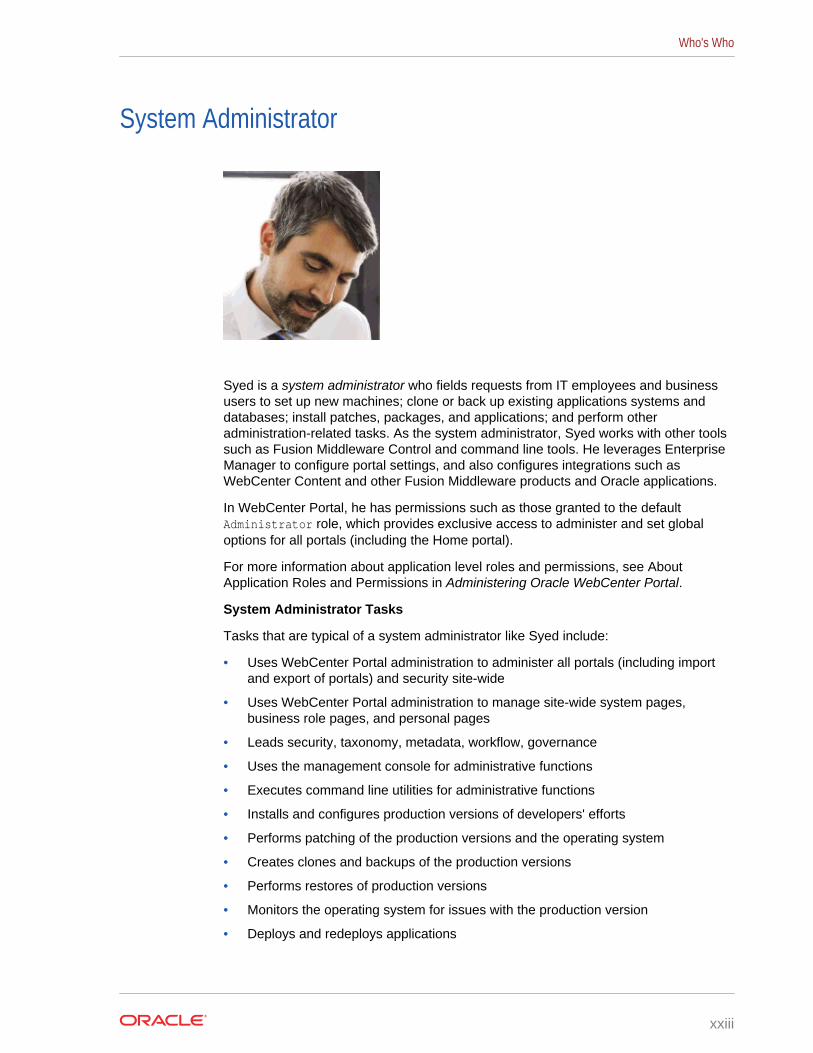
System Administrator
Syed is a system administrator who fields requests from IT employees and businessusers to set up new machines; clone or back up existing applications systems anddatabases; install patches, packages, and applications; and perform otheradministration-related tasks. As the system administrator, Syed works with other toolssuch as Fusion Middleware Control and command line tools. He leverages EnterpriseManager to configure portal settings, and also configures integrations such asWebCenter Content and other Fusion Middleware products and Oracle applications.
In WebCenter Portal, he has permissions such as those granted to the defaultAdministrator role, which provides exclusive access to administer and set globaloptions for all portals (including the Home portal).
For more information about application level roles and permissions, see AboutApplication Roles and Permissions in Administering Oracle WebCenter Portal.
System Administrator Tasks
Tasks that are typical of a system administrator like Syed include:
• Uses WebCenter Portal administration to administer all portals (including importand export of portals) and security site-wide
• Uses WebCenter Portal administration to manage site-wide system pages,business role pages, and personal pages
• Leads security, taxonomy, metadata, workflow, governance
• Uses the management console for administrative functions
• Executes command line utilities for administrative functions
• Installs and configures production versions of developers' efforts
• Performs patching of the production versions and the operating system
• Creates clones and backups of the production versions
• Performs restores of production versions
• Monitors the operating system for issues with the production version
• Deploys and redeploys applications
Who's Who
xxiii
Information targeted to system administrators like Syed is in Administering OracleWebCenter Portal and WebCenter WLST Command Reference Reference.
Who's Who
xxiv
Part IGetting Started
This part of Using Portals in Oracle WebCenter Portal provides an overview of thefeatures available to you in WebCenter Portal. It includes information about setting upyour personal environment, updating your personal profile, and finding your wayaround the portal and to specific information.
• Introduction to WebCenter Portal
• Exploring WebCenter Portal
• Searching for Information with Elasticsearch
• Managing Your Profile
• Setting Your Personal Preferences
• Using WebCenter Portal Impersonation
1Introduction to WebCenter Portal
Explore WebCenter Portal knowledge worker concepts and tasks.
Topics:
• About This Guide
• WebCenter Portal Concepts
• Basic WebCenter Portal Tasks
About This GuideThis guide is for the knowledge worker who interacts with information and usersthrough WebCenter Portal.
WebCenter Portal ConceptsThis section includes the following topics:
• What Is Oracle WebCenter Portal?
• What Is a Portal?
• What Is the Home Portal?
• What Are Pages?
• What Are Portal Components?
• What Are Portal Tools and Services?
What Is Oracle WebCenter Portal?Companies use Oracle WebCenter Portal to build enterprise-scale intranet andextranet portals that provide a foundation for the next-generation user experience (UX)with Oracle Fusion Middleware and Oracle Fusion Applications. Portals built withWebCenter Portal commonly support thousands of users who create, update, andaccess content and data from multiple back-end sources. WebCenter Portal deliversintuitive user experiences by leveraging the best UX capabilities from a significantportfolio of leading portal products and related technologies. From the user'sperspective, the integration is seamless.
1-1
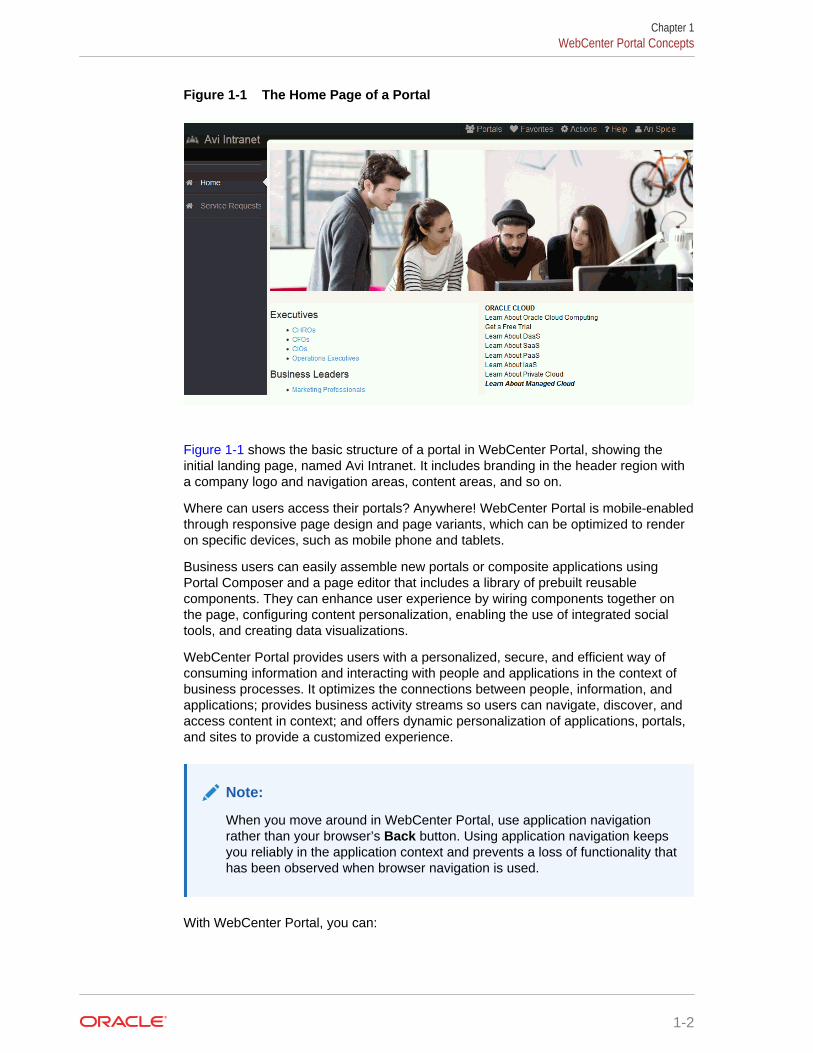
Figure 1-1 The Home Page of a Portal
Figure 1-1 shows the basic structure of a portal in WebCenter Portal, showing theinitial landing page, named Avi Intranet. It includes branding in the header region witha company logo and navigation areas, content areas, and so on.
Where can users access their portals? Anywhere! WebCenter Portal is mobile-enabledthrough responsive page design and page variants, which can be optimized to renderon specific devices, such as mobile phone and tablets.
Business users can easily assemble new portals or composite applications usingPortal Composer and a page editor that includes a library of prebuilt reusablecomponents. They can enhance user experience by wiring components together onthe page, configuring content personalization, enabling the use of integrated socialtools, and creating data visualizations.
WebCenter Portal provides users with a personalized, secure, and efficient way ofconsuming information and interacting with people and applications in the context ofbusiness processes. It optimizes the connections between people, information, andapplications; provides business activity streams so users can navigate, discover, andaccess content in context; and offers dynamic personalization of applications, portals,and sites to provide a customized experience.
Note:
When you move around in WebCenter Portal, use application navigationrather than your browser’s Back button. Using application navigation keepsyou reliably in the application context and prevents a loss of functionality thathas been observed when browser navigation is used.
With WebCenter Portal, you can:
Chapter 1WebCenter Portal Concepts
1-2
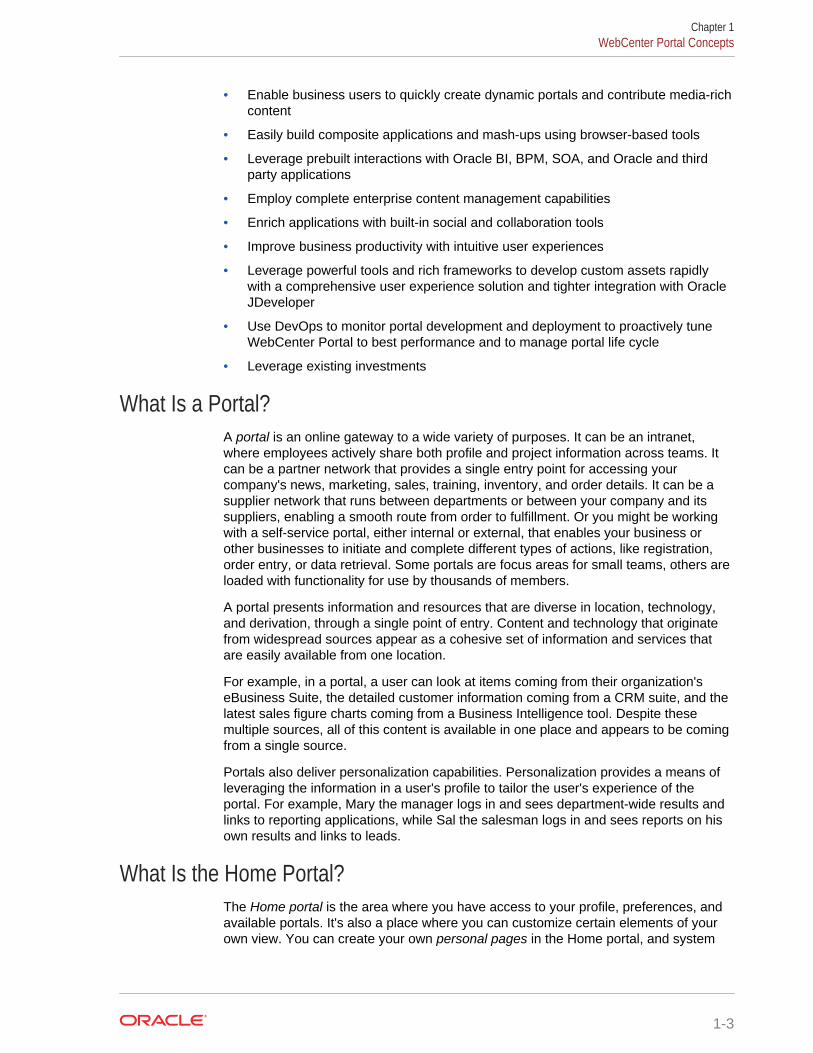
• Enable business users to quickly create dynamic portals and contribute media-richcontent
• Easily build composite applications and mash-ups using browser-based tools
• Leverage prebuilt interactions with Oracle BI, BPM, SOA, and Oracle and thirdparty applications
• Employ complete enterprise content management capabilities
• Enrich applications with built-in social and collaboration tools
• Improve business productivity with intuitive user experiences
• Leverage powerful tools and rich frameworks to develop custom assets rapidlywith a comprehensive user experience solution and tighter integration with OracleJDeveloper
• Use DevOps to monitor portal development and deployment to proactively tuneWebCenter Portal to best performance and to manage portal life cycle
• Leverage existing investments
What Is a Portal?A portal is an online gateway to a wide variety of purposes. It can be an intranet,where employees actively share both profile and project information across teams. Itcan be a partner network that provides a single entry point for accessing yourcompany's news, marketing, sales, training, inventory, and order details. It can be asupplier network that runs between departments or between your company and itssuppliers, enabling a smooth route from order to fulfillment. Or you might be workingwith a self-service portal, either internal or external, that enables your business orother businesses to initiate and complete different types of actions, like registration,order entry, or data retrieval. Some portals are focus areas for small teams, others areloaded with functionality for use by thousands of members.
A portal presents information and resources that are diverse in location, technology,and derivation, through a single point of entry. Content and technology that originatefrom widespread sources appear as a cohesive set of information and services thatare easily available from one location.
For example, in a portal, a user can look at items coming from their organization'seBusiness Suite, the detailed customer information coming from a CRM suite, and thelatest sales figure charts coming from a Business Intelligence tool. Despite thesemultiple sources, all of this content is available in one place and appears to be comingfrom a single source.
Portals also deliver personalization capabilities. Personalization provides a means ofleveraging the information in a user's profile to tailor the user's experience of theportal. For example, Mary the manager logs in and sees department-wide results andlinks to reporting applications, while Sal the salesman logs in and sees reports on hisown results and links to leads.
What Is the Home Portal?The Home portal is the area where you have access to your profile, preferences, andavailable portals. It's also a place where you can customize certain elements of yourown view. You can create your own personal pages in the Home portal, and system
Chapter 1WebCenter Portal Concepts
1-3
administrators can expose system pages and business role pages to selectedaudiences.
For more information, see Exploring WebCenter Portal.
What Are Pages?You will encounter several types of pages in WebCenter Portal. These may be out-of-the-box or user-created.
Out-of-the-box pages in WebCenter Portal include the following page types:
• System pages are utility pages, such as the Login page and the Documentspage. System pages are prepopulated with input fields and boilerplate text.System pages are managed by system administrators.
• Business role pages are role-based pages that can be populated with informationof relevance to a particular business role, like salesperson, accountant, ormarketing associate. You can push business role pages into the Home portalviews of those who are assigned a particular role. Business role pages aremanaged by the system administrator.
No matter how your portal is structured, there is always a need for new pages besidesthose that are available out-of-the-box. You and other WebCenter Portal users cancreate new pages to meet your needs:
• Personal pages are pages you create for your own exclusive use in the Homeportal. By default, personal pages can be seen in the Home portal only by you (theperson who created them), but you can also allow others to see your personalpages. For more information about personal pages, see Creating and ManagingPersonal Pages. While you are primarily responsible for managing the content ofyour personal pages, a system administrator has the authority to administer allpersonal pages.
• Portal pages are intended for use by a wider audience. They may serve all usersof your portal or a limited group of users. For example:
– The portal manager may create pages that are designed to contribute to theknowledge base of the portal. Typically, these are made available to allmembers of the portal.
– A portal member may selectively expose a portal page for their own use or forsharing with other selected portal members. While such pages may not beexposed to all portal members, a portal manager has the authority toadminister all portal pages.
Anyone with permissions to create pages can create portal pages.
You can change your personal view of a page by rearranging items, expanding orcollapsing viewers, and resizing areas.
Portal pages can have any number of subpages and page variants, which areoptimized for display on other devices, such as tablets or mobile phones.
What Are Portal Components?As you use WebCenter Portal, you will work with elements on the pages. Theseelements are many and varied, and are collectively referred to as portal components.
Chapter 1WebCenter Portal Concepts
1-4
Portal components include views/viewers, portlets, content containers, and other typesof resources such as images and links.
What Are Portal Tools and Services?WebCenter Portal offers many tools and services that allow you to collaborate andcommunicate with other WebCenter Portal users. If WebCenter Portal is installed andconfigured correctly and your system administrator has set up valid connections to therequired external back-end servers, tools and services are available for use inWebCenter Portal.
Tools and services can be exposed on their own page in a portal with a separatelyaddressable URL, or as one of many components on a page. Tools and servicesinclude: documents, events, tags, instant messaging and presence, links, mail, notes,and notifications.
Basic WebCenter Portal TasksThis section provides an overview of the tasks that knowledge workers typicallyperform in WebCenter Portal. These tasks are described step-by-step in the chaptersof this guide:
• Where Do I Start?
• Working with Portals and Pages
• Connecting and Collaborating with Other Users
• Adding Content to a Portal
• Staying Informed
• Staying Organized
Where Do I Start?Getting Started information and tasks are covered in the following chapters:
• Exploring WebCenter Portal
• Searching for Information with Elasticsearch
• Managing Your Favorites
• Managing Your Profile
• Setting Your Personal Preferences
• Using WebCenter Portal Impersonation
Working with Portals and PagesWorking with Portals and Pages information and tasks are covered in the followingchapters:
• Working In the Home Portal
• Creating and Managing Personal Pages
• Exploring Portals
Chapter 1Basic WebCenter Portal Tasks
1-5
Connecting and Collaborating with Other UsersConnecting and Collaborating with Other Users information and tasks are covered inthe following chapters:
• Managing Your Contacts
• Using Instant Messaging and Presence Viewer
• Sending and Viewing Mail
• Working with Feedback and the Message Board
• Liking, Commenting On, and Sharing Items
• Viewing and Participating in Discussions
Adding Content to a PortalAdding Content to a Portal information and tasks are covered in the following chapters:
• Introduction to Adding Content to a Portal
• Contributing and Publishing Content
• Adding and Managing Documents
• Working with Wikis
• Working with Blogs
Staying InformedStaying Informed information and tasks are covered in the following chapters:
• Getting Notified When Things Change
• Tracking Portal Activities
• Working with Announcements
• Monitoring RSS Feeds
Staying OrganizedStaying Organized information and tasks are covered in the following chapters:
• Working with Calendars and Events
• Managing Your Notes
• Working with Lists
• Linking Information
• Working with Tags
Chapter 1Basic WebCenter Portal Tasks
1-6
2Exploring WebCenter Portal
Get started in WebCenter Portal by registering, working in the portal browser,searching, saving favorites, setting preferences, and accessing help.
Permissions:
The tasks described in this chapter are available to any WebCenter Portaluser minimally assigned the role Authenticated-User; that is, any user whois logged in.
Note:
• If you are using Internet Explorer, turn off Compatibility Mode beforetrying to access WebCenter Portal. In Internet Explorer, from the Toolsmenu, select Compatibility View Settings. In the Compatibility ViewSettings dialog, deselect all the options, and click Close.
• WebCenter Portal supports only single browser tab or window viewing. Itwill not function properly if you try to view WebCenter Portal in multiplebrowser tabs or windows simultaneously.
Topics:
• Registering Yourself with WebCenter Portal
• Working In the Portal Browser
• Searching WebCenter Portal
• Saving Favorite Web Pages
• Working with Your Profile
• Setting Preferences
• Accessing WebCenter Portal Online Help
Registering Yourself with WebCenter PortalYour system administrator may enable self-registration with WebCenter Portal. Thisallows you to create your own login credentials to become aWebCenter Portalauthenticated user. The privileges of authentication are many: your own view of theHome portal, access to other features based on your assigned user role, a broaderrange of available interactive features, to name a few.
2-1
Note:
Whether self-registration is available depends on how your systemadministrator configures the application.
To register yourself as a WebCenter Portal user:
1. Open WebCenter Portal.
For example:
http://host:port/webcenter
Where host:port refers to the host name and port number of the system whereWebCenter Portal is installed. By default, WebCenter Portal is installed on port8888.
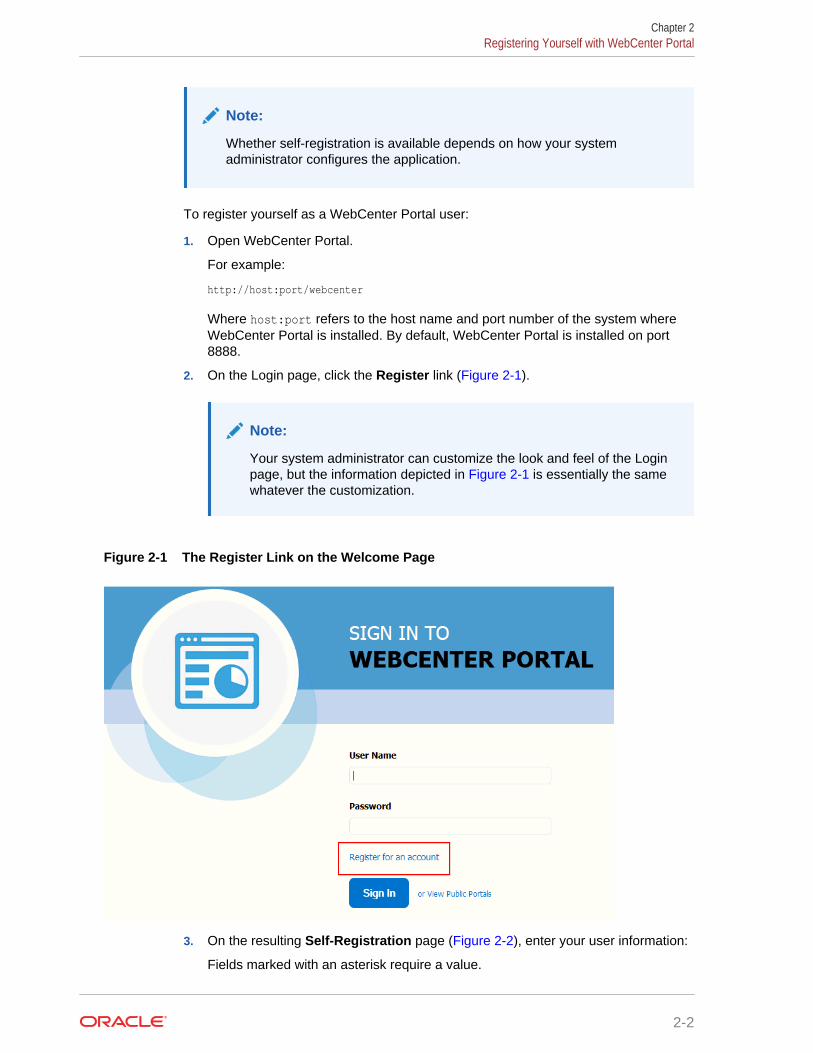
2. On the Login page, click the Register link (Figure 2-1).
Note:
Your system administrator can customize the look and feel of the Loginpage, but the information depicted in Figure 2-1 is essentially the samewhatever the customization.
Figure 2-1 The Register Link on the Welcome Page
3. On the resulting Self-Registration page (Figure 2-2), enter your user information:
Fields marked with an asterisk require a value.
Chapter 2Registering Yourself with WebCenter Portal
2-2
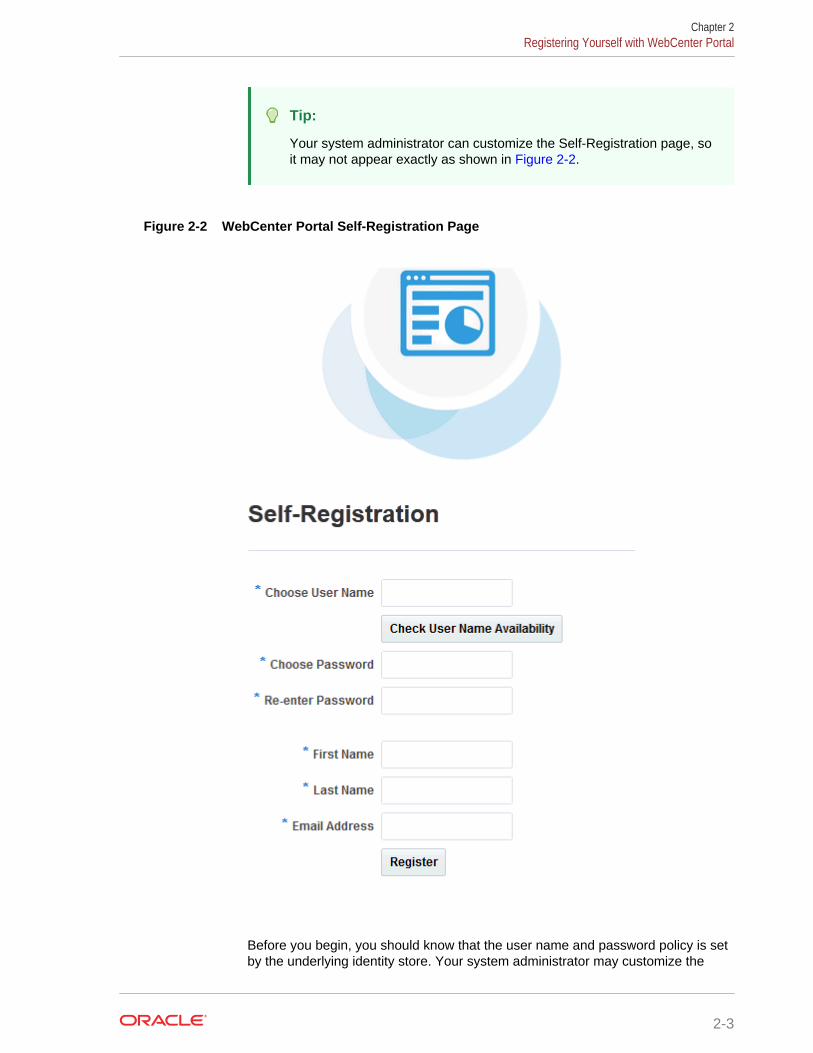
Tip:
Your system administrator can customize the Self-Registration page, soit may not appear exactly as shown in Figure 2-2.
Figure 2-2 WebCenter Portal Self-Registration Page
Before you begin, you should know that the user name and password policy is setby the underlying identity store. Your system administrator may customize the
Chapter 2Registering Yourself with WebCenter Portal
2-3
Self-Registration page to include information that explains your organization'suser name and password policy.
a. Enter your preferred user name in the Choose User Name field.
Note:
If your company uses email addresses as user names, enter youremail address.
b. Click Check User Name Availability to ensure the uniqueness of yourchosen user name.
If the name you entered is in use, provide another user name and test that it isunique.
c. Provide a password in the Choose Password field.
d. Reenter the password in the Re-enter Password field.
e. Enter your first name in the First Name field.
f. Enter your last name (that is, your surname) in the Last Name field.
g. Enter your company email address in the Email Address field.
Note:
You can create only one user account per email address.
4. Click Register. If you experience no response when you attempt to register withWebCenter Portal, refresh your browser and try again.
If the data you entered is accepted, a log-in dialog opens, enabling you to log in toWebCenter Portal.
Note:
By default, if a user name with the same mail ID exists, when you clickRegister, a dialog opens informing you that the mail ID exists. Thedialog includes a button for sending a message to the mail ID associatedwith the existing user name.
Because you are not yet authenticated, your message is sent to a publicmail box, provided your system administrator has configured public mailcredentials.
Note that this default behavior may be overridden by customizationsprovided by your portal developers.
Chapter 2Registering Yourself with WebCenter Portal
2-4
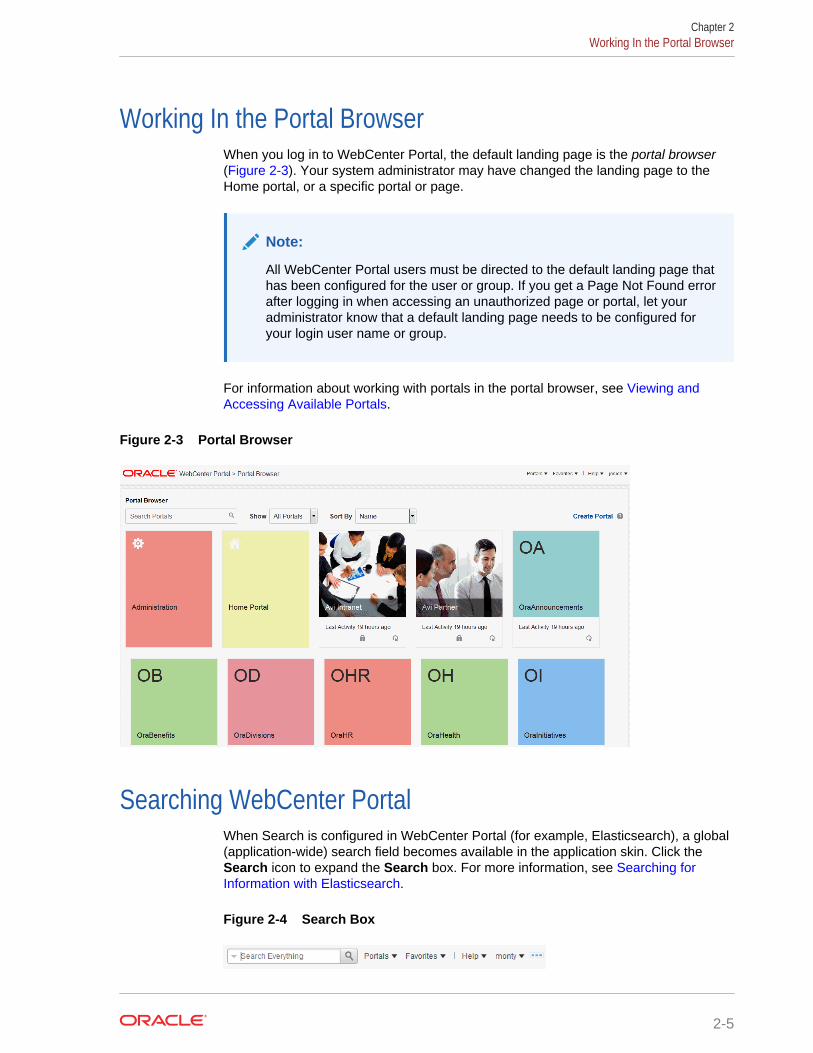
Working In the Portal BrowserWhen you log in to WebCenter Portal, the default landing page is the portal browser(Figure 2-3). Your system administrator may have changed the landing page to theHome portal, or a specific portal or page.
Note:
All WebCenter Portal users must be directed to the default landing page thathas been configured for the user or group. If you get a Page Not Found errorafter logging in when accessing an unauthorized page or portal, let youradministrator know that a default landing page needs to be configured foryour login user name or group.
For information about working with portals in the portal browser, see Viewing andAccessing Available Portals.
Figure 2-3 Portal Browser
Searching WebCenter PortalWhen Search is configured in WebCenter Portal (for example, Elasticsearch), a global(application-wide) search field becomes available in the application skin. Click theSearch icon to expand the Search box. For more information, see Searching forInformation with Elasticsearch.
Figure 2-4 Search Box
Chapter 2Working In the Portal Browser
2-5
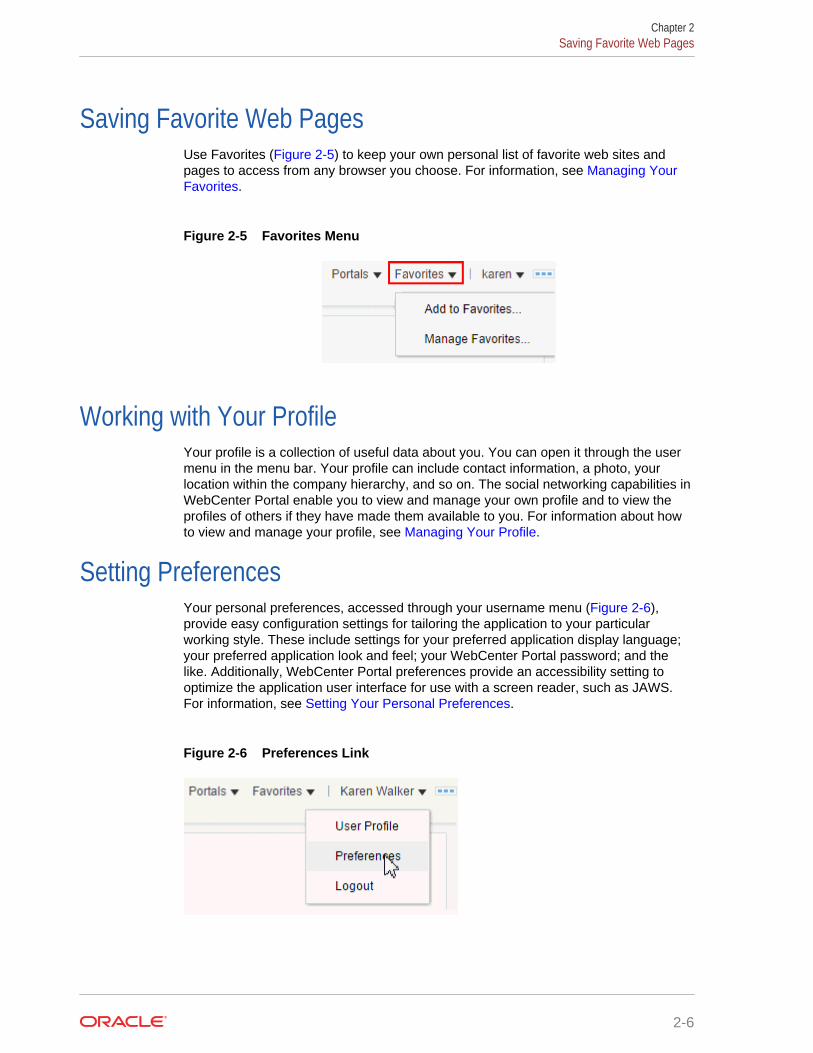
Saving Favorite Web PagesUse Favorites (Figure 2-5) to keep your own personal list of favorite web sites andpages to access from any browser you choose. For information, see Managing YourFavorites.
Figure 2-5 Favorites Menu
Working with Your ProfileYour profile is a collection of useful data about you. You can open it through the usermenu in the menu bar. Your profile can include contact information, a photo, yourlocation within the company hierarchy, and so on. The social networking capabilities inWebCenter Portal enable you to view and manage your own profile and to view theprofiles of others if they have made them available to you. For information about howto view and manage your profile, see Managing Your Profile.
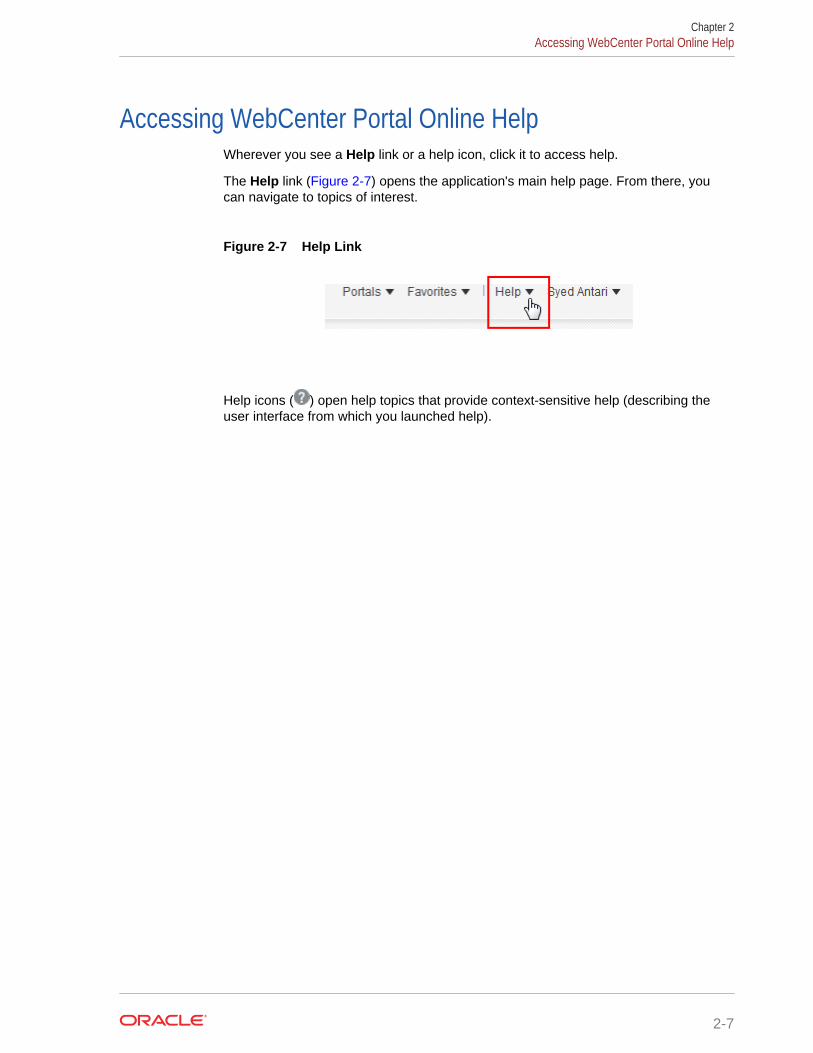
Setting PreferencesYour personal preferences, accessed through your username menu (Figure 2-6),provide easy configuration settings for tailoring the application to your particularworking style. These include settings for your preferred application display language;your preferred application look and feel; your WebCenter Portal password; and thelike. Additionally, WebCenter Portal preferences provide an accessibility setting tooptimize the application user interface for use with a screen reader, such as JAWS.For information, see Setting Your Personal Preferences.
Figure 2-6 Preferences Link
Chapter 2Saving Favorite Web Pages
2-6
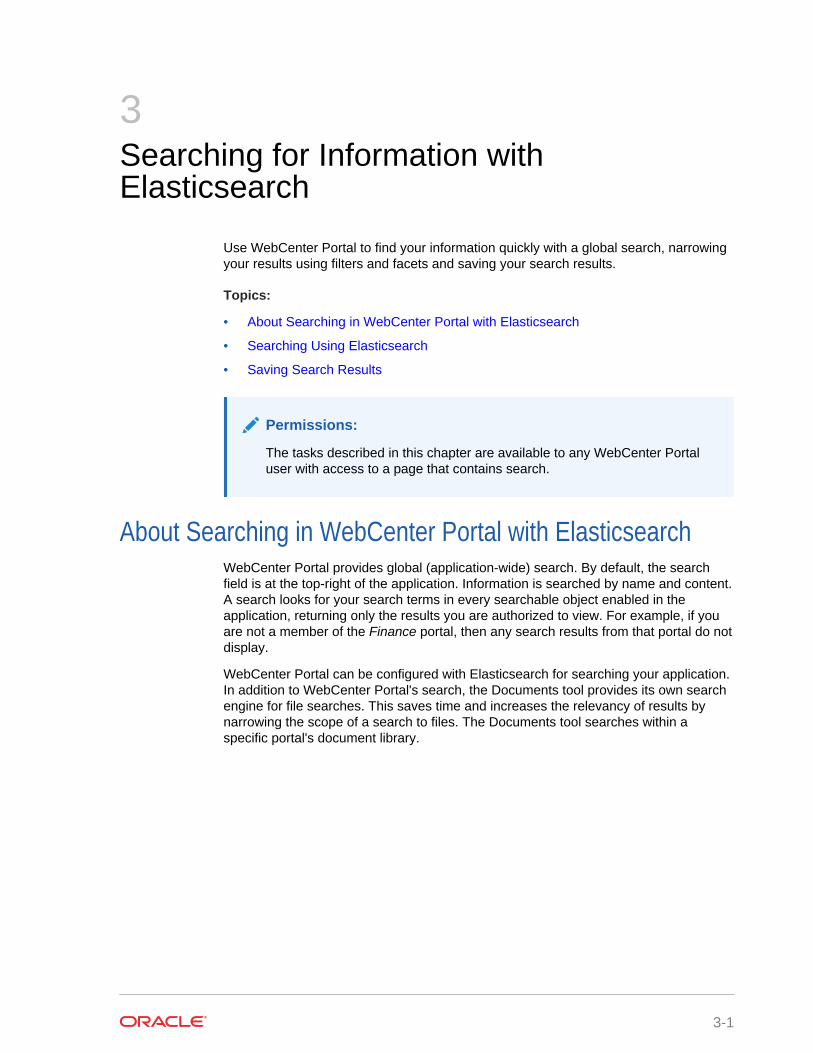
Accessing WebCenter Portal Online HelpWherever you see a Help link or a help icon, click it to access help.
The Help link (Figure 2-7) opens the application's main help page. From there, youcan navigate to topics of interest.
Figure 2-7 Help Link
Help icons ( ) open help topics that provide context-sensitive help (describing theuser interface from which you launched help).
Chapter 2Accessing WebCenter Portal Online Help
2-7
3Searching for Information withElasticsearch
Use WebCenter Portal to find your information quickly with a global search, narrowingyour results using filters and facets and saving your search results.
Topics:
• About Searching in WebCenter Portal with Elasticsearch
• Searching Using Elasticsearch
• Saving Search Results
Permissions:
The tasks described in this chapter are available to any WebCenter Portaluser with access to a page that contains search.
About Searching in WebCenter Portal with ElasticsearchWebCenter Portal provides global (application-wide) search. By default, the searchfield is at the top-right of the application. Information is searched by name and content.A search looks for your search terms in every searchable object enabled in theapplication, returning only the results you are authorized to view. For example, if youare not a member of the Finance portal, then any search results from that portal do notdisplay.
WebCenter Portal can be configured with Elasticsearch for searching your application.In addition to WebCenter Portal's search, the Documents tool provides its own searchengine for file searches. This saves time and increases the relevancy of results bynarrowing the scope of a search to files. The Documents tool searches within aspecific portal's document library.
3-1
Note:
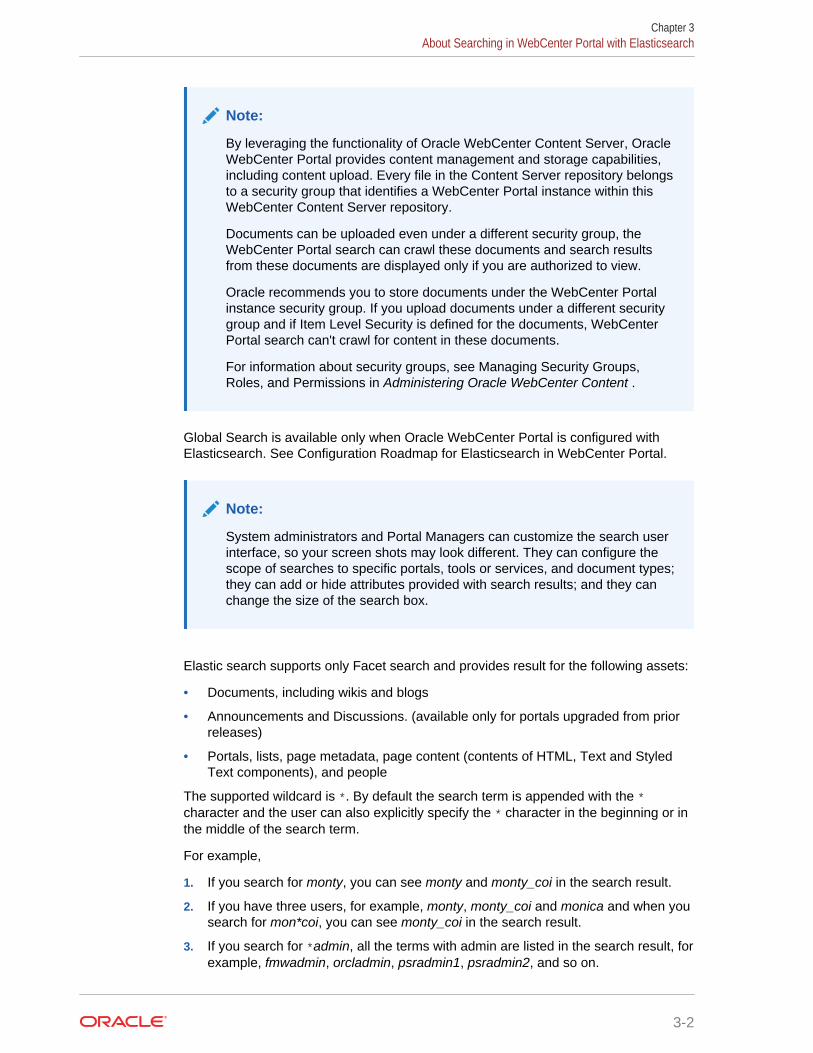
By leveraging the functionality of Oracle WebCenter Content Server, OracleWebCenter Portal provides content management and storage capabilities,including content upload. Every file in the Content Server repository belongsto a security group that identifies a WebCenter Portal instance within thisWebCenter Content Server repository.
Documents can be uploaded even under a different security group, theWebCenter Portal search can crawl these documents and search resultsfrom these documents are displayed only if you are authorized to view.
Oracle recommends you to store documents under the WebCenter Portalinstance security group. If you upload documents under a different securitygroup and if Item Level Security is defined for the documents, WebCenterPortal search can't crawl for content in these documents.
For information about security groups, see Managing Security Groups,Roles, and Permissions in Administering Oracle WebCenter Content .
Global Search is available only when Oracle WebCenter Portal is configured withElasticsearch. See Configuration Roadmap for Elasticsearch in WebCenter Portal.
Note:
System administrators and Portal Managers can customize the search userinterface, so your screen shots may look different. They can configure thescope of searches to specific portals, tools or services, and document types;they can add or hide attributes provided with search results; and they canchange the size of the search box.
Elastic search supports only Facet search and provides result for the following assets:
• Documents, including wikis and blogs
• Announcements and Discussions. (available only for portals upgraded from priorreleases)
• Portals, lists, page metadata, page content (contents of HTML, Text and StyledText components), and people
The supported wildcard is *. By default the search term is appended with the *character and the user can also explicitly specify the * character in the beginning or inthe middle of the search term.
For example,
1. If you search for monty, you can see monty and monty_coi in the search result.
2. If you have three users, for example, monty, monty_coi and monica and when yousearch for mon*coi, you can see monty_coi in the search result.
3. If you search for *admin, all the terms with admin are listed in the search result, forexample, fmwadmin, orcladmin, psradmin1, psradmin2, and so on.
Chapter 3About Searching in WebCenter Portal with Elasticsearch
3-2
We do not recommend searching a term with * character in the beginning.
When you search for a phrase, for example , dare to dream, all results that contain thewords in the phrase are listed ( that is dare, to, dream) and the records that match allthree phrases are also listed higher in the list of results.
Searching Using ElasticsearchYour search environment varies depending on how your system administrator or portalmanager configured search. The way you access search depends on how the portal isdesigned. The application specialist might also provide you with a pretty URL toaccess the page. Elasticsearch supports only Facet search.
This section includes the following topics:
• Running a Global Search with Elasticsearch
• Running Faceted Searches to Narrow Results with Elasticsearch
• Running Filtered Searches to Narrow Results with Elasticsearch
• Running Sorted Searches to Organize Results with Elasticsearch
• Searching Using Custom Attributes in Elasticsearch
Running a Global Search with ElasticsearchTo perform a global search:
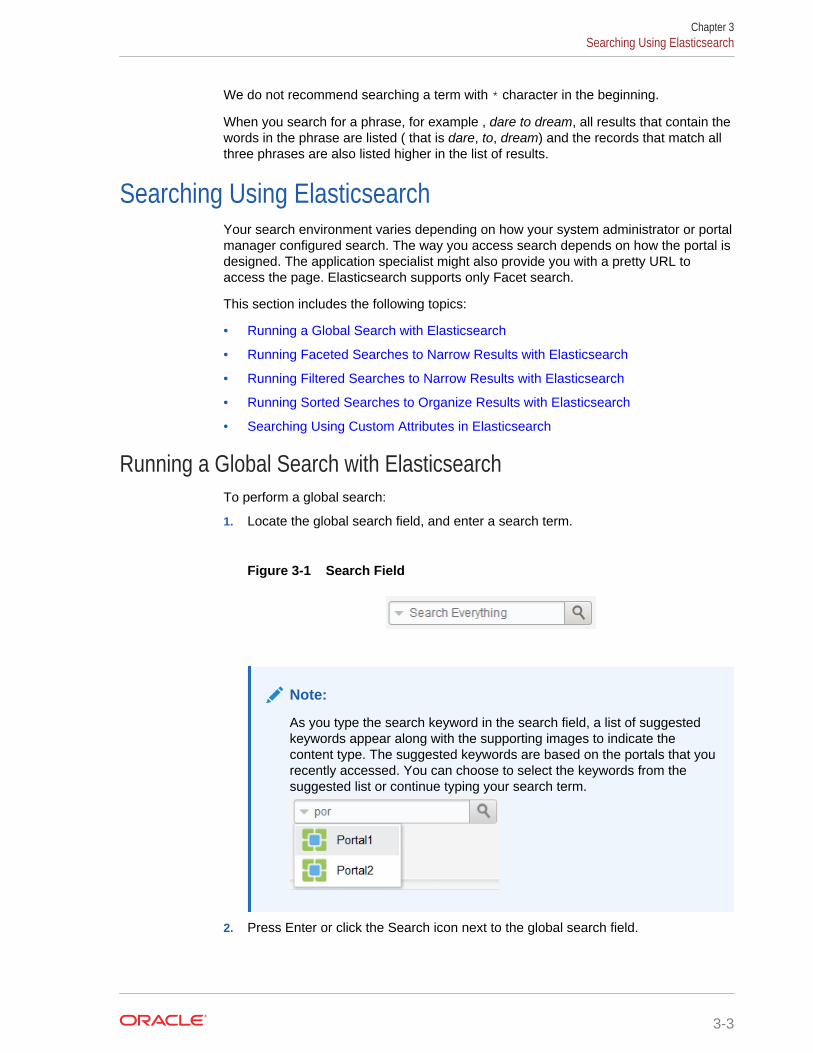
1. Locate the global search field, and enter a search term.
Figure 3-1 Search Field
Note:
As you type the search keyword in the search field, a list of suggestedkeywords appear along with the supporting images to indicate thecontent type. The suggested keywords are based on the portals that yourecently accessed. You can choose to select the keywords from thesuggested list or continue typing your search term.
2. Press Enter or click the Search icon next to the global search field.
Chapter 3Searching Using Elasticsearch
3-3
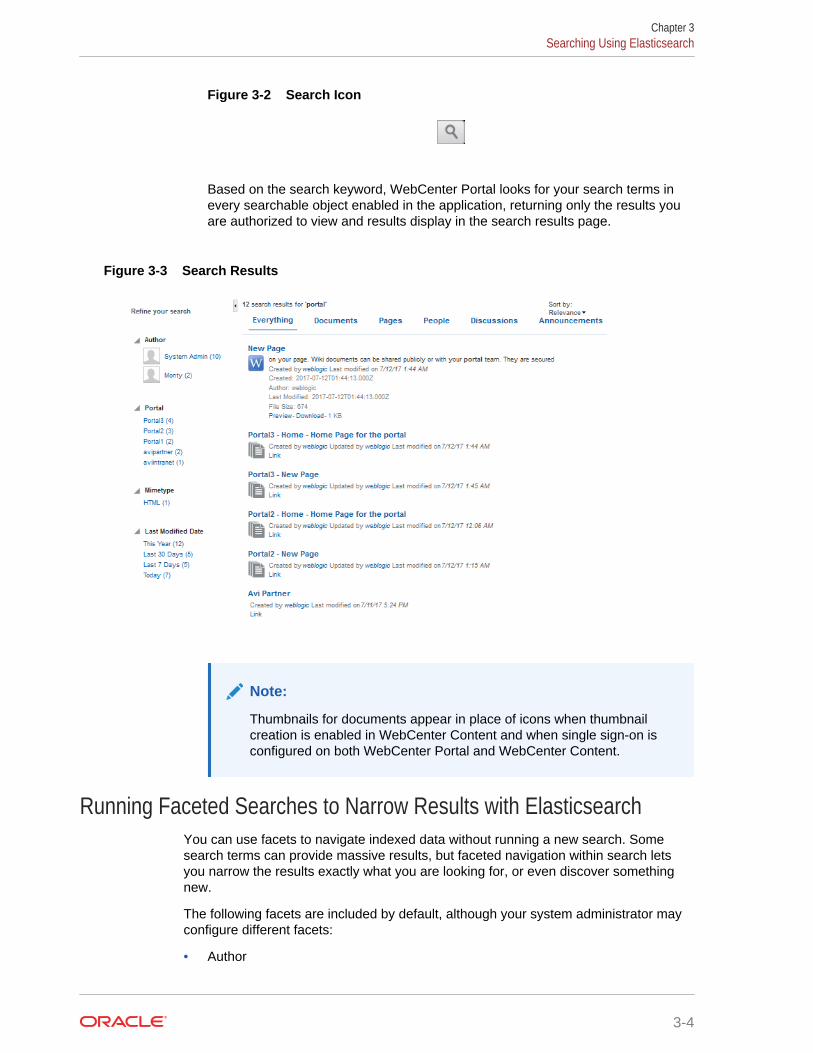
Figure 3-2 Search Icon
Based on the search keyword, WebCenter Portal looks for your search terms inevery searchable object enabled in the application, returning only the results youare authorized to view and results display in the search results page.
Figure 3-3 Search Results
Note:
Thumbnails for documents appear in place of icons when thumbnailcreation is enabled in WebCenter Content and when single sign-on isconfigured on both WebCenter Portal and WebCenter Content.
Running Faceted Searches to Narrow Results with ElasticsearchYou can use facets to navigate indexed data without running a new search. Somesearch terms can provide massive results, but faceted navigation within search letsyou narrow the results exactly what you are looking for, or even discover somethingnew.
The following facets are included by default, although your system administrator mayconfigure different facets:
• Author
Chapter 3Searching Using Elasticsearch
3-4
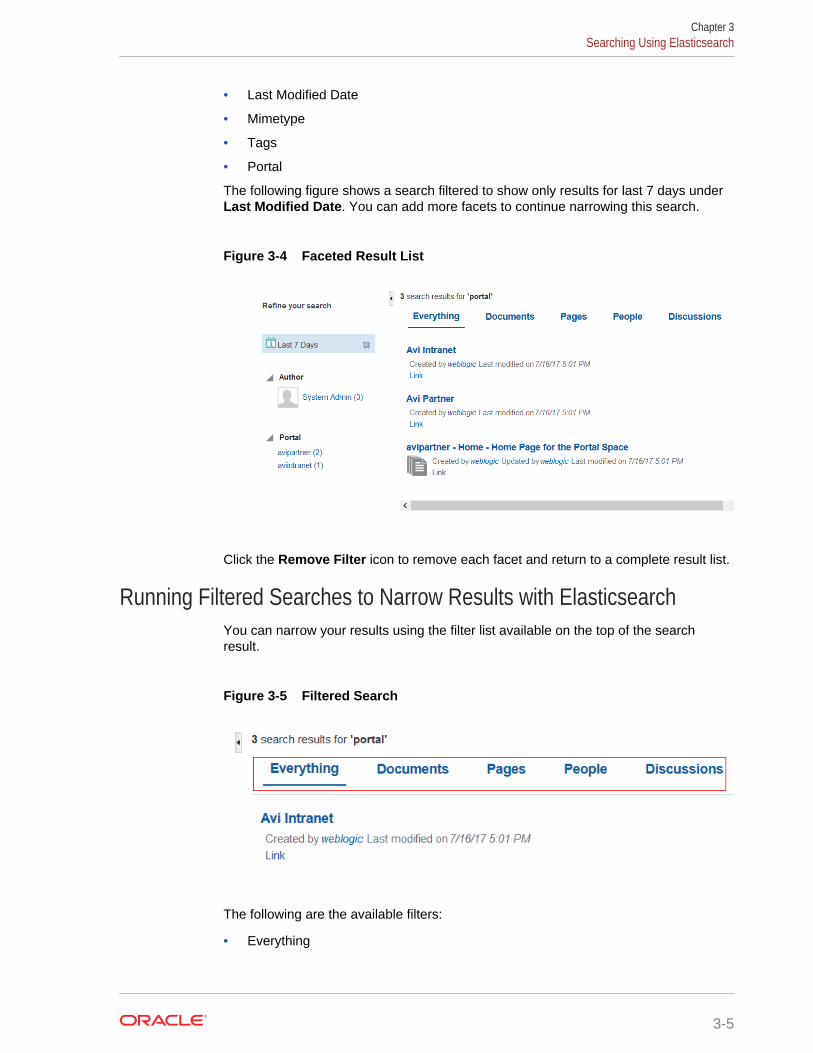
• Last Modified Date
• Mimetype
• Tags
• Portal
The following figure shows a search filtered to show only results for last 7 days underLast Modified Date. You can add more facets to continue narrowing this search.
Figure 3-4 Faceted Result List
Click the Remove Filter icon to remove each facet and return to a complete result list.
Running Filtered Searches to Narrow Results with ElasticsearchYou can narrow your results using the filter list available on the top of the searchresult.
Figure 3-5 Filtered Search
The following are the available filters:
• Everything
Chapter 3Searching Using Elasticsearch
3-5
• Documents
• Pages
• People
• Portals
• Blogs
• Discussions
• Announcements
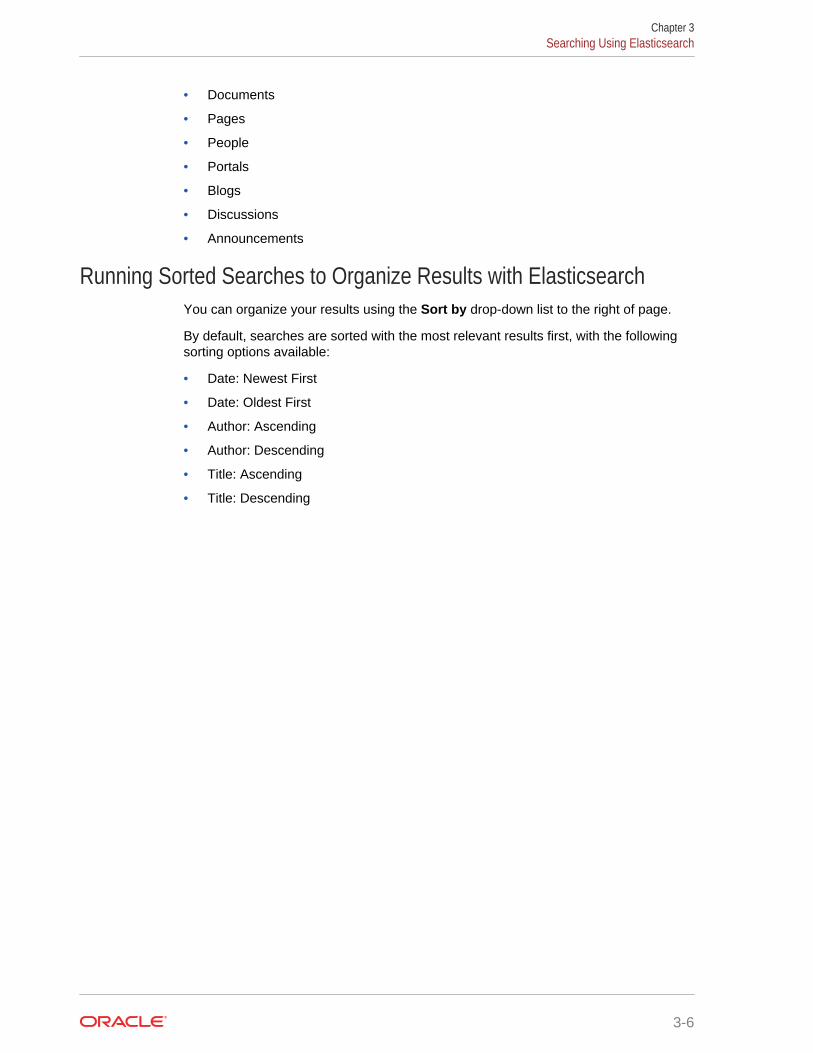
Running Sorted Searches to Organize Results with ElasticsearchYou can organize your results using the Sort by drop-down list to the right of page.
By default, searches are sorted with the most relevant results first, with the followingsorting options available:
• Date: Newest First
• Date: Oldest First
• Author: Ascending
• Author: Descending
• Title: Ascending
• Title: Descending
Chapter 3Searching Using Elasticsearch
3-6
Figure 3-6 Sorting in Search
Searching Using Custom Attributes in ElasticsearchYou can enrich your search results using the custom search attributes available inWebCenter Portal. Ensure that your system administrator has selected the requiredcustom search attributes in the Search settings in WebCenter Portal administration. Anattribute displays in the search results only if there is a value for it.
The following figure shows search results that include the custom attributes:
Chapter 3Searching Using Elasticsearch
3-7

Figure 3-7 Search Results Including Custom Attributes
Saving Search ResultsAfter you have performed a search, you can save it so that you can run it again laterwithout having to re-enter the search terms. You can also share the saved search withportals.
Oracle WebCenter Portal supports the following task flows to view the saved searchesin the portal page. You can see these task flows in your portal page, if your portalmanager has enabled it for you. See Saving the Search Results in Building Portalswith Oracle WebCenter Portal.
• All Saved Searches: Use to view the available saved searches in a portal. In thistask flow, portal users can view, and run the saved searches.
• Saved Searches: Every saved search that is available in the portal is stored in thisfolder as a task flow. Portal mangers enable this task flow to view the searchresults directly on a portal page.
Topics:
• Saving a Search
• Running a Saved Search
• Sharing a Saved Search
• Viewing the List of Saved Searches in Your Portal
• Personalizing a Saved Search
• Deleting a Saved Search
Saving a SearchIf you want to run the searches frequently, create saved searches to save time.
To create a saved search:
Chapter 3Saving Search Results
3-8
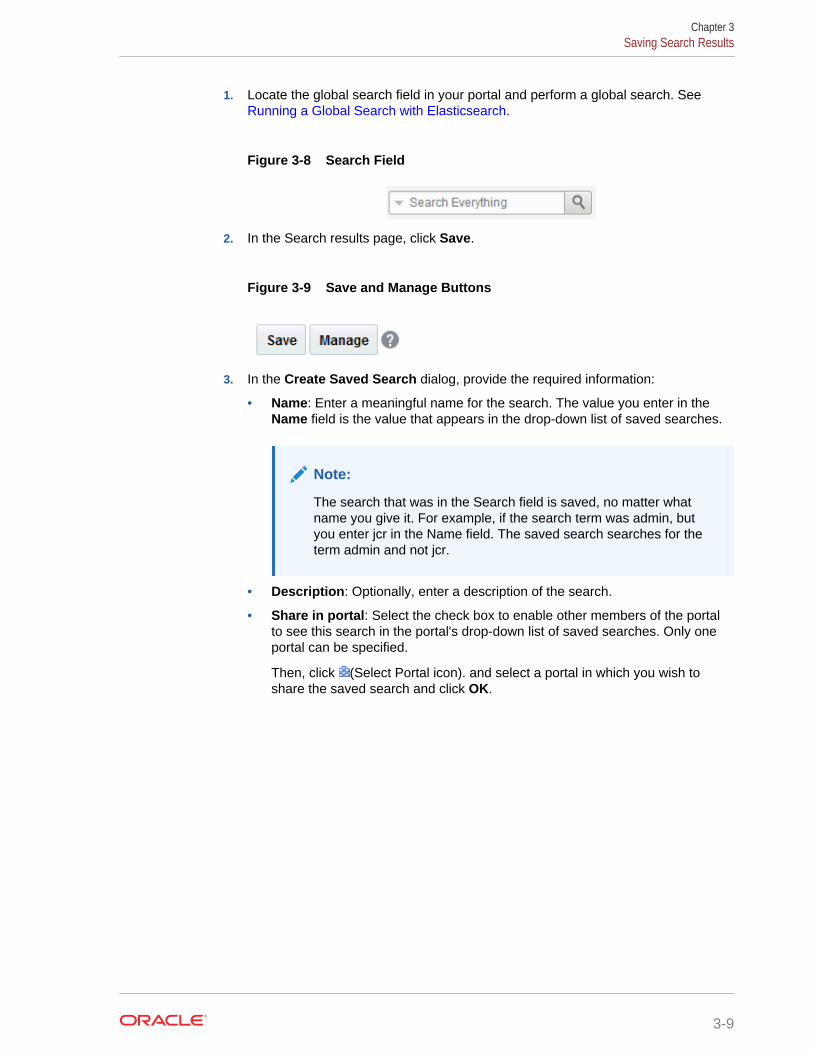
1. Locate the global search field in your portal and perform a global search. See Running a Global Search with Elasticsearch.
Figure 3-8 Search Field
2. In the Search results page, click Save.
Figure 3-9 Save and Manage Buttons
3. In the Create Saved Search dialog, provide the required information:
• Name: Enter a meaningful name for the search. The value you enter in theName field is the value that appears in the drop-down list of saved searches.
Note:
The search that was in the Search field is saved, no matter whatname you give it. For example, if the search term was admin, butyou enter jcr in the Name field. The saved search searches for theterm admin and not jcr.
• Description: Optionally, enter a description of the search.
• Share in portal: Select the check box to enable other members of the portalto see this search in the portal's drop-down list of saved searches. Only oneportal can be specified.
Then, click (Select Portal icon). and select a portal in which you wish toshare the saved search and click OK.
Chapter 3Saving Search Results
3-9
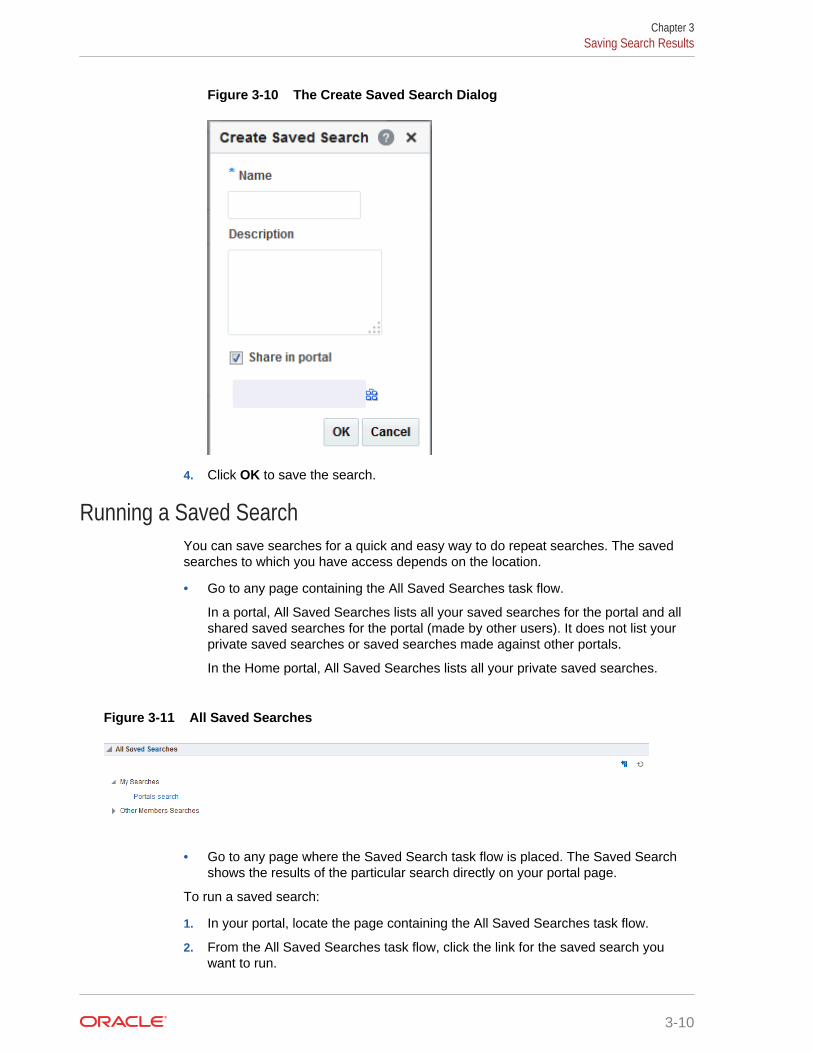
Figure 3-10 The Create Saved Search Dialog
4. Click OK to save the search.
Running a Saved SearchYou can save searches for a quick and easy way to do repeat searches. The savedsearches to which you have access depends on the location.
• Go to any page containing the All Saved Searches task flow.
In a portal, All Saved Searches lists all your saved searches for the portal and allshared saved searches for the portal (made by other users). It does not list yourprivate saved searches or saved searches made against other portals.
In the Home portal, All Saved Searches lists all your private saved searches.
Figure 3-11 All Saved Searches
• Go to any page where the Saved Search task flow is placed. The Saved Searchshows the results of the particular search directly on your portal page.
To run a saved search:
1. In your portal, locate the page containing the All Saved Searches task flow.
2. From the All Saved Searches task flow, click the link for the saved search youwant to run.
Chapter 3Saving Search Results
3-10
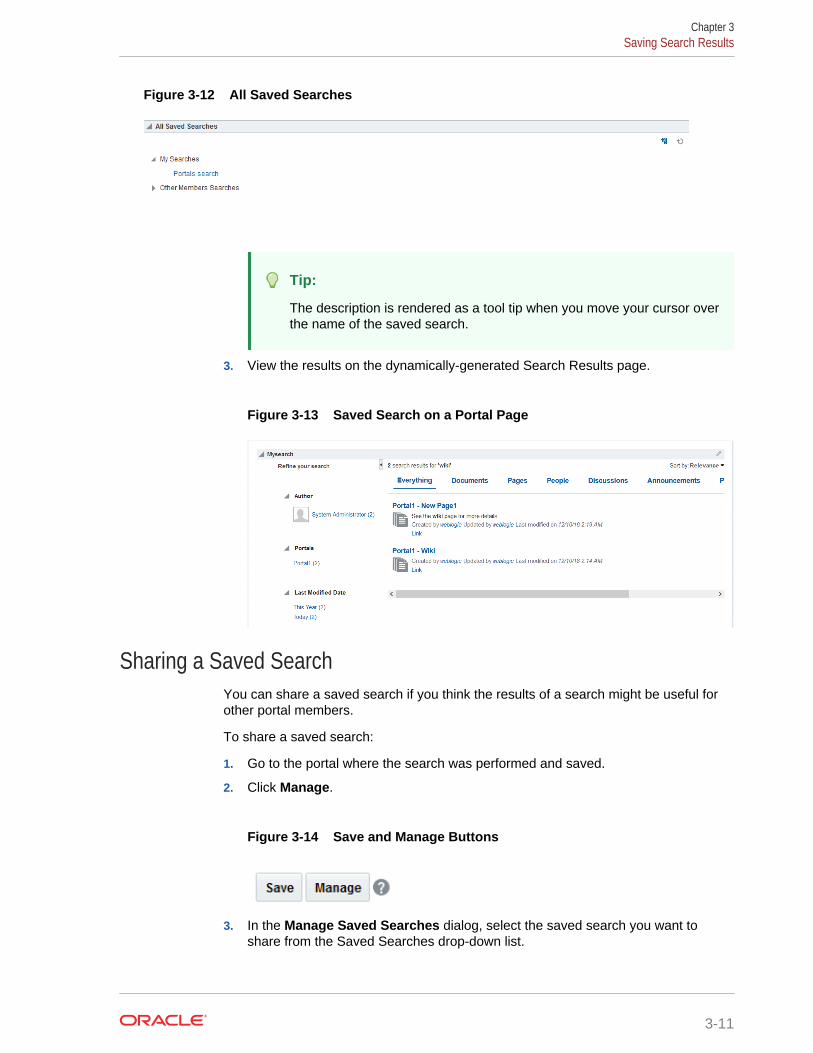
Figure 3-12 All Saved Searches
Tip:
The description is rendered as a tool tip when you move your cursor overthe name of the saved search.
3. View the results on the dynamically-generated Search Results page.
Figure 3-13 Saved Search on a Portal Page
Sharing a Saved SearchYou can share a saved search if you think the results of a search might be useful forother portal members.
To share a saved search:
1. Go to the portal where the search was performed and saved.
2. Click Manage.
Figure 3-14 Save and Manage Buttons
3. In the Manage Saved Searches dialog, select the saved search you want toshare from the Saved Searches drop-down list.
Chapter 3Saving Search Results
3-11
4. Select the Share in portal check box to enable other members of the portal to seethis search in the portal's drop-down list of saved searches. Only one portal can bespecified.
5. Click (Select Portal icon). From the Select a Portal dialog, select a portal inwhich you wish to share and click OK.
The saved search is now available for other members of the portal to run. Thesearch is listed in the Saved Searches list for all portal members and in the AllSaved Searches list, if one exists.
6. Click Apply, then OK.
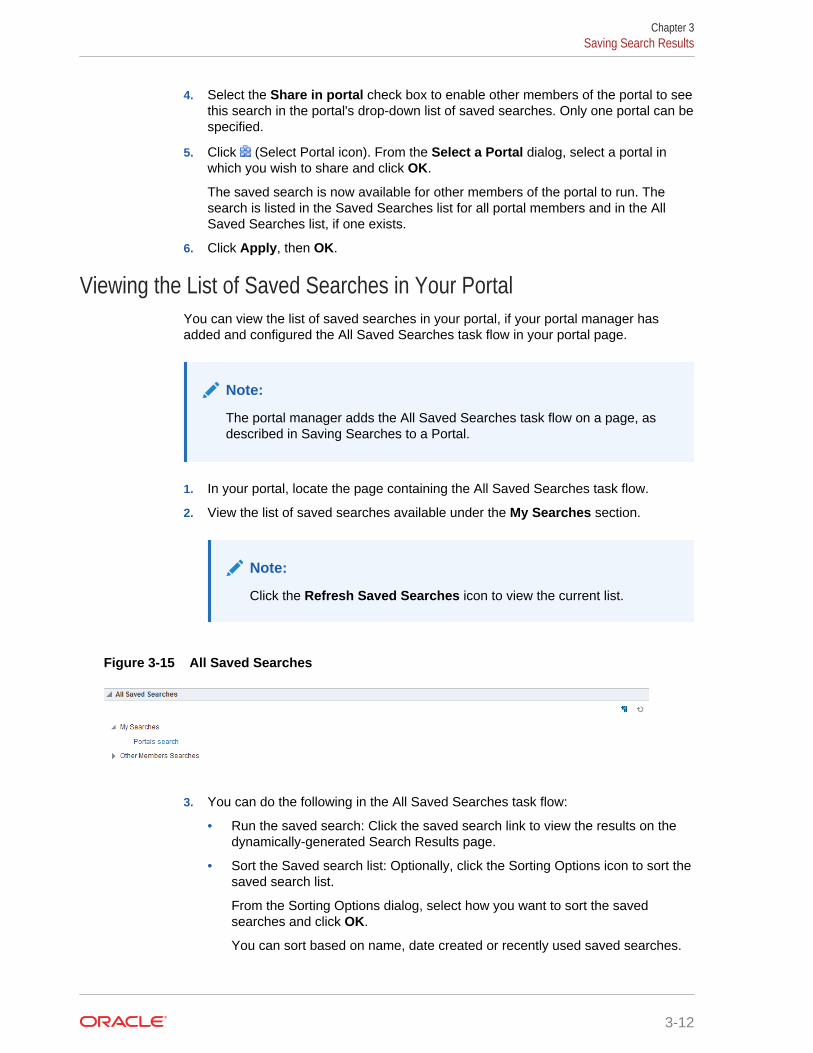
Viewing the List of Saved Searches in Your PortalYou can view the list of saved searches in your portal, if your portal manager hasadded and configured the All Saved Searches task flow in your portal page.
Note:
The portal manager adds the All Saved Searches task flow on a page, asdescribed in Saving Searches to a Portal.
1. In your portal, locate the page containing the All Saved Searches task flow.
2. View the list of saved searches available under the My Searches section.
Note:
Click the Refresh Saved Searches icon to view the current list.
Figure 3-15 All Saved Searches
3. You can do the following in the All Saved Searches task flow:
• Run the saved search: Click the saved search link to view the results on thedynamically-generated Search Results page.
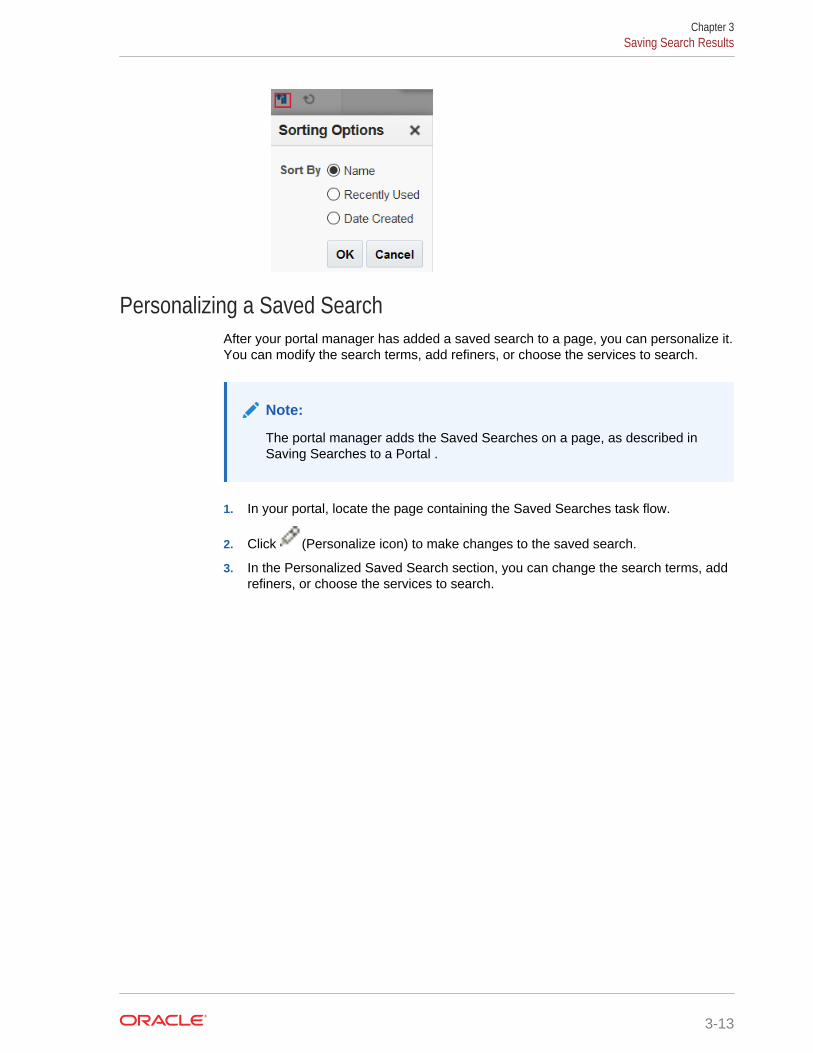
• Sort the Saved search list: Optionally, click the Sorting Options icon to sort thesaved search list.
From the Sorting Options dialog, select how you want to sort the savedsearches and click OK.
You can sort based on name, date created or recently used saved searches.
Chapter 3Saving Search Results
3-12
Personalizing a Saved SearchAfter your portal manager has added a saved search to a page, you can personalize it.You can modify the search terms, add refiners, or choose the services to search.
Note:
The portal manager adds the Saved Searches on a page, as described in Saving Searches to a Portal .
1. In your portal, locate the page containing the Saved Searches task flow.
2. Click (Personalize icon) to make changes to the saved search.
3. In the Personalized Saved Search section, you can change the search terms, addrefiners, or choose the services to search.
Chapter 3Saving Search Results
3-13
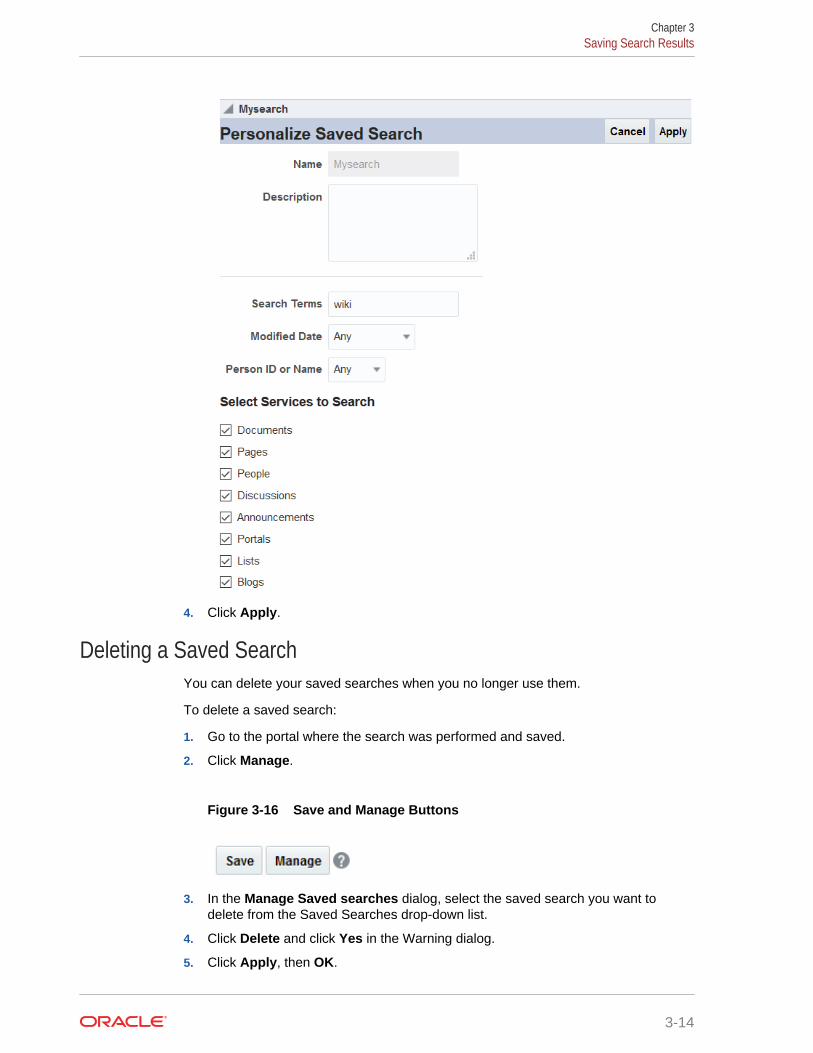
4. Click Apply.
Deleting a Saved SearchYou can delete your saved searches when you no longer use them.
To delete a saved search:
1. Go to the portal where the search was performed and saved.
2. Click Manage.
Figure 3-16 Save and Manage Buttons
3. In the Manage Saved searches dialog, select the saved search you want todelete from the Saved Searches drop-down list.
4. Click Delete and click Yes in the Warning dialog.
5. Click Apply, then OK.
Chapter 3Saving Search Results
3-14
4Managing Your Profile
Your WebCenter Portal profile is a collection of useful data about you, such as contactinformation, a photo, and your location within the company hierarchy.
Note:
The social networking capabilities in WebCenter Portal enable you to viewand manage your own profile and to view the profiles of others if they havemade them available to you. For information on viewing other users' profiles,see Viewing Another User's Profile.
Permissions:
To perform the tasks in this chapter, you need the application-levelpermission People Connections: Update People Connections Data.
Topics:
• About Profiles
• Viewing a Profile
• Editing Your Profile
• Setting Profile Preferences
About ProfilesConnecting with other users through People Connections gives you access to theirprofiles and gives them access to yours. Your profile can include contact information, astreaming view of the portal activity of your connections, a list of your connections,access to your personal document library, and a map of your location in yourorganization's hierarchy.
You can use your profile preferences to control how much of your profile a connectioncan see. For information about setting your profile preferences, see Setting ProfilePreferences.
Your system administrator can set global defaults that affect what all users may seeand do with their own and other users' profiles (for more information, see ConfiguringProfile in Administering Oracle WebCenter Portal).
Some information included in your profile is pulled from the user database used byWebCenter Portal. Depending on the settings configured by your systemadministrator, you might not see all the information discussed in this chapter and you
4-1

might not be able to edit some of the information when you edit your profile. Becauseyour system administrator can customize the available profile information, thescreenshots provided in the documentation might not match what you see in yourorganization's version of WebCenter Portal.
Note:
• The Profile user interface was updated in 12c (12.2.1). Depending onhow your system administrator configured your installation of WebCenterPortal, you might see the legacy Profile user interface. For informationon the legacy Profile user interface, see Managing Your Profile in User'sGuide for Oracle WebCenter Portal: Spaces for 11g Release 1(11.1.1.7.0).
• Empty fields (fields without any content) do not appear in some profileviews.
Viewing a ProfileYou can view a profile, including your own, by clicking a user name wherever you seeit in WebCenter Portal. Depending on where you click in the portal, you either see abrief, popup view of the user profile or you see a full profile view on the WebCenterPortal Profile page.
For more information, see one of the following sections:
• Profile Popup
• Profile Page
You can also view profile information in one of the following profile views that can beadded to a page in a portal:
• Organization View
• Profile
• Profile Gallery
• Profile Snapshot
Profile PopupYou can view a brief, popup profile view (Figure 4-1) for yourself, one of yourconnections, or a member of a portal to which you have access by clicking a username wherever it appears in the application context.
Chapter 4Viewing a Profile
4-2

Figure 4-1 Profile Popup
In the popup, click Go to Profile to view the user's full profile on the WebCenter PortalProfile page (described next).
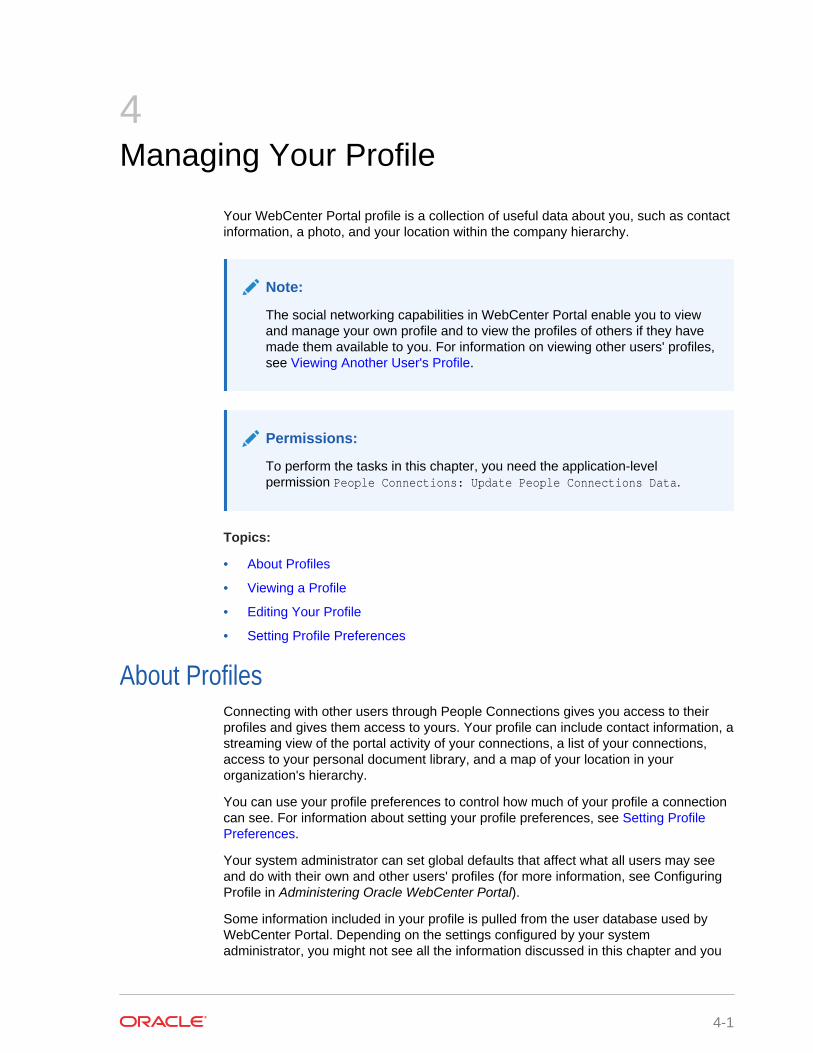
Profile PageYou can view the full details of a user's profile on the WebCenter Portal Profile page(Figure 4-2) by clicking your user name at the top of the application (highlighted in Figure 4-2), or Go to Profile in the profile popup.
Chapter 4Viewing a Profile
4-3
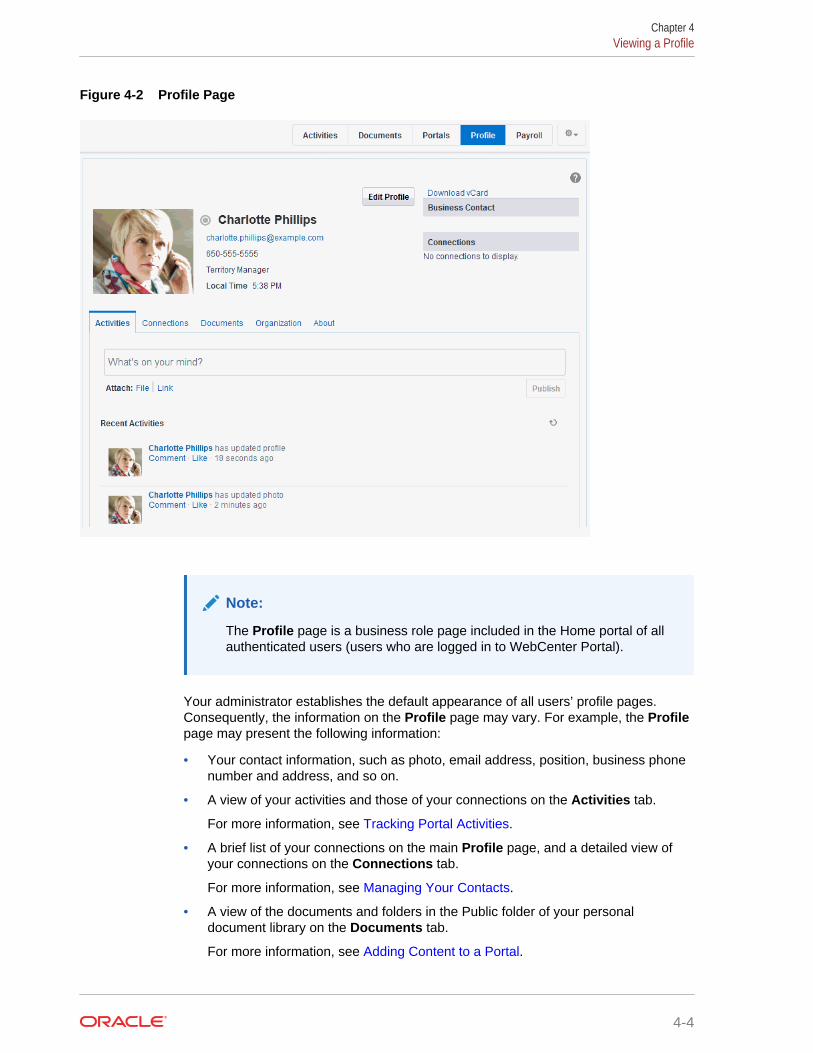
Figure 4-2 Profile Page
Note:
The Profile page is a business role page included in the Home portal of allauthenticated users (users who are logged in to WebCenter Portal).
Your administrator establishes the default appearance of all users’ profile pages.Consequently, the information on the Profile page may vary. For example, the Profilepage may present the following information:
• Your contact information, such as photo, email address, position, business phonenumber and address, and so on.
• A view of your activities and those of your connections on the Activities tab.
For more information, see Tracking Portal Activities.
• A brief list of your connections on the main Profile page, and a detailed view ofyour connections on the Connections tab.
For more information, see Managing Your Contacts.
• A view of the documents and folders in the Public folder of your personaldocument library on the Documents tab.
For more information, see Adding Content to a Portal.
Chapter 4Viewing a Profile
4-4
Note:
You must access the Documents page in the Home portal at least oncebefore accessing the Documents tab in your profile. Accessing theDocuments page in the Home portal initializes the Documents feature. Ifyou do not first access the Documents page in the Home portal, you willsee the following message: "The user does not currently have anypublic documents."
• A chart view of your location within the organization on the Organization tab.
• A view of additional profile details on the About tab.
Figure 4-3 About Tab on Profile Page
• A list of recommended connections.
• A list of your top contributions (your personal documents that you access most).
Note:
The type of information and number of items displayed in under TopContributions can be customized by selecting the Edit (pencil) icon.
Chapter 4Viewing a Profile
4-5
Your system administrator can revise the default Profile business role pages toinclude additional components, remove existing components, and revise the page lookand feel. Consequently, the page described in this guide may be different than theProfile page that you see. However, the basic profile functionality should remain aboutthe same.
Note:
Empty fields (fields without any content) do not appear on the Profile page.
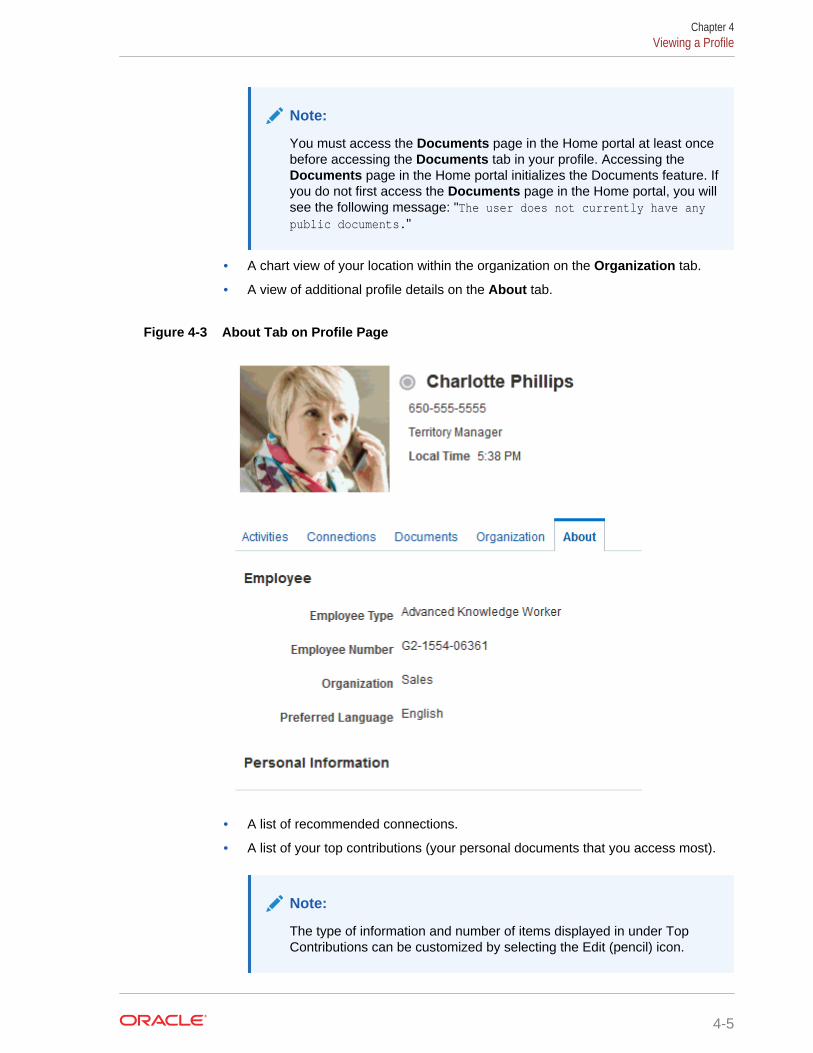
Organization ViewThe Organization View (Figure 4-4) can be added to a portal page to present agraphical depiction of the user's position within the company—that is, a detail of theoverall organization chart. In Organization View, you can click through three views ofthe user's profile information, including contact information; the user's address andcurrent time in the user's locale; and a summary About Me statement. You can alsoexpand the Organization View to show the user's reports or managers.
Figure 4-4 Organization View
ProfileThe Profile viewer (Figure 4-5) can be added to a portal page to display a user's profiledetails. If you are viewing your own profile, the Profile viewer allows you to upload aprofile photo and (if enabled) allows you to edit your profile details.
Chapter 4Viewing a Profile
4-6
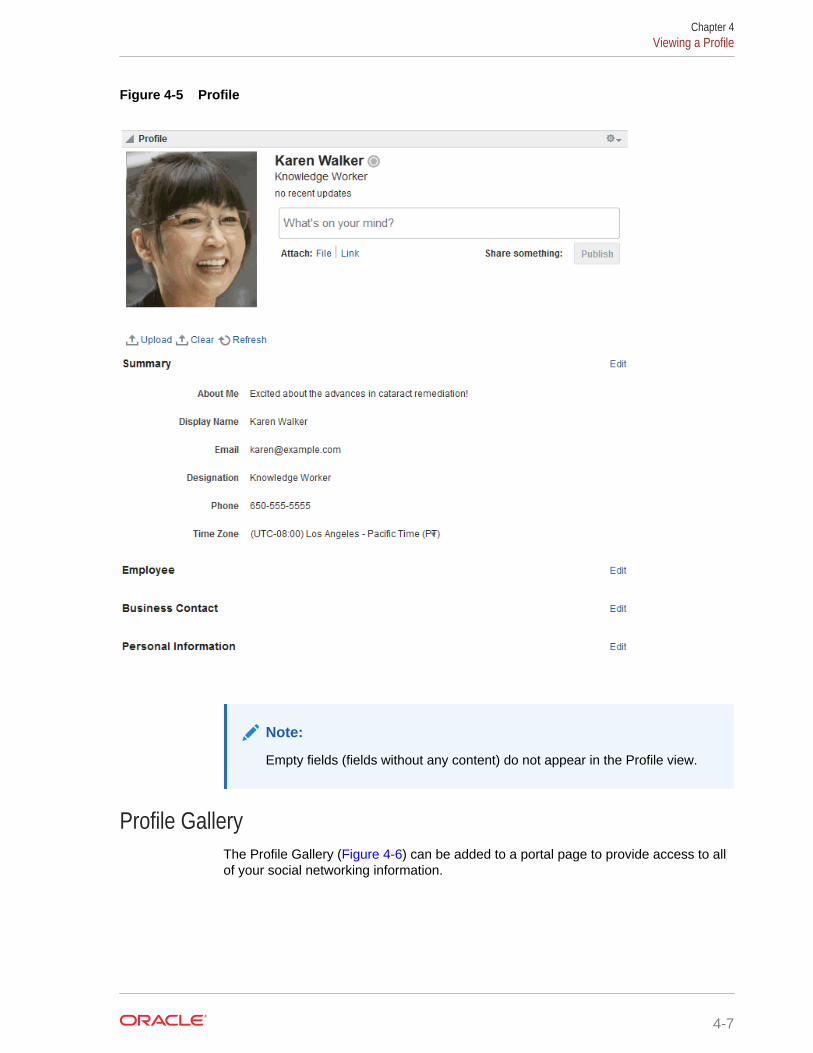
Figure 4-5 Profile
Note:
Empty fields (fields without any content) do not appear in the Profile view.
Profile GalleryThe Profile Gallery (Figure 4-6) can be added to a portal page to provide access to allof your social networking information.
Chapter 4Viewing a Profile
4-7
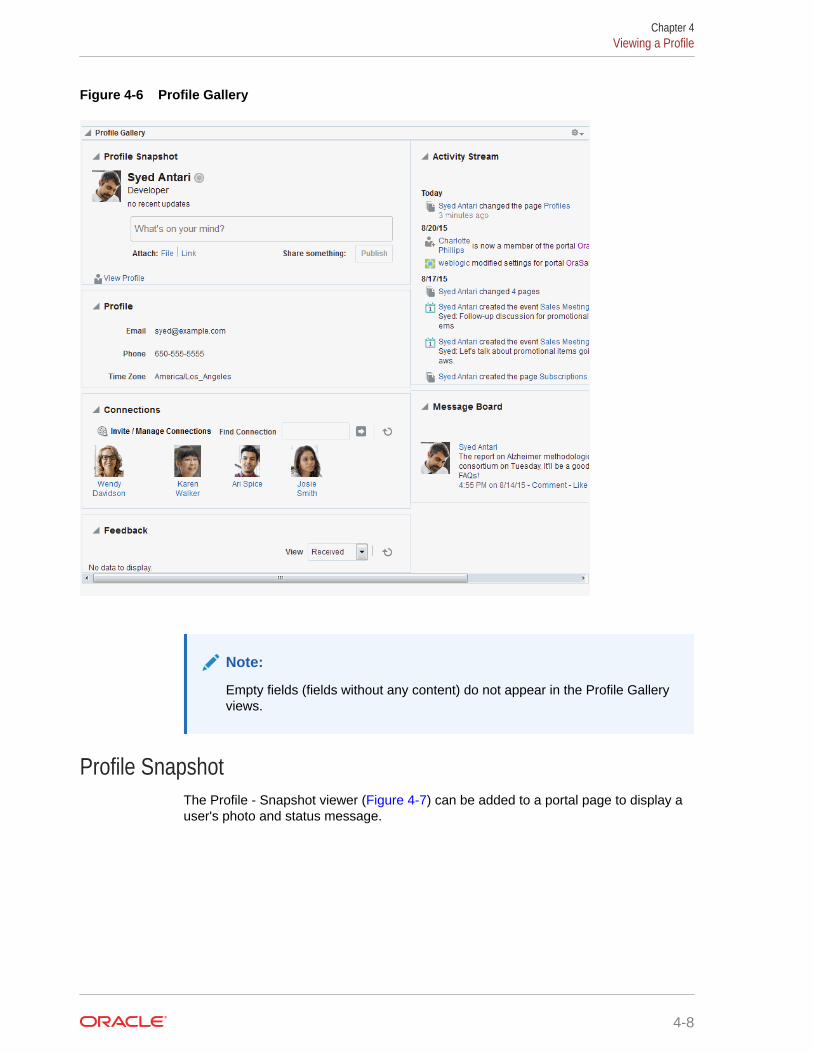
Figure 4-6 Profile Gallery
Note:
Empty fields (fields without any content) do not appear in the Profile Galleryviews.
Profile SnapshotThe Profile - Snapshot viewer (Figure 4-7) can be added to a portal page to display auser's photo and status message.
Chapter 4Viewing a Profile
4-8
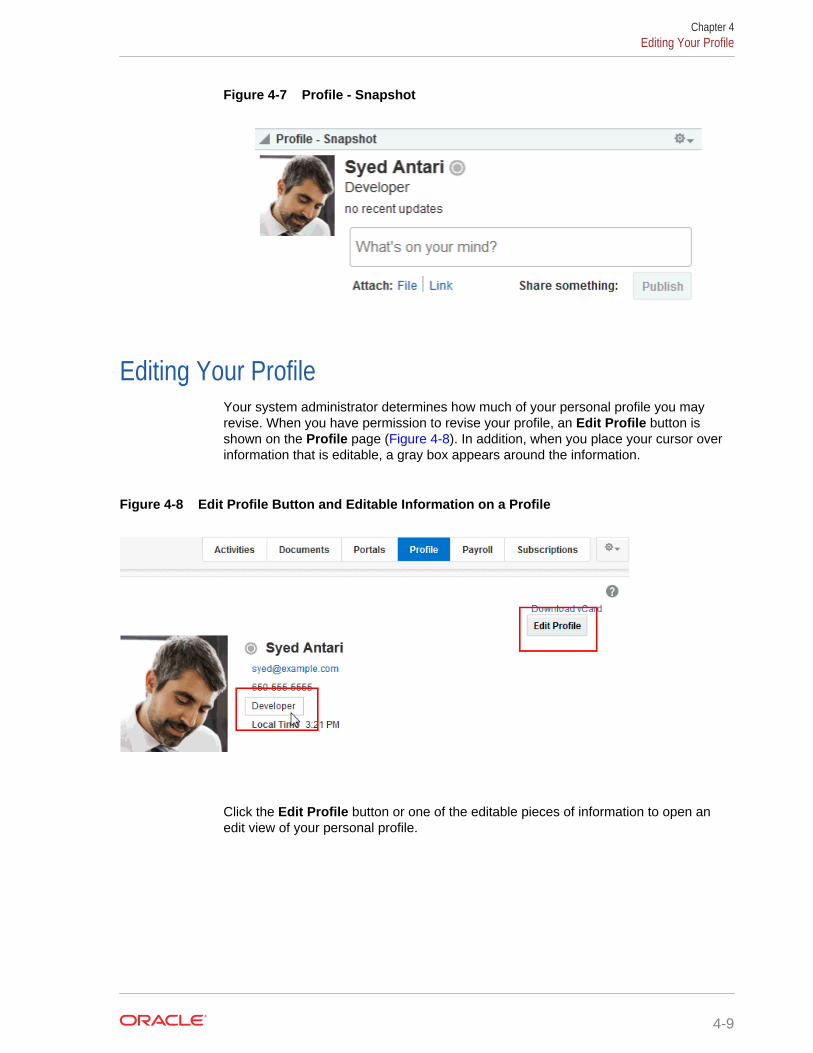
Figure 4-7 Profile - Snapshot
Editing Your ProfileYour system administrator determines how much of your personal profile you mayrevise. When you have permission to revise your profile, an Edit Profile button isshown on the Profile page (Figure 4-8). In addition, when you place your cursor overinformation that is editable, a gray box appears around the information.
Figure 4-8 Edit Profile Button and Editable Information on a Profile
Click the Edit Profile button or one of the editable pieces of information to open anedit view of your personal profile.
Chapter 4Editing Your Profile
4-9
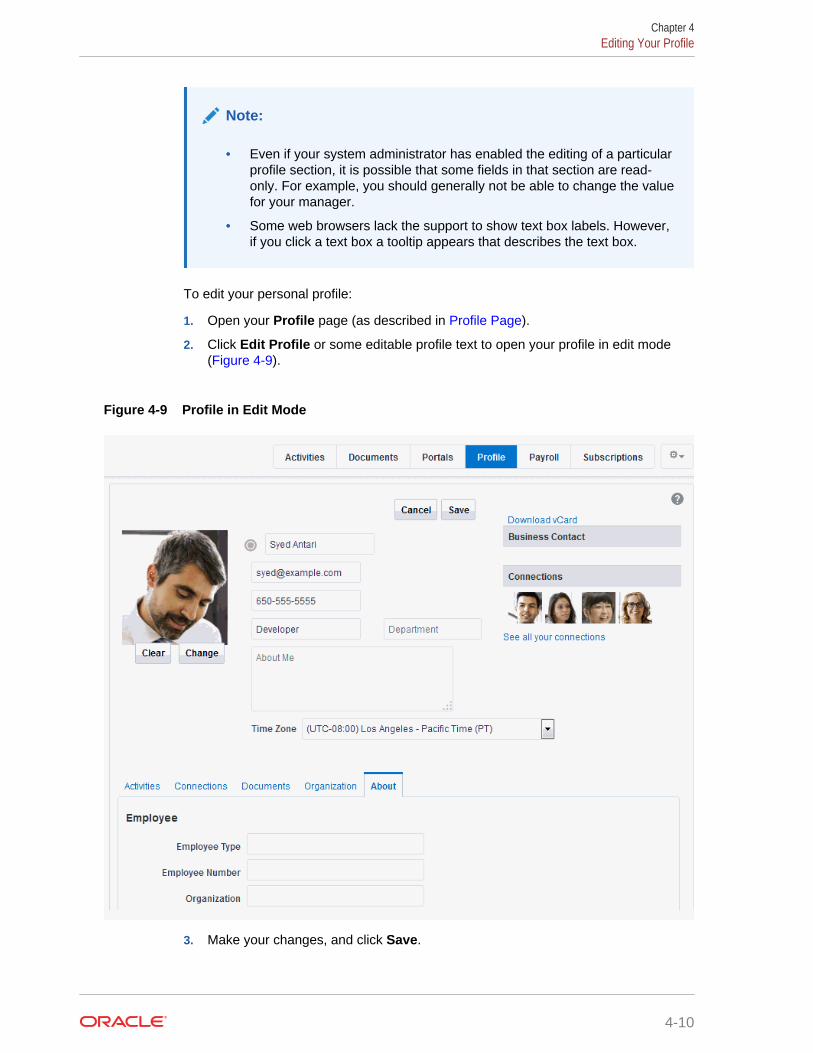
Note:
• Even if your system administrator has enabled the editing of a particularprofile section, it is possible that some fields in that section are read-only. For example, you should generally not be able to change the valuefor your manager.
• Some web browsers lack the support to show text box labels. However,if you click a text box a tooltip appears that describes the text box.
To edit your personal profile:
1. Open your Profile page (as described in Profile Page).
2. Click Edit Profile or some editable profile text to open your profile in edit mode(Figure 4-9).
Figure 4-9 Profile in Edit Mode
3. Make your changes, and click Save.
Chapter 4Editing Your Profile
4-10

Uploading and Updating a Personal Profile PictureProvided the profile viewer is configured to allow it, users with a personal profile canupload or update their profile image.
Note:
The file must have the mime-type image, and cannot have the extension*.ico. For best results, your photo should be 150x150 pixels.
To upload or update your profile image:
1. Open your Profile page (as described in Profile Page).
2. Click Edit Profile.
3. Upload, change, or remove your photo:
To upload or change your photo:
a. Click Change to open the Upload Photo dialog (Figure 4-10).
Figure 4-10 Change Photo Link and Upload Photo Dialog
b. Click Browse to locate and select a photo.
c. Click OK to complete the upload.
To remove your photo, click Clear.
Chapter 4Editing Your Profile
4-11
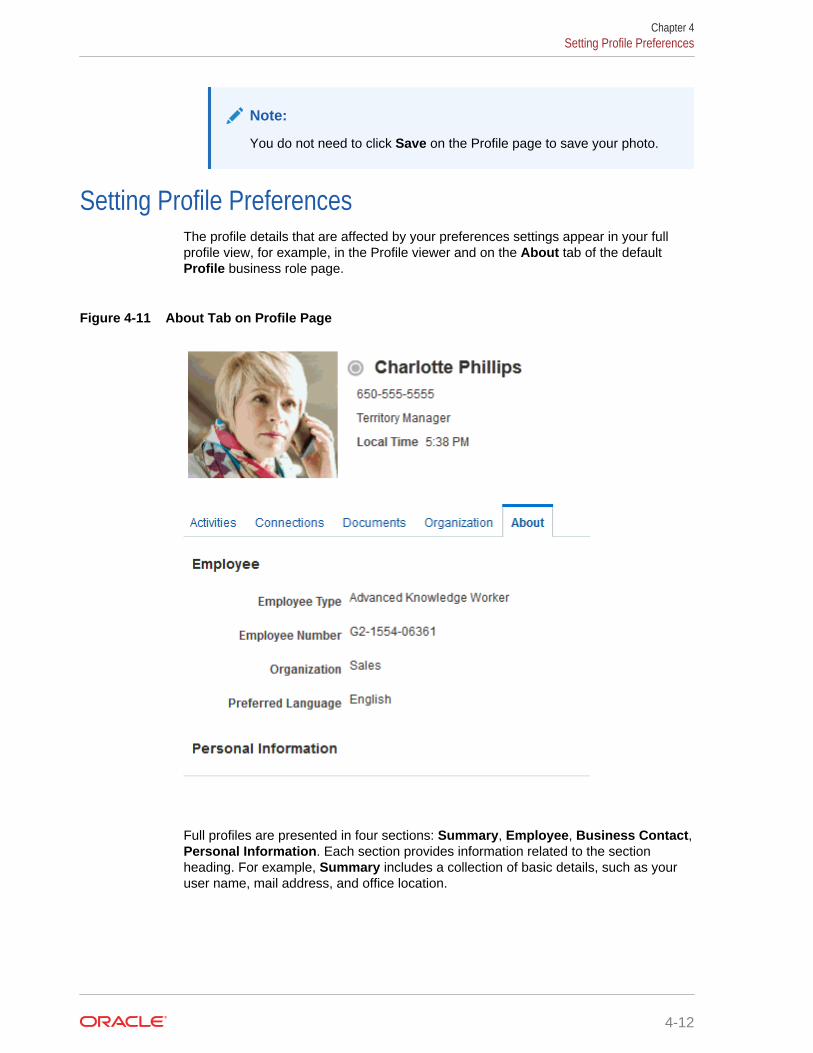
Note:
You do not need to click Save on the Profile page to save your photo.
Setting Profile PreferencesThe profile details that are affected by your preferences settings appear in your fullprofile view, for example, in the Profile viewer and on the About tab of the defaultProfile business role page.
Figure 4-11 About Tab on Profile Page
Full profiles are presented in four sections: Summary, Employee, Business Contact,Personal Information. Each section provides information related to the sectionheading. For example, Summary includes a collection of basic details, such as youruser name, mail address, and office location.
Chapter 4Setting Profile Preferences
4-12
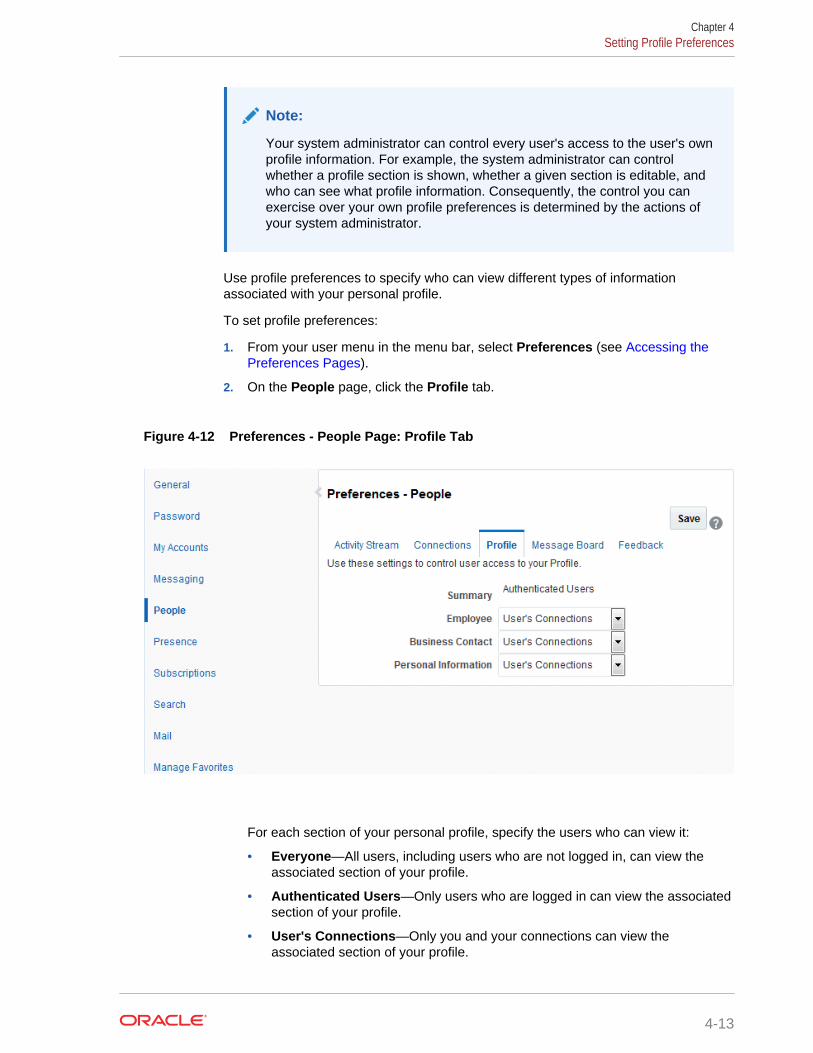
Note:
Your system administrator can control every user's access to the user's ownprofile information. For example, the system administrator can controlwhether a profile section is shown, whether a given section is editable, andwho can see what profile information. Consequently, the control you canexercise over your own profile preferences is determined by the actions ofyour system administrator.
Use profile preferences to specify who can view different types of informationassociated with your personal profile.
To set profile preferences:
1. From your user menu in the menu bar, select Preferences (see Accessing thePreferences Pages).
2. On the People page, click the Profile tab.
Figure 4-12 Preferences - People Page: Profile Tab
For each section of your personal profile, specify the users who can view it:
• Everyone—All users, including users who are not logged in, can view theassociated section of your profile.
• Authenticated Users—Only users who are logged in can view the associatedsection of your profile.
• User's Connections—Only you and your connections can view theassociated section of your profile.
Chapter 4Setting Profile Preferences
4-13

• User Only—Only you can view the associated section of your profile.
3. Click Save.
Chapter 4Setting Profile Preferences
4-14
5Setting Your Personal Preferences
Your personal preferences provide easy configuration settings for tailoring WebCenterPortal to your particular working style.
Personal preferences include settings for your preferred display language, yourpreferred look and feel. your WebCenter Portal password, and more. Additionally,WebCenter Portal preferences provide an accessibility setting to optimize theapplication user interface for use with a screen reader, such as JAWS. Preferencessettings are a user-level customization that affect only your view of WebCenter Portal.
Permissions:
The tasks described in this chapter are available to any WebCenter Portaluser.
See Also:
Preferences associated with specific areas of WebCenter Portal arediscussed in the chapters that cover each area.
For information about Messaging, Subscription, and Notificationspreferences, see:
• Establishing and Managing Your Messaging Channels and Filters
• Subscribing to the Application, to Portals, and to Objects
• Viewing and Cancelling Your Subscriptions
For information about People Connections preferences, see:
• Setting Profile Preferences
• Setting Connections Preferences
• Setting Feedback Preferences
• Setting Message Board Preferences
• Setting Activity Stream Preferences
For information about Instant Messaging and Presence preferences, see Identifying Your Preferred Instant Messaging Provider.
For information about Mail preferences, see Selecting Your Preferred MailConnection.
5-1
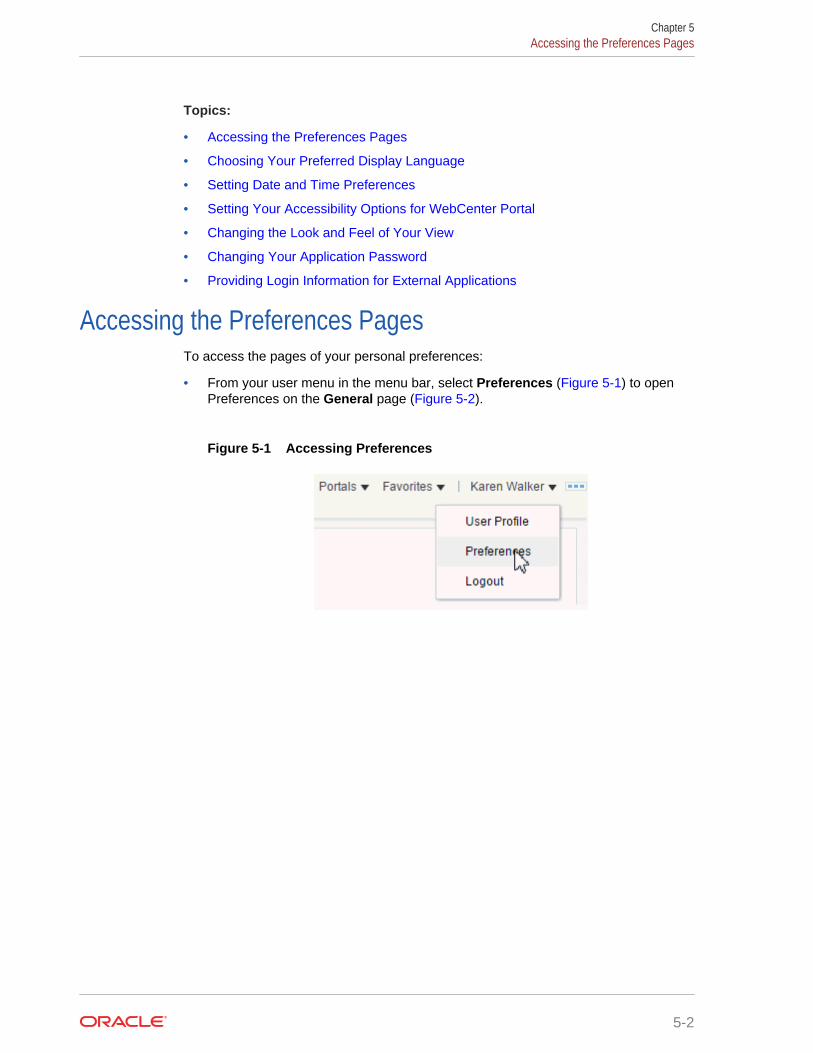
Topics:
• Accessing the Preferences Pages
• Choosing Your Preferred Display Language
• Setting Date and Time Preferences
• Setting Your Accessibility Options for WebCenter Portal
• Changing the Look and Feel of Your View
• Changing Your Application Password
• Providing Login Information for External Applications
Accessing the Preferences PagesTo access the pages of your personal preferences:
• From your user menu in the menu bar, select Preferences (Figure 5-1) to openPreferences on the General page (Figure 5-2).
Figure 5-1 Accessing Preferences
Chapter 5Accessing the Preferences Pages
5-2
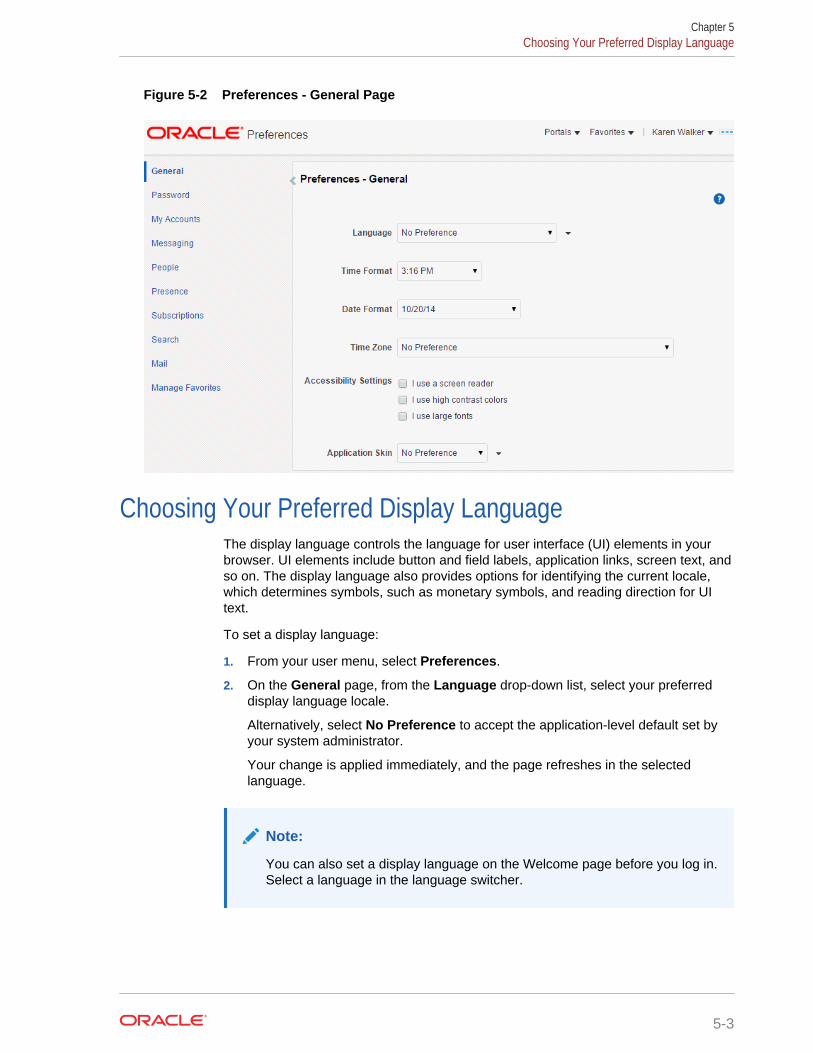
Figure 5-2 Preferences - General Page
Choosing Your Preferred Display LanguageThe display language controls the language for user interface (UI) elements in yourbrowser. UI elements include button and field labels, application links, screen text, andso on. The display language also provides options for identifying the current locale,which determines symbols, such as monetary symbols, and reading direction for UItext.
To set a display language:
1. From your user menu, select Preferences.
2. On the General page, from the Language drop-down list, select your preferreddisplay language locale.
Alternatively, select No Preference to accept the application-level default set byyour system administrator.
Your change is applied immediately, and the page refreshes in the selectedlanguage.
Note:
You can also set a display language on the Welcome page before you log in.Select a language in the language switcher.
Chapter 5Choosing Your Preferred Display Language
5-3
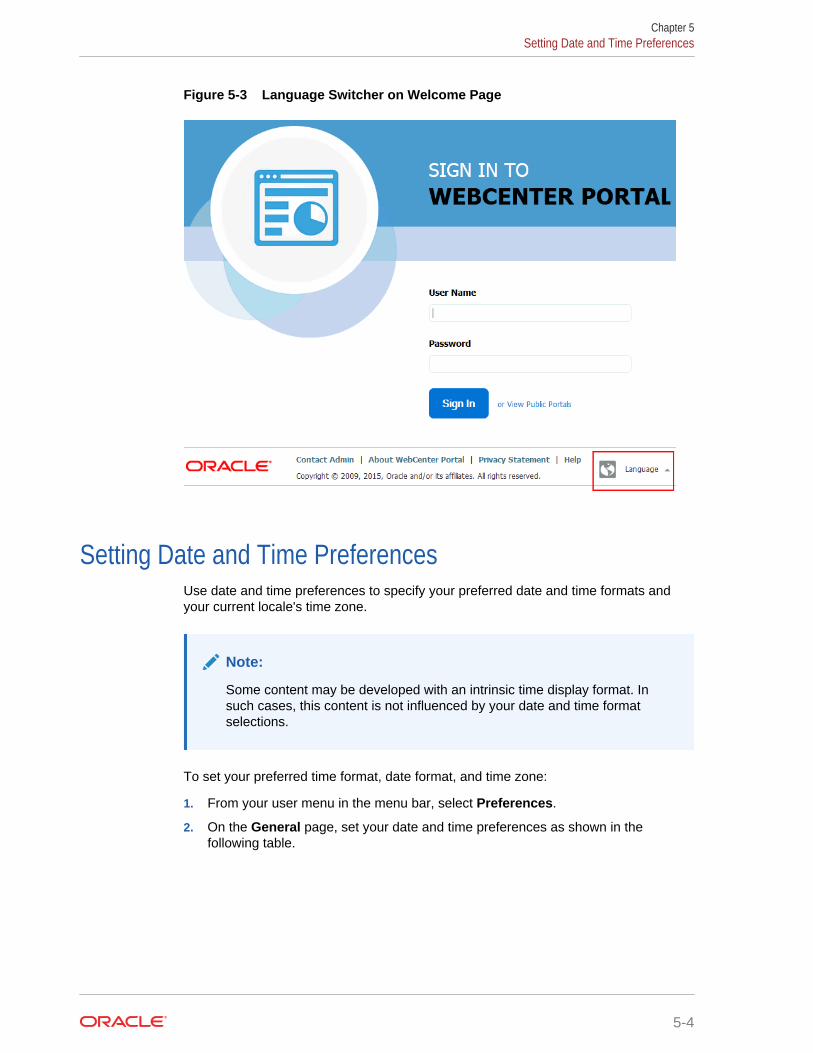
Figure 5-3 Language Switcher on Welcome Page
Setting Date and Time PreferencesUse date and time preferences to specify your preferred date and time formats andyour current locale's time zone.
Note:
Some content may be developed with an intrinsic time display format. Insuch cases, this content is not influenced by your date and time formatselections.
To set your preferred time format, date format, and time zone:
1. From your user menu in the menu bar, select Preferences.
2. On the General page, set your date and time preferences as shown in thefollowing table.
Chapter 5Setting Date and Time Preferences
5-4
Table 5-1 Date and Time Preference Settings
Preference Description
Time Format Select a display default for time information in WebCenter Portal. This setting controlsthe format for showing time for the services that receive time data from WebCenterPortal preferences. (Some services provide their own time format defaults.)
Note: The available time formats depend on the locale selected in the Language listor by your browser locale. For example, if you select English-United Kingdom[en-GB], the AM/PM is not included in the time format.
• No Preference—To display the default Time Format established by your systemadministrator
• H:M AM/PM—To display hour, minutes, and AM or PM, such as 4:47 PM• H:M:S AM/PM—To display hour, minutes, seconds, and AM or PM, such as
4:47:52 PM• H:M:S AM/PM Time Zone—To display hour, minutes, seconds, AM or PM, and
the abbreviation of the specified time zone, such as 4:47:52 PM PDT• H:M:S o'clock Time Zone—(Not available for all locales.) To display hour,
minutes, seconds, "o'clock", and the abbreviation of the specified time zone, suchas 4:47:52 o'clock PDT
Date Format Select a default format for date information in WebCenter Portal. This setting controlsformat for showing dates for the services that receive date data from WebCenterPortal preferences. (Some services provide their own date format defaults.)
Note: The available date formats depend on the locale selected in the Language listor by your browser locale. For example, if you select English-United Kingdom[en-GB], the dates are listed in day, month, year order.
• No Preference—To use the default date format set by your system administrator• M/D/YY—To use a number format, such as 4/21/09• MON D, YYYY—To use an abbreviation format and the full year, such as Aug
21, 2017
• MONTH D, YYYY—To display the full month name and the full year, such as Aug21, 2017
• DAY, MONTH D, YYYY—To display the full month name, the full year, andinclude the day of the week, such as Tuesday, August 21, 2017
Time Zone Select a time zone default. This setting helps to determine the time to show for time-stamped objects, such as uploaded and modified documents.
Alternatively select No Preference to accept the application-level default set by yoursystem administrator.
Setting Your Accessibility Options for WebCenter PortalUse accessibility options to optimize the application user interface (UI) for use withscreen readers; to enable support of high-contrast colors; and to enable support forlarge fonts.
This section includes the following topics:
• About Application Accessibility Options
• Applying Accessibility Options
Chapter 5Setting Your Accessibility Options for WebCenter Portal
5-5
About Application Accessibility OptionsWebCenter Portal Cloud accessibility options appear on the General panel of thePreferences page. Accessibility options assist visually and non-visually impairedusers in navigating the application user interface.
The next topic, Applying Accessibility Options, describes how to apply WebCenterPortal Cloud accessibility options.
Note:
The color contrast of disabled actions—which are gray—against a whitescreen may be difficult to discern for some users. Because disabled actionsare not selectable, this issue does not affect the use of WebCenter Portal.
Applying Accessibility OptionsTo apply accessibility options to the application UI:
1. From your user menu in the menu bar, select Preferences.
2. On the General page, select your preferred Accessibility Settings:
• I use a screen reader—Specifically for visually impaired users, enables theuse of JAWS, the screen reader software.
• I use high contrast colors—Makes the WebCenter Portal user interfacecompatible with operating systems or browsers that have high-contrastfeatures enabled. For example, WebCenter Portal changes its use ofbackground images and CSS styles in high-contrast mode to prevent the lossof visual information.
Note:
High-contrast mode is more beneficial if used in conjunction withyour browser's or operating system's high-contrast mode. Also,some users might find it beneficial to use large-font mode along withhigh-contrast mode.
The color contrast of disabled actions—which are gray—against awhite screen may be difficult to discern for some users. Becausedisabled actions are not selectable, this issue does not affect the useof WebCenter Portal.
• I use large fonts—Provides browser-zoom-friendly content. In default mode,most text and many containers have a fixed font size to provide a consistentand defined look. In large-font mode, text and containers are more scalable.This allows WebCenter Portal to be compatible with browsers that are set tolarger font sizes and to work with browser-zoom capabilities.
Chapter 5Setting Your Accessibility Options for WebCenter Portal
5-6
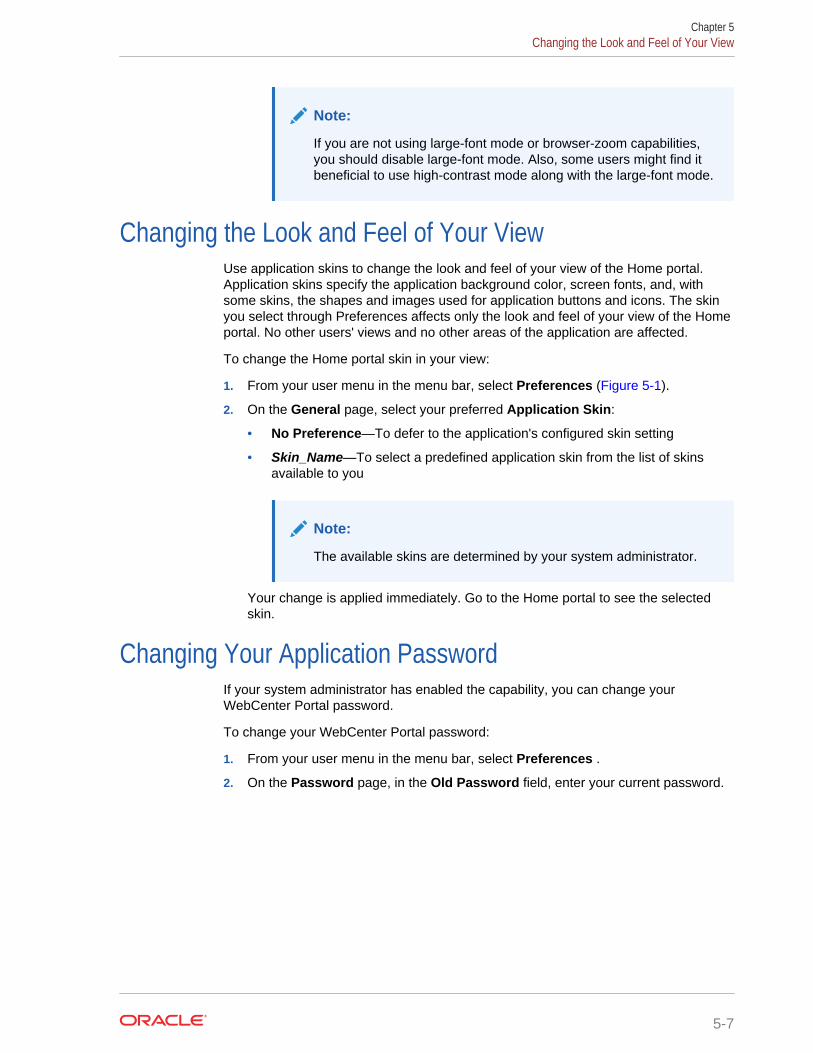
Note:
If you are not using large-font mode or browser-zoom capabilities,you should disable large-font mode. Also, some users might find itbeneficial to use high-contrast mode along with the large-font mode.
Changing the Look and Feel of Your ViewUse application skins to change the look and feel of your view of the Home portal.Application skins specify the application background color, screen fonts, and, withsome skins, the shapes and images used for application buttons and icons. The skinyou select through Preferences affects only the look and feel of your view of the Homeportal. No other users' views and no other areas of the application are affected.
To change the Home portal skin in your view:
1. From your user menu in the menu bar, select Preferences (Figure 5-1).
2. On the General page, select your preferred Application Skin:
• No Preference—To defer to the application's configured skin setting
• Skin_Name—To select a predefined application skin from the list of skinsavailable to you
Note:
The available skins are determined by your system administrator.
Your change is applied immediately. Go to the Home portal to see the selectedskin.
Changing Your Application PasswordIf your system administrator has enabled the capability, you can change yourWebCenter Portal password.
To change your WebCenter Portal password:
1. From your user menu in the menu bar, select Preferences .
2. On the Password page, in the Old Password field, enter your current password.
Chapter 5Changing the Look and Feel of Your View
5-7
Figure 5-4 Preferences - Password Page
3. In the New Password field, enter your new password.
Note:
The requirements for this password are driven by the identity store thatmanages WebCenter Portal application users. Every ID store has its ownpassword policy that enforces rules such as password length, passwordhistory, and so on. If you have issues setting a new password, contactyour system administrator for the password requirements and restrictionsof your ID store.
4. In the Confirm New Password field, enter your new password again.
5. Click Save to save your change.
Providing Login Information for External ApplicationsThe My Accounts page enables you to provide login credentials for all externalapplications that are configured to be accessed through WebCenter Portal. After youhave provided your credentials, every time you access an external application withinWebCenter Portal, the login credentials are provided automatically.
Note:
If you change the login credentials for an application, you must enter themagain on the My Accounts page.
To provide login credentials for external applications:
1. From your user menu in the menu bar, select Preferences.
Chapter 5Providing Login Information for External Applications
5-8
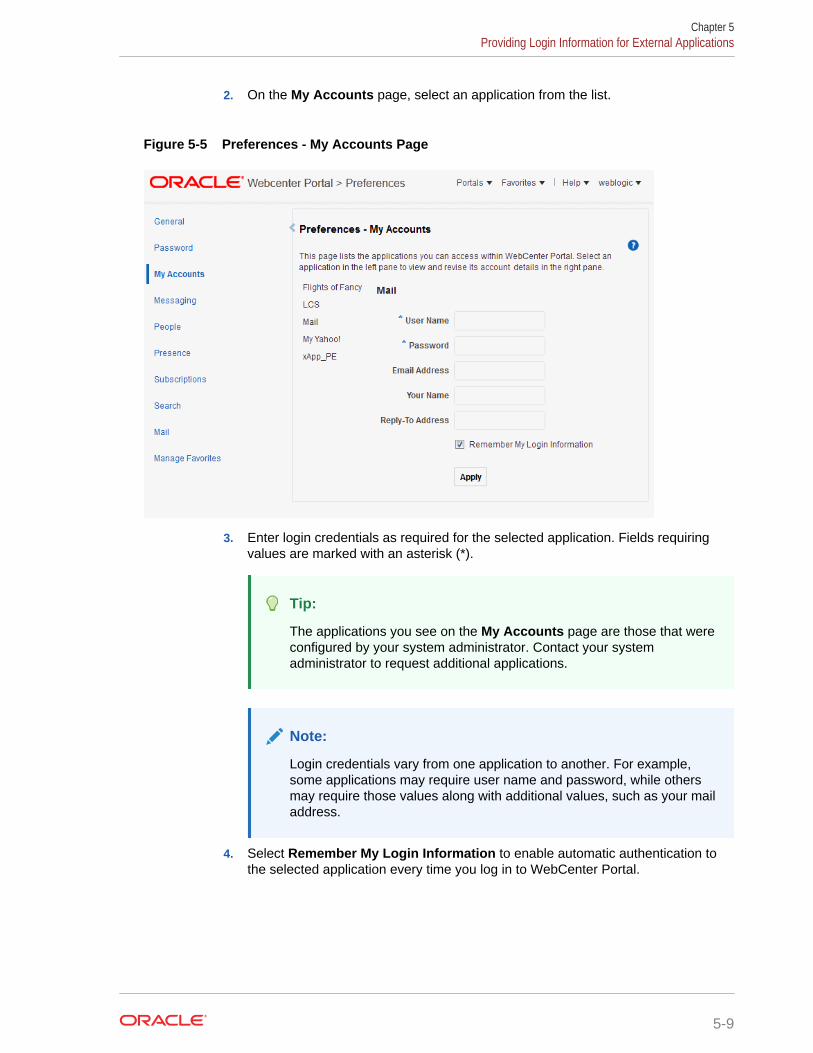
2. On the My Accounts page, select an application from the list.
Figure 5-5 Preferences - My Accounts Page
3. Enter login credentials as required for the selected application. Fields requiringvalues are marked with an asterisk (*).
Tip:
The applications you see on the My Accounts page are those that wereconfigured by your system administrator. Contact your systemadministrator to request additional applications.
Note:
Login credentials vary from one application to another. For example,some applications may require user name and password, while othersmay require those values along with additional values, such as your mailaddress.
4. Select Remember My Login Information to enable automatic authentication tothe selected application every time you log in to WebCenter Portal.
Chapter 5Providing Login Information for External Applications
5-9
Note:
If you do not select Remember My Login Information, the logininformation that you enter is used only for the current user session. Thismeans the next time you log in to WebCenter Portal, you must also log into this application.
5. Click Apply.
Chapter 5Providing Login Information for External Applications
5-10
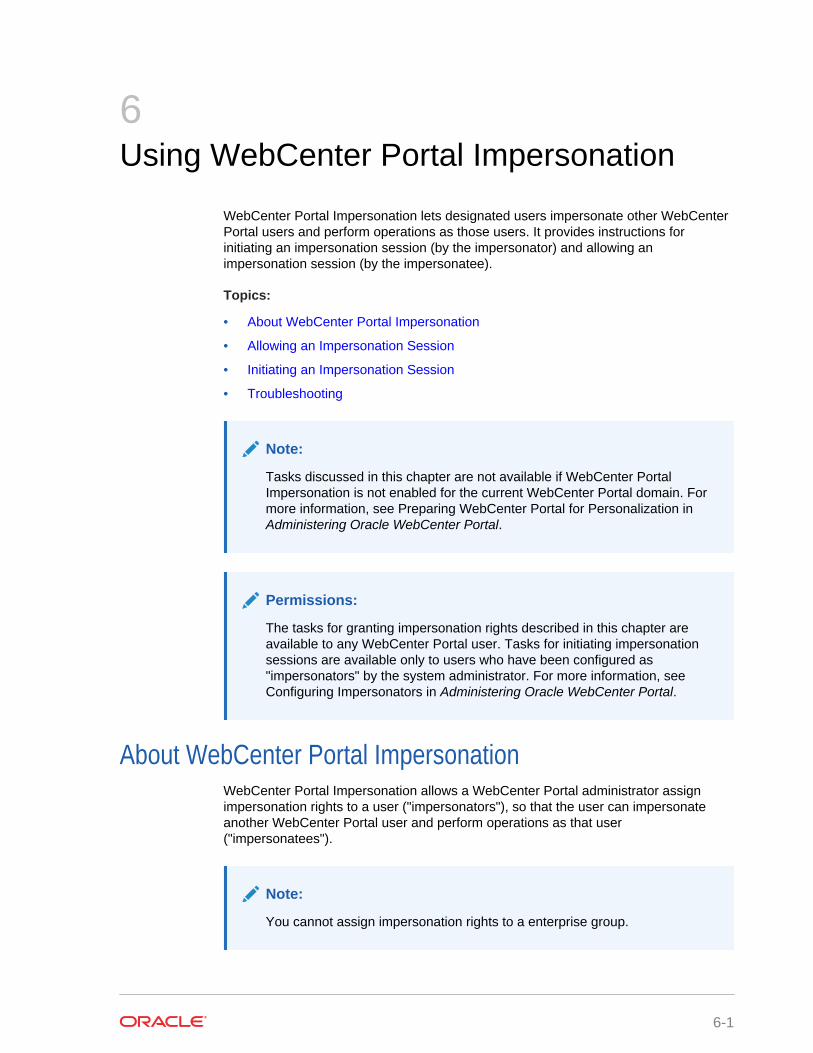
6Using WebCenter Portal Impersonation
WebCenter Portal Impersonation lets designated users impersonate other WebCenterPortal users and perform operations as those users. It provides instructions forinitiating an impersonation session (by the impersonator) and allowing animpersonation session (by the impersonatee).
Topics:
• About WebCenter Portal Impersonation
• Allowing an Impersonation Session
• Initiating an Impersonation Session
• Troubleshooting
Note:
Tasks discussed in this chapter are not available if WebCenter PortalImpersonation is not enabled for the current WebCenter Portal domain. Formore information, see Preparing WebCenter Portal for Personalization inAdministering Oracle WebCenter Portal.
Permissions:
The tasks for granting impersonation rights described in this chapter areavailable to any WebCenter Portal user. Tasks for initiating impersonationsessions are available only to users who have been configured as"impersonators" by the system administrator. For more information, see Configuring Impersonators in Administering Oracle WebCenter Portal.
About WebCenter Portal ImpersonationWebCenter Portal Impersonation allows a WebCenter Portal administrator assignimpersonation rights to a user ("impersonators"), so that the user can impersonateanother WebCenter Portal user and perform operations as that user("impersonatees").
Note:
You cannot assign impersonation rights to a enterprise group.
6-1
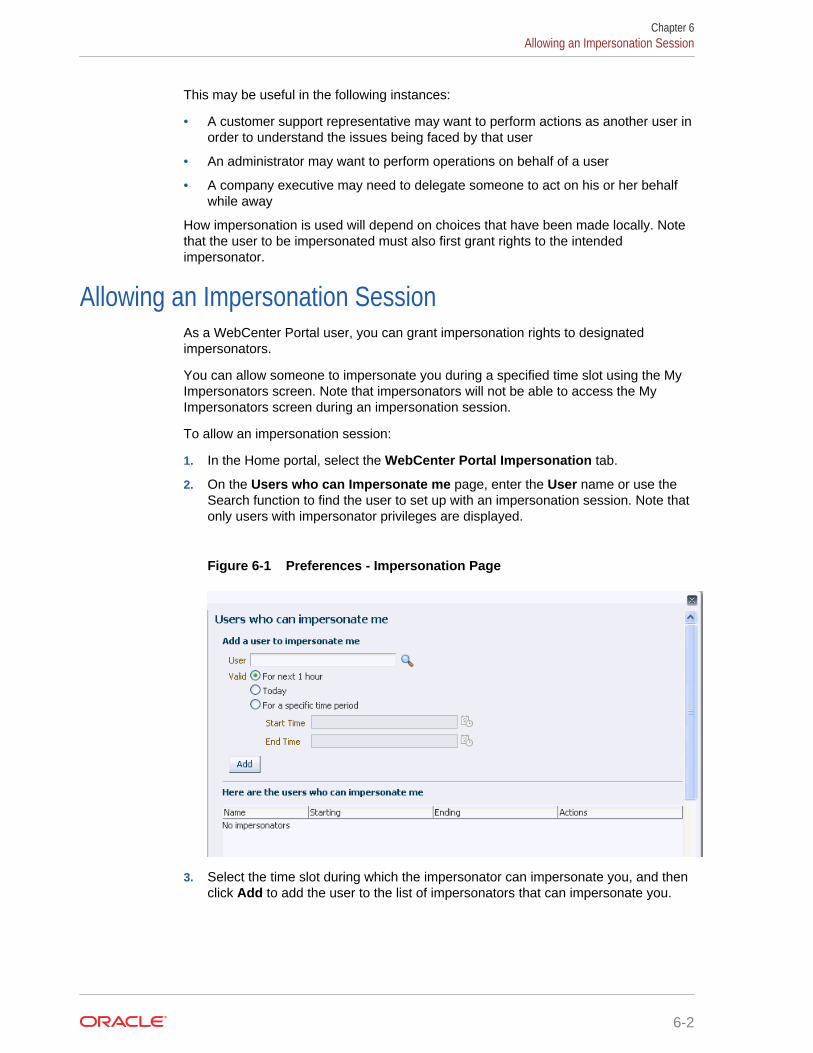
This may be useful in the following instances:
• A customer support representative may want to perform actions as another user inorder to understand the issues being faced by that user
• An administrator may want to perform operations on behalf of a user
• A company executive may need to delegate someone to act on his or her behalfwhile away
How impersonation is used will depend on choices that have been made locally. Notethat the user to be impersonated must also first grant rights to the intendedimpersonator.
Allowing an Impersonation SessionAs a WebCenter Portal user, you can grant impersonation rights to designatedimpersonators.
You can allow someone to impersonate you during a specified time slot using the MyImpersonators screen. Note that impersonators will not be able to access the MyImpersonators screen during an impersonation session.
To allow an impersonation session:
1. In the Home portal, select the WebCenter Portal Impersonation tab.
2. On the Users who can Impersonate me page, enter the User name or use theSearch function to find the user to set up with an impersonation session. Note thatonly users with impersonator privileges are displayed.
Figure 6-1 Preferences - Impersonation Page
3. Select the time slot during which the impersonator can impersonate you, and thenclick Add to add the user to the list of impersonators that can impersonate you.
Chapter 6Allowing an Impersonation Session
6-2
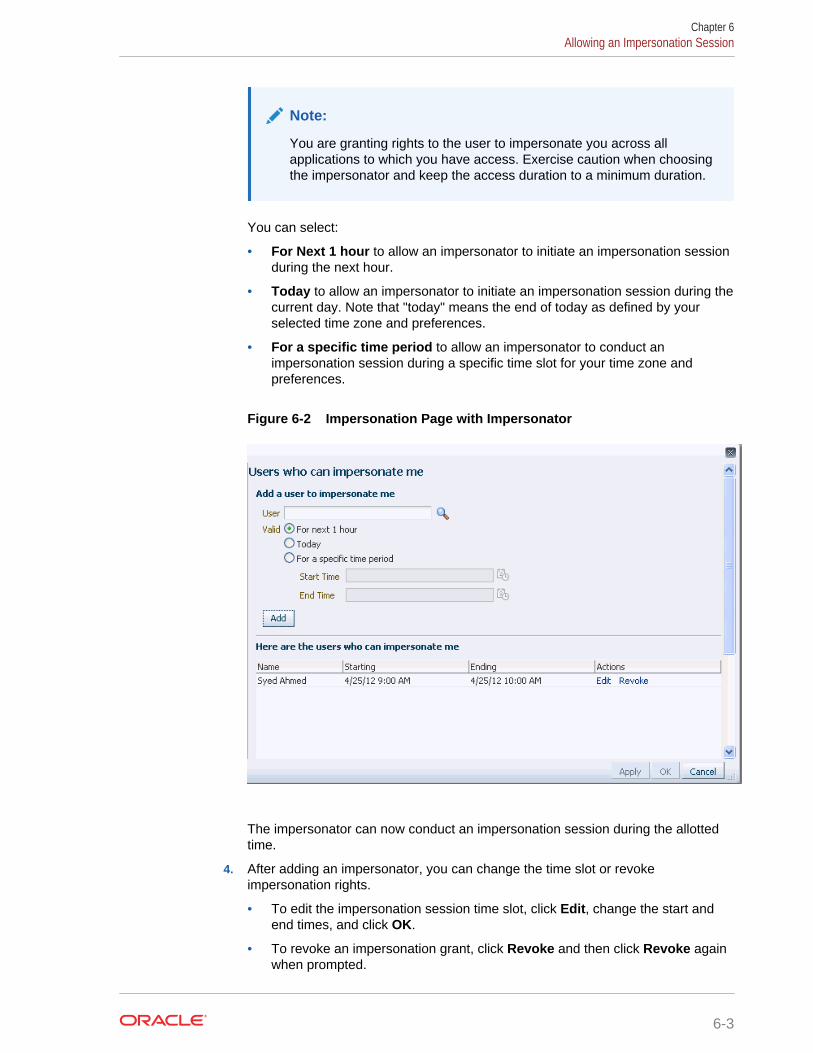
Note:
You are granting rights to the user to impersonate you across allapplications to which you have access. Exercise caution when choosingthe impersonator and keep the access duration to a minimum duration.
You can select:
• For Next 1 hour to allow an impersonator to initiate an impersonation sessionduring the next hour.
• Today to allow an impersonator to initiate an impersonation session during thecurrent day. Note that "today" means the end of today as defined by yourselected time zone and preferences.
• For a specific time period to allow an impersonator to conduct animpersonation session during a specific time slot for your time zone andpreferences.
Figure 6-2 Impersonation Page with Impersonator
The impersonator can now conduct an impersonation session during the allottedtime.
4. After adding an impersonator, you can change the time slot or revokeimpersonation rights.
• To edit the impersonation session time slot, click Edit, change the start andend times, and click OK.
• To revoke an impersonation grant, click Revoke and then click Revoke againwhen prompted.
Chapter 6Allowing an Impersonation Session
6-3
Note that impersonation grants that have already expired, or grants for userswhose rights as a designated impersonator have been revoked by theadministrator, will not appear in this list.
Initiating an Impersonation SessionThis section describes how impersonators can initiate an impersonation session usingeither the Impersonation preferences page or using a hot key.
This section includes the following topics:
• Initiating an Impersonation Session Using the Impersonation Preferences Page
• Initiating an Impersonation Session Using a Hot Key
Initiating an Impersonation Session Using the ImpersonationPreferences Page
You can view the impersonatees that have granted you impersonation rights and caninitiate impersonation sessions using the Impersonation preferences page. Note thatyou must have been granted impersonation rights to access this screen by theadministrator.
To view or start impersonation sessions:
1. From your user menu in the menu bar, select Preferences.
2. On the Impersonation page, scroll down past the list of users who canimpersonate you to the list of the users that have granted you impersonationrights. Note that unless you have been configured as an impersonator, you will notbe able to impersonate other users and the list will be empty.
Figure 6-3 Preferences - Impersonation Page
Chapter 6Initiating an Impersonation Session
6-4
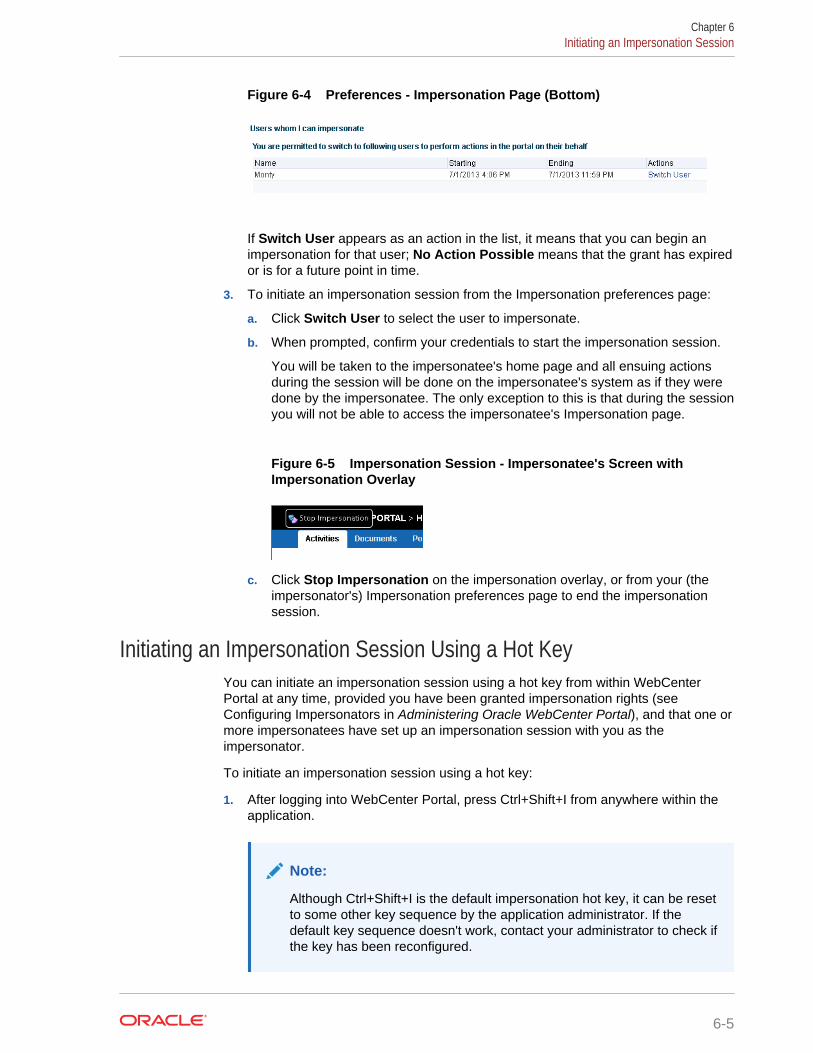
Figure 6-4 Preferences - Impersonation Page (Bottom)
If Switch User appears as an action in the list, it means that you can begin animpersonation for that user; No Action Possible means that the grant has expiredor is for a future point in time.
3. To initiate an impersonation session from the Impersonation preferences page:
a. Click Switch User to select the user to impersonate.
b. When prompted, confirm your credentials to start the impersonation session.
You will be taken to the impersonatee's home page and all ensuing actionsduring the session will be done on the impersonatee's system as if they weredone by the impersonatee. The only exception to this is that during the sessionyou will not be able to access the impersonatee's Impersonation page.
Figure 6-5 Impersonation Session - Impersonatee's Screen withImpersonation Overlay
c. Click Stop Impersonation on the impersonation overlay, or from your (theimpersonator's) Impersonation preferences page to end the impersonationsession.
Initiating an Impersonation Session Using a Hot KeyYou can initiate an impersonation session using a hot key from within WebCenterPortal at any time, provided you have been granted impersonation rights (see Configuring Impersonators in Administering Oracle WebCenter Portal), and that one ormore impersonatees have set up an impersonation session with you as theimpersonator.
To initiate an impersonation session using a hot key:
1. After logging into WebCenter Portal, press Ctrl+Shift+I from anywhere within theapplication.
Note:
Although Ctrl+Shift+I is the default impersonation hot key, it can be resetto some other key sequence by the application administrator. If thedefault key sequence doesn't work, contact your administrator to check ifthe key has been reconfigured.
Chapter 6Initiating an Impersonation Session
6-5
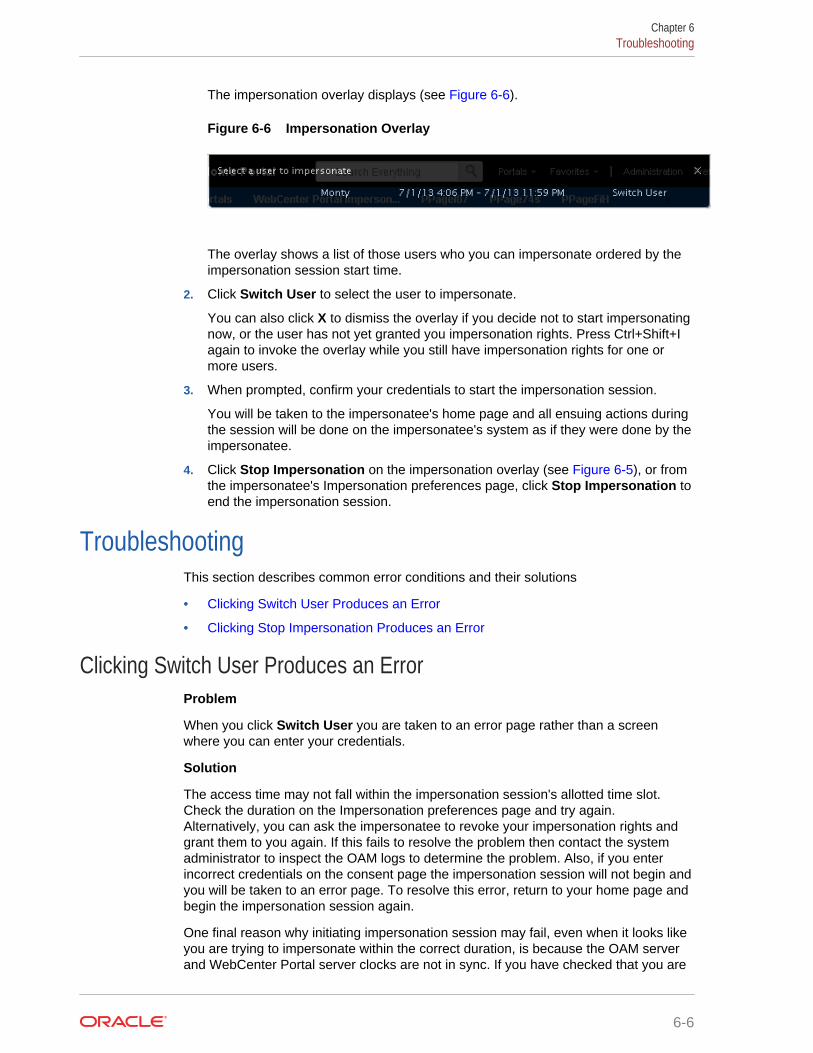
The impersonation overlay displays (see Figure 6-6).
Figure 6-6 Impersonation Overlay
The overlay shows a list of those users who you can impersonate ordered by theimpersonation session start time.
2. Click Switch User to select the user to impersonate.
You can also click X to dismiss the overlay if you decide not to start impersonatingnow, or the user has not yet granted you impersonation rights. Press Ctrl+Shift+Iagain to invoke the overlay while you still have impersonation rights for one ormore users.
3. When prompted, confirm your credentials to start the impersonation session.
You will be taken to the impersonatee's home page and all ensuing actions duringthe session will be done on the impersonatee's system as if they were done by theimpersonatee.
4. Click Stop Impersonation on the impersonation overlay (see Figure 6-5), or fromthe impersonatee's Impersonation preferences page, click Stop Impersonation toend the impersonation session.
TroubleshootingThis section describes common error conditions and their solutions
• Clicking Switch User Produces an Error
• Clicking Stop Impersonation Produces an Error
Clicking Switch User Produces an ErrorProblem
When you click Switch User you are taken to an error page rather than a screenwhere you can enter your credentials.
Solution
The access time may not fall within the impersonation session's allotted time slot.Check the duration on the Impersonation preferences page and try again.Alternatively, you can ask the impersonatee to revoke your impersonation rights andgrant them to you again. If this fails to resolve the problem then contact the systemadministrator to inspect the OAM logs to determine the problem. Also, if you enterincorrect credentials on the consent page the impersonation session will not begin andyou will be taken to an error page. To resolve this error, return to your home page andbegin the impersonation session again.
One final reason why initiating impersonation session may fail, even when it looks likeyou are trying to impersonate within the correct duration, is because the OAM serverand WebCenter Portal server clocks are not in sync. If you have checked that you are
Chapter 6Troubleshooting
6-6
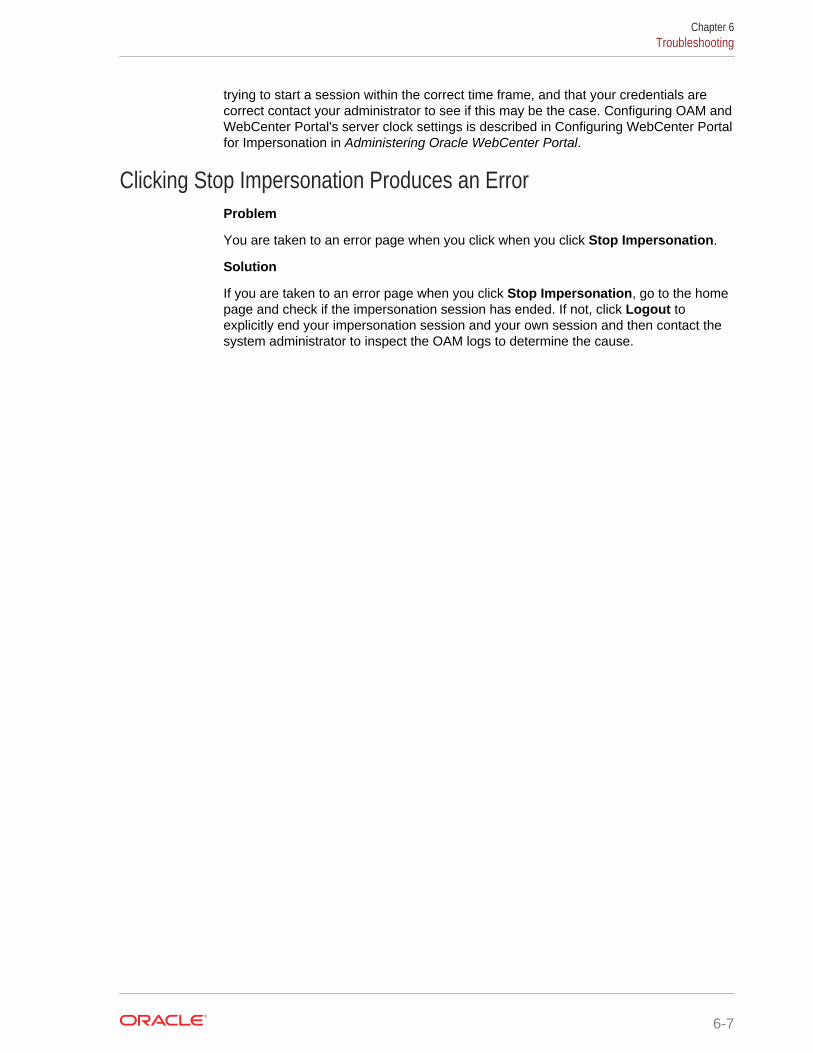
trying to start a session within the correct time frame, and that your credentials arecorrect contact your administrator to see if this may be the case. Configuring OAM andWebCenter Portal's server clock settings is described in Configuring WebCenter Portalfor Impersonation in Administering Oracle WebCenter Portal.
Clicking Stop Impersonation Produces an ErrorProblem
You are taken to an error page when you click when you click Stop Impersonation.
Solution
If you are taken to an error page when you click Stop Impersonation, go to the homepage and check if the impersonation session has ended. If not, click Logout toexplicitly end your impersonation session and your own session and then contact thesystem administrator to inspect the OAM logs to determine the cause.
Chapter 6Troubleshooting
6-7
Part IIWorking with Portals and Pages
This part of Using Portals in Oracle WebCenter Portal provides information about theHome portal, personal pages, and working with user-created portals.
• Working In the Home Portal
• Creating and Managing Personal Pages
• Exploring Portals
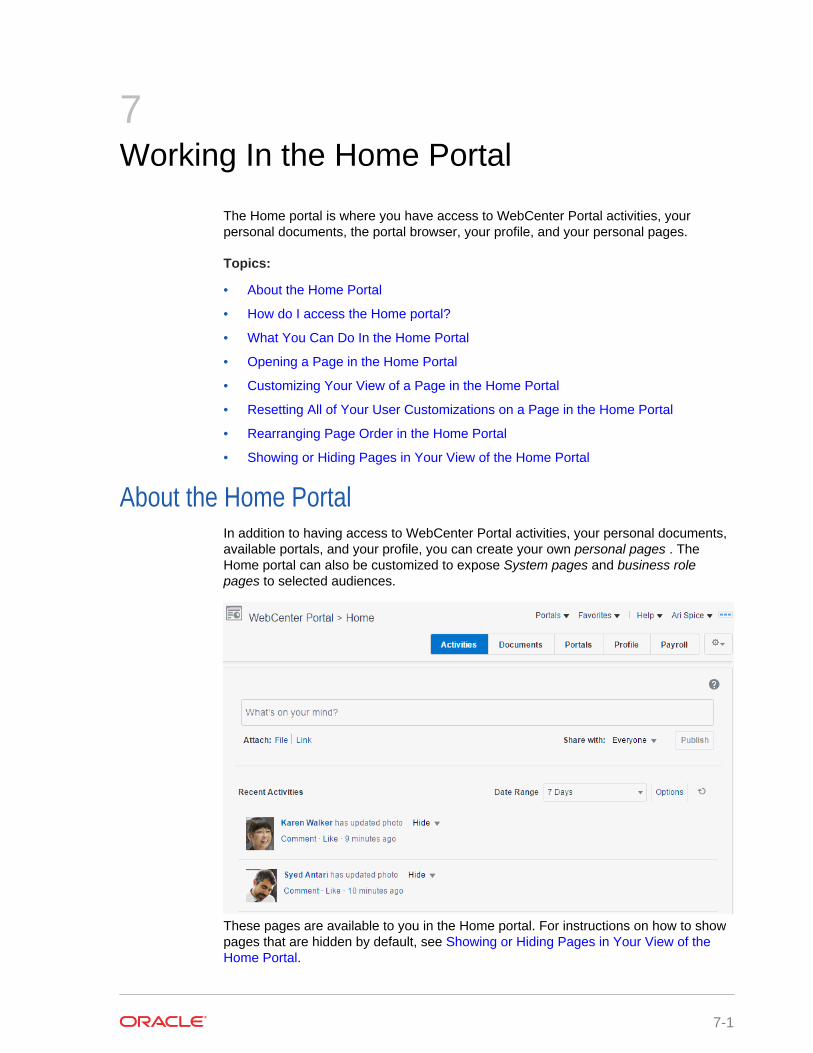
7Working In the Home Portal
The Home portal is where you have access to WebCenter Portal activities, yourpersonal documents, the portal browser, your profile, and your personal pages.
Topics:
• About the Home Portal
• How do I access the Home portal?
• What You Can Do In the Home Portal
• Opening a Page in the Home Portal
• Customizing Your View of a Page in the Home Portal
• Resetting All of Your User Customizations on a Page in the Home Portal
• Rearranging Page Order in the Home Portal
• Showing or Hiding Pages in Your View of the Home Portal
About the Home PortalIn addition to having access to WebCenter Portal activities, your personal documents,available portals, and your profile, you can create your own personal pages . TheHome portal can also be customized to expose System pages and business rolepages to selected audiences.
These pages are available to you in the Home portal. For instructions on how to showpages that are hidden by default, see Showing or Hiding Pages in Your View of theHome Portal.
7-1
To create your own personal pages to display here, see Creating and ManagingPersonal Pages.
Pages Description More Information
Activities Make statements about yourpersonal status and provide links toexternal or internal objects usingPublisher; View information aboutactivities using Activity Stream.
See Sharing Messages, Files, andURLs and Tracking Portal Activities
Documents Create, view, and manage yourdocuments in your personaldocument library.
See Adding Content to a Portal
Portals Access available portals, andmanage your portal memberships.
see Exploring Portals
Profile View personal information, such ascontact information, a photo, yourlocation within the companyhierarchy, and so on. You can alsoaccess to your connections, otherWebCenter Portal users with whomyou communicate or collaborate.
See Managing Your Profile and Managing Your Contacts
Portal Templates If you are an advanced user, you canbuild portals and custom portaltemplates using this page.
This page is hidden by default.
See Working with Portal Templatesin Building Portals with OracleWebCenter Portal
Tag Center Allows you to view and manage tagson WebCenter Portal objects.
Tags provide a means of applyingyour own meaningful terms to andbookmarking application objects,making them easy to locate the nexttime you go looking for them.
This page is hidden by default.
See Working with Tags
WebCenter PortalImpersonation
Lets you assign the right forsomeone else to impersonate youand lets you impersonate a user forwhom you have been givenimpersonation rights.
For example, impersonation might beuseful if a customer supportrepresentative needs to performactions on your behalf to understandissues you are experiencing, asystem administrator might need toperform operations on your behalf, oryou might be delegated someoneelse's responsibilities while they areaway.
This page is hidden by default.
See Using WebCenter PortalImpersonation
How do I access the Home portal?You can access the Home portal using any one of these methods.
Chapter 7How do I access the Home portal?
7-2
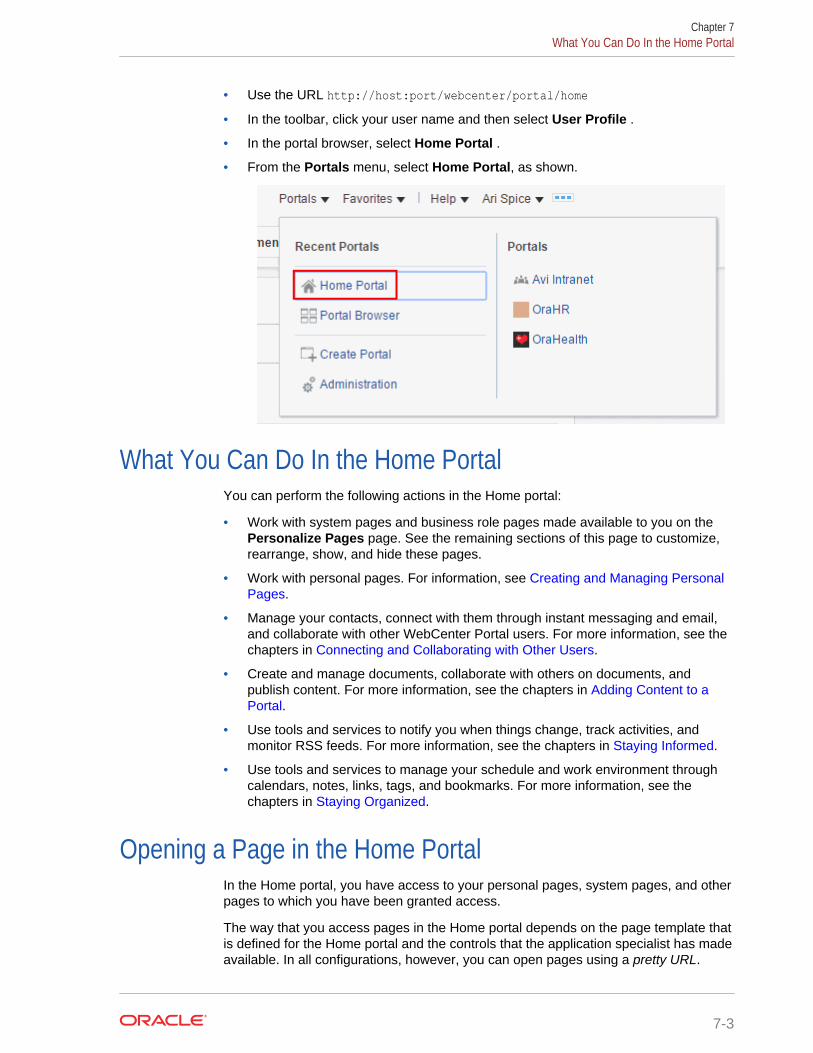
• Use the URL http://host:port/webcenter/portal/home
• In the toolbar, click your user name and then select User Profile .
• In the portal browser, select Home Portal .
• From the Portals menu, select Home Portal, as shown.
What You Can Do In the Home PortalYou can perform the following actions in the Home portal:
• Work with system pages and business role pages made available to you on thePersonalize Pages page. See the remaining sections of this page to customize,rearrange, show, and hide these pages.
• Work with personal pages. For information, see Creating and Managing PersonalPages.
• Manage your contacts, connect with them through instant messaging and email,and collaborate with other WebCenter Portal users. For more information, see thechapters in Connecting and Collaborating with Other Users.
• Create and manage documents, collaborate with others on documents, andpublish content. For more information, see the chapters in Adding Content to aPortal.
• Use tools and services to notify you when things change, track activities, andmonitor RSS feeds. For more information, see the chapters in Staying Informed.
• Use tools and services to manage your schedule and work environment throughcalendars, notes, links, tags, and bookmarks. For more information, see thechapters in Staying Organized.
Opening a Page in the Home PortalIn the Home portal, you have access to your personal pages, system pages, and otherpages to which you have been granted access.
The way that you access pages in the Home portal depends on the page template thatis defined for the Home portal and the controls that the application specialist has madeavailable. In all configurations, however, you can open pages using a pretty URL.
Chapter 7What You Can Do In the Home Portal
7-3
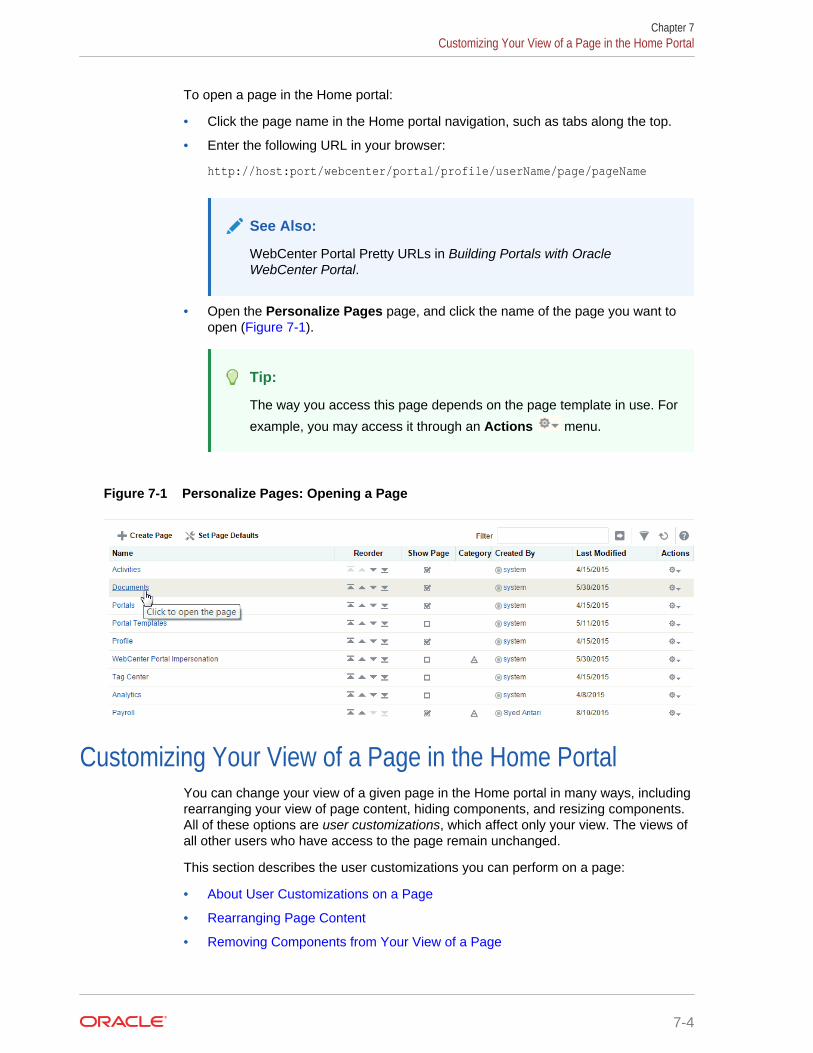
To open a page in the Home portal:
• Click the page name in the Home portal navigation, such as tabs along the top.
• Enter the following URL in your browser:
http://host:port/webcenter/portal/profile/userName/page/pageName
See Also:
WebCenter Portal Pretty URLs in Building Portals with OracleWebCenter Portal.
• Open the Personalize Pages page, and click the name of the page you want toopen (Figure 7-1).
Tip:
The way you access this page depends on the page template in use. For
example, you may access it through an Actions menu.
Figure 7-1 Personalize Pages: Opening a Page
Customizing Your View of a Page in the Home PortalYou can change your view of a given page in the Home portal in many ways, includingrearranging your view of page content, hiding components, and resizing components.All of these options are user customizations, which affect only your view. The views ofall other users who have access to the page remain unchanged.
This section describes the user customizations you can perform on a page:
• About User Customizations on a Page
• Rearranging Page Content
• Removing Components from Your View of a Page
Chapter 7Customizing Your View of a Page in the Home Portal
7-4

• Resizing Components
• Collapsing and Expanding Components
About User Customizations on a PageYou can customize the way pages appear in your own personal view of the page inmany ways. For example, you can change page layout, reposition, remove, resize,and collapse components, all within just your view of a page.
User customizations are yours and yours alone. That is, the changes you makethrough the procedures described in the following sections affect only your view of thepage. No other users are affected by your changes.
Note:
When you revise a component in page view mode while another user deletesthe same component in page edit mode, an error page opens. Simplynavigate back to the original page. The deleted component does not appear,and you can continue working on other components.
Whether you can customize a page depends on permissions granted to you or yourapplication role and on how user customizations are configured. You can tell if youhave such permission by the presence or absence of the controls discussed in thissection. If you do not see these controls, contact your system administrator to ask for ahigher-level of access or for a configuration change.
Rearranging Page ContentComponents can be repositioned by dragging and dropping them on the page.
To rearrange components by dragging and dropping:
• Click and hold the header of the component you want move, drag it to its targetposition, and release your mouse button.
A shadow indicates where the component is placed when you drop it (Figure 7-2).
Chapter 7Customizing Your View of a Page in the Home Portal
7-5
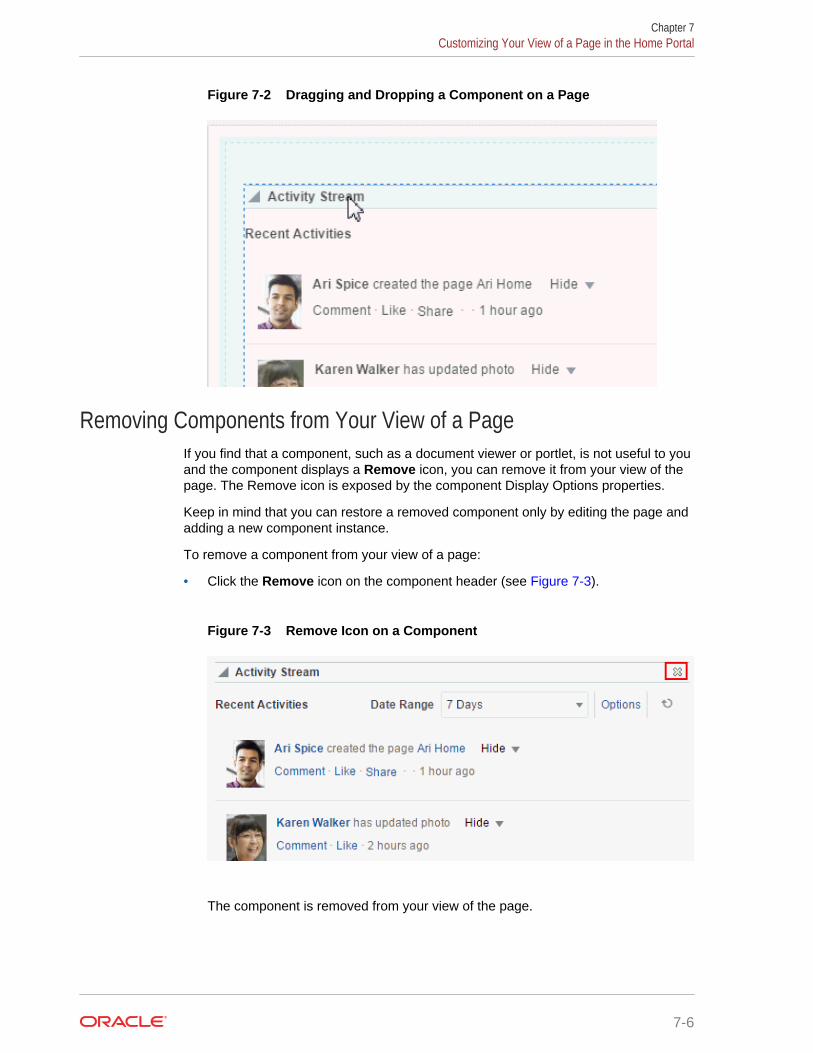
Figure 7-2 Dragging and Dropping a Component on a Page
Removing Components from Your View of a PageIf you find that a component, such as a document viewer or portlet, is not useful to youand the component displays a Remove icon, you can remove it from your view of thepage. The Remove icon is exposed by the component Display Options properties.
Keep in mind that you can restore a removed component only by editing the page andadding a new component instance.
To remove a component from your view of a page:
• Click the Remove icon on the component header (see Figure 7-3).
Figure 7-3 Remove Icon on a Component
The component is removed from your view of the page.
Chapter 7Customizing Your View of a Page in the Home Portal
7-6

Resizing ComponentsThe border and header surrounding a component is also known as chrome. Chromecan clarify the boundaries of the component and provide an access point forcomponent actions, such as those on the Actions menu and those embedded in thechrome itself. In the latter case, the chrome may include a Resize handle that you canuse to increase or decrease the height of the component (Figure 7-4).
Figure 7-4 Resize Handle on a Component
Note:
The position of the resize handle differs for bidirectionally displayedcomponents. Those components displayed in a right-to-left orientationdisplay the resize handle on the left side.
To use this feature, click and hold the Resize handle and drag it up to decrease theheight of the component or down to increase the height of the component.
Collapsing and Expanding ComponentsWith one click, you can collapse some components so that they roll up like a windowshade, useful for removing the visual noise of an unused component from yourapplication view. Collapse is available when a component shows a header. Withanother click, you can expand a collapsed component.
To collapse and expand components on a page:
1. Click the Collapse icon on the component header to roll the component up like awindow shade (Figure 7-5).
Chapter 7Customizing Your View of a Page in the Home Portal
7-7
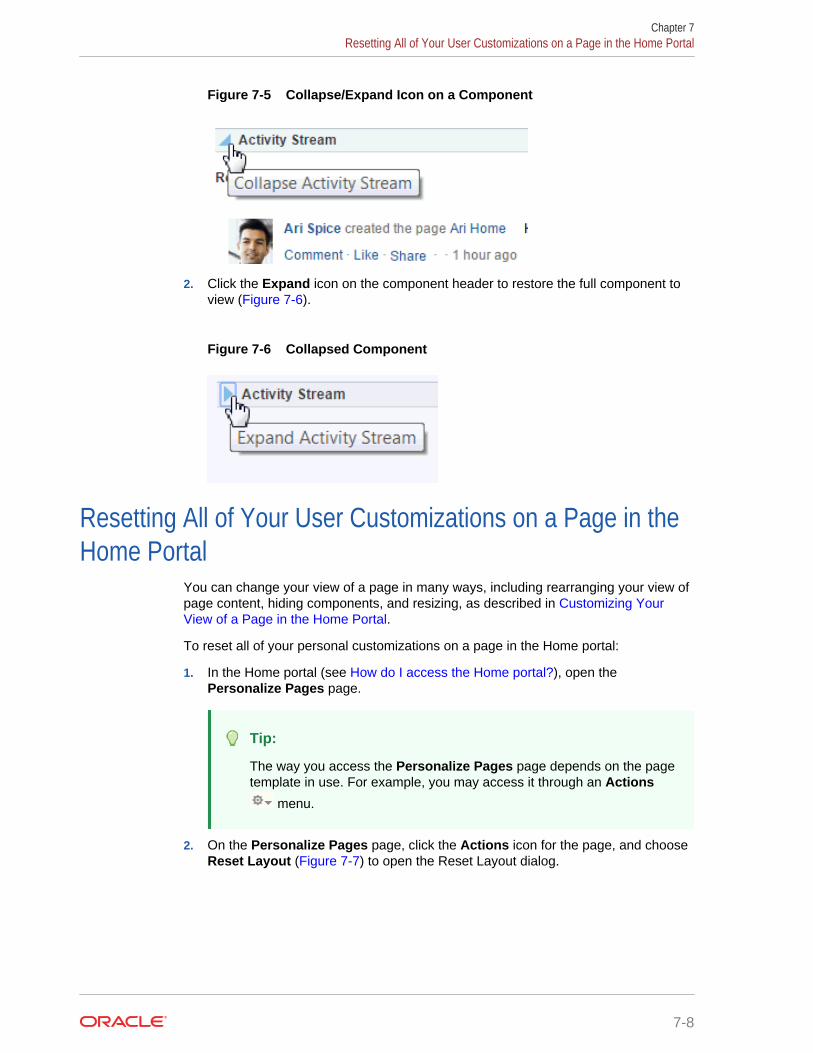
Figure 7-5 Collapse/Expand Icon on a Component
2. Click the Expand icon on the component header to restore the full component toview (Figure 7-6).
Figure 7-6 Collapsed Component
Resetting All of Your User Customizations on a Page in theHome Portal
You can change your view of a page in many ways, including rearranging your view ofpage content, hiding components, and resizing, as described in Customizing YourView of a Page in the Home Portal.
To reset all of your personal customizations on a page in the Home portal:
1. In the Home portal (see How do I access the Home portal?), open thePersonalize Pages page.
Tip:
The way you access the Personalize Pages page depends on the pagetemplate in use. For example, you may access it through an Actions
menu.
2. On the Personalize Pages page, click the Actions icon for the page, and chooseReset Layout (Figure 7-7) to open the Reset Layout dialog.
Chapter 7Resetting All of Your User Customizations on a Page in the Home Portal
7-8
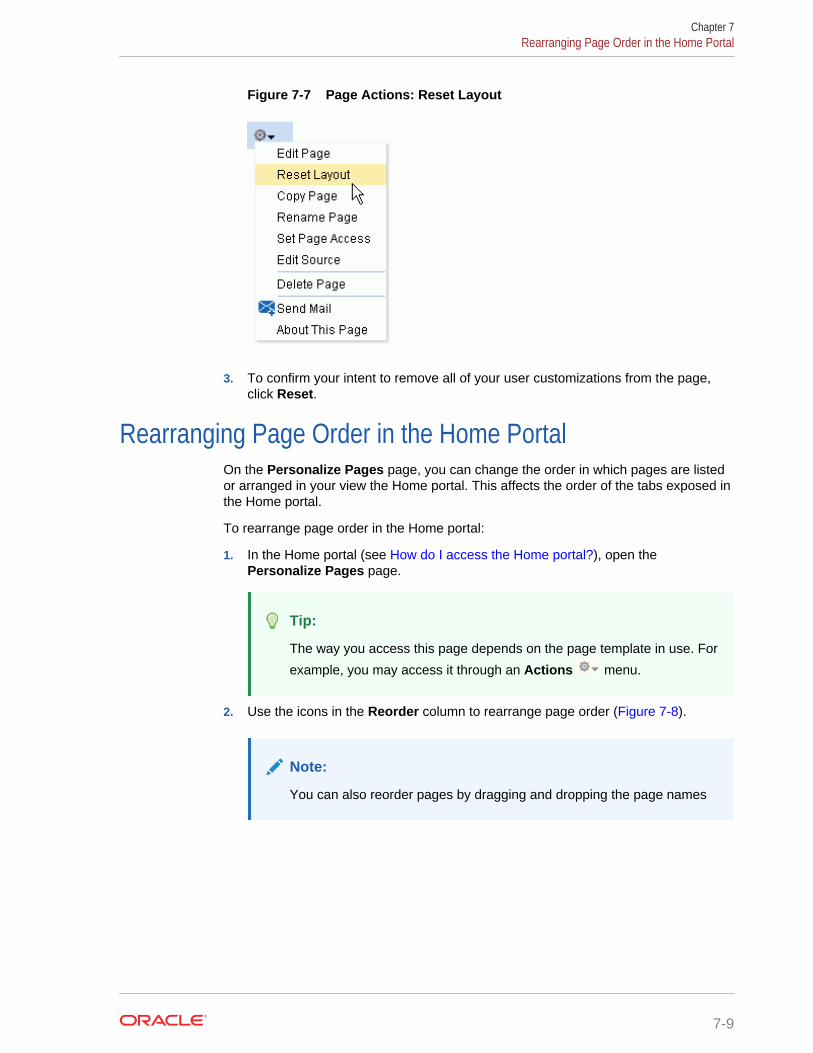
Figure 7-7 Page Actions: Reset Layout
3. To confirm your intent to remove all of your user customizations from the page,click Reset.
Rearranging Page Order in the Home PortalOn the Personalize Pages page, you can change the order in which pages are listedor arranged in your view the Home portal. This affects the order of the tabs exposed inthe Home portal.
To rearrange page order in the Home portal:
1. In the Home portal (see How do I access the Home portal?), open thePersonalize Pages page.
Tip:
The way you access this page depends on the page template in use. For
example, you may access it through an Actions menu.
2. Use the icons in the Reorder column to rearrange page order (Figure 7-8).
Note:
You can also reorder pages by dragging and dropping the page names
Chapter 7Rearranging Page Order in the Home Portal
7-9
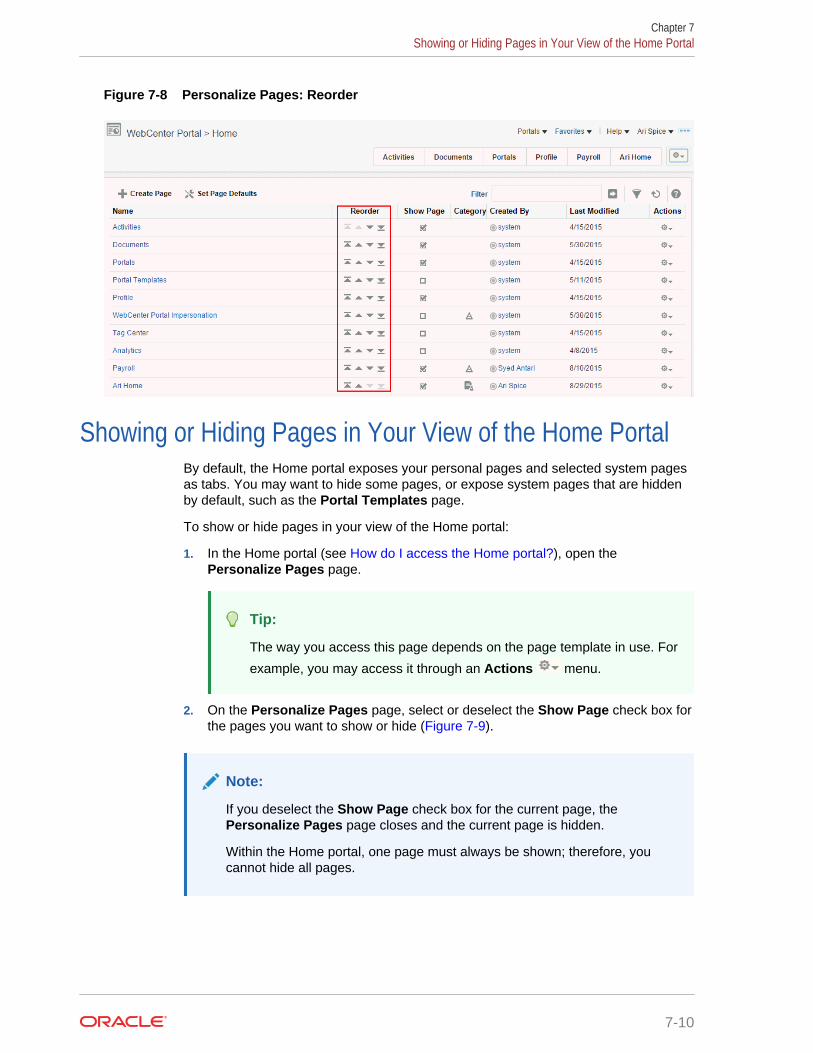
Figure 7-8 Personalize Pages: Reorder
Showing or Hiding Pages in Your View of the Home PortalBy default, the Home portal exposes your personal pages and selected system pagesas tabs. You may want to hide some pages, or expose system pages that are hiddenby default, such as the Portal Templates page.
To show or hide pages in your view of the Home portal:
1. In the Home portal (see How do I access the Home portal?), open thePersonalize Pages page.
Tip:
The way you access this page depends on the page template in use. For
example, you may access it through an Actions menu.
2. On the Personalize Pages page, select or deselect the Show Page check box forthe pages you want to show or hide (Figure 7-9).
Note:
If you deselect the Show Page check box for the current page, thePersonalize Pages page closes and the current page is hidden.
Within the Home portal, one page must always be shown; therefore, youcannot hide all pages.
Chapter 7Showing or Hiding Pages in Your View of the Home Portal
7-10
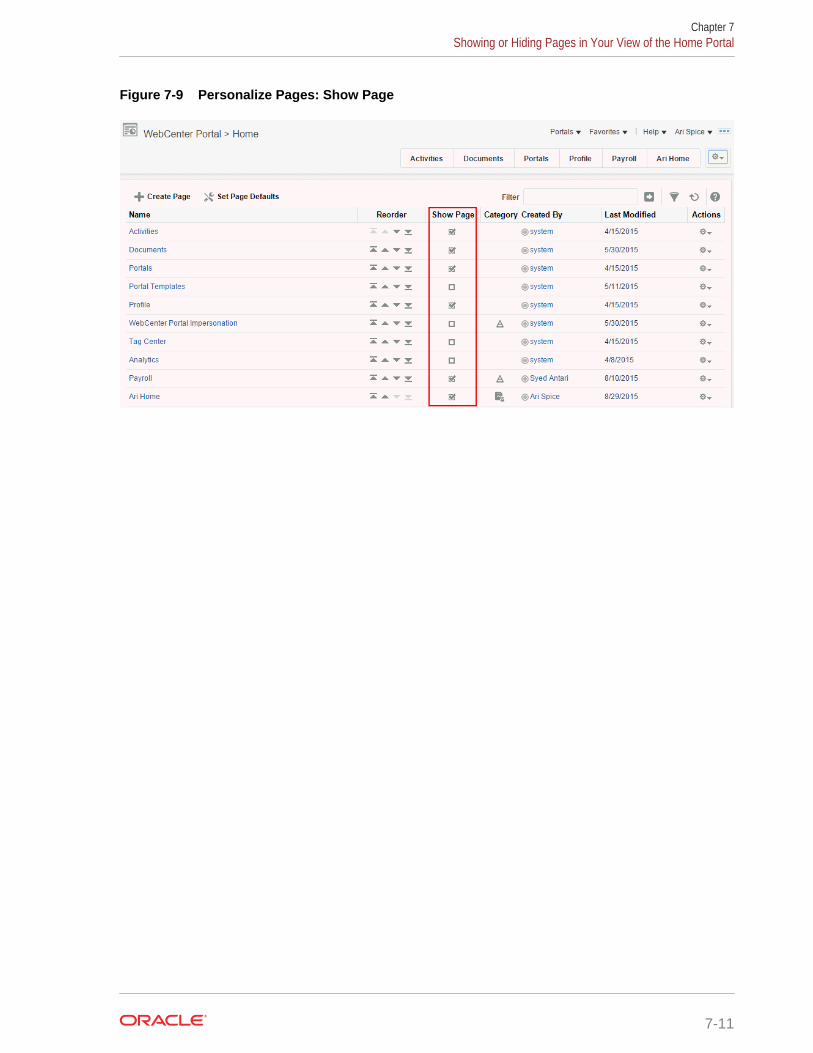
Figure 7-9 Personalize Pages: Show Page
Chapter 7Showing or Hiding Pages in Your View of the Home Portal
7-11
8Creating and Managing Personal Pages
Create, secure, edit, copy, and delete your own personal pages, which are available inthe Home portal to you and to other users to whom you grant access.
Permissions:
To perform the tasks in this chapter, you need the application-levelpermission Pages: Create, Edit, and Delete Pages. Users with thispermission can create and manage their personal pages in the Home portal.
Topics:
• About Personal Pages
• Creating a Personal Page in the Home Portal
• Changing the Layout of a Personal Page
• Changing Display Options for a Personal Page
• Adding or Modifying Parameters for a Personal Page
• Managing Your Personal Pages
• Setting Security for a Personal Page
• Editing a Personal Page
• Editing the Source of a Personal Page
• Copying a Personal Page
• Renaming a Personal Page
• Sending Mail with a Link to a Personal Page
• Viewing Information About a Personal Page
• Deleting a Personal Page
About Personal Pages
Note:
The system administrator may choose to prohibit the creation of personalpages in the Home portal, allowing only the display of business role pagesand system pages, over which you have less control.
8-1
With appropriate permissions, you can create, secure, edit, copy, and delete your ownpersonal pages in the Home portal, and populate them with components and contentsuch as Message Board, Events, Discussions, portlets, and documents.
By default, personal pages can be seen in the Home portal only by the user whocreated them, but users can also allow other users to see their personal pages (see Setting Security for a Personal Page). While individuals are primarily responsible formanaging the content of their personal pages, a system administrator has the authorityto administer all personal pages in WebCenter Portal administration, as described in Managing Personal Pages in Administering Oracle WebCenter Portal.
Personal pages are functionally similar to portal pages, but their purpose is different:personal pages are for an individual user's use in the Home portal, whereas portalpages are created by a portal manager for use by all members of a portal. For moreinformation about the different types of pages in WebCenter Portal, see What ArePages?
Creating a Personal Page in the Home PortalAfter setting page creation defaults, you can create a personal page in the Homeportal:
• Setting Page Creation Defaults for Personal Pages
• Creating a Personal Page
Setting Page Creation Defaults for Personal PagesIf your system administrator has made the option available, you can set page creationdefaults to reduce the number of steps required to create a personal page in the Homeportal. That is, you can specify the page style that is selected by default when youopen the Create Page dialog. You can also select to bypass the Create Page dialog,which enforces the default page style.
The settings you establish for yourself override any page creation settings set by thesystem administrator.
To set personal page creation defaults:
1. In the Home portal (see How do I access the Home portal?), open thePersonalize Pages page.
Tip:
The way you access this page depends on the page template in use. For
example, you may access it through an Actions menu.
2. On the Personalize Pages page, click Set Page Defaults to open the Set PageDefaults dialog.
Chapter 8Creating a Personal Page in the Home Portal
8-2

Figure 8-1 Set Page Defaults Dialog
3. To set page creation defaults:
a. Select a page layout from the Page Style dropdown list.
For detailed information about the seeded page styles, click the Help icon.Note, however, that your system administrator may provide additional custompage styles or restrict page styles to a shorter list.
Tip:
Make sure that the page style you select does not contain anycontent publishing components. Content publishing is not supportedin personal pages. Built-in page styles that you can use are Portal,Web, Blank, and Product Information.
b. Select an option next to Enable One-Click Page Creation:
• Yes—Bypass the Create Page dialog, and create all of your personalpages using the specified Page Style. This enforces a common look andfeel across your personal pages.
Tip:
When you bypass the Create Page dialog, your result is a pagewith a generic name. For information about renaming pages, see Renaming a Personal Page.
• No—Display the Create Page dialog, with the specified Page Styleselected as the default in the Create Page dialog for all of your personalpages. You can select a different style for your new personal pages.
4. Click Save to save your changes and exit the dialog.
Creating a Personal PageDepending on how your portal navigation is implemented and the page templatedesign in use, there may be several ways to create a personal page in your view onthe Home portal.
To create a personal page in the Home portal:
1. In the Home portal (see How do I access the Home portal?), click Create Page.
Chapter 8Creating a Personal Page in the Home Portal
8-3
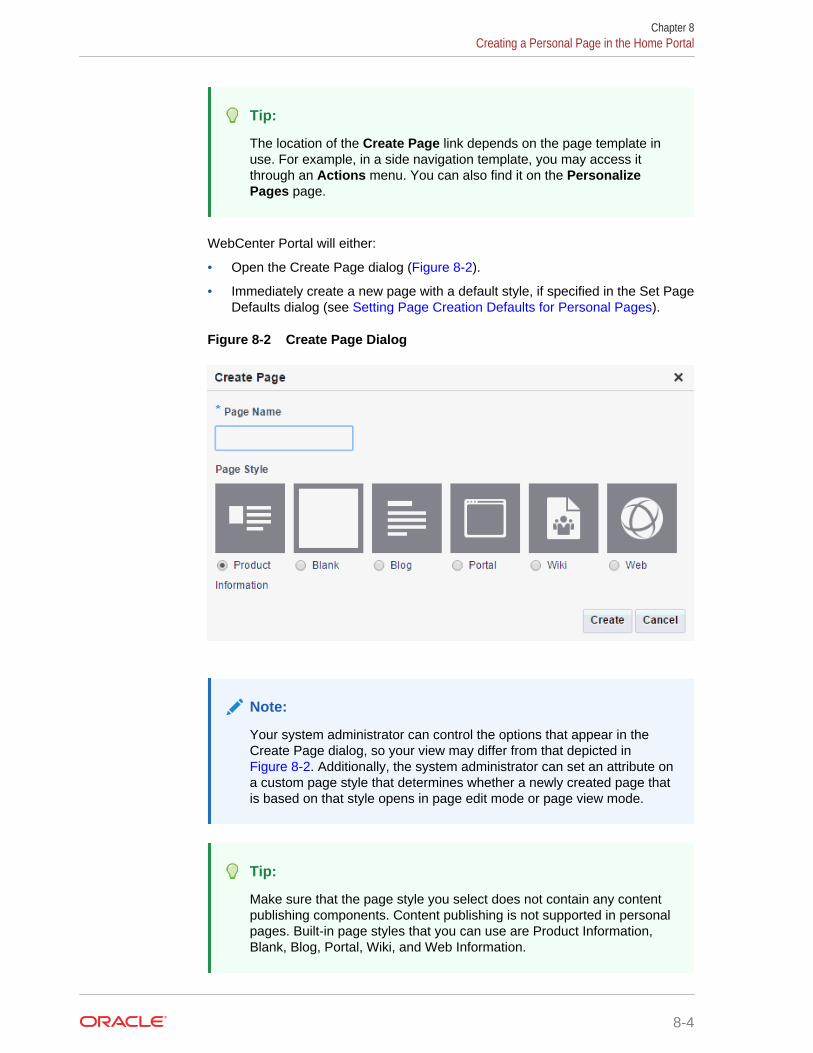
Tip:
The location of the Create Page link depends on the page template inuse. For example, in a side navigation template, you may access itthrough an Actions menu. You can also find it on the PersonalizePages page.
WebCenter Portal will either:
• Open the Create Page dialog (Figure 8-2).
• Immediately create a new page with a default style, if specified in the Set PageDefaults dialog (see Setting Page Creation Defaults for Personal Pages).
Figure 8-2 Create Page Dialog
Note:
Your system administrator can control the options that appear in theCreate Page dialog, so your view may differ from that depicted in Figure 8-2. Additionally, the system administrator can set an attribute ona custom page style that determines whether a newly created page thatis based on that style opens in page edit mode or page view mode.
Tip:
Make sure that the page style you select does not contain any contentpublishing components. Content publishing is not supported in personalpages. Built-in page styles that you can use are Product Information,Blank, Blog, Portal, Wiki, and Web Information.
Chapter 8Creating a Personal Page in the Home Portal
8-4
2. If the Create Page dialog opens, provide a name for the page.
There are no restrictions on the characters you can use in page names. Youcannot give a personal page the same name as an existing page or certain systempages (Activities, Documents, Tag Center, Analytics, WebCenter PortalImpersonation). However, the names of the following system pages are allowableas personal page names: Portals, Portal Templates, Profile.
Note:
While there are restrictions on naming files (including wiki documents),there are no naming restrictions for page names. Thus, while any of thefollowing characters can be used to name a wiki page, the page title willinclude the character(s) but the associated wiki document will replacethe illegal character with _.
? # & \ / * " | < > : ^
For example, if you create a wiki page named "What's In a Name?", thepage will have this title, but the associated wiki document will be named_What's In a Name__.
3. Select a page style to define the page structure.
For detailed information about the seeded page styles, click the Help icon. Note,however, that your system administrator may provide additional custom pagestyles or restrict page styles to a shorter list.
4. Click Create.
The new page opens in the page editor, where you can add content.
See Also:
For information about editing personal pages in the Home portal, see Editing a Personal Page.
Changing the Layout of a Personal PageWhen you create a new page, the first page of the wizard enables you to select a pagestyle for the page. Every page style includes a default layout, which you can modify inthe page editor.
Note:
With the exception of the Wiki, Blog, and Web page styles, pages based onthe built-in page styles allow you to modify the default layout in the pageeditor, selecting a new built-in or custom layout.
To change the page layout for a personal page:
Chapter 8Changing the Layout of a Personal Page
8-5
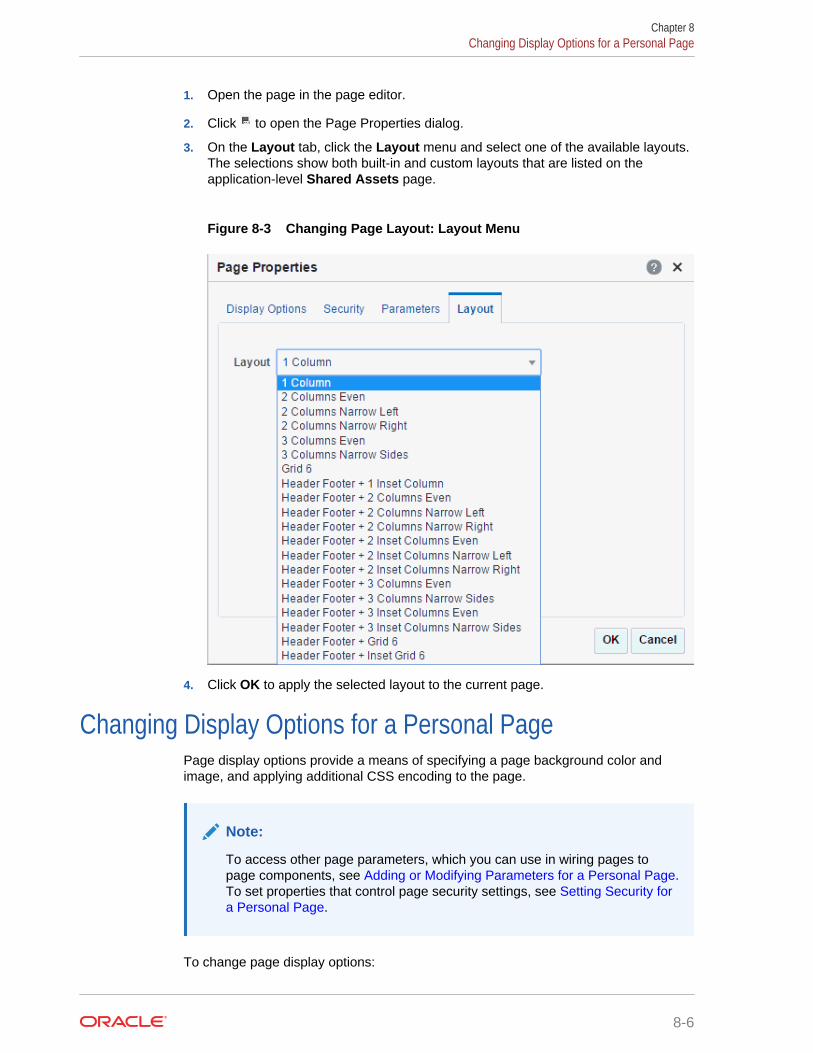
1. Open the page in the page editor.
2. Click to open the Page Properties dialog.
3. On the Layout tab, click the Layout menu and select one of the available layouts.The selections show both built-in and custom layouts that are listed on theapplication-level Shared Assets page.
Figure 8-3 Changing Page Layout: Layout Menu
4. Click OK to apply the selected layout to the current page.
Changing Display Options for a Personal PagePage display options provide a means of specifying a page background color andimage, and applying additional CSS encoding to the page.
Note:
To access other page parameters, which you can use in wiring pages topage components, see Adding or Modifying Parameters for a Personal Page.To set properties that control page security settings, see Setting Security fora Personal Page.
To change page display options:
Chapter 8Changing Display Options for a Personal Page
8-6
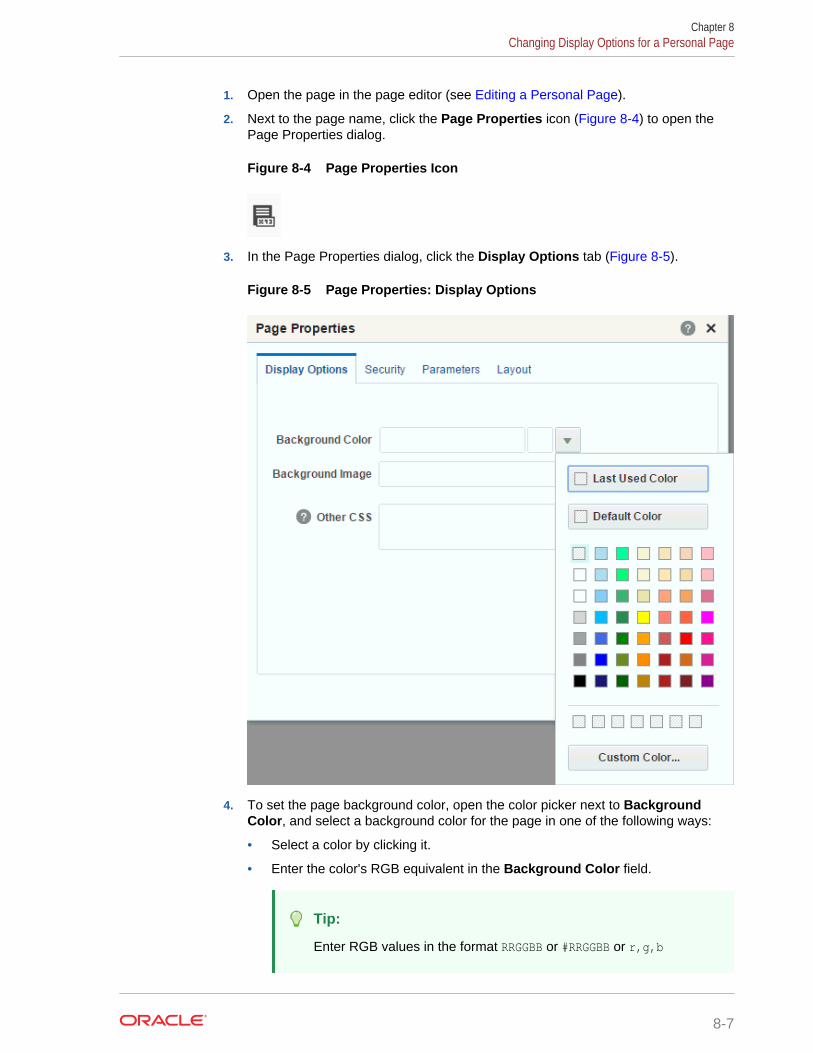
1. Open the page in the page editor (see Editing a Personal Page).
2. Next to the page name, click the Page Properties icon (Figure 8-4) to open thePage Properties dialog.
Figure 8-4 Page Properties Icon
3. In the Page Properties dialog, click the Display Options tab (Figure 8-5).
Figure 8-5 Page Properties: Display Options
4. To set the page background color, open the color picker next to BackgroundColor, and select a background color for the page in one of the following ways:
• Select a color by clicking it.
• Enter the color's RGB equivalent in the Background Color field.
Tip:
Enter RGB values in the format RRGGBB or #RRGGBB or r,g,b
Chapter 8Changing Display Options for a Personal Page
8-7

• Create a custom color by clicking Custom Color in the picker and selecting acolor and a saturation level using the selector and the slider provided.
Figure 8-6 Custom Color Picker
Click OK to enter the color value in the Background Color field.
5. To set a background image for the page, enter in the Background Image field afull URL or a URL relative to the application root. For example:
http://www.abc.com/image.jpg
6. In the Other CSS field, add any desired CSS encoding that is not covered by theother page properties. Examples:
background-position:center;background: #F8F8FF url(http://www.google.com/intl/en_ALL/images/logo.gif) no-repeat fixed top; font-size: xx-small
You must use standard CSS syntax for this value to be valid. For more informationabout Other CSS, see Other CSS Property: Usage and Examples in BuildingPortals with Oracle WebCenter Portal.
7. Click OK to save your changes and apply them to the page.
Adding or Modifying Parameters for a Personal PagePage parameters allow communication between components and the pages thatcontain them by providing a means of storing values for passing to page componentsthat have been configured to consume them.
Chapter 8Adding or Modifying Parameters for a Personal Page
8-8
For example, imagine a page that contains stock ticker and stock news components.You want the ticker and the news components to both consume the same parametervalue so that they both show information for the same company.
Note:
If you change a page parameter value, the new value is immediately saved.You cannot revert back to the prior value. Therefore, take note of parametervalues before you change them in case you want to set them back to theiroriginal values.
To add or modify page parameters:
1. Open the page in the page editor (see Editing a Personal Page).
2. Click the Page Properties icon (Figure 8-7) to open the Page Properties dialog.
Figure 8-7 Page Properties Icon
3. On the Parameters tab:
• Add new parameters by clicking Add a page parameter . In the Add a PageParameter dialog, enter a new parameter Name, then click Add Parameter toadd the parameter to the Parameters tab, with a value entry field. Optionally,enter a value for the new parameter.
• Modify existing parameters as required
Chapter 8Adding or Modifying Parameters for a Personal Page
8-9
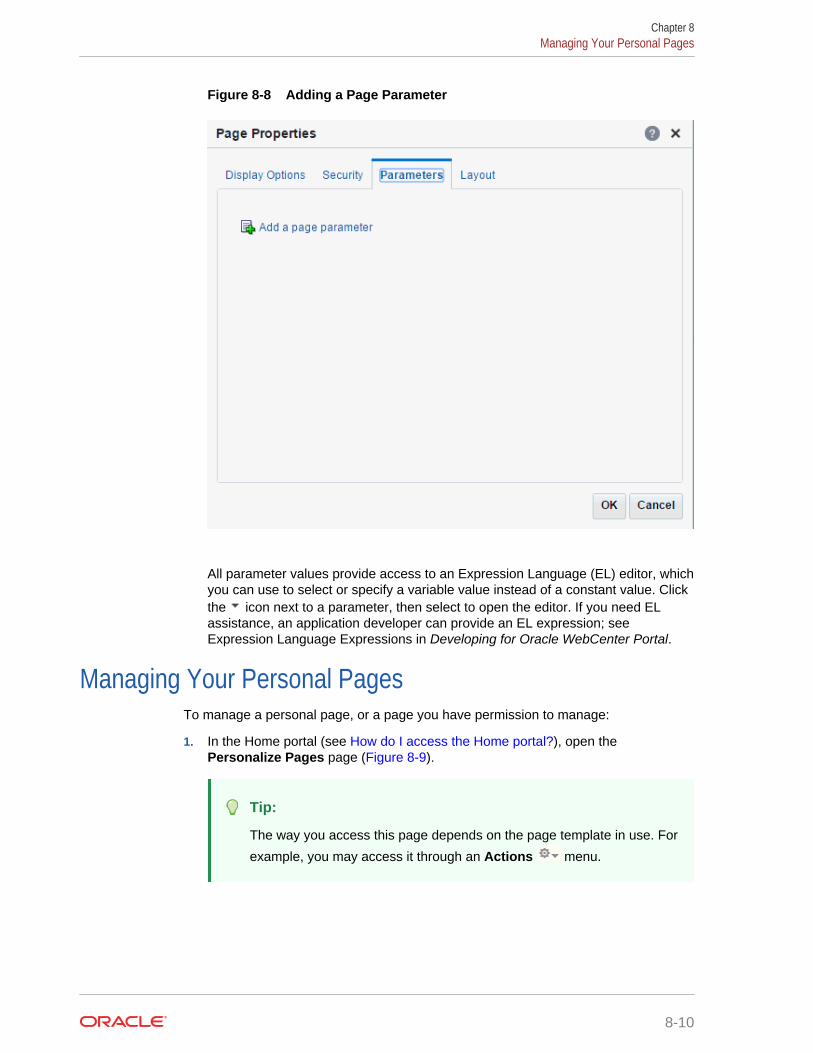
Figure 8-8 Adding a Page Parameter
All parameter values provide access to an Expression Language (EL) editor, whichyou can use to select or specify a variable value instead of a constant value. Clickthe icon next to a parameter, then select to open the editor. If you need ELassistance, an application developer can provide an EL expression; see Expression Language Expressions in Developing for Oracle WebCenter Portal.
Managing Your Personal PagesTo manage a personal page, or a page you have permission to manage:
1. In the Home portal (see How do I access the Home portal?), open thePersonalize Pages page (Figure 8-9).
Tip:
The way you access this page depends on the page template in use. For
example, you may access it through an Actions menu.
Chapter 8Managing Your Personal Pages
8-10
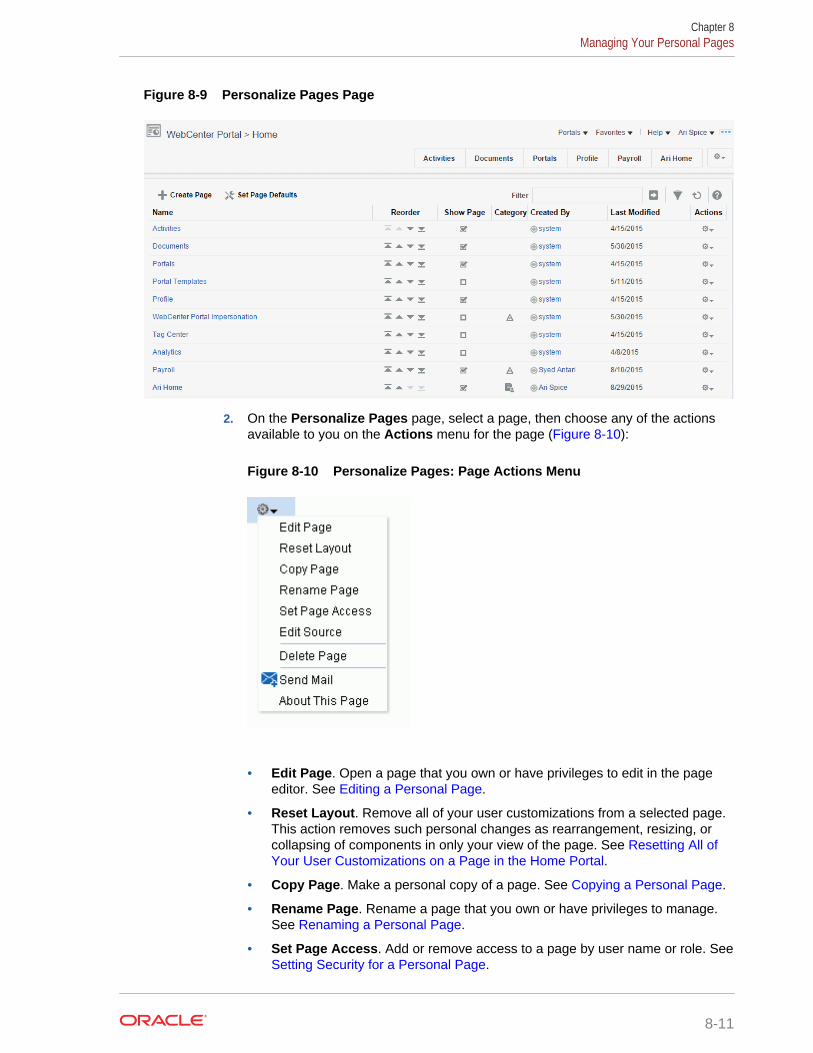
Figure 8-9 Personalize Pages Page
2. On the Personalize Pages page, select a page, then choose any of the actionsavailable to you on the Actions menu for the page (Figure 8-10):
Figure 8-10 Personalize Pages: Page Actions Menu
• Edit Page. Open a page that you own or have privileges to edit in the pageeditor. See Editing a Personal Page.
• Reset Layout. Remove all of your user customizations from a selected page.This action removes such personal changes as rearrangement, resizing, orcollapsing of components in only your view of the page. See Resetting All ofYour User Customizations on a Page in the Home Portal.
• Copy Page. Make a personal copy of a page. See Copying a Personal Page.
• Rename Page. Rename a page that you own or have privileges to manage.See Renaming a Personal Page.
• Set Page Access. Add or remove access to a page by user name or role. See Setting Security for a Personal Page.
Chapter 8Managing Your Personal Pages
8-11
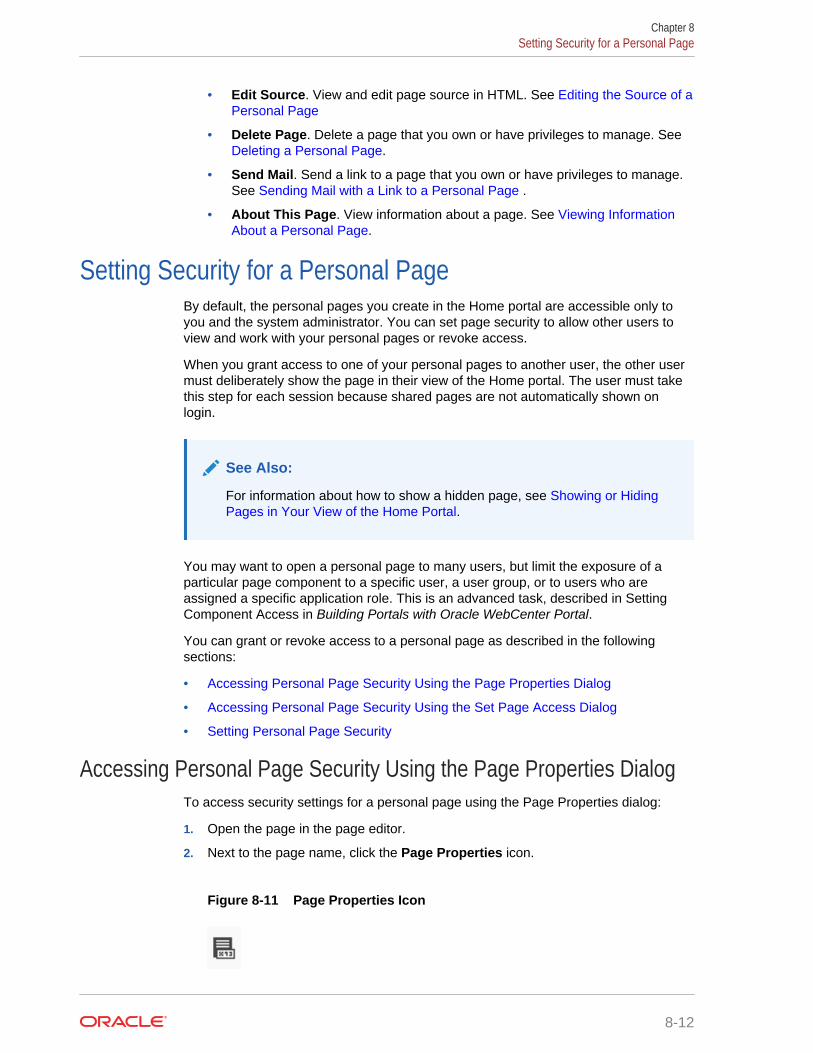
• Edit Source. View and edit page source in HTML. See Editing the Source of aPersonal Page
• Delete Page. Delete a page that you own or have privileges to manage. See Deleting a Personal Page.
• Send Mail. Send a link to a page that you own or have privileges to manage.See Sending Mail with a Link to a Personal Page .
• About This Page. View information about a page. See Viewing InformationAbout a Personal Page.
Setting Security for a Personal PageBy default, the personal pages you create in the Home portal are accessible only toyou and the system administrator. You can set page security to allow other users toview and work with your personal pages or revoke access.
When you grant access to one of your personal pages to another user, the other usermust deliberately show the page in their view of the Home portal. The user must takethis step for each session because shared pages are not automatically shown onlogin.
See Also:
For information about how to show a hidden page, see Showing or HidingPages in Your View of the Home Portal.
You may want to open a personal page to many users, but limit the exposure of aparticular page component to a specific user, a user group, or to users who areassigned a specific application role. This is an advanced task, described in SettingComponent Access in Building Portals with Oracle WebCenter Portal.
You can grant or revoke access to a personal page as described in the followingsections:
• Accessing Personal Page Security Using the Page Properties Dialog
• Accessing Personal Page Security Using the Set Page Access Dialog
• Setting Personal Page Security
Accessing Personal Page Security Using the Page Properties DialogTo access security settings for a personal page using the Page Properties dialog:
1. Open the page in the page editor.
2. Next to the page name, click the Page Properties icon.
Figure 8-11 Page Properties Icon
Chapter 8Setting Security for a Personal Page
8-12
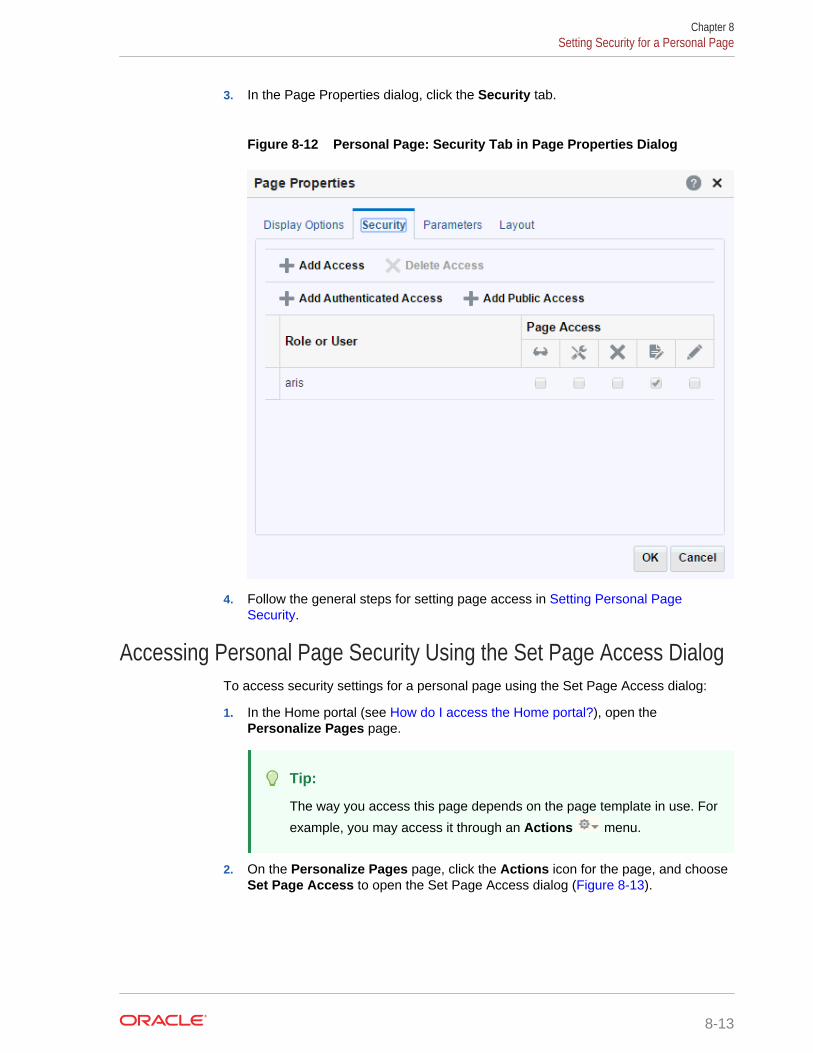
3. In the Page Properties dialog, click the Security tab.
Figure 8-12 Personal Page: Security Tab in Page Properties Dialog
4. Follow the general steps for setting page access in Setting Personal PageSecurity.
Accessing Personal Page Security Using the Set Page Access DialogTo access security settings for a personal page using the Set Page Access dialog:
1. In the Home portal (see How do I access the Home portal?), open thePersonalize Pages page.
Tip:
The way you access this page depends on the page template in use. For
example, you may access it through an Actions menu.
2. On the Personalize Pages page, click the Actions icon for the page, and chooseSet Page Access to open the Set Page Access dialog (Figure 8-13).
Chapter 8Setting Security for a Personal Page
8-13
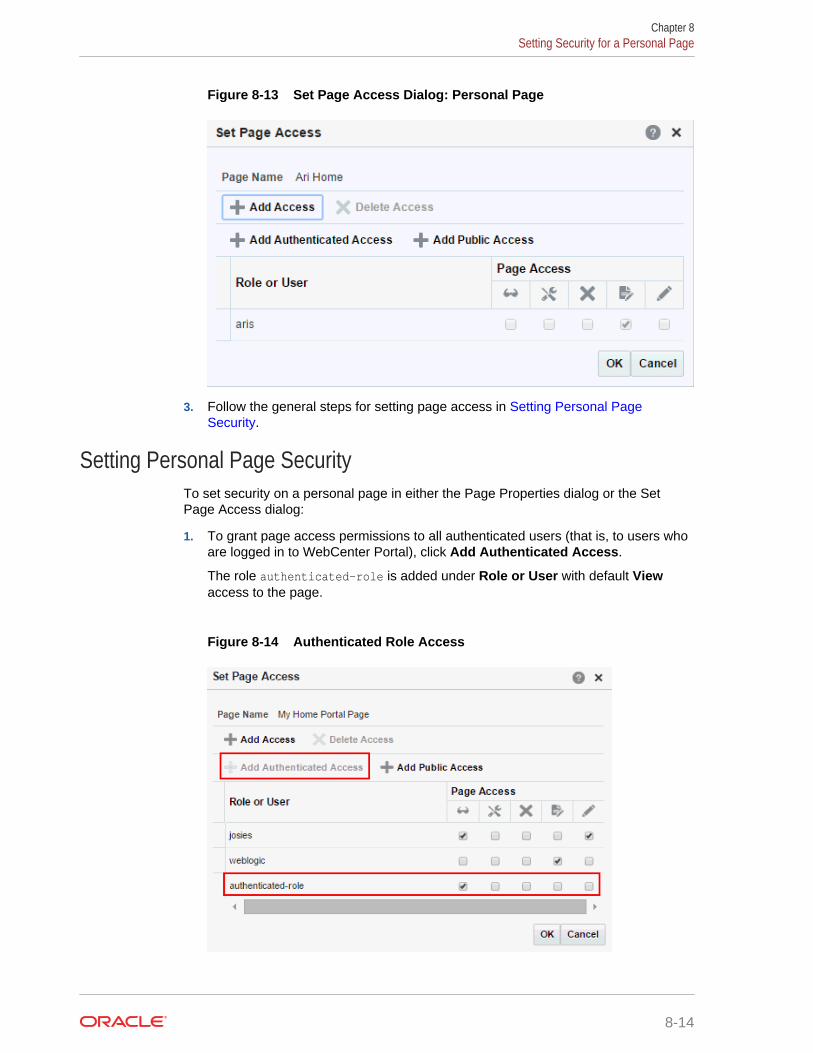
Figure 8-13 Set Page Access Dialog: Personal Page
3. Follow the general steps for setting page access in Setting Personal PageSecurity.
Setting Personal Page SecurityTo set security on a personal page in either the Page Properties dialog or the SetPage Access dialog:
1. To grant page access permissions to all authenticated users (that is, to users whoare logged in to WebCenter Portal), click Add Authenticated Access.
The role authenticated-role is added under Role or User with default Viewaccess to the page.
Figure 8-14 Authenticated Role Access
Chapter 8Setting Security for a Personal Page
8-14
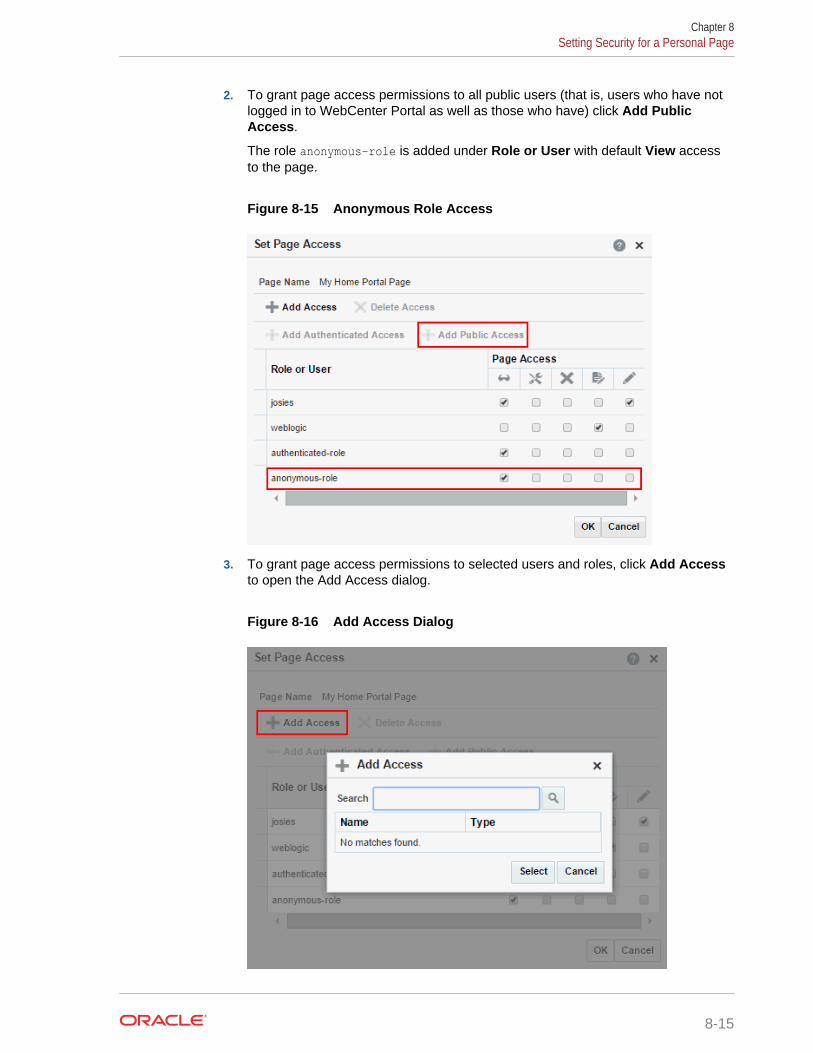
2. To grant page access permissions to all public users (that is, users who have notlogged in to WebCenter Portal as well as those who have) click Add PublicAccess.
The role anonymous-role is added under Role or User with default View accessto the page.
Figure 8-15 Anonymous Role Access
3. To grant page access permissions to selected users and roles, click Add Accessto open the Add Access dialog.
Figure 8-16 Add Access Dialog
Chapter 8Setting Security for a Personal Page
8-15
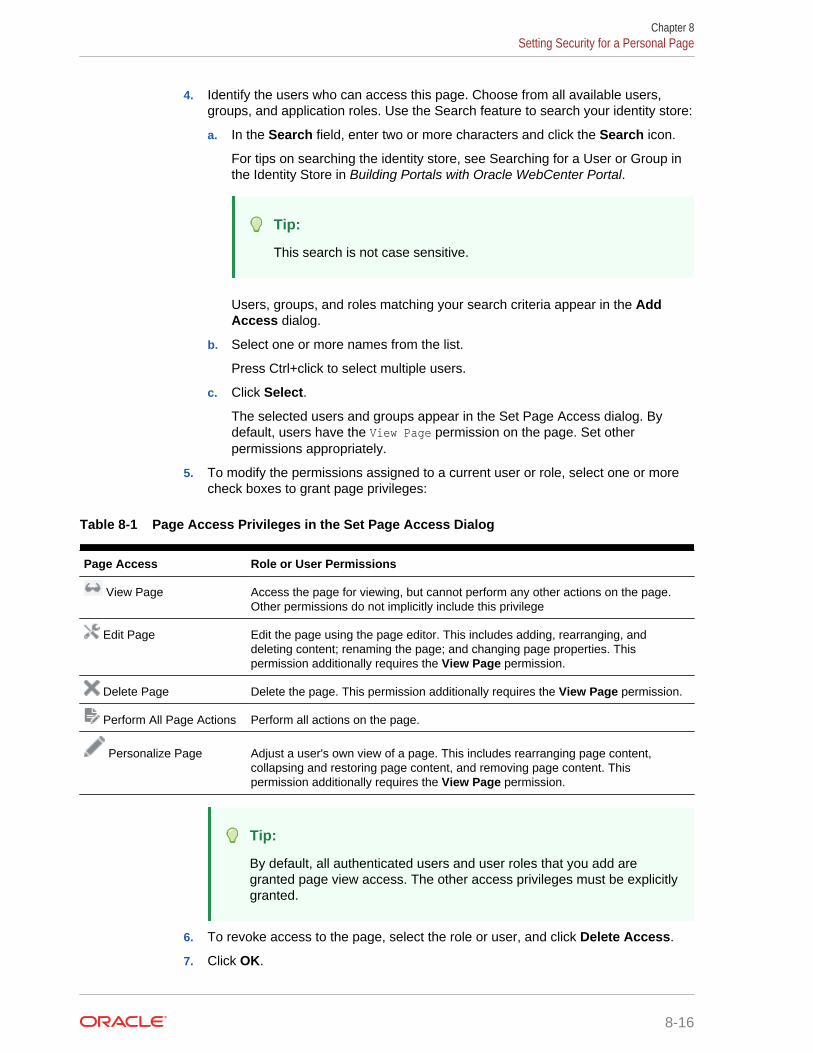
4. Identify the users who can access this page. Choose from all available users,groups, and application roles. Use the Search feature to search your identity store:
a. In the Search field, enter two or more characters and click the Search icon.
For tips on searching the identity store, see Searching for a User or Group inthe Identity Store in Building Portals with Oracle WebCenter Portal.
Tip:
This search is not case sensitive.
Users, groups, and roles matching your search criteria appear in the AddAccess dialog.
b. Select one or more names from the list.
Press Ctrl+click to select multiple users.
c. Click Select.
The selected users and groups appear in the Set Page Access dialog. Bydefault, users have the View Page permission on the page. Set otherpermissions appropriately.
5. To modify the permissions assigned to a current user or role, select one or morecheck boxes to grant page privileges:
Table 8-1 Page Access Privileges in the Set Page Access Dialog
Page Access Role or User Permissions
View Page Access the page for viewing, but cannot perform any other actions on the page.Other permissions do not implicitly include this privilege
Edit Page Edit the page using the page editor. This includes adding, rearranging, anddeleting content; renaming the page; and changing page properties. Thispermission additionally requires the View Page permission.
Delete Page Delete the page. This permission additionally requires the View Page permission.
Perform All Page Actions Perform all actions on the page.
Personalize Page Adjust a user's own view of a page. This includes rearranging page content,collapsing and restoring page content, and removing page content. Thispermission additionally requires the View Page permission.
Tip:
By default, all authenticated users and user roles that you add aregranted page view access. The other access privileges must be explicitlygranted.
6. To revoke access to the page, select the role or user, and click Delete Access.
7. Click OK.
Chapter 8Setting Security for a Personal Page
8-16
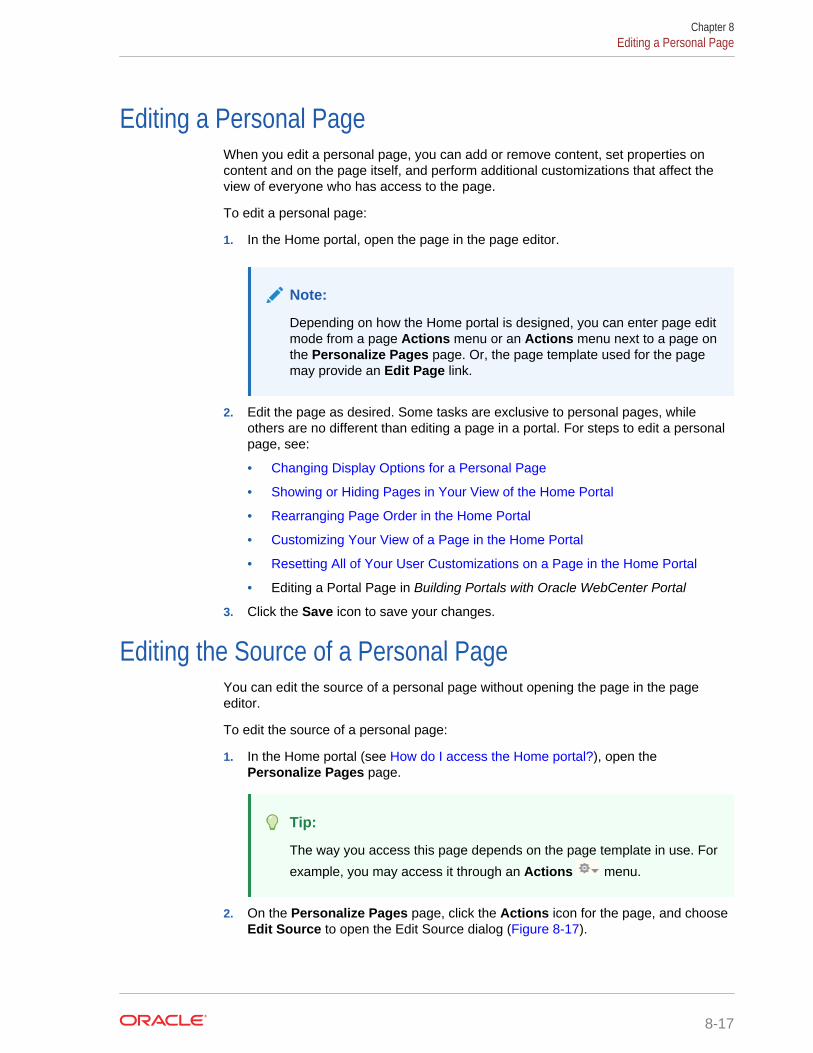
Editing a Personal PageWhen you edit a personal page, you can add or remove content, set properties oncontent and on the page itself, and perform additional customizations that affect theview of everyone who has access to the page.
To edit a personal page:
1. In the Home portal, open the page in the page editor.
Note:
Depending on how the Home portal is designed, you can enter page editmode from a page Actions menu or an Actions menu next to a page onthe Personalize Pages page. Or, the page template used for the pagemay provide an Edit Page link.
2. Edit the page as desired. Some tasks are exclusive to personal pages, whileothers are no different than editing a page in a portal. For steps to edit a personalpage, see:
• Changing Display Options for a Personal Page
• Showing or Hiding Pages in Your View of the Home Portal
• Rearranging Page Order in the Home Portal
• Customizing Your View of a Page in the Home Portal
• Resetting All of Your User Customizations on a Page in the Home Portal
• Editing a Portal Page in Building Portals with Oracle WebCenter Portal
3. Click the Save icon to save your changes.
Editing the Source of a Personal PageYou can edit the source of a personal page without opening the page in the pageeditor.
To edit the source of a personal page:
1. In the Home portal (see How do I access the Home portal?), open thePersonalize Pages page.
Tip:
The way you access this page depends on the page template in use. For
example, you may access it through an Actions menu.
2. On the Personalize Pages page, click the Actions icon for the page, and chooseEdit Source to open the Edit Source dialog (Figure 8-17).
Chapter 8Editing a Personal Page
8-17
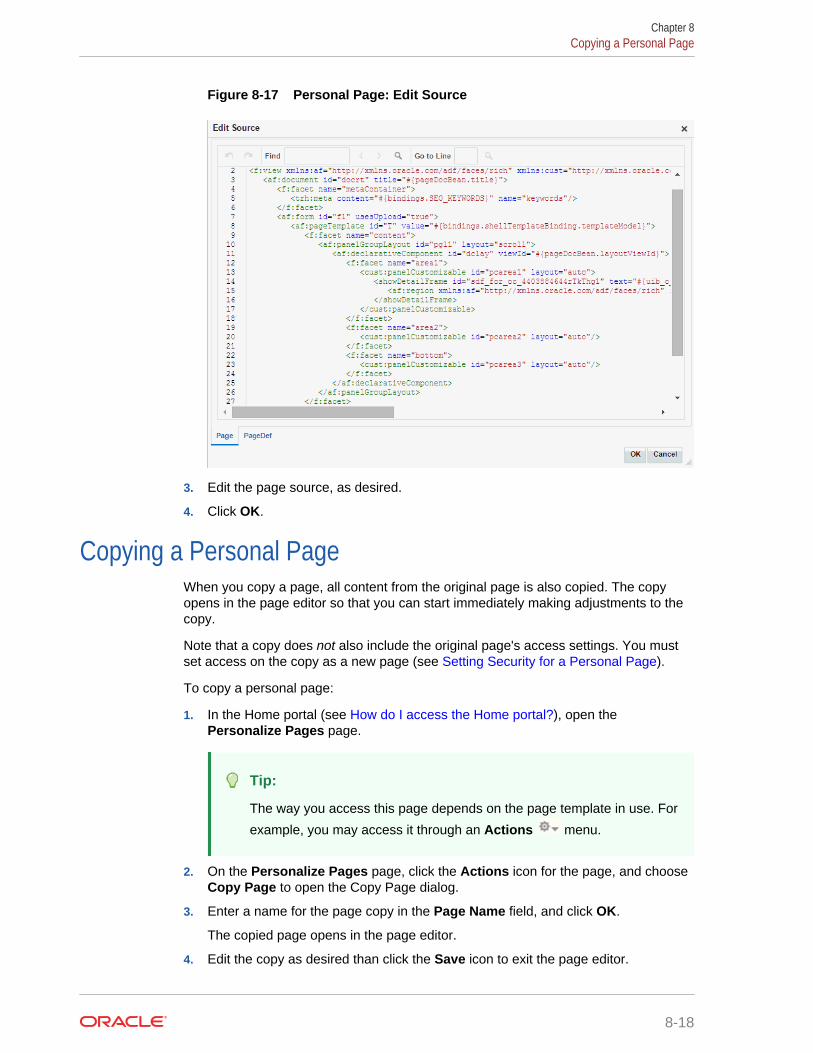
Figure 8-17 Personal Page: Edit Source
3. Edit the page source, as desired.
4. Click OK.
Copying a Personal PageWhen you copy a page, all content from the original page is also copied. The copyopens in the page editor so that you can start immediately making adjustments to thecopy.
Note that a copy does not also include the original page's access settings. You mustset access on the copy as a new page (see Setting Security for a Personal Page).
To copy a personal page:
1. In the Home portal (see How do I access the Home portal?), open thePersonalize Pages page.
Tip:
The way you access this page depends on the page template in use. For
example, you may access it through an Actions menu.
2. On the Personalize Pages page, click the Actions icon for the page, and chooseCopy Page to open the Copy Page dialog.
3. Enter a name for the page copy in the Page Name field, and click OK.
The copied page opens in the page editor.
4. Edit the copy as desired than click the Save icon to exit the page editor.
Chapter 8Copying a Personal Page
8-18
Renaming a Personal PageWhen you rename a page, any pretty URLs that use the old name will be broken. Alsonote that system pages, such as the Announcements, Lists, and Events pages,cannot be renamed.
To copy a personal page, or a page you have permission to manage:
1. In the Home portal (see How do I access the Home portal?), open thePersonalize Pages page.
Tip:
The way you access this page depends on the page template in use. For
example, you may access it through an Actions menu.
2. On the Personalize Pages page, click the Actions icon for the page, and chooseRename Page to open the Rename Page dialog.
3. Enter a new name for the page, and click the Save icon.
Sending Mail with a Link to a Personal PageIf you own or have manage permissions on a page in the Home portal, you can sendother users a link to the page.
To send mail to other users populated with a link to a personal page:
1. In the Home portal (see How do I access the Home portal?), open thePersonalize Pages page.
Tip:
The way you access this page depends on the page template in use. For
example, you may access it through an Actions menu.
2. On the Personalize Pages page, click the Actions icon for the page, and chooseSend Mail to open your mail application compose window, showing a URL link tothe page.
Viewing Information About a Personal PageTo view information about a personal page:
1. In the Home portal (see How do I access the Home portal?), open thePersonalize Pages page.
Chapter 8Renaming a Personal Page
8-19
Tip:
The way you access this page depends on the page template in use. For
example, you may access it through an Actions menu.
2. On the Personalize Pages page, click the Actions icon for the page, and chooseAbout This Page to open the Page Information dialog, which shows Name,Created By, Date Created, Last Modified, and Direct URL.
Deleting a Personal PageTo delete a personal page:
1. In the Home portal (see How do I access the Home portal?), open thePersonalize Pages page.
Tip:
The way you access this page depends on the page template in use. For
example, you may access it through an Actions menu.
2. On the Personalize Pages page, click the Actions icon for the page, and chooseDelete Page to display the Delete Page dialog.
3. In the Delete Page confirmation dialog, click Delete.
Chapter 8Deleting a Personal Page
8-20
9Exploring Portals
Learn more about portals and how to perform the tasks available to any knowledgeworker in an existing portal.
Permissions:
To perform the tasks in this chapter, you need the application-levelpermissions granted by default to the application Authenticated-User role.
Topics:
• About Portals
• Interacting with Portals Before Logging In (Public User)
• Viewing and Accessing Available Portals
• Sending Mail to Portal Members or Managers
• Viewing Information About a Portal
• Publishing the Link to a Portal
• Searching for a Portal
• Joining a Portal
• Searching in a Portal
• Working with Pages in a Portal
• Changing Your Role in a Portal
• Cancelling Your Portal Membership
About PortalsA portal provides a dedicated and readily accessible area for relevant tools, pages,and content and supports the inclusion of specified members, each of whom havedefined roles associated with permissions in the portal. As you explore, you will learnmore about the portals available to you, their purpose, and how to manage your role ina portal. Your experience in a particular portal depends on the purpose of the portaland your membership role.
Many features and tools to facilitate teamwork are built into the portal framework,instantly allowing portal members to share documents, discuss issues, schedulemeetings, exchange messages, create lists, and much more.
9-1
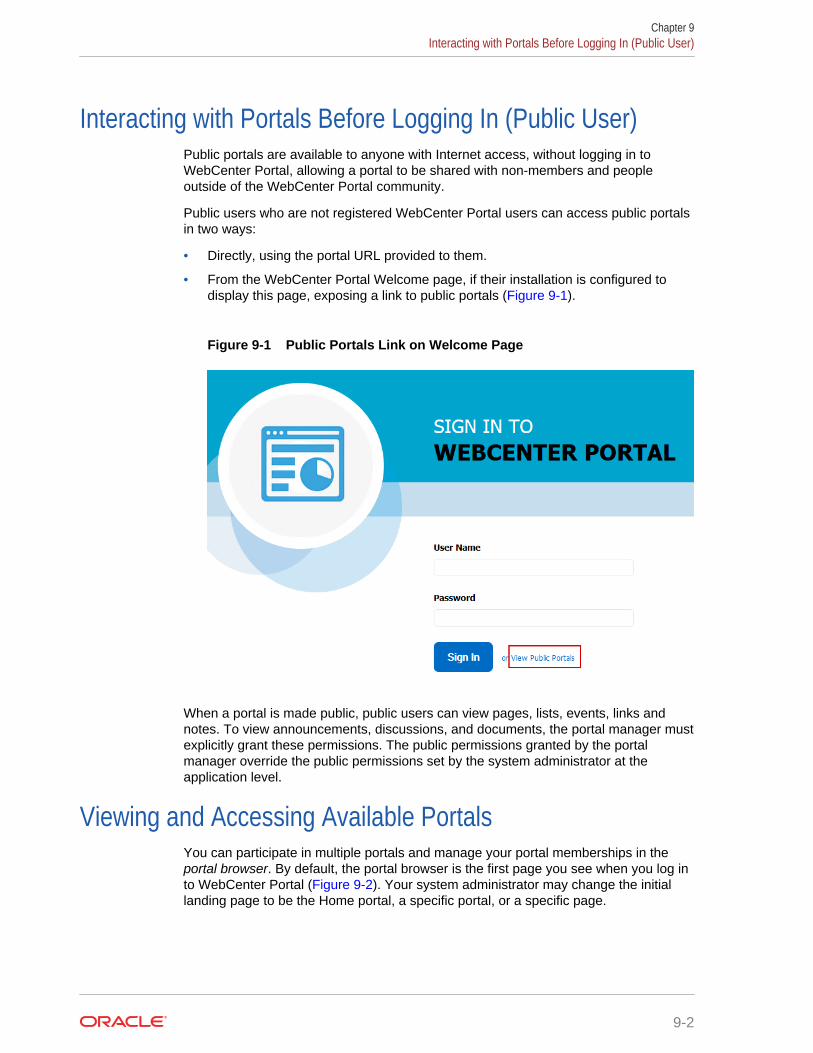
Interacting with Portals Before Logging In (Public User)Public portals are available to anyone with Internet access, without logging in toWebCenter Portal, allowing a portal to be shared with non-members and peopleoutside of the WebCenter Portal community.
Public users who are not registered WebCenter Portal users can access public portalsin two ways:
• Directly, using the portal URL provided to them.
• From the WebCenter Portal Welcome page, if their installation is configured todisplay this page, exposing a link to public portals (Figure 9-1).
Figure 9-1 Public Portals Link on Welcome Page
When a portal is made public, public users can view pages, lists, events, links andnotes. To view announcements, discussions, and documents, the portal manager mustexplicitly grant these permissions. The public permissions granted by the portalmanager override the public permissions set by the system administrator at theapplication level.
Viewing and Accessing Available PortalsYou can participate in multiple portals and manage your portal memberships in theportal browser. By default, the portal browser is the first page you see when you log into WebCenter Portal (Figure 9-2). Your system administrator may change the initiallanding page to be the Home portal, a specific portal, or a specific page.
Chapter 9Interacting with Portals Before Logging In (Public User)
9-2
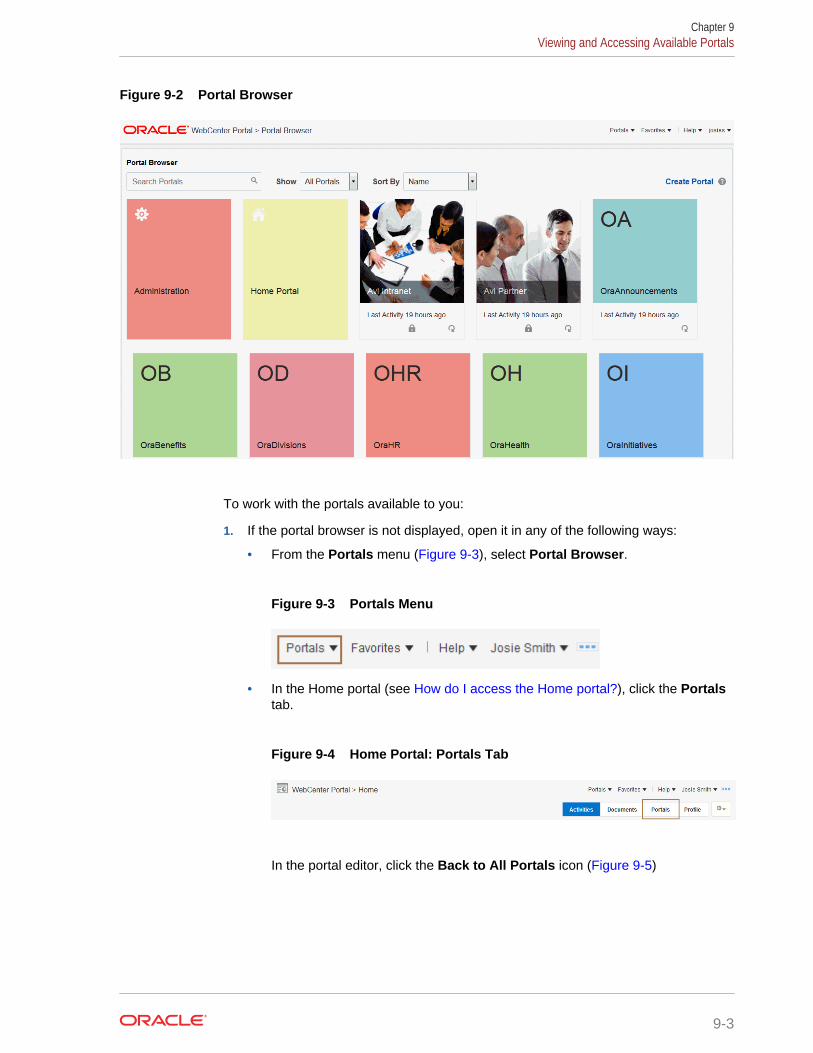
Figure 9-2 Portal Browser
To work with the portals available to you:
1. If the portal browser is not displayed, open it in any of the following ways:
• From the Portals menu (Figure 9-3), select Portal Browser.
Figure 9-3 Portals Menu
• In the Home portal (see How do I access the Home portal?), click the Portalstab.
Figure 9-4 Home Portal: Portals Tab
In the portal editor, click the Back to All Portals icon (Figure 9-5)
Chapter 9Viewing and Accessing Available Portals
9-3
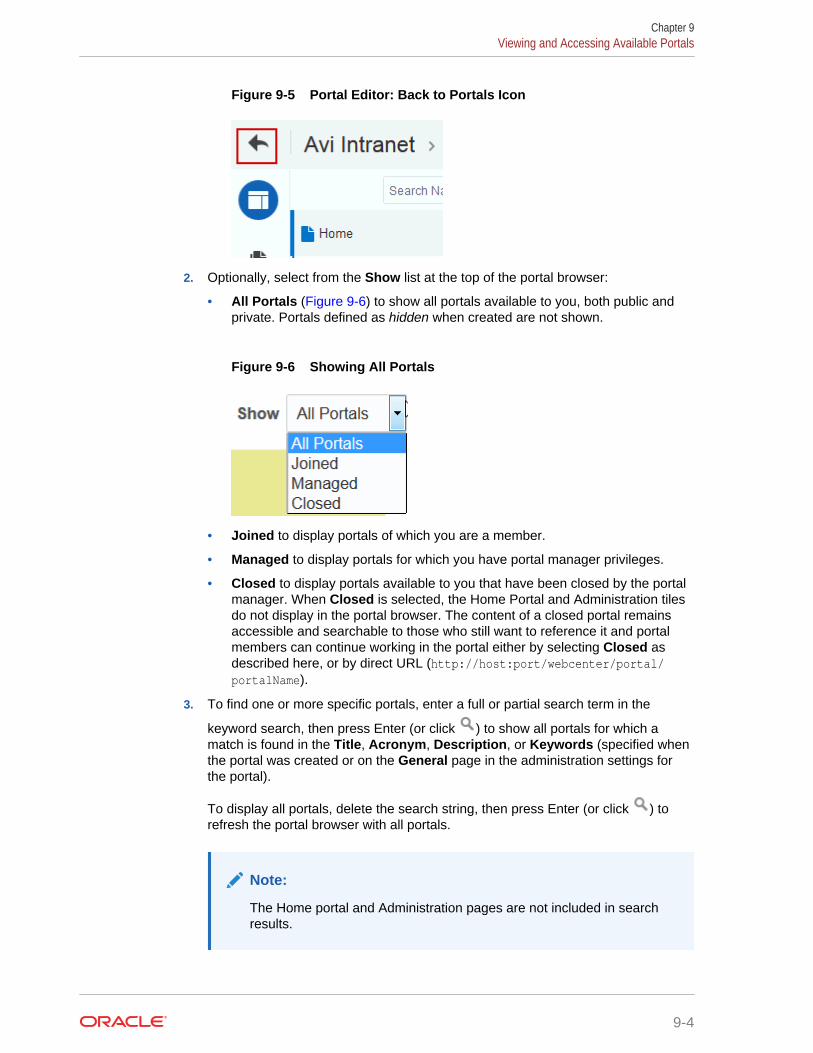
Figure 9-5 Portal Editor: Back to Portals Icon
2. Optionally, select from the Show list at the top of the portal browser:
• All Portals (Figure 9-6) to show all portals available to you, both public andprivate. Portals defined as hidden when created are not shown.
Figure 9-6 Showing All Portals
• Joined to display portals of which you are a member.
• Managed to display portals for which you have portal manager privileges.
• Closed to display portals available to you that have been closed by the portalmanager. When Closed is selected, the Home Portal and Administration tilesdo not display in the portal browser. The content of a closed portal remainsaccessible and searchable to those who still want to reference it and portalmembers can continue working in the portal either by selecting Closed asdescribed here, or by direct URL (http://host:port/webcenter/portal/portalName).
3. To find one or more specific portals, enter a full or partial search term in the
keyword search, then press Enter (or click ) to show all portals for which amatch is found in the Title, Acronym, Description, or Keywords (specified whenthe portal was created or on the General page in the administration settings forthe portal).
To display all portals, delete the search string, then press Enter (or click ) torefresh the portal browser with all portals.
Note:
The Home portal and Administration pages are not included in searchresults.
Chapter 9Viewing and Accessing Available Portals
9-4
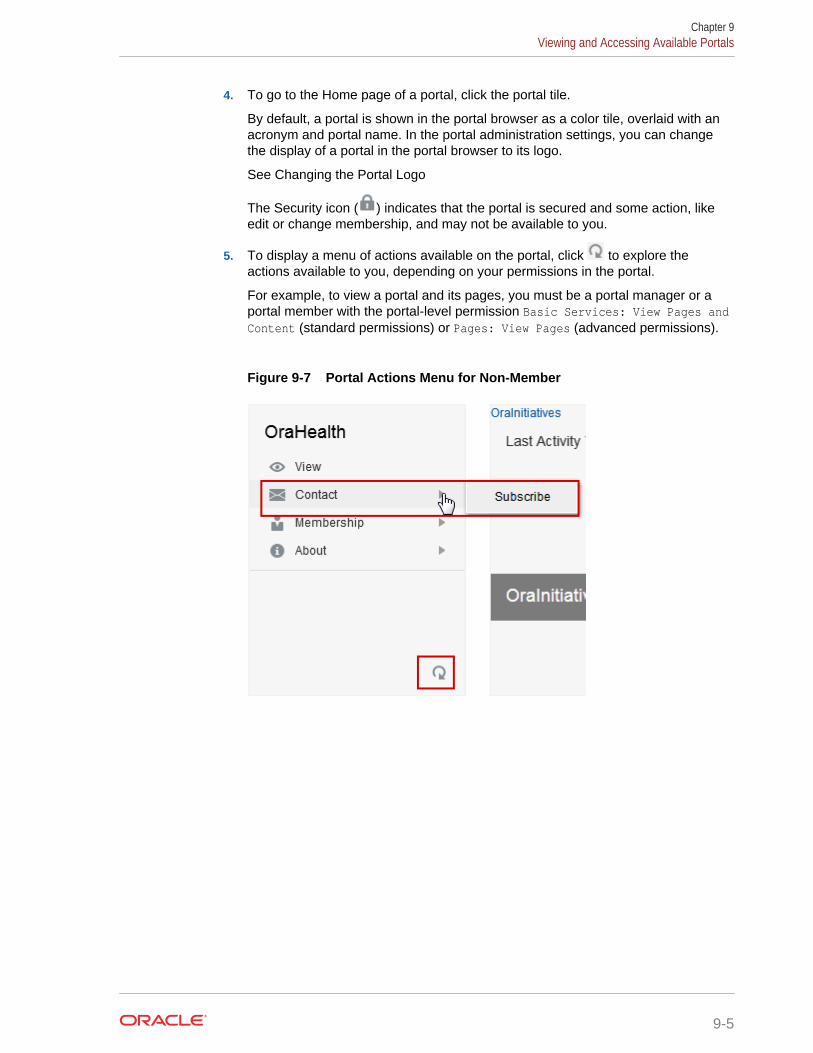
4. To go to the Home page of a portal, click the portal tile.
By default, a portal is shown in the portal browser as a color tile, overlaid with anacronym and portal name. In the portal administration settings, you can changethe display of a portal in the portal browser to its logo.
See Changing the Portal Logo
The Security icon ( ) indicates that the portal is secured and some action, likeedit or change membership, and may not be available to you.
5. To display a menu of actions available on the portal, click to explore theactions available to you, depending on your permissions in the portal.
For example, to view a portal and its pages, you must be a portal manager or aportal member with the portal-level permission Basic Services: View Pages andContent (standard permissions) or Pages: View Pages (advanced permissions).
Figure 9-7 Portal Actions Menu for Non-Member
Chapter 9Viewing and Accessing Available Portals
9-5
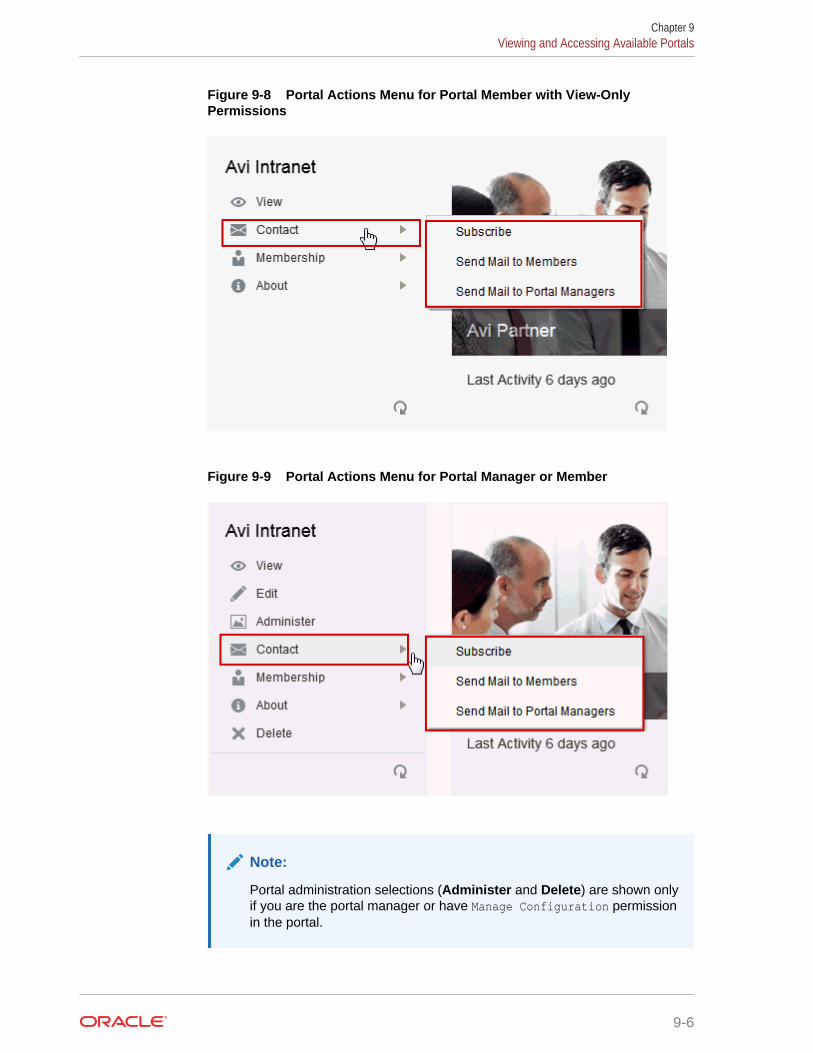
Figure 9-8 Portal Actions Menu for Portal Member with View-OnlyPermissions
Figure 9-9 Portal Actions Menu for Portal Manager or Member
Note:
Portal administration selections (Administer and Delete) are shown onlyif you are the portal manager or have Manage Configuration permissionin the portal.
Chapter 9Viewing and Accessing Available Portals
9-6
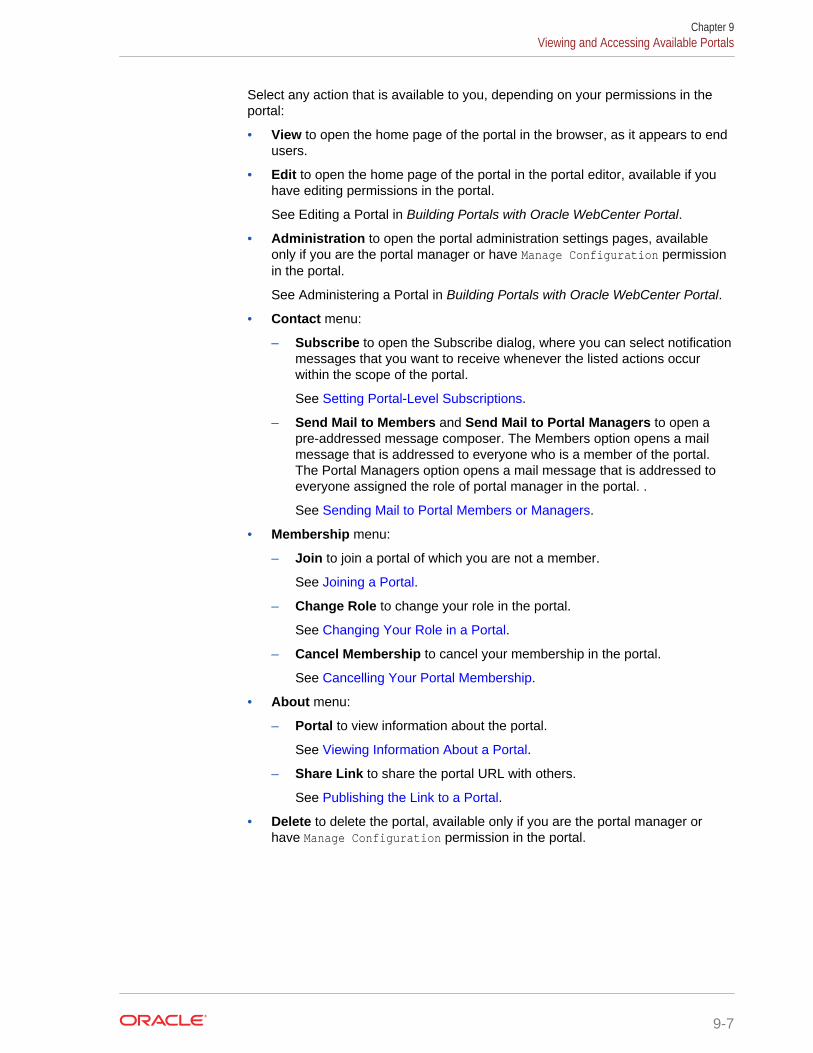
Select any action that is available to you, depending on your permissions in theportal:
• View to open the home page of the portal in the browser, as it appears to endusers.
• Edit to open the home page of the portal in the portal editor, available if youhave editing permissions in the portal.
See Editing a Portal in Building Portals with Oracle WebCenter Portal.
• Administration to open the portal administration settings pages, availableonly if you are the portal manager or have Manage Configuration permissionin the portal.
See Administering a Portal in Building Portals with Oracle WebCenter Portal.
• Contact menu:
– Subscribe to open the Subscribe dialog, where you can select notificationmessages that you want to receive whenever the listed actions occurwithin the scope of the portal.
See Setting Portal-Level Subscriptions.
– Send Mail to Members and Send Mail to Portal Managers to open apre-addressed message composer. The Members option opens a mailmessage that is addressed to everyone who is a member of the portal.The Portal Managers option opens a mail message that is addressed toeveryone assigned the role of portal manager in the portal. .
See Sending Mail to Portal Members or Managers.
• Membership menu:
– Join to join a portal of which you are not a member.
See Joining a Portal.
– Change Role to change your role in the portal.
See Changing Your Role in a Portal.
– Cancel Membership to cancel your membership in the portal.
See Cancelling Your Portal Membership.
• About menu:
– Portal to view information about the portal.
See Viewing Information About a Portal.
– Share Link to share the portal URL with others.
See Publishing the Link to a Portal.
• Delete to delete the portal, available only if you are the portal manager orhave Manage Configuration permission in the portal.
Chapter 9Viewing and Accessing Available Portals
9-7

Sending Mail to Portal Members or Managers
Note:
The Send Mail menu actions are available only if the profiles of one or moreportal members or managers specify a mail address, and you are a portalmember.
You can send mail to the members or the managers of a portal using the default maildistribution list for the portal. Advanced users can customize the mail distribution listsfor a portal, as described in Configuring the Mail Distribution List for a Portal inBuilding Portals with Oracle WebCenter Portal.
You can send mail to portal members or managers in either of the following ways:
• In the portal browser (see Viewing and Accessing Available Portals), locate the
portal to which the members or managers belong, click to display the portalactions, and select Contact, then Send Mail to Members or Send Mail to PortalManagers (Figure 9-10).
Figure 9-10 Portal Actions Menu for Portal Manager or Member
• When viewing a portal, click the Actions menu, and select Contact, then SendMail to Members or Send Mail to Portal Managers.
Chapter 9Sending Mail to Portal Members or Managers
9-8
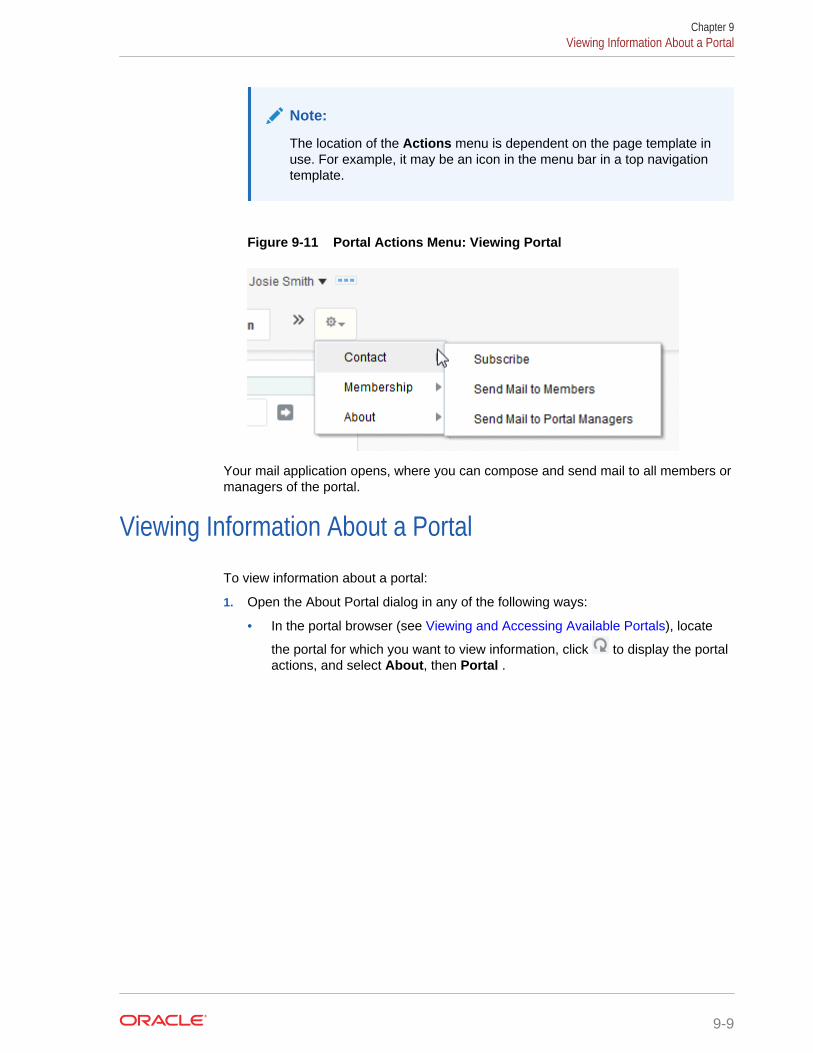
Note:
The location of the Actions menu is dependent on the page template inuse. For example, it may be an icon in the menu bar in a top navigationtemplate.
Figure 9-11 Portal Actions Menu: Viewing Portal
Your mail application opens, where you can compose and send mail to all members ormanagers of the portal.
Viewing Information About a Portal
To view information about a portal:
1. Open the About Portal dialog in any of the following ways:
• In the portal browser (see Viewing and Accessing Available Portals), locate
the portal for which you want to view information, click to display the portalactions, and select About, then Portal .
Chapter 9Viewing Information About a Portal
9-9
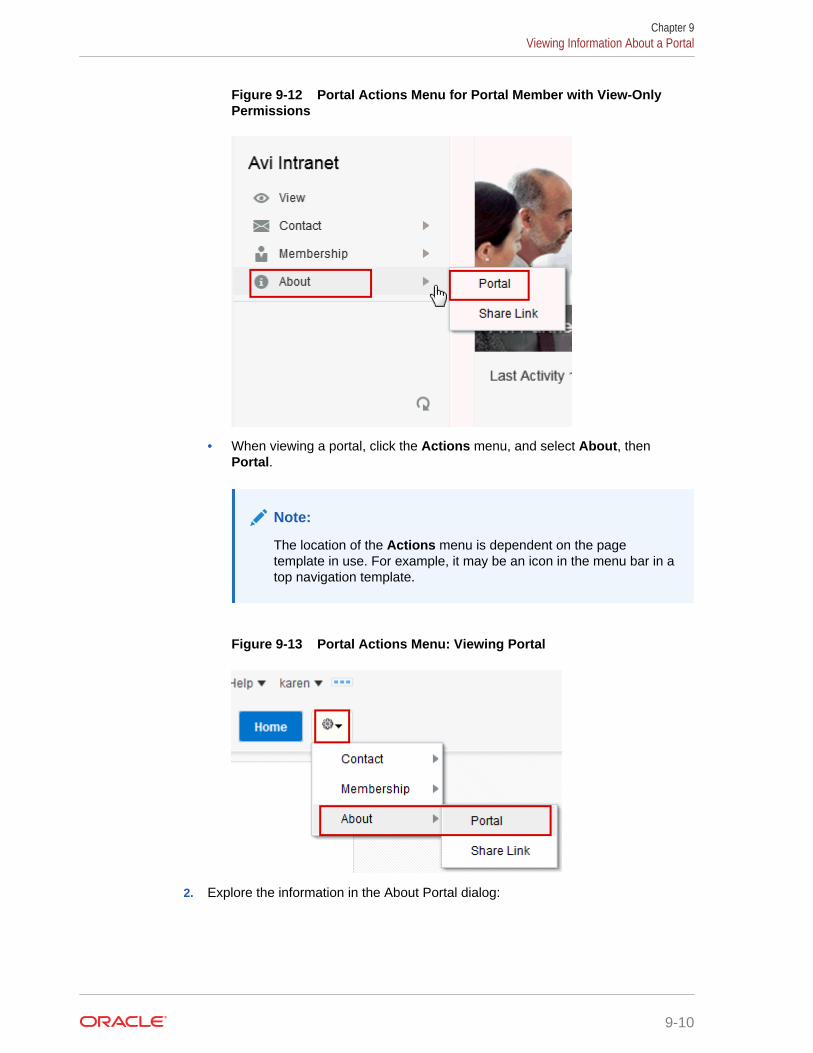
Figure 9-12 Portal Actions Menu for Portal Member with View-OnlyPermissions
• When viewing a portal, click the Actions menu, and select About, thenPortal.
Note:
The location of the Actions menu is dependent on the pagetemplate in use. For example, it may be an icon in the menu bar in atop navigation template.
Figure 9-13 Portal Actions Menu: Viewing Portal
2. Explore the information in the About Portal dialog:
Chapter 9Viewing Information About a Portal
9-10

Figure 9-14 About Portal Dialog
• Name: Internal name of the portal displayed in the portal URL.
• Display Name: The name specified when the portal was created. This namedisplays at the top of the portal and other places where portals are availablefor selection, such as the portal browser.
• Internal ID: ID of the portal, which other applications may use to reference thisportal.
• Description: A description of the portal, specified when creating the portal orin the portal administration settings.
• Created By: User name of the portal creator.
• Date Created: Date and time that the portal was created.
• Direct URL: URL that provides direct access to the portal.
Publishing the Link to a PortalIf you want to share a portal with others, you can publish a link to the portal that willappear in activity streams of other users. With appropriate permissions, users candirectly access a portal by clicking the link that specifies the portal display name.
To publish the direct link to a portal:
1. Open the Share Link dialog in any of the following ways:
• In the portal browser (see Viewing and Accessing Available Portals), locate
the portal for which you want to publish the link, click to display the portalactions, and select About, then Share Link.
Chapter 9Publishing the Link to a Portal
9-11
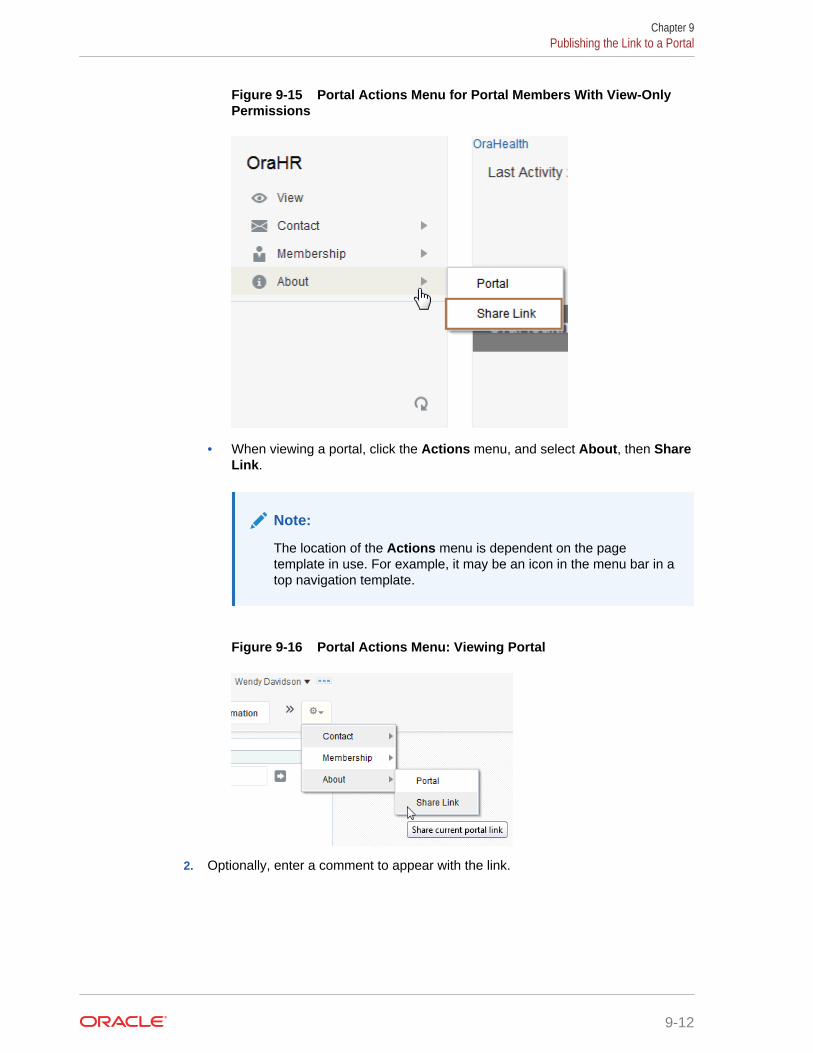
Figure 9-15 Portal Actions Menu for Portal Members With View-OnlyPermissions
• When viewing a portal, click the Actions menu, and select About, then ShareLink.
Note:
The location of the Actions menu is dependent on the pagetemplate in use. For example, it may be an icon in the menu bar in atop navigation template.
Figure 9-16 Portal Actions Menu: Viewing Portal
2. Optionally, enter a comment to appear with the link.
Chapter 9Publishing the Link to a Portal
9-12
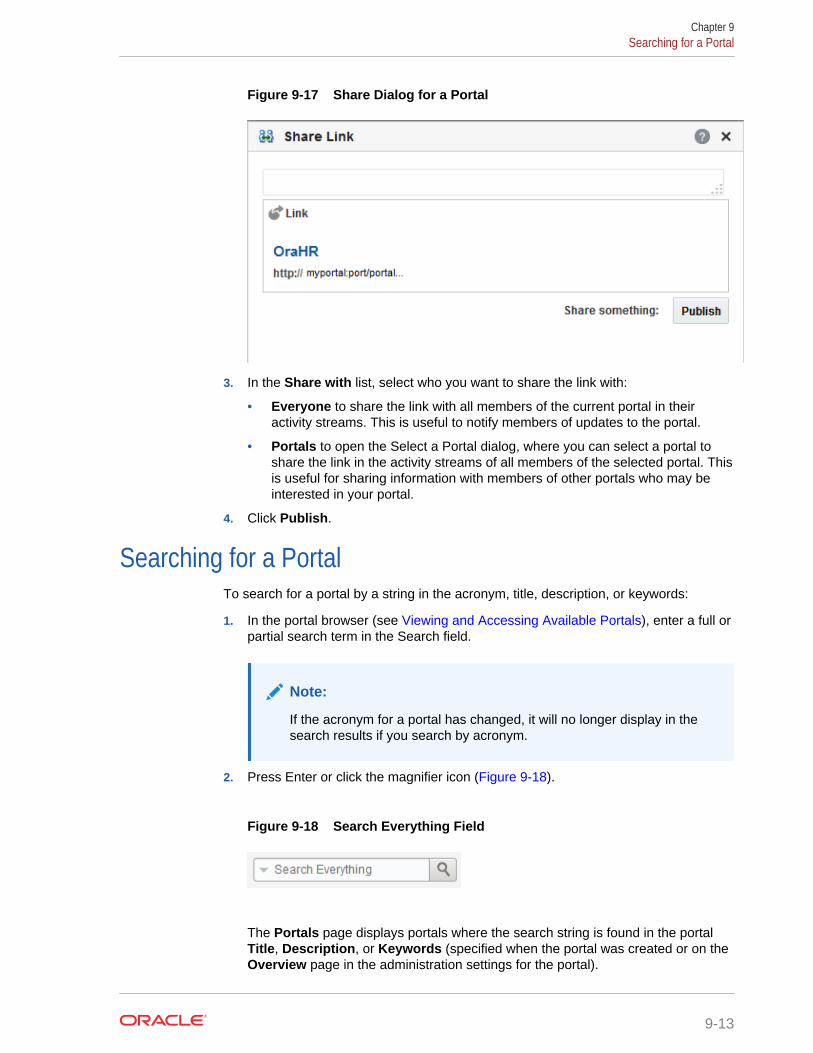
Figure 9-17 Share Dialog for a Portal
3. In the Share with list, select who you want to share the link with:
• Everyone to share the link with all members of the current portal in theiractivity streams. This is useful to notify members of updates to the portal.
• Portals to open the Select a Portal dialog, where you can select a portal toshare the link in the activity streams of all members of the selected portal. Thisis useful for sharing information with members of other portals who may beinterested in your portal.
4. Click Publish.
Searching for a PortalTo search for a portal by a string in the acronym, title, description, or keywords:
1. In the portal browser (see Viewing and Accessing Available Portals), enter a full orpartial search term in the Search field.
Note:
If the acronym for a portal has changed, it will no longer display in thesearch results if you search by acronym.
2. Press Enter or click the magnifier icon (Figure 9-18).
Figure 9-18 Search Everything Field
The Portals page displays portals where the search string is found in the portalTitle, Description, or Keywords (specified when the portal was created or on theOverview page in the administration settings for the portal).
Chapter 9Searching for a Portal
9-13
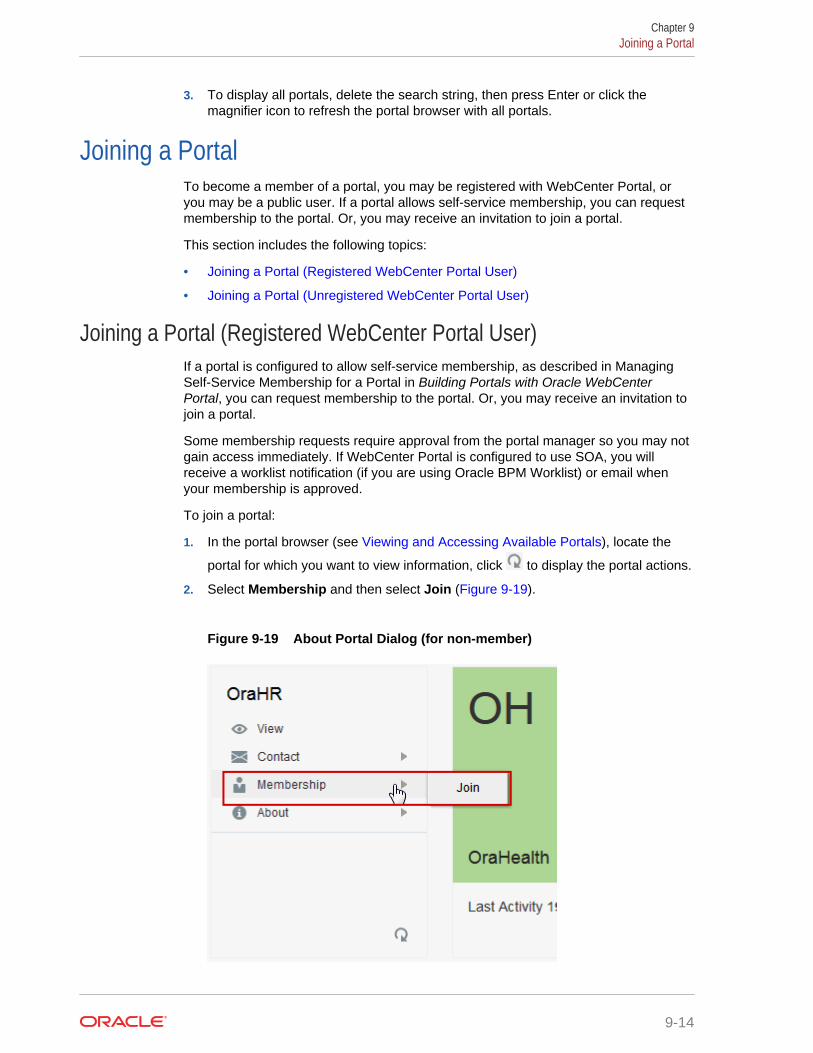
3. To display all portals, delete the search string, then press Enter or click themagnifier icon to refresh the portal browser with all portals.
Joining a PortalTo become a member of a portal, you may be registered with WebCenter Portal, oryou may be a public user. If a portal allows self-service membership, you can requestmembership to the portal. Or, you may receive an invitation to join a portal.
This section includes the following topics:
• Joining a Portal (Registered WebCenter Portal User)
• Joining a Portal (Unregistered WebCenter Portal User)
Joining a Portal (Registered WebCenter Portal User)If a portal is configured to allow self-service membership, as described in ManagingSelf-Service Membership for a Portal in Building Portals with Oracle WebCenterPortal, you can request membership to the portal. Or, you may receive an invitation tojoin a portal.
Some membership requests require approval from the portal manager so you may notgain access immediately. If WebCenter Portal is configured to use SOA, you willreceive a worklist notification (if you are using Oracle BPM Worklist) or email whenyour membership is approved.
To join a portal:
1. In the portal browser (see Viewing and Accessing Available Portals), locate the
portal for which you want to view information, click to display the portal actions.
2. Select Membership and then select Join (Figure 9-19).
Figure 9-19 About Portal Dialog (for non-member)
Chapter 9Joining a Portal
9-14
Note:
Join is shown only if the portal allows self-service membership, asdescribed in Managing Self-Service Membership for a Portal in BuildingPortals with Oracle WebCenter Portal. If Join Portal is not shown,contact the portal manager directly to request membership.
A portal membership request page similar to Figure 9-20 opens, showing thedefault Request Membership page. Because the portal manager may customizethis page, the page and roles you see may be different to the example shownhere.
Chapter 9Joining a Portal
9-15
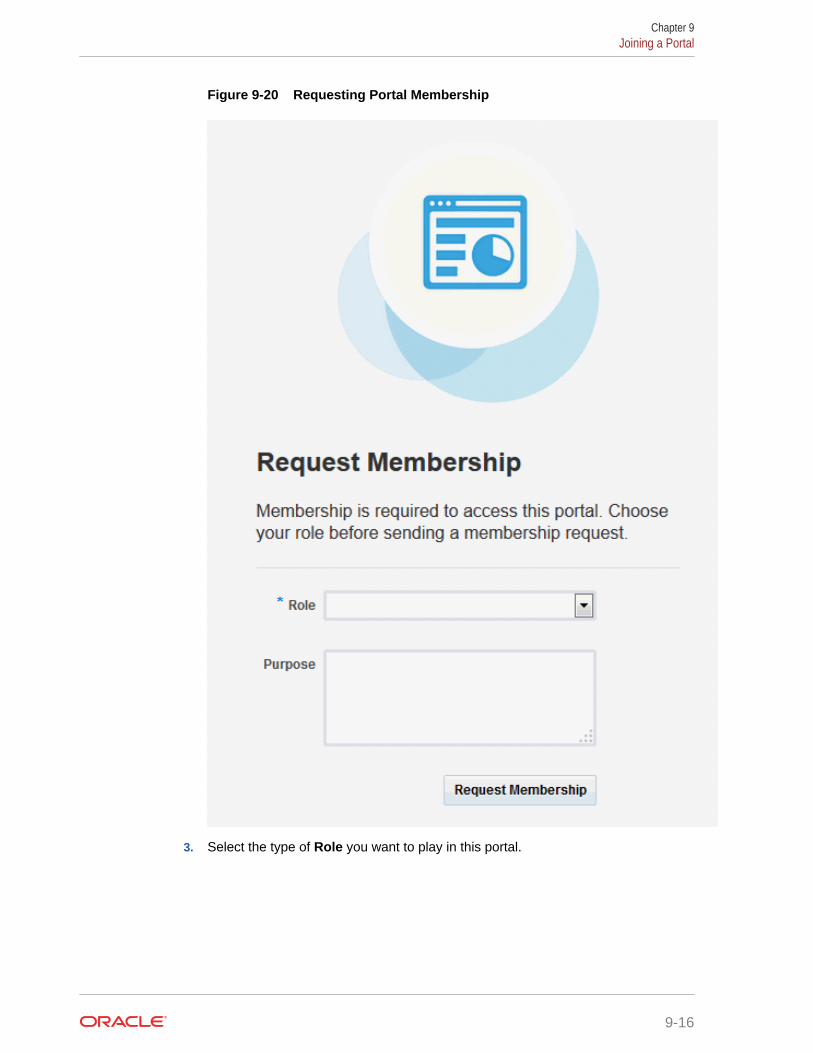
Figure 9-20 Requesting Portal Membership
3. Select the type of Role you want to play in this portal.
Chapter 9Joining a Portal
9-16
Note:
The only out-of-the-box portal role is that of Portal Manager, but asubset of this role or other custom roles names may display, dependingon what roles the portal manager has defined for the portal.
4. (Optional) In the Purpose field, enter an explanation of why you need access tothe portal with the role you have requested.
5. Click Request Membership.
You may see a confirmation message, depending on whether or not the selectedrole requires the approval of the portal manager.
6. Click OK.
7. On the Portals page, click the Refresh icon to confirm your new membershipstatus.
Note:
If membership requests require approval, you do not gain accessimmediately. Check back later or monitor your worklist (if you are usingOracle BPM Worklist) or email—you will receive notification as soon asyour membership is approved.
For more information about working with worklist items, see About theProcess Workspace Tasks Page in Managing and Monitoring Processeswith Oracle Business Process Management.
Joining a Portal (Unregistered WebCenter Portal User)If you are not a registered WebCenter Portal user, you can still view public portals, butyou cannot join a portal unless you receive a mail message from the portal managerinviting you to join a portal. If you want to join a portal, you must become a registeredWebCenter Portal user.
Some membership requests require approval from the portal manager so you may notgain access immediately. If WebCenter Portal is configured with SOA, you will receivea worklist notification (if you are using Oracle BPM Worklist) or email when yourmembership is approved.
For more information about working with worklist items, see About the ProcessWorkspace Tasks Page in Managing and Monitoring Processes with Oracle BusinessProcess Management.
1. In the mail message you receive inviting you to join a portal, click the RegisterYourself link included in the invitation mail to open the Self-Registration page,similar to Figure 9-21. Because the portal manager may customize this page, thepage you see may be different to the example shown here.
Chapter 9Joining a Portal
9-17
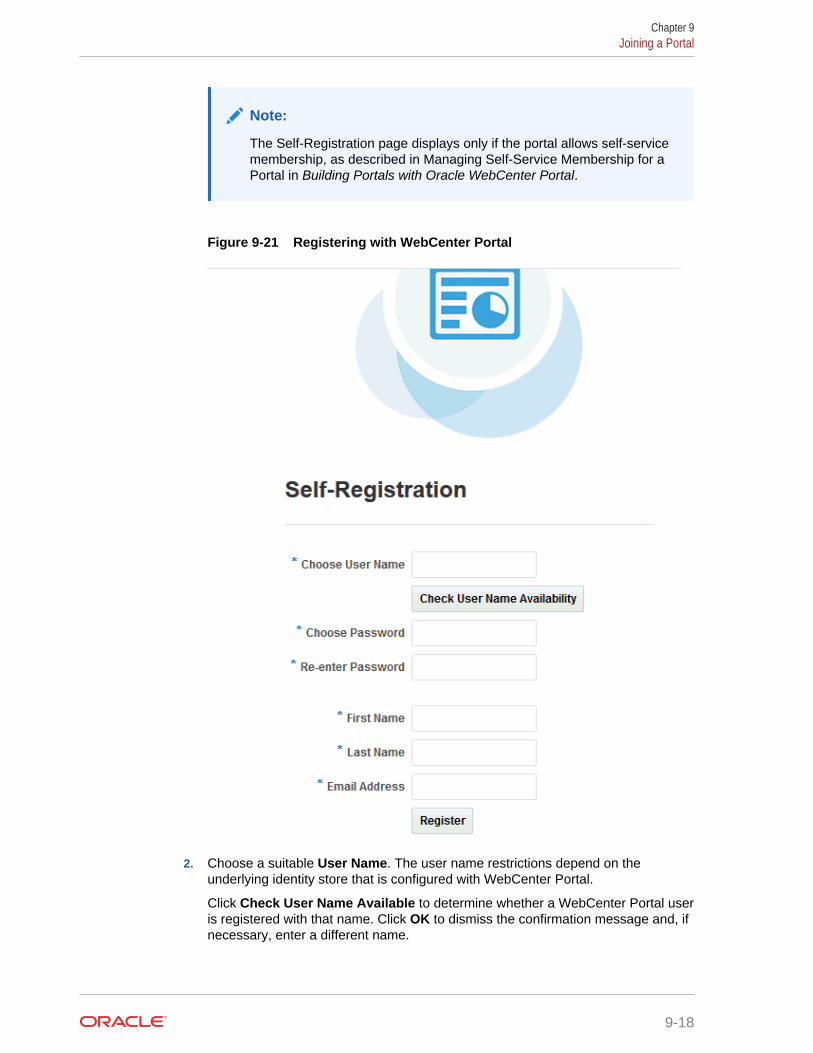
Note:
The Self-Registration page displays only if the portal allows self-servicemembership, as described in Managing Self-Service Membership for aPortal in Building Portals with Oracle WebCenter Portal.
Figure 9-21 Registering with WebCenter Portal
2. Choose a suitable User Name. The user name restrictions depend on theunderlying identity store that is configured with WebCenter Portal.
Click Check User Name Available to determine whether a WebCenter Portal useris registered with that name. Click OK to dismiss the confirmation message and, ifnecessary, enter a different name.
Chapter 9Joining a Portal
9-18

3. Enter a suitable Password, and then Re-enter Password for verification. Thepassword restrictions depend on the underlying identity store that is configuredwith WebCenter Portal.
4. Enter your First Name and Last Name, and an Email Address.
5. Click Register.
After your User Name and Password are registered with WebCenter Portal, the portalto which you were invited opens.
Searching in a PortalWebCenter Portal can be configured with Elasticsearch with facet support, whichincludes the Search field at the top of the application for global (application-wide)searches. For more information, see Searching for Information with Elasticsearch.
Working with Pages in a PortalAs a portal member, you will most likely be given access to pages in the portal. Theportal manager can grant you permissions to view, create, edit, and rename pages inthe portal. Other portal members can grant you permissions to access the pages thatthey own. Pages that you create are for your own use only, unless you specificallyshare them with other users.
You can work with pages in a portal as described in the following sections:
• Viewing a Page in a Portal
• Creating, Editing, and Managing a Page in a Portal
Viewing a Page in a PortalIn a portal, members have access to system pages and portal pages. The content on aportal page is typically targeted to a particular audience or objective.
The way that you access the pages of a portal depends on the page template that isdefined for the portal and the controls that the portal manager has made available. Inall configurations, however, you can view a page using a pretty URL.
You can view a page in a portal in the following ways:
• Click the page name in the portal navigation.
• Enter the following URL in your browser:
http://host:port/webcenter/portal/portalName/pageName
Creating, Editing, and Managing a Page in a PortalCreating, editing, and managing pages in a portal are advanced tasks, described in Working with Portal Pages in Building Portals with Oracle WebCenter Portal.
Changing Your Role in a PortalIf you are unable to perform all the actions that you would like in your portal, you canrequest a change to your membership role or add another role to your current role in
Chapter 9Searching in a Portal
9-19
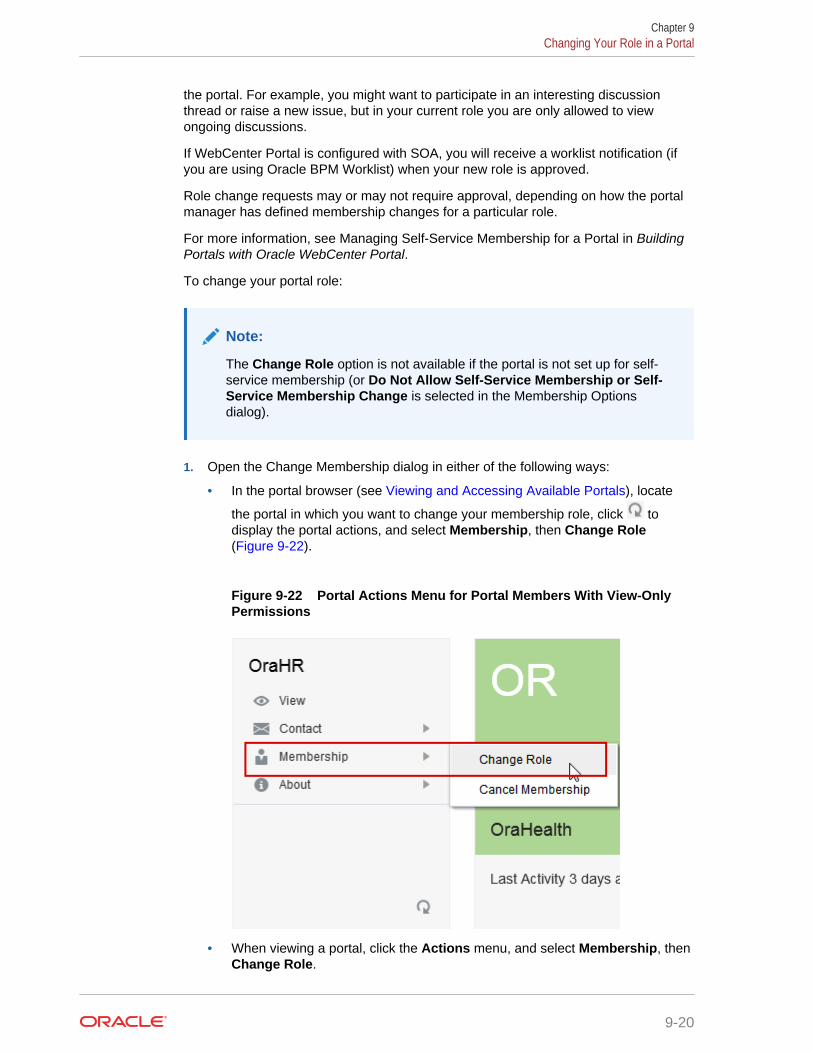
the portal. For example, you might want to participate in an interesting discussionthread or raise a new issue, but in your current role you are only allowed to viewongoing discussions.
If WebCenter Portal is configured with SOA, you will receive a worklist notification (ifyou are using Oracle BPM Worklist) when your new role is approved.
Role change requests may or may not require approval, depending on how the portalmanager has defined membership changes for a particular role.
For more information, see Managing Self-Service Membership for a Portal in BuildingPortals with Oracle WebCenter Portal.
To change your portal role:
Note:
The Change Role option is not available if the portal is not set up for self-service membership (or Do Not Allow Self-Service Membership or Self-Service Membership Change is selected in the Membership Optionsdialog).
1. Open the Change Membership dialog in either of the following ways:
• In the portal browser (see Viewing and Accessing Available Portals), locate
the portal in which you want to change your membership role, click todisplay the portal actions, and select Membership, then Change Role(Figure 9-22).
Figure 9-22 Portal Actions Menu for Portal Members With View-OnlyPermissions
• When viewing a portal, click the Actions menu, and select Membership, thenChange Role.
Chapter 9Changing Your Role in a Portal
9-20
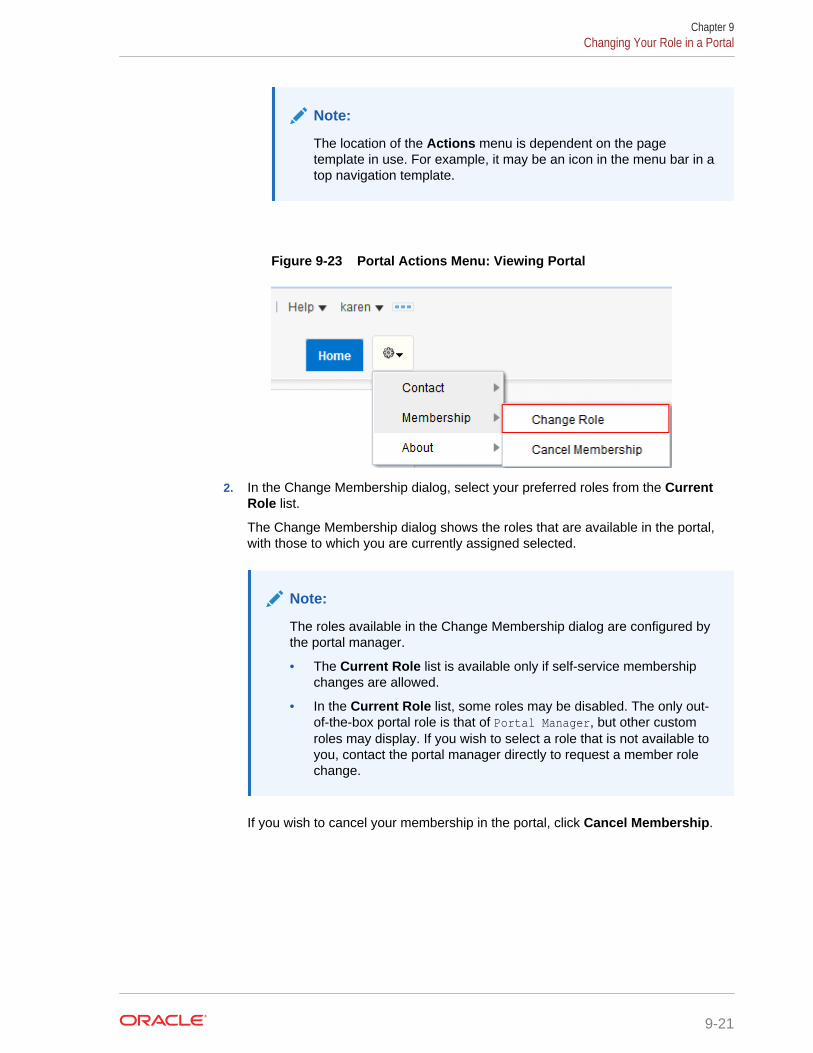
Note:
The location of the Actions menu is dependent on the pagetemplate in use. For example, it may be an icon in the menu bar in atop navigation template.
Figure 9-23 Portal Actions Menu: Viewing Portal
2. In the Change Membership dialog, select your preferred roles from the CurrentRole list.
The Change Membership dialog shows the roles that are available in the portal,with those to which you are currently assigned selected.
Note:
The roles available in the Change Membership dialog are configured bythe portal manager.
• The Current Role list is available only if self-service membershipchanges are allowed.
• In the Current Role list, some roles may be disabled. The only out-of-the-box portal role is that of Portal Manager, but other customroles may display. If you wish to select a role that is not available toyou, contact the portal manager directly to request a member rolechange.
If you wish to cancel your membership in the portal, click Cancel Membership.
Chapter 9Changing Your Role in a Portal
9-21
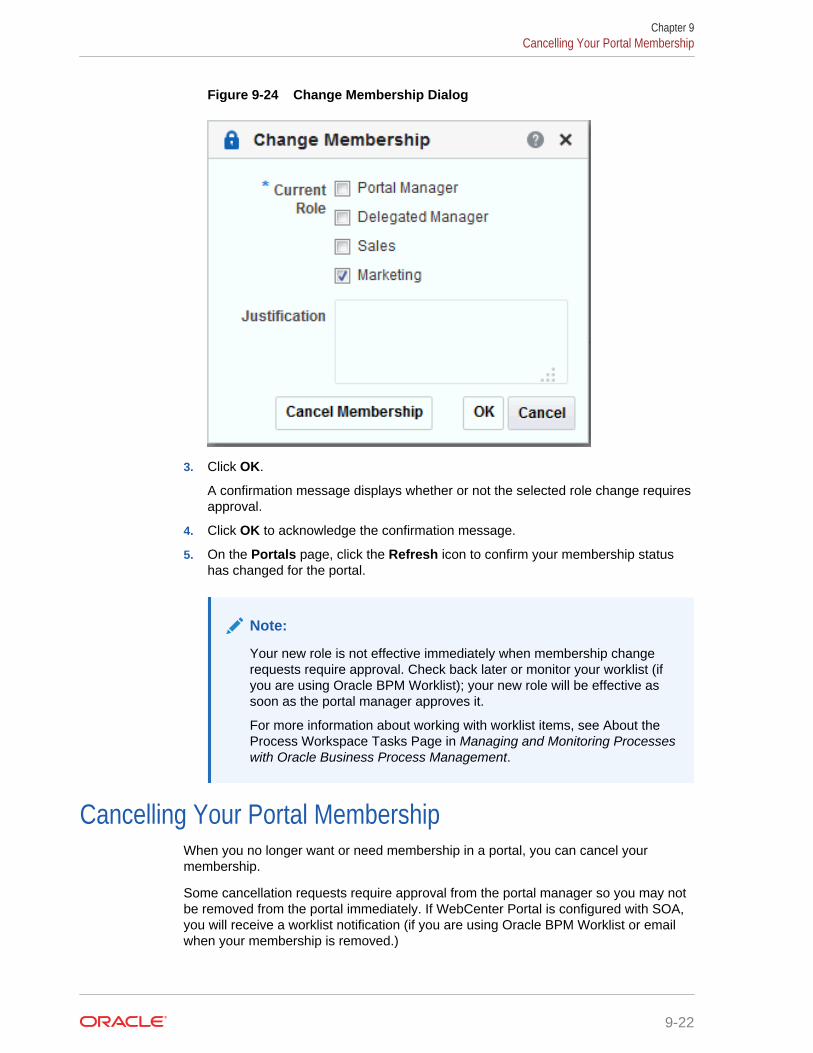
Figure 9-24 Change Membership Dialog
3. Click OK.
A confirmation message displays whether or not the selected role change requiresapproval.
4. Click OK to acknowledge the confirmation message.
5. On the Portals page, click the Refresh icon to confirm your membership statushas changed for the portal.
Note:
Your new role is not effective immediately when membership changerequests require approval. Check back later or monitor your worklist (ifyou are using Oracle BPM Worklist); your new role will be effective assoon as the portal manager approves it.
For more information about working with worklist items, see About theProcess Workspace Tasks Page in Managing and Monitoring Processeswith Oracle Business Process Management.
Cancelling Your Portal MembershipWhen you no longer want or need membership in a portal, you can cancel yourmembership.
Some cancellation requests require approval from the portal manager so you may notbe removed from the portal immediately. If WebCenter Portal is configured with SOA,you will receive a worklist notification (if you are using Oracle BPM Worklist or emailwhen your membership is removed.)
Chapter 9Cancelling Your Portal Membership
9-22
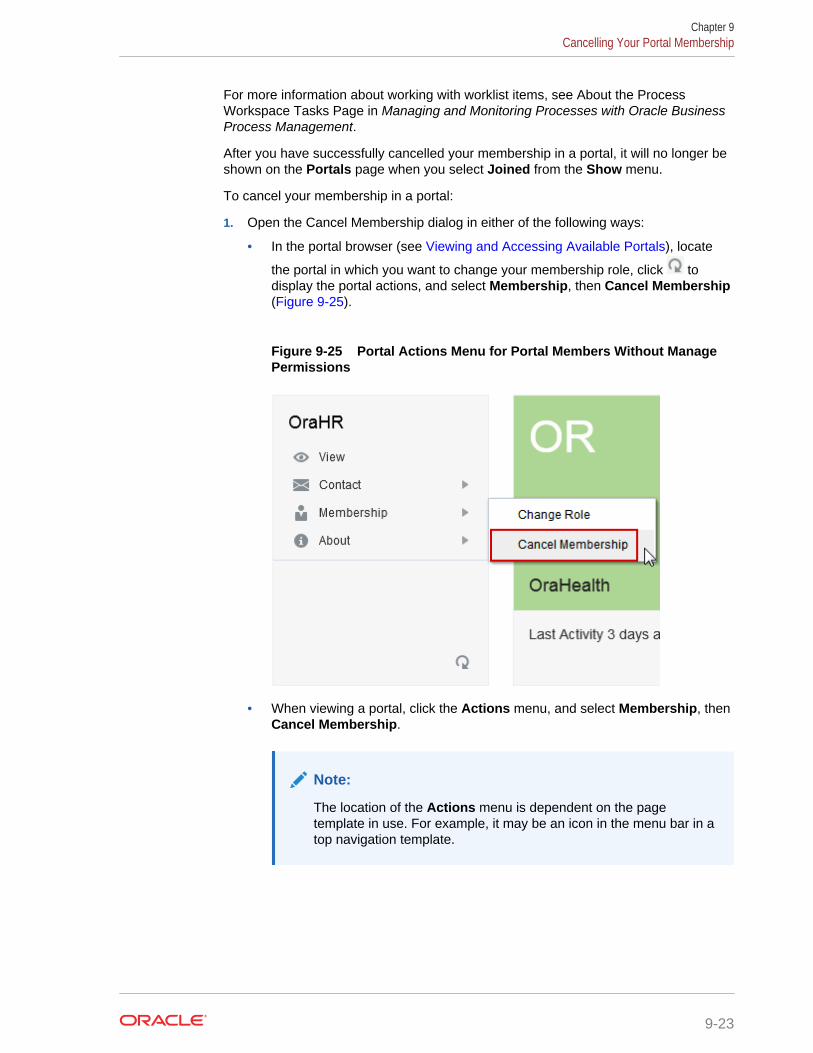
For more information about working with worklist items, see About the ProcessWorkspace Tasks Page in Managing and Monitoring Processes with Oracle BusinessProcess Management.
After you have successfully cancelled your membership in a portal, it will no longer beshown on the Portals page when you select Joined from the Show menu.
To cancel your membership in a portal:
1. Open the Cancel Membership dialog in either of the following ways:
• In the portal browser (see Viewing and Accessing Available Portals), locate
the portal in which you want to change your membership role, click todisplay the portal actions, and select Membership, then Cancel Membership(Figure 9-25).
Figure 9-25 Portal Actions Menu for Portal Members Without ManagePermissions
• When viewing a portal, click the Actions menu, and select Membership, thenCancel Membership.
Note:
The location of the Actions menu is dependent on the pagetemplate in use. For example, it may be an icon in the menu bar in atop navigation template.
Chapter 9Cancelling Your Portal Membership
9-23
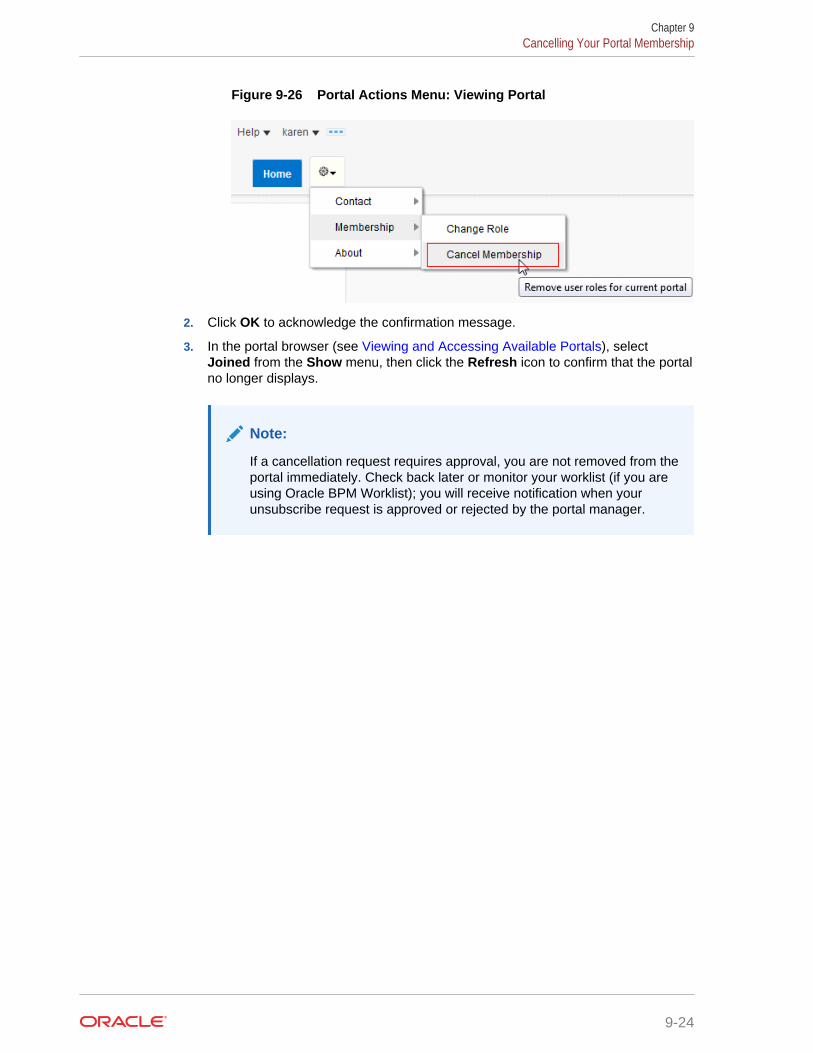
Figure 9-26 Portal Actions Menu: Viewing Portal
2. Click OK to acknowledge the confirmation message.
3. In the portal browser (see Viewing and Accessing Available Portals), selectJoined from the Show menu, then click the Refresh icon to confirm that the portalno longer displays.
Note:
If a cancellation request requires approval, you are not removed from theportal immediately. Check back later or monitor your worklist (if you areusing Oracle BPM Worklist); you will receive notification when yourunsubscribe request is approved or rejected by the portal manager.
Chapter 9Cancelling Your Portal Membership
9-24
Part IIIConnecting and Collaborating with OtherUsers
This part of Using Portals in Oracle WebCenter Portal provides information aboutsocial features in your portal. It describes how to set up and manage your personalcontacts, how to have online conversations and see who is currently available, andhow to use features for posting your opinion and discussing your ideas with others.
• Managing Your Contacts
• Using Instant Messaging and Presence Viewer
• Sending and Viewing Mail
• Working with Feedback and the Message Board
• Liking, Commenting On, and Sharing Items
• Viewing and Participating in Discussions
10Managing Your Contacts
Use the Connections feature of the People Connections service to establish a socialnetwork comprised of the coworkers you collaborate with most, your contacts, andyour work friends and associates.
Permissions:
To perform the tasks in this chapter, you need the application-levelpermission People Connections: Connect with People. To work withconnections lists, you also need the application-level permission PeopleConnections: Update People Connections Data.
Topics:
• About Connections
• Setting Connections Preferences
• Viewing Another User's Profile
• Viewing Connections
• Adding Contacts
• Removing Contacts
• Creating and Managing Groups of Contacts
About ConnectionsYou can use Connections to collect your business friends and contacts into a socialnetwork, manage your connections, and view the connections of others. Using PeopleConnections preferences, you can grant different levels of access to those who areand are not your connections. For example, you can give access to views of yourprofile, message board, activity stream, and feedback to just your connections, leavingthe people who are not your connections without access. For your profile, you can limitview privileges to just your connections or enable your connections to view certainsections of your profile, while hiding those sections from users who are not yourconnections. For your message board and feedback, you can give everyone viewaccess, but limit post access to just your connections or to a limited set of yourconnections through a connections list. When you connect with other users, you givethem access to your People Connections views and gain access to theirs.
10-1
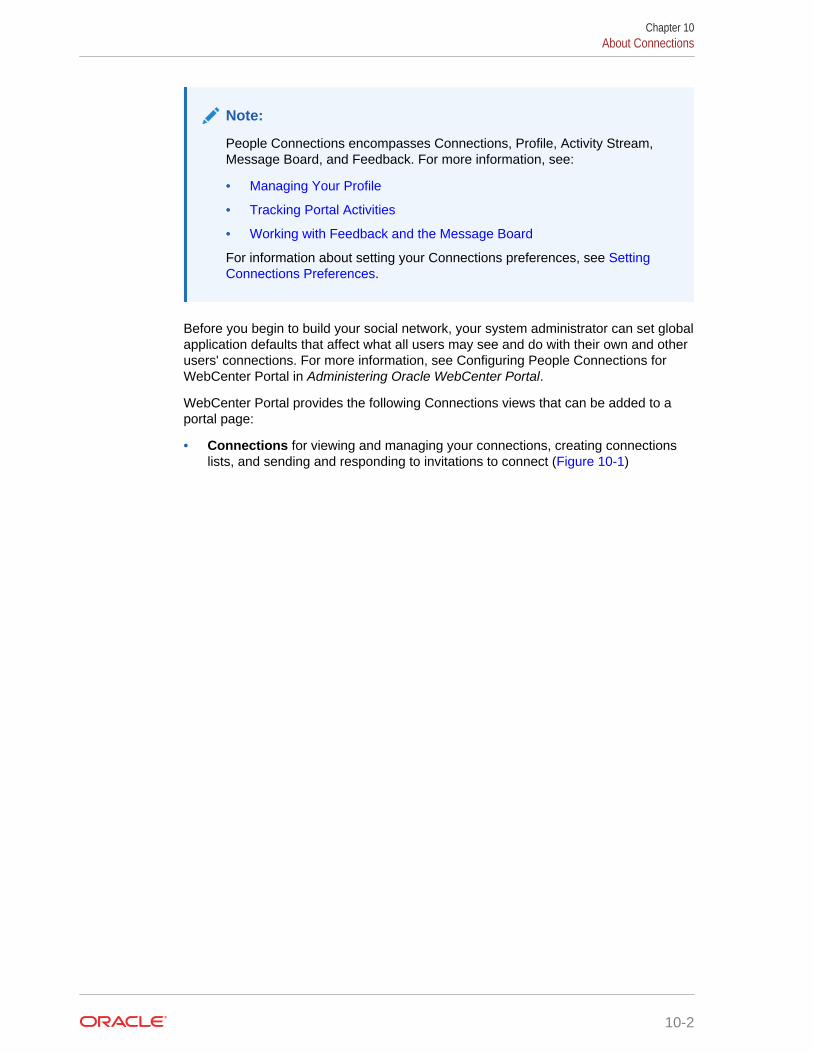
Note:
People Connections encompasses Connections, Profile, Activity Stream,Message Board, and Feedback. For more information, see:
• Managing Your Profile
• Tracking Portal Activities
• Working with Feedback and the Message Board
For information about setting your Connections preferences, see SettingConnections Preferences.
Before you begin to build your social network, your system administrator can set globalapplication defaults that affect what all users may see and do with their own and otherusers' connections. For more information, see Configuring People Connections forWebCenter Portal in Administering Oracle WebCenter Portal.
WebCenter Portal provides the following Connections views that can be added to aportal page:
• Connections for viewing and managing your connections, creating connectionslists, and sending and responding to invitations to connect (Figure 10-1)
Chapter 10About Connections
10-2
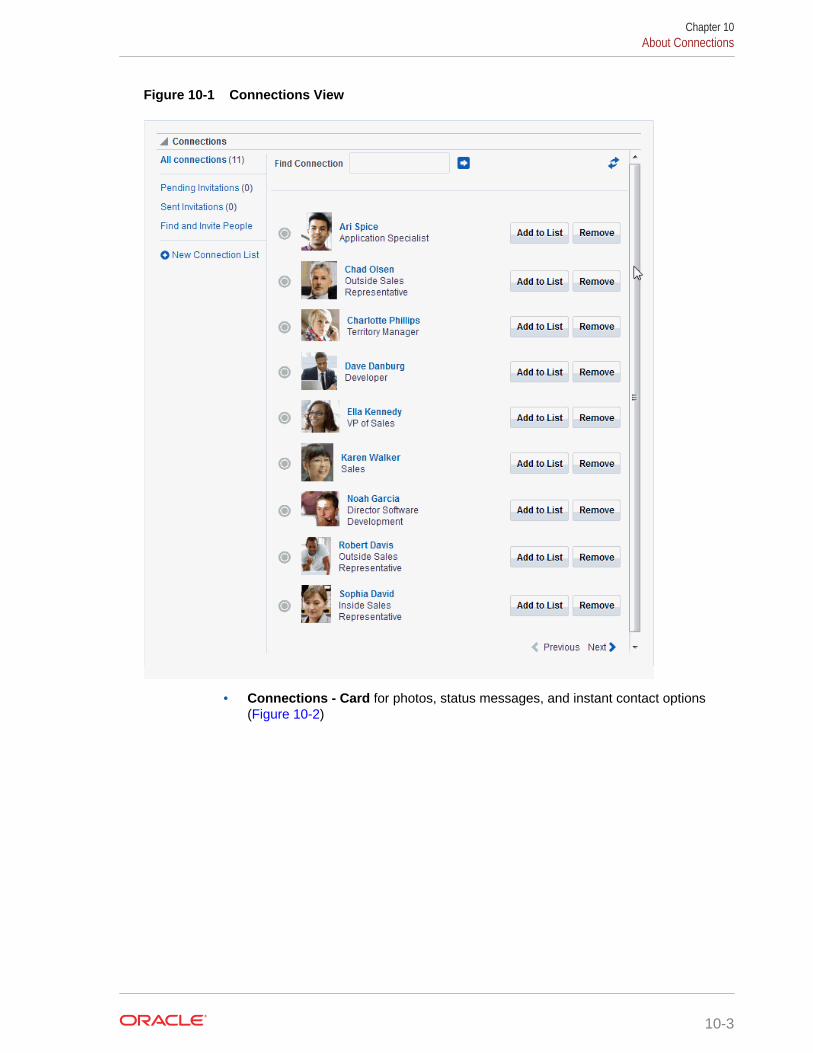
Figure 10-1 Connections View
• Connections - Card for photos, status messages, and instant contact options(Figure 10-2)
Chapter 10About Connections
10-3
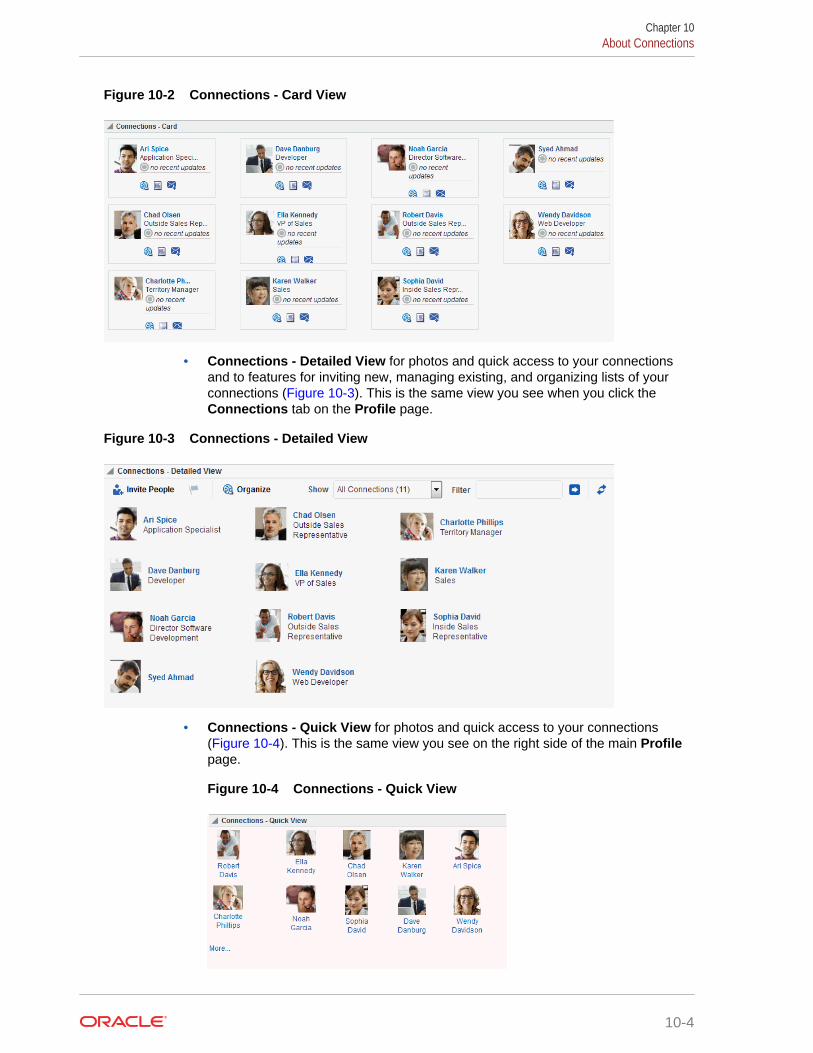
Figure 10-2 Connections - Card View
• Connections - Detailed View for photos and quick access to your connectionsand to features for inviting new, managing existing, and organizing lists of yourconnections (Figure 10-3). This is the same view you see when you click theConnections tab on the Profile page.
Figure 10-3 Connections - Detailed View
• Connections - Quick View for photos and quick access to your connections(Figure 10-4). This is the same view you see on the right side of the main Profilepage.
Figure 10-4 Connections - Quick View
Chapter 10About Connections
10-4
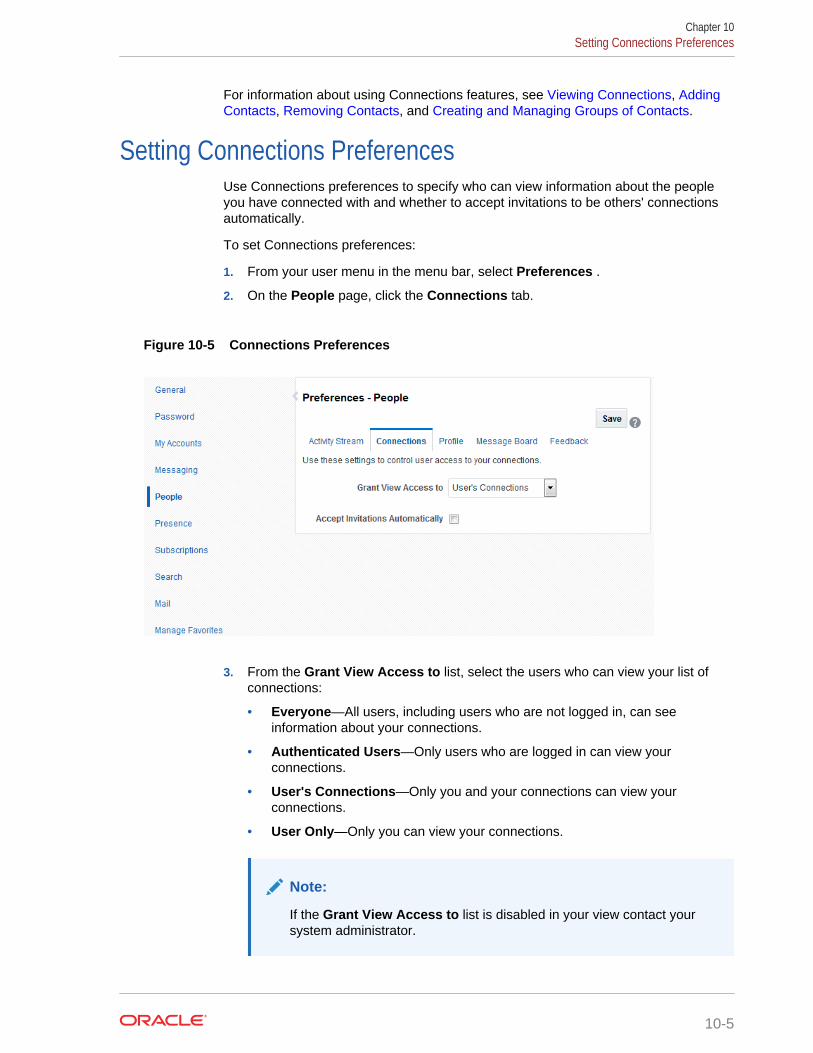
For information about using Connections features, see Viewing Connections, AddingContacts, Removing Contacts, and Creating and Managing Groups of Contacts.
Setting Connections PreferencesUse Connections preferences to specify who can view information about the peopleyou have connected with and whether to accept invitations to be others' connectionsautomatically.
To set Connections preferences:
1. From your user menu in the menu bar, select Preferences .
2. On the People page, click the Connections tab.
Figure 10-5 Connections Preferences
3. From the Grant View Access to list, select the users who can view your list ofconnections:
• Everyone—All users, including users who are not logged in, can seeinformation about your connections.
• Authenticated Users—Only users who are logged in can view yourconnections.
• User's Connections—Only you and your connections can view yourconnections.
• User Only—Only you can view your connections.
Note:
If the Grant View Access to list is disabled in your view contact yoursystem administrator.
Chapter 10Setting Connections Preferences
10-5
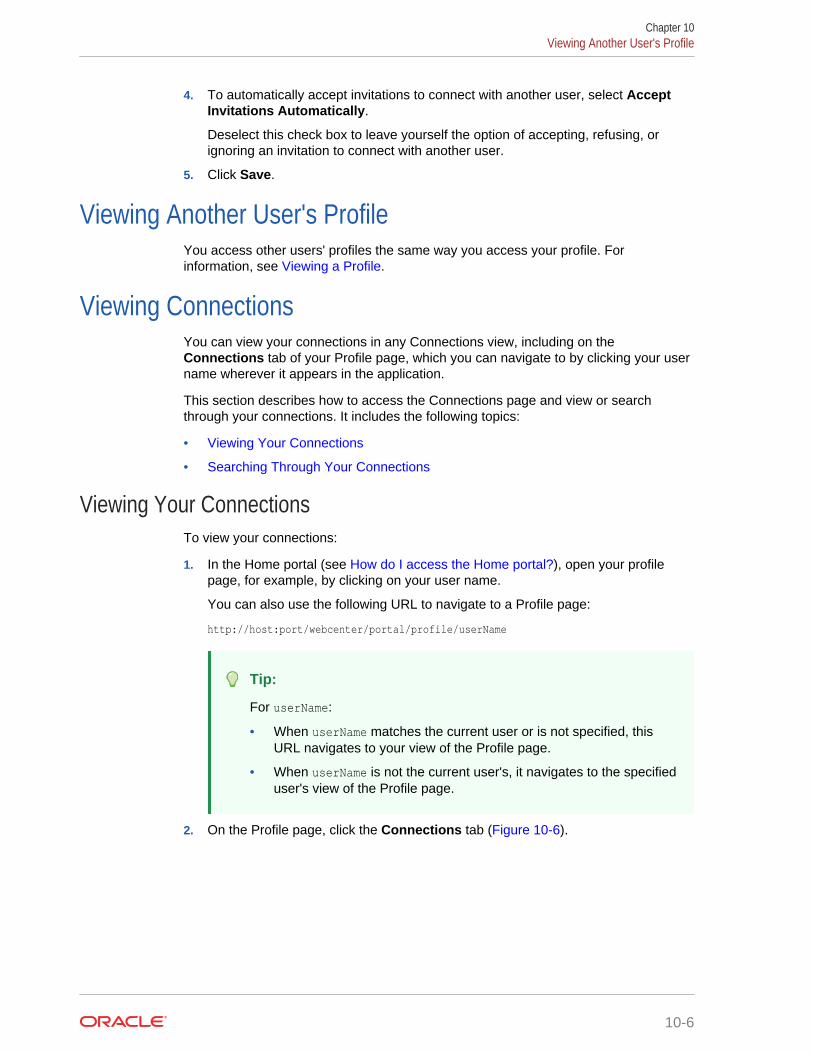
4. To automatically accept invitations to connect with another user, select AcceptInvitations Automatically.
Deselect this check box to leave yourself the option of accepting, refusing, orignoring an invitation to connect with another user.
5. Click Save.
Viewing Another User's ProfileYou access other users' profiles the same way you access your profile. Forinformation, see Viewing a Profile.
Viewing ConnectionsYou can view your connections in any Connections view, including on theConnections tab of your Profile page, which you can navigate to by clicking your username wherever it appears in the application.
This section describes how to access the Connections page and view or searchthrough your connections. It includes the following topics:
• Viewing Your Connections
• Searching Through Your Connections
Viewing Your ConnectionsTo view your connections:
1. In the Home portal (see How do I access the Home portal?), open your profilepage, for example, by clicking on your user name.
You can also use the following URL to navigate to a Profile page:
http://host:port/webcenter/portal/profile/userName
Tip:
For userName:
• When userName matches the current user or is not specified, thisURL navigates to your view of the Profile page.
• When userName is not the current user's, it navigates to the specifieduser's view of the Profile page.
2. On the Profile page, click the Connections tab (Figure 10-6).
Chapter 10Viewing Another User's Profile
10-6

Figure 10-6 Connections Tab on Profile Page
Searching Through Your ConnectionsThe Connections search feature provides an efficient way to locate a particularconnection in an otherwise long list of connections.
To search through your connections:
1. Go to the Connections page (as described in Viewing Your Connections.)
2. In the Filter field, type the text you want to search for in your connections, and
click next to the Filter field.
Tip:
You can search for part or all of a name, email, title, or department.
To exit the search, click next to the Filter field.
Adding ContactsThis section includes the following topics:
• Inviting Others to Connect
• Viewing Invitations to Connect
• Responding to Invitations to Be a Connection
Chapter 10Adding Contacts
10-7
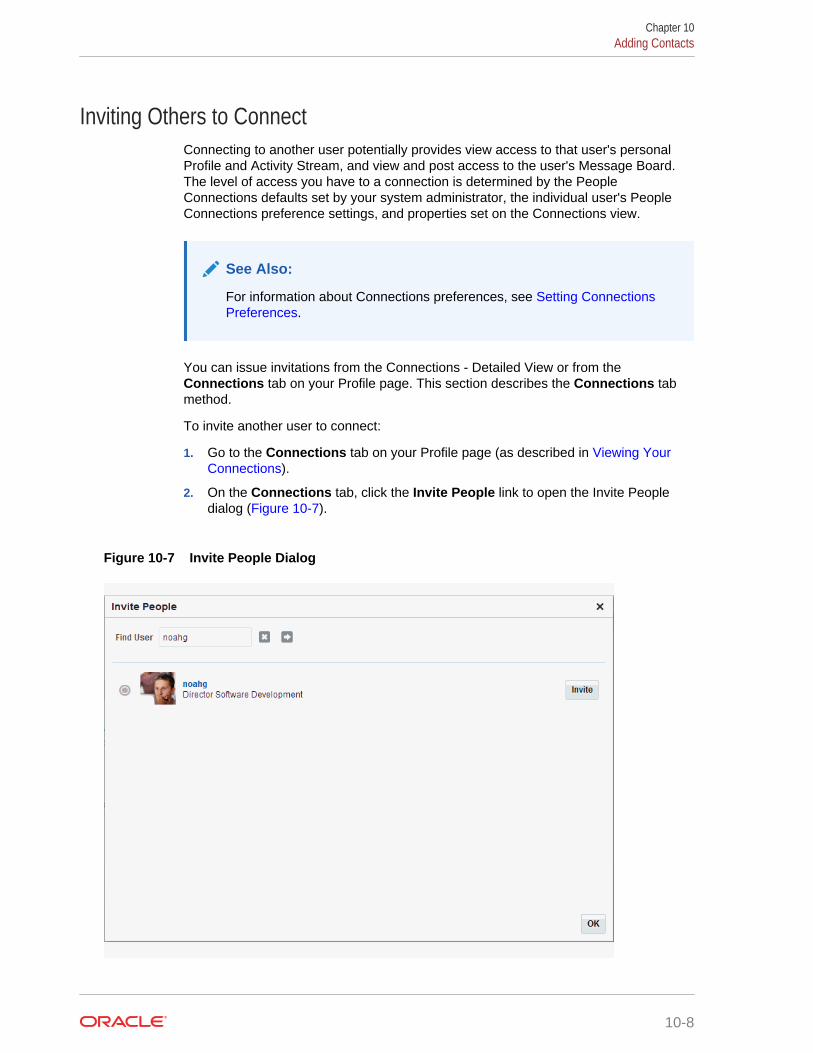
Inviting Others to ConnectConnecting to another user potentially provides view access to that user's personalProfile and Activity Stream, and view and post access to the user's Message Board.The level of access you have to a connection is determined by the PeopleConnections defaults set by your system administrator, the individual user's PeopleConnections preference settings, and properties set on the Connections view.
See Also:
For information about Connections preferences, see Setting ConnectionsPreferences.
You can issue invitations from the Connections - Detailed View or from theConnections tab on your Profile page. This section describes the Connections tabmethod.
To invite another user to connect:
1. Go to the Connections tab on your Profile page (as described in Viewing YourConnections).
2. On the Connections tab, click the Invite People link to open the Invite Peopledialog (Figure 10-7).
Figure 10-7 Invite People Dialog
Chapter 10Adding Contacts
10-8
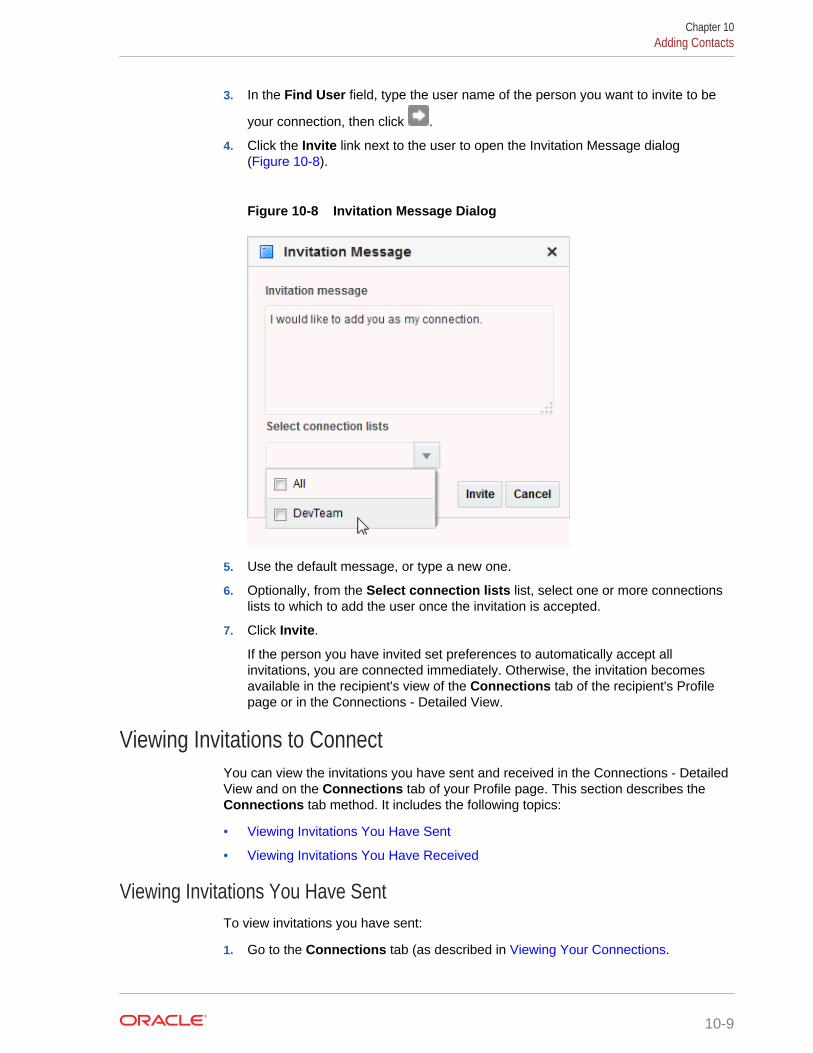
3. In the Find User field, type the user name of the person you want to invite to be
your connection, then click .
4. Click the Invite link next to the user to open the Invitation Message dialog(Figure 10-8).
Figure 10-8 Invitation Message Dialog
5. Use the default message, or type a new one.
6. Optionally, from the Select connection lists list, select one or more connectionslists to which to add the user once the invitation is accepted.
7. Click Invite.
If the person you have invited set preferences to automatically accept allinvitations, you are connected immediately. Otherwise, the invitation becomesavailable in the recipient's view of the Connections tab of the recipient's Profilepage or in the Connections - Detailed View.
Viewing Invitations to ConnectYou can view the invitations you have sent and received in the Connections - DetailedView and on the Connections tab of your Profile page. This section describes theConnections tab method. It includes the following topics:
• Viewing Invitations You Have Sent
• Viewing Invitations You Have Received
Viewing Invitations You Have SentTo view invitations you have sent:
1. Go to the Connections tab (as described in Viewing Your Connections.
Chapter 10Adding Contacts
10-9
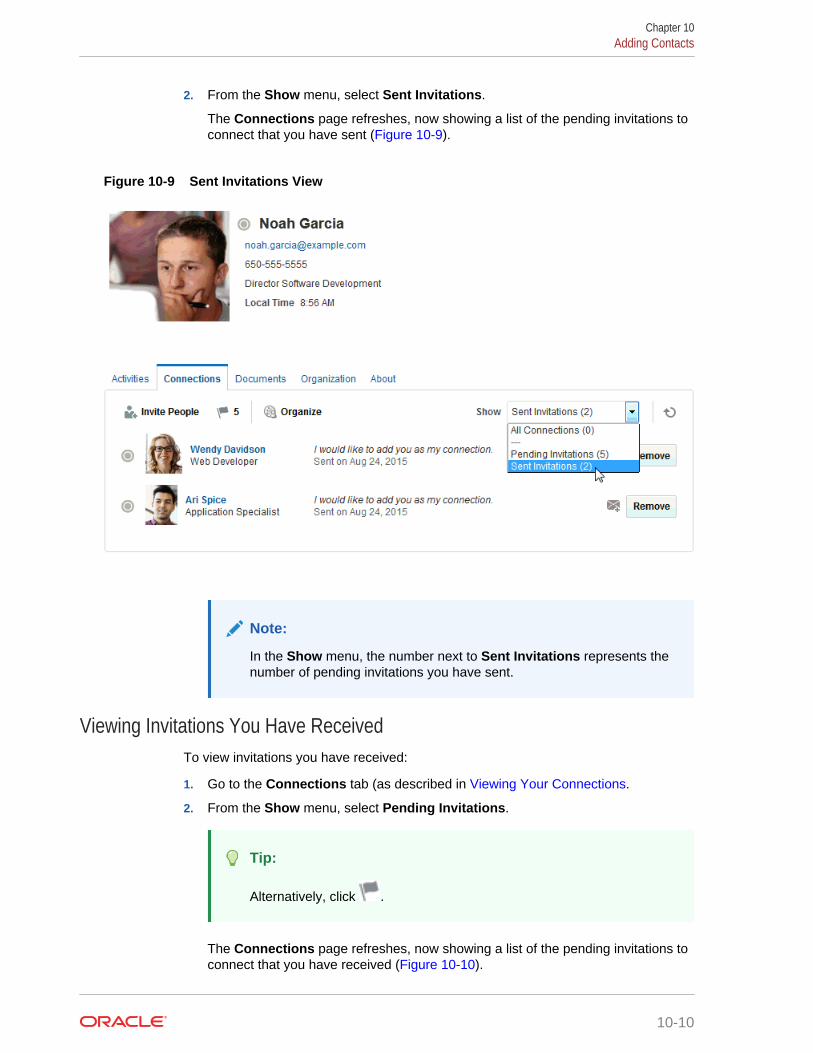
2. From the Show menu, select Sent Invitations.
The Connections page refreshes, now showing a list of the pending invitations toconnect that you have sent (Figure 10-9).
Figure 10-9 Sent Invitations View
Note:
In the Show menu, the number next to Sent Invitations represents thenumber of pending invitations you have sent.
Viewing Invitations You Have ReceivedTo view invitations you have received:
1. Go to the Connections tab (as described in Viewing Your Connections.
2. From the Show menu, select Pending Invitations.
Tip:
Alternatively, click .
The Connections page refreshes, now showing a list of the pending invitations toconnect that you have received (Figure 10-10).
Chapter 10Adding Contacts
10-10
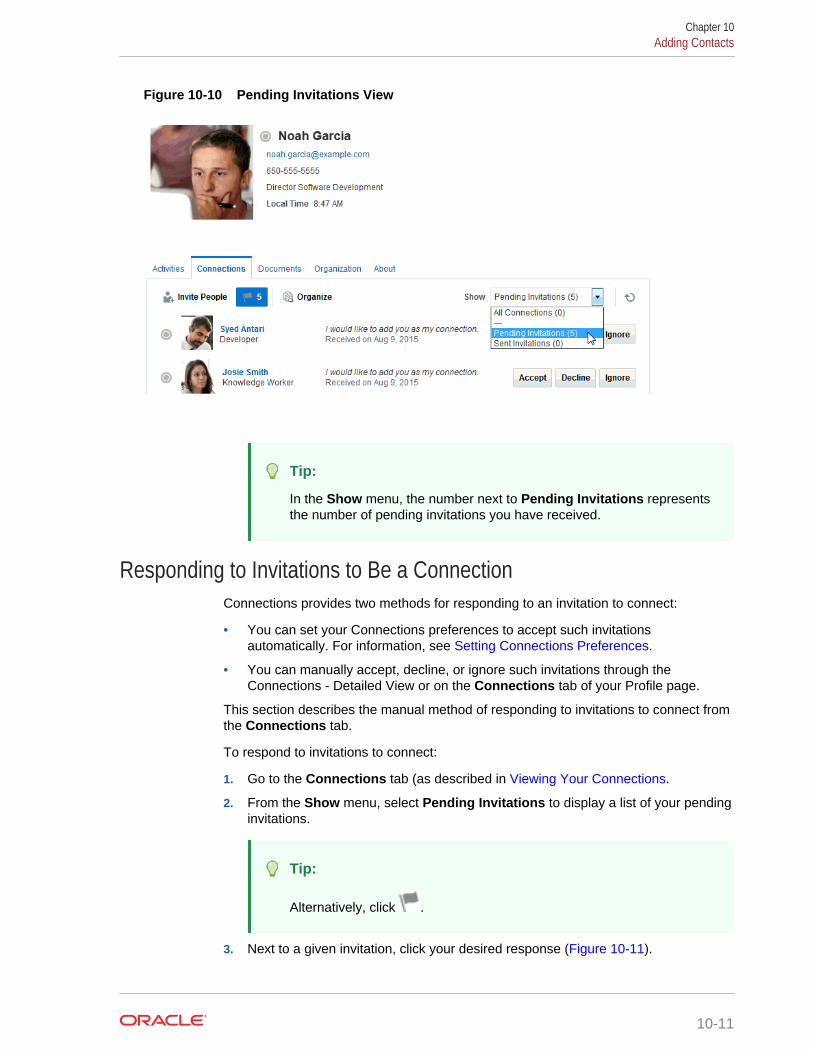
Figure 10-10 Pending Invitations View
Tip:
In the Show menu, the number next to Pending Invitations representsthe number of pending invitations you have received.
Responding to Invitations to Be a ConnectionConnections provides two methods for responding to an invitation to connect:
• You can set your Connections preferences to accept such invitationsautomatically. For information, see Setting Connections Preferences.
• You can manually accept, decline, or ignore such invitations through theConnections - Detailed View or on the Connections tab of your Profile page.
This section describes the manual method of responding to invitations to connect fromthe Connections tab.
To respond to invitations to connect:
1. Go to the Connections tab (as described in Viewing Your Connections.
2. From the Show menu, select Pending Invitations to display a list of your pendinginvitations.
Tip:
Alternatively, click .
3. Next to a given invitation, click your desired response (Figure 10-11).
Chapter 10Adding Contacts
10-11
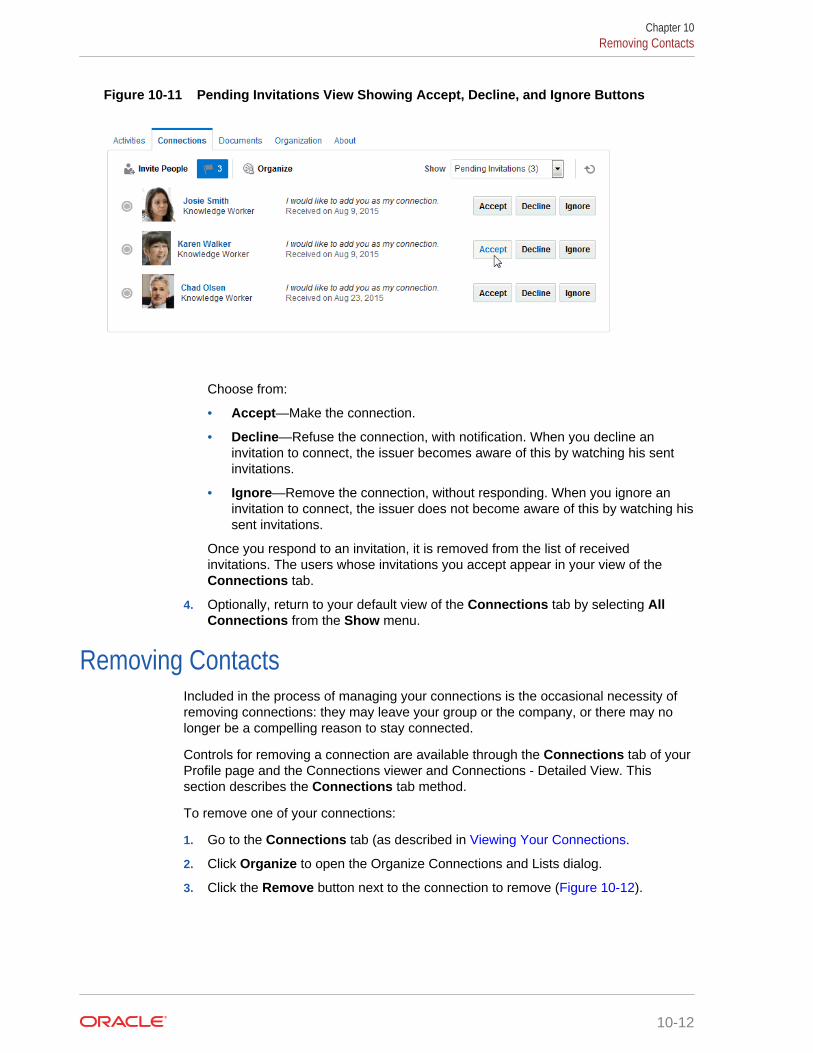
Figure 10-11 Pending Invitations View Showing Accept, Decline, and Ignore Buttons
Choose from:
• Accept—Make the connection.
• Decline—Refuse the connection, with notification. When you decline aninvitation to connect, the issuer becomes aware of this by watching his sentinvitations.
• Ignore—Remove the connection, without responding. When you ignore aninvitation to connect, the issuer does not become aware of this by watching hissent invitations.
Once you respond to an invitation, it is removed from the list of receivedinvitations. The users whose invitations you accept appear in your view of theConnections tab.
4. Optionally, return to your default view of the Connections tab by selecting AllConnections from the Show menu.
Removing ContactsIncluded in the process of managing your connections is the occasional necessity ofremoving connections: they may leave your group or the company, or there may nolonger be a compelling reason to stay connected.
Controls for removing a connection are available through the Connections tab of yourProfile page and the Connections viewer and Connections - Detailed View. Thissection describes the Connections tab method.
To remove one of your connections:
1. Go to the Connections tab (as described in Viewing Your Connections.
2. Click Organize to open the Organize Connections and Lists dialog.
3. Click the Remove button next to the connection to remove (Figure 10-12).
Chapter 10Removing Contacts
10-12
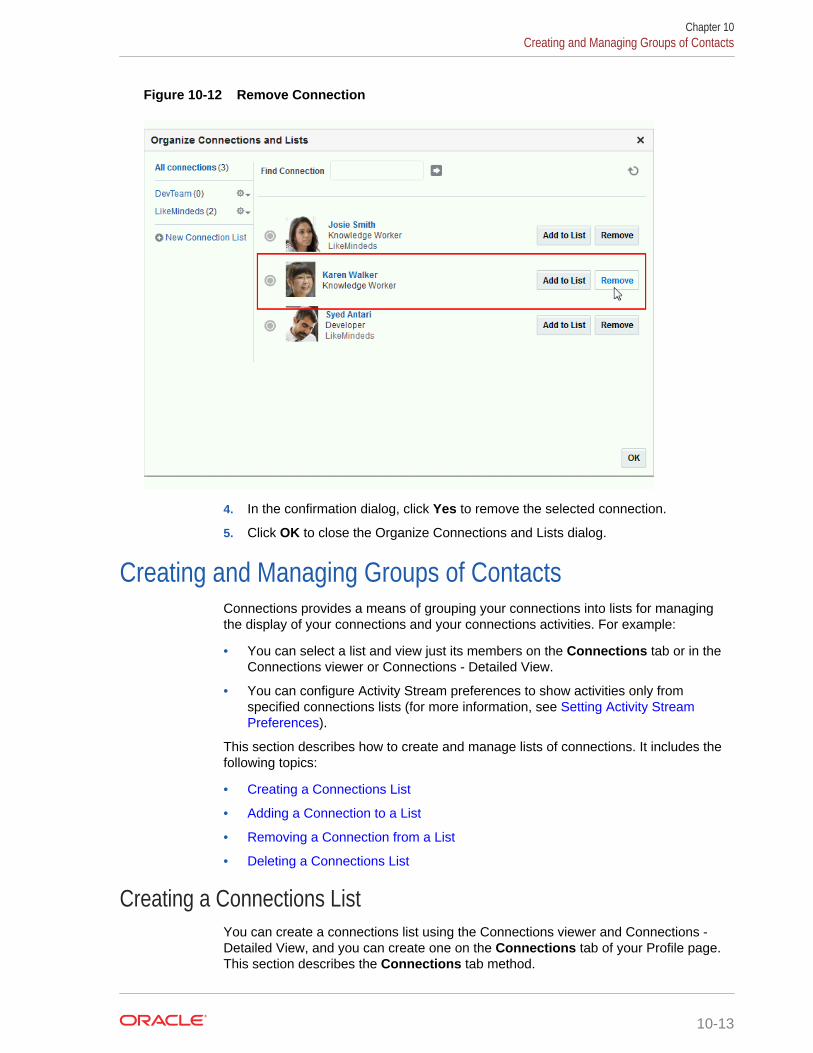
Figure 10-12 Remove Connection
4. In the confirmation dialog, click Yes to remove the selected connection.
5. Click OK to close the Organize Connections and Lists dialog.
Creating and Managing Groups of ContactsConnections provides a means of grouping your connections into lists for managingthe display of your connections and your connections activities. For example:
• You can select a list and view just its members on the Connections tab or in theConnections viewer or Connections - Detailed View.
• You can configure Activity Stream preferences to show activities only fromspecified connections lists (for more information, see Setting Activity StreamPreferences).
This section describes how to create and manage lists of connections. It includes thefollowing topics:
• Creating a Connections List
• Adding a Connection to a List
• Removing a Connection from a List
• Deleting a Connections List
Creating a Connections ListYou can create a connections list using the Connections viewer and Connections -Detailed View, and you can create one on the Connections tab of your Profile page.This section describes the Connections tab method.
Chapter 10Creating and Managing Groups of Contacts
10-13

To create a list of connections:
1. Go to the Connections tab on your Profile page (as described in Viewing YourConnections).
2. Click Organize to open the Organize Connections and Lists dialog.
3. Click New Connection List (Figure 10-13) to open the Create List dialog.
Figure 10-13 New Connection List
4. Enter a name for your list of connections, and click Save and Close to create thelist and open it in the Organize Connections and Lists dialog.
Tip:
To return to a view of all your connections, click All connections.
See Also:
For information about adding connections to a list, see Adding aConnection to a List.
Adding a Connection to a ListYou can add connections to a Connections list from the Connections tab of yourProfile page, the Connections viewer, and Connections - Detailed View. This sectiondescribes the Connections tab method.
Chapter 10Creating and Managing Groups of Contacts
10-14
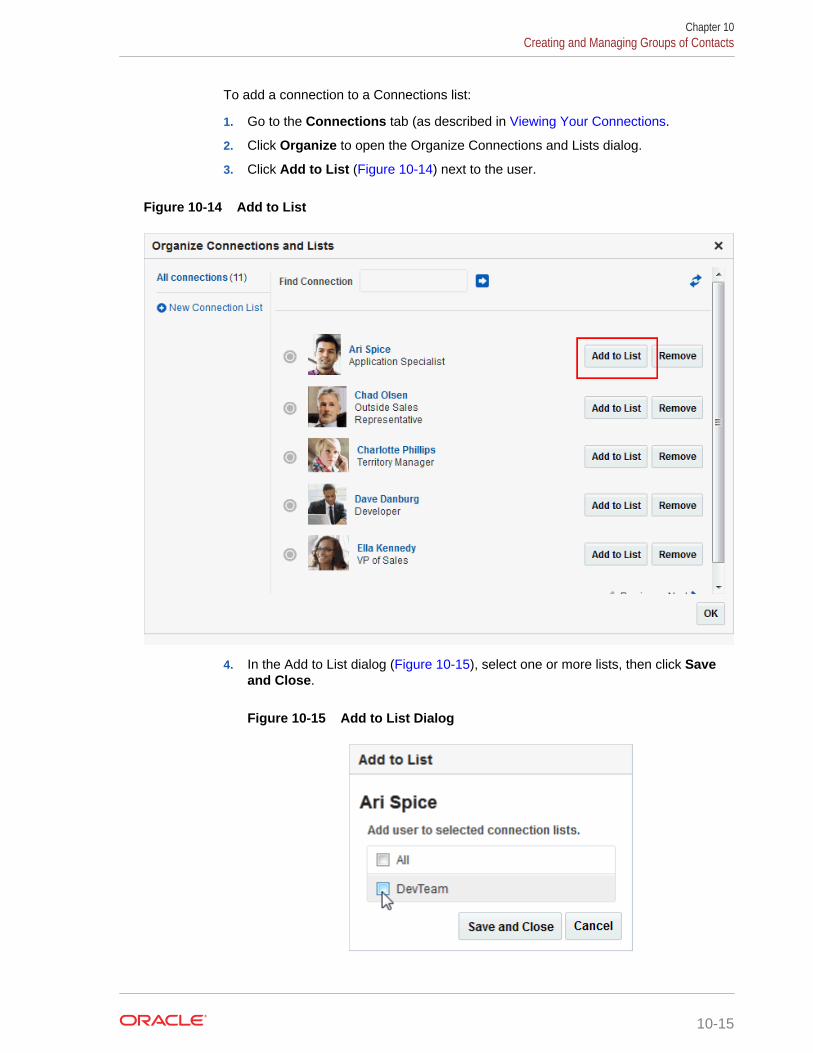
To add a connection to a Connections list:
1. Go to the Connections tab (as described in Viewing Your Connections.
2. Click Organize to open the Organize Connections and Lists dialog.
3. Click Add to List (Figure 10-14) next to the user.
Figure 10-14 Add to List
4. In the Add to List dialog (Figure 10-15), select one or more lists, then click Saveand Close.
Figure 10-15 Add to List Dialog
Chapter 10Creating and Managing Groups of Contacts
10-15
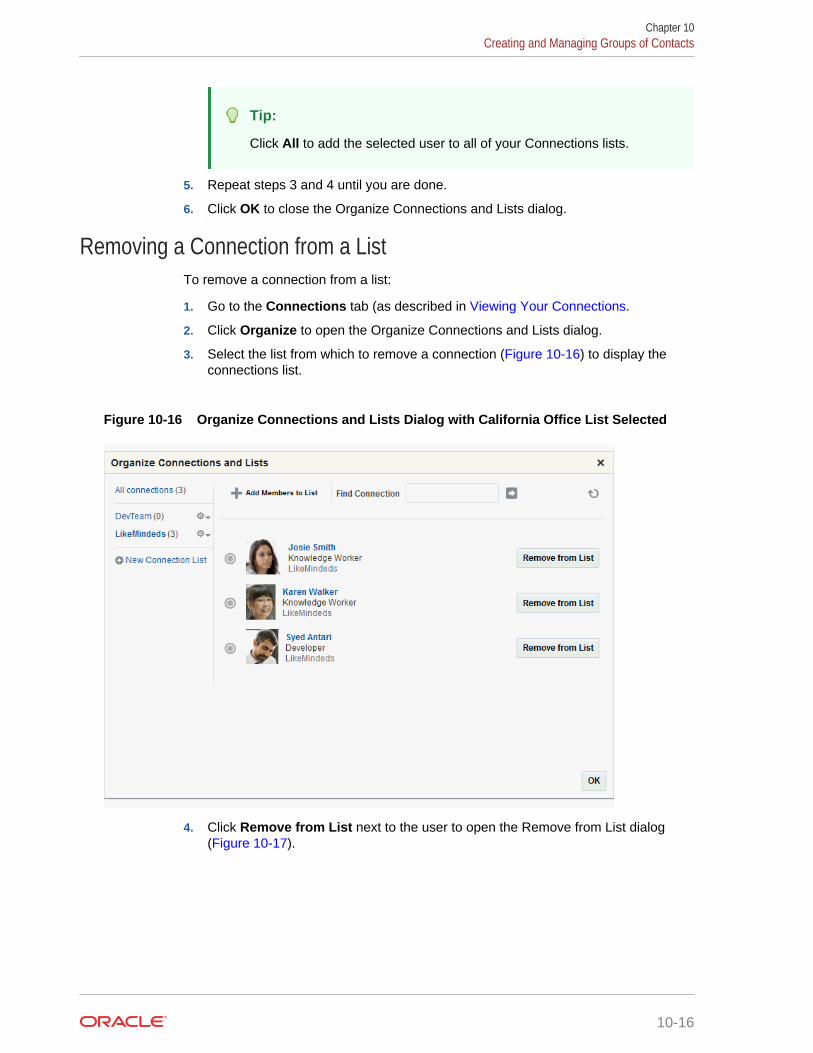
Tip:
Click All to add the selected user to all of your Connections lists.
5. Repeat steps 3 and 4 until you are done.
6. Click OK to close the Organize Connections and Lists dialog.
Removing a Connection from a ListTo remove a connection from a list:
1. Go to the Connections tab (as described in Viewing Your Connections.
2. Click Organize to open the Organize Connections and Lists dialog.
3. Select the list from which to remove a connection (Figure 10-16) to display theconnections list.
Figure 10-16 Organize Connections and Lists Dialog with California Office List Selected
4. Click Remove from List next to the user to open the Remove from List dialog(Figure 10-17).
Chapter 10Creating and Managing Groups of Contacts
10-16
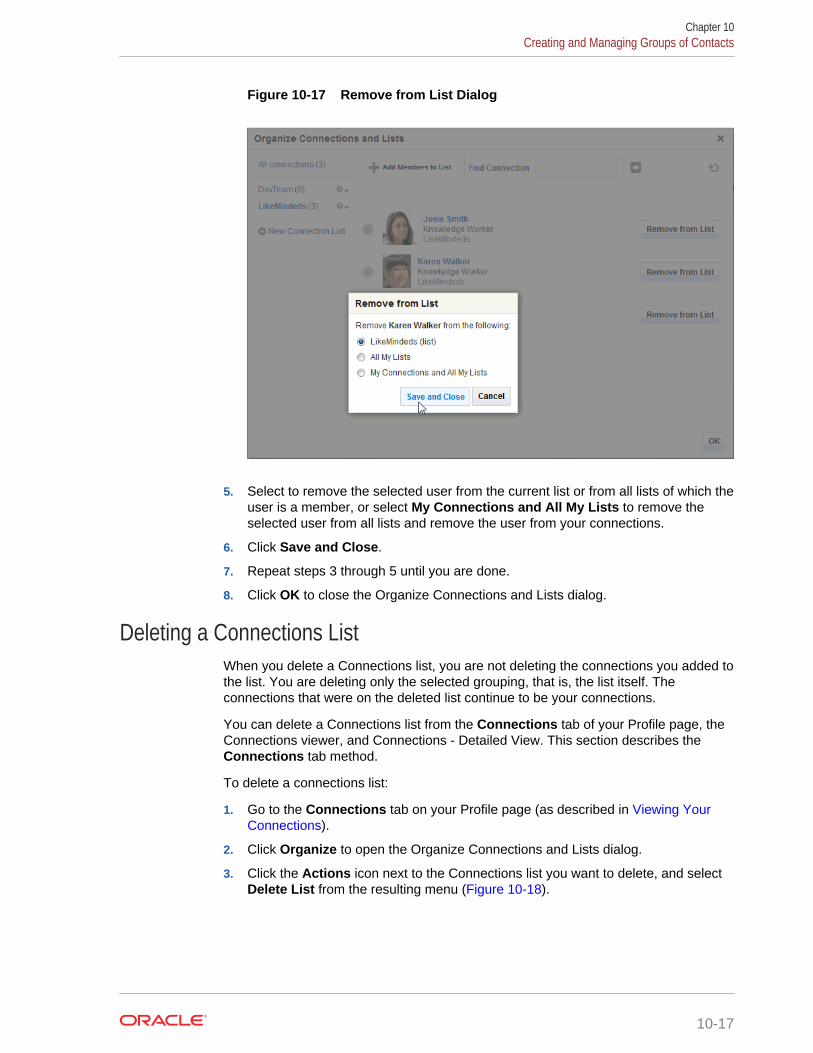
Figure 10-17 Remove from List Dialog
5. Select to remove the selected user from the current list or from all lists of which theuser is a member, or select My Connections and All My Lists to remove theselected user from all lists and remove the user from your connections.
6. Click Save and Close.
7. Repeat steps 3 through 5 until you are done.
8. Click OK to close the Organize Connections and Lists dialog.
Deleting a Connections ListWhen you delete a Connections list, you are not deleting the connections you added tothe list. You are deleting only the selected grouping, that is, the list itself. Theconnections that were on the deleted list continue to be your connections.
You can delete a Connections list from the Connections tab of your Profile page, theConnections viewer, and Connections - Detailed View. This section describes theConnections tab method.
To delete a connections list:
1. Go to the Connections tab on your Profile page (as described in Viewing YourConnections).
2. Click Organize to open the Organize Connections and Lists dialog.
3. Click the Actions icon next to the Connections list you want to delete, and selectDelete List from the resulting menu (Figure 10-18).
Chapter 10Creating and Managing Groups of Contacts
10-17
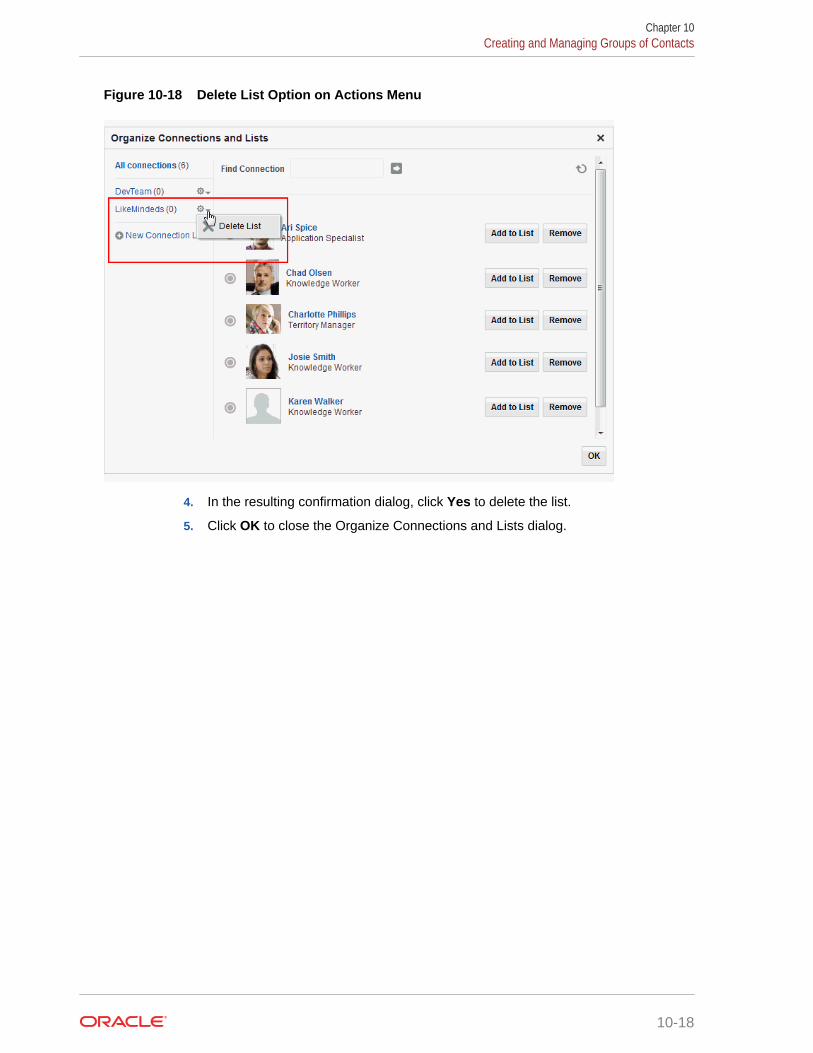
Figure 10-18 Delete List Option on Actions Menu
4. In the resulting confirmation dialog, click Yes to delete the list.
5. Click OK to close the Organize Connections and Lists dialog.
Chapter 10Creating and Managing Groups of Contacts
10-18
11Using Instant Messaging and PresenceViewer
Use WebCenter Portal's instant messaging and presence (IMP) features to see thepresence status of other authenticated users and interact with them through instantmessages and mail. Additionally, if enterprise presence is unavailable, you canconnect to a third party network presence service, such as Yahoo! Messenger.
Permissions:
This chapter is intended for WebCenter Portal users who want to view,create, and manage instant messaging and presence.
Such users must be granted, minimally, the portal-level permission ViewPages and Content. They can view the presence of other users only forassets for which they have view permission.
Authenticated users require the portal-level permission Customize Pages.They must have view permission on the asset.
Topics:
• About Instant Messaging and Presence
• Identifying Your Preferred Instant Messaging Provider
• Configuring Network Presence
• Working with IMP Features
About Instant Messaging and Presence
Note:
For Instant Messaging and Presence to work in a portal, make sure that:
• The back-end presence server has been installed and configured by thesystem administrator and the connection between WebCenter Portal andthe application is active. For more information, see the Managing InstantMessaging and Presence chapter in Administering Oracle WebCenterPortal.
• The external application has been registered by the systemadministrator. For more information, see the Managing ExternalApplications chapter in Administering Oracle WebCenter Portal.
11-1
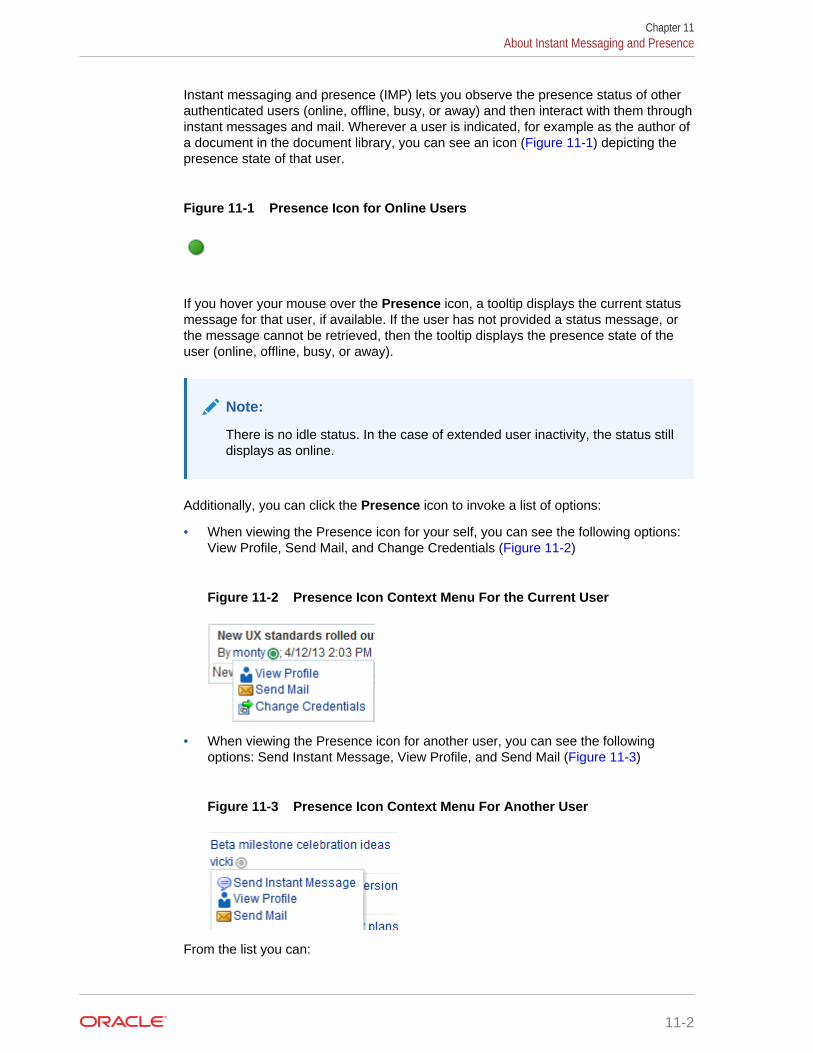
Instant messaging and presence (IMP) lets you observe the presence status of otherauthenticated users (online, offline, busy, or away) and then interact with them throughinstant messages and mail. Wherever a user is indicated, for example as the author ofa document in the document library, you can see an icon (Figure 11-1) depicting thepresence state of that user.
Figure 11-1 Presence Icon for Online Users
If you hover your mouse over the Presence icon, a tooltip displays the current statusmessage for that user, if available. If the user has not provided a status message, orthe message cannot be retrieved, then the tooltip displays the presence state of theuser (online, offline, busy, or away).
Note:
There is no idle status. In the case of extended user inactivity, the status stilldisplays as online.
Additionally, you can click the Presence icon to invoke a list of options:
• When viewing the Presence icon for your self, you can see the following options:View Profile, Send Mail, and Change Credentials (Figure 11-2)
Figure 11-2 Presence Icon Context Menu For the Current User
• When viewing the Presence icon for another user, you can see the followingoptions: Send Instant Message, View Profile, and Send Mail (Figure 11-3)
Figure 11-3 Presence Icon Context Menu For Another User
From the list you can:
Chapter 11About Instant Messaging and Presence
11-2
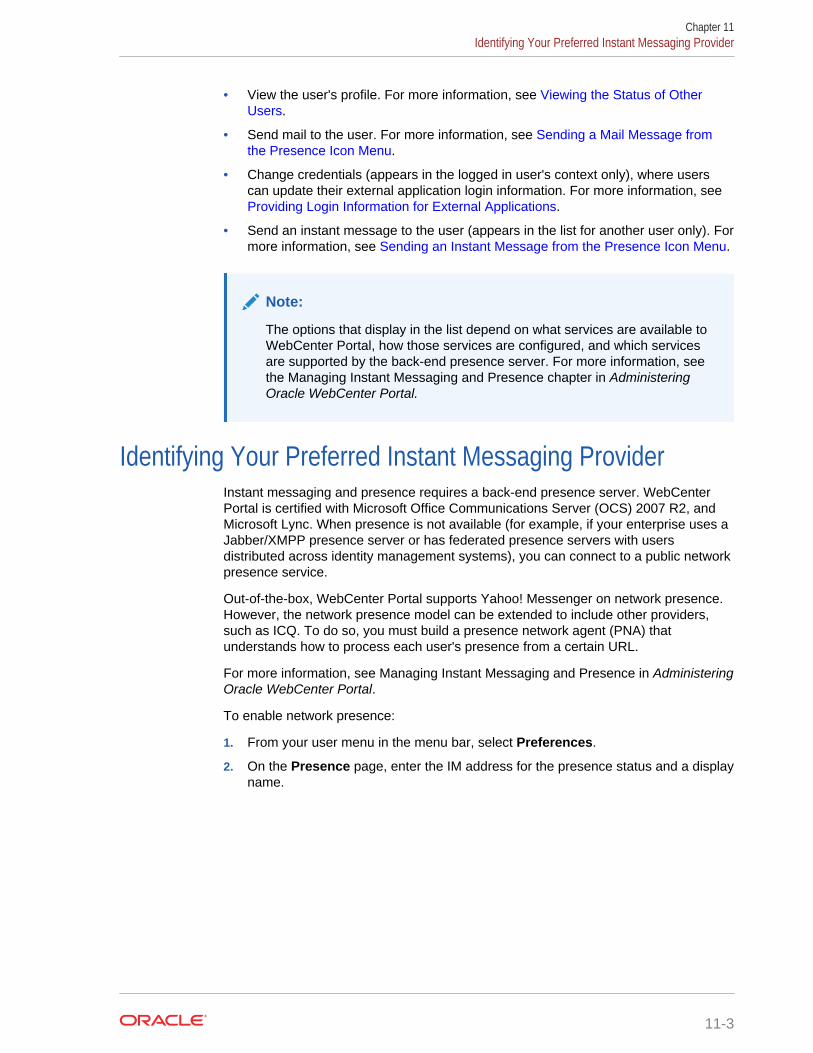
• View the user's profile. For more information, see Viewing the Status of OtherUsers.
• Send mail to the user. For more information, see Sending a Mail Message fromthe Presence Icon Menu.
• Change credentials (appears in the logged in user's context only), where userscan update their external application login information. For more information, see Providing Login Information for External Applications.
• Send an instant message to the user (appears in the list for another user only). Formore information, see Sending an Instant Message from the Presence Icon Menu.
Note:
The options that display in the list depend on what services are available toWebCenter Portal, how those services are configured, and which servicesare supported by the back-end presence server. For more information, seethe Managing Instant Messaging and Presence chapter in AdministeringOracle WebCenter Portal.
Identifying Your Preferred Instant Messaging ProviderInstant messaging and presence requires a back-end presence server. WebCenterPortal is certified with Microsoft Office Communications Server (OCS) 2007 R2, andMicrosoft Lync. When presence is not available (for example, if your enterprise uses aJabber/XMPP presence server or has federated presence servers with usersdistributed across identity management systems), you can connect to a public networkpresence service.
Out-of-the-box, WebCenter Portal supports Yahoo! Messenger on network presence.However, the network presence model can be extended to include other providers,such as ICQ. To do so, you must build a presence network agent (PNA) thatunderstands how to process each user's presence from a certain URL.
For more information, see Managing Instant Messaging and Presence in AdministeringOracle WebCenter Portal.
To enable network presence:
1. From your user menu in the menu bar, select Preferences.
2. On the Presence page, enter the IM address for the presence status and a displayname.
Chapter 11Identifying Your Preferred Instant Messaging Provider
11-3
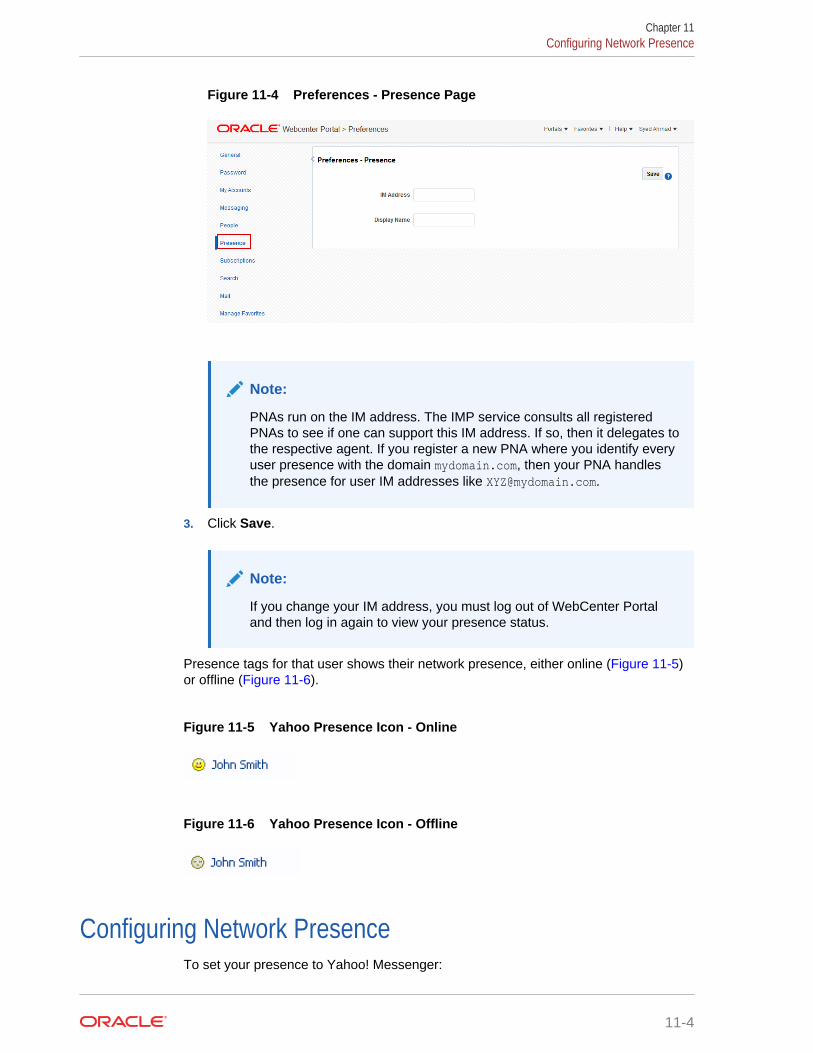
Figure 11-4 Preferences - Presence Page
Note:
PNAs run on the IM address. The IMP service consults all registeredPNAs to see if one can support this IM address. If so, then it delegates tothe respective agent. If you register a new PNA where you identify everyuser presence with the domain mydomain.com, then your PNA handlesthe presence for user IM addresses like [email protected].
3. Click Save.
Note:
If you change your IM address, you must log out of WebCenter Portaland then log in again to view your presence status.
Presence tags for that user shows their network presence, either online (Figure 11-5)or offline (Figure 11-6).
Figure 11-5 Yahoo Presence Icon - Online
Figure 11-6 Yahoo Presence Icon - Offline
Configuring Network PresenceTo set your presence to Yahoo! Messenger:
Chapter 11Configuring Network Presence
11-4
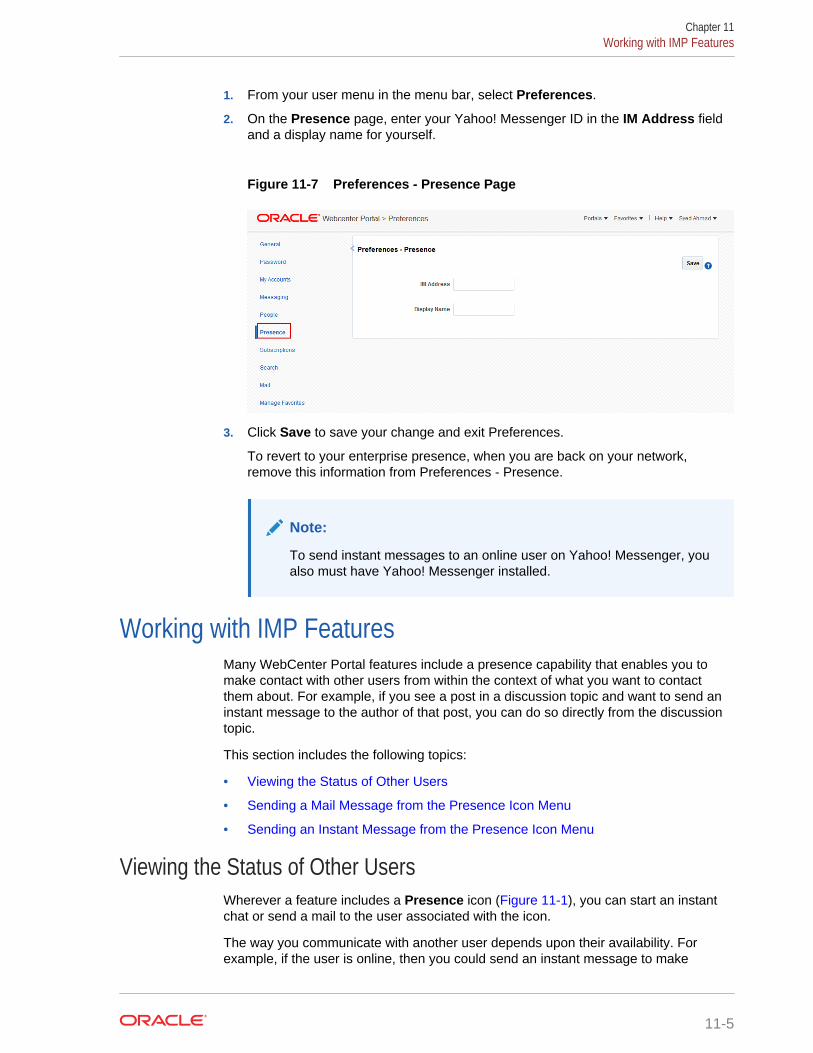
1. From your user menu in the menu bar, select Preferences.
2. On the Presence page, enter your Yahoo! Messenger ID in the IM Address fieldand a display name for yourself.
Figure 11-7 Preferences - Presence Page
3. Click Save to save your change and exit Preferences.
To revert to your enterprise presence, when you are back on your network,remove this information from Preferences - Presence.
Note:
To send instant messages to an online user on Yahoo! Messenger, youalso must have Yahoo! Messenger installed.
Working with IMP FeaturesMany WebCenter Portal features include a presence capability that enables you tomake contact with other users from within the context of what you want to contactthem about. For example, if you see a post in a discussion topic and want to send aninstant message to the author of that post, you can do so directly from the discussiontopic.
This section includes the following topics:
• Viewing the Status of Other Users
• Sending a Mail Message from the Presence Icon Menu
• Sending an Instant Message from the Presence Icon Menu
Viewing the Status of Other UsersWherever a feature includes a Presence icon (Figure 11-1), you can start an instantchat or send a mail to the user associated with the icon.
The way you communicate with another user depends upon their availability. Forexample, if the user is online, then you could send an instant message to make
Chapter 11Working with IMP Features
11-5
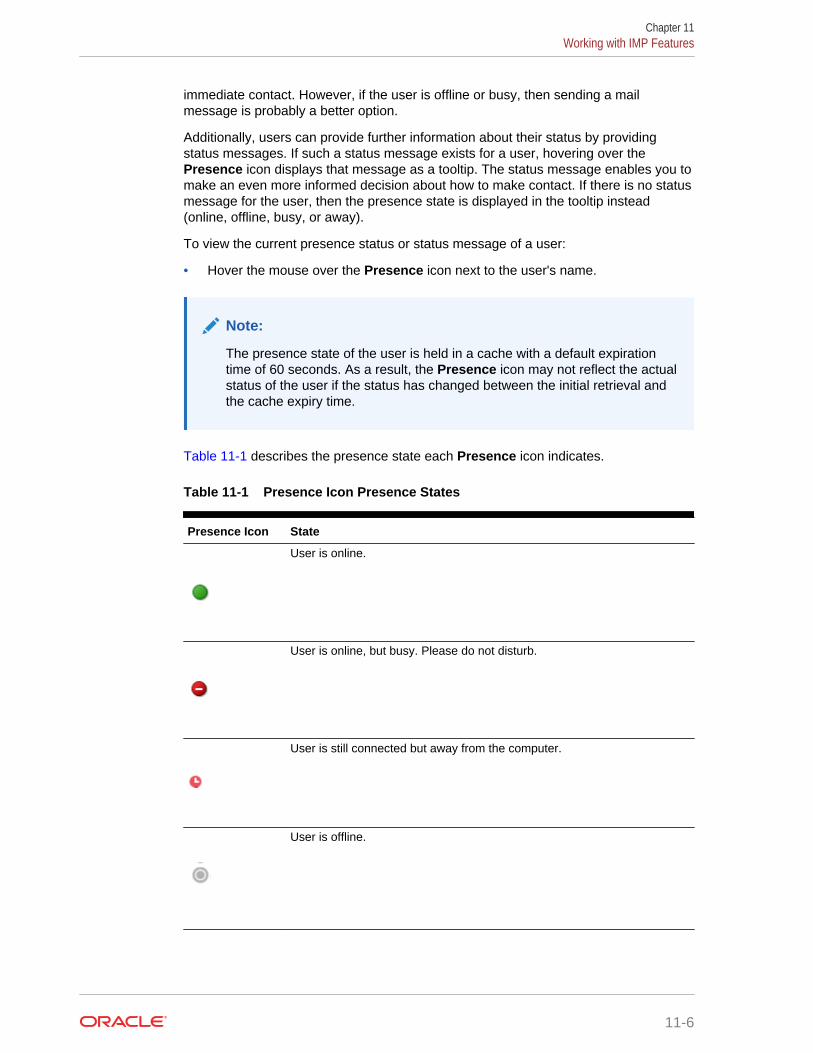
immediate contact. However, if the user is offline or busy, then sending a mailmessage is probably a better option.
Additionally, users can provide further information about their status by providingstatus messages. If such a status message exists for a user, hovering over thePresence icon displays that message as a tooltip. The status message enables you tomake an even more informed decision about how to make contact. If there is no statusmessage for the user, then the presence state is displayed in the tooltip instead(online, offline, busy, or away).
To view the current presence status or status message of a user:
• Hover the mouse over the Presence icon next to the user's name.
Note:
The presence state of the user is held in a cache with a default expirationtime of 60 seconds. As a result, the Presence icon may not reflect the actualstatus of the user if the status has changed between the initial retrieval andthe cache expiry time.
Table 11-1 describes the presence state each Presence icon indicates.
Table 11-1 Presence Icon Presence States
Presence Icon State
User is online.
User is online, but busy. Please do not disturb.
User is still connected but away from the computer.
User is offline.
Chapter 11Working with IMP Features
11-6
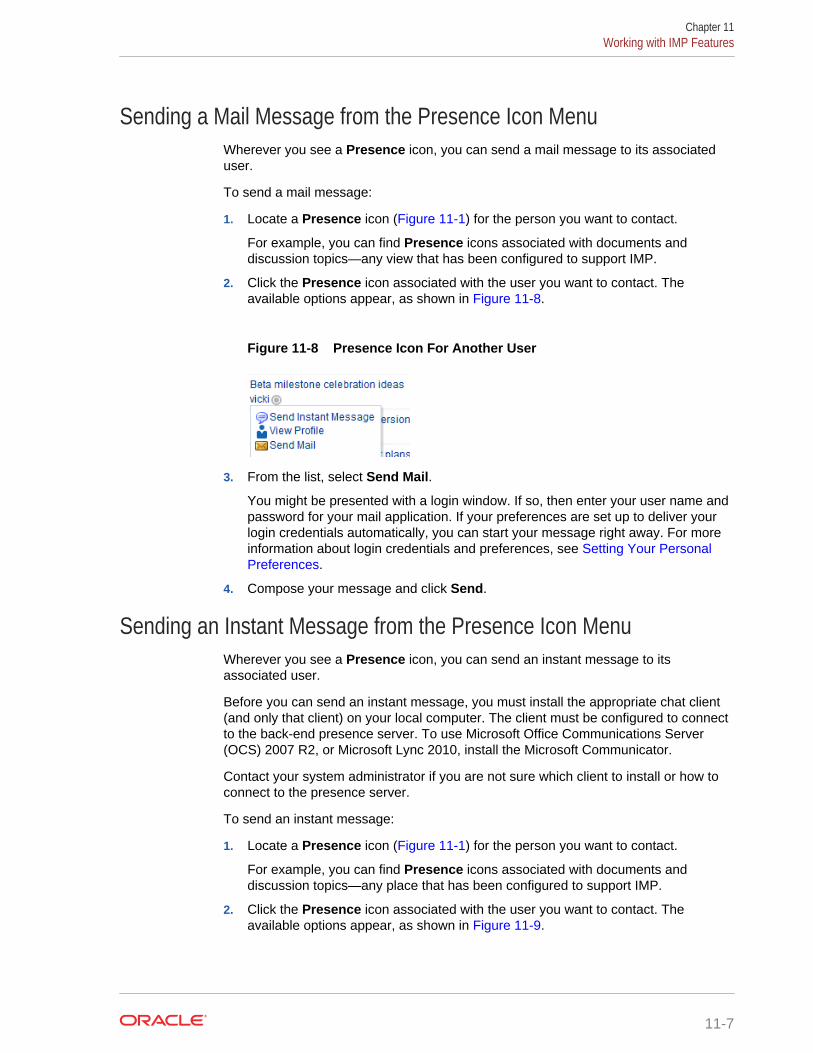
Sending a Mail Message from the Presence Icon MenuWherever you see a Presence icon, you can send a mail message to its associateduser.
To send a mail message:
1. Locate a Presence icon (Figure 11-1) for the person you want to contact.
For example, you can find Presence icons associated with documents anddiscussion topics—any view that has been configured to support IMP.
2. Click the Presence icon associated with the user you want to contact. Theavailable options appear, as shown in Figure 11-8.
Figure 11-8 Presence Icon For Another User
3. From the list, select Send Mail.
You might be presented with a login window. If so, then enter your user name andpassword for your mail application. If your preferences are set up to deliver yourlogin credentials automatically, you can start your message right away. For moreinformation about login credentials and preferences, see Setting Your PersonalPreferences.
4. Compose your message and click Send.
Sending an Instant Message from the Presence Icon MenuWherever you see a Presence icon, you can send an instant message to itsassociated user.
Before you can send an instant message, you must install the appropriate chat client(and only that client) on your local computer. The client must be configured to connectto the back-end presence server. To use Microsoft Office Communications Server(OCS) 2007 R2, or Microsoft Lync 2010, install the Microsoft Communicator.
Contact your system administrator if you are not sure which client to install or how toconnect to the presence server.
To send an instant message:
1. Locate a Presence icon (Figure 11-1) for the person you want to contact.
For example, you can find Presence icons associated with documents anddiscussion topics—any place that has been configured to support IMP.
2. Click the Presence icon associated with the user you want to contact. Theavailable options appear, as shown in Figure 11-9.
Chapter 11Working with IMP Features
11-7
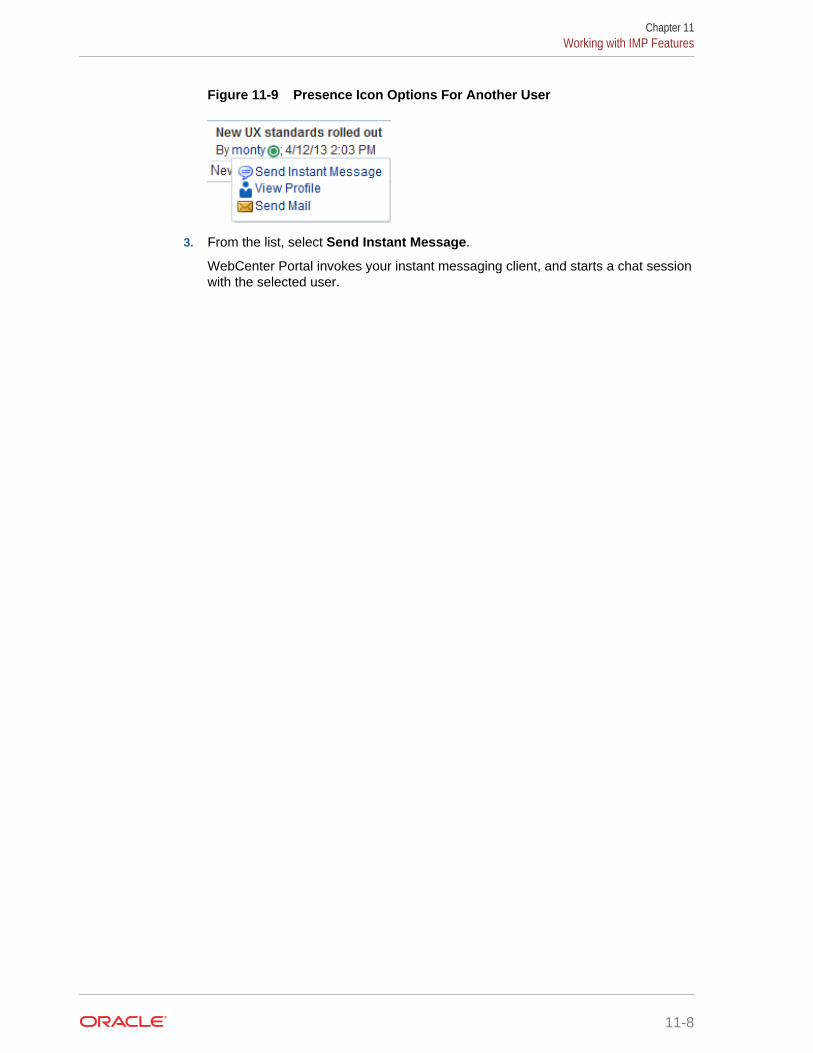
Figure 11-9 Presence Icon Options For Another User
3. From the list, select Send Instant Message.
WebCenter Portal invokes your instant messaging client, and starts a chat sessionwith the selected user.
Chapter 11Working with IMP Features
11-8
12Sending and Viewing Mail
Send and view mail from a portal using WebCenter Portal’s Mail service or your localmail client.
Permissions:
To perform the tasks in this chapter, you must be granted at least the portal-level permission View Pages and Content to view mail. You can view mailonly for assets for which they have view permission.
Authenticated users require the portal-level permission Customize Pages,and must have view permission on the resource.
Note:
Some of the tasks discussed in this chapter are not available if mail is notconfigured. Portal managers can add the Mail viewer to a portal, asdescribed in Adding Mail to a Portal in Building Portals with OracleWebCenter Portal.
Topics:
• About the Send Mail Feature
• About Mail in WebCenter Portal
• Selecting Your Preferred Mail Connection
• Working with Mail
About the Send Mail FeatureThroughout WebCenter Portal, you can click the Send Mail icon (Figure 12-1) to maildirectly from another feature, such as announcements (Figure 12-2). You need to havethe required permissions to work with the other features in order to use the Send Mailfeature from the feature.
Figure 12-1 Send Mail Icon
For example, Figure 12-2 shows an announcement topic with the Send Mail icon.
12-1

Figure 12-2 Send Mail Icon in an Announcement
Click the Send Mail icon to open a mail compose window prepopulated withinformation including the announcement topic title, author, date created, topic text, andlinks to the announcement and the portal. You can edit and add to the mail, asnecessary.
Note:
To use WebCenter Portal's Send Mail (not your local mail client), you mustchange the mail preference (see Selecting Your Preferred Mail Connection).If you are using your local mail client, you are required to log in to mail if youare not logged in (see Logging in to Mail). Log out and then log back in toWebCenter Portal after you change your preferences.
Figure 12-3 WebCenter Portal Mail Compose Window From an Announcement
Chapter 12About the Send Mail Feature
12-2
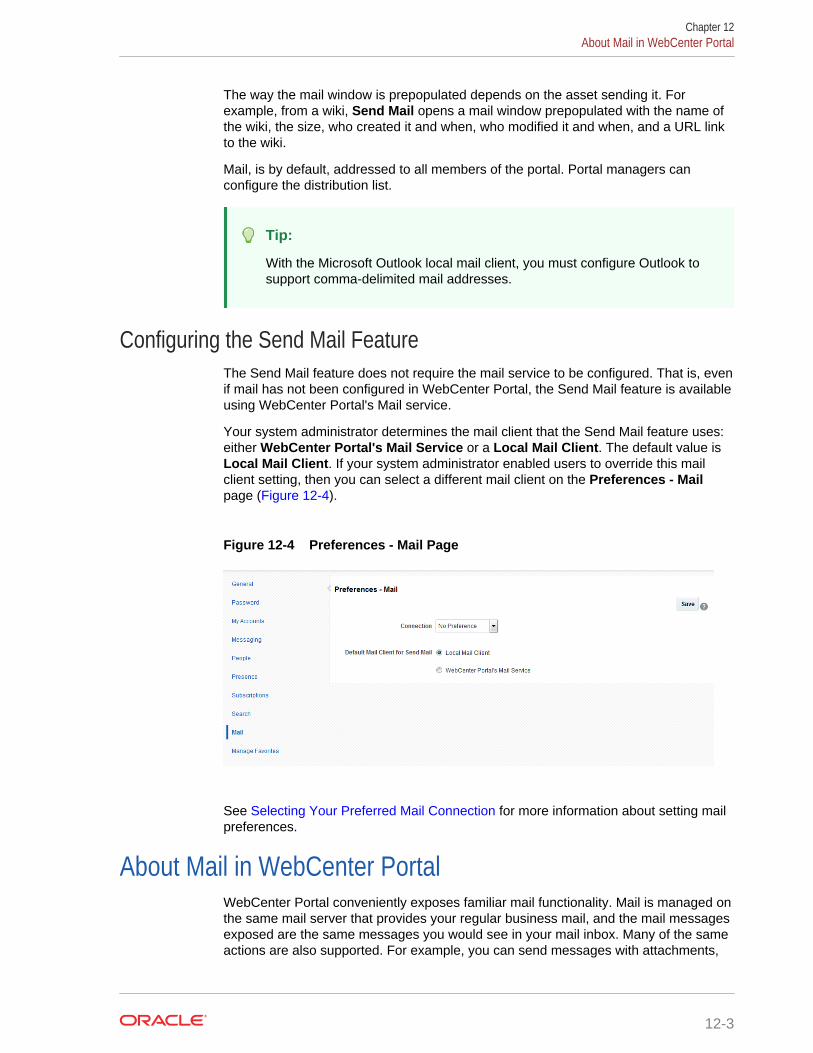
The way the mail window is prepopulated depends on the asset sending it. Forexample, from a wiki, Send Mail opens a mail window prepopulated with the name ofthe wiki, the size, who created it and when, who modified it and when, and a URL linkto the wiki.
Mail, is by default, addressed to all members of the portal. Portal managers canconfigure the distribution list.
Tip:
With the Microsoft Outlook local mail client, you must configure Outlook tosupport comma-delimited mail addresses.
Configuring the Send Mail FeatureThe Send Mail feature does not require the mail service to be configured. That is, evenif mail has not been configured in WebCenter Portal, the Send Mail feature is availableusing WebCenter Portal's Mail service.
Your system administrator determines the mail client that the Send Mail feature uses:either WebCenter Portal's Mail Service or a Local Mail Client. The default value isLocal Mail Client. If your system administrator enabled users to override this mailclient setting, then you can select a different mail client on the Preferences - Mailpage (Figure 12-4).
Figure 12-4 Preferences - Mail Page
See Selecting Your Preferred Mail Connection for more information about setting mailpreferences.
About Mail in WebCenter PortalWebCenter Portal conveniently exposes familiar mail functionality. Mail is managed onthe same mail server that provides your regular business mail, and the mail messagesexposed are the same messages you would see in your mail inbox. Many of the sameactions are also supported. For example, you can send messages with attachments,
Chapter 12About Mail in WebCenter Portal
12-3
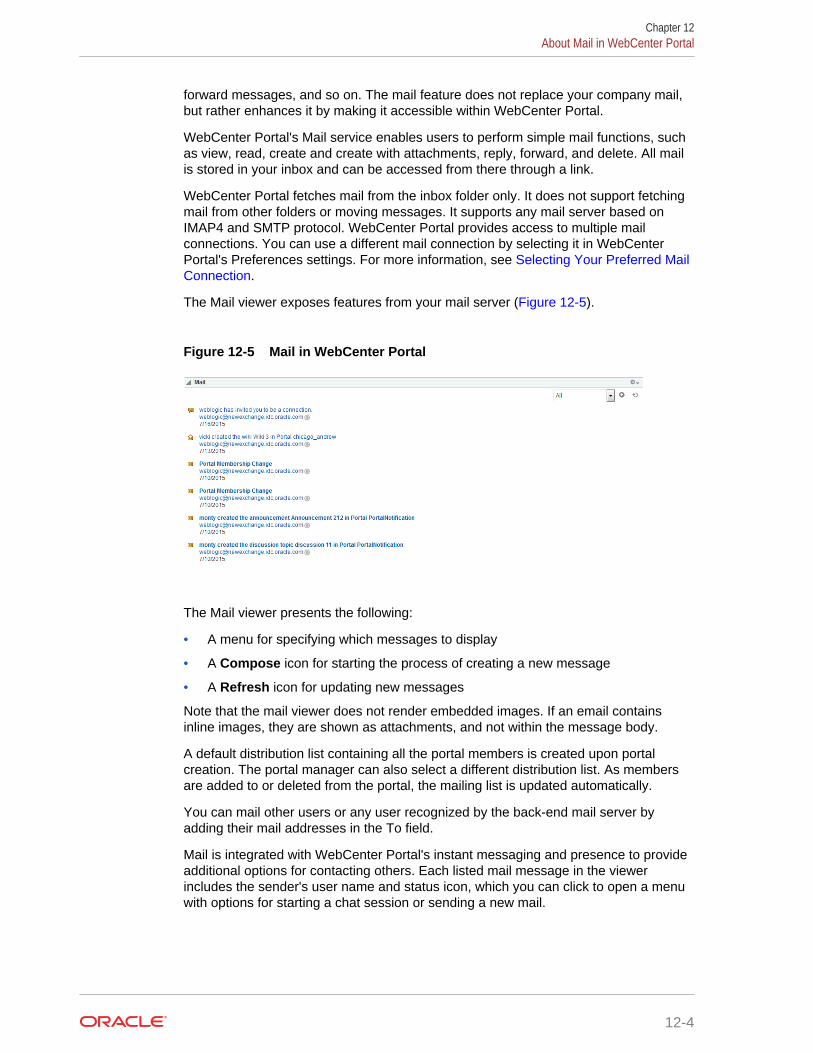
forward messages, and so on. The mail feature does not replace your company mail,but rather enhances it by making it accessible within WebCenter Portal.
WebCenter Portal's Mail service enables users to perform simple mail functions, suchas view, read, create and create with attachments, reply, forward, and delete. All mailis stored in your inbox and can be accessed from there through a link.
WebCenter Portal fetches mail from the inbox folder only. It does not support fetchingmail from other folders or moving messages. It supports any mail server based onIMAP4 and SMTP protocol. WebCenter Portal provides access to multiple mailconnections. You can use a different mail connection by selecting it in WebCenterPortal's Preferences settings. For more information, see Selecting Your Preferred MailConnection.
The Mail viewer exposes features from your mail server (Figure 12-5).
Figure 12-5 Mail in WebCenter Portal
The Mail viewer presents the following:
• A menu for specifying which messages to display
• A Compose icon for starting the process of creating a new message
• A Refresh icon for updating new messages
Note that the mail viewer does not render embedded images. If an email containsinline images, they are shown as attachments, and not within the message body.
A default distribution list containing all the portal members is created upon portalcreation. The portal manager can also select a different distribution list. As membersare added to or deleted from the portal, the mailing list is updated automatically.
You can mail other users or any user recognized by the back-end mail server byadding their mail addresses in the To field.
Mail is integrated with WebCenter Portal's instant messaging and presence to provideadditional options for contacting others. Each listed mail message in the viewerincludes the sender's user name and status icon, which you can click to open a menuwith options for starting a chat session or sending a new mail.
Chapter 12About Mail in WebCenter Portal
12-4
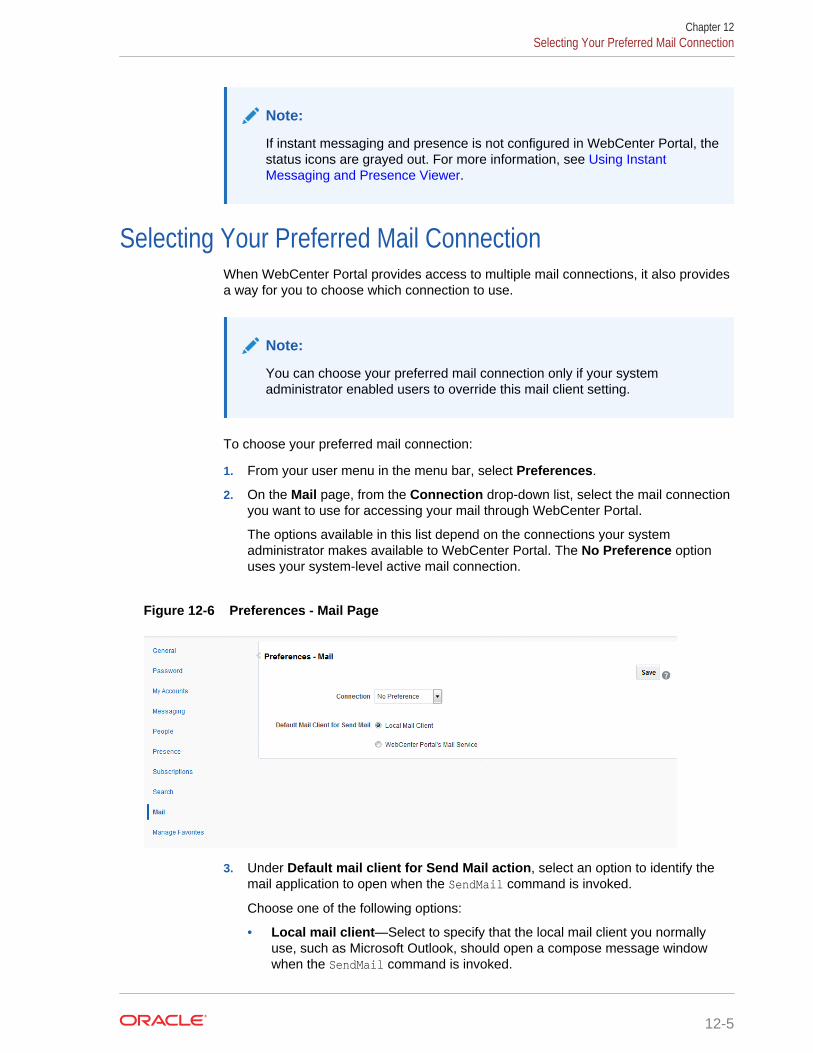
Note:
If instant messaging and presence is not configured in WebCenter Portal, thestatus icons are grayed out. For more information, see Using InstantMessaging and Presence Viewer.
Selecting Your Preferred Mail ConnectionWhen WebCenter Portal provides access to multiple mail connections, it also providesa way for you to choose which connection to use.
Note:
You can choose your preferred mail connection only if your systemadministrator enabled users to override this mail client setting.
To choose your preferred mail connection:
1. From your user menu in the menu bar, select Preferences.
2. On the Mail page, from the Connection drop-down list, select the mail connectionyou want to use for accessing your mail through WebCenter Portal.
The options available in this list depend on the connections your systemadministrator makes available to WebCenter Portal. The No Preference optionuses your system-level active mail connection.
Figure 12-6 Preferences - Mail Page
3. Under Default mail client for Send Mail action, select an option to identify themail application to open when the SendMail command is invoked.
Choose one of the following options:
• Local mail client—Select to specify that the local mail client you normallyuse, such as Microsoft Outlook, should open a compose message windowwhen the SendMail command is invoked.
Chapter 12Selecting Your Preferred Mail Connection
12-5
• WebCenter Portal's Mail Service—Select to specify to open WebCenterPortal's Mail service compose message window when the SendMail commandis invoked.
4. Click OK to save your changes and exit Preferences.
5. Log out of WebCenter Portal.
6. Log in to WebCenter Portal.
If you previously saved your credentials for this mail connection to the WebCenterPortal credential store, then you are logged in to the new mail connectionautomatically.
If you have not previously saved your credentials, log in to this mail connectionusing Preferences (see Providing Login Information for External Applications) orusing the login link where you see mail (see Logging in to Mail).
Working with MailWebCenter Portal's mail feature exposes your company's mail features within thecontext of your portal. You can view, respond to, and manage your personal mail.
This section provides information about how to use mail in WebCenter Portal. Itincludes the following topics:
• Logging in to Mail
• Personalizing Your View of Mail
• Opening Mail Messages
• Downloading Mail Attachments
• Composing and Sending Mail Messages
• Sending Mail with Attachments
• Removing Attachments from the Add Attachment Window
• Replying To and Forwarding Mail
• Refreshing Mail
• Deleting Mail
Logging in to MailIf you are using your local mail client, before you can access your mail in a portal, youmust provide your mail login credentials. The first time you access mail, it displays themessage depicted in Figure 12-7.
Figure 12-7 Mail Login Message
Chapter 12Working with Mail
12-6
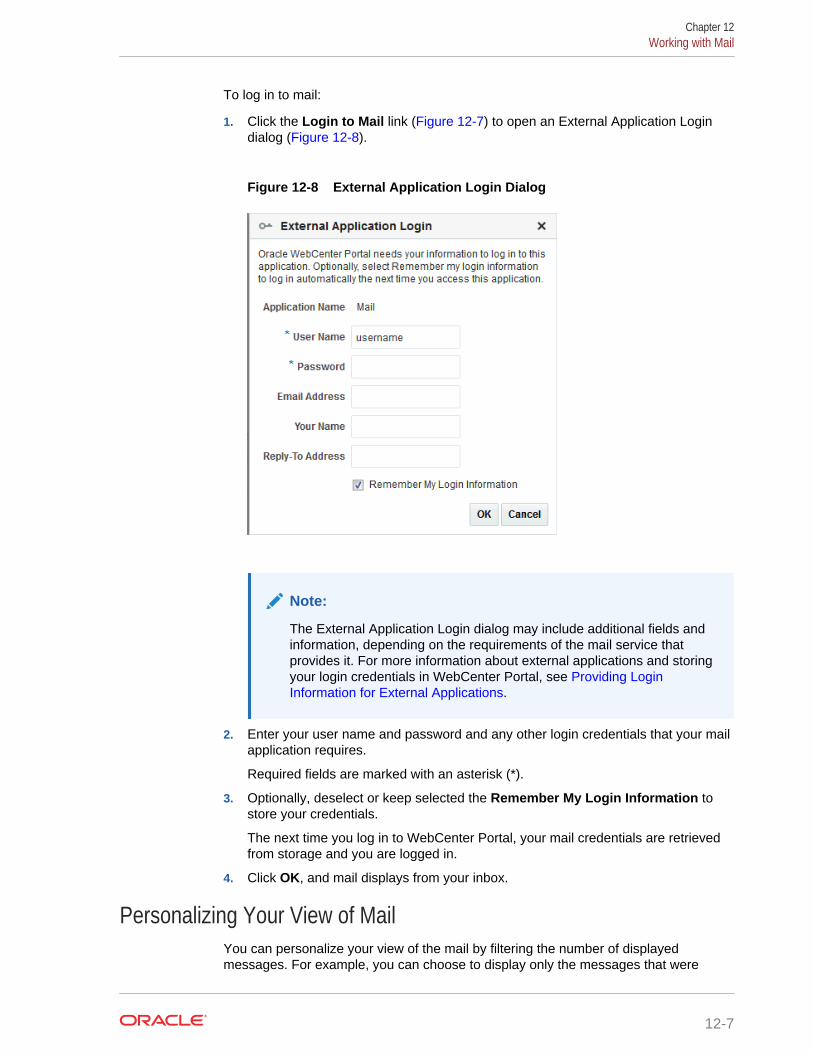
To log in to mail:
1. Click the Login to Mail link (Figure 12-7) to open an External Application Logindialog (Figure 12-8).
Figure 12-8 External Application Login Dialog
Note:
The External Application Login dialog may include additional fields andinformation, depending on the requirements of the mail service thatprovides it. For more information about external applications and storingyour login credentials in WebCenter Portal, see Providing LoginInformation for External Applications.
2. Enter your user name and password and any other login credentials that your mailapplication requires.
Required fields are marked with an asterisk (*).
3. Optionally, deselect or keep selected the Remember My Login Information tostore your credentials.
The next time you log in to WebCenter Portal, your mail credentials are retrievedfrom storage and you are logged in.
4. Click OK, and mail displays from your inbox.
Personalizing Your View of MailYou can personalize your view of the mail by filtering the number of displayedmessages. For example, you can choose to display only the messages that were
Chapter 12Working with Mail
12-7
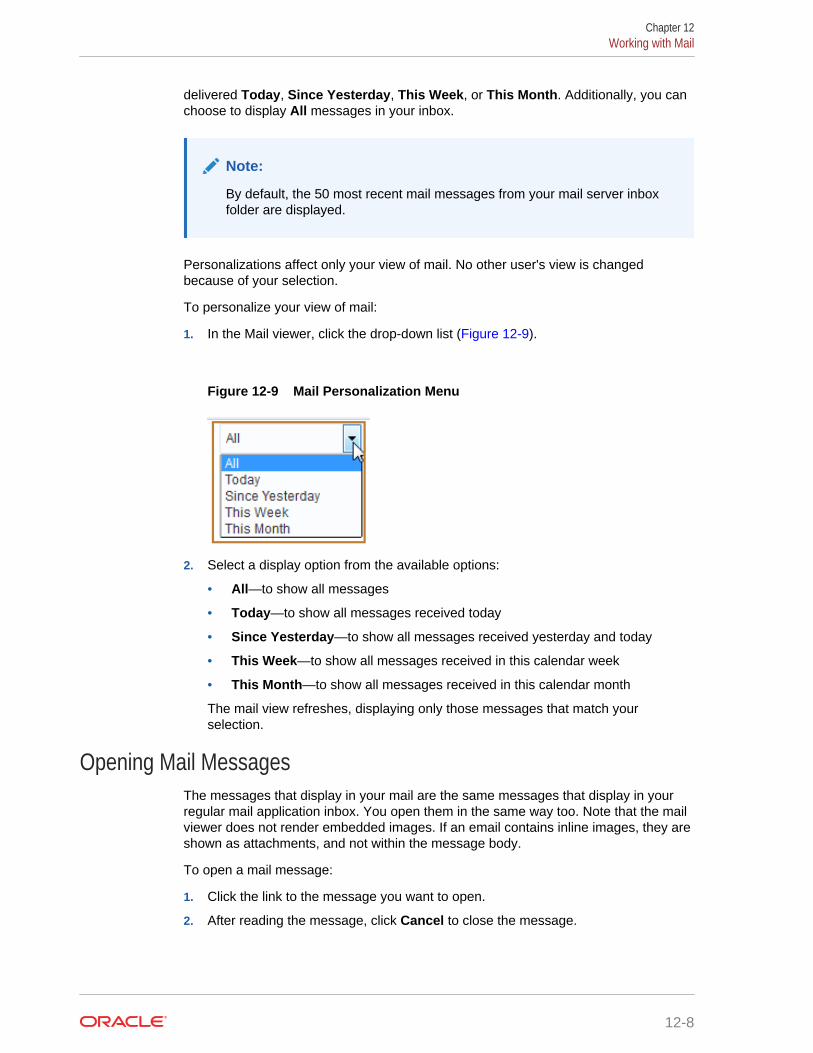
delivered Today, Since Yesterday, This Week, or This Month. Additionally, you canchoose to display All messages in your inbox.
Note:
By default, the 50 most recent mail messages from your mail server inboxfolder are displayed.
Personalizations affect only your view of mail. No other user's view is changedbecause of your selection.
To personalize your view of mail:
1. In the Mail viewer, click the drop-down list (Figure 12-9).
Figure 12-9 Mail Personalization Menu
2. Select a display option from the available options:
• All—to show all messages
• Today—to show all messages received today
• Since Yesterday—to show all messages received yesterday and today
• This Week—to show all messages received in this calendar week
• This Month—to show all messages received in this calendar month
The mail view refreshes, displaying only those messages that match yourselection.
Opening Mail MessagesThe messages that display in your mail are the same messages that display in yourregular mail application inbox. You open them in the same way too. Note that the mailviewer does not render embedded images. If an email contains inline images, they areshown as attachments, and not within the message body.
To open a mail message:
1. Click the link to the message you want to open.
2. After reading the message, click Cancel to close the message.
Chapter 12Working with Mail
12-8
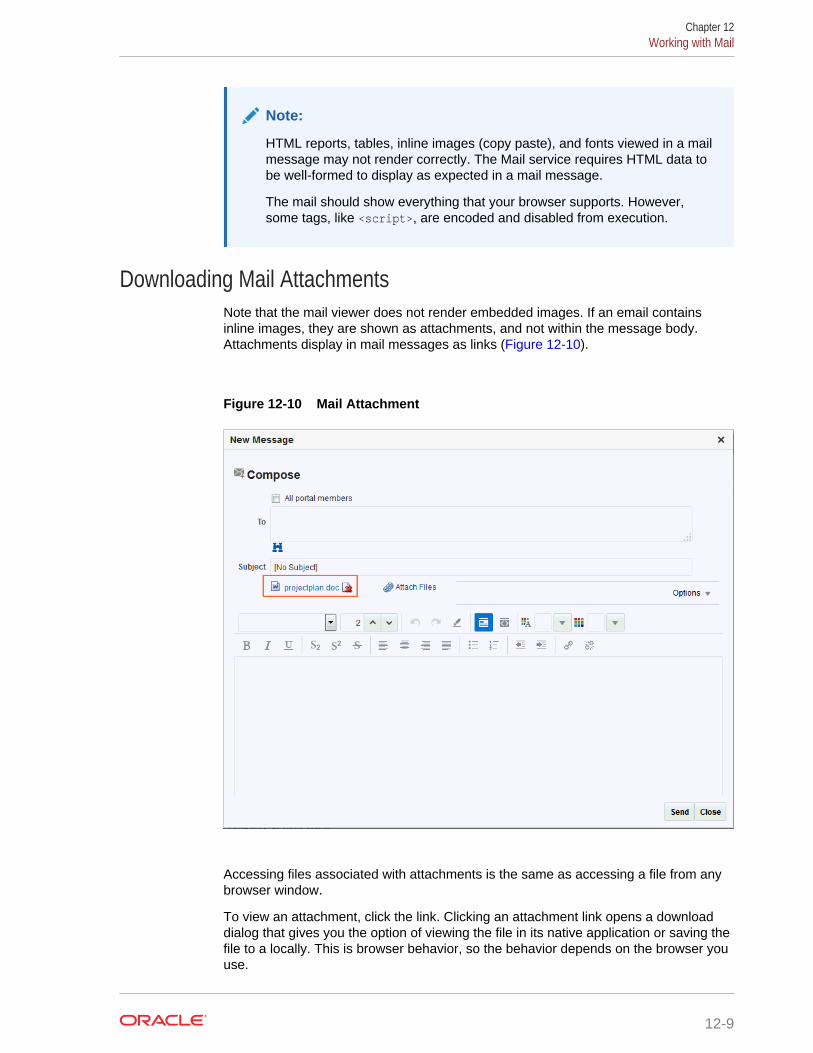
Note:
HTML reports, tables, inline images (copy paste), and fonts viewed in a mailmessage may not render correctly. The Mail service requires HTML data tobe well-formed to display as expected in a mail message.
The mail should show everything that your browser supports. However,some tags, like <script>, are encoded and disabled from execution.
Downloading Mail AttachmentsNote that the mail viewer does not render embedded images. If an email containsinline images, they are shown as attachments, and not within the message body.Attachments display in mail messages as links (Figure 12-10).
Figure 12-10 Mail Attachment
Accessing files associated with attachments is the same as accessing a file from anybrowser window.
To view an attachment, click the link. Clicking an attachment link opens a downloaddialog that gives you the option of viewing the file in its native application or saving thefile to a locally. This is browser behavior, so the behavior depends on the browser youuse.
Chapter 12Working with Mail
12-9
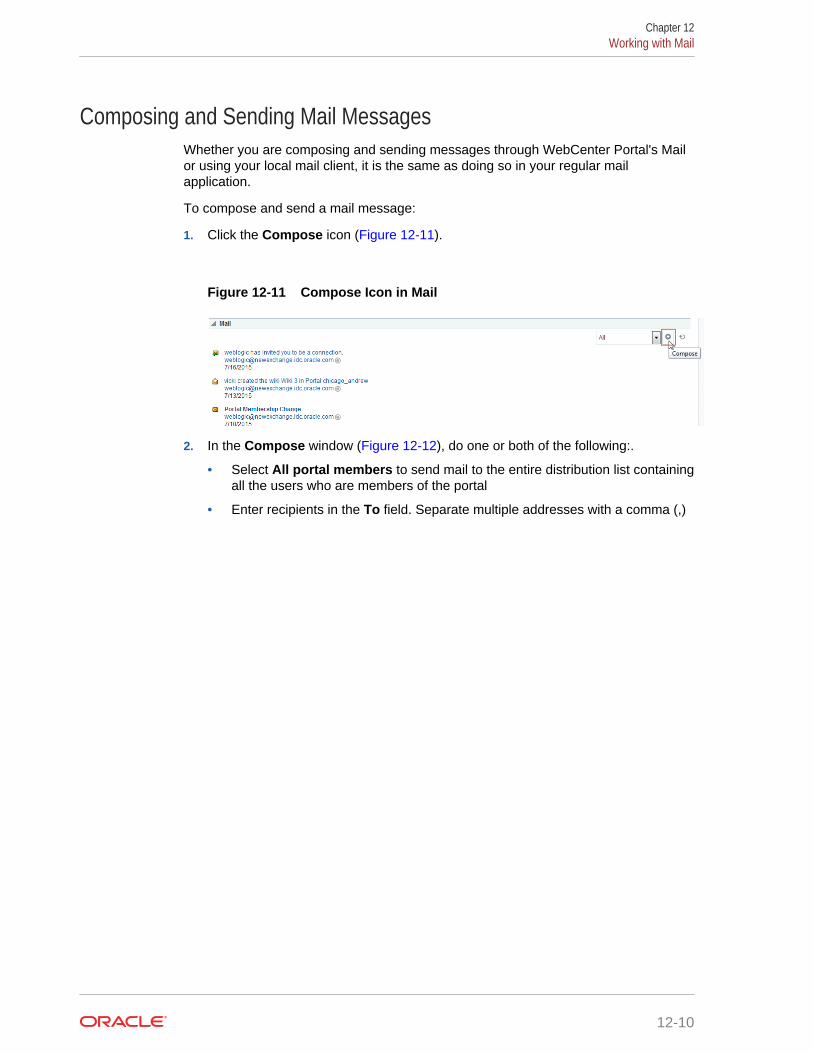
Composing and Sending Mail MessagesWhether you are composing and sending messages through WebCenter Portal's Mailor using your local mail client, it is the same as doing so in your regular mailapplication.
To compose and send a mail message:
1. Click the Compose icon (Figure 12-11).
Figure 12-11 Compose Icon in Mail
2. In the Compose window (Figure 12-12), do one or both of the following:.
• Select All portal members to send mail to the entire distribution list containingall the users who are members of the portal
• Enter recipients in the To field. Separate multiple addresses with a comma (,)
Chapter 12Working with Mail
12-10
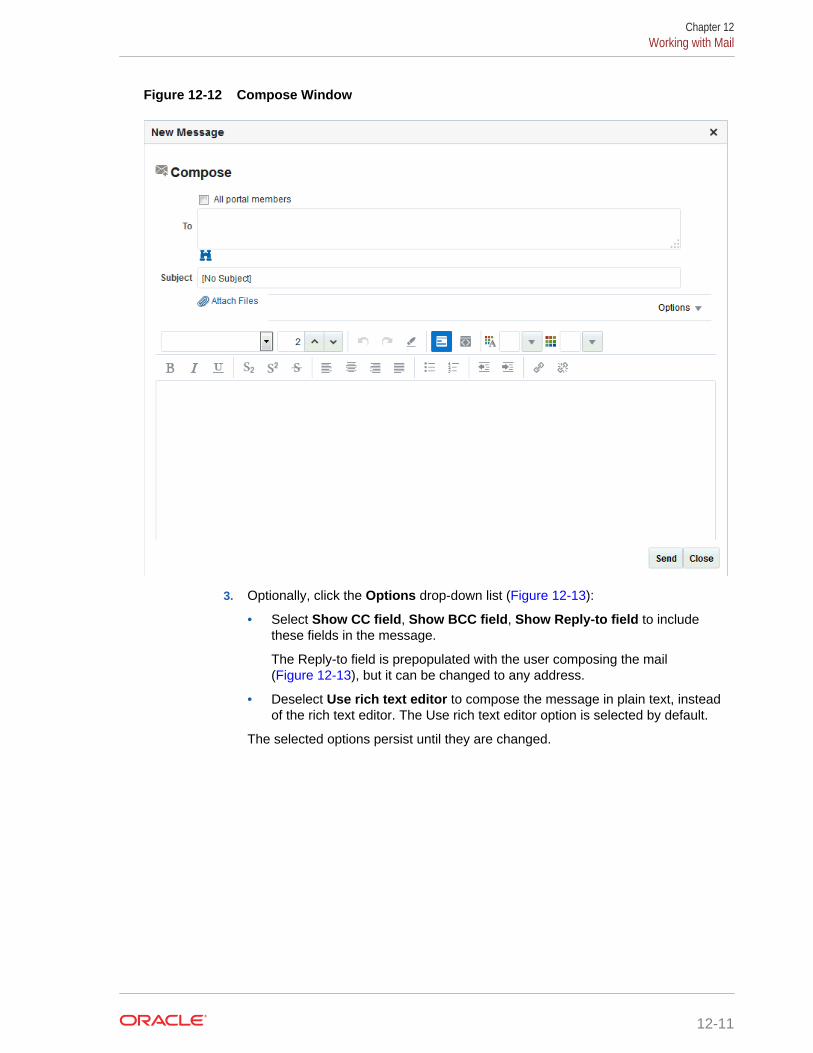
Figure 12-12 Compose Window
3. Optionally, click the Options drop-down list (Figure 12-13):
• Select Show CC field, Show BCC field, Show Reply-to field to includethese fields in the message.
The Reply-to field is prepopulated with the user composing the mail(Figure 12-13), but it can be changed to any address.
• Deselect Use rich text editor to compose the message in plain text, insteadof the rich text editor. The Use rich text editor option is selected by default.
The selected options persist until they are changed.
Chapter 12Working with Mail
12-11
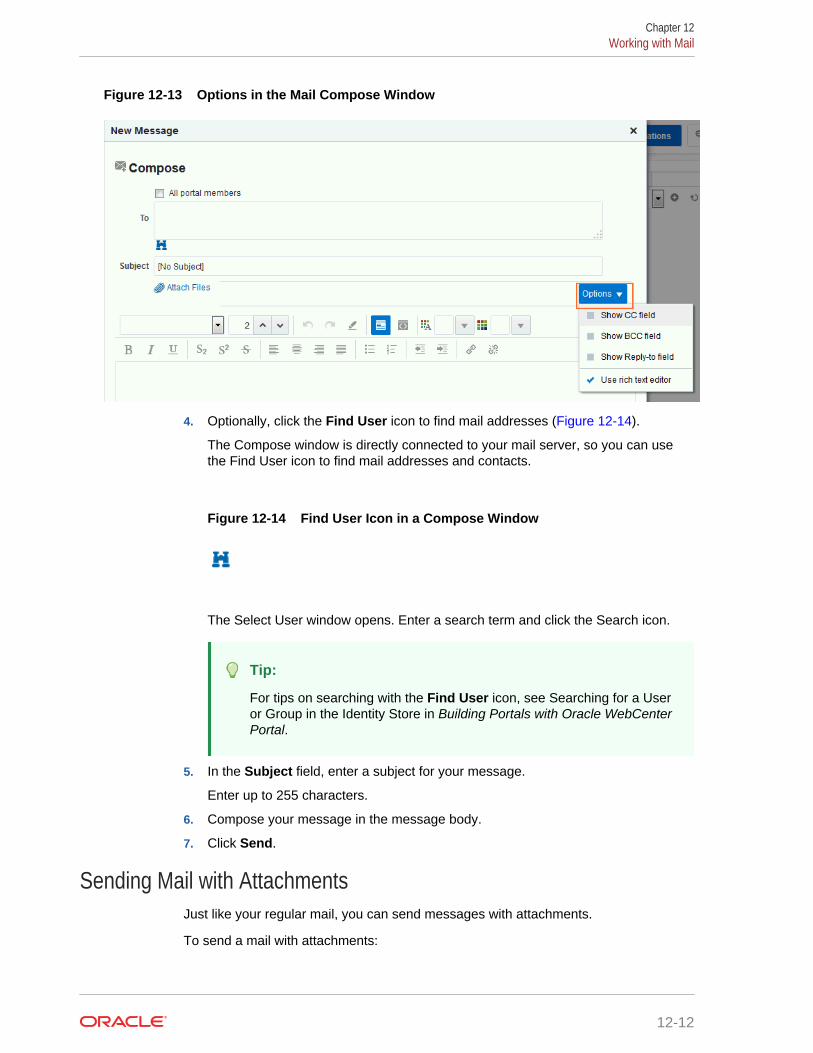
Figure 12-13 Options in the Mail Compose Window
4. Optionally, click the Find User icon to find mail addresses (Figure 12-14).
The Compose window is directly connected to your mail server, so you can usethe Find User icon to find mail addresses and contacts.
Figure 12-14 Find User Icon in a Compose Window
The Select User window opens. Enter a search term and click the Search icon.
Tip:
For tips on searching with the Find User icon, see Searching for a Useror Group in the Identity Store in Building Portals with Oracle WebCenterPortal.
5. In the Subject field, enter a subject for your message.
Enter up to 255 characters.
6. Compose your message in the message body.
7. Click Send.
Sending Mail with AttachmentsJust like your regular mail, you can send messages with attachments.
To send a mail with attachments:
Chapter 12Working with Mail
12-12
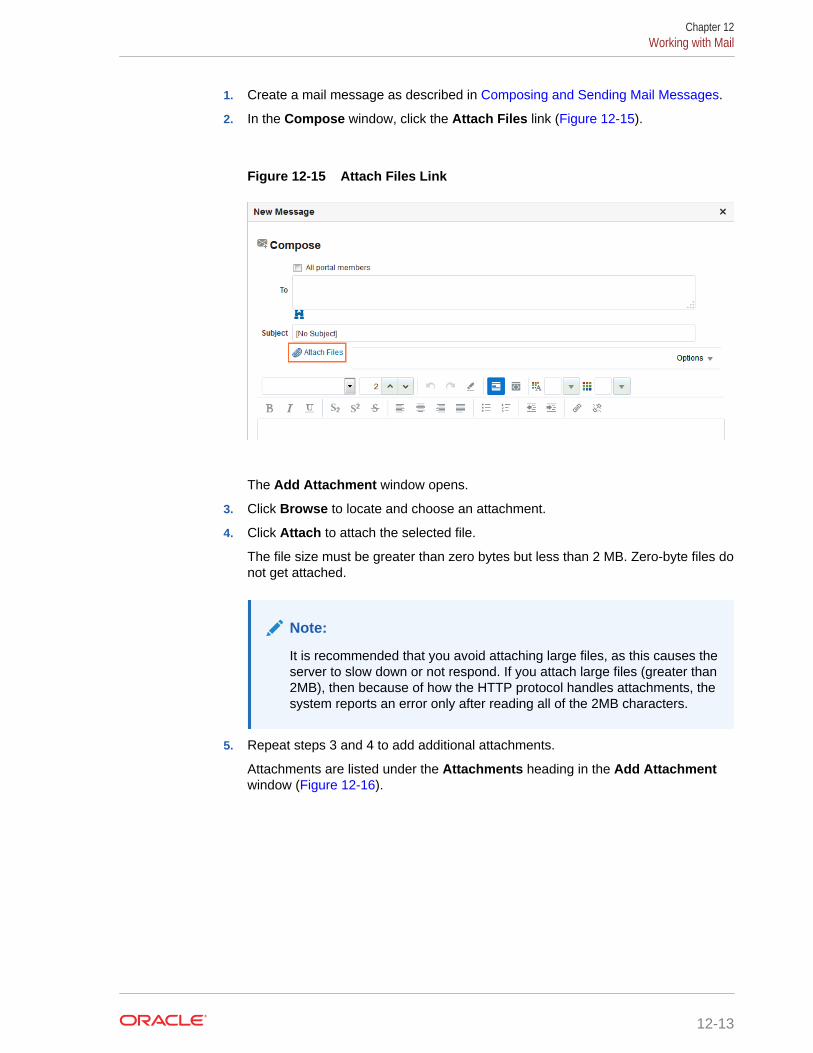
1. Create a mail message as described in Composing and Sending Mail Messages.
2. In the Compose window, click the Attach Files link (Figure 12-15).
Figure 12-15 Attach Files Link
The Add Attachment window opens.
3. Click Browse to locate and choose an attachment.
4. Click Attach to attach the selected file.
The file size must be greater than zero bytes but less than 2 MB. Zero-byte files donot get attached.
Note:
It is recommended that you avoid attaching large files, as this causes theserver to slow down or not respond. If you attach large files (greater than2MB), then because of how the HTTP protocol handles attachments, thesystem reports an error only after reading all of the 2MB characters.
5. Repeat steps 3 and 4 to add additional attachments.
Attachments are listed under the Attachments heading in the Add Attachmentwindow (Figure 12-16).
Chapter 12Working with Mail
12-13
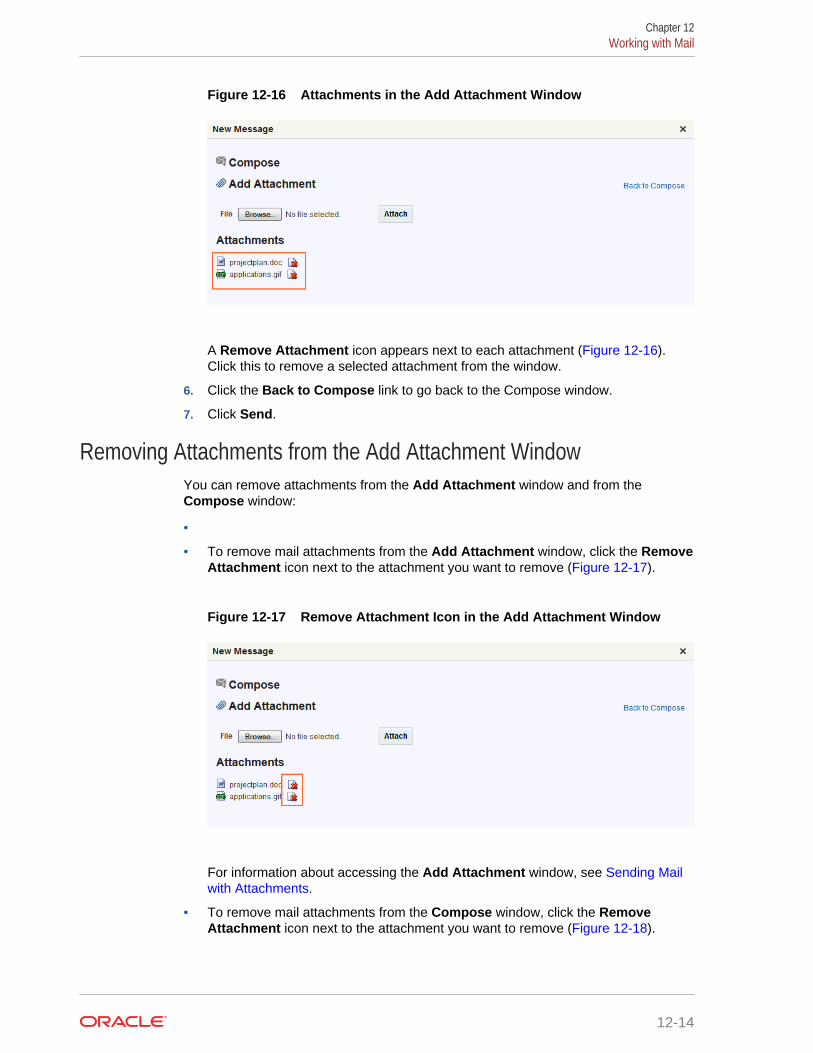
Figure 12-16 Attachments in the Add Attachment Window
A Remove Attachment icon appears next to each attachment (Figure 12-16).Click this to remove a selected attachment from the window.
6. Click the Back to Compose link to go back to the Compose window.
7. Click Send.
Removing Attachments from the Add Attachment WindowYou can remove attachments from the Add Attachment window and from theCompose window:
•
• To remove mail attachments from the Add Attachment window, click the RemoveAttachment icon next to the attachment you want to remove (Figure 12-17).
Figure 12-17 Remove Attachment Icon in the Add Attachment Window
For information about accessing the Add Attachment window, see Sending Mailwith Attachments.
• To remove mail attachments from the Compose window, click the RemoveAttachment icon next to the attachment you want to remove (Figure 12-18).
Chapter 12Working with Mail
12-14
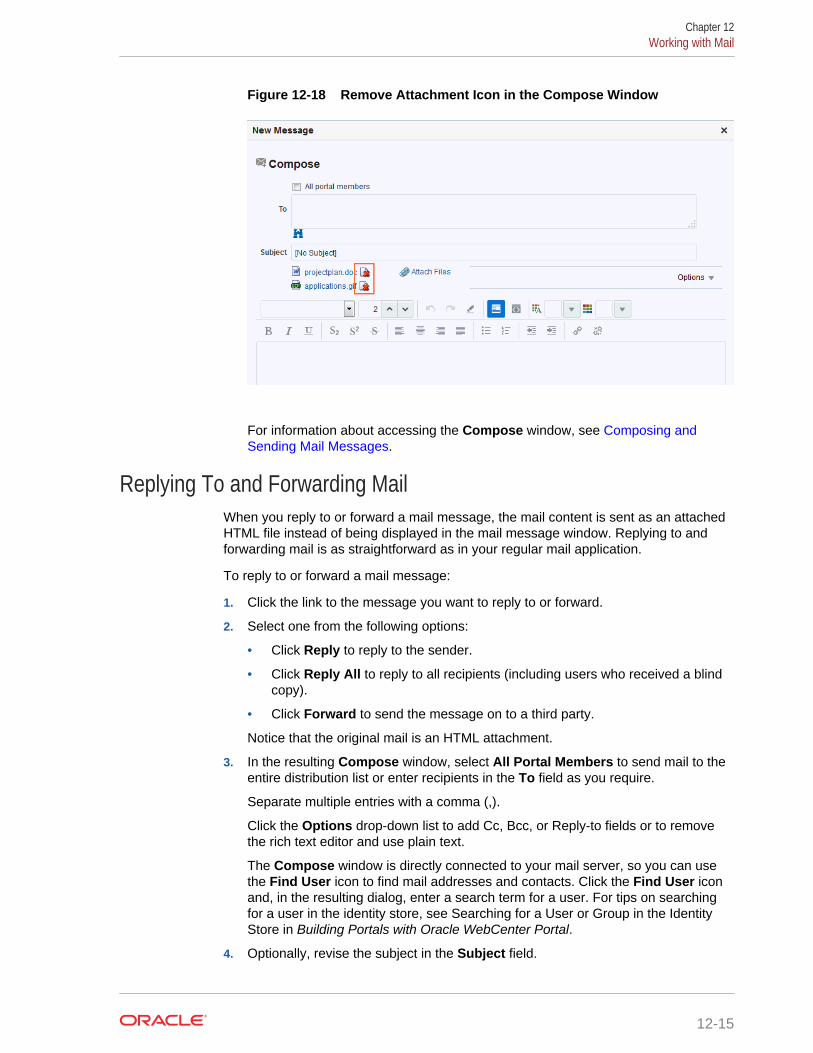
Figure 12-18 Remove Attachment Icon in the Compose Window
For information about accessing the Compose window, see Composing andSending Mail Messages.
Replying To and Forwarding MailWhen you reply to or forward a mail message, the mail content is sent as an attachedHTML file instead of being displayed in the mail message window. Replying to andforwarding mail is as straightforward as in your regular mail application.
To reply to or forward a mail message:
1. Click the link to the message you want to reply to or forward.
2. Select one from the following options:
• Click Reply to reply to the sender.
• Click Reply All to reply to all recipients (including users who received a blindcopy).
• Click Forward to send the message on to a third party.
Notice that the original mail is an HTML attachment.
3. In the resulting Compose window, select All Portal Members to send mail to theentire distribution list or enter recipients in the To field as you require.
Separate multiple entries with a comma (,).
Click the Options drop-down list to add Cc, Bcc, or Reply-to fields or to removethe rich text editor and use plain text.
The Compose window is directly connected to your mail server, so you can usethe Find User icon to find mail addresses and contacts. Click the Find User iconand, in the resulting dialog, enter a search term for a user. For tips on searchingfor a user in the identity store, see Searching for a User or Group in the IdentityStore in Building Portals with Oracle WebCenter Portal.
4. Optionally, revise the subject in the Subject field.
Chapter 12Working with Mail
12-15
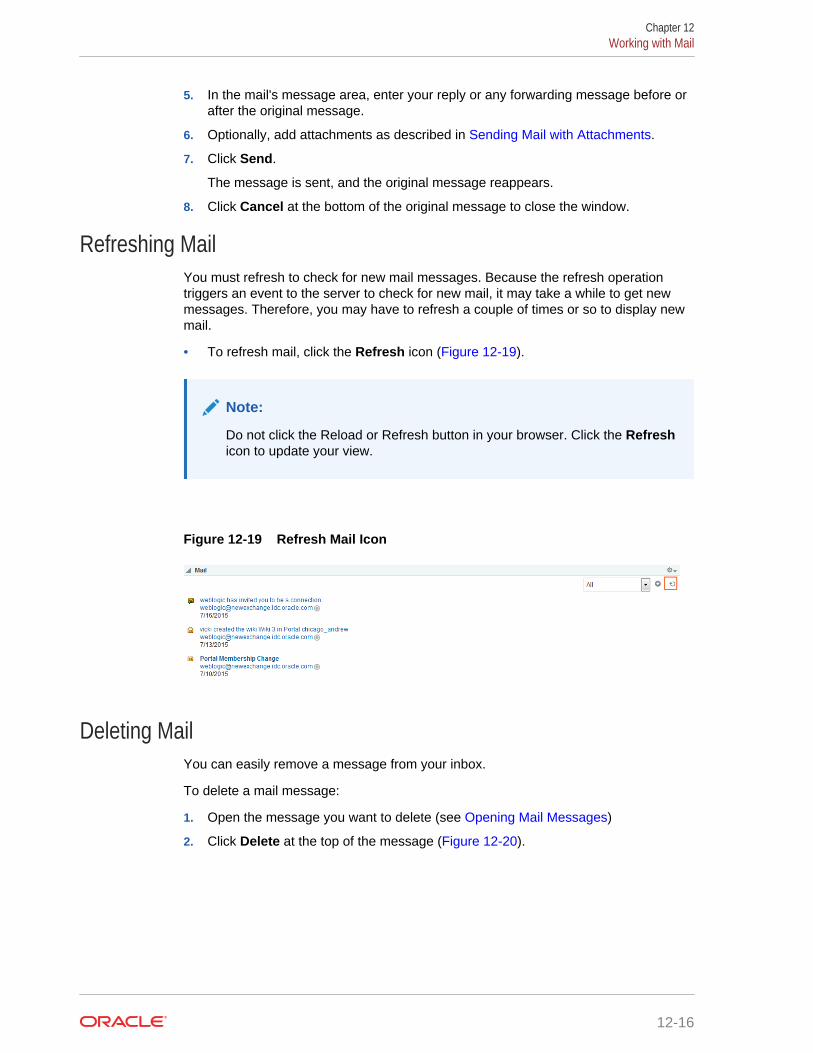
5. In the mail's message area, enter your reply or any forwarding message before orafter the original message.
6. Optionally, add attachments as described in Sending Mail with Attachments.
7. Click Send.
The message is sent, and the original message reappears.
8. Click Cancel at the bottom of the original message to close the window.
Refreshing MailYou must refresh to check for new mail messages. Because the refresh operationtriggers an event to the server to check for new mail, it may take a while to get newmessages. Therefore, you may have to refresh a couple of times or so to display newmail.
• To refresh mail, click the Refresh icon (Figure 12-19).
Note:
Do not click the Reload or Refresh button in your browser. Click the Refreshicon to update your view.
Figure 12-19 Refresh Mail Icon
Deleting MailYou can easily remove a message from your inbox.
To delete a mail message:
1. Open the message you want to delete (see Opening Mail Messages)
2. Click Delete at the top of the message (Figure 12-20).
Chapter 12Working with Mail
12-16
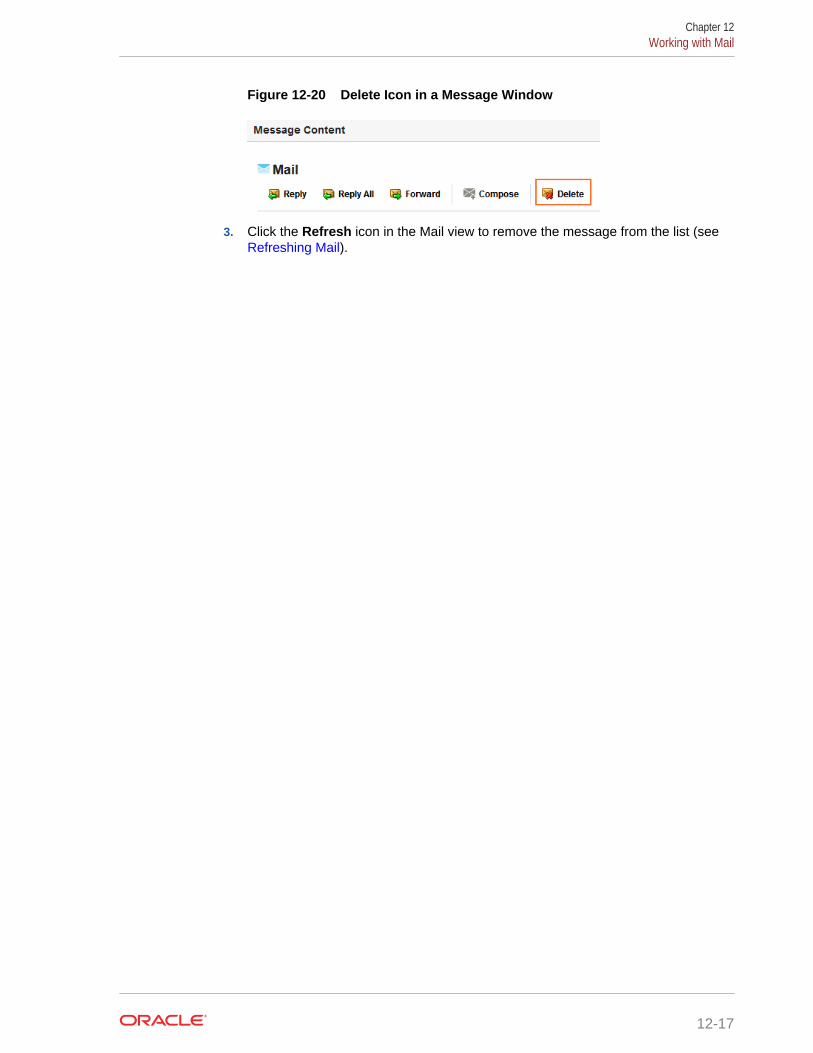
Figure 12-20 Delete Icon in a Message Window
3. Click the Refresh icon in the Mail view to remove the message from the list (see Refreshing Mail).
Chapter 12Working with Mail
12-17
13Working with Feedback and the MessageBoard
Post, view, and manage feedback and messages to and from your connections usingthe Feedback viewers and Message Board.
Permissions:
To perform the tasks in this chapter, you need the application-levelpermission People Connections: Update People Connections Data.
Topics:
• About Feedback
• Setting Feedback Preferences
• Viewing Feedback
• Posting Feedback
• Deleting Feedback
• About Messages
• Setting Message Board Preferences
• Viewing Messages
• Posting Messages
• Editing Messages
• Deleting Messages
• Enabling Other Users to Post Feedback and Messages for You
About FeedbackYou can use Feedback to view, post, and manage feedback between you and otherusers. To view your feedback, you must add a Feedback viewer to one of yourpersonal pages (a page you created) in the Home portal. To receive feedback fromother users, you must give other users access to that personal page and set yourfeedback preferences to allow those users to view and/or post feedback for you. Toview or post feedback for another user, you must be granted access to that user'spersonal page and access to view and/or post feedback for the user through thatuser's preferences.
For information about adding a Feedback viewer to a personal page and providingaccess to other users, see Enabling Other Users to Post Feedback and Messages forYou.
13-1
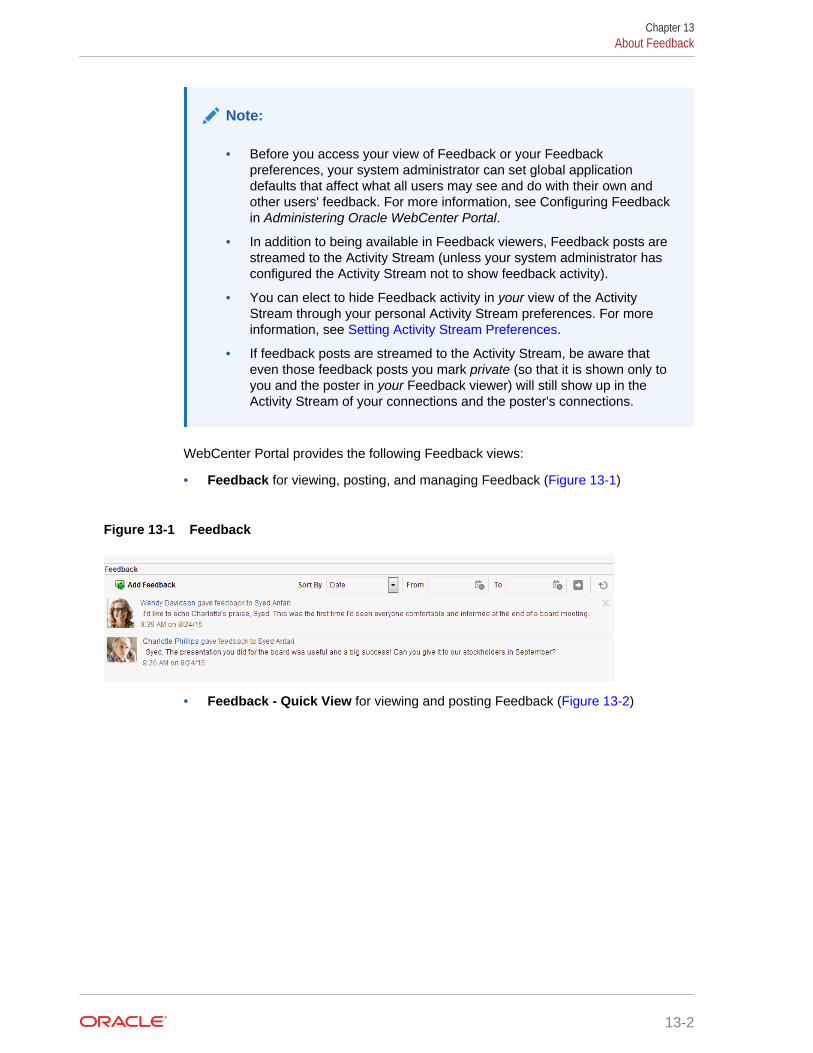
Note:
• Before you access your view of Feedback or your Feedbackpreferences, your system administrator can set global applicationdefaults that affect what all users may see and do with their own andother users' feedback. For more information, see Configuring Feedbackin Administering Oracle WebCenter Portal.
• In addition to being available in Feedback viewers, Feedback posts arestreamed to the Activity Stream (unless your system administrator hasconfigured the Activity Stream not to show feedback activity).
• You can elect to hide Feedback activity in your view of the ActivityStream through your personal Activity Stream preferences. For moreinformation, see Setting Activity Stream Preferences.
• If feedback posts are streamed to the Activity Stream, be aware thateven those feedback posts you mark private (so that it is shown only toyou and the poster in your Feedback viewer) will still show up in theActivity Stream of your connections and the poster's connections.
WebCenter Portal provides the following Feedback views:
• Feedback for viewing, posting, and managing Feedback (Figure 13-1)
Figure 13-1 Feedback
• Feedback - Quick View for viewing and posting Feedback (Figure 13-2)
Chapter 13About Feedback
13-2
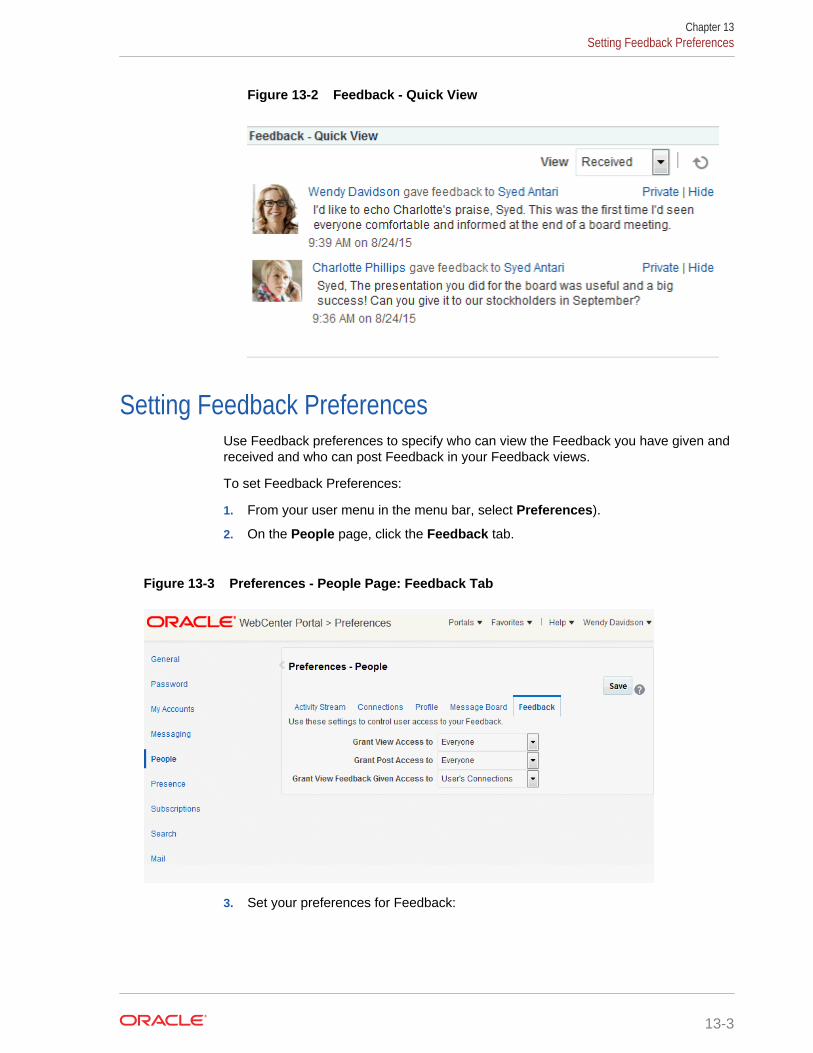
Figure 13-2 Feedback - Quick View
Setting Feedback PreferencesUse Feedback preferences to specify who can view the Feedback you have given andreceived and who can post Feedback in your Feedback views.
To set Feedback Preferences:
1. From your user menu in the menu bar, select Preferences).
2. On the People page, click the Feedback tab.
Figure 13-3 Preferences - People Page: Feedback Tab
3. Set your preferences for Feedback:
Chapter 13Setting Feedback Preferences
13-3
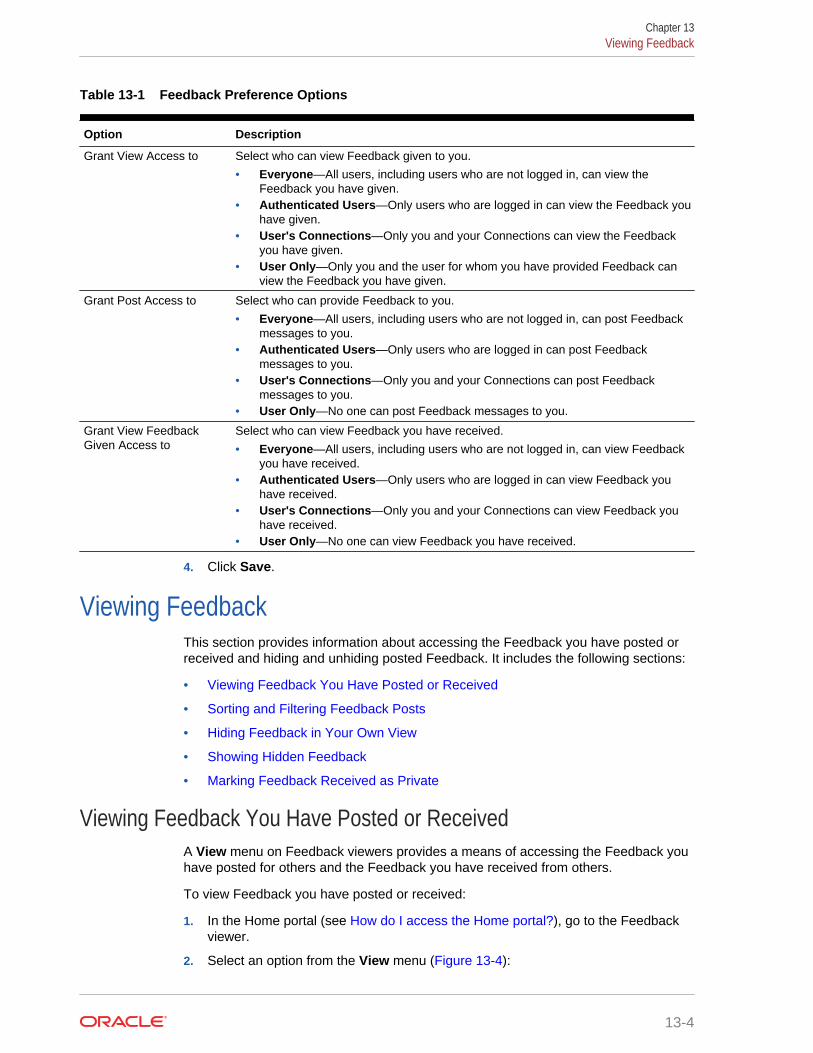
Table 13-1 Feedback Preference Options
Option Description
Grant View Access to Select who can view Feedback given to you.
• Everyone—All users, including users who are not logged in, can view theFeedback you have given.
• Authenticated Users—Only users who are logged in can view the Feedback youhave given.
• User's Connections—Only you and your Connections can view the Feedbackyou have given.
• User Only—Only you and the user for whom you have provided Feedback canview the Feedback you have given.
Grant Post Access to Select who can provide Feedback to you.
• Everyone—All users, including users who are not logged in, can post Feedbackmessages to you.
• Authenticated Users—Only users who are logged in can post Feedbackmessages to you.
• User's Connections—Only you and your Connections can post Feedbackmessages to you.
• User Only—No one can post Feedback messages to you.
Grant View FeedbackGiven Access to
Select who can view Feedback you have received.
• Everyone—All users, including users who are not logged in, can view Feedbackyou have received.
• Authenticated Users—Only users who are logged in can view Feedback youhave received.
• User's Connections—Only you and your Connections can view Feedback youhave received.
• User Only—No one can view Feedback you have received.
4. Click Save.
Viewing FeedbackThis section provides information about accessing the Feedback you have posted orreceived and hiding and unhiding posted Feedback. It includes the following sections:
• Viewing Feedback You Have Posted or Received
• Sorting and Filtering Feedback Posts
• Hiding Feedback in Your Own View
• Showing Hidden Feedback
• Marking Feedback Received as Private
Viewing Feedback You Have Posted or ReceivedA View menu on Feedback viewers provides a means of accessing the Feedback youhave posted for others and the Feedback you have received from others.
To view Feedback you have posted or received:
1. In the Home portal (see How do I access the Home portal?), go to the Feedbackviewer.
2. Select an option from the View menu (Figure 13-4):
Chapter 13Viewing Feedback
13-4
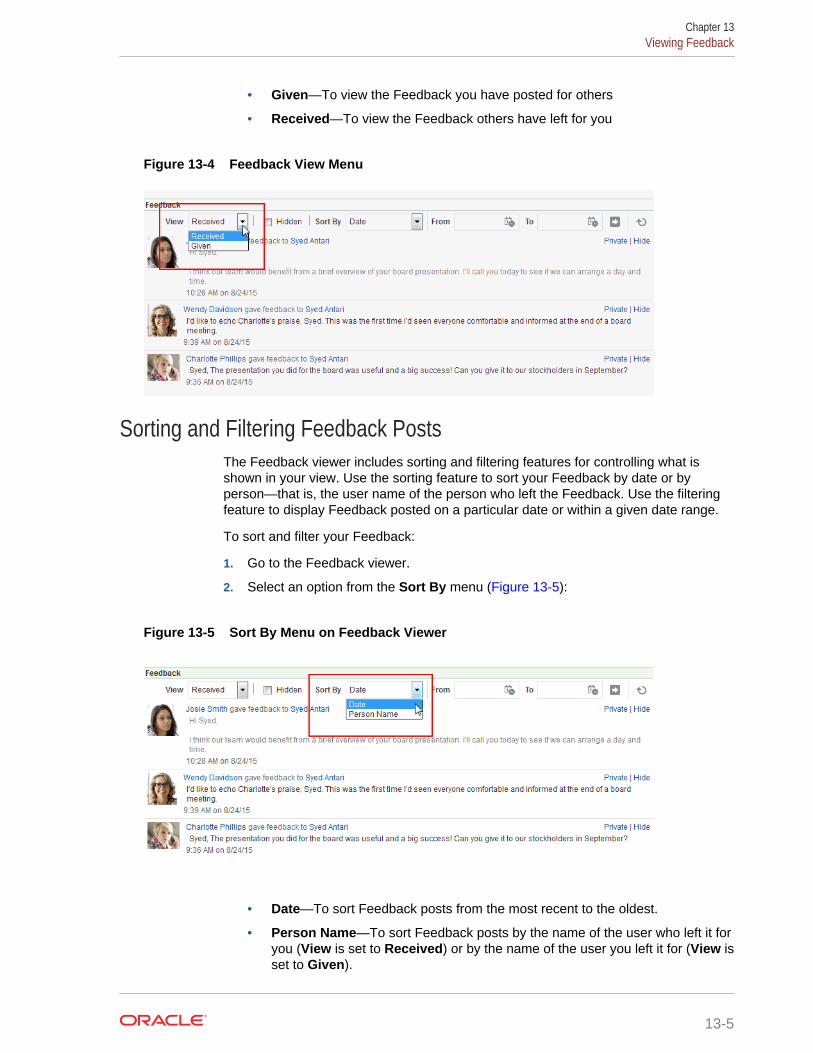
• Given—To view the Feedback you have posted for others
• Received—To view the Feedback others have left for you
Figure 13-4 Feedback View Menu
Sorting and Filtering Feedback PostsThe Feedback viewer includes sorting and filtering features for controlling what isshown in your view. Use the sorting feature to sort your Feedback by date or byperson—that is, the user name of the person who left the Feedback. Use the filteringfeature to display Feedback posted on a particular date or within a given date range.
To sort and filter your Feedback:
1. Go to the Feedback viewer.
2. Select an option from the Sort By menu (Figure 13-5):
Figure 13-5 Sort By Menu on Feedback Viewer
• Date—To sort Feedback posts from the most recent to the oldest.
• Person Name—To sort Feedback posts by the name of the user who left it foryou (View is set to Received) or by the name of the user you left it for (View isset to Given).
Chapter 13Viewing Feedback
13-5
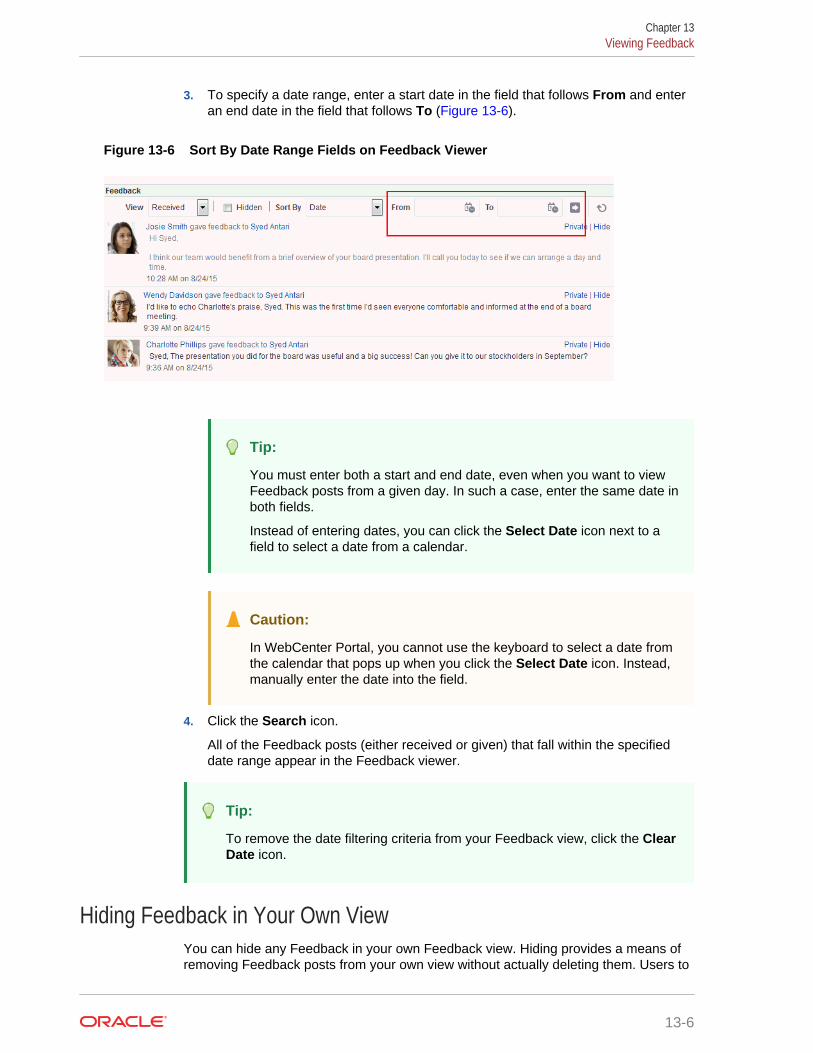
3. To specify a date range, enter a start date in the field that follows From and enteran end date in the field that follows To (Figure 13-6).
Figure 13-6 Sort By Date Range Fields on Feedback Viewer
Tip:
You must enter both a start and end date, even when you want to viewFeedback posts from a given day. In such a case, enter the same date inboth fields.
Instead of entering dates, you can click the Select Date icon next to afield to select a date from a calendar.
Caution:
In WebCenter Portal, you cannot use the keyboard to select a date fromthe calendar that pops up when you click the Select Date icon. Instead,manually enter the date into the field.
4. Click the Search icon.
All of the Feedback posts (either received or given) that fall within the specifieddate range appear in the Feedback viewer.
Tip:
To remove the date filtering criteria from your Feedback view, click the ClearDate icon.
Hiding Feedback in Your Own ViewYou can hide any Feedback in your own Feedback view. Hiding provides a means ofremoving Feedback posts from your own view without actually deleting them. Users to
Chapter 13Viewing Feedback
13-6
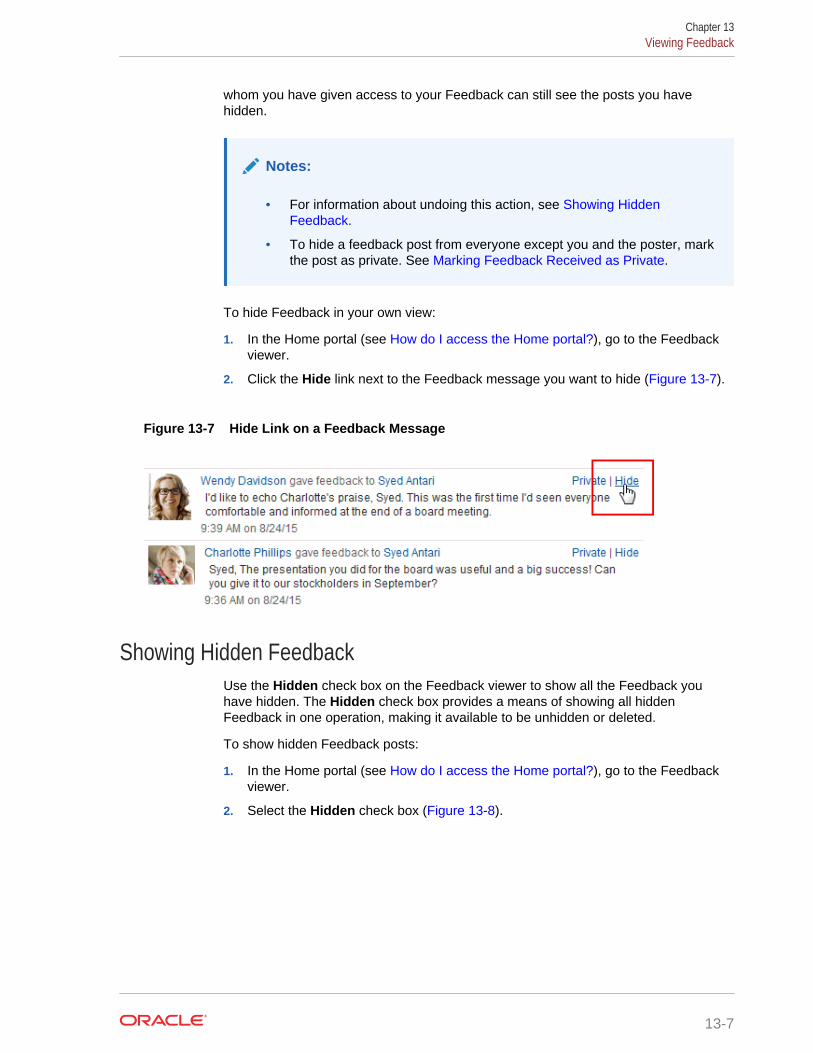
whom you have given access to your Feedback can still see the posts you havehidden.
Notes:
• For information about undoing this action, see Showing HiddenFeedback.
• To hide a feedback post from everyone except you and the poster, markthe post as private. See Marking Feedback Received as Private.
To hide Feedback in your own view:
1. In the Home portal (see How do I access the Home portal?), go to the Feedbackviewer.
2. Click the Hide link next to the Feedback message you want to hide (Figure 13-7).
Figure 13-7 Hide Link on a Feedback Message
Showing Hidden FeedbackUse the Hidden check box on the Feedback viewer to show all the Feedback youhave hidden. The Hidden check box provides a means of showing all hiddenFeedback in one operation, making it available to be unhidden or deleted.
To show hidden Feedback posts:
1. In the Home portal (see How do I access the Home portal?), go to the Feedbackviewer.
2. Select the Hidden check box (Figure 13-8).
Chapter 13Viewing Feedback
13-7
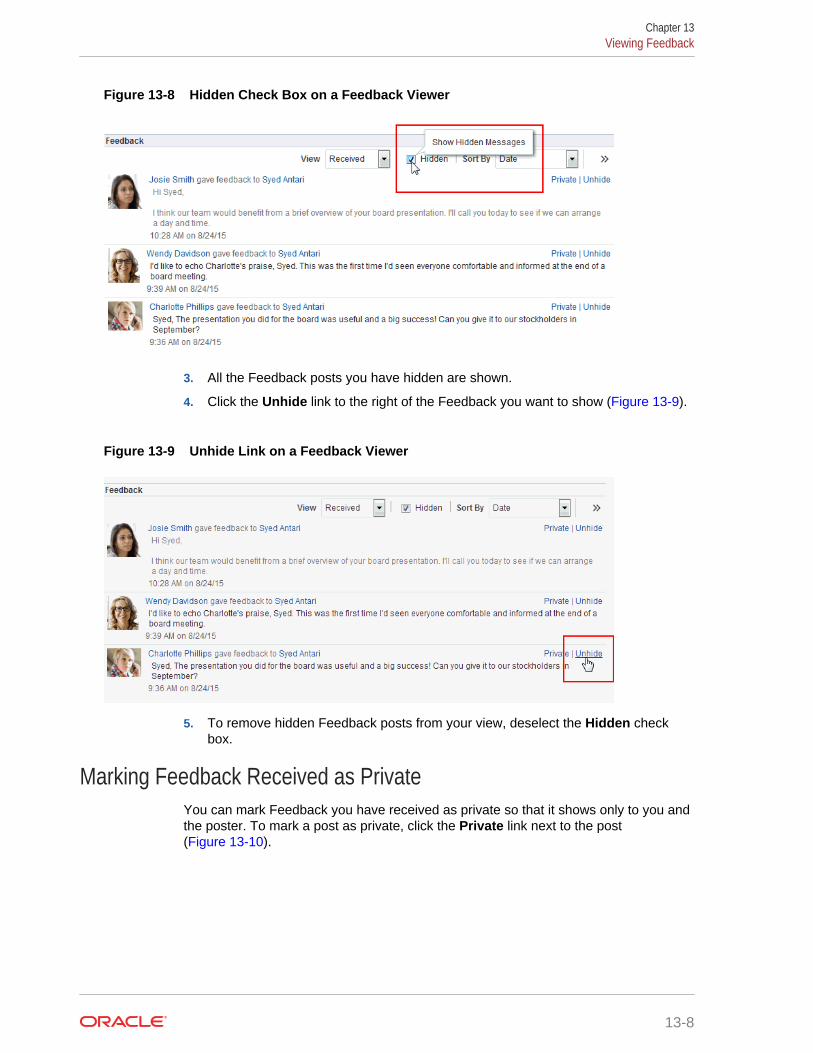
Figure 13-8 Hidden Check Box on a Feedback Viewer
3. All the Feedback posts you have hidden are shown.
4. Click the Unhide link to the right of the Feedback you want to show (Figure 13-9).
Figure 13-9 Unhide Link on a Feedback Viewer
5. To remove hidden Feedback posts from your view, deselect the Hidden checkbox.
Marking Feedback Received as PrivateYou can mark Feedback you have received as private so that it shows only to you andthe poster. To mark a post as private, click the Private link next to the post(Figure 13-10).
Chapter 13Viewing Feedback
13-8
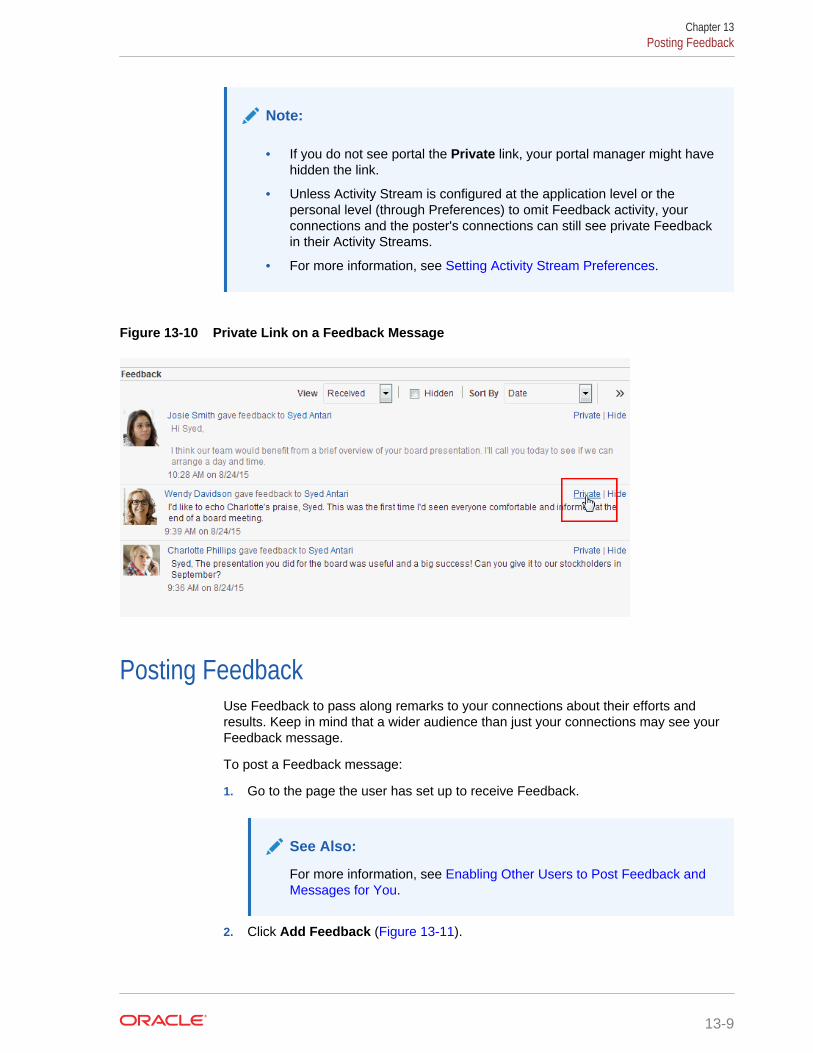
Note:
• If you do not see portal the Private link, your portal manager might havehidden the link.
• Unless Activity Stream is configured at the application level or thepersonal level (through Preferences) to omit Feedback activity, yourconnections and the poster's connections can still see private Feedbackin their Activity Streams.
• For more information, see Setting Activity Stream Preferences.
Figure 13-10 Private Link on a Feedback Message
Posting FeedbackUse Feedback to pass along remarks to your connections about their efforts andresults. Keep in mind that a wider audience than just your connections may see yourFeedback message.
To post a Feedback message:
1. Go to the page the user has set up to receive Feedback.
See Also:
For more information, see Enabling Other Users to Post Feedback andMessages for You.
2. Click Add Feedback (Figure 13-11).
Chapter 13Posting Feedback
13-9
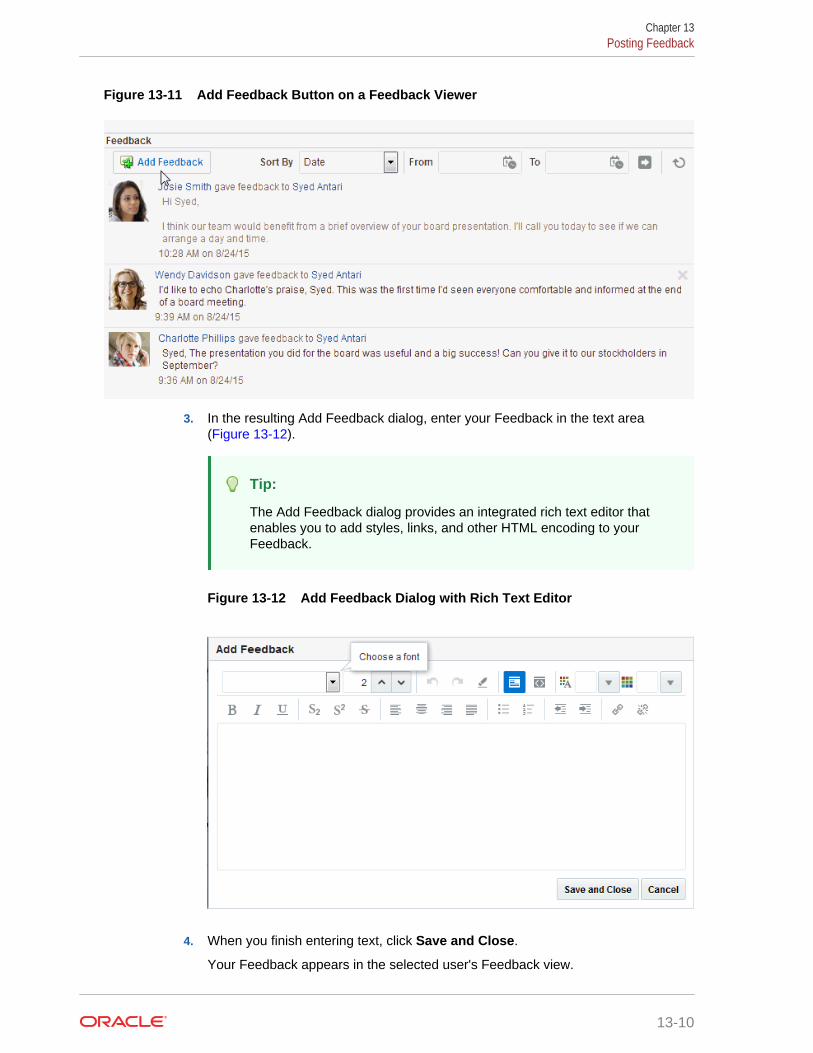
Figure 13-11 Add Feedback Button on a Feedback Viewer
3. In the resulting Add Feedback dialog, enter your Feedback in the text area(Figure 13-12).
Tip:
The Add Feedback dialog provides an integrated rich text editor thatenables you to add styles, links, and other HTML encoding to yourFeedback.
Figure 13-12 Add Feedback Dialog with Rich Text Editor
4. When you finish entering text, click Save and Close.
Your Feedback appears in the selected user's Feedback view.
Chapter 13Posting Feedback
13-10
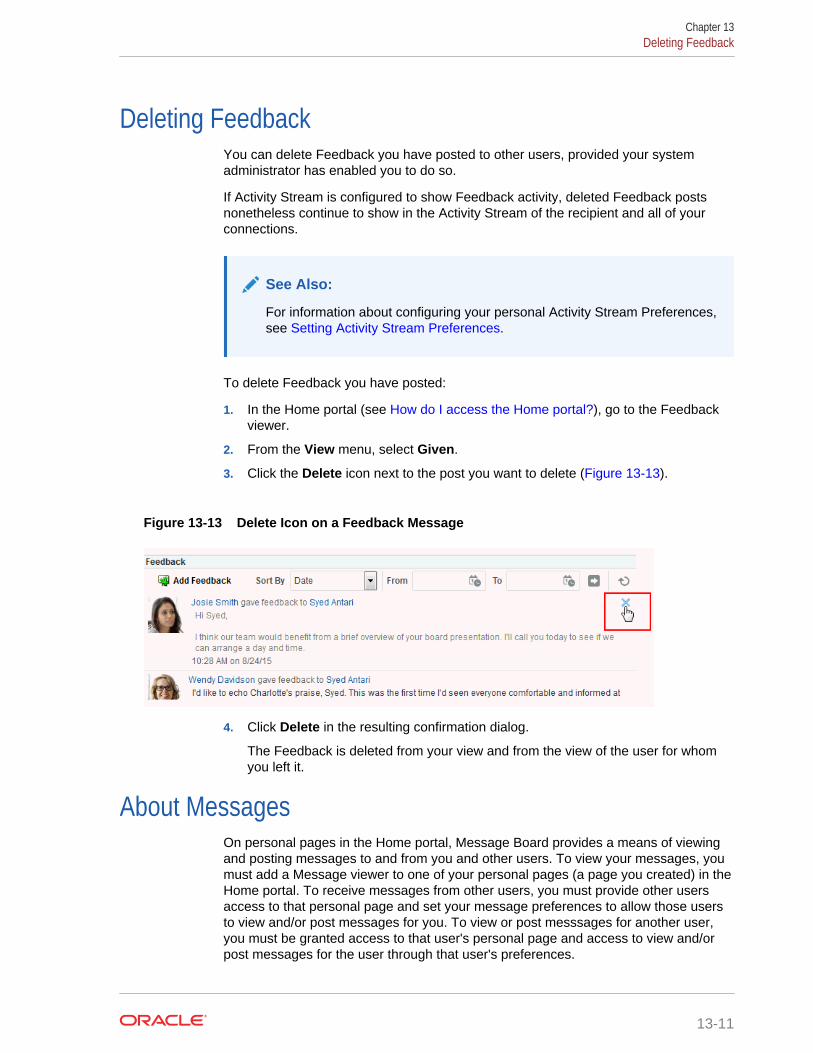
Deleting FeedbackYou can delete Feedback you have posted to other users, provided your systemadministrator has enabled you to do so.
If Activity Stream is configured to show Feedback activity, deleted Feedback postsnonetheless continue to show in the Activity Stream of the recipient and all of yourconnections.
See Also:
For information about configuring your personal Activity Stream Preferences,see Setting Activity Stream Preferences.
To delete Feedback you have posted:
1. In the Home portal (see How do I access the Home portal?), go to the Feedbackviewer.
2. From the View menu, select Given.
3. Click the Delete icon next to the post you want to delete (Figure 13-13).
Figure 13-13 Delete Icon on a Feedback Message
4. Click Delete in the resulting confirmation dialog.
The Feedback is deleted from your view and from the view of the user for whomyou left it.
About MessagesOn personal pages in the Home portal, Message Board provides a means of viewingand posting messages to and from you and other users. To view your messages, youmust add a Message viewer to one of your personal pages (a page you created) in theHome portal. To receive messages from other users, you must provide other usersaccess to that personal page and set your message preferences to allow those usersto view and/or post messages for you. To view or post messsages for another user,you must be granted access to that user's personal page and access to view and/orpost messages for the user through that user's preferences.
Chapter 13Deleting Feedback
13-11
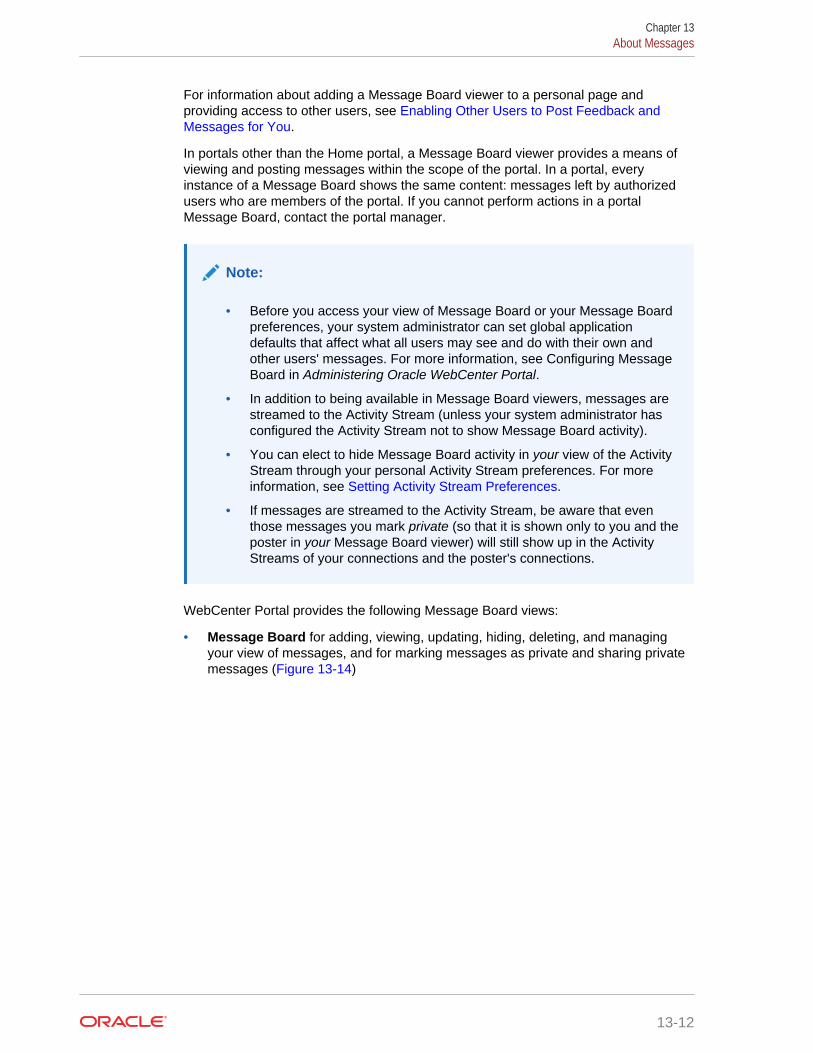
For information about adding a Message Board viewer to a personal page andproviding access to other users, see Enabling Other Users to Post Feedback andMessages for You.
In portals other than the Home portal, a Message Board viewer provides a means ofviewing and posting messages within the scope of the portal. In a portal, everyinstance of a Message Board shows the same content: messages left by authorizedusers who are members of the portal. If you cannot perform actions in a portalMessage Board, contact the portal manager.
Note:
• Before you access your view of Message Board or your Message Boardpreferences, your system administrator can set global applicationdefaults that affect what all users may see and do with their own andother users' messages. For more information, see Configuring MessageBoard in Administering Oracle WebCenter Portal.
• In addition to being available in Message Board viewers, messages arestreamed to the Activity Stream (unless your system administrator hasconfigured the Activity Stream not to show Message Board activity).
• You can elect to hide Message Board activity in your view of the ActivityStream through your personal Activity Stream preferences. For moreinformation, see Setting Activity Stream Preferences.
• If messages are streamed to the Activity Stream, be aware that eventhose messages you mark private (so that it is shown only to you and theposter in your Message Board viewer) will still show up in the ActivityStreams of your connections and the poster's connections.
WebCenter Portal provides the following Message Board views:
• Message Board for adding, viewing, updating, hiding, deleting, and managingyour view of messages, and for marking messages as private and sharing privatemessages (Figure 13-14)
Chapter 13About Messages
13-12
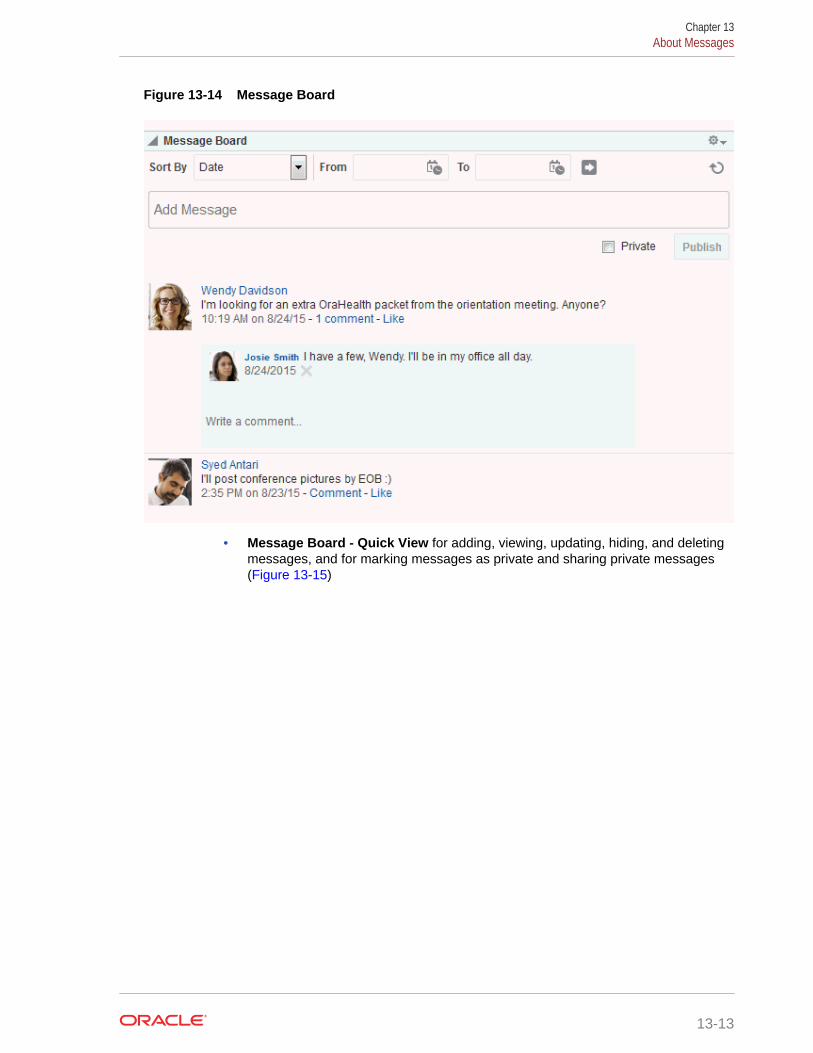
Figure 13-14 Message Board
• Message Board - Quick View for adding, viewing, updating, hiding, and deletingmessages, and for marking messages as private and sharing private messages(Figure 13-15)
Chapter 13About Messages
13-13
Figure 13-15 Message Board - Quick View
Setting Message Board PreferencesUse Message Board preferences to specify who can view and post to your MessageBoard.
To set Message Board Preferences:
1. From your user menu in the menu bar, select Preferences .
2. On the People page, click the Message Board tab.
Chapter 13Setting Message Board Preferences
13-14
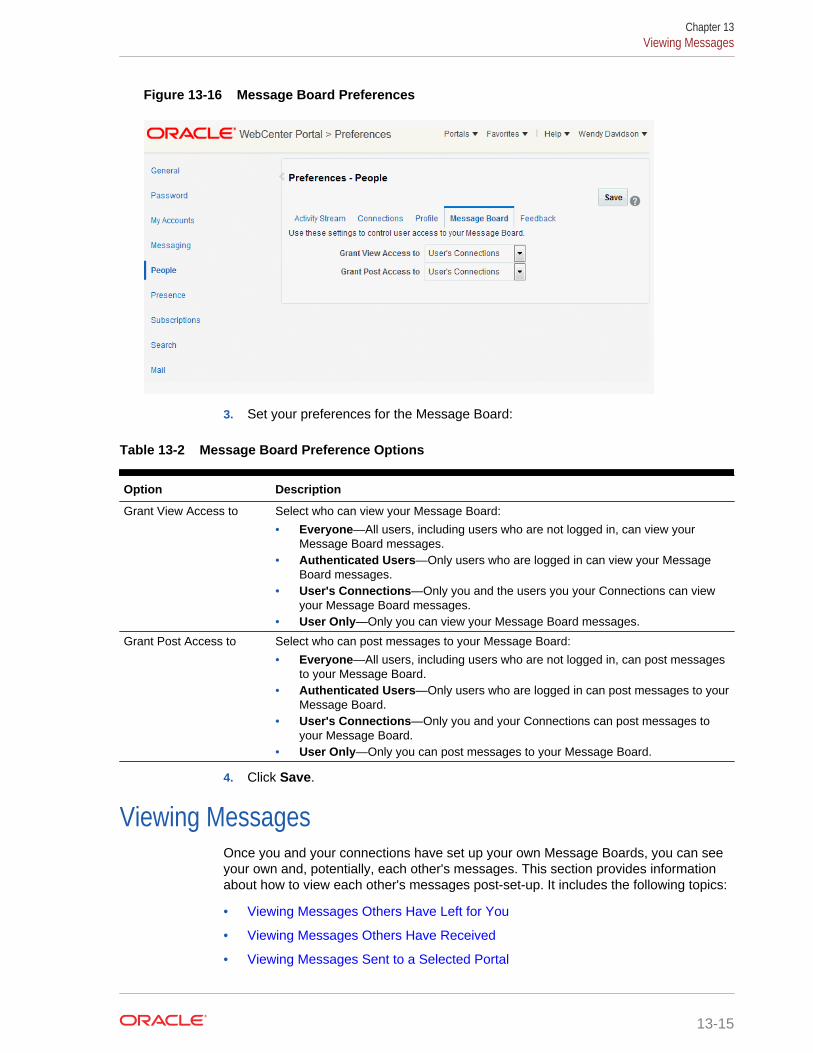
Figure 13-16 Message Board Preferences
3. Set your preferences for the Message Board:
Table 13-2 Message Board Preference Options
Option Description
Grant View Access to Select who can view your Message Board:
• Everyone—All users, including users who are not logged in, can view yourMessage Board messages.
• Authenticated Users—Only users who are logged in can view your MessageBoard messages.
• User's Connections—Only you and the users you your Connections can viewyour Message Board messages.
• User Only—Only you can view your Message Board messages.
Grant Post Access to Select who can post messages to your Message Board:
• Everyone—All users, including users who are not logged in, can post messagesto your Message Board.
• Authenticated Users—Only users who are logged in can post messages to yourMessage Board.
• User's Connections—Only you and your Connections can post messages toyour Message Board.
• User Only—Only you can post messages to your Message Board.
4. Click Save.
Viewing MessagesOnce you and your connections have set up your own Message Boards, you can seeyour own and, potentially, each other's messages. This section provides informationabout how to view each other's messages post-set-up. It includes the following topics:
• Viewing Messages Others Have Left for You
• Viewing Messages Others Have Received
• Viewing Messages Sent to a Selected Portal
Chapter 13Viewing Messages
13-15

Tip:
For information about setting up your view of Message Board, see EnablingOther Users to Post Feedback and Messages for You.
Viewing Messages Others Have Left for YouTo view Message Board messages other users have left for you, go to the personalpage in the Home portal that you have set up to receive Message Board messages(Figure 13-14).
Viewing Messages Others Have ReceivedTo view Message Board messages other users have received (including those youhave left for them), go to the page the user has made available to you in your view ofthe Home portal. You can access this page through the Personalize Pages page. Formore information, see Opening a Page in the Home Portal.
Viewing Messages Sent to a Selected PortalMessage Boards placed in a portal provide a means of viewing and posting messageswithin the portal context. All default Message Board views within a given portal displaythe same content: messages left by authorized users who are members of the portal.All users with access to the portal can see the posted messages.
To see the messages sent to a selected portal, navigate to the Message Board taskflow dedicated to the portal.
Sorting and Filtering Message Board MessagesYour full view of the Message Board includes sorting and filtering features formanaging your view of your messages. Use the sorting feature to sort your messagesby date or by the person who left the message. Use the filtering feature to showmessages posted on a particular date or within a given date range.
To sort and filter your Message Board messages:
1. Go to the Message Board viewer.
2. From the Sort By menu, select a sorting option (Figure 13-17):
Chapter 13Viewing Messages
13-16
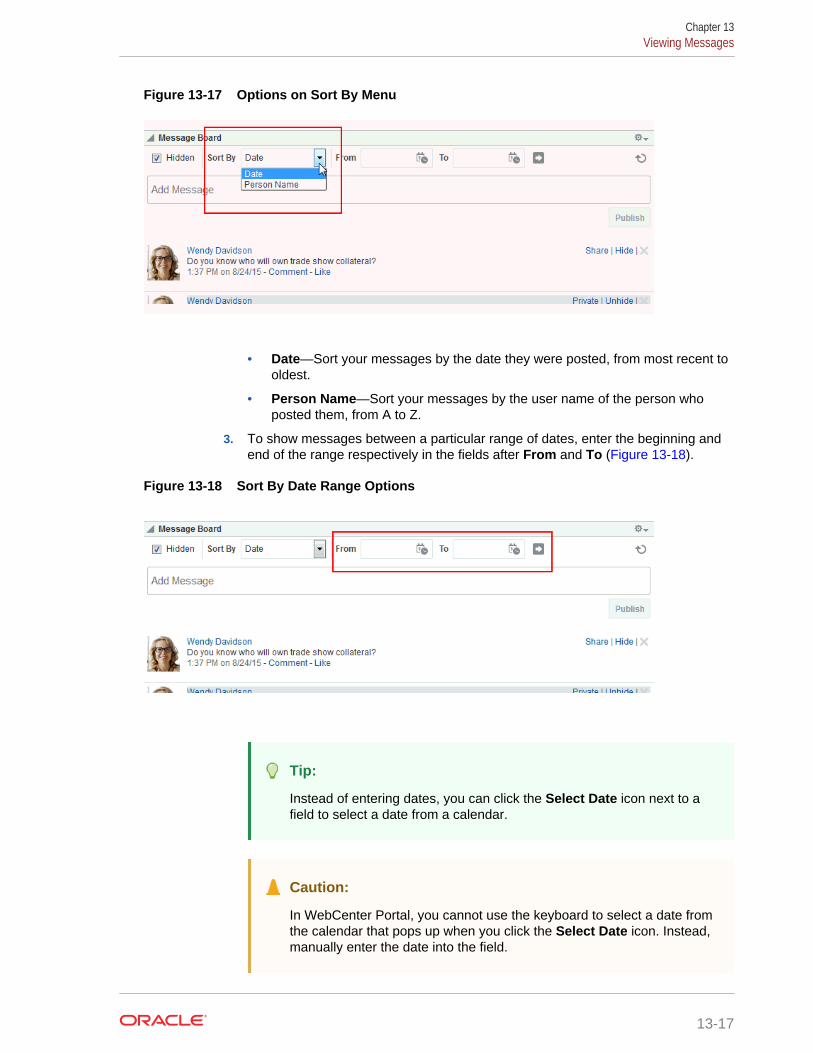
Figure 13-17 Options on Sort By Menu
• Date—Sort your messages by the date they were posted, from most recent tooldest.
• Person Name—Sort your messages by the user name of the person whoposted them, from A to Z.
3. To show messages between a particular range of dates, enter the beginning andend of the range respectively in the fields after From and To (Figure 13-18).
Figure 13-18 Sort By Date Range Options
Tip:
Instead of entering dates, you can click the Select Date icon next to afield to select a date from a calendar.
Caution:
In WebCenter Portal, you cannot use the keyboard to select a date fromthe calendar that pops up when you click the Select Date icon. Instead,manually enter the date into the field.
Chapter 13Viewing Messages
13-17
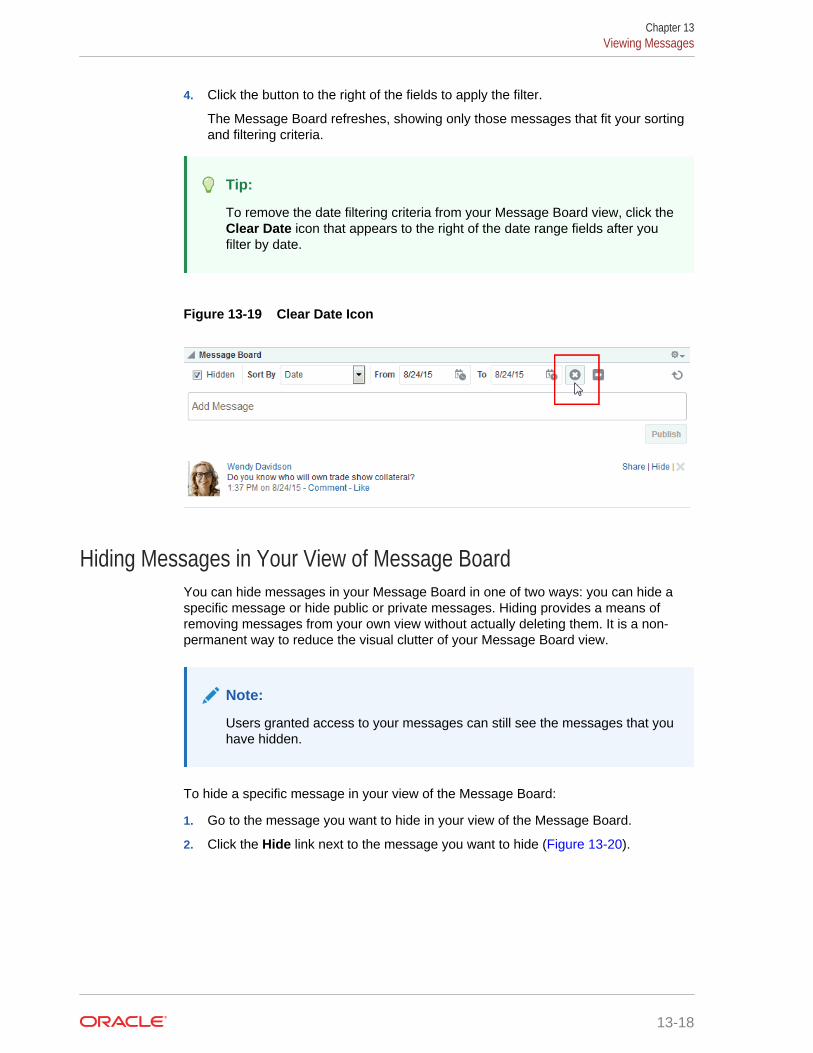
4. Click the button to the right of the fields to apply the filter.
The Message Board refreshes, showing only those messages that fit your sortingand filtering criteria.
Tip:
To remove the date filtering criteria from your Message Board view, click theClear Date icon that appears to the right of the date range fields after youfilter by date.
Figure 13-19 Clear Date Icon
Hiding Messages in Your View of Message BoardYou can hide messages in your Message Board in one of two ways: you can hide aspecific message or hide public or private messages. Hiding provides a means ofremoving messages from your own view without actually deleting them. It is a non-permanent way to reduce the visual clutter of your Message Board view.
Note:
Users granted access to your messages can still see the messages that youhave hidden.
To hide a specific message in your view of the Message Board:
1. Go to the message you want to hide in your view of the Message Board.
2. Click the Hide link next to the message you want to hide (Figure 13-20).
Chapter 13Viewing Messages
13-18
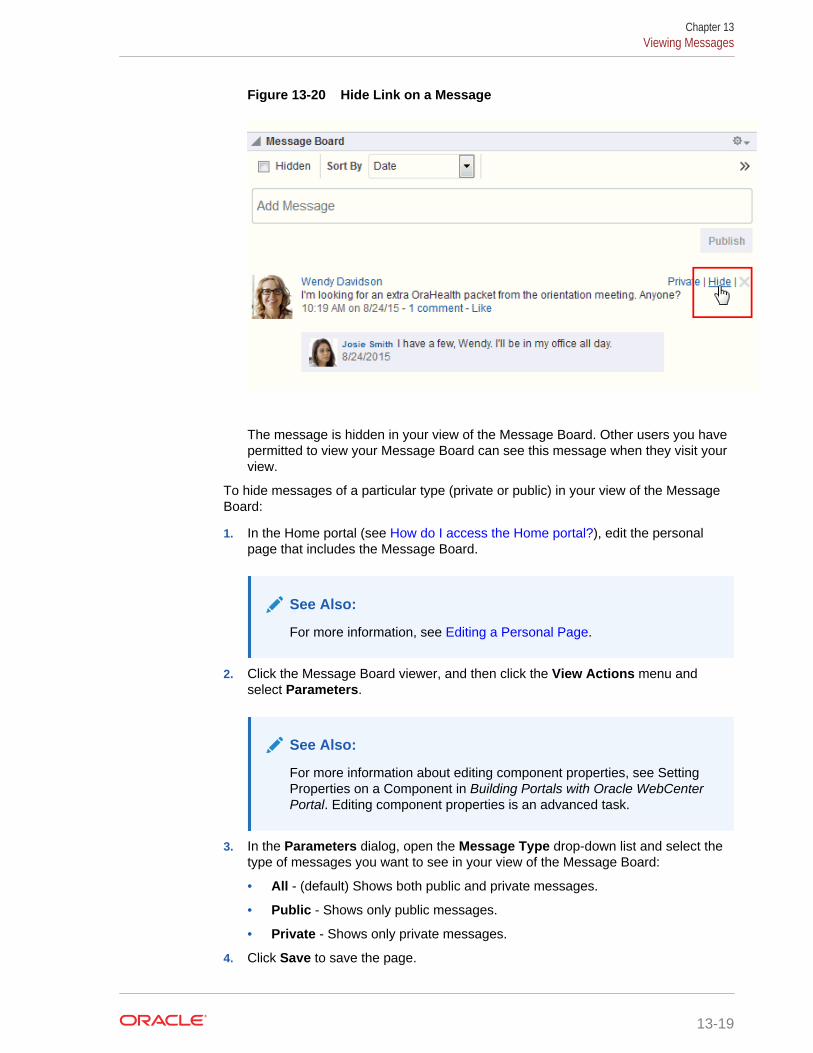
Figure 13-20 Hide Link on a Message
The message is hidden in your view of the Message Board. Other users you havepermitted to view your Message Board can see this message when they visit yourview.
To hide messages of a particular type (private or public) in your view of the MessageBoard:
1. In the Home portal (see How do I access the Home portal?), edit the personalpage that includes the Message Board.
See Also:
For more information, see Editing a Personal Page.
2. Click the Message Board viewer, and then click the View Actions menu andselect Parameters.
See Also:
For more information about editing component properties, see SettingProperties on a Component in Building Portals with Oracle WebCenterPortal. Editing component properties is an advanced task.
3. In the Parameters dialog, open the Message Type drop-down list and select thetype of messages you want to see in your view of the Message Board:
• All - (default) Shows both public and private messages.
• Public - Shows only public messages.
• Private - Shows only private messages.
4. Click Save to save the page.
Chapter 13Viewing Messages
13-19
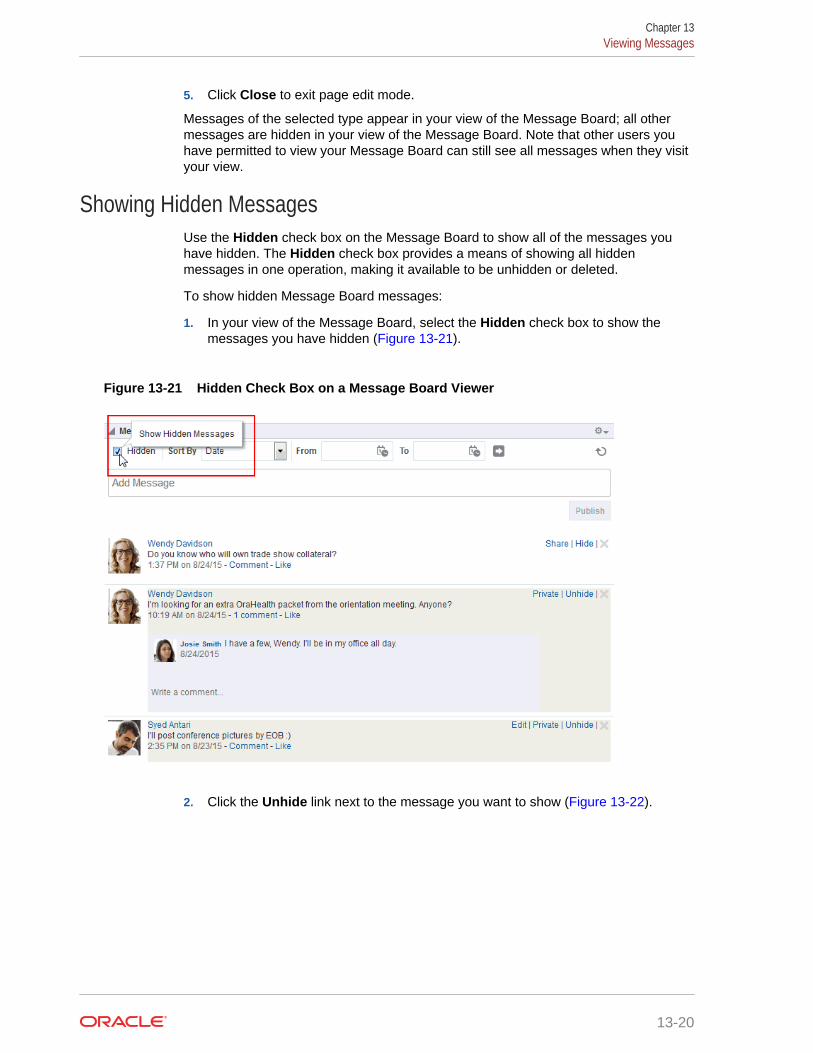
5. Click Close to exit page edit mode.
Messages of the selected type appear in your view of the Message Board; all othermessages are hidden in your view of the Message Board. Note that other users youhave permitted to view your Message Board can still see all messages when they visityour view.
Showing Hidden MessagesUse the Hidden check box on the Message Board to show all of the messages youhave hidden. The Hidden check box provides a means of showing all hiddenmessages in one operation, making it available to be unhidden or deleted.
To show hidden Message Board messages:
1. In your view of the Message Board, select the Hidden check box to show themessages you have hidden (Figure 13-21).
Figure 13-21 Hidden Check Box on a Message Board Viewer
2. Click the Unhide link next to the message you want to show (Figure 13-22).
Chapter 13Viewing Messages
13-20
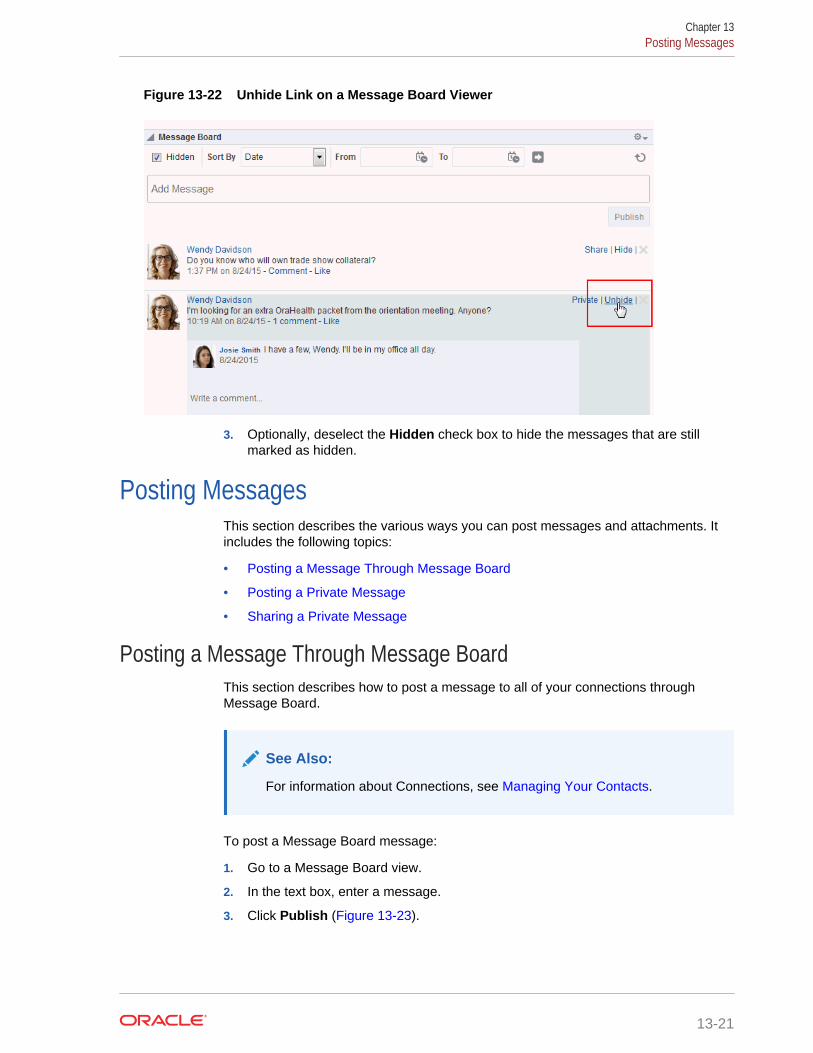
Figure 13-22 Unhide Link on a Message Board Viewer
3. Optionally, deselect the Hidden check box to hide the messages that are stillmarked as hidden.
Posting MessagesThis section describes the various ways you can post messages and attachments. Itincludes the following topics:
• Posting a Message Through Message Board
• Posting a Private Message
• Sharing a Private Message
Posting a Message Through Message BoardThis section describes how to post a message to all of your connections throughMessage Board.
See Also:
For information about Connections, see Managing Your Contacts.
To post a Message Board message:
1. Go to a Message Board view.
2. In the text box, enter a message.
3. Click Publish (Figure 13-23).
Chapter 13Posting Messages
13-21
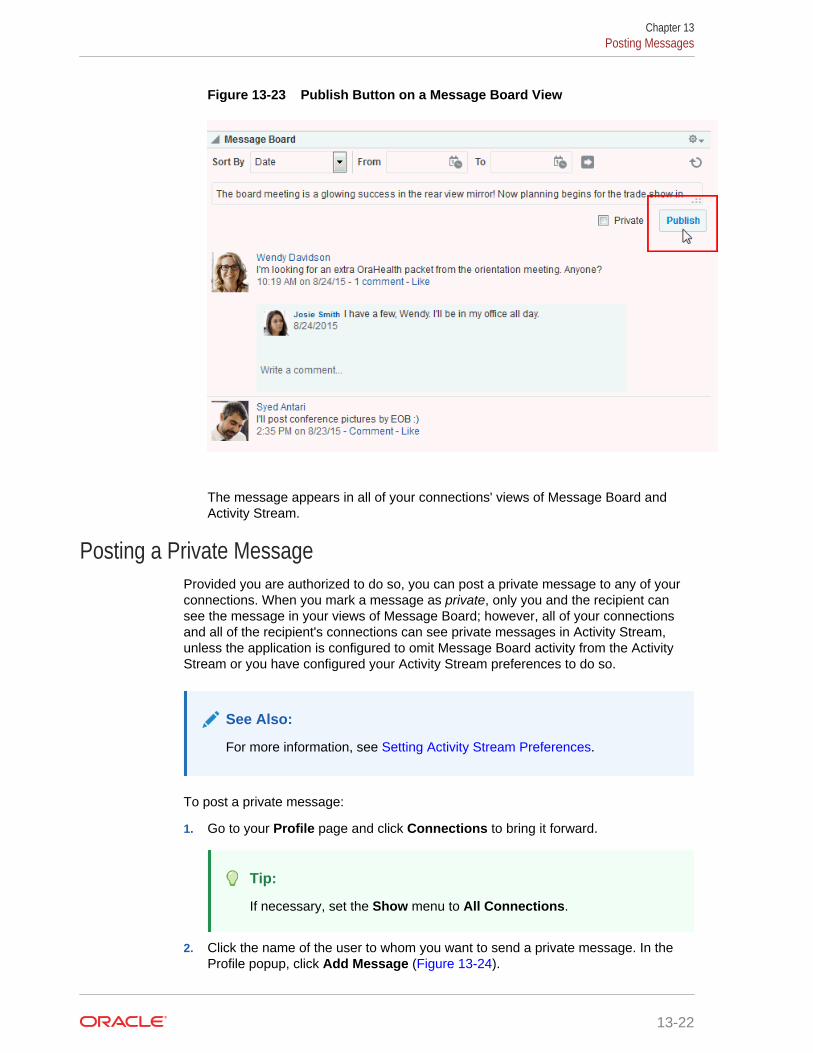
Figure 13-23 Publish Button on a Message Board View
The message appears in all of your connections' views of Message Board andActivity Stream.
Posting a Private MessageProvided you are authorized to do so, you can post a private message to any of yourconnections. When you mark a message as private, only you and the recipient cansee the message in your views of Message Board; however, all of your connectionsand all of the recipient's connections can see private messages in Activity Stream,unless the application is configured to omit Message Board activity from the ActivityStream or you have configured your Activity Stream preferences to do so.
See Also:
For more information, see Setting Activity Stream Preferences.
To post a private message:
1. Go to your Profile page and click Connections to bring it forward.
Tip:
If necessary, set the Show menu to All Connections.
2. Click the name of the user to whom you want to send a private message. In theProfile popup, click Add Message (Figure 13-24).
Chapter 13Posting Messages
13-22
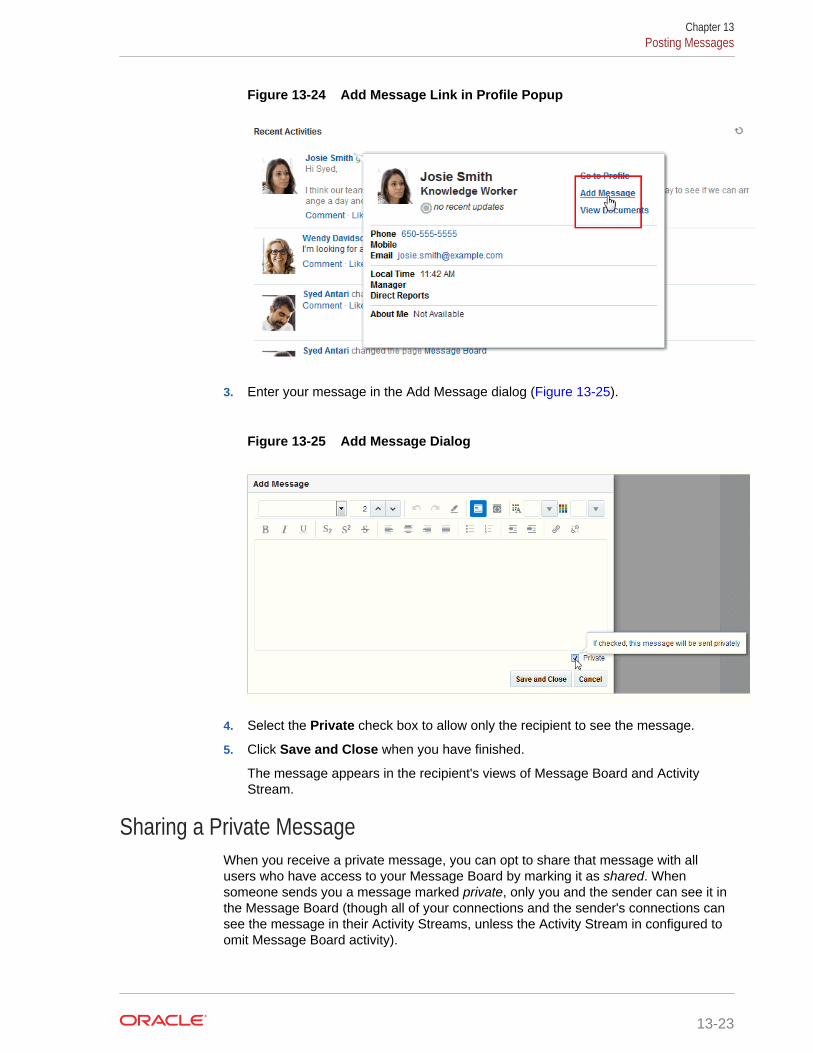
Figure 13-24 Add Message Link in Profile Popup
3. Enter your message in the Add Message dialog (Figure 13-25).
Figure 13-25 Add Message Dialog
4. Select the Private check box to allow only the recipient to see the message.
5. Click Save and Close when you have finished.
The message appears in the recipient's views of Message Board and ActivityStream.
Sharing a Private MessageWhen you receive a private message, you can opt to share that message with allusers who have access to your Message Board by marking it as shared. Whensomeone sends you a message marked private, only you and the sender can see it inthe Message Board (though all of your connections and the sender's connections cansee the message in their Activity Streams, unless the Activity Stream in configured toomit Message Board activity).
Chapter 13Posting Messages
13-23
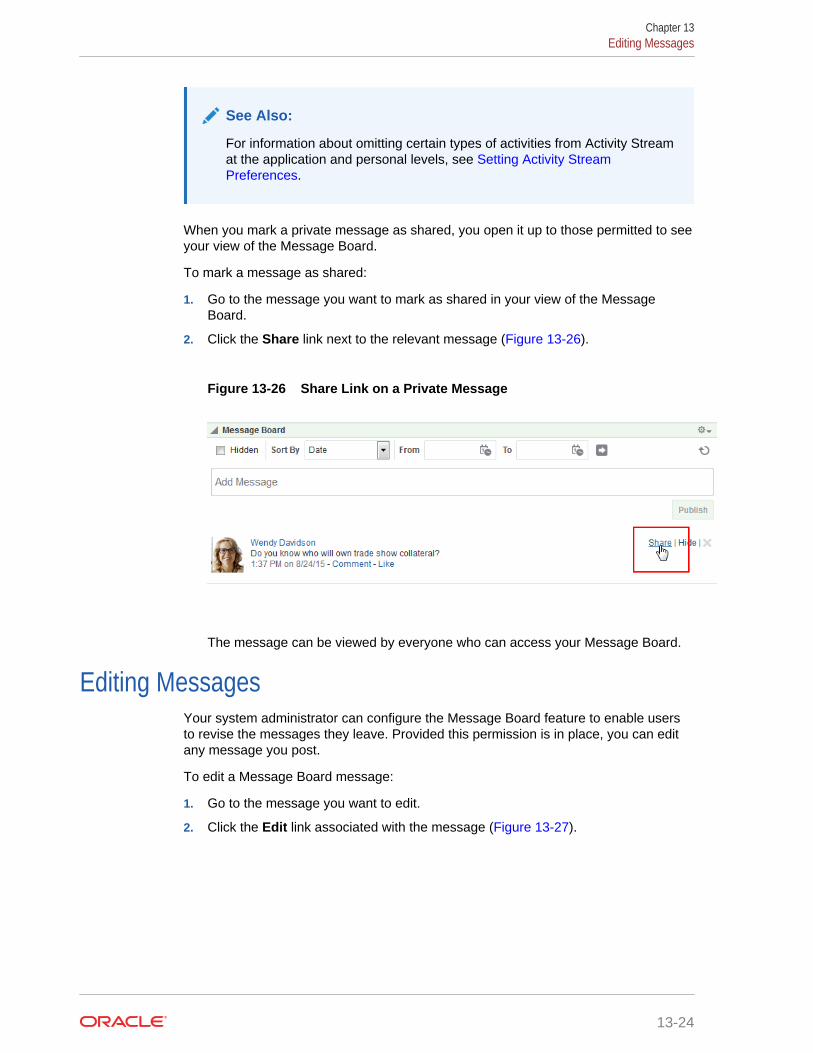
See Also:
For information about omitting certain types of activities from Activity Streamat the application and personal levels, see Setting Activity StreamPreferences.
When you mark a private message as shared, you open it up to those permitted to seeyour view of the Message Board.
To mark a message as shared:
1. Go to the message you want to mark as shared in your view of the MessageBoard.
2. Click the Share link next to the relevant message (Figure 13-26).
Figure 13-26 Share Link on a Private Message
The message can be viewed by everyone who can access your Message Board.
Editing MessagesYour system administrator can configure the Message Board feature to enable usersto revise the messages they leave. Provided this permission is in place, you can editany message you post.
To edit a Message Board message:
1. Go to the message you want to edit.
2. Click the Edit link associated with the message (Figure 13-27).
Chapter 13Editing Messages
13-24
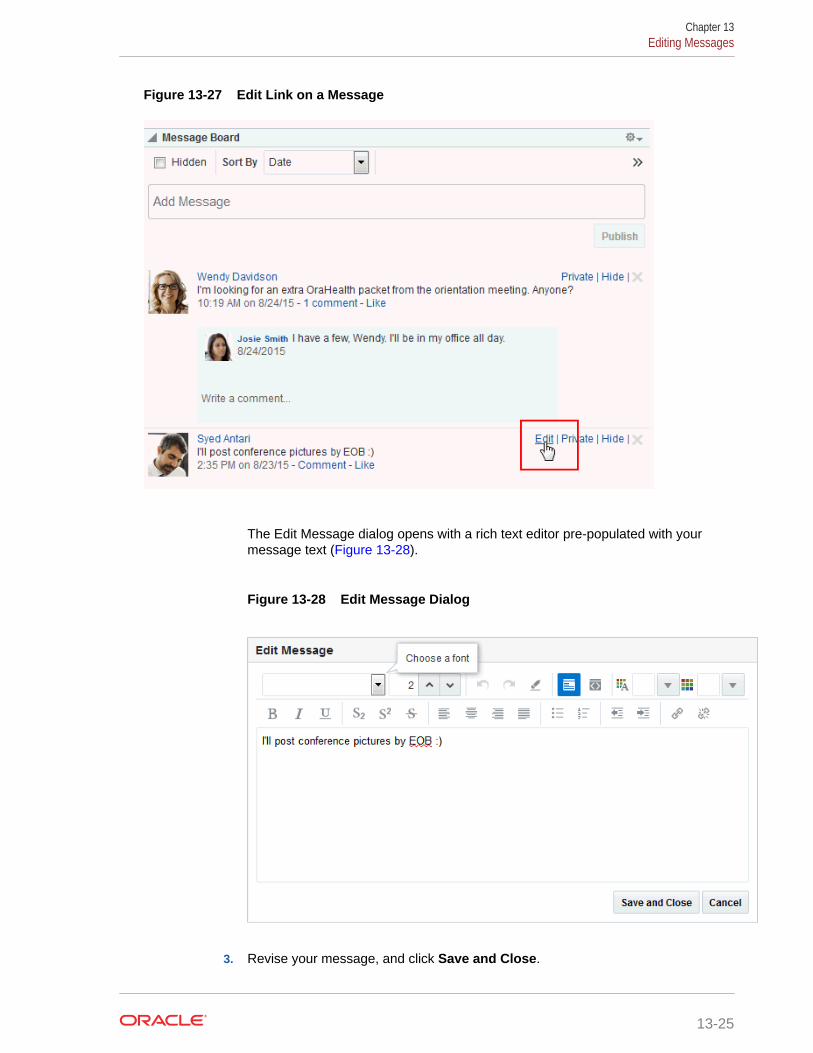
Figure 13-27 Edit Link on a Message
The Edit Message dialog opens with a rich text editor pre-populated with yourmessage text (Figure 13-28).
Figure 13-28 Edit Message Dialog
3. Revise your message, and click Save and Close.
Chapter 13Editing Messages
13-25
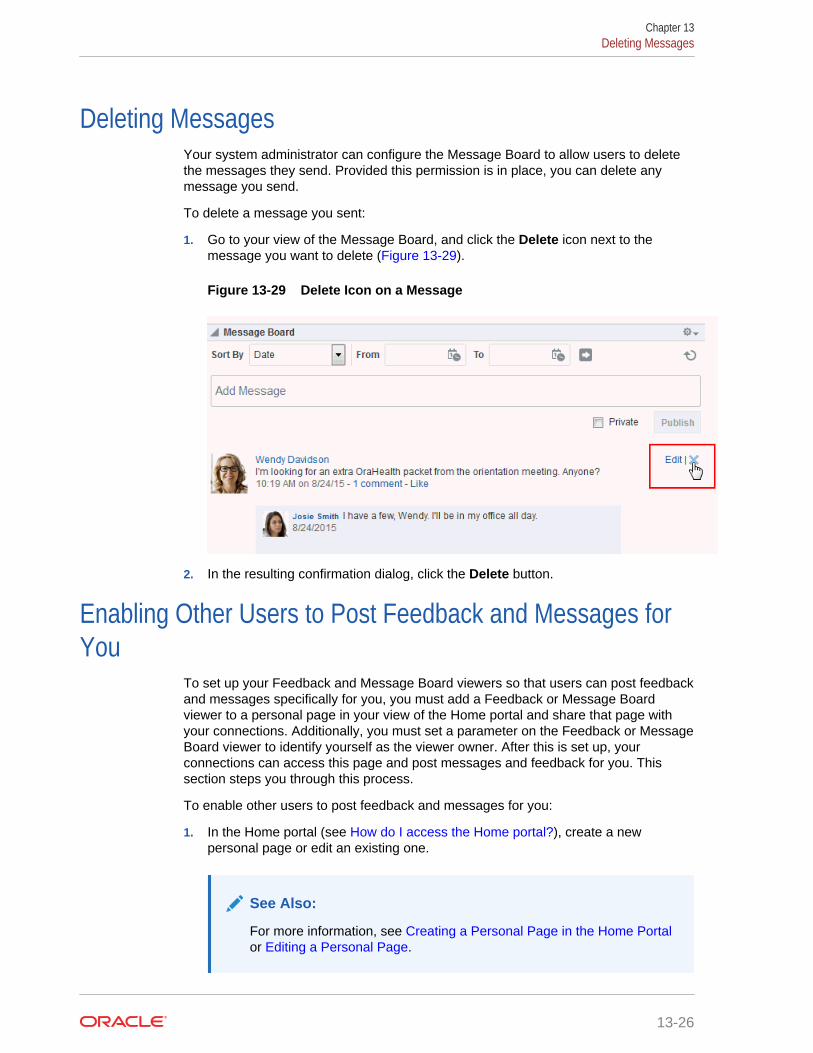
Deleting MessagesYour system administrator can configure the Message Board to allow users to deletethe messages they send. Provided this permission is in place, you can delete anymessage you send.
To delete a message you sent:
1. Go to your view of the Message Board, and click the Delete icon next to themessage you want to delete (Figure 13-29).
Figure 13-29 Delete Icon on a Message
2. In the resulting confirmation dialog, click the Delete button.
Enabling Other Users to Post Feedback and Messages forYou
To set up your Feedback and Message Board viewers so that users can post feedbackand messages specifically for you, you must add a Feedback or Message Boardviewer to a personal page in your view of the Home portal and share that page withyour connections. Additionally, you must set a parameter on the Feedback or MessageBoard viewer to identify yourself as the viewer owner. After this is set up, yourconnections can access this page and post messages and feedback for you. Thissection steps you through this process.
To enable other users to post feedback and messages for you:
1. In the Home portal (see How do I access the Home portal?), create a newpersonal page or edit an existing one.
See Also:
For more information, see Creating a Personal Page in the Home Portalor Editing a Personal Page.
Chapter 13Deleting Messages
13-26
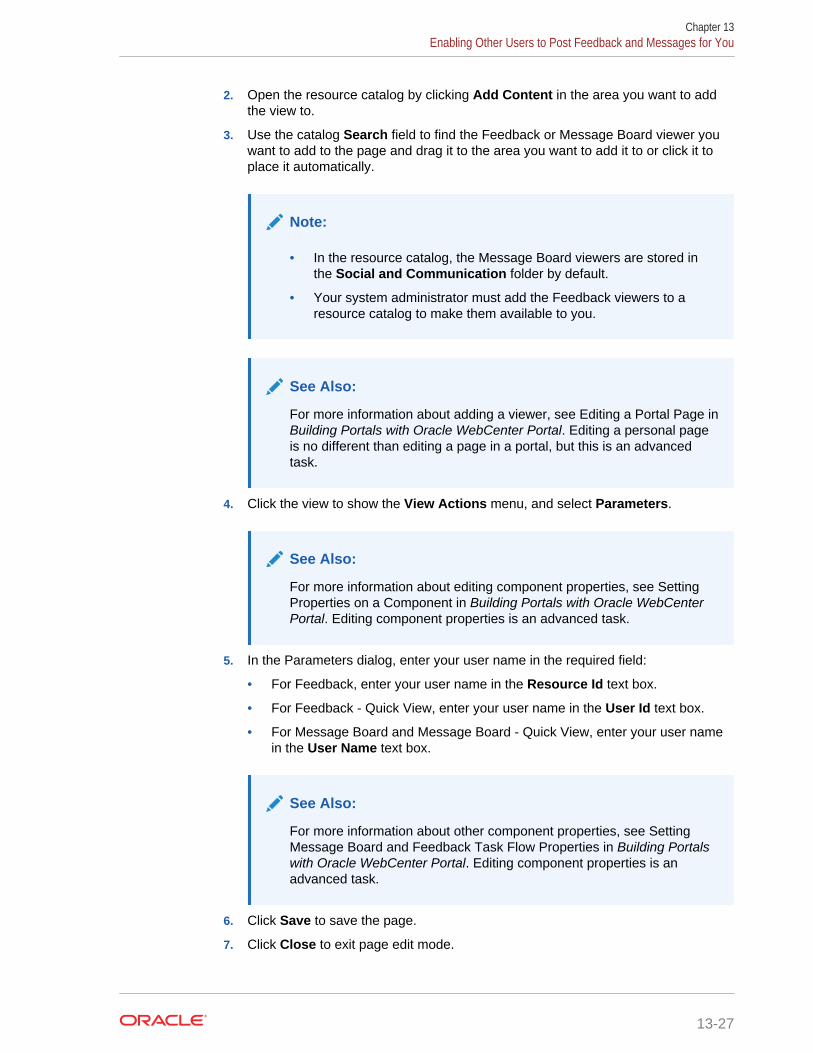
2. Open the resource catalog by clicking Add Content in the area you want to addthe view to.
3. Use the catalog Search field to find the Feedback or Message Board viewer youwant to add to the page and drag it to the area you want to add it to or click it toplace it automatically.
Note:
• In the resource catalog, the Message Board viewers are stored inthe Social and Communication folder by default.
• Your system administrator must add the Feedback viewers to aresource catalog to make them available to you.
See Also:
For more information about adding a viewer, see Editing a Portal Page inBuilding Portals with Oracle WebCenter Portal. Editing a personal pageis no different than editing a page in a portal, but this is an advancedtask.
4. Click the view to show the View Actions menu, and select Parameters.
See Also:
For more information about editing component properties, see SettingProperties on a Component in Building Portals with Oracle WebCenterPortal. Editing component properties is an advanced task.
5. In the Parameters dialog, enter your user name in the required field:
• For Feedback, enter your user name in the Resource Id text box.
• For Feedback - Quick View, enter your user name in the User Id text box.
• For Message Board and Message Board - Quick View, enter your user namein the User Name text box.
See Also:
For more information about other component properties, see SettingMessage Board and Feedback Task Flow Properties in Building Portalswith Oracle WebCenter Portal. Editing component properties is anadvanced task.
6. Click Save to save the page.
7. Click Close to exit page edit mode.
Chapter 13Enabling Other Users to Post Feedback and Messages for You
13-27
8. Set page access to enable other users to view and personalize the page asdescribed in Setting Security for a Personal Page.
Tip:
When you share one of your personal pages in the Home portal withother users, the shared page appears on their Personalize Pages page.Users can use controls on the Personalize Pages page to show thepage in their own view of the Home portal.
9. Set your preferences to allow users to view and/or post feedback and/ormessages for you. For more information, see Setting Feedback Preferences and Setting Message Board Preferences.
All users who have access to the page see the Feedback or Message Boardviewers that you place there, but only the users to whom you have grantedaccess, through preferences, see any content in these viewers.
You might want to send a link to this page to the users to whom you granted access,inviting them to leave you feedback or messages. For more information, see SendingMail with a Link to a Personal Page .
Chapter 13Enabling Other Users to Post Feedback and Messages for You
13-28
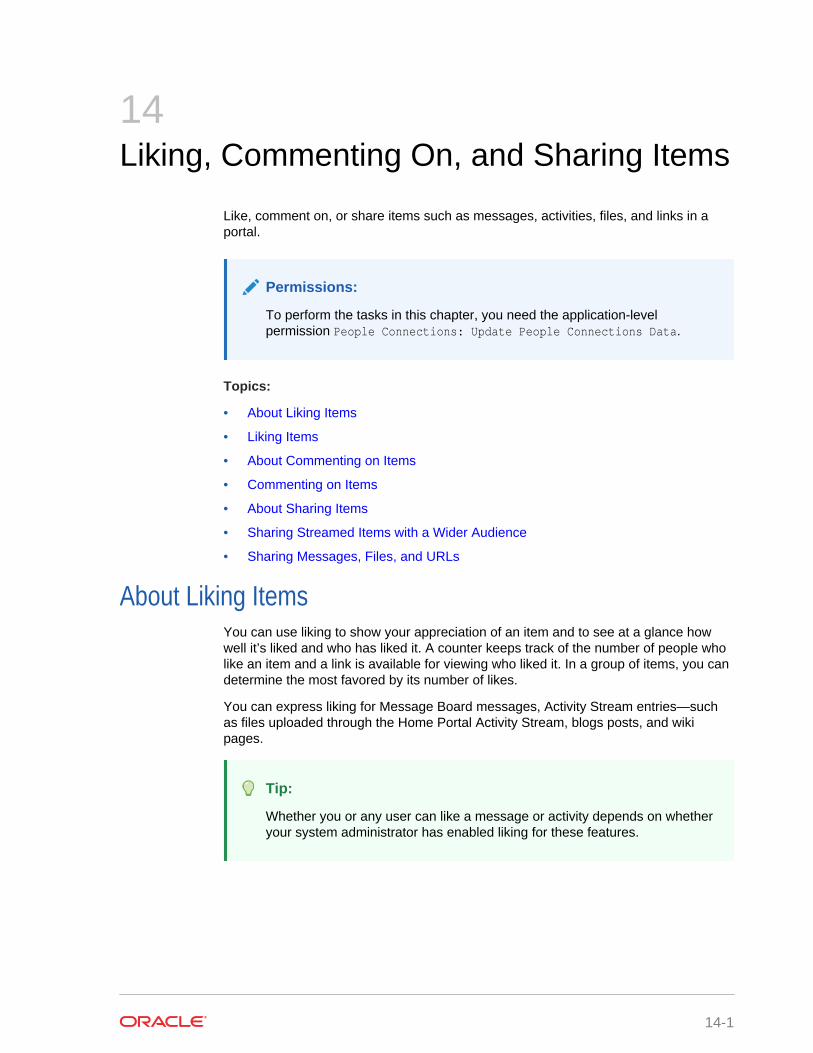
14Liking, Commenting On, and Sharing Items
Like, comment on, or share items such as messages, activities, files, and links in aportal.
Permissions:
To perform the tasks in this chapter, you need the application-levelpermission People Connections: Update People Connections Data.
Topics:
• About Liking Items
• Liking Items
• About Commenting on Items
• Commenting on Items
• About Sharing Items
• Sharing Streamed Items with a Wider Audience
• Sharing Messages, Files, and URLs
About Liking ItemsYou can use liking to show your appreciation of an item and to see at a glance howwell it’s liked and who has liked it. A counter keeps track of the number of people wholike an item and a link is available for viewing who liked it. In a group of items, you candetermine the most favored by its number of likes.
You can express liking for Message Board messages, Activity Stream entries—suchas files uploaded through the Home Portal Activity Stream, blogs posts, and wikipages.
Tip:
Whether you or any user can like a message or activity depends on whetheryour system administrator has enabled liking for these features.
14-1
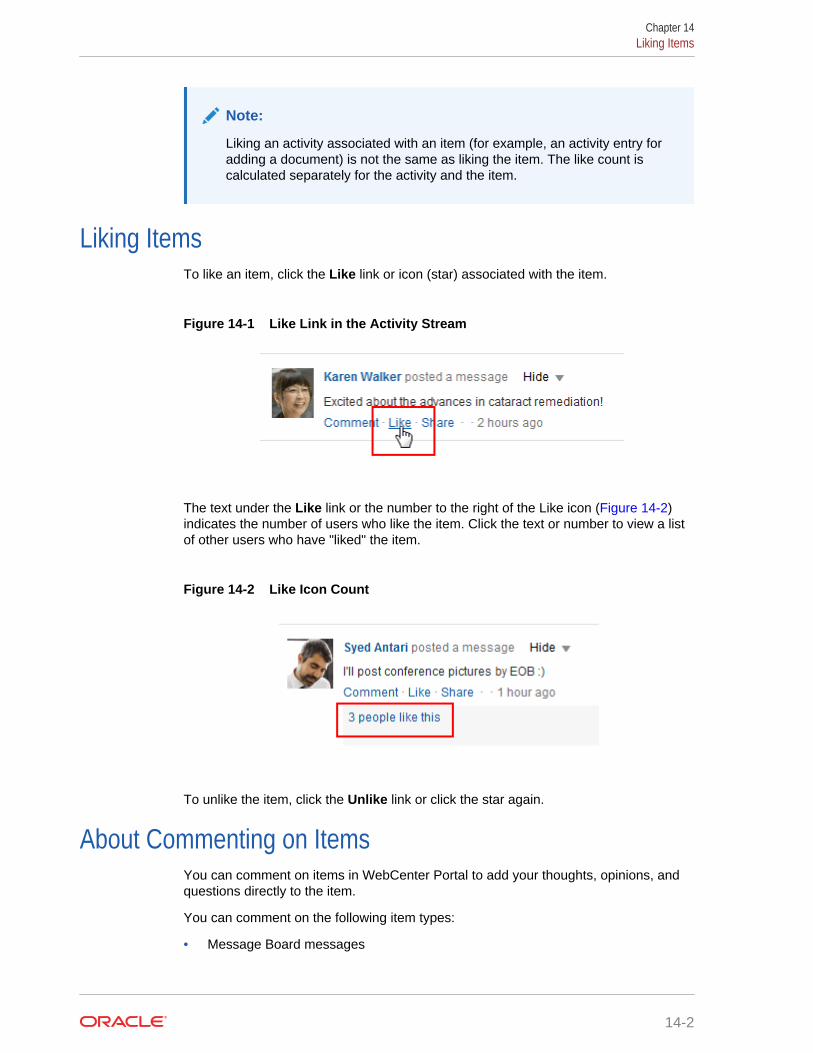
Note:
Liking an activity associated with an item (for example, an activity entry foradding a document) is not the same as liking the item. The like count iscalculated separately for the activity and the item.
Liking ItemsTo like an item, click the Like link or icon (star) associated with the item.
Figure 14-1 Like Link in the Activity Stream
The text under the Like link or the number to the right of the Like icon (Figure 14-2)indicates the number of users who like the item. Click the text or number to view a listof other users who have "liked" the item.
Figure 14-2 Like Icon Count
To unlike the item, click the Unlike link or click the star again.
About Commenting on ItemsYou can comment on items in WebCenter Portal to add your thoughts, opinions, andquestions directly to the item.
You can comment on the following item types:
• Message Board messages
Chapter 14Liking Items
14-2
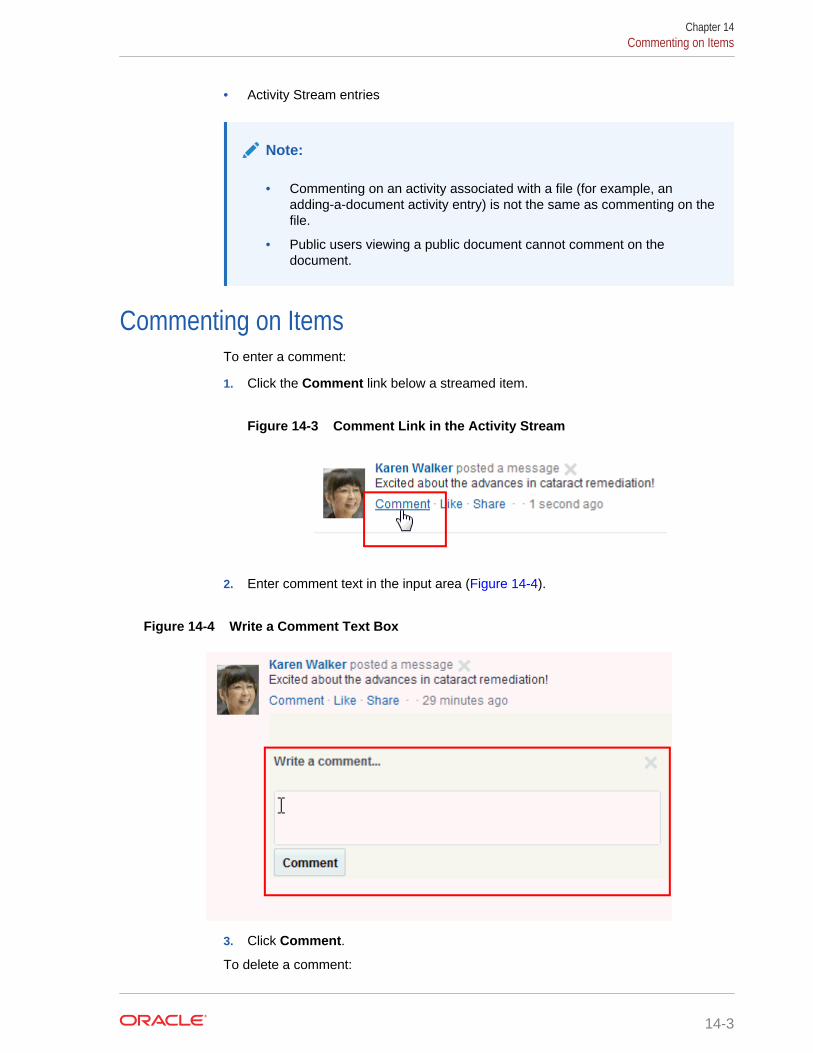
• Activity Stream entries
Note:
• Commenting on an activity associated with a file (for example, anadding-a-document activity entry) is not the same as commenting on thefile.
• Public users viewing a public document cannot comment on thedocument.
Commenting on ItemsTo enter a comment:
1. Click the Comment link below a streamed item.
Figure 14-3 Comment Link in the Activity Stream
2. Enter comment text in the input area (Figure 14-4).
Figure 14-4 Write a Comment Text Box
3. Click Comment.
To delete a comment:
Chapter 14Commenting on Items
14-3
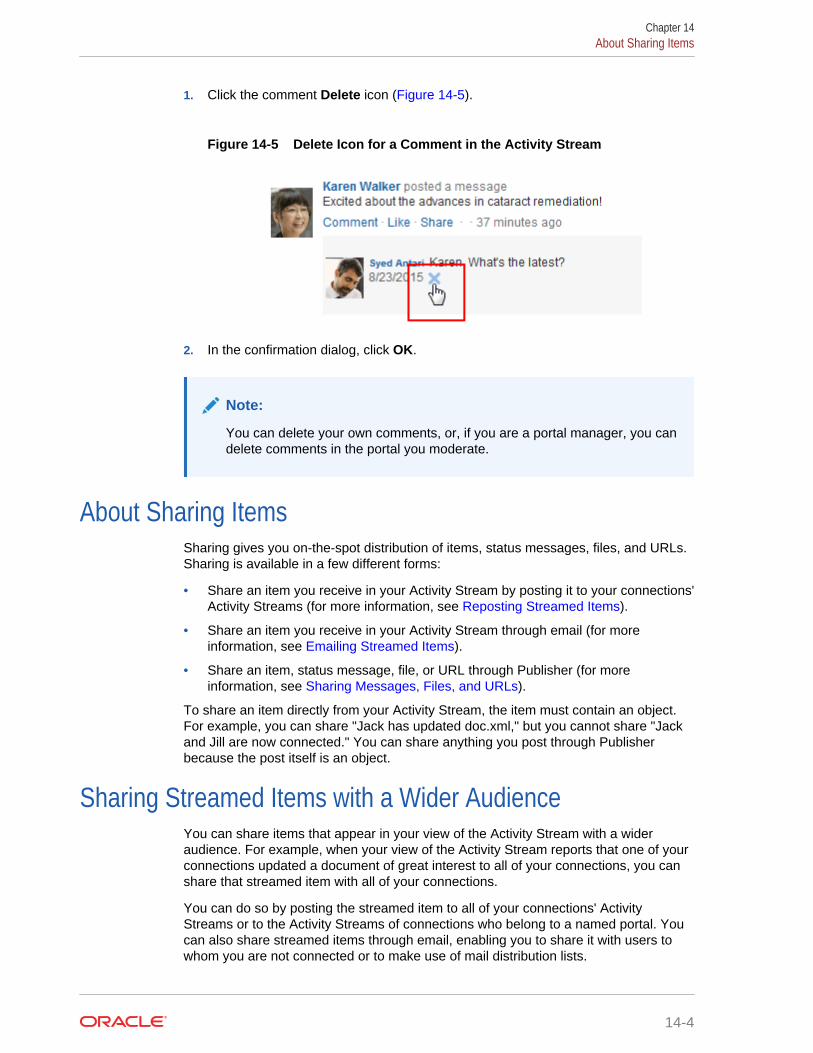
1. Click the comment Delete icon (Figure 14-5).
Figure 14-5 Delete Icon for a Comment in the Activity Stream
2. In the confirmation dialog, click OK.
Note:
You can delete your own comments, or, if you are a portal manager, you candelete comments in the portal you moderate.
About Sharing ItemsSharing gives you on-the-spot distribution of items, status messages, files, and URLs.Sharing is available in a few different forms:
• Share an item you receive in your Activity Stream by posting it to your connections'Activity Streams (for more information, see Reposting Streamed Items).
• Share an item you receive in your Activity Stream through email (for moreinformation, see Emailing Streamed Items).
• Share an item, status message, file, or URL through Publisher (for moreinformation, see Sharing Messages, Files, and URLs).
To share an item directly from your Activity Stream, the item must contain an object.For example, you can share "Jack has updated doc.xml," but you cannot share "Jackand Jill are now connected." You can share anything you post through Publisherbecause the post itself is an object.
Sharing Streamed Items with a Wider AudienceYou can share items that appear in your view of the Activity Stream with a wideraudience. For example, when your view of the Activity Stream reports that one of yourconnections updated a document of great interest to all of your connections, you canshare that streamed item with all of your connections.
You can do so by posting the streamed item to all of your connections' ActivityStreams or to the Activity Streams of connections who belong to a named portal. Youcan also share streamed items through email, enabling you to share it with users towhom you are not connected or to make use of mail distribution lists.
Chapter 14About Sharing Items
14-4
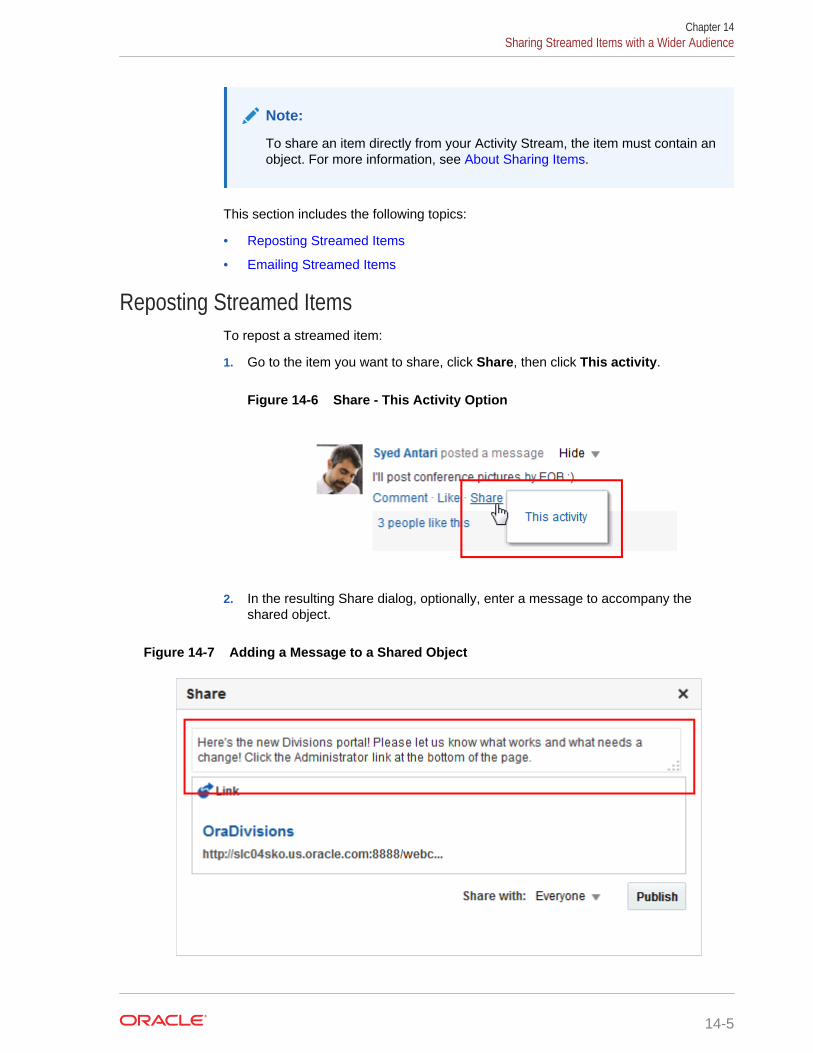
Note:
To share an item directly from your Activity Stream, the item must contain anobject. For more information, see About Sharing Items.
This section includes the following topics:
• Reposting Streamed Items
• Emailing Streamed Items
Reposting Streamed ItemsTo repost a streamed item:
1. Go to the item you want to share, click Share, then click This activity.
Figure 14-6 Share - This Activity Option
2. In the resulting Share dialog, optionally, enter a message to accompany theshared object.
Figure 14-7 Adding a Message to a Shared Object
Chapter 14Sharing Streamed Items with a Wider Audience
14-5
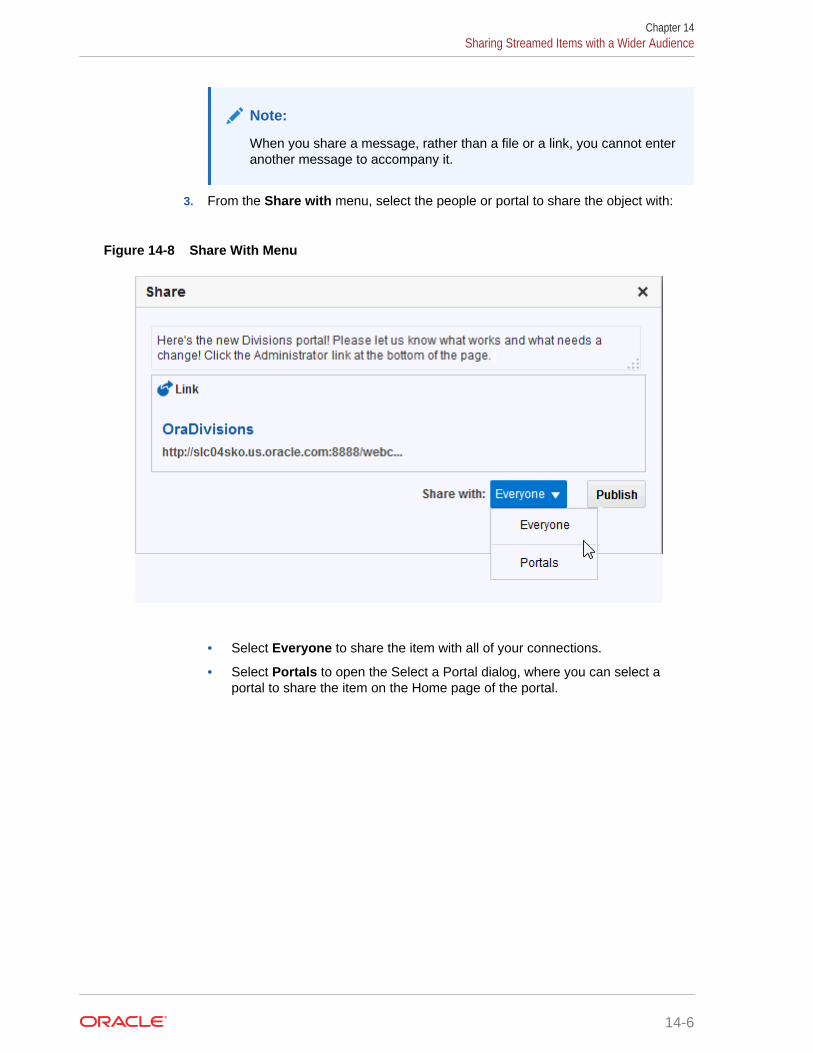
Note:
When you share a message, rather than a file or a link, you cannot enteranother message to accompany it.
3. From the Share with menu, select the people or portal to share the object with:
Figure 14-8 Share With Menu
• Select Everyone to share the item with all of your connections.
• Select Portals to open the Select a Portal dialog, where you can select aportal to share the item on the Home page of the portal.
Chapter 14Sharing Streamed Items with a Wider Audience
14-6
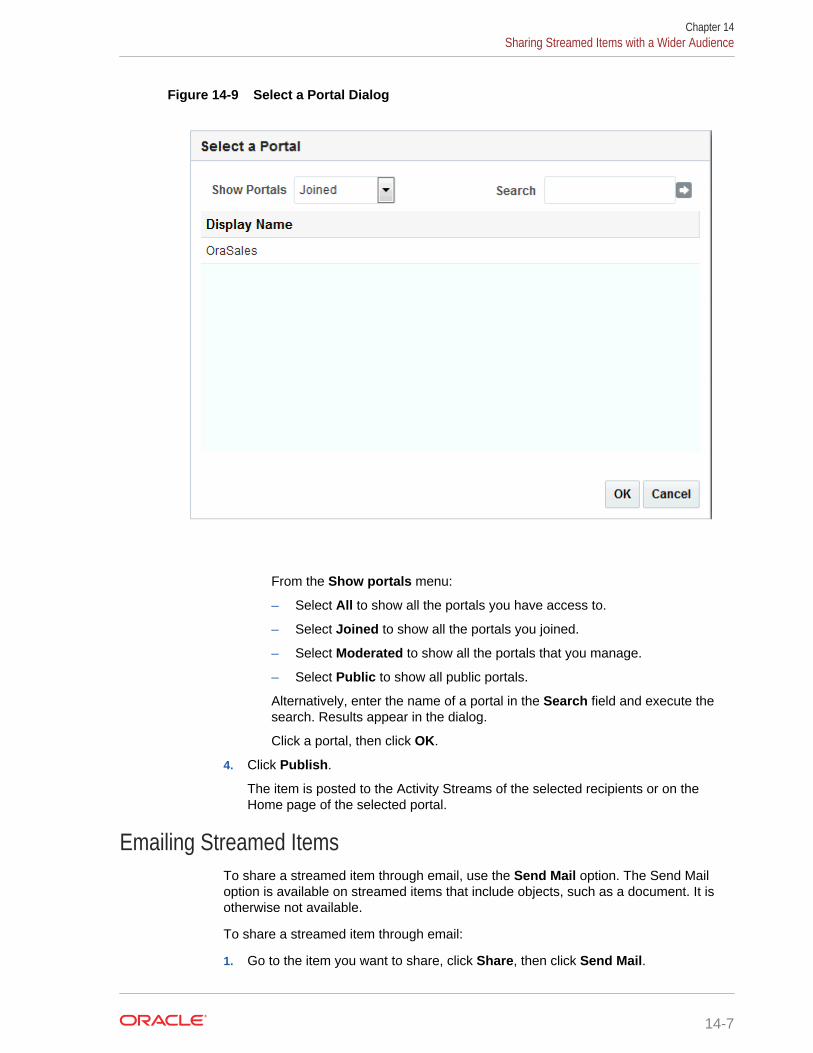
Figure 14-9 Select a Portal Dialog
From the Show portals menu:
– Select All to show all the portals you have access to.
– Select Joined to show all the portals you joined.
– Select Moderated to show all the portals that you manage.
– Select Public to show all public portals.
Alternatively, enter the name of a portal in the Search field and execute thesearch. Results appear in the dialog.
Click a portal, then click OK.
4. Click Publish.
The item is posted to the Activity Streams of the selected recipients or on theHome page of the selected portal.
Emailing Streamed ItemsTo share a streamed item through email, use the Send Mail option. The Send Mailoption is available on streamed items that include objects, such as a document. It isotherwise not available.
To share a streamed item through email:
1. Go to the item you want to share, click Share, then click Send Mail.
Chapter 14Sharing Streamed Items with a Wider Audience
14-7
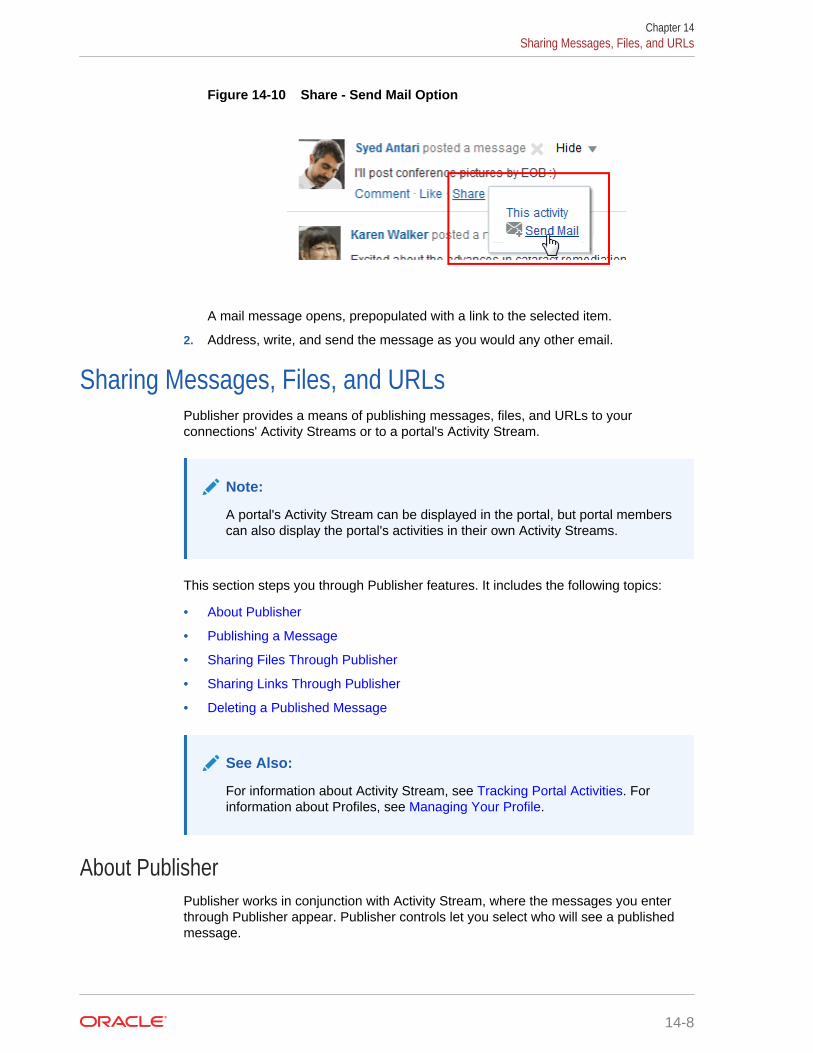
Figure 14-10 Share - Send Mail Option
A mail message opens, prepopulated with a link to the selected item.
2. Address, write, and send the message as you would any other email.
Sharing Messages, Files, and URLsPublisher provides a means of publishing messages, files, and URLs to yourconnections' Activity Streams or to a portal's Activity Stream.
Note:
A portal's Activity Stream can be displayed in the portal, but portal memberscan also display the portal's activities in their own Activity Streams.
This section steps you through Publisher features. It includes the following topics:
• About Publisher
• Publishing a Message
• Sharing Files Through Publisher
• Sharing Links Through Publisher
• Deleting a Published Message
See Also:
For information about Activity Stream, see Tracking Portal Activities. Forinformation about Profiles, see Managing Your Profile.
About PublisherPublisher works in conjunction with Activity Stream, where the messages you enterthrough Publisher appear. Publisher controls let you select who will see a publishedmessage.
Chapter 14Sharing Messages, Files, and URLs
14-8
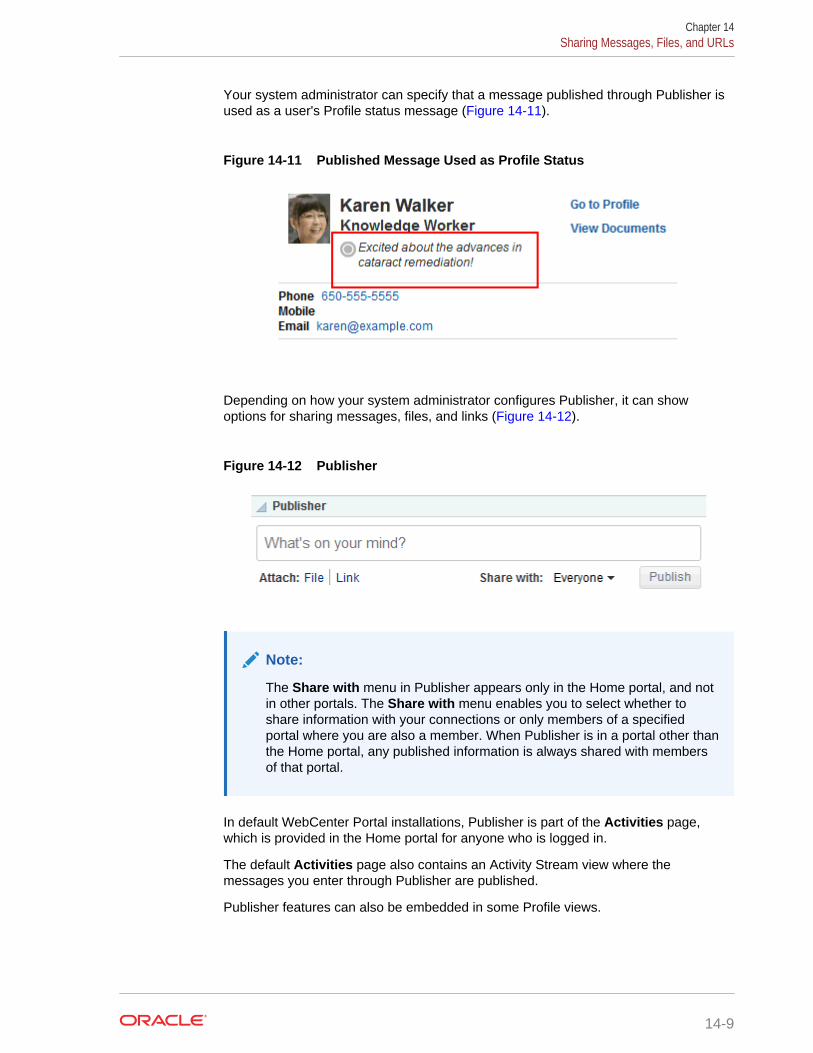
Your system administrator can specify that a message published through Publisher isused as a user's Profile status message (Figure 14-11).
Figure 14-11 Published Message Used as Profile Status
Depending on how your system administrator configures Publisher, it can showoptions for sharing messages, files, and links (Figure 14-12).
Figure 14-12 Publisher
Note:
The Share with menu in Publisher appears only in the Home portal, and notin other portals. The Share with menu enables you to select whether toshare information with your connections or only members of a specifiedportal where you are also a member. When Publisher is in a portal other thanthe Home portal, any published information is always shared with membersof that portal.
In default WebCenter Portal installations, Publisher is part of the Activities page,which is provided in the Home portal for anyone who is logged in.
The default Activities page also contains an Activity Stream view where themessages you enter through Publisher are published.
Publisher features can also be embedded in some Profile views.
Chapter 14Sharing Messages, Files, and URLs
14-9
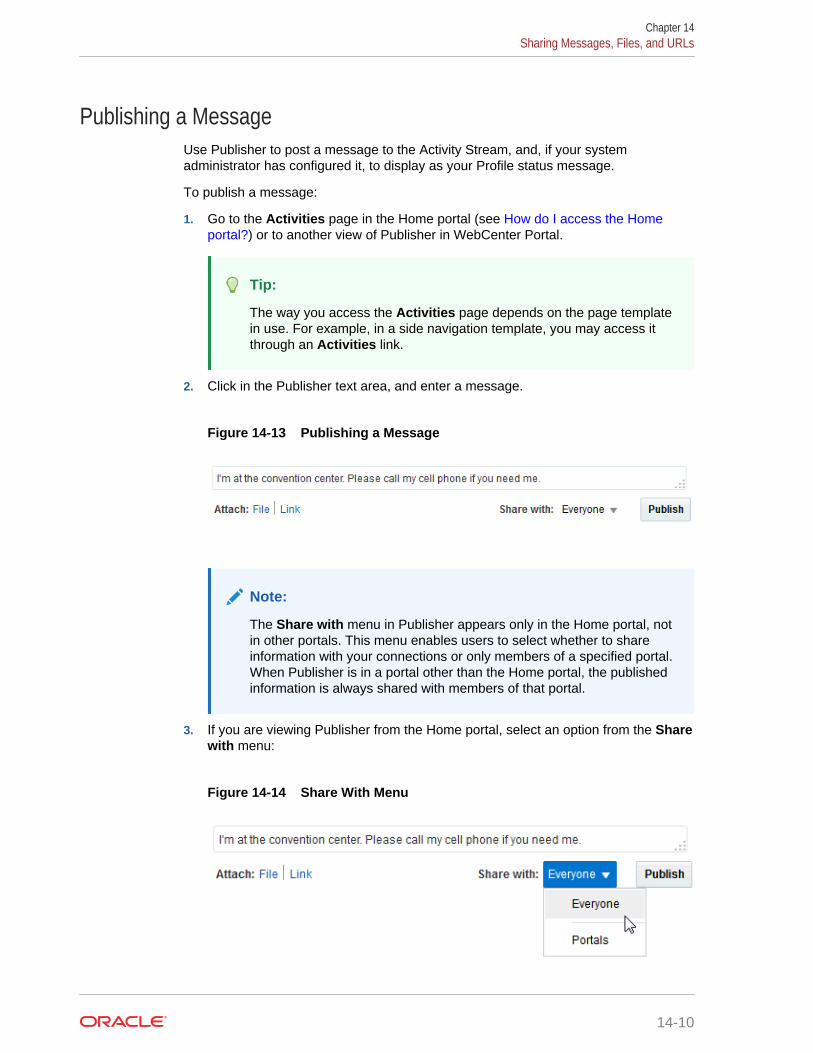
Publishing a MessageUse Publisher to post a message to the Activity Stream, and, if your systemadministrator has configured it, to display as your Profile status message.
To publish a message:
1. Go to the Activities page in the Home portal (see How do I access the Homeportal?) or to another view of Publisher in WebCenter Portal.
Tip:
The way you access the Activities page depends on the page templatein use. For example, in a side navigation template, you may access itthrough an Activities link.
2. Click in the Publisher text area, and enter a message.
Figure 14-13 Publishing a Message
Note:
The Share with menu in Publisher appears only in the Home portal, notin other portals. This menu enables users to select whether to shareinformation with your connections or only members of a specified portal.When Publisher is in a portal other than the Home portal, the publishedinformation is always shared with members of that portal.
3. If you are viewing Publisher from the Home portal, select an option from the Sharewith menu:
Figure 14-14 Share With Menu
Chapter 14Sharing Messages, Files, and URLs
14-10
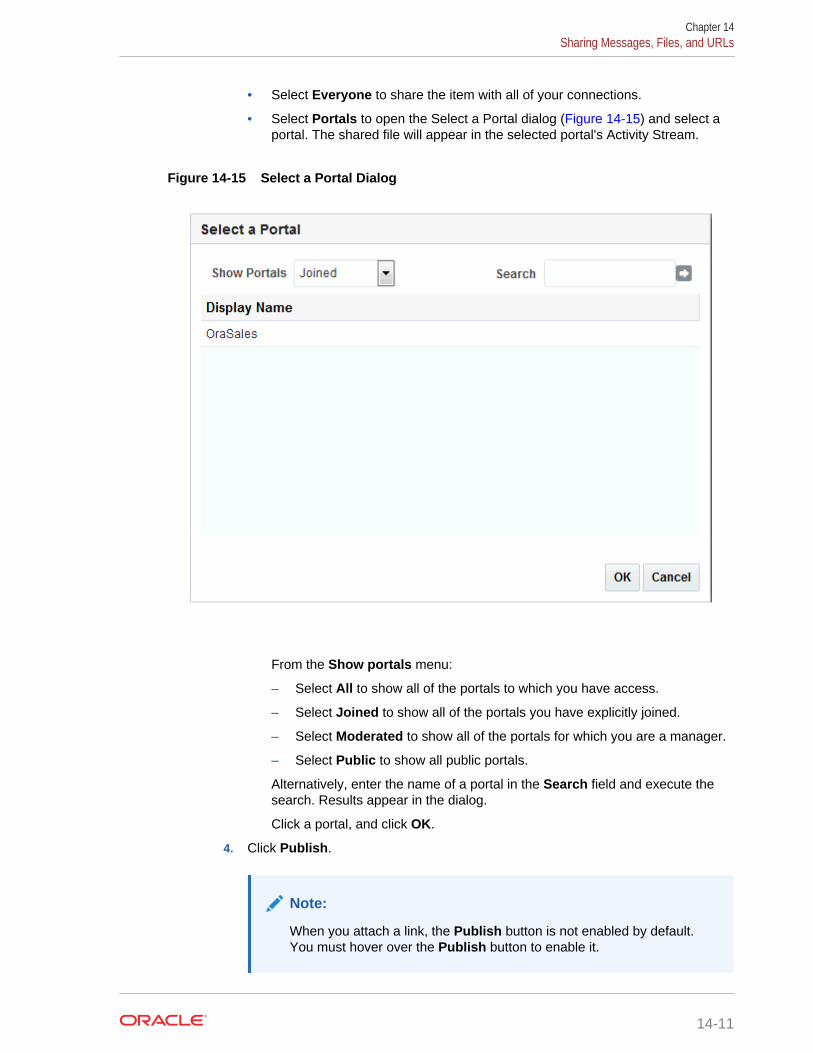
• Select Everyone to share the item with all of your connections.
• Select Portals to open the Select a Portal dialog (Figure 14-15) and select aportal. The shared file will appear in the selected portal's Activity Stream.
Figure 14-15 Select a Portal Dialog
From the Show portals menu:
– Select All to show all of the portals to which you have access.
– Select Joined to show all of the portals you have explicitly joined.
– Select Moderated to show all of the portals for which you are a manager.
– Select Public to show all public portals.
Alternatively, enter the name of a portal in the Search field and execute thesearch. Results appear in the dialog.
Click a portal, and click OK.
4. Click Publish.
Note:
When you attach a link, the Publish button is not enabled by default.You must hover over the Publish button to enable it.
Chapter 14Sharing Messages, Files, and URLs
14-11
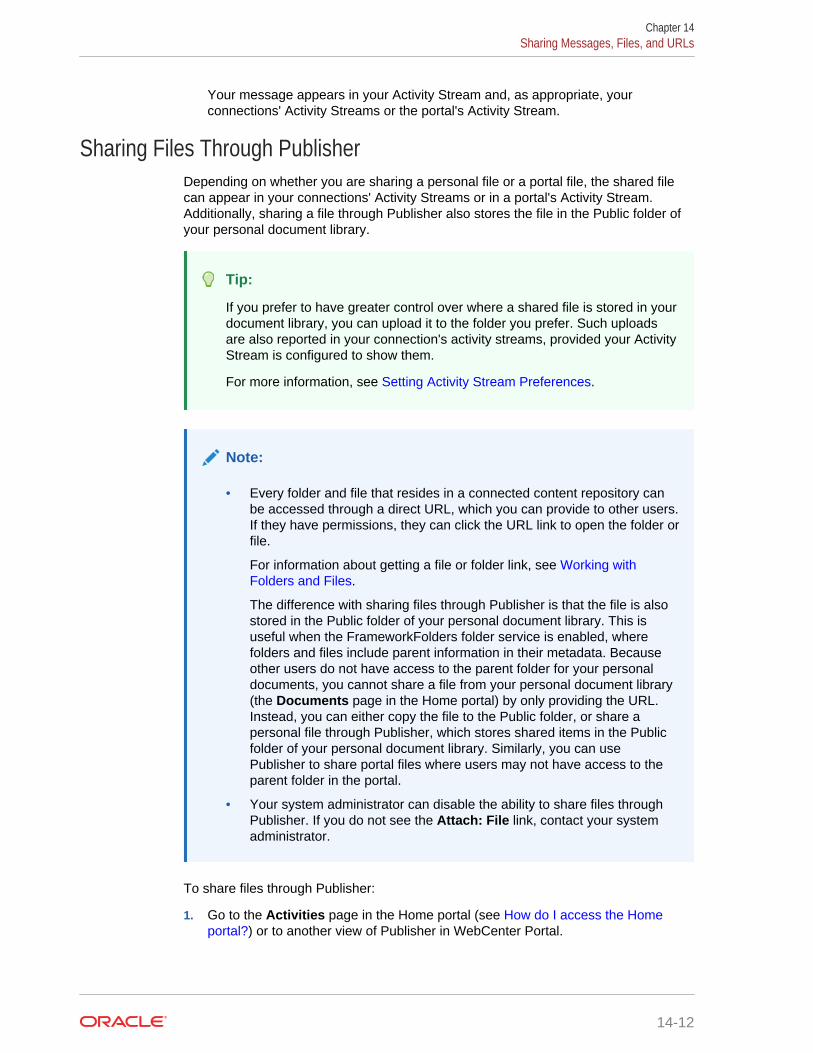
Your message appears in your Activity Stream and, as appropriate, yourconnections' Activity Streams or the portal's Activity Stream.
Sharing Files Through PublisherDepending on whether you are sharing a personal file or a portal file, the shared filecan appear in your connections' Activity Streams or in a portal's Activity Stream.Additionally, sharing a file through Publisher also stores the file in the Public folder ofyour personal document library.
Tip:
If you prefer to have greater control over where a shared file is stored in yourdocument library, you can upload it to the folder you prefer. Such uploadsare also reported in your connection's activity streams, provided your ActivityStream is configured to show them.
For more information, see Setting Activity Stream Preferences.
Note:
• Every folder and file that resides in a connected content repository canbe accessed through a direct URL, which you can provide to other users.If they have permissions, they can click the URL link to open the folder orfile.
For information about getting a file or folder link, see Working withFolders and Files.
The difference with sharing files through Publisher is that the file is alsostored in the Public folder of your personal document library. This isuseful when the FrameworkFolders folder service is enabled, wherefolders and files include parent information in their metadata. Becauseother users do not have access to the parent folder for your personaldocuments, you cannot share a file from your personal document library(the Documents page in the Home portal) by only providing the URL.Instead, you can either copy the file to the Public folder, or share apersonal file through Publisher, which stores shared items in the Publicfolder of your personal document library. Similarly, you can usePublisher to share portal files where users may not have access to theparent folder in the portal.
• Your system administrator can disable the ability to share files throughPublisher. If you do not see the Attach: File link, contact your systemadministrator.
To share files through Publisher:
1. Go to the Activities page in the Home portal (see How do I access the Homeportal?) or to another view of Publisher in WebCenter Portal.
Chapter 14Sharing Messages, Files, and URLs
14-12
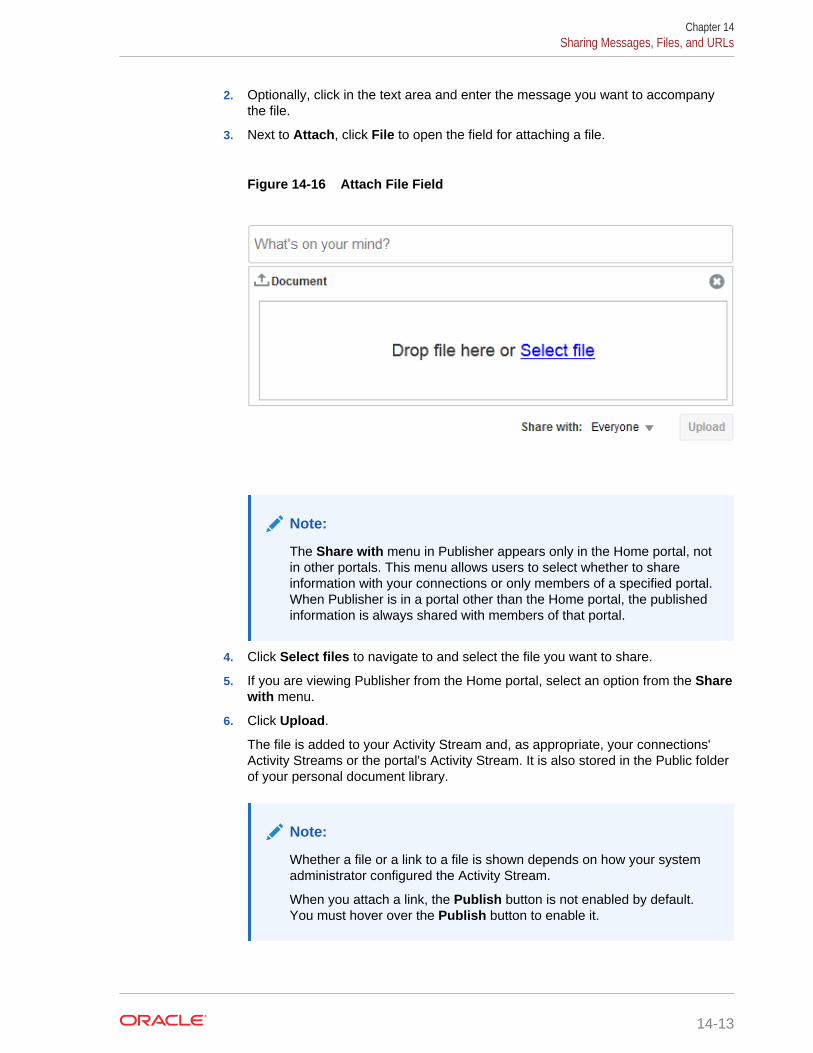
2. Optionally, click in the text area and enter the message you want to accompanythe file.
3. Next to Attach, click File to open the field for attaching a file.
Figure 14-16 Attach File Field
Note:
The Share with menu in Publisher appears only in the Home portal, notin other portals. This menu allows users to select whether to shareinformation with your connections or only members of a specified portal.When Publisher is in a portal other than the Home portal, the publishedinformation is always shared with members of that portal.
4. Click Select files to navigate to and select the file you want to share.
5. If you are viewing Publisher from the Home portal, select an option from the Sharewith menu.
6. Click Upload.
The file is added to your Activity Stream and, as appropriate, your connections'Activity Streams or the portal's Activity Stream. It is also stored in the Public folderof your personal document library.
Note:
Whether a file or a link to a file is shown depends on how your systemadministrator configured the Activity Stream.
When you attach a link, the Publish button is not enabled by default.You must hover over the Publish button to enable it.
Chapter 14Sharing Messages, Files, and URLs
14-13
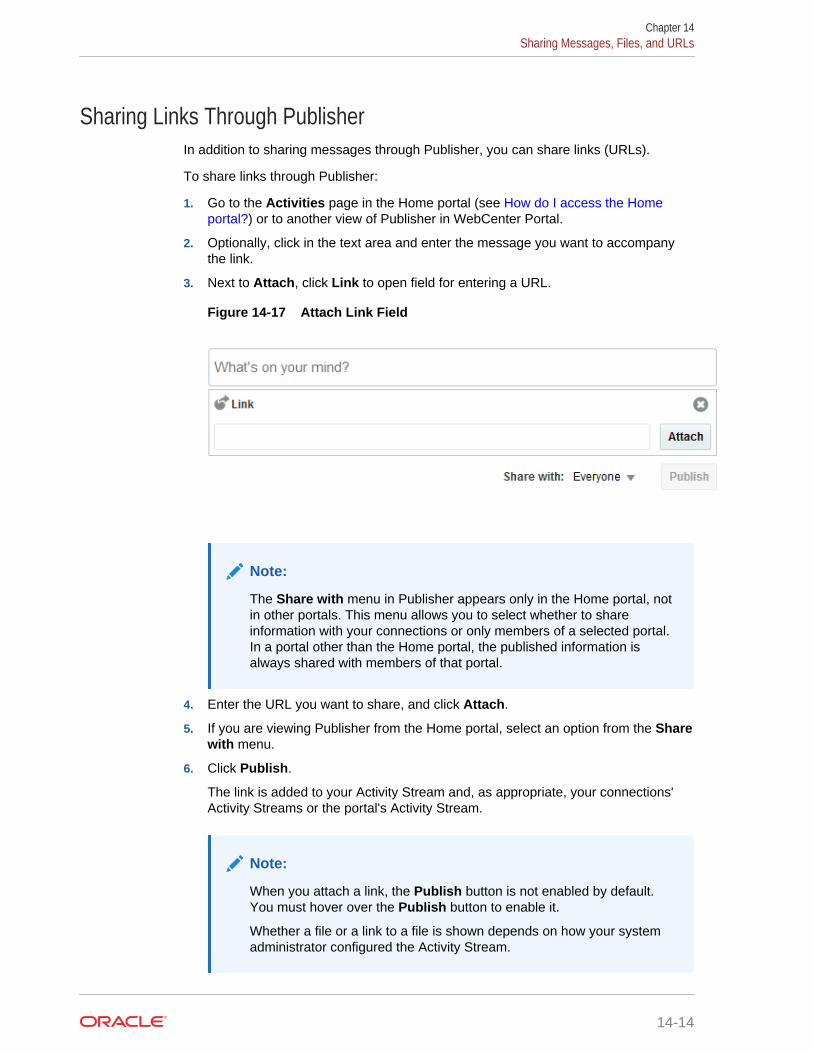
Sharing Links Through PublisherIn addition to sharing messages through Publisher, you can share links (URLs).
To share links through Publisher:
1. Go to the Activities page in the Home portal (see How do I access the Homeportal?) or to another view of Publisher in WebCenter Portal.
2. Optionally, click in the text area and enter the message you want to accompanythe link.
3. Next to Attach, click Link to open field for entering a URL.
Figure 14-17 Attach Link Field
Note:
The Share with menu in Publisher appears only in the Home portal, notin other portals. This menu allows you to select whether to shareinformation with your connections or only members of a selected portal.In a portal other than the Home portal, the published information isalways shared with members of that portal.
4. Enter the URL you want to share, and click Attach.
5. If you are viewing Publisher from the Home portal, select an option from the Sharewith menu.
6. Click Publish.
The link is added to your Activity Stream and, as appropriate, your connections'Activity Streams or the portal's Activity Stream.
Note:
When you attach a link, the Publish button is not enabled by default.You must hover over the Publish button to enable it.
Whether a file or a link to a file is shown depends on how your systemadministrator configured the Activity Stream.
Chapter 14Sharing Messages, Files, and URLs
14-14
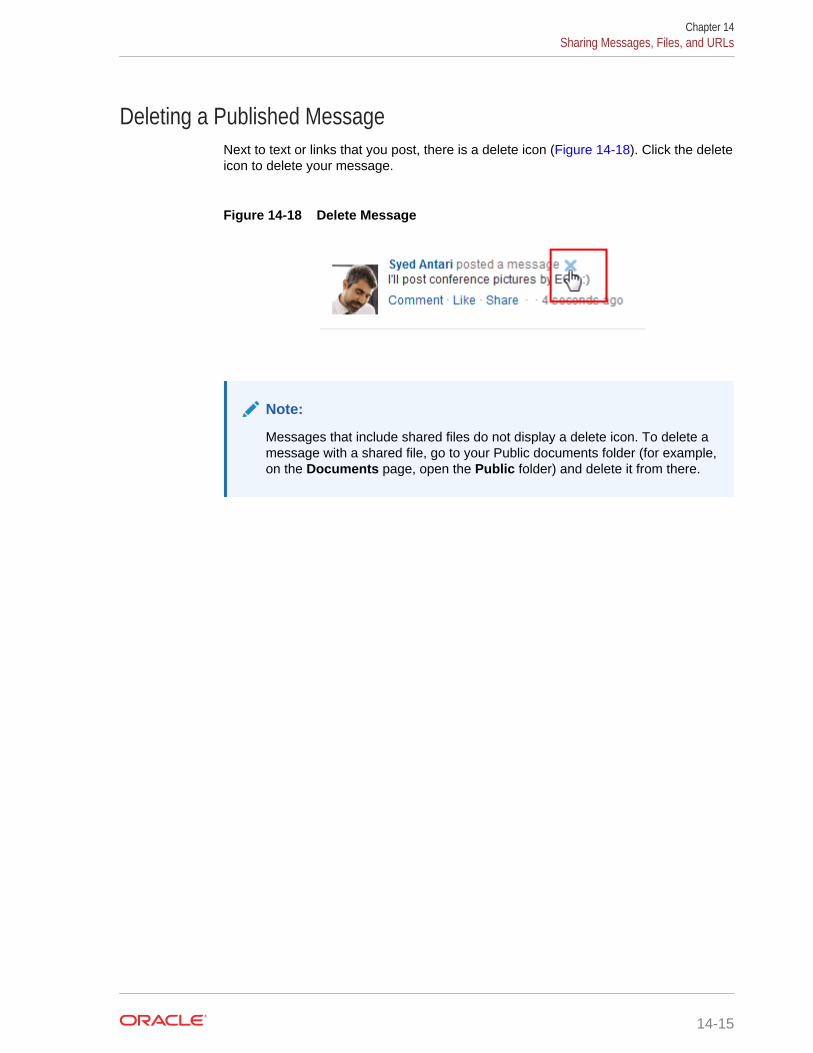
Deleting a Published MessageNext to text or links that you post, there is a delete icon (Figure 14-18). Click the deleteicon to delete your message.
Figure 14-18 Delete Message
Note:
Messages that include shared files do not display a delete icon. To delete amessage with a shared file, go to your Public documents folder (for example,on the Documents page, open the Public folder) and delete it from there.
Chapter 14Sharing Messages, Files, and URLs
14-15
15Viewing and Participating in Discussions
Create and participate in text-based discussions with other members of a portal. Usediscussion forums to preserve and revisit discussions.
Note:
Oracle WebCenter Portal has deprecated the support for Jive features(announcements and discussions). If you have upgraded from a prior releaseto Release 12c (12.2.1.4.0), Jive features remain available in your upgradedinstance but Oracle support is not provided for these features. In the nextrelease, Jive features will not be available even in the upgraded instances
Topics:
• About Discussions
• Working with Discussions
Permissions:
This chapter is intended for WebCenter Portal users who want to view,create, and manage portal discussion forums and topics. To perform thetasks in this chapter, you need one or more of the following portal-levelpermissions:
• Create, Edit, and Delete Discussions
• Create and Edit Discussions
• View Discussions
Note:
Tasks discussed in this chapter are not available if discussions are notenabled and exposed. The portal manager adds and configures discussions,as described in Adding Discussion Forums to a Portal in Building Portals withOracle WebCenter Portal.
About DiscussionsYou can use the discussions feature to post, respond to, and preserve topicalinformation in discussion forums scoped to portals or to the entire WebCenter Portal
15-1
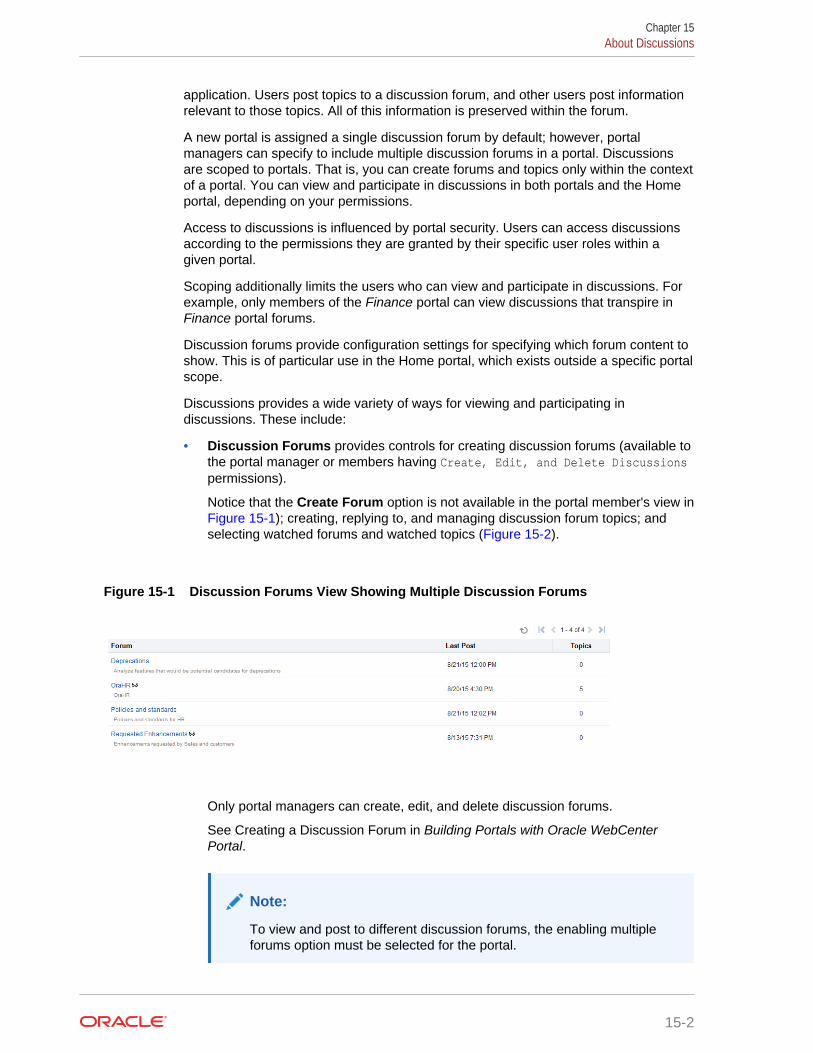
application. Users post topics to a discussion forum, and other users post informationrelevant to those topics. All of this information is preserved within the forum.
A new portal is assigned a single discussion forum by default; however, portalmanagers can specify to include multiple discussion forums in a portal. Discussionsare scoped to portals. That is, you can create forums and topics only within the contextof a portal. You can view and participate in discussions in both portals and the Homeportal, depending on your permissions.
Access to discussions is influenced by portal security. Users can access discussionsaccording to the permissions they are granted by their specific user roles within agiven portal.
Scoping additionally limits the users who can view and participate in discussions. Forexample, only members of the Finance portal can view discussions that transpire inFinance portal forums.
Discussion forums provide configuration settings for specifying which forum content toshow. This is of particular use in the Home portal, which exists outside a specific portalscope.
Discussions provides a wide variety of ways for viewing and participating indiscussions. These include:
• Discussion Forums provides controls for creating discussion forums (available tothe portal manager or members having Create, Edit, and Delete Discussionspermissions).
Notice that the Create Forum option is not available in the portal member's view in Figure 15-1); creating, replying to, and managing discussion forum topics; andselecting watched forums and watched topics (Figure 15-2).
Figure 15-1 Discussion Forums View Showing Multiple Discussion Forums
Only portal managers can create, edit, and delete discussion forums.
See Creating a Discussion Forum in Building Portals with Oracle WebCenterPortal.
Note:
To view and post to different discussion forums, the enabling multipleforums option must be selected for the portal.
Chapter 15About Discussions
15-2
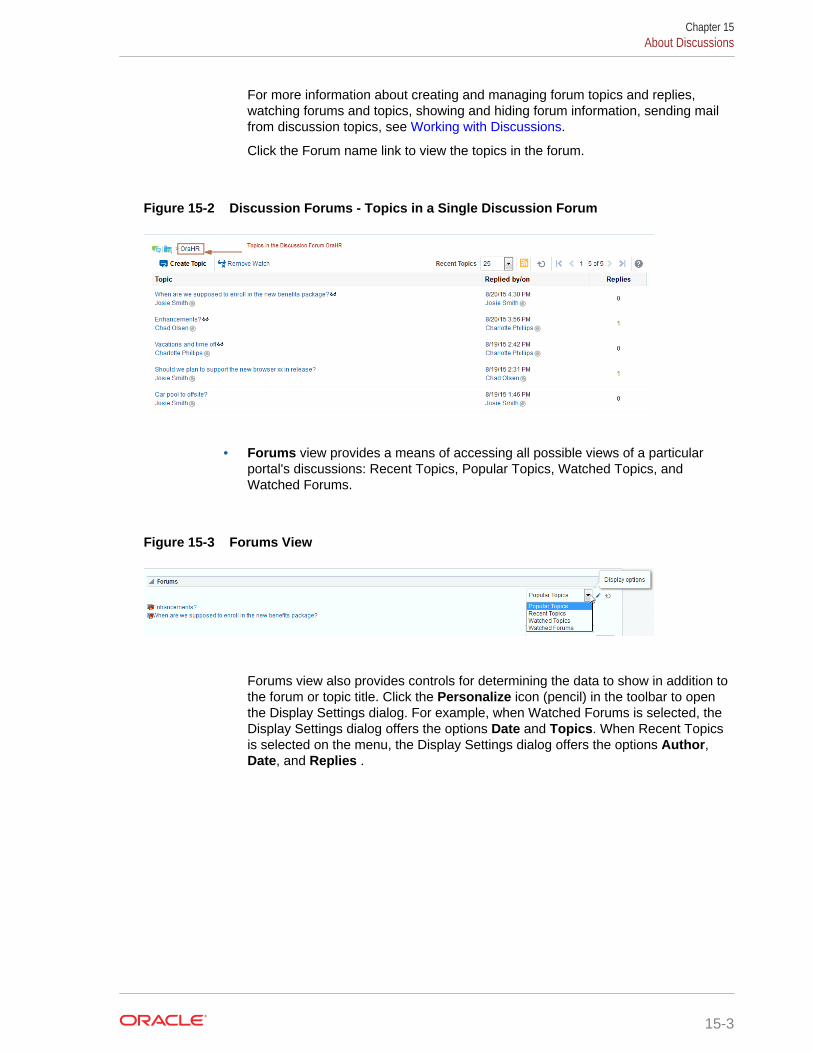
For more information about creating and managing forum topics and replies,watching forums and topics, showing and hiding forum information, sending mailfrom discussion topics, see Working with Discussions.
Click the Forum name link to view the topics in the forum.
Figure 15-2 Discussion Forums - Topics in a Single Discussion Forum
• Forums view provides a means of accessing all possible views of a particularportal's discussions: Recent Topics, Popular Topics, Watched Topics, andWatched Forums.
Figure 15-3 Forums View
Forums view also provides controls for determining the data to show in addition tothe forum or topic title. Click the Personalize icon (pencil) in the toolbar to openthe Display Settings dialog. For example, when Watched Forums is selected, theDisplay Settings dialog offers the options Date and Topics. When Recent Topicsis selected on the menu, the Display Settings dialog offers the options Author,Date, and Replies .
Chapter 15About Discussions
15-3
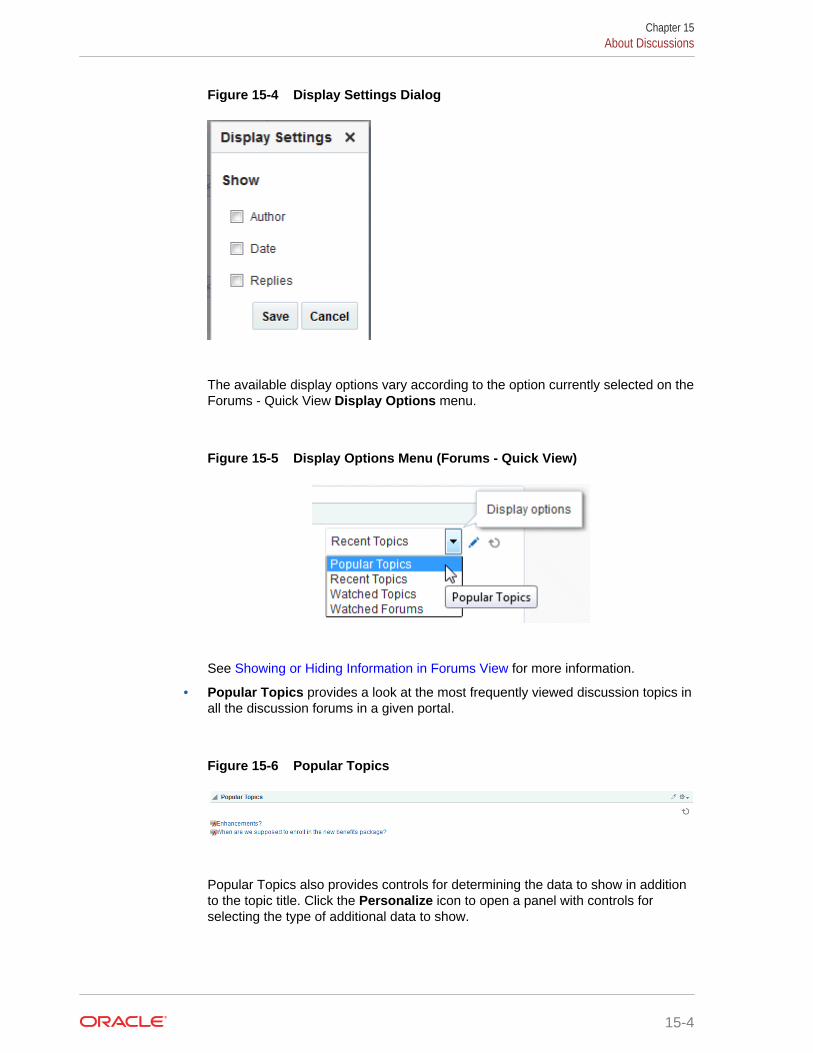
Figure 15-4 Display Settings Dialog
The available display options vary according to the option currently selected on theForums - Quick View Display Options menu.
Figure 15-5 Display Options Menu (Forums - Quick View)
See Showing or Hiding Information in Forums View for more information.
• Popular Topics provides a look at the most frequently viewed discussion topics inall the discussion forums in a given portal.
Figure 15-6 Popular Topics
Popular Topics also provides controls for determining the data to show in additionto the topic title. Click the Personalize icon to open a panel with controls forselecting the type of additional data to show.
Chapter 15About Discussions
15-4
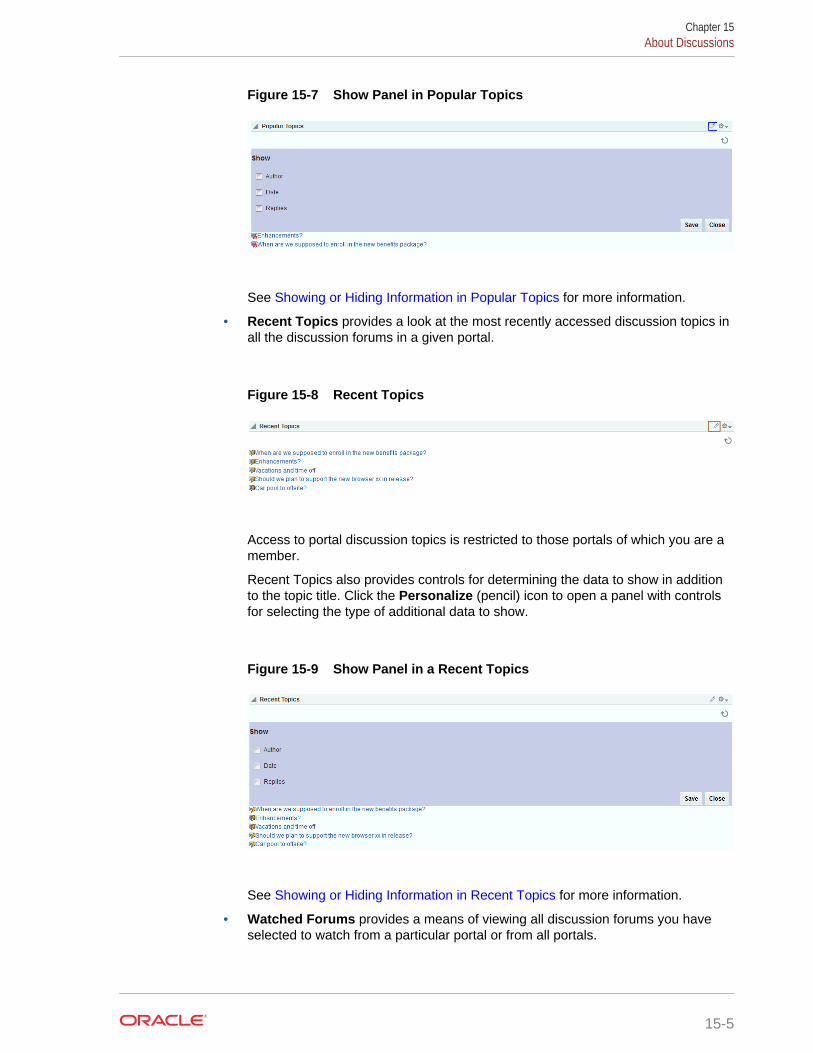
Figure 15-7 Show Panel in Popular Topics
See Showing or Hiding Information in Popular Topics for more information.
• Recent Topics provides a look at the most recently accessed discussion topics inall the discussion forums in a given portal.
Figure 15-8 Recent Topics
Access to portal discussion topics is restricted to those portals of which you are amember.
Recent Topics also provides controls for determining the data to show in additionto the topic title. Click the Personalize (pencil) icon to open a panel with controlsfor selecting the type of additional data to show.
Figure 15-9 Show Panel in a Recent Topics
See Showing or Hiding Information in Recent Topics for more information.
• Watched Forums provides a means of viewing all discussion forums you haveselected to watch from a particular portal or from all portals.
Chapter 15About Discussions
15-5
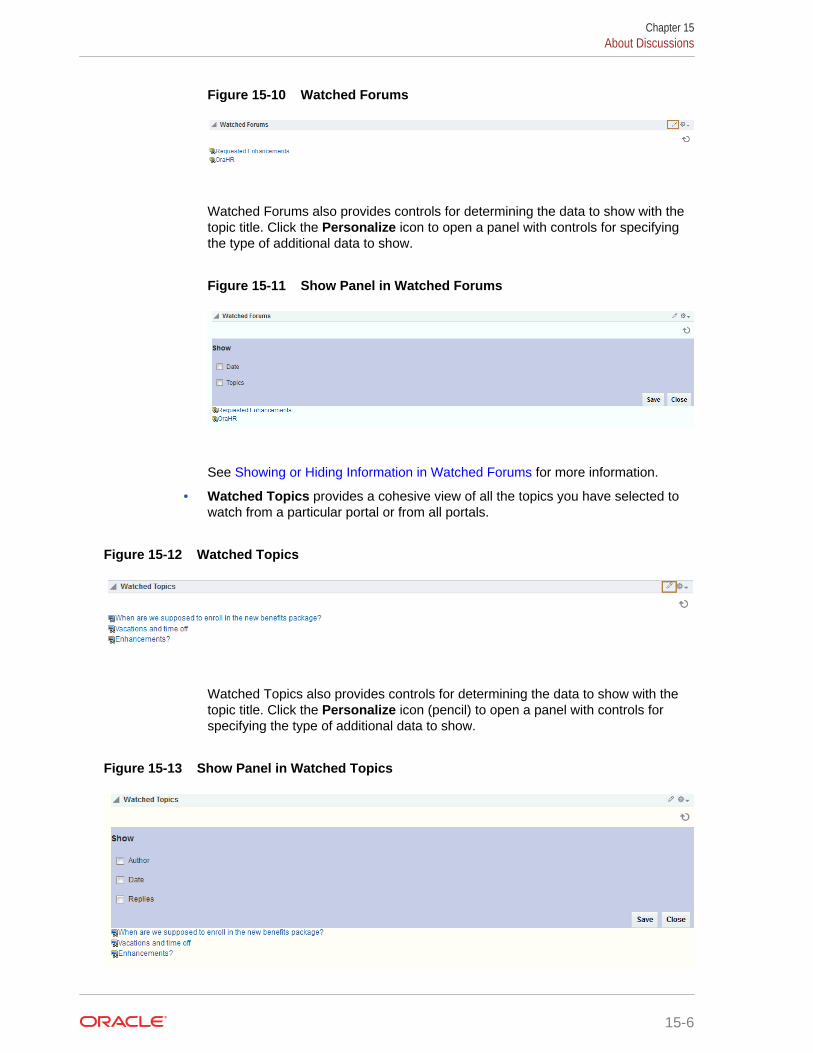
Figure 15-10 Watched Forums
Watched Forums also provides controls for determining the data to show with thetopic title. Click the Personalize icon to open a panel with controls for specifyingthe type of additional data to show.
Figure 15-11 Show Panel in Watched Forums
See Showing or Hiding Information in Watched Forums for more information.
• Watched Topics provides a cohesive view of all the topics you have selected towatch from a particular portal or from all portals.
Figure 15-12 Watched Topics
Watched Topics also provides controls for determining the data to show with thetopic title. Click the Personalize icon (pencil) to open a panel with controls forspecifying the type of additional data to show.
Figure 15-13 Show Panel in Watched Topics
Chapter 15About Discussions
15-6
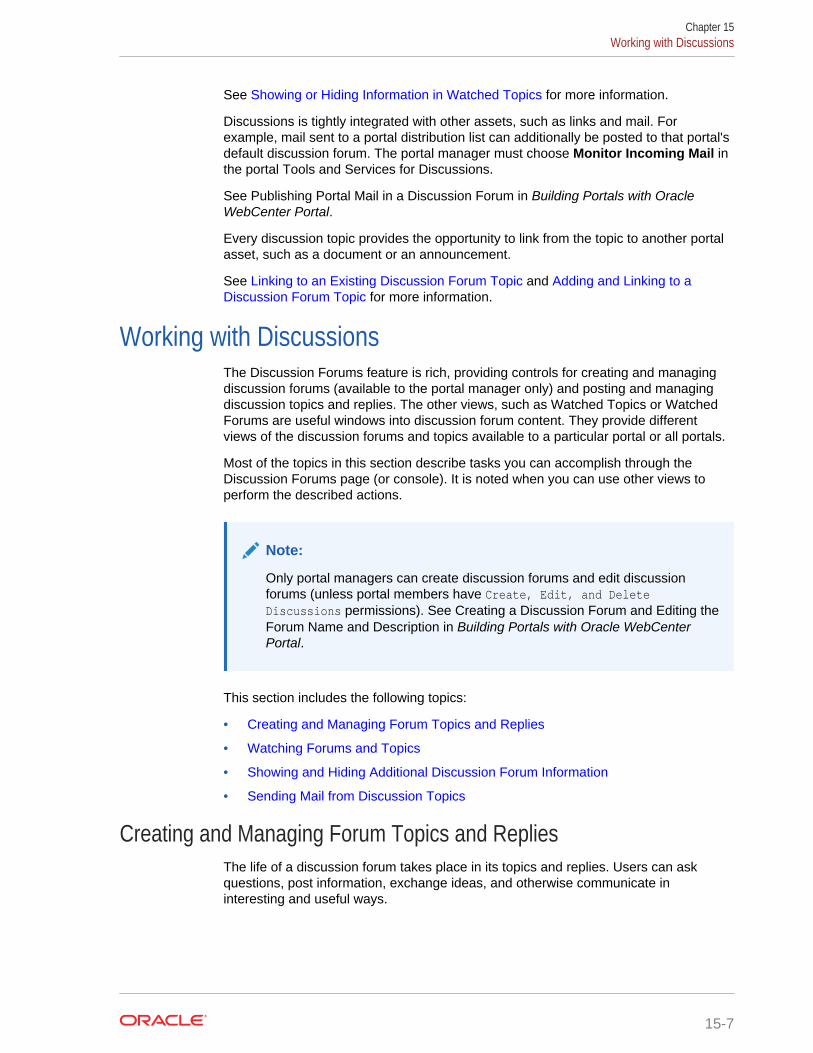
See Showing or Hiding Information in Watched Topics for more information.
Discussions is tightly integrated with other assets, such as links and mail. Forexample, mail sent to a portal distribution list can additionally be posted to that portal'sdefault discussion forum. The portal manager must choose Monitor Incoming Mail inthe portal Tools and Services for Discussions.
See Publishing Portal Mail in a Discussion Forum in Building Portals with OracleWebCenter Portal.
Every discussion topic provides the opportunity to link from the topic to another portalasset, such as a document or an announcement.
See Linking to an Existing Discussion Forum Topic and Adding and Linking to aDiscussion Forum Topic for more information.
Working with DiscussionsThe Discussion Forums feature is rich, providing controls for creating and managingdiscussion forums (available to the portal manager only) and posting and managingdiscussion topics and replies. The other views, such as Watched Topics or WatchedForums are useful windows into discussion forum content. They provide differentviews of the discussion forums and topics available to a particular portal or all portals.
Most of the topics in this section describe tasks you can accomplish through theDiscussion Forums page (or console). It is noted when you can use other views toperform the described actions.
Note:
Only portal managers can create discussion forums and edit discussionforums (unless portal members have Create, Edit, and DeleteDiscussions permissions). See Creating a Discussion Forum and Editing theForum Name and Description in Building Portals with Oracle WebCenterPortal.
This section includes the following topics:
• Creating and Managing Forum Topics and Replies
• Watching Forums and Topics
• Showing and Hiding Additional Discussion Forum Information
• Sending Mail from Discussion Topics
Creating and Managing Forum Topics and RepliesThe life of a discussion forum takes place in its topics and replies. Users can askquestions, post information, exchange ideas, and otherwise communicate ininteresting and useful ways.
Chapter 15Working with Discussions
15-7
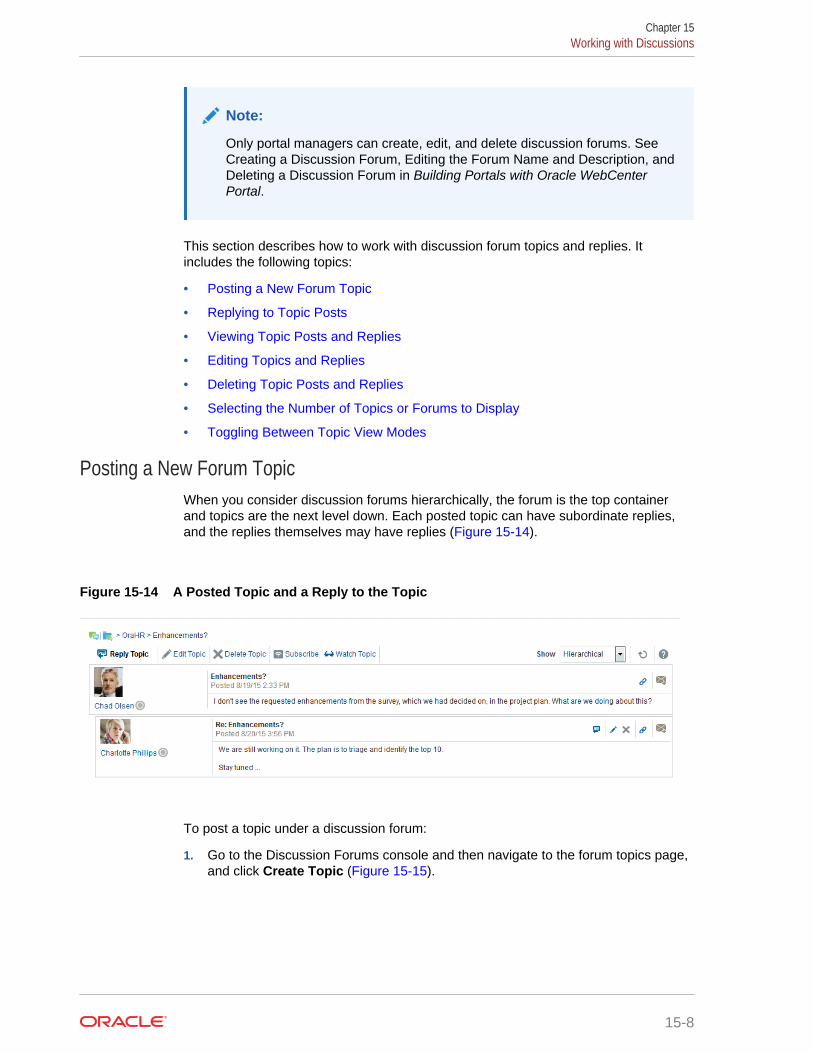
Note:
Only portal managers can create, edit, and delete discussion forums. See Creating a Discussion Forum, Editing the Forum Name and Description, and Deleting a Discussion Forum in Building Portals with Oracle WebCenterPortal.
This section describes how to work with discussion forum topics and replies. Itincludes the following topics:
• Posting a New Forum Topic
• Replying to Topic Posts
• Viewing Topic Posts and Replies
• Editing Topics and Replies
• Deleting Topic Posts and Replies
• Selecting the Number of Topics or Forums to Display
• Toggling Between Topic View Modes
Posting a New Forum TopicWhen you consider discussion forums hierarchically, the forum is the top containerand topics are the next level down. Each posted topic can have subordinate replies,and the replies themselves may have replies (Figure 15-14).
Figure 15-14 A Posted Topic and a Reply to the Topic
To post a topic under a discussion forum:
1. Go to the Discussion Forums console and then navigate to the forum topics page,and click Create Topic (Figure 15-15).
Chapter 15Working with Discussions
15-8
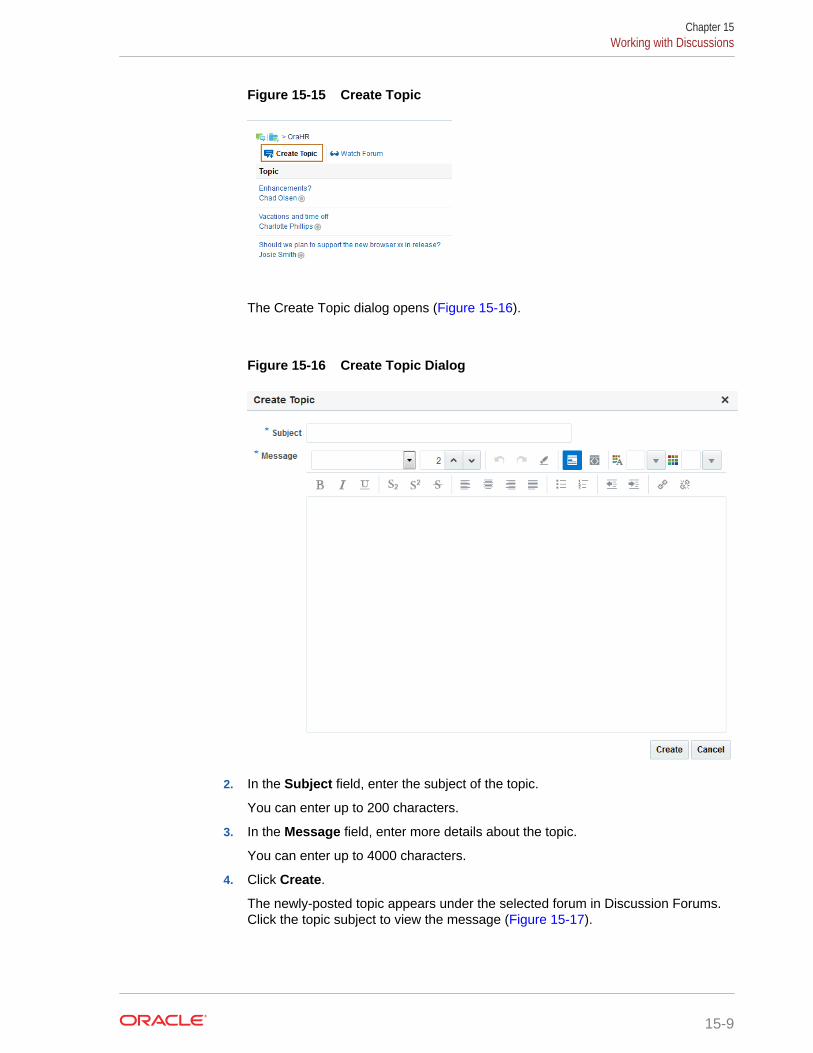
Figure 15-15 Create Topic
The Create Topic dialog opens (Figure 15-16).
Figure 15-16 Create Topic Dialog
2. In the Subject field, enter the subject of the topic.
You can enter up to 200 characters.
3. In the Message field, enter more details about the topic.
You can enter up to 4000 characters.
4. Click Create.
The newly-posted topic appears under the selected forum in Discussion Forums.Click the topic subject to view the message (Figure 15-17).
Chapter 15Working with Discussions
15-9
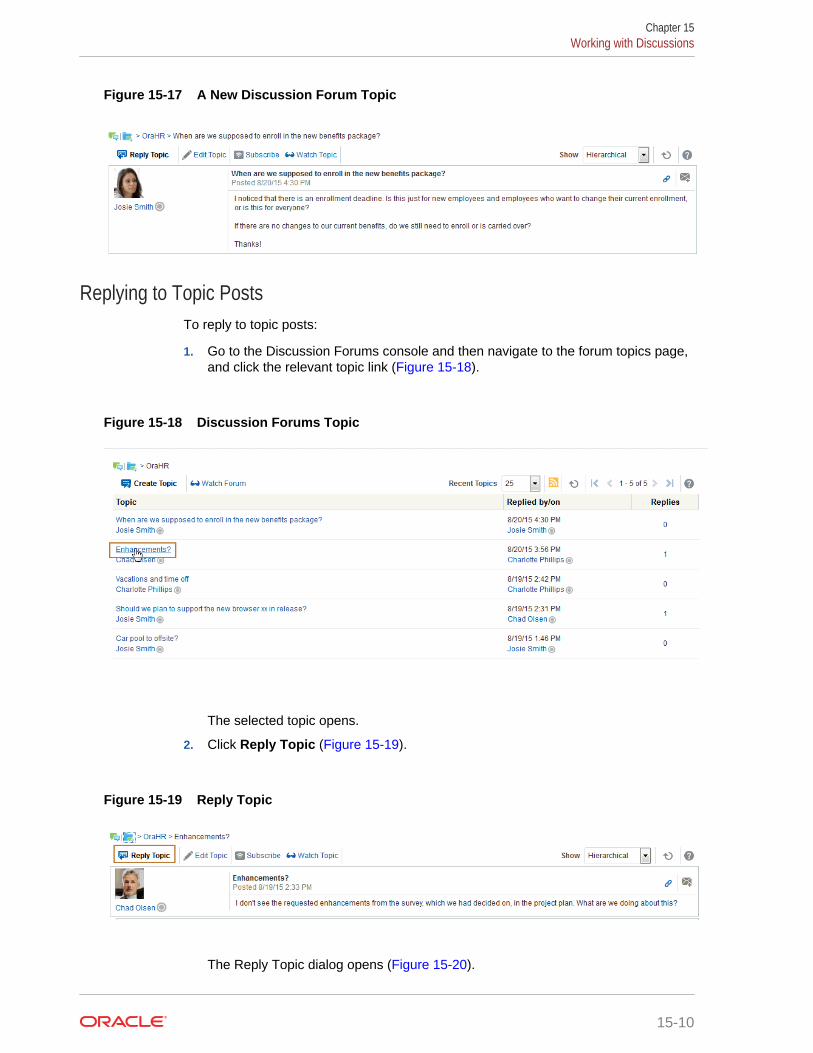
Figure 15-17 A New Discussion Forum Topic
Replying to Topic PostsTo reply to topic posts:
1. Go to the Discussion Forums console and then navigate to the forum topics page,and click the relevant topic link (Figure 15-18).
Figure 15-18 Discussion Forums Topic
The selected topic opens.
2. Click Reply Topic (Figure 15-19).
Figure 15-19 Reply Topic
The Reply Topic dialog opens (Figure 15-20).
Chapter 15Working with Discussions
15-10
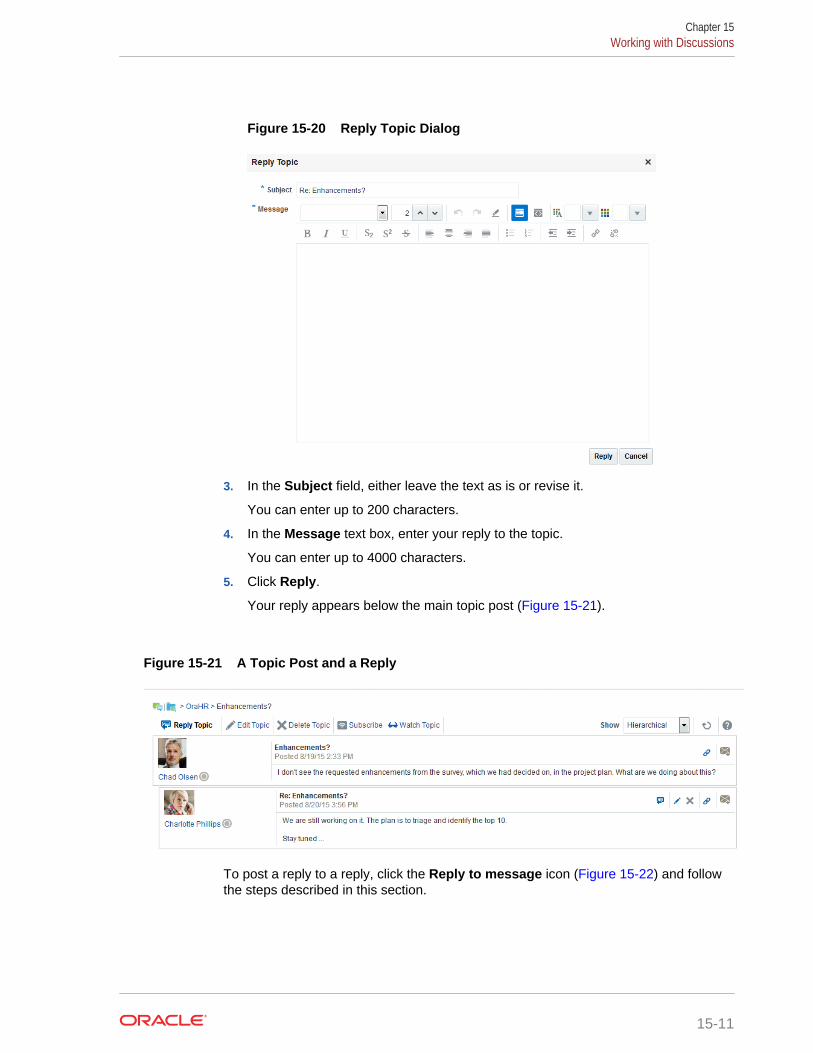
Figure 15-20 Reply Topic Dialog
3. In the Subject field, either leave the text as is or revise it.
You can enter up to 200 characters.
4. In the Message text box, enter your reply to the topic.
You can enter up to 4000 characters.
5. Click Reply.
Your reply appears below the main topic post (Figure 15-21).
Figure 15-21 A Topic Post and a Reply
To post a reply to a reply, click the Reply to message icon (Figure 15-22) and followthe steps described in this section.
Chapter 15Working with Discussions
15-11
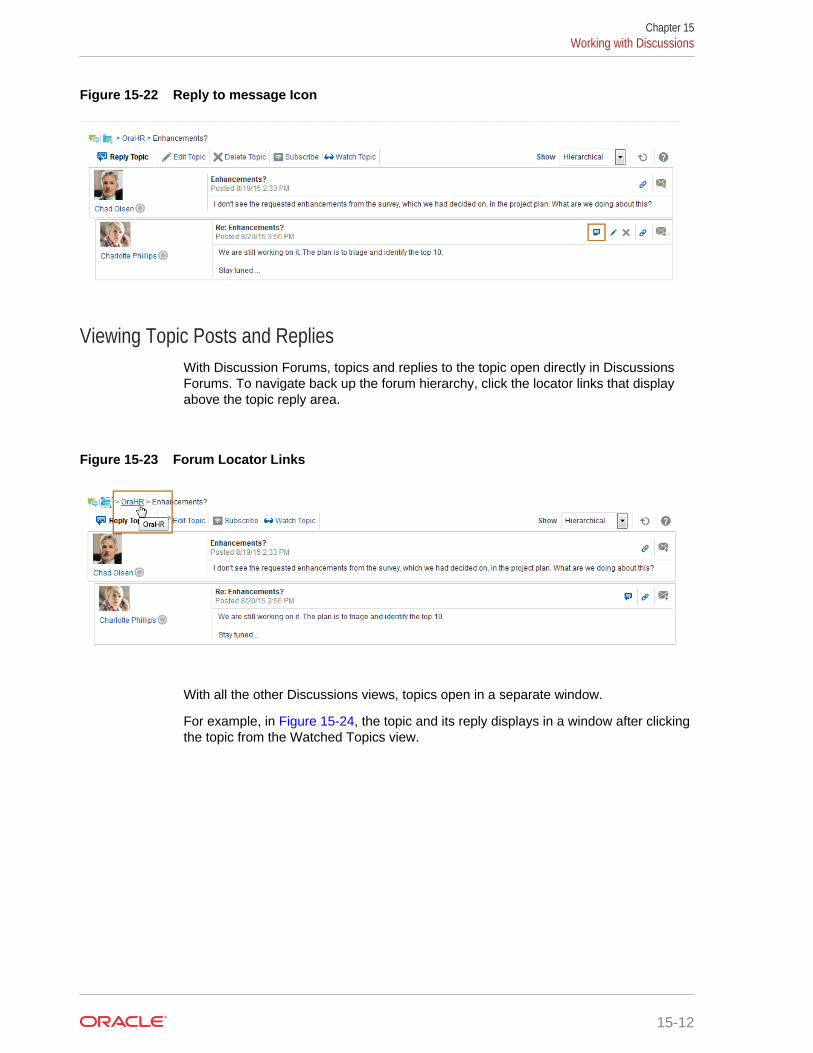
Figure 15-22 Reply to message Icon
Viewing Topic Posts and RepliesWith Discussion Forums, topics and replies to the topic open directly in DiscussionsForums. To navigate back up the forum hierarchy, click the locator links that displayabove the topic reply area.
Figure 15-23 Forum Locator Links
With all the other Discussions views, topics open in a separate window.
For example, in Figure 15-24, the topic and its reply displays in a window after clickingthe topic from the Watched Topics view.
Chapter 15Working with Discussions
15-12

Figure 15-24 Viewing a Topic in Discussions - Watched Topics
To return to the main view, click Close.
Editing Topics and RepliesAfter you post a topic or a reply, you retain the option of returning to it and revising itscontent. Only you, as the topic author, and portal managers (or a member with therequired permissions to edit discussions) can edit your replies. This section describeshow to edit topics and replies.
To edit a topic or a reply:
1. Go the Discussion Forum that displays the topic or reply you want to edit, and clickthe relevant topic.
The selected topic opens.
2. To edit a topic or a reply, do the following:
• To edit the topic, click Edit Topic (Figure 15-25).
Figure 15-25 Edit Topic
Chapter 15Working with Discussions
15-13
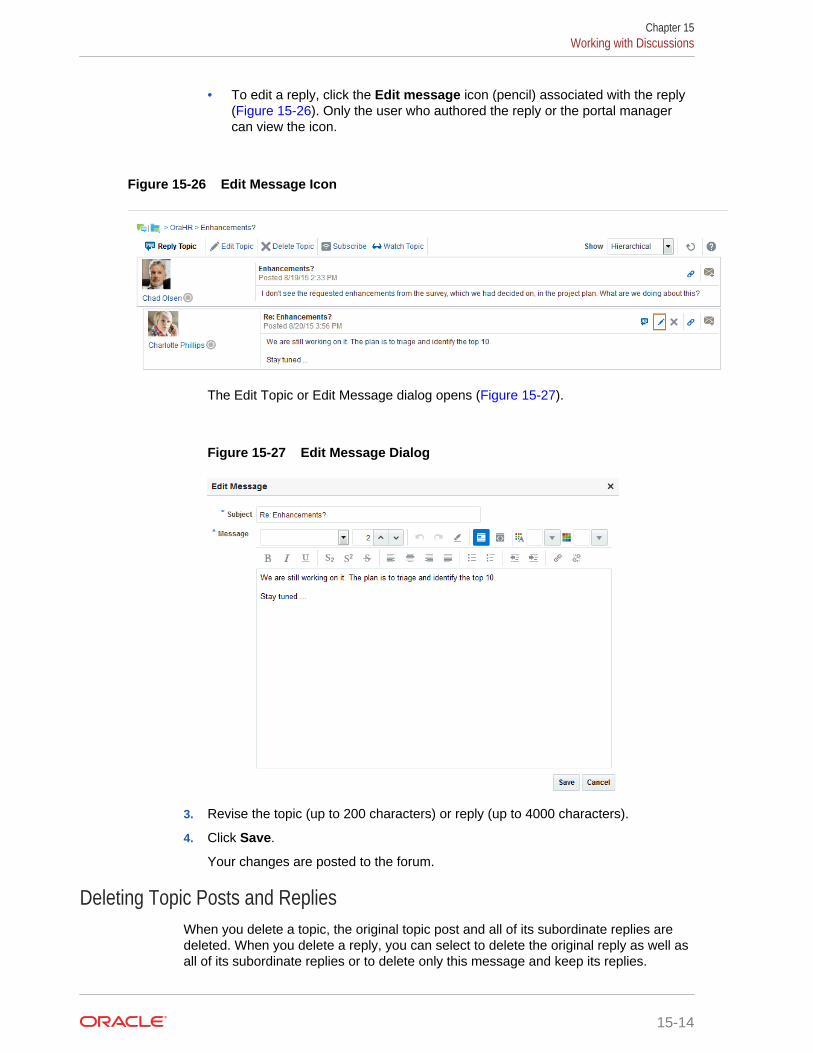
• To edit a reply, click the Edit message icon (pencil) associated with the reply(Figure 15-26). Only the user who authored the reply or the portal managercan view the icon.
Figure 15-26 Edit Message Icon
The Edit Topic or Edit Message dialog opens (Figure 15-27).
Figure 15-27 Edit Message Dialog
3. Revise the topic (up to 200 characters) or reply (up to 4000 characters).
4. Click Save.
Your changes are posted to the forum.
Deleting Topic Posts and RepliesWhen you delete a topic, the original topic post and all of its subordinate replies aredeleted. When you delete a reply, you can select to delete the original reply as well asall of its subordinate replies or to delete only this message and keep its replies.
Chapter 15Working with Discussions
15-14
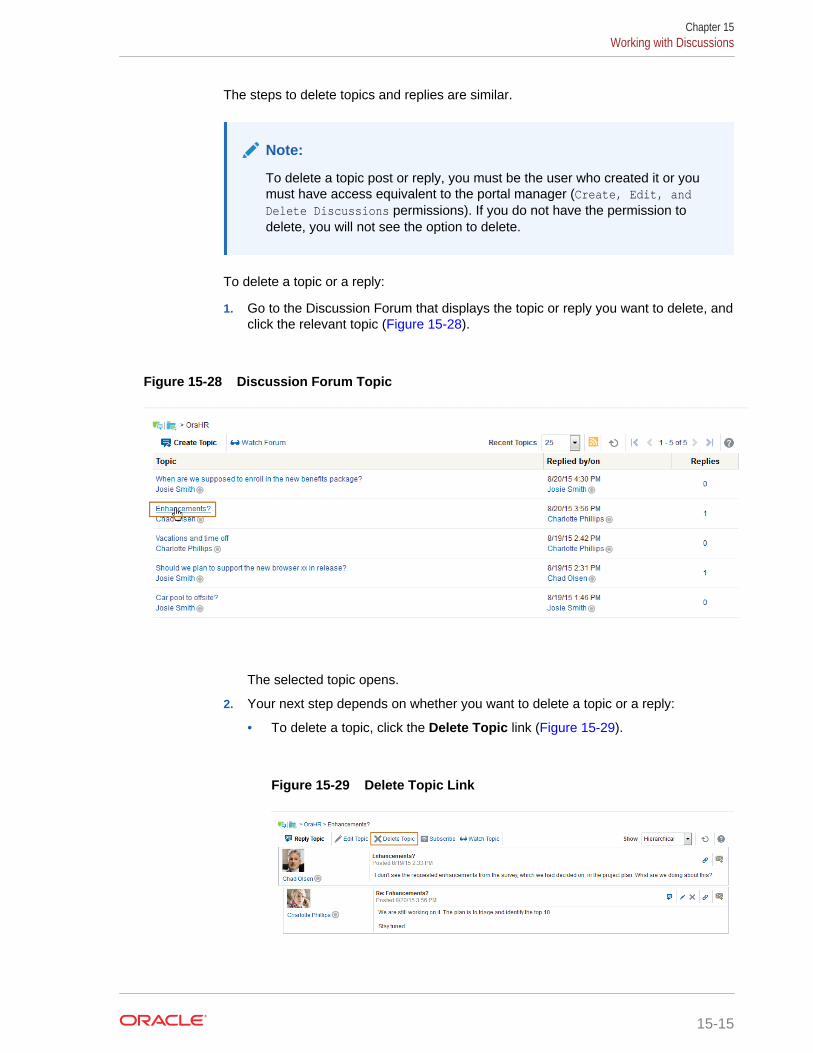
The steps to delete topics and replies are similar.
Note:
To delete a topic post or reply, you must be the user who created it or youmust have access equivalent to the portal manager (Create, Edit, andDelete Discussions permissions). If you do not have the permission todelete, you will not see the option to delete.
To delete a topic or a reply:
1. Go to the Discussion Forum that displays the topic or reply you want to delete, andclick the relevant topic (Figure 15-28).
Figure 15-28 Discussion Forum Topic
The selected topic opens.
2. Your next step depends on whether you want to delete a topic or a reply:
• To delete a topic, click the Delete Topic link (Figure 15-29).
Figure 15-29 Delete Topic Link
Chapter 15Working with Discussions
15-15
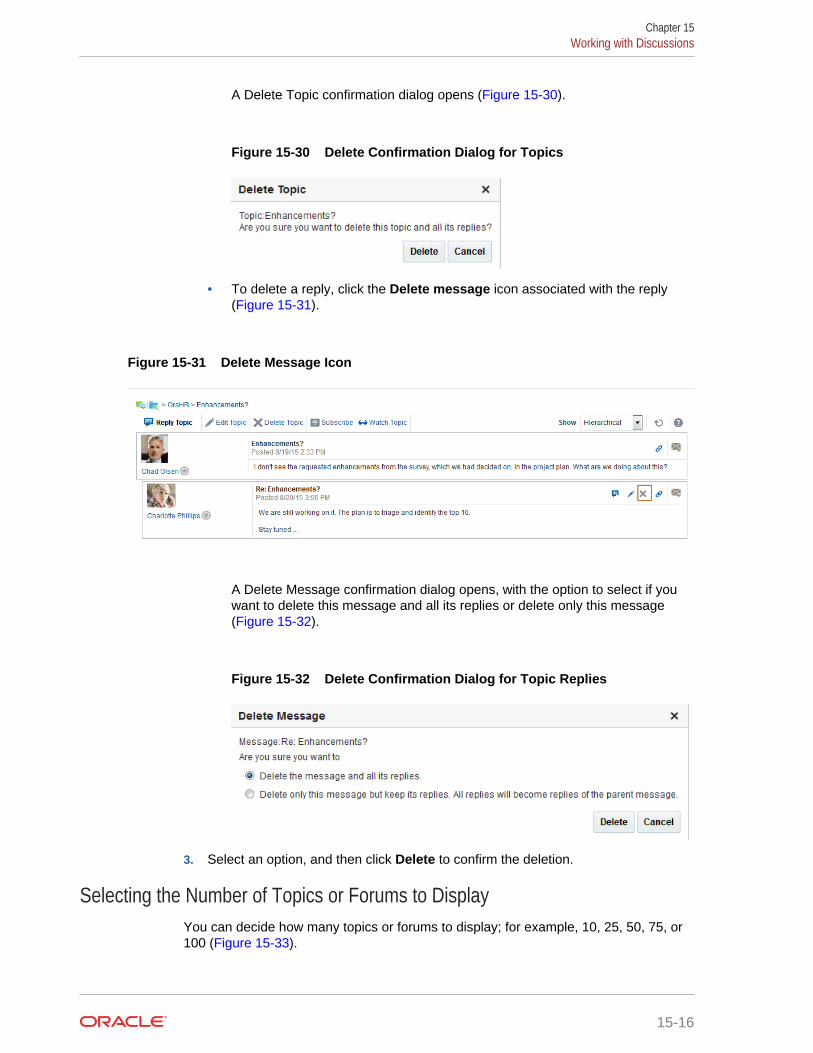
A Delete Topic confirmation dialog opens (Figure 15-30).
Figure 15-30 Delete Confirmation Dialog for Topics
• To delete a reply, click the Delete message icon associated with the reply(Figure 15-31).
Figure 15-31 Delete Message Icon
A Delete Message confirmation dialog opens, with the option to select if youwant to delete this message and all its replies or delete only this message(Figure 15-32).
Figure 15-32 Delete Confirmation Dialog for Topic Replies
3. Select an option, and then click Delete to confirm the deletion.
Selecting the Number of Topics or Forums to DisplayYou can decide how many topics or forums to display; for example, 10, 25, 50, 75, or100 (Figure 15-33).
Chapter 15Working with Discussions
15-16
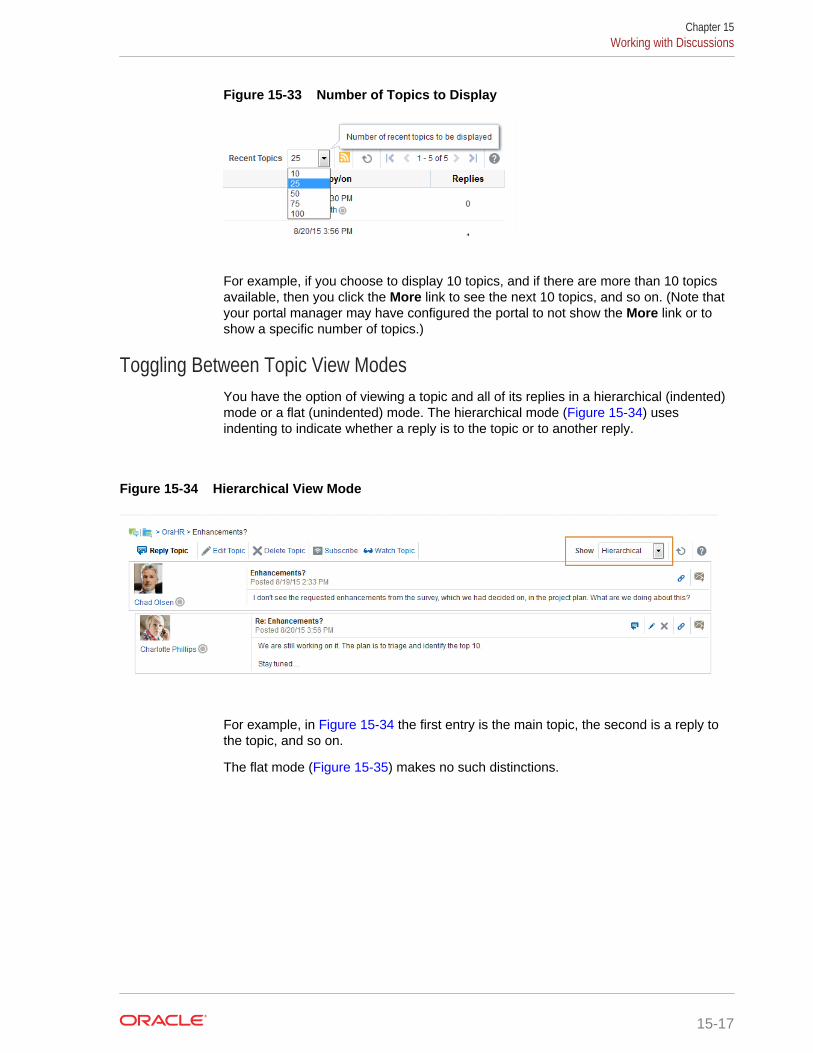
Figure 15-33 Number of Topics to Display
For example, if you choose to display 10 topics, and if there are more than 10 topicsavailable, then you click the More link to see the next 10 topics, and so on. (Note thatyour portal manager may have configured the portal to not show the More link or toshow a specific number of topics.)
Toggling Between Topic View ModesYou have the option of viewing a topic and all of its replies in a hierarchical (indented)mode or a flat (unindented) mode. The hierarchical mode (Figure 15-34) usesindenting to indicate whether a reply is to the topic or to another reply.
Figure 15-34 Hierarchical View Mode
For example, in Figure 15-34 the first entry is the main topic, the second is a reply tothe topic, and so on.
The flat mode (Figure 15-35) makes no such distinctions.
Chapter 15Working with Discussions
15-17
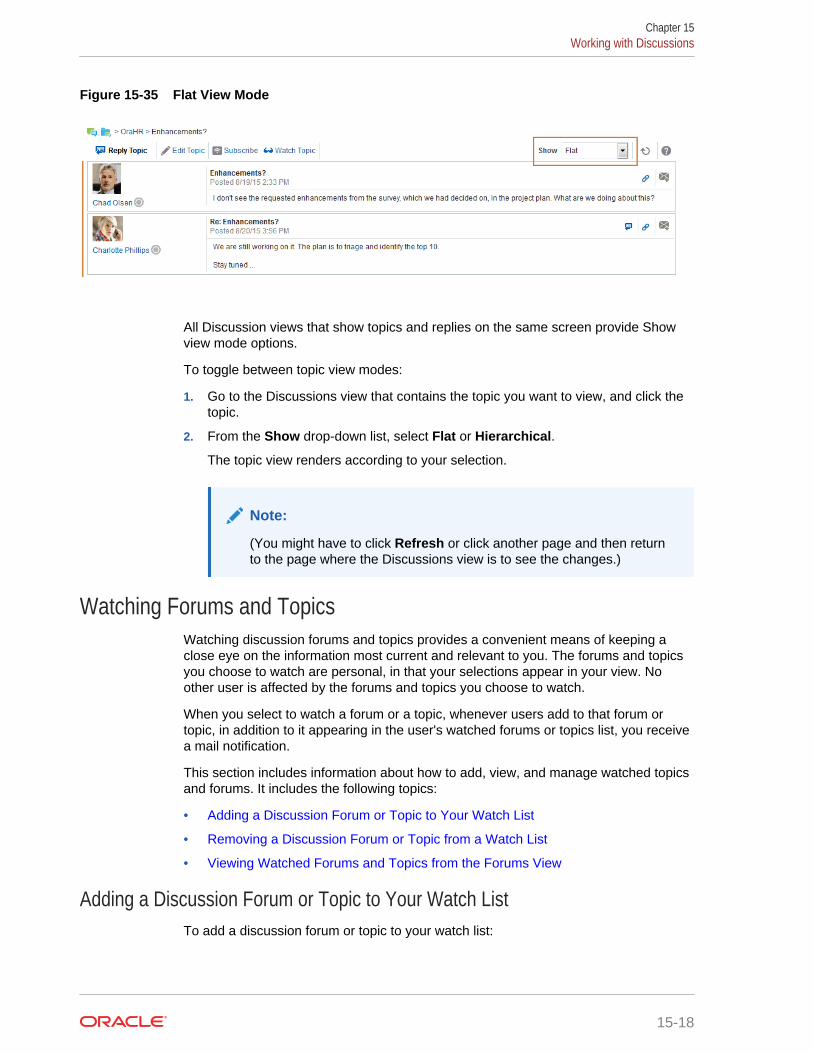
Figure 15-35 Flat View Mode
All Discussion views that show topics and replies on the same screen provide Showview mode options.
To toggle between topic view modes:
1. Go to the Discussions view that contains the topic you want to view, and click thetopic.
2. From the Show drop-down list, select Flat or Hierarchical.
The topic view renders according to your selection.
Note:
(You might have to click Refresh or click another page and then returnto the page where the Discussions view is to see the changes.)
Watching Forums and TopicsWatching discussion forums and topics provides a convenient means of keeping aclose eye on the information most current and relevant to you. The forums and topicsyou choose to watch are personal, in that your selections appear in your view. Noother user is affected by the forums and topics you choose to watch.
When you select to watch a forum or a topic, whenever users add to that forum ortopic, in addition to it appearing in the user's watched forums or topics list, you receivea mail notification.
This section includes information about how to add, view, and manage watched topicsand forums. It includes the following topics:
• Adding a Discussion Forum or Topic to Your Watch List
• Removing a Discussion Forum or Topic from a Watch List
• Viewing Watched Forums and Topics from the Forums View
Adding a Discussion Forum or Topic to Your Watch ListTo add a discussion forum or topic to your watch list:
Chapter 15Working with Discussions
15-18
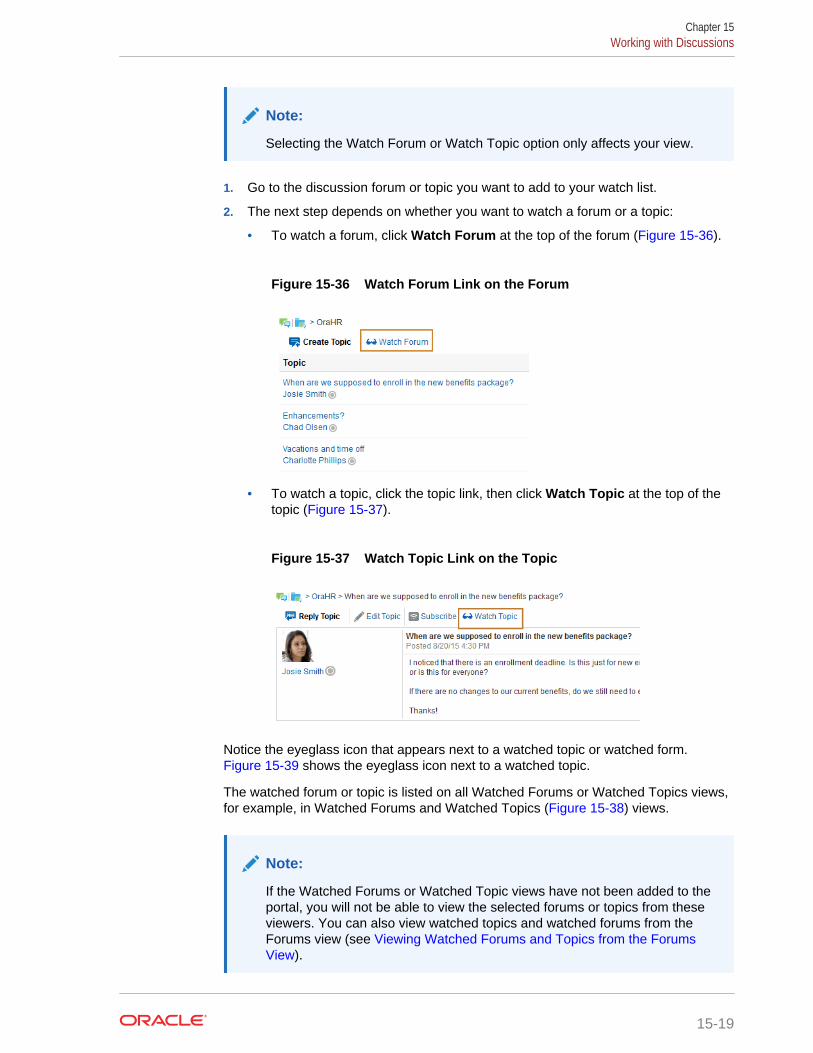
Note:
Selecting the Watch Forum or Watch Topic option only affects your view.
1. Go to the discussion forum or topic you want to add to your watch list.
2. The next step depends on whether you want to watch a forum or a topic:
• To watch a forum, click Watch Forum at the top of the forum (Figure 15-36).
Figure 15-36 Watch Forum Link on the Forum
• To watch a topic, click the topic link, then click Watch Topic at the top of thetopic (Figure 15-37).
Figure 15-37 Watch Topic Link on the Topic
Notice the eyeglass icon that appears next to a watched topic or watched form. Figure 15-39 shows the eyeglass icon next to a watched topic.
The watched forum or topic is listed on all Watched Forums or Watched Topics views,for example, in Watched Forums and Watched Topics (Figure 15-38) views.
Note:
If the Watched Forums or Watched Topic views have not been added to theportal, you will not be able to view the selected forums or topics from theseviewers. You can also view watched topics and watched forums from theForums view (see Viewing Watched Forums and Topics from the ForumsView).
Chapter 15Working with Discussions
15-19
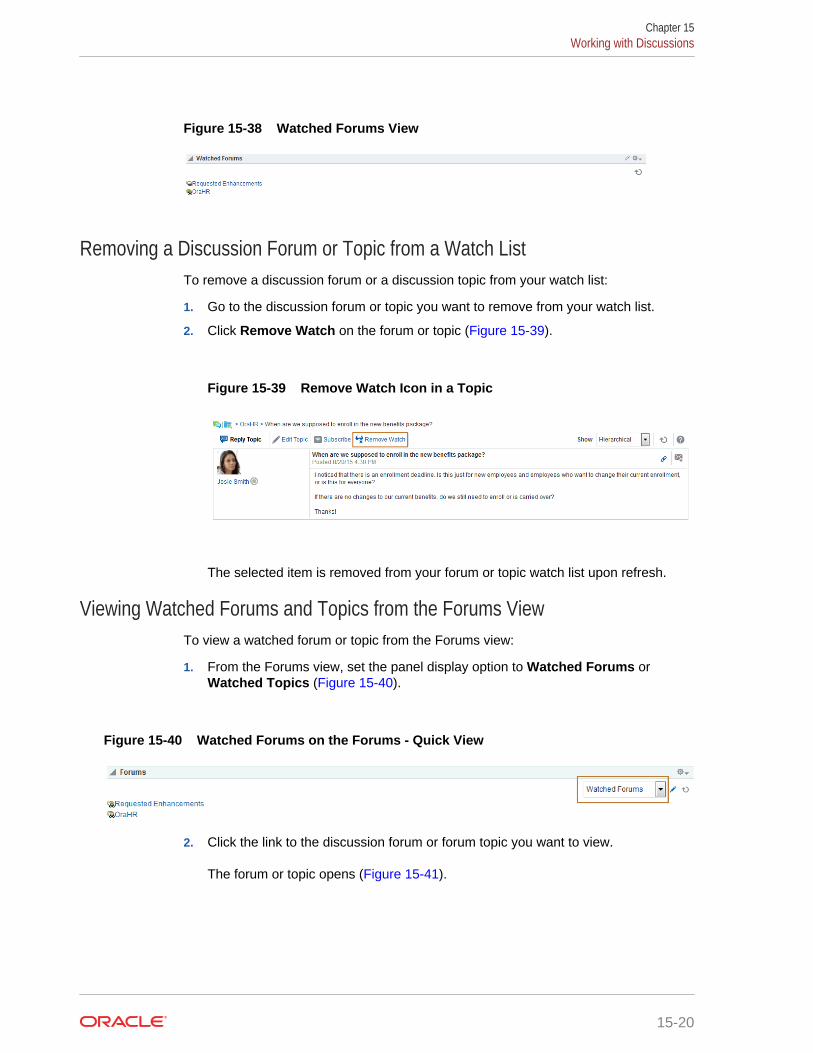
Figure 15-38 Watched Forums View
Removing a Discussion Forum or Topic from a Watch ListTo remove a discussion forum or a discussion topic from your watch list:
1. Go to the discussion forum or topic you want to remove from your watch list.
2. Click Remove Watch on the forum or topic (Figure 15-39).
Figure 15-39 Remove Watch Icon in a Topic
The selected item is removed from your forum or topic watch list upon refresh.
Viewing Watched Forums and Topics from the Forums ViewTo view a watched forum or topic from the Forums view:
1. From the Forums view, set the panel display option to Watched Forums orWatched Topics (Figure 15-40).
Figure 15-40 Watched Forums on the Forums - Quick View
2. Click the link to the discussion forum or forum topic you want to view.
The forum or topic opens (Figure 15-41).
Chapter 15Working with Discussions
15-20
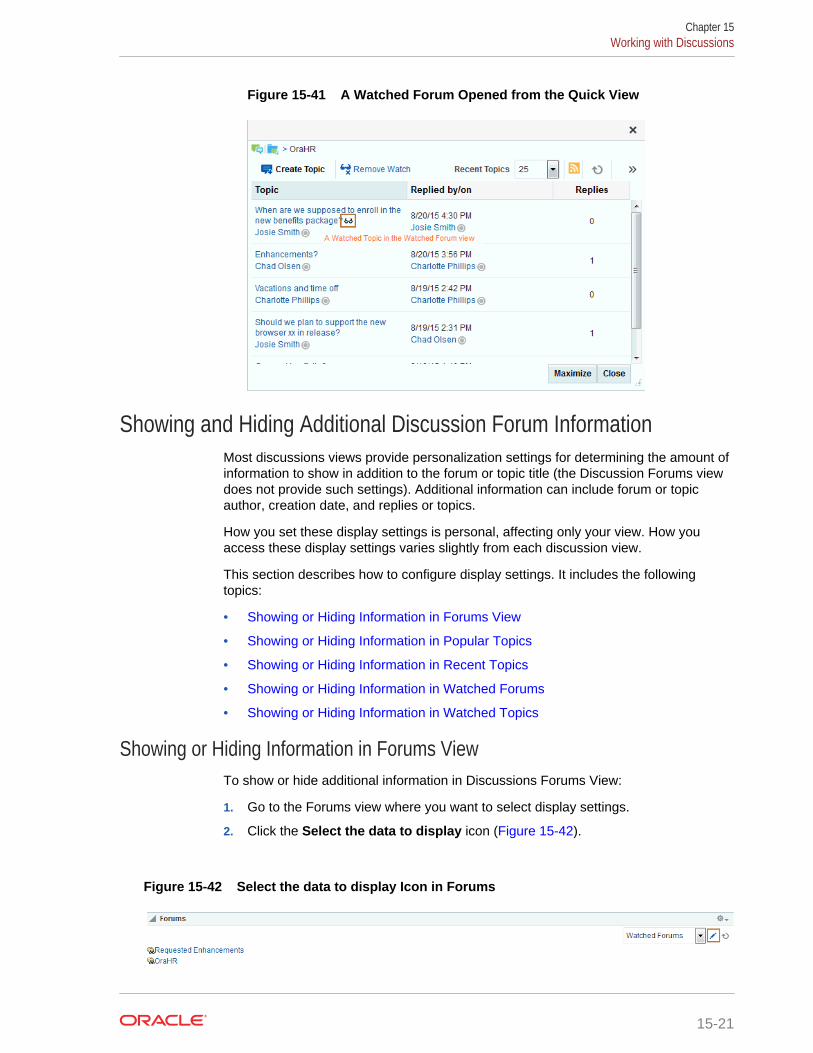
Figure 15-41 A Watched Forum Opened from the Quick View
Showing and Hiding Additional Discussion Forum InformationMost discussions views provide personalization settings for determining the amount ofinformation to show in addition to the forum or topic title (the Discussion Forums viewdoes not provide such settings). Additional information can include forum or topicauthor, creation date, and replies or topics.
How you set these display settings is personal, affecting only your view. How youaccess these display settings varies slightly from each discussion view.
This section describes how to configure display settings. It includes the followingtopics:
• Showing or Hiding Information in Forums View
• Showing or Hiding Information in Popular Topics
• Showing or Hiding Information in Recent Topics
• Showing or Hiding Information in Watched Forums
• Showing or Hiding Information in Watched Topics
Showing or Hiding Information in Forums ViewTo show or hide additional information in Discussions Forums View:
1. Go to the Forums view where you want to select display settings.
2. Click the Select the data to display icon (Figure 15-42).
Figure 15-42 Select the data to display Icon in Forums
Chapter 15Working with Discussions
15-21
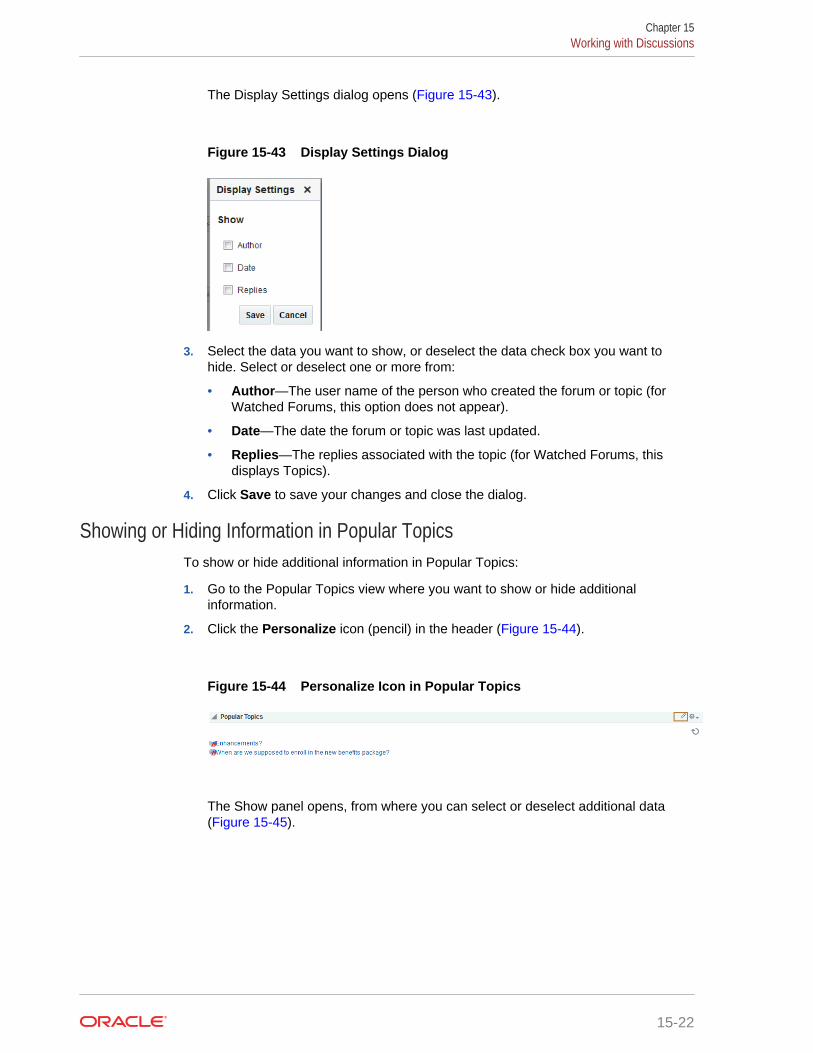
The Display Settings dialog opens (Figure 15-43).
Figure 15-43 Display Settings Dialog
3. Select the data you want to show, or deselect the data check box you want tohide. Select or deselect one or more from:
• Author—The user name of the person who created the forum or topic (forWatched Forums, this option does not appear).
• Date—The date the forum or topic was last updated.
• Replies—The replies associated with the topic (for Watched Forums, thisdisplays Topics).
4. Click Save to save your changes and close the dialog.
Showing or Hiding Information in Popular TopicsTo show or hide additional information in Popular Topics:
1. Go to the Popular Topics view where you want to show or hide additionalinformation.
2. Click the Personalize icon (pencil) in the header (Figure 15-44).
Figure 15-44 Personalize Icon in Popular Topics
The Show panel opens, from where you can select or deselect additional data(Figure 15-45).
Chapter 15Working with Discussions
15-22
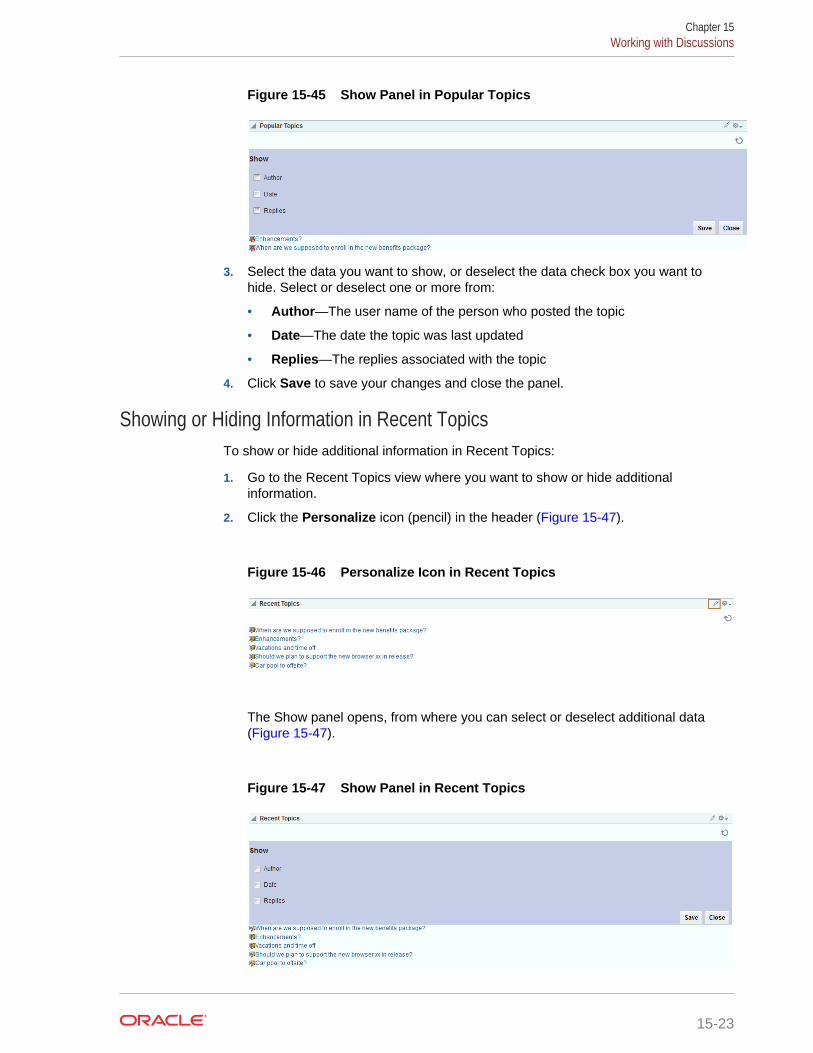
Figure 15-45 Show Panel in Popular Topics
3. Select the data you want to show, or deselect the data check box you want tohide. Select or deselect one or more from:
• Author—The user name of the person who posted the topic
• Date—The date the topic was last updated
• Replies—The replies associated with the topic
4. Click Save to save your changes and close the panel.
Showing or Hiding Information in Recent TopicsTo show or hide additional information in Recent Topics:
1. Go to the Recent Topics view where you want to show or hide additionalinformation.
2. Click the Personalize icon (pencil) in the header (Figure 15-47).
Figure 15-46 Personalize Icon in Recent Topics
The Show panel opens, from where you can select or deselect additional data(Figure 15-47).
Figure 15-47 Show Panel in Recent Topics
Chapter 15Working with Discussions
15-23
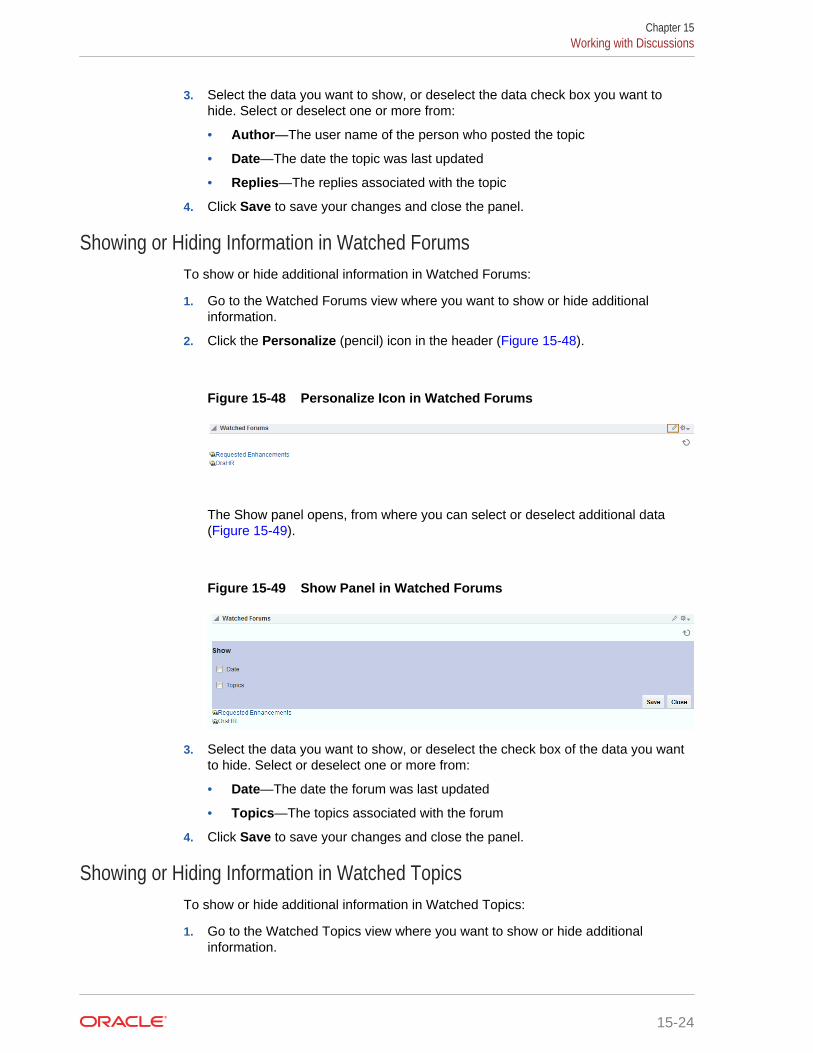
3. Select the data you want to show, or deselect the data check box you want tohide. Select or deselect one or more from:
• Author—The user name of the person who posted the topic
• Date—The date the topic was last updated
• Replies—The replies associated with the topic
4. Click Save to save your changes and close the panel.
Showing or Hiding Information in Watched ForumsTo show or hide additional information in Watched Forums:
1. Go to the Watched Forums view where you want to show or hide additionalinformation.
2. Click the Personalize (pencil) icon in the header (Figure 15-48).
Figure 15-48 Personalize Icon in Watched Forums
The Show panel opens, from where you can select or deselect additional data(Figure 15-49).
Figure 15-49 Show Panel in Watched Forums
3. Select the data you want to show, or deselect the check box of the data you wantto hide. Select or deselect one or more from:
• Date—The date the forum was last updated
• Topics—The topics associated with the forum
4. Click Save to save your changes and close the panel.
Showing or Hiding Information in Watched TopicsTo show or hide additional information in Watched Topics:
1. Go to the Watched Topics view where you want to show or hide additionalinformation.
Chapter 15Working with Discussions
15-24
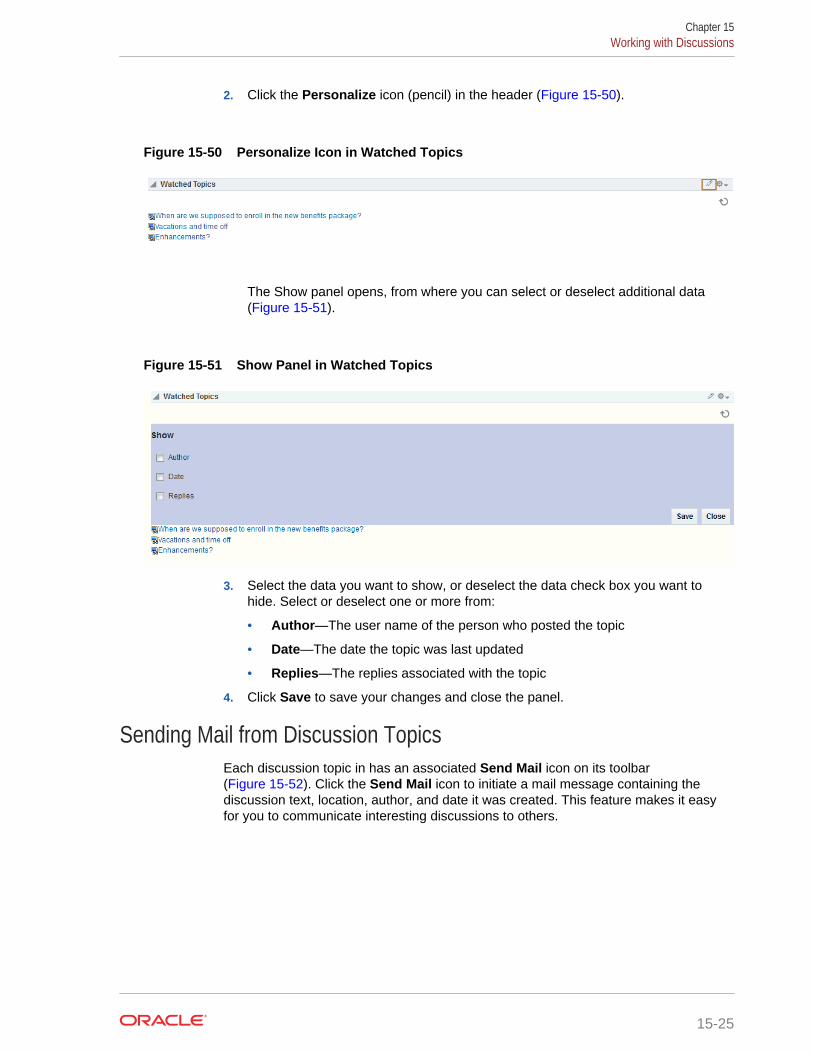
2. Click the Personalize icon (pencil) in the header (Figure 15-50).
Figure 15-50 Personalize Icon in Watched Topics
The Show panel opens, from where you can select or deselect additional data(Figure 15-51).
Figure 15-51 Show Panel in Watched Topics
3. Select the data you want to show, or deselect the data check box you want tohide. Select or deselect one or more from:
• Author—The user name of the person who posted the topic
• Date—The date the topic was last updated
• Replies—The replies associated with the topic
4. Click Save to save your changes and close the panel.
Sending Mail from Discussion TopicsEach discussion topic in has an associated Send Mail icon on its toolbar(Figure 15-52). Click the Send Mail icon to initiate a mail message containing thediscussion text, location, author, and date it was created. This feature makes it easyfor you to communicate interesting discussions to others.
Chapter 15Working with Discussions
15-25
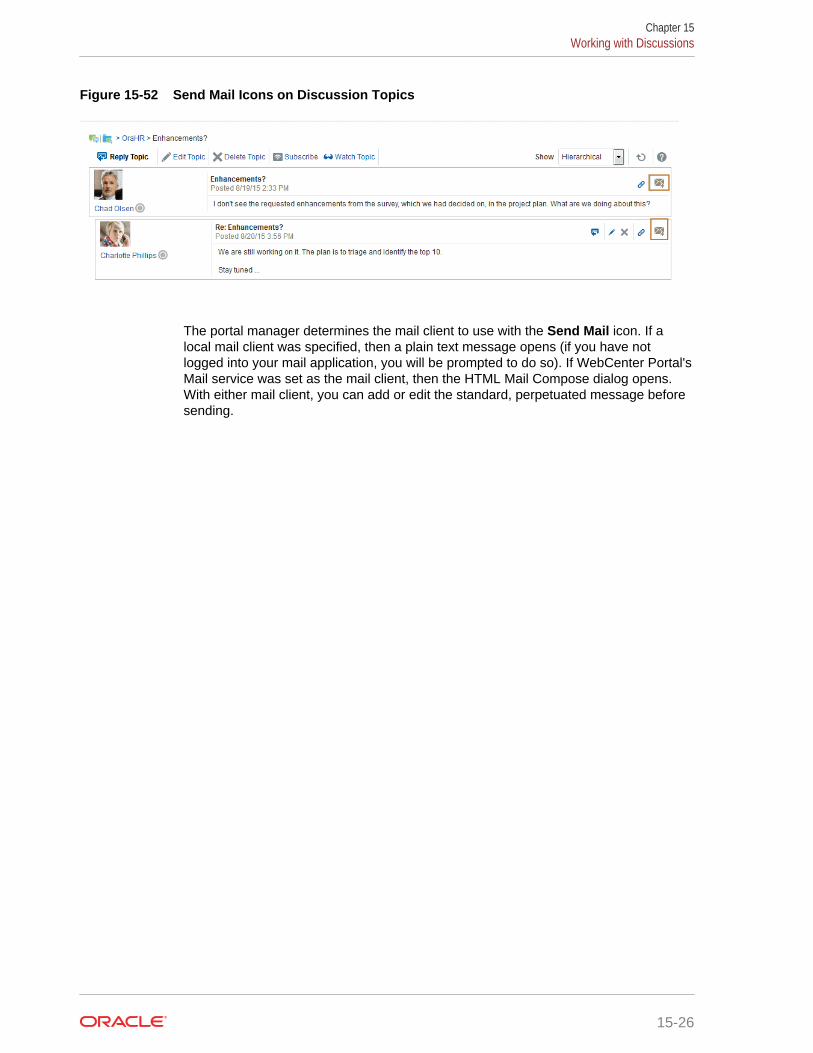
Figure 15-52 Send Mail Icons on Discussion Topics
The portal manager determines the mail client to use with the Send Mail icon. If alocal mail client was specified, then a plain text message opens (if you have notlogged into your mail application, you will be prompted to do so). If WebCenter Portal'sMail service was set as the mail client, then the HTML Mail Compose dialog opens.With either mail client, you can add or edit the standard, perpetuated message beforesending.
Chapter 15Working with Discussions
15-26
Part IVAdding Content to a Portal
This part of Using Portals in Oracle WebCenter Portal provides information aboutadding content to a portal, including adding documents, contributing, publishing andpresenting content, and collaborating with wikis and blogs.
• Introduction to Adding Content to a Portal
• Contributing and Publishing Content
• Adding and Managing Documents
• Working with Oracle Content and Experience Cloud
• Working with Wikis
• Working with Blogs
16Introduction to Adding Content to a Portal
WebCenter Portal provides several different containers in which to display andmanage content, enabling end users with appropriate permissions to manipulate anddisplay that content in a variety of ways.
In WebCenter Portal, there are several ways to work with portal content:
• Content Contribution and Publishing. Enables users to quickly add image, text,and video content to a portal page. When an Image, Text, or Styled Textcomponent is present on a page, a user who is granted Edit Page or ContributePage Content permission can contribute image, text, or video content to the pageat runtime.
Learn More:
For more information about contributing and publishing content, see Contributing and Publishing Content .
• Sophisticated Content. Design portal pages and add components to portalpages, such as calendars, activity streams, data visualizations, message boards,tag clouds, and portlets.
Learn More:
For more information about designing portal pages, see Working withPortal Pages in Building Portals with Oracle WebCenter Portal.
• Content Presenter. Enables users to precisely customize the selection andpresentation of content in a portal. When a Content Presenter task flow is presenton a page, a user who is granted Edit Page permission can select content fromthe Oracle WebCenter Content Server (a single item of content, contents under afolder, a list of items, or content query), and then select a template to render thecontent on a page in a portal. The Content Presenter task flow is available onlywhen the system administrator has completed the prerequisite WebCenterContent Server configuration, but Content Presenter has no dependency on theDocuments tool for adding or managing the content it displays.
Learn More:
For more information about Content Presenter, see Publishing ContentUsing Content Presenter in Building Portals with Oracle WebCenterPortal
16-1
• Content Manager. Enables users to work with libraries, folders, and files in theconnected WebCenter Content Server repository. It offers an easy and intuitiveuser interface with sophisticated searching capabilities. When Content Manager isavailable on a page, a user with the appropriate document permissions can workwith the WebCenter Content Server files and folders using Content Manager.Content Manager is available only when the system administrator has completedthe prerequisite WebCenter Content Server configuration and the portal managerhas enabled the Documents tool.
Learn More:
For more information about working with Content Manager, see Addingand Managing Documents.
• Oracle DOCS Content Manager. Enables users to access content in OracleContent and Experience Cloud. For more information, see Working with OracleContent and Experience Cloud.
• Wikis. Enable multiple users to collaborate on content that is relevant, useful, andup-to-date. Wiki pages are available only when the portal manager has enabledthe Documents tool.
Learn More:
For more information, see Working with Wikis.
• Blogs. Enable users to create and manage personal blogs to record experiencesand opinions, and group related blog posts. Blogs are available only when theportal manager has enabled the Documents tool.
Learn More:
For more information, see Working with Blogs.
Chapter 16
16-2
17Contributing and Publishing Content
WebCenter Portal provides a quick and easy way to contribute and publish simplecontent, such as images, formatted text, and embedded videos, to the pages in yourportal.
See Also:
For an overview of the different options available in WebCenter Portal forworking with portal content and adding content to a portal, see Introduction toAdding Content to a Portal.
Permissions:
To perform the tasks in this chapter, you need to be a member of a role thathas been granted the portal-level permission Contribute Page Content orhas been granted the Contribute permission on an individual page.
Topics:
• About Contributing and Publishing Content
• Entering Contribution Mode
• Contributing and Publishing an Image
• Contributing and Publishing Rich Text
• Contributing and Publishing Text with Predefined Formatting
• Contributing and Publishing a Video
• Adding a Hyperlink to an Image
• Adding a Hyperlink to Rich Text
• Contributing and Publishing Content in Different Languages
About Contributing and Publishing ContentYou can add text, images, and embedded videos to pages in your portal.
If you have the appropriate permissions, you can enter contribution mode to add thefollowing types of content to your portal:
• If the page includes an Image component, you can place a picture on the page, forexample, a logo, banner, photograph, or diagram. For more information, see Contributing and Publishing an Image.
17-1
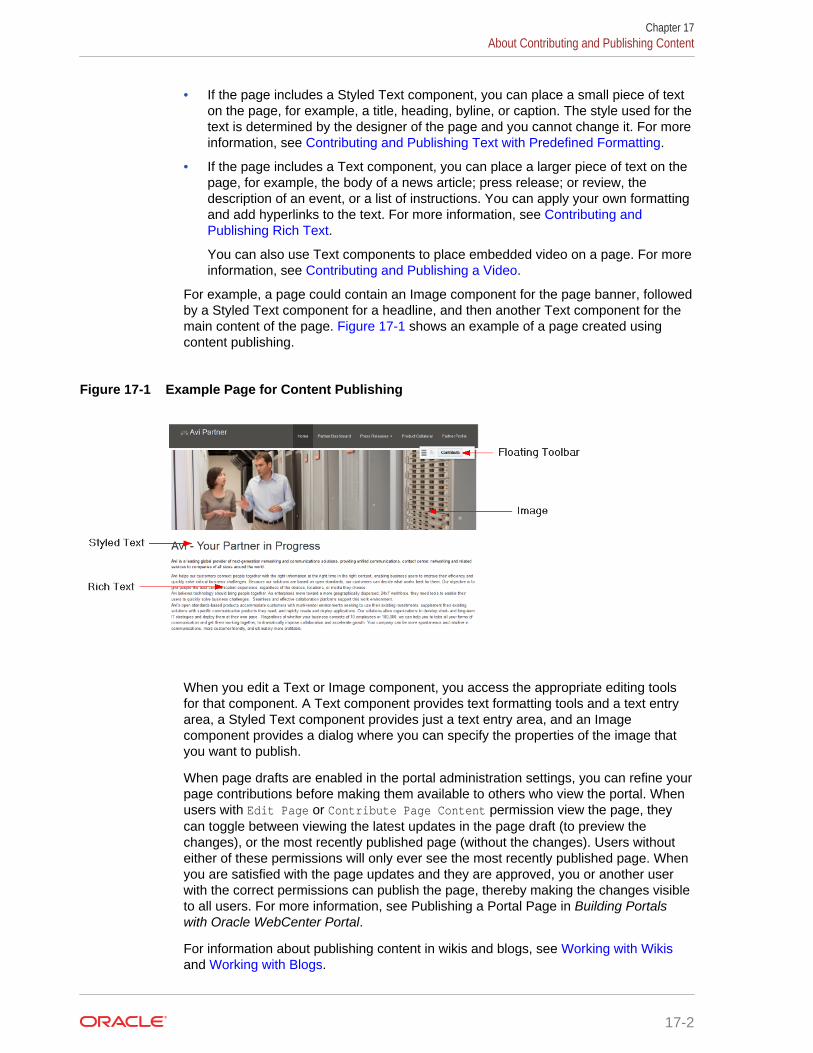
• If the page includes a Styled Text component, you can place a small piece of texton the page, for example, a title, heading, byline, or caption. The style used for thetext is determined by the designer of the page and you cannot change it. For moreinformation, see Contributing and Publishing Text with Predefined Formatting.
• If the page includes a Text component, you can place a larger piece of text on thepage, for example, the body of a news article; press release; or review, thedescription of an event, or a list of instructions. You can apply your own formattingand add hyperlinks to the text. For more information, see Contributing andPublishing Rich Text.
You can also use Text components to place embedded video on a page. For moreinformation, see Contributing and Publishing a Video.
For example, a page could contain an Image component for the page banner, followedby a Styled Text component for a headline, and then another Text component for themain content of the page. Figure 17-1 shows an example of a page created usingcontent publishing.
Figure 17-1 Example Page for Content Publishing
When you edit a Text or Image component, you access the appropriate editing toolsfor that component. A Text component provides text formatting tools and a text entryarea, a Styled Text component provides just a text entry area, and an Imagecomponent provides a dialog where you can specify the properties of the image thatyou want to publish.
When page drafts are enabled in the portal administration settings, you can refine yourpage contributions before making them available to others who view the portal. Whenusers with Edit Page or Contribute Page Content permission view the page, theycan toggle between viewing the latest updates in the page draft (to preview thechanges), or the most recently published page (without the changes). Users withouteither of these permissions will only ever see the most recently published page. Whenyou are satisfied with the page updates and they are approved, you or another userwith the correct permissions can publish the page, thereby making the changes visibleto all users. For more information, see Publishing a Portal Page in Building Portalswith Oracle WebCenter Portal.
For information about publishing content in wikis and blogs, see Working with Wikisand Working with Blogs.
Chapter 17About Contributing and Publishing Content
17-2
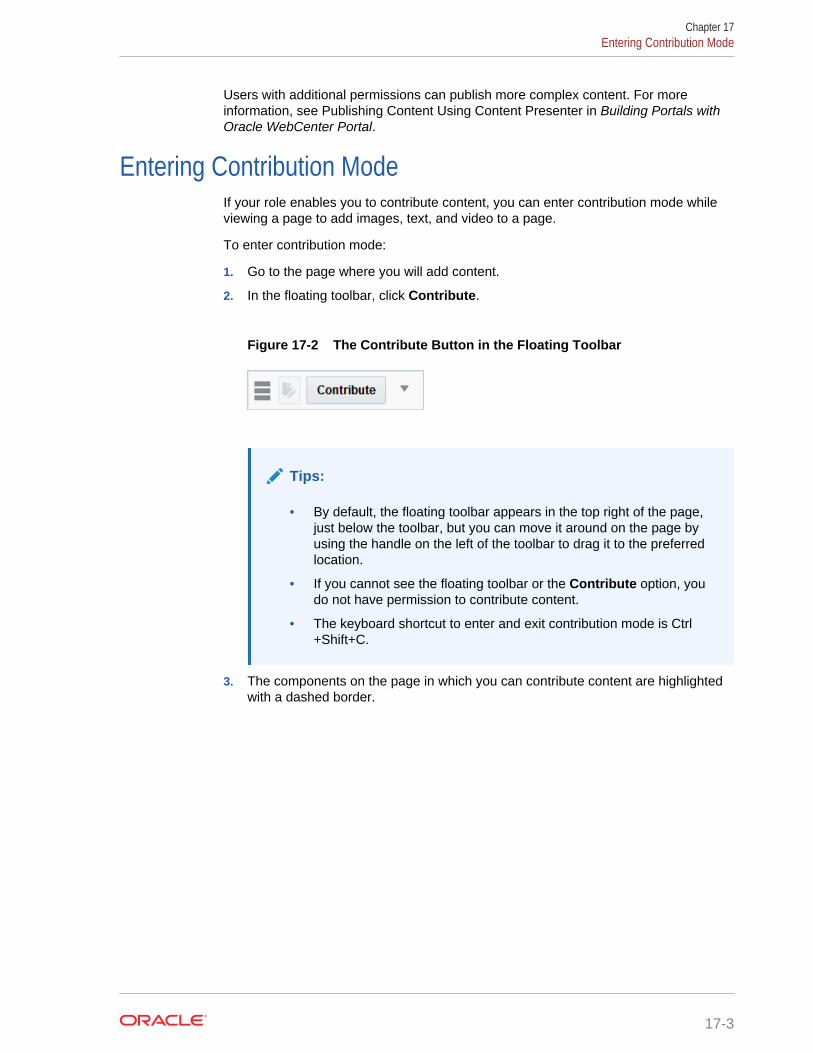
Users with additional permissions can publish more complex content. For moreinformation, see Publishing Content Using Content Presenter in Building Portals withOracle WebCenter Portal.
Entering Contribution ModeIf your role enables you to contribute content, you can enter contribution mode whileviewing a page to add images, text, and video to a page.
To enter contribution mode:
1. Go to the page where you will add content.
2. In the floating toolbar, click Contribute.
Figure 17-2 The Contribute Button in the Floating Toolbar
Tips:
• By default, the floating toolbar appears in the top right of the page,just below the toolbar, but you can move it around on the page byusing the handle on the left of the toolbar to drag it to the preferredlocation.
• If you cannot see the floating toolbar or the Contribute option, youdo not have permission to contribute content.
• The keyboard shortcut to enter and exit contribution mode is Ctrl+Shift+C.
3. The components on the page in which you can contribute content are highlightedwith a dashed border.
Chapter 17Entering Contribution Mode
17-3
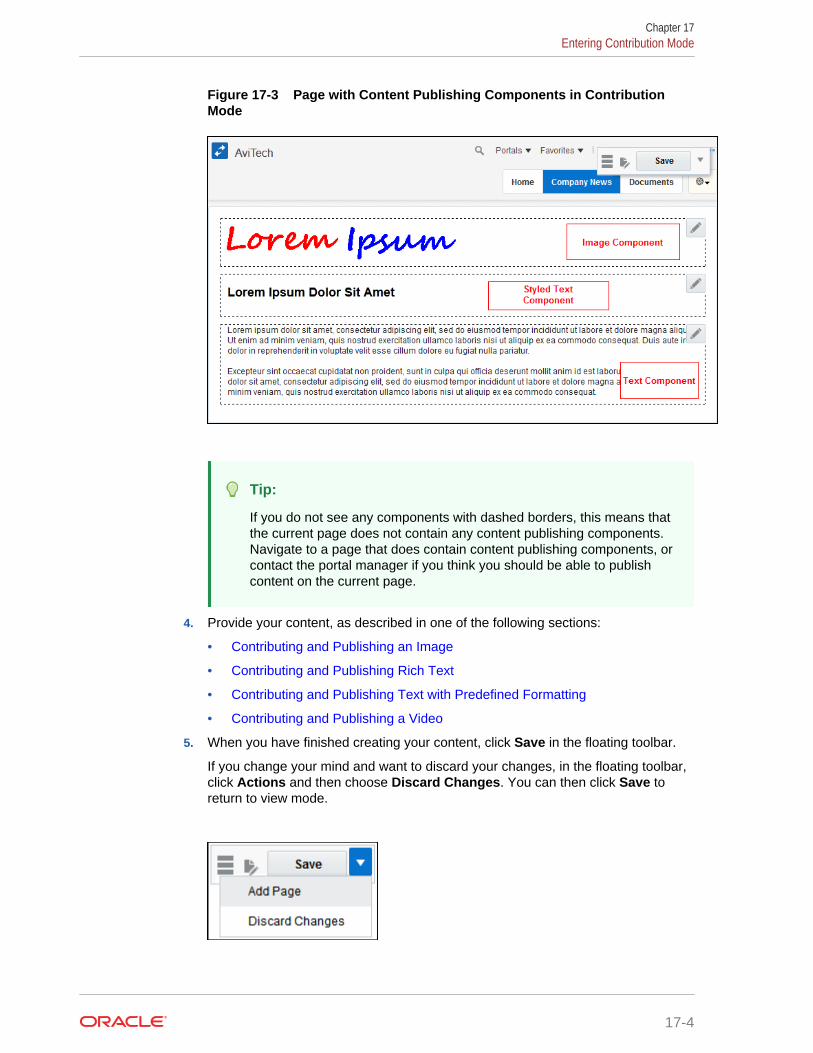
Figure 17-3 Page with Content Publishing Components in ContributionMode
Tip:
If you do not see any components with dashed borders, this means thatthe current page does not contain any content publishing components.Navigate to a page that does contain content publishing components, orcontact the portal manager if you think you should be able to publishcontent on the current page.
4. Provide your content, as described in one of the following sections:
• Contributing and Publishing an Image
• Contributing and Publishing Rich Text
• Contributing and Publishing Text with Predefined Formatting
• Contributing and Publishing a Video
5. When you have finished creating your content, click Save in the floating toolbar.
If you change your mind and want to discard your changes, in the floating toolbar,click Actions and then choose Discard Changes. You can then click Save toreturn to view mode.
Chapter 17Entering Contribution Mode
17-4
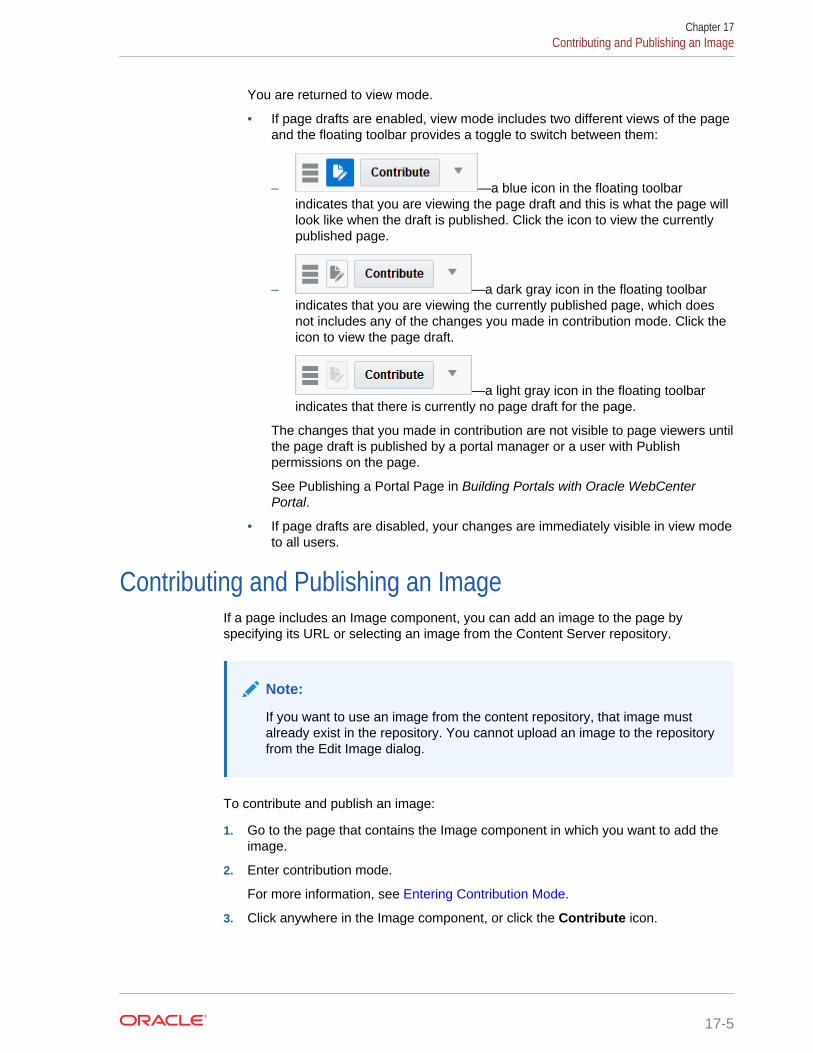
You are returned to view mode.
• If page drafts are enabled, view mode includes two different views of the pageand the floating toolbar provides a toggle to switch between them:
– —a blue icon in the floating toolbarindicates that you are viewing the page draft and this is what the page willlook like when the draft is published. Click the icon to view the currentlypublished page.
– —a dark gray icon in the floating toolbarindicates that you are viewing the currently published page, which doesnot includes any of the changes you made in contribution mode. Click theicon to view the page draft.
—a light gray icon in the floating toolbarindicates that there is currently no page draft for the page.
The changes that you made in contribution are not visible to page viewers untilthe page draft is published by a portal manager or a user with Publishpermissions on the page.
See Publishing a Portal Page in Building Portals with Oracle WebCenterPortal.
• If page drafts are disabled, your changes are immediately visible in view modeto all users.
Contributing and Publishing an ImageIf a page includes an Image component, you can add an image to the page byspecifying its URL or selecting an image from the Content Server repository.
Note:
If you want to use an image from the content repository, that image mustalready exist in the repository. You cannot upload an image to the repositoryfrom the Edit Image dialog.
To contribute and publish an image:
1. Go to the page that contains the Image component in which you want to add theimage.
2. Enter contribution mode.
For more information, see Entering Contribution Mode.
3. Click anywhere in the Image component, or click the Contribute icon.
Chapter 17Contributing and Publishing an Image
17-5
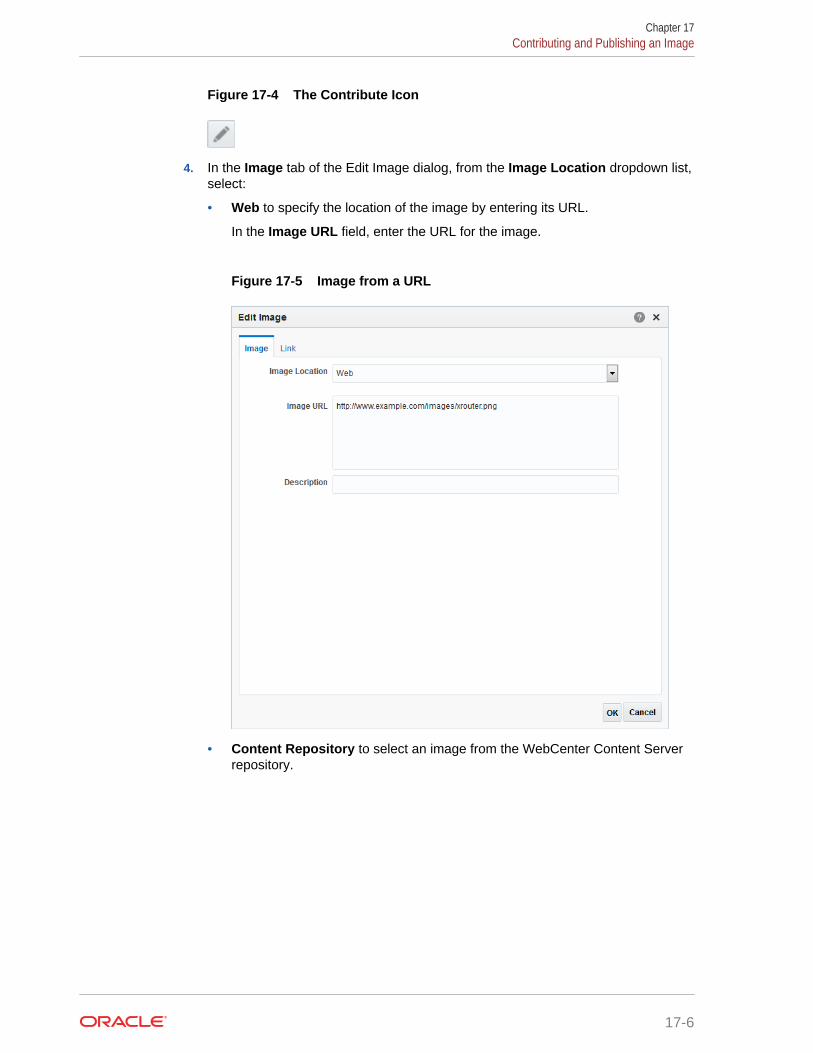
Figure 17-4 The Contribute Icon
4. In the Image tab of the Edit Image dialog, from the Image Location dropdown list,select:
• Web to specify the location of the image by entering its URL.
In the Image URL field, enter the URL for the image.
Figure 17-5 Image from a URL
• Content Repository to select an image from the WebCenter Content Serverrepository.
Chapter 17Contributing and Publishing an Image
17-6

Figure 17-6 Image from Content Repository
Note:
Select your image carefully. If a specific size has been defined forimages in this component, the image will be stretched or shrunk asappropriate to fit. If the size is not specified, the component will usewhitespace for padding if the image is too small, or scrollbars if it is toolarge.
5. In the Description field, enter a brief description of the image.
This description is used as the alternate text for the image and is displayed when auser hovers the mouse cursor over the image. The description is also read byscreen readers.
6. Click OK to preview the image.
Contributing and Publishing Rich TextIf a page includes a Text component, you can add text to the page and apply your ownformatting. For example, you can use a Text component to publish a list of items, anarticle, or a press release.
To contribute and publish rich text:
Chapter 17Contributing and Publishing Rich Text
17-7
1. Go to the page that contains the Text component in which you want to add thetext.
2. Enter contribution mode.
For more information, see Entering Contribution Mode.
3. Click anywhere in the Text component or click the Contribute icon (Figure 17-7).
Figure 17-7 The Contribute Icon
4. In the Text component, enter the text that you want to publish on the page.
Tips:
• Text components are for detailed pieces of content; if you want toadd a brief piece of content, such as a heading, use a Styled Textcomponent.
• You can paste existing text into the Text component. Any HTMLformatting will be retained.
5. Use the formatting tools, shown in Figure 17-8, to change the appearance of thetext.
Figure 17-8 A Text Component with Formatting Tools
For example, you can:
• Change the font, size, or color of the text
• Apply text effects, such as bold, italic, or strikethrough
• Align or indent text within the component
• Create bulleted or numbered lists
• Add hyperlinks (for more information, see Adding a Hyperlink to Rich Text)
Chapter 17Contributing and Publishing Rich Text
17-8
Note:
By default the text is formatted as defined by the page's skin. If youchange the font of your text, for example the font face, size, style, orcolor, this overrides the settings from the skin.
6. To preview your text, click anywhere outside the Text component.
Contributing and Publishing Text with Predefined FormattingIf a page includes a Styled Text component, you can add a heading, title, or caption.The text in a Styled Text component is formatted according to predetermined settings.
To contribute and publish text with predefined formatting:
1. Go to the page that contains the Styled Text component in which you want to addthe text.
2. Enter contribution mode.
For more information, see Entering Contribution Mode.
3. Click anywhere in the Styled Text component, or click the Contribute icon(Figure 17-9).
Figure 17-9 The Contribute Icon
4. In the Styled Text component, enter the text that you want to publish on the page.
Tip:
Styled Text components are intended for brief items of content, such asheadings and captions; if you want to provide more detailed text, use aText component.
5. To preview your text, click anywhere outside the Styled Text component.
The text uses the formatting defined for the component.
Contributing and Publishing a VideoTo add video to a page, you can use a Text component to enter the code to embed thevideo.
To contribute and publish a video:
1. Copy the code to embed the video.
For example:
Chapter 17Contributing and Publishing Text with Predefined Formatting
17-9
<iframe width="560" height="315" src="https://www.youtube.com/embed/3zdv65Kzw54" frameborder="0" allowfullscreen></iframe>
Tip:
The steps for obtaining this piece of code will depend on the source ofyour video.
2. Go to the page that includes the Text component in which you want to add thevideo.
3. Enter contribution mode.
For more information, see Entering Contribution Mode.
4. Click anywhere in the Text component where you want to add your video, or clickthe Contribute icon (Figure 17-10).
Figure 17-10 The Contribute Icon
5. In the rich text editor, click the Source Code Editing Mode icon (Figure 17-11).
Figure 17-11 The Source Code Editing Mode Icon
6. In the text area, paste the code for embedding the video, which you copied earlier(Figure 17-12).
Figure 17-12 Code in Text Component for Embedding Video
7. To preview the video, click anywhere outside the Text component (Figure 17-13).
Chapter 17Contributing and Publishing a Video
17-10
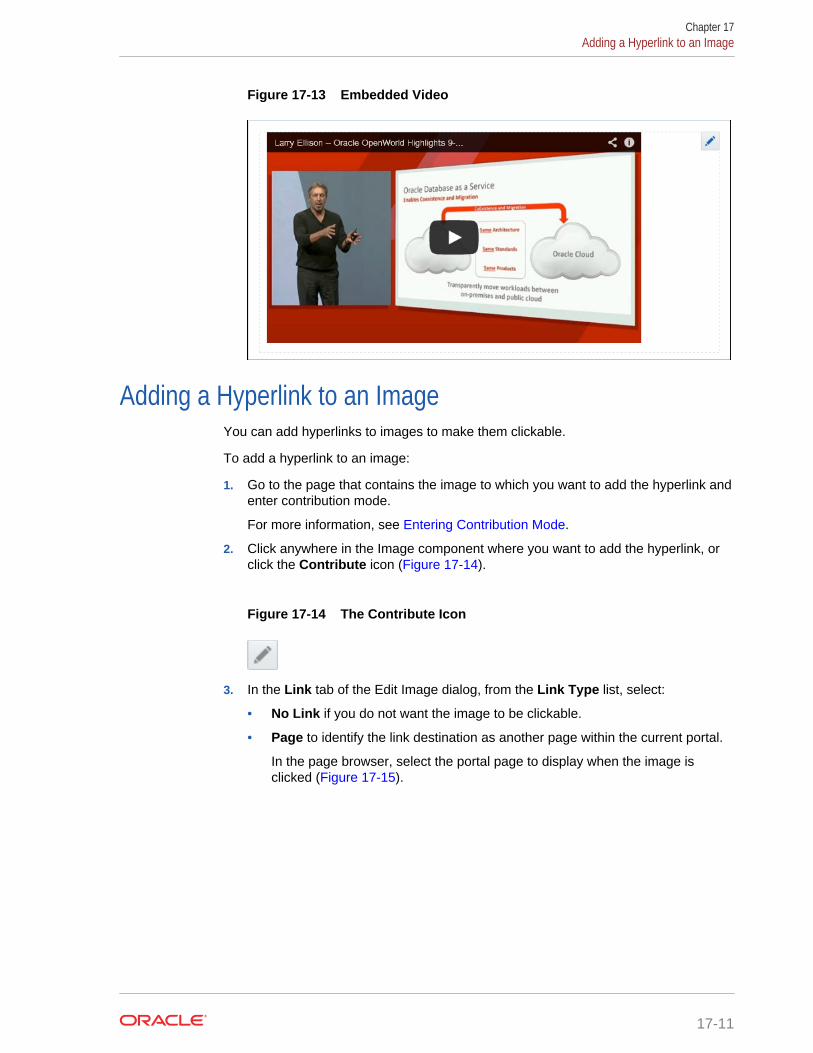
Figure 17-13 Embedded Video
Adding a Hyperlink to an ImageYou can add hyperlinks to images to make them clickable.
To add a hyperlink to an image:
1. Go to the page that contains the image to which you want to add the hyperlink andenter contribution mode.
For more information, see Entering Contribution Mode.
2. Click anywhere in the Image component where you want to add the hyperlink, orclick the Contribute icon (Figure 17-14).
Figure 17-14 The Contribute Icon
3. In the Link tab of the Edit Image dialog, from the Link Type list, select:
• No Link if you do not want the image to be clickable.
• Page to identify the link destination as another page within the current portal.
In the page browser, select the portal page to display when the image isclicked (Figure 17-15).
Chapter 17Adding a Hyperlink to an Image
17-11
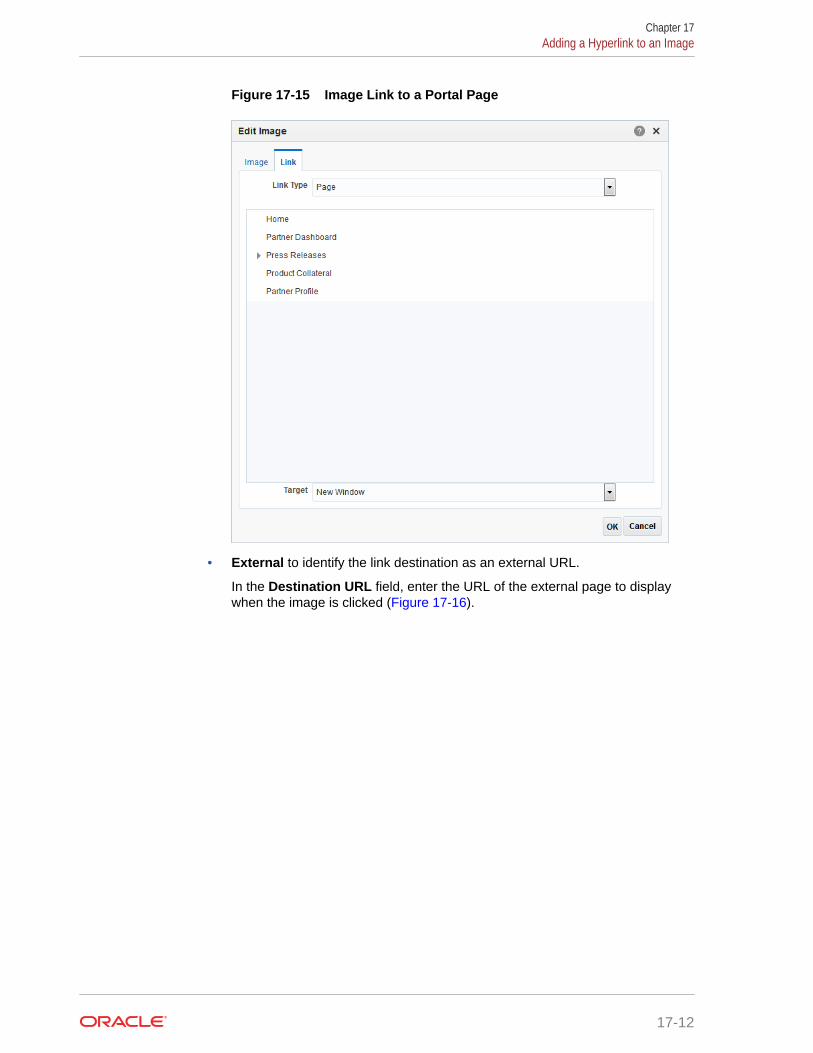
Figure 17-15 Image Link to a Portal Page
• External to identify the link destination as an external URL.
In the Destination URL field, enter the URL of the external page to displaywhen the image is clicked (Figure 17-16).
Chapter 17Adding a Hyperlink to an Image
17-12
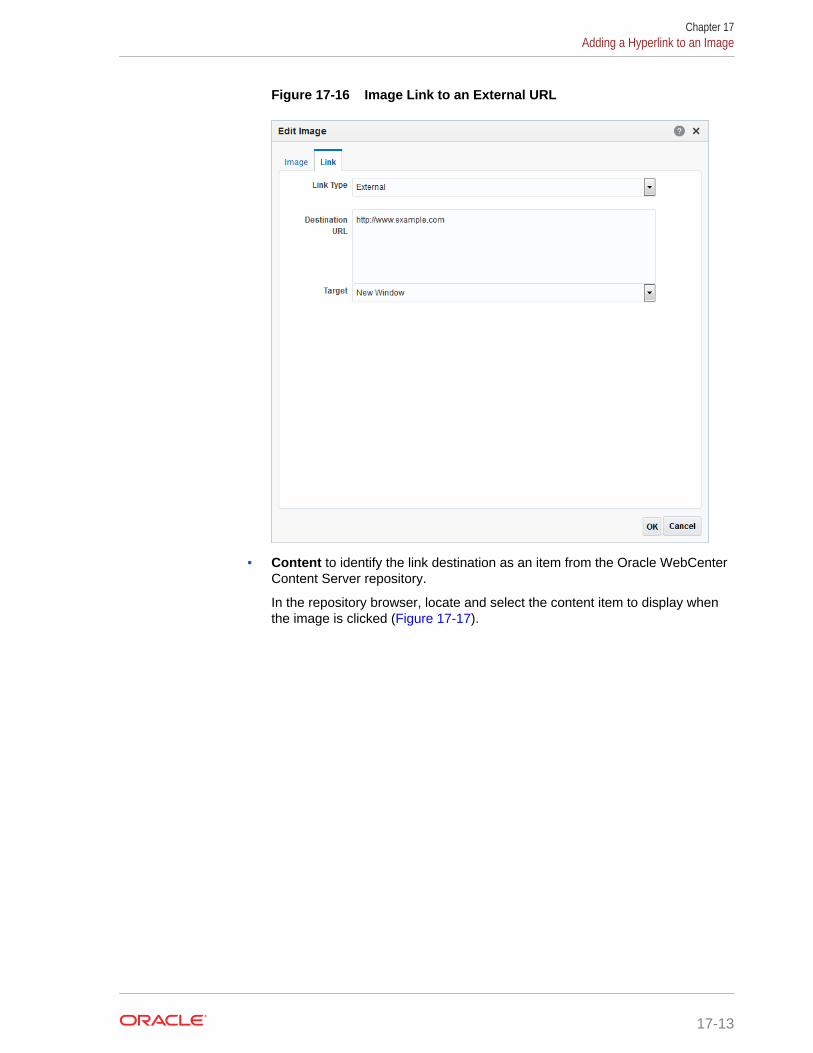
Figure 17-16 Image Link to an External URL
• Content to identify the link destination as an item from the Oracle WebCenterContent Server repository.
In the repository browser, locate and select the content item to display whenthe image is clicked (Figure 17-17).
Chapter 17Adding a Hyperlink to an Image
17-13
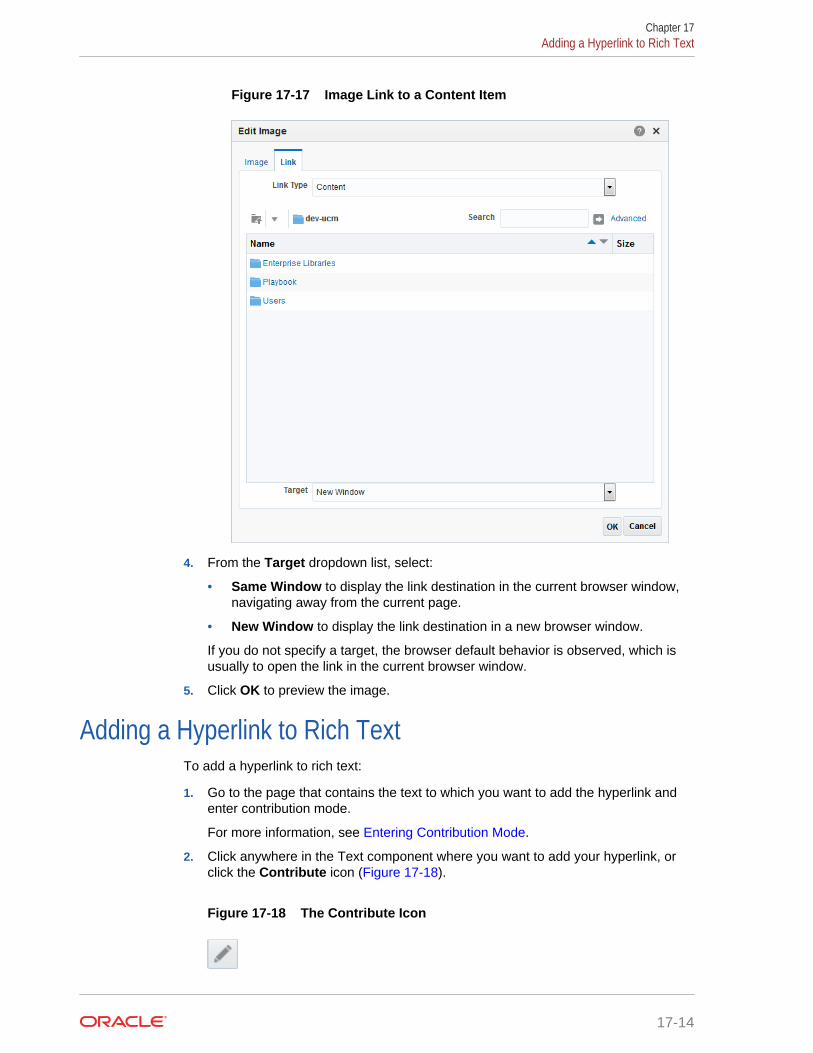
Figure 17-17 Image Link to a Content Item
4. From the Target dropdown list, select:
• Same Window to display the link destination in the current browser window,navigating away from the current page.
• New Window to display the link destination in a new browser window.
If you do not specify a target, the browser default behavior is observed, which isusually to open the link in the current browser window.
5. Click OK to preview the image.
Adding a Hyperlink to Rich TextTo add a hyperlink to rich text:
1. Go to the page that contains the text to which you want to add the hyperlink andenter contribution mode.
For more information, see Entering Contribution Mode.
2. Click anywhere in the Text component where you want to add your hyperlink, orclick the Contribute icon (Figure 17-18).
Figure 17-18 The Contribute Icon
Chapter 17Adding a Hyperlink to Rich Text
17-14
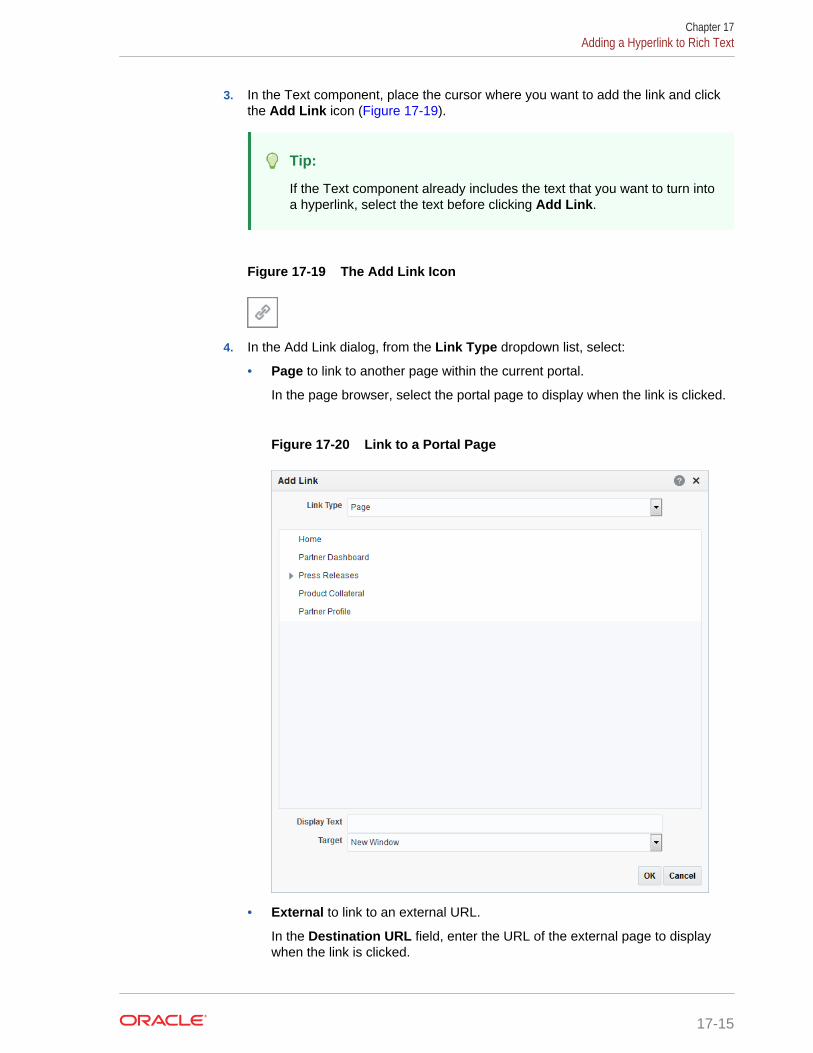
3. In the Text component, place the cursor where you want to add the link and clickthe Add Link icon (Figure 17-19).
Tip:
If the Text component already includes the text that you want to turn intoa hyperlink, select the text before clicking Add Link.
Figure 17-19 The Add Link Icon
4. In the Add Link dialog, from the Link Type dropdown list, select:
• Page to link to another page within the current portal.
In the page browser, select the portal page to display when the link is clicked.
Figure 17-20 Link to a Portal Page
• External to link to an external URL.
In the Destination URL field, enter the URL of the external page to displaywhen the link is clicked.
Chapter 17Adding a Hyperlink to Rich Text
17-15
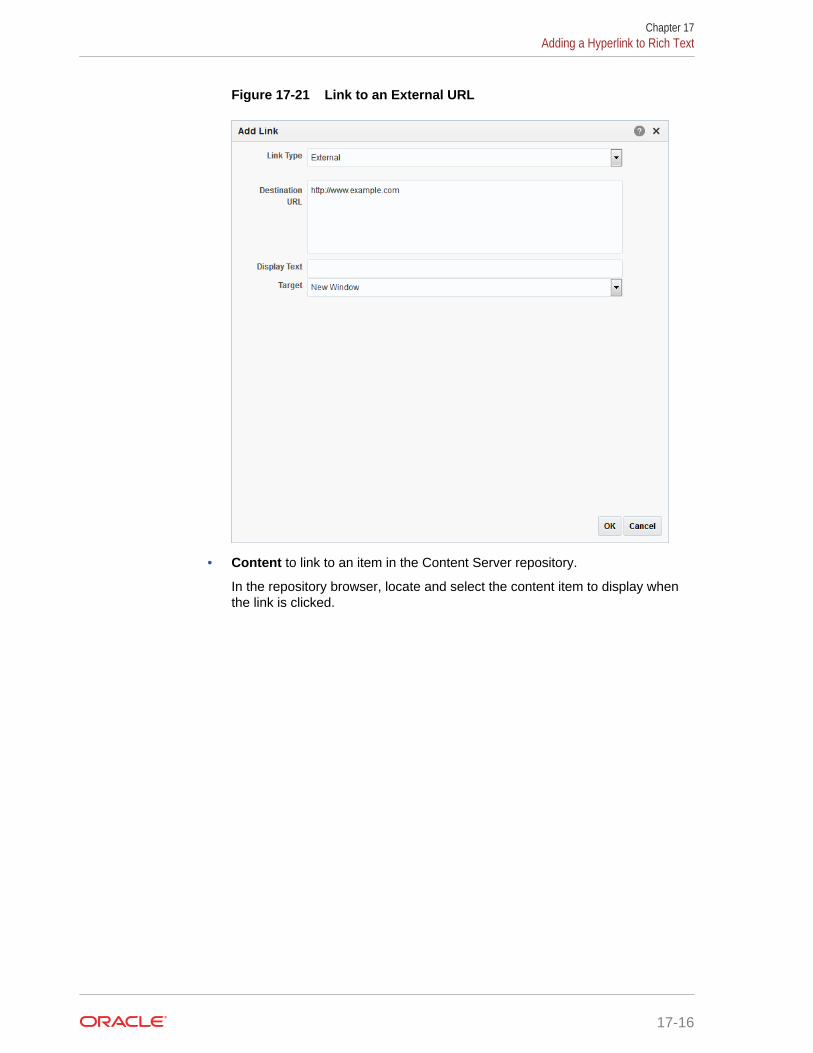
Figure 17-21 Link to an External URL
• Content to link to an item in the Content Server repository.
In the repository browser, locate and select the content item to display whenthe link is clicked.
Chapter 17Adding a Hyperlink to Rich Text
17-16
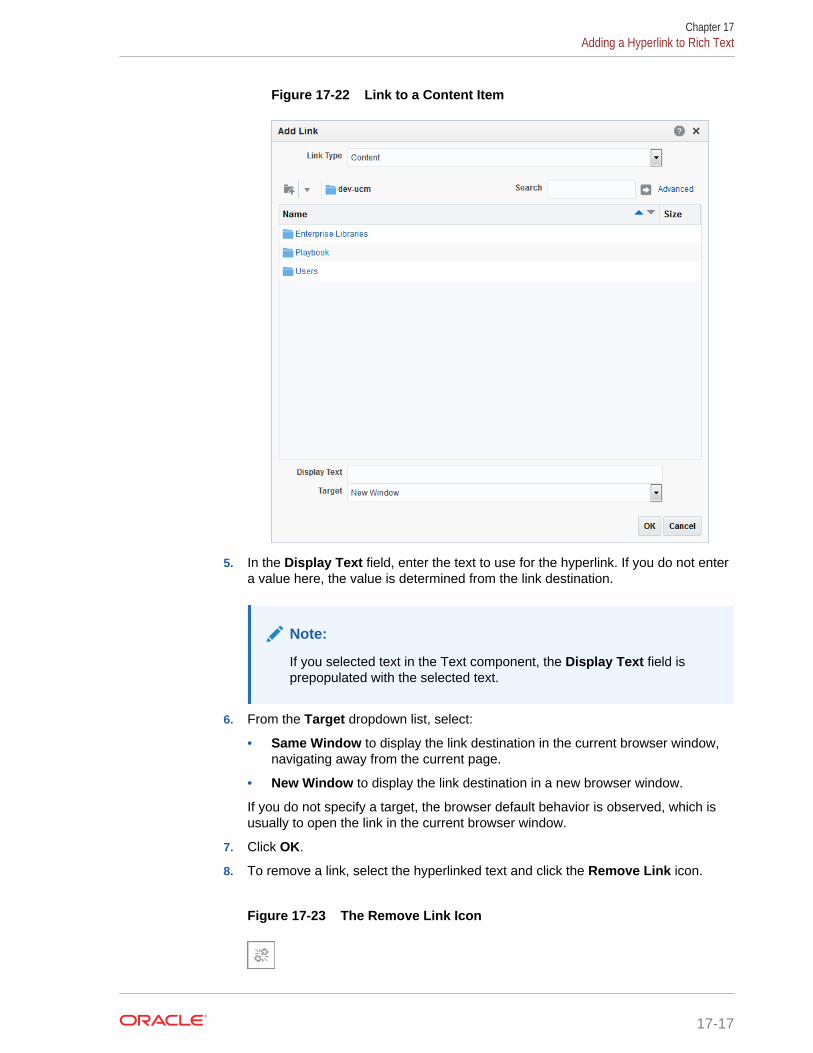
Figure 17-22 Link to a Content Item
5. In the Display Text field, enter the text to use for the hyperlink. If you do not entera value here, the value is determined from the link destination.
Note:
If you selected text in the Text component, the Display Text field isprepopulated with the selected text.
6. From the Target dropdown list, select:
• Same Window to display the link destination in the current browser window,navigating away from the current page.
• New Window to display the link destination in a new browser window.
If you do not specify a target, the browser default behavior is observed, which isusually to open the link in the current browser window.
7. Click OK.
8. To remove a link, select the hyperlinked text and click the Remove Link icon.
Figure 17-23 The Remove Link Icon
Chapter 17Adding a Hyperlink to Rich Text
17-17
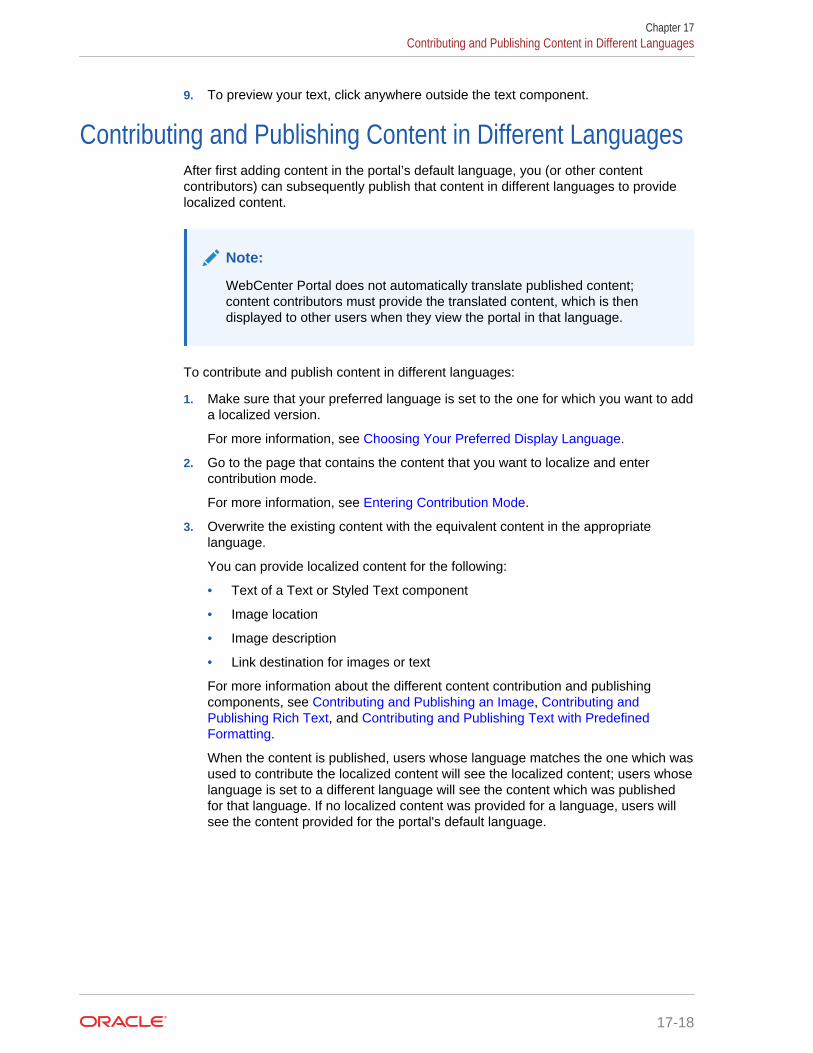
9. To preview your text, click anywhere outside the text component.
Contributing and Publishing Content in Different LanguagesAfter first adding content in the portal’s default language, you (or other contentcontributors) can subsequently publish that content in different languages to providelocalized content.
Note:
WebCenter Portal does not automatically translate published content;content contributors must provide the translated content, which is thendisplayed to other users when they view the portal in that language.
To contribute and publish content in different languages:
1. Make sure that your preferred language is set to the one for which you want to adda localized version.
For more information, see Choosing Your Preferred Display Language.
2. Go to the page that contains the content that you want to localize and entercontribution mode.
For more information, see Entering Contribution Mode.
3. Overwrite the existing content with the equivalent content in the appropriatelanguage.
You can provide localized content for the following:
• Text of a Text or Styled Text component
• Image location
• Image description
• Link destination for images or text
For more information about the different content contribution and publishingcomponents, see Contributing and Publishing an Image, Contributing andPublishing Rich Text, and Contributing and Publishing Text with PredefinedFormatting.
When the content is published, users whose language matches the one which wasused to contribute the localized content will see the localized content; users whoselanguage is set to a different language will see the content which was publishedfor that language. If no localized content was provided for a language, users willsee the content provided for the portal's default language.
Chapter 17Contributing and Publishing Content in Different Languages
17-18
18Adding and Managing Documents
Add and manage files and folders and work with document libraries in a portal usingContent Manager. Content Manager also supports Hybrid Enterprise ContentManagement (ECM), which allows you to access your content in the Oracle DocumentCloud Service.
See Also:
For an overview of the different options available in WebCenter Portal forworking with portal content and adding content to a portal, see Introduction toAdding Content to a Portal.
Permissions:
To perform the tasks in this chapter on your personal pages, you need theapplication-level permission Pages: Create, Edit, and Delete Pages.Users with this permission can create and manage their personal pages inthe Home portal.
To perform the tasks in this chapter on portal pages, you need the portal-level permissions Customize Pages and Edit Content and CreateDocuments (which includes delete permissions on documents that youcreate), granted by the portal manager. To delete documents that are notyour own, you must have Delete Documents permission.
To set security on a document in a portal, you must have the View andCreate Documents permission, granted by the portal manager.
For information about roles and permissions, see UnderstandingPermissions and Permission Models in a Portal in Building Portals withOracle WebCenter Portal.
Topics:
• About Adding and Managing Documents
• Understanding the Content Manager Interface
• Working with the Results List in Content Manager
• Searching Libraries, Folders, and Documents
• Working with Libraries
• Working with Folders and Files
• Viewing Documents in Content Viewer
18-1
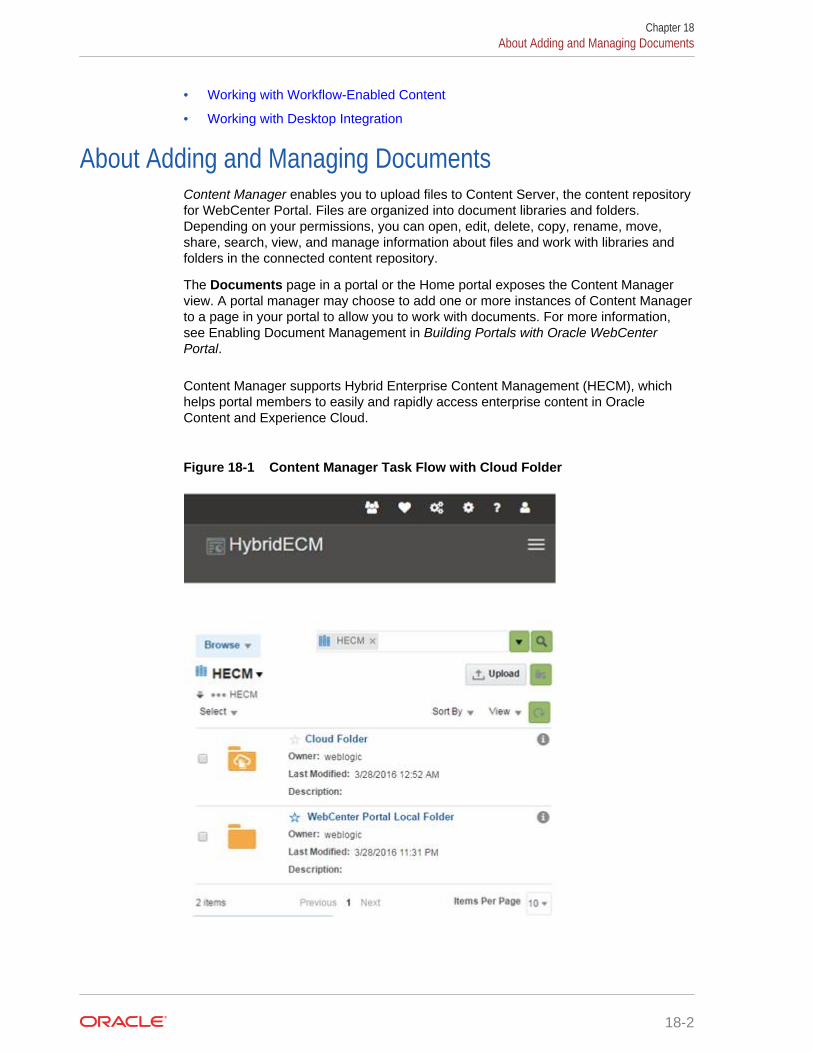
• Working with Workflow-Enabled Content
• Working with Desktop Integration
About Adding and Managing DocumentsContent Manager enables you to upload files to Content Server, the content repositoryfor WebCenter Portal. Files are organized into document libraries and folders.Depending on your permissions, you can open, edit, delete, copy, rename, move,share, search, view, and manage information about files and work with libraries andfolders in the connected content repository.
The Documents page in a portal or the Home portal exposes the Content Managerview. A portal manager may choose to add one or more instances of Content Managerto a page in your portal to allow you to work with documents. For more information,see Enabling Document Management in Building Portals with Oracle WebCenterPortal.
Content Manager supports Hybrid Enterprise Content Management (HECM), whichhelps portal members to easily and rapidly access enterprise content in OracleContent and Experience Cloud.
Figure 18-1 Content Manager Task Flow with Cloud Folder
Chapter 18About Adding and Managing Documents
18-2

Note:
The permissions on WebCenter Portal are independent from the OracleContent and Experience Cloud permissions and the WebCenter Portal rolescannot be paired with the Oracle Content and Experience Cloud roles. Thefollowing table lists the tasks you can perform with the specified WebCenterPortal document permissions.
Table 18-1 Permissions for Oracle Content and Experience Cloud Tasks
WebCenter PortalDocument Permissions
Available Tasks onOracle Content and Experience Cloud
Document: View • View and download documents• View folders
Document: View
Document: Create and Edit
• View, download and upload documents• View and create folders• Share documents and folders• Delete documents and folders• Copy and move documents and folders
Understanding the Content Manager InterfaceContent Manager offers an easy and intuitive user interface with sophisticatedsearching capabilities for managing libraries, folders, and documents. ContentManager is organized into two pages: Find Documents and View Documents.
Find Documents
The Find Documents page is the default view of Content Manager on a page. You canpersonalize this page to display all libraries, documents, or your favorite items. It alsoprovides ways to filter the documents displayed to help you find the requireddocuments more quickly.
For information about the basic concepts like library types, folders, search support,and favorites, see Basic WebCenter Content Concepts in Using Oracle WebCenterContent.
Figure 18-2 shows an example of the Find Documents page, highlighting the followingareas:
• Access selection area/side bar: Provides a way to browse through libraries,folders, files, and items you have marked as favorites. It includes the followingoptions:
Element Description
Search Click to open the Searching Documents page where you can locate andwork with the latest revision of all documents to which you have access.In this view, all documents are displayed in a single flat list regardless ofthe library or folder in which they may be stored.
Chapter 18Understanding the Content Manager Interface
18-3
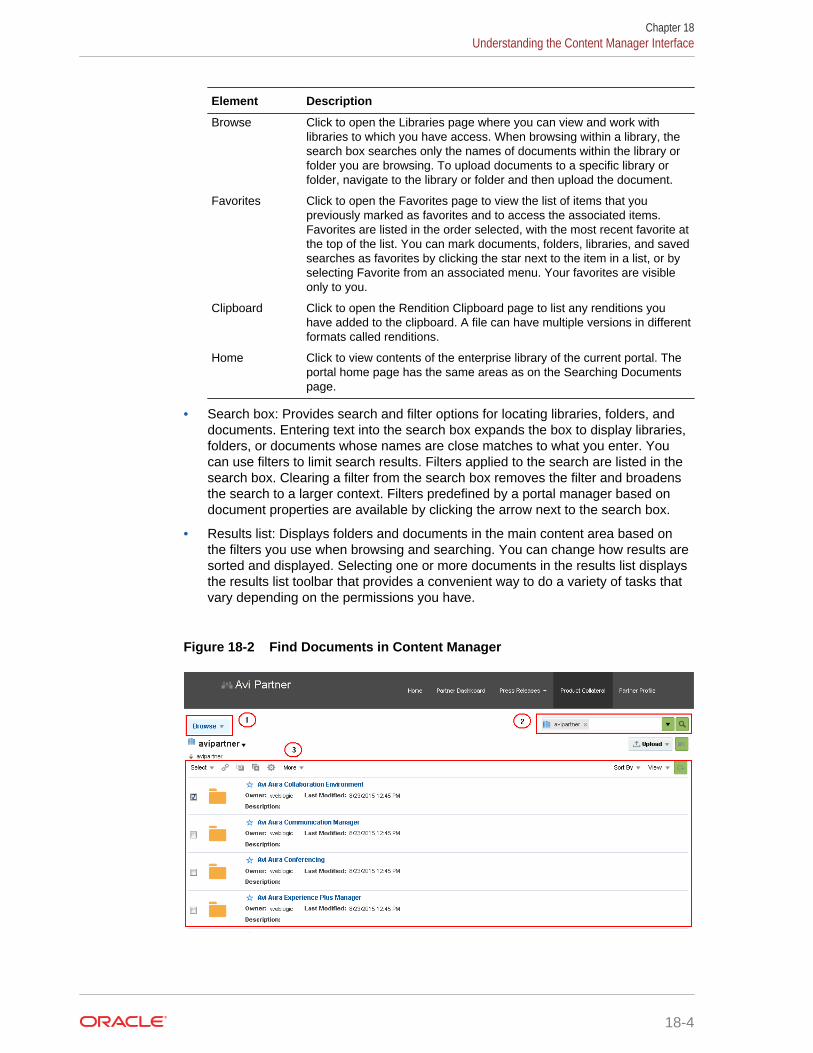
Element Description
Browse Click to open the Libraries page where you can view and work withlibraries to which you have access. When browsing within a library, thesearch box searches only the names of documents within the library orfolder you are browsing. To upload documents to a specific library orfolder, navigate to the library or folder and then upload the document.
Favorites Click to open the Favorites page to view the list of items that youpreviously marked as favorites and to access the associated items.Favorites are listed in the order selected, with the most recent favorite atthe top of the list. You can mark documents, folders, libraries, and savedsearches as favorites by clicking the star next to the item in a list, or byselecting Favorite from an associated menu. Your favorites are visibleonly to you.
Clipboard Click to open the Rendition Clipboard page to list any renditions youhave added to the clipboard. A file can have multiple versions in differentformats called renditions.
Home Click to view contents of the enterprise library of the current portal. Theportal home page has the same areas as on the Searching Documentspage.
• Search box: Provides search and filter options for locating libraries, folders, anddocuments. Entering text into the search box expands the box to display libraries,folders, or documents whose names are close matches to what you enter. Youcan use filters to limit search results. Filters applied to the search are listed in thesearch box. Clearing a filter from the search box removes the filter and broadensthe search to a larger context. Filters predefined by a portal manager based ondocument properties are available by clicking the arrow next to the search box.
• Results list: Displays folders and documents in the main content area based onthe filters you use when browsing and searching. You can change how results aresorted and displayed. Selecting one or more documents in the results list displaysthe results list toolbar that provides a convenient way to do a variety of tasks thatvary depending on the permissions you have.
Figure 18-2 Find Documents in Content Manager
Chapter 18Understanding the Content Manager Interface
18-4
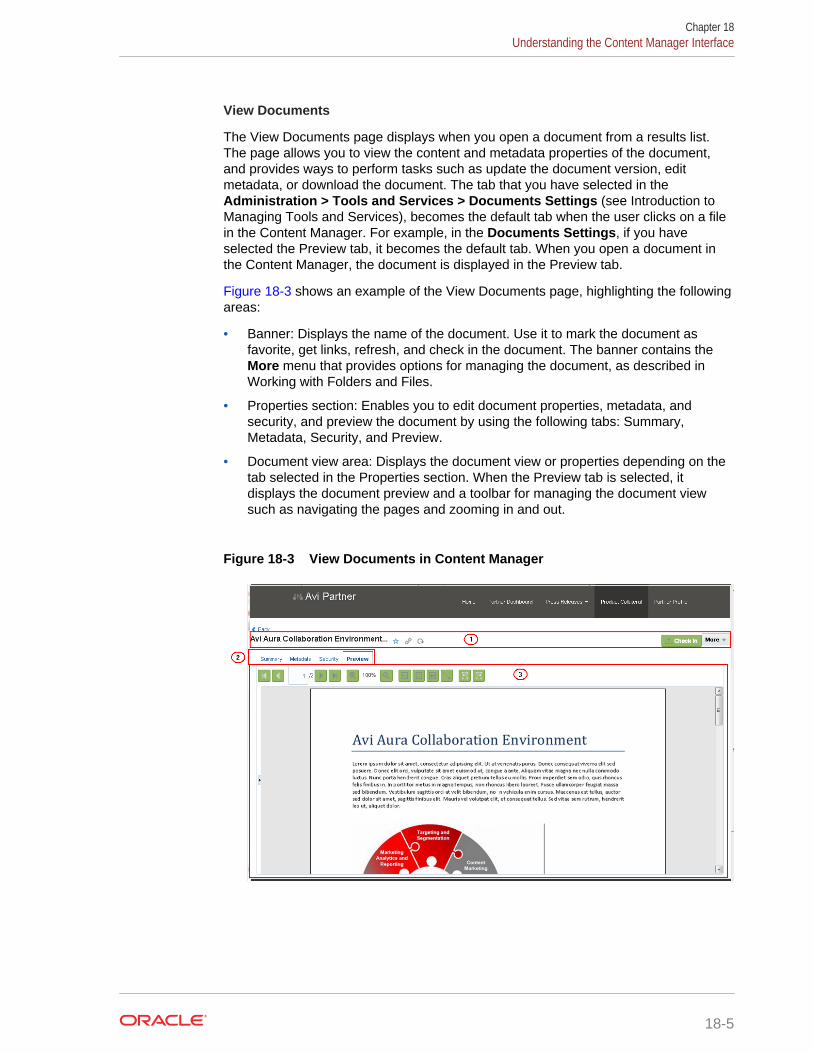
View Documents
The View Documents page displays when you open a document from a results list.The page allows you to view the content and metadata properties of the document,and provides ways to perform tasks such as update the document version, editmetadata, or download the document. The tab that you have selected in theAdministration > Tools and Services > Documents Settings (see Introduction toManaging Tools and Services), becomes the default tab when the user clicks on a filein the Content Manager. For example, in the Documents Settings, if you haveselected the Preview tab, it becomes the default tab. When you open a document inthe Content Manager, the document is displayed in the Preview tab.
Figure 18-3 shows an example of the View Documents page, highlighting the followingareas:
• Banner: Displays the name of the document. Use it to mark the document asfavorite, get links, refresh, and check in the document. The banner contains theMore menu that provides options for managing the document, as described in Working with Folders and Files.
• Properties section: Enables you to edit document properties, metadata, andsecurity, and preview the document by using the following tabs: Summary,Metadata, Security, and Preview.
• Document view area: Displays the document view or properties depending on thetab selected in the Properties section. When the Preview tab is selected, itdisplays the document preview and a toolbar for managing the document viewsuch as navigating the pages and zooming in and out.
Figure 18-3 View Documents in Content Manager
Chapter 18Understanding the Content Manager Interface
18-5
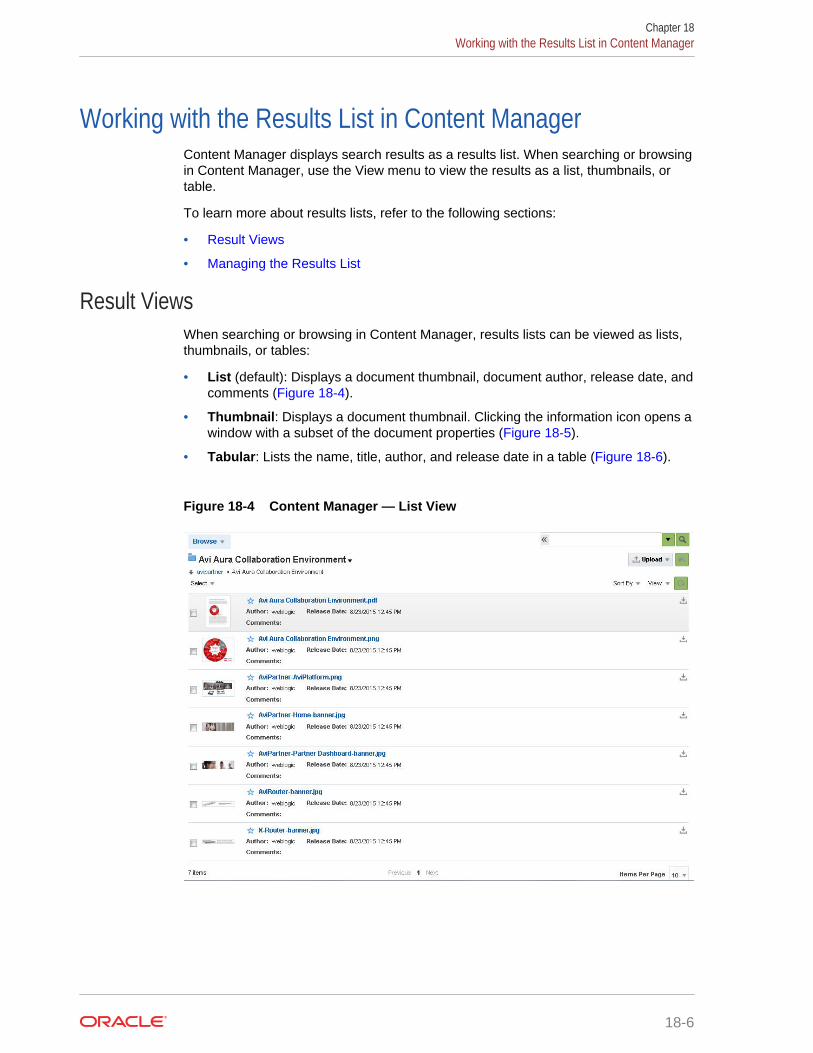
Working with the Results List in Content ManagerContent Manager displays search results as a results list. When searching or browsingin Content Manager, use the View menu to view the results as a list, thumbnails, ortable.
To learn more about results lists, refer to the following sections:
• Result Views
• Managing the Results List
Result ViewsWhen searching or browsing in Content Manager, results lists can be viewed as lists,thumbnails, or tables:
• List (default): Displays a document thumbnail, document author, release date, andcomments (Figure 18-4).
• Thumbnail: Displays a document thumbnail. Clicking the information icon opens awindow with a subset of the document properties (Figure 18-5).
• Tabular: Lists the name, title, author, and release date in a table (Figure 18-6).
Figure 18-4 Content Manager — List View
Chapter 18Working with the Results List in Content Manager
18-6

Figure 18-5 Content Manager — Thumbnail View
Figure 18-6 Content Manager — Tabular View
Managing the Results ListYou can manage the results list by changing the view, sorting and refreshing theresults list, and specifying the number of items to display.
Table 18-2 describes how you can manage the results list.
Table 18-2 Managing the Results List
Task Action Description More Information
Changing the result view View menu Enables you to changehow a results list isdisplayed. You can chooseto view the results as a list,thumbnails, or table.
Results View
Refreshing the results list Refresh icon Enables you to refresh thesearch results.
Refreshing the Results List
Chapter 18Working with the Results List in Content Manager
18-7

Table 18-2 (Cont.) Managing the Results List
Task Action Description More Information
Sorting the results Sort By menu Enables you to sort thefolder and documentresults lists. Library andfavorite results lists cannotbe sorted.
Sorting Results
Changing the number ofitems displayed per page
Items Per Page box Enables you to specify thenumber of items to displayper page in a results list.You can choose to displaydifferent number of libraryitems and document itemsper page.
Changing the Number ofItems Displayed per Page
Searching Libraries, Folders, and DocumentsDocuments uploaded to Content Server can be organized into libraries and folders, orthey can be unfiled, stored outside of any library or folder. Each library can havefolders and each folder can have subfolders. You can find documents by browsingthrough libraries and folders, by searching for key words or phrases in the documenttext and metadata, or a combination of both.
In Content Manager, you use the options on the access selection area to browsethrough libraries, folders, favorites, or the current portal. For example, you can selectHome to browse through your current portal or select Browse to search the libraries.You use the search box to search based on filters and metadata. As you enter the textin the search box, it expands to provide suggestions based on close matches to whatyou enter, organized into categories as Documents, Folders, and Libraries. Forexample, entering HR would show documents named HR Vacation Policy and HREmployees, folders named HR Forms and HR Policies, and a library named HR. Alongwith text entered into the search box, you can also use predefined filters to betterrefine your search. For example, you can limit your search by only browsing fordocuments authored, favorited, followed, or checked out by you. You can also chooseto save your searches to quickly execute them again later.
For information about how to search and browse, see Finding Libraries, Folders, andDocuments in Using Oracle WebCenter Content. Note that some features describedfor Oracle WebCenter Content in the referenced documentation might not be availablein WebCenter Portal and the UI may vary.
Chapter 18Searching Libraries, Folders, and Documents
18-8
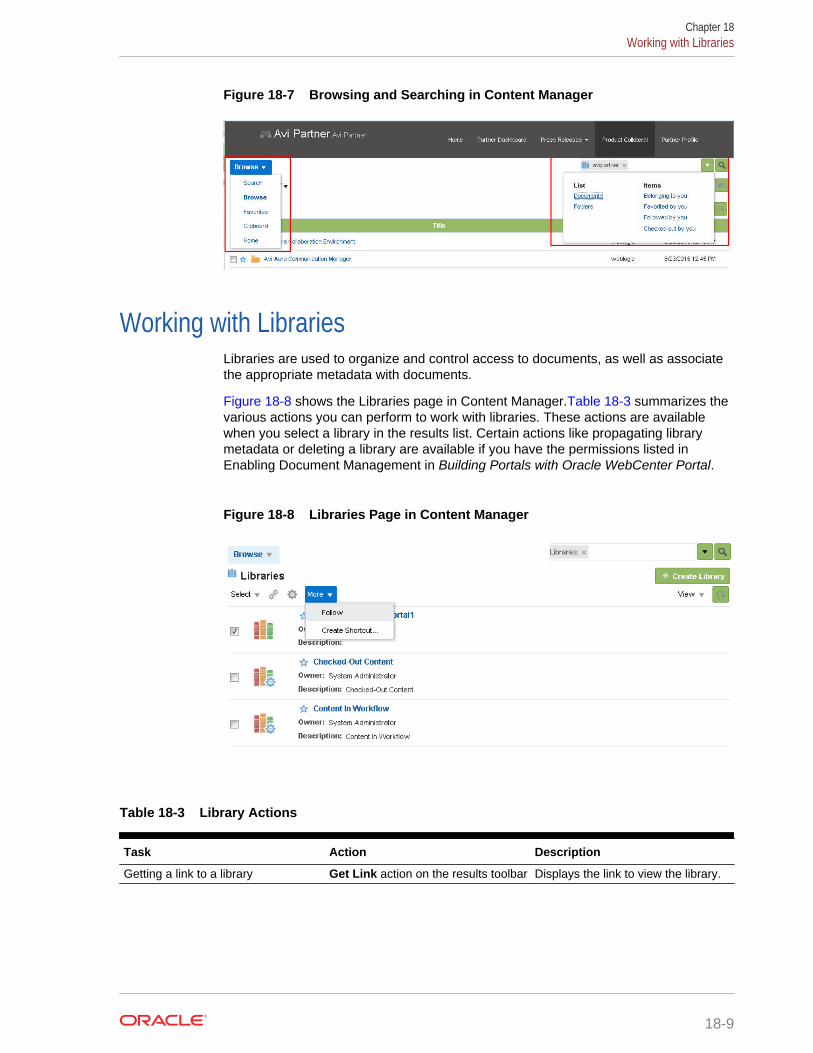
Figure 18-7 Browsing and Searching in Content Manager
Working with LibrariesLibraries are used to organize and control access to documents, as well as associatethe appropriate metadata with documents.
Figure 18-8 shows the Libraries page in Content Manager.Table 18-3 summarizes thevarious actions you can perform to work with libraries. These actions are availablewhen you select a library in the results list. Certain actions like propagating librarymetadata or deleting a library are available if you have the permissions listed in Enabling Document Management in Building Portals with Oracle WebCenter Portal.
Figure 18-8 Libraries Page in Content Manager
Table 18-3 Library Actions
Task Action Description
Getting a link to a library Get Link action on the results toolbar Displays the link to view the library.
Chapter 18Working with Libraries
18-9
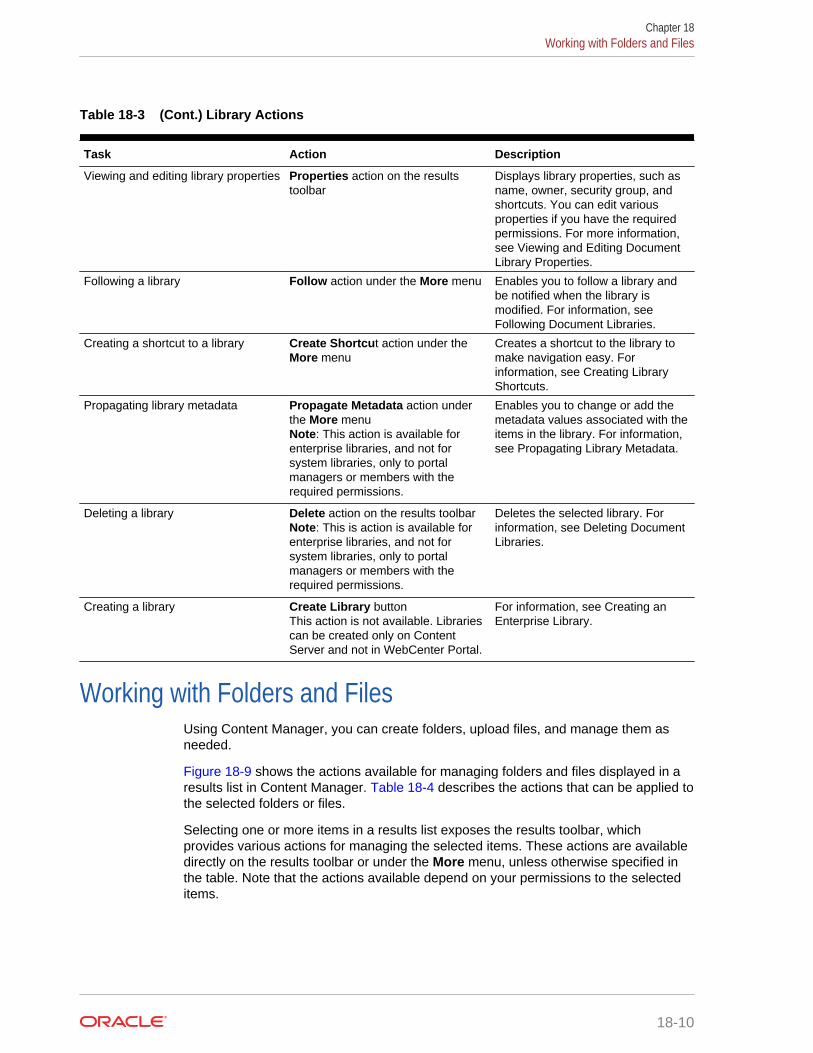
Table 18-3 (Cont.) Library Actions
Task Action Description
Viewing and editing library properties Properties action on the resultstoolbar
Displays library properties, such asname, owner, security group, andshortcuts. You can edit variousproperties if you have the requiredpermissions. For more information,see Viewing and Editing DocumentLibrary Properties.
Following a library Follow action under the More menu Enables you to follow a library andbe notified when the library ismodified. For information, see Following Document Libraries.
Creating a shortcut to a library Create Shortcut action under theMore menu
Creates a shortcut to the library tomake navigation easy. Forinformation, see Creating LibraryShortcuts.
Propagating library metadata Propagate Metadata action underthe More menuNote: This action is available forenterprise libraries, and not forsystem libraries, only to portalmanagers or members with therequired permissions.
Enables you to change or add themetadata values associated with theitems in the library. For information,see Propagating Library Metadata.
Deleting a library Delete action on the results toolbarNote: This is action is available forenterprise libraries, and not forsystem libraries, only to portalmanagers or members with therequired permissions.
Deletes the selected library. Forinformation, see Deleting DocumentLibraries.
Creating a library Create Library buttonThis action is not available. Librariescan be created only on ContentServer and not in WebCenter Portal.
For information, see Creating anEnterprise Library.
Working with Folders and FilesUsing Content Manager, you can create folders, upload files, and manage them asneeded.
Figure 18-9 shows the actions available for managing folders and files displayed in aresults list in Content Manager. Table 18-4 describes the actions that can be applied tothe selected folders or files.
Selecting one or more items in a results list exposes the results toolbar, whichprovides various actions for managing the selected items. These actions are availabledirectly on the results toolbar or under the More menu, unless otherwise specified inthe table. Note that the actions available depend on your permissions to the selecteditems.
Chapter 18Working with Folders and Files
18-10
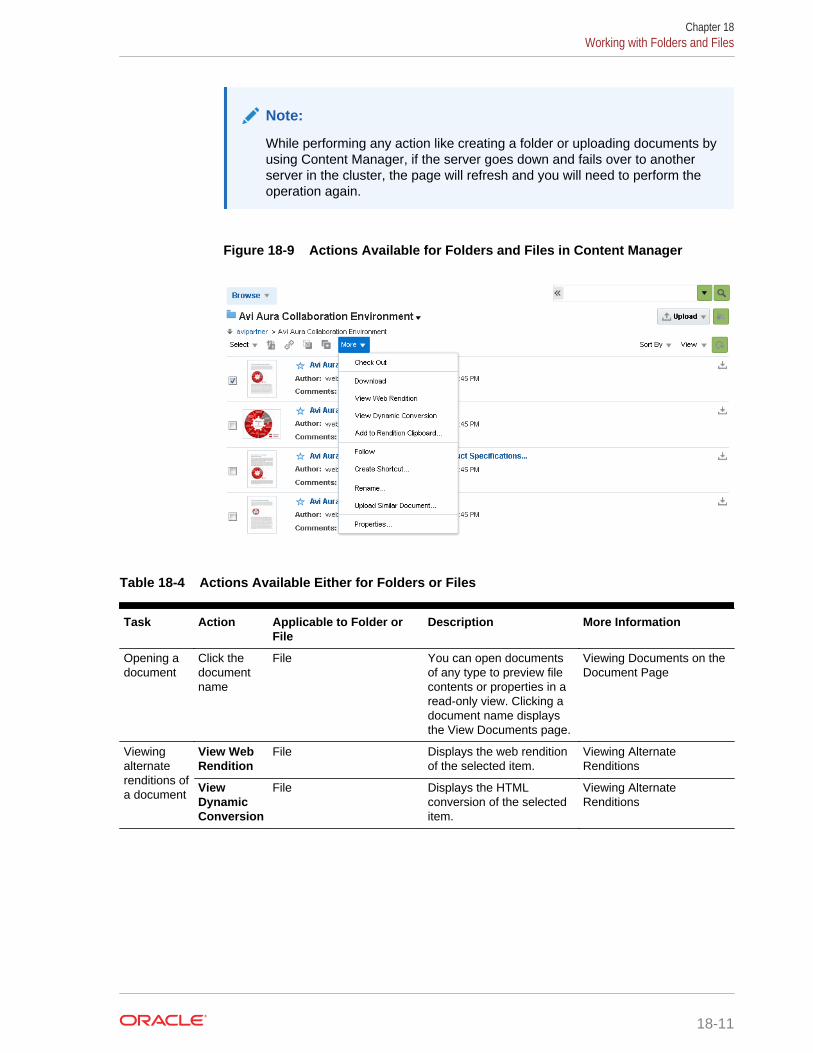
Note:
While performing any action like creating a folder or uploading documents byusing Content Manager, if the server goes down and fails over to anotherserver in the cluster, the page will refresh and you will need to perform theoperation again.
Figure 18-9 Actions Available for Folders and Files in Content Manager
Table 18-4 Actions Available Either for Folders or Files
Task Action Applicable to Folder orFile
Description More Information
Opening adocument
Click thedocumentname
File You can open documentsof any type to preview filecontents or properties in aread-only view. Clicking adocument name displaysthe View Documents page.
Viewing Documents on theDocument Page
Viewingalternaterenditions ofa document
View WebRendition
File Displays the web renditionof the selected item.
Viewing AlternateRenditions
ViewDynamicConversion
File Displays the HTMLconversion of the selecteditem.
Viewing AlternateRenditions
Chapter 18Working with Folders and Files
18-11
Table 18-4 (Cont.) Actions Available Either for Folders or Files
Task Action Applicable to Folder orFile
Description More Information
Add toRenditionClipboard
File Prompts you to choose therenditions of the selecteditem that you want to add tothe rendition clipboard. Therendition clipboard storesspecific renditions ofspecific document revisionsfor quick access. Forexample, you can save aweb-viewable rendition ofthe first revision of adocument as well as anative version of the currentrevision so that you canquickly compare them.
Use the RenditionsClipboard
Uploadingdocuments
Upload File Enables you to uploaddocuments. Whileuploading a document, youcan specify the metadatavalues of the document.
Note: While uploading filesfrom within a portal, youmust not change thesecurity group or accountmetadata.
Uploading Documents froma Web Browser
UploadSimilarDocument
File Prompts you to upload asimilar item. Selecting thisaction prepopulates themetadata values of theDocument Upload dialogwith those of the selecteddocument.
Note: While uploading filesfrom within a portal, youmust not change thesecurity group or accountmetadata.
Uploading Documents froma Web Browser
Checkingout anddownloadingdocuments
Check out File Checks out the selecteditem.
Checking Out Documents
Check outand edit
File Checks out the selecteditem and opens the nativefile for editing.
Checking Out and Editing aDocument
CancelCheck-Out
File Cancels the checked outstatus of a file.
Download File Allows you to save a filefrom the content repositoryto your local file system.
Downloading Documents
Chapter 18Working with Folders and Files
18-12
Table 18-4 (Cont.) Actions Available Either for Folders or Files
Task Action Applicable to Folder orFile
Description More Information
Workingwith fileversions/revisions
Check inNewRevision
File Enables you to replace afile with a new version thatyou have saved on yourlocal file system.
Checking In New Revisionsfrom a Web Browser
View andManageRevisions
File Enables you to download ordelete a file version.
Refreshingfile content
Refreshicon on theViewDocumentspage
File Displays the latest contentof a file.
Filing orunfiling adocument
FileDocument/UnfileDocument
File Allows you to file theselected unfiled documentin a library or folder, orremove the selected fileddocument from a library orfolder. When you unfile adocument, you can nolonger locate that documentby browsing to its parentlibrary or folder.
Viewingdocumentproperties
Properties File Opens the View Documentspage where you can viewand set various documentproperties such asmetadata and security.
Understanding Documentsand Document Properties
Settingsecurity ona file
Security tabon the ViewDocumentspage
File Enables you to change theaccess to documentsuploaded to a portal usingaccess control lists.
Note: You can use anaccess control list on adocument only if thesecurity group supportsaccess control lists. If youare uncertain whether thesecurity group you areusing supports accesscontrol lists, check withyour system administrator.
Changing Access toUploaded Documents
Propagatingfoldermetadata
PropagateMetadata
Folder Enables you to change oradd the metadata valuesassociated with the items ina folder.
Propagating LibraryMetadata
Chapter 18Working with Folders and Files
18-13
Table 18-4 (Cont.) Actions Available Either for Folders or Files
Task Action Applicable to Folder orFile
Description More Information
Creating afolder
CreateFolder
Folder Creates a folder within thecontext of a library,inheriting the properties ofthe parent library.
You can create a Localfolder or Oracle Contentand Experience Cloudfolder.
Creating Folders
Note: To create an OracleContent and ExperienceCloud folder, ensure thatyour system administratorhas configured the OracleContent and ExperienceCloud integration settings,as described in ConfiguringContent Manager for OracleContent and ExperienceCloud in AdministeringOracle WebCenter Portal.
Content Manager provides actions that are available for both folders and files whenviewing a listing of folders and/or files in the results list. These actions are availabledirectly on the results toolbar or under the More menu on the toolbar.
Table 18-5 summarizes the folder and file management actions.
Table 18-5 Common Actions Available for Both Folders and Files
Task Action Description More Information
Following a folder or file Follow Starts tracking the selecteditem so you can follow theupdates.
Following Items
Creating shortcuts Create Shortcut Prompts you to create ashortcut to the selecteditem.
ShortcutsSee also, Creating LibraryShortcuts
Renaming a folder or file Rename Prompts you to rename theselected item.
Linking to a folder or file Get link Displays links to view thedocument properties pageand to the native file of thelatest released revision oroptionally the specificrevision in the results list.This action is not availableif multiple items areselected.
Using Links
Moving a folder or file Move Prompts you to move theselected items.
Copying a folder or file Copy Prompts you to copy theselected items.
Deleting a folder or file Delete Prompts you to delete theselected folder or file.
Adding a folder or file toyour favorites
Favorite icon Provides quick access to afolder or file.
Setting Favorites
Chapter 18Working with Folders and Files
18-14
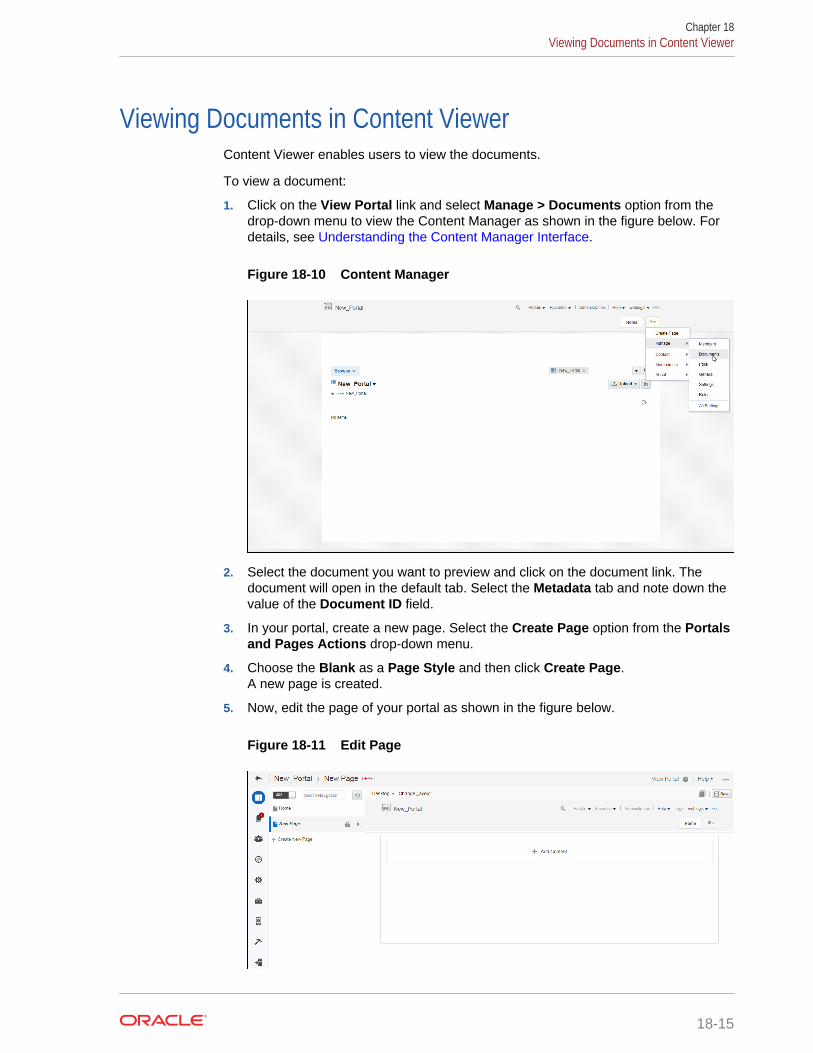
Viewing Documents in Content ViewerContent Viewer enables users to view the documents.
To view a document:
1. Click on the View Portal link and select Manage > Documents option from thedrop-down menu to view the Content Manager as shown in the figure below. Fordetails, see Understanding the Content Manager Interface.
Figure 18-10 Content Manager
2. Select the document you want to preview and click on the document link. Thedocument will open in the default tab. Select the Metadata tab and note down thevalue of the Document ID field.
3. In your portal, create a new page. Select the Create Page option from the Portalsand Pages Actions drop-down menu.
4. Choose the Blank as a Page Style and then click Create Page.A new page is created.
5. Now, edit the page of your portal as shown in the figure below.
Figure 18-11 Edit Page
Chapter 18Viewing Documents in Content Viewer
18-15
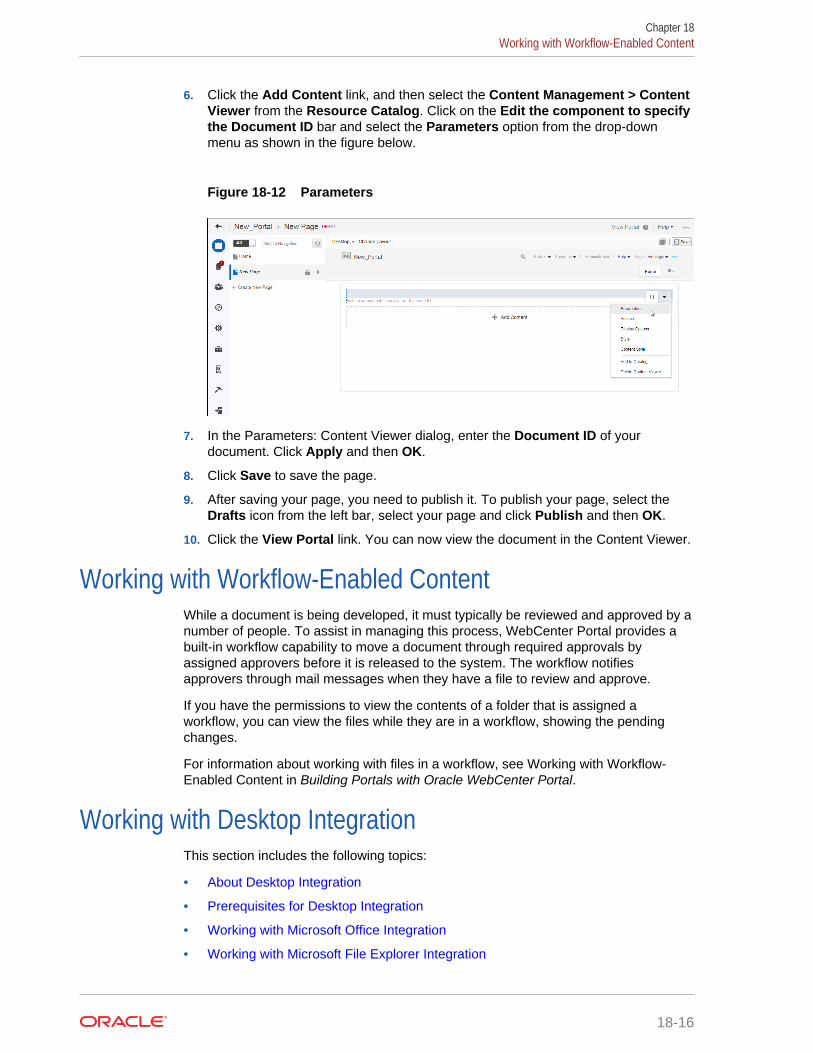
6. Click the Add Content link, and then select the Content Management > ContentViewer from the Resource Catalog. Click on the Edit the component to specifythe Document ID bar and select the Parameters option from the drop-downmenu as shown in the figure below.
Figure 18-12 Parameters
7. In the Parameters: Content Viewer dialog, enter the Document ID of yourdocument. Click Apply and then OK.
8. Click Save to save the page.
9. After saving your page, you need to publish it. To publish your page, select theDrafts icon from the left bar, select your page and click Publish and then OK.
10. Click the View Portal link. You can now view the document in the Content Viewer.
Working with Workflow-Enabled ContentWhile a document is being developed, it must typically be reviewed and approved by anumber of people. To assist in managing this process, WebCenter Portal provides abuilt-in workflow capability to move a document through required approvals byassigned approvers before it is released to the system. The workflow notifiesapprovers through mail messages when they have a file to review and approve.
If you have the permissions to view the contents of a folder that is assigned aworkflow, you can view the files while they are in a workflow, showing the pendingchanges.
For information about working with files in a workflow, see Working with Workflow-Enabled Content in Building Portals with Oracle WebCenter Portal.
Working with Desktop IntegrationThis section includes the following topics:
• About Desktop Integration
• Prerequisites for Desktop Integration
• Working with Microsoft Office Integration
• Working with Microsoft File Explorer Integration
Chapter 18Working with Workflow-Enabled Content
18-16
• Working with Email Client Integration
• Working with Web Browser Search Integration
About Desktop IntegrationWebCenter Portal, through Oracle WebCenter Content: Desktop, provides convenientaccess to the files in your portal directly from the following desktop applications:
• Microsoft File Explorer
• Microsoft Office applications (Word, Excel, and PowerPoint)
• Email clients (Microsoft Outlook and Lotus Notes)
• Web browsers (Internet Explorer, Mozilla Firefox, and Google Chrome)
Integrating your content repository with your desktop applications improves your abilityto work with your portal files. You can easily edit and manage files, and share files withother users directly from your desktop in addition to using WebCenter Portal.
Prerequisites for Desktop IntegrationTo allow for full integration of desktop applications with WebCenter Portal, your systemadministrator must complete the steps detailed in Configuring Content Server forDesktop in Administering Oracle WebCenter Portal.
Additionally, you must install the latest version of the Desktop client software and setup a connection to your portal's content repository. These tasks may have beenperformed for you by your system administrator. For more information, see thefollowing topics in Using Oracle WebCenter Content: Desktop:
• Setting Up the Desktop Client Software on Your Computer
• Working with Content Server Connections
Working with Microsoft Office IntegrationThis section includes the following topics:
• About Microsoft Office Integration
• Opening and Editing a Microsoft Office File from WebCenter Portal
• Working with Files in Microsoft Office
About Microsoft Office IntegrationIf you have installed the Desktop client and set up a connection to your portal's contentrepository, as described in Prerequisites for Desktop Integration, you can interact withthe Microsoft Word, Excel, and PowerPoint files in your portal directly in theappropriate Microsoft Office application.
Opening and Editing a Microsoft Office File from WebCenter PortalWhen you open a Microsoft Office file from WebCenter Portal, the file is automaticallychecked out of the Content Server repository.
Chapter 18Working with Desktop Integration
18-17
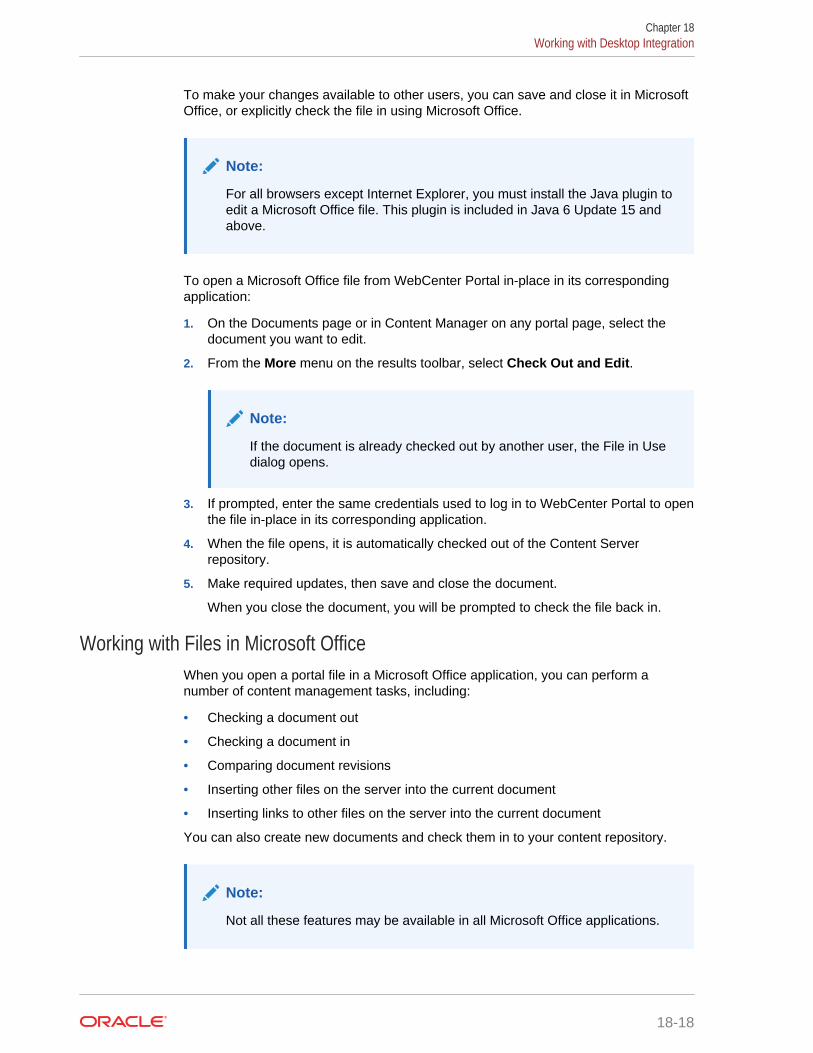
To make your changes available to other users, you can save and close it in MicrosoftOffice, or explicitly check the file in using Microsoft Office.
Note:
For all browsers except Internet Explorer, you must install the Java plugin toedit a Microsoft Office file. This plugin is included in Java 6 Update 15 andabove.
To open a Microsoft Office file from WebCenter Portal in-place in its correspondingapplication:
1. On the Documents page or in Content Manager on any portal page, select thedocument you want to edit.
2. From the More menu on the results toolbar, select Check Out and Edit.
Note:
If the document is already checked out by another user, the File in Usedialog opens.
3. If prompted, enter the same credentials used to log in to WebCenter Portal to openthe file in-place in its corresponding application.
4. When the file opens, it is automatically checked out of the Content Serverrepository.
5. Make required updates, then save and close the document.
When you close the document, you will be prompted to check the file back in.
Working with Files in Microsoft OfficeWhen you open a portal file in a Microsoft Office application, you can perform anumber of content management tasks, including:
• Checking a document out
• Checking a document in
• Comparing document revisions
• Inserting other files on the server into the current document
• Inserting links to other files on the server into the current document
You can also create new documents and check them in to your content repository.
Note:
Not all these features may be available in all Microsoft Office applications.
Chapter 18Working with Desktop Integration
18-18
The Desktop client provides access to portal document management tasks inMicrosoft Office in the following ways:
• A WebCenter Content ribbon
Figure 18-13 WebCenter Content Ribbon in Microsoft Word 2007
• In versions of Microsoft Office that include a File tab, Desktop adds OracleWebCenter Content options as follows:
– In Microsoft Office 2010, Desktop adds WebCenter Content Options directly tothe File tab.
– In Microsoft Office 2013, Desktop adds Oracle WebCenter Content options tothe Open and Save As pages, as well as to a new WebCenter Content page.These pages are available from the File tab.
For more information about how you can work with portal documents in MicrosoftOffice applications, see Microsoft Office Integration in Using Oracle WebCenterContent: Desktop.
Working with Microsoft File Explorer IntegrationIf you have installed the Desktop client, as described in Prerequisites for DesktopIntegration, you can manage your portal's documents using a "folders tree" inMicrosoft File Explorer.
After you install the Desktop client on your computer, Microsoft File Explorer includesa top-level node called WebCenter Content Servers, through which you can connectyour portal repository and work with the documents stored there.
Chapter 18Working with Desktop Integration
18-19
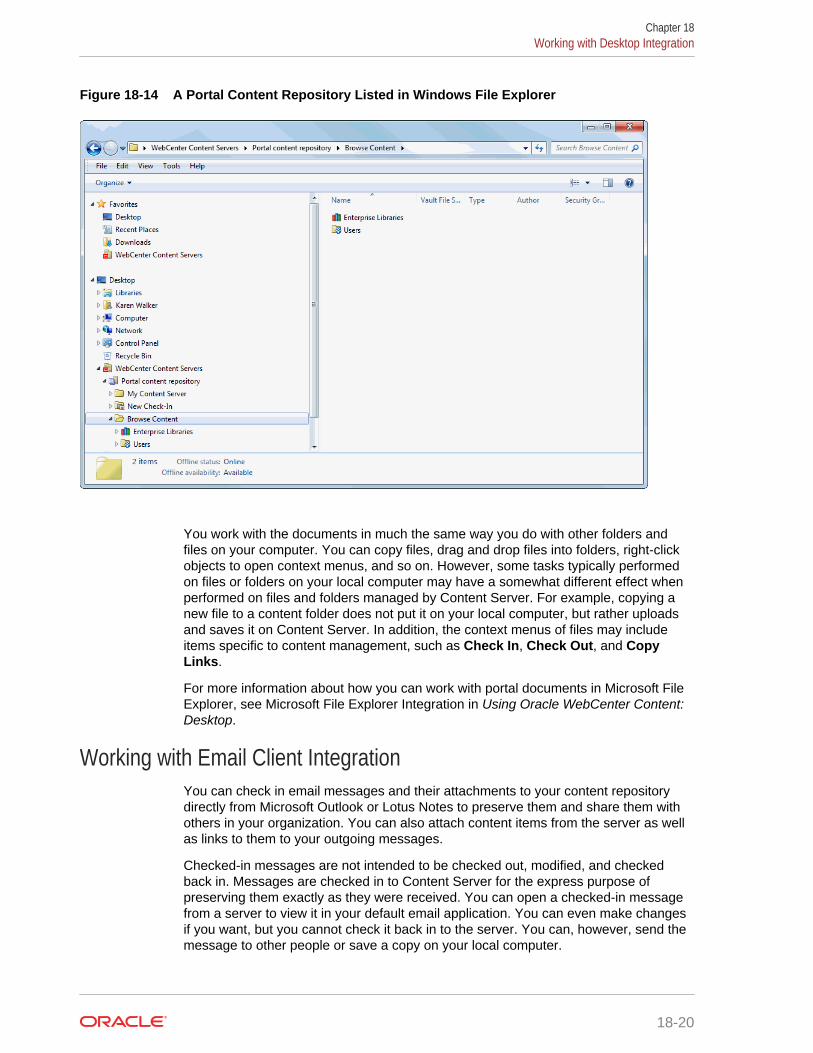
Figure 18-14 A Portal Content Repository Listed in Windows File Explorer
You work with the documents in much the same way you do with other folders andfiles on your computer. You can copy files, drag and drop files into folders, right-clickobjects to open context menus, and so on. However, some tasks typically performedon files or folders on your local computer may have a somewhat different effect whenperformed on files and folders managed by Content Server. For example, copying anew file to a content folder does not put it on your local computer, but rather uploadsand saves it on Content Server. In addition, the context menus of files may includeitems specific to content management, such as Check In, Check Out, and CopyLinks.
For more information about how you can work with portal documents in Microsoft FileExplorer, see Microsoft File Explorer Integration in Using Oracle WebCenter Content:Desktop.
Working with Email Client IntegrationYou can check in email messages and their attachments to your content repositorydirectly from Microsoft Outlook or Lotus Notes to preserve them and share them withothers in your organization. You can also attach content items from the server as wellas links to them to your outgoing messages.
Checked-in messages are not intended to be checked out, modified, and checkedback in. Messages are checked in to Content Server for the express purpose ofpreserving them exactly as they were received. You can open a checked-in messagefrom a server to view it in your default email application. You can even make changesif you want, but you cannot check it back in to the server. You can, however, send themessage to other people or save a copy on your local computer.
Chapter 18Working with Desktop Integration
18-20

For more information about how you can work with portal documents in your emailclient, see the following chapters in Using Oracle WebCenter Content: Desktop:
• Microsoft Outlook Integration
• Lotus Notes Integration
Working with Web Browser Search IntegrationYou can search for content in your content repository directly from the search field ofthe following web browsers:
• Internet Explorer
• Mozilla Firefox
• Google Chrome
Desktop's web browser integration adds a search provider or search engine to yourweb browser. A search provider or engine in your web browser is for a specific OracleWebCenter Content Server instance only. You cannot search multiple content serversusing a single search provider or engine. You cannot add two search providers orengines for the same Oracle WebCenter Content Server instance.
If you are logged into Content Server, you will see all content items that meet thesearch criteria and for which you have access privileges on the server. If you are notlogged in, then you will see only public content.
For web browser integration to work, it must first be enabled on Content Server by thesystem administrator.
For more information about searching for portal documents in your web browser, see Web Browser Search Integration in Using Oracle WebCenter Content: Desktop.
Chapter 18Working with Desktop Integration
18-21
19Working with Oracle Content andExperience Cloud
Access and manage files and folders located in Oracle Content and Experience Cloudfrom a portal.
If Oracle Content and Experience Cloud is integrated with WebCenter Portal, you canaccess Oracle Content and Experience Cloud documents from a portal. For moreinformation, your system administrator can refer to Integrating with Oracle Content andExperience Cloud in Administering Oracle WebCenter Portal.
Permissions:
To perform the tasks in this chapter, you need the application-levelpermission Pages: Create, Edit Pages.
For information about roles and permissions, see UnderstandingPermissions and Permission Models in a Portal in Building Portals withOracle WebCenter Portal.
Topics:
• About Oracle Content and Experience Cloud
• Using Oracle Content and Experience Cloud
About Oracle Content and Experience CloudOracle Content and Experience Cloud is a cloud-based content collaboration solution,built with robust security, application integration. If Oracle Content and ExperienceCloud is integrated with WebCenter Portal, you can add, view, and share yourdocuments and also collaborate with others in Oracle Content and Experience Cloudfor secure access to content using a cloud interface.
If external non-WebCenter Portal users want to share documents with WebCenterPortal users, they can use Oracle Content and Experience Cloud to allow access tothose documents from within a portal in WebCenter Portal.
For example, suppose marketing assets created by design agencies and some partnerinformation need to be shared with WebCenter Portal users. However, the marketingagencies and partners have Oracle Content and Experience Cloud accounts but notWebCenter Portal accounts. If marketing assets and partner documents are shared onOracle Content and Experience Cloud, WebCenter Portal users can access thedocuments from a portal that includes the Oracle DOCS Content Manager task flow.
The following figure shows an example of an Oracle Content and Experience Cloudview on a page in WebCenter Portal.
19-1
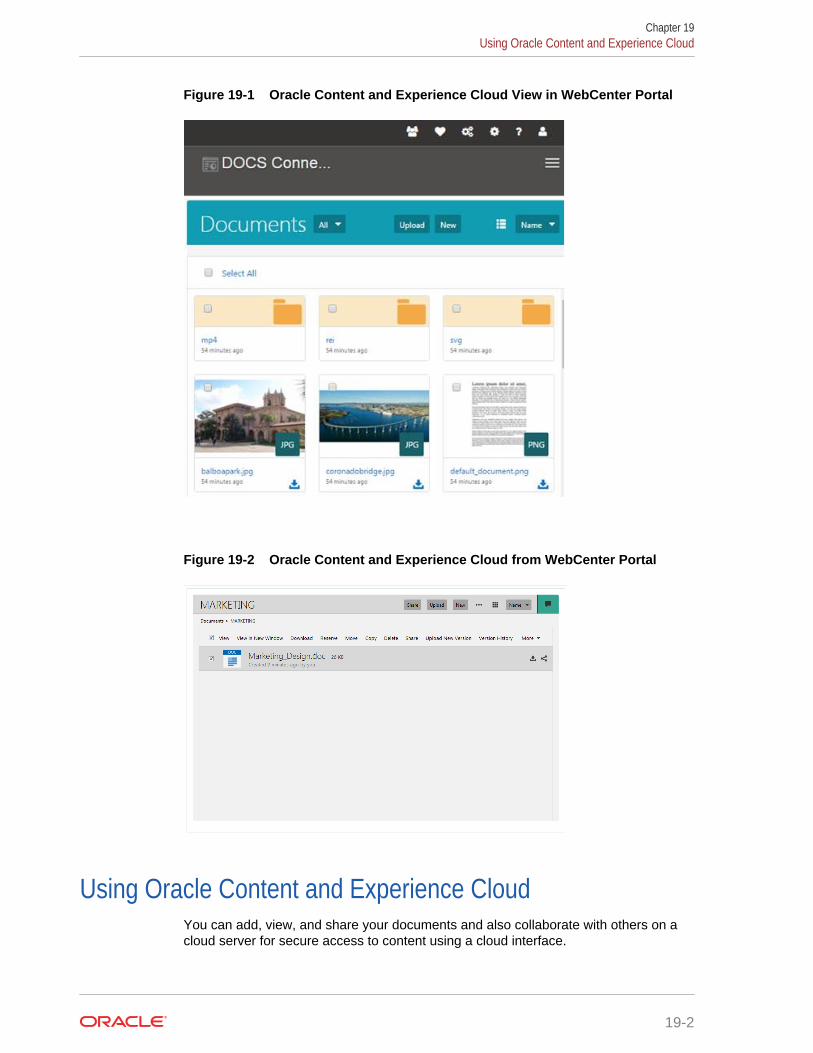
Figure 19-1 Oracle Content and Experience Cloud View in WebCenter Portal
Figure 19-2 Oracle Content and Experience Cloud from WebCenter Portal
Using Oracle Content and Experience CloudYou can add, view, and share your documents and also collaborate with others on acloud server for secure access to content using a cloud interface.
Chapter 19Using Oracle Content and Experience Cloud
19-2
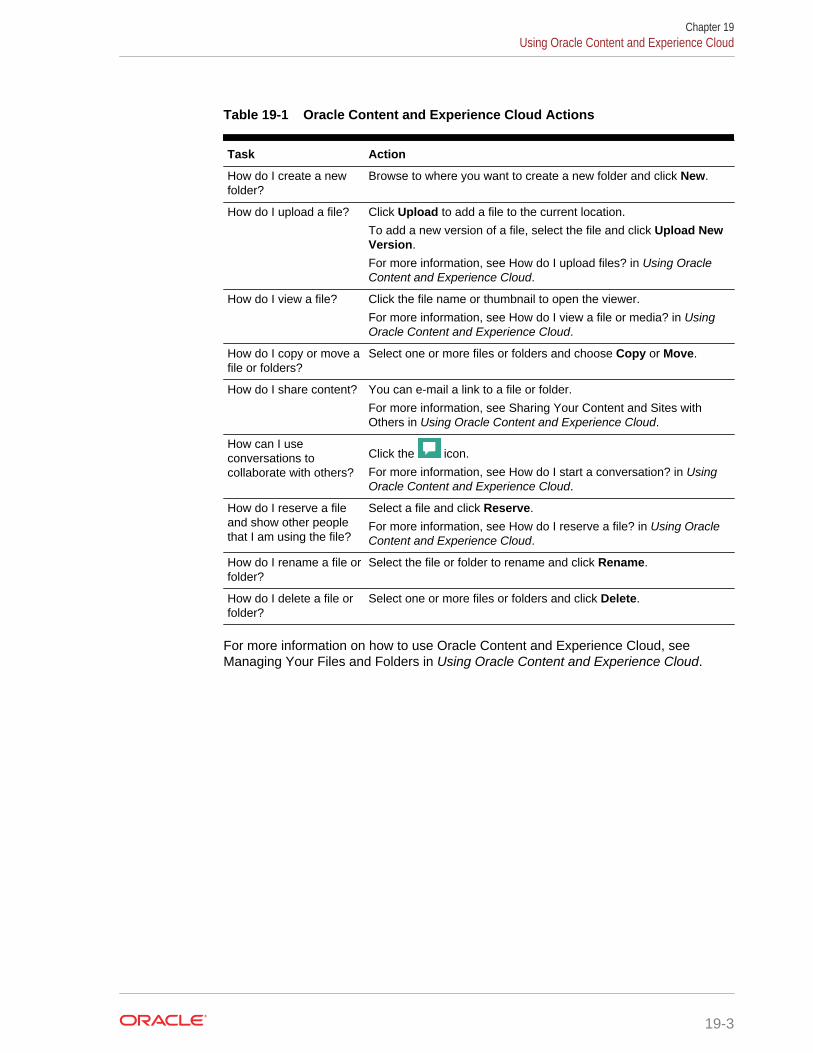
Table 19-1 Oracle Content and Experience Cloud Actions
Task Action
How do I create a newfolder?
Browse to where you want to create a new folder and click New.
How do I upload a file? Click Upload to add a file to the current location.
To add a new version of a file, select the file and click Upload NewVersion.
For more information, see How do I upload files? in Using OracleContent and Experience Cloud.
How do I view a file? Click the file name or thumbnail to open the viewer.
For more information, see How do I view a file or media? in UsingOracle Content and Experience Cloud.
How do I copy or move afile or folders?
Select one or more files or folders and choose Copy or Move.
How do I share content? You can e-mail a link to a file or folder.
For more information, see Sharing Your Content and Sites withOthers in Using Oracle Content and Experience Cloud.
How can I useconversations tocollaborate with others?
Click the icon.
For more information, see How do I start a conversation? in UsingOracle Content and Experience Cloud.
How do I reserve a fileand show other peoplethat I am using the file?
Select a file and click Reserve.
For more information, see How do I reserve a file? in Using OracleContent and Experience Cloud.
How do I rename a file orfolder?
Select the file or folder to rename and click Rename.
How do I delete a file orfolder?
Select one or more files or folders and click Delete.
For more information on how to use Oracle Content and Experience Cloud, see Managing Your Files and Folders in Using Oracle Content and Experience Cloud.
Chapter 19Using Oracle Content and Experience Cloud
19-3
20Working with Wikis
Create, edit, and manage wikis, which multiple users can use to share content that isrelevant, useful, and up-to-date.
See Also:
For an overview of the different options available in WebCenter Portal forworking with portal content and adding content to a portal, see Introduction toAdding Content to a Portal.
Note:
To perform the tasks in this chapter, you need the following permissions:
• To view or post comments on wiki documents, you need only the ViewDocuments permission.
• To view a wiki page, you need the View Page permission. Thispermission is granted to all authenticated users by default. To edit a wikipage, you need to be granted Edit permissions on the page.
• To create a personal page using the Wiki page style, you need theapplication-level permission Pages: Create. This permission is grantedto all authenticated users by default, allowing them to create andmanage their personal pages in the Home portal.
• To use the New Wiki Document action and work with wiki documents,you need the portal-level permission Create Documents (which includesdelete permissions on wiki documents that you create). To delete wikidocuments that are not your own, you must have Delete Documentspermission.
Permissions:
The tasks described in this chapter are available only if the systemadministrator and portal manager have made wiki functionality available inWebCenter Portal and the current portal, as described in Prerequisites forEnabling Wiki Functionality in Building Portals with Oracle WebCenter Portal.
Topics:
• About Wikis
20-1
• Creating a Wiki Page
• Creating a Wiki Document Within a Wiki Page
• Editing a Wiki
• Using the Rich Text Editor (RTE)
• Exposing an Existing Wiki Document in the Portal Navigation
• Managing Wiki Documents
About WikisWikis are web pages that offer in-place editing using HTML or a simple mark-uplanguage called wiki mark-up.
Wikis epitomize the concepts of community and collaboration by allowing allauthorized community members to contribute their information to a body of knowledge.Users with sufficient permissions on a wiki can add, revise, or delete content.Wikipedia (http://www.wikipedia.com) is a widely-known example of the use of wikis.Users from all over the world collaborate to create and edit Wikipedia pages, resultingin a rich, dynamic knowledge base for everyone's benefit.
In WebCenter Portal, you create a wiki page using Wiki page style, which supports adedicated wiki page with a default wiki document that offers in-place editing featuresthrough the Rich Text Editor (RTE).
A wiki page is exposed in the Content Manager task flow as a folder, just like any otherpage. The folder contains a default wiki document, with the same name as the pagename. The wiki page is automatically added to the portal’s navigation.
To create a new wiki page, you must have the following permissions:
• Create Pages or Create, Edit, Delete Pages
• Create Documents
In a portal, the newly created wiki page inherits portal permissions (where the PortalManager role and users with Customize Pages permissions have Create, Edit, andDelete permissions, and users with View Pages and Content permissions have onlyView permission).
In the Home portal, a newly created wiki page inherits the same permissions as apublic folder; the owner is granted the Administer, Read, Write, and Deletepermissions, and public users are granted only the Read access.
Creating a WikiThis section describes the ways to create a wiki.
This section includes the following topics:
• Creating a Wiki Page
• Creating a Wiki Document Within a Wiki Page
• Creating a Wiki Document Using the Wikis System Page
Chapter 20About Wikis
20-2
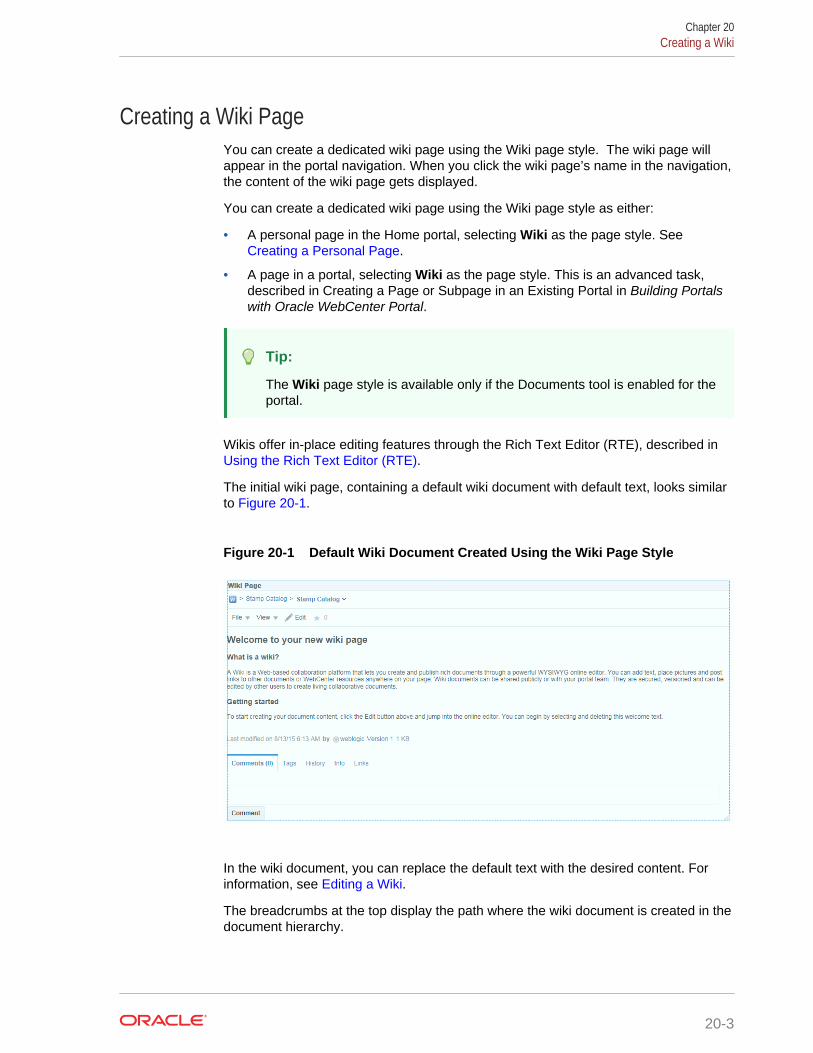
Creating a Wiki PageYou can create a dedicated wiki page using the Wiki page style. The wiki page willappear in the portal navigation. When you click the wiki page’s name in the navigation,the content of the wiki page gets displayed.
You can create a dedicated wiki page using the Wiki page style as either:
• A personal page in the Home portal, selecting Wiki as the page style. See Creating a Personal Page.
• A page in a portal, selecting Wiki as the page style. This is an advanced task,described in Creating a Page or Subpage in an Existing Portal in Building Portalswith Oracle WebCenter Portal.
Tip:
The Wiki page style is available only if the Documents tool is enabled for theportal.
Wikis offer in-place editing features through the Rich Text Editor (RTE), described in Using the Rich Text Editor (RTE).
The initial wiki page, containing a default wiki document with default text, looks similarto Figure 20-1.
Figure 20-1 Default Wiki Document Created Using the Wiki Page Style
In the wiki document, you can replace the default text with the desired content. Forinformation, see Editing a Wiki.
The breadcrumbs at the top display the path where the wiki document is created in thedocument hierarchy.
Chapter 20Creating a Wiki
20-3
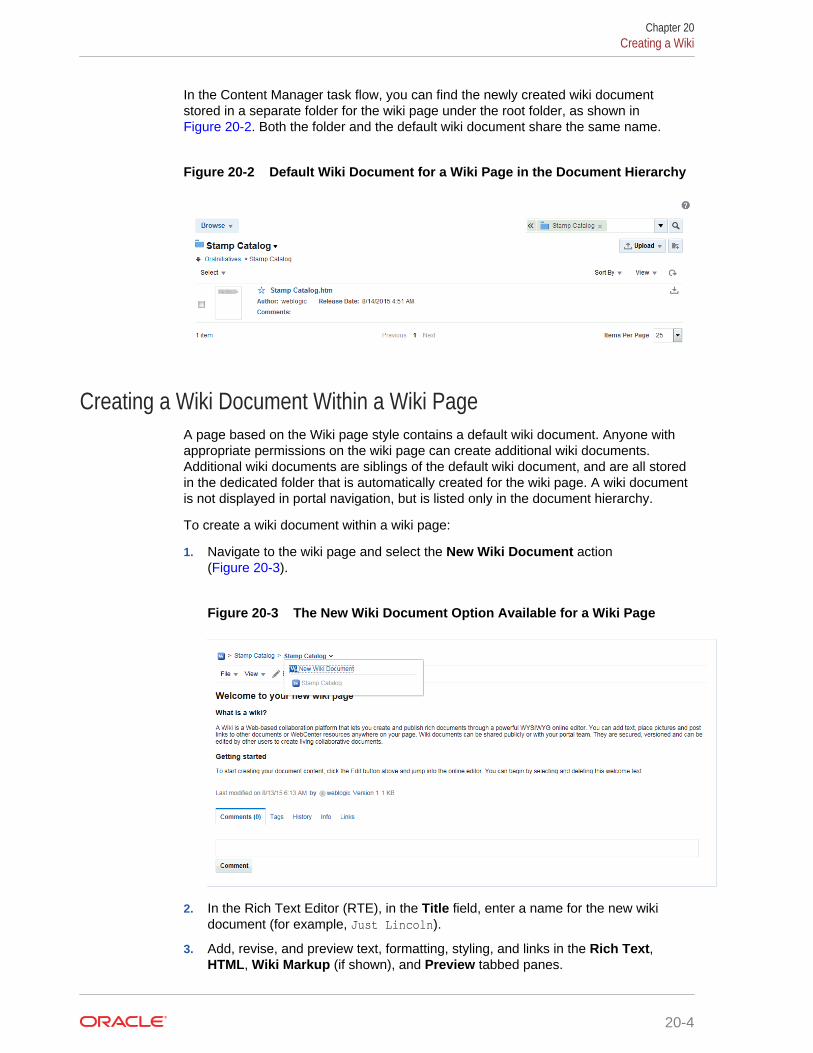
In the Content Manager task flow, you can find the newly created wiki documentstored in a separate folder for the wiki page under the root folder, as shown in Figure 20-2. Both the folder and the default wiki document share the same name.
Figure 20-2 Default Wiki Document for a Wiki Page in the Document Hierarchy
Creating a Wiki Document Within a Wiki PageA page based on the Wiki page style contains a default wiki document. Anyone withappropriate permissions on the wiki page can create additional wiki documents.Additional wiki documents are siblings of the default wiki document, and are all storedin the dedicated folder that is automatically created for the wiki page. A wiki documentis not displayed in portal navigation, but is listed only in the document hierarchy.
To create a wiki document within a wiki page:
1. Navigate to the wiki page and select the New Wiki Document action(Figure 20-3).
Figure 20-3 The New Wiki Document Option Available for a Wiki Page
2. In the Rich Text Editor (RTE), in the Title field, enter a name for the new wikidocument (for example, Just Lincoln).
3. Add, revise, and preview text, formatting, styling, and links in the Rich Text,HTML, Wiki Markup (if shown), and Preview tabbed panes.
Chapter 20Creating a Wiki
20-4
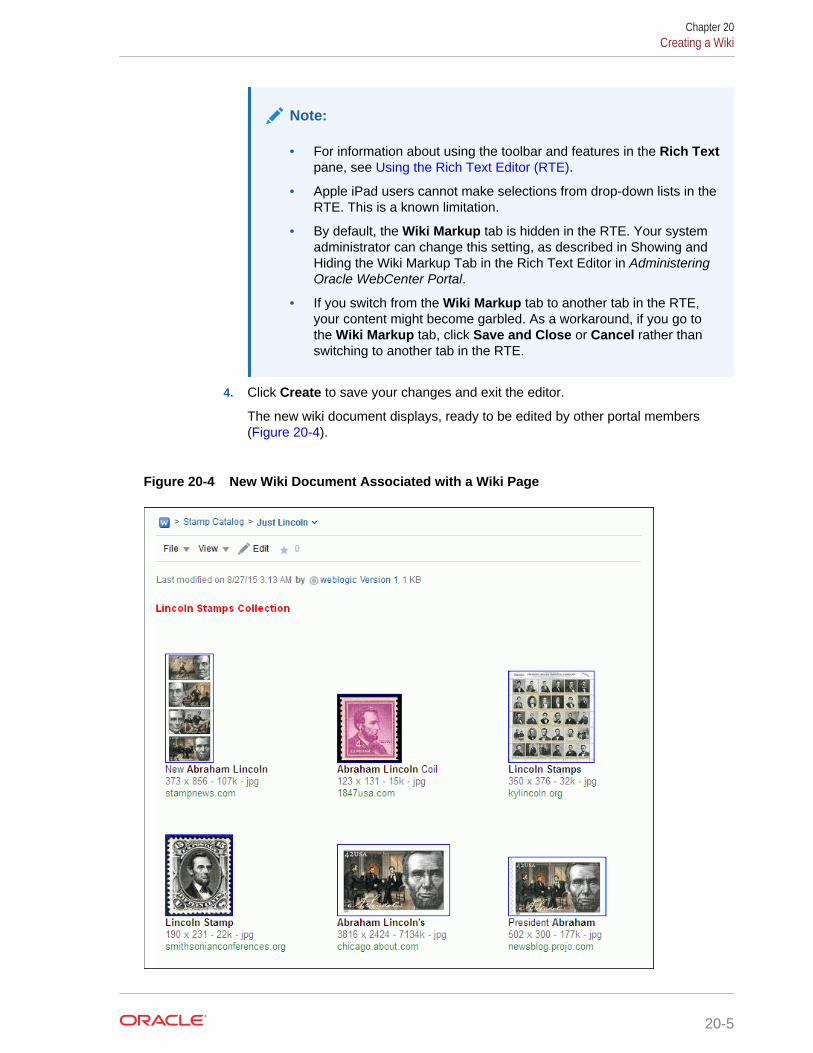
Note:
• For information about using the toolbar and features in the Rich Textpane, see Using the Rich Text Editor (RTE).
• Apple iPad users cannot make selections from drop-down lists in theRTE. This is a known limitation.
• By default, the Wiki Markup tab is hidden in the RTE. Your systemadministrator can change this setting, as described in Showing andHiding the Wiki Markup Tab in the Rich Text Editor in AdministeringOracle WebCenter Portal.
• If you switch from the Wiki Markup tab to another tab in the RTE,your content might become garbled. As a workaround, if you go tothe Wiki Markup tab, click Save and Close or Cancel rather thanswitching to another tab in the RTE.
4. Click Create to save your changes and exit the editor.
The new wiki document displays, ready to be edited by other portal members(Figure 20-4).
Figure 20-4 New Wiki Document Associated with a Wiki Page
Chapter 20Creating a Wiki
20-5
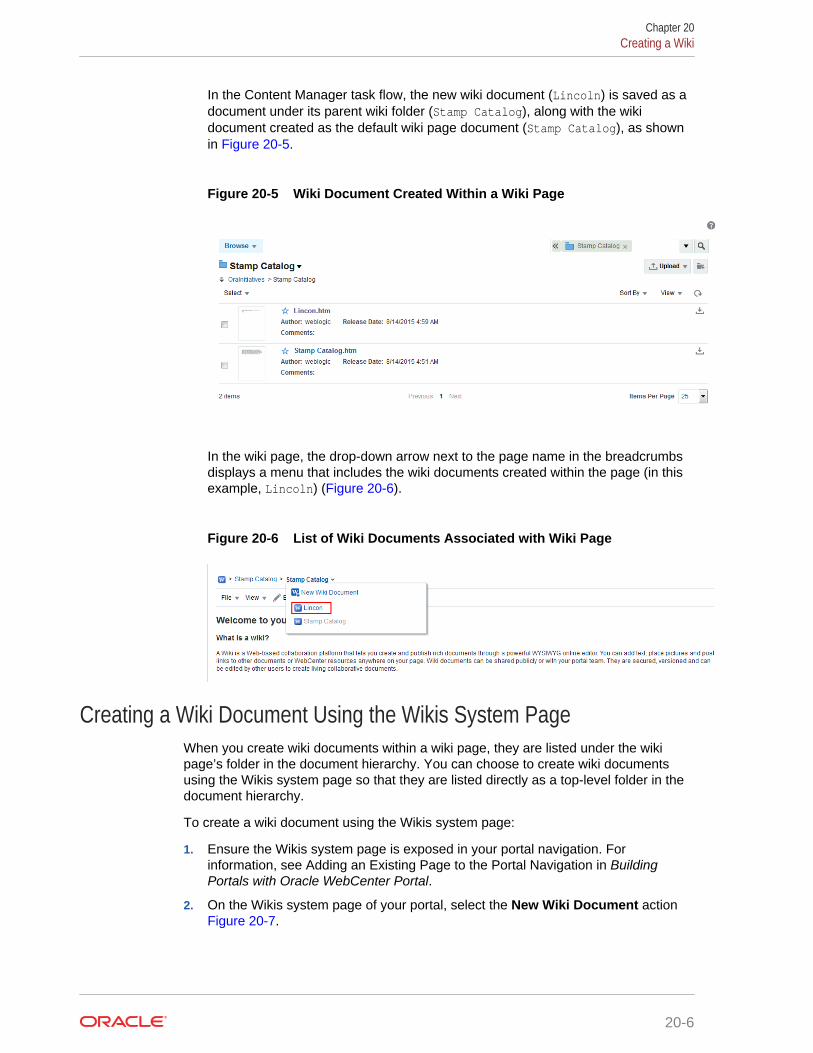
In the Content Manager task flow, the new wiki document (Lincoln) is saved as adocument under its parent wiki folder (Stamp Catalog), along with the wikidocument created as the default wiki page document (Stamp Catalog), as shownin Figure 20-5.
Figure 20-5 Wiki Document Created Within a Wiki Page
In the wiki page, the drop-down arrow next to the page name in the breadcrumbsdisplays a menu that includes the wiki documents created within the page (in thisexample, Lincoln) (Figure 20-6).
Figure 20-6 List of Wiki Documents Associated with Wiki Page
Creating a Wiki Document Using the Wikis System PageWhen you create wiki documents within a wiki page, they are listed under the wikipage’s folder in the document hierarchy. You can choose to create wiki documentsusing the Wikis system page so that they are listed directly as a top-level folder in thedocument hierarchy.
To create a wiki document using the Wikis system page:
1. Ensure the Wikis system page is exposed in your portal navigation. Forinformation, see Adding an Existing Page to the Portal Navigation in BuildingPortals with Oracle WebCenter Portal.
2. On the Wikis system page of your portal, select the New Wiki Document action Figure 20-7.
Chapter 20Creating a Wiki
20-6

Figure 20-7 The New Wiki Document Option Available on the Wikis SystemPage
3. Add, revise, and preview text, formatting, styling, and links in the Rich Text,HTML, Wiki Markup (if shown), and Preview tabbed panes.
Note:
• For information about using the toolbar and features in the Rich Textpane, see Using the Rich Text Editor (RTE).
• Apple iPad users cannot make selections from drop-down lists in theRTE. This is a known limitation.
• By default, the Wiki Markup tab is hidden in the RTE. Your systemadministrator can change this setting, as described in Showing andHiding the Wiki Markup Tab in the Rich Text Editor in AdministeringOracle WebCenter Portal.
• If you switch from the Wiki Markup tab to another tab in the RTE,your content might become garbled. As a workaround, if you go tothe Wiki Markup tab, click Save and Close or Cancel rather thanswitching to another tab in the RTE.
4. Click Create to save your changes and exit the editor.
The new wiki document displays, ready to be edited by other portal members.
On the Wikis system page, the new wiki document (MyStamps) is shown as a top-level folder in the document hierarchy, as shown in .
Figure 20-8 A Wiki Document Listed in the Document Hierarchy on theWikis System Page
Chapter 20Creating a Wiki
20-7

Editing a WikiYou use the Rich Text Editor (RTE) to add or revise the content of your wikidocuments.
Note:
The Rich Text Editor (RTE) can edit wiki documents up to 1MB in size. Forwiki documents larger than 1MB, the Edit action is not active.
When you open a wiki document for editing, WebCenter Portal automatically checksthe file out. If another user is already editing a wiki document when you try to open it,you will see a message that the wiki document has already been checked out.
Whenever you save changes to a wiki document, WebCenter Portal automaticallychecks the file in and creates a new version of the wiki document. This means that thelast saved version of a wiki document appears as the current version.
To edit a wiki:
1. Open the wiki document.
Tip:
To open the default wiki document, navigate to the wiki page.
To open another wiki document created within the wiki page, first clickthe dropdown arrow next to the page name in the breadcrumbs andselect the appropriate document.
2. Click the Edit action.
Figure 20-9 Editing a Wiki Page
Chapter 20Editing a Wiki
20-8
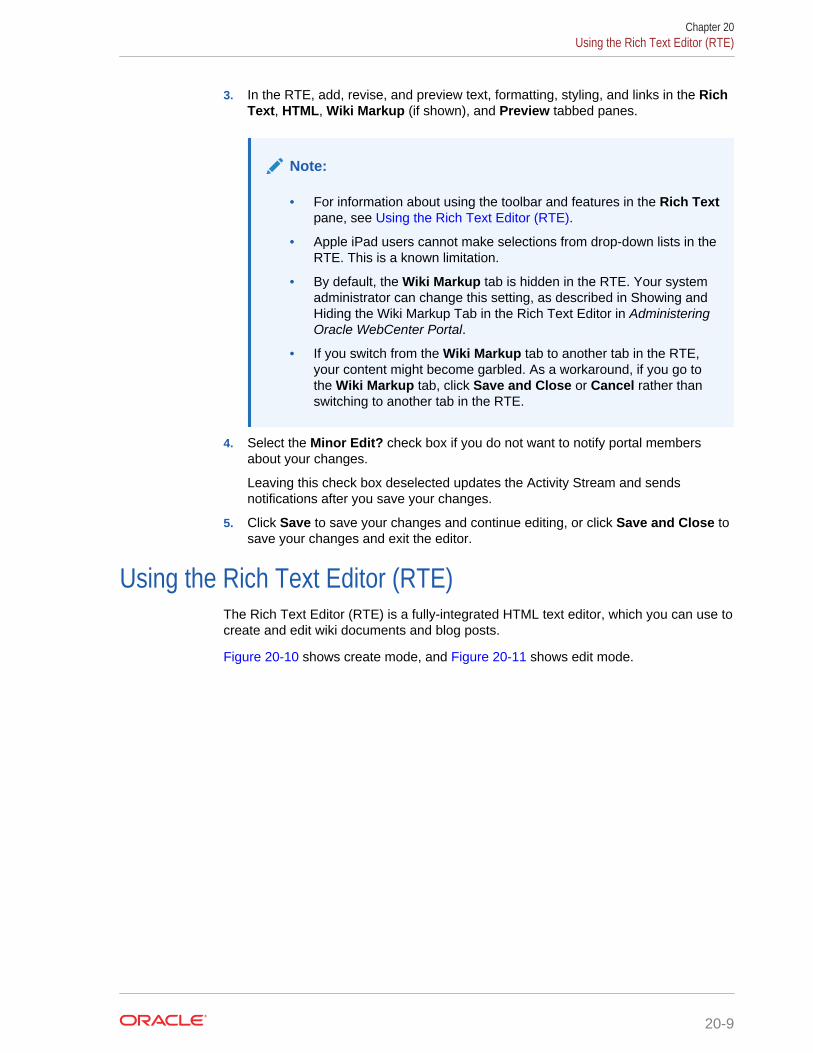
3. In the RTE, add, revise, and preview text, formatting, styling, and links in the RichText, HTML, Wiki Markup (if shown), and Preview tabbed panes.
Note:
• For information about using the toolbar and features in the Rich Textpane, see Using the Rich Text Editor (RTE).
• Apple iPad users cannot make selections from drop-down lists in theRTE. This is a known limitation.
• By default, the Wiki Markup tab is hidden in the RTE. Your systemadministrator can change this setting, as described in Showing andHiding the Wiki Markup Tab in the Rich Text Editor in AdministeringOracle WebCenter Portal.
• If you switch from the Wiki Markup tab to another tab in the RTE,your content might become garbled. As a workaround, if you go tothe Wiki Markup tab, click Save and Close or Cancel rather thanswitching to another tab in the RTE.
4. Select the Minor Edit? check box if you do not want to notify portal membersabout your changes.
Leaving this check box deselected updates the Activity Stream and sendsnotifications after you save your changes.
5. Click Save to save your changes and continue editing, or click Save and Close tosave your changes and exit the editor.
Using the Rich Text Editor (RTE)The Rich Text Editor (RTE) is a fully-integrated HTML text editor, which you can use tocreate and edit wiki documents and blog posts.
Figure 20-10 shows create mode, and Figure 20-11 shows edit mode.
Chapter 20Using the Rich Text Editor (RTE)
20-9
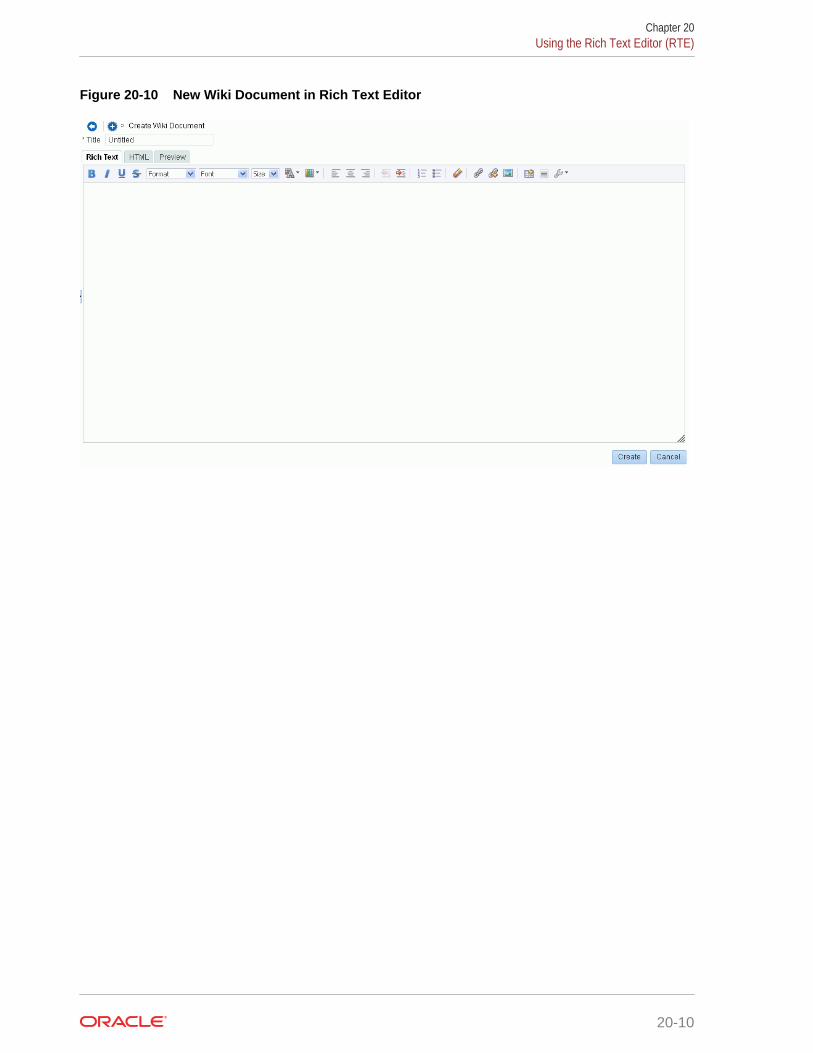
Figure 20-10 New Wiki Document in Rich Text Editor
Chapter 20Using the Rich Text Editor (RTE)
20-10
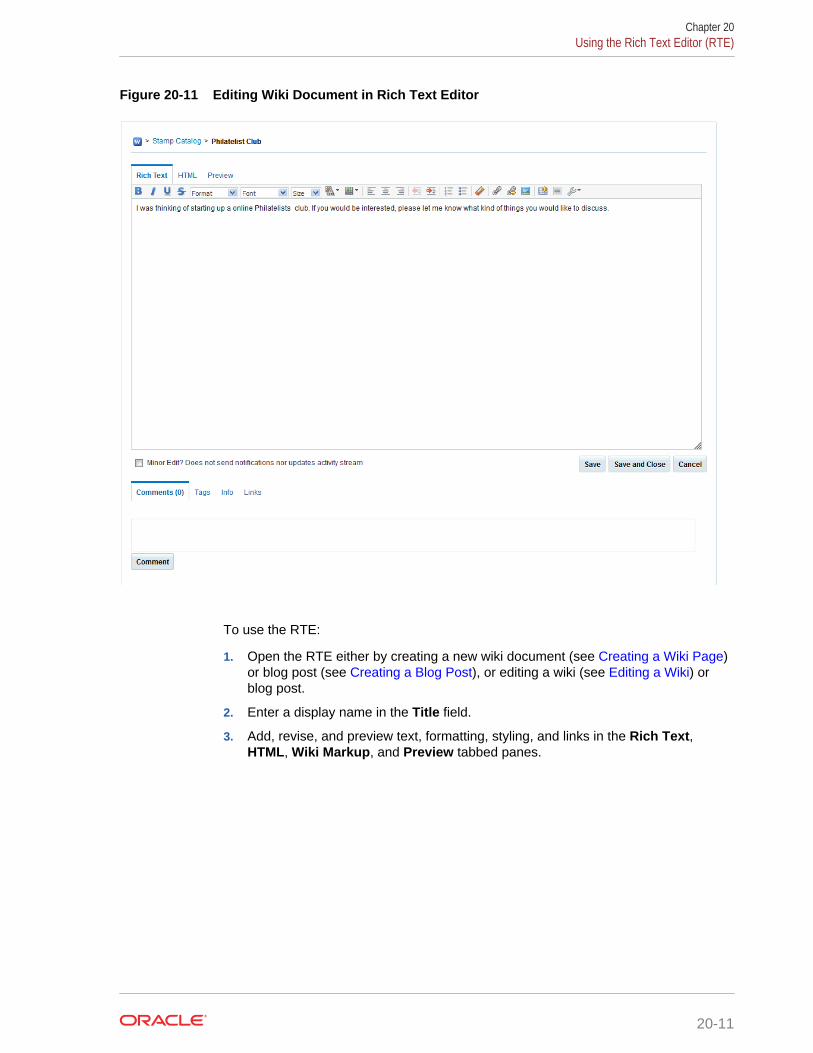
Figure 20-11 Editing Wiki Document in Rich Text Editor
To use the RTE:
1. Open the RTE either by creating a new wiki document (see Creating a Wiki Page)or blog post (see Creating a Blog Post), or editing a wiki (see Editing a Wiki) orblog post.
2. Enter a display name in the Title field.
3. Add, revise, and preview text, formatting, styling, and links in the Rich Text,HTML, Wiki Markup, and Preview tabbed panes.
Chapter 20Using the Rich Text Editor (RTE)
20-11
Note:
• For information about using the toolbar and features in the Rich Textpane, see About the Rich Text Editor Toolbar, Working with Tablesin the Rich Text Editor, and Using the Keyboard in the Rich TextEditor.
• Apple iPad users cannot make selections from drop-down lists in theRTE. This is a known limitation.
• By default, the Wiki Markup tab is hidden in the RTE. Your systemadministrator can change this setting, as described in Showing andHiding the Wiki Markup Tab in the Rich Text Editor in AdministeringOracle WebCenter Portal.
• If you switch from the Wiki Markup tab to another tab in the RTE,your content might become garbled. As a workaround, if you go tothe Wiki Markup tab, click Save and Close or Cancel rather thanswitching to another tab in the RTE.
4. (For wiki documents only) Select the Minor Edit? check box if you do not want tonotify portal members about your changes.
Leaving this check box deselected updates the Activity Stream and sendsnotifications after you save your changes.
5. In the tabbed panes along the bottom of the RTE, you can add comments, tags, orlinks pertinent to the document or post.
6. Save your changes:
• To create and save a new wiki document or blog post, click Create.
• To save updates to an existing wiki document or blog post, click Save. Tosave updates and exit the RTE, click Save and Close.
About the Rich Text Editor Tabbed PanesThe RTE provides four tabbed panes where you can create and edit your wiki and blogposts.
• Rich Text. Create and revise content in a WYSIWYG environment using the iconsand controls in the RTE toolbar (see About the Rich Text Editor Toolbar).
Note:
Apple iPad users cannot make selections from drop-down lists in theRTE. This is a known limitation.
• HTML. Enter HTML manually. This includes entering source code for HTML nothandled by the WYSIWYG icons and controls on the Rich Text tab.
If you exit the HTML pane, then come back to it again, any HTML that may havebeen entered on separate lines will reformat to display on a single line, as iscustomary for most HTML editors.
Chapter 20Using the Rich Text Editor (RTE)
20-12
Note:
– The RTE ignores the following types of tags when entered in HTMLbecause they are irrelevant or redundant within the RTE context:
* script tags
* form elements, such as input, select, textarea, and form
* frame/frameset
* document tags, such as html, head, body, meta, and title
* unknown tags; for example: <foo></foo>
– Changes to the behavior of the default CSS selectors in a wiki orblog is not supported.
• Preview. Shows a preview of your wiki document or blog post as it will appearwhen published.
• Wiki Markup (wiki documents only). If shown, use this tab to enter your own wikimarkup. For the full set of wiki markup syntax, click Wiki Markup Help. Anyformatting not provided by Wiki Markup uses HTML.
Note:
– By default, the Wiki Markup tab is hidden in the RTE. Your systemadministrator can change this setting, as described in Showing andHiding the Wiki Markup Tab in the Rich Text Editor in AdministeringOracle WebCenter Portal.
– If you switch from the Wiki Markup tab to another tab in the RTE,your content might become garbled. As a workaround, if you go tothe Wiki Markup tab, click Save and Close or Cancel rather thanswitching to another tab in the RTE.
About the Rich Text Editor ToolbarThe Rich Text tab of the Rich Text Editor includes various icons and controls to createand revise content in a WYSIWYG environment.
Table 20-1 describes the RTE toolbar icons and controls.
To perform an operation assigned to an icon, click the icon once to either immediatelyperform the action or open a dialog with further configuration options.
Chapter 20Using the Rich Text Editor (RTE)
20-13
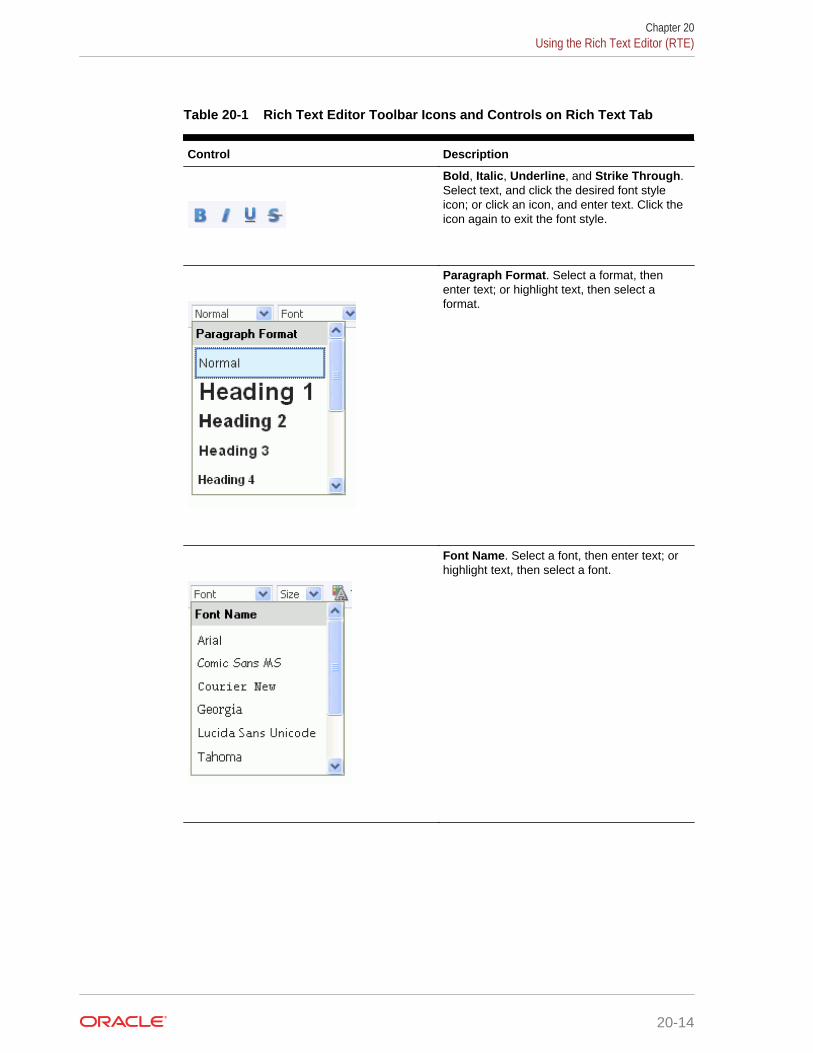
Table 20-1 Rich Text Editor Toolbar Icons and Controls on Rich Text Tab
Control Description
Bold, Italic, Underline, and Strike Through.Select text, and click the desired font styleicon; or click an icon, and enter text. Click theicon again to exit the font style.
Paragraph Format. Select a format, thenenter text; or highlight text, then select aformat.
Font Name. Select a font, then enter text; orhighlight text, then select a font.
Chapter 20Using the Rich Text Editor (RTE)
20-14
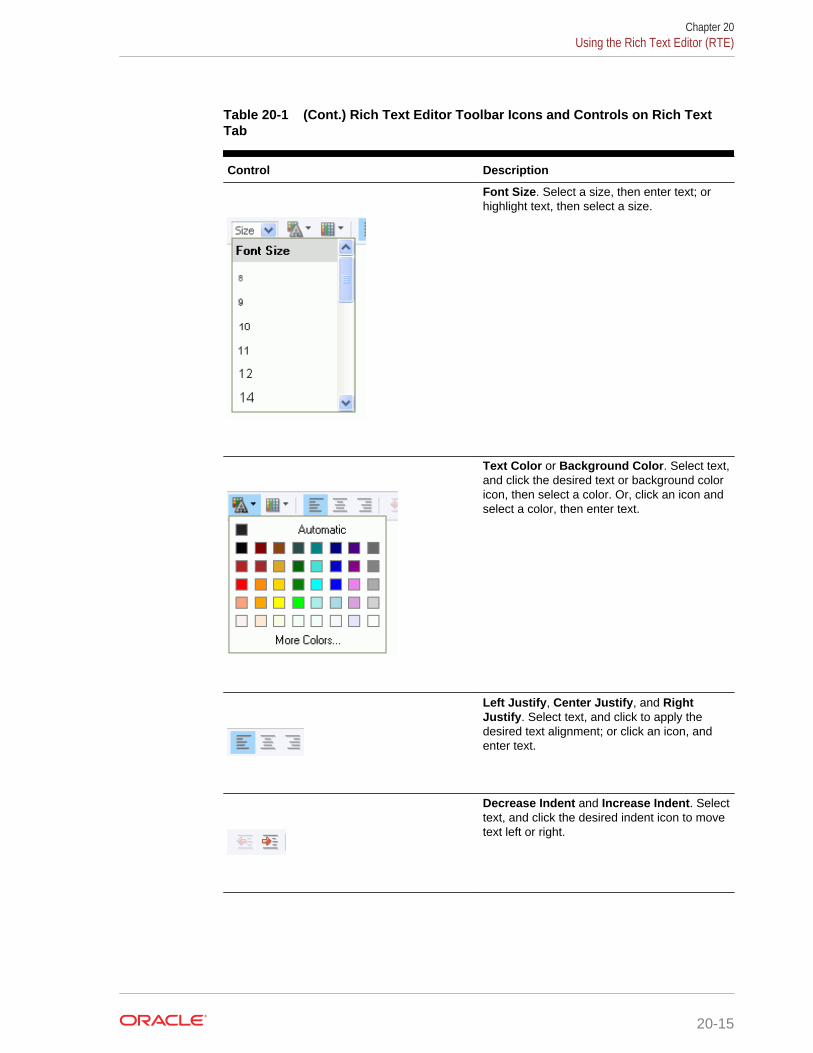
Table 20-1 (Cont.) Rich Text Editor Toolbar Icons and Controls on Rich TextTab
Control Description
Font Size. Select a size, then enter text; orhighlight text, then select a size.
Text Color or Background Color. Select text,and click the desired text or background coloricon, then select a color. Or, click an icon andselect a color, then enter text.
Left Justify, Center Justify, and RightJustify. Select text, and click to apply thedesired text alignment; or click an icon, andenter text.
Decrease Indent and Increase Indent. Selecttext, and click the desired indent icon to movetext left or right.
Chapter 20Using the Rich Text Editor (RTE)
20-15
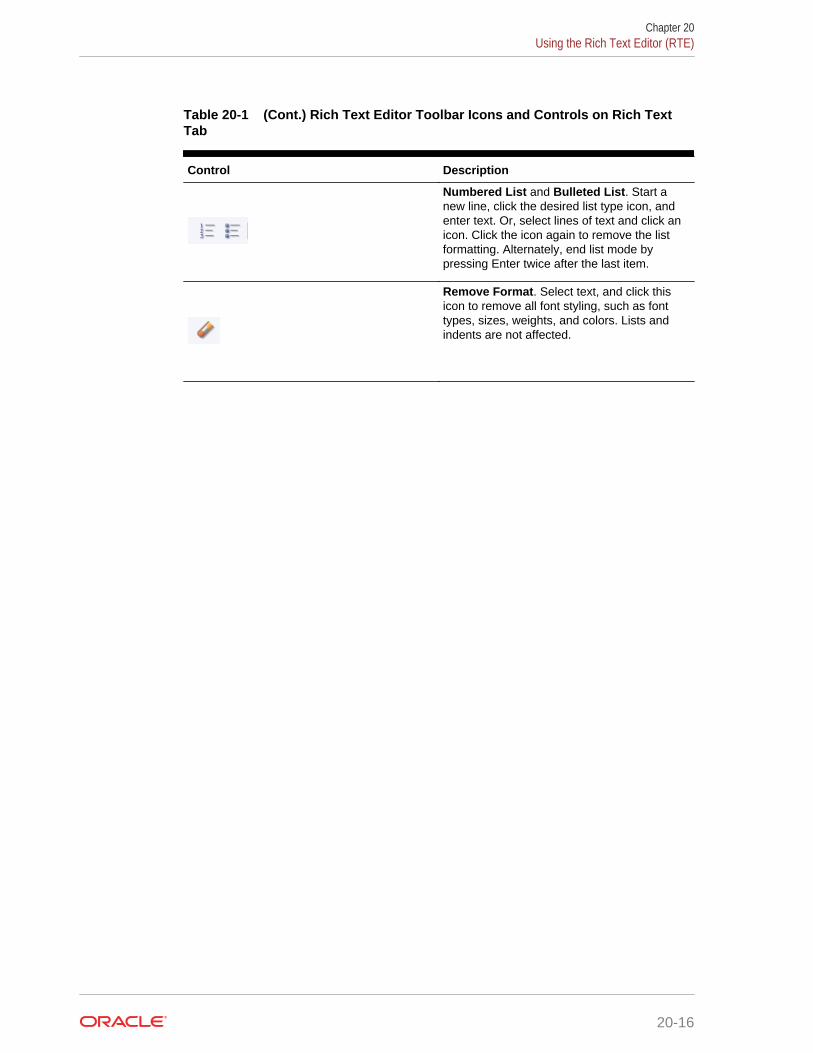
Table 20-1 (Cont.) Rich Text Editor Toolbar Icons and Controls on Rich TextTab
Control Description
Numbered List and Bulleted List. Start anew line, click the desired list type icon, andenter text. Or, select lines of text and click anicon. Click the icon again to remove the listformatting. Alternately, end list mode bypressing Enter twice after the last item.
Remove Format. Select text, and click thisicon to remove all font styling, such as fonttypes, sizes, weights, and colors. Lists andindents are not affected.
Chapter 20Using the Rich Text Editor (RTE)
20-16
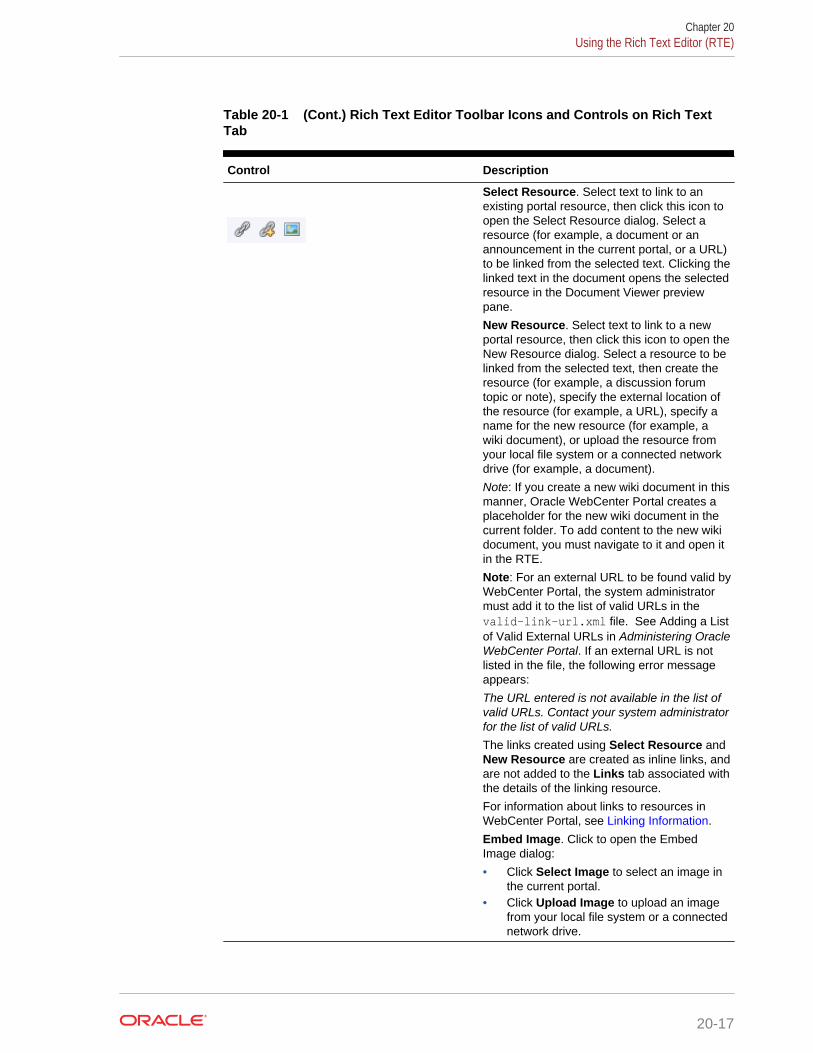
Table 20-1 (Cont.) Rich Text Editor Toolbar Icons and Controls on Rich TextTab
Control Description
Select Resource. Select text to link to anexisting portal resource, then click this icon toopen the Select Resource dialog. Select aresource (for example, a document or anannouncement in the current portal, or a URL)to be linked from the selected text. Clicking thelinked text in the document opens the selectedresource in the Document Viewer previewpane.
New Resource. Select text to link to a newportal resource, then click this icon to open theNew Resource dialog. Select a resource to belinked from the selected text, then create theresource (for example, a discussion forumtopic or note), specify the external location ofthe resource (for example, a URL), specify aname for the new resource (for example, awiki document), or upload the resource fromyour local file system or a connected networkdrive (for example, a document).
Note: If you create a new wiki document in thismanner, Oracle WebCenter Portal creates aplaceholder for the new wiki document in thecurrent folder. To add content to the new wikidocument, you must navigate to it and open itin the RTE.
Note: For an external URL to be found valid byWebCenter Portal, the system administratormust add it to the list of valid URLs in thevalid-link-url.xml file. See Adding a Listof Valid External URLs in Administering OracleWebCenter Portal. If an external URL is notlisted in the file, the following error messageappears:
The URL entered is not available in the list ofvalid URLs. Contact your system administratorfor the list of valid URLs.The links created using Select Resource andNew Resource are created as inline links, andare not added to the Links tab associated withthe details of the linking resource.
For information about links to resources inWebCenter Portal, see Linking Information.
Embed Image. Click to open the EmbedImage dialog:
• Click Select Image to select an image inthe current portal.
• Click Upload Image to upload an imagefrom your local file system or a connectednetwork drive.
Chapter 20Using the Rich Text Editor (RTE)
20-17
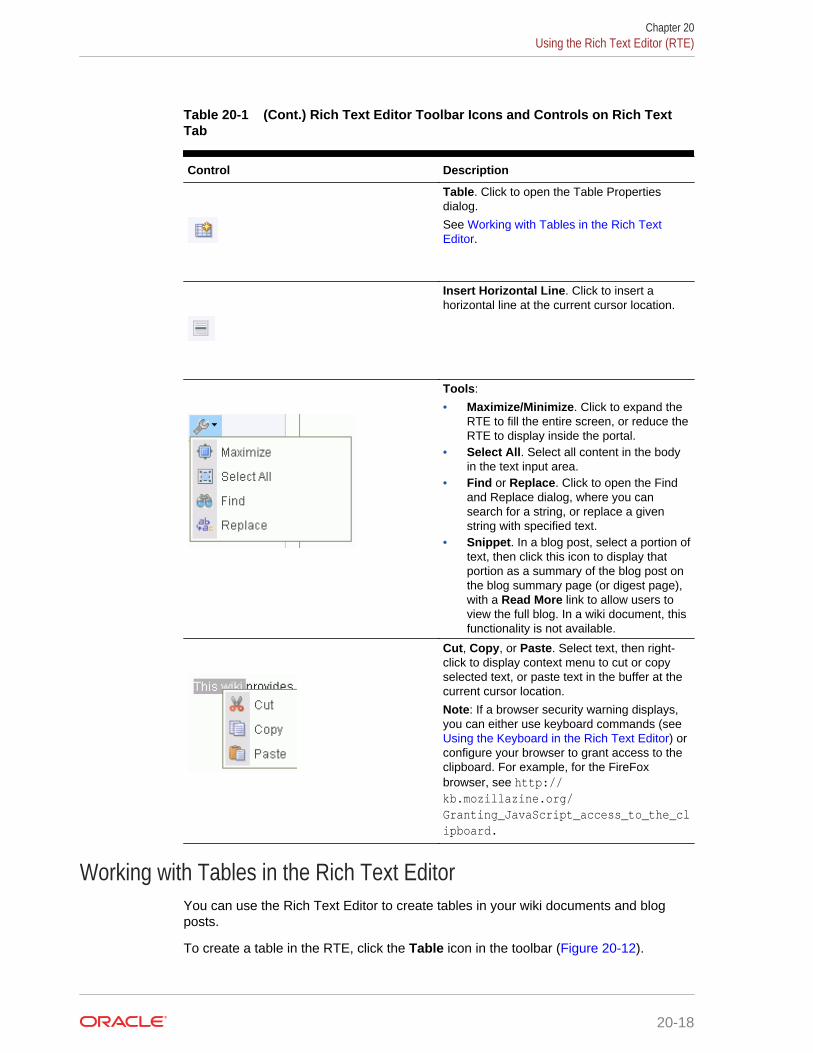
Table 20-1 (Cont.) Rich Text Editor Toolbar Icons and Controls on Rich TextTab
Control Description
Table. Click to open the Table Propertiesdialog.
See Working with Tables in the Rich TextEditor.
Insert Horizontal Line. Click to insert ahorizontal line at the current cursor location.
Tools:
• Maximize/Minimize. Click to expand theRTE to fill the entire screen, or reduce theRTE to display inside the portal.
• Select All. Select all content in the bodyin the text input area.
• Find or Replace. Click to open the Findand Replace dialog, where you cansearch for a string, or replace a givenstring with specified text.
• Snippet. In a blog post, select a portion oftext, then click this icon to display thatportion as a summary of the blog post onthe blog summary page (or digest page),with a Read More link to allow users toview the full blog. In a wiki document, thisfunctionality is not available.
Cut, Copy, or Paste. Select text, then right-click to display context menu to cut or copyselected text, or paste text in the buffer at thecurrent cursor location.
Note: If a browser security warning displays,you can either use keyboard commands (see Using the Keyboard in the Rich Text Editor) orconfigure your browser to grant access to theclipboard. For example, for the FireFoxbrowser, see http://kb.mozillazine.org/Granting_JavaScript_access_to_the_clipboard.
Working with Tables in the Rich Text EditorYou can use the Rich Text Editor to create tables in your wiki documents and blogposts.
To create a table in the RTE, click the Table icon in the toolbar (Figure 20-12).
Chapter 20Using the Rich Text Editor (RTE)
20-18
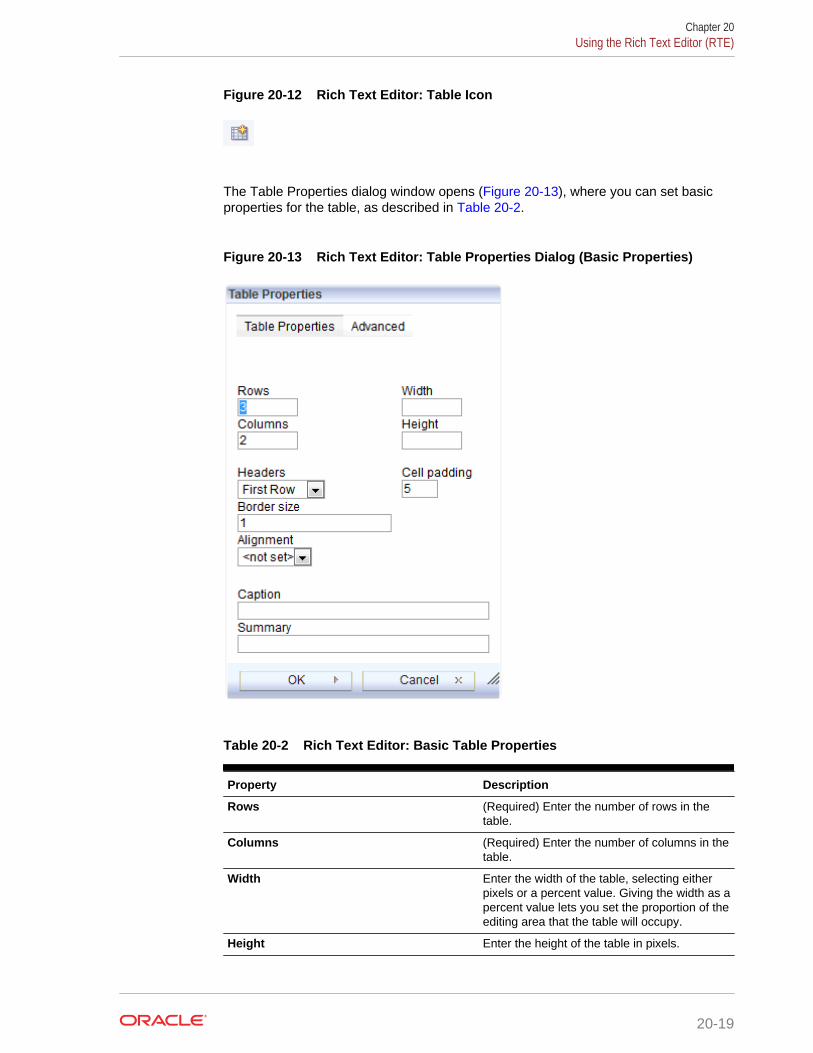
Figure 20-12 Rich Text Editor: Table Icon
The Table Properties dialog window opens (Figure 20-13), where you can set basicproperties for the table, as described in Table 20-2.
Figure 20-13 Rich Text Editor: Table Properties Dialog (Basic Properties)
Table 20-2 Rich Text Editor: Basic Table Properties
Property Description
Rows (Required) Enter the number of rows in thetable.
Columns (Required) Enter the number of columns in thetable.
Width Enter the width of the table, selecting eitherpixels or a percent value. Giving the width as apercent value lets you set the proportion of theediting area that the table will occupy.
Height Enter the height of the table in pixels.
Chapter 20Using the Rich Text Editor (RTE)
20-19
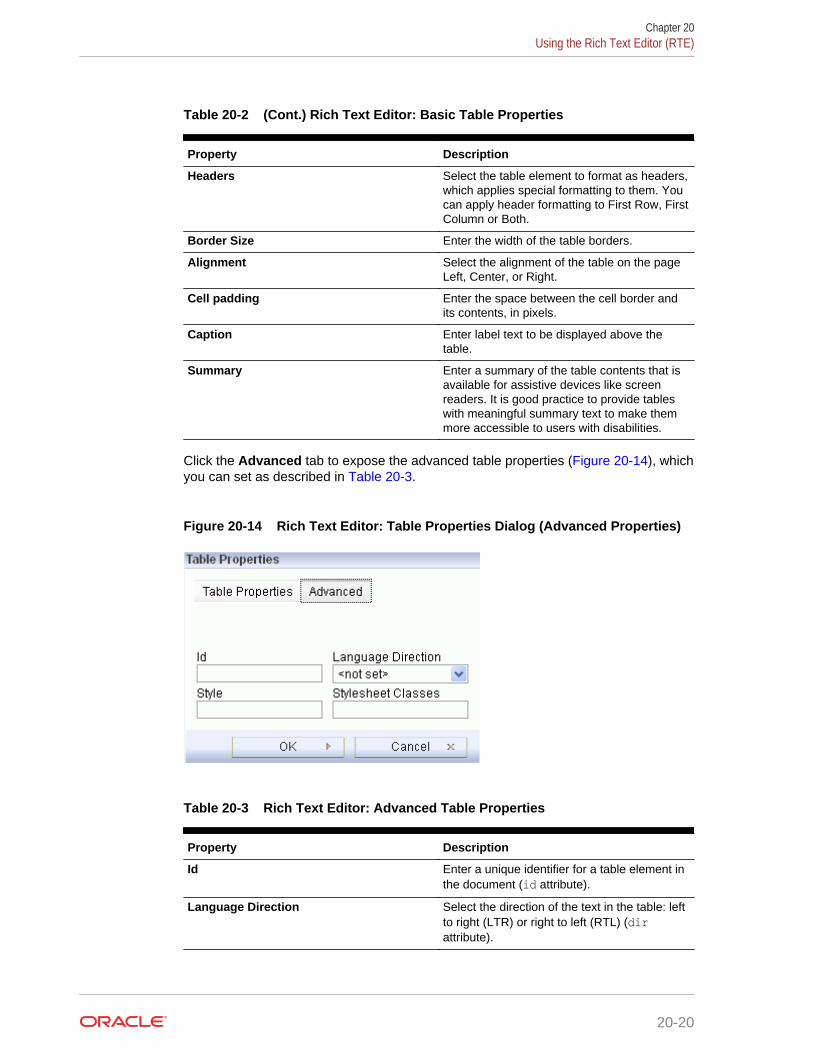
Table 20-2 (Cont.) Rich Text Editor: Basic Table Properties
Property Description
Headers Select the table element to format as headers,which applies special formatting to them. Youcan apply header formatting to First Row, FirstColumn or Both.
Border Size Enter the width of the table borders.
Alignment Select the alignment of the table on the pageLeft, Center, or Right.
Cell padding Enter the space between the cell border andits contents, in pixels.
Caption Enter label text to be displayed above thetable.
Summary Enter a summary of the table contents that isavailable for assistive devices like screenreaders. It is good practice to provide tableswith meaningful summary text to make themmore accessible to users with disabilities.
Click the Advanced tab to expose the advanced table properties (Figure 20-14), whichyou can set as described in Table 20-3.
Figure 20-14 Rich Text Editor: Table Properties Dialog (Advanced Properties)
Table 20-3 Rich Text Editor: Advanced Table Properties
Property Description
Id Enter a unique identifier for a table element inthe document (id attribute).
Language Direction Select the direction of the text in the table: leftto right (LTR) or right to left (RTL) (dirattribute).
Chapter 20Using the Rich Text Editor (RTE)
20-20
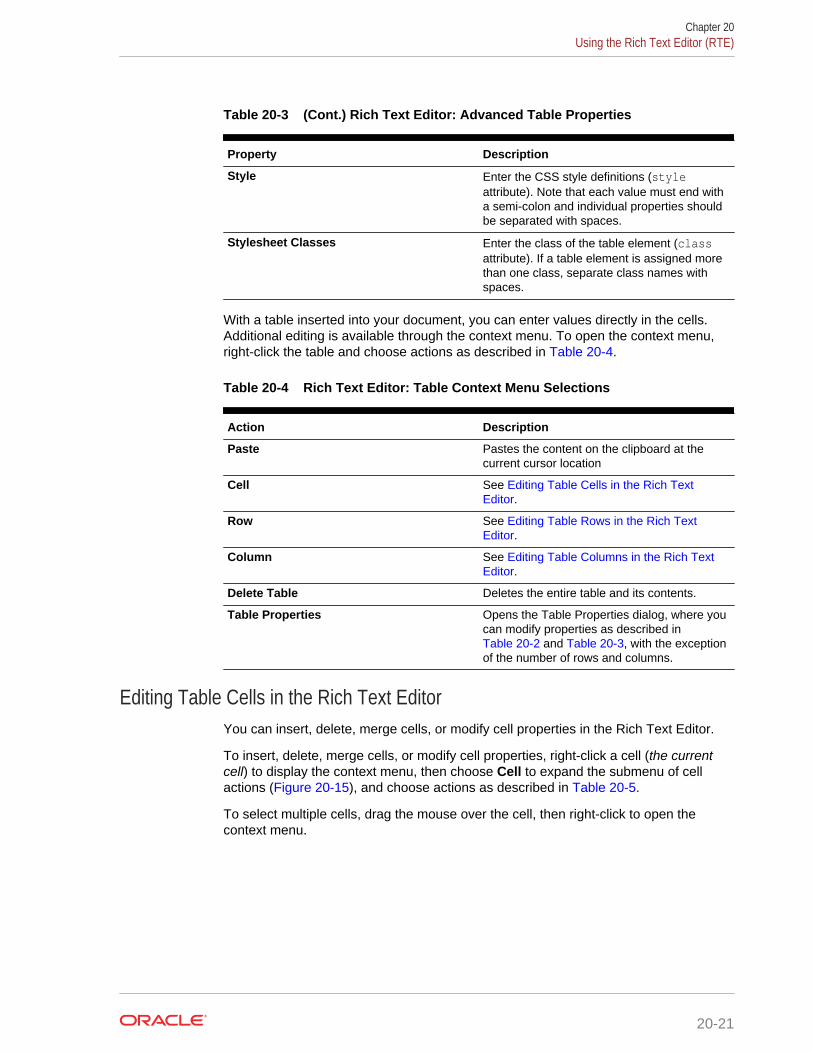
Table 20-3 (Cont.) Rich Text Editor: Advanced Table Properties
Property Description
Style Enter the CSS style definitions (styleattribute). Note that each value must end witha semi-colon and individual properties shouldbe separated with spaces.
Stylesheet Classes Enter the class of the table element (classattribute). If a table element is assigned morethan one class, separate class names withspaces.
With a table inserted into your document, you can enter values directly in the cells.Additional editing is available through the context menu. To open the context menu,right-click the table and choose actions as described in Table 20-4.
Table 20-4 Rich Text Editor: Table Context Menu Selections
Action Description
Paste Pastes the content on the clipboard at thecurrent cursor location
Cell See Editing Table Cells in the Rich TextEditor.
Row See Editing Table Rows in the Rich TextEditor.
Column See Editing Table Columns in the Rich TextEditor.
Delete Table Deletes the entire table and its contents.
Table Properties Opens the Table Properties dialog, where youcan modify properties as described in Table 20-2 and Table 20-3, with the exceptionof the number of rows and columns.
Editing Table Cells in the Rich Text EditorYou can insert, delete, merge cells, or modify cell properties in the Rich Text Editor.
To insert, delete, merge cells, or modify cell properties, right-click a cell (the currentcell) to display the context menu, then choose Cell to expand the submenu of cellactions (Figure 20-15), and choose actions as described in Table 20-5.
To select multiple cells, drag the mouse over the cell, then right-click to open thecontext menu.
Chapter 20Using the Rich Text Editor (RTE)
20-21
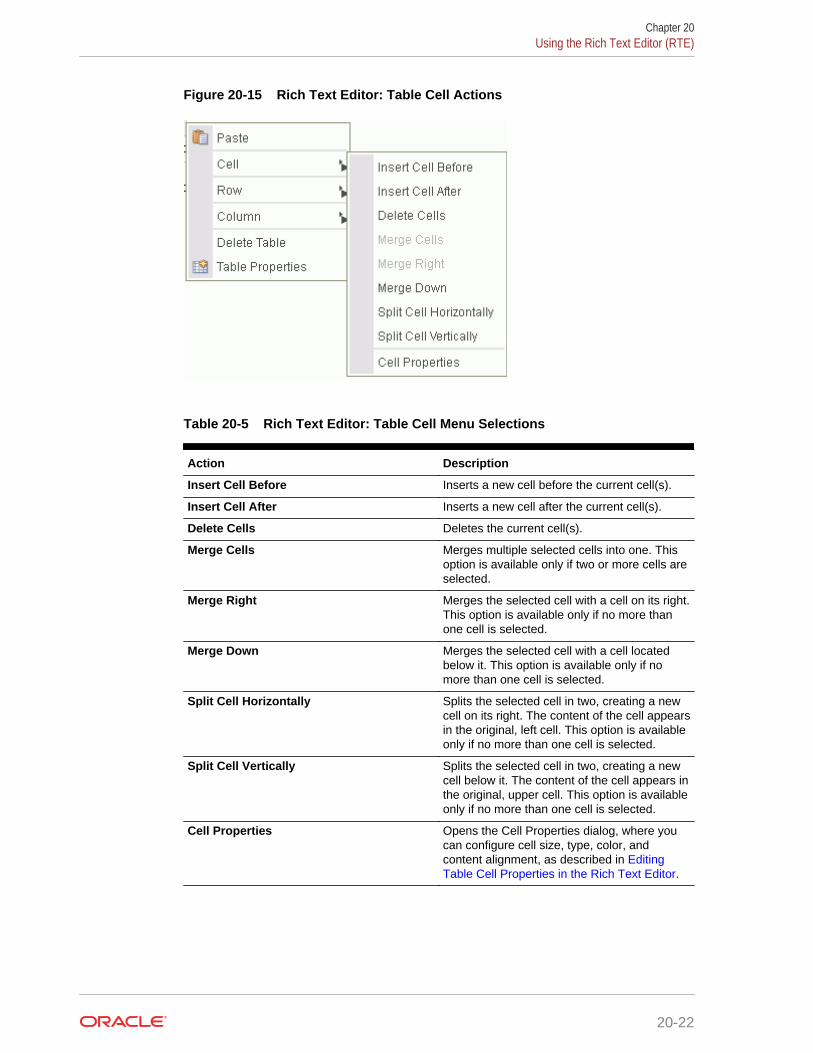
Figure 20-15 Rich Text Editor: Table Cell Actions
Table 20-5 Rich Text Editor: Table Cell Menu Selections
Action Description
Insert Cell Before Inserts a new cell before the current cell(s).
Insert Cell After Inserts a new cell after the current cell(s).
Delete Cells Deletes the current cell(s).
Merge Cells Merges multiple selected cells into one. Thisoption is available only if two or more cells areselected.
Merge Right Merges the selected cell with a cell on its right.This option is available only if no more thanone cell is selected.
Merge Down Merges the selected cell with a cell locatedbelow it. This option is available only if nomore than one cell is selected.
Split Cell Horizontally Splits the selected cell in two, creating a newcell on its right. The content of the cell appearsin the original, left cell. This option is availableonly if no more than one cell is selected.
Split Cell Vertically Splits the selected cell in two, creating a newcell below it. The content of the cell appears inthe original, upper cell. This option is availableonly if no more than one cell is selected.
Cell Properties Opens the Cell Properties dialog, where youcan configure cell size, type, color, andcontent alignment, as described in EditingTable Cell Properties in the Rich Text Editor.
Chapter 20Using the Rich Text Editor (RTE)
20-22
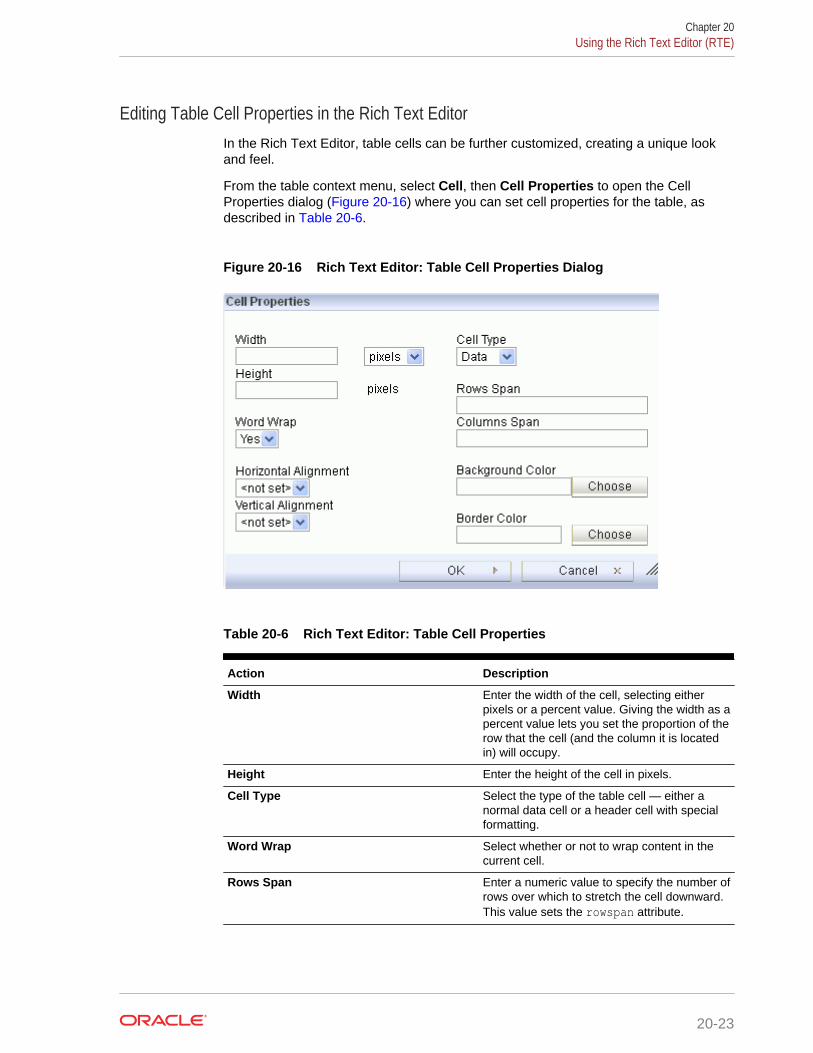
Editing Table Cell Properties in the Rich Text EditorIn the Rich Text Editor, table cells can be further customized, creating a unique lookand feel.
From the table context menu, select Cell, then Cell Properties to open the CellProperties dialog (Figure 20-16) where you can set cell properties for the table, asdescribed in Table 20-6.
Figure 20-16 Rich Text Editor: Table Cell Properties Dialog
Table 20-6 Rich Text Editor: Table Cell Properties
Action Description
Width Enter the width of the cell, selecting eitherpixels or a percent value. Giving the width as apercent value lets you set the proportion of therow that the cell (and the column it is locatedin) will occupy.
Height Enter the height of the cell in pixels.
Cell Type Select the type of the table cell — either anormal data cell or a header cell with specialformatting.
Word Wrap Select whether or not to wrap content in thecurrent cell.
Rows Span Enter a numeric value to specify the number ofrows over which to stretch the cell downward.This value sets the rowspan attribute.
Chapter 20Using the Rich Text Editor (RTE)
20-23
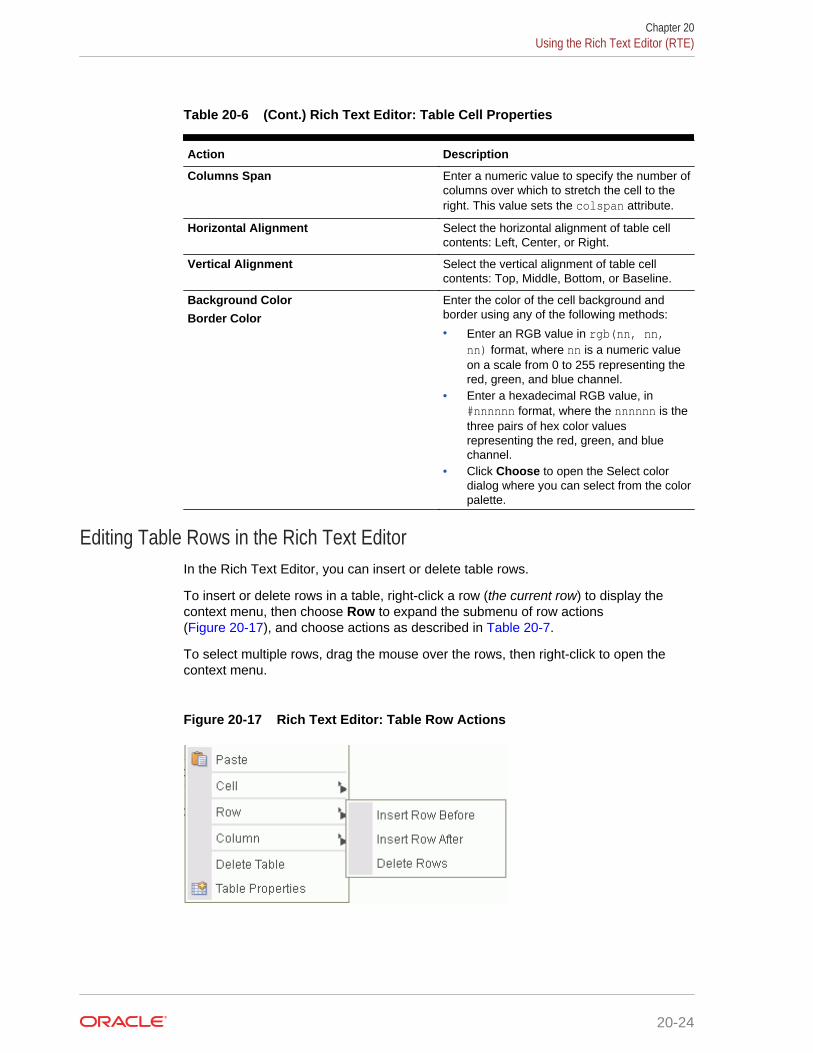
Table 20-6 (Cont.) Rich Text Editor: Table Cell Properties
Action Description
Columns Span Enter a numeric value to specify the number ofcolumns over which to stretch the cell to theright. This value sets the colspan attribute.
Horizontal Alignment Select the horizontal alignment of table cellcontents: Left, Center, or Right.
Vertical Alignment Select the vertical alignment of table cellcontents: Top, Middle, Bottom, or Baseline.
Background ColorBorder Color
Enter the color of the cell background andborder using any of the following methods:
• Enter an RGB value in rgb(nn, nn,nn) format, where nn is a numeric valueon a scale from 0 to 255 representing thered, green, and blue channel.
• Enter a hexadecimal RGB value, in#nnnnnn format, where the nnnnnn is thethree pairs of hex color valuesrepresenting the red, green, and bluechannel.
• Click Choose to open the Select colordialog where you can select from the colorpalette.
Editing Table Rows in the Rich Text EditorIn the Rich Text Editor, you can insert or delete table rows.
To insert or delete rows in a table, right-click a row (the current row) to display thecontext menu, then choose Row to expand the submenu of row actions(Figure 20-17), and choose actions as described in Table 20-7.
To select multiple rows, drag the mouse over the rows, then right-click to open thecontext menu.
Figure 20-17 Rich Text Editor: Table Row Actions
Chapter 20Using the Rich Text Editor (RTE)
20-24
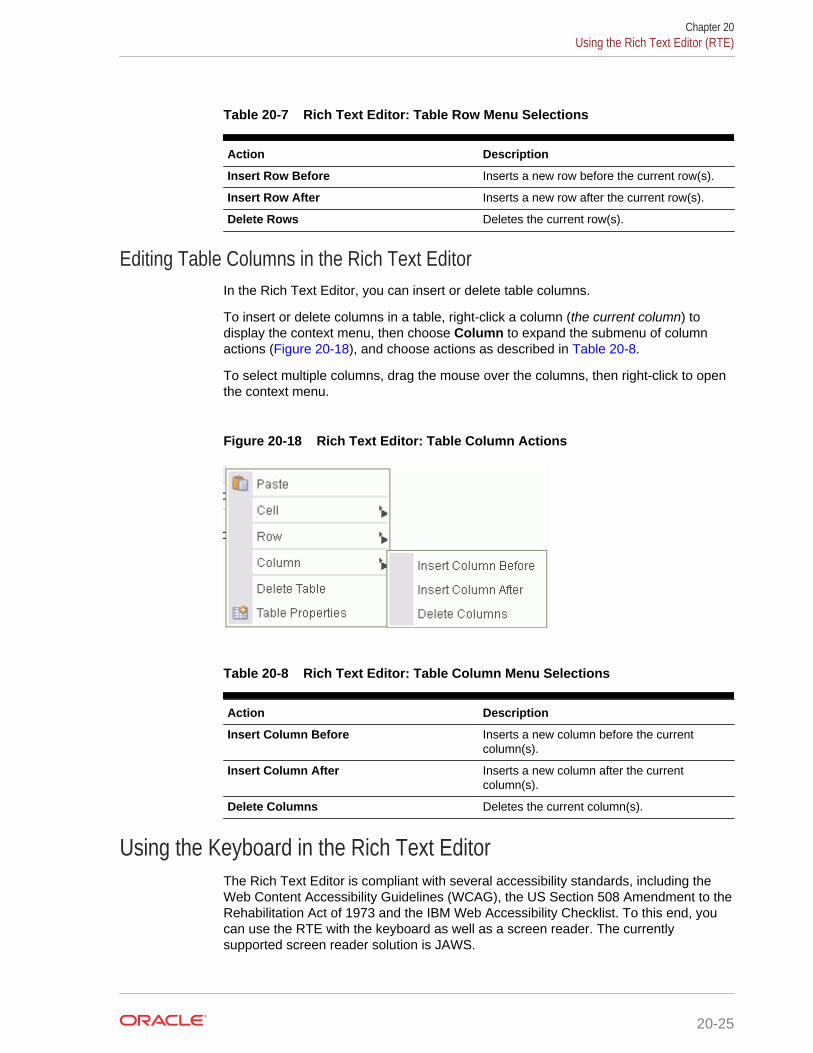
Table 20-7 Rich Text Editor: Table Row Menu Selections
Action Description
Insert Row Before Inserts a new row before the current row(s).
Insert Row After Inserts a new row after the current row(s).
Delete Rows Deletes the current row(s).
Editing Table Columns in the Rich Text EditorIn the Rich Text Editor, you can insert or delete table columns.
To insert or delete columns in a table, right-click a column (the current column) todisplay the context menu, then choose Column to expand the submenu of columnactions (Figure 20-18), and choose actions as described in Table 20-8.
To select multiple columns, drag the mouse over the columns, then right-click to openthe context menu.
Figure 20-18 Rich Text Editor: Table Column Actions
Table 20-8 Rich Text Editor: Table Column Menu Selections
Action Description
Insert Column Before Inserts a new column before the currentcolumn(s).
Insert Column After Inserts a new column after the currentcolumn(s).
Delete Columns Deletes the current column(s).
Using the Keyboard in the Rich Text EditorThe Rich Text Editor is compliant with several accessibility standards, including theWeb Content Accessibility Guidelines (WCAG), the US Section 508 Amendment to theRehabilitation Act of 1973 and the IBM Web Accessibility Checklist. To this end, youcan use the RTE with the keyboard as well as a screen reader. The currentlysupported screen reader solution is JAWS.
Chapter 20Using the Rich Text Editor (RTE)
20-25
For more information about accessibility in Oracle WebCenter Portal, see Setting YourAccessibility Options for WebCenter Portal.
Table 20-9 summarizes the keyboard keys and combinations available to you tonavigate and edit text in the RTE.
Table 20-9 Rich Text Editor: Keyboard
Keyboard Keys Description
Alt+F10 Moves to the toolbar.
Tab In the toolbar, moves to the next button group.
In a dialog, moves to the next element.
Shift+Tab In the toolbar, moves to the previous buttongroup.
In a dialog, moves to the previous element.
Left Arrow/Right Arrow In the toolbar, moves between buttons within abutton group.
In a dialog, moves within a field.
Enter In the toolbar, selects the current button ormenu item, or expands a drop-down list ormenu.
In a dialog, confirms entry at current cursorlocation.
Down Arrow/ Up Arrow Moves between selections in a drop-down list.
Esc Closes a menu without executing anycommand. When inside a submenu, closes thesubmenu and returns focus to the parentcontext menu. Press Esc again to close it. In adialog, cancels entries and closes dialog(equivalent to clicking Cancel or Close).
In the editing area:
Shift+F10 Opens the context menu of the currentelement (use down arrow and up arrow tomove between selections in the menu, andEnter to select an action).
Alt+F10 Moves to the tab selection in a dialog (use leftand right arrow keys to move between tabs,and Enter to move to the fields on a tab).
Ctrl+A Selects the entire content in the editing area.
Ctrl+B Changes the formatting of the selected text tobold or remove the bold formatting of theselected text.
Ctrl+C Copies highlighted selections to the clipboard.
Ctrl+I Changes the formatting of the selected text toitalics or remove the italics from the selectedtext.
Ctrl+U Underlines the selected text or remove theunderline formatting of the selected text.
Ctrl+V or Shift+Insert Pastes the content on the clipboard at thecurrent cursor location.
Chapter 20Using the Rich Text Editor (RTE)
20-26
Table 20-9 (Cont.) Rich Text Editor: Keyboard
Keyboard Keys Description
Ctrl+X or Shift+Delete Cuts highlighted selections to the clipboard.
Ctrl+Y Performs the redo operation.
Ctrl+Z Performs the undo operation.
Exposing an Existing Wiki Document in the PortalNavigation
If you have created a wiki document within a wiki page, it is not automatically added tothe portal navigation.
This section includes the following topics:
• Exposing an Existing Wiki Document as a Wiki Page
• Exposing an Existing Wiki Document Using Content Presenter
Exposing an Existing Wiki Document as a Wiki PageWhen you create a wiki page using the Wiki page style, it is listed in the documenthierarchy, and is exposed as a separate page in the portal navigation. However, whenyou create a wiki document using the New Wiki Document action, the wiki documentis listed only in the document hierarchy. For easy access to such a wiki document, youcan publish it to appear as a page in the portal navigation.
To publish an existing wiki document as a page in the portal navigation:
1. In the Content Manager task flow, create a folder with the same name as theexisting wiki document at the root level of the portal (see Working with Folders andFiles). For example, if the existing wiki document is named Member MeetingSchedule, create a folder named Member Meeting Schedule (Figure 20-19).
Figure 20-19 Folder Created at the Portal Root Level
Chapter 20Exposing an Existing Wiki Document in the Portal Navigation
20-27
2. Move the existing wiki document into the newly created folder.
Note:
The wiki document must have been originally created using the NewWiki Document action, as described in Creating a Wiki DocumentWithin a Wiki Page.
3. Create a new page in the portal, selecting the Wiki page style.
4. In the Title field, enter the display name of the existing wiki document that youwant to expose; for example, Member Meeting Schedule.
Note:
While there are restrictions on naming files (including wiki documents),there are no naming restrictions for page names. Thus, while any of thefollowing characters can be used to name a wiki page, the page title willinclude the character(s) but the associated wiki document will replacethe illegal character with _.
? # & \ / * " | < > : ^
For example, if you create a wiki page named What's In a Name?, thepage will have this title, but the associated wiki document will be namedWhat's In a Name_.
5. Click Create.
The wiki document is now exposed as a separate page in the navigation area. Thelocation depends on the page template used by your portal. Figure 20-20 showsthe Member Meeting Schedule wiki document exposed as a page in the navigationarea in a portal.
Figure 20-20 A Wiki Document Exposed as a Page
Exposing an Existing Wiki Document Using Content PresenterContent Presenter enables you to select a wiki document, and render its content in aspecific template on a page.
This is an advanced task, covered in Publishing Content Using Content Presenter inBuilding Portals with Oracle WebCenter Portal.
Chapter 20Exposing an Existing Wiki Document in the Portal Navigation
20-28
Managing Wiki DocumentsManaging a wiki document is like managing any file, as described in Working withFolders and Files.
Chapter 20Managing Wiki Documents
20-29
21Working with Blogs
Subscribe to blogs, create a blog page, and work with blog posts to recordexperiences and opinions.
See Also:
For an overview of the different options available in WebCenter Portal forworking with portal content and adding content to a portal, see Introduction toAdding Content to a Portal.
Note:
The tasks described in this chapter are available only if the systemadministrator and portal manager have made blog functionality available inWebCenter Portal and the current portal, as described in Prerequisites forEnabling Blog Functionality in Building Portals with Oracle WebCenter Portal.
Permissions:
To perform the tasks in this chapter, you need the following permissions:
• To create and manage with blog posts: in the Home portal, anyauthenticated user can add and manage their own blog posts in anexisting blog; in other portals, you need the portal-level permissionCreate Documents (which includes delete permissions on blog posts thatyou create). To delete blog posts that are not your own, you must haveDelete Documents permission.
• To view or post comments on blog posts, you need only the ViewDocuments permission.
• To view a blog page, you need the View Page permission. Thispermission is granted to all authenticated users by default. To edit a blogpage, you need to be granted Edit permissions on the page.
• To create a personal page using the Blog page style, you need theapplication-level permission Pages: Create. This permission is grantedto all authenticated users by default, allowing them to create andmanage their personal pages in the Home portal.
Topics:
• About Blogs
21-1
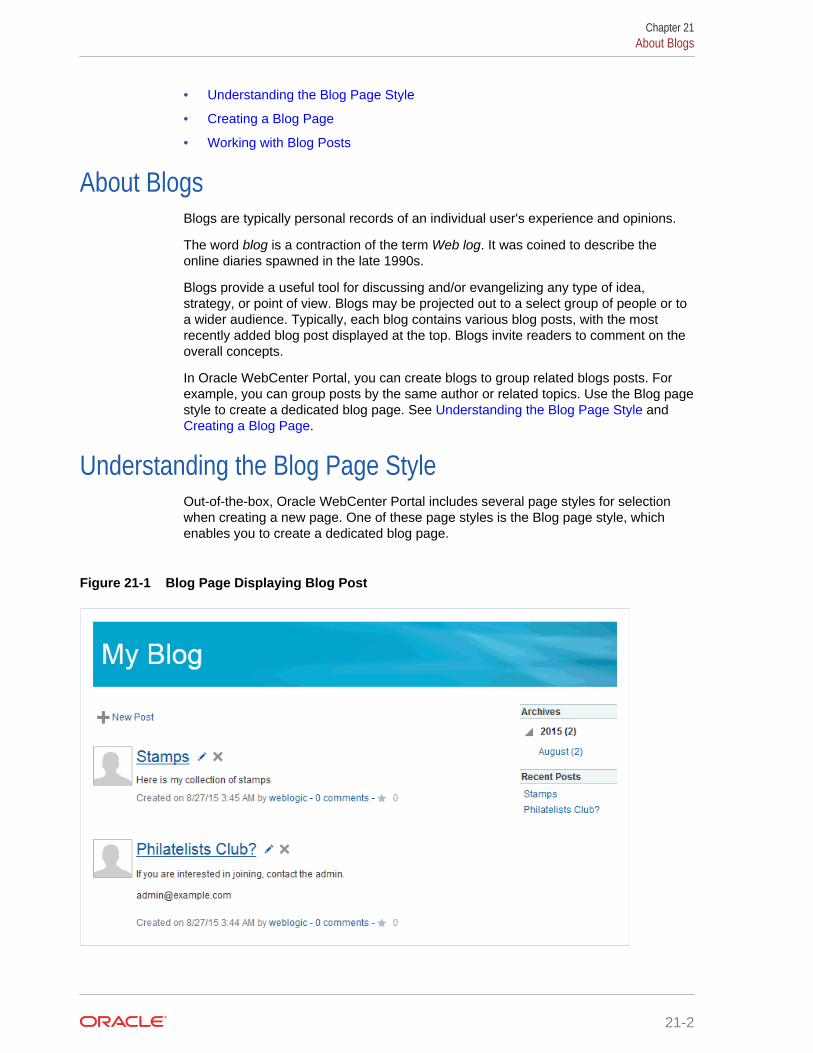
• Understanding the Blog Page Style
• Creating a Blog Page
• Working with Blog Posts
About BlogsBlogs are typically personal records of an individual user's experience and opinions.
The word blog is a contraction of the term Web log. It was coined to describe theonline diaries spawned in the late 1990s.
Blogs provide a useful tool for discussing and/or evangelizing any type of idea,strategy, or point of view. Blogs may be projected out to a select group of people or toa wider audience. Typically, each blog contains various blog posts, with the mostrecently added blog post displayed at the top. Blogs invite readers to comment on theoverall concepts.
In Oracle WebCenter Portal, you can create blogs to group related blogs posts. Forexample, you can group posts by the same author or related topics. Use the Blog pagestyle to create a dedicated blog page. See Understanding the Blog Page Style and Creating a Blog Page.
Understanding the Blog Page StyleOut-of-the-box, Oracle WebCenter Portal includes several page styles for selectionwhen creating a new page. One of these page styles is the Blog page style, whichenables you to create a dedicated blog page.
Figure 21-1 Blog Page Displaying Blog Post
Chapter 21About Blogs
21-2
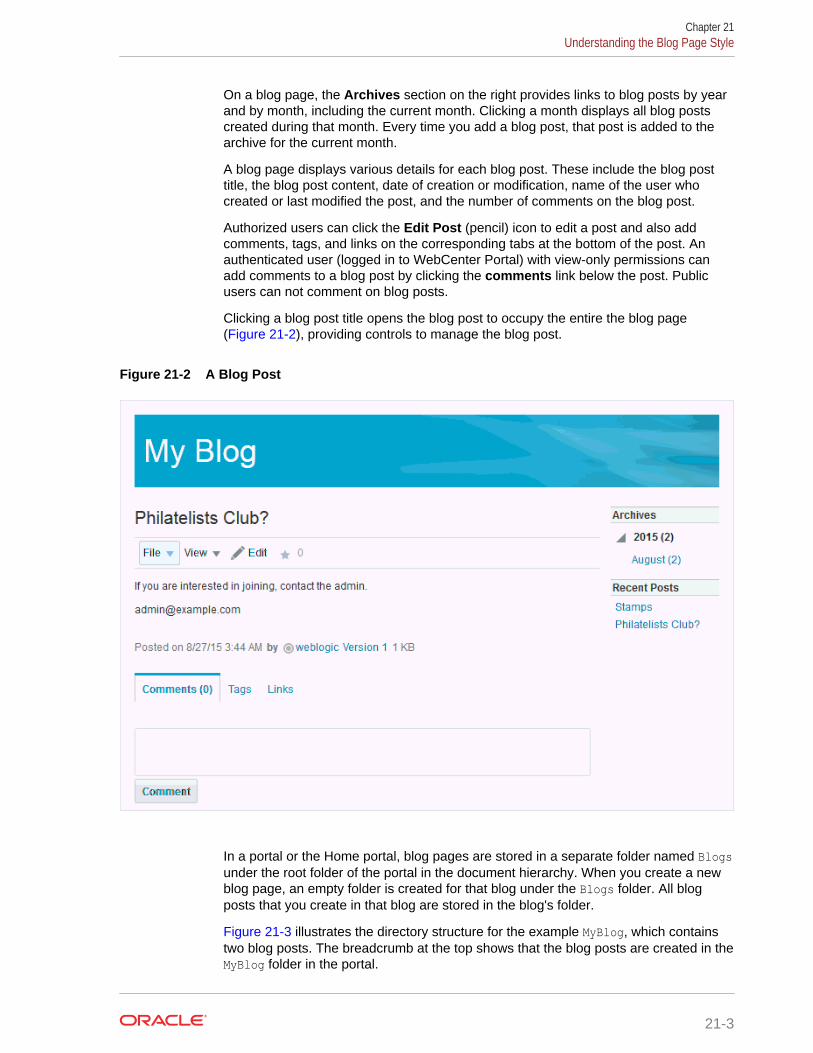
On a blog page, the Archives section on the right provides links to blog posts by yearand by month, including the current month. Clicking a month displays all blog postscreated during that month. Every time you add a blog post, that post is added to thearchive for the current month.
A blog page displays various details for each blog post. These include the blog posttitle, the blog post content, date of creation or modification, name of the user whocreated or last modified the post, and the number of comments on the blog post.
Authorized users can click the Edit Post (pencil) icon to edit a post and also addcomments, tags, and links on the corresponding tabs at the bottom of the post. Anauthenticated user (logged in to WebCenter Portal) with view-only permissions canadd comments to a blog post by clicking the comments link below the post. Publicusers can not comment on blog posts.
Clicking a blog post title opens the blog post to occupy the entire the blog page(Figure 21-2), providing controls to manage the blog post.
Figure 21-2 A Blog Post
In a portal or the Home portal, blog pages are stored in a separate folder named Blogsunder the root folder of the portal in the document hierarchy. When you create a newblog page, an empty folder is created for that blog under the Blogs folder. All blogposts that you create in that blog are stored in the blog's folder.
Figure 21-3 illustrates the directory structure for the example MyBlog, which containstwo blog posts. The breadcrumb at the top shows that the blog posts are created in theMyBlog folder in the portal.
Chapter 21Understanding the Blog Page Style
21-3
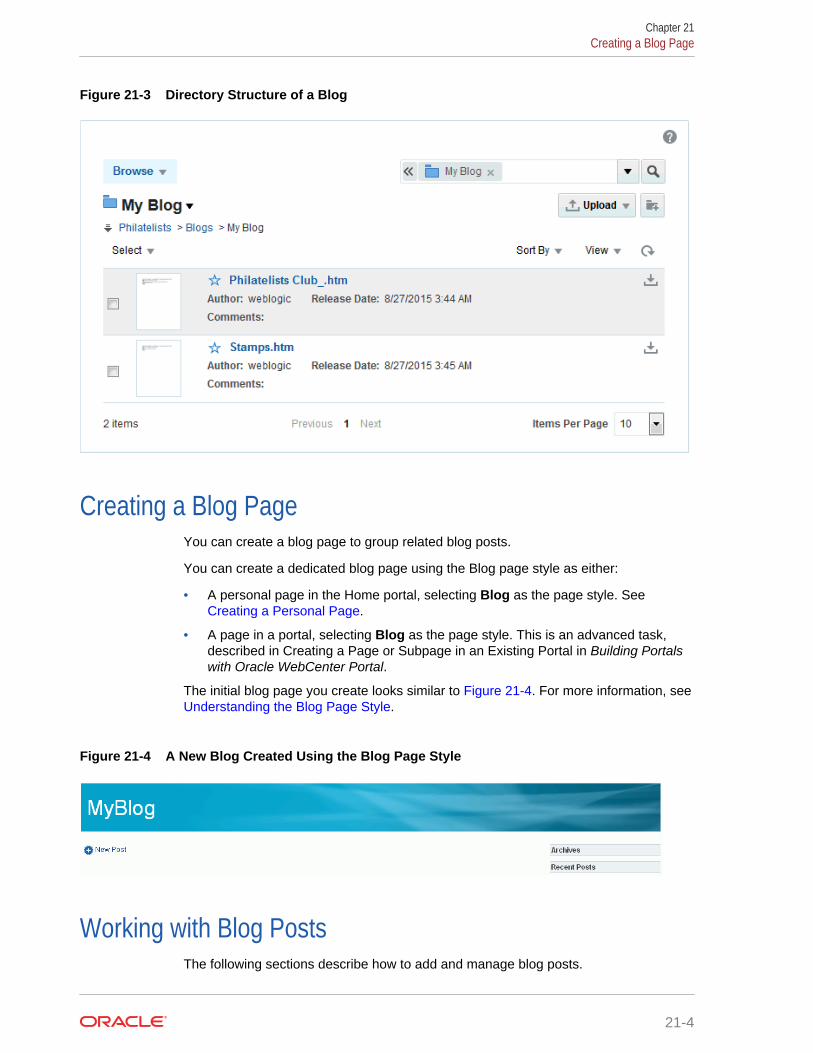
Figure 21-3 Directory Structure of a Blog
Creating a Blog PageYou can create a blog page to group related blog posts.
You can create a dedicated blog page using the Blog page style as either:
• A personal page in the Home portal, selecting Blog as the page style. See Creating a Personal Page.
• A page in a portal, selecting Blog as the page style. This is an advanced task,described in Creating a Page or Subpage in an Existing Portal in Building Portalswith Oracle WebCenter Portal.
The initial blog page you create looks similar to Figure 21-4. For more information, see Understanding the Blog Page Style.
Figure 21-4 A New Blog Created Using the Blog Page Style
Working with Blog PostsThe following sections describe how to add and manage blog posts.
Chapter 21Creating a Blog Page
21-4
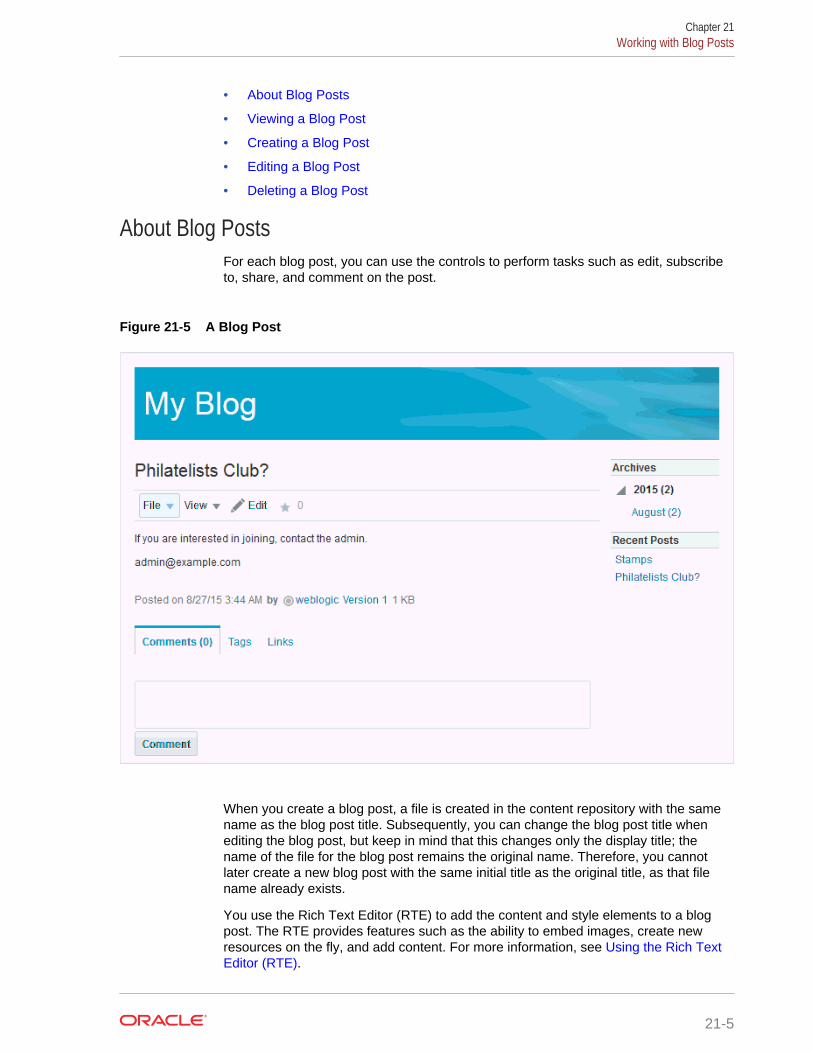
• About Blog Posts
• Viewing a Blog Post
• Creating a Blog Post
• Editing a Blog Post
• Deleting a Blog Post
About Blog PostsFor each blog post, you can use the controls to perform tasks such as edit, subscribeto, share, and comment on the post.
Figure 21-5 A Blog Post
When you create a blog post, a file is created in the content repository with the samename as the blog post title. Subsequently, you can change the blog post title whenediting the blog post, but keep in mind that this changes only the display title; thename of the file for the blog post remains the original name. Therefore, you cannotlater create a new blog post with the same initial title as the original title, as that filename already exists.
You use the Rich Text Editor (RTE) to add the content and style elements to a blogpost. The RTE provides features such as the ability to embed images, create newresources on the fly, and add content. For more information, see Using the Rich TextEditor (RTE).
Chapter 21Working with Blog Posts
21-5
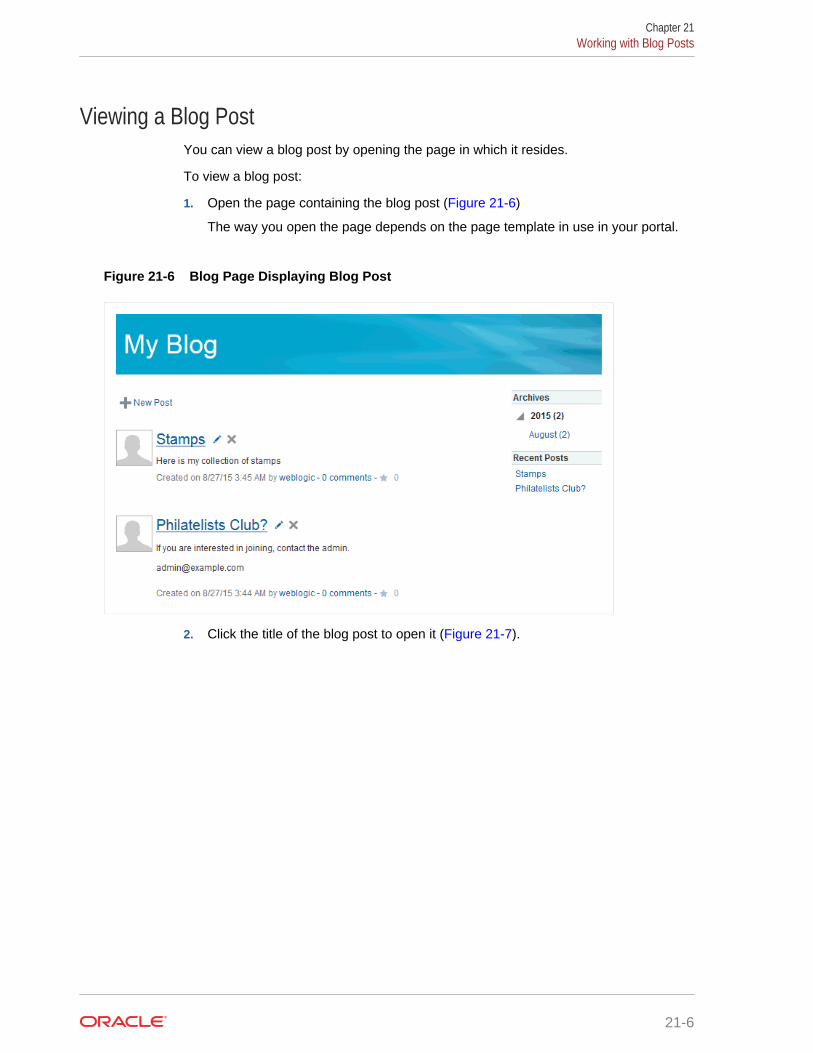
Viewing a Blog PostYou can view a blog post by opening the page in which it resides.
To view a blog post:
1. Open the page containing the blog post (Figure 21-6)
The way you open the page depends on the page template in use in your portal.
Figure 21-6 Blog Page Displaying Blog Post
2. Click the title of the blog post to open it (Figure 21-7).
Chapter 21Working with Blog Posts
21-6
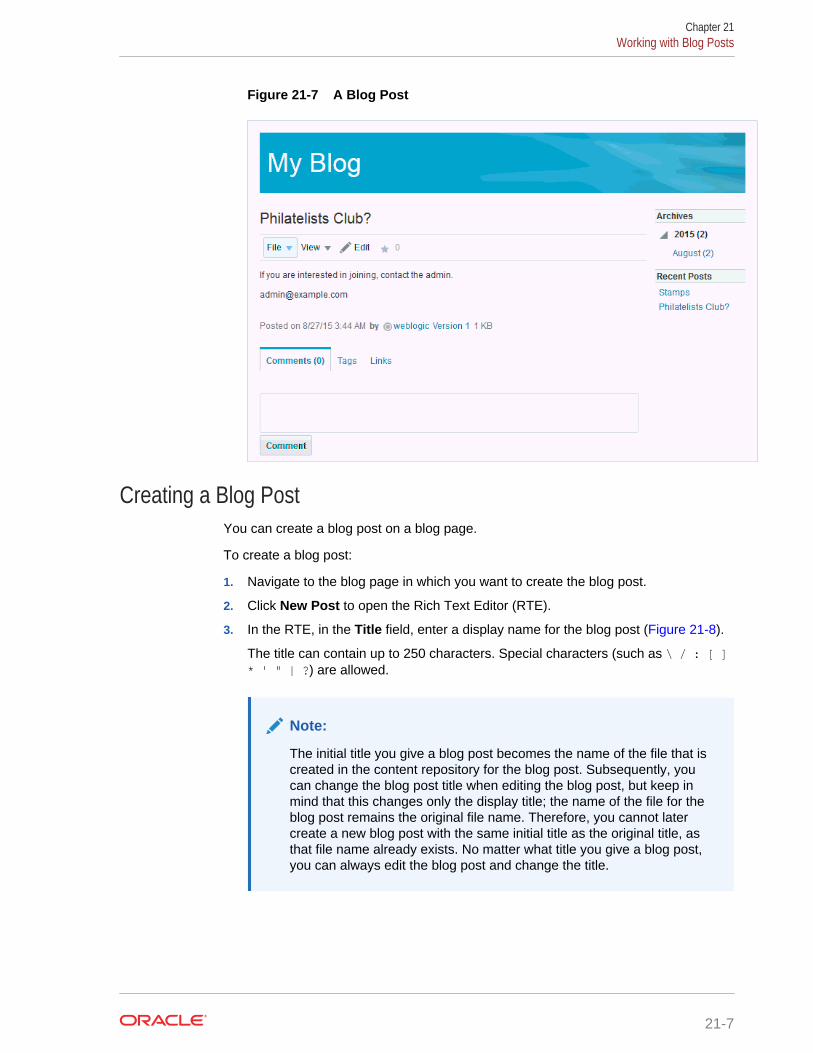
Figure 21-7 A Blog Post
Creating a Blog PostYou can create a blog post on a blog page.
To create a blog post:
1. Navigate to the blog page in which you want to create the blog post.
2. Click New Post to open the Rich Text Editor (RTE).
3. In the RTE, in the Title field, enter a display name for the blog post (Figure 21-8).
The title can contain up to 250 characters. Special characters (such as \ / : [ ]* ' " | ?) are allowed.
Note:
The initial title you give a blog post becomes the name of the file that iscreated in the content repository for the blog post. Subsequently, youcan change the blog post title when editing the blog post, but keep inmind that this changes only the display title; the name of the file for theblog post remains the original file name. Therefore, you cannot latercreate a new blog post with the same initial title as the original title, asthat file name already exists. No matter what title you give a blog post,you can always edit the blog post and change the title.
Chapter 21Working with Blog Posts
21-7
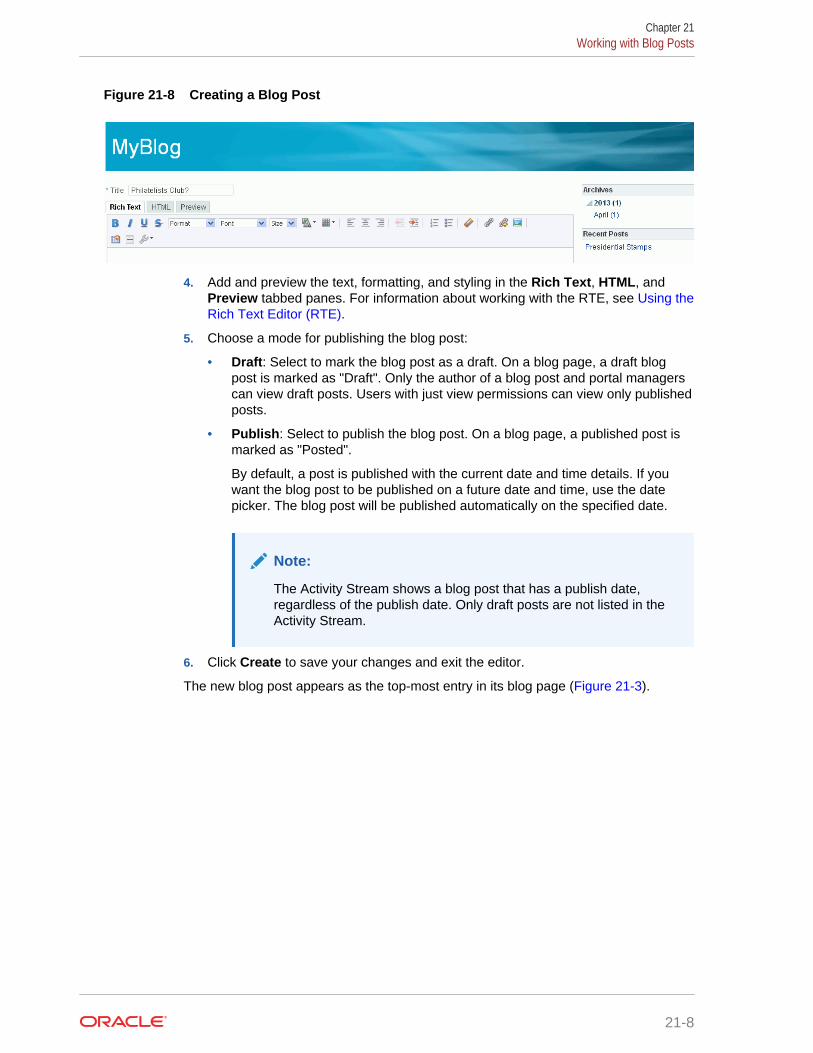
Figure 21-8 Creating a Blog Post
4. Add and preview the text, formatting, and styling in the Rich Text, HTML, andPreview tabbed panes. For information about working with the RTE, see Using theRich Text Editor (RTE).
5. Choose a mode for publishing the blog post:
• Draft: Select to mark the blog post as a draft. On a blog page, a draft blogpost is marked as "Draft". Only the author of a blog post and portal managerscan view draft posts. Users with just view permissions can view only publishedposts.
• Publish: Select to publish the blog post. On a blog page, a published post ismarked as "Posted".
By default, a post is published with the current date and time details. If youwant the blog post to be published on a future date and time, use the datepicker. The blog post will be published automatically on the specified date.
Note:
The Activity Stream shows a blog post that has a publish date,regardless of the publish date. Only draft posts are not listed in theActivity Stream.
6. Click Create to save your changes and exit the editor.
The new blog post appears as the top-most entry in its blog page (Figure 21-3).
Chapter 21Working with Blog Posts
21-8
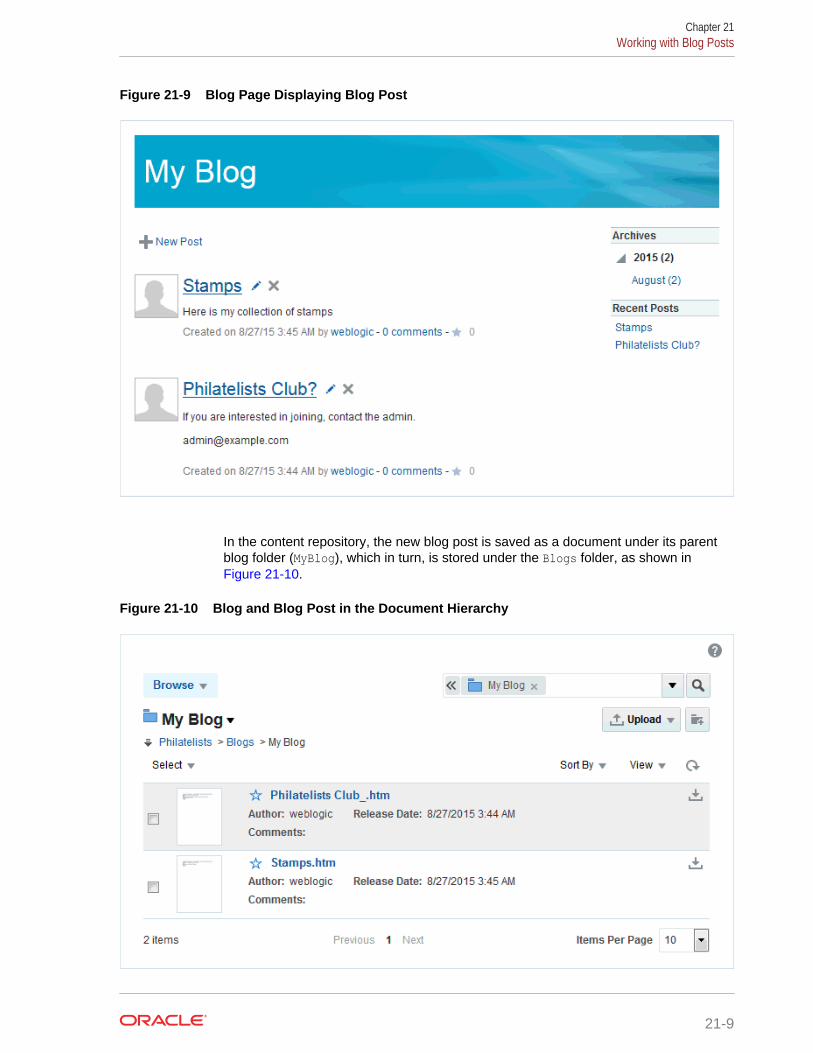
Figure 21-9 Blog Page Displaying Blog Post
In the content repository, the new blog post is saved as a document under its parentblog folder (MyBlog), which in turn, is stored under the Blogs folder, as shown in Figure 21-10.
Figure 21-10 Blog and Blog Post in the Document Hierarchy
Chapter 21Working with Blog Posts
21-9
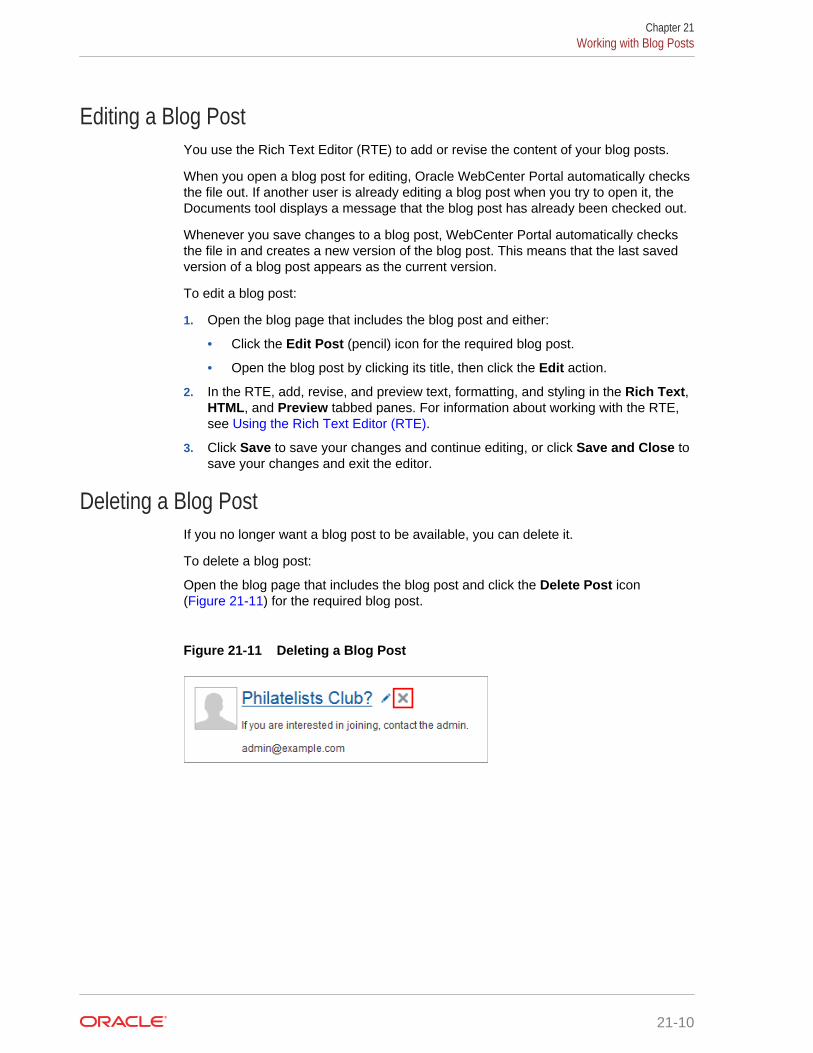
Editing a Blog PostYou use the Rich Text Editor (RTE) to add or revise the content of your blog posts.
When you open a blog post for editing, Oracle WebCenter Portal automatically checksthe file out. If another user is already editing a blog post when you try to open it, theDocuments tool displays a message that the blog post has already been checked out.
Whenever you save changes to a blog post, WebCenter Portal automatically checksthe file in and creates a new version of the blog post. This means that the last savedversion of a blog post appears as the current version.
To edit a blog post:
1. Open the blog page that includes the blog post and either:
• Click the Edit Post (pencil) icon for the required blog post.
• Open the blog post by clicking its title, then click the Edit action.
2. In the RTE, add, revise, and preview text, formatting, and styling in the Rich Text,HTML, and Preview tabbed panes. For information about working with the RTE,see Using the Rich Text Editor (RTE).
3. Click Save to save your changes and continue editing, or click Save and Close tosave your changes and exit the editor.
Deleting a Blog PostIf you no longer want a blog post to be available, you can delete it.
To delete a blog post:
Open the blog page that includes the blog post and click the Delete Post icon(Figure 21-11) for the required blog post.
Figure 21-11 Deleting a Blog Post
Chapter 21Working with Blog Posts
21-10
Part VStaying Informed
This part of Using Portals in Oracle WebCenter Portal provides ways to use trackingand notification features to stay on top of the business-relevant activities happening inyour organization, work group, and department.
• Getting Notified When Things Change
• Tracking Portal Activities
• Working with Announcements
• Monitoring RSS Feeds
• Working with Polls
22Getting Notified When Things Change
Subscribe to and unsubscribe from portals and application objects, manage yoursubscriptions, and specify how you are notified when they are changed.
Permissions:
The tasks described in this chapter are available to any WebCenter Portaluser. However, your system administrator can enforce certain applicationdefaults that prevent you from setting subscription and notificationpreferences for yourself. When application defaults are enforced, you will beunable to perform some of the actions described in this chapter.
Topics:
• About Subscriptions and Notifications
• Establishing and Managing Your Messaging Channels and Filters
• Subscribing to the Application, to Portals, and to Objects
• Viewing and Cancelling Your Subscriptions
About Subscriptions and NotificationsSubscriptions and Notifications are available for subscribing to services, portals, andobjects in WebCenter Portal and sending notifications of changes to subscribed itemsthrough texts and mail. Through subscriptions and notifications, you can track changesthat occur to your connections, your portal memberships, content in specific portals,and other application objects that are important to you. Depending on how notificationsare configured, you can receive notifications through texts or mail.
Notifications provide a way to trigger notices across different messaging channels.Notices are triggered when the portals and application objects to which you havesubscribed change.
Messaging channels can include texts and mail (depending on how your systemadministrator has configured Notifications). For example, you can receive a mailmessage when your portal membership changes and a text message when someoneresponds to a particular discussion topic. Messages contain links that take you to thescene of the change.
You can choose the objects that trigger a notice by subscribing to them. In WebCenterPortal, there are three levels of subscription:
• Application, which you can use to receive notices about changes to your portalmemberships, Message Board, Connections, and Feedback.
Such notifications occur only for application-level activities that involve you as theuser.
22-1
• Portal, for changes to a subscribed feature, such as Events, Discussions,Announcements, and Blogs, that occur within the scope of a selected portal
• Object, for changes to the application objects you have subscribed to, such as aparticular discussion topic
Table 22-1 describes the types of activities that can trigger a notification and indicatesthe level and location of the associated subscription (for more information, see Subscribing to the Application, to Portals, and to Objects).
Note:
You must explicitly subscribe to an object to receive subscription-relatednotifications about it, unless the system administrator has set and enforcedcompany-wide subscription defaults. For more information about object-levelsubscriptions, see Subscribing to a Discussion Topic.
Table 22-1 Activities that Can Trigger Notifications
Activity Level Where to Subscribe
A user sends you an invitation to connect
Note: Out of the box, the option to send notifications forinvitations to connect is enabled and is not end-userconfigurable.
Application Preferences (for more information, see Setting Application-LevelSubscriptions)
Your portal role changes, for example from PortalManager to another custom role
Application Preferences
You are added as a member of a portal Application Preferences
Your portal membership is removed Application Preferences
A user posts a message to your Message Board Application Preferences
A user likes your Message Board post (messagesexplicitly set on a Message Board and not those addedfrom Publisher to the Activity Stream)
Application Preferences
A user comments on your Message Board post(messages explicitly set on a Message Board and notthose added from Publisher to the Activity Stream)
Application Preferences
A user posts feedback for you Application Preferences
An announcement is created Portal On the portal, for example, from theActions menu on a portal in Browseportals (for more information, see Setting Portal-Level Subscriptions)
A new event is created Portal On the portal
An event is updated Portal On the portal
An event is deleted Portal On the portal
A new discussion topic is created Portal On the portal
A new discussion forum is created Portal On the portal
A user replies to a discussion topic Object On the topic (for more information, see Subscribing to a Discussion Topic)
A user comments on a discussion topic Object On the topic
Chapter 22About Subscriptions and Notifications
22-2
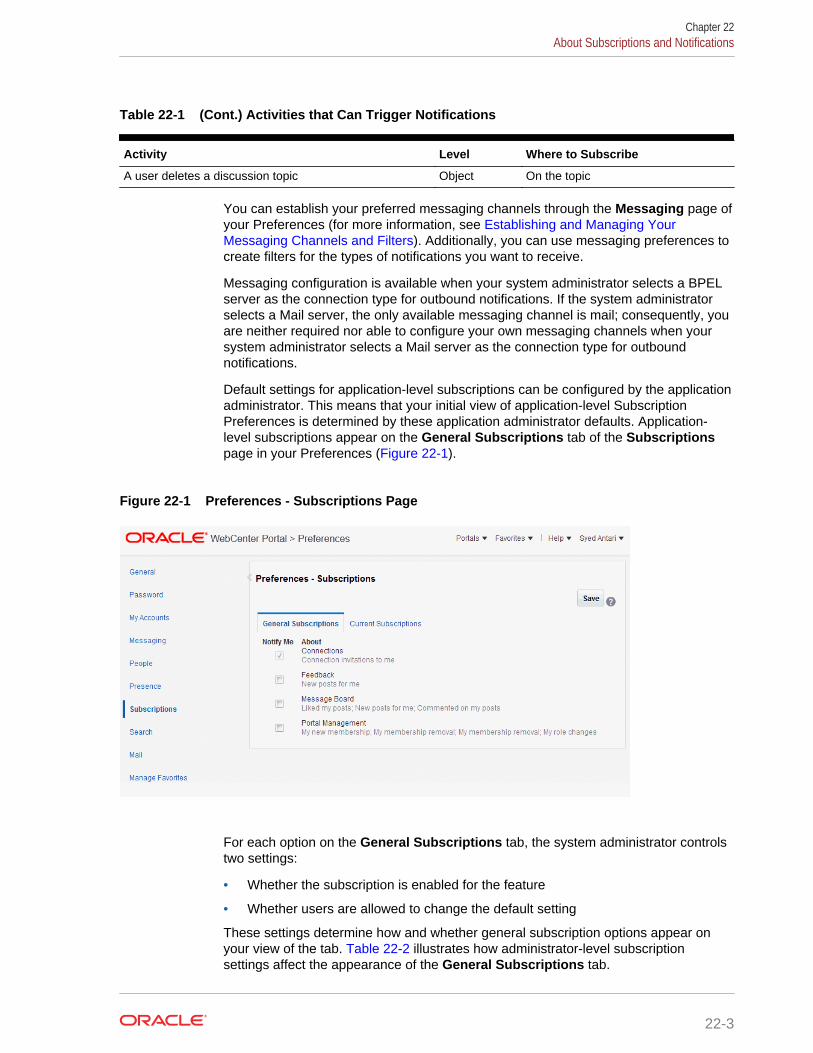
Table 22-1 (Cont.) Activities that Can Trigger Notifications
Activity Level Where to Subscribe
A user deletes a discussion topic Object On the topic
You can establish your preferred messaging channels through the Messaging page ofyour Preferences (for more information, see Establishing and Managing YourMessaging Channels and Filters). Additionally, you can use messaging preferences tocreate filters for the types of notifications you want to receive.
Messaging configuration is available when your system administrator selects a BPELserver as the connection type for outbound notifications. If the system administratorselects a Mail server, the only available messaging channel is mail; consequently, youare neither required nor able to configure your own messaging channels when yoursystem administrator selects a Mail server as the connection type for outboundnotifications.
Default settings for application-level subscriptions can be configured by the applicationadministrator. This means that your initial view of application-level SubscriptionPreferences is determined by these application administrator defaults. Application-level subscriptions appear on the General Subscriptions tab of the Subscriptionspage in your Preferences (Figure 22-1).
Figure 22-1 Preferences - Subscriptions Page
For each option on the General Subscriptions tab, the system administrator controlstwo settings:
• Whether the subscription is enabled for the feature
• Whether users are allowed to change the default setting
These settings determine how and whether general subscription options appear onyour view of the tab. Table 22-2 illustrates how administrator-level subscriptionsettings affect the appearance of the General Subscriptions tab.
Chapter 22About Subscriptions and Notifications
22-3
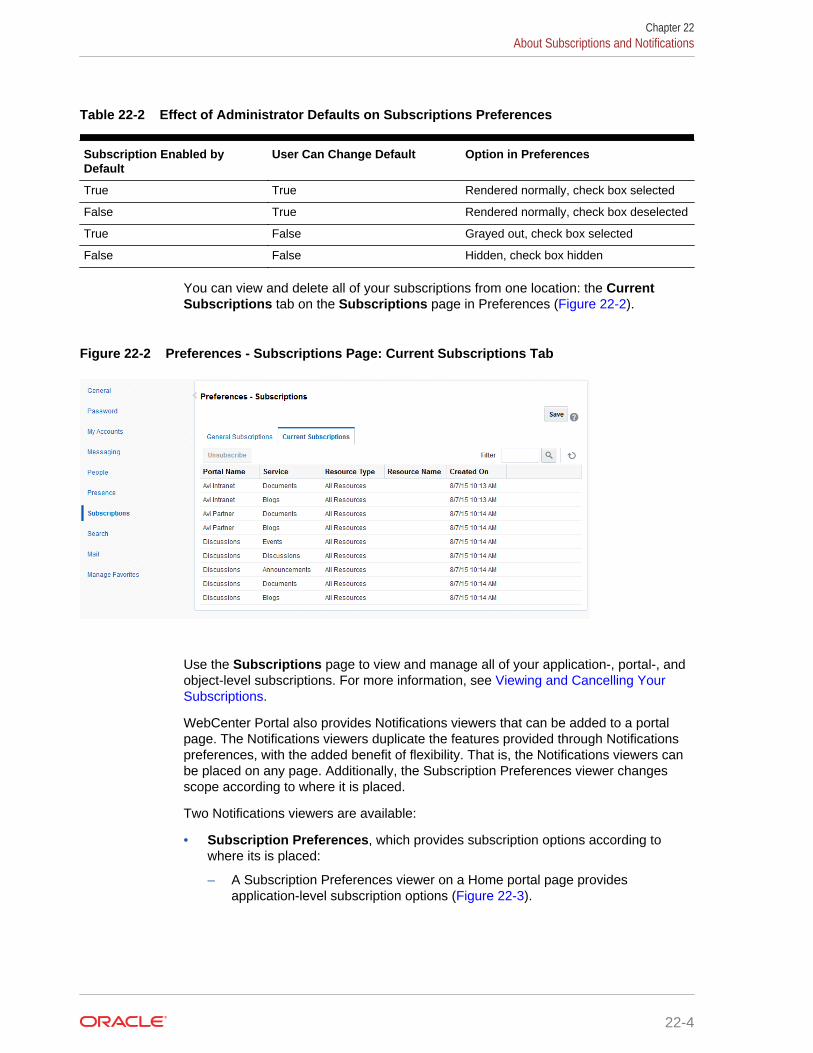
Table 22-2 Effect of Administrator Defaults on Subscriptions Preferences
Subscription Enabled byDefault
User Can Change Default Option in Preferences
True True Rendered normally, check box selected
False True Rendered normally, check box deselected
True False Grayed out, check box selected
False False Hidden, check box hidden
You can view and delete all of your subscriptions from one location: the CurrentSubscriptions tab on the Subscriptions page in Preferences (Figure 22-2).
Figure 22-2 Preferences - Subscriptions Page: Current Subscriptions Tab
Use the Subscriptions page to view and manage all of your application-, portal-, andobject-level subscriptions. For more information, see Viewing and Cancelling YourSubscriptions.
WebCenter Portal also provides Notifications viewers that can be added to a portalpage. The Notifications viewers duplicate the features provided through Notificationspreferences, with the added benefit of flexibility. That is, the Notifications viewers canbe placed on any page. Additionally, the Subscription Preferences viewer changesscope according to where it is placed.
Two Notifications viewers are available:
• Subscription Preferences, which provides subscription options according towhere its is placed:
– A Subscription Preferences viewer on a Home portal page providesapplication-level subscription options (Figure 22-3).
Chapter 22About Subscriptions and Notifications
22-4
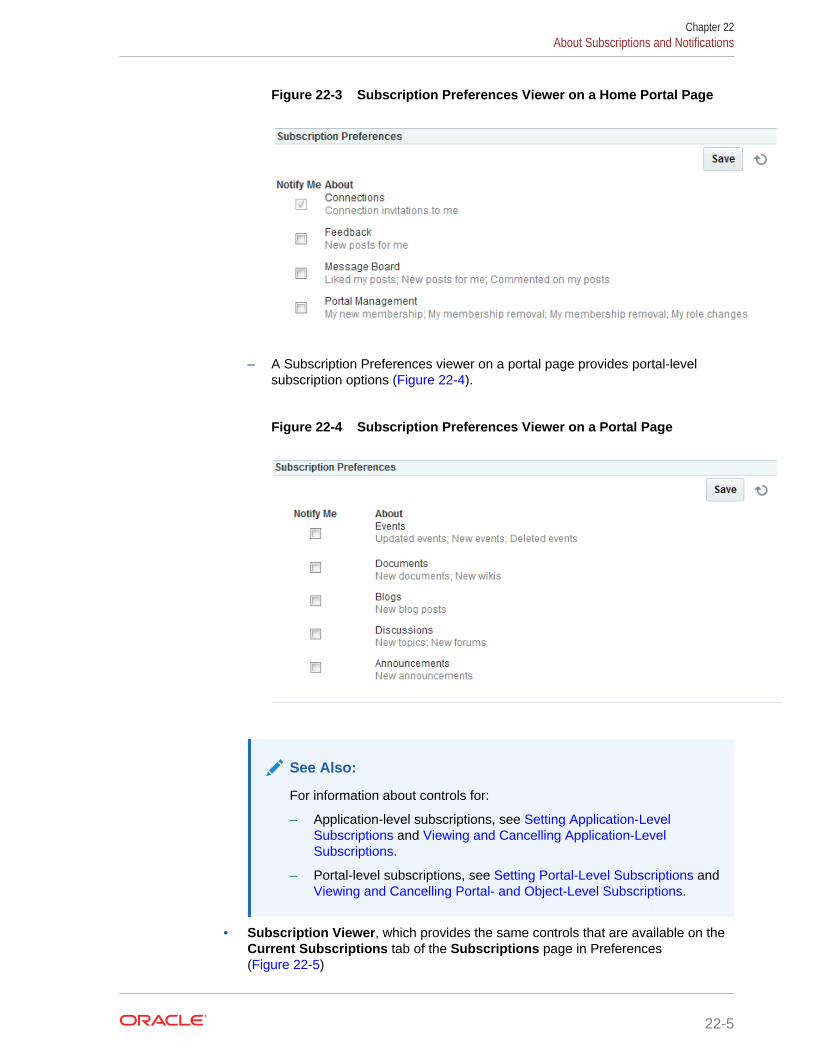
Figure 22-3 Subscription Preferences Viewer on a Home Portal Page
– A Subscription Preferences viewer on a portal page provides portal-levelsubscription options (Figure 22-4).
Figure 22-4 Subscription Preferences Viewer on a Portal Page
See Also:
For information about controls for:
– Application-level subscriptions, see Setting Application-LevelSubscriptions and Viewing and Cancelling Application-LevelSubscriptions.
– Portal-level subscriptions, see Setting Portal-Level Subscriptions and Viewing and Cancelling Portal- and Object-Level Subscriptions.
• Subscription Viewer, which provides the same controls that are available on theCurrent Subscriptions tab of the Subscriptions page in Preferences(Figure 22-5)
Chapter 22About Subscriptions and Notifications
22-5

Figure 22-5 Subscription Viewer
See Also:
For information about the controls that are available on the CurrentSubscriptions tab, see Viewing and Cancelling Portal- and Object-LevelSubscriptions.
Establishing and Managing Your Messaging Channels andFilters
Your mail address is your default messaging channel. With no filters defined, asubscription is sufficient to trigger a mail notification, provided your systemadministrator has configured shared credentials and mail is the messaging default.
After you have subscribed to an application object, no additional configuration isrequired to receive a notification through your mail when that object changes.
However, if you want to receive notifications over your phone or from an alternate mailaddress, you can use Messaging preferences to configure messaging channels anddefine messaging filters for messages generated from the Oracle User MessagingService:
• Messaging channels are the channels over which messages, notifications, andalerts are received from the Oracle User Messaging Service. Channels includemail and text. Messages, notifications, and alerts come from the services that areregistered with the Oracle User Messaging Service.
• Messaging filters define sorting conditions for messages and specify the channelsthrough which to send the messages that meet the conditions. For example, youcan specify that messages from a named user should come to you as a text, whilemessages from a named service come to you as an email.
The section includes the following topics:
• Accessing Messaging Configuration Settings
• Establishing a Messaging Channel
• Editing a Messaging Channel
• Deleting a Messaging Channel
Chapter 22Establishing and Managing Your Messaging Channels and Filters
22-6
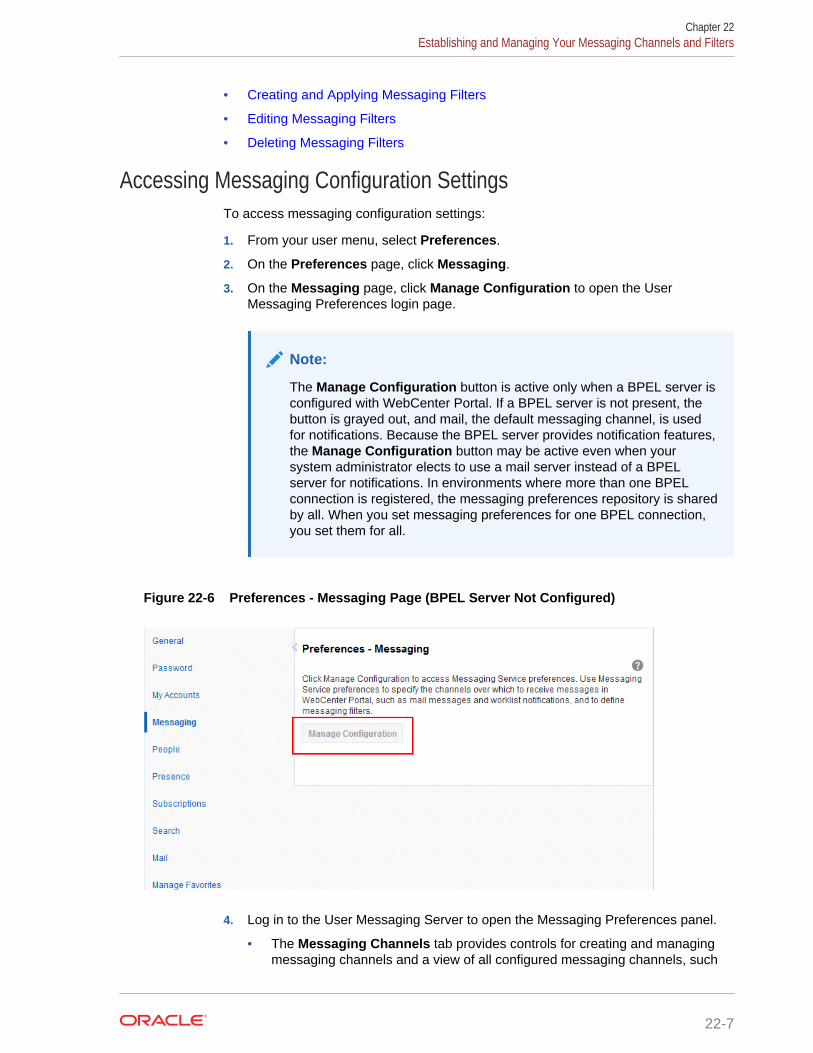
• Creating and Applying Messaging Filters
• Editing Messaging Filters
• Deleting Messaging Filters
Accessing Messaging Configuration SettingsTo access messaging configuration settings:
1. From your user menu, select Preferences.
2. On the Preferences page, click Messaging.
3. On the Messaging page, click Manage Configuration to open the UserMessaging Preferences login page.
Note:
The Manage Configuration button is active only when a BPEL server isconfigured with WebCenter Portal. If a BPEL server is not present, thebutton is grayed out, and mail, the default messaging channel, is usedfor notifications. Because the BPEL server provides notification features,the Manage Configuration button may be active even when yoursystem administrator elects to use a mail server instead of a BPELserver for notifications. In environments where more than one BPELconnection is registered, the messaging preferences repository is sharedby all. When you set messaging preferences for one BPEL connection,you set them for all.
Figure 22-6 Preferences - Messaging Page (BPEL Server Not Configured)
4. Log in to the User Messaging Server to open the Messaging Preferences panel.
• The Messaging Channels tab provides controls for creating and managingmessaging channels and a view of all configured messaging channels, such
Chapter 22Establishing and Managing Your Messaging Channels and Filters
22-7
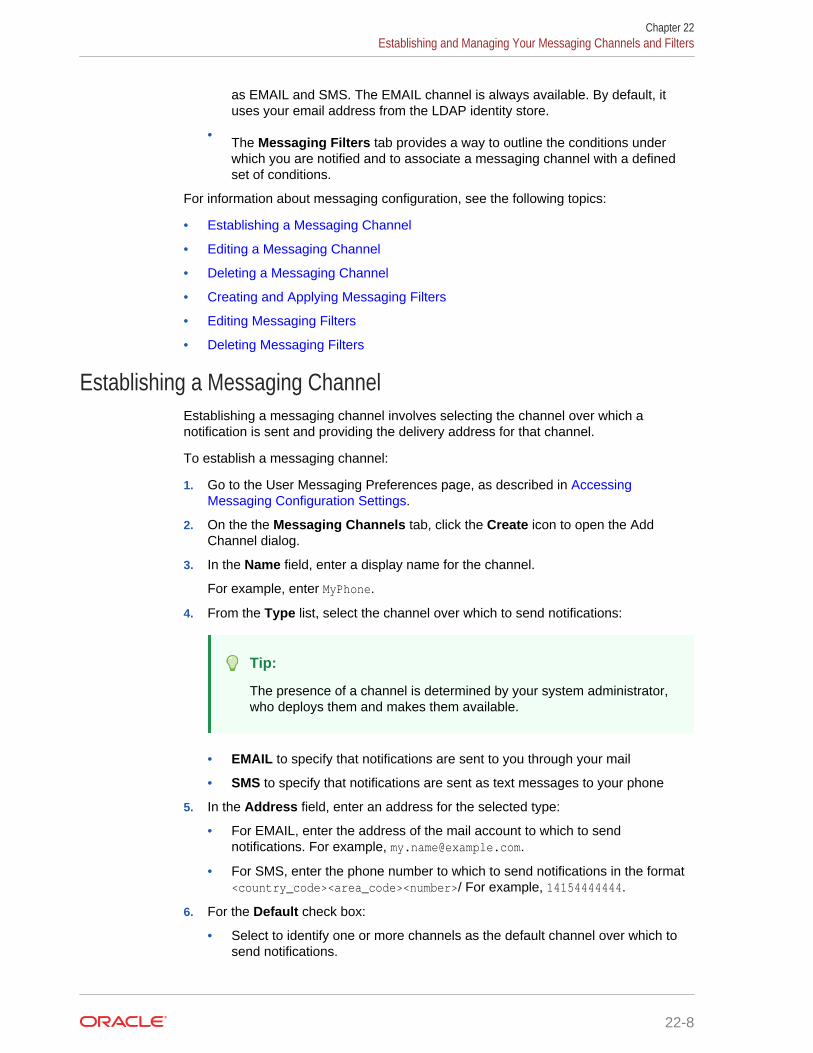
as EMAIL and SMS. The EMAIL channel is always available. By default, ituses your email address from the LDAP identity store.
• The Messaging Filters tab provides a way to outline the conditions underwhich you are notified and to associate a messaging channel with a definedset of conditions.
For information about messaging configuration, see the following topics:
• Establishing a Messaging Channel
• Editing a Messaging Channel
• Deleting a Messaging Channel
• Creating and Applying Messaging Filters
• Editing Messaging Filters
• Deleting Messaging Filters
Establishing a Messaging ChannelEstablishing a messaging channel involves selecting the channel over which anotification is sent and providing the delivery address for that channel.
To establish a messaging channel:
1. Go to the User Messaging Preferences page, as described in AccessingMessaging Configuration Settings.
2. On the the Messaging Channels tab, click the Create icon to open the AddChannel dialog.
3. In the Name field, enter a display name for the channel.
For example, enter MyPhone.
4. From the Type list, select the channel over which to send notifications:
Tip:
The presence of a channel is determined by your system administrator,who deploys them and makes them available.
• EMAIL to specify that notifications are sent to you through your mail
• SMS to specify that notifications are sent as text messages to your phone
5. In the Address field, enter an address for the selected type:
• For EMAIL, enter the address of the mail account to which to sendnotifications. For example, [email protected].
• For SMS, enter the phone number to which to send notifications in the format<country_code><area_code><number>/ For example, 14154444444.
6. For the Default check box:
• Select to identify one or more channels as the default channel over which tosend notifications.
Chapter 22Establishing and Managing Your Messaging Channels and Filters
22-8
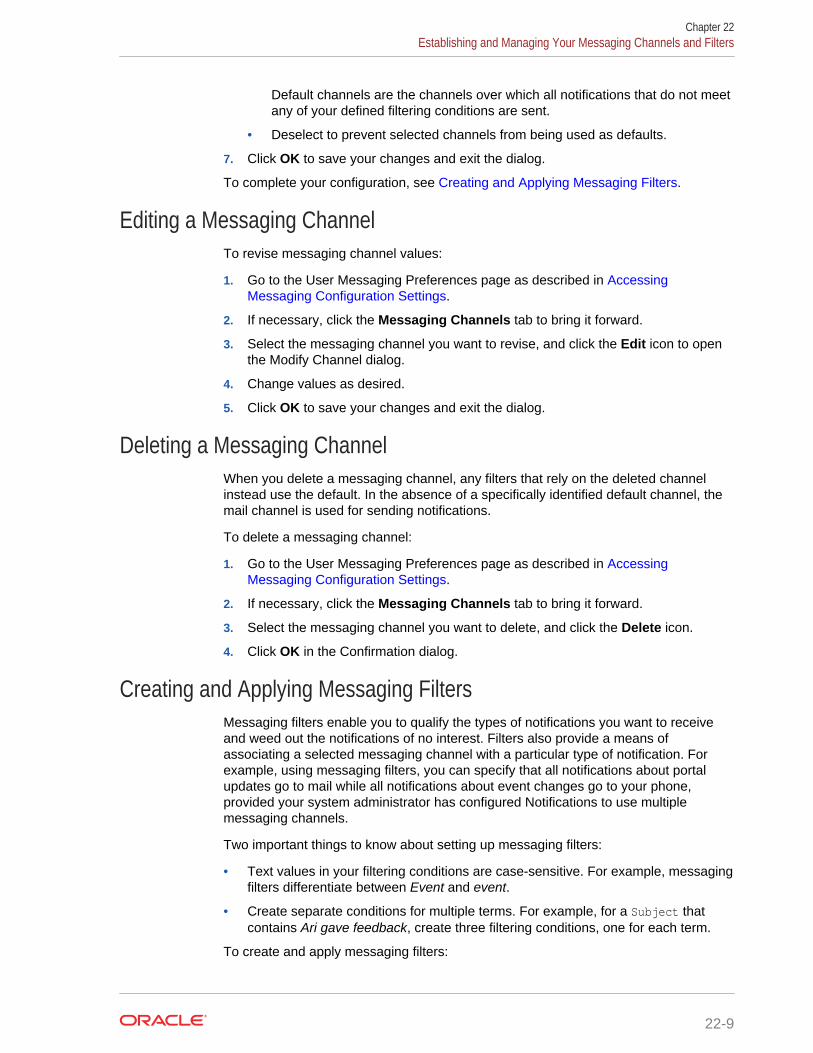
Default channels are the channels over which all notifications that do not meetany of your defined filtering conditions are sent.
• Deselect to prevent selected channels from being used as defaults.
7. Click OK to save your changes and exit the dialog.
To complete your configuration, see Creating and Applying Messaging Filters.
Editing a Messaging ChannelTo revise messaging channel values:
1. Go to the User Messaging Preferences page as described in AccessingMessaging Configuration Settings.
2. If necessary, click the Messaging Channels tab to bring it forward.
3. Select the messaging channel you want to revise, and click the Edit icon to openthe Modify Channel dialog.
4. Change values as desired.
5. Click OK to save your changes and exit the dialog.
Deleting a Messaging ChannelWhen you delete a messaging channel, any filters that rely on the deleted channelinstead use the default. In the absence of a specifically identified default channel, themail channel is used for sending notifications.
To delete a messaging channel:
1. Go to the User Messaging Preferences page as described in AccessingMessaging Configuration Settings.
2. If necessary, click the Messaging Channels tab to bring it forward.
3. Select the messaging channel you want to delete, and click the Delete icon.
4. Click OK in the Confirmation dialog.
Creating and Applying Messaging FiltersMessaging filters enable you to qualify the types of notifications you want to receiveand weed out the notifications of no interest. Filters also provide a means ofassociating a selected messaging channel with a particular type of notification. Forexample, using messaging filters, you can specify that all notifications about portalupdates go to mail while all notifications about event changes go to your phone,provided your system administrator has configured Notifications to use multiplemessaging channels.
Two important things to know about setting up messaging filters:
• Text values in your filtering conditions are case-sensitive. For example, messagingfilters differentiate between Event and event.
• Create separate conditions for multiple terms. For example, for a Subject thatcontains Ari gave feedback, create three filtering conditions, one for each term.
To create and apply messaging filters:
Chapter 22Establishing and Managing Your Messaging Channels and Filters
22-9
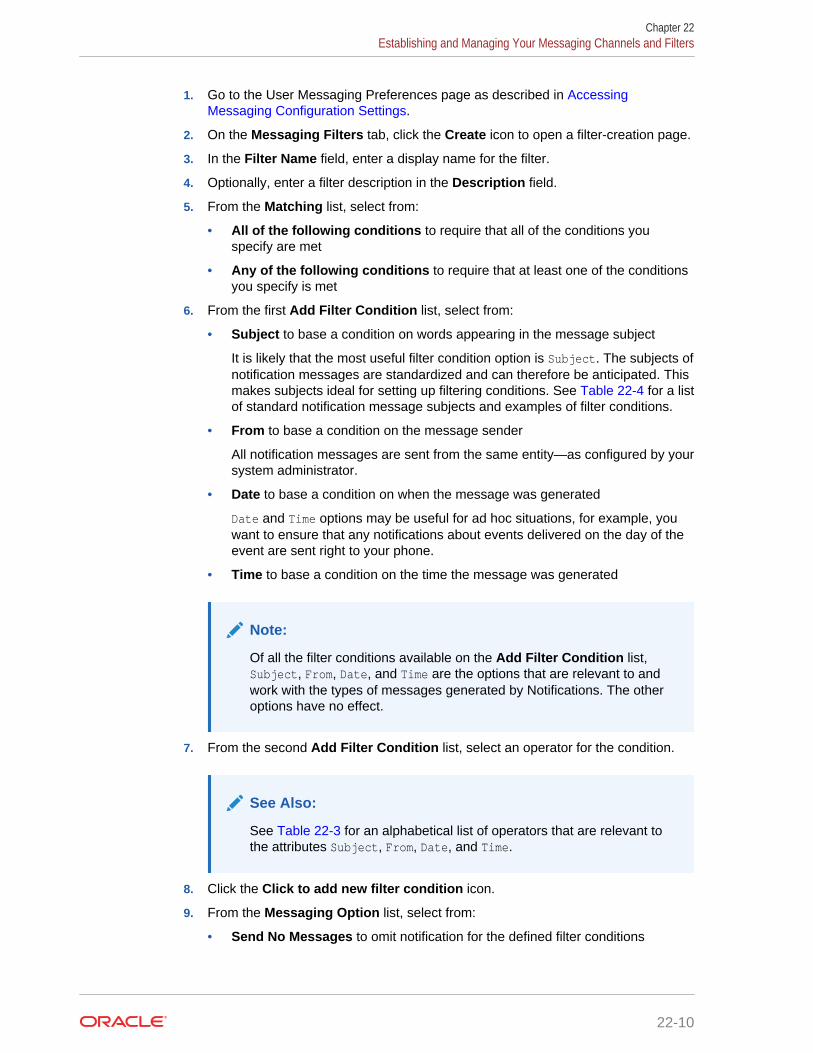
1. Go to the User Messaging Preferences page as described in AccessingMessaging Configuration Settings.
2. On the Messaging Filters tab, click the Create icon to open a filter-creation page.
3. In the Filter Name field, enter a display name for the filter.
4. Optionally, enter a filter description in the Description field.
5. From the Matching list, select from:
• All of the following conditions to require that all of the conditions youspecify are met
• Any of the following conditions to require that at least one of the conditionsyou specify is met
6. From the first Add Filter Condition list, select from:
• Subject to base a condition on words appearing in the message subject
It is likely that the most useful filter condition option is Subject. The subjects ofnotification messages are standardized and can therefore be anticipated. Thismakes subjects ideal for setting up filtering conditions. See Table 22-4 for a listof standard notification message subjects and examples of filter conditions.
• From to base a condition on the message sender
All notification messages are sent from the same entity—as configured by yoursystem administrator.
• Date to base a condition on when the message was generated
Date and Time options may be useful for ad hoc situations, for example, youwant to ensure that any notifications about events delivered on the day of theevent are sent right to your phone.
• Time to base a condition on the time the message was generated
Note:
Of all the filter conditions available on the Add Filter Condition list,Subject, From, Date, and Time are the options that are relevant to andwork with the types of messages generated by Notifications. The otheroptions have no effect.
7. From the second Add Filter Condition list, select an operator for the condition.
See Also:
See Table 22-3 for an alphabetical list of operators that are relevant tothe attributes Subject, From, Date, and Time.
8. Click the Click to add new filter condition icon.
9. From the Messaging Option list, select from:
• Send No Messages to omit notification for the defined filter conditions
Chapter 22Establishing and Managing Your Messaging Channels and Filters
22-10

• Send Messages to all Selected Channels to send notification through allchannels selected from the Add Notification Channel list
• Send to the First Available Channel to send notification through the firstopen channel of all the selected channels
10. From the Add Notification Channel list, select the channel over which to sendthe notification messages that meet your defined filter conditions, and then clickthe Click to add channel to this filter icon.
The Add Notification Channel list is populated with the channels that are definedon the Messaging Channels tab. You can add multiple channels in turn.
11. Click OK to save and apply the messaging filter.
Tip:
If your defined filtering conditions do not match an incoming notification,the User Messaging Server will send notifications over all the channelsyou have identified as default channels.
Table 22-3 provides an alphabetical list of operators that are relevant to the attributesSubject, From, Date, and Time and describes the values they require.
Table 22-3 Operators relevant to Subject, From, Date, and Time
Operator Value1 Attributes
Between In the fields provided:
• For Date, enter a start date and end date betweenwhich to apply the filter
• For Time, select a start time (hours and minutes)and end time between which to apply the filter
Date, Time
Contains Enter a string that must be included in the messageSubject or return address (From)
Separate multiple values with commas.
Subject, From
isEqual Enter the literal value that must be used for the messageSubject, Date, Time, or return address (From)
Subject, From, Date, Time
isGreaterThan Enter the message delivery date beyond which to applythe filter
Date
isGreaterThanOrEqual Enter the message delivery date on which to startapplying the filter
Date
isLessThan Enter the message delivery date before which to startapplying the filter
Date
isLessThanOrEqual Enter the message delivery date on which to stopapplying the filter
Date
isNotEqual Enter a literal value that must be ignored for themessage Subject, Date, Time, or return address (From)
Subject, From, Date, Time
isWeekday No value is required. This operator applies to messagessent on weekdays.
Date
isWeekend No value is required. This operator applies to messagessent on weekends.
Date
Chapter 22Establishing and Managing Your Messaging Channels and Filters
22-11
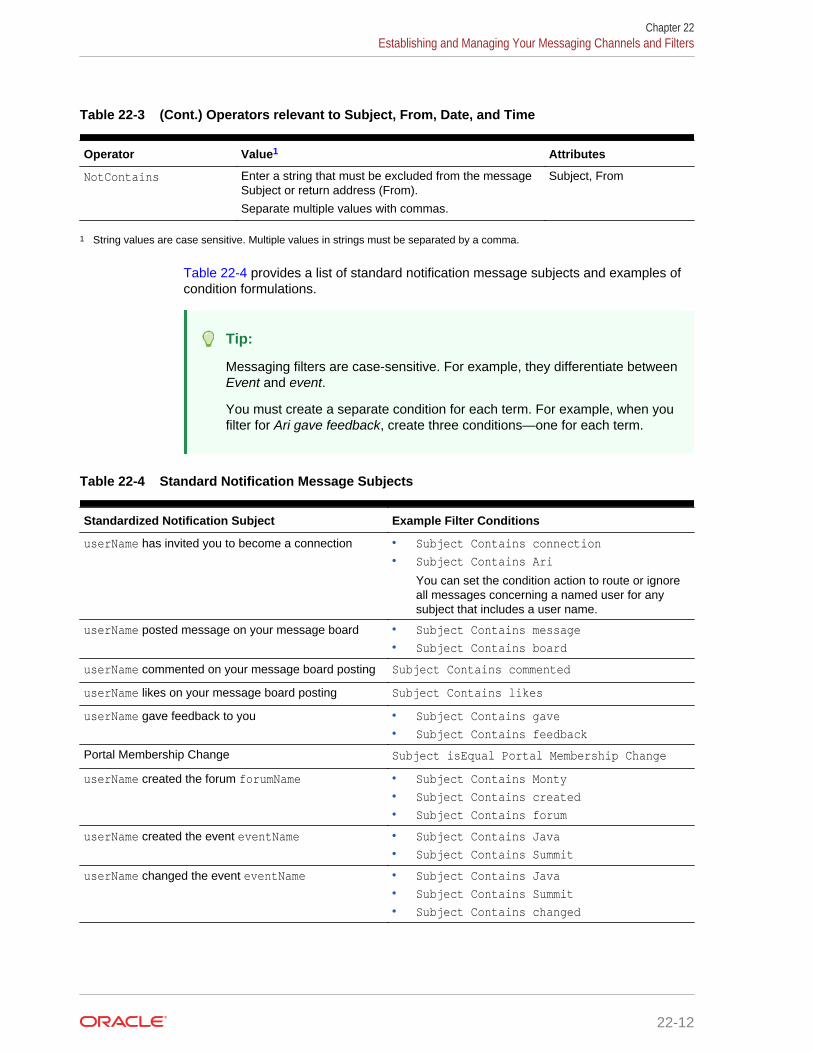
Table 22-3 (Cont.) Operators relevant to Subject, From, Date, and Time
Operator Value1 Attributes
NotContains Enter a string that must be excluded from the messageSubject or return address (From).
Separate multiple values with commas.
Subject, From
1 String values are case sensitive. Multiple values in strings must be separated by a comma.
Table 22-4 provides a list of standard notification message subjects and examples ofcondition formulations.
Tip:
Messaging filters are case-sensitive. For example, they differentiate betweenEvent and event.
You must create a separate condition for each term. For example, when youfilter for Ari gave feedback, create three conditions—one for each term.
Table 22-4 Standard Notification Message Subjects
Standardized Notification Subject Example Filter Conditions
userName has invited you to become a connection • Subject Contains connection• Subject Contains Ari
You can set the condition action to route or ignoreall messages concerning a named user for anysubject that includes a user name.
userName posted message on your message board • Subject Contains message• Subject Contains board
userName commented on your message board posting Subject Contains commented
userName likes on your message board posting Subject Contains likes
userName gave feedback to you • Subject Contains gave• Subject Contains feedback
Portal Membership Change Subject isEqual Portal Membership Change
userName created the forum forumName • Subject Contains Monty• Subject Contains created• Subject Contains forum
userName created the event eventName • Subject Contains Java• Subject Contains Summit
userName changed the event eventName • Subject Contains Java• Subject Contains Summit• Subject Contains changed
Chapter 22Establishing and Managing Your Messaging Channels and Filters
22-12
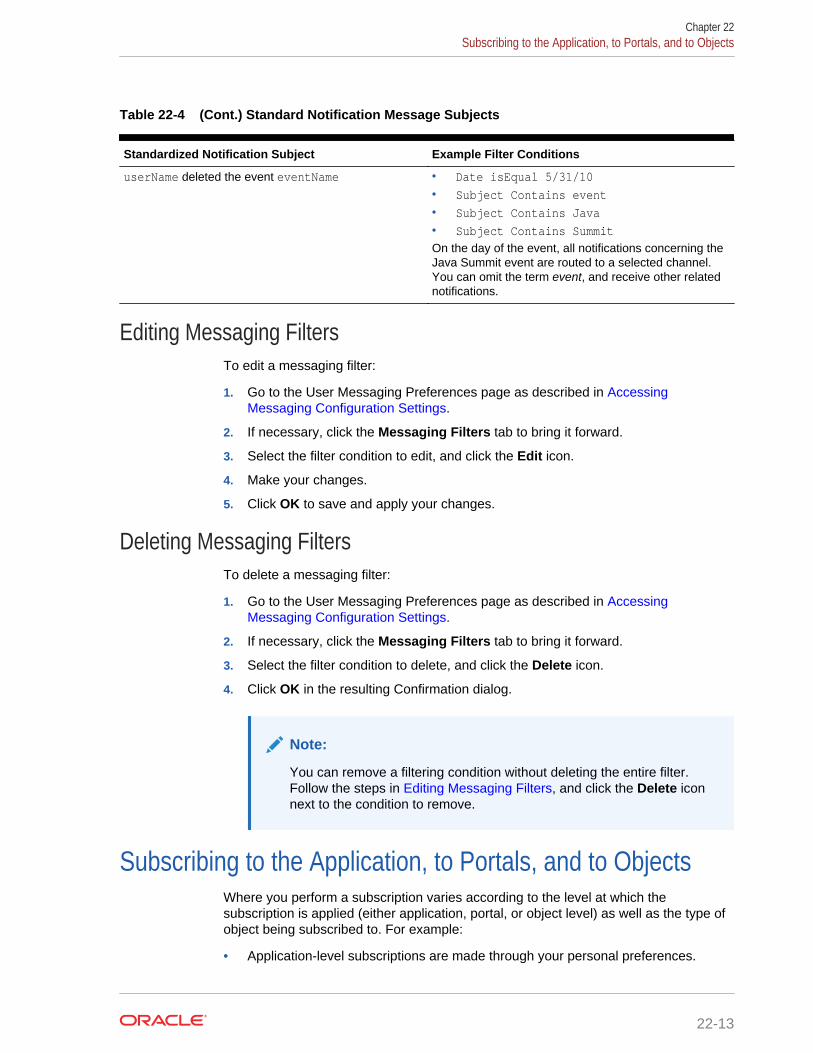
Table 22-4 (Cont.) Standard Notification Message Subjects
Standardized Notification Subject Example Filter Conditions
userName deleted the event eventName • Date isEqual 5/31/10• Subject Contains event• Subject Contains Java• Subject Contains SummitOn the day of the event, all notifications concerning theJava Summit event are routed to a selected channel.You can omit the term event, and receive other relatednotifications.
Editing Messaging FiltersTo edit a messaging filter:
1. Go to the User Messaging Preferences page as described in AccessingMessaging Configuration Settings.
2. If necessary, click the Messaging Filters tab to bring it forward.
3. Select the filter condition to edit, and click the Edit icon.
4. Make your changes.
5. Click OK to save and apply your changes.
Deleting Messaging FiltersTo delete a messaging filter:
1. Go to the User Messaging Preferences page as described in AccessingMessaging Configuration Settings.
2. If necessary, click the Messaging Filters tab to bring it forward.
3. Select the filter condition to delete, and click the Delete icon.
4. Click OK in the resulting Confirmation dialog.
Note:
You can remove a filtering condition without deleting the entire filter.Follow the steps in Editing Messaging Filters, and click the Delete iconnext to the condition to remove.
Subscribing to the Application, to Portals, and to ObjectsWhere you perform a subscription varies according to the level at which thesubscription is applied (either application, portal, or object level) as well as the type ofobject being subscribed to. For example:
• Application-level subscriptions are made through your personal preferences.
Chapter 22Subscribing to the Application, to Portals, and to Objects
22-13
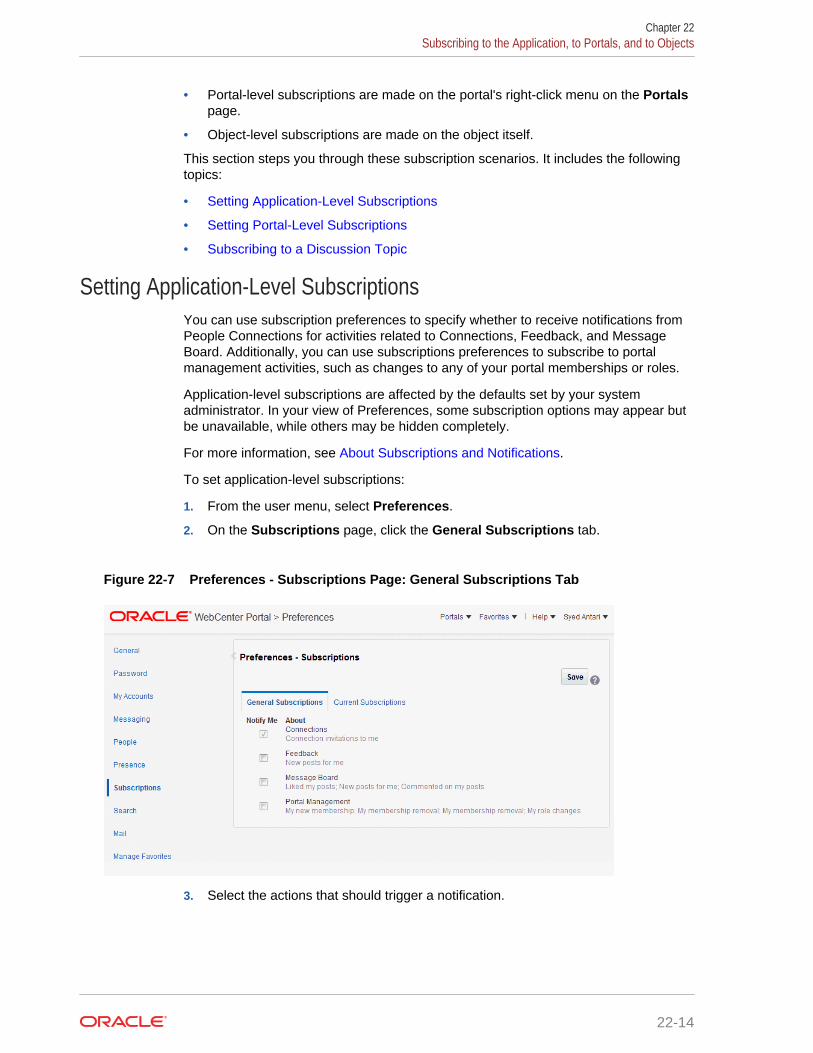
• Portal-level subscriptions are made on the portal's right-click menu on the Portalspage.
• Object-level subscriptions are made on the object itself.
This section steps you through these subscription scenarios. It includes the followingtopics:
• Setting Application-Level Subscriptions
• Setting Portal-Level Subscriptions
• Subscribing to a Discussion Topic
Setting Application-Level SubscriptionsYou can use subscription preferences to specify whether to receive notifications fromPeople Connections for activities related to Connections, Feedback, and MessageBoard. Additionally, you can use subscriptions preferences to subscribe to portalmanagement activities, such as changes to any of your portal memberships or roles.
Application-level subscriptions are affected by the defaults set by your systemadministrator. In your view of Preferences, some subscription options may appear butbe unavailable, while others may be hidden completely.
For more information, see About Subscriptions and Notifications.
To set application-level subscriptions:
1. From the user menu, select Preferences.
2. On the Subscriptions page, click the General Subscriptions tab.
Figure 22-7 Preferences - Subscriptions Page: General Subscriptions Tab
3. Select the actions that should trigger a notification.
Chapter 22Subscribing to the Application, to Portals, and to Objects
22-14
See Also:
For more information about messaging channels, see Establishing andManaging Your Messaging Channels and Filters.
Select from:
• Connections to receive notification when another user invites you to connect
• Feedback to receive notification when other users leave feedback for you
• Message Board to receive notification when other users post messages toyour Message Board, like your posts, and comment on your posts
• Portal Management to receive notification when you are added or removedas a member or your role changes
Deselect actions that should not trigger a notification.
4. Click Save.
See Also:
For information about managing application-level subscriptions, see Viewingand Cancelling Application-Level Subscriptions.
Setting Portal-Level SubscriptionsYou can use portal-level subscriptions to trigger notification messages whenever anyof the following actions occur in the portal:
• An announcement is created
• An event is created, updated, or deleted
• A discussion forum or topic is created
To subscribe to a portal:
1. Open the Subscribe dialog in one of the following ways:
• In the portal browser (see Viewing and Accessing Available Portals), locatethe portal you want to subscribe to, open its flip menu, and select Contact,then Subscribe (Figure 22-8).
Chapter 22Subscribing to the Application, to Portals, and to Objects
22-15
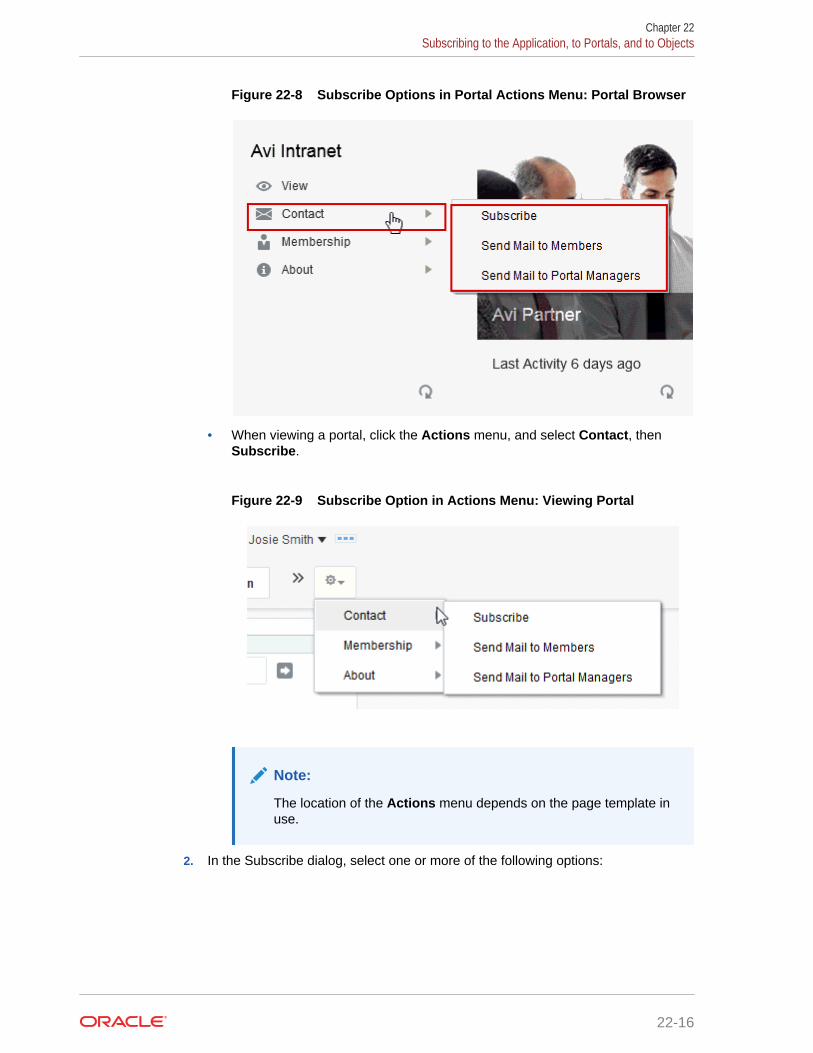
Figure 22-8 Subscribe Options in Portal Actions Menu: Portal Browser
• When viewing a portal, click the Actions menu, and select Contact, thenSubscribe.
Figure 22-9 Subscribe Option in Actions Menu: Viewing Portal
Note:
The location of the Actions menu depends on the page template inuse.
2. In the Subscribe dialog, select one or more of the following options:
Chapter 22Subscribing to the Application, to Portals, and to Objects
22-16
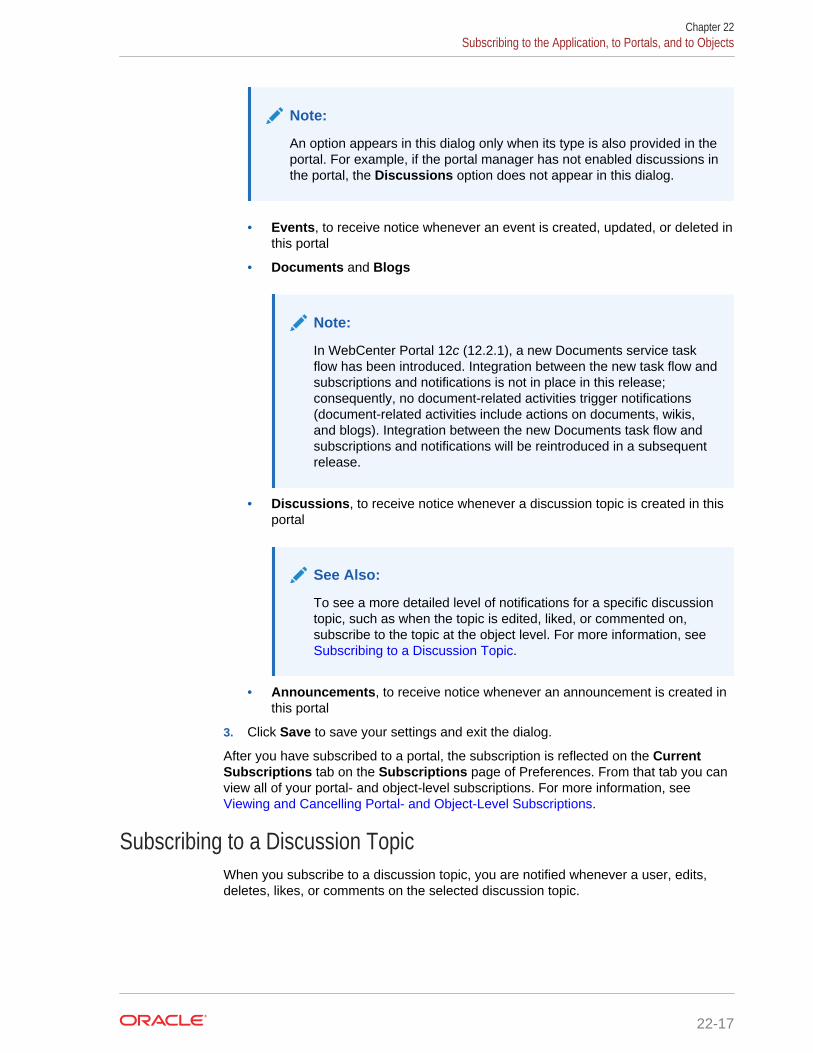
Note:
An option appears in this dialog only when its type is also provided in theportal. For example, if the portal manager has not enabled discussions inthe portal, the Discussions option does not appear in this dialog.
• Events, to receive notice whenever an event is created, updated, or deleted inthis portal
• Documents and Blogs
Note:
In WebCenter Portal 12c (12.2.1), a new Documents service taskflow has been introduced. Integration between the new task flow andsubscriptions and notifications is not in place in this release;consequently, no document-related activities trigger notifications(document-related activities include actions on documents, wikis,and blogs). Integration between the new Documents task flow andsubscriptions and notifications will be reintroduced in a subsequentrelease.
• Discussions, to receive notice whenever a discussion topic is created in thisportal
See Also:
To see a more detailed level of notifications for a specific discussiontopic, such as when the topic is edited, liked, or commented on,subscribe to the topic at the object level. For more information, see Subscribing to a Discussion Topic.
• Announcements, to receive notice whenever an announcement is created inthis portal
3. Click Save to save your settings and exit the dialog.
After you have subscribed to a portal, the subscription is reflected on the CurrentSubscriptions tab on the Subscriptions page of Preferences. From that tab you canview all of your portal- and object-level subscriptions. For more information, see Viewing and Cancelling Portal- and Object-Level Subscriptions.
Subscribing to a Discussion TopicWhen you subscribe to a discussion topic, you are notified whenever a user, edits,deletes, likes, or comments on the selected discussion topic.
Chapter 22Subscribing to the Application, to Portals, and to Objects
22-17
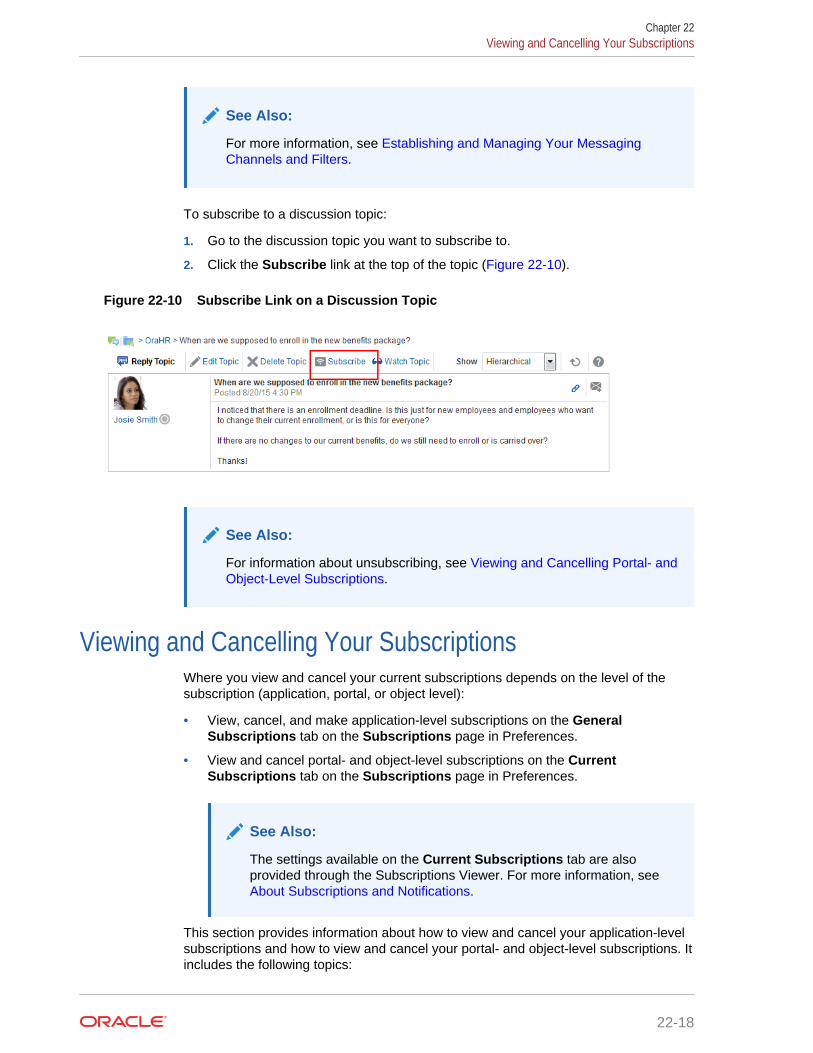
See Also:
For more information, see Establishing and Managing Your MessagingChannels and Filters.
To subscribe to a discussion topic:
1. Go to the discussion topic you want to subscribe to.
2. Click the Subscribe link at the top of the topic (Figure 22-10).
Figure 22-10 Subscribe Link on a Discussion Topic
See Also:
For information about unsubscribing, see Viewing and Cancelling Portal- andObject-Level Subscriptions.
Viewing and Cancelling Your SubscriptionsWhere you view and cancel your current subscriptions depends on the level of thesubscription (application, portal, or object level):
• View, cancel, and make application-level subscriptions on the GeneralSubscriptions tab on the Subscriptions page in Preferences.
• View and cancel portal- and object-level subscriptions on the CurrentSubscriptions tab on the Subscriptions page in Preferences.
See Also:
The settings available on the Current Subscriptions tab are alsoprovided through the Subscriptions Viewer. For more information, see About Subscriptions and Notifications.
This section provides information about how to view and cancel your application-levelsubscriptions and how to view and cancel your portal- and object-level subscriptions. Itincludes the following topics:
Chapter 22Viewing and Cancelling Your Subscriptions
22-18
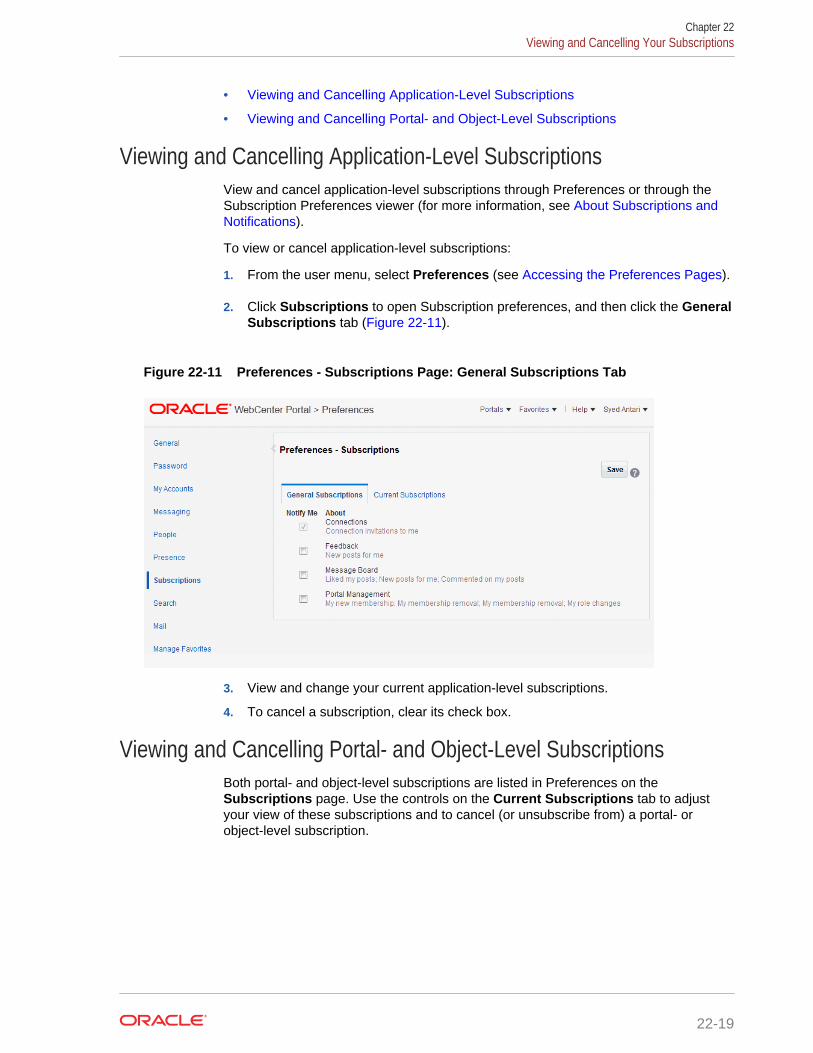
• Viewing and Cancelling Application-Level Subscriptions
• Viewing and Cancelling Portal- and Object-Level Subscriptions
Viewing and Cancelling Application-Level SubscriptionsView and cancel application-level subscriptions through Preferences or through theSubscription Preferences viewer (for more information, see About Subscriptions andNotifications).
To view or cancel application-level subscriptions:
1. From the user menu, select Preferences (see Accessing the Preferences Pages).
2. Click Subscriptions to open Subscription preferences, and then click the GeneralSubscriptions tab (Figure 22-11).
Figure 22-11 Preferences - Subscriptions Page: General Subscriptions Tab
3. View and change your current application-level subscriptions.
4. To cancel a subscription, clear its check box.
Viewing and Cancelling Portal- and Object-Level SubscriptionsBoth portal- and object-level subscriptions are listed in Preferences on theSubscriptions page. Use the controls on the Current Subscriptions tab to adjustyour view of these subscriptions and to cancel (or unsubscribe from) a portal- orobject-level subscription.
Chapter 22Viewing and Cancelling Your Subscriptions
22-19
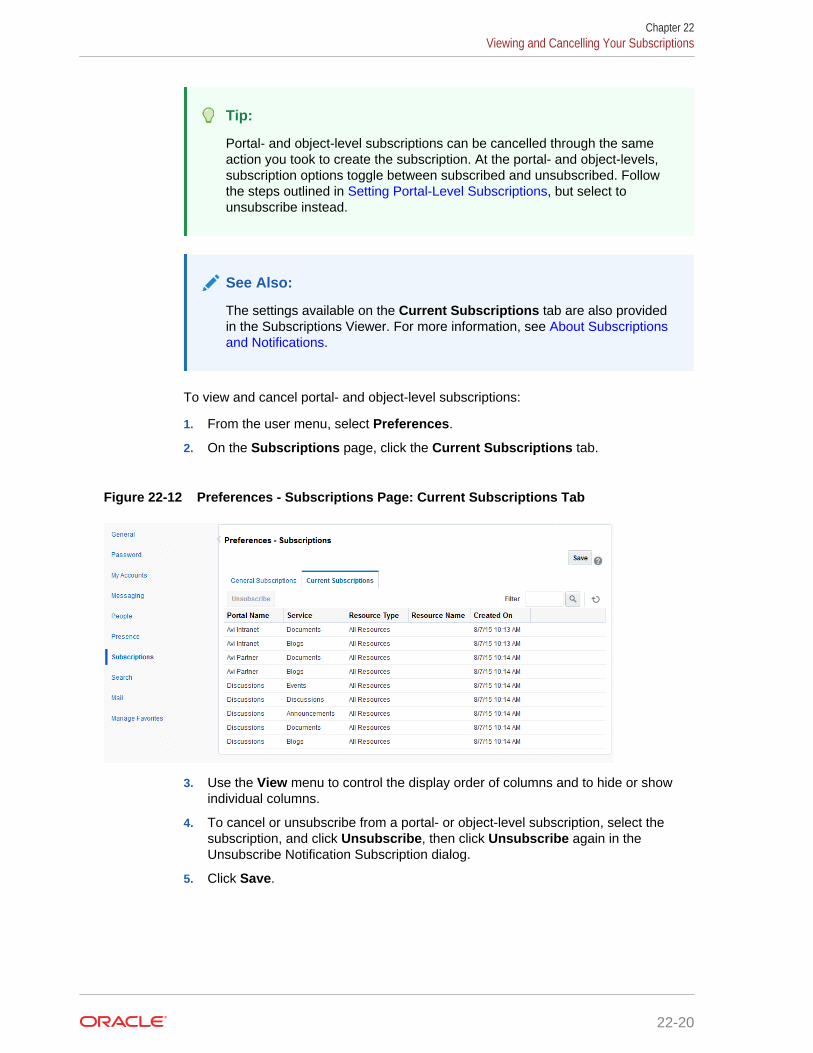
Tip:
Portal- and object-level subscriptions can be cancelled through the sameaction you took to create the subscription. At the portal- and object-levels,subscription options toggle between subscribed and unsubscribed. Followthe steps outlined in Setting Portal-Level Subscriptions, but select tounsubscribe instead.
See Also:
The settings available on the Current Subscriptions tab are also providedin the Subscriptions Viewer. For more information, see About Subscriptionsand Notifications.
To view and cancel portal- and object-level subscriptions:
1. From the user menu, select Preferences.
2. On the Subscriptions page, click the Current Subscriptions tab.
Figure 22-12 Preferences - Subscriptions Page: Current Subscriptions Tab
3. Use the View menu to control the display order of columns and to hide or showindividual columns.
4. To cancel or unsubscribe from a portal- or object-level subscription, select thesubscription, and click Unsubscribe, then click Unsubscribe again in theUnsubscribe Notification Subscription dialog.
5. Click Save.
Chapter 22Viewing and Cancelling Your Subscriptions
22-20
23Tracking Portal Activities
Activity Stream tracks and reports on activities in WebCenter Portal, enabling you tokeep up with what is going on.
Permissions:
To perform the tasks in this chapter, you need the application-levelpermission People Connections: Update People Connections Data.
Topics:
• About the Activity Stream
• Setting Activity Stream Preferences
• Working with the Activity Stream
About the Activity StreamIn WebCenter Portal, Activity Stream provides a streaming view of the activities of yourconnections, actions taken in portals, and business activities. For example, ActivityStream can note when you or a connection posts feedback or creates a discussionforum. Additionally, it streams messages and attachments entered through Publisher.
Note:
Activity Stream shows file upload activity that occurs through Publisher.Activity Stream does not show file activity that occurs through ContentManager. For example, if you or your connections edit, upload, download,check out, or check in a file through Content Manager, this activity does notappear in the Activity Stream.
Through Activity Stream Preferences, you can select to show connection and portalactivities. (However, your system administrator can disable users from overridingapplication-level settings.)
In addition to streaming messages, your Activity Stream can provide access to fileattachments and web links added through Publisher. File attachments are rendered aslinks, which you can use to access the file.
Users can share a streamed activity and its attachments using a Share feature,available on each streamed item.
23-1
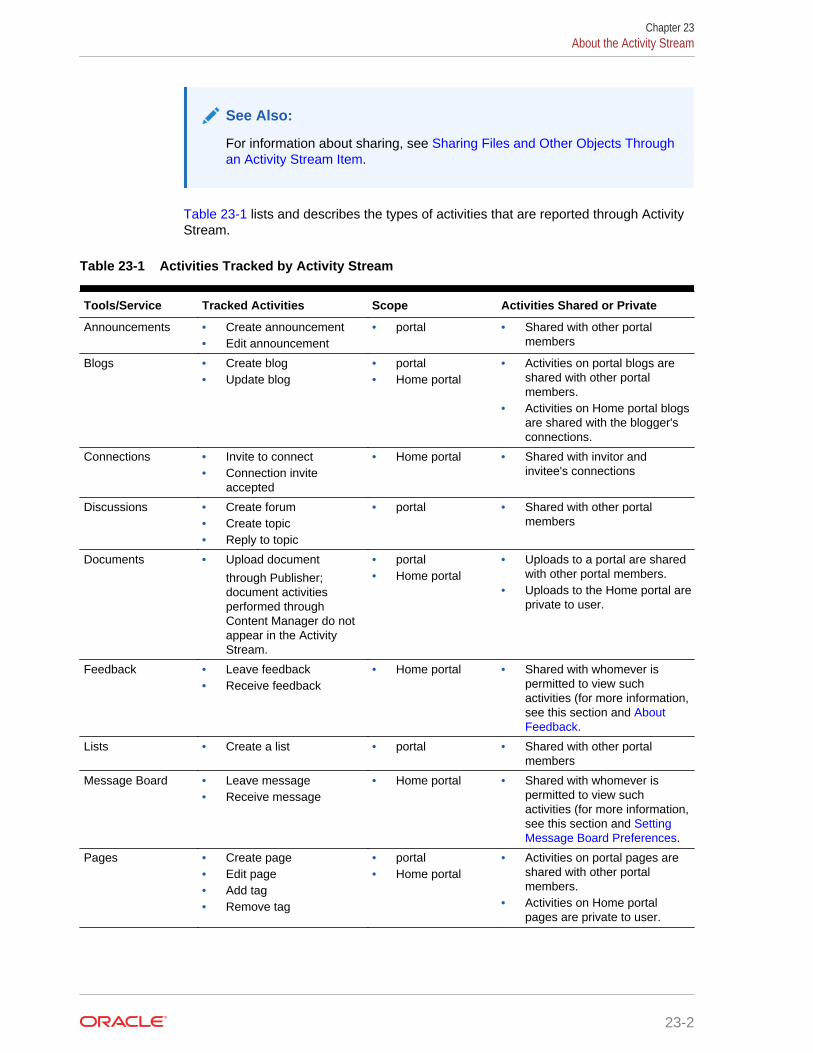
See Also:
For information about sharing, see Sharing Files and Other Objects Throughan Activity Stream Item.
Table 23-1 lists and describes the types of activities that are reported through ActivityStream.
Table 23-1 Activities Tracked by Activity Stream
Tools/Service Tracked Activities Scope Activities Shared or Private
Announcements • Create announcement• Edit announcement
• portal • Shared with other portalmembers
Blogs • Create blog• Update blog
• portal• Home portal
• Activities on portal blogs areshared with other portalmembers.
• Activities on Home portal blogsare shared with the blogger'sconnections.
Connections • Invite to connect• Connection invite
accepted
• Home portal • Shared with invitor andinvitee's connections
Discussions • Create forum• Create topic• Reply to topic
• portal • Shared with other portalmembers
Documents • Upload document
through Publisher;document activitiesperformed throughContent Manager do notappear in the ActivityStream.
• portal• Home portal
• Uploads to a portal are sharedwith other portal members.
• Uploads to the Home portal areprivate to user.
Feedback • Leave feedback• Receive feedback
• Home portal • Shared with whomever ispermitted to view suchactivities (for more information,see this section and AboutFeedback.
Lists • Create a list • portal • Shared with other portalmembers
Message Board • Leave message• Receive message
• Home portal • Shared with whomever ispermitted to view suchactivities (for more information,see this section and SettingMessage Board Preferences.
Pages • Create page• Edit page• Add tag• Remove tag
• portal• Home portal
• Activities on portal pages areshared with other portalmembers.
• Activities on Home portalpages are private to user.
Chapter 23About the Activity Stream
23-2
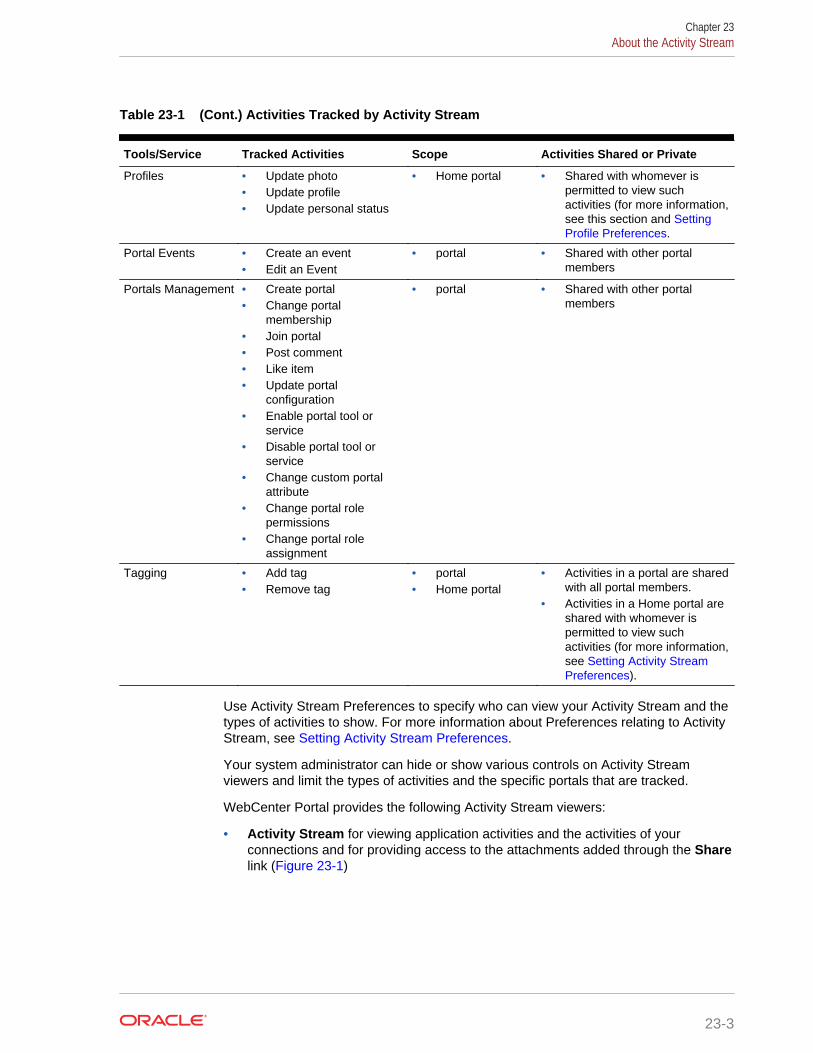
Table 23-1 (Cont.) Activities Tracked by Activity Stream
Tools/Service Tracked Activities Scope Activities Shared or Private
Profiles • Update photo• Update profile• Update personal status
• Home portal • Shared with whomever ispermitted to view suchactivities (for more information,see this section and SettingProfile Preferences.
Portal Events • Create an event• Edit an Event
• portal • Shared with other portalmembers
Portals Management • Create portal• Change portal
membership• Join portal• Post comment• Like item• Update portal
configuration• Enable portal tool or
service• Disable portal tool or
service• Change custom portal
attribute• Change portal role
permissions• Change portal role
assignment
• portal • Shared with other portalmembers
Tagging • Add tag• Remove tag
• portal• Home portal
• Activities in a portal are sharedwith all portal members.
• Activities in a Home portal areshared with whomever ispermitted to view suchactivities (for more information,see Setting Activity StreamPreferences).
Use Activity Stream Preferences to specify who can view your Activity Stream and thetypes of activities to show. For more information about Preferences relating to ActivityStream, see Setting Activity Stream Preferences.
Your system administrator can hide or show various controls on Activity Streamviewers and limit the types of activities and the specific portals that are tracked.
WebCenter Portal provides the following Activity Stream viewers:
• Activity Stream for viewing application activities and the activities of yourconnections and for providing access to the attachments added through the Sharelink (Figure 23-1)
Chapter 23About the Activity Stream
23-3
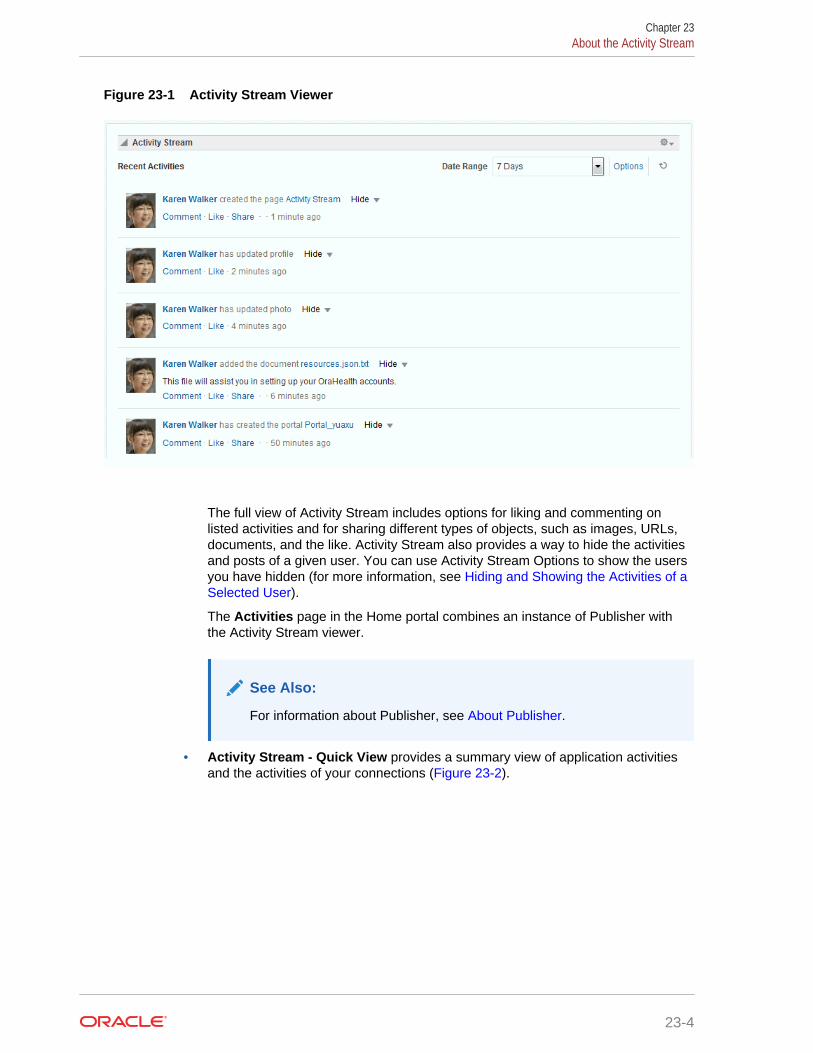
Figure 23-1 Activity Stream Viewer
The full view of Activity Stream includes options for liking and commenting onlisted activities and for sharing different types of objects, such as images, URLs,documents, and the like. Activity Stream also provides a way to hide the activitiesand posts of a given user. You can use Activity Stream Options to show the usersyou have hidden (for more information, see Hiding and Showing the Activities of aSelected User).
The Activities page in the Home portal combines an instance of Publisher withthe Activity Stream viewer.
See Also:
For information about Publisher, see About Publisher.
• Activity Stream - Quick View provides a summary view of application activitiesand the activities of your connections (Figure 23-2).
Chapter 23About the Activity Stream
23-4
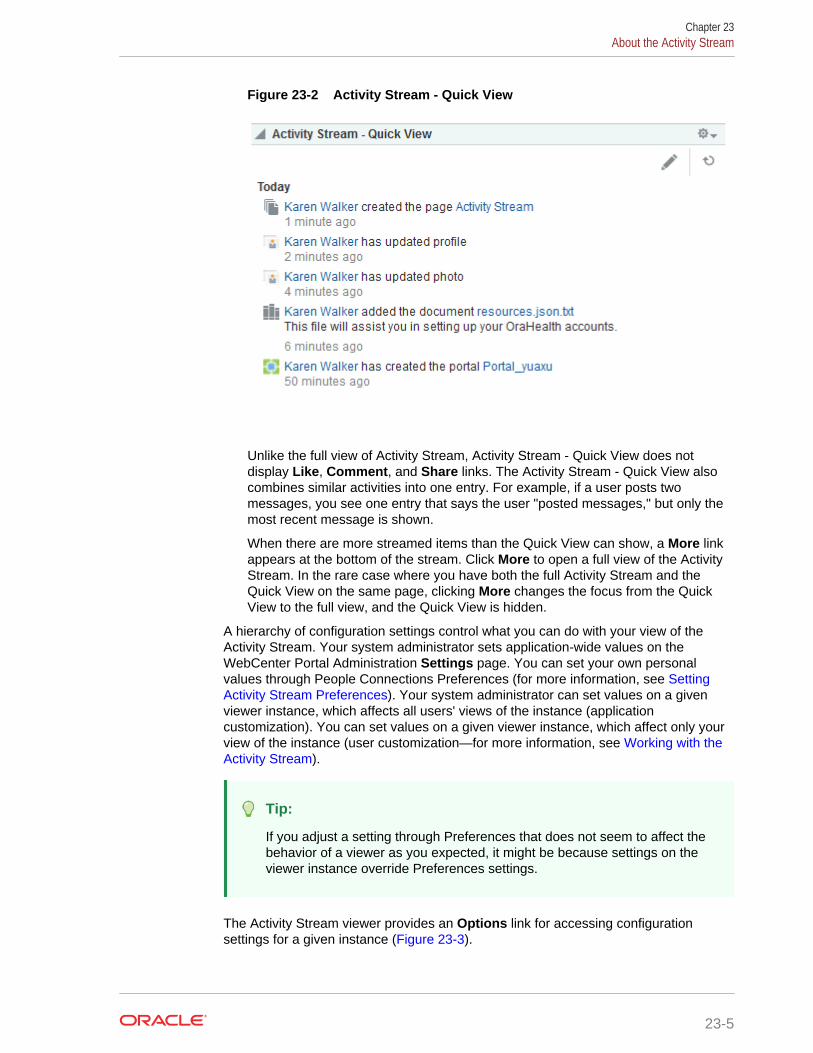
Figure 23-2 Activity Stream - Quick View
Unlike the full view of Activity Stream, Activity Stream - Quick View does notdisplay Like, Comment, and Share links. The Activity Stream - Quick View alsocombines similar activities into one entry. For example, if a user posts twomessages, you see one entry that says the user "posted messages," but only themost recent message is shown.
When there are more streamed items than the Quick View can show, a More linkappears at the bottom of the stream. Click More to open a full view of the ActivityStream. In the rare case where you have both the full Activity Stream and theQuick View on the same page, clicking More changes the focus from the QuickView to the full view, and the Quick View is hidden.
A hierarchy of configuration settings control what you can do with your view of theActivity Stream. Your system administrator sets application-wide values on theWebCenter Portal Administration Settings page. You can set your own personalvalues through People Connections Preferences (for more information, see SettingActivity Stream Preferences). Your system administrator can set values on a givenviewer instance, which affects all users' views of the instance (applicationcustomization). You can set values on a given viewer instance, which affect only yourview of the instance (user customization—for more information, see Working with theActivity Stream).
Tip:
If you adjust a setting through Preferences that does not seem to affect thebehavior of a viewer as you expected, it might be because settings on theviewer instance override Preferences settings.
The Activity Stream viewer provides an Options link for accessing configurationsettings for a given instance (Figure 23-3).
Chapter 23About the Activity Stream
23-5
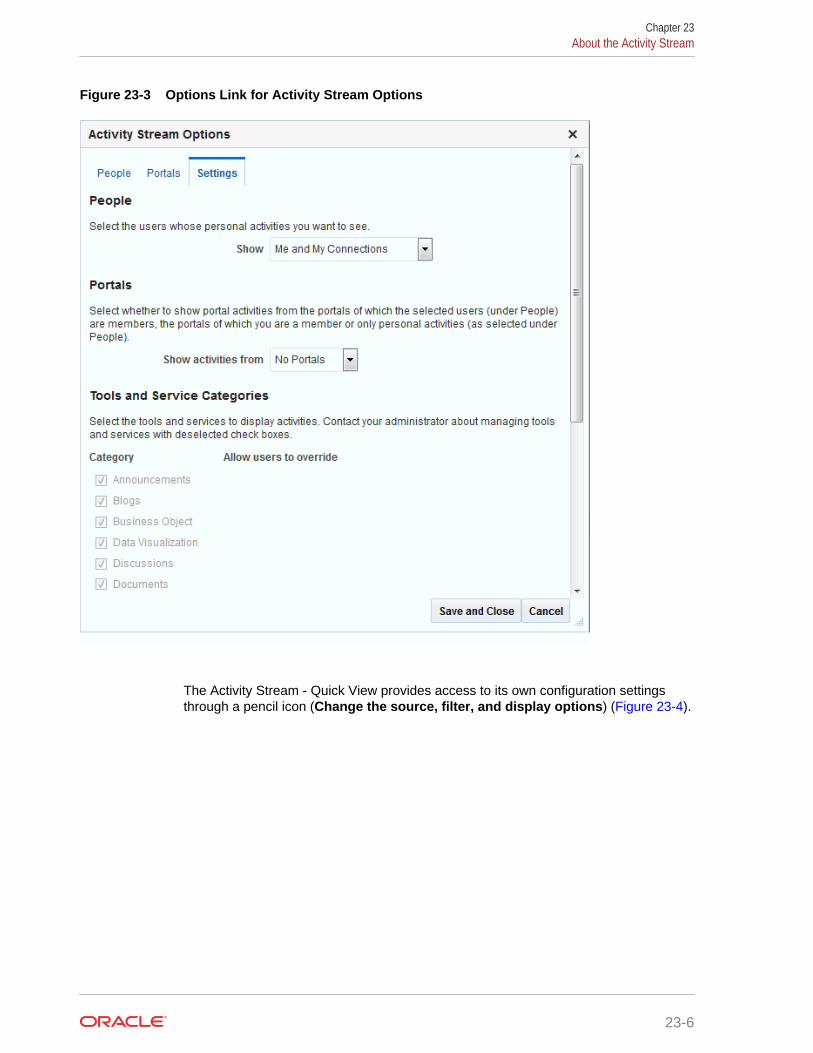
Figure 23-3 Options Link for Activity Stream Options
The Activity Stream - Quick View provides access to its own configuration settingsthrough a pencil icon (Change the source, filter, and display options) (Figure 23-4).
Chapter 23About the Activity Stream
23-6
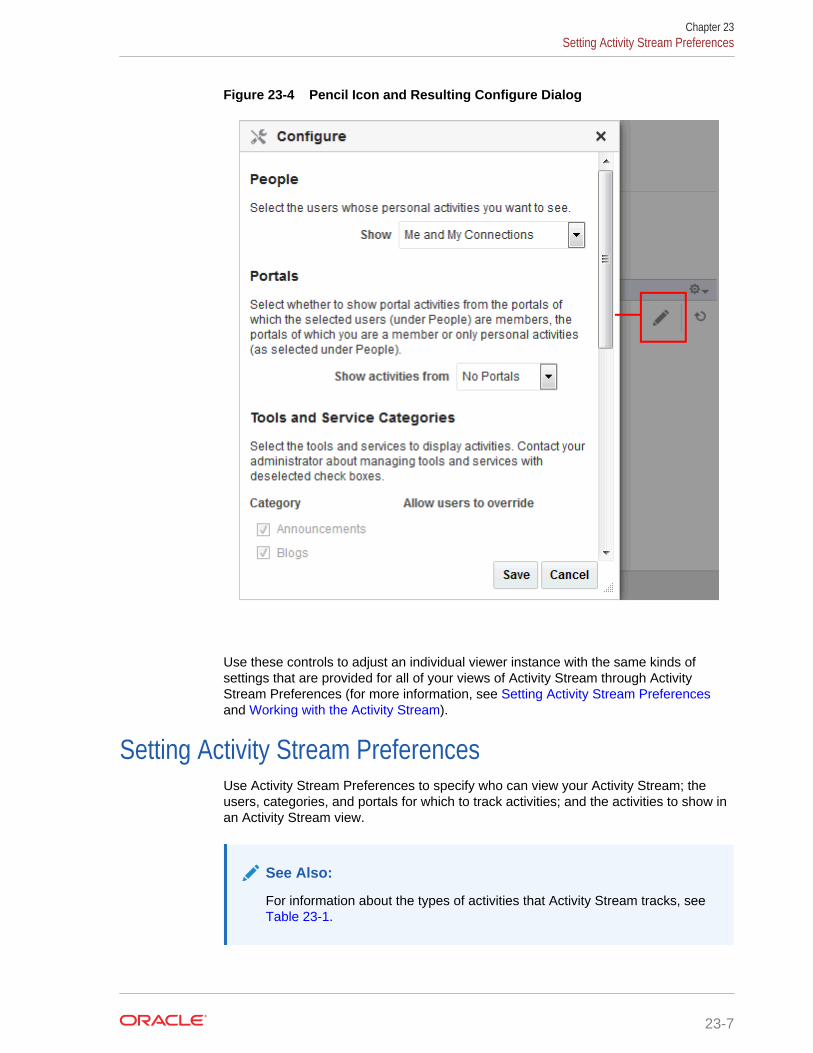
Figure 23-4 Pencil Icon and Resulting Configure Dialog
Use these controls to adjust an individual viewer instance with the same kinds ofsettings that are provided for all of your views of Activity Stream through ActivityStream Preferences (for more information, see Setting Activity Stream Preferencesand Working with the Activity Stream).
Setting Activity Stream PreferencesUse Activity Stream Preferences to specify who can view your Activity Stream; theusers, categories, and portals for which to track activities; and the activities to show inan Activity Stream view.
See Also:
For information about the types of activities that Activity Stream tracks, see Table 23-1.
Chapter 23Setting Activity Stream Preferences
23-7
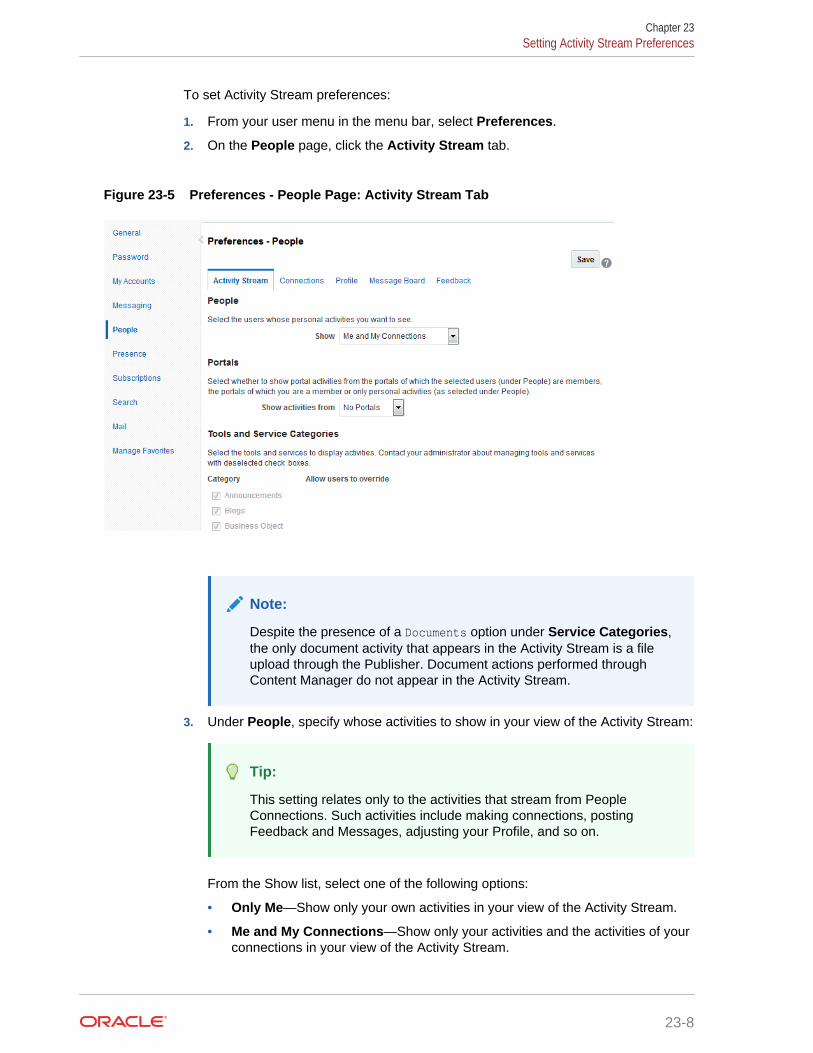
To set Activity Stream preferences:
1. From your user menu in the menu bar, select Preferences.
2. On the People page, click the Activity Stream tab.
Figure 23-5 Preferences - People Page: Activity Stream Tab
Note:
Despite the presence of a Documents option under Service Categories,the only document activity that appears in the Activity Stream is a fileupload through the Publisher. Document actions performed throughContent Manager do not appear in the Activity Stream.
3. Under People, specify whose activities to show in your view of the Activity Stream:
Tip:
This setting relates only to the activities that stream from PeopleConnections. Such activities include making connections, postingFeedback and Messages, adjusting your Profile, and so on.
From the Show list, select one of the following options:
• Only Me—Show only your own activities in your view of the Activity Stream.
• Me and My Connections—Show only your activities and the activities of yourconnections in your view of the Activity Stream.
Chapter 23Setting Activity Stream Preferences
23-8
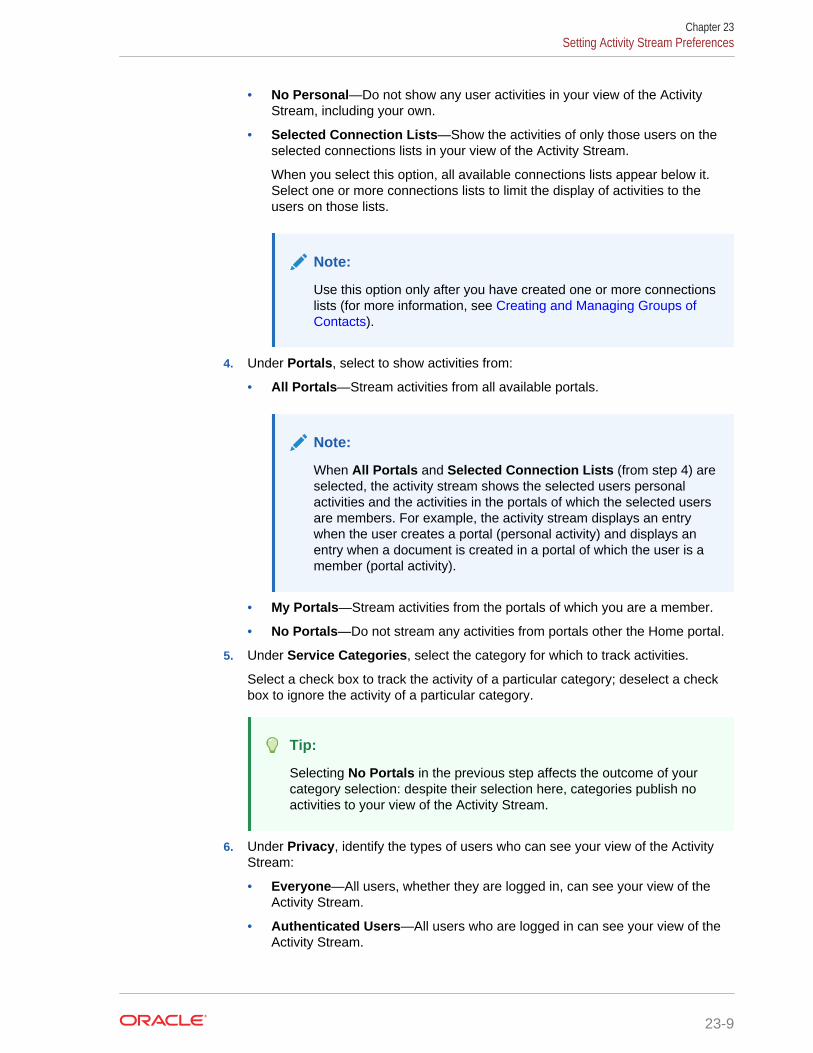
• No Personal—Do not show any user activities in your view of the ActivityStream, including your own.
• Selected Connection Lists—Show the activities of only those users on theselected connections lists in your view of the Activity Stream.
When you select this option, all available connections lists appear below it.Select one or more connections lists to limit the display of activities to theusers on those lists.
Note:
Use this option only after you have created one or more connectionslists (for more information, see Creating and Managing Groups ofContacts).
4. Under Portals, select to show activities from:
• All Portals—Stream activities from all available portals.
Note:
When All Portals and Selected Connection Lists (from step 4) areselected, the activity stream shows the selected users personalactivities and the activities in the portals of which the selected usersare members. For example, the activity stream displays an entrywhen the user creates a portal (personal activity) and displays anentry when a document is created in a portal of which the user is amember (portal activity).
• My Portals—Stream activities from the portals of which you are a member.
• No Portals—Do not stream any activities from portals other the Home portal.
5. Under Service Categories, select the category for which to track activities.
Select a check box to track the activity of a particular category; deselect a checkbox to ignore the activity of a particular category.
Tip:
Selecting No Portals in the previous step affects the outcome of yourcategory selection: despite their selection here, categories publish noactivities to your view of the Activity Stream.
6. Under Privacy, identify the types of users who can see your view of the ActivityStream:
• Everyone—All users, whether they are logged in, can see your view of theActivity Stream.
• Authenticated Users—All users who are logged in can see your view of theActivity Stream.
Chapter 23Setting Activity Stream Preferences
23-9
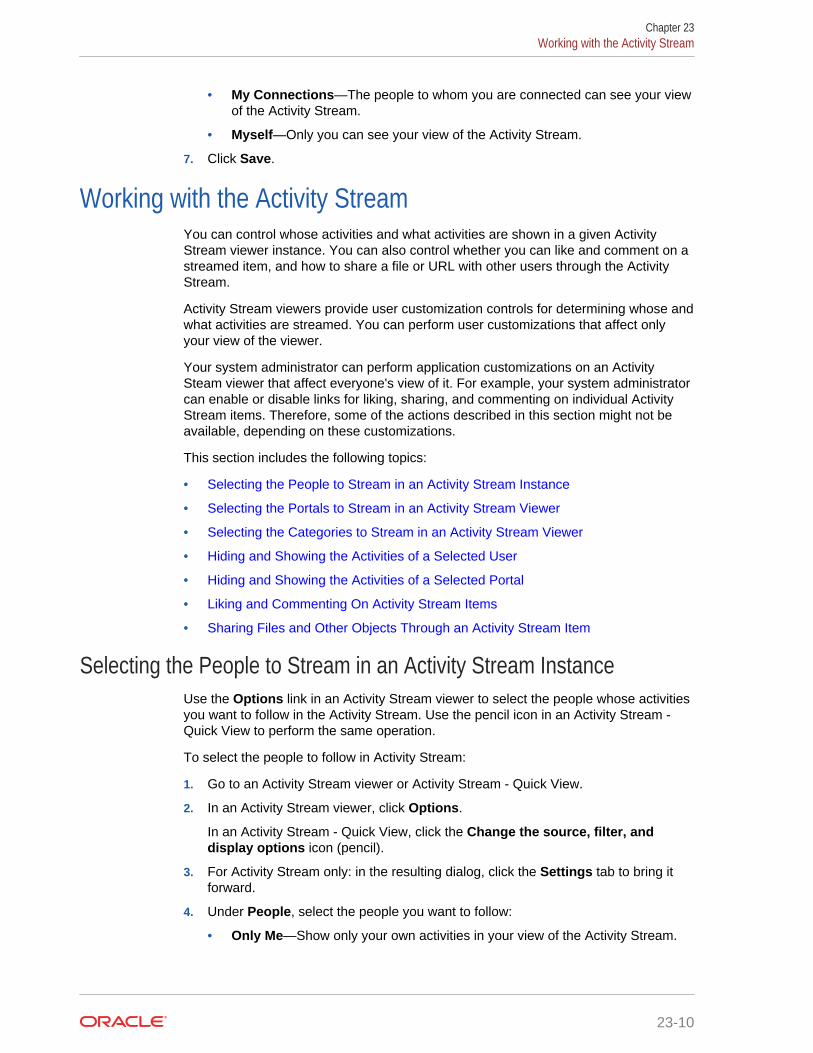
• My Connections—The people to whom you are connected can see your viewof the Activity Stream.
• Myself—Only you can see your view of the Activity Stream.
7. Click Save.
Working with the Activity StreamYou can control whose activities and what activities are shown in a given ActivityStream viewer instance. You can also control whether you can like and comment on astreamed item, and how to share a file or URL with other users through the ActivityStream.
Activity Stream viewers provide user customization controls for determining whose andwhat activities are streamed. You can perform user customizations that affect onlyyour view of the viewer.
Your system administrator can perform application customizations on an ActivitySteam viewer that affect everyone's view of it. For example, your system administratorcan enable or disable links for liking, sharing, and commenting on individual ActivityStream items. Therefore, some of the actions described in this section might not beavailable, depending on these customizations.
This section includes the following topics:
• Selecting the People to Stream in an Activity Stream Instance
• Selecting the Portals to Stream in an Activity Stream Viewer
• Selecting the Categories to Stream in an Activity Stream Viewer
• Hiding and Showing the Activities of a Selected User
• Hiding and Showing the Activities of a Selected Portal
• Liking and Commenting On Activity Stream Items
• Sharing Files and Other Objects Through an Activity Stream Item
Selecting the People to Stream in an Activity Stream InstanceUse the Options link in an Activity Stream viewer to select the people whose activitiesyou want to follow in the Activity Stream. Use the pencil icon in an Activity Stream -Quick View to perform the same operation.
To select the people to follow in Activity Stream:
1. Go to an Activity Stream viewer or Activity Stream - Quick View.
2. In an Activity Stream viewer, click Options.
In an Activity Stream - Quick View, click the Change the source, filter, anddisplay options icon (pencil).
3. For Activity Stream only: in the resulting dialog, click the Settings tab to bring itforward.
4. Under People, select the people you want to follow:
• Only Me—Show only your own activities in your view of the Activity Stream.
Chapter 23Working with the Activity Stream
23-10
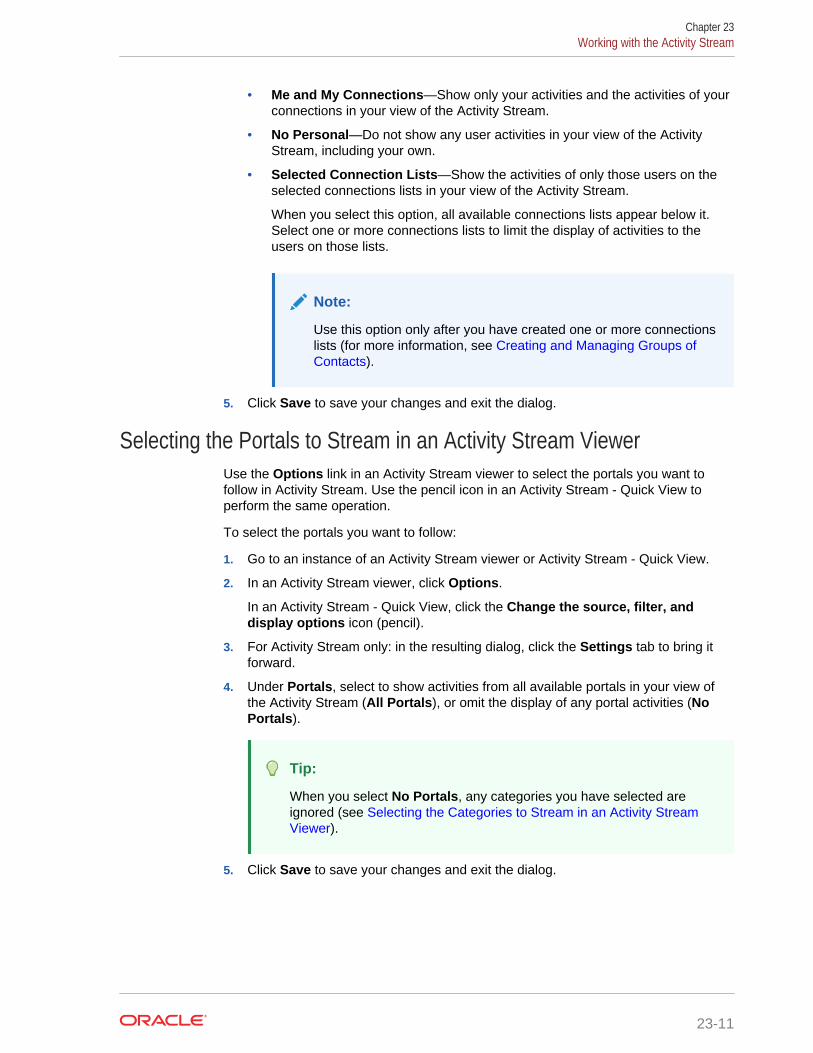
• Me and My Connections—Show only your activities and the activities of yourconnections in your view of the Activity Stream.
• No Personal—Do not show any user activities in your view of the ActivityStream, including your own.
• Selected Connection Lists—Show the activities of only those users on theselected connections lists in your view of the Activity Stream.
When you select this option, all available connections lists appear below it.Select one or more connections lists to limit the display of activities to theusers on those lists.
Note:
Use this option only after you have created one or more connectionslists (for more information, see Creating and Managing Groups ofContacts).
5. Click Save to save your changes and exit the dialog.
Selecting the Portals to Stream in an Activity Stream ViewerUse the Options link in an Activity Stream viewer to select the portals you want tofollow in Activity Stream. Use the pencil icon in an Activity Stream - Quick View toperform the same operation.
To select the portals you want to follow:
1. Go to an instance of an Activity Stream viewer or Activity Stream - Quick View.
2. In an Activity Stream viewer, click Options.
In an Activity Stream - Quick View, click the Change the source, filter, anddisplay options icon (pencil).
3. For Activity Stream only: in the resulting dialog, click the Settings tab to bring itforward.
4. Under Portals, select to show activities from all available portals in your view ofthe Activity Stream (All Portals), or omit the display of any portal activities (NoPortals).
Tip:
When you select No Portals, any categories you have selected areignored (see Selecting the Categories to Stream in an Activity StreamViewer).
5. Click Save to save your changes and exit the dialog.
Chapter 23Working with the Activity Stream
23-11
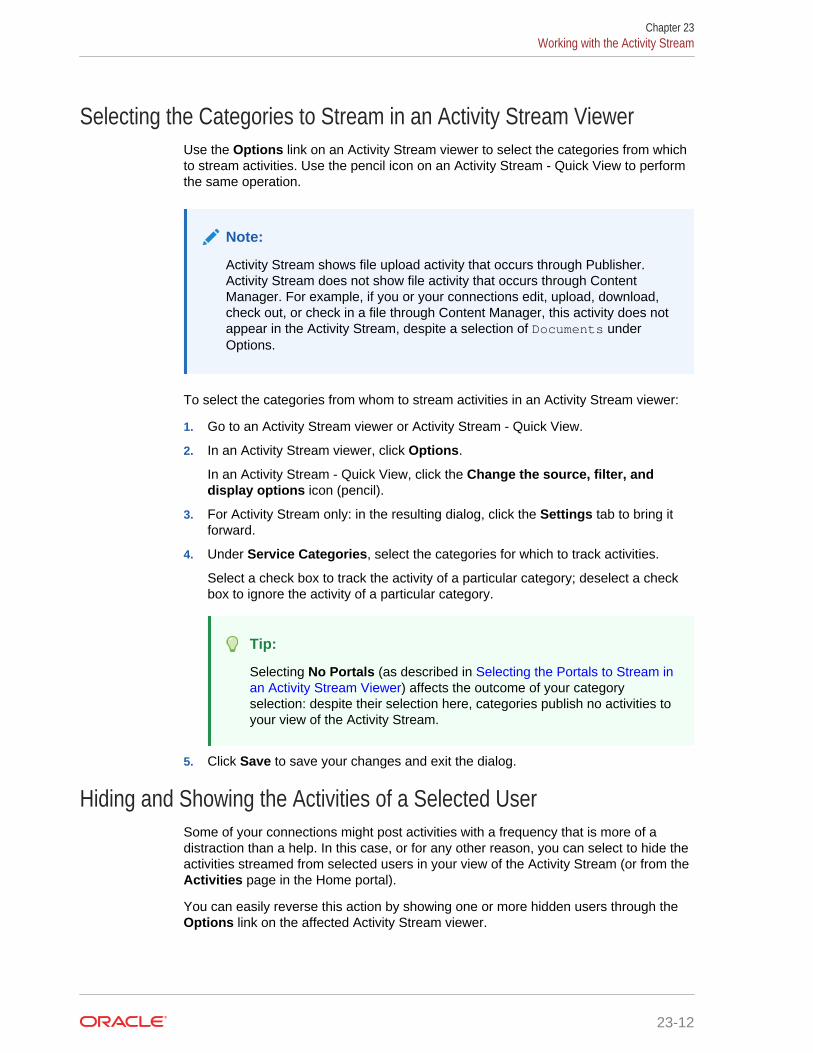
Selecting the Categories to Stream in an Activity Stream ViewerUse the Options link on an Activity Stream viewer to select the categories from whichto stream activities. Use the pencil icon on an Activity Stream - Quick View to performthe same operation.
Note:
Activity Stream shows file upload activity that occurs through Publisher.Activity Stream does not show file activity that occurs through ContentManager. For example, if you or your connections edit, upload, download,check out, or check in a file through Content Manager, this activity does notappear in the Activity Stream, despite a selection of Documents underOptions.
To select the categories from whom to stream activities in an Activity Stream viewer:
1. Go to an Activity Stream viewer or Activity Stream - Quick View.
2. In an Activity Stream viewer, click Options.
In an Activity Stream - Quick View, click the Change the source, filter, anddisplay options icon (pencil).
3. For Activity Stream only: in the resulting dialog, click the Settings tab to bring itforward.
4. Under Service Categories, select the categories for which to track activities.
Select a check box to track the activity of a particular category; deselect a checkbox to ignore the activity of a particular category.
Tip:
Selecting No Portals (as described in Selecting the Portals to Stream inan Activity Stream Viewer) affects the outcome of your categoryselection: despite their selection here, categories publish no activities toyour view of the Activity Stream.
5. Click Save to save your changes and exit the dialog.
Hiding and Showing the Activities of a Selected UserSome of your connections might post activities with a frequency that is more of adistraction than a help. In this case, or for any other reason, you can select to hide theactivities streamed from selected users in your view of the Activity Stream (or from theActivities page in the Home portal).
You can easily reverse this action by showing one or more hidden users through theOptions link on the affected Activity Stream viewer.
Chapter 23Working with the Activity Stream
23-12
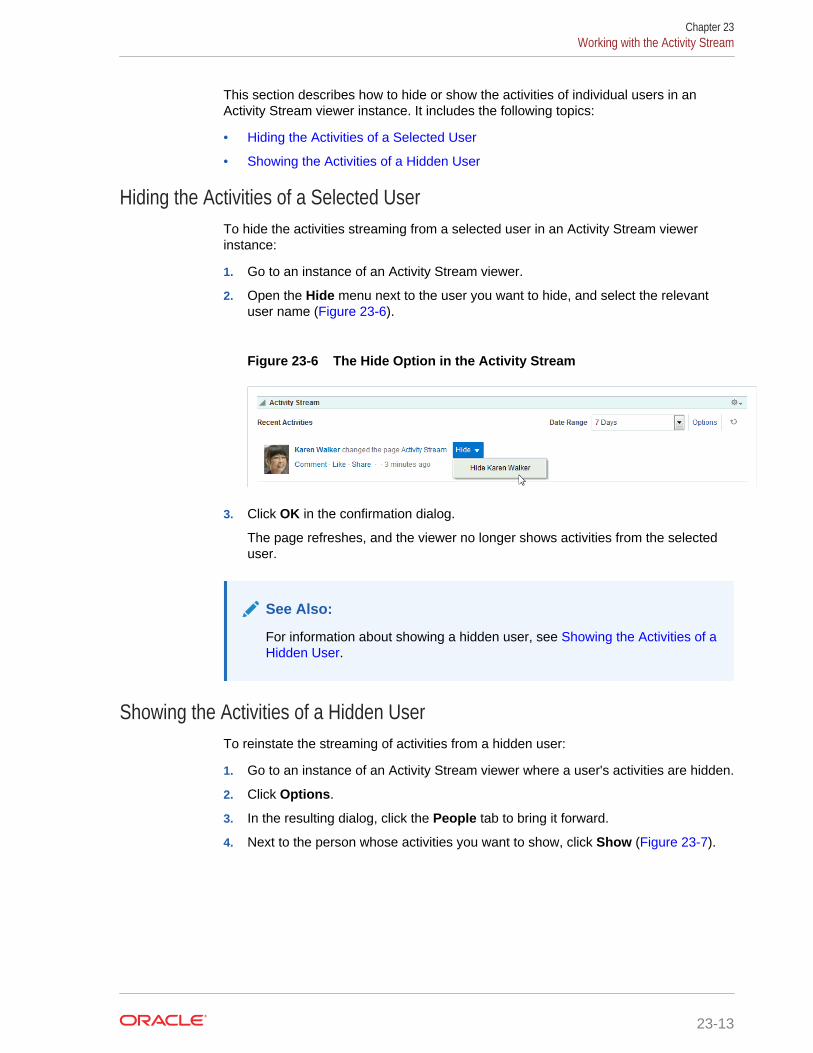
This section describes how to hide or show the activities of individual users in anActivity Stream viewer instance. It includes the following topics:
• Hiding the Activities of a Selected User
• Showing the Activities of a Hidden User
Hiding the Activities of a Selected UserTo hide the activities streaming from a selected user in an Activity Stream viewerinstance:
1. Go to an instance of an Activity Stream viewer.
2. Open the Hide menu next to the user you want to hide, and select the relevantuser name (Figure 23-6).
Figure 23-6 The Hide Option in the Activity Stream
3. Click OK in the confirmation dialog.
The page refreshes, and the viewer no longer shows activities from the selecteduser.
See Also:
For information about showing a hidden user, see Showing the Activities of aHidden User.
Showing the Activities of a Hidden UserTo reinstate the streaming of activities from a hidden user:
1. Go to an instance of an Activity Stream viewer where a user's activities are hidden.
2. Click Options.
3. In the resulting dialog, click the People tab to bring it forward.
4. Next to the person whose activities you want to show, click Show (Figure 23-7).
Chapter 23Working with the Activity Stream
23-13
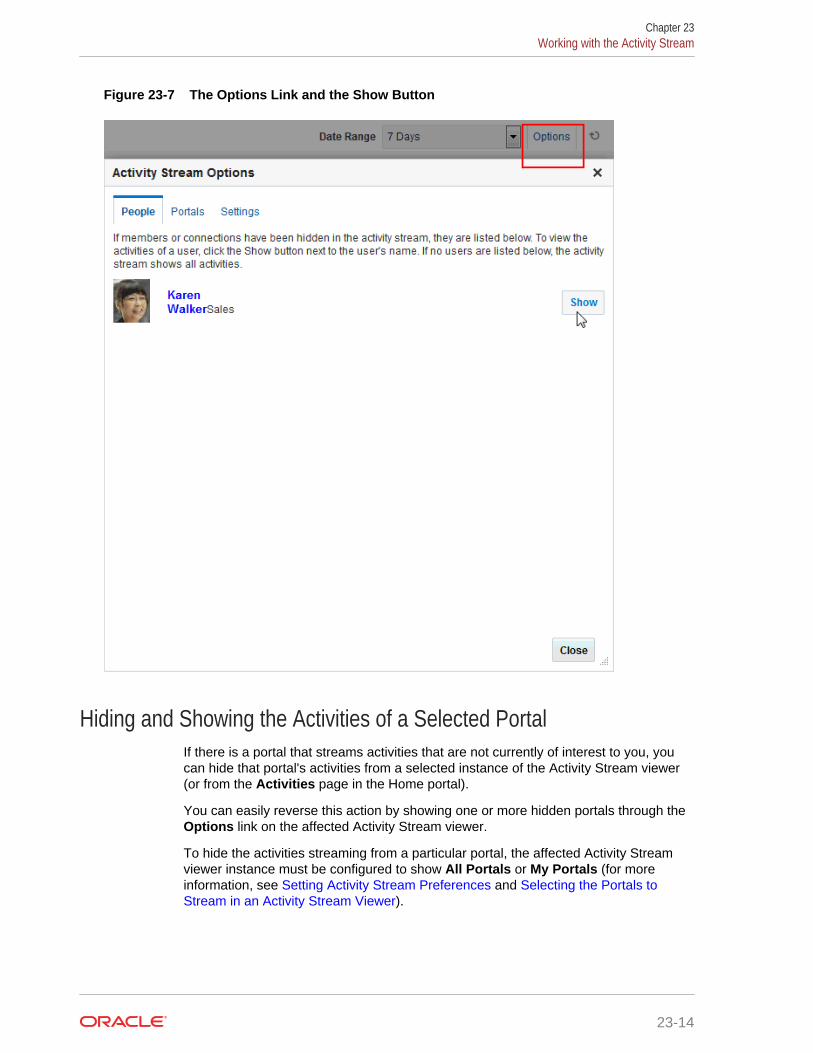
Figure 23-7 The Options Link and the Show Button
Hiding and Showing the Activities of a Selected PortalIf there is a portal that streams activities that are not currently of interest to you, youcan hide that portal's activities from a selected instance of the Activity Stream viewer(or from the Activities page in the Home portal).
You can easily reverse this action by showing one or more hidden portals through theOptions link on the affected Activity Stream viewer.
To hide the activities streaming from a particular portal, the affected Activity Streamviewer instance must be configured to show All Portals or My Portals (for moreinformation, see Setting Activity Stream Preferences and Selecting the Portals toStream in an Activity Stream Viewer).
Chapter 23Working with the Activity Stream
23-14

Tip:
Whether the activities streaming from portal are shown can be determined atthe application level, in personal Preferences, and on an individual viewerinstance by you or by your system administrator. If you find you cannot hideor show activities streaming from portals, it is likely that at one of theselevels, the facility to see such activities has been blocked.
This section describes how to hide the activities streaming from a particular portal andhow to show those hidden activities. It includes the following topics:
• Hiding the Activities of a Selected Portal
• Showing Hidden Portal Activities
Hiding the Activities of a Selected PortalTo hide the activities streaming from a selected portal in an Activity Stream viewerinstance:
Note:
Your Preference settings may prevent any portal activities from streaming.For information about Activity Stream Preferences, see Setting ActivityStream Preferences.
1. Go to an instance of an Activity Stream viewer.
2. Open the Hide menu next to an activity streamed from the portal whose activitiesyou want to hide, and select the relevant portal name (Figure 23-8).
Figure 23-8 Selecting to Hide the Portal teamsite2
3. Click Yes in the confirmation dialog.
The page refreshes, and the viewer no longer shows activities from the selectedportal.
See Also:
For information about showing a hidden portal, see Showing Hidden PortalActivities.
Chapter 23Working with the Activity Stream
23-15
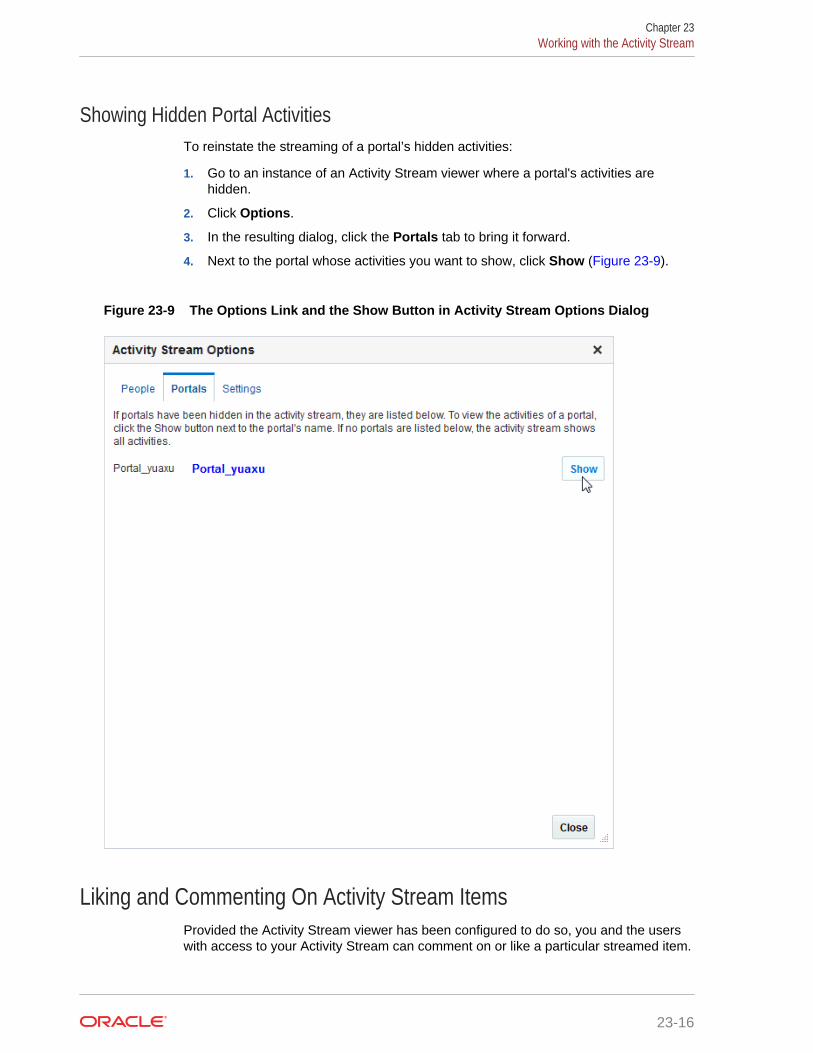
Showing Hidden Portal ActivitiesTo reinstate the streaming of a portal’s hidden activities:
1. Go to an instance of an Activity Stream viewer where a portal's activities arehidden.
2. Click Options.
3. In the resulting dialog, click the Portals tab to bring it forward.
4. Next to the portal whose activities you want to show, click Show (Figure 23-9).
Figure 23-9 The Options Link and the Show Button in Activity Stream Options Dialog
Liking and Commenting On Activity Stream ItemsProvided the Activity Stream viewer has been configured to do so, you and the userswith access to your Activity Stream can comment on or like a particular streamed item.
Chapter 23Working with the Activity Stream
23-16
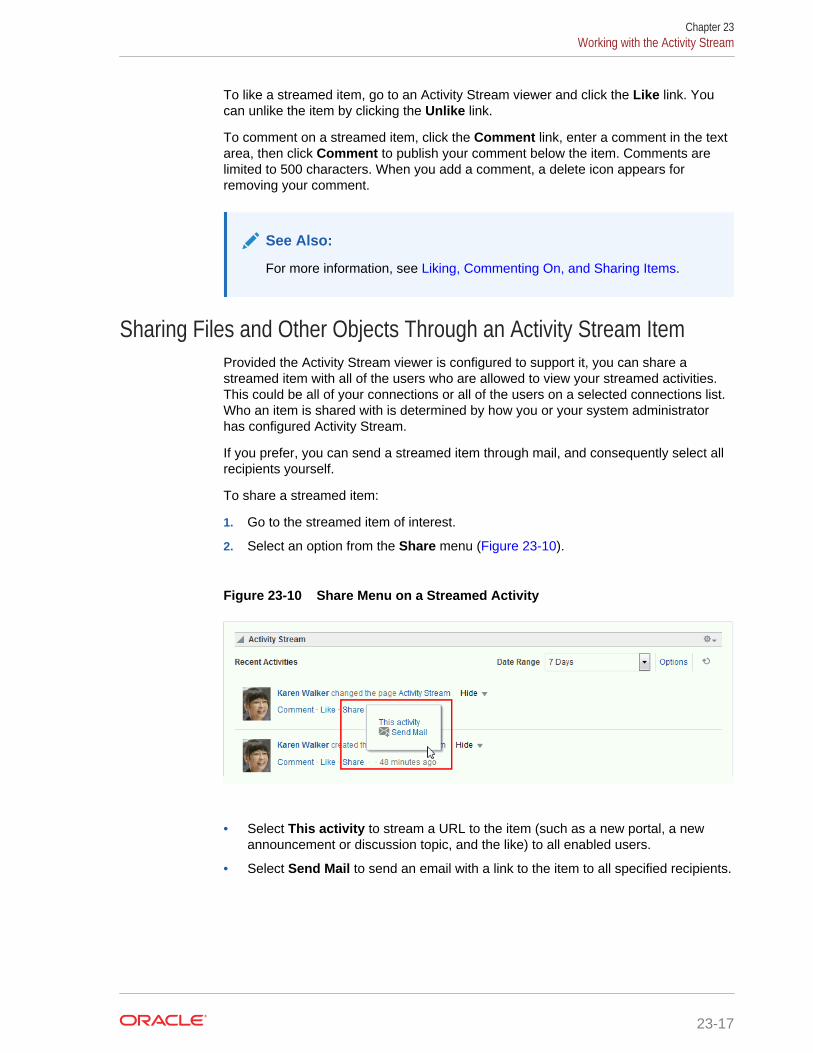
To like a streamed item, go to an Activity Stream viewer and click the Like link. Youcan unlike the item by clicking the Unlike link.
To comment on a streamed item, click the Comment link, enter a comment in the textarea, then click Comment to publish your comment below the item. Comments arelimited to 500 characters. When you add a comment, a delete icon appears forremoving your comment.
See Also:
For more information, see Liking, Commenting On, and Sharing Items.
Sharing Files and Other Objects Through an Activity Stream ItemProvided the Activity Stream viewer is configured to support it, you can share astreamed item with all of the users who are allowed to view your streamed activities.This could be all of your connections or all of the users on a selected connections list.Who an item is shared with is determined by how you or your system administratorhas configured Activity Stream.
If you prefer, you can send a streamed item through mail, and consequently select allrecipients yourself.
To share a streamed item:
1. Go to the streamed item of interest.
2. Select an option from the Share menu (Figure 23-10).
Figure 23-10 Share Menu on a Streamed Activity
• Select This activity to stream a URL to the item (such as a new portal, a newannouncement or discussion topic, and the like) to all enabled users.
• Select Send Mail to send an email with a link to the item to all specified recipients.
Chapter 23Working with the Activity Stream
23-17
See Also:
For more information, see Liking, Commenting On, and Sharing Items.
Chapter 23Working with the Activity Stream
23-18
24Working with Announcements
Announcements offer a quick, convenient way to create and broadcast messagesinstantly or at a specified future date.
Note:
Oracle WebCenter Portal has deprecated the support for Jive features(announcements and discussions). If you have upgraded from a prior releaseto Release 12c (12.2.1.4.0), Jive features remain available in your upgradedinstance but Oracle support is not provided for these features. In the nextrelease, Jive features will not be available even in the upgraded instances
Topics:
• About Announcements
• Working with Announcements
Permissions:
This chapter is intended for WebCenter Portal users who want to view,create, and manage portal announcements. To perform the tasks in thischapter, you need one or more of the following portal-level permissions:
• Create, Edit, and Delete Announcements
• Create and Edit Announcements
• View Announcements
Note:
Tasks discussed in this chapter are not available if announcements are notenabled and exposed. The portal manager adds and configuresannouncements, as described in Adding Announcements to a Portal inBuilding Portals with Oracle WebCenter Portal.
About AnnouncementsWebCenter Portal provides the ability to post announcements about importantactivities and events to all authenticated users. For example, an application specialistcan announce the availability of a new feature or the plan to take a portal offline
24-1
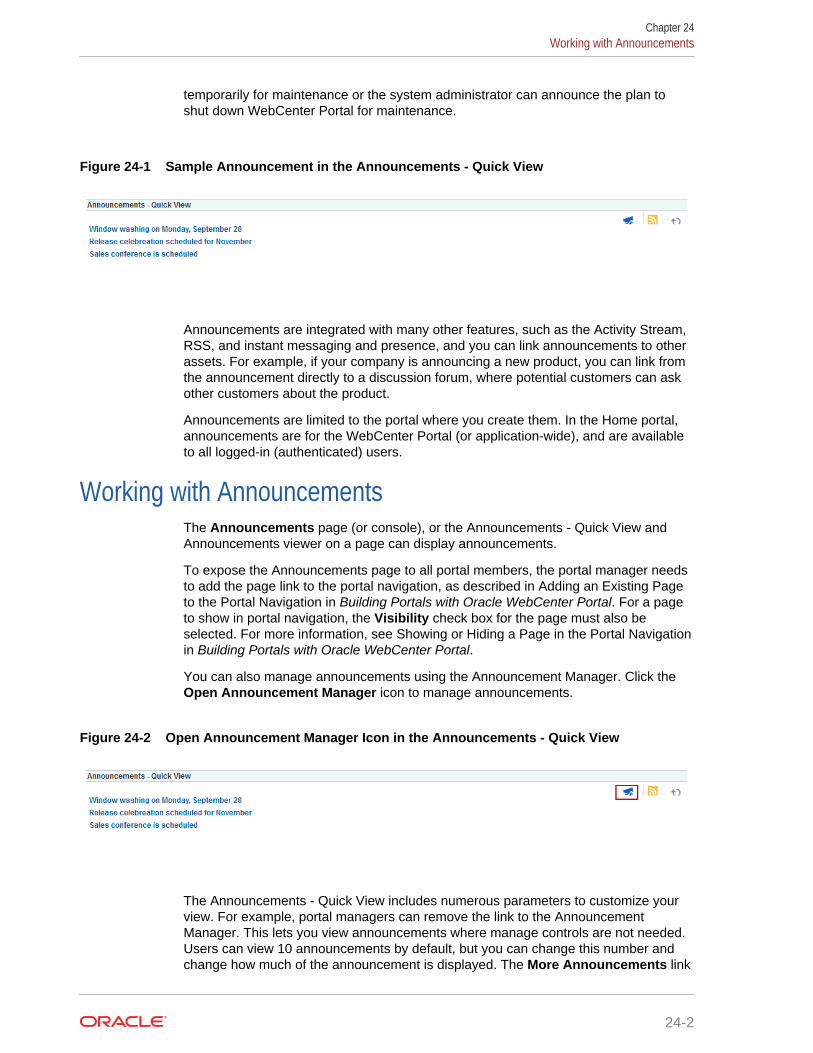
temporarily for maintenance or the system administrator can announce the plan toshut down WebCenter Portal for maintenance.
Figure 24-1 Sample Announcement in the Announcements - Quick View
Announcements are integrated with many other features, such as the Activity Stream,RSS, and instant messaging and presence, and you can link announcements to otherassets. For example, if your company is announcing a new product, you can link fromthe announcement directly to a discussion forum, where potential customers can askother customers about the product.
Announcements are limited to the portal where you create them. In the Home portal,announcements are for the WebCenter Portal (or application-wide), and are availableto all logged-in (authenticated) users.
Working with AnnouncementsThe Announcements page (or console), or the Announcements - Quick View andAnnouncements viewer on a page can display announcements.
To expose the Announcements page to all portal members, the portal manager needsto add the page link to the portal navigation, as described in Adding an Existing Pageto the Portal Navigation in Building Portals with Oracle WebCenter Portal. For a pageto show in portal navigation, the Visibility check box for the page must also beselected. For more information, see Showing or Hiding a Page in the Portal Navigationin Building Portals with Oracle WebCenter Portal.
You can also manage announcements using the Announcement Manager. Click theOpen Announcement Manager icon to manage announcements.
Figure 24-2 Open Announcement Manager Icon in the Announcements - Quick View
The Announcements - Quick View includes numerous parameters to customize yourview. For example, portal managers can remove the link to the AnnouncementManager. This lets you view announcements where manage controls are not needed.Users can view 10 announcements by default, but you can change this number andchange how much of the announcement is displayed. The More Announcements link
Chapter 24Working with Announcements
24-2
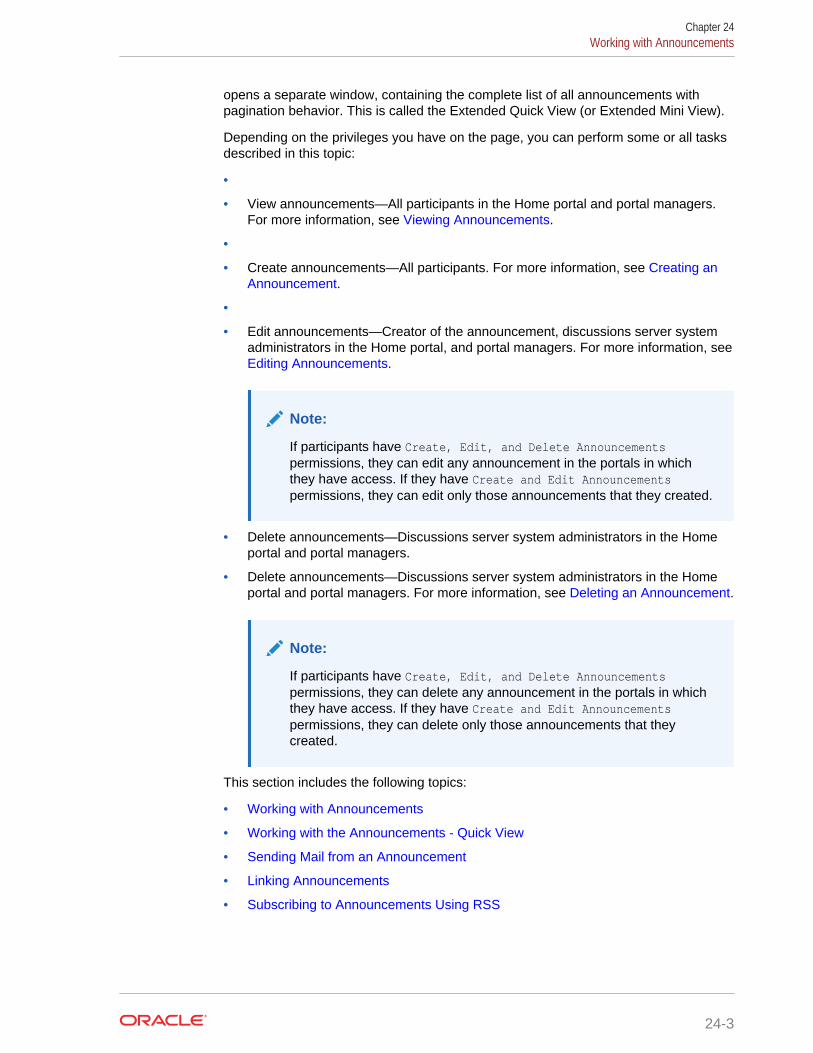
opens a separate window, containing the complete list of all announcements withpagination behavior. This is called the Extended Quick View (or Extended Mini View).
Depending on the privileges you have on the page, you can perform some or all tasksdescribed in this topic:
•
• View announcements—All participants in the Home portal and portal managers.For more information, see Viewing Announcements.
•
• Create announcements—All participants. For more information, see Creating anAnnouncement.
•
• Edit announcements—Creator of the announcement, discussions server systemadministrators in the Home portal, and portal managers. For more information, see Editing Announcements.
Note:
If participants have Create, Edit, and Delete Announcementspermissions, they can edit any announcement in the portals in whichthey have access. If they have Create and Edit Announcementspermissions, they can edit only those announcements that they created.
• Delete announcements—Discussions server system administrators in the Homeportal and portal managers.
• Delete announcements—Discussions server system administrators in the Homeportal and portal managers. For more information, see Deleting an Announcement.
Note:
If participants have Create, Edit, and Delete Announcementspermissions, they can delete any announcement in the portals in whichthey have access. If they have Create and Edit Announcementspermissions, they can delete only those announcements that theycreated.
This section includes the following topics:
• Working with Announcements
• Working with the Announcements - Quick View
• Sending Mail from an Announcement
• Linking Announcements
• Subscribing to Announcements Using RSS
Chapter 24Working with Announcements
24-3
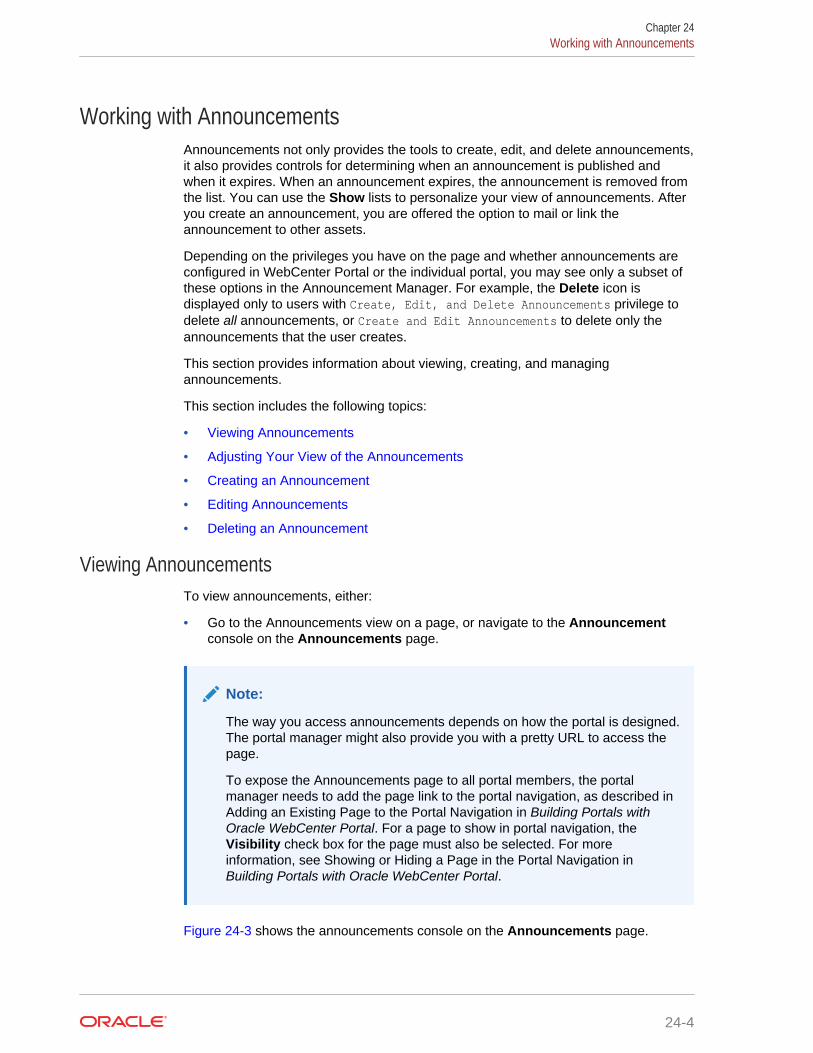
Working with AnnouncementsAnnouncements not only provides the tools to create, edit, and delete announcements,it also provides controls for determining when an announcement is published andwhen it expires. When an announcement expires, the announcement is removed fromthe list. You can use the Show lists to personalize your view of announcements. Afteryou create an announcement, you are offered the option to mail or link theannouncement to other assets.
Depending on the privileges you have on the page and whether announcements areconfigured in WebCenter Portal or the individual portal, you may see only a subset ofthese options in the Announcement Manager. For example, the Delete icon isdisplayed only to users with Create, Edit, and Delete Announcements privilege todelete all announcements, or Create and Edit Announcements to delete only theannouncements that the user creates.
This section provides information about viewing, creating, and managingannouncements.
This section includes the following topics:
• Viewing Announcements
• Adjusting Your View of the Announcements
• Creating an Announcement
• Editing Announcements
• Deleting an Announcement
Viewing AnnouncementsTo view announcements, either:
• Go to the Announcements view on a page, or navigate to the Announcementconsole on the Announcements page.
Note:
The way you access announcements depends on how the portal is designed.The portal manager might also provide you with a pretty URL to access thepage.
To expose the Announcements page to all portal members, the portalmanager needs to add the page link to the portal navigation, as described in Adding an Existing Page to the Portal Navigation in Building Portals withOracle WebCenter Portal. For a page to show in portal navigation, theVisibility check box for the page must also be selected. For moreinformation, see Showing or Hiding a Page in the Portal Navigation inBuilding Portals with Oracle WebCenter Portal.
Figure 24-3 shows the announcements console on the Announcements page.
Chapter 24Working with Announcements
24-4
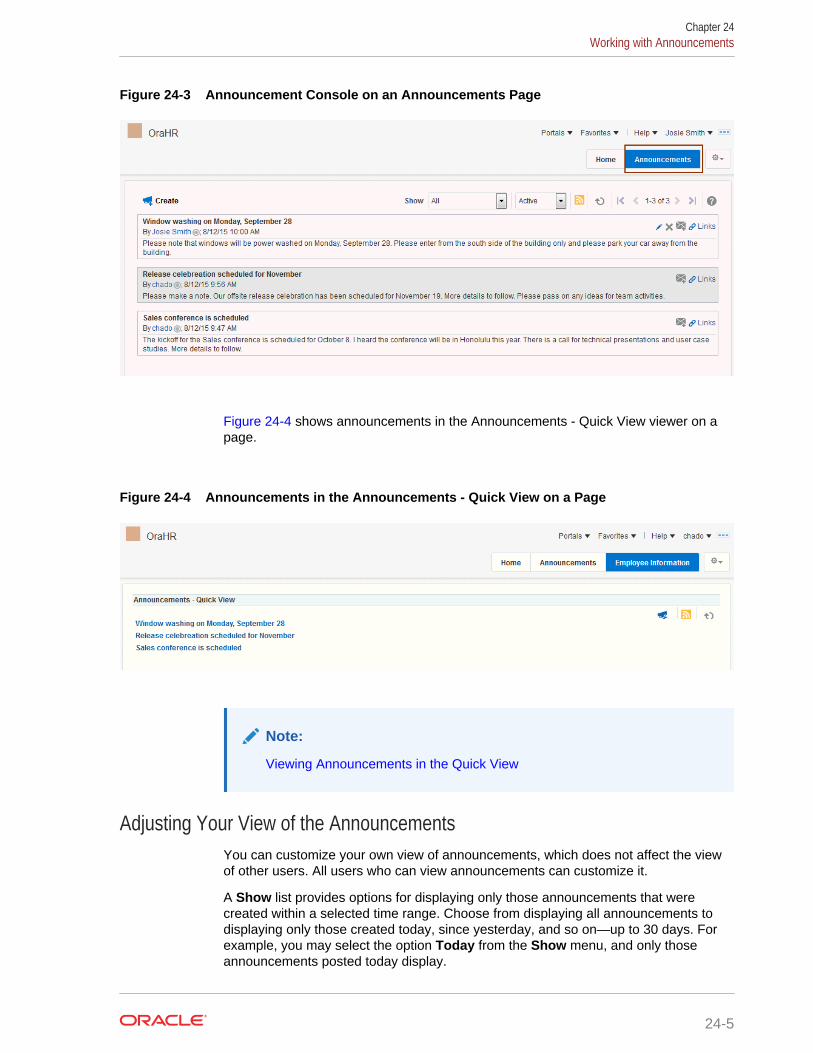
Figure 24-3 Announcement Console on an Announcements Page
Figure 24-4 shows announcements in the Announcements - Quick View viewer on apage.
Figure 24-4 Announcements in the Announcements - Quick View on a Page
Note:
Viewing Announcements in the Quick View
Adjusting Your View of the AnnouncementsYou can customize your own view of announcements, which does not affect the viewof other users. All users who can view announcements can customize it.
A Show list provides options for displaying only those announcements that werecreated within a selected time range. Choose from displaying all announcements todisplaying only those created today, since yesterday, and so on—up to 30 days. Forexample, you may select the option Today from the Show menu, and only thoseannouncements posted today display.
Chapter 24Working with Announcements
24-5
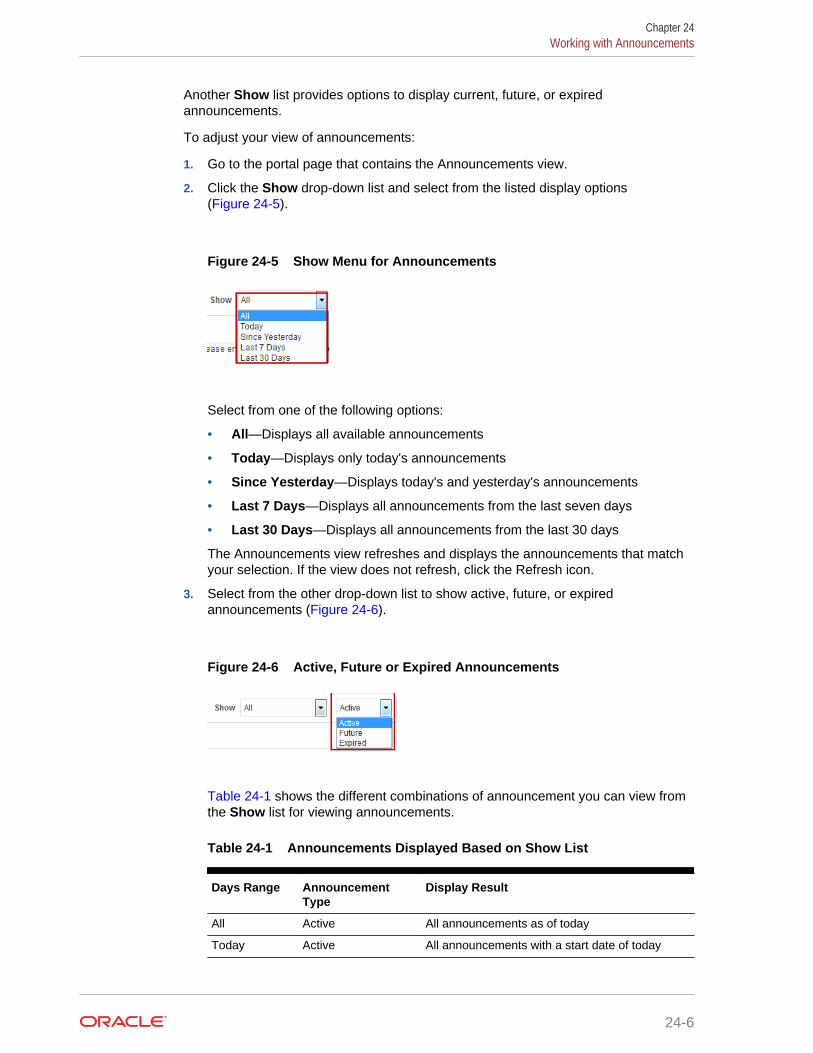
Another Show list provides options to display current, future, or expiredannouncements.
To adjust your view of announcements:
1. Go to the portal page that contains the Announcements view.
2. Click the Show drop-down list and select from the listed display options(Figure 24-5).
Figure 24-5 Show Menu for Announcements
Select from one of the following options:
• All—Displays all available announcements
• Today—Displays only today's announcements
• Since Yesterday—Displays today's and yesterday's announcements
• Last 7 Days—Displays all announcements from the last seven days
• Last 30 Days—Displays all announcements from the last 30 days
The Announcements view refreshes and displays the announcements that matchyour selection. If the view does not refresh, click the Refresh icon.
3. Select from the other drop-down list to show active, future, or expiredannouncements (Figure 24-6).
Figure 24-6 Active, Future or Expired Announcements
Table 24-1 shows the different combinations of announcement you can view fromthe Show list for viewing announcements.
Table 24-1 Announcements Displayed Based on Show List
Days Range AnnouncementType
Display Result
All Active All announcements as of today
Today Active All announcements with a start date of today
Chapter 24Working with Announcements
24-6
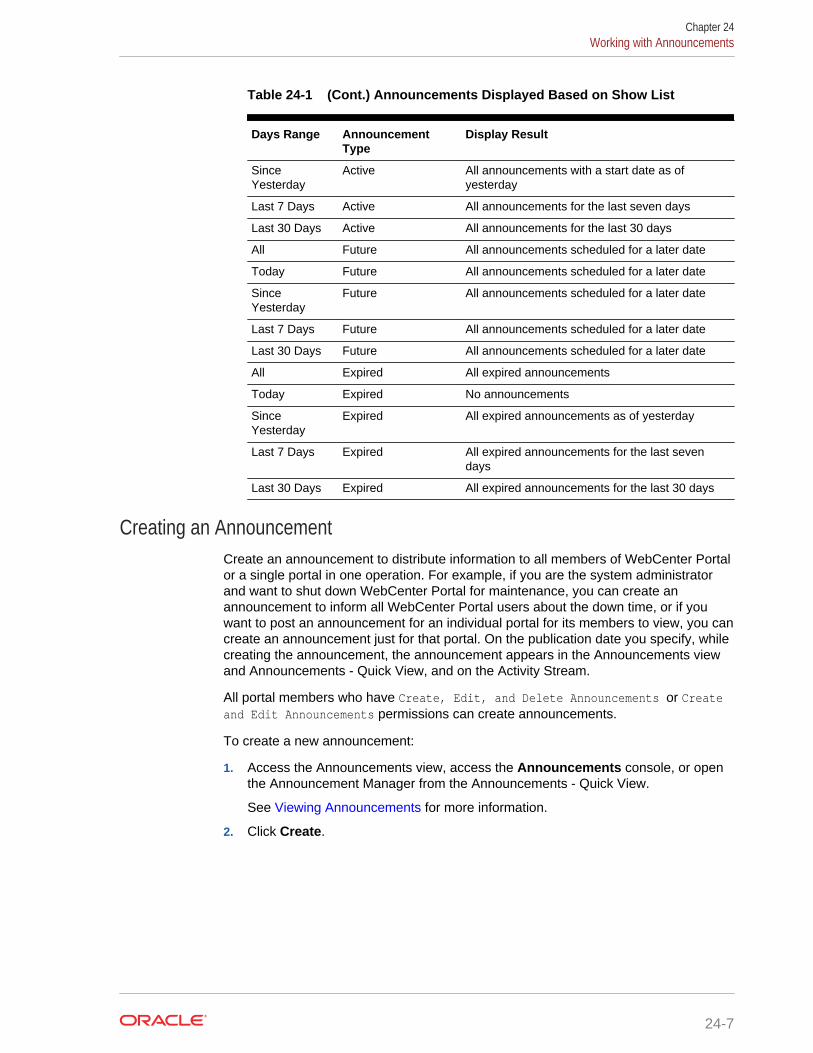
Table 24-1 (Cont.) Announcements Displayed Based on Show List
Days Range AnnouncementType
Display Result
SinceYesterday
Active All announcements with a start date as ofyesterday
Last 7 Days Active All announcements for the last seven days
Last 30 Days Active All announcements for the last 30 days
All Future All announcements scheduled for a later date
Today Future All announcements scheduled for a later date
SinceYesterday
Future All announcements scheduled for a later date
Last 7 Days Future All announcements scheduled for a later date
Last 30 Days Future All announcements scheduled for a later date
All Expired All expired announcements
Today Expired No announcements
SinceYesterday
Expired All expired announcements as of yesterday
Last 7 Days Expired All expired announcements for the last sevendays
Last 30 Days Expired All expired announcements for the last 30 days
Creating an AnnouncementCreate an announcement to distribute information to all members of WebCenter Portalor a single portal in one operation. For example, if you are the system administratorand want to shut down WebCenter Portal for maintenance, you can create anannouncement to inform all WebCenter Portal users about the down time, or if youwant to post an announcement for an individual portal for its members to view, you cancreate an announcement just for that portal. On the publication date you specify, whilecreating the announcement, the announcement appears in the Announcements viewand Announcements - Quick View, and on the Activity Stream.
All portal members who have Create, Edit, and Delete Announcements or Createand Edit Announcements permissions can create announcements.
To create a new announcement:
1. Access the Announcements view, access the Announcements console, or openthe Announcement Manager from the Announcements - Quick View.
See Viewing Announcements for more information.
2. Click Create.
Chapter 24Working with Announcements
24-7
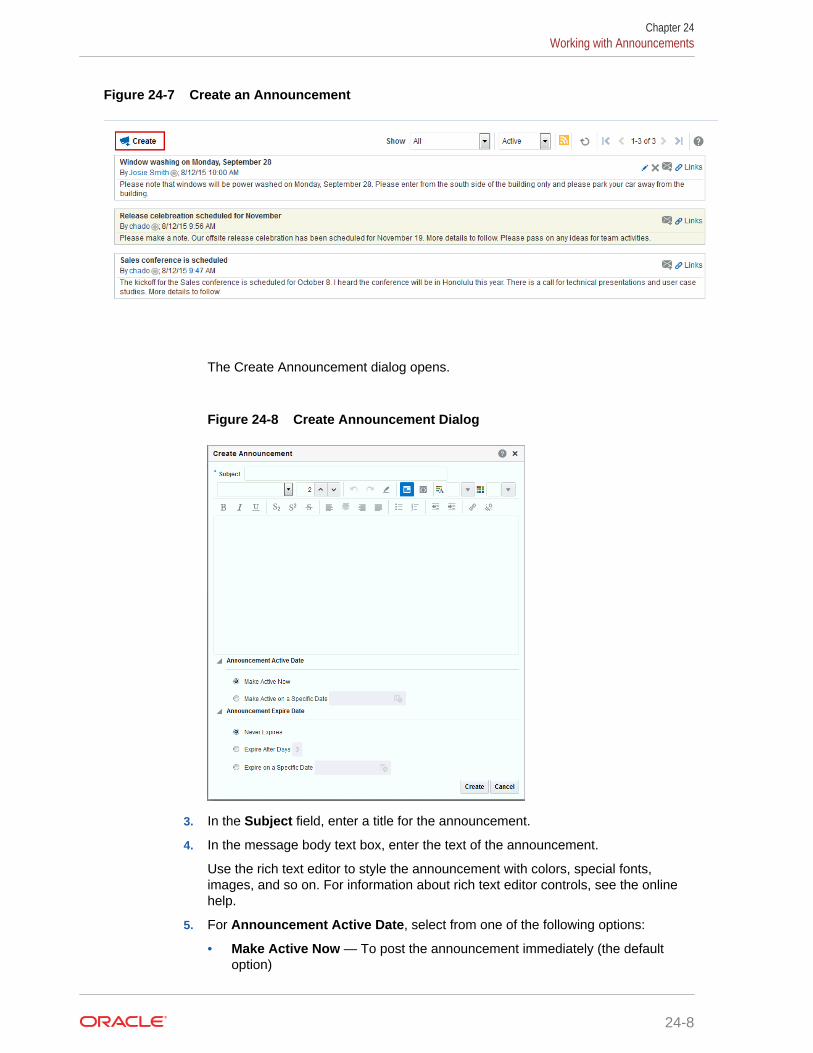
Figure 24-7 Create an Announcement
The Create Announcement dialog opens.
Figure 24-8 Create Announcement Dialog
3. In the Subject field, enter a title for the announcement.
4. In the message body text box, enter the text of the announcement.
Use the rich text editor to style the announcement with colors, special fonts,images, and so on. For information about rich text editor controls, see the onlinehelp.
5. For Announcement Active Date, select from one of the following options:
• Make Active Now — To post the announcement immediately (the defaultoption)
Chapter 24Working with Announcements
24-8
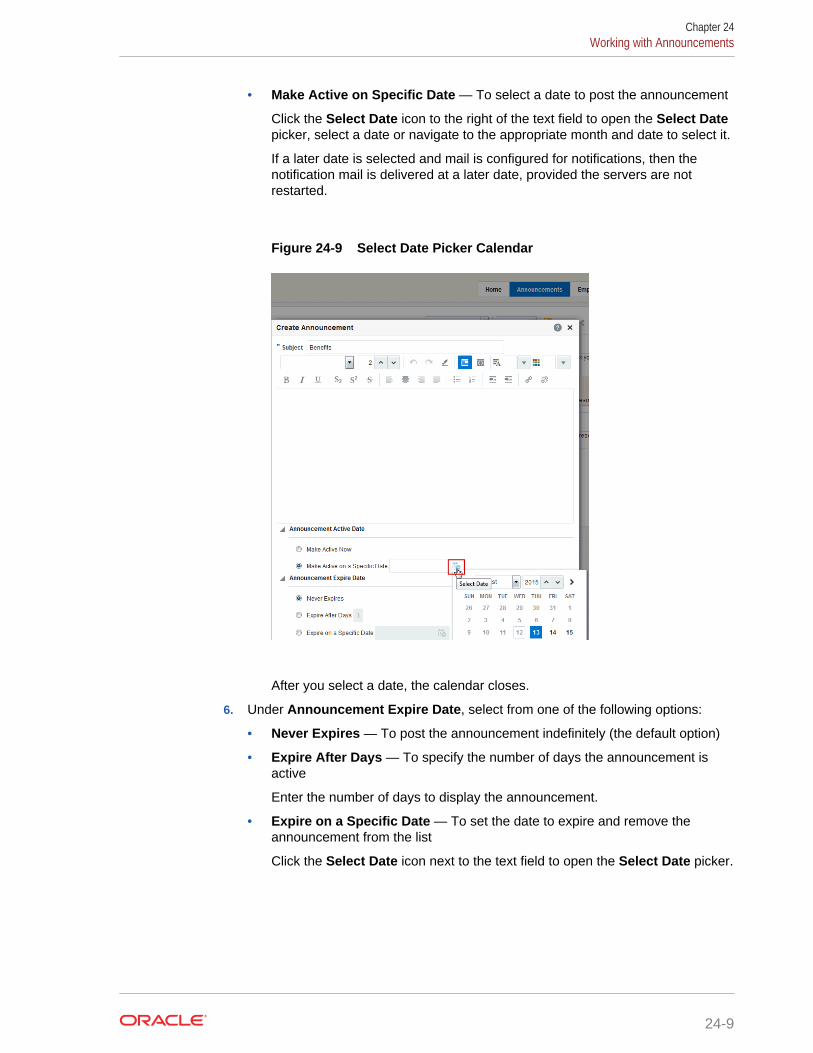
• Make Active on Specific Date — To select a date to post the announcement
Click the Select Date icon to the right of the text field to open the Select Datepicker, select a date or navigate to the appropriate month and date to select it.
If a later date is selected and mail is configured for notifications, then thenotification mail is delivered at a later date, provided the servers are notrestarted.
Figure 24-9 Select Date Picker Calendar
After you select a date, the calendar closes.
6. Under Announcement Expire Date, select from one of the following options:
• Never Expires — To post the announcement indefinitely (the default option)
• Expire After Days — To specify the number of days the announcement isactive
Enter the number of days to display the announcement.
• Expire on a Specific Date — To set the date to expire and remove theannouncement from the list
Click the Select Date icon next to the text field to open the Select Date picker.
Chapter 24Working with Announcements
24-9
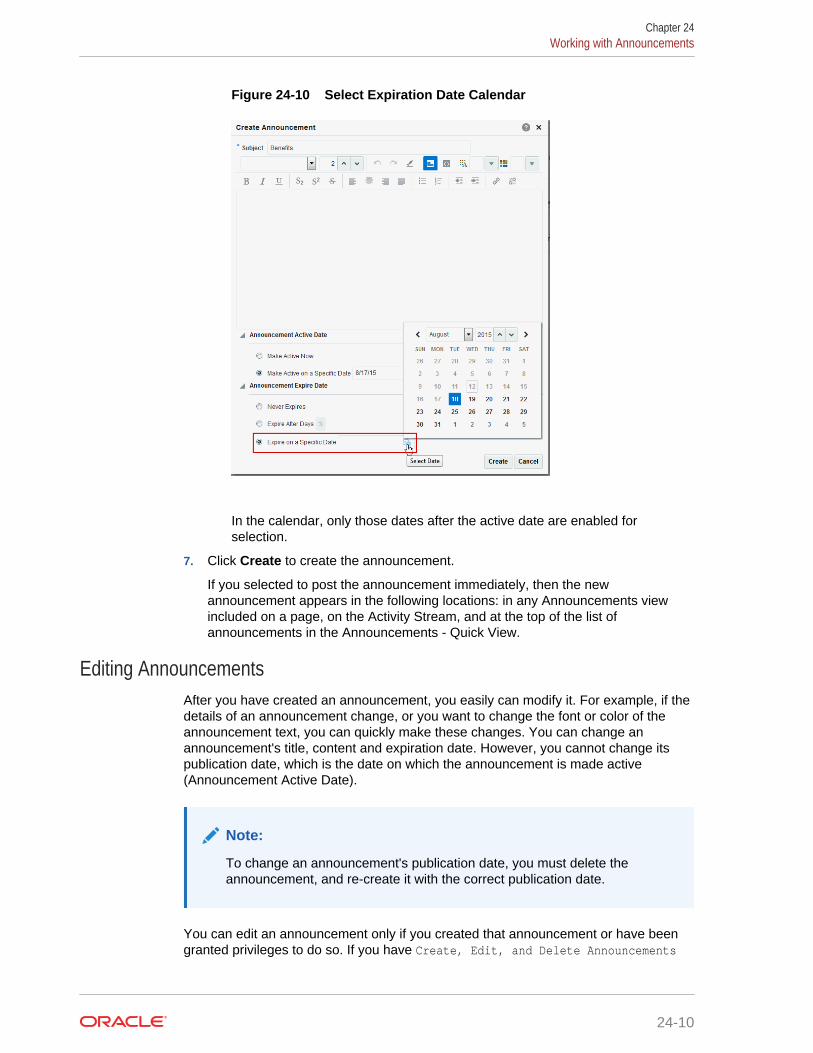
Figure 24-10 Select Expiration Date Calendar
In the calendar, only those dates after the active date are enabled forselection.
7. Click Create to create the announcement.
If you selected to post the announcement immediately, then the newannouncement appears in the following locations: in any Announcements viewincluded on a page, on the Activity Stream, and at the top of the list ofannouncements in the Announcements - Quick View.
Editing AnnouncementsAfter you have created an announcement, you easily can modify it. For example, if thedetails of an announcement change, or you want to change the font or color of theannouncement text, you can quickly make these changes. You can change anannouncement's title, content and expiration date. However, you cannot change itspublication date, which is the date on which the announcement is made active(Announcement Active Date).
Note:
To change an announcement's publication date, you must delete theannouncement, and re-create it with the correct publication date.
You can edit an announcement only if you created that announcement or have beengranted privileges to do so. If you have Create, Edit, and Delete Announcements
Chapter 24Working with Announcements
24-10
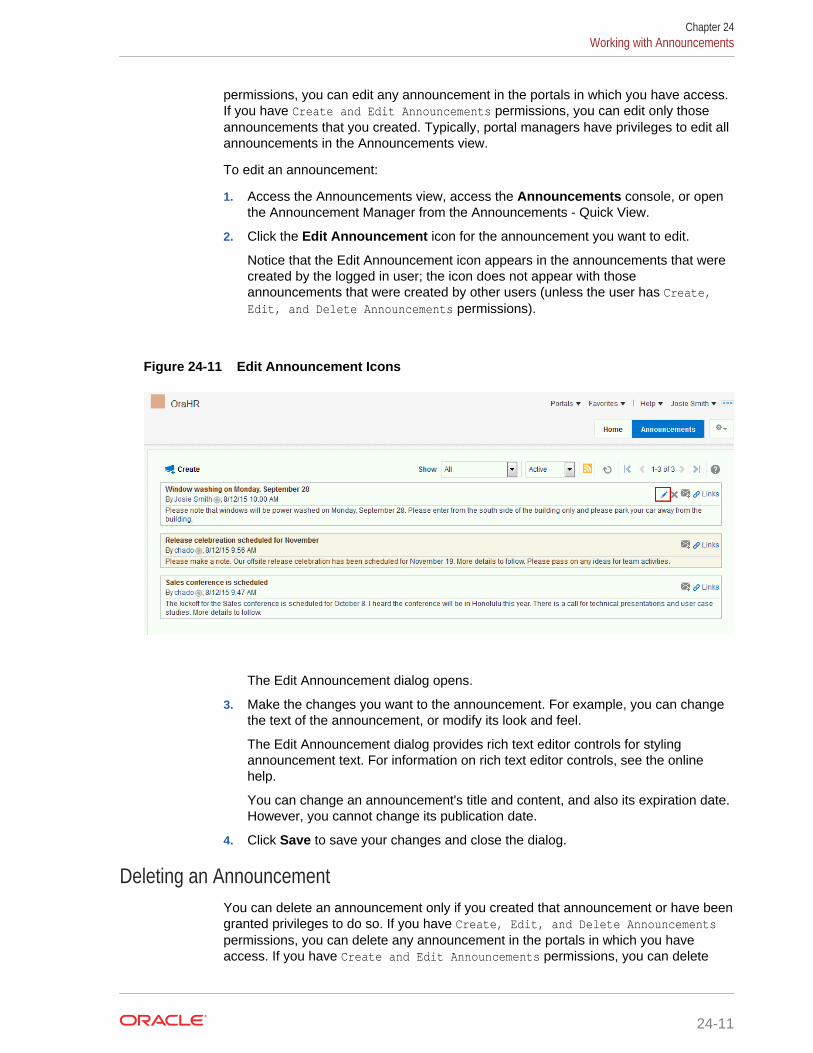
permissions, you can edit any announcement in the portals in which you have access.If you have Create and Edit Announcements permissions, you can edit only thoseannouncements that you created. Typically, portal managers have privileges to edit allannouncements in the Announcements view.
To edit an announcement:
1. Access the Announcements view, access the Announcements console, or openthe Announcement Manager from the Announcements - Quick View.
2. Click the Edit Announcement icon for the announcement you want to edit.
Notice that the Edit Announcement icon appears in the announcements that werecreated by the logged in user; the icon does not appear with thoseannouncements that were created by other users (unless the user has Create,Edit, and Delete Announcements permissions).
Figure 24-11 Edit Announcement Icons
The Edit Announcement dialog opens.
3. Make the changes you want to the announcement. For example, you can changethe text of the announcement, or modify its look and feel.
The Edit Announcement dialog provides rich text editor controls for stylingannouncement text. For information on rich text editor controls, see the onlinehelp.
You can change an announcement's title and content, and also its expiration date.However, you cannot change its publication date.
4. Click Save to save your changes and close the dialog.
Deleting an AnnouncementYou can delete an announcement only if you created that announcement or have beengranted privileges to do so. If you have Create, Edit, and Delete Announcementspermissions, you can delete any announcement in the portals in which you haveaccess. If you have Create and Edit Announcements permissions, you can delete
Chapter 24Working with Announcements
24-11
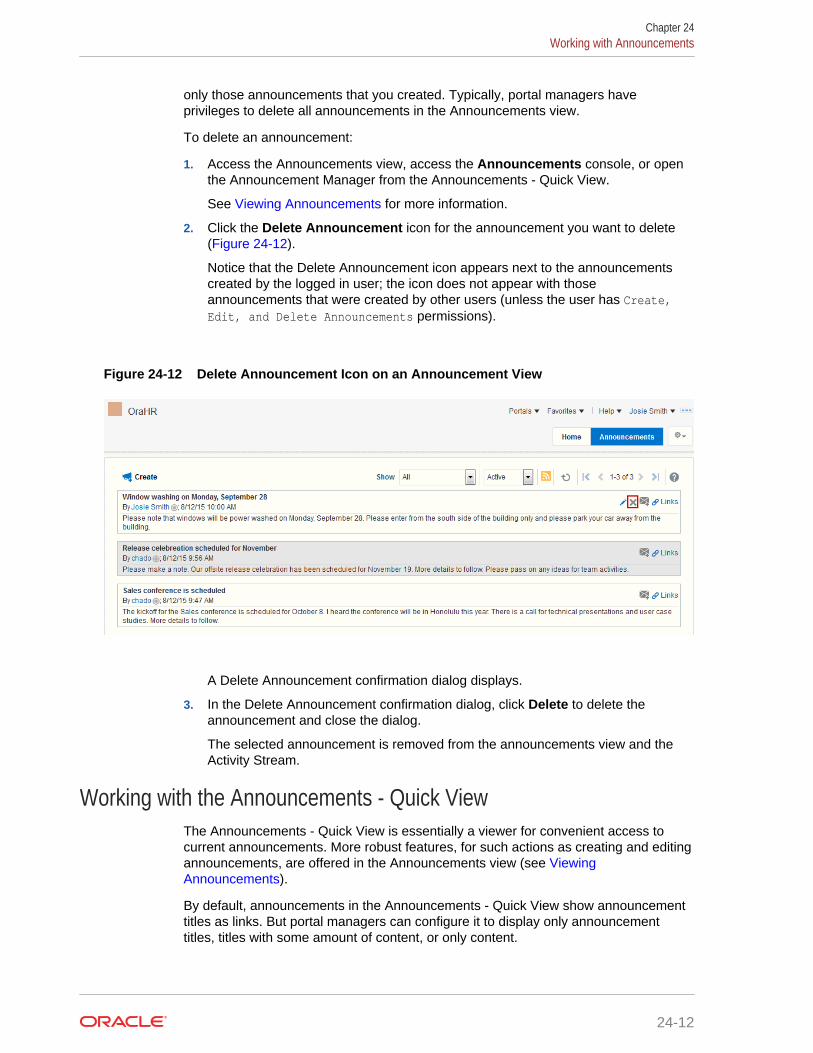
only those announcements that you created. Typically, portal managers haveprivileges to delete all announcements in the Announcements view.
To delete an announcement:
1. Access the Announcements view, access the Announcements console, or openthe Announcement Manager from the Announcements - Quick View.
See Viewing Announcements for more information.
2. Click the Delete Announcement icon for the announcement you want to delete(Figure 24-12).
Notice that the Delete Announcement icon appears next to the announcementscreated by the logged in user; the icon does not appear with thoseannouncements that were created by other users (unless the user has Create,Edit, and Delete Announcements permissions).
Figure 24-12 Delete Announcement Icon on an Announcement View
A Delete Announcement confirmation dialog displays.
3. In the Delete Announcement confirmation dialog, click Delete to delete theannouncement and close the dialog.
The selected announcement is removed from the announcements view and theActivity Stream.
Working with the Announcements - Quick ViewThe Announcements - Quick View is essentially a viewer for convenient access tocurrent announcements. More robust features, for such actions as creating and editingannouncements, are offered in the Announcements view (see ViewingAnnouncements).
By default, announcements in the Announcements - Quick View show announcementtitles as links. But portal managers can configure it to display only announcementtitles, titles with some amount of content, or only content.
Chapter 24Working with Announcements
24-12
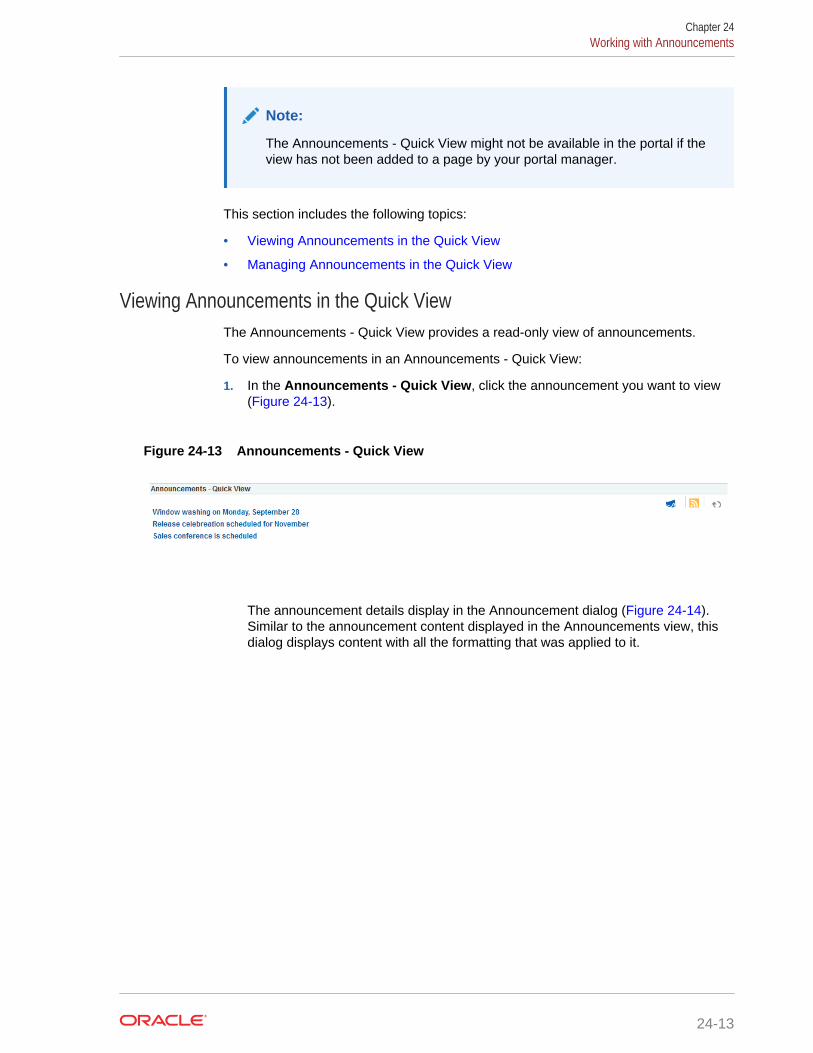
Note:
The Announcements - Quick View might not be available in the portal if theview has not been added to a page by your portal manager.
This section includes the following topics:
• Viewing Announcements in the Quick View
• Managing Announcements in the Quick View
Viewing Announcements in the Quick ViewThe Announcements - Quick View provides a read-only view of announcements.
To view announcements in an Announcements - Quick View:
1. In the Announcements - Quick View, click the announcement you want to view(Figure 24-13).
Figure 24-13 Announcements - Quick View
The announcement details display in the Announcement dialog (Figure 24-14).Similar to the announcement content displayed in the Announcements view, thisdialog displays content with all the formatting that was applied to it.
Chapter 24Working with Announcements
24-13

Figure 24-14 Announcement Accessed from Quick View
2. Click Close to exit the dialog.
Managing Announcements in the Quick ViewYou can manage announcements in the Announcements - Quick View with theAnnouncement Manager. The Announcement Manager provides the functionality thatis available in the Announcements view.
System administrators can remove the link to the Announcement Manager. If yoursystem administrator allows this functionality, then you can see the OpenAnnouncement Manager icon (Figure 24-15). The Announcement Manager lets youcreate, edit, delete, (only if you have the permissions to create and edit, or create, edit,and delete) mail, and link announcements. For more information, see Working withAnnouncements.
Figure 24-15 Open Announcement Manager Icon
Chapter 24Working with Announcements
24-14
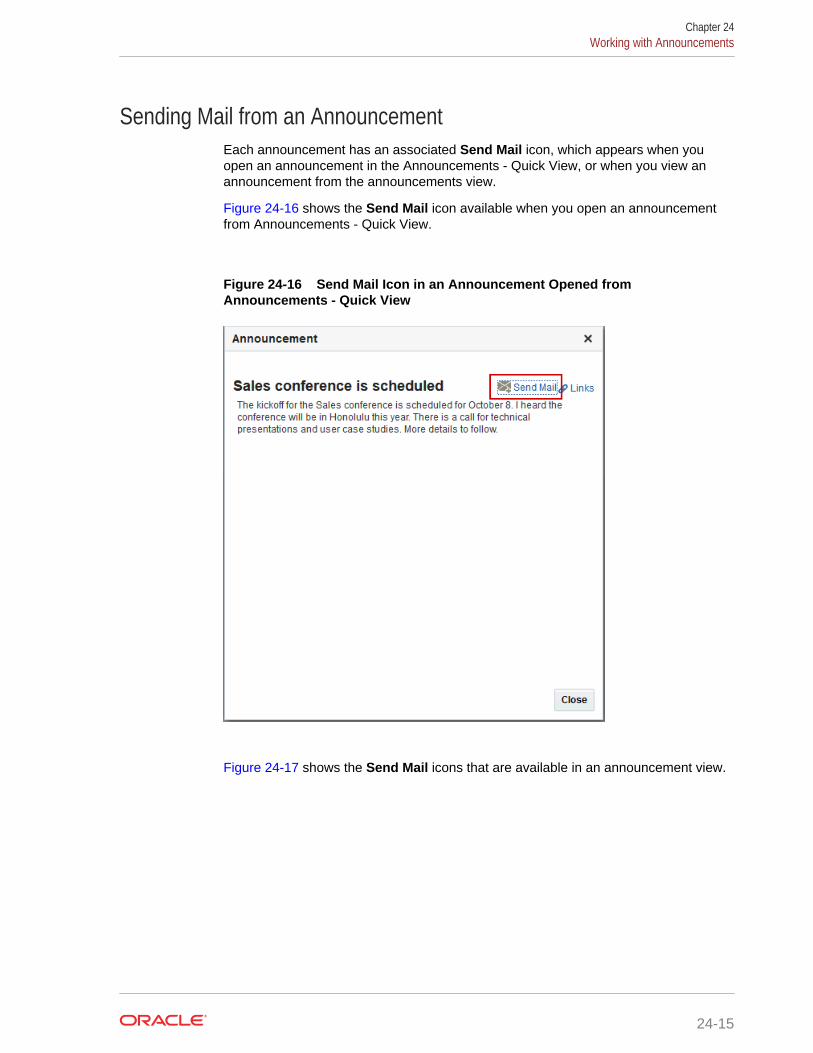
Sending Mail from an AnnouncementEach announcement has an associated Send Mail icon, which appears when youopen an announcement in the Announcements - Quick View, or when you view anannouncement from the announcements view.
Figure 24-16 shows the Send Mail icon available when you open an announcementfrom Announcements - Quick View.
Figure 24-16 Send Mail Icon in an Announcement Opened fromAnnouncements - Quick View
Figure 24-17 shows the Send Mail icons that are available in an announcement view.
Chapter 24Working with Announcements
24-15
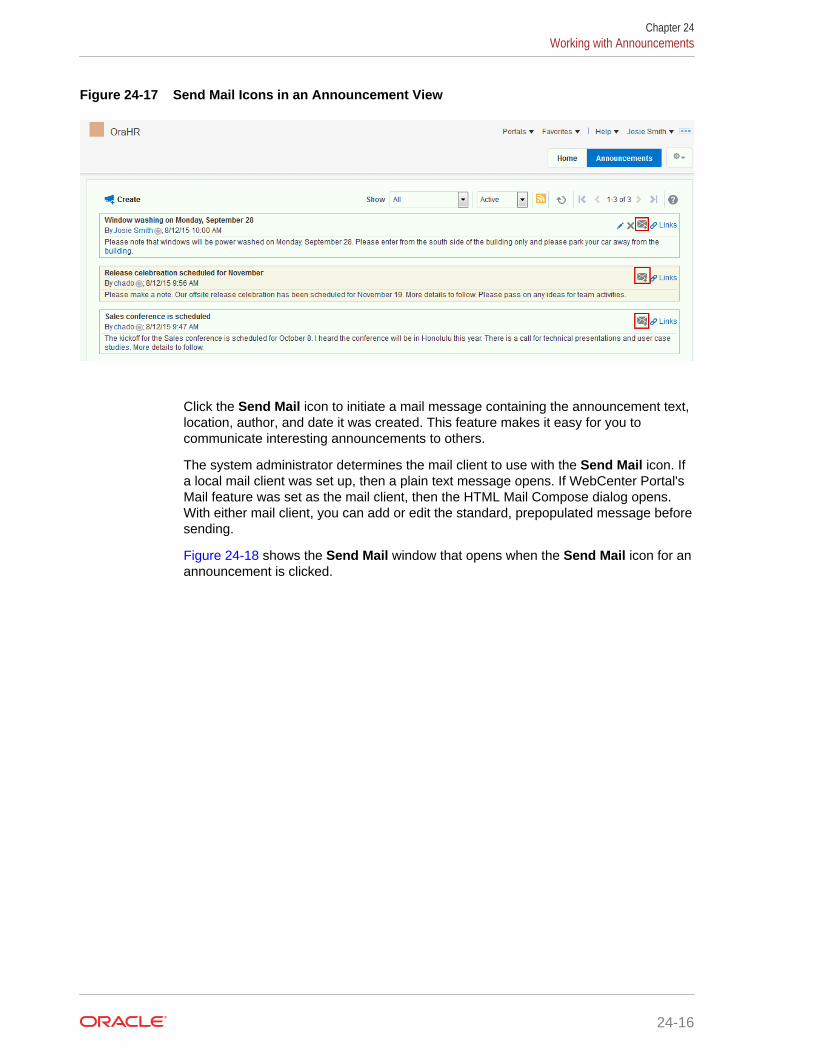
Figure 24-17 Send Mail Icons in an Announcement View
Click the Send Mail icon to initiate a mail message containing the announcement text,location, author, and date it was created. This feature makes it easy for you tocommunicate interesting announcements to others.
The system administrator determines the mail client to use with the Send Mail icon. Ifa local mail client was set up, then a plain text message opens. If WebCenter Portal'sMail feature was set as the mail client, then the HTML Mail Compose dialog opens.With either mail client, you can add or edit the standard, prepopulated message beforesending.
Figure 24-18 shows the Send Mail window that opens when the Send Mail icon for anannouncement is clicked.
Chapter 24Working with Announcements
24-16
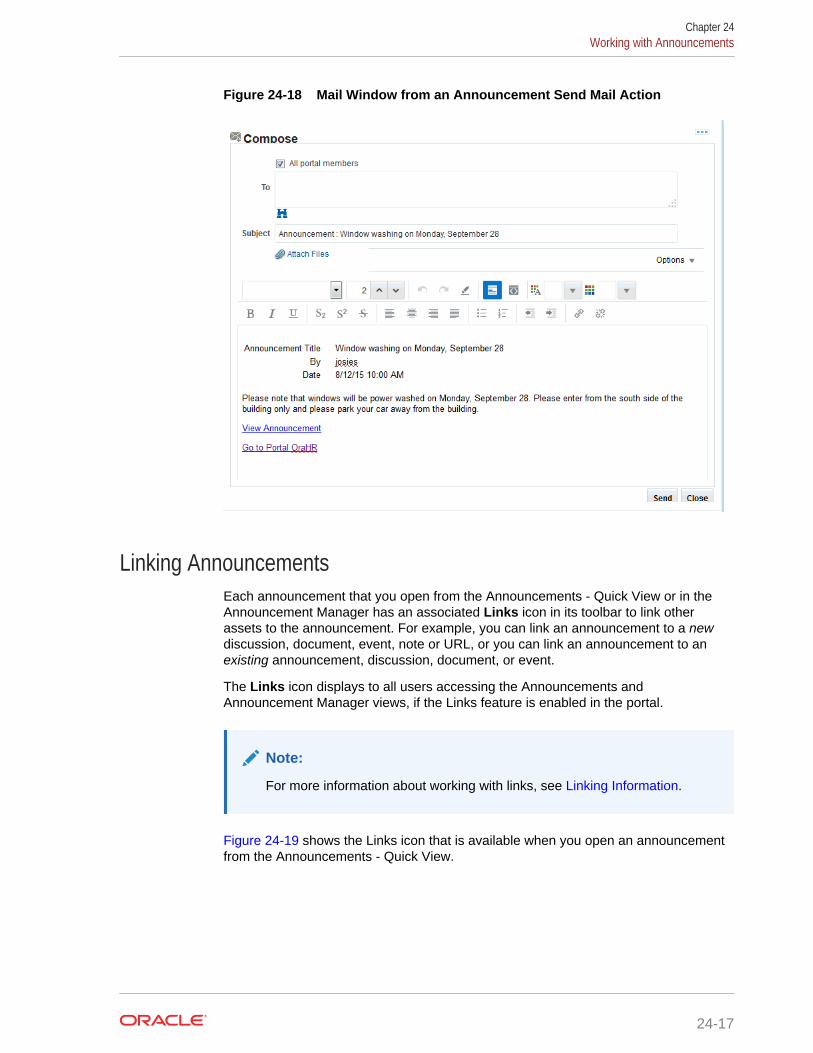
Figure 24-18 Mail Window from an Announcement Send Mail Action
Linking AnnouncementsEach announcement that you open from the Announcements - Quick View or in theAnnouncement Manager has an associated Links icon in its toolbar to link otherassets to the announcement. For example, you can link an announcement to a newdiscussion, document, event, note or URL, or you can link an announcement to anexisting announcement, discussion, document, or event.
The Links icon displays to all users accessing the Announcements andAnnouncement Manager views, if the Links feature is enabled in the portal.
Note:
For more information about working with links, see Linking Information.
Figure 24-19 shows the Links icon that is available when you open an announcementfrom the Announcements - Quick View.
Chapter 24Working with Announcements
24-17
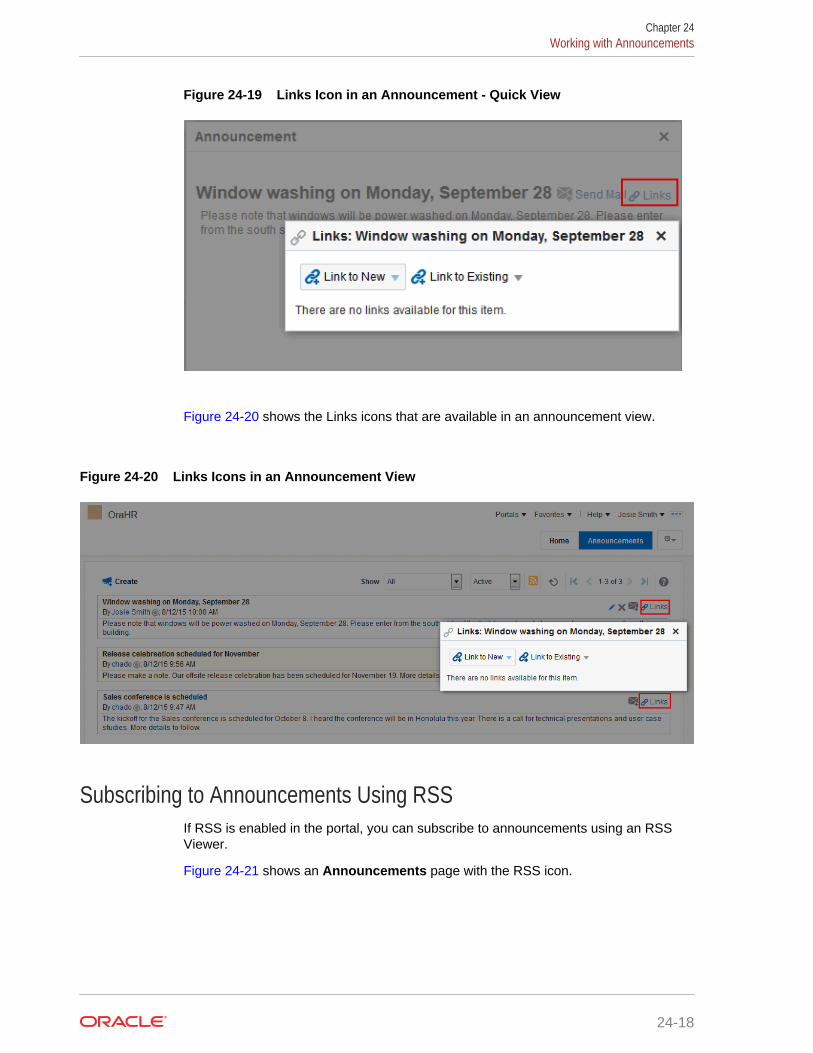
Figure 24-19 Links Icon in an Announcement - Quick View
Figure 24-20 shows the Links icons that are available in an announcement view.
Figure 24-20 Links Icons in an Announcement View
Subscribing to Announcements Using RSSIf RSS is enabled in the portal, you can subscribe to announcements using an RSSViewer.
Figure 24-21 shows an Announcements page with the RSS icon.
Chapter 24Working with Announcements
24-18
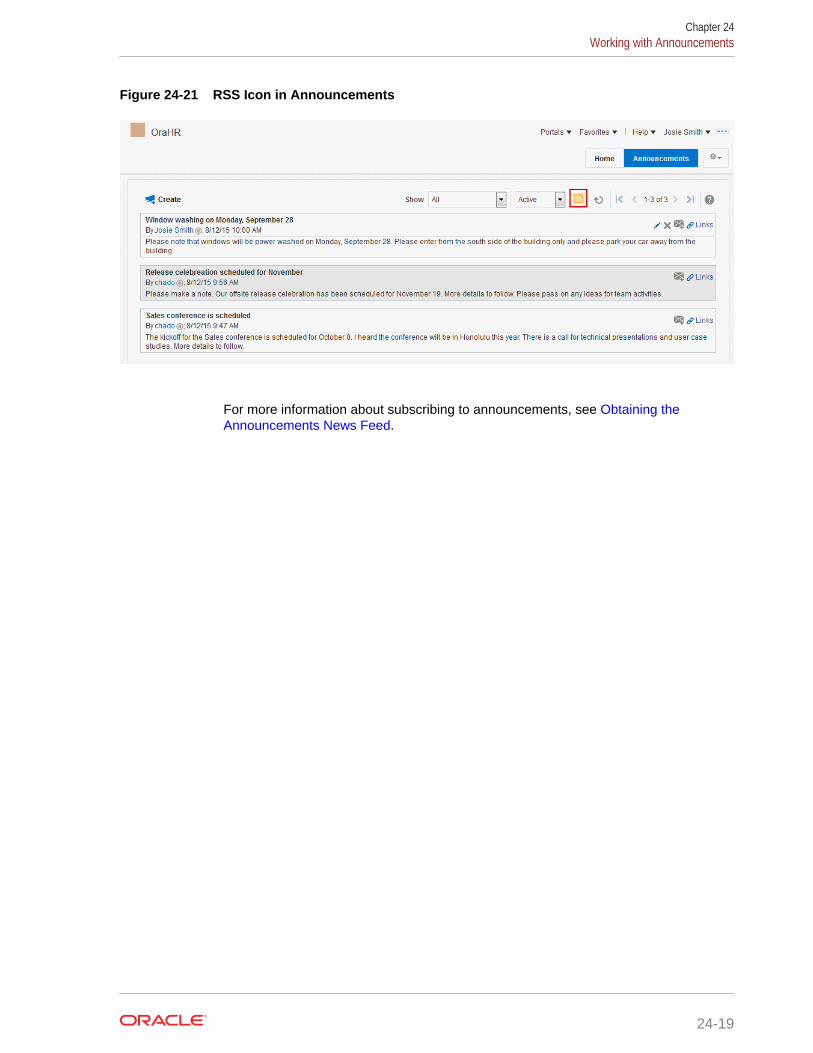
Figure 24-21 RSS Icon in Announcements
For more information about subscribing to announcements, see Obtaining theAnnouncements News Feed.
Chapter 24Working with Announcements
24-19
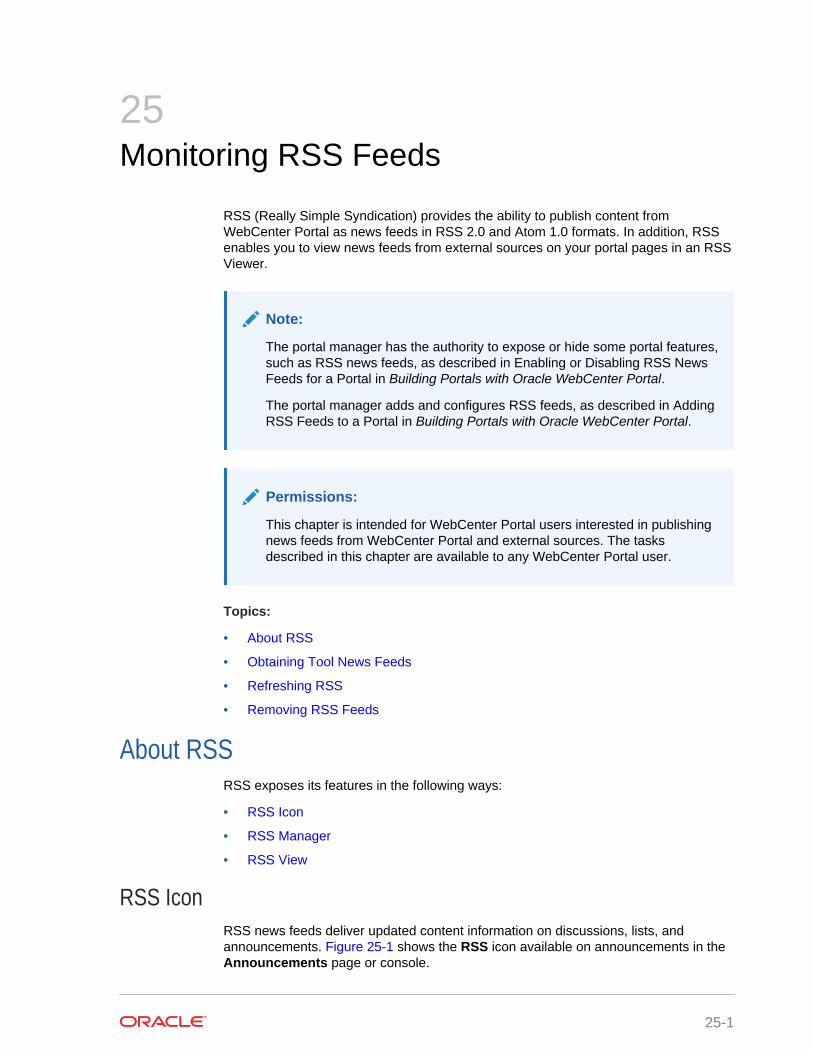
25Monitoring RSS Feeds
RSS (Really Simple Syndication) provides the ability to publish content fromWebCenter Portal as news feeds in RSS 2.0 and Atom 1.0 formats. In addition, RSSenables you to view news feeds from external sources on your portal pages in an RSSViewer.
Note:
The portal manager has the authority to expose or hide some portal features,such as RSS news feeds, as described in Enabling or Disabling RSS NewsFeeds for a Portal in Building Portals with Oracle WebCenter Portal.
The portal manager adds and configures RSS feeds, as described in AddingRSS Feeds to a Portal in Building Portals with Oracle WebCenter Portal.
Permissions:
This chapter is intended for WebCenter Portal users interested in publishingnews feeds from WebCenter Portal and external sources. The tasksdescribed in this chapter are available to any WebCenter Portal user.
Topics:
• About RSS
• Obtaining Tool News Feeds
• Refreshing RSS
• Removing RSS Feeds
About RSSRSS exposes its features in the following ways:
• RSS Icon
• RSS Manager
• RSS View
RSS IconRSS news feeds deliver updated content information on discussions, lists, andannouncements. Figure 25-1 shows the RSS icon available on announcements in theAnnouncements page or console.
25-1
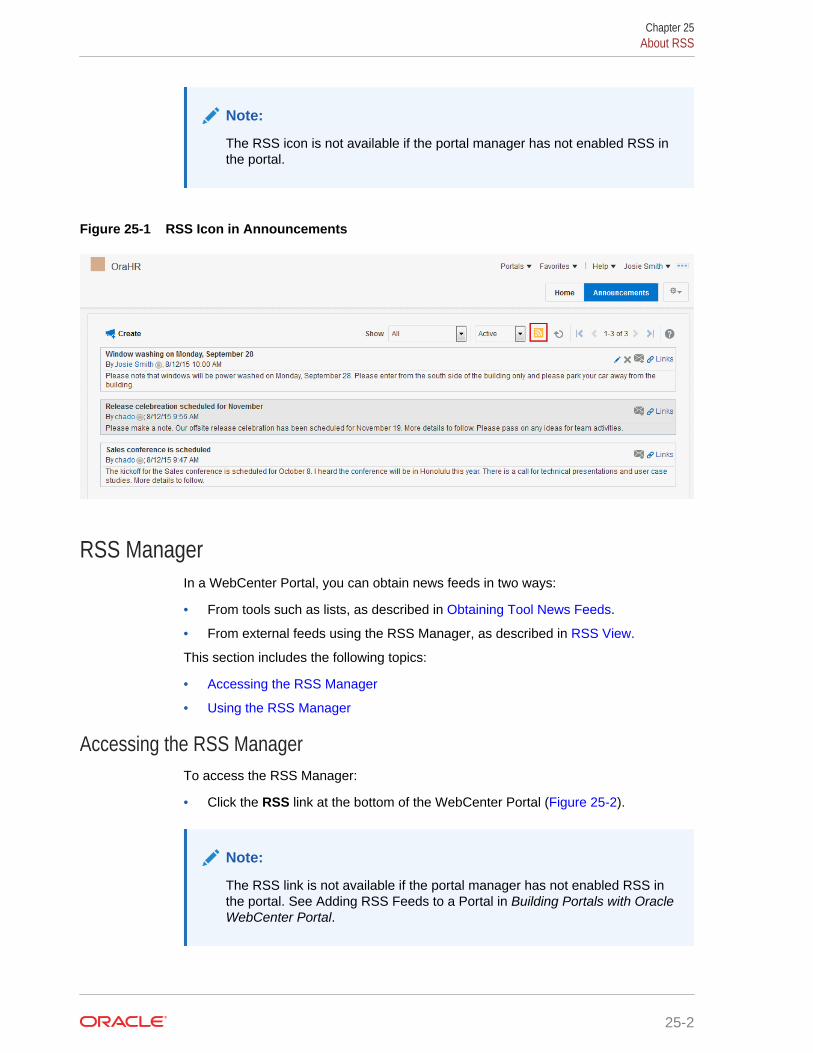
Note:
The RSS icon is not available if the portal manager has not enabled RSS inthe portal.
Figure 25-1 RSS Icon in Announcements
RSS ManagerIn a WebCenter Portal, you can obtain news feeds in two ways:
• From tools such as lists, as described in Obtaining Tool News Feeds.
• From external feeds using the RSS Manager, as described in RSS View.
This section includes the following topics:
• Accessing the RSS Manager
• Using the RSS Manager
Accessing the RSS ManagerTo access the RSS Manager:
• Click the RSS link at the bottom of the WebCenter Portal (Figure 25-2).
Note:
The RSS link is not available if the portal manager has not enabled RSS inthe portal. See Adding RSS Feeds to a Portal in Building Portals with OracleWebCenter Portal.
Chapter 25About RSS
25-2
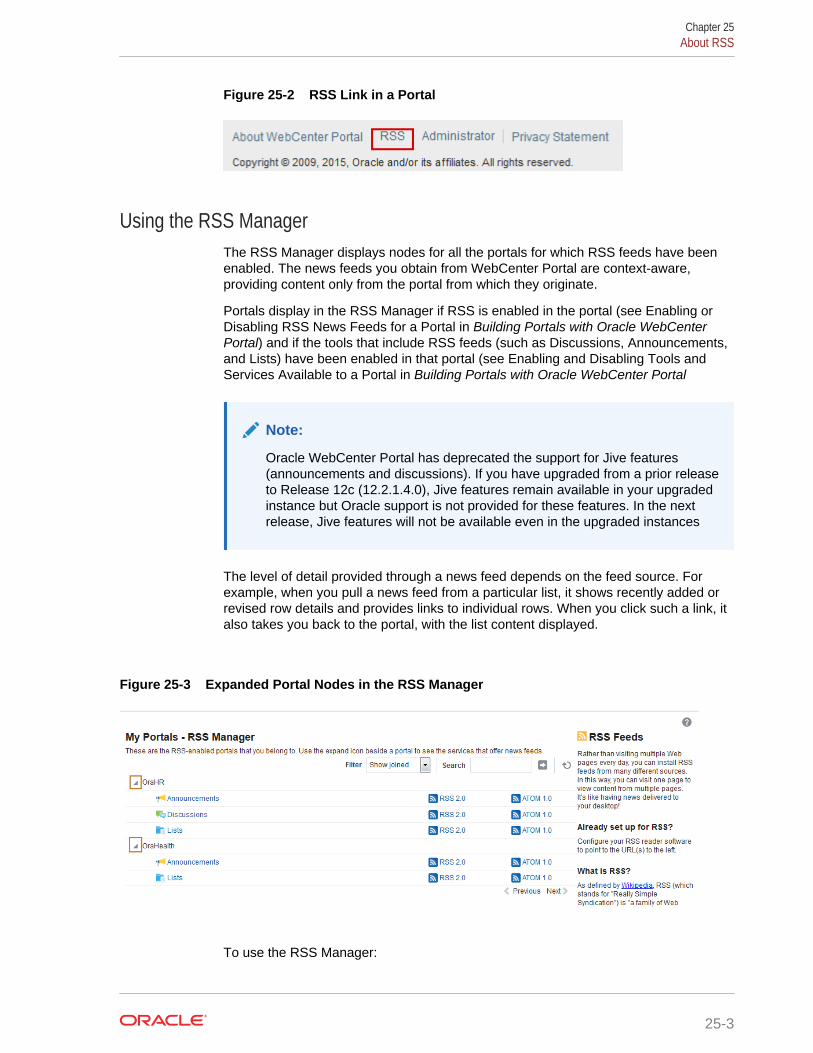
Figure 25-2 RSS Link in a Portal
Using the RSS ManagerThe RSS Manager displays nodes for all the portals for which RSS feeds have beenenabled. The news feeds you obtain from WebCenter Portal are context-aware,providing content only from the portal from which they originate.
Portals display in the RSS Manager if RSS is enabled in the portal (see Enabling orDisabling RSS News Feeds for a Portal in Building Portals with Oracle WebCenterPortal) and if the tools that include RSS feeds (such as Discussions, Announcements,and Lists) have been enabled in that portal (see Enabling and Disabling Tools andServices Available to a Portal in Building Portals with Oracle WebCenter Portal
Note:
Oracle WebCenter Portal has deprecated the support for Jive features(announcements and discussions). If you have upgraded from a prior releaseto Release 12c (12.2.1.4.0), Jive features remain available in your upgradedinstance but Oracle support is not provided for these features. In the nextrelease, Jive features will not be available even in the upgraded instances
The level of detail provided through a news feed depends on the feed source. Forexample, when you pull a news feed from a particular list, it shows recently added orrevised row details and provides links to individual rows. When you click such a link, italso takes you back to the portal, with the list content displayed.
Figure 25-3 Expanded Portal Nodes in the RSS Manager
To use the RSS Manager:
Chapter 25About RSS
25-3
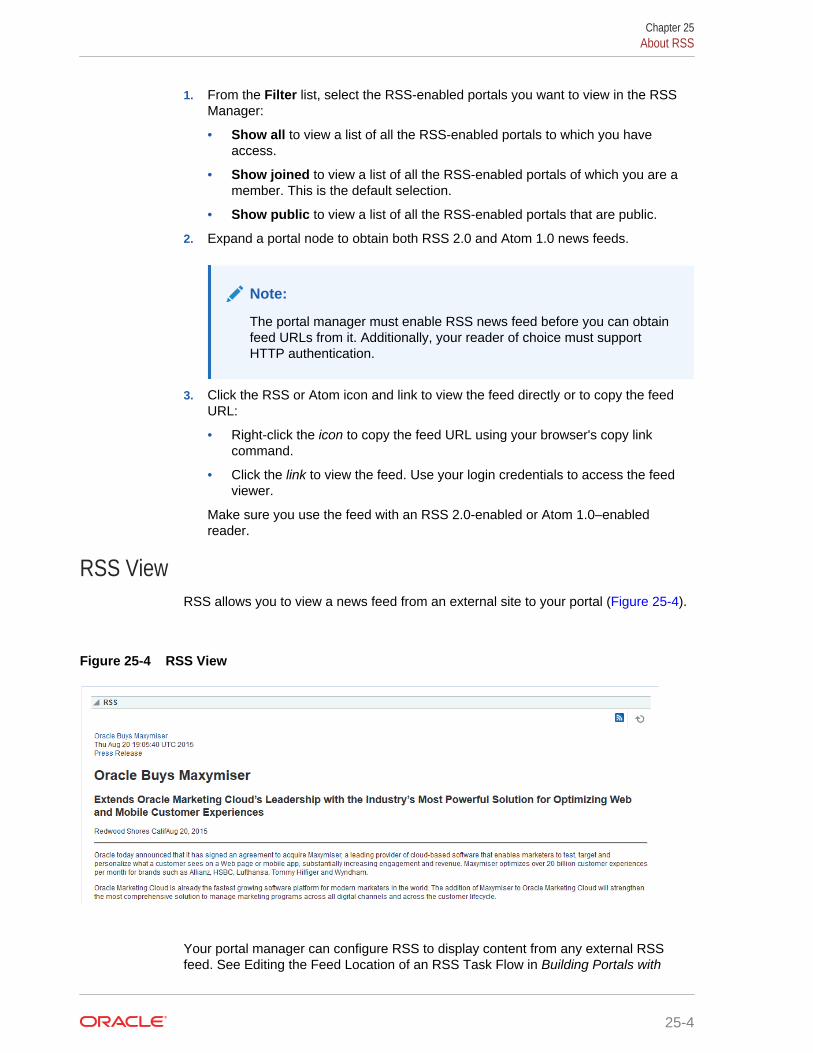
1. From the Filter list, select the RSS-enabled portals you want to view in the RSSManager:
• Show all to view a list of all the RSS-enabled portals to which you haveaccess.
• Show joined to view a list of all the RSS-enabled portals of which you are amember. This is the default selection.
• Show public to view a list of all the RSS-enabled portals that are public.
2. Expand a portal node to obtain both RSS 2.0 and Atom 1.0 news feeds.
Note:
The portal manager must enable RSS news feed before you can obtainfeed URLs from it. Additionally, your reader of choice must supportHTTP authentication.
3. Click the RSS or Atom icon and link to view the feed directly or to copy the feedURL:
• Right-click the icon to copy the feed URL using your browser's copy linkcommand.
• Click the link to view the feed. Use your login credentials to access the feedviewer.
Make sure you use the feed with an RSS 2.0-enabled or Atom 1.0–enabledreader.
RSS ViewRSS allows you to view a news feed from an external site to your portal (Figure 25-4).
Figure 25-4 RSS View
Your portal manager can configure RSS to display content from any external RSSfeed. See Editing the Feed Location of an RSS Task Flow in Building Portals with
Chapter 25About RSS
25-4
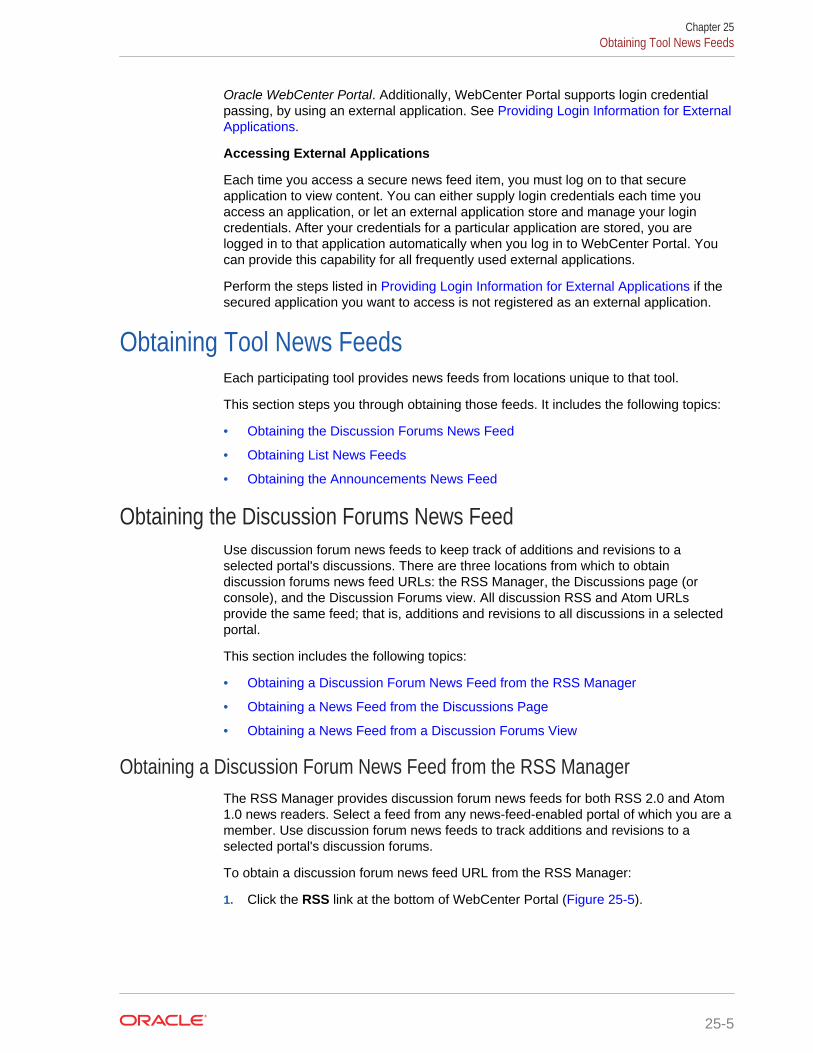
Oracle WebCenter Portal. Additionally, WebCenter Portal supports login credentialpassing, by using an external application. See Providing Login Information for ExternalApplications.
Accessing External Applications
Each time you access a secure news feed item, you must log on to that secureapplication to view content. You can either supply login credentials each time youaccess an application, or let an external application store and manage your logincredentials. After your credentials for a particular application are stored, you arelogged in to that application automatically when you log in to WebCenter Portal. Youcan provide this capability for all frequently used external applications.
Perform the steps listed in Providing Login Information for External Applications if thesecured application you want to access is not registered as an external application.
Obtaining Tool News FeedsEach participating tool provides news feeds from locations unique to that tool.
This section steps you through obtaining those feeds. It includes the following topics:
• Obtaining the Discussion Forums News Feed
• Obtaining List News Feeds
• Obtaining the Announcements News Feed
Obtaining the Discussion Forums News FeedUse discussion forum news feeds to keep track of additions and revisions to aselected portal's discussions. There are three locations from which to obtaindiscussion forums news feed URLs: the RSS Manager, the Discussions page (orconsole), and the Discussion Forums view. All discussion RSS and Atom URLsprovide the same feed; that is, additions and revisions to all discussions in a selectedportal.
This section includes the following topics:
• Obtaining a Discussion Forum News Feed from the RSS Manager
• Obtaining a News Feed from the Discussions Page
• Obtaining a News Feed from a Discussion Forums View
Obtaining a Discussion Forum News Feed from the RSS ManagerThe RSS Manager provides discussion forum news feeds for both RSS 2.0 and Atom1.0 news readers. Select a feed from any news-feed-enabled portal of which you are amember. Use discussion forum news feeds to track additions and revisions to aselected portal's discussion forums.
To obtain a discussion forum news feed URL from the RSS Manager:
1. Click the RSS link at the bottom of WebCenter Portal (Figure 25-5).
Chapter 25Obtaining Tool News Feeds
25-5
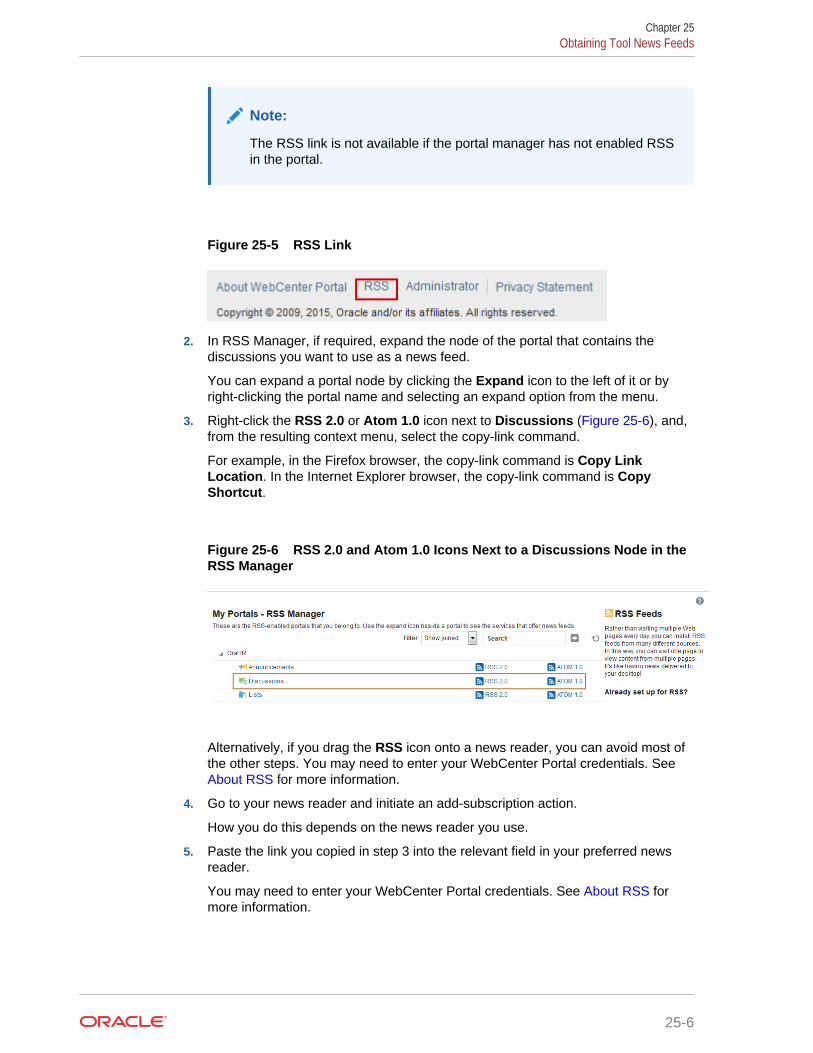
Note:
The RSS link is not available if the portal manager has not enabled RSSin the portal.
Figure 25-5 RSS Link
2. In RSS Manager, if required, expand the node of the portal that contains thediscussions you want to use as a news feed.
You can expand a portal node by clicking the Expand icon to the left of it or byright-clicking the portal name and selecting an expand option from the menu.
3. Right-click the RSS 2.0 or Atom 1.0 icon next to Discussions (Figure 25-6), and,from the resulting context menu, select the copy-link command.
For example, in the Firefox browser, the copy-link command is Copy LinkLocation. In the Internet Explorer browser, the copy-link command is CopyShortcut.
Figure 25-6 RSS 2.0 and Atom 1.0 Icons Next to a Discussions Node in theRSS Manager
Alternatively, if you drag the RSS icon onto a news reader, you can avoid most ofthe other steps. You may need to enter your WebCenter Portal credentials. See About RSS for more information.
4. Go to your news reader and initiate an add-subscription action.
How you do this depends on the news reader you use.
5. Paste the link you copied in step 3 into the relevant field in your preferred newsreader.
You may need to enter your WebCenter Portal credentials. See About RSS formore information.
Chapter 25Obtaining Tool News Feeds
25-6
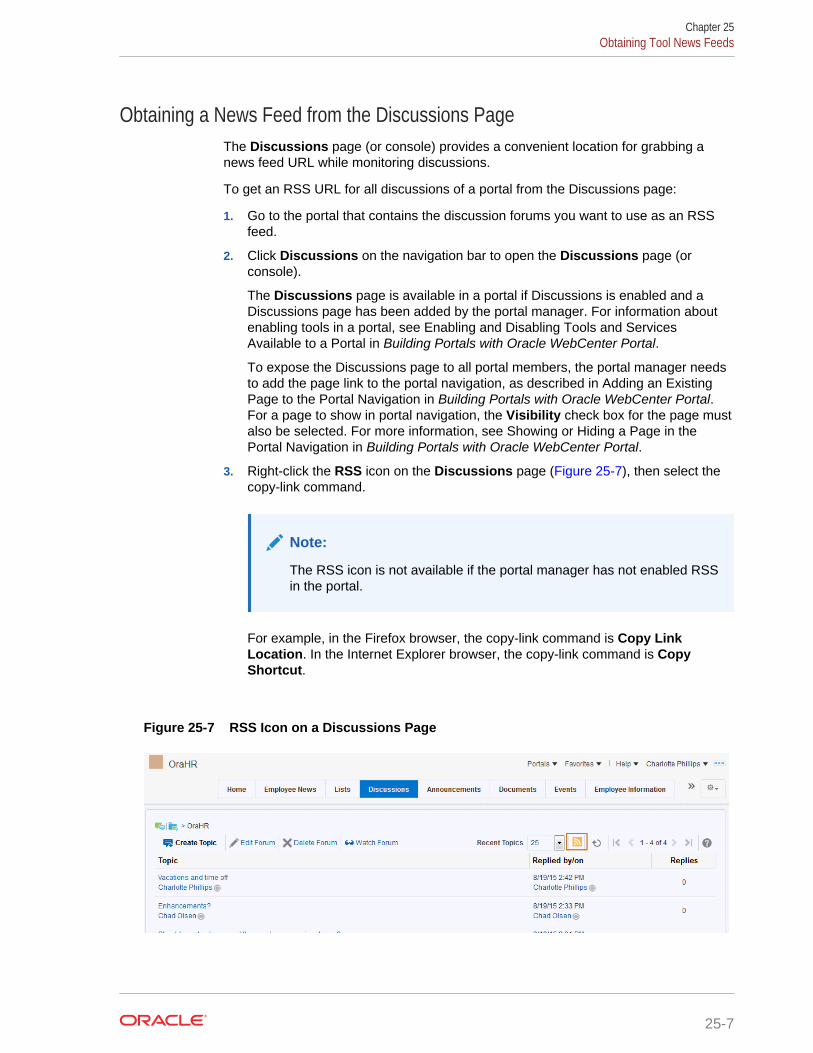
Obtaining a News Feed from the Discussions PageThe Discussions page (or console) provides a convenient location for grabbing anews feed URL while monitoring discussions.
To get an RSS URL for all discussions of a portal from the Discussions page:
1. Go to the portal that contains the discussion forums you want to use as an RSSfeed.
2. Click Discussions on the navigation bar to open the Discussions page (orconsole).
The Discussions page is available in a portal if Discussions is enabled and aDiscussions page has been added by the portal manager. For information aboutenabling tools in a portal, see Enabling and Disabling Tools and ServicesAvailable to a Portal in Building Portals with Oracle WebCenter Portal.
To expose the Discussions page to all portal members, the portal manager needsto add the page link to the portal navigation, as described in Adding an ExistingPage to the Portal Navigation in Building Portals with Oracle WebCenter Portal.For a page to show in portal navigation, the Visibility check box for the page mustalso be selected. For more information, see Showing or Hiding a Page in thePortal Navigation in Building Portals with Oracle WebCenter Portal.
3. Right-click the RSS icon on the Discussions page (Figure 25-7), then select thecopy-link command.
Note:
The RSS icon is not available if the portal manager has not enabled RSSin the portal.
For example, in the Firefox browser, the copy-link command is Copy LinkLocation. In the Internet Explorer browser, the copy-link command is CopyShortcut.
Figure 25-7 RSS Icon on a Discussions Page
Chapter 25Obtaining Tool News Feeds
25-7
Alternatively, if you drag the RSS icon onto your news reader, you can avoid mostof the other steps. You may need to enter your WebCenter Portal credentials. See About RSS for more information.
4. Go to your RSS reader and initiate an add-subscription action.
How you do this depends on the RSS reader you use.
5. Paste the link you copied in step 3 into the relevant field in your preferred RSSreader.
You may need to enter your WebCenter Portal credentials. See About RSS formore information.
Note:
The news feed URL on the Discussions page is for RSS 2.0 newsreaders only. If you prefer to use an Atom 1.0 news reader, then doeither of the following:
• Append &format=ATOM1.0 to the RSS news feed URL you pasted.
• Get the Atom 1.0 URL from the RSS Manager and use that URLhere. See Obtaining the Discussion Forums News Feed for moreinformation.
Obtaining a News Feed from a Discussion Forums ViewThe Discussion Forums view provides another location from where you can obtain adiscussions news feed for a selected portal. The placement of this view within a portalis at the discretion of the portal's manager. But, wherever you find it, an RSS icon isavailable to provide you with an RSS news feed URL. This section describes how touse it.
To obtain a news feed URL from a Discussion Forums view:
1. Go to the page in the required portal that contains discussion forums.
2. Right-click the RSS icon on the view (Figure 25-8), and then select the copy-linkcommand.
Note:
The RSS icon is not available if the portal manager has not enabled RSSin the portal.
For example, in the Firefox browser, the copy-link command is Copy LinkLocation. In the Internet Explorer browser, the copy-link command is CopyShortcut.
Chapter 25Obtaining Tool News Feeds
25-8

Figure 25-8 RSS Icon in a Discussion Forums View
Alternatively, if you drag the RSS icon onto your news reader, you can avoid mostof the other steps.
You may need to enter your WebCenter Portal credentials. See About RSS formore information.
3. Go to your RSS reader and initiate an add-subscription action.
How you do this depends on the RSS reader you use.
4. Paste the link you copied in step 2 into the relevant field in your preferred RSSreader.
Note:
The news feed URL in the Discussions view is for RSS 2.0 news readersonly. If you prefer to use an Atom 1.0 news reader, do either of thefollowing:
• Append &format=ATOM1.0 to the RSS news feed URL you pasted.
• Get the Atom 1.0 URL from the RSS Manager and use that URLhere. See Obtaining the Discussion Forums News Feed for moreinformation.
You may need to enter your WebCenter Portal credentials. See About RSS formore information.
Obtaining List News FeedsLists provide a vital form of tracking that can be used to track just about everythingwithin an organization. For example, a group might want a membership list thatoutlines assigned roles and contact information. A project lead might set up a list thattracks issue resolution.
It follows that it would be useful to track revisions to such lists from one convenientlocation: your favorite news reader.
Lists provides two options for keeping track of changes through a news reader:
• Keep track of all recently added or modified lists in a given portal.
• Keep track of recently added or modified data rows in a given list.
You can obtain the news feed URL for lists from three locations: the RSS Manager,the Lists page, and any Lists view on a given page. The RSS Manager and the Lists
Chapter 25Obtaining Tool News Feeds
25-9
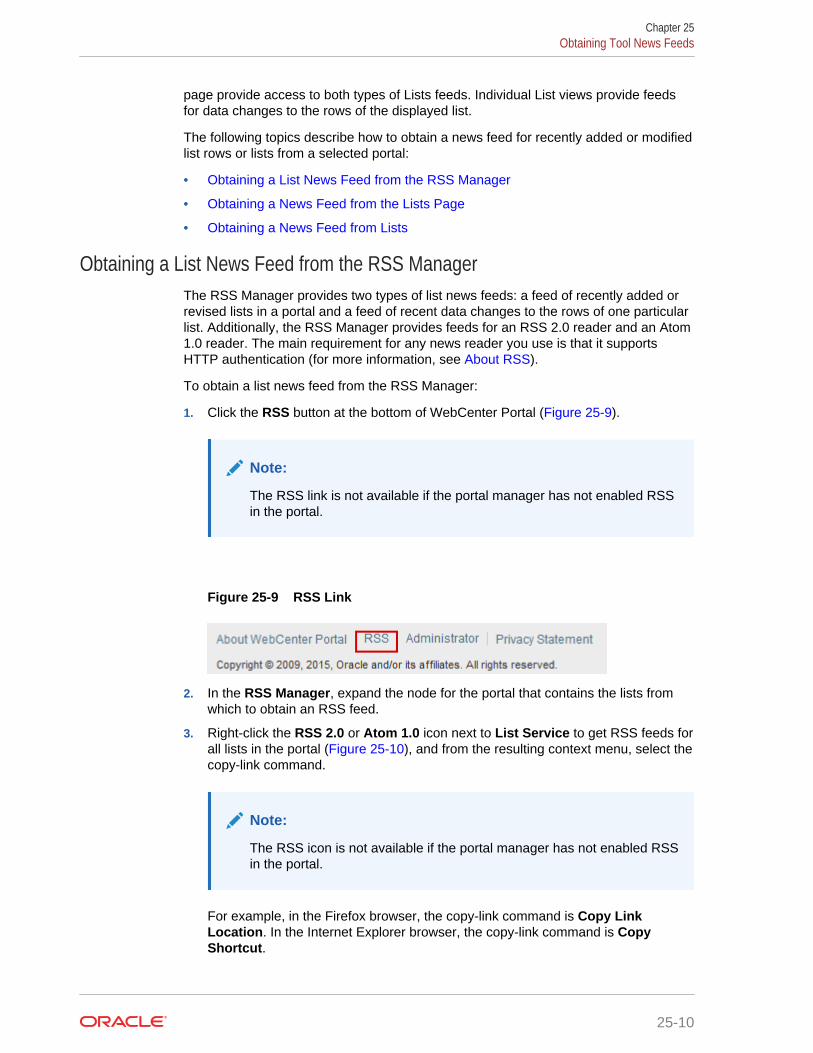
page provide access to both types of Lists feeds. Individual List views provide feedsfor data changes to the rows of the displayed list.
The following topics describe how to obtain a news feed for recently added or modifiedlist rows or lists from a selected portal:
• Obtaining a List News Feed from the RSS Manager
• Obtaining a News Feed from the Lists Page
• Obtaining a News Feed from Lists
Obtaining a List News Feed from the RSS ManagerThe RSS Manager provides two types of list news feeds: a feed of recently added orrevised lists in a portal and a feed of recent data changes to the rows of one particularlist. Additionally, the RSS Manager provides feeds for an RSS 2.0 reader and an Atom1.0 reader. The main requirement for any news reader you use is that it supportsHTTP authentication (for more information, see About RSS).
To obtain a list news feed from the RSS Manager:
1. Click the RSS button at the bottom of WebCenter Portal (Figure 25-9).
Note:
The RSS link is not available if the portal manager has not enabled RSSin the portal.
Figure 25-9 RSS Link
2. In the RSS Manager, expand the node for the portal that contains the lists fromwhich to obtain an RSS feed.
3. Right-click the RSS 2.0 or Atom 1.0 icon next to List Service to get RSS feeds forall lists in the portal (Figure 25-10), and from the resulting context menu, select thecopy-link command.
Note:
The RSS icon is not available if the portal manager has not enabled RSSin the portal.
For example, in the Firefox browser, the copy-link command is Copy LinkLocation. In the Internet Explorer browser, the copy-link command is CopyShortcut.
Chapter 25Obtaining Tool News Feeds
25-10
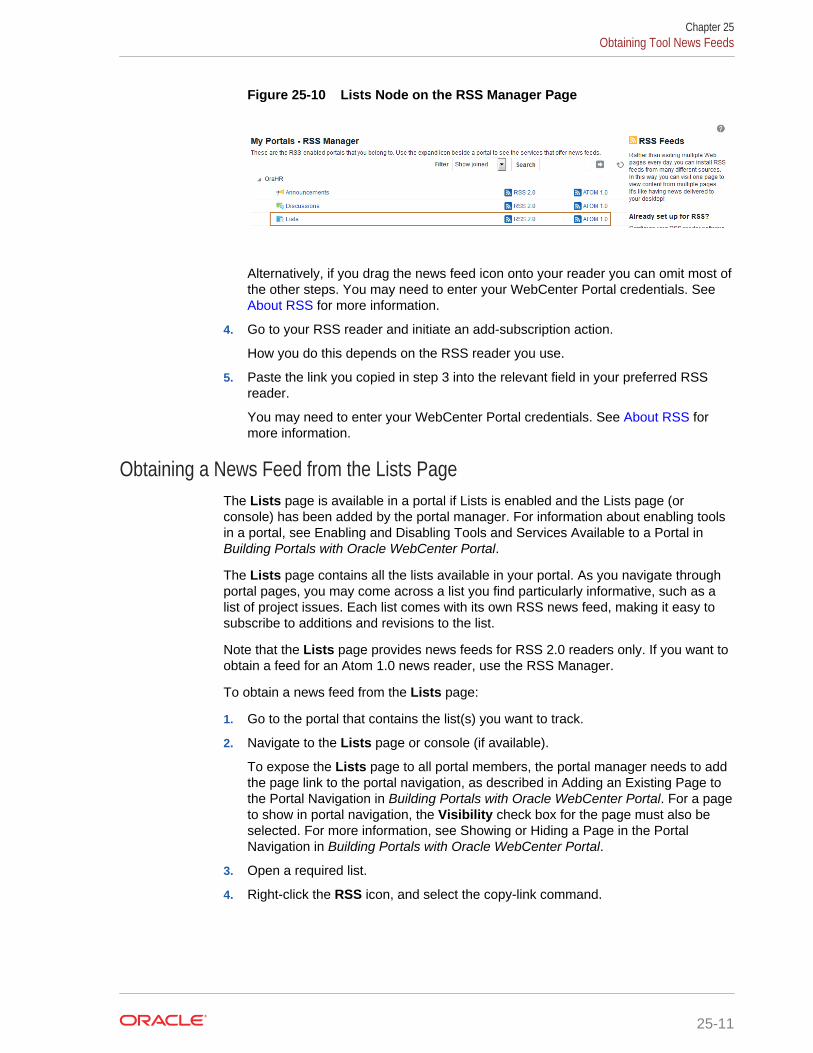
Figure 25-10 Lists Node on the RSS Manager Page
Alternatively, if you drag the news feed icon onto your reader you can omit most ofthe other steps. You may need to enter your WebCenter Portal credentials. See About RSS for more information.
4. Go to your RSS reader and initiate an add-subscription action.
How you do this depends on the RSS reader you use.
5. Paste the link you copied in step 3 into the relevant field in your preferred RSSreader.
You may need to enter your WebCenter Portal credentials. See About RSS formore information.
Obtaining a News Feed from the Lists PageThe Lists page is available in a portal if Lists is enabled and the Lists page (orconsole) has been added by the portal manager. For information about enabling toolsin a portal, see Enabling and Disabling Tools and Services Available to a Portal inBuilding Portals with Oracle WebCenter Portal.
The Lists page contains all the lists available in your portal. As you navigate throughportal pages, you may come across a list you find particularly informative, such as alist of project issues. Each list comes with its own RSS news feed, making it easy tosubscribe to additions and revisions to the list.
Note that the Lists page provides news feeds for RSS 2.0 readers only. If you want toobtain a feed for an Atom 1.0 news reader, use the RSS Manager.
To obtain a news feed from the Lists page:
1. Go to the portal that contains the list(s) you want to track.
2. Navigate to the Lists page or console (if available).
To expose the Lists page to all portal members, the portal manager needs to addthe page link to the portal navigation, as described in Adding an Existing Page tothe Portal Navigation in Building Portals with Oracle WebCenter Portal. For a pageto show in portal navigation, the Visibility check box for the page must also beselected. For more information, see Showing or Hiding a Page in the PortalNavigation in Building Portals with Oracle WebCenter Portal.
3. Open a required list.
4. Right-click the RSS icon, and select the copy-link command.
Chapter 25Obtaining Tool News Feeds
25-11
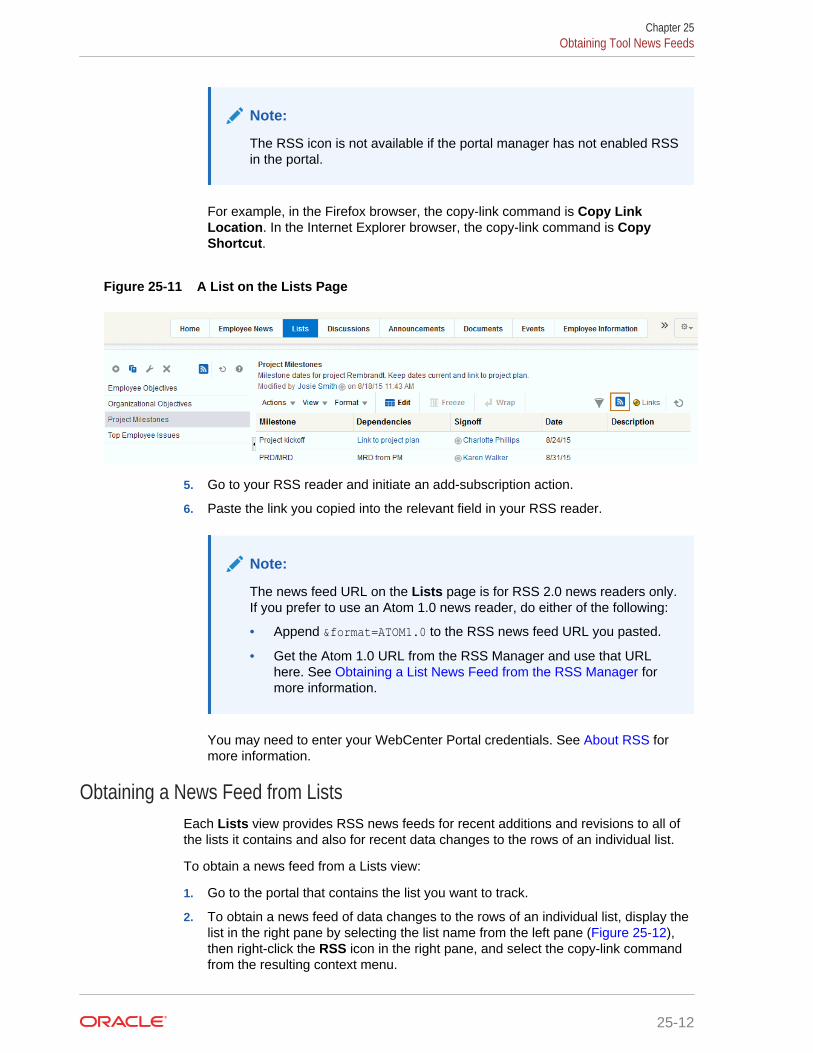
Note:
The RSS icon is not available if the portal manager has not enabled RSSin the portal.
For example, in the Firefox browser, the copy-link command is Copy LinkLocation. In the Internet Explorer browser, the copy-link command is CopyShortcut.
Figure 25-11 A List on the Lists Page
5. Go to your RSS reader and initiate an add-subscription action.
6. Paste the link you copied into the relevant field in your RSS reader.
Note:
The news feed URL on the Lists page is for RSS 2.0 news readers only.If you prefer to use an Atom 1.0 news reader, do either of the following:
• Append &format=ATOM1.0 to the RSS news feed URL you pasted.
• Get the Atom 1.0 URL from the RSS Manager and use that URLhere. See Obtaining a List News Feed from the RSS Manager formore information.
You may need to enter your WebCenter Portal credentials. See About RSS formore information.
Obtaining a News Feed from ListsEach Lists view provides RSS news feeds for recent additions and revisions to all ofthe lists it contains and also for recent data changes to the rows of an individual list.
To obtain a news feed from a Lists view:
1. Go to the portal that contains the list you want to track.
2. To obtain a news feed of data changes to the rows of an individual list, display thelist in the right pane by selecting the list name from the left pane (Figure 25-12),then right-click the RSS icon in the right pane, and select the copy-link commandfrom the resulting context menu.
Chapter 25Obtaining Tool News Feeds
25-12
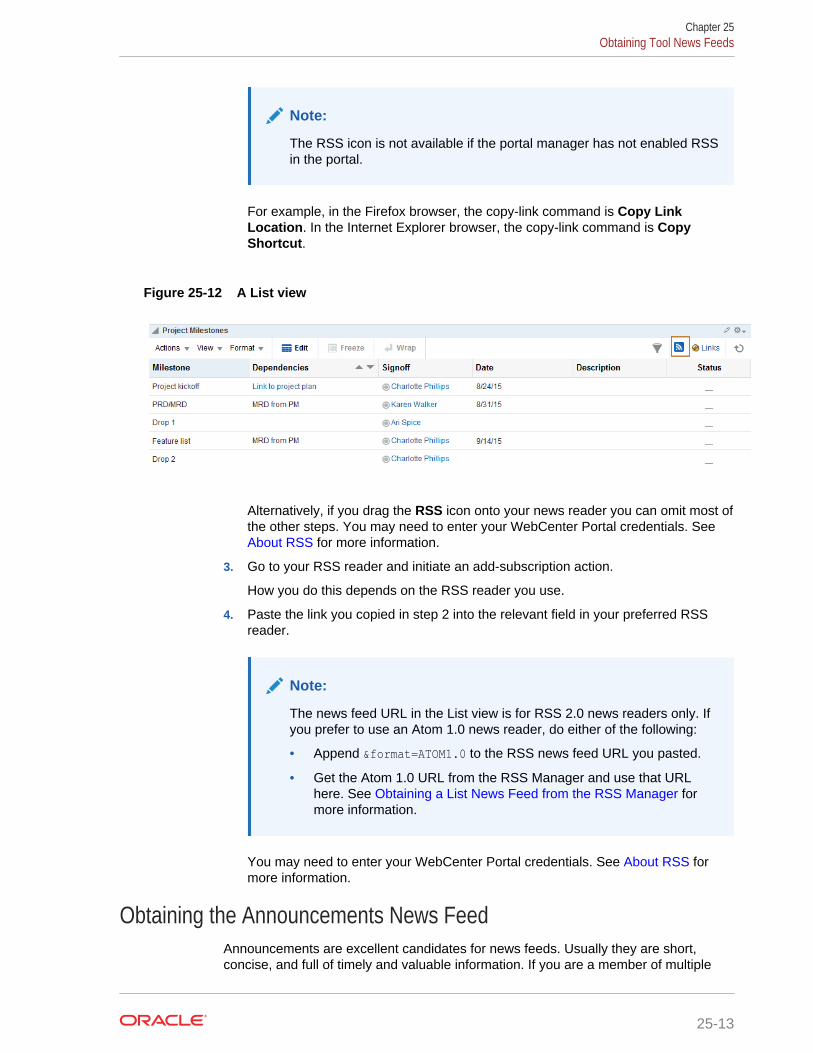
Note:
The RSS icon is not available if the portal manager has not enabled RSSin the portal.
For example, in the Firefox browser, the copy-link command is Copy LinkLocation. In the Internet Explorer browser, the copy-link command is CopyShortcut.
Figure 25-12 A List view
Alternatively, if you drag the RSS icon onto your news reader you can omit most ofthe other steps. You may need to enter your WebCenter Portal credentials. See About RSS for more information.
3. Go to your RSS reader and initiate an add-subscription action.
How you do this depends on the RSS reader you use.
4. Paste the link you copied in step 2 into the relevant field in your preferred RSSreader.
Note:
The news feed URL in the List view is for RSS 2.0 news readers only. Ifyou prefer to use an Atom 1.0 news reader, do either of the following:
• Append &format=ATOM1.0 to the RSS news feed URL you pasted.
• Get the Atom 1.0 URL from the RSS Manager and use that URLhere. See Obtaining a List News Feed from the RSS Manager formore information.
You may need to enter your WebCenter Portal credentials. See About RSS formore information.
Obtaining the Announcements News FeedAnnouncements are excellent candidates for news feeds. Usually they are short,concise, and full of timely and valuable information. If you are a member of multiple
Chapter 25Obtaining Tool News Feeds
25-13
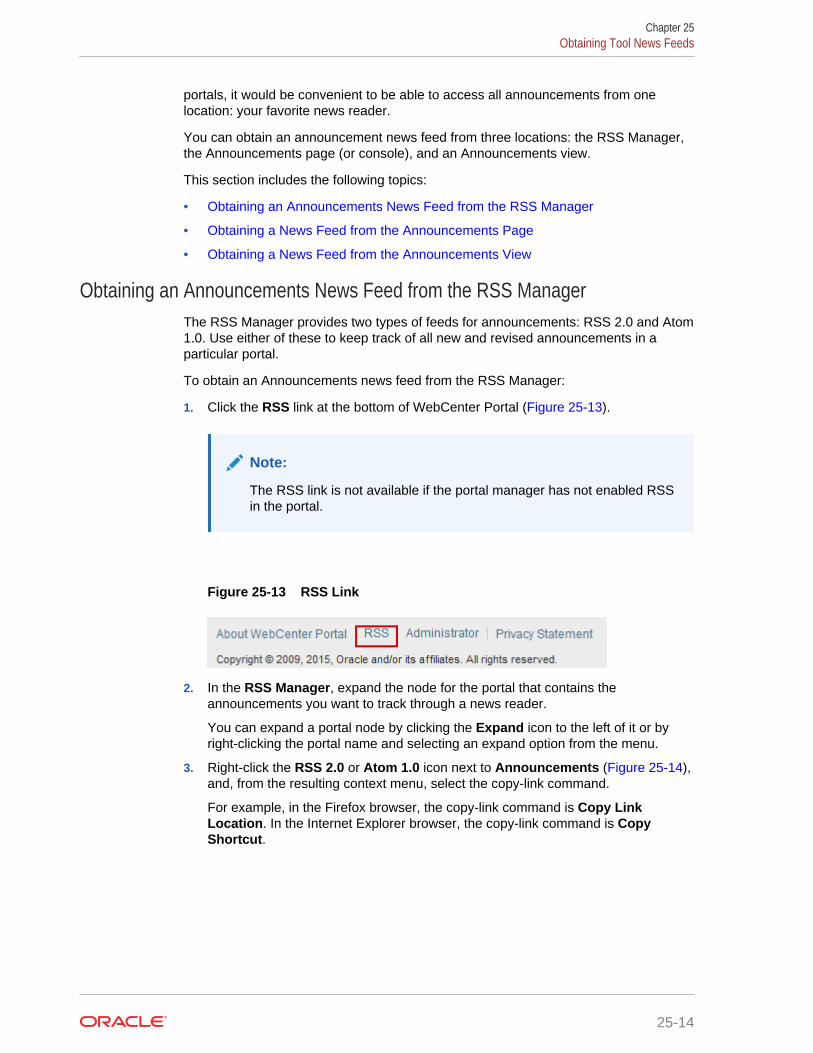
portals, it would be convenient to be able to access all announcements from onelocation: your favorite news reader.
You can obtain an announcement news feed from three locations: the RSS Manager,the Announcements page (or console), and an Announcements view.
This section includes the following topics:
• Obtaining an Announcements News Feed from the RSS Manager
• Obtaining a News Feed from the Announcements Page
• Obtaining a News Feed from the Announcements View
Obtaining an Announcements News Feed from the RSS ManagerThe RSS Manager provides two types of feeds for announcements: RSS 2.0 and Atom1.0. Use either of these to keep track of all new and revised announcements in aparticular portal.
To obtain an Announcements news feed from the RSS Manager:
1. Click the RSS link at the bottom of WebCenter Portal (Figure 25-13).
Note:
The RSS link is not available if the portal manager has not enabled RSSin the portal.
Figure 25-13 RSS Link
2. In the RSS Manager, expand the node for the portal that contains theannouncements you want to track through a news reader.
You can expand a portal node by clicking the Expand icon to the left of it or byright-clicking the portal name and selecting an expand option from the menu.
3. Right-click the RSS 2.0 or Atom 1.0 icon next to Announcements (Figure 25-14),and, from the resulting context menu, select the copy-link command.
For example, in the Firefox browser, the copy-link command is Copy LinkLocation. In the Internet Explorer browser, the copy-link command is CopyShortcut.
Chapter 25Obtaining Tool News Feeds
25-14
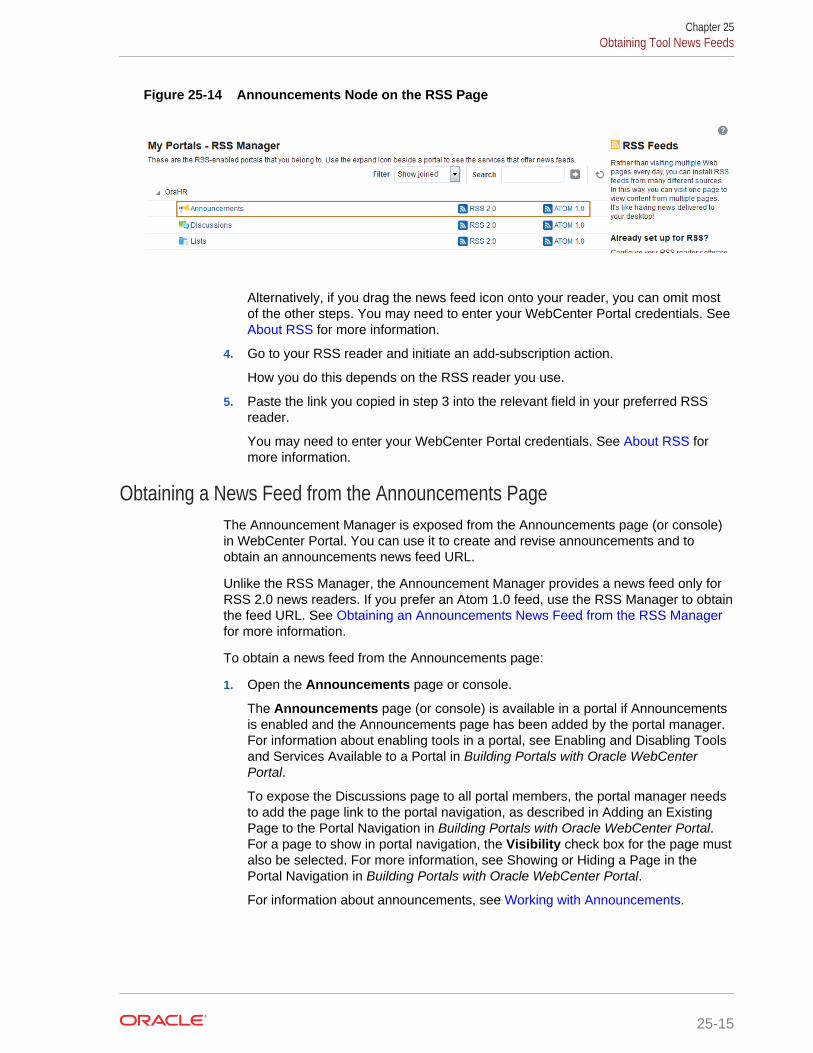
Figure 25-14 Announcements Node on the RSS Page
Alternatively, if you drag the news feed icon onto your reader, you can omit mostof the other steps. You may need to enter your WebCenter Portal credentials. See About RSS for more information.
4. Go to your RSS reader and initiate an add-subscription action.
How you do this depends on the RSS reader you use.
5. Paste the link you copied in step 3 into the relevant field in your preferred RSSreader.
You may need to enter your WebCenter Portal credentials. See About RSS formore information.
Obtaining a News Feed from the Announcements PageThe Announcement Manager is exposed from the Announcements page (or console)in WebCenter Portal. You can use it to create and revise announcements and toobtain an announcements news feed URL.
Unlike the RSS Manager, the Announcement Manager provides a news feed only forRSS 2.0 news readers. If you prefer an Atom 1.0 feed, use the RSS Manager to obtainthe feed URL. See Obtaining an Announcements News Feed from the RSS Managerfor more information.
To obtain a news feed from the Announcements page:
1. Open the Announcements page or console.
The Announcements page (or console) is available in a portal if Announcementsis enabled and the Announcements page has been added by the portal manager.For information about enabling tools in a portal, see Enabling and Disabling Toolsand Services Available to a Portal in Building Portals with Oracle WebCenterPortal.
To expose the Discussions page to all portal members, the portal manager needsto add the page link to the portal navigation, as described in Adding an ExistingPage to the Portal Navigation in Building Portals with Oracle WebCenter Portal.For a page to show in portal navigation, the Visibility check box for the page mustalso be selected. For more information, see Showing or Hiding a Page in thePortal Navigation in Building Portals with Oracle WebCenter Portal.
For information about announcements, see Working with Announcements.
Chapter 25Obtaining Tool News Feeds
25-15
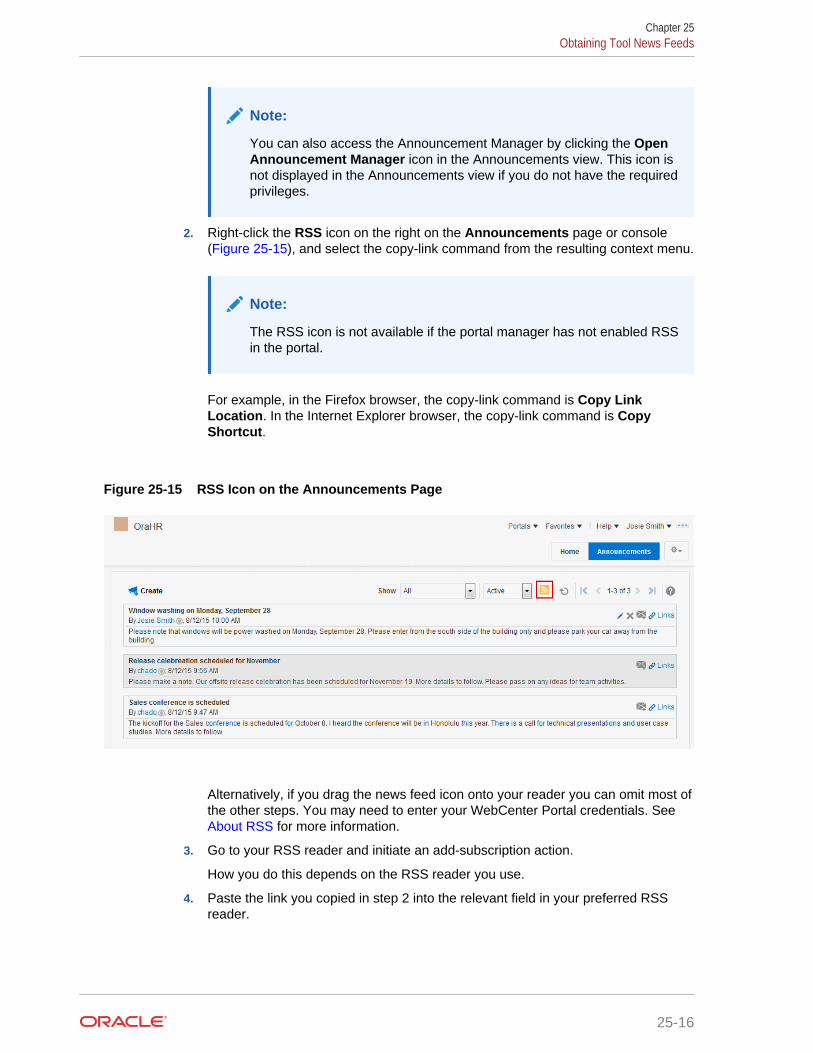
Note:
You can also access the Announcement Manager by clicking the OpenAnnouncement Manager icon in the Announcements view. This icon isnot displayed in the Announcements view if you do not have the requiredprivileges.
2. Right-click the RSS icon on the right on the Announcements page or console(Figure 25-15), and select the copy-link command from the resulting context menu.
Note:
The RSS icon is not available if the portal manager has not enabled RSSin the portal.
For example, in the Firefox browser, the copy-link command is Copy LinkLocation. In the Internet Explorer browser, the copy-link command is CopyShortcut.
Figure 25-15 RSS Icon on the Announcements Page
Alternatively, if you drag the news feed icon onto your reader you can omit most ofthe other steps. You may need to enter your WebCenter Portal credentials. See About RSS for more information.
3. Go to your RSS reader and initiate an add-subscription action.
How you do this depends on the RSS reader you use.
4. Paste the link you copied in step 2 into the relevant field in your preferred RSSreader.
Chapter 25Obtaining Tool News Feeds
25-16
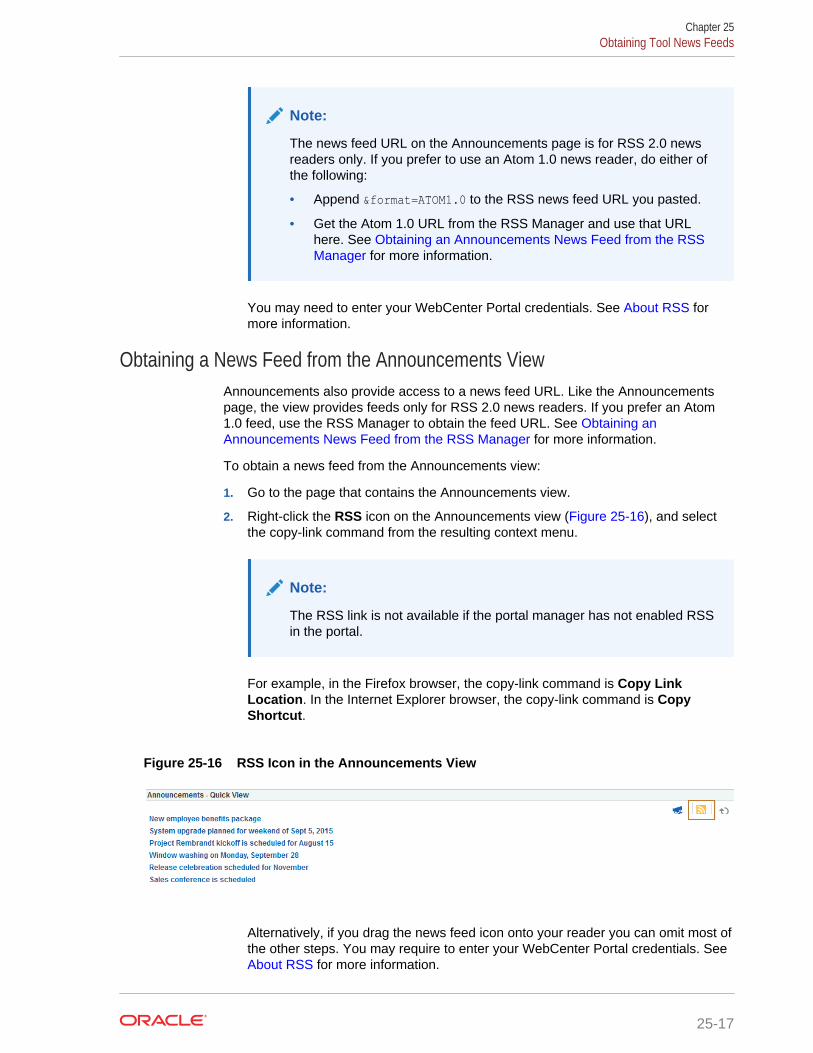
Note:
The news feed URL on the Announcements page is for RSS 2.0 newsreaders only. If you prefer to use an Atom 1.0 news reader, do either ofthe following:
• Append &format=ATOM1.0 to the RSS news feed URL you pasted.
• Get the Atom 1.0 URL from the RSS Manager and use that URLhere. See Obtaining an Announcements News Feed from the RSSManager for more information.
You may need to enter your WebCenter Portal credentials. See About RSS formore information.
Obtaining a News Feed from the Announcements ViewAnnouncements also provide access to a news feed URL. Like the Announcementspage, the view provides feeds only for RSS 2.0 news readers. If you prefer an Atom1.0 feed, use the RSS Manager to obtain the feed URL. See Obtaining anAnnouncements News Feed from the RSS Manager for more information.
To obtain a news feed from the Announcements view:
1. Go to the page that contains the Announcements view.
2. Right-click the RSS icon on the Announcements view (Figure 25-16), and selectthe copy-link command from the resulting context menu.
Note:
The RSS link is not available if the portal manager has not enabled RSSin the portal.
For example, in the Firefox browser, the copy-link command is Copy LinkLocation. In the Internet Explorer browser, the copy-link command is CopyShortcut.
Figure 25-16 RSS Icon in the Announcements View
Alternatively, if you drag the news feed icon onto your reader you can omit most ofthe other steps. You may require to enter your WebCenter Portal credentials. See About RSS for more information.
Chapter 25Obtaining Tool News Feeds
25-17
3. Go to your RSS reader and initiate an add-subscription action.
How you do this depends on the RSS reader you use.
4. Paste the link you copied in step 2 into the relevant field in your preferred RSSreader.
Note:
The news feed URL in the Announcements view is for RSS 2.0 newsreaders only. If you prefer to use an Atom 1.0 news reader, do either ofthe following:
• Append &format=ATOM1.0 to the RSS news feed URL you pasted.
• Get the Atom 1.0 URL from the RSS Manager and use that URLhere. See Obtaining an Announcements News Feed from the RSSManager for more information.
You may need to enter your WebCenter Portal credentials. See About RSS formore information.
Refreshing RSSThe RSS component, along with other page components, gets refreshed with everyserver request. However, as the content from news feeds may be dynamic, you havethe option of refreshing RSS yourself by clicking the Refresh icon (Figure 25-17),when required.
To see the latest RSS feeds, click the Refresh icon (Figure 25-17).
Note:
Do not click the Reload or Refresh button in your browser. Click the Refreshicon to update your view.
Chapter 25Refreshing RSS
25-18
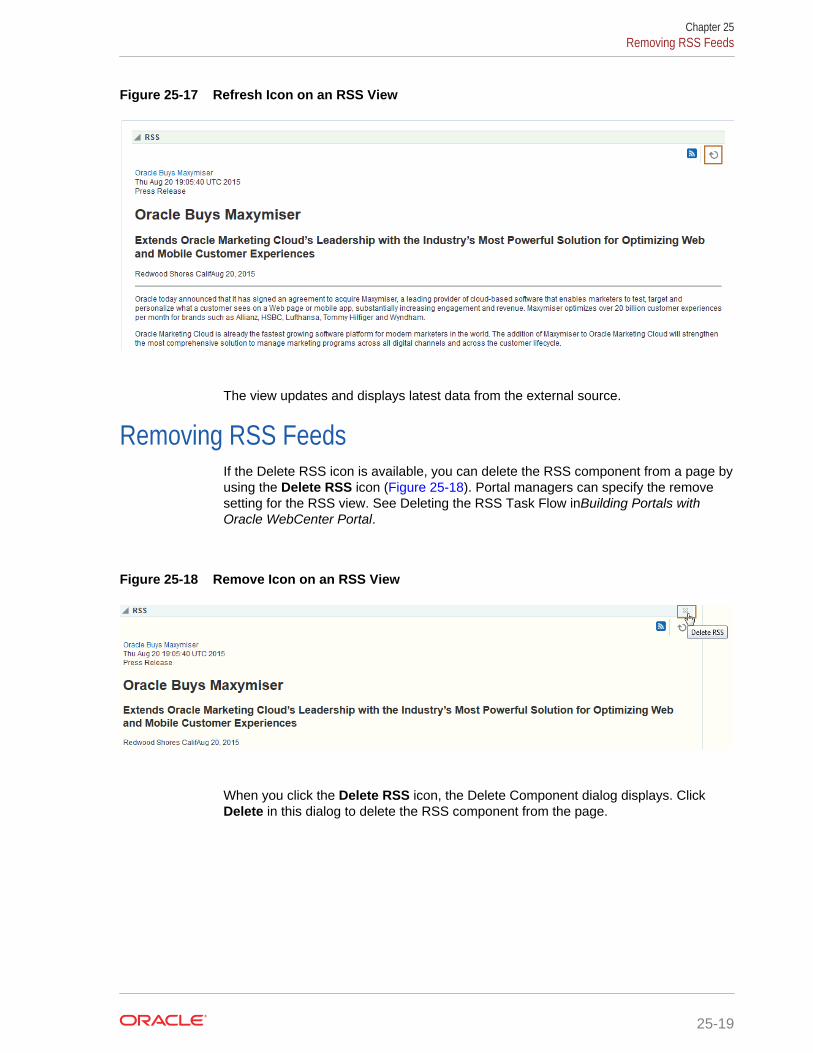
Figure 25-17 Refresh Icon on an RSS View
The view updates and displays latest data from the external source.
Removing RSS FeedsIf the Delete RSS icon is available, you can delete the RSS component from a page byusing the Delete RSS icon (Figure 25-18). Portal managers can specify the removesetting for the RSS view. See Deleting the RSS Task Flow inBuilding Portals withOracle WebCenter Portal.
Figure 25-18 Remove Icon on an RSS View
When you click the Delete RSS icon, the Delete Component dialog displays. ClickDelete in this dialog to delete the RSS component from the page.
Chapter 25Removing RSS Feeds
25-19
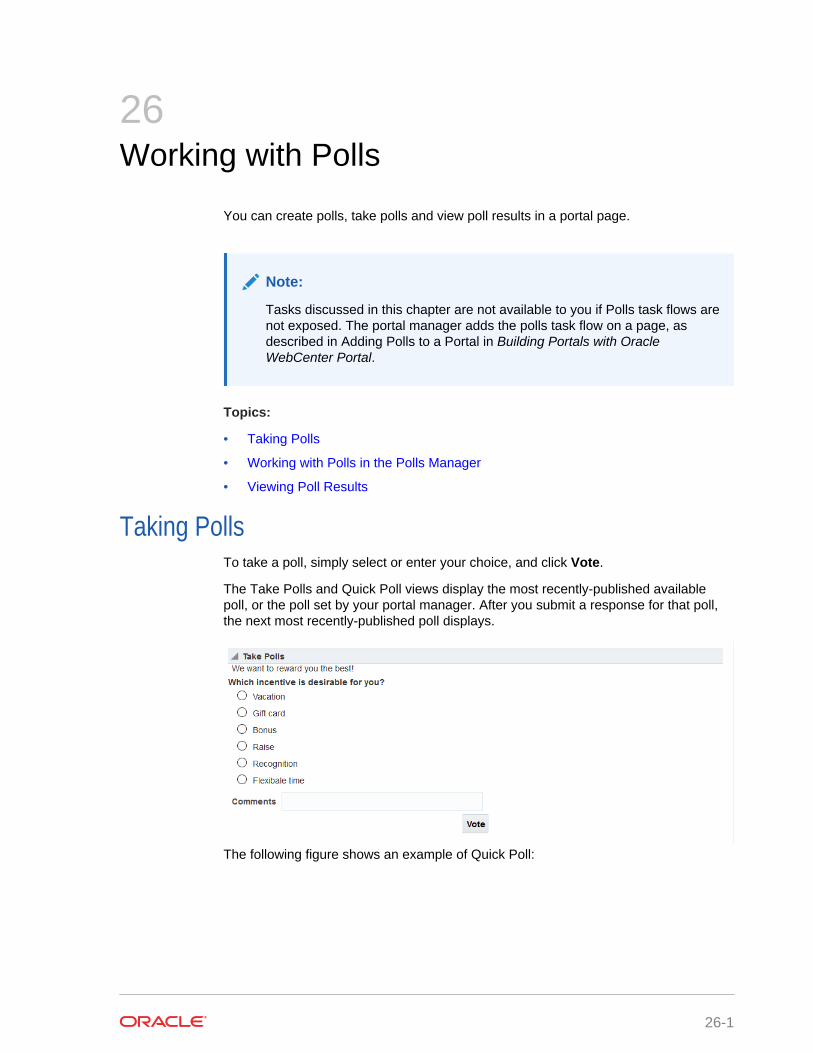
26Working with Polls
You can create polls, take polls and view poll results in a portal page.
Note:
Tasks discussed in this chapter are not available to you if Polls task flows arenot exposed. The portal manager adds the polls task flow on a page, asdescribed in Adding Polls to a Portal in Building Portals with OracleWebCenter Portal.
Topics:
• Taking Polls
• Working with Polls in the Polls Manager
• Viewing Poll Results
Taking PollsTo take a poll, simply select or enter your choice, and click Vote.
The Take Polls and Quick Poll views display the most recently-published availablepoll, or the poll set by your portal manager. After you submit a response for that poll,the next most recently-published poll displays.
The following figure shows an example of Quick Poll:
26-1
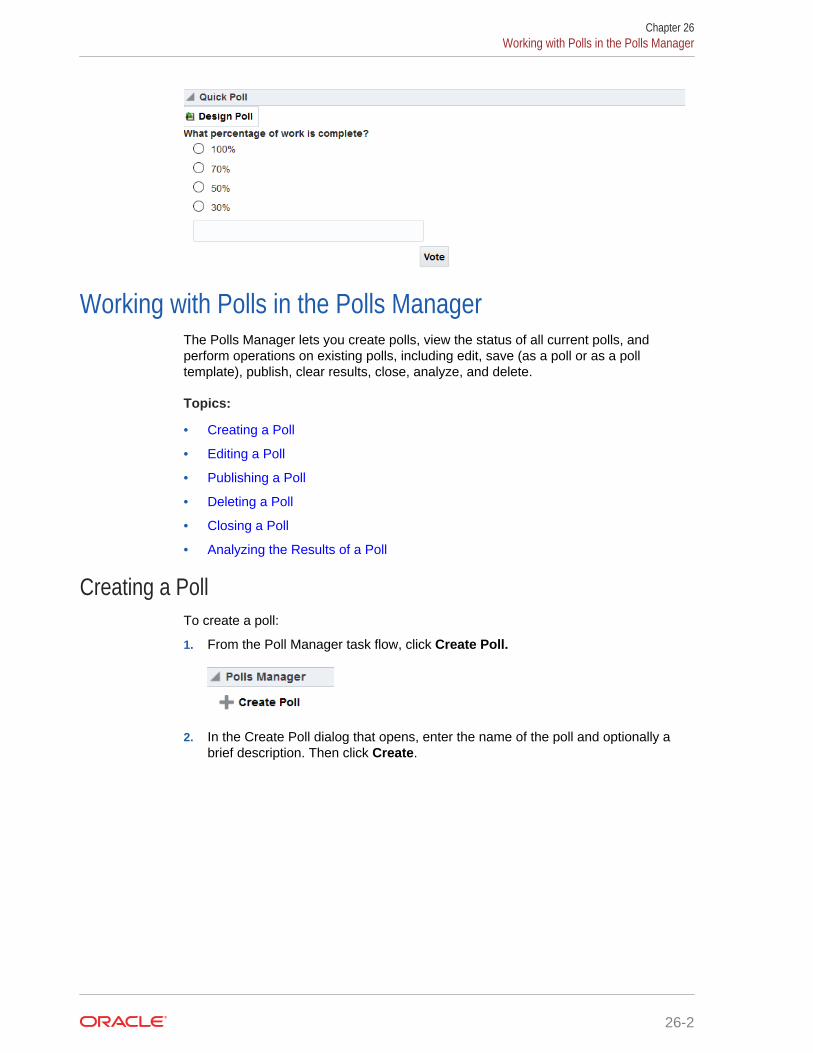
Working with Polls in the Polls ManagerThe Polls Manager lets you create polls, view the status of all current polls, andperform operations on existing polls, including edit, save (as a poll or as a polltemplate), publish, clear results, close, analyze, and delete.
Topics:
• Creating a Poll
• Editing a Poll
• Publishing a Poll
• Deleting a Poll
• Closing a Poll
• Analyzing the Results of a Poll
Creating a PollTo create a poll:
1. From the Poll Manager task flow, click Create Poll.
2. In the Create Poll dialog that opens, enter the name of the poll and optionally abrief description. Then click Create.
Chapter 26Working with Polls in the Polls Manager
26-2
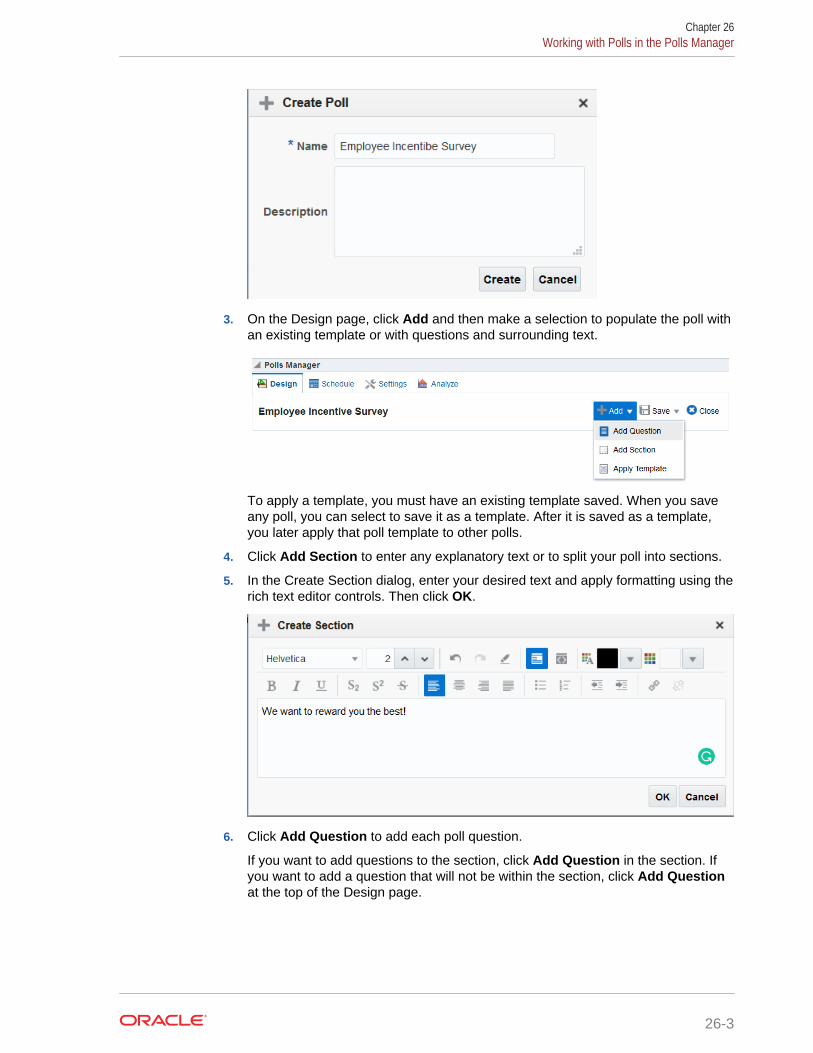
3. On the Design page, click Add and then make a selection to populate the poll withan existing template or with questions and surrounding text.
To apply a template, you must have an existing template saved. When you saveany poll, you can select to save it as a template. After it is saved as a template,you later apply that poll template to other polls.
4. Click Add Section to enter any explanatory text or to split your poll into sections.
5. In the Create Section dialog, enter your desired text and apply formatting using therich text editor controls. Then click OK.
6. Click Add Question to add each poll question.
If you want to add questions to the section, click Add Question in the section. Ifyou want to add a question that will not be within the section, click Add Questionat the top of the Design page.
Chapter 26Working with Polls in the Polls Manager
26-3
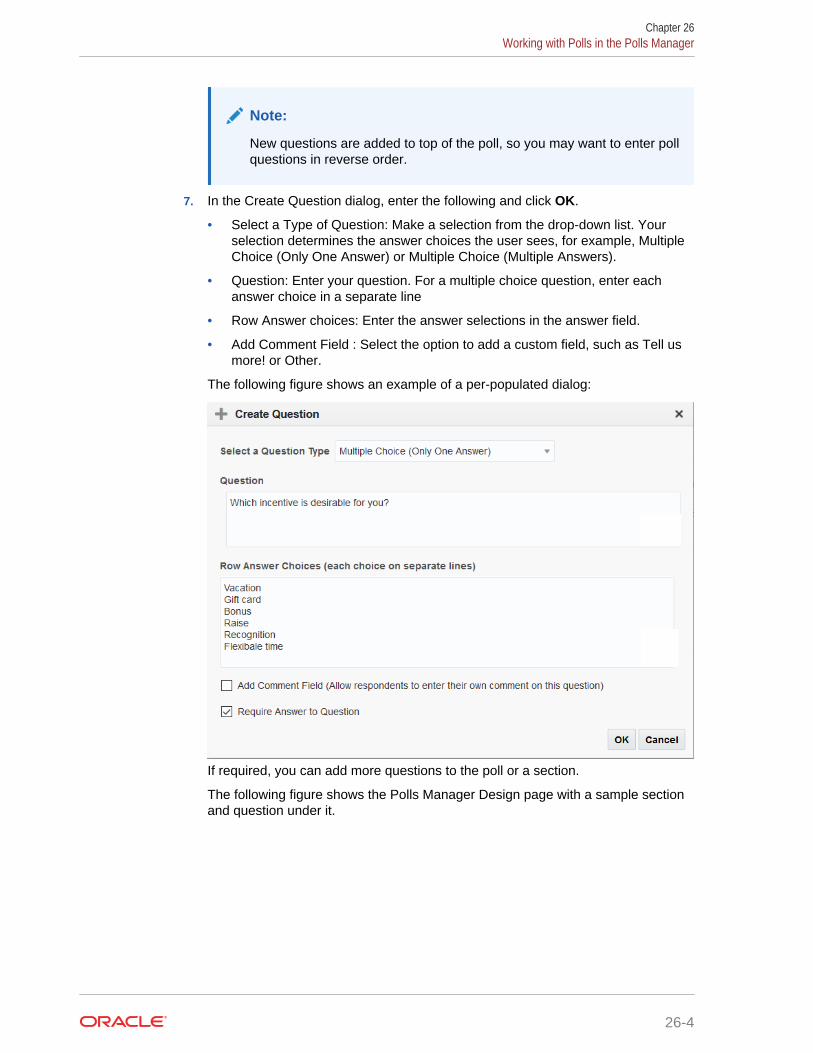
Note:
New questions are added to top of the poll, so you may want to enter pollquestions in reverse order.
7. In the Create Question dialog, enter the following and click OK.
• Select a Type of Question: Make a selection from the drop-down list. Yourselection determines the answer choices the user sees, for example, MultipleChoice (Only One Answer) or Multiple Choice (Multiple Answers).
• Question: Enter your question. For a multiple choice question, enter eachanswer choice in a separate line
• Row Answer choices: Enter the answer selections in the answer field.
• Add Comment Field : Select the option to add a custom field, such as Tell usmore! or Other.
The following figure shows an example of a per-populated dialog:
If required, you can add more questions to the poll or a section.
The following figure shows the Polls Manager Design page with a sample sectionand question under it.
Chapter 26Working with Polls in the Polls Manager
26-4
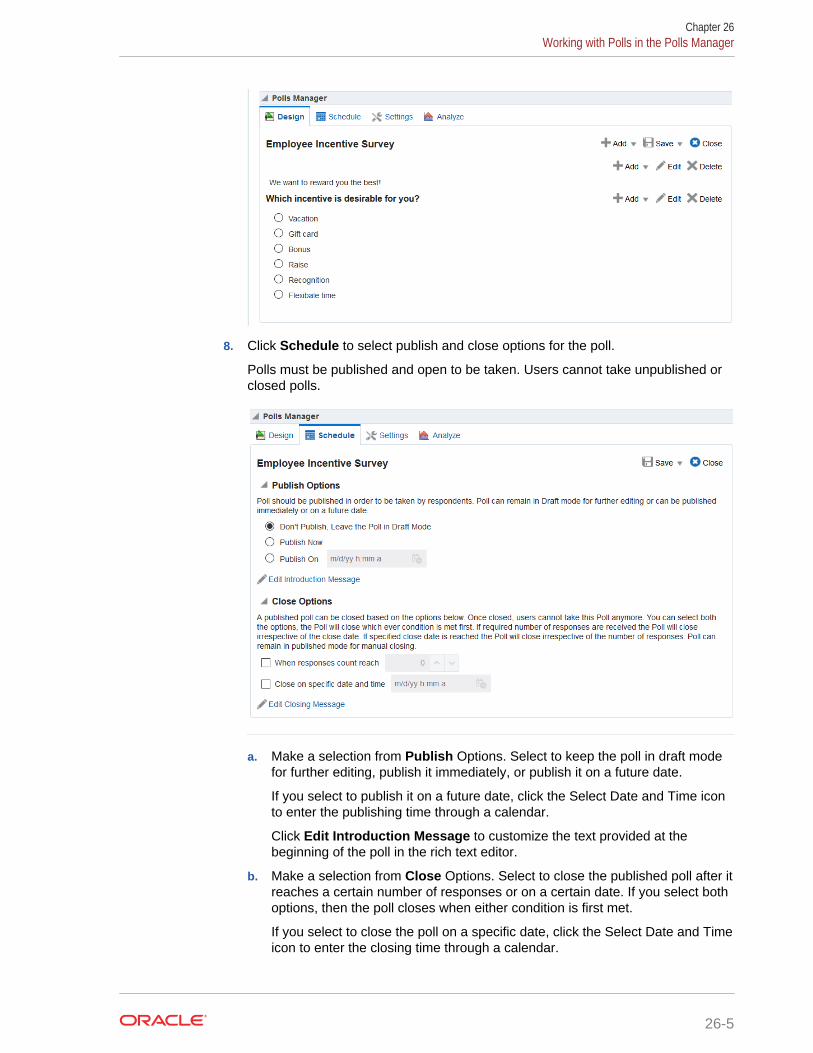
8. Click Schedule to select publish and close options for the poll.
Polls must be published and open to be taken. Users cannot take unpublished orclosed polls.
a. Make a selection from Publish Options. Select to keep the poll in draft modefor further editing, publish it immediately, or publish it on a future date.
If you select to publish it on a future date, click the Select Date and Time iconto enter the publishing time through a calendar.
Click Edit Introduction Message to customize the text provided at thebeginning of the poll in the rich text editor.
b. Make a selection from Close Options. Select to close the published poll after itreaches a certain number of responses or on a certain date. If you select bothoptions, then the poll closes when either condition is first met.
If you select to close the poll on a specific date, click the Select Date and Timeicon to enter the closing time through a calendar.
Chapter 26Working with Polls in the Polls Manager
26-5
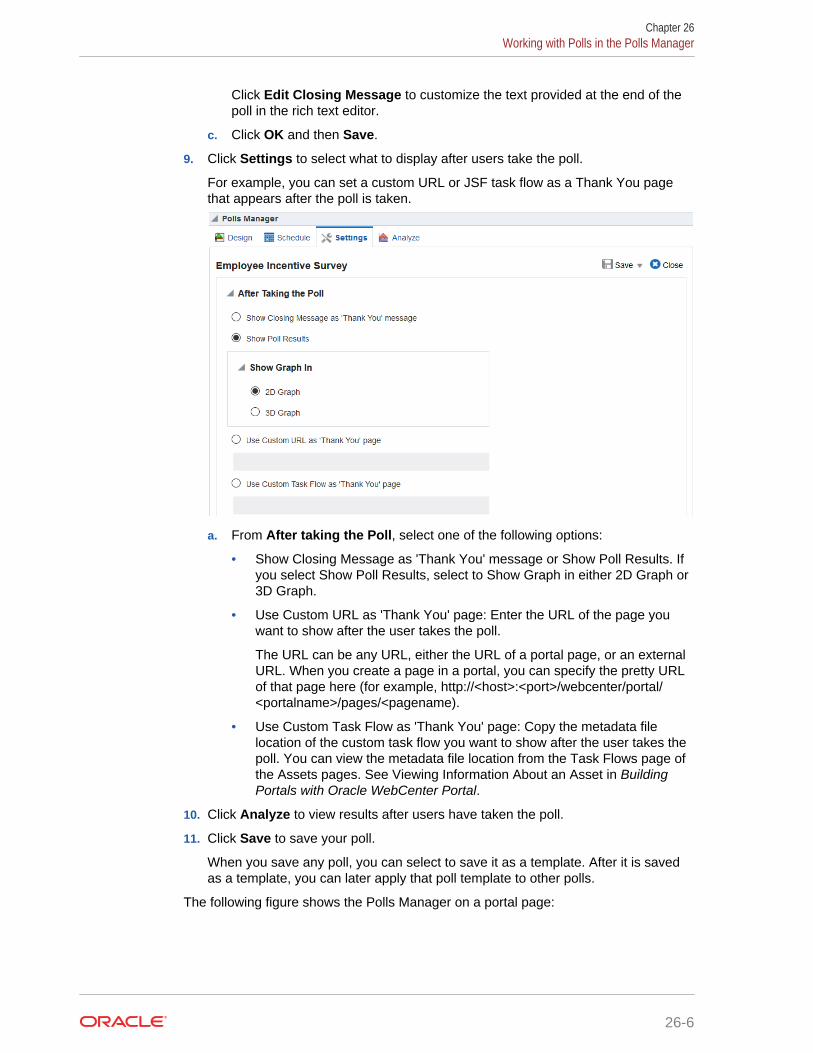
Click Edit Closing Message to customize the text provided at the end of thepoll in the rich text editor.
c. Click OK and then Save.
9. Click Settings to select what to display after users take the poll.
For example, you can set a custom URL or JSF task flow as a Thank You pagethat appears after the poll is taken.
a. From After taking the Poll, select one of the following options:
• Show Closing Message as 'Thank You' message or Show Poll Results. Ifyou select Show Poll Results, select to Show Graph in either 2D Graph or3D Graph.
• Use Custom URL as 'Thank You' page: Enter the URL of the page youwant to show after the user takes the poll.
The URL can be any URL, either the URL of a portal page, or an externalURL. When you create a page in a portal, you can specify the pretty URLof that page here (for example, http://<host>:<port>/webcenter/portal/<portalname>/pages/<pagename).
• Use Custom Task Flow as 'Thank You' page: Copy the metadata filelocation of the custom task flow you want to show after the user takes thepoll. You can view the metadata file location from the Task Flows page ofthe Assets pages. See Viewing Information About an Asset in BuildingPortals with Oracle WebCenter Portal.
10. Click Analyze to view results after users have taken the poll.
11. Click Save to save your poll.
When you save any poll, you can select to save it as a template. After it is savedas a template, you can later apply that poll template to other polls.
The following figure shows the Polls Manager on a portal page:
Chapter 26Working with Polls in the Polls Manager
26-6
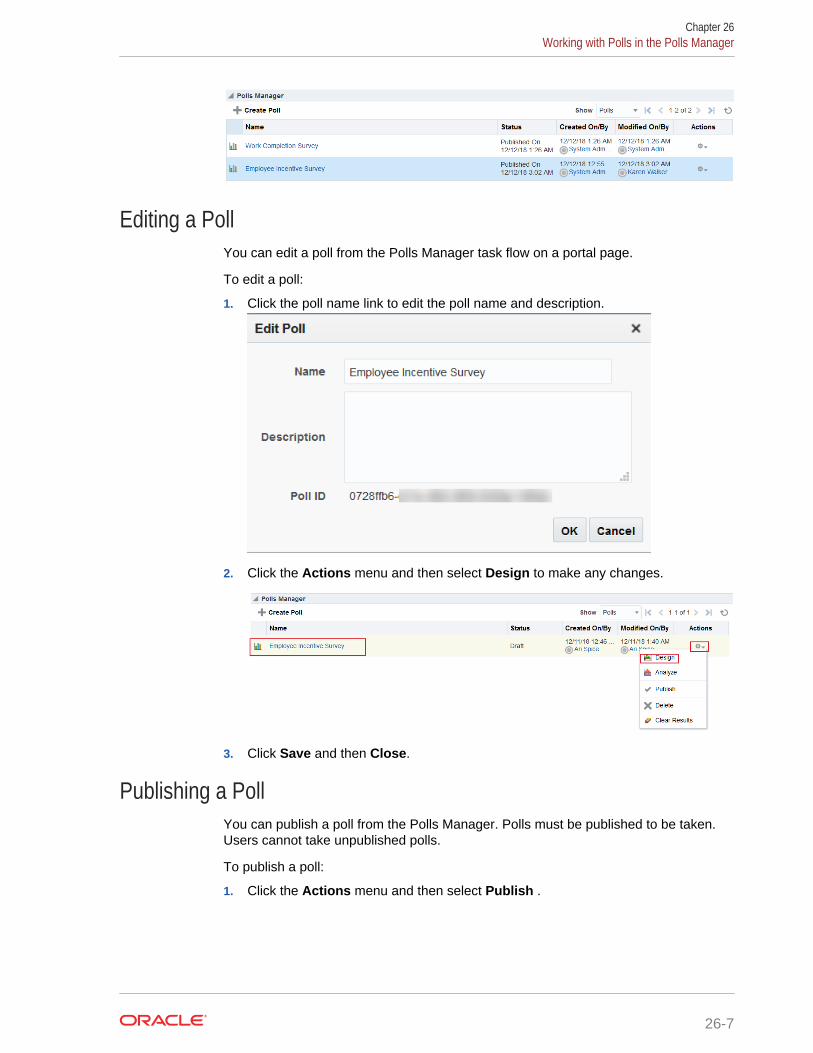
Editing a PollYou can edit a poll from the Polls Manager task flow on a portal page.
To edit a poll:
1. Click the poll name link to edit the poll name and description.
2. Click the Actions menu and then select Design to make any changes.
3. Click Save and then Close.
Publishing a PollYou can publish a poll from the Polls Manager. Polls must be published to be taken.Users cannot take unpublished polls.
To publish a poll:
1. Click the Actions menu and then select Publish .
Chapter 26Working with Polls in the Polls Manager
26-7
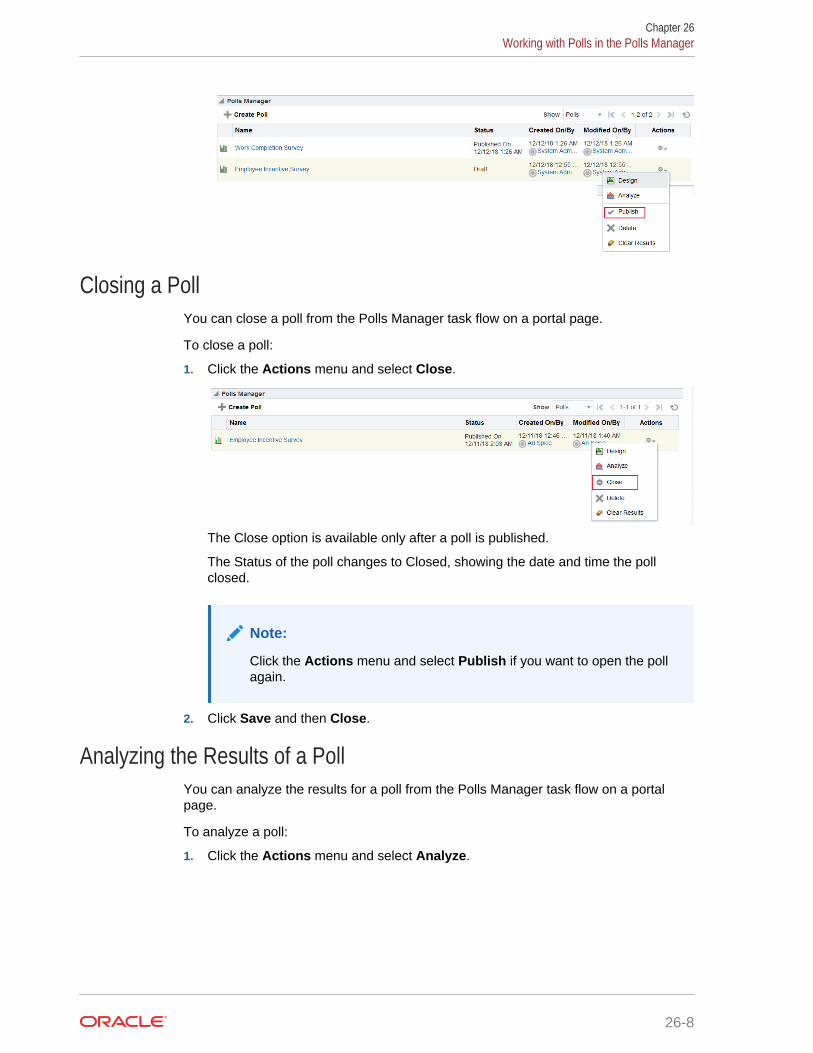
Closing a PollYou can close a poll from the Polls Manager task flow on a portal page.
To close a poll:
1. Click the Actions menu and select Close.
The Close option is available only after a poll is published.
The Status of the poll changes to Closed, showing the date and time the pollclosed.
Note:
Click the Actions menu and select Publish if you want to open the pollagain.
2. Click Save and then Close.
Analyzing the Results of a PollYou can analyze the results for a poll from the Polls Manager task flow on a portalpage.
To analyze a poll:
1. Click the Actions menu and select Analyze.
Chapter 26Working with Polls in the Polls Manager
26-8
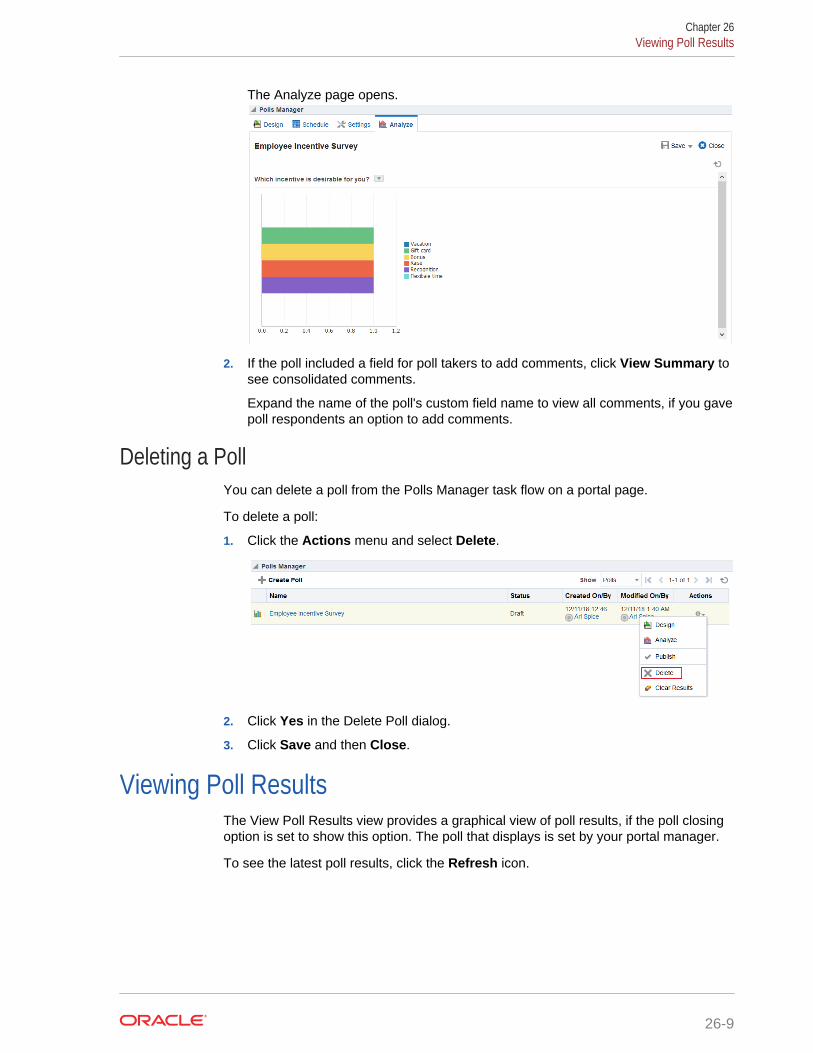
The Analyze page opens.
2. If the poll included a field for poll takers to add comments, click View Summary tosee consolidated comments.
Expand the name of the poll's custom field name to view all comments, if you gavepoll respondents an option to add comments.
Deleting a PollYou can delete a poll from the Polls Manager task flow on a portal page.
To delete a poll:
1. Click the Actions menu and select Delete.
2. Click Yes in the Delete Poll dialog.
3. Click Save and then Close.
Viewing Poll ResultsThe View Poll Results view provides a graphical view of poll results, if the poll closingoption is set to show this option. The poll that displays is set by your portal manager.
To see the latest poll results, click the Refresh icon.
Chapter 26Viewing Poll Results
26-9
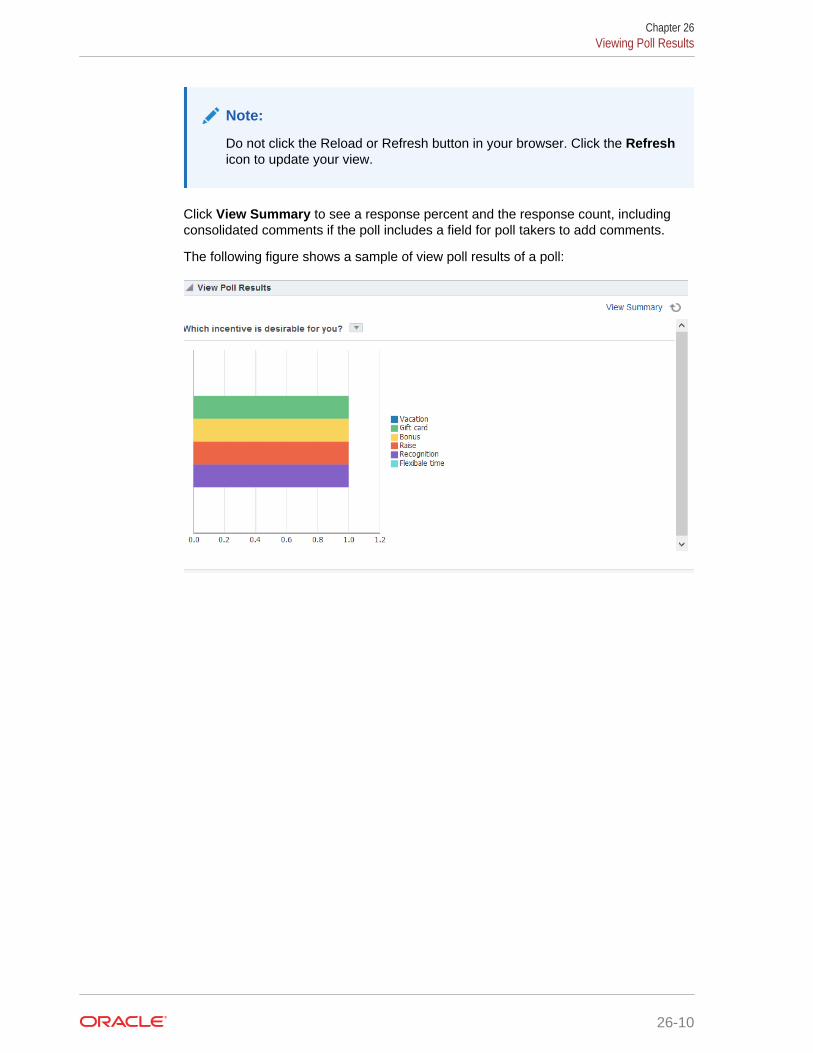
Note:
Do not click the Reload or Refresh button in your browser. Click the Refreshicon to update your view.
Click View Summary to see a response percent and the response count, includingconsolidated comments if the poll includes a field for poll takers to add comments.
The following figure shows a sample of view poll results of a poll:
Chapter 26Viewing Poll Results
26-10
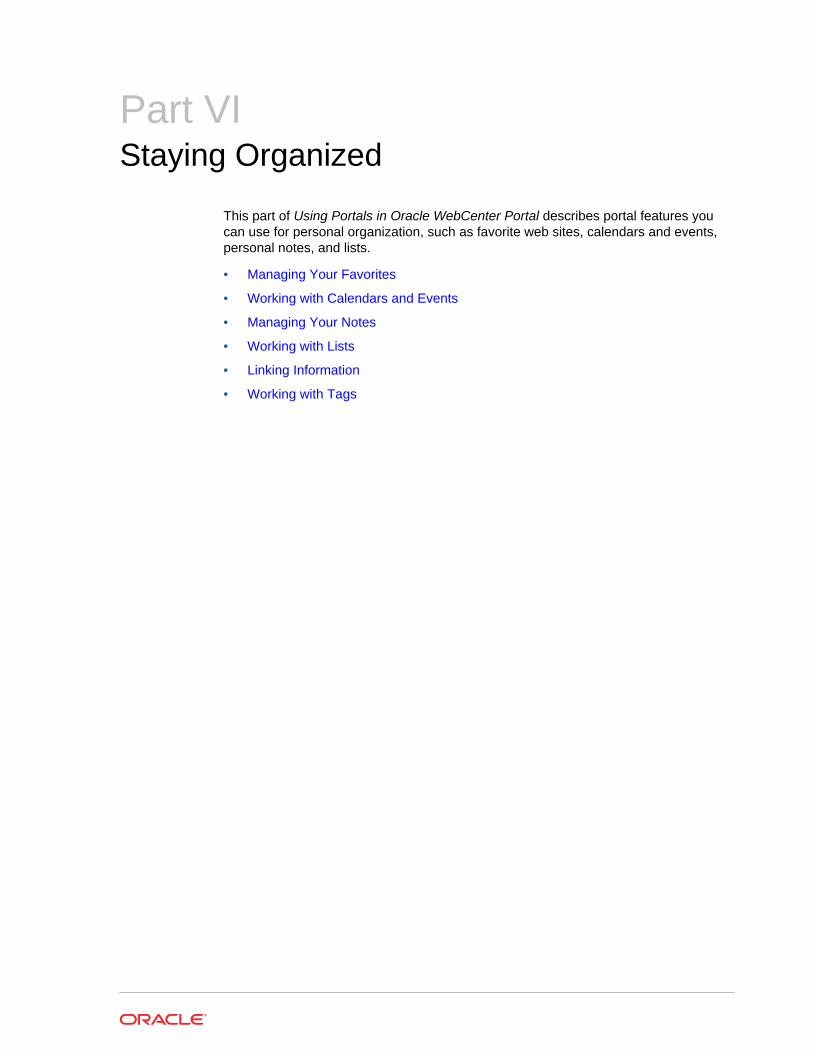
Part VIStaying Organized
This part of Using Portals in Oracle WebCenter Portal describes portal features youcan use for personal organization, such as favorite web sites, calendars and events,personal notes, and lists.
• Managing Your Favorites
• Working with Calendars and Events
• Managing Your Notes
• Working with Lists
• Linking Information
• Working with Tags
27Managing Your Favorites
Create, organize, and manage Favorites to keep your own personal list of favorite websites and pages to access from any browser.
Permissions:
The tasks described in this chapter are available to any WebCenter Portaluser.
Topics:
• About Favorites
• Accessing Your Favorites
• Adding Favorites
• Adding Favorites Folders
• Managing Favorites in Preferences
About FavoritesThe great advantage to WebCenter Portal Favorites is their portability. Favorites arenot dependent on a particular type of browser, so any browser you use to accessWebCenter Portal provides access to your WebCenter Portal Favorites. You cancreate favorites that link to sites within WebCenter Portal or to external sites. Thismakes WebCenter Portal the best choice for managing and tracking your favorites list.
Note:
URLs that start with a slash (/) are the only URLs recognized as internal toWebCenter Portal. If you create a favorite to a WebCenter Portal page thatdoes not start with a slash (/), but rather starts with http://, when younavigate to that page through your favorite, it will first show a messagewarning that you are leaving WebCenter Portal.
Favorites are personal. The favorites you see on the Favorites menu are the favoritesyou create. No other user sees your favorites, and you do not see any other user'sfavorites. If you like, though, you can share favorites with other users, by making oneor more of them discoverable in a search.
Favorites are created at the application level; consequently, when you move from oneportal to another, the favorites on the Favorites menu stay the same.
27-1
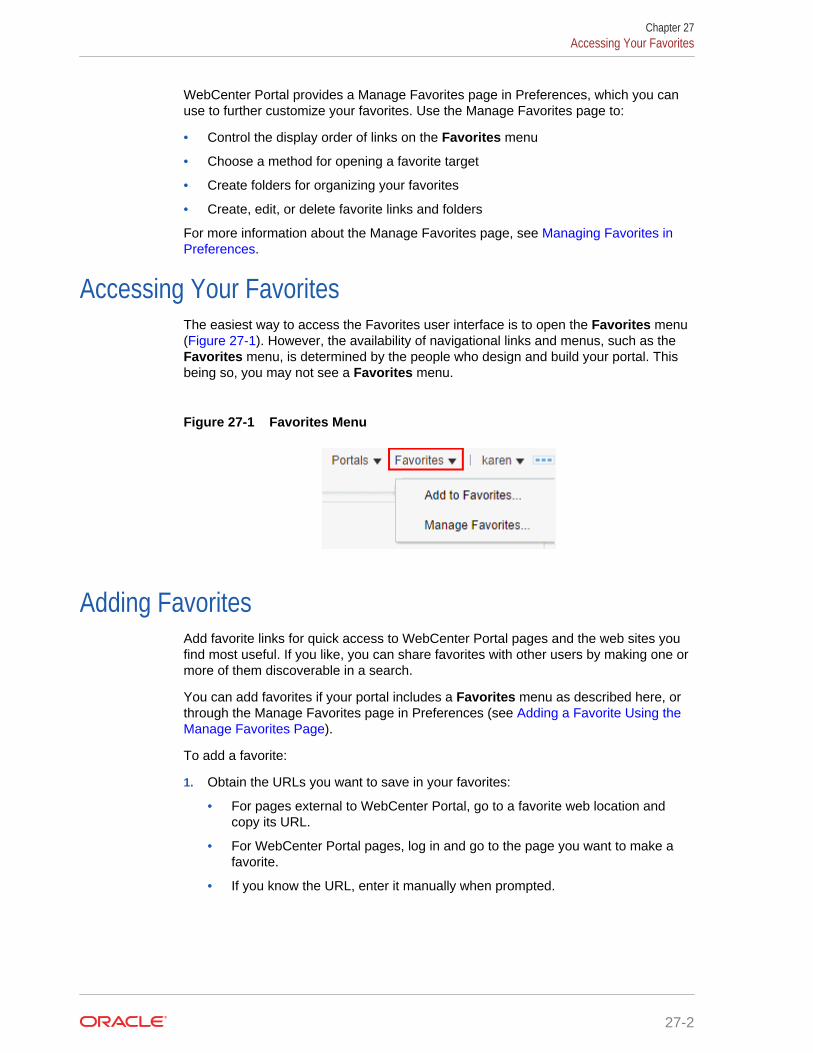
WebCenter Portal provides a Manage Favorites page in Preferences, which you canuse to further customize your favorites. Use the Manage Favorites page to:
• Control the display order of links on the Favorites menu
• Choose a method for opening a favorite target
• Create folders for organizing your favorites
• Create, edit, or delete favorite links and folders
For more information about the Manage Favorites page, see Managing Favorites inPreferences.
Accessing Your FavoritesThe easiest way to access the Favorites user interface is to open the Favorites menu(Figure 27-1). However, the availability of navigational links and menus, such as theFavorites menu, is determined by the people who design and build your portal. Thisbeing so, you may not see a Favorites menu.
Figure 27-1 Favorites Menu
Adding FavoritesAdd favorite links for quick access to WebCenter Portal pages and the web sites youfind most useful. If you like, you can share favorites with other users by making one ormore of them discoverable in a search.
You can add favorites if your portal includes a Favorites menu as described here, orthrough the Manage Favorites page in Preferences (see Adding a Favorite Using theManage Favorites Page).
To add a favorite:
1. Obtain the URLs you want to save in your favorites:
• For pages external to WebCenter Portal, go to a favorite web location andcopy its URL.
• For WebCenter Portal pages, log in and go to the page you want to make afavorite.
• If you know the URL, enter it manually when prompted.
Chapter 27Accessing Your Favorites
27-2
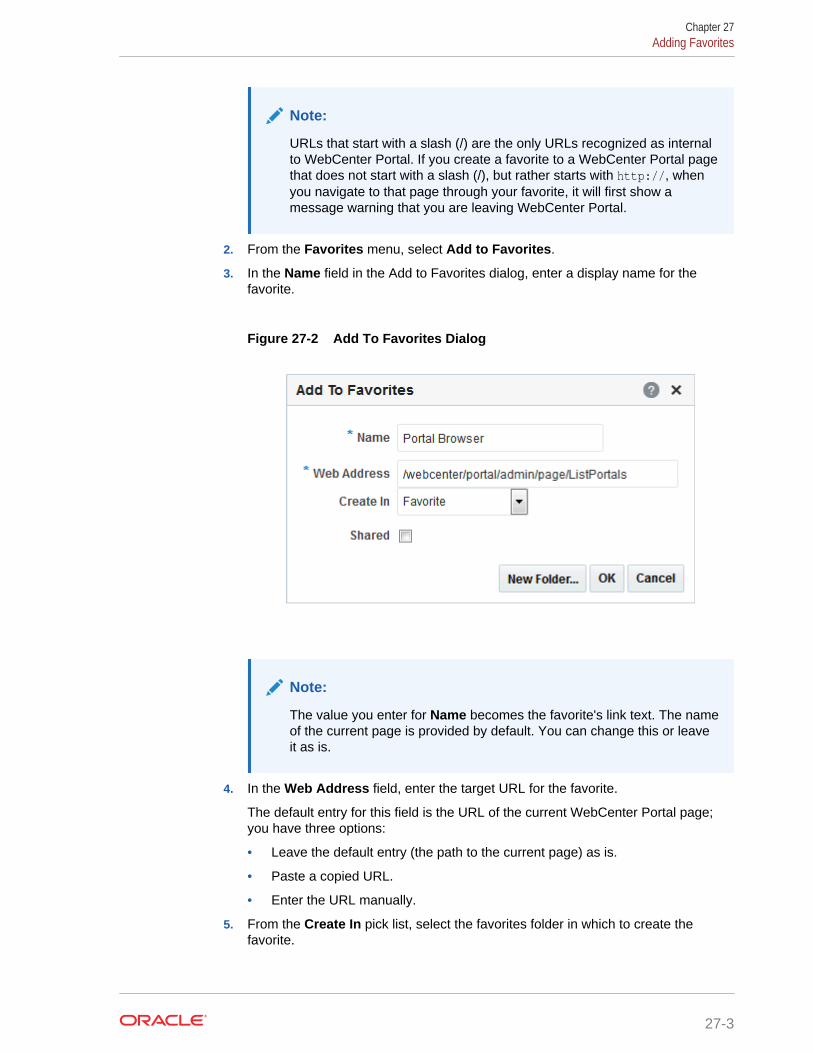
Note:
URLs that start with a slash (/) are the only URLs recognized as internalto WebCenter Portal. If you create a favorite to a WebCenter Portal pagethat does not start with a slash (/), but rather starts with http://, whenyou navigate to that page through your favorite, it will first show amessage warning that you are leaving WebCenter Portal.
2. From the Favorites menu, select Add to Favorites.
3. In the Name field in the Add to Favorites dialog, enter a display name for thefavorite.
Figure 27-2 Add To Favorites Dialog
Note:
The value you enter for Name becomes the favorite's link text. The nameof the current page is provided by default. You can change this or leaveit as is.
4. In the Web Address field, enter the target URL for the favorite.
The default entry for this field is the URL of the current WebCenter Portal page;you have three options:
• Leave the default entry (the path to the current page) as is.
• Paste a copied URL.
• Enter the URL manually.
5. From the Create In pick list, select the favorites folder in which to create thefavorite.
Chapter 27Adding Favorites
27-3
See Also:
WebCenter Portal provides one top-level default folder: Favorites. Youcan also create your own folders by clicking the New Folder button.
See Adding Favorites Folders.
6. To enable this favorite to be discovered by other users during a search, selectShared.
Deselect Shared if you do not want other users to have any access to this favorite.
7. Click OK to add the favorite to the Favorites menu and the Manage Favoritespage.
Adding Favorites FoldersTo keep your list of favorites manageable, you can organize them into folders. Thefolder hierarchy you create appears on the Favorites menu and on the ManageFavorites page. Because the favorites folders you create are user-levelcustomizations, they display only in your view of WebCenter Portal.
Note:
You can create a favorites folder as described here, or on the ManageFavorites page (see Editing Favorites and Favorites Folders).
To add a favorites folder:
1. Open the Add To Favorites dialog.
See Also:
For more information, see Accessing Your Favorites.
2. Click New Folder to open the Create Folder dialog.
Chapter 27Adding Favorites Folders
27-4
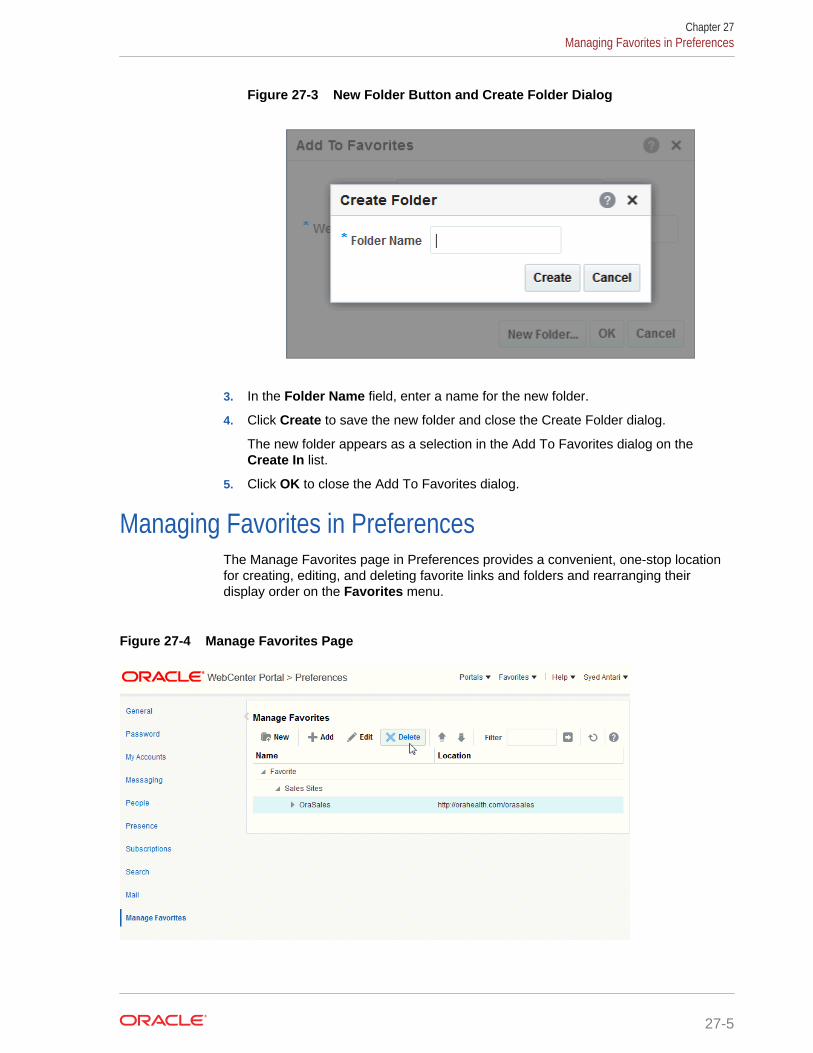
Figure 27-3 New Folder Button and Create Folder Dialog
3. In the Folder Name field, enter a name for the new folder.
4. Click Create to save the new folder and close the Create Folder dialog.
The new folder appears as a selection in the Add To Favorites dialog on theCreate In list.
5. Click OK to close the Add To Favorites dialog.
Managing Favorites in PreferencesThe Manage Favorites page in Preferences provides a convenient, one-stop locationfor creating, editing, and deleting favorite links and folders and rearranging theirdisplay order on the Favorites menu.
Figure 27-4 Manage Favorites Page
Chapter 27Managing Favorites in Preferences
27-5
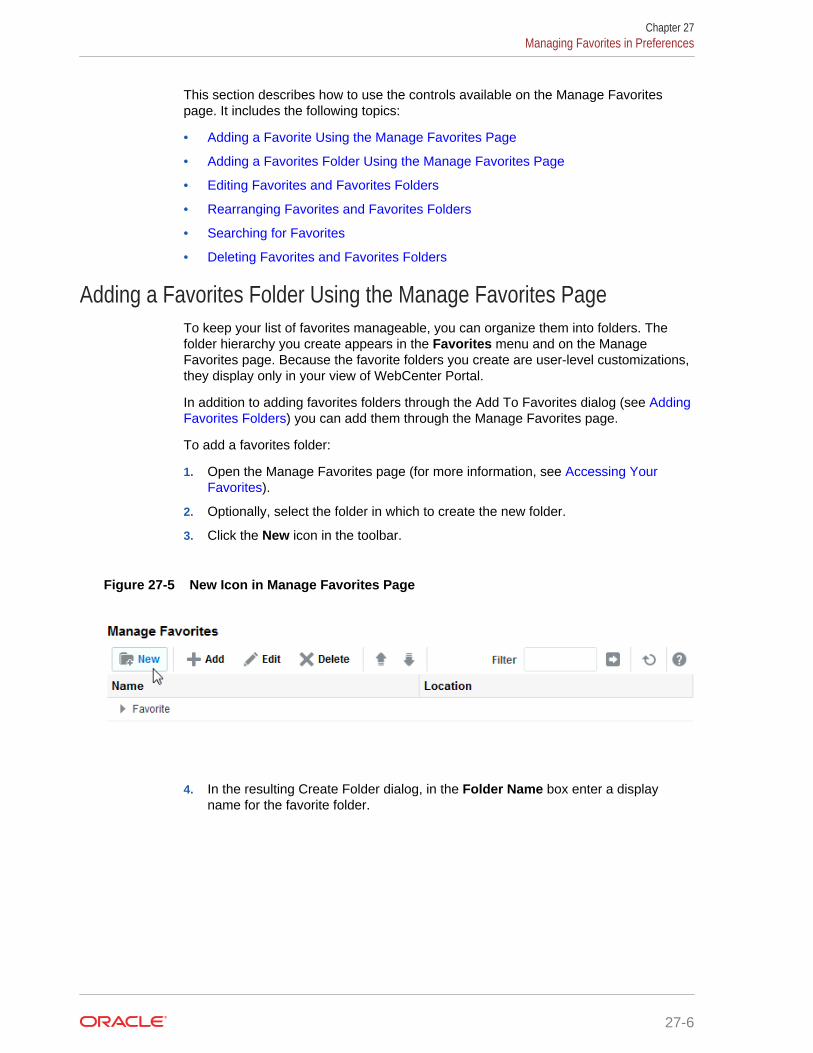
This section describes how to use the controls available on the Manage Favoritespage. It includes the following topics:
• Adding a Favorite Using the Manage Favorites Page
• Adding a Favorites Folder Using the Manage Favorites Page
• Editing Favorites and Favorites Folders
• Rearranging Favorites and Favorites Folders
• Searching for Favorites
• Deleting Favorites and Favorites Folders
Adding a Favorites Folder Using the Manage Favorites PageTo keep your list of favorites manageable, you can organize them into folders. Thefolder hierarchy you create appears in the Favorites menu and on the ManageFavorites page. Because the favorite folders you create are user-level customizations,they display only in your view of WebCenter Portal.
In addition to adding favorites folders through the Add To Favorites dialog (see AddingFavorites Folders) you can add them through the Manage Favorites page.
To add a favorites folder:
1. Open the Manage Favorites page (for more information, see Accessing YourFavorites).
2. Optionally, select the folder in which to create the new folder.
3. Click the New icon in the toolbar.
Figure 27-5 New Icon in Manage Favorites Page
4. In the resulting Create Folder dialog, in the Folder Name box enter a displayname for the favorite folder.
Chapter 27Managing Favorites in Preferences
27-6
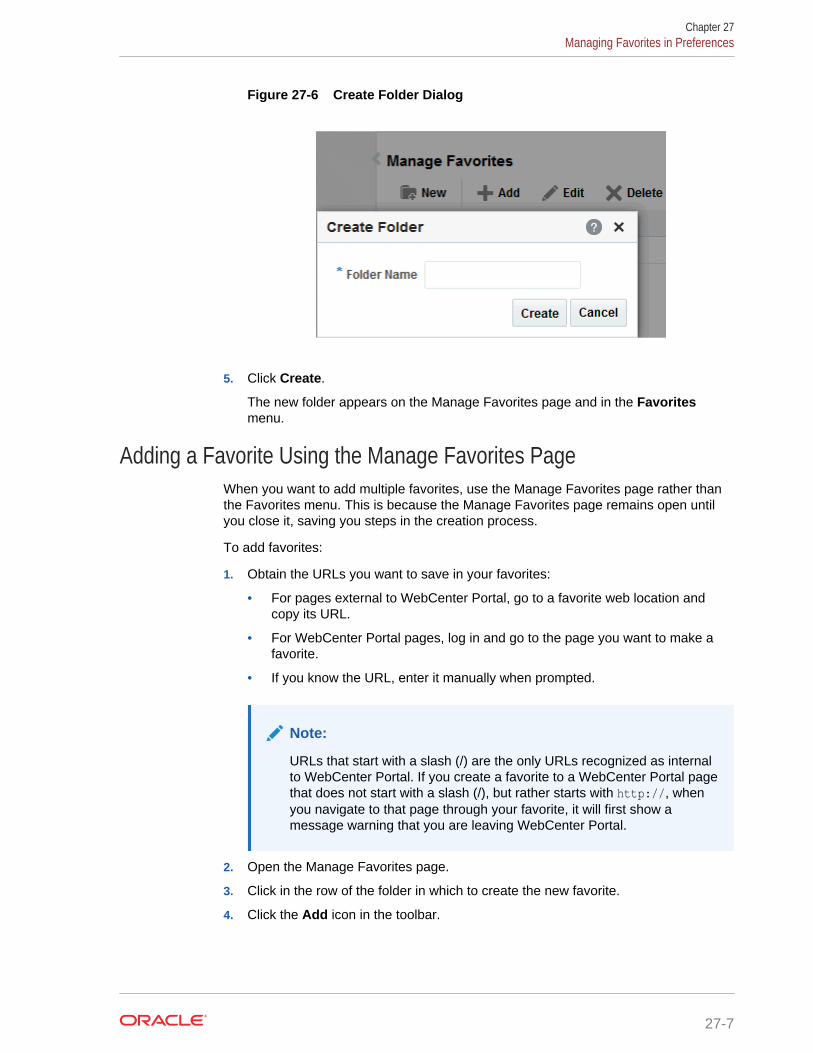
Figure 27-6 Create Folder Dialog
5. Click Create.
The new folder appears on the Manage Favorites page and in the Favoritesmenu.
Adding a Favorite Using the Manage Favorites PageWhen you want to add multiple favorites, use the Manage Favorites page rather thanthe Favorites menu. This is because the Manage Favorites page remains open untilyou close it, saving you steps in the creation process.
To add favorites:
1. Obtain the URLs you want to save in your favorites:
• For pages external to WebCenter Portal, go to a favorite web location andcopy its URL.
• For WebCenter Portal pages, log in and go to the page you want to make afavorite.
• If you know the URL, enter it manually when prompted.
Note:
URLs that start with a slash (/) are the only URLs recognized as internalto WebCenter Portal. If you create a favorite to a WebCenter Portal pagethat does not start with a slash (/), but rather starts with http://, whenyou navigate to that page through your favorite, it will first show amessage warning that you are leaving WebCenter Portal.
2. Open the Manage Favorites page.
3. Click in the row of the folder in which to create the new favorite.
4. Click the Add icon in the toolbar.
Chapter 27Managing Favorites in Preferences
27-7

Figure 27-7 Add Icon in Manage Favorites Page
5. In the Add To Favorites dialog, in the Name field enter a display name for thefavorite.
Figure 27-8 Add To Favorites Dialog
6. In the Web Address field, paste the URL you copied in step 1, or enter a URLmanually.
7. To enable the sharing of this favorite in other users' search results, select Shared.
8. Click OK.
The new favorite appears in the Manage Favorites page and in the Favoritesmenu.
Editing Favorites and Favorites FoldersThe Manage Favorites page provides controls for editing favorites and favoritesfolders. Use this feature to revise a folder or favorite name, a favorite target URL, or aopen behavior for a favorite. Open behavior determines how a favorite target URLopens from the Favorites menu or the Manage Favorites page. Choose from openinga favorite target in the current browser window or a new browser window or tab.
To edit a favorite or favorite folder:
Chapter 27Managing Favorites in Preferences
27-8
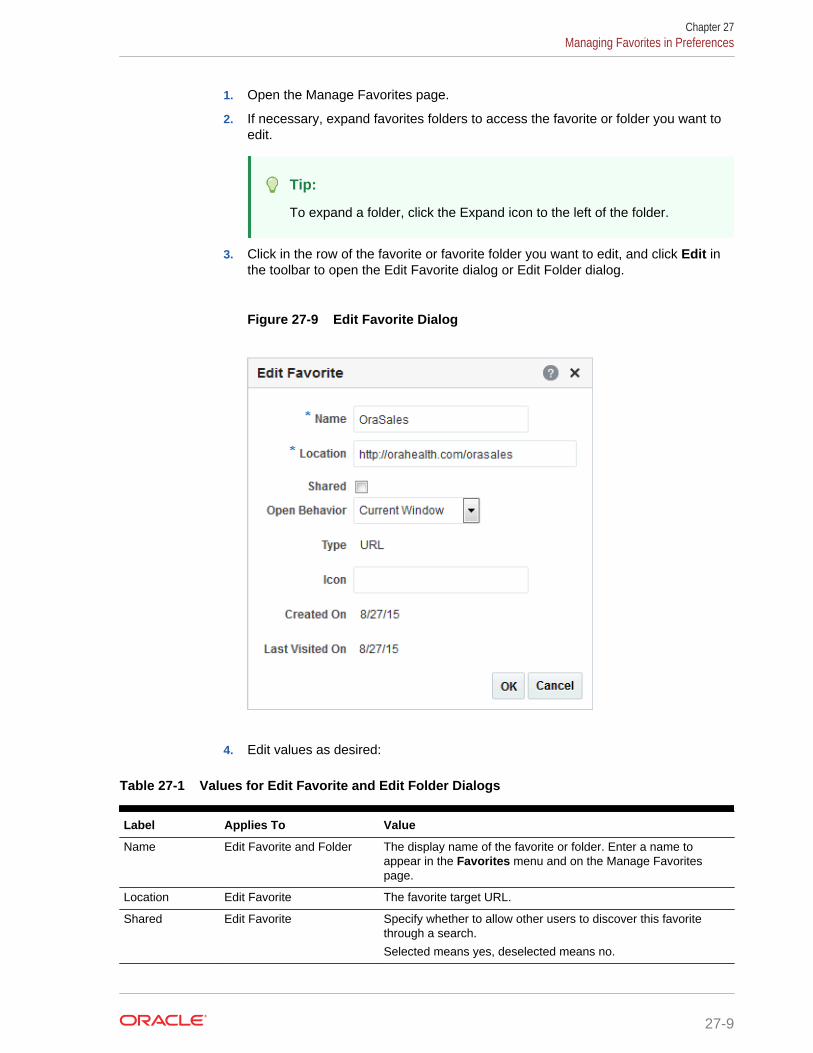
1. Open the Manage Favorites page.
2. If necessary, expand favorites folders to access the favorite or folder you want toedit.
Tip:
To expand a folder, click the Expand icon to the left of the folder.
3. Click in the row of the favorite or favorite folder you want to edit, and click Edit inthe toolbar to open the Edit Favorite dialog or Edit Folder dialog.
Figure 27-9 Edit Favorite Dialog
4. Edit values as desired:
Table 27-1 Values for Edit Favorite and Edit Folder Dialogs
Label Applies To Value
Name Edit Favorite and Folder The display name of the favorite or folder. Enter a name toappear in the Favorites menu and on the Manage Favoritespage.
Location Edit Favorite The favorite target URL.
Shared Edit Favorite Specify whether to allow other users to discover this favoritethrough a search.
Selected means yes, deselected means no.
Chapter 27Managing Favorites in Preferences
27-9
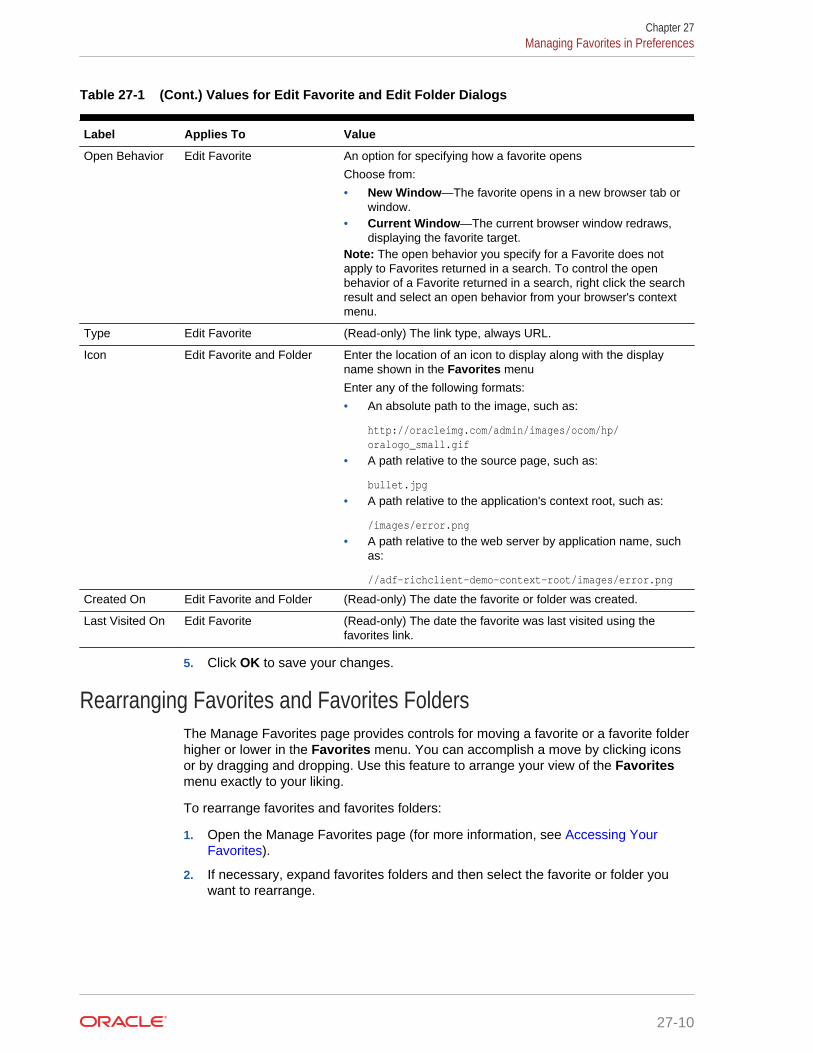
Table 27-1 (Cont.) Values for Edit Favorite and Edit Folder Dialogs
Label Applies To Value
Open Behavior Edit Favorite An option for specifying how a favorite opens
Choose from:
• New Window—The favorite opens in a new browser tab orwindow.
• Current Window—The current browser window redraws,displaying the favorite target.
Note: The open behavior you specify for a Favorite does notapply to Favorites returned in a search. To control the openbehavior of a Favorite returned in a search, right click the searchresult and select an open behavior from your browser's contextmenu.
Type Edit Favorite (Read-only) The link type, always URL.
Icon Edit Favorite and Folder Enter the location of an icon to display along with the displayname shown in the Favorites menu
Enter any of the following formats:
• An absolute path to the image, such as:
http://oracleimg.com/admin/images/ocom/hp/oralogo_small.gif
• A path relative to the source page, such as:
bullet.jpg
• A path relative to the application's context root, such as:
/images/error.png
• A path relative to the web server by application name, suchas:
//adf-richclient-demo-context-root/images/error.png
Created On Edit Favorite and Folder (Read-only) The date the favorite or folder was created.
Last Visited On Edit Favorite (Read-only) The date the favorite was last visited using thefavorites link.
5. Click OK to save your changes.
Rearranging Favorites and Favorites FoldersThe Manage Favorites page provides controls for moving a favorite or a favorite folderhigher or lower in the Favorites menu. You can accomplish a move by clicking iconsor by dragging and dropping. Use this feature to arrange your view of the Favoritesmenu exactly to your liking.
To rearrange favorites and favorites folders:
1. Open the Manage Favorites page (for more information, see Accessing YourFavorites).
2. If necessary, expand favorites folders and then select the favorite or folder youwant to rearrange.
Chapter 27Managing Favorites in Preferences
27-10
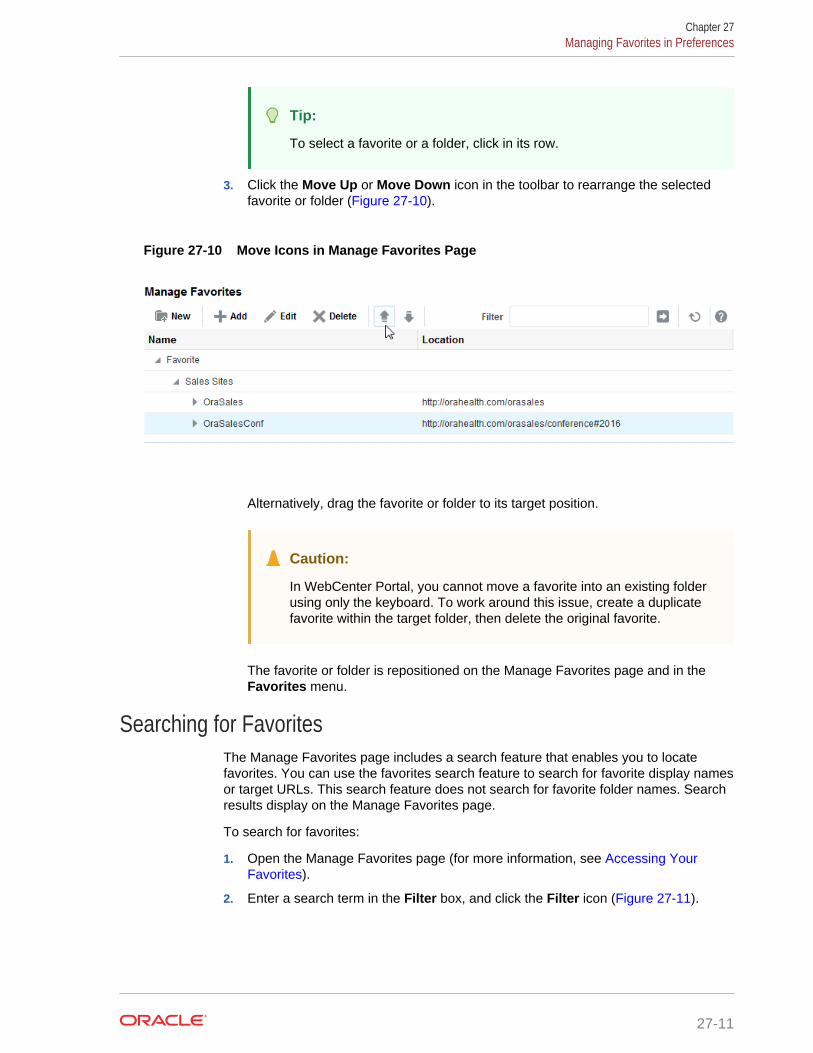
Tip:
To select a favorite or a folder, click in its row.
3. Click the Move Up or Move Down icon in the toolbar to rearrange the selectedfavorite or folder (Figure 27-10).
Figure 27-10 Move Icons in Manage Favorites Page
Alternatively, drag the favorite or folder to its target position.
Caution:
In WebCenter Portal, you cannot move a favorite into an existing folderusing only the keyboard. To work around this issue, create a duplicatefavorite within the target folder, then delete the original favorite.
The favorite or folder is repositioned on the Manage Favorites page and in theFavorites menu.
Searching for FavoritesThe Manage Favorites page includes a search feature that enables you to locatefavorites. You can use the favorites search feature to search for favorite display namesor target URLs. This search feature does not search for favorite folder names. Searchresults display on the Manage Favorites page.
To search for favorites:
1. Open the Manage Favorites page (for more information, see Accessing YourFavorites).
2. Enter a search term in the Filter box, and click the Filter icon (Figure 27-11).
Chapter 27Managing Favorites in Preferences
27-11
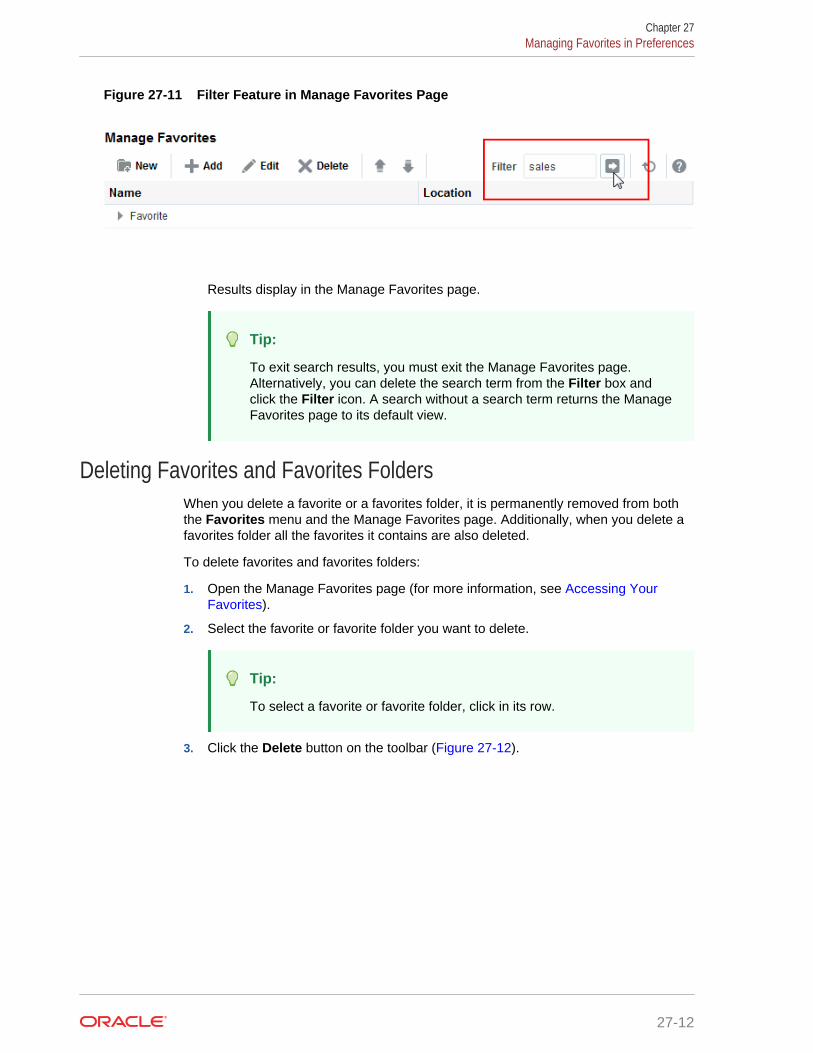
Figure 27-11 Filter Feature in Manage Favorites Page
Results display in the Manage Favorites page.
Tip:
To exit search results, you must exit the Manage Favorites page.Alternatively, you can delete the search term from the Filter box andclick the Filter icon. A search without a search term returns the ManageFavorites page to its default view.
Deleting Favorites and Favorites FoldersWhen you delete a favorite or a favorites folder, it is permanently removed from boththe Favorites menu and the Manage Favorites page. Additionally, when you delete afavorites folder all the favorites it contains are also deleted.
To delete favorites and favorites folders:
1. Open the Manage Favorites page (for more information, see Accessing YourFavorites).
2. Select the favorite or favorite folder you want to delete.
Tip:
To select a favorite or favorite folder, click in its row.
3. Click the Delete button on the toolbar (Figure 27-12).
Chapter 27Managing Favorites in Preferences
27-12
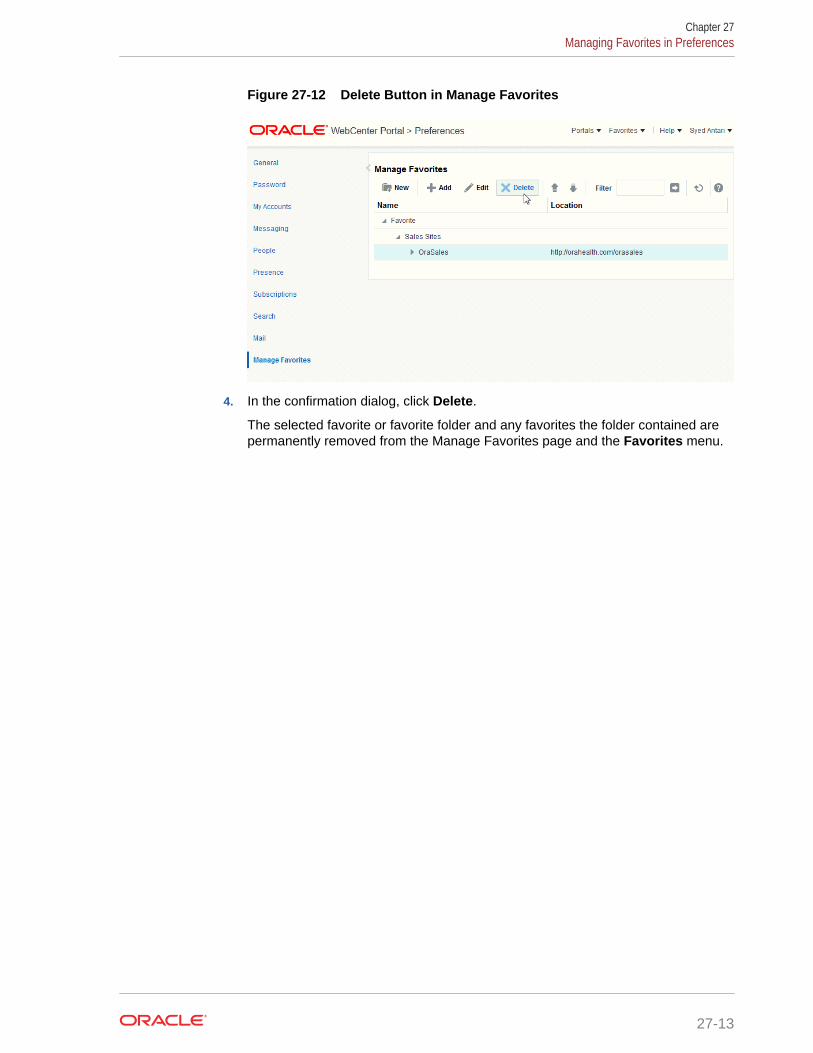
Figure 27-12 Delete Button in Manage Favorites
4. In the confirmation dialog, click Delete.
The selected favorite or favorite folder and any favorites the folder contained arepermanently removed from the Manage Favorites page and the Favorites menu.
Chapter 27Managing Favorites in Preferences
27-13
28Working with Calendars and Events
Events include calendars that you can use to schedule meetings and appointments,and also let you view your own personal Microsoft Exchange calendar within the Homeportal. Overlaying portal calendars on top of the Home portal calendar allows you toview your entire schedule in a single place.
Note:
Tasks discussed in this chapter are not available if events are not enabledand exposed. The portal manager adds and configures events, as describedin Adding a Calendar and Events to a Portal in Building Portals with OracleWebCenter Portal.
Permissions:
This chapter is intended for WebCenter Portal users who want to use thecalendar and events feature to schedule and track events. However, youmight not be able to do some tasks if one or more of the following advancedpermissions for events have been set:
• Create, Edit, and Delete Events
• View Events
Topics:
• About Events
• Working with Events
About EventsEvents include appointments, meetings, presentations, and so on. Within WebCenterPortal, there are two kinds of events:
• Personal events are those that are not related to a specific portal. They couldinclude personal appointments with a doctor or dentist, or lunch with a friend.
Personal events come from your Microsoft Exchange calendar and display in theEvents viewer on a page in the Home portal, only to the user who logged in to theExchange calendar. See Where to View Events for viewing events in yourpersonal calendar.
• Portal events are those that are related to a specific portal. They could includeweekly meetings, presentations, or a customer visit.
28-1
Portal events display to all members of the portal on the portal's dedicated Eventspage (or console) or in any Events viewer that is located on a page in the portal.
To expose the Events page to all portal members, the portal manager needs toadd the page link to the portal navigation, as described in Adding an Existing Pageto the Portal Navigation in Building Portals with Oracle WebCenter Portal. For apage to show in portal navigation, the Visibility check box for the page must alsobe selected. For more information, see Showing or Hiding a Page in the PortalNavigation in Building Portals with Oracle WebCenter Portal.
.Members with the required level of permission can schedule or update events.
Note:
If your portal is using the default user roles, then the requiredpermissions to create an event is included in the Portal Manager role.Portal Managers can manage all events.
Calendar OverlayingIn addition to viewing your personal events in your Home portal, you can also viewportal events from selected portals all together in one place. This is referred to ascalendar overlaying. In this way, all your important events are available in one location,your Home portal.
In a portal, if an Events page (or console) has been added, you can also add events toit. However, you can view personal events only in your Home portal.
See Where to View Events for more information about viewing events with or withoutcalendar overlaying.
Note:
Calendar overlaying must be enabled by your application specialist or portalmanager and set to a value other than None, if you want to view yourpersonal events from your Microsoft Exchange calendar. See EnablingCalendar Overlaying in Building Portals with Oracle WebCenter Portal formore information.
Where to View EventsYour portal may provide a variety of locations from which to view events.
See Also:
Viewing Events and Displaying Multiple Calendars Together.
Chapter 28About Events
28-2

• Every portal in which events is enabled or included in the portal template includesan Events page (or console) that can be displayed or hidden. The portal managercan provide a link to the Events viewer or add the Events page to the portalnavigation. Once added to the portal navigation, portal members can use theEvents page to access events. A portal manager may also choose to hide theEvents page by deselecting its Visible property. Figure 28-1 shows portal eventson the Events page or console.
Figure 28-1 Events on the Events Page
• If your portal manager has added the Events viewer to a page in a portal, you canview it from the portal navigation. Figure 28-2 shows events on another page inthe portal.
Note:
You can only view personal events in the Home portal.
Chapter 28About Events
28-3
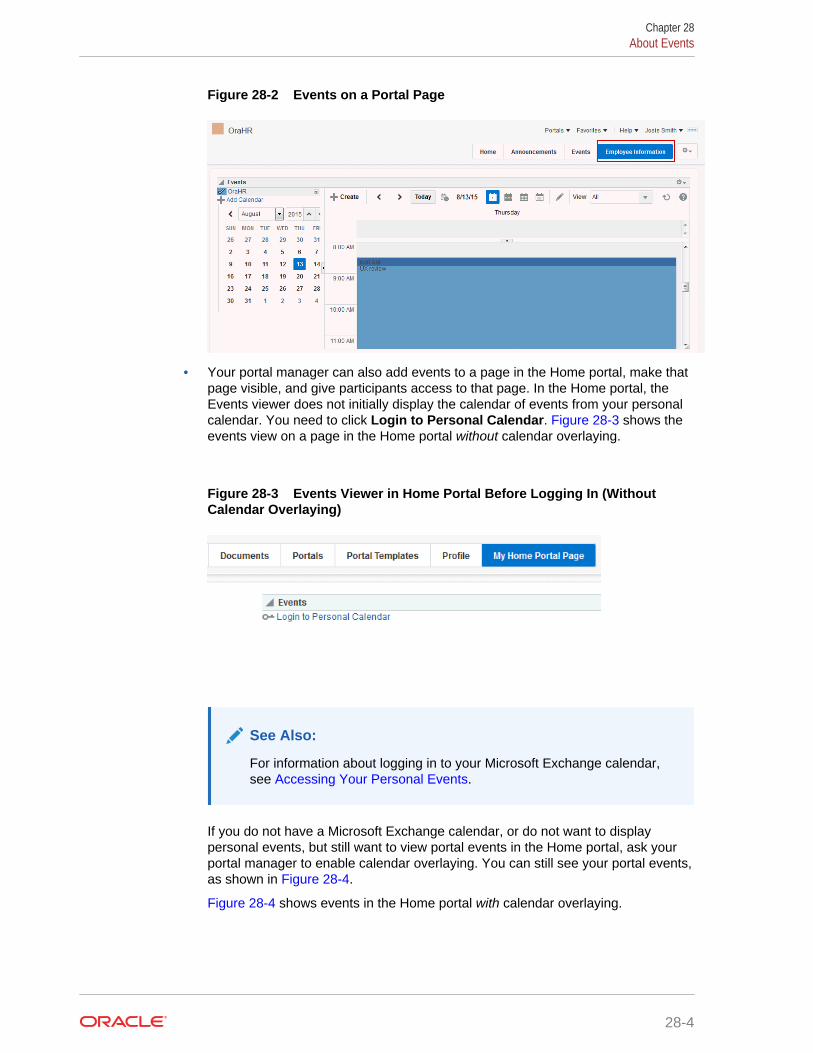
Figure 28-2 Events on a Portal Page
• Your portal manager can also add events to a page in the Home portal, make thatpage visible, and give participants access to that page. In the Home portal, theEvents viewer does not initially display the calendar of events from your personalcalendar. You need to click Login to Personal Calendar. Figure 28-3 shows theevents view on a page in the Home portal without calendar overlaying.
Figure 28-3 Events Viewer in Home Portal Before Logging In (WithoutCalendar Overlaying)
See Also:
For information about logging in to your Microsoft Exchange calendar,see Accessing Your Personal Events.
If you do not have a Microsoft Exchange calendar, or do not want to displaypersonal events, but still want to view portal events in the Home portal, ask yourportal manager to enable calendar overlaying. You can still see your portal events,as shown in Figure 28-4.
Figure 28-4 shows events in the Home portal with calendar overlaying.
Chapter 28About Events
28-4
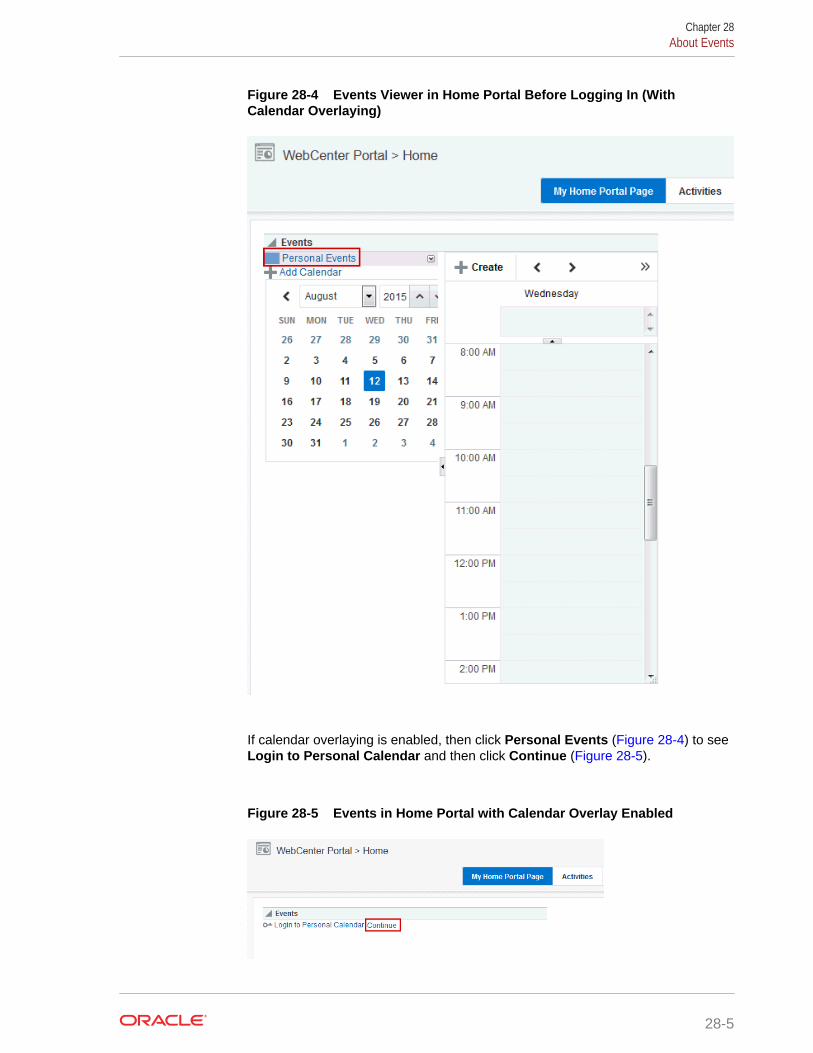
Figure 28-4 Events Viewer in Home Portal Before Logging In (WithCalendar Overlaying)
If calendar overlaying is enabled, then click Personal Events (Figure 28-4) to seeLogin to Personal Calendar and then click Continue (Figure 28-5).
Figure 28-5 Events in Home Portal with Calendar Overlay Enabled
Chapter 28About Events
28-5
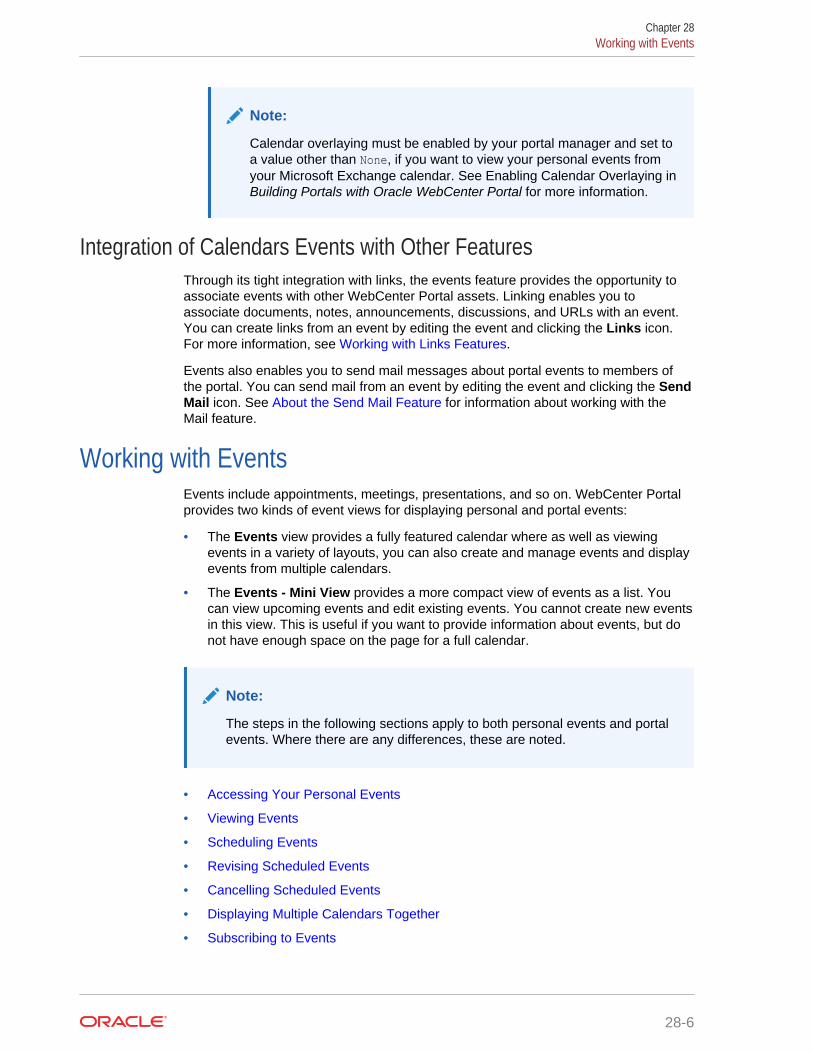
Note:
Calendar overlaying must be enabled by your portal manager and set toa value other than None, if you want to view your personal events fromyour Microsoft Exchange calendar. See Enabling Calendar Overlaying inBuilding Portals with Oracle WebCenter Portal for more information.
Integration of Calendars Events with Other FeaturesThrough its tight integration with links, the events feature provides the opportunity toassociate events with other WebCenter Portal assets. Linking enables you toassociate documents, notes, announcements, discussions, and URLs with an event.You can create links from an event by editing the event and clicking the Links icon.For more information, see Working with Links Features.
Events also enables you to send mail messages about portal events to members ofthe portal. You can send mail from an event by editing the event and clicking the SendMail icon. See About the Send Mail Feature for information about working with theMail feature.
Working with EventsEvents include appointments, meetings, presentations, and so on. WebCenter Portalprovides two kinds of event views for displaying personal and portal events:
• The Events view provides a fully featured calendar where as well as viewingevents in a variety of layouts, you can also create and manage events and displayevents from multiple calendars.
• The Events - Mini View provides a more compact view of events as a list. Youcan view upcoming events and edit existing events. You cannot create new eventsin this view. This is useful if you want to provide information about events, but donot have enough space on the page for a full calendar.
Note:
The steps in the following sections apply to both personal events and portalevents. Where there are any differences, these are noted.
• Accessing Your Personal Events
• Viewing Events
• Scheduling Events
• Revising Scheduled Events
• Cancelling Scheduled Events
• Displaying Multiple Calendars Together
• Subscribing to Events
Chapter 28Working with Events
28-6
Accessing Your Personal EventsYou can maintain a calendar of personal events outside of WebCenter Portal that doesnot relate to specific portals. If you use Microsoft Exchange Server for this calendar,you can include your personal events in the Home portal. This keeps all your calendarinformation in a single place, making it much easier for you to organize your day.
You can view personal events in the Home portal. You can also edit or delete personalevents or create new personal events that are pushed to your Exchange calendar.
Note:
Your portal manager can set up a page to view events in the Home portal,from where you can view your personal events. See Showing Events on aPage in the Home Portal in Building Portals with Oracle WebCenter Portal.
When setting up the Events view, your portal manager can also enablecalendar overlaying to display portal events alongside personal events in theHome portal. You can view your personal calendar events alongside portalevents, but you cannot push portal events into your Exchange calendar. See Calendar Overlaying for more information about calendar overlaying,
To access your personal events:
1. Navigate to the Home portal of the portal, and then to the page which containsyour personal events (see Figure 28-3).
2. Click Login to Personal Calendar (Figure 28-6).
In the Home portal, the Events view does not initially display the calendar ofevents from your personal calendar. Instead it displays a link prompting you toLogin to Personal Calendar (Figure 28-6).
Note:
If you see the link Try Again instead of Login to Personal Calendar,there is a problem with the connection to the Microsoft Exchange Server.Contact your system administrator.
Chapter 28Working with Events
28-7
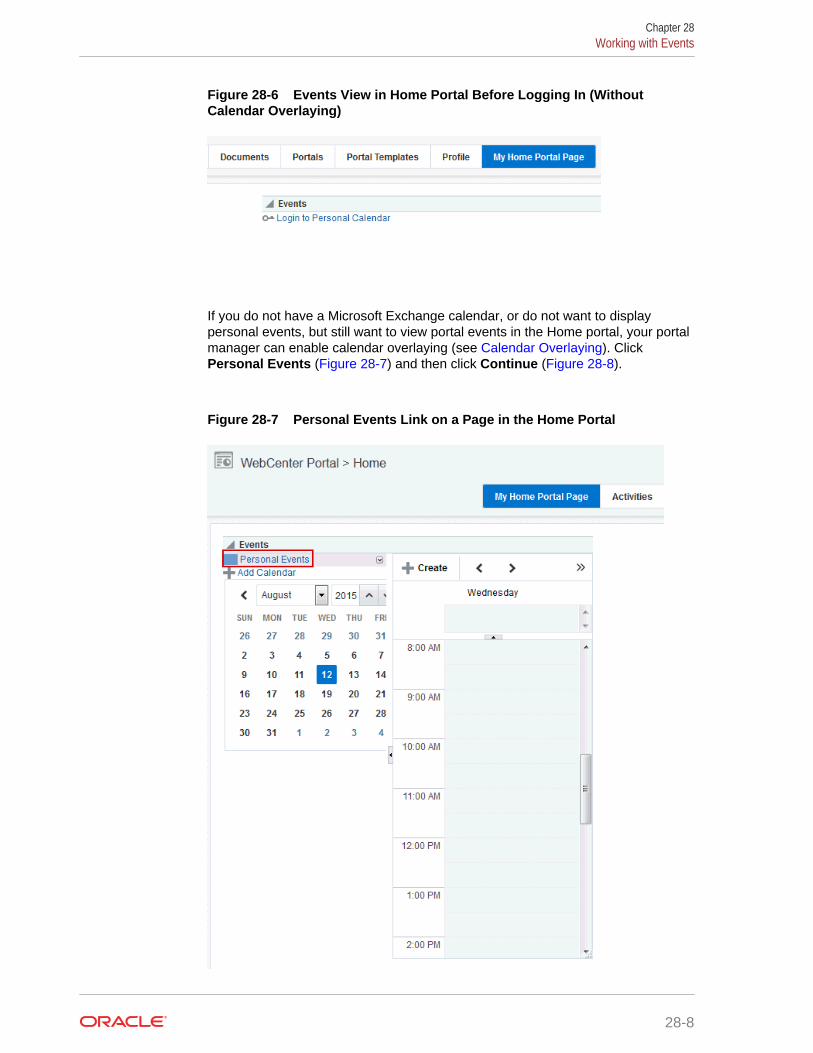
Figure 28-6 Events View in Home Portal Before Logging In (WithoutCalendar Overlaying)
If you do not have a Microsoft Exchange calendar, or do not want to displaypersonal events, but still want to view portal events in the Home portal, your portalmanager can enable calendar overlaying (see Calendar Overlaying). ClickPersonal Events (Figure 28-7) and then click Continue (Figure 28-8).
Figure 28-7 Personal Events Link on a Page in the Home Portal
Chapter 28Working with Events
28-8
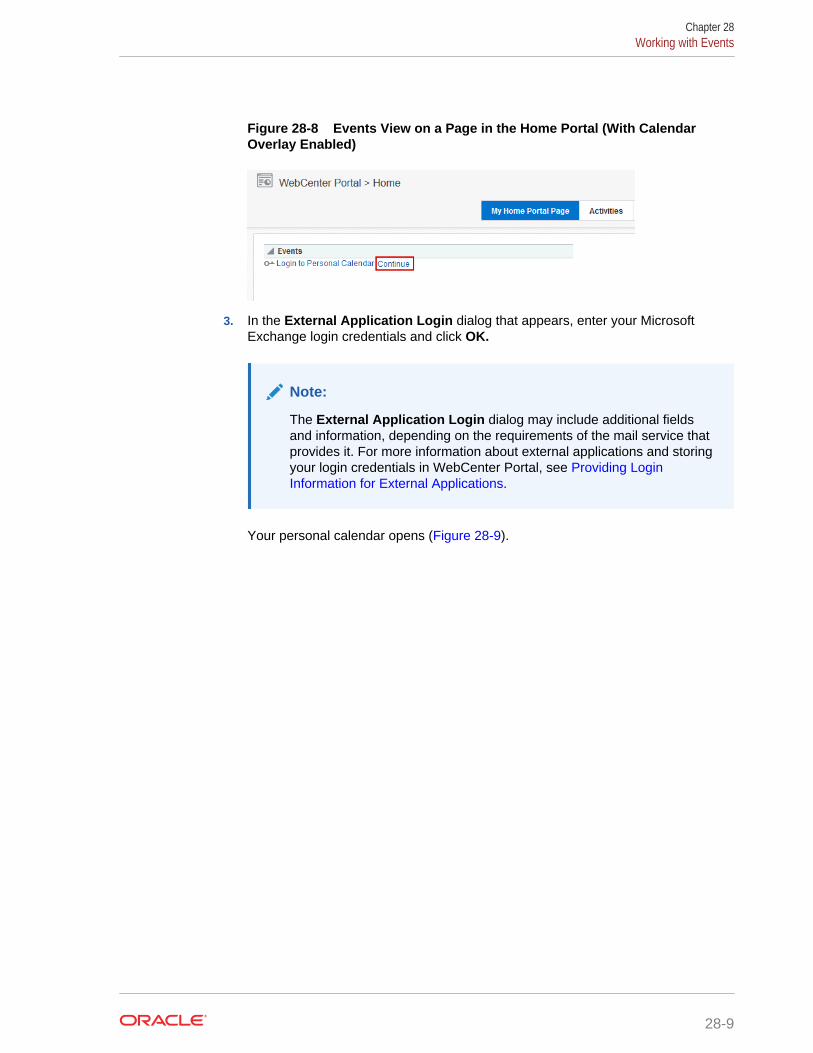
Figure 28-8 Events View on a Page in the Home Portal (With CalendarOverlay Enabled)
3. In the External Application Login dialog that appears, enter your MicrosoftExchange login credentials and click OK.
Note:
The External Application Login dialog may include additional fieldsand information, depending on the requirements of the mail service thatprovides it. For more information about external applications and storingyour login credentials in WebCenter Portal, see Providing LoginInformation for External Applications.
Your personal calendar opens (Figure 28-9).
Chapter 28Working with Events
28-9

Figure 28-9 Personal Calendar
Viewing EventsYou can view events as a grid or a list; choose to display events by day, week, or amonth; filter events by category; select the range of hours displayed per day; andinclude a second time zone in the display.
Chapter 28Working with Events
28-10
Note:
Where to View Events for information on viewing events on the Events page,on a page in the portal, and on a page in the Home portal.
To expose the Events page to all portal members, the portal manager needsto add the page link to the portal navigation, as described in Adding anExisting Page to the Portal Navigation in Building Portals with OracleWebCenter Portal. For a page to show in portal navigation, the Visibilitycheck box for the page must also be selected. For more information, see Showing or Hiding a Page in the Portal Navigation in Building Portals withOracle WebCenter Portal.
This section includes the following topics:
• Using the Calendar Interface
• Viewing Event Details
• Filtering Events by Category
• Setting Display Preferences
Using the Calendar InterfaceYou can use icons to display events in grid form or as a list. When you display eventsas a grid, you can show them by day, week, or month. When you display events as alist, the number of upcoming events listed depends on the display options selected.
See Also:
See Setting Display Preferences for information about changing List viewdisplay options.
Usually, in grid mode, events are displayed for the current day, week, or month. Toview events for a specific point in time, you can use the previous or next icons orselect a date so that the calendar displays events for a specific date.
The following table lists the different icons available and describes their function.
Note:
The following options are not available in the Events - Mini View.
Chapter 28Working with Events
28-11
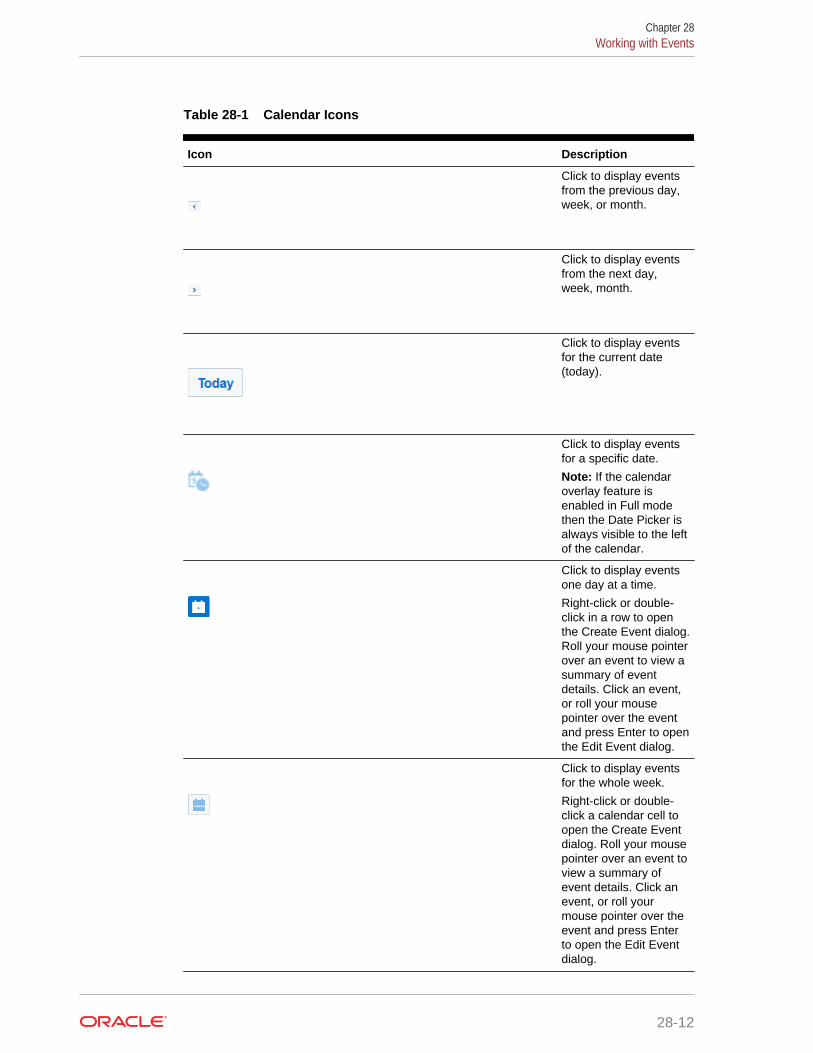
Table 28-1 Calendar Icons
Icon Description
Click to display eventsfrom the previous day,week, or month.
Click to display eventsfrom the next day,week, month.
Click to display eventsfor the current date(today).
Click to display eventsfor a specific date.
Note: If the calendaroverlay feature isenabled in Full modethen the Date Picker isalways visible to the leftof the calendar.
Click to display eventsone day at a time.
Right-click or double-click in a row to openthe Create Event dialog.Roll your mouse pointerover an event to view asummary of eventdetails. Click an event,or roll your mousepointer over the eventand press Enter to openthe Edit Event dialog.
Click to display eventsfor the whole week.
Right-click or double-click a calendar cell toopen the Create Eventdialog. Roll your mousepointer over an event toview a summary ofevent details. Click anevent, or roll yourmouse pointer over theevent and press Enterto open the Edit Eventdialog.
Chapter 28Working with Events
28-12
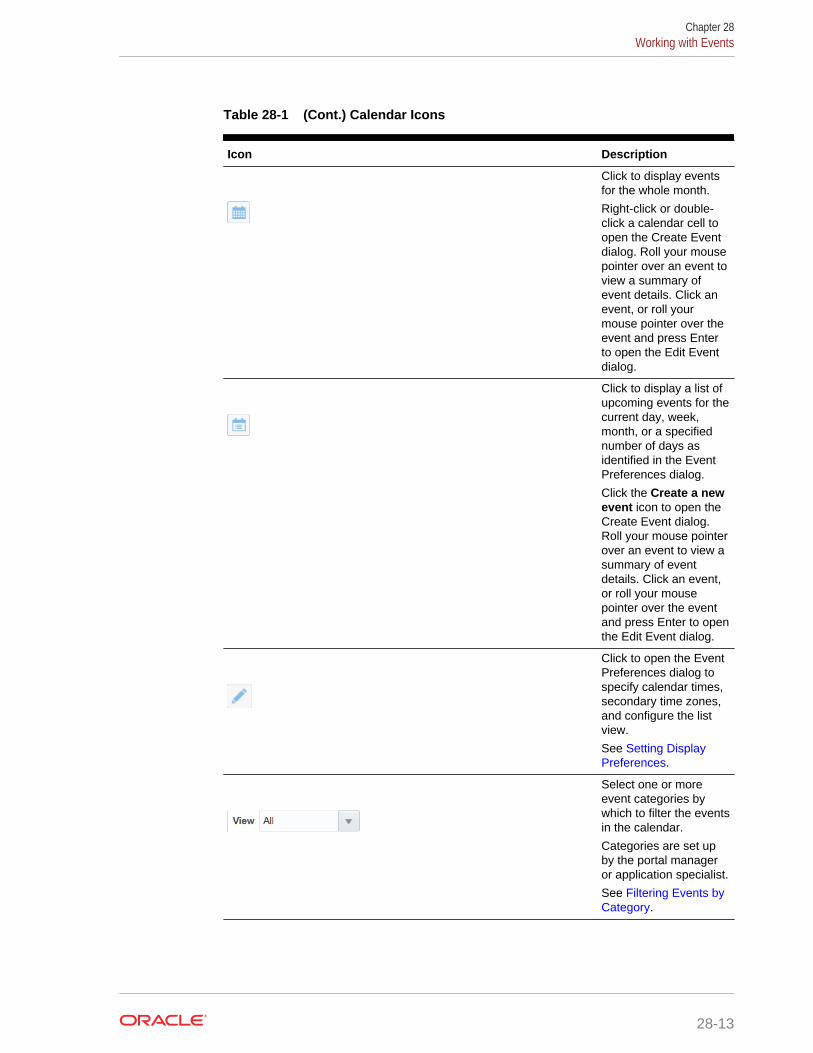
Table 28-1 (Cont.) Calendar Icons
Icon Description
Click to display eventsfor the whole month.
Right-click or double-click a calendar cell toopen the Create Eventdialog. Roll your mousepointer over an event toview a summary ofevent details. Click anevent, or roll yourmouse pointer over theevent and press Enterto open the Edit Eventdialog.
Click to display a list ofupcoming events for thecurrent day, week,month, or a specifiednumber of days asidentified in the EventPreferences dialog.
Click the Create a newevent icon to open theCreate Event dialog.Roll your mouse pointerover an event to view asummary of eventdetails. Click an event,or roll your mousepointer over the eventand press Enter to openthe Edit Event dialog.
Click to open the EventPreferences dialog tospecify calendar times,secondary time zones,and configure the listview.
See Setting DisplayPreferences.
Select one or moreevent categories bywhich to filter the eventsin the calendar.
Categories are set upby the portal manageror application specialist.
See Filtering Events byCategory.
Chapter 28Working with Events
28-13
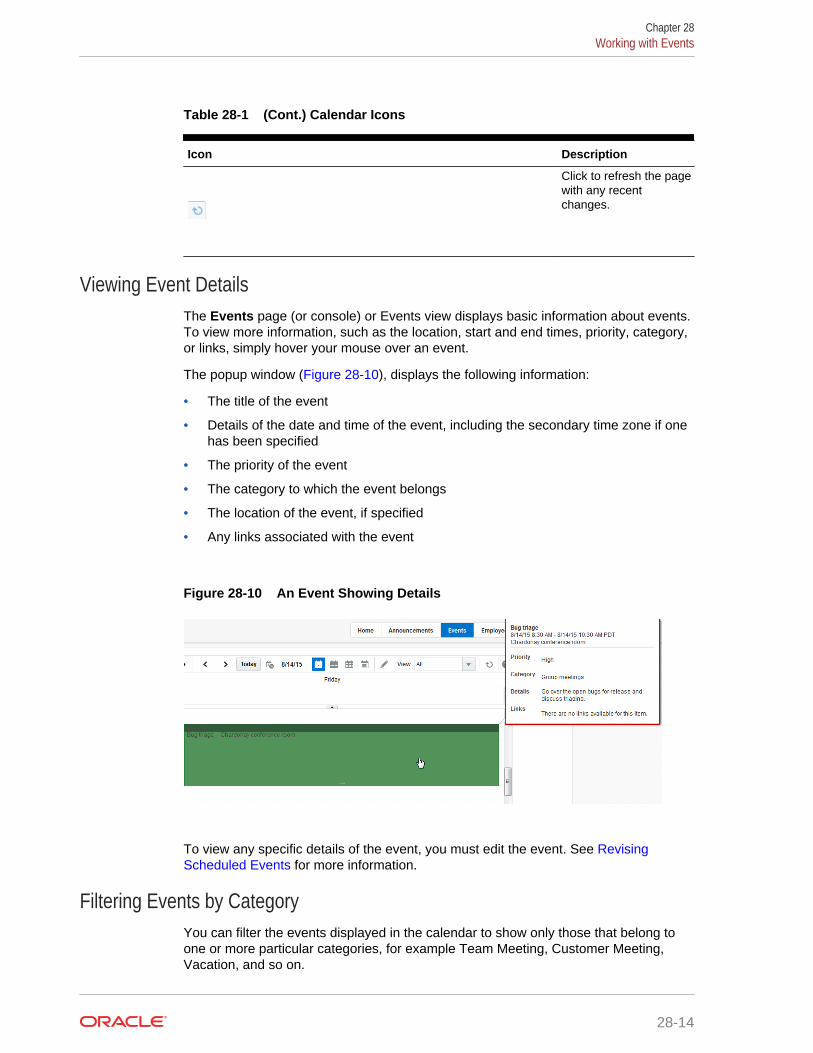
Table 28-1 (Cont.) Calendar Icons
Icon Description
Click to refresh the pagewith any recentchanges.
Viewing Event DetailsThe Events page (or console) or Events view displays basic information about events.To view more information, such as the location, start and end times, priority, category,or links, simply hover your mouse over an event.
The popup window (Figure 28-10), displays the following information:
• The title of the event
• Details of the date and time of the event, including the secondary time zone if onehas been specified
• The priority of the event
• The category to which the event belongs
• The location of the event, if specified
• Any links associated with the event
Figure 28-10 An Event Showing Details
To view any specific details of the event, you must edit the event. See RevisingScheduled Events for more information.
Filtering Events by CategoryYou can filter the events displayed in the calendar to show only those that belong toone or more particular categories, for example Team Meeting, Customer Meeting,Vacation, and so on.
Chapter 28Working with Events
28-14
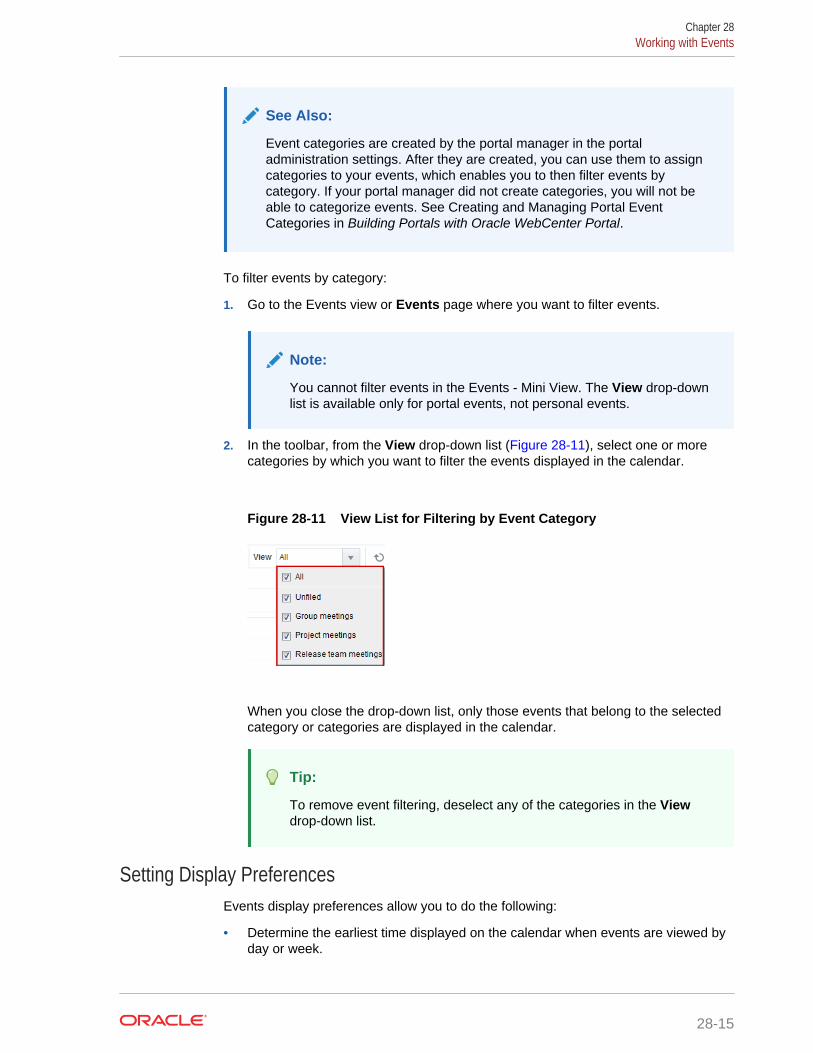
See Also:
Event categories are created by the portal manager in the portaladministration settings. After they are created, you can use them to assigncategories to your events, which enables you to then filter events bycategory. If your portal manager did not create categories, you will not beable to categorize events. See Creating and Managing Portal EventCategories in Building Portals with Oracle WebCenter Portal.
To filter events by category:
1. Go to the Events view or Events page where you want to filter events.
Note:
You cannot filter events in the Events - Mini View. The View drop-downlist is available only for portal events, not personal events.
2. In the toolbar, from the View drop-down list (Figure 28-11), select one or morecategories by which you want to filter the events displayed in the calendar.
Figure 28-11 View List for Filtering by Event Category
When you close the drop-down list, only those events that belong to the selectedcategory or categories are displayed in the calendar.
Tip:
To remove event filtering, deselect any of the categories in the Viewdrop-down list.
Setting Display PreferencesEvents display preferences allow you to do the following:
• Determine the earliest time displayed on the calendar when events are viewed byday or week.
Chapter 28Working with Events
28-15
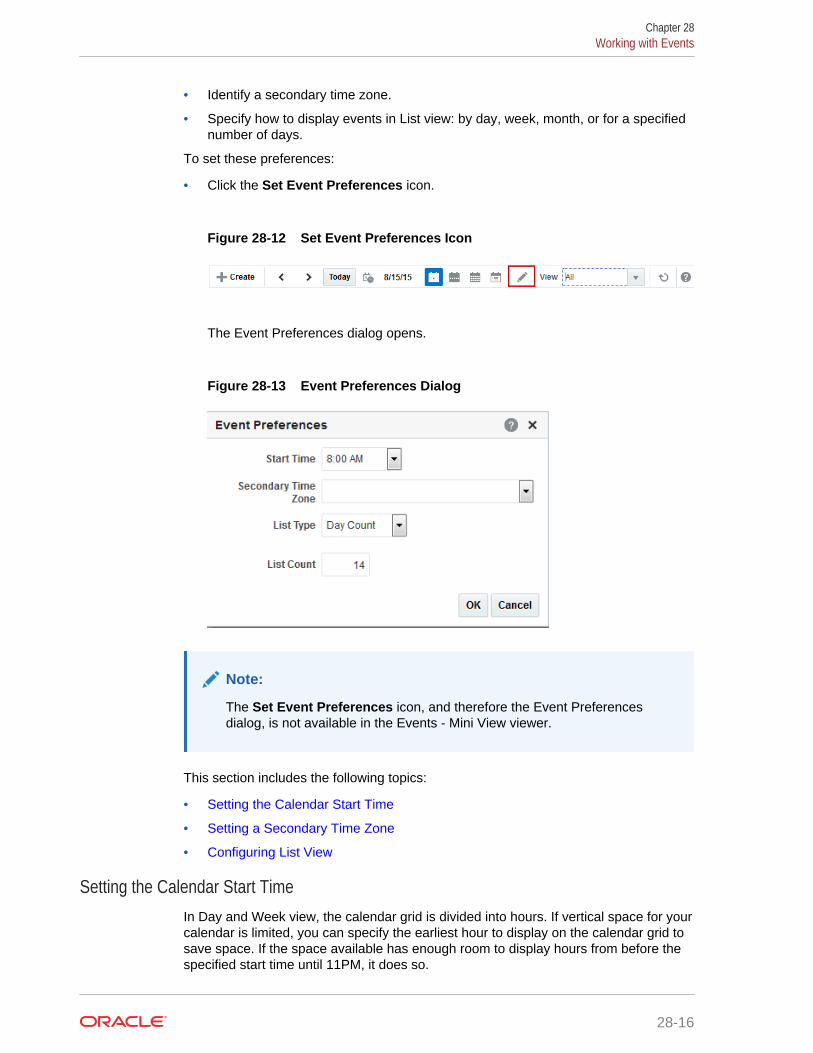
• Identify a secondary time zone.
• Specify how to display events in List view: by day, week, month, or for a specifiednumber of days.
To set these preferences:
• Click the Set Event Preferences icon.
Figure 28-12 Set Event Preferences Icon
The Event Preferences dialog opens.
Figure 28-13 Event Preferences Dialog
Note:
The Set Event Preferences icon, and therefore the Event Preferencesdialog, is not available in the Events - Mini View viewer.
This section includes the following topics:
• Setting the Calendar Start Time
• Setting a Secondary Time Zone
• Configuring List View
Setting the Calendar Start TimeIn Day and Week view, the calendar grid is divided into hours. If vertical space for yourcalendar is limited, you can specify the earliest hour to display on the calendar grid tosave space. If the space available has enough room to display hours from before thespecified start time until 11PM, it does so.
Chapter 28Working with Events
28-16
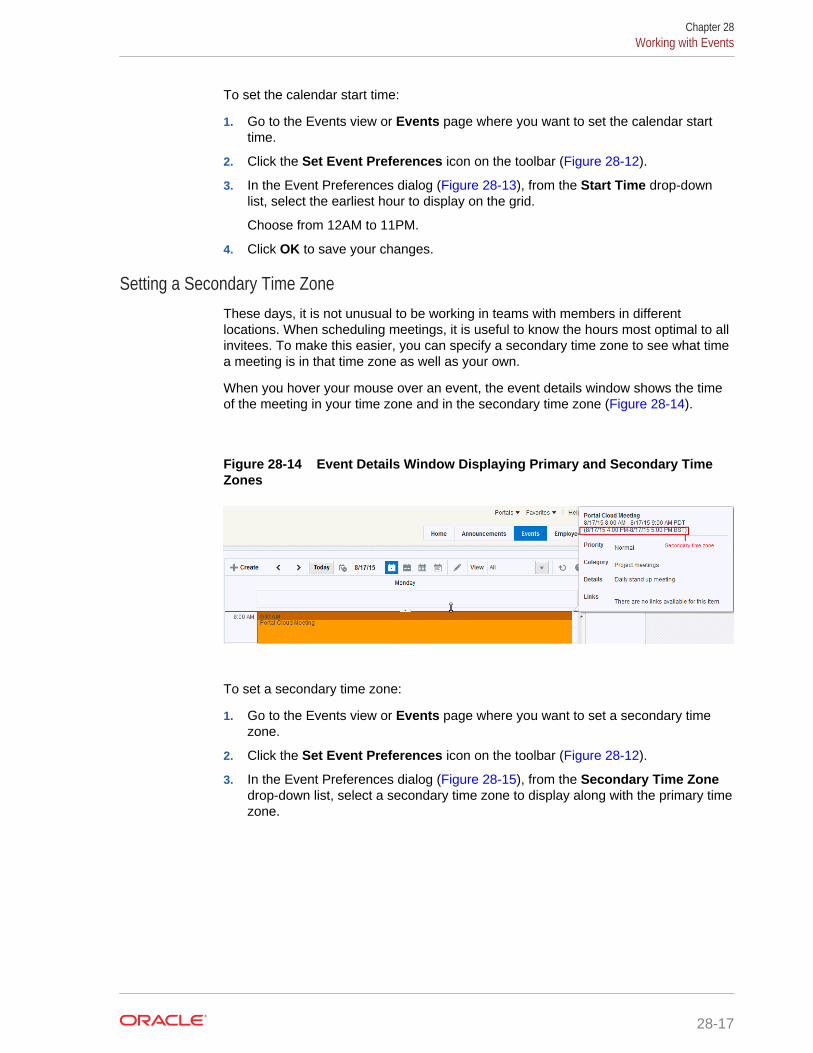
To set the calendar start time:
1. Go to the Events view or Events page where you want to set the calendar starttime.
2. Click the Set Event Preferences icon on the toolbar (Figure 28-12).
3. In the Event Preferences dialog (Figure 28-13), from the Start Time drop-downlist, select the earliest hour to display on the grid.
Choose from 12AM to 11PM.
4. Click OK to save your changes.
Setting a Secondary Time ZoneThese days, it is not unusual to be working in teams with members in differentlocations. When scheduling meetings, it is useful to know the hours most optimal to allinvitees. To make this easier, you can specify a secondary time zone to see what timea meeting is in that time zone as well as your own.
When you hover your mouse over an event, the event details window shows the timeof the meeting in your time zone and in the secondary time zone (Figure 28-14).
Figure 28-14 Event Details Window Displaying Primary and Secondary TimeZones
To set a secondary time zone:
1. Go to the Events view or Events page where you want to set a secondary timezone.
2. Click the Set Event Preferences icon on the toolbar (Figure 28-12).
3. In the Event Preferences dialog (Figure 28-15), from the Secondary Time Zonedrop-down list, select a secondary time zone to display along with the primary timezone.
Chapter 28Working with Events
28-17
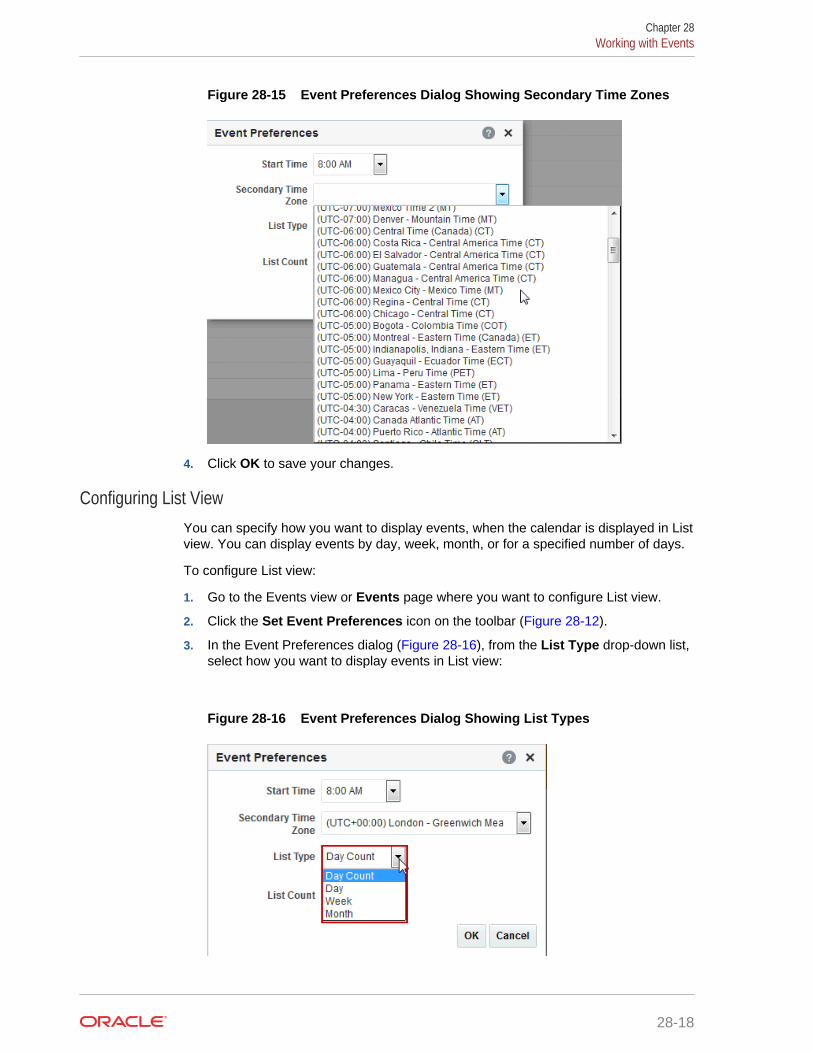
Figure 28-15 Event Preferences Dialog Showing Secondary Time Zones
4. Click OK to save your changes.
Configuring List ViewYou can specify how you want to display events, when the calendar is displayed in Listview. You can display events by day, week, month, or for a specified number of days.
To configure List view:
1. Go to the Events view or Events page where you want to configure List view.
2. Click the Set Event Preferences icon on the toolbar (Figure 28-12).
3. In the Event Preferences dialog (Figure 28-16), from the List Type drop-down list,select how you want to display events in List view:
Figure 28-16 Event Preferences Dialog Showing List Types
Chapter 28Working with Events
28-18
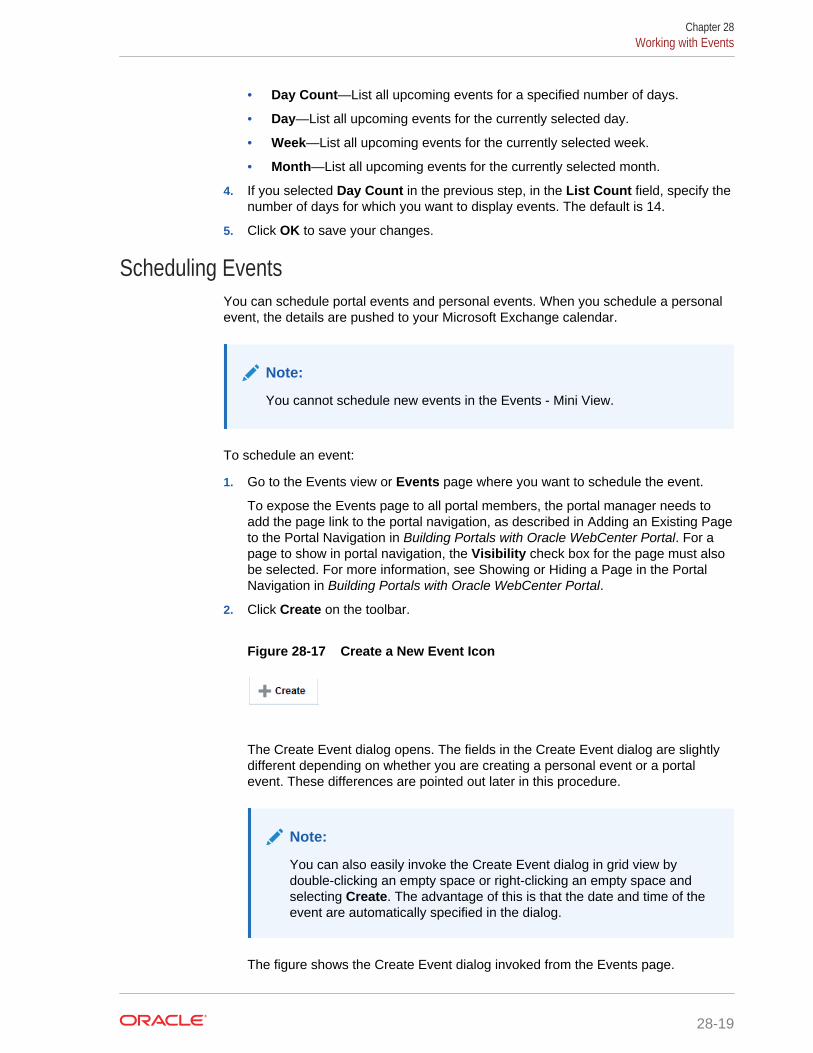
• Day Count—List all upcoming events for a specified number of days.
• Day—List all upcoming events for the currently selected day.
• Week—List all upcoming events for the currently selected week.
• Month—List all upcoming events for the currently selected month.
4. If you selected Day Count in the previous step, in the List Count field, specify thenumber of days for which you want to display events. The default is 14.
5. Click OK to save your changes.
Scheduling EventsYou can schedule portal events and personal events. When you schedule a personalevent, the details are pushed to your Microsoft Exchange calendar.
Note:
You cannot schedule new events in the Events - Mini View.
To schedule an event:
1. Go to the Events view or Events page where you want to schedule the event.
To expose the Events page to all portal members, the portal manager needs toadd the page link to the portal navigation, as described in Adding an Existing Pageto the Portal Navigation in Building Portals with Oracle WebCenter Portal. For apage to show in portal navigation, the Visibility check box for the page must alsobe selected. For more information, see Showing or Hiding a Page in the PortalNavigation in Building Portals with Oracle WebCenter Portal.
2. Click Create on the toolbar.
Figure 28-17 Create a New Event Icon
The Create Event dialog opens. The fields in the Create Event dialog are slightlydifferent depending on whether you are creating a personal event or a portalevent. These differences are pointed out later in this procedure.
Note:
You can also easily invoke the Create Event dialog in grid view bydouble-clicking an empty space or right-clicking an empty space andselecting Create. The advantage of this is that the date and time of theevent are automatically specified in the dialog.
The figure shows the Create Event dialog invoked from the Events page.
Chapter 28Working with Events
28-19
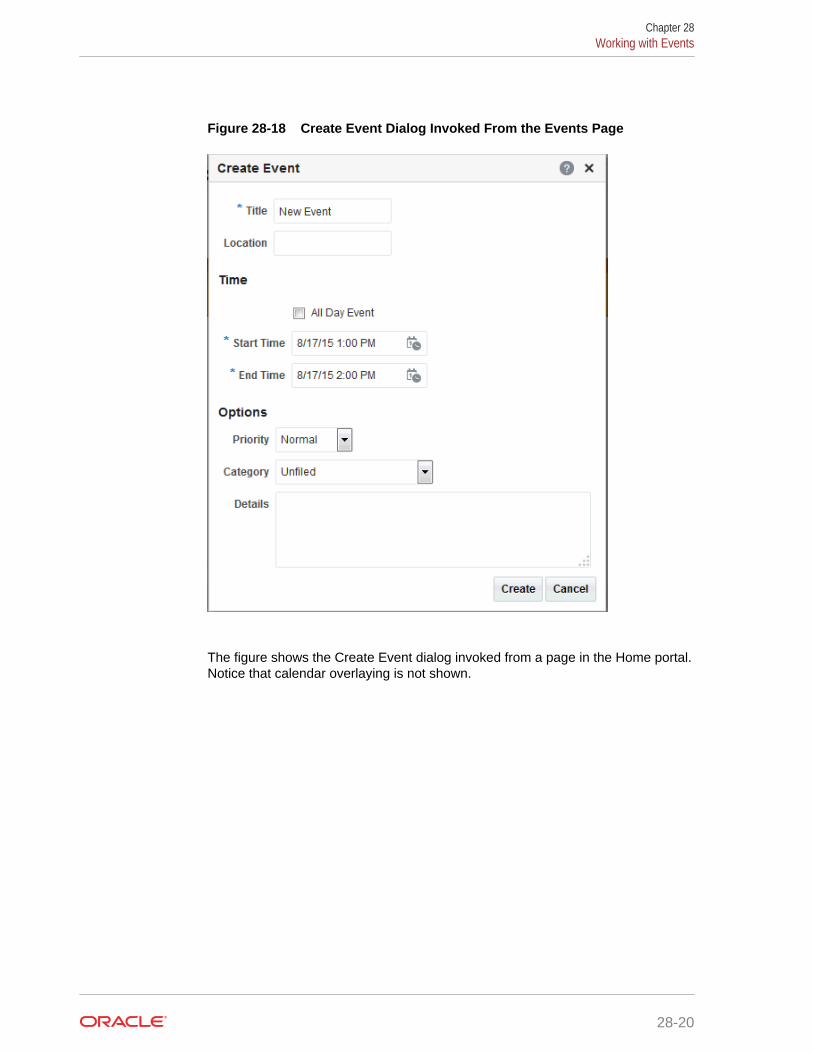
Figure 28-18 Create Event Dialog Invoked From the Events Page
The figure shows the Create Event dialog invoked from a page in the Home portal.Notice that calendar overlaying is not shown.
Chapter 28Working with Events
28-20
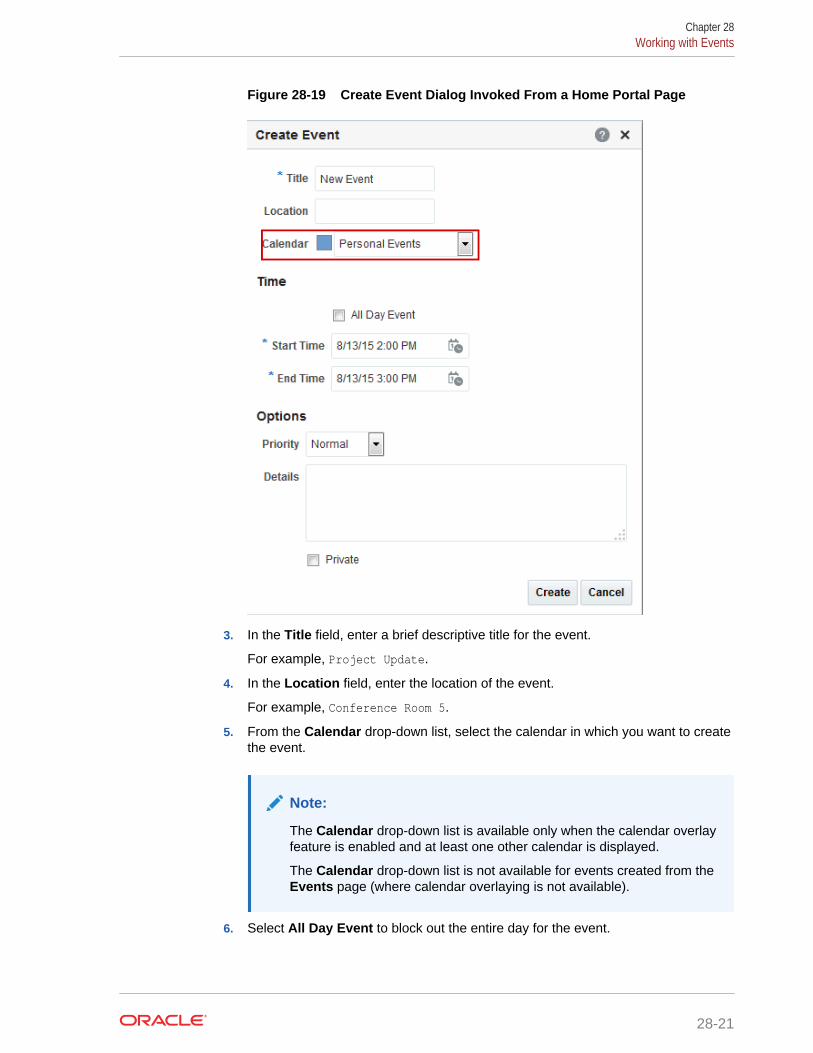
Figure 28-19 Create Event Dialog Invoked From a Home Portal Page
3. In the Title field, enter a brief descriptive title for the event.
For example, Project Update.
4. In the Location field, enter the location of the event.
For example, Conference Room 5.
5. From the Calendar drop-down list, select the calendar in which you want to createthe event.
Note:
The Calendar drop-down list is available only when the calendar overlayfeature is enabled and at least one other calendar is displayed.
The Calendar drop-down list is not available for events created from theEvents page (where calendar overlaying is not available).
6. Select All Day Event to block out the entire day for the event.
Chapter 28Working with Events
28-21
All day events can span multiple days. In Day and Week view mode, all dayevents are displayed in a separate area at the top of the calendar. In Month view,all day events are displayed surrounded by a block of color.
7. In the Start Time field enter a date and time to start the event.
Tip:
You can click the Select Date and Time icon and select a start timefrom the Date and Time Picker, if you prefer.
For all day events, you specify the date only.
8. In the End Time field enter a date and time to finish the event.
Tip:
You can click the Select Date and Time icon and select an end timefrom the Date and Time Picker, if you prefer.
For all day events, you specify the date only.
9. (Optional) From the Priority drop-down list, select a priority for the event: Highest,High, Normal, Low, or Lowest.
The priority of an event determines where it appears when events conflict. Anevent with Highest priority is displayed first. The event priority is also displayed inthe event popup window when a user hovers the mouse over the event.
10. (Optional) If your portal manager set up event categories, from the Category drop-down list, you can select a category to classify this event.
Categories are useful for creating distinct groups of events, organized according totheir general purpose.
See Creating and Managing Portal Event Categories in Building Portals withOracle WebCenter Portal.
The event category is displayed in the event popup window when a user hoversthe mouse over the event. Events in different categories can be displayed indifferent colors if the portal manager used colors to specify categories.
You can also filter a calendar to display events belonging to a specific category.
Note:
The Category drop-down list is available only for portal events.
11. Optional: In the Details field, enter any additional details you want to include, up toa maximum of 4000 characters.
For example, you might want to describe the purpose of the meeting, provide abrief agenda, or indicate if attendees need to prepare anything for the meeting.
Chapter 28Working with Events
28-22
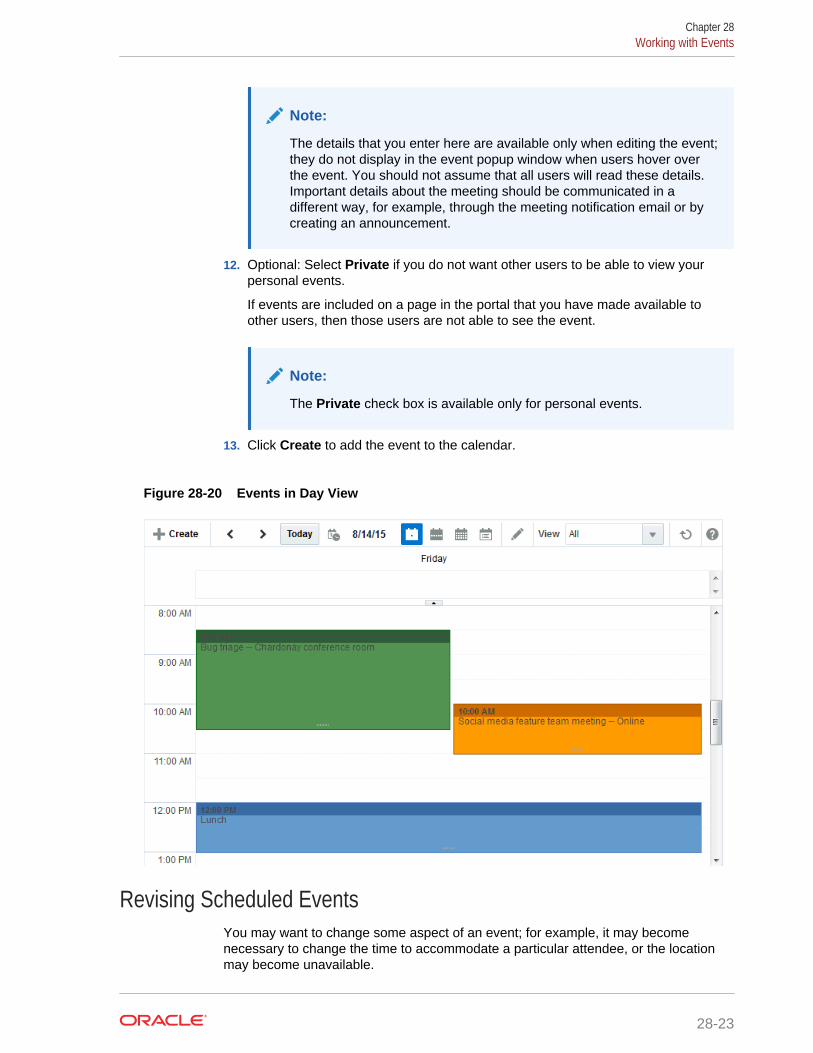
Note:
The details that you enter here are available only when editing the event;they do not display in the event popup window when users hover overthe event. You should not assume that all users will read these details.Important details about the meeting should be communicated in adifferent way, for example, through the meeting notification email or bycreating an announcement.
12. Optional: Select Private if you do not want other users to be able to view yourpersonal events.
If events are included on a page in the portal that you have made available toother users, then those users are not able to see the event.
Note:
The Private check box is available only for personal events.
13. Click Create to add the event to the calendar.
Figure 28-20 Events in Day View
Revising Scheduled EventsYou may want to change some aspect of an event; for example, it may becomenecessary to change the time to accommodate a particular attendee, or the locationmay become unavailable.
Chapter 28Working with Events
28-23
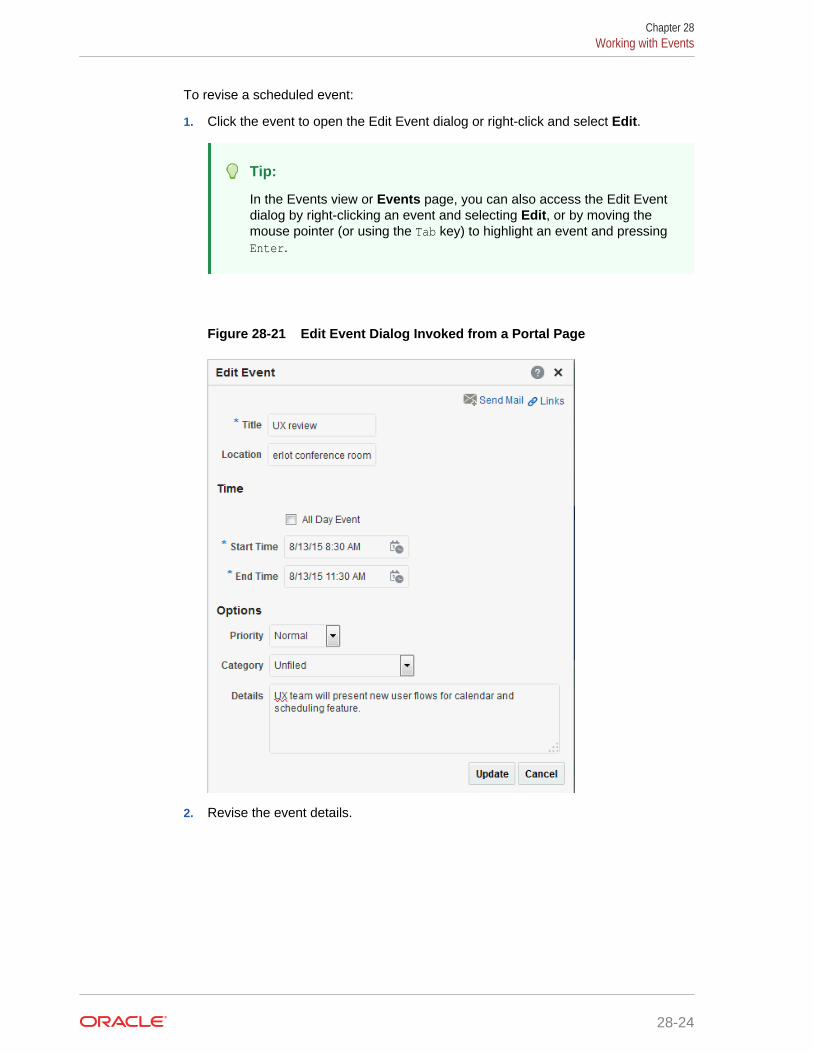
To revise a scheduled event:
1. Click the event to open the Edit Event dialog or right-click and select Edit.
Tip:
In the Events view or Events page, you can also access the Edit Eventdialog by right-clicking an event and selecting Edit, or by moving themouse pointer (or using the Tab key) to highlight an event and pressingEnter.
Figure 28-21 Edit Event Dialog Invoked from a Portal Page
2. Revise the event details.
Chapter 28Working with Events
28-24
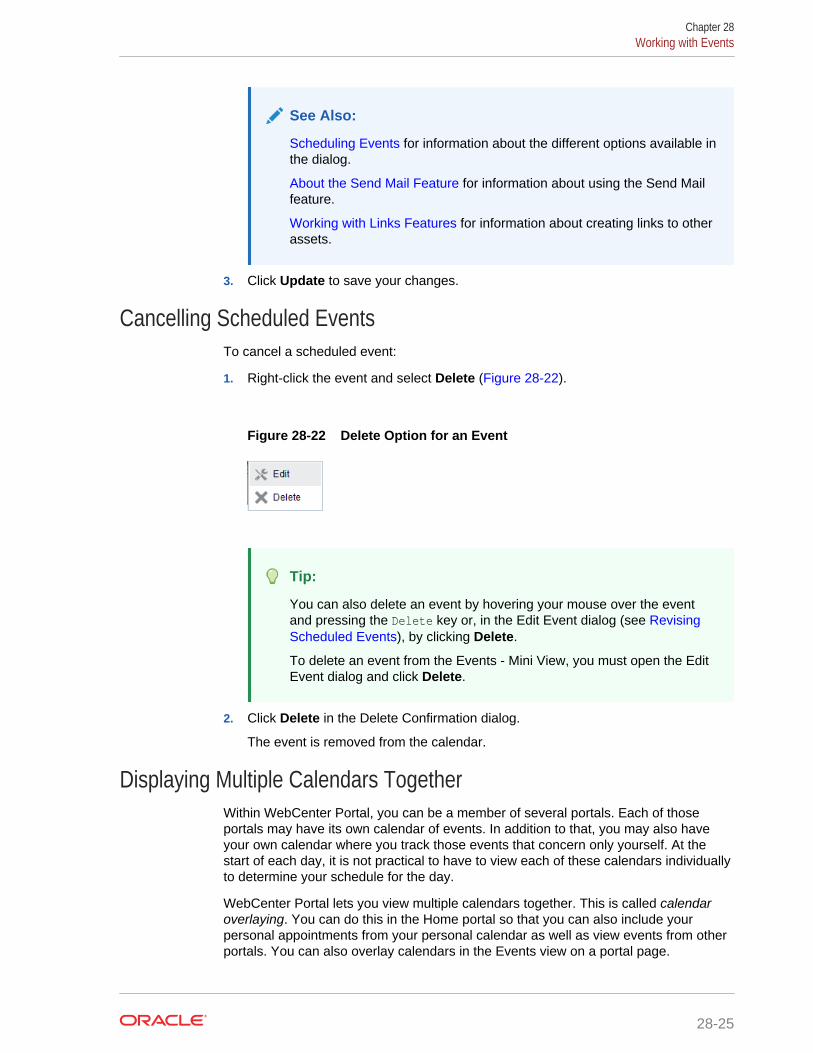
See Also:
Scheduling Events for information about the different options available inthe dialog.
About the Send Mail Feature for information about using the Send Mailfeature.
Working with Links Features for information about creating links to otherassets.
3. Click Update to save your changes.
Cancelling Scheduled EventsTo cancel a scheduled event:
1. Right-click the event and select Delete (Figure 28-22).
Figure 28-22 Delete Option for an Event
Tip:
You can also delete an event by hovering your mouse over the eventand pressing the Delete key or, in the Edit Event dialog (see RevisingScheduled Events), by clicking Delete.
To delete an event from the Events - Mini View, you must open the EditEvent dialog and click Delete.
2. Click Delete in the Delete Confirmation dialog.
The event is removed from the calendar.
Displaying Multiple Calendars TogetherWithin WebCenter Portal, you can be a member of several portals. Each of thoseportals may have its own calendar of events. In addition to that, you may also haveyour own calendar where you track those events that concern only yourself. At thestart of each day, it is not practical to have to view each of these calendars individuallyto determine your schedule for the day.
WebCenter Portal lets you view multiple calendars together. This is called calendaroverlaying. You can do this in the Home portal so that you can also include yourpersonal appointments from your personal calendar as well as view events from otherportals. You can also overlay calendars in the Events view on a portal page.
Chapter 28Working with Events
28-25
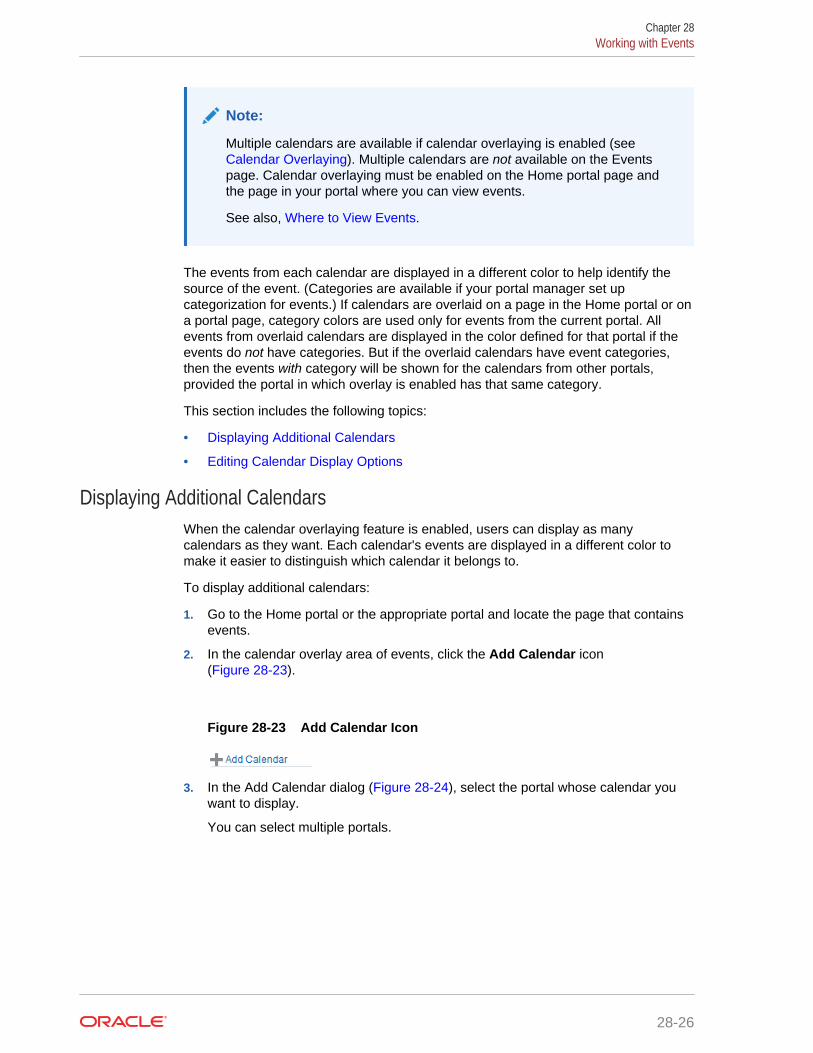
Note:
Multiple calendars are available if calendar overlaying is enabled (see Calendar Overlaying). Multiple calendars are not available on the Eventspage. Calendar overlaying must be enabled on the Home portal page andthe page in your portal where you can view events.
See also, Where to View Events.
The events from each calendar are displayed in a different color to help identify thesource of the event. (Categories are available if your portal manager set upcategorization for events.) If calendars are overlaid on a page in the Home portal or ona portal page, category colors are used only for events from the current portal. Allevents from overlaid calendars are displayed in the color defined for that portal if theevents do not have categories. But if the overlaid calendars have event categories,then the events with category will be shown for the calendars from other portals,provided the portal in which overlay is enabled has that same category.
This section includes the following topics:
• Displaying Additional Calendars
• Editing Calendar Display Options
Displaying Additional CalendarsWhen the calendar overlaying feature is enabled, users can display as manycalendars as they want. Each calendar's events are displayed in a different color tomake it easier to distinguish which calendar it belongs to.
To display additional calendars:
1. Go to the Home portal or the appropriate portal and locate the page that containsevents.
2. In the calendar overlay area of events, click the Add Calendar icon(Figure 28-23).
Figure 28-23 Add Calendar Icon
3. In the Add Calendar dialog (Figure 28-24), select the portal whose calendar youwant to display.
You can select multiple portals.
Chapter 28Working with Events
28-26
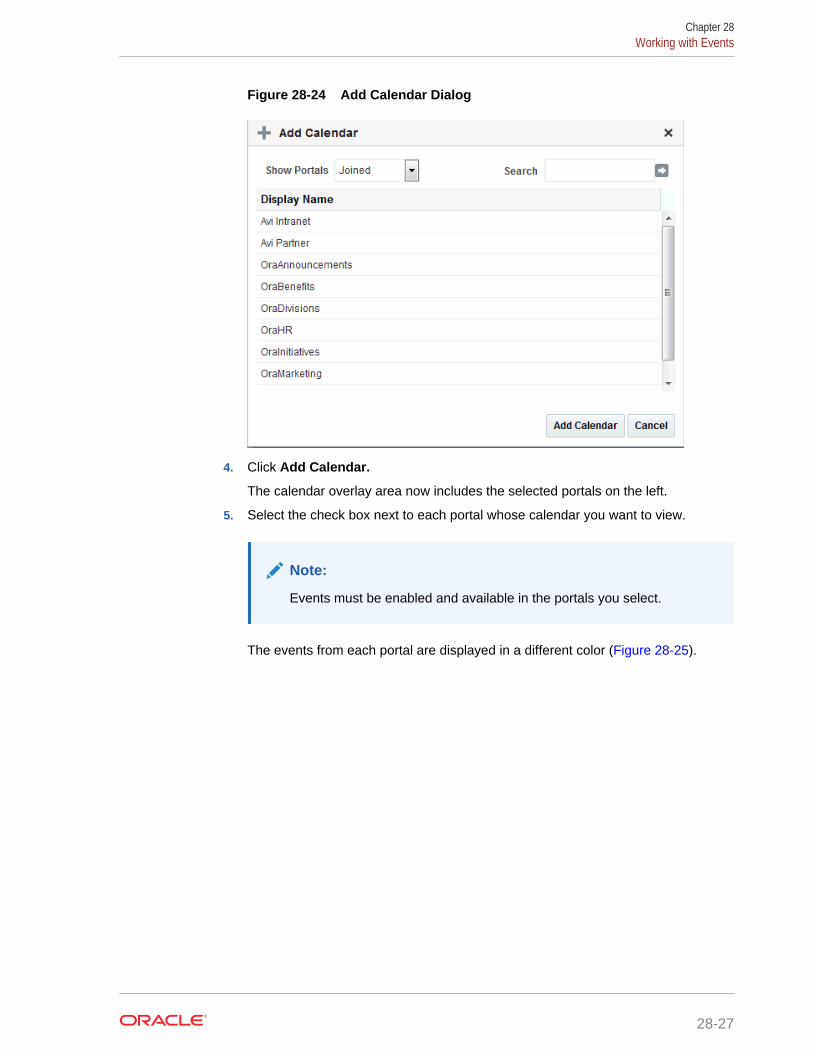
Figure 28-24 Add Calendar Dialog
4. Click Add Calendar.
The calendar overlay area now includes the selected portals on the left.
5. Select the check box next to each portal whose calendar you want to view.
Note:
Events must be enabled and available in the portals you select.
The events from each portal are displayed in a different color (Figure 28-25).
Chapter 28Working with Events
28-27
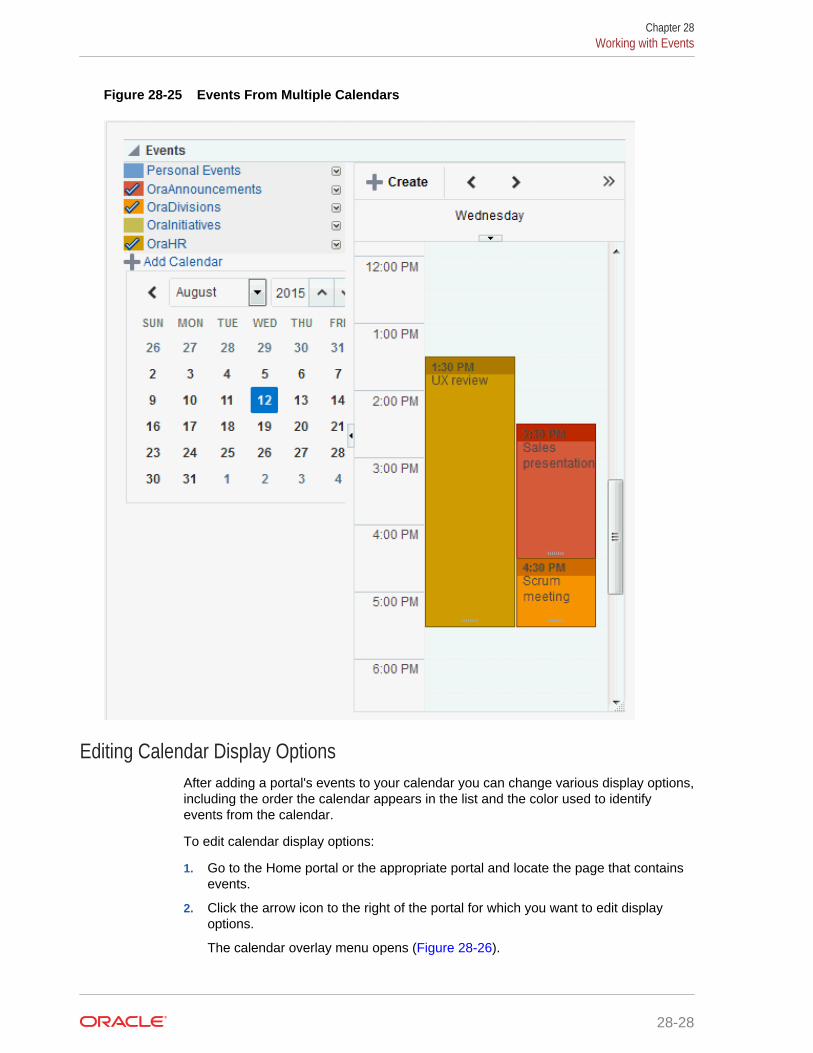
Figure 28-25 Events From Multiple Calendars
Editing Calendar Display OptionsAfter adding a portal's events to your calendar you can change various display options,including the order the calendar appears in the list and the color used to identifyevents from the calendar.
To edit calendar display options:
1. Go to the Home portal or the appropriate portal and locate the page that containsevents.
2. Click the arrow icon to the right of the portal for which you want to edit displayoptions.
The calendar overlay menu opens (Figure 28-26).
Chapter 28Working with Events
28-28
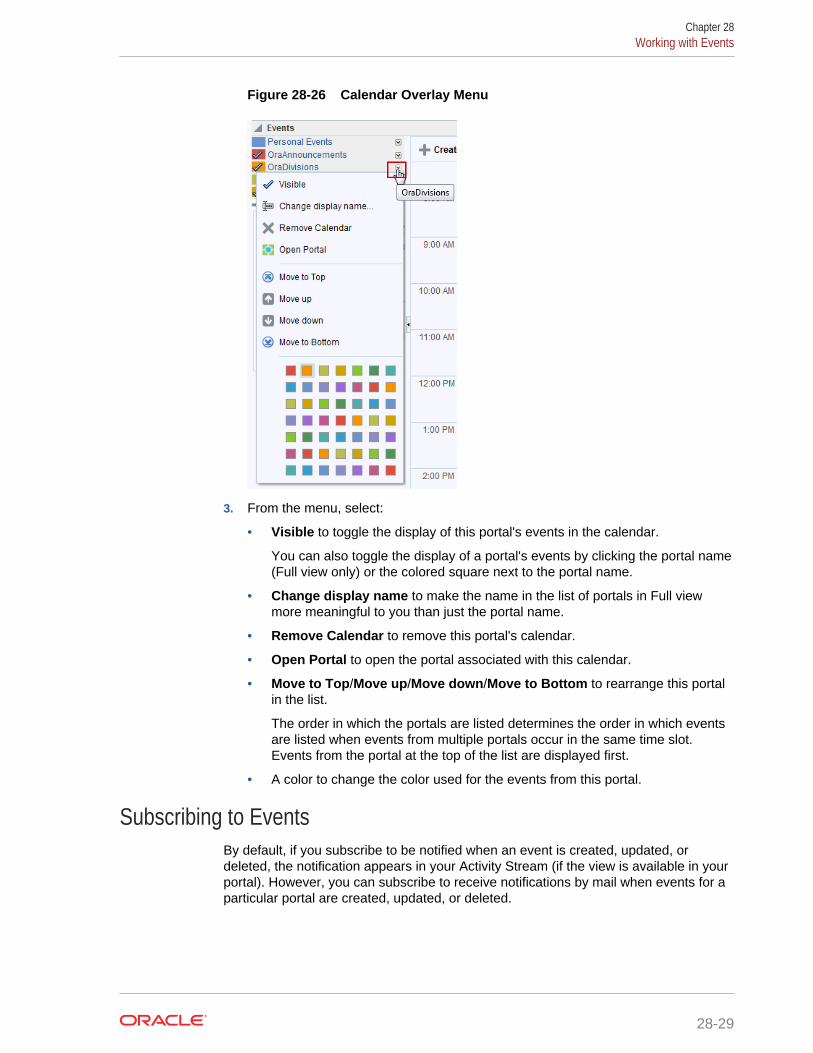
Figure 28-26 Calendar Overlay Menu
3. From the menu, select:
• Visible to toggle the display of this portal's events in the calendar.
You can also toggle the display of a portal's events by clicking the portal name(Full view only) or the colored square next to the portal name.
• Change display name to make the name in the list of portals in Full viewmore meaningful to you than just the portal name.
• Remove Calendar to remove this portal's calendar.
• Open Portal to open the portal associated with this calendar.
• Move to Top/Move up/Move down/Move to Bottom to rearrange this portalin the list.
The order in which the portals are listed determines the order in which eventsare listed when events from multiple portals occur in the same time slot.Events from the portal at the top of the list are displayed first.
• A color to change the color used for the events from this portal.
Subscribing to EventsBy default, if you subscribe to be notified when an event is created, updated, ordeleted, the notification appears in your Activity Stream (if the view is available in yourportal). However, you can subscribe to receive notifications by mail when events for aparticular portal are created, updated, or deleted.
Chapter 28Working with Events
28-29
See Also:
See Subscribing to the Application, to Portals, and to Objects for informationabout how to subscribe.
When you subscribe to a portal's events, whenever an event is created, updated, ordeleted in that portal, a notification is sent to you. If the client to which that notificationis sent supports iMAP (for example, Microsoft Outlook, Mozilla Thunderbird, Gmail,and so on), the notification email includes the ability to accept or decline the event,propose a new time for the event, and so on within the email.
If you accept an event, it is added to the calendar in your email client.
Chapter 28Working with Events
28-30
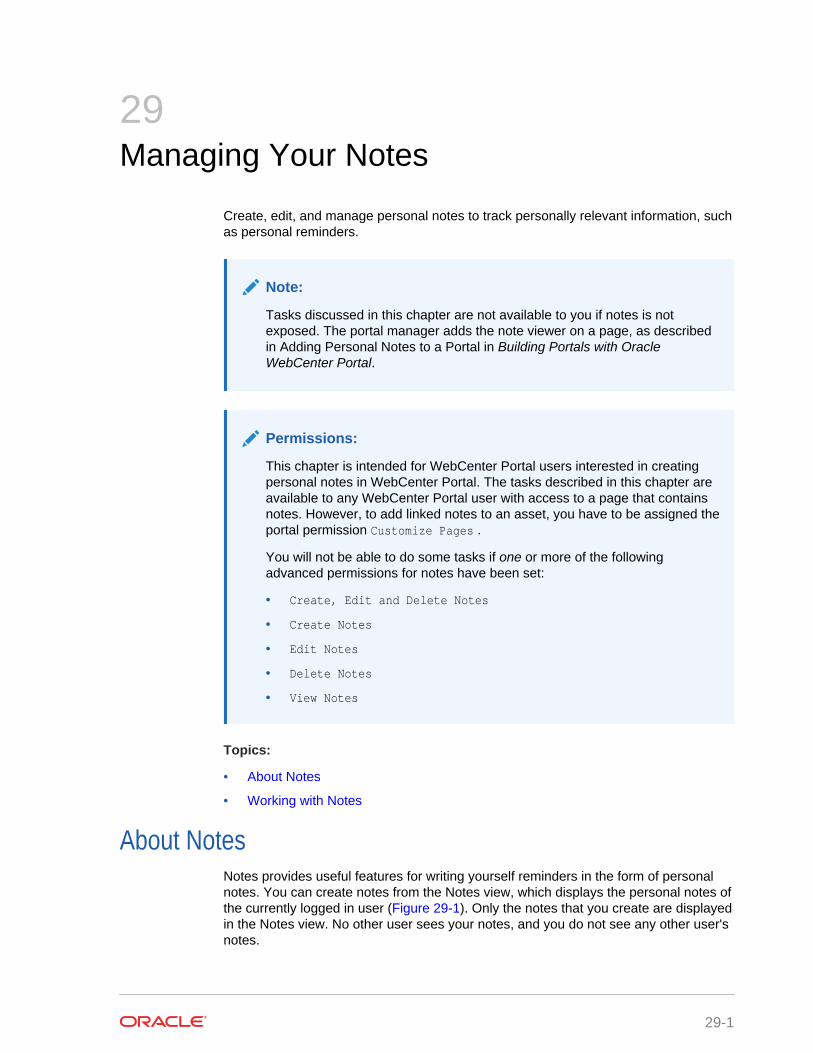
29Managing Your Notes
Create, edit, and manage personal notes to track personally relevant information, suchas personal reminders.
Note:
Tasks discussed in this chapter are not available to you if notes is notexposed. The portal manager adds the note viewer on a page, as describedin Adding Personal Notes to a Portal in Building Portals with OracleWebCenter Portal.
Permissions:
This chapter is intended for WebCenter Portal users interested in creatingpersonal notes in WebCenter Portal. The tasks described in this chapter areavailable to any WebCenter Portal user with access to a page that containsnotes. However, to add linked notes to an asset, you have to be assigned theportal permission Customize Pages .
You will not be able to do some tasks if one or more of the followingadvanced permissions for notes have been set:
• Create, Edit and Delete Notes
• Create Notes
• Edit Notes
• Delete Notes
• View Notes
Topics:
• About Notes
• Working with Notes
About NotesNotes provides useful features for writing yourself reminders in the form of personalnotes. You can create notes from the Notes view, which displays the personal notes ofthe currently logged in user (Figure 29-1). Only the notes that you create are displayedin the Notes view. No other user sees your notes, and you do not see any other user'snotes.
29-1
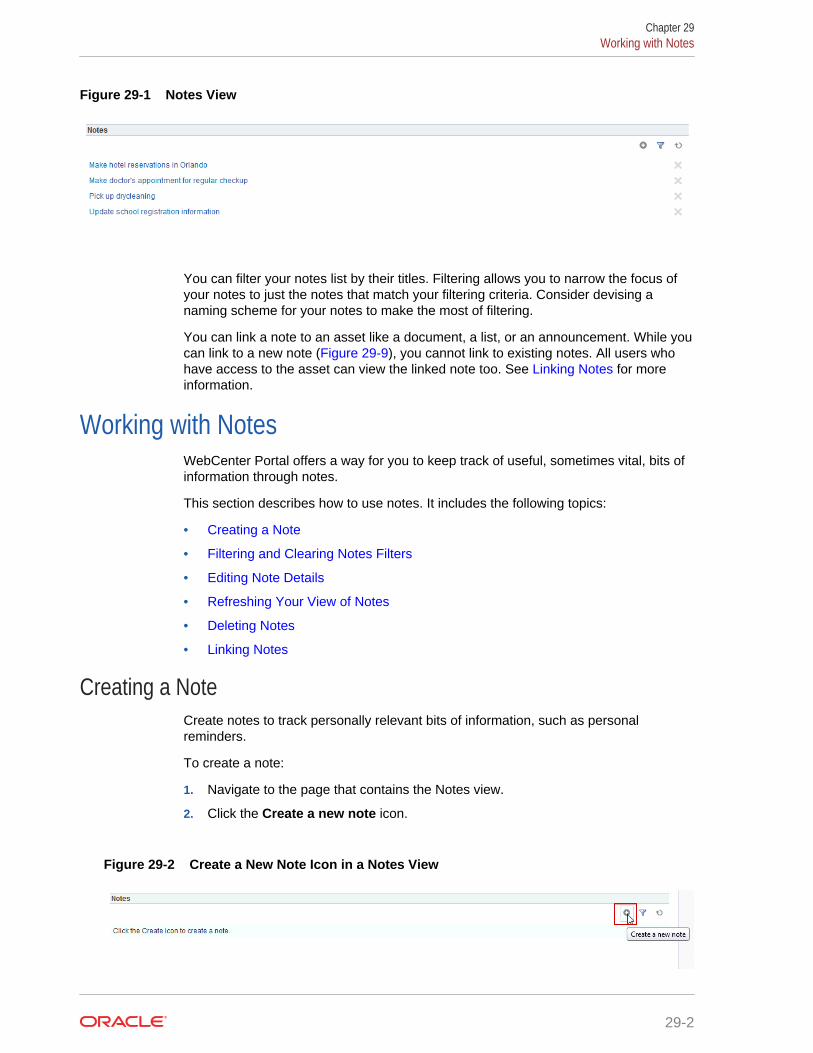
Figure 29-1 Notes View
You can filter your notes list by their titles. Filtering allows you to narrow the focus ofyour notes to just the notes that match your filtering criteria. Consider devising anaming scheme for your notes to make the most of filtering.
You can link a note to an asset like a document, a list, or an announcement. While youcan link to a new note (Figure 29-9), you cannot link to existing notes. All users whohave access to the asset can view the linked note too. See Linking Notes for moreinformation.
Working with NotesWebCenter Portal offers a way for you to keep track of useful, sometimes vital, bits ofinformation through notes.
This section describes how to use notes. It includes the following topics:
• Creating a Note
• Filtering and Clearing Notes Filters
• Editing Note Details
• Refreshing Your View of Notes
• Deleting Notes
• Linking Notes
Creating a NoteCreate notes to track personally relevant bits of information, such as personalreminders.
To create a note:
1. Navigate to the page that contains the Notes view.
2. Click the Create a new note icon.
Figure 29-2 Create a New Note Icon in a Notes View
Chapter 29Working with Notes
29-2
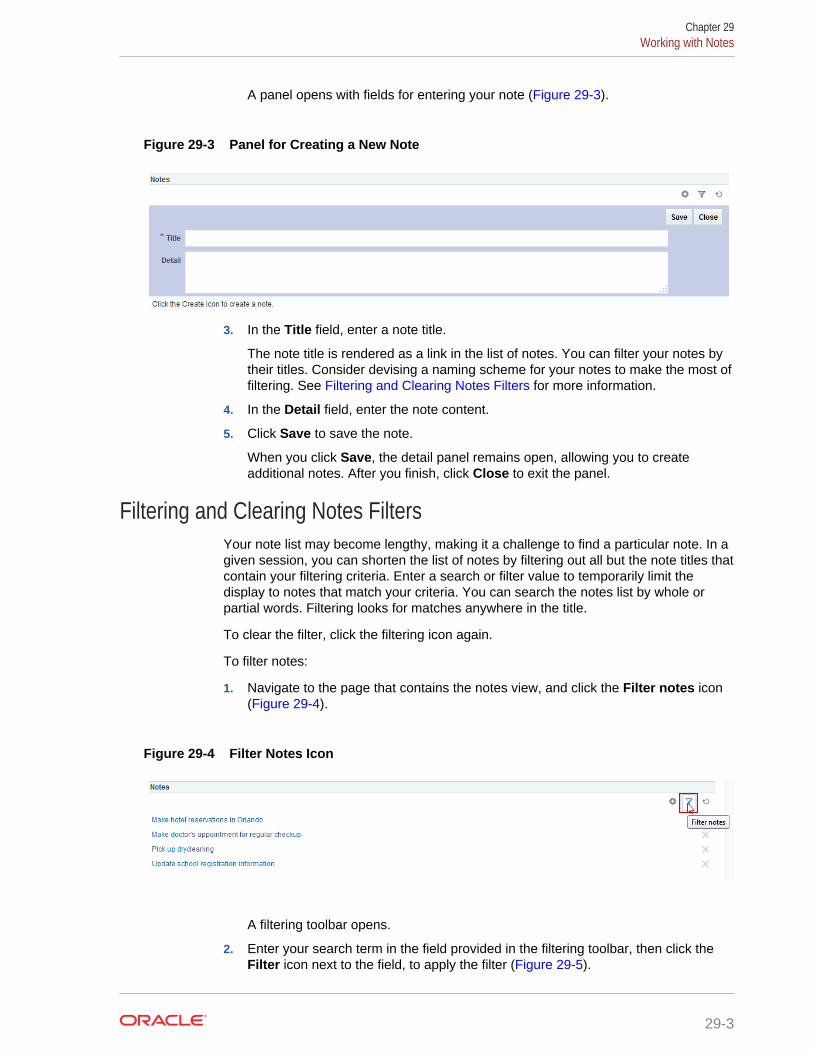
A panel opens with fields for entering your note (Figure 29-3).
Figure 29-3 Panel for Creating a New Note
3. In the Title field, enter a note title.
The note title is rendered as a link in the list of notes. You can filter your notes bytheir titles. Consider devising a naming scheme for your notes to make the most offiltering. See Filtering and Clearing Notes Filters for more information.
4. In the Detail field, enter the note content.
5. Click Save to save the note.
When you click Save, the detail panel remains open, allowing you to createadditional notes. After you finish, click Close to exit the panel.
Filtering and Clearing Notes FiltersYour note list may become lengthy, making it a challenge to find a particular note. In agiven session, you can shorten the list of notes by filtering out all but the note titles thatcontain your filtering criteria. Enter a search or filter value to temporarily limit thedisplay to notes that match your criteria. You can search the notes list by whole orpartial words. Filtering looks for matches anywhere in the title.
To clear the filter, click the filtering icon again.
To filter notes:
1. Navigate to the page that contains the notes view, and click the Filter notes icon(Figure 29-4).
Figure 29-4 Filter Notes Icon
A filtering toolbar opens.
2. Enter your search term in the field provided in the filtering toolbar, then click theFilter icon next to the field, to apply the filter (Figure 29-5).
Chapter 29Working with Notes
29-3
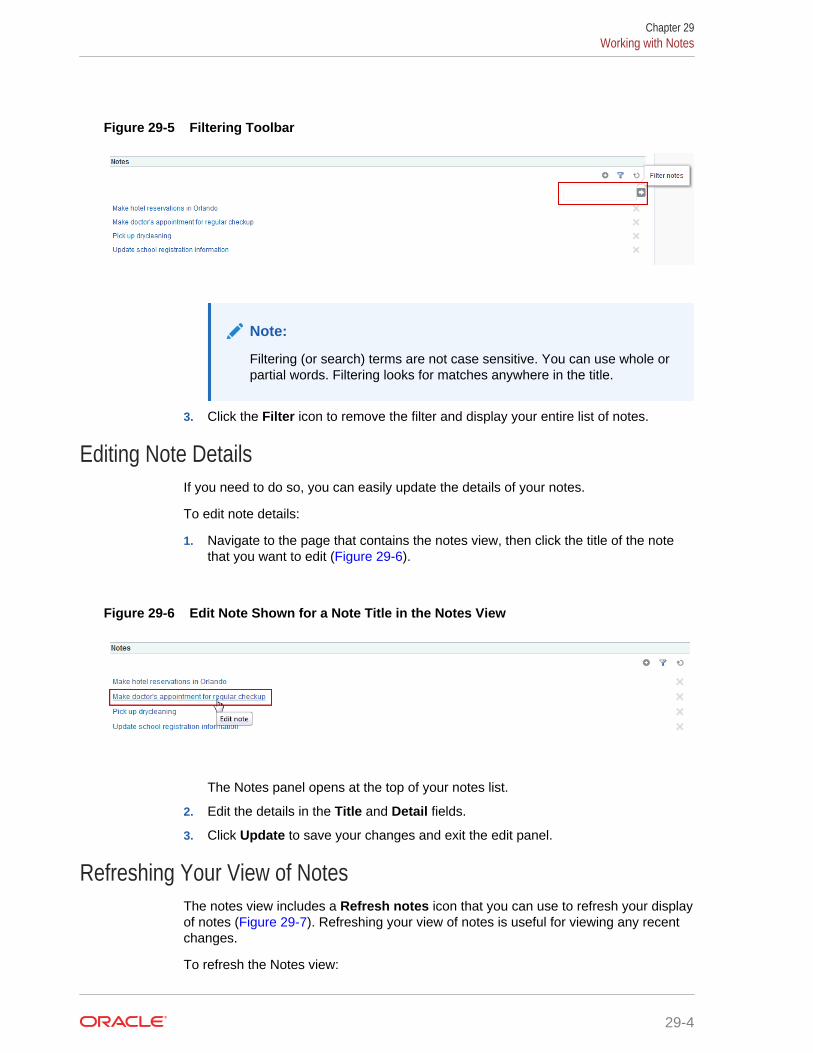
Figure 29-5 Filtering Toolbar
Note:
Filtering (or search) terms are not case sensitive. You can use whole orpartial words. Filtering looks for matches anywhere in the title.
3. Click the Filter icon to remove the filter and display your entire list of notes.
Editing Note DetailsIf you need to do so, you can easily update the details of your notes.
To edit note details:
1. Navigate to the page that contains the notes view, then click the title of the notethat you want to edit (Figure 29-6).
Figure 29-6 Edit Note Shown for a Note Title in the Notes View
The Notes panel opens at the top of your notes list.
2. Edit the details in the Title and Detail fields.
3. Click Update to save your changes and exit the edit panel.
Refreshing Your View of NotesThe notes view includes a Refresh notes icon that you can use to refresh your displayof notes (Figure 29-7). Refreshing your view of notes is useful for viewing any recentchanges.
To refresh the Notes view:
Chapter 29Working with Notes
29-4
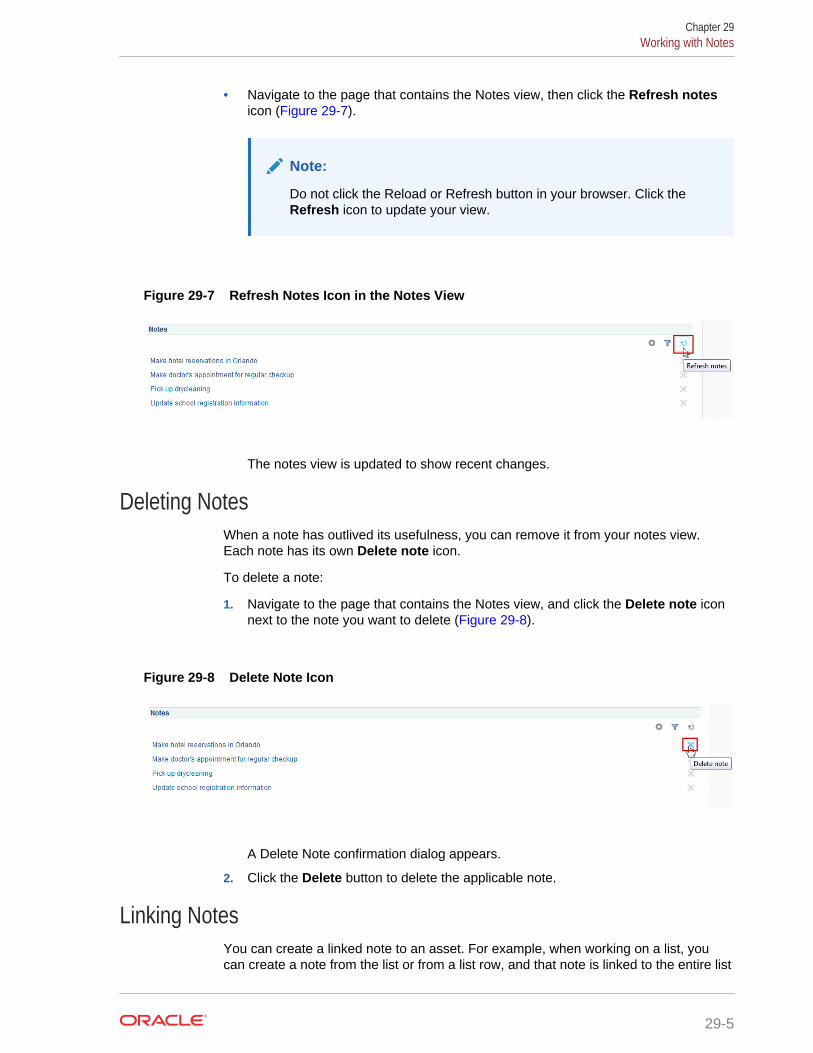
• Navigate to the page that contains the Notes view, then click the Refresh notesicon (Figure 29-7).
Note:
Do not click the Reload or Refresh button in your browser. Click theRefresh icon to update your view.
Figure 29-7 Refresh Notes Icon in the Notes View
The notes view is updated to show recent changes.
Deleting NotesWhen a note has outlived its usefulness, you can remove it from your notes view.Each note has its own Delete note icon.
To delete a note:
1. Navigate to the page that contains the Notes view, and click the Delete note iconnext to the note you want to delete (Figure 29-8).
Figure 29-8 Delete Note Icon
A Delete Note confirmation dialog appears.
2. Click the Delete button to delete the applicable note.
Linking NotesYou can create a linked note to an asset. For example, when working on a list, youcan create a note from the list or from a list row, and that note is linked to the entire list
Chapter 29Working with Notes
29-5
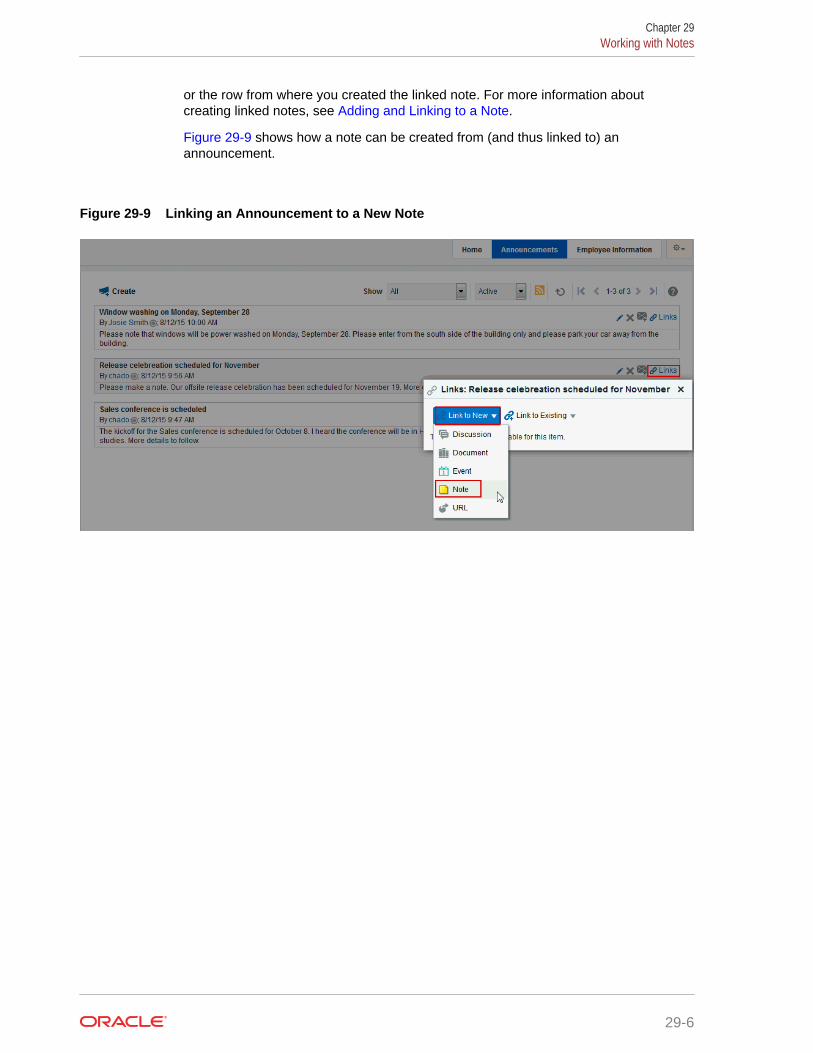
or the row from where you created the linked note. For more information aboutcreating linked notes, see Adding and Linking to a Note.
Figure 29-9 shows how a note can be created from (and thus linked to) anannouncement.
Figure 29-9 Linking an Announcement to a New Note
Chapter 29Working with Notes
29-6
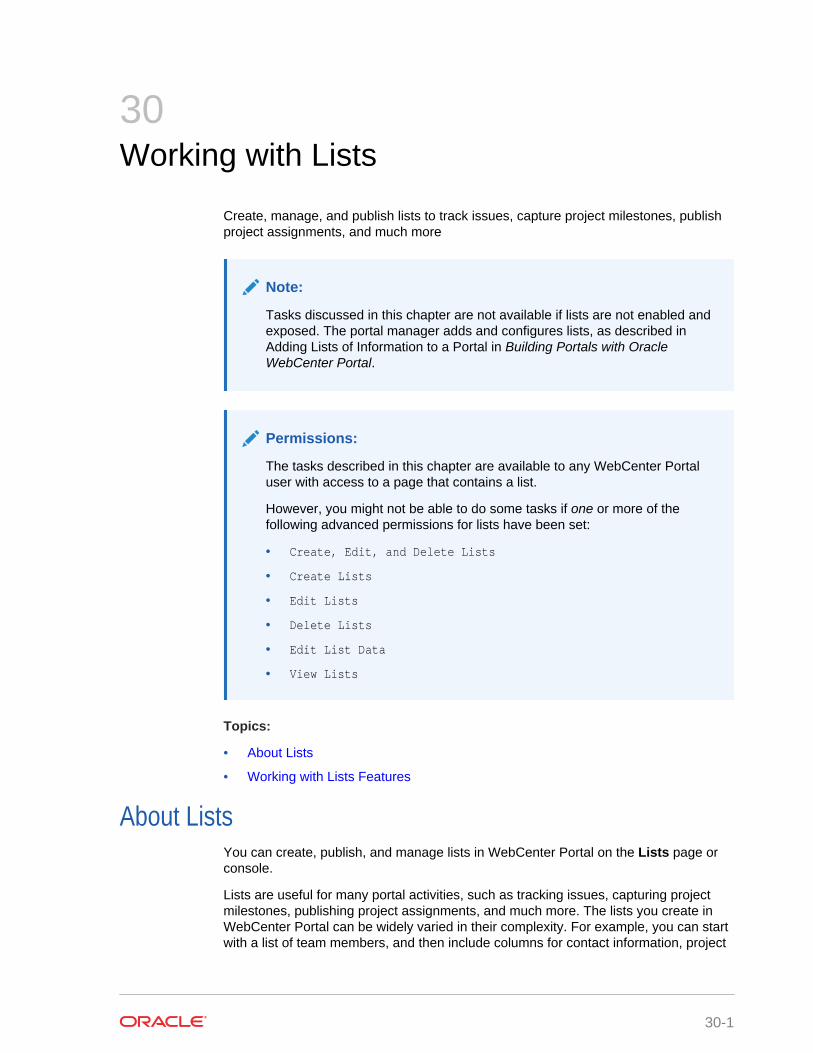
30Working with Lists
Create, manage, and publish lists to track issues, capture project milestones, publishproject assignments, and much more
Note:
Tasks discussed in this chapter are not available if lists are not enabled andexposed. The portal manager adds and configures lists, as described in Adding Lists of Information to a Portal in Building Portals with OracleWebCenter Portal.
Permissions:
The tasks described in this chapter are available to any WebCenter Portaluser with access to a page that contains a list.
However, you might not be able to do some tasks if one or more of thefollowing advanced permissions for lists have been set:
• Create, Edit, and Delete Lists
• Create Lists
• Edit Lists
• Delete Lists
• Edit List Data
• View Lists
Topics:
• About Lists
• Working with Lists Features
About ListsYou can create, publish, and manage lists in WebCenter Portal on the Lists page orconsole.
Lists are useful for many portal activities, such as tracking issues, capturing projectmilestones, publishing project assignments, and much more. The lists you create inWebCenter Portal can be widely varied in their complexity. For example, you can startwith a list of team members, and then include columns for contact information, project
30-1
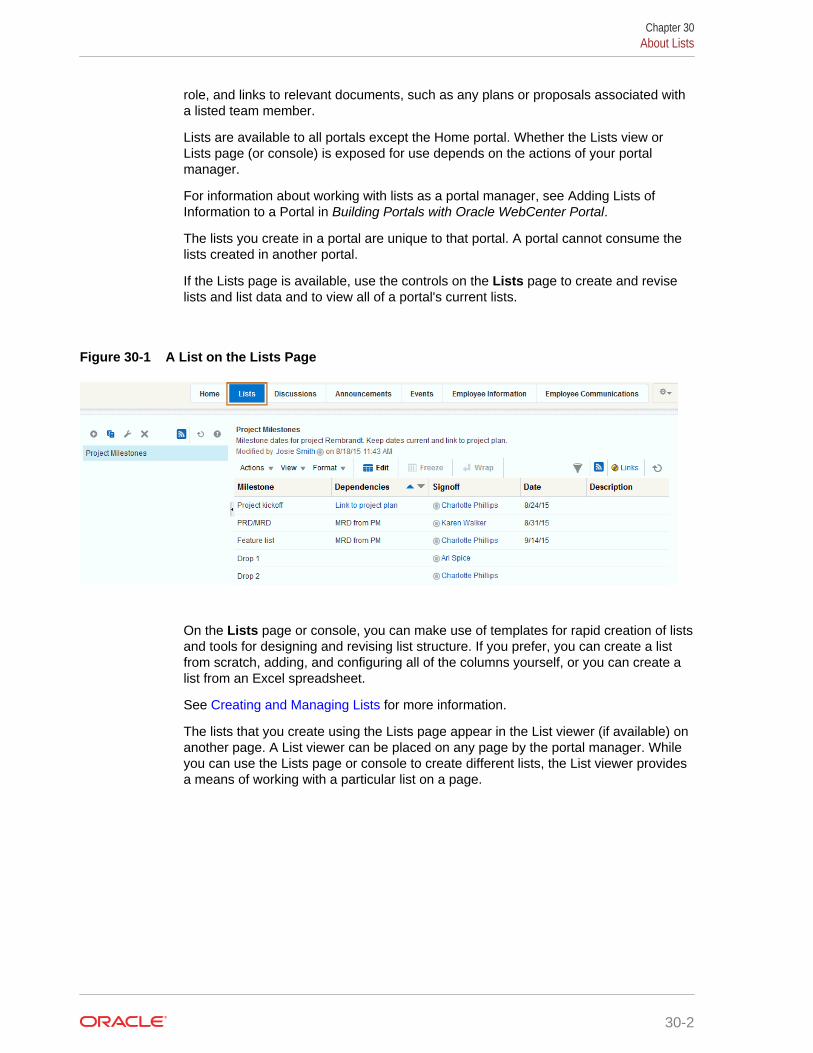
role, and links to relevant documents, such as any plans or proposals associated witha listed team member.
Lists are available to all portals except the Home portal. Whether the Lists view orLists page (or console) is exposed for use depends on the actions of your portalmanager.
For information about working with lists as a portal manager, see Adding Lists ofInformation to a Portal in Building Portals with Oracle WebCenter Portal.
The lists you create in a portal are unique to that portal. A portal cannot consume thelists created in another portal.
If the Lists page is available, use the controls on the Lists page to create and reviselists and list data and to view all of a portal's current lists.
Figure 30-1 A List on the Lists Page
On the Lists page or console, you can make use of templates for rapid creation of listsand tools for designing and revising list structure. If you prefer, you can create a listfrom scratch, adding, and configuring all of the columns yourself, or you can create alist from an Excel spreadsheet.
See Creating and Managing Lists for more information.
The lists that you create using the Lists page appear in the List viewer (if available) onanother page. A List viewer can be placed on any page by the portal manager. Whileyou can use the Lists page or console to create different lists, the List viewer providesa means of working with a particular list on a page.
Chapter 30About Lists
30-2
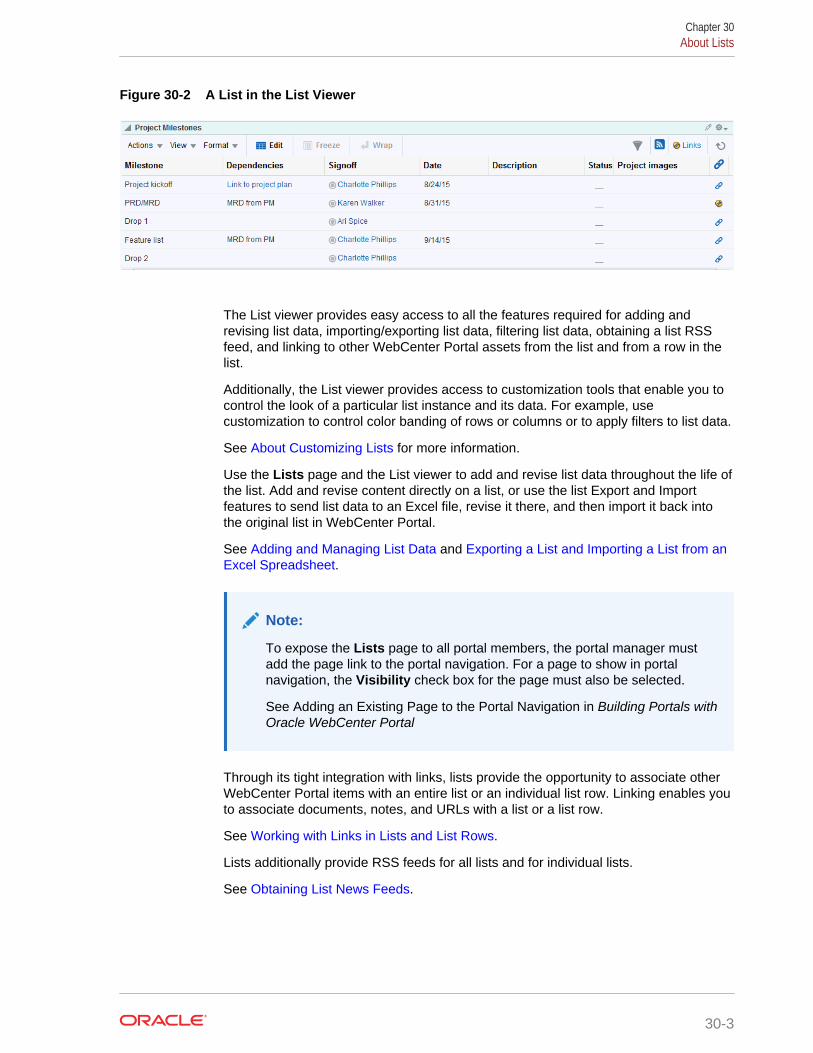
Figure 30-2 A List in the List Viewer
The List viewer provides easy access to all the features required for adding andrevising list data, importing/exporting list data, filtering list data, obtaining a list RSSfeed, and linking to other WebCenter Portal assets from the list and from a row in thelist.
Additionally, the List viewer provides access to customization tools that enable you tocontrol the look of a particular list instance and its data. For example, usecustomization to control color banding of rows or columns or to apply filters to list data.
See About Customizing Lists for more information.
Use the Lists page and the List viewer to add and revise list data throughout the life ofthe list. Add and revise content directly on a list, or use the list Export and Importfeatures to send list data to an Excel file, revise it there, and then import it back intothe original list in WebCenter Portal.
See Adding and Managing List Data and Exporting a List and Importing a List from anExcel Spreadsheet.
Note:
To expose the Lists page to all portal members, the portal manager mustadd the page link to the portal navigation. For a page to show in portalnavigation, the Visibility check box for the page must also be selected.
See Adding an Existing Page to the Portal Navigation in Building Portals withOracle WebCenter Portal
Through its tight integration with links, lists provide the opportunity to associate otherWebCenter Portal items with an entire list or an individual list row. Linking enables youto associate documents, notes, and URLs with a list or a list row.
See Working with Links in Lists and List Rows.
Lists additionally provide RSS feeds for all lists and for individual lists.
See Obtaining List News Feeds.
Chapter 30About Lists
30-3
Working with Lists FeaturesThis section provides information about using the features available through the Listspage and the List viewer. It includes the following topics:
• Viewing Lists
• Creating and Managing Lists
• Adding and Managing List Data
• About Customizing Lists
• Mailing a Link to a List to Other Users
• Exporting a List and Importing a List from an Excel Spreadsheet
Viewing ListsTo view the lists associated with a particular portal, you must have access to thatportal. If you have access, you can view all of a portal's lists on its Lists page orconsole. The List viewer can also be added to a page in WebCenter Portal by theportal manager. See Figure 30-2 for a list displayed in the List viewer and Figure 30-3for lists on a Lists page.
The Lists page is available in a portal if Lists is enabled and a Lists page has beenmade available by the portal manager. For information about enabling tools in a portal,see Enabling and Disabling Tools and Services Available to a Portal in Building Portalswith Oracle WebCenter Portal.
To expose the Lists page to all portal members, the portal manager needs to add thepage link to the portal navigation, as described in Adding an Existing Page to thePortal Navigation in Building Portals with Oracle WebCenter Portal. For a page toshow in portal navigation, the Visibility check box for the page must also be selected.For more information, see Showing or Hiding a Page in the Portal Navigation inBuilding Portals with Oracle WebCenter Portal.
To view a list on the Lists page or console:
1. Go to the portal that contains the list you want to view, and open the Lists page.
2. From the Lists panel, select the list you want to view.
List details appear on the right (Figure 30-3).
Chapter 30Working with Lists Features
30-4
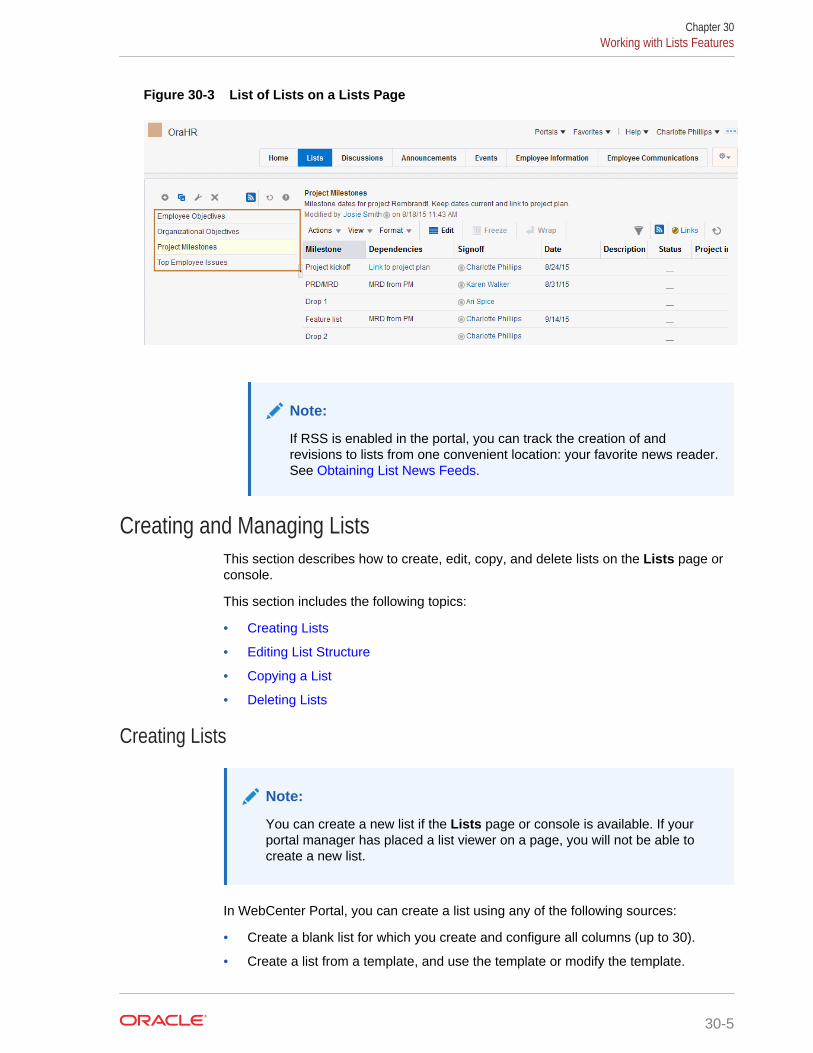
Figure 30-3 List of Lists on a Lists Page
Note:
If RSS is enabled in the portal, you can track the creation of andrevisions to lists from one convenient location: your favorite news reader.See Obtaining List News Feeds.
Creating and Managing ListsThis section describes how to create, edit, copy, and delete lists on the Lists page orconsole.
This section includes the following topics:
• Creating Lists
• Editing List Structure
• Copying a List
• Deleting Lists
Creating Lists
Note:
You can create a new list if the Lists page or console is available. If yourportal manager has placed a list viewer on a page, you will not be able tocreate a new list.
In WebCenter Portal, you can create a list using any of the following sources:
• Create a blank list for which you create and configure all columns (up to 30).
• Create a list from a template, and use the template or modify the template.
Chapter 30Working with Lists Features
30-5
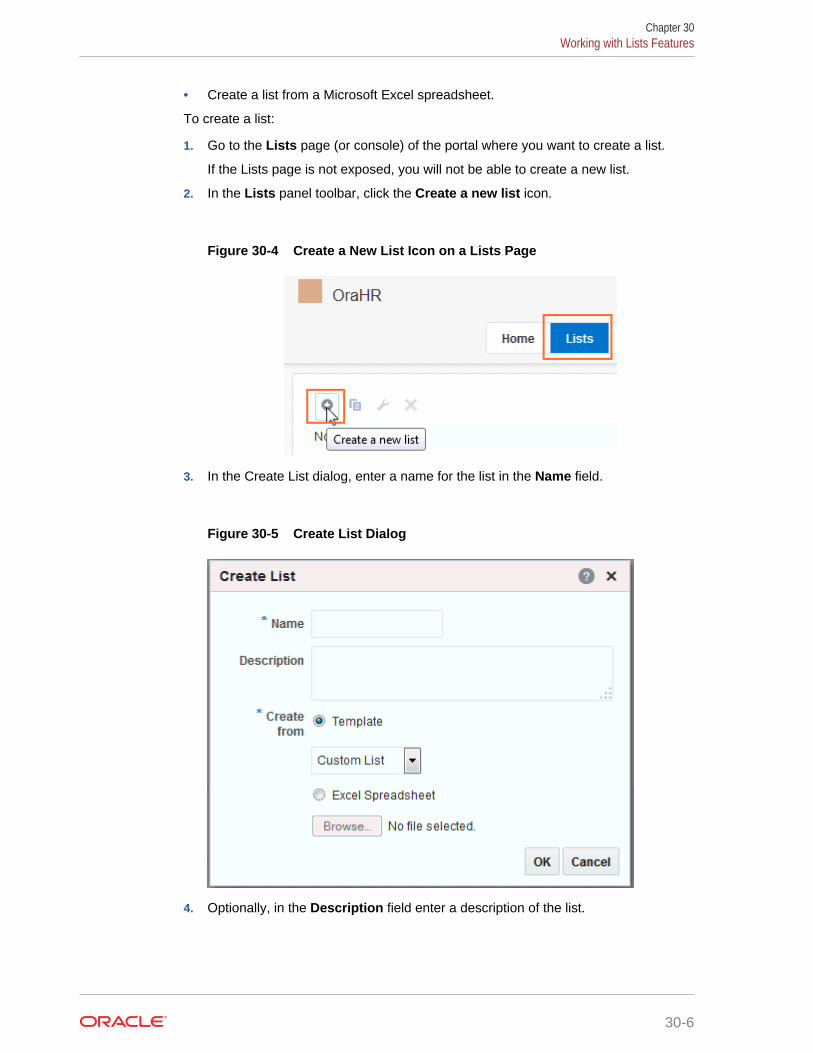
• Create a list from a Microsoft Excel spreadsheet.
To create a list:
1. Go to the Lists page (or console) of the portal where you want to create a list.
If the Lists page is not exposed, you will not be able to create a new list.
2. In the Lists panel toolbar, click the Create a new list icon.
Figure 30-4 Create a New List Icon on a Lists Page
3. In the Create List dialog, enter a name for the list in the Name field.
Figure 30-5 Create List Dialog
4. Optionally, in the Description field enter a description of the list.
Chapter 30Working with Lists Features
30-6

Tip:
In a completed list, the description appears between the list title and listdata.
5. For Create From, select to create the list using a predefined Template or from anExcel Spreadsheet.
6. If you select to create a list from a Template, select a template from the Templatedrop-down list:
• Custom List—To create a list without using a template.
• Issues—To create a list of, for example, project issues. By default, thistemplate provides the columns No., Description, Target Date, Assigned,Status, and Comments.
• Milestones—To create a list of, for example, project milestones. By default,this template provides the columns Date, Description, and Status.
• Objectives—To create a list of, for example, project objectives. By default,this template provides the columns Title and Description.
If you select to create a list from an Excel Spreadsheet, click Browse to navigateto and select the spreadsheet:
• The first row of the spreadsheet is used as column headings. The subsequentrows are added as data.
• All the columns are created with the data type Plain Text. After creation, youcan modify the data types as desired.
For information about data types, see #unique_461/unique_461_Connect_42_CIHJDGBE.
Tip:
You can use the Excel Spreadsheet option to import a list from adifferent portal or from a different WebCenter Portal instance. That is,you can export the list from the portal or WebCenter Portal instance andimport it into the current portal or instance.
7. Click OK.
The new list appears in the Lists panel on the Lists page.
Chapter 30Working with Lists Features
30-7
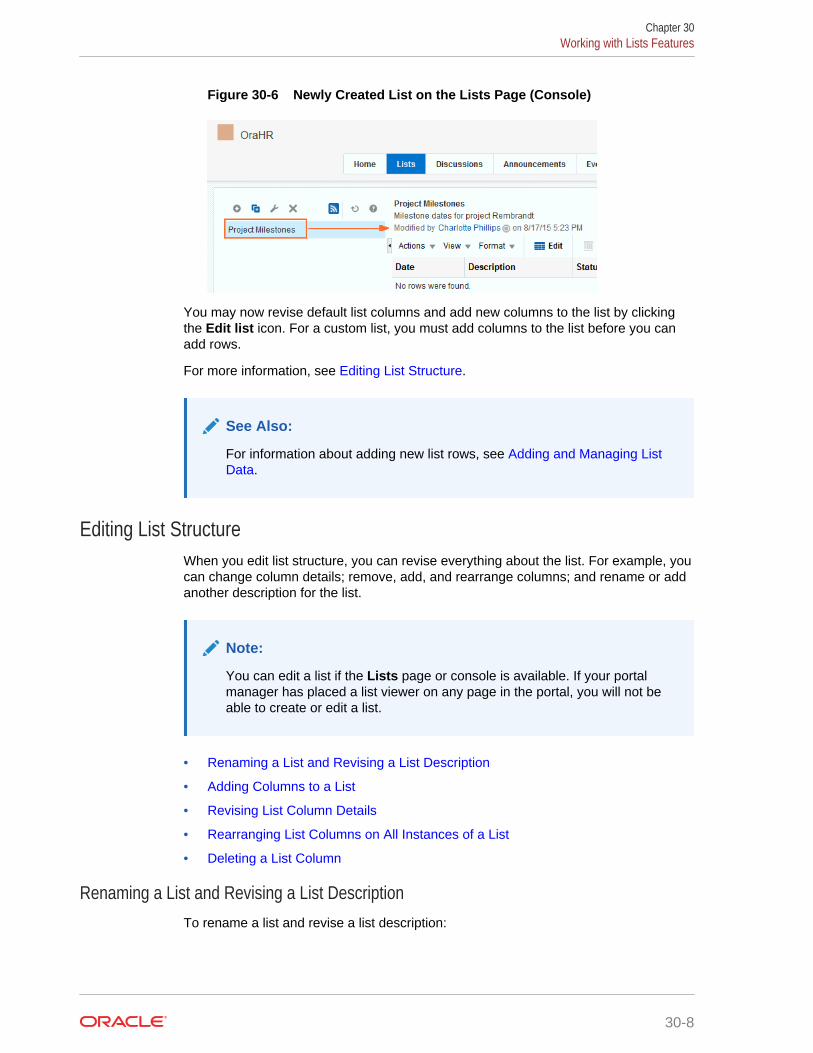
Figure 30-6 Newly Created List on the Lists Page (Console)
You may now revise default list columns and add new columns to the list by clickingthe Edit list icon. For a custom list, you must add columns to the list before you canadd rows.
For more information, see Editing List Structure.
See Also:
For information about adding new list rows, see Adding and Managing ListData.
Editing List StructureWhen you edit list structure, you can revise everything about the list. For example, youcan change column details; remove, add, and rearrange columns; and rename or addanother description for the list.
Note:
You can edit a list if the Lists page or console is available. If your portalmanager has placed a list viewer on any page in the portal, you will not beable to create or edit a list.
• Renaming a List and Revising a List Description
• Adding Columns to a List
• Revising List Column Details
• Rearranging List Columns on All Instances of a List
• Deleting a List Column
Renaming a List and Revising a List DescriptionTo rename a list and revise a list description:
Chapter 30Working with Lists Features
30-8
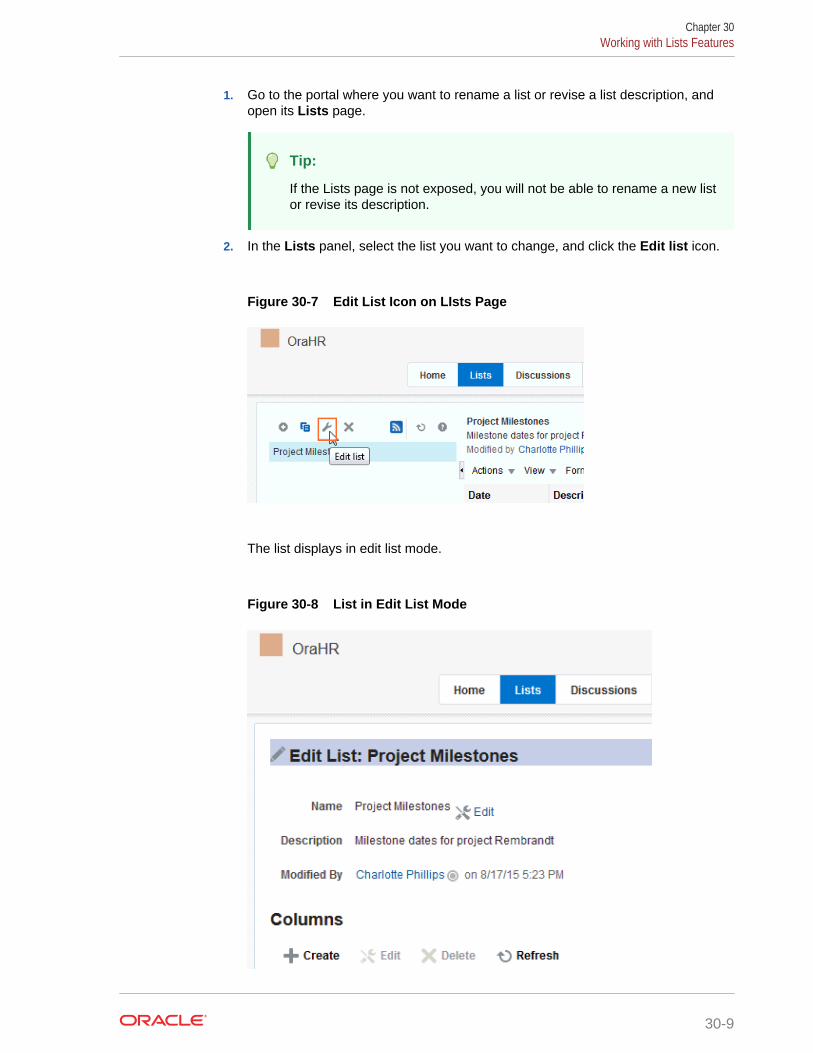
1. Go to the portal where you want to rename a list or revise a list description, andopen its Lists page.
Tip:
If the Lists page is not exposed, you will not be able to rename a new listor revise its description.
2. In the Lists panel, select the list you want to change, and click the Edit list icon.
Figure 30-7 Edit List Icon on LIsts Page
The list displays in edit list mode.
Figure 30-8 List in Edit List Mode
Chapter 30Working with Lists Features
30-9
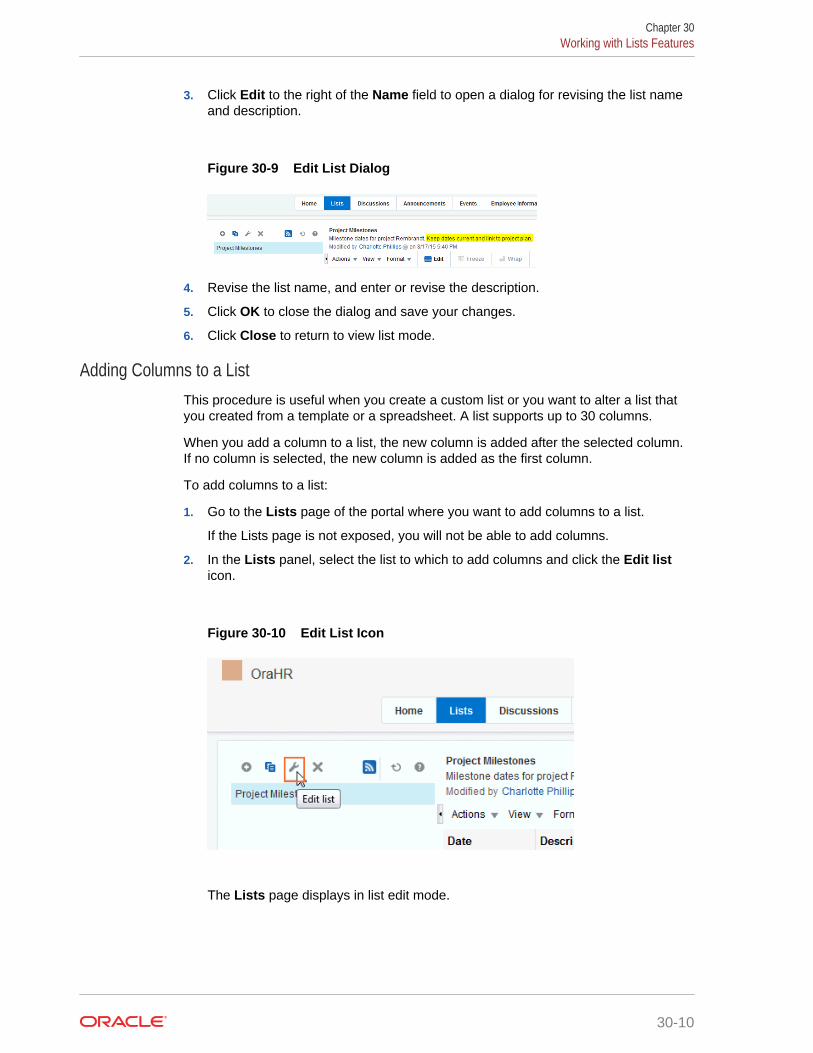
3. Click Edit to the right of the Name field to open a dialog for revising the list nameand description.
Figure 30-9 Edit List Dialog
4. Revise the list name, and enter or revise the description.
5. Click OK to close the dialog and save your changes.
6. Click Close to return to view list mode.
Adding Columns to a ListThis procedure is useful when you create a custom list or you want to alter a list thatyou created from a template or a spreadsheet. A list supports up to 30 columns.
When you add a column to a list, the new column is added after the selected column.If no column is selected, the new column is added as the first column.
To add columns to a list:
1. Go to the Lists page of the portal where you want to add columns to a list.
If the Lists page is not exposed, you will not be able to add columns.
2. In the Lists panel, select the list to which to add columns and click the Edit listicon.
Figure 30-10 Edit List Icon
The Lists page displays in list edit mode.
Chapter 30Working with Lists Features
30-10
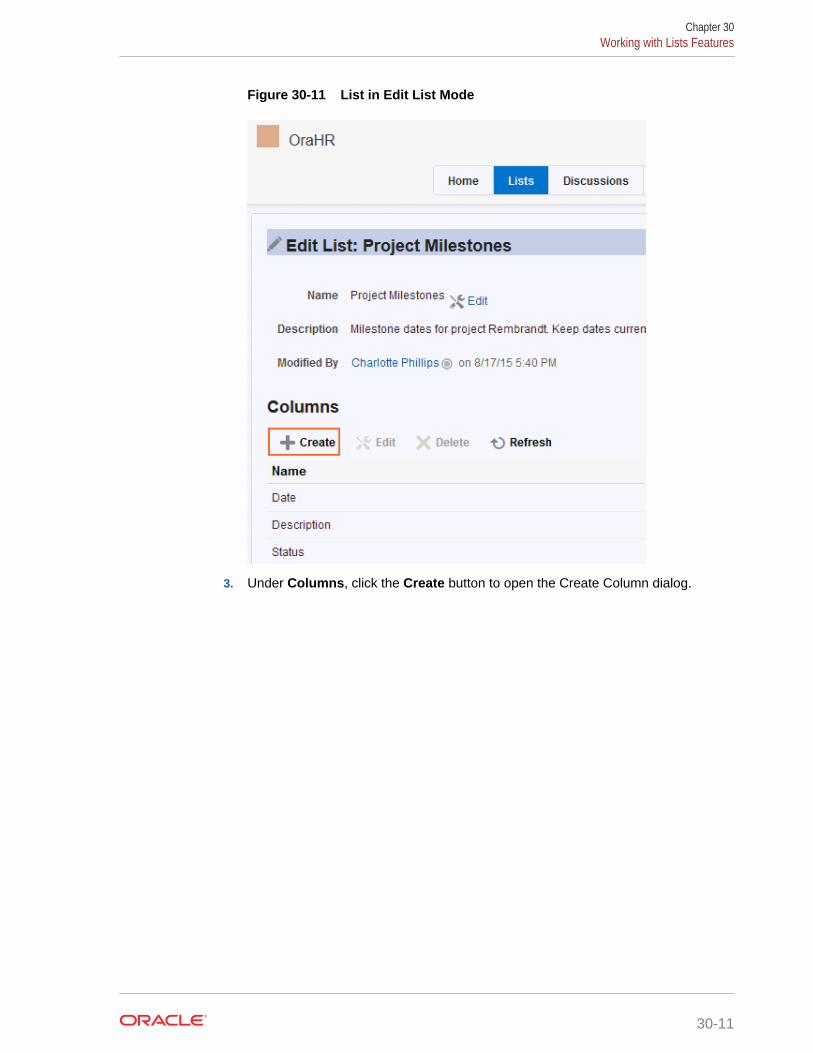
Figure 30-11 List in Edit List Mode
3. Under Columns, click the Create button to open the Create Column dialog.
Chapter 30Working with Lists Features
30-11
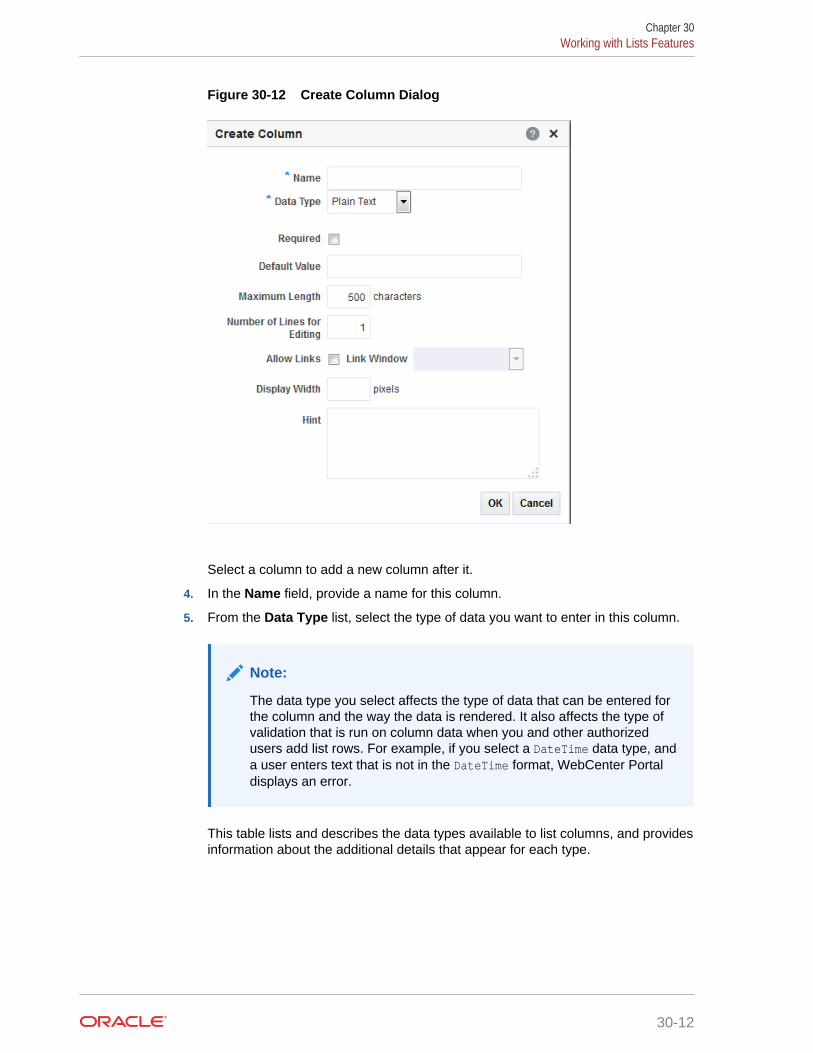
Figure 30-12 Create Column Dialog
Select a column to add a new column after it.
4. In the Name field, provide a name for this column.
5. From the Data Type list, select the type of data you want to enter in this column.
Note:
The data type you select affects the type of data that can be entered forthe column and the way the data is rendered. It also affects the type ofvalidation that is run on column data when you and other authorizedusers add list rows. For example, if you select a DateTime data type, anda user enters text that is not in the DateTime format, WebCenter Portaldisplays an error.
This table lists and describes the data types available to list columns, and providesinformation about the additional details that appear for each type.
Chapter 30Working with Lists Features
30-12
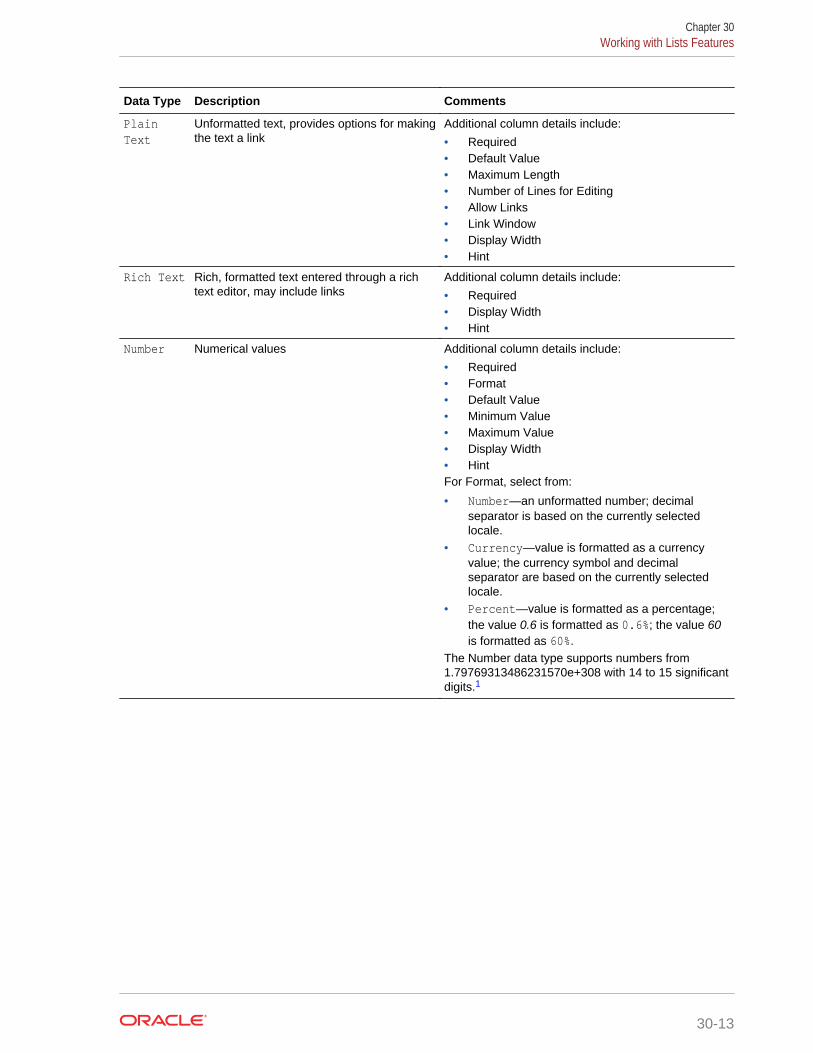
Data Type Description Comments
PlainText
Unformatted text, provides options for makingthe text a link
Additional column details include:
• Required• Default Value• Maximum Length• Number of Lines for Editing• Allow Links• Link Window• Display Width• Hint
Rich Text Rich, formatted text entered through a richtext editor, may include links
Additional column details include:
• Required• Display Width• Hint
Number Numerical values Additional column details include:
• Required• Format• Default Value• Minimum Value• Maximum Value• Display Width• HintFor Format, select from:
• Number—an unformatted number; decimalseparator is based on the currently selectedlocale.
• Currency—value is formatted as a currencyvalue; the currency symbol and decimalseparator are based on the currently selectedlocale.
• Percent—value is formatted as a percentage;the value 0.6 is formatted as 0.6%; the value 60is formatted as 60%.
The Number data type supports numbers from1.79769313486231570e+308 with 14 to 15 significantdigits.1
Chapter 30Working with Lists Features
30-13
Data Type Description Comments
DateTime Dates and times in the format specified in agiven user's WebCenter Portal Preferences.
Additional column details include:
• Required• Format• Default Value• Display Width• HintFor Format, select from:
• Date—For requiring a date.• Time—For requiring a time.• Date and Time—For requiring a date and a
time.The way the selected Format is rendered is controlledby the user's date and time preferences.
The Default Value field includes a date picker, whichyou can use to select a default date in the correctformat. The current date is highlighted, with a boxaround it.
This field does not require leading zeroes, forexample, for September 9, 2015, it does not require09/04/2015. Instead, you can use 9/4/2013.
Boolean Either TRUE or FALSE Additional column details include:
• Default Value• Display Width• HintTRUE or FALSE is rendered as a check box. Selectedequals TRUE; deselected equals FALSE.
Picture A URL to an image (the image is rendered inlist view mode)
Additional column details include:
• Required• Display Width• Hint
Person A valid user name Additional column details include:
• Required• Range of Users• Default Value• Display Width• HintThe Range of Users field enables you to limit thevalid range of users to the membership of the currentportal (or to include all users). The Default Value fieldincludes a Find user icon, which you can use tolocate and select a default user.
The list column contains a presence indicator next tothe user name. Click the presence indicator to open acontext menu with options for making contact with theperson instantly.
1 Number data-type columns adhere to the range and precision specified for the 8 byte IEEE 754 double data type. When themaximum number of significant digits is exceeded, the number is rounded.
6. After you select a data type, enter values for the remaining fields.
This table lists the possible remaining fields and their associated data types.
Chapter 30Working with Lists Features
30-14

Column Detail Description Associated Data Type(s)
Allow Links Specify whether to allow column data to behyperlinked. Specifying Allow Links enables theuser to enter both a column value and a URL. If aURL is specified, the column value is rendered as ahyperlink.
Plain Text
Default Value Optionally, provide a default value for the columnentry, such as a default image, number, user name,and the like.
• Plain Text• Number• DateTime• Boolean• Person
Display Width Enter a value in pixels to set the column width. All data types
Format Use this pick list to specify the format for columnvalues.
• Number• DateTime
Hint Enter text to assist the user in understanding thecontent to enter into the column. This text appearswhen focus is on this column in edit list data mode.
All data types
Link Window Indicate how a hyperlink on column data shouldopen.
Choose from:
• New Window—The link opens in a new browsertab or window.
• Current Window—The link opens in the currentbrowser window.
Plain Text
Maximum Length Enter the maximum number of characters for thiscolumn entry. This includes character spaces.
Plain Text
Maximum Value Indicate the highest number that can be entered inthis column.
Number
Minimum Value Indicate the lowest number that can be entered inthis column.
Number
Number of Lines forEditing
Indicate the number of lines to make available forediting. When the value is 1, the user enters data ina single line text field when editing list data. Longvalues scroll horizontally. When the value is greaterthan 1, the user enters data in a multiline text field.Long values scroll vertically. This makes enteringand viewing large values much easier.
Plain Text
Range of Users Indicate whether to limit the selection of users tomembers of the current portal (portal Members) or toallow a selection from all authenticated users (AllUsers).
Person
Required Select this check box to require that data is enteredin this column.
• Plain Text• Rich Text• DateTime• Number• Picture• Person
7. Click OK to save your changes and exit the dialog.
8. Click Close to exit List Edit mode.
Chapter 30Working with Lists Features
30-15
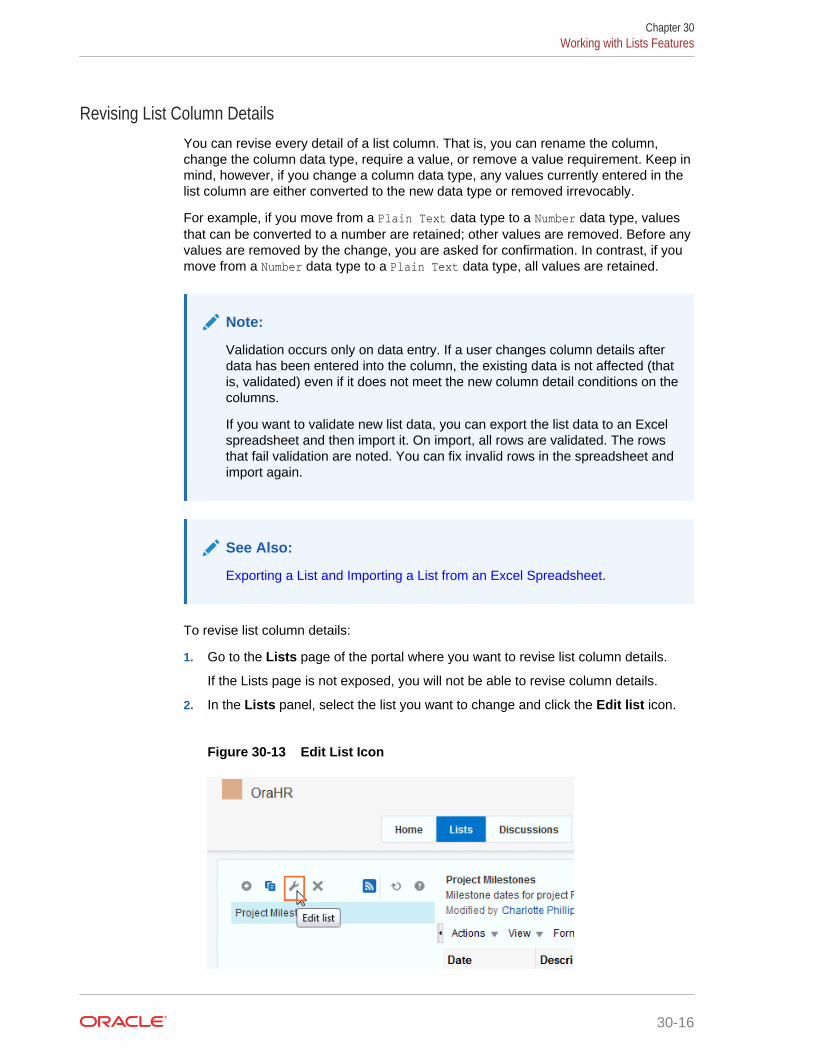
Revising List Column DetailsYou can revise every detail of a list column. That is, you can rename the column,change the column data type, require a value, or remove a value requirement. Keep inmind, however, if you change a column data type, any values currently entered in thelist column are either converted to the new data type or removed irrevocably.
For example, if you move from a Plain Text data type to a Number data type, valuesthat can be converted to a number are retained; other values are removed. Before anyvalues are removed by the change, you are asked for confirmation. In contrast, if youmove from a Number data type to a Plain Text data type, all values are retained.
Note:
Validation occurs only on data entry. If a user changes column details afterdata has been entered into the column, the existing data is not affected (thatis, validated) even if it does not meet the new column detail conditions on thecolumns.
If you want to validate new list data, you can export the list data to an Excelspreadsheet and then import it. On import, all rows are validated. The rowsthat fail validation are noted. You can fix invalid rows in the spreadsheet andimport again.
See Also:
Exporting a List and Importing a List from an Excel Spreadsheet.
To revise list column details:
1. Go to the Lists page of the portal where you want to revise list column details.
If the Lists page is not exposed, you will not be able to revise column details.
2. In the Lists panel, select the list you want to change and click the Edit list icon.
Figure 30-13 Edit List Icon
Chapter 30Working with Lists Features
30-16
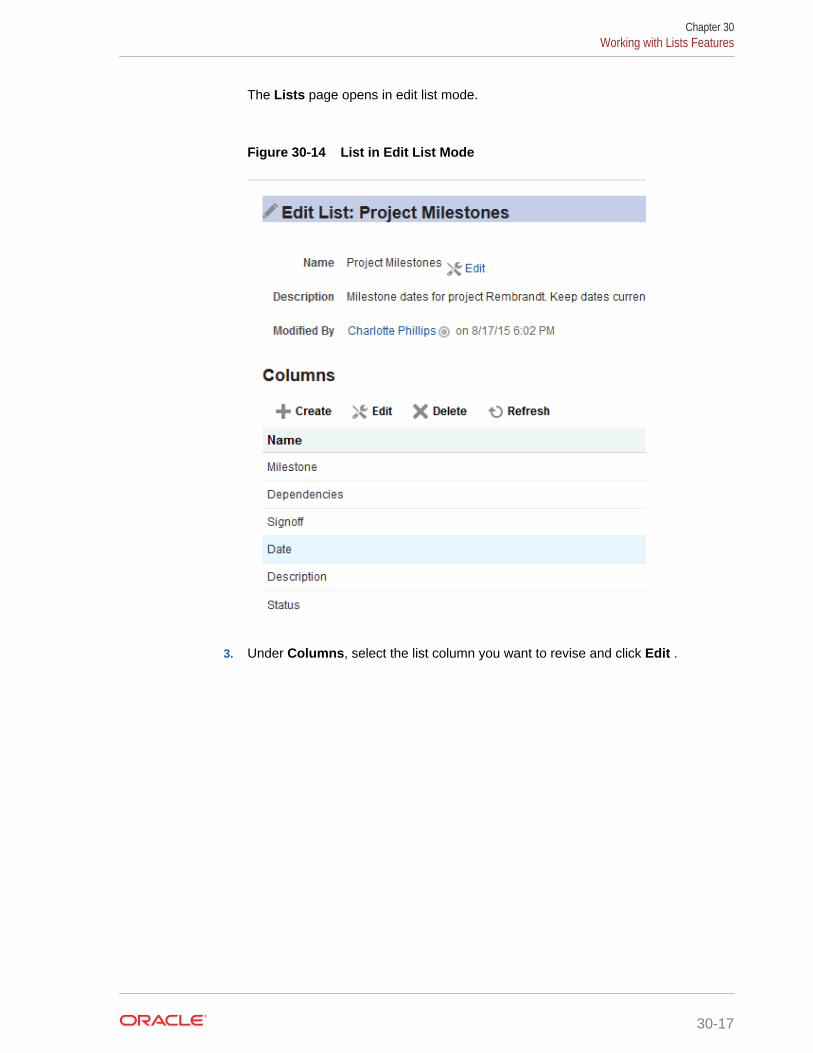
The Lists page opens in edit list mode.
Figure 30-14 List in Edit List Mode
3. Under Columns, select the list column you want to revise and click Edit .
Chapter 30Working with Lists Features
30-17
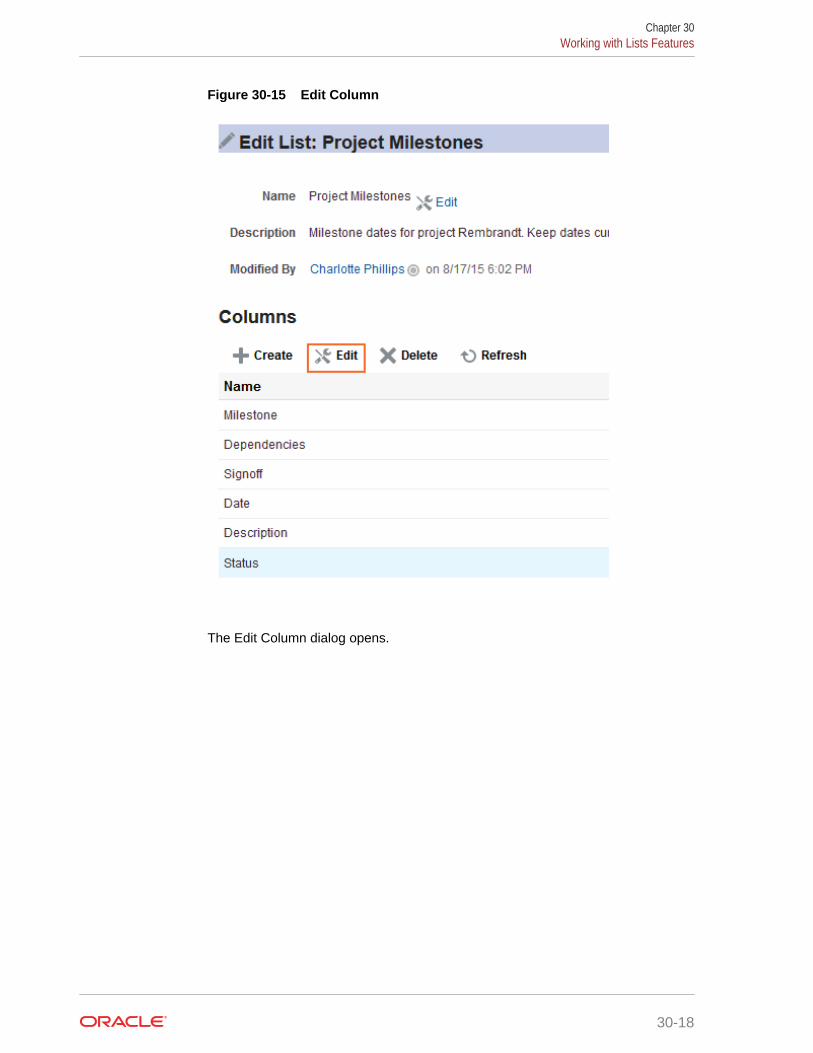
Figure 30-15 Edit Column
The Edit Column dialog opens.
Chapter 30Working with Lists Features
30-18
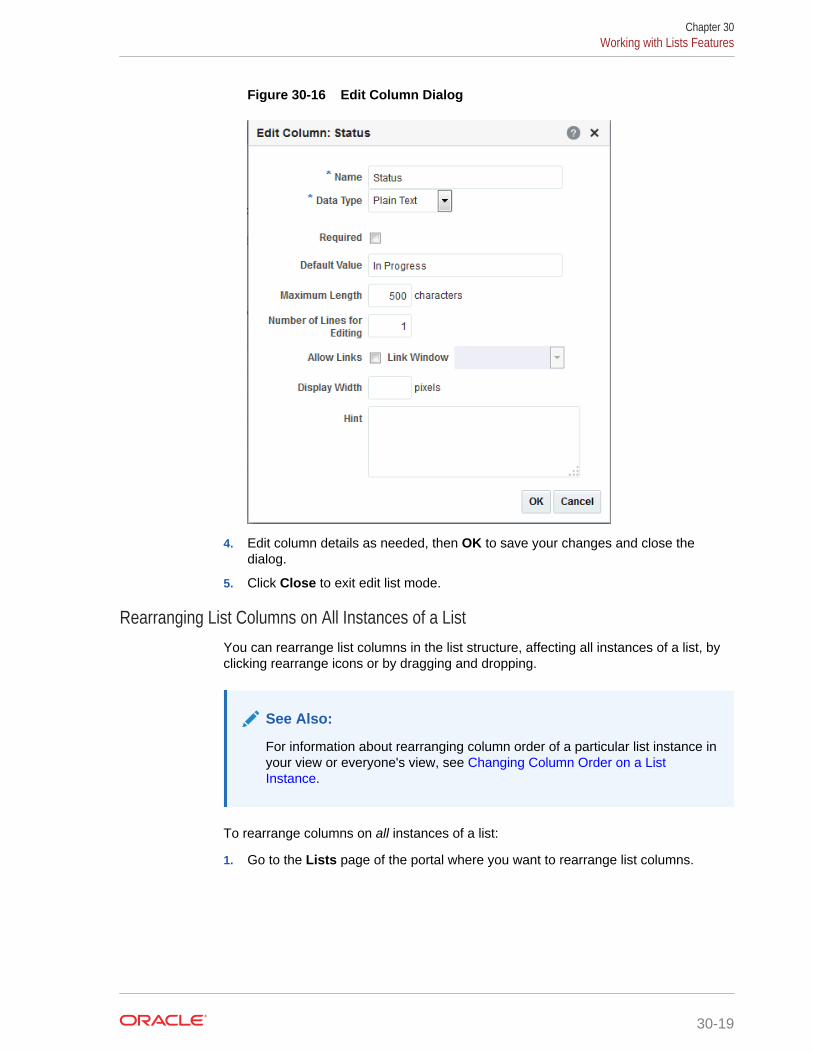
Figure 30-16 Edit Column Dialog
4. Edit column details as needed, then OK to save your changes and close thedialog.
5. Click Close to exit edit list mode.
Rearranging List Columns on All Instances of a ListYou can rearrange list columns in the list structure, affecting all instances of a list, byclicking rearrange icons or by dragging and dropping.
See Also:
For information about rearranging column order of a particular list instance inyour view or everyone's view, see Changing Column Order on a ListInstance.
To rearrange columns on all instances of a list:
1. Go to the Lists page of the portal where you want to rearrange list columns.
Chapter 30Working with Lists Features
30-19

Tip:
If the Lists page is not exposed, you can’t rearrange column details on allinstances of a list.
2. In the Lists panel, select the list you want to change and click the Edit list icon toopen the list edit mode.
3. In the Columns section, click an icon under the Reorder column to move acolumn higher or lower in the order of columns.
Figure 30-17 Reorder Column Icons on Edit List Page
Tip:
Moving a column higher causes it to appear further to the left in columndisplay order. Moving a column lower causes it to appear further to theright.
Alternatively, drag and drop a column higher or lower in the column hierarchy.
4. Click Close to exit list edit mode.
Chapter 30Working with Lists Features
30-20
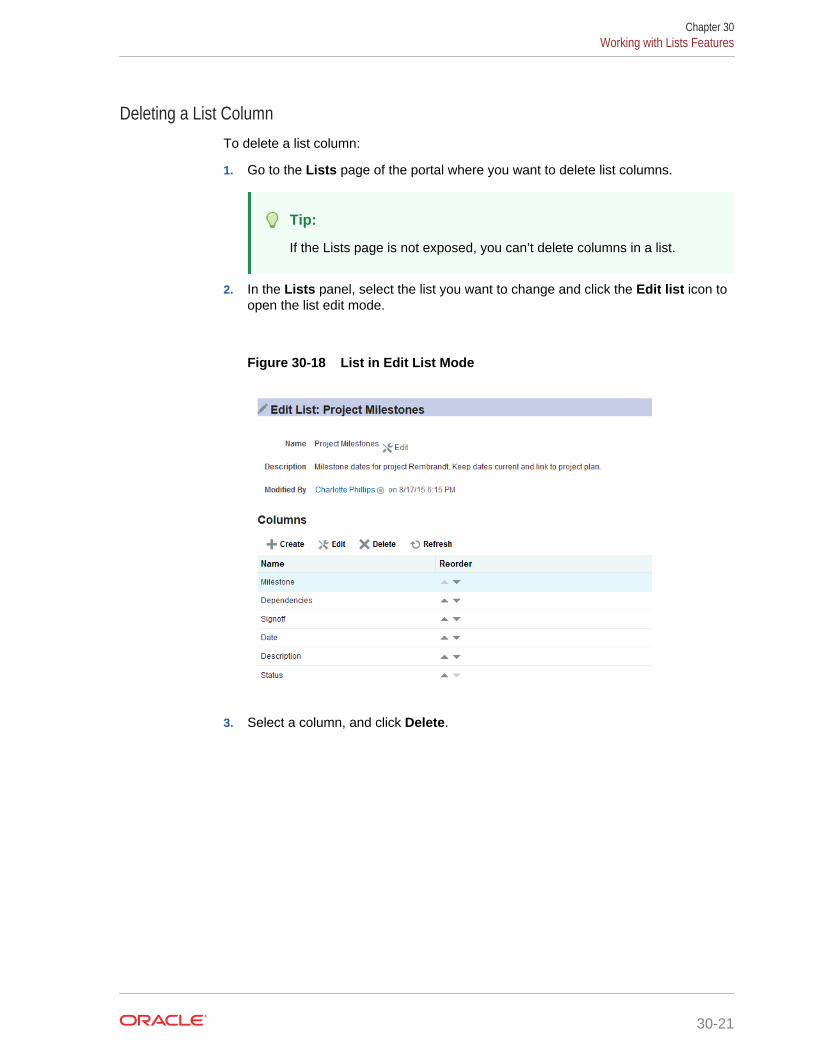
Deleting a List ColumnTo delete a list column:
1. Go to the Lists page of the portal where you want to delete list columns.
Tip:
If the Lists page is not exposed, you can’t delete columns in a list.
2. In the Lists panel, select the list you want to change and click the Edit list icon toopen the list edit mode.
Figure 30-18 List in Edit List Mode
3. Select a column, and click Delete.
Chapter 30Working with Lists Features
30-21
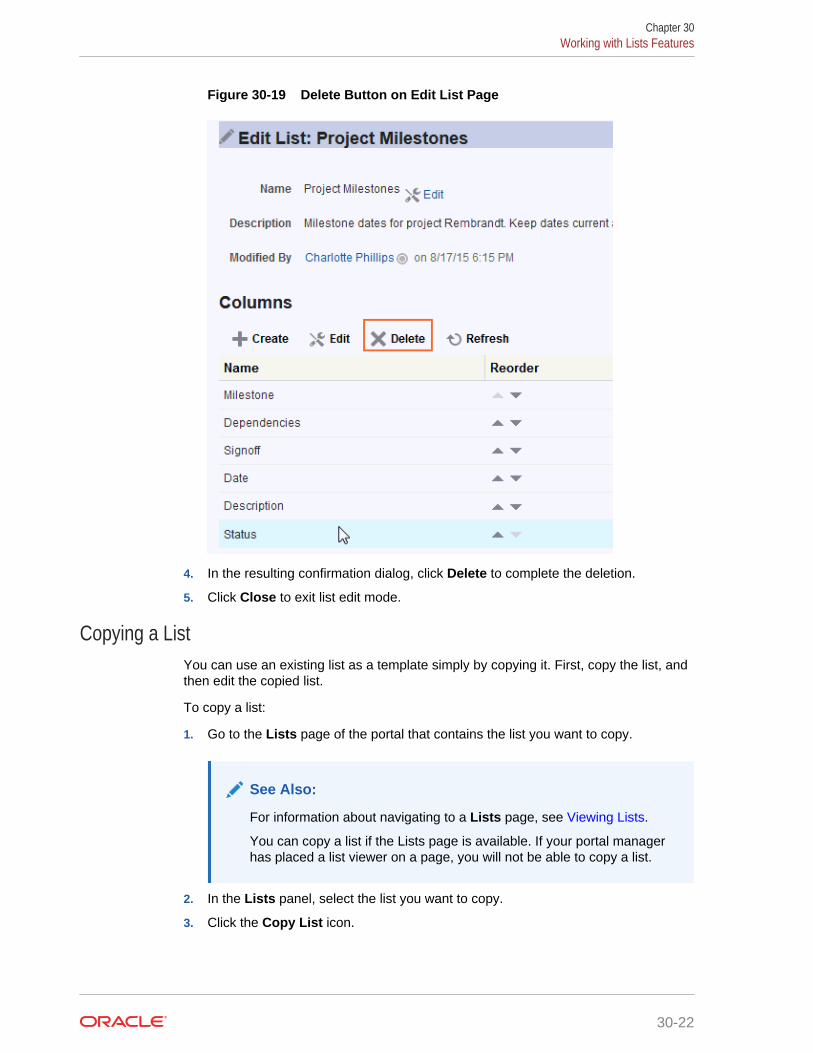
Figure 30-19 Delete Button on Edit List Page
4. In the resulting confirmation dialog, click Delete to complete the deletion.
5. Click Close to exit list edit mode.
Copying a ListYou can use an existing list as a template simply by copying it. First, copy the list, andthen edit the copied list.
To copy a list:
1. Go to the Lists page of the portal that contains the list you want to copy.
See Also:
For information about navigating to a Lists page, see Viewing Lists.
You can copy a list if the Lists page is available. If your portal managerhas placed a list viewer on a page, you will not be able to copy a list.
2. In the Lists panel, select the list you want to copy.
3. Click the Copy List icon.
Chapter 30Working with Lists Features
30-22
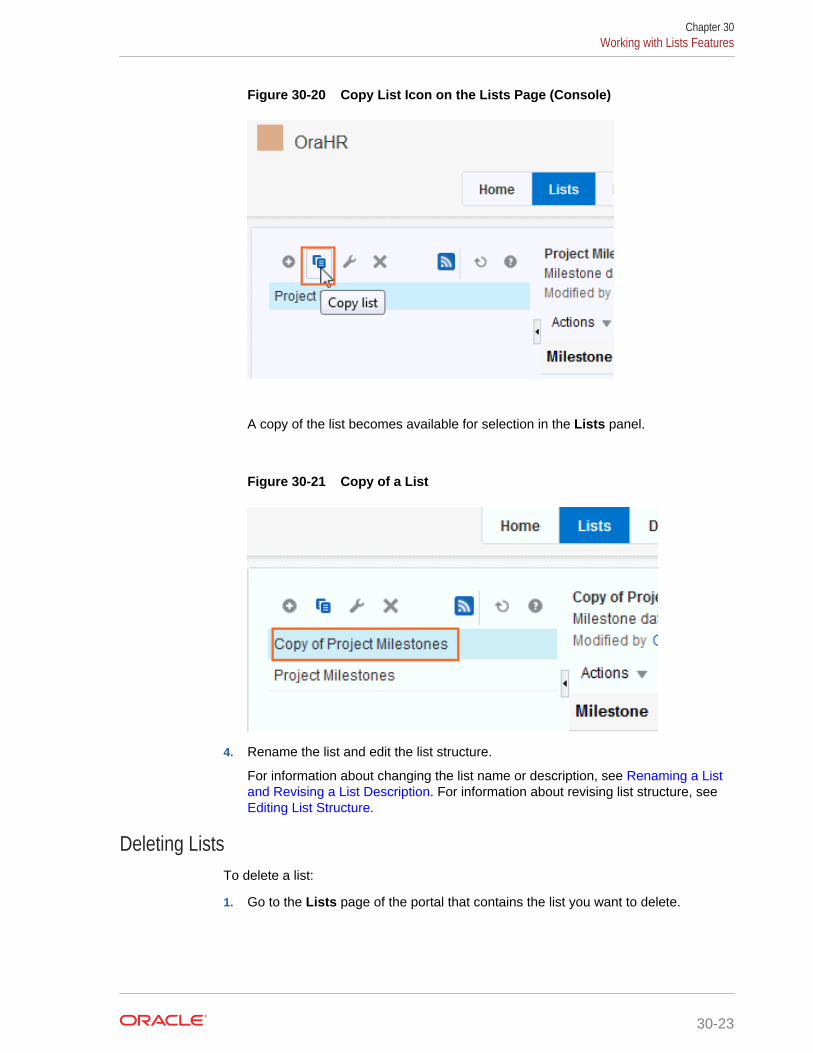
Figure 30-20 Copy List Icon on the Lists Page (Console)
A copy of the list becomes available for selection in the Lists panel.
Figure 30-21 Copy of a List
4. Rename the list and edit the list structure.
For information about changing the list name or description, see Renaming a Listand Revising a List Description. For information about revising list structure, see Editing List Structure.
Deleting ListsTo delete a list:
1. Go to the Lists page of the portal that contains the list you want to delete.
Chapter 30Working with Lists Features
30-23
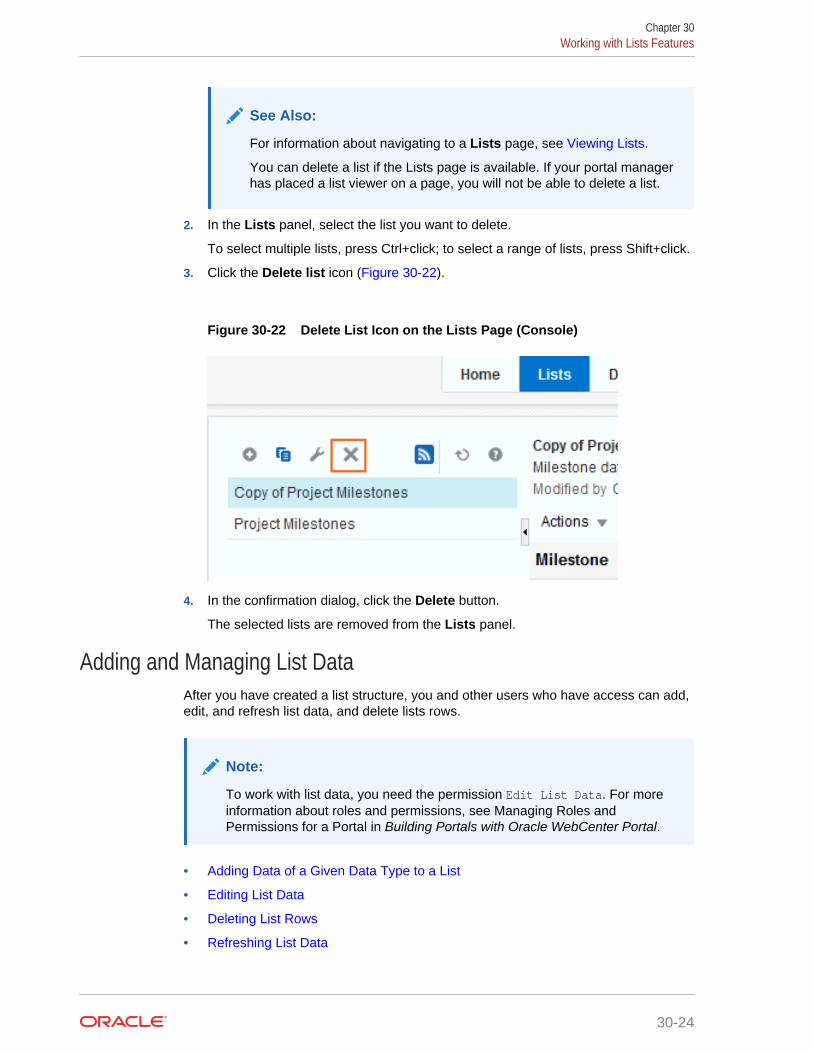
See Also:
For information about navigating to a Lists page, see Viewing Lists.
You can delete a list if the Lists page is available. If your portal managerhas placed a list viewer on a page, you will not be able to delete a list.
2. In the Lists panel, select the list you want to delete.
To select multiple lists, press Ctrl+click; to select a range of lists, press Shift+click.
3. Click the Delete list icon (Figure 30-22).
Figure 30-22 Delete List Icon on the Lists Page (Console)
4. In the confirmation dialog, click the Delete button.
The selected lists are removed from the Lists panel.
Adding and Managing List DataAfter you have created a list structure, you and other users who have access can add,edit, and refresh list data, and delete lists rows.
Note:
To work with list data, you need the permission Edit List Data. For moreinformation about roles and permissions, see Managing Roles andPermissions for a Portal in Building Portals with Oracle WebCenter Portal.
• Adding Data of a Given Data Type to a List
• Editing List Data
• Deleting List Rows
• Refreshing List Data
Chapter 30Working with Lists Features
30-24
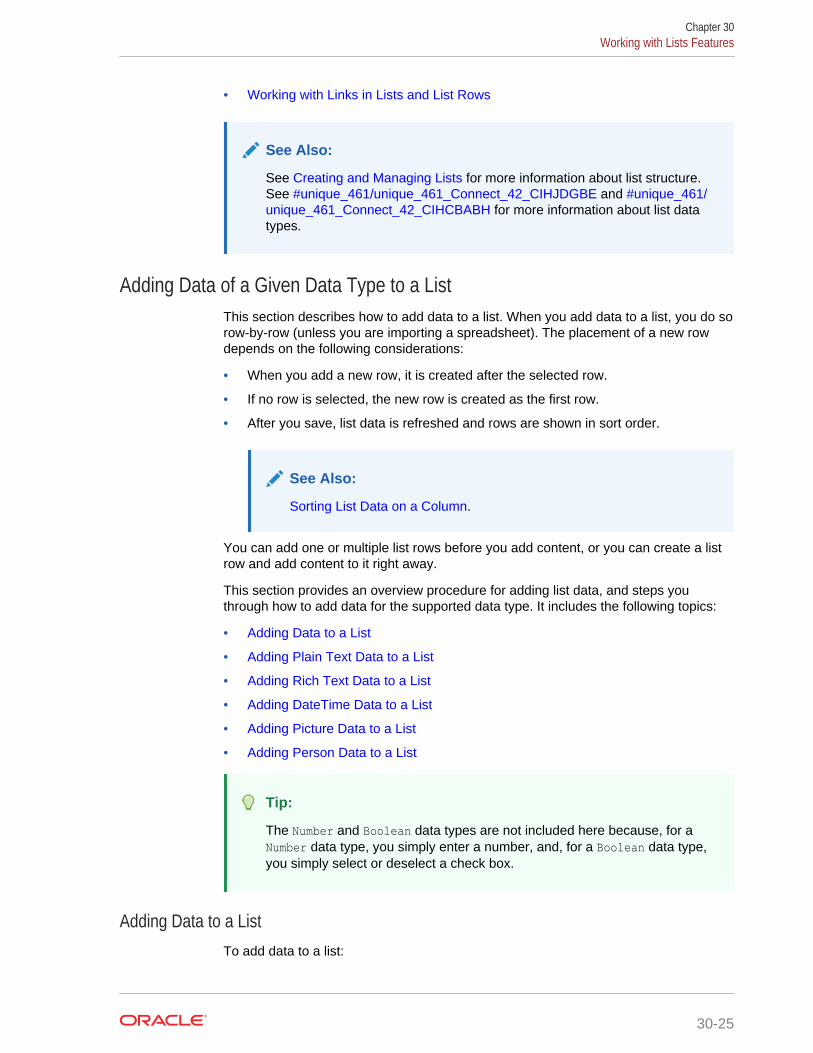
• Working with Links in Lists and List Rows
See Also:
See Creating and Managing Lists for more information about list structure.See #unique_461/unique_461_Connect_42_CIHJDGBE and #unique_461/unique_461_Connect_42_CIHCBABH for more information about list datatypes.
Adding Data of a Given Data Type to a ListThis section describes how to add data to a list. When you add data to a list, you do sorow-by-row (unless you are importing a spreadsheet). The placement of a new rowdepends on the following considerations:
• When you add a new row, it is created after the selected row.
• If no row is selected, the new row is created as the first row.
• After you save, list data is refreshed and rows are shown in sort order.
See Also:
Sorting List Data on a Column.
You can add one or multiple list rows before you add content, or you can create a listrow and add content to it right away.
This section provides an overview procedure for adding list data, and steps youthrough how to add data for the supported data type. It includes the following topics:
• Adding Data to a List
• Adding Plain Text Data to a List
• Adding Rich Text Data to a List
• Adding DateTime Data to a List
• Adding Picture Data to a List
• Adding Person Data to a List
Tip:
The Number and Boolean data types are not included here because, for aNumber data type, you simply enter a number, and, for a Boolean data type,you simply select or deselect a check box.
Adding Data to a ListTo add data to a list:
Chapter 30Working with Lists Features
30-25
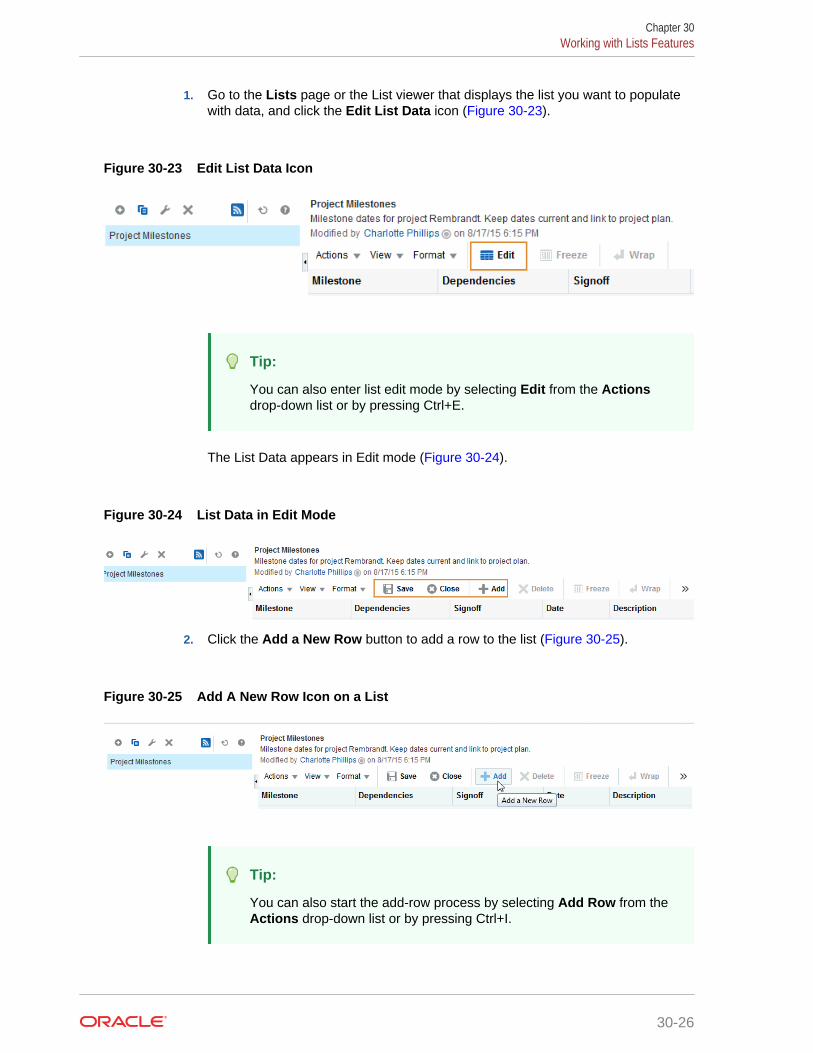
1. Go to the Lists page or the List viewer that displays the list you want to populatewith data, and click the Edit List Data icon (Figure 30-23).
Figure 30-23 Edit List Data Icon
Tip:
You can also enter list edit mode by selecting Edit from the Actionsdrop-down list or by pressing Ctrl+E.
The List Data appears in Edit mode (Figure 30-24).
Figure 30-24 List Data in Edit Mode
2. Click the Add a New Row button to add a row to the list (Figure 30-25).
Figure 30-25 Add A New Row Icon on a List
Tip:
You can also start the add-row process by selecting Add Row from theActions drop-down list or by pressing Ctrl+I.
Chapter 30Working with Lists Features
30-26
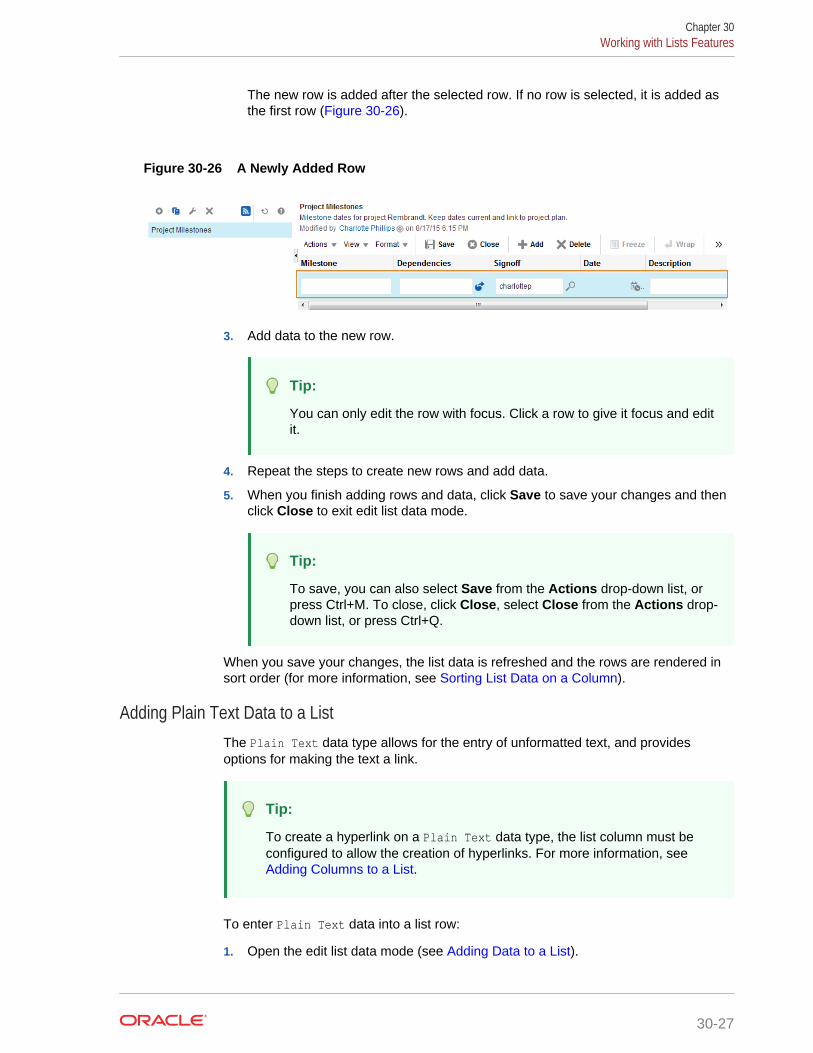
The new row is added after the selected row. If no row is selected, it is added asthe first row (Figure 30-26).
Figure 30-26 A Newly Added Row
3. Add data to the new row.
Tip:
You can only edit the row with focus. Click a row to give it focus and editit.
4. Repeat the steps to create new rows and add data.
5. When you finish adding rows and data, click Save to save your changes and thenclick Close to exit edit list data mode.
Tip:
To save, you can also select Save from the Actions drop-down list, orpress Ctrl+M. To close, click Close, select Close from the Actions drop-down list, or press Ctrl+Q.
When you save your changes, the list data is refreshed and the rows are rendered insort order (for more information, see Sorting List Data on a Column).
Adding Plain Text Data to a ListThe Plain Text data type allows for the entry of unformatted text, and providesoptions for making the text a link.
Tip:
To create a hyperlink on a Plain Text data type, the list column must beconfigured to allow the creation of hyperlinks. For more information, see Adding Columns to a List.
To enter Plain Text data into a list row:
1. Open the edit list data mode (see Adding Data to a List).
Chapter 30Working with Lists Features
30-27
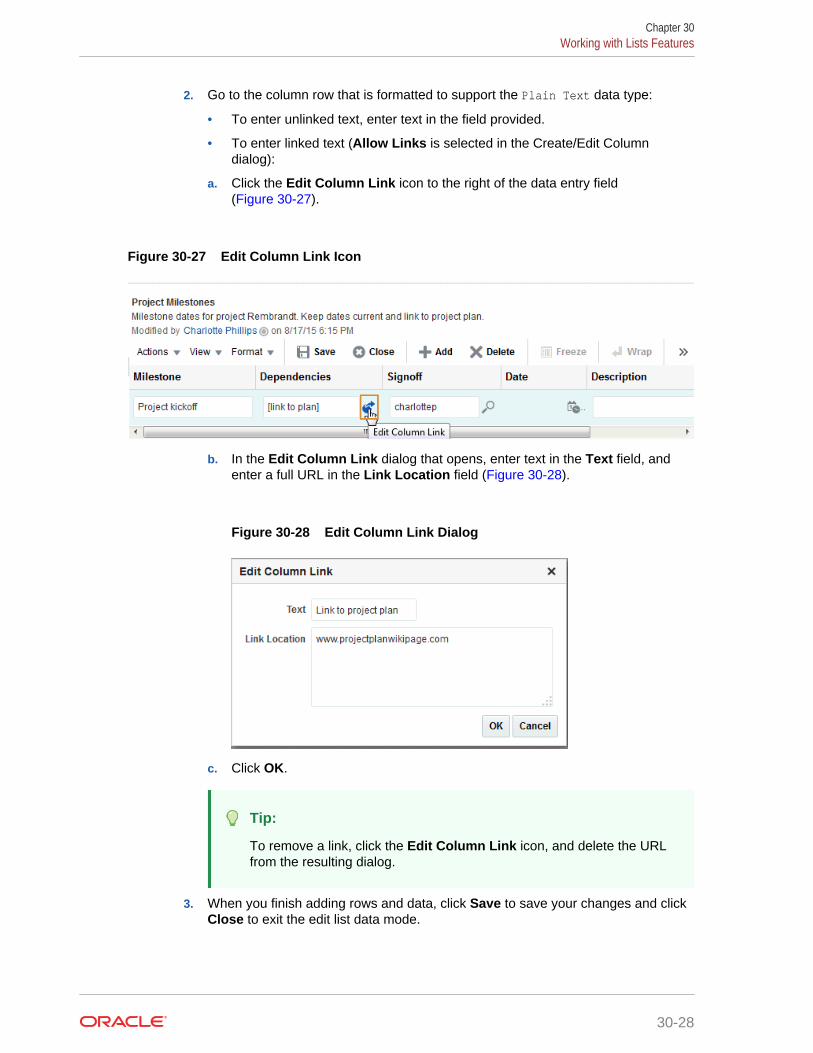
2. Go to the column row that is formatted to support the Plain Text data type:
• To enter unlinked text, enter text in the field provided.
• To enter linked text (Allow Links is selected in the Create/Edit Columndialog):
a. Click the Edit Column Link icon to the right of the data entry field(Figure 30-27).
Figure 30-27 Edit Column Link Icon
b. In the Edit Column Link dialog that opens, enter text in the Text field, andenter a full URL in the Link Location field (Figure 30-28).
Figure 30-28 Edit Column Link Dialog
c. Click OK.
Tip:
To remove a link, click the Edit Column Link icon, and delete the URLfrom the resulting dialog.
3. When you finish adding rows and data, click Save to save your changes and clickClose to exit the edit list data mode.
Chapter 30Working with Lists Features
30-28
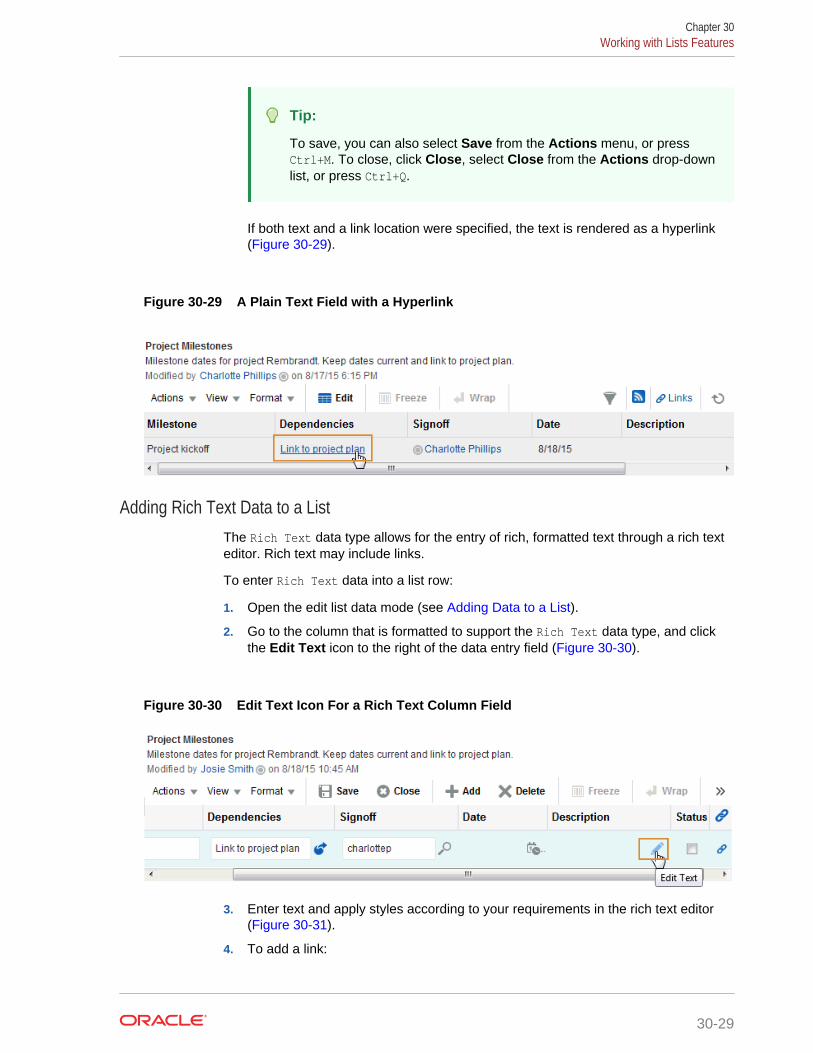
Tip:
To save, you can also select Save from the Actions menu, or pressCtrl+M. To close, click Close, select Close from the Actions drop-downlist, or press Ctrl+Q.
If both text and a link location were specified, the text is rendered as a hyperlink(Figure 30-29).
Figure 30-29 A Plain Text Field with a Hyperlink
Adding Rich Text Data to a ListThe Rich Text data type allows for the entry of rich, formatted text through a rich texteditor. Rich text may include links.
To enter Rich Text data into a list row:
1. Open the edit list data mode (see Adding Data to a List).
2. Go to the column that is formatted to support the Rich Text data type, and clickthe Edit Text icon to the right of the data entry field (Figure 30-30).
Figure 30-30 Edit Text Icon For a Rich Text Column Field
3. Enter text and apply styles according to your requirements in the rich text editor(Figure 30-31).
4. To add a link:
Chapter 30Working with Lists Features
30-29
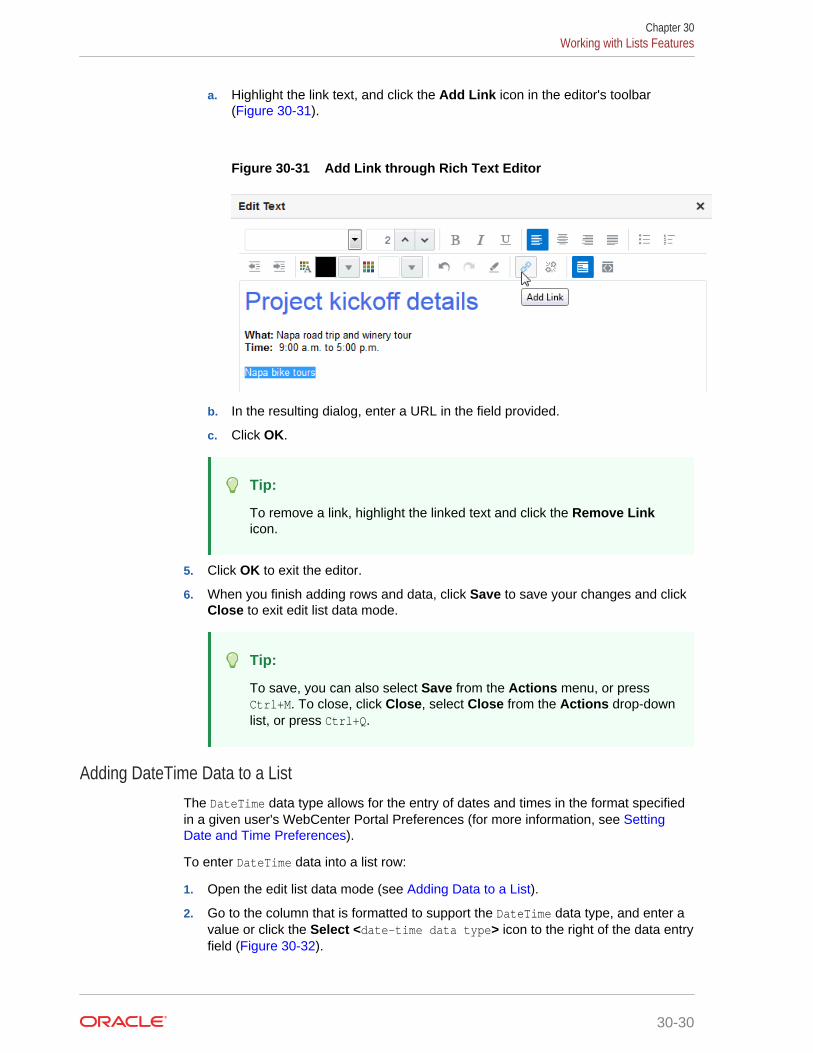
a. Highlight the link text, and click the Add Link icon in the editor's toolbar(Figure 30-31).
Figure 30-31 Add Link through Rich Text Editor
b. In the resulting dialog, enter a URL in the field provided.
c. Click OK.
Tip:
To remove a link, highlight the linked text and click the Remove Linkicon.
5. Click OK to exit the editor.
6. When you finish adding rows and data, click Save to save your changes and clickClose to exit edit list data mode.
Tip:
To save, you can also select Save from the Actions menu, or pressCtrl+M. To close, click Close, select Close from the Actions drop-downlist, or press Ctrl+Q.
Adding DateTime Data to a ListThe DateTime data type allows for the entry of dates and times in the format specifiedin a given user's WebCenter Portal Preferences (for more information, see SettingDate and Time Preferences).
To enter DateTime data into a list row:
1. Open the edit list data mode (see Adding Data to a List).
2. Go to the column that is formatted to support the DateTime data type, and enter avalue or click the Select <date-time data type> icon to the right of the data entryfield (Figure 30-32).
Chapter 30Working with Lists Features
30-30
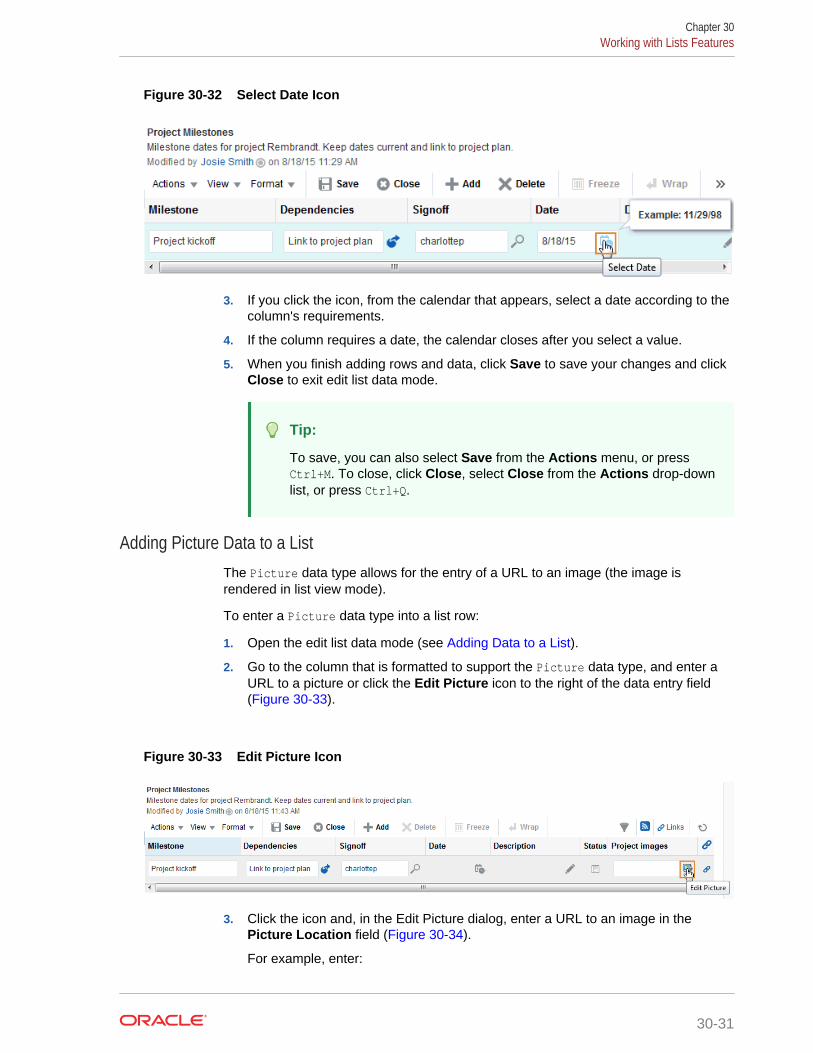
Figure 30-32 Select Date Icon
3. If you click the icon, from the calendar that appears, select a date according to thecolumn's requirements.
4. If the column requires a date, the calendar closes after you select a value.
5. When you finish adding rows and data, click Save to save your changes and clickClose to exit edit list data mode.
Tip:
To save, you can also select Save from the Actions menu, or pressCtrl+M. To close, click Close, select Close from the Actions drop-downlist, or press Ctrl+Q.
Adding Picture Data to a ListThe Picture data type allows for the entry of a URL to an image (the image isrendered in list view mode).
To enter a Picture data type into a list row:
1. Open the edit list data mode (see Adding Data to a List).
2. Go to the column that is formatted to support the Picture data type, and enter aURL to a picture or click the Edit Picture icon to the right of the data entry field(Figure 30-33).
Figure 30-33 Edit Picture Icon
3. Click the icon and, in the Edit Picture dialog, enter a URL to an image in thePicture Location field (Figure 30-34).
For example, enter:
Chapter 30Working with Lists Features
30-31
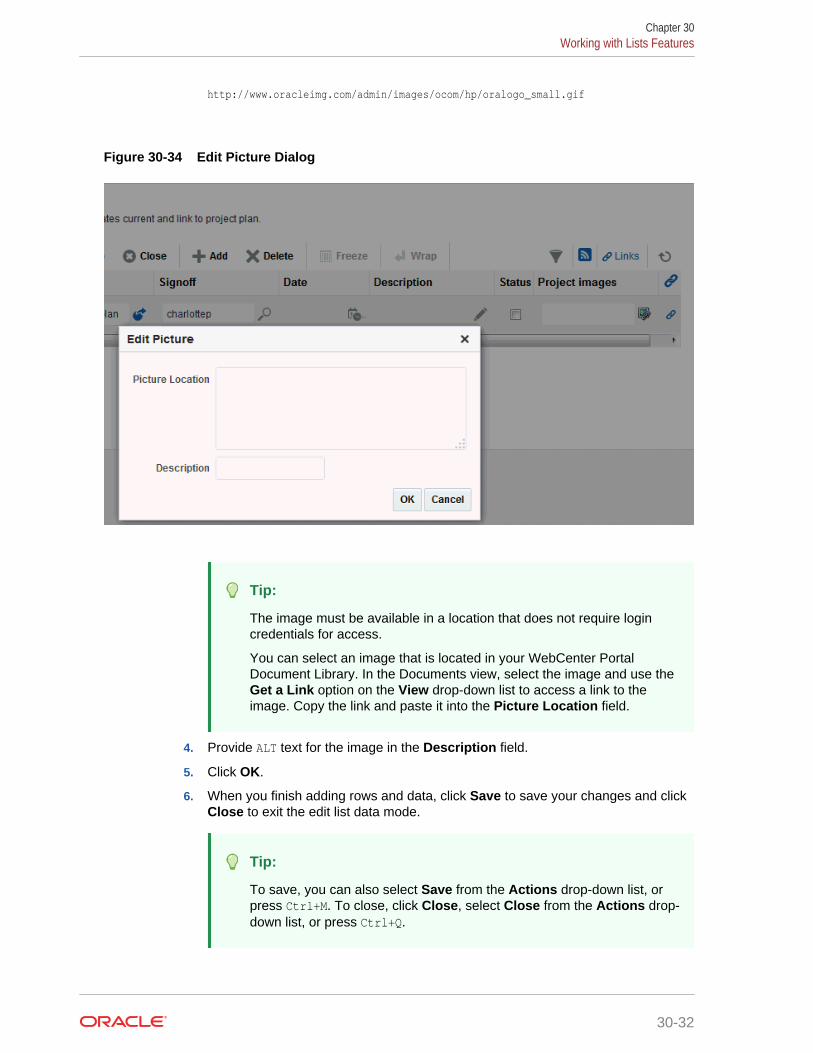
http://www.oracleimg.com/admin/images/ocom/hp/oralogo_small.gif
Figure 30-34 Edit Picture Dialog
Tip:
The image must be available in a location that does not require logincredentials for access.
You can select an image that is located in your WebCenter PortalDocument Library. In the Documents view, select the image and use theGet a Link option on the View drop-down list to access a link to theimage. Copy the link and paste it into the Picture Location field.
4. Provide ALT text for the image in the Description field.
5. Click OK.
6. When you finish adding rows and data, click Save to save your changes and clickClose to exit the edit list data mode.
Tip:
To save, you can also select Save from the Actions drop-down list, orpress Ctrl+M. To close, click Close, select Close from the Actions drop-down list, or press Ctrl+Q.
Chapter 30Working with Lists Features
30-32
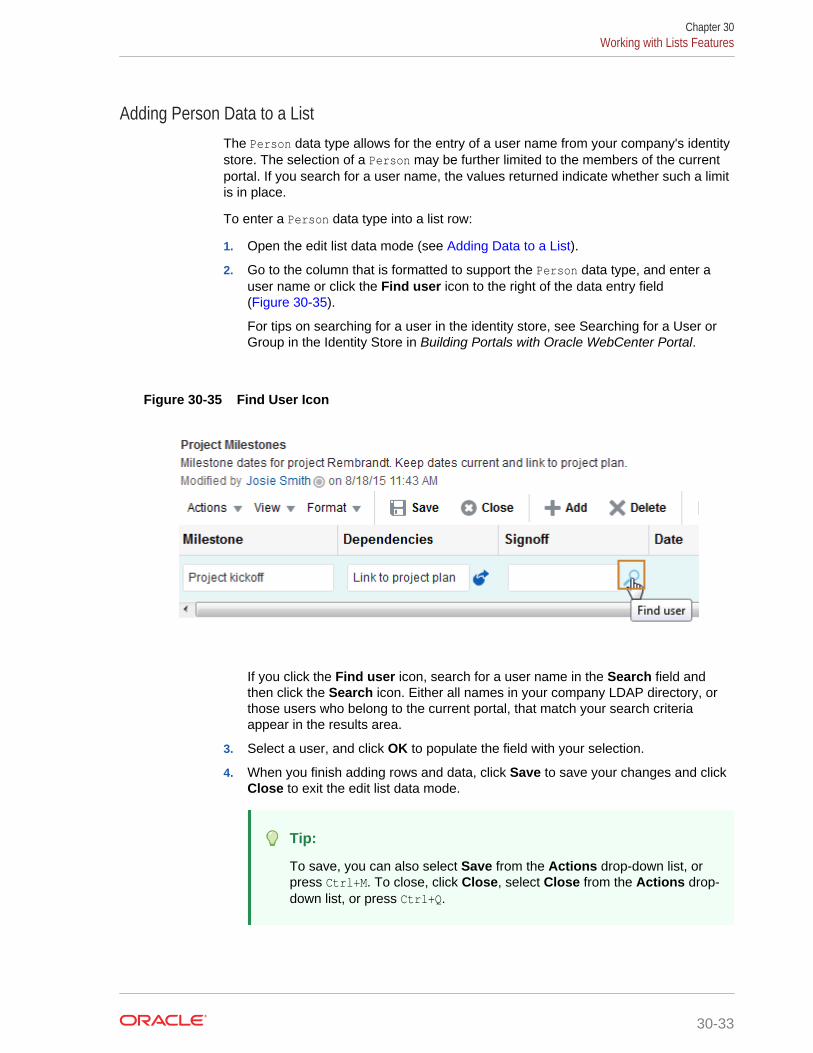
Adding Person Data to a ListThe Person data type allows for the entry of a user name from your company's identitystore. The selection of a Person may be further limited to the members of the currentportal. If you search for a user name, the values returned indicate whether such a limitis in place.
To enter a Person data type into a list row:
1. Open the edit list data mode (see Adding Data to a List).
2. Go to the column that is formatted to support the Person data type, and enter auser name or click the Find user icon to the right of the data entry field(Figure 30-35).
For tips on searching for a user in the identity store, see Searching for a User orGroup in the Identity Store in Building Portals with Oracle WebCenter Portal.
Figure 30-35 Find User Icon
If you click the Find user icon, search for a user name in the Search field andthen click the Search icon. Either all names in your company LDAP directory, orthose users who belong to the current portal, that match your search criteriaappear in the results area.
3. Select a user, and click OK to populate the field with your selection.
4. When you finish adding rows and data, click Save to save your changes and clickClose to exit the edit list data mode.
Tip:
To save, you can also select Save from the Actions drop-down list, orpress Ctrl+M. To close, click Close, select Close from the Actions drop-down list, or press Ctrl+Q.
Chapter 30Working with Lists Features
30-33
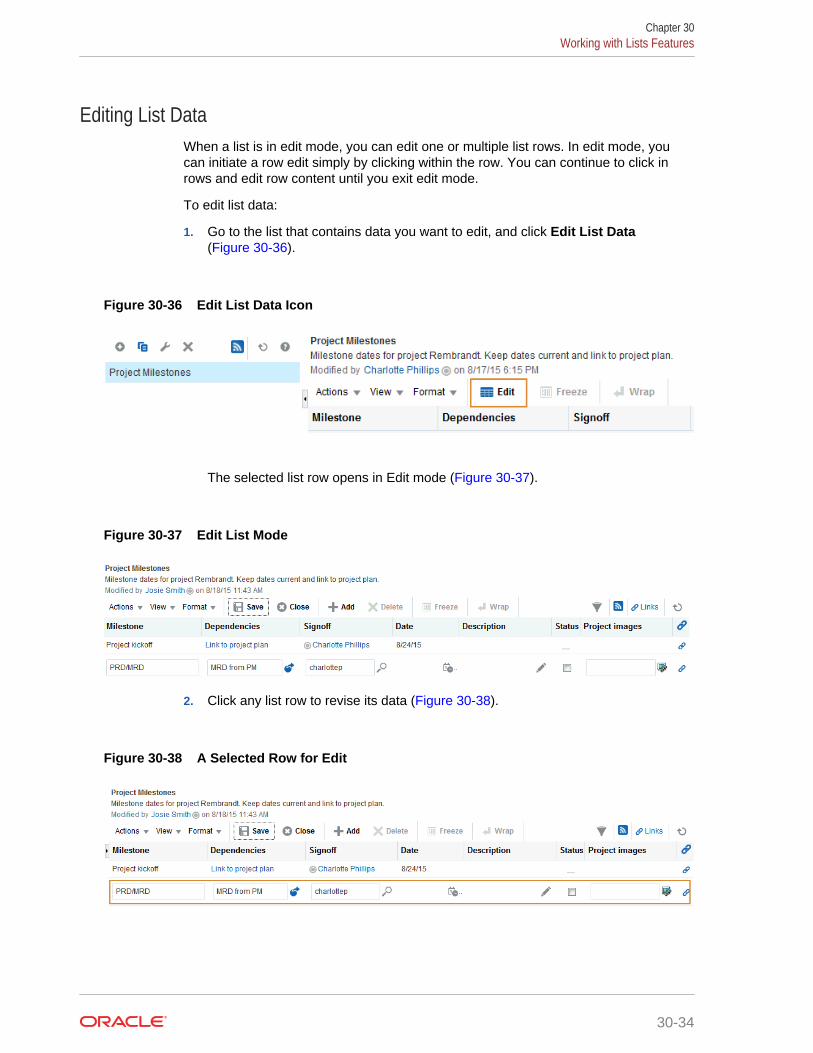
Editing List DataWhen a list is in edit mode, you can edit one or multiple list rows. In edit mode, youcan initiate a row edit simply by clicking within the row. You can continue to click inrows and edit row content until you exit edit mode.
To edit list data:
1. Go to the list that contains data you want to edit, and click Edit List Data(Figure 30-36).
Figure 30-36 Edit List Data Icon
The selected list row opens in Edit mode (Figure 30-37).
Figure 30-37 Edit List Mode
2. Click any list row to revise its data (Figure 30-38).
Figure 30-38 A Selected Row for Edit
Chapter 30Working with Lists Features
30-34
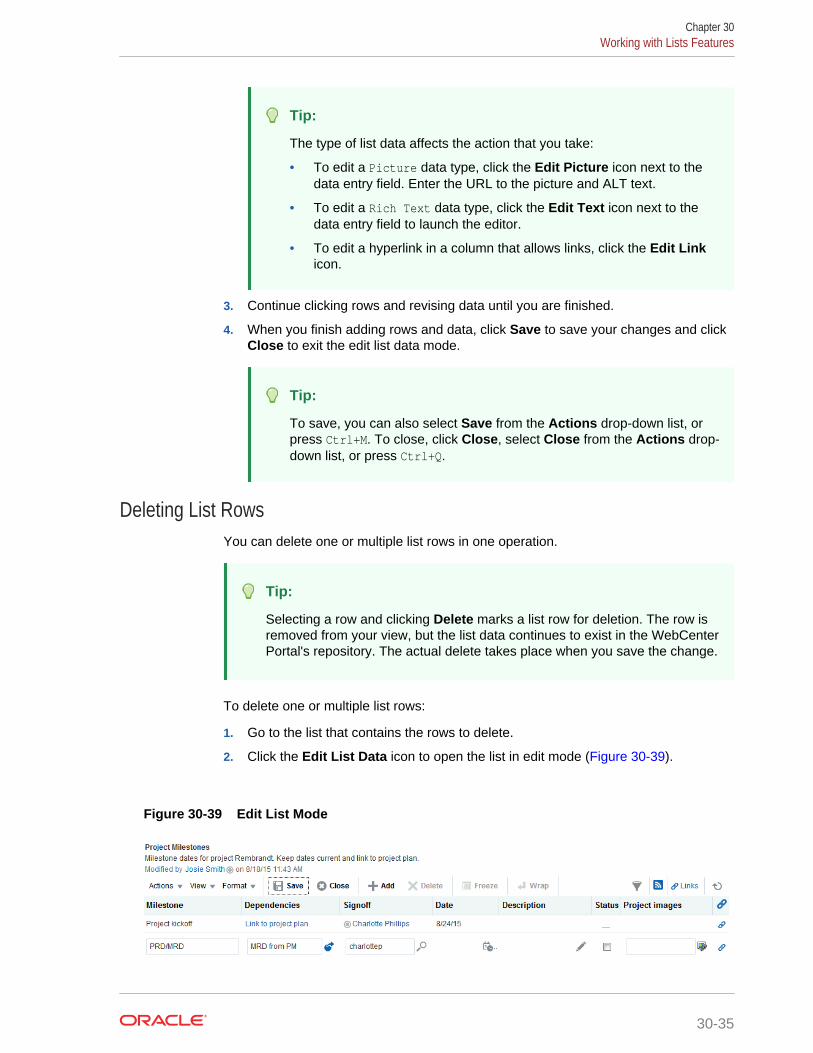
Tip:
The type of list data affects the action that you take:
• To edit a Picture data type, click the Edit Picture icon next to thedata entry field. Enter the URL to the picture and ALT text.
• To edit a Rich Text data type, click the Edit Text icon next to thedata entry field to launch the editor.
• To edit a hyperlink in a column that allows links, click the Edit Linkicon.
3. Continue clicking rows and revising data until you are finished.
4. When you finish adding rows and data, click Save to save your changes and clickClose to exit the edit list data mode.
Tip:
To save, you can also select Save from the Actions drop-down list, orpress Ctrl+M. To close, click Close, select Close from the Actions drop-down list, or press Ctrl+Q.
Deleting List RowsYou can delete one or multiple list rows in one operation.
Tip:
Selecting a row and clicking Delete marks a list row for deletion. The row isremoved from your view, but the list data continues to exist in the WebCenterPortal's repository. The actual delete takes place when you save the change.
To delete one or multiple list rows:
1. Go to the list that contains the rows to delete.
2. Click the Edit List Data icon to open the list in edit mode (Figure 30-39).
Figure 30-39 Edit List Mode
Chapter 30Working with Lists Features
30-35
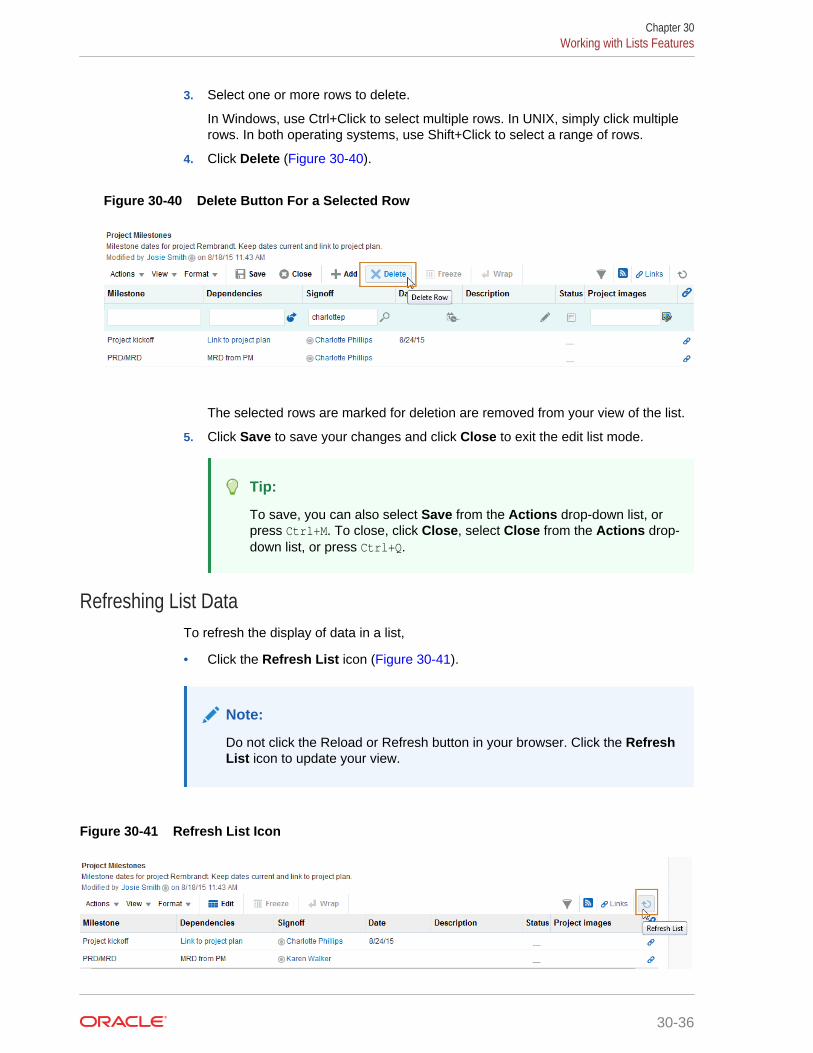
3. Select one or more rows to delete.
In Windows, use Ctrl+Click to select multiple rows. In UNIX, simply click multiplerows. In both operating systems, use Shift+Click to select a range of rows.
4. Click Delete (Figure 30-40).
Figure 30-40 Delete Button For a Selected Row
The selected rows are marked for deletion are removed from your view of the list.
5. Click Save to save your changes and click Close to exit the edit list mode.
Tip:
To save, you can also select Save from the Actions drop-down list, orpress Ctrl+M. To close, click Close, select Close from the Actions drop-down list, or press Ctrl+Q.
Refreshing List DataTo refresh the display of data in a list,
• Click the Refresh List icon (Figure 30-41).
Note:
Do not click the Reload or Refresh button in your browser. Click the RefreshList icon to update your view.
Figure 30-41 Refresh List Icon
Chapter 30Working with Lists Features
30-36
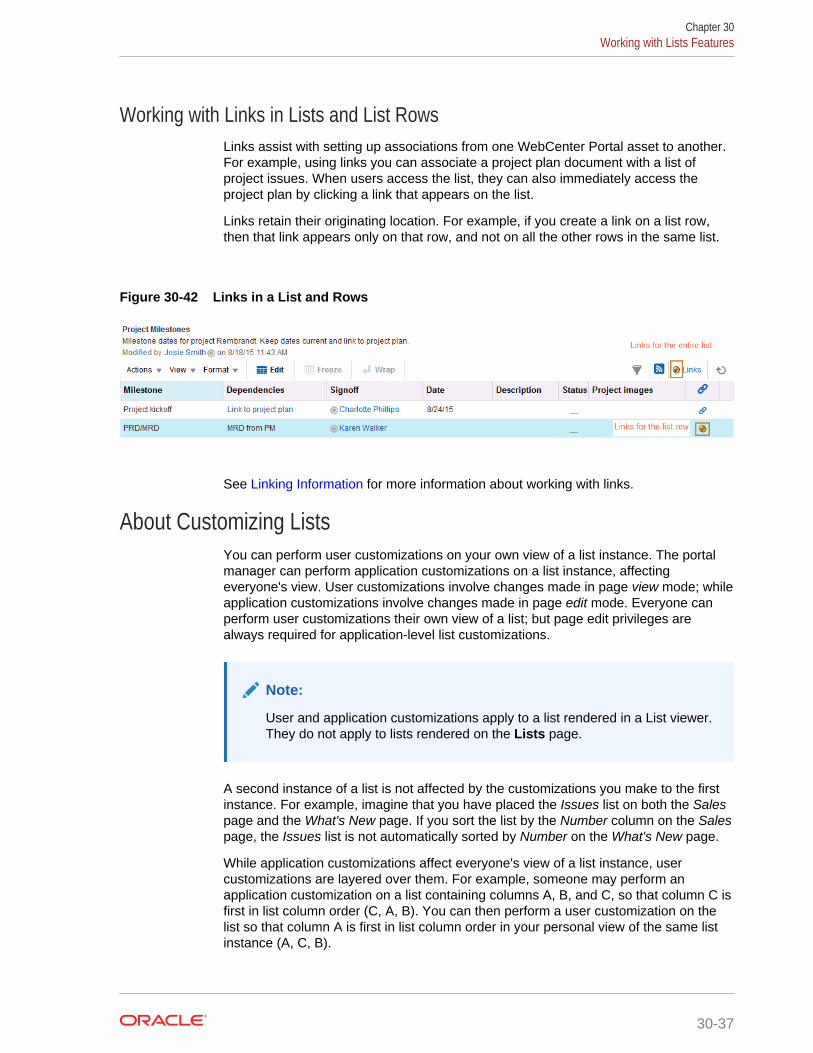
Working with Links in Lists and List RowsLinks assist with setting up associations from one WebCenter Portal asset to another.For example, using links you can associate a project plan document with a list ofproject issues. When users access the list, they can also immediately access theproject plan by clicking a link that appears on the list.
Links retain their originating location. For example, if you create a link on a list row,then that link appears only on that row, and not on all the other rows in the same list.
Figure 30-42 Links in a List and Rows
See Linking Information for more information about working with links.
About Customizing ListsYou can perform user customizations on your own view of a list instance. The portalmanager can perform application customizations on a list instance, affectingeveryone's view. User customizations involve changes made in page view mode; whileapplication customizations involve changes made in page edit mode. Everyone canperform user customizations their own view of a list; but page edit privileges arealways required for application-level list customizations.
Note:
User and application customizations apply to a list rendered in a List viewer.They do not apply to lists rendered on the Lists page.
A second instance of a list is not affected by the customizations you make to the firstinstance. For example, imagine that you have placed the Issues list on both the Salespage and the What's New page. If you sort the list by the Number column on the Salespage, the Issues list is not automatically sorted by Number on the What's New page.
While application customizations affect everyone's view of a list instance, usercustomizations are layered over them. For example, someone may perform anapplication customization on a list containing columns A, B, and C, so that column C isfirst in list column order (C, A, B). You can then perform a user customization on thelist so that column A is first in list column order in your personal view of the same listinstance (A, C, B).
Chapter 30Working with Lists Features
30-37
Note:
If the same property is set at both the application and user levels, the uservalue takes precedence in your own view. For application-levelcustomizations, see About Customizing Lists in Building Portals with OracleWebCenter Portal.
The following sections describe user-level customizations you can make to a listinstance:
• Sorting List Data on a Column
• Resizing List Columns
• Changing Column Order on a List Instance
• Hiding and Showing List Columns
• Freezing a Column Position
• Wrapping Column Data
• Applying Color Banding to List Rows
• Filtering List Data
Sorting List Data on a ColumnBy default, list data is sorted by create date. You can control the sort order of list databy clicking sort icons in each column's header. You can perform an advanced sortusing View drop-down list options.
Sort list data in the List viewer. You can sort list data on the Lists page, but the sortdoes not persist. It will revert if you change lists or navigate away from the page.
Note:
To sort list data on a column position in your view, perform the followingactions in page view mode. To sort list data on a column for all users, theapplication specialist or portal manager can perform the following actions inthe page editor.
This section describes regular and advanced sorting. It includes the following topics:
• Sorting List Data Using Column Icons
• Performing an Advanced Sort of List Data
Chapter 30Working with Lists Features
30-38
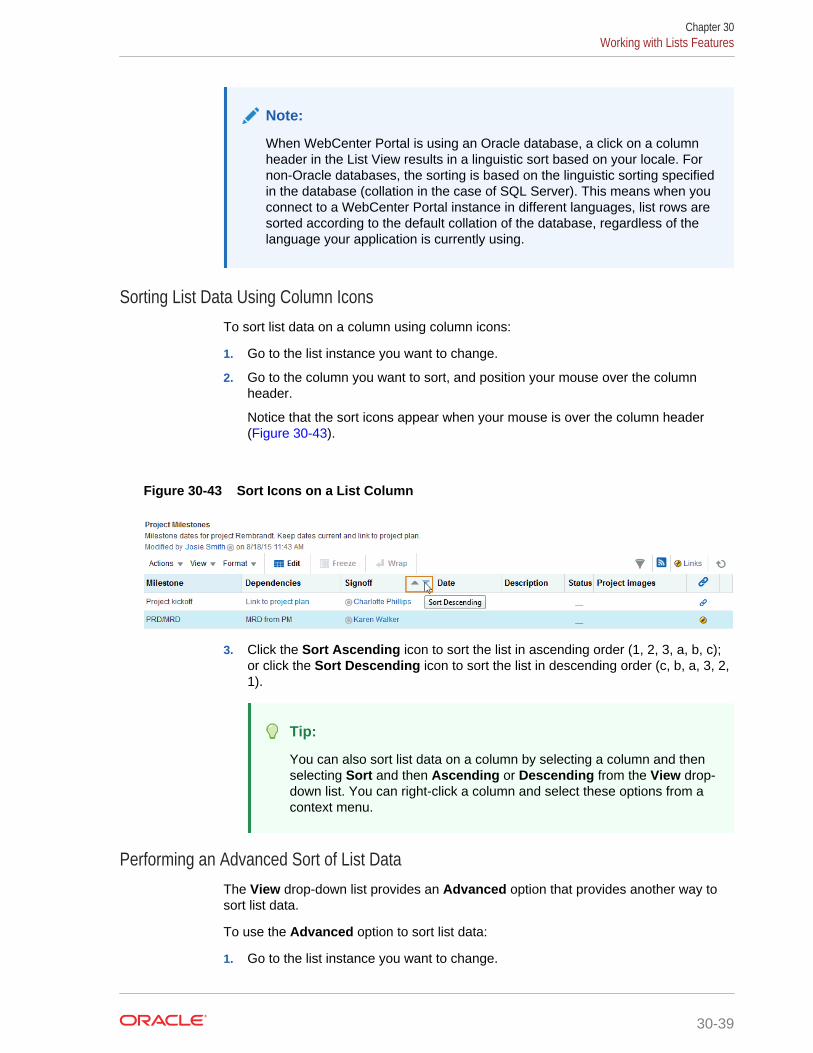
Note:
When WebCenter Portal is using an Oracle database, a click on a columnheader in the List View results in a linguistic sort based on your locale. Fornon-Oracle databases, the sorting is based on the linguistic sorting specifiedin the database (collation in the case of SQL Server). This means when youconnect to a WebCenter Portal instance in different languages, list rows aresorted according to the default collation of the database, regardless of thelanguage your application is currently using.
Sorting List Data Using Column IconsTo sort list data on a column using column icons:
1. Go to the list instance you want to change.
2. Go to the column you want to sort, and position your mouse over the columnheader.
Notice that the sort icons appear when your mouse is over the column header(Figure 30-43).
Figure 30-43 Sort Icons on a List Column
3. Click the Sort Ascending icon to sort the list in ascending order (1, 2, 3, a, b, c);or click the Sort Descending icon to sort the list in descending order (c, b, a, 3, 2,1).
Tip:
You can also sort list data on a column by selecting a column and thenselecting Sort and then Ascending or Descending from the View drop-down list. You can right-click a column and select these options from acontext menu.
Performing an Advanced Sort of List DataThe View drop-down list provides an Advanced option that provides another way tosort list data.
To use the Advanced option to sort list data:
1. Go to the list instance you want to change.
Chapter 30Working with Lists Features
30-39
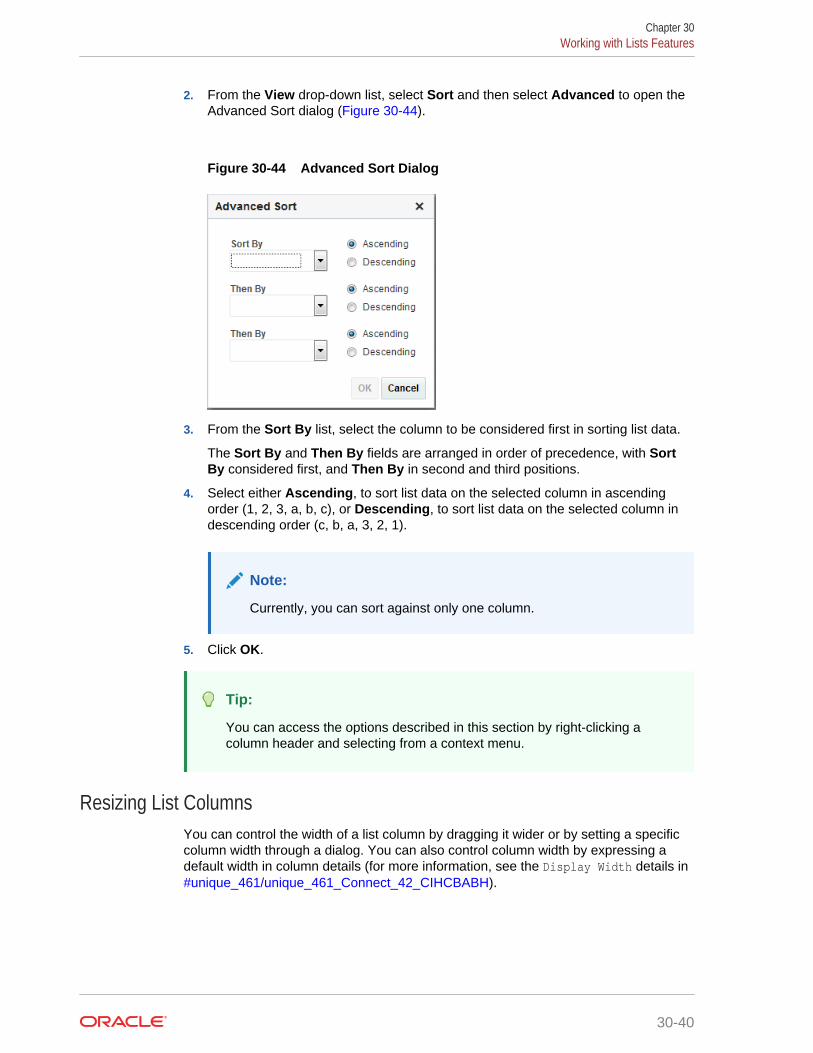
2. From the View drop-down list, select Sort and then select Advanced to open theAdvanced Sort dialog (Figure 30-44).
Figure 30-44 Advanced Sort Dialog
3. From the Sort By list, select the column to be considered first in sorting list data.
The Sort By and Then By fields are arranged in order of precedence, with SortBy considered first, and Then By in second and third positions.
4. Select either Ascending, to sort list data on the selected column in ascendingorder (1, 2, 3, a, b, c), or Descending, to sort list data on the selected column indescending order (c, b, a, 3, 2, 1).
Note:
Currently, you can sort against only one column.
5. Click OK.
Tip:
You can access the options described in this section by right-clicking acolumn header and selecting from a context menu.
Resizing List ColumnsYou can control the width of a list column by dragging it wider or by setting a specificcolumn width through a dialog. You can also control column width by expressing adefault width in column details (for more information, see the Display Width details in #unique_461/unique_461_Connect_42_CIHCBABH).
Chapter 30Working with Lists Features
30-40
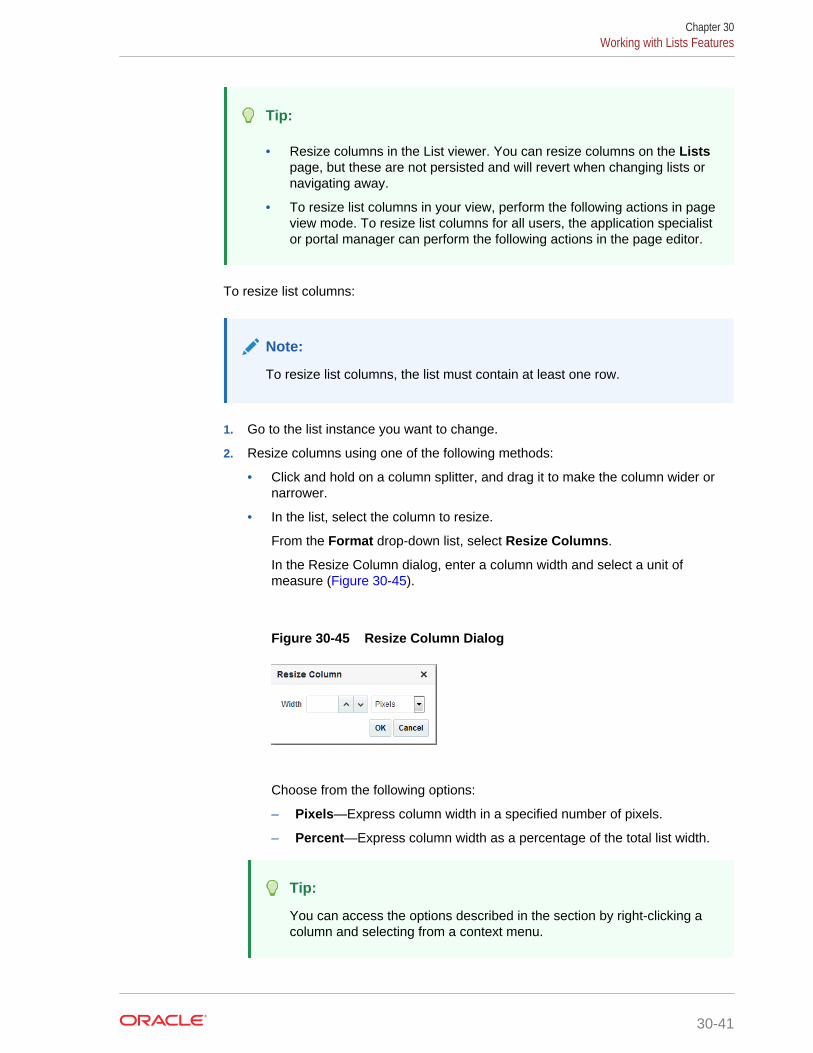
Tip:
• Resize columns in the List viewer. You can resize columns on the Listspage, but these are not persisted and will revert when changing lists ornavigating away.
• To resize list columns in your view, perform the following actions in pageview mode. To resize list columns for all users, the application specialistor portal manager can perform the following actions in the page editor.
To resize list columns:
Note:
To resize list columns, the list must contain at least one row.
1. Go to the list instance you want to change.
2. Resize columns using one of the following methods:
• Click and hold on a column splitter, and drag it to make the column wider ornarrower.
• In the list, select the column to resize.
From the Format drop-down list, select Resize Columns.
In the Resize Column dialog, enter a column width and select a unit ofmeasure (Figure 30-45).
Figure 30-45 Resize Column Dialog
Choose from the following options:
– Pixels—Express column width in a specified number of pixels.
– Percent—Express column width as a percentage of the total list width.
Tip:
You can access the options described in the section by right-clicking acolumn and selecting from a context menu.
Chapter 30Working with Lists Features
30-41
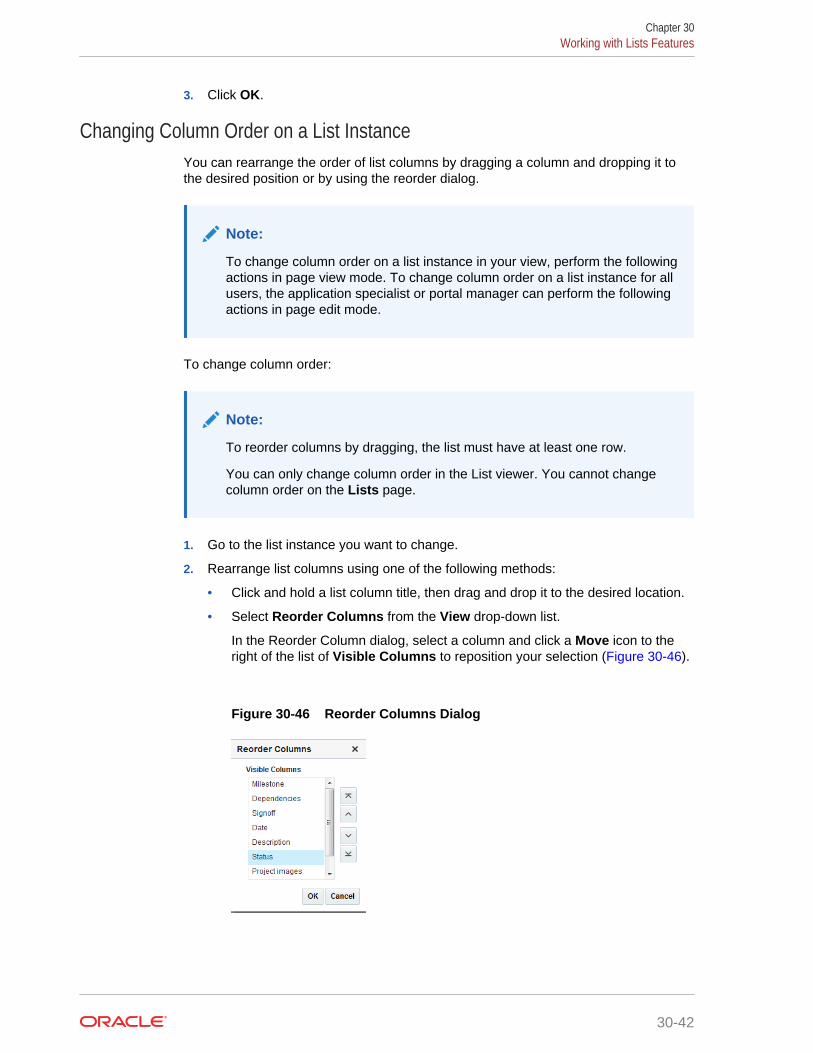
3. Click OK.
Changing Column Order on a List InstanceYou can rearrange the order of list columns by dragging a column and dropping it tothe desired position or by using the reorder dialog.
Note:
To change column order on a list instance in your view, perform the followingactions in page view mode. To change column order on a list instance for allusers, the application specialist or portal manager can perform the followingactions in page edit mode.
To change column order:
Note:
To reorder columns by dragging, the list must have at least one row.
You can only change column order in the List viewer. You cannot changecolumn order on the Lists page.
1. Go to the list instance you want to change.
2. Rearrange list columns using one of the following methods:
• Click and hold a list column title, then drag and drop it to the desired location.
• Select Reorder Columns from the View drop-down list.
In the Reorder Column dialog, select a column and click a Move icon to theright of the list of Visible Columns to reposition your selection (Figure 30-46).
Figure 30-46 Reorder Columns Dialog
Chapter 30Working with Lists Features
30-42
Tip:
You can access the options described in the section by right-clicking acolumn and selecting from a context menu.
3. Repeat until you have columns arranged in the desired order.
4. Click OK.
Hiding and Showing List ColumnsYou can use an option on a list's View drop-down list to hide selected list columns.
Note:
To hide or show columns in your view, perform the following actions in pageview mode. To hide or show columns for all users, the application specialistor portal manager can perform the following actions in page edit mode.
Hide or show list columns in the List viewer. You can hide or show columns on theLists page, but this setting does not persist and reverts when changing lists ornavigating away.
To hide or show list columns:
1. Go to the list instance you want to change.
2. From the View drop-down list, select Columns (Figure 30-47):
Chapter 30Working with Lists Features
30-43
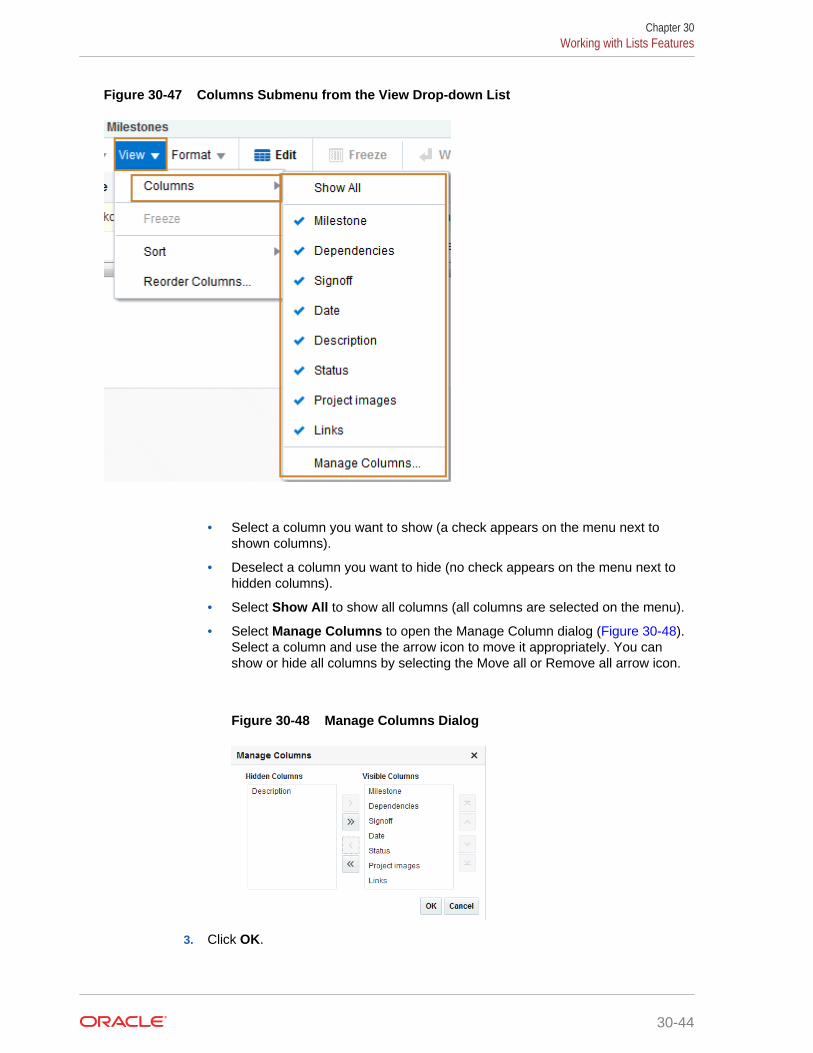
Figure 30-47 Columns Submenu from the View Drop-down List
• Select a column you want to show (a check appears on the menu next toshown columns).
• Deselect a column you want to hide (no check appears on the menu next tohidden columns).
• Select Show All to show all columns (all columns are selected on the menu).
• Select Manage Columns to open the Manage Column dialog (Figure 30-48).Select a column and use the arrow icon to move it appropriately. You canshow or hide all columns by selecting the Move all or Remove all arrow icon.
Figure 30-48 Manage Columns Dialog
3. Click OK.
Chapter 30Working with Lists Features
30-44
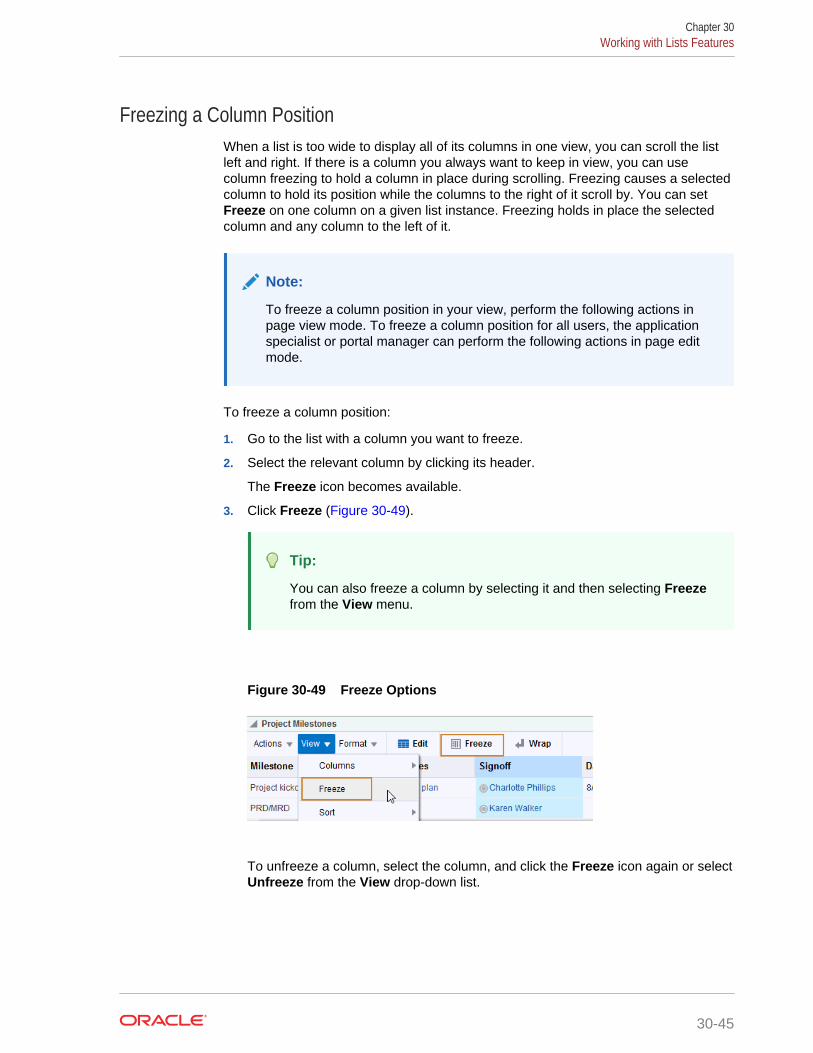
Freezing a Column PositionWhen a list is too wide to display all of its columns in one view, you can scroll the listleft and right. If there is a column you always want to keep in view, you can usecolumn freezing to hold a column in place during scrolling. Freezing causes a selectedcolumn to hold its position while the columns to the right of it scroll by. You can setFreeze on one column on a given list instance. Freezing holds in place the selectedcolumn and any column to the left of it.
Note:
To freeze a column position in your view, perform the following actions inpage view mode. To freeze a column position for all users, the applicationspecialist or portal manager can perform the following actions in page editmode.
To freeze a column position:
1. Go to the list with a column you want to freeze.
2. Select the relevant column by clicking its header.
The Freeze icon becomes available.
3. Click Freeze (Figure 30-49).
Tip:
You can also freeze a column by selecting it and then selecting Freezefrom the View menu.
Figure 30-49 Freeze Options
To unfreeze a column, select the column, and click the Freeze icon again or selectUnfreeze from the View drop-down list.
Chapter 30Working with Lists Features
30-45
Tip:
You can access the options described in the section by right-clicking acolumn and selecting from a context menu.
Wrapping Column DataUse the Wrap feature to control whether to allow column data to wrap in a selected listcolumn. Data that wraps breaks onto additional lines if it would otherwise exceed thecolumn width. Data that does not wrap, shows only as much data as fits into thecurrent column width (you can widen the column to view the data if you prefer, see Resizing List Columns).
Note:
By default, column data is wrapped.
To wrap column data:
1. Go to the list in which to wrap column data.
2. Select the relevant column by clicking its header.
3. Click Wrap.
Toggle the Wrap icon or the Wrap menu item to wrap text or turn the text wrap off.
Tip:
You can also wrap data by selecting the column and then selectingWrap from the Format drop-down list.
You can access the options described in the section by right-clicking acolumn and selecting from a context menu.
If any data was previously truncated, it now appears in the row with line breaks toaccommodate the column's width.
To turn wrapping off, select the relevant column and click the Wrap icon again orselect Wrap from the Format drop-down list.
Applying Color Banding to List RowsColor banding refers to a transparent overlay of color applied at specified intervals tolist rows or columns. When you define color banding on a list, you specify whether toapply color banding and how often to apply it.
You can easily enhance the readability of a list by applying row or column colorbanding.
Chapter 30Working with Lists Features
30-46
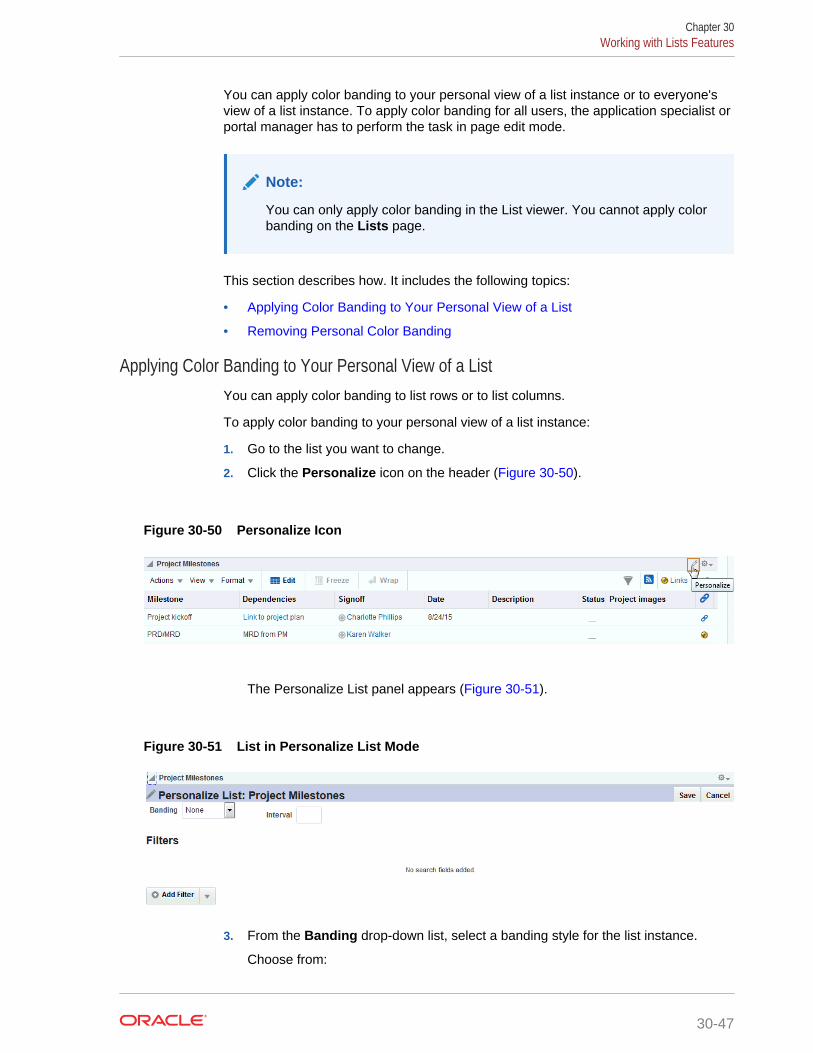
You can apply color banding to your personal view of a list instance or to everyone'sview of a list instance. To apply color banding for all users, the application specialist orportal manager has to perform the task in page edit mode.
Note:
You can only apply color banding in the List viewer. You cannot apply colorbanding on the Lists page.
This section describes how. It includes the following topics:
• Applying Color Banding to Your Personal View of a List
• Removing Personal Color Banding
Applying Color Banding to Your Personal View of a ListYou can apply color banding to list rows or to list columns.
To apply color banding to your personal view of a list instance:
1. Go to the list you want to change.
2. Click the Personalize icon on the header (Figure 30-50).
Figure 30-50 Personalize Icon
The Personalize List panel appears (Figure 30-51).
Figure 30-51 List in Personalize List Mode
3. From the Banding drop-down list, select a banding style for the list instance.
Choose from:
Chapter 30Working with Lists Features
30-47
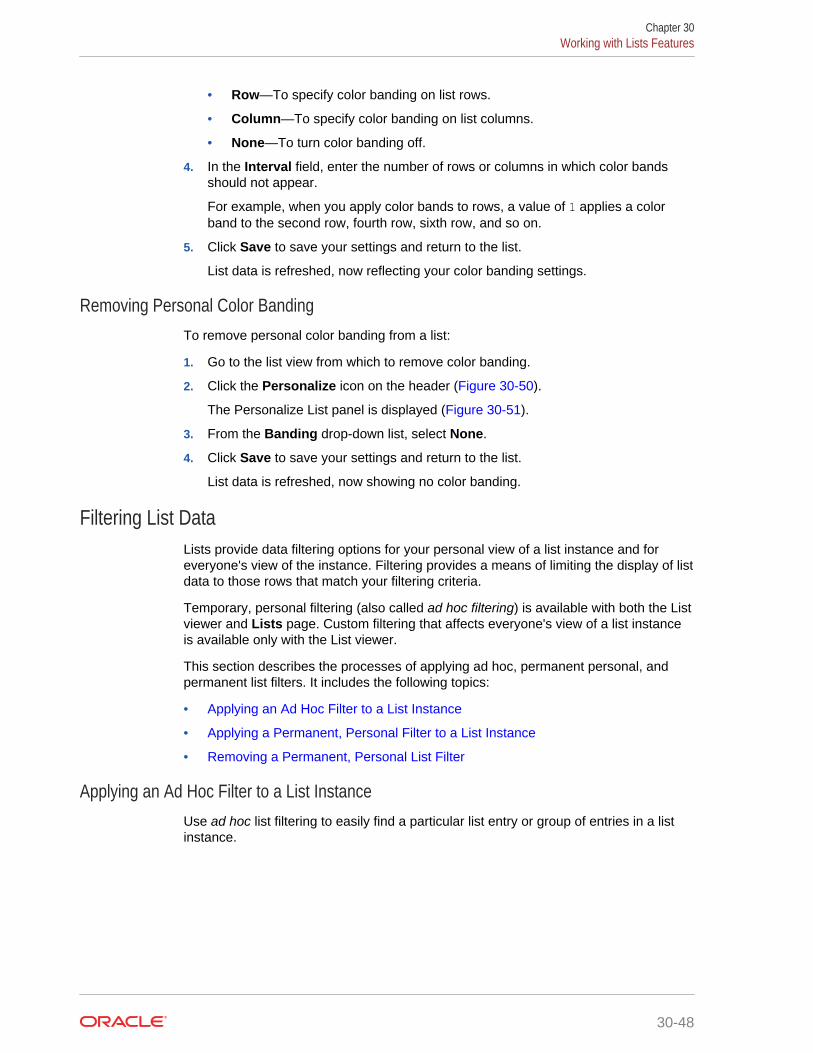
• Row—To specify color banding on list rows.
• Column—To specify color banding on list columns.
• None—To turn color banding off.
4. In the Interval field, enter the number of rows or columns in which color bandsshould not appear.
For example, when you apply color bands to rows, a value of 1 applies a colorband to the second row, fourth row, sixth row, and so on.
5. Click Save to save your settings and return to the list.
List data is refreshed, now reflecting your color banding settings.
Removing Personal Color BandingTo remove personal color banding from a list:
1. Go to the list view from which to remove color banding.
2. Click the Personalize icon on the header (Figure 30-50).
The Personalize List panel is displayed (Figure 30-51).
3. From the Banding drop-down list, select None.
4. Click Save to save your settings and return to the list.
List data is refreshed, now showing no color banding.
Filtering List DataLists provide data filtering options for your personal view of a list instance and foreveryone's view of the instance. Filtering provides a means of limiting the display of listdata to those rows that match your filtering criteria.
Temporary, personal filtering (also called ad hoc filtering) is available with both the Listviewer and Lists page. Custom filtering that affects everyone's view of a list instanceis available only with the List viewer.
This section describes the processes of applying ad hoc, permanent personal, andpermanent list filters. It includes the following topics:
• Applying an Ad Hoc Filter to a List Instance
• Applying a Permanent, Personal Filter to a List Instance
• Removing a Permanent, Personal List Filter
Applying an Ad Hoc Filter to a List InstanceUse ad hoc list filtering to easily find a particular list entry or group of entries in a listinstance.
Chapter 30Working with Lists Features
30-48
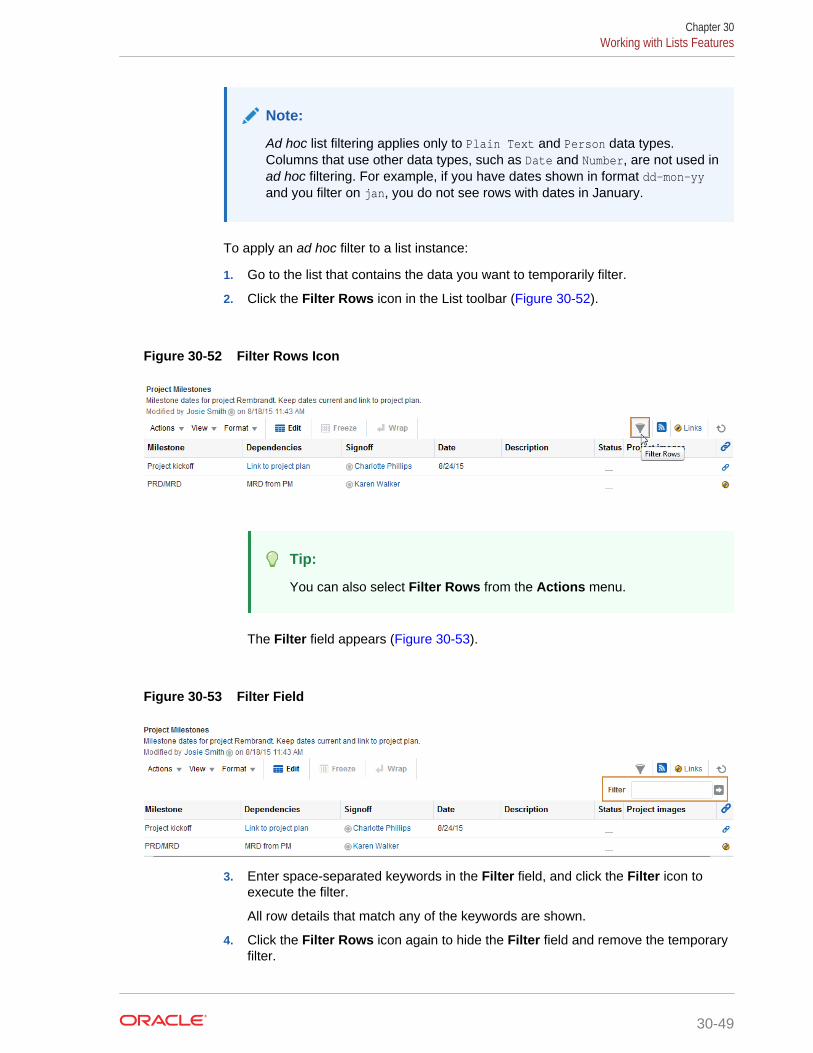
Note:
Ad hoc list filtering applies only to Plain Text and Person data types.Columns that use other data types, such as Date and Number, are not used inad hoc filtering. For example, if you have dates shown in format dd-mon-yyand you filter on jan, you do not see rows with dates in January.
To apply an ad hoc filter to a list instance:
1. Go to the list that contains the data you want to temporarily filter.
2. Click the Filter Rows icon in the List toolbar (Figure 30-52).
Figure 30-52 Filter Rows Icon
Tip:
You can also select Filter Rows from the Actions menu.
The Filter field appears (Figure 30-53).
Figure 30-53 Filter Field
3. Enter space-separated keywords in the Filter field, and click the Filter icon toexecute the filter.
All row details that match any of the keywords are shown.
4. Click the Filter Rows icon again to hide the Filter field and remove the temporaryfilter.
Chapter 30Working with Lists Features
30-49
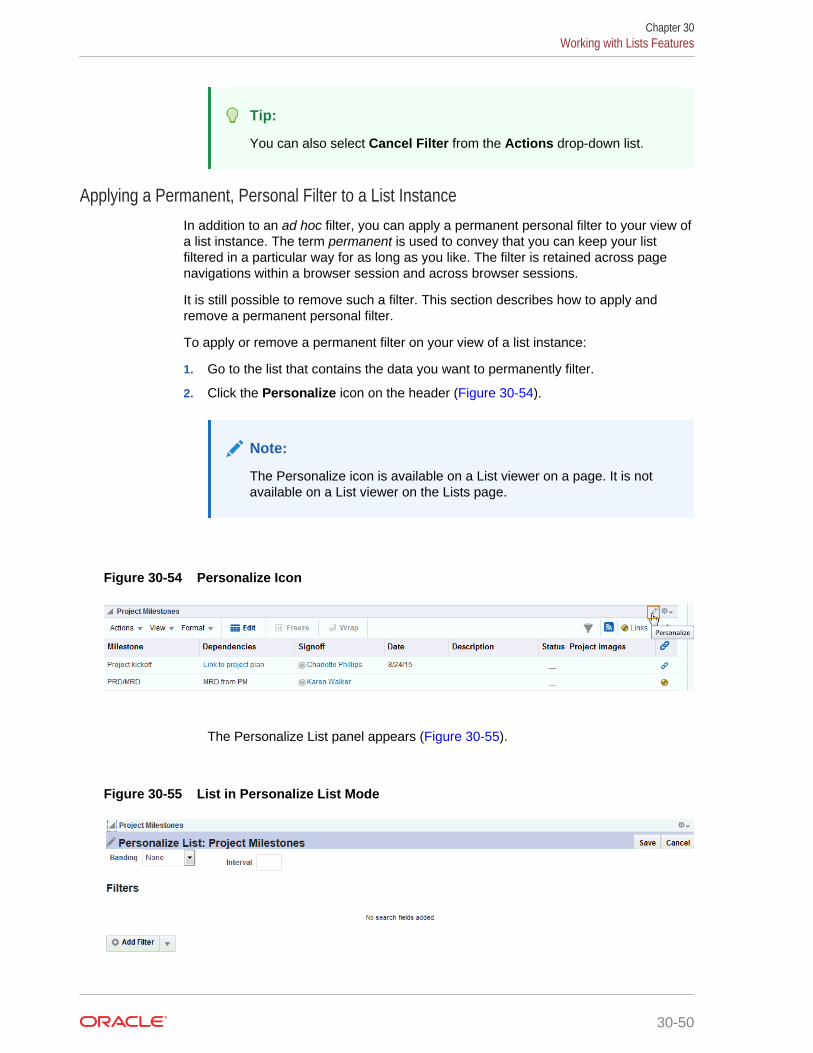
Tip:
You can also select Cancel Filter from the Actions drop-down list.
Applying a Permanent, Personal Filter to a List InstanceIn addition to an ad hoc filter, you can apply a permanent personal filter to your view ofa list instance. The term permanent is used to convey that you can keep your listfiltered in a particular way for as long as you like. The filter is retained across pagenavigations within a browser session and across browser sessions.
It is still possible to remove such a filter. This section describes how to apply andremove a permanent personal filter.
To apply or remove a permanent filter on your view of a list instance:
1. Go to the list that contains the data you want to permanently filter.
2. Click the Personalize icon on the header (Figure 30-54).
Note:
The Personalize icon is available on a List viewer on a page. It is notavailable on a List viewer on the Lists page.
Figure 30-54 Personalize Icon
The Personalize List panel appears (Figure 30-55).
Figure 30-55 List in Personalize List Mode
Chapter 30Working with Lists Features
30-50
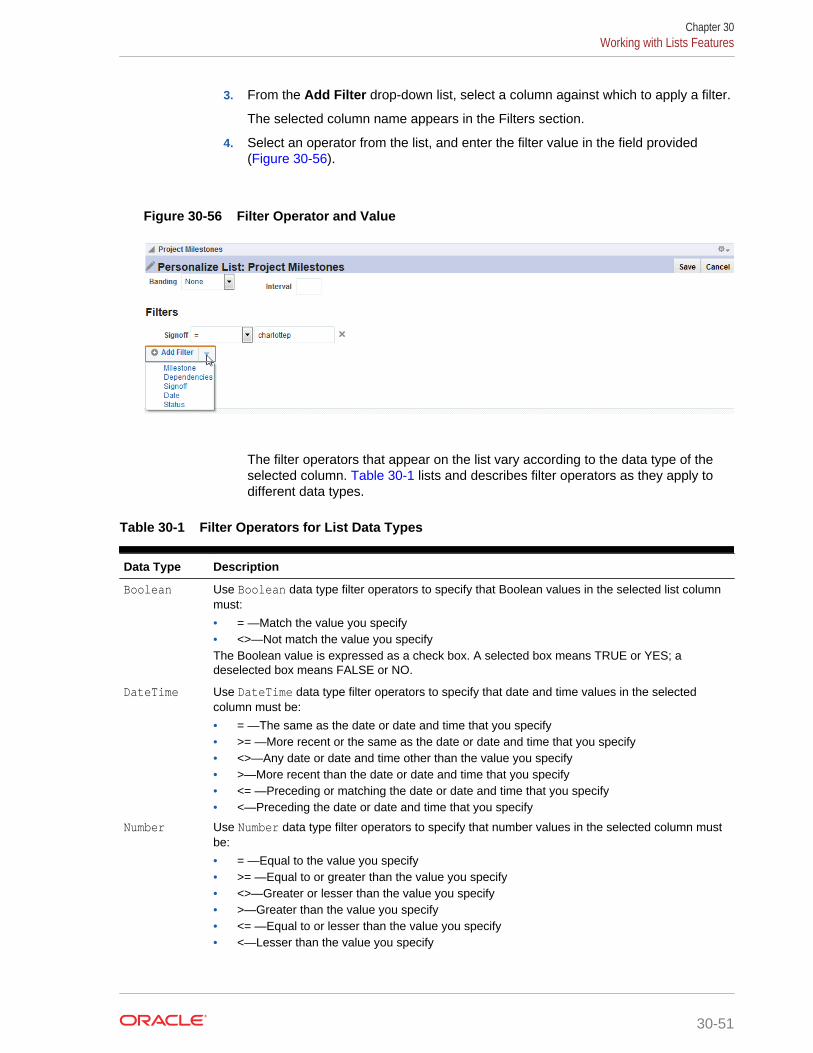
3. From the Add Filter drop-down list, select a column against which to apply a filter.
The selected column name appears in the Filters section.
4. Select an operator from the list, and enter the filter value in the field provided(Figure 30-56).
Figure 30-56 Filter Operator and Value
The filter operators that appear on the list vary according to the data type of theselected column. Table 30-1 lists and describes filter operators as they apply todifferent data types.
Table 30-1 Filter Operators for List Data Types
Data Type Description
Boolean Use Boolean data type filter operators to specify that Boolean values in the selected list columnmust:
• = —Match the value you specify• <>—Not match the value you specifyThe Boolean value is expressed as a check box. A selected box means TRUE or YES; adeselected box means FALSE or NO.
DateTime Use DateTime data type filter operators to specify that date and time values in the selectedcolumn must be:
• = —The same as the date or date and time that you specify• >= —More recent or the same as the date or date and time that you specify• <>—Any date or date and time other than the value you specify• >—More recent than the date or date and time that you specify• <= —Preceding or matching the date or date and time that you specify• <—Preceding the date or date and time that you specify
Number Use Number data type filter operators to specify that number values in the selected column mustbe:
• = —Equal to the value you specify• >= —Equal to or greater than the value you specify• <>—Greater or lesser than the value you specify• >—Greater than the value you specify• <= —Equal to or lesser than the value you specify• <—Lesser than the value you specify
Chapter 30Working with Lists Features
30-51
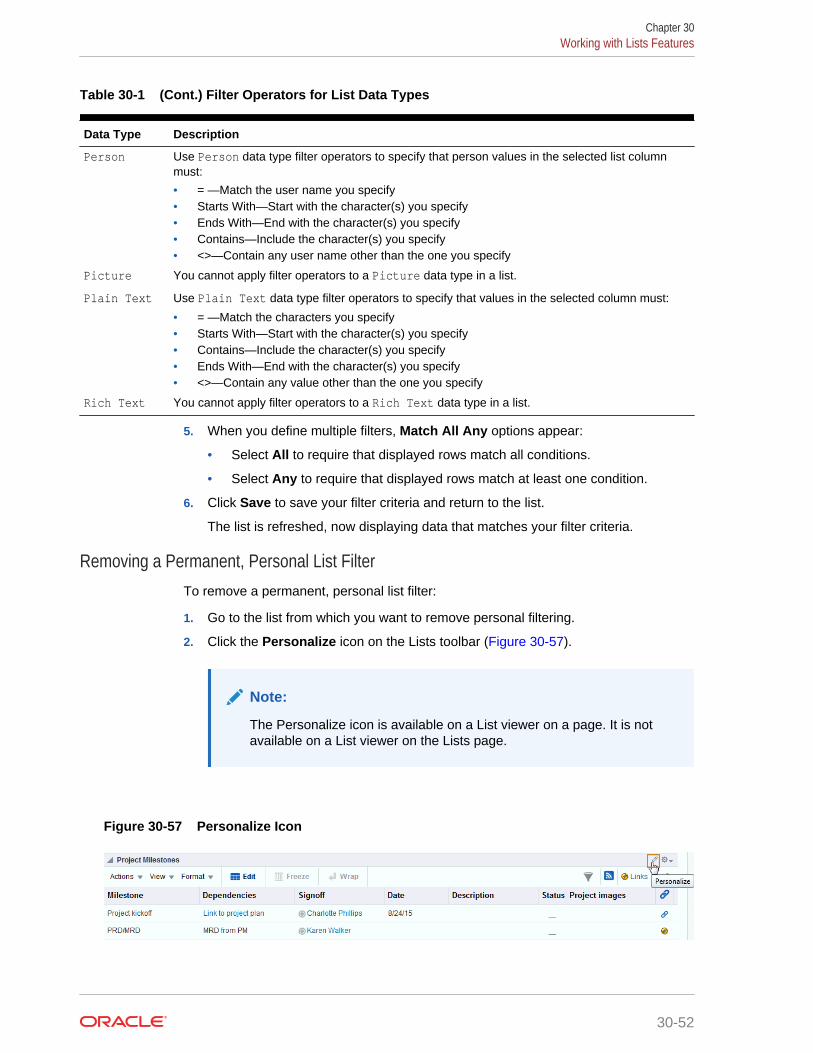
Table 30-1 (Cont.) Filter Operators for List Data Types
Data Type Description
Person Use Person data type filter operators to specify that person values in the selected list columnmust:
• = —Match the user name you specify• Starts With—Start with the character(s) you specify• Ends With—End with the character(s) you specify• Contains—Include the character(s) you specify• <>—Contain any user name other than the one you specify
Picture You cannot apply filter operators to a Picture data type in a list.
Plain Text Use Plain Text data type filter operators to specify that values in the selected column must:
• = —Match the characters you specify• Starts With—Start with the character(s) you specify• Contains—Include the character(s) you specify• Ends With—End with the character(s) you specify• <>—Contain any value other than the one you specify
Rich Text You cannot apply filter operators to a Rich Text data type in a list.
5. When you define multiple filters, Match All Any options appear:
• Select All to require that displayed rows match all conditions.
• Select Any to require that displayed rows match at least one condition.
6. Click Save to save your filter criteria and return to the list.
The list is refreshed, now displaying data that matches your filter criteria.
Removing a Permanent, Personal List FilterTo remove a permanent, personal list filter:
1. Go to the list from which you want to remove personal filtering.
2. Click the Personalize icon on the Lists toolbar (Figure 30-57).
Note:
The Personalize icon is available on a List viewer on a page. It is notavailable on a List viewer on the Lists page.
Figure 30-57 Personalize Icon
Chapter 30Working with Lists Features
30-52
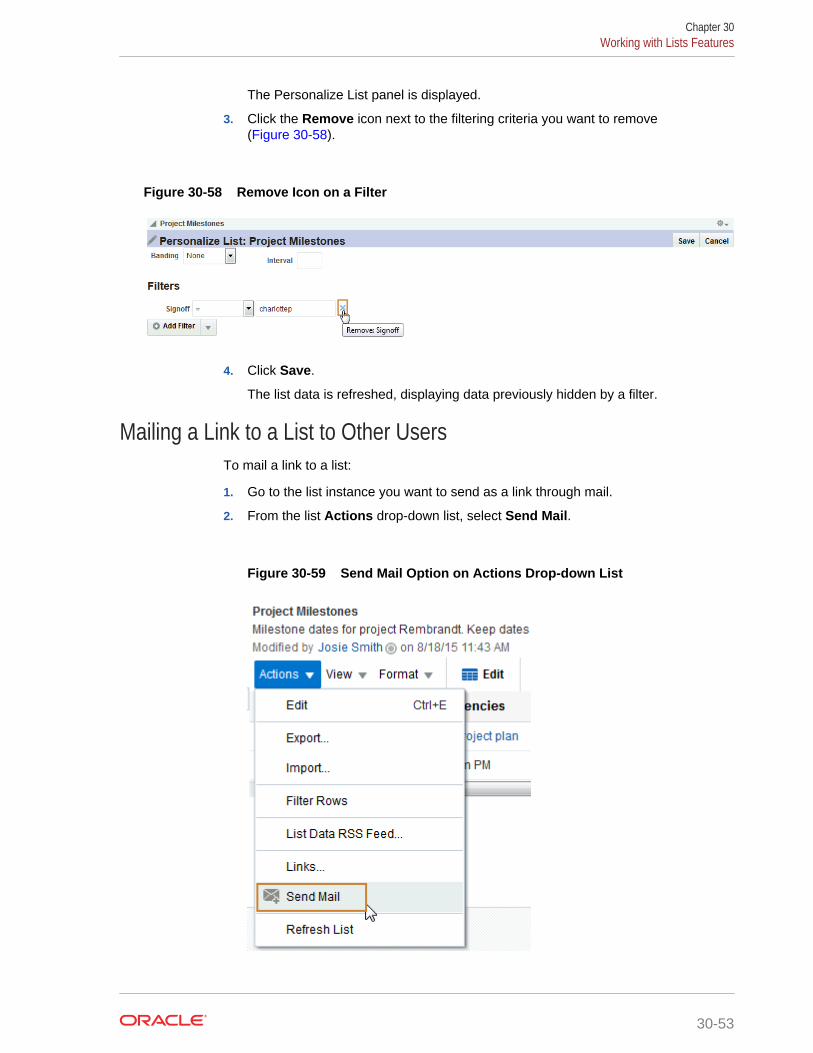
The Personalize List panel is displayed.
3. Click the Remove icon next to the filtering criteria you want to remove(Figure 30-58).
Figure 30-58 Remove Icon on a Filter
4. Click Save.
The list data is refreshed, displaying data previously hidden by a filter.
Mailing a Link to a List to Other UsersTo mail a link to a list:
1. Go to the list instance you want to send as a link through mail.
2. From the list Actions drop-down list, select Send Mail.
Figure 30-59 Send Mail Option on Actions Drop-down List
Chapter 30Working with Lists Features
30-53
A compose message window opens, addressed to portal members, with thefollowing information:
• The name of the portal from which the list instance originates
• The list title and description
• A link to the portal
• A link to the list instance
Note:
To view the list, users must have access to the portal that contains thelist instance.
3. Compose the message and send the mail message.
See Working with Mail for more information.
Exporting a List and Importing a List from an Excel SpreadsheetYou can export and import lists. If you can view the list, you can export it to MicrosoftExcel 1997 - 2003 and 2007 formats and revise list data in Excel. If you have sufficientprivileges to edit the list, you can import the revised list back into WebCenter Portal.
Tip:
You can also create a list by importing an Excel spreadsheet. See CreatingLists for more information.
The following sections in Building Portals with Oracle WebCenter Portal describe howto export and import lists and provides information about additional software that maybe of use in this process:
• About Exporting and Importing Lists
• Exporting a List to a Spreadsheet
• Importing an Exported List
Chapter 30Working with Lists Features
30-54
31Linking Information
This chapter describes how to use the features provided through links. Links provide away to view, access, create associations between different assets where links areavailable.This chapter includes the following topics:
• About Links
• Working with Links Features
Permissions:
This chapter is intended for WebCenter Portal users who want to view,create, and manage links.
Such users must be granted, minimally, the portal-level permission ViewPages and Content to view links. They can view shared links only for assetsfor which they have view permission.
Authenticated users who plan to create and manage links require the portal-level permission Customize Pages. They must have view permission on theresource. However, you might not be able to do some tasks if one or more ofthe following advanced permissions for links have been set:
• Create and Delete Links
• Create Links
• View Links
To associate links with other assets, such as announcements, discussions,documents, events, you must have the required permissions for thoseassets. See Managing Roles and Permissions for a Portal in Building Portalswith Oracle WebCenter Portal.
About LinksLinking gives users a means of explicitly associating two assets with each otherthrough easy-access reference points, called links. Links assist with setting up theseassociations from one WebCenter Portal asset to another. For example, using linksyou can associate a project plan document with a list of project issues. When usersaccess the list, they can also immediately access the project plan by clicking a link thatappears on the list. Links also provide a quick way to create new assets whileestablishing a link at the same time.
31-1
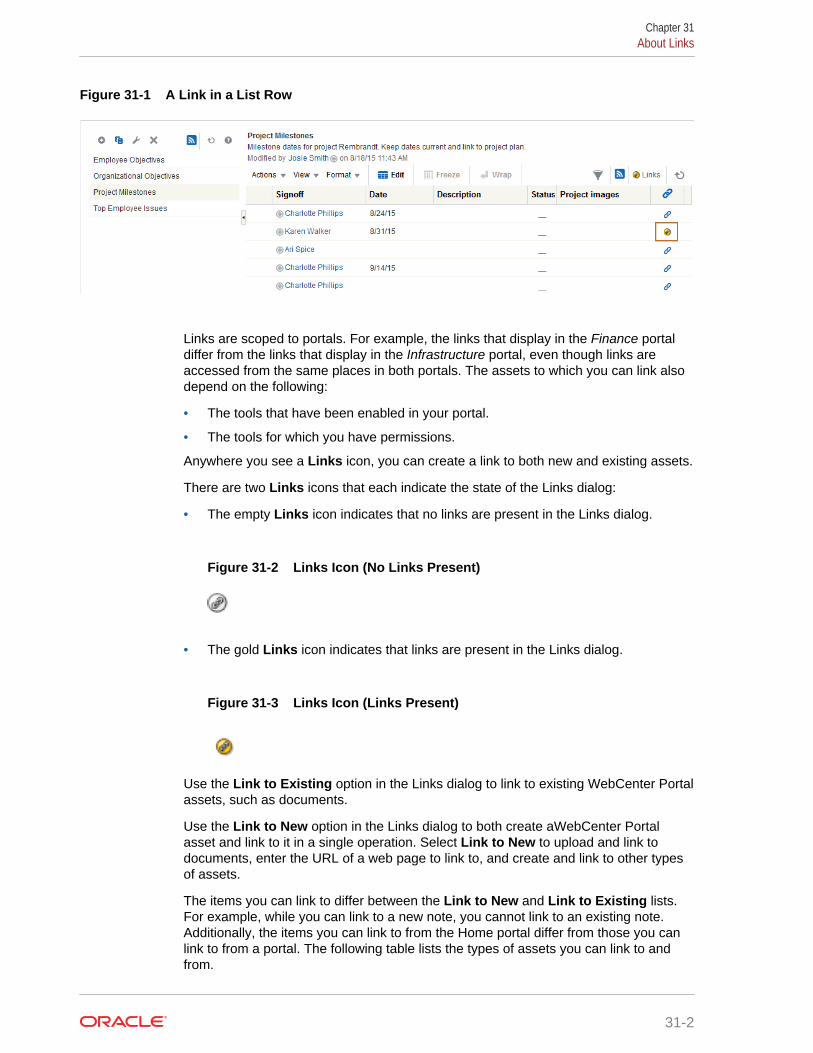
Figure 31-1 A Link in a List Row
Links are scoped to portals. For example, the links that display in the Finance portaldiffer from the links that display in the Infrastructure portal, even though links areaccessed from the same places in both portals. The assets to which you can link alsodepend on the following:
• The tools that have been enabled in your portal.
• The tools for which you have permissions.
Anywhere you see a Links icon, you can create a link to both new and existing assets.
There are two Links icons that each indicate the state of the Links dialog:
• The empty Links icon indicates that no links are present in the Links dialog.
Figure 31-2 Links Icon (No Links Present)
• The gold Links icon indicates that links are present in the Links dialog.
Figure 31-3 Links Icon (Links Present)
Use the Link to Existing option in the Links dialog to link to existing WebCenter Portalassets, such as documents.
Use the Link to New option in the Links dialog to both create aWebCenter Portalasset and link to it in a single operation. Select Link to New to upload and link todocuments, enter the URL of a web page to link to, and create and link to other typesof assets.
The items you can link to differ between the Link to New and Link to Existing lists.For example, while you can link to a new note, you cannot link to an existing note.Additionally, the items you can link to from the Home portal differ from those you canlink to from a portal. The following table lists the types of assets you can link to andfrom.
Chapter 31About Links
31-2
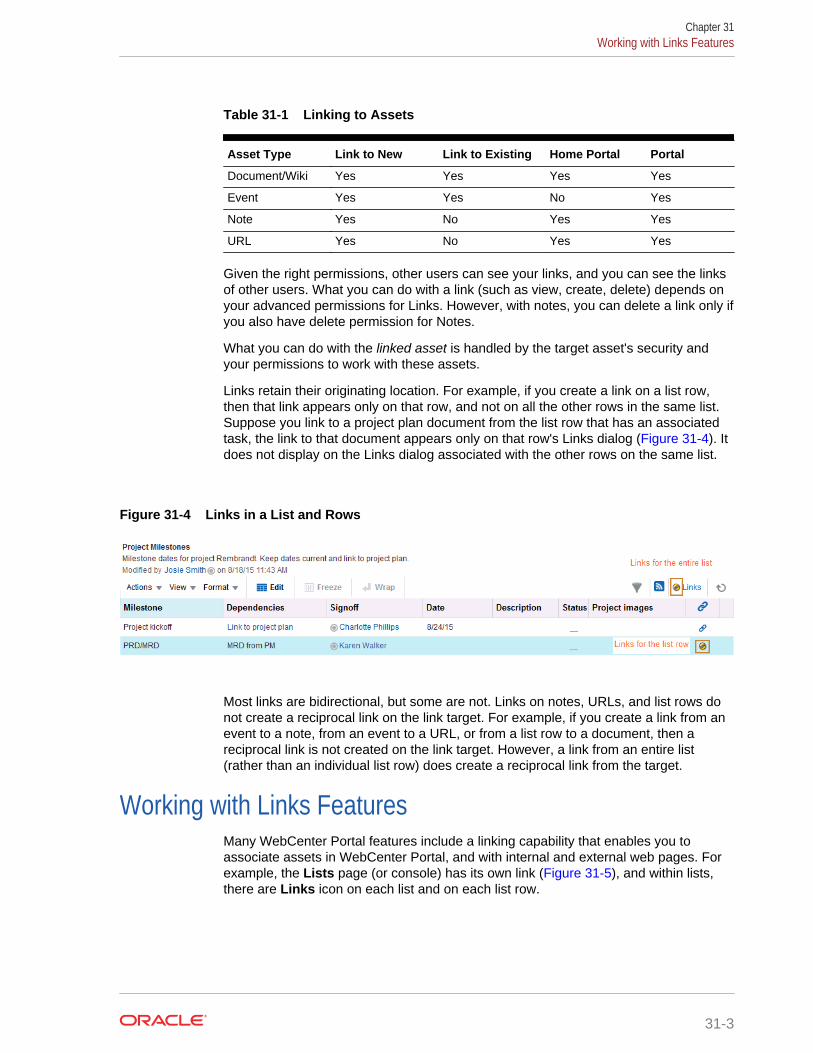
Table 31-1 Linking to Assets
Asset Type Link to New Link to Existing Home Portal Portal
Document/Wiki Yes Yes Yes Yes
Event Yes Yes No Yes
Note Yes No Yes Yes
URL Yes No Yes Yes
Given the right permissions, other users can see your links, and you can see the linksof other users. What you can do with a link (such as view, create, delete) depends onyour advanced permissions for Links. However, with notes, you can delete a link only ifyou also have delete permission for Notes.
What you can do with the linked asset is handled by the target asset's security andyour permissions to work with these assets.
Links retain their originating location. For example, if you create a link on a list row,then that link appears only on that row, and not on all the other rows in the same list.Suppose you link to a project plan document from the list row that has an associatedtask, the link to that document appears only on that row's Links dialog (Figure 31-4). Itdoes not display on the Links dialog associated with the other rows on the same list.
Figure 31-4 Links in a List and Rows
Most links are bidirectional, but some are not. Links on notes, URLs, and list rows donot create a reciprocal link on the link target. For example, if you create a link from anevent to a note, from an event to a URL, or from a list row to a document, then areciprocal link is not created on the link target. However, a link from an entire list(rather than an individual list row) does create a reciprocal link from the target.
Working with Links FeaturesMany WebCenter Portal features include a linking capability that enables you toassociate assets in WebCenter Portal, and with internal and external web pages. Forexample, the Lists page (or console) has its own link (Figure 31-5), and within lists,there are Links icon on each list and on each list row.
Chapter 31Working with Links Features
31-3
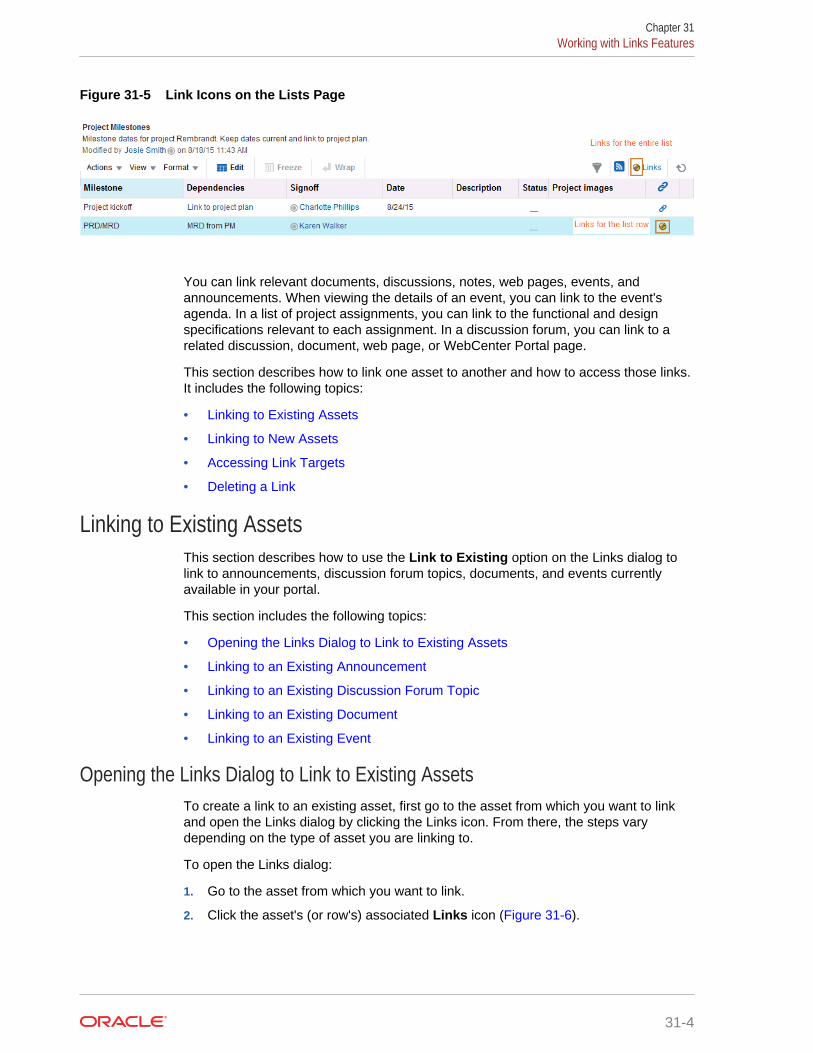
Figure 31-5 Link Icons on the Lists Page
You can link relevant documents, discussions, notes, web pages, events, andannouncements. When viewing the details of an event, you can link to the event'sagenda. In a list of project assignments, you can link to the functional and designspecifications relevant to each assignment. In a discussion forum, you can link to arelated discussion, document, web page, or WebCenter Portal page.
This section describes how to link one asset to another and how to access those links.It includes the following topics:
• Linking to Existing Assets
• Linking to New Assets
• Accessing Link Targets
• Deleting a Link
Linking to Existing AssetsThis section describes how to use the Link to Existing option on the Links dialog tolink to announcements, discussion forum topics, documents, and events currentlyavailable in your portal.
This section includes the following topics:
• Opening the Links Dialog to Link to Existing Assets
• Linking to an Existing Announcement
• Linking to an Existing Discussion Forum Topic
• Linking to an Existing Document
• Linking to an Existing Event
Opening the Links Dialog to Link to Existing AssetsTo create a link to an existing asset, first go to the asset from which you want to linkand open the Links dialog by clicking the Links icon. From there, the steps varydepending on the type of asset you are linking to.
To open the Links dialog:
1. Go to the asset from which you want to link.
2. Click the asset's (or row's) associated Links icon (Figure 31-6).
Chapter 31Working with Links Features
31-4
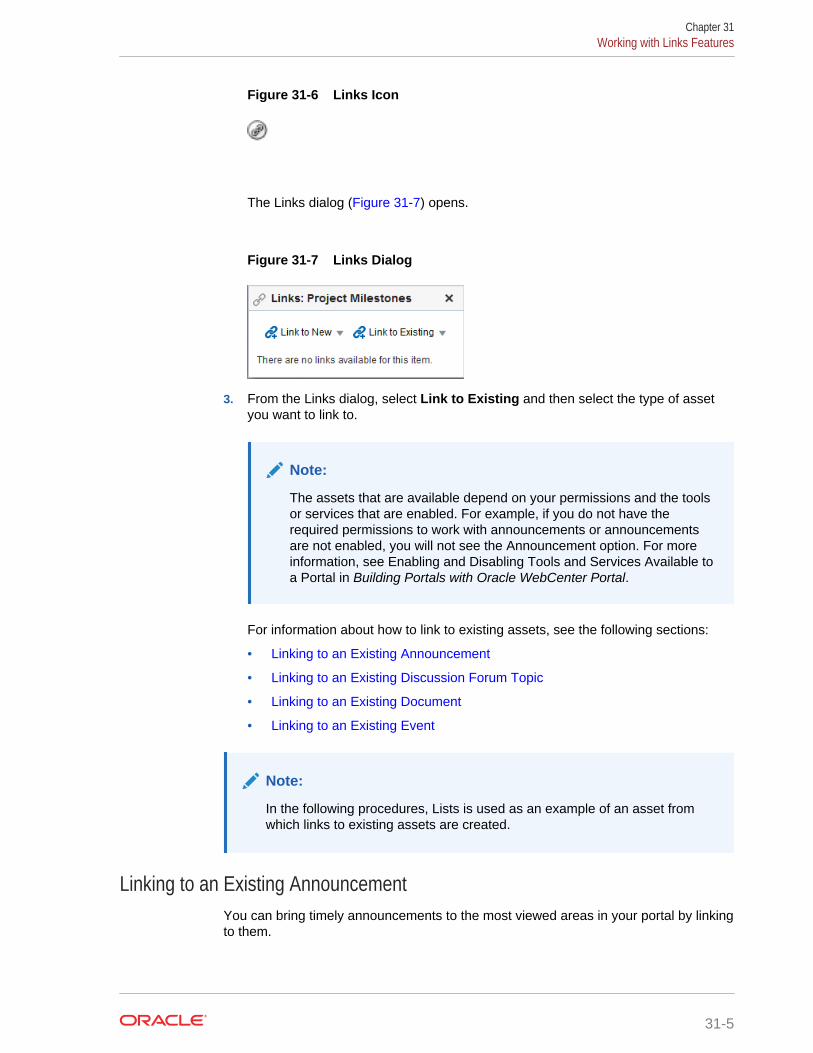
Figure 31-6 Links Icon
The Links dialog (Figure 31-7) opens.
Figure 31-7 Links Dialog
3. From the Links dialog, select Link to Existing and then select the type of assetyou want to link to.
Note:
The assets that are available depend on your permissions and the toolsor services that are enabled. For example, if you do not have therequired permissions to work with announcements or announcementsare not enabled, you will not see the Announcement option. For moreinformation, see Enabling and Disabling Tools and Services Available toa Portal in Building Portals with Oracle WebCenter Portal.
For information about how to link to existing assets, see the following sections:
• Linking to an Existing Announcement
• Linking to an Existing Discussion Forum Topic
• Linking to an Existing Document
• Linking to an Existing Event
Note:
In the following procedures, Lists is used as an example of an asset fromwhich links to existing assets are created.
Linking to an Existing AnnouncementYou can bring timely announcements to the most viewed areas in your portal by linkingto them.
Chapter 31Working with Links Features
31-5
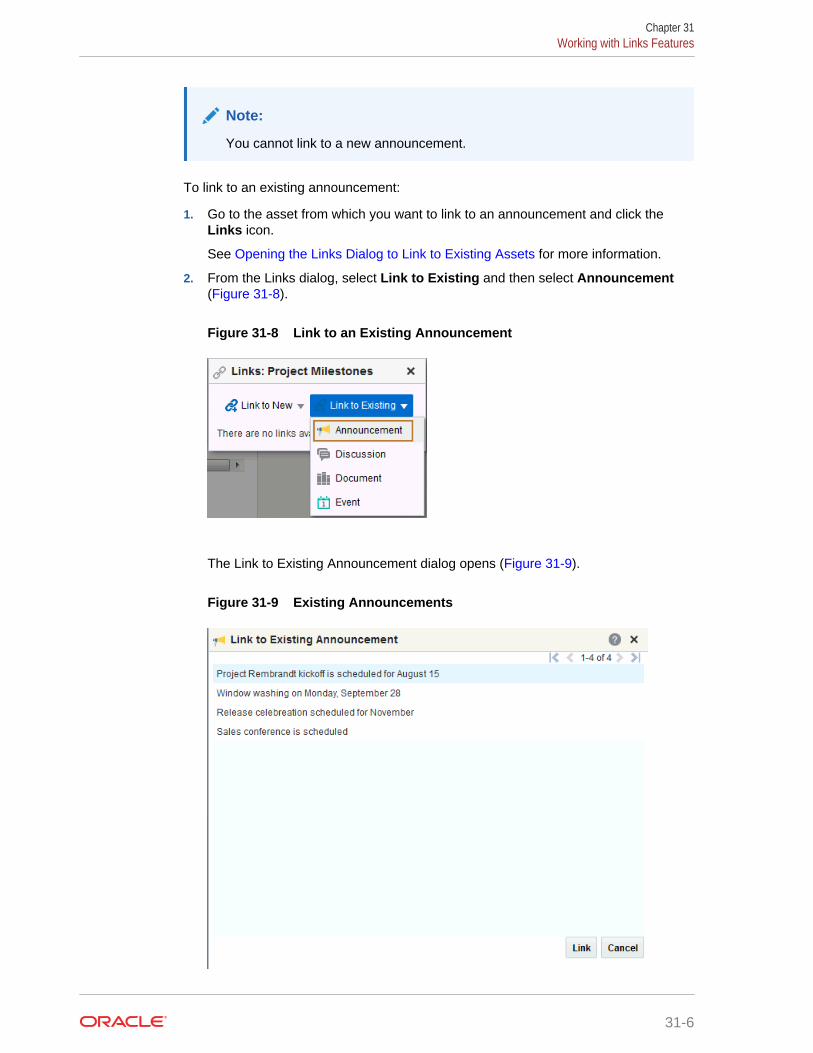
Note:
You cannot link to a new announcement.
To link to an existing announcement:
1. Go to the asset from which you want to link to an announcement and click theLinks icon.
See Opening the Links Dialog to Link to Existing Assets for more information.
2. From the Links dialog, select Link to Existing and then select Announcement(Figure 31-8).
Figure 31-8 Link to an Existing Announcement
The Link to Existing Announcement dialog opens (Figure 31-9).
Figure 31-9 Existing Announcements
Chapter 31Working with Links Features
31-6
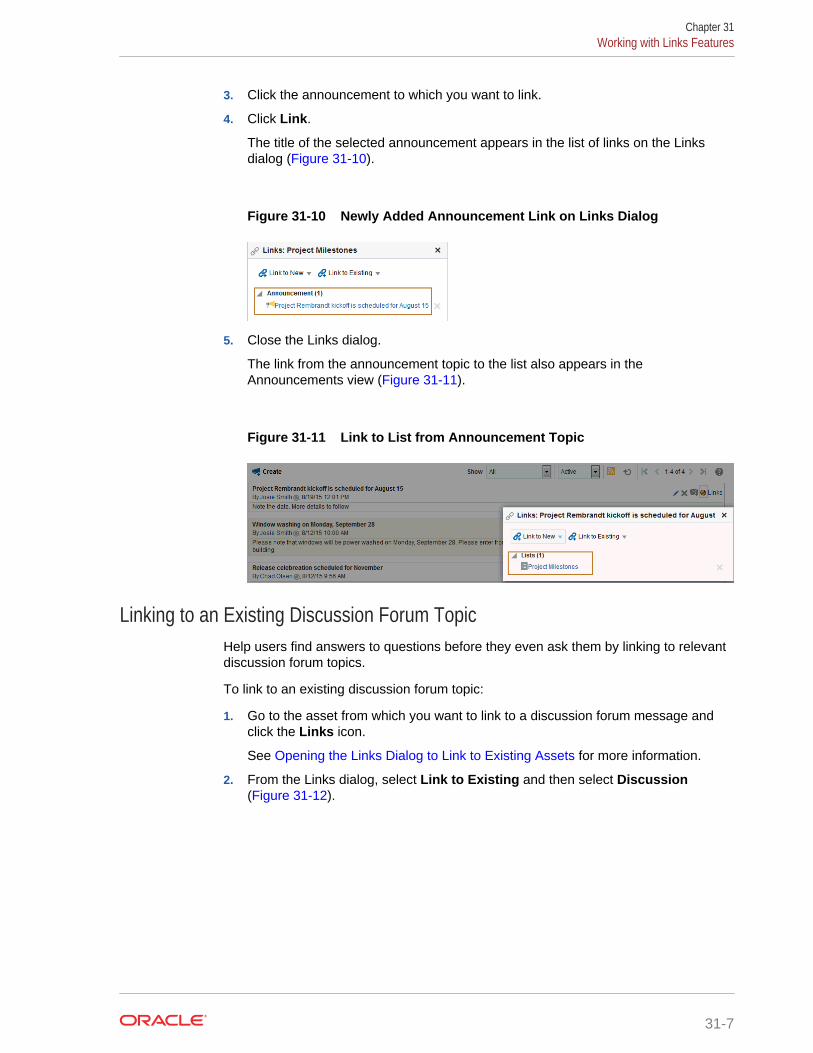
3. Click the announcement to which you want to link.
4. Click Link.
The title of the selected announcement appears in the list of links on the Linksdialog (Figure 31-10).
Figure 31-10 Newly Added Announcement Link on Links Dialog
5. Close the Links dialog.
The link from the announcement topic to the list also appears in theAnnouncements view (Figure 31-11).
Figure 31-11 Link to List from Announcement Topic
Linking to an Existing Discussion Forum TopicHelp users find answers to questions before they even ask them by linking to relevantdiscussion forum topics.
To link to an existing discussion forum topic:
1. Go to the asset from which you want to link to a discussion forum message andclick the Links icon.
See Opening the Links Dialog to Link to Existing Assets for more information.
2. From the Links dialog, select Link to Existing and then select Discussion(Figure 31-12).
Chapter 31Working with Links Features
31-7
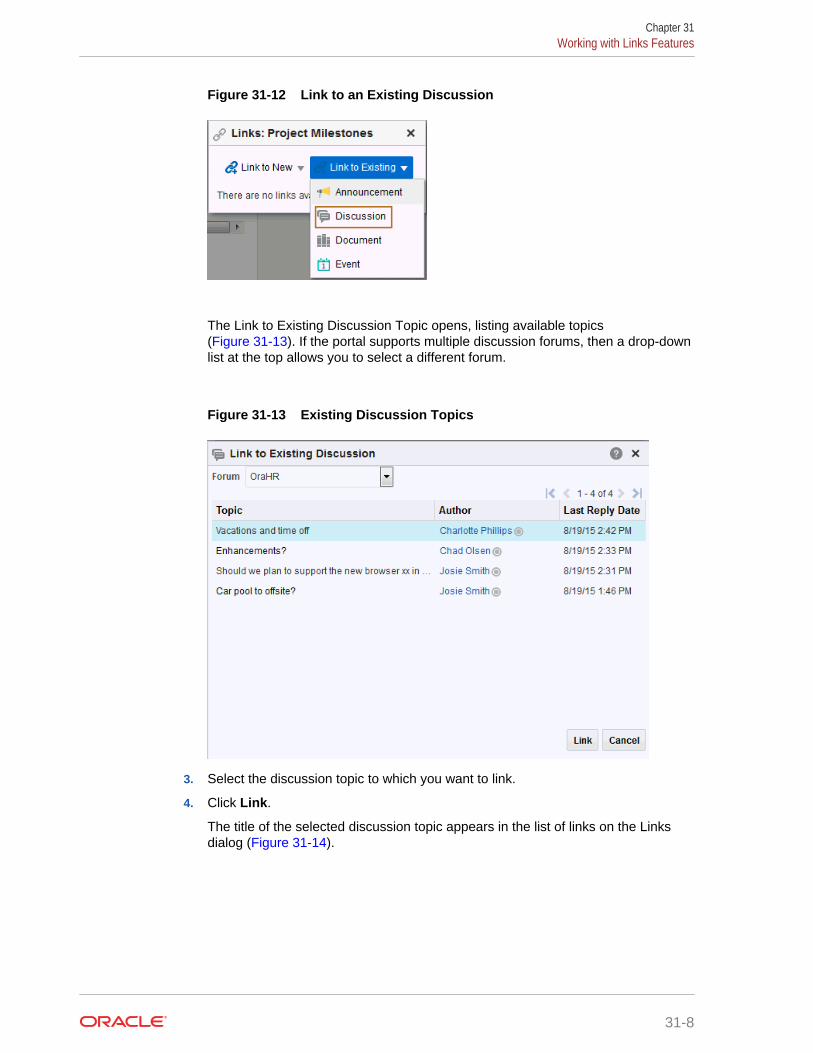
Figure 31-12 Link to an Existing Discussion
The Link to Existing Discussion Topic opens, listing available topics(Figure 31-13). If the portal supports multiple discussion forums, then a drop-downlist at the top allows you to select a different forum.
Figure 31-13 Existing Discussion Topics
3. Select the discussion topic to which you want to link.
4. Click Link.
The title of the selected discussion topic appears in the list of links on the Linksdialog (Figure 31-14).
Chapter 31Working with Links Features
31-8
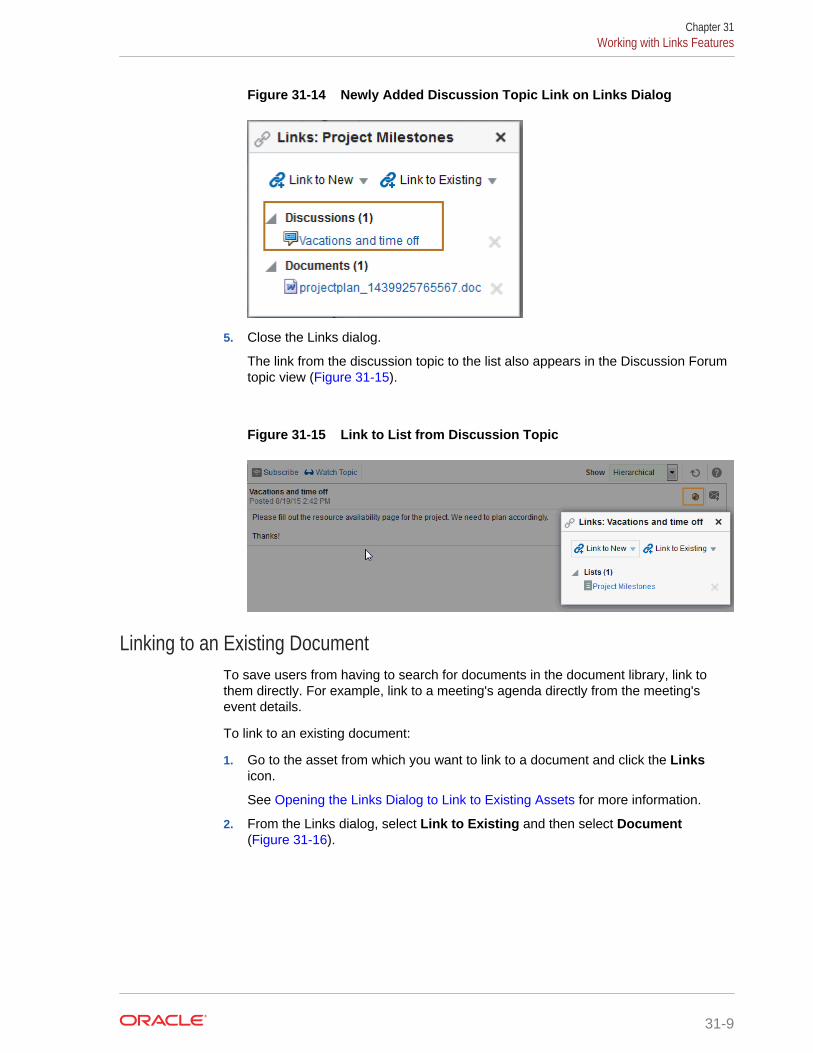
Figure 31-14 Newly Added Discussion Topic Link on Links Dialog
5. Close the Links dialog.
The link from the discussion topic to the list also appears in the Discussion Forumtopic view (Figure 31-15).
Figure 31-15 Link to List from Discussion Topic
Linking to an Existing DocumentTo save users from having to search for documents in the document library, link tothem directly. For example, link to a meeting's agenda directly from the meeting'sevent details.
To link to an existing document:
1. Go to the asset from which you want to link to a document and click the Linksicon.
See Opening the Links Dialog to Link to Existing Assets for more information.
2. From the Links dialog, select Link to Existing and then select Document(Figure 31-16).
Chapter 31Working with Links Features
31-9
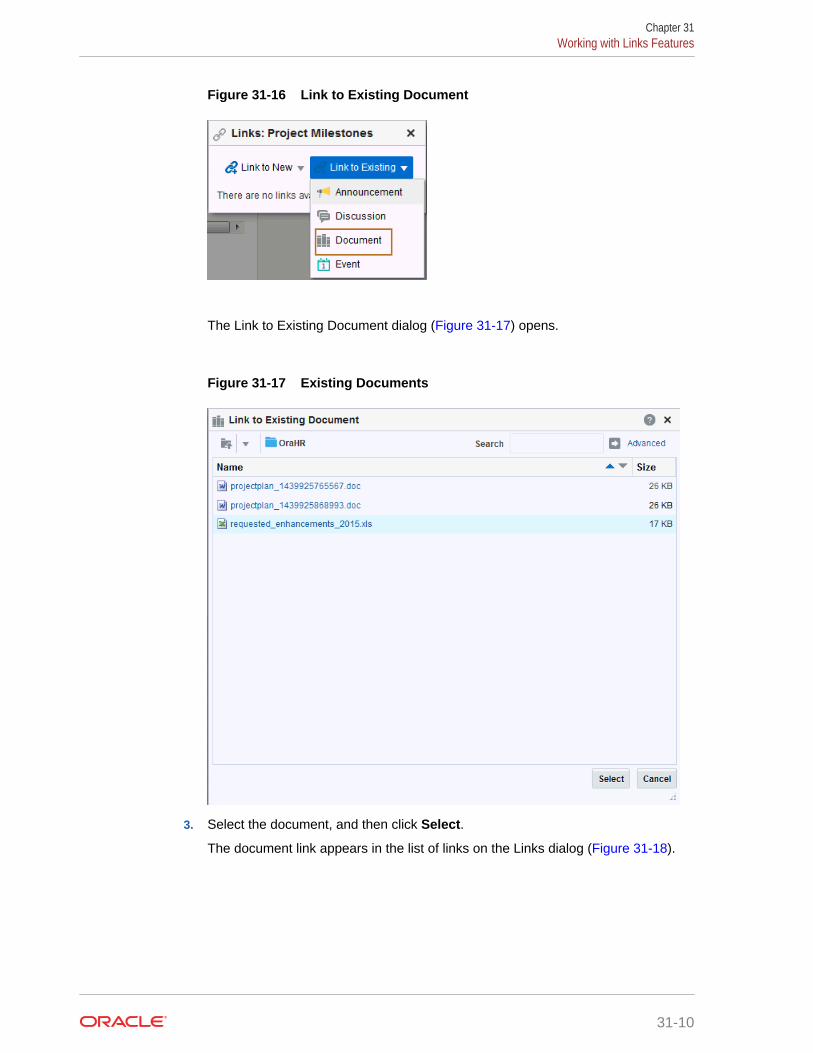
Figure 31-16 Link to Existing Document
The Link to Existing Document dialog (Figure 31-17) opens.
Figure 31-17 Existing Documents
3. Select the document, and then click Select.
The document link appears in the list of links on the Links dialog (Figure 31-18).
Chapter 31Working with Links Features
31-10
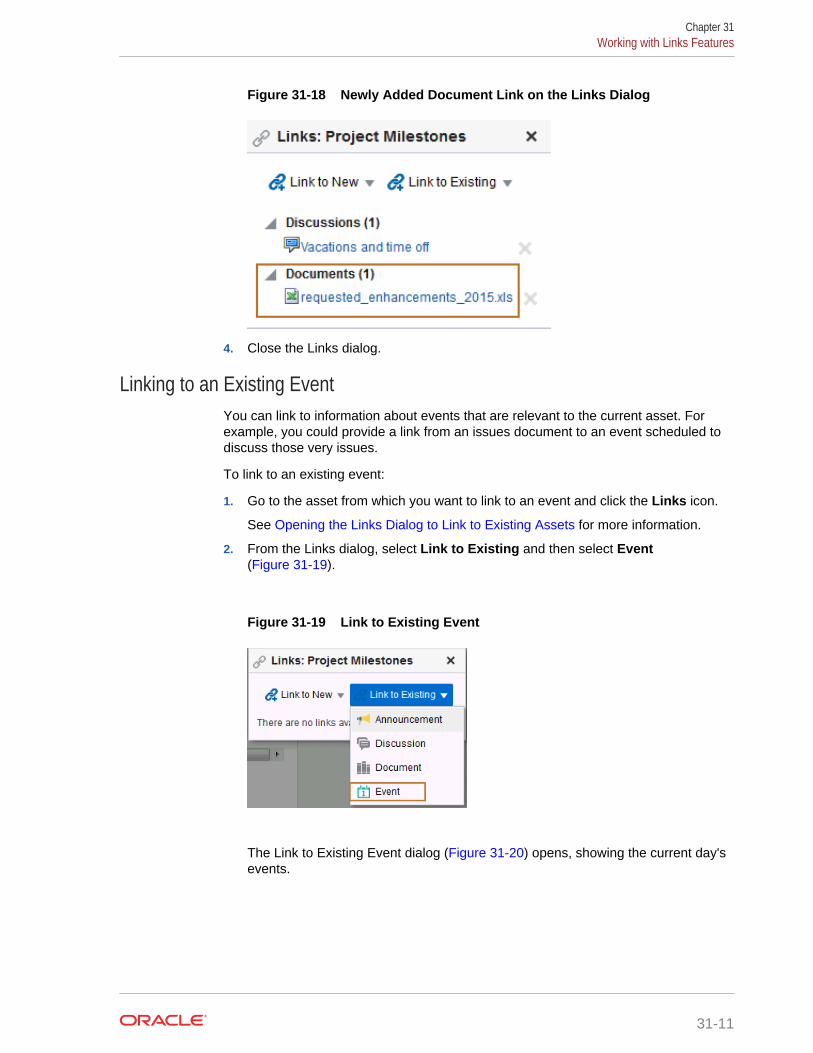
Figure 31-18 Newly Added Document Link on the Links Dialog
4. Close the Links dialog.
Linking to an Existing EventYou can link to information about events that are relevant to the current asset. Forexample, you could provide a link from an issues document to an event scheduled todiscuss those very issues.
To link to an existing event:
1. Go to the asset from which you want to link to an event and click the Links icon.
See Opening the Links Dialog to Link to Existing Assets for more information.
2. From the Links dialog, select Link to Existing and then select Event(Figure 31-19).
Figure 31-19 Link to Existing Event
The Link to Existing Event dialog (Figure 31-20) opens, showing the current day'sevents.
Chapter 31Working with Links Features
31-11
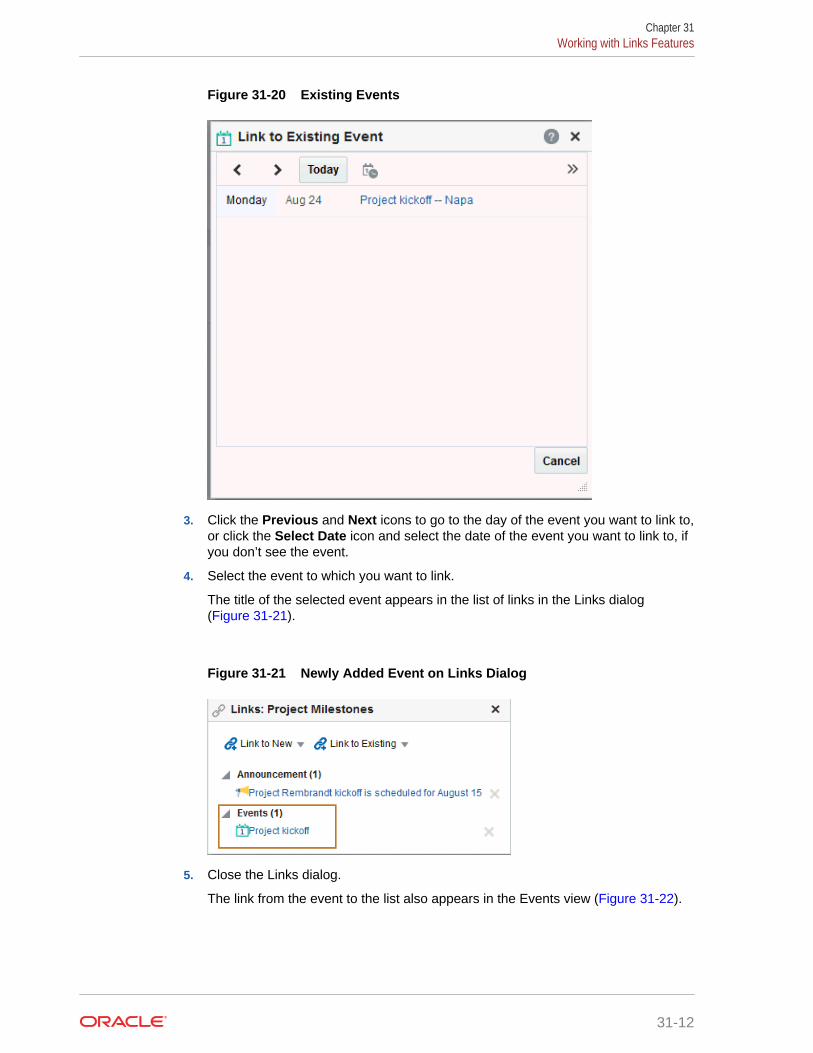
Figure 31-20 Existing Events
3. Click the Previous and Next icons to go to the day of the event you want to link to,or click the Select Date icon and select the date of the event you want to link to, ifyou don’t see the event.
4. Select the event to which you want to link.
The title of the selected event appears in the list of links in the Links dialog(Figure 31-21).
Figure 31-21 Newly Added Event on Links Dialog
5. Close the Links dialog.
The link from the event to the list also appears in the Events view (Figure 31-22).
Chapter 31Working with Links Features
31-12
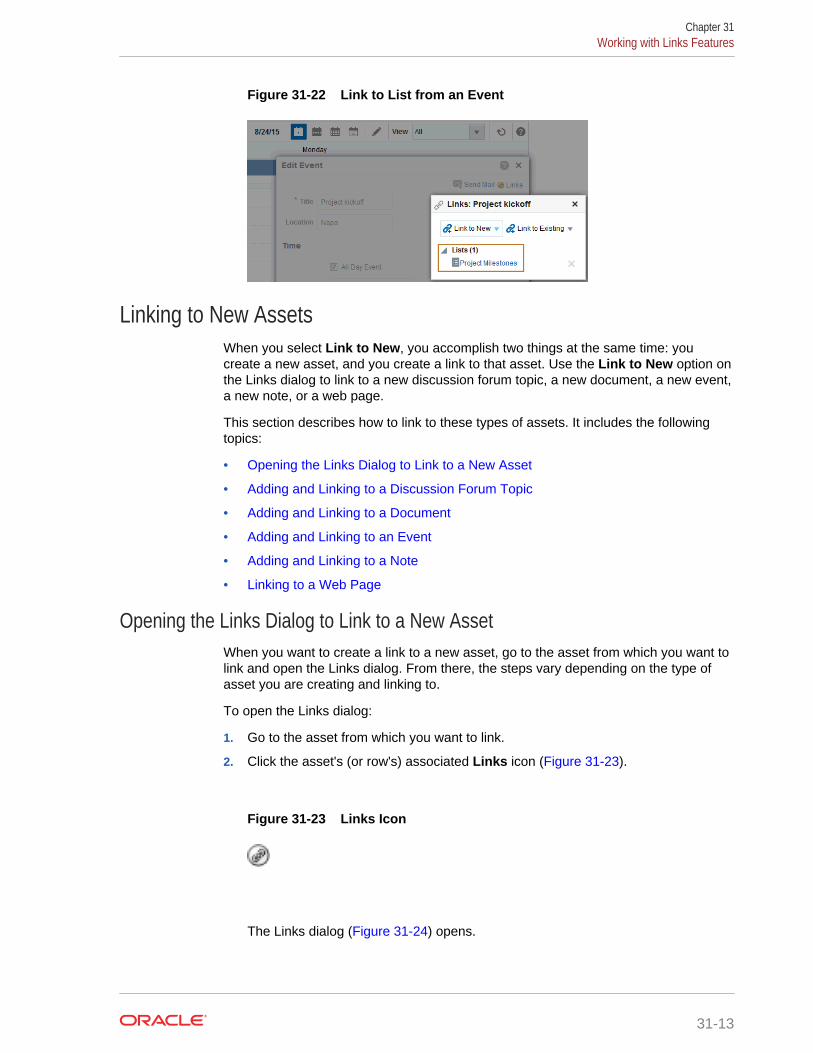
Figure 31-22 Link to List from an Event
Linking to New AssetsWhen you select Link to New, you accomplish two things at the same time: youcreate a new asset, and you create a link to that asset. Use the Link to New option onthe Links dialog to link to a new discussion forum topic, a new document, a new event,a new note, or a web page.
This section describes how to link to these types of assets. It includes the followingtopics:
• Opening the Links Dialog to Link to a New Asset
• Adding and Linking to a Discussion Forum Topic
• Adding and Linking to a Document
• Adding and Linking to an Event
• Adding and Linking to a Note
• Linking to a Web Page
Opening the Links Dialog to Link to a New AssetWhen you want to create a link to a new asset, go to the asset from which you want tolink and open the Links dialog. From there, the steps vary depending on the type ofasset you are creating and linking to.
To open the Links dialog:
1. Go to the asset from which you want to link.
2. Click the asset's (or row's) associated Links icon (Figure 31-23).
Figure 31-23 Links Icon
The Links dialog (Figure 31-24) opens.
Chapter 31Working with Links Features
31-13
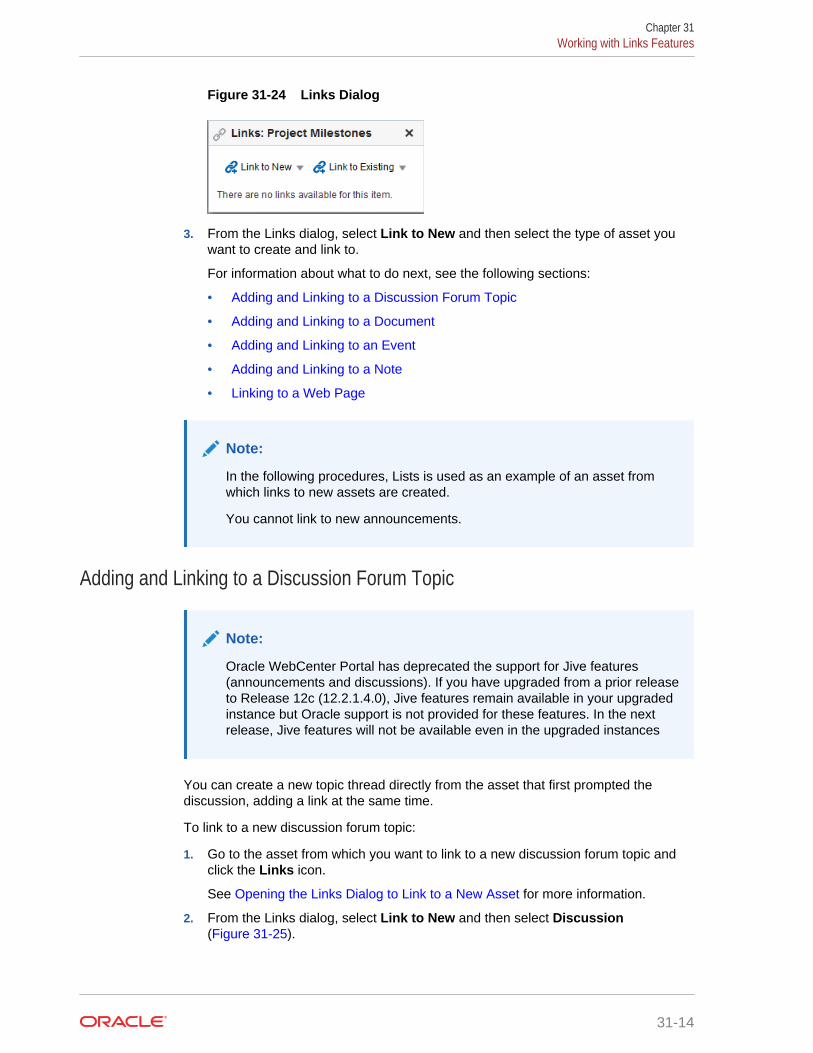
Figure 31-24 Links Dialog
3. From the Links dialog, select Link to New and then select the type of asset youwant to create and link to.
For information about what to do next, see the following sections:
• Adding and Linking to a Discussion Forum Topic
• Adding and Linking to a Document
• Adding and Linking to an Event
• Adding and Linking to a Note
• Linking to a Web Page
Note:
In the following procedures, Lists is used as an example of an asset fromwhich links to new assets are created.
You cannot link to new announcements.
Adding and Linking to a Discussion Forum Topic
Note:
Oracle WebCenter Portal has deprecated the support for Jive features(announcements and discussions). If you have upgraded from a prior releaseto Release 12c (12.2.1.4.0), Jive features remain available in your upgradedinstance but Oracle support is not provided for these features. In the nextrelease, Jive features will not be available even in the upgraded instances
You can create a new topic thread directly from the asset that first prompted thediscussion, adding a link at the same time.
To link to a new discussion forum topic:
1. Go to the asset from which you want to link to a new discussion forum topic andclick the Links icon.
See Opening the Links Dialog to Link to a New Asset for more information.
2. From the Links dialog, select Link to New and then select Discussion(Figure 31-25).
Chapter 31Working with Links Features
31-14
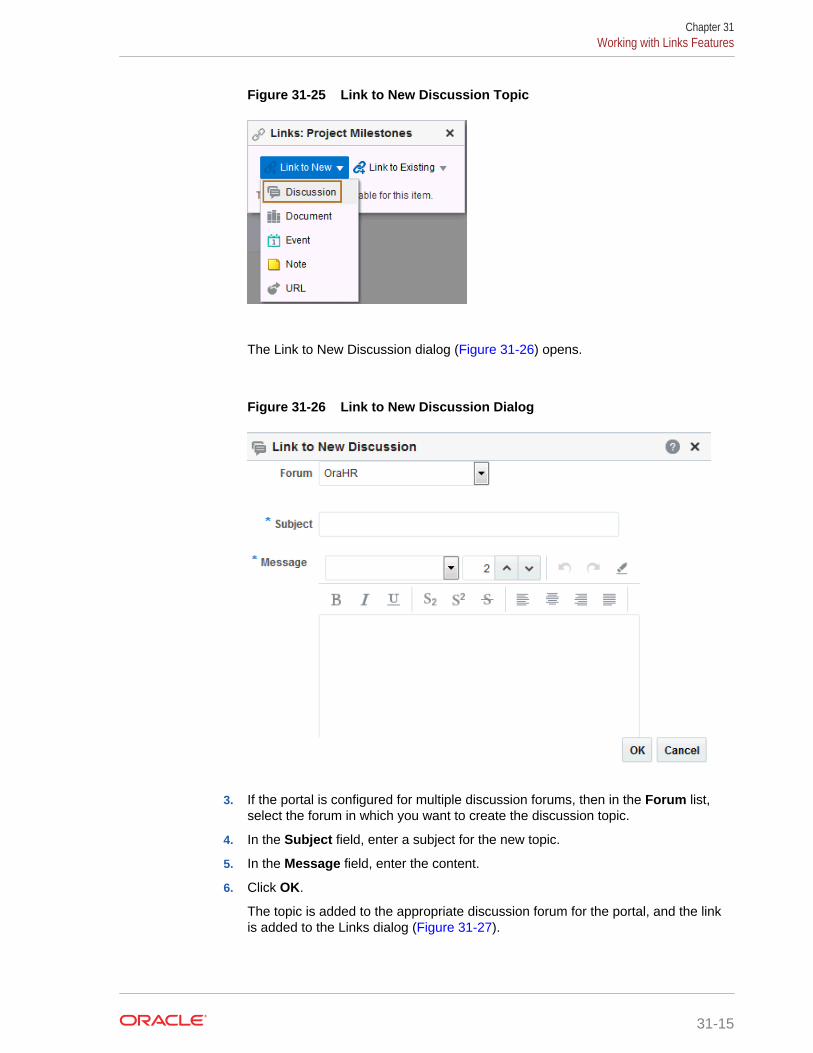
Figure 31-25 Link to New Discussion Topic
The Link to New Discussion dialog (Figure 31-26) opens.
Figure 31-26 Link to New Discussion Dialog
3. If the portal is configured for multiple discussion forums, then in the Forum list,select the forum in which you want to create the discussion topic.
4. In the Subject field, enter a subject for the new topic.
5. In the Message field, enter the content.
6. Click OK.
The topic is added to the appropriate discussion forum for the portal, and the linkis added to the Links dialog (Figure 31-27).
Chapter 31Working with Links Features
31-15
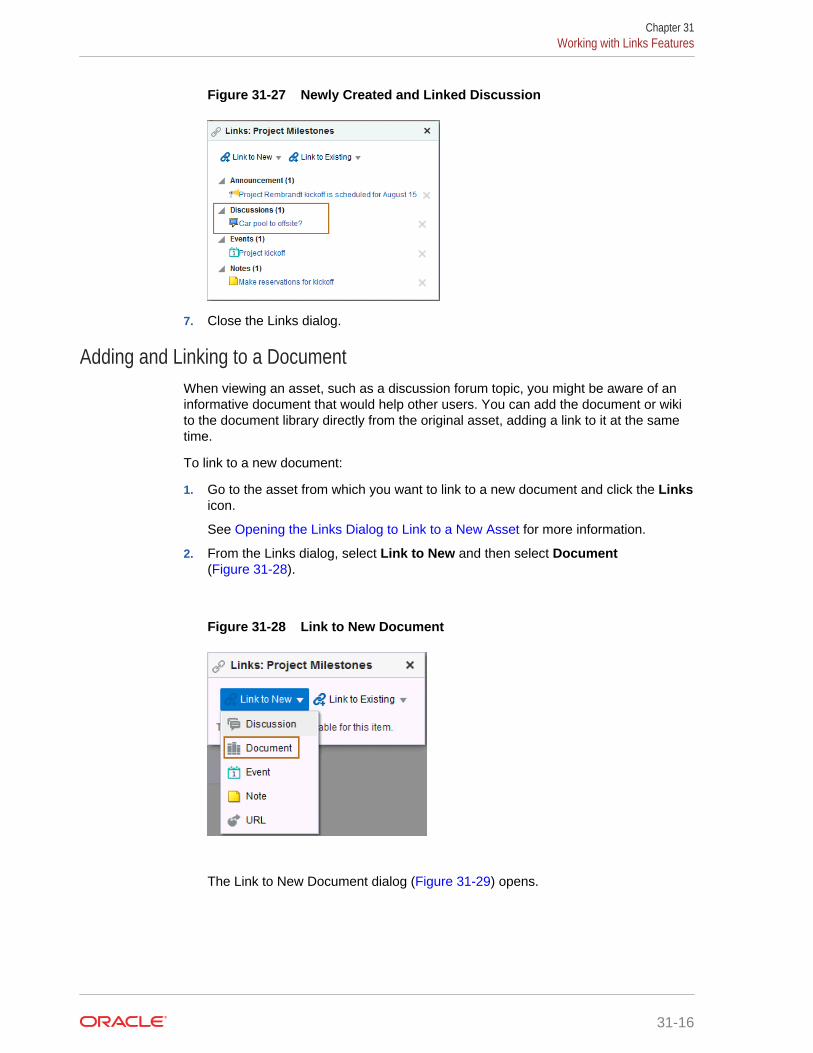
Figure 31-27 Newly Created and Linked Discussion
7. Close the Links dialog.
Adding and Linking to a DocumentWhen viewing an asset, such as a discussion forum topic, you might be aware of aninformative document that would help other users. You can add the document or wikito the document library directly from the original asset, adding a link to it at the sametime.
To link to a new document:
1. Go to the asset from which you want to link to a new document and click the Linksicon.
See Opening the Links Dialog to Link to a New Asset for more information.
2. From the Links dialog, select Link to New and then select Document(Figure 31-28).
Figure 31-28 Link to New Document
The Link to New Document dialog (Figure 31-29) opens.
Chapter 31Working with Links Features
31-16
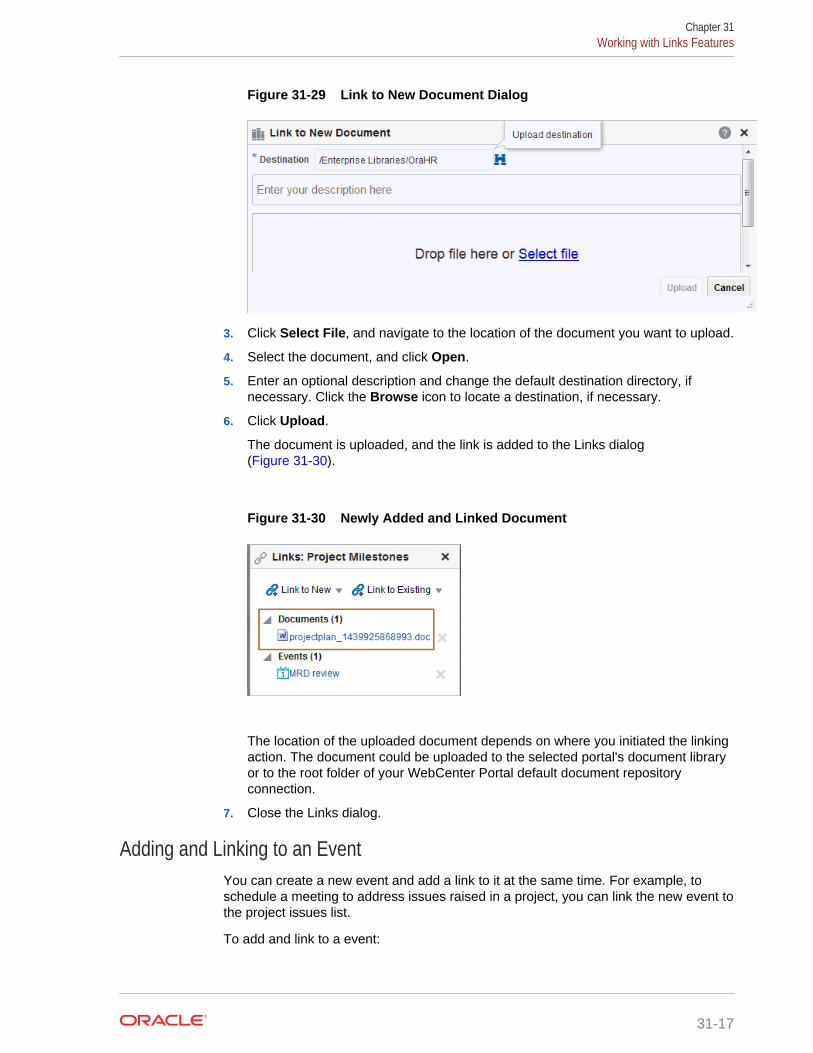
Figure 31-29 Link to New Document Dialog
3. Click Select File, and navigate to the location of the document you want to upload.
4. Select the document, and click Open.
5. Enter an optional description and change the default destination directory, ifnecessary. Click the Browse icon to locate a destination, if necessary.
6. Click Upload.
The document is uploaded, and the link is added to the Links dialog(Figure 31-30).
Figure 31-30 Newly Added and Linked Document
The location of the uploaded document depends on where you initiated the linkingaction. The document could be uploaded to the selected portal's document libraryor to the root folder of your WebCenter Portal default document repositoryconnection.
7. Close the Links dialog.
Adding and Linking to an EventYou can create a new event and add a link to it at the same time. For example, toschedule a meeting to address issues raised in a project, you can link the new event tothe project issues list.
To add and link to a event:
Chapter 31Working with Links Features
31-17
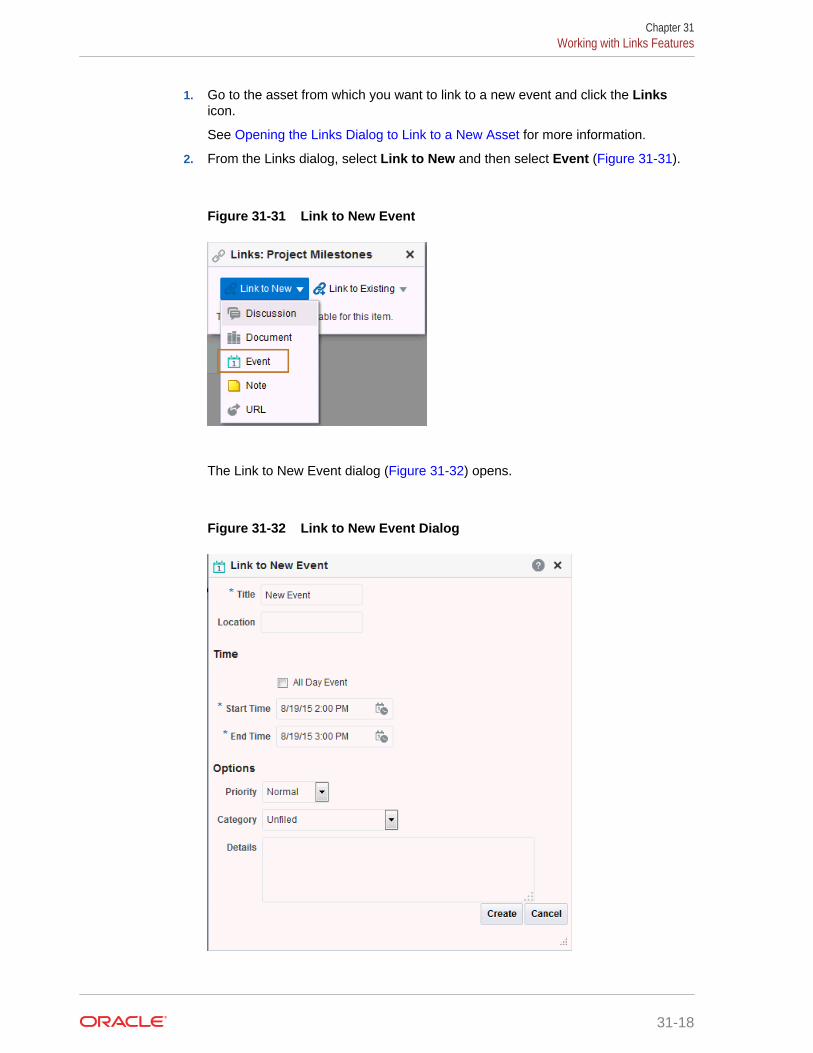
1. Go to the asset from which you want to link to a new event and click the Linksicon.
See Opening the Links Dialog to Link to a New Asset for more information.
2. From the Links dialog, select Link to New and then select Event (Figure 31-31).
Figure 31-31 Link to New Event
The Link to New Event dialog (Figure 31-32) opens.
Figure 31-32 Link to New Event Dialog
Chapter 31Working with Links Features
31-18
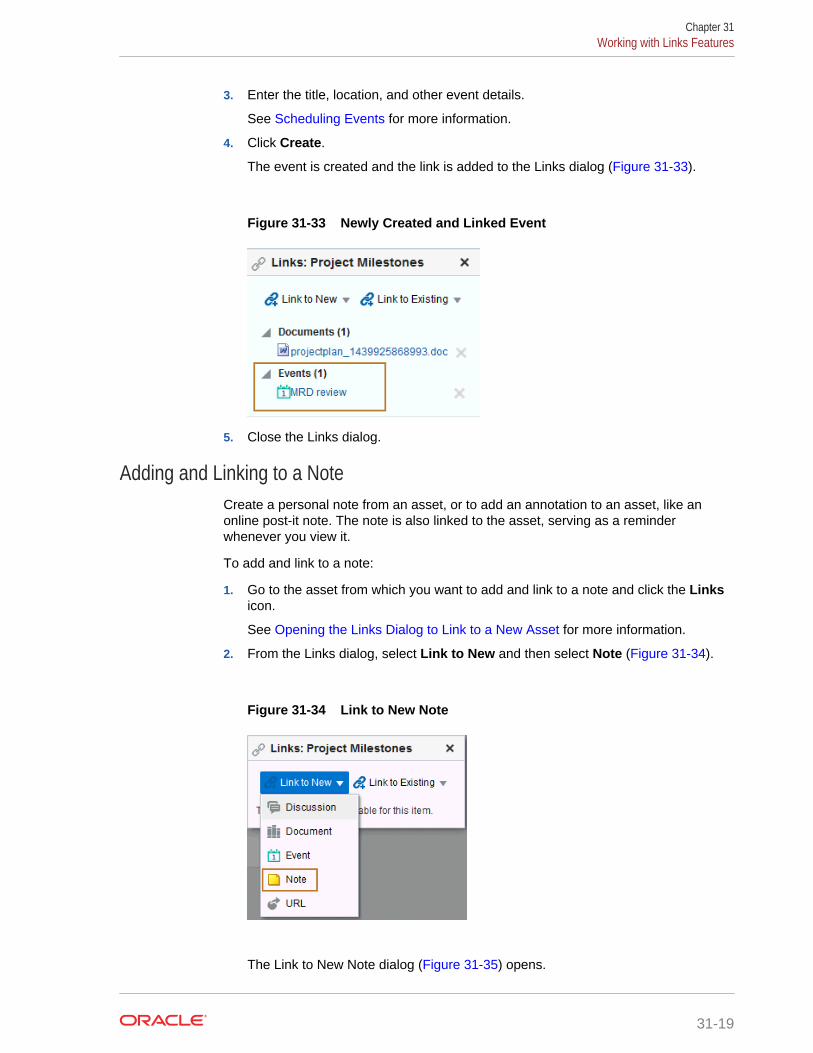
3. Enter the title, location, and other event details.
See Scheduling Events for more information.
4. Click Create.
The event is created and the link is added to the Links dialog (Figure 31-33).
Figure 31-33 Newly Created and Linked Event
5. Close the Links dialog.
Adding and Linking to a NoteCreate a personal note from an asset, or to add an annotation to an asset, like anonline post-it note. The note is also linked to the asset, serving as a reminderwhenever you view it.
To add and link to a note:
1. Go to the asset from which you want to add and link to a note and click the Linksicon.
See Opening the Links Dialog to Link to a New Asset for more information.
2. From the Links dialog, select Link to New and then select Note (Figure 31-34).
Figure 31-34 Link to New Note
The Link to New Note dialog (Figure 31-35) opens.
Chapter 31Working with Links Features
31-19
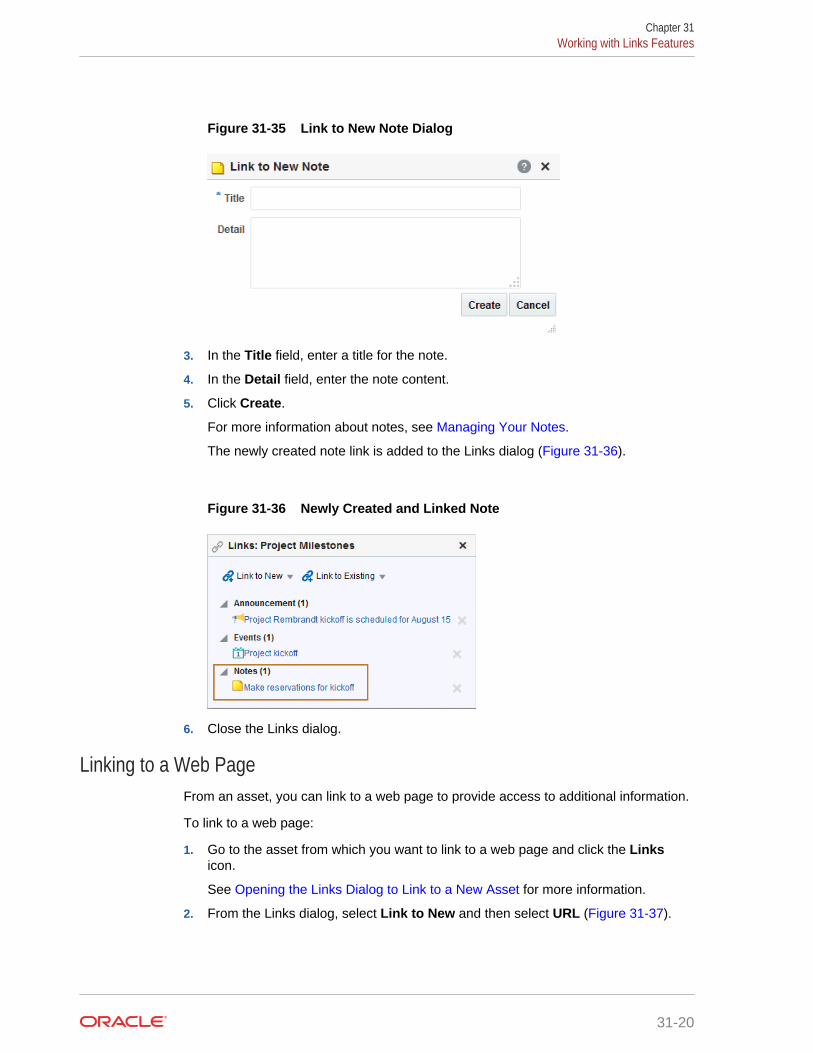
Figure 31-35 Link to New Note Dialog
3. In the Title field, enter a title for the note.
4. In the Detail field, enter the note content.
5. Click Create.
For more information about notes, see Managing Your Notes.
The newly created note link is added to the Links dialog (Figure 31-36).
Figure 31-36 Newly Created and Linked Note
6. Close the Links dialog.
Linking to a Web PageFrom an asset, you can link to a web page to provide access to additional information.
To link to a web page:
1. Go to the asset from which you want to link to a web page and click the Linksicon.
See Opening the Links Dialog to Link to a New Asset for more information.
2. From the Links dialog, select Link to New and then select URL (Figure 31-37).
Chapter 31Working with Links Features
31-20
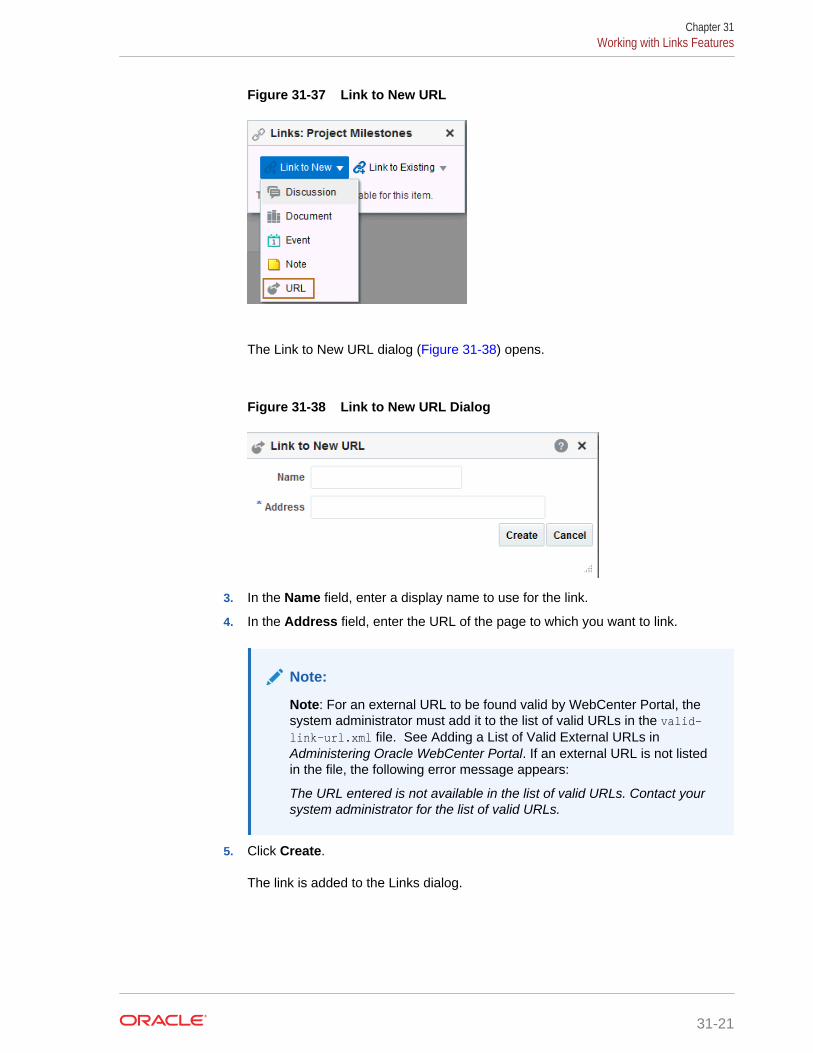
Figure 31-37 Link to New URL
The Link to New URL dialog (Figure 31-38) opens.
Figure 31-38 Link to New URL Dialog
3. In the Name field, enter a display name to use for the link.
4. In the Address field, enter the URL of the page to which you want to link.
Note:
Note: For an external URL to be found valid by WebCenter Portal, thesystem administrator must add it to the list of valid URLs in the valid-link-url.xml file. See Adding a List of Valid External URLs inAdministering Oracle WebCenter Portal. If an external URL is not listedin the file, the following error message appears:
The URL entered is not available in the list of valid URLs. Contact yoursystem administrator for the list of valid URLs.
5. Click Create.
The link is added to the Links dialog.
Chapter 31Working with Links Features
31-21
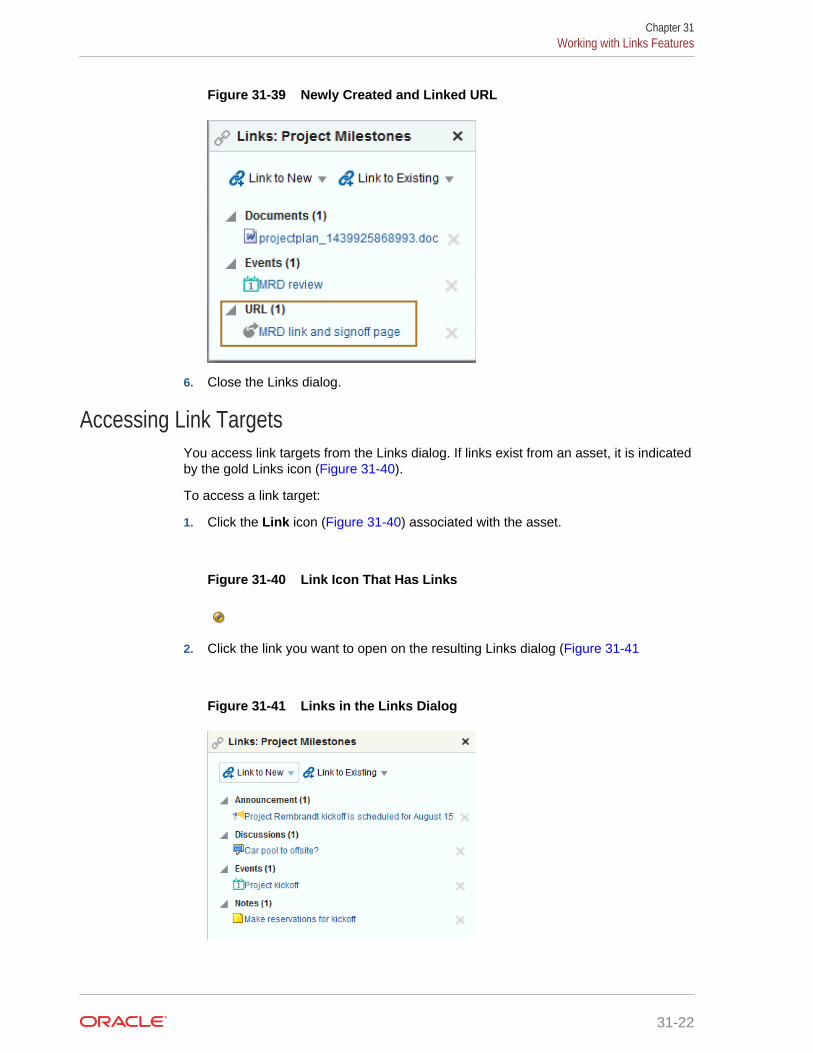
Figure 31-39 Newly Created and Linked URL
6. Close the Links dialog.
Accessing Link TargetsYou access link targets from the Links dialog. If links exist from an asset, it is indicatedby the gold Links icon (Figure 31-40).
To access a link target:
1. Click the Link icon (Figure 31-40) associated with the asset.
Figure 31-40 Link Icon That Has Links
2. Click the link you want to open on the resulting Links dialog (Figure 31-41
Figure 31-41 Links in the Links Dialog
Chapter 31Working with Links Features
31-22

Deleting a LinkDelete a link when it is no longer useful or when it is obsolete. For example, you candelete a link to an event after the event date has passed.
To delete a link:
1. Go to the asset associated with the link you want to delete, such as the document,list, list row, or other item for which the link was created.
2. Click the Links icon (Figure 31-42).
Figure 31-42 Links Icon
The Links dialog opens, showing a list of current links to the asset.
3. Click the Delete icon next to the link you want to delete (Figure 31-43).
Figure 31-43 Delete Icons Next to Links
The two assets are no longer linked. You can link the two assets again, if you wishto do so. See Linking to Existing Assets and Linking to New Assets.
Chapter 31Working with Links Features
31-23

32Working with Tags
Use tags to bookmark portal pages using your own meaningful terms.
Note:
To use tags, the Tags icon must be available on a page. This is typicallyaccomplished when a Tags component is included in the page template thatis used to create pages in the portal, but a page creator can also add a Tagscomponent to an individual page. This is an advanced task, described in Adding a Tags Icon to a Portal Page in Building Portals with OracleWebCenter Portal.
Permissions:
The tasks described in this chapter are available to any WebCenter Portaluser with access to portal pages that contain tags.
Topics:
• About Tags
• About the Tag Center
• Tagging Portal Pages
• Working with Tags in the Tag Center
• Working with Tags in the Tags View
• Working with the Tag Cloud and Tag Cloud Related Resources Views
• Working with the Similarly Tagged Items View
About TagsA tag is a word you associate with a portal page, applying your own classification toimprove search results, and to gather disparate items into a cohesive body ofknowledge and share it with others. For example, you could apply the tag staff to apage that provides useful information about the organizational structure of yourcompany. When you or others search for staff, the tagged page appears in theresults.
You can provide one or multiple tags to a given page. And multiple users can use thesame tag term that you used and apply it to the same item. Duplicates of tags acrossusers are tabulated and provide extra weight to the relevance of the tag term.
32-1
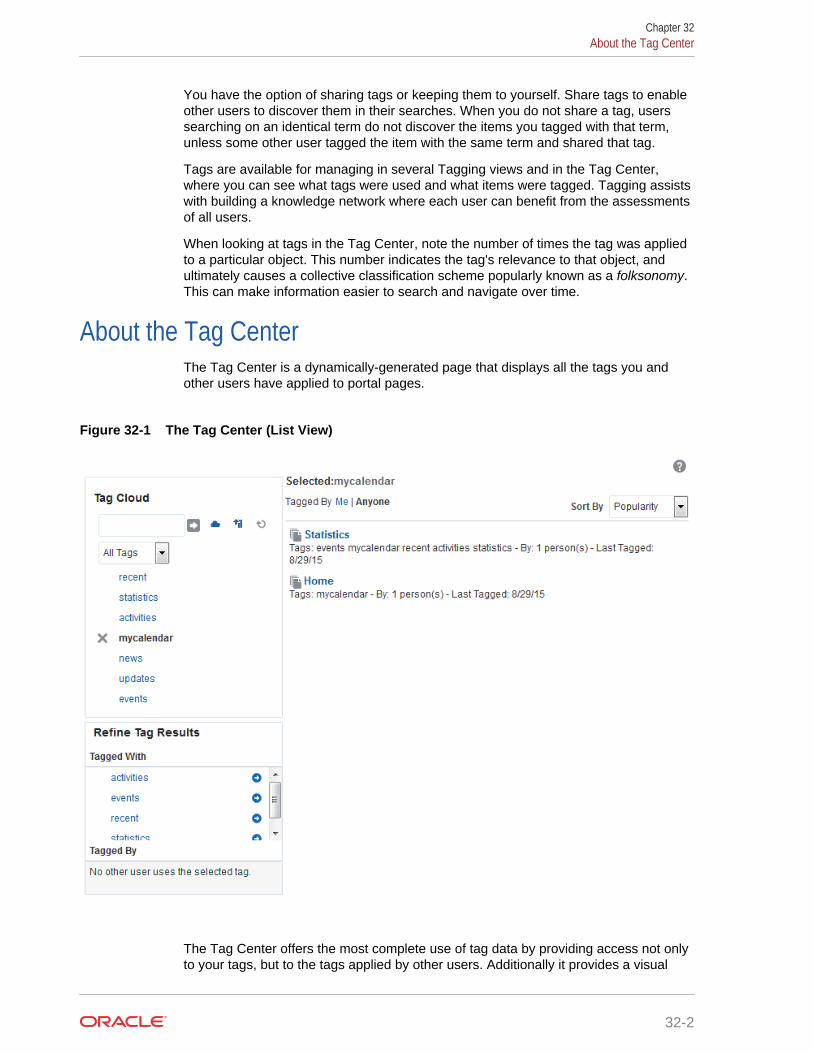
You have the option of sharing tags or keeping them to yourself. Share tags to enableother users to discover them in their searches. When you do not share a tag, userssearching on an identical term do not discover the items you tagged with that term,unless some other user tagged the item with the same term and shared that tag.
Tags are available for managing in several Tagging views and in the Tag Center,where you can see what tags were used and what items were tagged. Tagging assistswith building a knowledge network where each user can benefit from the assessmentsof all users.
When looking at tags in the Tag Center, note the number of times the tag was appliedto a particular object. This number indicates the tag's relevance to that object, andultimately causes a collective classification scheme popularly known as a folksonomy.This can make information easier to search and navigate over time.
About the Tag CenterThe Tag Center is a dynamically-generated page that displays all the tags you andother users have applied to portal pages.
Figure 32-1 The Tag Center (List View)
The Tag Center offers the most complete use of tag data by providing access not onlyto your tags, but to the tags applied by other users. Additionally it provides a visual
Chapter 32About the Tag Center
32-2
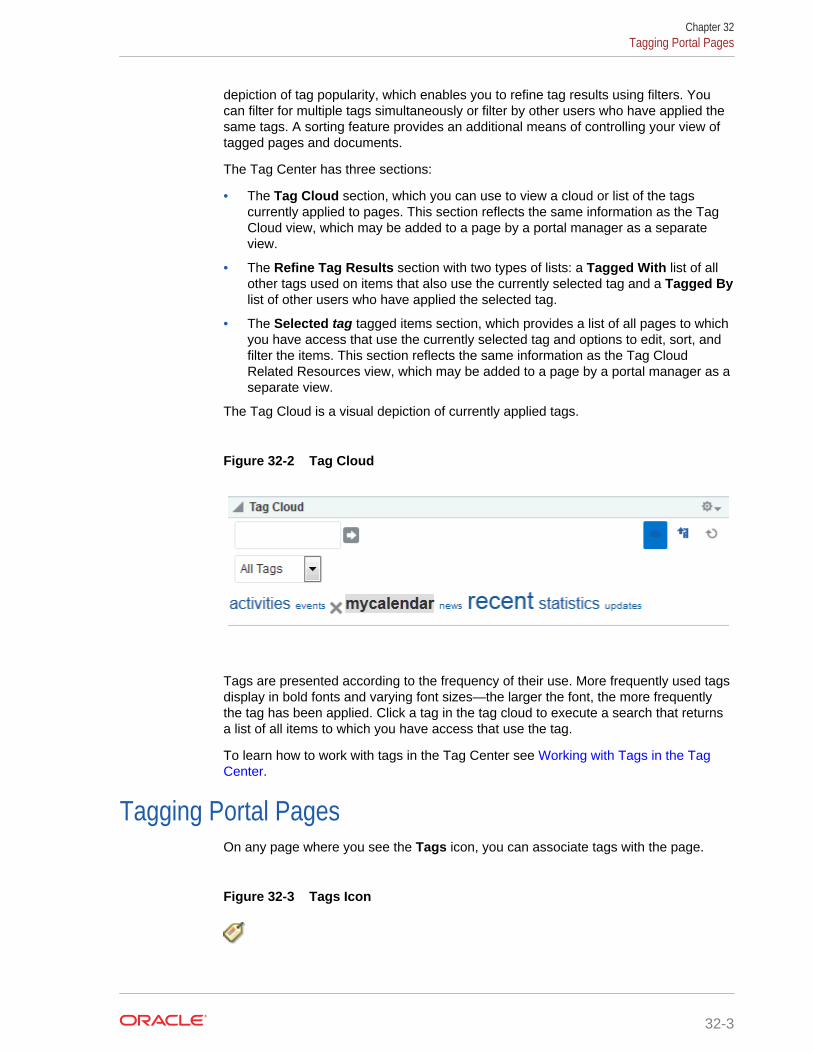
depiction of tag popularity, which enables you to refine tag results using filters. Youcan filter for multiple tags simultaneously or filter by other users who have applied thesame tags. A sorting feature provides an additional means of controlling your view oftagged pages and documents.
The Tag Center has three sections:
• The Tag Cloud section, which you can use to view a cloud or list of the tagscurrently applied to pages. This section reflects the same information as the TagCloud view, which may be added to a page by a portal manager as a separateview.
• The Refine Tag Results section with two types of lists: a Tagged With list of allother tags used on items that also use the currently selected tag and a Tagged Bylist of other users who have applied the selected tag.
• The Selected tag tagged items section, which provides a list of all pages to whichyou have access that use the currently selected tag and options to edit, sort, andfilter the items. This section reflects the same information as the Tag CloudRelated Resources view, which may be added to a page by a portal manager as aseparate view.
The Tag Cloud is a visual depiction of currently applied tags.
Figure 32-2 Tag Cloud
Tags are presented according to the frequency of their use. More frequently used tagsdisplay in bold fonts and varying font sizes—the larger the font, the more frequentlythe tag has been applied. Click a tag in the tag cloud to execute a search that returnsa list of all items to which you have access that use the tag.
To learn how to work with tags in the Tag Center see Working with Tags in the TagCenter.
Tagging Portal PagesOn any page where you see the Tags icon, you can associate tags with the page.
Figure 32-3 Tags Icon
Chapter 32Tagging Portal Pages
32-3
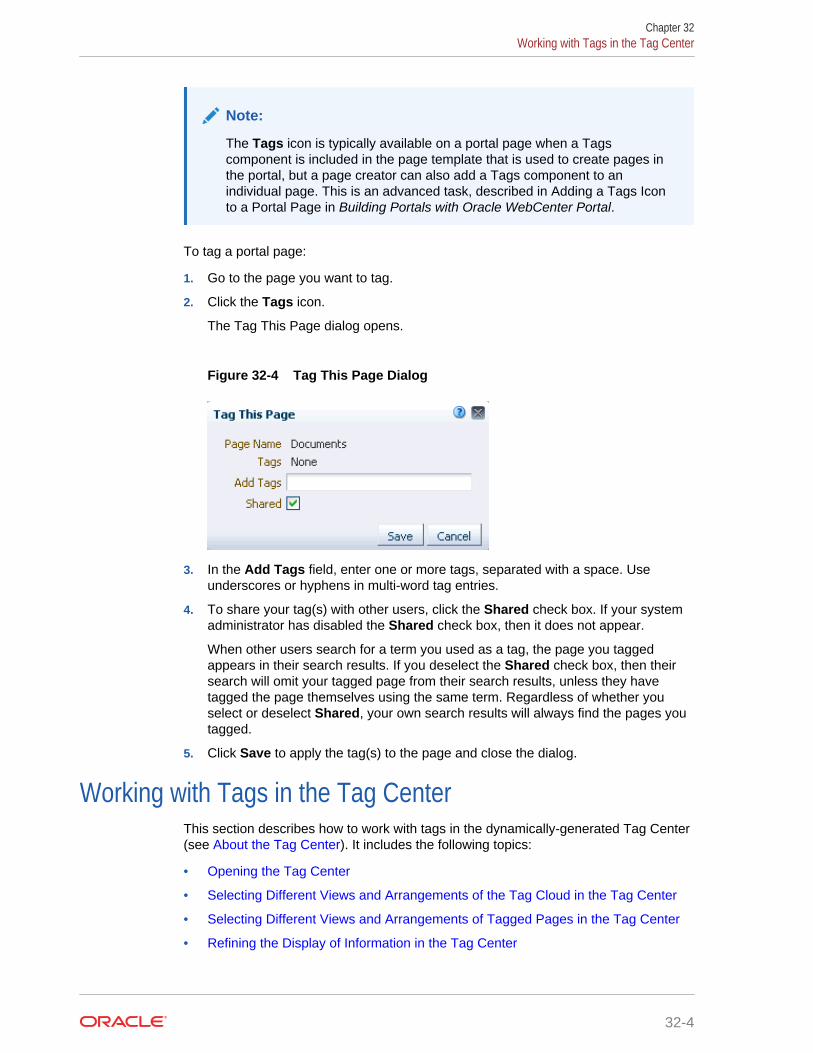
Note:
The Tags icon is typically available on a portal page when a Tagscomponent is included in the page template that is used to create pages inthe portal, but a page creator can also add a Tags component to anindividual page. This is an advanced task, described in Adding a Tags Iconto a Portal Page in Building Portals with Oracle WebCenter Portal.
To tag a portal page:
1. Go to the page you want to tag.
2. Click the Tags icon.
The Tag This Page dialog opens.
Figure 32-4 Tag This Page Dialog
3. In the Add Tags field, enter one or more tags, separated with a space. Useunderscores or hyphens in multi-word tag entries.
4. To share your tag(s) with other users, click the Shared check box. If your systemadministrator has disabled the Shared check box, then it does not appear.
When other users search for a term you used as a tag, the page you taggedappears in their search results. If you deselect the Shared check box, then theirsearch will omit your tagged page from their search results, unless they havetagged the page themselves using the same term. Regardless of whether youselect or deselect Shared, your own search results will always find the pages youtagged.
5. Click Save to apply the tag(s) to the page and close the dialog.
Working with Tags in the Tag CenterThis section describes how to work with tags in the dynamically-generated Tag Center(see About the Tag Center). It includes the following topics:
• Opening the Tag Center
• Selecting Different Views and Arrangements of the Tag Cloud in the Tag Center
• Selecting Different Views and Arrangements of Tagged Pages in the Tag Center
• Refining the Display of Information in the Tag Center
Chapter 32Working with Tags in the Tag Center
32-4
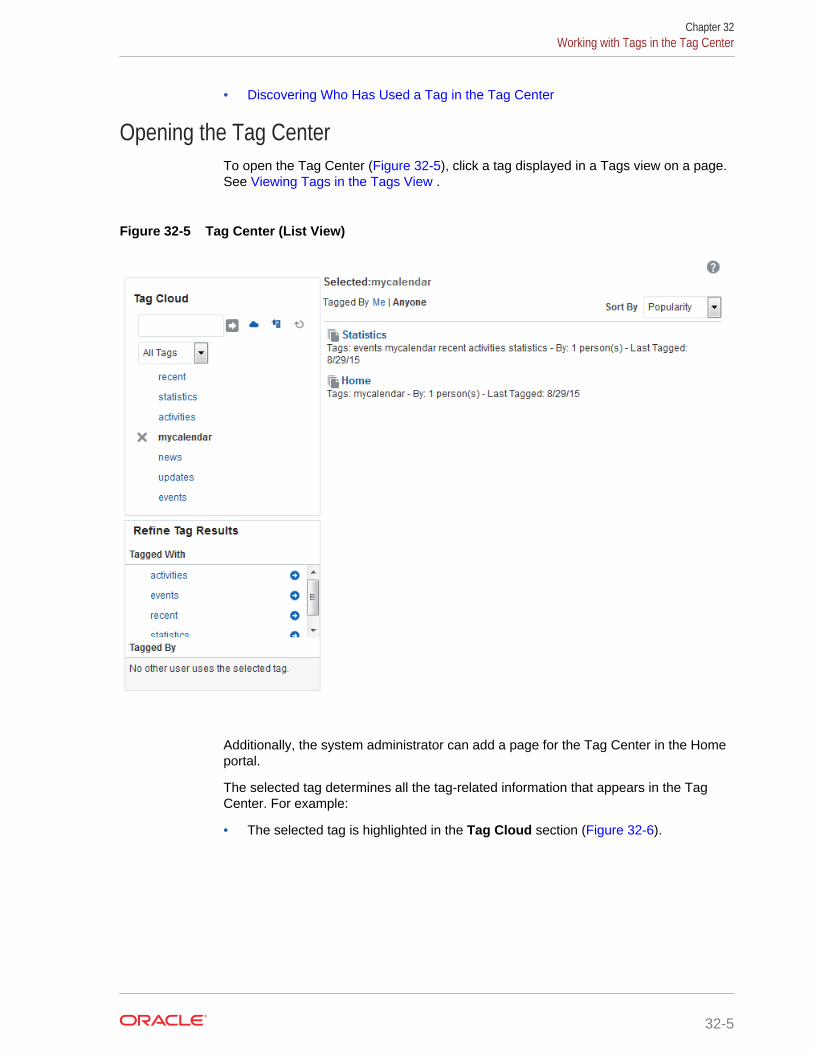
• Discovering Who Has Used a Tag in the Tag Center
Opening the Tag CenterTo open the Tag Center (Figure 32-5), click a tag displayed in a Tags view on a page.See Viewing Tags in the Tags View .
Figure 32-5 Tag Center (List View)
Additionally, the system administrator can add a page for the Tag Center in the Homeportal.
The selected tag determines all the tag-related information that appears in the TagCenter. For example:
• The selected tag is highlighted in the Tag Cloud section (Figure 32-6).
Chapter 32Working with Tags in the Tag Center
32-5
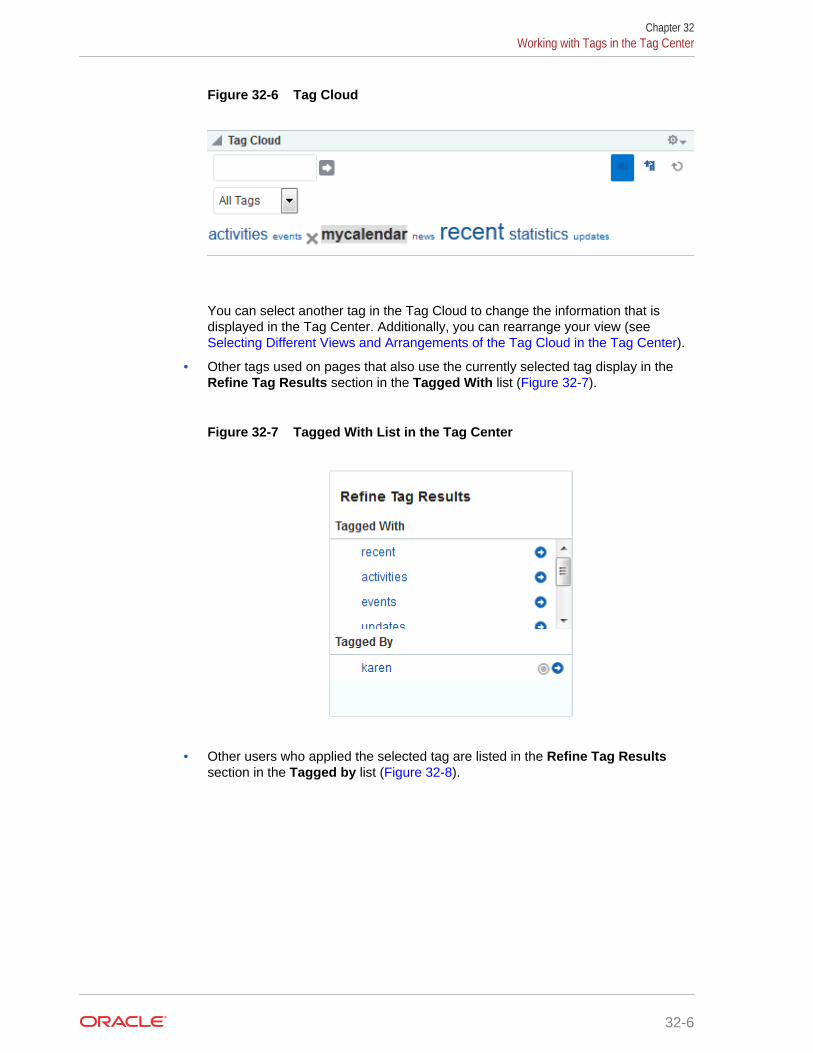
Figure 32-6 Tag Cloud
You can select another tag in the Tag Cloud to change the information that isdisplayed in the Tag Center. Additionally, you can rearrange your view (see Selecting Different Views and Arrangements of the Tag Cloud in the Tag Center).
• Other tags used on pages that also use the currently selected tag display in theRefine Tag Results section in the Tagged With list (Figure 32-7).
Figure 32-7 Tagged With List in the Tag Center
• Other users who applied the selected tag are listed in the Refine Tag Resultssection in the Tagged by list (Figure 32-8).
Chapter 32Working with Tags in the Tag Center
32-6
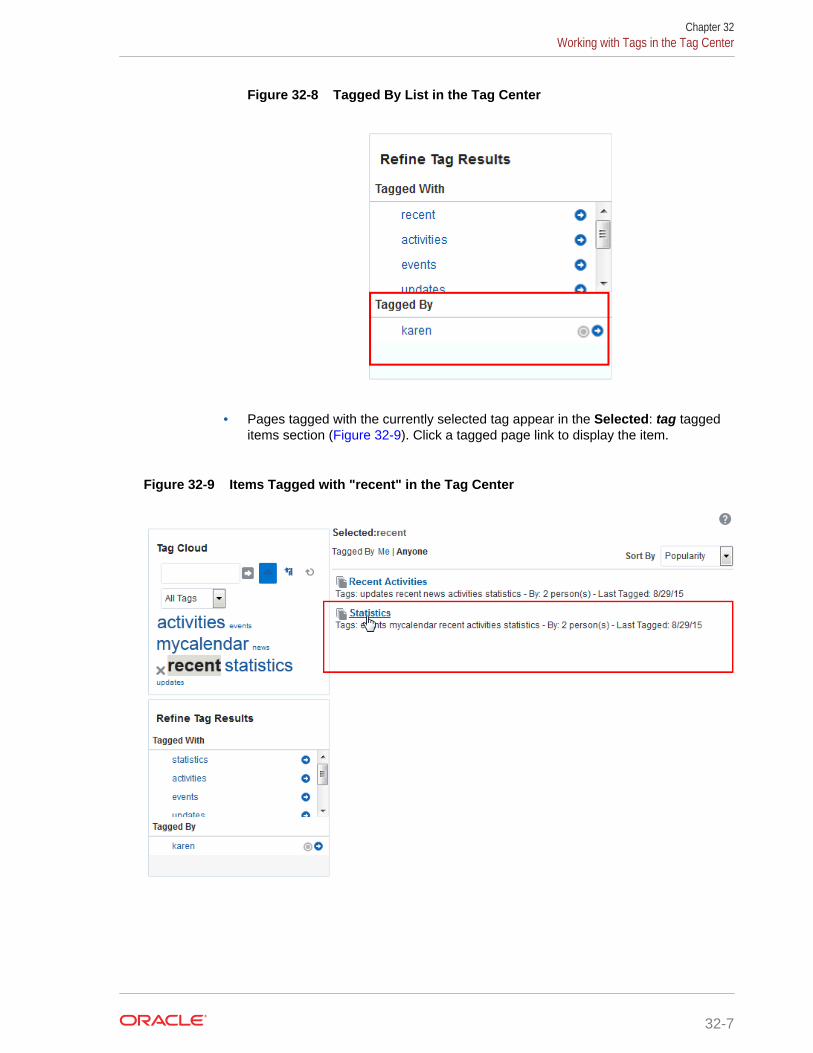
Figure 32-8 Tagged By List in the Tag Center
• Pages tagged with the currently selected tag appear in the Selected: tag taggeditems section (Figure 32-9). Click a tagged page link to display the item.
Figure 32-9 Items Tagged with "recent" in the Tag Center
Chapter 32Working with Tags in the Tag Center
32-7
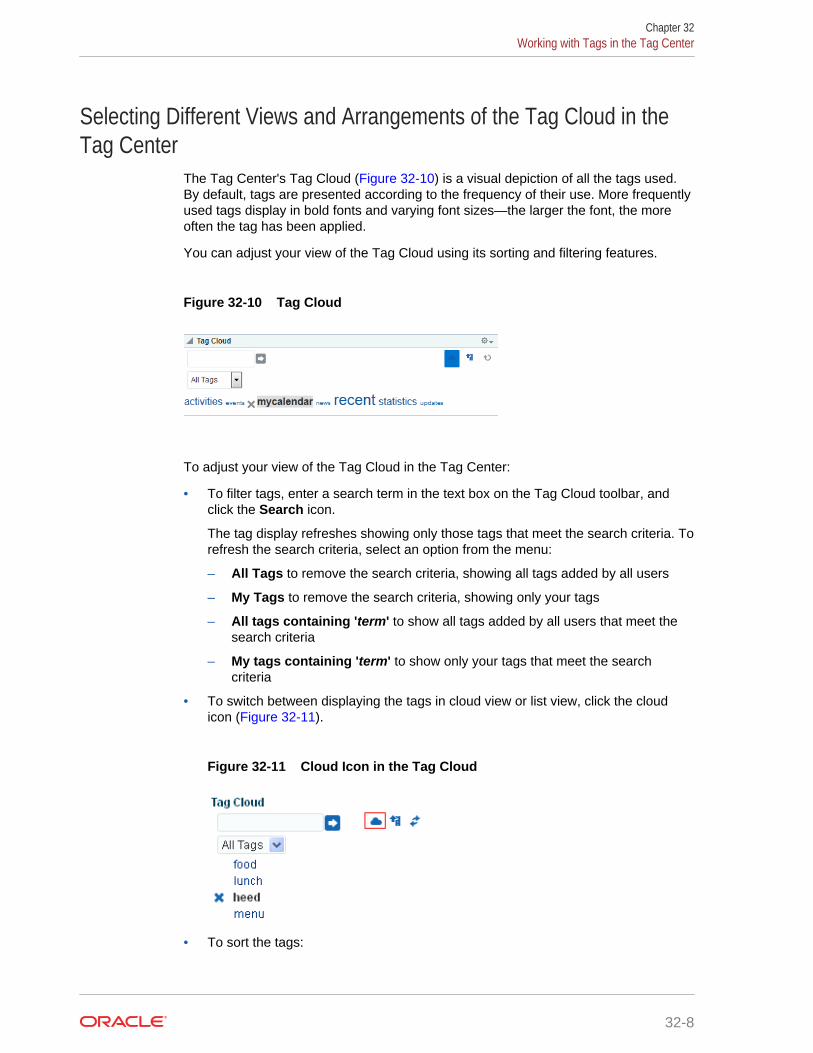
Selecting Different Views and Arrangements of the Tag Cloud in theTag Center
The Tag Center's Tag Cloud (Figure 32-10) is a visual depiction of all the tags used.By default, tags are presented according to the frequency of their use. More frequentlyused tags display in bold fonts and varying font sizes—the larger the font, the moreoften the tag has been applied.
You can adjust your view of the Tag Cloud using its sorting and filtering features.
Figure 32-10 Tag Cloud
To adjust your view of the Tag Cloud in the Tag Center:
• To filter tags, enter a search term in the text box on the Tag Cloud toolbar, andclick the Search icon.
The tag display refreshes showing only those tags that meet the search criteria. Torefresh the search criteria, select an option from the menu:
– All Tags to remove the search criteria, showing all tags added by all users
– My Tags to remove the search criteria, showing only your tags
– All tags containing 'term' to show all tags added by all users that meet thesearch criteria
– My tags containing 'term' to show only your tags that meet the searchcriteria
• To switch between displaying the tags in cloud view or list view, click the cloudicon (Figure 32-11).
Figure 32-11 Cloud Icon in the Tag Cloud
• To sort the tags:
Chapter 32Working with Tags in the Tag Center
32-8
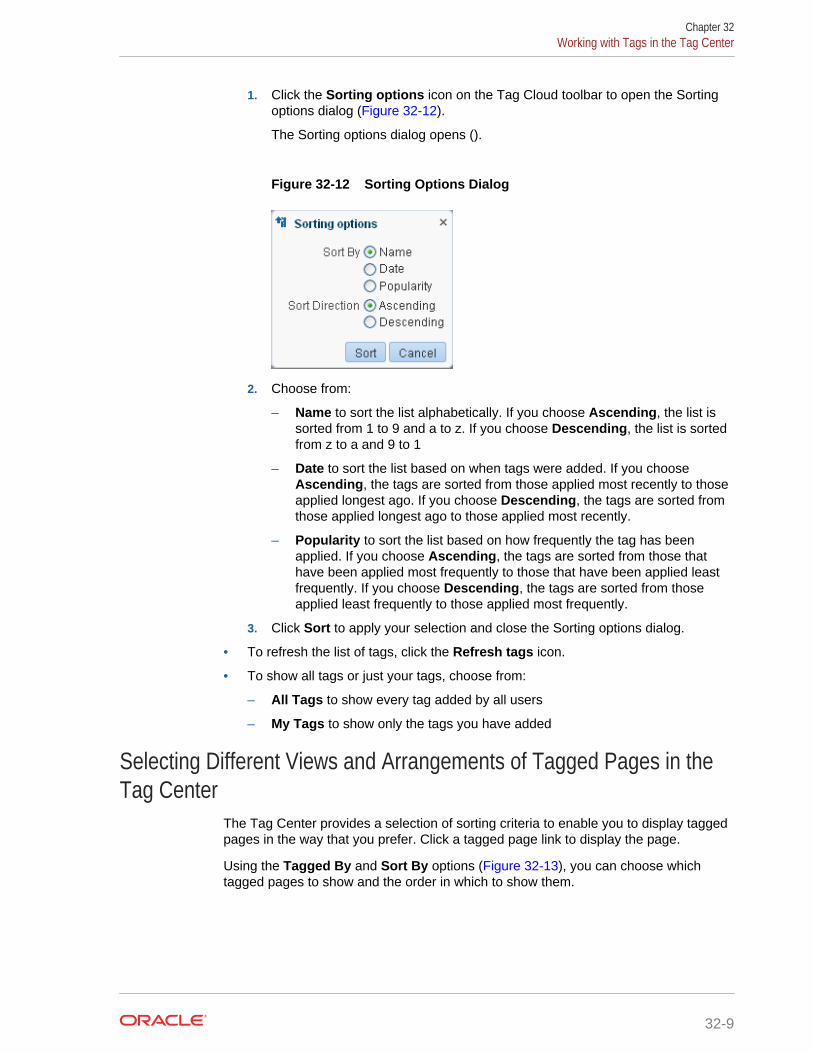
1. Click the Sorting options icon on the Tag Cloud toolbar to open the Sortingoptions dialog (Figure 32-12).
The Sorting options dialog opens ().
Figure 32-12 Sorting Options Dialog
2. Choose from:
– Name to sort the list alphabetically. If you choose Ascending, the list issorted from 1 to 9 and a to z. If you choose Descending, the list is sortedfrom z to a and 9 to 1
– Date to sort the list based on when tags were added. If you chooseAscending, the tags are sorted from those applied most recently to thoseapplied longest ago. If you choose Descending, the tags are sorted fromthose applied longest ago to those applied most recently.
– Popularity to sort the list based on how frequently the tag has beenapplied. If you choose Ascending, the tags are sorted from those thathave been applied most frequently to those that have been applied leastfrequently. If you choose Descending, the tags are sorted from thoseapplied least frequently to those applied most frequently.
3. Click Sort to apply your selection and close the Sorting options dialog.
• To refresh the list of tags, click the Refresh tags icon.
• To show all tags or just your tags, choose from:
– All Tags to show every tag added by all users
– My Tags to show only the tags you have added
Selecting Different Views and Arrangements of Tagged Pages in theTag Center
The Tag Center provides a selection of sorting criteria to enable you to display taggedpages in the way that you prefer. Click a tagged page link to display the page.
Using the Tagged By and Sort By options (Figure 32-13), you can choose whichtagged pages to show and the order in which to show them.
Chapter 32Working with Tags in the Tag Center
32-9
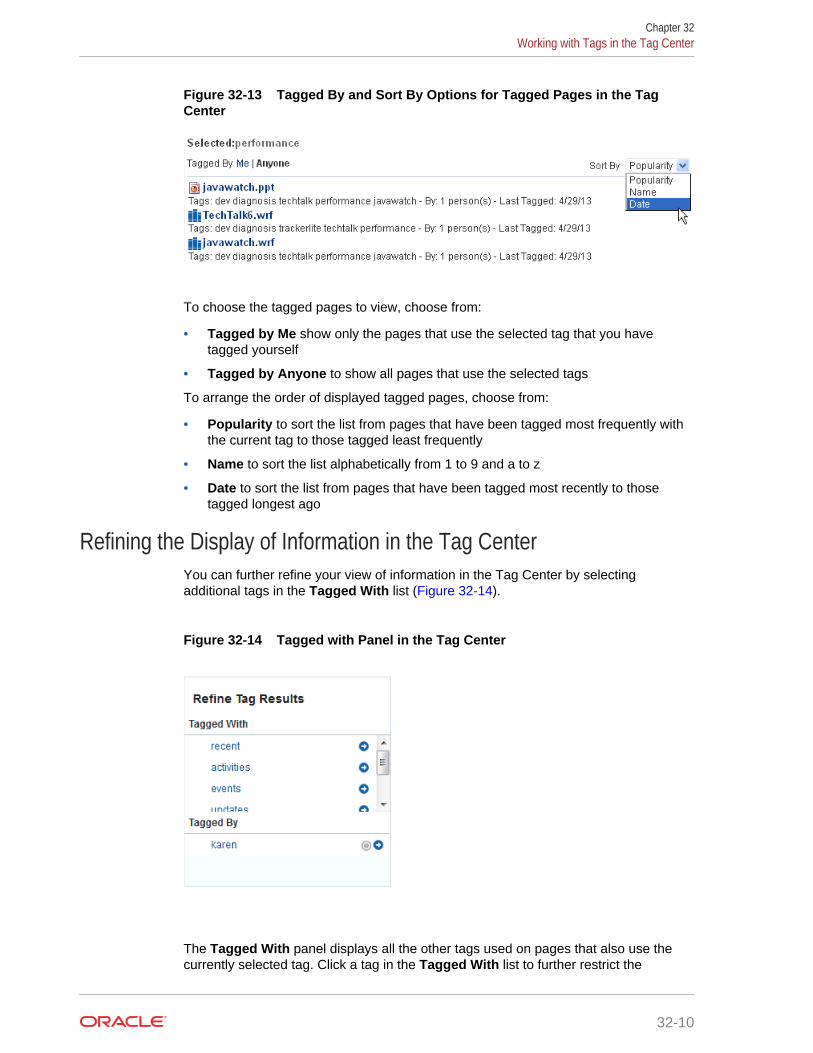
Figure 32-13 Tagged By and Sort By Options for Tagged Pages in the TagCenter
To choose the tagged pages to view, choose from:
• Tagged by Me show only the pages that use the selected tag that you havetagged yourself
• Tagged by Anyone to show all pages that use the selected tags
To arrange the order of displayed tagged pages, choose from:
• Popularity to sort the list from pages that have been tagged most frequently withthe current tag to those tagged least frequently
• Name to sort the list alphabetically from 1 to 9 and a to z
• Date to sort the list from pages that have been tagged most recently to thosetagged longest ago
Refining the Display of Information in the Tag CenterYou can further refine your view of information in the Tag Center by selectingadditional tags in the Tagged With list (Figure 32-14).
Figure 32-14 Tagged with Panel in the Tag Center
The Tagged With panel displays all the other tags used on pages that also use thecurrently selected tag. Click a tag in the Tagged With list to further restrict the
Chapter 32Working with Tags in the Tag Center
32-10
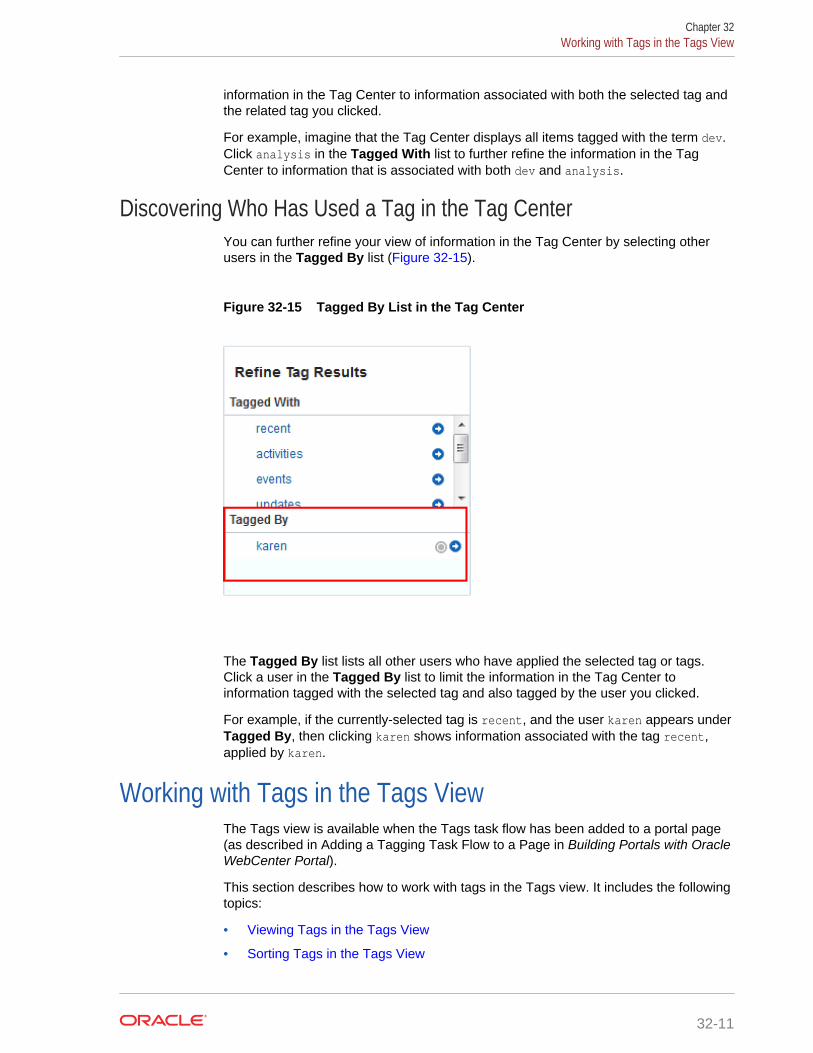
information in the Tag Center to information associated with both the selected tag andthe related tag you clicked.
For example, imagine that the Tag Center displays all items tagged with the term dev.Click analysis in the Tagged With list to further refine the information in the TagCenter to information that is associated with both dev and analysis.
Discovering Who Has Used a Tag in the Tag CenterYou can further refine your view of information in the Tag Center by selecting otherusers in the Tagged By list (Figure 32-15).
Figure 32-15 Tagged By List in the Tag Center
The Tagged By list lists all other users who have applied the selected tag or tags.Click a user in the Tagged By list to limit the information in the Tag Center toinformation tagged with the selected tag and also tagged by the user you clicked.
For example, if the currently-selected tag is recent, and the user karen appears underTagged By, then clicking karen shows information associated with the tag recent,applied by karen.
Working with Tags in the Tags ViewThe Tags view is available when the Tags task flow has been added to a portal page(as described in Adding a Tagging Task Flow to a Page in Building Portals with OracleWebCenter Portal).
This section describes how to work with tags in the Tags view. It includes the followingtopics:
• Viewing Tags in the Tags View
• Sorting Tags in the Tags View
Chapter 32Working with Tags in the Tags View
32-11
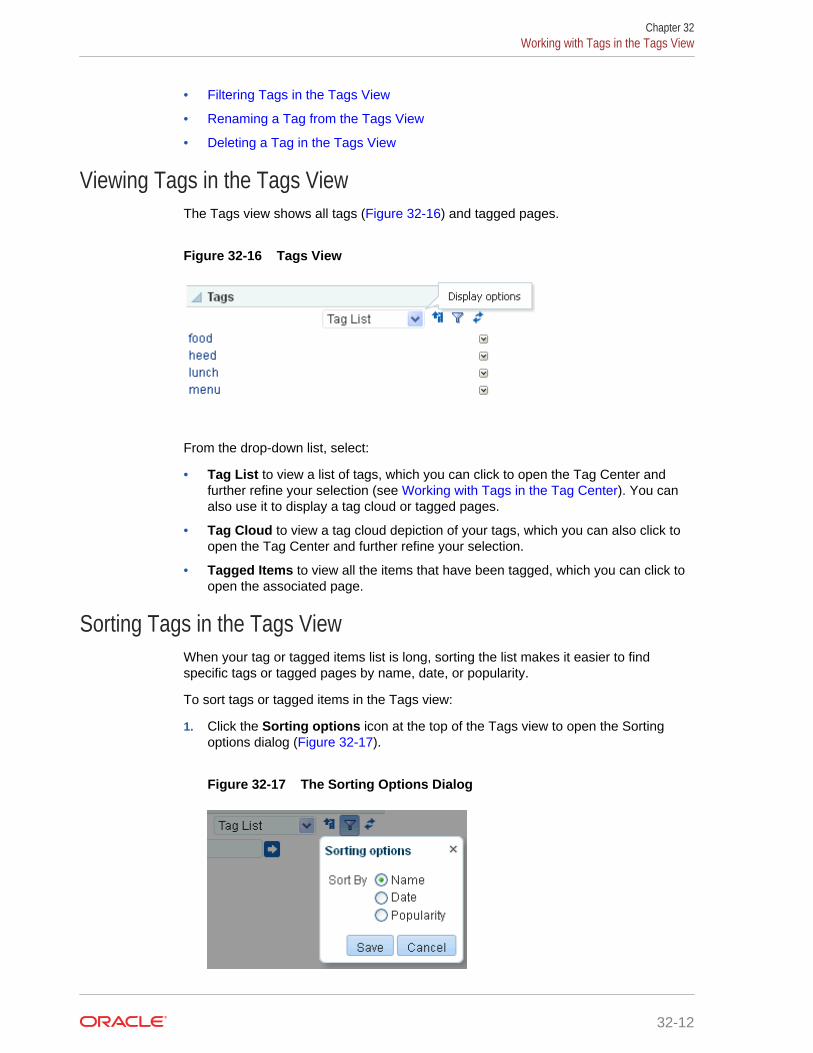
• Filtering Tags in the Tags View
• Renaming a Tag from the Tags View
• Deleting a Tag in the Tags View
Viewing Tags in the Tags ViewThe Tags view shows all tags (Figure 32-16) and tagged pages.
Figure 32-16 Tags View
From the drop-down list, select:
• Tag List to view a list of tags, which you can click to open the Tag Center andfurther refine your selection (see Working with Tags in the Tag Center). You canalso use it to display a tag cloud or tagged pages.
• Tag Cloud to view a tag cloud depiction of your tags, which you can also click toopen the Tag Center and further refine your selection.
• Tagged Items to view all the items that have been tagged, which you can click toopen the associated page.
Sorting Tags in the Tags ViewWhen your tag or tagged items list is long, sorting the list makes it easier to findspecific tags or tagged pages by name, date, or popularity.
To sort tags or tagged items in the Tags view:
1. Click the Sorting options icon at the top of the Tags view to open the Sortingoptions dialog (Figure 32-17).
Figure 32-17 The Sorting Options Dialog
Chapter 32Working with Tags in the Tags View
32-12
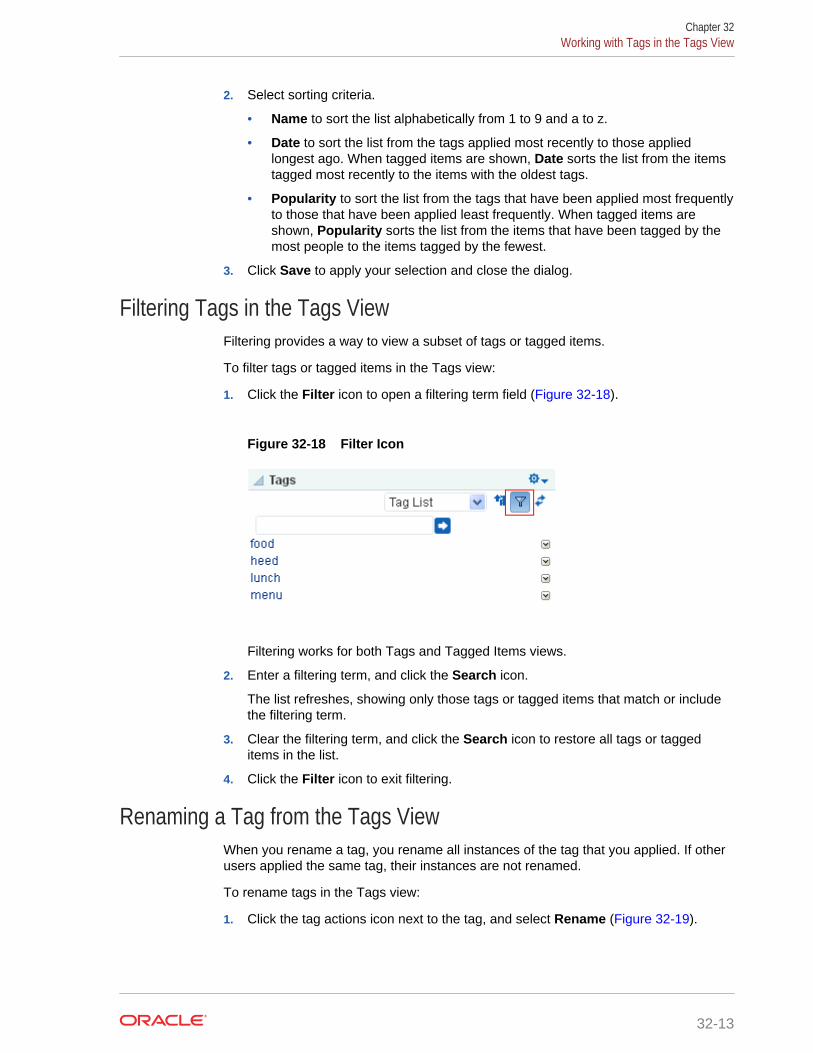
2. Select sorting criteria.
• Name to sort the list alphabetically from 1 to 9 and a to z.
• Date to sort the list from the tags applied most recently to those appliedlongest ago. When tagged items are shown, Date sorts the list from the itemstagged most recently to the items with the oldest tags.
• Popularity to sort the list from the tags that have been applied most frequentlyto those that have been applied least frequently. When tagged items areshown, Popularity sorts the list from the items that have been tagged by themost people to the items tagged by the fewest.
3. Click Save to apply your selection and close the dialog.
Filtering Tags in the Tags ViewFiltering provides a way to view a subset of tags or tagged items.
To filter tags or tagged items in the Tags view:
1. Click the Filter icon to open a filtering term field (Figure 32-18).
Figure 32-18 Filter Icon
Filtering works for both Tags and Tagged Items views.
2. Enter a filtering term, and click the Search icon.
The list refreshes, showing only those tags or tagged items that match or includethe filtering term.
3. Clear the filtering term, and click the Search icon to restore all tags or taggeditems in the list.
4. Click the Filter icon to exit filtering.
Renaming a Tag from the Tags ViewWhen you rename a tag, you rename all instances of the tag that you applied. If otherusers applied the same tag, their instances are not renamed.
To rename tags in the Tags view:
1. Click the tag actions icon next to the tag, and select Rename (Figure 32-19).
Chapter 32Working with Tags in the Tags View
32-13
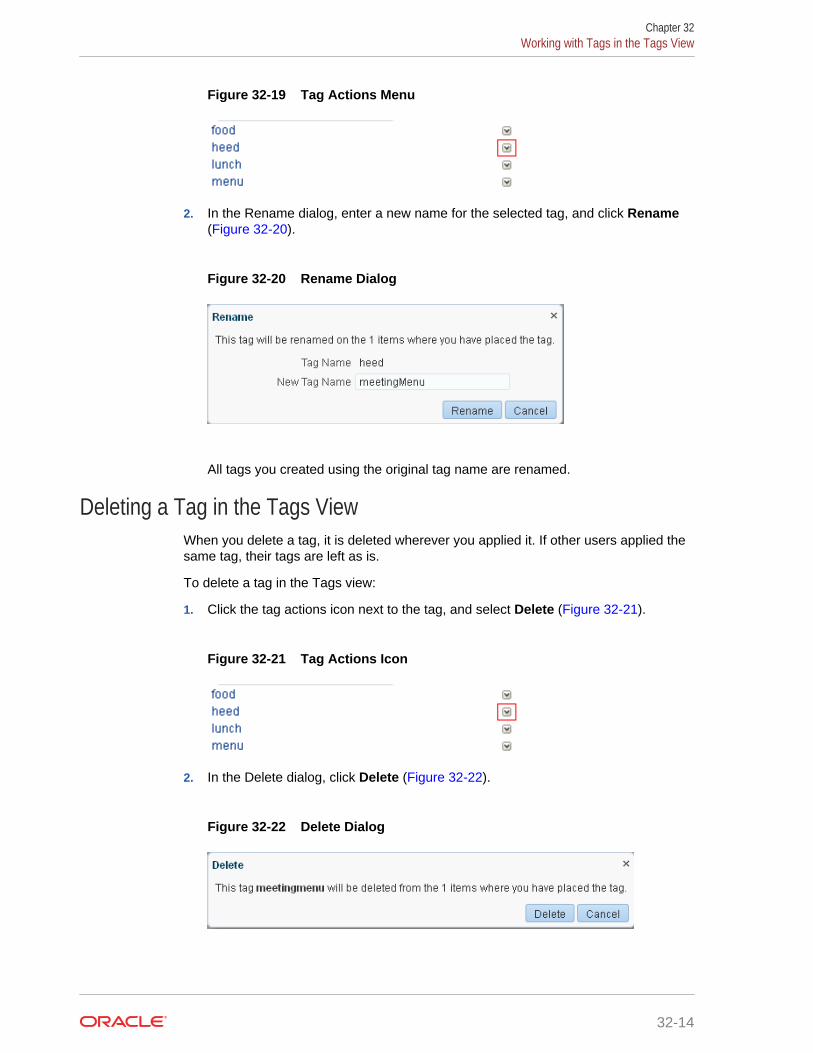
Figure 32-19 Tag Actions Menu
2. In the Rename dialog, enter a new name for the selected tag, and click Rename(Figure 32-20).
Figure 32-20 Rename Dialog
All tags you created using the original tag name are renamed.
Deleting a Tag in the Tags ViewWhen you delete a tag, it is deleted wherever you applied it. If other users applied thesame tag, their tags are left as is.
To delete a tag in the Tags view:
1. Click the tag actions icon next to the tag, and select Delete (Figure 32-21).
Figure 32-21 Tag Actions Icon
2. In the Delete dialog, click Delete (Figure 32-22).
Figure 32-22 Delete Dialog
Chapter 32Working with Tags in the Tags View
32-14
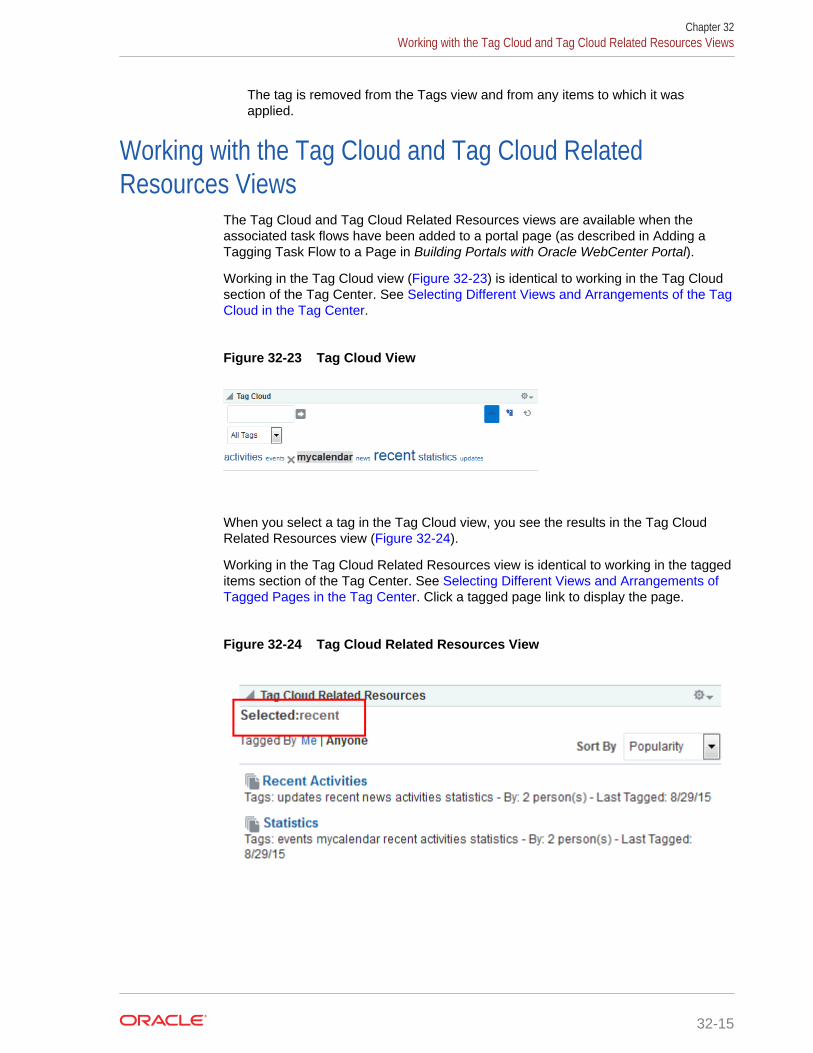
The tag is removed from the Tags view and from any items to which it wasapplied.
Working with the Tag Cloud and Tag Cloud RelatedResources Views
The Tag Cloud and Tag Cloud Related Resources views are available when theassociated task flows have been added to a portal page (as described in Adding aTagging Task Flow to a Page in Building Portals with Oracle WebCenter Portal).
Working in the Tag Cloud view (Figure 32-23) is identical to working in the Tag Cloudsection of the Tag Center. See Selecting Different Views and Arrangements of the TagCloud in the Tag Center.
Figure 32-23 Tag Cloud View
When you select a tag in the Tag Cloud view, you see the results in the Tag CloudRelated Resources view (Figure 32-24).
Working in the Tag Cloud Related Resources view is identical to working in the taggeditems section of the Tag Center. See Selecting Different Views and Arrangements ofTagged Pages in the Tag Center. Click a tagged page link to display the page.
Figure 32-24 Tag Cloud Related Resources View
Chapter 32Working with the Tag Cloud and Tag Cloud Related Resources Views
32-15

Working with the Similarly Tagged Items ViewThe Similarly Tagged Items view is available when the Similarly Tagged Items taskflow has been added to a portal page (as described in Adding a Tagging Task Flow toa Page in Building Portals with Oracle WebCenter Portal)
The Similarly Tagged Items view (Figure 32-25) provides a list of links to other pagesthat have at least one tag in common with the current page. Click a tagged item link todisplay the item
Figure 32-25 Similarly Tagged Items View
Chapter 32Working with the Similarly Tagged Items View
32-16