Embed Size (px)
Citation preview
Oracle® CloudUsing Oracle Infrastructure Monitoring
E73189-45April 2020

Oracle Cloud Using Oracle Infrastructure Monitoring,
E73189-45
Copyright © 2016, 2020, Oracle and/or its affiliates.
Primary Author: Oracle Corporation
This software and related documentation are provided under a license agreement containing restrictions onuse and disclosure and are protected by intellectual property laws. Except as expressly permitted in yourlicense agreement or allowed by law, you may not use, copy, reproduce, translate, broadcast, modify,license, transmit, distribute, exhibit, perform, publish, or display any part, in any form, or by any means.Reverse engineering, disassembly, or decompilation of this software, unless required by law forinteroperability, is prohibited.
The information contained herein is subject to change without notice and is not warranted to be error-free. Ifyou find any errors, please report them to us in writing.
If this is software or related documentation that is delivered to the U.S. Government or anyone licensing it onbehalf of the U.S. Government, then the following notice is applicable:
U.S. GOVERNMENT END USERS: Oracle programs (including any operating system, integrated software,any programs embedded, installed or activated on delivered hardware, and modifications of such programs)and Oracle computer documentation or other Oracle data delivered to or accessed by U.S. Government endusers are "commercial computer software" or “commercial computer software documentation” pursuant to theapplicable Federal Acquisition Regulation and agency-specific supplemental regulations. As such, the use,reproduction, duplication, release, display, disclosure, modification, preparation of derivative works, and/oradaptation of i) Oracle programs (including any operating system, integrated software, any programsembedded, installed or activated on delivered hardware, and modifications of such programs), ii) Oraclecomputer documentation and/or iii) other Oracle data, is subject to the rights and limitations specified in thelicense contained in the applicable contract. The terms governing the U.S. Government’s use of Oracle cloudservices are defined by the applicable contract for such services. No other rights are granted to the U.S.Government.
This software or hardware is developed for general use in a variety of information management applications.It is not developed or intended for use in any inherently dangerous applications, including applications thatmay create a risk of personal injury. If you use this software or hardware in dangerous applications, then youshall be responsible to take all appropriate fail-safe, backup, redundancy, and other measures to ensure itssafe use. Oracle Corporation and its affiliates disclaim any liability for any damages caused by use of thissoftware or hardware in dangerous applications.
Oracle and Java are registered trademarks of Oracle and/or its affiliates. Other names may be trademarks oftheir respective owners.
Intel and Intel Inside are trademarks or registered trademarks of Intel Corporation. All SPARC trademarks areused under license and are trademarks or registered trademarks of SPARC International, Inc. AMD, Epyc,and the AMD logo are trademarks or registered trademarks of Advanced Micro Devices. UNIX is a registeredtrademark of The Open Group.
This software or hardware and documentation may provide access to or information about content, products,and services from third parties. Oracle Corporation and its affiliates are not responsible for and expresslydisclaim all warranties of any kind with respect to third-party content, products, and services unless otherwiseset forth in an applicable agreement between you and Oracle. Oracle Corporation and its affiliates will not beresponsible for any loss, costs, or damages incurred due to your access to or use of third-party content,products, or services, except as set forth in an applicable agreement between you and Oracle.
Contents
Preface
Audience x
Documentation Accessibility x
Related Resources x
Conventions xi
1 Getting Started with Oracle Infrastructure Monitoring
About Oracle Infrastructure Monitoring 1-1
About Oracle Infrastructure Monitoring Roles and Users 1-2
Configure Oracle Infrastructure Monitoring 1-3
2 Add Entities for Infrastructure Monitoring
Supported Entity Types 2-1
Prerequisites and Monitoring Credentials 2-5
Enable Host Monitoring 2-7
Add Entities from the Console 2-9
Define Associations Between Entities 2-13
Discover Cloud Services 2-13
Discover Oracle Database Systems 2-24
Add Entities Using JSON Files 2-32
Download and Customize Oracle Infrastructure Monitoring JSONs 2-38
Use Tags to Define Associations Between Entities 2-41
3 Enable Monitoring for Previously Discovered Entities
Auto-Discovery of Previously Discovered Entities 3-1
Manual Discovery of Log Analytics Entities 3-4
4 Extend Monitoring Capability with Metric Collectors
Expand Monitoring with collectd 4-1
iii
Example Read Plugin — Processes Plugin 4-2
Example: Configuring collectd 4-2
Example: Generic Metric Collector Entity Type (Auto-mapping) 4-5
Expand Monitoring with Telegraf 4-7
Example Input Plugin: Processes Plugin 4-8
Example: Configure Telegraf for Oracle Management Cloud Integration 4-8
Example Generic Metric Collector Entity (Telegraf) 4-10
Troubleshooting Telegraf Metric Collection 4-14
5 Expand Monitoring Capability with Custom Metrics
Custom Metric Lifecycle 5-2
Working with Custom Metrics 5-3
6 Host Process Monitoring
Create a Process Set 6-2
Map the Process Set ID to One or More Hosts 6-3
Monitor the Processes from the UI 6-4
Create Alert Rules to Monitor Process Status and Resource Consumption 6-6
7 Set Up Alert Rules
Typical Workflow for Setting Up Alert Rules 7-1
Set Up Alert Thresholds and Notifications 7-1
Create an Alert Rule 7-2
Set Up Notification Channels 7-6
Create an Email Notification Channel 7-7
Create a Mobile Notification Channel 7-7
Create a WebHook Notification Channel (Integration) 7-8
Create a PagerDuty Notification Channel 7-9
Create a ServiceNow Notification Channel 7-12
Create a Slack Notification Channel 7-13
8 Monitor the Availability and Performance of Your Infrastructure
Typical Workflow for Monitoring the Availability and Performance of YourInfrastructure 8-1
Monitor Availability Status 8-1
Investigate Alerts 8-3
Monitor Availability Status Within Each Tier 8-6
Monitor Performance Within Each Tier 8-7
iv
Monitor Entity Health 8-8
Metric Collection Errors 8-11
9 Oracle Infrastructure Monitoring Administration Tasks
Typical Administration Tasks for Oracle Infrastructure Monitoring 9-1
Maintenance Windows 9-1
Change Monitoring Configuration 9-2
Create and Set Global Properties 9-2
Creating a Global Property 9-3
Setting the Value of a Global Property 9-3
Delete Entities 9-3
Delete Entities from the Administration Console 9-4
View Deleted Entities 9-4
Delete Entities Using omcli 9-4
10
Troubleshooting
Lack of Data 10-1
Create an Agent Support Bundle 10-6
Host Prerequisite Validation 10-7
Status Unknown 10-11
A Monitoring Prerequisites and Credentials
Host A-1
Docker Engine / Docker Container A-2
XEN Virtual Platform / XEN Virtual Server A-3
Oracle Database A-4
AWS-RDS Oracle DB A-9
Oracle Automatic Storage Management (ASM) A-10
Oracle NoSQL A-10
MySQL Database A-10
Microsoft SQL Server A-11
MongoDB Database A-12
Oracle WebLogic Server (includes WebLogic Domain and WebLogic Cluster) A-13
Oracle Service Bus A-14
Tomcat A-15
Oracle Traffic Director (OTD) A-16
Apache HTTP Server A-17
Oracle HTTP Server (OHS) A-18
Arista Ethernet Switch A-19
v
Cisco Ethernet (Catalyst) Switch A-19
Cisco Nexus Ethernet Switch A-19
Oracle Power Distribution Unit (PDU) A-19
Juniper Ethernet Switch A-20
Oracle Infiniband Switch A-20
Brocade Fibre Channel Switch A-20
SCOM (System Center Operations Manager) A-21
Juniper SRX Firewall A-21
Fujitsu Server A-22
Intel/SPARC Computers A-22
VMware vCenter A-23
Docker Swarm A-24
Apache SOLR A-25
Hadoop Cluster A-25
Arbor TMS/CP A-26
Juniper Netscreen Firewall A-26
Juniper MX Router A-26
F5 BIG-IP LTM A-27
F5 BIG-IP DNS A-27
ES2 Ethernet Switch A-27
Oracle Flash Storage A-27
Apache Cassandra DB A-28
Oracle VM Server for SPARC (LDoms) A-29
Coherence A-29
Oracle Unified Directory(OUD) A-30
Oracle Access Manager (OAM) A-31
Oracle Internet Directory (OID) A-31
Microsoft Internet Information Services (IIS) A-32
Oracle Identity Manager (OIM) A-34
Oracle Clusterware (CRS) A-34
JBOSS A-34
Kubernetes Cluster A-36
Oracle GoldenGate A-49
Oracle VM Manager A-50
Oracle JVM Runtime A-51
Microsoft Azure A-52
Apache Kafka A-54
B Entity Attributes and Properties
vi
C Discovery
Add Apache HTTP Server C-3
Add Apache SOLR C-6
Add Apache Zookeeper C-9
Add Arbor CP C-10
Add Arbor TMS C-13
Add Arista Ethernet Switch C-15
Add Brocade Fibre Channel Switch C-17
Add Apache Casandra Database C-21
Add Cisco Catalyst Switch C-24
Add Cisco Nexus Ethernet Switch C-26
Add Docker Engine/Docker Container C-30
Add Docker Swarm C-34
Add F5 BIG-IP DNS C-37
Add F5 BIG-IP LTM C-39
Add Hadoop Cluster C-41
Add JBoss Server/Domain C-44
Add Juniper Ethernet Switch C-49
Add Juniper MX Router C-52
Add Juniper Netscreen Firewall C-54
Add Juniper SRX Firewall C-56
Add Kubernetes Cluster C-59
Add Microsoft IIS C-62
Add Microsoft SCOM C-66
Add Microsoft SQL Server C-68
Add MongoDB C-72
Add MySQL Database C-74
Add NetApp FAS C-76
Add NGINX C-77
Add Oracle Access Manager/Oracle Internet Directory C-79
Add Oracle Automatic Storage Management (ASM) C-80
Add Oracle Clusterware (CRS) C-82
Add Oracle Coherence Clusters C-83
Add Oracle Database Listener Cluster C-85
Add Oracle Database Listeners C-86
Add Oracle Databases C-89
Add Oracle ES2 Ethernet Switches C-96
Add Oracle GoldenGate C-99
Add Oracle HTTP Server C-104
Add Oracle Identity Manager C-106
vii

Add Oracle Infiniband Switch C-108
Add Oracle JVM Runtime C-111
Add Oracle NoSQL Database C-113
Add Oracle Pluggable Database C-115
Add Oracle Power Distribution Unit (PDU) C-116
Add Oracle Service Bus C-118
Add Oracle Traffic Director C-120
Add Oracle Unified Directory C-124
Add Oracle Virtual Networking C-126
Add Oracle VM Manager C-128
Add Oracle VM Server for SPARC (LDOMS) C-130
Add Oracle WebLogic Server/Domain C-132
Add SPARC/Intel Computers C-134
Add Tomcat C-136
Add VMware vCenter C-141
Add ZFS Storage Appliance C-142
D Agent-monitored Entity Types and Cloud Services
E Monitor AWS - RDS Oracle DB
F Configure a Coherence Cluster
G Additional collectd Configurations and Information
Manual Mapping G-1
Example: Generic Metric Collector Entity (Manual Mapping) G-1
Example: Mapping Metadata G-4
Example: Destination Metric Definitions G-5
Metric Schema Mapping (collectd) G-8
Send a Subset of collectd Metrics to Oracle Management Cloud G-10
Receive Metrics from a Remote Generic Metric Collector G-11
Availability (Up/Down) Status for Entities Monitored by collectd G-14
Troubleshooting collectd Metric Collection G-15
H Additional Telegraf Configurations and Information
Metric Schema Mapping (Telegraf) H-1
Receive Metrics from a Remote Telegraf Collector H-4
viii

Availability (Up/Down) Status for Entities Monitored by Telegraf H-6
I Custom Metric Collection Methods and Metric Columns
OS Command I-1
SQL Query I-2
Java Management Extensions (JMX) I-3
REST I-4
Compute Expressions I-6
Rate and Delta Metric Columns I-9
ix
Preface
Oracle Infrastructure Monitoring provides performance and availability monitoring foryour enterprise.
Topics:
• Audience
• Related Resources
• Conventions
Using Oracle Infrastructure Monitoring describes how to use this service to performcommon monitoring and alerting tasks.
AudienceUsing Oracle Infrastructure Monitoring is intended for administrators who want to setup status and performance infrastructure monitoring as well as alerting across theirenterprise.
Documentation AccessibilityFor information about Oracle's commitment to accessibility, visit the OracleAccessibility Program website at http://www.oracle.com/pls/topic/lookup?ctx=acc&id=docacc.
Access to Oracle Support
Oracle customers that have purchased support have access to electronic supportthrough My Oracle Support. For information, visit http://www.oracle.com/pls/topic/lookup?ctx=acc&id=info or visit http://www.oracle.com/pls/topic/lookup?ctx=acc&id=trsif you are hearing impaired.
Related ResourcesFor more information about Oracle Management Cloud see:
• Oracle Cloud
Preface
x

ConventionsTable 1 Text Conventions
Convention Meaning
boldface Boldface type indicates graphical user interfaceelements associated with an action, or terms defined intext or the glossary.
italic Italic type indicates the book titles, emphasis, orplaceholder variables for which you supply particularvalues.
monospace Monospace type indicates commands within aparagraph. URLs, code in examples, text that appearson the screen, or text that you enter.
Preface
xi
1Getting Started with Oracle InfrastructureMonitoring
Topics:
• About Oracle Infrastructure Monitoring
• About Oracle Infrastructure Monitoring Roles and Users
• Configure Oracle Infrastructure Monitoring
About Oracle Infrastructure MonitoringOracle Infrastructure Monitoring is built on Oracle Management Cloud’s secure, unifieddata platform and provides proactive monitoring for your entire IT infrastructure. As anadministrator, you can perform status and health monitoring across tiers and bealerted about issues, troubleshoot and resolve them before they affect users.
Oracle Infrastructure Monitoring simplifies monitoring by offering a common set ofmetrics that allow you to compare performance across various vendor technologies.The functionality also extends to vendor-specific metrics to monitor unique vendorfunctionality. In addition, this service automatically generates alerts when managedentities are down and allows you to create alert rules that specify the metricsthresholds and notifications options.
Here are some common terms and concepts used in Oracle Management Cloudand Oracle Infrastructure Monitoring.
Entity: A monitored resource, such as, a database, a host server, a computeresource, or an application server.
Metrics: A set of parameters and values measured and collected periodically for aparticular system for tracking performance and availability. For a complete list anddescription of all metrics collected for each entity, see List of Supported Entities in theMetric Reference for Oracle Infrastructure Monitoring.
Thresholds: Boundary values that the monitored metric values are compared against.If a metric value crosses a set threshold, then, an alert is raised.
Alerts: Information generated in response to an availability issue or when a metriccrosses its thresholds. Conditions for generating alerts are defined in Alert Rules.Alerts sent to administrators by using various channels, such as, email and SMS areknown as notifications.
Alert rules: A set of rules that define the conditions under which alerts are generatedand notifications sent when an alert is raised. Alert conditions consist of a metric, acomparison operator, and thresholds against which metric values are evaluated.
Cloud Agent: The on-premises interface to Oracle Management Cloud that isconfigured to monitor various entities by collecting status, performance andconfiguration data.
1-1
Gateway: A gateway is a Cloud Agent that acts as a proxy between OracleManagement Cloud and all other Cloud Agents.
Using the Oracle Infrastructure Monitoring, you can:
• Monitor your entire IT infrastructure from a single platform
• Monitor availability and performance across a broad range of infrastructuretechnologies
• Identify potential performance issues within a tier
• Set up alert rules to notify you of availability and performance issues
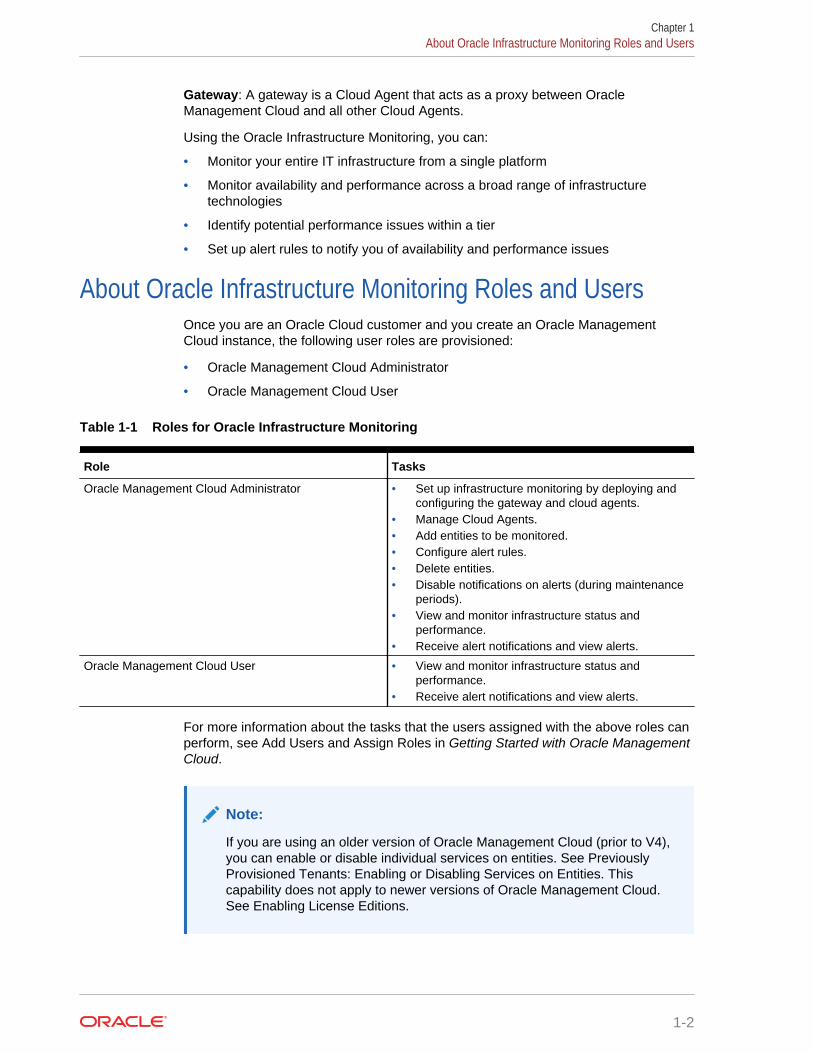
About Oracle Infrastructure Monitoring Roles and UsersOnce you are an Oracle Cloud customer and you create an Oracle ManagementCloud instance, the following user roles are provisioned:
• Oracle Management Cloud Administrator
• Oracle Management Cloud User
Table 1-1 Roles for Oracle Infrastructure Monitoring
Role Tasks
Oracle Management Cloud Administrator • Set up infrastructure monitoring by deploying andconfiguring the gateway and cloud agents.
• Manage Cloud Agents.• Add entities to be monitored.• Configure alert rules.• Delete entities.• Disable notifications on alerts (during maintenance
periods).• View and monitor infrastructure status and
performance.• Receive alert notifications and view alerts.
Oracle Management Cloud User • View and monitor infrastructure status andperformance.
• Receive alert notifications and view alerts.
For more information about the tasks that the users assigned with the above roles canperform, see Add Users and Assign Roles in Getting Started with Oracle ManagementCloud.
Note:
If you are using an older version of Oracle Management Cloud (prior to V4),you can enable or disable individual services on entities. See PreviouslyProvisioned Tenants: Enabling or Disabling Services on Entities. Thiscapability does not apply to newer versions of Oracle Management Cloud.See Enabling License Editions.
Chapter 1About Oracle Infrastructure Monitoring Roles and Users
1-2

Configure Oracle Infrastructure MonitoringOracle Infrastructure Monitoring uses Cloud Agents to monitor entities for availabilitystatus and performance. Cloud Agents are made aware of entities they need tomonitor through the process of adding entities. As an Oracle Infrastructure MonitoringAdministrator, perform the following tasks to add entities to your monitoring service:
Table 1-2 Typical Workflow for Adding Oracle Infrastructure Monitoring Entities
Task Description More Information
Pre-requisite: Deploy Cloud Agents Cloud Agents are deployed formultiple Oracle ManagementServices that require an agent toenable specific functionality. Theagents deployment task is part of theinitial set up of your service. Itincludes the deployment of CloudAgents as well as an optionalgateway that acts as a proxybetween Oracle Management Cloudand all Cloud Agents.
See Installing Oracle ManagementCloud Agents in Installing andManaging Oracle ManagementCloud Agents.
Decide what you want to monitor. Oracle Management Cloud lets youmonitor a wide variety of entity typesacross your IT environment. Identifythe entity types you intend to monitor
Agent-monitored Entity Types andCloud Services
Prepare your entities for monitoring. Most entities require someconfiguration or specific credentialsin order to enable their monitoring.Once you’ve identified the types ofentities to monitor, perform the stepsrequired to allow monitoring on thoseentities.
Prerequisites and MonitoringCredentials
Decide how you want to add entitiesto Infrastructure Monitoring.
Entities can be added toInfrastructure Monitoring in twoways:• Directly from the Oracle
Management Cloud UI.• Using JSON files.
.
Chapter 1Configure Oracle Infrastructure Monitoring
1-3

Table 1-2 (Cont.) Typical Workflow for Adding Oracle Infrastructure Monitoring Entities
Task Description More Information
IF you add entities from the UI: The Oracle Management Cloudconsole provides an intuitiveinterface that simplifies adding oneor a small number of entities.
Note:
Although notallentitytypescan beaddedusingthe UI,the listof UI-enabled entitytypesthatcan beaddedincreases witheachrelease.
Add Entities from the Console
Chapter 1Configure Oracle Infrastructure Monitoring
1-4
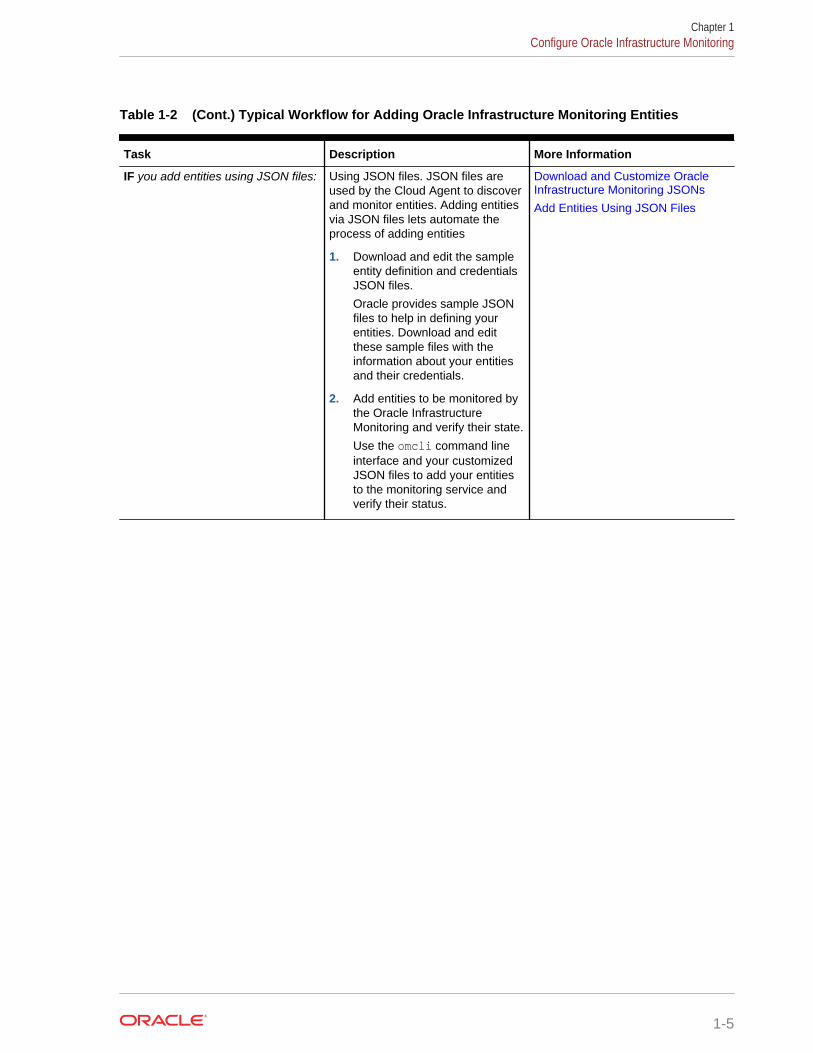
Table 1-2 (Cont.) Typical Workflow for Adding Oracle Infrastructure Monitoring Entities
Task Description More Information
IF you add entities using JSON files: Using JSON files. JSON files areused by the Cloud Agent to discoverand monitor entities. Adding entitiesvia JSON files lets automate theprocess of adding entities
1. Download and edit the sampleentity definition and credentialsJSON files.
Oracle provides sample JSONfiles to help in defining yourentities. Download and editthese sample files with theinformation about your entitiesand their credentials.
2. Add entities to be monitored bythe Oracle InfrastructureMonitoring and verify their state.
Use the omcli command lineinterface and your customizedJSON files to add your entitiesto the monitoring service andverify their status.
Download and Customize OracleInfrastructure Monitoring JSONs
Add Entities Using JSON Files
Chapter 1Configure Oracle Infrastructure Monitoring
1-5
2Add Entities for Infrastructure Monitoring
Adding entities to Oracle Infrastructure Monitoring lets you monitor their performanceand availability via Cloud agents.
Topics:
• Supported Entity Types
• Prerequisites and Monitoring Credentials
• Enable Host Monitoring
• Add Entities from the Console
• Discover Cloud Services
• Discover Oracle Database Systems
• Add Entities Using JSON Files
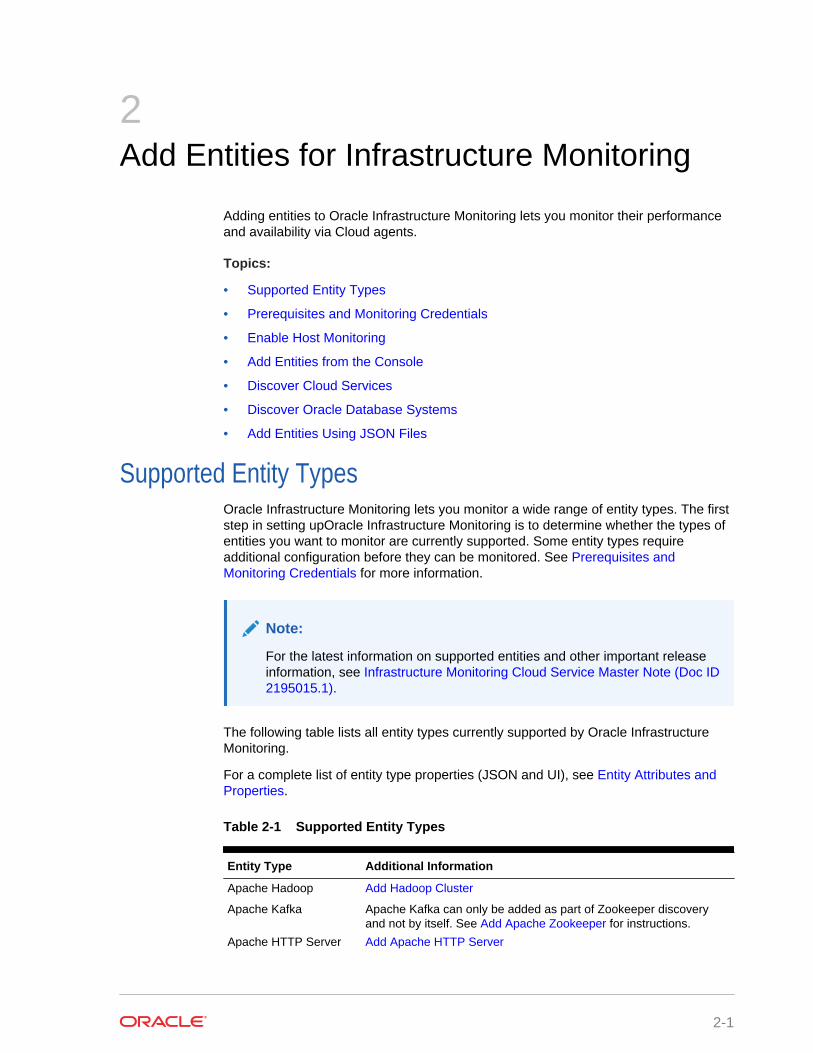
Supported Entity TypesOracle Infrastructure Monitoring lets you monitor a wide range of entity types. The firststep in setting upOracle Infrastructure Monitoring is to determine whether the types ofentities you want to monitor are currently supported. Some entity types requireadditional configuration before they can be monitored. See Prerequisites andMonitoring Credentials for more information.
Note:
For the latest information on supported entities and other important releaseinformation, see Infrastructure Monitoring Cloud Service Master Note (Doc ID2195015.1).
The following table lists all entity types currently supported by Oracle InfrastructureMonitoring.
For a complete list of entity type properties (JSON and UI), see Entity Attributes andProperties.
Table 2-1 Supported Entity Types
Entity Type Additional Information
Apache Hadoop Add Hadoop Cluster
Apache Kafka Apache Kafka can only be added as part of Zookeeper discoveryand not by itself. See Add Apache Zookeeper for instructions.
Apache HTTP Server Add Apache HTTP Server
2-1
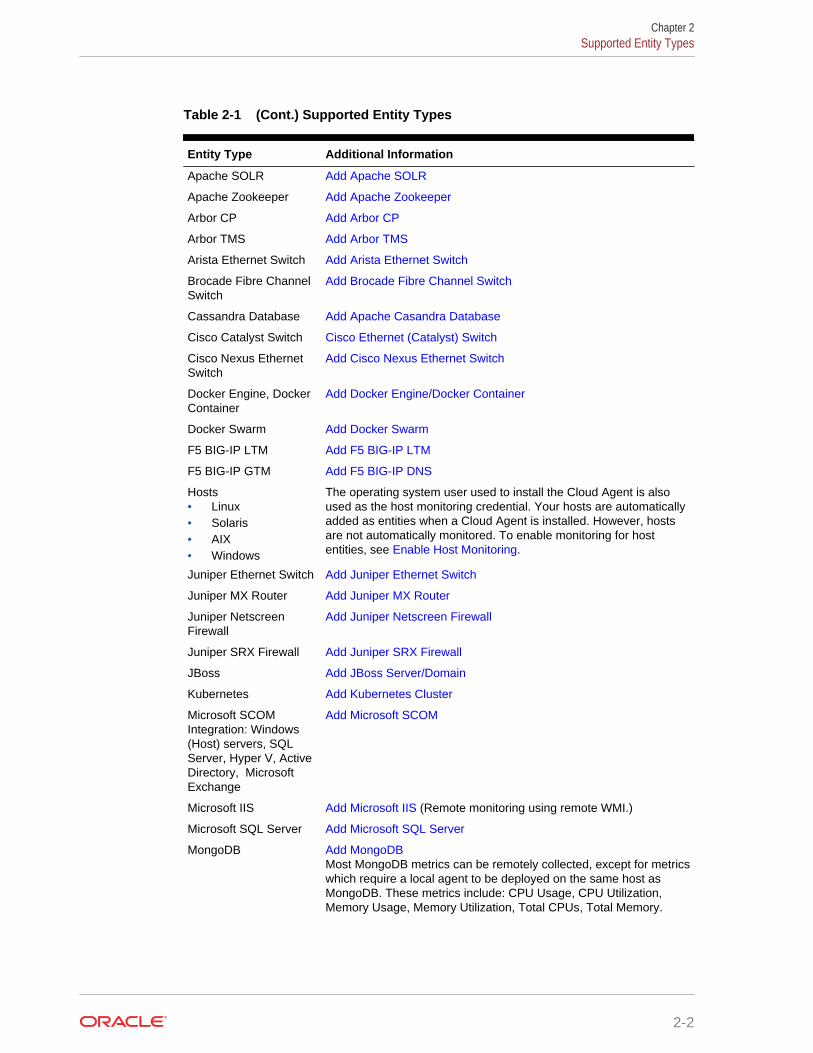
Table 2-1 (Cont.) Supported Entity Types
Entity Type Additional Information
Apache SOLR Add Apache SOLR
Apache Zookeeper Add Apache Zookeeper
Arbor CP Add Arbor CP
Arbor TMS Add Arbor TMS
Arista Ethernet Switch Add Arista Ethernet Switch
Brocade Fibre ChannelSwitch
Add Brocade Fibre Channel Switch
Cassandra Database Add Apache Casandra Database
Cisco Catalyst Switch Cisco Ethernet (Catalyst) Switch
Cisco Nexus EthernetSwitch
Add Cisco Nexus Ethernet Switch
Docker Engine, DockerContainer
Add Docker Engine/Docker Container
Docker Swarm Add Docker Swarm
F5 BIG-IP LTM Add F5 BIG-IP LTM
F5 BIG-IP GTM Add F5 BIG-IP DNS
Hosts• Linux• Solaris• AIX• Windows
The operating system user used to install the Cloud Agent is alsoused as the host monitoring credential. Your hosts are automaticallyadded as entities when a Cloud Agent is installed. However, hostsare not automatically monitored. To enable monitoring for hostentities, see Enable Host Monitoring.
Juniper Ethernet Switch Add Juniper Ethernet Switch
Juniper MX Router Add Juniper MX Router
Juniper NetscreenFirewall
Add Juniper Netscreen Firewall
Juniper SRX Firewall Add Juniper SRX Firewall
JBoss Add JBoss Server/Domain
Kubernetes Add Kubernetes Cluster
Microsoft SCOMIntegration: Windows(Host) servers, SQLServer, Hyper V, ActiveDirectory, MicrosoftExchange
Add Microsoft SCOM
Microsoft IIS Add Microsoft IIS (Remote monitoring using remote WMI.)
Microsoft SQL Server Add Microsoft SQL Server
MongoDB Add MongoDBMost MongoDB metrics can be remotely collected, except for metricswhich require a local agent to be deployed on the same host asMongoDB. These metrics include: CPU Usage, CPU Utilization,Memory Usage, Memory Utilization, Total CPUs, Total Memory.
Chapter 2Supported Entity Types
2-2
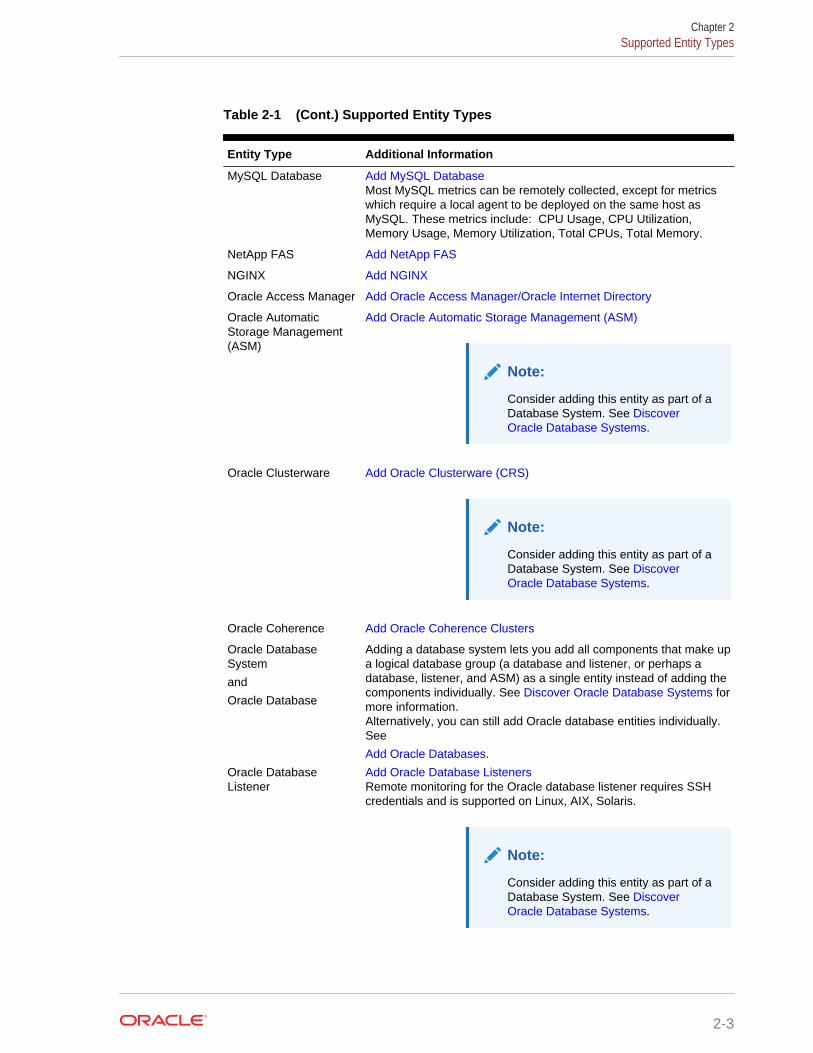
Table 2-1 (Cont.) Supported Entity Types
Entity Type Additional Information
MySQL Database Add MySQL DatabaseMost MySQL metrics can be remotely collected, except for metricswhich require a local agent to be deployed on the same host asMySQL. These metrics include: CPU Usage, CPU Utilization,Memory Usage, Memory Utilization, Total CPUs, Total Memory.
NetApp FAS Add NetApp FAS
NGINX Add NGINX
Oracle Access Manager Add Oracle Access Manager/Oracle Internet Directory
Oracle AutomaticStorage Management(ASM)
Add Oracle Automatic Storage Management (ASM)
Note:
Consider adding this entity as part of aDatabase System. See DiscoverOracle Database Systems.
Oracle Clusterware Add Oracle Clusterware (CRS)
Note:
Consider adding this entity as part of aDatabase System. See DiscoverOracle Database Systems.
Oracle Coherence Add Oracle Coherence Clusters
Oracle DatabaseSystem
and
Oracle Database
Adding a database system lets you add all components that make upa logical database group (a database and listener, or perhaps adatabase, listener, and ASM) as a single entity instead of adding thecomponents individually. See Discover Oracle Database Systems formore information.Alternatively, you can still add Oracle database entities individually.See
Add Oracle Databases.
Oracle DatabaseListener
Add Oracle Database ListenersRemote monitoring for the Oracle database listener requires SSHcredentials and is supported on Linux, AIX, Solaris.
Note:
Consider adding this entity as part of aDatabase System. See DiscoverOracle Database Systems.
Chapter 2Supported Entity Types
2-3
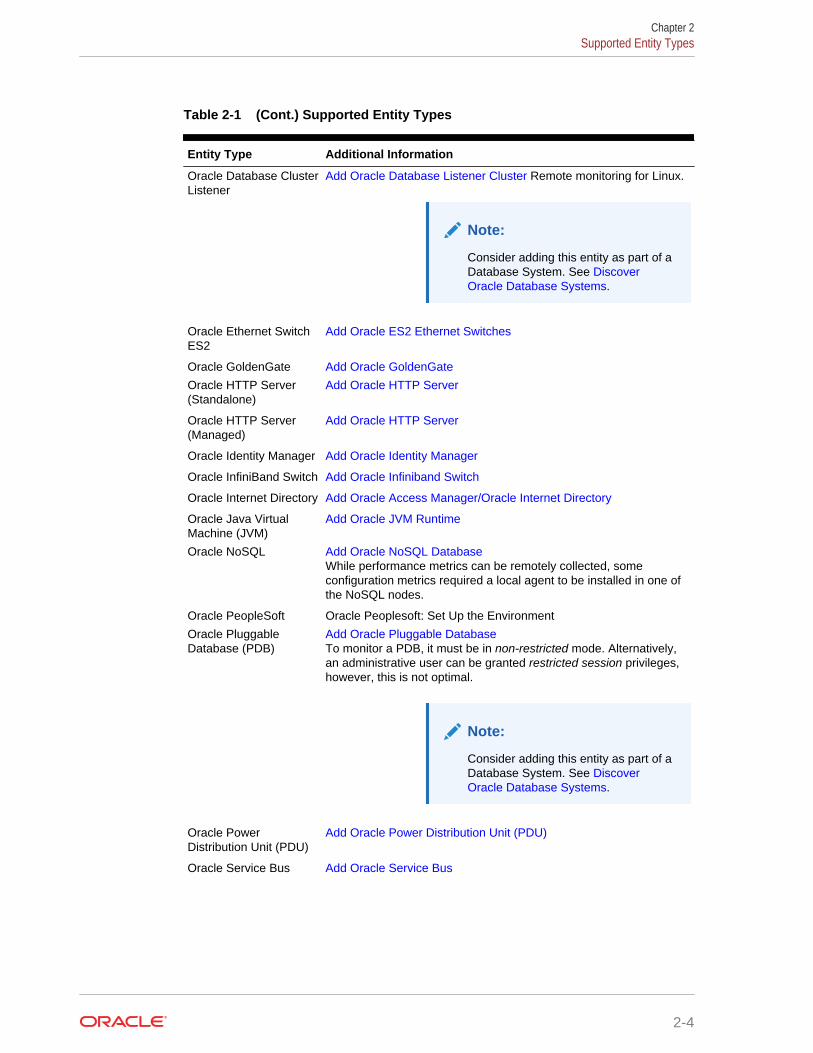
Table 2-1 (Cont.) Supported Entity Types
Entity Type Additional Information
Oracle Database ClusterListener
Add Oracle Database Listener Cluster Remote monitoring for Linux.
Note:
Consider adding this entity as part of aDatabase System. See DiscoverOracle Database Systems.
Oracle Ethernet SwitchES2
Add Oracle ES2 Ethernet Switches
Oracle GoldenGate Add Oracle GoldenGate
Oracle HTTP Server(Standalone)
Add Oracle HTTP Server
Oracle HTTP Server(Managed)
Add Oracle HTTP Server
Oracle Identity Manager Add Oracle Identity Manager
Oracle InfiniBand Switch Add Oracle Infiniband Switch
Oracle Internet Directory Add Oracle Access Manager/Oracle Internet Directory
Oracle Java VirtualMachine (JVM)
Add Oracle JVM Runtime
Oracle NoSQL Add Oracle NoSQL DatabaseWhile performance metrics can be remotely collected, someconfiguration metrics required a local agent to be installed in one ofthe NoSQL nodes.
Oracle PeopleSoft Oracle Peoplesoft: Set Up the Environment
Oracle PluggableDatabase (PDB)
Add Oracle Pluggable DatabaseTo monitor a PDB, it must be in non-restricted mode. Alternatively,an administrative user can be granted restricted session privileges,however, this is not optimal.
Note:
Consider adding this entity as part of aDatabase System. See DiscoverOracle Database Systems.
Oracle PowerDistribution Unit (PDU)
Add Oracle Power Distribution Unit (PDU)
Oracle Service Bus Add Oracle Service Bus
Chapter 2Supported Entity Types
2-4
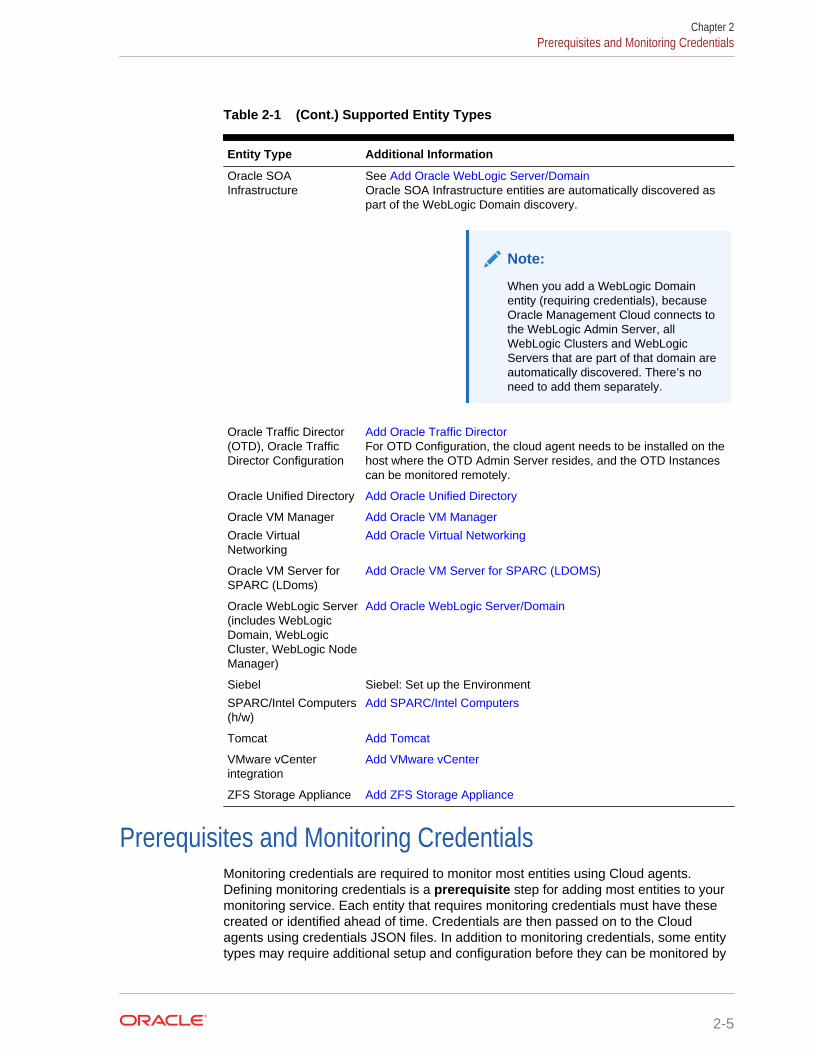
Table 2-1 (Cont.) Supported Entity Types
Entity Type Additional Information
Oracle SOAInfrastructure
See Add Oracle WebLogic Server/DomainOracle SOA Infrastructure entities are automatically discovered aspart of the WebLogic Domain discovery.
Note:
When you add a WebLogic Domainentity (requiring credentials), becauseOracle Management Cloud connects tothe WebLogic Admin Server, allWebLogic Clusters and WebLogicServers that are part of that domain areautomatically discovered. There’s noneed to add them separately.
Oracle Traffic Director(OTD), Oracle TrafficDirector Configuration
Add Oracle Traffic DirectorFor OTD Configuration, the cloud agent needs to be installed on thehost where the OTD Admin Server resides, and the OTD Instancescan be monitored remotely.
Oracle Unified Directory Add Oracle Unified Directory
Oracle VM Manager Add Oracle VM Manager
Oracle VirtualNetworking
Add Oracle Virtual Networking
Oracle VM Server forSPARC (LDoms)
Add Oracle VM Server for SPARC (LDOMS)
Oracle WebLogic Server(includes WebLogicDomain, WebLogicCluster, WebLogic NodeManager)
Add Oracle WebLogic Server/Domain
Siebel Siebel: Set up the Environment
SPARC/Intel Computers(h/w)
Add SPARC/Intel Computers
Tomcat Add Tomcat
VMware vCenterintegration
Add VMware vCenter
ZFS Storage Appliance Add ZFS Storage Appliance
Prerequisites and Monitoring CredentialsMonitoring credentials are required to monitor most entities using Cloud agents.Defining monitoring credentials is a prerequisite step for adding most entities to yourmonitoring service. Each entity that requires monitoring credentials must have thesecreated or identified ahead of time. Credentials are then passed on to the Cloudagents using credentials JSON files. In addition to monitoring credentials, some entitytypes may require additional setup and configuration before they can be monitored by
Chapter 2Prerequisites and Monitoring Credentials
2-5

Infrastructure Monitoring. The following table provides links to prerequisite andmonitoring credential information.
Entity Type Entity
Hosts • Host• Fujitsu Server• Intel/SPARC Computers
Virtual Servers • Oracle VM Server for SPARC (LDoms)• Docker Engine / Docker Container• XEN Virtual Platform / XEN Virtual Server
Oracle DB SystemsProvides single-step discovery of the OracleDB and all related entities, such as DB, PDB,Clusterware, and Listeners
• For more information about discoveringOracle DB Systems, see Discover OracleDatabase Systems.
Relational Databases • Oracle Database• Oracle NoSQL• AWS-RDS Oracle DB• MySQL Database• Microsoft SQL Server
NoSQL Databases • Apache Cassandra DB• MongoDB Database
Storage Management • Oracle Flash Storage• Oracle Automatic Storage Management
(ASM)
Java Application Servers • Tomcat• JBOSS
Java EE Application Servers • Oracle Service Bus• Oracle WebLogic Server (includes
WebLogic Domain and WebLogic Cluster)
Web Application Servers • Apache HTTP Server• Oracle HTTP Server (OHS)• Microsoft Internet Information Services
(IIS)
Load Balancers • Oracle Traffic Director (OTD)• F5 BIG-IP LTM
Physical Switches • Arista Ethernet Switch• Cisco Ethernet (Catalyst) Switch• Cisco Nexus Ethernet Switch• Juniper Ethernet Switch• Oracle Infiniband Switch• Brocade Fibre Channel Switch• ES2 Ethernet Switch
Applications • SCOM (System Center OperationsManager)
• VMware vCenter• Docker Swarm• Oracle Access Manager (OAM)• Oracle Clusterware (CRS)• Oracle E-Business Suite (Workflow for
Setting up the Environment)• Oracle VM Manager
Chapter 2Prerequisites and Monitoring Credentials
2-6
Entity Type Entity
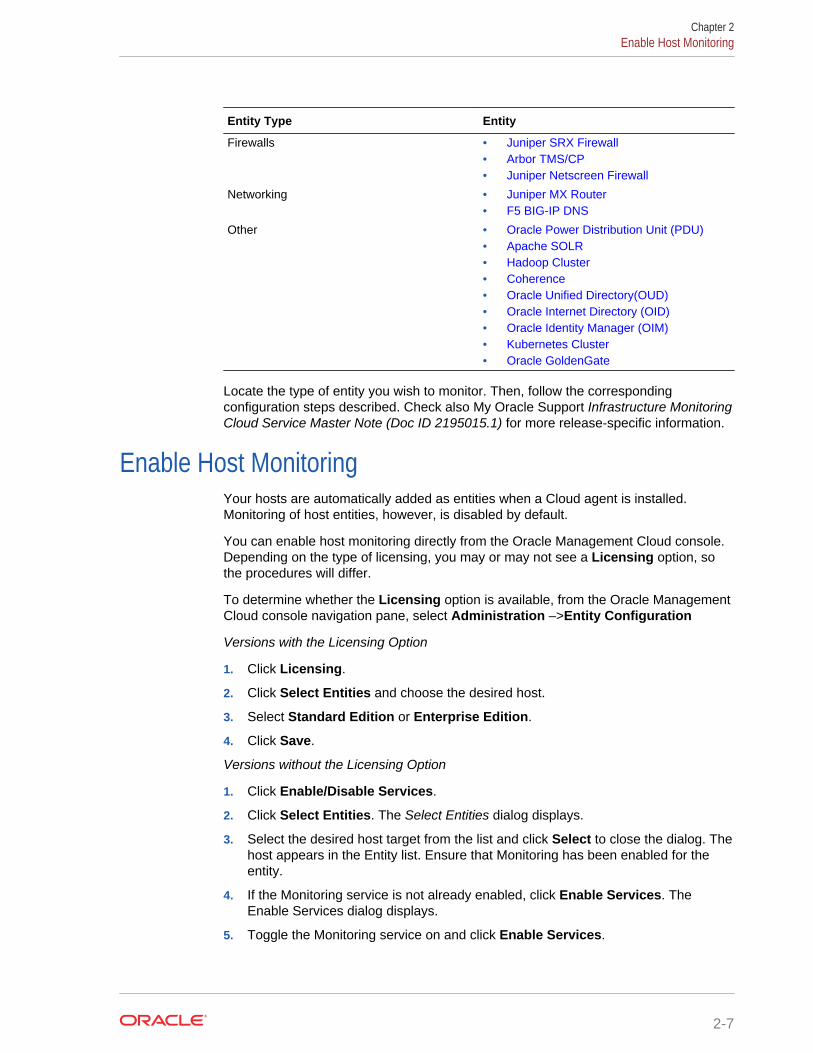
Firewalls • Juniper SRX Firewall• Arbor TMS/CP• Juniper Netscreen Firewall
Networking • Juniper MX Router• F5 BIG-IP DNS
Other • Oracle Power Distribution Unit (PDU)• Apache SOLR• Hadoop Cluster• Coherence• Oracle Unified Directory(OUD)• Oracle Internet Directory (OID)• Oracle Identity Manager (OIM)• Kubernetes Cluster• Oracle GoldenGate
Locate the type of entity you wish to monitor. Then, follow the correspondingconfiguration steps described. Check also My Oracle Support Infrastructure MonitoringCloud Service Master Note (Doc ID 2195015.1) for more release-specific information.
Enable Host MonitoringYour hosts are automatically added as entities when a Cloud agent is installed.Monitoring of host entities, however, is disabled by default.
You can enable host monitoring directly from the Oracle Management Cloud console.Depending on the type of licensing, you may or may not see a Licensing option, sothe procedures will differ.
To determine whether the Licensing option is available, from the Oracle ManagementCloud console navigation pane, select Administration –>Entity Configuration
Versions with the Licensing Option
1. Click Licensing.
2. Click Select Entities and choose the desired host.
3. Select Standard Edition or Enterprise Edition.
4. Click Save.
Versions without the Licensing Option
1. Click Enable/Disable Services.
2. Click Select Entities. The Select Entities dialog displays.
3. Select the desired host target from the list and click Select to close the dialog. Thehost appears in the Entity list. Ensure that Monitoring has been enabled for theentity.
4. If the Monitoring service is not already enabled, click Enable Services. TheEnable Services dialog displays.
5. Toggle the Monitoring service on and click Enable Services.
Chapter 2Enable Host Monitoring
2-7
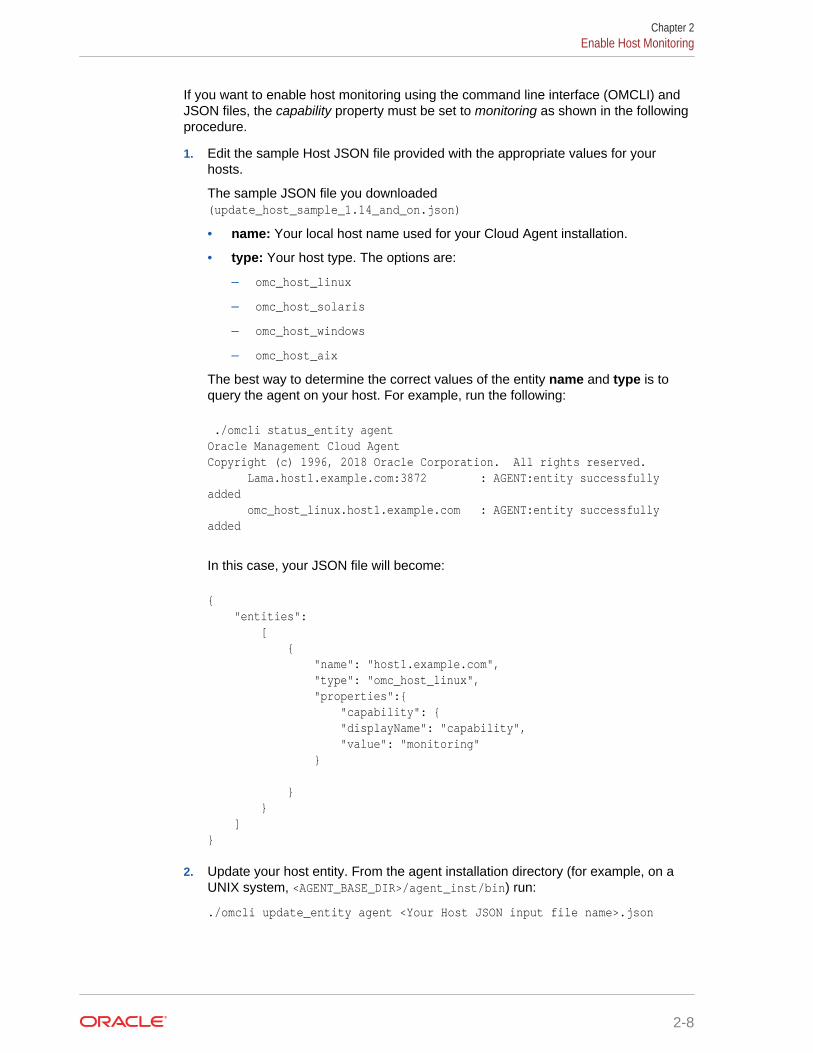
If you want to enable host monitoring using the command line interface (OMCLI) andJSON files, the capability property must be set to monitoring as shown in the followingprocedure.
1. Edit the sample Host JSON file provided with the appropriate values for yourhosts.
The sample JSON file you downloaded(update_host_sample_1.14_and_on.json)
• name: Your local host name used for your Cloud Agent installation.
• type: Your host type. The options are:
– omc_host_linux
– omc_host_solaris
– omc_host_windows
– omc_host_aix
The best way to determine the correct values of the entity name and type is toquery the agent on your host. For example, run the following:
./omcli status_entity agentOracle Management Cloud Agent Copyright (c) 1996, 2018 Oracle Corporation. All rights reserved. Lama.host1.example.com:3872 : AGENT:entity successfully added omc_host_linux.host1.example.com : AGENT:entity successfully added
In this case, your JSON file will become:
{ "entities": [ { "name": "host1.example.com", "type": "omc_host_linux", "properties":{ "capability": { "displayName": "capability", "value": "monitoring" }
} } ]}
2. Update your host entity. From the agent installation directory (for example, on aUNIX system, <AGENT_BASE_DIR>/agent_inst/bin) run:
./omcli update_entity agent <Your Host JSON input file name>.json
Chapter 2Enable Host Monitoring
2-8
For example,
./omcli update_entity agent update_host_host1.json
If you have an HA configuration (a virtual host with two or more physical hostsconfigured with failover software) note the following:
• Your Cloud agents must be installed on all hosts (virtual and physical hosts).
• The Cloud agents on your physical hosts will monitor the host entities. Therefore,the steps listed above to enable host monitoring must be performed on thephysical hosts.
• The other entities you want monitored must be added using the Cloud agent onthe virtual host.
Add Entities from the ConsoleFor entities that are monitored by Cloud Agents, you can alternatively add themdirectly from the Oracle Management Cloud Add Entities page. This greatly simplifiesthe entity addition process.
When adding an entity from the UI, the entity-specific properties are submitted as anOracle Management Cloud discovery job. For more information about specific entityattributes and properties, see Entity Attributes and Properties. The new entity will beadded upon successful completion of the job.
Note:
Not all agent-monitored entity types can be added using the OracleManagement Cloud console. For entity types not available as a selectableoption, you will need to add them manually using the Oracle ManagementCloud command line interface (omcli). See Add Entities Using JSON Files.
Adding an Entity
To add an entity from the Add Entity page.
1. From the Management Cloud main menu, select Administration, Discovery, andthen Add Entity. The Add Entity page displays.
2. Select an Entity Type. Property and monitoring credential fields specific to theselected entity type are displayed as shown in the following graphic.
Chapter 2Add Entities from the Console
2-9
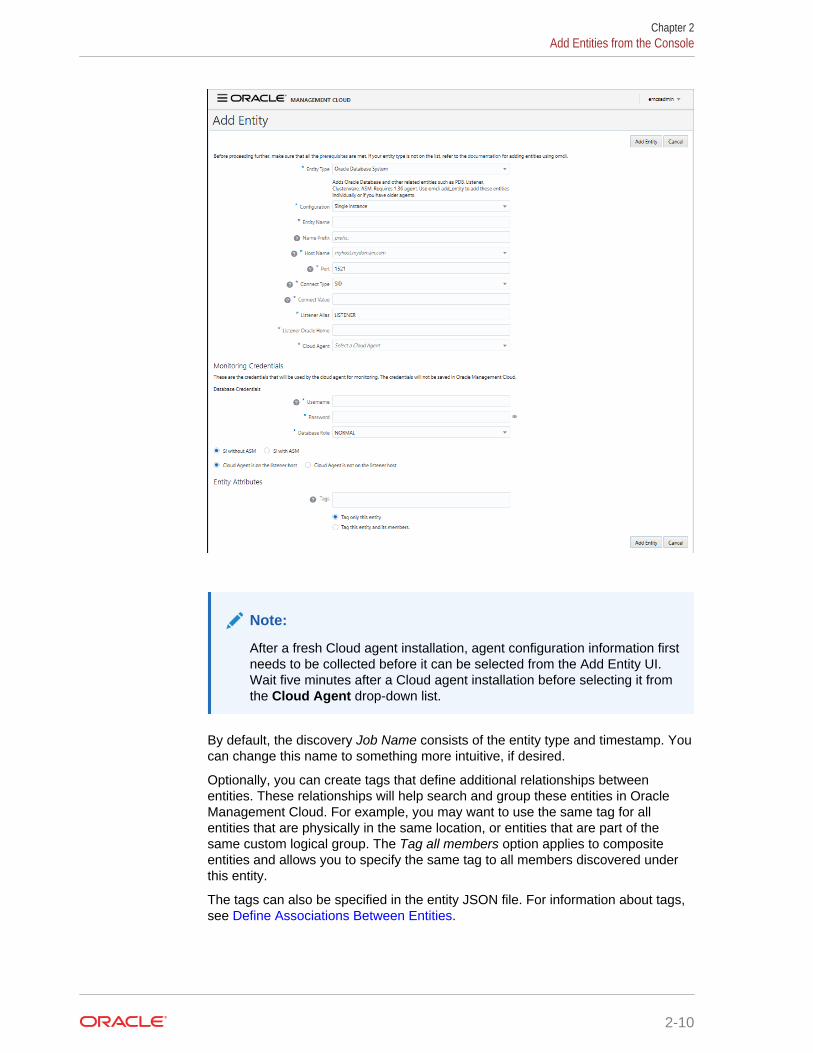
Note:
After a fresh Cloud agent installation, agent configuration information firstneeds to be collected before it can be selected from the Add Entity UI.Wait five minutes after a Cloud agent installation before selecting it fromthe Cloud Agent drop-down list.
By default, the discovery Job Name consists of the entity type and timestamp. Youcan change this name to something more intuitive, if desired.
Optionally, you can create tags that define additional relationships betweenentities. These relationships will help search and group these entities in OracleManagement Cloud. For example, you may want to use the same tag for allentities that are physically in the same location, or entities that are part of thesame custom logical group. The Tag all members option applies to compositeentities and allows you to specify the same tag to all members discovered underthis entity.
The tags can also be specified in the entity JSON file. For information about tags,see Define Associations Between Entities.
Chapter 2Add Entities from the Console
2-10
Note:
If you cannot find the desired entity type from the drop-down list, youmay have to add the entity using omcli. See Add Entities Using JSONFiles.
3. Enter the requisite properties, monitoring credentials, and tags if desired. Theentity properties shown on this page mirror those found in the entity type’s JSONfile. See Entity Attributes and Properties for more information about entity typeproperties.
4. Click Add Entity. You are returned to the Discovery Job Status page. The entityaddition job name specified in step 3 will appear in the table.
From the Discovery Job Status page, you can view the current status of entity additionattempts. Entity status can be one of the following:
• Success - This is a terminal state where the discovery job is a success.
• Submitted - This is the initial state when the discovery job has just beensubmitted.
• In Progress - This is the state when the discovery is on-going.
• Failure - This is a terminal state when the discovery job has failed.
• Success with warnings - This is a terminal state where entity discovery hassucceeded but there are some warnings.
For entity discovery jobs with a Failed or Warning status, Retry appears in the Actioncolumn. Clicking Retry will open up the Add Entity page populated with parameters(except monitoring credentials) that were used when the entity was originally added.This allows you to quickly make any corrections and resubmit the entity discovery jobwithout having to enter all the parameters.
Prerequisite Checks
When the discovery job is run, prerequisite checks are automatically performed forcertain entity types. You can view the output of the prerequisite checks by clicking onthe discovery job status for that entity. The output contains valuable information thatcan help you diagnose discovery job failures.
Chapter 2Add Entities from the Console
2-11
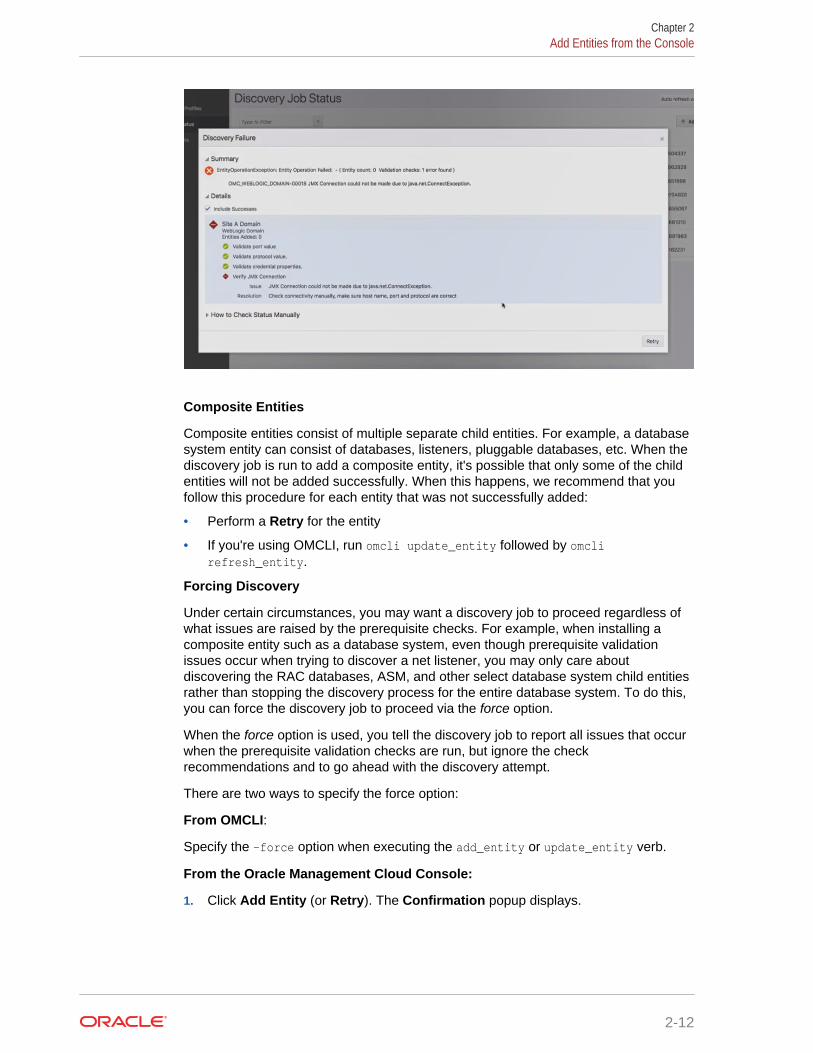
Composite Entities
Composite entities consist of multiple separate child entities. For example, a databasesystem entity can consist of databases, listeners, pluggable databases, etc. When thediscovery job is run to add a composite entity, it's possible that only some of the childentities will not be added successfully. When this happens, we recommend that youfollow this procedure for each entity that was not successfully added:
• Perform a Retry for the entity
• If you're using OMCLI, run omcli update_entity followed by omclirefresh_entity.
Forcing Discovery
Under certain circumstances, you may want a discovery job to proceed regardless ofwhat issues are raised by the prerequisite checks. For example, when installing acomposite entity such as a database system, even though prerequisite validationissues occur when trying to discover a net listener, you may only care aboutdiscovering the RAC databases, ASM, and other select database system child entitiesrather than stopping the discovery process for the entire database system. To do this,you can force the discovery job to proceed via the force option.
When the force option is used, you tell the discovery job to report all issues that occurwhen the prerequisite validation checks are run, but ignore the checkrecommendations and to go ahead with the discovery attempt.
There are two ways to specify the force option:
From OMCLI:
Specify the -force option when executing the add_entity or update_entity verb.
From the Oracle Management Cloud Console:
1. Click Add Entity (or Retry). The Confirmation popup displays.
Chapter 2Add Entities from the Console
2-12
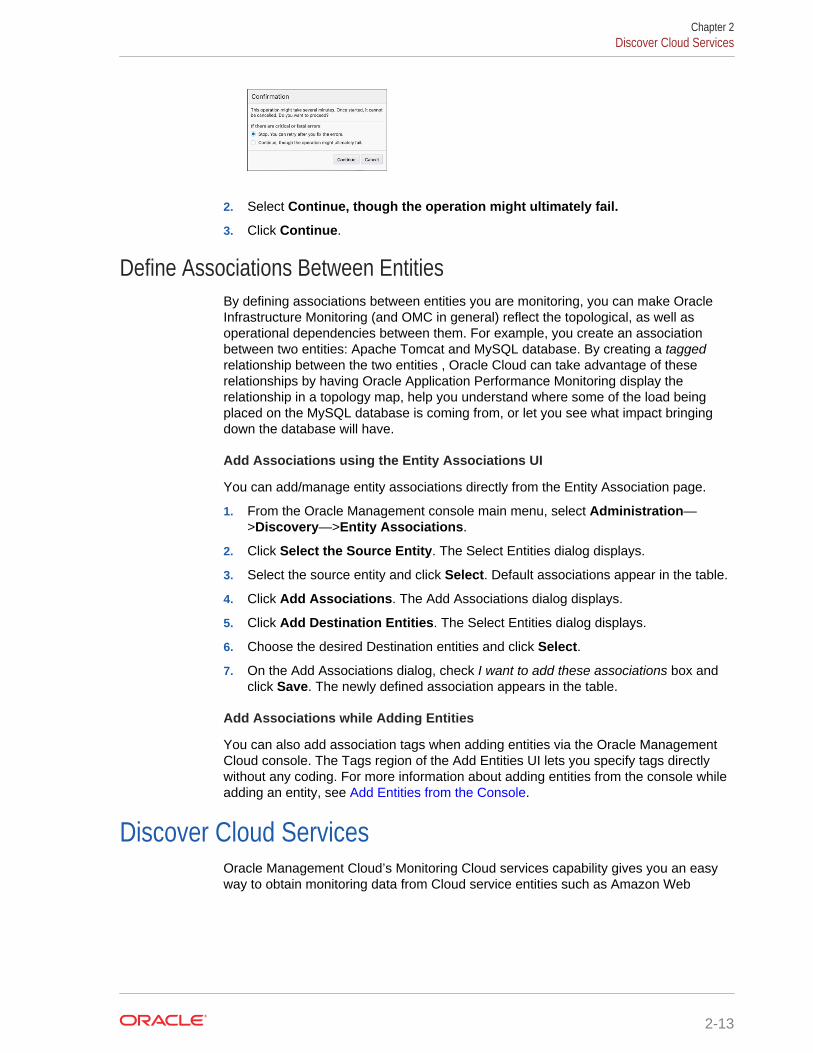
2. Select Continue, though the operation might ultimately fail.
3. Click Continue.
Define Associations Between EntitiesBy defining associations between entities you are monitoring, you can make OracleInfrastructure Monitoring (and OMC in general) reflect the topological, as well asoperational dependencies between them. For example, you create an associationbetween two entities: Apache Tomcat and MySQL database. By creating a taggedrelationship between the two entities , Oracle Cloud can take advantage of theserelationships by having Oracle Application Performance Monitoring display therelationship in a topology map, help you understand where some of the load beingplaced on the MySQL database is coming from, or let you see what impact bringingdown the database will have.
Add Associations using the Entity Associations UI
You can add/manage entity associations directly from the Entity Association page.
1. From the Oracle Management console main menu, select Administration—>Discovery—>Entity Associations.
2. Click Select the Source Entity. The Select Entities dialog displays.
3. Select the source entity and click Select. Default associations appear in the table.
4. Click Add Associations. The Add Associations dialog displays.
5. Click Add Destination Entities. The Select Entities dialog displays.
6. Choose the desired Destination entities and click Select.
7. On the Add Associations dialog, check I want to add these associations box andclick Save. The newly defined association appears in the table.
Add Associations while Adding Entities
You can also add association tags when adding entities via the Oracle ManagementCloud console. The Tags region of the Add Entities UI lets you specify tags directlywithout any coding. For more information about adding entities from the console whileadding an entity, see Add Entities from the Console.
Discover Cloud ServicesOracle Management Cloud’s Monitoring Cloud services capability gives you an easyway to obtain monitoring data from Cloud service entities such as Amazon Web
Chapter 2Discover Cloud Services
2-13
Services or Microsoft Azure. By defining a monitoring Discovery Profile that is used toaccess the desired service, you can monitor Cloud services with minimal setup.
About Monitoring Cloud Services
To monitor a Cloud service, you first create a Cloud Discovery Profile. This profiledefines Cloud service account information required to discover services and monitorthem as entities. Monitoring of Cloud services automatically starts as soon as theservices are discovered. Every 15 minutes, Oracle Management Cloud automaticallychecks for new services and also automatically polls metric data from your monitoredservices. Once the Cloud services are discovered, and status and performancemetrics have been collected, monitoring features such as alerting and notifications willbe automatically applied to the Cloud services.
Adding a Cloud Service
You add Cloud services by defining a Cloud Discovery Profile.
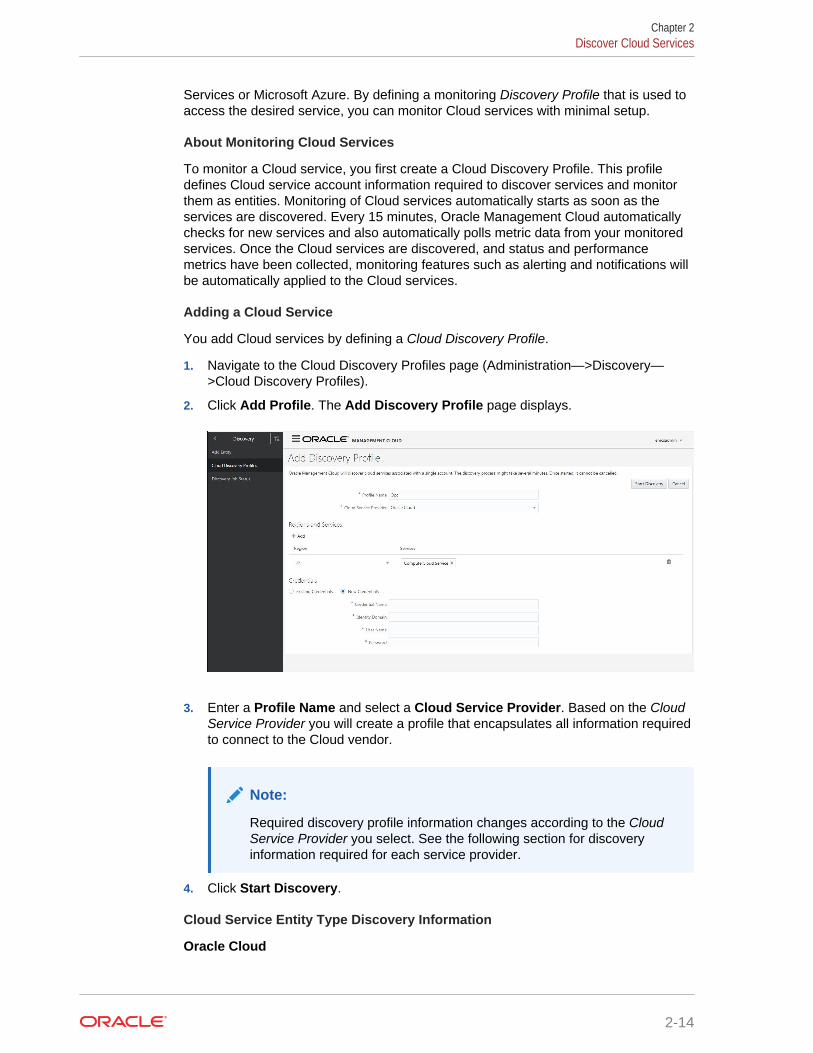
1. Navigate to the Cloud Discovery Profiles page (Administration—>Discovery—>Cloud Discovery Profiles).
2. Click Add Profile. The Add Discovery Profile page displays.
3. Enter a Profile Name and select a Cloud Service Provider. Based on the CloudService Provider you will create a profile that encapsulates all information requiredto connect to the Cloud vendor.
Note:
Required discovery profile information changes according to the CloudService Provider you select. See the following section for discoveryinformation required for each service provider.
4. Click Start Discovery.
Cloud Service Entity Type Discovery Information
Oracle Cloud
Chapter 2Discover Cloud Services
2-14
• Regions and Services
– Region: Region in which your services are enabled. US or Europe
– Service: Services enrolled in Oracle Public Cloud that are to be monitored byOracle Management Cloud.
• Credentials
– Credential Name: Any name for the credentials account.
– Identity Domain: If you are using the traditional account, specify the IdentityDomain. If you are using an Identity Cloud Service (IDCS)-based account,specify the Identity Service ID. This would be of the form idcs-<GUID>.
– Username: Username from Oracle Public Cloud.
– Password: Password from Oracle Public Cloud.
Using Cloud Discovery Profiles with Single Sign-on
Note:
For monitoring via cloud profiles, only Oracle Compute is supported.Database Cloud Service and Java Cloud Service can be discovered viaCloud profiles but they are only supported for Compliance Service. Tomonitor (unmanaged) DBCS and JCS, you should use the cloud agent tomonitor it like an Oracle database and WebLogic Server.
If IDCS single sign-on has been enabled, you will need to perform the followingprocedures in order to enable monitoring using these IDCS-based accounts.
Find the Identity Domain to be provided for adding Oracle Public Cloud (OPC)profiles for an IDCS-based account:
1. Log in and navigate to the MyServices page https://myservices-<tenantid>..console.oraclecloud.com/mycloud/cloudportal/dashboard
2. Click Customize Dashboard and select Identity Cloud from the drop-down list.
3. In the overview page, search for Identity Service Id. This corresponds to theIDCS GUID that should be used when creating OPC cloud profiles.
For an IDCS-based user account, grant the Monitoring_ApiAcess privilege to theuser:
1. Log in and navigate to the MyServices page https://myservices-<tenantid>.console.oraclecloud.com/mycloud/cloudportal/dashboard
2. At the upper-right corner, click Users.
3. Navigate to the tab Groups.
4. Click Add and create a group with name Monitoring_ApiAccess (if the group doesnot exist already)
5. Click on the created group.
6. Navigate to the tab Users.
7. Click Add To Group at the right side. This lists all the existing users. Select theuser for which you want to grant access to this group and click Add.
Chapter 2Discover Cloud Services
2-15
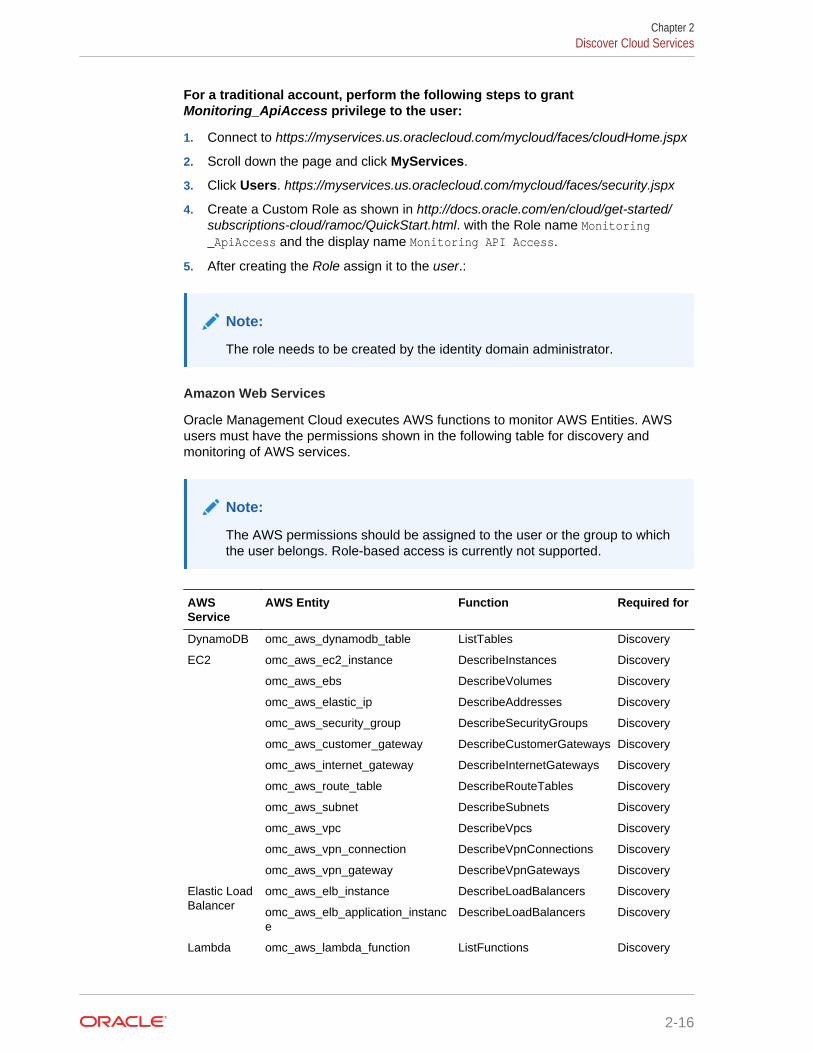
For a traditional account, perform the following steps to grantMonitoring_ApiAccess privilege to the user:
1. Connect to https://myservices.us.oraclecloud.com/mycloud/faces/cloudHome.jspx
2. Scroll down the page and click MyServices.
3. Click Users. https://myservices.us.oraclecloud.com/mycloud/faces/security.jspx
4. Create a Custom Role as shown in http://docs.oracle.com/en/cloud/get-started/subscriptions-cloud/ramoc/QuickStart.html. with the Role name Monitoring_ApiAccess and the display name Monitoring API Access.
5. After creating the Role assign it to the user.:
Note:
The role needs to be created by the identity domain administrator.
Amazon Web Services
Oracle Management Cloud executes AWS functions to monitor AWS Entities. AWSusers must have the permissions shown in the following table for discovery andmonitoring of AWS services.
Note:
The AWS permissions should be assigned to the user or the group to whichthe user belongs. Role-based access is currently not supported.
AWSService
AWS Entity Function Required for
DynamoDB omc_aws_dynamodb_table ListTables Discovery
EC2 omc_aws_ec2_instance DescribeInstances Discovery
omc_aws_ebs DescribeVolumes Discovery
omc_aws_elastic_ip DescribeAddresses Discovery
omc_aws_security_group DescribeSecurityGroups Discovery
omc_aws_customer_gateway DescribeCustomerGateways Discovery
omc_aws_internet_gateway DescribeInternetGateways Discovery
omc_aws_route_table DescribeRouteTables Discovery
omc_aws_subnet DescribeSubnets Discovery
omc_aws_vpc DescribeVpcs Discovery
omc_aws_vpn_connection DescribeVpnConnections Discovery
omc_aws_vpn_gateway DescribeVpnGateways Discovery
Elastic LoadBalancer
omc_aws_elb_instance DescribeLoadBalancers Discovery
omc_aws_elb_application_instance
DescribeLoadBalancers Discovery
Lambda omc_aws_lambda_function ListFunctions Discovery
Chapter 2Discover Cloud Services
2-16
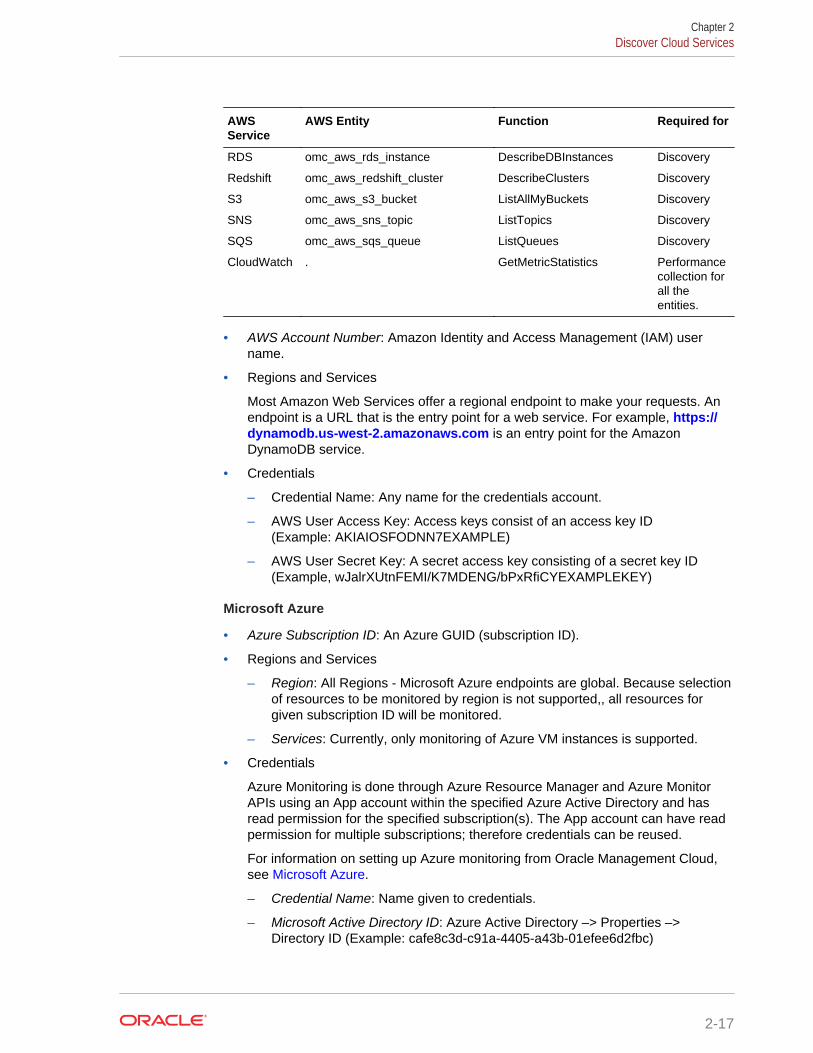
AWSService
AWS Entity Function Required for
RDS omc_aws_rds_instance DescribeDBInstances Discovery
Redshift omc_aws_redshift_cluster DescribeClusters Discovery
S3 omc_aws_s3_bucket ListAllMyBuckets Discovery
SNS omc_aws_sns_topic ListTopics Discovery
SQS omc_aws_sqs_queue ListQueues Discovery
CloudWatch . GetMetricStatistics Performancecollection forall theentities.
• AWS Account Number: Amazon Identity and Access Management (IAM) username.
• Regions and Services
Most Amazon Web Services offer a regional endpoint to make your requests. Anendpoint is a URL that is the entry point for a web service. For example, https://dynamodb.us-west-2.amazonaws.com is an entry point for the AmazonDynamoDB service.
• Credentials
– Credential Name: Any name for the credentials account.
– AWS User Access Key: Access keys consist of an access key ID(Example: AKIAIOSFODNN7EXAMPLE)
– AWS User Secret Key: A secret access key consisting of a secret key ID(Example, wJalrXUtnFEMI/K7MDENG/bPxRfiCYEXAMPLEKEY)
Microsoft Azure
• Azure Subscription ID: An Azure GUID (subscription ID).
• Regions and Services
– Region: All Regions - Microsoft Azure endpoints are global. Because selectionof resources to be monitored by region is not supported,, all resources forgiven subscription ID will be monitored.
– Services: Currently, only monitoring of Azure VM instances is supported.
• Credentials
Azure Monitoring is done through Azure Resource Manager and Azure MonitorAPIs using an App account within the specified Azure Active Directory and hasread permission for the specified subscription(s). The App account can have readpermission for multiple subscriptions; therefore credentials can be reused.
For information on setting up Azure monitoring from Oracle Management Cloud,see Microsoft Azure.
– Credential Name: Name given to credentials.
– Microsoft Active Directory ID: Azure Active Directory –> Properties –>Directory ID (Example: cafe8c3d-c91a-4405-a43b-01efee6d2fbc)
Chapter 2Discover Cloud Services
2-17
– Microsoft Active Directory Application ID: Azure Active Directory –> Appregistrations –> App / APPLICATION ID (Example: cafef0f5-f431-4c8b-9ee3-22524407ce69)
– Microsoft Active Directory Application Key: Displayed on the registration of theApp in the Azure Active Directory
Chapter 2Discover Cloud Services
2-18
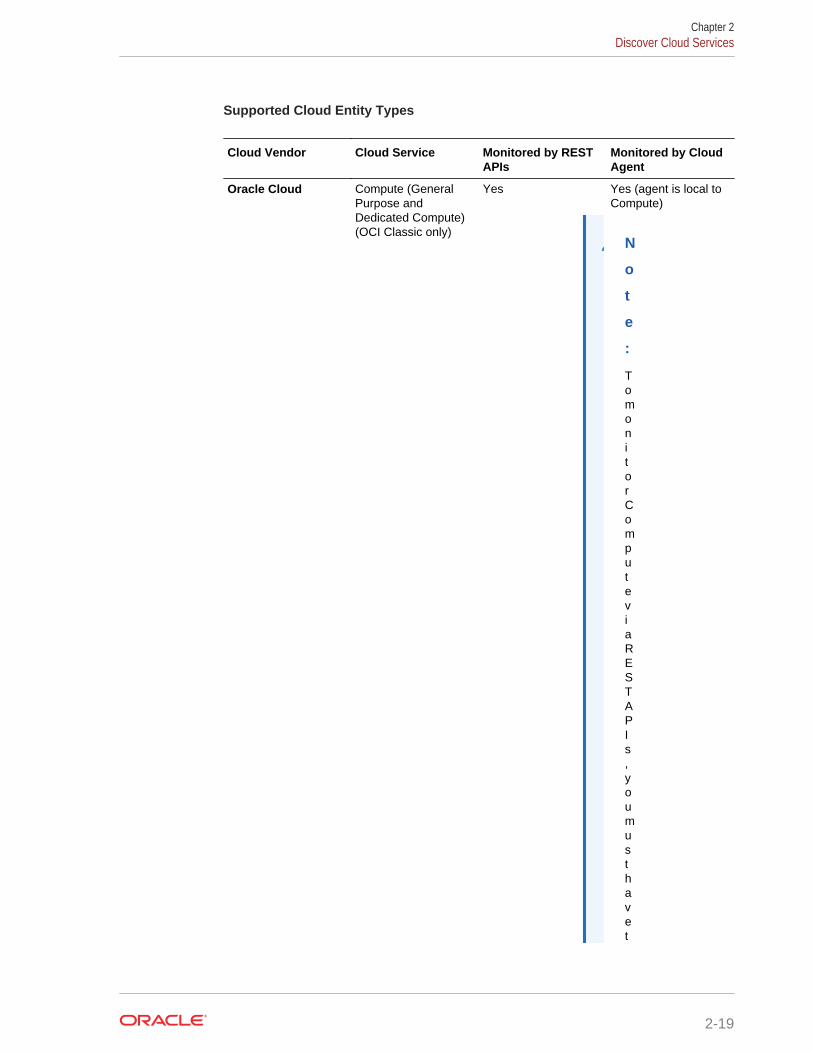
Supported Cloud Entity Types
Cloud Vendor Cloud Service Monitored by RESTAPIs
Monitored by CloudAgent
Oracle Cloud Compute (GeneralPurpose andDedicated Compute)(OCI Classic only)
Yes
N
o
t
e
:
TomonitorComputeviaRESTAPIs,youmusthavet
Yes (agent is local toCompute)
Chapter 2Discover Cloud Services
2-19

Cloud Vendor Cloud Service Monitored by RESTAPIs
Monitored by CloudAgent
heMonitoring_apiAccess
role.Therearetwowaystoperformth
Chapter 2Discover Cloud Services
2-20
Cloud Vendor Cloud Service Monitored by RESTAPIs
Monitored by CloudAgent
isactiondependingonwhetheryouareusingatraditionalaccou
Chapter 2Discover Cloud Services
2-21
Cloud Vendor Cloud Service Monitored by RESTAPIs
Monitored by CloudAgent
ntoraIDCS-basedaccount.Formoreinformation,seeQuickStart
Chapter 2Discover Cloud Services
2-22
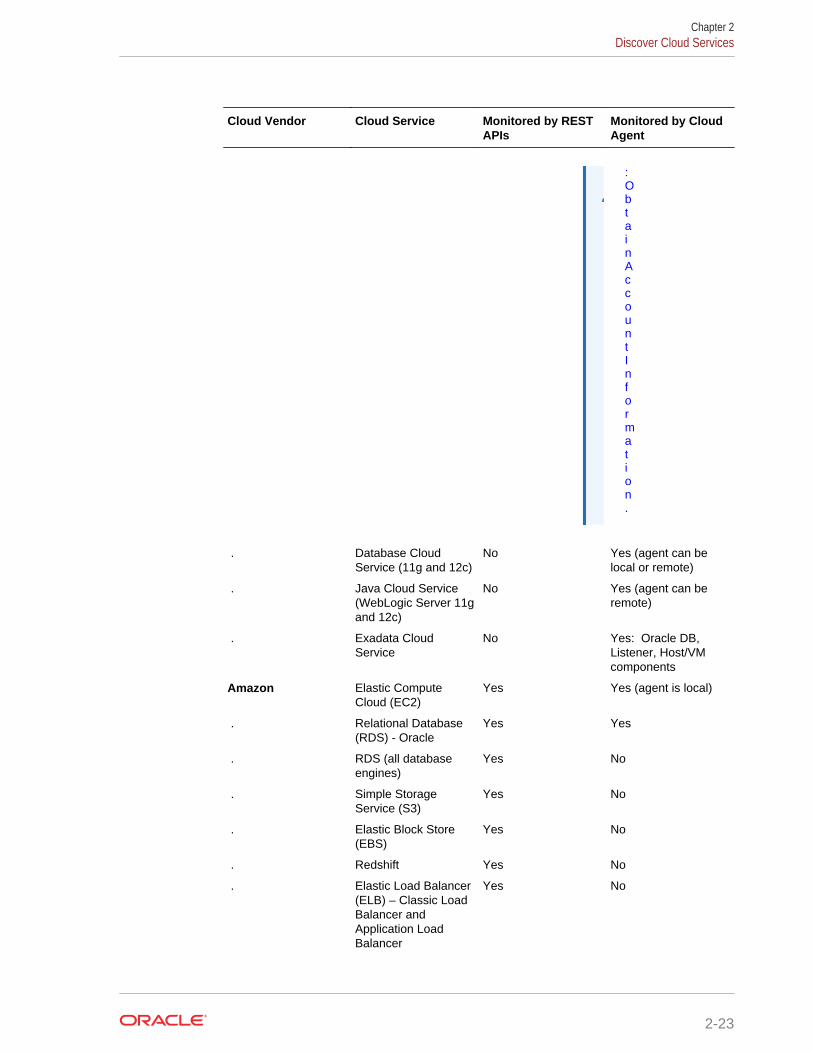
Cloud Vendor Cloud Service Monitored by RESTAPIs
Monitored by CloudAgent
:ObtainAccountInformation.
. Database CloudService (11g and 12c)
No Yes (agent can belocal or remote)
. Java Cloud Service(WebLogic Server 11gand 12c)
No Yes (agent can beremote)
. Exadata CloudService
No Yes: Oracle DB,Listener, Host/VMcomponents
Amazon Elastic ComputeCloud (EC2)
Yes Yes (agent is local)
. Relational Database(RDS) - Oracle
Yes Yes
. RDS (all databaseengines)
Yes No
. Simple StorageService (S3)
Yes No
. Elastic Block Store(EBS)
Yes No
. Redshift Yes No
. Elastic Load Balancer(ELB) – Classic LoadBalancer andApplication LoadBalancer
Yes No
Chapter 2Discover Cloud Services
2-23
Cloud Vendor Cloud Service Monitored by RESTAPIs
Monitored by CloudAgent
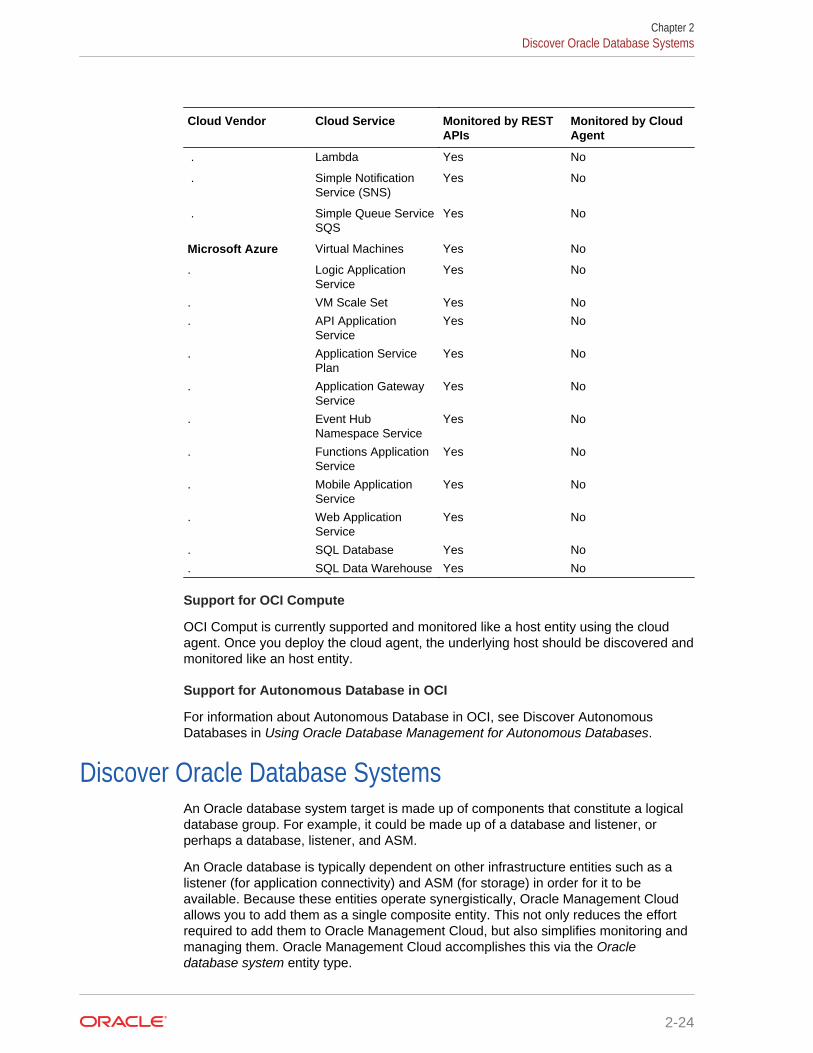
. Lambda Yes No
. Simple NotificationService (SNS)
Yes No
. Simple Queue ServiceSQS
Yes No
Microsoft Azure Virtual Machines Yes No
. Logic ApplicationService
Yes No
. VM Scale Set Yes No
. API ApplicationService
Yes No
. Application ServicePlan
Yes No
. Application GatewayService
Yes No
. Event HubNamespace Service
Yes No
. Functions ApplicationService
Yes No
. Mobile ApplicationService
Yes No
. Web ApplicationService
Yes No
. SQL Database Yes No
. SQL Data Warehouse Yes No
Support for OCI Compute
OCI Comput is currently supported and monitored like a host entity using the cloudagent. Once you deploy the cloud agent, the underlying host should be discovered andmonitored like an host entity.
Support for Autonomous Database in OCI
For information about Autonomous Database in OCI, see Discover AutonomousDatabases in Using Oracle Database Management for Autonomous Databases.
Discover Oracle Database SystemsAn Oracle database system target is made up of components that constitute a logicaldatabase group. For example, it could be made up of a database and listener, orperhaps a database, listener, and ASM.
An Oracle database is typically dependent on other infrastructure entities such as alistener (for application connectivity) and ASM (for storage) in order for it to beavailable. Because these entities operate synergistically, Oracle Management Cloudallows you to add them as a single composite entity. This not only reduces the effortrequired to add them to Oracle Management Cloud, but also simplifies monitoring andmanaging them. Oracle Management Cloud accomplishes this via the Oracledatabase system entity type.
Chapter 2Discover Oracle Database Systems
2-24
Single Instance Database System
When adding a database system for a single instance database, the following entitieswould be added:
• Oracle Database
• Pluggable Databases (if the DB is a Container)
• Database Instances
• Automatic Storage Management (ASM)
• Net Listener
RAC Database System
When adding a database system for a RAC database or RAC database with storageon ASM, the following entities would automatically be added.
• Oracle Database
• Pluggable Database (if the DB is a Container)
• SCAN Listener
• Database Instances
• ASM
• Oracle Clusterware
Availability
Since a database system is a logical grouping of entities required to make a databaseavailable to the connecting applications, the availability of a database system isdetermined from the status of its member entities: The database system is UP if all themember entities are also UP.
Shared Entities
Database system entities such as ASM, CRS, and SCAN listeners are shared entitiessuch that they can be shared resources between multiple database systems. Forexample, four RAC database systems can have the same Oracle Clusterware entity.
Prerequisites
Granting Privileges
Before you can begin monitoring DB systems, you must have the necessary privileges.A SQL script (grantPrivileges.sql) is available to automate granting theseprivileges. This script must be run as the Oracle DB SYS user. In addition to grantingprivileges, the grantPrivileges.sql script can also be used to create new or updateexisting monitoring users with the necessary privileges. For information about this SQLscript, location and usage instructions, see Creating the Oracle Database monitoringcredentials for Oracle Management Cloud (Doc ID 2401597.1).
Setting Up Monitoring Credentials for Database System Discovery
You need to ensure that all monitoring credentials are set up before preparing todiscover an Oracle database system. As a composite entity, all prerequisites andcredentials for related entities need to be defined before the database system can besuccessfully added.
Chapter 2Discover Oracle Database Systems
2-25
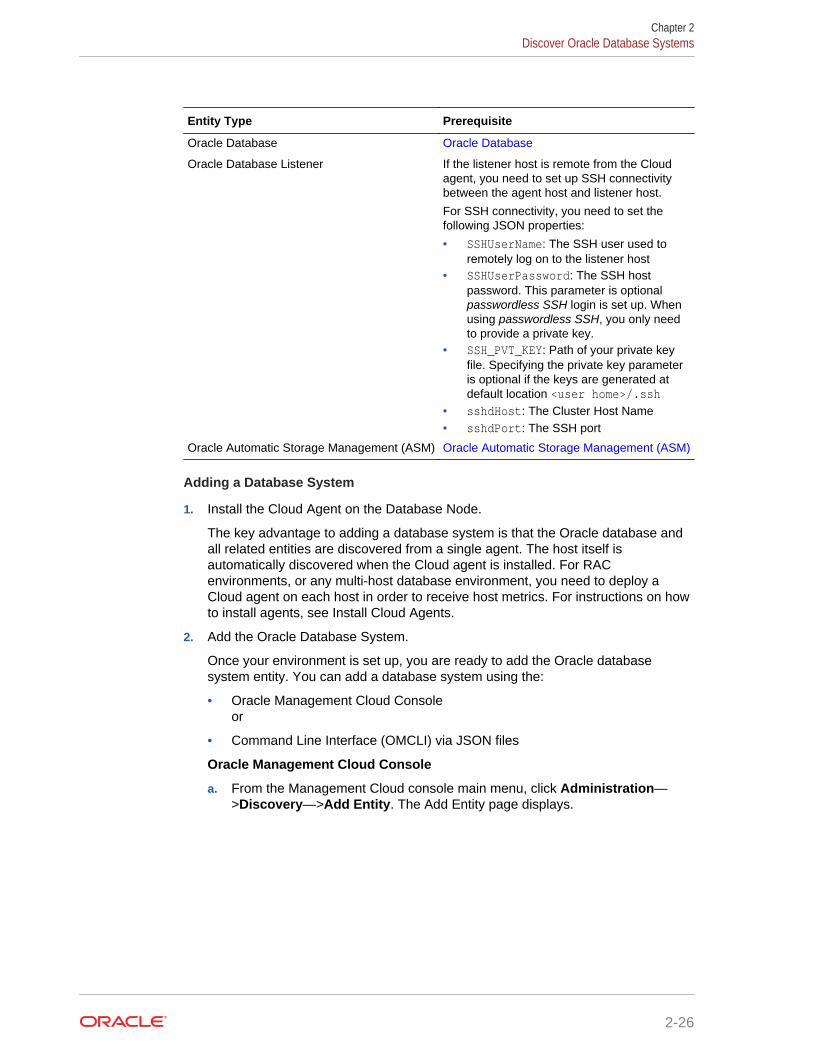
Entity Type Prerequisite
Oracle Database Oracle Database
Oracle Database Listener If the listener host is remote from the Cloudagent, you need to set up SSH connectivitybetween the agent host and listener host.
For SSH connectivity, you need to set thefollowing JSON properties:
• SSHUserName: The SSH user used toremotely log on to the listener host
• SSHUserPassword: The SSH hostpassword. This parameter is optionalpasswordless SSH login is set up. Whenusing passwordless SSH, you only needto provide a private key.
• SSH_PVT_KEY: Path of your private keyfile. Specifying the private key parameteris optional if the keys are generated atdefault location <user home>/.ssh
• sshdHost: The Cluster Host Name• sshdPort: The SSH port
Oracle Automatic Storage Management (ASM) Oracle Automatic Storage Management (ASM)
Adding a Database System
1. Install the Cloud Agent on the Database Node.
The key advantage to adding a database system is that the Oracle database andall related entities are discovered from a single agent. The host itself isautomatically discovered when the Cloud agent is installed. For RACenvironments, or any multi-host database environment, you need to deploy aCloud agent on each host in order to receive host metrics. For instructions on howto install agents, see Install Cloud Agents.
2. Add the Oracle Database System.
Once your environment is set up, you are ready to add the Oracle databasesystem entity. You can add a database system using the:
• Oracle Management Cloud Consoleor
• Command Line Interface (OMCLI) via JSON files
Oracle Management Cloud Console
a. From the Management Cloud console main menu, click Administration—>Discovery—>Add Entity. The Add Entity page displays.
Chapter 2Discover Oracle Database Systems
2-26

b. Select the Configuration (Single Instance or RAC) and enter the requisiteconfiguration and monitoring credentials. UI parameters vary depending on theselected configuration.
Chapter 2Discover Oracle Database Systems
2-27

Oracle Database System (single instance) UI Property Fields
• Entity Name: Your Oracle Database entity name. This name will also be used forthe database system name
• Configuration: Configuration for database system: Single Instance or RAC• Name Prefix: Name that will be used to de-duplicate, if needed, the auto-
generated names for the Listener and Cluster (SCAN) Listener. Generated namewill be hostname-of-listener_Listener Alias
• Host Name:Name of the listener host that will be used to create the connectstring to the database (host:port:SID or host:port:ServiceName)
• Port: Listener port number used for connection requests• Connect Type: Type of connection: SID or Service Name• Connect Value: The value of the SID or Service Name• Listener Alias: Value of Listener Alias• Listener Oracle Home: Oracle Home directory of the Listener
The Listener Oracle Home field in the UI is the Oracle Home of the listenerconfigured for that database. The Oracle Home for the listener may or may not bethe same Oracle Home as the database as illustrated by the following example.
The following example shows two discrete database instances (prod_1 andtest_1) in two separate Oracle Homes:
Oracle Home 1: /u01/app/oracle/product/19.0.0/prod_1
Oracle Home 2: /u01/app/oracle/product/19.0.0/test_1
Because both instances are configured with the listener in Oracle Home 1, todiscover the test_1 instance (in Oracle Home 2) you would enter /u01/app/oracle/product/19.0.0/prod_1 in the Listener Oracle Home field.
• Cloud Agent: Cloud agent monitoring the database system.Monitoring Credentials
• Username: Your Database User Name.• Password: Your Database Password.• Database Role: Your Database User Role (NORMAL/SYSDBA). Default is
Normal.SI with ASM (ASM Credentials)
• Username: Database user (ASM user name) that will be used by the cloud agentto connect to ASM.
• Password: Your ASM Password• Role: Your ASM User roleCloud Agent is not on the Cluster Host (Host SSH Credentials)
• SSH Username: Your SSH user used to remotely log on to the listener host.• SSH Username: Your SSH user used to remotely log on to the listener host.• SSH Password: Your SSH host Password.• SSH Private Key: Path of your private key file.• SSH Public Key: Path of your public key file.• SSH Host Name: Your Cluster Host Name.• SSH Port: Your SSH port.
Chapter 2Discover Oracle Database Systems
2-28
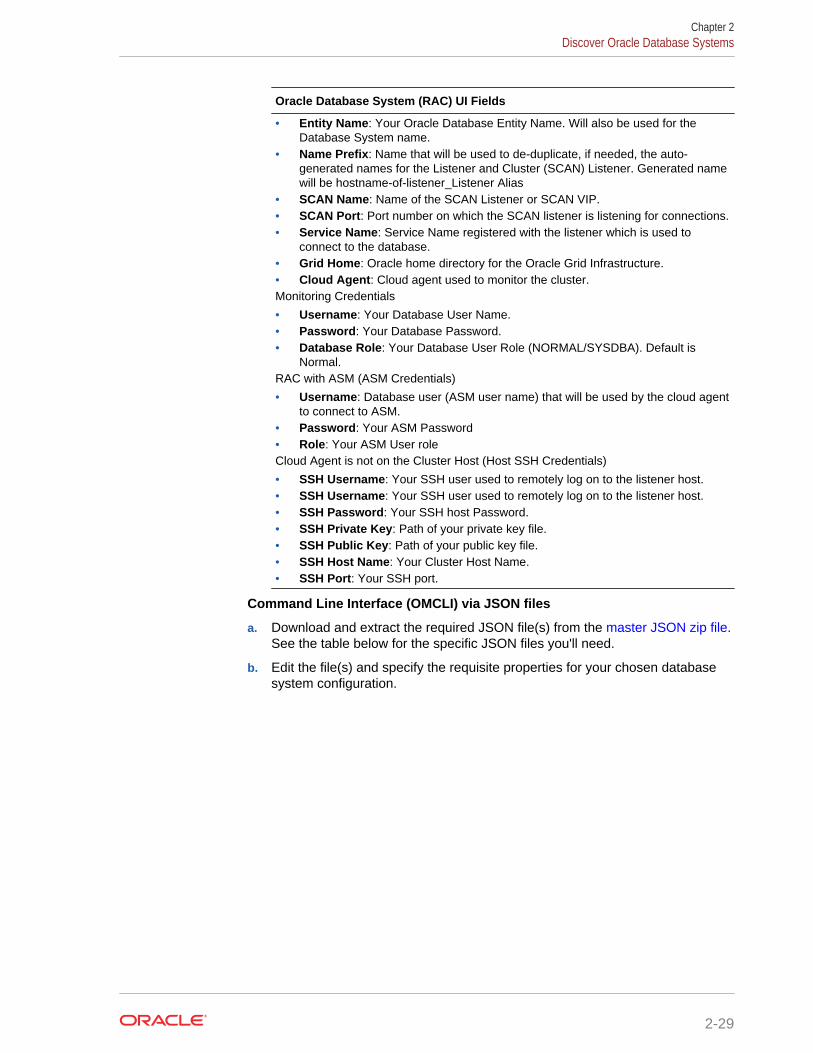
Oracle Database System (RAC) UI Fields
• Entity Name: Your Oracle Database Entity Name. Will also be used for theDatabase System name.
• Name Prefix: Name that will be used to de-duplicate, if needed, the auto-generated names for the Listener and Cluster (SCAN) Listener. Generated namewill be hostname-of-listener_Listener Alias
• SCAN Name: Name of the SCAN Listener or SCAN VIP.• SCAN Port: Port number on which the SCAN listener is listening for connections.• Service Name: Service Name registered with the listener which is used to
connect to the database.• Grid Home: Oracle home directory for the Oracle Grid Infrastructure.• Cloud Agent: Cloud agent used to monitor the cluster.Monitoring Credentials
• Username: Your Database User Name.• Password: Your Database Password.• Database Role: Your Database User Role (NORMAL/SYSDBA). Default is
Normal.RAC with ASM (ASM Credentials)
• Username: Database user (ASM user name) that will be used by the cloud agentto connect to ASM.
• Password: Your ASM Password• Role: Your ASM User roleCloud Agent is not on the Cluster Host (Host SSH Credentials)
• SSH Username: Your SSH user used to remotely log on to the listener host.• SSH Username: Your SSH user used to remotely log on to the listener host.• SSH Password: Your SSH host Password.• SSH Private Key: Path of your private key file.• SSH Public Key: Path of your public key file.• SSH Host Name: Your Cluster Host Name.• SSH Port: Your SSH port.
Command Line Interface (OMCLI) via JSON files
a. Download and extract the required JSON file(s) from the master JSON zip file.See the table below for the specific JSON files you'll need.
b. Edit the file(s) and specify the requisite properties for your chosen databasesystem configuration.
Chapter 2Discover Oracle Database Systems
2-29
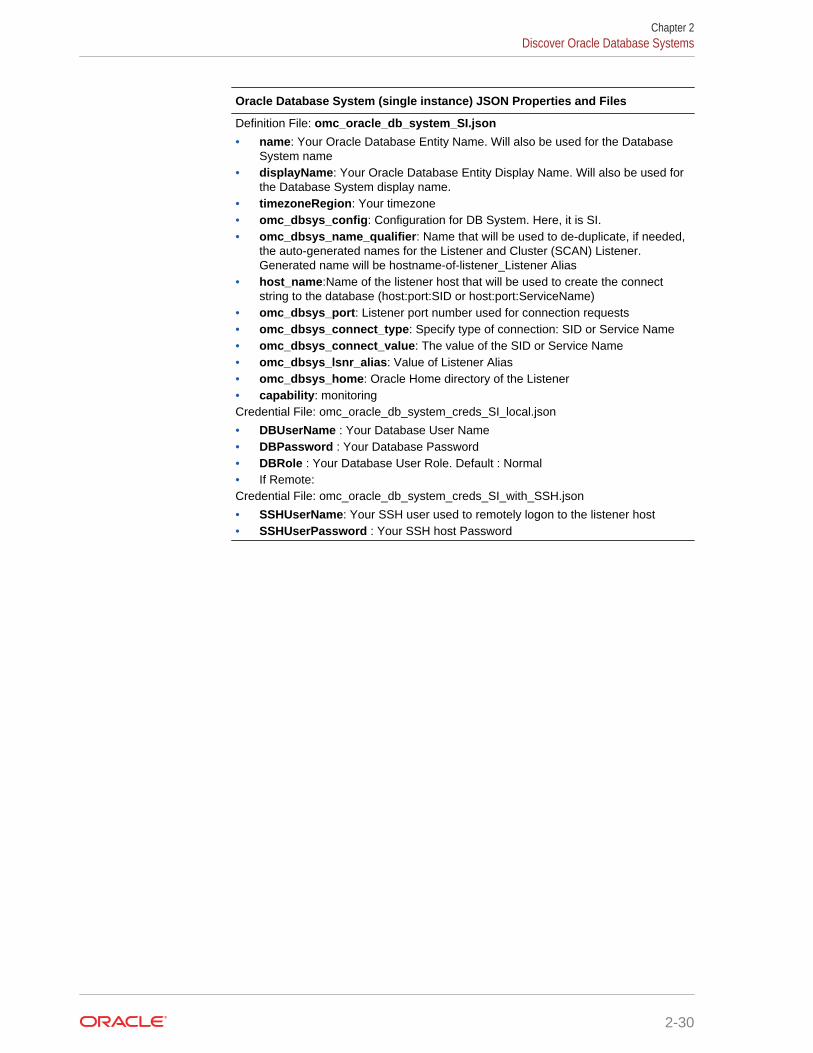
Oracle Database System (single instance) JSON Properties and Files
Definition File: omc_oracle_db_system_SI.json
• name: Your Oracle Database Entity Name. Will also be used for the DatabaseSystem name
• displayName: Your Oracle Database Entity Display Name. Will also be used forthe Database System display name.
• timezoneRegion: Your timezone• omc_dbsys_config: Configuration for DB System. Here, it is SI.• omc_dbsys_name_qualifier: Name that will be used to de-duplicate, if needed,
the auto-generated names for the Listener and Cluster (SCAN) Listener.Generated name will be hostname-of-listener_Listener Alias
• host_name:Name of the listener host that will be used to create the connectstring to the database (host:port:SID or host:port:ServiceName)
• omc_dbsys_port: Listener port number used for connection requests• omc_dbsys_connect_type: Specify type of connection: SID or Service Name• omc_dbsys_connect_value: The value of the SID or Service Name• omc_dbsys_lsnr_alias: Value of Listener Alias• omc_dbsys_home: Oracle Home directory of the Listener• capability: monitoringCredential File: omc_oracle_db_system_creds_SI_local.json
• DBUserName : Your Database User Name• DBPassword : Your Database Password• DBRole : Your Database User Role. Default : Normal• If Remote:Credential File: omc_oracle_db_system_creds_SI_with_SSH.json
• SSHUserName: Your SSH user used to remotely logon to the listener host• SSHUserPassword : Your SSH host Password
Chapter 2Discover Oracle Database Systems
2-30
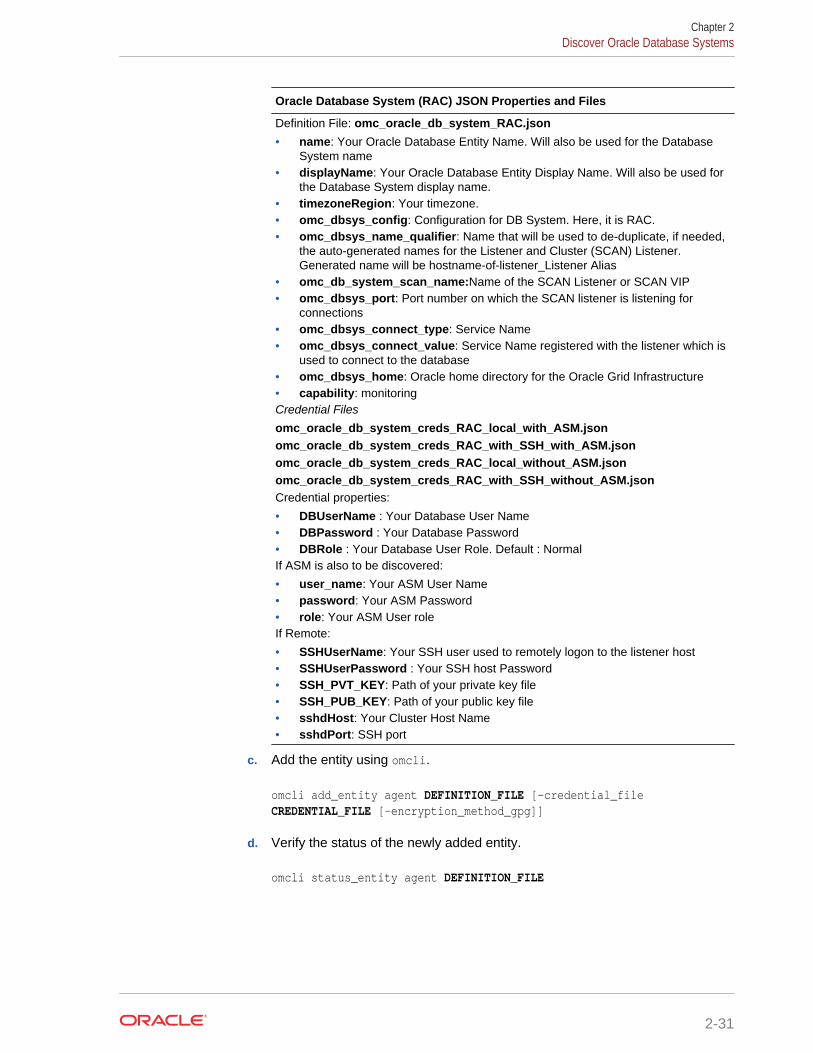
Oracle Database System (RAC) JSON Properties and Files
Definition File: omc_oracle_db_system_RAC.json
• name: Your Oracle Database Entity Name. Will also be used for the DatabaseSystem name
• displayName: Your Oracle Database Entity Display Name. Will also be used forthe Database System display name.
• timezoneRegion: Your timezone.• omc_dbsys_config: Configuration for DB System. Here, it is RAC.• omc_dbsys_name_qualifier: Name that will be used to de-duplicate, if needed,
the auto-generated names for the Listener and Cluster (SCAN) Listener.Generated name will be hostname-of-listener_Listener Alias
• omc_db_system_scan_name:Name of the SCAN Listener or SCAN VIP• omc_dbsys_port: Port number on which the SCAN listener is listening for
connections• omc_dbsys_connect_type: Service Name• omc_dbsys_connect_value: Service Name registered with the listener which is
used to connect to the database• omc_dbsys_home: Oracle home directory for the Oracle Grid Infrastructure• capability: monitoringCredential Files
omc_oracle_db_system_creds_RAC_local_with_ASM.jsonomc_oracle_db_system_creds_RAC_with_SSH_with_ASM.jsonomc_oracle_db_system_creds_RAC_local_without_ASM.jsonomc_oracle_db_system_creds_RAC_with_SSH_without_ASM.jsonCredential properties:
• DBUserName : Your Database User Name• DBPassword : Your Database Password• DBRole : Your Database User Role. Default : NormalIf ASM is also to be discovered:
• user_name: Your ASM User Name• password: Your ASM Password• role: Your ASM User roleIf Remote:
• SSHUserName: Your SSH user used to remotely logon to the listener host• SSHUserPassword : Your SSH host Password• SSH_PVT_KEY: Path of your private key file• SSH_PUB_KEY: Path of your public key file• sshdHost: Your Cluster Host Name• sshdPort: SSH port
c. Add the entity using omcli.
omcli add_entity agent DEFINITION_FILE [-credential_file CREDENTIAL_FILE [-encryption_method_gpg]]
d. Verify the status of the newly added entity.
omcli status_entity agent DEFINITION_FILE
Chapter 2Discover Oracle Database Systems
2-31

Deleting a Database System
When a database system is deleted, only the database system, the associateddatabase and database's child entities (instances and pluggable databases) will bedeleted. Other entities such as ASM, Clusterware and listeners will not be deleted.
Enabling Log Collection
Log collection via Log Analytics is available for specific types of database systems. Toenable log collection, click the Associate Logs option. By default, the following logsare collected for the following entity types associated with the database system:
• Oracle Database Instance:
– Database Trace Logs
– Database Alert Logs
– Database Incident Dump Files
• Oracle Database Clusterware
– Clusterware Disk Monitor Logs
– Clusterware Ready Services Alert Logs
– Clusterware Ready Services Deamon Logs
• Oracle Database Listener
– Database Listener Alert Logs
– Database Listener Trace Logs
• Oracle ASM Instance
– Automatic Storage Management Alert Logs
– Automatic Storage Management Trace Logs
For more information about Log Anaytics, see About Oracle Log Analytics.
Add Entities Using JSON FilesIn order to monitor various entities, you need to first add them to Oracle InfrastructureMonitoring. Adding new entities to your service includes the tasks listed below.
Note:
You will need to add each entity and its corresponding credentials (ifapplicable) to its local monitoring agent (Cloud Agent). In some cases,remote monitoring is supported, see My Oracle Support InfrastructureMonitoring Cloud Service Master Note (Doc ID 2195015.1) for more release-specific information.
Chapter 2Add Entities Using JSON Files
2-32

Note:
Before you begin, ensure that all required agent deployment steps havebeen performed. These steps are part of the initial setup of your service, see Install Cloud Agents in Installing and Managing Oracle Management CloudAgents.
Oracle by Example
For examples on adding entities, take a look at the following tutorials:
• Add a MongoDB Entity
• Add a WebLogic Server Entity to Oracle Log Analytics and Later OracleInfrastructure Monitoring
1. Identify the Entity Types You Want to Monitor
You add entities to Oracle Infrastructure Monitoring directly through the UI, or byadding their respective JSON files to the system. The following table lists entities thatthe Cloud Agent can monitor for the Oracle Infrastructure Monitoring Service in thecurrent release. Make a note of the entity type(s) you will want to monitor with yourservice.
In addition to being able to monitor conventional entity types, Infrastructure Monitoringalso allows you to monitor Cloud services for third-party vendors that provide Cloudservice REST APIs. The following table lists the current
2. Set Up Monitoring Credentials
Monitoring credentials are required to monitor some of the entities using OracleInfrastructure Monitoring. To locate your entities and set up monitoring credentials, see Prerequisites and Monitoring Credentials.
3. Downloading and Customizing JSON Files
For monitoring, you must create two types of JSON files that contain information aboutthe entities to be monitored:
1. An entity definition JSON file for each entity type you’re adding.
2. A corresponding credentials JSON file for each entity you’re adding, if credentialsare required to monitor this entity.
To download and customize the JSON files that correspond to your entities, see Download and Customize Oracle Infrastructure Monitoring JSONs.
For information on the various properties and attributes associated with each entity,see Entity Attributes and Properties.
Encrypting the Credentials JSON File
For security, you can use GNU Privacy Guard (GPG) to encrypt text-based credentialJSON files using asymmetric keypairs (public and private).
Prerequisites:
• Ensure both the entities JSON file and credential JSON file have a .json extension.
Chapter 2Add Entities Using JSON Files
2-33
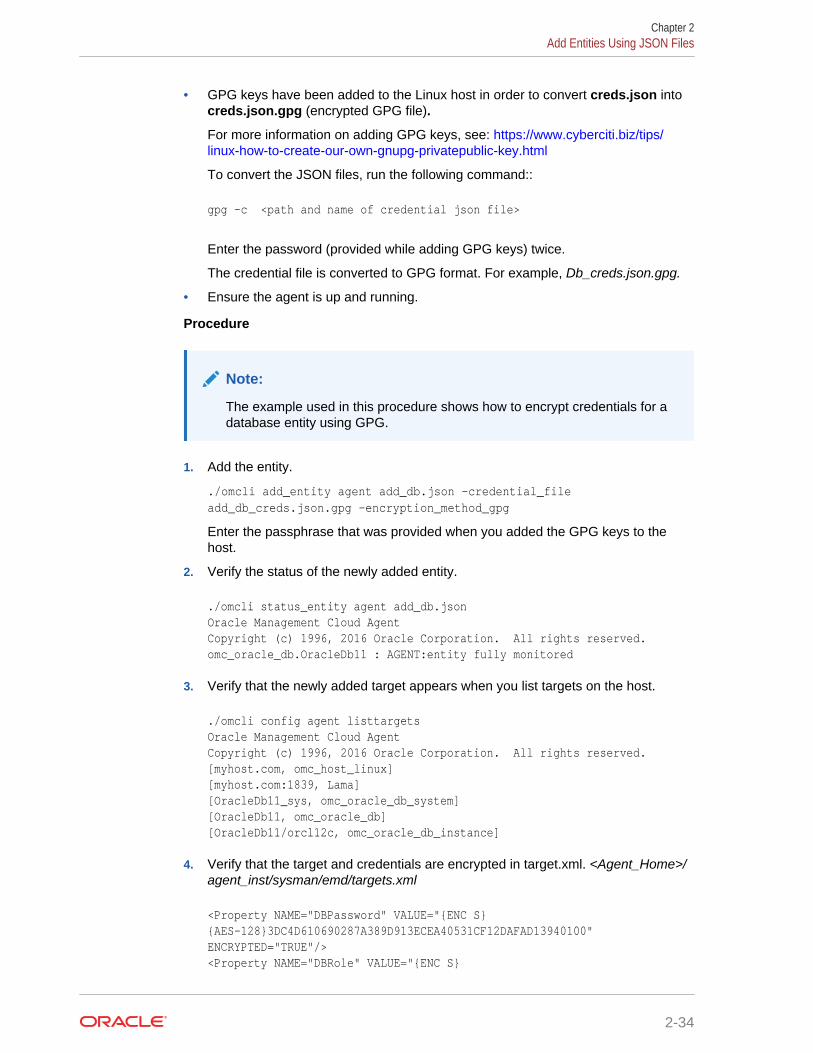
• GPG keys have been added to the Linux host in order to convert creds.json intocreds.json.gpg (encrypted GPG file).
For more information on adding GPG keys, see: https://www.cyberciti.biz/tips/linux-how-to-create-our-own-gnupg-privatepublic-key.html
To convert the JSON files, run the following command::
gpg –c <path and name of credential json file>
Enter the password (provided while adding GPG keys) twice.
The credential file is converted to GPG format. For example, Db_creds.json.gpg.
• Ensure the agent is up and running.
Procedure
Note:
The example used in this procedure shows how to encrypt credentials for adatabase entity using GPG.
1. Add the entity.
./omcli add_entity agent add_db.json -credential_fileadd_db_creds.json.gpg -encryption_method_gpg
Enter the passphrase that was provided when you added the GPG keys to thehost.
2. Verify the status of the newly added entity.
./omcli status_entity agent add_db.jsonOracle Management Cloud Agent Copyright (c) 1996, 2016 Oracle Corporation. All rights reserved.omc_oracle_db.OracleDb11 : AGENT:entity fully monitored
3. Verify that the newly added target appears when you list targets on the host.
./omcli config agent listtargetsOracle Management Cloud Agent Copyright (c) 1996, 2016 Oracle Corporation. All rights reserved.[myhost.com, omc_host_linux][myhost.com:1839, Lama][OracleDb11_sys, omc_oracle_db_system][OracleDb11, omc_oracle_db][OracleDb11/orcl12c, omc_oracle_db_instance]
4. Verify that the target and credentials are encrypted in target.xml. <Agent_Home>/agent_inst/sysman/emd/targets.xml
<Property NAME="DBPassword" VALUE="{ENC S}{AES-128}3DC4D610690287A389D913ECEA40531CF12DAFAD13940100" ENCRYPTED="TRUE"/> <Property NAME="DBRole" VALUE="{ENC S}
Chapter 2Add Entities Using JSON Files
2-34
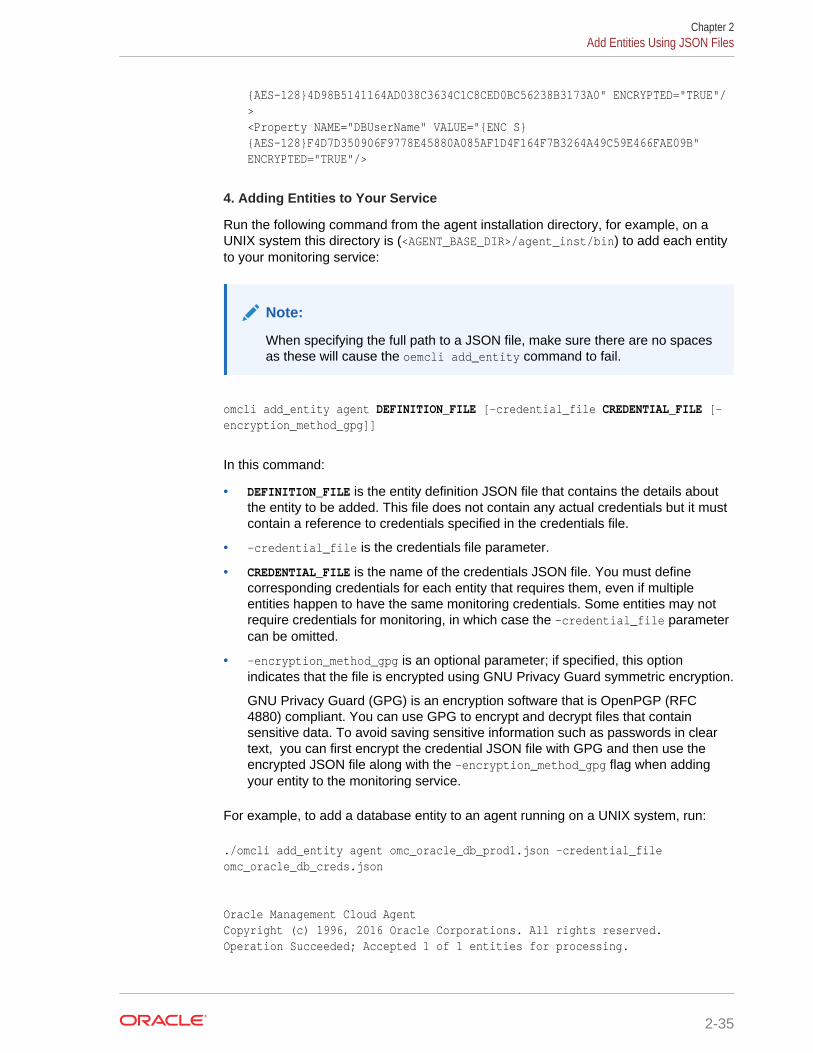
{AES-128}4D98B5141164AD038C3634C1C8CED0BC56238B3173A0" ENCRYPTED="TRUE"/> <Property NAME="DBUserName" VALUE="{ENC S}{AES-128}F4D7D350906F9778E45880A085AF1D4F164F7B3264A49C59E466FAE09B" ENCRYPTED="TRUE"/>
4. Adding Entities to Your Service
Run the following command from the agent installation directory, for example, on aUNIX system this directory is (<AGENT_BASE_DIR>/agent_inst/bin) to add each entityto your monitoring service:
Note:
When specifying the full path to a JSON file, make sure there are no spacesas these will cause the oemcli add_entity command to fail.
omcli add_entity agent DEFINITION_FILE [-credential_file CREDENTIAL_FILE [-encryption_method_gpg]]
In this command:
• DEFINITION_FILE is the entity definition JSON file that contains the details aboutthe entity to be added. This file does not contain any actual credentials but it mustcontain a reference to credentials specified in the credentials file.
• -credential_file is the credentials file parameter.
• CREDENTIAL_FILE is the name of the credentials JSON file. You must definecorresponding credentials for each entity that requires them, even if multipleentities happen to have the same monitoring credentials. Some entities may notrequire credentials for monitoring, in which case the -credential_file parametercan be omitted.
• -encryption_method_gpg is an optional parameter; if specified, this optionindicates that the file is encrypted using GNU Privacy Guard symmetric encryption.
GNU Privacy Guard (GPG) is an encryption software that is OpenPGP (RFC4880) compliant. You can use GPG to encrypt and decrypt files that containsensitive data. To avoid saving sensitive information such as passwords in cleartext, you can first encrypt the credential JSON file with GPG and then use theencrypted JSON file along with the -encryption_method_gpg flag when addingyour entity to the monitoring service.
For example, to add a database entity to an agent running on a UNIX system, run:
./omcli add_entity agent omc_oracle_db_prod1.json -credential_file omc_oracle_db_creds.json
Oracle Management Cloud AgentCopyright (c) 1996, 2016 Oracle Corporations. All rights reserved.Operation Succeeded; Accepted 1 of 1 entities for processing.
Chapter 2Add Entities Using JSON Files
2-35

If you have an HA configuration (a virtual host with 2 or more physical hosts configuredwith failover software) note the following:
• Your Cloud Agents must be installed on all hosts (virtual and physical hosts).
• The Cloud Agents on your physical hosts will monitor the host entities. Therefore,the steps to enable host monitoring must be performed on the physical hosts, see Monitoring Credentials.
• The entities you want monitored must be added using the Cloud Agent on thevirtual host.
5. Verifying Added Entities
Verify your entity addition by running the following command from the same agentdirectory (<AGENT_BASE_DIR>/agent_inst/bin):
omcli status_entity agent DEFINITION_FILE
where DEFINITION_FILE is the entity definition JSON file.
When the addition is complete, the verification will indicate that the entity is fullymonitored. For example, if running on a UNIX host, verify as follows:
./omcli status_entity agent omc_oracle_db_prod1.json
Oracle Management Cloud AgentCopyright (c) 1996, 2019 Oracle Corporation. All rights reserved.omc_oracle_db.prod1 : AGENT : entity fully monitored
Navigate to the Enterprise Summary dashboard and note the new entity you added.Depending on your network latency and other load factors, allow a few minutes for thisprocess to complete.
Troubleshooting
View Prerequisite Checks
If there are issues when adding an entity, you can obtain more information about theentity addition process by using the -verbose option when performing the verification.This option displays the results of the prerequisite checks which are run automaticallyduring the entity discovery process. For each prerequisite check, the status and, ifthere is an error, the issue and associated resolution is shown.
omcli status_entity agent DEFINITION_FILE -verbose
./omcli status_entity agent apache_entity.json -verboseOracle Management Cloud AgentCopyright (c) 1996, 2019 Oracle Corporation. All rights reserved.omc_generic_apache.TestApache2 : AGENT:EntityOperationExeption: Entity Operation Failed: - (Entity count: 0 Validaiton checks: 2 errors found) OMC_GENERIC_APACHE-00002 Invalid value for property Is Remote (omc_is_remote).Provided value [ yres ] expected value is Yes or No.Details:CHECK 1 : Validate input property - Listen Port (omc_listen_port)
Chapter 2Add Entities Using JSON Files
2-36
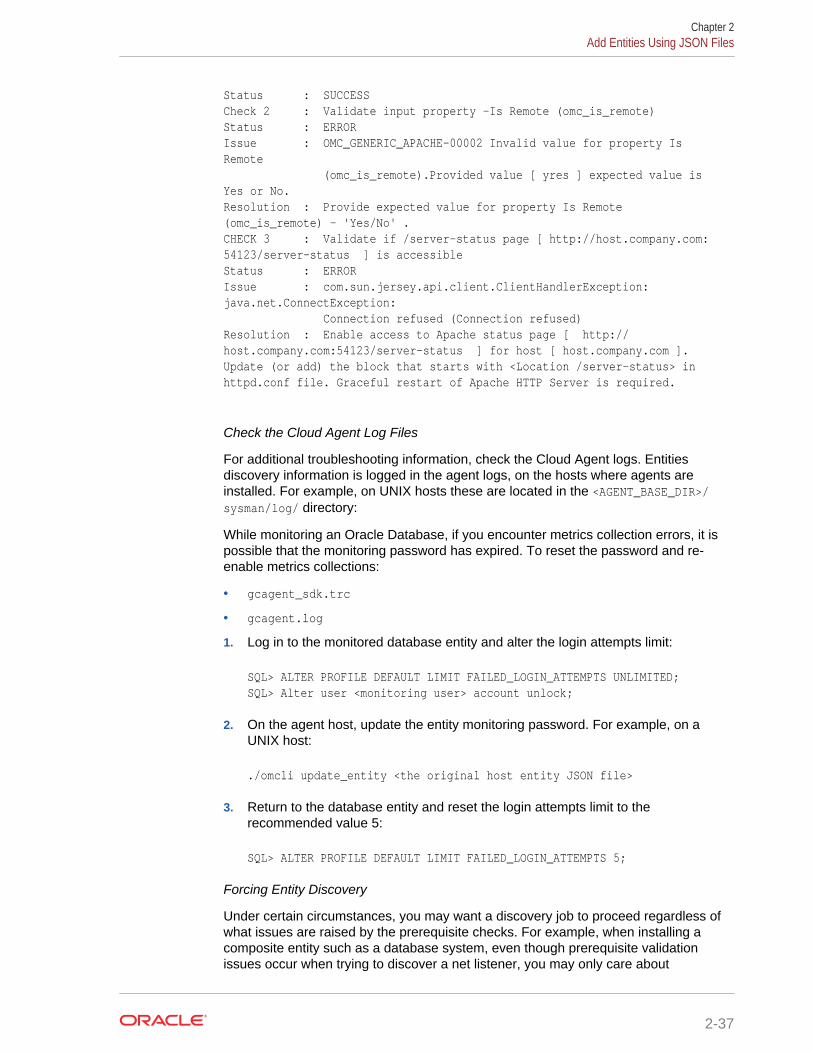
Status : SUCCESSCheck 2 : Validate input property -Is Remote (omc_is_remote)Status : ERRORIssue : OMC_GENERIC_APACHE-00002 Invalid value for property Is Remote (omc_is_remote).Provided value [ yres ] expected value is Yes or No.Resolution : Provide expected value for property Is Remote (omc_is_remote) - 'Yes/No' .CHECK 3 : Validate if /server-status page [ http://host.company.com:54123/server-status ] is accessibleStatus : ERRORIssue : com.sun.jersey.api.client.ClientHandlerException: java.net.ConnectException: Connection refused (Connection refused)Resolution : Enable access to Apache status page [ http://host.company.com:54123/server-status ] for host [ host.company.com ]. Update (or add) the block that starts with <Location /server-status> in httpd.conf file. Graceful restart of Apache HTTP Server is required.
Check the Cloud Agent Log Files
For additional troubleshooting information, check the Cloud Agent logs. Entitiesdiscovery information is logged in the agent logs, on the hosts where agents areinstalled. For example, on UNIX hosts these are located in the <AGENT_BASE_DIR>/sysman/log/ directory:
While monitoring an Oracle Database, if you encounter metrics collection errors, it ispossible that the monitoring password has expired. To reset the password and re-enable metrics collections:
• gcagent_sdk.trc
• gcagent.log
1. Log in to the monitored database entity and alter the login attempts limit:
SQL> ALTER PROFILE DEFAULT LIMIT FAILED_LOGIN_ATTEMPTS UNLIMITED;SQL> Alter user <monitoring user> account unlock;
2. On the agent host, update the entity monitoring password. For example, on aUNIX host:
./omcli update_entity <the original host entity JSON file>
3. Return to the database entity and reset the login attempts limit to therecommended value 5:
SQL> ALTER PROFILE DEFAULT LIMIT FAILED_LOGIN_ATTEMPTS 5;
Forcing Entity Discovery
Under certain circumstances, you may want a discovery job to proceed regardless ofwhat issues are raised by the prerequisite checks. For example, when installing acomposite entity such as a database system, even though prerequisite validationissues occur when trying to discover a net listener, you may only care about
Chapter 2Add Entities Using JSON Files
2-37
discovering the RAC databases, ASM, and other select database system child entitiesrather than stopping the discovery process for the entire database system. To do this,you can force the discovery job to proceed via the force option.
When the force option is used, you tell the discovery job to report all issues that occurwhen the prerequisite validation checks are run, but ignore the checkrecommendations and to go ahead with the discovery attempt.
Specify the -force option when executing the omcli add_entity or update_entityverb.
./omcli update_entity <entity definition json file> -force
Download and Customize Oracle Infrastructure Monitoring JSONsDownload the set of JSON files provided for the Oracle Infrastructure Monitoring,included in the Infrastructure Monitoring sub-folder of this zip file:
Sample JSON files (zip file)
General Guidelines For Editing JSON Files
• Identify the JSON files you will be working with. The name of each file is based onthe entity internal names. For example, the file omc_mysql_db_sample.json is theJSON entity definition file for an entity whose internal name is omc_mysql_db (MySQL Database) and its corresponding credentials file is omc_mysql_creds.json.
• IMPORTANT! In entity definition files, change the values indicated in the anglebrackets (< >) and remove the angle brackets. DO NOT change any other values.
• IMPORTANT! In credentials files, change the values indicated in the squarebrackets ([ ]) and keep the square brackets. DO NOT change any other values.
• Consider using a JSON validation tool when you are ready to save your files.
• Check My Oracle Support Infrastructure Monitoring Cloud Service Master Note(Doc ID 2195015.1) for certified entity versions and more release-specificinformation.
JSON Files Description
The entity definition JSON file helps you specify the type of entities that you want tomonitor with your service and includes some of the required parameters for asuccessful discovery into your service. The entity definition files include the following:
• Name and type of entity, as well as other entity-specific information, such as entityconnection information.
Chapter 2Add Entities Using JSON Files
2-38
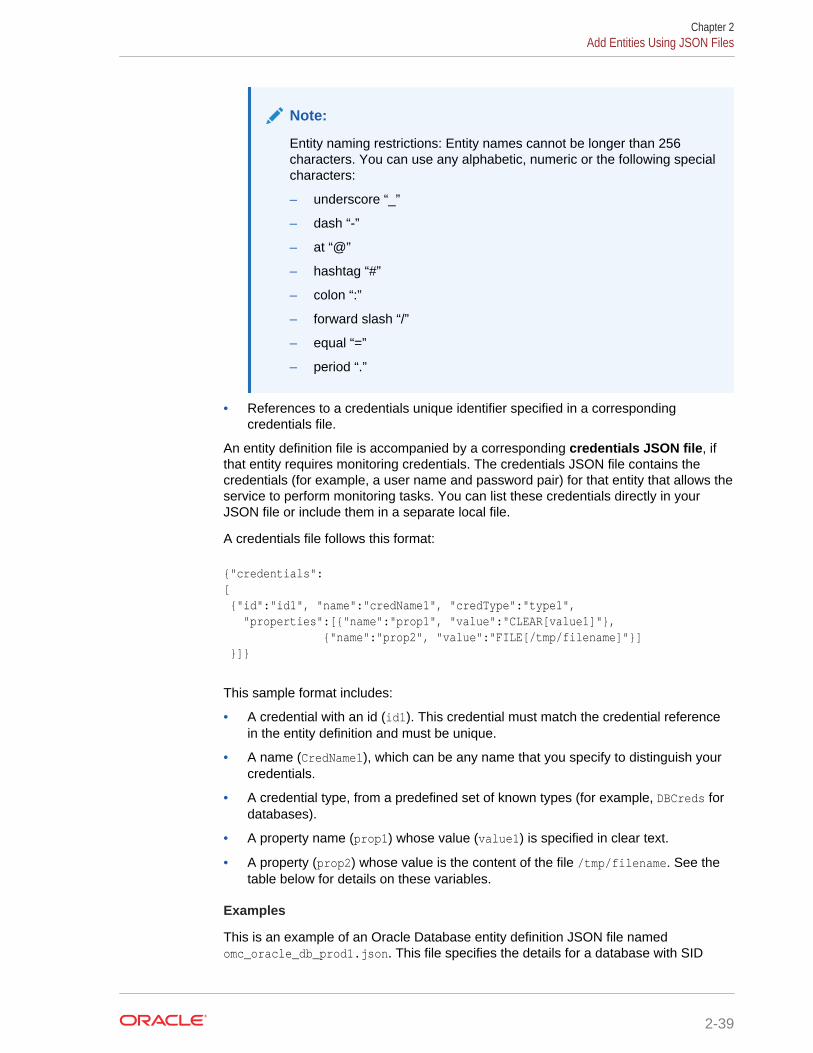
Note:
Entity naming restrictions: Entity names cannot be longer than 256characters. You can use any alphabetic, numeric or the following specialcharacters:
– underscore “_”
– dash “-”
– at “@”
– hashtag “#”
– colon “:”
– forward slash “/”
– equal “=”
– period “.”
• References to a credentials unique identifier specified in a correspondingcredentials file.
An entity definition file is accompanied by a corresponding credentials JSON file, ifthat entity requires monitoring credentials. The credentials JSON file contains thecredentials (for example, a user name and password pair) for that entity that allows theservice to perform monitoring tasks. You can list these credentials directly in yourJSON file or include them in a separate local file.
A credentials file follows this format:
{"credentials": [ {"id":"id1", "name":"credName1", "credType":"type1", "properties":[{"name":"prop1", "value":"CLEAR[value1]"}, {"name":"prop2", "value":"FILE[/tmp/filename]"}] }]}
This sample format includes:
• A credential with an id (id1). This credential must match the credential referencein the entity definition and must be unique.
• A name (CredName1), which can be any name that you specify to distinguish yourcredentials.
• A credential type, from a predefined set of known types (for example, DBCreds fordatabases).
• A property name (prop1) whose value (value1) is specified in clear text.
• A property (prop2) whose value is the content of the file /tmp/filename. See thetable below for details on these variables.
Examples
This is an example of an Oracle Database entity definition JSON file namedomc_oracle_db_prod1.json. This file specifies the details for a database with SID
Chapter 2Add Entities Using JSON Files
2-39

PROD1, hosted on myhost.example.com and listening on port 1521. This file points to acredentials unique ID, SQLCreds, that must be defined in a credentials file. Note thefields in bold are the only ones that needed to be customized and the angled brackets(< >) are removed.
{ "entities": [{ "name": "oracle_PROD1", "type": "omc_oracle_db", "displayName": "West Coast Financials Production (Oracle)", "timezoneRegion": "America/Los_Angeles", "credentialRefs": ["SQLCreds"], "properties": { "host_name": { "displayName": "host_name", "value": "myhost.example.com " }, "port": { "displayName": "port", "value": "1521" }, "sid": { "displayName": "sid", "value": "PROD1" }, "capability": { "displayName": "capability", "value": "monitoring" }}}]}
The following is an example of the required credentials file,omc_oracle_db_creds.json that corresponds to the Oracle Database entity definitionJSON file above. The credentials JSON file defines the unique credentials ID,SQLCreds, referenced in the entity definition file and specifies the connection to theOracle Database instance as user name moncs, password moncs with a role Normal.
Note the square brackets are not removed.
{ "credentials" : [ { "id" : "SQLCreds", "name" : "SQLCreds", "credType" : "DBCreds", "properties" : [ { "name" : "DBUserName", "value" : "CLEAR[moncs]" },{ "name" : "DBPassword", "value" : "CLEAR[moncs]" },{ "name" : "DBRole",
Chapter 2Add Entities Using JSON Files
2-40
"value" : "CLEAR[Normal]" }]}]}
Use Tags to Define Associations Between EntitiesYou can define entity associations at the time you first add entities for monitoring. Byadding one of two special tags within an entity JSON file, you define the entity aseither a source entity or a destination entity. This source-destination pairing links twoentities together--from a source entity to a destination entity.
The following two tags are used to define either a source or destination entity:
• assoc_source (Source Entity Marker tag is used for tagging source entities)
• assoc_dest (Destination Entity Marker tag is used for tagging destination entities.)
Tag Syntax:
assoc_source:<Association Hint>
assoc_dest:<Association Hint>
Once added, the tags will be visible on an entity’s home page.
where Association Hint is the unique identifier used to associate two entities. TheAssociation Hint used for the source entity must match the one specified for thedestination entity.
You can specify up to 50 tags per entity. For each tag key:value pair, you can specifyup to 128 characters for the key and 256 characters for the value.
Usage Example
You have an environment with five WebLogic servers and two databases. For the fiveWebLogic servers, the following tag is used to mark them as source entities:
assoc_source:my_prod_dbs.
For the two databases, the following tag is used to mark them as destination entities:
assoc_dest:my_prod_dbs.
These tags will create associations between each WebLogic server and the twodatabases.
Note:
The Association Hint must be unique for each entity type.
Once you’ve defined the entity associations and added the entities, you can view themin the topology map.
Add Association Tags to Entity JSON Files
As discussed above, you create the association when you add a new entity. Thefollowing JSON file examples illustrate how the tags are implemented in the entity
Chapter 2Add Entities Using JSON Files
2-41
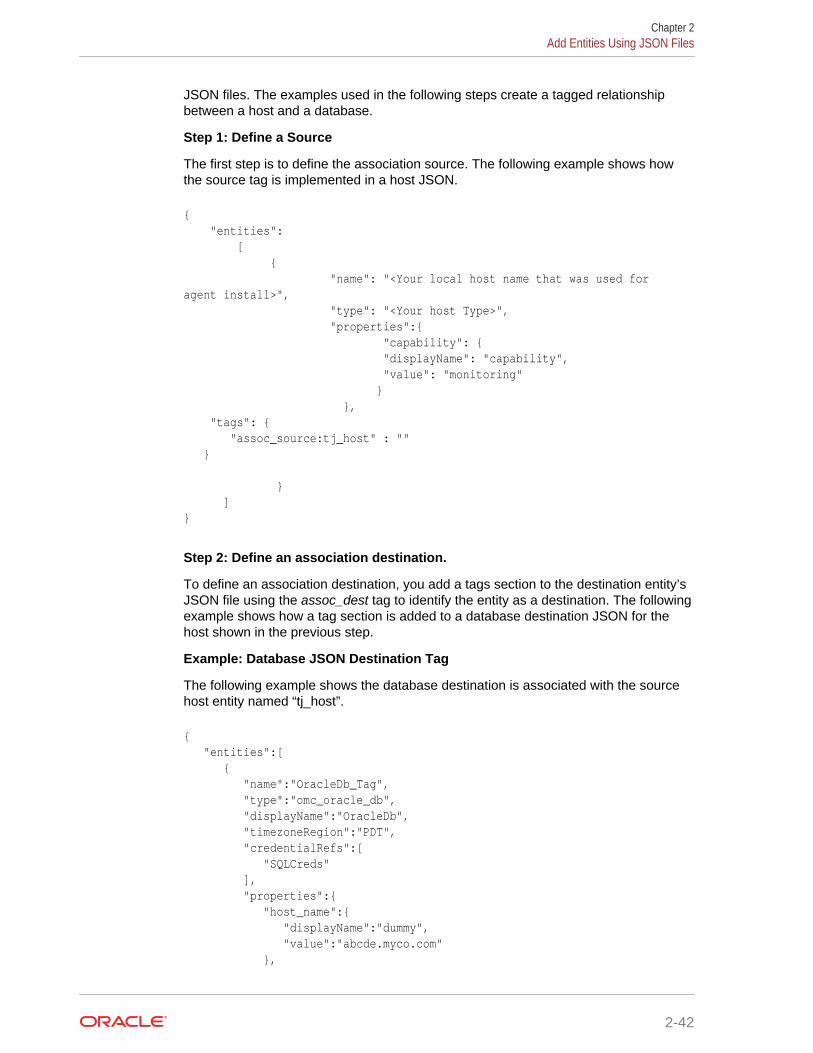
JSON files. The examples used in the following steps create a tagged relationshipbetween a host and a database.
Step 1: Define a Source
The first step is to define the association source. The following example shows howthe source tag is implemented in a host JSON.
{ "entities": [ { "name": "<Your local host name that was used for agent install>", "type": "<Your host Type>", "properties":{ "capability": { "displayName": "capability", "value": "monitoring" } }, "tags": { "assoc_source:tj_host" : "" }
} ]}
Step 2: Define an association destination.
To define an association destination, you add a tags section to the destination entity’sJSON file using the assoc_dest tag to identify the entity as a destination. The followingexample shows how a tag section is added to a database destination JSON for thehost shown in the previous step.
Example: Database JSON Destination Tag
The following example shows the database destination is associated with the sourcehost entity named “tj_host”.
{ "entities":[ { "name":"OracleDb_Tag", "type":"omc_oracle_db", "displayName":"OracleDb", "timezoneRegion":"PDT", "credentialRefs":[ "SQLCreds" ], "properties":{ "host_name":{ "displayName":"dummy", "value":"abcde.myco.com" },
Chapter 2Add Entities Using JSON Files
2-42
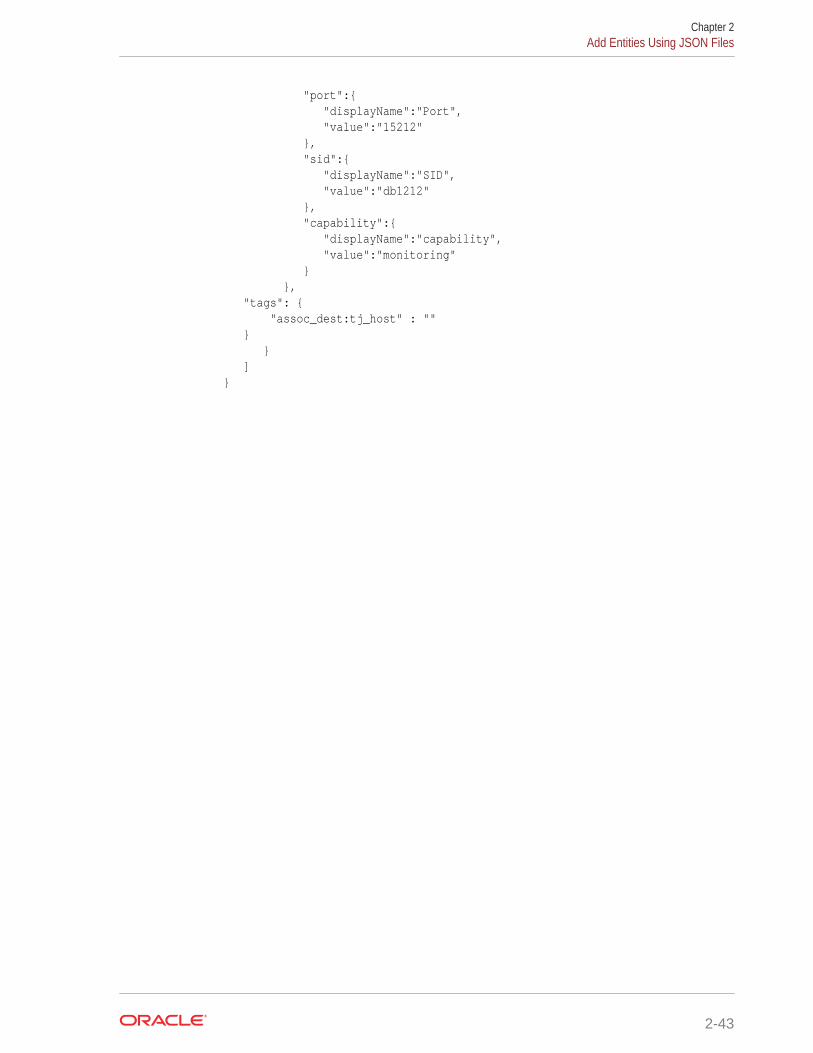
"port":{ "displayName":"Port", "value":"15212" }, "sid":{ "displayName":"SID", "value":"db1212" }, "capability":{ "displayName":"capability", "value":"monitoring" } }, "tags": { "assoc_dest:tj_host" : "" } } ]}
Chapter 2Add Entities Using JSON Files
2-43
3Enable Monitoring for PreviouslyDiscovered Entities
Entities can be added from other Oracle Management Cloud services. The followingtopics cover how to allow Infrastructure Monitoring to monitor entities added via LogAnalytics and Application Performance Management.
• Auto-Discovery of Previously Discovered Entities
• Manual Discovery of Log Analytics Entities
Auto-Discovery of Previously Discovered EntitiesWhat is Auto-Discovery
Auto-Discovery allows you to enable Infrastructure Monitoring on entities that werepreviously added by non-monitoring services, such as Application PerformanceManagement or Log Analytics, without further intervention. Enabling auto-discovery iscarried out in two phases:
1. Prepare a Cloud agent for auto-discovery.
2. Register the entity/agent auto-discovery configuration from the OracleManagement Cloud console.
Prerequisites
• Oracle Management Cloud agents version 1.23 and greater are auto-discoverycapable.
• If Cloud agents are upgraded, auto-discovery can start only after configurationmetric collections from the selected Cloud agents have begun. This can take up to24 hours depending on configuration metric collection schedule.
• Only Tomcat and WebLogic J2EE Server entity types can be auto-discovered forthe current release. For Tomcat and WebLogic Server monitoring prerequisites,see Prerequisites and Monitoring Credentials.
• If the WebLogic J2EE Server does not use the t3/t3s security protocol, then twoauto-discovery attempts are made: One with "t3" and the second with "t3s"
• For targets that require secured communications, one of the following will be true:
– Either all targets of the same entity type will be configured to use the samesecurity settings for auto-discovery or,
– all targets of the same entity type with the same "tag" will be configured to usethe same security settings for auto-discovery. See Prerequisites andMonitoring Credentialsfor more information regarding monitoring credentials.
Setting Up Auto-Discovery
Preparing the Cloud Agent
3-1
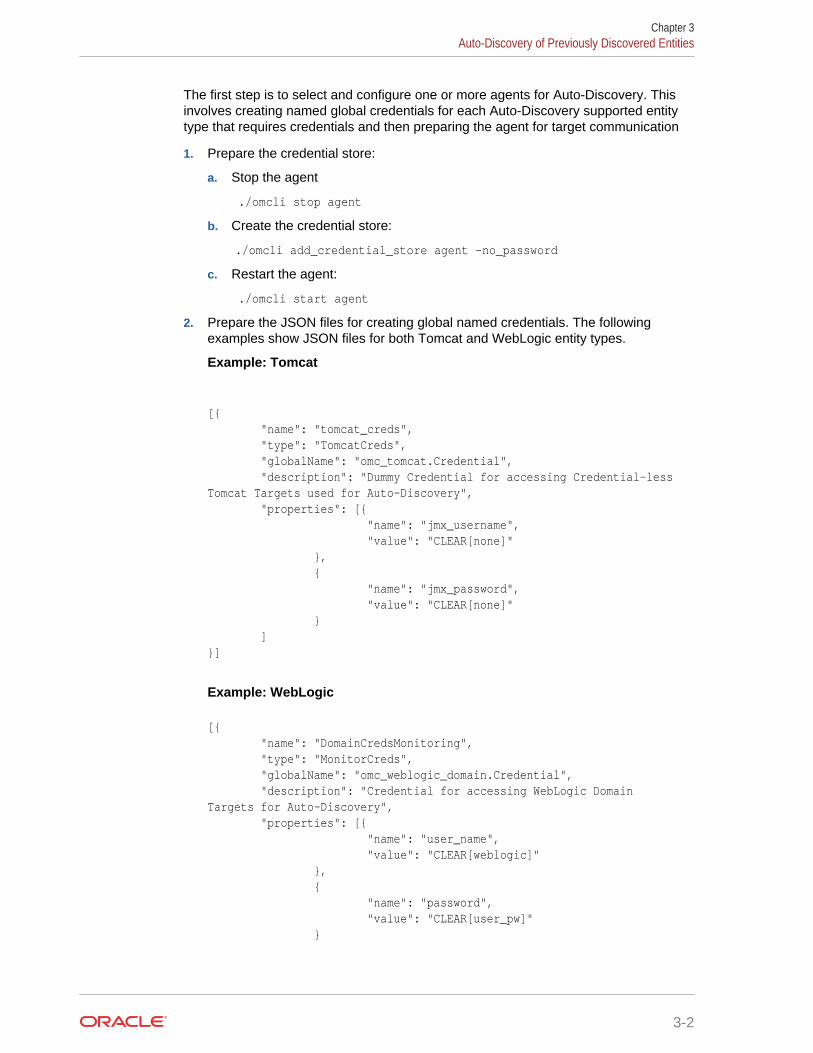
The first step is to select and configure one or more agents for Auto-Discovery. Thisinvolves creating named global credentials for each Auto-Discovery supported entitytype that requires credentials and then preparing the agent for target communication
1. Prepare the credential store:
a. Stop the agent
./omcli stop agent
b. Create the credential store:
./omcli add_credential_store agent -no_password
c. Restart the agent:
./omcli start agent
2. Prepare the JSON files for creating global named credentials. The followingexamples show JSON files for both Tomcat and WebLogic entity types.
Example: Tomcat
[{ "name": "tomcat_creds", "type": "TomcatCreds", "globalName": "omc_tomcat.Credential", "description": "Dummy Credential for accessing Credential-less Tomcat Targets used for Auto-Discovery", "properties": [{ "name": "jmx_username", "value": "CLEAR[none]" }, { "name": "jmx_password", "value": "CLEAR[none]" } ]}]
Example: WebLogic
[{ "name": "DomainCredsMonitoring", "type": "MonitorCreds", "globalName": "omc_weblogic_domain.Credential", "description": "Credential for accessing WebLogic Domain Targets for Auto-Discovery", "properties": [{ "name": "user_name", "value": "CLEAR[weblogic]" }, { "name": "password", "value": "CLEAR[user_pw]" }
Chapter 3Auto-Discovery of Previously Discovered Entities
3-2
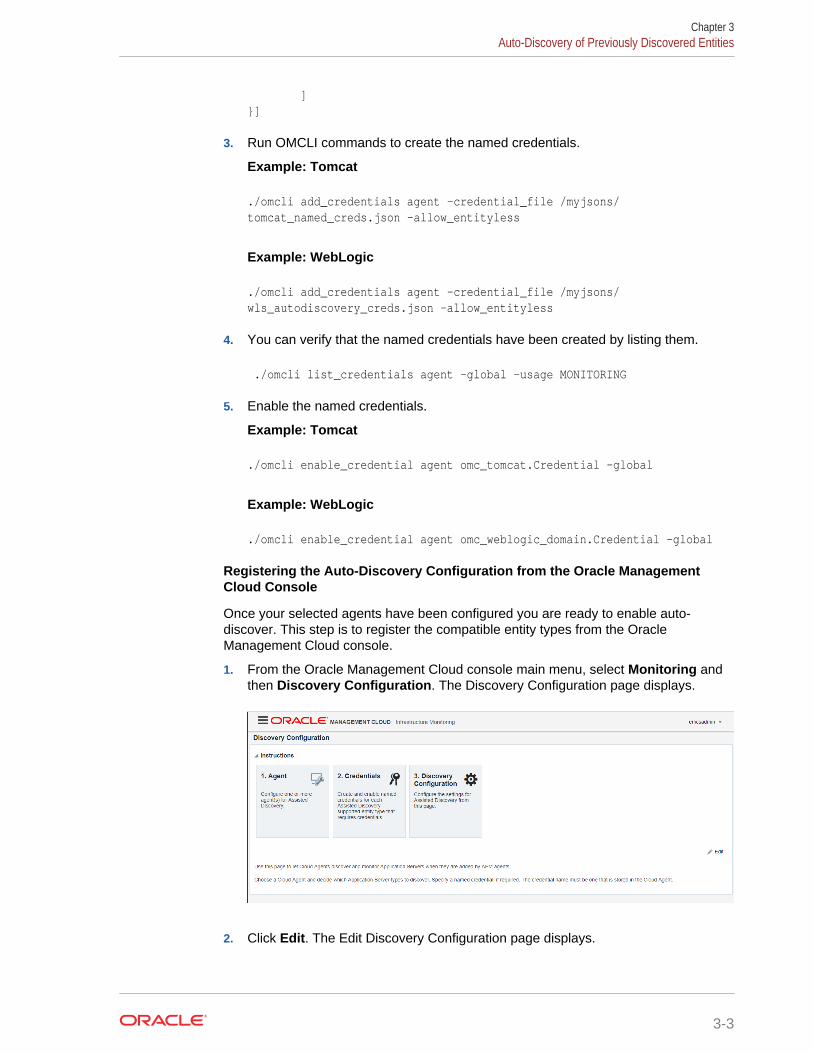
]}]
3. Run OMCLI commands to create the named credentials.
Example: Tomcat
./omcli add_credentials agent -credential_file /myjsons/tomcat_named_creds.json -allow_entityless
Example: WebLogic
./omcli add_credentials agent -credential_file /myjsons/wls_autodiscovery_creds.json -allow_entityless
4. You can verify that the named credentials have been created by listing them.
./omcli list_credentials agent -global -usage MONITORING
5. Enable the named credentials.
Example: Tomcat
./omcli enable_credential agent omc_tomcat.Credential -global
Example: WebLogic
./omcli enable_credential agent omc_weblogic_domain.Credential -global
Registering the Auto-Discovery Configuration from the Oracle ManagementCloud Console
Once your selected agents have been configured you are ready to enable auto-discover. This step is to register the compatible entity types from the OracleManagement Cloud console.
1. From the Oracle Management Cloud console main menu, select Monitoring andthen Discovery Configuration. The Discovery Configuration page displays.
2. Click Edit. The Edit Discovery Configuration page displays.
Chapter 3Auto-Discovery of Previously Discovered Entities
3-3
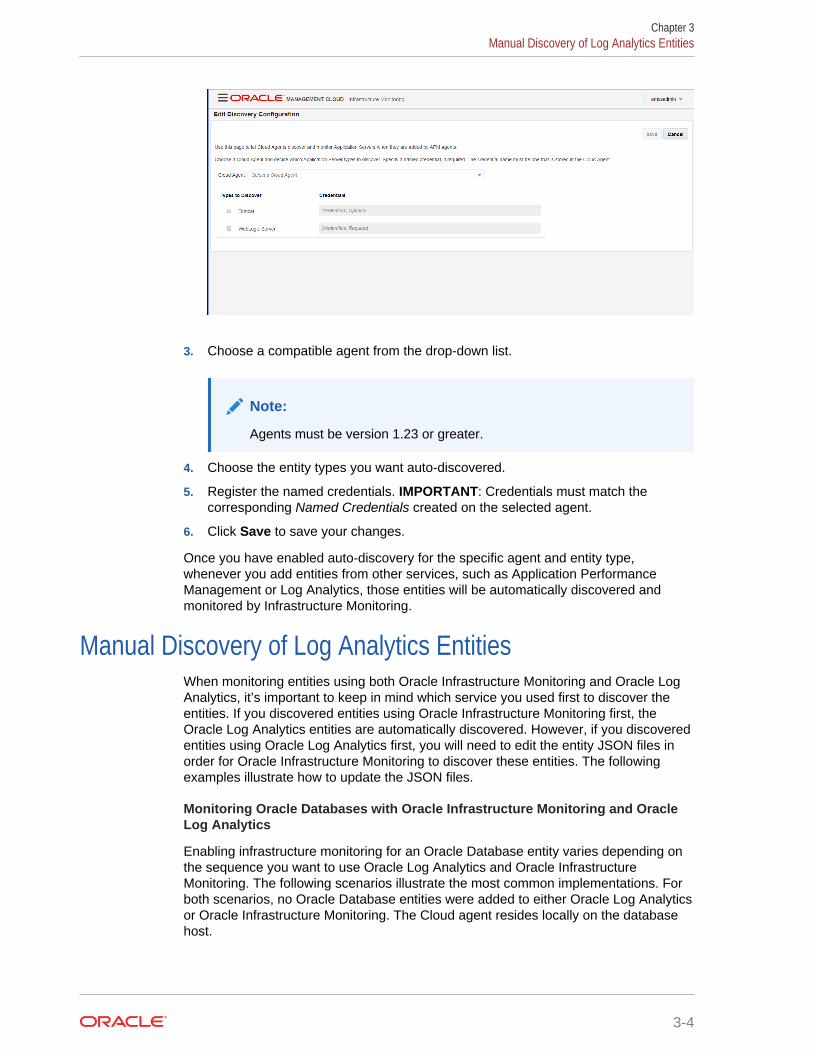
3. Choose a compatible agent from the drop-down list.
Note:
Agents must be version 1.23 or greater.
4. Choose the entity types you want auto-discovered.
5. Register the named credentials. IMPORTANT: Credentials must match thecorresponding Named Credentials created on the selected agent.
6. Click Save to save your changes.
Once you have enabled auto-discovery for the specific agent and entity type,whenever you add entities from other services, such as Application PerformanceManagement or Log Analytics, those entities will be automatically discovered andmonitored by Infrastructure Monitoring.
Manual Discovery of Log Analytics EntitiesWhen monitoring entities using both Oracle Infrastructure Monitoring and Oracle LogAnalytics, it’s important to keep in mind which service you used first to discover theentities. If you discovered entities using Oracle Infrastructure Monitoring first, theOracle Log Analytics entities are automatically discovered. However, if you discoveredentities using Oracle Log Analytics first, you will need to edit the entity JSON files inorder for Oracle Infrastructure Monitoring to discover these entities. The followingexamples illustrate how to update the JSON files.
Monitoring Oracle Databases with Oracle Infrastructure Monitoring and OracleLog Analytics
Enabling infrastructure monitoring for an Oracle Database entity varies depending onthe sequence you want to use Oracle Log Analytics and Oracle InfrastructureMonitoring. The following scenarios illustrate the most common implementations. Forboth scenarios, no Oracle Database entities were added to either Oracle Log Analyticsor Oracle Infrastructure Monitoring. The Cloud agent resides locally on the databasehost.
Chapter 3Manual Discovery of Log Analytics Entities
3-4
Example 1: Enabling Oracle Infrastructure Monitoring and Oracle Log AnalyticsConcurrently
What you want: You want to use both Oracle Infrastructure Monitoring and OracleLog Analytics to monitor an Oracle Database entity.
How to do it: Add the Oracle Database entity using the Oracle InfrastructureMonitoring JSON files:
• omc_oracle_db_sample.json
• omc_oracle_db_sample_creds.json
Once the Oracle Database entity has been added, the database will be monitored byOracle Infrastructure Monitoring and a database instance will have been added forOracle Log Analytics.
Example 2: Enabling Oracle Log Analytics First and Adding Oracle InfrastructureMonitoring Later
What you want: You only want to use Oracle Log Analytics for a newly added OracleDatabase entity at this time. However, at some point in the future, you may want tomonitor that same Oracle Database entity using Oracle Infrastructure Monitoring.
How to do it: Add the Oracle Database entity using the special JSON fileDB_Discovery_Credless.json (supplied in the omc_lasrv_entity_json_samples.zip) thatis set up to gives you the option of later enabling that same Oracle Database forOracle Infrastructure Monitoring.
Note:
DB_Discovery_Credless.json file is a Oracle Log Analytics-specific JSON filethat allows you to add Oracle Infrastructure Monitoring capability at a latertime. It cannot be used interchangeably with Oracle Infrastructure MonitoringJSON files used to add Oracle database entities (shown in Example 1).
Example 3: Adding Oracle Infrastructure Monitoring
What you want: You now want to enable Oracle Infrastructure Monitoring for theOracle Database entity you previously added to Oracle Log Analytics.
How to do it: Modify a copy of DB_Discovery_Credless.json file, and update theOracle Database entity added in Example 2 using the following steps:
1. Edit your copy of the DB_Discovery_Credless.json file to include only the followinginformation For this example, we’ll call the file omc_oracle_yourdb_credless.json.
a. Entity name: Use the same name used for Oracle Log Analytics.
b. Entity type: This is a reserved field name, unique for each entity type. Use thesame type used for Oracle Log Analytics.
Chapter 3Manual Discovery of Log Analytics Entities
3-5

c. Under attributes, add the credentialRefs, marked as credential_refs_id,as follows. Note: "credential_refs_id" must match credential ID in credentialfile.
"credentialRefs":[ "credential_refs_id" ]
d. Under property, keep only the capability section, marked as monitoring,
"capability":{ "displayName":"capability", "value":"monitoring" }
2. Edit the credentials JSON files, as documented for monitoring. For this example,let’s call the file omc_oracle_yourdb_creds.json.
"credentials" : [ { "id" : "SQLCreds", "name" : "SQLCreds", "credType" : "DBCreds", "properties" : [ { "name" : "DBUserName", "value" : "CLEAR[Your Database User Name]" }, { "name" : "DBPassword", "value" : "CLEAR[Your Database Password]" }, { "name" : "DBRole", "value" : "CLEAR[Normal]" } ] } ]
For target communications in secured mode, you need additional entity-typespecific information, so make sure you select the appropriate credentials sampleJSON file to edit.
3. Update the entity with the edited JSON files:
omcli update_entity agent DEFINITION_FILE [-credential_file CREDENTIAL_FILE]
Chapter 3Manual Discovery of Log Analytics Entities
3-6
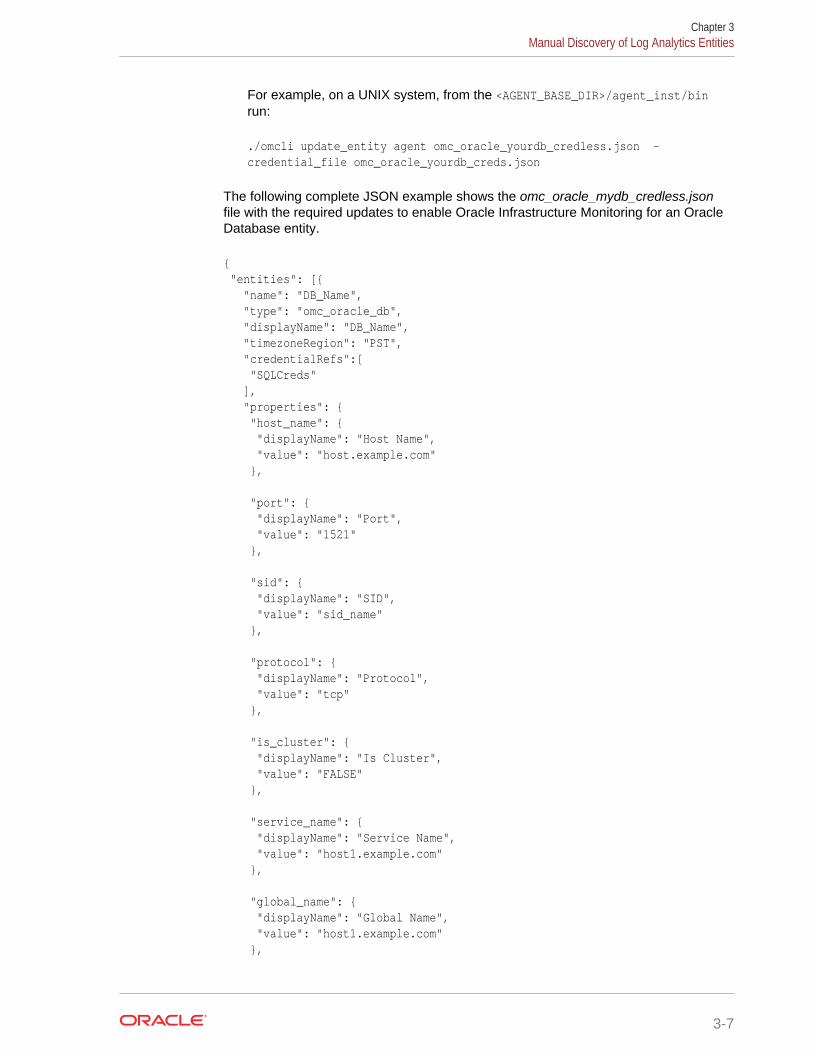
For example, on a UNIX system, from the <AGENT_BASE_DIR>/agent_inst/binrun:
./omcli update_entity agent omc_oracle_yourdb_credless.json -credential_file omc_oracle_yourdb_creds.json
The following complete JSON example shows the omc_oracle_mydb_credless.jsonfile with the required updates to enable Oracle Infrastructure Monitoring for an OracleDatabase entity.
{ "entities": [{ "name": "DB_Name", "type": "omc_oracle_db", "displayName": "DB_Name", "timezoneRegion": "PST", "credentialRefs":[ "SQLCreds" ], "properties": { "host_name": { "displayName": "Host Name", "value": "host.example.com" },
"port": { "displayName": "Port", "value": "1521" },
"sid": { "displayName": "SID", "value": "sid_name" },
"protocol": { "displayName": "Protocol", "value": "tcp" },
"is_cluster": { "displayName": "Is Cluster", "value": "FALSE" },
"service_name": { "displayName": "Service Name", "value": "host1.example.com" },
"global_name": { "displayName": "Global Name", "value": "host1.example.com" },
Chapter 3Manual Discovery of Log Analytics Entities
3-7
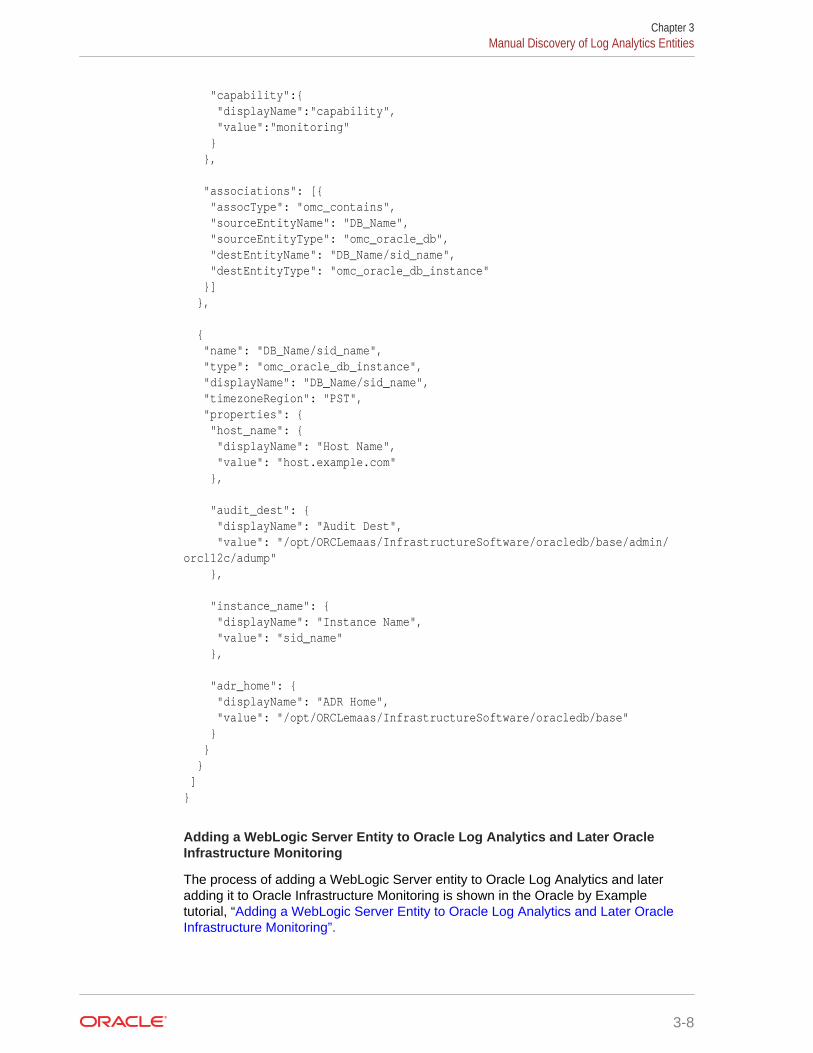
"capability":{ "displayName":"capability", "value":"monitoring" } },
"associations": [{ "assocType": "omc_contains", "sourceEntityName": "DB_Name", "sourceEntityType": "omc_oracle_db", "destEntityName": "DB_Name/sid_name", "destEntityType": "omc_oracle_db_instance" }] },
{ "name": "DB_Name/sid_name", "type": "omc_oracle_db_instance", "displayName": "DB_Name/sid_name", "timezoneRegion": "PST", "properties": { "host_name": { "displayName": "Host Name", "value": "host.example.com" },
"audit_dest": { "displayName": "Audit Dest", "value": "/opt/ORCLemaas/InfrastructureSoftware/oracledb/base/admin/orcl12c/adump" },
"instance_name": { "displayName": "Instance Name", "value": "sid_name" },
"adr_home": { "displayName": "ADR Home", "value": "/opt/ORCLemaas/InfrastructureSoftware/oracledb/base" } } } ]}
Adding a WebLogic Server Entity to Oracle Log Analytics and Later OracleInfrastructure Monitoring
The process of adding a WebLogic Server entity to Oracle Log Analytics and lateradding it to Oracle Infrastructure Monitoring is shown in the Oracle by Exampletutorial, “Adding a WebLogic Server Entity to Oracle Log Analytics and Later OracleInfrastructure Monitoring”.
Chapter 3Manual Discovery of Log Analytics Entities
3-8
The process shown in this tutorial also demonstrates the general process used to addOracle Infrastructure Monitoring to an existing Oracle Log Analytics deployment.
Chapter 3Manual Discovery of Log Analytics Entities
3-9
4Extend Monitoring Capability with MetricCollectors
You can extend Oracle Infrastructure Monitoring capability by using open sourcemetric collector agents to collect additional types of metric data.
Oracle Management Cloud supports two collector agents: collectd and Telegraf.
• Expand Monitoring with collectd
• Expand Monitoring with Telegraf
Expand Monitoring with collectdcollectd is an open source tool used to collect metric data from various sources (suchas operating systems, applications, external devices, and log files). .
When installed, collectd expands the scope of Oracle Infrastructure Monitoring byincreasing the number and type of metrics that can be collected via collectd’s largeand ever increasing open source plugin library.
Enabling collectd for Oracle Management Cloud, involves configuring collectd to sendmetric data to the Cloud Agent. collectd metrics can be automatically mapped toOracle Management Cloud metrics. When collectd auto-mapping has been performed,a new entity type is created for each plugin.
When viewing these auto-created entities from the Oracle Management Cloudconsole, you can determine whether Oracle Management Cloud is receiving thecollectd metrics through the following entity availability states:
• UP: Oracle Management Cloud is receiving metrics from collectd.
• DOWN: Oracle Management Cloud is not receiving metrics from collectd.
You can modify these auto-created entity types via REST API.
Note:
REST API documentation access is currently limited to approved customers.Contact your Oracle Support or Sales Representative for more informationabout accessing and using REST API documentation.
Auto-created entities require a Standard Edition/Enterprise Edition license. For moreinformation, see Enabling License Editions for Oracle Management Cloud and OracleManagement Cloud Offerings.
The following steps illustrate how to use collectd with Oracle Management Cloud.
Important: All tasks shown within step examples are required unless otherwise noted.
4-1
Step Illustrative Example
1. Configure READ plugins to read data intocollectd.
Example Read Plugin — Processes Plugin
2. Integrate collectd with the Cloud agent.Here, you configure collectd to send metrics tothe Cloud agent receiver over HTTPS and thepermit the Cloud agent to monitor it usingcollectdctl.
Example: Configuring collectd
3. Add a generic metric collector entity toOracle Management Cloud.
Example: Generic Metric Collector Entity Type(Auto-mapping)
Example Read Plugin — Processes PluginThe processes plugin collects the number of processes, grouped by their state (e. g.running, sleeping, zombies, etc.). Additionally, it can collect detailed statistics aboutselected processes, grouped by name. For more information about specifying theselected processes, refer to the collectd.conf(5) man page. For example, the followingconfiguration snippet can be used to collect detailed statistics on Apache HTTP serverprocesses, the Cloud agent processes, and collectd's own process running on aparticular system.
Processes Plugin Configuration Example
LoadPlugin processes<Plugin processes> Process "httpd" ProcessMatch "omc-cloud-agent" "java .*oracle.sysman.gcagent.tmmain.TMMain" Process "collectd"</Plugin>
Example: Configuring collectdIn this example, we'll configure collectd to push metrics to the cloud agent receiver viacollectd's write_http plugin.
Note:
The examples shown in this section are only applicable to collectd version5.5 and above.
The generic metric collector's receiver listens to requests sent to https://<host>:<port>/emd/receiver/gmc. Here, <port> is same port shown in the URLreturned by running the omcli status agent command on the cloud agent host.
On the collectd side, the same information is provided in its configuration file, asshown in the following example.
Chapter 4Expand Monitoring with collectd
4-2

write_http Plugin Configuration
<Plugin write_http> <Node "omc"> URL "https://127.0.0.1:1899/emd/receiver/gmc" Format "JSON" StoreRates true VerifyPeer false </Node></Plugin>
By setting StoreRates to true, collectd is configured to send rates rather than countervalues to Oracle Management Cloud. The POST method is used to send and receivemetrics.
The collectdctl control interface communicates with the collectd agent process usingUNIX domain sockets. To have the cloud agent monitor collectd, the unixsock plugin isenabled and configured as shown in unixsock Plugin Configuration.
Note:
If collectd is remotely located relative to the cloud agent host, specify thecloud agent host name instead of the loop-back address of 127.0.0.1.
unixsock Plugin Configuration
<Plugin unixsock> SocketFile "/opt/collectd/var/run/collectd-unixsock" SocketGroup "collectd" SocketPerms "0660" DeleteSocket false</Plugin>
Note:
unixsock plugin configuration (along with adding an agent user to theSocketGroup) is only required if collectd is co-located with cloud agent andshould be monitored by it.
As shown in the configuration above, UNIX domain sockets use file-basedpermissions, unlike internet sockets. In case the cloud agent user is not the same asthe user running the collectd process, you need to ensure that the cloud agent userhas both read and write (06) permission on the socket. One way to ensure this is byadding the cloud agent user to SocketGroup ("collectd" in the above example).
The cloud agent user is the user who started the cloud agent. You can determine whothe cloud agent user is by running the following command:
omcli status agent
Chapter 4Expand Monitoring with collectd
4-3
If the group specified for SocketGroup does not exist on the host, you'll need to addone as shown below.
$ sudo /usr/sbin/groupadd collectd
Add a Cloud Agent User to a SocketGroup
In the following example, you are adding a cloud agent to SocketGroup in collectd.
$ sudo /usr/sbin/usermod -a -G collectd <cloud agent user name>
With group permissions in effect, the cloud agent user will be able to run collectdctlcommands that communicate with collectd agent.
Additionally, to protect the receiver URI, a new credential with username andpassword can be added to the cloud agent using the omcli command line interface.
Add HTTP Basic Authentication Credentials (Optional)
$ omcli add_credentials agent -credential_file http_receiver_auth.json
Example content for the http_receiver_auth.json is shown below.
[ { "entity":"Lama.mycompany.com:1899", "name":"omc-receiver-cred", "type":"HttpReceiver-Auth", "globalName":"HttpReceiver.basic", "description":"Internal authorization for the HTTP receiver", "properties":[ { "name":"username", "value":"CLEAR[scott]" }, { "name":"password", "value":"CLEAR[tiger]" } ] }]
Here, the cloud agent entity is specified in "<type>.<name>" format (using a period (.)as a separator) where the <name> includes the agent's listening port. The propertiesusername and password are set to scott and tiger respectively. The sender will berequired to authenticate with these credentials.
The same username and password are then made known to collectd's write_httpplugin by adding User and Password fields to its configuration as shown in the nextsection.
write_http Plugin Configuration for HTTP Basic Authentication (Optional)
<Plugin write_http> <Node "omc"> URL "https://127.0.0.1:1899/emd/receiver/gmc" Format "JSON" StoreRates true VerifyPeer false User "scott"
Chapter 4Expand Monitoring with collectd
4-4
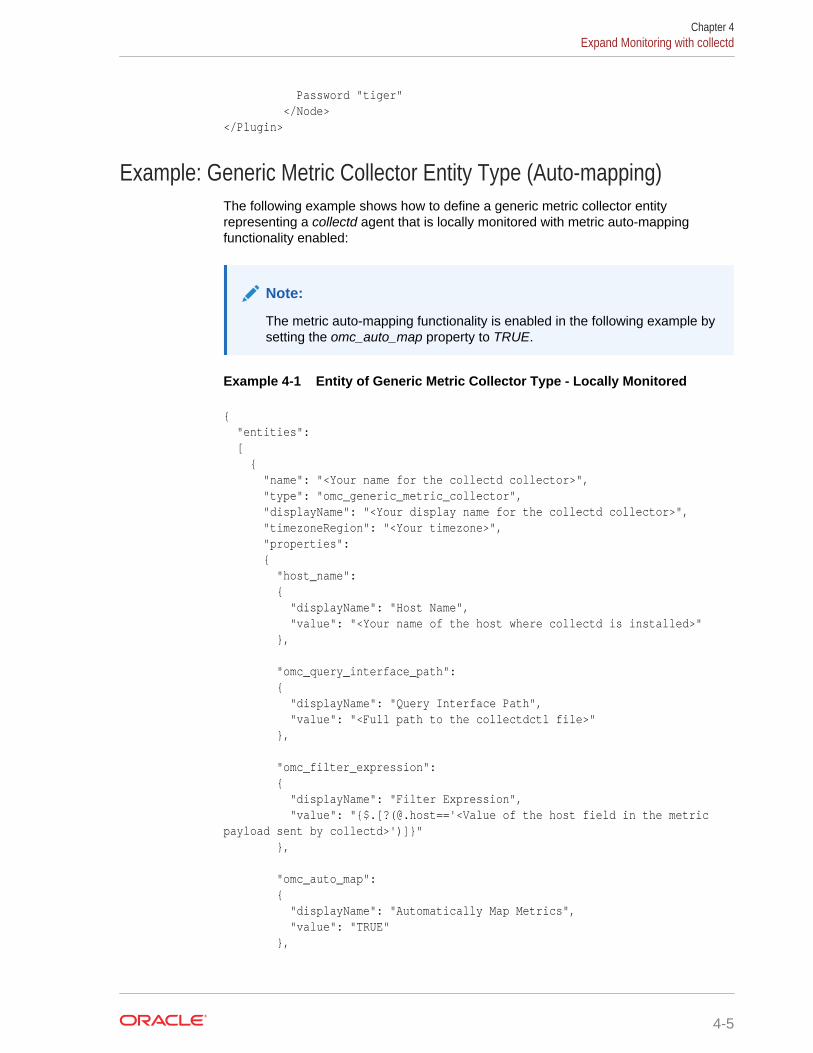
Password "tiger" </Node></Plugin>
Example: Generic Metric Collector Entity Type (Auto-mapping)The following example shows how to define a generic metric collector entityrepresenting a collectd agent that is locally monitored with metric auto-mappingfunctionality enabled:
Note:
The metric auto-mapping functionality is enabled in the following example bysetting the omc_auto_map property to TRUE.
Example 4-1 Entity of Generic Metric Collector Type - Locally Monitored
{ "entities": [ { "name": "<Your name for the collectd collector>", "type": "omc_generic_metric_collector", "displayName": "<Your display name for the collectd collector>", "timezoneRegion": "<Your timezone>", "properties": { "host_name": { "displayName": "Host Name", "value": "<Your name of the host where collectd is installed>" },
"omc_query_interface_path": { "displayName": "Query Interface Path", "value": "<Full path to the collectdctl file>" },
"omc_filter_expression": { "displayName": "Filter Expression", "value": "{$.[?(@.host=='<Value of the host field in the metric payload sent by collectd>')]}" },
"omc_auto_map": { "displayName": "Automatically Map Metrics", "value": "TRUE" },
Chapter 4Expand Monitoring with collectd
4-5
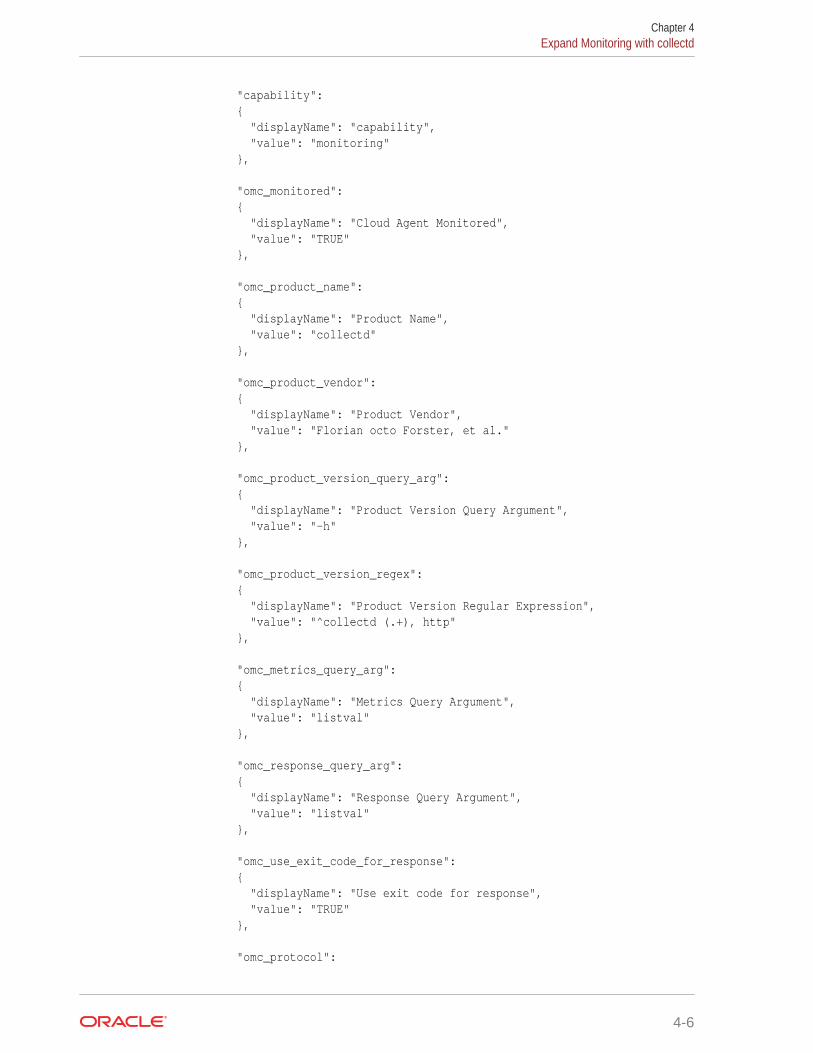
"capability": { "displayName": "capability", "value": "monitoring" },
"omc_monitored": { "displayName": "Cloud Agent Monitored", "value": "TRUE" },
"omc_product_name": { "displayName": "Product Name", "value": "collectd" },
"omc_product_vendor": { "displayName": "Product Vendor", "value": "Florian octo Forster, et al." },
"omc_product_version_query_arg": { "displayName": "Product Version Query Argument", "value": "-h" },
"omc_product_version_regex": { "displayName": "Product Version Regular Expression", "value": "^collectd (.+), http" },
"omc_metrics_query_arg": { "displayName": "Metrics Query Argument", "value": "listval" },
"omc_response_query_arg": { "displayName": "Response Query Argument", "value": "listval" },
"omc_use_exit_code_for_response": { "displayName": "Use exit code for response", "value": "TRUE" },
"omc_protocol":
Chapter 4Expand Monitoring with collectd
4-6
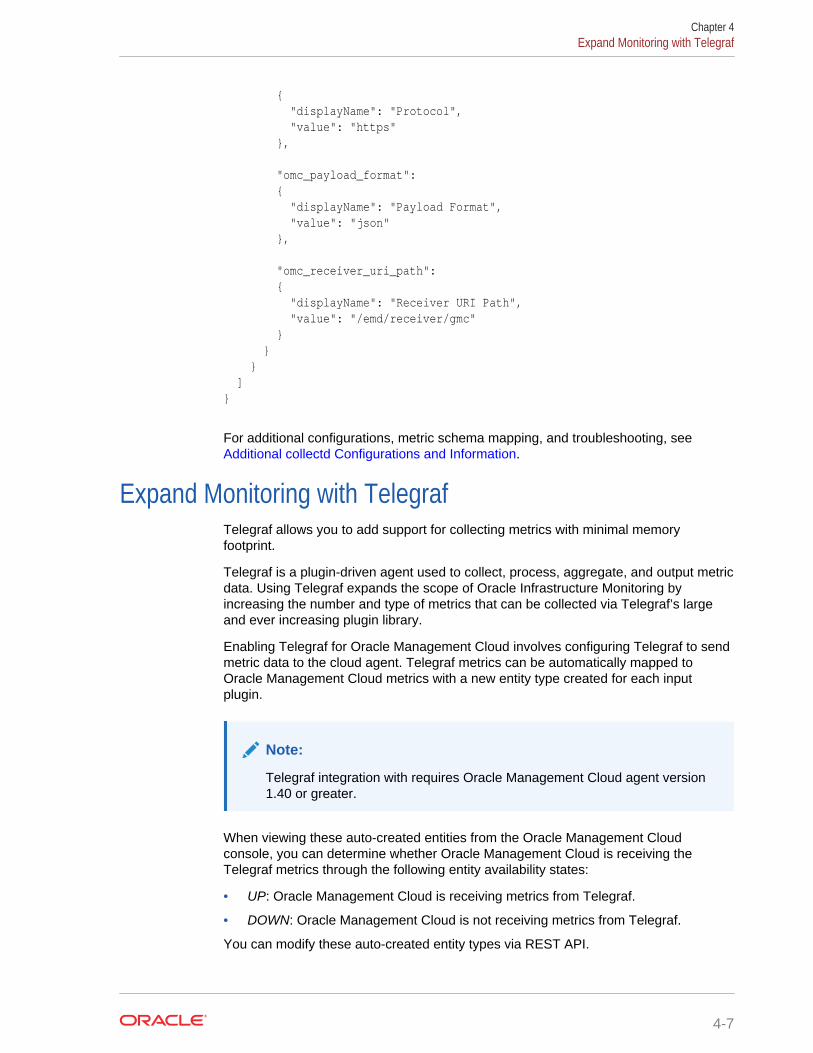
{ "displayName": "Protocol", "value": "https" },
"omc_payload_format": { "displayName": "Payload Format", "value": "json" },
"omc_receiver_uri_path": { "displayName": "Receiver URI Path", "value": "/emd/receiver/gmc" } } } ]}
For additional configurations, metric schema mapping, and troubleshooting, see Additional collectd Configurations and Information.
Expand Monitoring with TelegrafTelegraf allows you to add support for collecting metrics with minimal memoryfootprint.
Telegraf is a plugin-driven agent used to collect, process, aggregate, and output metricdata. Using Telegraf expands the scope of Oracle Infrastructure Monitoring byincreasing the number and type of metrics that can be collected via Telegraf’s largeand ever increasing plugin library.
Enabling Telegraf for Oracle Management Cloud involves configuring Telegraf to sendmetric data to the cloud agent. Telegraf metrics can be automatically mapped toOracle Management Cloud metrics with a new entity type created for each inputplugin.
Note:
Telegraf integration with requires Oracle Management Cloud agent version1.40 or greater.
When viewing these auto-created entities from the Oracle Management Cloudconsole, you can determine whether Oracle Management Cloud is receiving theTelegraf metrics through the following entity availability states:
• UP: Oracle Management Cloud is receiving metrics from Telegraf.
• DOWN: Oracle Management Cloud is not receiving metrics from Telegraf.
You can modify these auto-created entity types via REST API.
Chapter 4Expand Monitoring with Telegraf
4-7
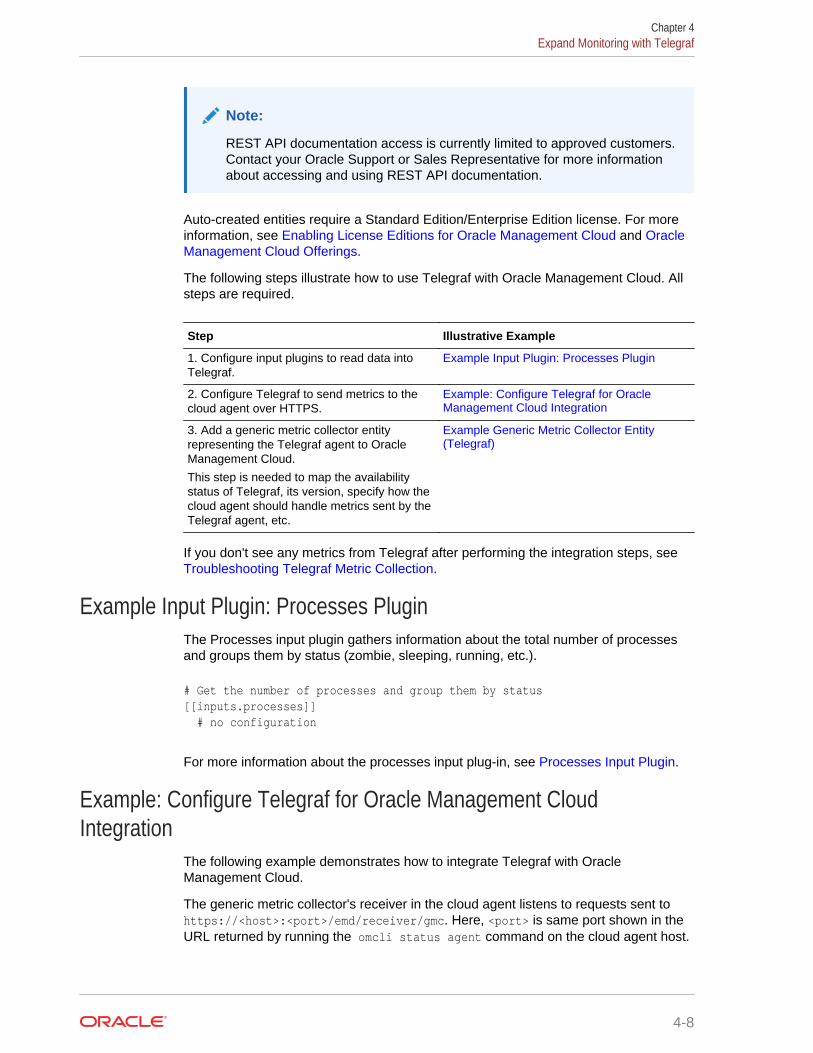
Note:
REST API documentation access is currently limited to approved customers.Contact your Oracle Support or Sales Representative for more informationabout accessing and using REST API documentation.
Auto-created entities require a Standard Edition/Enterprise Edition license. For moreinformation, see Enabling License Editions for Oracle Management Cloud and OracleManagement Cloud Offerings.
The following steps illustrate how to use Telegraf with Oracle Management Cloud. Allsteps are required.
Step Illustrative Example
1. Configure input plugins to read data intoTelegraf.
Example Input Plugin: Processes Plugin
2. Configure Telegraf to send metrics to thecloud agent over HTTPS.
Example: Configure Telegraf for OracleManagement Cloud Integration
3. Add a generic metric collector entityrepresenting the Telegraf agent to OracleManagement Cloud.
This step is needed to map the availabilitystatus of Telegraf, its version, specify how thecloud agent should handle metrics sent by theTelegraf agent, etc.
Example Generic Metric Collector Entity(Telegraf)
If you don't see any metrics from Telegraf after performing the integration steps, see Troubleshooting Telegraf Metric Collection.
Example Input Plugin: Processes PluginThe Processes input plugin gathers information about the total number of processesand groups them by status (zombie, sleeping, running, etc.).
# Get the number of processes and group them by status[[inputs.processes]] # no configuration
For more information about the processes input plug-in, see Processes Input Plugin.
Example: Configure Telegraf for Oracle Management CloudIntegration
The following example demonstrates how to integrate Telegraf with OracleManagement Cloud.
The generic metric collector's receiver in the cloud agent listens to requests sent tohttps://<host>:<port>/emd/receiver/gmc. Here, <port> is same port shown in theURL returned by running the omcli status agent command on the cloud agent host.
Chapter 4Expand Monitoring with Telegraf
4-8

On the Telegraf side, the same information is provided in its configuration file, asshown in the following example.
# Global tags can be specified here in key="value" format.[global_tags] collector = "telegraf" [[outputs.http]] url = "https://127.0.0.1:1899/emd/receiver/gmc" method = "POST" insecure_skip_verify = true data_format = "json"
The POST method is used to send and receive metrics. Also, the above configurationsets a global tag called collector to the value telegraf. This setting is essential andis used by cloud agent to recognize metrics sent by Telegraf.
Note:
If Telegraf is remotely located relative to the cloud agent host, specify thecloud agent host name instead of the loop-back address of 127.0.0.1. Moreon this configuration is covered in Receive Metrics from a Remote TelegrafCollector.
Metrics sent by Telegraf are posted against entities in Oracle Management Cloudwhose names are derived using the value of the host tag set in Telegraf's payload sentto cloud agent. This value is usually the short host name by default. If multiple hostscan exist with the same short host name (in different domains) within your tenancy,you also need to set the hostname tag to the host's FQDN to disambiguate the entitynames that will be created in Oracle Management Cloud.
[agent] hostname="myhost.myco.com"
Incorporate HTTP Basic Authentication Scheme (Optional)
To protect the receiver URI, a new credential with username and password can beadded to the cloud agent using the omcli add_credentials command:
omcli add_credentials agent -credential_file http_receiver_auth.json
Example content for the http_receiver_auth.json is shown below.
[ { "entity":"Lama.mycompany.com:1899", "name":"omc-receiver-cred", "type":"HttpReceiver-Auth", "globalName":"HttpReceiver.basic", "description":"Internal authorization for the HTTP receiver", "properties":[ { "name":"username", "value":"CLEAR[scott]" }, { "name":"password", "value":"CLEAR[tiger]" } ] }]
Chapter 4Expand Monitoring with Telegraf
4-9
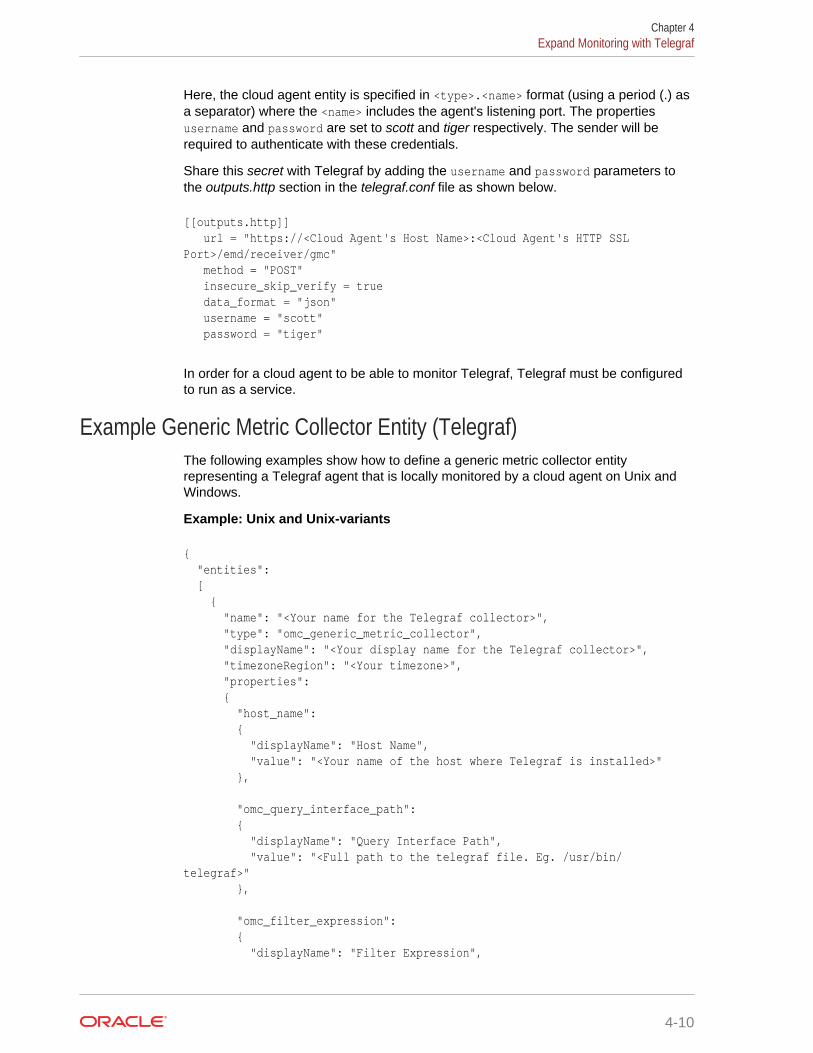
Here, the cloud agent entity is specified in <type>.<name> format (using a period (.) asa separator) where the <name> includes the agent's listening port. The propertiesusername and password are set to scott and tiger respectively. The sender will berequired to authenticate with these credentials.
Share this secret with Telegraf by adding the username and password parameters tothe outputs.http section in the telegraf.conf file as shown below.
[[outputs.http]] url = "https://<Cloud Agent's Host Name>:<Cloud Agent's HTTP SSL Port>/emd/receiver/gmc" method = "POST" insecure_skip_verify = true data_format = "json" username = "scott" password = "tiger"
In order for a cloud agent to be able to monitor Telegraf, Telegraf must be configuredto run as a service.
Example Generic Metric Collector Entity (Telegraf)The following examples show how to define a generic metric collector entityrepresenting a Telegraf agent that is locally monitored by a cloud agent on Unix andWindows.
Example: Unix and Unix-variants
{ "entities": [ { "name": "<Your name for the Telegraf collector>", "type": "omc_generic_metric_collector", "displayName": "<Your display name for the Telegraf collector>", "timezoneRegion": "<Your timezone>", "properties": { "host_name": { "displayName": "Host Name", "value": "<Your name of the host where Telegraf is installed>" }, "omc_query_interface_path": { "displayName": "Query Interface Path", "value": "<Full path to the telegraf file. Eg. /usr/bin/telegraf>" }, "omc_filter_expression": { "displayName": "Filter Expression",
Chapter 4Expand Monitoring with Telegraf
4-10
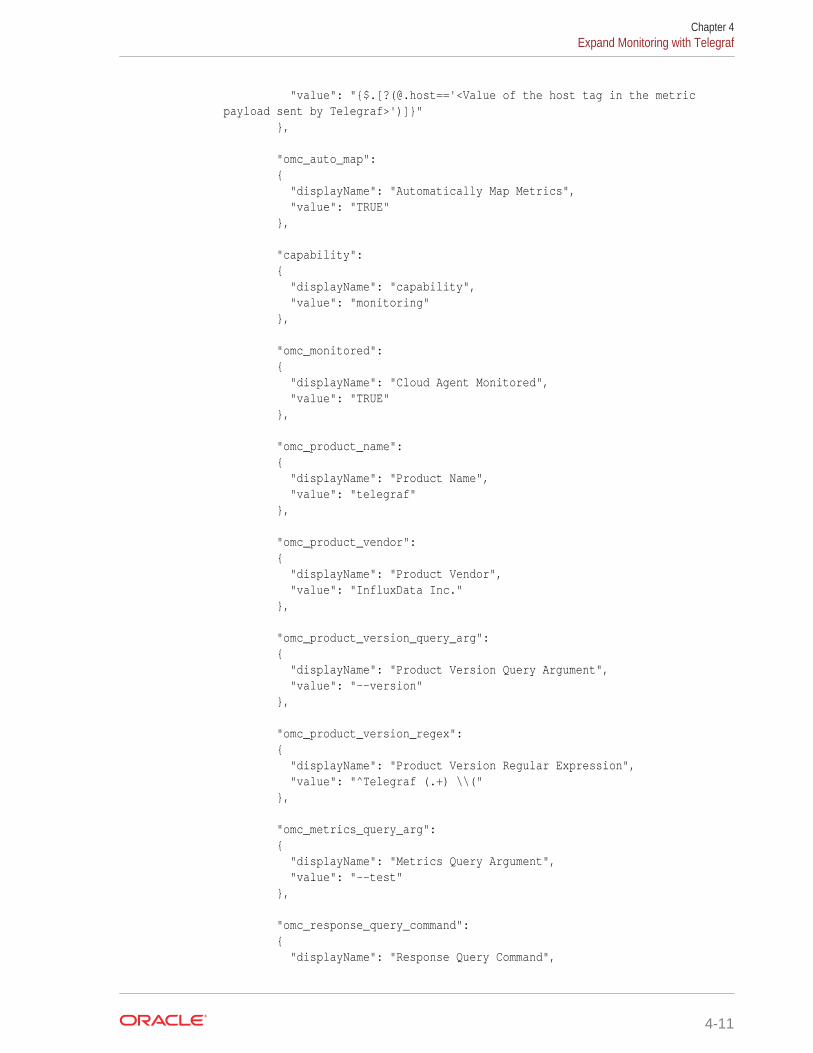
"value": "{$.[?(@.host=='<Value of the host tag in the metric payload sent by Telegraf>')]}" }, "omc_auto_map": { "displayName": "Automatically Map Metrics", "value": "TRUE" }, "capability": { "displayName": "capability", "value": "monitoring" }, "omc_monitored": { "displayName": "Cloud Agent Monitored", "value": "TRUE" }, "omc_product_name": { "displayName": "Product Name", "value": "telegraf" }, "omc_product_vendor": { "displayName": "Product Vendor", "value": "InfluxData Inc." }, "omc_product_version_query_arg": { "displayName": "Product Version Query Argument", "value": "--version" }, "omc_product_version_regex": { "displayName": "Product Version Regular Expression", "value": "^Telegraf (.+) \\(" }, "omc_metrics_query_arg": { "displayName": "Metrics Query Argument", "value": "--test" }, "omc_response_query_command": { "displayName": "Response Query Command",
Chapter 4Expand Monitoring with Telegraf
4-11
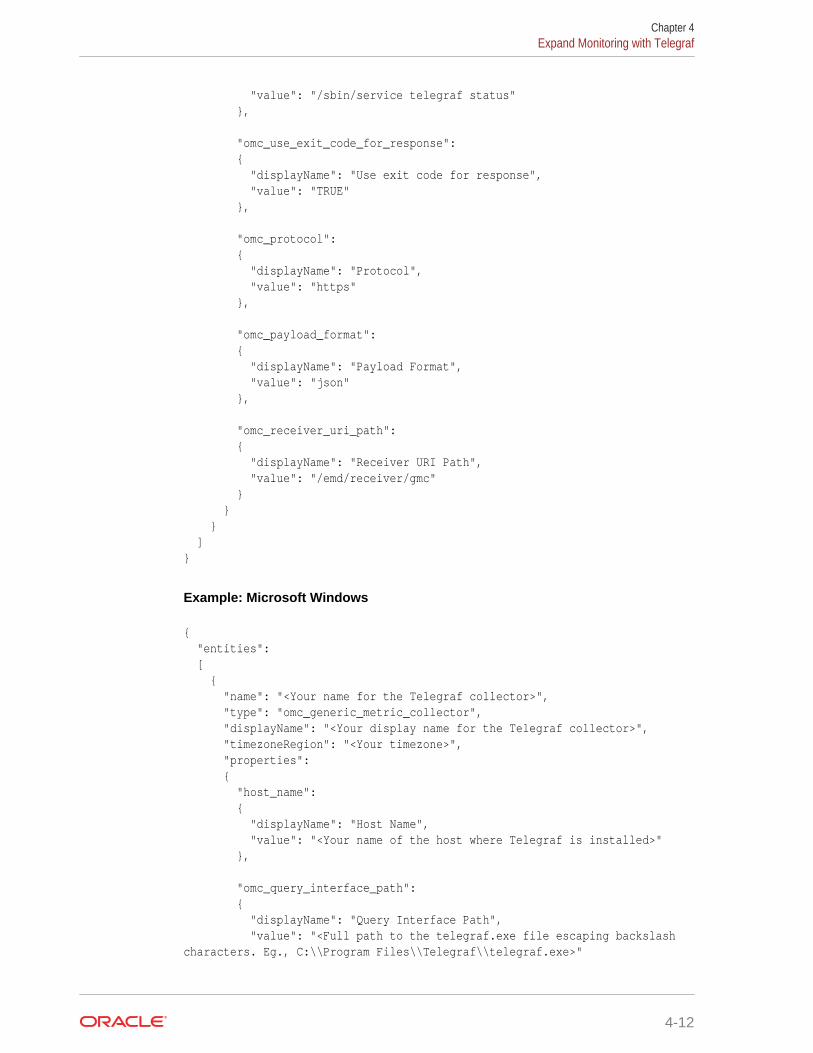
"value": "/sbin/service telegraf status" }, "omc_use_exit_code_for_response": { "displayName": "Use exit code for response", "value": "TRUE" }, "omc_protocol": { "displayName": "Protocol", "value": "https" }, "omc_payload_format": { "displayName": "Payload Format", "value": "json" }, "omc_receiver_uri_path": { "displayName": "Receiver URI Path", "value": "/emd/receiver/gmc" } } } ]}
Example: Microsoft Windows
{ "entities": [ { "name": "<Your name for the Telegraf collector>", "type": "omc_generic_metric_collector", "displayName": "<Your display name for the Telegraf collector>", "timezoneRegion": "<Your timezone>", "properties": { "host_name": { "displayName": "Host Name", "value": "<Your name of the host where Telegraf is installed>" }, "omc_query_interface_path": { "displayName": "Query Interface Path", "value": "<Full path to the telegraf.exe file escaping backslash characters. Eg., C:\\Program Files\\Telegraf\\telegraf.exe>"
Chapter 4Expand Monitoring with Telegraf
4-12

}, "omc_filter_expression": { "displayName": "Filter Expression", "value": "{$.[?(@.host=='<Value of the host tag in the metric payload sent by Telegraf>')]}" }, "omc_auto_map": { "displayName": "Automatically Map Metrics", "value": "TRUE" }, "capability": { "displayName": "capability", "value": "monitoring" }, "omc_monitored": { "displayName": "Cloud Agent Monitored", "value": "TRUE" }, "omc_product_name": { "displayName": "Product Name", "value": "telegraf" }, "omc_product_vendor": { "displayName": "Product Vendor", "value": "InfluxData Inc." }, "omc_product_version_query_arg": { "displayName": "Product Version Query Argument", "value": "--version" }, "omc_product_version_regex": { "displayName": "Product Version Regular Expression", "value": "^Telegraf (.+) \\(" }, "omc_metrics_query_arg": { "displayName": "Metrics Query Argument", "value": "--console --test"
Chapter 4Expand Monitoring with Telegraf
4-13
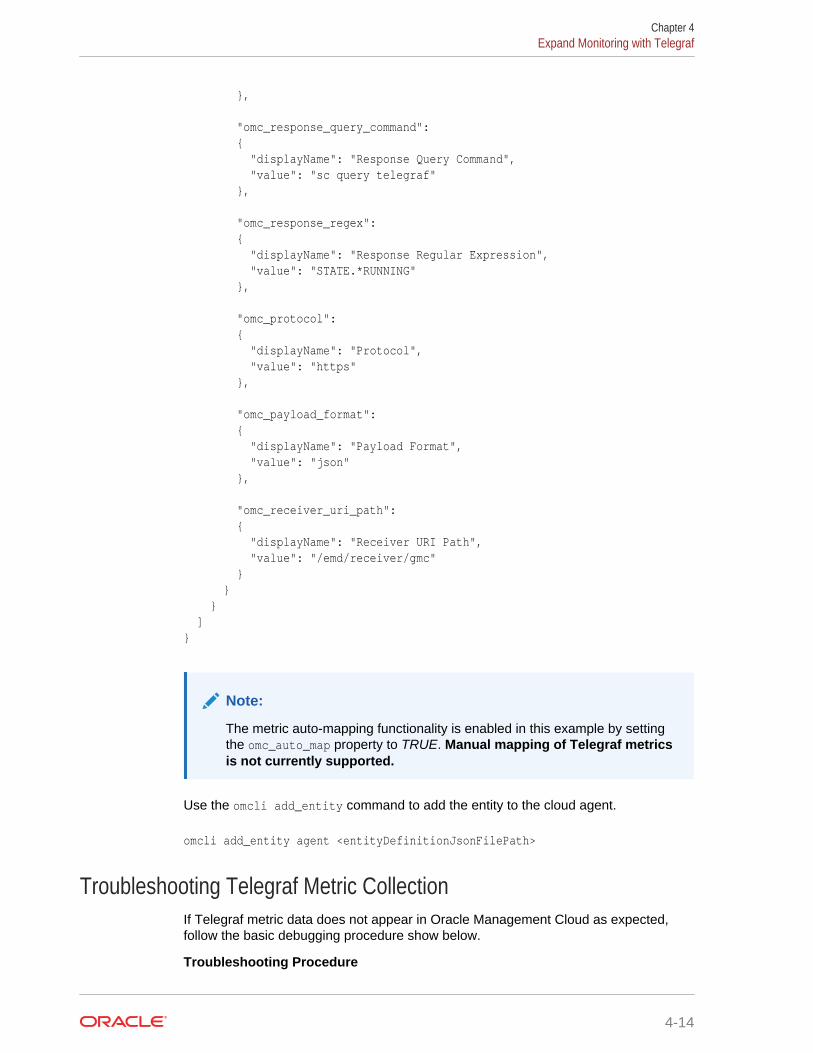
}, "omc_response_query_command": { "displayName": "Response Query Command", "value": "sc query telegraf" }, "omc_response_regex": { "displayName": "Response Regular Expression", "value": "STATE.*RUNNING" }, "omc_protocol": { "displayName": "Protocol", "value": "https" }, "omc_payload_format": { "displayName": "Payload Format", "value": "json" }, "omc_receiver_uri_path": { "displayName": "Receiver URI Path", "value": "/emd/receiver/gmc" } } } ]}
Note:
The metric auto-mapping functionality is enabled in this example by settingthe omc_auto_map property to TRUE. Manual mapping of Telegraf metricsis not currently supported.
Use the omcli add_entity command to add the entity to the cloud agent.
omcli add_entity agent <entityDefinitionJsonFilePath>
Troubleshooting Telegraf Metric CollectionIf Telegraf metric data does not appear in Oracle Management Cloud as expected,follow the basic debugging procedure show below.
Troubleshooting Procedure
Chapter 4Expand Monitoring with Telegraf
4-14
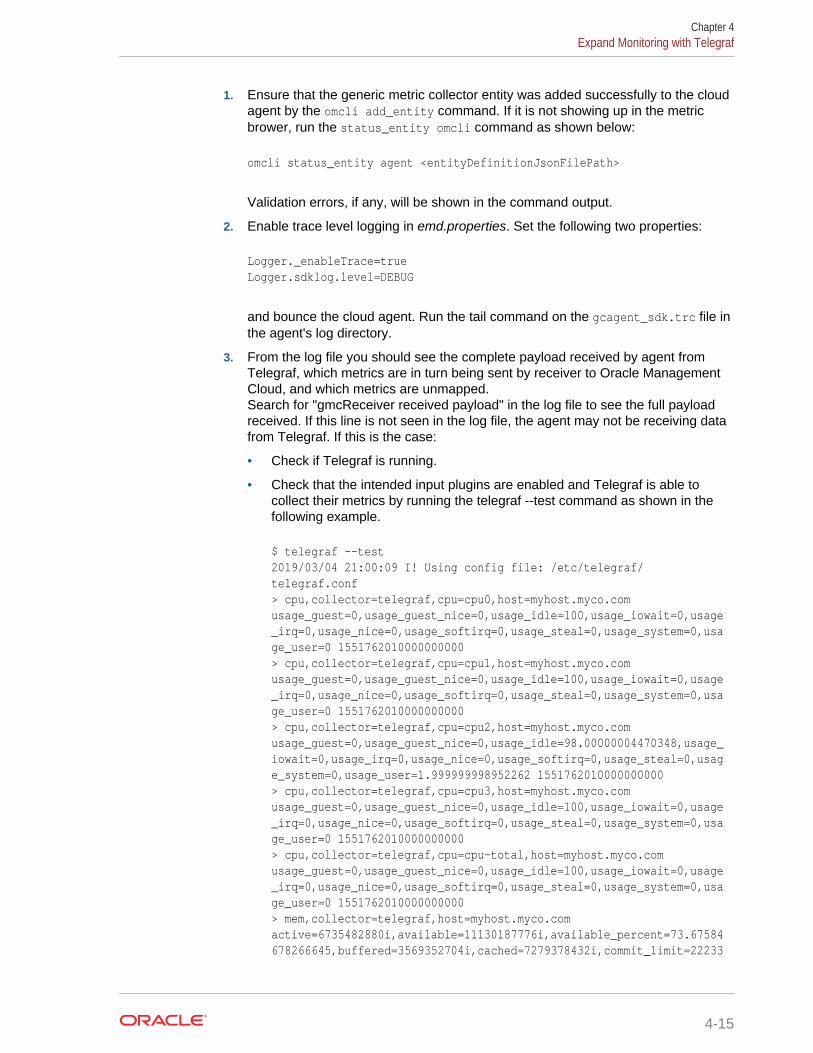
1. Ensure that the generic metric collector entity was added successfully to the cloudagent by the omcli add_entity command. If it is not showing up in the metricbrower, run the status_entity omcli command as shown below:
omcli status_entity agent <entityDefinitionJsonFilePath>
Validation errors, if any, will be shown in the command output.
2. Enable trace level logging in emd.properties. Set the following two properties:
Logger._enableTrace=trueLogger.sdklog.level=DEBUG
and bounce the cloud agent. Run the tail command on the gcagent_sdk.trc file inthe agent's log directory.
3. From the log file you should see the complete payload received by agent fromTelegraf, which metrics are in turn being sent by receiver to Oracle ManagementCloud, and which metrics are unmapped.Search for "gmcReceiver received payload" in the log file to see the full payloadreceived. If this line is not seen in the log file, the agent may not be receiving datafrom Telegraf. If this is the case:
• Check if Telegraf is running.
• Check that the intended input plugins are enabled and Telegraf is able tocollect their metrics by running the telegraf --test command as shown in thefollowing example.
$ telegraf --test2019/03/04 21:00:09 I! Using config file: /etc/telegraf/telegraf.conf> cpu,collector=telegraf,cpu=cpu0,host=myhost.myco.com usage_guest=0,usage_guest_nice=0,usage_idle=100,usage_iowait=0,usage_irq=0,usage_nice=0,usage_softirq=0,usage_steal=0,usage_system=0,usage_user=0 1551762010000000000> cpu,collector=telegraf,cpu=cpu1,host=myhost.myco.com usage_guest=0,usage_guest_nice=0,usage_idle=100,usage_iowait=0,usage_irq=0,usage_nice=0,usage_softirq=0,usage_steal=0,usage_system=0,usage_user=0 1551762010000000000> cpu,collector=telegraf,cpu=cpu2,host=myhost.myco.com usage_guest=0,usage_guest_nice=0,usage_idle=98.00000004470348,usage_iowait=0,usage_irq=0,usage_nice=0,usage_softirq=0,usage_steal=0,usage_system=0,usage_user=1.999999998952262 1551762010000000000> cpu,collector=telegraf,cpu=cpu3,host=myhost.myco.com usage_guest=0,usage_guest_nice=0,usage_idle=100,usage_iowait=0,usage_irq=0,usage_nice=0,usage_softirq=0,usage_steal=0,usage_system=0,usage_user=0 1551762010000000000> cpu,collector=telegraf,cpu=cpu-total,host=myhost.myco.com usage_guest=0,usage_guest_nice=0,usage_idle=100,usage_iowait=0,usage_irq=0,usage_nice=0,usage_softirq=0,usage_steal=0,usage_system=0,usage_user=0 1551762010000000000> mem,collector=telegraf,host=myhost.myco.com active=6735482880i,available=11130187776i,available_percent=73.67584678266645,buffered=3569352704i,cached=7279378432i,commit_limit=22233
Chapter 4Expand Monitoring with Telegraf
4-15

530368i,committed_as=4000460800i,dirty=839680i,free=281456640i,high_free=0i,high_total=0i,huge_page_size=2097152i,huge_pages_free=0i,huge_pages_total=0i,inactive=5336559616i,low_free=0i,low_total=0i,mapped=1415385088i,page_tables=116322304i,shared=1340026880i,slab=2446262272i,swap_cached=14417920i,swap_free=14367285248i,swap_total=14680047616i,total=15106969600i,used=3976781824i,used_percent=26.324153217333542,vmalloc_chunk=35184301154304i,vmalloc_total=35184372087808i,vmalloc_used=50819072i,wired=0i,write_back=0i,write_back_tmp=0i 1551762010000000000
If the test is successful, but metrics are still not being received by cloud agent,check that the HTTP output plugin has been configured correctly. Check the hostand port in the URL. Check Telegraf's log file or syslog for errors if any reportedfrom outputs.http. Check if other software applications such as SELinux, anti-virus,or a firewall may be blocking Telegraf's ability to write metrics to the cloud agent'sport.
4. Search for payload level summary lines in the log file which starts with the "SourceMetrics" line. These lines should give a summary count of statistics such as howmany metrics are being received in each payload, how many have been sent toOracle Management Cloud, or how many are unmapped.
Payload Level Summary Logging Example - gcagent_sdk.trc
Log of Payload Level Summary
2019-03-04 21:45:04,613 [401336:9A108C02] DEBUG - Source Metrics: 182019-03-04 21:45:04,613 [401336:9A108C02] DEBUG - SEND_METRIC_GROUP_CALLED: 18
If the summary shows SEND_METRIC_GROUP_CALLED: <count>, that'snormal.
If the summary showsNO_ASSOC_GMC_ENTITY_WITH_MONITORING_CAPABILITY: <count>, thencheck that omc_filter_expression of the generic metric collector (gmc) entity allowsthe payload to filter through. Ensure that the name of the host field (if any)specified in the omc_filter_expression property exactly matches the host field'svalue in the payload. Also ensure that the gmc entity has either standard orenterprise license. License can be checked from Oracle Management Cloud’sAdministration UI.
If the summary shows METRIC_UPLOAD_RATE_LIMIT_EXCEEDED: <count>,then <count> metrics in the payload were down-sampled. They were not sent toup Oracle Management Cloud. This is expected if the sending interval is anythinglower than once a minute (interval "60s" in the telegraf.conf file).
If the summary shows WAITING_FOR_MAPPING_METADATA: <count>, then<count> metrics in the payload are waiting for auto-map processing to complete.This is a transient state only expected in the automatic mapping case. Auto-mapprocessing can take a few minutes to a tens of minutes to complete.
If the summary shows SKIPPED_DUPLICATE_METRIC_POST: <count>, then<count> metrics in the payload were skipped because multiple metric recordswere detected for any given entity, metric group and timestamp. In some casesthis may be OK, such as when the payload contains redundant records whichwere skipped. In other cases, this may require user to tweak which tag(s) are used
Chapter 4Expand Monitoring with Telegraf
4-16
for entity identification by manually specifying entity_identifier in telegrafconfiguration file. In other cases, this may require tweaking the input pluginconfiguration or may even be a mapping limitation. For eg., ensure that theprocess name or pattern specified for procstat plugin captures a single process(PID). Ingesting procstat metrics for multiple processes in Oracle Managed Cloudis currently not supported and will result in skipped posts as seen in the log file.
If the summary shows SKIPPED_AGGREGATE_METRIC_POST: <count>, then<count> metrics were skipped because they are aggregates. Ingestion ofaggregate metrics such as sum, min, max, mean, count, histograms, etc. fromTelegraf is currently not supported.
5. If SEND_METRIC_GROUP_CALLED: <count> is seen, you should eventuallystart seeing entities on the monitoring service UI with type same as the Telegrafplugin name and entity name containing the Telegraf host's name (as obtainedfrom the host field within the payload sent by Telegraf to Cloud agent). If you donot see such an entity, it’s possible that the entity has been created, but has notbeen granted Standard or Enterprise license. This can be fixed by adding a licensefrom the License Administration UI. From the Oracle Management Cloud console,select the Administration > Entities Configuration > Licensing link. From this page,look at the Unlicensed Entities link. If it shows the auto-created entity, assignLicense Edition = Standard or Enterprise and click Save. To ensure this happensautomatically in future, set the License Auto-Assignment to Standard orEnterprise.
6. Once the auto-created entity shows up on the list of entities in the monitoringservice UI, drill down into the entity to see the auto-mapped metrics. Only theavailability metric will be shown by default. On the Performance Charts tab, ClickOptions > Choose Metrics to select the auto-created metrics for viewing theircharts. Metric alert rules based on availability and threshold can also be definedon these performance metrics and are expected to work similar to alerts onmetrics natively collected by Oracle Cloud agent. Anomaly alerts is disabled out ofthe box for Telegraf metrics auto-mapped in Oracle Manged Cloud
7. When debugging is no longer required, turn off trace level logging and set the SDKlog level to INFO. Set the following in emd.properties.
Reset Log Level
Logger._enableTrace=falseLogger.sdklog.level=INFO
Chapter 4Expand Monitoring with Telegraf
4-17
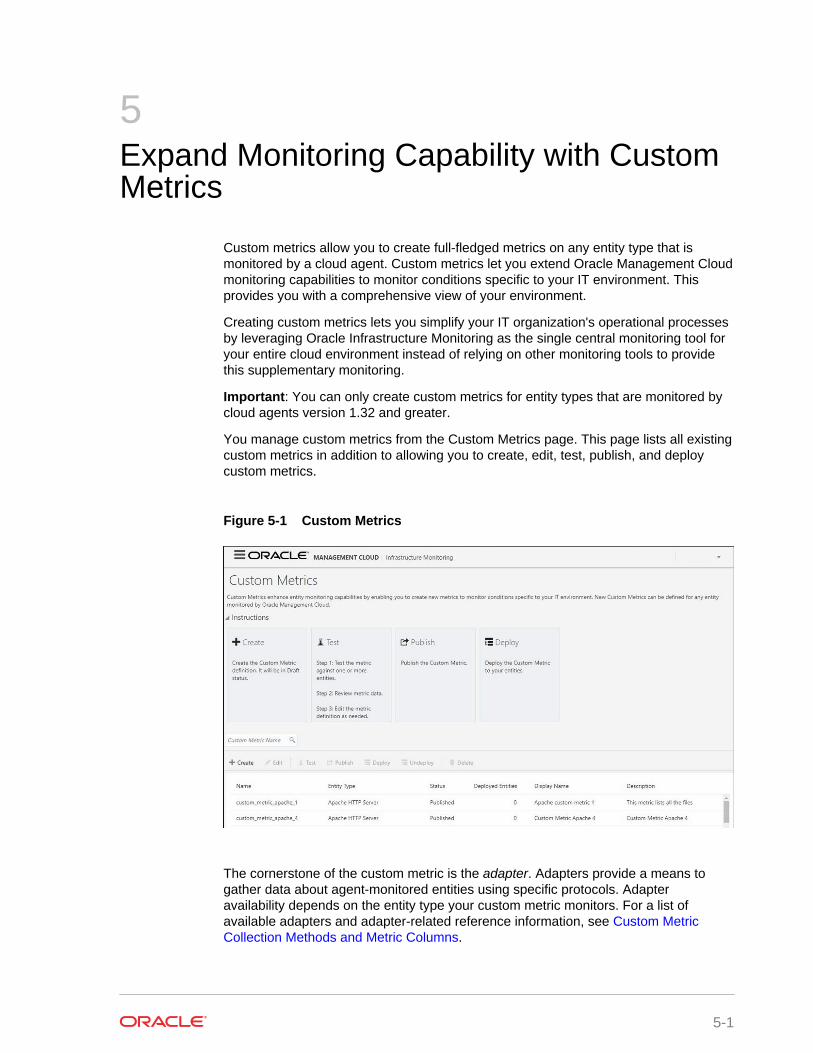
5Expand Monitoring Capability with CustomMetrics
Custom metrics allow you to create full-fledged metrics on any entity type that ismonitored by a cloud agent. Custom metrics let you extend Oracle Management Cloudmonitoring capabilities to monitor conditions specific to your IT environment. Thisprovides you with a comprehensive view of your environment.
Creating custom metrics lets you simplify your IT organization's operational processesby leveraging Oracle Infrastructure Monitoring as the single central monitoring tool foryour entire cloud environment instead of relying on other monitoring tools to providethis supplementary monitoring.
Important: You can only create custom metrics for entity types that are monitored bycloud agents version 1.32 and greater.
You manage custom metrics from the Custom Metrics page. This page lists all existingcustom metrics in addition to allowing you to create, edit, test, publish, and deploycustom metrics.
Figure 5-1 Custom Metrics
The cornerstone of the custom metric is the adapter. Adapters provide a means togather data about agent-monitored entities using specific protocols. Adapteravailability depends on the entity type your custom metric monitors. For a list ofavailable adapters and adapter-related reference information, see Custom MetricCollection Methods and Metric Columns.
5-1
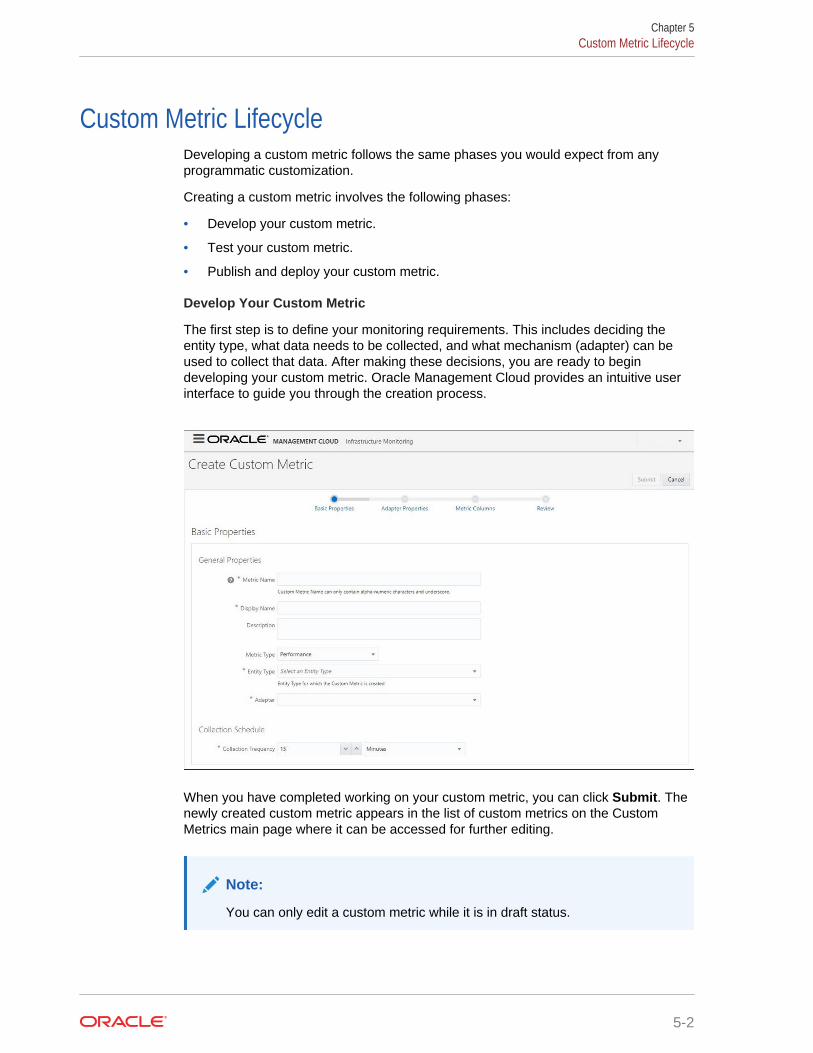
Custom Metric LifecycleDeveloping a custom metric follows the same phases you would expect from anyprogrammatic customization.
Creating a custom metric involves the following phases:
• Develop your custom metric.
• Test your custom metric.
• Publish and deploy your custom metric.
Develop Your Custom Metric
The first step is to define your monitoring requirements. This includes deciding theentity type, what data needs to be collected, and what mechanism (adapter) can beused to collect that data. After making these decisions, you are ready to begindeveloping your custom metric. Oracle Management Cloud provides an intuitive userinterface to guide you through the creation process.
When you have completed working on your custom metric, you can click Submit. Thenewly created custom metric appears in the list of custom metrics on the CustomMetrics main page where it can be accessed for further editing.
Note:
You can only edit a custom metric while it is in draft status.
Chapter 5Custom Metric Lifecycle
5-2
The custom metric UI allows you to develop and refine your custom metric in acompletely editable format. And more importantly, allows you to interactively test yourmetric against selected targets without having first to deploy the custom metric to adedicated test environment. The Test page allows you to run real-time metricevaluations to ensure there are no syntactical errors in your script or custom metricdefinition.
Test Your Custom Metric
Once your custom metric returns the expected data during real-time target testing, youare ready to test its robustness and actual behavior in Oracle Management Cloud bydeploying it against entities and start collecting data. This step involves selecting youreditable custom metric shown in the Custom Metrics main page and running the metricagainst a valid entity from the Test page.
Publish and Deploy Your Custom Metric
After rigorous testing, your custom metric is ready for deployment to your productionenvironment. Until this point, your custom metric is only viewable by you, the metriccreator. To make it accessible to all Oracle Management Cloud administrators, it mustbe published. Simply select the desired custom metric from list on the Custom Metricspage and click Publish.
Now that your custom metric has been made public, it can be deployed to intendedentities in your production environment.
Working with Custom MetricsMost all custom metric operations can be carried out from the Custom Metrics UI.
Important: You must have Oracle Management Cloud Administrator privileges inorder to create, edit, view, test, delete, publish, deploy or undeploy custom metrics.
Create a New Custom Metric
1. From the Oracle Management Cloud console navigation menu, select Monitoring,then Monitoring Admin, and finally Custom Metrics. The Custom Metrics pagedisplays.
2. Click Create. The Create Custom Metric page displays.
3. Decide on a custom metric name. Be aware that both the Metric Name andDisplay Name must be unique across an entity type.
4. Enter the remaining general properties.The selected adapter type defines the properties you must specify in AdapterProperties page. The following adapter types are available:
• OS Command Adapter: Executes the specified OS command and parses eachcommand output line (delimited by a user-specified string) into multiple values.The metric result is a mult-row, multi-column table.
• SQL Adapter: Executes custom SQL queries or function calls against singleinstance databases and instances on Real Application Clusters (RAC).
• JMX (Java Management Extensions) Adapter: Retrieves JMX attributes fromJMX-enabled servers and returns these attributes as a metric table.
5. Set the Collection Schedule. You defined the frequency with which metric data iscollected by specifying collection schedule properties.
Chapter 5Working with Custom Metrics
5-3
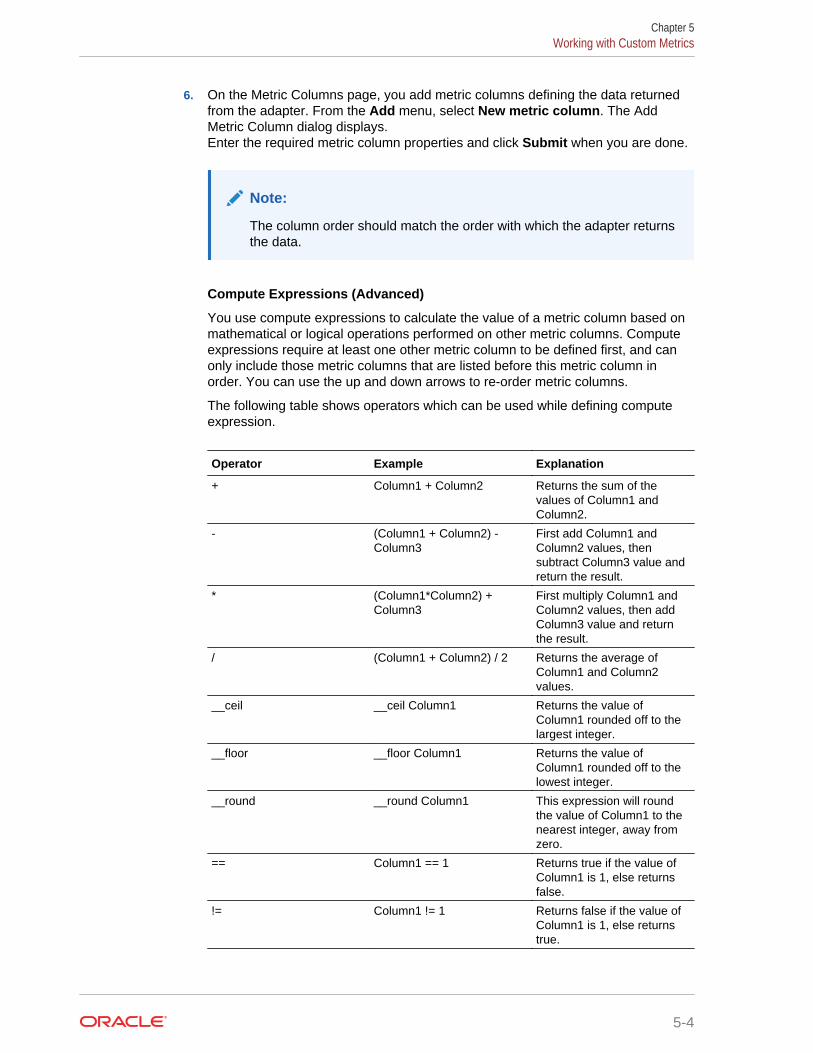
6. On the Metric Columns page, you add metric columns defining the data returnedfrom the adapter. From the Add menu, select New metric column. The AddMetric Column dialog displays.Enter the required metric column properties and click Submit when you are done.
Note:
The column order should match the order with which the adapter returnsthe data.
Compute Expressions (Advanced)
You use compute expressions to calculate the value of a metric column based onmathematical or logical operations performed on other metric columns. Computeexpressions require at least one other metric column to be defined first, and canonly include those metric columns that are listed before this metric column inorder. You can use the up and down arrows to re-order metric columns.
The following table shows operators which can be used while defining computeexpression.
Operator Example Explanation
+ Column1 + Column2 Returns the sum of thevalues of Column1 andColumn2.
- (Column1 + Column2) -Column3
First add Column1 andColumn2 values, thensubtract Column3 value andreturn the result.
* (Column1*Column2) +Column3
First multiply Column1 andColumn2 values, then addColumn3 value and returnthe result.
/ (Column1 + Column2) / 2 Returns the average ofColumn1 and Column2values.
__ceil __ceil Column1 Returns the value ofColumn1 rounded off to thelargest integer.
__floor __floor Column1 Returns the value ofColumn1 rounded off to thelowest integer.
__round __round Column1 This expression will roundthe value of Column1 to thenearest integer, away fromzero.
== Column1 == 1 Returns true if the value ofColumn1 is 1, else returnsfalse.
!= Column1 != 1 Returns false if the value ofColumn1 is 1, else returnstrue.
Chapter 5Working with Custom Metrics
5-4

Operator Example Explanation
() ? : ; (Status == 1) ? "UP":"DOWN"
This operator is equivalent toif then else statement. Thisexpression will return "UP" ifStatus value is 1 otherwise itwill return "DOWN"
__is_null __is_null Column1 Returns true if the value ofColumn1 is NULL, elsereturns false.
__delta __delta Column1 Returns the differencebetween the current valueand the previous value ofColumn1.
__contains Column1 __contains "ORA-" Returns true if the value ofColumn1 contains the string"ORA-", else returns false.
__beginswith Column1 __beginswith"ORA-"
Returns true if the value ofColumn1 starts with thestring "ORA-", else returnsfalse.
__matches Column1 __matches "UP" Returns true if the value ofColumn1 is equal to "UP",else returns false.
__length __length Column1 Returns the length of stringvalue of Column1.
__to_upper __to_upper Column1 Returns the upper case ofstring value of Column1
__to_lower __to_lower Column1 Returns the lower case ofstring value of Column1.
__interval Column1 / __interval Returns the Column1 valuedivided by the collectioninterval.
The value of the column is calculated using the given compute expression.
Usage:
This attribute specifies the formula for calculating the value of the column.Columns previously defined can participate in the calculation.
Refer to the examples for details about the expression grammar and usage.
Predefined special values:
• __interval: collect interval.
• __sysdate: current system time.
• __GMTdate: current GMT time.
• __contains: tests a given string expression for presence of a string expression.
• __beginswith: tests whether a given string expression begins with a specifiedstring expression.
• __endswith: tests whether a given string expression ends with the specifiedstring expression.
• __matches: tests whether a given string expression matches a specified stringexpression.
Chapter 5Working with Custom Metrics
5-5
• __delta: computes the difference between the current value and the previousvalue.
• __leadingchars: returns the leading characters in the specified string.
• __trailingchars: returns the trailing characters in the specified string.
• __substringpos: returns the position of the occurrence of the pattern within aspecified string.
• __is_null: tests whether the expression is NULL
• __length: returns the length of the string expression.
• __to_upper: converts the string to upper case.
• __to_lower: converts the string to lowercase.
• __ceil: returns the smallest integral value not less than identifier.
• __floor: returns the largest integral value not greater than the identifier.
• __round: rounds to nearest integer, away from zero.
Examples:
• NAME="Average" COMPUTE_EXPR="(Column1 + Column2 )/ 2"
The value of the column is the average of the columns Column1 andColumn2.
• NAME="Version" COMPUTE_EXPR="(Column1 __contains 'NetApp Release7.') ? '7.X':'6.X'"
The value of the column Version is computed as 7.X if column Column1contains the String NetApp Release 7..
• NAME="Column1" COMPUTE_EXPR="(Column2 - Column3)"
The value of the column Column1 is the difference of the columnsColumn2 and Column3.
• NAME="Status" COMPUTE_EXPR="State __matches 'STARTED'"
The value of the column Status is 1 if the value of column State matches theString STARTED and 0 otherwise.
• NAME="Column1" COMPUTE_EXPR="(__is_null Column2)?'yes':'no'"
The value of the column Column1 is yes if the value of column Column2 is nulland no otherwise.
• NAME="Source" COMPUTE_EXPR="((__length result) == 0) ? 'lanplus' :result"
The value of the column Source is lanplus if the length of string value ofcolumn result is 0; el e it is the value of the column result.
• NAME="Rate" COMPUTE_EXPR="(__ceil (Column1/__interval))"
The value of the column Rate is the value of column Column1 divided by thecollection interval, rounded up to the largest integer.
• NAME="Column1" COMPUTE_EXPR="((Column2 == 0) ? 0 : ((Column3 /(Column2 / 8)) * 100.0))"
The value of the column is the Column1 when Column2 and Column3 areexisting metric columns.
Chapter 5Working with Custom Metrics
5-6
• NAME="PERCENTAGE_VALUE" COMPUTE_EXPR="(Column1 != 0) ?100.0*(Column2/Column1) : 0"
The value of the column is the total percentage of disk available whereColumn1 and Column2 are existing metric columns
Rate and Delta Metric Columns
You can create additional metric columns based on an existing data column thatmeasure the rate at which data changes or the difference in value (delta) since thelast metric collection. After at least one metric column has been created and themetric column row is selected in the table, two additional options appear in theAdd menu:
• Delta metric column on <selected metric column>
• Rate (per min) metric column on <selected metric column>
To create a rate/delta metric column, click on an existing data column in the metriccolumns table and then select one of the rate/delta column menu options from theAdd menu.
Usage Examples
• Add Delta metric columns based on another metric column
Example: You want to know the difference in the table space used since thelast collection.
Delta Calculation:
current metric value - previous metric value
• Add Rate Per Minute metric column based on another metric column
Example: You want to know the average table space usage per minute basedon the table space column metric which is collected every 1 hr.
Rate Per Minute Calculation:
(current metric value - previous metric value)/ collection schedule
7. Once you're done, click Review to see your custom metric definition. If you needto change any properties or metric columns, go back to any of the previous pagesand make the modifications.
8. Click Submit to create the custom metric. The new custom metric appears in thelist on the Custom Metrics page.
Edit, Test, Delete or Publish of Your Custom Metric
After you click Submit, your custom metric is saved in draft status. When you select adraft status metric on the Custom Metrics page, you can edit, test, delete, or publishthe custom metric. Also, the custom metric is only viewable by you, the custom metricowner.
When you're ready to push your custom metric to a production environment, it mustfirst be published. You will no longer be able to edit or test the metric. You can onlydeploy the metric to production target entities at this point.
Edit a Custom Metric
1. Choose a custom metric in draft status from the list on the Custom Metrics page.
2. Click Edit. The custom metric property pages display.
Chapter 5Working with Custom Metrics
5-7
3. Modify the custom metric properties.
4. Click Submit to save the changes.
Test Deploy a Custom Metric to One or More Entities
1. Choose a custom metric in draft status from the list on the Custom Metrics page.
2. Click Test. The Test Custom Metric page displays.
3. Click Add Entity. The Select Entities dialog displays.
4. Add one or more entities then click Select.
5. Click Test to begin the test deployment process. While the test deployment job isrunning, test status will be updated in the Test Results region.IMPORTANT: DO NOT use your browser's refresh/reload function or navigateaway from this page. Doing so will erase the test result data. You can set the auto-refresh rate by using the refresh drop-down menu.
Delete a Custom Metric
1. Choose a custom metric in draft status from the list on the Custom Metrics page.
2. Click Delete. The Confirmation dialog displays.
3. Click Yes.
Publish a Custom Metric
1. Choose a custom metric in draft status from the list on the Custom Metrics page.
2. Click Publish.
Deploy or Undeploy a Custom Metric
Once your custom metric has been published, you can deploy the metric to productiontarget entities. If the custom metric has already been deployed, you have ability toundeploy the metrics from production target entities.
Deploy a Custom Metric to One or More Entities
1. Choose a custom metric in published status from the list on the Custom Metricspage.
2. Click Deploy. The Deploy Custom Metric page displays.
3. Click Add Entity. The Select Entities dialog displays.
4. Add one or more entities then click Select.
5. Click Deploy to begin the deployment process. While the deployment job isrunning, deployment status will be updated in the Deployment Sesults region.IMPORTANT: DO NOT use your browser's refresh/reload function or navigateaway from this page. Doing so will erase the deployment status data. You can setthe auto-refresh rate by using the refresh drop-down menu.
Undeploy a Custom Metric from One or More Entities
1. Choose a custom metric in published status from the list on the Custom Metricspage.
2. Click Undeploy. The Undeploy Custom Metric page displays.
3. Select one or more deployed entities.
Chapter 5Working with Custom Metrics
5-8
4. Click Undeploy to begin the undeployment process. While the undeployment jobis running, its status will be updated in the Undeployment Status region.IMPORTANT: DO NOT use your browser's refresh/reload function or navigateaway from this page. Doing so will erase the undeployment status data. You canset the auto-refresh rate by using the refresh drop-down menu.
Chapter 5Working with Custom Metrics
5-9
6Host Process Monitoring
Process monitoring enables you to monitor the state and resource utilization ofprocesses running on a host. This is useful in scenarios where you may want to keepa proactive eye on the state of the critical processes that make up an application. Youcan also monitor the CPU and Memory Utilization of these processes as well as getalerts if they cross boundary threshold conditions.
To identify the specific set of processes that need to be monitored, you define aProcess Set, which is a user-specified set of processes. When defining a Process Set,you specify a name and a java Regex filter expression based on the attributes such asprocess name, process owner, or process command. For example, you can create aProcess Set called "Java processes" which consists of all of the processes with 'java'in their name. All the processes that match the filter expression will be part of theProcess Set.
The following metrics are collected for each Process Set:
• Process Id
• Process Name
• Process User
• Process State
• Memory Utilization
• CPU Utilization
• CPU Usage
• Virtual Memory Usage
• Physical Memory Usage
• Command and Arguments
• Count of processes in the Process Set
Process Monitoring Prerequisites
In order to monitor host process, ensure that you perform the following:
• Install a Cloud Agent on the host. See Install Cloud Agents for more information.
Note:
For this release only UNIX and Windows platforms are supported.
• Install and configure a data transfer tool (such as cURL) to process REST APIrequests
Set Up Process Monitoring
6-1

Set Up and Use Process Monitoring
Step 1: Create a Process SetCreate a Process Set that identifies the set the processes that you would like to monitor.
Step 2: Map the Process Set ID to One or More HostsIdentify the hosts on which the processes should be monitored.
Step 3: Monitor the Processes from the UIYou can now use the Oracle Infrastructure Monitoring UI to monitor your host processes asyou would other metrics for the host.
Step 4: Create Alert Rules to Monitor Process Status and Resource ConsumptionYou can create alert rules on process metrics and send notifications when alerts trigger.
Create a Process SetA Process Set represents a template for specifying host processes and consists of oneor more filter patterns that specify a set of processes running on a host.
A host process gets matched to a Process Set if it meets all the filter criteria defined inthe Process Set. A Process Set is created using REST APIs with a JSON payload.The JSON file contains the Process Set definition, which is constructed using regularexpressions (regex) to filter out the processes that you're interested in. Once you'vecreated the Process Set, you can then make REST API calls that perform processmonitoring setup and configuration operations.
IMPORTANT: You must have access to the REST API for process monitoring. Allprocess monitoring setup and configuration operations are performed using REST APIcalls. For this release, contact Oracle Support for the REST API documentation andreference MOS Note 2547614.1. Support will then provide you a zip file containing theREST API documentation.
Creating a Process Set
1. You first need to create a JSON file using the Process Set syntax specified in theprocess monitoring REST API. In this file, you'll specify the following:
• Name of the Process Set to be displayed (as a metric) in the UI.
• A brief description of the Process Set.
• A regular expression (Regex) search pattern that will be used to filter out onlythose processes of interest. For example, if you want to filter out host Javaprocesses, you could define the following search pattern:
^java$
For comprehensive information on creating Regex expressions, see " Summary ofregular-expression constructs" in the Java API.
2. Create the Process Set using the REST API and JSON file you created in the firststep. You can use any URL-based data transfer tool, such as cURL, to make theREST API call. See Infrastructure Monitoring Cloud Service Master Note (Doc ID2195015.1) in My Oracle Support (MOS) for access to the REST API for processmonitoring.Upon successful execution, the API call returns the pertinent Process Setdefinition information.
Chapter 6Create a Process Set
6-2
• Process Set Name
• Prosess Set meID
• Execution confirmation message.
In the following example, the returned output shows that the Process Set namedJava Processes with the meID 8A978264528271548A80BB656B526FCA was addedsuccessfully.
{"name":"JavaProcesses","meID":"8A978264528271548A80BB656B526FCA","message":"Successfully added Process Set : Java Processes"}
Important: You'll need the Process Set meID (shown in the REST API outputabove) for the next step when you map this Process Set to the host whoseprocesses you want to monitor.
Map the Process Set ID to One or More HostsOnce you've created the Process Set and obtained the Process Set meID, you mustnow associate it with the hosts on which the processes of interest are running.
Note:
You must have the meID of the host in order to complete this step. The hostmeID can be obtained using the extended entity REST APIs. For thisrelease, the REST API documentation can be accessed via the InfrastructureMonitoring Cloud Service Master Note (Doc ID 2195015.1) in My OracleSupport (MOS).
Map the Process Set to the Host
1. Create a JSON file using the map file syntax specified in the process monitoringREST API. In this file, you'll specify the following:
• meID of the Process Set
• Name of the Process Set
• meID of the host whose processes you want to monitorThe meID can be obtained using the Oracle Management Cloud extendedAPIs.
Note:
See Oracle Management Cloud: Find the meID of a Host EntityUsing REST API in the References section of the InfrastructureMonitoring Cloud Service Master Note (Doc ID 2195015.1).
2. Map the Process Set to the host using the process monitoring REST API.Upon successful execution, the API call returns the Process Set-Host mappingstatus.
Chapter 6Map the Process Set ID to One or More Hosts
6-3
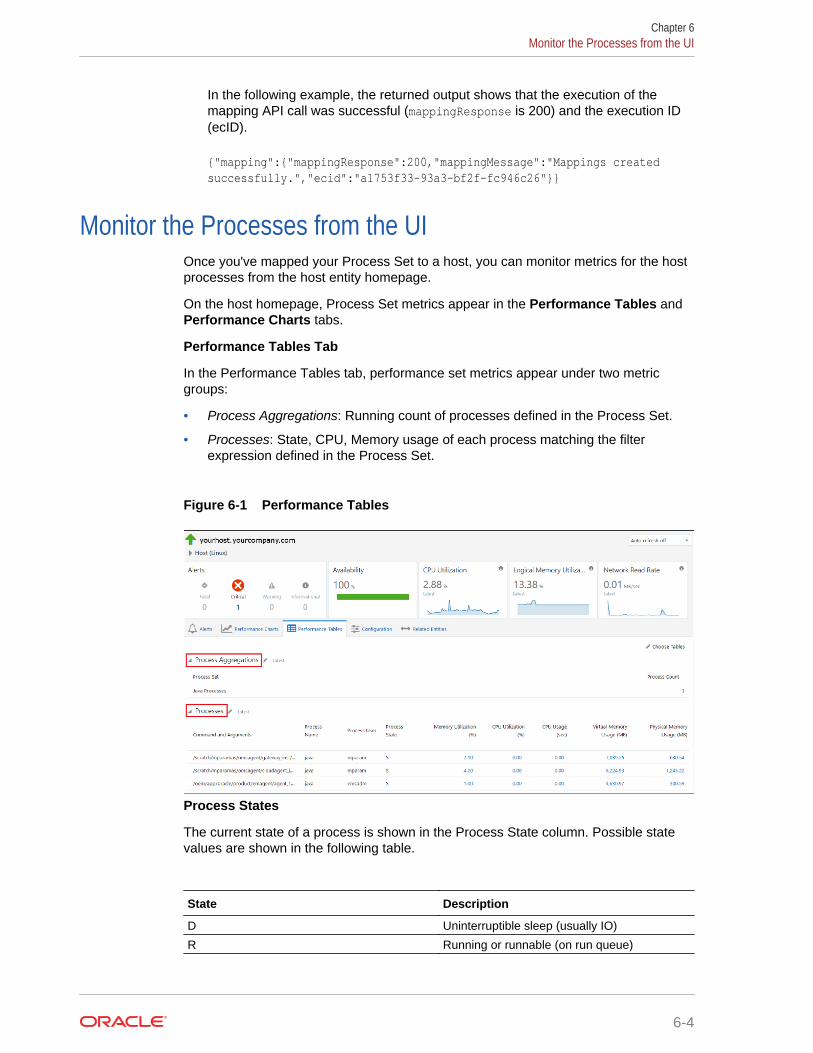
In the following example, the returned output shows that the execution of themapping API call was successful (mappingResponse is 200) and the execution ID(ecID).
{"mapping":{"mappingResponse":200,"mappingMessage":"Mappings created successfully.","ecid":"a1753f33-93a3-bf2f-fc946c26"}}
Monitor the Processes from the UIOnce you've mapped your Process Set to a host, you can monitor metrics for the hostprocesses from the host entity homepage.
On the host homepage, Process Set metrics appear in the Performance Tables andPerformance Charts tabs.
Performance Tables Tab
In the Performance Tables tab, performance set metrics appear under two metricgroups:
• Process Aggregations: Running count of processes defined in the Process Set.
• Processes: State, CPU, Memory usage of each process matching the filterexpression defined in the Process Set.
Figure 6-1 Performance Tables
Process States
The current state of a process is shown in the Process State column. Possible statevalues are shown in the following table.
State Description
D Uninterruptible sleep (usually IO)
R Running or runnable (on run queue)
Chapter 6Monitor the Processes from the UI
6-4
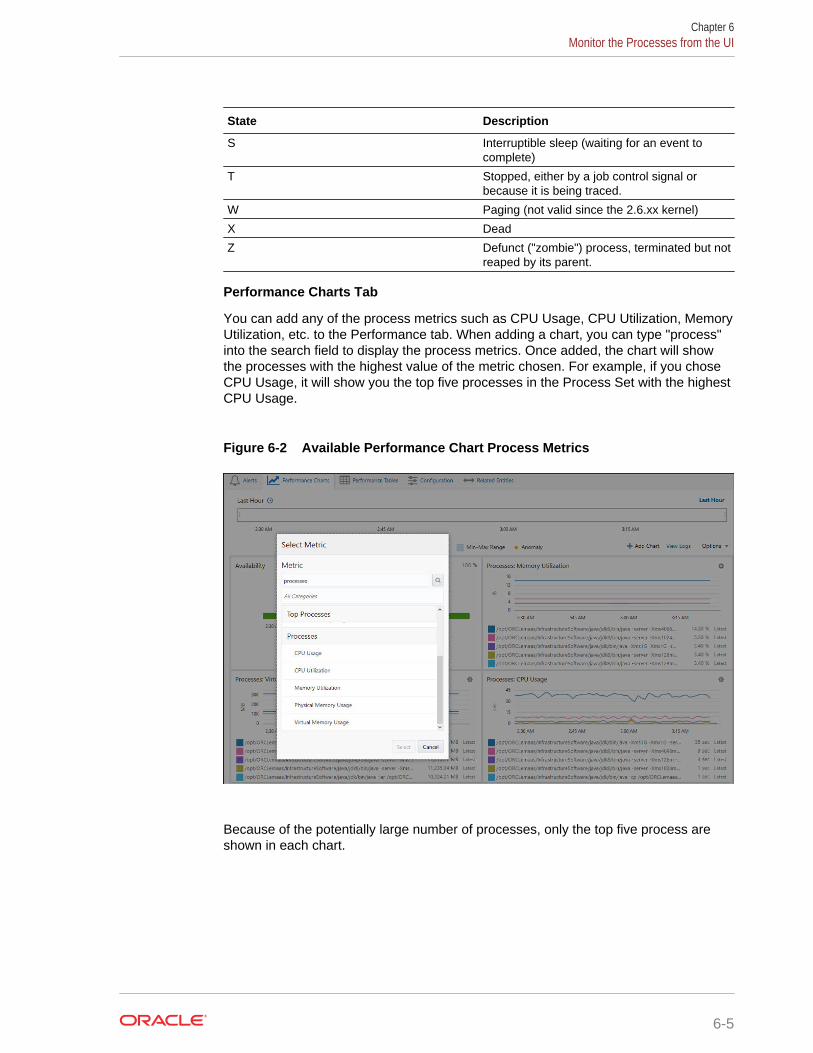
State Description
S Interruptible sleep (waiting for an event tocomplete)
T Stopped, either by a job control signal orbecause it is being traced.
W Paging (not valid since the 2.6.xx kernel)
X Dead
Z Defunct ("zombie") process, terminated but notreaped by its parent.
Performance Charts Tab
You can add any of the process metrics such as CPU Usage, CPU Utilization, MemoryUtilization, etc. to the Performance tab. When adding a chart, you can type "process"into the search field to display the process metrics. Once added, the chart will showthe processes with the highest value of the metric chosen. For example, if you choseCPU Usage, it will show you the top five processes in the Process Set with the highestCPU Usage.
Figure 6-2 Available Performance Chart Process Metrics
Because of the potentially large number of processes, only the top five process areshown in each chart.
Chapter 6Monitor the Processes from the UI
6-5
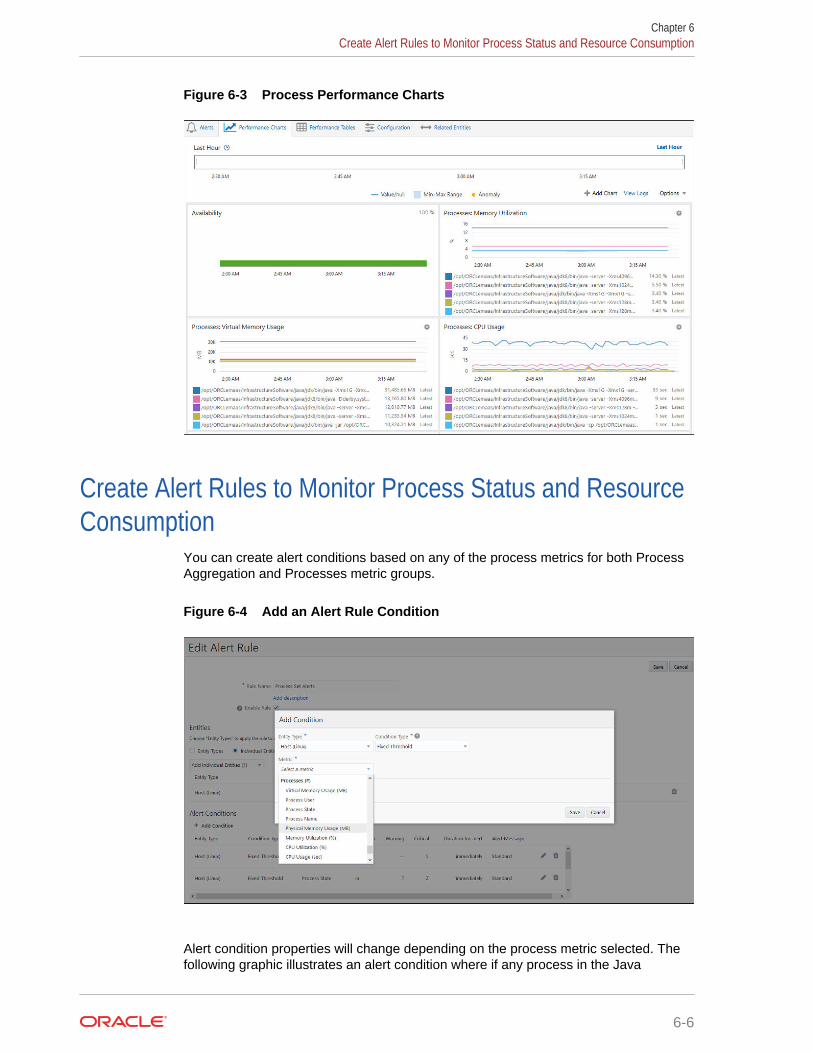
Figure 6-3 Process Performance Charts
Create Alert Rules to Monitor Process Status and ResourceConsumption
You can create alert conditions based on any of the process metrics for both ProcessAggregation and Processes metric groups.
Figure 6-4 Add an Alert Rule Condition
Alert condition properties will change depending on the process metric selected. Thefollowing graphic illustrates an alert condition where if any process in the Java
Chapter 6Create Alert Rules to Monitor Process Status and Resource Consumption
6-6

Processes process has CPU utilization greater than 80 for at least 30 minutes, awarning alert is generated. If CPU utilization is greater than 90 for at least 30 min, thena critical alert is generated.
Figure 6-5 Alert Condition Properties
The following graphic illustrates an alert condition where a critical alert is generatedimmediately if a process does not exist (process count is less than one).
Figure 6-6 Alert Properties: Process No Longer Exists
For more information on creating alerts, see Create an Alert Rule.
Chapter 6Create Alert Rules to Monitor Process Status and Resource Consumption
6-7
For more information on setting up notification channels, see Set Up NotificationChannels.
Chapter 6Create Alert Rules to Monitor Process Status and Resource Consumption
6-8
7Set Up Alert Rules
Alert rules allow you to set up metric thresholds and define how to be notified if anentity is down or metrics thresholds are exceeded.
You must have Oracle Management Cloud Administrator privileges to set up AlertRules.
Topics
• Typical Workflow for Setting Up Alert Rules
• Set Up Alert Thresholds and Notifications
Typical Workflow for Setting Up Alert RulesSet up Alert Rules for your monitored infrastructure to trigger alerts on impendingissues.
Table 7-1 Typical Workflow for Setting Up Alert Rules
Task Description More Information
Select the entities for which you wantto set up alerts.
Choose individual entities or entitytypes to set up alerts on.
Set Up Alert Thresholds andNotifications
Specify the alert conditions andnotification options.
Select threshold conditions thatapply to your entities in order tomonitor performance. Select yournotification options for performanceand availability alerts.
Set Up Alert Thresholds andNotifications
For a brief video demonstrating how to create an Alert Rule, see Set Up an Alert Rule.
Set Up Alert Thresholds and NotificationsOracle Management Cloud (OMC) collects performance and availability metrics for allentities set up for monitoring. The alerts sub-system informs you of availability orperformance problems. Alert Rules enable you to define how alerts are triggered (ifthey are not automatic) and how you get notified.
Setting up alerts thresholds or notifications requires an understanding of how entitiesare defined in Oracle Management Cloud. Each entity is defined using a multi-levelhierarchical model as pictured below.
7-1
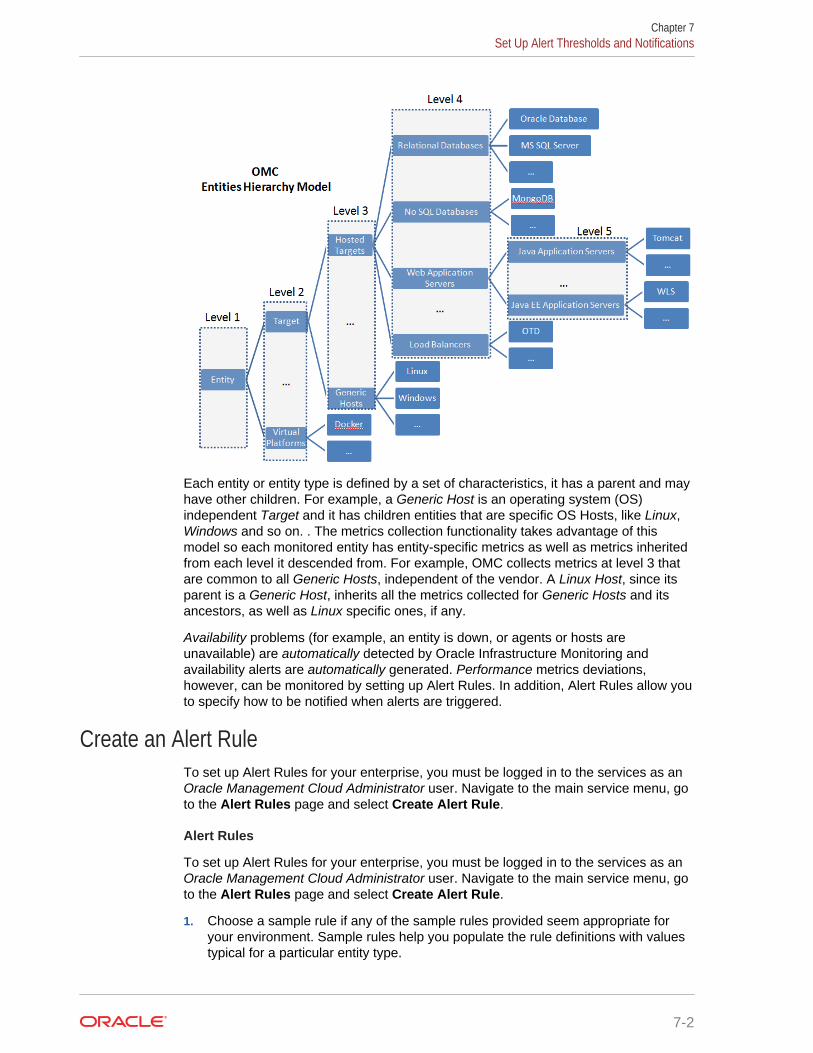
Each entity or entity type is defined by a set of characteristics, it has a parent and mayhave other children. For example, a Generic Host is an operating system (OS)independent Target and it has children entities that are specific OS Hosts, like Linux,Windows and so on. . The metrics collection functionality takes advantage of thismodel so each monitored entity has entity-specific metrics as well as metrics inheritedfrom each level it descended from. For example, OMC collects metrics at level 3 thatare common to all Generic Hosts, independent of the vendor. A Linux Host, since itsparent is a Generic Host, inherits all the metrics collected for Generic Hosts and itsancestors, as well as Linux specific ones, if any.
Availability problems (for example, an entity is down, or agents or hosts areunavailable) are automatically detected by Oracle Infrastructure Monitoring andavailability alerts are automatically generated. Performance metrics deviations,however, can be monitored by setting up Alert Rules. In addition, Alert Rules allow youto specify how to be notified when alerts are triggered.
Create an Alert RuleTo set up Alert Rules for your enterprise, you must be logged in to the services as anOracle Management Cloud Administrator user. Navigate to the main service menu, goto the Alert Rules page and select Create Alert Rule.
Alert Rules
To set up Alert Rules for your enterprise, you must be logged in to the services as anOracle Management Cloud Administrator user. Navigate to the main service menu, goto the Alert Rules page and select Create Alert Rule.
1. Choose a sample rule if any of the sample rules provided seem appropriate foryour environment. Sample rules help you populate the rule definitions with valuestypical for a particular entity type.
Chapter 7Set Up Alert Thresholds and Notifications
7-2
2. Enter a name and optionally a description for your new alert rule.
3. Alert rules can apply to one or more entity types (based on the entities definitionmodel described above), groups, or they can apply to an individual entity.
You can choose one of these options:
• Entity Types if the rule will apply to a set of entities of the same type. Thisincludes specific entity types (for example, MySQL database or Tomcat, whichare entities with no children in the definition model above) or generic entitytypes. Here are some examples of generic entity types:
—A Relational Database, an entity type with several children in the definitionmodel above; choose this to indicate that this rule applies to all entities thathave the Relational Database as a parent.
—A Hosted Target; choose this to indicate that this rule applies to all entitiesthat run on a host, such as databases and application servers.
—A Target; choose this if the alert rule will apply to all Hosted Targets andGeneric Hosts entities and their children.
—Any other custom defined entity type.
• Individual Entities, if the rule will apply to specific entities defined in yourmonitoring environment.
Your selection will determine the options that follow in selecting alertconditions.
Best Practice Tip: As mentioned above, alert rules can also apply to groups orcomposite entities. You can have an alert rule automatically apply to specificentities, by specifying a group, such as a dynamic group, as the entity for the alertrule. As more entities are monitored, you can add them to the group and the alertrule will automatically apply. You can further streamline this by creating dynamicgroups based on tags. When you add an entity and also add the appropriate tag,the entity automatically joins the dynamic group and thus be part of the alert rule.
4. Specify the alert conditions. Availability monitoring is based on the availability ofan entity. For performance monitoring, alert conditions are based on set thresholdsof various performance metrics. Select one of the following then click Save to savethese settings:
• Fixed Threshold condition to generate an alert when a metric exceeds a setmetric threshold value. From the metric drop-down, choose the metric ofinterest and the operator. Use the graphical display (chart) of historical valuesof that particular metric to guide you in entering the Warning and Criticalvalues. Hover over the graph to see the metric values at various points in time.If metrics are is associated with key values, you can set individual warning andcritical thresholds values for each key value. For example, the File SystemSpace Available % host metric has mount points as key values. You can setwarning and critical thresholds for each mount point defined on that host.The alert will be triggered immediately, unless you specify the number ofminutes that the value should remain outside the threshold before an alert isgenerated.
You can also use a statistical value of the metric (Average, Sum, Minimum,Maximum, Count) as the value to be used when evaluating against specifiedmetric thresholds. For example, if CPU utilization % has a warning threshold of70% and a critical threshold of 90%, you can specify that when the Average
Chapter 7Set Up Alert Thresholds and Notifications
7-3
CPU utilization value remains over 70% for more than 30 minutes, generatean alert.You can select a standard alert message or, select to customize the messagewhen the alert first triggers as well as the message sent when the alert clears.Use the provided tokens, encapsulated as %{token_name}%, to construct ameaningful custom alert message. This table lists the tokens you can use:
Table 7-2 Valid Tokens
Token Name Description
sys.entityDisplayName Name of the entity
sys.entityId Entity ID
sys.value Value of the metric that triggered the alert
sys.criticalThreshold Critical threshold used in evaluating the alert condition
sys.warningThreshold Warning threshold used in evaluating the alert condition
sys.operator Operator used in evaluating the alert condition
sys.conditionName Alert condition name
sys.ruleName Alert Rule name
sys.slidingWindowSize Number of minutes that the metric crossed the thresholdbefore the alert was triggered
sys.defaultMessage Show the default message normally generated for thealert condition. Additional text can be added before andafter this token. The additional text can include otheralert message tokens.Example
"messageTemplates": { "warning": "Warning Default message : %{sys.defaultMessage}%. Please contact the administrator to report the issue for entity %{sys.entityDisplayName}%. "}
Generated MessageWarning Default message : TestMetric1_num forTestMsgTempEntity is 11; it is greater than expectedvalue of 10 . Please contact the administrator to reportthe issue for entity TestMsgTempEntity.
For a complete list and descriptions of all metrics collected for each entitytype, see List of Supported Entities in Metric Reference for OracleInfrastructure Monitoring.
Alert Condition Notes
When creating an alert condition as part of an Alert Rule, you can specifynotes that contain runbook instructions (or a runbook URL) that should befollowed when responding to an alert.
• Other Types of Alert ConditionsIn addition to alerting for specific metric thresholds, you can also have OracleInfrastructure Monitoring send alert notifications based on the followingconditions:
Chapter 7Set Up Alert Thresholds and Notifications
7-4
Alert Anomalies: Alerts can be triggered when metric threshold values occuroutside the bounds of expected normal values. Oracle InfrastructureMonitoring determines what is normal behavior for a monitored entity bycreating metric baselines. A baseline is an expected range of values for ametric based on its past performance. Baselines are automatically tracked andadjusted for seasonality, or the ability to adjust baseline values according tothe time of day, or day of week once there is sufficient historical metric data.
When monitoring for anomalies, you may not want to raise an alert every timean anomalous condition occurs. Instead, you may only want to raise an alert ifa metric anomaly occurs for a specific duration. For example, you don’t care ifthere is a brief spike in a host’s CPU usage, but you do want to be alerted ifCPU usage remains abnormally high for 5 minutes or more. When defining anAlert Condition, you can specify duration-based anomalies.
Early Warning: Early warning conditions will trigger an alert when, based onhistorical metric data, Oracle Infrastructure Monitoring predicts the providedalert threshold will be crossed in the future.
• Availability alerts are automatically raised by Oracle Management Cloudwhen entities are detected to be Down or Not Heard From in the case of hosts,agents, gateways and data collectors. Down alerts or Not Heard From alertson host and agent entities are alerts of Fatal severity. To get notifications foralerts of Fatal severity, choose the Availability alert condition.
5. Specify the recipients for the alert notifications by choosing the appropriatenotification channel. See Set Up Notification Channels for more information.Customizing When Notifications are Sent: By default, notifications are sent whenalerts are first raised, when they worsen in severity, or when they are closed. If thedefault notification settings don't fit your needs, you can change them by settingvarious options under Advanced Options. You can change:
• The alert conditions under which a notification should be sent (use default oron every severity change).
Note:
This option only applies to Email, Mobile, and Slack notificationchannels.
• The alert conditions under which a notification should be suppressed (basedon selected severities).
Note:
This option only applies to Email, Mobile, and Slack notificationchannels.
• Whether or not a notification should be sent repeatedly. Repeat notificationsallow administrators to be notified at specified intervals until an alert is eithercleared or acknowledged or the number of Maximum number of repeatnotifications has been reached.
Chapter 7Set Up Alert Thresholds and Notifications
7-5

Note:
This option only applies to Email notification channels.
6. Click Save to save the alert rule.
Once the alert rule has been created, it appears in the table on the Alert Rules pagewhere it can be enabled, disabled, or deleted. Disabled alert rules do not create alertsor send notifications. Alert rules can also be enabled/disabled while editing/creatingthe alert rule.
Set Up Notification ChannelsWhen an Oracle Management Cloud alert is raised, worsens in severity, or clears, youmay want to be actively notified through email, by push notifications (mobile devices),or have a third-party application take action. These types of notifications are definedusing notification channels.
Types of Notification Channels
Classes of notification destinations are called notification channels, Notificationchannels allow you to set up and reuse functional groups of notification recipients,such as regional administrators, IT managers, or other Web servers without having tospecify large numbers of individual destinations repeatedly. Once you set up anotification channel, you can reuse the channels across different alert rules.
Available of notification channels:
• Email: Allows you to manage/logically organize the email recipients of alertnotifications. For example, you can create an email channel for the On-Call Teamcontaining the email addresses of the IT operators that staff the on-call team, or aDBA Team email channel containing all email addresses of databaseadministrators in your department.
Create an Email Notification Channel
• Mobile: Allows you to send push notifications to one or more mobile phonesassociated with Oracle Management Cloud users.
Create a Mobile Notification Channel
• Integration (WebHook): Allows you to send HTTP POST (WebHook) messagesto a destination URL. A WebHook notification message contains a JSON payloadthat specifies pertinent information to a destination Web application.
Create a WebHook Notification Channel (Integration)
• PagerDuty: Allows you to integrate Oracle Management Cloud's monitoringcapability with PagerDuty's incident response services.
Create a PagerDuty Notification Channel
• ServiceNow: Allows you to integrate Oracle Management Cloud’s monitoringcapability with ServiceNow’s incident management services.
Create a ServiceNow Notification Channel
• Slack: Allows you to send Oracle Management Cloud notifications to a specifiedSlack channel.
Chapter 7Set Up Alert Thresholds and Notifications
7-6

Create a Slack Notification Channel
Create an Email Notification ChannelNotification channels can be defined while creating/editing an alert rule from the AlertRules UI or via the Notification Channel UI.
To create an email notification channel from the Notification Channel UI:
1. From the Management Cloud side menu, select Administration, and thenNotification Channels.
2. On the Notification Channels page, click, Create Notification Channel. The fournotification channel options are displayed.
3. Click on the desired notification channel type and specify the requisite information.
The most common method of notification is via email. Using an email notificationchannel lets you specify the channel and rather than having to specify individualemails every time. For an email notification channel, you specify:
• Channel Name: An intuitive name for this notification channel.
• Email Addresses: A comma-separated list of recipient email addresses .
Create a Mobile Notification ChannelIn order to receive push notification on your mobile device, the Oracle ManagementCloud Mobile application must be installed on your device and signed into. As shownbelow, the Oracle Management Cloud Mobile application offers anywhere access toinformation about the entire IT infrastructure managed by Oracle Management Cloud.
1. From the Management Cloud side menu, select Administration, and thenNotification Channels.
Chapter 7Set Up Alert Thresholds and Notifications
7-7
2. On the Notification Channels page, click, Create Notification Channel. The fournotification channel options are displayed.
3. Click on the desired notification channel type and specify the requisite information.
For a Mobile notification channel, you specify:
• Channel Name: An intuitive name for this notification channel.
• OMC User Names: A comma-separated list of recipient Oracle ManagementCloud users.
Create a WebHook Notification Channel (Integration)In addition to notifying people, Oracle Management Cloud can also send relevantinformation to third-party Web applications (such as Slack or Hipchat) if an alert israised, thus allowing you extend Oracle Management Cloud functionality by havingthird-party applications carry out actions in response to an Oracle Management Cloudalert notification. This type of system integration is achieved using WebHooks; anHTTP POST message containing a JSON payload that is sent to a destination URL.
1. From the Management Cloud side menu, select Administration, and thenNotification Channels.
2. On the Notification Channels page, click, Create Notification Channel.
3. Click on the desired notification channel type and specify the requisite information.To define a WebHook notification channel, you need to specify:.
• URL: Destination URL where the JSON payload is sent. If you want to specifya port number, please note that only port numbers 80 and 443 are supported.
• Authentication Type: Type of authentication used when accessing thedestination URL. You can specify None or Basic (Username and Password).When specifying Basic credentials, you choose whether you want to useExisting Credentials, or create New Credentials. For every new credential, youspecify a Credential Name that will be used for future identificaiton. If youselect the Existing Credentials option instead of New Credentials, theCredential Name will appear as a selectable item in the drop-down lilst.
• HTTP Headers: Headers to be included with the notification message. Youspecify a Name and associated Value. Click the plus (+) icon to add additionalheaders.
• Payload: The JSON payload specifying the requisite information sent to thedestination URL. Payload consists of the following JSON code:
{ "alertId": "${alert.id}", "ruleName": "${rule.ruleName}", "conditionName": "${rule.conditionName}", "updateType": "${updateType}", "message": "${alert.message}", "severity": "${alert.severity}", "time": "${alert.time}", "eventName": "${alert.eventName}", "alertDetailUrl": "${alert.detailUiUrl}", "entityId": "${entity.id}", "entityName": "${entity.name}", "entityType": "${entity.type}",
Chapter 7Set Up Alert Thresholds and Notifications
7-8
"entityDisplayName": "${entity.displayName}", "entityHostName": "${entity.hostName}"}
The JSON payload provides 14 tokens that are used to pass information to thedestination URL. You can modify the JSON payload to send specific informationrequired by the receiving Web application.
Token Name Description
${alert.id} ID of the alert. Example: 1234
${updateType} Type of update. Example: created, updated,closed
${rule.ruleName} Name of the alert rule that triggered the alert.
${rule.conditionName} Name of the condition triggering the alert.
${alert.eventName} Name of the event.
${alert.message} Text of the alert message.
${alert.severity} Severity of the alert. Example: warning, critical
${alert.time} Date/time when the update occurred Example:2017-07-05T20:22:04.134Z
${alert.detailUiUrl} URL where explicit details about the alert canbe found.
${entity.id} ID of the entity.
${entity.name} Name of the entity impacted (internal name).
${entity.displayName} Display name of entity impacted.
${entity.type} Type of the entity. Example: APM ServerRequest, host(linux)
${entity.hostName} Host name of the host where the entityresides.
Create a PagerDuty Notification ChannelWhen an Oracle Management Cloud alert is raised, you can have that alert sent toPagerDuty for incident management. Oracle Management Cloud updates the sameticket when the alert is updated by PagerDuty, and closes the ticket when PagerDutyclears the alert. Integrating Oracle Management Cloud with PagerDuty is a two-phaseprocess: Configure PagerDuty to receive Oracle Management Cloud alerts and thencreate a PagerDuty notification channel.
Obtaining the PagerDuty Authorization and Integration Keys
You need to obtain both an Authorization Key and an Integration Key from PagerDutybefore you can define the PagerDuty notification channel.
1. Go to the PagerDuty authentication page and log in.
2. From the PagerDuty Configuration menu, select API Access. The API AccessKeys page displays.
3. Click Create New API Key. The Create API Key dialog displays.
Chapter 7Set Up Alert Thresholds and Notifications
7-9
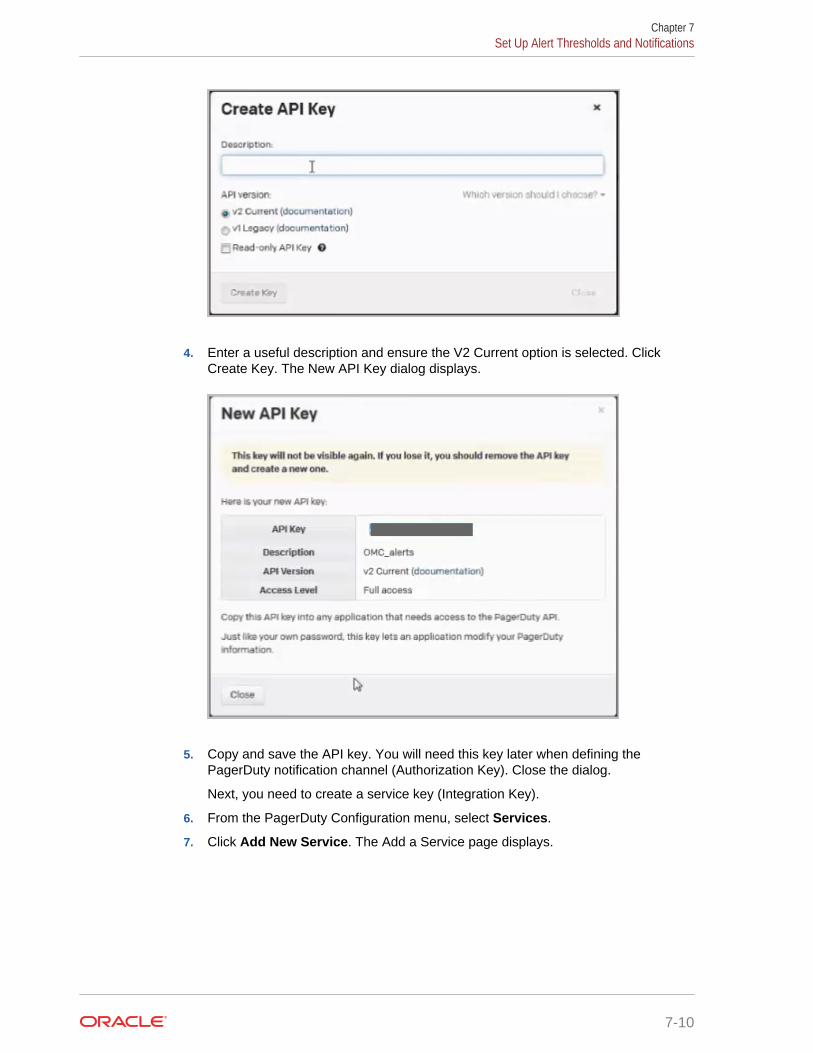
4. Enter a useful description and ensure the V2 Current option is selected. ClickCreate Key. The New API Key dialog displays.
5. Copy and save the API key. You will need this key later when defining thePagerDuty notification channel (Authorization Key). Close the dialog.
Next, you need to create a service key (Integration Key).
6. From the PagerDuty Configuration menu, select Services.
7. Click Add New Service. The Add a Service page displays.
Chapter 7Set Up Alert Thresholds and Notifications
7-10
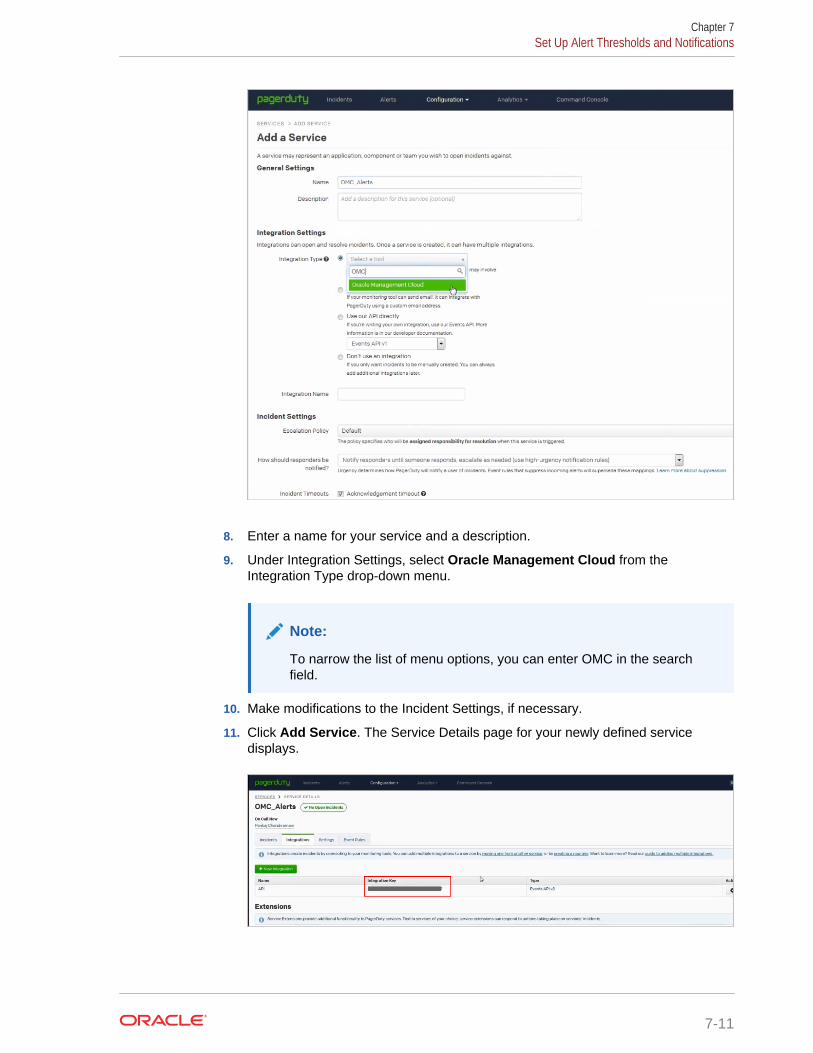
8. Enter a name for your service and a description.
9. Under Integration Settings, select Oracle Management Cloud from theIntegration Type drop-down menu.
Note:
To narrow the list of menu options, you can enter OMC in the searchfield.
10. Make modifications to the Incident Settings, if necessary.
11. Click Add Service. The Service Details page for your newly defined servicedisplays.
Chapter 7Set Up Alert Thresholds and Notifications
7-11
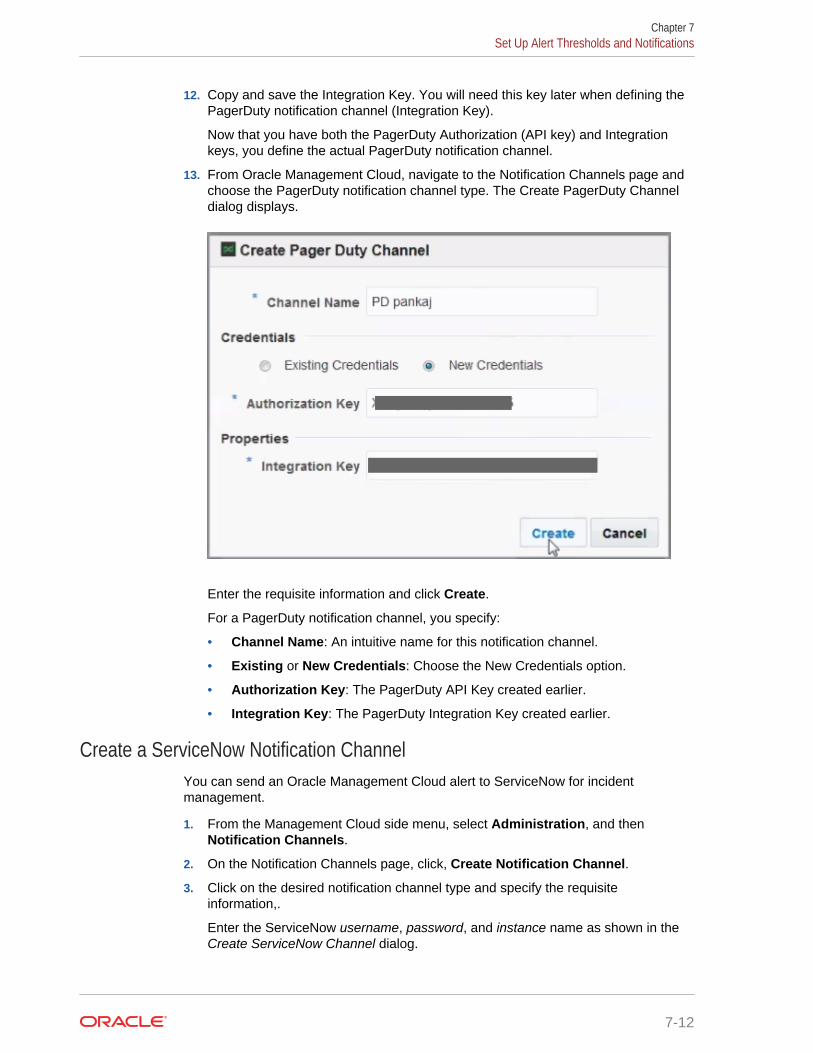
12. Copy and save the Integration Key. You will need this key later when defining thePagerDuty notification channel (Integration Key).
Now that you have both the PagerDuty Authorization (API key) and Integrationkeys, you define the actual PagerDuty notification channel.
13. From Oracle Management Cloud, navigate to the Notification Channels page andchoose the PagerDuty notification channel type. The Create PagerDuty Channeldialog displays.
Enter the requisite information and click Create.
For a PagerDuty notification channel, you specify:
• Channel Name: An intuitive name for this notification channel.
• Existing or New Credentials: Choose the New Credentials option.
• Authorization Key: The PagerDuty API Key created earlier.
• Integration Key: The PagerDuty Integration Key created earlier.
Create a ServiceNow Notification ChannelYou can send an Oracle Management Cloud alert to ServiceNow for incidentmanagement.
1. From the Management Cloud side menu, select Administration, and thenNotification Channels.
2. On the Notification Channels page, click, Create Notification Channel.
3. Click on the desired notification channel type and specify the requisiteinformation,.
Enter the ServiceNow username, password, and instance name as shown in theCreate ServiceNow Channel dialog.
Chapter 7Set Up Alert Thresholds and Notifications
7-12
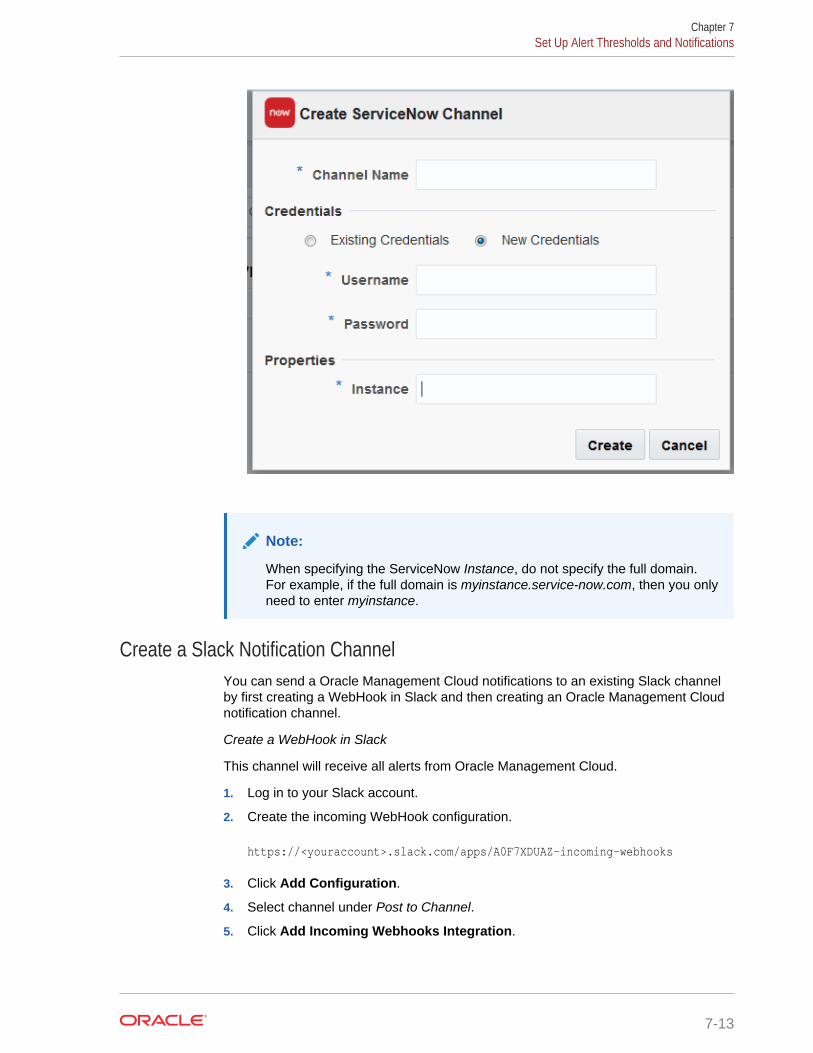
Note:
When specifying the ServiceNow Instance, do not specify the full domain.For example, if the full domain is myinstance.service-now.com, then you onlyneed to enter myinstance.
Create a Slack Notification ChannelYou can send a Oracle Management Cloud notifications to an existing Slack channelby first creating a WebHook in Slack and then creating an Oracle Management Cloudnotification channel.
Create a WebHook in Slack
This channel will receive all alerts from Oracle Management Cloud.
1. Log in to your Slack account.
2. Create the incoming WebHook configuration.
https://<youraccount>.slack.com/apps/A0F7XDUAZ-incoming-webhooks
3. Click Add Configuration.
4. Select channel under Post to Channel.
5. Click Add Incoming Webhooks Integration.
Chapter 7Set Up Alert Thresholds and Notifications
7-13
6. From confirmation page, capture the WebHook URL. This URL will be requiredwhen you create the notification channel in Oracle Management Cloud.
You will need to remember the channel name as this will be used when you createthe Slack notification channel in Oracle Management Cloud.
Create a Slack Notification Channel
1. From the Management Cloud side menu, select Administration, and thenNotification Channels.
2. On the Notification Channels page, click, Create Notification Channel.
3. Click on the Slack notification channel type and specify the requisite information,.
Enter the Channel Name (name of the Slack channel to be displayed in the OracleManagement Cloud console), URL (the Slack URL), and Team Channel (the Slackteam channel you are sending the notification to).
4. Click Create. A test message will be sent to Slack to confirm that the integration isworking.
Chapter 7Set Up Alert Thresholds and Notifications
7-14
8Monitor the Availability and Performance ofYour Infrastructure
Monitoring your entities’ health and performance is an important part of every ITadministrator’s job. Oracle Infrastructure Monitoring allows you to setup alerts,investigate alerts and monitor the availability status and performance of yourinfrastructure.
Topics
• Typical Workflow for Monitoring the Availability and Performance of YourInfrastructure
• Monitor Availability Status
• Investigate Alerts
• Monitor Availability Status Within Each Tier
• Monitor Performance Within Each Tier
• Monitor Entity Health
Typical Workflow for Monitoring the Availability andPerformance of Your InfrastructureTable 8-1 Workflow to Monitor the Availability and Performance of Your Infrastructure
Task Description More Information
Find out if any entities are downacross the enterprise.
Identify and investigate entities thatare down or have availability issues.
Monitor Availability Status
Investigate open alerts. Review details of each open alert. Investigate Alerts
Look for entities that are down withinthe tier that you manage.
Within each tier, investigate entitiesthat are down or have availabilityissues.
Monitor Availability Status WithinEach Tier
Identify and analyze performanceissues within the tier that youmanage.
Within each tier, identify entities thathave potential performanceproblems.
Monitor Performance Within EachTier
Check the overall health of an entity. Check current performance of anentity.
Monitor Entity Health
Monitor Availability StatusAs an administrator responsible for your entire IT infrastructure, you constantly monitorthe availability status of all your infrastructure components so that you can detect andresolve problems before they affect users. Oracle Infrastructure Monitoring provides
8-1
an Entity Summary Dashboard that shows at a glance the current availability of allyour monitored entities.
Availability Status Monitoring
• Availability status is monitored automatically
• If an entity is down, a Down alert of fatal severity is automatically generated. If it isa host or agent entity, a not heard from alert (also fatal severity) is generated.
• To get notifications for these, you must create an alert rule, choose the entity type(or entity) and choose Availability alert condition.
• Once an entity is detected to be up, the alert will clear automatically.
• If there is an error with evaluating availability status, the entity is in Error status. Analert will be generated automatically for this as well.
To monitor the current availability status across your IT infrastructure:
1. Navigate to the Enterprise Summary page and locate the Status region to view thecurrent availability status all your entities. Note the date and time on the top-rightcorner of the page and make sure that you have a refreshed set of data. Set thepage Auto Refresh option to a value that best matches the period during whichyour data needs to be refreshed.
The Entities Status section indicates the state of each entity:
• Up The entity is up and running, metrics are correctly collected.
• Error The entity has encountered some errors, and it needs furtherinvestigation.
• Down The entity is down, it isn’t in a running state.
• Pending The entity is in the process of being added to the monitoring service.
2. Typically, you first focus on entities that show a Down or Error status.
Drill down into the Down or Error labels and note all the entities with this status. Tonarrow down your list you can:
• Filter your list of entities by type.
• Search for a particular entity by name . For example, if you have selectedentities with Down status, you can check one of the entity types listed on theleft menu, and then search for a particular entity name to further refine yourlist.
• If global properties are set, further filter your list by the global properties ofyour entities. For example, you might choose to look first into Productionsystems and later into any non-production systems.
3. For every system with a Down or Error status, drill down into the Entity Home pagefor more details. Review in particular any availability alert messages on the Alertssection of the home page. Alert messages provide critical information that helpsresolve availability problems. When an issue is resolved, the alert automaticallyclears.
To set up alert rules to send notifications for entities down or other availability issues,see Set Up Alert Thresholds and Notifications.
Chapter 8Monitor Availability Status
8-2
Note:
You must have administrator privileges to create any alert rules.
Investigate AlertsAlerts help keep your entities continuously up and running by notifying you whenperformance or availability problems occur.
Alerts are generated either:
1. Automatically, for all availability issues (when an entity is down or an agent isunavailable). No alert rule is required to generate these alerts.
2. Based on custom alert rules that specify a condition. For more information, see Set Up Alert Rules.
Alerts indicate that a problem has occurred with one of your monitored entities. Thealert details give you enough context to start investigating the problem. These detailsinclude the following:
• Name and type of entity on which the alert was raised
• Entity Status
• Severity of the problem
• Date and time when the alert was created as well as date and time of any otherchanges in the alert
• The alert rule associated with the alert which has details about the alert conditionthat triggered the alert and where the notification was sent
The Alert Severity is a key component of an alert that translates as follows:
• Fatal: An entity is down.
• Critical: A metric crosses a critical threshold.
• Warning: A metric crosses a warning threshold.
• Agent Unavailable: no recent communication has occurred between the CloudAgent and Oracle Management Cloud. This could indicate one of the following:
– The Cloud Agent is down.
– Even though the Cloud Agent is running, there’s a connectivity problembetween the Cloud Agent and Oracle Management Cloud.
– The Host on which the Cloud Agent is deployed is down.
The Alert Details also includes a graphical display of values of the metric beingtracked and its values at various points in time. The Alert History keeps track of allstages of notifications.
Investigating Alerts Received
If your Oracle Infrastructure Monitoring service was set up for receiving alerts, thenyour administrators on duty will receive email alerts when set thresholds are exceededor when monitored entities are down.
Chapter 8Investigate Alerts
8-3
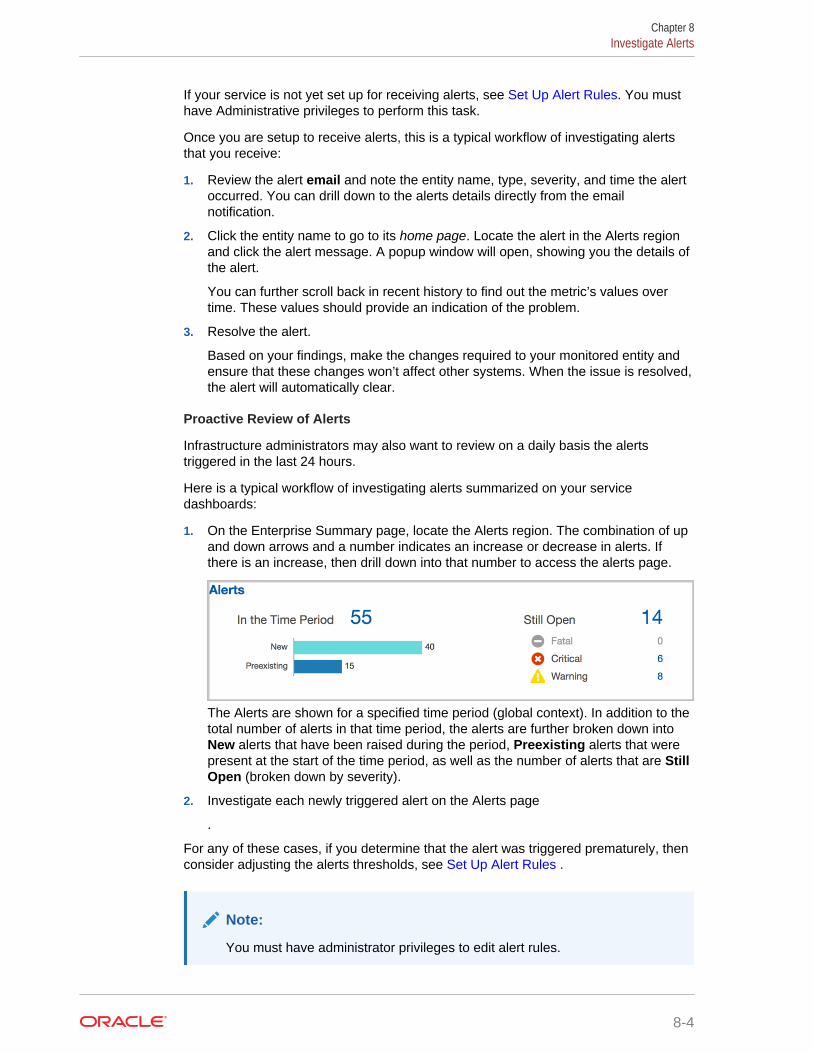
If your service is not yet set up for receiving alerts, see Set Up Alert Rules. You musthave Administrative privileges to perform this task.
Once you are setup to receive alerts, this is a typical workflow of investigating alertsthat you receive:
1. Review the alert email and note the entity name, type, severity, and time the alertoccurred. You can drill down to the alerts details directly from the emailnotification.
2. Click the entity name to go to its home page. Locate the alert in the Alerts regionand click the alert message. A popup window will open, showing you the details ofthe alert.
You can further scroll back in recent history to find out the metric’s values overtime. These values should provide an indication of the problem.
3. Resolve the alert.
Based on your findings, make the changes required to your monitored entity andensure that these changes won’t affect other systems. When the issue is resolved,the alert will automatically clear.
Proactive Review of Alerts
Infrastructure administrators may also want to review on a daily basis the alertstriggered in the last 24 hours.
Here is a typical workflow of investigating alerts summarized on your servicedashboards:
1. On the Enterprise Summary page, locate the Alerts region. The combination of upand down arrows and a number indicates an increase or decrease in alerts. Ifthere is an increase, then drill down into that number to access the alerts page.
The Alerts are shown for a specified time period (global context). In addition to thetotal number of alerts in that time period, the alerts are further broken down intoNew alerts that have been raised during the period, Preexisting alerts that werepresent at the start of the time period, as well as the number of alerts that are StillOpen (broken down by severity).
2. Investigate each newly triggered alert on the Alerts page
.
For any of these cases, if you determine that the alert was triggered prematurely, thenconsider adjusting the alerts thresholds, see Set Up Alert Rules .
Note:
You must have administrator privileges to edit alert rules.
Chapter 8Investigate Alerts
8-4
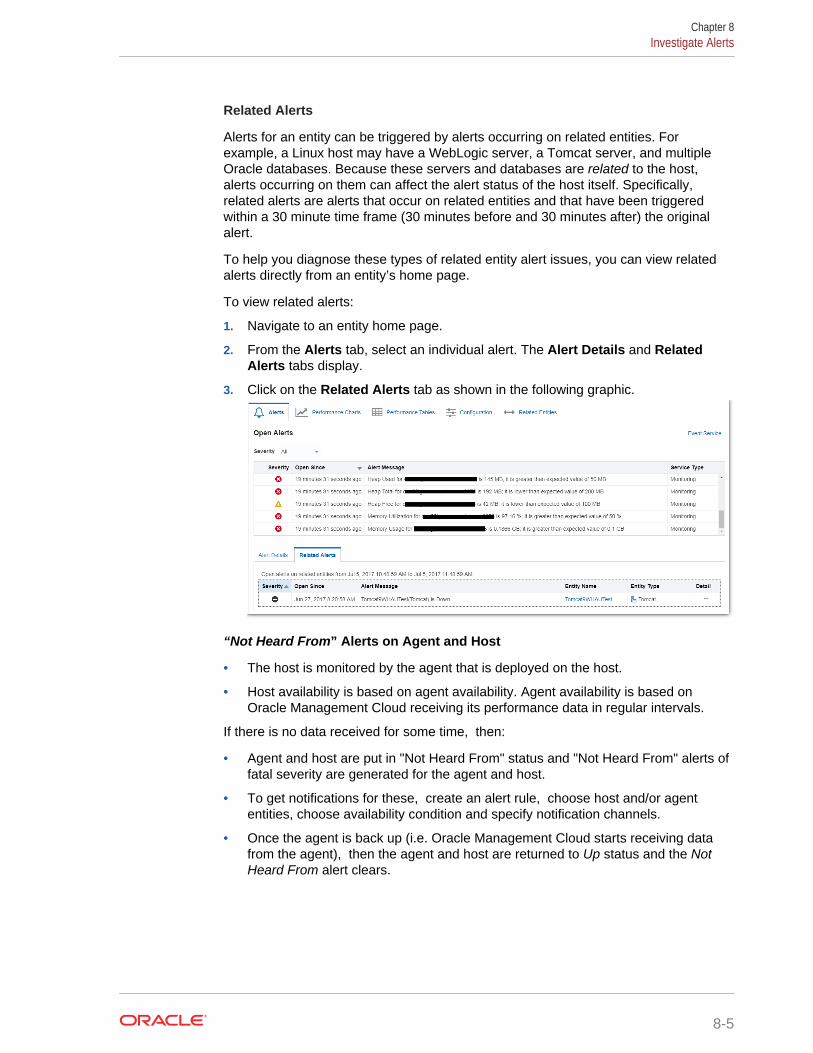
Related Alerts
Alerts for an entity can be triggered by alerts occurring on related entities. Forexample, a Linux host may have a WebLogic server, a Tomcat server, and multipleOracle databases. Because these servers and databases are related to the host,alerts occurring on them can affect the alert status of the host itself. Specifically,related alerts are alerts that occur on related entities and that have been triggeredwithin a 30 minute time frame (30 minutes before and 30 minutes after) the originalalert.
To help you diagnose these types of related entity alert issues, you can view relatedalerts directly from an entity’s home page.
To view related alerts:
1. Navigate to an entity home page.
2. From the Alerts tab, select an individual alert. The Alert Details and RelatedAlerts tabs display.
3. Click on the Related Alerts tab as shown in the following graphic.
“Not Heard From” Alerts on Agent and Host
• The host is monitored by the agent that is deployed on the host.
• Host availability is based on agent availability. Agent availability is based onOracle Management Cloud receiving its performance data in regular intervals.
If there is no data received for some time, then:
• Agent and host are put in "Not Heard From" status and "Not Heard From" alerts offatal severity are generated for the agent and host.
• To get notifications for these, create an alert rule, choose host and/or agententities, choose availability condition and specify notification channels.
• Once the agent is back up (i.e. Oracle Management Cloud starts receiving datafrom the agent), then the agent and host are returned to Up status and the NotHeard From alert clears.
Chapter 8Investigate Alerts
8-5
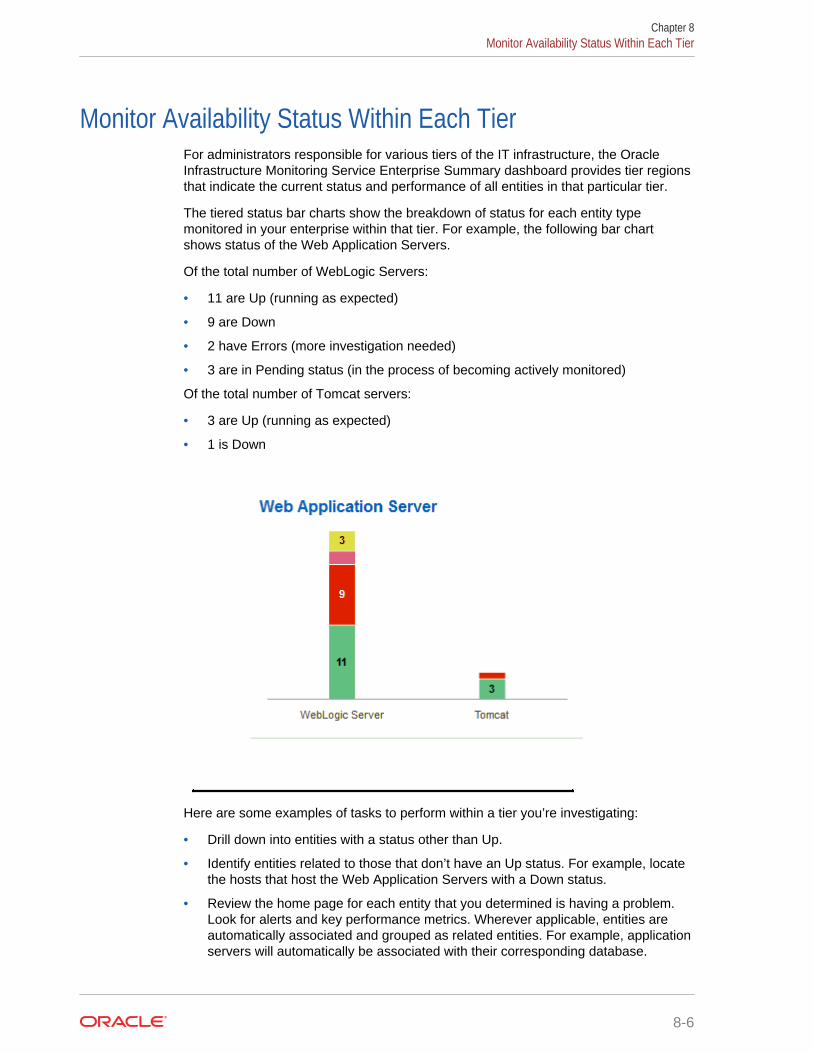
Monitor Availability Status Within Each TierFor administrators responsible for various tiers of the IT infrastructure, the OracleInfrastructure Monitoring Service Enterprise Summary dashboard provides tier regionsthat indicate the current status and performance of all entities in that particular tier.
The tiered status bar charts show the breakdown of status for each entity typemonitored in your enterprise within that tier. For example, the following bar chartshows status of the Web Application Servers.
Of the total number of WebLogic Servers:
• 11 are Up (running as expected)
• 9 are Down
• 2 have Errors (more investigation needed)
• 3 are in Pending status (in the process of becoming actively monitored)
Of the total number of Tomcat servers:
• 3 are Up (running as expected)
• 1 is Down
Here are some examples of tasks to perform within a tier you’re investigating:
• Drill down into entities with a status other than Up.
• Identify entities related to those that don’t have an Up status. For example, locatethe hosts that host the Web Application Servers with a Down status.
• Review the home page for each entity that you determined is having a problem.Look for alerts and key performance metrics. Wherever applicable, entities areautomatically associated and grouped as related entities. For example, applicationservers will automatically be associated with their corresponding database.
Chapter 8Monitor Availability Status Within Each Tier
8-6
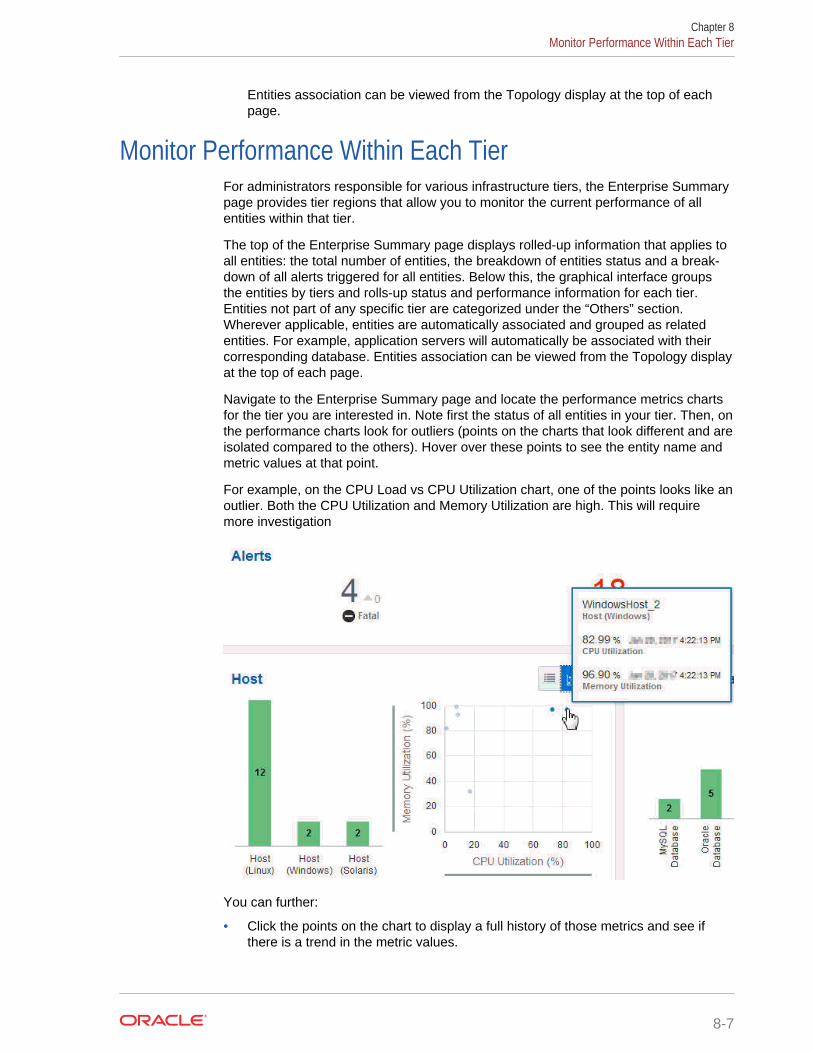
Entities association can be viewed from the Topology display at the top of eachpage.
Monitor Performance Within Each TierFor administrators responsible for various infrastructure tiers, the Enterprise Summarypage provides tier regions that allow you to monitor the current performance of allentities within that tier.
The top of the Enterprise Summary page displays rolled-up information that applies toall entities: the total number of entities, the breakdown of entities status and a break-down of all alerts triggered for all entities. Below this, the graphical interface groupsthe entities by tiers and rolls-up status and performance information for each tier.Entities not part of any specific tier are categorized under the “Others” section.Wherever applicable, entities are automatically associated and grouped as relatedentities. For example, application servers will automatically be associated with theircorresponding database. Entities association can be viewed from the Topology displayat the top of each page.
Navigate to the Enterprise Summary page and locate the performance metrics chartsfor the tier you are interested in. Note first the status of all entities in your tier. Then, onthe performance charts look for outliers (points on the charts that look different and areisolated compared to the others). Hover over these points to see the entity name andmetric values at that point.
For example, on the CPU Load vs CPU Utilization chart, one of the points looks like anoutlier. Both the CPU Utilization and Memory Utilization are high. This will requiremore investigation
You can further:
• Click the points on the chart to display a full history of those metrics and see ifthere is a trend in the metric values.
Chapter 8Monitor Performance Within Each Tier
8-7

• Change the metrics displayed in the scatter chart to review the collectiveperformance of any other two metrics. To vary the metrics displayed on eachchart, select Choose Metrics.
Switch the performance chart to show, for example, the CPU Utilization % andMemory Utilization % across all monitored hosts. At this point you can:
• Check for outliers in this chart, look for high values of CPU Utilization % and/orMemory Utilization % which could indicate that these hosts are currently under aheavy load.
• Hover your mouse over the data point to find out which specific host is underheavy load.
• Click the data point to examine the trend of these metrics and identify how long thehosts have been under a heavy load. A long trend might indicate issues on thehost that need further investigation.
While exploring your tiers, it is useful to see a sorted list of values of a particularmetric, for the tier you are investigating. To help you visually assess the relativeperformance across entities in a tier, you can switch the display from a scatter chart toa metric table listing the top values (or bottom values) of a particular metric for allentities. This data helps to assess the most heavily loaded entities or those with theslowest performance within a tier. To correlate your findings with other related metrics,click the Edit button to select a new metric and assess its values for the subset ofentities you are interested in.
Additional Performance Charts Controls
On the Performance charts, use the scroll wheel on the mouse to zoom in and outwhile maintaining the same center of the image.
You can hold down your left mouse button to select an area of data to zoom in on.When you release the mouse button, the selected area will pan to the center of thescreen and automatically zoom in to fill the entire area of the chart.
The x-axis and y-axis ranges can also slide. Hold down the left mouse button andmove left and right on the x-axis, or up and down on the y-axis, until you find the idealconcentration of points for your research.
Monitor Entity HealthBy proactively monitoring your infrastructure, you can identify and resolve potentialproblems before they affect users.
The Oracle Infrastructure Monitoring Entity Home page enables you to proactivelymonitor the health of an entity. It provides an overview of all entity-related information,from entity status and open alerts to key performance indicators. Typically you reachan Entity Home page when exploring your monitored infrastructure in various ways,such as:
• Investigating a performance problem visible on the Enterprise Summary pageperformance scatter charts: Drilling down into the data point of interest allows youto reach a filtered view of the metrics in question and provides a link to theassociated Entity Home page.
• Troubleshooting entities status from the Enterprise Summary page Entity Statusregion: Clicking any status provides you with a narrowed down list of all entities
Chapter 8Monitor Entity Health
8-8

with that status; you can further filter your list and click the entity name to reachthat Entity Home page.
• Reviewing the health and status of any entity group from the Enterprise Summarypage tiered view bar charts: Clicking any tier provides you with a narrowed downlist of all entities of that type; you can further filter your list and click on the entityname to reach that Entity Home page.
• Exploring all entities from the Enterprise Summary page Entities region: Drillingdown into the number of entities in your infrastructure allows you to reach theEntities page where you can further filter your list and reach a particular EntityHome page.
Exploring the Entity Home page
Here is a typical set of tasks that you can perform from the Entity Home page:
1. To reach the Entity Home page, click the name of each entity you’re analyzing.
The Entity Home page has all the entity information that allows you to determinethe cause of a problem. Note the following content:
• The current availability status displaying the entity’s availability over time.Moving your cursor along the availability time line displays the correspondingtime in the key performance metric charts for the entity. .
• The open alerts in the current time period along with their status. You can drilldown on the alert numbers for more detail about those alerts.
• Key performance metrics for the entity. Clicking on a key performance metricdisplays detailed performance charts for that metric.
• The Alerts tab displays all alerts for the entity. You can click on an alert toview explicit details and also view related alerts (alerts generated by relatedentities that impact the currently viewed entity).
2. Correlate your findings by identifying first when the entity status changed. Note thekey performance metric values at that same time. Data from the last 24 hours isshown by default, and you can scroll back to more recent time periods to reviewthe trend of the metrics over time. Hold down the left mouse button and slide thedate range along the timeline until you reach the range with the data of interest.The first set of performance charts includes the key health indicators, but you canhover over any data point. You can also correlate the key performance metricsover the same time period, in all the functional categories mentioned (Capacity,Load, Response, Error, or Utilization) .
For example, you detect a performance degradation on one of your hosts. Notethe key metric values at the same time.
Chapter 8Monitor Entity Health
8-9
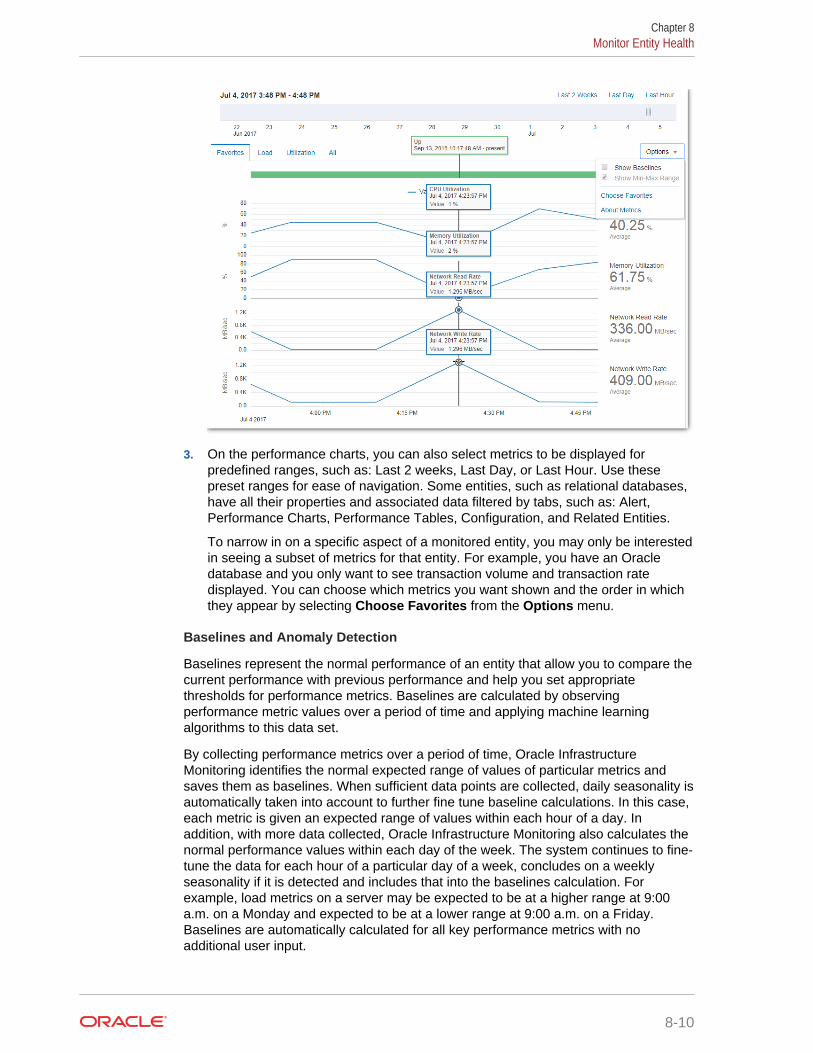
3. On the performance charts, you can also select metrics to be displayed forpredefined ranges, such as: Last 2 weeks, Last Day, or Last Hour. Use thesepreset ranges for ease of navigation. Some entities, such as relational databases,have all their properties and associated data filtered by tabs, such as: Alert,Performance Charts, Performance Tables, Configuration, and Related Entities.
To narrow in on a specific aspect of a monitored entity, you may only be interestedin seeing a subset of metrics for that entity. For example, you have an Oracledatabase and you only want to see transaction volume and transaction ratedisplayed. You can choose which metrics you want shown and the order in whichthey appear by selecting Choose Favorites from the Options menu.
Baselines and Anomaly Detection
Baselines represent the normal performance of an entity that allow you to compare thecurrent performance with previous performance and help you set appropriatethresholds for performance metrics. Baselines are calculated by observingperformance metric values over a period of time and applying machine learningalgorithms to this data set.
By collecting performance metrics over a period of time, Oracle InfrastructureMonitoring identifies the normal expected range of values of particular metrics andsaves them as baselines. When sufficient data points are collected, daily seasonality isautomatically taken into account to further fine tune baseline calculations. In this case,each metric is given an expected range of values within each hour of a day. Inaddition, with more data collected, Oracle Infrastructure Monitoring also calculates thenormal performance values within each day of the week. The system continues to fine-tune the data for each hour of a particular day of a week, concludes on a weeklyseasonality if it is detected and includes that into the baselines calculation. Forexample, load metrics on a server may be expected to be at a higher range at 9:00a.m. on a Monday and expected to be at a lower range at 9:00 a.m. on a Friday.Baselines are automatically calculated for all key performance metrics with noadditional user input.
Chapter 8Monitor Entity Health
8-10
Metric values outside of the normal ranges are identified as anomalous and visuallyhighlighted in performance charts. To receive alerts when metrics exceed normalbaseline values, use the calculated baselines as guidelines and set the alertthresholds values outside of the normal ranges. For example, if a host CPU utilizationis calculated to be normal between 60% and 75% on average days of the week and65% to 80% on peak days of the week, then set your warning level alerts to 80% and acritical level alert to anything above 90%.
Metric Collection ErrorsIf there are errors encountered with the evaluation of a metric, then an alert of MetricCollection Error is generated. This alert is of critical severity.
• You can see the alerts in the Alerts UI. You can get email by creating an alert rulewith the alert condition "Metric Error".
• You should look at the message of the alert and resolve the issue.
• Once the issue is resolved, this alert will clear automatically when the agent cansuccessfully collect the metric.
• Any new metric collection errors will automatically generate an alert of 'Warning'severity instead of 'Critical' severity. All pre-existing metric collection error alerts ofcritical severity will remain as-is (i.e. no severity change).
Chapter 8Metric Collection Errors
8-11
9Oracle Infrastructure MonitoringAdministration Tasks
Topics
• Typical Administration Tasks for Oracle Infrastructure Monitoring
• Maintenance Windows
• Change Monitoring Configuration
• Create and Set Global Properties
• Delete Entities
Typical Administration Tasks for Oracle InfrastructureMonitoringTable 9-1 Typical Administration Tasks for Oracle Infrastructure Monitoring
Task Description More Information
Change the monitoring configuration. Update the configuration propertiesof an entity in Oracle ManagementCloud (such as port number) toreflect the change in the entity'sconfiguration.
Change Monitoring Configuration
Add new global properties. Create new global properties thatcan be applied to existing or newentities or entity types.
Create and Set Global Properties
Set values of global properties toone or more entities.
Set predefined global properties toone or more entities.
Create and Set Global Properties
Delete monitored entities. Delete entities you no longer want tomonitor by using the omclicommand.
Delete Entities
Maintenance WindowsA maintenance window is a period of time designated to perform regular maintenanceactivities on monitored entities.
A maintenance window can be scheduled to run immediately or in the future, and torun indefinitely or stop after a specific duration. Notifications, such as emails andwebhooks, are suppressed during the maintenance window. However, OracleManagement Cloud continues to monitor entities and display entity status, whileindicating that the entity is currently under maintenance. Although events aregenerated during the maintenance window, event notifications are suppressed.
9-1
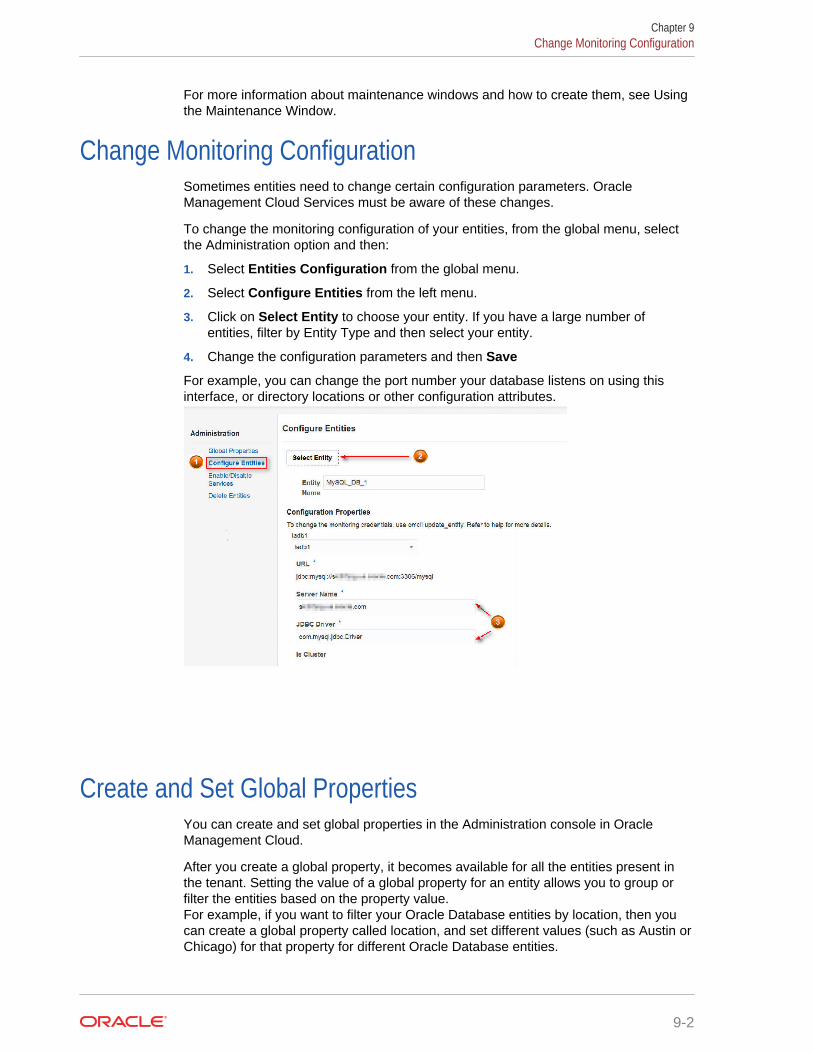
For more information about maintenance windows and how to create them, see Usingthe Maintenance Window.
Change Monitoring ConfigurationSometimes entities need to change certain configuration parameters. OracleManagement Cloud Services must be aware of these changes.
To change the monitoring configuration of your entities, from the global menu, selectthe Administration option and then:
1. Select Entities Configuration from the global menu.
2. Select Configure Entities from the left menu.
3. Click on Select Entity to choose your entity. If you have a large number ofentities, filter by Entity Type and then select your entity.
4. Change the configuration parameters and then Save
For example, you can change the port number your database listens on using thisinterface, or directory locations or other configuration attributes.
Create and Set Global PropertiesYou can create and set global properties in the Administration console in OracleManagement Cloud.
After you create a global property, it becomes available for all the entities present inthe tenant. Setting the value of a global property for an entity allows you to group orfilter the entities based on the property value.For example, if you want to filter your Oracle Database entities by location, then youcan create a global property called location, and set different values (such as Austin orChicago) for that property for different Oracle Database entities.
Chapter 9Change Monitoring Configuration
9-2
Creating a Global PropertyTo create a global property:
1. Select Administration in the Management Cloud navigation menu.
2. Select Entity Configuration in the Administration navigation menu, then clickGlobal Properties.
3. Click Create New Global Property.
4. In the Create New Global Property dialog box, enter the display name of theproperty and click OK.
The property is created and is now available to be used by an entity in the OracleManagement Cloud tenant.
Setting the Value of a Global PropertyTo set the value of a global property for a single or set of entities:
1. Select Administration in the Management Cloud navigation menu.
2. Select Entity Configuration in the Administration navigation menu, then clickGlobal Properties.
3. In the Select Entities dialog box, select the entities for which you want to set theglobal property value and click Select.
The Global Properties page is displayed with the list of available global propertiesin the tenant.
4. In the selected entities in the New Value field adjacent to the property name, enterthe global property value that you want to set for the selected entities, and clickSet.
Note:
If a global property is set with different values for different entities, then(mixed) is displayed in the Value column for that property.
The value for the global property is now set for the selected entities.
Delete EntitiesYou can delete entities that you no longer want to monitor.
Topics:
Delete Entities from the Administration Console
Delete Entities Using omcli
Chapter 9Delete Entities
9-3
Delete Entities from the Administration ConsoleYou can delete an entity from Oracle Management Cloud or view deleted entities inthe Administration console.
1. Select Administration in the Management Cloud navigation menu.
2. Select Entity Configuration in the Administration navigation menu, then clickDelete Entities.
3. In the Select Entities dialog box, select the entities that you want to delete andclick Select.
The selected entities are displayed on the Delete Entities page. If you want toremove one of the selected entities, then click the Remove button adjacent to theentity.
4. Click Delete <number> Entities to delete the selected entities.
View Deleted Entities1. On the Delete Entities page, click the Recently Deleted tab.
2. Select a time frame in the View entities deleted drop-down list.
The entities deleted within the selected time frame are displayed.
Delete Entities Using omcliYou can delete a previously added entity using the omcli delete_entity commandas shown below.
<AGENT_BASE_DIR>/agent_inst/bin/omcli delete_entity agent FILENAME
Where FILENAME is the name of the file that contains the entity definition to be deleted.
Example
Say you want to delete the Oracle WebLogic Server domain that you had previouslyadded with the following JSON file: omc_weblogic_domain.json.
Run the following command to delete this WebLogic Server domain:
<AGENT_BASE_DIR>/agent_inst/bin/omcli delete_entity agent omc_weblogic_domain.json
Note:
Cascading deletion is not supported. The JSON input for the deletecommand must include all entities and their sub-entities to be deleted.
Chapter 9Delete Entities
9-4
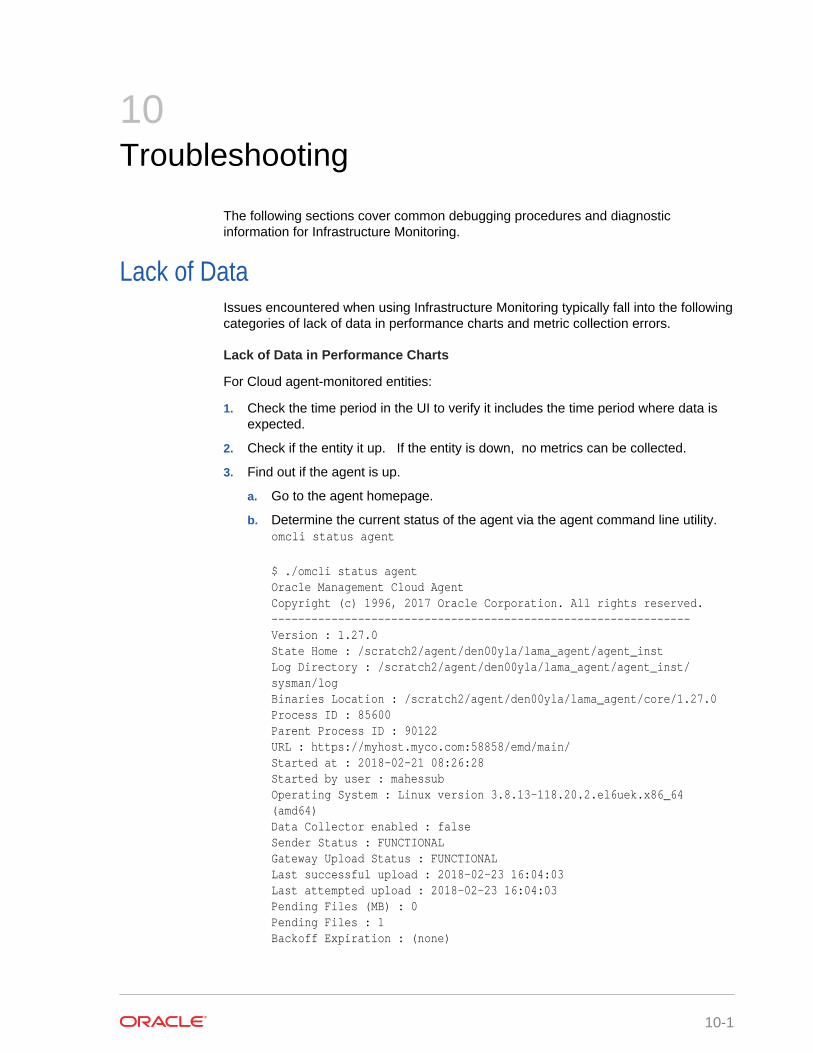
10Troubleshooting
The following sections cover common debugging procedures and diagnosticinformation for Infrastructure Monitoring.
Lack of DataIssues encountered when using Infrastructure Monitoring typically fall into the followingcategories of lack of data in performance charts and metric collection errors.
Lack of Data in Performance Charts
For Cloud agent-monitored entities:
1. Check the time period in the UI to verify it includes the time period where data isexpected.
2. Check if the entity it up. If the entity is down, no metrics can be collected.
3. Find out if the agent is up.
a. Go to the agent homepage.
b. Determine the current status of the agent via the agent command line utility. omcli status agent
$ ./omcli status agentOracle Management Cloud Agent Copyright (c) 1996, 2017 Oracle Corporation. All rights reserved.---------------------------------------------------------------Version : 1.27.0State Home : /scratch2/agent/den00yla/lama_agent/agent_instLog Directory : /scratch2/agent/den00yla/lama_agent/agent_inst/sysman/logBinaries Location : /scratch2/agent/den00yla/lama_agent/core/1.27.0Process ID : 85600Parent Process ID : 90122URL : https://myhost.myco.com:58858/emd/main/Started at : 2018-02-21 08:26:28Started by user : mahessubOperating System : Linux version 3.8.13-118.20.2.el6uek.x86_64 (amd64)Data Collector enabled : falseSender Status : FUNCTIONALGateway Upload Status : FUNCTIONALLast successful upload : 2018-02-23 16:04:03Last attempted upload : 2018-02-23 16:04:03Pending Files (MB) : 0Pending Files : 1Backoff Expiration : (none)
10-1
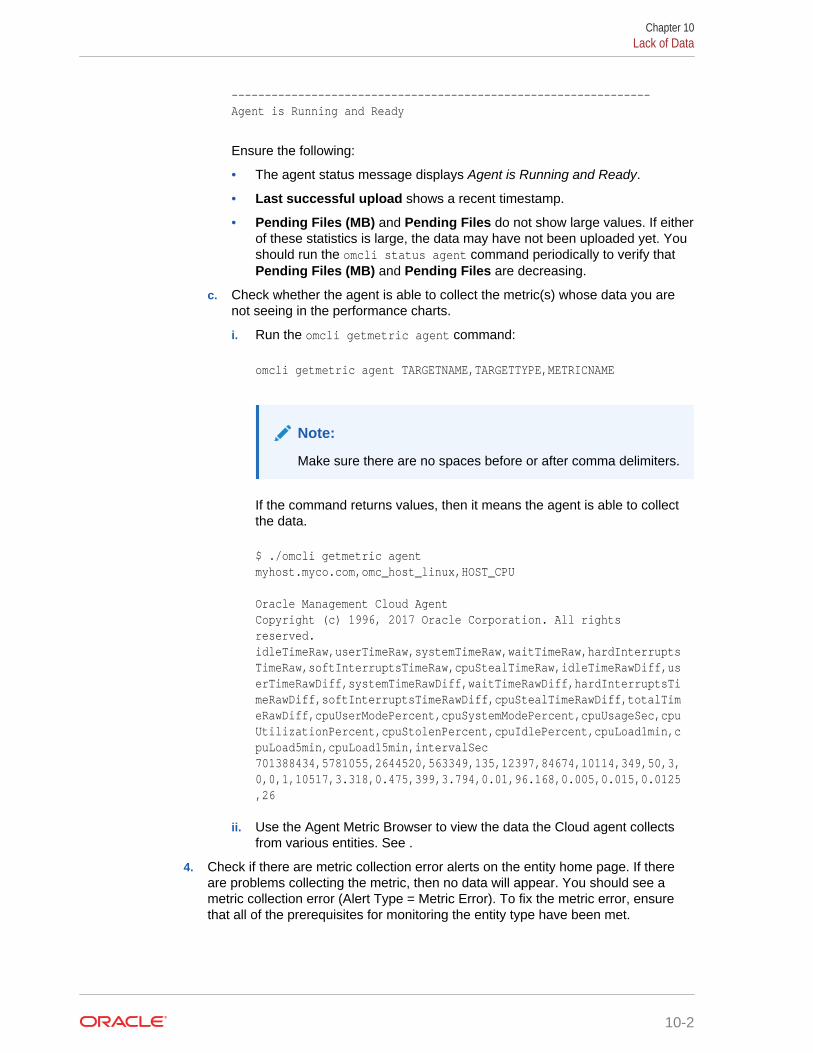
---------------------------------------------------------------Agent is Running and Ready
Ensure the following:
• The agent status message displays Agent is Running and Ready.
• Last successful upload shows a recent timestamp.
• Pending Files (MB) and Pending Files do not show large values. If eitherof these statistics is large, the data may have not been uploaded yet. Youshould run the omcli status agent command periodically to verify thatPending Files (MB) and Pending Files are decreasing.
c. Check whether the agent is able to collect the metric(s) whose data you arenot seeing in the performance charts.
i. Run the omcli getmetric agent command:
omcli getmetric agent TARGETNAME,TARGETTYPE,METRICNAME
Note:
Make sure there are no spaces before or after comma delimiters.
If the command returns values, then it means the agent is able to collectthe data.
$ ./omcli getmetric agent myhost.myco.com,omc_host_linux,HOST_CPU
Oracle Management Cloud Agent Copyright (c) 1996, 2017 Oracle Corporation. All rights reserved.idleTimeRaw,userTimeRaw,systemTimeRaw,waitTimeRaw,hardInterruptsTimeRaw,softInterruptsTimeRaw,cpuStealTimeRaw,idleTimeRawDiff,userTimeRawDiff,systemTimeRawDiff,waitTimeRawDiff,hardInterruptsTimeRawDiff,softInterruptsTimeRawDiff,cpuStealTimeRawDiff,totalTimeRawDiff,cpuUserModePercent,cpuSystemModePercent,cpuUsageSec,cpuUtilizationPercent,cpuStolenPercent,cpuIdlePercent,cpuLoad1min,cpuLoad5min,cpuLoad15min,intervalSec701388434,5781055,2644520,563349,135,12397,84674,10114,349,50,3,0,0,1,10517,3.318,0.475,399,3.794,0.01,96.168,0.005,0.015,0.0125,26
ii. Use the Agent Metric Browser to view the data the Cloud agent collectsfrom various entities. See .
4. Check if there are metric collection error alerts on the entity home page. If thereare problems collecting the metric, then no data will appear. You should see ametric collection error (Alert Type = Metric Error). To fix the metric error, ensurethat all of the prerequisites for monitoring the entity type have been met.
Chapter 10Lack of Data
10-2
Metric Collection Errors
Table 10-1 Debugging Metric Collection Errors
Entity Type Metric Collection ErrorMessage
Cause/Resolution
Oracle Database oracle.sysman.emSDK.agent.fetchlet.exception.FetchletException:Failed to connect:java.sql.SQLRecoverableException: IO Error:The Network Adaptercould not establish theconnection
DB monitoring relies on aJDBC connection to thedatabase. Check if the DBservice is registered with thelistener.
Oracle Pluggable Database oracle.sysman.emd.fetchlets.db.exception.AwrFetchletException:SharedDBFetchlet -E8C3A7030E443414D10A7BAF993842BD - AWR Sharedmetric collectionfailed:java.sql.SQLRecoverableException: IO Error:The Network Adaptercould not establish theconnection
DB monitoring relies on aJDBC connection to thedatabase. Ensure that the DBservice is registered with thelistener.
Oracle Database oracle.sysman.emd.fetchlets.db.exception.AwrFetchletException:UDSSqlEntityFetchlet -E8C3A7030E443414D10A7BAF993842BD - AWR UDS sqlentity collectionfailed:java.sql.SQLRecoverableException: IO Error:Socket read timed out
The root cause in most casesis a failure of the database torespond in a reasonableamount of time. This errorcould also be caused bynetwork issues.
Chapter 10Lack of Data
10-3

Table 10-1 (Cont.) Debugging Metric Collection Errors
Entity Type Metric Collection ErrorMessage
Cause/Resolution
Oracle Database orcldb123/PDB1(OraclePluggable Database) isin Error state.Reason : oracle.sysman.emSDK.agent.fetchlet.exception.FetchletException: assoctarget does not existor is broken
apmc/ORCLPDB(OraclePluggable Database) isin Error state.Reason :oracle.sysman.emSDK.agent.fetchlet.exception.FetchletException: assoctarget does not existor is broken
This issue occurs when thewrong JSON file has beenused.
Example: The CDB JSON wasused to discover a PDB.
For more information aboutInfrastructure MonitoringJSON files, see Download andCustomize OracleInfrastructure MonitoringJSONs.
Oracle Database Error evaluating TopSQL Executions:5MinCollection -AwrFetchletException:SharedDBFetchlet -4A8DD99203A4341B15B61BA452994851 - internalerror:java.sql.SQLSyntaxErrorException: ORA-00942:table or view does notexist
Ensure the monitoring userhas sufficient privileges. Formore information, see Prerequisites and MonitoringCredentials.
Oracle Database Error evaluatingCorrelationAssociations:24HrCollection-FetchletException:ORA-24247:networkaccess denied by accesscontrol list (ACL)ORA-06512:at“SYS.UTL_INADD”,line19ORA-06512:at”SYS.UTL_INADDR",line 40ORA-06512:at line 1
Run the PL/SQL block
dbms_network_acl_admin
For more information aboutOracle Databaseprerequisites, see Prerequisites and MonitoringCredentials.
Chapter 10Lack of Data
10-4
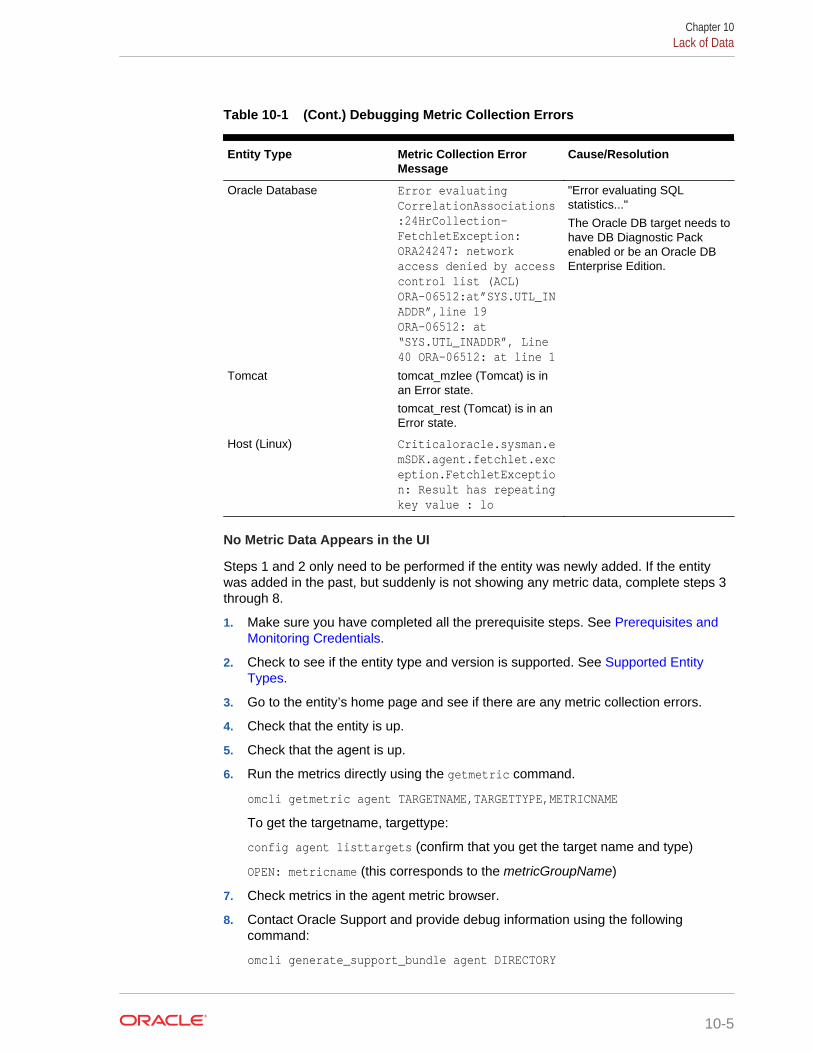
Table 10-1 (Cont.) Debugging Metric Collection Errors
Entity Type Metric Collection ErrorMessage
Cause/Resolution
Oracle Database Error evaluatingCorrelationAssociations:24HrCollection-FetchletException:ORA24247: networkaccess denied by accesscontrol list (ACL)ORA-06512:at”SYS.UTL_INADDR”,line 19ORA-06512: at“SYS.UTL_INADDR”, Line40 ORA-06512: at line 1
"Error evaluating SQLstatistics..."
The Oracle DB target needs tohave DB Diagnostic Packenabled or be an Oracle DBEnterprise Edition.
Tomcat tomcat_mzlee (Tomcat) is inan Error state.
tomcat_rest (Tomcat) is in anError state.
Host (Linux) Criticaloracle.sysman.emSDK.agent.fetchlet.exception.FetchletException: Result has repeatingkey value : lo
No Metric Data Appears in the UI
Steps 1 and 2 only need to be performed if the entity was newly added. If the entitywas added in the past, but suddenly is not showing any metric data, complete steps 3through 8.
1. Make sure you have completed all the prerequisite steps. See Prerequisites andMonitoring Credentials.
2. Check to see if the entity type and version is supported. See Supported EntityTypes.
3. Go to the entity’s home page and see if there are any metric collection errors.
4. Check that the entity is up.
5. Check that the agent is up.
6. Run the metrics directly using the getmetric command.
omcli getmetric agent TARGETNAME,TARGETTYPE,METRICNAME
To get the targetname, targettype:
config agent listtargets (confirm that you get the target name and type)
OPEN: metricname (this corresponds to the metricGroupName)
7. Check metrics in the agent metric browser.
8. Contact Oracle Support and provide debug information using the followingcommand:
omcli generate_support_bundle agent DIRECTORY
Chapter 10Lack of Data
10-5
Metrics Not Collected for Windows Environments
A Cloud agent is deployed on a Windows Server. Although the host entity has beenregistered in Infrastructure Monitoring performance metrics are not collected. In thissituation, the root cause of the issue is performance counters in this environment werecorrupt. .
To check whether performance counters are functioning properly:
1. From an administrator command prompt execute wbemtest. A dialog displays.
2. Click connect. Check the namespace is root\cimv2 and click connect again.
3. Click Open class and enter the class name. For example:Win32_PerfRawData_PerfOS_Processor
4. A new window will open with details about the class. If the window displays theclass details, then the performance counters are working properly.
5. If any error message is displayed, execute following command as administratorfrom command prompt:
lodctr /R
6. After executing the above command, perform steps one through four again toverify the performance counters are working.
Create an Agent Support BundleWhen contacting Oracle Support to diagnose Oracle Management Cloud agent entitydiscovery issues, having comprehensive, standardized diagnostic information aboutyour agent deployment simplifies the diagnostic process. There is a specific set of logsand configuration information that is useful for Oracle Support to diagnose problemswith the agent software. This log/configuration information is called an agent supportbundle.
Generating the Agent Support Bundle
You generate the agent support bundle by running the omcligenerate_support_bundle command. This command creates a ZIP archive containinglogs and configuration information specific to your agent deployment.
Syntax
omcli generate_support_bundle agent DIRECTORY
DIRECTORY is the directory where you want the agent support bundle ZIP archive tobe generated.
Example 10-1 Example Title
In the following example, you are generating an agent support bundle. The archive ZIPfile will appear in the /my_server/diagnostics directory.
omcli generate_support_bundle agent /my_server/diagnostics
Chapter 10Create an Agent Support Bundle
10-6

Host Prerequisite ValidationWhen installing a Cloud agent on a host, prerequisite validation checks are run. Thiscan result in agent installation error messages shown in the following table.
ErrorCode
Message Cause Effect Remedy
OMCAGNT-4500
OMCAGNT-4500:Host (Linux):Error occurredduringprerequisitecheck process.
UnexpectedError duringvalidation codeexecution
Validationsdidn't run
NA
OMCAGNT-4501
OMCAGNT-4501:This operatingsystem [os] is notsupported for hostmonitoring.
Is the OSsupported formonitoring?
Novalidations forunsupportedOS.
NA
OMCAGNT-4502
Host (Linux): Thefile [filePath]required by metricgroup MG cannotis eitherunavailable or theuser agentUserdoesn't have readpermissions.
Host (Solaris):The file [filePath]required by metricgroup MG cannotis eitherunavailable or theuser agentUserdoesn't have readpermissions.
Host (AIX): Thefile [filePath]required by metricgroup MGcannotis eitherunavailable or theuser agentUserdoesn't have readpermissions.
agentUser cannot access filegiven bypath filePath.
Collection ofmetricgroup MG would beaffected
Make sure agentUser canread filePath
Chapter 10Host Prerequisite Validation
10-7
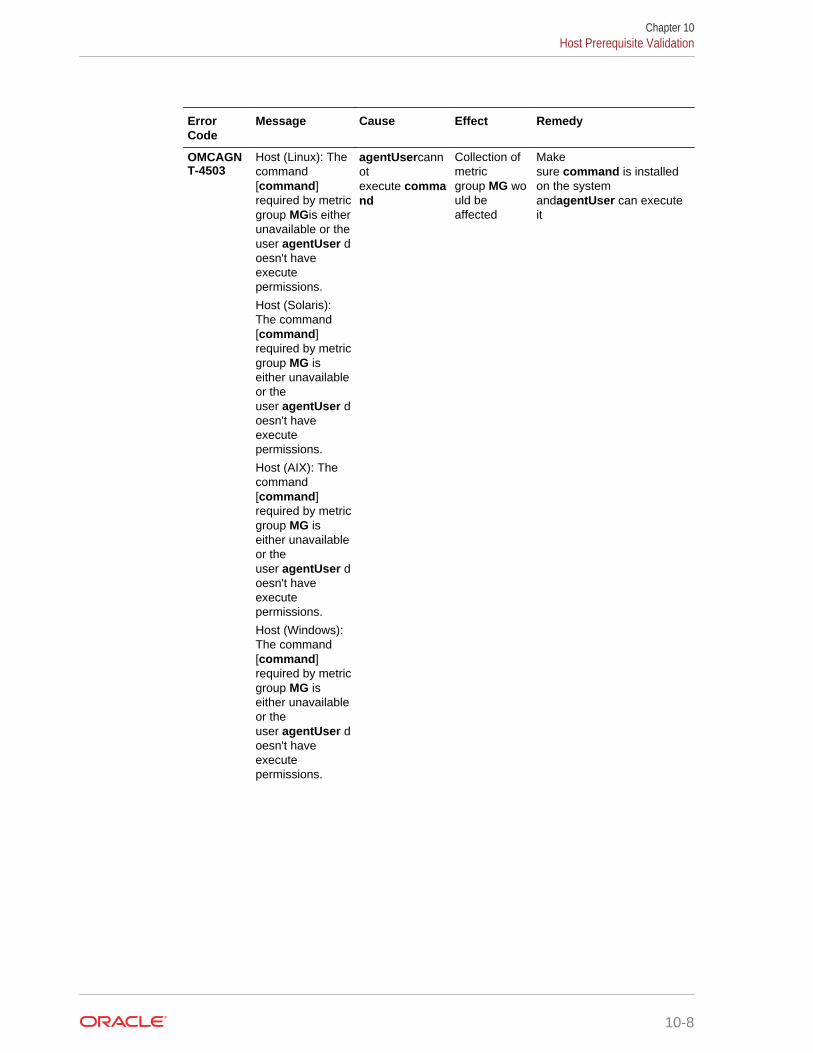
ErrorCode
Message Cause Effect Remedy
OMCAGNT-4503
Host (Linux): Thecommand[command]required by metricgroup MGis eitherunavailable or theuser agentUser doesn't haveexecutepermissions.
Host (Solaris):The command[command]required by metricgroup MG iseither unavailableor theuser agentUser doesn't haveexecutepermissions.
Host (AIX): Thecommand[command]required by metricgroup MG iseither unavailableor theuser agentUser doesn't haveexecutepermissions.
Host (Windows):The command[command]required by metricgroup MG iseither unavailableor theuser agentUser doesn't haveexecutepermissions.
agentUsercannotexecute command
Collection ofmetricgroup MG would beaffected
Makesure command is installedon the systemandagentUser can executeit
Chapter 10Host Prerequisite Validation
10-8
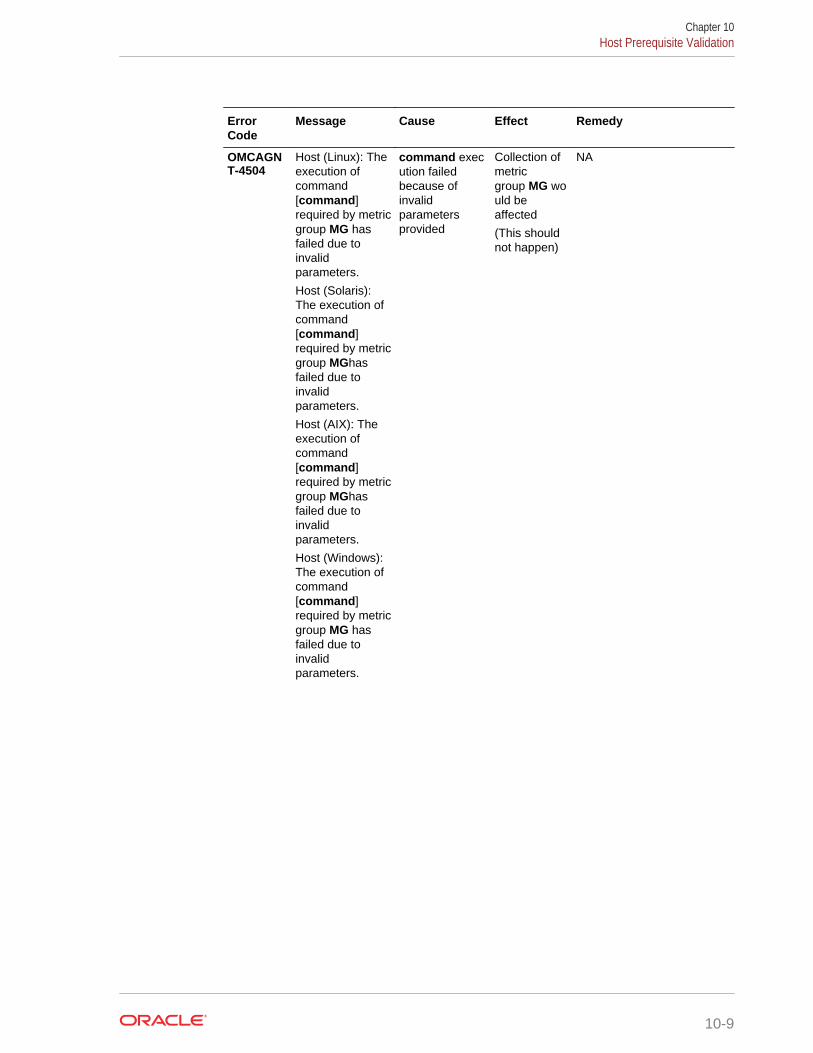
ErrorCode
Message Cause Effect Remedy
OMCAGNT-4504
Host (Linux): Theexecution ofcommand[command]required by metricgroup MG hasfailed due toinvalidparameters.
Host (Solaris):The execution ofcommand[command]required by metricgroup MGhasfailed due toinvalidparameters.
Host (AIX): Theexecution ofcommand[command]required by metricgroup MGhasfailed due toinvalidparameters.
Host (Windows):The execution ofcommand[command]required by metricgroup MG hasfailed due toinvalidparameters.
command execution failedbecause ofinvalidparametersprovided
Collection ofmetricgroup MG would beaffected
(This shouldnot happen)
NA
Chapter 10Host Prerequisite Validation
10-9
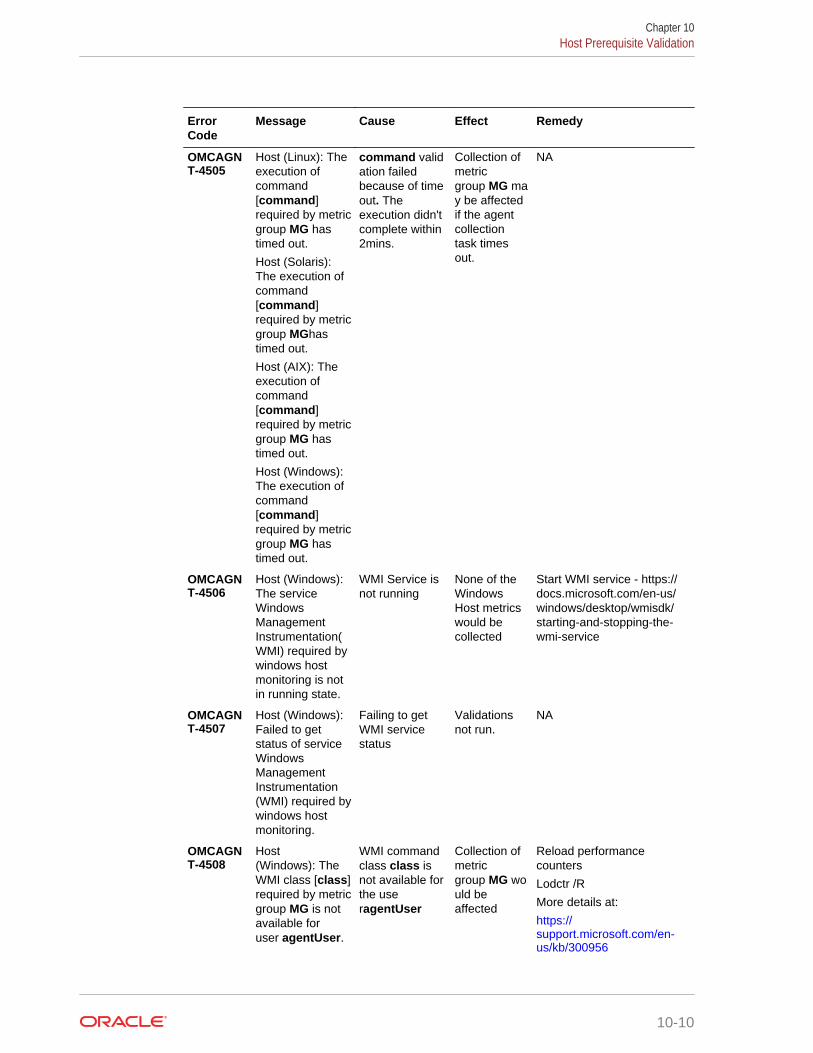
ErrorCode
Message Cause Effect Remedy
OMCAGNT-4505
Host (Linux): Theexecution ofcommand[command]required by metricgroup MG hastimed out.
Host (Solaris):The execution ofcommand[command]required by metricgroup MGhastimed out.
Host (AIX): Theexecution ofcommand[command]required by metricgroup MG hastimed out.
Host (Windows):The execution ofcommand[command]required by metricgroup MG hastimed out.
command validation failedbecause of timeout. Theexecution didn'tcomplete within2mins.
Collection ofmetricgroup MG may be affectedif the agentcollectiontask timesout.
NA
OMCAGNT-4506
Host (Windows):The serviceWindowsManagementInstrumentation(WMI) required bywindows hostmonitoring is notin running state.
WMI Service isnot running
None of theWindowsHost metricswould becollected
Start WMI service - https://docs.microsoft.com/en-us/windows/desktop/wmisdk/starting-and-stopping-the-wmi-service
OMCAGNT-4507
Host (Windows):Failed to getstatus of serviceWindowsManagementInstrumentation(WMI) required bywindows hostmonitoring.
Failing to getWMI servicestatus
Validationsnot run.
NA
OMCAGNT-4508
Host(Windows): TheWMI class [class]required by metricgroup MG is notavailable foruser agentUser.
WMI commandclass class isnot available forthe useragentUser
Collection ofmetricgroup MG would beaffected
Reload performancecounters
Lodctr /R
More details at:
https://support.microsoft.com/en-us/kb/300956
Chapter 10Host Prerequisite Validation
10-10
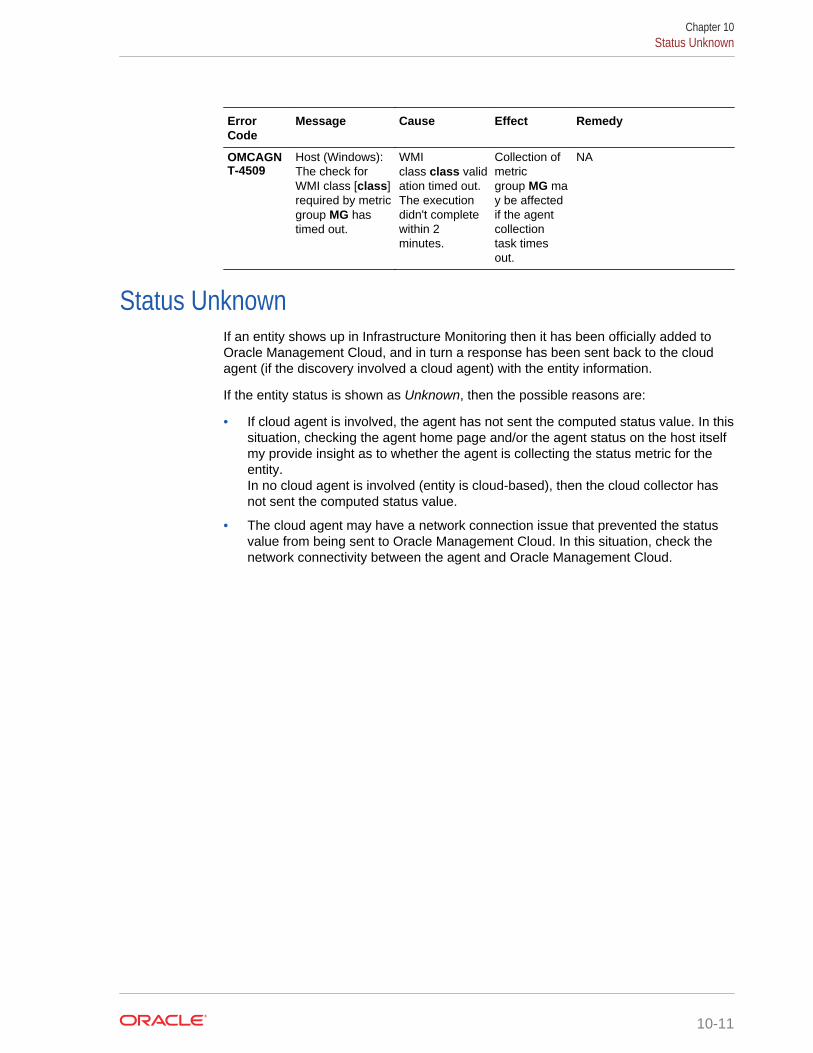
ErrorCode
Message Cause Effect Remedy
OMCAGNT-4509
Host (Windows):The check forWMI class [class]required by metricgroup MG hastimed out.
WMIclass class validation timed out.The executiondidn't completewithin 2minutes.
Collection ofmetricgroup MG may be affectedif the agentcollectiontask timesout.
NA
Status UnknownIf an entity shows up in Infrastructure Monitoring then it has been officially added toOracle Management Cloud, and in turn a response has been sent back to the cloudagent (if the discovery involved a cloud agent) with the entity information.
If the entity status is shown as Unknown, then the possible reasons are:
• If cloud agent is involved, the agent has not sent the computed status value. In thissituation, checking the agent home page and/or the agent status on the host itselfmy provide insight as to whether the agent is collecting the status metric for theentity.In no cloud agent is involved (entity is cloud-based), then the cloud collector hasnot sent the computed status value.
• The cloud agent may have a network connection issue that prevented the statusvalue from being sent to Oracle Management Cloud. In this situation, check thenetwork connectivity between the agent and Oracle Management Cloud.
Chapter 10Status Unknown
10-11

AMonitoring Prerequisites and Credentials
This appendix contains additional prerequisite and monitoring credential informationfor specific entities.
Host
Prerequisites
The operating system user used to install the Cloud Agent is also used as the host monitoringcredential. Your hosts are automatically added as entities when a Cloud Agent is installed.However, hosts are not automatically monitored. To enable monitoring for host entities, see Download and Customize Oracle Infrastructure Monitoring JSONs.
A-1
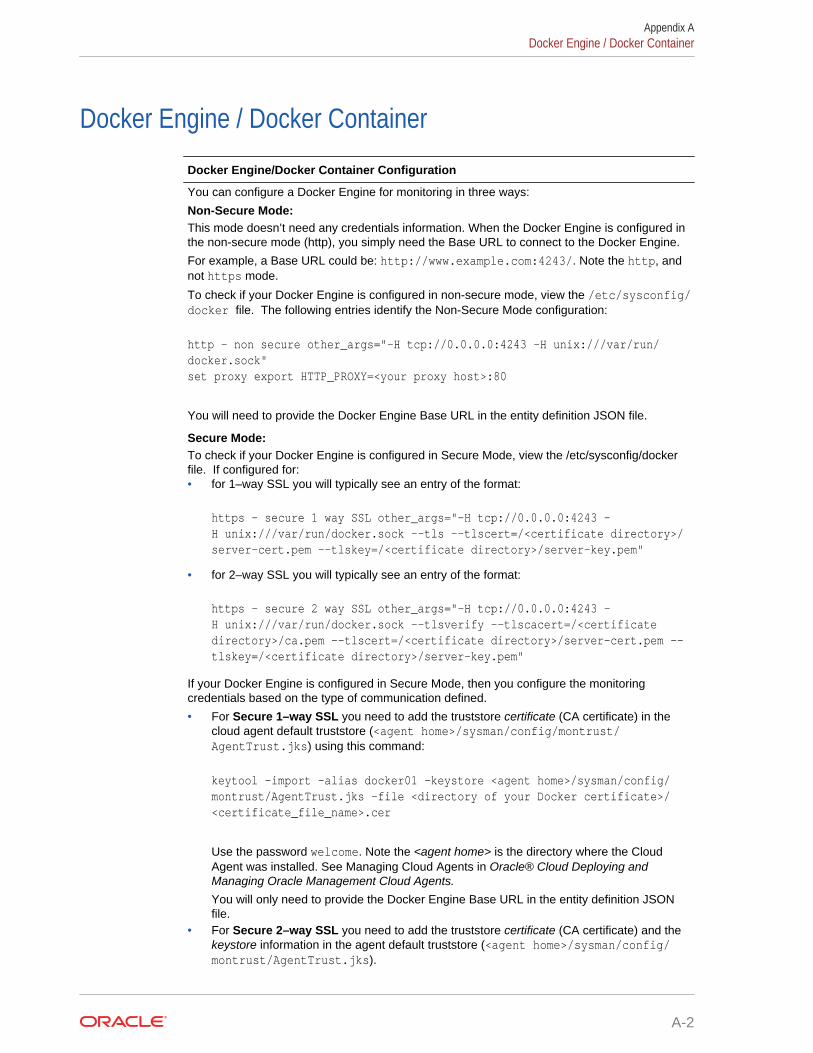
Docker Engine / Docker Container
Docker Engine/Docker Container Configuration
You can configure a Docker Engine for monitoring in three ways:
Non-Secure Mode:This mode doesn’t need any credentials information. When the Docker Engine is configured inthe non-secure mode (http), you simply need the Base URL to connect to the Docker Engine.
For example, a Base URL could be: http://www.example.com:4243/. Note the http, andnot https mode.
To check if your Docker Engine is configured in non-secure mode, view the /etc/sysconfig/docker file. The following entries identify the Non-Secure Mode configuration:
http - non secure other_args="-H tcp://0.0.0.0:4243 -H unix:///var/run/docker.sock" set proxy export HTTP_PROXY=<your proxy host>:80
You will need to provide the Docker Engine Base URL in the entity definition JSON file.
Secure Mode:To check if your Docker Engine is configured in Secure Mode, view the /etc/sysconfig/dockerfile. If configured for:• for 1–way SSL you will typically see an entry of the format:
https - secure 1 way SSL other_args="-H tcp://0.0.0.0:4243 -H unix:///var/run/docker.sock --tls --tlscert=/<certificate directory>/server-cert.pem --tlskey=/<certificate directory>/server-key.pem"
• for 2–way SSL you will typically see an entry of the format:
https - secure 2 way SSL other_args="-H tcp://0.0.0.0:4243 -H unix:///var/run/docker.sock --tlsverify --tlscacert=/<certificate directory>/ca.pem --tlscert=/<certificate directory>/server-cert.pem --tlskey=/<certificate directory>/server-key.pem"
If your Docker Engine is configured in Secure Mode, then you configure the monitoringcredentials based on the type of communication defined.
• For Secure 1–way SSL you need to add the truststore certificate (CA certificate) in thecloud agent default truststore (<agent home>/sysman/config/montrust/AgentTrust.jks) using this command:
keytool -import -alias docker01 -keystore <agent home>/sysman/config/montrust/AgentTrust.jks -file <directory of your Docker certificate>/<certificate_file_name>.cer
Use the password welcome. Note the <agent home> is the directory where the CloudAgent was installed. See Managing Cloud Agents in Oracle® Cloud Deploying andManaging Oracle Management Cloud Agents.
You will only need to provide the Docker Engine Base URL in the entity definition JSONfile.
• For Secure 2–way SSL you need to add the truststore certificate (CA certificate) and thekeystore information in the agent default truststore (<agent home>/sysman/config/montrust/AgentTrust.jks).
Appendix ADocker Engine / Docker Container
A-2
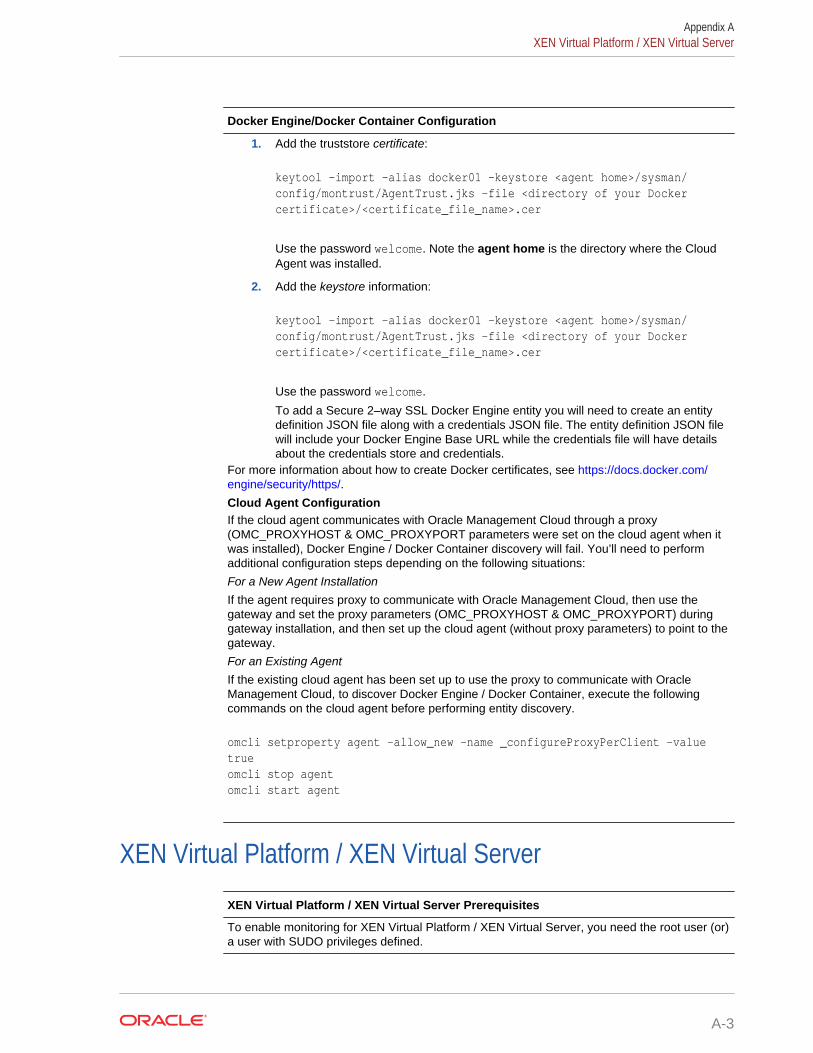
Docker Engine/Docker Container Configuration
1. Add the truststore certificate:
keytool -import -alias docker01 -keystore <agent home>/sysman/config/montrust/AgentTrust.jks -file <directory of your Docker certificate>/<certificate_file_name>.cer
Use the password welcome. Note the agent home is the directory where the CloudAgent was installed.
2. Add the keystore information:
keytool -import -alias docker01 -keystore <agent home>/sysman/config/montrust/AgentTrust.jks -file <directory of your Docker certificate>/<certificate_file_name>.cer
Use the password welcome.
To add a Secure 2–way SSL Docker Engine entity you will need to create an entitydefinition JSON file along with a credentials JSON file. The entity definition JSON filewill include your Docker Engine Base URL while the credentials file will have detailsabout the credentials store and credentials.
For more information about how to create Docker certificates, see https://docs.docker.com/engine/security/https/.
Cloud Agent ConfigurationIf the cloud agent communicates with Oracle Management Cloud through a proxy(OMC_PROXYHOST & OMC_PROXYPORT parameters were set on the cloud agent when itwas installed), Docker Engine / Docker Container discovery will fail. You’ll need to performadditional configuration steps depending on the following situations:
For a New Agent Installation
If the agent requires proxy to communicate with Oracle Management Cloud, then use thegateway and set the proxy parameters (OMC_PROXYHOST & OMC_PROXYPORT) duringgateway installation, and then set up the cloud agent (without proxy parameters) to point to thegateway.
For an Existing Agent
If the existing cloud agent has been set up to use the proxy to communicate with OracleManagement Cloud, to discover Docker Engine / Docker Container, execute the followingcommands on the cloud agent before performing entity discovery.
omcli setproperty agent -allow_new -name _configureProxyPerClient -value true omcli stop agent omcli start agent
XEN Virtual Platform / XEN Virtual Server
XEN Virtual Platform / XEN Virtual Server Prerequisites
To enable monitoring for XEN Virtual Platform / XEN Virtual Server, you need the root user (or)a user with SUDO privileges defined.
Appendix AXEN Virtual Platform / XEN Virtual Server
A-3
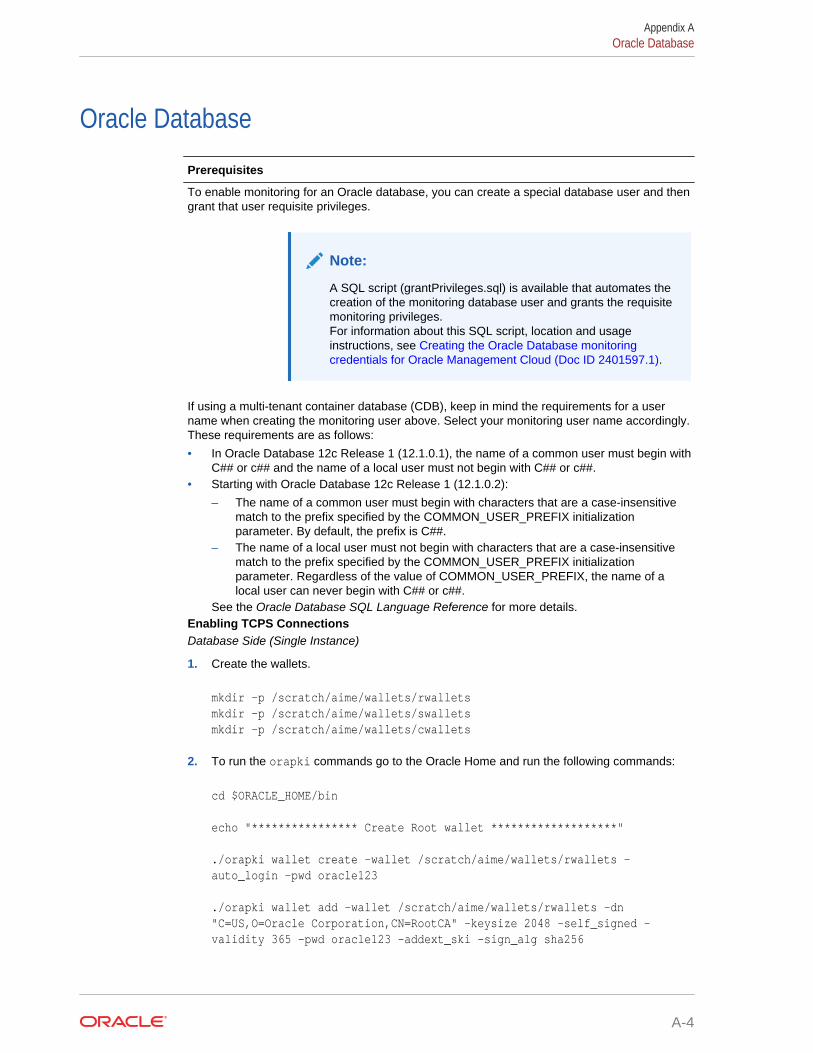
Oracle Database
Prerequisites
To enable monitoring for an Oracle database, you can create a special database user and thengrant that user requisite privileges.
Note:
A SQL script (grantPrivileges.sql) is available that automates thecreation of the monitoring database user and grants the requisitemonitoring privileges.For information about this SQL script, location and usageinstructions, see Creating the Oracle Database monitoringcredentials for Oracle Management Cloud (Doc ID 2401597.1).
If using a multi-tenant container database (CDB), keep in mind the requirements for a username when creating the monitoring user above. Select your monitoring user name accordingly.These requirements are as follows:
• In Oracle Database 12c Release 1 (12.1.0.1), the name of a common user must begin withC## or c## and the name of a local user must not begin with C## or c##.
• Starting with Oracle Database 12c Release 1 (12.1.0.2):
– The name of a common user must begin with characters that are a case-insensitivematch to the prefix specified by the COMMON_USER_PREFIX initializationparameter. By default, the prefix is C##.
– The name of a local user must not begin with characters that are a case-insensitivematch to the prefix specified by the COMMON_USER_PREFIX initializationparameter. Regardless of the value of COMMON_USER_PREFIX, the name of alocal user can never begin with C## or c##.
See the Oracle Database SQL Language Reference for more details.Enabling TCPS ConnectionsDatabase Side (Single Instance)
1. Create the wallets.
mkdir -p /scratch/aime/wallets/rwalletsmkdir -p /scratch/aime/wallets/swalletsmkdir -p /scratch/aime/wallets/cwallets
2. To run the orapki commands go to the Oracle Home and run the following commands:
cd $ORACLE_HOME/bin
echo "**************** Create Root wallet *******************"
./orapki wallet create -wallet /scratch/aime/wallets/rwallets -auto_login -pwd oracle123
./orapki wallet add -wallet /scratch/aime/wallets/rwallets -dn "C=US,O=Oracle Corporation,CN=RootCA" -keysize 2048 -self_signed -validity 365 -pwd oracle123 -addext_ski -sign_alg sha256
Appendix AOracle Database
A-4
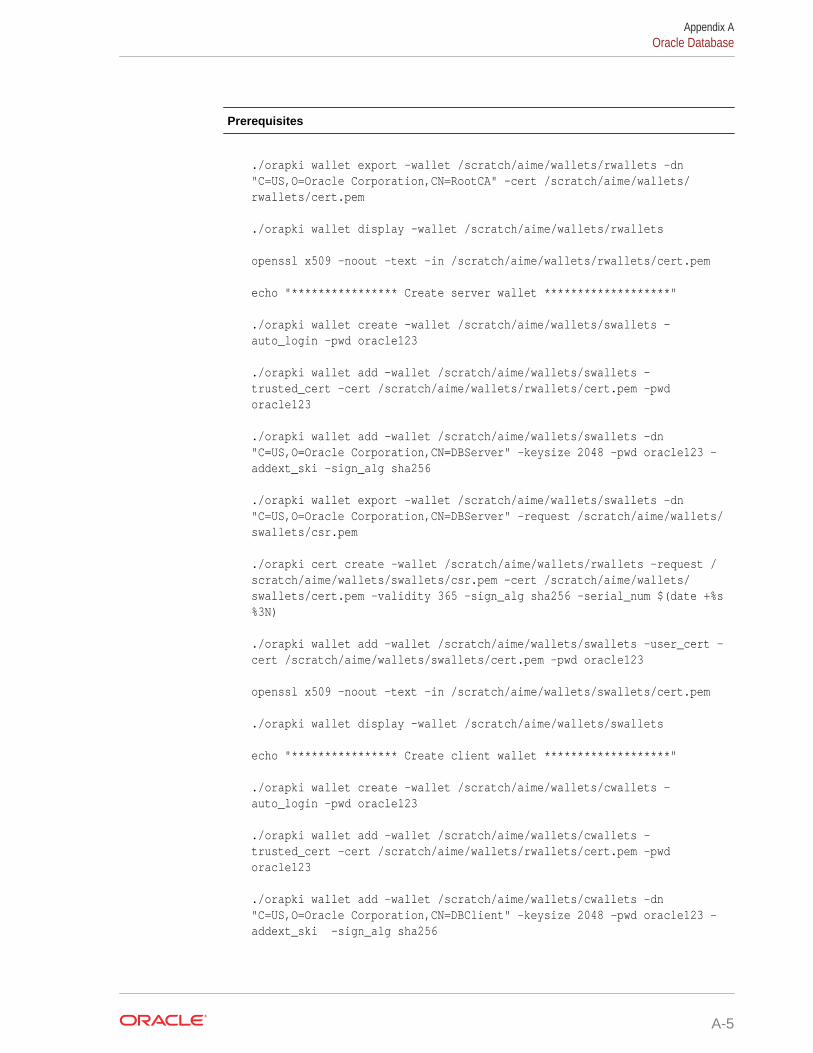
Prerequisites
./orapki wallet export -wallet /scratch/aime/wallets/rwallets -dn "C=US,O=Oracle Corporation,CN=RootCA" -cert /scratch/aime/wallets/rwallets/cert.pem
./orapki wallet display -wallet /scratch/aime/wallets/rwallets
openssl x509 -noout -text -in /scratch/aime/wallets/rwallets/cert.pem
echo "**************** Create server wallet *******************"
./orapki wallet create -wallet /scratch/aime/wallets/swallets -auto_login -pwd oracle123
./orapki wallet add -wallet /scratch/aime/wallets/swallets -trusted_cert -cert /scratch/aime/wallets/rwallets/cert.pem -pwd oracle123
./orapki wallet add -wallet /scratch/aime/wallets/swallets -dn "C=US,O=Oracle Corporation,CN=DBServer" -keysize 2048 -pwd oracle123 -addext_ski -sign_alg sha256
./orapki wallet export -wallet /scratch/aime/wallets/swallets -dn "C=US,O=Oracle Corporation,CN=DBServer" -request /scratch/aime/wallets/swallets/csr.pem
./orapki cert create -wallet /scratch/aime/wallets/rwallets -request /scratch/aime/wallets/swallets/csr.pem -cert /scratch/aime/wallets/swallets/cert.pem -validity 365 -sign_alg sha256 -serial_num $(date +%s%3N)
./orapki wallet add -wallet /scratch/aime/wallets/swallets -user_cert -cert /scratch/aime/wallets/swallets/cert.pem -pwd oracle123
openssl x509 -noout -text -in /scratch/aime/wallets/swallets/cert.pem
./orapki wallet display -wallet /scratch/aime/wallets/swallets echo "**************** Create client wallet *******************" ./orapki wallet create -wallet /scratch/aime/wallets/cwallets -auto_login -pwd oracle123
./orapki wallet add -wallet /scratch/aime/wallets/cwallets -trusted_cert -cert /scratch/aime/wallets/rwallets/cert.pem -pwd oracle123
./orapki wallet add -wallet /scratch/aime/wallets/cwallets -dn "C=US,O=Oracle Corporation,CN=DBClient" -keysize 2048 -pwd oracle123 -addext_ski -sign_alg sha256
Appendix AOracle Database
A-5
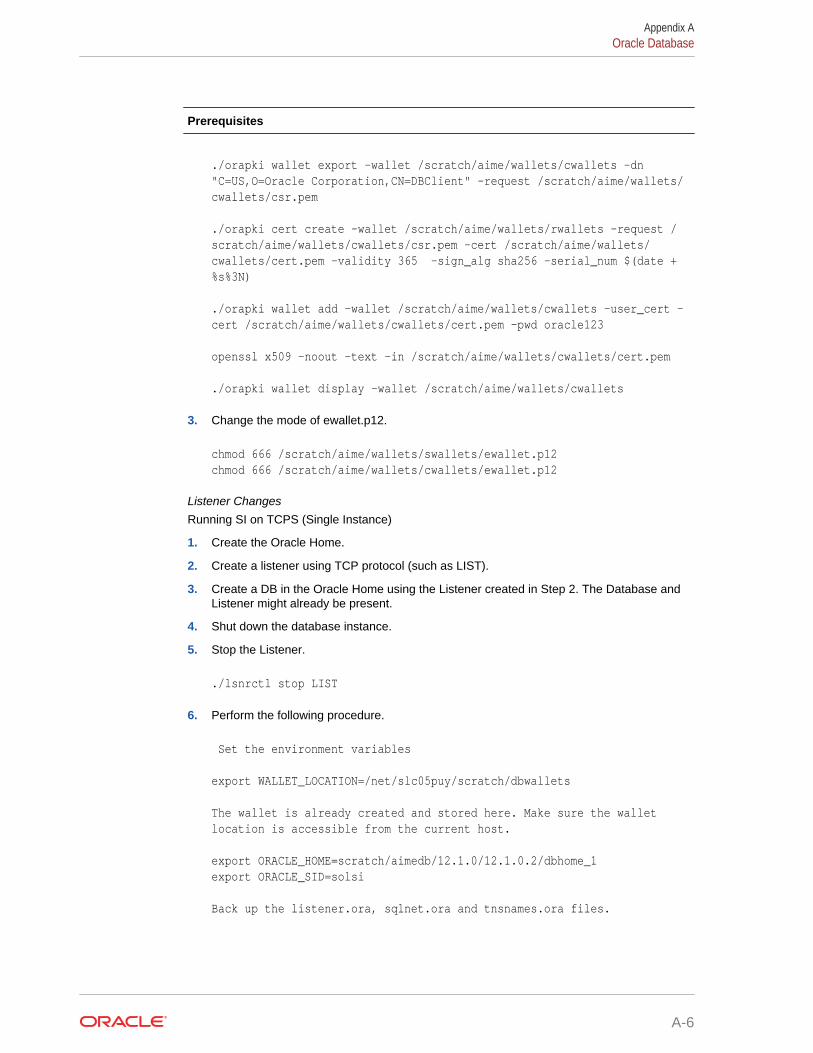
Prerequisites
./orapki wallet export -wallet /scratch/aime/wallets/cwallets -dn "C=US,O=Oracle Corporation,CN=DBClient" -request /scratch/aime/wallets/cwallets/csr.pem
./orapki cert create -wallet /scratch/aime/wallets/rwallets -request /scratch/aime/wallets/cwallets/csr.pem -cert /scratch/aime/wallets/cwallets/cert.pem -validity 365 -sign_alg sha256 -serial_num $(date +%s%3N)
./orapki wallet add -wallet /scratch/aime/wallets/cwallets -user_cert -cert /scratch/aime/wallets/cwallets/cert.pem -pwd oracle123
openssl x509 -noout -text -in /scratch/aime/wallets/cwallets/cert.pem
./orapki wallet display -wallet /scratch/aime/wallets/cwallets
3. Change the mode of ewallet.p12.
chmod 666 /scratch/aime/wallets/swallets/ewallet.p12chmod 666 /scratch/aime/wallets/cwallets/ewallet.p12
Listener Changes
Running SI on TCPS (Single Instance)
1. Create the Oracle Home.
2. Create a listener using TCP protocol (such as LIST).
3. Create a DB in the Oracle Home using the Listener created in Step 2. The Database andListener might already be present.
4. Shut down the database instance.
5. Stop the Listener.
./lsnrctl stop LIST
6. Perform the following procedure.
Set the environment variables
export WALLET_LOCATION=/net/slc05puy/scratch/dbwallets
The wallet is already created and stored here. Make sure the wallet location is accessible from the current host.
export ORACLE_HOME=scratch/aimedb/12.1.0/12.1.0.2/dbhome_1export ORACLE_SID=solsi
Back up the listener.ora, sqlnet.ora and tnsnames.ora files.
Appendix AOracle Database
A-6
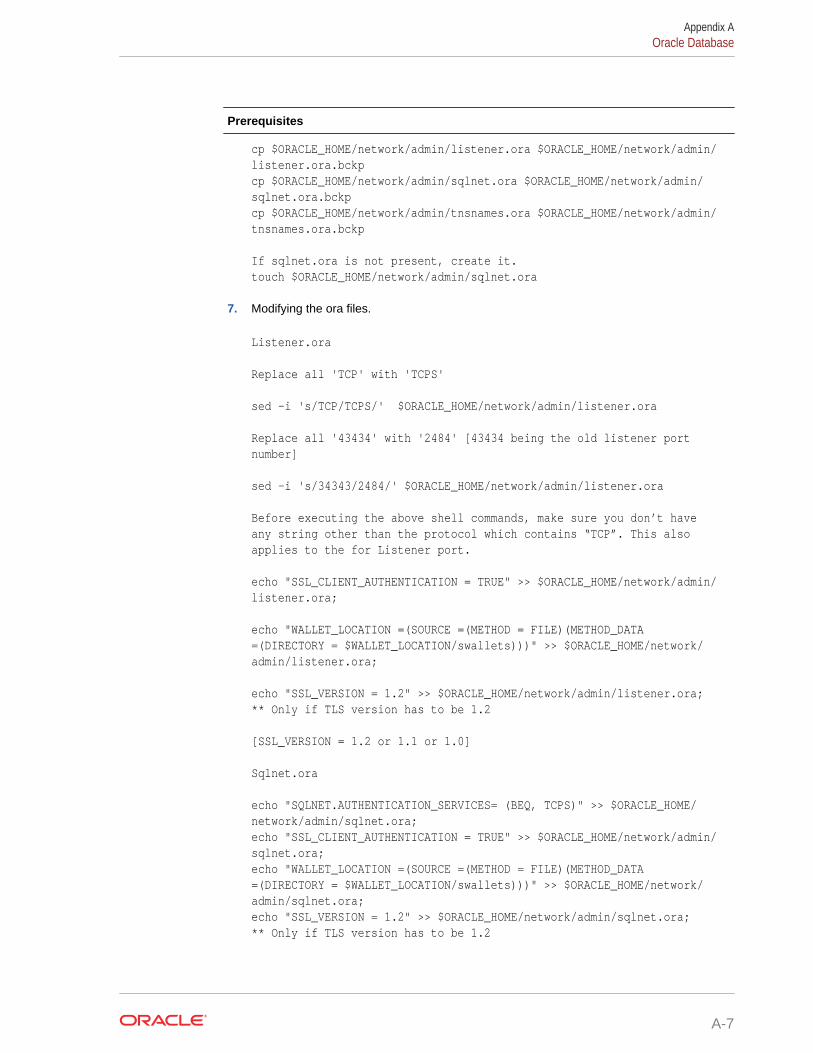
Prerequisites
cp $ORACLE_HOME/network/admin/listener.ora $ORACLE_HOME/network/admin/listener.ora.bckpcp $ORACLE_HOME/network/admin/sqlnet.ora $ORACLE_HOME/network/admin/sqlnet.ora.bckpcp $ORACLE_HOME/network/admin/tnsnames.ora $ORACLE_HOME/network/admin/tnsnames.ora.bckp
If sqlnet.ora is not present, create it. touch $ORACLE_HOME/network/admin/sqlnet.ora
7. Modifying the ora files.
Listener.ora
Replace all 'TCP' with 'TCPS'
sed -i 's/TCP/TCPS/' $ORACLE_HOME/network/admin/listener.ora
Replace all '43434' with '2484' [43434 being the old listener port number]
sed -i 's/34343/2484/' $ORACLE_HOME/network/admin/listener.ora
Before executing the above shell commands, make sure you don’t have any string other than the protocol which contains “TCP”. This also applies to the for Listener port. echo "SSL_CLIENT_AUTHENTICATION = TRUE" >> $ORACLE_HOME/network/admin/listener.ora;
echo "WALLET_LOCATION =(SOURCE =(METHOD = FILE)(METHOD_DATA =(DIRECTORY = $WALLET_LOCATION/swallets)))" >> $ORACLE_HOME/network/admin/listener.ora;
echo "SSL_VERSION = 1.2" >> $ORACLE_HOME/network/admin/listener.ora; ** Only if TLS version has to be 1.2 [SSL_VERSION = 1.2 or 1.1 or 1.0]
Sqlnet.ora
echo "SQLNET.AUTHENTICATION_SERVICES= (BEQ, TCPS)" >> $ORACLE_HOME/network/admin/sqlnet.ora;echo "SSL_CLIENT_AUTHENTICATION = TRUE" >> $ORACLE_HOME/network/admin/sqlnet.ora;echo "WALLET_LOCATION =(SOURCE =(METHOD = FILE)(METHOD_DATA =(DIRECTORY = $WALLET_LOCATION/swallets)))" >> $ORACLE_HOME/network/admin/sqlnet.ora;echo "SSL_VERSION = 1.2" >> $ORACLE_HOME/network/admin/sqlnet.ora; ** Only if TLS version has to be 1.2
Appendix AOracle Database
A-7
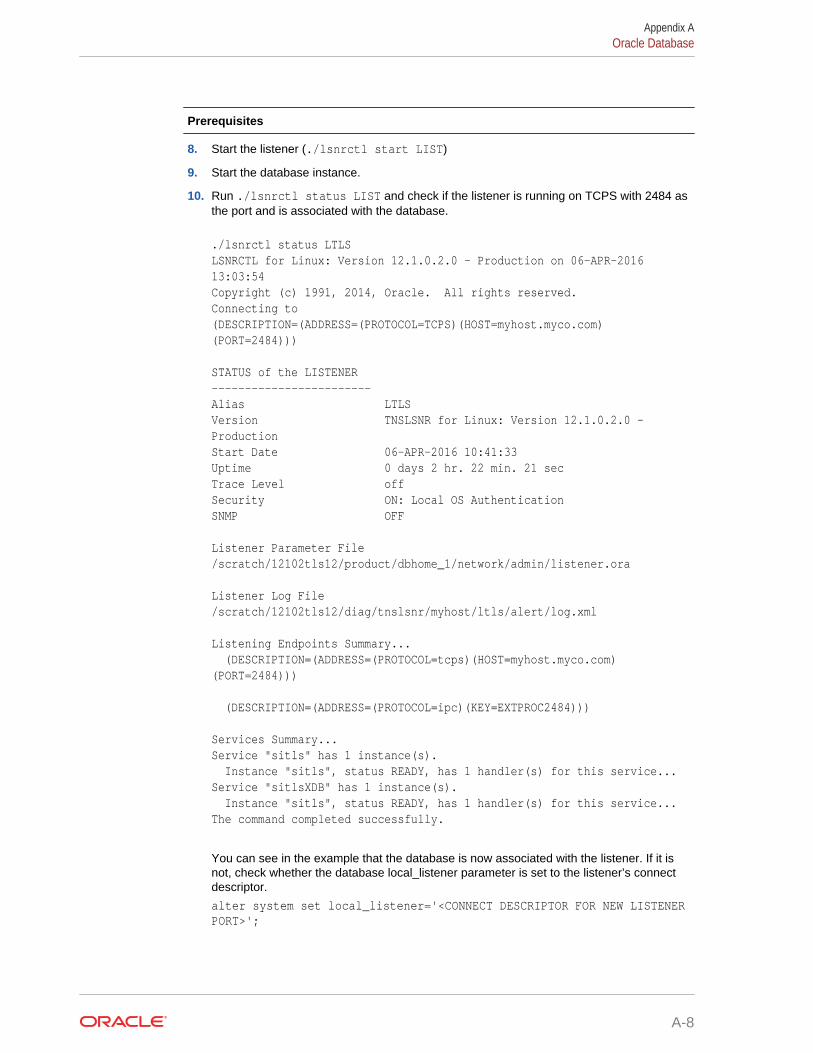
Prerequisites
8. Start the listener (./lsnrctl start LIST)
9. Start the database instance.
10. Run ./lsnrctl status LIST and check if the listener is running on TCPS with 2484 asthe port and is associated with the database.
./lsnrctl status LTLSLSNRCTL for Linux: Version 12.1.0.2.0 - Production on 06-APR-2016 13:03:54Copyright (c) 1991, 2014, Oracle. All rights reserved.Connecting to(DESCRIPTION=(ADDRESS=(PROTOCOL=TCPS)(HOST=myhost.myco.com)(PORT=2484)))
STATUS of the LISTENER------------------------Alias LTLSVersion TNSLSNR for Linux: Version 12.1.0.2.0 - ProductionStart Date 06-APR-2016 10:41:33Uptime 0 days 2 hr. 22 min. 21 secTrace Level offSecurity ON: Local OS AuthenticationSNMP OFF
Listener Parameter File/scratch/12102tls12/product/dbhome_1/network/admin/listener.ora
Listener Log File /scratch/12102tls12/diag/tnslsnr/myhost/ltls/alert/log.xml
Listening Endpoints Summary... (DESCRIPTION=(ADDRESS=(PROTOCOL=tcps)(HOST=myhost.myco.com)(PORT=2484)))
(DESCRIPTION=(ADDRESS=(PROTOCOL=ipc)(KEY=EXTPROC2484)))
Services Summary...Service "sitls" has 1 instance(s). Instance "sitls", status READY, has 1 handler(s) for this service...Service "sitlsXDB" has 1 instance(s). Instance "sitls", status READY, has 1 handler(s) for this service...The command completed successfully.
You can see in the example that the database is now associated with the listener. If it isnot, check whether the database local_listener parameter is set to the listener’s connectdescriptor.
alter system set local_listener='<CONNECT DESCRIPTOR FOR NEW LISTENERPORT>';
Appendix AOracle Database
A-8
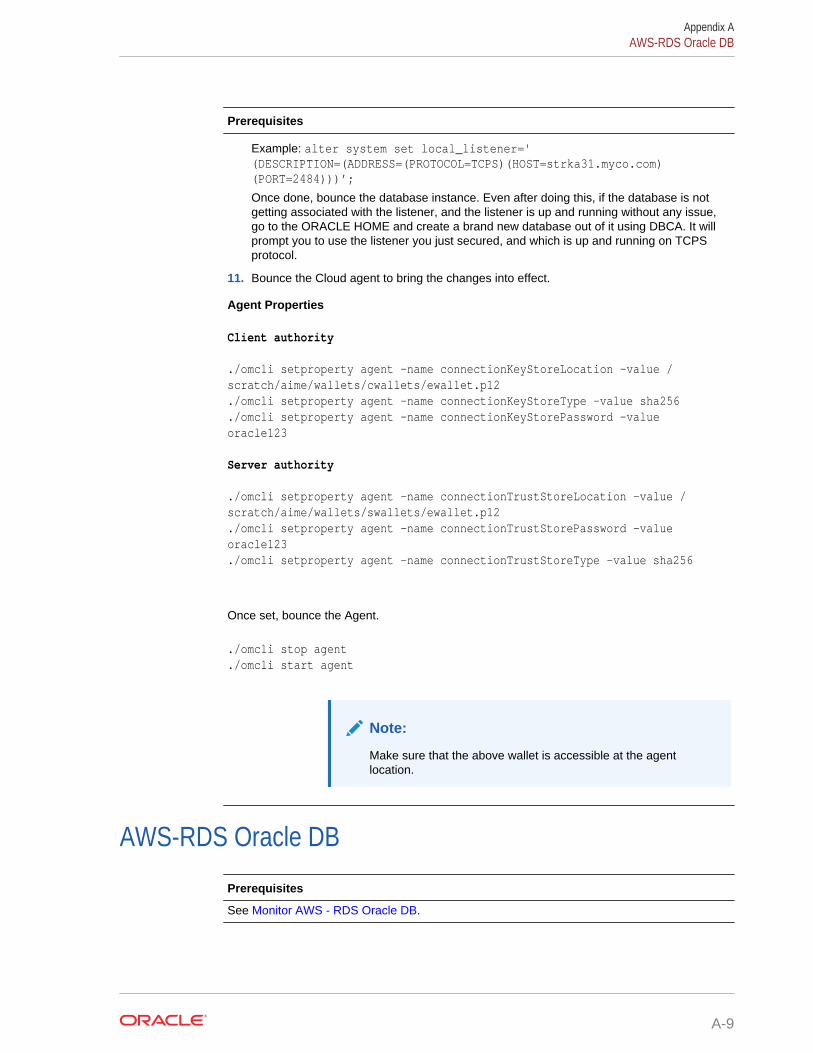
Prerequisites
Example: alter system set local_listener='(DESCRIPTION=(ADDRESS=(PROTOCOL=TCPS)(HOST=strka31.myco.com)(PORT=2484)))’;
Once done, bounce the database instance. Even after doing this, if the database is notgetting associated with the listener, and the listener is up and running without any issue,go to the ORACLE HOME and create a brand new database out of it using DBCA. It willprompt you to use the listener you just secured, and which is up and running on TCPSprotocol.
11. Bounce the Cloud agent to bring the changes into effect.
Agent Properties
Client authority
./omcli setproperty agent -name connectionKeyStoreLocation -value /scratch/aime/wallets/cwallets/ewallet.p12./omcli setproperty agent -name connectionKeyStoreType -value sha256./omcli setproperty agent -name connectionKeyStorePassword -value oracle123
Server authority
./omcli setproperty agent -name connectionTrustStoreLocation -value /scratch/aime/wallets/swallets/ewallet.p12./omcli setproperty agent -name connectionTrustStorePassword -value oracle123./omcli setproperty agent -name connectionTrustStoreType -value sha256
Once set, bounce the Agent.
./omcli stop agent
./omcli start agent
Note:
Make sure that the above wallet is accessible at the agentlocation.
AWS-RDS Oracle DB
Prerequisites
See Monitor AWS - RDS Oracle DB.
Appendix AAWS-RDS Oracle DB
A-9
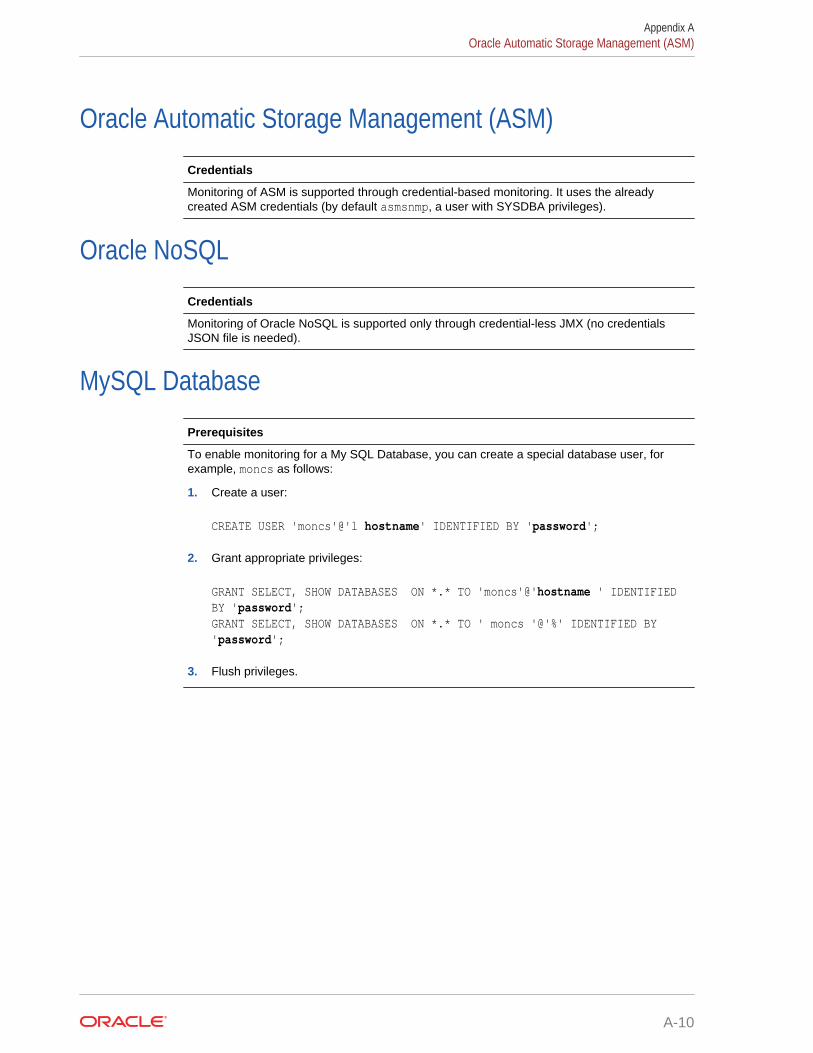
Oracle Automatic Storage Management (ASM)
Credentials
Monitoring of ASM is supported through credential-based monitoring. It uses the alreadycreated ASM credentials (by default asmsnmp, a user with SYSDBA privileges).
Oracle NoSQL
Credentials
Monitoring of Oracle NoSQL is supported only through credential-less JMX (no credentialsJSON file is needed).
MySQL Database
Prerequisites
To enable monitoring for a My SQL Database, you can create a special database user, forexample, moncs as follows:
1. Create a user:
CREATE USER 'moncs'@'l hostname' IDENTIFIED BY 'password';
2. Grant appropriate privileges:
GRANT SELECT, SHOW DATABASES ON *.* TO 'moncs'@'hostname ' IDENTIFIED BY 'password';GRANT SELECT, SHOW DATABASES ON *.* TO ' moncs '@'%' IDENTIFIED BY 'password';
3. Flush privileges.
Appendix AOracle Automatic Storage Management (ASM)
A-10
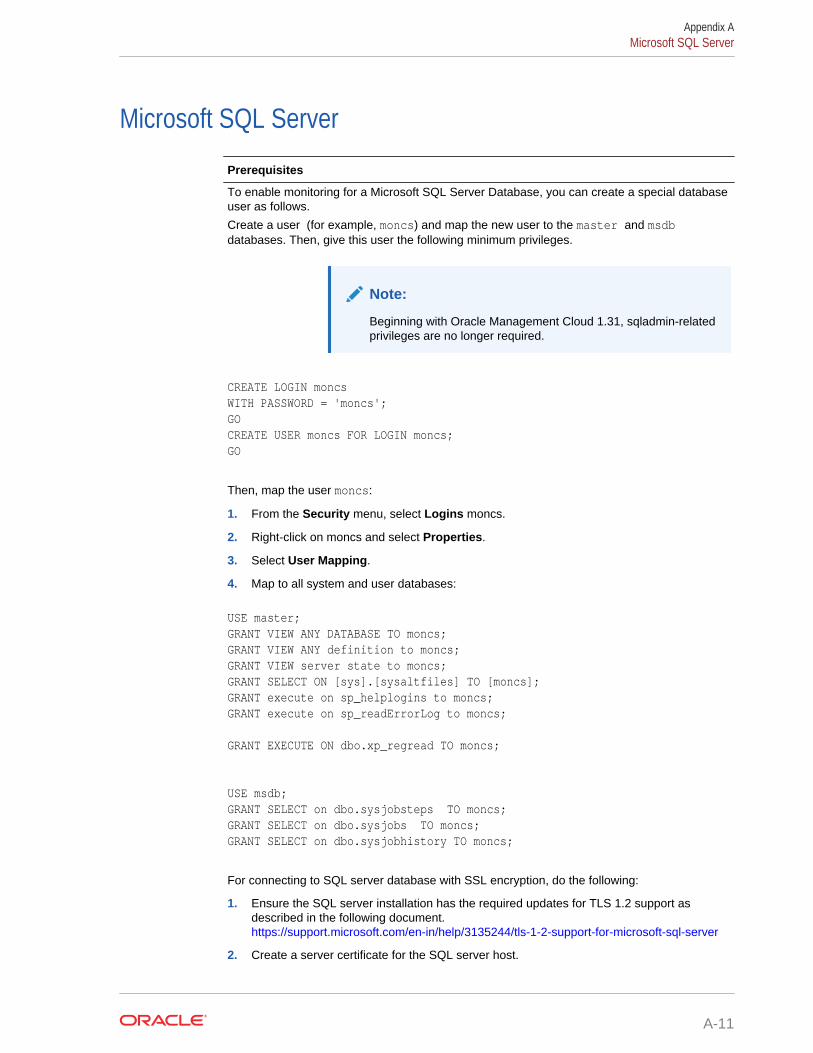
Microsoft SQL Server
Prerequisites
To enable monitoring for a Microsoft SQL Server Database, you can create a special databaseuser as follows.
Create a user (for example, moncs) and map the new user to the master and msdbdatabases. Then, give this user the following minimum privileges.
Note:
Beginning with Oracle Management Cloud 1.31, sqladmin-relatedprivileges are no longer required.
CREATE LOGIN moncsWITH PASSWORD = 'moncs';GOCREATE USER moncs FOR LOGIN moncs;GO
Then, map the user moncs:
1. From the Security menu, select Logins moncs.
2. Right-click on moncs and select Properties.
3. Select User Mapping.
4. Map to all system and user databases:
USE master;GRANT VIEW ANY DATABASE TO moncs;GRANT VIEW ANY definition to moncs;GRANT VIEW server state to moncs;GRANT SELECT ON [sys].[sysaltfiles] TO [moncs];GRANT execute on sp_helplogins to moncs;GRANT execute on sp_readErrorLog to moncs;
GRANT EXECUTE ON dbo.xp_regread TO moncs;
USE msdb;GRANT SELECT on dbo.sysjobsteps TO moncs;GRANT SELECT on dbo.sysjobs TO moncs;GRANT SELECT on dbo.sysjobhistory TO moncs;
For connecting to SQL server database with SSL encryption, do the following:
1. Ensure the SQL server installation has the required updates for TLS 1.2 support asdescribed in the following document.https://support.microsoft.com/en-in/help/3135244/tls-1-2-support-for-microsoft-sql-server
2. Create a server certificate for the SQL server host.
Appendix AMicrosoft SQL Server
A-11
Prerequisites
Set up the certificate as mentioned in the section “Install a certificate on a server withMicrosoft Management Console (MMC)” in the following document: https://support.microsoft.com/en-in/help/316898/how-to-enable-ssl-encryption-for-an-instance-of-sql-server-by-using-mi
3. Install the server certificate for the SQL server instance.Set up the SQL server instance to use the server certificate created above, as mentionedin the section “To install a certificate for a single SQL Server instance” in the followingdocument: https://docs.microsoft.com/en-us/sql/database-engine/configure-windows/manage-certificates?view=sql-server-2016
4. Export to a file, the root certification authority’s certificate that has signed the SQL serverhost certificate, and copy this file to the cloud agent host.Export the certificate as described in section “Enable encryption for a specific client” in thefollowing document: https://support.microsoft.com/en-in/help/316898/how-to-enable-ssl-encryption-for-an-instance-of-sql-server-by-using-mi
5. Create a trust store on the cloud agent host, and import the root certification authority’scertificate exported above.
keytool -import -file .\ca_cert.cer –alias mytrust -keystore .\trustStore.jks -storetype jks
6. Form the connection URL pointing to the trust store.
jdbc:sqlserver://xxx.xxx.com:1433;encrypt=true;trustServerCertificate=false;trustStore=C:\trustStore.jks;trustStorePassword=xxxx;
MongoDB Database
Prerequisites
To enable monitoring for a MongoDB Database, you can create a special database user, forexample, omc_monitor as follows:
1. Connect to your database:
use your MongoDB database name;
2. Create user:
db.createUser({user: "omc_monitor",pwd: "mongo123",roles: [ "read" ]})
Appendix AMongoDB Database
A-12
Oracle WebLogic Server (includes WebLogic Domain andWebLogic Cluster)
Prerequisites
To enable monitoring of a Oracle WebLogic Server (WLS), use a WebLogic user with at leastthe Monitor role. The user can also have Operator or Administrator roles, which include theMonitor role.
If you have enabled the Oracle WebLogic Server with SSL, you must export the certificate fromits keystore and import it in the Cloud Agent keystore. Perform the following steps:
1. Stop the Cloud Agent.
omcli stop agent
2. Export the certificate from the WLS instance JMX SSL keystore to the Cloud Agent'struststore. For example, on a UNIX host:
cd <agent base Directory>/agentStateDir/sysman/config/montrust
keytool -exportcert -alias <alias of WLS SSL key> -file <ExportedCert Name> -keystore <path to the WLS SSL Keystore>.keystore -storepass <WLS SSL Keystore password> -rfc
3. Import the WLS instance JMX SSL keystore to the Cloud Agent's truststore:
keytool -import -noprompt -alias <alias agent's truststore key> -file<Exported Cert Name>.cer -keystore AgentTrust.jks -storepass <Agenttruststore password, default is "welcome">
4. Restart the Cloud Agent..
omcli start agent
Appendix AOracle WebLogic Server (includes WebLogic Domain and WebLogic Cluster)
A-13
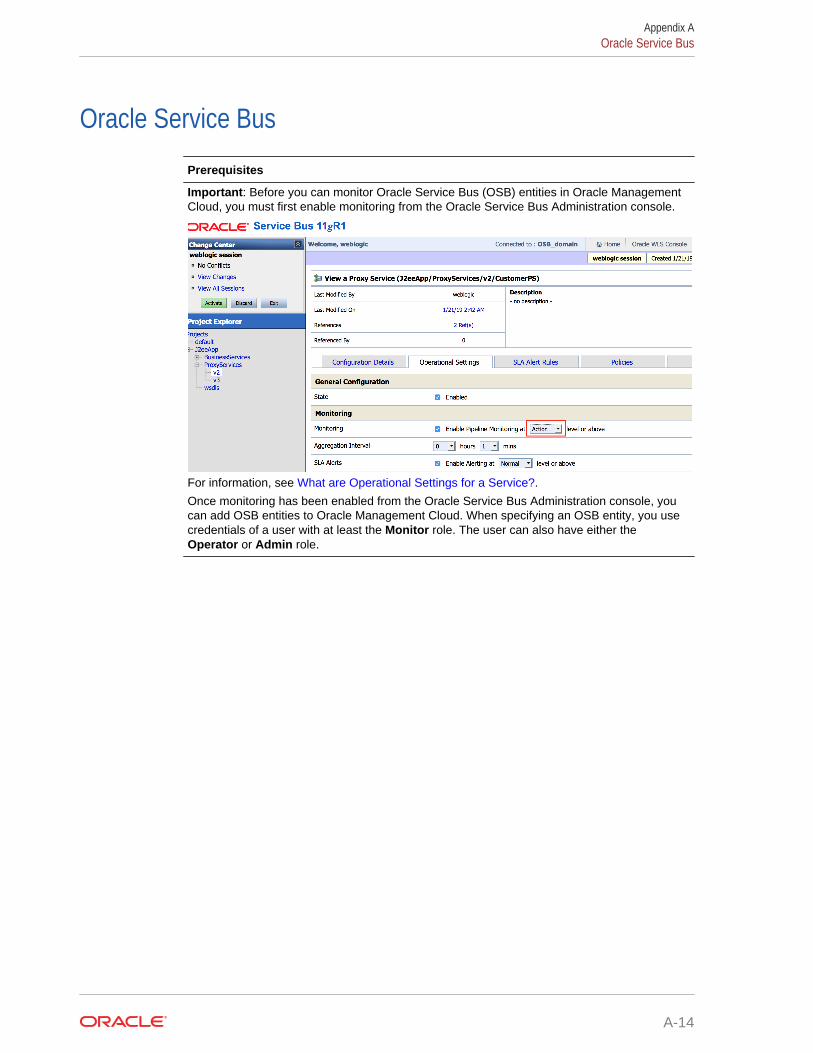
Oracle Service Bus
Prerequisites
Important: Before you can monitor Oracle Service Bus (OSB) entities in Oracle ManagementCloud, you must first enable monitoring from the Oracle Service Bus Administration console.
For information, see What are Operational Settings for a Service?.
Once monitoring has been enabled from the Oracle Service Bus Administration console, youcan add OSB entities to Oracle Management Cloud. When specifying an OSB entity, you usecredentials of a user with at least the Monitor role. The user can also have either theOperator or Admin role.
Appendix AOracle Service Bus
A-14
Tomcat
Prerequisites and Credentials
Tomcat is monitored using JMX. You must configure Tomcat for JMX remote monitoring even ifyou are using a local agent.
Tomcat can be monitored with or without authentication. If a JMX credential is created, then it’sassumed you’re monitoring this entity with credentials.
To create a JMX credential for monitoring:
1. Edit the environment file:
vi $CATALINA_HOME/bin/setenv.sh
Add:
CATALINA_OPTS="-Dcom.sun.management.jmxremote -Dcom.sun.management.jmxremote.port=9999 -Dcom.sun.management.jmxremote.ssl=false -Dcom.sun.management.jmxremote.authenticate=true -Dcom.sun.management.jmxremote.password.file=../conf/jmxremote.password -Dcom.sun.management.jmxremote.access.file=../conf/jmxremote.access"
2. Save the file.
3. Change the file permission as executable:
chmod 755 $CATALINA_HOME/bin/setenv.sh
4. Edit the password file:
vi $CATALINA_HOME/conf/jmxremote.password
Add:
control tomcatadmin tomcat
5. Edit the access file:
vi $CATALINA_HOME/conf/jmxremote.access
Add:
control readonlyadmin readwrite
6. Change the file permission for only the owner:
chmod 600 jmxremote.accesschmod 600 jmxremote.password
Appendix ATomcat
A-15
Prerequisites and Credentials
7. Bounce the Tomcat instance:
sh $CATALINA_HOME/bin/shutdown.shsh $CATALINA_HOME/bin/startup.sh
If you have enabled the Tomcat JMX with SSL, you must export the certificate from its keystoreand import it in the Cloud Agent keystore. Perform the following steps:
1. Export the certificate from the Tomcat instance JMX SSL keystore to the Cloud Agent'struststore. For example, on a UNIX host:
cd <agent Base Directory>/agentStateDir/sysman/config/montrust
keytool -exportcert -alias <alias of Tomcat JMX SSL key> -file<Exported Cert Name>.cer -keystore <path to the Tomcat JMX SSLKeystore>.keystore -storepass <Tomcat JMX SSL Keystore password> -rfc
2. Import the Tomcat instance JMX SSL keystore to the Cloud Agent's truststore:
keytool -import -noprompt -alias <alias agent's truststore key> -file<Exported Cert Name>.cer -keystore AgentTrust.jks -storepass <agenttruststore password, default is "welcome">
3. Restart the agent, using the command line interface:
omcli stop agentomcli start agent
Oracle Traffic Director (OTD)
Prerequisites
OTD 11Use an OTD Administrator user.
In addition, to enable collection of metrics, you must configure and start an SNMP subagent.To start the SNMP subagent, use OTD Admin Console, or use the following command:
tadm start-snmp-subagent--host=<otd_host>--port=<otd port>--user=<otd user>--password-file=<password_file>
For more information on configuring and starting an SNMP subagent, see the Oracle TrafficDirector documentation.
OTD 12Use a WebLogic Server user with the Monitor role. The user can also have Operator or Adminroles, which include the Monitor role.
Appendix AOracle Traffic Director (OTD)
A-16
Apache HTTP Server
Apache HTTP Server Prerequisites
In this release, only Apache HTTP Server 2.4.x and 2.2 for Linux are supported.
To enable the collection of configuration metrics, note the following:
1. The Cloud Agent should be installed on the same host as Apache HTTP Server. TheApache *.conf file(s) , including httpd.conf file, should be accessible and readable bythe Cloud Agent install user.
2. The Apache install user and the Cloud Agent install user should be a part of the sameoperating system group.
In order to monitor an Apache HTTP Server you must first:
• Enable ‘mod_status’ for the Apache module.• Configure/server-status location directive for the specified Host and Port (default or
configured virtual host).• Turn ‘ON’ the Extended Status.• If applicable, provide access to the configured location directive so that HTTP/HTTPS
request can be successfully made from the host where the agent is installed on.For more information, see https://httpd.apache.org/docs/2.4/mod/mod_status.html and http://httpd.apache.org/docs/current/mod/core.html#location.
For HTTPS/Secure communication between Apache HTTP Server and the cloud agent duringmetrics collection, you must provide an SSL certificate. To make the certificate available withthe cloud agent:
1. Append the contents of your certificate file to the existing certificate file. For example, on aUNIX host the existing certificate file is: <AGENT_BASE_DIR>/sysman/config/b64InternetCertificate.txt
Ensure that only the following lines are appended to the b64InternetCertificate.txtfile. Do not include blank lines, comments, or any other special characters.
----BEGIN CERTIFICATE----<<<Certificate in Base64 format>>>----END CERTIFICATE----
2. Restart the agent by running the following commands from the agent installation directory(for example, on a UNIX host, this directory is <AGENT_BASE_DIR>/agent_inst/bin).
a) ./omcli stop agentb) ./omcli start agent
For data retrieval of memory-related metrics (supported on Unix platforms and when an entityis locally monitored), the PID file (httpd.pid) file needs to be accessed.
If Apache is running as root or some user other than the agent process owner, access to thePID file will fail. Hence, to allow access to httpd.pid, you need to ensure that the file can beaccessed without compromising Linux security. There are several ways to achieve this. Oneoption is as follows:
As a privileged user, run the following commands:
setfacl -R -L -d -m u:<agent_user>:rx /etc/httpd/runsetfacl -R -L -m u:<agent_user>:rx /etc/httpd/run
Appendix AApache HTTP Server
A-17

Apache HTTP Server Prerequisites
where /etc/httpd/run is the directory containing the PID file.
Oracle HTTP Server (OHS)
Prerequisites
OHS 12 : Node Manager credentials are required.
Also, the following prerequisites must be met:• Cred-less (No credential file to be provided when running omcli add_entity during
discovery) OHS discovery when the standalone OHS process owner and agent processowner are same user.
• Cred-based: OHS discovery when the standalone OHS process owner and agent processowners are different users.
Note:
cred-less and cred-based discovery is applicable for standalone OHS 11. ForOHS 12, only cred-based discovery is supported
• For HTTPS/Secured communication between OHS and the Cloud agent (for metric datacollection) , the required certificate must be available with the agent in order for the SSLhandshake to be successful. To make the certificate available with the agent :– Append the contents of your certificate file to the file : /sysman/config/
b64InternetCertificate.txt– Ensure that only the following lines are appended to the
b64InternetCertificate.txt file (that is, do not include blank lines, comments,or any other special characters):
-----BEGIN CERTIFICATE-----<<<Certificate in Base64 format>>>-----END CERTIFICATE-----
– Restart the agent by running the following commands :
omcli stop agent;omcli start agent;
Appendix AOracle HTTP Server (OHS)
A-18

Arista Ethernet Switch
Prerequisites
SNMPv1/v2 or SNMPv3 credentials are needed for monitoring.
If SNMPv1/v2 is used, you must provide the SNMP community string (which was enteredduring the Arista Switch configuration) along with IP address of agent that will be used forArista Switch monitoring.
If SNMPv3 is used, you must provide the SNMPv3 user, plus the authentication method (SHAor MD5) and authorization password if authorization is used. In addition, you must supply theprivilege method (only DES is supported) and privilege password if privilege is used.Everything needs to be manually configured up front in the Arista Switch.
Read-only access is all that’s required for Arista Switch monitoring.
Cisco Ethernet (Catalyst) Switch
Prerequisites
To enable monitoring of the Cisco Ethernet (Catalyst) Switch, you will need to provide theSNMPv1/v2 or SNMPv3 credentials in the JSON credential file. Read-only access is sufficientfor Cisco Catalyst Switch monitoring. For more information on how to configure an SNMP userfor a Cisco Catalyst Switch, see http://www.cisco.com/c/en/us/td/docs/switches/lan/catalyst2960/software/release/12-2_55_se/configuration/guide/scg_2960/swsnmp.html#78160
Cisco Nexus Ethernet Switch
Prerequisites
SNMPv1/v2 or SNMPv3 credentials are needed for monitoring.
If SNMPv1/v2 is used, you must provide the SNMP community string (which was enteredduring Cisco Nexus Ethernet Switch configuration) along with IP address of agent that will beused for Cisco Nexus Ethernet Switch monitoring.
If SNMPv3 is used, you must provide the SNMPv3 user, plus the authentication method (SHAor MD5) and authentication password if authentication is used,. In addition, the privilegemethod (only DES supported) and privilege password must be supplied if privilege is used.Everything needs to be manually configured up front in the Cisco Nexus Ethernet Switch.
Read only access is enough for the Cisco Nexus Ethernet Switch monitoring.
Oracle Power Distribution Unit (PDU)
Prerequisites
To enable monitoring, HTTP and SNMPv1/v2c/v3 are needed. The NMS and trap tables inPDU administration interface must be set for a proper SNMP monitoring. for more information,see the PDU vendor documentation.
Appendix AArista Ethernet Switch
A-19
Juniper Ethernet Switch
Prerequisites
To enable monitoring, HTTP and SNMPv1/v2c/v3 are needed.
If SNMPv1/v2 is used, you must provide SNMP community string that has been used earlier inJuniper Switch configuration along with IP address of agent which will be used for JuniperSwitch monitoring.
If SNMPv3 is used, in addition to SNMPv3 user, you must provide the auth method (SHA orMD5) and auth-password if auth is used, and priv method (only DES supported) and priv-password if priv used. You must configure everything manually in Juniper Switch. Read onlyaccess is sufficient for Juniper Switch monitoring.
Oracle Infiniband Switch
Prerequisites
To enable monitoring, HTTP and SNMPv1/v2c/v3 are needed.
If SNMPv1/v2 is used, you must provide SNMP community string that has been used earlier inIB Switch configuration along with IP address of agent which will be used for IB Switchmonitoring.
If SNMPv3 is used, in addition to SNMPv3 user, you must provide the auth method (SHA orMD5) and auth-password if auth used, and plus priv method (only DES supported) and priv-password if priv used. You must configure everything manually in IB Switch. Read only accessis sufficient for IB Switch monitoring.
Brocade Fibre Channel Switch
Prerequisites
SNMPv1/v2 or SNMPv3 credentials are needed for monitoring.
If SNMPv1/v2 is used, you must provide the SNMP community string (entered during BrocadeFibre Channel Switch configuration), along with the IP address of the agent that will be usedfor Brocade Fibre Channel Switch monitoring.
If SNMPv3 is used, you must provide the SNMPv3 the user, plus the authentication method(SHA or MD5) and authorization password (if authorization is used), plus privilege method(only DES is supported) and privilege password if a privilege method is used. All of this needsto be manually configured up front in the Brocade Fibre Channel Switch.
Read-only access is enough for Brocade Fibre Channel Switch monitoring.
Appendix AJuniper Ethernet Switch
A-20

SCOM (System Center Operations Manager)
Prerequisites
Credentials must follow the same criteria as any program which tries to obtain data fromSCOM using the SCOM SDK. See How to Connect an Operations Manager SDK Client tothe System Center Data Access Service.
... The account that is used for authentication must be included in an Operations Manager user-role profile ...
The OMC Cloud Agent uses the omc_scom.exe client to connect to the SCOM SDK. TheCloud agent does not bundle required SCOM SDK libraries (due to the license type oflibraries). You must manually copy the SCOM SDK libraries to the machine where the agent isrunning.
C:\Program Files\Microsoft System Center 2012 R2\Operations Manager\Server\SDK Binaries\Microsoft.EnterpriseManagement.Runtime.dll C:\Program Files\Microsoft System Center 2012 R2\Operations Manager\Server\SDK Binaries\Microsoft.EnterpriseManagement.OperationsManager.dll C:\Program Files\Microsoft System Center 2012 R2\Operations Manager\Server\SDK Binaries\Microsoft.EnterpriseManagement.Core.dll
Juniper SRX Firewall
Prerequisites
SNMPv1/v2 or SNMPv3 credentials are needed for monitoring.
If SNMPv1/v2 is used, you must supply the SNMP community string (which was entered duringJuniper SRX Firewall configuration) along with IP address of agent that will be used to monitorthe Juniper SRX Firewall.
If SNMPv3 is used, you must supply the SNMPv3 user, plus the authentication method (SHAor MD5) and authentication password, if authentication is used. In addition, privilege method(only DES supported) and privilege password will be required, if privileges are used. Everythingmust be manually configured up front in the Juniper SRX Firewall.
Read-only access is sufficient for Juniper SRX Firewall monitoring.
Appendix ASCOM (System Center Operations Manager)
A-21
Fujitsu Server
Prerequisites
SNMPv1/v2 or SNMPv3 credentials are needed for monitoring.
If SNMPv1/v2 is used, you must provide the SNMP community string that was entered duringXSCF configuration along with IP address of the agent that will be used to monitor the FujitsuServer.
If SNMPv3 is used, you must provide the SNMPv3 user, plus authorization method (SHA orMD5) and authorization password if authorization used. You must also provide the privilegemethod (only DES supported) and privilege password if privilages are used. All of this must bemanually configured upfront in the Fujitsu server service processor..
Read-only access is adequate for the monitoring.
For more information on how to configure SNMP users in Fujitsu M10 servers, see http://www.fujitsu.com/downloads/SPARCS/manuals/en/c120-e684-11en.pdf
Intel/SPARC Computers
Credentials
Only the username and password are required to use SSH to log in to the ILOM serviceprocessor.
Appendix AFujitsu Server
A-22
VMware vCenter
Prerequisites
In order for the Cloud Agent to be able to collect all the metrics for the Oracle ManagementCloud VMware entities, you should:
1. Install VMware tools on the VM host.
2. Set the statistics level to one (1).
Credentials: username/password required to access VMware vCenter (use Administratorrole).
Example:
[email protected] / password=<admin_pw>
Certificates:
You need to explicitly add the vCenter certificate to the Agent's JKS:
Example:
<jdk>/bin/keytool -importcert -file <vmware-vsphere-certificate> -aliasvmware -keystore $T_WORK/agentStateDir/sysman/config/montrust/AgentTrust.jks -storepass welcome
How to extract certificate from vCenter:
openssl s_client -showcerts -connect <hostname>:443
Discovery properties:
How to retrieve VMware vCenter Server Instance UUID to be passed in at discovery timethrough the entity property omc_virtual_mgmt_system_id using VMware PowerCLI:
Example:
PS C:\> $vcenter = Connect-viserver vcsa-01a.corp.local -User [email protected] -Password admin_pwPS C:\> $vcenter.InstanceUuidd322b019-58d4-4d6f-9f8b-d28695a716c0
Appendix AVMware vCenter
A-23
Docker Swarm
Prerequisites and Credentials
Cloud Agent ConfigurationIf the cloud agent communicates with Oracle Management Cloud through a proxy(OMC_PROXYHOST & OMC_PROXYPORT parameters were set on the cloud agent when itwas installed), Docker Swarm discovery will fail. You’ll need to perform additional configurationsteps depending on the following situations:
For a New Agent Installation
If the agent requires proxy to communicate with Oracle Management Cloud, then use thegateway and set the proxy parameters (OMC_PROXYHOST & OMC_PROXYPORT) duringgateway installation, and then set up the cloud agent (without proxy parameters) to point to thegateway.
For an Existing Agent
If the existing cloud agent has been set up to use the proxy to communicate with OracleManagement Cloud, to discover Docker Swarm, execute the following commands on the cloudagent before performing entity discovery.
omcli setproperty agent -allow_new -name _configureProxyPerClient -value true omcli stop agent omcli start agent
CredentialsThere are three methods you can use to authenticate and connect to the Docker Swarm viaRest APIs
1) Non-secure
2) Secure (https): 1–way SSL mode
3) Secure (https): 2–way SSL mode
Appendix ADocker Swarm
A-24
Apache SOLR
Prerequisites
Two modes are supported: standalone & solrcloud
Monitoring is done over REST APIs exposed by Apache SOLR
Monitoring credentials require read access to following URIs:
• /admin/collections?action=clusterstatus• /admin/collections?action=overseerstatus• /admin/info/system• /admin/info/threads• /admin/cores• /<core_name>/admin/mbeansCredentials
1. Without Credentials:
a. non-secure (http)
b. secure (https)
2. With Credentials:
a. Client Authentication - (2–way SSL)
b. Basic Authentication - non secure
c. Basic Authentication - secure
d. Basic Authentication with Client authentication
Hadoop Cluster
Prerequisites
By default, Hadoop runs in non-secure mode in which no actual authentication is required.
By configuring Hadoop to run in secure mode, each user and service needs to beauthenticated by Kerberos in order to use Hadoop services.
To perform Kerberos authentication, the Cloud Agent requires the following:
1. krb5.conf file. This file can be found at /etc/krb5.conf
2. Username and password
The Cloud Agent can use only one krb5.conf at a time. If a single Agent needs to performKerberos authentication with more than one domain, these details should be defined in a singlekrb5.conf file.
Appendix AApache SOLR
A-25
Arbor TMS/CP
Prerequisites
SNMP v1/v2 or SNMPv3 credentials are needed for monitoring.
If SNMPv1/v2 is used, you must provide the SNMP community string that was entered duringArbor appliance configuration along with IP address of Cloud Agent which will be used forappliance monitoring.
If SNMPv3 is used, you must provide the SNMPv3 user, plus authentication method (SHA orMD5) and password if authorization is used, plus the privilege method (only DES is supported)and privilege password if privilege is used. All of this needs to be manually configuredbeforehand in the appliance..
Read-only access is adequate for Arbor appliance monitoring.
Juniper Netscreen Firewall
Prerequisites
SNMPv1/v2 or SNMPv3 credentials are needed for monitoring.
If SNMPv1/v2 is used, you must provide the SNMP community string that was entered duringfirewall configuration along with IP address of the Cloud Agent which will be used for Juniperfirewall monitoring.
If SNMPv3 is used, you must provide the SNMPv3 user, plus authentication method (SHA orMD5) and password if authorization is used, plus the privilege method (only DES is supported)and privilege password if privilege is used. All of this needs to be manually configuredbeforehand in the firewall..
Read-only access is adequate for Juniper firewall monitoring.
Juniper MX Router
Prerequisites
SNMPv1/v2 or SNMPv3 credentials are needed for monitoring.
If SNMPv1/v2 is used, you must provide the SNMP community string that was entered duringrouter configuration along with the IP address of the Cloud Agent which will be used for routermonitoring.
If SNMPv3 is used, you must provide the SNMPv3 user, plus authentication method (SHA orMD5) and password if authorization is used, plus the privilege method (only DES is supported)and privilege password if privilege is used. All of this needs to be manually configuredbeforehand in the router.
Read-only access is adequate for MX router monitoring.
Appendix AArbor TMS/CP
A-26
F5 BIG-IP LTM
Credentials
SNMPv1/v2 or SNMPv3 credentials are needed for monitoring.
If SNMPv1/v2 is used, you must provide the SNMP community string that was entered duringF5 BIG-IP LTM configuration along with IP address of Cloud Agent which will be used for theLTM monitoring.
If SNMPv3 is used, you must provide the SNMPv3 user, plus authentication method (SHA orMD5) and password if authorization is used, plus the privilege method (only DES is supported)and privilege password if privilege is used. All of this needs to be manually configuredbeforehand in the LTM.
Read-only access is adequate for LTM monitoring.
F5 BIG-IP DNS
Prerequisites
SNMPv1/v2 or SNMPv3 credentials are needed for monitoring.
If SNMPv1/v2 is used, you must provide the SNMP community string that was entered duringF5 BIG-IP DNS configuration along with IP address of the Cloud Agent which will be used forthe DNS monitoring.
If SNMPv3 is used, you must provide the SNMPv3 user, plus authentication method (SHA orMD5) and password if authorization is used, plus the privilege method (only DES is supported)and privilege password if privilege is used. All of this needs to be manually configuredbeforehand in the DNS.
Read-only access is adequate for DNS monitoring.
ES2 Ethernet Switch
Prerequisites
SNMPv1/v2 or SNMPv3 credentials needed for monitoring.
If SNMPv1/v2 is used, you must provide the SNMP community string that was entered duringES2 configuration along with IP address of the Cloud Agent which will be used for appliancemonitoring.
If SNMPv3 used, you must provide the SNMPv3 user, plus authentication method (SHA orMD5) password if authentication is used, plus the privilege method (only DES is supported)and privilege password if privilege is used. All of this needs to be manually configuredbeforehand in the appliance.
Read-only access is adequate for the ES2 monitoring.
Oracle Flash Storage
Prerequisites and Credentials
Oracle Flash Storage exposes monitoring data through the REST API.
Oracle Flash Storage credentials (username and password) are required to monitor OracleFlash Storage.
Appendix AF5 BIG-IP LTM
A-27
Apache Cassandra DB
Prerequisites
The default settings for Cassandra make JMX accessible only from the local host. If you wantto enable remote JMX connections, change the LOCAL_JMX setting in cassandra-env.sh and enable authentication and/or SSL. To do this, perform the following procedure:
1. Open the cassandra-env.sh file for editing and update or add these lines:
JVM_OPTS="$JVM_OPTS -Dcom.sun.management.jmxremote.authenticate=true"JVM_OPTS="$JVM_OPTS -Dcom.sun.management.jmxremote.password.file=/etc/cassandra/jmxremote.password"
If the LOCAL_JMX setting is in your file, set it to no:
LOCAL_JMX=no
2. Depending on whether the JDK or JRE is installed:
• Copy the jmxremote.password.template from /jdk_install_location/jre/lib/management/ to /etc/cassandra/ andrename it to jmxremote.password
$ cp /jdk_install_dir/lib/management/jmxremote.password.template /etc/cassandra/jmxremote.password
• Copy the jmxremote.password.template from /jre_install_location/lib/management/ to /etc/cassandra/ and rename it to jmxremote.password
$ cp /jre_install_dir/lib/management/jmxremote.password.template /etc/cassandra/jmxremote.password
3. Change the ownership of the jmxremote.password to the user you use to runCassandra and change permission to read-only:
$ chown cassandra:cassandra /etc/cassandra/jmxremote.password$ chmod 400 /etc/cassandra/jmxremote.password
4. Edit jmxremote.password and add the user and password for JMX-compliant utilities:
monitorRole QEDcontrolRole R&Dcassandra cassandrapassword
Note:
The Cassandra user and Cassandra password shown in the above sample areexamples. Specify the user and password for your environment.
Appendix AApache Cassandra DB
A-28
Prerequisites
5. Add the Cassandra user with read and write permission to /jre_install_location/lib/management/jmxremote.access
monitorRole readonlycassandra readwritecontrolRole readwrite \create javax.management.monitor.,javax.management.timer. \unregister
6. Restart Cassandra.
Oracle VM Server for SPARC (LDoms)
Prerequisites
• Prerequisites: OMC Cloud Agent is deployed on the LDoms Control Domain• Discovery does not require any user credentials but you need to grant solaris ldoms read
RBAC privileges to the OMC Cloud Agent user:
/usr/sbin/usermod -A solaris.ldoms.read oracle
• Discovery properties:
– The following command retrieves the LDoms Control Domain UUID to be supplied atdiscovery time through entity identifying property omc_virtual_platform_id usingvirtinfo:
# virtinfo -ap | grep DOMAINUUIDDOMAINUUID|uuid=280c9ff4-a134-48cd-cee9-a270b2aaefa0
• Autodiscovery of LDoms-related entities:
– Use a JSON file with details to discover the Oracle VM Server for SPARC (LDoms).Using this method, all Logical Domains (Virtual Machines) are automaticallydiscovered and updated periodically when things change in the Oracle VM Server forSPARC (LDoms) deployment.
Coherence
Prerequisites
Supports both credential and non-credential monitoring. When using a secured JMXconnection, a credential input file needs to be passed. For information on configuring aCoherence cluster, see Configure a Coherence Cluster.
Appendix AOracle VM Server for SPARC (LDoms)
A-29

Oracle Unified Directory(OUD)
Prerequisites
i) OUD Gateway
ii) OUD Replication
iii) OUD Proxy
LDAP username and LDAP passwords are used to connect to the OUD LDAP server.
OUD Credentials:
Directory Server Username and Password: The username and password that will be usedby the agent to bind to the server instance. Ensure the password is in the appropriate field.
The following credential JSON sample illustrates how the properties should be entered.
{ "entities":[ { "name":"OMC_OUD_Directory1", "type":"omc_oud_directory", "displayName":"OUD_directory1", "timezoneRegion":"PST", "credentialRefs":["OudCreds"], "properties":{ "host_name":{"displayName":"Directory Server Host","value":"myserver.myco.com"}, "omc_ldap_port":{"displayName":"Administration Port","value":"4444"}, "omc_trust_all":{"displayName":"Trust ALL Server SSL certificates","value":"true"}, "capability":{"displayName":"capability","value":"monitoring"}} }]}
{"credentials":[ { "id":"OudCreds","name":"OUD Credentials","credType":"MonitorCreds", "properties":[{"name":"authUser", "value":"CLEAR[cn=Directory Manager]"}, {"name":"authPasswd", "value":"CLEAR[mypassword]"}] } ]}
Appendix AOracle Unified Directory(OUD)
A-30
Oracle Access Manager (OAM)
Prerequisites and Monitoring Credentials
The same credentials are used to discover the WebLogic Domain.
Note:
Refresh of IDM targets is now supported. To refresh any IDMdomain run omcli refresh_entity idm_domain.json
where the content of idm_domain.json is:
{ "entities":[{"name": "Idm Domain","type": "omc_weblogic_domain"}]}
Oracle Internet Directory (OID)
Prerequisites
Same credentials used to discover the WebLogic Domain.
Note:
Refresh of IDM targets is now supported. To refresh any IDMdomain run omcli refresh_entity idm_domain.json
where the content of idm_domain.json is:
{ "entities":[{"name": "Idm Domain","type": "omc_weblogic_domain"}]}
Appendix AOracle Access Manager (OAM)
A-31
Microsoft Internet Information Services (IIS)
Prerequisites
Local Monitoring: Credentials are not required. The agent user is used for monitoring.
Remote Monitoring via WMI: Credentials are required. The credentials to be provided includethe username and password used to log into the remote Windows host.
Before you can monitor Microsoft IIS entities, you must ensure the following prerequisites havebeen met:
• Remote Monitoring of IIS: If the Cloud agent and IIS are installed on different machines,then Microsoft Visual C++ needs to be installed on the Windows machine running theCloud agent. The DLL msvcr100.dll , which is part of the Microsoft Visual C++ installation,is required.
Local Monitoring of IIS: If the Cloud agent and IIS are installed on the same machine,Microsoft Visual C++ is not required.
• IIS has been installed on a Windows Server. For more information about running theinstallation wizards from Server Manager, see Installing IIS 8.5 on Windows Server 2012R2.
• IIS Management Compatibility Components have been installed. To install thecomponents:
1. Click Start, click Control Panel, click Programs and Features, and then click TurnWindows features on or off.
2. Follow the installation wizards and on the Select Server Roles page, select WebServer (IIS). For more information about running the installation wizards from ServerManager, see Installing IIS 8.5 on Windows Server 2012 R2.
3. In Server Manager, expand Roles in the navigation pane and right-click Web Server(IIS), and then select Add Role Services.
4. In the Select Role Services pane, scroll down to Web Server>Management Tools.Check the following boxes:
– IIS 6 Management Compatibility– IIS 6 Metabase Compatibility– IIS 6 Management Console– IIS 6 WMI Compatibility
5. Enable FTP Server.• DCOM settings and WMI namespace security settings have been enabled for a remote
WMI connection.
WMI uses DCOM to handle remote calls. DCOM settings for WMI can be configured usingthe DCOM Config utility (DCOMCnfg.exe) found in Administrative Tools in ControlPanel. This utility exposes the settings that enable certain users to connect to thecomputer remotely through DCOM.
The following procedure describes how to grant DCOM remote startup and activationpermissions for certain users and groups.
1. Click Start, click Run, type DCOMCNFG, and then click OK
2. In the Component Services dialog box, expand Component Services,expand Computers, and then right-click My Computer and click Properties
3. In the My Computer Properties dialog box, click the COM Security tab
4. Under Launch and Activation Permissions, click Edit Limits
5. In the Launch Permission dialog box, follow these steps if your name or your groupdoes not appear in the Groups or user names list
Appendix AMicrosoft Internet Information Services (IIS)
A-32
Prerequisites
a. In the Launch Permission dialog box, click Add
b. In the Select Users, Computers, or Groups dialog box, add your name and thegroup in the Enter the object names to select box, and then click OK
6. In the Launch Permission dialog box, select your user and group in the Group oruser names box. In the Allow column under Permissions for User, select RemoteLaunch and select Remote Activation, and then click OK
The following procedure describes how to grant DCOM remote access permissions forcertain users and groups.
1. Click Start, click Run, type DCOMCNFG, and then click OK
2. In the Component Services dialog box, expand Component Services,expand Computers, and then right-click My Computer and click Properties
3. In the My Computer Properties dialog box, click the COM Security tab
4. Under Access Permissions, click Edit Limits
5. In the Access Permission dialog box, select ANONYMOUS LOGON name inthe Group or user names box. In the Allow column under Permissions for User,select Remote Access, and then click OK
.
Allowing Users Access to a Specific WMI NamespaceIt is possible to allow or disallow users access to a specific WMI namespace by setting the"Remote Enable" permission in the WMI Control for a namespace.
The following procedure sets remote enable permissions for a non-administrator user:
1. In the Control Panel, double-click Administrative Tools
2. In the Administrative Tools window, double-click Computer Management
3. In the Computer Management window, expand the Services and Applications treeand double-click the WMI Contro
4. Right-click the WMI Control icon and select Properties
5. In the Security tab, select the namespace and click Security
6. Locate the appropriate account and check Remote Enable in the Permissions list
Firewall Settings
1. Click Start, click Run, type GPEDIT.MSC, and then click OK
2. In the Group Policy dialog box, expand Administrative Templates,expand Network, expandNetwork Connections, and then expand WindowsFirewall
3. Select Standard Profile and double click on Windows Firewall : Allow InboundRemote Administration Exceptions
4. In the dialogue box that pops up, select Enabled and click on Apply
5. If required, repeat the above 2 steps for Domain Profile as well
Appendix AMicrosoft Internet Information Services (IIS)
A-33
Oracle Identity Manager (OIM)
Prerequisites
Same credentials used to discover the WebLogic Domain.
Note:
Refresh of IDM targets is now supported. To refresh any IDMdomain run omcli refresh_entity idm_domain.json
where the content of idm_domain.json is:
{ "entities":[{"name": "Idm Domain","type": "omc_weblogic_domain"}]}
Oracle Clusterware (CRS)
Prerequisite for Remote Monitoring
:
SSH must be set up between the machine where the Cloud agent is installed and the machinewhere CRS is installed, The Cloud agent connects to the remote machine where CRS isinstalled via SSH authentication.
JBOSS
Prerequisites
Before discovering a JBOSS server or domain, you must first add the JBOSS client jar file tothe Cloud agent as a plug-in. The JBOSS client jar file contains the required JMX protocols thatallow the agent to collect JBOSS metrics.
The JBOSS client jar is distributed as part of the JBOSS installation. When you download theJBOSS zip file, the client jar file will be bundled with it.
Step Action
Step 1: Locate the JBOSS client jar file. From the JBOSS home directory, you will findthe client jar file at the following location:
> JBOSS_HOME/bin/client
In this directory, you’ll see the jboss-client.jarfile. This is the file you need to copy over tothe Cloud agent location.
Appendix AOracle Identity Manager (OIM)
A-34
Step Action
Step 2: Copy the JBOSS client jar file to theCloud agent installation.
Copy the jboss-client.jar file to a securelocation that is accessible by the Cloud agent.Typically, this is located on the same hostwhere the agent is installed.
Step 3: Add the jboss-client.jar to the Cloudagent installation as a plug-in.
From the Cloud agent home directory,navigate to the agent state directory:
<agent_home>/sysman/config
Create a classpath file. This file tells the agentwhere to find the jboss-client.jar. The filenaming convention is<plugin_id>.classpath.lst.
Example: If you’re adding the GFM plug-in(plug-in ID is oracle.em.sgfm), the file namewould be oracle.em.sgfm.classpath.lst .
Edit the classpath file and add the absolutepath to the jboss-client.jar file at the end of thefile.
/scratch/securelocation/jboss-client.jar
Bounce the agent. Any modifications made tothe classpath file will not take effect until theagent is restarted. Once the agent has beenbounced, you are ready to discover theJBOSS entity (server or domain).
Appendix AJBOSS
A-35

Step Action
Step 4: Discover the JBOSS server/domain. 1. From the Oracle Management Cloudconsole, selectAdministrationàDiscoveryàAdd Entity. TheAdd Entity page displays.
2. From the Entity Type drop-down menu,choose either JBOSS Domain or JBOSSServer. The appropriate JBOSSparameters are displayed.
3. Enter the appropriate parameters andmonitoring credentials.
4. Click Add Entity.
About JBOSS Monitoring CredentialsDepending on whether you choose JBOSSServer or JBOSS Domain entity type, therequired monitoring credentials will differ:
JBOSS Server
• JBOSS Username: User account used bythe agent for monitoring.
• JBOSS Password: Password for theabove user account.
JBOSS Domain
• JBOSS Credentials:– JBOSS username and password:
Credentials used by the agent formonitoring.
– App User Name and Password:Credentials used to communicatewith servers in the domain.
• User Credential Set:– Alias and Password: Same as the
JBOSS username and passwordused for the JBOSS Credentials.
Note:
This is needed becausetwo different fetchlets arebeing used.
Kubernetes ClusterIn order to monitor Kubernetes, you need to set access permissions.
Cloud Agent Configuration
If the cloud agent communicates with Oracle Management Cloud through a proxy(OMC_PROXYHOST & OMC_PROXYPORT parameters were set on the cloud agentwhen it was installed), Kubernetes discovery will fail. You’ll need to perform additionalconfiguration steps depending on the following situations:
Appendix AKubernetes Cluster
A-36

For a New Agent Installation
If the agent requires proxy to communicate with Oracle Management Cloud, then usethe gateway and set the proxy parameters (OMC_PROXYHOST &OMC_PROXYPORT) during gateway installation, and then set up the cloud agent(without proxy parameters) to point to the gateway.
For an Existing Agent
If the existing cloud agent has been set up to use the proxy to communicate withOracle Management Cloud, to discover Kubernetes, execute the following commandson the cloud agent before performing entity discovery.
omcli setproperty agent -allow_new -name _configureProxyPerClient -value true omcli stop agent omcli start agent
Master's Server Certificate
To connect to the Kubernetes API server, you need to add the Master's ServerCertificate to the agent trust store.
Downloading the Certificate (Command Line)
# echo -n | openssl s_client -connect <master host>:<master port> | sed -ne '/-BEGIN CERTIFICATE-/,/-END CERTIFICATE-/p' > <certificate name>.crt# Example for Kubernetes Master URL https://myhost.myco.com:6443/ execute the following$ echo -n | openssl s_client -connect myhost.myco.com:6443 | sed -ne '/-BEGIN CERTIFICATE-/,/-END CERTIFICATE-/p' > "slcak155.crt"
Adding to the Agent Trust Store
For secure Kubernetes installations (https), it is mandatory to add the certificate of theKubernetes master to the agent's trust store. This can be done either using OMCLI orduring the discovery process. If you add the certificate to the agent trust store usingomcli secure, then you don't need to fill out the certificate-related fields(Certificate,CertAlias,CertPassword) in the JSON or the UI when adding the target.Alternatively, you can add the certificate to the agent trust store during the discoveryprocess (either through the UI or using omcli add_entity).
• Using OMCLI
# omcli secure add_trust_cert_to_jks -password welcome -trust_certs_loc <path to the certificate> -alias <alias of the certificate>$ omcli secure add_trust_cert_to_jks -password welcome trust_certs_loc /agentdir/cloud_agent/agent_inst/bin/slcak155.crt -alias kube-server
• During Discovery
Appendix AKubernetes Cluster
A-37

From the UI (Token Credentials, Basic Credentials, Keystore Credentials)
From the Command Line
When running omcli add_entity, the path to the certificate, its alias, and theagent's trust store password can be specified as part of the credential JSON, asshown in the following JSON example (Token-based authentication).
{ "credentials": [ { "id": "KubeCredsRef", "name": "TokenCredentialSet", "credType": "TokenCredential", "properties": [ { "name": "Token", "value": "CLEAR[<Token>]" }, { "name": "Certificate", "value": "FILE[<Absolute path of Kubernetes certificate file>]" }, { "name": "CertAlias", "value": "CLEAR[<Kubernetes certificate alias>]" }, { "name": "CertPassword", "value": "CLEAR[<Agent trust store password>]" } ]
Appendix AKubernetes Cluster
A-38
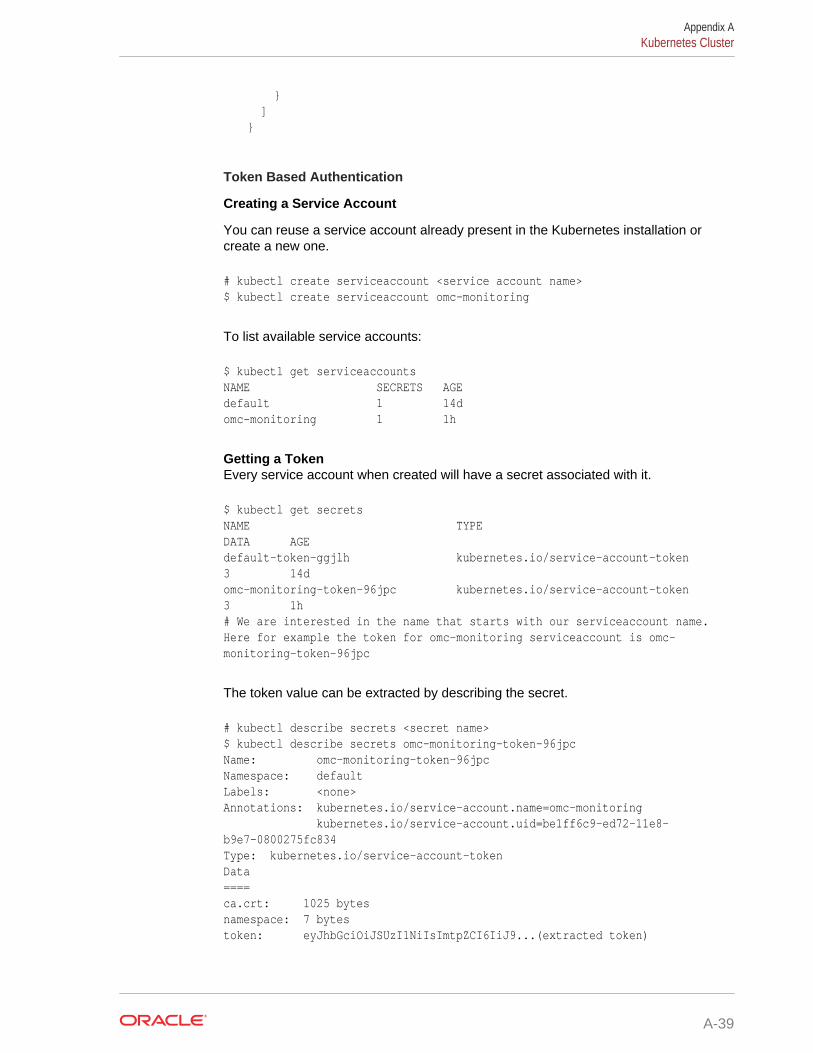
} ]}
Token Based Authentication
Creating a Service Account
You can reuse a service account already present in the Kubernetes installation orcreate a new one.
# kubectl create serviceaccount <service account name>$ kubectl create serviceaccount omc-monitoring
To list available service accounts:
$ kubectl get serviceaccountsNAME SECRETS AGEdefault 1 14domc-monitoring 1 1h
Getting a TokenEvery service account when created will have a secret associated with it.
$ kubectl get secretsNAME TYPE DATA AGEdefault-token-ggjlh kubernetes.io/service-account-token 3 14domc-monitoring-token-96jpc kubernetes.io/service-account-token 3 1h# We are interested in the name that starts with our serviceaccount name. Here for example the token for omc-monitoring serviceaccount is omc-monitoring-token-96jpc
The token value can be extracted by describing the secret.
# kubectl describe secrets <secret name>$ kubectl describe secrets omc-monitoring-token-96jpcName: omc-monitoring-token-96jpcNamespace: defaultLabels: <none>Annotations: kubernetes.io/service-account.name=omc-monitoring kubernetes.io/service-account.uid=be1ff6c9-ed72-11e8-b9e7-0800275fc834Type: kubernetes.io/service-account-tokenData====ca.crt: 1025 bytesnamespace: 7 bytestoken: eyJhbGciOiJSUzI1NiIsImtpZCI6IiJ9...(extracted token)
Appendix AKubernetes Cluster
A-39
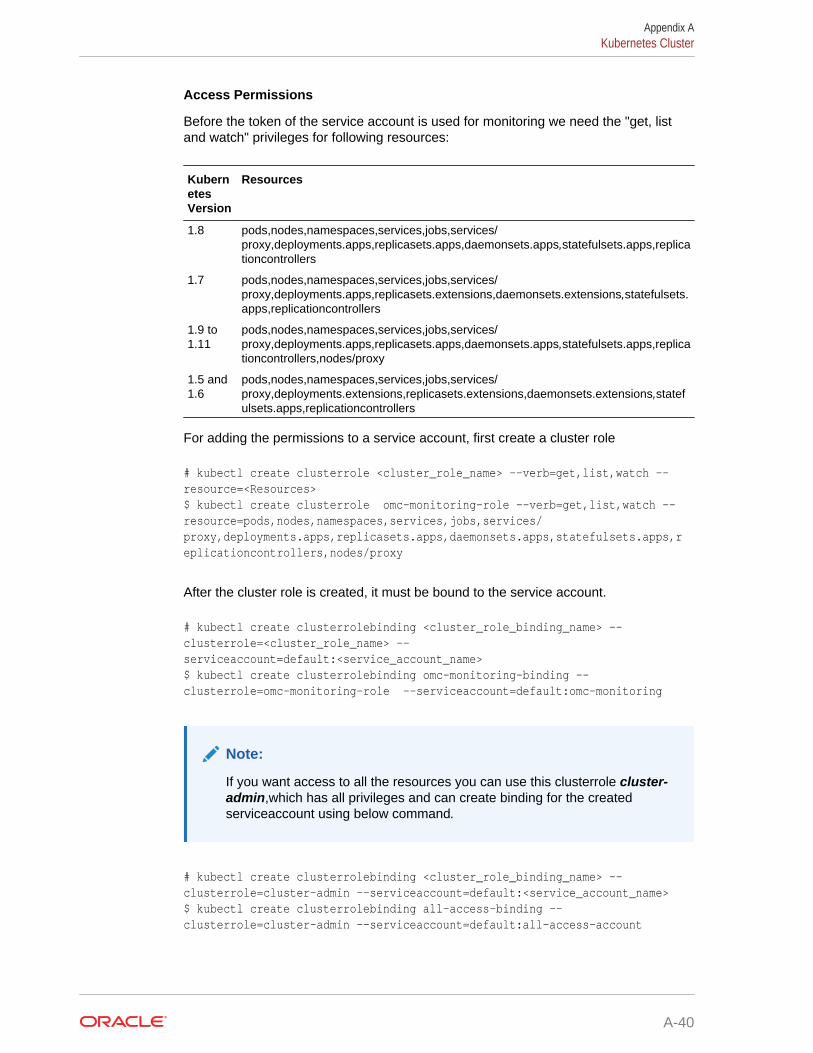
Access Permissions
Before the token of the service account is used for monitoring we need the "get, listand watch" privileges for following resources:
KubernetesVersion
Resources
1.8 pods,nodes,namespaces,services,jobs,services/proxy,deployments.apps,replicasets.apps,daemonsets.apps,statefulsets.apps,replicationcontrollers
1.7 pods,nodes,namespaces,services,jobs,services/proxy,deployments.apps,replicasets.extensions,daemonsets.extensions,statefulsets.apps,replicationcontrollers
1.9 to1.11
pods,nodes,namespaces,services,jobs,services/proxy,deployments.apps,replicasets.apps,daemonsets.apps,statefulsets.apps,replicationcontrollers,nodes/proxy
1.5 and1.6
pods,nodes,namespaces,services,jobs,services/proxy,deployments.extensions,replicasets.extensions,daemonsets.extensions,statefulsets.apps,replicationcontrollers
For adding the permissions to a service account, first create a cluster role
# kubectl create clusterrole <cluster_role_name> --verb=get,list,watch --resource=<Resources>$ kubectl create clusterrole omc-monitoring-role --verb=get,list,watch --resource=pods,nodes,namespaces,services,jobs,services/proxy,deployments.apps,replicasets.apps,daemonsets.apps,statefulsets.apps,replicationcontrollers,nodes/proxy
After the cluster role is created, it must be bound to the service account.
# kubectl create clusterrolebinding <cluster_role_binding_name> --clusterrole=<cluster_role_name> --serviceaccount=default:<service_account_name>$ kubectl create clusterrolebinding omc-monitoring-binding --clusterrole=omc-monitoring-role --serviceaccount=default:omc-monitoring
Note:
If you want access to all the resources you can use this clusterrole cluster-admin,which has all privileges and can create binding for the createdserviceaccount using below command.
# kubectl create clusterrolebinding <cluster_role_binding_name> --clusterrole=cluster-admin --serviceaccount=default:<service_account_name>$ kubectl create clusterrolebinding all-access-binding --clusterrole=cluster-admin --serviceaccount=default:all-access-account
Appendix AKubernetes Cluster
A-40
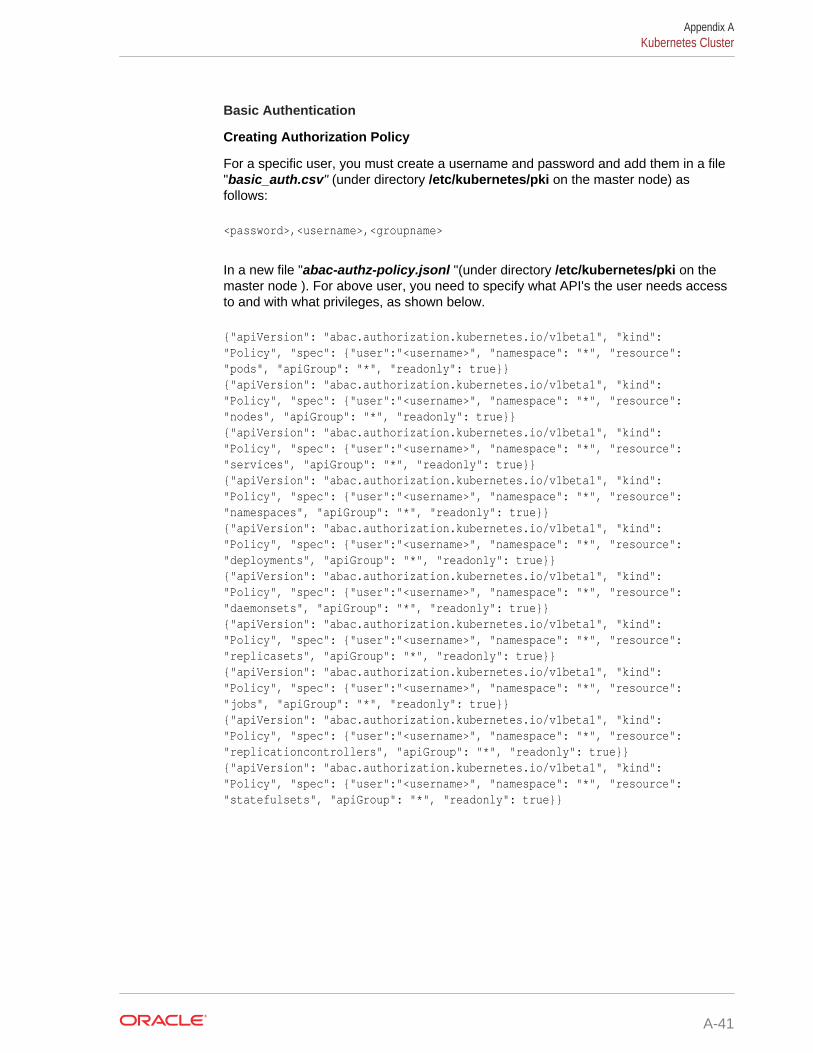
Basic Authentication
Creating Authorization Policy
For a specific user, you must create a username and password and add them in a file"basic_auth.csv" (under directory /etc/kubernetes/pki on the master node) asfollows:
<password>,<username>,<groupname>
In a new file "abac-authz-policy.jsonl "(under directory /etc/kubernetes/pki on themaster node ). For above user, you need to specify what API's the user needs accessto and with what privileges, as shown below.
{"apiVersion": "abac.authorization.kubernetes.io/v1beta1", "kind": "Policy", "spec": {"user":"<username>", "namespace": "*", "resource": "pods", "apiGroup": "*", "readonly": true}}{"apiVersion": "abac.authorization.kubernetes.io/v1beta1", "kind": "Policy", "spec": {"user":"<username>", "namespace": "*", "resource": "nodes", "apiGroup": "*", "readonly": true}}{"apiVersion": "abac.authorization.kubernetes.io/v1beta1", "kind": "Policy", "spec": {"user":"<username>", "namespace": "*", "resource": "services", "apiGroup": "*", "readonly": true}}{"apiVersion": "abac.authorization.kubernetes.io/v1beta1", "kind": "Policy", "spec": {"user":"<username>", "namespace": "*", "resource": "namespaces", "apiGroup": "*", "readonly": true}}{"apiVersion": "abac.authorization.kubernetes.io/v1beta1", "kind": "Policy", "spec": {"user":"<username>", "namespace": "*", "resource": "deployments", "apiGroup": "*", "readonly": true}}{"apiVersion": "abac.authorization.kubernetes.io/v1beta1", "kind": "Policy", "spec": {"user":"<username>", "namespace": "*", "resource": "daemonsets", "apiGroup": "*", "readonly": true}}{"apiVersion": "abac.authorization.kubernetes.io/v1beta1", "kind": "Policy", "spec": {"user":"<username>", "namespace": "*", "resource": "replicasets", "apiGroup": "*", "readonly": true}}{"apiVersion": "abac.authorization.kubernetes.io/v1beta1", "kind": "Policy", "spec": {"user":"<username>", "namespace": "*", "resource": "jobs", "apiGroup": "*", "readonly": true}}{"apiVersion": "abac.authorization.kubernetes.io/v1beta1", "kind": "Policy", "spec": {"user":"<username>", "namespace": "*", "resource": "replicationcontrollers", "apiGroup": "*", "readonly": true}}{"apiVersion": "abac.authorization.kubernetes.io/v1beta1", "kind": "Policy", "spec": {"user":"<username>", "namespace": "*", "resource": "statefulsets", "apiGroup": "*", "readonly": true}}
Appendix AKubernetes Cluster
A-41
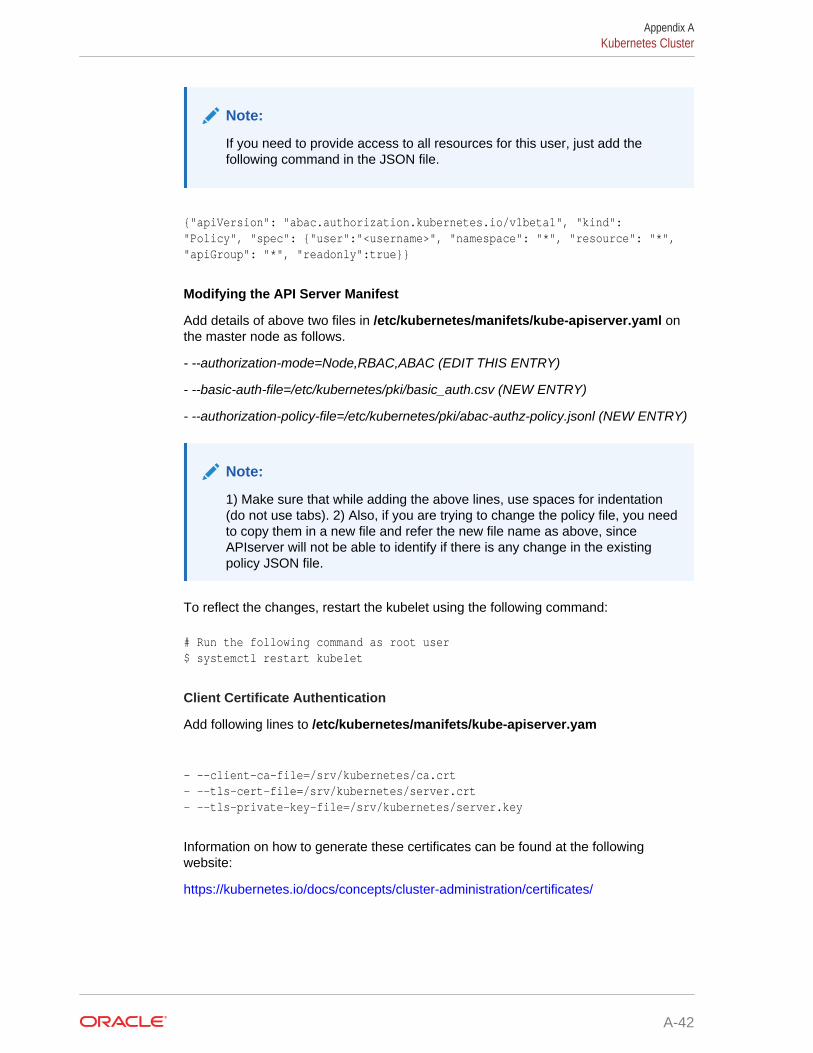
Note:
If you need to provide access to all resources for this user, just add thefollowing command in the JSON file.
{"apiVersion": "abac.authorization.kubernetes.io/v1beta1", "kind": "Policy", "spec": {"user":"<username>", "namespace": "*", "resource": "*", "apiGroup": "*", "readonly":true}}
Modifying the API Server Manifest
Add details of above two files in /etc/kubernetes/manifets/kube-apiserver.yaml onthe master node as follows.
- --authorization-mode=Node,RBAC,ABAC (EDIT THIS ENTRY)
- --basic-auth-file=/etc/kubernetes/pki/basic_auth.csv (NEW ENTRY)
- --authorization-policy-file=/etc/kubernetes/pki/abac-authz-policy.jsonl (NEW ENTRY)
Note:
1) Make sure that while adding the above lines, use spaces for indentation(do not use tabs). 2) Also, if you are trying to change the policy file, you needto copy them in a new file and refer the new file name as above, sinceAPIserver will not be able to identify if there is any change in the existingpolicy JSON file.
To reflect the changes, restart the kubelet using the following command:
# Run the following command as root user$ systemctl restart kubelet
Client Certificate Authentication
Add following lines to /etc/kubernetes/manifets/kube-apiserver.yam
- --client-ca-file=/srv/kubernetes/ca.crt- --tls-cert-file=/srv/kubernetes/server.crt- --tls-private-key-file=/srv/kubernetes/server.key
Information on how to generate these certificates can be found at the followingwebsite:
https://kubernetes.io/docs/concepts/cluster-administration/certificates/
Appendix AKubernetes Cluster
A-42
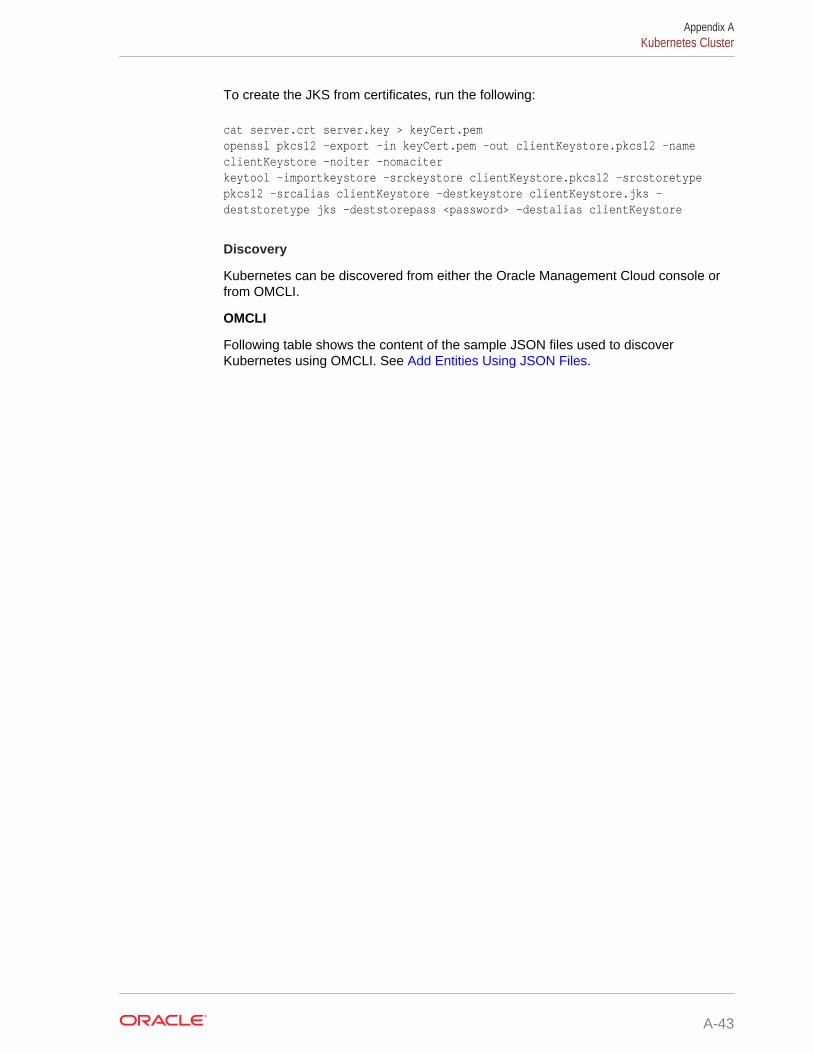
To create the JKS from certificates, run the following:
cat server.crt server.key > keyCert.pemopenssl pkcs12 -export -in keyCert.pem -out clientKeystore.pkcs12 -name clientKeystore -noiter -nomaciterkeytool -importkeystore -srckeystore clientKeystore.pkcs12 -srcstoretype pkcs12 -srcalias clientKeystore -destkeystore clientKeystore.jks -deststoretype jks -deststorepass <password> -destalias clientKeystore
Discovery
Kubernetes can be discovered from either the Oracle Management Cloud console orfrom OMCLI.
OMCLI
Following table shows the content of the sample JSON files used to discoverKubernetes using OMCLI. See Add Entities Using JSON Files.
Appendix AKubernetes Cluster
A-43
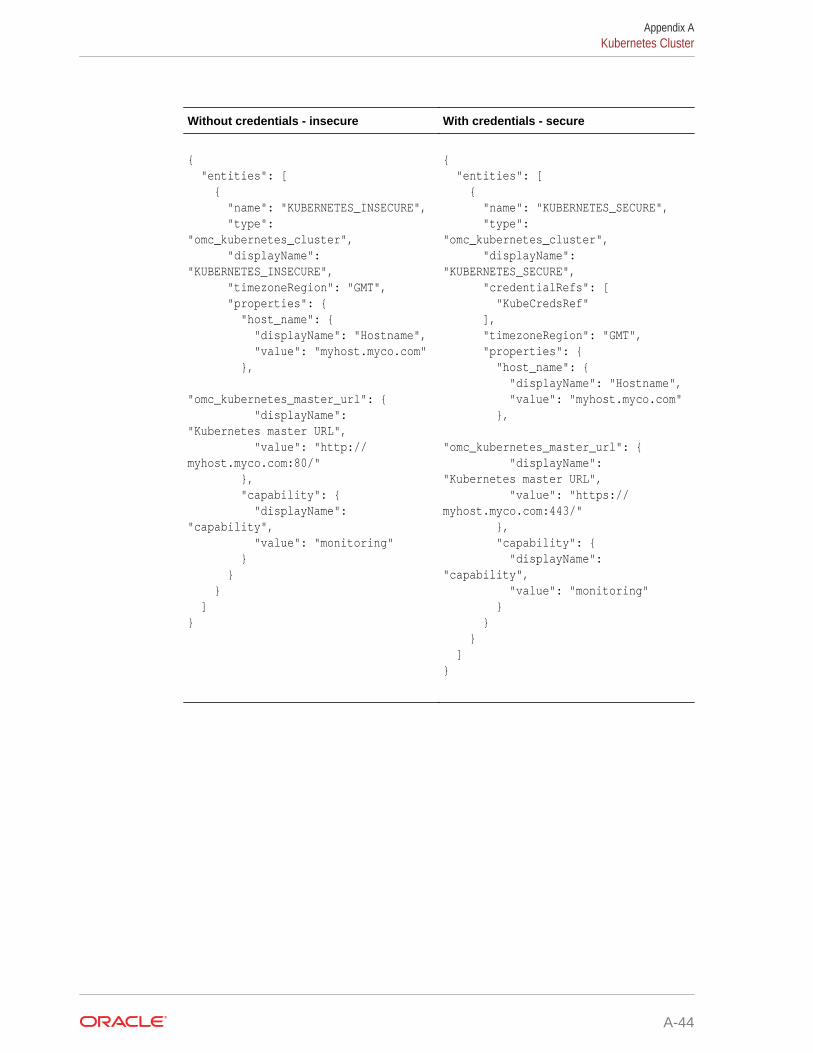
Without credentials - insecure With credentials - secure
{ "entities": [ { "name": "KUBERNETES_INSECURE", "type": "omc_kubernetes_cluster", "displayName": "KUBERNETES_INSECURE", "timezoneRegion": "GMT", "properties": { "host_name": { "displayName": "Hostname", "value": "myhost.myco.com" }, "omc_kubernetes_master_url": { "displayName": "Kubernetes master URL", "value": "http://myhost.myco.com:80/" }, "capability": { "displayName": "capability", "value": "monitoring" } } } ]}
{ "entities": [ { "name": "KUBERNETES_SECURE", "type": "omc_kubernetes_cluster", "displayName": "KUBERNETES_SECURE", "credentialRefs": [ "KubeCredsRef" ], "timezoneRegion": "GMT", "properties": { "host_name": { "displayName": "Hostname", "value": "myhost.myco.com" }, "omc_kubernetes_master_url": { "displayName": "Kubernetes master URL", "value": "https://myhost.myco.com:443/" }, "capability": { "displayName": "capability", "value": "monitoring" } } } ]}
Appendix AKubernetes Cluster
A-44
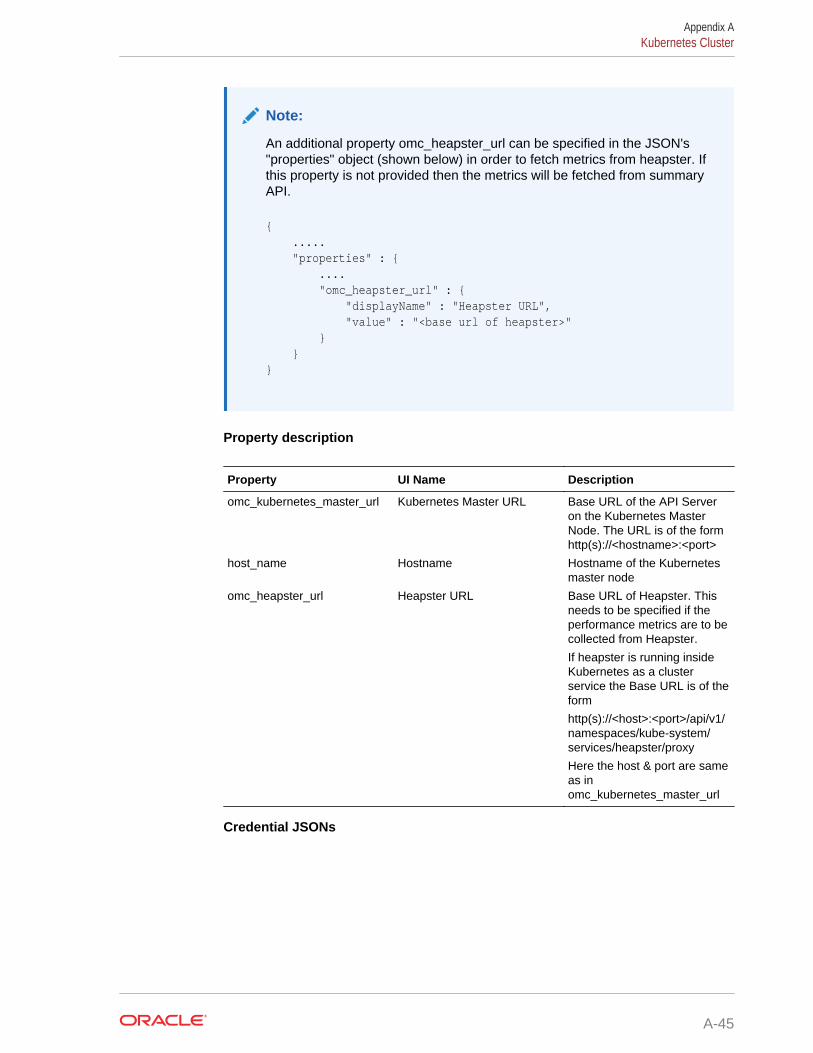
Note:
An additional property omc_heapster_url can be specified in the JSON's"properties" object (shown below) in order to fetch metrics from heapster. Ifthis property is not provided then the metrics will be fetched from summaryAPI.
{ ..... "properties" : { .... "omc_heapster_url" : { "displayName" : "Heapster URL", "value" : "<base url of heapster>" } }}
Property description
Property UI Name Description
omc_kubernetes_master_url Kubernetes Master URL Base URL of the API Serveron the Kubernetes MasterNode. The URL is of the formhttp(s)://<hostname>:<port>
host_name Hostname Hostname of the Kubernetesmaster node
omc_heapster_url Heapster URL Base URL of Heapster. Thisneeds to be specified if theperformance metrics are to becollected from Heapster.
If heapster is running insideKubernetes as a clusterservice the Base URL is of theform
http(s)://<host>:<port>/api/v1/namespaces/kube-system/services/heapster/proxy
Here the host & port are sameas inomc_kubernetes_master_url
Credential JSONs
Appendix AKubernetes Cluster
A-45
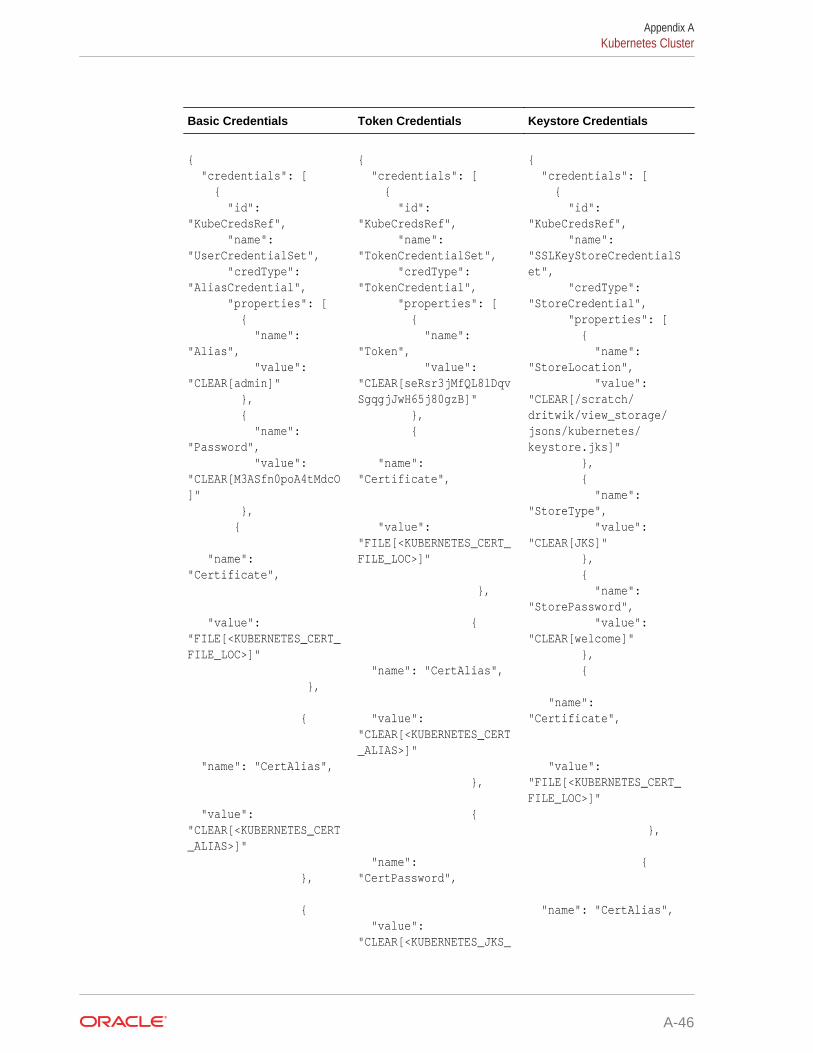
Basic Credentials Token Credentials Keystore Credentials
{ "credentials": [ { "id": "KubeCredsRef", "name": "UserCredentialSet", "credType": "AliasCredential", "properties": [ { "name": "Alias", "value": "CLEAR[admin]" }, { "name": "Password", "value": "CLEAR[M3ASfn0poA4tMdcO]" }, { "name": "Certificate",
"value": "FILE[<KUBERNETES_CERT_FILE_LOC>]"
},
{
"name": "CertAlias",
"value": "CLEAR[<KUBERNETES_CERT_ALIAS>]"
},
{
{ "credentials": [ { "id": "KubeCredsRef", "name": "TokenCredentialSet", "credType": "TokenCredential", "properties": [ { "name": "Token", "value": "CLEAR[seRsr3jMfQL8lDqvSgqgjJwH65j80gzB]" }, { "name": "Certificate",
"value": "FILE[<KUBERNETES_CERT_FILE_LOC>]"
},
{
"name": "CertAlias",
"value": "CLEAR[<KUBERNETES_CERT_ALIAS>]"
},
{
"name": "CertPassword",
"value": "CLEAR[<KUBERNETES_JKS_
{ "credentials": [ { "id": "KubeCredsRef", "name": "SSLKeyStoreCredentialSet", "credType": "StoreCredential", "properties": [ { "name": "StoreLocation", "value": "CLEAR[/scratch/dritwik/view_storage/jsons/kubernetes/keystore.jks]" }, { "name": "StoreType", "value": "CLEAR[JKS]" }, { "name": "StorePassword", "value": "CLEAR[welcome]" }, { "name": "Certificate",
"value": "FILE[<KUBERNETES_CERT_FILE_LOC>]"
},
{
"name": "CertAlias",
Appendix AKubernetes Cluster
A-46
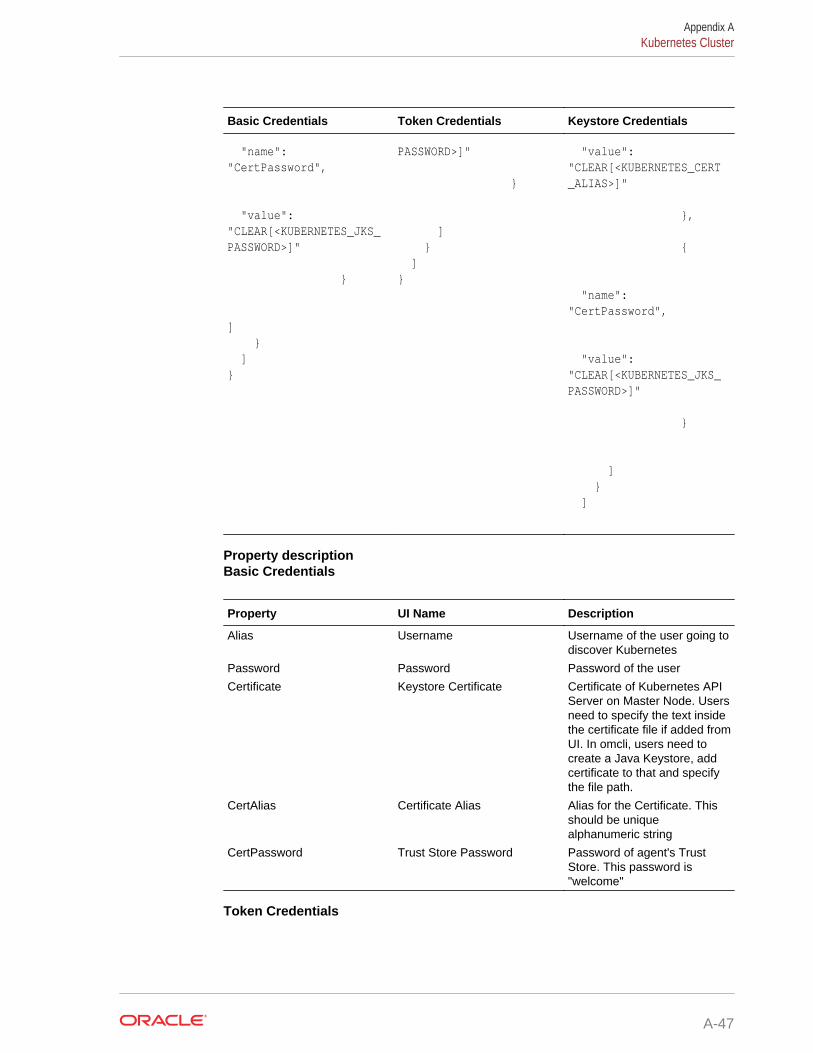
Basic Credentials Token Credentials Keystore Credentials
"name": "CertPassword",
"value": "CLEAR[<KUBERNETES_JKS_PASSWORD>]"
}
] } ]}
PASSWORD>]"
}
] } ]}
"value": "CLEAR[<KUBERNETES_CERT_ALIAS>]"
},
{
"name": "CertPassword",
"value": "CLEAR[<KUBERNETES_JKS_PASSWORD>]"
}
] } ]
Property descriptionBasic Credentials
Property UI Name Description
Alias Username Username of the user going todiscover Kubernetes
Password Password Password of the user
Certificate Keystore Certificate Certificate of Kubernetes APIServer on Master Node. Usersneed to specify the text insidethe certificate file if added fromUI. In omcli, users need tocreate a Java Keystore, addcertificate to that and specifythe file path.
CertAlias Certificate Alias Alias for the Certificate. Thisshould be uniquealphanumeric string
CertPassword Trust Store Password Password of agent's TrustStore. This password is"welcome"
Token Credentials
Appendix AKubernetes Cluster
A-47

Property UI Name Description
Token Token Token of the user going todiscover Kubernetes
Certificate Keystore Certificate Refer Basic Credentials
CertAlias Certificate Alias Refer Basic Credentials
CertPassword Trust Store Password Refer Basic Credentials
Keystore Credentials
Property UI Name Description
StoreLocation Store Location Location of Client keystore.This Java Keystore file (JKS)should contain client'scertificate.
StoreType Store Type Store type. This value isalways set to "JKS"
StorePassword Store Password Password of the JKS file
Certificate Keystore Certificate Refer Basic Credentials
CertAlias Certificate Alias Refer Basic Credentials
CertPassword Trust Store Password Refer Basic Credentials
Appendix AKubernetes Cluster
A-48
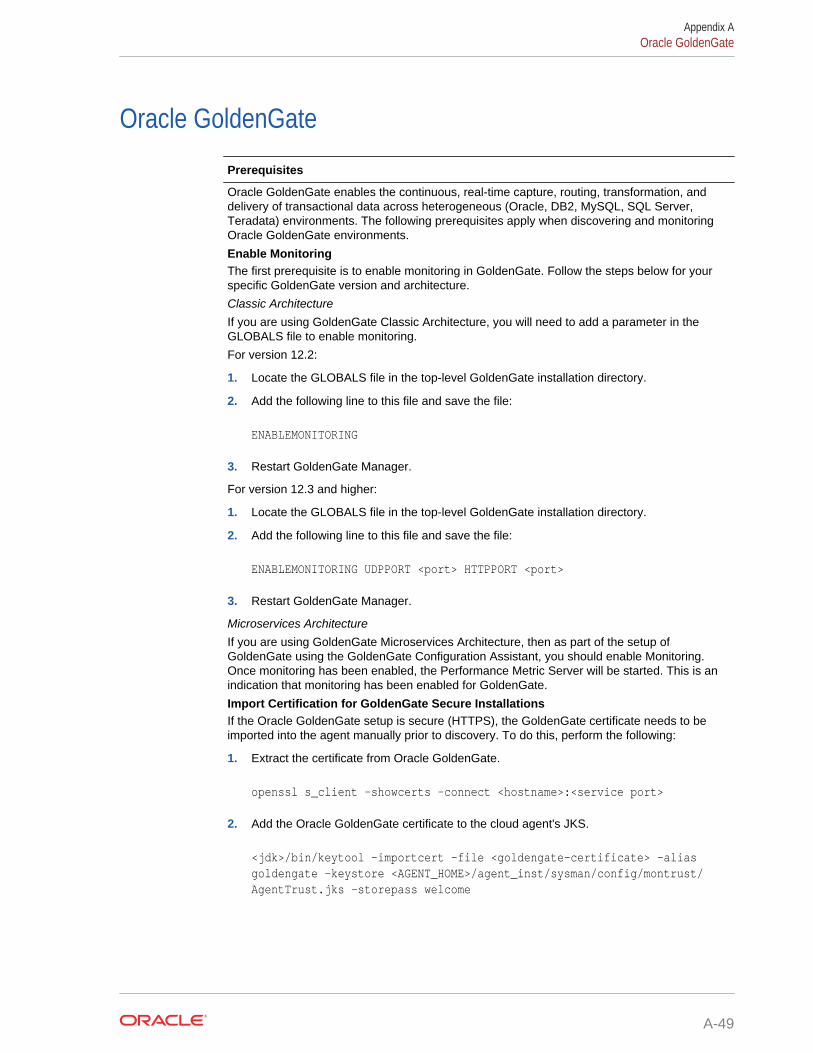
Oracle GoldenGate
Prerequisites
Oracle GoldenGate enables the continuous, real-time capture, routing, transformation, anddelivery of transactional data across heterogeneous (Oracle, DB2, MySQL, SQL Server,Teradata) environments. The following prerequisites apply when discovering and monitoringOracle GoldenGate environments.
Enable MonitoringThe first prerequisite is to enable monitoring in GoldenGate. Follow the steps below for yourspecific GoldenGate version and architecture.
Classic Architecture
If you are using GoldenGate Classic Architecture, you will need to add a parameter in theGLOBALS file to enable monitoring.
For version 12.2:
1. Locate the GLOBALS file in the top-level GoldenGate installation directory.
2. Add the following line to this file and save the file:
ENABLEMONITORING
3. Restart GoldenGate Manager.
For version 12.3 and higher:
1. Locate the GLOBALS file in the top-level GoldenGate installation directory.
2. Add the following line to this file and save the file:
ENABLEMONITORING UDPPORT <port> HTTPPORT <port>
3. Restart GoldenGate Manager.
Microservices Architecture
If you are using GoldenGate Microservices Architecture, then as part of the setup ofGoldenGate using the GoldenGate Configuration Assistant, you should enable Monitoring.Once monitoring has been enabled, the Performance Metric Server will be started. This is anindication that monitoring has been enabled for GoldenGate.
Import Certification for GoldenGate Secure InstallationsIf the Oracle GoldenGate setup is secure (HTTPS), the GoldenGate certificate needs to beimported into the agent manually prior to discovery. To do this, perform the following:
1. Extract the certificate from Oracle GoldenGate.
openssl s_client -showcerts -connect <hostname>:<service port>
2. Add the Oracle GoldenGate certificate to the cloud agent's JKS.
<jdk>/bin/keytool -importcert -file <goldengate-certificate> -alias goldengate -keystore <AGENT_HOME>/agent_inst/sysman/config/montrust/AgentTrust.jks -storepass welcome
Appendix AOracle GoldenGate
A-49
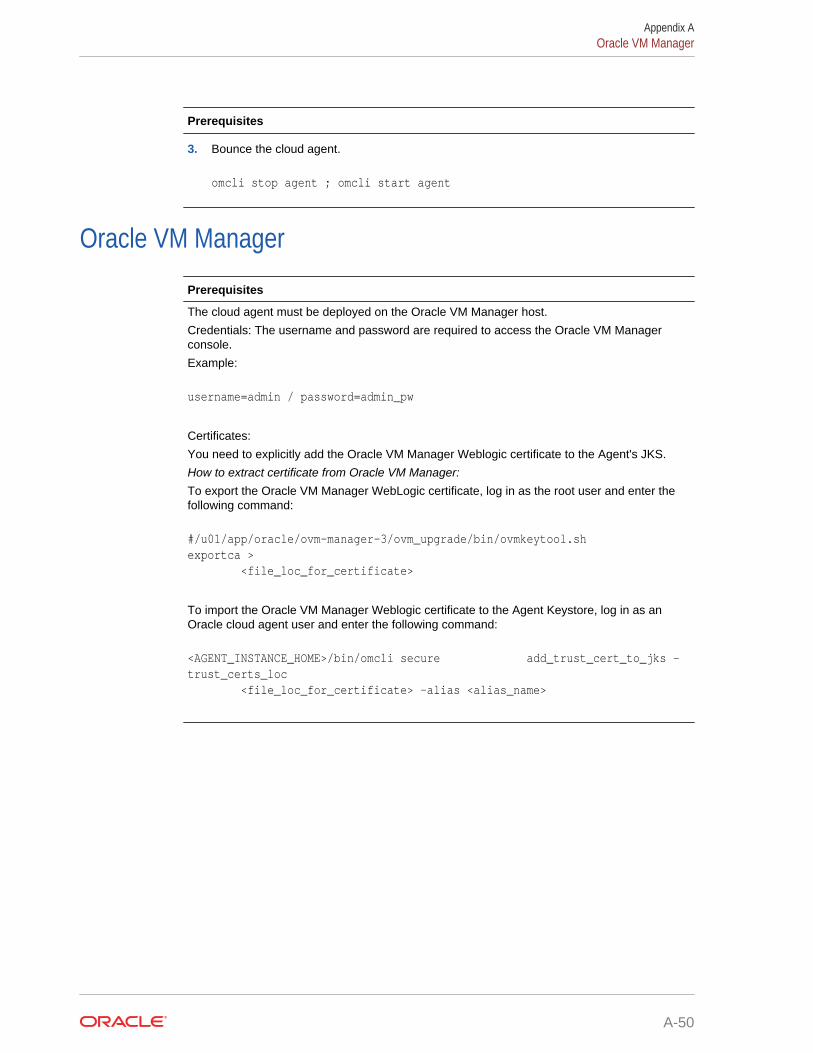
Prerequisites
3. Bounce the cloud agent.
omcli stop agent ; omcli start agent
Oracle VM Manager
Prerequisites
The cloud agent must be deployed on the Oracle VM Manager host.
Credentials: The username and password are required to access the Oracle VM Managerconsole.
Example:
username=admin / password=admin_pw
Certificates:
You need to explicitly add the Oracle VM Manager Weblogic certificate to the Agent's JKS.
How to extract certificate from Oracle VM Manager:
To export the Oracle VM Manager WebLogic certificate, log in as the root user and enter thefollowing command:
#/u01/app/oracle/ovm-manager-3/ovm_upgrade/bin/ovmkeytool.sh exportca > <file_loc_for_certificate>
To import the Oracle VM Manager Weblogic certificate to the Agent Keystore, log in as anOracle cloud agent user and enter the following command:
<AGENT_INSTANCE_HOME>/bin/omcli secure add_trust_cert_to_jks -trust_certs_loc <file_loc_for_certificate> -alias <alias_name>
Appendix AOracle VM Manager
A-50
Oracle JVM Runtime
Prerequisites
Monitoring Oracle JVM Runtime can be performed in the following modes:
1. No user authentication, No SSL
2. No user authentication, SSL
3. User authentication, No SSL
4. User Authentication, SSL
SSL configuration:
You will need to import your truststore certificate into the cloud agent truststore using omcli asshown in the following example:
$ omcli secure add_trust_cert_to_jks -alias <Alias of cert to import> -trust_certs_loc <Cert file to import>
Appendix AOracle JVM Runtime
A-51
Microsoft Azure
Prerequisites
Before monitoring Microsoft Azure with Infrastructure Monitoring, you first need to create aWep app/API application registration for your Oracle Management Cloud account in Azure.
1. Log in to the Microsoft Azure portal using Global administrator credentials: .
https://portal.azure.com/#home
Note:
You can find Azure Active Directory, Subscriptions, etc. in the All Servicesmenu (or you may already have them in Favorites)
2. Under Azure services, open the "Azure Active Directory" service. Click More services tosee the Azure Active Directory service.
3. Switch to the Default Directory if not already selected.
4. In the Manage section, click App Registrations.
5. Click New Application Registration and fill in details:• Name = Name of your application, e.g. OMCAzureMonitoring• Supported account types = Accounts in this organizational directory only (Default
Directory only - Single tenant)• Redirect URI (optional) = Web (Leave blank--does not affect discovery.)• Click Register.
6. After clicking Register, you'll see the Application ID (you can later find the Application ID inthe Application Registration blade).Save the Application (client) ID and Directory (tenant) ID as you'll need them later to addthe Microsoft Azure entity to Oracle Management Cloud.
7. From the Manage section, click Certificates & secrets.
8. In the area below Client Secrets click +New client secret, and provide the Description andexpiration time frame. Click Add.
9. The Client Secret has been created. Make note of the Client Secret value as you'll need itfor discovery.
Note:
You won't be able to check the value after you leave the screen. You need tocreate a new secret if you ever forget or lose the key you've just created.
10. Navigate Home, then to Subscriptions.
11. Copy the Subscription ID directly from the screen or select the desired Subscription (ineither case, it needs to belong to the Azure Active Directory used above) and copy theSubscription ID from the Overview section. Save the Subscription ID as you'll need it fordiscovery.
Appendix AMicrosoft Azure
A-52
Prerequisites
12. Grant access to application principal to Azure resources.There is no Oracle Management Cloud recommended practice to define the access policyand permissions for the user/application in the Azure Active Directory (tenant). Accessdepends on the customer security policy to allow monitoring access to the whole tenant,resource group or just individual resources. Further explanation can be found in the Azuredocumentation for role-based access control (RBAC).• The easiest approach is to grant the Monitoring Reader role to the registered app at
the Subscription level:
a. Navigate to Subscriptions.
b. Select the desired Subscription (it needs to belong to the Azure Active Directoryused above).
c. Select Access control (IAM) and click Add. Fill in details for the following:– Role: Monitoring Reader– Assign access to: Azure AD user, group, or service principal (default value)– Select: Type in name of the application (e.g. OMCAzureMonitoring as used
above).
d. Click Save.• The process to grant access for Resource Groups or Resources is the same (instead
of Subscription select the desired Resource Group or Resource).• More information on how to create the service principal can be found in Azure
documentation.
13. Once you've created a Wep app/API application registration for your Oracle ManagementCloud account in Azure, you're now ready to add the Microsoft Azure entity to OracleManagement Cloud. Use the saved values (from the Azure prerequisites above) to fill inthe details in the Cloud Discovery Profile and Monitoring Credentials for Azure.
Appendix AMicrosoft Azure
A-53
Apache Kafka
Prerequisites
Import Zookeeper Jar• Place the Zookeeper jar from <Zookeeper Installation Home>/zookeeper-
<version>.jar in an appropriate directory which is readable by the cloud agent user.• Add the location where the jar is placed to the Cloud Agent classpath lst file available
under <Agent Installation Directory>/sysman/config/oracle.em.sgfm.classpath.lst
• Restart the cloud agent for the inclusion to take effect.Import Kafka Client Jar• Place the Kafka Client jar from <Kafka Installation Home>/libs/kafka-
clients-0.10.2.1.jar in an appropriate directory which is readable by the cloud agentuser
• Add the location where the jar is placed to the cloud agent Classpath lst file availableunder <Agent Installation Directory>/sysman/config/oracle.em.sgfm.classpath.lst
• Restart the cloud agent for the inclusion to take effect.JMX ConfigurationEnable JMX on Kafka Brokers with no authenticationAdd the following lines to <Kafka Installation Home>/bin/kafka-server-start.sh toenable JMX with no authentication.
• export JMX_PORT=<enter jmx port>• KAFKA_JMX_OPTS="-Dcom.sun.management.jmxremote=true -
Dcom.sun.management.jmxremote.authenticate=false -Dcom.sun.management.jmxremote.ssl=false-Djava.rmi.server.hostname=<Hostname> -Dcom.sun.management.jmxremote.port=<JMX port> -Dcom.sun.management.jmxremote.rmi.port=<RMI port>"
Start the Kafka server.
Note:
For a multibroker setup, provide a unique JMX port and uniquebroker ID for each. The listen port should be different if brokersare started on the same node. If there are duplicate broker IDs,the connection will fail with an error "Address already in use".
Appendix AApache Kafka
A-54
BEntity Attributes and Properties
For first time discovery of your entities, the following tables provide details on thevarious entity properties (JSON properties/UI fields) you will need to customize. Theentity properties listed are the minimum required for successful discovery of yourentities.
Oracle JVM Runtime
Oracle JVM Runtime JSON Files and Properties
Definition File: omc_jvm_sample_creds.json• JVM host name (hostname) - the host where is the JVM application is running. It is
specified during discovery in the discovery JSON or discovery UI. The value populatedduring discovery is the value specified by the user in discovery parameters
• JVM application JMX port (omc_jmx_port) - the JMX port where the JVM application isrunning. It is specified during discovery in the discovery JSON or discovery UI. The valuepopulated during discovery is the value specified by the user in discovery parameters
• JVM runtime name (omc_runtime_name) - value determined by querying runtimeMBean value Name (. The format of the value is <pid>@hostname.
• JVM application JMX service URL (omc_jmx_service_url) - This values is calculatedfrom the typical remote JMX service URL format -
service:jmx:rmi:///jndi/rmi://<hostname>:<jmx_port>/jmxrmi
where the hostname and jmx port is determined from the values specified by the user inthe discovery parameters.
• JVM application class name - (omc_jvm_application_class_name) - value determinedby querying runtime MBean value SystemProperties. The value is located by the key"sun.java.command" in the list of system properties.
• JVM application instance command line arguments(omc_jvm_app_command_line_args) - value determined by querying runtime MBeanvalue InputArguments. The value retuned by the MBean is formatted from an array tospace delimted string. This is the command line arguments specified by the user when theJVM application is started
Identifying propertiesThe identifying properties specified in the target model for reconciliation purposes are thefollowing:
• host_name• omc_jmx_port• omc_jvm_application_class_nameCredential File: omc_jvm_sample_creds.json
• user_name: JVM username.• password: JVM password.
B-1
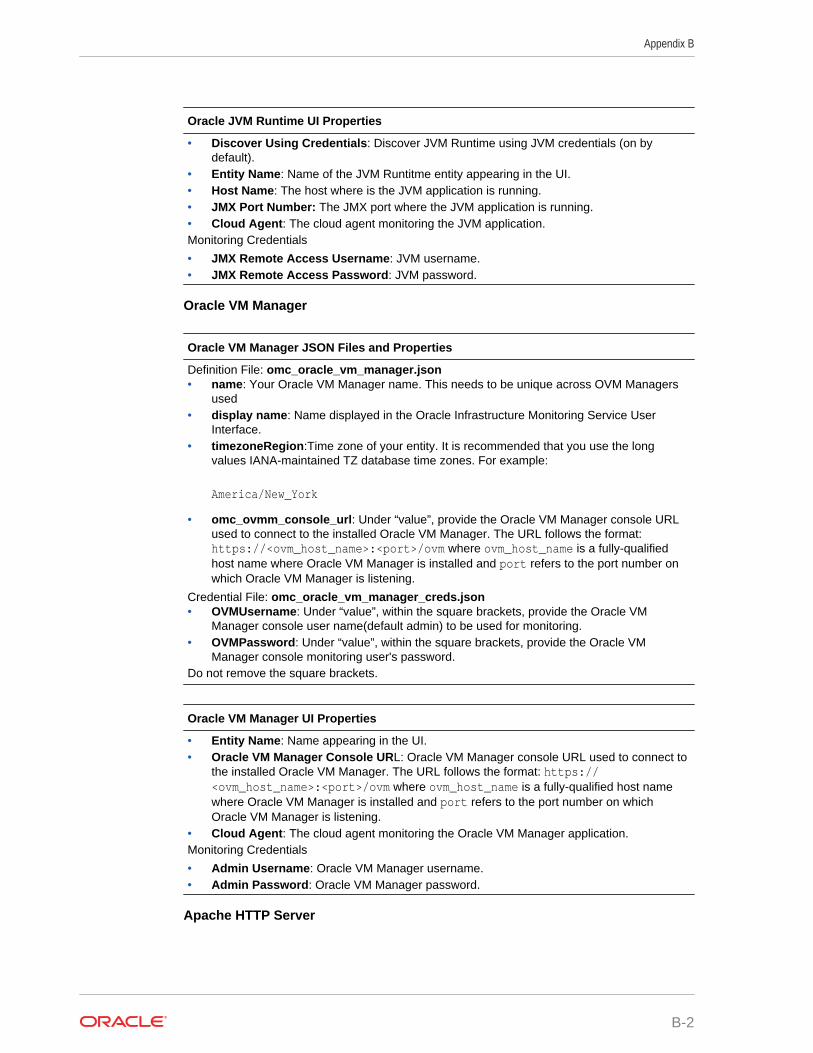
Oracle JVM Runtime UI Properties
• Discover Using Credentials: Discover JVM Runtime using JVM credentials (on bydefault).
• Entity Name: Name of the JVM Runtitme entity appearing in the UI.• Host Name: The host where is the JVM application is running.• JMX Port Number: The JMX port where the JVM application is running.• Cloud Agent: The cloud agent monitoring the JVM application.Monitoring Credentials
• JMX Remote Access Username: JVM username.• JMX Remote Access Password: JVM password.
Oracle VM Manager
Oracle VM Manager JSON Files and Properties
Definition File: omc_oracle_vm_manager.json• name: Your Oracle VM Manager name. This needs to be unique across OVM Managers
used• display name: Name displayed in the Oracle Infrastructure Monitoring Service User
Interface.• timezoneRegion:Time zone of your entity. It is recommended that you use the long
values IANA-maintained TZ database time zones. For example:
America/New_York
• omc_ovmm_console_url: Under “value”, provide the Oracle VM Manager console URLused to connect to the installed Oracle VM Manager. The URL follows the format:https://<ovm_host_name>:<port>/ovm where ovm_host_name is a fully-qualifiedhost name where Oracle VM Manager is installed and port refers to the port number onwhich Oracle VM Manager is listening.
Credential File: omc_oracle_vm_manager_creds.json• OVMUsername: Under “value”, within the square brackets, provide the Oracle VM
Manager console user name(default admin) to be used for monitoring.• OVMPassword: Under “value”, within the square brackets, provide the Oracle VM
Manager console monitoring user's password.Do not remove the square brackets.
Oracle VM Manager UI Properties
• Entity Name: Name appearing in the UI.• Oracle VM Manager Console URL: Oracle VM Manager console URL used to connect to
the installed Oracle VM Manager. The URL follows the format: https://<ovm_host_name>:<port>/ovm where ovm_host_name is a fully-qualified host namewhere Oracle VM Manager is installed and port refers to the port number on whichOracle VM Manager is listening.
• Cloud Agent: The cloud agent monitoring the Oracle VM Manager application.Monitoring Credentials
• Admin Username: Oracle VM Manager username.• Admin Password: Oracle VM Manager password.
Apache HTTP Server
Appendix B
B-2
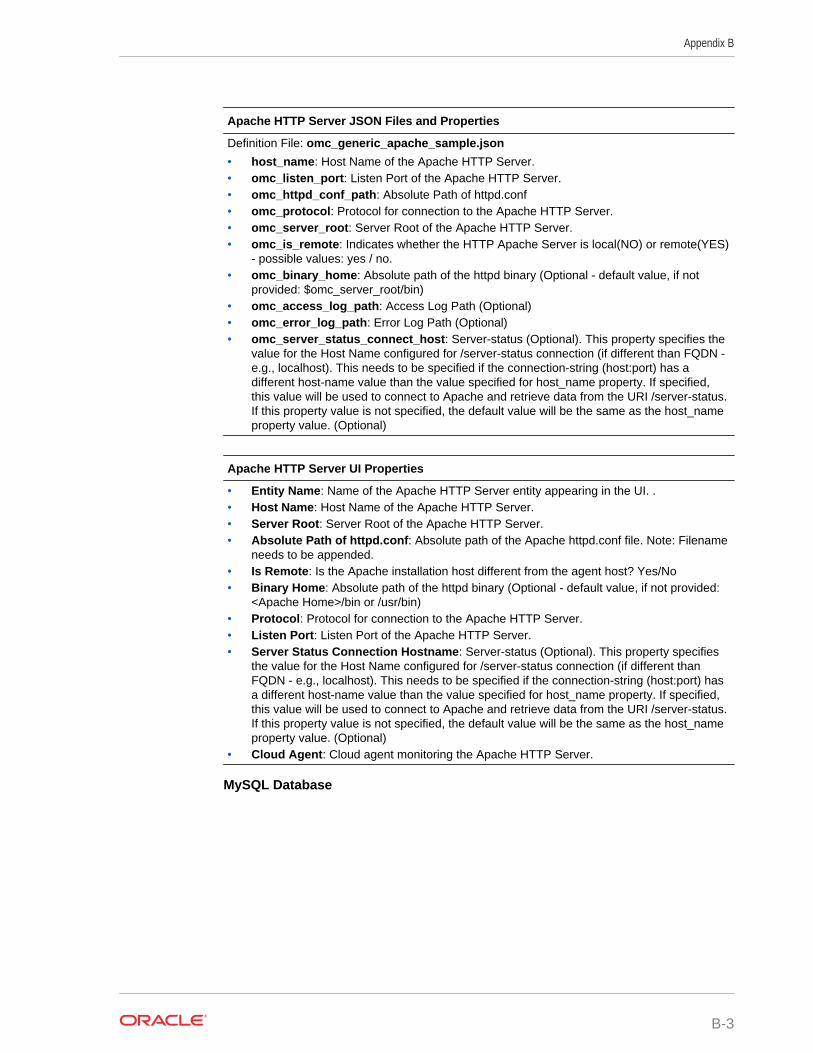
Apache HTTP Server JSON Files and Properties
Definition File: omc_generic_apache_sample.json
• host_name: Host Name of the Apache HTTP Server.• omc_listen_port: Listen Port of the Apache HTTP Server.• omc_httpd_conf_path: Absolute Path of httpd.conf• omc_protocol: Protocol for connection to the Apache HTTP Server.• omc_server_root: Server Root of the Apache HTTP Server.• omc_is_remote: Indicates whether the HTTP Apache Server is local(NO) or remote(YES)
- possible values: yes / no.• omc_binary_home: Absolute path of the httpd binary (Optional - default value, if not
provided: $omc_server_root/bin)• omc_access_log_path: Access Log Path (Optional)• omc_error_log_path: Error Log Path (Optional)• omc_server_status_connect_host: Server-status (Optional). This property specifies the
value for the Host Name configured for /server-status connection (if different than FQDN -e.g., localhost). This needs to be specified if the connection-string (host:port) has adifferent host-name value than the value specified for host_name property. If specified,this value will be used to connect to Apache and retrieve data from the URI /server-status.If this property value is not specified, the default value will be the same as the host_nameproperty value. (Optional)
Apache HTTP Server UI Properties
• Entity Name: Name of the Apache HTTP Server entity appearing in the UI. .• Host Name: Host Name of the Apache HTTP Server.• Server Root: Server Root of the Apache HTTP Server.• Absolute Path of httpd.conf: Absolute path of the Apache httpd.conf file. Note: Filename
needs to be appended.• Is Remote: Is the Apache installation host different from the agent host? Yes/No• Binary Home: Absolute path of the httpd binary (Optional - default value, if not provided:
<Apache Home>/bin or /usr/bin)• Protocol: Protocol for connection to the Apache HTTP Server.• Listen Port: Listen Port of the Apache HTTP Server.• Server Status Connection Hostname: Server-status (Optional). This property specifies
the value for the Host Name configured for /server-status connection (if different thanFQDN - e.g., localhost). This needs to be specified if the connection-string (host:port) hasa different host-name value than the value specified for host_name property. If specified,this value will be used to connect to Apache and retrieve data from the URI /server-status.If this property value is not specified, the default value will be the same as the host_nameproperty value. (Optional)
• Cloud Agent: Cloud agent monitoring the Apache HTTP Server.
MySQL Database
Appendix B
B-3
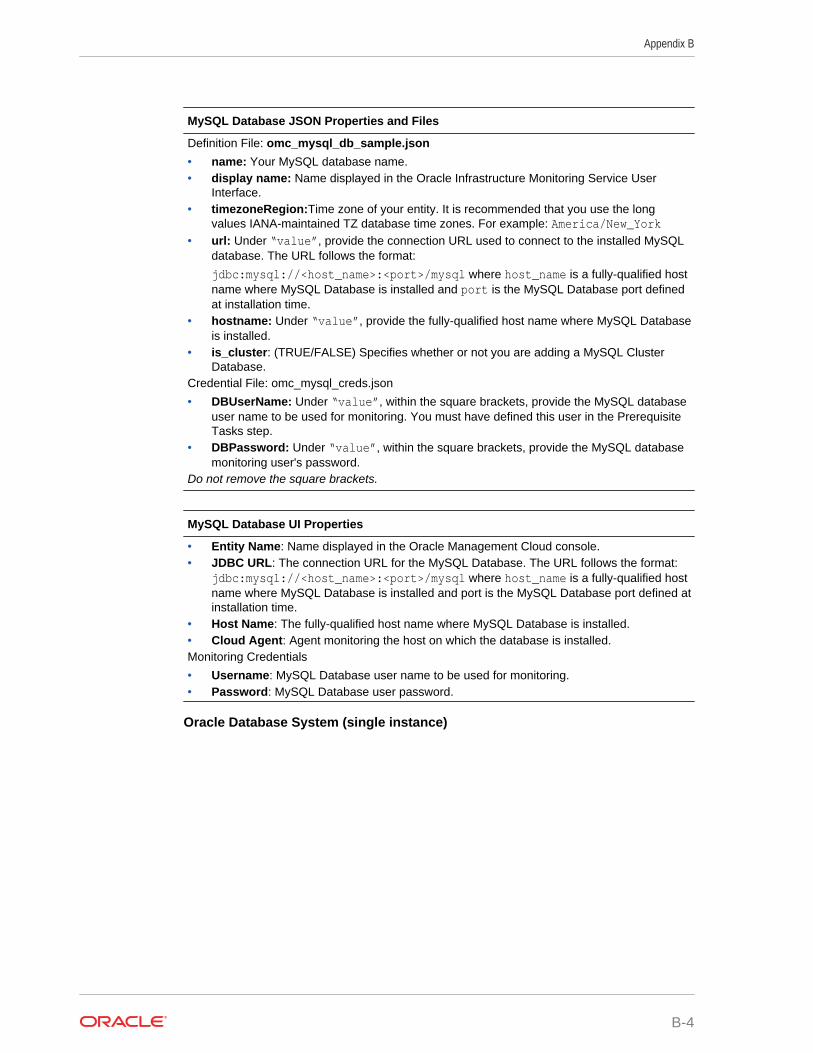
MySQL Database JSON Properties and Files
Definition File: omc_mysql_db_sample.json
• name: Your MySQL database name.• display name: Name displayed in the Oracle Infrastructure Monitoring Service User
Interface.• timezoneRegion:Time zone of your entity. It is recommended that you use the long
values IANA-maintained TZ database time zones. For example: America/New_York• url: Under “value”, provide the connection URL used to connect to the installed MySQL
database. The URL follows the format:
jdbc:mysql://<host_name>:<port>/mysql where host_name is a fully-qualified hostname where MySQL Database is installed and port is the MySQL Database port definedat installation time.
• hostname: Under “value”, provide the fully-qualified host name where MySQL Databaseis installed.
• is_cluster: (TRUE/FALSE) Specifies whether or not you are adding a MySQL ClusterDatabase.
Credential File: omc_mysql_creds.json
• DBUserName: Under “value”, within the square brackets, provide the MySQL databaseuser name to be used for monitoring. You must have defined this user in the PrerequisiteTasks step.
• DBPassword: Under “value”, within the square brackets, provide the MySQL databasemonitoring user's password.
Do not remove the square brackets.
MySQL Database UI Properties
• Entity Name: Name displayed in the Oracle Management Cloud console.• JDBC URL: The connection URL for the MySQL Database. The URL follows the format:
jdbc:mysql://<host_name>:<port>/mysql where host_name is a fully-qualified hostname where MySQL Database is installed and port is the MySQL Database port defined atinstallation time.
• Host Name: The fully-qualified host name where MySQL Database is installed.• Cloud Agent: Agent monitoring the host on which the database is installed.Monitoring Credentials
• Username: MySQL Database user name to be used for monitoring.• Password: MySQL Database user password.
Oracle Database System (single instance)
Appendix B
B-4
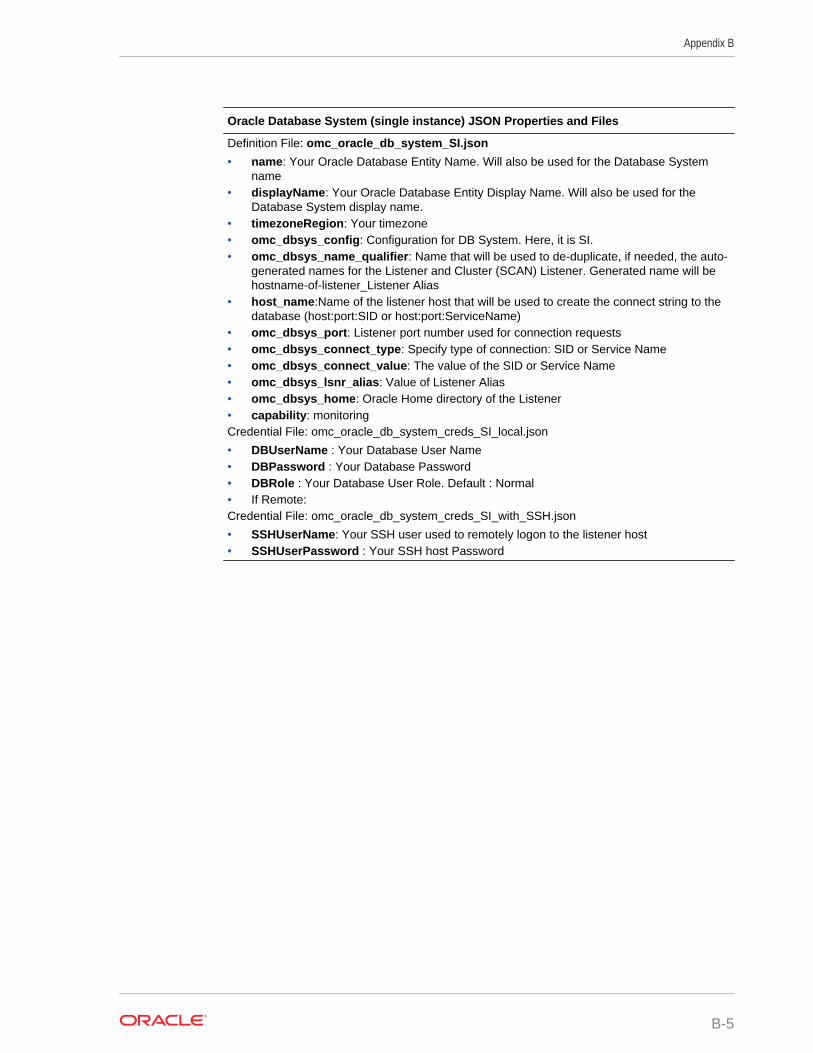
Oracle Database System (single instance) JSON Properties and Files
Definition File: omc_oracle_db_system_SI.json
• name: Your Oracle Database Entity Name. Will also be used for the Database Systemname
• displayName: Your Oracle Database Entity Display Name. Will also be used for theDatabase System display name.
• timezoneRegion: Your timezone• omc_dbsys_config: Configuration for DB System. Here, it is SI.• omc_dbsys_name_qualifier: Name that will be used to de-duplicate, if needed, the auto-
generated names for the Listener and Cluster (SCAN) Listener. Generated name will behostname-of-listener_Listener Alias
• host_name:Name of the listener host that will be used to create the connect string to thedatabase (host:port:SID or host:port:ServiceName)
• omc_dbsys_port: Listener port number used for connection requests• omc_dbsys_connect_type: Specify type of connection: SID or Service Name• omc_dbsys_connect_value: The value of the SID or Service Name• omc_dbsys_lsnr_alias: Value of Listener Alias• omc_dbsys_home: Oracle Home directory of the Listener• capability: monitoringCredential File: omc_oracle_db_system_creds_SI_local.json
• DBUserName : Your Database User Name• DBPassword : Your Database Password• DBRole : Your Database User Role. Default : Normal• If Remote:Credential File: omc_oracle_db_system_creds_SI_with_SSH.json
• SSHUserName: Your SSH user used to remotely logon to the listener host• SSHUserPassword : Your SSH host Password
Appendix B
B-5

Oracle Database System (single instance) UI Property Fields
• Entity Name: Your Oracle Database entity name. This name will also be used for thedatabase system name
• Configuration: Configuration for database system: Single Instance or RAC• Name Prefix: Name that will be used to de-duplicate, if needed, the auto-generated
names for the Listener and Cluster (SCAN) Listener. Generated name will be hostname-of-listener_Listener Alias
• Host Name:Name of the listener host that will be used to create the connect string to thedatabase (host:port:SID or host:port:ServiceName)
• Port: Listener port number used for connection requests• Connect Type: Type of connection: SID or Service Name• Connect Value: The value of the SID or Service Name• Listener Alias: Value of Listener Alias• Listener Oracle Home: Oracle Home directory of the Listener
The Listener Oracle Home field in the UI is the Oracle Home of the listener configured forthat database. The Oracle Home for the listener may or may not be the same OracleHome as the database as illustrated by the following example.
The following example shows two discrete database instances (prod_1 and test_1) in twoseparate Oracle Homes:
Oracle Home 1: /u01/app/oracle/product/19.0.0/prod_1
Oracle Home 2: /u01/app/oracle/product/19.0.0/test_1
Because both instances are configured with the listener in Oracle Home 1, to discover thetest_1 instance (in Oracle Home 2) you would enter /u01/app/oracle/product/19.0.0/prod_1 in the Listener Oracle Home field.
• Cloud Agent: Cloud agent monitoring the database system.Monitoring Credentials
• Username: Your Database User Name.• Password: Your Database Password.• Database Role: Your Database User Role (NORMAL/SYSDBA). Default is Normal.SI with ASM (ASM Credentials)
• Username: Database user (ASM user name) that will be used by the cloud agent toconnect to ASM.
• Password: Your ASM Password• Role: Your ASM User roleCloud Agent is not on the Cluster Host (Host SSH Credentials)
• SSH Username: Your SSH user used to remotely log on to the listener host.• SSH Username: Your SSH user used to remotely log on to the listener host.• SSH Password: Your SSH host Password.• SSH Private Key: Path of your private key file.• SSH Public Key: Path of your public key file.• SSH Host Name: Your Cluster Host Name.• SSH Port: Your SSH port.
Oracle Database System (RAC)
Appendix B
B-6
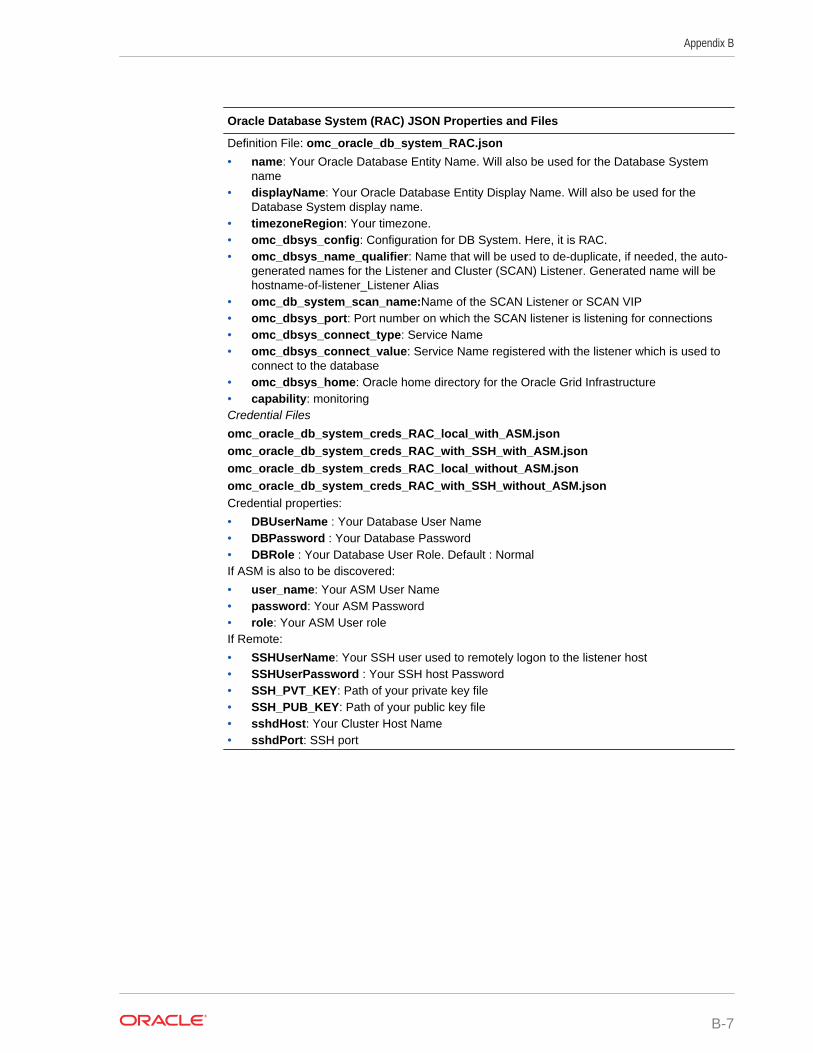
Oracle Database System (RAC) JSON Properties and Files
Definition File: omc_oracle_db_system_RAC.json
• name: Your Oracle Database Entity Name. Will also be used for the Database Systemname
• displayName: Your Oracle Database Entity Display Name. Will also be used for theDatabase System display name.
• timezoneRegion: Your timezone.• omc_dbsys_config: Configuration for DB System. Here, it is RAC.• omc_dbsys_name_qualifier: Name that will be used to de-duplicate, if needed, the auto-
generated names for the Listener and Cluster (SCAN) Listener. Generated name will behostname-of-listener_Listener Alias
• omc_db_system_scan_name:Name of the SCAN Listener or SCAN VIP• omc_dbsys_port: Port number on which the SCAN listener is listening for connections• omc_dbsys_connect_type: Service Name• omc_dbsys_connect_value: Service Name registered with the listener which is used to
connect to the database• omc_dbsys_home: Oracle home directory for the Oracle Grid Infrastructure• capability: monitoringCredential Files
omc_oracle_db_system_creds_RAC_local_with_ASM.jsonomc_oracle_db_system_creds_RAC_with_SSH_with_ASM.jsonomc_oracle_db_system_creds_RAC_local_without_ASM.jsonomc_oracle_db_system_creds_RAC_with_SSH_without_ASM.jsonCredential properties:
• DBUserName : Your Database User Name• DBPassword : Your Database Password• DBRole : Your Database User Role. Default : NormalIf ASM is also to be discovered:
• user_name: Your ASM User Name• password: Your ASM Password• role: Your ASM User roleIf Remote:
• SSHUserName: Your SSH user used to remotely logon to the listener host• SSHUserPassword : Your SSH host Password• SSH_PVT_KEY: Path of your private key file• SSH_PUB_KEY: Path of your public key file• sshdHost: Your Cluster Host Name• sshdPort: SSH port
Appendix B
B-7
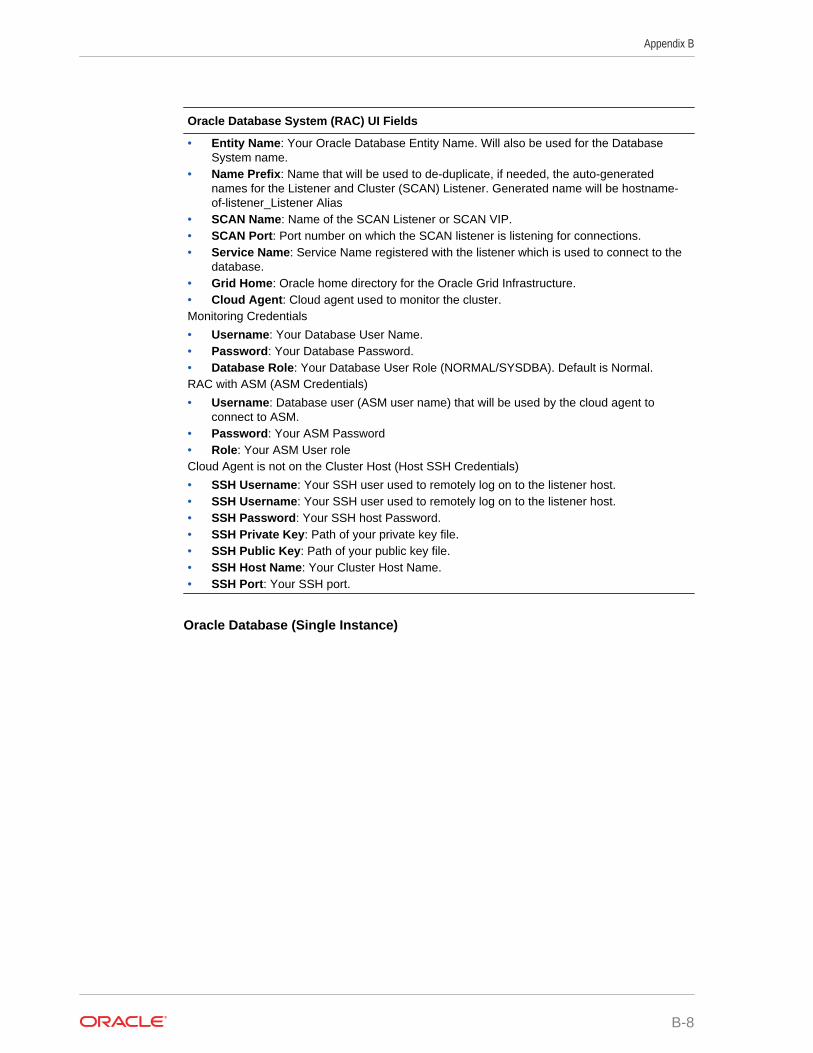
Oracle Database System (RAC) UI Fields
• Entity Name: Your Oracle Database Entity Name. Will also be used for the DatabaseSystem name.
• Name Prefix: Name that will be used to de-duplicate, if needed, the auto-generatednames for the Listener and Cluster (SCAN) Listener. Generated name will be hostname-of-listener_Listener Alias
• SCAN Name: Name of the SCAN Listener or SCAN VIP.• SCAN Port: Port number on which the SCAN listener is listening for connections.• Service Name: Service Name registered with the listener which is used to connect to the
database.• Grid Home: Oracle home directory for the Oracle Grid Infrastructure.• Cloud Agent: Cloud agent used to monitor the cluster.Monitoring Credentials
• Username: Your Database User Name.• Password: Your Database Password.• Database Role: Your Database User Role (NORMAL/SYSDBA). Default is Normal.RAC with ASM (ASM Credentials)
• Username: Database user (ASM user name) that will be used by the cloud agent toconnect to ASM.
• Password: Your ASM Password• Role: Your ASM User roleCloud Agent is not on the Cluster Host (Host SSH Credentials)
• SSH Username: Your SSH user used to remotely log on to the listener host.• SSH Username: Your SSH user used to remotely log on to the listener host.• SSH Password: Your SSH host Password.• SSH Private Key: Path of your private key file.• SSH Public Key: Path of your public key file.• SSH Host Name: Your Cluster Host Name.• SSH Port: Your SSH port.
Oracle Database (Single Instance)
Appendix B
B-8
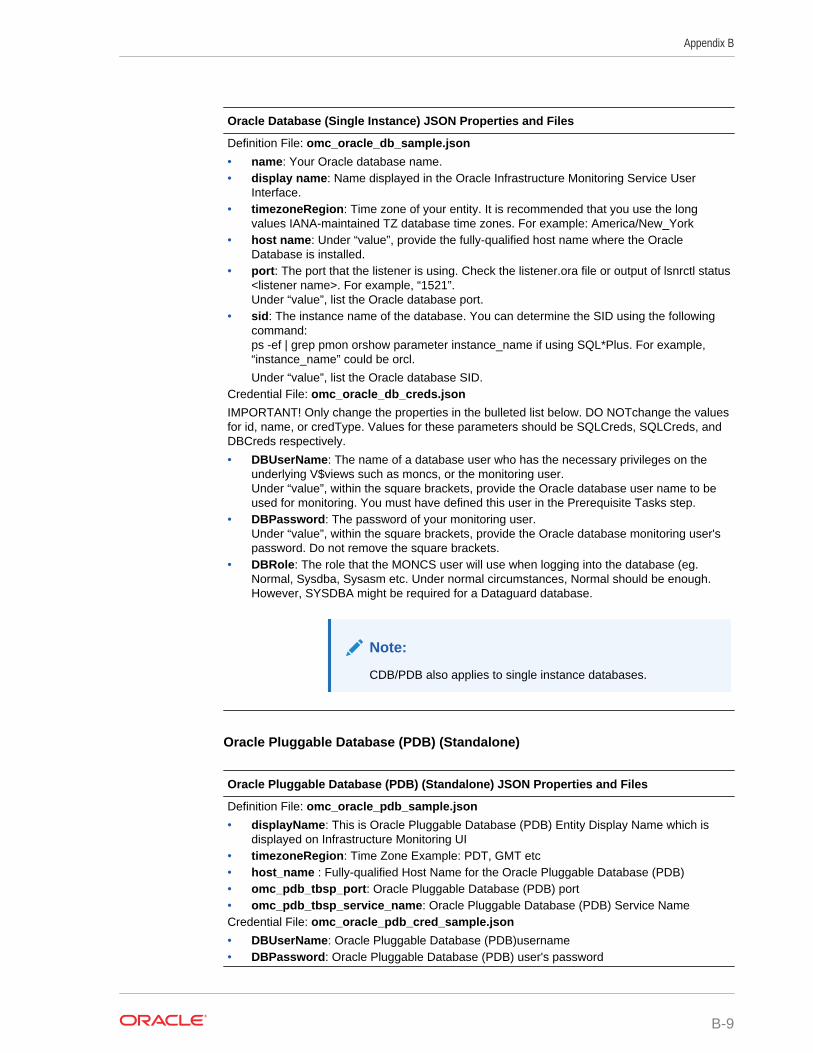
Oracle Database (Single Instance) JSON Properties and Files
Definition File: omc_oracle_db_sample.json
• name: Your Oracle database name.• display name: Name displayed in the Oracle Infrastructure Monitoring Service User
Interface.• timezoneRegion: Time zone of your entity. It is recommended that you use the long
values IANA-maintained TZ database time zones. For example: America/New_York• host name: Under “value”, provide the fully-qualified host name where the Oracle
Database is installed.• port: The port that the listener is using. Check the listener.ora file or output of lsnrctl status
<listener name>. For example, “1521”.Under “value”, list the Oracle database port.
• sid: The instance name of the database. You can determine the SID using the followingcommand:ps -ef | grep pmon orshow parameter instance_name if using SQL*Plus. For example,“instance_name” could be orcl.
Under “value”, list the Oracle database SID.Credential File: omc_oracle_db_creds.json
IMPORTANT! Only change the properties in the bulleted list below. DO NOTchange the valuesfor id, name, or credType. Values for these parameters should be SQLCreds, SQLCreds, andDBCreds respectively.
• DBUserName: The name of a database user who has the necessary privileges on theunderlying V$views such as moncs, or the monitoring user.Under “value”, within the square brackets, provide the Oracle database user name to beused for monitoring. You must have defined this user in the Prerequisite Tasks step.
• DBPassword: The password of your monitoring user.Under “value”, within the square brackets, provide the Oracle database monitoring user'spassword. Do not remove the square brackets.
• DBRole: The role that the MONCS user will use when logging into the database (eg.Normal, Sysdba, Sysasm etc. Under normal circumstances, Normal should be enough.However, SYSDBA might be required for a Dataguard database.
Note:
CDB/PDB also applies to single instance databases.
Oracle Pluggable Database (PDB) (Standalone)
Oracle Pluggable Database (PDB) (Standalone) JSON Properties and Files
Definition File: omc_oracle_pdb_sample.json
• displayName: This is Oracle Pluggable Database (PDB) Entity Display Name which isdisplayed on Infrastructure Monitoring UI
• timezoneRegion: Time Zone Example: PDT, GMT etc• host_name : Fully-qualified Host Name for the Oracle Pluggable Database (PDB)• omc_pdb_tbsp_port: Oracle Pluggable Database (PDB) port• omc_pdb_tbsp_service_name: Oracle Pluggable Database (PDB) Service NameCredential File: omc_oracle_pdb_cred_sample.json
• DBUserName: Oracle Pluggable Database (PDB)username• DBPassword: Oracle Pluggable Database (PDB) user's password
Appendix B
B-9
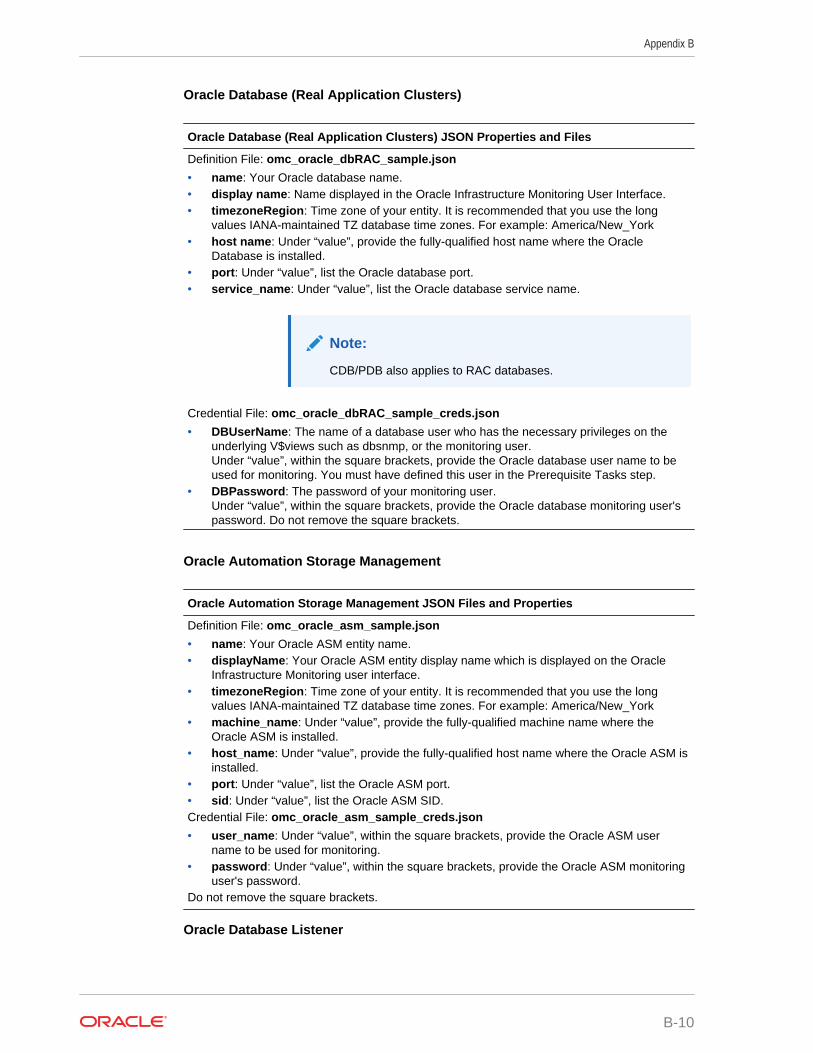
Oracle Database (Real Application Clusters)
Oracle Database (Real Application Clusters) JSON Properties and Files
Definition File: omc_oracle_dbRAC_sample.json
• name: Your Oracle database name.• display name: Name displayed in the Oracle Infrastructure Monitoring User Interface.• timezoneRegion: Time zone of your entity. It is recommended that you use the long
values IANA-maintained TZ database time zones. For example: America/New_York• host name: Under “value”, provide the fully-qualified host name where the Oracle
Database is installed.• port: Under “value”, list the Oracle database port.• service_name: Under “value”, list the Oracle database service name.
Note:
CDB/PDB also applies to RAC databases.
Credential File: omc_oracle_dbRAC_sample_creds.json
• DBUserName: The name of a database user who has the necessary privileges on theunderlying V$views such as dbsnmp, or the monitoring user.Under “value”, within the square brackets, provide the Oracle database user name to beused for monitoring. You must have defined this user in the Prerequisite Tasks step.
• DBPassword: The password of your monitoring user.Under “value”, within the square brackets, provide the Oracle database monitoring user'spassword. Do not remove the square brackets.
Oracle Automation Storage Management
Oracle Automation Storage Management JSON Files and Properties
Definition File: omc_oracle_asm_sample.json
• name: Your Oracle ASM entity name.• displayName: Your Oracle ASM entity display name which is displayed on the Oracle
Infrastructure Monitoring user interface.• timezoneRegion: Time zone of your entity. It is recommended that you use the long
values IANA-maintained TZ database time zones. For example: America/New_York• machine_name: Under “value”, provide the fully-qualified machine name where the
Oracle ASM is installed.• host_name: Under “value”, provide the fully-qualified host name where the Oracle ASM is
installed.• port: Under “value”, list the Oracle ASM port.• sid: Under “value”, list the Oracle ASM SID.Credential File: omc_oracle_asm_sample_creds.json
• user_name: Under “value”, within the square brackets, provide the Oracle ASM username to be used for monitoring.
• password: Under “value”, within the square brackets, provide the Oracle ASM monitoringuser's password.
Do not remove the square brackets.
Oracle Database Listener
Appendix B
B-10
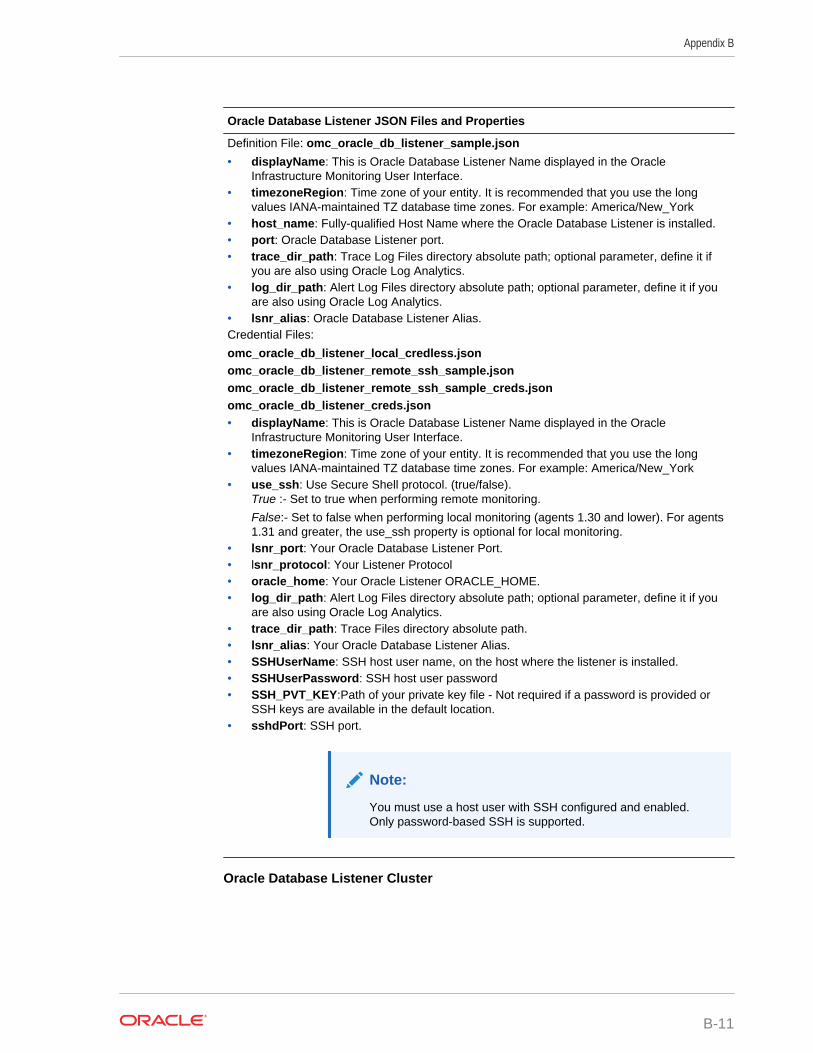
Oracle Database Listener JSON Files and Properties
Definition File: omc_oracle_db_listener_sample.json
• displayName: This is Oracle Database Listener Name displayed in the OracleInfrastructure Monitoring User Interface.
• timezoneRegion: Time zone of your entity. It is recommended that you use the longvalues IANA-maintained TZ database time zones. For example: America/New_York
• host_name: Fully-qualified Host Name where the Oracle Database Listener is installed.• port: Oracle Database Listener port.• trace_dir_path: Trace Log Files directory absolute path; optional parameter, define it if
you are also using Oracle Log Analytics.• log_dir_path: Alert Log Files directory absolute path; optional parameter, define it if you
are also using Oracle Log Analytics.• lsnr_alias: Oracle Database Listener Alias.Credential Files:
omc_oracle_db_listener_local_credless.jsonomc_oracle_db_listener_remote_ssh_sample.jsonomc_oracle_db_listener_remote_ssh_sample_creds.jsonomc_oracle_db_listener_creds.json• displayName: This is Oracle Database Listener Name displayed in the Oracle
Infrastructure Monitoring User Interface.• timezoneRegion: Time zone of your entity. It is recommended that you use the long
values IANA-maintained TZ database time zones. For example: America/New_York• use_ssh: Use Secure Shell protocol. (true/false).
True :- Set to true when performing remote monitoring.
False:- Set to false when performing local monitoring (agents 1.30 and lower). For agents1.31 and greater, the use_ssh property is optional for local monitoring.
• lsnr_port: Your Oracle Database Listener Port.• lsnr_protocol: Your Listener Protocol• oracle_home: Your Oracle Listener ORACLE_HOME.• log_dir_path: Alert Log Files directory absolute path; optional parameter, define it if you
are also using Oracle Log Analytics.• trace_dir_path: Trace Files directory absolute path.• lsnr_alias: Your Oracle Database Listener Alias.• SSHUserName: SSH host user name, on the host where the listener is installed.• SSHUserPassword: SSH host user password• SSH_PVT_KEY:Path of your private key file - Not required if a password is provided or
SSH keys are available in the default location.• sshdPort: SSH port.
Note:
You must use a host user with SSH configured and enabled.Only password-based SSH is supported.
Oracle Database Listener Cluster
Appendix B
B-11
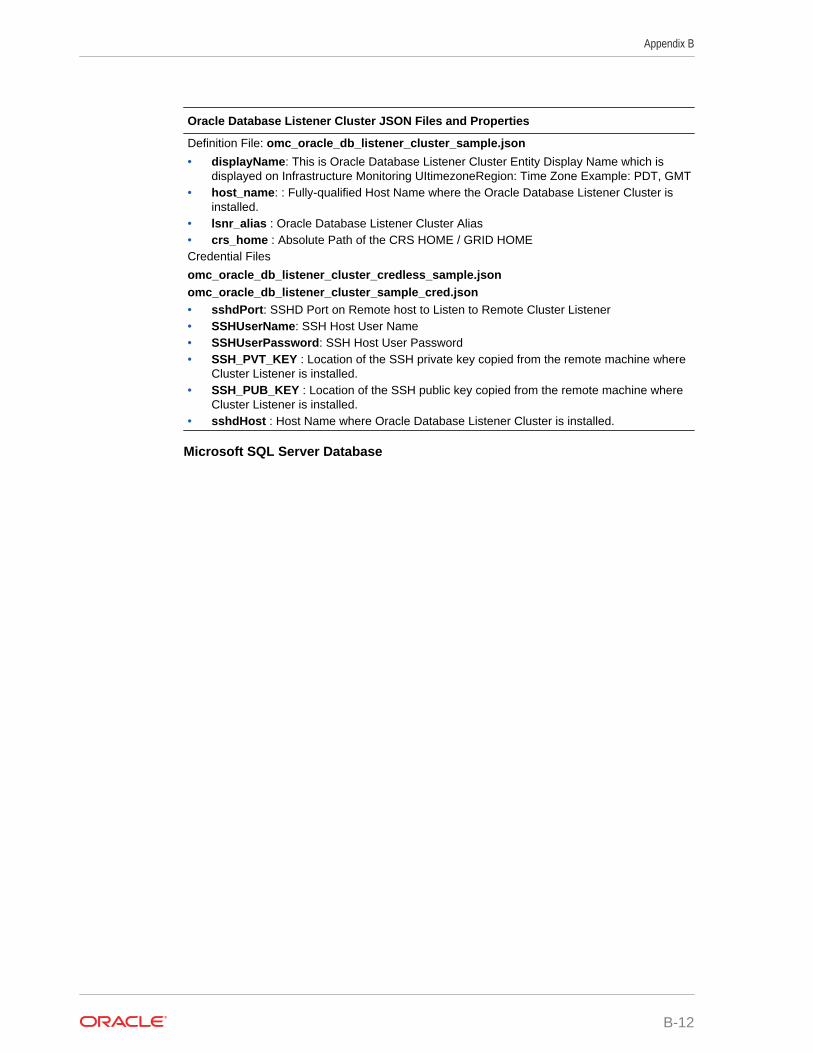
Oracle Database Listener Cluster JSON Files and Properties
Definition File: omc_oracle_db_listener_cluster_sample.json
• displayName: This is Oracle Database Listener Cluster Entity Display Name which isdisplayed on Infrastructure Monitoring UItimezoneRegion: Time Zone Example: PDT, GMT
• host_name: : Fully-qualified Host Name where the Oracle Database Listener Cluster isinstalled.
• lsnr_alias : Oracle Database Listener Cluster Alias• crs_home : Absolute Path of the CRS HOME / GRID HOMECredential Files
omc_oracle_db_listener_cluster_credless_sample.jsonomc_oracle_db_listener_cluster_sample_cred.json• sshdPort: SSHD Port on Remote host to Listen to Remote Cluster Listener• SSHUserName: SSH Host User Name• SSHUserPassword: SSH Host User Password• SSH_PVT_KEY : Location of the SSH private key copied from the remote machine where
Cluster Listener is installed.• SSH_PUB_KEY : Location of the SSH public key copied from the remote machine where
Cluster Listener is installed.• sshdHost : Host Name where Oracle Database Listener Cluster is installed.
Microsoft SQL Server Database
Appendix B
B-12
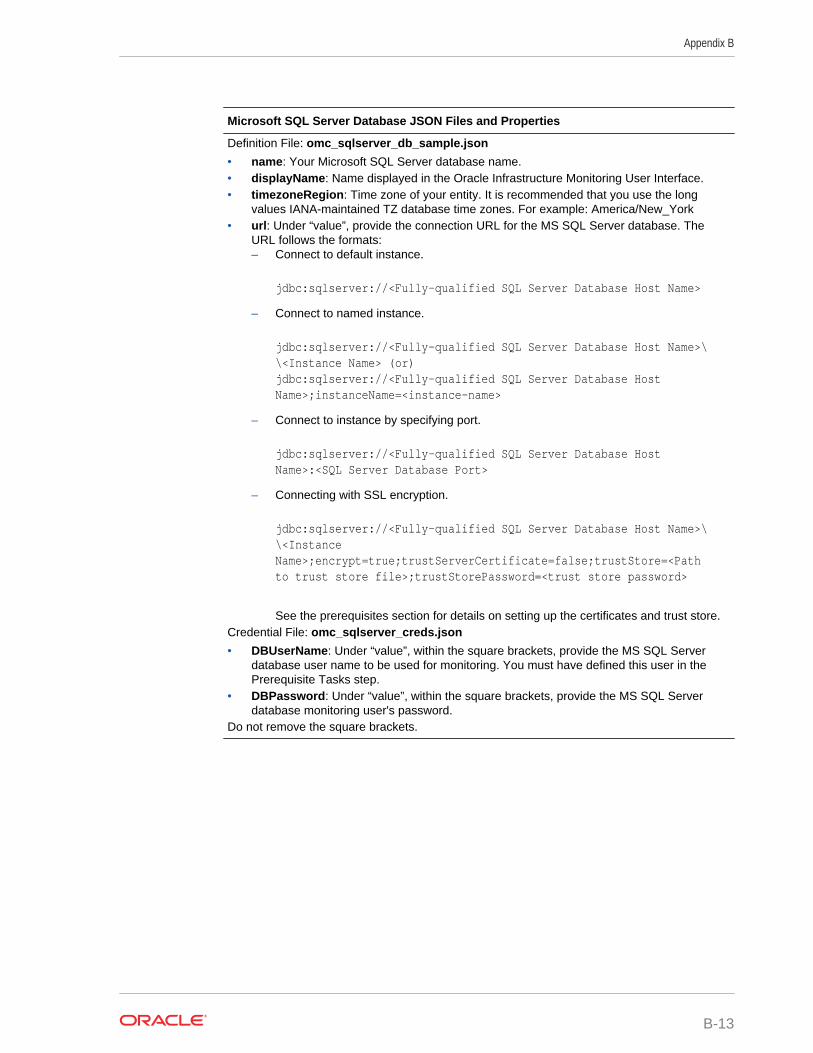
Microsoft SQL Server Database JSON Files and Properties
Definition File: omc_sqlserver_db_sample.json
• name: Your Microsoft SQL Server database name.• displayName: Name displayed in the Oracle Infrastructure Monitoring User Interface.• timezoneRegion: Time zone of your entity. It is recommended that you use the long
values IANA-maintained TZ database time zones. For example: America/New_York• url: Under “value”, provide the connection URL for the MS SQL Server database. The
URL follows the formats:– Connect to default instance.
jdbc:sqlserver://<Fully-qualified SQL Server Database Host Name>
– Connect to named instance.
jdbc:sqlserver://<Fully-qualified SQL Server Database Host Name>\\<Instance Name> (or)jdbc:sqlserver://<Fully-qualified SQL Server Database Host Name>;instanceName=<instance-name>
– Connect to instance by specifying port.
jdbc:sqlserver://<Fully-qualified SQL Server Database Host Name>:<SQL Server Database Port>
– Connecting with SSL encryption.
jdbc:sqlserver://<Fully-qualified SQL Server Database Host Name>\\<Instance Name>;encrypt=true;trustServerCertificate=false;trustStore=<Path to trust store file>;trustStorePassword=<trust store password>
See the prerequisites section for details on setting up the certificates and trust store.Credential File: omc_sqlserver_creds.json
• DBUserName: Under “value”, within the square brackets, provide the MS SQL Serverdatabase user name to be used for monitoring. You must have defined this user in thePrerequisite Tasks step.
• DBPassword: Under “value”, within the square brackets, provide the MS SQL Serverdatabase monitoring user's password.
Do not remove the square brackets.
Appendix B
B-13
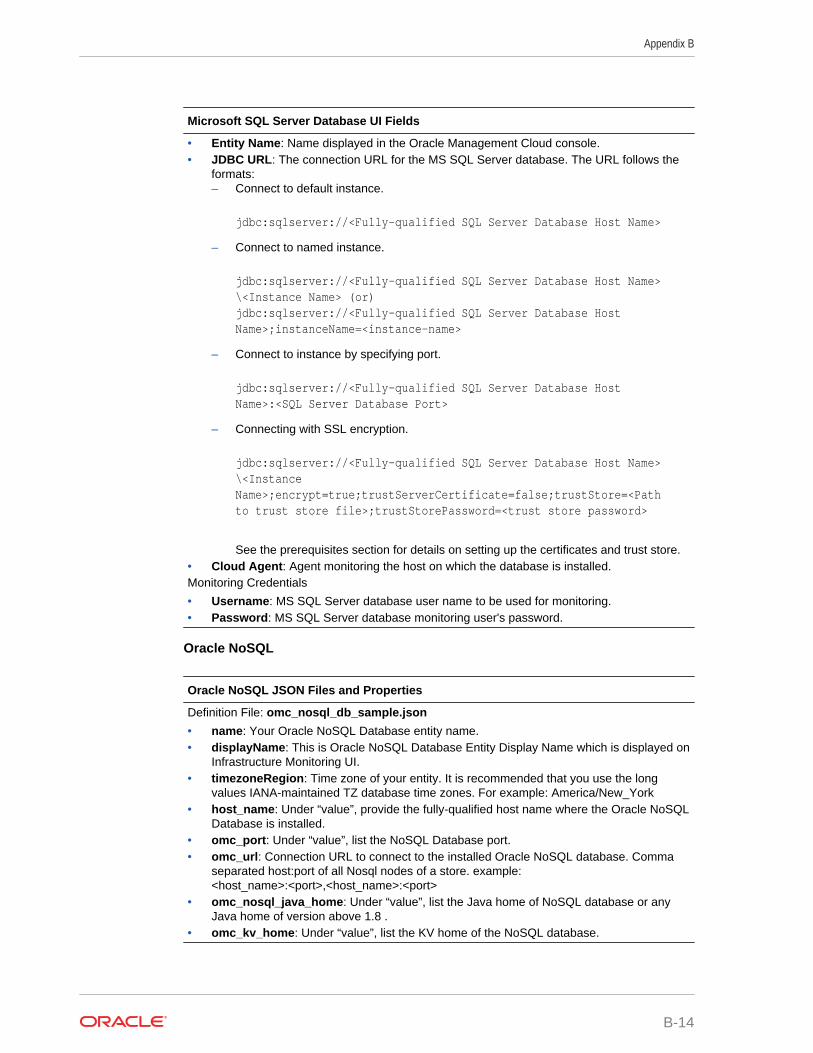
Microsoft SQL Server Database UI Fields
• Entity Name: Name displayed in the Oracle Management Cloud console.• JDBC URL: The connection URL for the MS SQL Server database. The URL follows the
formats:– Connect to default instance.
jdbc:sqlserver://<Fully-qualified SQL Server Database Host Name>
– Connect to named instance.
jdbc:sqlserver://<Fully-qualified SQL Server Database Host Name>\<Instance Name> (or)jdbc:sqlserver://<Fully-qualified SQL Server Database Host Name>;instanceName=<instance-name>
– Connect to instance by specifying port.
jdbc:sqlserver://<Fully-qualified SQL Server Database Host Name>:<SQL Server Database Port>
– Connecting with SSL encryption.
jdbc:sqlserver://<Fully-qualified SQL Server Database Host Name>\<Instance Name>;encrypt=true;trustServerCertificate=false;trustStore=<Path to trust store file>;trustStorePassword=<trust store password>
See the prerequisites section for details on setting up the certificates and trust store.• Cloud Agent: Agent monitoring the host on which the database is installed.Monitoring Credentials
• Username: MS SQL Server database user name to be used for monitoring.• Password: MS SQL Server database monitoring user's password.
Oracle NoSQL
Oracle NoSQL JSON Files and Properties
Definition File: omc_nosql_db_sample.json
• name: Your Oracle NoSQL Database entity name.• displayName: This is Oracle NoSQL Database Entity Display Name which is displayed on
Infrastructure Monitoring UI.• timezoneRegion: Time zone of your entity. It is recommended that you use the long
values IANA-maintained TZ database time zones. For example: America/New_York• host_name: Under “value”, provide the fully-qualified host name where the Oracle NoSQL
Database is installed.• omc_port: Under “value”, list the NoSQL Database port.• omc_url: Connection URL to connect to the installed Oracle NoSQL database. Comma
separated host:port of all Nosql nodes of a store. example:<host_name>:<port>,<host_name>:<port>
• omc_nosql_java_home: Under “value”, list the Java home of NoSQL database or anyJava home of version above 1.8 .
• omc_kv_home: Under “value”, list the KV home of the NoSQL database.
Appendix B
B-14
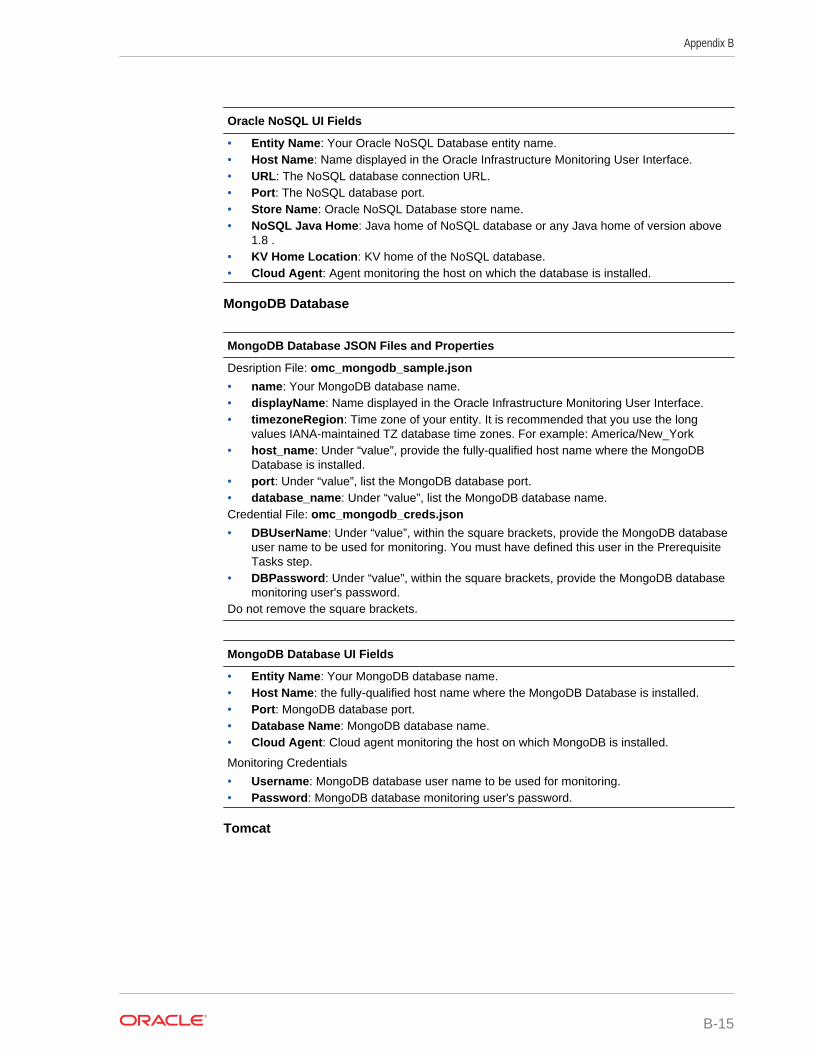
Oracle NoSQL UI Fields
• Entity Name: Your Oracle NoSQL Database entity name.• Host Name: Name displayed in the Oracle Infrastructure Monitoring User Interface.• URL: The NoSQL database connection URL.• Port: The NoSQL database port.• Store Name: Oracle NoSQL Database store name.• NoSQL Java Home: Java home of NoSQL database or any Java home of version above
1.8 .• KV Home Location: KV home of the NoSQL database.• Cloud Agent: Agent monitoring the host on which the database is installed.
MongoDB Database
MongoDB Database JSON Files and Properties
Desription File: omc_mongodb_sample.json
• name: Your MongoDB database name.• displayName: Name displayed in the Oracle Infrastructure Monitoring User Interface.• timezoneRegion: Time zone of your entity. It is recommended that you use the long
values IANA-maintained TZ database time zones. For example: America/New_York• host_name: Under “value”, provide the fully-qualified host name where the MongoDB
Database is installed.• port: Under “value”, list the MongoDB database port.• database_name: Under “value”, list the MongoDB database name.Credential File: omc_mongodb_creds.json
• DBUserName: Under “value”, within the square brackets, provide the MongoDB databaseuser name to be used for monitoring. You must have defined this user in the PrerequisiteTasks step.
• DBPassword: Under “value”, within the square brackets, provide the MongoDB databasemonitoring user's password.
Do not remove the square brackets.
MongoDB Database UI Fields
• Entity Name: Your MongoDB database name.• Host Name: the fully-qualified host name where the MongoDB Database is installed.• Port: MongoDB database port.• Database Name: MongoDB database name.• Cloud Agent: Cloud agent monitoring the host on which MongoDB is installed.
Monitoring Credentials
• Username: MongoDB database user name to be used for monitoring.• Password: MongoDB database monitoring user's password.
Tomcat
Appendix B
B-15
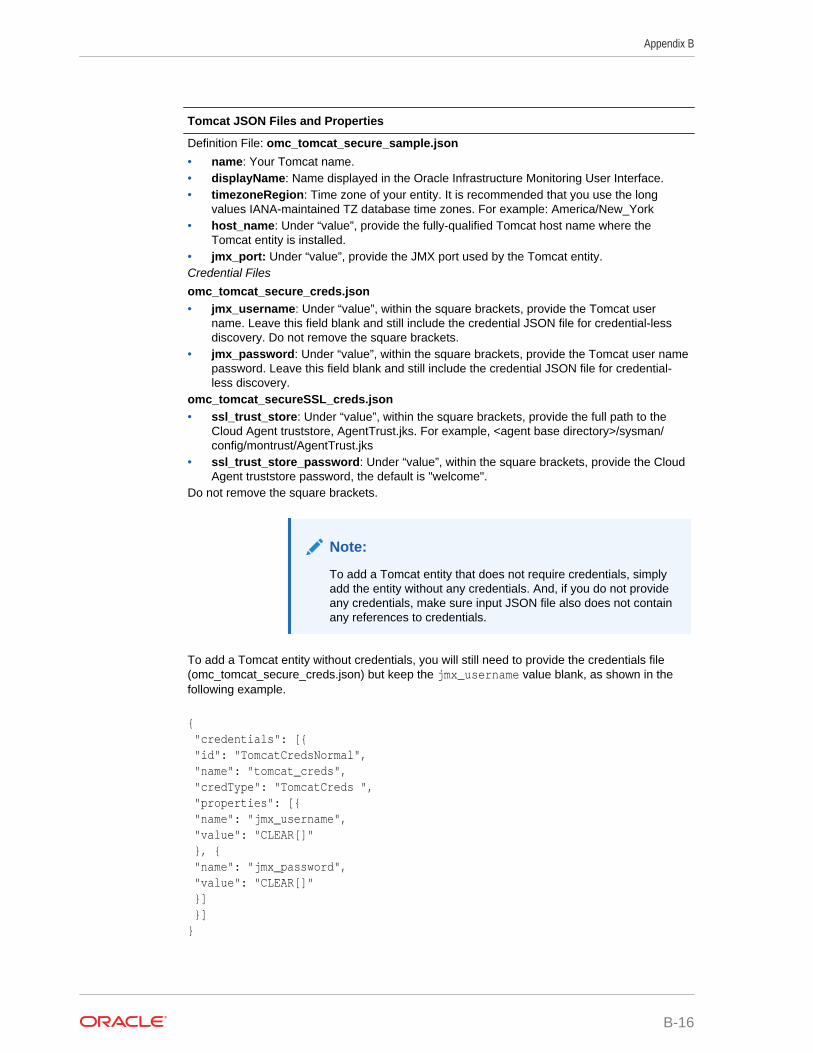
Tomcat JSON Files and Properties
Definition File: omc_tomcat_secure_sample.json
• name: Your Tomcat name.• displayName: Name displayed in the Oracle Infrastructure Monitoring User Interface.• timezoneRegion: Time zone of your entity. It is recommended that you use the long
values IANA-maintained TZ database time zones. For example: America/New_York• host_name: Under “value”, provide the fully-qualified Tomcat host name where the
Tomcat entity is installed.• jmx_port: Under “value”, provide the JMX port used by the Tomcat entity.Credential Files
omc_tomcat_secure_creds.json• jmx_username: Under “value”, within the square brackets, provide the Tomcat user
name. Leave this field blank and still include the credential JSON file for credential-lessdiscovery. Do not remove the square brackets.
• jmx_password: Under “value”, within the square brackets, provide the Tomcat user namepassword. Leave this field blank and still include the credential JSON file for credential-less discovery.
omc_tomcat_secureSSL_creds.json• ssl_trust_store: Under “value”, within the square brackets, provide the full path to the
Cloud Agent truststore, AgentTrust.jks. For example, <agent base directory>/sysman/config/montrust/AgentTrust.jks
• ssl_trust_store_password: Under “value”, within the square brackets, provide the CloudAgent truststore password, the default is "welcome".
Do not remove the square brackets.
Note:
To add a Tomcat entity that does not require credentials, simplyadd the entity without any credentials. And, if you do not provideany credentials, make sure input JSON file also does not containany references to credentials.
To add a Tomcat entity without credentials, you will still need to provide the credentials file(omc_tomcat_secure_creds.json) but keep the jmx_username value blank, as shown in thefollowing example.
{ "credentials": [{ "id": "TomcatCredsNormal", "name": "tomcat_creds", "credType": "TomcatCreds ", "properties": [{ "name": "jmx_username", "value": "CLEAR[]" }, { "name": "jmx_password", "value": "CLEAR[]" }] }]}
Appendix B
B-16
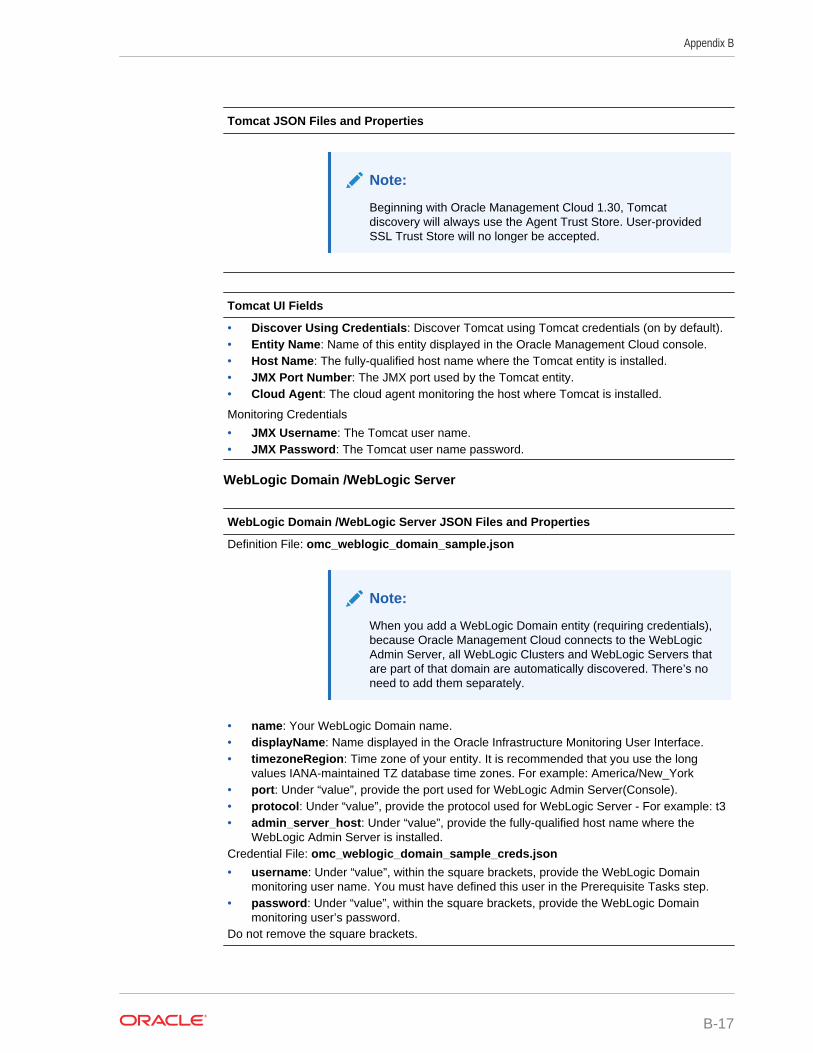
Tomcat JSON Files and Properties
Note:
Beginning with Oracle Management Cloud 1.30, Tomcatdiscovery will always use the Agent Trust Store. User-providedSSL Trust Store will no longer be accepted.
Tomcat UI Fields
• Discover Using Credentials: Discover Tomcat using Tomcat credentials (on by default).• Entity Name: Name of this entity displayed in the Oracle Management Cloud console.• Host Name: The fully-qualified host name where the Tomcat entity is installed.• JMX Port Number: The JMX port used by the Tomcat entity.• Cloud Agent: The cloud agent monitoring the host where Tomcat is installed.
Monitoring Credentials
• JMX Username: The Tomcat user name.• JMX Password: The Tomcat user name password.
WebLogic Domain /WebLogic Server
WebLogic Domain /WebLogic Server JSON Files and Properties
Definition File: omc_weblogic_domain_sample.json
Note:
When you add a WebLogic Domain entity (requiring credentials),because Oracle Management Cloud connects to the WebLogicAdmin Server, all WebLogic Clusters and WebLogic Servers thatare part of that domain are automatically discovered. There’s noneed to add them separately.
• name: Your WebLogic Domain name.• displayName: Name displayed in the Oracle Infrastructure Monitoring User Interface.• timezoneRegion: Time zone of your entity. It is recommended that you use the long
values IANA-maintained TZ database time zones. For example: America/New_York• port: Under “value”, provide the port used for WebLogic Admin Server(Console).• protocol: Under “value”, provide the protocol used for WebLogic Server - For example: t3• admin_server_host: Under “value”, provide the fully-qualified host name where the
WebLogic Admin Server is installed.Credential File: omc_weblogic_domain_sample_creds.json
• username: Under “value”, within the square brackets, provide the WebLogic Domainmonitoring user name. You must have defined this user in the Prerequisite Tasks step.
• password: Under “value”, within the square brackets, provide the WebLogic Domainmonitoring user’s password.
Do not remove the square brackets.
Appendix B
B-17
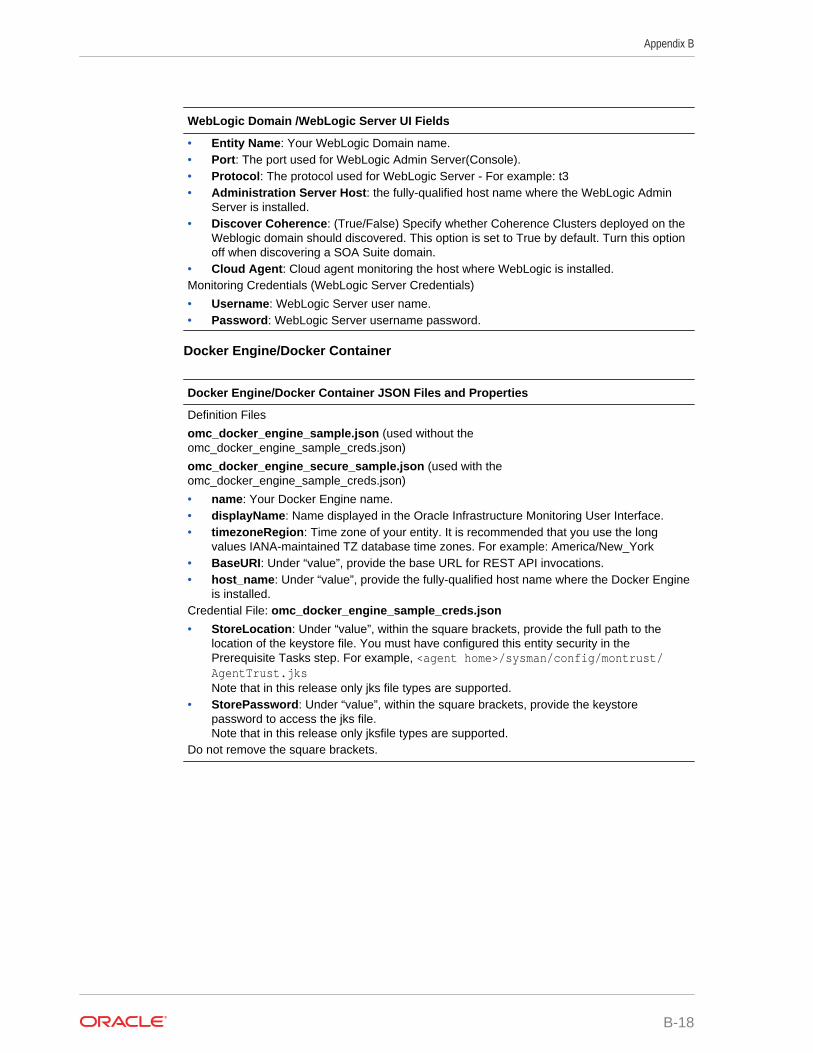
WebLogic Domain /WebLogic Server UI Fields
• Entity Name: Your WebLogic Domain name.• Port: The port used for WebLogic Admin Server(Console).• Protocol: The protocol used for WebLogic Server - For example: t3• Administration Server Host: the fully-qualified host name where the WebLogic Admin
Server is installed.• Discover Coherence: (True/False) Specify whether Coherence Clusters deployed on the
Weblogic domain should discovered. This option is set to True by default. Turn this optionoff when discovering a SOA Suite domain.
• Cloud Agent: Cloud agent monitoring the host where WebLogic is installed.Monitoring Credentials (WebLogic Server Credentials)
• Username: WebLogic Server user name.• Password: WebLogic Server username password.
Docker Engine/Docker Container
Docker Engine/Docker Container JSON Files and Properties
Definition Files
omc_docker_engine_sample.json (used without theomc_docker_engine_sample_creds.json)
omc_docker_engine_secure_sample.json (used with theomc_docker_engine_sample_creds.json)
• name: Your Docker Engine name.• displayName: Name displayed in the Oracle Infrastructure Monitoring User Interface.• timezoneRegion: Time zone of your entity. It is recommended that you use the long
values IANA-maintained TZ database time zones. For example: America/New_York• BaseURI: Under “value”, provide the base URL for REST API invocations.• host_name: Under “value”, provide the fully-qualified host name where the Docker Engine
is installed.Credential File: omc_docker_engine_sample_creds.json
• StoreLocation: Under “value”, within the square brackets, provide the full path to thelocation of the keystore file. You must have configured this entity security in thePrerequisite Tasks step. For example, <agent home>/sysman/config/montrust/AgentTrust.jksNote that in this release only jks file types are supported.
• StorePassword: Under “value”, within the square brackets, provide the keystorepassword to access the jks file.Note that in this release only jksfile types are supported.
Do not remove the square brackets.
Appendix B
B-18
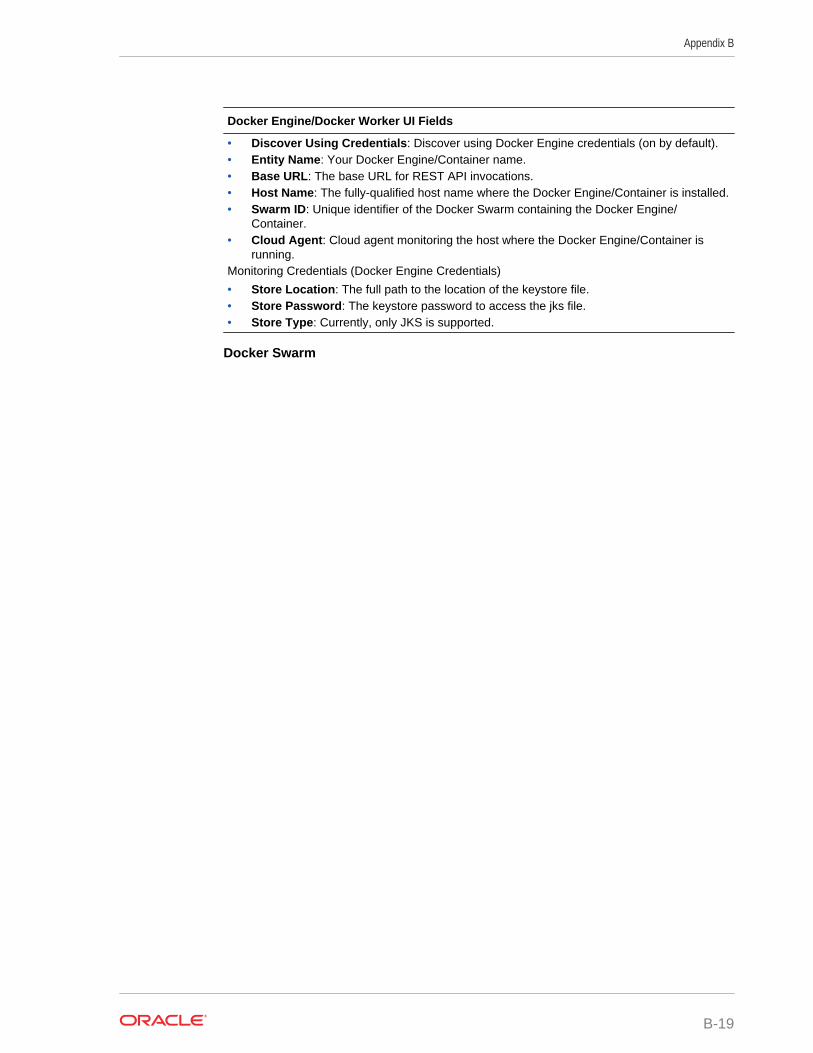
Docker Engine/Docker Worker UI Fields
• Discover Using Credentials: Discover using Docker Engine credentials (on by default).• Entity Name: Your Docker Engine/Container name.• Base URL: The base URL for REST API invocations.• Host Name: The fully-qualified host name where the Docker Engine/Container is installed.• Swarm ID: Unique identifier of the Docker Swarm containing the Docker Engine/
Container.• Cloud Agent: Cloud agent monitoring the host where the Docker Engine/Container is
running.Monitoring Credentials (Docker Engine Credentials)
• Store Location: The full path to the location of the keystore file.• Store Password: The keystore password to access the jks file.• Store Type: Currently, only JKS is supported.
Docker Swarm
Appendix B
B-19
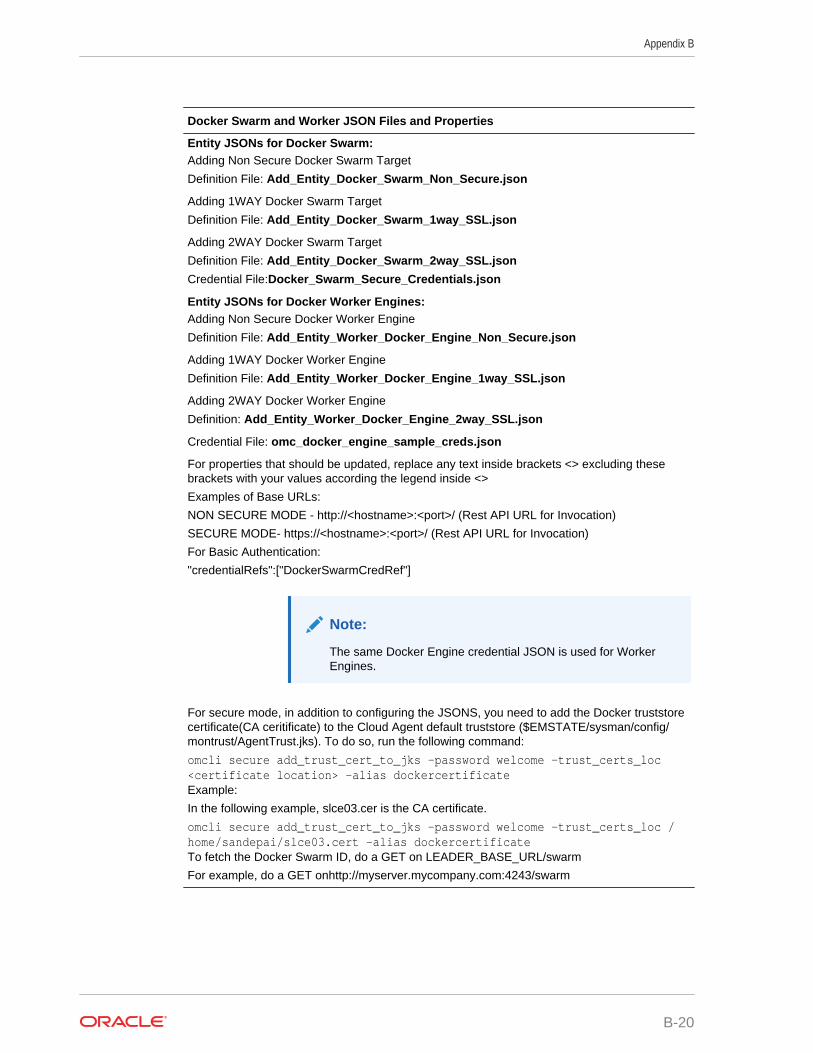
Docker Swarm and Worker JSON Files and Properties
Entity JSONs for Docker Swarm:Adding Non Secure Docker Swarm Target
Definition File: Add_Entity_Docker_Swarm_Non_Secure.json
Adding 1WAY Docker Swarm Target
Definition File: Add_Entity_Docker_Swarm_1way_SSL.json
Adding 2WAY Docker Swarm Target
Definition File: Add_Entity_Docker_Swarm_2way_SSL.json
Credential File:Docker_Swarm_Secure_Credentials.json
Entity JSONs for Docker Worker Engines:Adding Non Secure Docker Worker Engine
Definition File: Add_Entity_Worker_Docker_Engine_Non_Secure.json
Adding 1WAY Docker Worker Engine
Definition File: Add_Entity_Worker_Docker_Engine_1way_SSL.json
Adding 2WAY Docker Worker Engine
Definition: Add_Entity_Worker_Docker_Engine_2way_SSL.json
Credential File: omc_docker_engine_sample_creds.json
For properties that should be updated, replace any text inside brackets <> excluding thesebrackets with your values according the legend inside <>
Examples of Base URLs:
NON SECURE MODE - http://<hostname>:<port>/ (Rest API URL for Invocation)
SECURE MODE- https://<hostname>:<port>/ (Rest API URL for Invocation)
For Basic Authentication:
"credentialRefs":["DockerSwarmCredRef"]
Note:
The same Docker Engine credential JSON is used for WorkerEngines.
For secure mode, in addition to configuring the JSONS, you need to add the Docker truststorecertificate(CA ceritificate) to the Cloud Agent default truststore ($EMSTATE/sysman/config/montrust/AgentTrust.jks). To do so, run the following command:
omcli secure add_trust_cert_to_jks -password welcome -trust_certs_loc<certificate location> -alias dockercertificateExample:
In the following example, slce03.cer is the CA certificate.
omcli secure add_trust_cert_to_jks -password welcome -trust_certs_loc /home/sandepai/slce03.cert -alias dockercertificateTo fetch the Docker Swarm ID, do a GET on LEADER_BASE_URL/swarm
For example, do a GET onhttp://myserver.mycompany.com:4243/swarm
Appendix B
B-20

Docker Swarm UI Fields
• Discover Using Credentials: Discover using Docker Swarm credentials (on by default).• Entity Name: Your Docker Swarm name.• Base URL of Swarm Leader: The base URL of the Swarm Leader for REST API
invocations.• Host Name: The fully-qualified host name where the Docker Swarm is installed.• Cloud Agent: Cloud agent monitoring the host where the Docker Swarm is running.Monitoring Credentials (Docker Swarm Credentials)• Store Location: The full path to the location of the keystore file.• Store Password: The keystore password to access the JKS file.• Store Type: Currently, only JKS is supported.
Xen Virtual Platform/Xen Virtual Server
Xen Virtual Platform/Xen Virtual Server JSON Files and Properties
The Xen Virtual Server is automatically discovered when you discover a Xen Virtual Platform.
Definition File: omc_xen_virtual_platform_sample.json
• name: Your Xen Server name.• displayName: Name displayed in the Oracle Infrastructure Monitoring User Interface.• timezoneRegion: Time zone of your entity. It is recommended that you use the long
values IANA-maintained TZ database time zones. For example: America/New_York• host_name: Under“value”, provide the fully-qualified host name where the Xen Server is
installed.Credential Files
omc_xen_virtual_platform_with_root_creds.jsonUse this credentials JSON file if using root as a monitoring user.
• password: Under“value”, within the square brackets, provide the root password.omc_xen_virtual_platform_with_sudo_creds.jsonUse this credentials JSON file if using a user with SUDO privileges as a monitoring user.
• username: Under “value”, within the square brackets, provide the user name with SUDOprivileges to be used for monitoring. You must have defined this user in a previous step.
• password: Under “value”, within the square brackets, provide the monitoring SUDO userpassword.
omc_xen_virtual_platform_with_ssh_keys.jsonUse this credentials JSON file if using SSH keys credentials.
• SshPublicKey: Under “value”, within the square brackets, provide the Public Key.• SshPrivateKey: Under “value”, within the square brackets, provide the Private Key.omc_xen_virtual_platform_with_sudo_ssh_keys.jsonUse this credentials JSON file if using a user with SUDO privileges as a monitoring user aswell as SSH keys.
• username: Under “value”, within the square brackets, provide the user name with SUDOprivileges to be used for monitoring. You must have defined this user in a previous step.
• password: Under“value”, within the square brackets, provide the monitoring SUDO userpassword.
• SshPublicKey: Under “value”, within the square brackets, provide the Public Key.• SshPrivateKey: Under “value”, within the square brackets, provide the Private Key.Do not remove the square brackets.
Leave the rest of the fields unchanged.
Appendix B
B-21
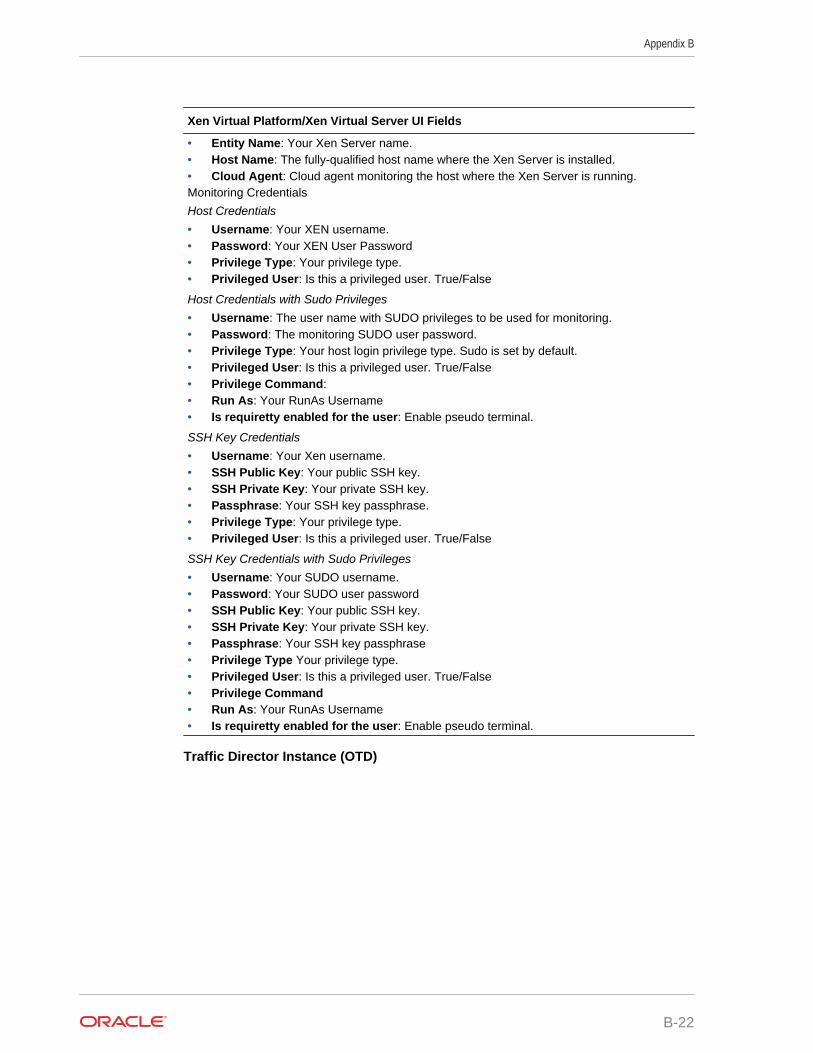
Xen Virtual Platform/Xen Virtual Server UI Fields
• Entity Name: Your Xen Server name.• Host Name: The fully-qualified host name where the Xen Server is installed.• Cloud Agent: Cloud agent monitoring the host where the Xen Server is running.Monitoring Credentials
Host Credentials
• Username: Your XEN username.• Password: Your XEN User Password• Privilege Type: Your privilege type.• Privileged User: Is this a privileged user. True/False
Host Credentials with Sudo Privileges
• Username: The user name with SUDO privileges to be used for monitoring.• Password: The monitoring SUDO user password.• Privilege Type: Your host login privilege type. Sudo is set by default.• Privileged User: Is this a privileged user. True/False• Privilege Command:• Run As: Your RunAs Username• Is requiretty enabled for the user: Enable pseudo terminal.
SSH Key Credentials
• Username: Your Xen username.• SSH Public Key: Your public SSH key.• SSH Private Key: Your private SSH key.• Passphrase: Your SSH key passphrase.• Privilege Type: Your privilege type.• Privileged User: Is this a privileged user. True/False
SSH Key Credentials with Sudo Privileges
• Username: Your SUDO username.• Password: Your SUDO user password• SSH Public Key: Your public SSH key.• SSH Private Key: Your private SSH key.• Passphrase: Your SSH key passphrase• Privilege Type Your privilege type.• Privileged User: Is this a privileged user. True/False• Privilege Command• Run As: Your RunAs Username• Is requiretty enabled for the user: Enable pseudo terminal.
Traffic Director Instance (OTD)
Appendix B
B-22
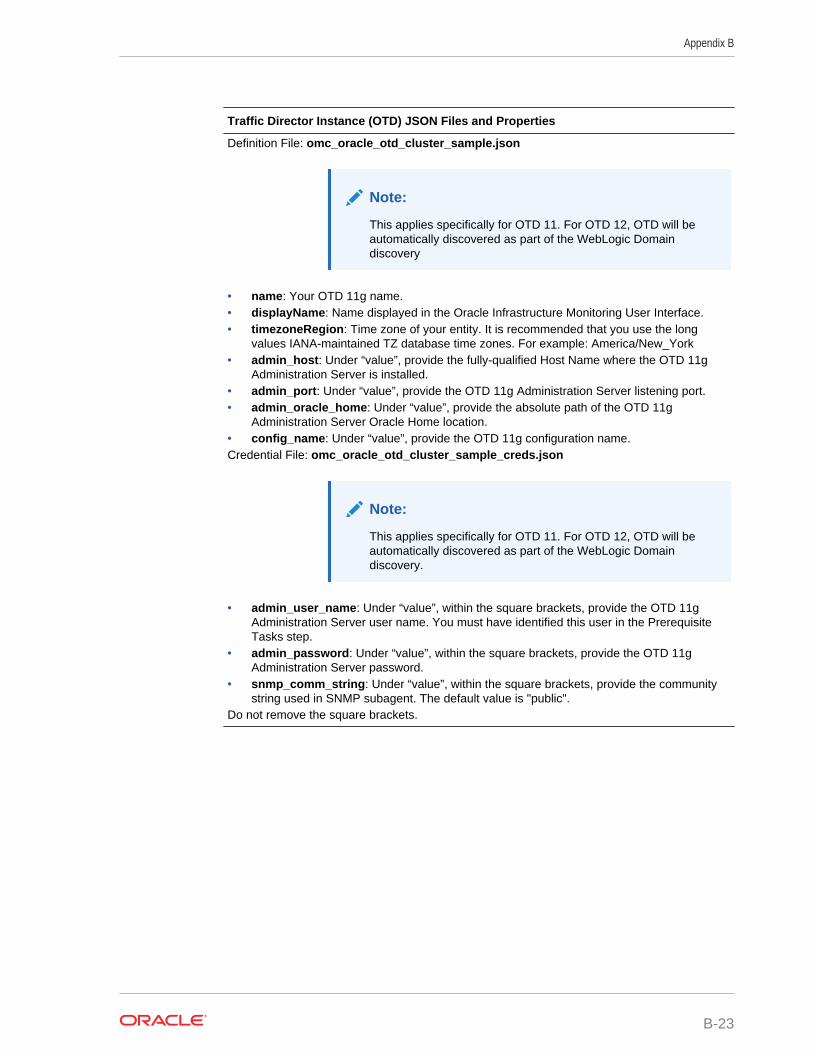
Traffic Director Instance (OTD) JSON Files and Properties
Definition File: omc_oracle_otd_cluster_sample.json
Note:
This applies specifically for OTD 11. For OTD 12, OTD will beautomatically discovered as part of the WebLogic Domaindiscovery
• name: Your OTD 11g name.• displayName: Name displayed in the Oracle Infrastructure Monitoring User Interface.• timezoneRegion: Time zone of your entity. It is recommended that you use the long
values IANA-maintained TZ database time zones. For example: America/New_York• admin_host: Under “value”, provide the fully-qualified Host Name where the OTD 11g
Administration Server is installed.• admin_port: Under “value”, provide the OTD 11g Administration Server listening port.• admin_oracle_home: Under “value”, provide the absolute path of the OTD 11g
Administration Server Oracle Home location.• config_name: Under “value”, provide the OTD 11g configuration name.Credential File: omc_oracle_otd_cluster_sample_creds.json
Note:
This applies specifically for OTD 11. For OTD 12, OTD will beautomatically discovered as part of the WebLogic Domaindiscovery.
• admin_user_name: Under “value”, within the square brackets, provide the OTD 11gAdministration Server user name. You must have identified this user in the PrerequisiteTasks step.
• admin_password: Under “value”, within the square brackets, provide the OTD 11gAdministration Server password.
• snmp_comm_string: Under “value”, within the square brackets, provide the communitystring used in SNMP subagent. The default value is "public".
Do not remove the square brackets.
Appendix B
B-23
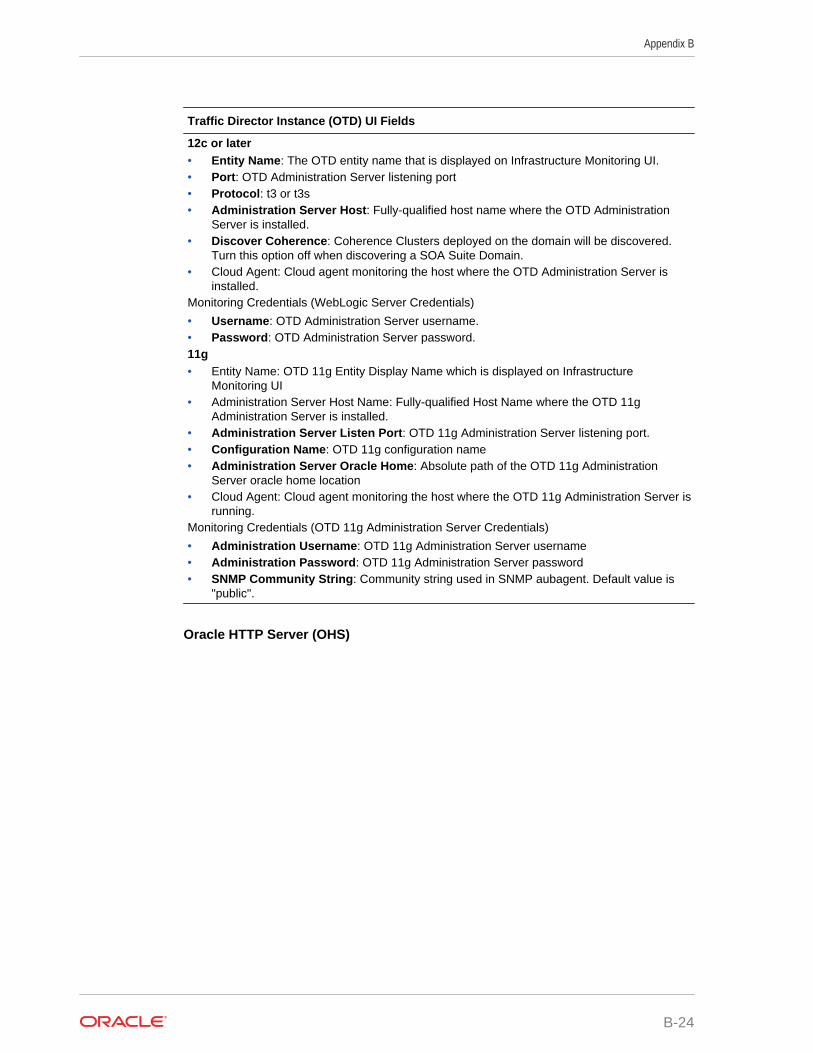
Traffic Director Instance (OTD) UI Fields
12c or later• Entity Name: The OTD entity name that is displayed on Infrastructure Monitoring UI.• Port: OTD Administration Server listening port• Protocol: t3 or t3s• Administration Server Host: Fully-qualified host name where the OTD Administration
Server is installed.• Discover Coherence: Coherence Clusters deployed on the domain will be discovered.
Turn this option off when discovering a SOA Suite Domain.• Cloud Agent: Cloud agent monitoring the host where the OTD Administration Server is
installed.Monitoring Credentials (WebLogic Server Credentials)
• Username: OTD Administration Server username.• Password: OTD Administration Server password.11g• Entity Name: OTD 11g Entity Display Name which is displayed on Infrastructure
Monitoring UI• Administration Server Host Name: Fully-qualified Host Name where the OTD 11g
Administration Server is installed.• Administration Server Listen Port: OTD 11g Administration Server listening port.• Configuration Name: OTD 11g configuration name• Administration Server Oracle Home: Absolute path of the OTD 11g Administration
Server oracle home location• Cloud Agent: Cloud agent monitoring the host where the OTD 11g Administration Server is
running.Monitoring Credentials (OTD 11g Administration Server Credentials)
• Administration Username: OTD 11g Administration Server username• Administration Password: OTD 11g Administration Server password• SNMP Community String: Community string used in SNMP aubagent. Default value is
"public".
Oracle HTTP Server (OHS)
Appendix B
B-24
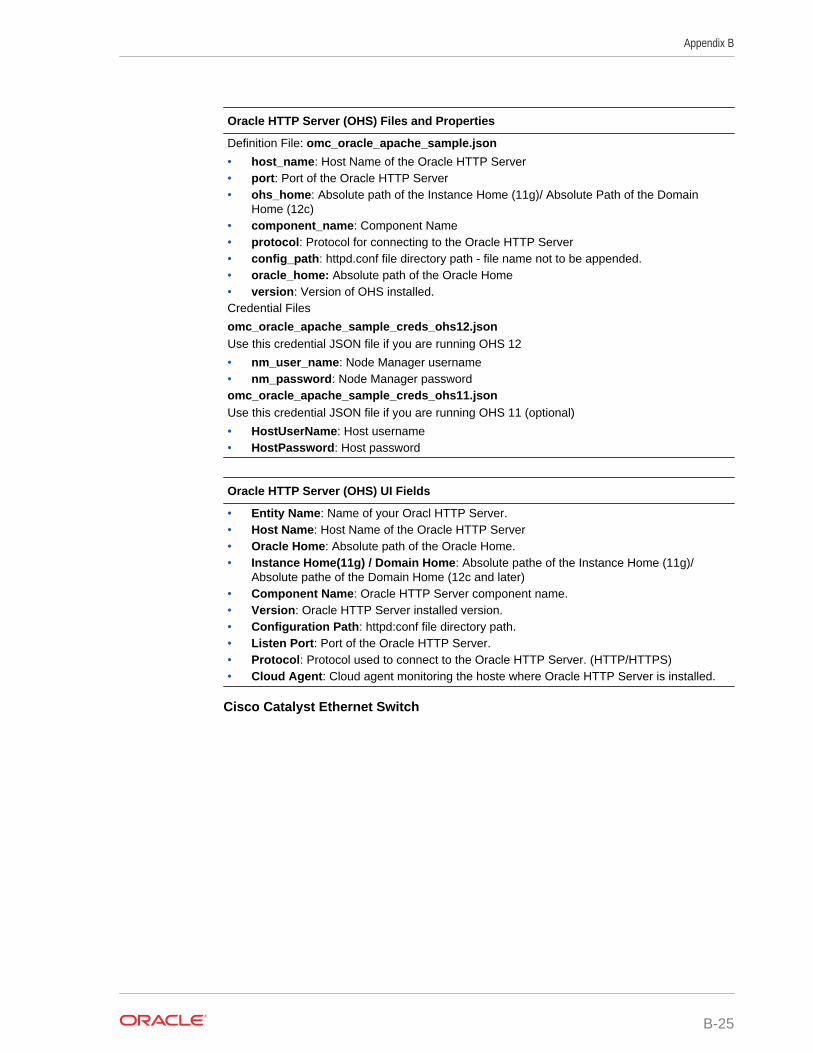
Oracle HTTP Server (OHS) Files and Properties
Definition File: omc_oracle_apache_sample.json
• host_name: Host Name of the Oracle HTTP Server• port: Port of the Oracle HTTP Server• ohs_home: Absolute path of the Instance Home (11g)/ Absolute Path of the Domain
Home (12c)• component_name: Component Name• protocol: Protocol for connecting to the Oracle HTTP Server• config_path: httpd.conf file directory path - file name not to be appended.• oracle_home: Absolute path of the Oracle Home• version: Version of OHS installed.Credential Files
omc_oracle_apache_sample_creds_ohs12.jsonUse this credential JSON file if you are running OHS 12
• nm_user_name: Node Manager username• nm_password: Node Manager passwordomc_oracle_apache_sample_creds_ohs11.jsonUse this credential JSON file if you are running OHS 11 (optional)
• HostUserName: Host username• HostPassword: Host password
Oracle HTTP Server (OHS) UI Fields
• Entity Name: Name of your Oracl HTTP Server.• Host Name: Host Name of the Oracle HTTP Server• Oracle Home: Absolute path of the Oracle Home.• Instance Home(11g) / Domain Home: Absolute pathe of the Instance Home (11g)/
Absolute pathe of the Domain Home (12c and later)• Component Name: Oracle HTTP Server component name.• Version: Oracle HTTP Server installed version.• Configuration Path: httpd:conf file directory path.• Listen Port: Port of the Oracle HTTP Server.• Protocol: Protocol used to connect to the Oracle HTTP Server. (HTTP/HTTPS)• Cloud Agent: Cloud agent monitoring the hoste where Oracle HTTP Server is installed.
Cisco Catalyst Ethernet Switch
Appendix B
B-25
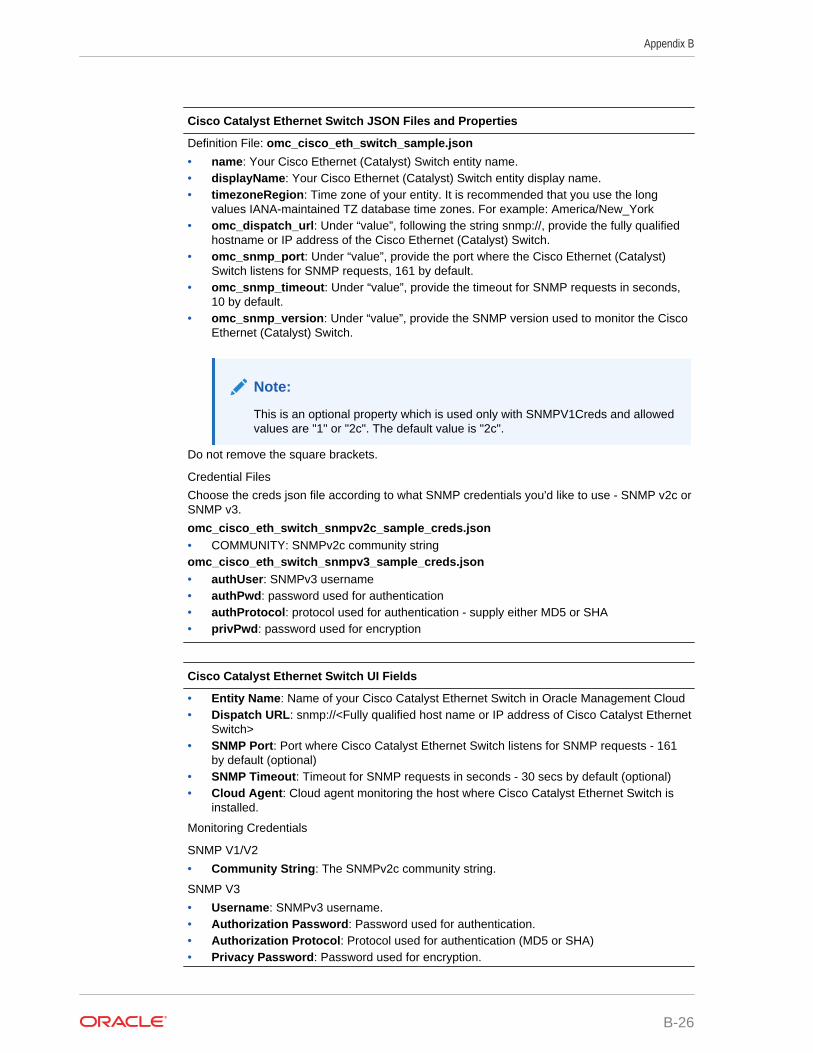
Cisco Catalyst Ethernet Switch JSON Files and Properties
Definition File: omc_cisco_eth_switch_sample.json
• name: Your Cisco Ethernet (Catalyst) Switch entity name.• displayName: Your Cisco Ethernet (Catalyst) Switch entity display name.• timezoneRegion: Time zone of your entity. It is recommended that you use the long
values IANA-maintained TZ database time zones. For example: America/New_York• omc_dispatch_url: Under “value”, following the string snmp://, provide the fully qualified
hostname or IP address of the Cisco Ethernet (Catalyst) Switch.• omc_snmp_port: Under “value”, provide the port where the Cisco Ethernet (Catalyst)
Switch listens for SNMP requests, 161 by default.• omc_snmp_timeout: Under “value”, provide the timeout for SNMP requests in seconds,
10 by default.• omc_snmp_version: Under “value”, provide the SNMP version used to monitor the Cisco
Ethernet (Catalyst) Switch.
Note:
This is an optional property which is used only with SNMPV1Creds and allowedvalues are "1" or "2c". The default value is "2c".
Do not remove the square brackets.
Credential Files
Choose the creds json file according to what SNMP credentials you'd like to use - SNMP v2c orSNMP v3.
omc_cisco_eth_switch_snmpv2c_sample_creds.json• COMMUNITY: SNMPv2c community stringomc_cisco_eth_switch_snmpv3_sample_creds.json• authUser: SNMPv3 username• authPwd: password used for authentication• authProtocol: protocol used for authentication - supply either MD5 or SHA• privPwd: password used for encryption
Cisco Catalyst Ethernet Switch UI Fields
• Entity Name: Name of your Cisco Catalyst Ethernet Switch in Oracle Management Cloud• Dispatch URL: snmp://<Fully qualified host name or IP address of Cisco Catalyst Ethernet
Switch>• SNMP Port: Port where Cisco Catalyst Ethernet Switch listens for SNMP requests - 161
by default (optional)• SNMP Timeout: Timeout for SNMP requests in seconds - 30 secs by default (optional)• Cloud Agent: Cloud agent monitoring the host where Cisco Catalyst Ethernet Switch is
installed.
Monitoring Credentials
SNMP V1/V2
• Community String: The SNMPv2c community string.
SNMP V3
• Username: SNMPv3 username.• Authorization Password: Password used for authentication.• Authorization Protocol: Protocol used for authentication (MD5 or SHA)• Privacy Password: Password used for encryption.
Appendix B
B-26

Cisco Nexus Ethernet Switch
Cisco Nexus Ethernet Switch JSON Files and Properties
Definition File: omc_cisco_nexus_eth_switch_sample.json
• name: Your Cisco Nexus Ethernet Switch entity name.• displayName: Your Cisco Nexus Ethernet Switch entity display name.• timezoneRegion: Time zone of your entity. It is recommended that you use the long
values IANA-maintained TZ database time zones. For example: America/New_York• omc_dispatch_url: Under “value”, following the string snmp://, provide the fully qualified
hostname or IP address of the Cisco Nexus Ethernet Switch.• omc_snmp_port: Under “value”, provide the port where the Cisco Nexus Ethernet Switch
listens for SNMP requests, 161 by default.• omc_snmp_timeout: Under “value”, provide the timeout for SNMP requests in seconds,
10 by default.• omc_snmp_version: Under “value”, provide the SNMP version used to monitor the Cisco
Nexus Ethernet Switch.
Note:
This is an optional property which is used only with SNMPV1Creds and allowedvalues are "1" or "2c". The default value is "2c".
Credential Files
omc_cisco_nexus_eth_switch_snmpv2_sample_creds.json• COMMUNITY: Use this credential file if you have configured your switch with SNMPv1/v2.omc_cisco_nexus_eth_switch_snmpv3_sample_creds.jsonUnder “value”, within the square brackets, provide the SNMPv3 user name.
• authPwd: Under “value”, within the square brackets, provide the auth password or emptyout the field.
• authProtocol: Under “value”, within the square brackets, provide the auth-method (SHAor MD5).
• privPwd: Under “value”, within the square brackets, provide the priv method password, ifpriv is used. Only the DES priv method is supported.
Do not remove the square brackets.
Appendix B
B-27
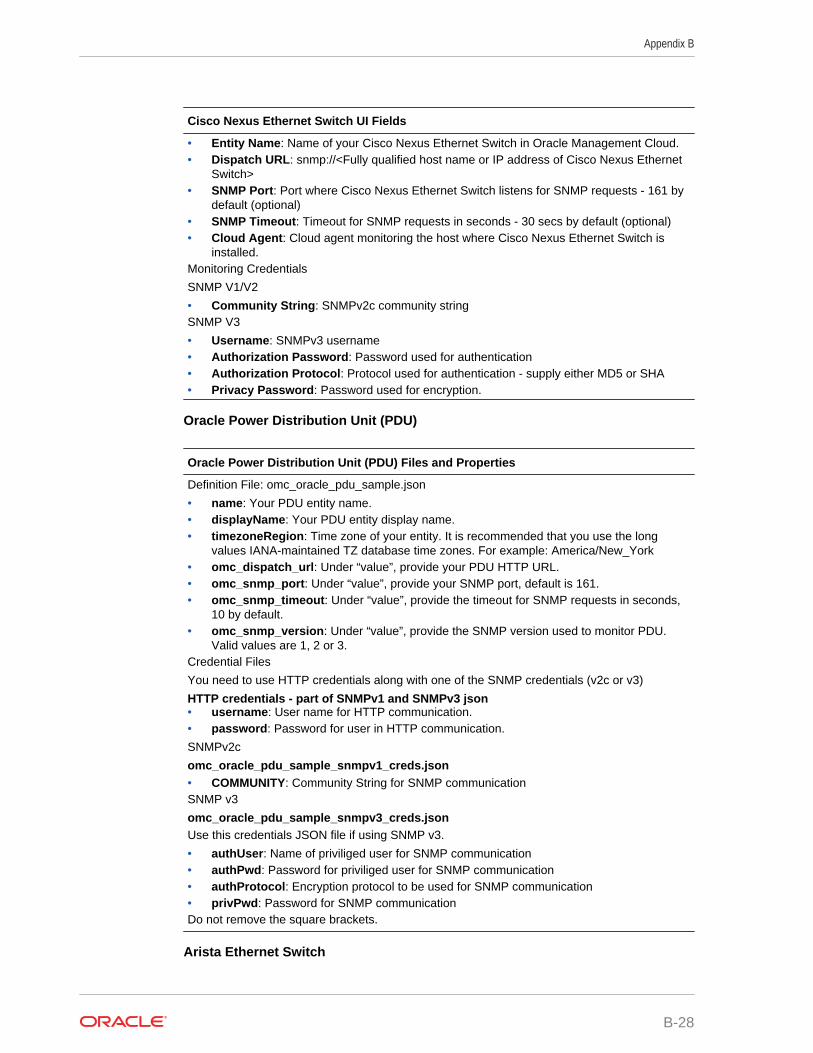
Cisco Nexus Ethernet Switch UI Fields
• Entity Name: Name of your Cisco Nexus Ethernet Switch in Oracle Management Cloud.• Dispatch URL: snmp://<Fully qualified host name or IP address of Cisco Nexus Ethernet
Switch>• SNMP Port: Port where Cisco Nexus Ethernet Switch listens for SNMP requests - 161 by
default (optional)• SNMP Timeout: Timeout for SNMP requests in seconds - 30 secs by default (optional)• Cloud Agent: Cloud agent monitoring the host where Cisco Nexus Ethernet Switch is
installed.Monitoring Credentials
SNMP V1/V2
• Community String: SNMPv2c community stringSNMP V3
• Username: SNMPv3 username• Authorization Password: Password used for authentication• Authorization Protocol: Protocol used for authentication - supply either MD5 or SHA• Privacy Password: Password used for encryption.
Oracle Power Distribution Unit (PDU)
Oracle Power Distribution Unit (PDU) Files and Properties
Definition File: omc_oracle_pdu_sample.json
• name: Your PDU entity name.• displayName: Your PDU entity display name.• timezoneRegion: Time zone of your entity. It is recommended that you use the long
values IANA-maintained TZ database time zones. For example: America/New_York• omc_dispatch_url: Under “value”, provide your PDU HTTP URL.• omc_snmp_port: Under “value”, provide your SNMP port, default is 161.• omc_snmp_timeout: Under “value”, provide the timeout for SNMP requests in seconds,
10 by default.• omc_snmp_version: Under “value”, provide the SNMP version used to monitor PDU.
Valid values are 1, 2 or 3.Credential Files
You need to use HTTP credentials along with one of the SNMP credentials (v2c or v3)
HTTP credentials - part of SNMPv1 and SNMPv3 json• username: User name for HTTP communication.• password: Password for user in HTTP communication.
SNMPv2c
omc_oracle_pdu_sample_snmpv1_creds.json• COMMUNITY: Community String for SNMP communicationSNMP v3
omc_oracle_pdu_sample_snmpv3_creds.jsonUse this credentials JSON file if using SNMP v3.
• authUser: Name of priviliged user for SNMP communication• authPwd: Password for priviliged user for SNMP communication• authProtocol: Encryption protocol to be used for SNMP communication• privPwd: Password for SNMP communicationDo not remove the square brackets.
Arista Ethernet Switch
Appendix B
B-28
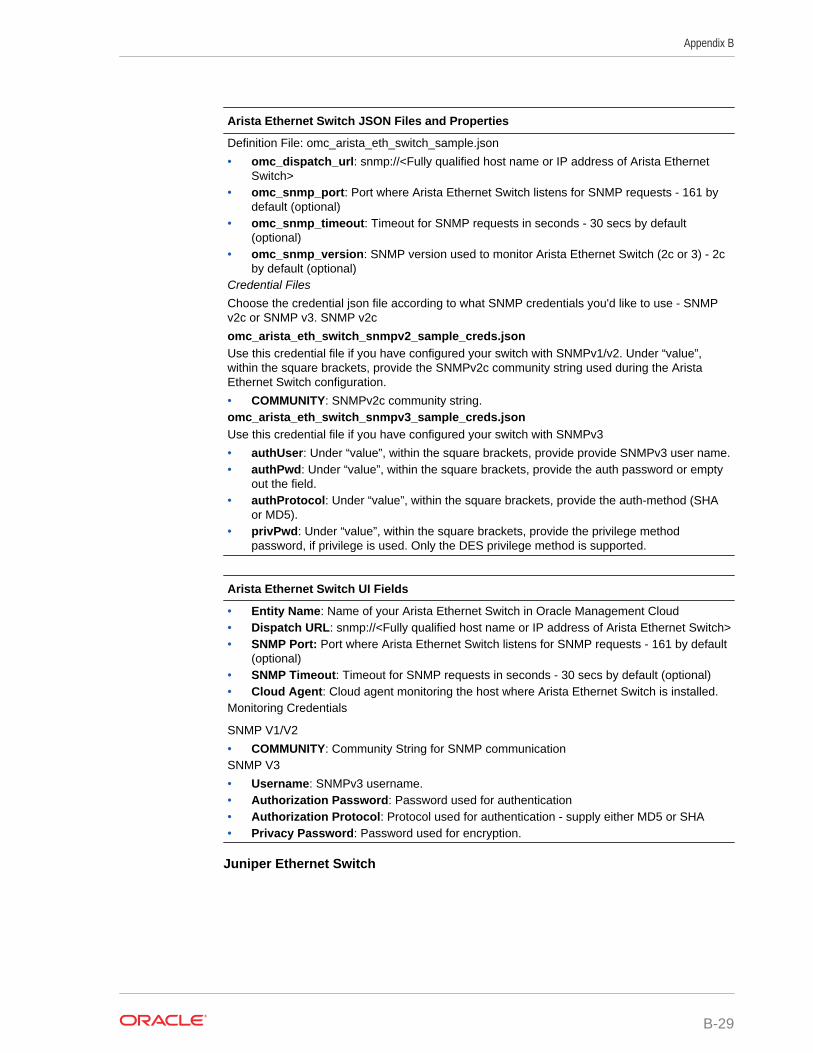
Arista Ethernet Switch JSON Files and Properties
Definition File: omc_arista_eth_switch_sample.json
• omc_dispatch_url: snmp://<Fully qualified host name or IP address of Arista EthernetSwitch>
• omc_snmp_port: Port where Arista Ethernet Switch listens for SNMP requests - 161 bydefault (optional)
• omc_snmp_timeout: Timeout for SNMP requests in seconds - 30 secs by default(optional)
• omc_snmp_version: SNMP version used to monitor Arista Ethernet Switch (2c or 3) - 2cby default (optional)
Credential Files
Choose the credential json file according to what SNMP credentials you'd like to use - SNMPv2c or SNMP v3. SNMP v2c
omc_arista_eth_switch_snmpv2_sample_creds.jsonUse this credential file if you have configured your switch with SNMPv1/v2. Under “value”,within the square brackets, provide the SNMPv2c community string used during the AristaEthernet Switch configuration.
• COMMUNITY: SNMPv2c community string.omc_arista_eth_switch_snmpv3_sample_creds.jsonUse this credential file if you have configured your switch with SNMPv3
• authUser: Under “value”, within the square brackets, provide provide SNMPv3 user name.• authPwd: Under “value”, within the square brackets, provide the auth password or empty
out the field.• authProtocol: Under “value”, within the square brackets, provide the auth-method (SHA
or MD5).• privPwd: Under “value”, within the square brackets, provide the privilege method
password, if privilege is used. Only the DES privilege method is supported.
Arista Ethernet Switch UI Fields
• Entity Name: Name of your Arista Ethernet Switch in Oracle Management Cloud• Dispatch URL: snmp://<Fully qualified host name or IP address of Arista Ethernet Switch>• SNMP Port: Port where Arista Ethernet Switch listens for SNMP requests - 161 by default
(optional)• SNMP Timeout: Timeout for SNMP requests in seconds - 30 secs by default (optional)• Cloud Agent: Cloud agent monitoring the host where Arista Ethernet Switch is installed.Monitoring Credentials
SNMP V1/V2
• COMMUNITY: Community String for SNMP communicationSNMP V3
• Username: SNMPv3 username.• Authorization Password: Password used for authentication• Authorization Protocol: Protocol used for authentication - supply either MD5 or SHA• Privacy Password: Password used for encryption.
Juniper Ethernet Switch
Appendix B
B-29
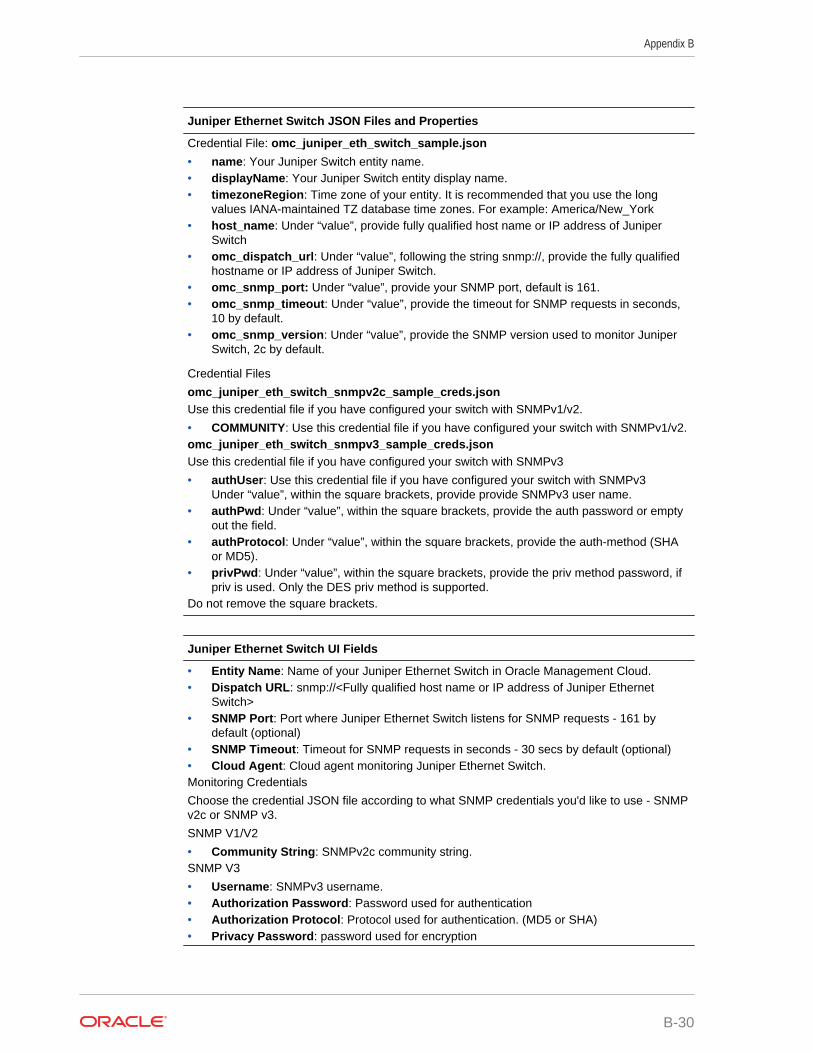
Juniper Ethernet Switch JSON Files and Properties
Credential File: omc_juniper_eth_switch_sample.json
• name: Your Juniper Switch entity name.• displayName: Your Juniper Switch entity display name.• timezoneRegion: Time zone of your entity. It is recommended that you use the long
values IANA-maintained TZ database time zones. For example: America/New_York• host_name: Under “value”, provide fully qualified host name or IP address of Juniper
Switch• omc_dispatch_url: Under “value”, following the string snmp://, provide the fully qualified
hostname or IP address of Juniper Switch.• omc_snmp_port: Under “value”, provide your SNMP port, default is 161.• omc_snmp_timeout: Under “value”, provide the timeout for SNMP requests in seconds,
10 by default.• omc_snmp_version: Under “value”, provide the SNMP version used to monitor Juniper
Switch, 2c by default.
Credential Files
omc_juniper_eth_switch_snmpv2c_sample_creds.jsonUse this credential file if you have configured your switch with SNMPv1/v2.
• COMMUNITY: Use this credential file if you have configured your switch with SNMPv1/v2.omc_juniper_eth_switch_snmpv3_sample_creds.jsonUse this credential file if you have configured your switch with SNMPv3
• authUser: Use this credential file if you have configured your switch with SNMPv3Under “value”, within the square brackets, provide provide SNMPv3 user name.
• authPwd: Under “value”, within the square brackets, provide the auth password or emptyout the field.
• authProtocol: Under “value”, within the square brackets, provide the auth-method (SHAor MD5).
• privPwd: Under “value”, within the square brackets, provide the priv method password, ifpriv is used. Only the DES priv method is supported.
Do not remove the square brackets.
Juniper Ethernet Switch UI Fields
• Entity Name: Name of your Juniper Ethernet Switch in Oracle Management Cloud.• Dispatch URL: snmp://<Fully qualified host name or IP address of Juniper Ethernet
Switch>• SNMP Port: Port where Juniper Ethernet Switch listens for SNMP requests - 161 by
default (optional)• SNMP Timeout: Timeout for SNMP requests in seconds - 30 secs by default (optional)• Cloud Agent: Cloud agent monitoring Juniper Ethernet Switch.Monitoring Credentials
Choose the credential JSON file according to what SNMP credentials you'd like to use - SNMPv2c or SNMP v3.
SNMP V1/V2
• Community String: SNMPv2c community string.SNMP V3
• Username: SNMPv3 username.• Authorization Password: Password used for authentication• Authorization Protocol: Protocol used for authentication. (MD5 or SHA)• Privacy Password: password used for encryption
Appendix B
B-30
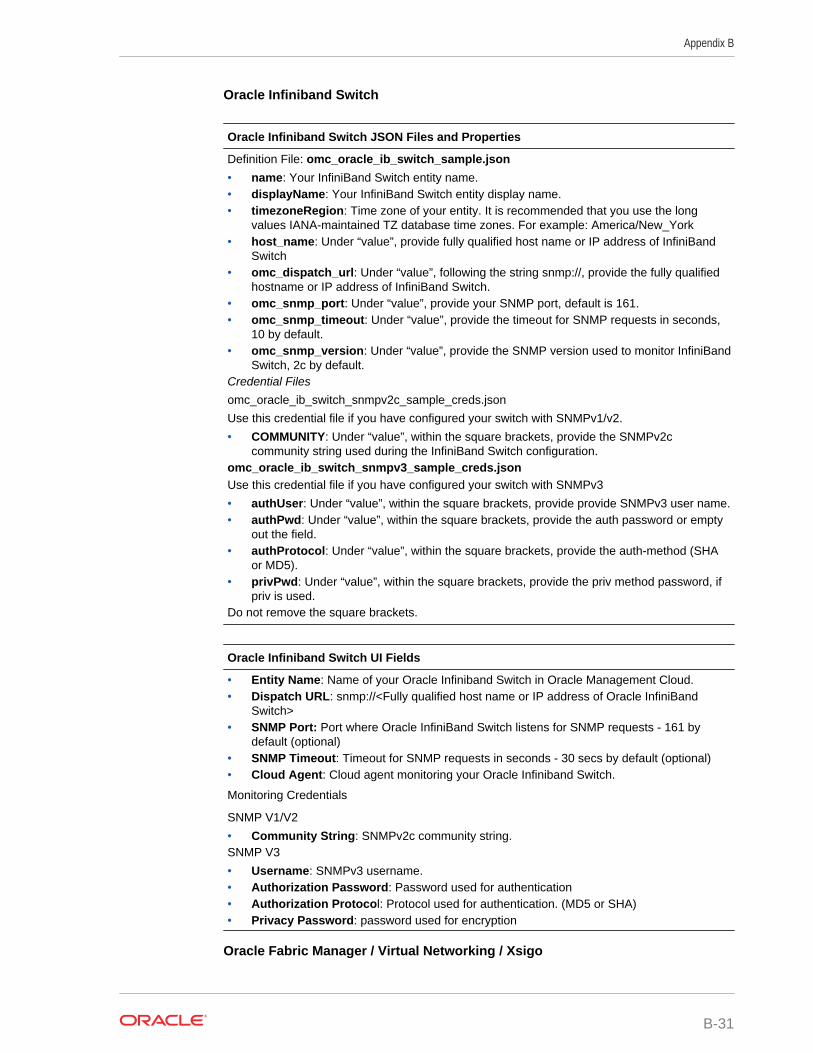
Oracle Infiniband Switch
Oracle Infiniband Switch JSON Files and Properties
Definition File: omc_oracle_ib_switch_sample.json
• name: Your InfiniBand Switch entity name.• displayName: Your InfiniBand Switch entity display name.• timezoneRegion: Time zone of your entity. It is recommended that you use the long
values IANA-maintained TZ database time zones. For example: America/New_York• host_name: Under “value”, provide fully qualified host name or IP address of InfiniBand
Switch• omc_dispatch_url: Under “value”, following the string snmp://, provide the fully qualified
hostname or IP address of InfiniBand Switch.• omc_snmp_port: Under “value”, provide your SNMP port, default is 161.• omc_snmp_timeout: Under “value”, provide the timeout for SNMP requests in seconds,
10 by default.• omc_snmp_version: Under “value”, provide the SNMP version used to monitor InfiniBand
Switch, 2c by default.Credential Files
omc_oracle_ib_switch_snmpv2c_sample_creds.json
Use this credential file if you have configured your switch with SNMPv1/v2.
• COMMUNITY: Under “value”, within the square brackets, provide the SNMPv2ccommunity string used during the InfiniBand Switch configuration.
omc_oracle_ib_switch_snmpv3_sample_creds.jsonUse this credential file if you have configured your switch with SNMPv3
• authUser: Under “value”, within the square brackets, provide provide SNMPv3 user name.• authPwd: Under “value”, within the square brackets, provide the auth password or empty
out the field.• authProtocol: Under “value”, within the square brackets, provide the auth-method (SHA
or MD5).• privPwd: Under “value”, within the square brackets, provide the priv method password, if
priv is used.Do not remove the square brackets.
Oracle Infiniband Switch UI Fields
• Entity Name: Name of your Oracle Infiniband Switch in Oracle Management Cloud.• Dispatch URL: snmp://<Fully qualified host name or IP address of Oracle InfiniBand
Switch>• SNMP Port: Port where Oracle InfiniBand Switch listens for SNMP requests - 161 by
default (optional)• SNMP Timeout: Timeout for SNMP requests in seconds - 30 secs by default (optional)• Cloud Agent: Cloud agent monitoring your Oracle Infiniband Switch.
Monitoring Credentials
SNMP V1/V2
• Community String: SNMPv2c community string.SNMP V3
• Username: SNMPv3 username.• Authorization Password: Password used for authentication• Authorization Protocol: Protocol used for authentication. (MD5 or SHA)• Privacy Password: password used for encryption
Oracle Fabric Manager / Virtual Networking / Xsigo
Appendix B
B-31
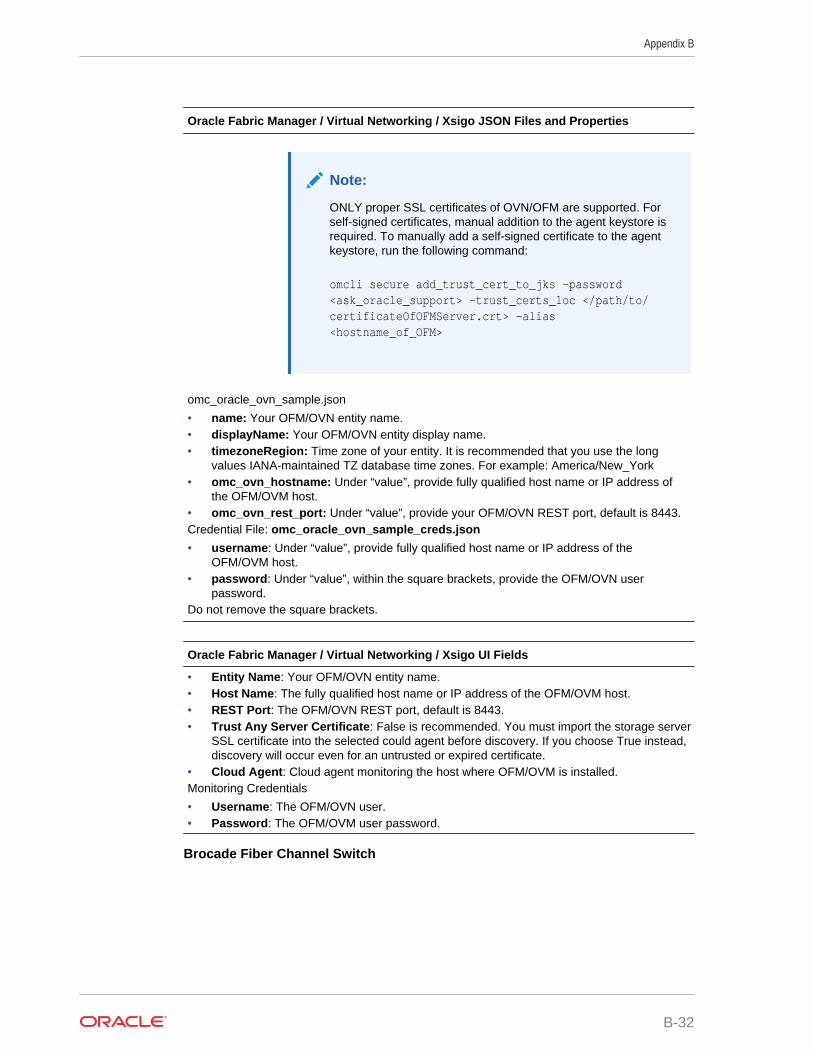
Oracle Fabric Manager / Virtual Networking / Xsigo JSON Files and Properties
Note:
ONLY proper SSL certificates of OVN/OFM are supported. Forself-signed certificates, manual addition to the agent keystore isrequired. To manually add a self-signed certificate to the agentkeystore, run the following command:
omcli secure add_trust_cert_to_jks -password <ask_oracle_support> -trust_certs_loc </path/to/certificateOfOFMServer.crt> -alias <hostname_of_OFM>
omc_oracle_ovn_sample.json
• name: Your OFM/OVN entity name.• displayName: Your OFM/OVN entity display name.• timezoneRegion: Time zone of your entity. It is recommended that you use the long
values IANA-maintained TZ database time zones. For example: America/New_York• omc_ovn_hostname: Under “value”, provide fully qualified host name or IP address of
the OFM/OVM host.• omc_ovn_rest_port: Under “value”, provide your OFM/OVN REST port, default is 8443.Credential File: omc_oracle_ovn_sample_creds.json
• username: Under “value”, provide fully qualified host name or IP address of theOFM/OVM host.
• password: Under “value”, within the square brackets, provide the OFM/OVN userpassword.
Do not remove the square brackets.
Oracle Fabric Manager / Virtual Networking / Xsigo UI Fields
• Entity Name: Your OFM/OVN entity name.• Host Name: The fully qualified host name or IP address of the OFM/OVM host.• REST Port: The OFM/OVN REST port, default is 8443.• Trust Any Server Certificate: False is recommended. You must import the storage server
SSL certificate into the selected could agent before discovery. If you choose True instead,discovery will occur even for an untrusted or expired certificate.
• Cloud Agent: Cloud agent monitoring the host where OFM/OVM is installed.Monitoring Credentials
• Username: The OFM/OVN user.• Password: The OFM/OVM user password.
Brocade Fiber Channel Switch
Appendix B
B-32
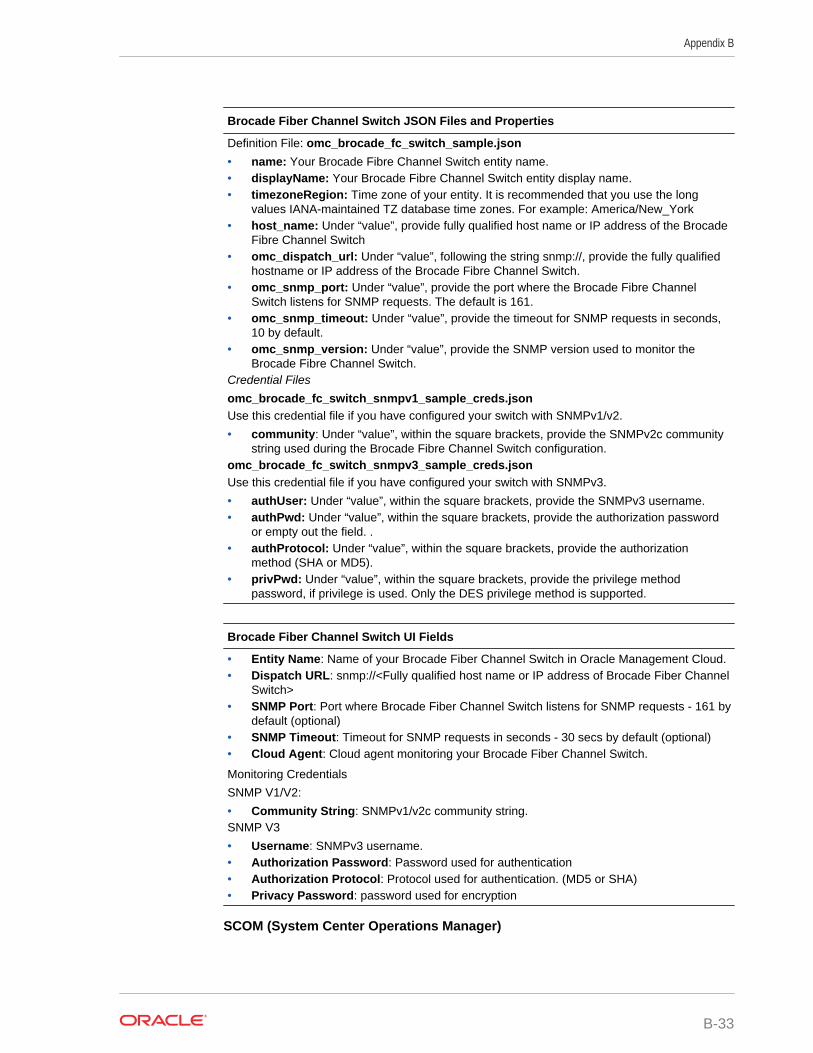
Brocade Fiber Channel Switch JSON Files and Properties
Definition File: omc_brocade_fc_switch_sample.json
• name: Your Brocade Fibre Channel Switch entity name.• displayName: Your Brocade Fibre Channel Switch entity display name.• timezoneRegion: Time zone of your entity. It is recommended that you use the long
values IANA-maintained TZ database time zones. For example: America/New_York• host_name: Under “value”, provide fully qualified host name or IP address of the Brocade
Fibre Channel Switch• omc_dispatch_url: Under “value”, following the string snmp://, provide the fully qualified
hostname or IP address of the Brocade Fibre Channel Switch.• omc_snmp_port: Under “value”, provide the port where the Brocade Fibre Channel
Switch listens for SNMP requests. The default is 161.• omc_snmp_timeout: Under “value”, provide the timeout for SNMP requests in seconds,
10 by default.• omc_snmp_version: Under “value”, provide the SNMP version used to monitor the
Brocade Fibre Channel Switch.Credential Files
omc_brocade_fc_switch_snmpv1_sample_creds.jsonUse this credential file if you have configured your switch with SNMPv1/v2.
• community: Under “value”, within the square brackets, provide the SNMPv2c communitystring used during the Brocade Fibre Channel Switch configuration.
omc_brocade_fc_switch_snmpv3_sample_creds.jsonUse this credential file if you have configured your switch with SNMPv3.
• authUser: Under “value”, within the square brackets, provide the SNMPv3 username.• authPwd: Under “value”, within the square brackets, provide the authorization password
or empty out the field. .• authProtocol: Under “value”, within the square brackets, provide the authorization
method (SHA or MD5).• privPwd: Under “value”, within the square brackets, provide the privilege method
password, if privilege is used. Only the DES privilege method is supported.
Brocade Fiber Channel Switch UI Fields
• Entity Name: Name of your Brocade Fiber Channel Switch in Oracle Management Cloud.• Dispatch URL: snmp://<Fully qualified host name or IP address of Brocade Fiber Channel
Switch>• SNMP Port: Port where Brocade Fiber Channel Switch listens for SNMP requests - 161 by
default (optional)• SNMP Timeout: Timeout for SNMP requests in seconds - 30 secs by default (optional)• Cloud Agent: Cloud agent monitoring your Brocade Fiber Channel Switch.
Monitoring Credentials
SNMP V1/V2:
• Community String: SNMPv1/v2c community string.SNMP V3
• Username: SNMPv3 username.• Authorization Password: Password used for authentication• Authorization Protocol: Protocol used for authentication. (MD5 or SHA)• Privacy Password: password used for encryption
SCOM (System Center Operations Manager)
Appendix B
B-33
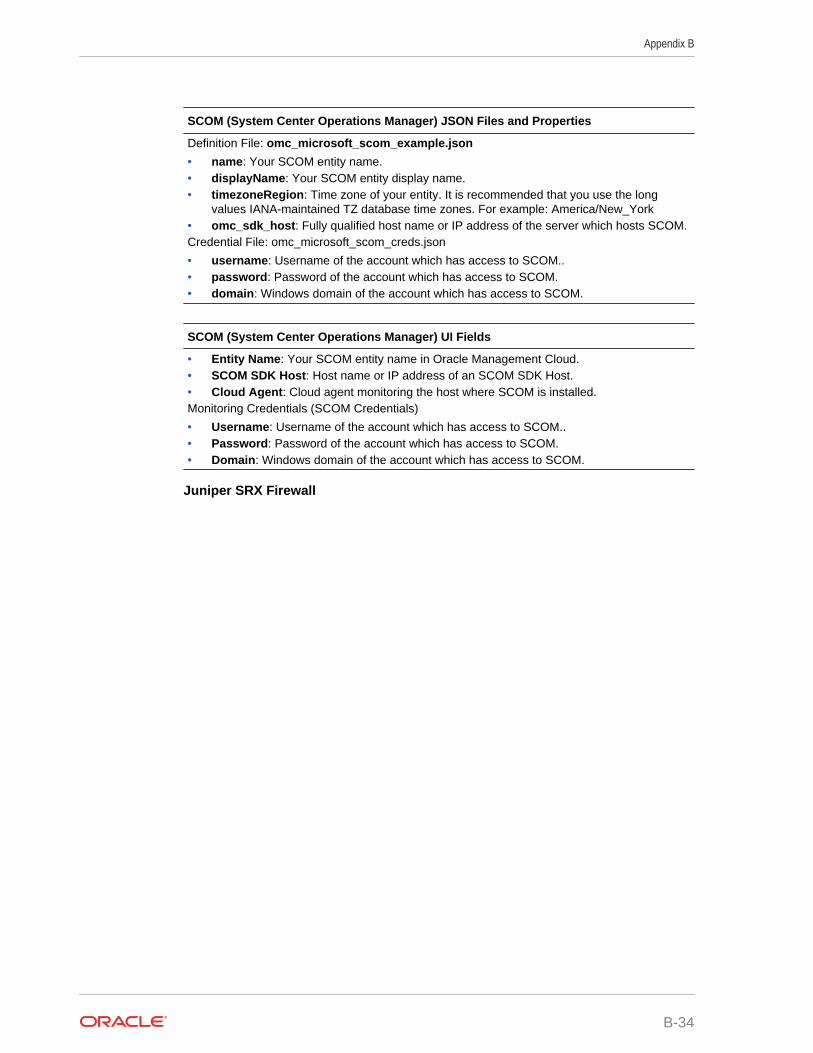
SCOM (System Center Operations Manager) JSON Files and Properties
Definition File: omc_microsoft_scom_example.json
• name: Your SCOM entity name.• displayName: Your SCOM entity display name.• timezoneRegion: Time zone of your entity. It is recommended that you use the long
values IANA-maintained TZ database time zones. For example: America/New_York• omc_sdk_host: Fully qualified host name or IP address of the server which hosts SCOM.Credential File: omc_microsoft_scom_creds.json
• username: Username of the account which has access to SCOM..• password: Password of the account which has access to SCOM.• domain: Windows domain of the account which has access to SCOM.
SCOM (System Center Operations Manager) UI Fields
• Entity Name: Your SCOM entity name in Oracle Management Cloud.• SCOM SDK Host: Host name or IP address of an SCOM SDK Host.• Cloud Agent: Cloud agent monitoring the host where SCOM is installed.Monitoring Credentials (SCOM Credentials)
• Username: Username of the account which has access to SCOM..• Password: Password of the account which has access to SCOM.• Domain: Windows domain of the account which has access to SCOM.
Juniper SRX Firewall
Appendix B
B-34
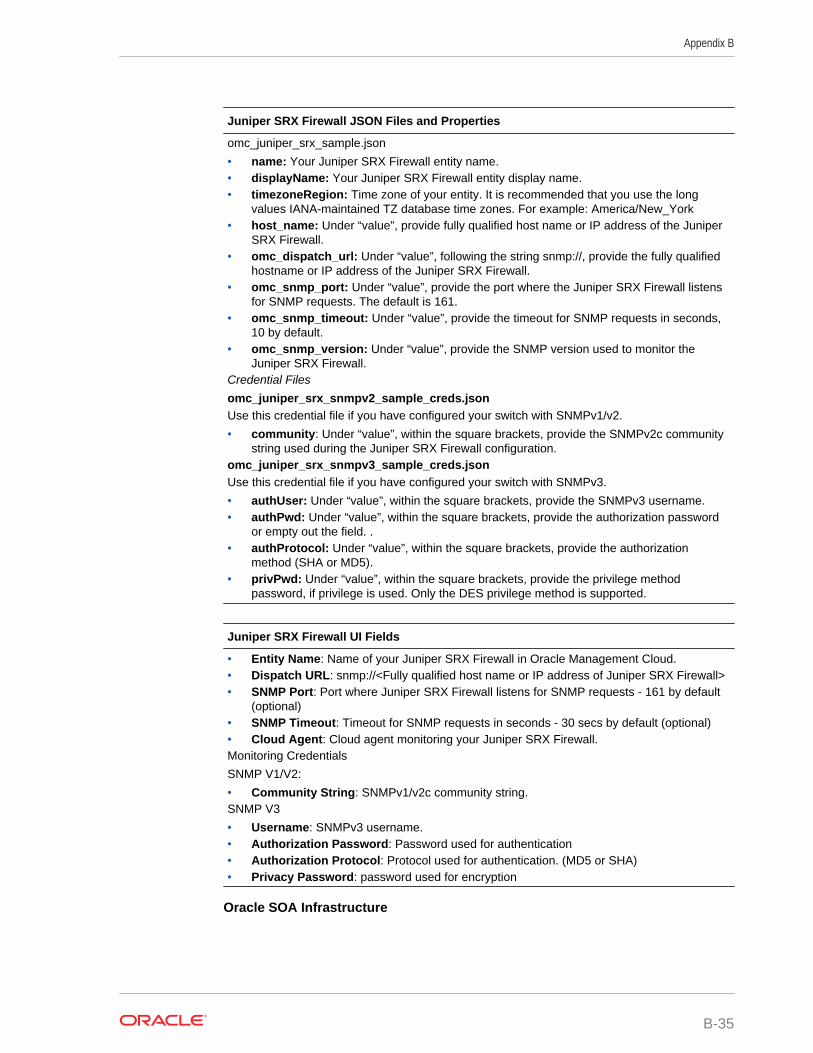
Juniper SRX Firewall JSON Files and Properties
omc_juniper_srx_sample.json
• name: Your Juniper SRX Firewall entity name.• displayName: Your Juniper SRX Firewall entity display name.• timezoneRegion: Time zone of your entity. It is recommended that you use the long
values IANA-maintained TZ database time zones. For example: America/New_York• host_name: Under “value”, provide fully qualified host name or IP address of the Juniper
SRX Firewall.• omc_dispatch_url: Under “value”, following the string snmp://, provide the fully qualified
hostname or IP address of the Juniper SRX Firewall.• omc_snmp_port: Under “value”, provide the port where the Juniper SRX Firewall listens
for SNMP requests. The default is 161.• omc_snmp_timeout: Under “value”, provide the timeout for SNMP requests in seconds,
10 by default.• omc_snmp_version: Under “value”, provide the SNMP version used to monitor the
Juniper SRX Firewall.Credential Files
omc_juniper_srx_snmpv2_sample_creds.jsonUse this credential file if you have configured your switch with SNMPv1/v2.
• community: Under “value”, within the square brackets, provide the SNMPv2c communitystring used during the Juniper SRX Firewall configuration.
omc_juniper_srx_snmpv3_sample_creds.jsonUse this credential file if you have configured your switch with SNMPv3.
• authUser: Under “value”, within the square brackets, provide the SNMPv3 username.• authPwd: Under “value”, within the square brackets, provide the authorization password
or empty out the field. .• authProtocol: Under “value”, within the square brackets, provide the authorization
method (SHA or MD5).• privPwd: Under “value”, within the square brackets, provide the privilege method
password, if privilege is used. Only the DES privilege method is supported.
Juniper SRX Firewall UI Fields
• Entity Name: Name of your Juniper SRX Firewall in Oracle Management Cloud.• Dispatch URL: snmp://<Fully qualified host name or IP address of Juniper SRX Firewall>• SNMP Port: Port where Juniper SRX Firewall listens for SNMP requests - 161 by default
(optional)• SNMP Timeout: Timeout for SNMP requests in seconds - 30 secs by default (optional)• Cloud Agent: Cloud agent monitoring your Juniper SRX Firewall.Monitoring Credentials
SNMP V1/V2:
• Community String: SNMPv1/v2c community string.SNMP V3
• Username: SNMPv3 username.• Authorization Password: Password used for authentication• Authorization Protocol: Protocol used for authentication. (MD5 or SHA)• Privacy Password: password used for encryption
Oracle SOA Infrastructure
Appendix B
B-35
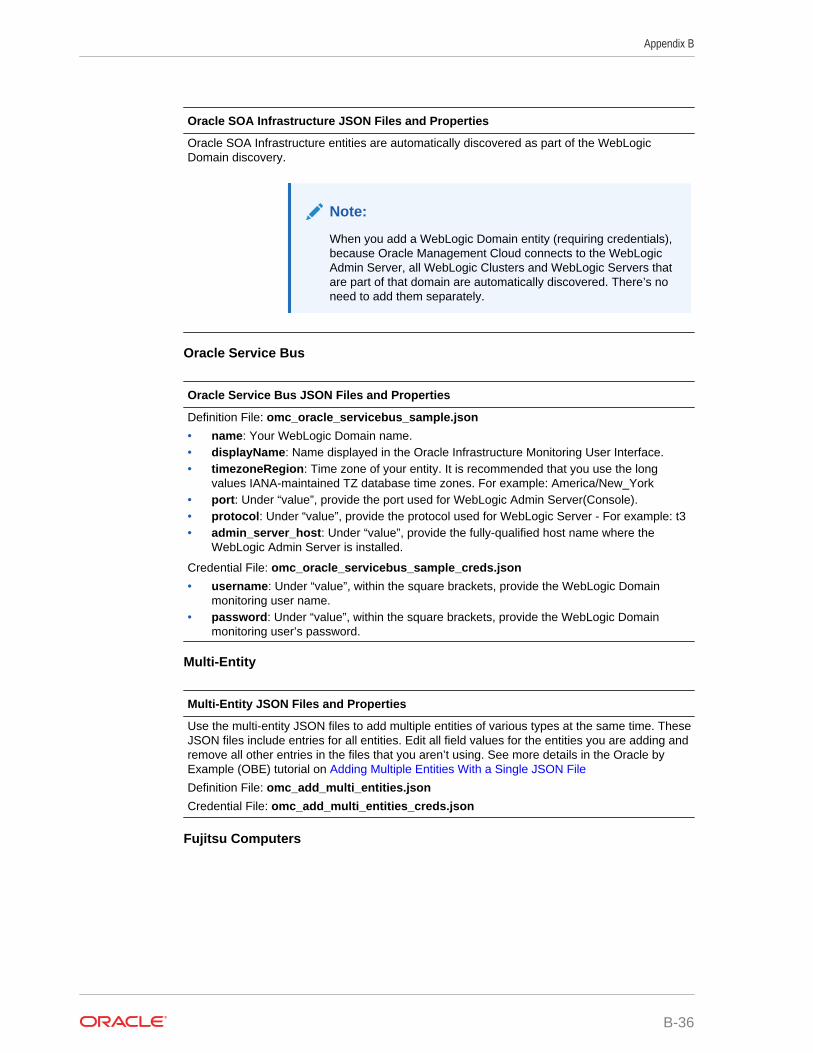
Oracle SOA Infrastructure JSON Files and Properties
Oracle SOA Infrastructure entities are automatically discovered as part of the WebLogicDomain discovery.
Note:
When you add a WebLogic Domain entity (requiring credentials),because Oracle Management Cloud connects to the WebLogicAdmin Server, all WebLogic Clusters and WebLogic Servers thatare part of that domain are automatically discovered. There’s noneed to add them separately.
Oracle Service Bus
Oracle Service Bus JSON Files and Properties
Definition File: omc_oracle_servicebus_sample.json
• name: Your WebLogic Domain name.• displayName: Name displayed in the Oracle Infrastructure Monitoring User Interface.• timezoneRegion: Time zone of your entity. It is recommended that you use the long
values IANA-maintained TZ database time zones. For example: America/New_York• port: Under “value”, provide the port used for WebLogic Admin Server(Console).• protocol: Under “value”, provide the protocol used for WebLogic Server - For example: t3• admin_server_host: Under “value”, provide the fully-qualified host name where the
WebLogic Admin Server is installed.
Credential File: omc_oracle_servicebus_sample_creds.json
• username: Under “value”, within the square brackets, provide the WebLogic Domainmonitoring user name.
• password: Under “value”, within the square brackets, provide the WebLogic Domainmonitoring user’s password.
Multi-Entity
Multi-Entity JSON Files and Properties
Use the multi-entity JSON files to add multiple entities of various types at the same time. TheseJSON files include entries for all entities. Edit all field values for the entities you are adding andremove all other entries in the files that you aren’t using. See more details in the Oracle byExample (OBE) tutorial on Adding Multiple Entities With a Single JSON File
Definition File: omc_add_multi_entities.json
Credential File: omc_add_multi_entities_creds.json
Fujitsu Computers
Appendix B
B-36
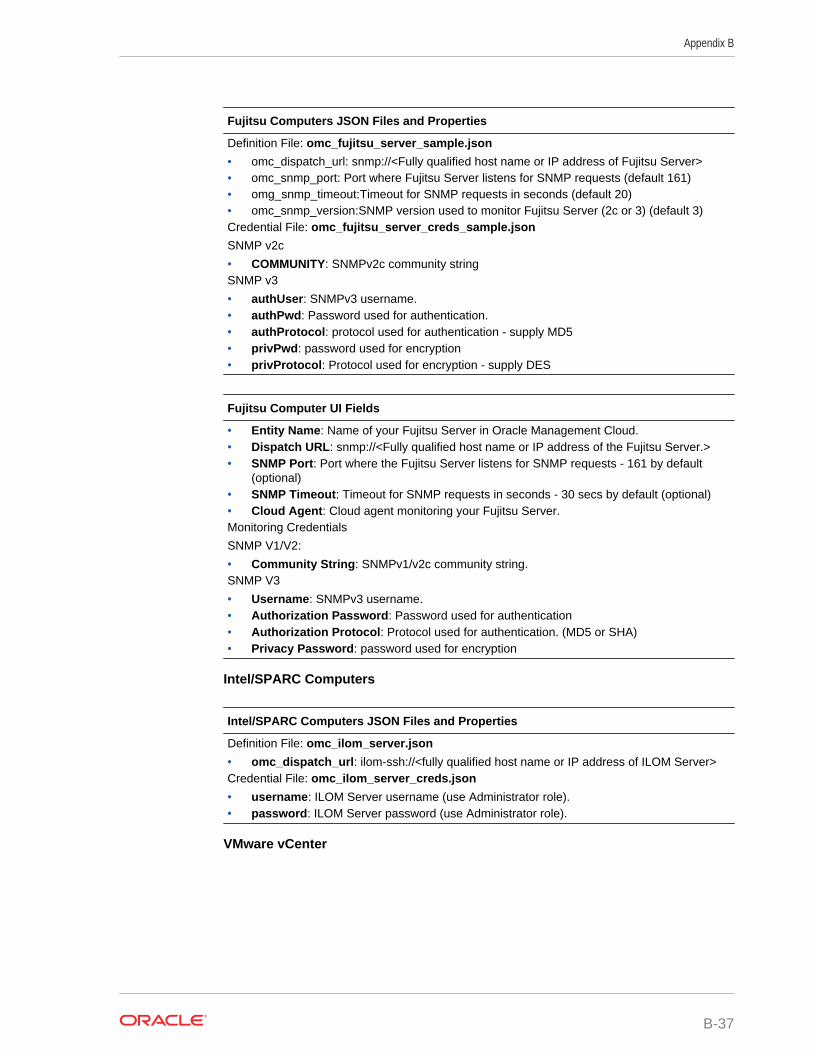
Fujitsu Computers JSON Files and Properties
Definition File: omc_fujitsu_server_sample.json
• omc_dispatch_url: snmp://<Fully qualified host name or IP address of Fujitsu Server>• omc_snmp_port: Port where Fujitsu Server listens for SNMP requests (default 161)• omg_snmp_timeout:Timeout for SNMP requests in seconds (default 20)• omc_snmp_version:SNMP version used to monitor Fujitsu Server (2c or 3) (default 3)Credential File: omc_fujitsu_server_creds_sample.json
SNMP v2c
• COMMUNITY: SNMPv2c community stringSNMP v3
• authUser: SNMPv3 username.• authPwd: Password used for authentication.• authProtocol: protocol used for authentication - supply MD5• privPwd: password used for encryption• privProtocol: Protocol used for encryption - supply DES
Fujitsu Computer UI Fields
• Entity Name: Name of your Fujitsu Server in Oracle Management Cloud.• Dispatch URL: snmp://<Fully qualified host name or IP address of the Fujitsu Server.>• SNMP Port: Port where the Fujitsu Server listens for SNMP requests - 161 by default
(optional)• SNMP Timeout: Timeout for SNMP requests in seconds - 30 secs by default (optional)• Cloud Agent: Cloud agent monitoring your Fujitsu Server.Monitoring Credentials
SNMP V1/V2:
• Community String: SNMPv1/v2c community string.SNMP V3
• Username: SNMPv3 username.• Authorization Password: Password used for authentication• Authorization Protocol: Protocol used for authentication. (MD5 or SHA)• Privacy Password: password used for encryption
Intel/SPARC Computers
Intel/SPARC Computers JSON Files and Properties
Definition File: omc_ilom_server.json
• omc_dispatch_url: ilom-ssh://<fully qualified host name or IP address of ILOM Server>Credential File: omc_ilom_server_creds.json
• username: ILOM Server username (use Administrator role).• password: ILOM Server password (use Administrator role).
VMware vCenter
Appendix B
B-37
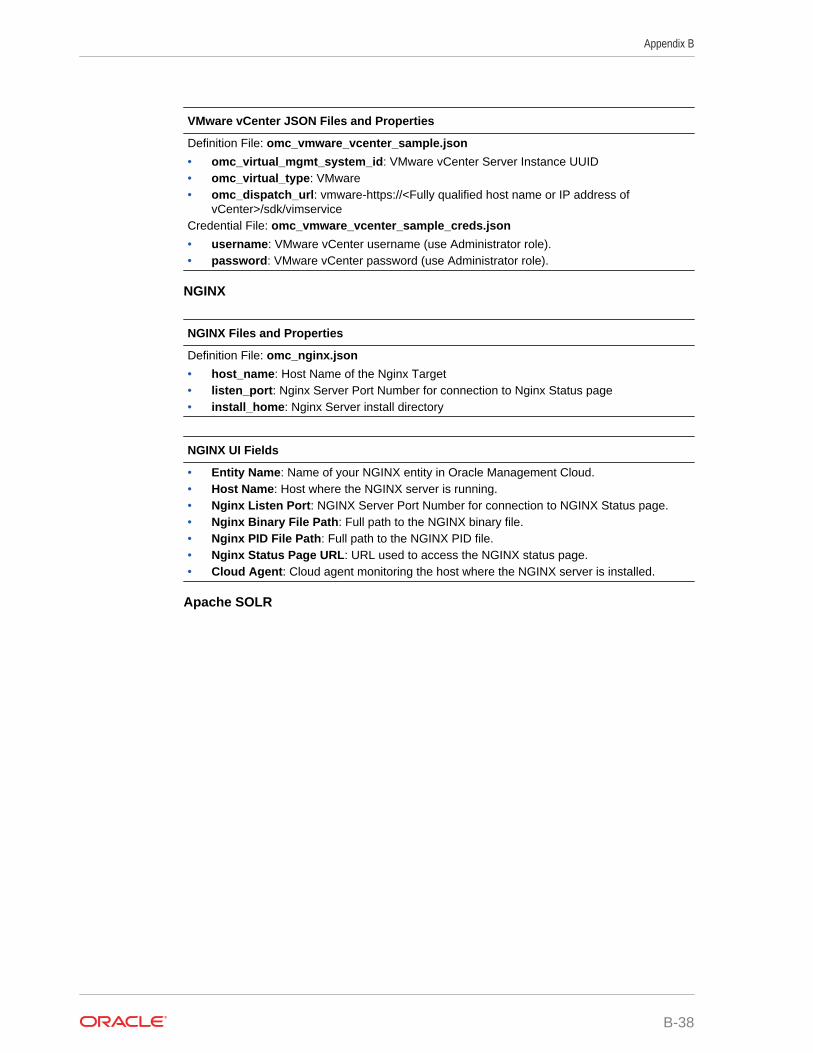
VMware vCenter JSON Files and Properties
Definition File: omc_vmware_vcenter_sample.json
• omc_virtual_mgmt_system_id: VMware vCenter Server Instance UUID• omc_virtual_type: VMware• omc_dispatch_url: vmware-https://<Fully qualified host name or IP address of
vCenter>/sdk/vimserviceCredential File: omc_vmware_vcenter_sample_creds.json
• username: VMware vCenter username (use Administrator role).• password: VMware vCenter password (use Administrator role).
NGINX
NGINX Files and Properties
Definition File: omc_nginx.json
• host_name: Host Name of the Nginx Target• listen_port: Nginx Server Port Number for connection to Nginx Status page• install_home: Nginx Server install directory
NGINX UI Fields
• Entity Name: Name of your NGINX entity in Oracle Management Cloud.• Host Name: Host where the NGINX server is running.• Nginx Listen Port: NGINX Server Port Number for connection to NGINX Status page.• Nginx Binary File Path: Full path to the NGINX binary file.• Nginx PID File Path: Full path to the NGINX PID file.• Nginx Status Page URL: URL used to access the NGINX status page.• Cloud Agent: Cloud agent monitoring the host where the NGINX server is installed.
Apache SOLR
Appendix B
B-38
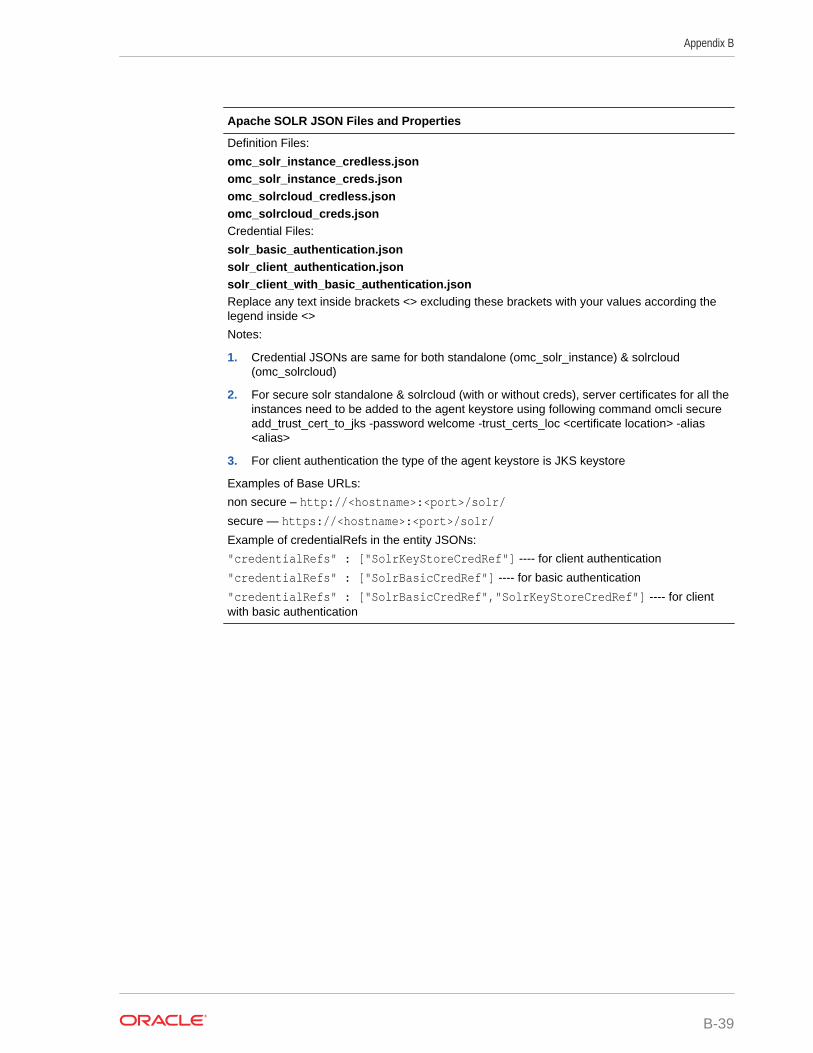
Apache SOLR JSON Files and Properties
Definition Files:
omc_solr_instance_credless.jsonomc_solr_instance_creds.jsonomc_solrcloud_credless.jsonomc_solrcloud_creds.jsonCredential Files:
solr_basic_authentication.jsonsolr_client_authentication.jsonsolr_client_with_basic_authentication.jsonReplace any text inside brackets <> excluding these brackets with your values according thelegend inside <>
Notes:
1. Credential JSONs are same for both standalone (omc_solr_instance) & solrcloud(omc_solrcloud)
2. For secure solr standalone & solrcloud (with or without creds), server certificates for all theinstances need to be added to the agent keystore using following command omcli secureadd_trust_cert_to_jks -password welcome -trust_certs_loc <certificate location> -alias<alias>
3. For client authentication the type of the agent keystore is JKS keystore
Examples of Base URLs:
non secure – http://<hostname>:<port>/solr/
secure — https://<hostname>:<port>/solr/
Example of credentialRefs in the entity JSONs:
"credentialRefs" : ["SolrKeyStoreCredRef"] ---- for client authentication
"credentialRefs" : ["SolrBasicCredRef"] ---- for basic authentication
"credentialRefs" : ["SolrBasicCredRef","SolrKeyStoreCredRef"] ---- for clientwith basic authentication
Appendix B
B-39
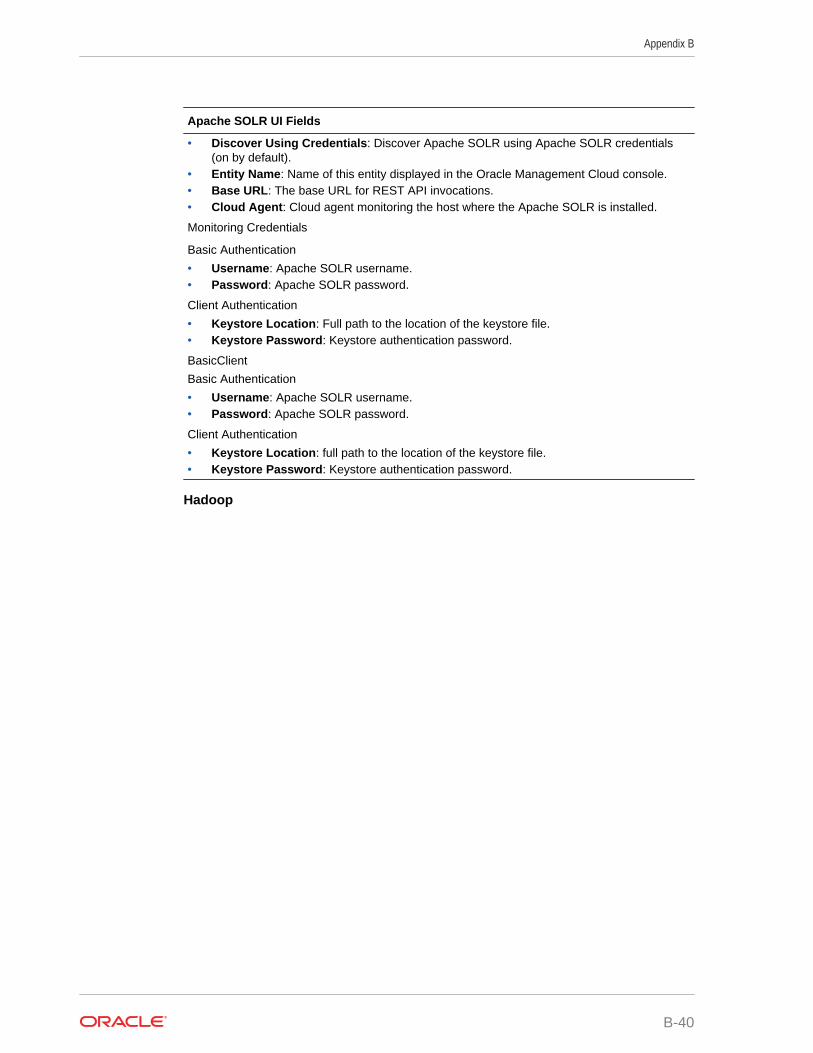
Apache SOLR UI Fields
• Discover Using Credentials: Discover Apache SOLR using Apache SOLR credentials(on by default).
• Entity Name: Name of this entity displayed in the Oracle Management Cloud console.• Base URL: The base URL for REST API invocations.• Cloud Agent: Cloud agent monitoring the host where the Apache SOLR is installed.
Monitoring Credentials
Basic Authentication
• Username: Apache SOLR username.• Password: Apache SOLR password.
Client Authentication
• Keystore Location: Full path to the location of the keystore file.• Keystore Password: Keystore authentication password.
BasicClient
Basic Authentication
• Username: Apache SOLR username.• Password: Apache SOLR password.
Client Authentication
• Keystore Location: full path to the location of the keystore file.• Keystore Password: Keystore authentication password.
Hadoop
Appendix B
B-40
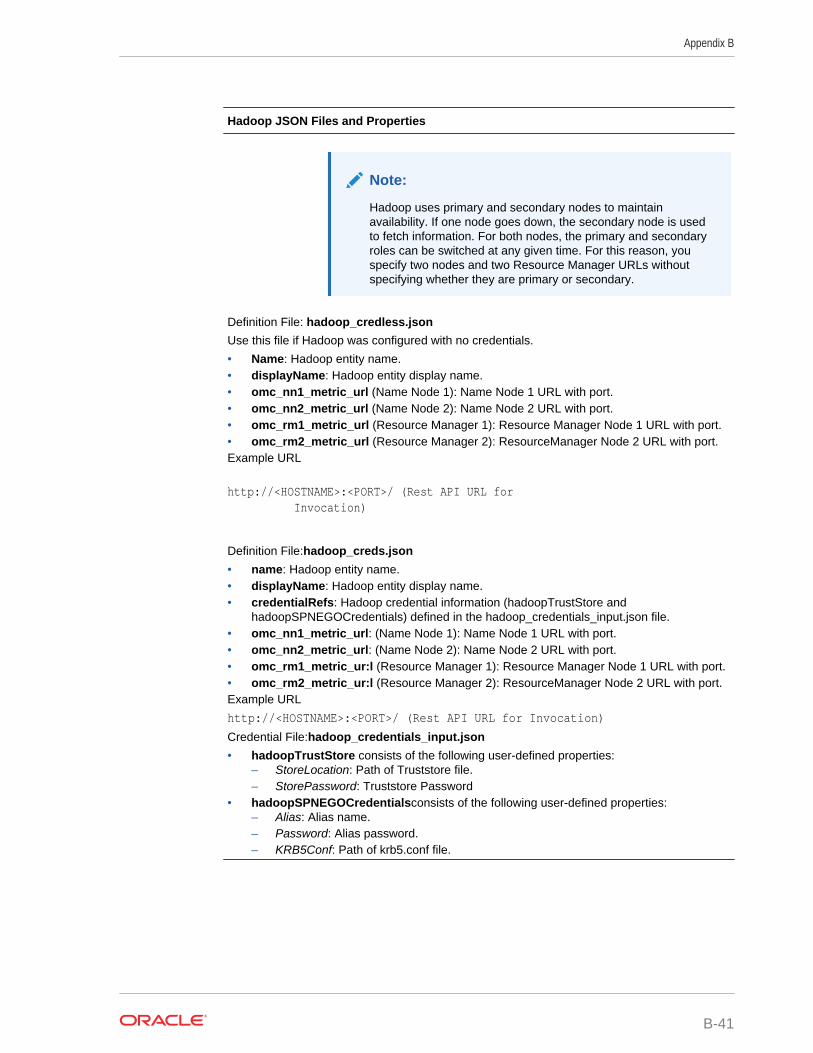
Hadoop JSON Files and Properties
Note:
Hadoop uses primary and secondary nodes to maintainavailability. If one node goes down, the secondary node is usedto fetch information. For both nodes, the primary and secondaryroles can be switched at any given time. For this reason, youspecify two nodes and two Resource Manager URLs withoutspecifying whether they are primary or secondary.
Definition File: hadoop_credless.json
Use this file if Hadoop was configured with no credentials.
• Name: Hadoop entity name.• displayName: Hadoop entity display name.• omc_nn1_metric_url (Name Node 1): Name Node 1 URL with port.• omc_nn2_metric_url (Name Node 2): Name Node 2 URL with port.• omc_rm1_metric_url (Resource Manager 1): Resource Manager Node 1 URL with port.• omc_rm2_metric_url (Resource Manager 2): ResourceManager Node 2 URL with port.Example URL
http://<HOSTNAME>:<PORT>/ (Rest API URL for Invocation)
Definition File:hadoop_creds.json
• name: Hadoop entity name.• displayName: Hadoop entity display name.• credentialRefs: Hadoop credential information (hadoopTrustStore and
hadoopSPNEGOCredentials) defined in the hadoop_credentials_input.json file.• omc_nn1_metric_url: (Name Node 1): Name Node 1 URL with port.• omc_nn2_metric_url: (Name Node 2): Name Node 2 URL with port.• omc_rm1_metric_ur:l (Resource Manager 1): Resource Manager Node 1 URL with port.• omc_rm2_metric_ur:l (Resource Manager 2): ResourceManager Node 2 URL with port.Example URL
http://<HOSTNAME>:<PORT>/ (Rest API URL for Invocation)
Credential File:hadoop_credentials_input.json
• hadoopTrustStore consists of the following user-defined properties:– StoreLocation: Path of Truststore file.– StorePassword: Truststore Password
• hadoopSPNEGOCredentialsconsists of the following user-defined properties:– Alias: Alias name.– Password: Alias password.– KRB5Conf: Path of krb5.conf file.
Appendix B
B-41
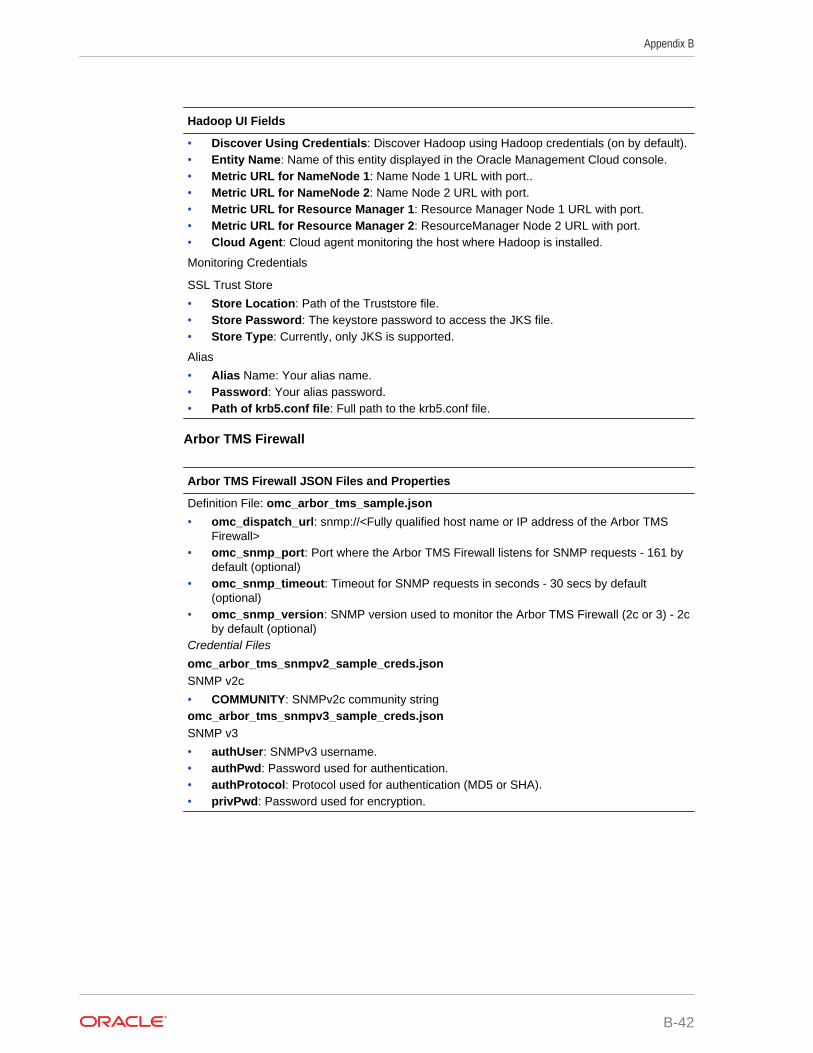
Hadoop UI Fields
• Discover Using Credentials: Discover Hadoop using Hadoop credentials (on by default).• Entity Name: Name of this entity displayed in the Oracle Management Cloud console.• Metric URL for NameNode 1: Name Node 1 URL with port..• Metric URL for NameNode 2: Name Node 2 URL with port.• Metric URL for Resource Manager 1: Resource Manager Node 1 URL with port.• Metric URL for Resource Manager 2: ResourceManager Node 2 URL with port.• Cloud Agent: Cloud agent monitoring the host where Hadoop is installed.
Monitoring Credentials
SSL Trust Store
• Store Location: Path of the Truststore file.• Store Password: The keystore password to access the JKS file.• Store Type: Currently, only JKS is supported.
Alias
• Alias Name: Your alias name.• Password: Your alias password.• Path of krb5.conf file: Full path to the krb5.conf file.
Arbor TMS Firewall
Arbor TMS Firewall JSON Files and Properties
Definition File: omc_arbor_tms_sample.json
• omc_dispatch_url: snmp://<Fully qualified host name or IP address of the Arbor TMSFirewall>
• omc_snmp_port: Port where the Arbor TMS Firewall listens for SNMP requests - 161 bydefault (optional)
• omc_snmp_timeout: Timeout for SNMP requests in seconds - 30 secs by default(optional)
• omc_snmp_version: SNMP version used to monitor the Arbor TMS Firewall (2c or 3) - 2cby default (optional)
Credential Files
omc_arbor_tms_snmpv2_sample_creds.jsonSNMP v2c
• COMMUNITY: SNMPv2c community stringomc_arbor_tms_snmpv3_sample_creds.jsonSNMP v3
• authUser: SNMPv3 username.• authPwd: Password used for authentication.• authProtocol: Protocol used for authentication (MD5 or SHA).• privPwd: Password used for encryption.
Appendix B
B-42
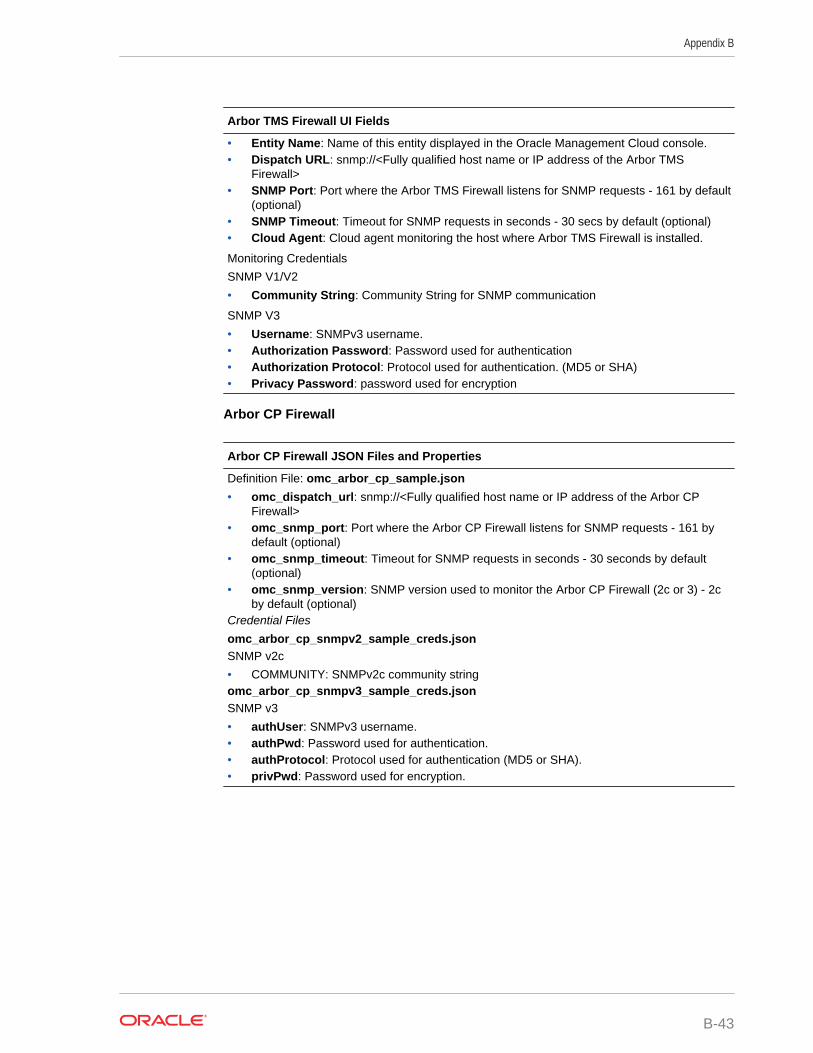
Arbor TMS Firewall UI Fields
• Entity Name: Name of this entity displayed in the Oracle Management Cloud console.• Dispatch URL: snmp://<Fully qualified host name or IP address of the Arbor TMS
Firewall>• SNMP Port: Port where the Arbor TMS Firewall listens for SNMP requests - 161 by default
(optional)• SNMP Timeout: Timeout for SNMP requests in seconds - 30 secs by default (optional)• Cloud Agent: Cloud agent monitoring the host where Arbor TMS Firewall is installed.
Monitoring Credentials
SNMP V1/V2
• Community String: Community String for SNMP communication
SNMP V3
• Username: SNMPv3 username.• Authorization Password: Password used for authentication• Authorization Protocol: Protocol used for authentication. (MD5 or SHA)• Privacy Password: password used for encryption
Arbor CP Firewall
Arbor CP Firewall JSON Files and Properties
Definition File: omc_arbor_cp_sample.json
• omc_dispatch_url: snmp://<Fully qualified host name or IP address of the Arbor CPFirewall>
• omc_snmp_port: Port where the Arbor CP Firewall listens for SNMP requests - 161 bydefault (optional)
• omc_snmp_timeout: Timeout for SNMP requests in seconds - 30 seconds by default(optional)
• omc_snmp_version: SNMP version used to monitor the Arbor CP Firewall (2c or 3) - 2cby default (optional)
Credential Files
omc_arbor_cp_snmpv2_sample_creds.jsonSNMP v2c
• COMMUNITY: SNMPv2c community stringomc_arbor_cp_snmpv3_sample_creds.jsonSNMP v3
• authUser: SNMPv3 username.• authPwd: Password used for authentication.• authProtocol: Protocol used for authentication (MD5 or SHA).• privPwd: Password used for encryption.
Appendix B
B-43
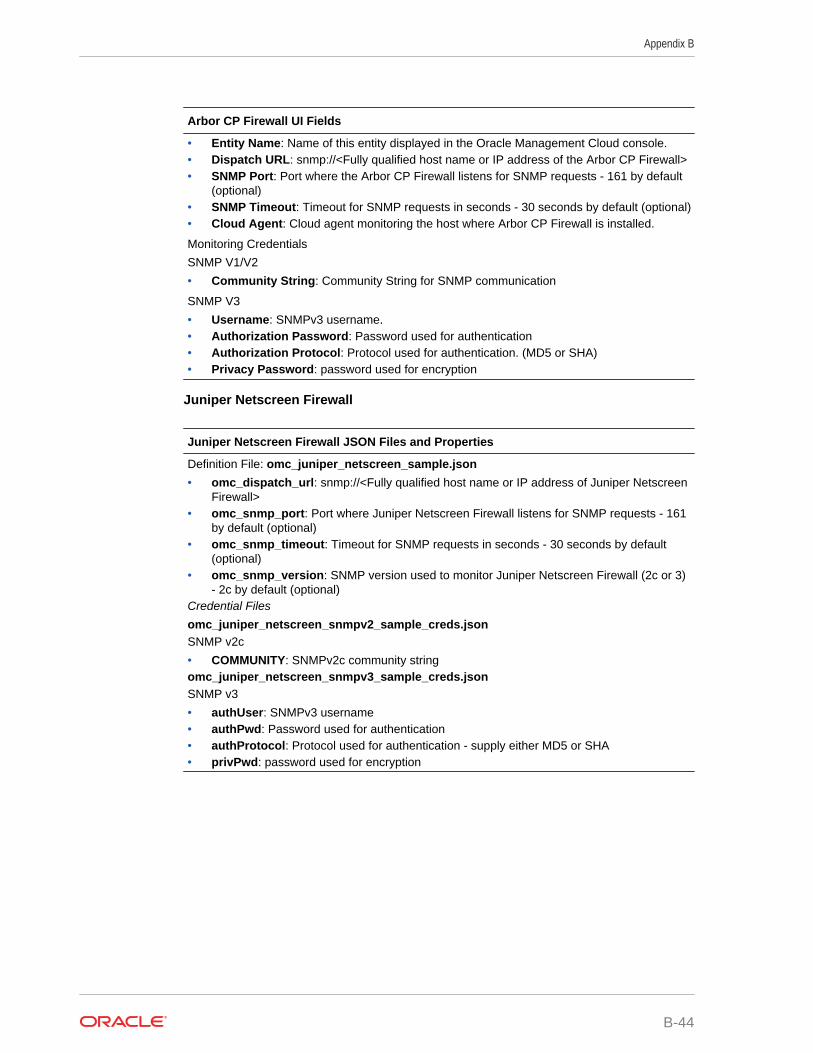
Arbor CP Firewall UI Fields
• Entity Name: Name of this entity displayed in the Oracle Management Cloud console.• Dispatch URL: snmp://<Fully qualified host name or IP address of the Arbor CP Firewall>• SNMP Port: Port where the Arbor CP Firewall listens for SNMP requests - 161 by default
(optional)• SNMP Timeout: Timeout for SNMP requests in seconds - 30 seconds by default (optional)• Cloud Agent: Cloud agent monitoring the host where Arbor CP Firewall is installed.
Monitoring Credentials
SNMP V1/V2
• Community String: Community String for SNMP communication
SNMP V3
• Username: SNMPv3 username.• Authorization Password: Password used for authentication• Authorization Protocol: Protocol used for authentication. (MD5 or SHA)• Privacy Password: password used for encryption
Juniper Netscreen Firewall
Juniper Netscreen Firewall JSON Files and Properties
Definition File: omc_juniper_netscreen_sample.json
• omc_dispatch_url: snmp://<Fully qualified host name or IP address of Juniper NetscreenFirewall>
• omc_snmp_port: Port where Juniper Netscreen Firewall listens for SNMP requests - 161by default (optional)
• omc_snmp_timeout: Timeout for SNMP requests in seconds - 30 seconds by default(optional)
• omc_snmp_version: SNMP version used to monitor Juniper Netscreen Firewall (2c or 3)- 2c by default (optional)
Credential Files
omc_juniper_netscreen_snmpv2_sample_creds.jsonSNMP v2c
• COMMUNITY: SNMPv2c community stringomc_juniper_netscreen_snmpv3_sample_creds.jsonSNMP v3
• authUser: SNMPv3 username• authPwd: Password used for authentication• authProtocol: Protocol used for authentication - supply either MD5 or SHA• privPwd: password used for encryption
Appendix B
B-44

Juniper Netscreen Firewall UI Fields
• Entity Name: Name of this entity displayed in the Oracle Management Cloud console.• Dispatch URL: snmp://<Fully qualified host name or IP address of
Juniper Netscreen Firewall>• SNMP Port: Port where Juniper Netscreen Firewall listens for SNMP requests - 161 by
default (optional)• SNMP Timeout: Timeout for SNMP requests in seconds - 30 seconds by default (optional)• Cloud Agent: Cloud agent monitoring the host where Juniper Netscreen Firewall is
installed.
Monitoring Credentials
SNMP V1/V2
• Community String: Community String for SNMP communication
SNMP V3
• Username: SNMPv3 username.• Authorization Password: Password used for authentication• Authorization Protocol: Protocol used for authentication. (MD5 or SHA)• Privacy Password: password used for encryption
Juniper MX Router
Juniper MX Router JSON Files and Properties
Definition File: omc_juniper_mx_sample.json
• omc_dispatch_url: snmp://<Fully qualified host name or IP address of Juniper MXRouter>
• omc_snmp_port: Port where Juniper MX Router listens for SNMP requests - 161 bydefault (optional)
• omc_snmp_timeout: Timeout for SNMP requests in seconds - 30 seconds by default(optional)
• omc_snmp_version: SNMP version used to monitor Juniper MX Router (2c or 3) - 2c bydefault (optional)
Credential Files
omc_juniper_mx_snmpv2_sample_creds.jsonSNMP v2c
• COMMUNITY: SNMPv2c community stringomc_juniper_mx_snmpv3_sample_creds.jsonSNMP v3
• authUser: SNMPv3 username.• authPwd: Password used for authentication.• authProtocol: Protocol used for authentication - supply either MD5 or SHA.• privPwd: Password used for encryption.
Appendix B
B-45

Juniper MX Router UI Fields
• Entity Name: Name of this entity displayed in the Oracle Management Cloud console.• Dispatch URL: snmp://<Fully qualified host name or IP address of Juniper MX Router>• SNMP Port: Port where Juniper MX Router listens for SNMP requests - 161 by default
(optional)• SNMP Timeout: Timeout for SNMP requests in seconds - 30 seconds by default (optional)• Cloud Agent: Cloud agent monitoring the host where the Juniper MX Router is installed.
Monitoring Credentials
SNMP V1/V2
• Community String: Community String for SNMP communication
SNMP V3
• Username: SNMPv3 username.• Authorization Password: Password used for authentication• Authorization Protocol: Protocol used for authentication. (MD5 or SHA)• Privacy Password: password used for encryption
F5 BIG-IP LTM
F5 BIG-IP LTM JSON Files and Properties
Definition File: omc_f5_bigip_ltm_sample.json
• omc_dispatch_url: snmp://<Fully qualified host name or IP address of F5 BIG-IP LTM>• omc_snmp_port: Port where F5 BIG-IP LTM listens for SNMP requests - 161 by default
(optional)• omc_snmp_timeout: Timeout for SNMP requests in seconds - 30 secs by default
(optional)• omc_snmp_version: SNMP version used to monitor F5 BIG-IP LTM (2c or 3) - 2c by
default (optional)
Credential Files
omc_f5_bigip_ltm_snmpv2_sample_creds.jsonSNMP v2c
• COMMUNITY: SNMPv2c community stringomc_f5_bigip_ltm_snmpv3_sample_creds.jsonSNMP v3
• authUser: SNMPv3 username.• authPwd: Password used for authentication.• authProtocol: Protocol used for authentication - supply either MD5 or SHA.• privPwd: Password used for encryption.
Appendix B
B-46
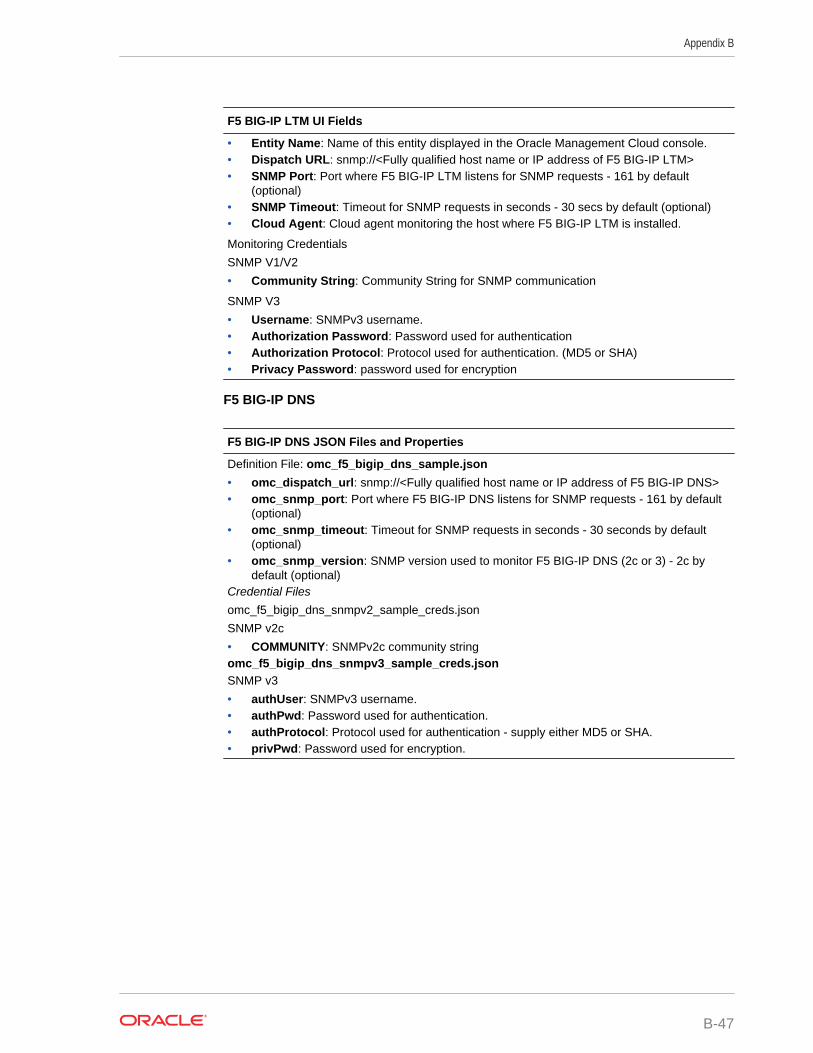
F5 BIG-IP LTM UI Fields
• Entity Name: Name of this entity displayed in the Oracle Management Cloud console.• Dispatch URL: snmp://<Fully qualified host name or IP address of F5 BIG-IP LTM>• SNMP Port: Port where F5 BIG-IP LTM listens for SNMP requests - 161 by default
(optional)• SNMP Timeout: Timeout for SNMP requests in seconds - 30 secs by default (optional)• Cloud Agent: Cloud agent monitoring the host where F5 BIG-IP LTM is installed.
Monitoring Credentials
SNMP V1/V2
• Community String: Community String for SNMP communication
SNMP V3
• Username: SNMPv3 username.• Authorization Password: Password used for authentication• Authorization Protocol: Protocol used for authentication. (MD5 or SHA)• Privacy Password: password used for encryption
F5 BIG-IP DNS
F5 BIG-IP DNS JSON Files and Properties
Definition File: omc_f5_bigip_dns_sample.json
• omc_dispatch_url: snmp://<Fully qualified host name or IP address of F5 BIG-IP DNS>• omc_snmp_port: Port where F5 BIG-IP DNS listens for SNMP requests - 161 by default
(optional)• omc_snmp_timeout: Timeout for SNMP requests in seconds - 30 seconds by default
(optional)• omc_snmp_version: SNMP version used to monitor F5 BIG-IP DNS (2c or 3) - 2c by
default (optional)Credential Files
omc_f5_bigip_dns_snmpv2_sample_creds.json
SNMP v2c
• COMMUNITY: SNMPv2c community stringomc_f5_bigip_dns_snmpv3_sample_creds.jsonSNMP v3
• authUser: SNMPv3 username.• authPwd: Password used for authentication.• authProtocol: Protocol used for authentication - supply either MD5 or SHA.• privPwd: Password used for encryption.
Appendix B
B-47
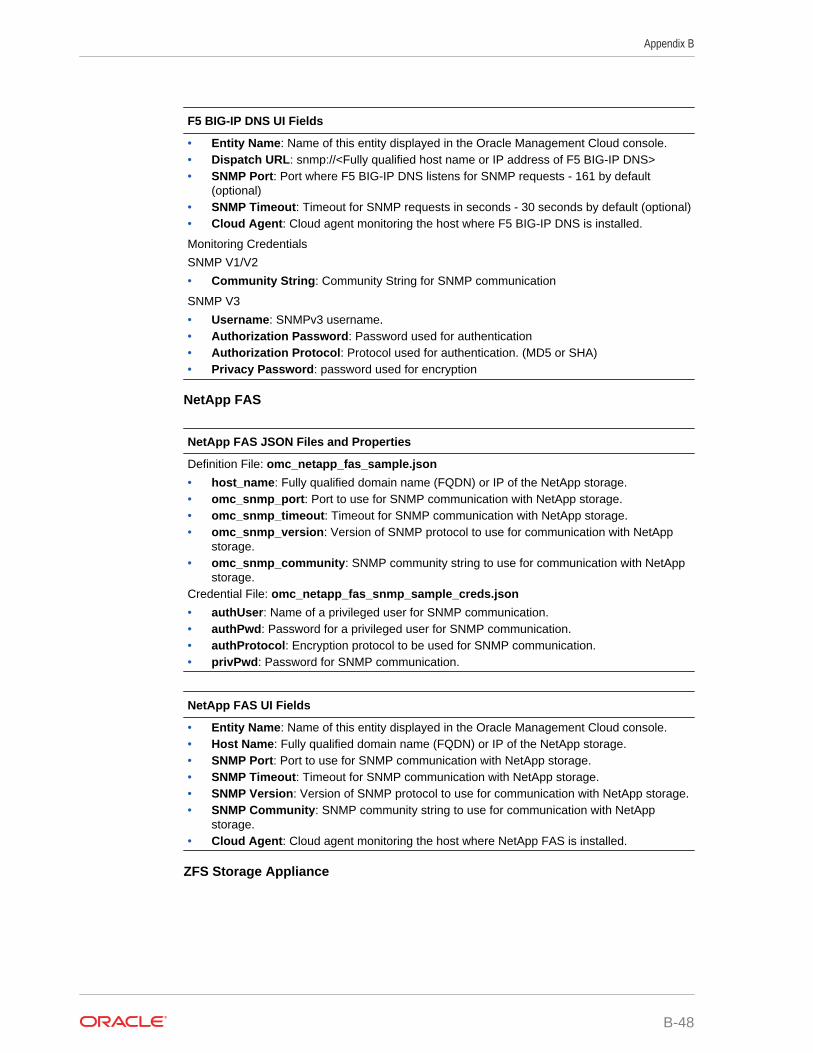
F5 BIG-IP DNS UI Fields
• Entity Name: Name of this entity displayed in the Oracle Management Cloud console.• Dispatch URL: snmp://<Fully qualified host name or IP address of F5 BIG-IP DNS>• SNMP Port: Port where F5 BIG-IP DNS listens for SNMP requests - 161 by default
(optional)• SNMP Timeout: Timeout for SNMP requests in seconds - 30 seconds by default (optional)• Cloud Agent: Cloud agent monitoring the host where F5 BIG-IP DNS is installed.
Monitoring Credentials
SNMP V1/V2
• Community String: Community String for SNMP communication
SNMP V3
• Username: SNMPv3 username.• Authorization Password: Password used for authentication• Authorization Protocol: Protocol used for authentication. (MD5 or SHA)• Privacy Password: password used for encryption
NetApp FAS
NetApp FAS JSON Files and Properties
Definition File: omc_netapp_fas_sample.json
• host_name: Fully qualified domain name (FQDN) or IP of the NetApp storage.• omc_snmp_port: Port to use for SNMP communication with NetApp storage.• omc_snmp_timeout: Timeout for SNMP communication with NetApp storage.• omc_snmp_version: Version of SNMP protocol to use for communication with NetApp
storage.• omc_snmp_community: SNMP community string to use for communication with NetApp
storage.Credential File: omc_netapp_fas_snmp_sample_creds.json
• authUser: Name of a privileged user for SNMP communication.• authPwd: Password for a privileged user for SNMP communication.• authProtocol: Encryption protocol to be used for SNMP communication.• privPwd: Password for SNMP communication.
NetApp FAS UI Fields
• Entity Name: Name of this entity displayed in the Oracle Management Cloud console.• Host Name: Fully qualified domain name (FQDN) or IP of the NetApp storage.• SNMP Port: Port to use for SNMP communication with NetApp storage.• SNMP Timeout: Timeout for SNMP communication with NetApp storage.• SNMP Version: Version of SNMP protocol to use for communication with NetApp storage.• SNMP Community: SNMP community string to use for communication with NetApp
storage.• Cloud Agent: Cloud agent monitoring the host where NetApp FAS is installed.
ZFS Storage Appliance
Appendix B
B-48

ZFS Storage Appliance JSON Files and Properties
Definition File: omc_oracle_zfs_storage_appliance_sample.json
• omc_zfssa_hostname: ONLY IP of the ZFS Storage Appliance (if you use hostname/fullyqualified domain name, you will trigger a REST fetchlet problem with certificate validation:(javax.net.ssl.SSLProtocolException: handshake alert: unrecognized_name ))
• omc_zfssa_port: Port to use for REST API communication with ZFS Storage Appliancestorage
• omc_ssl_trust_server_cert: Flag indicating whether to trust self-signed certificates.Credential File: omc_oracle_zfs_storage_appliance_sample_creds.json
• Alias: Alias (username/login name) to be used for the ZFS Storage Appliance REST API• Password: Password for the ZFS Storage Appliance REST API alias.
ZFS Storage Appliance UI Fields
• Entity Name: Name of this entity displayed in the Oracle Management Cloud console.• ZFFSA IP Address: IP address of the ZFS storage appliance with REST API.• ZFFSA Port: Port of the storage appliance REST API.• Trust Any Server Certificate: False is recommended. You must import the storage server
SSL certificate into the selected could agent before discovery. If you choose True instead,discovery will occur even for an untrusted or expired certificate.
• Cloud Agent: Cloud agent monitoring the host where the ZFS Storage Appliance isinstalled.
Monitoring Credentials (ZFFSA Credentials)
• Username: Storage appliance username.• Password: Storage appliance password.
Kubernetes Cluster
Kubernetes Cluster JSON Files and Properties
Replace any text inside brackets <> excluding these brackets with your values according thelegend within the brackets <>.
See Kubernetes Cluster for property descriptions.
Definition Files
omc_kubernetes_cluster_insecure.jsonomc_kubernetes_cluster_secure.jsonCredential Files
omc_kubernetes_cluster_basic_creds.jsonomc_kubernetes_cluster_keystore_creds.jsonomc_kubernetes_cluster_token_creds.json
Appendix B
B-49
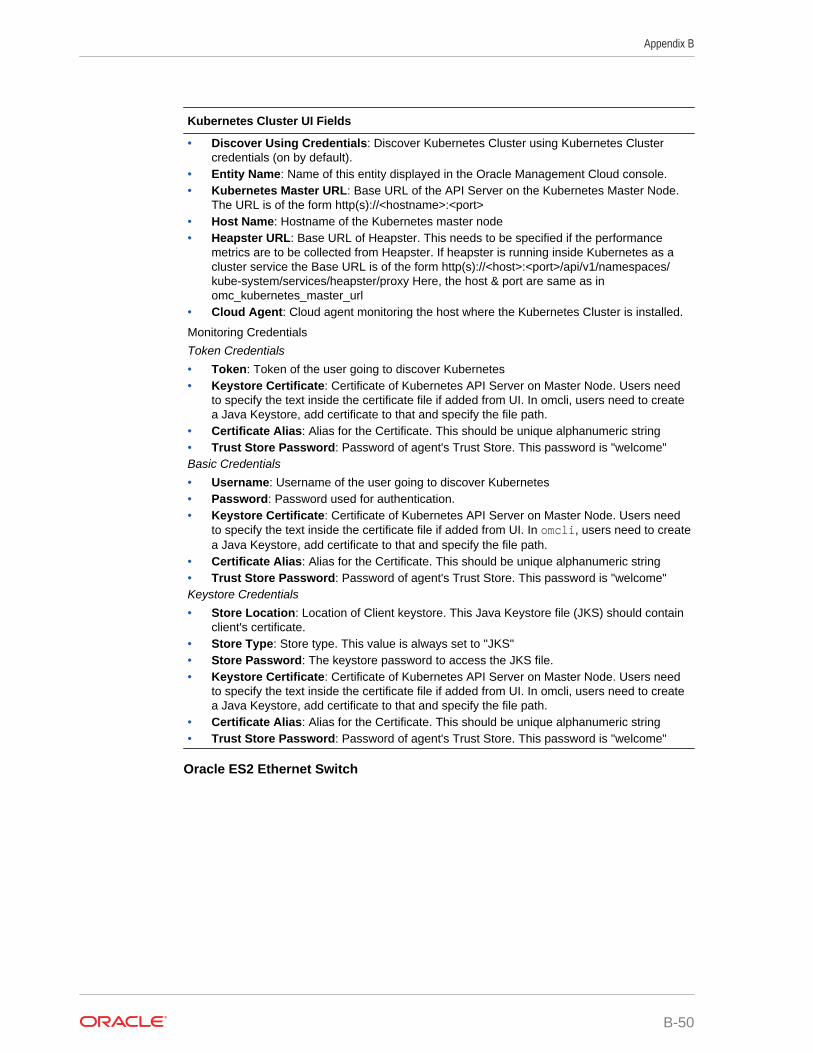
Kubernetes Cluster UI Fields
• Discover Using Credentials: Discover Kubernetes Cluster using Kubernetes Clustercredentials (on by default).
• Entity Name: Name of this entity displayed in the Oracle Management Cloud console.• Kubernetes Master URL: Base URL of the API Server on the Kubernetes Master Node.
The URL is of the form http(s)://<hostname>:<port>• Host Name: Hostname of the Kubernetes master node• Heapster URL: Base URL of Heapster. This needs to be specified if the performance
metrics are to be collected from Heapster. If heapster is running inside Kubernetes as acluster service the Base URL is of the form http(s)://<host>:<port>/api/v1/namespaces/kube-system/services/heapster/proxy Here, the host & port are same as inomc_kubernetes_master_url
• Cloud Agent: Cloud agent monitoring the host where the Kubernetes Cluster is installed.
Monitoring Credentials
Token Credentials
• Token: Token of the user going to discover Kubernetes• Keystore Certificate: Certificate of Kubernetes API Server on Master Node. Users need
to specify the text inside the certificate file if added from UI. In omcli, users need to createa Java Keystore, add certificate to that and specify the file path.
• Certificate Alias: Alias for the Certificate. This should be unique alphanumeric string• Trust Store Password: Password of agent's Trust Store. This password is "welcome"Basic Credentials
• Username: Username of the user going to discover Kubernetes• Password: Password used for authentication.• Keystore Certificate: Certificate of Kubernetes API Server on Master Node. Users need
to specify the text inside the certificate file if added from UI. In omcli, users need to createa Java Keystore, add certificate to that and specify the file path.
• Certificate Alias: Alias for the Certificate. This should be unique alphanumeric string• Trust Store Password: Password of agent's Trust Store. This password is "welcome"Keystore Credentials
• Store Location: Location of Client keystore. This Java Keystore file (JKS) should containclient's certificate.
• Store Type: Store type. This value is always set to "JKS"• Store Password: The keystore password to access the JKS file.• Keystore Certificate: Certificate of Kubernetes API Server on Master Node. Users need
to specify the text inside the certificate file if added from UI. In omcli, users need to createa Java Keystore, add certificate to that and specify the file path.
• Certificate Alias: Alias for the Certificate. This should be unique alphanumeric string• Trust Store Password: Password of agent's Trust Store. This password is "welcome"
Oracle ES2 Ethernet Switch
Appendix B
B-50

Oracle ES2 Ethernet Switch JSON Files and Properties
Definition File: omc_es2_sample.json
• omc_dispatch_url: snmp://<Fully qualified host name or IP address of Oracle ES2Ethernet Switch>
• omc_snmp_port: Port where Oracle ES-2 Ethernet Switch listens for SNMP requests -161 by default (optional)
• omc_snmp_timeout: Timeout for SNMP requests in seconds - 30 secs by default(optional)
• omc_snmp_version: SNMP version used to monitor Oracle ES-2 Ethernet Switch (2c or3) - 2c by default (optional)
Credential Files
Choose the credential JSON file according to the SNMP version credentials you’re using(SNMP v2c or SNMP v3).
omc_es2_snmpv2_sample_creds.jsonSNMP v2c
• COMMUNITY: SNMPv2c community string.omc_es2_snmpv3_sample_creds.jsonSNMP v3
• authUser: SNMPv3 username.• authPwd: Password used for authentication.• authProtocol: Protocol used for authentication - supply either MD5 or SHA.• privPwd: Password used for encryption.
Oracle ES2 Ethernet Switch UI Fields
• Entity Name: Name of this entity displayed in the Oracle Management Cloud console.• Dispatch URL: snmp://<Fully qualified host name or IP address of Oracle ES2 Ethernet
Switch>• SNMP Port: Port where Oracle ES-2 Ethernet Switch listens for SNMP requests - 161 by
default (optional)• SNMP Timeout: Timeout for SNMP requests in seconds - 30 secs by default (optional)• Cloud Agent: Cloud agent monitoring the host where the Oracle ES2 Ethernet Switch is
installed.
Monitoring Credentials
SNMP V1/V2
• Community String: Community String for SNMP communication
SNMP V3
• Username: SNMPv3 username.• Authorization Password: Password used for authentication• Authorization Protocol: Protocol used for authentication. (MD5 or SHA)• Privacy Password: password used for encryption
Oracle Flash Storage
Appendix B
B-51
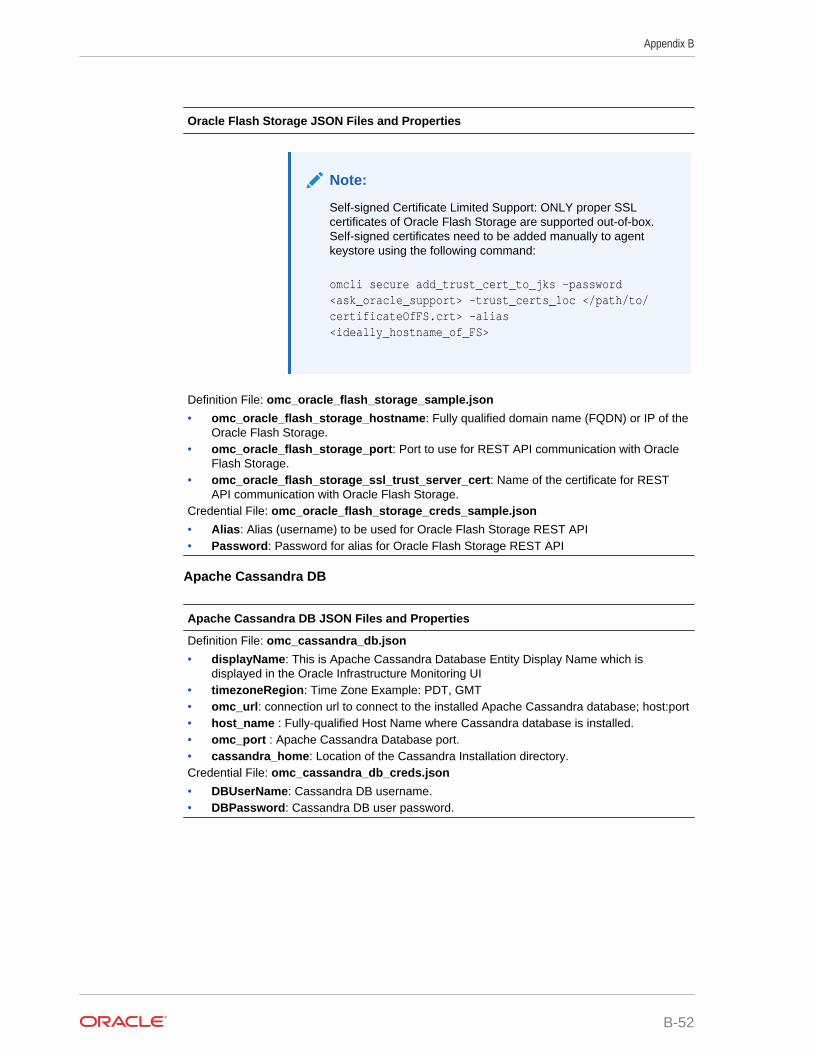
Oracle Flash Storage JSON Files and Properties
Note:
Self-signed Certificate Limited Support: ONLY proper SSLcertificates of Oracle Flash Storage are supported out-of-box.Self-signed certificates need to be added manually to agentkeystore using the following command:
omcli secure add_trust_cert_to_jks -password <ask_oracle_support> -trust_certs_loc </path/to/certificateOfFS.crt> -alias <ideally_hostname_of_FS>
Definition File: omc_oracle_flash_storage_sample.json
• omc_oracle_flash_storage_hostname: Fully qualified domain name (FQDN) or IP of theOracle Flash Storage.
• omc_oracle_flash_storage_port: Port to use for REST API communication with OracleFlash Storage.
• omc_oracle_flash_storage_ssl_trust_server_cert: Name of the certificate for RESTAPI communication with Oracle Flash Storage.
Credential File: omc_oracle_flash_storage_creds_sample.json
• Alias: Alias (username) to be used for Oracle Flash Storage REST API• Password: Password for alias for Oracle Flash Storage REST API
Apache Cassandra DB
Apache Cassandra DB JSON Files and Properties
Definition File: omc_cassandra_db.json
• displayName: This is Apache Cassandra Database Entity Display Name which isdisplayed in the Oracle Infrastructure Monitoring UI
• timezoneRegion: Time Zone Example: PDT, GMT• omc_url: connection url to connect to the installed Apache Cassandra database; host:port• host_name : Fully-qualified Host Name where Cassandra database is installed.• omc_port : Apache Cassandra Database port.• cassandra_home: Location of the Cassandra Installation directory.Credential File: omc_cassandra_db_creds.json
• DBUserName: Cassandra DB username.• DBPassword: Cassandra DB user password.
Appendix B
B-52
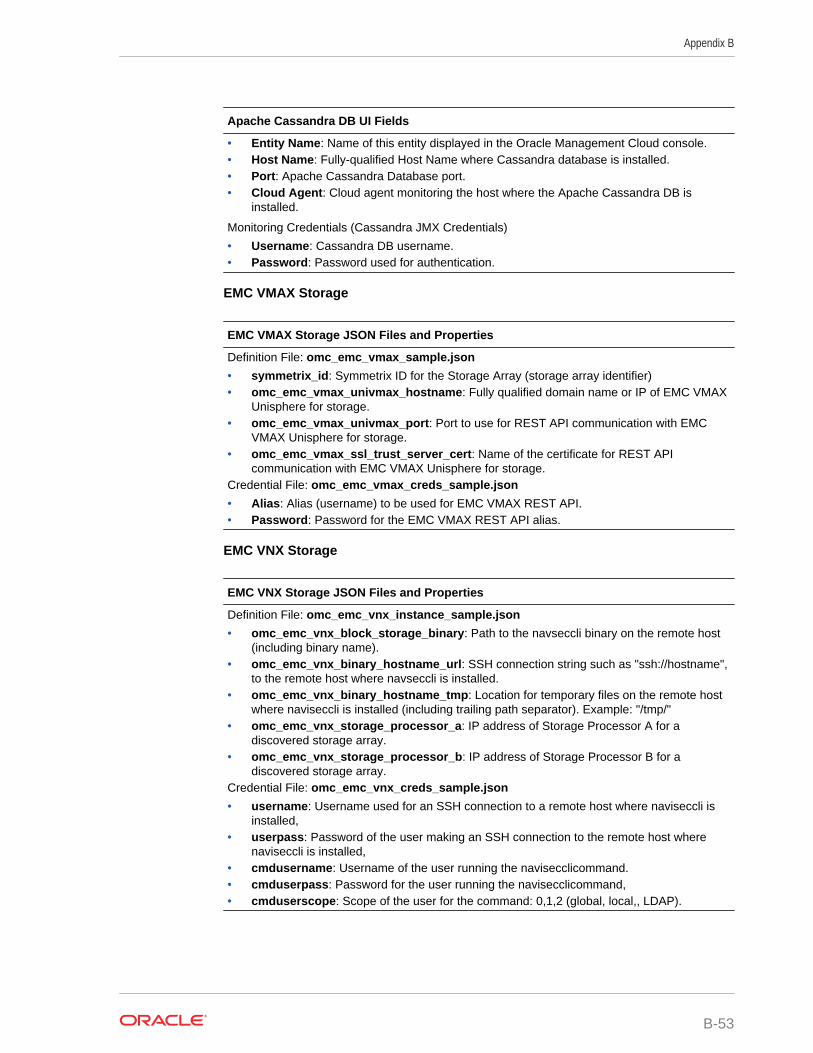
Apache Cassandra DB UI Fields
• Entity Name: Name of this entity displayed in the Oracle Management Cloud console.• Host Name: Fully-qualified Host Name where Cassandra database is installed.• Port: Apache Cassandra Database port.• Cloud Agent: Cloud agent monitoring the host where the Apache Cassandra DB is
installed.
Monitoring Credentials (Cassandra JMX Credentials)
• Username: Cassandra DB username.• Password: Password used for authentication.
EMC VMAX Storage
EMC VMAX Storage JSON Files and Properties
Definition File: omc_emc_vmax_sample.json
• symmetrix_id: Symmetrix ID for the Storage Array (storage array identifier)• omc_emc_vmax_univmax_hostname: Fully qualified domain name or IP of EMC VMAX
Unisphere for storage.• omc_emc_vmax_univmax_port: Port to use for REST API communication with EMC
VMAX Unisphere for storage.• omc_emc_vmax_ssl_trust_server_cert: Name of the certificate for REST API
communication with EMC VMAX Unisphere for storage.Credential File: omc_emc_vmax_creds_sample.json
• Alias: Alias (username) to be used for EMC VMAX REST API.• Password: Password for the EMC VMAX REST API alias.
EMC VNX Storage
EMC VNX Storage JSON Files and Properties
Definition File: omc_emc_vnx_instance_sample.json
• omc_emc_vnx_block_storage_binary: Path to the navseccli binary on the remote host(including binary name).
• omc_emc_vnx_binary_hostname_url: SSH connection string such as "ssh://hostname",to the remote host where navseccli is installed.
• omc_emc_vnx_binary_hostname_tmp: Location for temporary files on the remote hostwhere naviseccli is installed (including trailing path separator). Example: "/tmp/"
• omc_emc_vnx_storage_processor_a: IP address of Storage Processor A for adiscovered storage array.
• omc_emc_vnx_storage_processor_b: IP address of Storage Processor B for adiscovered storage array.
Credential File: omc_emc_vnx_creds_sample.json
• username: Username used for an SSH connection to a remote host where naviseccli isinstalled,
• userpass: Password of the user making an SSH connection to the remote host wherenaviseccli is installed,
• cmdusername: Username of the user running the navisecclicommand.• cmduserpass: Password for the user running the navisecclicommand,• cmduserscope: Scope of the user for the command: 0,1,2 (global, local,, LDAP).
Appendix B
B-53
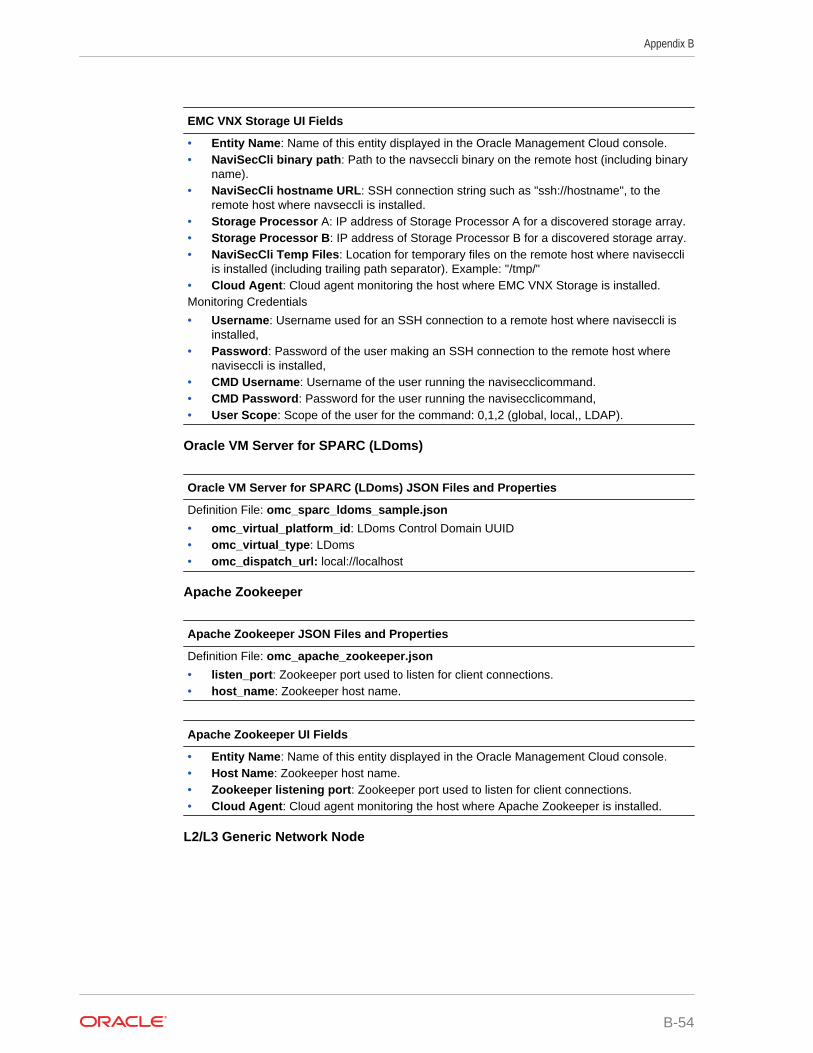
EMC VNX Storage UI Fields
• Entity Name: Name of this entity displayed in the Oracle Management Cloud console.• NaviSecCli binary path: Path to the navseccli binary on the remote host (including binary
name).• NaviSecCli hostname URL: SSH connection string such as "ssh://hostname", to the
remote host where navseccli is installed.• Storage Processor A: IP address of Storage Processor A for a discovered storage array.• Storage Processor B: IP address of Storage Processor B for a discovered storage array.• NaviSecCli Temp Files: Location for temporary files on the remote host where naviseccli
is installed (including trailing path separator). Example: "/tmp/"• Cloud Agent: Cloud agent monitoring the host where EMC VNX Storage is installed.Monitoring Credentials
• Username: Username used for an SSH connection to a remote host where naviseccli isinstalled,
• Password: Password of the user making an SSH connection to the remote host wherenaviseccli is installed,
• CMD Username: Username of the user running the navisecclicommand.• CMD Password: Password for the user running the navisecclicommand,• User Scope: Scope of the user for the command: 0,1,2 (global, local,, LDAP).
Oracle VM Server for SPARC (LDoms)
Oracle VM Server for SPARC (LDoms) JSON Files and Properties
Definition File: omc_sparc_ldoms_sample.json
• omc_virtual_platform_id: LDoms Control Domain UUID• omc_virtual_type: LDoms• omc_dispatch_url: local://localhost
Apache Zookeeper
Apache Zookeeper JSON Files and Properties
Definition File: omc_apache_zookeeper.json
• listen_port: Zookeeper port used to listen for client connections.• host_name: Zookeeper host name.
Apache Zookeeper UI Fields
• Entity Name: Name of this entity displayed in the Oracle Management Cloud console.• Host Name: Zookeeper host name.• Zookeeper listening port: Zookeeper port used to listen for client connections.• Cloud Agent: Cloud agent monitoring the host where Apache Zookeeper is installed.
L2/L3 Generic Network Node
Appendix B
B-54

L2/L3 Generic Network Node JSON Files and Properties
Definition File: omc_network_node_sample.json
• omc_node_id: The string to be used as the identifying property for the hardware.• omc_hw_vendor: The vendor name that will be exposed in the Product metric group• omc_hw_product : The product name that will be exposed in the Product metric group• omc_hw_version : The product version that will be exposed in the Product metric group• omc_dispatch_url: snmp://<Fully qualified host name or IP address of network node>• omc_snmp_port: Port where network hardware listens for SNMP requests - 161 by
default (optional)• omc_snmp_timeout: Timeout for SNMP requests in seconds - 30 secs by default
(optional)• omc_snmp_version: SNMP version used to monitor the network node (2c or 3) - 2c by
default (optional)
Credential Files
Choose the creds JSON file according to what SNMP credentials you'd like to use - SNMP v2cor SNMP v3.
omc_network_node_snmpv2_sample_creds.jsonSNMP v2c
• COMMUNITY: SNMPv2c community stringomc_network_node_snmpv3_sample_creds.jsonSNMP v3
• authUser: SNMPv3 username• authPwd: Password used for authentication• authProtocol: Protocol used for authentication - supply either MD5 or SHA• privPwd: Password used for encryption
L2/L3 Generic Network Node UI Fields
• Entity Name: Name of this entity displayed in the Oracle Management Cloud console.• Network Node ID: The string to be used as the identifying property for the hardware.• Vendor: The vendor name that will be exposed in the Product metric group• Product : The product name that will be exposed in the Product metric group• Version: The product version that will be exposed in the Product metric group• Dispatch URL: snmp://<Fully qualified host name or IP address of network node>• SNMP Port: Port where network hardware listens for SNMP requests - 161 by default
(optional)• SNMP Timeout: Timeout for SNMP requests in seconds - 30 secs by default (optional)• Cloud Agent: Cloud agent monitoring the host where the L2/L3 Generic Network Node is
installed.
Monitoring Credentials
SNMP V1/V2
• Community String: Community String for SNMP communication
SNMP V3
• Username: SNMPv3 username.• Authorization Password: Password used for authentication• Authorization Protocol: Protocol used for authentication. (MD5 or SHA)• Privacy Password: password used for encryption
JBoss Server/Domain
Appendix B
B-55
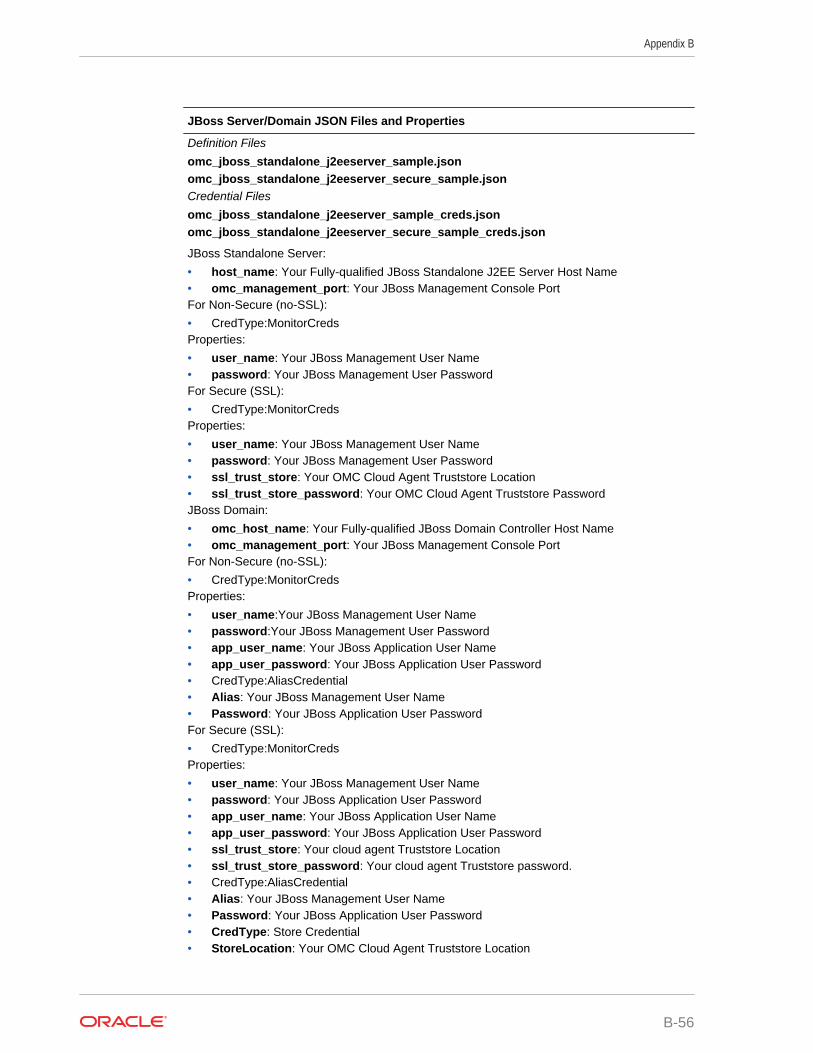
JBoss Server/Domain JSON Files and Properties
Definition Files
omc_jboss_standalone_j2eeserver_sample.jsonomc_jboss_standalone_j2eeserver_secure_sample.jsonCredential Files
omc_jboss_standalone_j2eeserver_sample_creds.jsonomc_jboss_standalone_j2eeserver_secure_sample_creds.json
JBoss Standalone Server:
• host_name: Your Fully-qualified JBoss Standalone J2EE Server Host Name• omc_management_port: Your JBoss Management Console PortFor Non-Secure (no-SSL):
• CredType:MonitorCredsProperties:
• user_name: Your JBoss Management User Name• password: Your JBoss Management User PasswordFor Secure (SSL):
• CredType:MonitorCredsProperties:
• user_name: Your JBoss Management User Name• password: Your JBoss Management User Password• ssl_trust_store: Your OMC Cloud Agent Truststore Location• ssl_trust_store_password: Your OMC Cloud Agent Truststore PasswordJBoss Domain:
• omc_host_name: Your Fully-qualified JBoss Domain Controller Host Name• omc_management_port: Your JBoss Management Console PortFor Non-Secure (no-SSL):
• CredType:MonitorCredsProperties:
• user_name:Your JBoss Management User Name• password:Your JBoss Management User Password• app_user_name: Your JBoss Application User Name• app_user_password: Your JBoss Application User Password• CredType:AliasCredential• Alias: Your JBoss Management User Name• Password: Your JBoss Application User PasswordFor Secure (SSL):
• CredType:MonitorCredsProperties:
• user_name: Your JBoss Management User Name• password: Your JBoss Application User Password• app_user_name: Your JBoss Application User Name• app_user_password: Your JBoss Application User Password• ssl_trust_store: Your cloud agent Truststore Location• ssl_trust_store_password: Your cloud agent Truststore password.• CredType:AliasCredential• Alias: Your JBoss Management User Name• Password: Your JBoss Application User Password• CredType: Store Credential• StoreLocation: Your OMC Cloud Agent Truststore Location
Appendix B
B-56
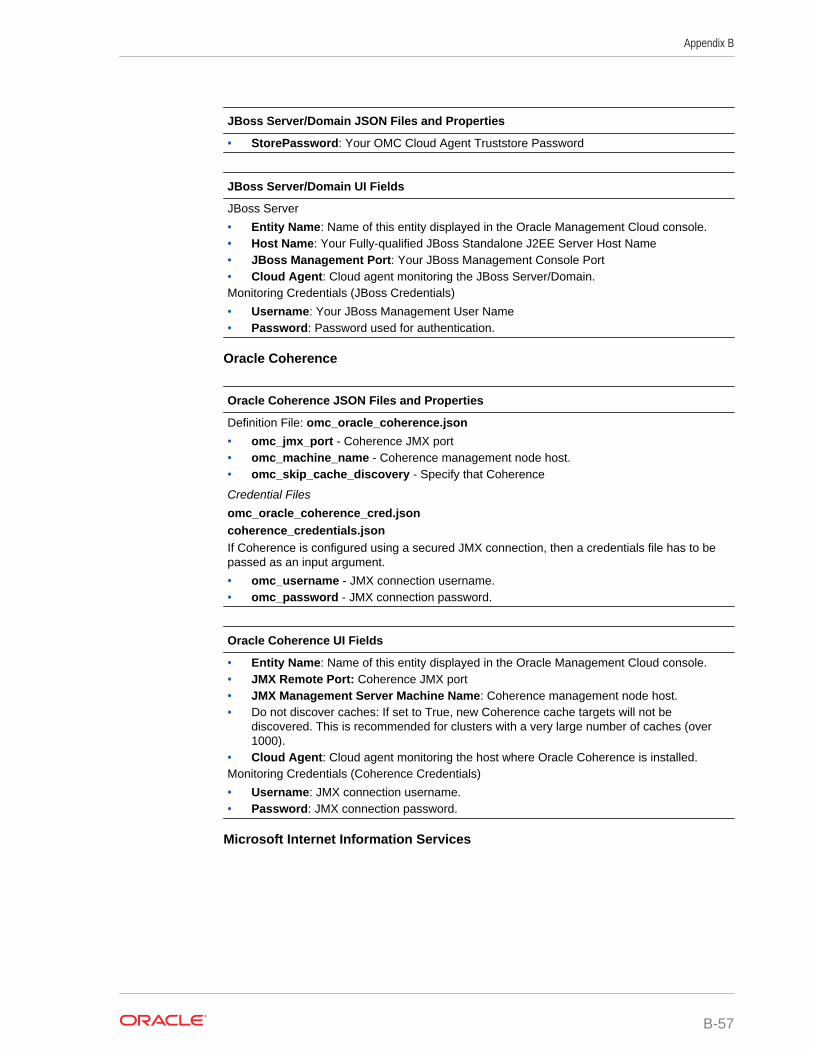
JBoss Server/Domain JSON Files and Properties
• StorePassword: Your OMC Cloud Agent Truststore Password
JBoss Server/Domain UI Fields
JBoss Server
• Entity Name: Name of this entity displayed in the Oracle Management Cloud console.• Host Name: Your Fully-qualified JBoss Standalone J2EE Server Host Name• JBoss Management Port: Your JBoss Management Console Port• Cloud Agent: Cloud agent monitoring the JBoss Server/Domain.Monitoring Credentials (JBoss Credentials)
• Username: Your JBoss Management User Name• Password: Password used for authentication.
Oracle Coherence
Oracle Coherence JSON Files and Properties
Definition File: omc_oracle_coherence.json
• omc_jmx_port - Coherence JMX port• omc_machine_name - Coherence management node host.• omc_skip_cache_discovery - Specify that Coherence
Credential Files
omc_oracle_coherence_cred.jsoncoherence_credentials.jsonIf Coherence is configured using a secured JMX connection, then a credentials file has to bepassed as an input argument.
• omc_username - JMX connection username.• omc_password - JMX connection password.
Oracle Coherence UI Fields
• Entity Name: Name of this entity displayed in the Oracle Management Cloud console.• JMX Remote Port: Coherence JMX port• JMX Management Server Machine Name: Coherence management node host.• Do not discover caches: If set to True, new Coherence cache targets will not be
discovered. This is recommended for clusters with a very large number of caches (over1000).
• Cloud Agent: Cloud agent monitoring the host where Oracle Coherence is installed.Monitoring Credentials (Coherence Credentials)
• Username: JMX connection username.• Password: JMX connection password.
Microsoft Internet Information Services
Appendix B
B-57

Microsoft Internet Information Services JSON Files and Properties
Definition Files
omc_microsoft_iis_server_local_sample.json• host_name: Hostname of Microsoft IIS Server• install_dir: Absolute installation path of the Microsoft IIS Server. You need to specify the
path using double backslashes ( \\).Example: C:\\Windows\\system32\\inetsrv
omc_microsoft_iis_server_remote_sample.json• omc_is_remote: Property to indicate if the Microsoft IIS Server is local(no) or remote(yes)Credential File: omc_microsoft_iis_server_remote_creds_sample.json
Credential properties (Applicable for remote monitoring via WMI)
• wbem_username: Windows user on the Microsoft IIS Server host• wbem_password: Password for the Windows user
Microsoft Internet Information Services UI Fields
• Entity Name: Name of this entity displayed in the Oracle Management Cloud console.• Host Name: Hostname of Microsoft IIS Server• Installation Directory: Absolute installation path of the Microsoft IIS Server. You need to
specify the path using double backslashes ( \\).Example: C:\\Windows\\system32\\inetsrv
• Logging Directory: Absolute path to log file directory.• Cloud Agent: Cloud agent monitoring the host where Microsoft Internet Information
Services is installed.
Monitoring Credentials
• Host Username: Windows user on the Microsoft IIS Server host• Host Password: Password for the Windows user
Oracle Unified Directory
Appendix B
B-58
Oracle Unified Directory JSON Files and Properties
i) OUD Server
ii) OUD Proxy Server
Definition Files
omc_oud_directory.jsonomc_oud_proxy.jsonCredential File: omc_oud_creds.json
Replace any text inside brackets <> excluding these brackets with your values according thelegend inside <>
• Administration Port: The administration port of the target server instance.• Directory Server Host: The fully qualified domain name of the target server instance. For
replicated servers, you must provide the same host name that was used when replicationwas configured.
• Trust All : Set to true by default. This implies that all the certificates that are presented bythe server (or servers, in the case of replication) will be accepted automatically. Changethis setting if you want to specify different behavior. (Optional)If you have changed the default setting for the Trust All field, enter a path in the TrustStore Path field..
The agent will use the trust store located in this path to validate the certificates of theadministration connector that are presented by the server(s). This path must be readableby the agent (and thus located in a file system that is accessible by the agent). The truststore must contain the public keys of the administration connector certificates. It must be inJKS format and must not be password protected.
Oracle Internet Directory (OID)/Oracle Access Manager (OAM)
Oracle Internet Directory (OID)/Oracle Access Manager (OAM) JSON Files andProperties
Definition File: omc_weblogic_domian.json
• displayName: WebLogic Domain Entity Display Name that is displayed in theInfrastructure Monitoring UI time zone.
• Region: Time Zone (tz database time zones). For example: America/New_York.• port: Port used for the WebLogic Admin Server(Console)• protocol: The Protocol used for the WebLogic Server. For example: t3• admin_server_host: Fully qualified WebLogic Admin Server Host Name where the
WebLogic Admin Server is installed.Credential File: omc_weblogic_domain_creds.json
• user_name: WebLogic Domain Entity User Name.• password: WebLogic Domain Entity Password.
Oracle Identity Manager (OIM)
Appendix B
B-59
Oracle Identity Manager (OIM) JSON Files and Properties
Definition File: omc_weblogic_domian.json
• displayName: WebLogic Domain Entity Display Name that is displayed in theInfrastructure Monitoring UI time zone.
• Region: Time Zone (tz database time zones). For example: America/New_York.• port: Port used for the WebLogic Admin Server(Console)• protocol: Protocol used for the WebLogic Server. For example: t3• admin_server_host: Fully-qualified WebLogic Admin Server Host Name where the
WebLogic Admin Server is installed.Credential File: omc_weblogic_domain_creds.json
• user_name: WebLogic Domain Entity User Name.• password: WebLogic Domain Entity Password.
Oracle Identity Manager (OIM) UI Fields
• Entity Name: Name of this entity displayed in the Oracle Management Cloud console.• Port: Port used for the WebLogic Admin Server(Console)• Protocol: Protocol used for the WebLogic Server. For example: t3• Administration Server Host: Fully-qualified WebLogic Admin Server Host Name where
the WebLogic Admin Server is installed.• Discover Coherence: Discover Oracle Coherence.• Cloud Agent: Cloud agent monitoring the host where OIM is installed.
Monitoring Credentials (WebLogic Server Credentials)
• Username: WebLogic Domain Entity User Name.• Password: WebLogic Domain Entity Password.
Oracle Clusterware (CRS)
Oracle Clusterware (CRS) JSON Files and Properties
Definition File: omc_oracle_clusterware_sample.json
• scan_name : Scan name for the cluster• cluster_name : Cluster name• scan_port : Scan port for the cluster• oracle_home : CRS home base directory• omc_sshd_port : SSH port value for remote monitoring• credential_ref : "credentialRefs":["remote_sshcreds"] � for SSH Key based authenticationCredential Files
omc_oracle_clusterware_credless_sample.jsonomc_oracle_clusterware_credential_sample.json• USERNAME: username to log in and execute commands for CRS.• SSH_PVT_KEY: File path of the SSH private key for authentication.• SSH_PUB_KEY : File path of the SSH public key for authentication.• sshdHost : FQDN machine name on which CRS is present for remote monitoring.
Oracle E-Business Suite (EBS)
Appendix B
B-60
Oracle E-Business Suite (EBS) JSON Files and Properties
Definition File: omc_oracle_ebiz_sample.json
• name: Oracle EBS Entity Name• displayName: This is Oracle EBS Entity Display Name shown in the Infrastructure
Monitoring UI.• timezoneRegion: Time Zone Example: PDT, GMT, etc• omc_ebs_db_host: Fully-qualified Host Name where the Oracle Database is installed.• omc_ebs_db_port: Oracle Database port• omc_ebs_db_service_name: Oracle Database Service NameCredential File: omc_oracle_ebiz_sample_creds.json
• DBUserName: Oracle Database username• DBPassword: Oracle database user's password• user_name: WebLogic Domain Entity User Name• password: WebLogic Domain Entity Password
Oracle E-Business Suite (EBS) UI Fields
• Entity Name: Name of this entity displayed in the Oracle Management Cloud console.• Database Host Name: Host name of the database containing the EBS schema.• Database Port: Port used to connect to the database containing the EBS schema.• Database Service Name: Service name of the database containing the EBS schema.• Cloud Agent: Cloud agent monitoring the host where EBS is installed.Monitoring Credentials
Database Credentials
• Username: Database user who has the necessary privileges on the underlying V$viewssuch as moncs, or the monitoring user.
• Password: Password used for authentication.• Database RoleWebLogic Server Credentials
• Username: WebLogic Server user with at least the Monitor security role.• Password: WebLogic Domain Entity Password
Generic Metric Collector
Generic Metric Collector JSON Files and Properties
Definition File: omc_generic_metric_collector_collectd_auto_map_sample.json
• name: Your name for the collectd collector. Eg. collectd-host1.example.com• displayName: Your display name for the collectd collector Eg. collectd-
host1.example.comProperty Value Inputs:
• host_name: Name of the host where collectd is installed. Forexample,host1.example.com
• omc_query_interface_path: Location where collectdctl is installed. For example: "/opt/collectd/bin/collectdctl"
• omc_filter_expression: "{$.[?(@.host=='<Value of the host field in the metric payloadsent by collectd>')]}" For example: "{$.[?(@.host=='host1.example.com')]}"
Definition File: omc_generic_metric_collector_collectd_manual_map_sample.json
Additional Property Value Inputs(manual map case)
• omc_mapping_metadata_file_path: Path to the mapping metadata json file. Forexample: /scratch/agent/gmc/mapping_metadata_processes.json
Appendix B
B-61
Oracle GoldenGate
Oracle GoldenGate JSON Files and Properties
Note:
Credentials are required only for Oracle GoldenGateMicroservice architecture. No credentials are required for OracleGoldenGate Classic architecture.
Definition Files
omc_oracle_goldengate_sample_arch_classic.jsonomc_oracle_goldengate_sample_arch_microservice.json• host_name: Fully-qualified Host Name where the Oracle GoldenGate is installed.• omc_port: Oracle GoldenGate Service Manager port (if Microservice architecture).
Otherwise, Performance Metric port if available, else Manager Port (if Classic architecture)• omc_ogg_arch: Architecture - Microservice or Classic• omc_ogg_conn_timeout: Connection Timeout in Seconds (Default 15 sec)Credential File: omc_oracle_goldengate_sample_creds.json
Credentials (Microservice architecture only)
• Alias: Oracle GoldenGate Username• Password: Oracle GoldenGate Password
Appendix B
B-62
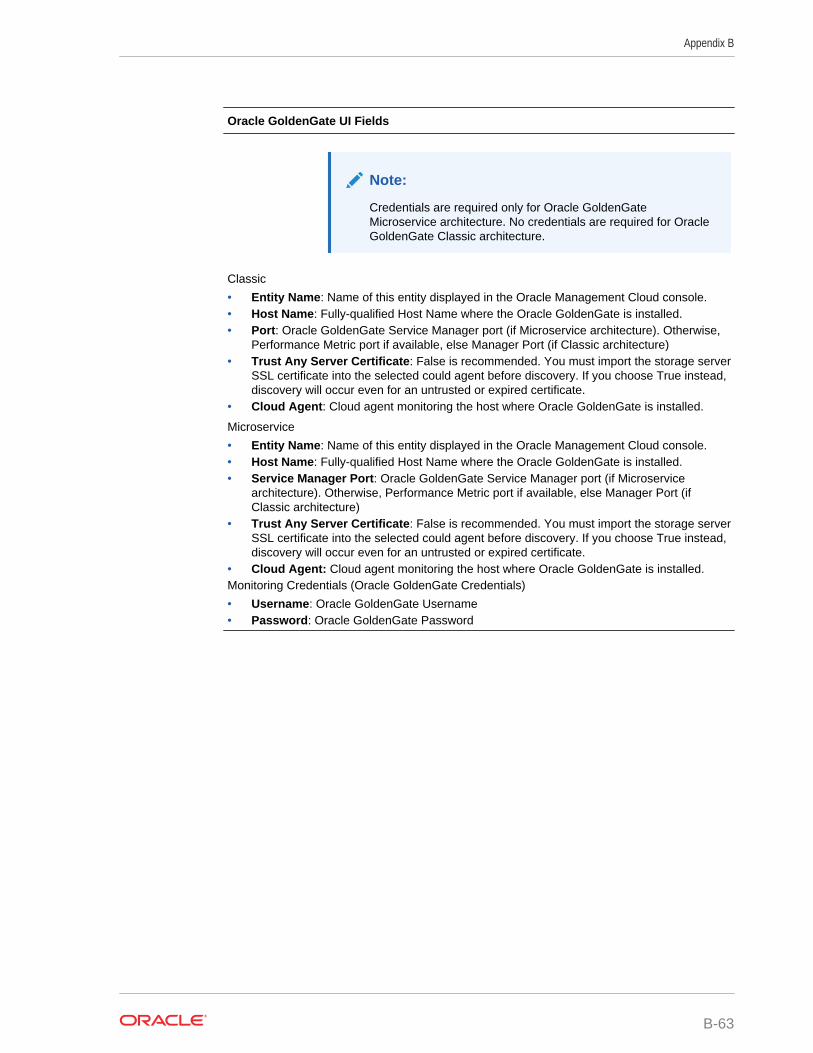
Oracle GoldenGate UI Fields
Note:
Credentials are required only for Oracle GoldenGateMicroservice architecture. No credentials are required for OracleGoldenGate Classic architecture.
Classic
• Entity Name: Name of this entity displayed in the Oracle Management Cloud console.• Host Name: Fully-qualified Host Name where the Oracle GoldenGate is installed.• Port: Oracle GoldenGate Service Manager port (if Microservice architecture). Otherwise,
Performance Metric port if available, else Manager Port (if Classic architecture)• Trust Any Server Certificate: False is recommended. You must import the storage server
SSL certificate into the selected could agent before discovery. If you choose True instead,discovery will occur even for an untrusted or expired certificate.
• Cloud Agent: Cloud agent monitoring the host where Oracle GoldenGate is installed.
Microservice
• Entity Name: Name of this entity displayed in the Oracle Management Cloud console.• Host Name: Fully-qualified Host Name where the Oracle GoldenGate is installed.• Service Manager Port: Oracle GoldenGate Service Manager port (if Microservice
architecture). Otherwise, Performance Metric port if available, else Manager Port (ifClassic architecture)
• Trust Any Server Certificate: False is recommended. You must import the storage serverSSL certificate into the selected could agent before discovery. If you choose True instead,discovery will occur even for an untrusted or expired certificate.
• Cloud Agent: Cloud agent monitoring the host where Oracle GoldenGate is installed.Monitoring Credentials (Oracle GoldenGate Credentials)
• Username: Oracle GoldenGate Username• Password: Oracle GoldenGate Password
Appendix B
B-63
CDiscovery
This appendix contains how-to instructions for discovering various entity types toOracle Infrastructure Monitoring.
Topics:
• Add Apache HTTP Server
• Add Apache SOLR
• Add Apache Zookeeper
• Add Arbor CP
• Add Arbor TMS
• Add Arista Ethernet Switch
• Add Brocade Fibre Channel Switch
• Add Apache Casandra Database
• Add Cisco Catalyst Switch
• Add Cisco Nexus Ethernet Switch
• Add Docker Engine/Docker Container
• Add Docker Swarm
• Add F5 BIG-IP DNS
• Add F5 BIG-IP LTM
• Add Hadoop Cluster
• Add JBoss Server/Domain
• Add Juniper Ethernet Switch
• Add Juniper MX Router
• Add Juniper Netscreen Firewall
• Add Juniper SRX Firewall
• Add Kubernetes Cluster
• Add Microsoft IIS
• Add Microsoft SCOM
• Add Microsoft SQL Server
• Add MongoDB
• Add MySQL Database
• Add NetApp FAS
• Add NGINX
• Add Oracle Access Manager/Oracle Internet Directory
C-1
• Add Oracle Automatic Storage Management (ASM)
• Add Oracle Clusterware (CRS)
• Add Oracle Coherence Clusters
• Add Oracle Database Listener Cluster
• Add Oracle Database Listeners
• Add Oracle Databases
• Add Oracle ES2 Ethernet Switches
• Add Oracle GoldenGate
• Add Oracle HTTP Server
• Add Oracle Identity Manager
• Add Oracle Infiniband Switch
• Add Oracle JVM Runtime
• Add Oracle NoSQL Database
• Add Oracle Pluggable Database
• Add Oracle Power Distribution Unit (PDU)
• Add Oracle Service Bus
• Add Oracle Traffic Director
• Add Oracle Unified Directory
• Add Oracle Virtual Networking
• Add Oracle VM Manager
• Add Oracle VM Server for SPARC (LDOMS)
• Add Oracle WebLogic Server/Domain
• Add SPARC/Intel Computers
• Add Tomcat
• Add VMware vCenter
• Add ZFS Storage Appliance
Appendix C
C-2
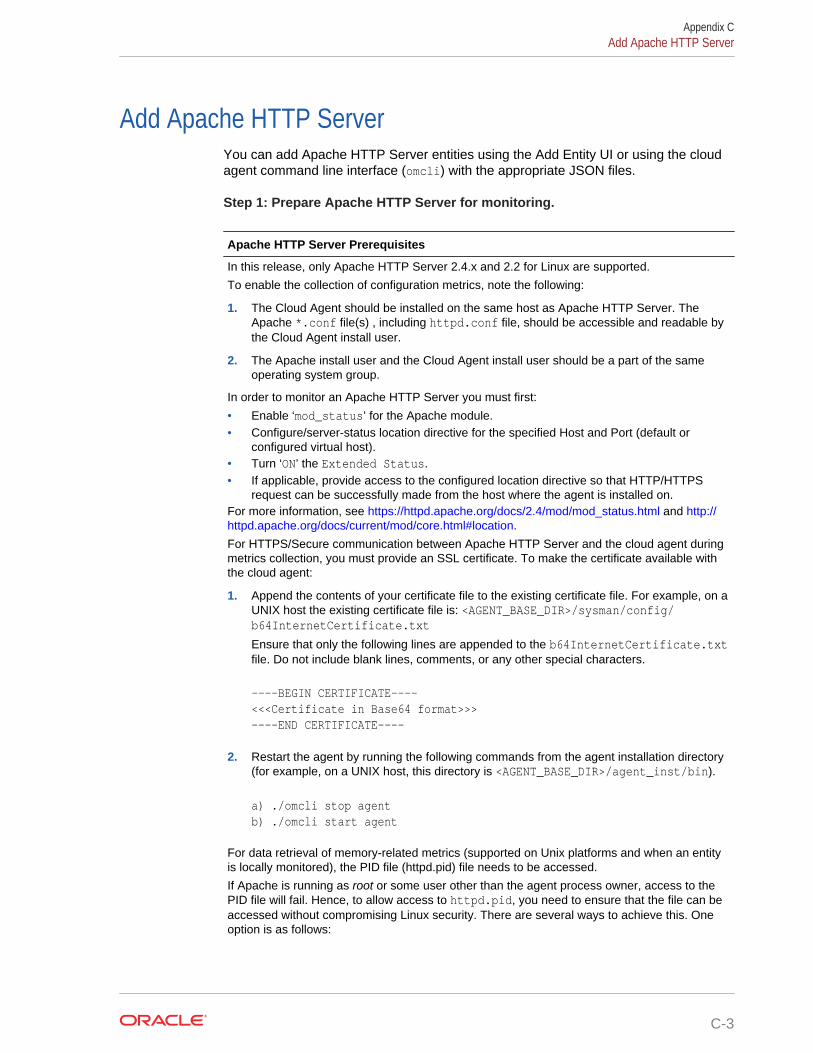
Add Apache HTTP ServerYou can add Apache HTTP Server entities using the Add Entity UI or using the cloudagent command line interface (omcli) with the appropriate JSON files.
Step 1: Prepare Apache HTTP Server for monitoring.
Apache HTTP Server Prerequisites
In this release, only Apache HTTP Server 2.4.x and 2.2 for Linux are supported.
To enable the collection of configuration metrics, note the following:
1. The Cloud Agent should be installed on the same host as Apache HTTP Server. TheApache *.conf file(s) , including httpd.conf file, should be accessible and readable bythe Cloud Agent install user.
2. The Apache install user and the Cloud Agent install user should be a part of the sameoperating system group.
In order to monitor an Apache HTTP Server you must first:
• Enable ‘mod_status’ for the Apache module.• Configure/server-status location directive for the specified Host and Port (default or
configured virtual host).• Turn ‘ON’ the Extended Status.• If applicable, provide access to the configured location directive so that HTTP/HTTPS
request can be successfully made from the host where the agent is installed on.For more information, see https://httpd.apache.org/docs/2.4/mod/mod_status.html and http://httpd.apache.org/docs/current/mod/core.html#location.
For HTTPS/Secure communication between Apache HTTP Server and the cloud agent duringmetrics collection, you must provide an SSL certificate. To make the certificate available withthe cloud agent:
1. Append the contents of your certificate file to the existing certificate file. For example, on aUNIX host the existing certificate file is: <AGENT_BASE_DIR>/sysman/config/b64InternetCertificate.txt
Ensure that only the following lines are appended to the b64InternetCertificate.txtfile. Do not include blank lines, comments, or any other special characters.
----BEGIN CERTIFICATE----<<<Certificate in Base64 format>>>----END CERTIFICATE----
2. Restart the agent by running the following commands from the agent installation directory(for example, on a UNIX host, this directory is <AGENT_BASE_DIR>/agent_inst/bin).
a) ./omcli stop agentb) ./omcli start agent
For data retrieval of memory-related metrics (supported on Unix platforms and when an entityis locally monitored), the PID file (httpd.pid) file needs to be accessed.
If Apache is running as root or some user other than the agent process owner, access to thePID file will fail. Hence, to allow access to httpd.pid, you need to ensure that the file can beaccessed without compromising Linux security. There are several ways to achieve this. Oneoption is as follows:
Appendix CAdd Apache HTTP Server
C-3
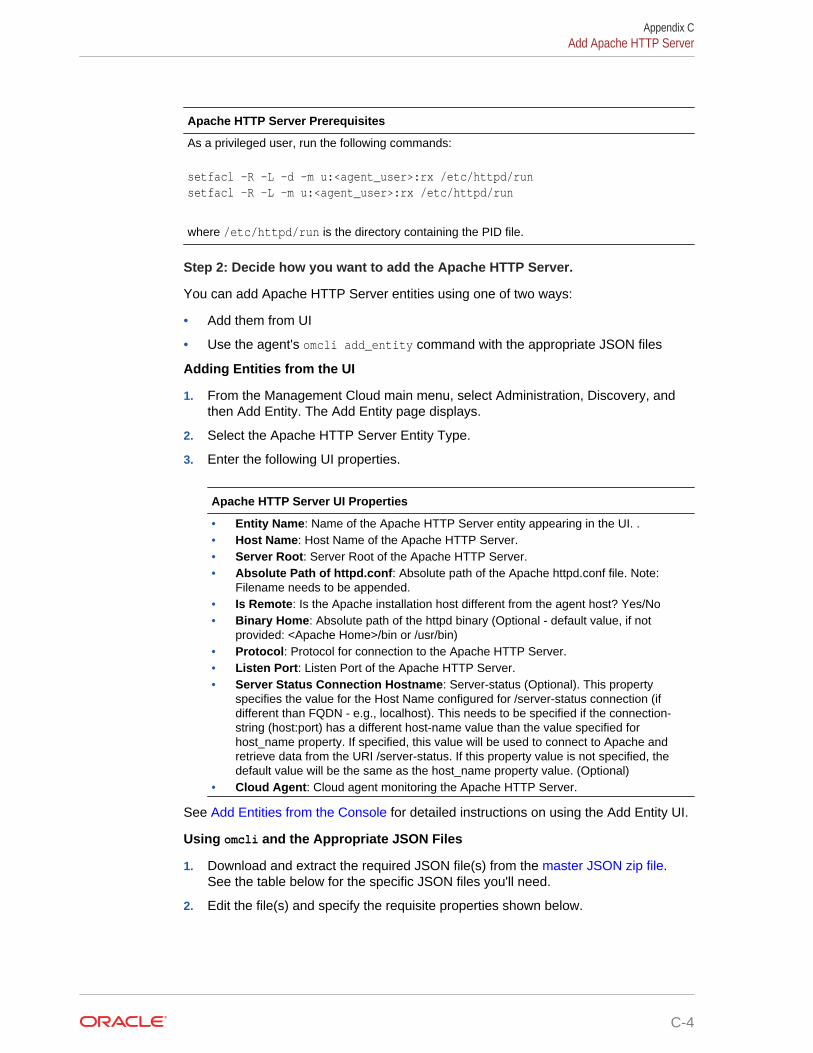
Apache HTTP Server Prerequisites
As a privileged user, run the following commands:
setfacl -R -L -d -m u:<agent_user>:rx /etc/httpd/runsetfacl -R -L -m u:<agent_user>:rx /etc/httpd/run
where /etc/httpd/run is the directory containing the PID file.
Step 2: Decide how you want to add the Apache HTTP Server.
You can add Apache HTTP Server entities using one of two ways:
• Add them from UI
• Use the agent's omcli add_entity command with the appropriate JSON files
Adding Entities from the UI
1. From the Management Cloud main menu, select Administration, Discovery, andthen Add Entity. The Add Entity page displays.
2. Select the Apache HTTP Server Entity Type.
3. Enter the following UI properties.
Apache HTTP Server UI Properties
• Entity Name: Name of the Apache HTTP Server entity appearing in the UI. .• Host Name: Host Name of the Apache HTTP Server.• Server Root: Server Root of the Apache HTTP Server.• Absolute Path of httpd.conf: Absolute path of the Apache httpd.conf file. Note:
Filename needs to be appended.• Is Remote: Is the Apache installation host different from the agent host? Yes/No• Binary Home: Absolute path of the httpd binary (Optional - default value, if not
provided: <Apache Home>/bin or /usr/bin)• Protocol: Protocol for connection to the Apache HTTP Server.• Listen Port: Listen Port of the Apache HTTP Server.• Server Status Connection Hostname: Server-status (Optional). This property
specifies the value for the Host Name configured for /server-status connection (ifdifferent than FQDN - e.g., localhost). This needs to be specified if the connection-string (host:port) has a different host-name value than the value specified forhost_name property. If specified, this value will be used to connect to Apache andretrieve data from the URI /server-status. If this property value is not specified, thedefault value will be the same as the host_name property value. (Optional)
• Cloud Agent: Cloud agent monitoring the Apache HTTP Server.
See Add Entities from the Console for detailed instructions on using the Add Entity UI.
Using omcli and the Appropriate JSON Files
1. Download and extract the required JSON file(s) from the master JSON zip file.See the table below for the specific JSON files you'll need.
2. Edit the file(s) and specify the requisite properties shown below.
Appendix CAdd Apache HTTP Server
C-4
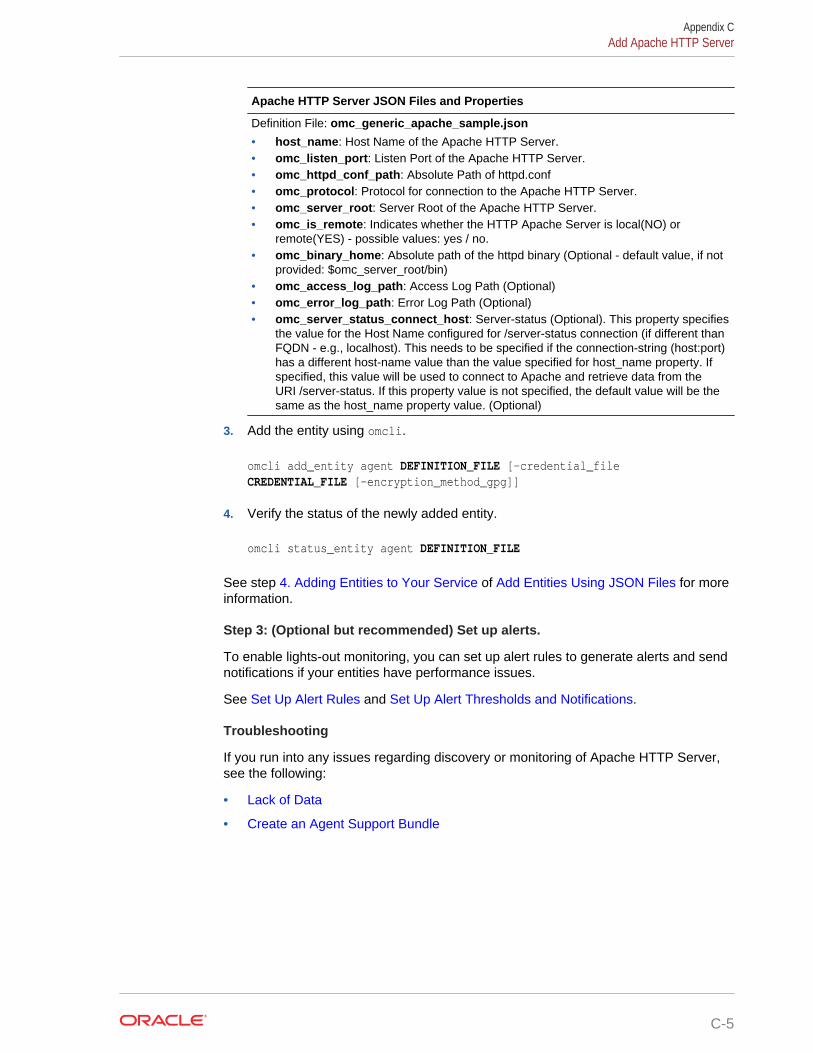
Apache HTTP Server JSON Files and Properties
Definition File: omc_generic_apache_sample.json
• host_name: Host Name of the Apache HTTP Server.• omc_listen_port: Listen Port of the Apache HTTP Server.• omc_httpd_conf_path: Absolute Path of httpd.conf• omc_protocol: Protocol for connection to the Apache HTTP Server.• omc_server_root: Server Root of the Apache HTTP Server.• omc_is_remote: Indicates whether the HTTP Apache Server is local(NO) or
remote(YES) - possible values: yes / no.• omc_binary_home: Absolute path of the httpd binary (Optional - default value, if not
provided: $omc_server_root/bin)• omc_access_log_path: Access Log Path (Optional)• omc_error_log_path: Error Log Path (Optional)• omc_server_status_connect_host: Server-status (Optional). This property specifies
the value for the Host Name configured for /server-status connection (if different thanFQDN - e.g., localhost). This needs to be specified if the connection-string (host:port)has a different host-name value than the value specified for host_name property. Ifspecified, this value will be used to connect to Apache and retrieve data from theURI /server-status. If this property value is not specified, the default value will be thesame as the host_name property value. (Optional)
3. Add the entity using omcli.
omcli add_entity agent DEFINITION_FILE [-credential_file CREDENTIAL_FILE [-encryption_method_gpg]]
4. Verify the status of the newly added entity.
omcli status_entity agent DEFINITION_FILE
See step 4. Adding Entities to Your Service of Add Entities Using JSON Files for moreinformation.
Step 3: (Optional but recommended) Set up alerts.
To enable lights-out monitoring, you can set up alert rules to generate alerts and sendnotifications if your entities have performance issues.
See Set Up Alert Rules and Set Up Alert Thresholds and Notifications.
Troubleshooting
If you run into any issues regarding discovery or monitoring of Apache HTTP Server,see the following:
• Lack of Data
• Create an Agent Support Bundle
Appendix CAdd Apache HTTP Server
C-5
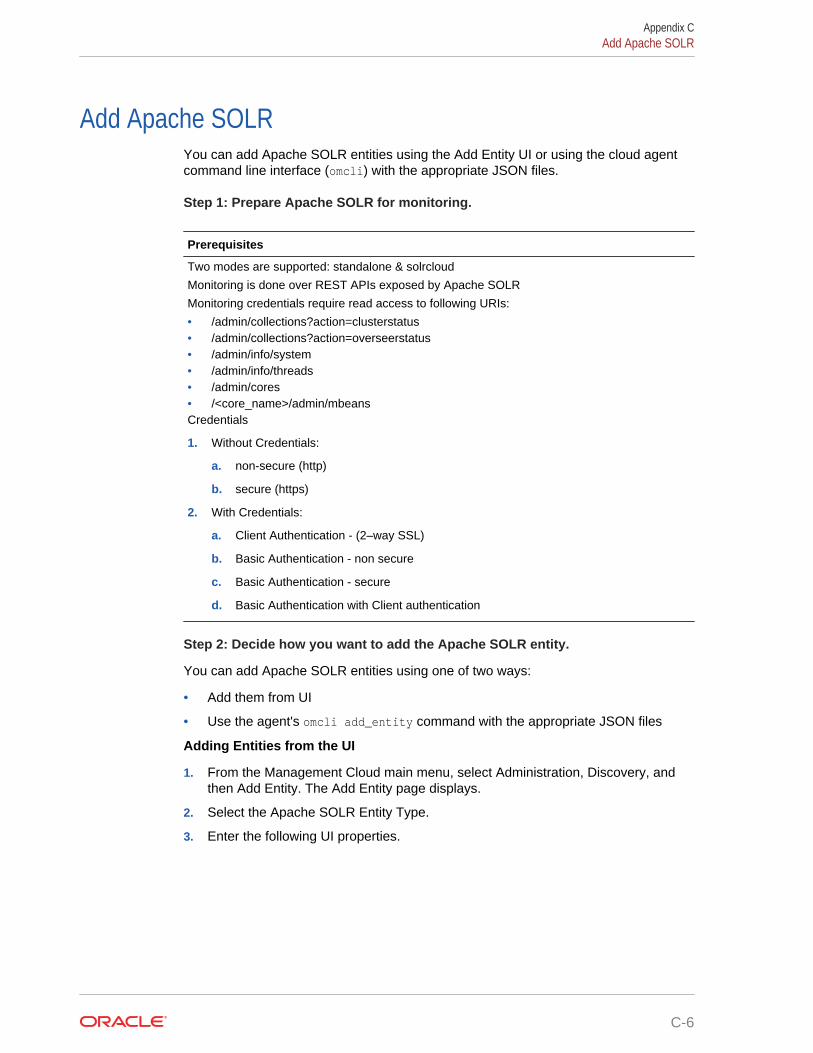
Add Apache SOLRYou can add Apache SOLR entities using the Add Entity UI or using the cloud agentcommand line interface (omcli) with the appropriate JSON files.
Step 1: Prepare Apache SOLR for monitoring.
Prerequisites
Two modes are supported: standalone & solrcloud
Monitoring is done over REST APIs exposed by Apache SOLR
Monitoring credentials require read access to following URIs:
• /admin/collections?action=clusterstatus• /admin/collections?action=overseerstatus• /admin/info/system• /admin/info/threads• /admin/cores• /<core_name>/admin/mbeansCredentials
1. Without Credentials:
a. non-secure (http)
b. secure (https)
2. With Credentials:
a. Client Authentication - (2–way SSL)
b. Basic Authentication - non secure
c. Basic Authentication - secure
d. Basic Authentication with Client authentication
Step 2: Decide how you want to add the Apache SOLR entity.
You can add Apache SOLR entities using one of two ways:
• Add them from UI
• Use the agent's omcli add_entity command with the appropriate JSON files
Adding Entities from the UI
1. From the Management Cloud main menu, select Administration, Discovery, andthen Add Entity. The Add Entity page displays.
2. Select the Apache SOLR Entity Type.
3. Enter the following UI properties.
Appendix CAdd Apache SOLR
C-6
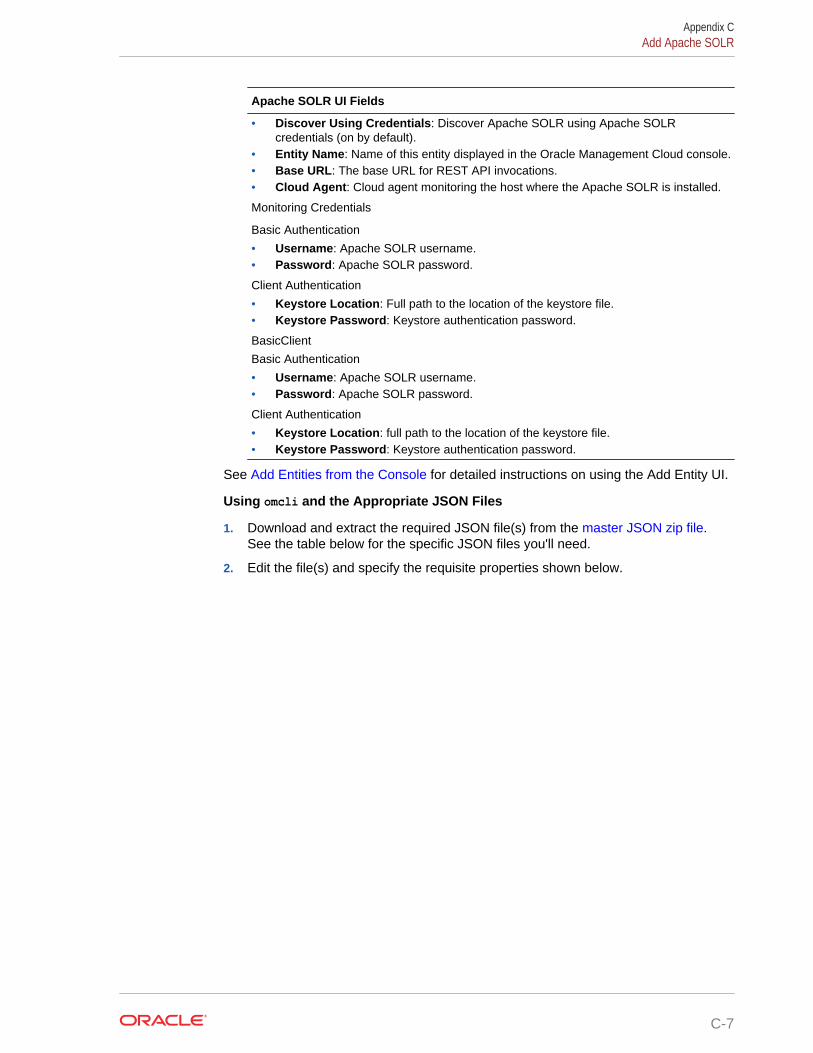
Apache SOLR UI Fields
• Discover Using Credentials: Discover Apache SOLR using Apache SOLRcredentials (on by default).
• Entity Name: Name of this entity displayed in the Oracle Management Cloud console.• Base URL: The base URL for REST API invocations.• Cloud Agent: Cloud agent monitoring the host where the Apache SOLR is installed.
Monitoring Credentials
Basic Authentication
• Username: Apache SOLR username.• Password: Apache SOLR password.
Client Authentication
• Keystore Location: Full path to the location of the keystore file.• Keystore Password: Keystore authentication password.
BasicClient
Basic Authentication
• Username: Apache SOLR username.• Password: Apache SOLR password.
Client Authentication
• Keystore Location: full path to the location of the keystore file.• Keystore Password: Keystore authentication password.
See Add Entities from the Console for detailed instructions on using the Add Entity UI.
Using omcli and the Appropriate JSON Files
1. Download and extract the required JSON file(s) from the master JSON zip file.See the table below for the specific JSON files you'll need.
2. Edit the file(s) and specify the requisite properties shown below.
Appendix CAdd Apache SOLR
C-7
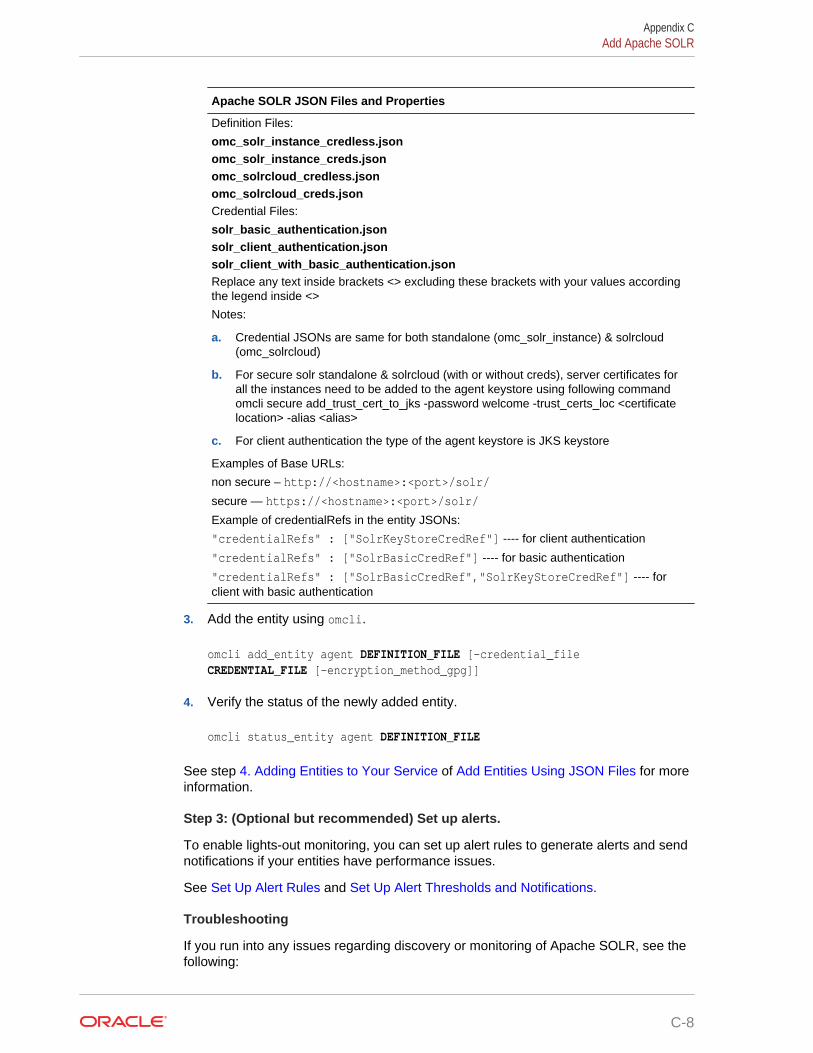
Apache SOLR JSON Files and Properties
Definition Files:
omc_solr_instance_credless.jsonomc_solr_instance_creds.jsonomc_solrcloud_credless.jsonomc_solrcloud_creds.jsonCredential Files:
solr_basic_authentication.jsonsolr_client_authentication.jsonsolr_client_with_basic_authentication.jsonReplace any text inside brackets <> excluding these brackets with your values accordingthe legend inside <>
Notes:
a. Credential JSONs are same for both standalone (omc_solr_instance) & solrcloud(omc_solrcloud)
b. For secure solr standalone & solrcloud (with or without creds), server certificates forall the instances need to be added to the agent keystore using following commandomcli secure add_trust_cert_to_jks -password welcome -trust_certs_loc <certificatelocation> -alias <alias>
c. For client authentication the type of the agent keystore is JKS keystore
Examples of Base URLs:
non secure – http://<hostname>:<port>/solr/
secure — https://<hostname>:<port>/solr/
Example of credentialRefs in the entity JSONs:
"credentialRefs" : ["SolrKeyStoreCredRef"] ---- for client authentication
"credentialRefs" : ["SolrBasicCredRef"] ---- for basic authentication
"credentialRefs" : ["SolrBasicCredRef","SolrKeyStoreCredRef"] ---- forclient with basic authentication
3. Add the entity using omcli.
omcli add_entity agent DEFINITION_FILE [-credential_file CREDENTIAL_FILE [-encryption_method_gpg]]
4. Verify the status of the newly added entity.
omcli status_entity agent DEFINITION_FILE
See step 4. Adding Entities to Your Service of Add Entities Using JSON Files for moreinformation.
Step 3: (Optional but recommended) Set up alerts.
To enable lights-out monitoring, you can set up alert rules to generate alerts and sendnotifications if your entities have performance issues.
See Set Up Alert Rules and Set Up Alert Thresholds and Notifications.
Troubleshooting
If you run into any issues regarding discovery or monitoring of Apache SOLR, see thefollowing:
Appendix CAdd Apache SOLR
C-8
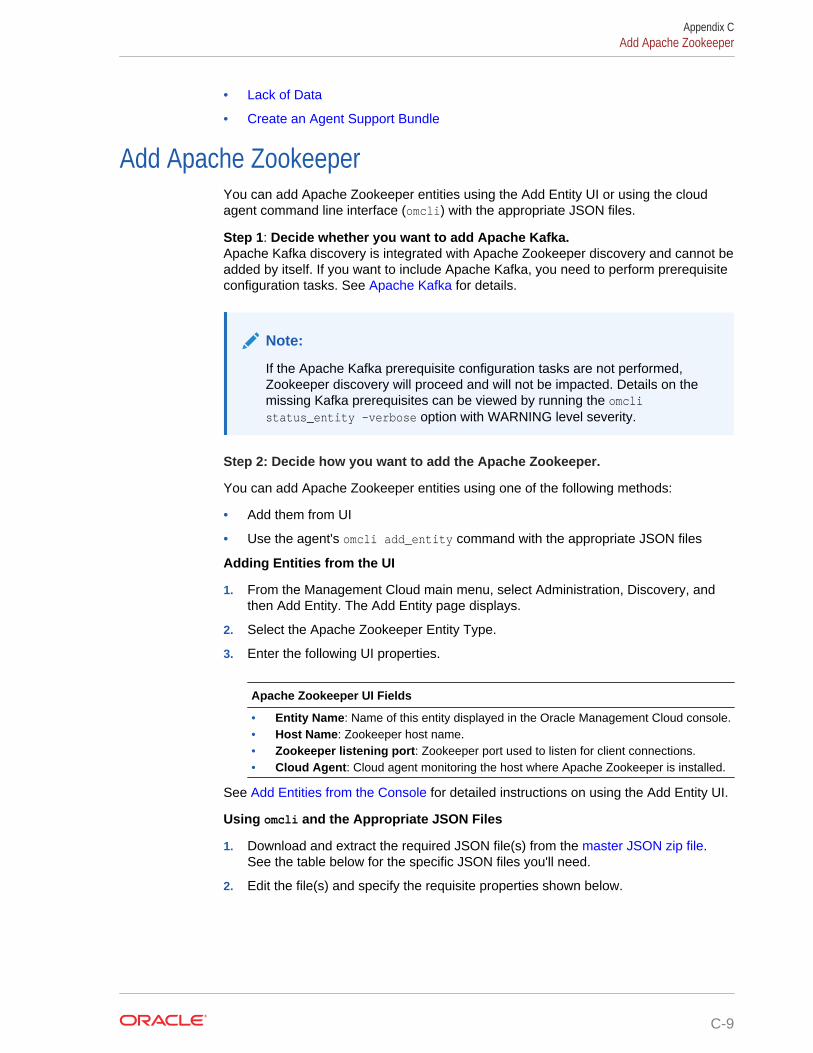
• Lack of Data
• Create an Agent Support Bundle
Add Apache ZookeeperYou can add Apache Zookeeper entities using the Add Entity UI or using the cloudagent command line interface (omcli) with the appropriate JSON files.
Step 1: Decide whether you want to add Apache Kafka.Apache Kafka discovery is integrated with Apache Zookeeper discovery and cannot beadded by itself. If you want to include Apache Kafka, you need to perform prerequisiteconfiguration tasks. See Apache Kafka for details.
Note:
If the Apache Kafka prerequisite configuration tasks are not performed,Zookeeper discovery will proceed and will not be impacted. Details on themissing Kafka prerequisites can be viewed by running the omclistatus_entity -verbose option with WARNING level severity.
Step 2: Decide how you want to add the Apache Zookeeper.
You can add Apache Zookeeper entities using one of the following methods:
• Add them from UI
• Use the agent's omcli add_entity command with the appropriate JSON files
Adding Entities from the UI
1. From the Management Cloud main menu, select Administration, Discovery, andthen Add Entity. The Add Entity page displays.
2. Select the Apache Zookeeper Entity Type.
3. Enter the following UI properties.
Apache Zookeeper UI Fields
• Entity Name: Name of this entity displayed in the Oracle Management Cloud console.• Host Name: Zookeeper host name.• Zookeeper listening port: Zookeeper port used to listen for client connections.• Cloud Agent: Cloud agent monitoring the host where Apache Zookeeper is installed.
See Add Entities from the Console for detailed instructions on using the Add Entity UI.
Using omcli and the Appropriate JSON Files
1. Download and extract the required JSON file(s) from the master JSON zip file.See the table below for the specific JSON files you'll need.
2. Edit the file(s) and specify the requisite properties shown below.
Appendix CAdd Apache Zookeeper
C-9
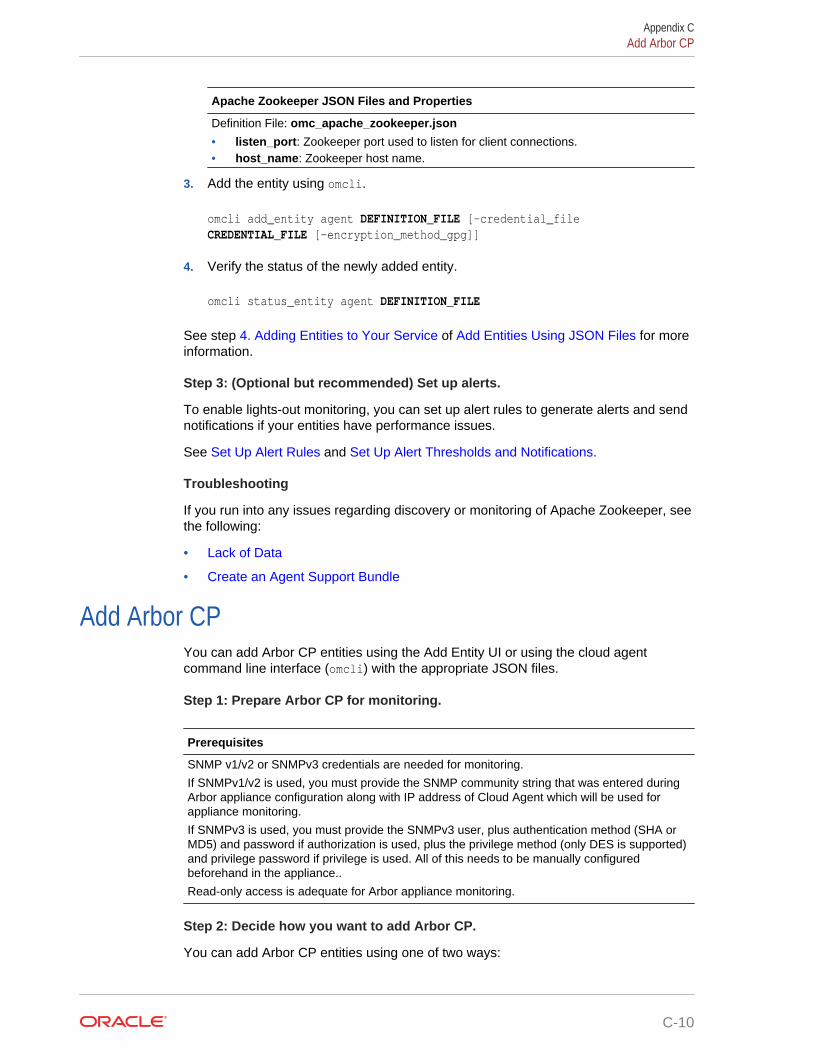
Apache Zookeeper JSON Files and Properties
Definition File: omc_apache_zookeeper.json
• listen_port: Zookeeper port used to listen for client connections.• host_name: Zookeeper host name.
3. Add the entity using omcli.
omcli add_entity agent DEFINITION_FILE [-credential_file CREDENTIAL_FILE [-encryption_method_gpg]]
4. Verify the status of the newly added entity.
omcli status_entity agent DEFINITION_FILE
See step 4. Adding Entities to Your Service of Add Entities Using JSON Files for moreinformation.
Step 3: (Optional but recommended) Set up alerts.
To enable lights-out monitoring, you can set up alert rules to generate alerts and sendnotifications if your entities have performance issues.
See Set Up Alert Rules and Set Up Alert Thresholds and Notifications.
Troubleshooting
If you run into any issues regarding discovery or monitoring of Apache Zookeeper, seethe following:
• Lack of Data
• Create an Agent Support Bundle
Add Arbor CPYou can add Arbor CP entities using the Add Entity UI or using the cloud agentcommand line interface (omcli) with the appropriate JSON files.
Step 1: Prepare Arbor CP for monitoring.
Prerequisites
SNMP v1/v2 or SNMPv3 credentials are needed for monitoring.
If SNMPv1/v2 is used, you must provide the SNMP community string that was entered duringArbor appliance configuration along with IP address of Cloud Agent which will be used forappliance monitoring.
If SNMPv3 is used, you must provide the SNMPv3 user, plus authentication method (SHA orMD5) and password if authorization is used, plus the privilege method (only DES is supported)and privilege password if privilege is used. All of this needs to be manually configuredbeforehand in the appliance..
Read-only access is adequate for Arbor appliance monitoring.
Step 2: Decide how you want to add Arbor CP.
You can add Arbor CP entities using one of two ways:
Appendix CAdd Arbor CP
C-10
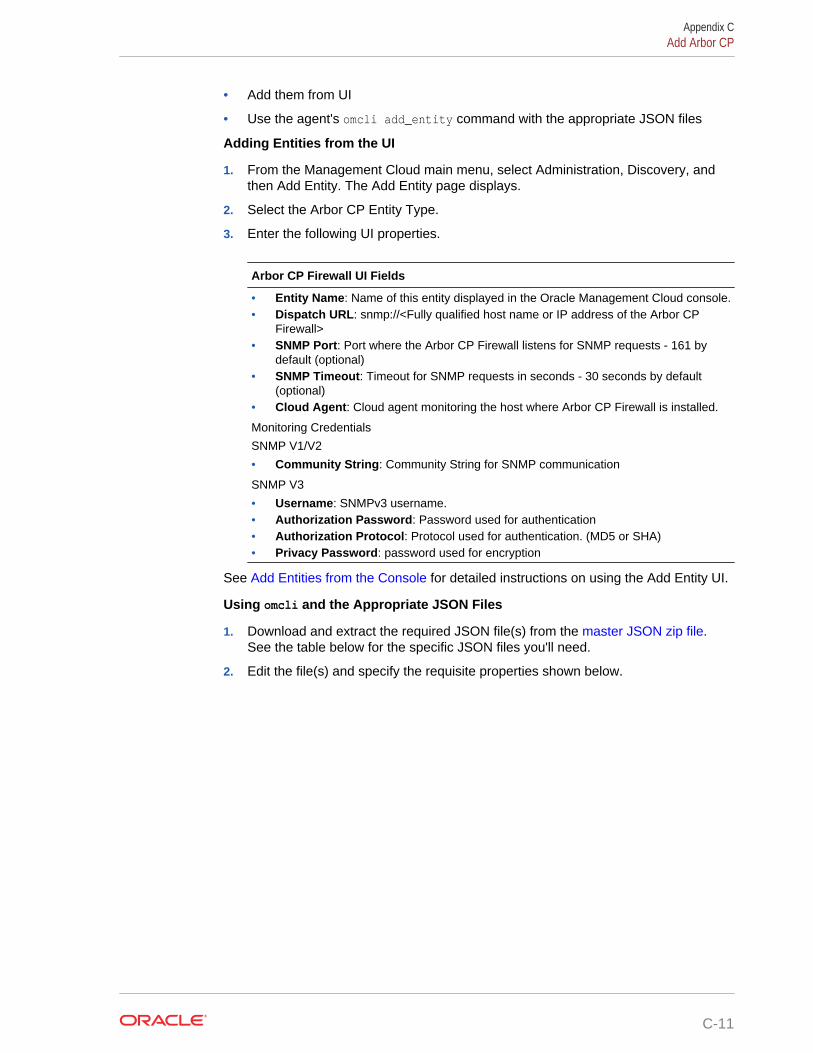
• Add them from UI
• Use the agent's omcli add_entity command with the appropriate JSON files
Adding Entities from the UI
1. From the Management Cloud main menu, select Administration, Discovery, andthen Add Entity. The Add Entity page displays.
2. Select the Arbor CP Entity Type.
3. Enter the following UI properties.
Arbor CP Firewall UI Fields
• Entity Name: Name of this entity displayed in the Oracle Management Cloud console.• Dispatch URL: snmp://<Fully qualified host name or IP address of the Arbor CP
Firewall>• SNMP Port: Port where the Arbor CP Firewall listens for SNMP requests - 161 by
default (optional)• SNMP Timeout: Timeout for SNMP requests in seconds - 30 seconds by default
(optional)• Cloud Agent: Cloud agent monitoring the host where Arbor CP Firewall is installed.
Monitoring Credentials
SNMP V1/V2
• Community String: Community String for SNMP communication
SNMP V3
• Username: SNMPv3 username.• Authorization Password: Password used for authentication• Authorization Protocol: Protocol used for authentication. (MD5 or SHA)• Privacy Password: password used for encryption
See Add Entities from the Console for detailed instructions on using the Add Entity UI.
Using omcli and the Appropriate JSON Files
1. Download and extract the required JSON file(s) from the master JSON zip file.See the table below for the specific JSON files you'll need.
2. Edit the file(s) and specify the requisite properties shown below.
Appendix CAdd Arbor CP
C-11
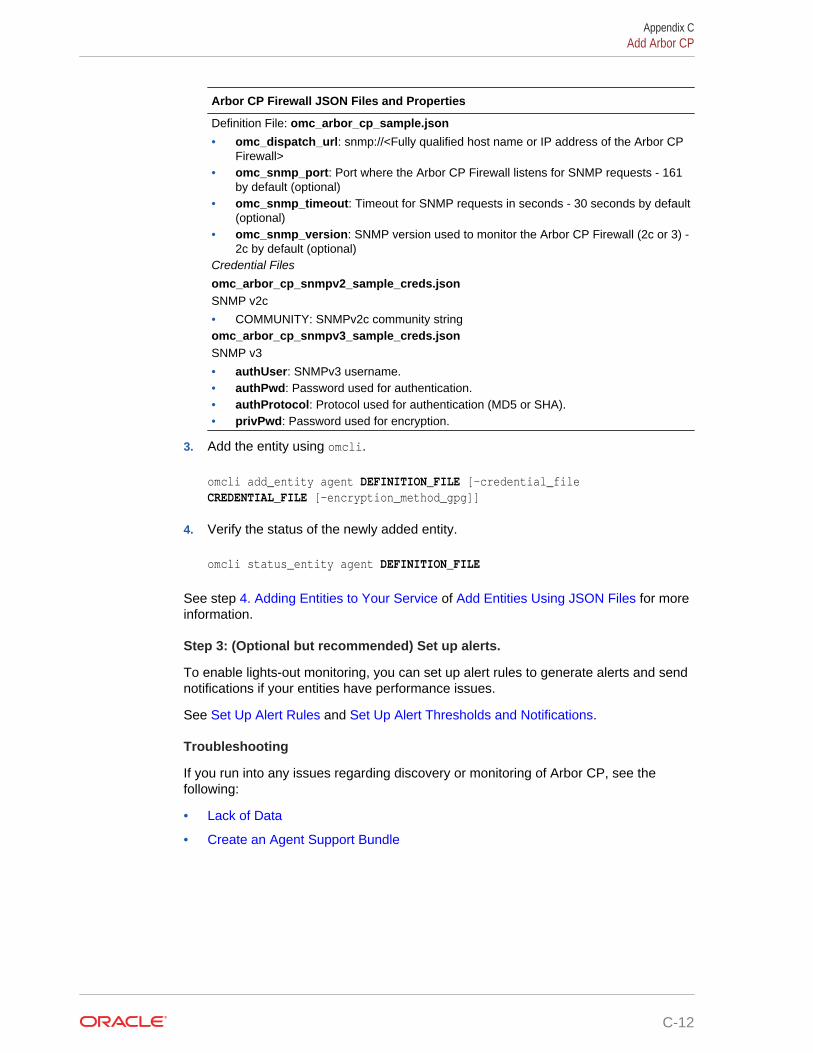
Arbor CP Firewall JSON Files and Properties
Definition File: omc_arbor_cp_sample.json
• omc_dispatch_url: snmp://<Fully qualified host name or IP address of the Arbor CPFirewall>
• omc_snmp_port: Port where the Arbor CP Firewall listens for SNMP requests - 161by default (optional)
• omc_snmp_timeout: Timeout for SNMP requests in seconds - 30 seconds by default(optional)
• omc_snmp_version: SNMP version used to monitor the Arbor CP Firewall (2c or 3) -2c by default (optional)
Credential Files
omc_arbor_cp_snmpv2_sample_creds.jsonSNMP v2c
• COMMUNITY: SNMPv2c community stringomc_arbor_cp_snmpv3_sample_creds.jsonSNMP v3
• authUser: SNMPv3 username.• authPwd: Password used for authentication.• authProtocol: Protocol used for authentication (MD5 or SHA).• privPwd: Password used for encryption.
3. Add the entity using omcli.
omcli add_entity agent DEFINITION_FILE [-credential_file CREDENTIAL_FILE [-encryption_method_gpg]]
4. Verify the status of the newly added entity.
omcli status_entity agent DEFINITION_FILE
See step 4. Adding Entities to Your Service of Add Entities Using JSON Files for moreinformation.
Step 3: (Optional but recommended) Set up alerts.
To enable lights-out monitoring, you can set up alert rules to generate alerts and sendnotifications if your entities have performance issues.
See Set Up Alert Rules and Set Up Alert Thresholds and Notifications.
Troubleshooting
If you run into any issues regarding discovery or monitoring of Arbor CP, see thefollowing:
• Lack of Data
• Create an Agent Support Bundle
Appendix CAdd Arbor CP
C-12

Add Arbor TMSYou can add Arbor TMS entities using the Add Entity UI or using the cloud agentcommand line interface (omcli) with the appropriate JSON files.
Step 1: Prepare Arbor TMS for monitoring.
Prerequisites
SNMP v1/v2 or SNMPv3 credentials are needed for monitoring.
If SNMPv1/v2 is used, you must provide the SNMP community string that was entered duringArbor appliance configuration along with IP address of Cloud Agent which will be used forappliance monitoring.
If SNMPv3 is used, you must provide the SNMPv3 user, plus authentication method (SHA orMD5) and password if authorization is used, plus the privilege method (only DES is supported)and privilege password if privilege is used. All of this needs to be manually configuredbeforehand in the appliance..
Read-only access is adequate for Arbor appliance monitoring.
Step 2: Decide how you want to add Arbor TMS.
You can add Arbor TMS entities using one of two ways:
• Add them from UI
• Use the agent's omcli add_entity command with the appropriate JSON files
Adding Entities from the UI
1. From the Management Cloud main menu, select Administration, Discovery, andthen Add Entity. The Add Entity page displays.
2. Select the Arbor TMS Entity Type.
3. Enter the following UI properties.
Arbor TMS Firewall UI Fields
• Entity Name: Name of this entity displayed in the Oracle Management Cloud console.• Dispatch URL: snmp://<Fully qualified host name or IP address of the Arbor TMS
Firewall>• SNMP Port: Port where the Arbor TMS Firewall listens for SNMP requests - 161 by
default (optional)• SNMP Timeout: Timeout for SNMP requests in seconds - 30 secs by default
(optional)• Cloud Agent: Cloud agent monitoring the host where Arbor TMS Firewall is installed.
Monitoring Credentials
SNMP V1/V2
• Community String: Community String for SNMP communication
SNMP V3
• Username: SNMPv3 username.• Authorization Password: Password used for authentication• Authorization Protocol: Protocol used for authentication. (MD5 or SHA)• Privacy Password: password used for encryption
See Add Entities from the Console for detailed instructions on using the Add Entity UI.
Appendix CAdd Arbor TMS
C-13
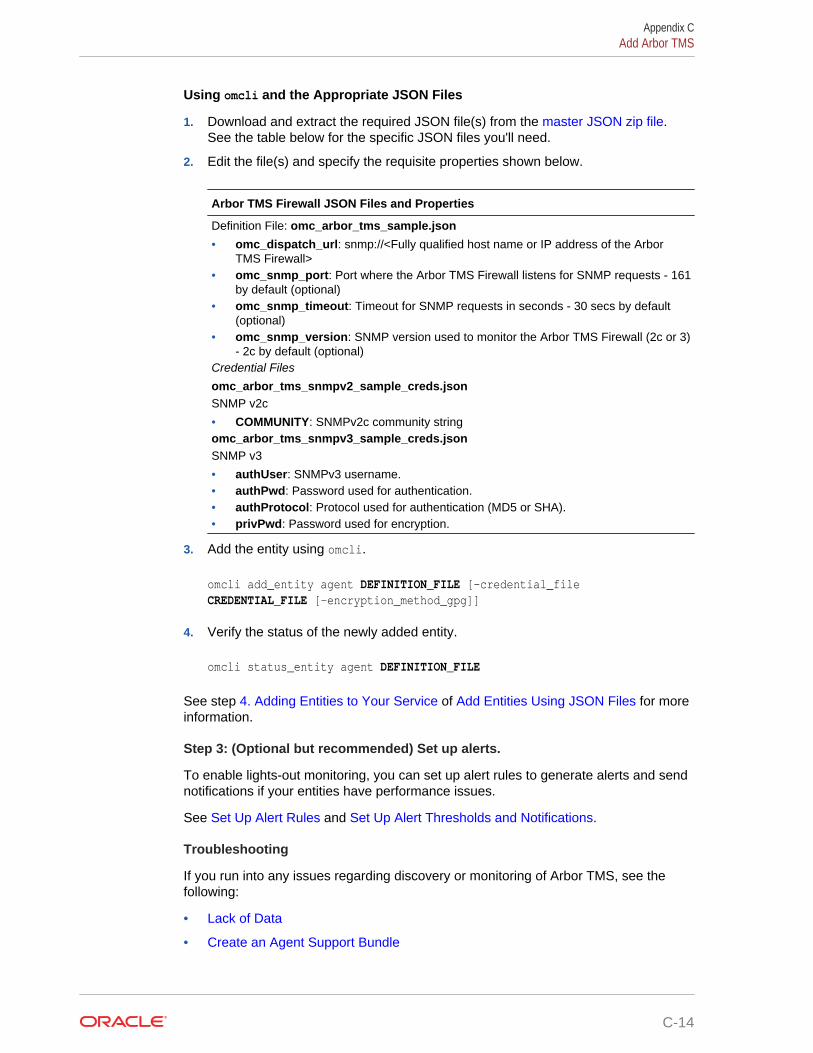
Using omcli and the Appropriate JSON Files
1. Download and extract the required JSON file(s) from the master JSON zip file.See the table below for the specific JSON files you'll need.
2. Edit the file(s) and specify the requisite properties shown below.
Arbor TMS Firewall JSON Files and Properties
Definition File: omc_arbor_tms_sample.json
• omc_dispatch_url: snmp://<Fully qualified host name or IP address of the ArborTMS Firewall>
• omc_snmp_port: Port where the Arbor TMS Firewall listens for SNMP requests - 161by default (optional)
• omc_snmp_timeout: Timeout for SNMP requests in seconds - 30 secs by default(optional)
• omc_snmp_version: SNMP version used to monitor the Arbor TMS Firewall (2c or 3)- 2c by default (optional)
Credential Files
omc_arbor_tms_snmpv2_sample_creds.jsonSNMP v2c
• COMMUNITY: SNMPv2c community stringomc_arbor_tms_snmpv3_sample_creds.jsonSNMP v3
• authUser: SNMPv3 username.• authPwd: Password used for authentication.• authProtocol: Protocol used for authentication (MD5 or SHA).• privPwd: Password used for encryption.
3. Add the entity using omcli.
omcli add_entity agent DEFINITION_FILE [-credential_file CREDENTIAL_FILE [-encryption_method_gpg]]
4. Verify the status of the newly added entity.
omcli status_entity agent DEFINITION_FILE
See step 4. Adding Entities to Your Service of Add Entities Using JSON Files for moreinformation.
Step 3: (Optional but recommended) Set up alerts.
To enable lights-out monitoring, you can set up alert rules to generate alerts and sendnotifications if your entities have performance issues.
See Set Up Alert Rules and Set Up Alert Thresholds and Notifications.
Troubleshooting
If you run into any issues regarding discovery or monitoring of Arbor TMS, see thefollowing:
• Lack of Data
• Create an Agent Support Bundle
Appendix CAdd Arbor TMS
C-14
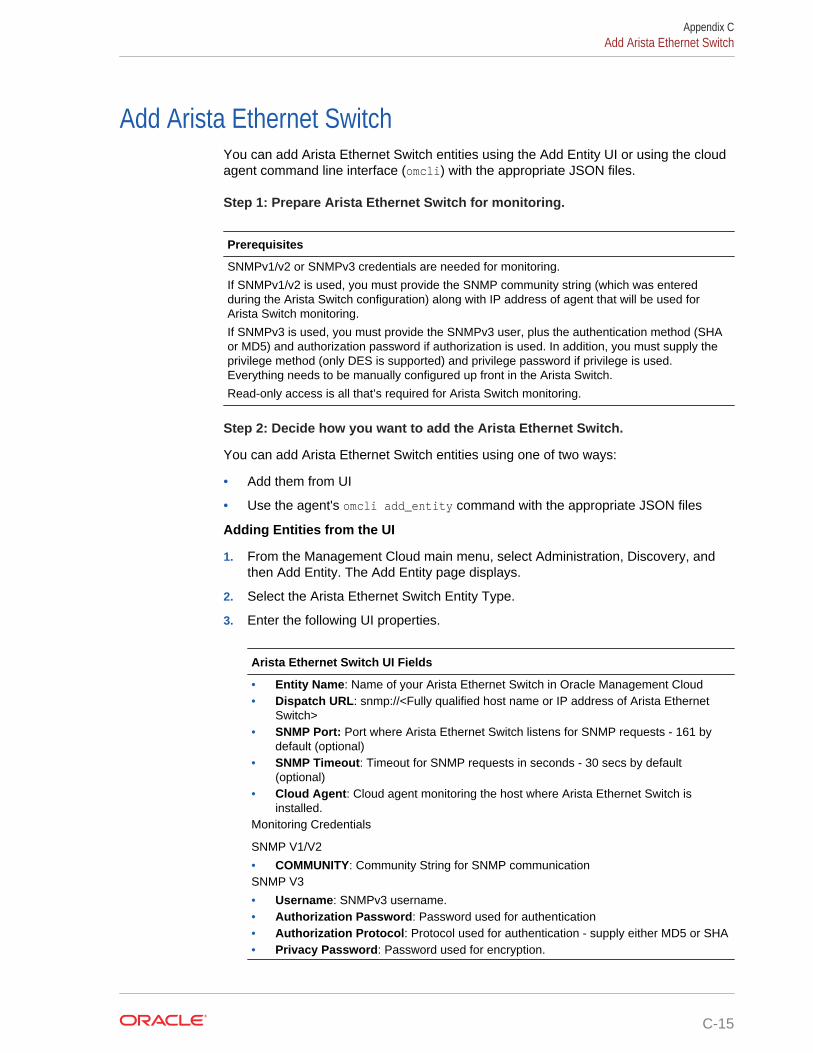
Add Arista Ethernet SwitchYou can add Arista Ethernet Switch entities using the Add Entity UI or using the cloudagent command line interface (omcli) with the appropriate JSON files.
Step 1: Prepare Arista Ethernet Switch for monitoring.
Prerequisites
SNMPv1/v2 or SNMPv3 credentials are needed for monitoring.
If SNMPv1/v2 is used, you must provide the SNMP community string (which was enteredduring the Arista Switch configuration) along with IP address of agent that will be used forArista Switch monitoring.
If SNMPv3 is used, you must provide the SNMPv3 user, plus the authentication method (SHAor MD5) and authorization password if authorization is used. In addition, you must supply theprivilege method (only DES is supported) and privilege password if privilege is used.Everything needs to be manually configured up front in the Arista Switch.
Read-only access is all that’s required for Arista Switch monitoring.
Step 2: Decide how you want to add the Arista Ethernet Switch.
You can add Arista Ethernet Switch entities using one of two ways:
• Add them from UI
• Use the agent's omcli add_entity command with the appropriate JSON files
Adding Entities from the UI
1. From the Management Cloud main menu, select Administration, Discovery, andthen Add Entity. The Add Entity page displays.
2. Select the Arista Ethernet Switch Entity Type.
3. Enter the following UI properties.
Arista Ethernet Switch UI Fields
• Entity Name: Name of your Arista Ethernet Switch in Oracle Management Cloud• Dispatch URL: snmp://<Fully qualified host name or IP address of Arista Ethernet
Switch>• SNMP Port: Port where Arista Ethernet Switch listens for SNMP requests - 161 by
default (optional)• SNMP Timeout: Timeout for SNMP requests in seconds - 30 secs by default
(optional)• Cloud Agent: Cloud agent monitoring the host where Arista Ethernet Switch is
installed.Monitoring Credentials
SNMP V1/V2
• COMMUNITY: Community String for SNMP communicationSNMP V3
• Username: SNMPv3 username.• Authorization Password: Password used for authentication• Authorization Protocol: Protocol used for authentication - supply either MD5 or SHA• Privacy Password: Password used for encryption.
Appendix CAdd Arista Ethernet Switch
C-15
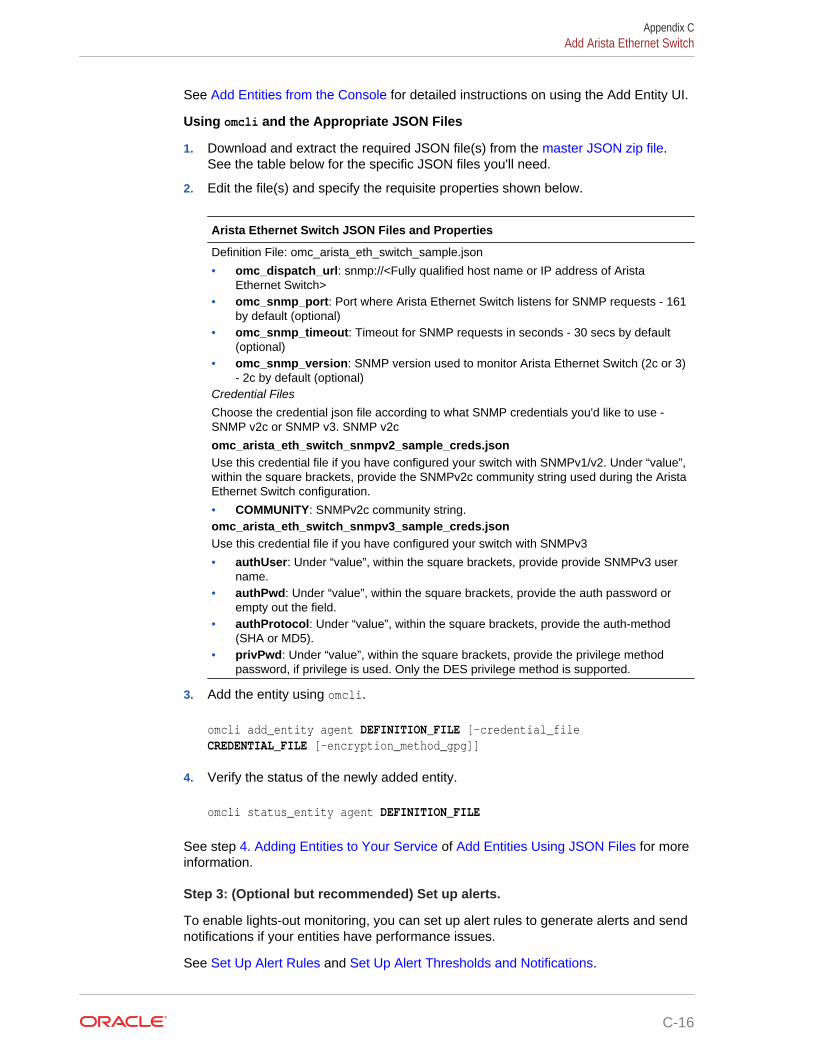
See Add Entities from the Console for detailed instructions on using the Add Entity UI.
Using omcli and the Appropriate JSON Files
1. Download and extract the required JSON file(s) from the master JSON zip file.See the table below for the specific JSON files you'll need.
2. Edit the file(s) and specify the requisite properties shown below.
Arista Ethernet Switch JSON Files and Properties
Definition File: omc_arista_eth_switch_sample.json
• omc_dispatch_url: snmp://<Fully qualified host name or IP address of AristaEthernet Switch>
• omc_snmp_port: Port where Arista Ethernet Switch listens for SNMP requests - 161by default (optional)
• omc_snmp_timeout: Timeout for SNMP requests in seconds - 30 secs by default(optional)
• omc_snmp_version: SNMP version used to monitor Arista Ethernet Switch (2c or 3)- 2c by default (optional)
Credential Files
Choose the credential json file according to what SNMP credentials you'd like to use -SNMP v2c or SNMP v3. SNMP v2c
omc_arista_eth_switch_snmpv2_sample_creds.jsonUse this credential file if you have configured your switch with SNMPv1/v2. Under “value”,within the square brackets, provide the SNMPv2c community string used during the AristaEthernet Switch configuration.
• COMMUNITY: SNMPv2c community string.omc_arista_eth_switch_snmpv3_sample_creds.jsonUse this credential file if you have configured your switch with SNMPv3
• authUser: Under “value”, within the square brackets, provide provide SNMPv3 username.
• authPwd: Under “value”, within the square brackets, provide the auth password orempty out the field.
• authProtocol: Under “value”, within the square brackets, provide the auth-method(SHA or MD5).
• privPwd: Under “value”, within the square brackets, provide the privilege methodpassword, if privilege is used. Only the DES privilege method is supported.
3. Add the entity using omcli.
omcli add_entity agent DEFINITION_FILE [-credential_file CREDENTIAL_FILE [-encryption_method_gpg]]
4. Verify the status of the newly added entity.
omcli status_entity agent DEFINITION_FILE
See step 4. Adding Entities to Your Service of Add Entities Using JSON Files for moreinformation.
Step 3: (Optional but recommended) Set up alerts.
To enable lights-out monitoring, you can set up alert rules to generate alerts and sendnotifications if your entities have performance issues.
See Set Up Alert Rules and Set Up Alert Thresholds and Notifications.
Appendix CAdd Arista Ethernet Switch
C-16
Troubleshooting
If you run into any issues regarding discovery or monitoring of Arista Ethernet Switch,see the following:
• Lack of Data
• Create an Agent Support Bundle
Add Brocade Fibre Channel SwitchYou can add Brocade Fibre Channel Switch entities using the Add Entity UI or usingthe cloud agent command line interface (omcli) with the appropriate JSON files.
Step 1: Prepare Brocade Fibre Channel Switch for monitoring.
Prerequisites
SNMPv1/v2 or SNMPv3 credentials are needed for monitoring.
If SNMPv1/v2 is used, you must provide the SNMP community string (entered during BrocadeFibre Channel Switch configuration), along with the IP address of the agent that will be usedfor Brocade Fibre Channel Switch monitoring.
If SNMPv3 is used, you must provide the SNMPv3 the user, plus the authentication method(SHA or MD5) and authorization password (if authorization is used), plus privilege method(only DES is supported) and privilege password if a privilege method is used. All of this needsto be manually configured up front in the Brocade Fibre Channel Switch.
Read-only access is enough for Brocade Fibre Channel Switch monitoring.
Step 2: Decide how you want to add the Brocade Fibre Channel Switch.
You can add Brocade Fibre Channel Switch entities using one of two ways:
• Add them from UI
• Use the agent's omcli add_entity command with the appropriate JSON files
Adding Entities from the UI
1. From the Management Cloud main menu, select Administration, Discovery, andthen Add Entity. The Add Entity page displays.
2. Select the Brocade Fibre Channel Entity Type.
3. Enter the following UI properties.
Appendix CAdd Brocade Fibre Channel Switch
C-17
Brocade Fiber Channel Switch UI Fields
• Entity Name: Name of your Brocade Fiber Channel Switch in Oracle ManagementCloud.
• Dispatch URL: snmp://<Fully qualified host name or IP address of Brocade FiberChannel Switch>
• SNMP Port: Port where Brocade Fiber Channel Switch listens for SNMP requests -161 by default (optional)
• SNMP Timeout: Timeout for SNMP requests in seconds - 30 secs by default(optional)
• Cloud Agent: Cloud agent monitoring your Brocade Fiber Channel Switch.
Monitoring Credentials
SNMP V1/V2:
• Community String: SNMPv1/v2c community string.SNMP V3
• Username: SNMPv3 username.• Authorization Password: Password used for authentication• Authorization Protocol: Protocol used for authentication. (MD5 or SHA)• Privacy Password: password used for encryption
See Add Entities from the Console for detailed instructions on using the Add Entity UI.
Using omcli and the Appropriate JSON Files
1. Download and extract the required JSON file(s) from the master JSON zip file.See the table below for the specific JSON files you'll need.
2. Edit the file(s) and specify the requisite properties shown below.
Appendix CAdd Brocade Fibre Channel Switch
C-18
Brocade Fiber Channel Switch JSON Files and Properties
Definition File: omc_brocade_fc_switch_sample.json
• name: Your Brocade Fibre Channel Switch entity name.• displayName: Your Brocade Fibre Channel Switch entity display name.• timezoneRegion: Time zone of your entity. It is recommended that you use the long
values IANA-maintained TZ database time zones. For example: America/New_York• host_name: Under “value”, provide fully qualified host name or IP address of the
Brocade Fibre Channel Switch• omc_dispatch_url: Under “value”, following the string snmp://, provide the fully
qualified hostname or IP address of the Brocade Fibre Channel Switch.• omc_snmp_port: Under “value”, provide the port where the Brocade Fibre Channel
Switch listens for SNMP requests. The default is 161.• omc_snmp_timeout: Under “value”, provide the timeout for SNMP requests in
seconds, 10 by default.• omc_snmp_version: Under “value”, provide the SNMP version used to monitor the
Brocade Fibre Channel Switch.Credential Files
omc_brocade_fc_switch_snmpv1_sample_creds.jsonUse this credential file if you have configured your switch with SNMPv1/v2.
• community: Under “value”, within the square brackets, provide the SNMPv2ccommunity string used during the Brocade Fibre Channel Switch configuration.
omc_brocade_fc_switch_snmpv3_sample_creds.jsonUse this credential file if you have configured your switch with SNMPv3.
• authUser: Under “value”, within the square brackets, provide the SNMPv3 username.• authPwd: Under “value”, within the square brackets, provide the authorization
password or empty out the field. .• authProtocol: Under “value”, within the square brackets, provide the authorization
method (SHA or MD5).• privPwd: Under “value”, within the square brackets, provide the privilege method
password, if privilege is used. Only the DES privilege method is supported.
3. Add the entity using omcli.
omcli add_entity agent DEFINITION_FILE [-credential_file CREDENTIAL_FILE [-encryption_method_gpg]]
4. Verify the status of the newly added entity.
omcli status_entity agent DEFINITION_FILE
See step 4. Adding Entities to Your Service of Add Entities Using JSON Files for moreinformation.
Step 3: (Optional but recommended) Set up alerts.
To enable lights-out monitoring, you can set up alert rules to generate alerts and sendnotifications if your entities have performance issues.
See Set Up Alert Rules and Set Up Alert Thresholds and Notifications.
Troubleshooting
If you run into any issues regarding discovery or monitoring of Brocade Fibre ChannelSwitch, see the following:
Appendix CAdd Brocade Fibre Channel Switch
C-19
• Lack of Data
• Create an Agent Support Bundle
Appendix CAdd Brocade Fibre Channel Switch
C-20
Add Apache Casandra DatabaseYou can add Apache Casandra Database entities using the Add Entity UI or using thecloud agent command line interface (omcli) with the appropriate JSON files.
Step 1: Prepare Apache Casandra Database for monitoring.
Prerequisites
The default settings for Cassandra make JMX accessible only from the local host. If you wantto enable remote JMX connections, change the LOCAL_JMX setting in cassandra-env.sh and enable authentication and/or SSL. To do this, perform the following procedure:
1. Open the cassandra-env.sh file for editing and update or add these lines:
JVM_OPTS="$JVM_OPTS -Dcom.sun.management.jmxremote.authenticate=true"JVM_OPTS="$JVM_OPTS -Dcom.sun.management.jmxremote.password.file=/etc/cassandra/jmxremote.password"
If the LOCAL_JMX setting is in your file, set it to no:
LOCAL_JMX=no
2. Depending on whether the JDK or JRE is installed:
• Copy the jmxremote.password.template from /jdk_install_location/jre/lib/management/ to /etc/cassandra/ andrename it to jmxremote.password
$ cp /jdk_install_dir/lib/management/jmxremote.password.template /etc/cassandra/jmxremote.password
• Copy the jmxremote.password.template from /jre_install_location/lib/management/ to /etc/cassandra/ and rename it to jmxremote.password
$ cp /jre_install_dir/lib/management/jmxremote.password.template /etc/cassandra/jmxremote.password
3. Change the ownership of the jmxremote.password to the user you use to runCassandra and change permission to read-only:
$ chown cassandra:cassandra /etc/cassandra/jmxremote.password$ chmod 400 /etc/cassandra/jmxremote.password
4. Edit jmxremote.password and add the user and password for JMX-compliant utilities:
monitorRole QEDcontrolRole R&Dcassandra cassandrapassword
Note:
The Cassandra user and Cassandra password shown in the above sample areexamples. Specify the user and password for your environment.
Appendix CAdd Apache Casandra Database
C-21
Prerequisites
5. Add the Cassandra user with read and write permission to /jre_install_location/lib/management/jmxremote.access
monitorRole readonlycassandra readwritecontrolRole readwrite \create javax.management.monitor.,javax.management.timer. \unregister
6. Restart Cassandra.
Step 2: Decide how you want to add the Apache Casandra Database.
You can add Apache Casandra Database entities using one of two ways:
• Add them from UI
• Use the agent's omcli add_entity command with the appropriate JSON files
Adding Entities from the UI
1. From the Management Cloud main menu, select Administration, Discovery, andthen Add Entity. The Add Entity page displays.
2. Select the Apache Casandra Database Entity Type.
3. Enter the following UI properties.
Apache Cassandra DB UI Fields
• Entity Name: Name of this entity displayed in the Oracle Management Cloud console.• Host Name: Fully-qualified Host Name where Cassandra database is installed.• Port: Apache Cassandra Database port.• Cloud Agent: Cloud agent monitoring the host where the Apache Cassandra DB is
installed.
Monitoring Credentials (Cassandra JMX Credentials)
• Username: Cassandra DB username.• Password: Password used for authentication.
See Add Entities from the Console for detailed instructions on using the Add Entity UI.
Using omcli and the Appropriate JSON Files
1. Download and extract the required JSON file(s) from the master JSON zip file.See the table below for the specific JSON files you'll need.
2. Edit the file(s) and specify the requisite properties shown below.
Appendix CAdd Apache Casandra Database
C-22
Apache Cassandra DB JSON Files and Properties
Definition File: omc_cassandra_db.json
• displayName: This is Apache Cassandra Database Entity Display Name which isdisplayed in the Oracle Infrastructure Monitoring UI
• timezoneRegion: Time Zone Example: PDT, GMT• omc_url: connection url to connect to the installed Apache Cassandra database;
host:port• host_name : Fully-qualified Host Name where Cassandra database is installed.• omc_port : Apache Cassandra Database port.• cassandra_home: Location of the Cassandra Installation directory.Credential File: omc_cassandra_db_creds.json
• DBUserName: Cassandra DB username.• DBPassword: Cassandra DB user password.
3. Add the entity using omcli.
omcli add_entity agent DEFINITION_FILE [-credential_file CREDENTIAL_FILE [-encryption_method_gpg]]
4. Verify the status of the newly added entity.
omcli status_entity agent DEFINITION_FILE
See step 4. Adding Entities to Your Service of Add Entities Using JSON Files for moreinformation.
Step 3: (Optional but recommended) Set up alerts.
To enable lights-out monitoring, you can set up alert rules to generate alerts and sendnotifications if your entities have performance issues.
See Set Up Alert Rules and Set Up Alert Thresholds and Notifications.
Troubleshooting
If you run into any issues regarding discovery or monitoring of Apache CasandraDatabase, see the following:
• Lack of Data
• Create an Agent Support Bundle
Appendix CAdd Apache Casandra Database
C-23
Add Cisco Catalyst SwitchYou can add Cisco Catalyst Switch entities using the Add Entity UI or using the cloudagent command line interface (omcli) with the appropriate JSON files.
Step 1: Prepare Cisco Catalyst Switch for monitoring.
Prerequisites
To enable monitoring of the Cisco Ethernet (Catalyst) Switch, you will need to provide theSNMPv1/v2 or SNMPv3 credentials in the JSON credential file. Read-only access is sufficientfor Cisco Catalyst Switch monitoring. For more information on how to configure an SNMP userfor a Cisco Catalyst Switch, see http://www.cisco.com/c/en/us/td/docs/switches/lan/catalyst2960/software/release/12-2_55_se/configuration/guide/scg_2960/swsnmp.html#78160
Step 2: Decide how you want to add the Cisco Catalyst Switch.
You can add Cisco Catalyst Switch entities using one of two ways:
• Add them from UI
• Use the agent's omcli add_entity command with the appropriate JSON files
Adding Entities from the UI
1. From the Management Cloud main menu, select Administration, Discovery, andthen Add Entity. The Add Entity page displays.
2. Select the Cisco Catalyst Switch Entity Type.
3. Enter the following UI properties.
Cisco Catalyst Ethernet Switch UI Fields
• Entity Name: Name of your Cisco Catalyst Ethernet Switch in Oracle ManagementCloud
• Dispatch URL: snmp://<Fully qualified host name or IP address of Cisco CatalystEthernet Switch>
• SNMP Port: Port where Cisco Catalyst Ethernet Switch listens for SNMP requests -161 by default (optional)
• SNMP Timeout: Timeout for SNMP requests in seconds - 30 secs by default(optional)
• Cloud Agent: Cloud agent monitoring the host where Cisco Catalyst Ethernet Switchis installed.
Monitoring Credentials
SNMP V1/V2
• Community String: The SNMPv2c community string.
SNMP V3
• Username: SNMPv3 username.• Authorization Password: Password used for authentication.• Authorization Protocol: Protocol used for authentication (MD5 or SHA)• Privacy Password: Password used for encryption.
See Add Entities from the Console for detailed instructions on using the Add Entity UI.
Using omcli and the Appropriate JSON Files
Appendix CAdd Cisco Catalyst Switch
C-24
1. Download and extract the required JSON file(s) from the master JSON zip file.See the table below for the specific JSON files you'll need.
2. Edit the file(s) and specify the requisite properties shown below.
Cisco Catalyst Ethernet Switch JSON Files and Properties
Definition File: omc_cisco_eth_switch_sample.json
• name: Your Cisco Ethernet (Catalyst) Switch entity name.• displayName: Your Cisco Ethernet (Catalyst) Switch entity display name.• timezoneRegion: Time zone of your entity. It is recommended that you use the long
values IANA-maintained TZ database time zones. For example: America/New_York• omc_dispatch_url: Under “value”, following the string snmp://, provide the fully
qualified hostname or IP address of the Cisco Ethernet (Catalyst) Switch.• omc_snmp_port: Under “value”, provide the port where the Cisco Ethernet (Catalyst)
Switch listens for SNMP requests, 161 by default.• omc_snmp_timeout: Under “value”, provide the timeout for SNMP requests in
seconds, 10 by default.• omc_snmp_version: Under “value”, provide the SNMP version used to monitor the
Cisco Ethernet (Catalyst) Switch.
Note:
This is an optional property which is used only with SNMPV1Creds andallowed values are "1" or "2c". The default value is "2c".
Do not remove the square brackets.
Credential Files
Choose the creds json file according to what SNMP credentials you'd like to use - SNMPv2c or SNMP v3.
omc_cisco_eth_switch_snmpv2c_sample_creds.json• COMMUNITY: SNMPv2c community stringomc_cisco_eth_switch_snmpv3_sample_creds.json• authUser: SNMPv3 username• authPwd: password used for authentication• authProtocol: protocol used for authentication - supply either MD5 or SHA• privPwd: password used for encryption
3. Add the entity using omcli.
omcli add_entity agent DEFINITION_FILE [-credential_file CREDENTIAL_FILE [-encryption_method_gpg]]
4. Verify the status of the newly added entity.
omcli status_entity agent DEFINITION_FILE
See step 4. Adding Entities to Your Service of Add Entities Using JSON Files for moreinformation.
Step 3: (Optional but recommended) Set up alerts.
To enable lights-out monitoring, you can set up alert rules to generate alerts and sendnotifications if your entities have performance issues.
Appendix CAdd Cisco Catalyst Switch
C-25
See Set Up Alert Rules and Set Up Alert Thresholds and Notifications.
Troubleshooting
If you run into any issues regarding discovery or monitoring of Cisco Catalyst Switch,see the following:
• Lack of Data
• Create an Agent Support Bundle
Add Cisco Nexus Ethernet SwitchYou can add Cisco Nexus Ethernet Switch entities using the Add Entity UI or using thecloud agent command line interface (omcli) with the appropriate JSON files.
Step 1: Prepare Cisco Nexus Ethernet Switch for monitoring.
Prerequisites
SNMPv1/v2 or SNMPv3 credentials are needed for monitoring.
If SNMPv1/v2 is used, you must provide the SNMP community string (which was enteredduring Cisco Nexus Ethernet Switch configuration) along with IP address of agent that will beused for Cisco Nexus Ethernet Switch monitoring.
If SNMPv3 is used, you must provide the SNMPv3 user, plus the authentication method (SHAor MD5) and authentication password if authentication is used,. In addition, the privilegemethod (only DES supported) and privilege password must be supplied if privilege is used.Everything needs to be manually configured up front in the Cisco Nexus Ethernet Switch.
Read only access is enough for the Cisco Nexus Ethernet Switch monitoring.
Step 2: Decide how you want to add the Cisco Nexus Ethernet Switch.
You can add Cisco Nexus Ethernet Switch entities using one of two ways:
• Add them from UI
• Use the agent's omcli add_entity command with the appropriate JSON files
Adding Entities from the UI
1. From the Management Cloud main menu, select Administration, Discovery, andthen Add Entity. The Add Entity page displays.
2. Select the Cisco Nexus Ethernet Switch Entity Type.
3. Enter the following UI properties.
Appendix CAdd Cisco Nexus Ethernet Switch
C-26
Cisco Nexus Ethernet Switch UI Fields
• Entity Name: Name of your Cisco Nexus Ethernet Switch in Oracle ManagementCloud.
• Dispatch URL: snmp://<Fully qualified host name or IP address of Cisco NexusEthernet Switch>
• SNMP Port: Port where Cisco Nexus Ethernet Switch listens for SNMP requests -161 by default (optional)
• SNMP Timeout: Timeout for SNMP requests in seconds - 30 secs by default(optional)
• Cloud Agent: Cloud agent monitoring the host where Cisco Nexus Ethernet Switch isinstalled.
Monitoring Credentials
SNMP V1/V2
• Community String: SNMPv2c community stringSNMP V3
• Username: SNMPv3 username• Authorization Password: Password used for authentication• Authorization Protocol: Protocol used for authentication - supply either MD5 or SHA• Privacy Password: Password used for encryption.
See Add Entities from the Console for detailed instructions on using the Add Entity UI.
Using omcli and the Appropriate JSON Files
1. Download and extract the required JSON file(s) from the master JSON zip file.See the table below for the specific JSON files you'll need.
2. Edit the file(s) and specify the requisite properties shown below.
Appendix CAdd Cisco Nexus Ethernet Switch
C-27
Cisco Nexus Ethernet Switch JSON Files and Properties
Definition File: omc_cisco_nexus_eth_switch_sample.json
• name: Your Cisco Nexus Ethernet Switch entity name.• displayName: Your Cisco Nexus Ethernet Switch entity display name.• timezoneRegion: Time zone of your entity. It is recommended that you use the long
values IANA-maintained TZ database time zones. For example: America/New_York• omc_dispatch_url: Under “value”, following the string snmp://, provide the fully
qualified hostname or IP address of the Cisco Nexus Ethernet Switch.• omc_snmp_port: Under “value”, provide the port where the Cisco Nexus Ethernet
Switch listens for SNMP requests, 161 by default.• omc_snmp_timeout: Under “value”, provide the timeout for SNMP requests in
seconds, 10 by default.• omc_snmp_version: Under “value”, provide the SNMP version used to monitor the
Cisco Nexus Ethernet Switch.
Note:
This is an optional property which is used only with SNMPV1Creds andallowed values are "1" or "2c". The default value is "2c".
Credential Files
omc_cisco_nexus_eth_switch_snmpv2_sample_creds.json• COMMUNITY: Use this credential file if you have configured your switch with
SNMPv1/v2.omc_cisco_nexus_eth_switch_snmpv3_sample_creds.jsonUnder “value”, within the square brackets, provide the SNMPv3 user name.
• authPwd: Under “value”, within the square brackets, provide the auth password orempty out the field.
• authProtocol: Under “value”, within the square brackets, provide the auth-method(SHA or MD5).
• privPwd: Under “value”, within the square brackets, provide the priv methodpassword, if priv is used. Only the DES priv method is supported.
Do not remove the square brackets.
3. Add the entity using omcli.
omcli add_entity agent DEFINITION_FILE [-credential_file CREDENTIAL_FILE [-encryption_method_gpg]]
4. Verify the status of the newly added entity.
omcli status_entity agent DEFINITION_FILE
See step 4. Adding Entities to Your Service of Add Entities Using JSON Files for moreinformation.
Step 3: (Optional but recommended) Set up alerts.
To enable lights-out monitoring, you can set up alert rules to generate alerts and sendnotifications if your entities have performance issues.
See Set Up Alert Rules and Set Up Alert Thresholds and Notifications.
Appendix CAdd Cisco Nexus Ethernet Switch
C-28
Troubleshooting
If you run into any issues regarding discovery or monitoring of Cisco Nexus EthernetSwitch, see the following:
• Lack of Data
• Create an Agent Support Bundle
Appendix CAdd Cisco Nexus Ethernet Switch
C-29
Add Docker Engine/Docker ContainerYou can add Docker Engine/Docker Container entities using the Add Entity UI or usingthe cloud agent command line interface (omcli) with the appropriate JSON files.
Step 1: Prepare Docker Engine/Docker Container for monitoring.
Docker Engine/Docker Container Configuration
You can configure a Docker Engine for monitoring in three ways:
Non-Secure Mode:This mode doesn’t need any credentials information. When the Docker Engine is configured inthe non-secure mode (http), you simply need the Base URL to connect to the Docker Engine.
For example, a Base URL could be: http://www.example.com:4243/. Note the http, andnot https mode.
To check if your Docker Engine is configured in non-secure mode, view the /etc/sysconfig/docker file. The following entries identify the Non-Secure Mode configuration:
http - non secure other_args="-H tcp://0.0.0.0:4243 -H unix:///var/run/docker.sock" set proxy export HTTP_PROXY=<your proxy host>:80
You will need to provide the Docker Engine Base URL in the entity definition JSON file.
Secure Mode:To check if your Docker Engine is configured in Secure Mode, view the /etc/sysconfig/dockerfile. If configured for:• for 1–way SSL you will typically see an entry of the format:
https - secure 1 way SSL other_args="-H tcp://0.0.0.0:4243 -H unix:///var/run/docker.sock --tls --tlscert=/<certificate directory>/server-cert.pem --tlskey=/<certificate directory>/server-key.pem"
• for 2–way SSL you will typically see an entry of the format:
https - secure 2 way SSL other_args="-H tcp://0.0.0.0:4243 -H unix:///var/run/docker.sock --tlsverify --tlscacert=/<certificate directory>/ca.pem --tlscert=/<certificate directory>/server-cert.pem --tlskey=/<certificate directory>/server-key.pem"
If your Docker Engine is configured in Secure Mode, then you configure the monitoringcredentials based on the type of communication defined.
• For Secure 1–way SSL you need to add the truststore certificate (CA certificate) in thecloud agent default truststore (<agent home>/sysman/config/montrust/AgentTrust.jks) using this command:
keytool -import -alias docker01 -keystore <agent home>/sysman/config/montrust/AgentTrust.jks -file <directory of your Docker certificate>/<certificate_file_name>.cer
Use the password welcome. Note the <agent home> is the directory where the CloudAgent was installed. See Managing Cloud Agents in Oracle® Cloud Deploying andManaging Oracle Management Cloud Agents.
Appendix CAdd Docker Engine/Docker Container
C-30
Docker Engine/Docker Container Configuration
You will only need to provide the Docker Engine Base URL in the entity definition JSONfile.
• For Secure 2–way SSL you need to add the truststore certificate (CA certificate) and thekeystore information in the agent default truststore (<agent home>/sysman/config/montrust/AgentTrust.jks).
1. Add the truststore certificate:
keytool -import -alias docker01 -keystore <agent home>/sysman/config/montrust/AgentTrust.jks -file <directory of your Docker certificate>/<certificate_file_name>.cer
Use the password welcome. Note the agent home is the directory where the CloudAgent was installed.
2. Add the keystore information:
keytool -import -alias docker01 -keystore <agent home>/sysman/config/montrust/AgentTrust.jks -file <directory of your Docker certificate>/<certificate_file_name>.cer
Use the password welcome.
To add a Secure 2–way SSL Docker Engine entity you will need to create an entitydefinition JSON file along with a credentials JSON file. The entity definition JSON filewill include your Docker Engine Base URL while the credentials file will have detailsabout the credentials store and credentials.
For more information about how to create Docker certificates, see https://docs.docker.com/engine/security/https/.
Cloud Agent ConfigurationIf the cloud agent communicates with Oracle Management Cloud through a proxy(OMC_PROXYHOST & OMC_PROXYPORT parameters were set on the cloud agent when itwas installed), Docker Engine / Docker Container discovery will fail. You’ll need to performadditional configuration steps depending on the following situations:
For a New Agent Installation
If the agent requires proxy to communicate with Oracle Management Cloud, then use thegateway and set the proxy parameters (OMC_PROXYHOST & OMC_PROXYPORT) duringgateway installation, and then set up the cloud agent (without proxy parameters) to point to thegateway.
For an Existing Agent
If the existing cloud agent has been set up to use the proxy to communicate with OracleManagement Cloud, to discover Docker Engine / Docker Container, execute the followingcommands on the cloud agent before performing entity discovery.
omcli setproperty agent -allow_new -name _configureProxyPerClient -value true omcli stop agent omcli start agent
Step 2: Decide how you want to add the Docker Engine/Docker Container.
You can add Docker Engine/Docker Container entities using one of two ways:
Appendix CAdd Docker Engine/Docker Container
C-31

• Add them from UI
• Use the agent's omcli add_entity command with the appropriate JSON files
Adding Entities from the UI
1. From the Management Cloud main menu, select Administration, Discovery, andthen Add Entity. The Add Entity page displays.
2. Select the Docker Engine/Docker Container Entity Type.
3. Enter the following UI properties.
Docker Engine/Docker Worker UI Fields
• Discover Using Credentials: Discover using Docker Engine credentials (on bydefault).
• Entity Name: Your Docker Engine/Container name.• Base URL: The base URL for REST API invocations.• Host Name: The fully-qualified host name where the Docker Engine/Container is
installed.• Swarm ID: Unique identifier of the Docker Swarm containing the Docker Engine/
Container.• Cloud Agent: Cloud agent monitoring the host where the Docker Engine/Container is
running.Monitoring Credentials (Docker Engine Credentials)
• Store Location: The full path to the location of the keystore file.• Store Password: The keystore password to access the jks file.• Store Type: Currently, only JKS is supported.
See Add Entities from the Console for detailed instructions on using the Add Entity UI.
Using omcli and the Appropriate JSON Files
1. Download and extract the required JSON file(s) from the master JSON zip file.See the table below for the specific JSON files you'll need.
2. Edit the file(s) and specify the requisite properties shown below.
Appendix CAdd Docker Engine/Docker Container
C-32
Docker Engine/Docker Container JSON Files and Properties
Definition Files
omc_docker_engine_sample.json (used without theomc_docker_engine_sample_creds.json)
omc_docker_engine_secure_sample.json (used with theomc_docker_engine_sample_creds.json)
• name: Your Docker Engine name.• displayName: Name displayed in the Oracle Infrastructure Monitoring User Interface.• timezoneRegion: Time zone of your entity. It is recommended that you use the long
values IANA-maintained TZ database time zones. For example: America/New_York• BaseURI: Under “value”, provide the base URL for REST API invocations.• host_name: Under “value”, provide the fully-qualified host name where the Docker
Engine is installed.Credential File: omc_docker_engine_sample_creds.json
• StoreLocation: Under “value”, within the square brackets, provide the full path to thelocation of the keystore file. You must have configured this entity security in thePrerequisite Tasks step. For example, <agent home>/sysman/config/montrust/AgentTrust.jksNote that in this release only jks file types are supported.
• StorePassword: Under “value”, within the square brackets, provide the keystorepassword to access the jks file.Note that in this release only jksfile types are supported.
Do not remove the square brackets.
3. Add the entity using omcli.
omcli add_entity agent DEFINITION_FILE [-credential_file CREDENTIAL_FILE [-encryption_method_gpg]]
4. Verify the status of the newly added entity.
omcli status_entity agent DEFINITION_FILE
See step 4. Adding Entities to Your Service of Add Entities Using JSON Files for moreinformation.
Step 3: (Optional but recommended) Set up alerts.
To enable lights-out monitoring, you can set up alert rules to generate alerts and sendnotifications if your entities have performance issues.
See Set Up Alert Rules and Set Up Alert Thresholds and Notifications.
Troubleshooting
If you run into any issues regarding discovery or monitoring of Docker Engine/DockerContainer, see the following:
• Lack of Data
• Create an Agent Support Bundle
Appendix CAdd Docker Engine/Docker Container
C-33
Add Docker SwarmYou can add Docker Swarm entities using the Add Entity UI or using the cloud agentcommand line interface (omcli) with the appropriate JSON files.
Step 1: Prepare Docker Swarm for monitoring.
Prerequisites and Credentials
Cloud Agent ConfigurationIf the cloud agent communicates with Oracle Management Cloud through a proxy(OMC_PROXYHOST & OMC_PROXYPORT parameters were set on the cloud agent when itwas installed), Docker Swarm discovery will fail. You’ll need to perform additional configurationsteps depending on the following situations:
For a New Agent Installation
If the agent requires proxy to communicate with Oracle Management Cloud, then use thegateway and set the proxy parameters (OMC_PROXYHOST & OMC_PROXYPORT) duringgateway installation, and then set up the cloud agent (without proxy parameters) to point to thegateway.
For an Existing Agent
If the existing cloud agent has been set up to use the proxy to communicate with OracleManagement Cloud, to discover Docker Swarm, execute the following commands on the cloudagent before performing entity discovery.
omcli setproperty agent -allow_new -name _configureProxyPerClient -value true omcli stop agent omcli start agent
CredentialsThere are three methods you can use to authenticate and connect to the Docker Swarm viaRest APIs
1) Non-secure
2) Secure (https): 1–way SSL mode
3) Secure (https): 2–way SSL mode
Step 2: Decide how you want to add the Docker Swarm.
You can add Docker Swarm entities using one of two ways:
• Add them from UI
• Use the agent's omcli add_entity command with the appropriate JSON files
Adding Entities from the UI
1. From the Management Cloud main menu, select Administration, Discovery, andthen Add Entity. The Add Entity page displays.
2. Select the Docker Swarm Entity Type.
3. Enter the following UI properties.
Appendix CAdd Docker Swarm
C-34
Docker Swarm UI Fields
• Discover Using Credentials: Discover using Docker Swarm credentials (on bydefault).
• Entity Name: Your Docker Swarm name.• Base URL of Swarm Leader: The base URL of the Swarm Leader for REST API
invocations.• Host Name: The fully-qualified host name where the Docker Swarm is installed.• Cloud Agent: Cloud agent monitoring the host where the Docker Swarm is running.Monitoring Credentials (Docker Swarm Credentials)• Store Location: The full path to the location of the keystore file.• Store Password: The keystore password to access the JKS file.• Store Type: Currently, only JKS is supported.
See Add Entities from the Console for detailed instructions on using the Add Entity UI.
Using omcli and the Appropriate JSON Files
1. Download and extract the required JSON file(s) from the master JSON zip file.See the table below for the specific JSON files you'll need.
2. Edit the file(s) and specify the requisite properties shown below.
Appendix CAdd Docker Swarm
C-35

Docker Swarm and Worker JSON Files and Properties
Entity JSONs for Docker Swarm:Adding Non Secure Docker Swarm Target
Definition File: Add_Entity_Docker_Swarm_Non_Secure.json
Adding 1WAY Docker Swarm Target
Definition File: Add_Entity_Docker_Swarm_1way_SSL.json
Adding 2WAY Docker Swarm Target
Definition File: Add_Entity_Docker_Swarm_2way_SSL.json
Credential File:Docker_Swarm_Secure_Credentials.json
Entity JSONs for Docker Worker Engines:Adding Non Secure Docker Worker Engine
Definition File: Add_Entity_Worker_Docker_Engine_Non_Secure.json
Adding 1WAY Docker Worker Engine
Definition File: Add_Entity_Worker_Docker_Engine_1way_SSL.json
Adding 2WAY Docker Worker Engine
Definition: Add_Entity_Worker_Docker_Engine_2way_SSL.json
Credential File: omc_docker_engine_sample_creds.json
For properties that should be updated, replace any text inside brackets <> excluding thesebrackets with your values according the legend inside <>
Examples of Base URLs:
NON SECURE MODE - http://<hostname>:<port>/ (Rest API URL for Invocation)
SECURE MODE- https://<hostname>:<port>/ (Rest API URL for Invocation)
For Basic Authentication:
"credentialRefs":["DockerSwarmCredRef"]
Note:
The same Docker Engine credential JSON is used for Worker Engines.
For secure mode, in addition to configuring the JSONS, you need to add the Dockertruststore certificate(CA ceritificate) to the Cloud Agent default truststore ($EMSTATE/sysman/config/montrust/AgentTrust.jks). To do so, run the following command:
omcli secure add_trust_cert_to_jks -password welcome -trust_certs_loc<certificate location> -alias dockercertificateExample:
In the following example, slce03.cer is the CA certificate.
omcli secure add_trust_cert_to_jks -password welcome -trust_certs_loc /home/sandepai/slce03.cert -alias dockercertificateTo fetch the Docker Swarm ID, do a GET on LEADER_BASE_URL/swarm
For example, do a GET onhttp://myserver.mycompany.com:4243/swarm
3. Add the entity using omcli.
omcli add_entity agent DEFINITION_FILE [-credential_file CREDENTIAL_FILE [-encryption_method_gpg]]
Appendix CAdd Docker Swarm
C-36
4. Verify the status of the newly added entity.
omcli status_entity agent DEFINITION_FILE
See step 4. Adding Entities to Your Service of Add Entities Using JSON Files for moreinformation.
Step 3: (Optional but recommended) Set up alerts.
To enable lights-out monitoring, you can set up alert rules to generate alerts and sendnotifications if your entities have performance issues.
See Set Up Alert Rules and Set Up Alert Thresholds and Notifications.
Troubleshooting
If you run into any issues regarding discovery or monitoring of Docker Swarm, see thefollowing:
• Lack of Data
• Create an Agent Support Bundle
Add F5 BIG-IP DNSYou can add F5 BIG-IP DNS entities using the Add Entity UI or using the cloud agentcommand line interface (omcli) with the appropriate JSON files.
Step 1: Prepare F5 BIG-IP DNS for monitoring.
Prerequisites
SNMPv1/v2 or SNMPv3 credentials are needed for monitoring.
If SNMPv1/v2 is used, you must provide the SNMP community string that was entered duringF5 BIG-IP DNS configuration along with IP address of the Cloud Agent which will be used forthe DNS monitoring.
If SNMPv3 is used, you must provide the SNMPv3 user, plus authentication method (SHA orMD5) and password if authorization is used, plus the privilege method (only DES is supported)and privilege password if privilege is used. All of this needs to be manually configuredbeforehand in the DNS.
Read-only access is adequate for DNS monitoring.
Step 2: Decide how you want to add the F5 BIG-IP DNS.
You can add F5 BIG-IP DNS entities using one of two ways:
• Add them from UI
• Use the agent's omcli add_entity command with the appropriate JSON files
Adding Entities from the UI
1. From the Management Cloud main menu, select Administration, Discovery, andthen Add Entity. The Add Entity page displays.
2. Select the F5 BIG-IP DNS Entity Type.
3. Enter the following UI properties.
Appendix CAdd F5 BIG-IP DNS
C-37
F5 BIG-IP DNS UI Fields
• Entity Name: Name of this entity displayed in the Oracle Management Cloud console.• Dispatch URL: snmp://<Fully qualified host name or IP address of F5 BIG-IP DNS>• SNMP Port: Port where F5 BIG-IP DNS listens for SNMP requests - 161 by default
(optional)• SNMP Timeout: Timeout for SNMP requests in seconds - 30 seconds by default
(optional)• Cloud Agent: Cloud agent monitoring the host where F5 BIG-IP DNS is installed.
Monitoring Credentials
SNMP V1/V2
• Community String: Community String for SNMP communication
SNMP V3
• Username: SNMPv3 username.• Authorization Password: Password used for authentication• Authorization Protocol: Protocol used for authentication. (MD5 or SHA)• Privacy Password: password used for encryption
See Add Entities from the Console for detailed instructions on using the Add Entity UI.
Using omcli and the Appropriate JSON Files
1. Download and extract the required JSON file(s) from the master JSON zip file.See the table below for the specific JSON files you'll need.
2. Edit the file(s) and specify the requisite properties shown below.
F5 BIG-IP DNS JSON Files and Properties
Definition File: omc_f5_bigip_dns_sample.json
• omc_dispatch_url: snmp://<Fully qualified host name or IP address of F5 BIG-IPDNS>
• omc_snmp_port: Port where F5 BIG-IP DNS listens for SNMP requests - 161 bydefault (optional)
• omc_snmp_timeout: Timeout for SNMP requests in seconds - 30 seconds by default(optional)
• omc_snmp_version: SNMP version used to monitor F5 BIG-IP DNS (2c or 3) - 2c bydefault (optional)
Credential Files
omc_f5_bigip_dns_snmpv2_sample_creds.json
SNMP v2c
• COMMUNITY: SNMPv2c community stringomc_f5_bigip_dns_snmpv3_sample_creds.jsonSNMP v3
• authUser: SNMPv3 username.• authPwd: Password used for authentication.• authProtocol: Protocol used for authentication - supply either MD5 or SHA.• privPwd: Password used for encryption.
3. Add the entity using omcli.
omcli add_entity agent DEFINITION_FILE [-credential_file CREDENTIAL_FILE [-encryption_method_gpg]]
Appendix CAdd F5 BIG-IP DNS
C-38

4. Verify the status of the newly added entity.
omcli status_entity agent DEFINITION_FILE
See step 4. Adding Entities to Your Service of Add Entities Using JSON Files for moreinformation.
Step 3: (Optional but recommended) Set up alerts.
To enable lights-out monitoring, you can set up alert rules to generate alerts and sendnotifications if your entities have performance issues.
See Set Up Alert Rules and Set Up Alert Thresholds and Notifications.
Troubleshooting
If you run into any issues regarding discovery or monitoring of F5 BIG-IP DNS, see thefollowing:
• Lack of Data
• Create an Agent Support Bundle
Add F5 BIG-IP LTMYou can add F5 BIG-IP LTM entities using the Add Entity UI or using the cloud agentcommand line interface (omcli) with the appropriate JSON files.
Step 1: Prepare F5 BIG-IP LTM for monitoring.
Credentials
SNMPv1/v2 or SNMPv3 credentials are needed for monitoring.
If SNMPv1/v2 is used, you must provide the SNMP community string that was entered duringF5 BIG-IP LTM configuration along with IP address of Cloud Agent which will be used for theLTM monitoring.
If SNMPv3 is used, you must provide the SNMPv3 user, plus authentication method (SHA orMD5) and password if authorization is used, plus the privilege method (only DES is supported)and privilege password if privilege is used. All of this needs to be manually configuredbeforehand in the LTM.
Read-only access is adequate for LTM monitoring.
Step 2: Decide how you want to add the F5 BIG-IP LTM.
You can add F5 BIG-IP LTM entities using one of two ways:
• Add them from UI
• Use the agent's omcli add_entity command with the appropriate JSON files
Adding Entities from the UI
1. From the Management Cloud main menu, select Administration, Discovery, andthen Add Entity. The Add Entity page displays.
2. Select the F5 BIG-IP LTM Entity Type.
3. Enter the following UI properties.
Appendix CAdd F5 BIG-IP LTM
C-39
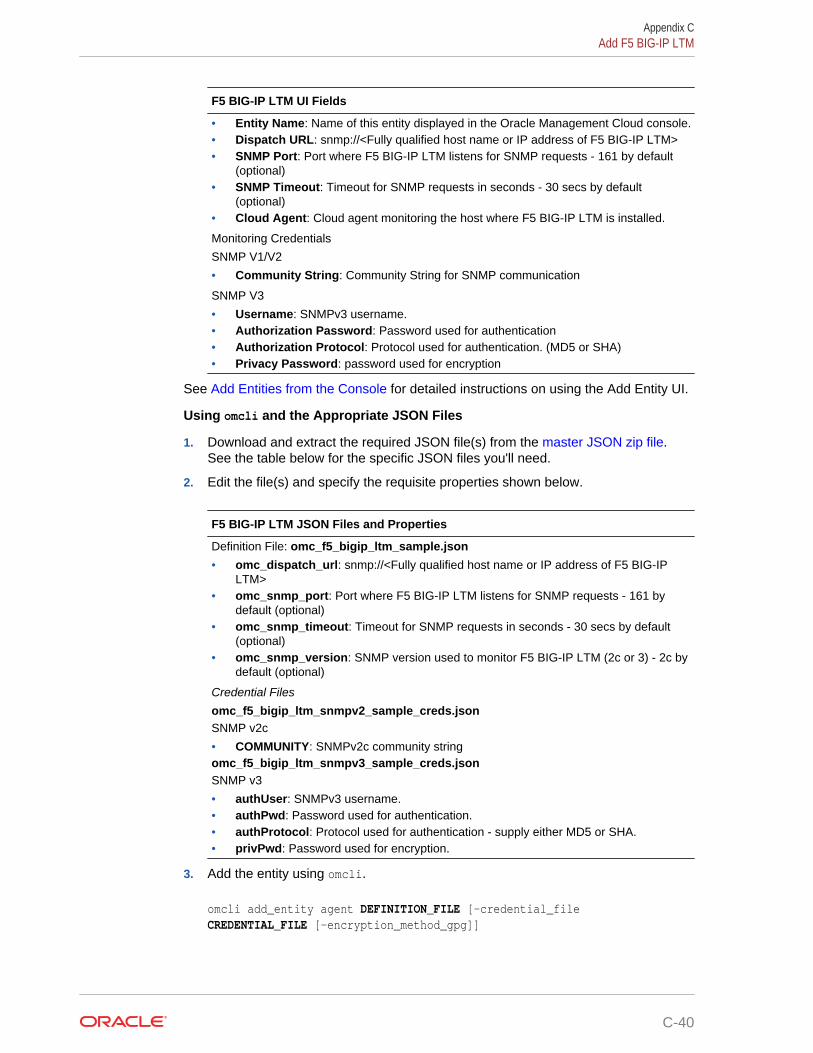
F5 BIG-IP LTM UI Fields
• Entity Name: Name of this entity displayed in the Oracle Management Cloud console.• Dispatch URL: snmp://<Fully qualified host name or IP address of F5 BIG-IP LTM>• SNMP Port: Port where F5 BIG-IP LTM listens for SNMP requests - 161 by default
(optional)• SNMP Timeout: Timeout for SNMP requests in seconds - 30 secs by default
(optional)• Cloud Agent: Cloud agent monitoring the host where F5 BIG-IP LTM is installed.
Monitoring Credentials
SNMP V1/V2
• Community String: Community String for SNMP communication
SNMP V3
• Username: SNMPv3 username.• Authorization Password: Password used for authentication• Authorization Protocol: Protocol used for authentication. (MD5 or SHA)• Privacy Password: password used for encryption
See Add Entities from the Console for detailed instructions on using the Add Entity UI.
Using omcli and the Appropriate JSON Files
1. Download and extract the required JSON file(s) from the master JSON zip file.See the table below for the specific JSON files you'll need.
2. Edit the file(s) and specify the requisite properties shown below.
F5 BIG-IP LTM JSON Files and Properties
Definition File: omc_f5_bigip_ltm_sample.json
• omc_dispatch_url: snmp://<Fully qualified host name or IP address of F5 BIG-IPLTM>
• omc_snmp_port: Port where F5 BIG-IP LTM listens for SNMP requests - 161 bydefault (optional)
• omc_snmp_timeout: Timeout for SNMP requests in seconds - 30 secs by default(optional)
• omc_snmp_version: SNMP version used to monitor F5 BIG-IP LTM (2c or 3) - 2c bydefault (optional)
Credential Files
omc_f5_bigip_ltm_snmpv2_sample_creds.jsonSNMP v2c
• COMMUNITY: SNMPv2c community stringomc_f5_bigip_ltm_snmpv3_sample_creds.jsonSNMP v3
• authUser: SNMPv3 username.• authPwd: Password used for authentication.• authProtocol: Protocol used for authentication - supply either MD5 or SHA.• privPwd: Password used for encryption.
3. Add the entity using omcli.
omcli add_entity agent DEFINITION_FILE [-credential_file CREDENTIAL_FILE [-encryption_method_gpg]]
Appendix CAdd F5 BIG-IP LTM
C-40

4. Verify the status of the newly added entity.
omcli status_entity agent DEFINITION_FILE
See step 4. Adding Entities to Your Service of Add Entities Using JSON Files for moreinformation.
Step 3: (Optional but recommended) Set up alerts.
To enable lights-out monitoring, you can set up alert rules to generate alerts and sendnotifications if your entities have performance issues.
See Set Up Alert Rules and Set Up Alert Thresholds and Notifications.
Troubleshooting
If you run into any issues regarding discovery or monitoring of F5 BIG-IP LTM, see thefollowing:
• Lack of Data
• Create an Agent Support Bundle
Add Hadoop ClusterYou can add Hadoop Cluster entities using the Add Entity UI or using the cloud agentcommand line interface (omcli) with the appropriate JSON files.
Step 1: Prepare Hadoop Cluster for monitoring.
Prerequisites
By default, Hadoop runs in non-secure mode in which no actual authentication is required.
By configuring Hadoop to run in secure mode, each user and service needs to beauthenticated by Kerberos in order to use Hadoop services.
To perform Kerberos authentication, the Cloud Agent requires the following:
1. krb5.conf file. This file can be found at /etc/krb5.conf
2. Username and password
The Cloud Agent can use only one krb5.conf at a time. If a single Agent needs to performKerberos authentication with more than one domain, these details should be defined in a singlekrb5.conf file.
Step 2: Decide how you want to add the Hadoop Cluster.
You can add Hadoop Cluster entities using one of two ways:
• Add them from UI
• Use the agent's omcli add_entity command with the appropriate JSON files
Adding Entities from the UI
1. From the Management Cloud main menu, select Administration, Discovery, andthen Add Entity. The Add Entity page displays.
2. Select the Hadoop Clusters Entity Type.
Appendix CAdd Hadoop Cluster
C-41
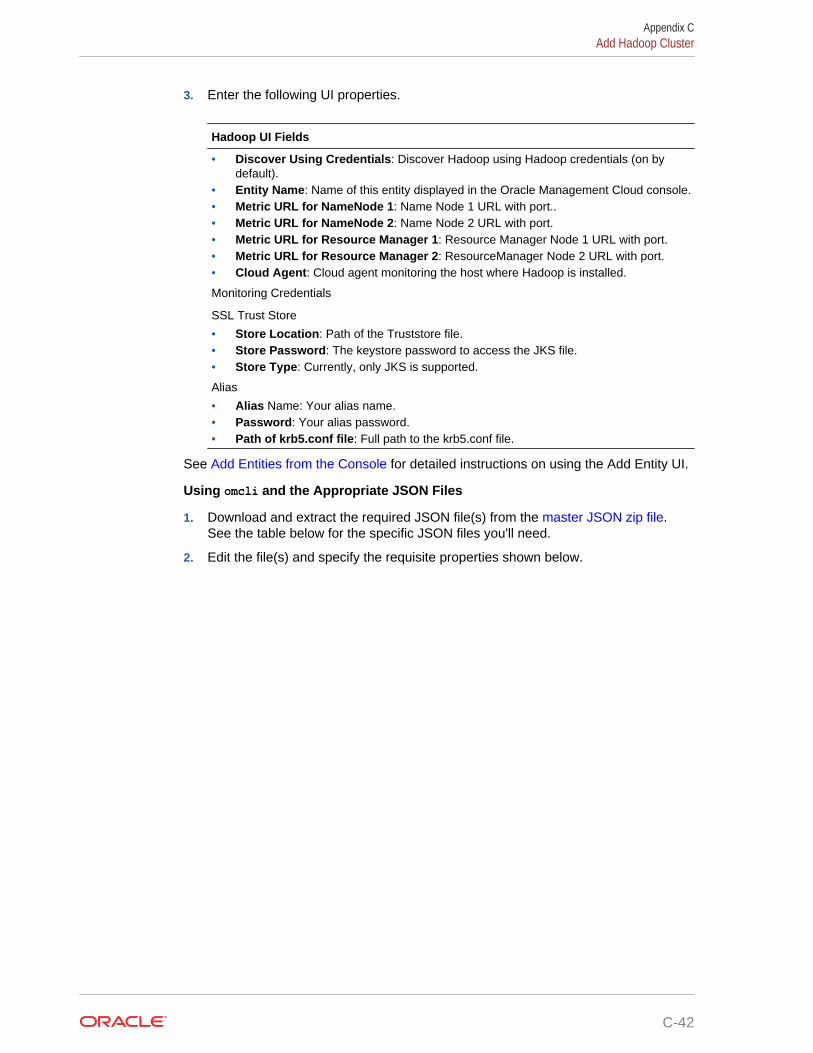
3. Enter the following UI properties.
Hadoop UI Fields
• Discover Using Credentials: Discover Hadoop using Hadoop credentials (on bydefault).
• Entity Name: Name of this entity displayed in the Oracle Management Cloud console.• Metric URL for NameNode 1: Name Node 1 URL with port..• Metric URL for NameNode 2: Name Node 2 URL with port.• Metric URL for Resource Manager 1: Resource Manager Node 1 URL with port.• Metric URL for Resource Manager 2: ResourceManager Node 2 URL with port.• Cloud Agent: Cloud agent monitoring the host where Hadoop is installed.
Monitoring Credentials
SSL Trust Store
• Store Location: Path of the Truststore file.• Store Password: The keystore password to access the JKS file.• Store Type: Currently, only JKS is supported.
Alias
• Alias Name: Your alias name.• Password: Your alias password.• Path of krb5.conf file: Full path to the krb5.conf file.
See Add Entities from the Console for detailed instructions on using the Add Entity UI.
Using omcli and the Appropriate JSON Files
1. Download and extract the required JSON file(s) from the master JSON zip file.See the table below for the specific JSON files you'll need.
2. Edit the file(s) and specify the requisite properties shown below.
Appendix CAdd Hadoop Cluster
C-42

Hadoop JSON Files and Properties
Note:
Hadoop uses primary and secondary nodes to maintain availability. If one nodegoes down, the secondary node is used to fetch information. For both nodes,the primary and secondary roles can be switched at any given time. For thisreason, you specify two nodes and two Resource Manager URLs withoutspecifying whether they are primary or secondary.
Definition File: hadoop_credless.json
Use this file if Hadoop was configured with no credentials.
• Name: Hadoop entity name.• displayName: Hadoop entity display name.• omc_nn1_metric_url (Name Node 1): Name Node 1 URL with port.• omc_nn2_metric_url (Name Node 2): Name Node 2 URL with port.• omc_rm1_metric_url (Resource Manager 1): Resource Manager Node 1 URL with
port.• omc_rm2_metric_url (Resource Manager 2): ResourceManager Node 2 URL with
port.Example URL
http://<HOSTNAME>:<PORT>/ (Rest API URL for Invocation)
Definition File:hadoop_creds.json
• name: Hadoop entity name.• displayName: Hadoop entity display name.• credentialRefs: Hadoop credential information (hadoopTrustStore and
hadoopSPNEGOCredentials) defined in the hadoop_credentials_input.json file.• omc_nn1_metric_url: (Name Node 1): Name Node 1 URL with port.• omc_nn2_metric_url: (Name Node 2): Name Node 2 URL with port.• omc_rm1_metric_ur:l (Resource Manager 1): Resource Manager Node 1 URL with
port.• omc_rm2_metric_ur:l (Resource Manager 2): ResourceManager Node 2 URL with
port.Example URL
http://<HOSTNAME>:<PORT>/ (Rest API URL for Invocation)
Credential File:hadoop_credentials_input.json
• hadoopTrustStore consists of the following user-defined properties:– StoreLocation: Path of Truststore file.– StorePassword: Truststore Password
• hadoopSPNEGOCredentialsconsists of the following user-defined properties:– Alias: Alias name.– Password: Alias password.– KRB5Conf: Path of krb5.conf file.
3. Add the entity using omcli.
omcli add_entity agent DEFINITION_FILE [-credential_file CREDENTIAL_FILE [-encryption_method_gpg]]
Appendix CAdd Hadoop Cluster
C-43

4. Verify the status of the newly added entity.
omcli status_entity agent DEFINITION_FILE
See step 4. Adding Entities to Your Service of Add Entities Using JSON Files for moreinformation.
Step 3: (Optional but recommended) Set up alerts.
To enable lights-out monitoring, you can set up alert rules to generate alerts and sendnotifications if your entities have performance issues.
See Set Up Alert Rules and Set Up Alert Thresholds and Notifications.
Troubleshooting
If you run into any issues regarding discovery or monitoring of Hadoop Clusters, seethe following:
• Lack of Data
• Create an Agent Support Bundle
Add JBoss Server/DomainYou can add JBoss entities using the Add Entity UI or using the cloud agent commandline interface (omcli) with the appropriate JSON files.
Step 1: Prepare JBoss for monitoring.
Prerequisites
Before discovering a JBOSS server or domain, you must first add the JBOSS client jar file tothe Cloud agent as a plug-in. The JBOSS client jar file contains the required JMX protocols thatallow the agent to collect JBOSS metrics.
The JBOSS client jar is distributed as part of the JBOSS installation. When you download theJBOSS zip file, the client jar file will be bundled with it.
Step Action
Step 1: Locate the JBOSS client jar file. From the JBOSS home directory, you will findthe client jar file at the following location:
> JBOSS_HOME/bin/client
In this directory, you’ll see the jboss-client.jarfile. This is the file you need to copy over tothe Cloud agent location.
Step 2: Copy the JBOSS client jar file to theCloud agent installation.
Copy the jboss-client.jar file to a securelocation that is accessible by the Cloud agent.Typically, this is located on the same hostwhere the agent is installed.
Appendix CAdd JBoss Server/Domain
C-44
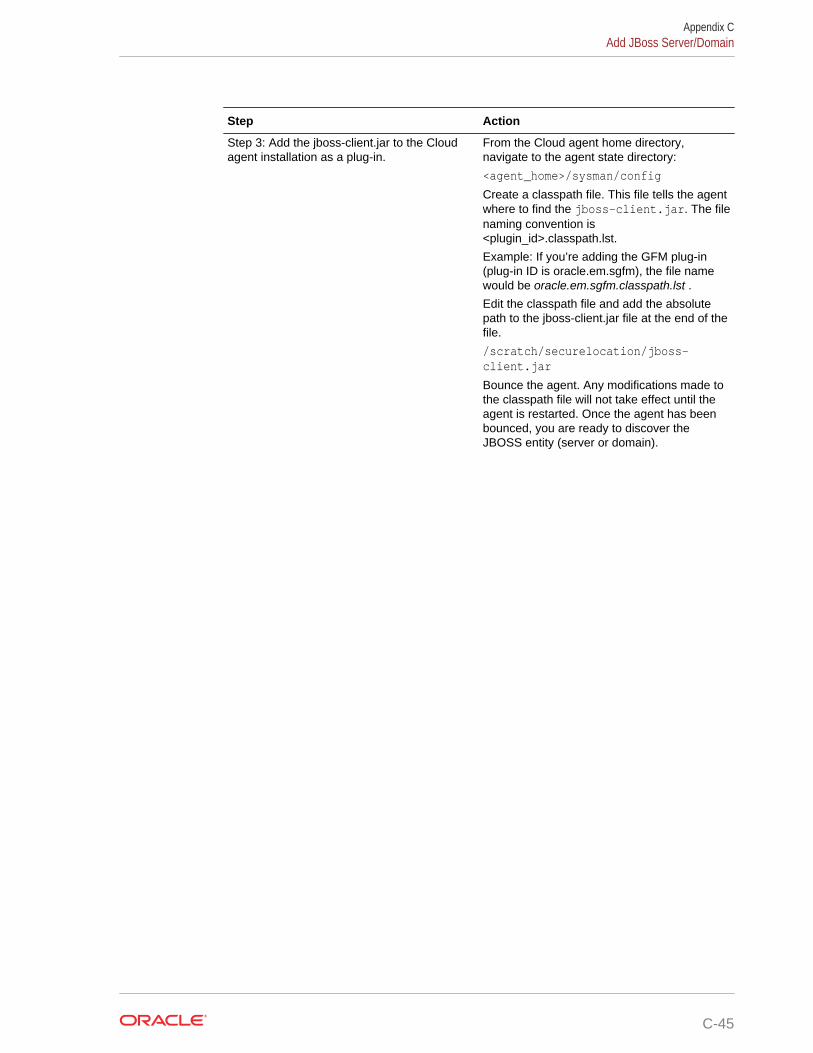
Step Action
Step 3: Add the jboss-client.jar to the Cloudagent installation as a plug-in.
From the Cloud agent home directory,navigate to the agent state directory:
<agent_home>/sysman/config
Create a classpath file. This file tells the agentwhere to find the jboss-client.jar. The filenaming convention is<plugin_id>.classpath.lst.
Example: If you’re adding the GFM plug-in(plug-in ID is oracle.em.sgfm), the file namewould be oracle.em.sgfm.classpath.lst .
Edit the classpath file and add the absolutepath to the jboss-client.jar file at the end of thefile.
/scratch/securelocation/jboss-client.jar
Bounce the agent. Any modifications made tothe classpath file will not take effect until theagent is restarted. Once the agent has beenbounced, you are ready to discover theJBOSS entity (server or domain).
Appendix CAdd JBoss Server/Domain
C-45
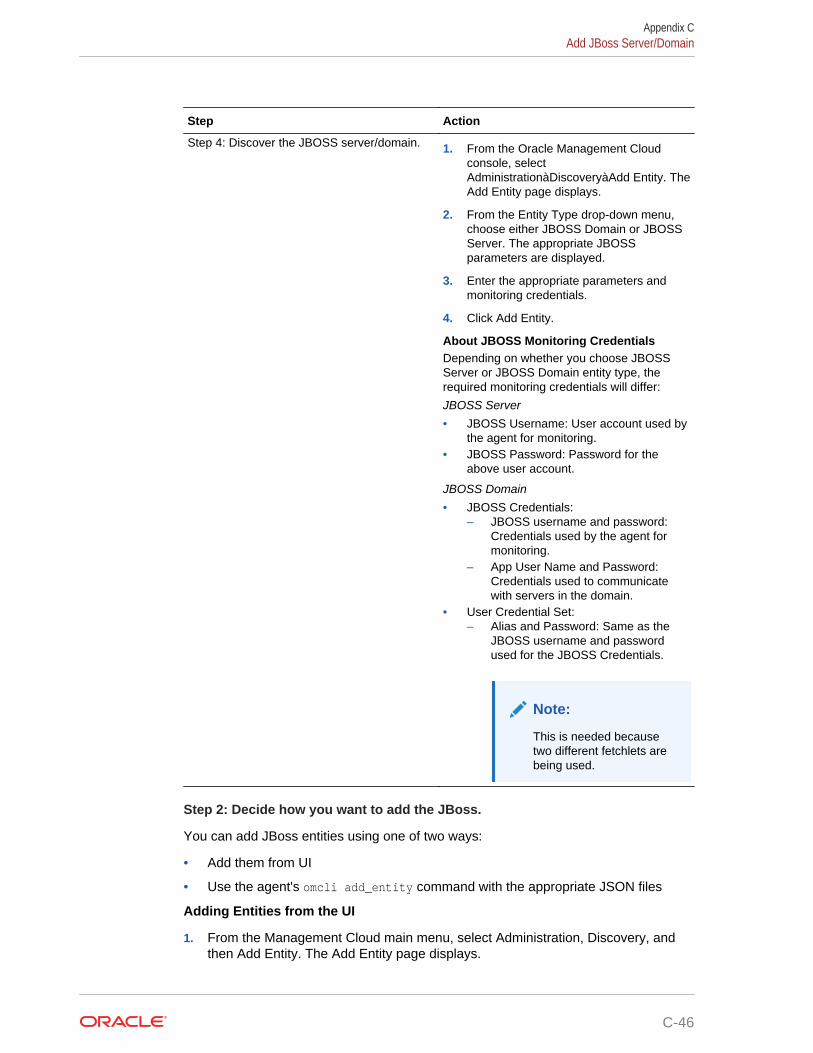
Step Action
Step 4: Discover the JBOSS server/domain. 1. From the Oracle Management Cloudconsole, selectAdministrationàDiscoveryàAdd Entity. TheAdd Entity page displays.
2. From the Entity Type drop-down menu,choose either JBOSS Domain or JBOSSServer. The appropriate JBOSSparameters are displayed.
3. Enter the appropriate parameters andmonitoring credentials.
4. Click Add Entity.
About JBOSS Monitoring CredentialsDepending on whether you choose JBOSSServer or JBOSS Domain entity type, therequired monitoring credentials will differ:
JBOSS Server
• JBOSS Username: User account used bythe agent for monitoring.
• JBOSS Password: Password for theabove user account.
JBOSS Domain
• JBOSS Credentials:– JBOSS username and password:
Credentials used by the agent formonitoring.
– App User Name and Password:Credentials used to communicatewith servers in the domain.
• User Credential Set:– Alias and Password: Same as the
JBOSS username and passwordused for the JBOSS Credentials.
Note:
This is needed becausetwo different fetchlets arebeing used.
Step 2: Decide how you want to add the JBoss.
You can add JBoss entities using one of two ways:
• Add them from UI
• Use the agent's omcli add_entity command with the appropriate JSON files
Adding Entities from the UI
1. From the Management Cloud main menu, select Administration, Discovery, andthen Add Entity. The Add Entity page displays.
Appendix CAdd JBoss Server/Domain
C-46

2. Select the JBoss Entity Type.
3. Enter the following UI properties.
JBoss Server/Domain UI Fields
JBoss Server
• Entity Name: Name of this entity displayed in the Oracle Management Cloud console.• Host Name: Your Fully-qualified JBoss Standalone J2EE Server Host Name• JBoss Management Port: Your JBoss Management Console Port• Cloud Agent: Cloud agent monitoring the JBoss Server/Domain.Monitoring Credentials (JBoss Credentials)
• Username: Your JBoss Management User Name• Password: Password used for authentication.
See Add Entities from the Console for detailed instructions on using the Add Entity UI.
Using omcli and the Appropriate JSON Files
1. Download and extract the required JSON file(s) from the master JSON zip file.See the table below for the specific JSON files you'll need.
2. Edit the file(s) and specify the requisite properties shown below.
Appendix CAdd JBoss Server/Domain
C-47
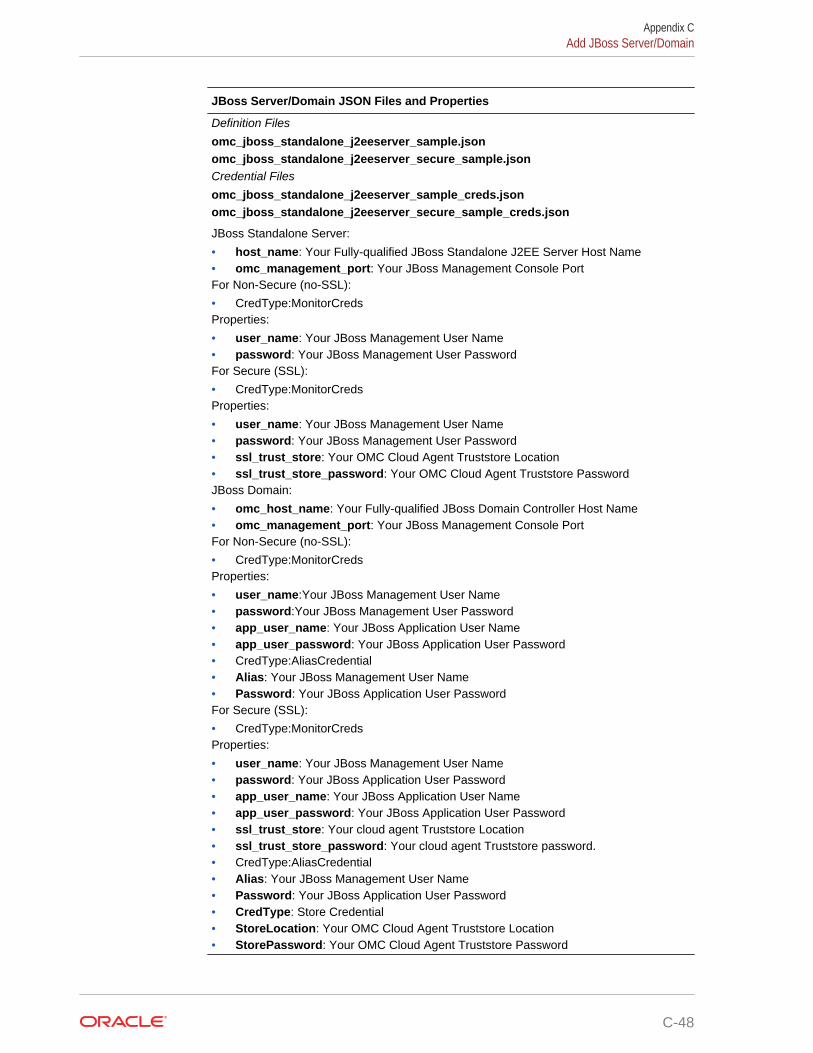
JBoss Server/Domain JSON Files and Properties
Definition Files
omc_jboss_standalone_j2eeserver_sample.jsonomc_jboss_standalone_j2eeserver_secure_sample.jsonCredential Files
omc_jboss_standalone_j2eeserver_sample_creds.jsonomc_jboss_standalone_j2eeserver_secure_sample_creds.json
JBoss Standalone Server:
• host_name: Your Fully-qualified JBoss Standalone J2EE Server Host Name• omc_management_port: Your JBoss Management Console PortFor Non-Secure (no-SSL):
• CredType:MonitorCredsProperties:
• user_name: Your JBoss Management User Name• password: Your JBoss Management User PasswordFor Secure (SSL):
• CredType:MonitorCredsProperties:
• user_name: Your JBoss Management User Name• password: Your JBoss Management User Password• ssl_trust_store: Your OMC Cloud Agent Truststore Location• ssl_trust_store_password: Your OMC Cloud Agent Truststore PasswordJBoss Domain:
• omc_host_name: Your Fully-qualified JBoss Domain Controller Host Name• omc_management_port: Your JBoss Management Console PortFor Non-Secure (no-SSL):
• CredType:MonitorCredsProperties:
• user_name:Your JBoss Management User Name• password:Your JBoss Management User Password• app_user_name: Your JBoss Application User Name• app_user_password: Your JBoss Application User Password• CredType:AliasCredential• Alias: Your JBoss Management User Name• Password: Your JBoss Application User PasswordFor Secure (SSL):
• CredType:MonitorCredsProperties:
• user_name: Your JBoss Management User Name• password: Your JBoss Application User Password• app_user_name: Your JBoss Application User Name• app_user_password: Your JBoss Application User Password• ssl_trust_store: Your cloud agent Truststore Location• ssl_trust_store_password: Your cloud agent Truststore password.• CredType:AliasCredential• Alias: Your JBoss Management User Name• Password: Your JBoss Application User Password• CredType: Store Credential• StoreLocation: Your OMC Cloud Agent Truststore Location• StorePassword: Your OMC Cloud Agent Truststore Password
Appendix CAdd JBoss Server/Domain
C-48

3. Add the entity using omcli.
omcli add_entity agent DEFINITION_FILE [-credential_file CREDENTIAL_FILE [-encryption_method_gpg]]
4. Verify the status of the newly added entity.
omcli status_entity agent DEFINITION_FILE
See step 4. Adding Entities to Your Service of Add Entities Using JSON Files for moreinformation.
Step 3: (Optional but recommended) Set up alerts.
To enable lights-out monitoring, you can set up alert rules to generate alerts and sendnotifications if your entities have performance issues.
See Set Up Alert Rules and Set Up Alert Thresholds and Notifications.
Troubleshooting
If you run into any issues regarding discovery or monitoring of JBoss, see thefollowing:
• Lack of Data
• Create an Agent Support Bundle
Add Juniper Ethernet SwitchYou can add Juniper Ethernet Switch entities using the Add Entity UI or using thecloud agent command line interface (omcli) with the appropriate JSON files.
Step 1: Prepare Juniper Ethernet Switch for monitoring.
Prerequisites
To enable monitoring, HTTP and SNMPv1/v2c/v3 are needed.
If SNMPv1/v2 is used, you must provide SNMP community string that has been used earlier inJuniper Switch configuration along with IP address of agent which will be used for JuniperSwitch monitoring.
If SNMPv3 is used, in addition to SNMPv3 user, you must provide the auth method (SHA orMD5) and auth-password if auth is used, and priv method (only DES supported) and priv-password if priv used. You must configure everything manually in Juniper Switch. Read onlyaccess is sufficient for Juniper Switch monitoring.
Step 2: Decide how you want to add the Juniper Ethernet Switch.
You can add Juniper Ethernet Switch entities using one of two ways:
• Add them from UI
• Use the agent's omcli add_entity command with the appropriate JSON files
Adding Entities from the UI
1. From the Management Cloud main menu, select Administration, Discovery, andthen Add Entity. The Add Entity page displays.
Appendix CAdd Juniper Ethernet Switch
C-49
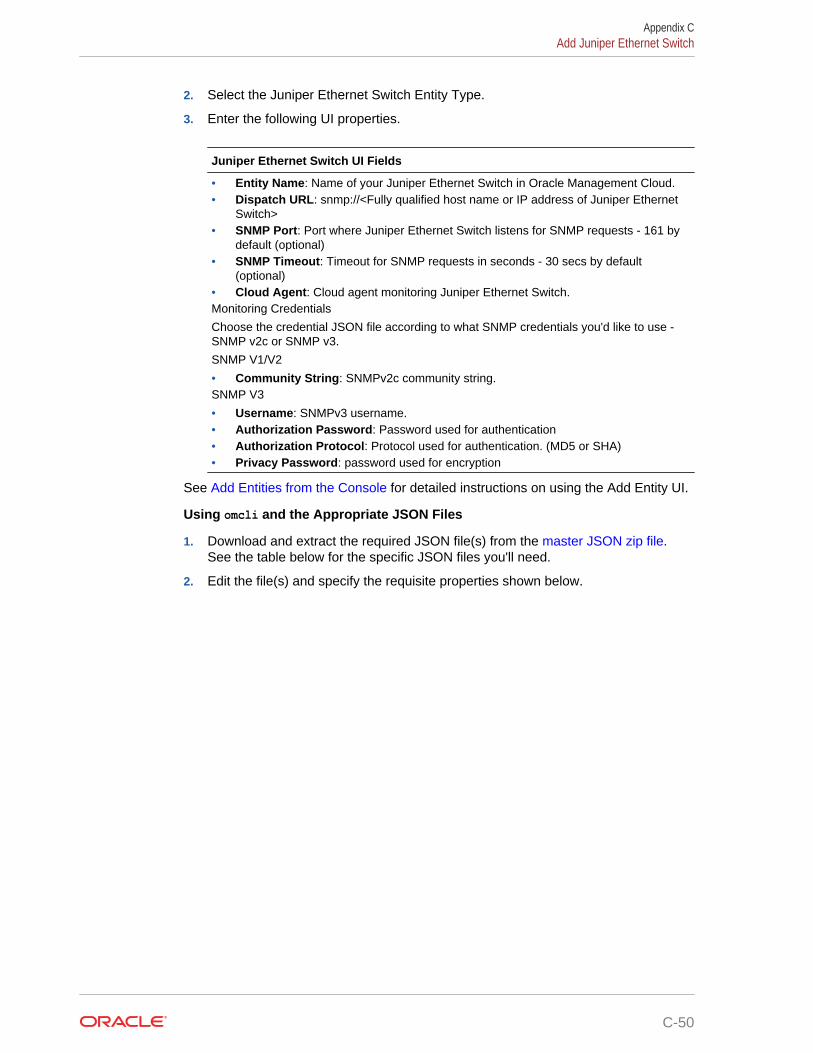
2. Select the Juniper Ethernet Switch Entity Type.
3. Enter the following UI properties.
Juniper Ethernet Switch UI Fields
• Entity Name: Name of your Juniper Ethernet Switch in Oracle Management Cloud.• Dispatch URL: snmp://<Fully qualified host name or IP address of Juniper Ethernet
Switch>• SNMP Port: Port where Juniper Ethernet Switch listens for SNMP requests - 161 by
default (optional)• SNMP Timeout: Timeout for SNMP requests in seconds - 30 secs by default
(optional)• Cloud Agent: Cloud agent monitoring Juniper Ethernet Switch.Monitoring Credentials
Choose the credential JSON file according to what SNMP credentials you'd like to use -SNMP v2c or SNMP v3.
SNMP V1/V2
• Community String: SNMPv2c community string.SNMP V3
• Username: SNMPv3 username.• Authorization Password: Password used for authentication• Authorization Protocol: Protocol used for authentication. (MD5 or SHA)• Privacy Password: password used for encryption
See Add Entities from the Console for detailed instructions on using the Add Entity UI.
Using omcli and the Appropriate JSON Files
1. Download and extract the required JSON file(s) from the master JSON zip file.See the table below for the specific JSON files you'll need.
2. Edit the file(s) and specify the requisite properties shown below.
Appendix CAdd Juniper Ethernet Switch
C-50
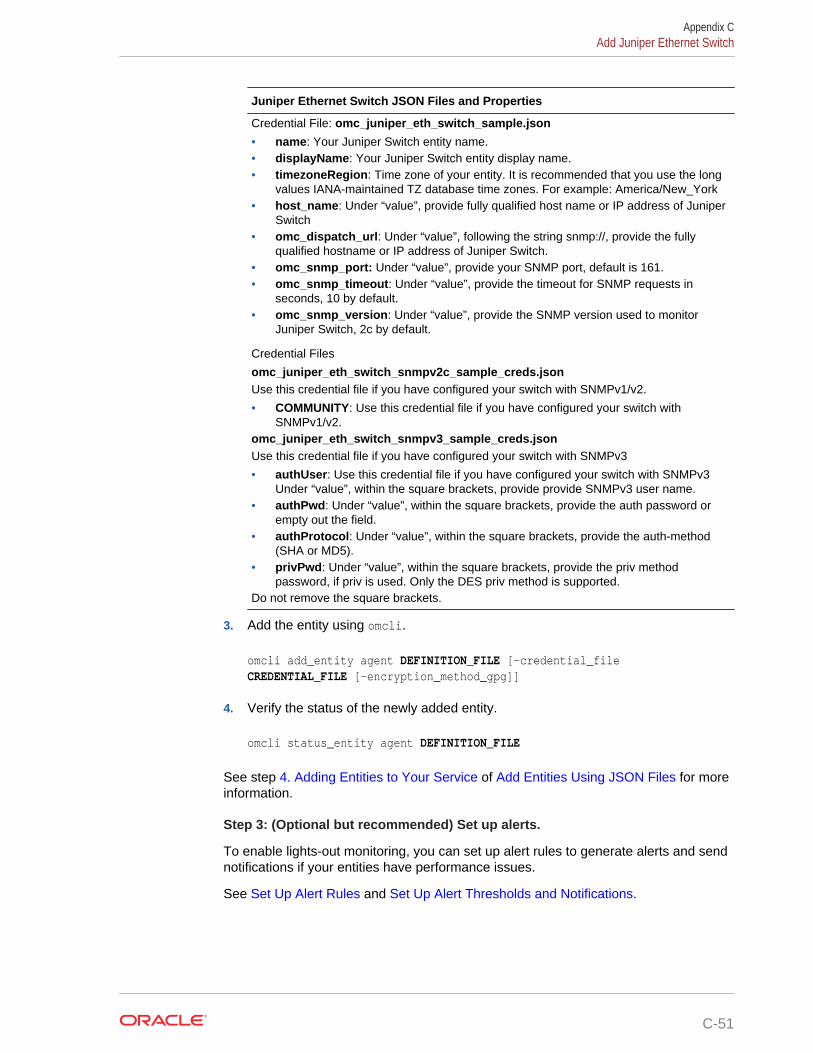
Juniper Ethernet Switch JSON Files and Properties
Credential File: omc_juniper_eth_switch_sample.json
• name: Your Juniper Switch entity name.• displayName: Your Juniper Switch entity display name.• timezoneRegion: Time zone of your entity. It is recommended that you use the long
values IANA-maintained TZ database time zones. For example: America/New_York• host_name: Under “value”, provide fully qualified host name or IP address of Juniper
Switch• omc_dispatch_url: Under “value”, following the string snmp://, provide the fully
qualified hostname or IP address of Juniper Switch.• omc_snmp_port: Under “value”, provide your SNMP port, default is 161.• omc_snmp_timeout: Under “value”, provide the timeout for SNMP requests in
seconds, 10 by default.• omc_snmp_version: Under “value”, provide the SNMP version used to monitor
Juniper Switch, 2c by default.
Credential Files
omc_juniper_eth_switch_snmpv2c_sample_creds.jsonUse this credential file if you have configured your switch with SNMPv1/v2.
• COMMUNITY: Use this credential file if you have configured your switch withSNMPv1/v2.
omc_juniper_eth_switch_snmpv3_sample_creds.jsonUse this credential file if you have configured your switch with SNMPv3
• authUser: Use this credential file if you have configured your switch with SNMPv3Under “value”, within the square brackets, provide provide SNMPv3 user name.
• authPwd: Under “value”, within the square brackets, provide the auth password orempty out the field.
• authProtocol: Under “value”, within the square brackets, provide the auth-method(SHA or MD5).
• privPwd: Under “value”, within the square brackets, provide the priv methodpassword, if priv is used. Only the DES priv method is supported.
Do not remove the square brackets.
3. Add the entity using omcli.
omcli add_entity agent DEFINITION_FILE [-credential_file CREDENTIAL_FILE [-encryption_method_gpg]]
4. Verify the status of the newly added entity.
omcli status_entity agent DEFINITION_FILE
See step 4. Adding Entities to Your Service of Add Entities Using JSON Files for moreinformation.
Step 3: (Optional but recommended) Set up alerts.
To enable lights-out monitoring, you can set up alert rules to generate alerts and sendnotifications if your entities have performance issues.
See Set Up Alert Rules and Set Up Alert Thresholds and Notifications.
Appendix CAdd Juniper Ethernet Switch
C-51
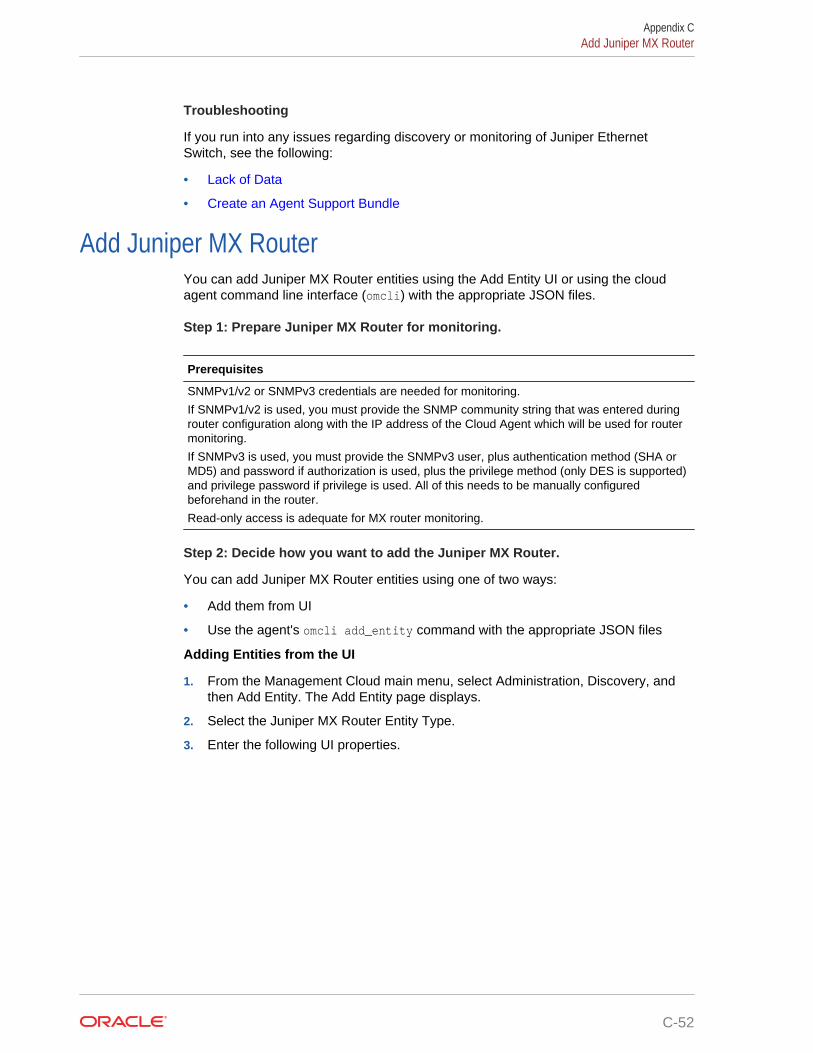
Troubleshooting
If you run into any issues regarding discovery or monitoring of Juniper EthernetSwitch, see the following:
• Lack of Data
• Create an Agent Support Bundle
Add Juniper MX RouterYou can add Juniper MX Router entities using the Add Entity UI or using the cloudagent command line interface (omcli) with the appropriate JSON files.
Step 1: Prepare Juniper MX Router for monitoring.
Prerequisites
SNMPv1/v2 or SNMPv3 credentials are needed for monitoring.
If SNMPv1/v2 is used, you must provide the SNMP community string that was entered duringrouter configuration along with the IP address of the Cloud Agent which will be used for routermonitoring.
If SNMPv3 is used, you must provide the SNMPv3 user, plus authentication method (SHA orMD5) and password if authorization is used, plus the privilege method (only DES is supported)and privilege password if privilege is used. All of this needs to be manually configuredbeforehand in the router.
Read-only access is adequate for MX router monitoring.
Step 2: Decide how you want to add the Juniper MX Router.
You can add Juniper MX Router entities using one of two ways:
• Add them from UI
• Use the agent's omcli add_entity command with the appropriate JSON files
Adding Entities from the UI
1. From the Management Cloud main menu, select Administration, Discovery, andthen Add Entity. The Add Entity page displays.
2. Select the Juniper MX Router Entity Type.
3. Enter the following UI properties.
Appendix CAdd Juniper MX Router
C-52
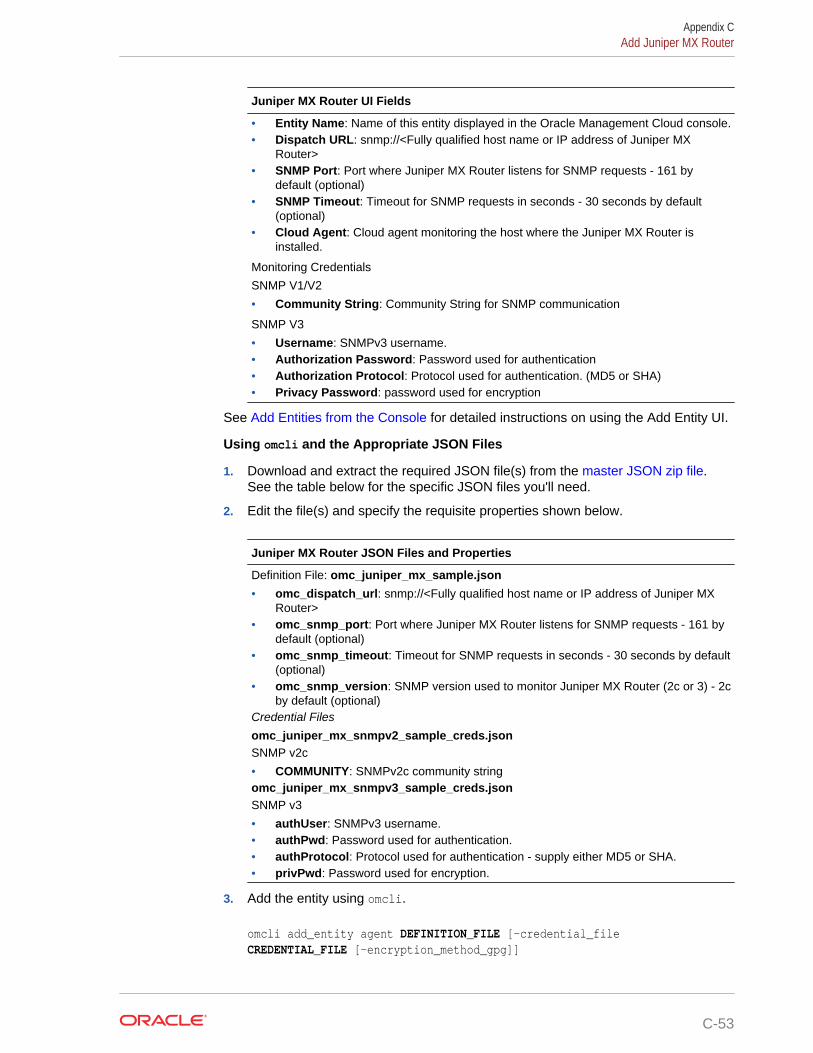
Juniper MX Router UI Fields
• Entity Name: Name of this entity displayed in the Oracle Management Cloud console.• Dispatch URL: snmp://<Fully qualified host name or IP address of Juniper MX
Router>• SNMP Port: Port where Juniper MX Router listens for SNMP requests - 161 by
default (optional)• SNMP Timeout: Timeout for SNMP requests in seconds - 30 seconds by default
(optional)• Cloud Agent: Cloud agent monitoring the host where the Juniper MX Router is
installed.
Monitoring Credentials
SNMP V1/V2
• Community String: Community String for SNMP communication
SNMP V3
• Username: SNMPv3 username.• Authorization Password: Password used for authentication• Authorization Protocol: Protocol used for authentication. (MD5 or SHA)• Privacy Password: password used for encryption
See Add Entities from the Console for detailed instructions on using the Add Entity UI.
Using omcli and the Appropriate JSON Files
1. Download and extract the required JSON file(s) from the master JSON zip file.See the table below for the specific JSON files you'll need.
2. Edit the file(s) and specify the requisite properties shown below.
Juniper MX Router JSON Files and Properties
Definition File: omc_juniper_mx_sample.json
• omc_dispatch_url: snmp://<Fully qualified host name or IP address of Juniper MXRouter>
• omc_snmp_port: Port where Juniper MX Router listens for SNMP requests - 161 bydefault (optional)
• omc_snmp_timeout: Timeout for SNMP requests in seconds - 30 seconds by default(optional)
• omc_snmp_version: SNMP version used to monitor Juniper MX Router (2c or 3) - 2cby default (optional)
Credential Files
omc_juniper_mx_snmpv2_sample_creds.jsonSNMP v2c
• COMMUNITY: SNMPv2c community stringomc_juniper_mx_snmpv3_sample_creds.jsonSNMP v3
• authUser: SNMPv3 username.• authPwd: Password used for authentication.• authProtocol: Protocol used for authentication - supply either MD5 or SHA.• privPwd: Password used for encryption.
3. Add the entity using omcli.
omcli add_entity agent DEFINITION_FILE [-credential_file CREDENTIAL_FILE [-encryption_method_gpg]]
Appendix CAdd Juniper MX Router
C-53

4. Verify the status of the newly added entity.
omcli status_entity agent DEFINITION_FILE
See step 4. Adding Entities to Your Service of Add Entities Using JSON Files for moreinformation.
Step 3: (Optional but recommended) Set up alerts.
To enable lights-out monitoring, you can set up alert rules to generate alerts and sendnotifications if your entities have performance issues.
See Set Up Alert Rules and Set Up Alert Thresholds and Notifications.
Troubleshooting
If you run into any issues regarding discovery or monitoring of Juniper MX Router, seethe following:
• Lack of Data
• Create an Agent Support Bundle
Add Juniper Netscreen FirewallYou can add Juniper Netscreen Firewall entities using the Add Entity UI or using thecloud agent command line interface (omcli) with the appropriate JSON files.
Step 1: Prepare Juniper Netscreen Firewall for monitoring.
Prerequisites
SNMPv1/v2 or SNMPv3 credentials are needed for monitoring.
If SNMPv1/v2 is used, you must provide the SNMP community string that was entered duringfirewall configuration along with IP address of the Cloud Agent which will be used for Juniperfirewall monitoring.
If SNMPv3 is used, you must provide the SNMPv3 user, plus authentication method (SHA orMD5) and password if authorization is used, plus the privilege method (only DES is supported)and privilege password if privilege is used. All of this needs to be manually configuredbeforehand in the firewall..
Read-only access is adequate for Juniper firewall monitoring.
Step 2: Decide how you want to add the Juniper Netscreen Firewall.
You can add Juniper Netscreen Firewall entities using one of two ways:
• Add them from UI
• Use the agent's omcli add_entity command with the appropriate JSON files
Adding Entities from the UI
1. From the Management Cloud main menu, select Administration, Discovery, andthen Add Entity. The Add Entity page displays.
2. Select the Juniper Netscreen Firewall Entity Type.
3. Enter the following UI properties.
Appendix CAdd Juniper Netscreen Firewall
C-54
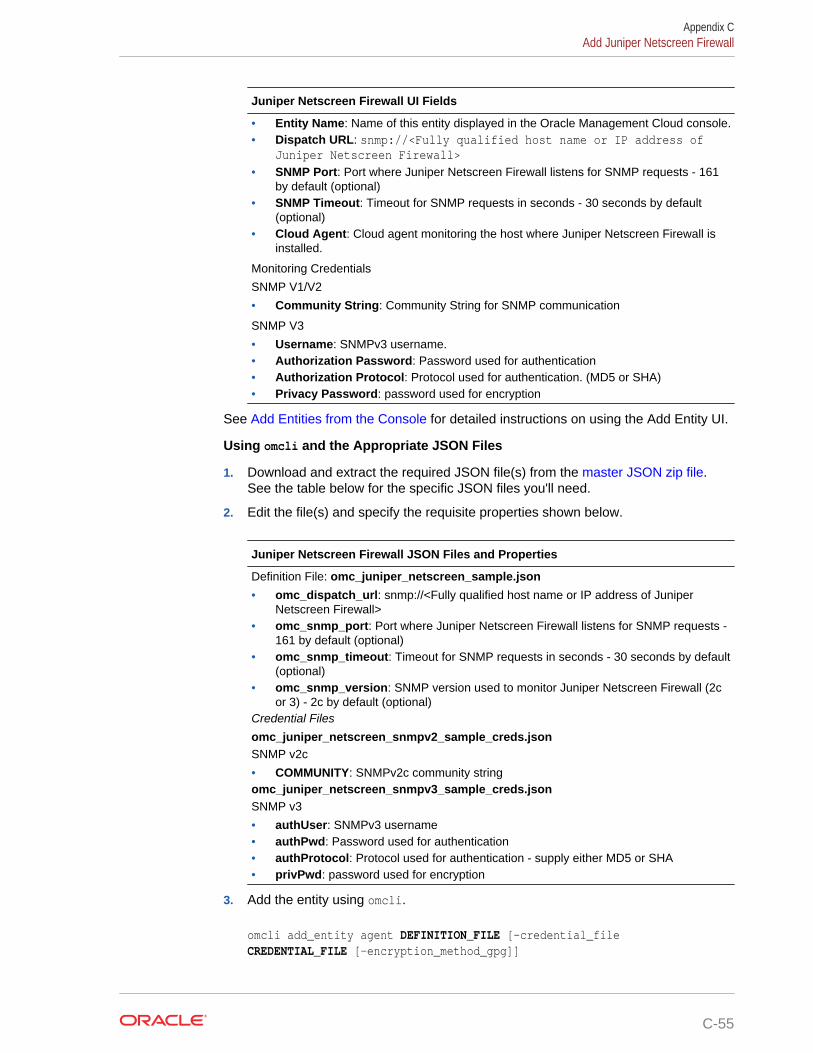
Juniper Netscreen Firewall UI Fields
• Entity Name: Name of this entity displayed in the Oracle Management Cloud console.• Dispatch URL: snmp://<Fully qualified host name or IP address of
Juniper Netscreen Firewall>• SNMP Port: Port where Juniper Netscreen Firewall listens for SNMP requests - 161
by default (optional)• SNMP Timeout: Timeout for SNMP requests in seconds - 30 seconds by default
(optional)• Cloud Agent: Cloud agent monitoring the host where Juniper Netscreen Firewall is
installed.
Monitoring Credentials
SNMP V1/V2
• Community String: Community String for SNMP communication
SNMP V3
• Username: SNMPv3 username.• Authorization Password: Password used for authentication• Authorization Protocol: Protocol used for authentication. (MD5 or SHA)• Privacy Password: password used for encryption
See Add Entities from the Console for detailed instructions on using the Add Entity UI.
Using omcli and the Appropriate JSON Files
1. Download and extract the required JSON file(s) from the master JSON zip file.See the table below for the specific JSON files you'll need.
2. Edit the file(s) and specify the requisite properties shown below.
Juniper Netscreen Firewall JSON Files and Properties
Definition File: omc_juniper_netscreen_sample.json
• omc_dispatch_url: snmp://<Fully qualified host name or IP address of JuniperNetscreen Firewall>
• omc_snmp_port: Port where Juniper Netscreen Firewall listens for SNMP requests -161 by default (optional)
• omc_snmp_timeout: Timeout for SNMP requests in seconds - 30 seconds by default(optional)
• omc_snmp_version: SNMP version used to monitor Juniper Netscreen Firewall (2cor 3) - 2c by default (optional)
Credential Files
omc_juniper_netscreen_snmpv2_sample_creds.jsonSNMP v2c
• COMMUNITY: SNMPv2c community stringomc_juniper_netscreen_snmpv3_sample_creds.jsonSNMP v3
• authUser: SNMPv3 username• authPwd: Password used for authentication• authProtocol: Protocol used for authentication - supply either MD5 or SHA• privPwd: password used for encryption
3. Add the entity using omcli.
omcli add_entity agent DEFINITION_FILE [-credential_file CREDENTIAL_FILE [-encryption_method_gpg]]
Appendix CAdd Juniper Netscreen Firewall
C-55
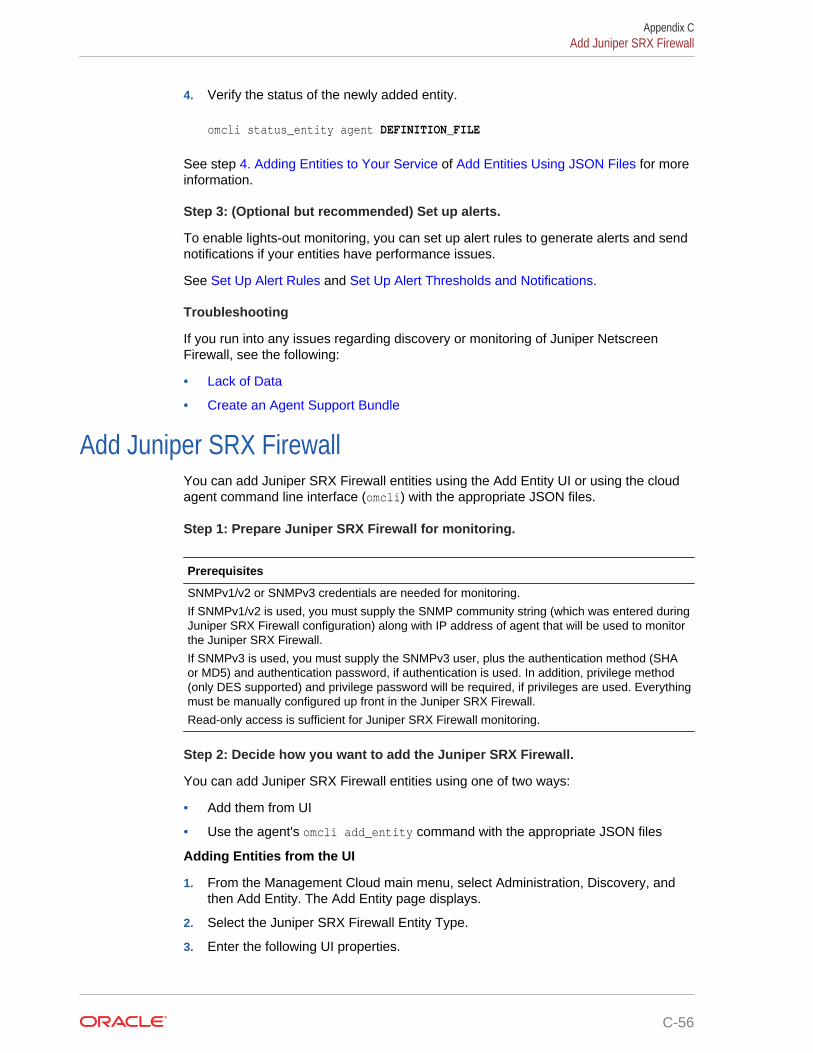
4. Verify the status of the newly added entity.
omcli status_entity agent DEFINITION_FILE
See step 4. Adding Entities to Your Service of Add Entities Using JSON Files for moreinformation.
Step 3: (Optional but recommended) Set up alerts.
To enable lights-out monitoring, you can set up alert rules to generate alerts and sendnotifications if your entities have performance issues.
See Set Up Alert Rules and Set Up Alert Thresholds and Notifications.
Troubleshooting
If you run into any issues regarding discovery or monitoring of Juniper NetscreenFirewall, see the following:
• Lack of Data
• Create an Agent Support Bundle
Add Juniper SRX FirewallYou can add Juniper SRX Firewall entities using the Add Entity UI or using the cloudagent command line interface (omcli) with the appropriate JSON files.
Step 1: Prepare Juniper SRX Firewall for monitoring.
Prerequisites
SNMPv1/v2 or SNMPv3 credentials are needed for monitoring.
If SNMPv1/v2 is used, you must supply the SNMP community string (which was entered duringJuniper SRX Firewall configuration) along with IP address of agent that will be used to monitorthe Juniper SRX Firewall.
If SNMPv3 is used, you must supply the SNMPv3 user, plus the authentication method (SHAor MD5) and authentication password, if authentication is used. In addition, privilege method(only DES supported) and privilege password will be required, if privileges are used. Everythingmust be manually configured up front in the Juniper SRX Firewall.
Read-only access is sufficient for Juniper SRX Firewall monitoring.
Step 2: Decide how you want to add the Juniper SRX Firewall.
You can add Juniper SRX Firewall entities using one of two ways:
• Add them from UI
• Use the agent's omcli add_entity command with the appropriate JSON files
Adding Entities from the UI
1. From the Management Cloud main menu, select Administration, Discovery, andthen Add Entity. The Add Entity page displays.
2. Select the Juniper SRX Firewall Entity Type.
3. Enter the following UI properties.
Appendix CAdd Juniper SRX Firewall
C-56

Juniper SRX Firewall UI Fields
• Entity Name: Name of your Juniper SRX Firewall in Oracle Management Cloud.• Dispatch URL: snmp://<Fully qualified host name or IP address of Juniper SRX
Firewall>• SNMP Port: Port where Juniper SRX Firewall listens for SNMP requests - 161 by
default (optional)• SNMP Timeout: Timeout for SNMP requests in seconds - 30 secs by default
(optional)• Cloud Agent: Cloud agent monitoring your Juniper SRX Firewall.Monitoring Credentials
SNMP V1/V2:
• Community String: SNMPv1/v2c community string.SNMP V3
• Username: SNMPv3 username.• Authorization Password: Password used for authentication• Authorization Protocol: Protocol used for authentication. (MD5 or SHA)• Privacy Password: password used for encryption
See Add Entities from the Console for detailed instructions on using the Add Entity UI.
Using omcli and the Appropriate JSON Files
1. Download and extract the required JSON file(s) from the master JSON zip file.See the table below for the specific JSON files you'll need.
2. Edit the file(s) and specify the requisite properties shown below.
Appendix CAdd Juniper SRX Firewall
C-57
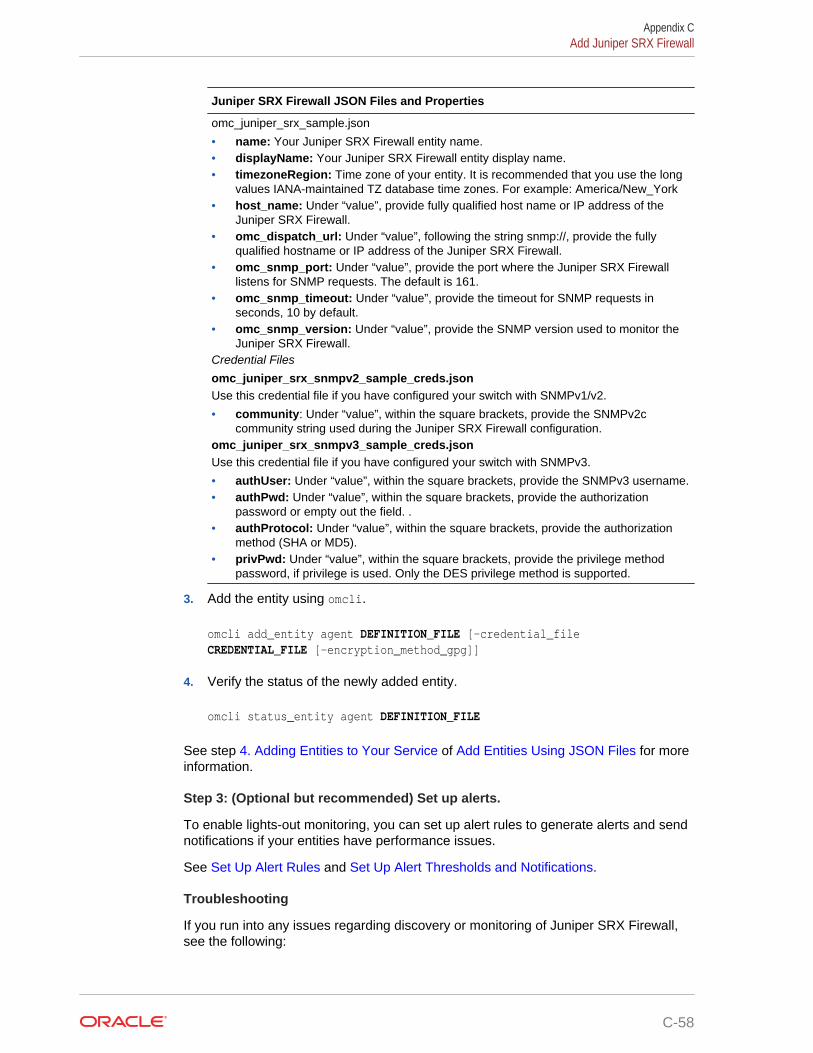
Juniper SRX Firewall JSON Files and Properties
omc_juniper_srx_sample.json
• name: Your Juniper SRX Firewall entity name.• displayName: Your Juniper SRX Firewall entity display name.• timezoneRegion: Time zone of your entity. It is recommended that you use the long
values IANA-maintained TZ database time zones. For example: America/New_York• host_name: Under “value”, provide fully qualified host name or IP address of the
Juniper SRX Firewall.• omc_dispatch_url: Under “value”, following the string snmp://, provide the fully
qualified hostname or IP address of the Juniper SRX Firewall.• omc_snmp_port: Under “value”, provide the port where the Juniper SRX Firewall
listens for SNMP requests. The default is 161.• omc_snmp_timeout: Under “value”, provide the timeout for SNMP requests in
seconds, 10 by default.• omc_snmp_version: Under “value”, provide the SNMP version used to monitor the
Juniper SRX Firewall.Credential Files
omc_juniper_srx_snmpv2_sample_creds.jsonUse this credential file if you have configured your switch with SNMPv1/v2.
• community: Under “value”, within the square brackets, provide the SNMPv2ccommunity string used during the Juniper SRX Firewall configuration.
omc_juniper_srx_snmpv3_sample_creds.jsonUse this credential file if you have configured your switch with SNMPv3.
• authUser: Under “value”, within the square brackets, provide the SNMPv3 username.• authPwd: Under “value”, within the square brackets, provide the authorization
password or empty out the field. .• authProtocol: Under “value”, within the square brackets, provide the authorization
method (SHA or MD5).• privPwd: Under “value”, within the square brackets, provide the privilege method
password, if privilege is used. Only the DES privilege method is supported.
3. Add the entity using omcli.
omcli add_entity agent DEFINITION_FILE [-credential_file CREDENTIAL_FILE [-encryption_method_gpg]]
4. Verify the status of the newly added entity.
omcli status_entity agent DEFINITION_FILE
See step 4. Adding Entities to Your Service of Add Entities Using JSON Files for moreinformation.
Step 3: (Optional but recommended) Set up alerts.
To enable lights-out monitoring, you can set up alert rules to generate alerts and sendnotifications if your entities have performance issues.
See Set Up Alert Rules and Set Up Alert Thresholds and Notifications.
Troubleshooting
If you run into any issues regarding discovery or monitoring of Juniper SRX Firewall,see the following:
Appendix CAdd Juniper SRX Firewall
C-58

• Lack of Data
• Create an Agent Support Bundle
Add Kubernetes ClusterYou can add Kubernetes Cluster entities using the Add Entity UI or using the cloudagent command line interface (omcli) with the appropriate JSON files.
Step 1: Prepare Kubernetes Cluster for monitoring.
For details on Kubernetes Cluster setup, see Kubernetes Cluster.
Step 2: Decide how you want to add the Kubernetes Cluster.
You can add Kubernetes Cluster entities using one of two ways:
• Add them from UI
• Use the agent's omcli add_entity command with the appropriate JSON files
Adding Entities from the UI
1. From the Management Cloud main menu, select Administration, Discovery, andthen Add Entity. The Add Entity page displays.
2. Select the Kubernetes Cluster Entity Type.
3. Enter the following UI properties.
Appendix CAdd Kubernetes Cluster
C-59
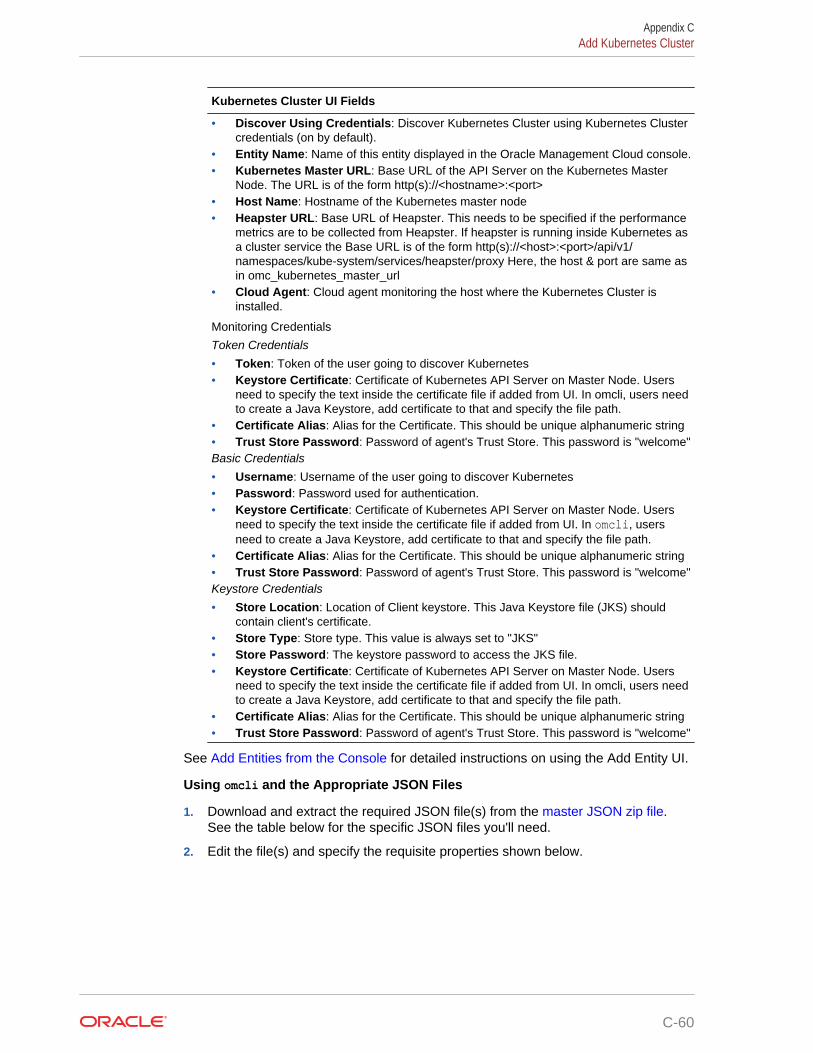
Kubernetes Cluster UI Fields
• Discover Using Credentials: Discover Kubernetes Cluster using Kubernetes Clustercredentials (on by default).
• Entity Name: Name of this entity displayed in the Oracle Management Cloud console.• Kubernetes Master URL: Base URL of the API Server on the Kubernetes Master
Node. The URL is of the form http(s)://<hostname>:<port>• Host Name: Hostname of the Kubernetes master node• Heapster URL: Base URL of Heapster. This needs to be specified if the performance
metrics are to be collected from Heapster. If heapster is running inside Kubernetes asa cluster service the Base URL is of the form http(s)://<host>:<port>/api/v1/namespaces/kube-system/services/heapster/proxy Here, the host & port are same asin omc_kubernetes_master_url
• Cloud Agent: Cloud agent monitoring the host where the Kubernetes Cluster isinstalled.
Monitoring Credentials
Token Credentials
• Token: Token of the user going to discover Kubernetes• Keystore Certificate: Certificate of Kubernetes API Server on Master Node. Users
need to specify the text inside the certificate file if added from UI. In omcli, users needto create a Java Keystore, add certificate to that and specify the file path.
• Certificate Alias: Alias for the Certificate. This should be unique alphanumeric string• Trust Store Password: Password of agent's Trust Store. This password is "welcome"Basic Credentials
• Username: Username of the user going to discover Kubernetes• Password: Password used for authentication.• Keystore Certificate: Certificate of Kubernetes API Server on Master Node. Users
need to specify the text inside the certificate file if added from UI. In omcli, usersneed to create a Java Keystore, add certificate to that and specify the file path.
• Certificate Alias: Alias for the Certificate. This should be unique alphanumeric string• Trust Store Password: Password of agent's Trust Store. This password is "welcome"Keystore Credentials
• Store Location: Location of Client keystore. This Java Keystore file (JKS) shouldcontain client's certificate.
• Store Type: Store type. This value is always set to "JKS"• Store Password: The keystore password to access the JKS file.• Keystore Certificate: Certificate of Kubernetes API Server on Master Node. Users
need to specify the text inside the certificate file if added from UI. In omcli, users needto create a Java Keystore, add certificate to that and specify the file path.
• Certificate Alias: Alias for the Certificate. This should be unique alphanumeric string• Trust Store Password: Password of agent's Trust Store. This password is "welcome"
See Add Entities from the Console for detailed instructions on using the Add Entity UI.
Using omcli and the Appropriate JSON Files
1. Download and extract the required JSON file(s) from the master JSON zip file.See the table below for the specific JSON files you'll need.
2. Edit the file(s) and specify the requisite properties shown below.
Appendix CAdd Kubernetes Cluster
C-60
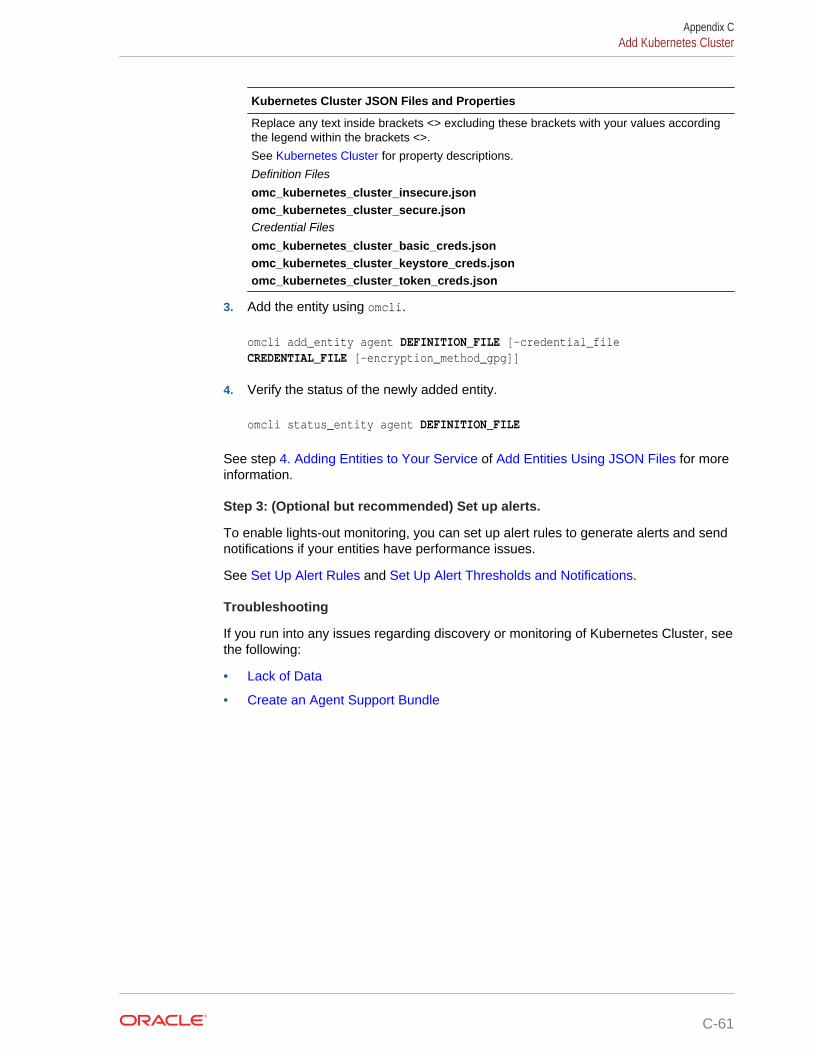
Kubernetes Cluster JSON Files and Properties
Replace any text inside brackets <> excluding these brackets with your values accordingthe legend within the brackets <>.
See Kubernetes Cluster for property descriptions.
Definition Files
omc_kubernetes_cluster_insecure.jsonomc_kubernetes_cluster_secure.jsonCredential Files
omc_kubernetes_cluster_basic_creds.jsonomc_kubernetes_cluster_keystore_creds.jsonomc_kubernetes_cluster_token_creds.json
3. Add the entity using omcli.
omcli add_entity agent DEFINITION_FILE [-credential_file CREDENTIAL_FILE [-encryption_method_gpg]]
4. Verify the status of the newly added entity.
omcli status_entity agent DEFINITION_FILE
See step 4. Adding Entities to Your Service of Add Entities Using JSON Files for moreinformation.
Step 3: (Optional but recommended) Set up alerts.
To enable lights-out monitoring, you can set up alert rules to generate alerts and sendnotifications if your entities have performance issues.
See Set Up Alert Rules and Set Up Alert Thresholds and Notifications.
Troubleshooting
If you run into any issues regarding discovery or monitoring of Kubernetes Cluster, seethe following:
• Lack of Data
• Create an Agent Support Bundle
Appendix CAdd Kubernetes Cluster
C-61
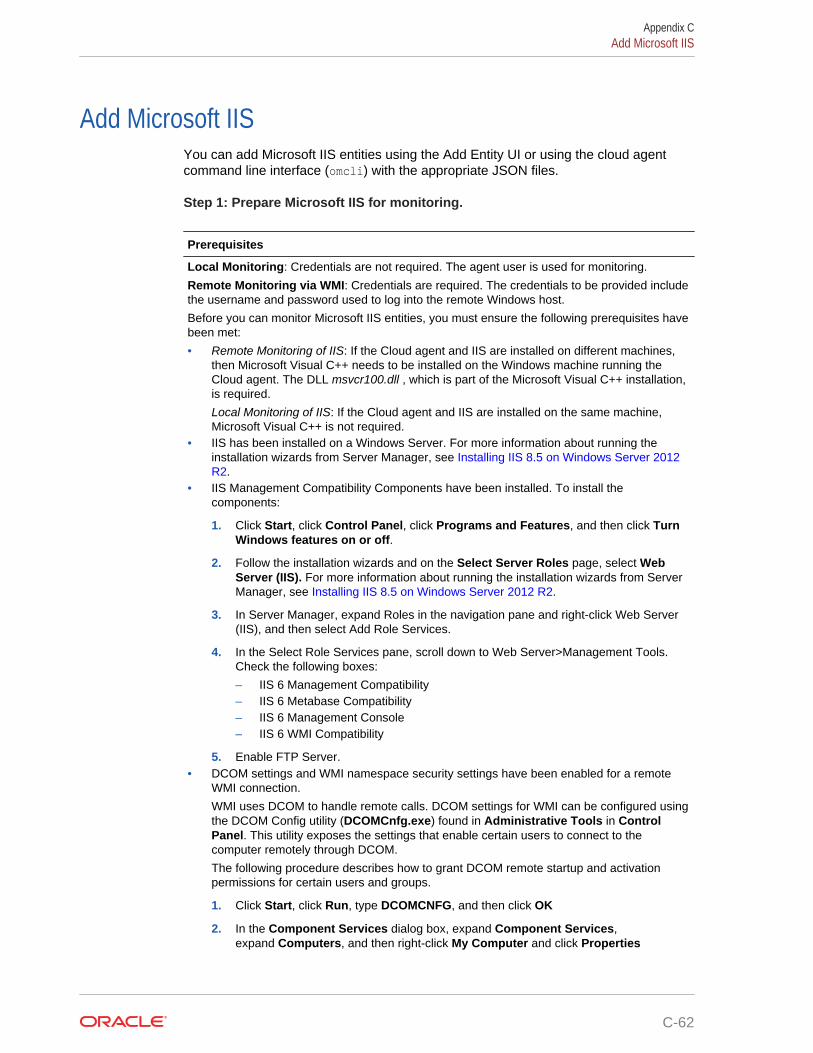
Add Microsoft IISYou can add Microsoft IIS entities using the Add Entity UI or using the cloud agentcommand line interface (omcli) with the appropriate JSON files.
Step 1: Prepare Microsoft IIS for monitoring.
Prerequisites
Local Monitoring: Credentials are not required. The agent user is used for monitoring.
Remote Monitoring via WMI: Credentials are required. The credentials to be provided includethe username and password used to log into the remote Windows host.
Before you can monitor Microsoft IIS entities, you must ensure the following prerequisites havebeen met:
• Remote Monitoring of IIS: If the Cloud agent and IIS are installed on different machines,then Microsoft Visual C++ needs to be installed on the Windows machine running theCloud agent. The DLL msvcr100.dll , which is part of the Microsoft Visual C++ installation,is required.
Local Monitoring of IIS: If the Cloud agent and IIS are installed on the same machine,Microsoft Visual C++ is not required.
• IIS has been installed on a Windows Server. For more information about running theinstallation wizards from Server Manager, see Installing IIS 8.5 on Windows Server 2012R2.
• IIS Management Compatibility Components have been installed. To install thecomponents:
1. Click Start, click Control Panel, click Programs and Features, and then click TurnWindows features on or off.
2. Follow the installation wizards and on the Select Server Roles page, select WebServer (IIS). For more information about running the installation wizards from ServerManager, see Installing IIS 8.5 on Windows Server 2012 R2.
3. In Server Manager, expand Roles in the navigation pane and right-click Web Server(IIS), and then select Add Role Services.
4. In the Select Role Services pane, scroll down to Web Server>Management Tools.Check the following boxes:
– IIS 6 Management Compatibility– IIS 6 Metabase Compatibility– IIS 6 Management Console– IIS 6 WMI Compatibility
5. Enable FTP Server.• DCOM settings and WMI namespace security settings have been enabled for a remote
WMI connection.
WMI uses DCOM to handle remote calls. DCOM settings for WMI can be configured usingthe DCOM Config utility (DCOMCnfg.exe) found in Administrative Tools in ControlPanel. This utility exposes the settings that enable certain users to connect to thecomputer remotely through DCOM.
The following procedure describes how to grant DCOM remote startup and activationpermissions for certain users and groups.
1. Click Start, click Run, type DCOMCNFG, and then click OK
2. In the Component Services dialog box, expand Component Services,expand Computers, and then right-click My Computer and click Properties
Appendix CAdd Microsoft IIS
C-62
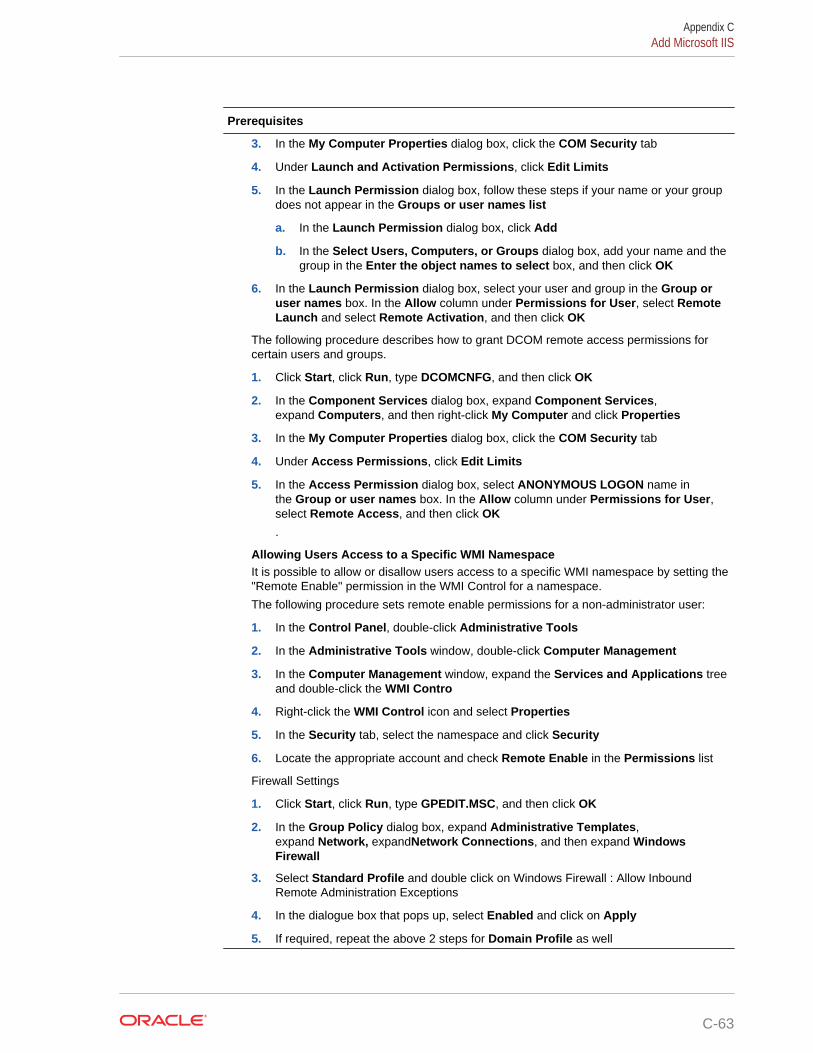
Prerequisites
3. In the My Computer Properties dialog box, click the COM Security tab
4. Under Launch and Activation Permissions, click Edit Limits
5. In the Launch Permission dialog box, follow these steps if your name or your groupdoes not appear in the Groups or user names list
a. In the Launch Permission dialog box, click Add
b. In the Select Users, Computers, or Groups dialog box, add your name and thegroup in the Enter the object names to select box, and then click OK
6. In the Launch Permission dialog box, select your user and group in the Group oruser names box. In the Allow column under Permissions for User, select RemoteLaunch and select Remote Activation, and then click OK
The following procedure describes how to grant DCOM remote access permissions forcertain users and groups.
1. Click Start, click Run, type DCOMCNFG, and then click OK
2. In the Component Services dialog box, expand Component Services,expand Computers, and then right-click My Computer and click Properties
3. In the My Computer Properties dialog box, click the COM Security tab
4. Under Access Permissions, click Edit Limits
5. In the Access Permission dialog box, select ANONYMOUS LOGON name inthe Group or user names box. In the Allow column under Permissions for User,select Remote Access, and then click OK
.
Allowing Users Access to a Specific WMI NamespaceIt is possible to allow or disallow users access to a specific WMI namespace by setting the"Remote Enable" permission in the WMI Control for a namespace.
The following procedure sets remote enable permissions for a non-administrator user:
1. In the Control Panel, double-click Administrative Tools
2. In the Administrative Tools window, double-click Computer Management
3. In the Computer Management window, expand the Services and Applications treeand double-click the WMI Contro
4. Right-click the WMI Control icon and select Properties
5. In the Security tab, select the namespace and click Security
6. Locate the appropriate account and check Remote Enable in the Permissions list
Firewall Settings
1. Click Start, click Run, type GPEDIT.MSC, and then click OK
2. In the Group Policy dialog box, expand Administrative Templates,expand Network, expandNetwork Connections, and then expand WindowsFirewall
3. Select Standard Profile and double click on Windows Firewall : Allow InboundRemote Administration Exceptions
4. In the dialogue box that pops up, select Enabled and click on Apply
5. If required, repeat the above 2 steps for Domain Profile as well
Appendix CAdd Microsoft IIS
C-63
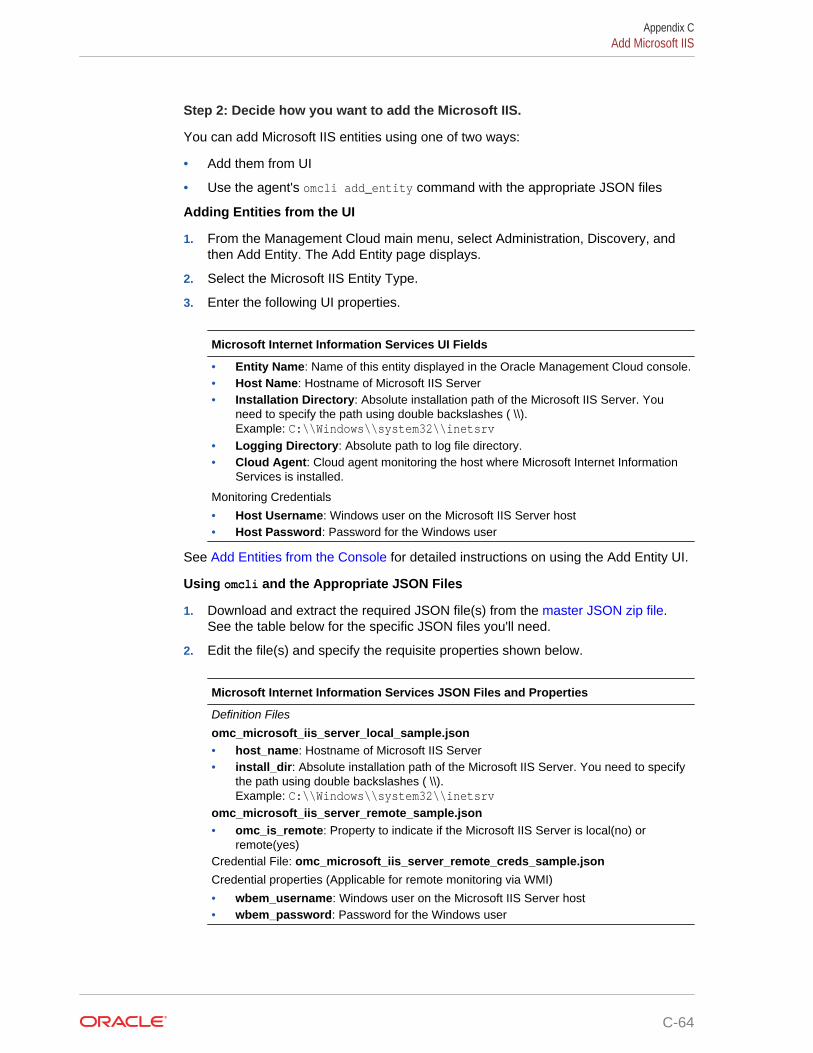
Step 2: Decide how you want to add the Microsoft IIS.
You can add Microsoft IIS entities using one of two ways:
• Add them from UI
• Use the agent's omcli add_entity command with the appropriate JSON files
Adding Entities from the UI
1. From the Management Cloud main menu, select Administration, Discovery, andthen Add Entity. The Add Entity page displays.
2. Select the Microsoft IIS Entity Type.
3. Enter the following UI properties.
Microsoft Internet Information Services UI Fields
• Entity Name: Name of this entity displayed in the Oracle Management Cloud console.• Host Name: Hostname of Microsoft IIS Server• Installation Directory: Absolute installation path of the Microsoft IIS Server. You
need to specify the path using double backslashes ( \\).Example: C:\\Windows\\system32\\inetsrv
• Logging Directory: Absolute path to log file directory.• Cloud Agent: Cloud agent monitoring the host where Microsoft Internet Information
Services is installed.
Monitoring Credentials
• Host Username: Windows user on the Microsoft IIS Server host• Host Password: Password for the Windows user
See Add Entities from the Console for detailed instructions on using the Add Entity UI.
Using omcli and the Appropriate JSON Files
1. Download and extract the required JSON file(s) from the master JSON zip file.See the table below for the specific JSON files you'll need.
2. Edit the file(s) and specify the requisite properties shown below.
Microsoft Internet Information Services JSON Files and Properties
Definition Files
omc_microsoft_iis_server_local_sample.json• host_name: Hostname of Microsoft IIS Server• install_dir: Absolute installation path of the Microsoft IIS Server. You need to specify
the path using double backslashes ( \\).Example: C:\\Windows\\system32\\inetsrv
omc_microsoft_iis_server_remote_sample.json• omc_is_remote: Property to indicate if the Microsoft IIS Server is local(no) or
remote(yes)Credential File: omc_microsoft_iis_server_remote_creds_sample.json
Credential properties (Applicable for remote monitoring via WMI)
• wbem_username: Windows user on the Microsoft IIS Server host• wbem_password: Password for the Windows user
Appendix CAdd Microsoft IIS
C-64
3. Add the entity using omcli.
omcli add_entity agent DEFINITION_FILE [-credential_file CREDENTIAL_FILE [-encryption_method_gpg]]
4. Verify the status of the newly added entity.
omcli status_entity agent DEFINITION_FILE
See step 4. Adding Entities to Your Service of Add Entities Using JSON Files for moreinformation.
Step 3: (Optional but recommended) Set up alerts.
To enable lights-out monitoring, you can set up alert rules to generate alerts and sendnotifications if your entities have performance issues.
See Set Up Alert Rules and Set Up Alert Thresholds and Notifications.
Troubleshooting
If you run into any issues regarding discovery or monitoring of Microsoft IIS, see thefollowing:
• Lack of Data
• Create an Agent Support Bundle
Appendix CAdd Microsoft IIS
C-65
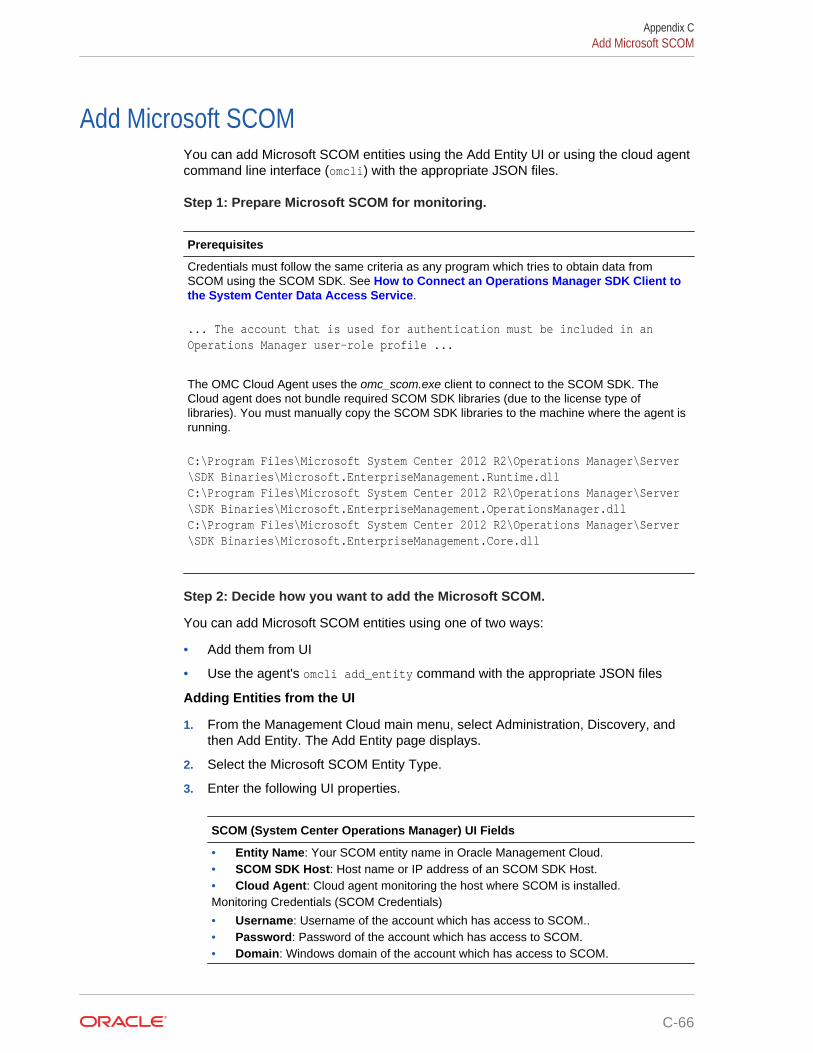
Add Microsoft SCOMYou can add Microsoft SCOM entities using the Add Entity UI or using the cloud agentcommand line interface (omcli) with the appropriate JSON files.
Step 1: Prepare Microsoft SCOM for monitoring.
Prerequisites
Credentials must follow the same criteria as any program which tries to obtain data fromSCOM using the SCOM SDK. See How to Connect an Operations Manager SDK Client tothe System Center Data Access Service.
... The account that is used for authentication must be included in an Operations Manager user-role profile ...
The OMC Cloud Agent uses the omc_scom.exe client to connect to the SCOM SDK. TheCloud agent does not bundle required SCOM SDK libraries (due to the license type oflibraries). You must manually copy the SCOM SDK libraries to the machine where the agent isrunning.
C:\Program Files\Microsoft System Center 2012 R2\Operations Manager\Server\SDK Binaries\Microsoft.EnterpriseManagement.Runtime.dll C:\Program Files\Microsoft System Center 2012 R2\Operations Manager\Server\SDK Binaries\Microsoft.EnterpriseManagement.OperationsManager.dll C:\Program Files\Microsoft System Center 2012 R2\Operations Manager\Server\SDK Binaries\Microsoft.EnterpriseManagement.Core.dll
Step 2: Decide how you want to add the Microsoft SCOM.
You can add Microsoft SCOM entities using one of two ways:
• Add them from UI
• Use the agent's omcli add_entity command with the appropriate JSON files
Adding Entities from the UI
1. From the Management Cloud main menu, select Administration, Discovery, andthen Add Entity. The Add Entity page displays.
2. Select the Microsoft SCOM Entity Type.
3. Enter the following UI properties.
SCOM (System Center Operations Manager) UI Fields
• Entity Name: Your SCOM entity name in Oracle Management Cloud.• SCOM SDK Host: Host name or IP address of an SCOM SDK Host.• Cloud Agent: Cloud agent monitoring the host where SCOM is installed.Monitoring Credentials (SCOM Credentials)
• Username: Username of the account which has access to SCOM..• Password: Password of the account which has access to SCOM.• Domain: Windows domain of the account which has access to SCOM.
Appendix CAdd Microsoft SCOM
C-66
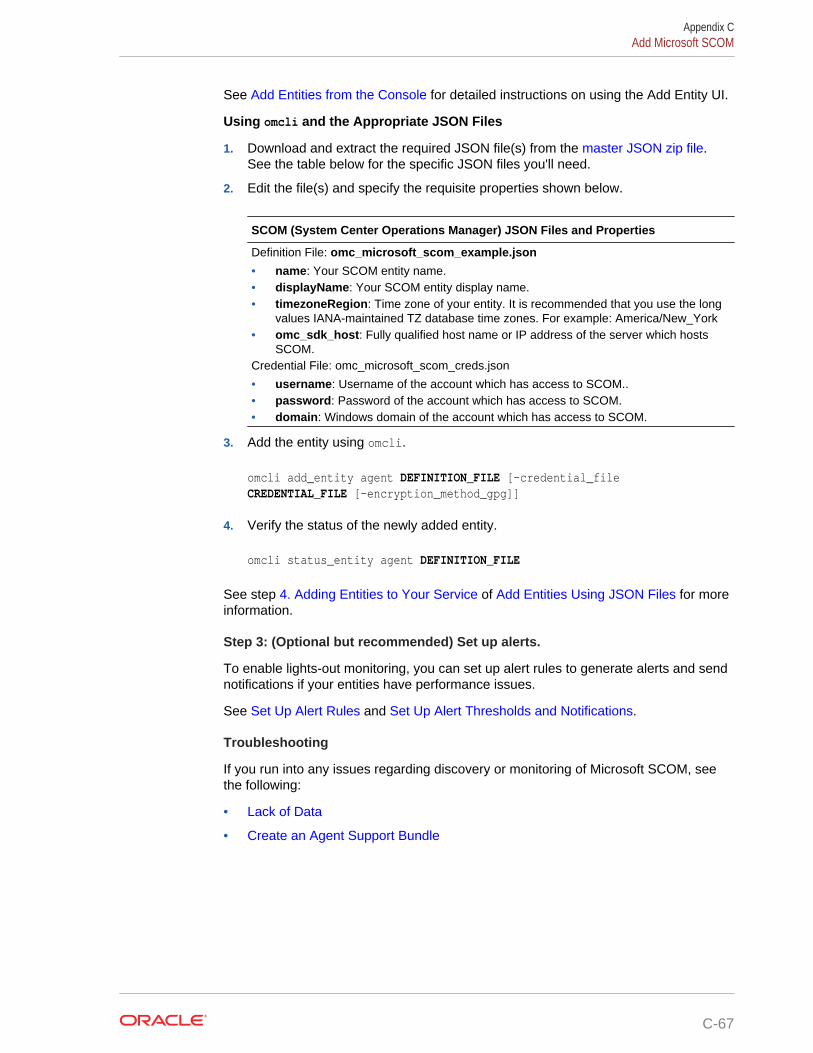
See Add Entities from the Console for detailed instructions on using the Add Entity UI.
Using omcli and the Appropriate JSON Files
1. Download and extract the required JSON file(s) from the master JSON zip file.See the table below for the specific JSON files you'll need.
2. Edit the file(s) and specify the requisite properties shown below.
SCOM (System Center Operations Manager) JSON Files and Properties
Definition File: omc_microsoft_scom_example.json
• name: Your SCOM entity name.• displayName: Your SCOM entity display name.• timezoneRegion: Time zone of your entity. It is recommended that you use the long
values IANA-maintained TZ database time zones. For example: America/New_York• omc_sdk_host: Fully qualified host name or IP address of the server which hosts
SCOM.Credential File: omc_microsoft_scom_creds.json
• username: Username of the account which has access to SCOM..• password: Password of the account which has access to SCOM.• domain: Windows domain of the account which has access to SCOM.
3. Add the entity using omcli.
omcli add_entity agent DEFINITION_FILE [-credential_file CREDENTIAL_FILE [-encryption_method_gpg]]
4. Verify the status of the newly added entity.
omcli status_entity agent DEFINITION_FILE
See step 4. Adding Entities to Your Service of Add Entities Using JSON Files for moreinformation.
Step 3: (Optional but recommended) Set up alerts.
To enable lights-out monitoring, you can set up alert rules to generate alerts and sendnotifications if your entities have performance issues.
See Set Up Alert Rules and Set Up Alert Thresholds and Notifications.
Troubleshooting
If you run into any issues regarding discovery or monitoring of Microsoft SCOM, seethe following:
• Lack of Data
• Create an Agent Support Bundle
Appendix CAdd Microsoft SCOM
C-67

Add Microsoft SQL ServerYou can add Microsoft SQL Server entities using the Add Entity UI or using the cloudagent command line interface (omcli) with the appropriate JSON files.
Step 1: Prepare Microsoft SQL Server for monitoring.
Prerequisites
To enable monitoring for a Microsoft SQL Server Database, you can create a special databaseuser as follows.
Create a user (for example, moncs) and map the new user to the master and msdbdatabases. Then, give this user the following minimum privileges.
Note:
Beginning with Oracle Management Cloud 1.31, sqladmin-relatedprivileges are no longer required.
CREATE LOGIN moncsWITH PASSWORD = 'moncs';GOCREATE USER moncs FOR LOGIN moncs;GO
Then, map the user moncs:
1. From the Security menu, select Logins moncs.
2. Right-click on moncs and select Properties.
3. Select User Mapping.
4. Map to all system and user databases:
USE master;GRANT VIEW ANY DATABASE TO moncs;GRANT VIEW ANY definition to moncs;GRANT VIEW server state to moncs;GRANT SELECT ON [sys].[sysaltfiles] TO [moncs];GRANT execute on sp_helplogins to moncs;GRANT execute on sp_readErrorLog to moncs;
GRANT EXECUTE ON dbo.xp_regread TO moncs;
USE msdb;GRANT SELECT on dbo.sysjobsteps TO moncs;GRANT SELECT on dbo.sysjobs TO moncs;GRANT SELECT on dbo.sysjobhistory TO moncs;
For connecting to SQL server database with SSL encryption, do the following:
Appendix CAdd Microsoft SQL Server
C-68
Prerequisites
1. Ensure the SQL server installation has the required updates for TLS 1.2 support asdescribed in the following document.https://support.microsoft.com/en-in/help/3135244/tls-1-2-support-for-microsoft-sql-server
2. Create a server certificate for the SQL server host.Set up the certificate as mentioned in the section “Install a certificate on a server withMicrosoft Management Console (MMC)” in the following document: https://support.microsoft.com/en-in/help/316898/how-to-enable-ssl-encryption-for-an-instance-of-sql-server-by-using-mi
3. Install the server certificate for the SQL server instance.Set up the SQL server instance to use the server certificate created above, as mentionedin the section “To install a certificate for a single SQL Server instance” in the followingdocument: https://docs.microsoft.com/en-us/sql/database-engine/configure-windows/manage-certificates?view=sql-server-2016
4. Export to a file, the root certification authority’s certificate that has signed the SQL serverhost certificate, and copy this file to the cloud agent host.Export the certificate as described in section “Enable encryption for a specific client” in thefollowing document: https://support.microsoft.com/en-in/help/316898/how-to-enable-ssl-encryption-for-an-instance-of-sql-server-by-using-mi
5. Create a trust store on the cloud agent host, and import the root certification authority’scertificate exported above.
keytool -import -file .\ca_cert.cer –alias mytrust -keystore .\trustStore.jks -storetype jks
6. Form the connection URL pointing to the trust store.
jdbc:sqlserver://xxx.xxx.com:1433;encrypt=true;trustServerCertificate=false;trustStore=C:\trustStore.jks;trustStorePassword=xxxx;
Step 2: Decide how you want to add the Microsoft SQL Server.
You can add Microsoft SQL Server entities using one of two ways:
• Add them from UI
• Use the agent's omcli add_entity command with the appropriate JSON files
Adding Entities from the UI
1. From the Management Cloud main menu, select Administration, Discovery, andthen Add Entity. The Add Entity page displays.
2. Select the Microsoft SQL Server Entity Type.
3. Enter the following UI properties.
Appendix CAdd Microsoft SQL Server
C-69
Microsoft SQL Server Database UI Fields
• Entity Name: Name displayed in the Oracle Management Cloud console.• JDBC URL: The connection URL for the MS SQL Server database. The URL follows
the formats:– Connect to default instance.
jdbc:sqlserver://<Fully-qualified SQL Server Database Host Name>
– Connect to named instance.
jdbc:sqlserver://<Fully-qualified SQL Server Database Host Name>\<Instance Name> (or)jdbc:sqlserver://<Fully-qualified SQL Server Database Host Name>;instanceName=<instance-name>
– Connect to instance by specifying port.
jdbc:sqlserver://<Fully-qualified SQL Server Database Host Name>:<SQL Server Database Port>
– Connecting with SSL encryption.
jdbc:sqlserver://<Fully-qualified SQL Server Database Host Name>\<Instance Name>;encrypt=true;trustServerCertificate=false;trustStore=<Path to trust store file>;trustStorePassword=<trust store password>
See the prerequisites section for details on setting up the certificates and truststore.
• Cloud Agent: Agent monitoring the host on which the database is installed.Monitoring Credentials
• Username: MS SQL Server database user name to be used for monitoring.• Password: MS SQL Server database monitoring user's password.
See Add Entities from the Console for detailed instructions on using the Add Entity UI.
Using omcli and the Appropriate JSON Files
1. Download and extract the required JSON file(s) from the master JSON zip file.See the table below for the specific JSON files you'll need.
2. Edit the file(s) and specify the requisite properties shown below.
Appendix CAdd Microsoft SQL Server
C-70
Microsoft SQL Server Database JSON Files and Properties
Definition File: omc_sqlserver_db_sample.json
• name: Your Microsoft SQL Server database name.• displayName: Name displayed in the Oracle Infrastructure Monitoring User Interface.• timezoneRegion: Time zone of your entity. It is recommended that you use the long
values IANA-maintained TZ database time zones. For example: America/New_York• url: Under “value”, provide the connection URL for the MS SQL Server database. The
URL follows the formats:– Connect to default instance.
jdbc:sqlserver://<Fully-qualified SQL Server Database Host Name>
– Connect to named instance.
jdbc:sqlserver://<Fully-qualified SQL Server Database Host Name>\\<Instance Name> (or)jdbc:sqlserver://<Fully-qualified SQL Server Database Host Name>;instanceName=<instance-name>
– Connect to instance by specifying port.
jdbc:sqlserver://<Fully-qualified SQL Server Database Host Name>:<SQL Server Database Port>
– Connecting with SSL encryption.
jdbc:sqlserver://<Fully-qualified SQL Server Database Host Name>\\<Instance Name>;encrypt=true;trustServerCertificate=false;trustStore=<Path to trust store file>;trustStorePassword=<trust store password>
See the prerequisites section for details on setting up the certificates and truststore.
Credential File: omc_sqlserver_creds.json
• DBUserName: Under “value”, within the square brackets, provide the MS SQL Serverdatabase user name to be used for monitoring. You must have defined this user in thePrerequisite Tasks step.
• DBPassword: Under “value”, within the square brackets, provide the MS SQL Serverdatabase monitoring user's password.
Do not remove the square brackets.
3. Add the entity using omcli.
omcli add_entity agent DEFINITION_FILE [-credential_file CREDENTIAL_FILE [-encryption_method_gpg]]
4. Verify the status of the newly added entity.
omcli status_entity agent DEFINITION_FILE
See step 4. Adding Entities to Your Service of Add Entities Using JSON Files for moreinformation.
Appendix CAdd Microsoft SQL Server
C-71
Step 3: (Optional but recommended) Set up alerts.
To enable lights-out monitoring, you can set up alert rules to generate alerts and sendnotifications if your entities have performance issues.
See Set Up Alert Rules and Set Up Alert Thresholds and Notifications.
Troubleshooting
If you run into any issues regarding discovery or monitoring of Microsoft SQL Server,see the following:
• Lack of Data
• Create an Agent Support Bundle
Add MongoDBYou can add MongoDB entities using the Add Entity UI or using the cloud agentcommand line interface (omcli) with the appropriate JSON files.
Step 1: Prepare MongoDB for monitoring.
Prerequisites
To enable monitoring for a MongoDB Database, you can create a special database user, forexample, omc_monitor as follows:
1. Connect to your database:
use your MongoDB database name;
2. Create user:
db.createUser({user: "omc_monitor",pwd: "mongo123",roles: [ "read" ]})
Step 2: Decide how you want to add the MongoDB.
You can add MongoDB entities using one of two ways:
• Add them from UI
• Use the agent's omcli add_entity command with the appropriate JSON files
Adding Entities from the UI
1. From the Management Cloud main menu, select Administration, Discovery, andthen Add Entity. The Add Entity page displays.
2. Select the MongoDB Entity Type.
3. Enter the following UI properties.
Appendix CAdd MongoDB
C-72
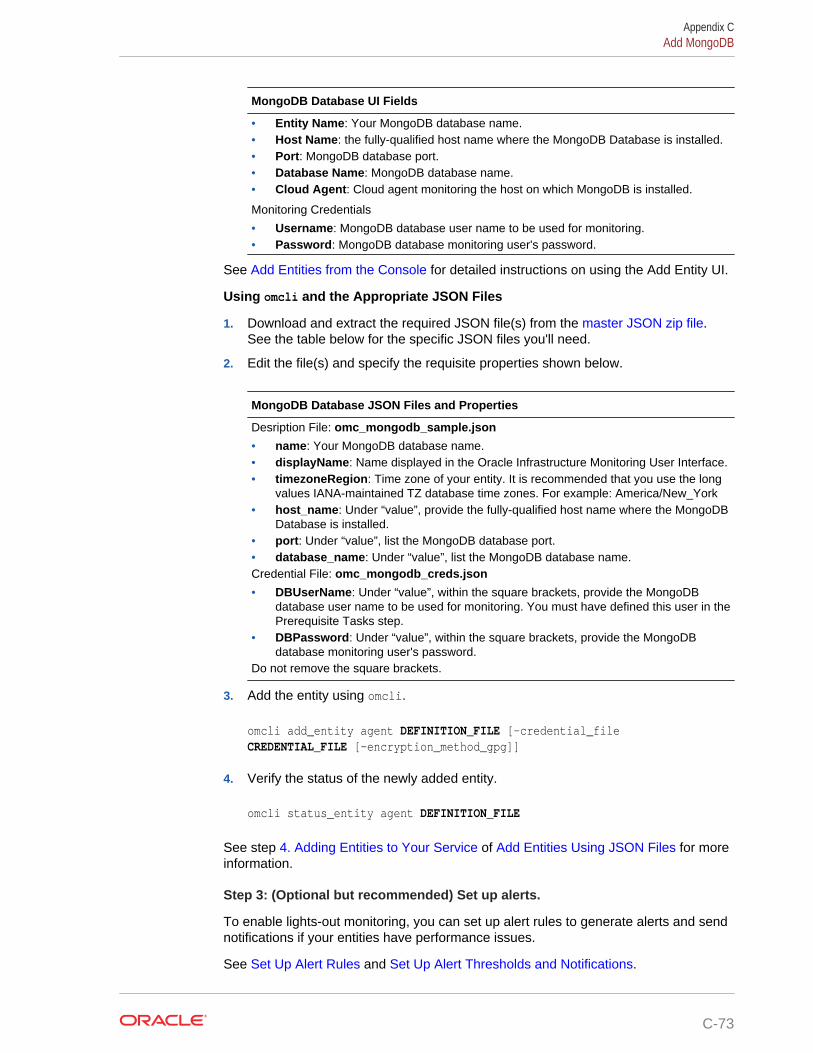
MongoDB Database UI Fields
• Entity Name: Your MongoDB database name.• Host Name: the fully-qualified host name where the MongoDB Database is installed.• Port: MongoDB database port.• Database Name: MongoDB database name.• Cloud Agent: Cloud agent monitoring the host on which MongoDB is installed.
Monitoring Credentials
• Username: MongoDB database user name to be used for monitoring.• Password: MongoDB database monitoring user's password.
See Add Entities from the Console for detailed instructions on using the Add Entity UI.
Using omcli and the Appropriate JSON Files
1. Download and extract the required JSON file(s) from the master JSON zip file.See the table below for the specific JSON files you'll need.
2. Edit the file(s) and specify the requisite properties shown below.
MongoDB Database JSON Files and Properties
Desription File: omc_mongodb_sample.json
• name: Your MongoDB database name.• displayName: Name displayed in the Oracle Infrastructure Monitoring User Interface.• timezoneRegion: Time zone of your entity. It is recommended that you use the long
values IANA-maintained TZ database time zones. For example: America/New_York• host_name: Under “value”, provide the fully-qualified host name where the MongoDB
Database is installed.• port: Under “value”, list the MongoDB database port.• database_name: Under “value”, list the MongoDB database name.Credential File: omc_mongodb_creds.json
• DBUserName: Under “value”, within the square brackets, provide the MongoDBdatabase user name to be used for monitoring. You must have defined this user in thePrerequisite Tasks step.
• DBPassword: Under “value”, within the square brackets, provide the MongoDBdatabase monitoring user's password.
Do not remove the square brackets.
3. Add the entity using omcli.
omcli add_entity agent DEFINITION_FILE [-credential_file CREDENTIAL_FILE [-encryption_method_gpg]]
4. Verify the status of the newly added entity.
omcli status_entity agent DEFINITION_FILE
See step 4. Adding Entities to Your Service of Add Entities Using JSON Files for moreinformation.
Step 3: (Optional but recommended) Set up alerts.
To enable lights-out monitoring, you can set up alert rules to generate alerts and sendnotifications if your entities have performance issues.
See Set Up Alert Rules and Set Up Alert Thresholds and Notifications.
Appendix CAdd MongoDB
C-73

Troubleshooting
If you run into any issues regarding discovery or monitoring of MongoDB, see thefollowing:
• Lack of Data
• Create an Agent Support Bundle
Add MySQL DatabaseYou can add MySQL Database entities using the Add Entity UI or using the cloudagent command line interface (omcli) with the appropriate JSON files.
Step 1: Prepare MySQL Database for monitoring.
Prerequisites
To enable monitoring for a My SQL Database, you can create a special database user, forexample, moncs as follows:
1. Create a user:
CREATE USER 'moncs'@'l hostname' IDENTIFIED BY 'password';
2. Grant appropriate privileges:
GRANT SELECT, SHOW DATABASES ON *.* TO 'moncs'@'hostname ' IDENTIFIED BY 'password';GRANT SELECT, SHOW DATABASES ON *.* TO ' moncs '@'%' IDENTIFIED BY 'password';
3. Flush privileges.
Step 2: Decide how you want to add the MySQL Database.
You can add MySQL Database entities using one of two ways:
• Add them from UI
• Use the agent's omcli add_entity command with the appropriate JSON files
Adding Entities from the UI
1. From the Management Cloud main menu, select Administration, Discovery, andthen Add Entity. The Add Entity page displays.
2. Select the MySQL Database Entity Type.
3. Enter the following UI properties.
Appendix CAdd MySQL Database
C-74
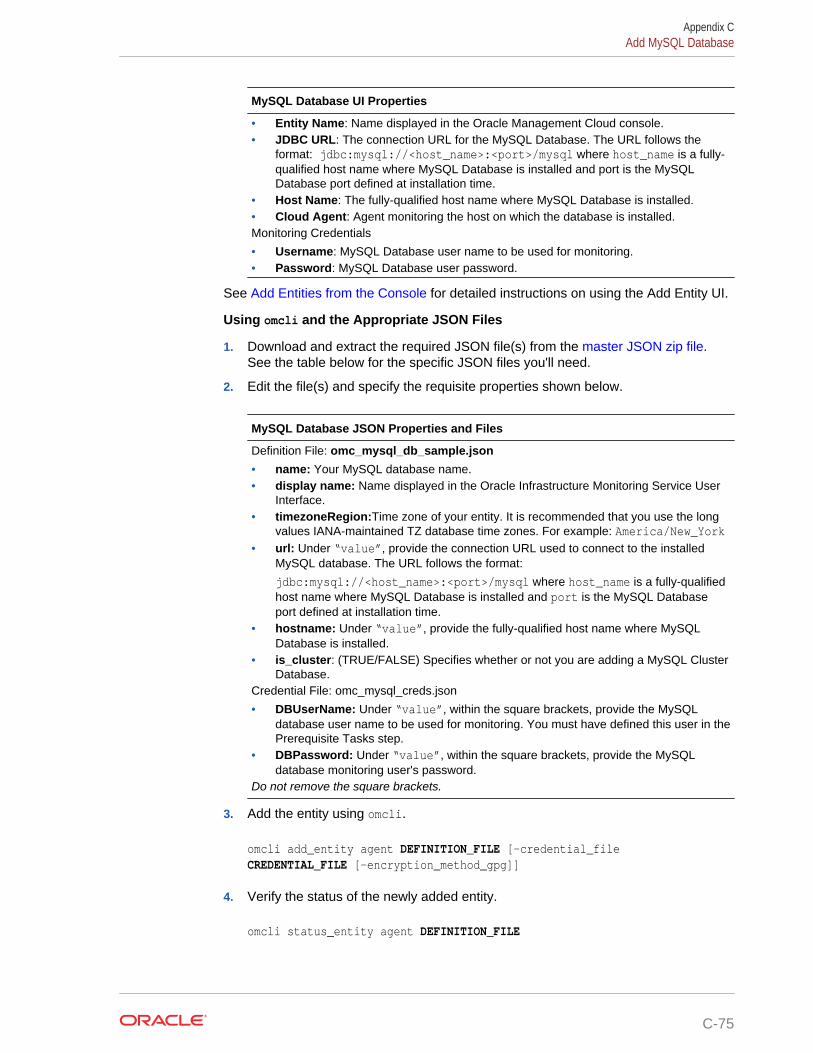
MySQL Database UI Properties
• Entity Name: Name displayed in the Oracle Management Cloud console.• JDBC URL: The connection URL for the MySQL Database. The URL follows the
format: jdbc:mysql://<host_name>:<port>/mysql where host_name is a fully-qualified host name where MySQL Database is installed and port is the MySQLDatabase port defined at installation time.
• Host Name: The fully-qualified host name where MySQL Database is installed.• Cloud Agent: Agent monitoring the host on which the database is installed.Monitoring Credentials
• Username: MySQL Database user name to be used for monitoring.• Password: MySQL Database user password.
See Add Entities from the Console for detailed instructions on using the Add Entity UI.
Using omcli and the Appropriate JSON Files
1. Download and extract the required JSON file(s) from the master JSON zip file.See the table below for the specific JSON files you'll need.
2. Edit the file(s) and specify the requisite properties shown below.
MySQL Database JSON Properties and Files
Definition File: omc_mysql_db_sample.json
• name: Your MySQL database name.• display name: Name displayed in the Oracle Infrastructure Monitoring Service User
Interface.• timezoneRegion:Time zone of your entity. It is recommended that you use the long
values IANA-maintained TZ database time zones. For example: America/New_York• url: Under “value”, provide the connection URL used to connect to the installed
MySQL database. The URL follows the format:
jdbc:mysql://<host_name>:<port>/mysql where host_name is a fully-qualifiedhost name where MySQL Database is installed and port is the MySQL Databaseport defined at installation time.
• hostname: Under “value”, provide the fully-qualified host name where MySQLDatabase is installed.
• is_cluster: (TRUE/FALSE) Specifies whether or not you are adding a MySQL ClusterDatabase.
Credential File: omc_mysql_creds.json
• DBUserName: Under “value”, within the square brackets, provide the MySQLdatabase user name to be used for monitoring. You must have defined this user in thePrerequisite Tasks step.
• DBPassword: Under “value”, within the square brackets, provide the MySQLdatabase monitoring user's password.
Do not remove the square brackets.
3. Add the entity using omcli.
omcli add_entity agent DEFINITION_FILE [-credential_file CREDENTIAL_FILE [-encryption_method_gpg]]
4. Verify the status of the newly added entity.
omcli status_entity agent DEFINITION_FILE
Appendix CAdd MySQL Database
C-75

See step 4. Adding Entities to Your Service of Add Entities Using JSON Files for moreinformation.
Step 3: (Optional but recommended) Set up alerts.
To enable lights-out monitoring, you can set up alert rules to generate alerts and sendnotifications if your entities have performance issues.
See Set Up Alert Rules and Set Up Alert Thresholds and Notifications.
Troubleshooting
If you run into any issues regarding discovery or monitoring of MySQL Database, seethe following:
• Lack of Data
• Create an Agent Support Bundle
Add NetApp FASYou can add NetApp FAS entities using the Add Entity UI or using the cloud agentcommand line interface (omcli) with the appropriate JSON files.
Step 1: Decide how you want to add the NetApp FAS.
You can add NetApp FAS entities using one of two ways:
• Add them from UI
• Use the agent's omcli add_entity command with the appropriate JSON files
Adding Entities from the UI
1. From the Management Cloud main menu, select Administration, Discovery, andthen Add Entity. The Add Entity page displays.
2. Select the NetApp FAS Entity Type.
3. Enter the following UI properties.
NetApp FAS UI Fields
• Entity Name: Name of this entity displayed in the Oracle Management Cloud console.• Host Name: Fully qualified domain name (FQDN) or IP of the NetApp storage.• SNMP Port: Port to use for SNMP communication with NetApp storage.• SNMP Timeout: Timeout for SNMP communication with NetApp storage.• SNMP Version: Version of SNMP protocol to use for communication with NetApp
storage.• SNMP Community: SNMP community string to use for communication with NetApp
storage.• Cloud Agent: Cloud agent monitoring the host where NetApp FAS is installed.
See Add Entities from the Console for detailed instructions on using the Add Entity UI.
Using omcli and the Appropriate JSON Files
1. Download and extract the required JSON file(s) from the master JSON zip file.See the table below for the specific JSON files you'll need.
2. Edit the file(s) and specify the requisite properties shown below.
Appendix CAdd NetApp FAS
C-76
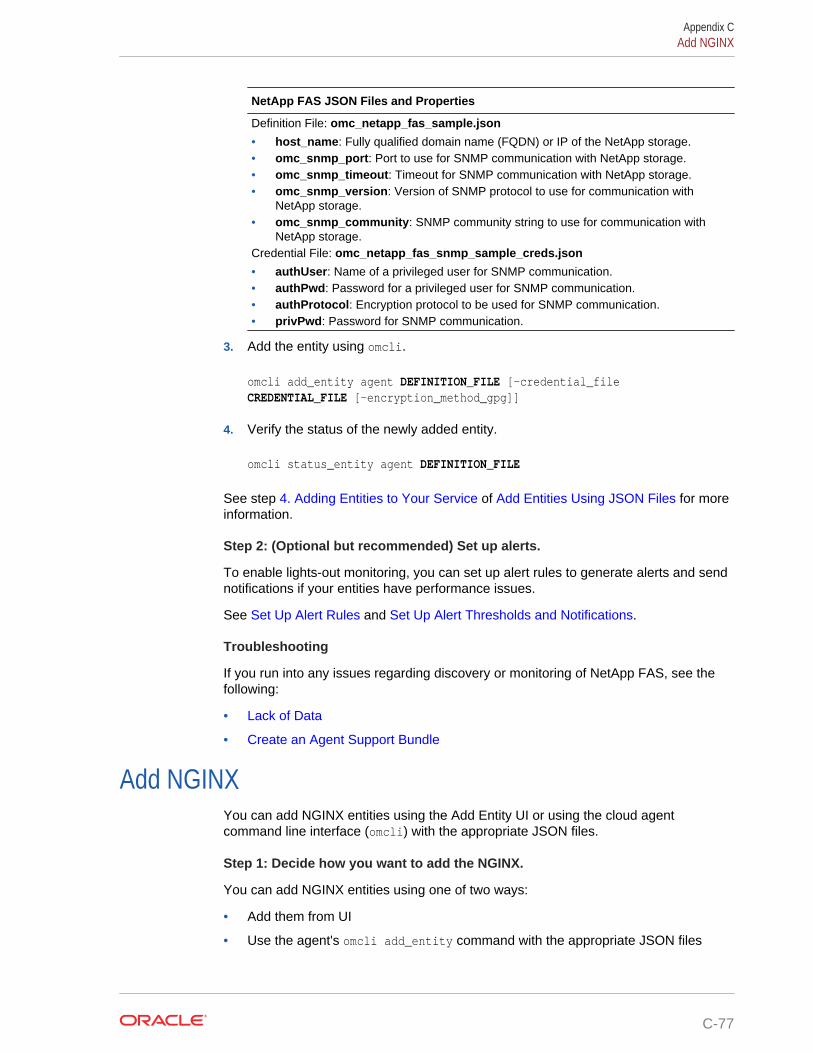
NetApp FAS JSON Files and Properties
Definition File: omc_netapp_fas_sample.json
• host_name: Fully qualified domain name (FQDN) or IP of the NetApp storage.• omc_snmp_port: Port to use for SNMP communication with NetApp storage.• omc_snmp_timeout: Timeout for SNMP communication with NetApp storage.• omc_snmp_version: Version of SNMP protocol to use for communication with
NetApp storage.• omc_snmp_community: SNMP community string to use for communication with
NetApp storage.Credential File: omc_netapp_fas_snmp_sample_creds.json
• authUser: Name of a privileged user for SNMP communication.• authPwd: Password for a privileged user for SNMP communication.• authProtocol: Encryption protocol to be used for SNMP communication.• privPwd: Password for SNMP communication.
3. Add the entity using omcli.
omcli add_entity agent DEFINITION_FILE [-credential_file CREDENTIAL_FILE [-encryption_method_gpg]]
4. Verify the status of the newly added entity.
omcli status_entity agent DEFINITION_FILE
See step 4. Adding Entities to Your Service of Add Entities Using JSON Files for moreinformation.
Step 2: (Optional but recommended) Set up alerts.
To enable lights-out monitoring, you can set up alert rules to generate alerts and sendnotifications if your entities have performance issues.
See Set Up Alert Rules and Set Up Alert Thresholds and Notifications.
Troubleshooting
If you run into any issues regarding discovery or monitoring of NetApp FAS, see thefollowing:
• Lack of Data
• Create an Agent Support Bundle
Add NGINXYou can add NGINX entities using the Add Entity UI or using the cloud agentcommand line interface (omcli) with the appropriate JSON files.
Step 1: Decide how you want to add the NGINX.
You can add NGINX entities using one of two ways:
• Add them from UI
• Use the agent's omcli add_entity command with the appropriate JSON files
Appendix CAdd NGINX
C-77
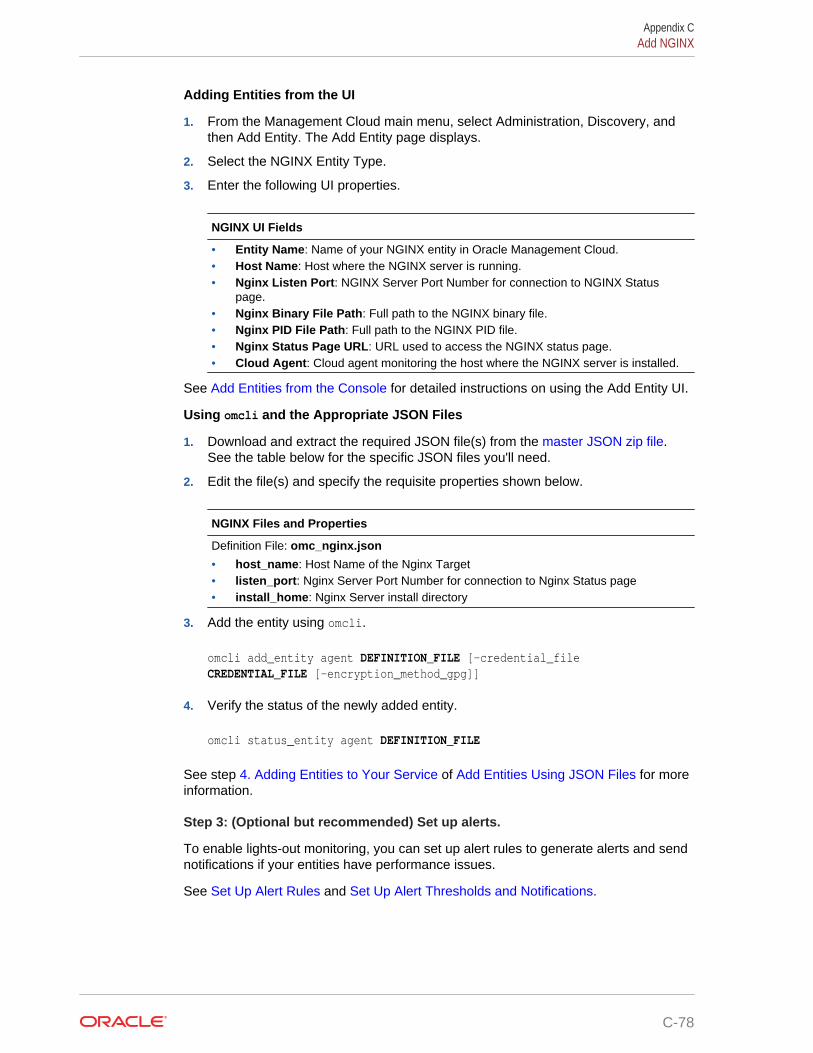
Adding Entities from the UI
1. From the Management Cloud main menu, select Administration, Discovery, andthen Add Entity. The Add Entity page displays.
2. Select the NGINX Entity Type.
3. Enter the following UI properties.
NGINX UI Fields
• Entity Name: Name of your NGINX entity in Oracle Management Cloud.• Host Name: Host where the NGINX server is running.• Nginx Listen Port: NGINX Server Port Number for connection to NGINX Status
page.• Nginx Binary File Path: Full path to the NGINX binary file.• Nginx PID File Path: Full path to the NGINX PID file.• Nginx Status Page URL: URL used to access the NGINX status page.• Cloud Agent: Cloud agent monitoring the host where the NGINX server is installed.
See Add Entities from the Console for detailed instructions on using the Add Entity UI.
Using omcli and the Appropriate JSON Files
1. Download and extract the required JSON file(s) from the master JSON zip file.See the table below for the specific JSON files you'll need.
2. Edit the file(s) and specify the requisite properties shown below.
NGINX Files and Properties
Definition File: omc_nginx.json
• host_name: Host Name of the Nginx Target• listen_port: Nginx Server Port Number for connection to Nginx Status page• install_home: Nginx Server install directory
3. Add the entity using omcli.
omcli add_entity agent DEFINITION_FILE [-credential_file CREDENTIAL_FILE [-encryption_method_gpg]]
4. Verify the status of the newly added entity.
omcli status_entity agent DEFINITION_FILE
See step 4. Adding Entities to Your Service of Add Entities Using JSON Files for moreinformation.
Step 3: (Optional but recommended) Set up alerts.
To enable lights-out monitoring, you can set up alert rules to generate alerts and sendnotifications if your entities have performance issues.
See Set Up Alert Rules and Set Up Alert Thresholds and Notifications.
Appendix CAdd NGINX
C-78
Troubleshooting
If you run into any issues regarding discovery or monitoring of NGINX, see thefollowing:
• Lack of Data
• Create an Agent Support Bundle
Add Oracle Access Manager/Oracle Internet DirectoryYou can add Oracle Access Manager/Oracle Internet Directory entities using the AddEntity UI or using the cloud agent command line interface (omcli) with the appropriateJSON files.
Step 1: Prepare Oracle Access Manager/Oracle Internet Directory for monitoring.
Prerequisites and Monitoring Credentials
The same credentials are used to discover the WebLogic Domain.
Note:
Refresh of IDM targets is now supported. To refresh any IDMdomain run omcli refresh_entity idm_domain.json
where the content of idm_domain.json is:
{ "entities":[{"name": "Idm Domain","type": "omc_weblogic_domain"}]}
Step 2: Add the Oracle Access Manager/Oracle Internet Directory using omcliand the Appropriate JSON Files
1. Download and extract the required JSON file(s) from the master JSON zip file.See the table below for the specific JSON files you'll need.
2. Edit the file(s) and specify the requisite properties shown below.
Appendix CAdd Oracle Access Manager/Oracle Internet Directory
C-79

Oracle Internet Directory (OID)/Oracle Access Manager (OAM) JSON Files andProperties
Definition File: omc_weblogic_domian.json
• displayName: WebLogic Domain Entity Display Name that is displayed in theInfrastructure Monitoring UI time zone.
• Region: Time Zone (tz database time zones). For example: America/New_York.• port: Port used for the WebLogic Admin Server(Console)• protocol: The Protocol used for the WebLogic Server. For example: t3• admin_server_host: Fully qualified WebLogic Admin Server Host Name where the
WebLogic Admin Server is installed.Credential File: omc_weblogic_domain_creds.json
• user_name: WebLogic Domain Entity User Name.• password: WebLogic Domain Entity Password.
3. Add the entity using omcli.
omcli add_entity agent DEFINITION_FILE [-credential_file CREDENTIAL_FILE [-encryption_method_gpg]]
4. Verify the status of the newly added entity.
omcli status_entity agent DEFINITION_FILE
See step 4. Adding Entities to Your Service of Add Entities Using JSON Files for moreinformation.
Step 3: (Optional but recommended) Set up alerts.
To enable lights-out monitoring, you can set up alert rules to generate alerts and sendnotifications if your entities have performance issues.
See Set Up Alert Rules and Set Up Alert Thresholds and Notifications.
Troubleshooting
If you run into any issues regarding discovery or monitoring of Oracle AccessManager/Oracle Internet Directory, see the following:
• Lack of Data
• Create an Agent Support Bundle
Add Oracle Automatic Storage Management (ASM)You can add Oracle Automatic Storage Management entities using the cloud agentcommand line interface (omcli) with the appropriate JSON files. Alternatively, theseentities can be added as part of a Database System.
Step 1: Prepare Oracle Automatic Storage Management for monitoring.
Credentials
Monitoring of ASM is supported through credential-based monitoring. It uses the alreadycreated ASM credentials (by default asmsnmp, a user with SYSDBA privileges).
Appendix CAdd Oracle Automatic Storage Management (ASM)
C-80

Step 2: Add the Oracle Automatic Storage Management using omcli and theAppropriate JSON Files
1. Download and extract the required JSON file(s) from the master JSON zip file.See the table below for the specific JSON files you'll need.
2. Edit the file(s) and specify the requisite properties shown below.
Oracle Automation Storage Management JSON Files and Properties
Definition File: omc_oracle_asm_sample.json
• name: Your Oracle ASM entity name.• displayName: Your Oracle ASM entity display name which is displayed on the Oracle
Infrastructure Monitoring user interface.• timezoneRegion: Time zone of your entity. It is recommended that you use the long
values IANA-maintained TZ database time zones. For example: America/New_York• machine_name: Under “value”, provide the fully-qualified machine name where the
Oracle ASM is installed.• host_name: Under “value”, provide the fully-qualified host name where the Oracle
ASM is installed.• port: Under “value”, list the Oracle ASM port.• sid: Under “value”, list the Oracle ASM SID.Credential File: omc_oracle_asm_sample_creds.json
• user_name: Under “value”, within the square brackets, provide the Oracle ASM username to be used for monitoring.
• password: Under “value”, within the square brackets, provide the Oracle ASMmonitoring user's password.
Do not remove the square brackets.
3. Add the entity using omcli.
omcli add_entity agent DEFINITION_FILE [-credential_file CREDENTIAL_FILE [-encryption_method_gpg]]
4. Verify the status of the newly added entity.
omcli status_entity agent DEFINITION_FILE
See step 4. Adding Entities to Your Service of Add Entities Using JSON Files for moreinformation.
Step 3: (Optional but recommended) Set up alerts.
To enable lights-out monitoring, you can set up alert rules to generate alerts and sendnotifications if your entities have performance issues.
See Set Up Alert Rules and Set Up Alert Thresholds and Notifications.
Troubleshooting
If you run into any issues regarding discovery or monitoring of Oracle AutomaticStorage Management, see the following:
• Lack of Data
• Create an Agent Support Bundle
Appendix CAdd Oracle Automatic Storage Management (ASM)
C-81
Add Oracle Clusterware (CRS)You can add Oracle Clusterware entities using the cloud agent command line interface(omcli) with the appropriate JSON files. Alternatively, these entities can be added aspart of a Database System.
Step 1: Prepare Oracle Clusterware for monitoring.
Prerequisite for Remote Monitoring
:
SSH must be set up between the machine where the Cloud agent is installed and the machinewhere CRS is installed, The Cloud agent connects to the remote machine where CRS isinstalled via SSH authentication.
Step 2: Add the Oracle Clusterware using omcli and the Appropriate JSON Files
1. Download and extract the required JSON file(s) from the master JSON zip file.See the table below for the specific JSON files you'll need.
2. Edit the file(s) and specify the requisite properties shown below.
Oracle Clusterware (CRS) JSON Files and Properties
Definition File: omc_oracle_clusterware_sample.json
• scan_name : Scan name for the cluster• cluster_name : Cluster name• scan_port : Scan port for the cluster• oracle_home : CRS home base directory• omc_sshd_port : SSH port value for remote monitoring• credential_ref : "credentialRefs":["remote_sshcreds"] � for SSH Key based
authenticationCredential Files
omc_oracle_clusterware_credless_sample.jsonomc_oracle_clusterware_credential_sample.json• USERNAME: username to log in and execute commands for CRS.• SSH_PVT_KEY: File path of the SSH private key for authentication.• SSH_PUB_KEY : File path of the SSH public key for authentication.• sshdHost : FQDN machine name on which CRS is present for remote monitoring.
3. Add the entity using omcli.
omcli add_entity agent DEFINITION_FILE [-credential_file CREDENTIAL_FILE [-encryption_method_gpg]]
4. Verify the status of the newly added entity.
omcli status_entity agent DEFINITION_FILE
See step 4. Adding Entities to Your Service of Add Entities Using JSON Files for moreinformation.
Appendix CAdd Oracle Clusterware (CRS)
C-82

Step 3: (Optional but recommended) Set up alerts.
To enable lights-out monitoring, you can set up alert rules to generate alerts and sendnotifications if your entities have performance issues.
See Set Up Alert Rules and Set Up Alert Thresholds and Notifications.
Troubleshooting
If you run into any issues regarding discovery or monitoring of Oracle Clusterware, seethe following:
• Lack of Data
• Create an Agent Support Bundle
Add Oracle Coherence ClustersYou can add Oracle Coherence Cluster entities using the Add Entity UI or using thecloud agent command line interface (omcli) with the appropriate JSON files.
Step 1: Prepare Oracle Coherence Cluster for monitoring.
Prerequisites
Supports both credential and non-credential monitoring. When using a secured JMXconnection, a credential input file needs to be passed. For information on configuring aCoherence cluster, see Configure a Coherence Cluster.
Step 2: Decide how you want to add the Oracle Coherence Cluster.
You can add Oracle Coherence Cluster entities using one of two ways:
• Add them from UI
• Use the agent's omcli add_entity command with the appropriate JSON files
Adding Entities from the UI
1. From the Management Cloud main menu, select Administration, Discovery, andthen Add Entity. The Add Entity page displays.
2. Select the Oracle Coherence Cluster Entity Type.
3. Enter the following UI properties.
Oracle Coherence UI Fields
• Entity Name: Name of this entity displayed in the Oracle Management Cloud console.• JMX Remote Port: Coherence JMX port• JMX Management Server Machine Name: Coherence management node host.• Do not discover caches: If set to True, new Coherence cache targets will not be
discovered. This is recommended for clusters with a very large number of caches(over 1000).
• Cloud Agent: Cloud agent monitoring the host where Oracle Coherence is installed.Monitoring Credentials (Coherence Credentials)
• Username: JMX connection username.• Password: JMX connection password.
Appendix CAdd Oracle Coherence Clusters
C-83

See Add Entities from the Console for detailed instructions on using the Add Entity UI.
Using omcli and the Appropriate JSON Files
1. Download and extract the required JSON file(s) from the master JSON zip file.See the table below for the specific JSON files you'll need.
2. Edit the file(s) and specify the requisite properties shown below.
Oracle Coherence JSON Files and Properties
Definition File: omc_oracle_coherence.json
• omc_jmx_port - Coherence JMX port• omc_machine_name - Coherence management node host.• omc_skip_cache_discovery - Specify that Coherence
Credential Files
omc_oracle_coherence_cred.jsoncoherence_credentials.jsonIf Coherence is configured using a secured JMX connection, then a credentials file has tobe passed as an input argument.
• omc_username - JMX connection username.• omc_password - JMX connection password.
3. Add the entity using omcli.
omcli add_entity agent DEFINITION_FILE [-credential_file CREDENTIAL_FILE [-encryption_method_gpg]]
4. Verify the status of the newly added entity.
omcli status_entity agent DEFINITION_FILE
See step 4. Adding Entities to Your Service of Add Entities Using JSON Files for moreinformation.
Step 3: (Optional but recommended) Set up alerts.
To enable lights-out monitoring, you can set up alert rules to generate alerts and sendnotifications if your entities have performance issues.
See Set Up Alert Rules and Set Up Alert Thresholds and Notifications.
Troubleshooting
If you run into any issues regarding discovery or monitoring of Oracle CoherenceCluster, see the following:
• Lack of Data
• Create an Agent Support Bundle
Appendix CAdd Oracle Coherence Clusters
C-84
Add Oracle Database Listener ClusterYou can add individual Oracle Database Listener Cluster entities using the cloud agentcommand line interface (omcli) with the appropriate JSON files. Alternatively, theseentities can be added as part of a Database System.
Step 1: Add the Oracle Database Listener Cluster using omcli and theAppropriate JSON Files
1. Download and extract the required JSON file(s) from the master JSON zip file.See the table below for the specific JSON files you'll need.
2. Edit the file(s) and specify the requisite properties shown below.
Oracle Database Listener Cluster JSON Files and Properties
Definition File: omc_oracle_db_listener_cluster_sample.json
• displayName: This is Oracle Database Listener Cluster Entity Display Name which isdisplayed on Infrastructure Monitoring UItimezoneRegion: Time Zone Example: PDT,GMT
• host_name: : Fully-qualified Host Name where the Oracle Database Listener Clusteris installed.
• lsnr_alias : Oracle Database Listener Cluster Alias• crs_home : Absolute Path of the CRS HOME / GRID HOMECredential Files
omc_oracle_db_listener_cluster_credless_sample.jsonomc_oracle_db_listener_cluster_sample_cred.json• sshdPort: SSHD Port on Remote host to Listen to Remote Cluster Listener• SSHUserName: SSH Host User Name• SSHUserPassword: SSH Host User Password• SSH_PVT_KEY : Location of the SSH private key copied from the remote machine
where Cluster Listener is installed.• SSH_PUB_KEY : Location of the SSH public key copied from the remote machine
where Cluster Listener is installed.• sshdHost : Host Name where Oracle Database Listener Cluster is installed.
3. Add the entity using omcli.
omcli add_entity agent DEFINITION_FILE [-credential_file CREDENTIAL_FILE [-encryption_method_gpg]]
4. Verify the status of the newly added entity.
omcli status_entity agent DEFINITION_FILE
See step 4. Adding Entities to Your Service of Add Entities Using JSON Files for moreinformation.
Step 2: (Optional but recommended) Set up alerts.
To enable lights-out monitoring, you can set up alert rules to generate alerts and sendnotifications if your entities have performance issues.
See Set Up Alert Rules and Set Up Alert Thresholds and Notifications.
Appendix CAdd Oracle Database Listener Cluster
C-85
Troubleshooting
If you run into any issues regarding discovery or monitoring of Oracle DatabaseListener Cluster, see the following:
• Lack of Data
• Create an Agent Support Bundle
Add Oracle Database ListenersYou can add Oracle Database Listener entities using the cloud agent command lineinterface (omcli) with the appropriate JSON files. Alternatively, these entities can beadded as part of a Database System.
Step 1: Add the Oracle Database Listener using omcli and the Appropriate JSONFiles
1. Download and extract the required JSON file(s) from the master JSON zip file.See the table below for the specific JSON files you'll need.
2. Edit the file(s) and specify the requisite properties shown below.
Appendix CAdd Oracle Database Listeners
C-86

Oracle Database Listener JSON Files and Properties
Definition File: omc_oracle_db_listener_sample.json
• displayName: This is Oracle Database Listener Name displayed in the OracleInfrastructure Monitoring User Interface.
• timezoneRegion: Time zone of your entity. It is recommended that you use the longvalues IANA-maintained TZ database time zones. For example: America/New_York
• host_name: Fully-qualified Host Name where the Oracle Database Listener isinstalled.
• port: Oracle Database Listener port.• trace_dir_path: Trace Log Files directory absolute path; optional parameter, define it
if you are also using Oracle Log Analytics.• log_dir_path: Alert Log Files directory absolute path; optional parameter, define it if
you are also using Oracle Log Analytics.• lsnr_alias: Oracle Database Listener Alias.Credential Files:
omc_oracle_db_listener_local_credless.jsonomc_oracle_db_listener_remote_ssh_sample.jsonomc_oracle_db_listener_remote_ssh_sample_creds.jsonomc_oracle_db_listener_creds.json• displayName: This is Oracle Database Listener Name displayed in the Oracle
Infrastructure Monitoring User Interface.• timezoneRegion: Time zone of your entity. It is recommended that you use the long
values IANA-maintained TZ database time zones. For example: America/New_York• use_ssh: Use Secure Shell protocol. (true/false).
True :- Set to true when performing remote monitoring.
False:- Set to false when performing local monitoring (agents 1.30 and lower). Foragents 1.31 and greater, the use_ssh property is optional for local monitoring.
• lsnr_port: Your Oracle Database Listener Port.• lsnr_protocol: Your Listener Protocol• oracle_home: Your Oracle Listener ORACLE_HOME.• log_dir_path: Alert Log Files directory absolute path; optional parameter, define it if
you are also using Oracle Log Analytics.• trace_dir_path: Trace Files directory absolute path.• lsnr_alias: Your Oracle Database Listener Alias.• SSHUserName: SSH host user name, on the host where the listener is installed.• SSHUserPassword: SSH host user password• SSH_PVT_KEY:Path of your private key file - Not required if a password is provided
or SSH keys are available in the default location.• sshdPort: SSH port.
Note:
You must use a host user with SSH configured and enabled. Only password-based SSH is supported.
3. Add the entity using omcli.
omcli add_entity agent DEFINITION_FILE [-credential_file CREDENTIAL_FILE [-encryption_method_gpg]]
Appendix CAdd Oracle Database Listeners
C-87

4. Verify the status of the newly added entity.
omcli status_entity agent DEFINITION_FILE
See step 4. Adding Entities to Your Service of Add Entities Using JSON Files for moreinformation.
Step 2: (Optional but recommended) Set up alerts.
To enable lights-out monitoring, you can set up alert rules to generate alerts and sendnotifications if your entities have performance issues.
See Set Up Alert Rules and Set Up Alert Thresholds and Notifications.
Troubleshooting
If you run into any issues regarding discovery or monitoring of Oracle DatabaseListener, see the following:
• Lack of Data
• Create an Agent Support Bundle
Appendix CAdd Oracle Database Listeners
C-88

Add Oracle DatabasesYou can add Oracle Database entities using the cloud agent command line interface(omcli) with the appropriate JSON files. Alternatively, these entities can be added aspart of a Database System.
Step 1: Prepare Oracle Database for monitoring.
Prerequisites
To enable monitoring for an Oracle database, you can create a special database user and thengrant that user requisite privileges.
Note:
A SQL script (grantPrivileges.sql) is available that automates thecreation of the monitoring database user and grants the requisitemonitoring privileges.For information about this SQL script, location and usageinstructions, see Creating the Oracle Database monitoringcredentials for Oracle Management Cloud (Doc ID 2401597.1).
If using a multi-tenant container database (CDB), keep in mind the requirements for a username when creating the monitoring user above. Select your monitoring user name accordingly.These requirements are as follows:
• In Oracle Database 12c Release 1 (12.1.0.1), the name of a common user must begin withC## or c## and the name of a local user must not begin with C## or c##.
• Starting with Oracle Database 12c Release 1 (12.1.0.2):
– The name of a common user must begin with characters that are a case-insensitivematch to the prefix specified by the COMMON_USER_PREFIX initializationparameter. By default, the prefix is C##.
– The name of a local user must not begin with characters that are a case-insensitivematch to the prefix specified by the COMMON_USER_PREFIX initializationparameter. Regardless of the value of COMMON_USER_PREFIX, the name of alocal user can never begin with C## or c##.
See the Oracle Database SQL Language Reference for more details.Enabling TCPS ConnectionsDatabase Side (Single Instance)
1. Create the wallets.
mkdir -p /scratch/aime/wallets/rwalletsmkdir -p /scratch/aime/wallets/swalletsmkdir -p /scratch/aime/wallets/cwallets
2. To run the orapki commands go to the Oracle Home and run the following commands:
cd $ORACLE_HOME/bin
echo "**************** Create Root wallet *******************"
Appendix CAdd Oracle Databases
C-89
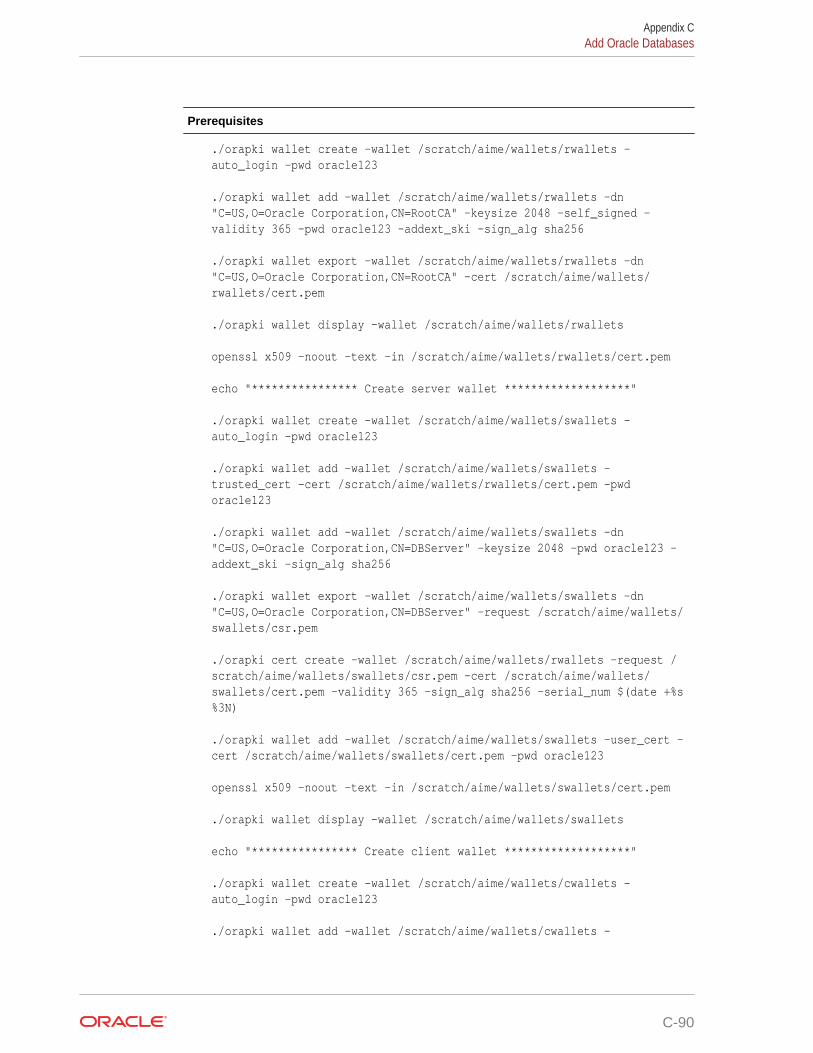
Prerequisites
./orapki wallet create -wallet /scratch/aime/wallets/rwallets -auto_login -pwd oracle123
./orapki wallet add -wallet /scratch/aime/wallets/rwallets -dn "C=US,O=Oracle Corporation,CN=RootCA" -keysize 2048 -self_signed -validity 365 -pwd oracle123 -addext_ski -sign_alg sha256
./orapki wallet export -wallet /scratch/aime/wallets/rwallets -dn "C=US,O=Oracle Corporation,CN=RootCA" -cert /scratch/aime/wallets/rwallets/cert.pem
./orapki wallet display -wallet /scratch/aime/wallets/rwallets
openssl x509 -noout -text -in /scratch/aime/wallets/rwallets/cert.pem
echo "**************** Create server wallet *******************"
./orapki wallet create -wallet /scratch/aime/wallets/swallets -auto_login -pwd oracle123
./orapki wallet add -wallet /scratch/aime/wallets/swallets -trusted_cert -cert /scratch/aime/wallets/rwallets/cert.pem -pwd oracle123
./orapki wallet add -wallet /scratch/aime/wallets/swallets -dn "C=US,O=Oracle Corporation,CN=DBServer" -keysize 2048 -pwd oracle123 -addext_ski -sign_alg sha256
./orapki wallet export -wallet /scratch/aime/wallets/swallets -dn "C=US,O=Oracle Corporation,CN=DBServer" -request /scratch/aime/wallets/swallets/csr.pem
./orapki cert create -wallet /scratch/aime/wallets/rwallets -request /scratch/aime/wallets/swallets/csr.pem -cert /scratch/aime/wallets/swallets/cert.pem -validity 365 -sign_alg sha256 -serial_num $(date +%s%3N)
./orapki wallet add -wallet /scratch/aime/wallets/swallets -user_cert -cert /scratch/aime/wallets/swallets/cert.pem -pwd oracle123
openssl x509 -noout -text -in /scratch/aime/wallets/swallets/cert.pem
./orapki wallet display -wallet /scratch/aime/wallets/swallets echo "**************** Create client wallet *******************" ./orapki wallet create -wallet /scratch/aime/wallets/cwallets -auto_login -pwd oracle123
./orapki wallet add -wallet /scratch/aime/wallets/cwallets -
Appendix CAdd Oracle Databases
C-90
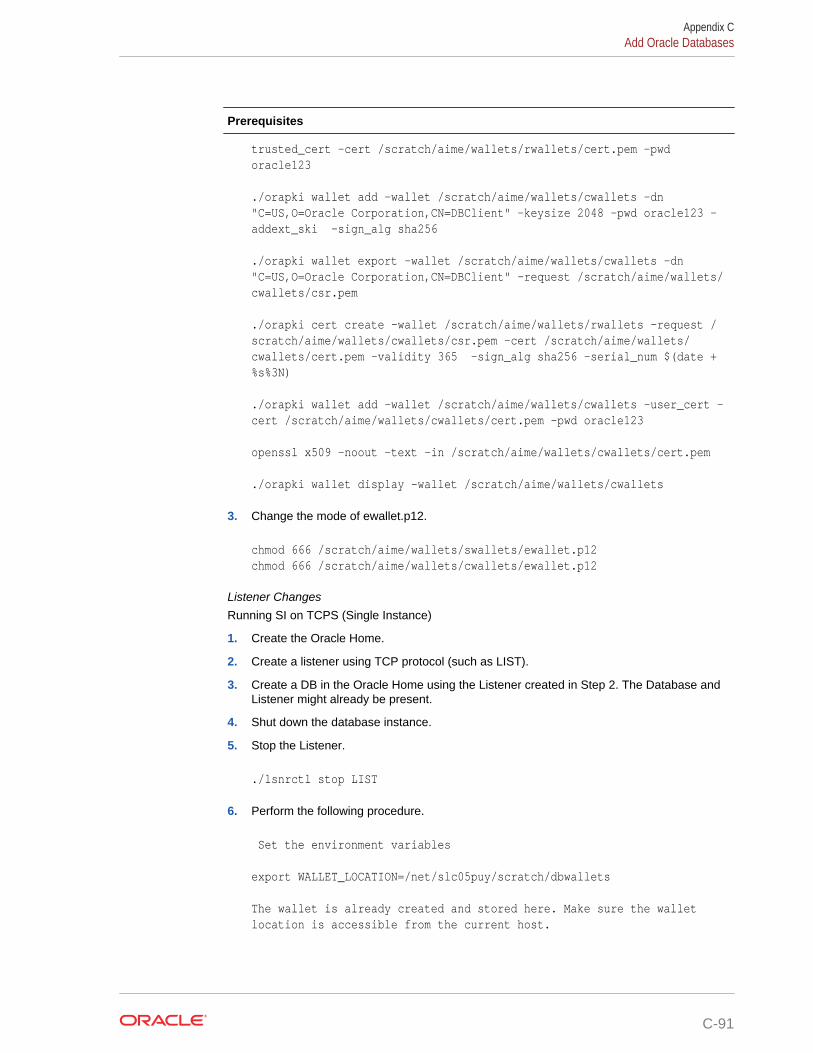
Prerequisites
trusted_cert -cert /scratch/aime/wallets/rwallets/cert.pem -pwd oracle123
./orapki wallet add -wallet /scratch/aime/wallets/cwallets -dn "C=US,O=Oracle Corporation,CN=DBClient" -keysize 2048 -pwd oracle123 -addext_ski -sign_alg sha256
./orapki wallet export -wallet /scratch/aime/wallets/cwallets -dn "C=US,O=Oracle Corporation,CN=DBClient" -request /scratch/aime/wallets/cwallets/csr.pem
./orapki cert create -wallet /scratch/aime/wallets/rwallets -request /scratch/aime/wallets/cwallets/csr.pem -cert /scratch/aime/wallets/cwallets/cert.pem -validity 365 -sign_alg sha256 -serial_num $(date +%s%3N)
./orapki wallet add -wallet /scratch/aime/wallets/cwallets -user_cert -cert /scratch/aime/wallets/cwallets/cert.pem -pwd oracle123
openssl x509 -noout -text -in /scratch/aime/wallets/cwallets/cert.pem
./orapki wallet display -wallet /scratch/aime/wallets/cwallets
3. Change the mode of ewallet.p12.
chmod 666 /scratch/aime/wallets/swallets/ewallet.p12chmod 666 /scratch/aime/wallets/cwallets/ewallet.p12
Listener Changes
Running SI on TCPS (Single Instance)
1. Create the Oracle Home.
2. Create a listener using TCP protocol (such as LIST).
3. Create a DB in the Oracle Home using the Listener created in Step 2. The Database andListener might already be present.
4. Shut down the database instance.
5. Stop the Listener.
./lsnrctl stop LIST
6. Perform the following procedure.
Set the environment variables
export WALLET_LOCATION=/net/slc05puy/scratch/dbwallets
The wallet is already created and stored here. Make sure the wallet location is accessible from the current host.
Appendix CAdd Oracle Databases
C-91
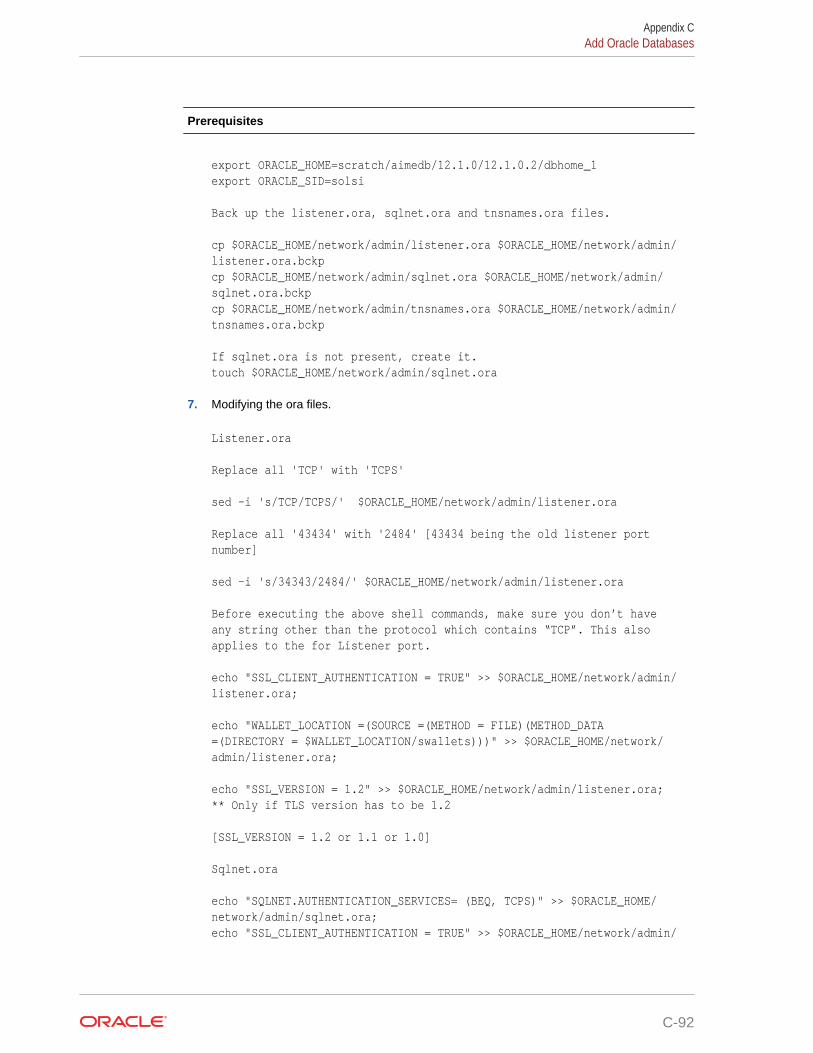
Prerequisites
export ORACLE_HOME=scratch/aimedb/12.1.0/12.1.0.2/dbhome_1export ORACLE_SID=solsi
Back up the listener.ora, sqlnet.ora and tnsnames.ora files. cp $ORACLE_HOME/network/admin/listener.ora $ORACLE_HOME/network/admin/listener.ora.bckpcp $ORACLE_HOME/network/admin/sqlnet.ora $ORACLE_HOME/network/admin/sqlnet.ora.bckpcp $ORACLE_HOME/network/admin/tnsnames.ora $ORACLE_HOME/network/admin/tnsnames.ora.bckp
If sqlnet.ora is not present, create it. touch $ORACLE_HOME/network/admin/sqlnet.ora
7. Modifying the ora files.
Listener.ora
Replace all 'TCP' with 'TCPS'
sed -i 's/TCP/TCPS/' $ORACLE_HOME/network/admin/listener.ora
Replace all '43434' with '2484' [43434 being the old listener port number]
sed -i 's/34343/2484/' $ORACLE_HOME/network/admin/listener.ora
Before executing the above shell commands, make sure you don’t have any string other than the protocol which contains “TCP”. This also applies to the for Listener port. echo "SSL_CLIENT_AUTHENTICATION = TRUE" >> $ORACLE_HOME/network/admin/listener.ora;
echo "WALLET_LOCATION =(SOURCE =(METHOD = FILE)(METHOD_DATA =(DIRECTORY = $WALLET_LOCATION/swallets)))" >> $ORACLE_HOME/network/admin/listener.ora;
echo "SSL_VERSION = 1.2" >> $ORACLE_HOME/network/admin/listener.ora; ** Only if TLS version has to be 1.2 [SSL_VERSION = 1.2 or 1.1 or 1.0]
Sqlnet.ora
echo "SQLNET.AUTHENTICATION_SERVICES= (BEQ, TCPS)" >> $ORACLE_HOME/network/admin/sqlnet.ora;echo "SSL_CLIENT_AUTHENTICATION = TRUE" >> $ORACLE_HOME/network/admin/
Appendix CAdd Oracle Databases
C-92
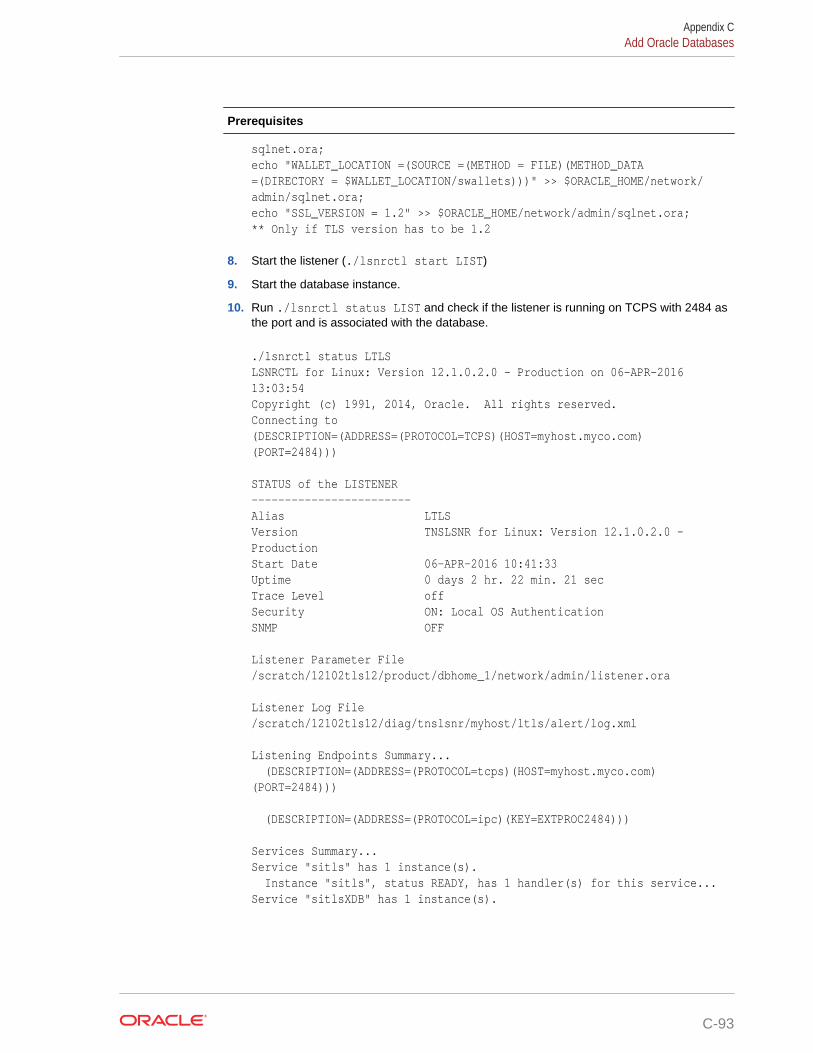
Prerequisites
sqlnet.ora;echo "WALLET_LOCATION =(SOURCE =(METHOD = FILE)(METHOD_DATA =(DIRECTORY = $WALLET_LOCATION/swallets)))" >> $ORACLE_HOME/network/admin/sqlnet.ora;echo "SSL_VERSION = 1.2" >> $ORACLE_HOME/network/admin/sqlnet.ora; ** Only if TLS version has to be 1.2
8. Start the listener (./lsnrctl start LIST)
9. Start the database instance.
10. Run ./lsnrctl status LIST and check if the listener is running on TCPS with 2484 asthe port and is associated with the database.
./lsnrctl status LTLSLSNRCTL for Linux: Version 12.1.0.2.0 - Production on 06-APR-2016 13:03:54Copyright (c) 1991, 2014, Oracle. All rights reserved.Connecting to(DESCRIPTION=(ADDRESS=(PROTOCOL=TCPS)(HOST=myhost.myco.com)(PORT=2484)))
STATUS of the LISTENER------------------------Alias LTLSVersion TNSLSNR for Linux: Version 12.1.0.2.0 - ProductionStart Date 06-APR-2016 10:41:33Uptime 0 days 2 hr. 22 min. 21 secTrace Level offSecurity ON: Local OS AuthenticationSNMP OFF
Listener Parameter File/scratch/12102tls12/product/dbhome_1/network/admin/listener.ora
Listener Log File /scratch/12102tls12/diag/tnslsnr/myhost/ltls/alert/log.xml
Listening Endpoints Summary... (DESCRIPTION=(ADDRESS=(PROTOCOL=tcps)(HOST=myhost.myco.com)(PORT=2484)))
(DESCRIPTION=(ADDRESS=(PROTOCOL=ipc)(KEY=EXTPROC2484)))
Services Summary...Service "sitls" has 1 instance(s). Instance "sitls", status READY, has 1 handler(s) for this service...Service "sitlsXDB" has 1 instance(s).
Appendix CAdd Oracle Databases
C-93
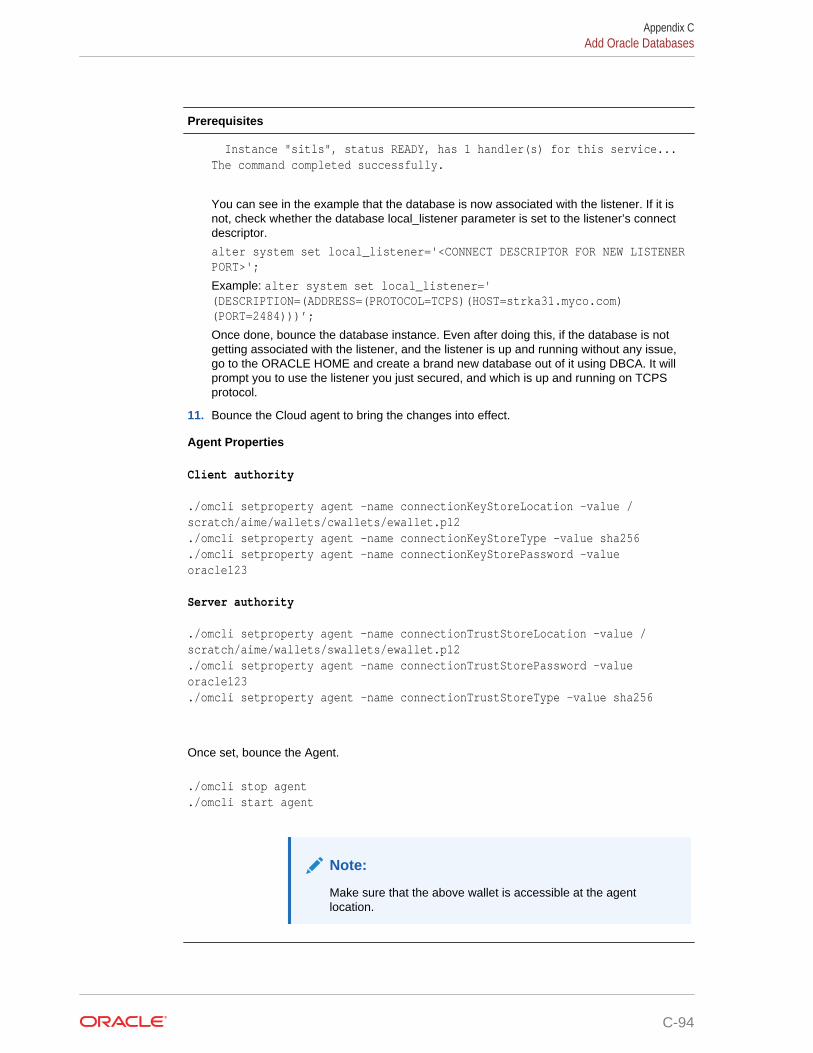
Prerequisites
Instance "sitls", status READY, has 1 handler(s) for this service...The command completed successfully.
You can see in the example that the database is now associated with the listener. If it isnot, check whether the database local_listener parameter is set to the listener’s connectdescriptor.
alter system set local_listener='<CONNECT DESCRIPTOR FOR NEW LISTENERPORT>';
Example: alter system set local_listener='(DESCRIPTION=(ADDRESS=(PROTOCOL=TCPS)(HOST=strka31.myco.com)(PORT=2484)))’;
Once done, bounce the database instance. Even after doing this, if the database is notgetting associated with the listener, and the listener is up and running without any issue,go to the ORACLE HOME and create a brand new database out of it using DBCA. It willprompt you to use the listener you just secured, and which is up and running on TCPSprotocol.
11. Bounce the Cloud agent to bring the changes into effect.
Agent Properties
Client authority
./omcli setproperty agent -name connectionKeyStoreLocation -value /scratch/aime/wallets/cwallets/ewallet.p12./omcli setproperty agent -name connectionKeyStoreType -value sha256./omcli setproperty agent -name connectionKeyStorePassword -value oracle123
Server authority
./omcli setproperty agent -name connectionTrustStoreLocation -value /scratch/aime/wallets/swallets/ewallet.p12./omcli setproperty agent -name connectionTrustStorePassword -value oracle123./omcli setproperty agent -name connectionTrustStoreType -value sha256
Once set, bounce the Agent.
./omcli stop agent
./omcli start agent
Note:
Make sure that the above wallet is accessible at the agentlocation.
Appendix CAdd Oracle Databases
C-94
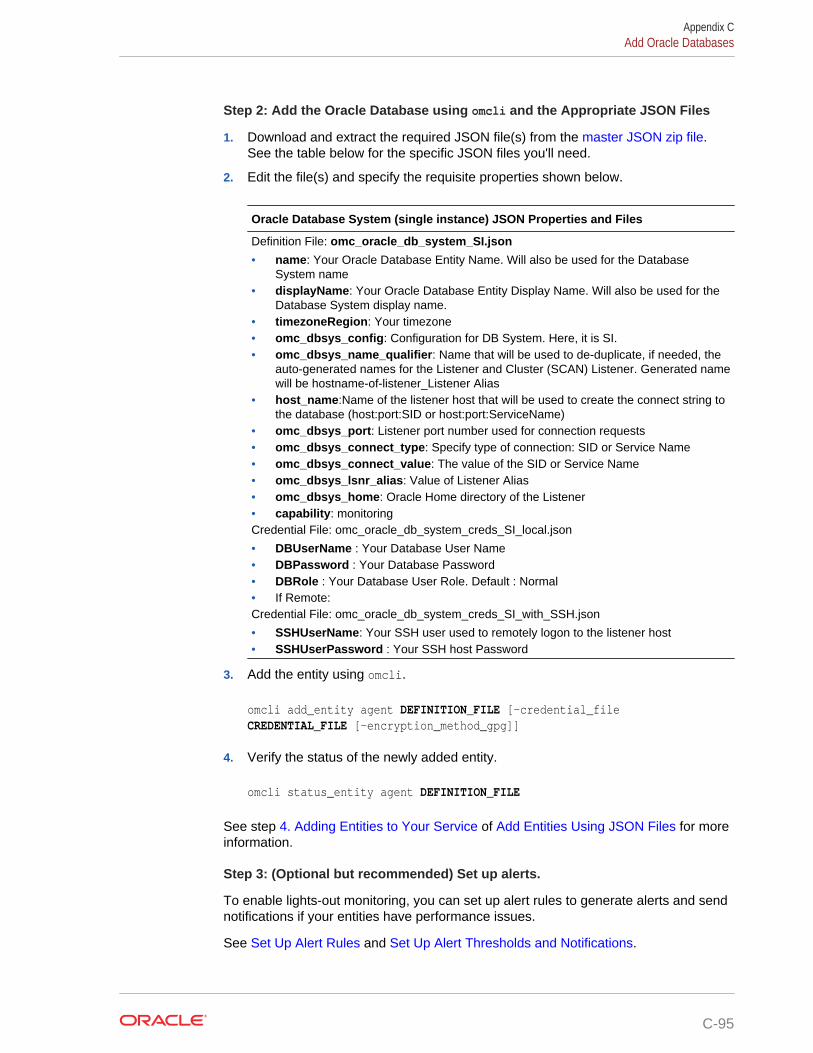
Step 2: Add the Oracle Database using omcli and the Appropriate JSON Files
1. Download and extract the required JSON file(s) from the master JSON zip file.See the table below for the specific JSON files you'll need.
2. Edit the file(s) and specify the requisite properties shown below.
Oracle Database System (single instance) JSON Properties and Files
Definition File: omc_oracle_db_system_SI.json
• name: Your Oracle Database Entity Name. Will also be used for the DatabaseSystem name
• displayName: Your Oracle Database Entity Display Name. Will also be used for theDatabase System display name.
• timezoneRegion: Your timezone• omc_dbsys_config: Configuration for DB System. Here, it is SI.• omc_dbsys_name_qualifier: Name that will be used to de-duplicate, if needed, the
auto-generated names for the Listener and Cluster (SCAN) Listener. Generated namewill be hostname-of-listener_Listener Alias
• host_name:Name of the listener host that will be used to create the connect string tothe database (host:port:SID or host:port:ServiceName)
• omc_dbsys_port: Listener port number used for connection requests• omc_dbsys_connect_type: Specify type of connection: SID or Service Name• omc_dbsys_connect_value: The value of the SID or Service Name• omc_dbsys_lsnr_alias: Value of Listener Alias• omc_dbsys_home: Oracle Home directory of the Listener• capability: monitoringCredential File: omc_oracle_db_system_creds_SI_local.json
• DBUserName : Your Database User Name• DBPassword : Your Database Password• DBRole : Your Database User Role. Default : Normal• If Remote:Credential File: omc_oracle_db_system_creds_SI_with_SSH.json
• SSHUserName: Your SSH user used to remotely logon to the listener host• SSHUserPassword : Your SSH host Password
3. Add the entity using omcli.
omcli add_entity agent DEFINITION_FILE [-credential_file CREDENTIAL_FILE [-encryption_method_gpg]]
4. Verify the status of the newly added entity.
omcli status_entity agent DEFINITION_FILE
See step 4. Adding Entities to Your Service of Add Entities Using JSON Files for moreinformation.
Step 3: (Optional but recommended) Set up alerts.
To enable lights-out monitoring, you can set up alert rules to generate alerts and sendnotifications if your entities have performance issues.
See Set Up Alert Rules and Set Up Alert Thresholds and Notifications.
Appendix CAdd Oracle Databases
C-95
Troubleshooting
If you run into any issues regarding discovery or monitoring of Oracle Database, seethe following:
• Lack of Data
• Create an Agent Support Bundle
Add Oracle ES2 Ethernet SwitchesYou can add Oracle ES2 Ethernet Switch entities using the Add Entity UI or using thecloud agent command line interface (omcli) with the appropriate JSON files.
Step 1: Prepare Oracle ES2 Ethernet Switch for monitoring.
Prerequisites
SNMPv1/v2 or SNMPv3 credentials needed for monitoring.
If SNMPv1/v2 is used, you must provide the SNMP community string that was entered duringES2 configuration along with IP address of the Cloud Agent which will be used for appliancemonitoring.
If SNMPv3 used, you must provide the SNMPv3 user, plus authentication method (SHA orMD5) password if authentication is used, plus the privilege method (only DES is supported)and privilege password if privilege is used. All of this needs to be manually configuredbeforehand in the appliance.
Read-only access is adequate for the ES2 monitoring.
Step 2: Decide how you want to add the Oracle ES2 Ethernet Switch.
You can add Oracle ES2 Ethernet Switch entities using one of two ways:
• Add them from UI
• Use the agent's omcli add_entity command with the appropriate JSON files
Adding Entities from the UI
1. From the Management Cloud main menu, select Administration, Discovery, andthen Add Entity. The Add Entity page displays.
2. Select the Oracle ES2 Ethernet Switch Entity Type.
3. Enter the following UI properties.
Appendix CAdd Oracle ES2 Ethernet Switches
C-96
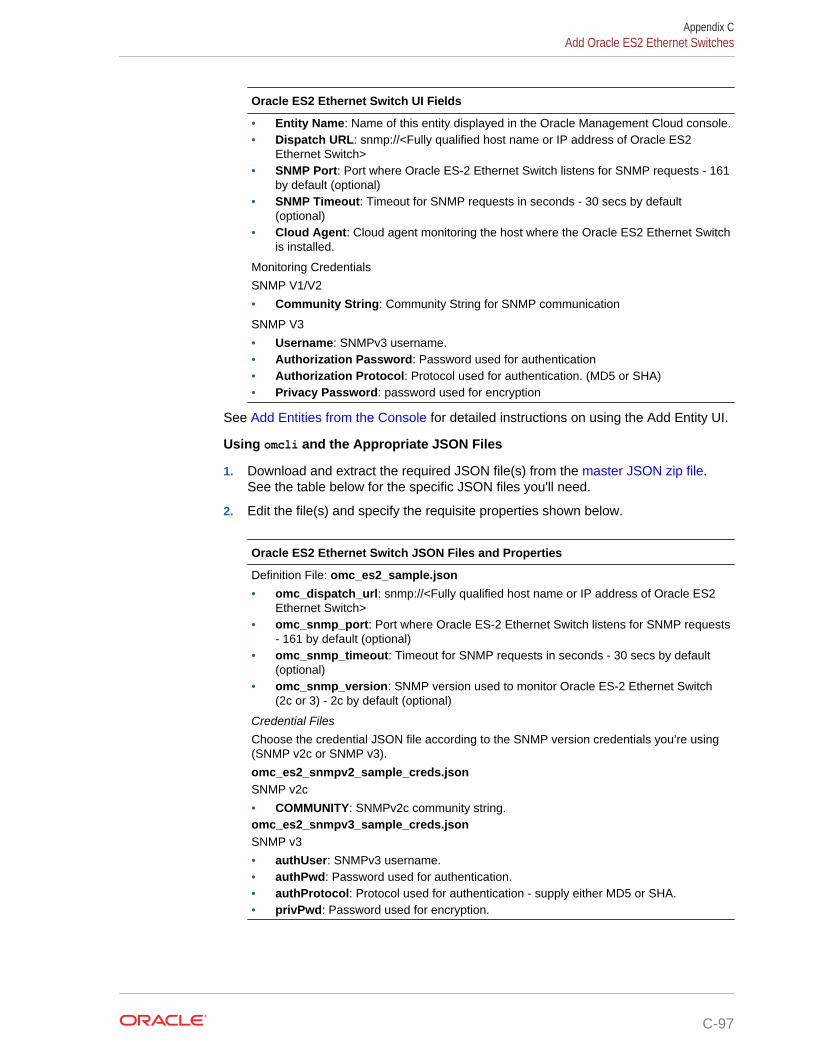
Oracle ES2 Ethernet Switch UI Fields
• Entity Name: Name of this entity displayed in the Oracle Management Cloud console.• Dispatch URL: snmp://<Fully qualified host name or IP address of Oracle ES2
Ethernet Switch>• SNMP Port: Port where Oracle ES-2 Ethernet Switch listens for SNMP requests - 161
by default (optional)• SNMP Timeout: Timeout for SNMP requests in seconds - 30 secs by default
(optional)• Cloud Agent: Cloud agent monitoring the host where the Oracle ES2 Ethernet Switch
is installed.
Monitoring Credentials
SNMP V1/V2
• Community String: Community String for SNMP communication
SNMP V3
• Username: SNMPv3 username.• Authorization Password: Password used for authentication• Authorization Protocol: Protocol used for authentication. (MD5 or SHA)• Privacy Password: password used for encryption
See Add Entities from the Console for detailed instructions on using the Add Entity UI.
Using omcli and the Appropriate JSON Files
1. Download and extract the required JSON file(s) from the master JSON zip file.See the table below for the specific JSON files you'll need.
2. Edit the file(s) and specify the requisite properties shown below.
Oracle ES2 Ethernet Switch JSON Files and Properties
Definition File: omc_es2_sample.json
• omc_dispatch_url: snmp://<Fully qualified host name or IP address of Oracle ES2Ethernet Switch>
• omc_snmp_port: Port where Oracle ES-2 Ethernet Switch listens for SNMP requests- 161 by default (optional)
• omc_snmp_timeout: Timeout for SNMP requests in seconds - 30 secs by default(optional)
• omc_snmp_version: SNMP version used to monitor Oracle ES-2 Ethernet Switch(2c or 3) - 2c by default (optional)
Credential Files
Choose the credential JSON file according to the SNMP version credentials you’re using(SNMP v2c or SNMP v3).
omc_es2_snmpv2_sample_creds.jsonSNMP v2c
• COMMUNITY: SNMPv2c community string.omc_es2_snmpv3_sample_creds.jsonSNMP v3
• authUser: SNMPv3 username.• authPwd: Password used for authentication.• authProtocol: Protocol used for authentication - supply either MD5 or SHA.• privPwd: Password used for encryption.
Appendix CAdd Oracle ES2 Ethernet Switches
C-97
3. Add the entity using omcli.
omcli add_entity agent DEFINITION_FILE [-credential_file CREDENTIAL_FILE [-encryption_method_gpg]]
4. Verify the status of the newly added entity.
omcli status_entity agent DEFINITION_FILE
See step 4. Adding Entities to Your Service of Add Entities Using JSON Files for moreinformation.
Step 3: (Optional but recommended) Set up alerts.
To enable lights-out monitoring, you can set up alert rules to generate alerts and sendnotifications if your entities have performance issues.
See Set Up Alert Rules and Set Up Alert Thresholds and Notifications.
Troubleshooting
If you run into any issues regarding discovery or monitoring of Oracle ES2 EthernetSwitch, see the following:
• Lack of Data
• Create an Agent Support Bundle
Appendix CAdd Oracle ES2 Ethernet Switches
C-98
Add Oracle GoldenGateYou can add Oracle GoldenGate entities using the Add Entity UI or using the cloudagent command line interface (omcli) with the appropriate JSON files.
Step 1: Prepare Oracle GoldenGate for monitoring.
Prerequisites
Oracle GoldenGate enables the continuous, real-time capture, routing, transformation, anddelivery of transactional data across heterogeneous (Oracle, DB2, MySQL, SQL Server,Teradata) environments. The following prerequisites apply when discovering and monitoringOracle GoldenGate environments.
Enable MonitoringThe first prerequisite is to enable monitoring in GoldenGate. Follow the steps below for yourspecific GoldenGate version and architecture.
Classic Architecture
If you are using GoldenGate Classic Architecture, you will need to add a parameter in theGLOBALS file to enable monitoring.
For version 12.2:
1. Locate the GLOBALS file in the top-level GoldenGate installation directory.
2. Add the following line to this file and save the file:
ENABLEMONITORING
3. Restart GoldenGate Manager.
For version 12.3 and higher:
1. Locate the GLOBALS file in the top-level GoldenGate installation directory.
2. Add the following line to this file and save the file:
ENABLEMONITORING UDPPORT <port> HTTPPORT <port>
3. Restart GoldenGate Manager.
Microservices Architecture
If you are using GoldenGate Microservices Architecture, then as part of the setup ofGoldenGate using the GoldenGate Configuration Assistant, you should enable Monitoring.Once monitoring has been enabled, the Performance Metric Server will be started. This is anindication that monitoring has been enabled for GoldenGate.
Import Certification for GoldenGate Secure InstallationsIf the Oracle GoldenGate setup is secure (HTTPS), the GoldenGate certificate needs to beimported into the agent manually prior to discovery. To do this, perform the following:
1. Extract the certificate from Oracle GoldenGate.
openssl s_client -showcerts -connect <hostname>:<service port>
Appendix CAdd Oracle GoldenGate
C-99
Prerequisites
2. Add the Oracle GoldenGate certificate to the cloud agent's JKS.
<jdk>/bin/keytool -importcert -file <goldengate-certificate> -alias goldengate -keystore <AGENT_HOME>/agent_inst/sysman/config/montrust/AgentTrust.jks -storepass welcome
3. Bounce the cloud agent.
omcli stop agent ; omcli start agent
Step 2: Decide how you want to add Oracle GoldenGate.
You can add Oracle GoldenGate entities using one of two ways:
• Add them from UI
• Use the agent's omcli add_entity command with the appropriate JSON files
Adding Entities from the UI
1. From the Management Cloud main menu, select Administration, Discovery, andthen Add Entity. The Add Entity page displays.
2. Select the Oracle GoldenGate Entity Type.
3. Enter the following UI properties.
Appendix CAdd Oracle GoldenGate
C-100
Oracle GoldenGate UI Fields
Note:
Credentials are required only for Oracle GoldenGate Microservice architecture.No credentials are required for Oracle GoldenGate Classic architecture.
Classic
• Entity Name: Name of this entity displayed in the Oracle Management Cloud console.• Host Name: Fully-qualified Host Name where the Oracle GoldenGate is installed.• Port: Oracle GoldenGate Service Manager port (if Microservice architecture).
Otherwise, Performance Metric port if available, else Manager Port (if Classicarchitecture)
• Trust Any Server Certificate: False is recommended. You must import the storageserver SSL certificate into the selected could agent before discovery. If you chooseTrue instead, discovery will occur even for an untrusted or expired certificate.
• Cloud Agent: Cloud agent monitoring the host where Oracle GoldenGate is installed.
Microservice
• Entity Name: Name of this entity displayed in the Oracle Management Cloud console.• Host Name: Fully-qualified Host Name where the Oracle GoldenGate is installed.• Service Manager Port: Oracle GoldenGate Service Manager port (if Microservice
architecture). Otherwise, Performance Metric port if available, else Manager Port (ifClassic architecture)
• Trust Any Server Certificate: False is recommended. You must import the storageserver SSL certificate into the selected could agent before discovery. If you chooseTrue instead, discovery will occur even for an untrusted or expired certificate.
• Cloud Agent: Cloud agent monitoring the host where Oracle GoldenGate is installed.Monitoring Credentials (Oracle GoldenGate Credentials)
• Username: Oracle GoldenGate Username• Password: Oracle GoldenGate Password
See Add Entities from the Console for detailed instructions on using the Add Entity UI.
Using omcli and the Appropriate JSON Files
1. Download and extract the required JSON file(s) from the master JSON zip file.See the table below for the specific JSON files you'll need.
2. Edit the file(s) and specify the requisite properties shown below.
Appendix CAdd Oracle GoldenGate
C-101
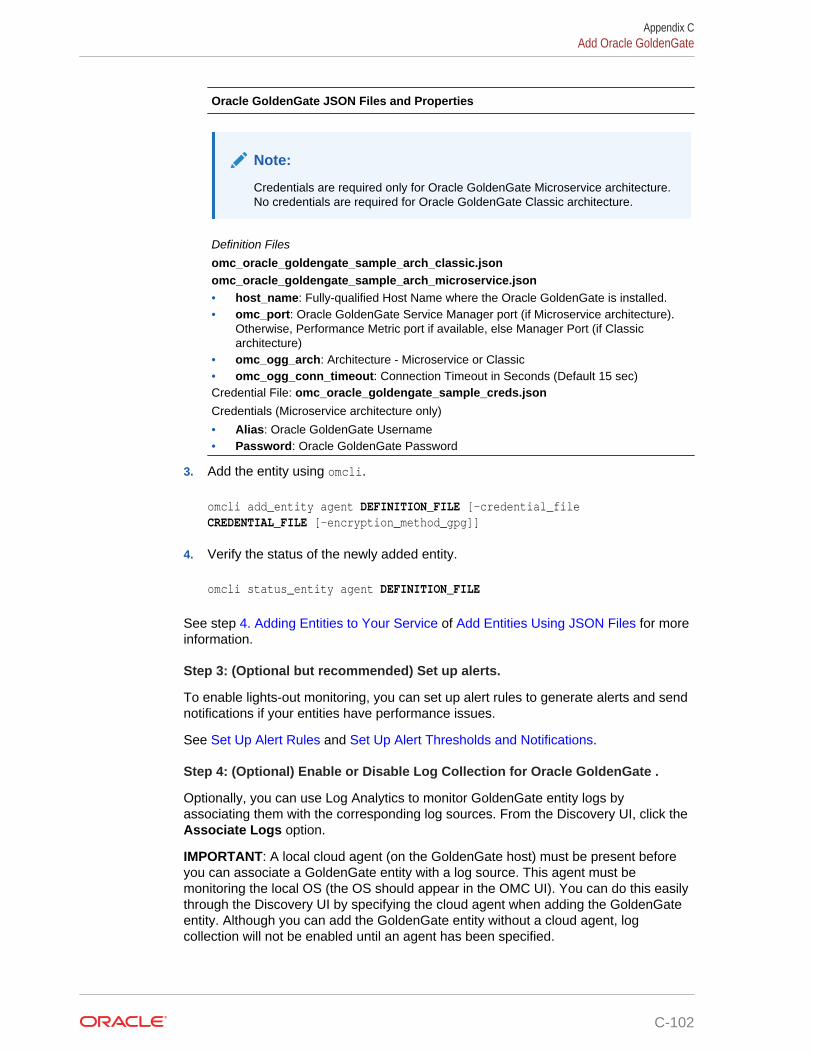
Oracle GoldenGate JSON Files and Properties
Note:
Credentials are required only for Oracle GoldenGate Microservice architecture.No credentials are required for Oracle GoldenGate Classic architecture.
Definition Files
omc_oracle_goldengate_sample_arch_classic.jsonomc_oracle_goldengate_sample_arch_microservice.json• host_name: Fully-qualified Host Name where the Oracle GoldenGate is installed.• omc_port: Oracle GoldenGate Service Manager port (if Microservice architecture).
Otherwise, Performance Metric port if available, else Manager Port (if Classicarchitecture)
• omc_ogg_arch: Architecture - Microservice or Classic• omc_ogg_conn_timeout: Connection Timeout in Seconds (Default 15 sec)Credential File: omc_oracle_goldengate_sample_creds.json
Credentials (Microservice architecture only)
• Alias: Oracle GoldenGate Username• Password: Oracle GoldenGate Password
3. Add the entity using omcli.
omcli add_entity agent DEFINITION_FILE [-credential_file CREDENTIAL_FILE [-encryption_method_gpg]]
4. Verify the status of the newly added entity.
omcli status_entity agent DEFINITION_FILE
See step 4. Adding Entities to Your Service of Add Entities Using JSON Files for moreinformation.
Step 3: (Optional but recommended) Set up alerts.
To enable lights-out monitoring, you can set up alert rules to generate alerts and sendnotifications if your entities have performance issues.
See Set Up Alert Rules and Set Up Alert Thresholds and Notifications.
Step 4: (Optional) Enable or Disable Log Collection for Oracle GoldenGate .
Optionally, you can use Log Analytics to monitor GoldenGate entity logs byassociating them with the corresponding log sources. From the Discovery UI, click theAssociate Logs option.
IMPORTANT: A local cloud agent (on the GoldenGate host) must be present beforeyou can associate a GoldenGate entity with a log source. This agent must bemonitoring the local OS (the OS should appear in the OMC UI). You can do this easilythrough the Discovery UI by specifying the cloud agent when adding the GoldenGateentity. Although you can add the GoldenGate entity without a cloud agent, logcollection will not be enabled until an agent has been specified.
Appendix CAdd Oracle GoldenGate
C-102
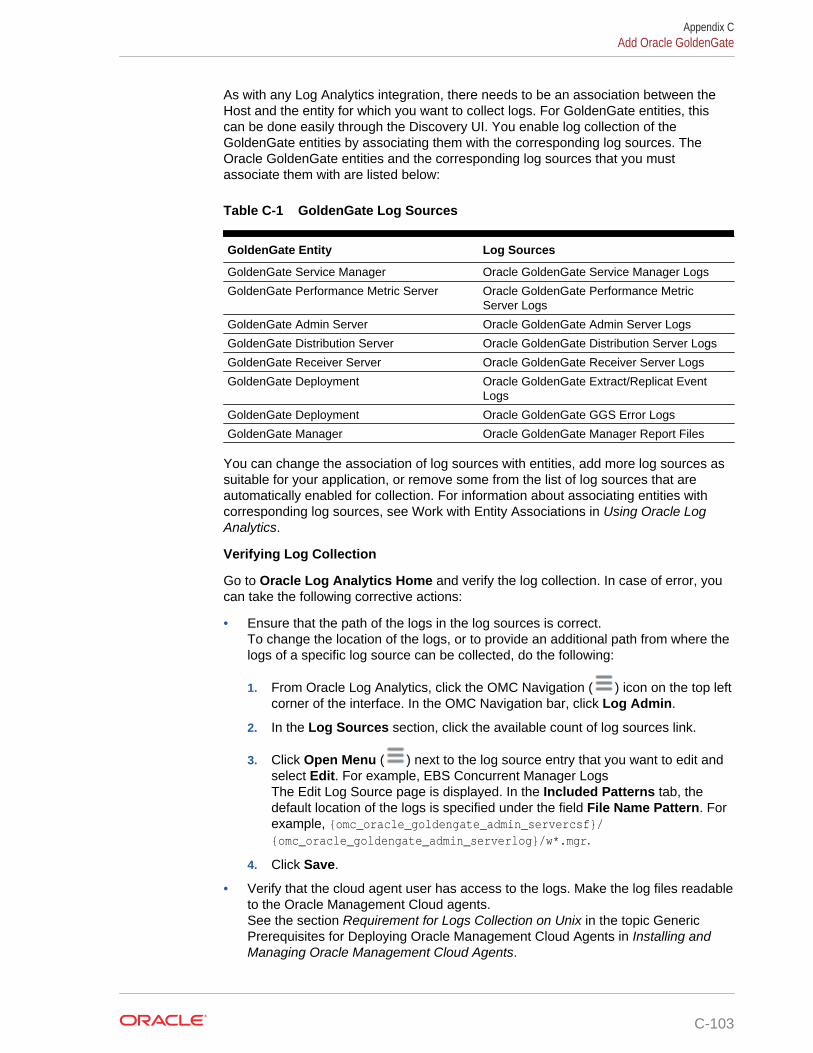
As with any Log Analytics integration, there needs to be an association between theHost and the entity for which you want to collect logs. For GoldenGate entities, thiscan be done easily through the Discovery UI. You enable log collection of theGoldenGate entities by associating them with the corresponding log sources. TheOracle GoldenGate entities and the corresponding log sources that you mustassociate them with are listed below:
Table C-1 GoldenGate Log Sources
GoldenGate Entity Log Sources
GoldenGate Service Manager Oracle GoldenGate Service Manager Logs
GoldenGate Performance Metric Server Oracle GoldenGate Performance MetricServer Logs
GoldenGate Admin Server Oracle GoldenGate Admin Server Logs
GoldenGate Distribution Server Oracle GoldenGate Distribution Server Logs
GoldenGate Receiver Server Oracle GoldenGate Receiver Server Logs
GoldenGate Deployment Oracle GoldenGate Extract/Replicat EventLogs
GoldenGate Deployment Oracle GoldenGate GGS Error Logs
GoldenGate Manager Oracle GoldenGate Manager Report Files
You can change the association of log sources with entities, add more log sources assuitable for your application, or remove some from the list of log sources that areautomatically enabled for collection. For information about associating entities withcorresponding log sources, see Work with Entity Associations in Using Oracle LogAnalytics.
Verifying Log Collection
Go to Oracle Log Analytics Home and verify the log collection. In case of error, youcan take the following corrective actions:
• Ensure that the path of the logs in the log sources is correct.To change the location of the logs, or to provide an additional path from where thelogs of a specific log source can be collected, do the following:
1. From Oracle Log Analytics, click the OMC Navigation ( ) icon on the top leftcorner of the interface. In the OMC Navigation bar, click Log Admin.
2. In the Log Sources section, click the available count of log sources link.
3. Click Open Menu ( ) next to the log source entry that you want to edit andselect Edit. For example, EBS Concurrent Manager LogsThe Edit Log Source page is displayed. In the Included Patterns tab, thedefault location of the logs is specified under the field File Name Pattern. Forexample, {omc_oracle_goldengate_admin_servercsf}/{omc_oracle_goldengate_admin_serverlog}/w*.mgr.
4. Click Save.
• Verify that the cloud agent user has access to the logs. Make the log files readableto the Oracle Management Cloud agents.See the section Requirement for Logs Collection on Unix in the topic GenericPrerequisites for Deploying Oracle Management Cloud Agents in Installing andManaging Oracle Management Cloud Agents.
Appendix CAdd Oracle GoldenGate
C-103
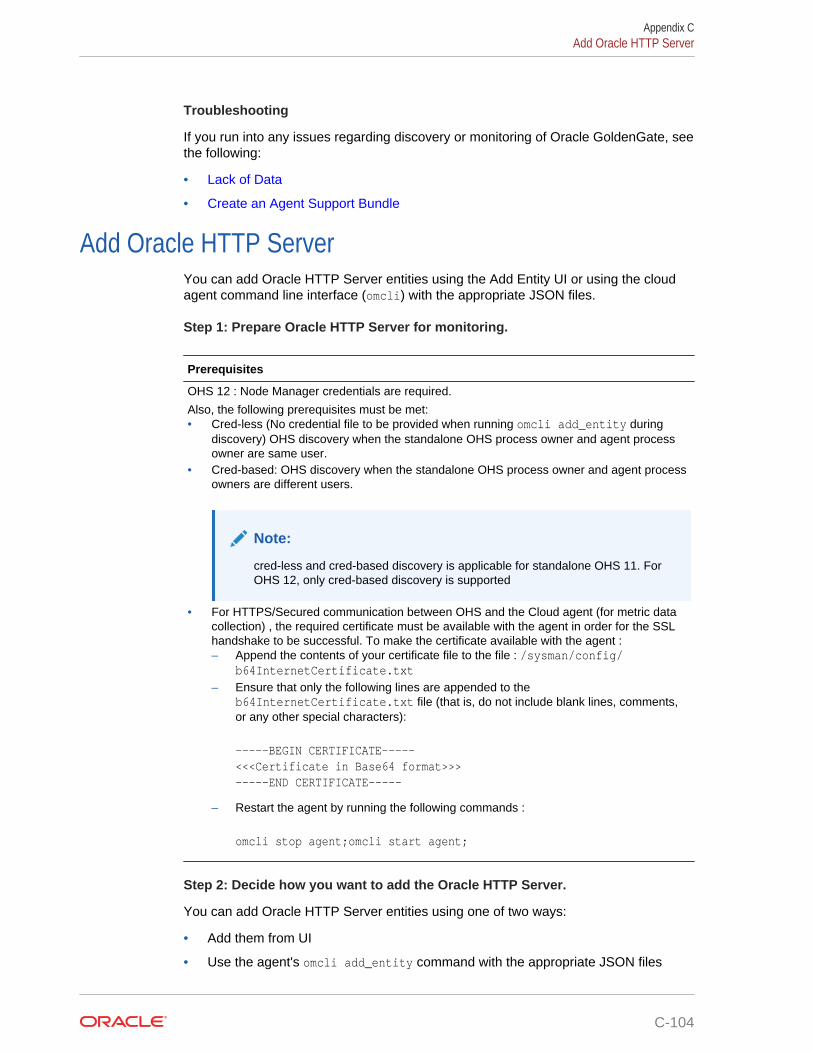
Troubleshooting
If you run into any issues regarding discovery or monitoring of Oracle GoldenGate, seethe following:
• Lack of Data
• Create an Agent Support Bundle
Add Oracle HTTP ServerYou can add Oracle HTTP Server entities using the Add Entity UI or using the cloudagent command line interface (omcli) with the appropriate JSON files.
Step 1: Prepare Oracle HTTP Server for monitoring.
Prerequisites
OHS 12 : Node Manager credentials are required.
Also, the following prerequisites must be met:• Cred-less (No credential file to be provided when running omcli add_entity during
discovery) OHS discovery when the standalone OHS process owner and agent processowner are same user.
• Cred-based: OHS discovery when the standalone OHS process owner and agent processowners are different users.
Note:
cred-less and cred-based discovery is applicable for standalone OHS 11. ForOHS 12, only cred-based discovery is supported
• For HTTPS/Secured communication between OHS and the Cloud agent (for metric datacollection) , the required certificate must be available with the agent in order for the SSLhandshake to be successful. To make the certificate available with the agent :– Append the contents of your certificate file to the file : /sysman/config/
b64InternetCertificate.txt– Ensure that only the following lines are appended to the
b64InternetCertificate.txt file (that is, do not include blank lines, comments,or any other special characters):
-----BEGIN CERTIFICATE-----<<<Certificate in Base64 format>>>-----END CERTIFICATE-----
– Restart the agent by running the following commands :
omcli stop agent;omcli start agent;
Step 2: Decide how you want to add the Oracle HTTP Server.
You can add Oracle HTTP Server entities using one of two ways:
• Add them from UI
• Use the agent's omcli add_entity command with the appropriate JSON files
Appendix CAdd Oracle HTTP Server
C-104
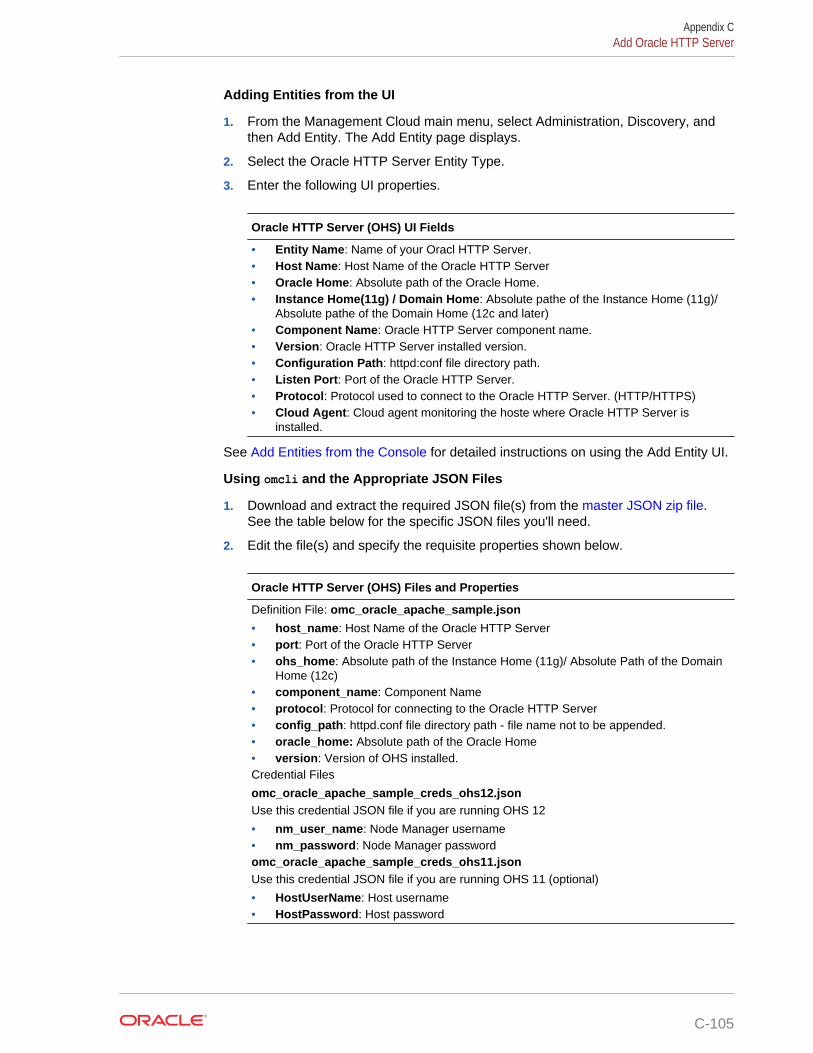
Adding Entities from the UI
1. From the Management Cloud main menu, select Administration, Discovery, andthen Add Entity. The Add Entity page displays.
2. Select the Oracle HTTP Server Entity Type.
3. Enter the following UI properties.
Oracle HTTP Server (OHS) UI Fields
• Entity Name: Name of your Oracl HTTP Server.• Host Name: Host Name of the Oracle HTTP Server• Oracle Home: Absolute path of the Oracle Home.• Instance Home(11g) / Domain Home: Absolute pathe of the Instance Home (11g)/
Absolute pathe of the Domain Home (12c and later)• Component Name: Oracle HTTP Server component name.• Version: Oracle HTTP Server installed version.• Configuration Path: httpd:conf file directory path.• Listen Port: Port of the Oracle HTTP Server.• Protocol: Protocol used to connect to the Oracle HTTP Server. (HTTP/HTTPS)• Cloud Agent: Cloud agent monitoring the hoste where Oracle HTTP Server is
installed.
See Add Entities from the Console for detailed instructions on using the Add Entity UI.
Using omcli and the Appropriate JSON Files
1. Download and extract the required JSON file(s) from the master JSON zip file.See the table below for the specific JSON files you'll need.
2. Edit the file(s) and specify the requisite properties shown below.
Oracle HTTP Server (OHS) Files and Properties
Definition File: omc_oracle_apache_sample.json
• host_name: Host Name of the Oracle HTTP Server• port: Port of the Oracle HTTP Server• ohs_home: Absolute path of the Instance Home (11g)/ Absolute Path of the Domain
Home (12c)• component_name: Component Name• protocol: Protocol for connecting to the Oracle HTTP Server• config_path: httpd.conf file directory path - file name not to be appended.• oracle_home: Absolute path of the Oracle Home• version: Version of OHS installed.Credential Files
omc_oracle_apache_sample_creds_ohs12.jsonUse this credential JSON file if you are running OHS 12
• nm_user_name: Node Manager username• nm_password: Node Manager passwordomc_oracle_apache_sample_creds_ohs11.jsonUse this credential JSON file if you are running OHS 11 (optional)
• HostUserName: Host username• HostPassword: Host password
Appendix CAdd Oracle HTTP Server
C-105
3. Add the entity using omcli.
omcli add_entity agent DEFINITION_FILE [-credential_file CREDENTIAL_FILE [-encryption_method_gpg]]
4. Verify the status of the newly added entity.
omcli status_entity agent DEFINITION_FILE
See step 4. Adding Entities to Your Service of Add Entities Using JSON Files for moreinformation.
Step 3: (Optional but recommended) Set up alerts.
To enable lights-out monitoring, you can set up alert rules to generate alerts and sendnotifications if your entities have performance issues.
See Set Up Alert Rules and Set Up Alert Thresholds and Notifications.
Troubleshooting
If you run into any issues regarding discovery or monitoring of Oracle HTTP Server,see the following:
• Lack of Data
• Create an Agent Support Bundle
Add Oracle Identity ManagerYou can add Oracle Identity Manager entities using the Add Entity UI or using thecloud agent command line interface (omcli) with the appropriate JSON files.
Step 1: Prepare Oracle Identity Manager for monitoring.
Prerequisites
Same credentials used to discover the WebLogic Domain.
Note:
Refresh of IDM targets is now supported. To refresh any IDMdomain run omcli refresh_entity idm_domain.json
where the content of idm_domain.json is:
{ "entities":[{"name": "Idm Domain","type": "omc_weblogic_domain"}]}
Appendix CAdd Oracle Identity Manager
C-106
Step 2: Decide how you want to add the Oracle Identity Manager.
You can add Oracle Identity Manager entities using one of two ways:
• Add them from UI
• Use the agent's omcli add_entity command with the appropriate JSON files
Adding Entities from the UI
1. From the Management Cloud main menu, select Administration, Discovery, andthen Add Entity. The Add Entity page displays.
2. Select the Oracle Identity Manager Entity Type.
3. Enter the following UI properties.
Oracle Identity Manager (OIM) UI Fields
• Entity Name: Name of this entity displayed in the Oracle Management Cloud console.• Port: Port used for the WebLogic Admin Server(Console)• Protocol: Protocol used for the WebLogic Server. For example: t3• Administration Server Host: Fully-qualified WebLogic Admin Server Host Name
where the WebLogic Admin Server is installed.• Discover Coherence: Discover Oracle Coherence.• Cloud Agent: Cloud agent monitoring the host where OIM is installed.
Monitoring Credentials (WebLogic Server Credentials)
• Username: WebLogic Domain Entity User Name.• Password: WebLogic Domain Entity Password.
See Add Entities from the Console for detailed instructions on using the Add Entity UI.
Using omcli and the Appropriate JSON Files
1. Download and extract the required JSON file(s) from the master JSON zip file.See the table below for the specific JSON files you'll need.
2. Edit the file(s) and specify the requisite properties shown below.
Oracle Identity Manager (OIM) JSON Files and Properties
Definition File: omc_weblogic_domian.json
• displayName: WebLogic Domain Entity Display Name that is displayed in theInfrastructure Monitoring UI time zone.
• Region: Time Zone (tz database time zones). For example: America/New_York.• port: Port used for the WebLogic Admin Server(Console)• protocol: Protocol used for the WebLogic Server. For example: t3• admin_server_host: Fully-qualified WebLogic Admin Server Host Name where the
WebLogic Admin Server is installed.Credential File: omc_weblogic_domain_creds.json
• user_name: WebLogic Domain Entity User Name.• password: WebLogic Domain Entity Password.
3. Add the entity using omcli.
omcli add_entity agent DEFINITION_FILE [-credential_file CREDENTIAL_FILE [-encryption_method_gpg]]
Appendix CAdd Oracle Identity Manager
C-107
4. Verify the status of the newly added entity.
omcli status_entity agent DEFINITION_FILE
See step 4. Adding Entities to Your Service of Add Entities Using JSON Files for moreinformation.
Step 3: (Optional but recommended) Set up alerts.
To enable lights-out monitoring, you can set up alert rules to generate alerts and sendnotifications if your entities have performance issues.
See Set Up Alert Rules and Set Up Alert Thresholds and Notifications.
Troubleshooting
If you run into any issues regarding discovery or monitoring of Oracle IdentityManager, see the following:
• Lack of Data
• Create an Agent Support Bundle
Add Oracle Infiniband SwitchYou can add Oracle Infiniband Switch entities using the Add Entity UI or using thecloud agent command line interface (omcli) with the appropriate JSON files.
Step 1: Prepare Oracle Infiniband Switch for monitoring.
Prerequisites
To enable monitoring, HTTP and SNMPv1/v2c/v3 are needed.
If SNMPv1/v2 is used, you must provide SNMP community string that has been used earlier inIB Switch configuration along with IP address of agent which will be used for IB Switchmonitoring.
If SNMPv3 is used, in addition to SNMPv3 user, you must provide the auth method (SHA orMD5) and auth-password if auth used, and plus priv method (only DES supported) and priv-password if priv used. You must configure everything manually in IB Switch. Read only accessis sufficient for IB Switch monitoring.
Step 2: Decide how you want to add the Oracle Infiniband Switch.
You can add Oracle Infiniband Switch entities using one of two ways:
• Add them from UI
• Use the agent's omcli add_entity command with the appropriate JSON files
Adding Entities from the UI
1. From the Management Cloud main menu, select Administration, Discovery, andthen Add Entity. The Add Entity page displays.
2. Select the Oracle Infiniband Switch Entity Type.
3. Enter the following UI properties.
Appendix CAdd Oracle Infiniband Switch
C-108
Oracle Infiniband Switch UI Fields
• Entity Name: Name of your Oracle Infiniband Switch in Oracle Management Cloud.• Dispatch URL: snmp://<Fully qualified host name or IP address of Oracle InfiniBand
Switch>• SNMP Port: Port where Oracle InfiniBand Switch listens for SNMP requests - 161 by
default (optional)• SNMP Timeout: Timeout for SNMP requests in seconds - 30 secs by default
(optional)• Cloud Agent: Cloud agent monitoring your Oracle Infiniband Switch.
Monitoring Credentials
SNMP V1/V2
• Community String: SNMPv2c community string.SNMP V3
• Username: SNMPv3 username.• Authorization Password: Password used for authentication• Authorization Protocol: Protocol used for authentication. (MD5 or SHA)• Privacy Password: password used for encryption
See Add Entities from the Console for detailed instructions on using the Add Entity UI.
Using omcli and the Appropriate JSON Files
1. Download and extract the required JSON file(s) from the master JSON zip file.See the table below for the specific JSON files you'll need.
2. Edit the file(s) and specify the requisite properties shown below.
Appendix CAdd Oracle Infiniband Switch
C-109
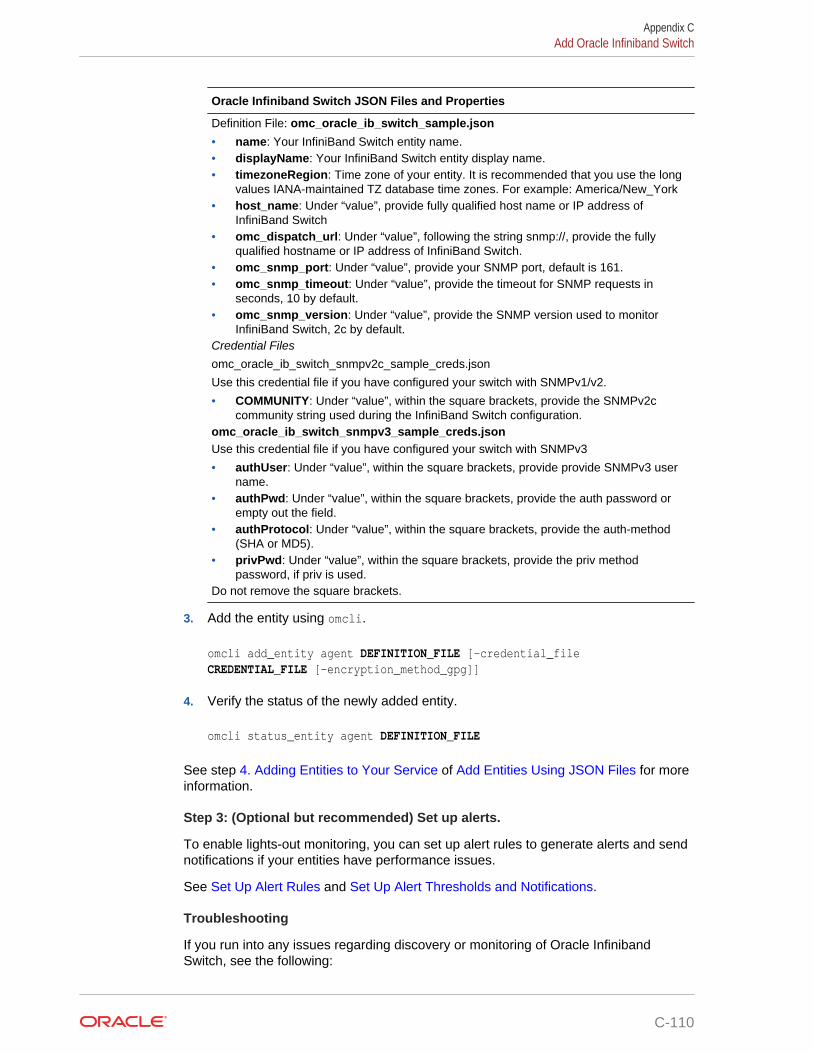
Oracle Infiniband Switch JSON Files and Properties
Definition File: omc_oracle_ib_switch_sample.json
• name: Your InfiniBand Switch entity name.• displayName: Your InfiniBand Switch entity display name.• timezoneRegion: Time zone of your entity. It is recommended that you use the long
values IANA-maintained TZ database time zones. For example: America/New_York• host_name: Under “value”, provide fully qualified host name or IP address of
InfiniBand Switch• omc_dispatch_url: Under “value”, following the string snmp://, provide the fully
qualified hostname or IP address of InfiniBand Switch.• omc_snmp_port: Under “value”, provide your SNMP port, default is 161.• omc_snmp_timeout: Under “value”, provide the timeout for SNMP requests in
seconds, 10 by default.• omc_snmp_version: Under “value”, provide the SNMP version used to monitor
InfiniBand Switch, 2c by default.Credential Files
omc_oracle_ib_switch_snmpv2c_sample_creds.json
Use this credential file if you have configured your switch with SNMPv1/v2.
• COMMUNITY: Under “value”, within the square brackets, provide the SNMPv2ccommunity string used during the InfiniBand Switch configuration.
omc_oracle_ib_switch_snmpv3_sample_creds.jsonUse this credential file if you have configured your switch with SNMPv3
• authUser: Under “value”, within the square brackets, provide provide SNMPv3 username.
• authPwd: Under “value”, within the square brackets, provide the auth password orempty out the field.
• authProtocol: Under “value”, within the square brackets, provide the auth-method(SHA or MD5).
• privPwd: Under “value”, within the square brackets, provide the priv methodpassword, if priv is used.
Do not remove the square brackets.
3. Add the entity using omcli.
omcli add_entity agent DEFINITION_FILE [-credential_file CREDENTIAL_FILE [-encryption_method_gpg]]
4. Verify the status of the newly added entity.
omcli status_entity agent DEFINITION_FILE
See step 4. Adding Entities to Your Service of Add Entities Using JSON Files for moreinformation.
Step 3: (Optional but recommended) Set up alerts.
To enable lights-out monitoring, you can set up alert rules to generate alerts and sendnotifications if your entities have performance issues.
See Set Up Alert Rules and Set Up Alert Thresholds and Notifications.
Troubleshooting
If you run into any issues regarding discovery or monitoring of Oracle InfinibandSwitch, see the following:
Appendix CAdd Oracle Infiniband Switch
C-110
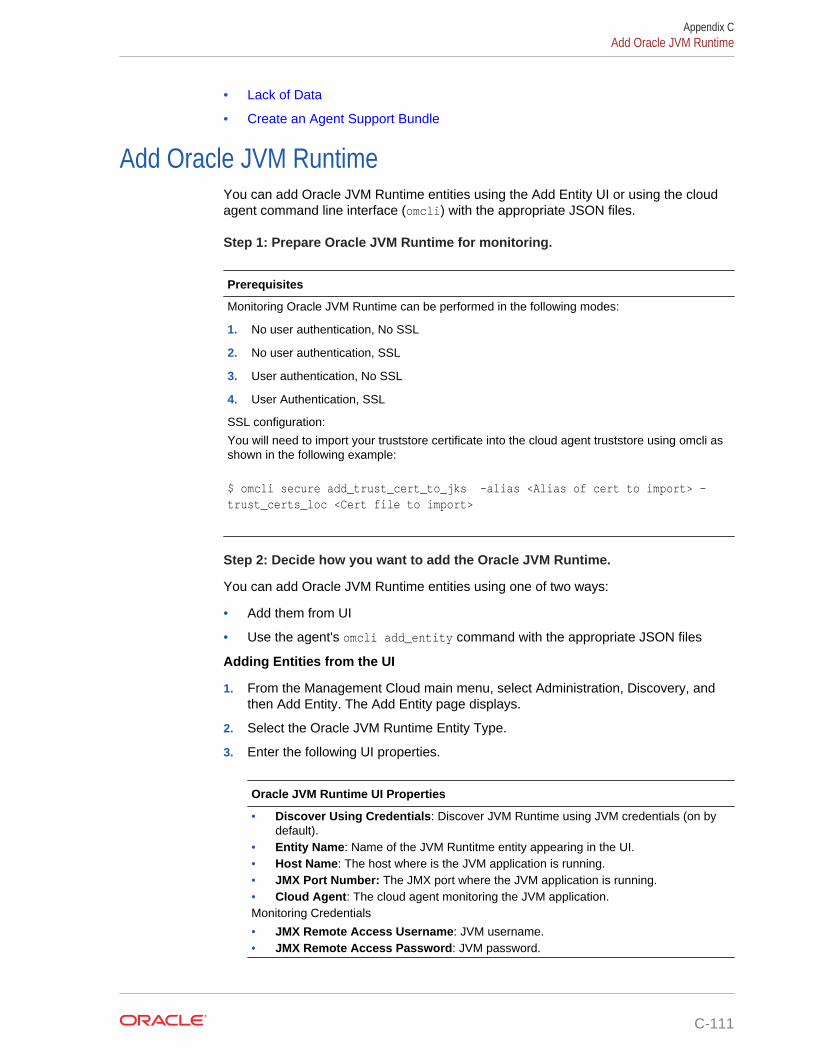
• Lack of Data
• Create an Agent Support Bundle
Add Oracle JVM RuntimeYou can add Oracle JVM Runtime entities using the Add Entity UI or using the cloudagent command line interface (omcli) with the appropriate JSON files.
Step 1: Prepare Oracle JVM Runtime for monitoring.
Prerequisites
Monitoring Oracle JVM Runtime can be performed in the following modes:
1. No user authentication, No SSL
2. No user authentication, SSL
3. User authentication, No SSL
4. User Authentication, SSL
SSL configuration:
You will need to import your truststore certificate into the cloud agent truststore using omcli asshown in the following example:
$ omcli secure add_trust_cert_to_jks -alias <Alias of cert to import> -trust_certs_loc <Cert file to import>
Step 2: Decide how you want to add the Oracle JVM Runtime.
You can add Oracle JVM Runtime entities using one of two ways:
• Add them from UI
• Use the agent's omcli add_entity command with the appropriate JSON files
Adding Entities from the UI
1. From the Management Cloud main menu, select Administration, Discovery, andthen Add Entity. The Add Entity page displays.
2. Select the Oracle JVM Runtime Entity Type.
3. Enter the following UI properties.
Oracle JVM Runtime UI Properties
• Discover Using Credentials: Discover JVM Runtime using JVM credentials (on bydefault).
• Entity Name: Name of the JVM Runtitme entity appearing in the UI.• Host Name: The host where is the JVM application is running.• JMX Port Number: The JMX port where the JVM application is running.• Cloud Agent: The cloud agent monitoring the JVM application.Monitoring Credentials
• JMX Remote Access Username: JVM username.• JMX Remote Access Password: JVM password.
Appendix CAdd Oracle JVM Runtime
C-111
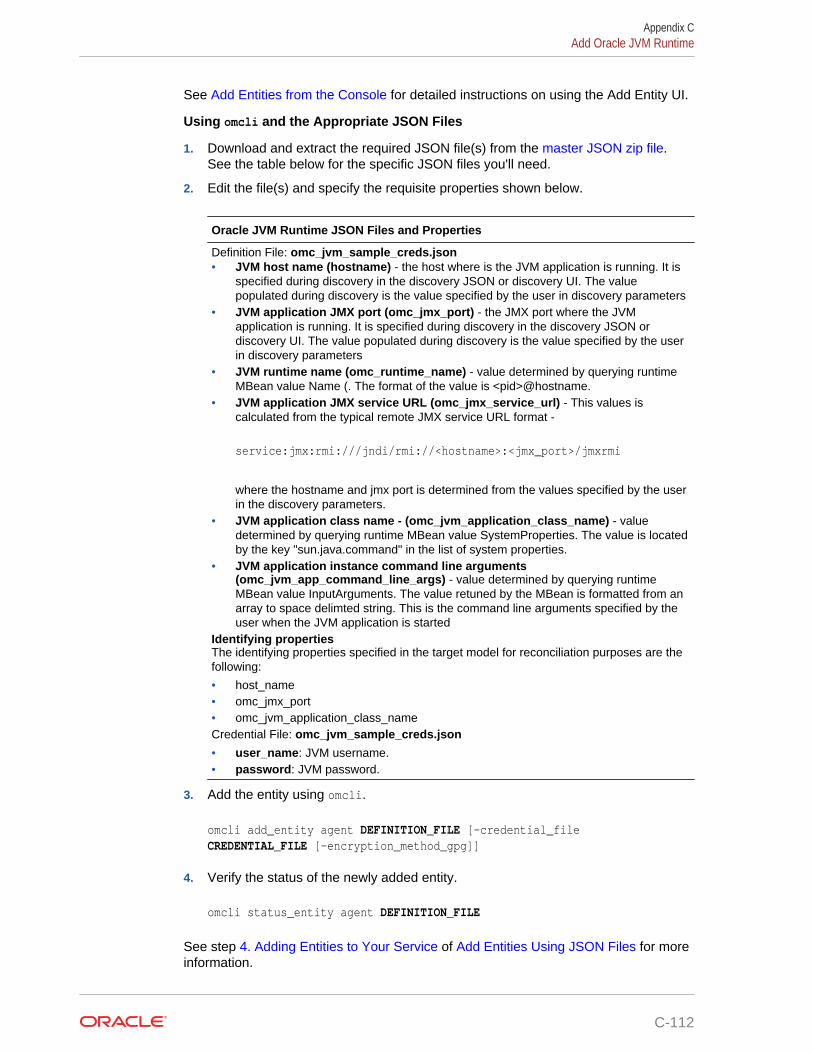
See Add Entities from the Console for detailed instructions on using the Add Entity UI.
Using omcli and the Appropriate JSON Files
1. Download and extract the required JSON file(s) from the master JSON zip file.See the table below for the specific JSON files you'll need.
2. Edit the file(s) and specify the requisite properties shown below.
Oracle JVM Runtime JSON Files and Properties
Definition File: omc_jvm_sample_creds.json• JVM host name (hostname) - the host where is the JVM application is running. It is
specified during discovery in the discovery JSON or discovery UI. The valuepopulated during discovery is the value specified by the user in discovery parameters
• JVM application JMX port (omc_jmx_port) - the JMX port where the JVMapplication is running. It is specified during discovery in the discovery JSON ordiscovery UI. The value populated during discovery is the value specified by the userin discovery parameters
• JVM runtime name (omc_runtime_name) - value determined by querying runtimeMBean value Name (. The format of the value is <pid>@hostname.
• JVM application JMX service URL (omc_jmx_service_url) - This values iscalculated from the typical remote JMX service URL format -
service:jmx:rmi:///jndi/rmi://<hostname>:<jmx_port>/jmxrmi
where the hostname and jmx port is determined from the values specified by the userin the discovery parameters.
• JVM application class name - (omc_jvm_application_class_name) - valuedetermined by querying runtime MBean value SystemProperties. The value is locatedby the key "sun.java.command" in the list of system properties.
• JVM application instance command line arguments(omc_jvm_app_command_line_args) - value determined by querying runtimeMBean value InputArguments. The value retuned by the MBean is formatted from anarray to space delimted string. This is the command line arguments specified by theuser when the JVM application is started
Identifying propertiesThe identifying properties specified in the target model for reconciliation purposes are thefollowing:
• host_name• omc_jmx_port• omc_jvm_application_class_nameCredential File: omc_jvm_sample_creds.json
• user_name: JVM username.• password: JVM password.
3. Add the entity using omcli.
omcli add_entity agent DEFINITION_FILE [-credential_file CREDENTIAL_FILE [-encryption_method_gpg]]
4. Verify the status of the newly added entity.
omcli status_entity agent DEFINITION_FILE
See step 4. Adding Entities to Your Service of Add Entities Using JSON Files for moreinformation.
Appendix CAdd Oracle JVM Runtime
C-112

Step 3: (Optional but recommended) Set up alerts.
To enable lights-out monitoring, you can set up alert rules to generate alerts and sendnotifications if your entities have performance issues.
See Set Up Alert Rules and Set Up Alert Thresholds and Notifications.
Troubleshooting
If you run into any issues regarding discovery or monitoring of Oracle JVM Runtime,see the following:
• Lack of Data
• Create an Agent Support Bundle
Add Oracle NoSQL DatabaseYou can add Oracle NoSQL Database entities using the Add Entity UI or using thecloud agent command line interface (omcli) with the appropriate JSON files.
Step 1: Prepare Oracle NoSQL Database for monitoring.
Credentials
Monitoring of Oracle NoSQL is supported only through credential-less JMX (no credentialsJSON file is needed).
Step 2: Decide how you want to add the Oracle NoSQL Database.
You can add Oracle NoSQL Database entities using one of two ways:
• Add them from UI
• Use the agent's omcli add_entity command with the appropriate JSON files
Adding Entities from the UI
1. From the Management Cloud main menu, select Administration, Discovery, andthen Add Entity. The Add Entity page displays.
2. Select the Oracle NoSQL Database Entity Type.
3. Enter the following UI properties.
Oracle NoSQL UI Fields
• Entity Name: Your Oracle NoSQL Database entity name.• Host Name: Name displayed in the Oracle Infrastructure Monitoring User Interface.• URL: The NoSQL database connection URL.• Port: The NoSQL database port.• Store Name: Oracle NoSQL Database store name.• NoSQL Java Home: Java home of NoSQL database or any Java home of version
above 1.8 .• KV Home Location: KV home of the NoSQL database.• Cloud Agent: Agent monitoring the host on which the database is installed.
See Add Entities from the Console for detailed instructions on using the Add Entity UI.
Appendix CAdd Oracle NoSQL Database
C-113
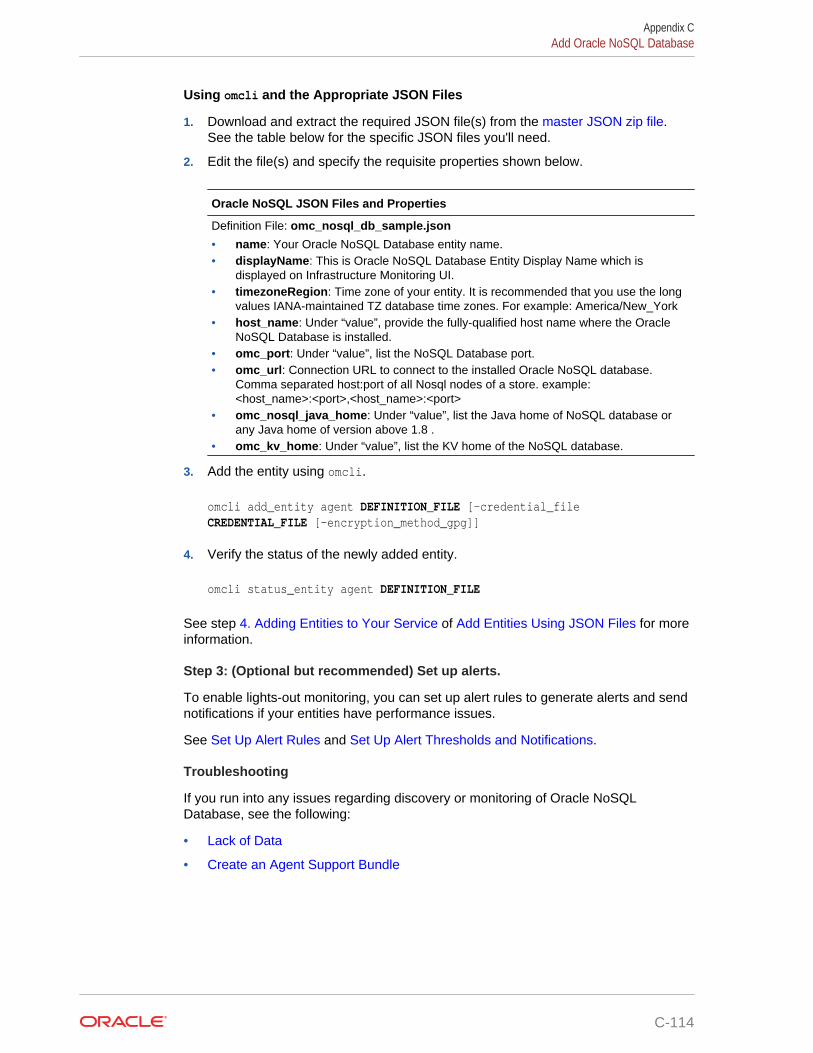
Using omcli and the Appropriate JSON Files
1. Download and extract the required JSON file(s) from the master JSON zip file.See the table below for the specific JSON files you'll need.
2. Edit the file(s) and specify the requisite properties shown below.
Oracle NoSQL JSON Files and Properties
Definition File: omc_nosql_db_sample.json
• name: Your Oracle NoSQL Database entity name.• displayName: This is Oracle NoSQL Database Entity Display Name which is
displayed on Infrastructure Monitoring UI.• timezoneRegion: Time zone of your entity. It is recommended that you use the long
values IANA-maintained TZ database time zones. For example: America/New_York• host_name: Under “value”, provide the fully-qualified host name where the Oracle
NoSQL Database is installed.• omc_port: Under “value”, list the NoSQL Database port.• omc_url: Connection URL to connect to the installed Oracle NoSQL database.
Comma separated host:port of all Nosql nodes of a store. example:<host_name>:<port>,<host_name>:<port>
• omc_nosql_java_home: Under “value”, list the Java home of NoSQL database orany Java home of version above 1.8 .
• omc_kv_home: Under “value”, list the KV home of the NoSQL database.
3. Add the entity using omcli.
omcli add_entity agent DEFINITION_FILE [-credential_file CREDENTIAL_FILE [-encryption_method_gpg]]
4. Verify the status of the newly added entity.
omcli status_entity agent DEFINITION_FILE
See step 4. Adding Entities to Your Service of Add Entities Using JSON Files for moreinformation.
Step 3: (Optional but recommended) Set up alerts.
To enable lights-out monitoring, you can set up alert rules to generate alerts and sendnotifications if your entities have performance issues.
See Set Up Alert Rules and Set Up Alert Thresholds and Notifications.
Troubleshooting
If you run into any issues regarding discovery or monitoring of Oracle NoSQLDatabase, see the following:
• Lack of Data
• Create an Agent Support Bundle
Appendix CAdd Oracle NoSQL Database
C-114
Add Oracle Pluggable DatabaseYou can add Oracle Pluggable Database entities using the Add Entity UI or using thecloud agent command line interface (omcli) with the appropriate JSON files.
Step 2: Add the Oracle Pluggable Database using omcli and the AppropriateJSON Files
1. Download and extract the required JSON file(s) from the master JSON zip file.See the table below for the specific JSON files you'll need.
2. Edit the file(s) and specify the requisite properties shown below.
Oracle Pluggable Database (PDB) (Standalone) JSON Properties and Files
Definition File: omc_oracle_pdb_sample.json
• displayName: This is Oracle Pluggable Database (PDB) Entity Display Name whichis displayed on Infrastructure Monitoring UI
• timezoneRegion: Time Zone Example: PDT, GMT etc• host_name : Fully-qualified Host Name for the Oracle Pluggable Database (PDB)• omc_pdb_tbsp_port: Oracle Pluggable Database (PDB) port• omc_pdb_tbsp_service_name: Oracle Pluggable Database (PDB) Service NameCredential File: omc_oracle_pdb_cred_sample.json
• DBUserName: Oracle Pluggable Database (PDB)username• DBPassword: Oracle Pluggable Database (PDB) user's password
3. Add the entity using omcli.
omcli add_entity agent DEFINITION_FILE [-credential_file CREDENTIAL_FILE [-encryption_method_gpg]]
4. Verify the status of the newly added entity.
omcli status_entity agent DEFINITION_FILE
See step 4. Adding Entities to Your Service of Add Entities Using JSON Files for moreinformation.
Step 3: (Optional but recommended) Set up alerts.
To enable lights-out monitoring, you can set up alert rules to generate alerts and sendnotifications if your entities have performance issues.
See Set Up Alert Rules and Set Up Alert Thresholds and Notifications.
Troubleshooting
If you run into any issues regarding discovery or monitoring of Oracle PluggableDatabase, see the following:
• Lack of Data
• Create an Agent Support Bundle
Appendix CAdd Oracle Pluggable Database
C-115

Add Oracle Power Distribution Unit (PDU)You can add PDU entities using the Add Entity UI or using the cloud agent commandline interface (omcli) with the appropriate JSON files.
Step 1: Prepare PDU for monitoring.
Prerequisites
To enable monitoring, HTTP and SNMPv1/v2c/v3 are needed. The NMS and trap tables inPDU administration interface must be set for a proper SNMP monitoring. for more information,see the PDU vendor documentation.
Step 2: Add the PDU using omcli and the Appropriate JSON Files
1. Download and extract the required JSON file(s) from the master JSON zip file.See the table below for the specific JSON files you'll need.
2. Edit the file(s) and specify the requisite properties shown below.
Oracle Power Distribution Unit (PDU) Files and Properties
Definition File: omc_oracle_pdu_sample.json
• name: Your PDU entity name.• displayName: Your PDU entity display name.• timezoneRegion: Time zone of your entity. It is recommended that you use the long
values IANA-maintained TZ database time zones. For example: America/New_York• omc_dispatch_url: Under “value”, provide your PDU HTTP URL.• omc_snmp_port: Under “value”, provide your SNMP port, default is 161.• omc_snmp_timeout: Under “value”, provide the timeout for SNMP requests in
seconds, 10 by default.• omc_snmp_version: Under “value”, provide the SNMP version used to monitor PDU.
Valid values are 1, 2 or 3.Credential Files
You need to use HTTP credentials along with one of the SNMP credentials (v2c or v3)
HTTP credentials - part of SNMPv1 and SNMPv3 json• username: User name for HTTP communication.• password: Password for user in HTTP communication.
SNMPv2c
omc_oracle_pdu_sample_snmpv1_creds.json• COMMUNITY: Community String for SNMP communicationSNMP v3
omc_oracle_pdu_sample_snmpv3_creds.jsonUse this credentials JSON file if using SNMP v3.
• authUser: Name of priviliged user for SNMP communication• authPwd: Password for priviliged user for SNMP communication• authProtocol: Encryption protocol to be used for SNMP communication• privPwd: Password for SNMP communicationDo not remove the square brackets.
Appendix CAdd Oracle Power Distribution Unit (PDU)
C-116
3. Add the entity using omcli.
omcli add_entity agent DEFINITION_FILE [-credential_file CREDENTIAL_FILE [-encryption_method_gpg]]
4. Verify the status of the newly added entity.
omcli status_entity agent DEFINITION_FILE
See step 4. Adding Entities to Your Service of Add Entities Using JSON Files for moreinformation.
Step 3: (Optional but recommended) Set up alerts.
To enable lights-out monitoring, you can set up alert rules to generate alerts and sendnotifications if your entities have performance issues.
See Set Up Alert Rules and Set Up Alert Thresholds and Notifications.
Troubleshooting
If you run into any issues regarding discovery or monitoring of PDU, see the following:
• Lack of Data
• Create an Agent Support Bundle
Appendix CAdd Oracle Power Distribution Unit (PDU)
C-117

Add Oracle Service BusYou can add Oracle Service Bus entities using the Add Entity UI or using the cloudagent command line interface (omcli) with the appropriate JSON files.
Step 1: Prepare Oracle Service Bus for monitoring.
Prerequisites
Important: Before you can monitor Oracle Service Bus (OSB) entities in Oracle ManagementCloud, you must first enable monitoring from the Oracle Service Bus Administration console.
For information, see What are Operational Settings for a Service?.
Once monitoring has been enabled from the Oracle Service Bus Administration console, youcan add OSB entities to Oracle Management Cloud. When specifying an OSB entity, you usecredentials of a user with at least the Monitor role. The user can also have either theOperator or Admin role.
Step 2: Add the Oracle Service Bus using omcli and the Appropriate JSON Files
1. Download and extract the required JSON file(s) from the master JSON zip file.See the table below for the specific JSON files you'll need.
2. Edit the file(s) and specify the requisite properties shown below.
Appendix CAdd Oracle Service Bus
C-118

Prerequisites
Important: Before you can monitor Oracle Service Bus (OSB) entities in OracleManagement Cloud, you must first enable monitoring from the Oracle Service BusAdministration console.
For information, see What are Operational Settings for a Service?.
Once monitoring has been enabled from the Oracle Service Bus Administration console,you can add OSB entities to Oracle Management Cloud. When specifying an OSB entity,you use credentials of a user with at least the Monitor role. The user can also have eitherthe Operator or Admin role.
3. Add the entity using omcli.
omcli add_entity agent DEFINITION_FILE [-credential_file CREDENTIAL_FILE [-encryption_method_gpg]]
4. Verify the status of the newly added entity.
omcli status_entity agent DEFINITION_FILE
See step 4. Adding Entities to Your Service of Add Entities Using JSON Files for moreinformation.
Step 3: (Optional but recommended) Set up alerts.
To enable lights-out monitoring, you can set up alert rules to generate alerts and sendnotifications if your entities have performance issues.
See Set Up Alert Rules and Set Up Alert Thresholds and Notifications.
Troubleshooting
If you run into any issues regarding discovery or monitoring of Oracle Service Bus, seethe following:
• Lack of Data
• Create an Agent Support Bundle
Appendix CAdd Oracle Service Bus
C-119

Add Oracle Traffic DirectorYou can add Oracle Traffic Director entities using the Add Entity UI or using the cloudagent command line interface (omcli) with the appropriate JSON files.
Step 1: Prepare Oracle Traffic Director for monitoring.
Prerequisites
OTD 11Use an OTD Administrator user.
In addition, to enable collection of metrics, you must configure and start an SNMP subagent.To start the SNMP subagent, use OTD Admin Console, or use the following command:
tadm start-snmp-subagent--host=<otd_host>--port=<otd port>--user=<otd user>--password-file=<password_file>
For more information on configuring and starting an SNMP subagent, see the Oracle TrafficDirector documentation.
OTD 12Use a WebLogic Server user with the Monitor role. The user can also have Operator or Adminroles, which include the Monitor role.
Step 2: Decide how you want to add the Oracle Traffic Director.
You can add Oracle Traffic Director entities using one of two ways:
• Add them from UI
• Use the agent's omcli add_entity command with the appropriate JSON files
Adding Entities from the UI
1. From the Management Cloud main menu, select Administration, Discovery, andthen Add Entity. The Add Entity page displays.
2. Select the Oracle Traffic Director Entity Type.
3. Enter the following UI properties.
Appendix CAdd Oracle Traffic Director
C-120

Traffic Director Instance (OTD) UI Fields
12c or later• Entity Name: The OTD entity name that is displayed on Infrastructure Monitoring UI.• Port: OTD Administration Server listening port• Protocol: t3 or t3s• Administration Server Host: Fully-qualified host name where the OTD
Administration Server is installed.• Discover Coherence: Coherence Clusters deployed on the domain will be
discovered. Turn this option off when discovering a SOA Suite Domain.• Cloud Agent: Cloud agent monitoring the host where the OTD Administration Server
is installed.Monitoring Credentials (WebLogic Server Credentials)
• Username: OTD Administration Server username.• Password: OTD Administration Server password.11g• Entity Name: OTD 11g Entity Display Name which is displayed on Infrastructure
Monitoring UI• Administration Server Host Name: Fully-qualified Host Name where the OTD 11g
Administration Server is installed.• Administration Server Listen Port: OTD 11g Administration Server listening port.• Configuration Name: OTD 11g configuration name• Administration Server Oracle Home: Absolute path of the OTD 11g Administration
Server oracle home location• Cloud Agent: Cloud agent monitoring the host where the OTD 11g Administration
Server is running.Monitoring Credentials (OTD 11g Administration Server Credentials)
• Administration Username: OTD 11g Administration Server username• Administration Password: OTD 11g Administration Server password• SNMP Community String: Community string used in SNMP aubagent. Default value
is "public".
See Add Entities from the Console for detailed instructions on using the Add Entity UI.
Using omcli and the Appropriate JSON Files
1. Download and extract the required JSON file(s) from the master JSON zip file.See the table below for the specific JSON files you'll need.
2. Edit the file(s) and specify the requisite properties shown below.
Appendix CAdd Oracle Traffic Director
C-121
Traffic Director Instance (OTD) JSON Files and Properties
Definition File: omc_oracle_otd_cluster_sample.json
Note:
This applies specifically for OTD 11. For OTD 12, OTD will be automaticallydiscovered as part of the WebLogic Domain discovery
• name: Your OTD 11g name.• displayName: Name displayed in the Oracle Infrastructure Monitoring User Interface.• timezoneRegion: Time zone of your entity. It is recommended that you use the long
values IANA-maintained TZ database time zones. For example: America/New_York• admin_host: Under “value”, provide the fully-qualified Host Name where the OTD
11g Administration Server is installed.• admin_port: Under “value”, provide the OTD 11g Administration Server listening port.• admin_oracle_home: Under “value”, provide the absolute path of the OTD 11g
Administration Server Oracle Home location.• config_name: Under “value”, provide the OTD 11g configuration name.Credential File: omc_oracle_otd_cluster_sample_creds.json
Note:
This applies specifically for OTD 11. For OTD 12, OTD will be automaticallydiscovered as part of the WebLogic Domain discovery.
• admin_user_name: Under “value”, within the square brackets, provide the OTD 11gAdministration Server user name. You must have identified this user in thePrerequisite Tasks step.
• admin_password: Under “value”, within the square brackets, provide the OTD 11gAdministration Server password.
• snmp_comm_string: Under “value”, within the square brackets, provide thecommunity string used in SNMP subagent. The default value is "public".
Do not remove the square brackets.
3. Add the entity using omcli.
omcli add_entity agent DEFINITION_FILE [-credential_file CREDENTIAL_FILE [-encryption_method_gpg]]
4. Verify the status of the newly added entity.
omcli status_entity agent DEFINITION_FILE
See step 4. Adding Entities to Your Service of Add Entities Using JSON Files for moreinformation.
Step 3: (Optional but recommended) Set up alerts.
To enable lights-out monitoring, you can set up alert rules to generate alerts and sendnotifications if your entities have performance issues.
See Set Up Alert Rules and Set Up Alert Thresholds and Notifications.
Appendix CAdd Oracle Traffic Director
C-122
Troubleshooting
If you run into any issues regarding discovery or monitoring of Oracle Traffic Director,see the following:
• Lack of Data
• Create an Agent Support Bundle
Appendix CAdd Oracle Traffic Director
C-123
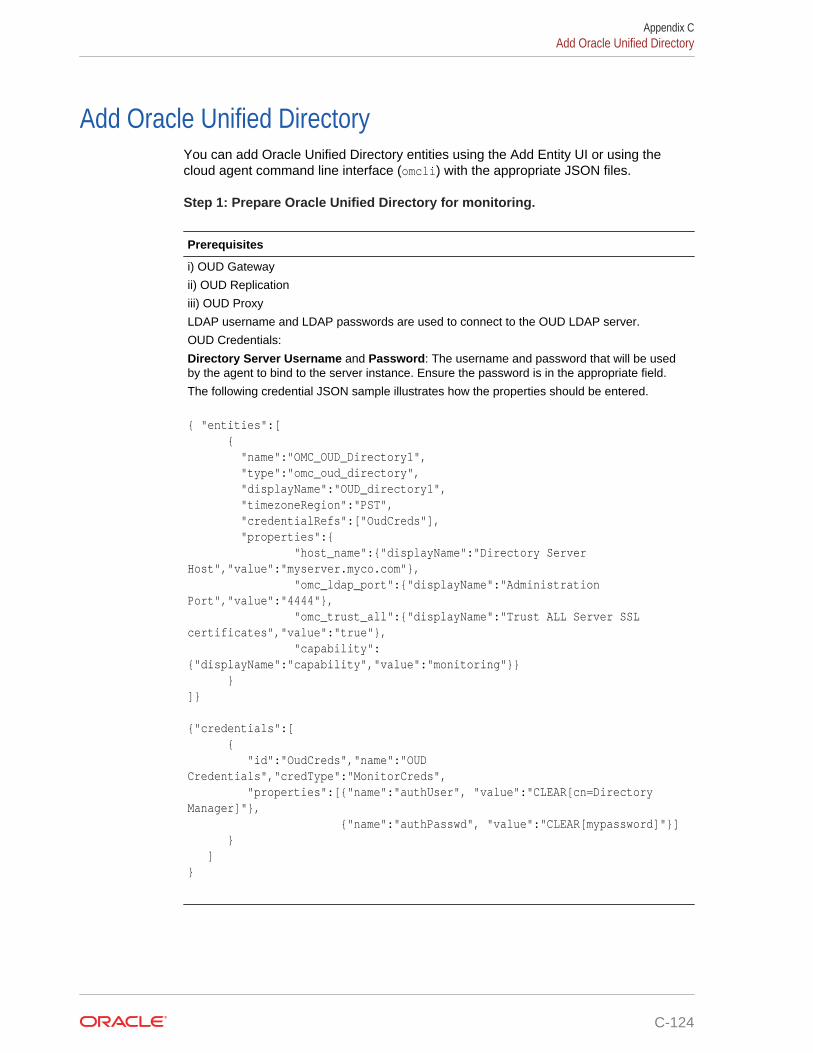
Add Oracle Unified DirectoryYou can add Oracle Unified Directory entities using the Add Entity UI or using thecloud agent command line interface (omcli) with the appropriate JSON files.
Step 1: Prepare Oracle Unified Directory for monitoring.
Prerequisites
i) OUD Gateway
ii) OUD Replication
iii) OUD Proxy
LDAP username and LDAP passwords are used to connect to the OUD LDAP server.
OUD Credentials:
Directory Server Username and Password: The username and password that will be usedby the agent to bind to the server instance. Ensure the password is in the appropriate field.
The following credential JSON sample illustrates how the properties should be entered.
{ "entities":[ { "name":"OMC_OUD_Directory1", "type":"omc_oud_directory", "displayName":"OUD_directory1", "timezoneRegion":"PST", "credentialRefs":["OudCreds"], "properties":{ "host_name":{"displayName":"Directory Server Host","value":"myserver.myco.com"}, "omc_ldap_port":{"displayName":"Administration Port","value":"4444"}, "omc_trust_all":{"displayName":"Trust ALL Server SSL certificates","value":"true"}, "capability":{"displayName":"capability","value":"monitoring"}} }]}
{"credentials":[ { "id":"OudCreds","name":"OUD Credentials","credType":"MonitorCreds", "properties":[{"name":"authUser", "value":"CLEAR[cn=Directory Manager]"}, {"name":"authPasswd", "value":"CLEAR[mypassword]"}] } ]}
Appendix CAdd Oracle Unified Directory
C-124
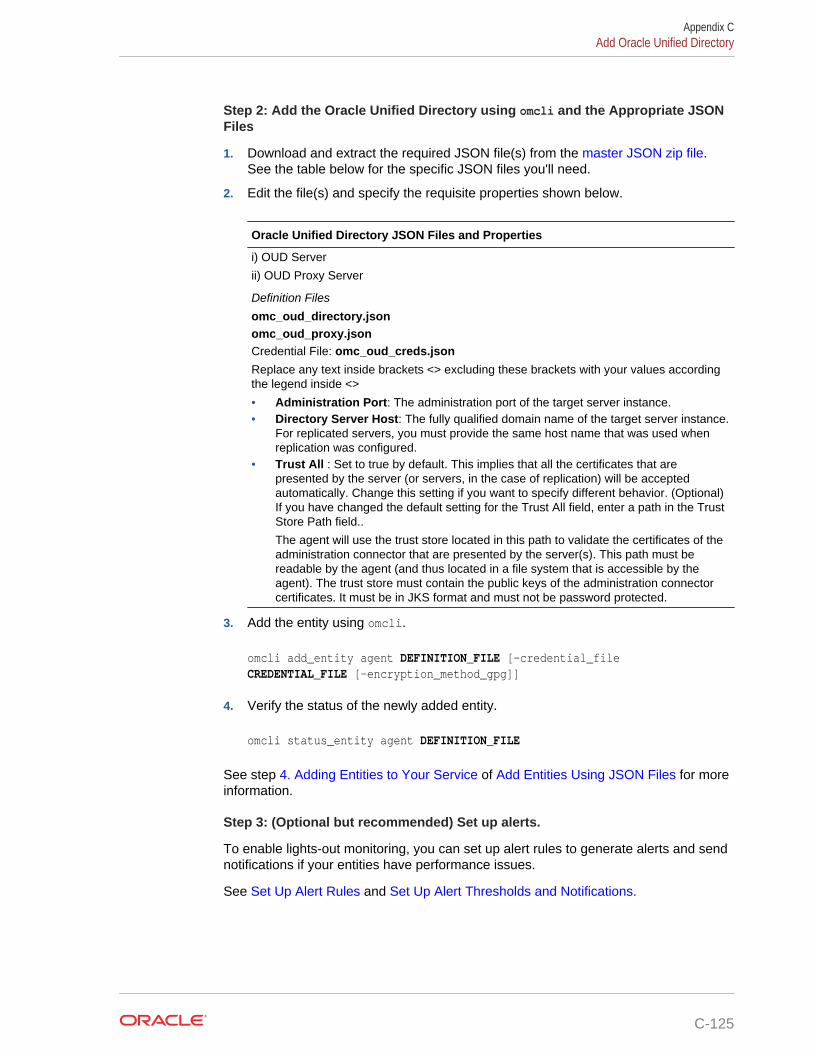
Step 2: Add the Oracle Unified Directory using omcli and the Appropriate JSONFiles
1. Download and extract the required JSON file(s) from the master JSON zip file.See the table below for the specific JSON files you'll need.
2. Edit the file(s) and specify the requisite properties shown below.
Oracle Unified Directory JSON Files and Properties
i) OUD Server
ii) OUD Proxy Server
Definition Files
omc_oud_directory.jsonomc_oud_proxy.jsonCredential File: omc_oud_creds.json
Replace any text inside brackets <> excluding these brackets with your values accordingthe legend inside <>
• Administration Port: The administration port of the target server instance.• Directory Server Host: The fully qualified domain name of the target server instance.
For replicated servers, you must provide the same host name that was used whenreplication was configured.
• Trust All : Set to true by default. This implies that all the certificates that arepresented by the server (or servers, in the case of replication) will be acceptedautomatically. Change this setting if you want to specify different behavior. (Optional)If you have changed the default setting for the Trust All field, enter a path in the TrustStore Path field..
The agent will use the trust store located in this path to validate the certificates of theadministration connector that are presented by the server(s). This path must bereadable by the agent (and thus located in a file system that is accessible by theagent). The trust store must contain the public keys of the administration connectorcertificates. It must be in JKS format and must not be password protected.
3. Add the entity using omcli.
omcli add_entity agent DEFINITION_FILE [-credential_file CREDENTIAL_FILE [-encryption_method_gpg]]
4. Verify the status of the newly added entity.
omcli status_entity agent DEFINITION_FILE
See step 4. Adding Entities to Your Service of Add Entities Using JSON Files for moreinformation.
Step 3: (Optional but recommended) Set up alerts.
To enable lights-out monitoring, you can set up alert rules to generate alerts and sendnotifications if your entities have performance issues.
See Set Up Alert Rules and Set Up Alert Thresholds and Notifications.
Appendix CAdd Oracle Unified Directory
C-125
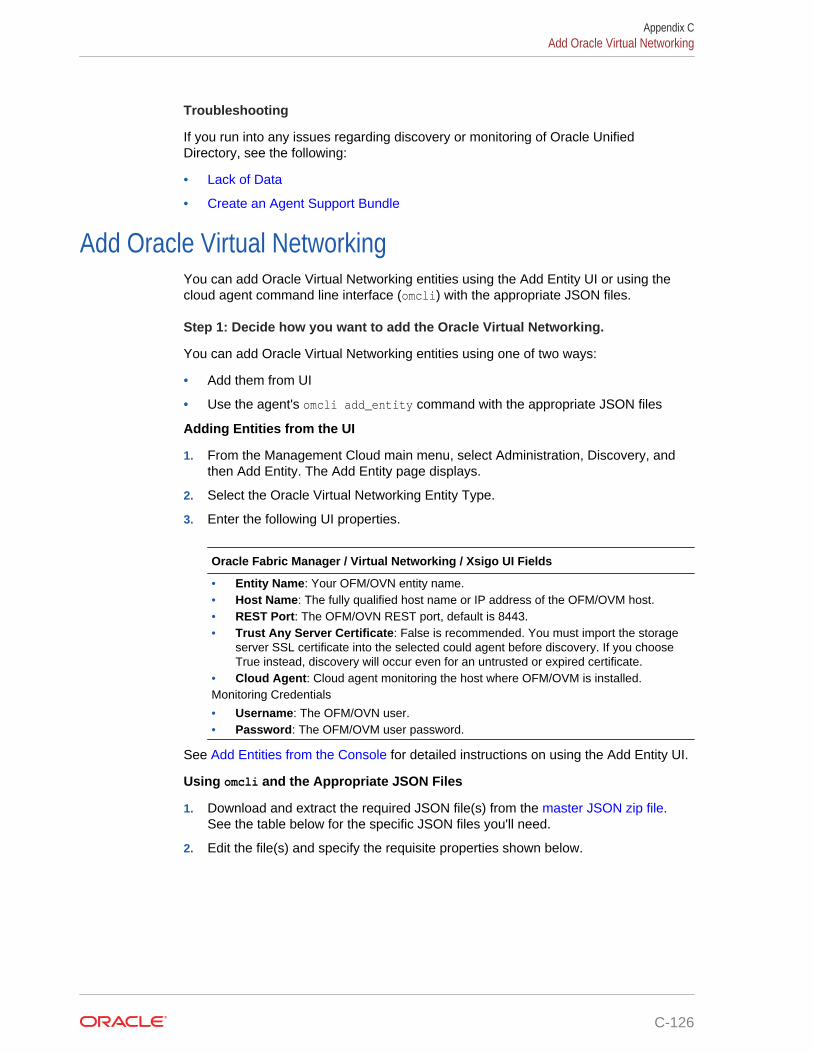
Troubleshooting
If you run into any issues regarding discovery or monitoring of Oracle UnifiedDirectory, see the following:
• Lack of Data
• Create an Agent Support Bundle
Add Oracle Virtual NetworkingYou can add Oracle Virtual Networking entities using the Add Entity UI or using thecloud agent command line interface (omcli) with the appropriate JSON files.
Step 1: Decide how you want to add the Oracle Virtual Networking.
You can add Oracle Virtual Networking entities using one of two ways:
• Add them from UI
• Use the agent's omcli add_entity command with the appropriate JSON files
Adding Entities from the UI
1. From the Management Cloud main menu, select Administration, Discovery, andthen Add Entity. The Add Entity page displays.
2. Select the Oracle Virtual Networking Entity Type.
3. Enter the following UI properties.
Oracle Fabric Manager / Virtual Networking / Xsigo UI Fields
• Entity Name: Your OFM/OVN entity name.• Host Name: The fully qualified host name or IP address of the OFM/OVM host.• REST Port: The OFM/OVN REST port, default is 8443.• Trust Any Server Certificate: False is recommended. You must import the storage
server SSL certificate into the selected could agent before discovery. If you chooseTrue instead, discovery will occur even for an untrusted or expired certificate.
• Cloud Agent: Cloud agent monitoring the host where OFM/OVM is installed.Monitoring Credentials
• Username: The OFM/OVN user.• Password: The OFM/OVM user password.
See Add Entities from the Console for detailed instructions on using the Add Entity UI.
Using omcli and the Appropriate JSON Files
1. Download and extract the required JSON file(s) from the master JSON zip file.See the table below for the specific JSON files you'll need.
2. Edit the file(s) and specify the requisite properties shown below.
Appendix CAdd Oracle Virtual Networking
C-126
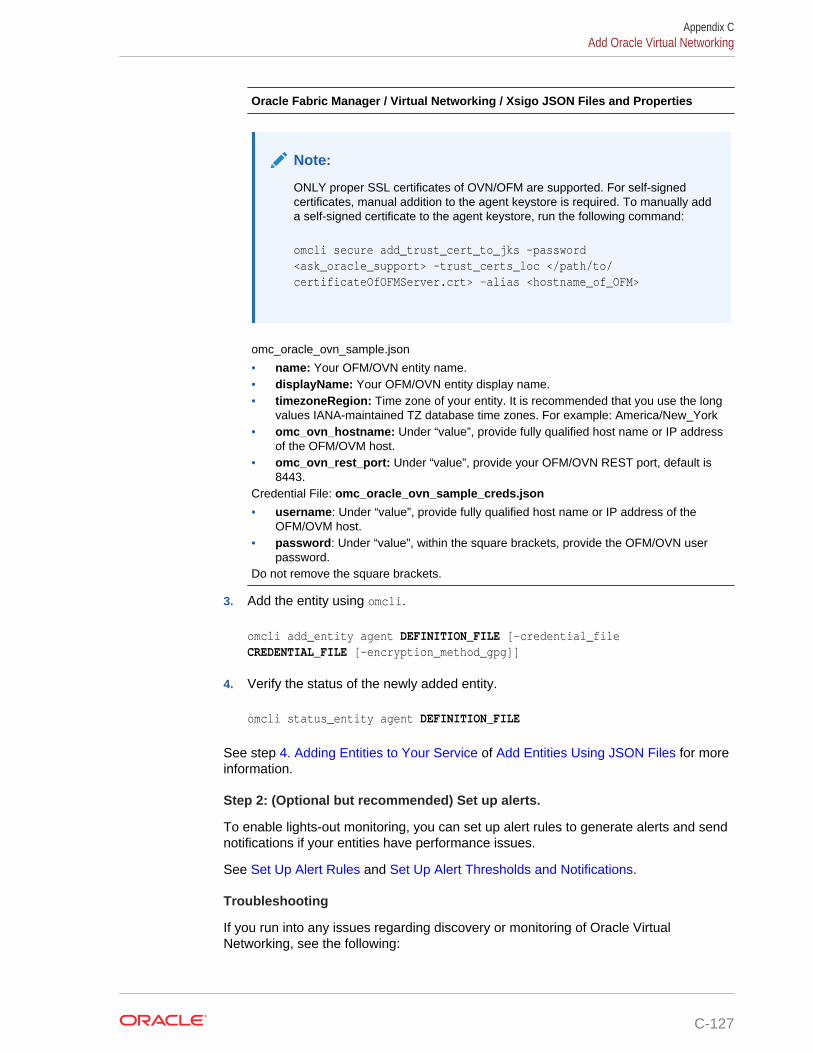
Oracle Fabric Manager / Virtual Networking / Xsigo JSON Files and Properties
Note:
ONLY proper SSL certificates of OVN/OFM are supported. For self-signedcertificates, manual addition to the agent keystore is required. To manually adda self-signed certificate to the agent keystore, run the following command:
omcli secure add_trust_cert_to_jks -password <ask_oracle_support> -trust_certs_loc </path/to/certificateOfOFMServer.crt> -alias <hostname_of_OFM>
omc_oracle_ovn_sample.json
• name: Your OFM/OVN entity name.• displayName: Your OFM/OVN entity display name.• timezoneRegion: Time zone of your entity. It is recommended that you use the long
values IANA-maintained TZ database time zones. For example: America/New_York• omc_ovn_hostname: Under “value”, provide fully qualified host name or IP address
of the OFM/OVM host.• omc_ovn_rest_port: Under “value”, provide your OFM/OVN REST port, default is
8443.Credential File: omc_oracle_ovn_sample_creds.json
• username: Under “value”, provide fully qualified host name or IP address of theOFM/OVM host.
• password: Under “value”, within the square brackets, provide the OFM/OVN userpassword.
Do not remove the square brackets.
3. Add the entity using omcli.
omcli add_entity agent DEFINITION_FILE [-credential_file CREDENTIAL_FILE [-encryption_method_gpg]]
4. Verify the status of the newly added entity.
omcli status_entity agent DEFINITION_FILE
See step 4. Adding Entities to Your Service of Add Entities Using JSON Files for moreinformation.
Step 2: (Optional but recommended) Set up alerts.
To enable lights-out monitoring, you can set up alert rules to generate alerts and sendnotifications if your entities have performance issues.
See Set Up Alert Rules and Set Up Alert Thresholds and Notifications.
Troubleshooting
If you run into any issues regarding discovery or monitoring of Oracle VirtualNetworking, see the following:
Appendix CAdd Oracle Virtual Networking
C-127
• Lack of Data
• Create an Agent Support Bundle
Add Oracle VM ManagerYou can add Oracle VM Manager entities using the Add Entity UI or using the cloudagent command line interface (omcli) with the appropriate JSON files.
Step 1: Prepare Oracle VM Manager for monitoring.
Prerequisites
The cloud agent must be deployed on the Oracle VM Manager host.
Credentials: The username and password are required to access the Oracle VM Managerconsole.
Example:
username=admin / password=admin_pw
Certificates:
You need to explicitly add the Oracle VM Manager Weblogic certificate to the Agent's JKS.
How to extract certificate from Oracle VM Manager:
To export the Oracle VM Manager WebLogic certificate, log in as the root user and enter thefollowing command:
#/u01/app/oracle/ovm-manager-3/ovm_upgrade/bin/ovmkeytool.sh exportca > <file_loc_for_certificate>
To import the Oracle VM Manager Weblogic certificate to the Agent Keystore, log in as anOracle cloud agent user and enter the following command:
<AGENT_INSTANCE_HOME>/bin/omcli secure add_trust_cert_to_jks -trust_certs_loc <file_loc_for_certificate> -alias <alias_name>
Step 2: Decide how you want to add the Oracle VM Manager.
You can add Oracle VM Manager entities from the UI or using OMCLI and entity JSONfiles.
Adding Entities from the UI
1. From the Management Cloud main menu, select Administration, Discovery, andthen Add Entity. The Add Entity page displays.
2. Select an Oracle VM Manager Entity Type.
3. Enter the following UI properties.
Appendix CAdd Oracle VM Manager
C-128
Oracle VM Manager UI Properties
• Entity Name: Name appearing in the UI.• Oracle VM Manager Console URL: Oracle VM Manager console URL used to
connect to the installed Oracle VM Manager. The URL follows the format: https://<ovm_host_name>:<port>/ovm where ovm_host_name is a fully-qualified hostname where Oracle VM Manager is installed and port refers to the port number onwhich Oracle VM Manager is listening.
• Cloud Agent: The cloud agent monitoring the Oracle VM Manager application.Monitoring Credentials
• Admin Username: Oracle VM Manager username.• Admin Password: Oracle VM Manager password.
See Add Entities from the Console for more information.
Using omcli and the Appropriate JSON Files
1. Download and extract the required JSON file(s) from the master JSON zip file.See the table below for the specific JSON files you'll need.
2. Edit the file(s) and specify the requisite properties shown below.
Oracle VM Manager JSON Files and Properties
Definition File: omc_oracle_vm_manager.json• name: Your Oracle VM Manager name. This needs to be unique across OVM
Managers used• display name: Name displayed in the Oracle Infrastructure Monitoring Service User
Interface.• timezoneRegion:Time zone of your entity. It is recommended that you use the long
values IANA-maintained TZ database time zones. For example:
America/New_York
• omc_ovmm_console_url: Under “value”, provide the Oracle VM Manager consoleURL used to connect to the installed Oracle VM Manager. The URL follows theformat: https://<ovm_host_name>:<port>/ovm where ovm_host_name is a fully-qualified host name where Oracle VM Manager is installed and port refers to the portnumber on which Oracle VM Manager is listening.
Credential File: omc_oracle_vm_manager_creds.json• OVMUsername: Under “value”, within the square brackets, provide the Oracle VM
Manager console user name(default admin) to be used for monitoring.• OVMPassword: Under “value”, within the square brackets, provide the Oracle VM
Manager console monitoring user's password.Do not remove the square brackets.
3. Add the entity using OMCLI.
omcli add_entity agent DEFINITION_FILE [-credential_file CREDENTIAL_FILE [-encryption_method_gpg]]
4. Verify the status of the newly added entity.
omcli status_entity agent DEFINITION_FILE
See step 4. Adding Entities to Your Service of Add Entities Using JSON Files for moreinformation.
Appendix CAdd Oracle VM Manager
C-129
Step 3: (Optional but recommended) Set up alerts.
To enable lights-out monitoring, you can set up alert rules to generate alerts and sendnotifications if your entities have performance issues.
See Set Up Alert Rules and Set Up Alert Thresholds and Notifications.
Troubleshooting
If you run into any issues regarding discovery or monitoring of Apache HTTP Server,see the following:
• Lack of Data
• Create an Agent Support Bundle
Add Oracle VM Server for SPARC (LDOMS)You can add Oracle VM Server entities using the Add Entity UI or using the cloudagent command line interface (omcli) with the appropriate JSON files.
Step 1: Prepare Oracle VM Server for monitoring.
Prerequisites
• Prerequisites: OMC Cloud Agent is deployed on the LDoms Control Domain• Discovery does not require any user credentials but you need to grant solaris ldoms read
RBAC privileges to the OMC Cloud Agent user:
/usr/sbin/usermod -A solaris.ldoms.read oracle
• Discovery properties:
– The following command retrieves the LDoms Control Domain UUID to be supplied atdiscovery time through entity identifying property omc_virtual_platform_id usingvirtinfo:
# virtinfo -ap | grep DOMAINUUIDDOMAINUUID|uuid=280c9ff4-a134-48cd-cee9-a270b2aaefa0
• Autodiscovery of LDoms-related entities:
– Use a JSON file with details to discover the Oracle VM Server for SPARC (LDoms).Using this method, all Logical Domains (Virtual Machines) are automaticallydiscovered and updated periodically when things change in the Oracle VM Server forSPARC (LDoms) deployment.
Step 2: Add the Oracle VM Server using omcli and the Appropriate JSON Files
1. Download and extract the required JSON file(s) from the master JSON zip file.See the table below for the specific JSON files you'll need.
2. Edit the file(s) and specify the requisite properties shown below.
Appendix CAdd Oracle VM Server for SPARC (LDOMS)
C-130
Oracle VM Server for SPARC (LDoms) JSON Files and Properties
Definition File: omc_sparc_ldoms_sample.json
• omc_virtual_platform_id: LDoms Control Domain UUID• omc_virtual_type: LDoms• omc_dispatch_url: local://localhost
3. Add the entity using omcli.
omcli add_entity agent DEFINITION_FILE [-credential_file CREDENTIAL_FILE [-encryption_method_gpg]]
4. Verify the status of the newly added entity.
omcli status_entity agent DEFINITION_FILE
See step 4. Adding Entities to Your Service of Add Entities Using JSON Files for moreinformation.
Step 3: (Optional but recommended) Set up alerts.
To enable lights-out monitoring, you can set up alert rules to generate alerts and sendnotifications if your entities have performance issues.
See Set Up Alert Rules and Set Up Alert Thresholds and Notifications.
Troubleshooting
If you run into any issues regarding discovery or monitoring of Oracle VM Server, seethe following:
• Lack of Data
• Create an Agent Support Bundle
Appendix CAdd Oracle VM Server for SPARC (LDOMS)
C-131
Add Oracle WebLogic Server/DomainYou can add Oracle WebLogic Server/Domain entities using the Add Entity UI or usingthe cloud agent command line interface (omcli) with the appropriate JSON files.
Step 1: Prepare Oracle WebLogic Server/Domain for monitoring.
Prerequisites
To enable monitoring of a Oracle WebLogic Server (WLS), use a WebLogic user with at leastthe Monitor role. The user can also have Operator or Administrator roles, which include theMonitor role.
If you have enabled the Oracle WebLogic Server with SSL, you must export the certificate fromits keystore and import it in the Cloud Agent keystore. Perform the following steps:
1. Stop the Cloud Agent.
omcli stop agent
2. Export the certificate from the WLS instance JMX SSL keystore to the Cloud Agent'struststore. For example, on a UNIX host:
cd <agent base Directory>/agentStateDir/sysman/config/montrust
keytool -exportcert -alias <alias of WLS SSL key> -file <ExportedCert Name> -keystore <path to the WLS SSL Keystore>.keystore -storepass <WLS SSL Keystore password> -rfc
3. Import the WLS instance JMX SSL keystore to the Cloud Agent's truststore:
keytool -import -noprompt -alias <alias agent's truststore key> -file<Exported Cert Name>.cer -keystore AgentTrust.jks -storepass <Agenttruststore password, default is "welcome">
4. Restart the Cloud Agent..
omcli start agent
Step 2: Decide how you want to add the Oracle WebLogic Server/Domain.
You can add Oracle WebLogic Server/Domain entities using one of two ways:
• Add them from UI
• Use the agent's omcli add_entity command with the appropriate JSON files
Adding Entities from the UI
1. From the Management Cloud main menu, select Administration, Discovery, andthen Add Entity. The Add Entity page displays.
2. Select the Oracle WebLogic Server/Domain Entity Type.
3. Enter the following UI properties.
Appendix CAdd Oracle WebLogic Server/Domain
C-132
WebLogic Domain /WebLogic Server UI Fields
• Entity Name: Your WebLogic Domain name.• Port: The port used for WebLogic Admin Server(Console).• Protocol: The protocol used for WebLogic Server - For example: t3• Administration Server Host: the fully-qualified host name where the WebLogic
Admin Server is installed.• Discover Coherence: (True/False) Specify whether Coherence Clusters deployed on
the Weblogic domain should discovered. This option is set to True by default. Turnthis option off when discovering a SOA Suite domain.
• Cloud Agent: Cloud agent monitoring the host where WebLogic is installed.Monitoring Credentials (WebLogic Server Credentials)
• Username: WebLogic Server user name.• Password: WebLogic Server username password.
See Add Entities from the Console for detailed instructions on using the Add Entity UI.
Using omcli and the Appropriate JSON Files
1. Download and extract the required JSON file(s) from the master JSON zip file.See the table below for the specific JSON files you'll need.
2. Edit the file(s) and specify the requisite properties shown below.
WebLogic Domain /WebLogic Server JSON Files and Properties
Definition File: omc_weblogic_domain_sample.json
Note:
When you add a WebLogic Domain entity (requiring credentials), becauseOracle Management Cloud connects to the WebLogic Admin Server, allWebLogic Clusters and WebLogic Servers that are part of that domain areautomatically discovered. There’s no need to add them separately.
• name: Your WebLogic Domain name.• displayName: Name displayed in the Oracle Infrastructure Monitoring User Interface.• timezoneRegion: Time zone of your entity. It is recommended that you use the long
values IANA-maintained TZ database time zones. For example: America/New_York• port: Under “value”, provide the port used for WebLogic Admin Server(Console).• protocol: Under “value”, provide the protocol used for WebLogic Server - For
example: t3• admin_server_host: Under “value”, provide the fully-qualified host name where the
WebLogic Admin Server is installed.Credential File: omc_weblogic_domain_sample_creds.json
• username: Under “value”, within the square brackets, provide the WebLogic Domainmonitoring user name. You must have defined this user in the Prerequisite Tasksstep.
• password: Under “value”, within the square brackets, provide the WebLogic Domainmonitoring user’s password.
Do not remove the square brackets.
Appendix CAdd Oracle WebLogic Server/Domain
C-133
3. Add the entity using omcli.
omcli add_entity agent DEFINITION_FILE [-credential_file CREDENTIAL_FILE [-encryption_method_gpg]]
4. Verify the status of the newly added entity.
omcli status_entity agent DEFINITION_FILE
See step 4. Adding Entities to Your Service of Add Entities Using JSON Files for moreinformation.
Step 3: (Optional but recommended) Set up alerts.
To enable lights-out monitoring, you can set up alert rules to generate alerts and sendnotifications if your entities have performance issues.
See Set Up Alert Rules and Set Up Alert Thresholds and Notifications.
Troubleshooting
If you run into any issues regarding discovery or monitoring of Oracle WebLogicServer/Domain, see the following:
• Lack of Data
• Create an Agent Support Bundle
Add SPARC/Intel ComputersYou can add SPARC/Intel Computers entities using the Add Entity UI or using thecloud agent command line interface (omcli) with the appropriate JSON files.
Step 1: Prepare SPARC/Intel Computers for monitoring.
Credentials
Only the username and password are required to use SSH to log in to the ILOM serviceprocessor.
Step 2: Add the SPARC/Intel Computers using omcli and the Appropriate JSONFiles
1. Download and extract the required JSON file(s) from the master JSON zip file.See the table below for the specific JSON files you'll need.
2. Edit the file(s) and specify the requisite properties shown below.
Intel/SPARC Computers JSON Files and Properties
Definition File: omc_ilom_server.json
• omc_dispatch_url: ilom-ssh://<fully qualified host name or IP address of ILOMServer>
Credential File: omc_ilom_server_creds.json
• username: ILOM Server username (use Administrator role).• password: ILOM Server password (use Administrator role).
Appendix CAdd SPARC/Intel Computers
C-134
3. Add the entity using omcli.
omcli add_entity agent DEFINITION_FILE [-credential_file CREDENTIAL_FILE [-encryption_method_gpg]]
4. Verify the status of the newly added entity.
omcli status_entity agent DEFINITION_FILE
See step 4. Adding Entities to Your Service of Add Entities Using JSON Files for moreinformation.
Step 3: (Optional but recommended) Set up alerts.
To enable lights-out monitoring, you can set up alert rules to generate alerts and sendnotifications if your entities have performance issues.
See Set Up Alert Rules and Set Up Alert Thresholds and Notifications.
Troubleshooting
If you run into any issues regarding discovery or monitoring of SPARC/IntelComputers, see the following:
• Lack of Data
• Create an Agent Support Bundle
Appendix CAdd SPARC/Intel Computers
C-135

Add TomcatYou can add Tomcat entities using the Add Entity UI or using the cloud agentcommand line interface (omcli) with the appropriate JSON files.
Step 1: Prepare Tomcat for monitoring.
Prerequisites and Credentials
Tomcat is monitored using JMX. You must configure Tomcat for JMX remote monitoring even ifyou are using a local agent.
Tomcat can be monitored with or without authentication. If a JMX credential is created, then it’sassumed you’re monitoring this entity with credentials.
To create a JMX credential for monitoring:
1. Edit the environment file:
vi $CATALINA_HOME/bin/setenv.sh
Add:
CATALINA_OPTS="-Dcom.sun.management.jmxremote -Dcom.sun.management.jmxremote.port=9999 -Dcom.sun.management.jmxremote.ssl=false -Dcom.sun.management.jmxremote.authenticate=true -Dcom.sun.management.jmxremote.password.file=../conf/jmxremote.password -Dcom.sun.management.jmxremote.access.file=../conf/jmxremote.access"
2. Save the file.
3. Change the file permission as executable:
chmod 755 $CATALINA_HOME/bin/setenv.sh
4. Edit the password file:
vi $CATALINA_HOME/conf/jmxremote.password
Add:
control tomcatadmin tomcat
5. Edit the access file:
vi $CATALINA_HOME/conf/jmxremote.access
Add:
control readonlyadmin readwrite
Appendix CAdd Tomcat
C-136
Prerequisites and Credentials
6. Change the file permission for only the owner:
chmod 600 jmxremote.accesschmod 600 jmxremote.password
7. Bounce the Tomcat instance:
sh $CATALINA_HOME/bin/shutdown.shsh $CATALINA_HOME/bin/startup.sh
If you have enabled the Tomcat JMX with SSL, you must export the certificate from its keystoreand import it in the Cloud Agent keystore. Perform the following steps:
1. Export the certificate from the Tomcat instance JMX SSL keystore to the Cloud Agent'struststore. For example, on a UNIX host:
cd <agent Base Directory>/agentStateDir/sysman/config/montrust
keytool -exportcert -alias <alias of Tomcat JMX SSL key> -file<Exported Cert Name>.cer -keystore <path to the Tomcat JMX SSLKeystore>.keystore -storepass <Tomcat JMX SSL Keystore password> -rfc
2. Import the Tomcat instance JMX SSL keystore to the Cloud Agent's truststore:
keytool -import -noprompt -alias <alias agent's truststore key> -file<Exported Cert Name>.cer -keystore AgentTrust.jks -storepass <agenttruststore password, default is "welcome">
3. Restart the agent, using the command line interface:
omcli stop agentomcli start agent
Step 2: Decide how you want to add the Tomcat.
You can add Tomcat entities using one of two ways:
• Add them from UI
• Use the agent's omcli add_entity command with the appropriate JSON files
Adding Entities from the UI
1. From the Management Cloud main menu, select Administration, Discovery, andthen Add Entity. The Add Entity page displays.
2. Select the Tomcat Entity Type.
3. Enter the following UI properties.
Appendix CAdd Tomcat
C-137
Tomcat UI Fields
• Discover Using Credentials: Discover Tomcat using Tomcat credentials (on bydefault).
• Entity Name: Name of this entity displayed in the Oracle Management Cloud console.• Host Name: The fully-qualified host name where the Tomcat entity is installed.• JMX Port Number: The JMX port used by the Tomcat entity.• Cloud Agent: The cloud agent monitoring the host where Tomcat is installed.
Monitoring Credentials
• JMX Username: The Tomcat user name.• JMX Password: The Tomcat user name password.
See Add Entities from the Console for detailed instructions on using the Add Entity UI.
Using omcli and the Appropriate JSON Files
1. Download and extract the required JSON file(s) from the master JSON zip file.See the table below for the specific JSON files you'll need.
2. Edit the file(s) and specify the requisite properties shown below.
Appendix CAdd Tomcat
C-138
Tomcat JSON Files and Properties
Definition File: omc_tomcat_secure_sample.json
• name: Your Tomcat name.• displayName: Name displayed in the Oracle Infrastructure Monitoring User Interface.• timezoneRegion: Time zone of your entity. It is recommended that you use the long
values IANA-maintained TZ database time zones. For example: America/New_York• host_name: Under “value”, provide the fully-qualified Tomcat host name where the
Tomcat entity is installed.• jmx_port: Under “value”, provide the JMX port used by the Tomcat entity.Credential Files
omc_tomcat_secure_creds.json• jmx_username: Under “value”, within the square brackets, provide the Tomcat user
name. Leave this field blank and still include the credential JSON file for credential-less discovery. Do not remove the square brackets.
• jmx_password: Under “value”, within the square brackets, provide the Tomcat username password. Leave this field blank and still include the credential JSON file forcredential-less discovery.
omc_tomcat_secureSSL_creds.json• ssl_trust_store: Under “value”, within the square brackets, provide the full path to the
Cloud Agent truststore, AgentTrust.jks. For example, <agent base directory>/sysman/config/montrust/AgentTrust.jks
• ssl_trust_store_password: Under “value”, within the square brackets, provide theCloud Agent truststore password, the default is "welcome".
Do not remove the square brackets.
Note:
To add a Tomcat entity that does not require credentials, simply add the entitywithout any credentials. And, if you do not provide any credentials, make sureinput JSON file also does not contain any references to credentials.
To add a Tomcat entity without credentials, you will still need to provide the credentials file(omc_tomcat_secure_creds.json) but keep the jmx_username value blank, as shown inthe following example.
{ "credentials": [{ "id": "TomcatCredsNormal", "name": "tomcat_creds", "credType": "TomcatCreds ", "properties": [{ "name": "jmx_username", "value": "CLEAR[]" }, { "name": "jmx_password", "value": "CLEAR[]" }] }]}
Appendix CAdd Tomcat
C-139
Tomcat JSON Files and Properties
Note:
Beginning with Oracle Management Cloud 1.30, Tomcat discovery will alwaysuse the Agent Trust Store. User-provided SSL Trust Store will no longer beaccepted.
3. Add the entity using omcli.
omcli add_entity agent DEFINITION_FILE [-credential_file CREDENTIAL_FILE [-encryption_method_gpg]]
4. Verify the status of the newly added entity.
omcli status_entity agent DEFINITION_FILE
See step 4. Adding Entities to Your Service of Add Entities Using JSON Files for moreinformation.
Step 3: (Optional but recommended) Set up alerts.
To enable lights-out monitoring, you can set up alert rules to generate alerts and sendnotifications if your entities have performance issues.
See Set Up Alert Rules and Set Up Alert Thresholds and Notifications.
Troubleshooting
If you run into any issues regarding discovery or monitoring of Tomcat, see thefollowing:
• Lack of Data
• Create an Agent Support Bundle
Appendix CAdd Tomcat
C-140
Add VMware vCenterYou can add VMware vCenter entities using the Add Entity UI or using the cloud agentcommand line interface (omcli) with the appropriate JSON files.
Step 1: Prepare VMware vCenter for monitoring.
Prerequisites
In order for the Cloud Agent to be able to collect all the metrics for the Oracle ManagementCloud VMware entities, you should:
1. Install VMware tools on the VM host.
2. Set the statistics level to one (1).
Credentials: username/password required to access VMware vCenter (use Administratorrole).
Example:
[email protected] / password=<admin_pw>
Certificates:
You need to explicitly add the vCenter certificate to the Agent's JKS:
Example:
<jdk>/bin/keytool -importcert -file <vmware-vsphere-certificate> -aliasvmware -keystore $T_WORK/agentStateDir/sysman/config/montrust/AgentTrust.jks -storepass welcome
How to extract certificate from vCenter:
openssl s_client -showcerts -connect <hostname>:443
Discovery properties:
How to retrieve VMware vCenter Server Instance UUID to be passed in at discovery timethrough the entity property omc_virtual_mgmt_system_id using VMware PowerCLI:
Example:
PS C:\> $vcenter = Connect-viserver vcsa-01a.corp.local -User [email protected] -Password admin_pwPS C:\> $vcenter.InstanceUuidd322b019-58d4-4d6f-9f8b-d28695a716c0
Step 2: Add the VMware vCenter using omcli and the Appropriate JSON Files
1. Download and extract the required JSON file(s) from the master JSON zip file.See the table below for the specific JSON files you'll need.
2. Edit the file(s) and specify the requisite properties shown below.
Appendix CAdd VMware vCenter
C-141
VMware vCenter JSON Files and Properties
Definition File: omc_vmware_vcenter_sample.json
• omc_virtual_mgmt_system_id: VMware vCenter Server Instance UUID• omc_virtual_type: VMware• omc_dispatch_url: vmware-https://<Fully qualified host name or IP address of
vCenter>/sdk/vimserviceCredential File: omc_vmware_vcenter_sample_creds.json
• username: VMware vCenter username (use Administrator role).• password: VMware vCenter password (use Administrator role).
3. Add the entity using omcli.
omcli add_entity agent DEFINITION_FILE [-credential_file CREDENTIAL_FILE [-encryption_method_gpg]]
4. Verify the status of the newly added entity.
omcli status_entity agent DEFINITION_FILE
See step 4. Adding Entities to Your Service of Add Entities Using JSON Files for moreinformation.
Step 3: (Optional but recommended) Set up alerts.
To enable lights-out monitoring, you can set up alert rules to generate alerts and sendnotifications if your entities have performance issues.
See Set Up Alert Rules and Set Up Alert Thresholds and Notifications.
Troubleshooting
If you run into any issues regarding discovery or monitoring of VMware vCenter, seethe following:
• Lack of Data
• Create an Agent Support Bundle
Add ZFS Storage ApplianceYou can add ZFS Storage Appliance entities using the Add Entity UI or using the cloudagent command line interface (omcli) with the appropriate JSON files.
Step 1: Decide how you want to add the ZFS Storage Appliance.
You can add ZFS Storage Appliance entities using one of two ways:
• Add them from UI
• Use the agent's omcli add_entity command with the appropriate JSON files
Adding Entities from the UI
1. From the Management Cloud main menu, select Administration, Discovery, andthen Add Entity. The Add Entity page displays.
2. Select the ZFS Storage Appliance Entity Type.
Appendix CAdd ZFS Storage Appliance
C-142
3. Enter the following UI properties.
ZFS Storage Appliance UI Fields
• Entity Name: Name of this entity displayed in the Oracle Management Cloud console.• ZFFSA IP Address: IP address of the ZFS storage appliance with REST API.• ZFFSA Port: Port of the storage appliance REST API.• Trust Any Server Certificate: False is recommended. You must import the storage
server SSL certificate into the selected could agent before discovery. If you chooseTrue instead, discovery will occur even for an untrusted or expired certificate.
• Cloud Agent: Cloud agent monitoring the host where the ZFS Storage Appliance isinstalled.
Monitoring Credentials (ZFFSA Credentials)
• Username: Storage appliance username.• Password: Storage appliance password.
See Add Entities from the Console for detailed instructions on using the Add Entity UI.
Using omcli and the Appropriate JSON Files
1. Download and extract the required JSON file(s) from the master JSON zip file.See the table below for the specific JSON files you'll need.
2. Edit the file(s) and specify the requisite properties shown below.
ZFS Storage Appliance JSON Files and Properties
Definition File: omc_oracle_zfs_storage_appliance_sample.json
• omc_zfssa_hostname: ONLY IP of the ZFS Storage Appliance (if you usehostname/fully qualified domain name, you will trigger a REST fetchlet problem withcertificate validation: (javax.net.ssl.SSLProtocolException: handshake alert:unrecognized_name ))
• omc_zfssa_port: Port to use for REST API communication with ZFS StorageAppliance storage
• omc_ssl_trust_server_cert: Flag indicating whether to trust self-signed certificates.Credential File: omc_oracle_zfs_storage_appliance_sample_creds.json
• Alias: Alias (username/login name) to be used for the ZFS Storage Appliance RESTAPI
• Password: Password for the ZFS Storage Appliance REST API alias.
3. Add the entity using omcli.
omcli add_entity agent DEFINITION_FILE [-credential_file CREDENTIAL_FILE [-encryption_method_gpg]]
4. Verify the status of the newly added entity.
omcli status_entity agent DEFINITION_FILE
See step 4. Adding Entities to Your Service of Add Entities Using JSON Files for moreinformation.
Step 3: (Optional but recommended) Set up alerts.
To enable lights-out monitoring, you can set up alert rules to generate alerts and sendnotifications if your entities have performance issues.
Appendix CAdd ZFS Storage Appliance
C-143
See Set Up Alert Rules and Set Up Alert Thresholds and Notifications.
Troubleshooting
If you run into any issues regarding discovery or monitoring of ZFS Storage Appliance,see the following:
• Lack of Data
• Create an Agent Support Bundle
Appendix CAdd ZFS Storage Appliance
C-144
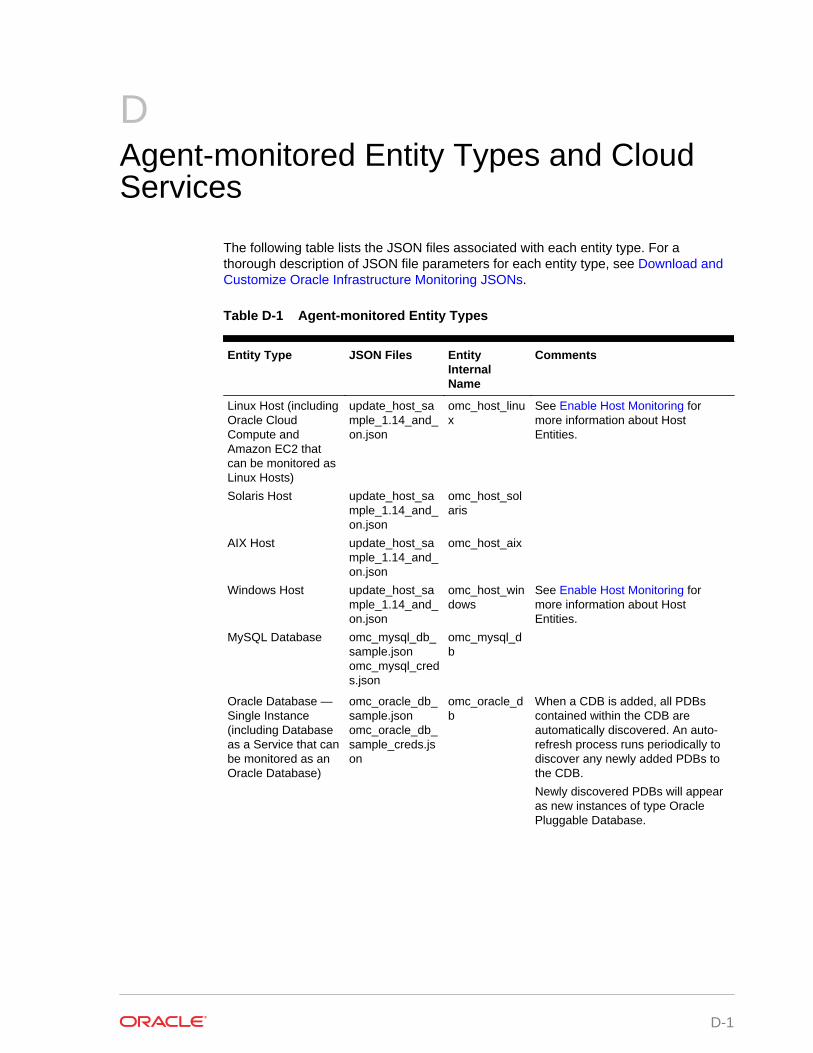
DAgent-monitored Entity Types and CloudServices
The following table lists the JSON files associated with each entity type. For athorough description of JSON file parameters for each entity type, see Download andCustomize Oracle Infrastructure Monitoring JSONs.
Table D-1 Agent-monitored Entity Types
Entity Type JSON Files EntityInternalName
Comments
Linux Host (includingOracle CloudCompute andAmazon EC2 thatcan be monitored asLinux Hosts)
update_host_sample_1.14_and_on.json
omc_host_linux
See Enable Host Monitoring formore information about HostEntities.
Solaris Host update_host_sample_1.14_and_on.json
omc_host_solaris
AIX Host update_host_sample_1.14_and_on.json
omc_host_aix
Windows Host update_host_sample_1.14_and_on.json
omc_host_windows
See Enable Host Monitoring formore information about HostEntities.
MySQL Database omc_mysql_db_sample.jsonomc_mysql_creds.json
omc_mysql_db
Oracle Database —Single Instance(including Databaseas a Service that canbe monitored as anOracle Database)
omc_oracle_db_sample.jsonomc_oracle_db_sample_creds.json
omc_oracle_db
When a CDB is added, all PDBscontained within the CDB areautomatically discovered. An auto-refresh process runs periodically todiscover any newly added PDBs tothe CDB.
Newly discovered PDBs will appearas new instances of type OraclePluggable Database.
D-1

Table D-1 (Cont.) Agent-monitored Entity Types
Entity Type JSON Files EntityInternalName
Comments
Oracle Database —Real ApplicationClusters (RAC)
omc_oracle_dbRAC_sample.jsonomc_oracle_dbRAC_sample_creds.json
omc_oracle_db
RAC instances are automaticallydiscovered on a periodic basis onceyou add an Oracle RAC database.RAC instances are monitored usingmetrics associated with the OracleDatabase.When a CDB is discovered, all PDBscontained within the CDB areautomatically discovered. An auto-refresh process runs periodically todiscover any newly added PDBs tothe CDB.
Newly discovered PDBs will appearas new instances of type OraclePluggable Database.
Oracle AutomationStorageManagement (ASM)
omc_oracle_asm_sample.jsonomc_oracle_asm_sample_creds.json
omc_oracle_asm
You discover RAC ASM targets one-by-one on each node. However,when discovering an ASM target onthe first node, all nodes containingASM instances will also bediscovered.
Oracle DatabaseListener
omc_oracle_db_listener_sample.jsonomc_oracle_db_listener_creds.json
omc_oracle_db_listener
Oracle DatabaseListener Cluster
omc_oracle_db_listener_cluster_credless_sample.json
omc_oracle_db_listener_cluster_sample.json
omc_oracle_db_listener_cluster_sample_cred.json
omc_oracle_db_listener_cluster
Cluster Listener discovery adds thefollowing:
1. Cluster Listener/SCAN Listener( Entity Type:omc_oracle_db_listener_cluster)
2. All the Nodes/ SI Listener ofCluster(omc_oracle_db_listener)
Oracle HTTP Server(OHS)
omc_oracle_apache_sample.jsonomc_oracle_apache_sample_creds_ohs11.json
omc_oracle_apache_sample_creds_ohs12.json
Oracle SOAInfrastructure
omc_oracle_soainfra_sample_creds.jsonomc_oracle_soainfra_sample.json
omc_oracle_soainfra
Appendix D
D-2
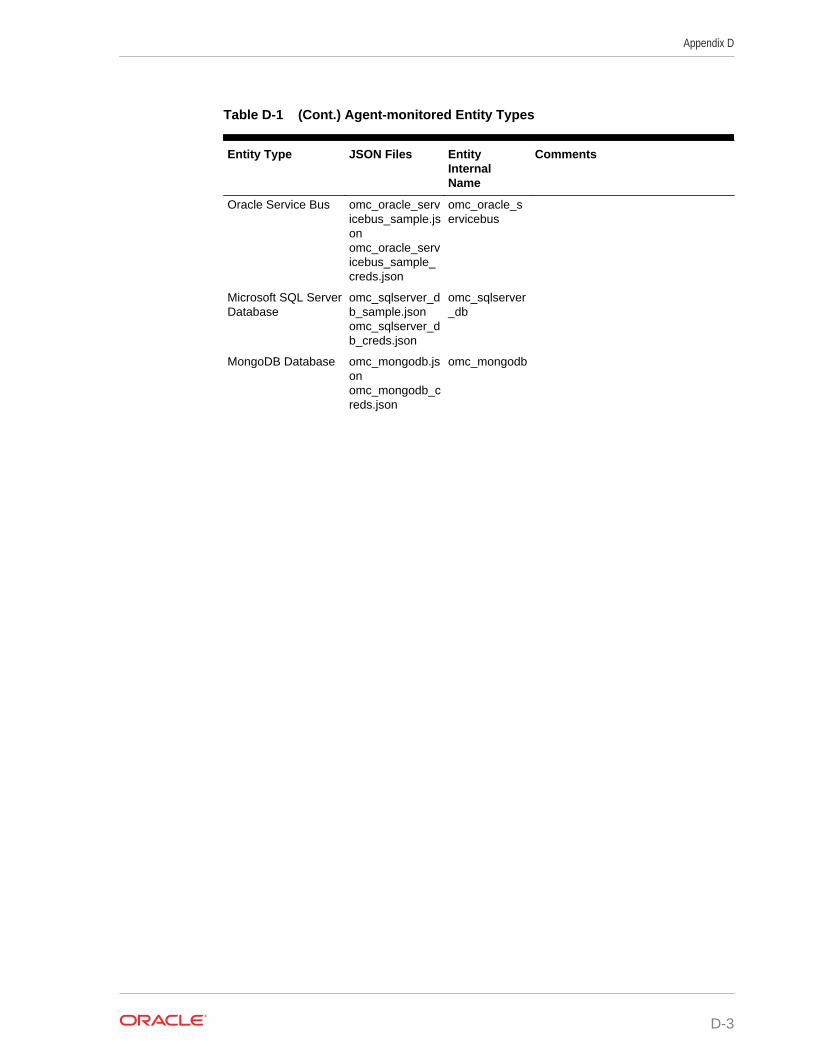
Table D-1 (Cont.) Agent-monitored Entity Types
Entity Type JSON Files EntityInternalName
Comments
Oracle Service Bus omc_oracle_servicebus_sample.jsonomc_oracle_servicebus_sample_creds.json
omc_oracle_servicebus
Microsoft SQL ServerDatabase
omc_sqlserver_db_sample.jsonomc_sqlserver_db_creds.json
omc_sqlserver_db
MongoDB Database omc_mongodb.jsonomc_mongodb_creds.json
omc_mongodb
Appendix D
D-3
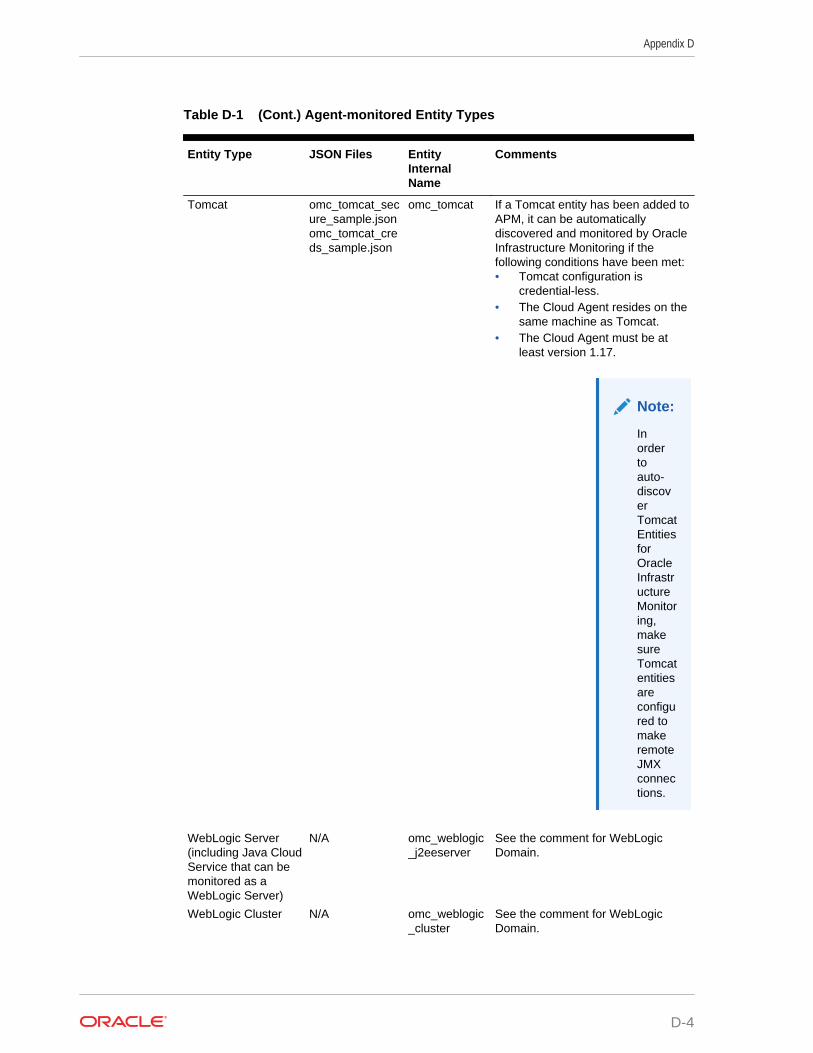
Table D-1 (Cont.) Agent-monitored Entity Types
Entity Type JSON Files EntityInternalName
Comments
Tomcat omc_tomcat_secure_sample.jsonomc_tomcat_creds_sample.json
omc_tomcat If a Tomcat entity has been added toAPM, it can be automaticallydiscovered and monitored by OracleInfrastructure Monitoring if thefollowing conditions have been met:• Tomcat configuration is
credential-less.• The Cloud Agent resides on the
same machine as Tomcat.• The Cloud Agent must be at
least version 1.17.
Note:
Inordertoauto-discoverTomcatEntitiesforOracleInfrastructureMonitoring,makesureTomcatentitiesareconfigured tomakeremoteJMXconnections.
WebLogic Server(including Java CloudService that can bemonitored as aWebLogic Server)
N/A omc_weblogic_j2eeserver
See the comment for WebLogicDomain.
WebLogic Cluster N/A omc_weblogic_cluster
See the comment for WebLogicDomain.
Appendix D
D-4
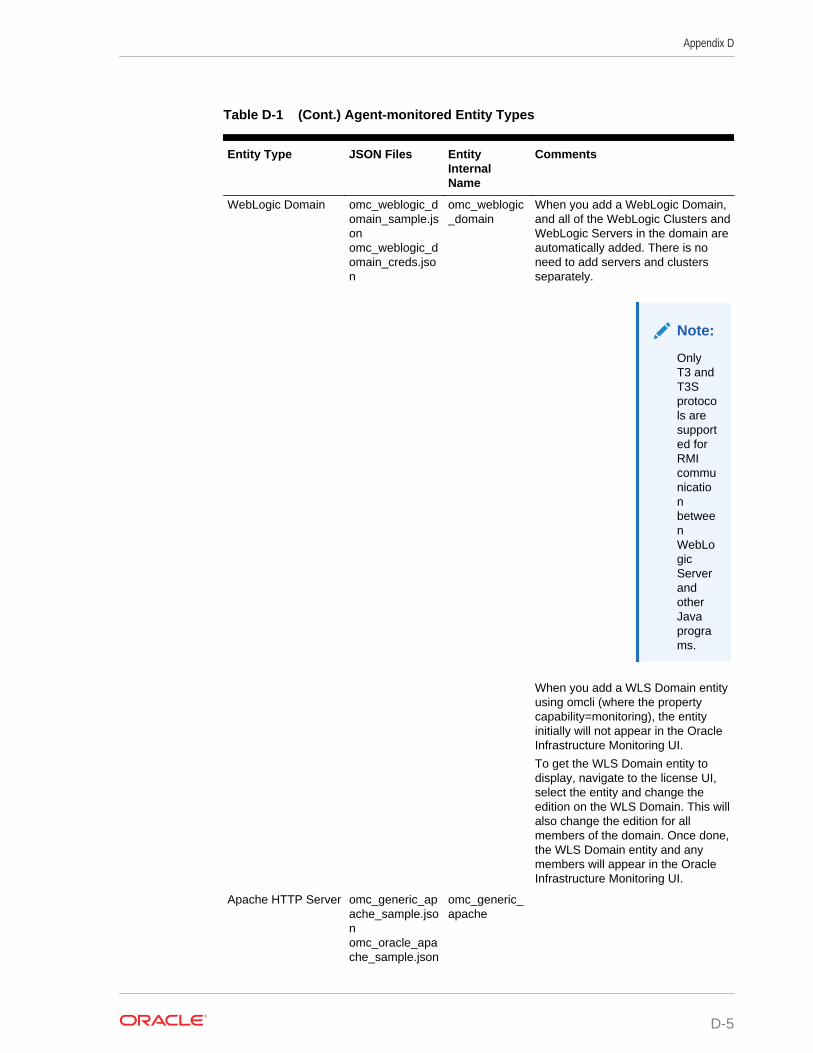
Table D-1 (Cont.) Agent-monitored Entity Types
Entity Type JSON Files EntityInternalName
Comments
WebLogic Domain omc_weblogic_domain_sample.jsonomc_weblogic_domain_creds.json
omc_weblogic_domain
When you add a WebLogic Domain,and all of the WebLogic Clusters andWebLogic Servers in the domain areautomatically added. There is noneed to add servers and clustersseparately.
Note:
OnlyT3 andT3Sprotocols aresupported forRMIcommunicationbetweenWebLogicServerandotherJavaprograms.
When you add a WLS Domain entityusing omcli (where the propertycapability=monitoring), the entityinitially will not appear in the OracleInfrastructure Monitoring UI.
To get the WLS Domain entity todisplay, navigate to the license UI,select the entity and change theedition on the WLS Domain. This willalso change the edition for allmembers of the domain. Once done,the WLS Domain entity and anymembers will appear in the OracleInfrastructure Monitoring UI.
Apache HTTP Server omc_generic_apache_sample.jsonomc_oracle_apache_sample.json
omc_generic_apache
Appendix D
D-5
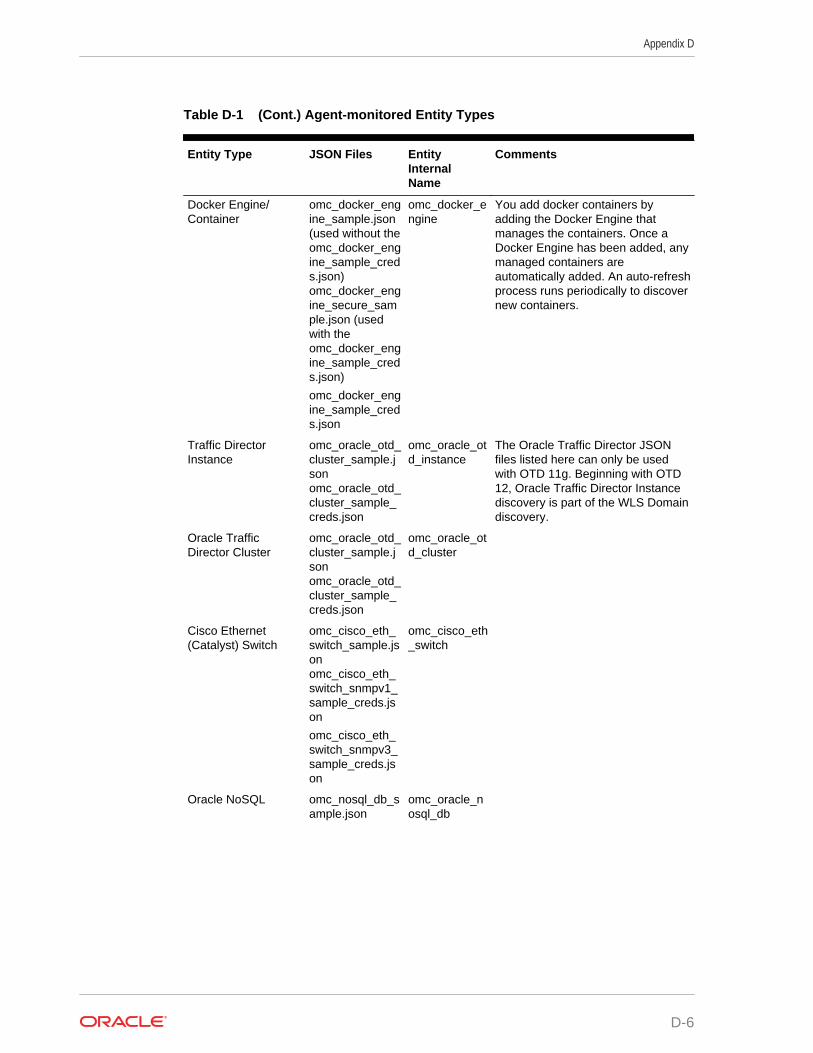
Table D-1 (Cont.) Agent-monitored Entity Types
Entity Type JSON Files EntityInternalName
Comments
Docker Engine/Container
omc_docker_engine_sample.json(used without theomc_docker_engine_sample_creds.json)omc_docker_engine_secure_sample.json (usedwith theomc_docker_engine_sample_creds.json)
omc_docker_engine_sample_creds.json
omc_docker_engine
You add docker containers byadding the Docker Engine thatmanages the containers. Once aDocker Engine has been added, anymanaged containers areautomatically added. An auto-refreshprocess runs periodically to discovernew containers.
Traffic DirectorInstance
omc_oracle_otd_cluster_sample.jsonomc_oracle_otd_cluster_sample_creds.json
omc_oracle_otd_instance
The Oracle Traffic Director JSONfiles listed here can only be usedwith OTD 11g. Beginning with OTD12, Oracle Traffic Director Instancediscovery is part of the WLS Domaindiscovery.
Oracle TrafficDirector Cluster
omc_oracle_otd_cluster_sample.jsonomc_oracle_otd_cluster_sample_creds.json
omc_oracle_otd_cluster
Cisco Ethernet(Catalyst) Switch
omc_cisco_eth_switch_sample.jsonomc_cisco_eth_switch_snmpv1_sample_creds.json
omc_cisco_eth_switch_snmpv3_sample_creds.json
omc_cisco_eth_switch
Oracle NoSQL omc_nosql_db_sample.json
omc_oracle_nosql_db
Appendix D
D-6
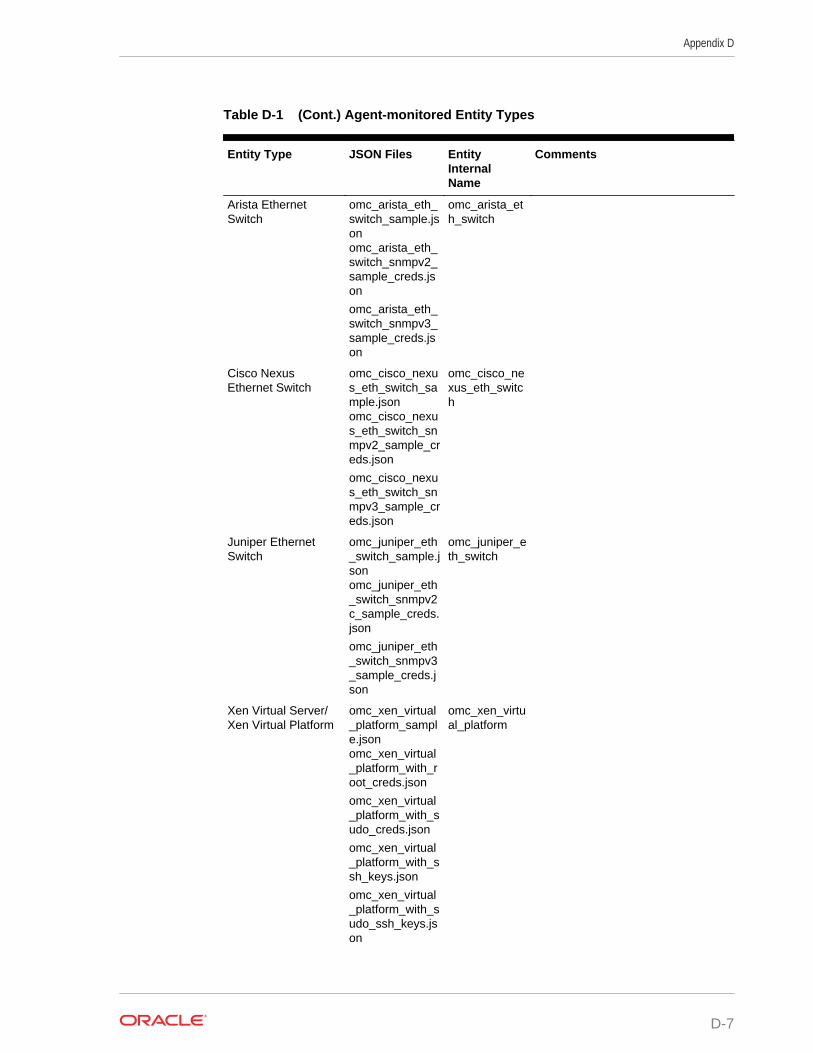
Table D-1 (Cont.) Agent-monitored Entity Types
Entity Type JSON Files EntityInternalName
Comments
Arista EthernetSwitch
omc_arista_eth_switch_sample.jsonomc_arista_eth_switch_snmpv2_sample_creds.json
omc_arista_eth_switch_snmpv3_sample_creds.json
omc_arista_eth_switch
Cisco NexusEthernet Switch
omc_cisco_nexus_eth_switch_sample.jsonomc_cisco_nexus_eth_switch_snmpv2_sample_creds.json
omc_cisco_nexus_eth_switch_snmpv3_sample_creds.json
omc_cisco_nexus_eth_switch
Juniper EthernetSwitch
omc_juniper_eth_switch_sample.jsonomc_juniper_eth_switch_snmpv2c_sample_creds.json
omc_juniper_eth_switch_snmpv3_sample_creds.json
omc_juniper_eth_switch
Xen Virtual Server/Xen Virtual Platform
omc_xen_virtual_platform_sample.jsonomc_xen_virtual_platform_with_root_creds.json
omc_xen_virtual_platform_with_sudo_creds.json
omc_xen_virtual_platform_with_ssh_keys.json
omc_xen_virtual_platform_with_sudo_ssh_keys.json
omc_xen_virtual_platform
Appendix D
D-7
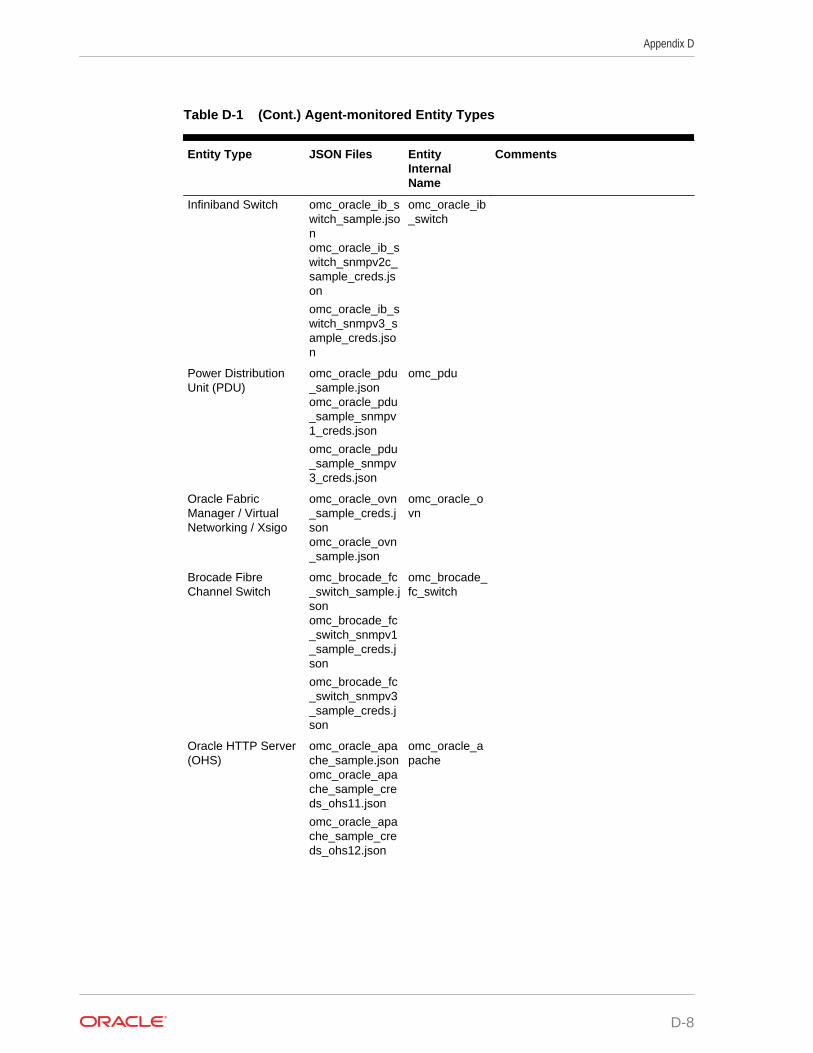
Table D-1 (Cont.) Agent-monitored Entity Types
Entity Type JSON Files EntityInternalName
Comments
Infiniband Switch omc_oracle_ib_switch_sample.jsonomc_oracle_ib_switch_snmpv2c_sample_creds.json
omc_oracle_ib_switch_snmpv3_sample_creds.json
omc_oracle_ib_switch
Power DistributionUnit (PDU)
omc_oracle_pdu_sample.jsonomc_oracle_pdu_sample_snmpv1_creds.json
omc_oracle_pdu_sample_snmpv3_creds.json
omc_pdu
Oracle FabricManager / VirtualNetworking / Xsigo
omc_oracle_ovn_sample_creds.jsonomc_oracle_ovn_sample.json
omc_oracle_ovn
Brocade FibreChannel Switch
omc_brocade_fc_switch_sample.jsonomc_brocade_fc_switch_snmpv1_sample_creds.json
omc_brocade_fc_switch_snmpv3_sample_creds.json
omc_brocade_fc_switch
Oracle HTTP Server(OHS)
omc_oracle_apache_sample.jsonomc_oracle_apache_sample_creds_ohs11.json
omc_oracle_apache_sample_creds_ohs12.json
omc_oracle_apache
Appendix D
D-8
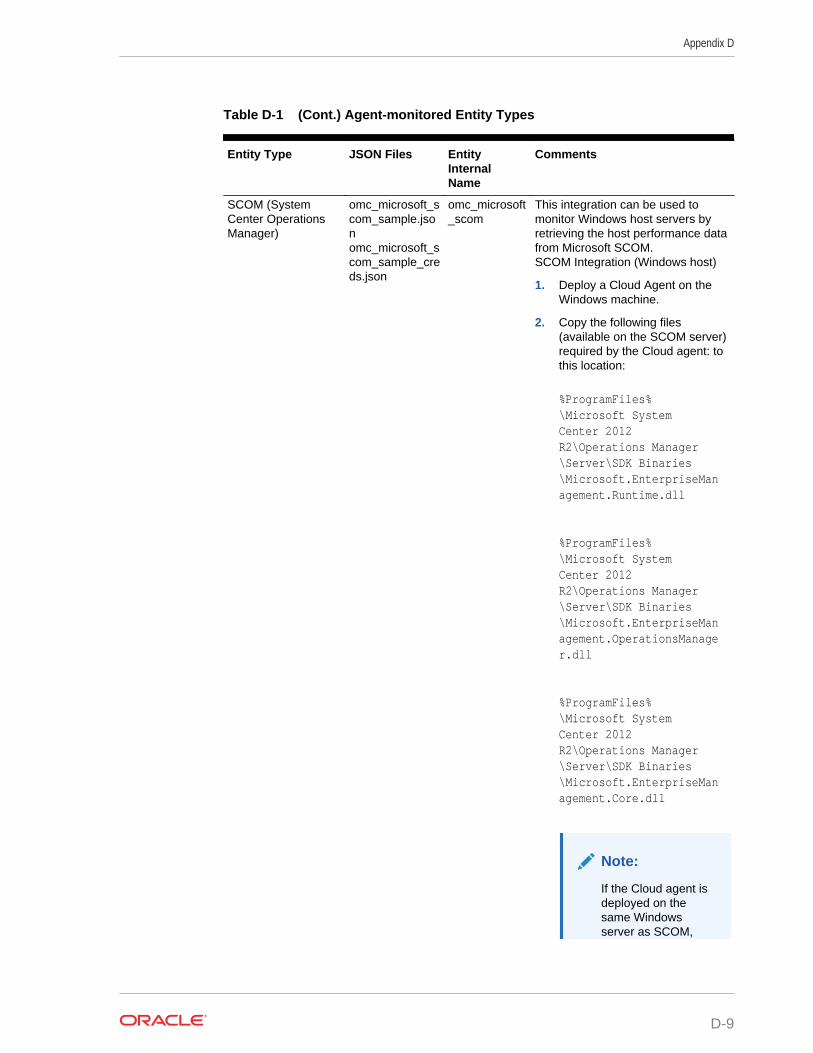
Table D-1 (Cont.) Agent-monitored Entity Types
Entity Type JSON Files EntityInternalName
Comments
SCOM (SystemCenter OperationsManager)
omc_microsoft_scom_sample.jsonomc_microsoft_scom_sample_creds.json
omc_microsoft_scom
This integration can be used tomonitor Windows host servers byretrieving the host performance datafrom Microsoft SCOM.SCOM Integration (Windows host)
1. Deploy a Cloud Agent on theWindows machine.
2. Copy the following files(available on the SCOM server)required by the Cloud agent: tothis location:
%ProgramFiles%\Microsoft System Center 2012 R2\Operations Manager\Server\SDK Binaries\Microsoft.EnterpriseManagement.Runtime.dll
%ProgramFiles%\Microsoft System Center 2012 R2\Operations Manager\Server\SDK Binaries\Microsoft.EnterpriseManagement.OperationsManager.dll
%ProgramFiles%\Microsoft System Center 2012 R2\Operations Manager\Server\SDK Binaries\Microsoft.EnterpriseManagement.Core.dll
Note:
If the Cloud agent isdeployed on thesame Windowsserver as SCOM,
Appendix D
D-9
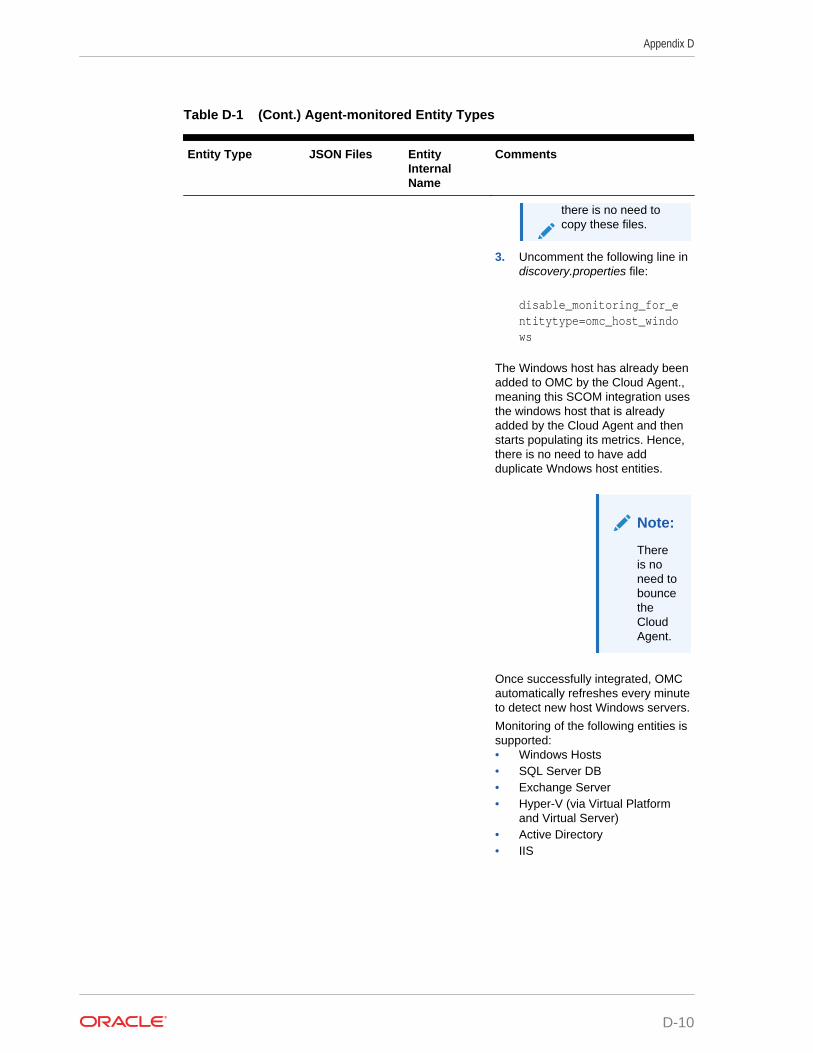
Table D-1 (Cont.) Agent-monitored Entity Types
Entity Type JSON Files EntityInternalName
Comments
there is no need tocopy these files.
3. Uncomment the following line indiscovery.properties file:
disable_monitoring_for_entitytype=omc_host_windows
The Windows host has already beenadded to OMC by the Cloud Agent.,meaning this SCOM integration usesthe windows host that is alreadyadded by the Cloud Agent and thenstarts populating its metrics. Hence,there is no need to have addduplicate Wndows host entities.
Note:
Thereis noneed tobouncetheCloudAgent.
Once successfully integrated, OMCautomatically refreshes every minuteto detect new host Windows servers.
Monitoring of the following entities issupported:• Windows Hosts• SQL Server DB• Exchange Server• Hyper-V (via Virtual Platform
and Virtual Server)• Active Directory• IIS
Appendix D
D-10
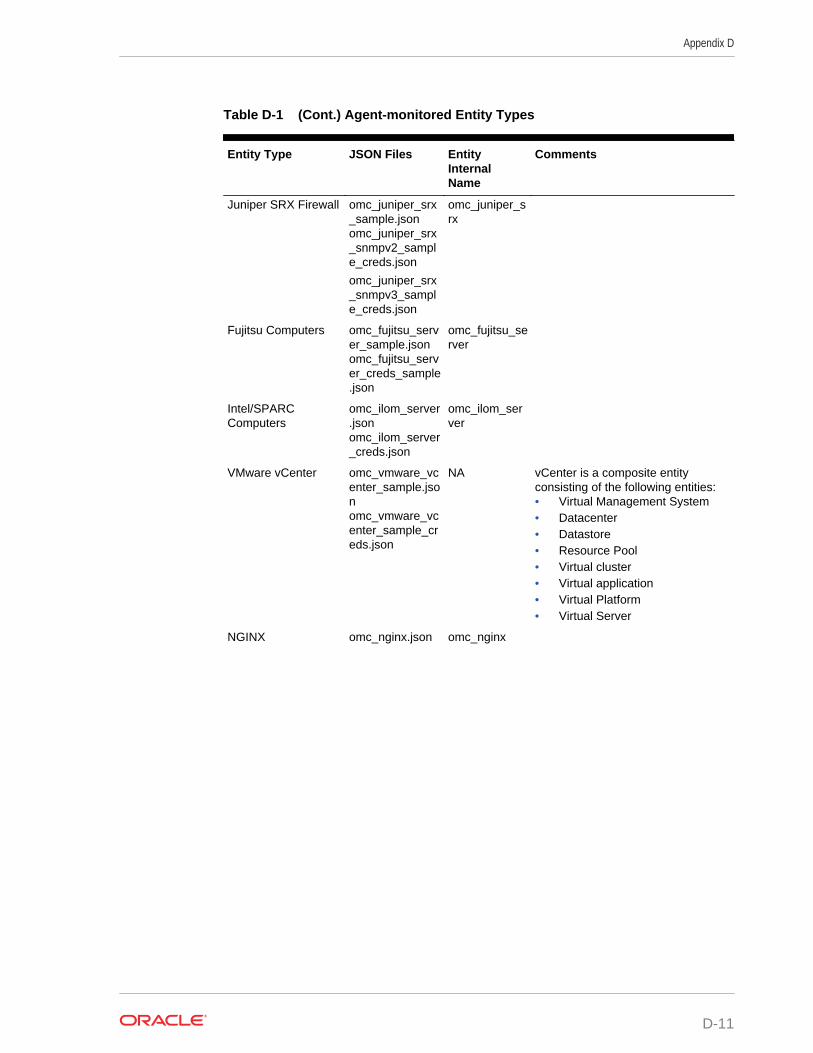
Table D-1 (Cont.) Agent-monitored Entity Types
Entity Type JSON Files EntityInternalName
Comments
Juniper SRX Firewall omc_juniper_srx_sample.jsonomc_juniper_srx_snmpv2_sample_creds.json
omc_juniper_srx_snmpv3_sample_creds.json
omc_juniper_srx
Fujitsu Computers omc_fujitsu_server_sample.jsonomc_fujitsu_server_creds_sample.json
omc_fujitsu_server
Intel/SPARCComputers
omc_ilom_server.jsonomc_ilom_server_creds.json
omc_ilom_server
VMware vCenter omc_vmware_vcenter_sample.jsonomc_vmware_vcenter_sample_creds.json
NA vCenter is a composite entityconsisting of the following entities:• Virtual Management System• Datacenter• Datastore• Resource Pool• Virtual cluster• Virtual application• Virtual Platform• Virtual Server
NGINX omc_nginx.json omc_nginx
Appendix D
D-11
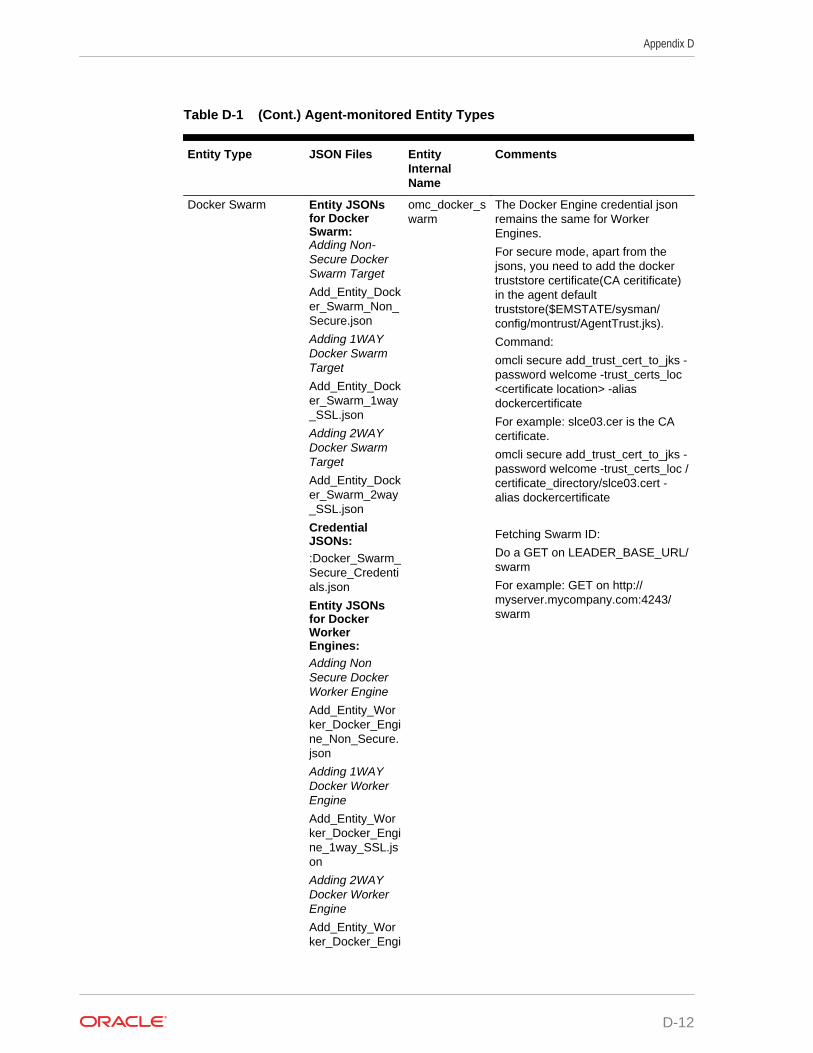
Table D-1 (Cont.) Agent-monitored Entity Types
Entity Type JSON Files EntityInternalName
Comments
Docker Swarm Entity JSONsfor DockerSwarm:Adding Non-Secure DockerSwarm Target
Add_Entity_Docker_Swarm_Non_Secure.json
Adding 1WAYDocker SwarmTarget
Add_Entity_Docker_Swarm_1way_SSL.json
Adding 2WAYDocker SwarmTarget
Add_Entity_Docker_Swarm_2way_SSL.json
CredentialJSONs::Docker_Swarm_Secure_Credentials.json
Entity JSONsfor DockerWorkerEngines:Adding NonSecure DockerWorker Engine
Add_Entity_Worker_Docker_Engine_Non_Secure.json
Adding 1WAYDocker WorkerEngine
Add_Entity_Worker_Docker_Engine_1way_SSL.json
Adding 2WAYDocker WorkerEngine
Add_Entity_Worker_Docker_Engi
omc_docker_swarm
The Docker Engine credential jsonremains the same for WorkerEngines.
For secure mode, apart from thejsons, you need to add the dockertruststore certificate(CA ceritificate)in the agent defaulttruststore($EMSTATE/sysman/config/montrust/AgentTrust.jks).
Command:
omcli secure add_trust_cert_to_jks -password welcome -trust_certs_loc<certificate location> -aliasdockercertificate
For example: slce03.cer is the CAcertificate.
omcli secure add_trust_cert_to_jks -password welcome -trust_certs_loc /certificate_directory/slce03.cert -alias dockercertificate
Fetching Swarm ID:
Do a GET on LEADER_BASE_URL/swarm
For example: GET on http://myserver.mycompany.com:4243/swarm
Appendix D
D-12
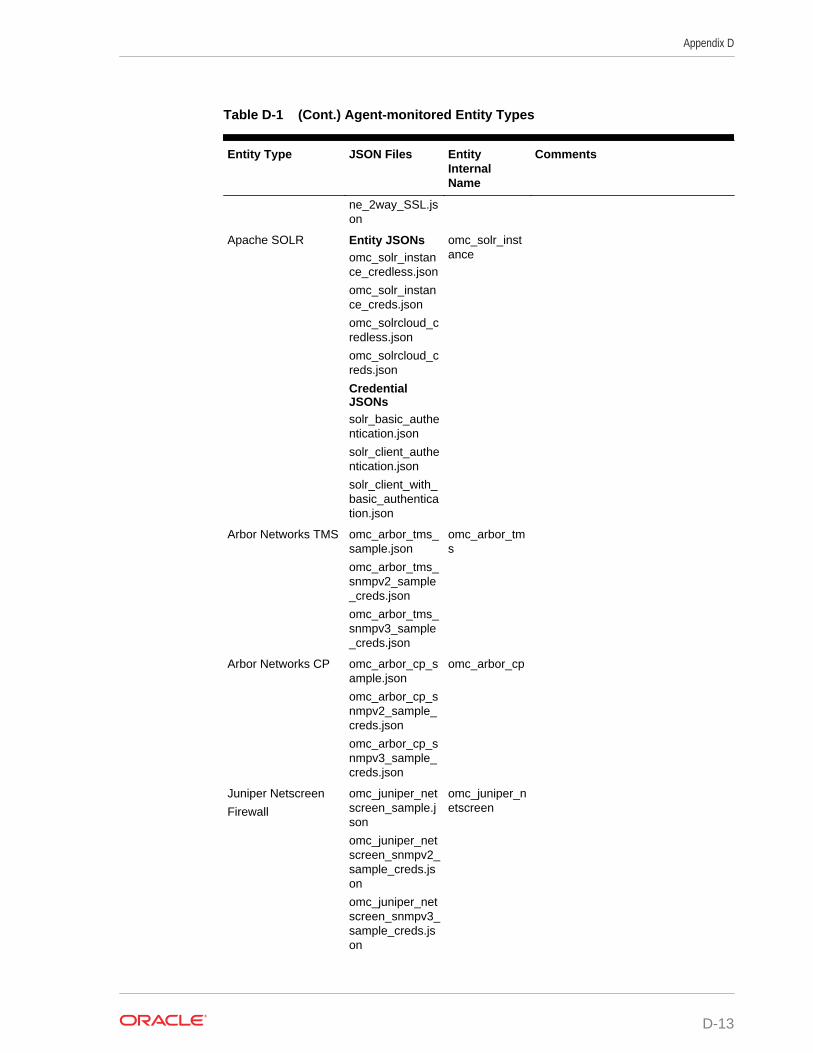
Table D-1 (Cont.) Agent-monitored Entity Types
Entity Type JSON Files EntityInternalName
Comments
ne_2way_SSL.json
Apache SOLR Entity JSONsomc_solr_instance_credless.json
omc_solr_instance_creds.json
omc_solrcloud_credless.json
omc_solrcloud_creds.json
CredentialJSONssolr_basic_authentication.json
solr_client_authentication.json
solr_client_with_basic_authentication.json
omc_solr_instance
Arbor Networks TMS omc_arbor_tms_sample.json
omc_arbor_tms_snmpv2_sample_creds.json
omc_arbor_tms_snmpv3_sample_creds.json
omc_arbor_tms
Arbor Networks CP omc_arbor_cp_sample.json
omc_arbor_cp_snmpv2_sample_creds.json
omc_arbor_cp_snmpv3_sample_creds.json
omc_arbor_cp
Juniper Netscreen
Firewall
omc_juniper_netscreen_sample.json
omc_juniper_netscreen_snmpv2_sample_creds.json
omc_juniper_netscreen_snmpv3_sample_creds.json
omc_juniper_netscreen
Appendix D
D-13
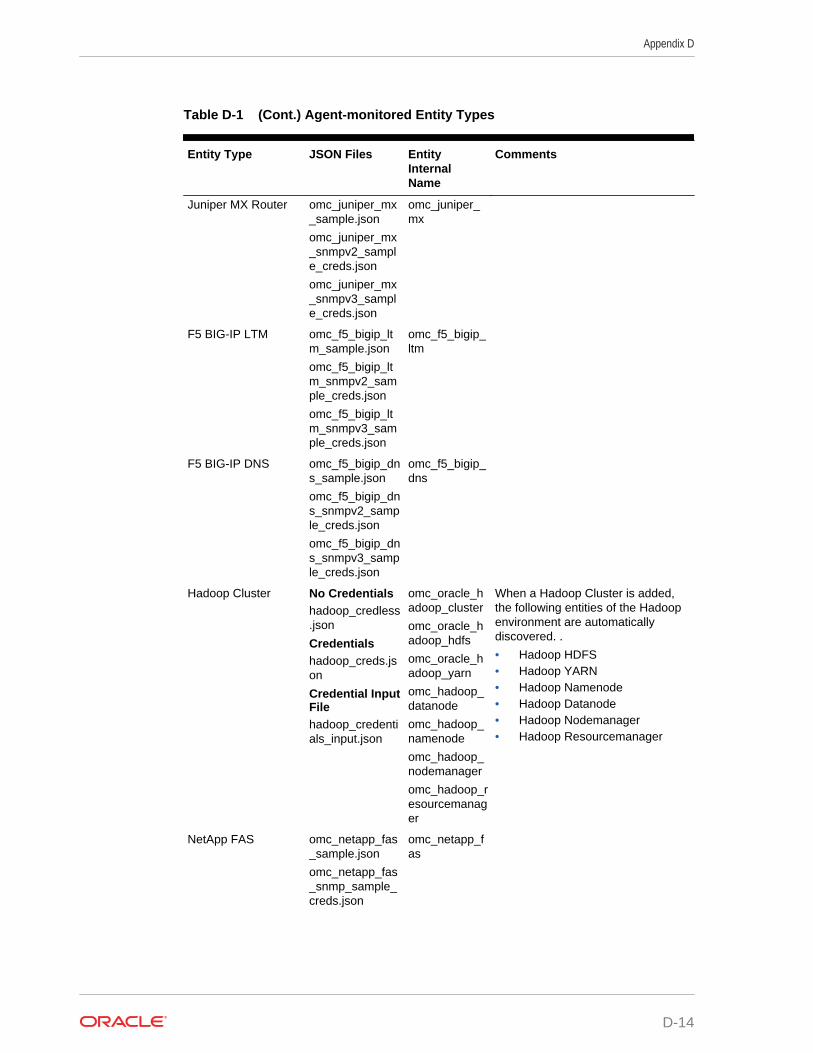
Table D-1 (Cont.) Agent-monitored Entity Types
Entity Type JSON Files EntityInternalName
Comments
Juniper MX Router omc_juniper_mx_sample.json
omc_juniper_mx_snmpv2_sample_creds.json
omc_juniper_mx_snmpv3_sample_creds.json
omc_juniper_mx
F5 BIG-IP LTM omc_f5_bigip_ltm_sample.json
omc_f5_bigip_ltm_snmpv2_sample_creds.json
omc_f5_bigip_ltm_snmpv3_sample_creds.json
omc_f5_bigip_ltm
F5 BIG-IP DNS omc_f5_bigip_dns_sample.json
omc_f5_bigip_dns_snmpv2_sample_creds.json
omc_f5_bigip_dns_snmpv3_sample_creds.json
omc_f5_bigip_dns
Hadoop Cluster No Credentialshadoop_credless.json
Credentialshadoop_creds.json
Credential InputFilehadoop_credentials_input.json
omc_oracle_hadoop_cluster
omc_oracle_hadoop_hdfs
omc_oracle_hadoop_yarn
omc_hadoop_datanode
omc_hadoop_namenode
omc_hadoop_nodemanager
omc_hadoop_resourcemanager
When a Hadoop Cluster is added,the following entities of the Hadoopenvironment are automaticallydiscovered. .
• Hadoop HDFS• Hadoop YARN• Hadoop Namenode• Hadoop Datanode• Hadoop Nodemanager• Hadoop Resourcemanager
NetApp FAS omc_netapp_fas_sample.json
omc_netapp_fas_snmp_sample_creds.json
omc_netapp_fas
Appendix D
D-14
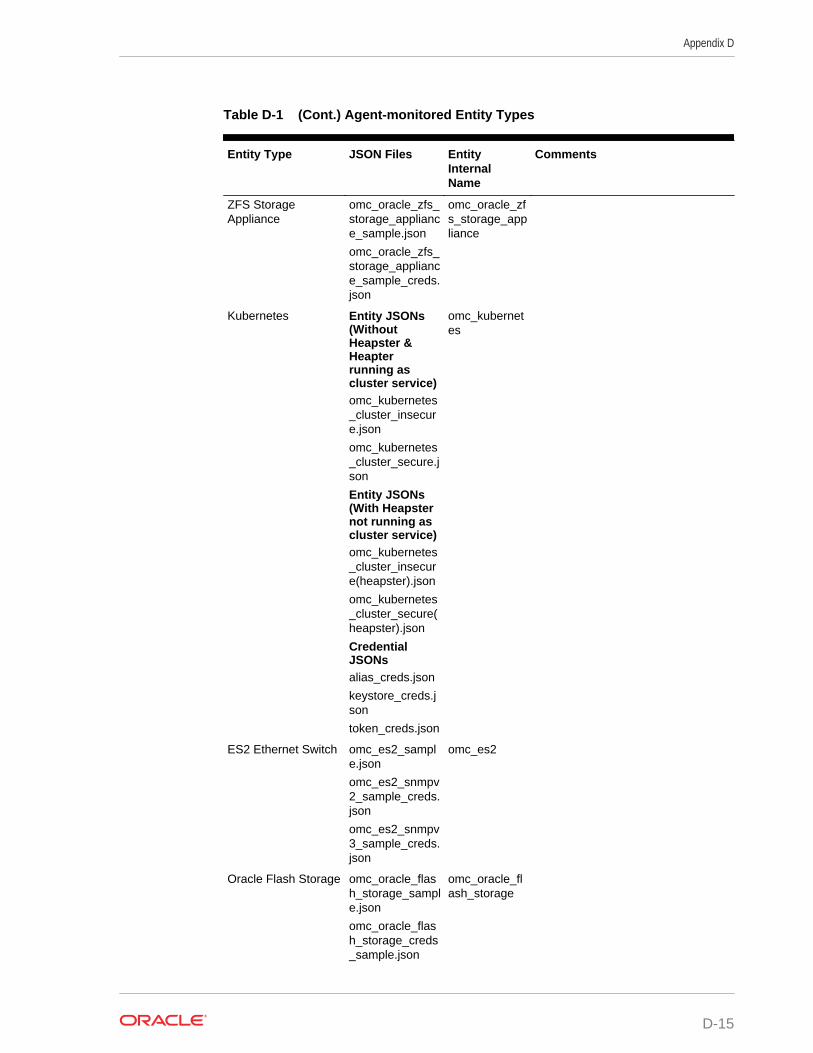
Table D-1 (Cont.) Agent-monitored Entity Types
Entity Type JSON Files EntityInternalName
Comments
ZFS StorageAppliance
omc_oracle_zfs_storage_appliance_sample.json
omc_oracle_zfs_storage_appliance_sample_creds.json
omc_oracle_zfs_storage_appliance
Kubernetes Entity JSONs(WithoutHeapster &Heapterrunning ascluster service)omc_kubernetes_cluster_insecure.json
omc_kubernetes_cluster_secure.json
Entity JSONs(With Heapsternot running ascluster service)omc_kubernetes_cluster_insecure(heapster).json
omc_kubernetes_cluster_secure(heapster).json
CredentialJSONsalias_creds.json
keystore_creds.json
token_creds.json
omc_kubernetes
ES2 Ethernet Switch omc_es2_sample.json
omc_es2_snmpv2_sample_creds.json
omc_es2_snmpv3_sample_creds.json
omc_es2
Oracle Flash Storage omc_oracle_flash_storage_sample.json
omc_oracle_flash_storage_creds_sample.json
omc_oracle_flash_storage
Appendix D
D-15
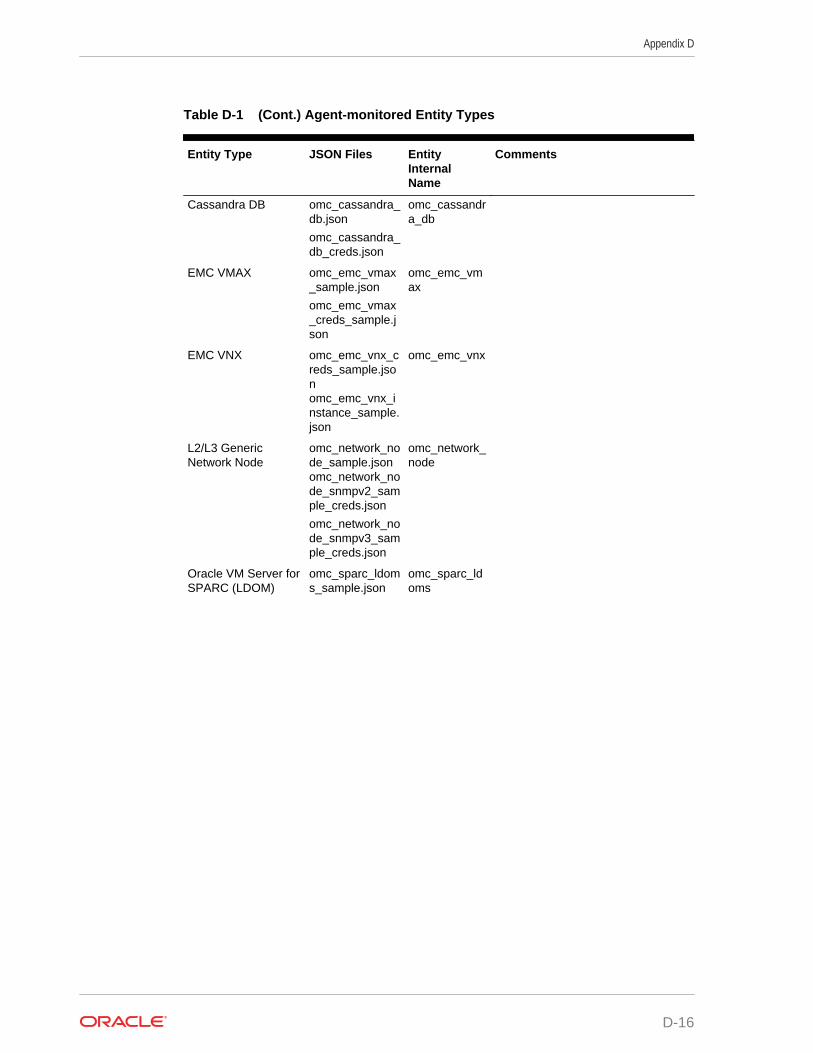
Table D-1 (Cont.) Agent-monitored Entity Types
Entity Type JSON Files EntityInternalName
Comments
Cassandra DB omc_cassandra_db.json
omc_cassandra_db_creds.json
omc_cassandra_db
EMC VMAX omc_emc_vmax_sample.json
omc_emc_vmax_creds_sample.json
omc_emc_vmax
EMC VNX omc_emc_vnx_creds_sample.jsonomc_emc_vnx_instance_sample.json
omc_emc_vnx
L2/L3 GenericNetwork Node
omc_network_node_sample.jsonomc_network_node_snmpv2_sample_creds.json
omc_network_node_snmpv3_sample_creds.json
omc_network_node
Oracle VM Server forSPARC (LDOM)
omc_sparc_ldoms_sample.json
omc_sparc_ldoms
Appendix D
D-16
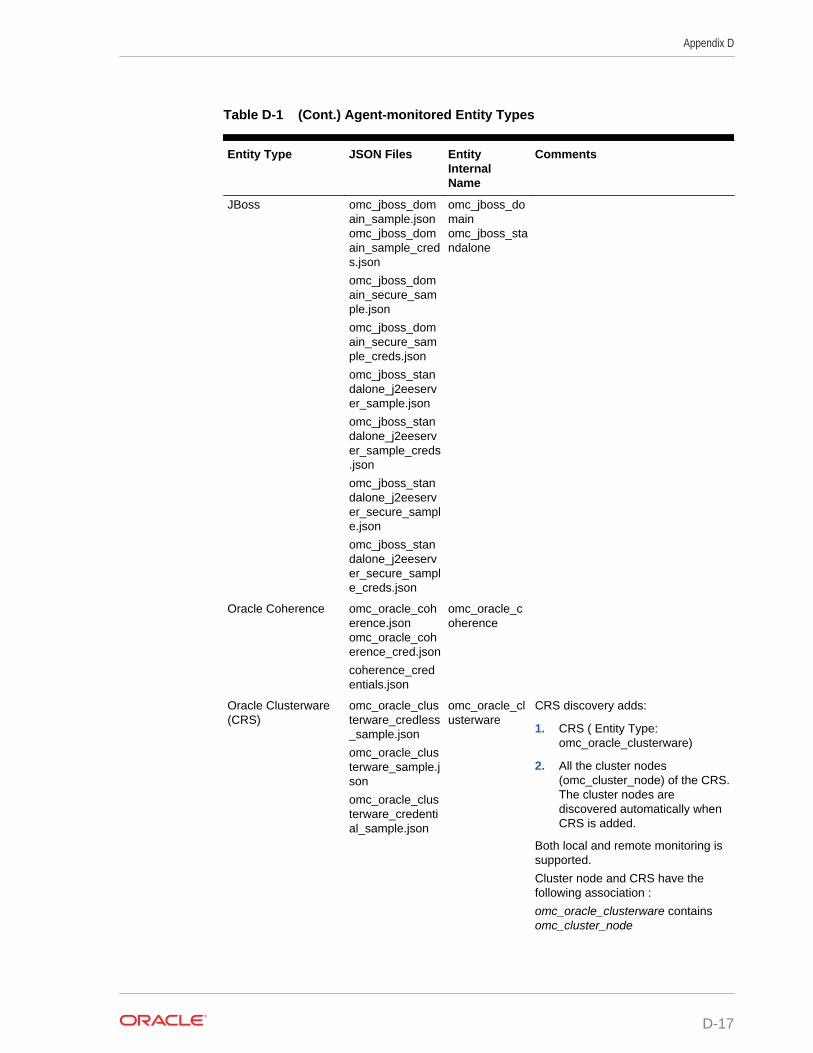
Table D-1 (Cont.) Agent-monitored Entity Types
Entity Type JSON Files EntityInternalName
Comments
JBoss omc_jboss_domain_sample.jsonomc_jboss_domain_sample_creds.json
omc_jboss_domain_secure_sample.json
omc_jboss_domain_secure_sample_creds.json
omc_jboss_standalone_j2eeserver_sample.json
omc_jboss_standalone_j2eeserver_sample_creds.json
omc_jboss_standalone_j2eeserver_secure_sample.json
omc_jboss_standalone_j2eeserver_secure_sample_creds.json
omc_jboss_domainomc_jboss_standalone
Oracle Coherence omc_oracle_coherence.jsonomc_oracle_coherence_cred.json
coherence_credentials.json
omc_oracle_coherence
Oracle Clusterware(CRS)
omc_oracle_clusterware_credless_sample.json
omc_oracle_clusterware_sample.json
omc_oracle_clusterware_credential_sample.json
omc_oracle_clusterware
CRS discovery adds:
1. CRS ( Entity Type:omc_oracle_clusterware)
2. All the cluster nodes(omc_cluster_node) of the CRS.The cluster nodes arediscovered automatically whenCRS is added.
Both local and remote monitoring issupported.
Cluster node and CRS have thefollowing association :
omc_oracle_clusterware containsomc_cluster_node
Appendix D
D-17
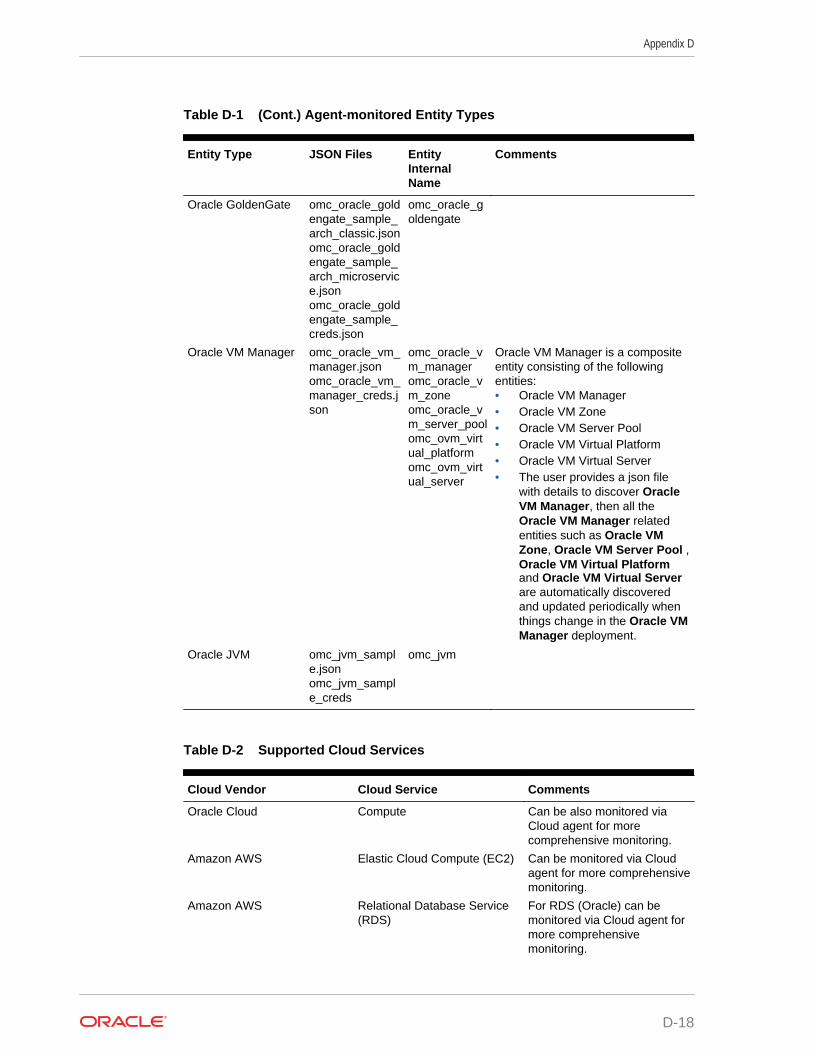
Table D-1 (Cont.) Agent-monitored Entity Types
Entity Type JSON Files EntityInternalName
Comments
Oracle GoldenGate omc_oracle_goldengate_sample_arch_classic.jsonomc_oracle_goldengate_sample_arch_microservice.jsonomc_oracle_goldengate_sample_creds.json
omc_oracle_goldengate
Oracle VM Manager omc_oracle_vm_manager.jsonomc_oracle_vm_manager_creds.json
omc_oracle_vm_manageromc_oracle_vm_zoneomc_oracle_vm_server_poolomc_ovm_virtual_platformomc_ovm_virtual_server
Oracle VM Manager is a compositeentity consisting of the followingentities:• Oracle VM Manager• Oracle VM Zone• Oracle VM Server Pool• Oracle VM Virtual Platform• Oracle VM Virtual Server• The user provides a json file
with details to discover OracleVM Manager, then all theOracle VM Manager relatedentities such as Oracle VMZone, Oracle VM Server Pool ,Oracle VM Virtual Platformand Oracle VM Virtual Serverare automatically discoveredand updated periodically whenthings change in the Oracle VMManager deployment.
Oracle JVM omc_jvm_sample.jsonomc_jvm_sample_creds
omc_jvm
Table D-2 Supported Cloud Services
Cloud Vendor Cloud Service Comments
Oracle Cloud Compute Can be also monitored viaCloud agent for morecomprehensive monitoring.
Amazon AWS Elastic Cloud Compute (EC2) Can be monitored via Cloudagent for more comprehensivemonitoring.
Amazon AWS Relational Database Service(RDS)
For RDS (Oracle) can bemonitored via Cloud agent formore comprehensivemonitoring.
Appendix D
D-18
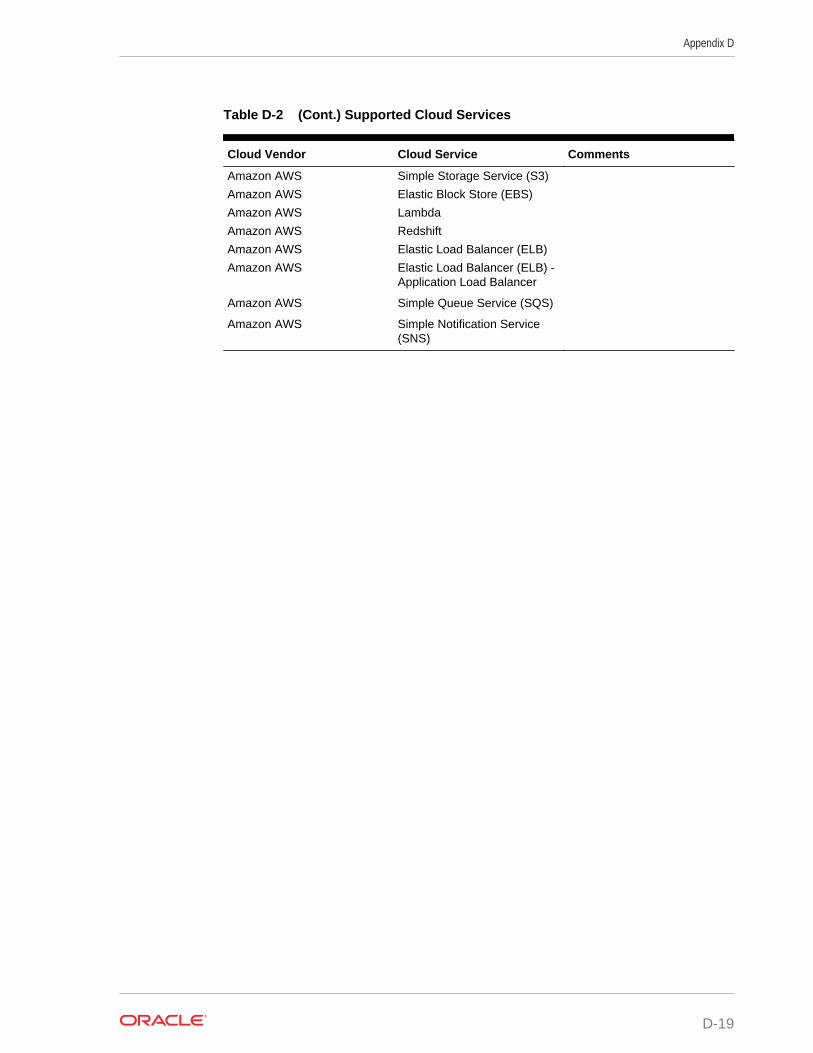
Table D-2 (Cont.) Supported Cloud Services
Cloud Vendor Cloud Service Comments
Amazon AWS Simple Storage Service (S3)
Amazon AWS Elastic Block Store (EBS)
Amazon AWS Lambda
Amazon AWS Redshift
Amazon AWS Elastic Load Balancer (ELB)
Amazon AWS Elastic Load Balancer (ELB) -Application Load Balancer
Amazon AWS Simple Queue Service (SQS)
Amazon AWS Simple Notification Service(SNS)
Appendix D
D-19
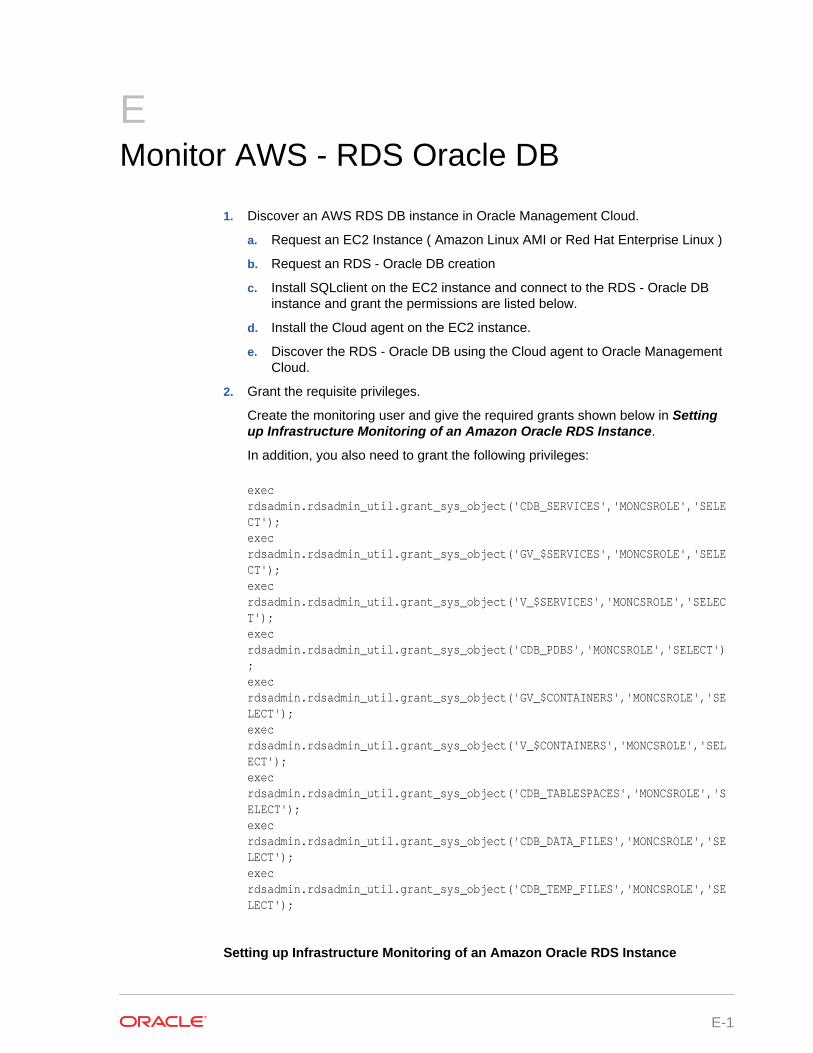
EMonitor AWS - RDS Oracle DB
1. Discover an AWS RDS DB instance in Oracle Management Cloud.
a. Request an EC2 Instance ( Amazon Linux AMI or Red Hat Enterprise Linux )
b. Request an RDS - Oracle DB creation
c. Install SQLclient on the EC2 instance and connect to the RDS - Oracle DBinstance and grant the permissions are listed below.
d. Install the Cloud agent on the EC2 instance.
e. Discover the RDS - Oracle DB using the Cloud agent to Oracle ManagementCloud.
2. Grant the requisite privileges.
Create the monitoring user and give the required grants shown below in Settingup Infrastructure Monitoring of an Amazon Oracle RDS Instance.
In addition, you also need to grant the following privileges:
exec rdsadmin.rdsadmin_util.grant_sys_object('CDB_SERVICES','MONCSROLE','SELECT'); exec rdsadmin.rdsadmin_util.grant_sys_object('GV_$SERVICES','MONCSROLE','SELECT'); exec rdsadmin.rdsadmin_util.grant_sys_object('V_$SERVICES','MONCSROLE','SELECT'); exec rdsadmin.rdsadmin_util.grant_sys_object('CDB_PDBS','MONCSROLE','SELECT'); exec rdsadmin.rdsadmin_util.grant_sys_object('GV_$CONTAINERS','MONCSROLE','SELECT'); exec rdsadmin.rdsadmin_util.grant_sys_object('V_$CONTAINERS','MONCSROLE','SELECT'); exec rdsadmin.rdsadmin_util.grant_sys_object('CDB_TABLESPACES','MONCSROLE','SELECT'); exec rdsadmin.rdsadmin_util.grant_sys_object('CDB_DATA_FILES','MONCSROLE','SELECT'); exec rdsadmin.rdsadmin_util.grant_sys_object('CDB_TEMP_FILES','MONCSROLE','SELECT');
Setting up Infrastructure Monitoring of an Amazon Oracle RDS Instance
E-1
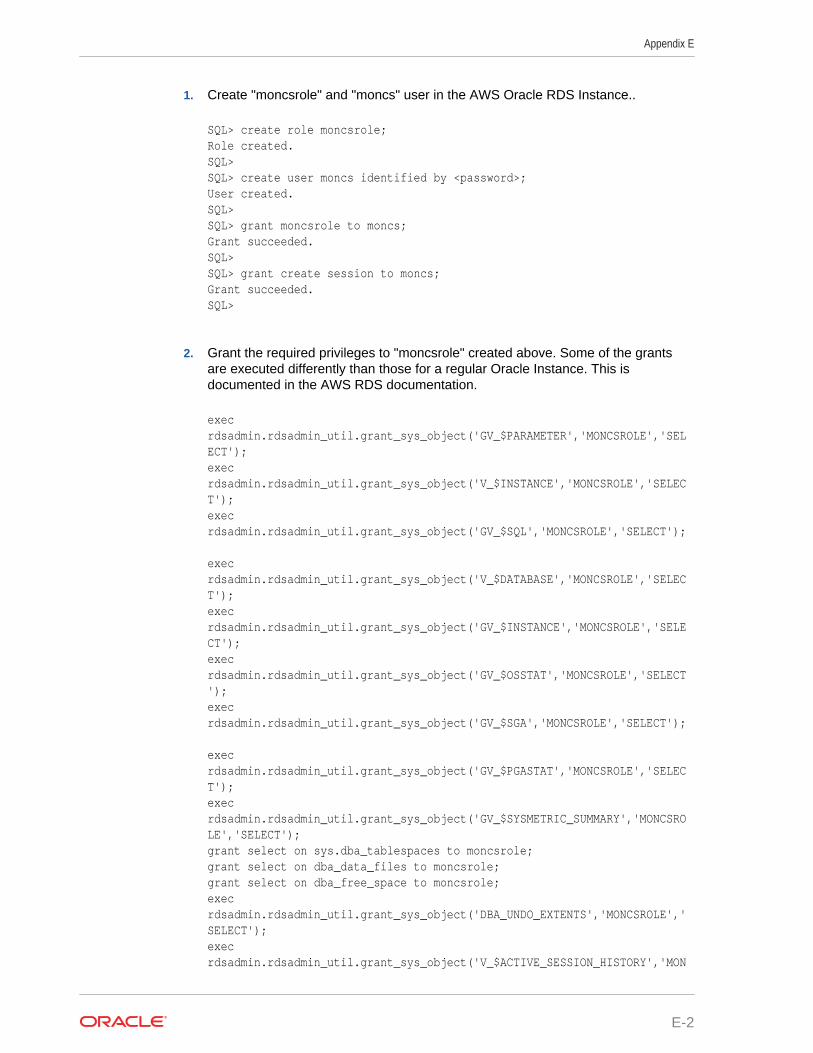
1. Create "moncsrole" and "moncs" user in the AWS Oracle RDS Instance..
SQL> create role moncsrole;Role created.SQL>SQL> create user moncs identified by <password>;User created.SQL>SQL> grant moncsrole to moncs;Grant succeeded.SQL>SQL> grant create session to moncs;Grant succeeded.SQL>
2. Grant the required privileges to "moncsrole" created above. Some of the grantsare executed differently than those for a regular Oracle Instance. This isdocumented in the AWS RDS documentation.
exec rdsadmin.rdsadmin_util.grant_sys_object('GV_$PARAMETER','MONCSROLE','SELECT'); exec rdsadmin.rdsadmin_util.grant_sys_object('V_$INSTANCE','MONCSROLE','SELECT'); exec rdsadmin.rdsadmin_util.grant_sys_object('GV_$SQL','MONCSROLE','SELECT'); exec rdsadmin.rdsadmin_util.grant_sys_object('V_$DATABASE','MONCSROLE','SELECT'); exec rdsadmin.rdsadmin_util.grant_sys_object('GV_$INSTANCE','MONCSROLE','SELECT'); exec rdsadmin.rdsadmin_util.grant_sys_object('GV_$OSSTAT','MONCSROLE','SELECT'); exec rdsadmin.rdsadmin_util.grant_sys_object('GV_$SGA','MONCSROLE','SELECT'); exec rdsadmin.rdsadmin_util.grant_sys_object('GV_$PGASTAT','MONCSROLE','SELECT'); exec rdsadmin.rdsadmin_util.grant_sys_object('GV_$SYSMETRIC_SUMMARY','MONCSROLE','SELECT'); grant select on sys.dba_tablespaces to moncsrole; grant select on dba_data_files to moncsrole; grant select on dba_free_space to moncsrole; exec rdsadmin.rdsadmin_util.grant_sys_object('DBA_UNDO_EXTENTS','MONCSROLE','SELECT'); exec rdsadmin.rdsadmin_util.grant_sys_object('V_$ACTIVE_SESSION_HISTORY','MON
Appendix E
E-2
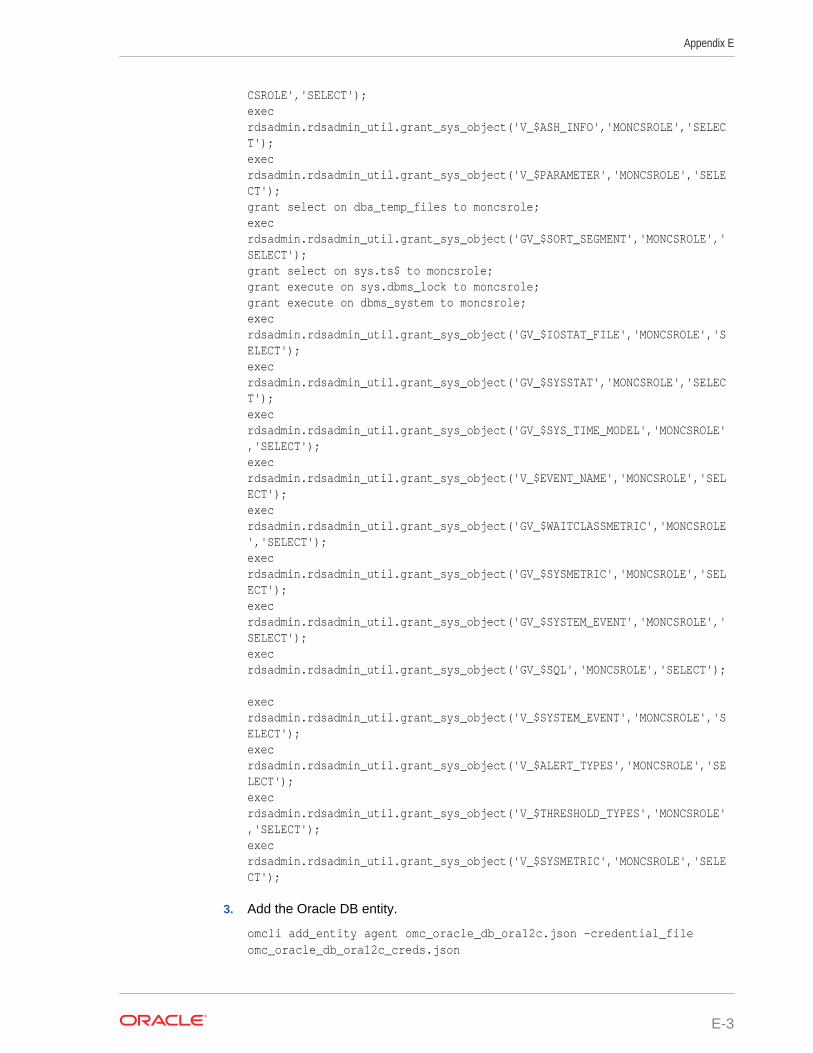
CSROLE','SELECT'); exec rdsadmin.rdsadmin_util.grant_sys_object('V_$ASH_INFO','MONCSROLE','SELECT'); exec rdsadmin.rdsadmin_util.grant_sys_object('V_$PARAMETER','MONCSROLE','SELECT'); grant select on dba_temp_files to moncsrole; exec rdsadmin.rdsadmin_util.grant_sys_object('GV_$SORT_SEGMENT','MONCSROLE','SELECT'); grant select on sys.ts$ to moncsrole; grant execute on sys.dbms_lock to moncsrole; grant execute on dbms_system to moncsrole; exec rdsadmin.rdsadmin_util.grant_sys_object('GV_$IOSTAT_FILE','MONCSROLE','SELECT'); exec rdsadmin.rdsadmin_util.grant_sys_object('GV_$SYSSTAT','MONCSROLE','SELECT'); exec rdsadmin.rdsadmin_util.grant_sys_object('GV_$SYS_TIME_MODEL','MONCSROLE','SELECT'); exec rdsadmin.rdsadmin_util.grant_sys_object('V_$EVENT_NAME','MONCSROLE','SELECT'); exec rdsadmin.rdsadmin_util.grant_sys_object('GV_$WAITCLASSMETRIC','MONCSROLE','SELECT'); exec rdsadmin.rdsadmin_util.grant_sys_object('GV_$SYSMETRIC','MONCSROLE','SELECT'); exec rdsadmin.rdsadmin_util.grant_sys_object('GV_$SYSTEM_EVENT','MONCSROLE','SELECT'); exec rdsadmin.rdsadmin_util.grant_sys_object('GV_$SQL','MONCSROLE','SELECT'); exec rdsadmin.rdsadmin_util.grant_sys_object('V_$SYSTEM_EVENT','MONCSROLE','SELECT'); exec rdsadmin.rdsadmin_util.grant_sys_object('V_$ALERT_TYPES','MONCSROLE','SELECT'); exec rdsadmin.rdsadmin_util.grant_sys_object('V_$THRESHOLD_TYPES','MONCSROLE','SELECT'); exec rdsadmin.rdsadmin_util.grant_sys_object('V_$SYSMETRIC','MONCSROLE','SELECT');
3. Add the Oracle DB entity.
omcli add_entity agent omc_oracle_db_ora12c.json -credential_fileomc_oracle_db_ora12c_creds.json
Appendix E
E-3
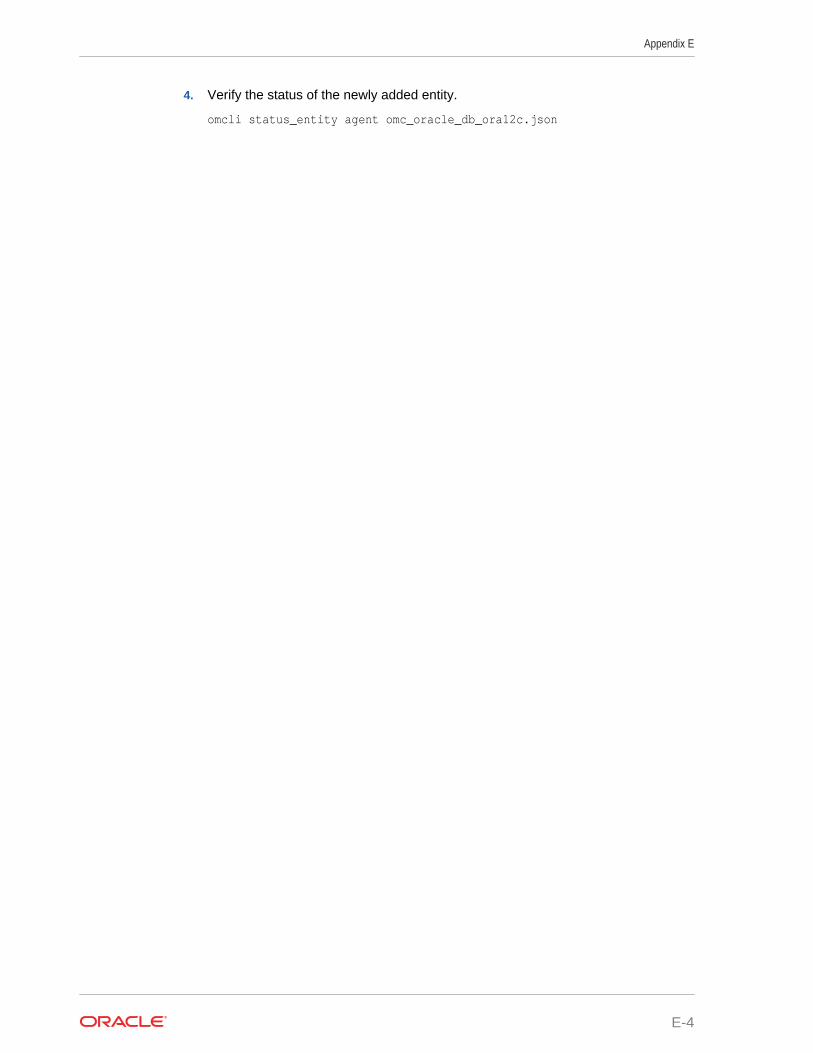
4. Verify the status of the newly added entity.
omcli status_entity agent omc_oracle_db_ora12c.json
Appendix E
E-4
FConfigure a Coherence Cluster
The following section covers the configuration procedure for a standalone Coherencecluster. For details on configuring a managed Coherence cluster, refer to theWebLogic documentation.
Overview
Oracle Coherence standalone deployments can be monitored using OracleManagement Cloud by configuring the Coherence nodes with a set of Coherence andJMX system properties (start arguments). In addition, one of the nodes will have to beconfigured as a central JMX management node. This JMX management node mustexpose all Coherence MBeans and attributes. See Creating and Starting a JMXManagement Node for details. In addition to configuring the JMX management node,the Cloud Agent must also be installed and configured on the same host as JMXmanagement node. This is required to discover and monitor the Coherence cluster inOracle Management Cloud.
Coherence Management (JMX) node's MBean server will expose MBeans for entireCoherence cluster. Enterprise Manager will connect to this management node todiscover and monitor Coherence cluster.
Creating and Starting a JMX Management Node
The Cloud Agent uses the JMX management node (centralized MBean server) todiscover and monitor the entire Coherence cluster, including the nodes and caches.As a best practice, it is recommended that the Management Agent be present on thesame host as the JMX management node that is used to discover and monitor theCoherence cluster. The Management Agent must be setup on all the machines onwhich the Coherence nodes are running to monitor and provision the cluster. Toconfigure the JMX management node, you must:
• Specify Additional System Properties
• Include Additional Class Path
• Use the Enterprise Manager Custom Start Class
Specifying Additional System Properties
Note:
Oracle recommends that the management node is configured as a storagedisabled node to ensure minimal performance impact on any Coherencecaches.
The following start arguments must be added to one of the Coherence nodes toconfigure it as the JMX central management node.
F-1
• -Dtangosol.coherence.management.extendedmbeanname=true (allows anyrestarted node to be automatically detected by Enterprise Manager. Thisparameter is available in Coherence 3.7.1.9 and later versions)
– If set to true, the status of the node is automatically refreshed when a node isrestarted.
– If this property is not set, you must use the Refresh Cluster option to updatethe status of a node when it is restarted.
– If you start a node after setting this property to true, all nodes in the clustermust be started after the extendedmbeanname property is set to true.
• -Dtangosol.coherence.management=all (enables monitoring for all nodes)
• -Dcom.sun.management.jmxremote.port=<port number> (required for remoteconnection for coherence 12.2.1.x or older versions. )
• -Dtangosol.coherence.distributed.localstorage=false (disables caching andensures that the node is a dedicated monitoring node)
• -Doracle.coherence.home=<coherence home>
• -Dtangosol.coherence.member=<member name> (required for target name)
• -Doracle.coherence.machine=<fully qualified hostname> (must match thename of the host discovered in Enterprise Manager)
Note:
If you are using JMX credentials, you must set the following additional startarguments.
• -Dcom.sun.management.jmxremote.ssl=true
• -Dcom.sun.management.jmxremote.authenticate=true
If no JMX credentials are used, you must set these arguments to false.
Including the Additional Class Path
You must include the path to the Enterprise Manager custom jar files,coherenceEMIntg.jar and the bulkoperationsmbean.jar for clusters versions olderthan 12.2.1. These jar files are available in the following locations:
<AGENT_BASE_DIRECTORY>/plugins/oracle.em.sgfm.zip/<VERSION 1.26 or above>/archives/bulkoperationsmbean.jar
<AGENT_BASE_DIRECTORY>/plugins/oracle.em.sgfm.zip/<VERSION 1.26 or above>/archives/coherenceEMIntg.jar
Coherence cluster with version 12.2.1 and above must use the coherenceEMIntg.jarfile available in the
<AGENT_BASE_DIRECTORY>/plugins/oracle.em.sgfm.zip/<VERSION 1.26 or above>/archives/12.2.1 directory.
Appendix F
F-2
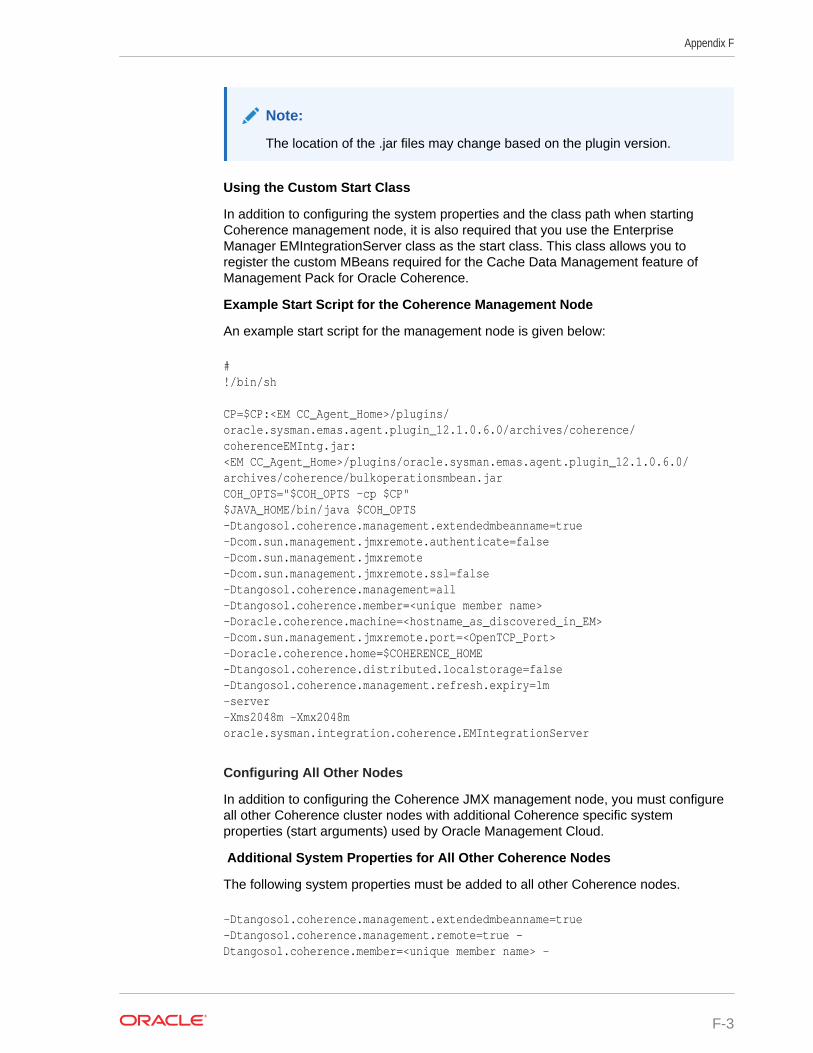
Note:
The location of the .jar files may change based on the plugin version.
Using the Custom Start Class
In addition to configuring the system properties and the class path when startingCoherence management node, it is also required that you use the EnterpriseManager EMIntegrationServer class as the start class. This class allows you toregister the custom MBeans required for the Cache Data Management feature ofManagement Pack for Oracle Coherence.
Example Start Script for the Coherence Management Node
An example start script for the management node is given below:
#!/bin/sh
CP=$CP:<EM CC_Agent_Home>/plugins/oracle.sysman.emas.agent.plugin_12.1.0.6.0/archives/coherence/coherenceEMIntg.jar:<EM CC_Agent_Home>/plugins/oracle.sysman.emas.agent.plugin_12.1.0.6.0/archives/coherence/bulkoperationsmbean.jarCOH_OPTS="$COH_OPTS -cp $CP"$JAVA_HOME/bin/java $COH_OPTS-Dtangosol.coherence.management.extendedmbeanname=true-Dcom.sun.management.jmxremote.authenticate=false-Dcom.sun.management.jmxremote -Dcom.sun.management.jmxremote.ssl=false -Dtangosol.coherence.management=all -Dtangosol.coherence.member=<unique member name> -Doracle.coherence.machine=<hostname_as_discovered_in_EM> -Dcom.sun.management.jmxremote.port=<OpenTCP_Port>-Doracle.coherence.home=$COHERENCE_HOME -Dtangosol.coherence.distributed.localstorage=false -Dtangosol.coherence.management.refresh.expiry=1m -server -Xms2048m -Xmx2048m oracle.sysman.integration.coherence.EMIntegrationServer
Configuring All Other Nodes
In addition to configuring the Coherence JMX management node, you must configureall other Coherence cluster nodes with additional Coherence specific systemproperties (start arguments) used by Oracle Management Cloud.
Additional System Properties for All Other Coherence Nodes
The following system properties must be added to all other Coherence nodes.
-Dtangosol.coherence.management.extendedmbeanname=true-Dtangosol.coherence.management.remote=true –Dtangosol.coherence.member=<unique member name> -
Appendix F
F-3
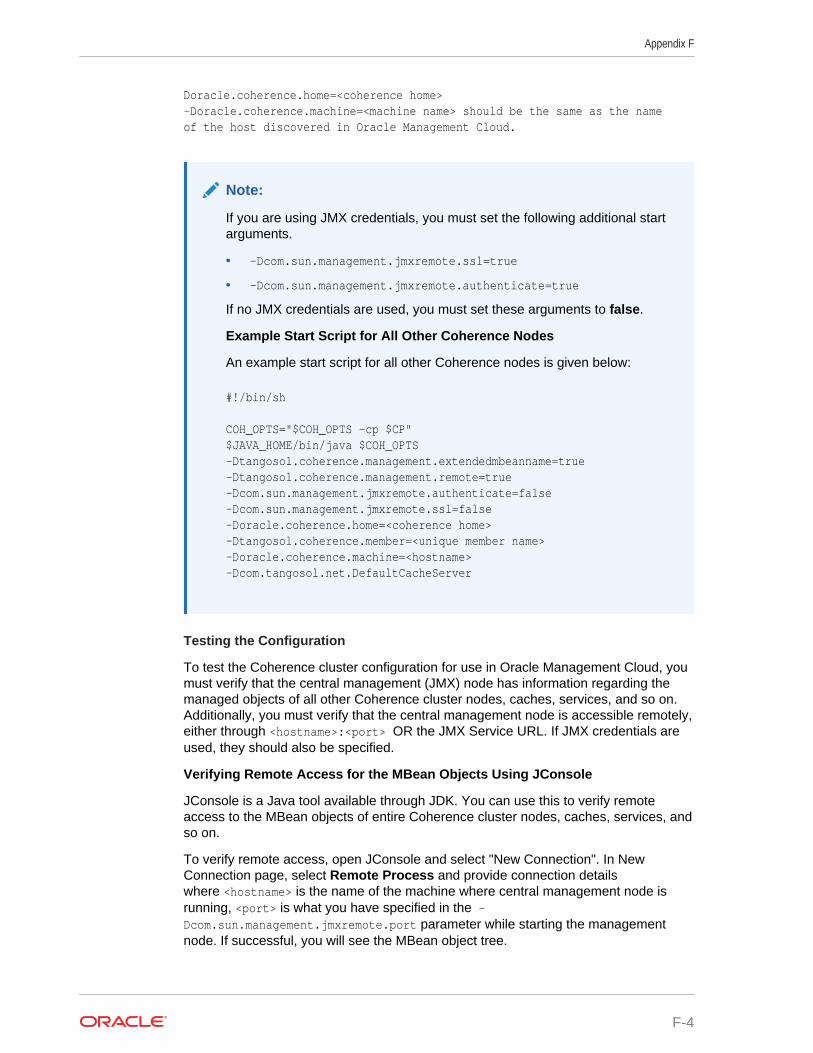
Doracle.coherence.home=<coherence home>-Doracle.coherence.machine=<machine name> should be the same as the name of the host discovered in Oracle Management Cloud.
Note:
If you are using JMX credentials, you must set the following additional startarguments.
• -Dcom.sun.management.jmxremote.ssl=true
• -Dcom.sun.management.jmxremote.authenticate=true
If no JMX credentials are used, you must set these arguments to false.
Example Start Script for All Other Coherence Nodes
An example start script for all other Coherence nodes is given below:
#!/bin/sh COH_OPTS="$COH_OPTS -cp $CP"$JAVA_HOME/bin/java $COH_OPTS-Dtangosol.coherence.management.extendedmbeanname=true-Dtangosol.coherence.management.remote=true -Dcom.sun.management.jmxremote.authenticate=false -Dcom.sun.management.jmxremote.ssl=false -Doracle.coherence.home=<coherence home>-Dtangosol.coherence.member=<unique member name> -Doracle.coherence.machine=<hostname> -Dcom.tangosol.net.DefaultCacheServer
Testing the Configuration
To test the Coherence cluster configuration for use in Oracle Management Cloud, youmust verify that the central management (JMX) node has information regarding themanaged objects of all other Coherence cluster nodes, caches, services, and so on.Additionally, you must verify that the central management node is accessible remotely,either through <hostname>:<port> OR the JMX Service URL. If JMX credentials areused, they should also be specified.
Verifying Remote Access for the MBean Objects Using JConsole
JConsole is a Java tool available through JDK. You can use this to verify remoteaccess to the MBean objects of entire Coherence cluster nodes, caches, services, andso on.
To verify remote access, open JConsole and select "New Connection". In NewConnection page, select Remote Process and provide connection detailswhere <hostname> is the name of the machine where central management node isrunning, <port> is what you have specified in the -Dcom.sun.management.jmxremote.port parameter while starting the managementnode. If successful, you will see the MBean object tree.
Appendix F
F-4
If you see MBeans for all Coherence nodes in the System MBean Browser orJConsole, you can now discover and monitor the Coherence cluster and its associatedelements in Oracle Management Cloud.
Appendix F
F-5
GAdditional collectd Configurations andInformation
This appendix contains the following:
• Manual Mapping
• Metric Schema Mapping (collectd)
• Send a Subset of collectd Metrics to Oracle Management Cloud
• Receive Metrics from a Remote Generic Metric Collector
• Troubleshooting collectd Metric Collection
Manual MappingAs an alternative to automatic data mapping, you can manually map metric data tohandle monitoring requirements not covered with automatic mapping.
Manual mapping can provide greater flexibility in mapping data when automaticmapping doesn't fit your monitoring requirements.
Note:
The metric schema automatically defined with automatic mapping isdescribed in Metric Schema Mapping (collectd).
The metric schema automatically defined with automatic mapping is described in Metric Schema Mapping (collectd). If you feel this definition does not suit yourrequirement, you can try manually mapping the metrics. For this you'll need to performthe following steps:
1. Define your own destination metric in Oracle Management Cloud using RESTAPIs.Example: Generic Metric Collector Entity Type (Auto-mapping)
2. Write a mapping metadata JSON file to map source collectd metrics to thedestination metrics.Example: Mapping Metadata
3. Provide a path to the mapping metadata JSON file when adding the GenericMetric Collector entity.Example: Destination Metric Definitions
Example: Generic Metric Collector Entity (Manual Mapping)The following example shows a generic metric collector entity named collectd-myhostthat is locally monitored on the Cloud agent host myhost.
G-1
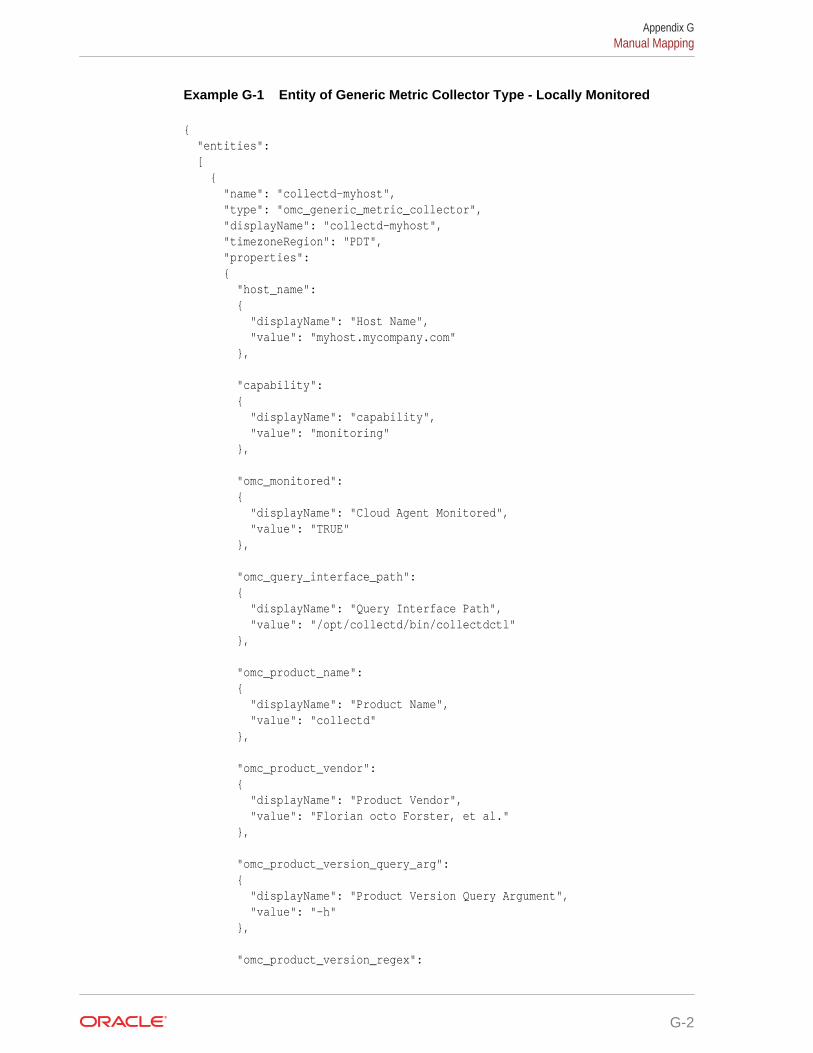
Example G-1 Entity of Generic Metric Collector Type - Locally Monitored
{ "entities": [ { "name": "collectd-myhost", "type": "omc_generic_metric_collector", "displayName": "collectd-myhost", "timezoneRegion": "PDT", "properties": { "host_name": { "displayName": "Host Name", "value": "myhost.mycompany.com" }, "capability": { "displayName": "capability", "value": "monitoring" }, "omc_monitored": { "displayName": "Cloud Agent Monitored", "value": "TRUE" }, "omc_query_interface_path": { "displayName": "Query Interface Path", "value": "/opt/collectd/bin/collectdctl" }, "omc_product_name": { "displayName": "Product Name", "value": "collectd" }, "omc_product_vendor": { "displayName": "Product Vendor", "value": "Florian octo Forster, et al." }, "omc_product_version_query_arg": { "displayName": "Product Version Query Argument", "value": "-h" }, "omc_product_version_regex":
Appendix GManual Mapping
G-2
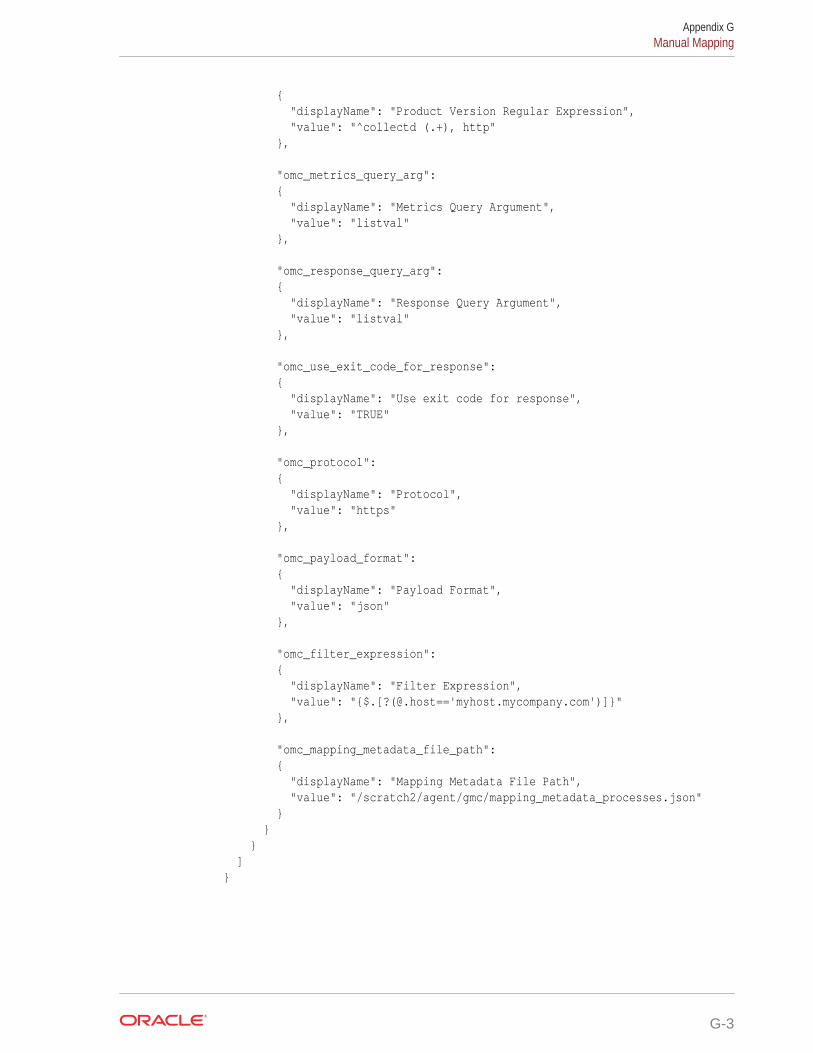
{ "displayName": "Product Version Regular Expression", "value": "^collectd (.+), http" }, "omc_metrics_query_arg": { "displayName": "Metrics Query Argument", "value": "listval" }, "omc_response_query_arg": { "displayName": "Response Query Argument", "value": "listval" }, "omc_use_exit_code_for_response": { "displayName": "Use exit code for response", "value": "TRUE" }, "omc_protocol": { "displayName": "Protocol", "value": "https" }, "omc_payload_format": { "displayName": "Payload Format", "value": "json" }, "omc_filter_expression": { "displayName": "Filter Expression", "value": "{$.[?(@.host=='myhost.mycompany.com')]}" }, "omc_mapping_metadata_file_path": { "displayName": "Mapping Metadata File Path", "value": "/scratch2/agent/gmc/mapping_metadata_processes.json" } } } ]}
Appendix GManual Mapping
G-3
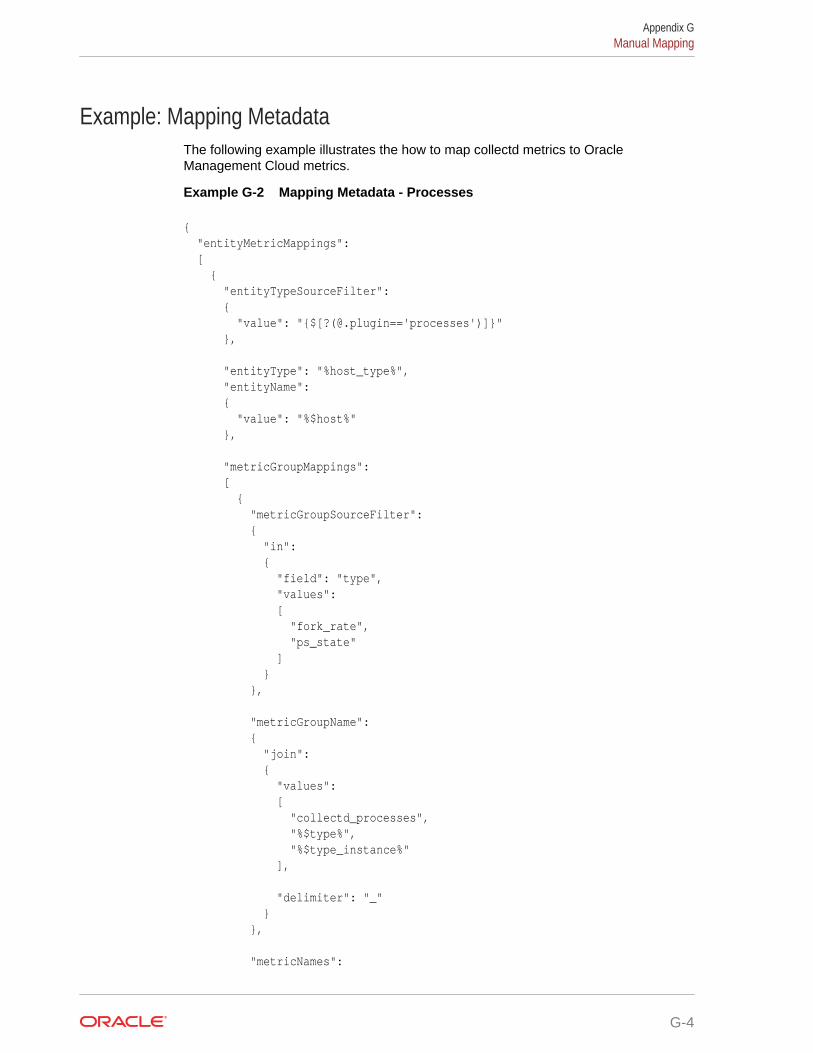
Example: Mapping Metadata The following example illustrates the how to map collectd metrics to OracleManagement Cloud metrics.
Example G-2 Mapping Metadata - Processes
{ "entityMetricMappings": [ { "entityTypeSourceFilter": { "value": "{$[?(@.plugin=='processes')]}" }, "entityType": "%host_type%", "entityName": { "value": "%$host%" }, "metricGroupMappings": [ { "metricGroupSourceFilter": { "in": { "field": "type", "values": [ "fork_rate", "ps_state" ] } }, "metricGroupName": { "join": { "values": [ "collectd_processes", "%$type%", "%$type_instance%" ], "delimiter": "_" } }, "metricNames":
Appendix GManual Mapping
G-4
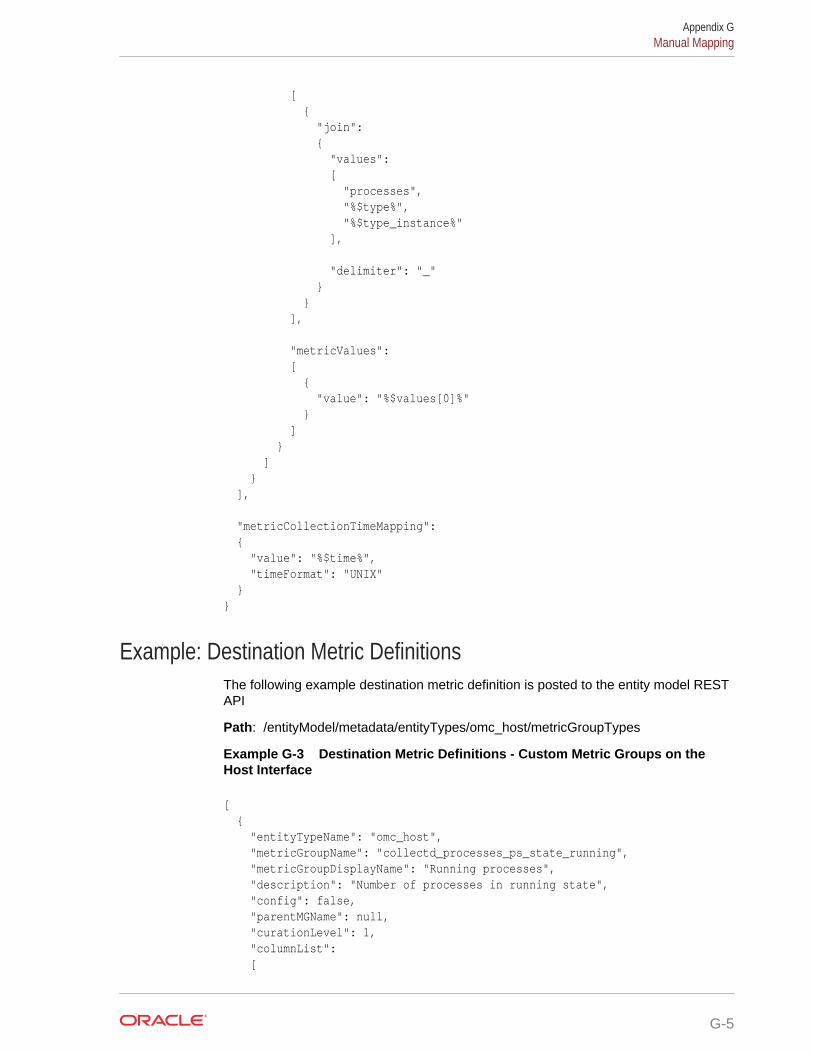
[ { "join": { "values": [ "processes", "%$type%", "%$type_instance%" ], "delimiter": "_" } } ], "metricValues": [ { "value": "%$values[0]%" } ] } ] } ], "metricCollectionTimeMapping": { "value": "%$time%", "timeFormat": "UNIX" }}
Example: Destination Metric DefinitionsThe following example destination metric definition is posted to the entity model RESTAPI
Path: /entityModel/metadata/entityTypes/omc_host/metricGroupTypes
Example G-3 Destination Metric Definitions - Custom Metric Groups on theHost Interface
[ { "entityTypeName": "omc_host", "metricGroupName": "collectd_processes_ps_state_running", "metricGroupDisplayName": "Running processes", "description": "Number of processes in running state", "config": false, "parentMGName": null, "curationLevel": 1, "columnList": [
Appendix GManual Mapping
G-5
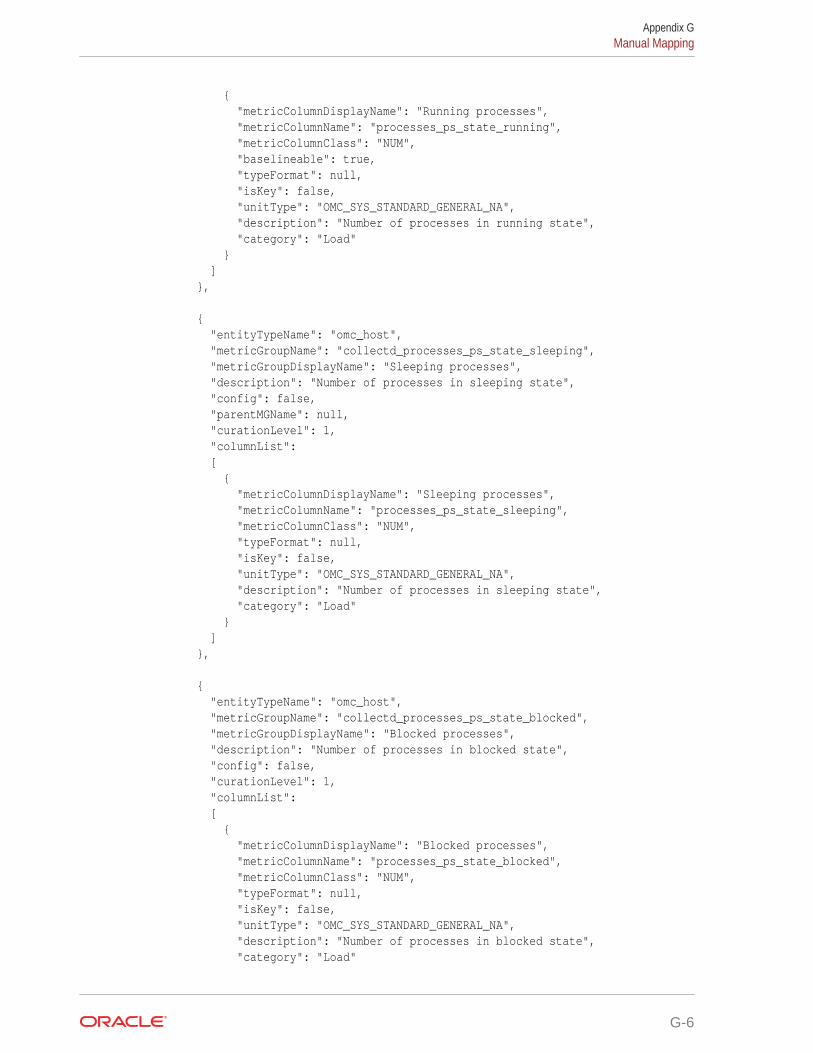
{ "metricColumnDisplayName": "Running processes", "metricColumnName": "processes_ps_state_running", "metricColumnClass": "NUM", "baselineable": true, "typeFormat": null, "isKey": false, "unitType": "OMC_SYS_STANDARD_GENERAL_NA", "description": "Number of processes in running state", "category": "Load" } ] }, { "entityTypeName": "omc_host", "metricGroupName": "collectd_processes_ps_state_sleeping", "metricGroupDisplayName": "Sleeping processes", "description": "Number of processes in sleeping state", "config": false, "parentMGName": null, "curationLevel": 1, "columnList": [ { "metricColumnDisplayName": "Sleeping processes", "metricColumnName": "processes_ps_state_sleeping", "metricColumnClass": "NUM", "typeFormat": null, "isKey": false, "unitType": "OMC_SYS_STANDARD_GENERAL_NA", "description": "Number of processes in sleeping state", "category": "Load" } ] }, { "entityTypeName": "omc_host", "metricGroupName": "collectd_processes_ps_state_blocked", "metricGroupDisplayName": "Blocked processes", "description": "Number of processes in blocked state", "config": false, "curationLevel": 1, "columnList": [ { "metricColumnDisplayName": "Blocked processes", "metricColumnName": "processes_ps_state_blocked", "metricColumnClass": "NUM", "typeFormat": null, "isKey": false, "unitType": "OMC_SYS_STANDARD_GENERAL_NA", "description": "Number of processes in blocked state", "category": "Load"
Appendix GManual Mapping
G-6
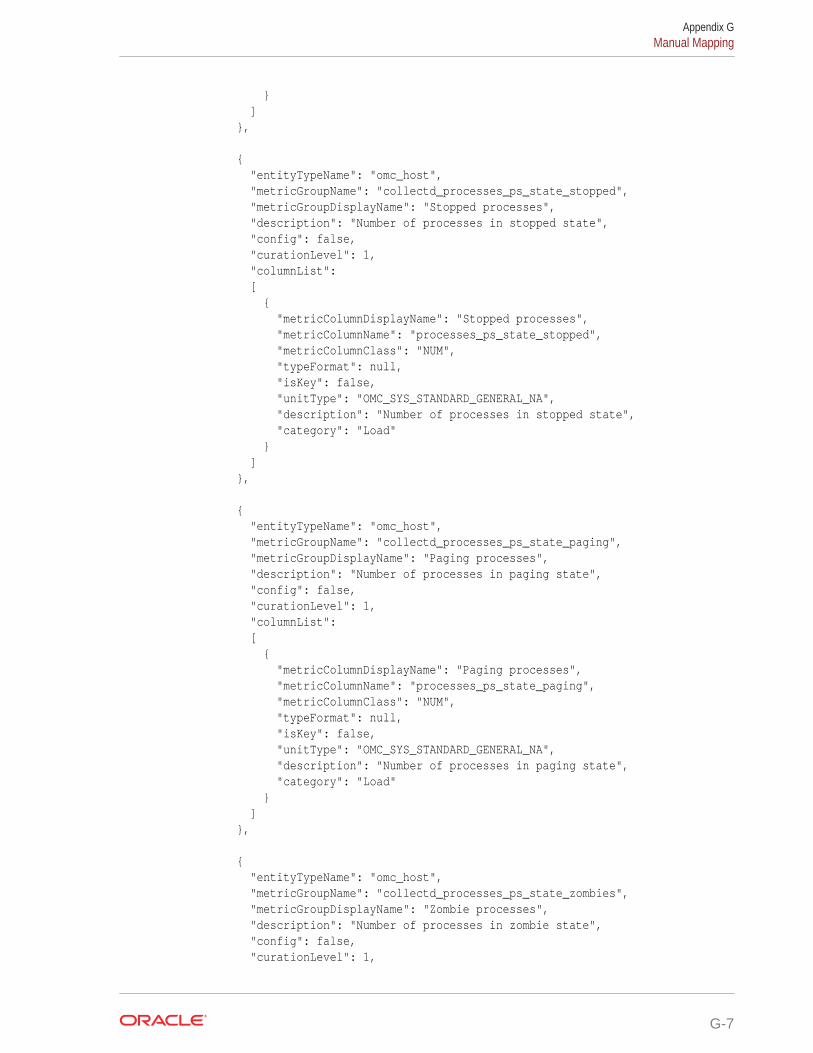
} ] }, { "entityTypeName": "omc_host", "metricGroupName": "collectd_processes_ps_state_stopped", "metricGroupDisplayName": "Stopped processes", "description": "Number of processes in stopped state", "config": false, "curationLevel": 1, "columnList": [ { "metricColumnDisplayName": "Stopped processes", "metricColumnName": "processes_ps_state_stopped", "metricColumnClass": "NUM", "typeFormat": null, "isKey": false, "unitType": "OMC_SYS_STANDARD_GENERAL_NA", "description": "Number of processes in stopped state", "category": "Load" } ] }, { "entityTypeName": "omc_host", "metricGroupName": "collectd_processes_ps_state_paging", "metricGroupDisplayName": "Paging processes", "description": "Number of processes in paging state", "config": false, "curationLevel": 1, "columnList": [ { "metricColumnDisplayName": "Paging processes", "metricColumnName": "processes_ps_state_paging", "metricColumnClass": "NUM", "typeFormat": null, "isKey": false, "unitType": "OMC_SYS_STANDARD_GENERAL_NA", "description": "Number of processes in paging state", "category": "Load" } ] }, { "entityTypeName": "omc_host", "metricGroupName": "collectd_processes_ps_state_zombies", "metricGroupDisplayName": "Zombie processes", "description": "Number of processes in zombie state", "config": false, "curationLevel": 1,
Appendix GManual Mapping
G-7
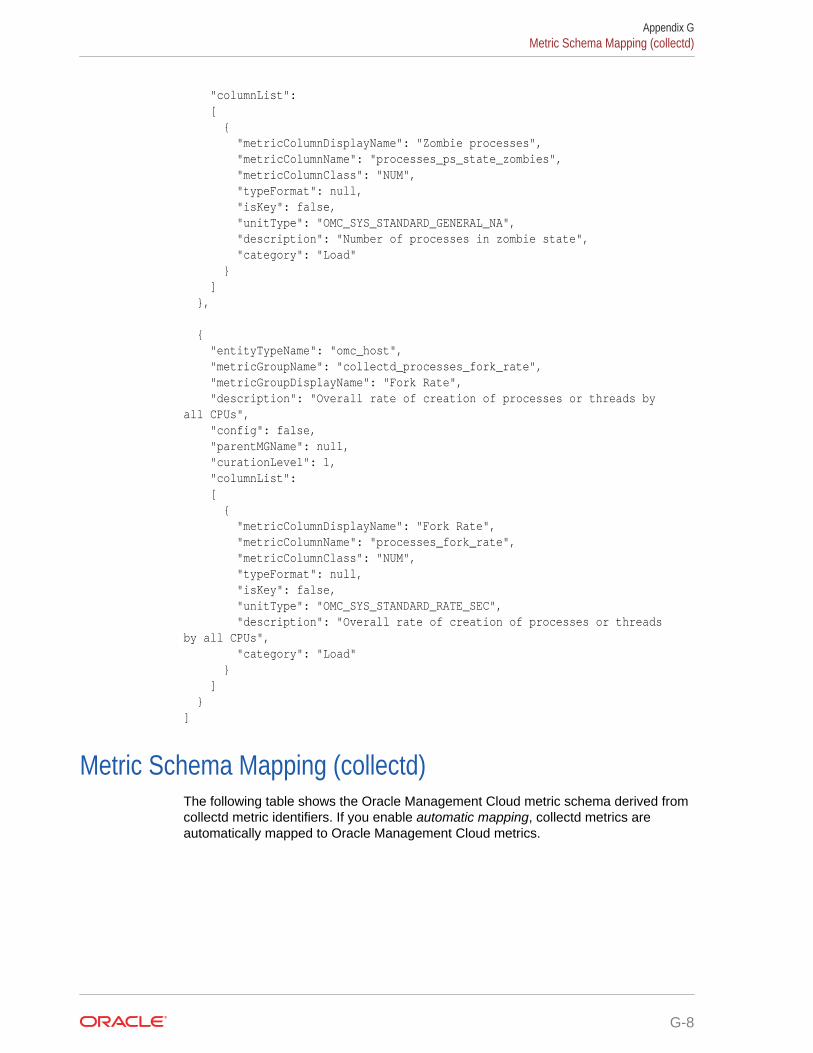
"columnList": [ { "metricColumnDisplayName": "Zombie processes", "metricColumnName": "processes_ps_state_zombies", "metricColumnClass": "NUM", "typeFormat": null, "isKey": false, "unitType": "OMC_SYS_STANDARD_GENERAL_NA", "description": "Number of processes in zombie state", "category": "Load" } ] }, { "entityTypeName": "omc_host", "metricGroupName": "collectd_processes_fork_rate", "metricGroupDisplayName": "Fork Rate", "description": "Overall rate of creation of processes or threads by all CPUs", "config": false, "parentMGName": null, "curationLevel": 1, "columnList": [ { "metricColumnDisplayName": "Fork Rate", "metricColumnName": "processes_fork_rate", "metricColumnClass": "NUM", "typeFormat": null, "isKey": false, "unitType": "OMC_SYS_STANDARD_RATE_SEC", "description": "Overall rate of creation of processes or threads by all CPUs", "category": "Load" } ] }]
Metric Schema Mapping (collectd)The following table shows the Oracle Management Cloud metric schema derived fromcollectd metric identifiers. If you enable automatic mapping, collectd metrics areautomatically mapped to Oracle Management Cloud metrics.
Appendix GMetric Schema Mapping (collectd)
G-8

Note:
The maximum number of metric groups per entity type (auto-created byOracle Management Cloud when using the automatic mapping) is 70. On thecollectd side, this translates to 70 distinct type + type_instance combinationsof metric identifiers per collectd plugin.
Table G-1 Metric Schema Mapping
Field Value Example
parentTargetType(64) omc_target omc_target
entityType(64) '_gmc_collectd_' <plugin> _gmc_collectd_redis
typeDisplayName(128) <plugin in Title Case, replaceunderscore with space>
Redis
entityName(256) <host>'-'<plugin_instance>
or
<host> (if no plugin_instance)
myhost.myco.com-6379
metricGroupName(64) <type>'_'<type_instance>
or
<type> (if no type_instance)
1.memcached_connections_clients
2. df_memory
3. uptime (no type_instance)
metricGroupDisplayName(256)
<metricGroupName in TitleCase with underscoresreplaced by spaces>
Memcached ConnectionsClients
metricColumnName(64) <dsname> 1. value
2. used, free
3. value
metricColumnDisplayName(256)
If <dsname> equals 'value'
same as<metricGroupDisplayName>
Else
<metricGroupDisplayName>' '<dsname in Title Case>
1. Memcached ConnectionsClients ('value' omitted)
2. Df Memory Used, DfMemory Free
3. Uptime (no type_instance)
metricColumnClass NUM NUM
You can extract the plugin name, plugin_instance, type, and type instance by runningthe collectdctl listval command.
Example:
$ /opt/collectd/bin/collectdctl listvalmyhost.mycompany.com/load/loadmyhost.mycompany.com/processes/fork_ratemyhost.mycompany.com/processes/ps_state-blocked
Appendix GMetric Schema Mapping (collectd)
G-9
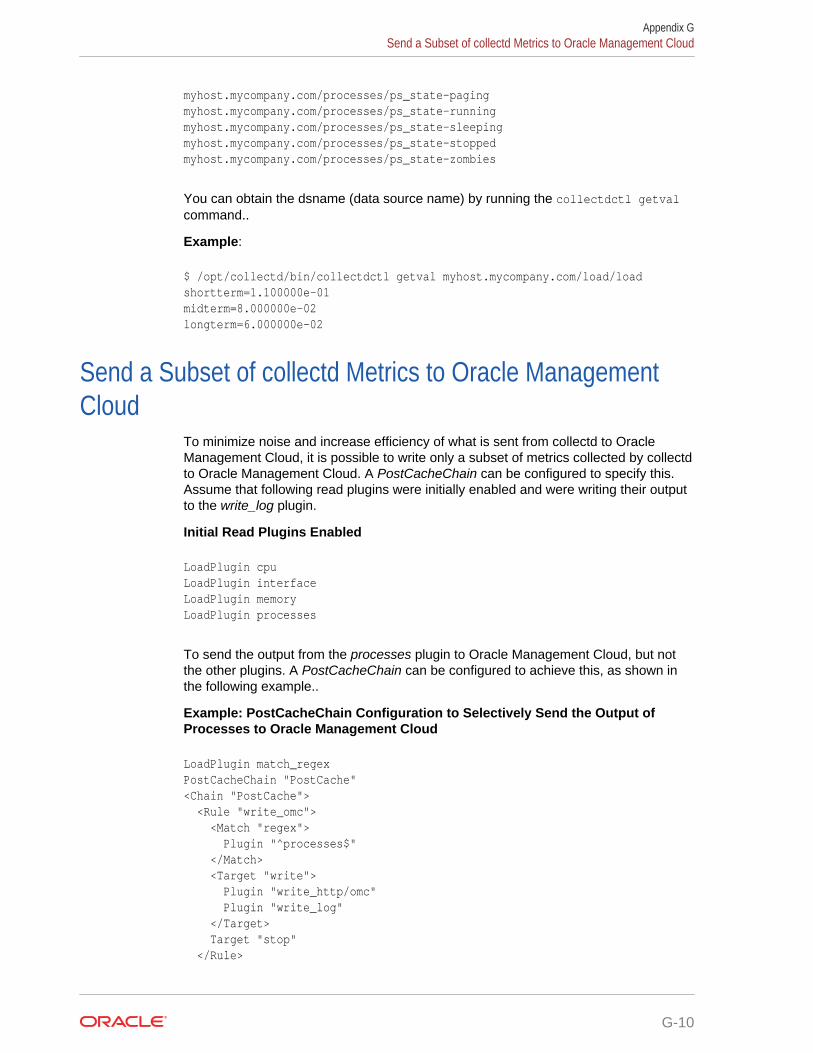
myhost.mycompany.com/processes/ps_state-pagingmyhost.mycompany.com/processes/ps_state-runningmyhost.mycompany.com/processes/ps_state-sleepingmyhost.mycompany.com/processes/ps_state-stoppedmyhost.mycompany.com/processes/ps_state-zombies
You can obtain the dsname (data source name) by running the collectdctl getvalcommand..
Example:
$ /opt/collectd/bin/collectdctl getval myhost.mycompany.com/load/loadshortterm=1.100000e-01midterm=8.000000e-02longterm=6.000000e-02
Send a Subset of collectd Metrics to Oracle ManagementCloud
To minimize noise and increase efficiency of what is sent from collectd to OracleManagement Cloud, it is possible to write only a subset of metrics collected by collectdto Oracle Management Cloud. A PostCacheChain can be configured to specify this.Assume that following read plugins were initially enabled and were writing their outputto the write_log plugin.
Initial Read Plugins Enabled
LoadPlugin cpuLoadPlugin interfaceLoadPlugin memoryLoadPlugin processes
To send the output from the processes plugin to Oracle Management Cloud, but notthe other plugins. A PostCacheChain can be configured to achieve this, as shown inthe following example..
Example: PostCacheChain Configuration to Selectively Send the Output ofProcesses to Oracle Management Cloud
LoadPlugin match_regexPostCacheChain "PostCache"<Chain "PostCache"> <Rule "write_omc"> <Match "regex"> Plugin "^processes$" </Match> <Target "write"> Plugin "write_http/omc" Plugin "write_log" </Target> Target "stop" </Rule>
Appendix GSend a Subset of collectd Metrics to Oracle Management Cloud
G-10
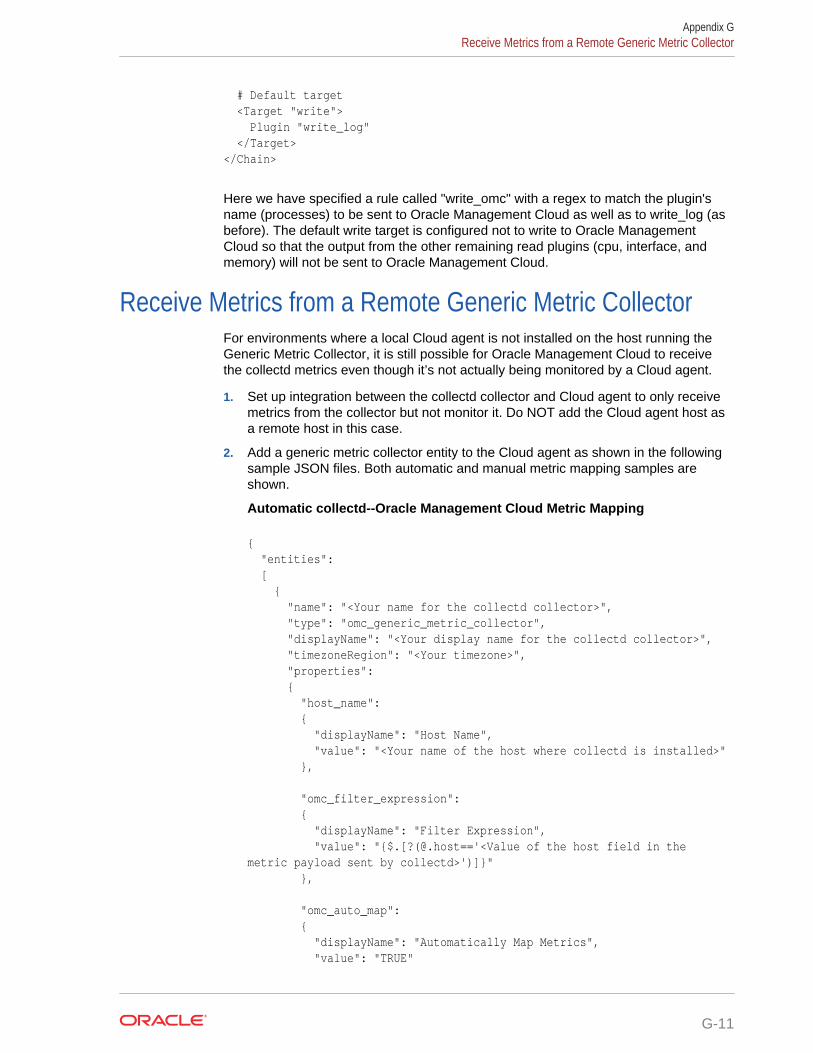
# Default target <Target "write"> Plugin "write_log" </Target></Chain>
Here we have specified a rule called "write_omc" with a regex to match the plugin'sname (processes) to be sent to Oracle Management Cloud as well as to write_log (asbefore). The default write target is configured not to write to Oracle ManagementCloud so that the output from the other remaining read plugins (cpu, interface, andmemory) will not be sent to Oracle Management Cloud.
Receive Metrics from a Remote Generic Metric CollectorFor environments where a local Cloud agent is not installed on the host running theGeneric Metric Collector, it is still possible for Oracle Management Cloud to receivethe collectd metrics even though it’s not actually being monitored by a Cloud agent.
1. Set up integration between the collectd collector and Cloud agent to only receivemetrics from the collector but not monitor it. Do NOT add the Cloud agent host asa remote host in this case.
2. Add a generic metric collector entity to the Cloud agent as shown in the followingsample JSON files. Both automatic and manual metric mapping samples areshown.
Automatic collectd--Oracle Management Cloud Metric Mapping
{ "entities": [ { "name": "<Your name for the collectd collector>", "type": "omc_generic_metric_collector", "displayName": "<Your display name for the collectd collector>", "timezoneRegion": "<Your timezone>", "properties": { "host_name": { "displayName": "Host Name", "value": "<Your name of the host where collectd is installed>" }, "omc_filter_expression": { "displayName": "Filter Expression", "value": "{$.[?(@.host=='<Value of the host field in the metric payload sent by collectd>')]}" },
"omc_auto_map": { "displayName": "Automatically Map Metrics", "value": "TRUE"
Appendix GReceive Metrics from a Remote Generic Metric Collector
G-11
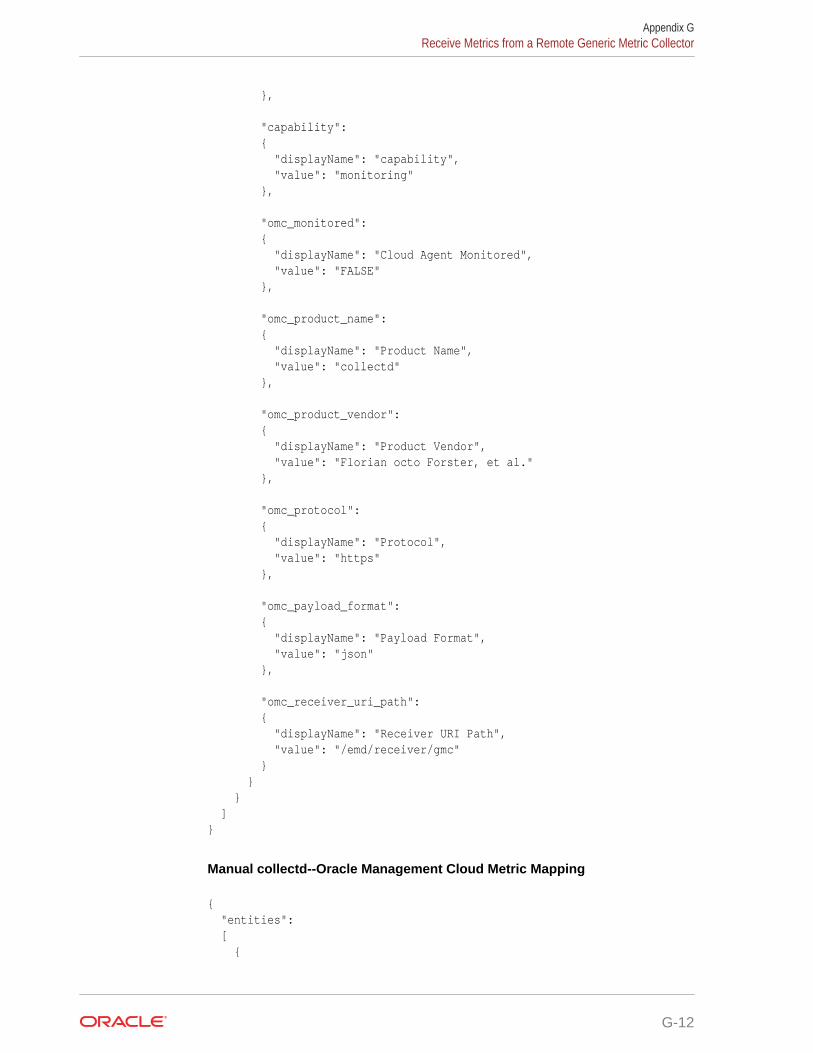
},
"capability": { "displayName": "capability", "value": "monitoring" },
"omc_monitored": { "displayName": "Cloud Agent Monitored", "value": "FALSE" },
"omc_product_name": { "displayName": "Product Name", "value": "collectd" },
"omc_product_vendor": { "displayName": "Product Vendor", "value": "Florian octo Forster, et al." }, "omc_protocol": { "displayName": "Protocol", "value": "https" },
"omc_payload_format": { "displayName": "Payload Format", "value": "json" },
"omc_receiver_uri_path": { "displayName": "Receiver URI Path", "value": "/emd/receiver/gmc" } } } ]}
Manual collectd--Oracle Management Cloud Metric Mapping
{ "entities": [ {
Appendix GReceive Metrics from a Remote Generic Metric Collector
G-12
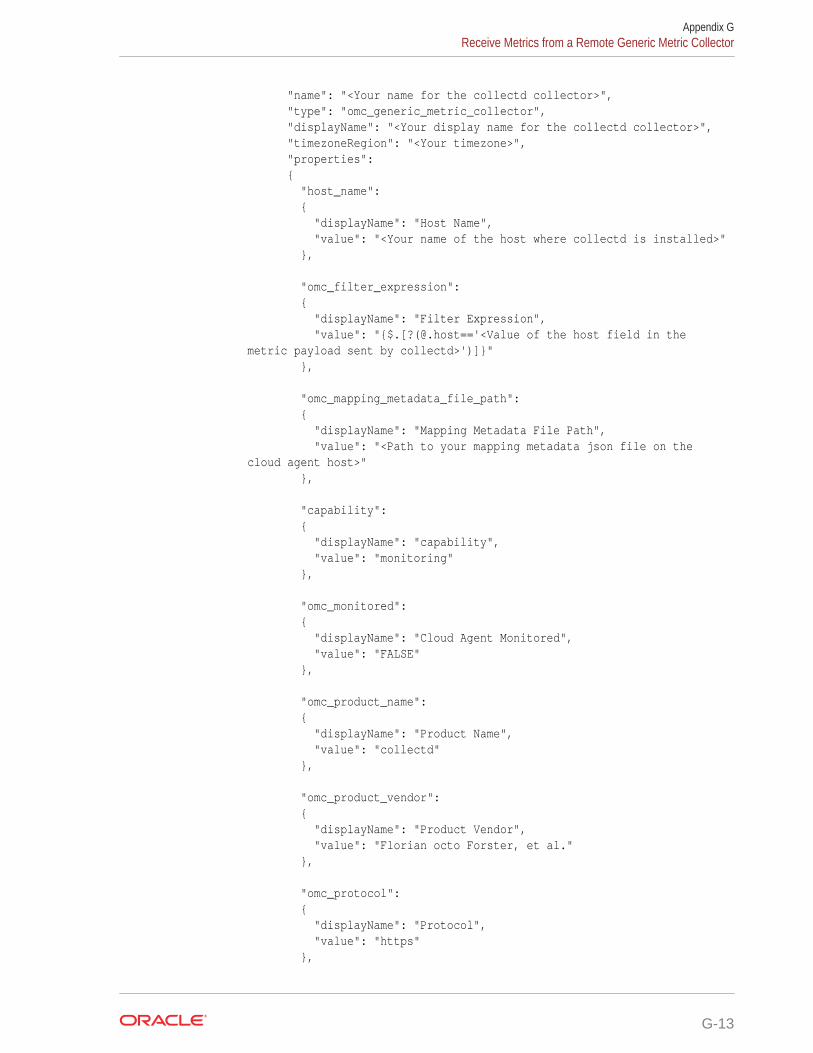
"name": "<Your name for the collectd collector>", "type": "omc_generic_metric_collector", "displayName": "<Your display name for the collectd collector>", "timezoneRegion": "<Your timezone>", "properties": { "host_name": { "displayName": "Host Name", "value": "<Your name of the host where collectd is installed>" },
"omc_filter_expression": { "displayName": "Filter Expression", "value": "{$.[?(@.host=='<Value of the host field in the metric payload sent by collectd>')]}" },
"omc_mapping_metadata_file_path": { "displayName": "Mapping Metadata File Path", "value": "<Path to your mapping metadata json file on the cloud agent host>" },
"capability": { "displayName": "capability", "value": "monitoring" },
"omc_monitored": { "displayName": "Cloud Agent Monitored", "value": "FALSE" },
"omc_product_name": { "displayName": "Product Name", "value": "collectd" },
"omc_product_vendor": { "displayName": "Product Vendor", "value": "Florian octo Forster, et al." }, "omc_protocol": { "displayName": "Protocol", "value": "https" },
Appendix GReceive Metrics from a Remote Generic Metric Collector
G-13

"omc_payload_format": { "displayName": "Payload Format", "value": "json" },
"omc_receiver_uri_path": { "displayName": "Receiver URI Path", "value": "/emd/receiver/gmc" } } } ]}
3. Configure the collectd write_http plugin to send metrics to the following URL:
https://<remote-cloud-agent-host>:<remote-cloud-agent-port>/emd/receiver/gmc
There is no need to configure the unixsock plugin or add the Cloud agent user to thecollectd socket group.
Once this configuration is complete, the Cloud agent will not try to monitor the GenericMetric Collector entity. It will instead send an unknown response to OracleManagement Cloud so that the availability of the Generic Metric Collector will beunknown.
Availability (Up/Down) Status for Entities Monitored bycollectd
For most entities monitored by collectd, availability is turned off by default, but can beenabled by setting the appropriate emd.properties file property. For a specific subsetof entities where the concept of “availability” does not apply, availability processingcannot be enabled.
By default, availability processing is turned on for the following collectd plug-ins:
• processes
• postgresql
Availability processing is not applicable (and cannot be enabled) for the followingcollectd plug-ins:
• cpu
• df
• disk
• interface
• load
• memory
Appendix GAvailability (Up/Down) Status for Entities Monitored by collectd
G-14
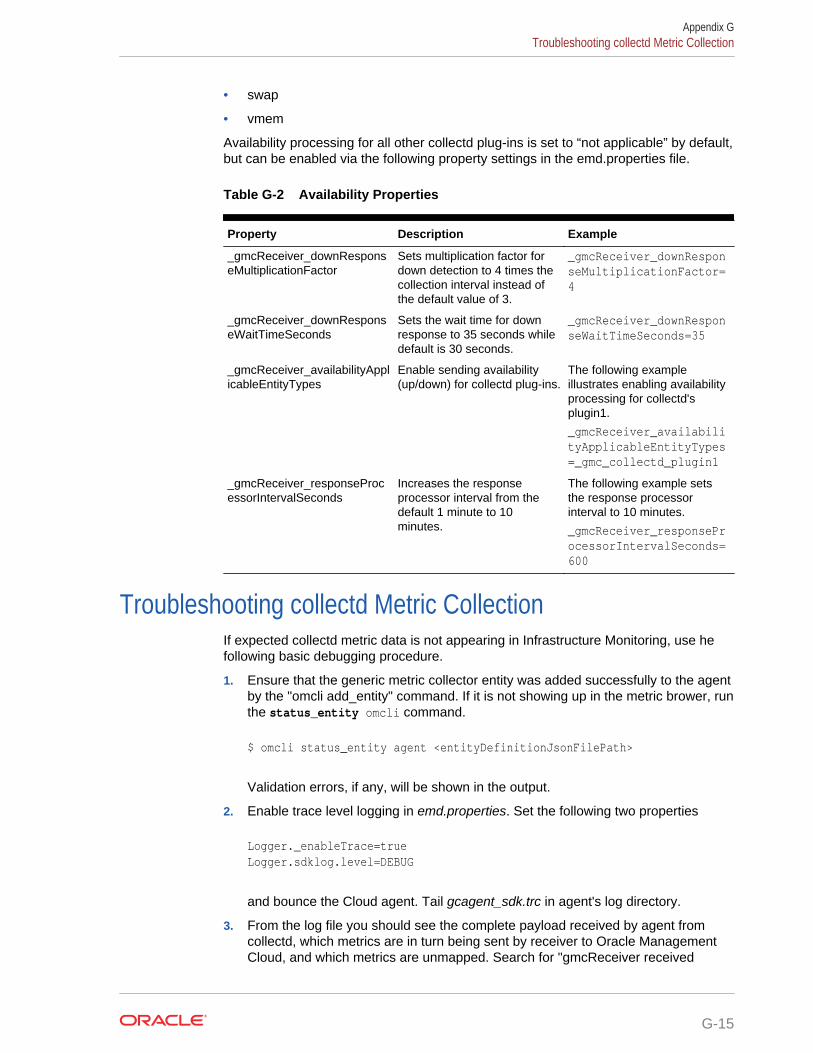
• swap
• vmem
Availability processing for all other collectd plug-ins is set to “not applicable” by default,but can be enabled via the following property settings in the emd.properties file.
Table G-2 Availability Properties
Property Description Example
_gmcReceiver_downResponseMultiplicationFactor
Sets multiplication factor fordown detection to 4 times thecollection interval instead ofthe default value of 3.
_gmcReceiver_downResponseMultiplicationFactor=4
_gmcReceiver_downResponseWaitTimeSeconds
Sets the wait time for downresponse to 35 seconds whiledefault is 30 seconds.
_gmcReceiver_downResponseWaitTimeSeconds=35
_gmcReceiver_availabilityApplicableEntityTypes
Enable sending availability(up/down) for collectd plug-ins.
The following exampleillustrates enabling availabilityprocessing for collectd'splugin1.
_gmcReceiver_availabilityApplicableEntityTypes=_gmc_collectd_plugin1
_gmcReceiver_responseProcessorIntervalSeconds
Increases the responseprocessor interval from thedefault 1 minute to 10minutes.
The following example setsthe response processorinterval to 10 minutes.
_gmcReceiver_responseProcessorIntervalSeconds=600
Troubleshooting collectd Metric CollectionIf expected collectd metric data is not appearing in Infrastructure Monitoring, use hefollowing basic debugging procedure.
1. Ensure that the generic metric collector entity was added successfully to the agentby the "omcli add_entity" command. If it is not showing up in the metric brower, runthe status_entity omcli command.
$ omcli status_entity agent <entityDefinitionJsonFilePath>
Validation errors, if any, will be shown in the output.
2. Enable trace level logging in emd.properties. Set the following two properties
Logger._enableTrace=trueLogger.sdklog.level=DEBUG
and bounce the Cloud agent. Tail gcagent_sdk.trc in agent's log directory.
3. From the log file you should see the complete payload received by agent fromcollectd, which metrics are in turn being sent by receiver to Oracle ManagementCloud, and which metrics are unmapped. Search for "gmcReceiver received
Appendix GTroubleshooting collectd Metric Collection
G-15
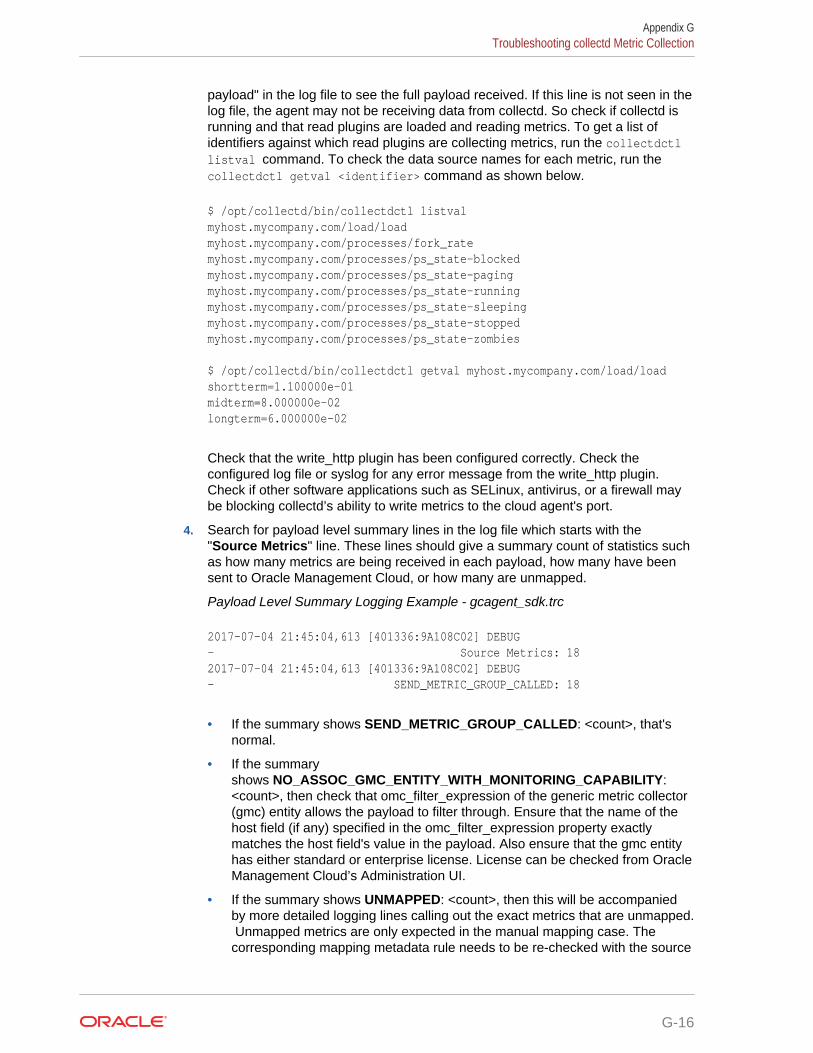
payload" in the log file to see the full payload received. If this line is not seen in thelog file, the agent may not be receiving data from collectd. So check if collectd isrunning and that read plugins are loaded and reading metrics. To get a list ofidentifiers against which read plugins are collecting metrics, run the collectdctllistval command. To check the data source names for each metric, run thecollectdctl getval <identifier> command as shown below.
$ /opt/collectd/bin/collectdctl listvalmyhost.mycompany.com/load/loadmyhost.mycompany.com/processes/fork_ratemyhost.mycompany.com/processes/ps_state-blockedmyhost.mycompany.com/processes/ps_state-pagingmyhost.mycompany.com/processes/ps_state-runningmyhost.mycompany.com/processes/ps_state-sleepingmyhost.mycompany.com/processes/ps_state-stoppedmyhost.mycompany.com/processes/ps_state-zombies $ /opt/collectd/bin/collectdctl getval myhost.mycompany.com/load/loadshortterm=1.100000e-01midterm=8.000000e-02longterm=6.000000e-02
Check that the write_http plugin has been configured correctly. Check theconfigured log file or syslog for any error message from the write_http plugin.Check if other software applications such as SELinux, antivirus, or a firewall maybe blocking collectd’s ability to write metrics to the cloud agent's port.
4. Search for payload level summary lines in the log file which starts with the"Source Metrics" line. These lines should give a summary count of statistics suchas how many metrics are being received in each payload, how many have beensent to Oracle Management Cloud, or how many are unmapped.
Payload Level Summary Logging Example - gcagent_sdk.trc
2017-07-04 21:45:04,613 [401336:9A108C02] DEBUG - Source Metrics: 182017-07-04 21:45:04,613 [401336:9A108C02] DEBUG - SEND_METRIC_GROUP_CALLED: 18
• If the summary shows SEND_METRIC_GROUP_CALLED: <count>, that'snormal.
• If the summaryshows NO_ASSOC_GMC_ENTITY_WITH_MONITORING_CAPABILITY:<count>, then check that omc_filter_expression of the generic metric collector(gmc) entity allows the payload to filter through. Ensure that the name of thehost field (if any) specified in the omc_filter_expression property exactlymatches the host field's value in the payload. Also ensure that the gmc entityhas either standard or enterprise license. License can be checked from OracleManagement Cloud’s Administration UI.
• If the summary shows UNMAPPED: <count>, then this will be accompaniedby more detailed logging lines calling out the exact metrics that are unmapped. Unmapped metrics are only expected in the manual mapping case. Thecorresponding mapping metadata rule needs to be re-checked with the source
Appendix GTroubleshooting collectd Metric Collection
G-16

data sent by collectd, particularly the filter expressions in metadata. Check ifthey match up with the metric data and structure.
• If the summary shows METRIC_UPLOAD_RATE_LIMIT_EXCEEDED:<count>, then <count> metrics in the payload were down-sampled. They werenot sent to up Oracle Management Cloud. This is expected if the sendinginterval is anything lower than once a minute (Interval 60 in the collectd.conffile).
• If the summary shows WAITING_FOR_MAPPING_METADATA: <count>,then <count> metrics in the payload are waiting for auto-map processing tocomplete. This is a transient state only expected in the automatic mappingcase. Auto-map processing can take a few minutes to a tens of minutes tocomplete.
5. Futher Steps - Automatic Mapping Case
a. If SEND_METRIC_GROUP_CALLED: <count> is seen, you should eventuallystart seeing entities on the monitoring service UI with type same as thecollectd plugin name and entity name containing the collectd host's name (asobtained from the host field within the payload sent by collectd to Cloudagent). If you do not see such an entity, it’s possible that the entity has beencreated, but has not been granted Standard or Enterprise license. This can befixed by adding a license from the License Administration UI. From the OracleManagement Cloud console, select the Administration > Entities Configuration> Licensing link. From this page, look at the Unlicensed Entities link. If itshows the auto-created entity, assign License Edition= Standard or Enterprise and click Save. To ensure this happensautomatically in future, set the License Auto-Assignment to Standard orEnterprise.
b. Once the auto-created entity shows up on the list of entities in the monitoringservice UI, drill down into the entity to see the auto-mapped metrics. Only theavailability metric will be shown by default. On the Performance Charts tab,Click Options > Choose Metrics to select the auto-created metrics forviewing their charts. Metric alert rules can also be defined on theseperformance metrics and are expected to work similar to alerts on metricsnatively collected by Oracle Cloud agent.
6. Further Step - Manual Mapping Case. This step is only applicable to manualmapping. If metrics are being sent from the agent to Oracle Management Cloud,check that the shape of the metrics sent (entity type, metric group and columns)are as expected and that the metrics are sent against the correct entityname. Search for the particular metric name or entity type in the log. Look for linescontaining the string "Calling sendMetricGroup".
Send Metric Group Example - gcagent_sdk.trc
2018-03-04 11:25:04,610 [401336:9A108C02] DEBUG - Calling sendMetricGroup on targetID=_gmc_collectd_snmp.myhost.mycompany.com; PostMetricActionBinding [mergeKey=MergeKey [entityName=myhost.mycompany.com, metricGroupName=if_octets_eth0, MetricColumnWrappers=[MetricColumnWrapper [getColumnName()=rx, isNumeric()=true], MetricColumnWrapper [getColumnName()=tx, isNumeric()=true]], entityType=_gmc_collectd_snmp, collectionTS=Mon Mar 05 22:27:40 PST 2018], metricValues=[[6634.04566173485, 2624.41806371072]], gmcEntityName=collectd-slc11ciy-automap, response=null, autoMapRequests=null
Appendix GTroubleshooting collectd Metric Collection
G-17

From the above log line, the target entity type is _gmc_collectd_snmp; entity nameis myhost.mycompany.com; metric group name is if_octets_eth0; metric columnnames are rx and tx; metric values are 6634.04566173485 and2624.41806371072; and the associated gmc entity name is collectd-slc11ciy-automap.
7. When debugging is no longer required, turn off trace level logging and set the SDKlog level to INFO. Set the following in emd.properties.
Logger._enableTrace=falseLogger.sdklog.level=INFO
Appendix GTroubleshooting collectd Metric Collection
G-18
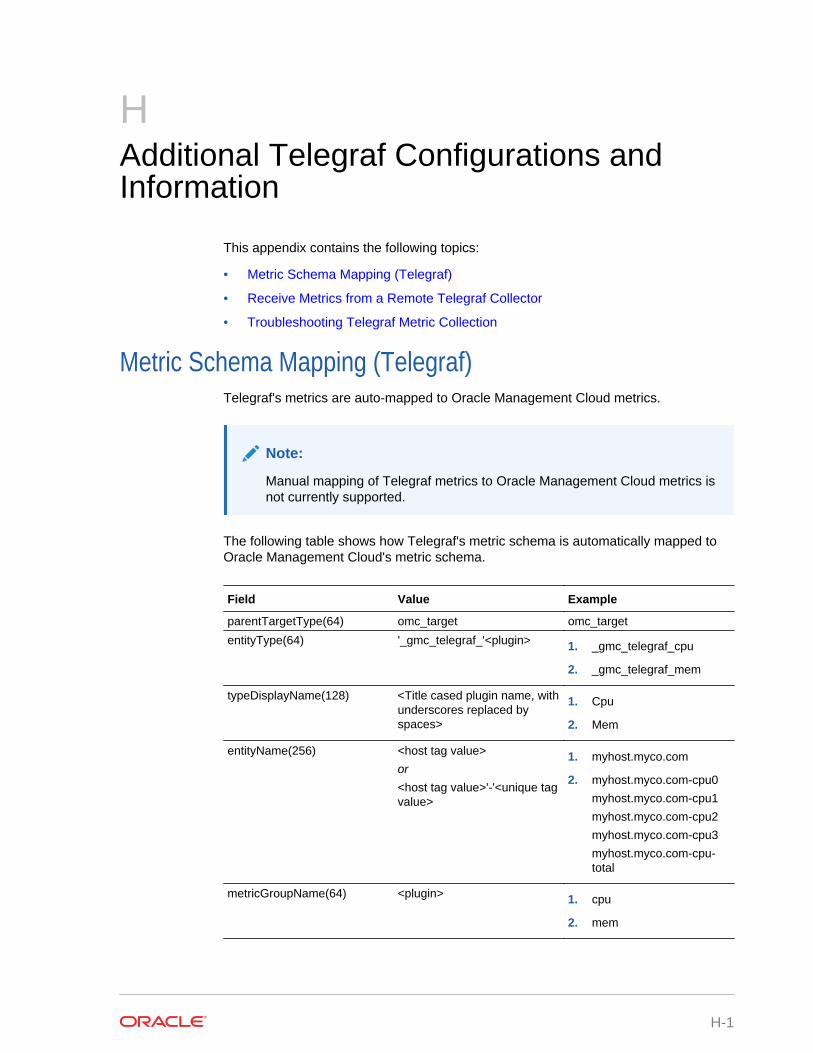
HAdditional Telegraf Configurations andInformation
This appendix contains the following topics:
• Metric Schema Mapping (Telegraf)
• Receive Metrics from a Remote Telegraf Collector
• Troubleshooting Telegraf Metric Collection
Metric Schema Mapping (Telegraf)Telegraf's metrics are auto-mapped to Oracle Management Cloud metrics.
Note:
Manual mapping of Telegraf metrics to Oracle Management Cloud metrics isnot currently supported.
The following table shows how Telegraf's metric schema is automatically mapped toOracle Management Cloud's metric schema.
Field Value Example
parentTargetType(64) omc_target omc_target
entityType(64) '_gmc_telegraf_'<plugin> 1. _gmc_telegraf_cpu
2. _gmc_telegraf_mem
typeDisplayName(128) <Title cased plugin name, withunderscores replaced byspaces>
1. Cpu
2. Mem
entityName(256) <host tag value>
or
<host tag value>'-'<unique tagvalue>
1. myhost.myco.com
2. myhost.myco.com-cpu0
myhost.myco.com-cpu1
myhost.myco.com-cpu2
myhost.myco.com-cpu3
myhost.myco.com-cpu-total
metricGroupName(64) <plugin> 1. cpu
2. mem
H-1
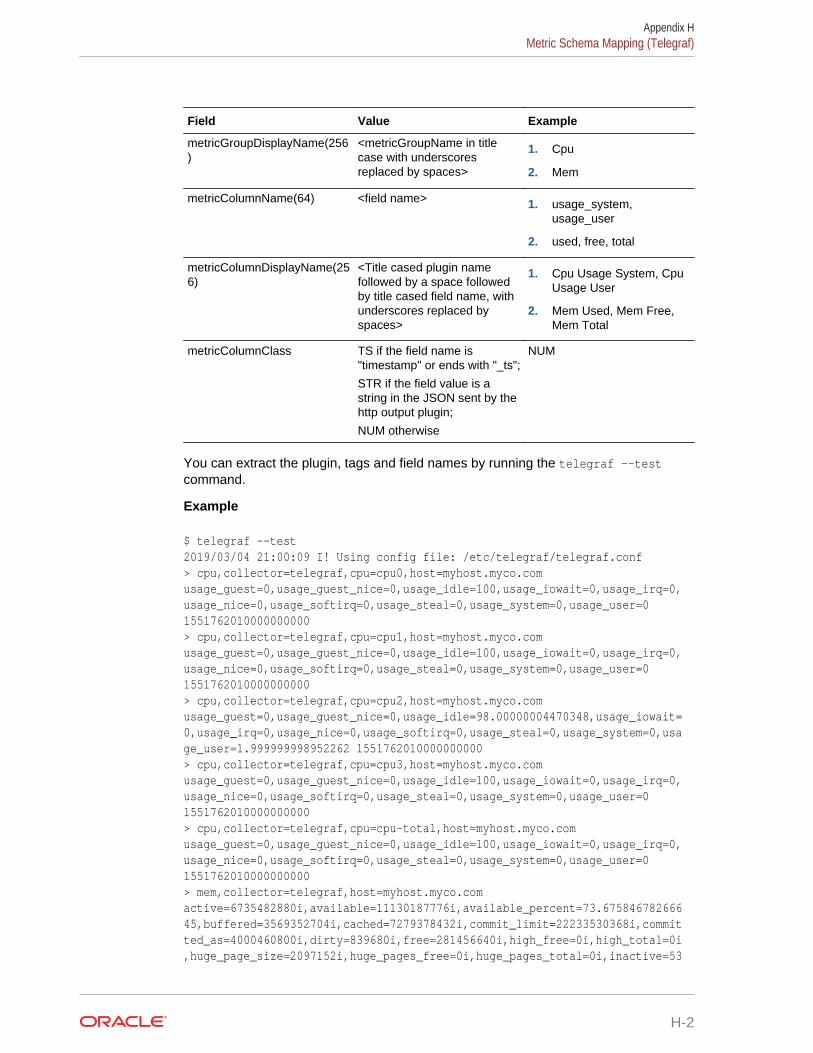
Field Value Example
metricGroupDisplayName(256)
<metricGroupName in titlecase with underscoresreplaced by spaces>
1. Cpu
2. Mem
metricColumnName(64) <field name> 1. usage_system,usage_user
2. used, free, total
metricColumnDisplayName(256)
<Title cased plugin namefollowed by a space followedby title cased field name, withunderscores replaced byspaces>
1. Cpu Usage System, CpuUsage User
2. Mem Used, Mem Free,Mem Total
metricColumnClass TS if the field name is"timestamp" or ends with "_ts";
STR if the field value is astring in the JSON sent by thehttp output plugin;
NUM otherwise
NUM
You can extract the plugin, tags and field names by running the telegraf --testcommand.
Example
$ telegraf --test2019/03/04 21:00:09 I! Using config file: /etc/telegraf/telegraf.conf> cpu,collector=telegraf,cpu=cpu0,host=myhost.myco.com usage_guest=0,usage_guest_nice=0,usage_idle=100,usage_iowait=0,usage_irq=0,usage_nice=0,usage_softirq=0,usage_steal=0,usage_system=0,usage_user=0 1551762010000000000> cpu,collector=telegraf,cpu=cpu1,host=myhost.myco.com usage_guest=0,usage_guest_nice=0,usage_idle=100,usage_iowait=0,usage_irq=0,usage_nice=0,usage_softirq=0,usage_steal=0,usage_system=0,usage_user=0 1551762010000000000> cpu,collector=telegraf,cpu=cpu2,host=myhost.myco.com usage_guest=0,usage_guest_nice=0,usage_idle=98.00000004470348,usage_iowait=0,usage_irq=0,usage_nice=0,usage_softirq=0,usage_steal=0,usage_system=0,usage_user=1.999999998952262 1551762010000000000> cpu,collector=telegraf,cpu=cpu3,host=myhost.myco.com usage_guest=0,usage_guest_nice=0,usage_idle=100,usage_iowait=0,usage_irq=0,usage_nice=0,usage_softirq=0,usage_steal=0,usage_system=0,usage_user=0 1551762010000000000> cpu,collector=telegraf,cpu=cpu-total,host=myhost.myco.com usage_guest=0,usage_guest_nice=0,usage_idle=100,usage_iowait=0,usage_irq=0,usage_nice=0,usage_softirq=0,usage_steal=0,usage_system=0,usage_user=0 1551762010000000000> mem,collector=telegraf,host=myhost.myco.com active=6735482880i,available=11130187776i,available_percent=73.67584678266645,buffered=3569352704i,cached=7279378432i,commit_limit=22233530368i,committed_as=4000460800i,dirty=839680i,free=281456640i,high_free=0i,high_total=0i,huge_page_size=2097152i,huge_pages_free=0i,huge_pages_total=0i,inactive=53
Appendix HMetric Schema Mapping (Telegraf)
H-2
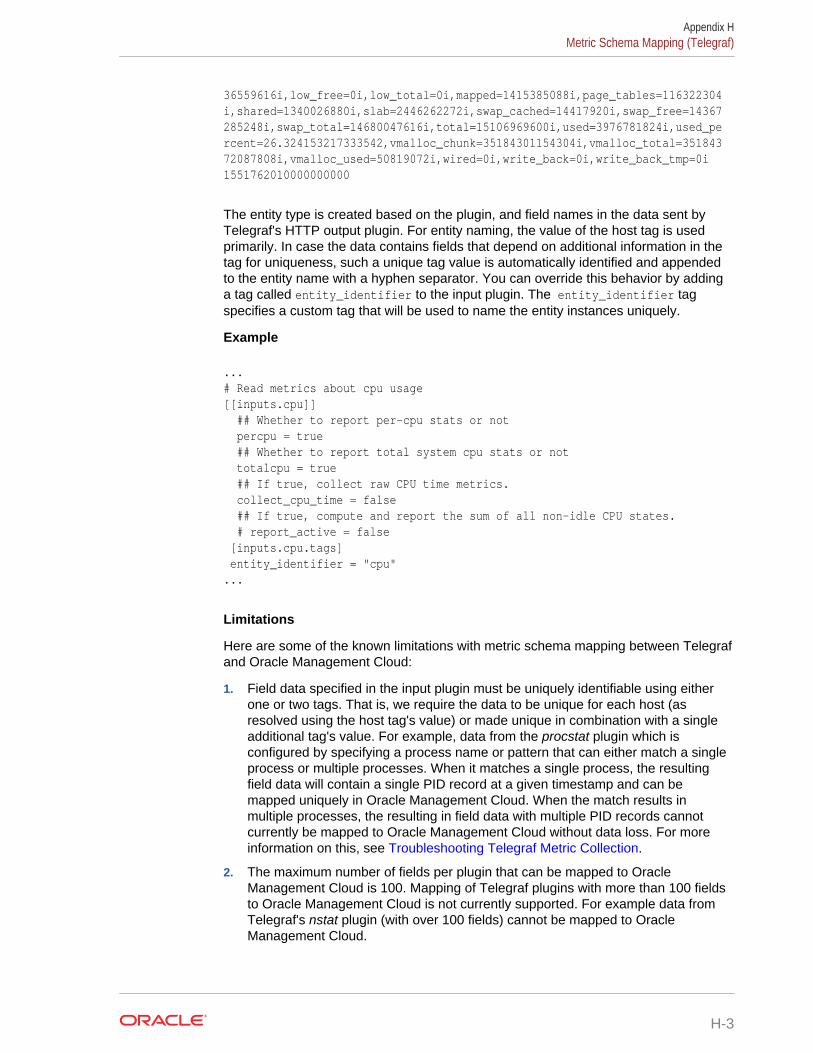
36559616i,low_free=0i,low_total=0i,mapped=1415385088i,page_tables=116322304i,shared=1340026880i,slab=2446262272i,swap_cached=14417920i,swap_free=14367285248i,swap_total=14680047616i,total=15106969600i,used=3976781824i,used_percent=26.324153217333542,vmalloc_chunk=35184301154304i,vmalloc_total=35184372087808i,vmalloc_used=50819072i,wired=0i,write_back=0i,write_back_tmp=0i 1551762010000000000
The entity type is created based on the plugin, and field names in the data sent byTelegraf's HTTP output plugin. For entity naming, the value of the host tag is usedprimarily. In case the data contains fields that depend on additional information in thetag for uniqueness, such a unique tag value is automatically identified and appendedto the entity name with a hyphen separator. You can override this behavior by addinga tag called entity_identifier to the input plugin. The entity_identifier tagspecifies a custom tag that will be used to name the entity instances uniquely.
Example
...# Read metrics about cpu usage[[inputs.cpu]] ## Whether to report per-cpu stats or not percpu = true ## Whether to report total system cpu stats or not totalcpu = true ## If true, collect raw CPU time metrics. collect_cpu_time = false ## If true, compute and report the sum of all non-idle CPU states. # report_active = false [inputs.cpu.tags] entity_identifier = "cpu"...
Limitations
Here are some of the known limitations with metric schema mapping between Telegrafand Oracle Management Cloud:
1. Field data specified in the input plugin must be uniquely identifiable using eitherone or two tags. That is, we require the data to be unique for each host (asresolved using the host tag's value) or made unique in combination with a singleadditional tag's value. For example, data from the procstat plugin which isconfigured by specifying a process name or pattern that can either match a singleprocess or multiple processes. When it matches a single process, the resultingfield data will contain a single PID record at a given timestamp and can bemapped uniquely in Oracle Management Cloud. When the match results inmultiple processes, the resulting in field data with multiple PID records cannotcurrently be mapped to Oracle Management Cloud without data loss. For moreinformation on this, see Troubleshooting Telegraf Metric Collection.
2. The maximum number of fields per plugin that can be mapped to OracleManagement Cloud is 100. Mapping of Telegraf plugins with more than 100 fieldsto Oracle Management Cloud is not currently supported. For example data fromTelegraf's nstat plugin (with over 100 fields) cannot be mapped to OracleManagement Cloud.
Appendix HMetric Schema Mapping (Telegraf)
H-3
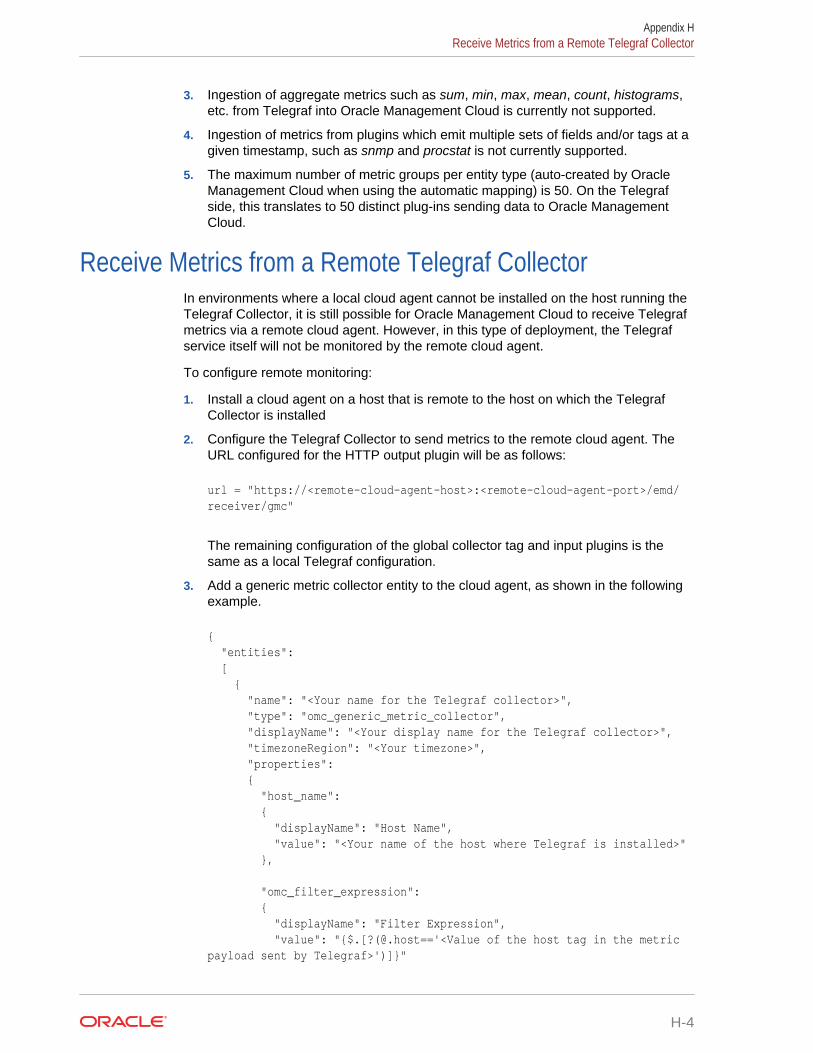
3. Ingestion of aggregate metrics such as sum, min, max, mean, count, histograms,etc. from Telegraf into Oracle Management Cloud is currently not supported.
4. Ingestion of metrics from plugins which emit multiple sets of fields and/or tags at agiven timestamp, such as snmp and procstat is not currently supported.
5. The maximum number of metric groups per entity type (auto-created by OracleManagement Cloud when using the automatic mapping) is 50. On the Telegrafside, this translates to 50 distinct plug-ins sending data to Oracle ManagementCloud.
Receive Metrics from a Remote Telegraf CollectorIn environments where a local cloud agent cannot be installed on the host running theTelegraf Collector, it is still possible for Oracle Management Cloud to receive Telegrafmetrics via a remote cloud agent. However, in this type of deployment, the Telegrafservice itself will not be monitored by the remote cloud agent.
To configure remote monitoring:
1. Install a cloud agent on a host that is remote to the host on which the TelegrafCollector is installed
2. Configure the Telegraf Collector to send metrics to the remote cloud agent. TheURL configured for the HTTP output plugin will be as follows:
url = "https://<remote-cloud-agent-host>:<remote-cloud-agent-port>/emd/receiver/gmc"
The remaining configuration of the global collector tag and input plugins is thesame as a local Telegraf configuration.
3. Add a generic metric collector entity to the cloud agent, as shown in the followingexample.
{ "entities": [ { "name": "<Your name for the Telegraf collector>", "type": "omc_generic_metric_collector", "displayName": "<Your display name for the Telegraf collector>", "timezoneRegion": "<Your timezone>", "properties": { "host_name": { "displayName": "Host Name", "value": "<Your name of the host where Telegraf is installed>" }, "omc_filter_expression": { "displayName": "Filter Expression", "value": "{$.[?(@.host=='<Value of the host tag in the metric payload sent by Telegraf>')]}"
Appendix HReceive Metrics from a Remote Telegraf Collector
H-4
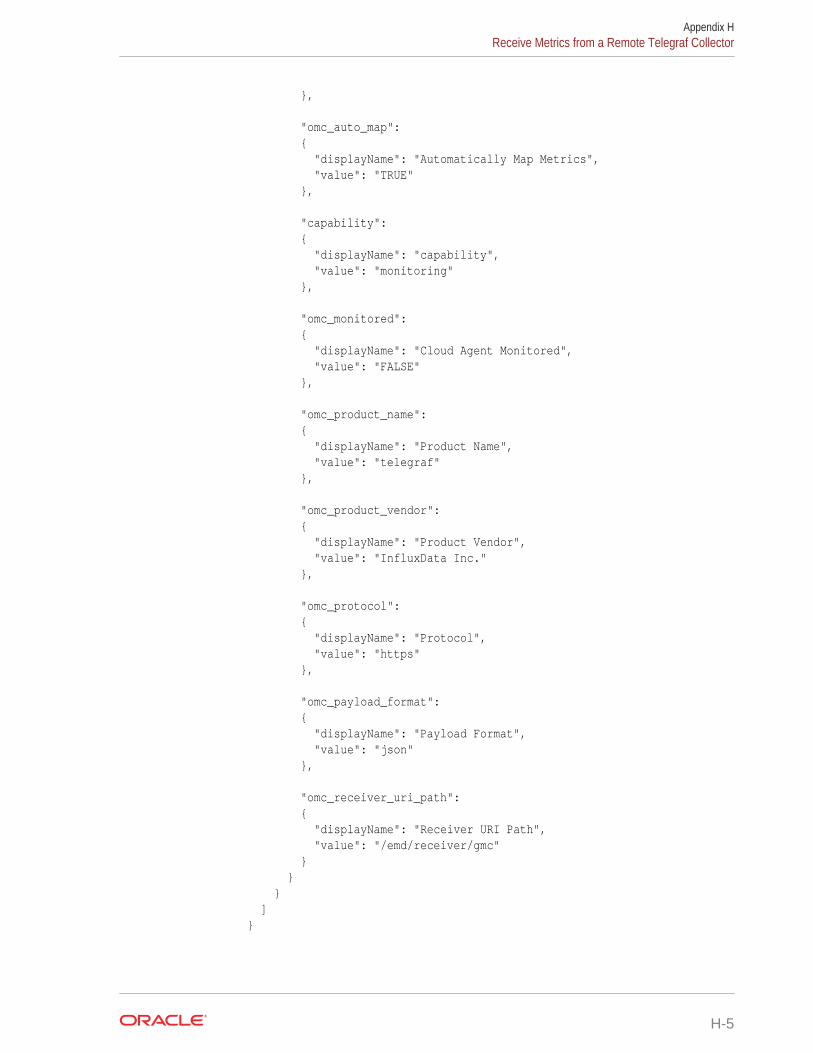
}, "omc_auto_map": { "displayName": "Automatically Map Metrics", "value": "TRUE" }, "capability": { "displayName": "capability", "value": "monitoring" }, "omc_monitored": { "displayName": "Cloud Agent Monitored", "value": "FALSE" }, "omc_product_name": { "displayName": "Product Name", "value": "telegraf" }, "omc_product_vendor": { "displayName": "Product Vendor", "value": "InfluxData Inc." }, "omc_protocol": { "displayName": "Protocol", "value": "https" }, "omc_payload_format": { "displayName": "Payload Format", "value": "json" }, "omc_receiver_uri_path": { "displayName": "Receiver URI Path", "value": "/emd/receiver/gmc" } } } ]}
Appendix HReceive Metrics from a Remote Telegraf Collector
H-5
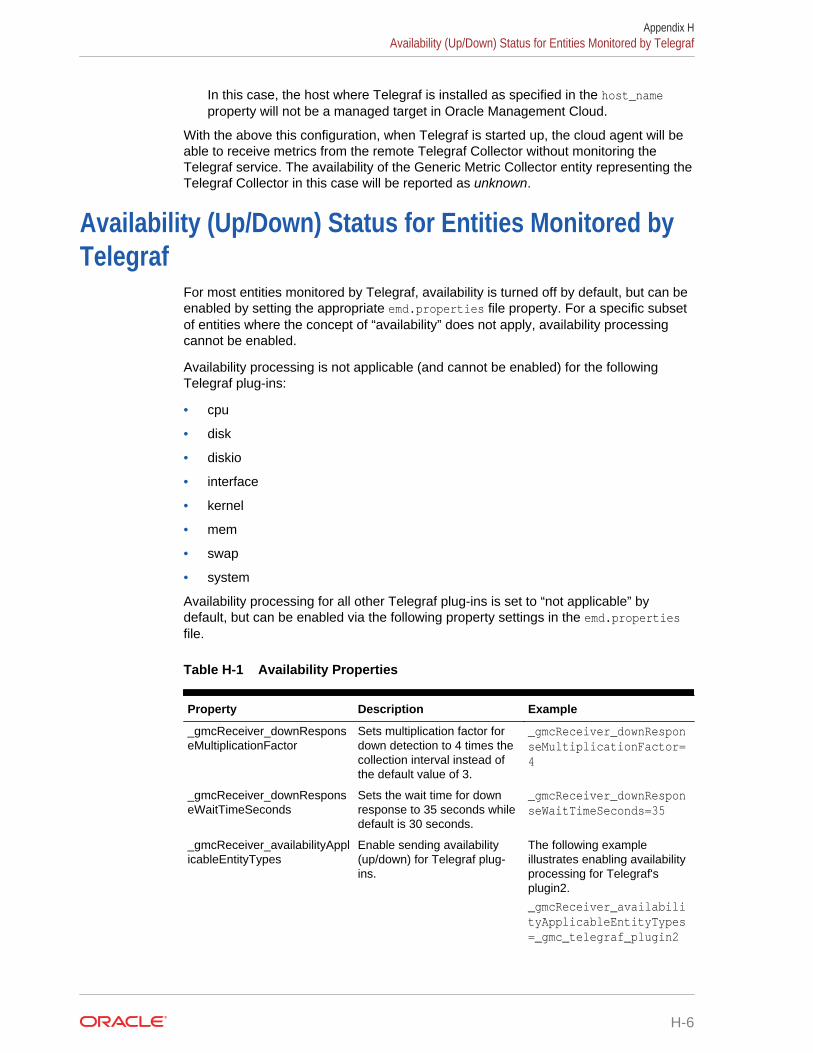
In this case, the host where Telegraf is installed as specified in the host_nameproperty will not be a managed target in Oracle Management Cloud.
With the above this configuration, when Telegraf is started up, the cloud agent will beable to receive metrics from the remote Telegraf Collector without monitoring theTelegraf service. The availability of the Generic Metric Collector entity representing theTelegraf Collector in this case will be reported as unknown.
Availability (Up/Down) Status for Entities Monitored byTelegraf
For most entities monitored by Telegraf, availability is turned off by default, but can beenabled by setting the appropriate emd.properties file property. For a specific subsetof entities where the concept of “availability” does not apply, availability processingcannot be enabled.
Availability processing is not applicable (and cannot be enabled) for the followingTelegraf plug-ins:
• cpu
• disk
• diskio
• interface
• kernel
• mem
• swap
• system
Availability processing for all other Telegraf plug-ins is set to “not applicable” bydefault, but can be enabled via the following property settings in the emd.propertiesfile.
Table H-1 Availability Properties
Property Description Example
_gmcReceiver_downResponseMultiplicationFactor
Sets multiplication factor fordown detection to 4 times thecollection interval instead ofthe default value of 3.
_gmcReceiver_downResponseMultiplicationFactor=4
_gmcReceiver_downResponseWaitTimeSeconds
Sets the wait time for downresponse to 35 seconds whiledefault is 30 seconds.
_gmcReceiver_downResponseWaitTimeSeconds=35
_gmcReceiver_availabilityApplicableEntityTypes
Enable sending availability(up/down) for Telegraf plug-ins.
The following exampleillustrates enabling availabilityprocessing for Telegraf'splugin2.
_gmcReceiver_availabilityApplicableEntityTypes=_gmc_telegraf_plugin2
Appendix HAvailability (Up/Down) Status for Entities Monitored by Telegraf
H-6
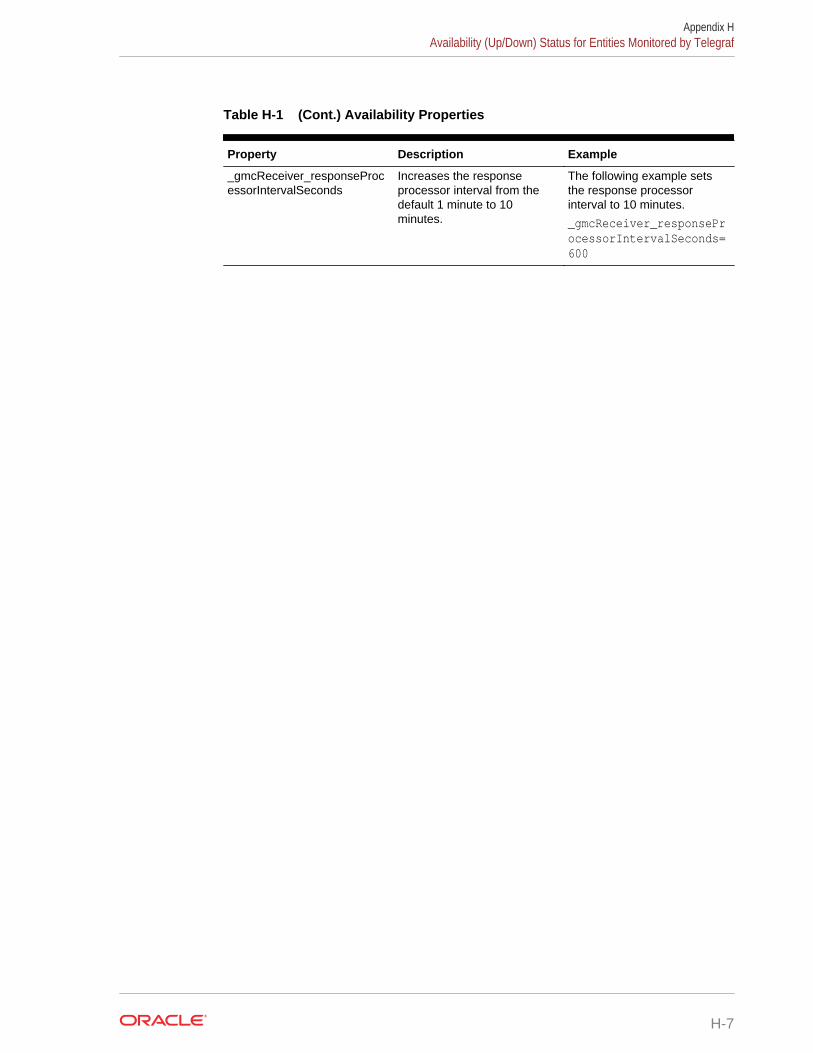
Table H-1 (Cont.) Availability Properties
Property Description Example
_gmcReceiver_responseProcessorIntervalSeconds
Increases the responseprocessor interval from thedefault 1 minute to 10minutes.
The following example setsthe response processorinterval to 10 minutes.
_gmcReceiver_responseProcessorIntervalSeconds=600
Appendix HAvailability (Up/Down) Status for Entities Monitored by Telegraf
H-7
ICustom Metric Collection Methods andMetric Columns
Collection methods provide comprehensive, easy-to-use monitoring connectivity with avariety of target types. Metric columns define the data returned by the collectionmethod.
Collection Method
A collection method enables communication with a specific entity type and translatesthe entity data to standards-compliant XML and back. The custom metric entity typedetermines which collection methods are made available from the Oracle ManagementCloud console. For example, when creating a custom metric for an Automatic StorageManagement entity type, only two collection methods (OS Command and SQL) areavailable from the UI.
Oracle Management Cloud provides the following collection methods:
• OS Command
• SQL Query
• Java Management Extensions (JMX)
• REST
Metric Columns (Advanced Options)
Metric columns define the data that is returned by the collection method. In certainsituations, you may want the metric column value to be based on calculationsperformed using other metric columns, or perhaps differences and/or rates of changebetween metric columns. Oracle Infrastructure Monitoring allows you to performadvanced operations on metric columns to increase metric utility and flexibility:
• Compute Expressions
• Rate and Delta Metric Columns
OS CommandThis collection method executes the specified command and returns the commandoutput, delimited by a specified string, as multiple columns.
For example, if the command output is: em_result=1|2|3 and the Delimiter is set as |,then three columns are populated with values 1,2,3 respectively.
Properties
• Command - The command to execute. For example, %perlBin%/perl. Thecomplete command line will be constructed as: Command + Script + Arguments.
I-1
• Script - A script to pass to the command. For example, %scriptsDir%/myscript.pl. You can upload custom files to the agent, which will be accessibleunder the %scriptsDir% directory.
• Script Location - The absolute path to the script. This path and script location mustbe accessible by the cloud agent user.
• Arguments - Additional arguments required by the script.
• Prefix for Output - The starting string of metric result lines. For example, if thecommand output is: em_result=4354 temp res you can set "Starts With" =em_result, so that only lines starting with em_result will be parsed.
• Delimiter for Output - The string used to delimit the command output.
Available Variables
Variables can be used in collection method properties. Variable names are case-sensitive. To escape '%', use '%%'.
Name Description
%perlBin% Location of perl binary.
%scriptsDir% Directory where scripts are stored.
%NAME% Name of the entity.
%TYPE% Entity type.
%DISPLAY_NAME% Display name of target instance.
%TYPE_DISPLAY_NAME% Display name of target type.
SQL QueryThe SQL Query collection method allows you to execute a normal SQL query orPL/SQL statement against the database to retrieve data.
Properties
• SQL Query - The SQL query to execute. Normal SQL statements should not besemi-colon terminated. For example, SQL Query = "select a.ename, (selectcount(*) from emp p where p.mgr=a.empno) directs from emp a". PL/SQLstatements are also supported, and if used, the "Out Parameter Position" and "OutParameter Type" properties should be populated.
• SQL Query File - A SQL query file. Note that only one of "SQL Query" or "SQLQuery File" should be used. For example, %scriptsDir%/myquery.sql. You canupload custom files to the agent, which will be accessible under the %scriptsDir%directory.
• Out Parameter Position - The bind variable used for PL/SQL output. Only anumber should be specified. For example, if the SQL Query is:
DECLARE l_output1 NUMBER; l_output2 NUMBER; BEGIN ..... OPEN :1 FOR
Appendix ISQL Query
I-2
SELECT l_output1,l_output2 FROM dual; END;
then you can set Out Parameter Position = 1, and Out Parameter Type =SQL_CURSOR
• Out Parameter Type - The SQL type of the PL/SQL output parameter.
Available Variables
Variables can be used in collection method properties. Variable names are case-sensitive. To escape '%', use '%%'.
Name Description
%perlBin% location of perl binary
%scriptsDir% directory where scripts are stored
%NAME% name of target instance
%TYPE% target type
%DISPLAY_NAME% display name of target instance
%TYPE_DISPLAY_NAME% display name of target type
%OracleHome% Oracle Home Path
%MachineName% Listener Machine Name
%Port% Port
%SID% Database SID
Java Management Extensions (JMX)This collection method can be used to retrieve JMX attributes from JMX enabledservers and returns these attributes as a metric table.
Properties
• MBean Name - This is the MBean ObjectName or ObjectName pattern whoseattributes are to be queried. Since this is specified as metric metadata, it needs tobe instance agnostic, so instance specific key-properties if any (like servername),on the MBean ObjectName may need to be replaced with wild-cards.
• JMX Attributes - This is a semicolon separated list of JMX attributes in the orderthey need to be presented in the metric.
• Identity Column - This is an MBean key property that needs to be surfaced as acolumn when it is not available as a JMX attribute.Example: com.myCompany:Name=myName,Dept=deptName, prop1=prop1Val,prop2=prop2Val
In this example, setting identityCol as Name;Dept will result in two additional keycolumns representing Name and Dept besides the columns representing the JMXattributes specified in the Column Order property above.
• Auto Row Prefix - This is prefix used for an automatically generated row, in casethe MBean ObjectName pattern specified in metric property matches multipleMBeans and none of the JMX attributes specified in the Column Order are uniquefor each. The Auto Row Prefix value specified here will be used as a prefix for theadditional key column created.Example: If the Metric is defined as com.myCompany:Type=CustomerOrder,*
Appendix IJava Management Extensions (JMX)
I-3
Column Order is CustomerName;OrderNumber;DateShipped
and assuming CustomerName;OrderNumber;Amount may not be unique
if an order is shipped in two parts, setting Auto Row Prefix as
"ShipItem-" will populate an additional key column for the metric
for each row with
ShipItem-0,
ShipItem-1
• Metric Service - True/False. This indicates whether Metric Service is enabled onthe target WebLogic Server domain. If set to true, then the basic property MBeanName above should be the Metric Service table name and the basic property JMXAttributes should be a semicolon-separated list of column names for above MetricService table.
Available Variables
Variables can be used in collection method properties. Variable names are case-sensitive. To escape '%', use '%%'.
Name Description
%perlBin% Location of perl binary
%scriptsDir% Directory where scripts are stored
%NAME% Name of target instance
%TYPE% Target type
%DISPLAY_NAME% Display name of target instance
%TYPE_DISPLAY_NAME% Display name of target type
%ServerNames% Server Names
%version% Version
%ObjectName% Object Name
%OracleHome% Oracle Home
%ProxyMBeanObjectName% Proxy MBean ObjectName
%OracleInstance% Oracle Instance
%CanonicalPath% Canonical Path
%compVersion% Component Version
%OPMNMBeanName% OPMN MBean Name
%VersionCategory% Version Category
RESTThe REST (Representational State Transfer) collection method retrieves attributesfrom enabled servers and returns the results as a table.
Properties
• Namespace - Set of all namespaces referenced. Specify using notation:[ns0="uri0"][ns1="uri1"].. Example: [ns0="http://type.abc.com"][ns1="http://app.abc.com"]
Appendix IREST
I-4
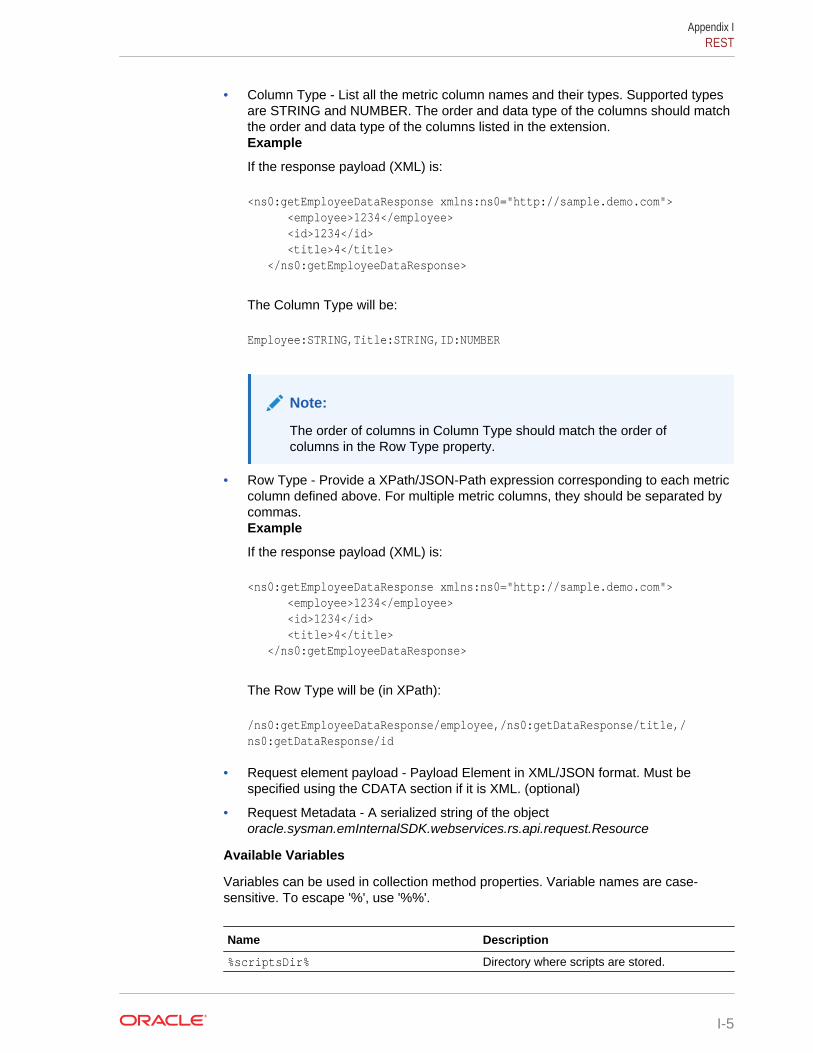
• Column Type - List all the metric column names and their types. Supported typesare STRING and NUMBER. The order and data type of the columns should matchthe order and data type of the columns listed in the extension.Example
If the response payload (XML) is:
<ns0:getEmployeeDataResponse xmlns:ns0="http://sample.demo.com"> <employee>1234</employee> <id>1234</id> <title>4</title> </ns0:getEmployeeDataResponse>
The Column Type will be:
Employee:STRING,Title:STRING,ID:NUMBER
Note:
The order of columns in Column Type should match the order ofcolumns in the Row Type property.
• Row Type - Provide a XPath/JSON-Path expression corresponding to each metriccolumn defined above. For multiple metric columns, they should be separated bycommas.Example
If the response payload (XML) is:
<ns0:getEmployeeDataResponse xmlns:ns0="http://sample.demo.com"> <employee>1234</employee> <id>1234</id> <title>4</title> </ns0:getEmployeeDataResponse>
The Row Type will be (in XPath):
/ns0:getEmployeeDataResponse/employee,/ns0:getDataResponse/title,/ns0:getDataResponse/id
• Request element payload - Payload Element in XML/JSON format. Must bespecified using the CDATA section if it is XML. (optional)
• Request Metadata - A serialized string of the objectoracle.sysman.emInternalSDK.webservices.rs.api.request.Resource
Available Variables
Variables can be used in collection method properties. Variable names are case-sensitive. To escape '%', use '%%'.
Name Description
%scriptsDir% Directory where scripts are stored.
Appendix IREST
I-5

Name Description
%NAME% Name of the entity.
%TYPE% Entity type.
%DISPLAY_NAME% Display name of target instance.
%TYPE_DISPLAY_NAME% Display name of target type.
Compute ExpressionsYou use compute expressions to calculate the value of a metric column based onmathematical or logical operations performed on other metric columns.
Compute expressions require at least one other metric column to be defined first, andcan only include those metric columns that are listed before this metric column inorder. You can use the up and down arrows to re-order metric columns. The value ofthe column is calculated using the given compute expression.
The following table shows operators which can be used while defining computeexpression.
Operator Example Explanation
+ Column1 + Column2 Returns the sum of the valuesof Column1 and Column2.
- (Column1 + Column2) -Column3
First add Column1 andColumn2 values, then subtractColumn3 value and return theresult.
* (Column1*Column2) +Column3
First multiply Column1 andColumn2 values, then addColumn3 value and return theresult.
/ (Column1 + Column2) /2 Returns the average ofColumn1 and Column2values.
__ceil __ceil Column1 Returns the value of Column1rounded off to the largestinteger.
__floor __floor Column1 Returns the value of Column1rounded off to the lowestinteger.
__round __round Column1 This expression will round thevalue of Column1 to thenearest integer, away fromzero.
== Column1 == 1 Returns true if the value ofColumn1 is 1, else returnsfalse.
!= Column1 != 1 Returns false if the value ofColumn1 is 1, else returnstrue.
Appendix ICompute Expressions
I-6
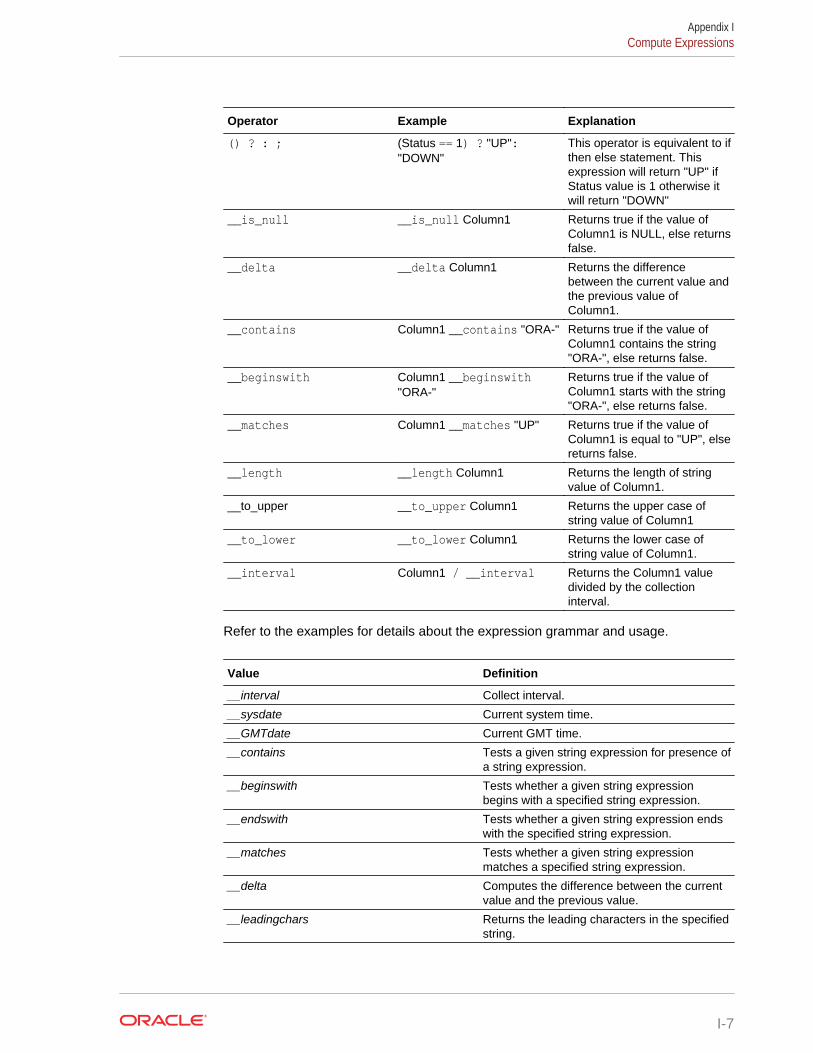
Operator Example Explanation
() ? : ; (Status == 1) ? "UP":"DOWN"
This operator is equivalent to ifthen else statement. Thisexpression will return "UP" ifStatus value is 1 otherwise itwill return "DOWN"
__is_null __is_null Column1 Returns true if the value ofColumn1 is NULL, else returnsfalse.
__delta __delta Column1 Returns the differencebetween the current value andthe previous value ofColumn1.
__contains Column1 __contains "ORA-" Returns true if the value ofColumn1 contains the string"ORA-", else returns false.
__beginswith Column1 __beginswith"ORA-"
Returns true if the value ofColumn1 starts with the string"ORA-", else returns false.
__matches Column1 __matches "UP" Returns true if the value ofColumn1 is equal to "UP", elsereturns false.
__length __length Column1 Returns the length of stringvalue of Column1.
__to_upper __to_upper Column1 Returns the upper case ofstring value of Column1
__to_lower __to_lower Column1 Returns the lower case ofstring value of Column1.
__interval Column1 / __interval Returns the Column1 valuedivided by the collectioninterval.
Refer to the examples for details about the expression grammar and usage.
Value Definition
__interval Collect interval.
__sysdate Current system time.
__GMTdate Current GMT time.
__contains Tests a given string expression for presence ofa string expression.
__beginswith Tests whether a given string expressionbegins with a specified string expression.
__endswith Tests whether a given string expression endswith the specified string expression.
__matches Tests whether a given string expressionmatches a specified string expression.
__delta Computes the difference between the currentvalue and the previous value.
__leadingchars Returns the leading characters in the specifiedstring.
Appendix ICompute Expressions
I-7
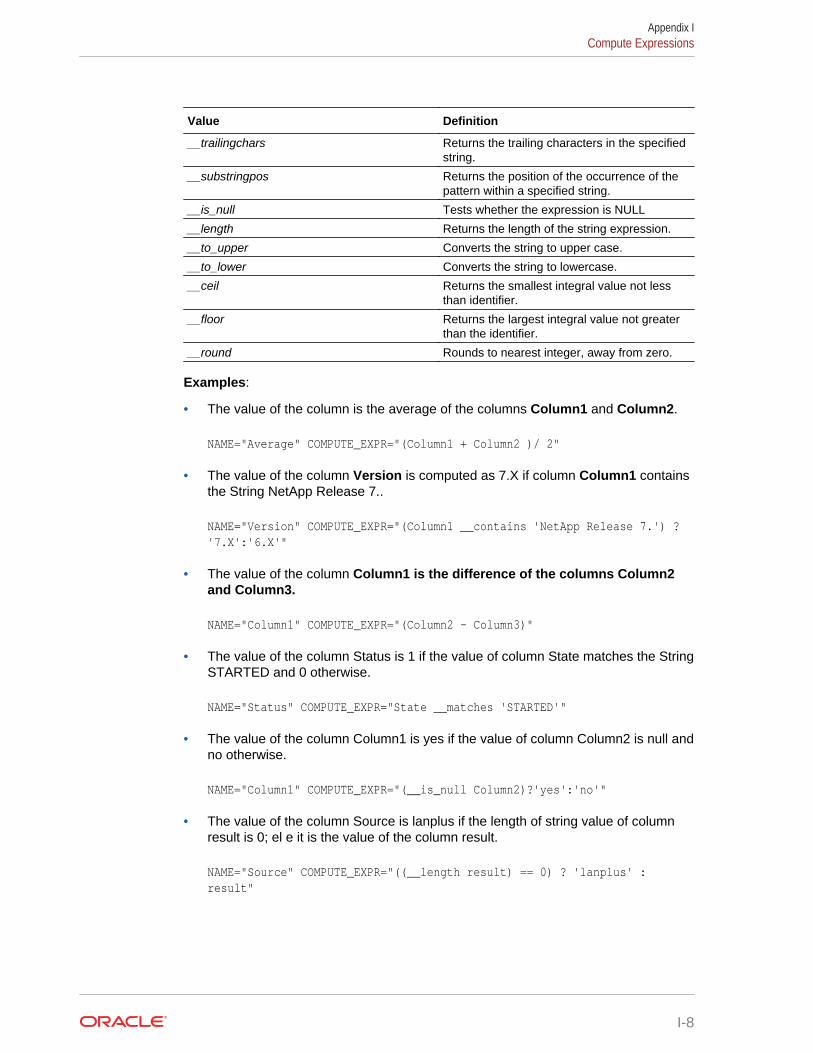
Value Definition
__trailingchars Returns the trailing characters in the specifiedstring.
__substringpos Returns the position of the occurrence of thepattern within a specified string.
__is_null Tests whether the expression is NULL
__length Returns the length of the string expression.
__to_upper Converts the string to upper case.
__to_lower Converts the string to lowercase.
__ceil Returns the smallest integral value not lessthan identifier.
__floor Returns the largest integral value not greaterthan the identifier.
__round Rounds to nearest integer, away from zero.
Examples:
• The value of the column is the average of the columns Column1 and Column2.
NAME="Average" COMPUTE_EXPR="(Column1 + Column2 )/ 2"
• The value of the column Version is computed as 7.X if column Column1 containsthe String NetApp Release 7..
NAME="Version" COMPUTE_EXPR="(Column1 __contains 'NetApp Release 7.') ? '7.X':'6.X'"
• The value of the column Column1 is the difference of the columns Column2and Column3.
NAME="Column1" COMPUTE_EXPR="(Column2 - Column3)"
• The value of the column Status is 1 if the value of column State matches the StringSTARTED and 0 otherwise.
NAME="Status" COMPUTE_EXPR="State __matches 'STARTED'"
• The value of the column Column1 is yes if the value of column Column2 is null andno otherwise.
NAME="Column1" COMPUTE_EXPR="(__is_null Column2)?'yes':'no'"
• The value of the column Source is lanplus if the length of string value of columnresult is 0; el e it is the value of the column result.
NAME="Source" COMPUTE_EXPR="((__length result) == 0) ? 'lanplus' : result"
Appendix ICompute Expressions
I-8
• The value of the column Rate is the value of column Column1 divided by thecollection interval, rounded up to the largest integer.
NAME="Rate" COMPUTE_EXPR="(__ceil (Column1/__interval))"
• The value of the column is the Column1 when Column2 and Column3 are existingmetric columns.
NAME="Column1" COMPUTE_EXPR="((Column2 == 0) ? 0 : ((Column3 / (Column2 / 8)) * 100.0))"
• The value of the column is the total percentage of disk available where Column1and Column2 are existing metric columns
NAME="PERCENTAGE_VALUE" COMPUTE_EXPR="(Column1 != 0) ? 100.0*(Column2/Column1) : 0"
Rate and Delta Metric ColumnsYou can create additional metric columns based on an existing data column thatmeasure the rate at which data changes or the difference in value (delta) since the lastmetric collection.
After at least one metric column has been created and the metric column row isselected in the table, two additional options appear in the Add menu:
• Delta metric column on <selected metric column>
• Rate (per min) metric column on <selected metric column>
To create a rate/delta metric column, click on an existing data column in the metriccolumns table and then select one of the rate/delta column menu options from the Addmenu.
Usage Examples
• Add Delta metric columns based on another metric column
Example: You want to know the difference in the table space used since the lastcollection.
Delta Calculation:
current metric value - previous metric value
• Add Rate Per Minute metric column based on another metric column
Example: You want to know the average table space usage per minute based onthe table space column metric which is collected every 1 hr.
Rate Per Minute Calculation:
(current metric value - previous metric value)/ collection schedule
Appendix IRate and Delta Metric Columns
I-9


![Best Practices for Oracle Monitoring with Oracle Extended Agent. - IBM · PDF fileBest Practices for Oracle Monitoring with Oracle Extended Agent. Document version [0.3] [Byline for](https://img.pdfslide.us/doc/110x75/5a705d237f8b9ac0538bea20/best-practices-for-oracle-monitoring-with-oracle-extended-agent-ibm-pdf.jpg)

![Monitoring databases with zabbix · • Database monitoring using Zabbix principal consultant @ Experis Ciber [Oracle] DBA, also postgres, cockroachDB Oracle ACE Oracle Certified](https://img.pdfslide.us/doc/110x75/5ebeba232166744a1b018c7f/monitoring-databases-with-zabbix-a-database-monitoring-using-zabbix-principal.jpg)