Embed Size (px)
Citation preview
Oracle VM 3: Using Oracle Clusterware to Protect Oracle VM Manager O R A C L E W H I T E P A P E R | F E B R U A R Y 2 0 1 8
II | ORACLE VM 3: USING ORACLE CLUSTERWARE TO PROTECT ORACLE VM MANAGER
1. Introduction ............................................................................................................... 1
2. Oracle Grid Infrastructure 12c Requirements for Oracle Linux 6 ...................... 2
3. High Level Architecture (picture) ........................................................................... 4
4. Prepare ASM devices to be used by Oracle Clusterware 12c ............................ 4 4.1. Identify ASM devices ......................................................................................... 4 4.2. Configure ASM disks ......................................................................................... 5
5. Further parameters needed to "oracle" account .................................................. 6
6. Install Oracle Grid Infrastructure 12c on both nodes .......................................... 6 6.1. Prepare X11 display for Oracle Grid Infrastructure 12c installation.................. 6 6.2. Start installation process of Oracle Grid Infrastructure 12c .............................. 6 6.3. Execute configuration scripts when requested................................................ 14
7. Install Oracle Grid Infrastructure standalone Agents on clustered nodes ..... 14
8. Create a new ACFS filesystem (on shared device) for Oracle VM Manager ... 15
9. Create one user-vip clustered with Oracle Grid Infrastructure 12c that will be dedicated to Oracle VM Manager services .................................................................. 17
10. Proceed to install Oracle VM Manager .............................................................. 18
11. Install the "Oracle VM Manager" MySQL RPMs on the second node ........... 19
12. Disable and stop Oracle VM Manager services ............................................... 20
13. Optional: create a custom script to see all clustered resource status on a single line ......................................................................................................................... 20
14. Configure MySQL Server to be managed by Oracle Clusterware ................. 21 14.1. Prepare MySQL Repository to be managed by Oracle Cluster ...................... 21 14.2. Define MySQL clustered resource................................................................... 22 14.3. Verify resource status and MySQL resource created above .......................... 23
15. Configure Weblogic Server to be managed by Oracle Clusterware 12c ...... 25 15.1. Prepare Oracle VM Manager WebLogic service to be managed by Oracle Cluster 25 15.3. Define new Weblogic Server clustered resource ............................................ 27 15.4. Change SCRIPT_TIMEOUT value from 60 to 300 to get higher timeouts on starting/checking/stopping cluster resource .................................................................. 29 15.5. Verify resources status and new "Oracle VM Manager" Weblogic Server resource created above ................................................................................................. 29
16. Configure Oracle VM CLI to be managed by Oracle Clusterware 12c .......... 30 16.1. Prepare Oracle VM CLI service ....................................................................... 30 16.2. Verify the status of the ovmcli resource .......................................................... 33
17. Clustered Oracle VM Manager: Architecture and Network ............................ 35 Using theOracle VM Manager clustered: "oraenv" command....................................... 38
18. Upgrading a clustered Oracle VM Manager ..................................................... 38 18.1. Stop and disable all "Oracle VM Manager" linux services, as “root”............ 38
III | ORACLE VM 3: USING ORACLE CLUSTERWARE TO PROTECT ORACLE VM MANAGER
18.2. Edit Weblogic start script .............................................................................. 38 18.3. Edit Weblogic configuration file..................................................................... 39 18.4. Edit Oracle VM Manager MySQL configuration file following the steps below 39 18.5. Add “auth_socket.so” plugin to MySQL.cnf conf file .................................... 39 18.6. Start "MySQL" linux service temporarily ....................................................... 40 18.7. Create MySQL “oracle” user ......................................................................... 40 18.8. Execute following MySQL commands once connected to the database ..... 40 18.9. Stop "MySQL" linux service, as "root" .......................................................... 40 18.10. Copy and edit “ovmcli” service file cluster resource management .............. 40 18.11. Update MySQL RPMs packages on the second node ................................. 41 18.12. Copy the updated release "zip" and "rpm" files containing on the second node of the cluster. ...................................................................................................... 42 Note that releases of these files can change on different Oracle VM Manager version. ........................................................................................................................ 42 18.13. On the second node of the cluster, extract RPMs contained in the zip file . 42 18.14. Upgrade MySQL RPMs on the second node ............................................... 42 18.15. Start all "Oracle VM Manager" services by Oracle Clusterware 12c ........... 43
Conclusion....................................................................................................................... 43
I | ORACLE VM 3: USING ORACLE CLUSTERWARE TO PROTECT ORACLE VM MANAGER
1. Introduction
Oracle VM Manager provides an easy-to-use and centralized management environment for
configuring and operating your Oracle VM server, network, and storage infrastructure from a
browser-based interface, and it is accessible from just about anywhere. Oracle VM Manager 3 is
an Oracle Fusion Middleware application, based on the Oracle Weblogic application server.
Oracle VM Manager uses the bundled MySQL Database Enterprise Edition as the management
repository beginning with Oracle VM Manager 3.2 release. The Oracle VM Manager 3 runs on 64-
bit Oracle Linux.
This document describes the steps to set up a clustered environment by using Oracle
Clusterware to provide fail-over capabilities for Oracle VM Manager 3.4. To make the Oracle VM
management components highly available, the built-in management database repository and the
Oracle Weblogic Server that come with Oracle VM Manager must be protected in case of a
server or application failure.
The following software components are used as part of the solution:
• Oracle Clusterware 12c that ships with Oracle Grid Infrastructure 12c
• Oracle Grid Infrastructure Bundled Agents (for MySQL and WebLogic)
• Oracle ACFS ( ASM Clustered Filesystem )
Customers with Oracle Linux support subscriptions get a restricted use-license for the Oracle
Clusterware. To understand the product features of Oracle VM and Oracle Clusterware, please
refer to the following white paper and documentation:
• White Paper: Oracle Clusterware 12c Overview
• Oracle VM Concepts Guide for Release 3.4
2 | Oracle VM 3: Using Oracle Clusterware to Protect Oracle VM Manager
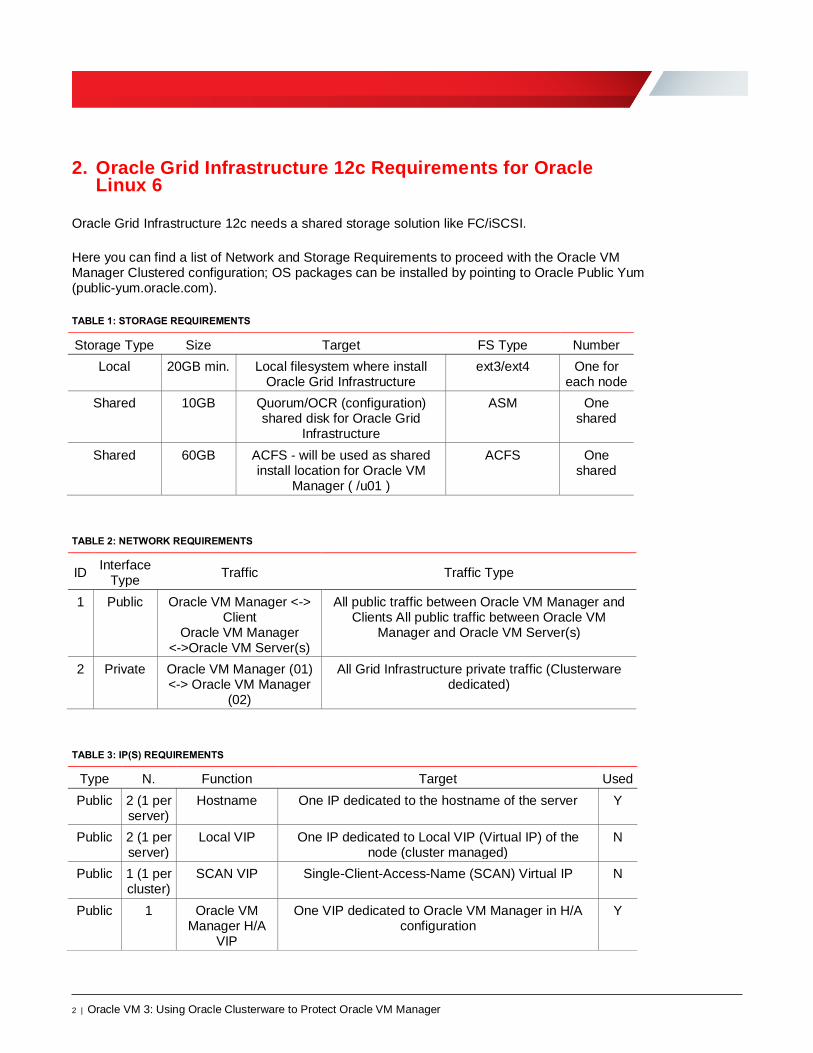
2. Oracle Grid Infrastructure 12c Requirements for Oracle Linux 6
Oracle Grid Infrastructure 12c needs a shared storage solution like FC/iSCSI.
Here you can find a list of Network and Storage Requirements to proceed with the Oracle VM Manager Clustered configuration; OS packages can be installed by pointing to Oracle Public Yum (public-yum.oracle.com).
TABLE 1: STORAGE REQUIREMENTS
Storage Type Size Target FS Type Number
Local 20GB min. Local filesystem where install Oracle Grid Infrastructure
ext3/ext4 One for each node
Shared 10GB Quorum/OCR (configuration) shared disk for Oracle Grid
Infrastructure
ASM One shared
Shared 60GB ACFS - will be used as shared install location for Oracle VM
Manager ( /u01 )
ACFS One shared
TABLE 2: NETWORK REQUIREMENTS
ID Interface
Type Traffic Traffic Type
1 Public Oracle VM Manager <-> Client
Oracle VM Manager <->Oracle VM Server(s)
All public traffic between Oracle VM Manager and Clients All public traffic between Oracle VM
Manager and Oracle VM Server(s)
2 Private Oracle VM Manager (01) <-> Oracle VM Manager
(02)
All Grid Infrastructure private traffic (Clusterware dedicated)
TABLE 3: IP(S) REQUIREMENTS
Type N. Function Target Used
Public 2 (1 per server)
Hostname One IP dedicated to the hostname of the server Y
Public 2 (1 per server)
Local VIP One IP dedicated to Local VIP (Virtual IP) of the node (cluster managed)
N
Public 1 (1 per cluster)
SCAN VIP Single-Client-Access-Name (SCAN) Virtual IP N
Public 1 Oracle VM Manager H/A
VIP
One VIP dedicated to Oracle VM Manager in H/A configuration
Y
III | ORACLE VM 3: USING ORACLE CLUSTERWARE TO PROTECT ORACLE VM MANAGER
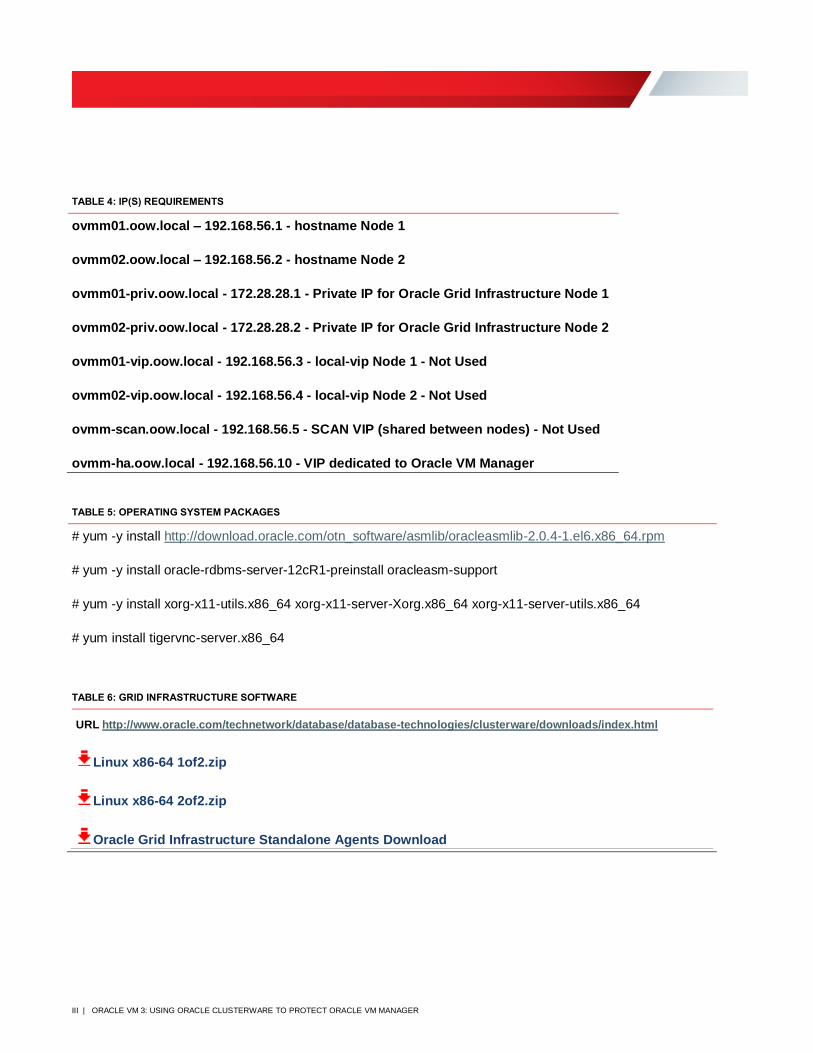
TABLE 4: IP(S) REQUIREMENTS
ovmm01.oow.local – 192.168.56.1 - hostname Node 1
ovmm02.oow.local – 192.168.56.2 - hostname Node 2
ovmm01-priv.oow.local - 172.28.28.1 - Private IP for Oracle Grid Infrastructure Node 1
ovmm02-priv.oow.local - 172.28.28.2 - Private IP for Oracle Grid Infrastructure Node 2
ovmm01-vip.oow.local - 192.168.56.3 - local-vip Node 1 - Not Used
ovmm02-vip.oow.local - 192.168.56.4 - local-vip Node 2 - Not Used
ovmm-scan.oow.local - 192.168.56.5 - SCAN VIP (shared between nodes) - Not Used
ovmm-ha.oow.local - 192.168.56.10 - VIP dedicated to Oracle VM Manager
TABLE 5: OPERATING SYSTEM PACKAGES
# yum -y install http://download.oracle.com/otn_software/asmlib/oracleasmlib-2.0.4-1.el6.x86_64.rpm
# yum -y install oracle-rdbms-server-12cR1-preinstall oracleasm-support
# yum -y install xorg-x11-utils.x86_64 xorg-x11-server-Xorg.x86_64 xorg-x11-server-utils.x86_64
# yum install tigervnc-server.x86_64
TABLE 6: GRID INFRASTRUCTURE SOFTWARE
URL http://www.oracle.com/technetwork/database/database-technologies/clusterware/downloads/index.html
Linux x86-64 1of2.zip
Linux x86-64 2of2.zip
Oracle Grid Infrastructure Standalone Agents Download
IV | ORACLE VM 3: USING ORACLE CLUSTERWARE TO PROTECT ORACLE VM MANAGER
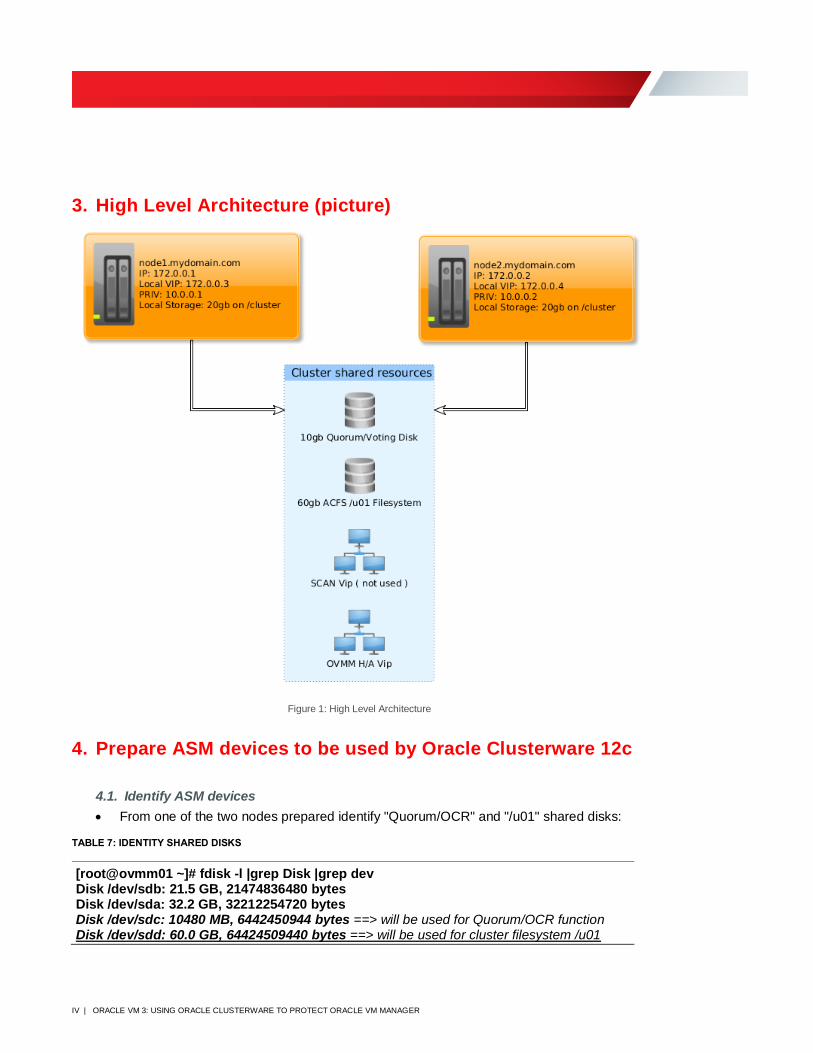
3. High Level Architecture (picture)
Figure 1: High Level Architecture
4. Prepare ASM devices to be used by Oracle Clusterware 12c
4.1. Identify ASM devices
• From one of the two nodes prepared identify "Quorum/OCR" and "/u01" shared disks:
TABLE 7: IDENTITY SHARED DISKS
[root@ovmm01 ~]# fdisk -l |grep Disk |grep dev Disk /dev/sdb: 21.5 GB, 21474836480 bytes Disk /dev/sda: 32.2 GB, 32212254720 bytes Disk /dev/sdc: 10480 MB, 6442450944 bytes ==> will be used for Quorum/OCR function Disk /dev/sdd: 60.0 GB, 64424509440 bytes ==> will be used for cluster filesystem /u01
V | ORACLE VM 3: USING ORACLE CLUSTERWARE TO PROTECT ORACLE VM MANAGER
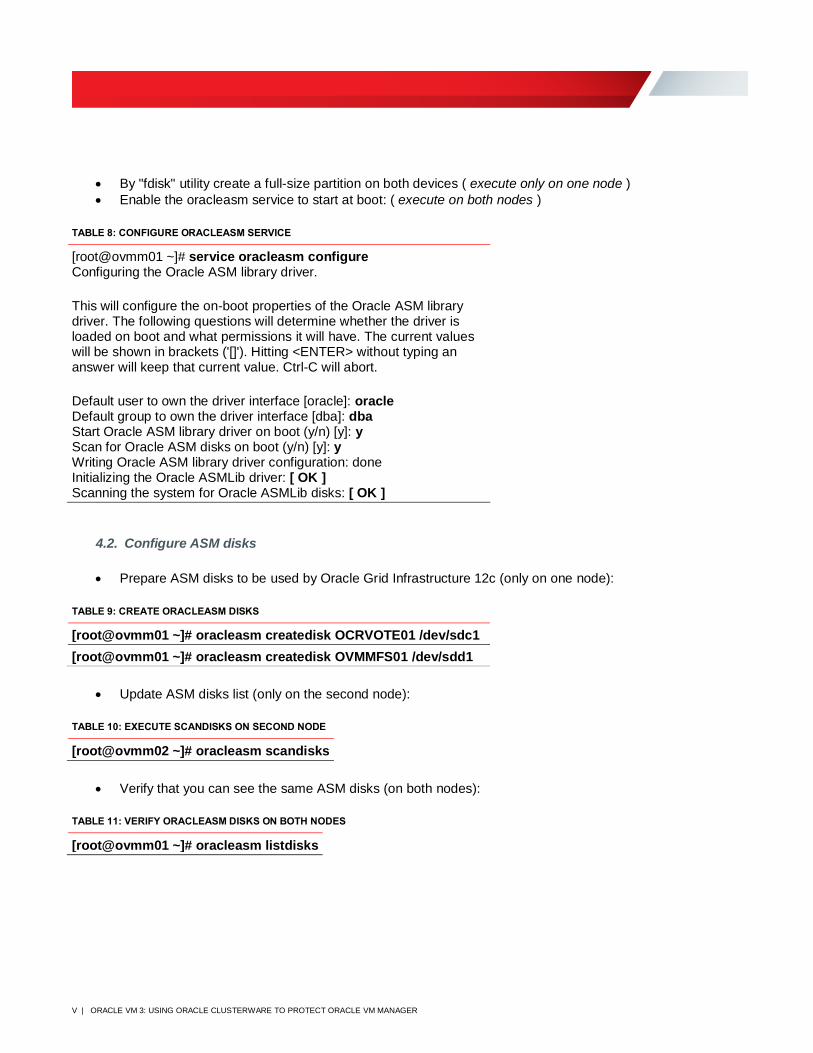
• By "fdisk" utility create a full-size partition on both devices ( execute only on one node )
• Enable the oracleasm service to start at boot: ( execute on both nodes )
TABLE 8: CONFIGURE ORACLEASM SERVICE
[root@ovmm01 ~]# service oracleasm configure Configuring the Oracle ASM library driver.
This will configure the on-boot properties of the Oracle ASM library driver. The following questions will determine whether the driver is loaded on boot and what permissions it will have. The current values will be shown in brackets ('[]'). Hitting <ENTER> without typing an answer will keep that current value. Ctrl-C will abort.
Default user to own the driver interface [oracle]: oracle Default group to own the driver interface [dba]: dba Start Oracle ASM library driver on boot (y/n) [y]: y Scan for Oracle ASM disks on boot (y/n) [y]: y Writing Oracle ASM library driver configuration: done Initializing the Oracle ASMLib driver: [ OK ] Scanning the system for Oracle ASMLib disks: [ OK ]
4.2. Configure ASM disks
• Prepare ASM disks to be used by Oracle Grid Infrastructure 12c (only on one node):
TABLE 9: CREATE ORACLEASM DISKS
[root@ovmm01 ~]# oracleasm createdisk OCRVOTE01 /dev/sdc1
[root@ovmm01 ~]# oracleasm createdisk OVMMFS01 /dev/sdd1
• Update ASM disks list (only on the second node):
TABLE 10: EXECUTE SCANDISKS ON SECOND NODE
[root@ovmm02 ~]# oracleasm scandisks
• Verify that you can see the same ASM disks (on both nodes):
TABLE 11: VERIFY ORACLEASM DISKS ON BOTH NODES
[root@ovmm01 ~]# oracleasm listdisks
VI | ORACLE VM 3: USING ORACLE CLUSTERWARE TO PROTECT ORACLE VM MANAGER
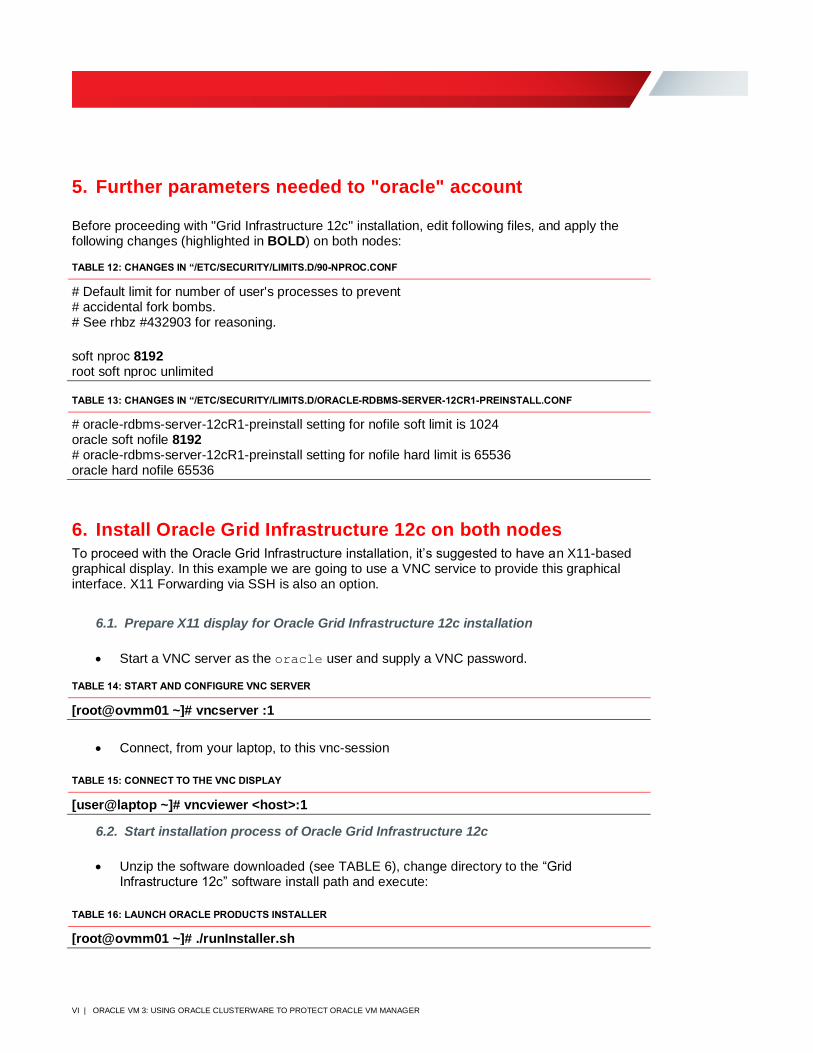
5. Further parameters needed to "oracle" account
Before proceeding with "Grid Infrastructure 12c" installation, edit following files, and apply the following changes (highlighted in BOLD) on both nodes:
TABLE 12: CHANGES IN “/ETC/SECURITY/LIMITS.D/90-NPROC.CONF
# Default limit for number of user's processes to prevent # accidental fork bombs. # See rhbz #432903 for reasoning.
soft nproc 8192 root soft nproc unlimited
TABLE 13: CHANGES IN “/ETC/SECURITY/LIMITS.D/ORACLE-RDBMS-SERVER-12CR1-PREINSTALL.CONF
# oracle-rdbms-server-12cR1-preinstall setting for nofile soft limit is 1024 oracle soft nofile 8192 # oracle-rdbms-server-12cR1-preinstall setting for nofile hard limit is 65536 oracle hard nofile 65536
6. Install Oracle Grid Infrastructure 12c on both nodes
To proceed with the Oracle Grid Infrastructure installation, it’s suggested to have an X11-based graphical display. In this example we are going to use a VNC service to provide this graphical interface. X11 Forwarding via SSH is also an option.
6.1. Prepare X11 display for Oracle Grid Infrastructure 12c installation
• Start a VNC server as the oracle user and supply a VNC password.
TABLE 14: START AND CONFIGURE VNC SERVER
[root@ovmm01 ~]# vncserver :1
• Connect, from your laptop, to this vnc-session
TABLE 15: CONNECT TO THE VNC DISPLAY
[user@laptop ~]# vncviewer <host>:1
6.2. Start installation process of Oracle Grid Infrastructure 12c
• Unzip the software downloaded (see TABLE 6), change directory to the “Grid Infrastructure 12c” software install path and execute:
TABLE 16: LAUNCH ORACLE PRODUCTS INSTALLER
[root@ovmm01 ~]# ./runInstaller.sh

VII | ORACLE VM 3: USING ORACLE CLUSTERWARE TO PROTECT ORACLE VM MANAGER
• Select the "Skip software updates" option, then click the "Next" button.
Figure 2: Install Oracle Grid Infrastructure 12c
• Select the "Install and Configure Oracle Grid Infrastructure for a Cluster".
Figure 3: Install Oracle Grid Infrastructure 12c
VIII | ORACLE VM 3: USING ORACLE CLUSTERWARE TO PROTECT ORACLE VM MANAGER
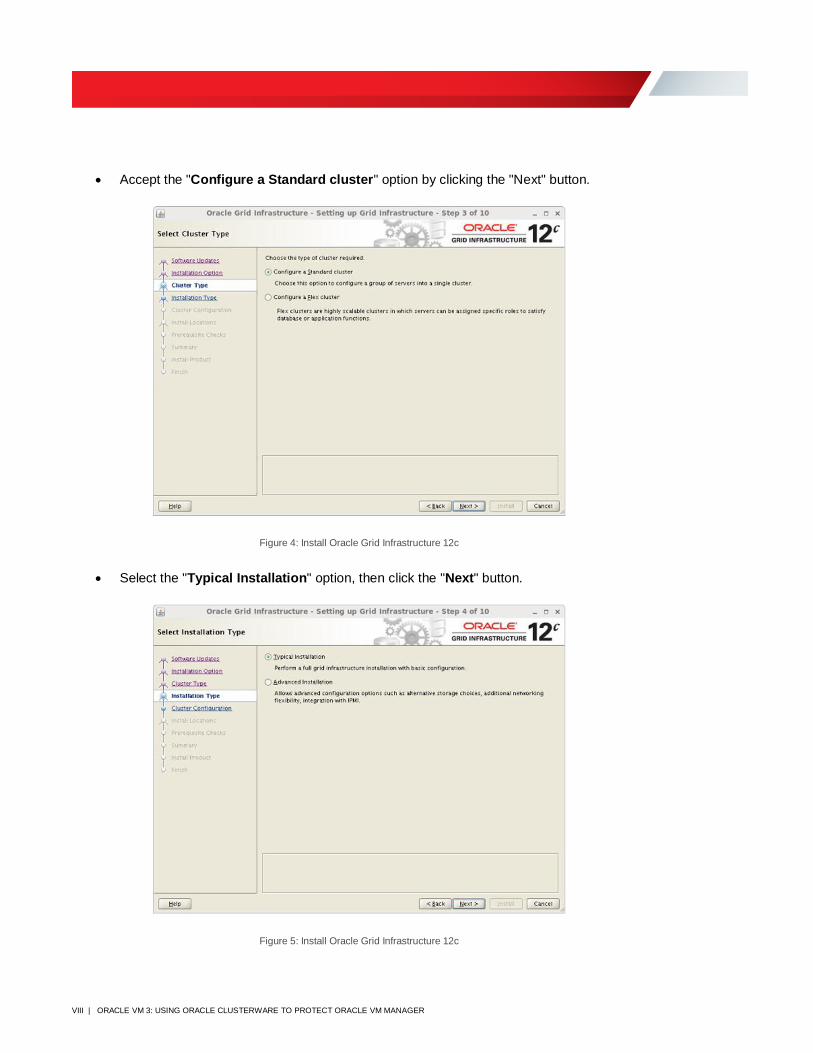
• Accept the "Configure a Standard cluster" option by clicking the "Next" button.
Figure 4: Install Oracle Grid Infrastructure 12c
• Select the "Typical Installation" option, then click the "Next" button.
Figure 5: Install Oracle Grid Infrastructure 12c
IX | ORACLE VM 3: USING ORACLE CLUSTERWARE TO PROTECT ORACLE VM MANAGER
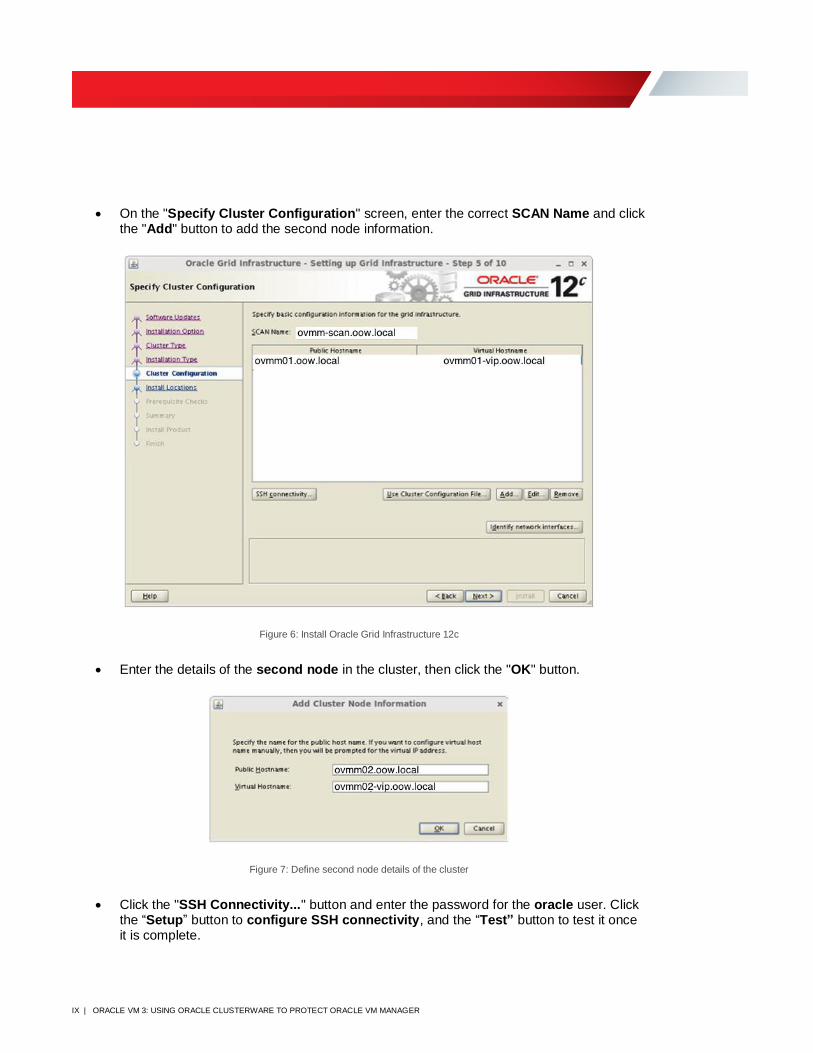
• On the "Specify Cluster Configuration" screen, enter the correct SCAN Name and click the "Add" button to add the second node information.
Figure 6: Install Oracle Grid Infrastructure 12c
• Enter the details of the second node in the cluster, then click the "OK" button.
Figure 7: Define second node details of the cluster
• Click the "SSH Connectivity..." button and enter the password for the oracle user. Click the “Setup” button to configure SSH connectivity, and the “Test” button to test it once it is complete.
X | ORACLE VM 3: USING ORACLE CLUSTERWARE TO PROTECT ORACLE VM MANAGER
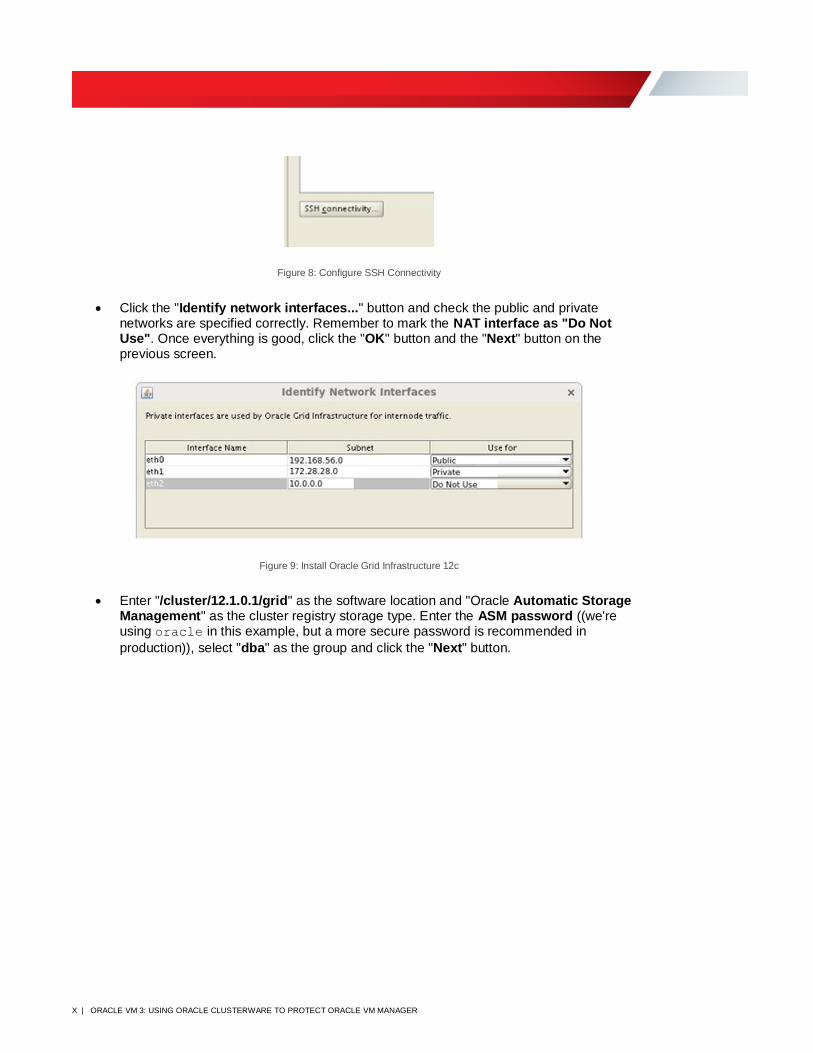
Figure 8: Configure SSH Connectivity
• Click the "Identify network interfaces..." button and check the public and private networks are specified correctly. Remember to mark the NAT interface as "Do Not Use". Once everything is good, click the "OK" button and the "Next" button on the previous screen.
Figure 9: Install Oracle Grid Infrastructure 12c
• Enter "/cluster/12.1.0.1/grid" as the software location and "Oracle Automatic Storage Management" as the cluster registry storage type. Enter the ASM password ((we're using oracle in this example, but a more secure password is recommended in
production)), select "dba" as the group and click the "Next" button.
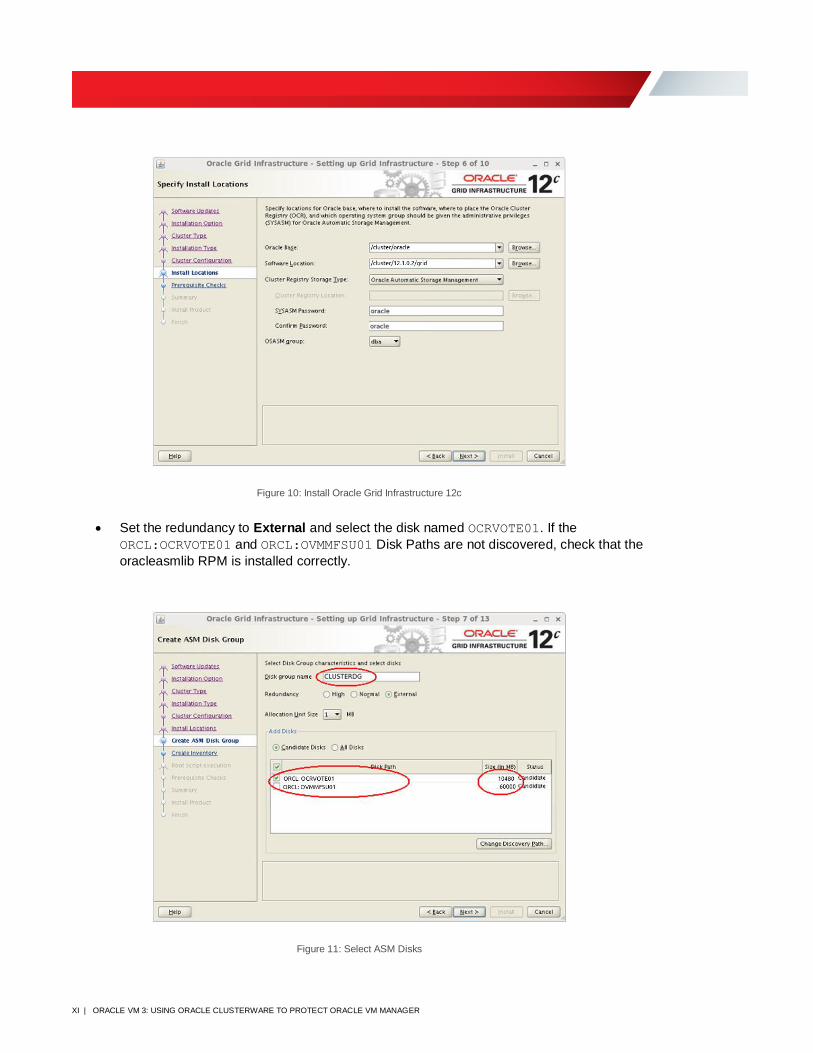
XI | ORACLE VM 3: USING ORACLE CLUSTERWARE TO PROTECT ORACLE VM MANAGER
Figure 10: Install Oracle Grid Infrastructure 12c
• Set the redundancy to External and select the disk named OCRVOTE01. If the
ORCL:OCRVOTE01 and ORCL:OVMMFSU01 Disk Paths are not discovered, check that the
oracleasmlib RPM is installed correctly.
Figure 11: Select ASM Disks
XII | ORACLE VM 3: USING ORACLE CLUSTERWARE TO PROTECT ORACLE VM MANAGER
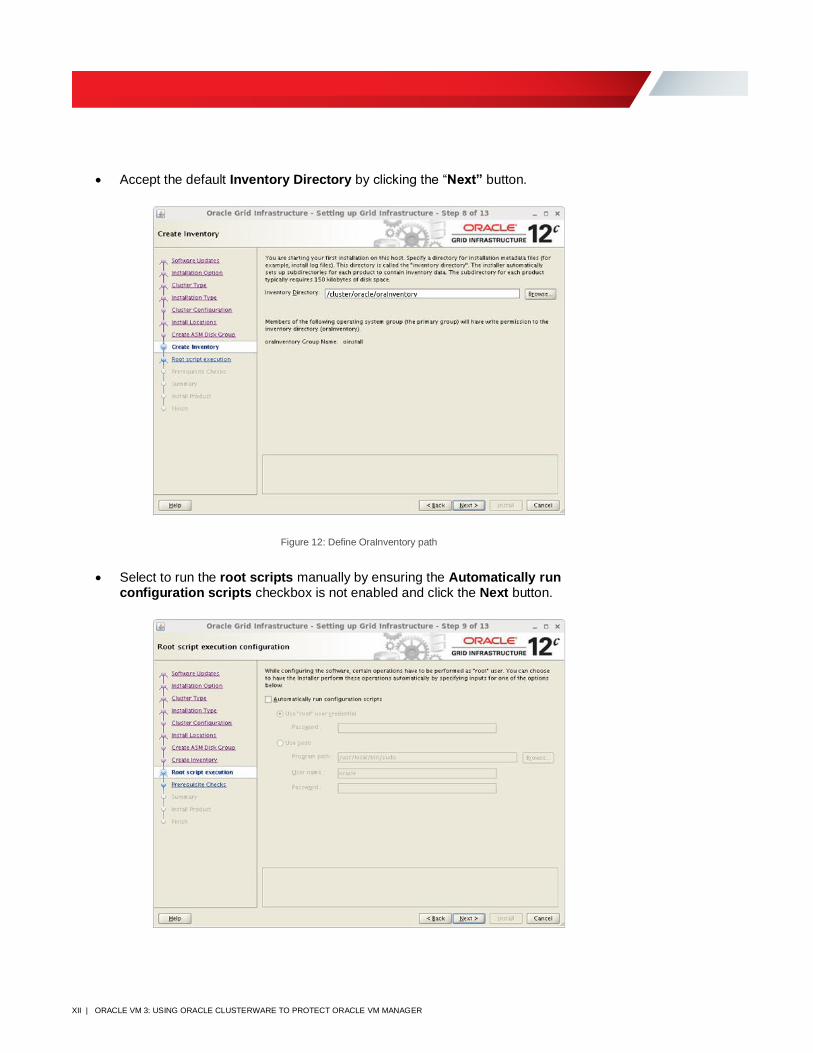
• Accept the default Inventory Directory by clicking the “Next” button.
Figure 12: Define OraInventory path
• Select to run the root scripts manually by ensuring the Automatically run configuration scripts checkbox is not enabled and click the Next button.
XIII | ORACLE VM 3: USING ORACLE CLUSTERWARE TO PROTECT ORACLE VM MANAGER
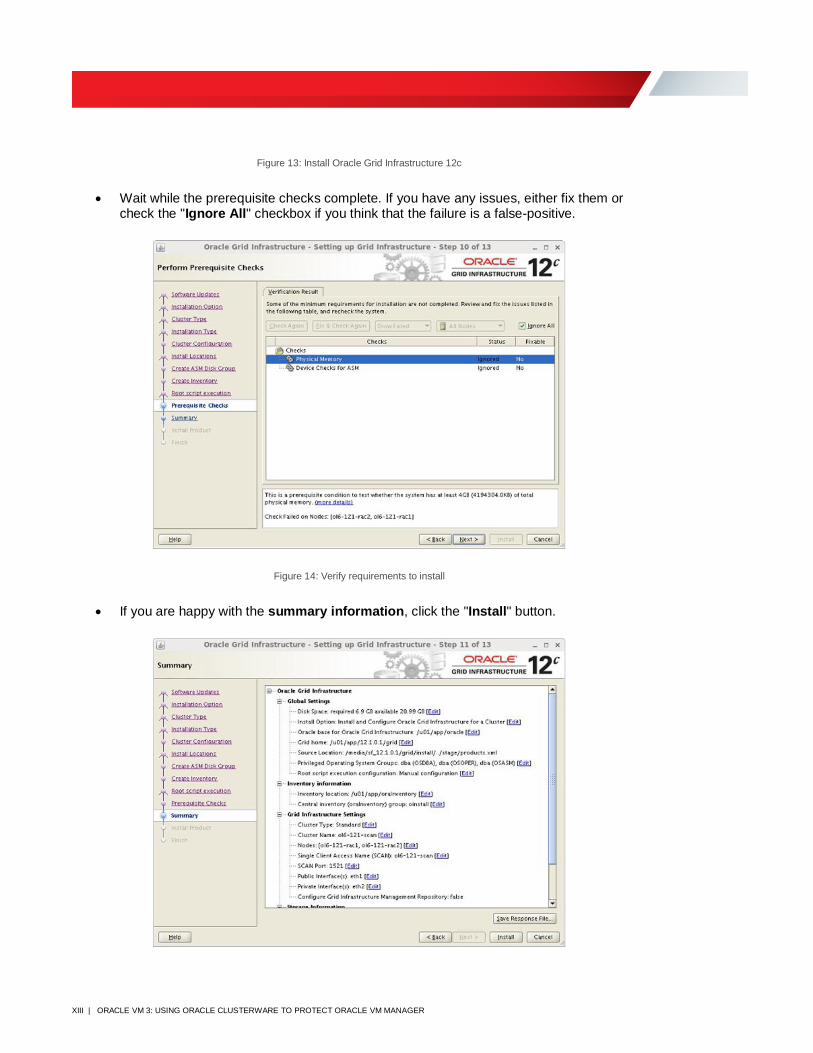
Figure 13: Install Oracle Grid Infrastructure 12c
• Wait while the prerequisite checks complete. If you have any issues, either fix them or check the "Ignore All" checkbox if you think that the failure is a false-positive.
Figure 14: Verify requirements to install
• If you are happy with the summary information, click the "Install" button.
XIV | ORACLE VM 3: USING ORACLE CLUSTERWARE TO PROTECT ORACLE VM MANAGER
Figure 15: Summary report information
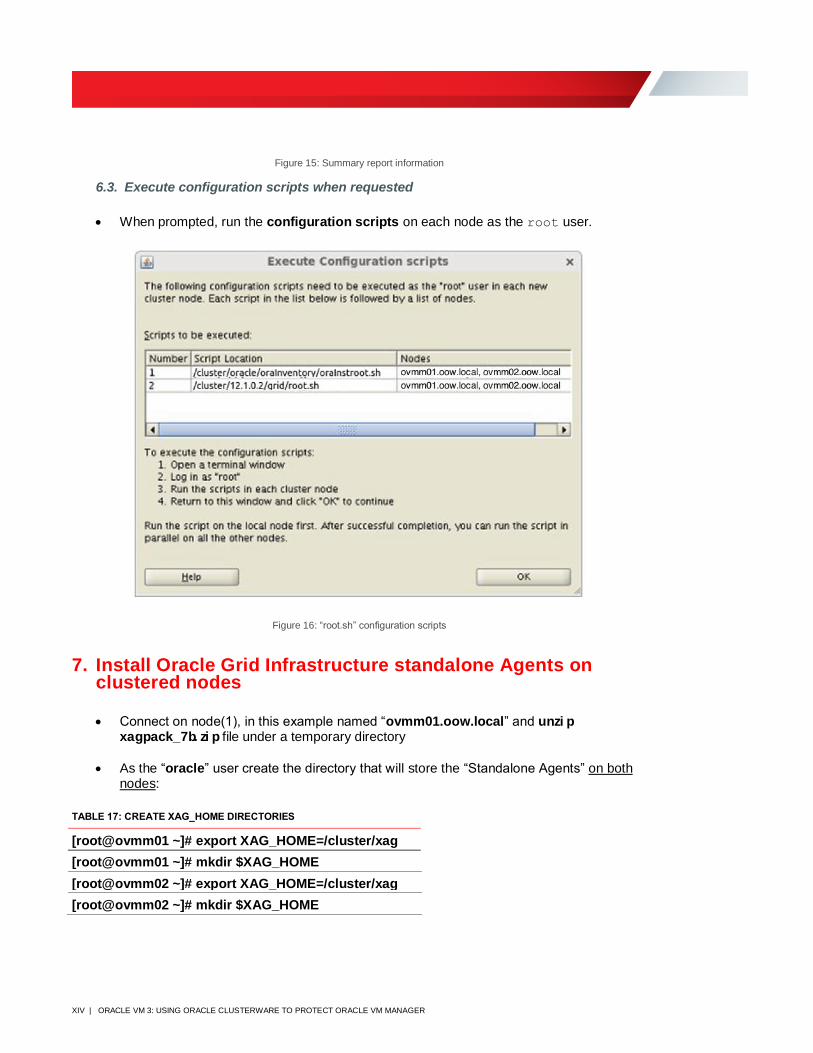
6.3. Execute configuration scripts when requested
• When prompted, run the configuration scripts on each node as the root user.
Figure 16: “root.sh” configuration scripts
7. Install Oracle Grid Infrastructure standalone Agents on clustered nodes
• Connect on node(1), in this example named “ovmm01.oow.local” and unzi p xagpack_7b. zi p file under a temporary directory
• As the “oracle” user create the directory that will store the “Standalone Agents” on both nodes:
TABLE 17: CREATE XAG_HOME DIRECTORIES
[root@ovmm01 ~]# export XAG_HOME=/cluster/xag
[root@ovmm01 ~]# mkdir $XAG_HOME
[root@ovmm02 ~]# export XAG_HOME=/cluster/xag
[root@ovmm02 ~]# mkdir $XAG_HOME
XV | ORACLE VM 3: USING ORACLE CLUSTERWARE TO PROTECT ORACLE VM MANAGER
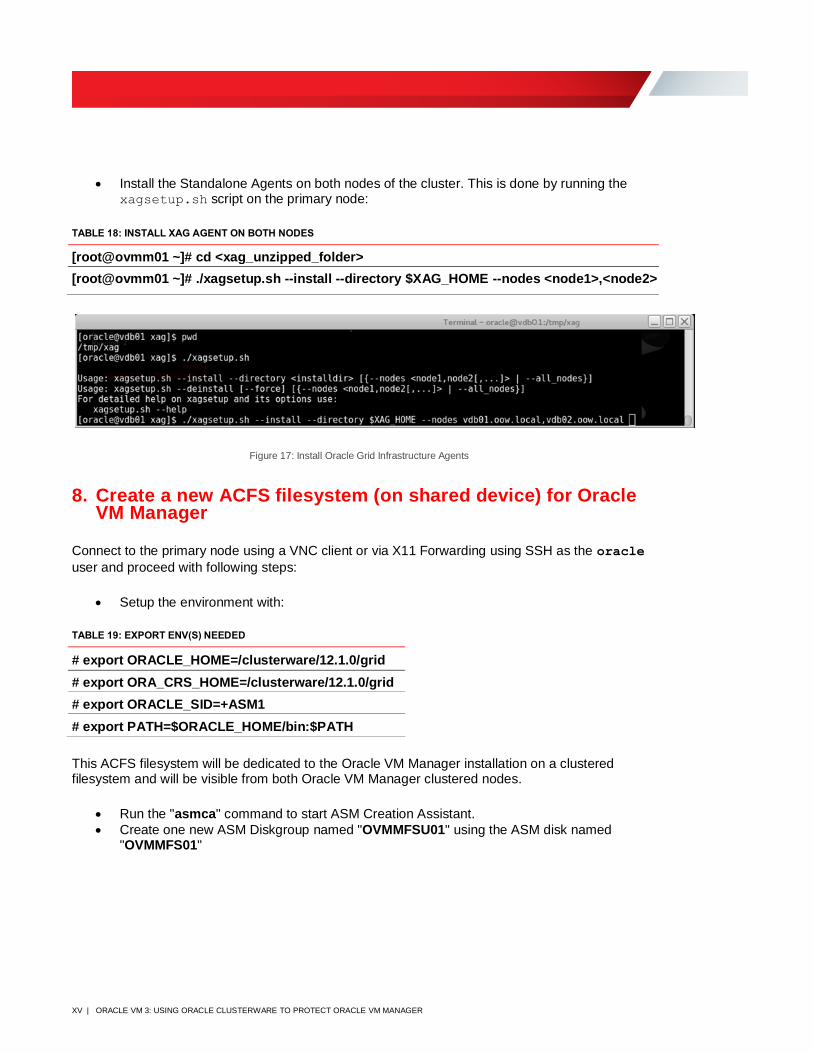
• Install the Standalone Agents on both nodes of the cluster. This is done by running the xagsetup.sh script on the primary node:
TABLE 18: INSTALL XAG AGENT ON BOTH NODES
[root@ovmm01 ~]# cd <xag_unzipped_folder>
[root@ovmm01 ~]# ./xagsetup.sh --install --directory $XAG_HOME --nodes <node1>,<node2>
Figure 17: Install Oracle Grid Infrastructure Agents
8. Create a new ACFS filesystem (on shared device) for Oracle VM Manager
Connect to the primary node using a VNC client or via X11 Forwarding using SSH as the oracle
user and proceed with following steps:
• Setup the environment with:
TABLE 19: EXPORT ENV(S) NEEDED
# export ORACLE_HOME=/clusterware/12.1.0/grid
# export ORA_CRS_HOME=/clusterware/12.1.0/grid
# export ORACLE_SID=+ASM1
# export PATH=$ORACLE_HOME/bin:$PATH
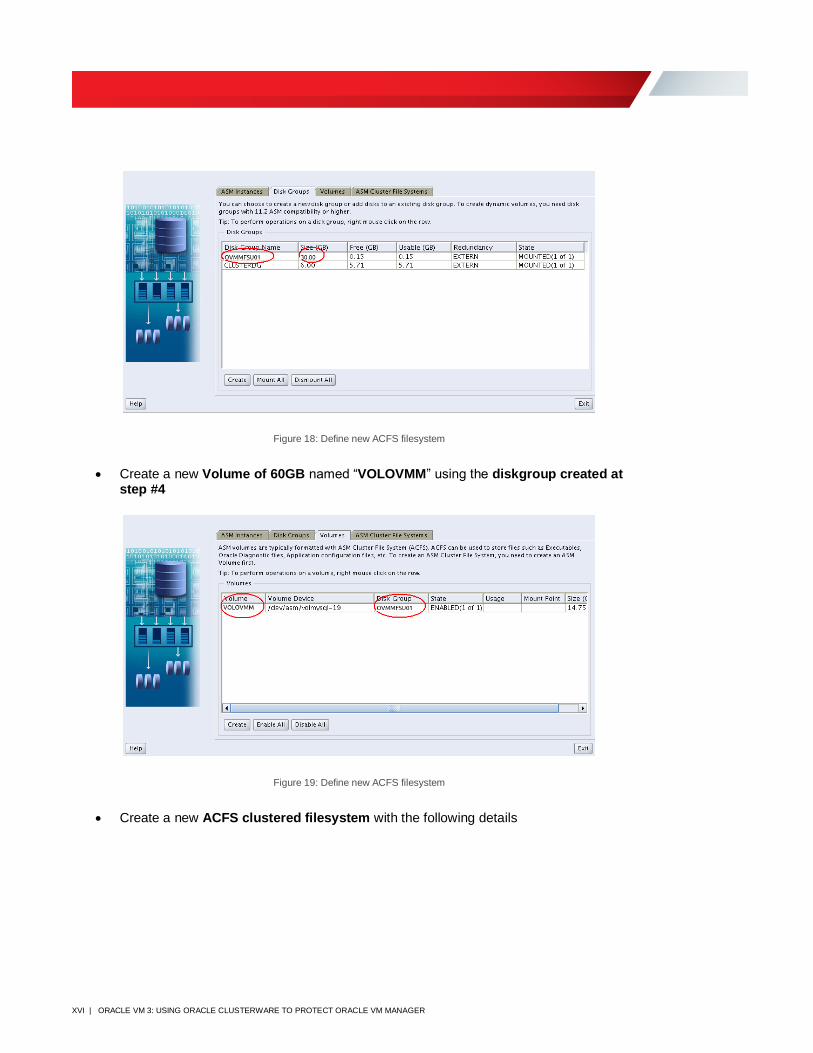
This ACFS filesystem will be dedicated to the Oracle VM Manager installation on a clustered filesystem and will be visible from both Oracle VM Manager clustered nodes.
• Run the "asmca" command to start ASM Creation Assistant.
• Create one new ASM Diskgroup named "OVMMFSU01" using the ASM disk named "OVMMFS01"
XVI | ORACLE VM 3: USING ORACLE CLUSTERWARE TO PROTECT ORACLE VM MANAGER
Figure 18: Define new ACFS filesystem
• Create a new Volume of 60GB named “VOLOVMM” using the diskgroup created at step #4
Figure 19: Define new ACFS filesystem
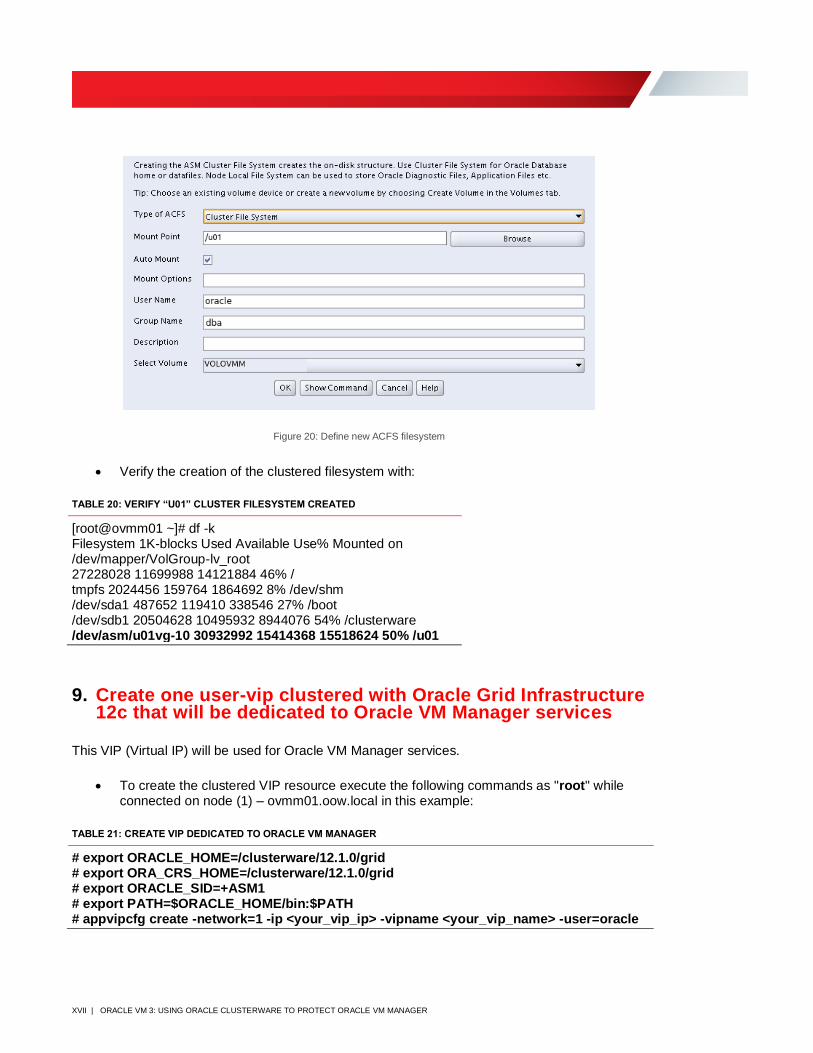
• Create a new ACFS clustered filesystem with the following details
XVII | ORACLE VM 3: USING ORACLE CLUSTERWARE TO PROTECT ORACLE VM MANAGER
Figure 20: Define new ACFS filesystem
• Verify the creation of the clustered filesystem with:
TABLE 20: VERIFY “U01” CLUSTER FILESYSTEM CREATED
[root@ovmm01 ~]# df -k Filesystem 1K-blocks Used Available Use% Mounted on /dev/mapper/VolGroup-lv_root 27228028 11699988 14121884 46% / tmpfs 2024456 159764 1864692 8% /dev/shm /dev/sda1 487652 119410 338546 27% /boot /dev/sdb1 20504628 10495932 8944076 54% /clusterware /dev/asm/u01vg-10 30932992 15414368 15518624 50% /u01
9. Create one user-vip clustered with Oracle Grid Infrastructure
12c that will be dedicated to Oracle VM Manager services
This VIP (Virtual IP) will be used for Oracle VM Manager services.
• To create the clustered VIP resource execute the following commands as "root" while connected on node (1) – ovmm01.oow.local in this example:
TABLE 21: CREATE VIP DEDICATED TO ORACLE VM MANAGER
# export ORACLE_HOME=/clusterware/12.1.0/grid # export ORA_CRS_HOME=/clusterware/12.1.0/grid # export ORACLE_SID=+ASM1 # export PATH=$ORACLE_HOME/bin:$PATH # appvipcfg create -network=1 -ip <your_vip_ip> -vipname <your_vip_name> -user=oracle
XVIII | ORACLE VM 3: USING ORACLE CLUSTERWARE TO PROTECT ORACLE VM MANAGER
Example: # appvipcfg create -network=1 -ip 192.168.56.100 -vipname ovmm-ha.oow.local -user=oracle
• To start the clustered VIP execute the following commands as the “oracle” user:
TABLE 22: START ORACLE VM MANAGER VIP
# export ORACLE_HOME=/clusterware/12.1.0/grid # export ORA_CRS_HOME=/clusterware/12.1.0/grid # export ORACLE_SID=+ASM1 # export PATH=$ORACLE_HOME/bin:$PATH # crsctl start resource <vip_resource_name>
Example: # crsctl start resource ovmm-ha.oow.local
10. Proceed to install Oracle VM Manager
Perform a default installation of Oracle VM Manager 3.4 but pay attention to the IP address specified for Oracle VM Manager Certificate as demonstrated below:
TABLE 23: INSTALL ORACLE VM MANAGER
# ./runInstaller.sh
Oracle VM Manager Release 3.4.4 Installer - Oracle VM Manager Installer log file: /var/log/ovmm/ovm-manager-3-install-2014-08-10-162959.log
Please select an installation type: 1: Install 2: Upgrade 3: Uninstall 4: Help
Select Number (1-4): 1
Starting production with local database installation ...
Verifying installation prerequisites ...
One password is used for all users created and used during the installation. Enter a password for all logins used during the installation: Enter a password for all logins used during the installation (confirm):
Please enter your fully qualified domain name, e.g. ovs123.us.oracle.com, (or IP address) of your management server for SSL certification generation 192.168.56.101 [ovmm01.oow.local]:
==> Insert the IP address of the Application VIP created in step 9, i.e. 192.168.56.100
XIX | ORACLE VM 3: USING ORACLE CLUSTERWARE TO PROTECT ORACLE VM MANAGER
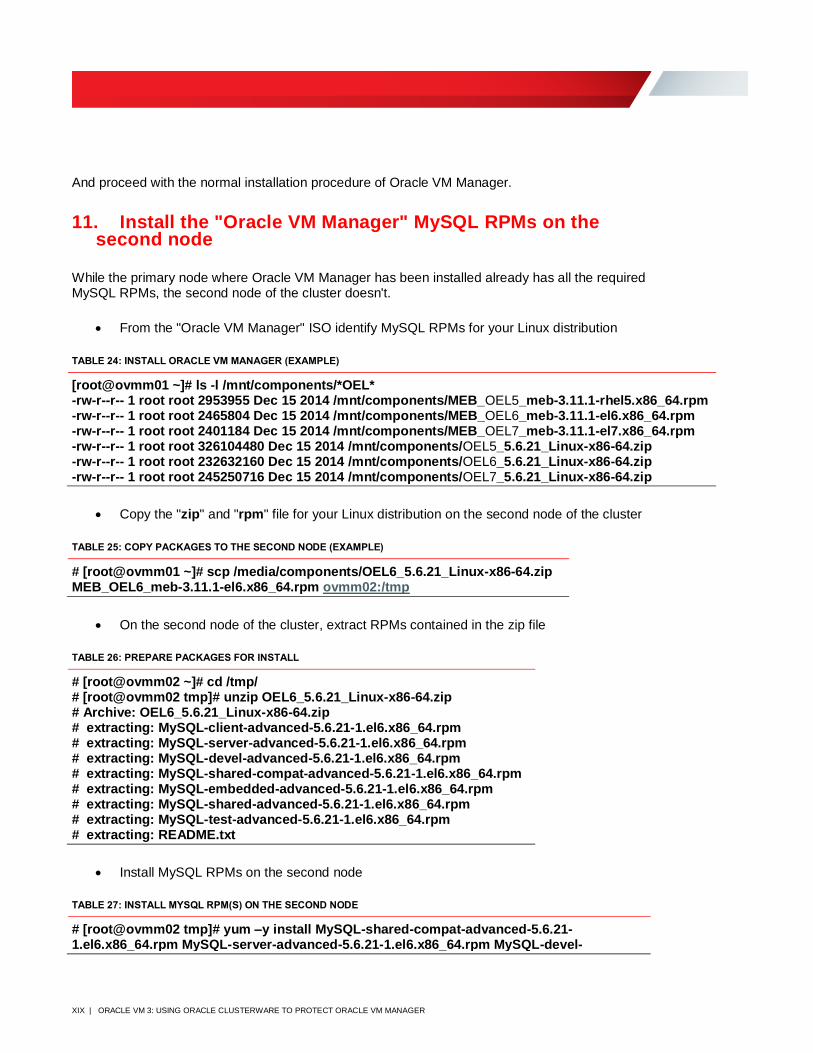
And proceed with the normal installation procedure of Oracle VM Manager.
11. Install the "Oracle VM Manager" MySQL RPMs on the second node
While the primary node where Oracle VM Manager has been installed already has all the required MySQL RPMs, the second node of the cluster doesn't.
• From the "Oracle VM Manager" ISO identify MySQL RPMs for your Linux distribution
TABLE 24: INSTALL ORACLE VM MANAGER (EXAMPLE)
[root@ovmm01 ~]# ls -l /mnt/components/*OEL* -rw-r--r-- 1 root root 2953955 Dec 15 2014 /mnt/components/MEB_OEL5_meb-3.11.1-rhel5.x86_64.rpm -rw-r--r-- 1 root root 2465804 Dec 15 2014 /mnt/components/MEB_OEL6_meb-3.11.1-el6.x86_64.rpm -rw-r--r-- 1 root root 2401184 Dec 15 2014 /mnt/components/MEB_OEL7_meb-3.11.1-el7.x86_64.rpm -rw-r--r-- 1 root root 326104480 Dec 15 2014 /mnt/components/OEL5_5.6.21_Linux-x86-64.zip -rw-r--r-- 1 root root 232632160 Dec 15 2014 /mnt/components/OEL6_5.6.21_Linux-x86-64.zip -rw-r--r-- 1 root root 245250716 Dec 15 2014 /mnt/components/OEL7_5.6.21_Linux-x86-64.zip
• Copy the "zip" and "rpm" file for your Linux distribution on the second node of the cluster
TABLE 25: COPY PACKAGES TO THE SECOND NODE (EXAMPLE)
# [root@ovmm01 ~]# scp /media/components/OEL6_5.6.21_Linux-x86-64.zip MEB_OEL6_meb-3.11.1-el6.x86_64.rpm ovmm02:/tmp
• On the second node of the cluster, extract RPMs contained in the zip file
TABLE 26: PREPARE PACKAGES FOR INSTALL
# [root@ovmm02 ~]# cd /tmp/ # [root@ovmm02 tmp]# unzip OEL6_5.6.21_Linux-x86-64.zip # Archive: OEL6_5.6.21_Linux-x86-64.zip # extracting: MySQL-client-advanced-5.6.21-1.el6.x86_64.rpm # extracting: MySQL-server-advanced-5.6.21-1.el6.x86_64.rpm # extracting: MySQL-devel-advanced-5.6.21-1.el6.x86_64.rpm # extracting: MySQL-shared-compat-advanced-5.6.21-1.el6.x86_64.rpm # extracting: MySQL-embedded-advanced-5.6.21-1.el6.x86_64.rpm # extracting: MySQL-shared-advanced-5.6.21-1.el6.x86_64.rpm # extracting: MySQL-test-advanced-5.6.21-1.el6.x86_64.rpm # extracting: README.txt
• Install MySQL RPMs on the second node
TABLE 27: INSTALL MYSQL RPM(S) ON THE SECOND NODE
# [root@ovmm02 tmp]# yum –y install MySQL-shared-compat-advanced-5.6.21-1.el6.x86_64.rpm MySQL-server-advanced-5.6.21-1.el6.x86_64.rpm MySQL-devel-
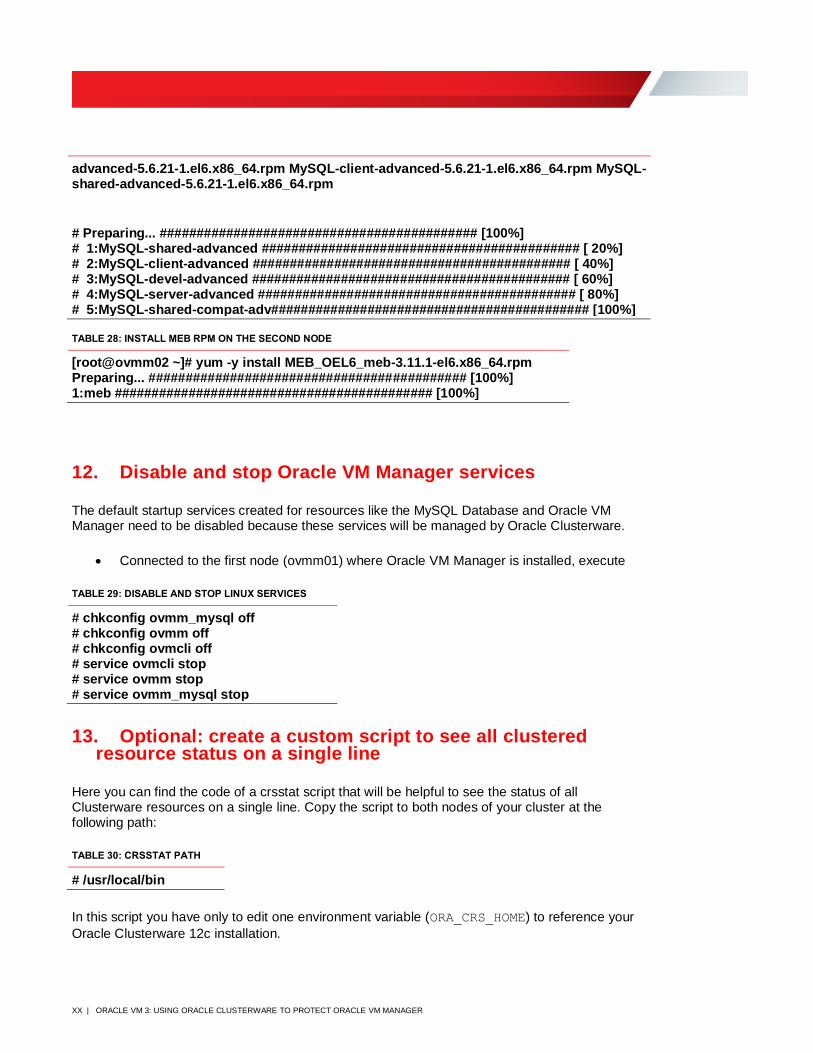
XX | ORACLE VM 3: USING ORACLE CLUSTERWARE TO PROTECT ORACLE VM MANAGER
advanced-5.6.21-1.el6.x86_64.rpm MySQL-client-advanced-5.6.21-1.el6.x86_64.rpm MySQL-shared-advanced-5.6.21-1.el6.x86_64.rpm
# Preparing... ########################################### [100%] # 1:MySQL-shared-advanced ########################################### [ 20%] # 2:MySQL-client-advanced ########################################### [ 40%] # 3:MySQL-devel-advanced ########################################### [ 60%] # 4:MySQL-server-advanced ########################################### [ 80%] # 5:MySQL-shared-compat-adv########################################### [100%]
TABLE 28: INSTALL MEB RPM ON THE SECOND NODE
[root@ovmm02 ~]# yum -y install MEB_OEL6_meb-3.11.1-el6.x86_64.rpm Preparing... ########################################### [100%] 1:meb ########################################### [100%]
12. Disable and stop Oracle VM Manager services
The default startup services created for resources like the MySQL Database and Oracle VM Manager need to be disabled because these services will be managed by Oracle Clusterware.
• Connected to the first node (ovmm01) where Oracle VM Manager is installed, execute
TABLE 29: DISABLE AND STOP LINUX SERVICES
# chkconfig ovmm_mysql off # chkconfig ovmm off # chkconfig ovmcli off # service ovmcli stop # service ovmm stop # service ovmm_mysql stop
13. Optional: create a custom script to see all clustered resource status on a single line
Here you can find the code of a crsstat script that will be helpful to see the status of all Clusterware resources on a single line. Copy the script to both nodes of your cluster at the following path:
TABLE 30: CRSSTAT PATH
# /usr/local/bin
In this script you have only to edit one environment variable (ORA_CRS_HOME) to reference your
Oracle Clusterware 12c installation.

XXI | ORACLE VM 3: USING ORACLE CLUSTERWARE TO PROTECT ORACLE VM MANAGER
TABLE 31: CRSSTAT DOWNLOAD URL
https://blogs.oracle.com/scoter/resource/permanent/crsstat.tgz
14. Configure MySQL Server to be managed by Oracle Clusterware
14.1. Prepare MySQL Repository to be managed by Oracle Cluster
On both nodes of the cluster execute following steps, as the root user.
• Change permissions and ownership of XAG_HOME path
TABLE 32: CHANGE XAG_HOME PERMISSIONS
# cd /clusterware # chown -R root:dba xag # chmod -R 750 xag
• Backup and edit Oracle VM Manager MySQL configuration file
TABLE 33: BACKUP AND EDIT MYSQL CONFIGURATION FILE
# cp /u01/app/oracle/mysql/data/my.cnf /u01/app/oracle/mysql/data/my.cnf.original
# vi /u01/app/oracle/mysql/data/my.cnf
• Add the following plugin-load function in the head of the file under section [mysqld]:
TABLE 34: CHANGE INTRODUCED IN MYSQL.CNF
plugin-load=auth_socket.so
EXAMPLE:
[mysqld] plugin-load=auth_socket.so basedir=/usr datadir=/u01/app/oracle/mysql/data .....
• On the node where we installed Oracle VM Manager, start MySQL database, as the root user
TABLE 35: START MYSQL DATABASE SERVICE
# service ovmm_mysql start
XXII | ORACLE VM 3: USING ORACLE CLUSTERWARE TO PROTECT ORACLE VM MANAGER
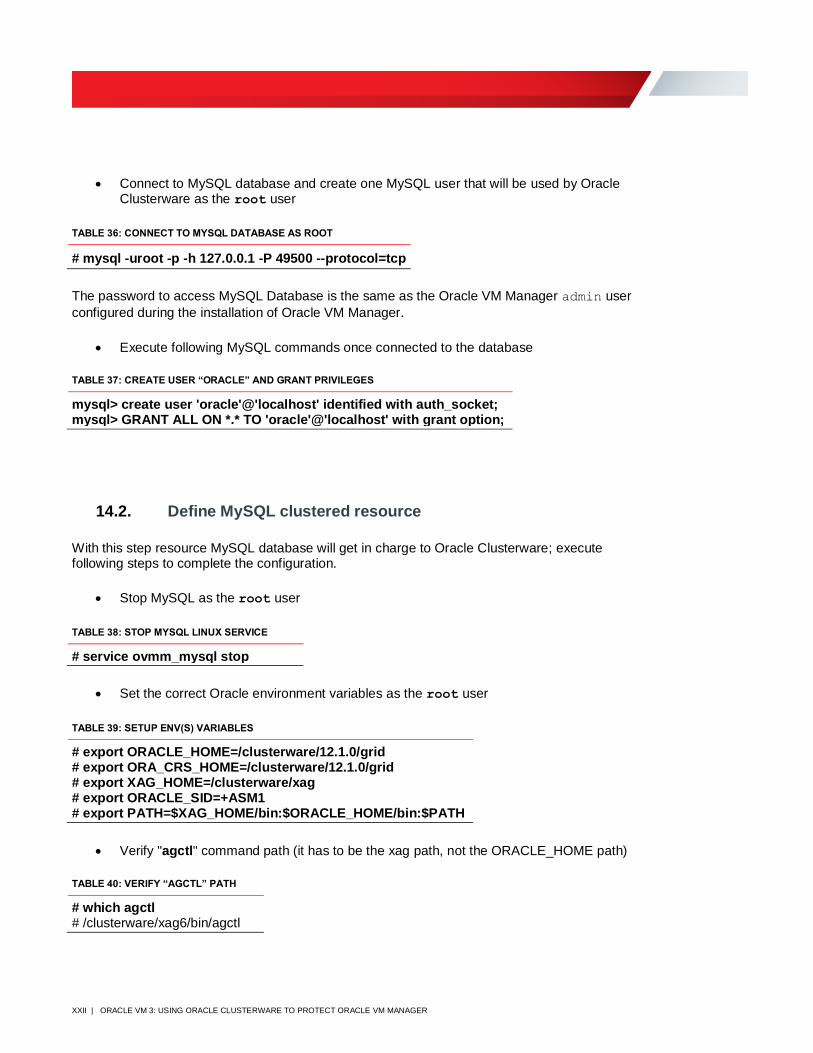
• Connect to MySQL database and create one MySQL user that will be used by Oracle Clusterware as the root user
TABLE 36: CONNECT TO MYSQL DATABASE AS ROOT
# mysql -uroot -p -h 127.0.0.1 -P 49500 --protocol=tcp
The password to access MySQL Database is the same as the Oracle VM Manager admin user
configured during the installation of Oracle VM Manager.
• Execute following MySQL commands once connected to the database
TABLE 37: CREATE USER “ORACLE” AND GRANT PRIVILEGES
mysql> create user 'oracle'@'localhost' identified with auth_socket; mysql> GRANT ALL ON *.* TO 'oracle'@'localhost' with grant option;
14.2. Define MySQL clustered resource
With this step resource MySQL database will get in charge to Oracle Clusterware; execute following steps to complete the configuration.
• Stop MySQL as the root user
TABLE 38: STOP MYSQL LINUX SERVICE
# service ovmm_mysql stop
• Set the correct Oracle environment variables as the root user
TABLE 39: SETUP ENV(S) VARIABLES
# export ORACLE_HOME=/clusterware/12.1.0/grid # export ORA_CRS_HOME=/clusterware/12.1.0/grid # export XAG_HOME=/clusterware/xag # export ORACLE_SID=+ASM1 # export PATH=$XAG_HOME/bin:$ORACLE_HOME/bin:$PATH
• Verify "agctl" command path (it has to be the xag path, not the ORACLE_HOME path)
TABLE 40: VERIFY “AGCTL” PATH
# which agctl # /clusterware/xag6/bin/agctl
XXIII | ORACLE VM 3: USING ORACLE CLUSTERWARE TO PROTECT ORACLE VM MANAGER
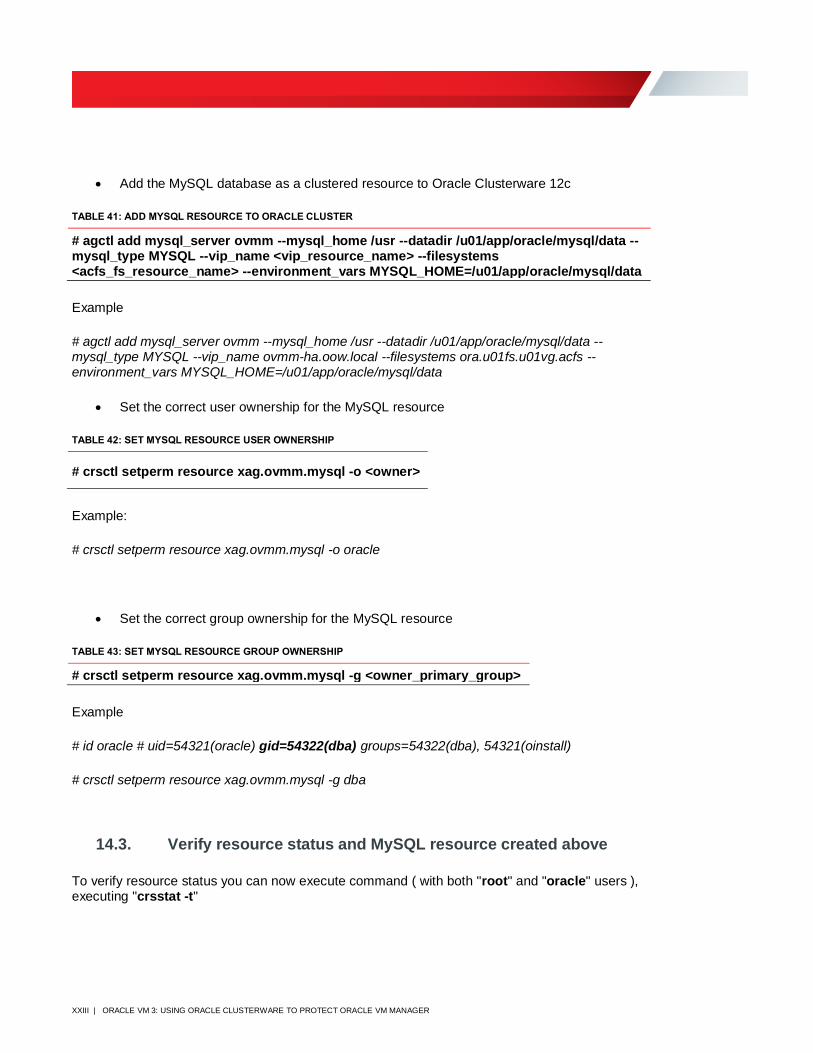
• Add the MySQL database as a clustered resource to Oracle Clusterware 12c
TABLE 41: ADD MYSQL RESOURCE TO ORACLE CLUSTER
# agctl add mysql_server ovmm --mysql_home /usr --datadir /u01/app/oracle/mysql/data --mysql_type MYSQL --vip_name <vip_resource_name> --filesystems <acfs_fs_resource_name> --environment_vars MYSQL_HOME=/u01/app/oracle/mysql/data
Example
# agctl add mysql_server ovmm --mysql_home /usr --datadir /u01/app/oracle/mysql/data --mysql_type MYSQL --vip_name ovmm-ha.oow.local --filesystems ora.u01fs.u01vg.acfs --environment_vars MYSQL_HOME=/u01/app/oracle/mysql/data
• Set the correct user ownership for the MySQL resource
TABLE 42: SET MYSQL RESOURCE USER OWNERSHIP
# crsctl setperm resource xag.ovmm.mysql -o <owner>
Example:
# crsctl setperm resource xag.ovmm.mysql -o oracle
• Set the correct group ownership for the MySQL resource
TABLE 43: SET MYSQL RESOURCE GROUP OWNERSHIP
# crsctl setperm resource xag.ovmm.mysql -g <owner_primary_group>
Example
# id oracle # uid=54321(oracle) gid=54322(dba) groups=54322(dba), 54321(oinstall)
# crsctl setperm resource xag.ovmm.mysql -g dba
14.3. Verify resource status and MySQL resource created above
To verify resource status you can now execute command ( with both "root" and "oracle" users ), executing "crsstat -t"

XXIV | ORACLE VM 3: USING ORACLE CLUSTERWARE TO PROTECT ORACLE VM MANAGER
Figure 21: Cluster Resource status
As you can see, all resources are ONLINE while the new MySQL resource is OFFLINE for both
Target and State.
• To start the clustered MySQL resource, run the following commands as the root user
TABLE 44: START MYSQL WITH ORACLE CLUSTERWARE
# export ORACLE_HOME=/clusterware/12.1.0/grid # export ORA_CRS_HOME=/clusterware/12.1.0/grid # export PATH=$ORACLE_HOME/bin:$PATH # crs_start xag.ovmm.mysql Attempting to start `xag.ovmm.mysql` on member `ovmm01` Start of `xag.ovmm.mysql` on member `ovmm01` succeeded.
• Re-verify resource status and you'll see that MySQL database is now active:
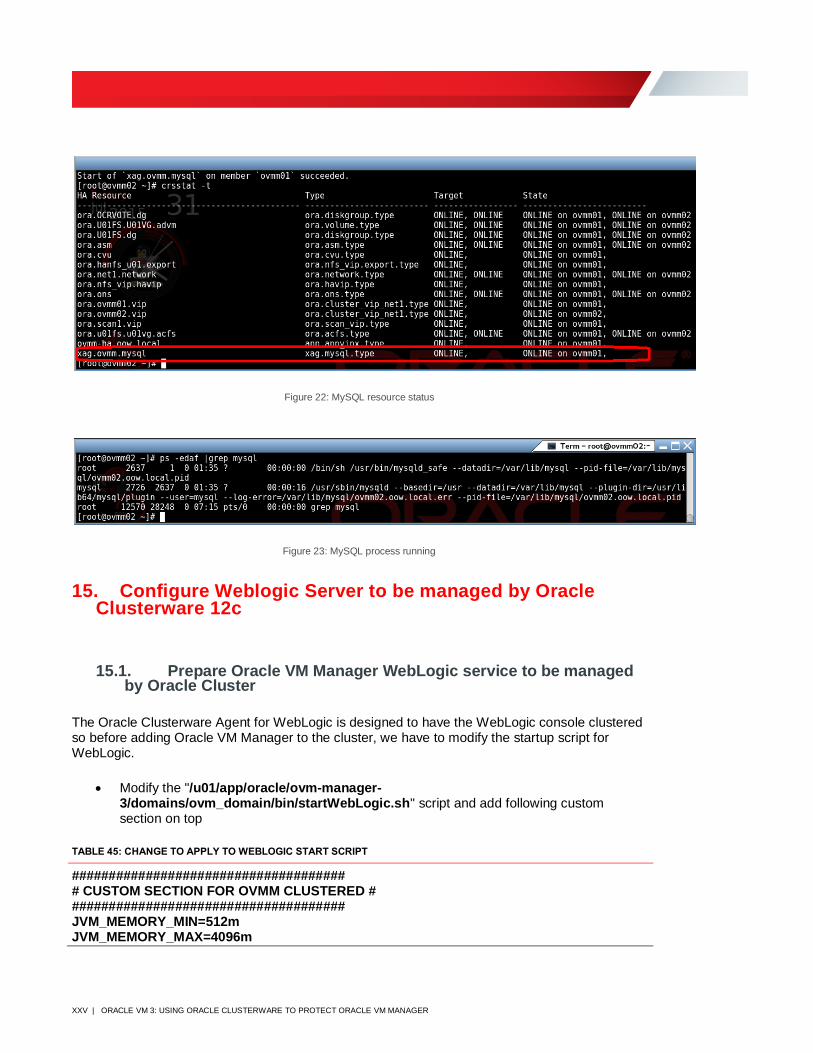
XXV | ORACLE VM 3: USING ORACLE CLUSTERWARE TO PROTECT ORACLE VM MANAGER
Figure 22: MySQL resource status
Figure 23: MySQL process running
15. Configure Weblogic Server to be managed by Oracle Clusterware 12c
15.1. Prepare Oracle VM Manager WebLogic service to be managed by Oracle Cluster
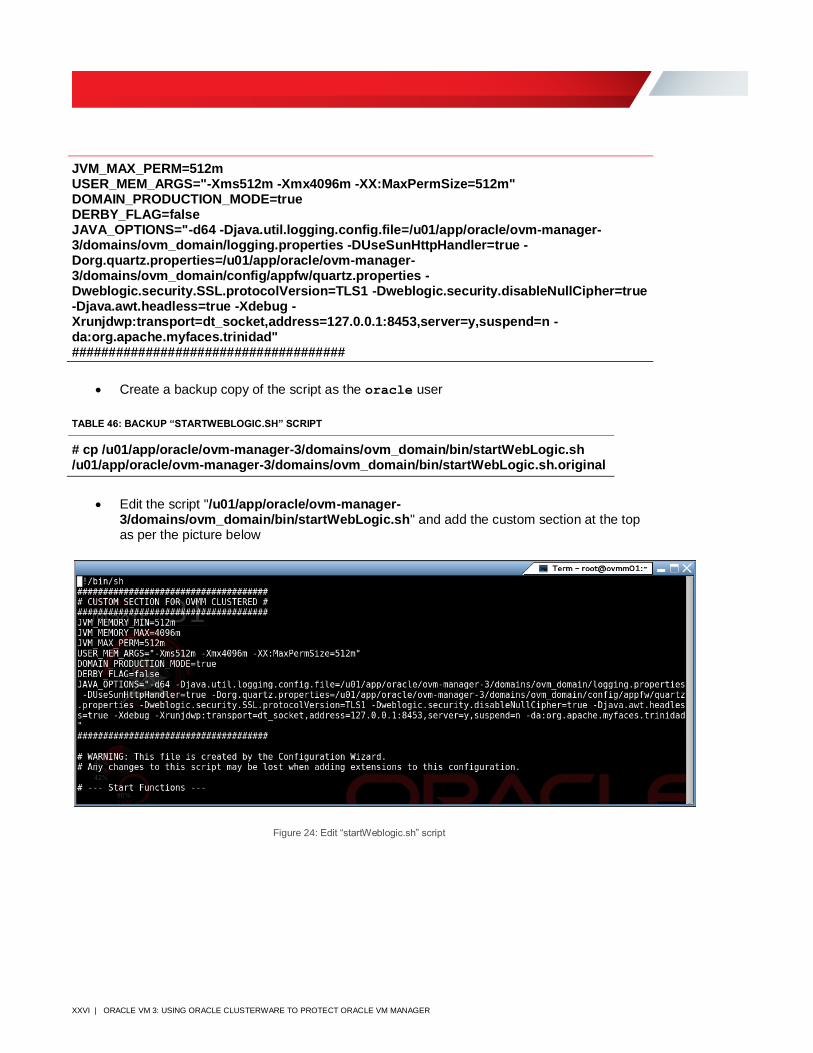
The Oracle Clusterware Agent for WebLogic is designed to have the WebLogic console clustered so before adding Oracle VM Manager to the cluster, we have to modify the startup script for WebLogic.
• Modify the "/u01/app/oracle/ovm-manager-3/domains/ovm_domain/bin/startWebLogic.sh" script and add following custom section on top
TABLE 45: CHANGE TO APPLY TO WEBLOGIC START SCRIPT
##################################### # CUSTOM SECTION FOR OVMM CLUSTERED # ##################################### JVM_MEMORY_MIN=512m JVM_MEMORY_MAX=4096m
XXVI | ORACLE VM 3: USING ORACLE CLUSTERWARE TO PROTECT ORACLE VM MANAGER
JVM_MAX_PERM=512m USER_MEM_ARGS="-Xms512m -Xmx4096m -XX:MaxPermSize=512m" DOMAIN_PRODUCTION_MODE=true DERBY_FLAG=false JAVA_OPTIONS="-d64 -Djava.util.logging.config.file=/u01/app/oracle/ovm-manager-3/domains/ovm_domain/logging.properties -DUseSunHttpHandler=true -Dorg.quartz.properties=/u01/app/oracle/ovm-manager-3/domains/ovm_domain/config/appfw/quartz.properties -Dweblogic.security.SSL.protocolVersion=TLS1 -Dweblogic.security.disableNullCipher=true -Djava.awt.headless=true -Xdebug -Xrunjdwp:transport=dt_socket,address=127.0.0.1:8453,server=y,suspend=n -da:org.apache.myfaces.trinidad" #####################################
• Create a backup copy of the script as the oracle user
TABLE 46: BACKUP “STARTWEBLOGIC.SH” SCRIPT
# cp /u01/app/oracle/ovm-manager-3/domains/ovm_domain/bin/startWebLogic.sh /u01/app/oracle/ovm-manager-3/domains/ovm_domain/bin/startWebLogic.sh.original
• Edit the script "/u01/app/oracle/ovm-manager-3/domains/ovm_domain/bin/startWebLogic.sh" and add the custom section at the top as per the picture below
Figure 24: Edit “startWeblogic.sh” script
XXVII | ORACLE VM 3: USING ORACLE CLUSTERWARE TO PROTECT ORACLE VM MANAGER
15.2. Prepare WebLogic userconfig to start/check/stop Oracle Weblogic.
• Run the following steps as the oracl e user to prepare the userconfig and key. Everything is created on /u01 so it is available for both nodes.
TABLE 47: CREATE USERCONFIG AND KEY FILES FOR CLUSTER WEBLOGIC ADMINISTRATION
# . /u01/app/oracle/Middleware/wlserver/server/bin/setWLSEnv.sh # mkdir /u01/app/oracle/cluster_agent (oracle.dba) # java weblogic.Admin -username weblogic -userconfigfile /u01/app/oracle/cluster_agent/config -userkeyfile /u01/app/oracle/cluster_agent/key -password Welcome1 STOREUSERCONFIG
• You should obtain something similar to the following output
TABLE 48: KEY AND CONFIG FILES EXAMPLE
[root@ovmm01 ~]# ls -l /u01/app/oracle/cluster_agent total 20 -rw-r--r-- 1 oracle dba 227 Jul 15 06:43 config -rw-r--r-- 1 oracle dba 64 Jul 15 06:43 key
• Edit the script / u01/ app/ oracl e/ ov m- manager-3/ domai ns/ ov m_domai n/ bi n/ st opWebLogi c. sh and substitute the following entry
TABLE 49: T3 URL STANDARD CONFIGURATION
# t3://<hostname>:7001
With:
TABLE 50: T3 URL FOR CLUSTERED OVMM
# t3://<vip_name_created_above>:7001
15.3. Define new Weblogic Server clustered resource
With this step Oracle VM Manager Weblogic resource will get in charge to Oracle Clusterware; execute following steps to complete the configuration.
• Stop Oracle VM Manager service as the root user:
XXVIII | ORACLE VM 3: USING ORACLE CLUSTERWARE TO PROTECT ORACLE VM MANAGER
TABLE 51: STOP ORACLE VM MANAGER
# service ovmm stop
• Set correct environment variables for the root user
TABLE 52: SET THE CORRECT ENV(S) VARIABLES
# export ORACLE_HOME=/clusterware/12.1.0/grid # export ORA_CRS_HOME=/clusterware/12.1.0/grid # export XAG_HOME=/clusterware/xag # export ORACLE_SID=+ASM1 # export PATH=$XAG_HOME/bin:$ORACLE_HOME/bin:$PATH
• Verify the agctl command uses the XAG_HOME path not the ORACLE_HOME path:
TABLE 53: STOP ORACLE VM MANAGER
# which agctl # /clusterware/xag/bin/agctl
• Add WebLogic as a clustered resource
TABLE 54: COMMAND SYNTAX
# agctl add weblogic_admin_server ovmm --domain_home /u01/app/oracle/ovm-manager-3/domains/ovm_domain --userconfigfile <config_file_created_above> --userkeyfile <key_file_created_above>
# crsctl setperm resource xag.ovmm.wl -o <user>
# crsctl setperm resource xag.ovmm.wl -g <group>
# crsctl modify resource xag.ovmm.wl -attr "START_DEPENDENCIES='hard(<vip_resource_name>,<mysql_resource_name>) pullup(<vip_resource_name>,<mysql_resource_name>)'" # crsctl modify resource xag.ovmm.wl -attr "STOP_DEPENDENCIES='hard(<vip_resource_name>,<mysql_resource_name>)'"
TABLE 55: COMMAND EXAMPLE
# agctl add weblogic_admin_server ovmm --domain_home /u01/app/oracle/ovm-manager-3/domains/ovm_domain --userconfigfile /u01/app/oracle/cluster_agent/config --userkeyfile /u01/app/oracle/cluster_agent/key
# crsctl setperm resource xag.ovmm.wl -o oracle
# crsctl setperm resource xag.ovmm.wl -g dba
# crsctl modify resource xag.ovmm.wl -attr "START_DEPENDENCIES='hard(ovmm-ha.oow.local,xag.ovmm.mysql) pullup(ovmm-ha.oow.local,xag.ovmm.mysql)'"
XXIX | ORACLE VM 3: USING ORACLE CLUSTERWARE TO PROTECT ORACLE VM MANAGER
# crsctl modify resource xag.ovmm.wl -attr "STOP_DEPENDENCIES='hard(ovmm-ha.oow.local,xag.ovmm.mysql)'"
15.4. Change SCRIPT_TIMEOUT value from 60 to 300 to get higher timeouts on starting/checking/stopping cluster resource
• The maximum time (in seconds) for an action to run. Oracle Clusterware returns an error message if the
action script does not complete within the time specified. The timeout applies to all actions (start, stop,
check, and clean).
TABLE 56: CHANGE TIMEOUT VALUE
# crsctl modify resource xag.ovmm.wl -attr "SCRIPT_TIMEOUT=300"
15.5. Verify resources status and new "Oracle VM Manager" Weblogic Server resource created above
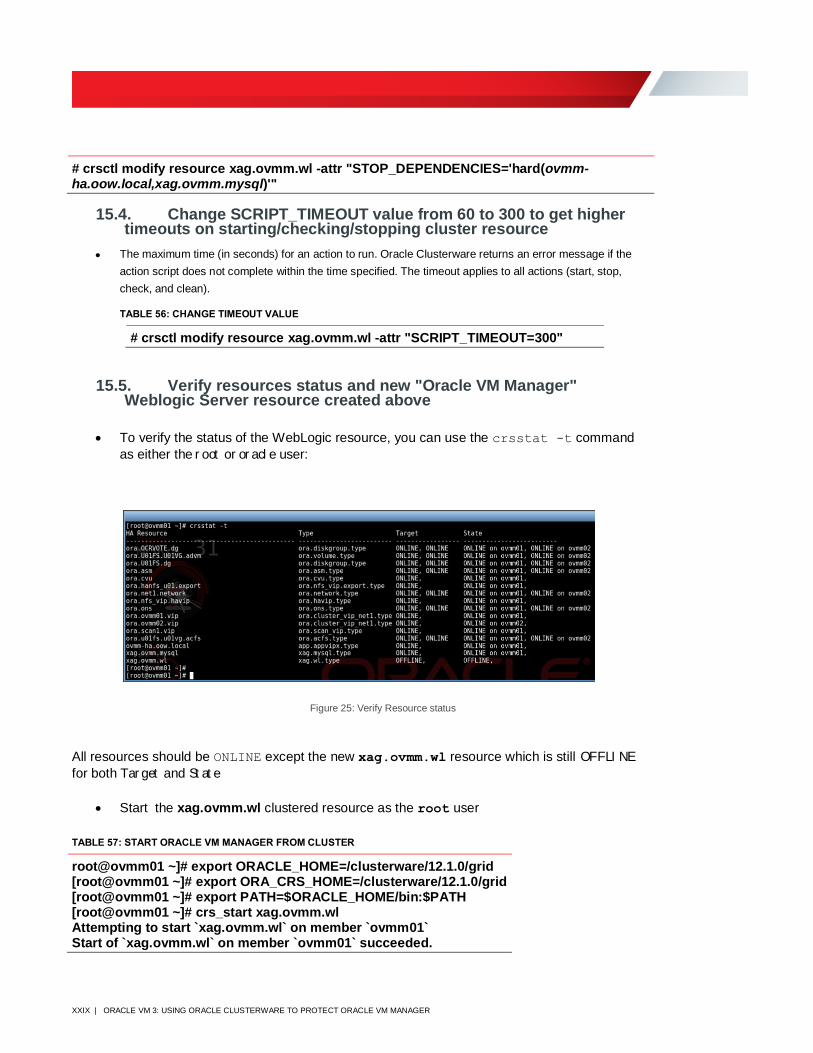
• To verify the status of the WebLogic resource, you can use the crsstat -t command
as either the r oot or or acl e user:
Figure 25: Verify Resource status
All resources should be ONLINE except the new xag.ovmm.wl resource which is still OFFLI NE
for both Tar get and St at e
• Start the xag.ovmm.wl clustered resource as the root user
TABLE 57: START ORACLE VM MANAGER FROM CLUSTER
root@ovmm01 ~]# export ORACLE_HOME=/clusterware/12.1.0/grid [root@ovmm01 ~]# export ORA_CRS_HOME=/clusterware/12.1.0/grid [root@ovmm01 ~]# export PATH=$ORACLE_HOME/bin:$PATH [root@ovmm01 ~]# crs_start xag.ovmm.wl Attempting to start `xag.ovmm.wl` on member `ovmm01` Start of `xag.ovmm.wl` on member `ovmm01` succeeded.

XXX | ORACLE VM 3: USING ORACLE CLUSTERWARE TO PROTECT ORACLE VM MANAGER
• Re-verify the cluster status and you'll see that the xag.ovmm.wl WebLogic resource is
now active
Figure 26: Verify resource status
Figure 27: Verify process listening on ports 7001/7002
At this point you should be able to connect and login to Oracle VM Manager using a web browser using the Application VIP hostname or IP address.
16. Configure Oracle VM CLI to be managed by Oracle Clusterware 12c
16.1. Prepare Oracle VM CLI service
Copy linux service file “/etc/init.d/ovmcli” startup script to “/u01/app/oracle/cluster_gent/ovmcli”
XXXI | ORACLE VM 3: USING ORACLE CLUSTERWARE TO PROTECT ORACLE VM MANAGER
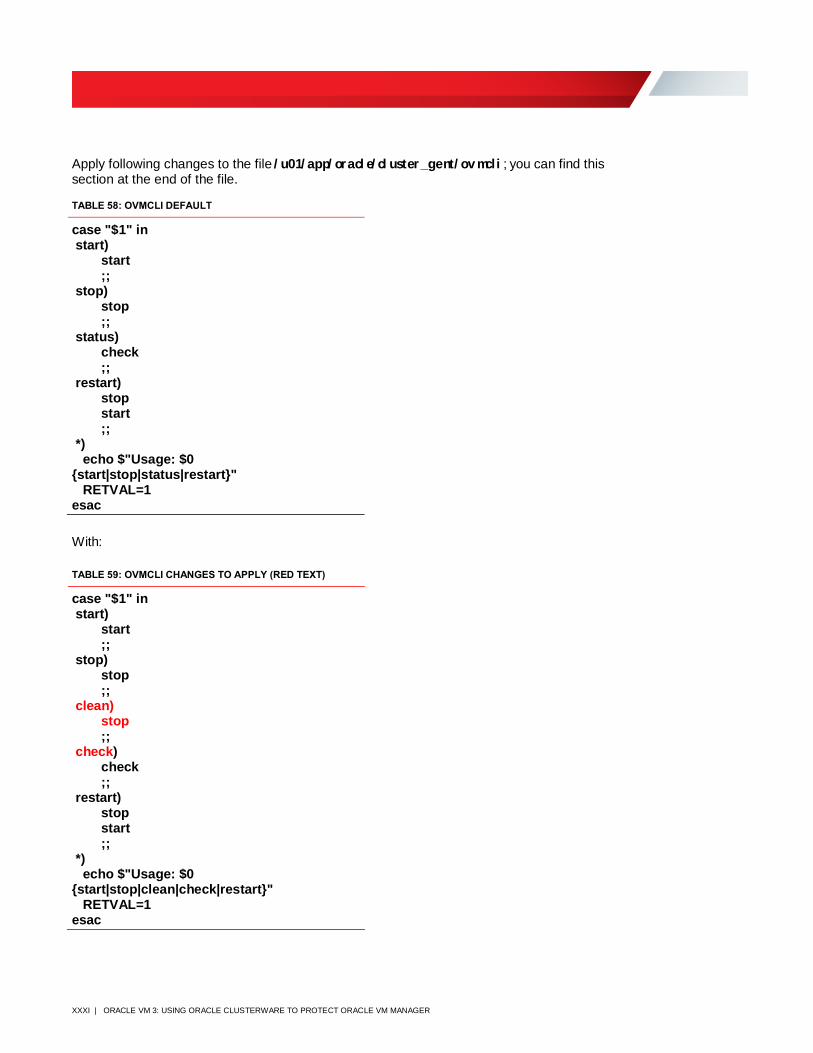
Apply following changes to the file / u01/ app/ oracl e/ cl uster_gent/ ov mcli ; you can find this section at the end of the file.
TABLE 58: OVMCLI DEFAULT
case "$1" in start) start ;; stop) stop ;; status) check ;; restart) stop start ;; *) echo $"Usage: $0 {start|stop|status|restart}" RETVAL=1 esac
With:
TABLE 59: OVMCLI CHANGES TO APPLY (RED TEXT)
case "$1" in start) start ;; stop) stop ;; clean) stop ;; check) check ;; restart) stop start ;; *) echo $"Usage: $0 {start|stop|clean|check|restart}" RETVAL=1 esac
XXXII | ORACLE VM 3: USING ORACLE CLUSTERWARE TO PROTECT ORACLE VM MANAGER
• On the primary node of the cluster, stop the existing ovmcli service, as "root":
TABLE 60: STOP OVMCLI LINUX SERVICE
# service ovmcli stop
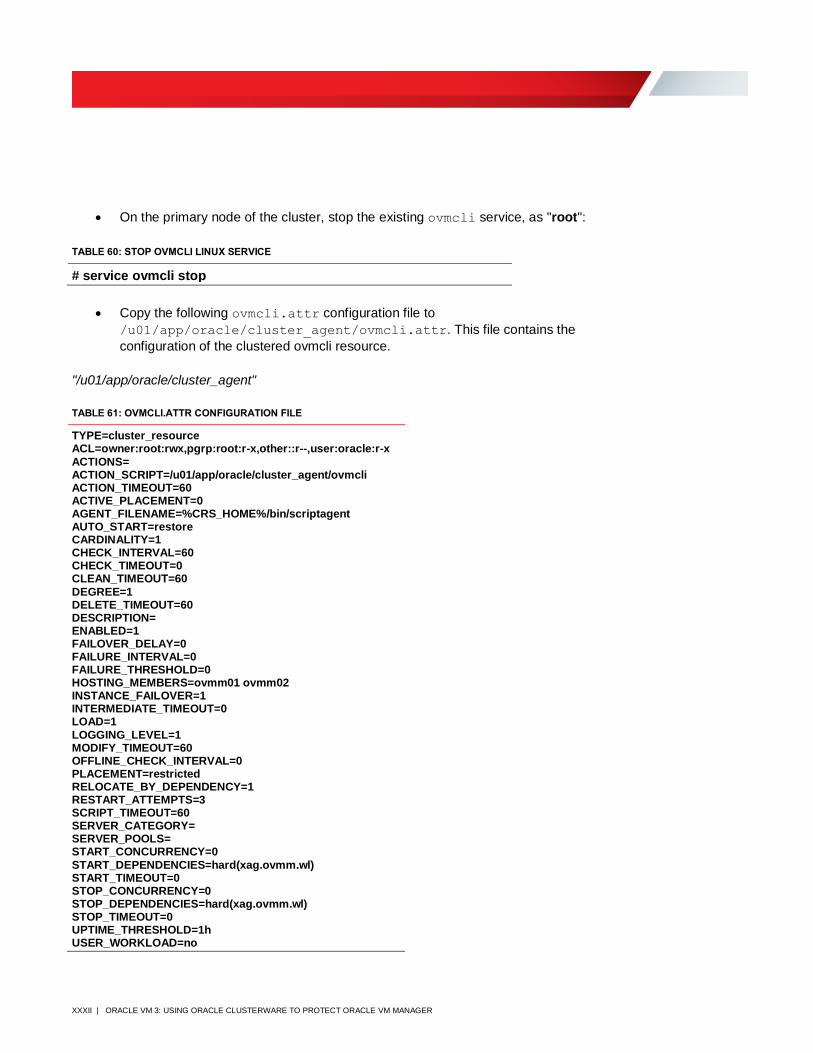
• Copy the following ovmcli.attr configuration file to
/u01/app/oracle/cluster_agent/ovmcli.attr. This file contains the
configuration of the clustered ovmcli resource.
"/u01/app/oracle/cluster_agent"
TABLE 61: OVMCLI.ATTR CONFIGURATION FILE
TYPE=cluster_resource ACL=owner:root:rwx,pgrp:root:r-x,other::r--,user:oracle:r-x
ACTIONS= ACTION_SCRIPT=/u01/app/oracle/cluster_agent/ovmcli ACTION_TIMEOUT=60 ACTIVE_PLACEMENT=0 AGENT_FILENAME=%CRS_HOME%/bin/scriptagent AUTO_START=restore CARDINALITY=1 CHECK_INTERVAL=60 CHECK_TIMEOUT=0 CLEAN_TIMEOUT=60
DEGREE=1 DELETE_TIMEOUT=60 DESCRIPTION= ENABLED=1 FAILOVER_DELAY=0 FAILURE_INTERVAL=0 FAILURE_THRESHOLD=0 HOSTING_MEMBERS=ovmm01 ovmm02 INSTANCE_FAILOVER=1 INTERMEDIATE_TIMEOUT=0 LOAD=1
LOGGING_LEVEL=1 MODIFY_TIMEOUT=60 OFFLINE_CHECK_INTERVAL=0 PLACEMENT=restricted RELOCATE_BY_DEPENDENCY=1 RESTART_ATTEMPTS=3 SCRIPT_TIMEOUT=60 SERVER_CATEGORY= SERVER_POOLS= START_CONCURRENCY=0
START_DEPENDENCIES=hard(xag.ovmm.wl) START_TIMEOUT=0 STOP_CONCURRENCY=0 STOP_DEPENDENCIES=hard(xag.ovmm.wl) STOP_TIMEOUT=0 UPTIME_THRESHOLD=1h USER_WORKLOAD=no
XXXIII | ORACLE VM 3: USING ORACLE CLUSTERWARE TO PROTECT ORACLE VM MANAGER
USE_STICKINESS=0
• Edit "ovmcli.attr" file at the following line
TABLE 62: CHANGES IN OVMCLI.ATTR FILE
HOSTING_MEMBERS=ovmm01 ovmm02
Ensure that you use the correct hostnames for the HOSTING_MEMBERS setting in ovmcli.attr. This
should match the hostnames of your cluster nodes.
• Register the ovmcli resource by running the following commands as the root user
TABLE 63: CHANGES IN OVMCLI.ATTR FILE
# export ORACLE_HOME=/clusterware/12.1.0/grid # export ORA_CRS_HOME=/clusterware/12.1.0/grid # export PATH=$ORACLE_HOME/bin:$PATH # crsctl add resource ovmm.ovmcli.service -type cluster_resource -file /u01/app/oracle/cluster_agent/ovmcli.attr
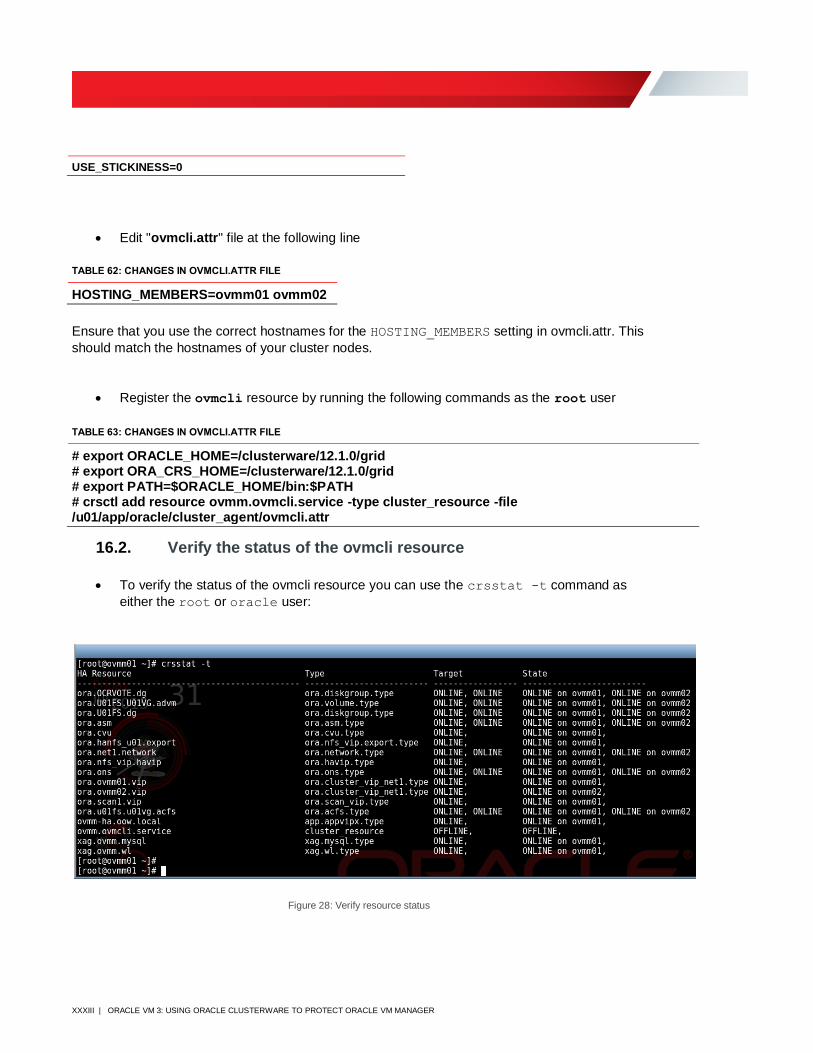
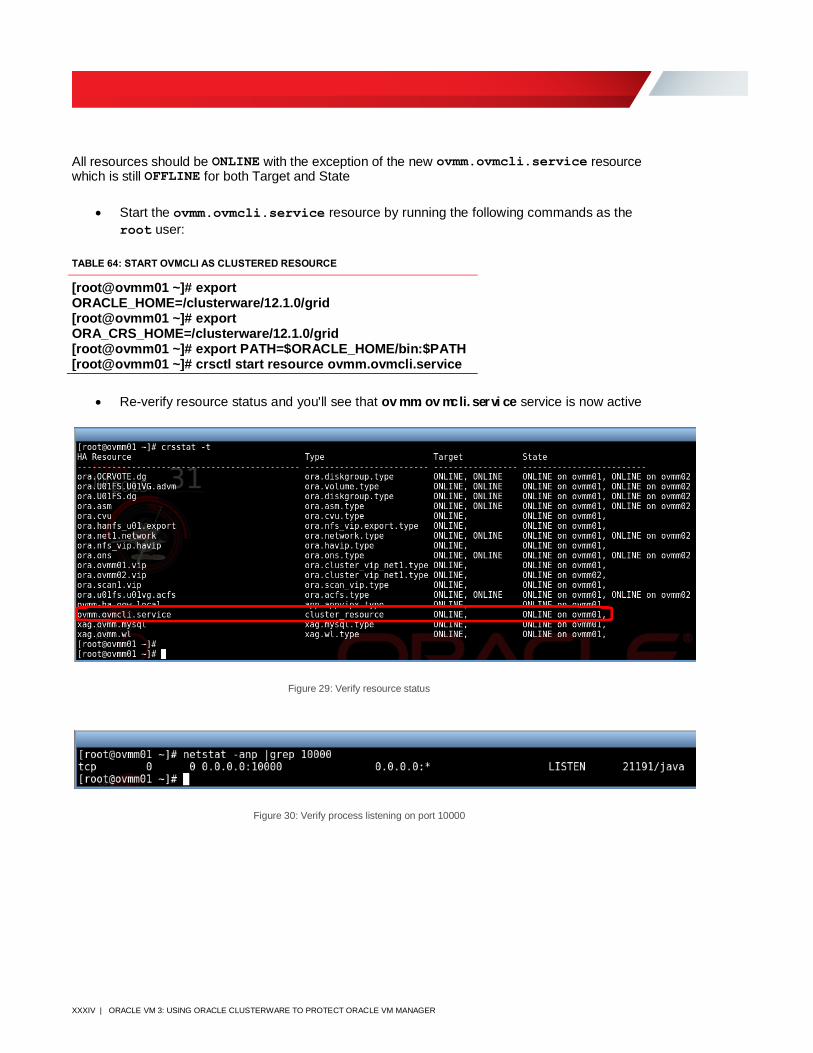
16.2. Verify the status of the ovmcli resource
• To verify the status of the ovmcli resource you can use the crsstat -t command as
either the root or oracle user:
Figure 28: Verify resource status
XXXIV | ORACLE VM 3: USING ORACLE CLUSTERWARE TO PROTECT ORACLE VM MANAGER
All resources should be ONLINE with the exception of the new ovmm.ovmcli.service resource which is still OFFLINE for both Target and State
• Start the ovmm.ovmcli.service resource by running the following commands as the
root user:
TABLE 64: START OVMCLI AS CLUSTERED RESOURCE
[root@ovmm01 ~]# export ORACLE_HOME=/clusterware/12.1.0/grid [root@ovmm01 ~]# export ORA_CRS_HOME=/clusterware/12.1.0/grid [root@ovmm01 ~]# export PATH=$ORACLE_HOME/bin:$PATH [root@ovmm01 ~]# crsctl start resource ovmm.ovmcli.service
• Re-verify resource status and you'll see that ov mm. ov mcli. servi ce service is now active
Figure 29: Verify resource status
Figure 30: Verify process listening on port 10000
XXXV | ORACLE VM 3: USING ORACLE CLUSTERWARE TO PROTECT ORACLE VM MANAGER
17. Clustered Oracle VM Manager: Architecture and Network
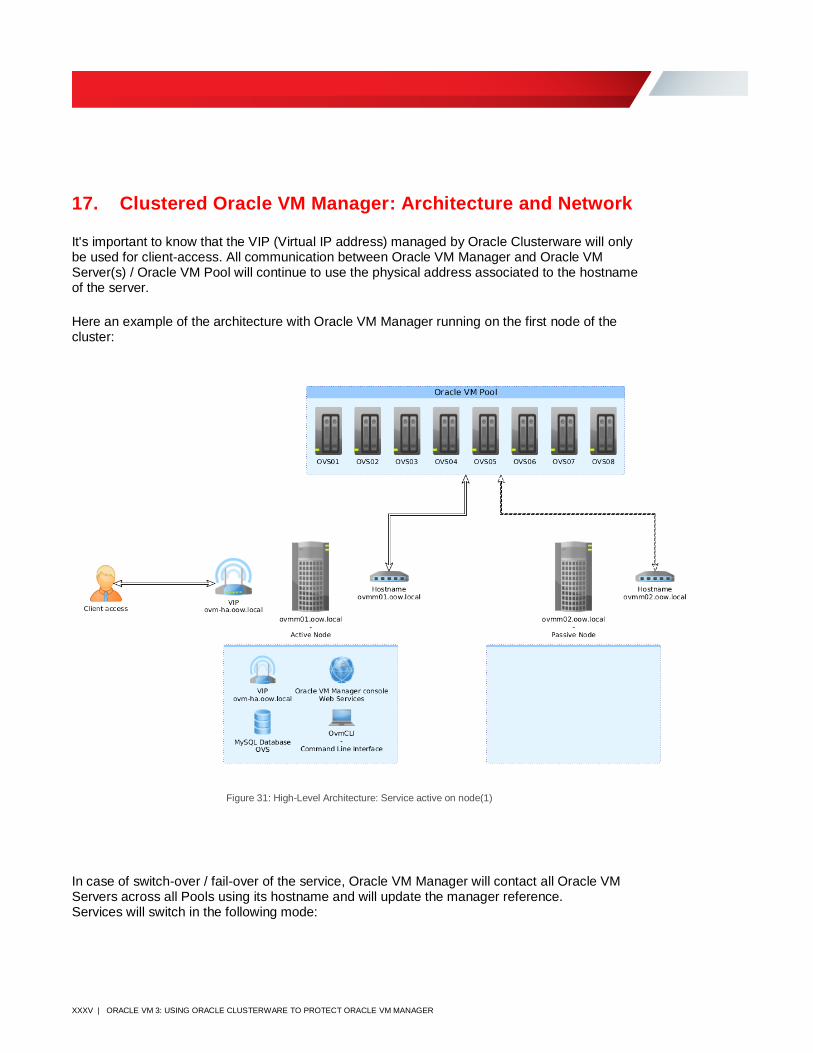
It's important to know that the VIP (Virtual IP address) managed by Oracle Clusterware will only be used for client-access. All communication between Oracle VM Manager and Oracle VM Server(s) / Oracle VM Pool will continue to use the physical address associated to the hostname of the server.
Here an example of the architecture with Oracle VM Manager running on the first node of the cluster:
Figure 31: High-Level Architecture: Service active on node(1)
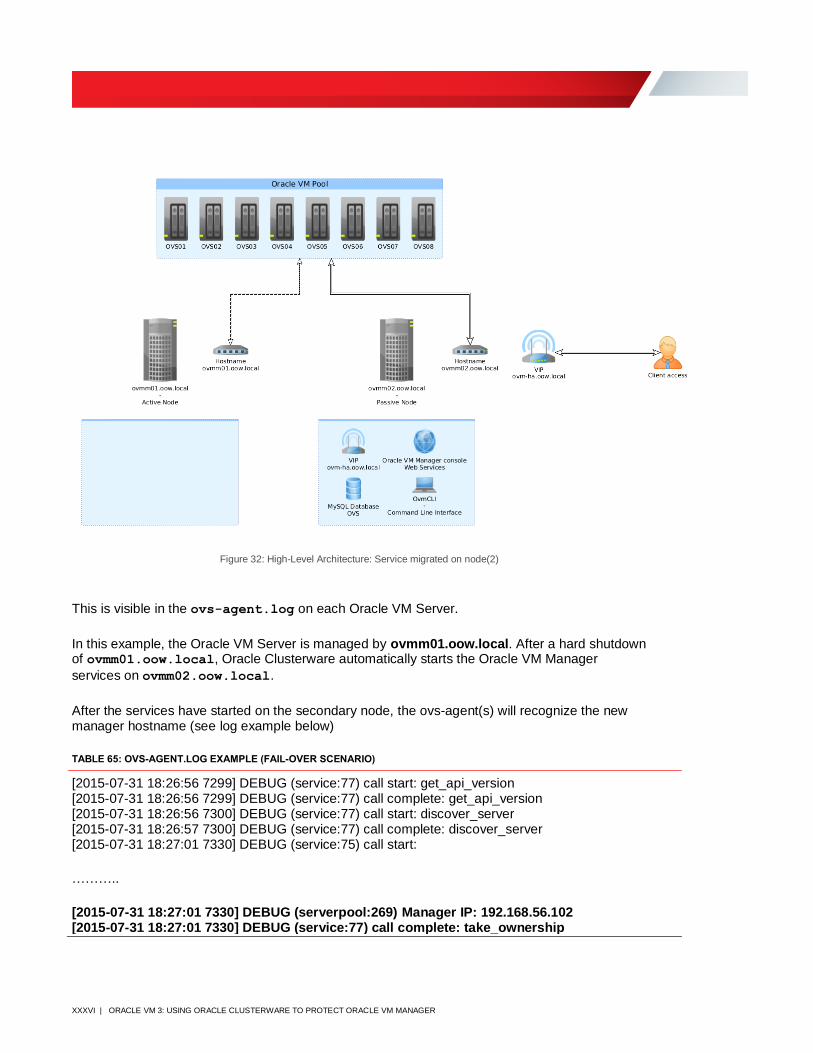
In case of switch-over / fail-over of the service, Oracle VM Manager will contact all Oracle VM Servers across all Pools using its hostname and will update the manager reference. Services will switch in the following mode:
XXXVI | ORACLE VM 3: USING ORACLE CLUSTERWARE TO PROTECT ORACLE VM MANAGER
Figure 32: High-Level Architecture: Service migrated on node(2)
This is visible in the ovs-agent.log on each Oracle VM Server.
In this example, the Oracle VM Server is managed by ovmm01.oow.local. After a hard shutdown of ovmm01.oow.local, Oracle Clusterware automatically starts the Oracle VM Manager
services on ovmm02.oow.local.
After the services have started on the secondary node, the ovs-agent(s) will recognize the new manager hostname (see log example below)
TABLE 65: OVS-AGENT.LOG EXAMPLE (FAIL-OVER SCENARIO)
[2015-07-31 18:26:56 7299] DEBUG (service:77) call start: get_api_version [2015-07-31 18:26:56 7299] DEBUG (service:77) call complete: get_api_version [2015-07-31 18:26:56 7300] DEBUG (service:77) call start: discover_server [2015-07-31 18:26:57 7300] DEBUG (service:77) call complete: discover_server [2015-07-31 18:27:01 7330] DEBUG (service:75) call start:
………..
[2015-07-31 18:27:01 7330] DEBUG (serverpool:269) Manager IP: 192.168.56.102 [2015-07-31 18:27:01 7330] DEBUG (service:77) call complete: take_ownership
XXXVII | ORACLE VM 3: USING ORACLE CLUSTERWARE TO PROTECT ORACLE VM MANAGER
In the following example, we force Clusterware to move the services from ovmm02.oow.local
back to ovmm01.oow.local:
“crsctl relocate resource ovmm-ha.oow.local -f”
TABLE 66: EXAMPLE FORCE SWITCHOVER
[root@ovmm02 ~]# crsctl relocate resource ovmm-ha.oow.local -f CRS-2673: Attempting to stop 'xag.ovmm.mysql' on 'ovmm02' CRS-2677: Stop of 'xag.ovmm.mysql' on 'ovmm02' succeeded CRS-2673: Attempting to stop 'ovmm-ha.oow.local' on 'ovmm02' CRS-2677: Stop of 'ovmm-ha.oow.local' on 'ovmm02' succeeded CRS-2672: Attempting to start 'ovmm-ha.oow.local' on 'ovmm01' CRS-2676: Start of 'ovmm-ha.oow.local' on 'ovmm01' succeeded CRS-2672: Attempting to start 'xag.ovmm.mysql' on 'ovmm01' CRS-2676: Start of 'xag.ovmm.mysql' on 'ovmm01' succeeded CRS-2672: Attempting to start `xag.ovmm.wl` on member `ovmm01` CRS-2676: Start of `xag.ovmm.wl` on member `ovmm01` succeeded. CRS-2672: Attempting to start `ovmm.ovmcli.service` on member `ovmm01` CRS-2676: Start of `ovmm.ovmcli.service` on member `ovmm01` succeeded.
Output from /var/log/ovs-agent.log of a managed Oracle VM Server:
TABLE 67: OVS-AGENT.LOG EXAMPLE (FAIL-OVER SCENARIO)
[2015-07-31 18:54:57 1916] ERROR (notificationserver:240) Error sendinging statistics: [Errno 111] Connection refused [2015-07-31 18:55:27 1916] ERROR (notificationserver:240) Error sendinging statistics: [Errno 111] Connection refused [2015-07-31 18:55:57 1916] ERROR (notificationserver:240) Error sendinging statistics: [Errno 111] Connection refused [2015-07-31 18:56:27 1916] ERROR (notificationserver:240) Error sendinging statistics: [Errno 111] Connection refused [2015-07-31 18:56:57 1916] ERROR (notificationserver:240) Error sendinging statistics: [Errno 111] Connection refused [2015-07-31 18:56:59 9807] DEBUG (service:77) call start: get_api_version [2015-07-31 18:56:59 9807] DEBUG (service:77) call complete: get_api_version [2015-07-31 18:56:59 9808] DEBUG (service:77) call start: discover_server [2015-07-31 18:57:00 9808] DEBUG (service:77) call complete: discover_server [2015-07-31 18:57:03 9833] DEBUG (service:75) call start:
…..
……..
[2015-07-31 18:57:03 9833] DEBUG (serverpool:269) Manager IP: 192.168.56.101 [2015-07-31 18:57:04 9833] DEBUG (service:77) call complete: take_ownership
XXXVIII | ORACLE VM 3: USING ORACLE CLUSTERWARE TO PROTECT ORACLE VM MANAGER
Using theOracle VM Manager clustered: "oraenv" command
Instead of exporting all variables each time, you can use the oraenv script to automatically
configure the user environment
TABLE 68: USE “ORAENV” SCRIPT
[oracle@ovmm01 ~]$ . oraenv
ORACLE_SID = [oracle] ? +ASM1
The Oracle base has been set to /clusterware/oracle [oracle@ovmm01 ~]$
18. Upgrading a clustered Oracle VM Manager
Before upgrading a clustered Oracle VM Manager, disable all the cluster resources and restart the
services on the primary node using the non-clustered startup scripts. This will prevent Clusterware
trying to start the services on the secondary node during the upgrade process.
Once the upgrade is completed, execute the following steps to have clusterware resources correctly working.
18.1. Stop and disable all "Oracle VM Manager" linux services, as “root”
TABLE 69: DISABLE LINUX SERVICES
# service ovmm stop # service ovmcli stop # service ovmm_mysql stop # chkconfig ovmm off # chkconfig ovmcli off # chkconfig ovmm_mysql off
18.2. Edit Weblogic start script
Modify "/u01/app/oracle/ovm-manager-3/domains/ovm_domain/bin/startWebLogic.sh" script and add following custom section on top:
TABLE 70: CUSTOM SECTION OF STARTWEBLOGIC.SH
##################################### # CUSTOM SECTION FOR OVMM CLUSTERED # ##################################### JVM_MEMORY_MIN=512m JVM_MEMORY_MAX=4096m JVM_MAX_PERM=512m USER_MEM_ARGS="-Xms512m -Xmx4096m -XX:MaxPermSize=512m" DOMAIN_PRODUCTION_MODE=true DERBY_FLAG=false
XXXIX | ORACLE VM 3: USING ORACLE CLUSTERWARE TO PROTECT ORACLE VM MANAGER
JAVA_OPTIONS="-d64 -Djava.util.logging.config.file=/u01/app/oracle/ovm-manager-3/domains/ovm_domain/logging.properties -DUseSunHttpHandler=true -Dorg.quartz.properties=/u01/app/oracle/ovm-manager-3/domains/ovm_domain/config/appfw/quartz.properties -Dweblogic.security.SSL.protocolVersion=TLS1 -Dweblogic.security.disableNullCipher=true -Djava.awt.headless=true -Xdebug -Xrunjdwp:transport=dt_socket,address=127.0.0.1:8453,server=y,suspend=n -da:org.apache.myfaces.trinidad" #####################################
18.3. Edit Weblogic configuration file
Edit the script "/u01/app/oracle/ovm-manager-3/domains/ovm_domain/bin/stopWebLogic.sh" and substitute the following entry:
TABLE 71: T3 URL STANDARD CONFIGURATION
# t3://<hostname>:7001
With:
TABLE 72: T3 URL FOR CLUSTERED ORACLE VM MANAGER
# t3://<vip_dedicated>:7001
18.4. Edit Oracle VM Manager MySQL configuration file following the steps below
TABLE 73: EDIT “MY.CNF” MYSQL CONFIGURATION FILE
# cp /u01/app/oracle/mysql/data/my.cnf /u01/app/oracle/mysql/data/my.cnf.original
# vi /u01/app/oracle/mysql/data/my.cnf
18.5. Add “auth_socket.so” plugin to MySQL.cnf conf file
Add the following plugin-load function in the head of the file under section "mysqld"
TABLE 74: CHANGE INTRODUCED IN MYSQL.CNF
plugin-load=auth_socket.so
EXAMPLE:
[mysqld] plugin-load=auth_socket.so basedir=/usr datadir=/u01/app/oracle/mysql/data
XL | ORACLE VM 3: USING ORACLE CLUSTERWARE TO PROTECT ORACLE VM MANAGER
.....
18.6. Start "MySQL" linux service temporarily
TABLE 75: START MYSQL SERVICE
# service ovmm_mysql start
18.7. Create MySQL “oracle” user
Connect to MySQL database and create one MySQL user that will be used by Oracle Clusterware, as "root" (admin password of Oracle VM Manager to access)
TABLE 76: CONNECT TO MYSQL DATABASE AS ROOT
# mysql -uroot -p -h 127.0.0.1 -P 49500 --protocol=tcp
The password to access MySQL Database is the same of user "admin" of Oracle VM Manager
18.8. Execute following MySQL commands once connected to the database
TABLE 77: CREATE USER “ORACLE” AND GRANT PRIVILEGES
mysql> create user 'oracle'@'localhost' identified with auth_socket; mysql> GRANT ALL ON *.* TO 'oracle'@'localhost' with grant option;
18.9. Stop "MySQL" linux service, as "root"
TABLE 78: STOP MYSQL LINUX SERVICE
# service ovmm_mysql stop
18.10. Copy and edit “ovmcli” service file cluster resource management
Copy linux service file “/etc/init.d/ovmcli” to “/u01/app/oracle/cluster_gent/ovmcli” Apply following changes to the file / u01/ app/ oracl e/ cl uster_gent/ ov mcli ; you can find this section at the end of the file.
TABLE 79: OVMCLI DEFAULT
case "$1" in start) start ;; stop) stop ;; status) check ;;
XLI | ORACLE VM 3: USING ORACLE CLUSTERWARE TO PROTECT ORACLE VM MANAGER
restart) stop start ;; *) echo $"Usage: $0 {start|stop|status|restart}" RETVAL=1 esac
TABLE 80: OVMCLI CHANGES TO APPLY (RED TEXT)
case "$1" in start) start ;; stop) stop ;; clean) stop ;; check) check ;; restart) stop start ;; *) echo $"Usage: $0 {start|stop|clean|check|restart}" RETVAL=1 esac
18.11. Update MySQL RPMs packages on the second node
While the node where Oracle VM Manager has been upgraded already has all MySQL RPMs updated, the second node of the cluster doesn't; from the "Oracle VM Manager" ISO identify MySQL RPMs for your Linux distribution
TABLE 81: IDENTIFY MYSQL RPMS
[root@ovmm01 ~]# ll /mnt/components/*OEL* -rw-r--r-- 1 root root 3017880 May 20 20:28 /mnt/components/MEB_OEL5_meb-3.12.0-rhel5.x86_64.rpm -rw-r--r-- 1 root root 2499624 May 20 20:28 /mnt/components/MEB_OEL6_meb-3.12.0-el6.x86_64.rpm -rw-r--r-- 1 root root 2443348 May 20 20:28 /mnt/components/MEB_OEL7_meb-3.12.0-
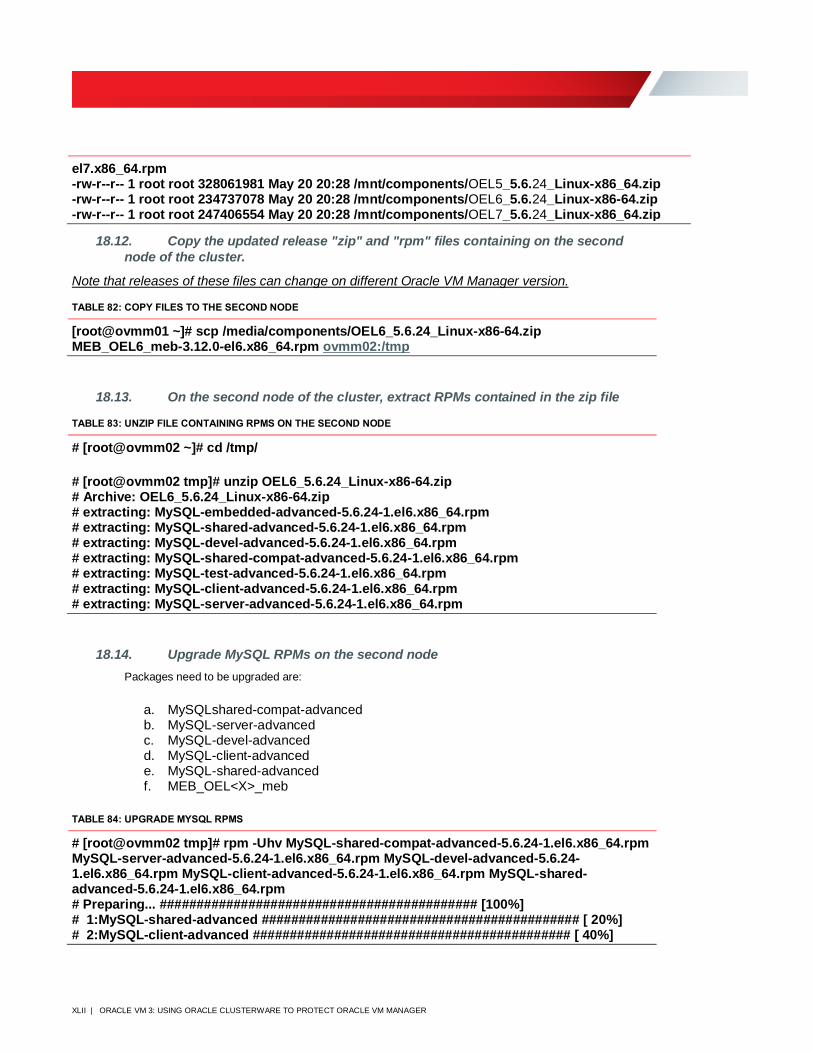
XLII | ORACLE VM 3: USING ORACLE CLUSTERWARE TO PROTECT ORACLE VM MANAGER
el7.x86_64.rpm -rw-r--r-- 1 root root 328061981 May 20 20:28 /mnt/components/OEL5_5.6.24_Linux-x86_64.zip -rw-r--r-- 1 root root 234737078 May 20 20:28 /mnt/components/OEL6_5.6.24_Linux-x86-64.zip -rw-r--r-- 1 root root 247406554 May 20 20:28 /mnt/components/OEL7_5.6.24_Linux-x86_64.zip
18.12. Copy the updated release "zip" and "rpm" files containing on the second
node of the cluster.
Note that releases of these files can change on different Oracle VM Manager version.
TABLE 82: COPY FILES TO THE SECOND NODE
[root@ovmm01 ~]# scp /media/components/OEL6_5.6.24_Linux-x86-64.zip MEB_OEL6_meb-3.12.0-el6.x86_64.rpm ovmm02:/tmp
18.13. On the second node of the cluster, extract RPMs contained in the zip file
TABLE 83: UNZIP FILE CONTAINING RPMS ON THE SECOND NODE
# [root@ovmm02 ~]# cd /tmp/
# [root@ovmm02 tmp]# unzip OEL6_5.6.24_Linux-x86-64.zip # Archive: OEL6_5.6.24_Linux-x86-64.zip # extracting: MySQL-embedded-advanced-5.6.24-1.el6.x86_64.rpm # extracting: MySQL-shared-advanced-5.6.24-1.el6.x86_64.rpm # extracting: MySQL-devel-advanced-5.6.24-1.el6.x86_64.rpm # extracting: MySQL-shared-compat-advanced-5.6.24-1.el6.x86_64.rpm # extracting: MySQL-test-advanced-5.6.24-1.el6.x86_64.rpm # extracting: MySQL-client-advanced-5.6.24-1.el6.x86_64.rpm # extracting: MySQL-server-advanced-5.6.24-1.el6.x86_64.rpm
18.14. Upgrade MySQL RPMs on the second node
Packages need to be upgraded are:
a. MySQLshared-compat-advanced b. MySQL-server-advanced c. MySQL-devel-advanced d. MySQL-client-advanced e. MySQL-shared-advanced f. MEB_OEL<X>_meb
TABLE 84: UPGRADE MYSQL RPMS
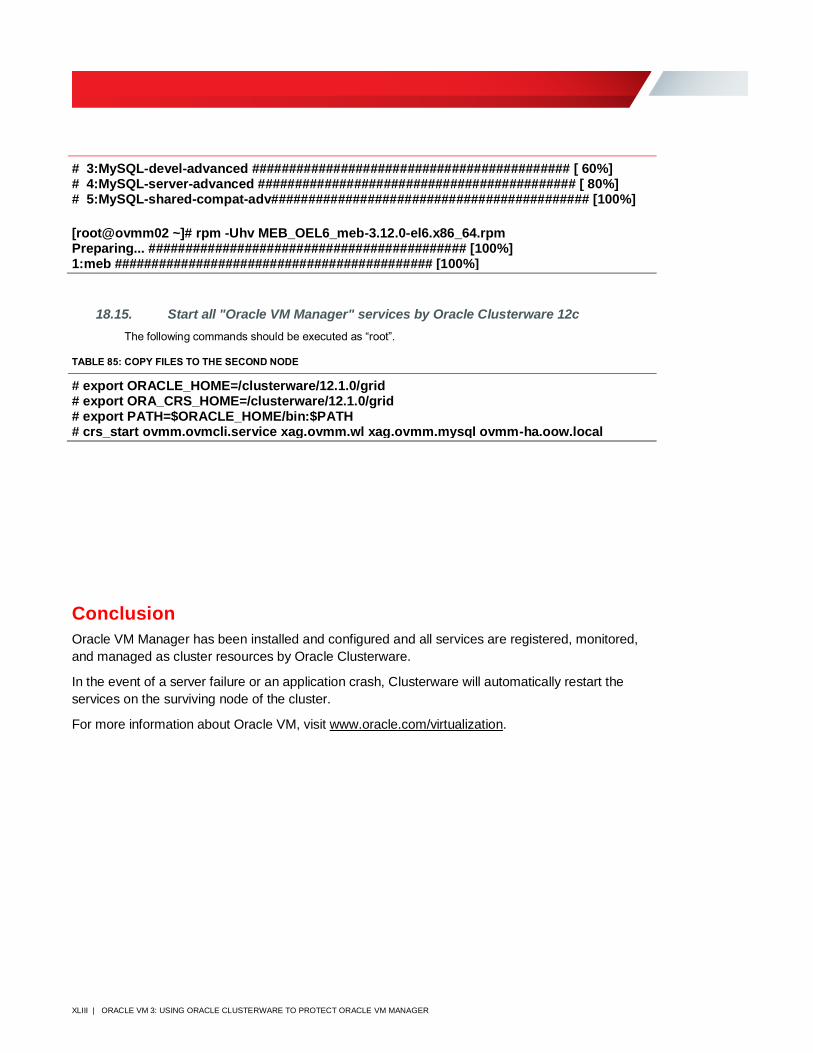
# [root@ovmm02 tmp]# rpm -Uhv MySQL-shared-compat-advanced-5.6.24-1.el6.x86_64.rpm MySQL-server-advanced-5.6.24-1.el6.x86_64.rpm MySQL-devel-advanced-5.6.24-1.el6.x86_64.rpm MySQL-client-advanced-5.6.24-1.el6.x86_64.rpm MySQL-shared-advanced-5.6.24-1.el6.x86_64.rpm # Preparing... ########################################### [100%] # 1:MySQL-shared-advanced ########################################### [ 20%] # 2:MySQL-client-advanced ########################################### [ 40%]
XLIII | ORACLE VM 3: USING ORACLE CLUSTERWARE TO PROTECT ORACLE VM MANAGER
# 3:MySQL-devel-advanced ########################################### [ 60%] # 4:MySQL-server-advanced ########################################### [ 80%] # 5:MySQL-shared-compat-adv########################################### [100%]
[root@ovmm02 ~]# rpm -Uhv MEB_OEL6_meb-3.12.0-el6.x86_64.rpm Preparing... ########################################### [100%] 1:meb ########################################### [100%]
18.15. Start all "Oracle VM Manager" services by Oracle Clusterware 12c
The following commands should be executed as “root”.
TABLE 85: COPY FILES TO THE SECOND NODE
# export ORACLE_HOME=/clusterware/12.1.0/grid # export ORA_CRS_HOME=/clusterware/12.1.0/grid # export PATH=$ORACLE_HOME/bin:$PATH # crs_start ovmm.ovmcli.service xag.ovmm.wl xag.ovmm.mysql ovmm-ha.oow.local
Conclusion
Oracle VM Manager has been installed and configured and all services are registered, monitored,
and managed as cluster resources by Oracle Clusterware.
In the event of a server failure or an application crash, Clusterware will automatically restart the
services on the surviving node of the cluster.
For more information about Oracle VM, visit www.oracle.com/virtualization.

Oracle Corporation, World Headquarters
500 Oracle Parkway
Redwood Shores, CA 94065, USA
Worldwide Inquiries
Phone: +1.650.506.7000
Fax: +1.650.506.7200
Copyright © 2015, Oracle and/or its affiliates. All rights reserved. This document is provided for information purposes only, and the contents hereof are subject to change without notice. This document is not warranted to be error-free, nor subject to any other warranties or conditions, whether expressed orally or implied in law, including implied warranties and conditions of merchantability or fitness for a particular purpose. We specifically disclaim any liability with respect to this document, and no contractual obligations are formed either directly or indirectly by this document. This document may not be reproduced or transmitted in any form or by any means, electronic or mechanical, for any purpose, without our prior written permission. Oracle and Java are registered trademarks of Oracle and/or its affiliates. Other names may be trademarks of their respective owners. Intel and Intel Xeon are trademarks or registered trademarks of Intel Corporation. All SPARC trademarks are used under license and are trademarks or registered trademarks of SPARC International, Inc. AMD, Opteron, the AMD logo, and the AMD Opteron logo are trademarks or registered trademarks of Advanced Micro Devices. UNIX is a registered trademark of The Open Group. 0218 Oracle VM 3: Using Oracle Clusterware to Protect Oracle VM Manager February 2018 Author: Simon Coter Revision: 7.0 Change in custom doc properties
C O N N E C T W I T H U S
Blogs.oracle.com/virtualization
Facebook.com/OracleVirtualization
Twitter.com/ORCL_Virtualize
oracle.com


![Twp Oracle clusterware 3rd party[1]](https://img.pdfslide.us/doc/110x75/577cd7581a28ab9e789ebda9/twp-oracle-clusterware-3rd-party1.jpg)