Embed Size (px)
Citation preview
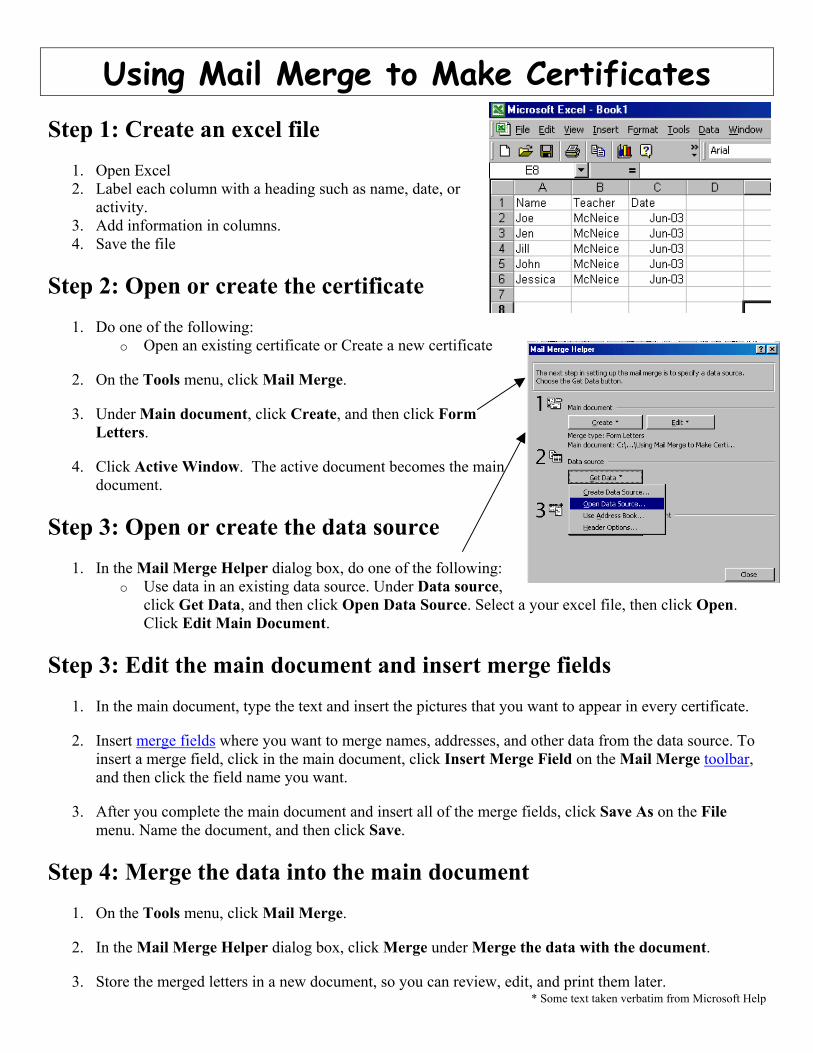
Using Mail Merge to Make Certificates Step 1: Create an excel file
1. Open Excel 2. Label each column with a heading such as name, date, or
activity. 3. Add information in columns. 4. Save the file
Step 2: Open or create the certificate 1. Do one of the following:
o Open an existing certificate or Create a new certificate
2. On the Tools menu, click Mail Merge.
3. Under Main document, click Create, and then click Form Letters.
4. Click Active Window. The active document becomes the main document.
Step 3: Open or create the data source 1. In the Mail Merge Helper dialog box, do one of the following:
o Use data in an existing data source. Under Data source, click Get Data, and then click Open Data Source. Select a your excel file, then click Open. Click Edit Main Document.
Step 3: Edit the main document and insert merge fields 1. In the main document, type the text and insert the pictures that you want to appear in every certificate.
2. Insert merge fields where you want to merge names, addresses, and other data from the data source. To insert a merge field, click in the main document, click Insert Merge Field on the Mail Merge toolbar, and then click the field name you want.
3. After you complete the main document and insert all of the merge fields, click Save As on the File menu. Name the document, and then click Save.
Step 4: Merge the data into the main document 1. On the Tools menu, click Mail Merge.
2. In the Mail Merge Helper dialog box, click Merge under Merge the data with the document.
* Some text taken verbatim from Microsoft Help 3. Store the merged letters in a new document, so you can review, edit, and print them later.


![How To Mail Merge PDF Documents - Evermap Company · PDF fileEVERMAP [HOW TO MAIL MERGE PDF DOCUMENTS ] 2 What is a mail merge? Mail merge is a computer term describing the production](https://img.pdfslide.us/doc/110x75/5a70516a7f8b9aac538bcd9a/how-to-mail-merge-pdf-documents-evermap-company-wwwevermapcomautomailmergehowtoautomailmergepdfpdf.jpg)