Embed Size (px)
Citation preview
Using Hibernate in a Web Application
In this tutorial, you use the NetBeans IDE to create and deploy a web application that displays data from a database. The web
application uses the Hibernate framework as the persistence layer for retrieving and storing plain old Java objects (POJOs) to a
relational database.
Hibernate is framework that provides tools for object relational mapping (ORM). The tutorial demonstrates how to add support for
the Hibernate framework to the IDE and create the necessary Hibernate files. After creating the Java objects and configuring the
application to use Hibernate, you create a JSF managed bean and JSF 2.0 pages to display the data.
Before starting this tutorial you may want to familiarize yourself with the following documents.
Hibernate documentation at hibernate.org
Introduction to Developing Web Applications
Introduction to JavaServer Faces 2.0
Note. If you are using NetBeans IDE 6.7, please see Using Hibernate in a Web Application in NetBeans IDE 6.7. If you are
using NetBeans IDE 6.5, please see Using Hibernate in a Web Application in NetBeans IDE 6.5.
Contents
Creating the Database
Creating the Web Application Project
Modifying the Hibernate Configuration File
Creating the HibernateUtil.java Helper File
Generating Hibernate Mapping Files and Java Classes
Creating the FilmHelper.java Helper Class
Creating the JSF Managed Bean
Creating the Web Pages
Running the Project
Downloading the Solution Project
To follow this tutorial, you need the following software and resources.
Software or Resource Version Required
NetBeans IDE 6.8 and 6.9, Java version
Java Development Kit (JDK) Version 6
GlassFish Server Open Source Edition 3.0.1
MySQL database server Version 5.x
Sakila Database Plugin available from update center
Notes.
NetBeans IDE 6.9 and the GlassFish server 3.0.1 require Java Development Kit (JDK) 6.
If you are using the GlassFish server 2.1 or an older version of NetBeans IDE, see Using Hibernate in a Web Application -
NetBeans IDE 6.7 Tutorial.
You can download a zip archive of the finished project.
Creating the Database
This tutorial uses a MySQL database called sakila, a free sample MySQL database that is available from the MySQL site. The
Using Hibernate in a Web Application - NetBeans IDE Tutorial http://netbeans.org/kb/docs/web/hibernate-webapp.html?print=yes
1 z 23 2010-12-20 10:36
sakila database is not included when you install the IDE so you need to first create the database to follow this tutorial.
To create the sakila database you can download and install the Sakila Sample Database plugin using the Plugins manager. After
you install the plugin the sakila database is added to the list of databases in the Create MySQL database dialog box.
For more information on configuring the IDE to work with MySQL, see the Connecting to a MySQL Database tutorial.
Open the Plugins manager and install the Sakila Sample Database plugin.1.
After installing the plugin, start the MySQL database by expanding the Databases node in the Services window, right-
clicking the MySQL Server node and choosing Start.
2.
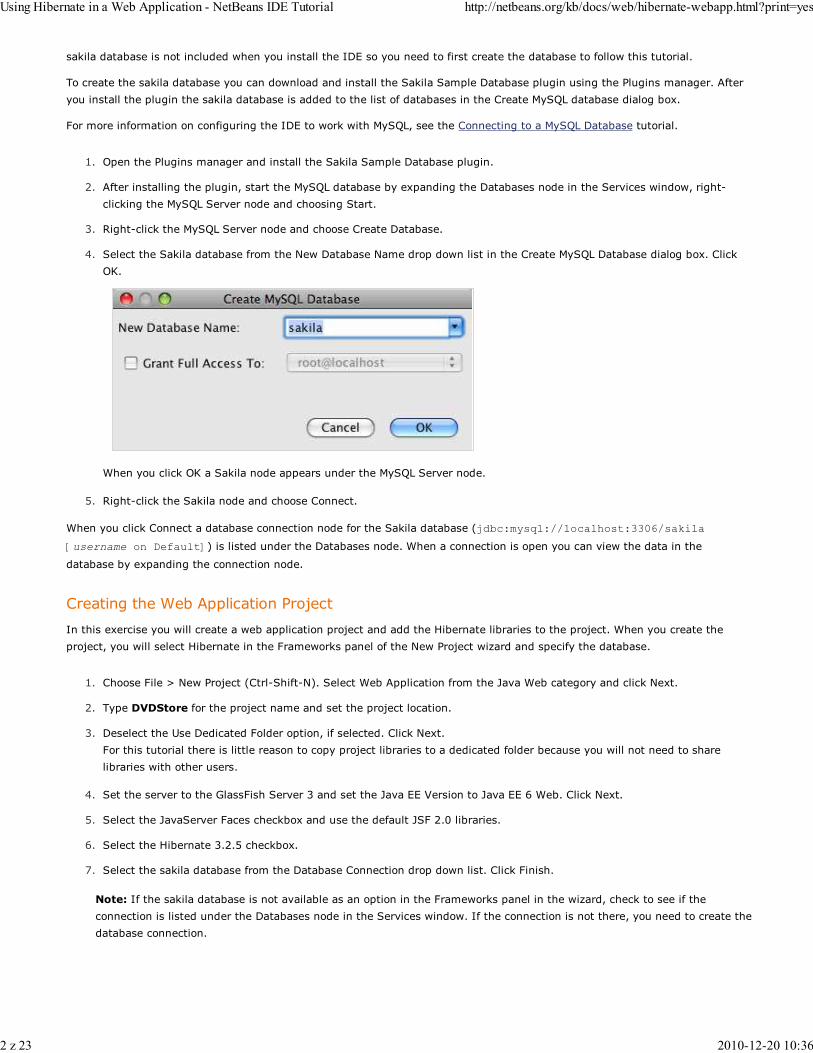
Right-click the MySQL Server node and choose Create Database.3.
Select the Sakila database from the New Database Name drop down list in the Create MySQL Database dialog box. Click
OK.
When you click OK a Sakila node appears under the MySQL Server node.
4.
Right-click the Sakila node and choose Connect.5.
When you click Connect a database connection node for the Sakila database (jdbc:mysql://localhost:3306/sakila
[username on Default]) is listed under the Databases node. When a connection is open you can view the data in the
database by expanding the connection node.
Creating the Web Application Project
In this exercise you will create a web application project and add the Hibernate libraries to the project. When you create the
project, you will select Hibernate in the Frameworks panel of the New Project wizard and specify the database.
Choose File > New Project (Ctrl-Shift-N). Select Web Application from the Java Web category and click Next.1.
Type DVDStore for the project name and set the project location.2.
Deselect the Use Dedicated Folder option, if selected. Click Next.
For this tutorial there is little reason to copy project libraries to a dedicated folder because you will not need to share
libraries with other users.
3.
Set the server to the GlassFish Server 3 and set the Java EE Version to Java EE 6 Web. Click Next.4.
Select the JavaServer Faces checkbox and use the default JSF 2.0 libraries.5.
Select the Hibernate 3.2.5 checkbox.6.
Select the sakila database from the Database Connection drop down list. Click Finish.7.
Note: If the sakila database is not available as an option in the Frameworks panel in the wizard, check to see if the
connection is listed under the Databases node in the Services window. If the connection is not there, you need to create the
database connection.
Using Hibernate in a Web Application - NetBeans IDE Tutorial http://netbeans.org/kb/docs/web/hibernate-webapp.html?print=yes
2 z 23 2010-12-20 10:36
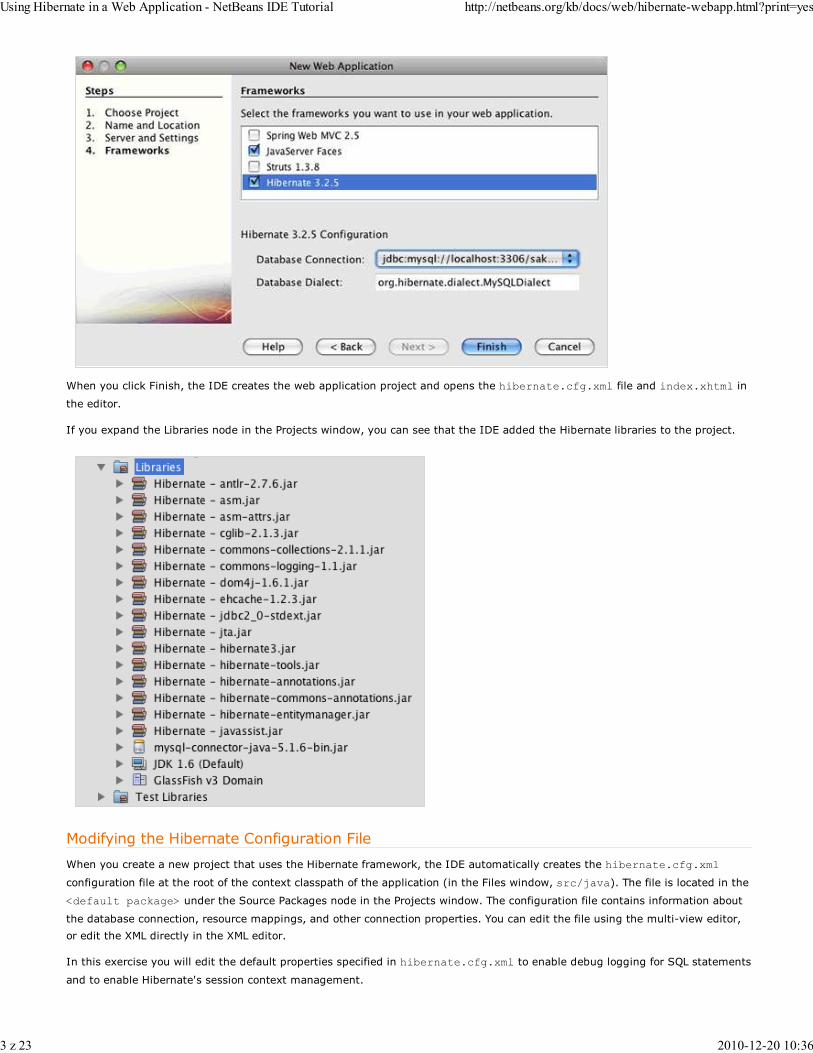
When you click Finish, the IDE creates the web application project and opens the hibernate.cfg.xml file and index.xhtml in
the editor.
If you expand the Libraries node in the Projects window, you can see that the IDE added the Hibernate libraries to the project.
Modifying the Hibernate Configuration File
When you create a new project that uses the Hibernate framework, the IDE automatically creates the hibernate.cfg.xml
configuration file at the root of the context classpath of the application (in the Files window, src/java). The file is located in the
<default package> under the Source Packages node in the Projects window. The configuration file contains information about
the database connection, resource mappings, and other connection properties. You can edit the file using the multi-view editor,
or edit the XML directly in the XML editor.
In this exercise you will edit the default properties specified in hibernate.cfg.xml to enable debug logging for SQL statements
and to enable Hibernate's session context management.
Using Hibernate in a Web Application - NetBeans IDE Tutorial http://netbeans.org/kb/docs/web/hibernate-webapp.html?print=yes
3 z 23 2010-12-20 10:36
Open hibernate.cfg.xml in the Design tab. You can open the file by expanding Source Packages > <default package>
in the Projects window and double-clicking hibernate.cfg.xml.
1.
In the multi-view XML editor, expand the Configuration Properties node under Optional Properties.2.
Click Add to open the Add Hibernate Property dialog box.3.
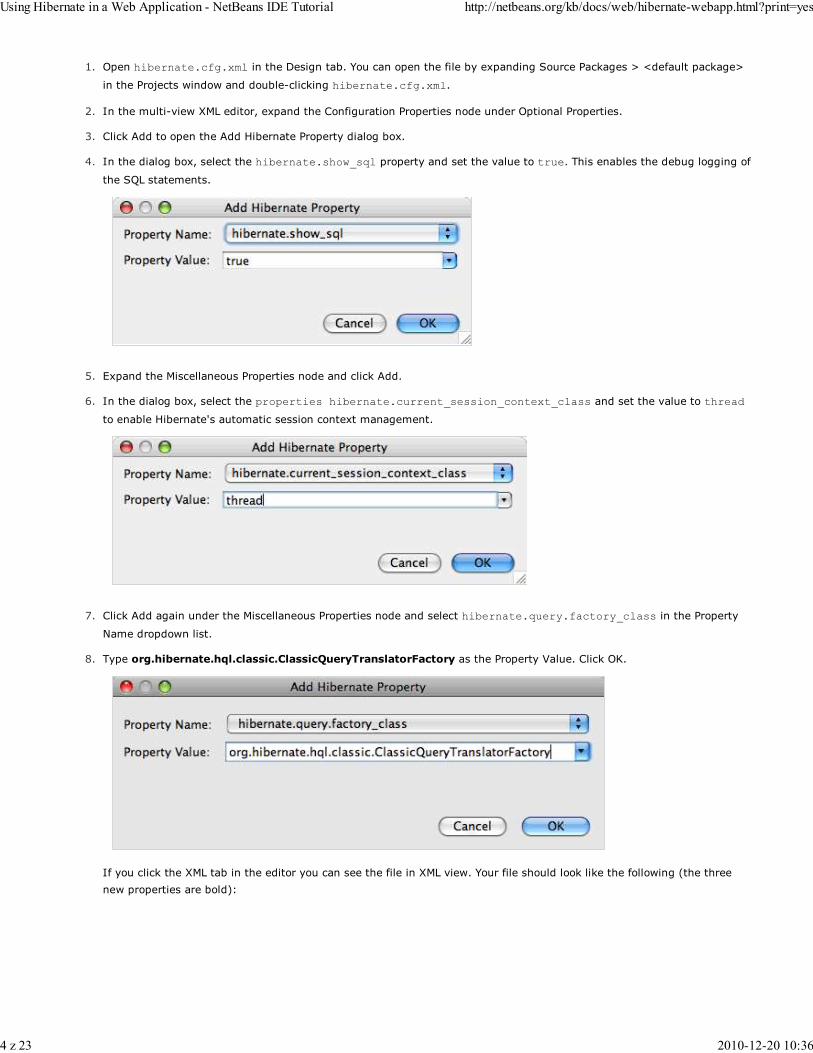
In the dialog box, select the hibernate.show_sql property and set the value to true. This enables the debug logging of
the SQL statements.
4.
Expand the Miscellaneous Properties node and click Add.5.
In the dialog box, select the properties hibernate.current_session_context_class and set the value to thread
to enable Hibernate's automatic session context management.
6.
Click Add again under the Miscellaneous Properties node and select hibernate.query.factory_class in the Property
Name dropdown list.
7.
Type org.hibernate.hql.classic.ClassicQueryTranslatorFactory as the Property Value. Click OK.
If you click the XML tab in the editor you can see the file in XML view. Your file should look like the following (the three
new properties are bold):
8.
Using Hibernate in a Web Application - NetBeans IDE Tutorial http://netbeans.org/kb/docs/web/hibernate-webapp.html?print=yes
4 z 23 2010-12-20 10:36
<hibernate-configuration>
<session-factory name="session1">
<property name="hibernate.dialect">org.hibernate.dialect.MySQLDialect</property>
<property name="hibernate.connection.driver_class">com.mysql.jdbc.Driver</property>
<property name="hibernate.connection.url">jdbc:mysql://localhost:3306/sakila</property>
<property name="hibernate.connection.username">root</property>
<property name="hibernate.connection.password">######</property>
<property name="hibernate.show_sql">true</property>
<property name="hibernate.current_session_context_class">thread</property>
<property name="hibernate.query.factory_class">org.hibernate.hql.classic.ClassicQueryTranslatorFactory<
</session-factory>
</hibernate-configuration>
Save your changes to the file.9.
You can close the file because you do not need to edit the file again.
Creating the HibernateUtil.java Helper File
To use Hibernate you need to create a helper class that handles startup and that accesses Hibernate's SessionFactory to
obtain a Session object. The class calls configure() and loads the hibernate.cfg.xml configuration file and then builds the
SessionFactory to obtain the Session object.
In this section you use the New File wizard to create the helper class HibernateUtil.java.
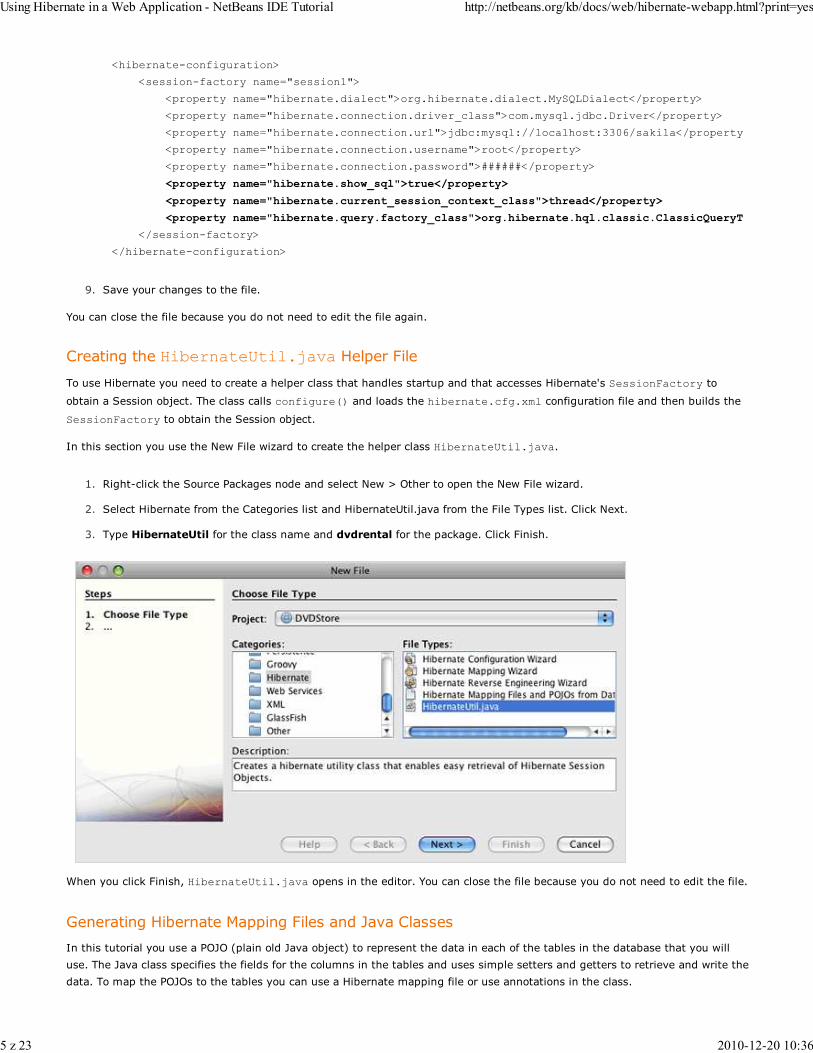
Right-click the Source Packages node and select New > Other to open the New File wizard.1.
Select Hibernate from the Categories list and HibernateUtil.java from the File Types list. Click Next.2.
Type HibernateUtil for the class name and dvdrental for the package. Click Finish.3.
When you click Finish, HibernateUtil.java opens in the editor. You can close the file because you do not need to edit the file.
Generating Hibernate Mapping Files and Java Classes
In this tutorial you use a POJO (plain old Java object) to represent the data in each of the tables in the database that you will
use. The Java class specifies the fields for the columns in the tables and uses simple setters and getters to retrieve and write the
data. To map the POJOs to the tables you can use a Hibernate mapping file or use annotations in the class.
Using Hibernate in a Web Application - NetBeans IDE Tutorial http://netbeans.org/kb/docs/web/hibernate-webapp.html?print=yes
5 z 23 2010-12-20 10:36
You can use the Hibernate Mapping Files and POJOs from a Database wizard to create multiple POJOs and mapping files based on
database tables. When you use the wizard you select all the tables for which you want POJOs and mapping files and the IDE then
generates the files for you based on the database tables and adds the mapping entries to hibernate.cfg.xml. When you use
the wizard you can choose the files that you want the IDE to generate (only the POJOs, for example) and select code generation
options (generate code that uses EJB 3 annotations, for example).
Note. The IDE also has wizards to help you create individual POJOs and mapping files from scratch.
Creating the Hibernate Reverse Engineering File
If you want to use the Hibernate Mapping Files and POJOs from a Database wizard, you first need to create a
hibernate.reveng.xml reverse engineering file. The Hibernate Mapping Files and POJOs from a Database wizard requires
hibernate.reveng.xml and hibernate.cfg.xml.
The reverse engineering file enables you to have greater control over the database mapping strategy. The Hibernate Reverse
Engineering Wizard creates a reverse engineering file with a default configuration that you can edit in the XML editor.
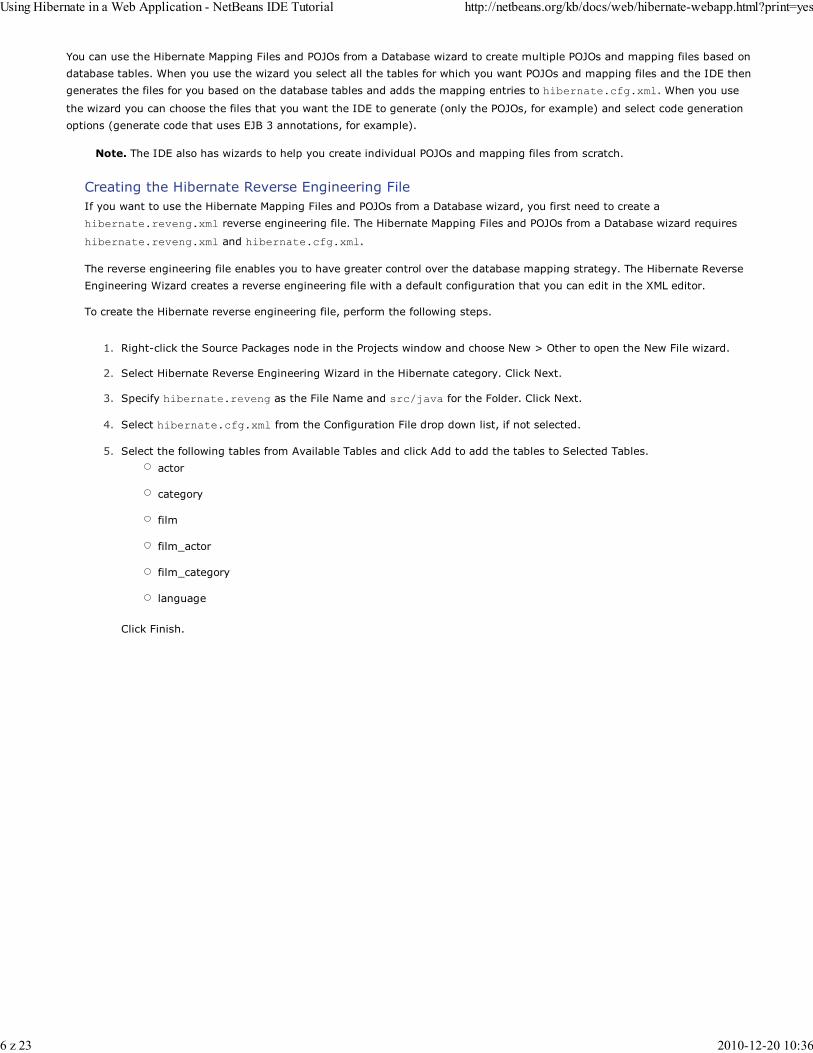
To create the Hibernate reverse engineering file, perform the following steps.
Right-click the Source Packages node in the Projects window and choose New > Other to open the New File wizard.1.
Select Hibernate Reverse Engineering Wizard in the Hibernate category. Click Next.2.
Specify hibernate.reveng as the File Name and src/java for the Folder. Click Next.3.
Select hibernate.cfg.xml from the Configuration File drop down list, if not selected.4.
Select the following tables from Available Tables and click Add to add the tables to Selected Tables.
actor
category
film
film_actor
film_category
language
Click Finish.
5.
Using Hibernate in a Web Application - NetBeans IDE Tutorial http://netbeans.org/kb/docs/web/hibernate-webapp.html?print=yes
6 z 23 2010-12-20 10:36

The wizard generates a hibernate.reveng.xml reverse engineering file and opens the file in the editor. You can close the
reverse engineering file because you will not need to edit the file.
For more details about working with the hibernate.reveng.xml file, see Chapter 5. Controlling reverse engineering in
the Hibernate Tools Reference Guide.
Creating the Hibernate Mapping Files and POJOs
You can use the Hibernate Mapping Files and POJOs from a Database wizard to generate files for you. The wizard can generate
a POJO and a corresponding mapping file for each table that you select in the wizard. The mapping files are XML files that
contain data about how the columns in the tables are mapped to the fields in the POJOs. You need to have the
hibernate.reveng.xml and hibernate.cfg.xml files to use the wizard.
To create the POJOS and mapping files using a wizard, perform the following steps.
Right-click the Source Packages node in the Projects window and choose New > Other to open the New File wizard.1.
Select Hibernate Mapping Files and POJOs from a Database in the Hibernate category. Click Next.2.
Ensure that the hibernate.cfg.xml and hibernate.reveng.xml files are selected in the drop down lists.3.
Select JDK 5 Language Features under the General Settings options.4.
Ensure that the Domain Code and Hibernate XML Mappings options are selected.5.
Select dvdrental for the Package name. Click Finish.6.
Using Hibernate in a Web Application - NetBeans IDE Tutorial http://netbeans.org/kb/docs/web/hibernate-webapp.html?print=yes
7 z 23 2010-12-20 10:36
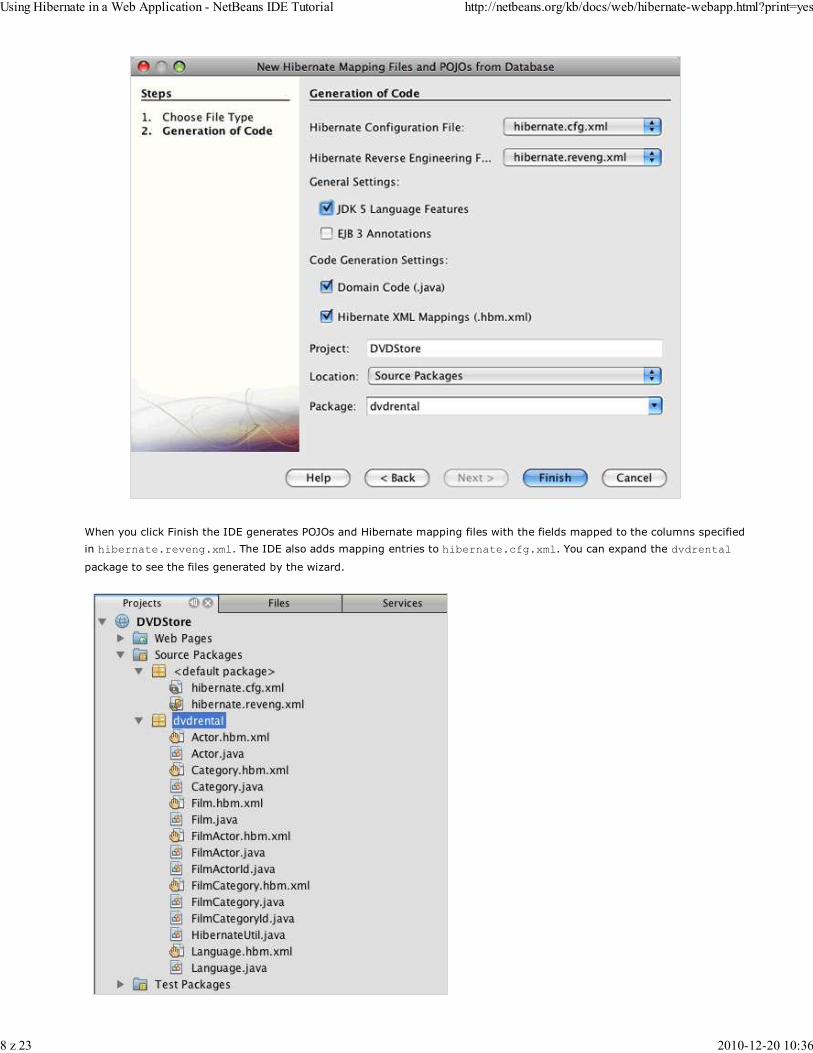
When you click Finish the IDE generates POJOs and Hibernate mapping files with the fields mapped to the columns specified
in hibernate.reveng.xml. The IDE also adds mapping entries to hibernate.cfg.xml. You can expand the dvdrental
package to see the files generated by the wizard.
Using Hibernate in a Web Application - NetBeans IDE Tutorial http://netbeans.org/kb/docs/web/hibernate-webapp.html?print=yes
8 z 23 2010-12-20 10:36
You can use the Hibernate Mapping wizard if you want to create a Hibernate mapping file that maps a specific table to a
specific class.
For more details about working with the hibernate.reveng.xml file, see Chapter 5. Basic O/R Mapping in the
Hibernate Reference Documentation.
Creating the FilmHelper.java Helper Class
You will now create a helper class in the dvdrental package that will be used to perform Hibernate queries on the database. You
will use the Hibernate Query Language (HQL) editor to construct and test the queries for retrieving data. After you test the
queries you will create methods in the helper class that construct and run the queries. You will then invoke the methods in the
helper class from a JSF managed bean.
Creating the Class
In this section you use the New File wizard to create the helper class FilmHelper.java in the dvdrental package. You will
create a Hibernate session by calling getSessionFactory in HibernateUtil.java and create some helper methods to
create queries to retrieve data from the database. You will invoke the helper methods from the JSP pages.
Right-click the dvdrental source package node and select New > Java Class to open the New File wizard.1.
Type FilmHelper for the class name.2.
Confirm that dvdrental is selected as the Package. Click Finish.3.
Adding the following code (in bold) to create a Hibernate session.
public class FilmHelper {
Session session = null;
public FilmHelper() {
this.session = HibernateUtil.getSessionFactory().getCurrentSession();
}
}
4.
Fix your imports (org.hibernate.Session) and save your changes.5.
You will now modify FilmHelper.java to add methods that query the DB.
Enumerating Film Titles and Retrieving Actors Using an HQL Query
In this exercise you will create a Hibernate Query Language (HQL) query that queries the database to retrieve a list of film
titles from the Film table. You will then add a method that queries both the Actor and Film_actor tables to fetch the actors
involved in a particular film.
The Film table has 1000 records so the method to retrieve the list of films should be able to retrieve records based on the
filmId primary key. You will use the HQL editor to construct and test the HQL query. After you have created the correct
query you will add a method to the class that can generate the proper query.
Right-click hibernate.cfg.xml in the Projects window and choose Run HQL Query to open the HQL query editor.1.
Select hibernate.cfg from the drop down list in the toolbar.2.
Test the connection by typing the following in the editor and clicking the Run HQL Query button ( ) in the toolbar.
from Film
When you click Run HQL Query you can see the results of the query in the botton window of the HQL query editor.
3.
Using Hibernate in a Web Application - NetBeans IDE Tutorial http://netbeans.org/kb/docs/web/hibernate-webapp.html?print=yes
9 z 23 2010-12-20 10:36
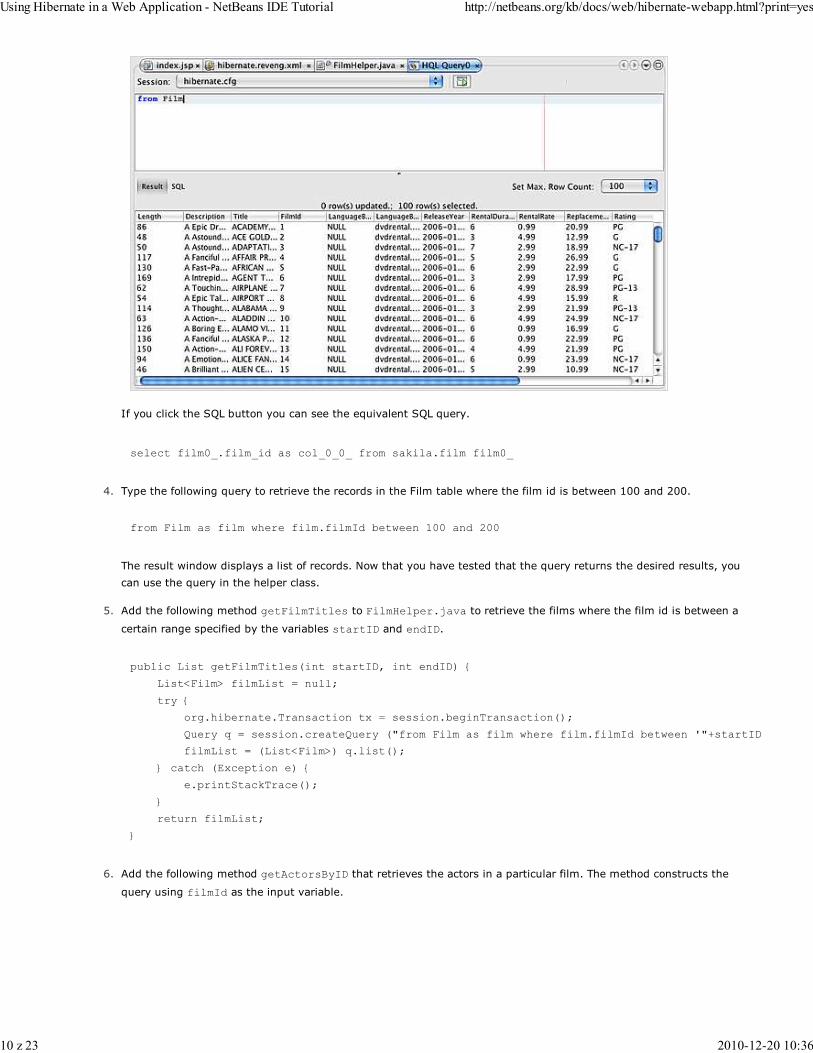
If you click the SQL button you can see the equivalent SQL query.
select film0_.film_id as col_0_0_ from sakila.film film0_
Type the following query to retrieve the records in the Film table where the film id is between 100 and 200.
from Film as film where film.filmId between 100 and 200
The result window displays a list of records. Now that you have tested that the query returns the desired results, you
can use the query in the helper class.
4.
Add the following method getFilmTitles to FilmHelper.java to retrieve the films where the film id is between a
certain range specified by the variables startID and endID.
public List getFilmTitles(int startID, int endID) {
List<Film> filmList = null;
try {
org.hibernate.Transaction tx = session.beginTransaction();
Query q = session.createQuery ("from Film as film where film.filmId between '"+startID+"' and '"+endID+
filmList = (List<Film>) q.list();
} catch (Exception e) {
e.printStackTrace();
}
return filmList;
}
5.
Add the following method getActorsByID that retrieves the actors in a particular film. The method constructs the
query using filmId as the input variable.
6.
Using Hibernate in a Web Application - NetBeans IDE Tutorial http://netbeans.org/kb/docs/web/hibernate-webapp.html?print=yes
10 z 23 2010-12-20 10:36
public List getActorsByID(int filmId){
List<Actor> actorList = null;
try {
org.hibernate.Transaction tx = session.beginTransaction();
Query q = session.createQuery ("from Actor as actor where actor.actorId in (select filmActor.actor.acto
actorList = (List<Actor>) q.list();
} catch (Exception e) {
e.printStackTrace();
}
return actorList;
}
Fix your imports and save your changes.
When you fix your imports you want to choose java.util.List and org.hibernate.Query.
7.
Adding Additional Helper Methods
You will now add additional helper methods that create queries based on an input variable. You can check the queries in the
HQL query editor.
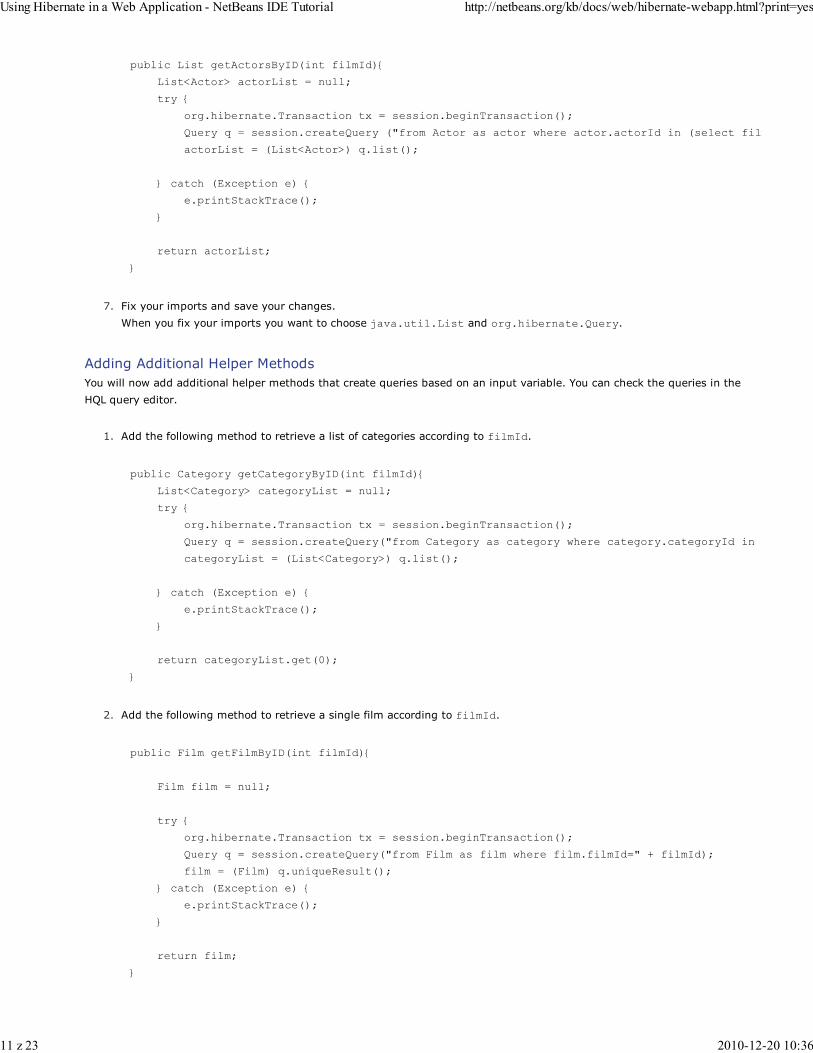
Add the following method to retrieve a list of categories according to filmId.
public Category getCategoryByID(int filmId){
List<Category> categoryList = null;
try {
org.hibernate.Transaction tx = session.beginTransaction();
Query q = session.createQuery("from Category as category where category.categoryId in (select filmCat.c
categoryList = (List<Category>) q.list();
} catch (Exception e) {
e.printStackTrace();
}
return categoryList.get(0);
}
1.
Add the following method to retrieve a single film according to filmId.
public Film getFilmByID(int filmId){
Film film = null;
try {
org.hibernate.Transaction tx = session.beginTransaction();
Query q = session.createQuery("from Film as film where film.filmId=" + filmId);
film = (Film) q.uniqueResult();
} catch (Exception e) {
e.printStackTrace();
}
return film;
}
2.
Using Hibernate in a Web Application - NetBeans IDE Tutorial http://netbeans.org/kb/docs/web/hibernate-webapp.html?print=yes
11 z 23 2010-12-20 10:36
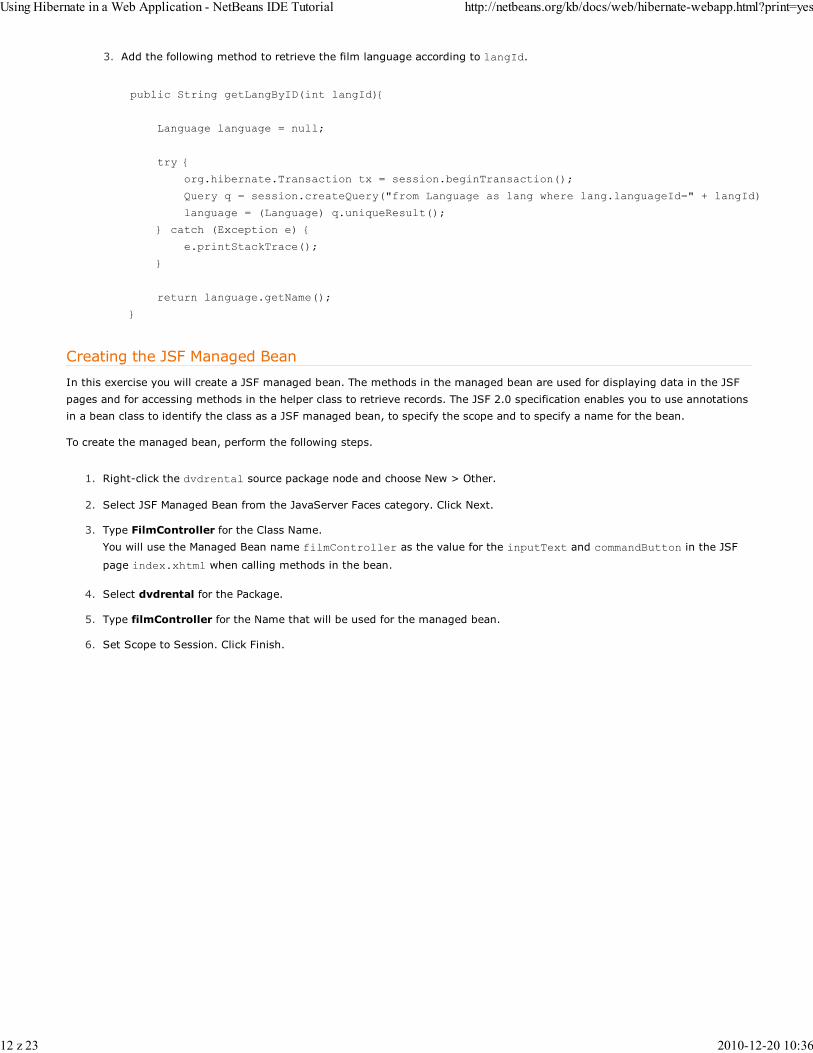
Add the following method to retrieve the film language according to langId.
public String getLangByID(int langId){
Language language = null;
try {
org.hibernate.Transaction tx = session.beginTransaction();
Query q = session.createQuery("from Language as lang where lang.languageId=" + langId);
language = (Language) q.uniqueResult();
} catch (Exception e) {
e.printStackTrace();
}
return language.getName();
}
3.
Creating the JSF Managed Bean
In this exercise you will create a JSF managed bean. The methods in the managed bean are used for displaying data in the JSF
pages and for accessing methods in the helper class to retrieve records. The JSF 2.0 specification enables you to use annotations
in a bean class to identify the class as a JSF managed bean, to specify the scope and to specify a name for the bean.
To create the managed bean, perform the following steps.
Right-click the dvdrental source package node and choose New > Other.1.
Select JSF Managed Bean from the JavaServer Faces category. Click Next.2.
Type FilmController for the Class Name.
You will use the Managed Bean name filmController as the value for the inputText and commandButton in the JSF
page index.xhtml when calling methods in the bean.
3.
Select dvdrental for the Package.4.
Type filmController for the Name that will be used for the managed bean.5.
Set Scope to Session. Click Finish.6.
Using Hibernate in a Web Application - NetBeans IDE Tutorial http://netbeans.org/kb/docs/web/hibernate-webapp.html?print=yes
12 z 23 2010-12-20 10:36
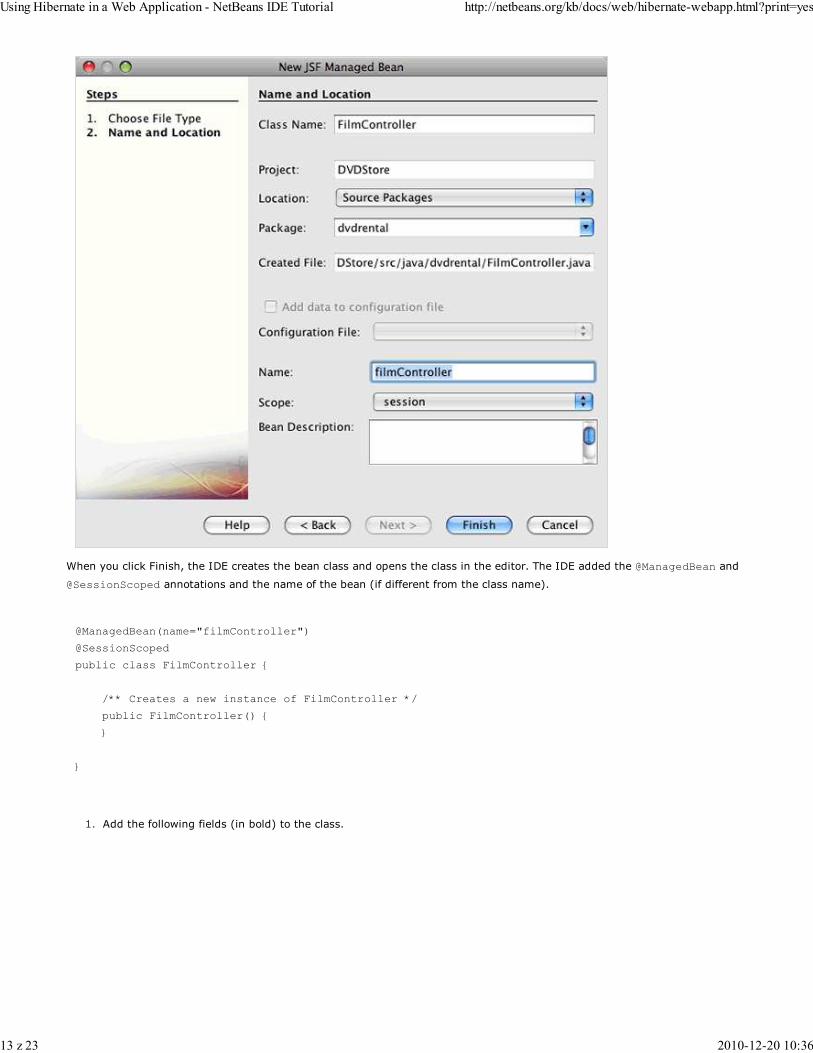
When you click Finish, the IDE creates the bean class and opens the class in the editor. The IDE added the @ManagedBean and
@SessionScoped annotations and the name of the bean (if different from the class name).
@ManagedBean(name="filmController")
@SessionScoped
public class FilmController {
/** Creates a new instance of FilmController */
public FilmController() {
}
}
Add the following fields (in bold) to the class.1.
Using Hibernate in a Web Application - NetBeans IDE Tutorial http://netbeans.org/kb/docs/web/hibernate-webapp.html?print=yes
13 z 23 2010-12-20 10:36
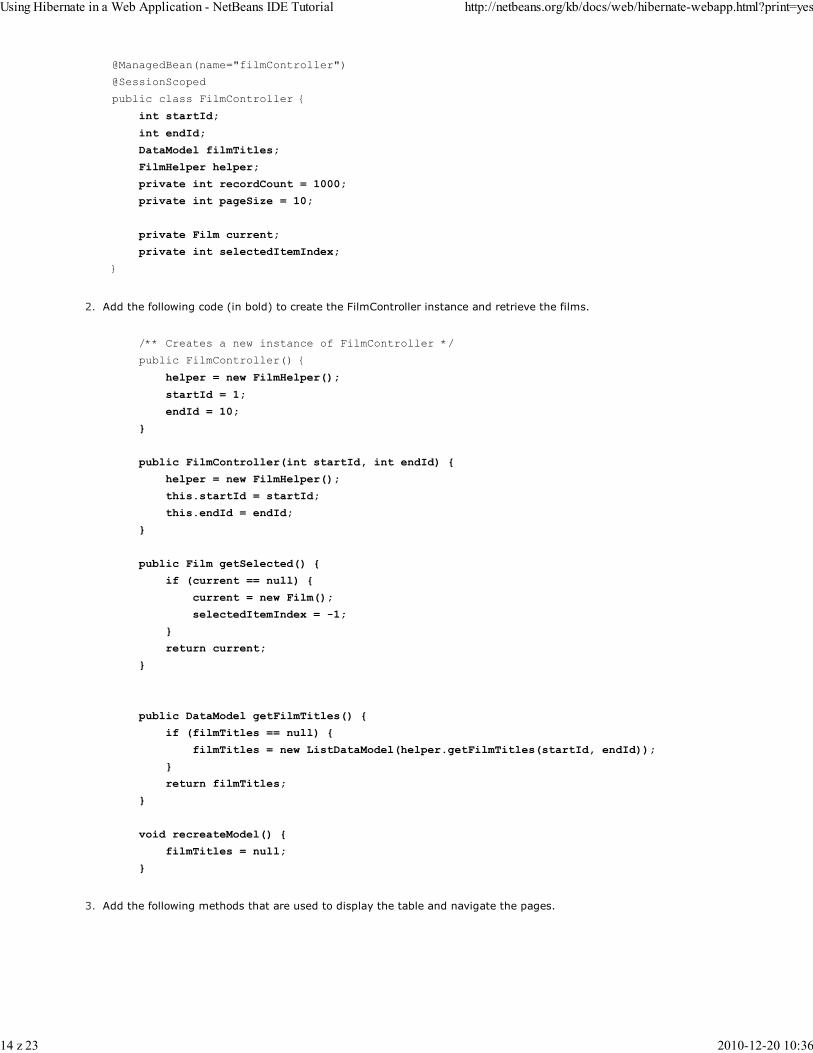
@ManagedBean(name="filmController")
@SessionScoped
public class FilmController {
int startId;
int endId;
DataModel filmTitles;
FilmHelper helper;
private int recordCount = 1000;
private int pageSize = 10;
private Film current;
private int selectedItemIndex;
}
Add the following code (in bold) to create the FilmController instance and retrieve the films.
/** Creates a new instance of FilmController */
public FilmController() {
helper = new FilmHelper();
startId = 1;
endId = 10;
}
public FilmController(int startId, int endId) {
helper = new FilmHelper();
this.startId = startId;
this.endId = endId;
}
public Film getSelected() {
if (current == null) {
current = new Film();
selectedItemIndex = -1;
}
return current;
}
public DataModel getFilmTitles() {
if (filmTitles == null) {
filmTitles = new ListDataModel(helper.getFilmTitles(startId, endId));
}
return filmTitles;
}
void recreateModel() {
filmTitles = null;
}
2.
Add the following methods that are used to display the table and navigate the pages.3.
Using Hibernate in a Web Application - NetBeans IDE Tutorial http://netbeans.org/kb/docs/web/hibernate-webapp.html?print=yes
14 z 23 2010-12-20 10:36
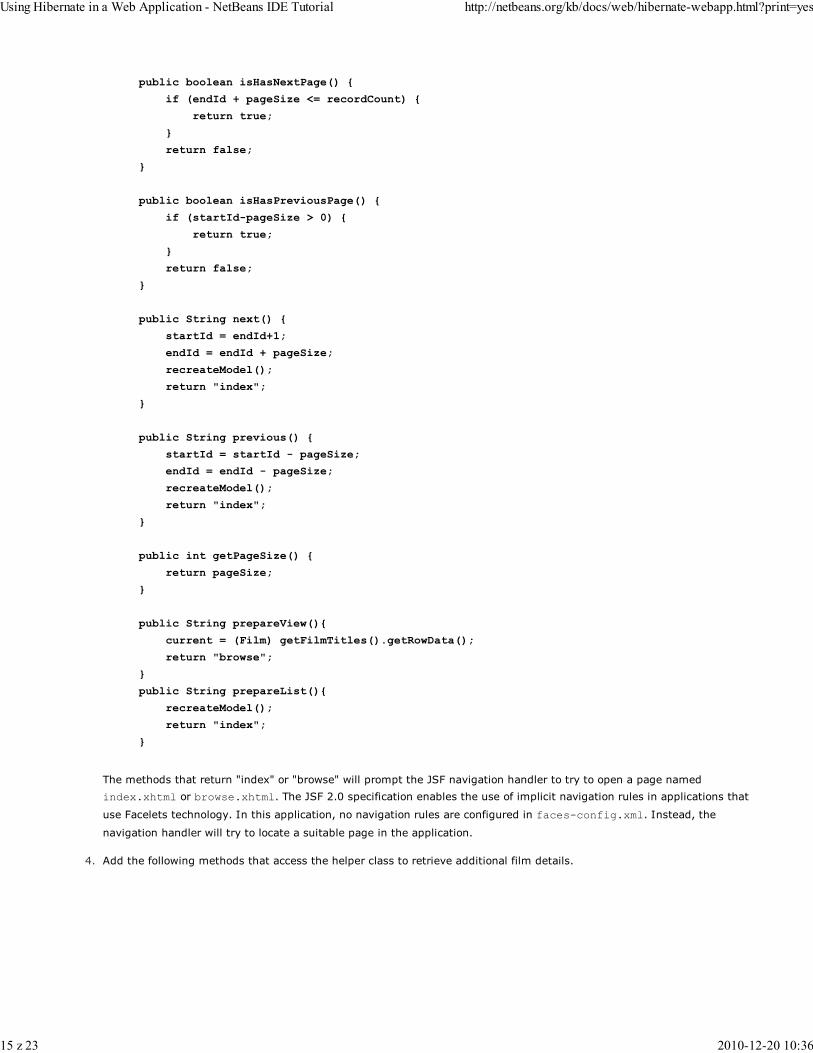
public boolean isHasNextPage() {
if (endId + pageSize <= recordCount) {
return true;
}
return false;
}
public boolean isHasPreviousPage() {
if (startId-pageSize > 0) {
return true;
}
return false;
}
public String next() {
startId = endId+1;
endId = endId + pageSize;
recreateModel();
return "index";
}
public String previous() {
startId = startId - pageSize;
endId = endId - pageSize;
recreateModel();
return "index";
}
public int getPageSize() {
return pageSize;
}
public String prepareView(){
current = (Film) getFilmTitles().getRowData();
return "browse";
}
public String prepareList(){
recreateModel();
return "index";
}
The methods that return "index" or "browse" will prompt the JSF navigation handler to try to open a page named
index.xhtml or browse.xhtml. The JSF 2.0 specification enables the use of implicit navigation rules in applications that
use Facelets technology. In this application, no navigation rules are configured in faces-config.xml. Instead, the
navigation handler will try to locate a suitable page in the application.
Add the following methods that access the helper class to retrieve additional film details.4.
Using Hibernate in a Web Application - NetBeans IDE Tutorial http://netbeans.org/kb/docs/web/hibernate-webapp.html?print=yes
15 z 23 2010-12-20 10:36

public String getLanguage() {
int langID = current.getLanguageByLanguageId().getLanguageId().intValue();
String language = helper.getLangByID(langID);
return language;
}
public String getActors() {
List actors = helper.getActorsByID(current.getFilmId());
StringBuffer totalCast = new StringBuffer();
for (int i = 0; i < actors.size(); i++) {
Actor actor = (Actor) actors.get(i);
totalCast.append(actor.getFirstName());
totalCast.append(" ");
totalCast.append(actor.getLastName());
totalCast.append(" ");
}
return totalCast.toString();
}
public String getCategory() {
Category category = helper.getCategoryByID(current.getFilmId());
return category.getName();
}
Fix your imports (Ctrl-Shift-I) and save your changes.5.
You can use the code completion in the editor to help you type your code.
Creating the Web Pages
In this exercise you will create two web pages for displaying the data. You will modify the index.xhtml generated by the IDE to
add a table that displays the films in the database. You will then create browse.xhtml to display a film's details when you click
the "View" link in the table. You will also create a JSF template page that is used by index.xhtml and browse.xhtml.
For more about using JSF 2.0 and Facelets templates, see Introduction to JavaServer Faces 2.0
Creating template.xhtml
You will first create the JSF Facelets template template.xhtml that is used in the composition of the index.xhtml and
browse.xhtml pages.
Right-click DVDStore in the Projects window and choose New > Other.1.
Select Facelets Template in the JavaServer Faces category. Click Next.2.
Type template for the File Name and choose the first CSS layout style.3.
Click Finish.
When you click Finish, the file template.xhtml opens in the editor. The template contains the following default code.
4.
Using Hibernate in a Web Application - NetBeans IDE Tutorial http://netbeans.org/kb/docs/web/hibernate-webapp.html?print=yes
16 z 23 2010-12-20 10:36
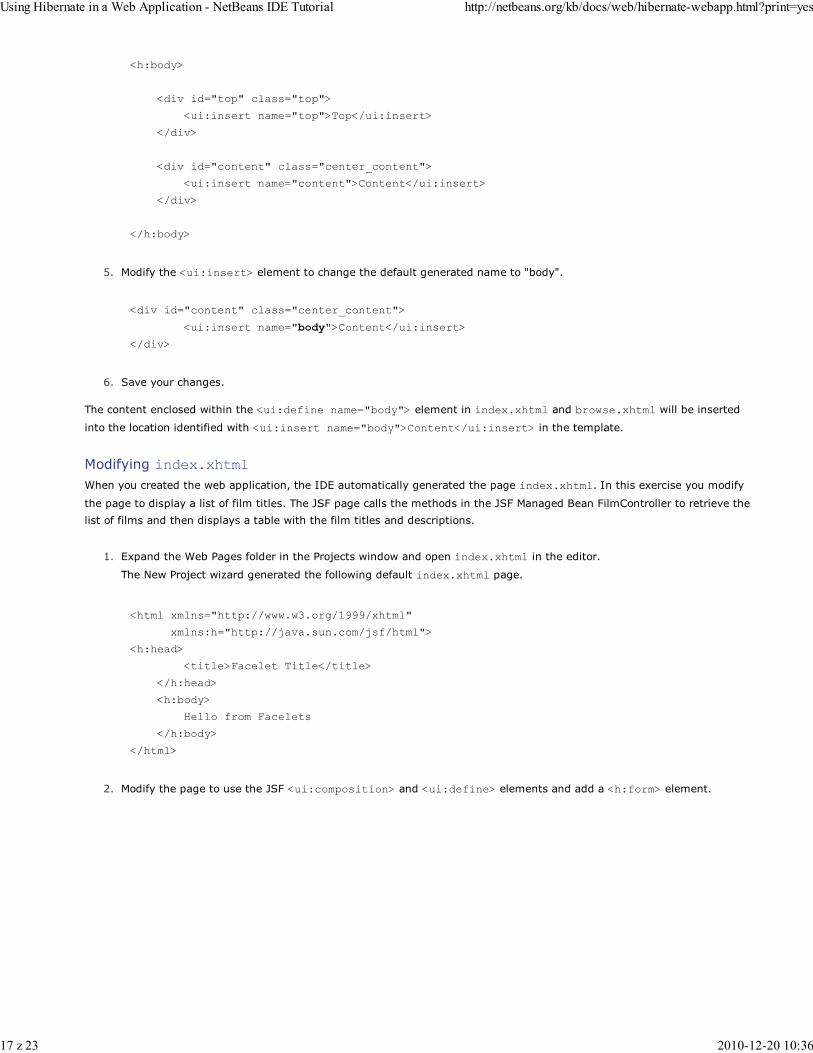
<h:body>
<div id="top" class="top">
<ui:insert name="top">Top</ui:insert>
</div>
<div id="content" class="center_content">
<ui:insert name="content">Content</ui:insert>
</div>
</h:body>
Modify the <ui:insert> element to change the default generated name to "body".
<div id="content" class="center_content">
<ui:insert name="body">Content</ui:insert>
</div>
5.
Save your changes.6.
The content enclosed within the <ui:define name="body"> element in index.xhtml and browse.xhtml will be inserted
into the location identified with <ui:insert name="body">Content</ui:insert> in the template.
Modifying index.xhtml
When you created the web application, the IDE automatically generated the page index.xhtml. In this exercise you modify
the page to display a list of film titles. The JSF page calls the methods in the JSF Managed Bean FilmController to retrieve the
list of films and then displays a table with the film titles and descriptions.
Expand the Web Pages folder in the Projects window and open index.xhtml in the editor.
The New Project wizard generated the following default index.xhtml page.
<html xmlns="http://www.w3.org/1999/xhtml"
xmlns:h="http://java.sun.com/jsf/html">
<h:head>
<title>Facelet Title</title>
</h:head>
<h:body>
Hello from Facelets
</h:body>
</html>
1.
Modify the page to use the JSF <ui:composition> and <ui:define> elements and add a <h:form> element.2.
Using Hibernate in a Web Application - NetBeans IDE Tutorial http://netbeans.org/kb/docs/web/hibernate-webapp.html?print=yes
17 z 23 2010-12-20 10:36
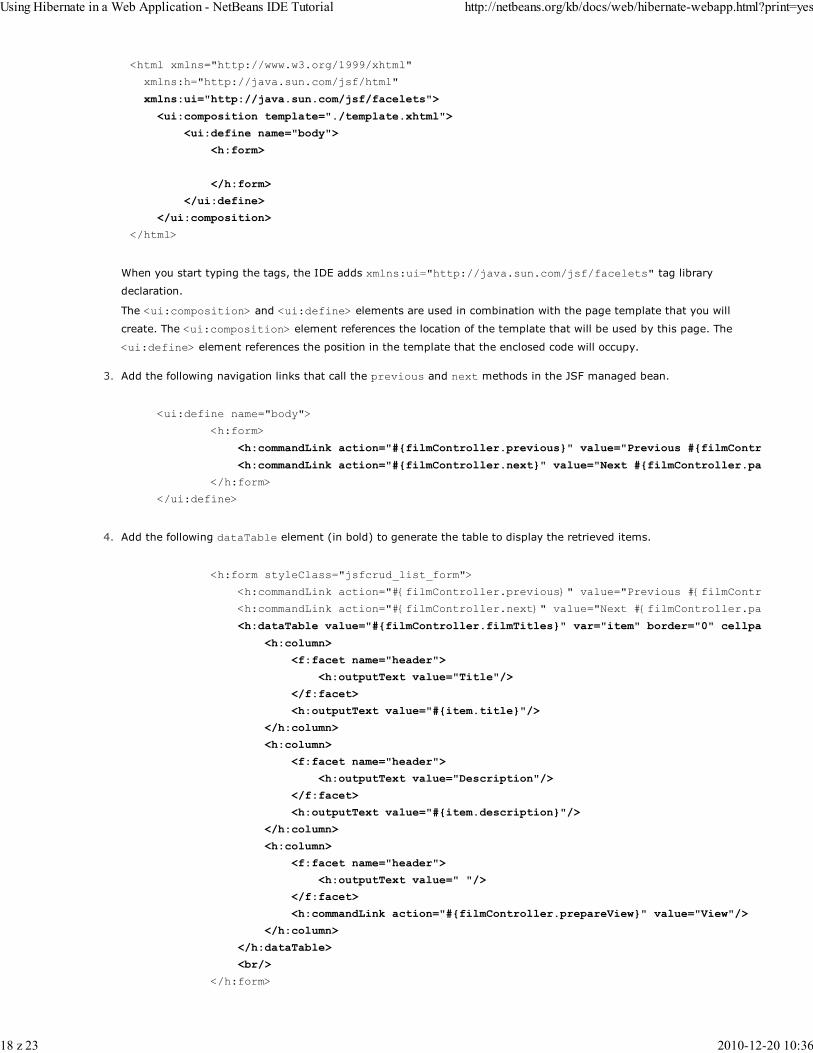
<html xmlns="http://www.w3.org/1999/xhtml"
xmlns:h="http://java.sun.com/jsf/html"
xmlns:ui="http://java.sun.com/jsf/facelets">
<ui:composition template="./template.xhtml">
<ui:define name="body">
<h:form>
</h:form>
</ui:define>
</ui:composition>
</html>
When you start typing the tags, the IDE adds xmlns:ui="http://java.sun.com/jsf/facelets" tag library
declaration.
The <ui:composition> and <ui:define> elements are used in combination with the page template that you will
create. The <ui:composition> element references the location of the template that will be used by this page. The
<ui:define> element references the position in the template that the enclosed code will occupy.
Add the following navigation links that call the previous and next methods in the JSF managed bean.
<ui:define name="body">
<h:form>
<h:commandLink action="#{filmController.previous}" value="Previous #{filmController.
<h:commandLink action="#{filmController.next}" value="Next #{filmController.pageSize}" rendered
</h:form>
</ui:define>
3.
Add the following dataTable element (in bold) to generate the table to display the retrieved items.
<h:form styleClass="jsfcrud_list_form">
<h:commandLink action="#{filmController.previous}" value="Previous #{filmController.pageSize}"
<h:commandLink action="#{filmController.next}" value="Next #{filmController.pageSize}" rendered
<h:dataTable value="#{filmController.filmTitles}" var="item" border="0" cellpadding=
<h:column>
<f:facet name="header">
<h:outputText value="Title"/>
</f:facet>
<h:outputText value="#{item.title}"/>
</h:column>
<h:column>
<f:facet name="header">
<h:outputText value="Description"/>
</f:facet>
<h:outputText value="#{item.description}"/>
</h:column>
<h:column>
<f:facet name="header">
<h:outputText value=" "/>
</f:facet>
<h:commandLink action="#{filmController.prepareView}" value="View"/>
</h:column>
</h:dataTable>
<br/>
</h:form>
4.
Using Hibernate in a Web Application - NetBeans IDE Tutorial http://netbeans.org/kb/docs/web/hibernate-webapp.html?print=yes
18 z 23 2010-12-20 10:36
Save your changes.5.
The index page will now display a list of film titles in the database. Each row in the table includes a "View" link that invokes
the prepareView method in the managed bean. The prepareView method returns "browse" and will open browse.xhtml.
When you type the <f:facet> tag, the IDE will add xmlns:f="http://java.sun.com/jsf/core tag library
declaration.
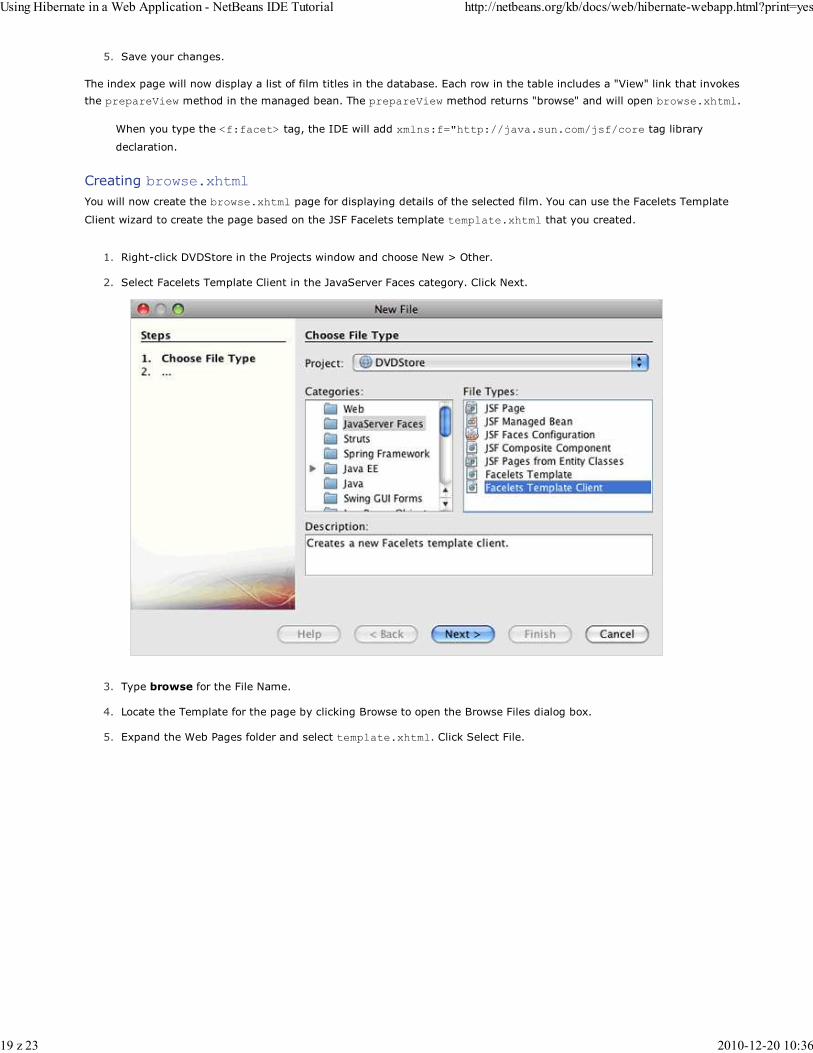
Creating browse.xhtml
You will now create the browse.xhtml page for displaying details of the selected film. You can use the Facelets Template
Client wizard to create the page based on the JSF Facelets template template.xhtml that you created.
Right-click DVDStore in the Projects window and choose New > Other.1.
Select Facelets Template Client in the JavaServer Faces category. Click Next.2.
Type browse for the File Name.3.
Locate the Template for the page by clicking Browse to open the Browse Files dialog box.4.
Expand the Web Pages folder and select template.xhtml. Click Select File.5.
Using Hibernate in a Web Application - NetBeans IDE Tutorial http://netbeans.org/kb/docs/web/hibernate-webapp.html?print=yes
19 z 23 2010-12-20 10:36
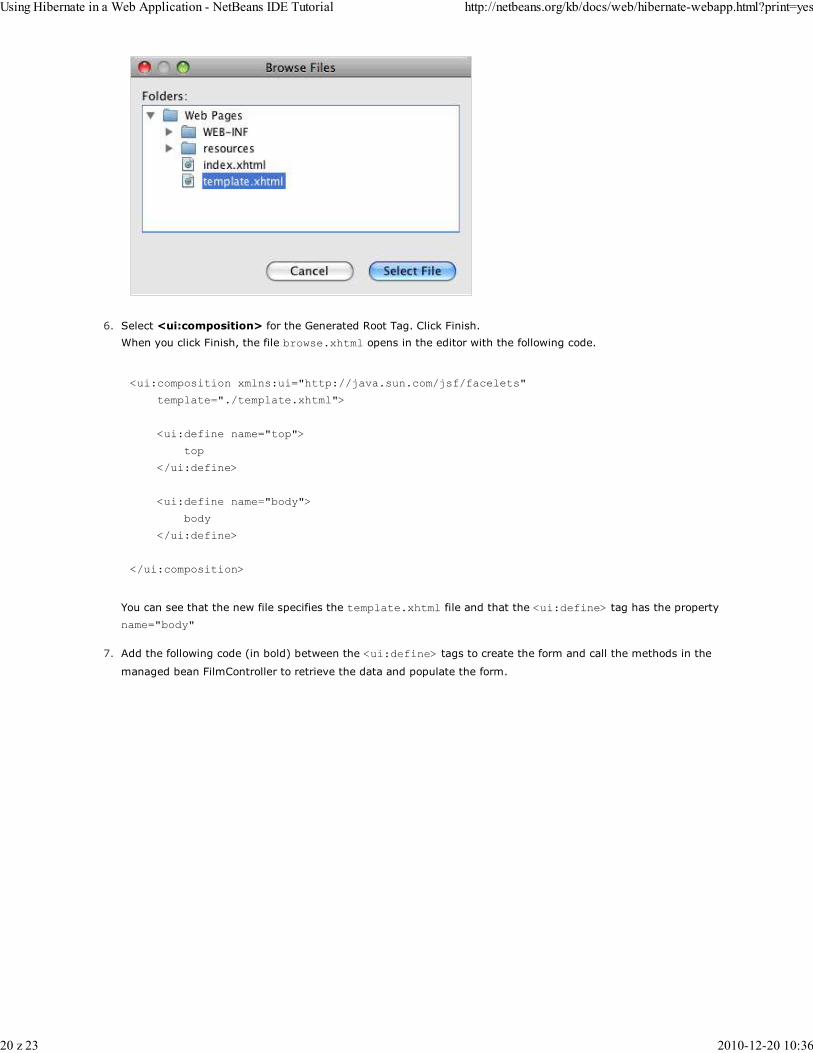
Select <ui:composition> for the Generated Root Tag. Click Finish.
When you click Finish, the file browse.xhtml opens in the editor with the following code.
<ui:composition xmlns:ui="http://java.sun.com/jsf/facelets"
template="./template.xhtml">
<ui:define name="top">
top
</ui:define>
<ui:define name="body">
body
</ui:define>
</ui:composition>
You can see that the new file specifies the template.xhtml file and that the <ui:define> tag has the property
name="body"
6.
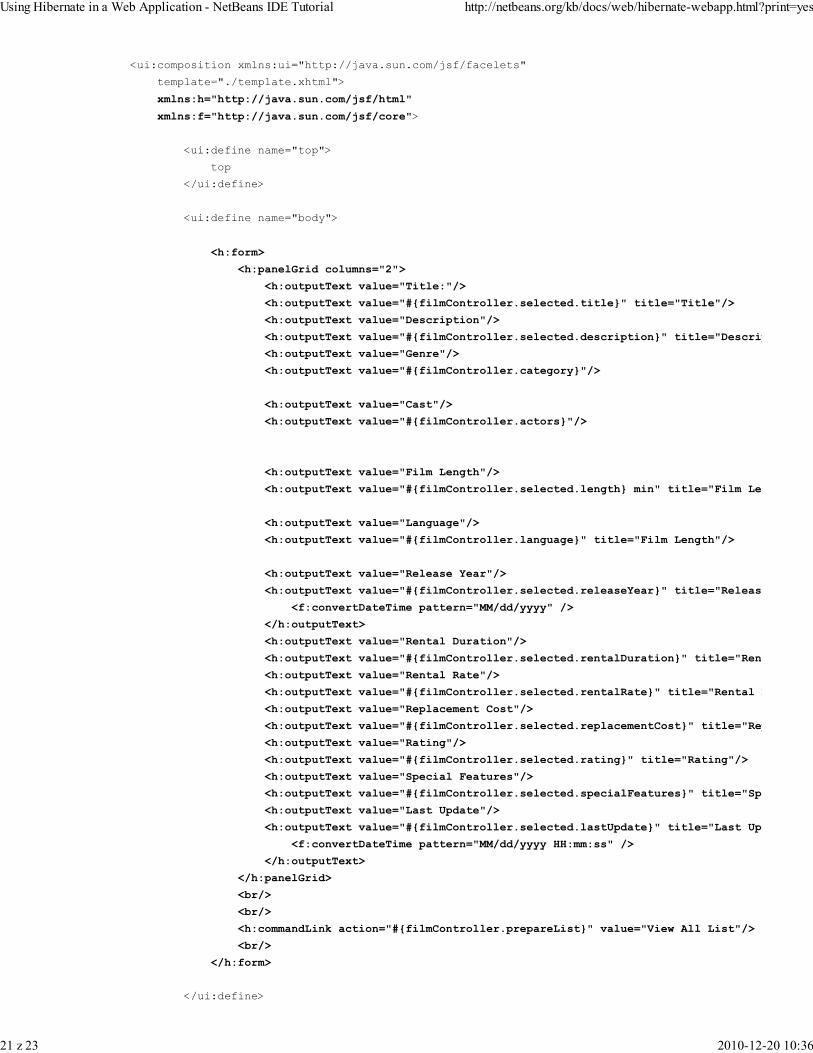
Add the following code (in bold) between the <ui:define> tags to create the form and call the methods in the
managed bean FilmController to retrieve the data and populate the form.
7.
Using Hibernate in a Web Application - NetBeans IDE Tutorial http://netbeans.org/kb/docs/web/hibernate-webapp.html?print=yes
20 z 23 2010-12-20 10:36
<ui:composition xmlns:ui="http://java.sun.com/jsf/facelets"
template="./template.xhtml">
xmlns:h="http://java.sun.com/jsf/html"
xmlns:f="http://java.sun.com/jsf/core">
<ui:define name="top">
top
</ui:define>
<ui:define name="body">
<h:form>
<h:panelGrid columns="2">
<h:outputText value="Title:"/>
<h:outputText value="#{filmController.selected.title}" title="Title"/>
<h:outputText value="Description"/>
<h:outputText value="#{filmController.selected.description}" title="Description"/>
<h:outputText value="Genre"/>
<h:outputText value="#{filmController.category}"/>
<h:outputText value="Cast"/>
<h:outputText value="#{filmController.actors}"/>
<h:outputText value="Film Length"/>
<h:outputText value="#{filmController.selected.length} min" title="Film Length"/>
<h:outputText value="Language"/>
<h:outputText value="#{filmController.language}" title="Film Length"/>
<h:outputText value="Release Year"/>
<h:outputText value="#{filmController.selected.releaseYear}" title="Release Year">
<f:convertDateTime pattern="MM/dd/yyyy" />
</h:outputText>
<h:outputText value="Rental Duration"/>
<h:outputText value="#{filmController.selected.rentalDuration}" title="Rental DUration"/>
<h:outputText value="Rental Rate"/>
<h:outputText value="#{filmController.selected.rentalRate}" title="Rental Rate"/>
<h:outputText value="Replacement Cost"/>
<h:outputText value="#{filmController.selected.replacementCost}" title="Replacement Cost"/>
<h:outputText value="Rating"/>
<h:outputText value="#{filmController.selected.rating}" title="Rating"/>
<h:outputText value="Special Features"/>
<h:outputText value="#{filmController.selected.specialFeatures}" title="Special Features"/>
<h:outputText value="Last Update"/>
<h:outputText value="#{filmController.selected.lastUpdate}" title="Last Update">
<f:convertDateTime pattern="MM/dd/yyyy HH:mm:ss" />
</h:outputText>
</h:panelGrid>
<br/>
<br/>
<h:commandLink action="#{filmController.prepareList}" value="View All List"/>
<br/>
</h:form>
</ui:define>
Using Hibernate in a Web Application - NetBeans IDE Tutorial http://netbeans.org/kb/docs/web/hibernate-webapp.html?print=yes
21 z 23 2010-12-20 10:36
You can see that browse.xhtml and index.xhtml will use the same page template.
Save your changes.8.
Running the Project
The basics of the application are now complete. You can now run the application to check if everything is working correctly.
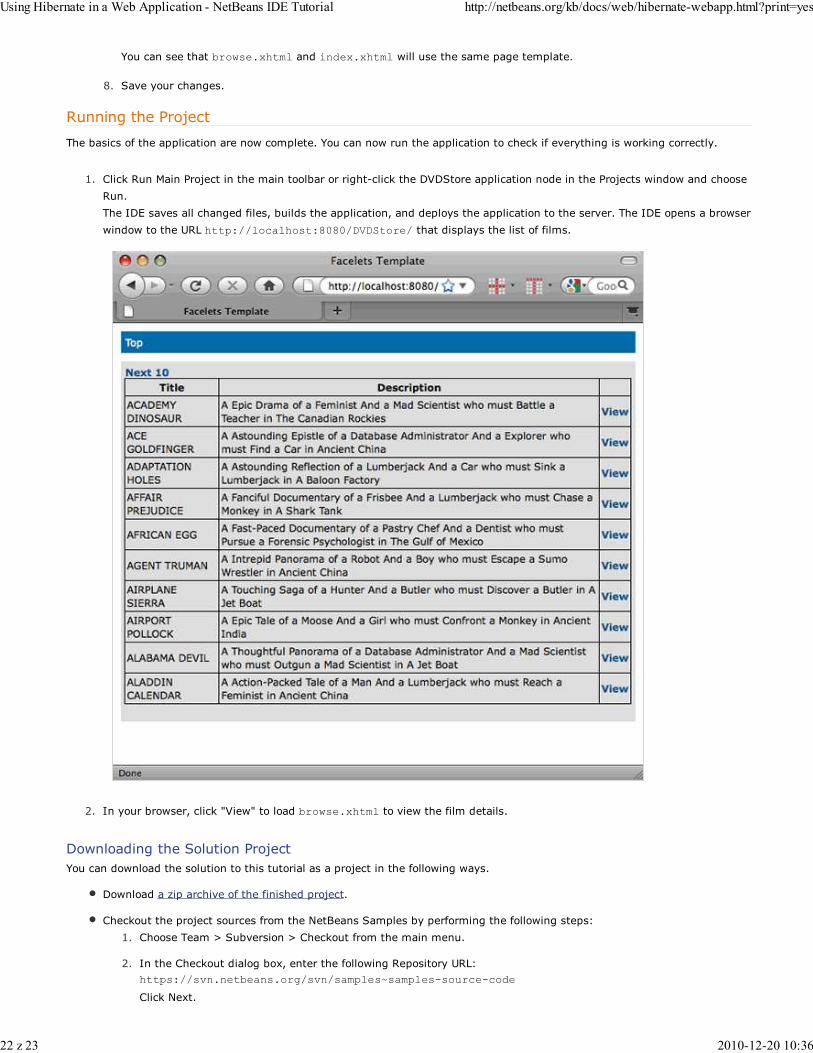
Click Run Main Project in the main toolbar or right-click the DVDStore application node in the Projects window and choose
Run.
The IDE saves all changed files, builds the application, and deploys the application to the server. The IDE opens a browser
window to the URL http://localhost:8080/DVDStore/ that displays the list of films.
1.
In your browser, click "View" to load browse.xhtml to view the film details.2.
Downloading the Solution Project
You can download the solution to this tutorial as a project in the following ways.
Download a zip archive of the finished project.
Checkout the project sources from the NetBeans Samples by performing the following steps:
Choose Team > Subversion > Checkout from the main menu.1.
In the Checkout dialog box, enter the following Repository URL:
https://svn.netbeans.org/svn/samples~samples-source-code
Click Next.
2.
Using Hibernate in a Web Application - NetBeans IDE Tutorial http://netbeans.org/kb/docs/web/hibernate-webapp.html?print=yes
22 z 23 2010-12-20 10:36
Send Us Your Feedback
Click Browse to open the Browse Repostiory Folders dialog box.3.
Expand the root node and select samples/javaee/DVDStoreEE6. Click OK.4.
Specify the Local Folder for the sources (the local folder must be empty).5.
Click Finish.
When you click Finish, the IDE initializes the local folder as a Subversion repository and checks out the project
sources.
6.
Click Open Project in the dialog that appears when checkout is complete.7.
Notes.
Steps for checking out sources from Kenai only apply to NetBeans IDE 6.8.
You need a Subversion client to checkout the sources from Kenai. For more about installing Subversion, see the
section on Setting up Subversion in the Guide to Subversion in NetBeans IDE.
See Also
Using Hibernate with the Java Persistence API and JSF 1.2
JSF 2.0 Support in NetBeans IDE 6.8
Introduction to JavaServer Faces 2.0
Java EE & Java Web Learning Trail
Using Hibernate in a Web Application - NetBeans IDE Tutorial http://netbeans.org/kb/docs/web/hibernate-webapp.html?print=yes
23 z 23 2010-12-20 10:36