Embed Size (px)
Citation preview
Dreamweaver CS5/CS6 Copyright 2012 Mary L. Lanigan, Ph.D. Page 1 Last update: February 24, 2013
Using Dreamweaver (CS5 and CS6) to Create a Web Site
The purpose of this job aid is to show you the basic steps needed to create a web site. The web site for this job aid focuses on a training workshop.
Before starting this job aid, you need to have completed your flowchart and storyboards depicting the training web site you wish to create. You also need your image folder and all the contents needed to create your web site including logo, buttons, and pictures (see and complete the Photoshop job aid first).
Create a new folder for your Dreamweaver project. This folder will be FTPed to your server space; therefore, keep the name simple. For example, call the folder: project. Next, take the image folder and all its contents you created with the Photoshop job aid and move it into the project folder.
Once you completed the above, you are ready to begin creating your Dreamweaver project.
Starting a New Web Site
Step 1: Open up Dreamweaver.
Step 2: Click Site; New Site.
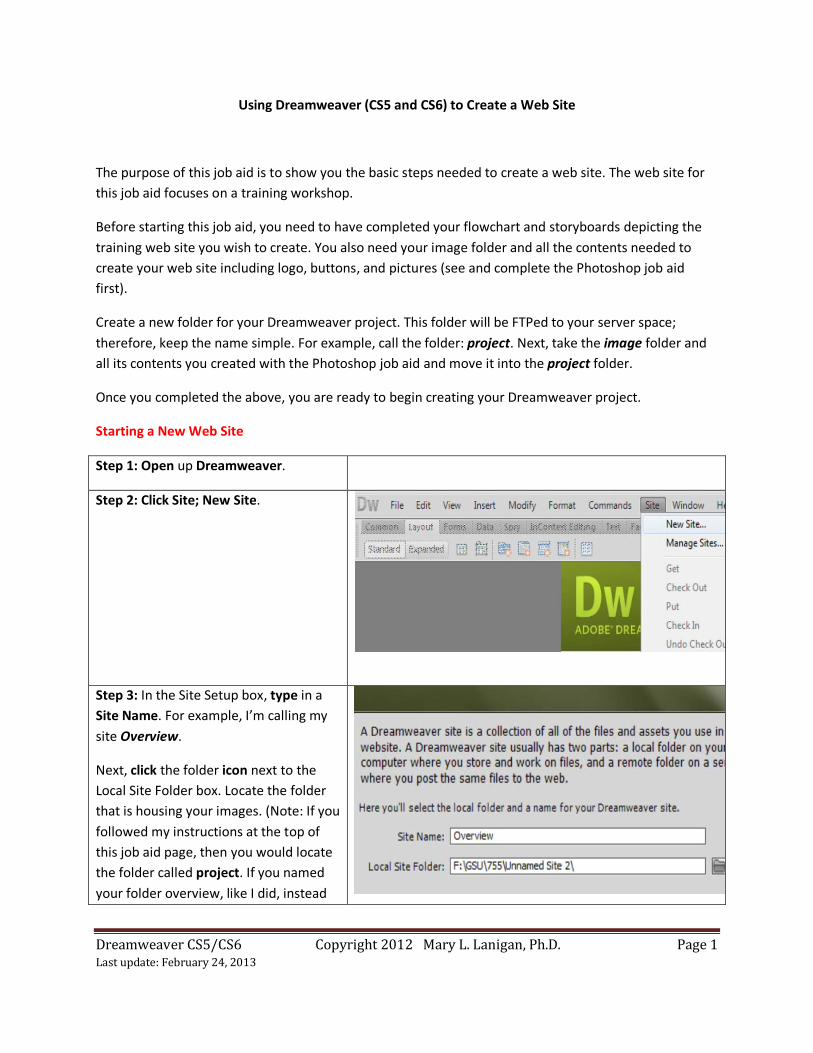
Step 3: In the Site Setup box, type in a Site Name. For example, I’m calling my site Overview.
Next, click the folder icon next to the Local Site Folder box. Locate the folder that is housing your images. (Note: If you followed my instructions at the top of this job aid page, then you would locate the folder called project. If you named your folder overview, like I did, instead
Dreamweaver CS5/CS6 Copyright 2012 Mary L. Lanigan, Ph.D. Page 2 Last update: February 24, 2013
of project , then click on that folder. )
My images for this web site are contained in the folder called overview. (Note: This is a folder called overview, which is different than the Site Name.)
Double-click on the folder and then click Select.
Lastly, click Save.
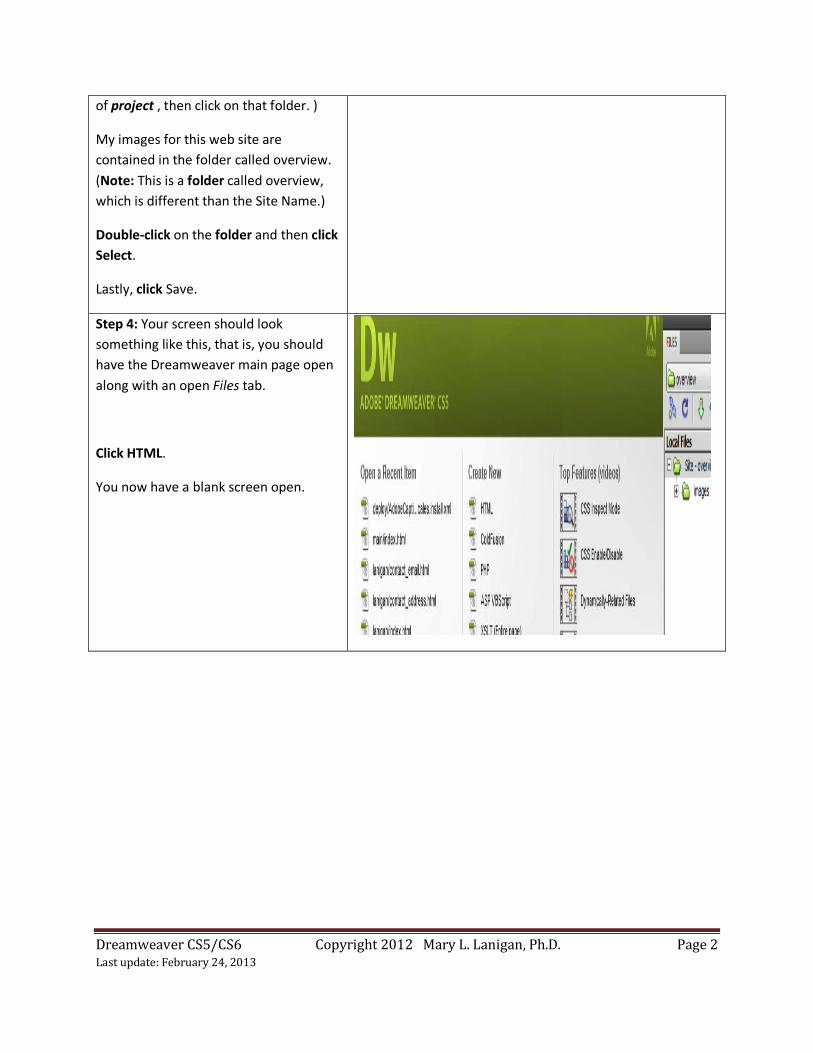
Step 4: Your screen should look something like this, that is, you should have the Dreamweaver main page open along with an open Files tab.
Click HTML.
You now have a blank screen open.
Dreamweaver CS5/CS6 Copyright 2012 Mary L. Lanigan, Ph.D. Page 3 Last update: February 24, 2013
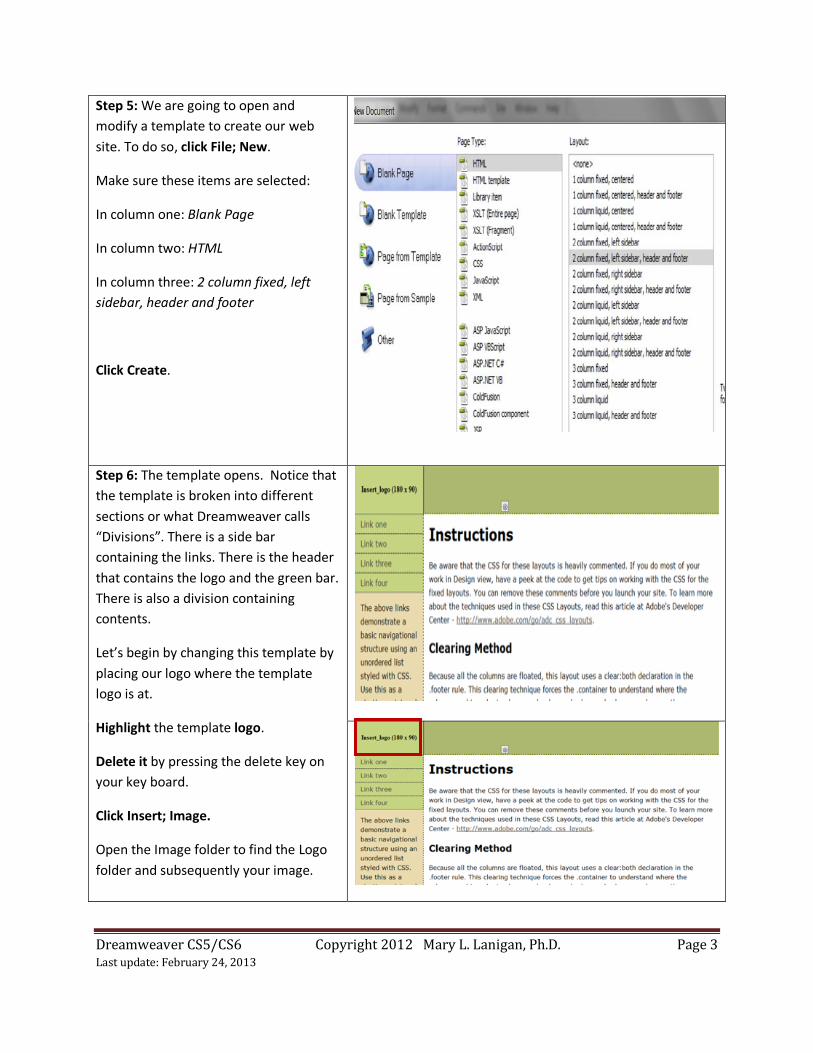
Step 5: We are going to open and modify a template to create our web site. To do so, click File; New.
Make sure these items are selected:
In column one: Blank Page
In column two: HTML
In column three: 2 column fixed, left sidebar, header and footer
Click Create.
Step 6: The template opens. Notice that the template is broken into different sections or what Dreamweaver calls “Divisions”. There is a side bar containing the links. There is the header that contains the logo and the green bar. There is also a division containing contents.
Let’s begin by changing this template by placing our logo where the template logo is at.
Highlight the template logo.
Delete it by pressing the delete key on your key board.
Click Insert; Image.
Open the Image folder to find the Logo folder and subsequently your image.
Dreamweaver CS5/CS6 Copyright 2012 Mary L. Lanigan, Ph.D. Page 4 Last update: February 24, 2013
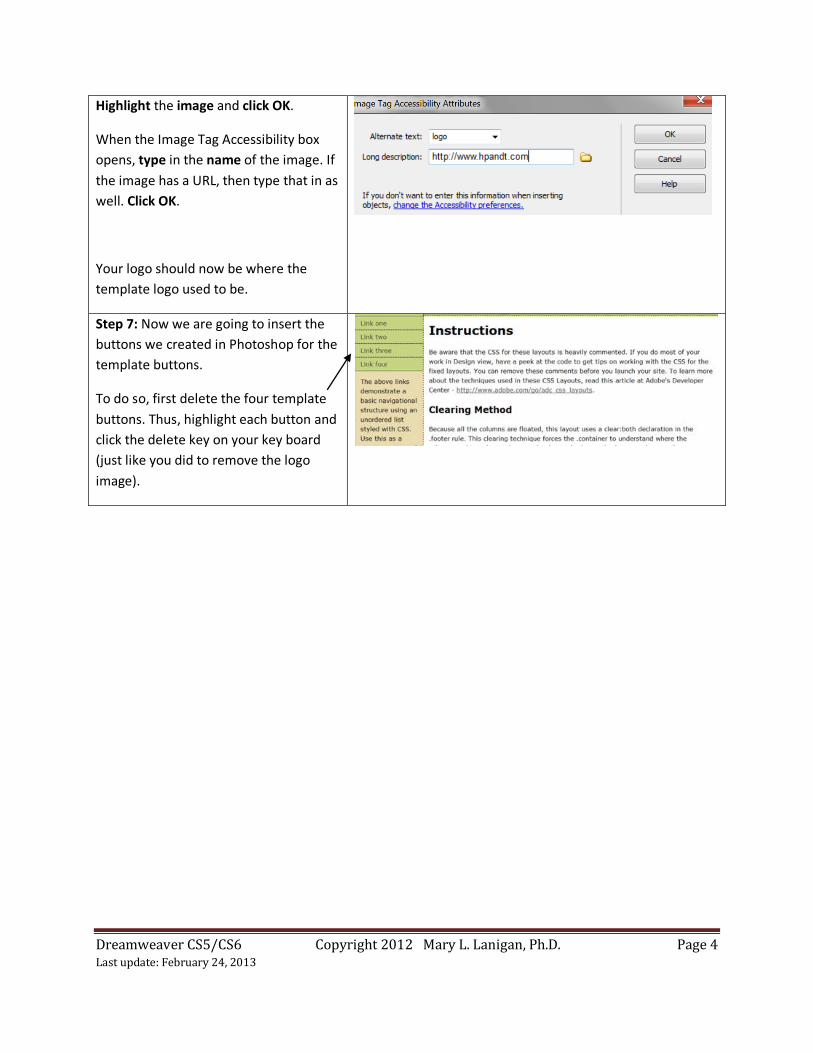
Highlight the image and click OK.
When the Image Tag Accessibility box opens, type in the name of the image. If the image has a URL, then type that in as well. Click OK.
Your logo should now be where the template logo used to be.
Step 7: Now we are going to insert the buttons we created in Photoshop for the template buttons.
To do so, first delete the four template buttons. Thus, highlight each button and click the delete key on your key board (just like you did to remove the logo image).
Dreamweaver CS5/CS6 Copyright 2012 Mary L. Lanigan, Ph.D. Page 5 Last update: February 24, 2013
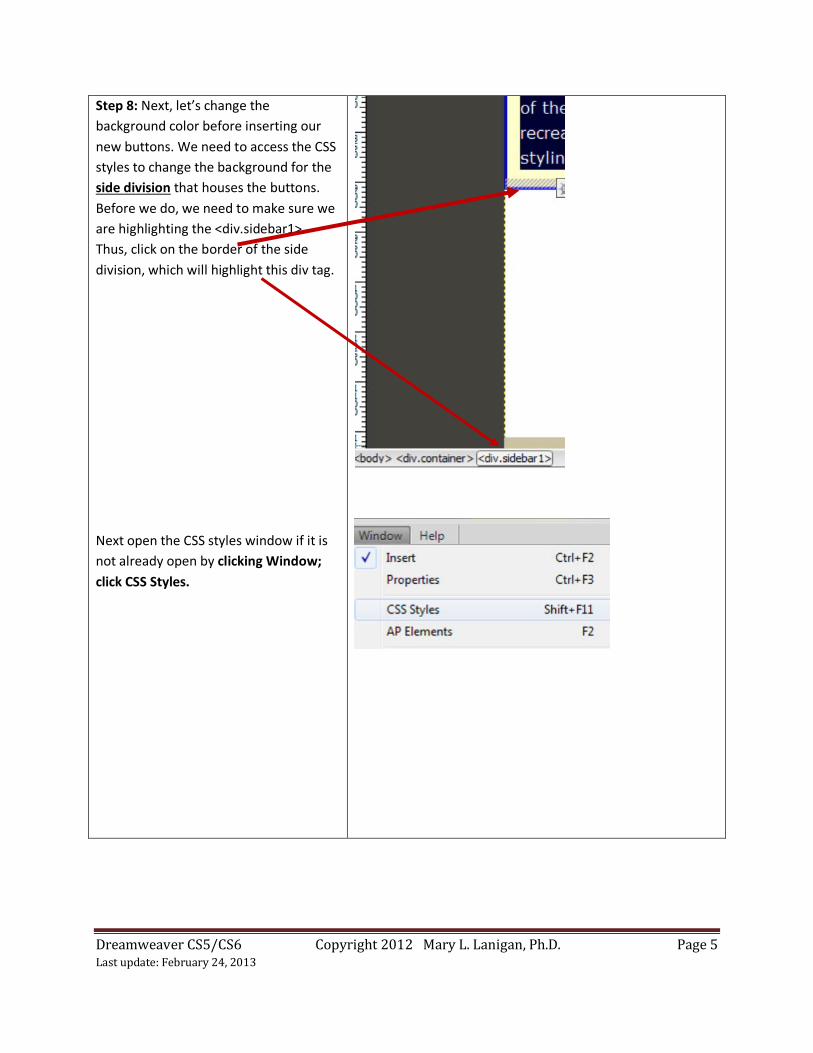
Step 8: Next, let’s change the background color before inserting our new buttons. We need to access the CSS styles to change the background for the side division that houses the buttons. Before we do, we need to make sure we are highlighting the <div.sidebar1>. Thus, click on the border of the side division, which will highlight this div tag.
Next open the CSS styles window if it is not already open by clicking Window; click CSS Styles.
Dreamweaver CS5/CS6 Copyright 2012 Mary L. Lanigan, Ph.D. Page 6 Last update: February 24, 2013
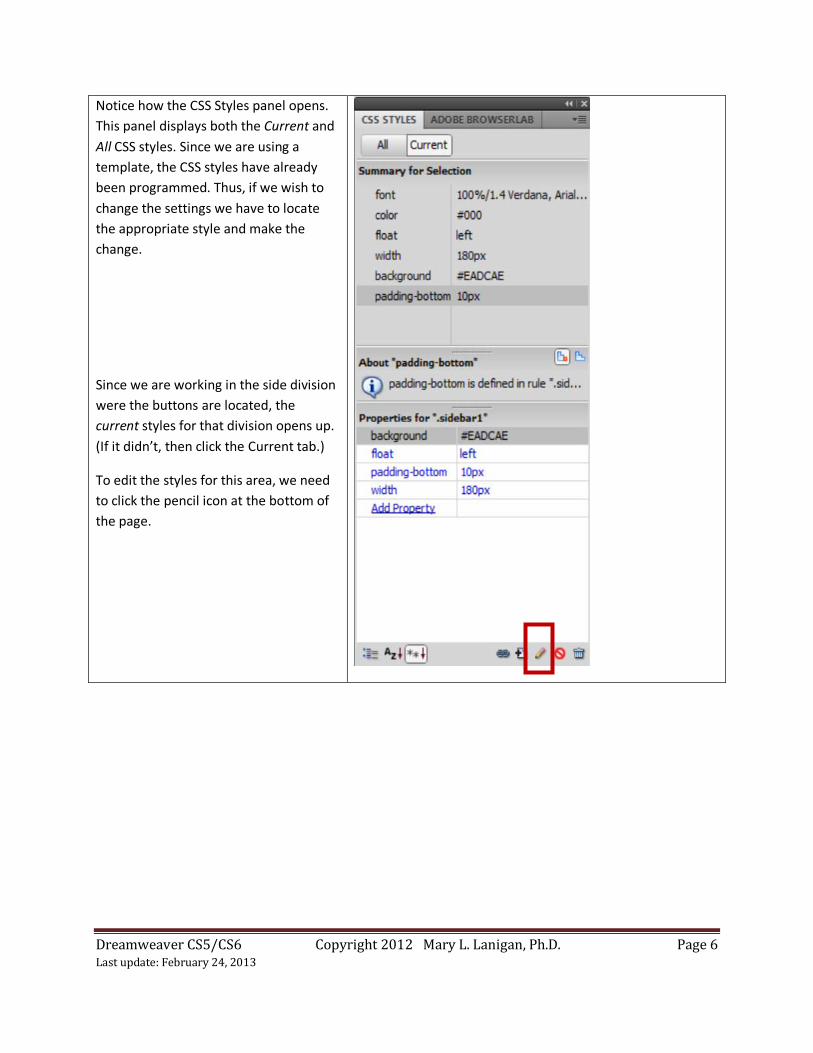
Notice how the CSS Styles panel opens. This panel displays both the Current and All CSS styles. Since we are using a template, the CSS styles have already been programmed. Thus, if we wish to change the settings we have to locate the appropriate style and make the change.
Since we are working in the side division were the buttons are located, the current styles for that division opens up. (If it didn’t, then click the Current tab.)
To edit the styles for this area, we need to click the pencil icon at the bottom of the page.
Dreamweaver CS5/CS6 Copyright 2012 Mary L. Lanigan, Ph.D. Page 7 Last update: February 24, 2013
Step 8 continued
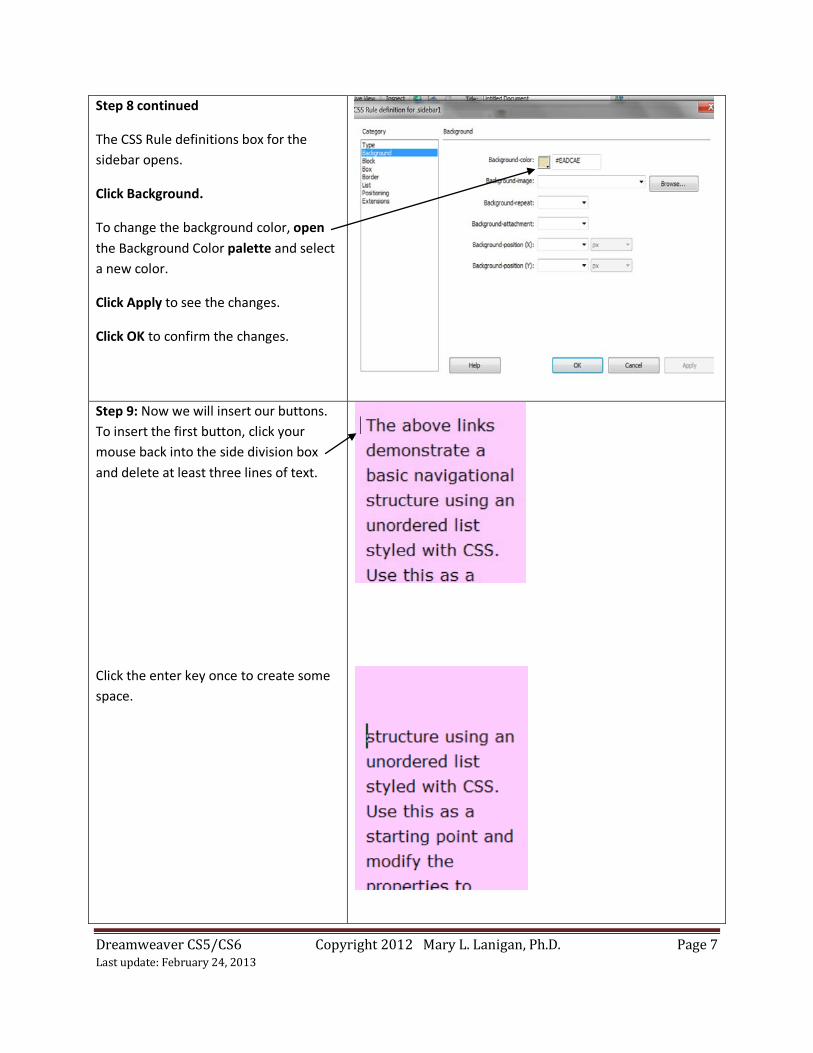
The CSS Rule definitions box for the sidebar opens.
Click Background.
To change the background color, open the Background Color palette and select a new color.
Click Apply to see the changes.
Click OK to confirm the changes.
Step 9: Now we will insert our buttons. To insert the first button, click your mouse back into the side division box and delete at least three lines of text.
Click the enter key once to create some space.
Dreamweaver CS5/CS6 Copyright 2012 Mary L. Lanigan, Ph.D. Page 8 Last update: February 24, 2013
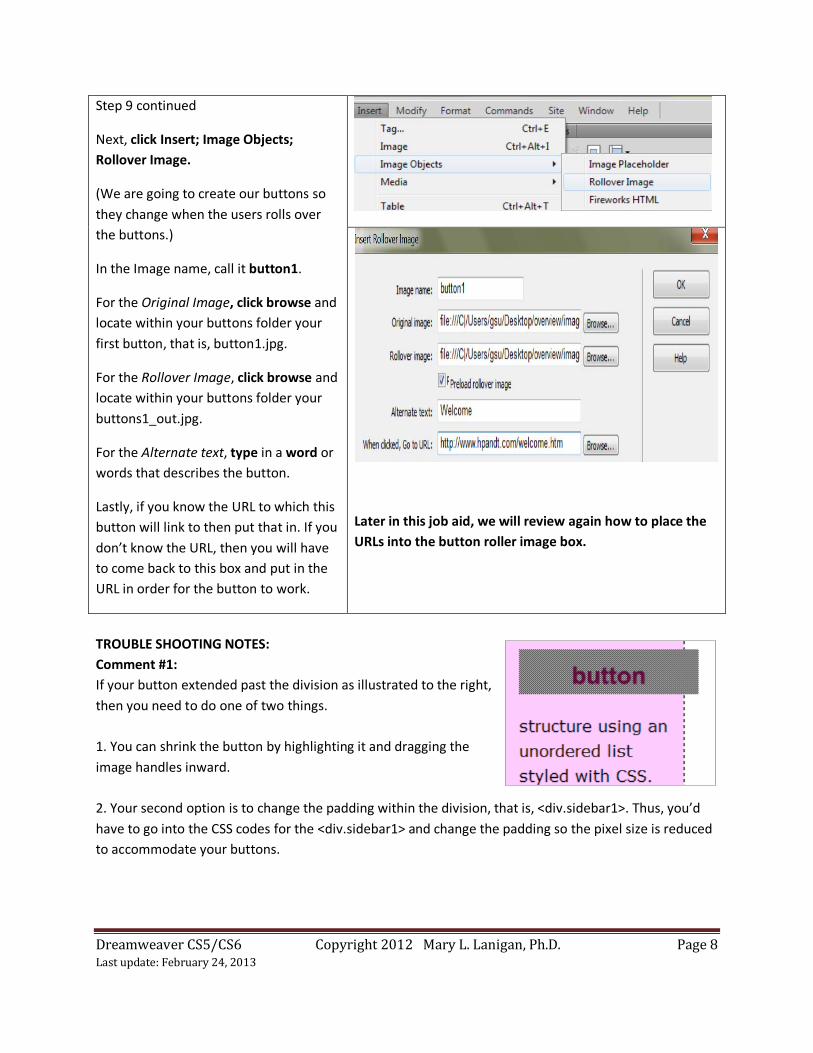
Step 9 continued
Next, click Insert; Image Objects; Rollover Image.
(We are going to create our buttons so they change when the users rolls over the buttons.)
In the Image name, call it button1.
For the Original Image, click browse and locate within your buttons folder your first button, that is, button1.jpg.
For the Rollover Image, click browse and locate within your buttons folder your buttons1_out.jpg.
For the Alternate text, type in a word or words that describes the button.
Lastly, if you know the URL to which this button will link to then put that in. If you don’t know the URL, then you will have to come back to this box and put in the URL in order for the button to work.
Later in this job aid, we will review again how to place the URLs into the button roller image box.
TROUBLE SHOOTING NOTES: Comment #1: If your button extended past the division as illustrated to the right, then you need to do one of two things. 1. You can shrink the button by highlighting it and dragging the image handles inward. 2. Your second option is to change the padding within the division, that is, <div.sidebar1>. Thus, you’d have to go into the CSS codes for the <div.sidebar1> and change the padding so the pixel size is reduced to accommodate your buttons.
Dreamweaver CS5/CS6 Copyright 2012 Mary L. Lanigan, Ph.D. Page 9 Last update: February 24, 2013
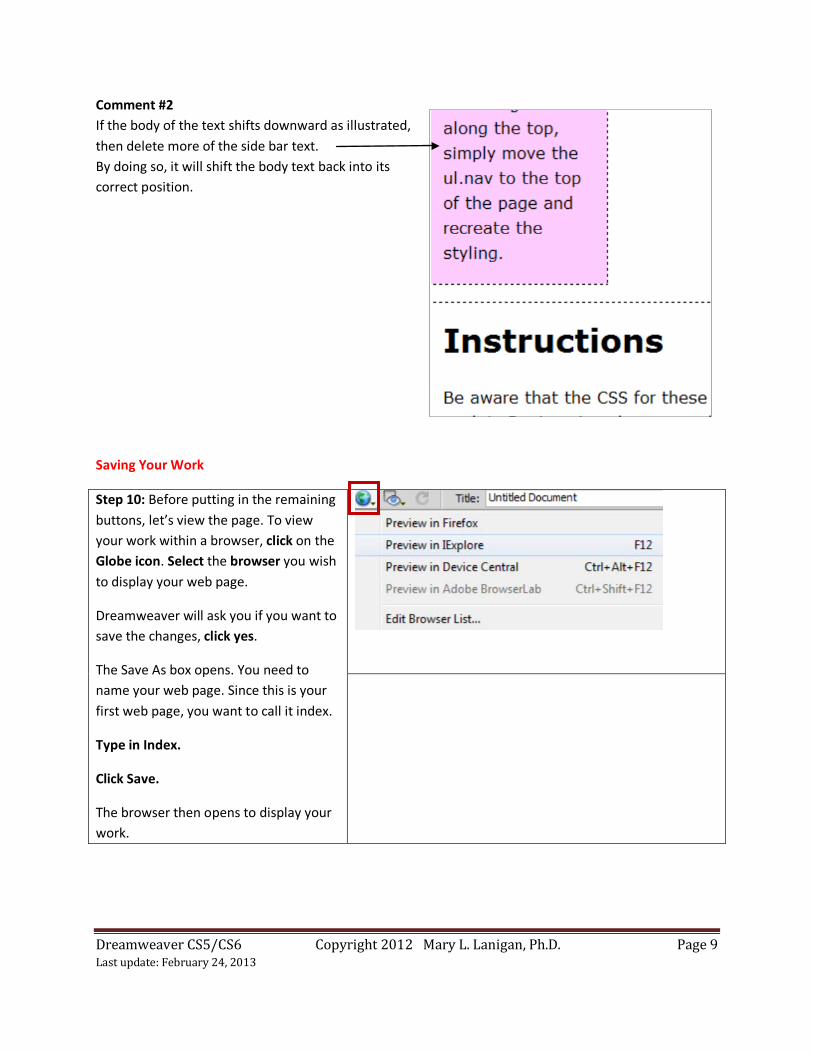
Comment #2 If the body of the text shifts downward as illustrated, then delete more of the side bar text. By doing so, it will shift the body text back into its correct position.
Saving Your Work
Step 10: Before putting in the remaining buttons, let’s view the page. To view your work within a browser, click on the Globe icon. Select the browser you wish to display your web page.
Dreamweaver will ask you if you want to save the changes, click yes.
The Save As box opens. You need to name your web page. Since this is your first web page, you want to call it index.
Type in Index.
Click Save.
The browser then opens to display your work.
Dreamweaver CS5/CS6 Copyright 2012 Mary L. Lanigan, Ph.D. Page 10 Last update: February 24, 2013
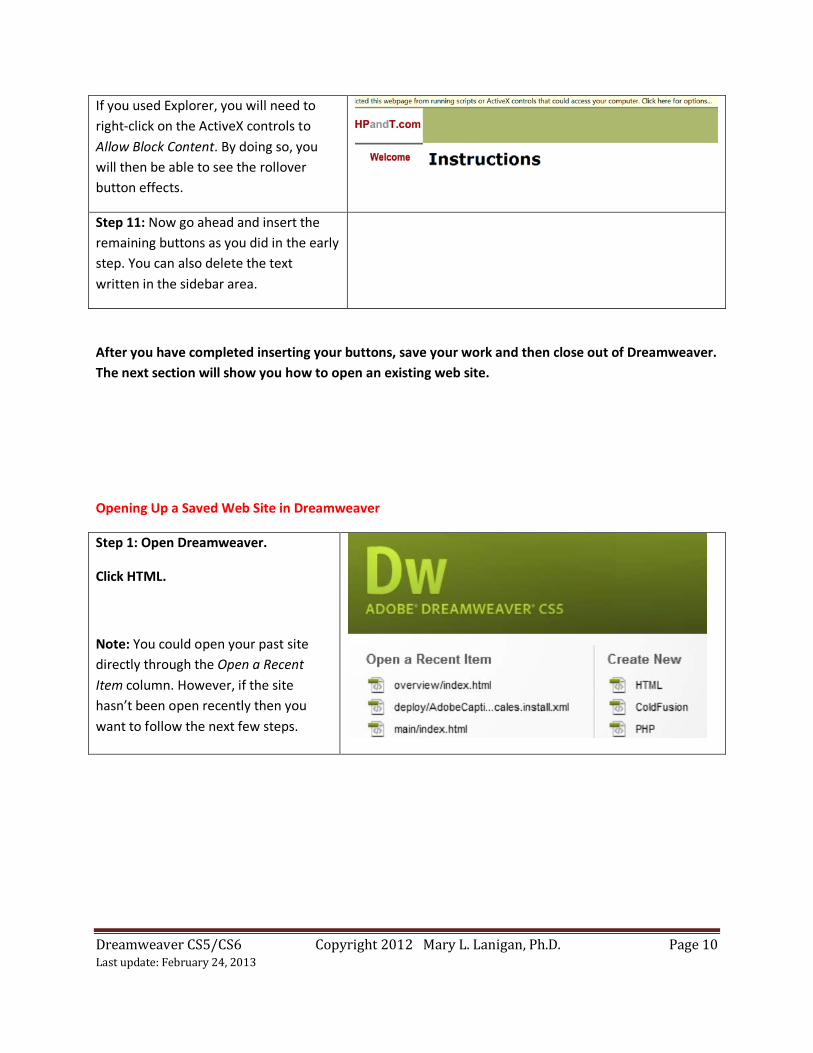
If you used Explorer, you will need to right-click on the ActiveX controls to Allow Block Content. By doing so, you will then be able to see the rollover button effects.
Step 11: Now go ahead and insert the remaining buttons as you did in the early step. You can also delete the text written in the sidebar area.
After you have completed inserting your buttons, save your work and then close out of Dreamweaver. The next section will show you how to open an existing web site.
Opening Up a Saved Web Site in Dreamweaver
Step 1: Open Dreamweaver.
Click HTML.
Note: You could open your past site directly through the Open a Recent Item column. However, if the site hasn’t been open recently then you want to follow the next few steps.
Dreamweaver CS5/CS6 Copyright 2012 Mary L. Lanigan, Ph.D. Page 11 Last update: February 24, 2013
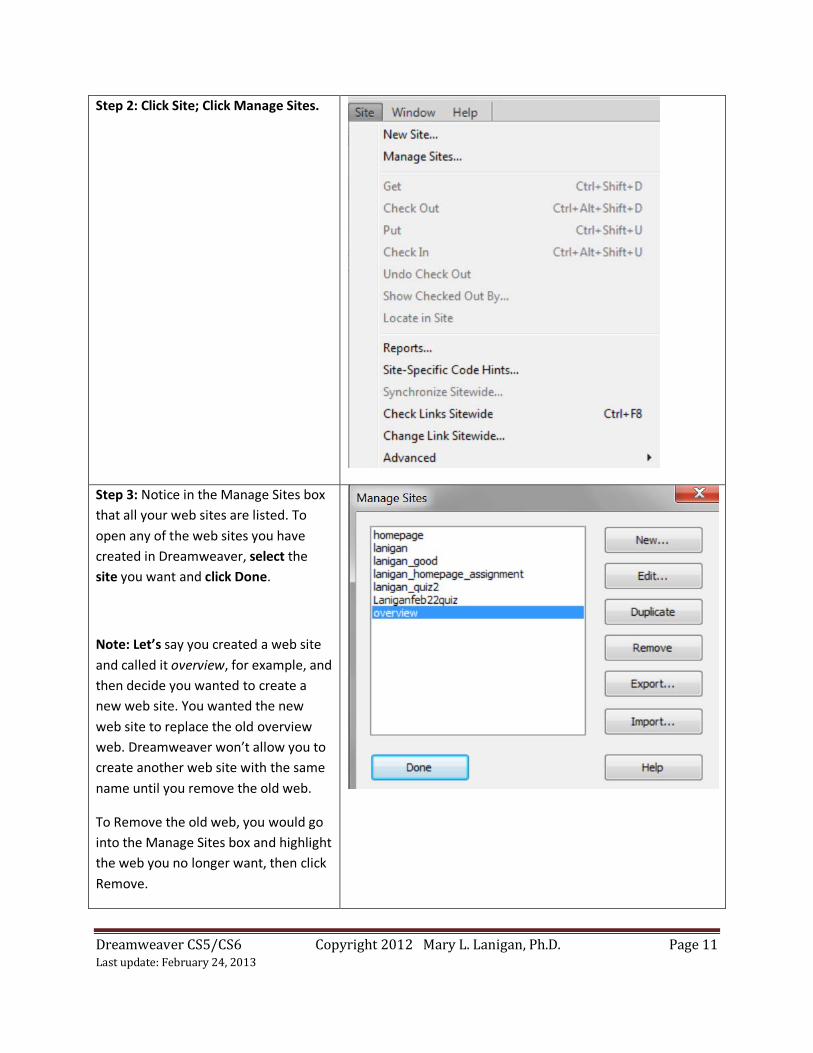
Step 2: Click Site; Click Manage Sites.
Step 3: Notice in the Manage Sites box that all your web sites are listed. To open any of the web sites you have created in Dreamweaver, select the site you want and click Done.
Note: Let’s say you created a web site and called it overview, for example, and then decide you wanted to create a new web site. You wanted the new web site to replace the old overview web. Dreamweaver won’t allow you to create another web site with the same name until you remove the old web.
To Remove the old web, you would go into the Manage Sites box and highlight the web you no longer want, then click Remove.
Dreamweaver CS5/CS6 Copyright 2012 Mary L. Lanigan, Ph.D. Page 12 Last update: February 24, 2013
Opening Up the File Window or Other Panels
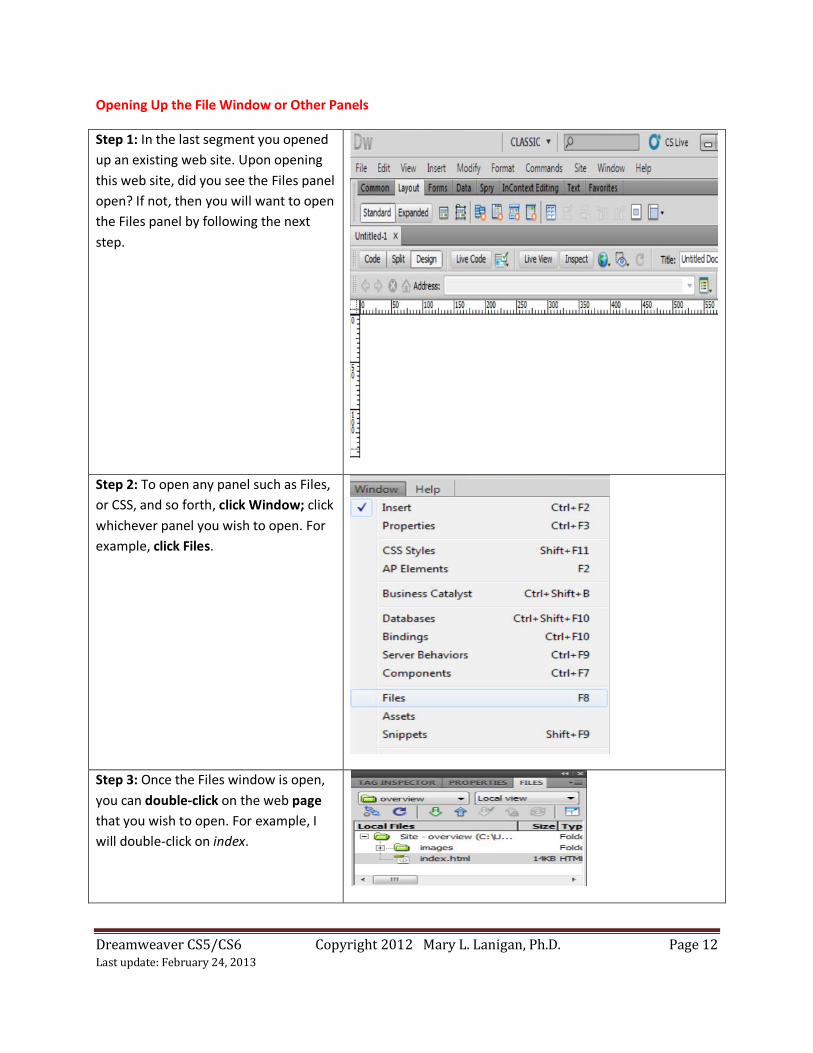
Step 1: In the last segment you opened up an existing web site. Upon opening this web site, did you see the Files panel open? If not, then you will want to open the Files panel by following the next step.
Step 2: To open any panel such as Files, or CSS, and so forth, click Window; click whichever panel you wish to open. For example, click Files.
Step 3: Once the Files window is open, you can double-click on the web page that you wish to open. For example, I will double-click on index.
Dreamweaver CS5/CS6 Copyright 2012 Mary L. Lanigan, Ph.D. Page 13 Last update: February 24, 2013
Changing the Header Color and Adding Text to Your Web Page
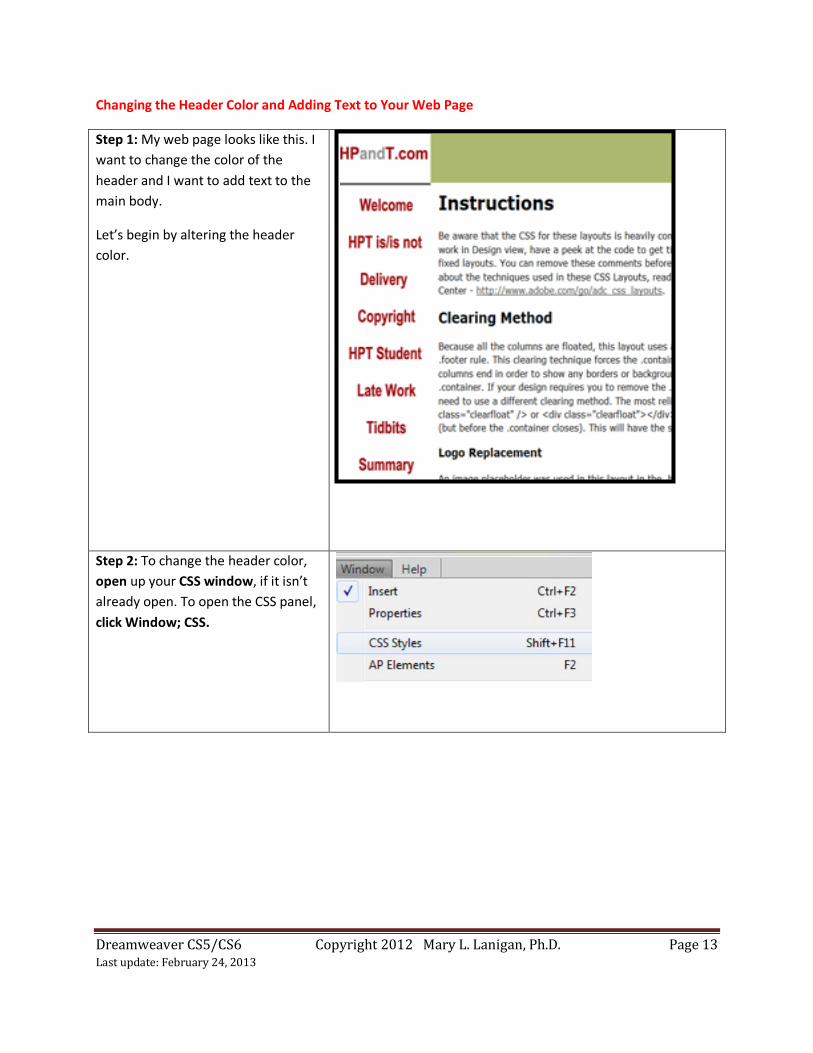
Step 1: My web page looks like this. I want to change the color of the header and I want to add text to the main body.
Let’s begin by altering the header color.
Step 2: To change the header color, open up your CSS window, if it isn’t already open. To open the CSS panel, click Window; CSS.
Dreamweaver CS5/CS6 Copyright 2012 Mary L. Lanigan, Ph.D. Page 14 Last update: February 24, 2013
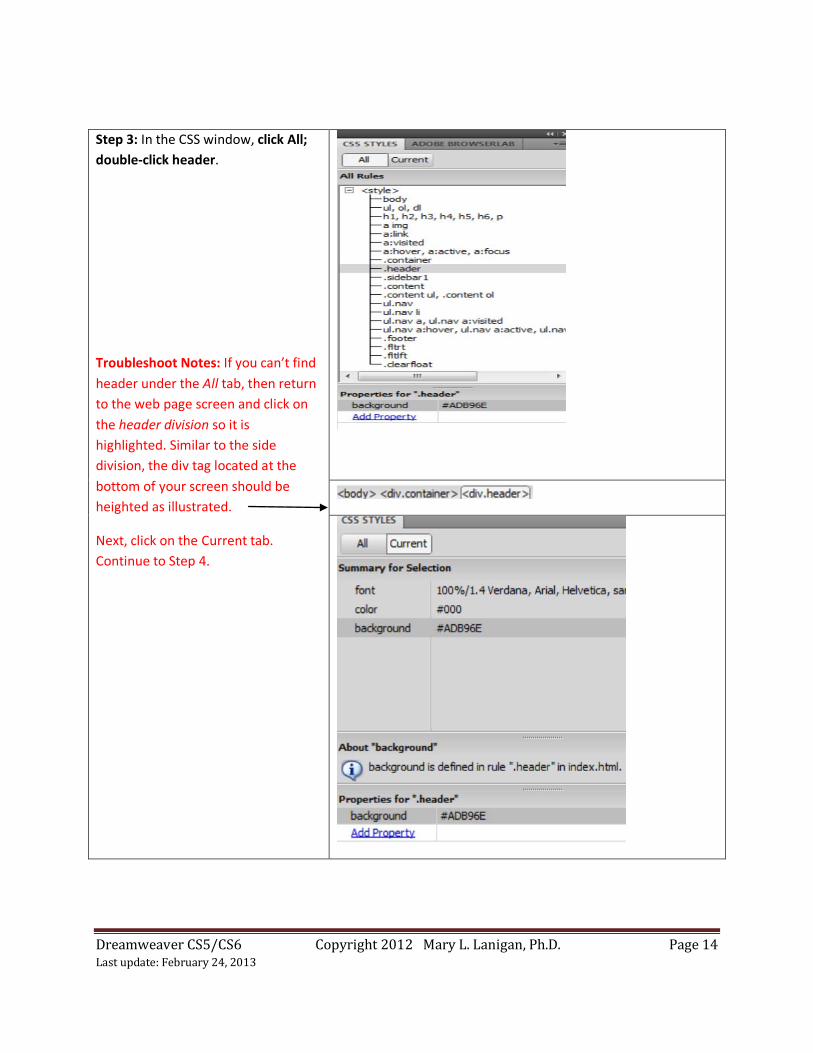
Step 3: In the CSS window, click All; double-click header.
Troubleshoot Notes: If you can’t find header under the All tab, then return to the web page screen and click on the header division so it is highlighted. Similar to the side division, the div tag located at the bottom of your screen should be heighted as illustrated.
Next, click on the Current tab. Continue to Step 4.
Dreamweaver CS5/CS6 Copyright 2012 Mary L. Lanigan, Ph.D. Page 15 Last update: February 24, 2013
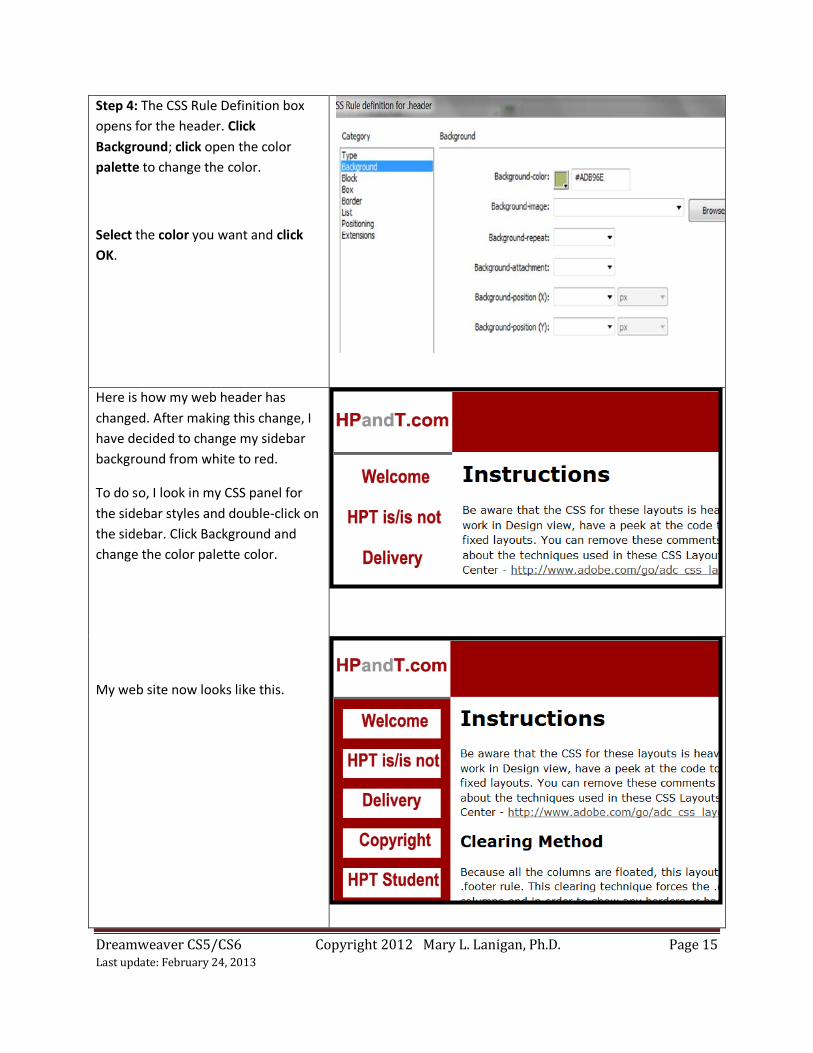
Step 4: The CSS Rule Definition box opens for the header. Click Background; click open the color palette to change the color.
Select the color you want and click OK.
Here is how my web header has changed. After making this change, I have decided to change my sidebar background from white to red.
To do so, I look in my CSS panel for the sidebar styles and double-click on the sidebar. Click Background and change the color palette color.
My web site now looks like this.
Dreamweaver CS5/CS6 Copyright 2012 Mary L. Lanigan, Ph.D. Page 16 Last update: February 24, 2013
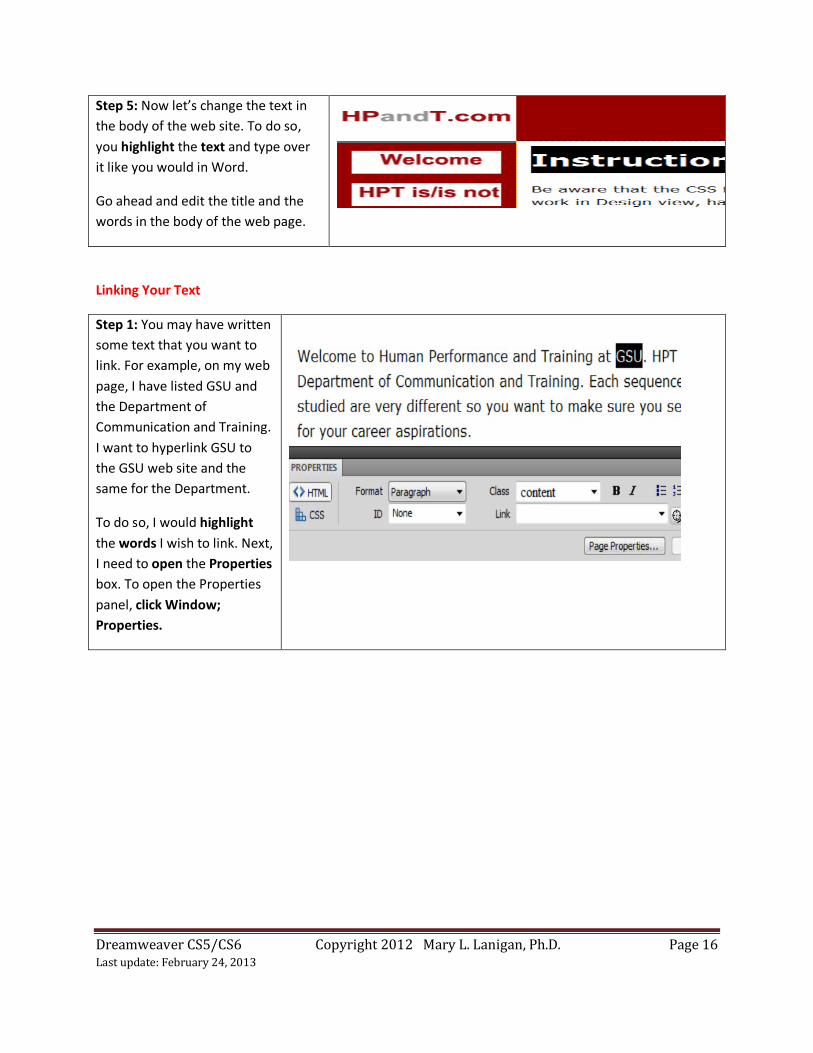
Step 5: Now let’s change the text in the body of the web site. To do so, you highlight the text and type over it like you would in Word.
Go ahead and edit the title and the words in the body of the web page.
Linking Your Text
Step 1: You may have written some text that you want to link. For example, on my web page, I have listed GSU and the Department of Communication and Training. I want to hyperlink GSU to the GSU web site and the same for the Department.
To do so, I would highlight the words I wish to link. Next, I need to open the Properties box. To open the Properties panel, click Window; Properties.
Dreamweaver CS5/CS6 Copyright 2012 Mary L. Lanigan, Ph.D. Page 17 Last update: February 24, 2013
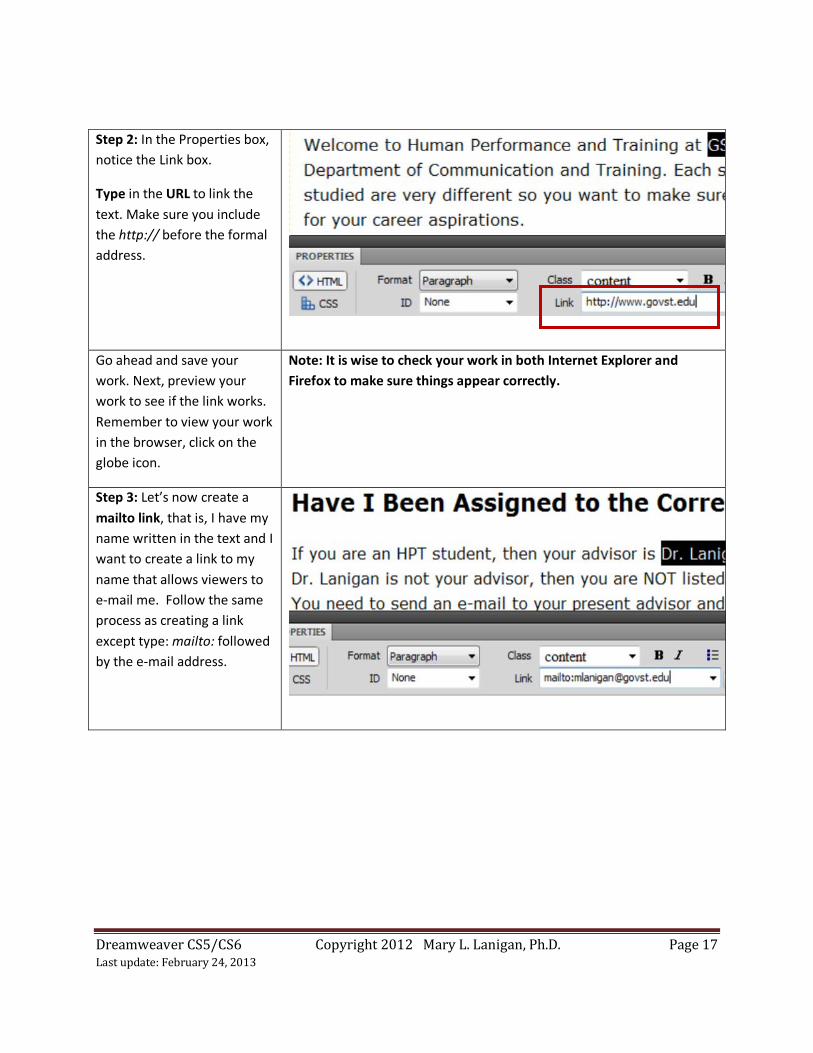
Step 2: In the Properties box, notice the Link box.
Type in the URL to link the text. Make sure you include the http:// before the formal address.
Go ahead and save your work. Next, preview your work to see if the link works. Remember to view your work in the browser, click on the globe icon.
Note: It is wise to check your work in both Internet Explorer and Firefox to make sure things appear correctly.
Step 3: Let’s now create a mailto link, that is, I have my name written in the text and I want to create a link to my name that allows viewers to e-mail me. Follow the same process as creating a link except type: mailto: followed by the e-mail address.

Dreamweaver CS5/CS6 Copyright 2012 Mary L. Lanigan, Ph.D. Page 18 Last update: February 24, 2013
Adding Pictures
Let’s add a picture to our web site.
Step 1: Locate the location you want to place your picture. Click your mouse at that place. Next, click Insert; Image.
Step 2: The Select Image Source box opens. Locate your picture from the Image folder. Hopefully, you placed the image inside your Pictures folder that is inside your Image folder. If you didn’t, place the picture inside that folder before adding it to your web page.
Highlight the picture. Click OK.
Type in the Alternative Text in the Attributes box that automatically pops open.
Dreamweaver CS5/CS6 Copyright 2012 Mary L. Lanigan, Ph.D. Page 19 Last update: February 24, 2013
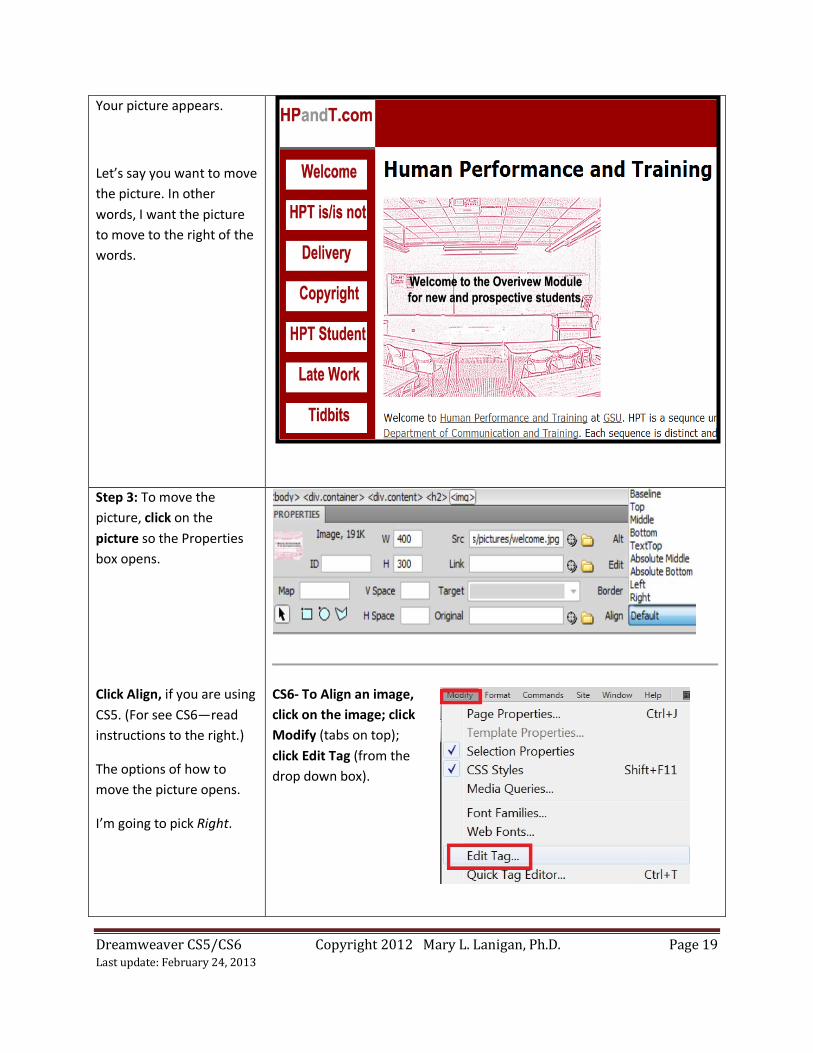
Your picture appears.
Let’s say you want to move the picture. In other words, I want the picture to move to the right of the words.
Step 3: To move the picture, click on the picture so the Properties box opens.
Click Align, if you are using CS5. (For see CS6—read instructions to the right.)
The options of how to move the picture opens.
I’m going to pick Right.
CS6- To Align an image, click on the image; click Modify (tabs on top); click Edit Tag (from the drop down box).
Dreamweaver CS5/CS6 Copyright 2012 Mary L. Lanigan, Ph.D. Page 20 Last update: February 24, 2013
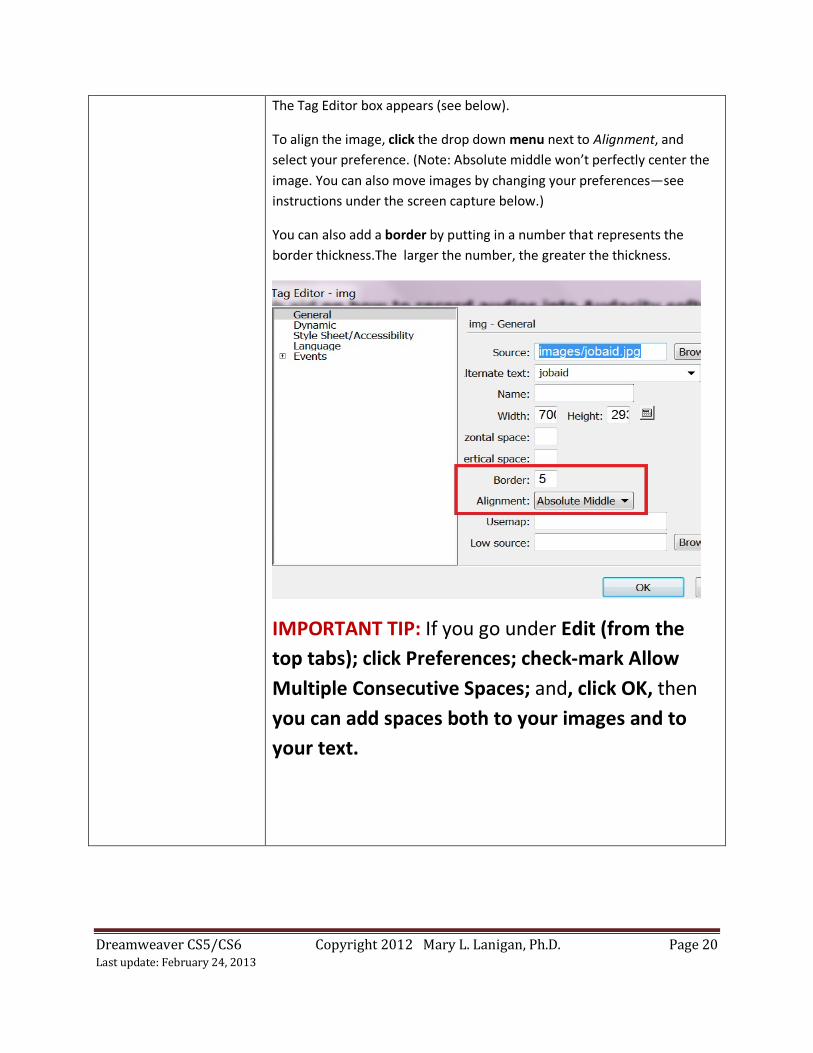
The Tag Editor box appears (see below).
To align the image, click the drop down menu next to Alignment, and select your preference. (Note: Absolute middle won’t perfectly center the image. You can also move images by changing your preferences—see instructions under the screen capture below.)
You can also add a border by putting in a number that represents the border thickness.The larger the number, the greater the thickness.
IMPORTANT TIP: If you go under Edit (from the top tabs); click Preferences; check-mark Allow Multiple Consecutive Spaces; and, click OK, then you can add spaces both to your images and to your text.
Dreamweaver CS5/CS6 Copyright 2012 Mary L. Lanigan, Ph.D. Page 21 Last update: February 24, 2013
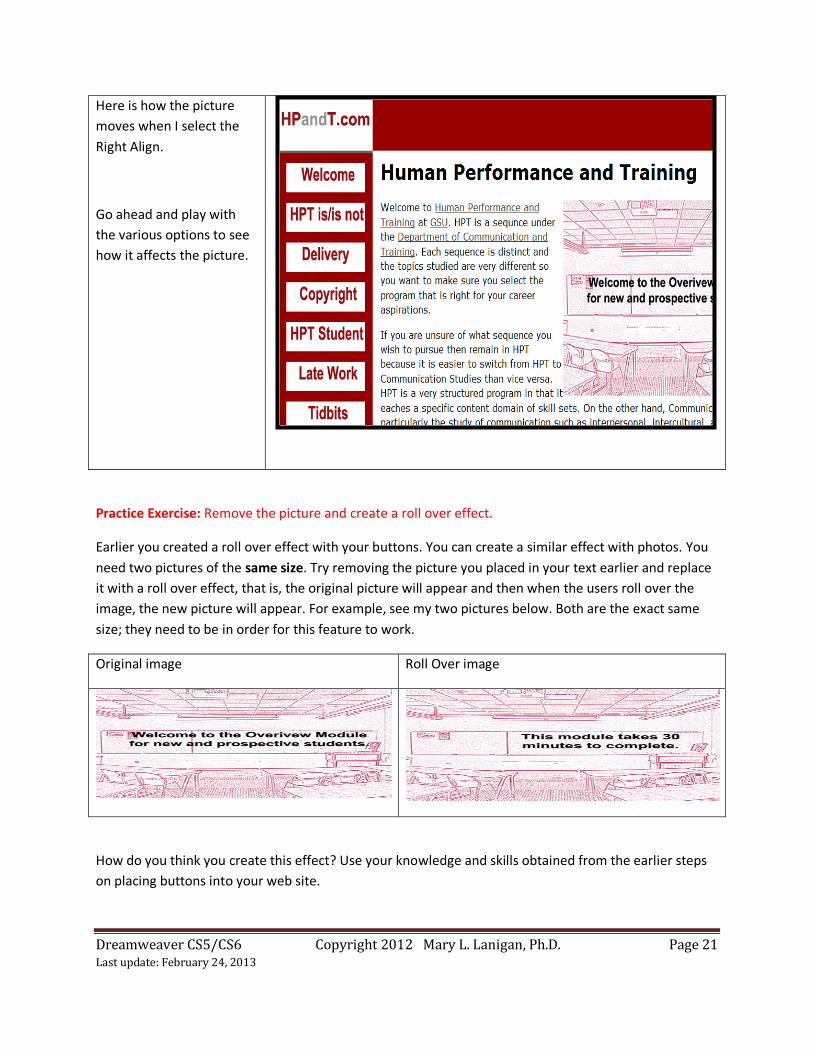
Here is how the picture moves when I select the Right Align.
Go ahead and play with the various options to see how it affects the picture.
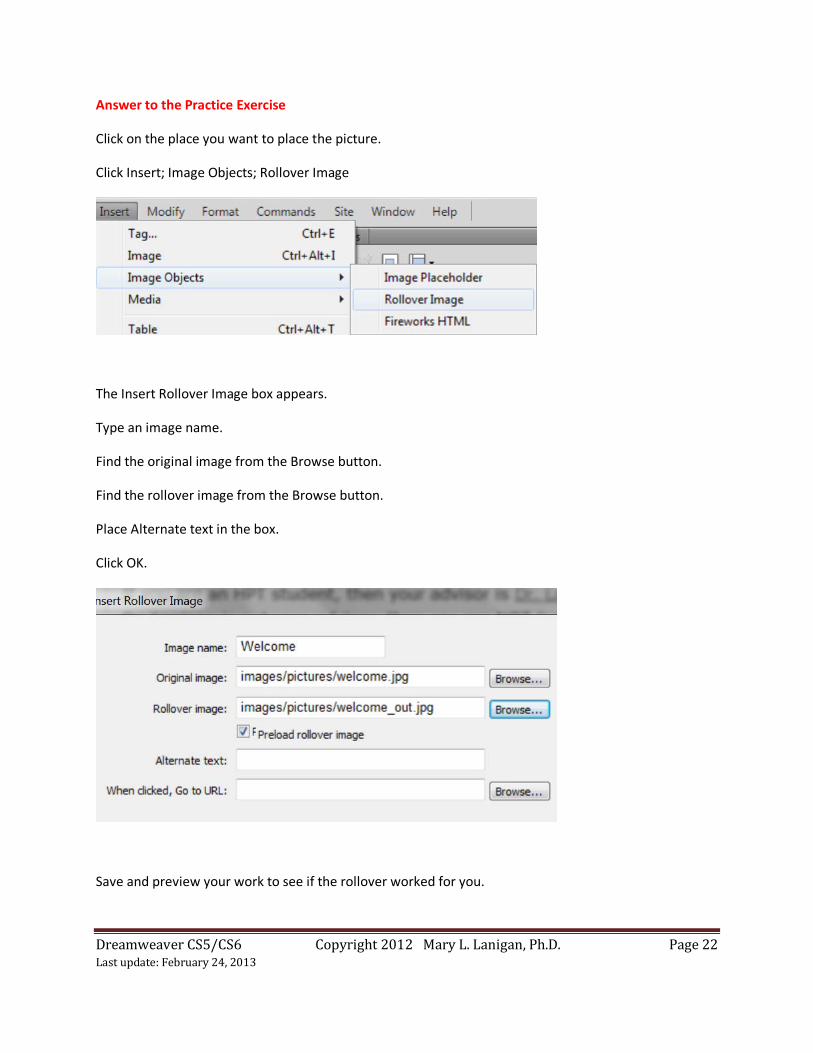
Practice Exercise: Remove the picture and create a roll over effect.
Earlier you created a roll over effect with your buttons. You can create a similar effect with photos. You need two pictures of the same size. Try removing the picture you placed in your text earlier and replace it with a roll over effect, that is, the original picture will appear and then when the users roll over the image, the new picture will appear. For example, see my two pictures below. Both are the exact same size; they need to be in order for this feature to work.
Original image Roll Over image
How do you think you create this effect? Use your knowledge and skills obtained from the earlier steps on placing buttons into your web site.
Dreamweaver CS5/CS6 Copyright 2012 Mary L. Lanigan, Ph.D. Page 22 Last update: February 24, 2013
Answer to the Practice Exercise
Click on the place you want to place the picture.
Click Insert; Image Objects; Rollover Image
The Insert Rollover Image box appears.
Type an image name.
Find the original image from the Browse button.
Find the rollover image from the Browse button.
Place Alternate text in the box.
Click OK.
Save and preview your work to see if the rollover worked for you.
Dreamweaver CS5/CS6 Copyright 2012 Mary L. Lanigan, Ph.D. Page 23 Last update: February 24, 2013
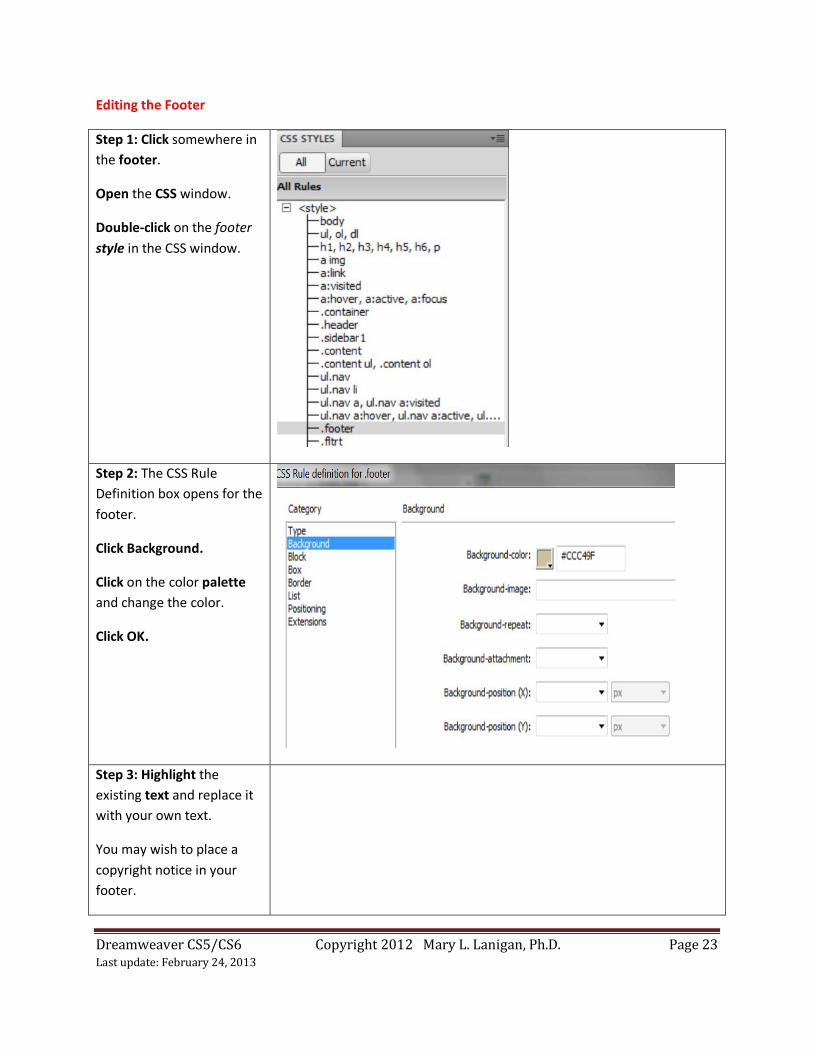
Editing the Footer
Step 1: Click somewhere in the footer.
Open the CSS window.
Double-click on the footer style in the CSS window.
Step 2: The CSS Rule Definition box opens for the footer.
Click Background.
Click on the color palette and change the color.
Click OK.
Step 3: Highlight the existing text and replace it with your own text.
You may wish to place a copyright notice in your footer.
Dreamweaver CS5/CS6 Copyright 2012 Mary L. Lanigan, Ph.D. Page 24 Last update: February 24, 2013
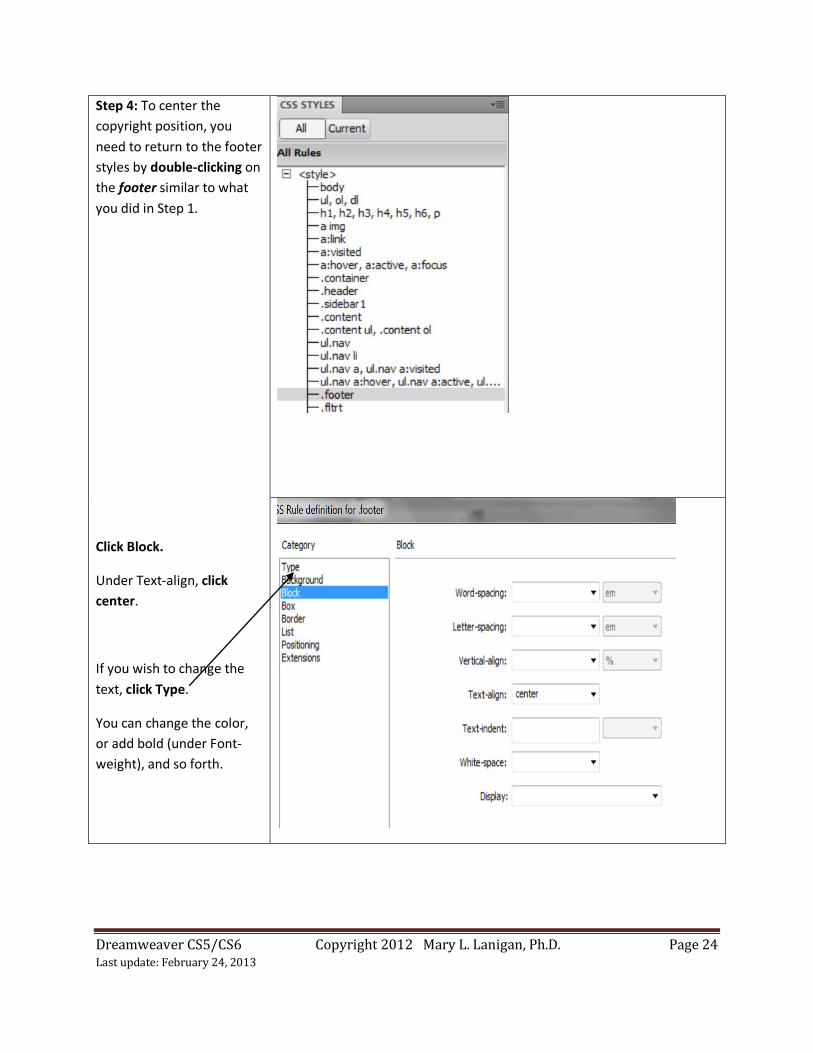
Step 4: To center the copyright position, you need to return to the footer styles by double-clicking on the footer similar to what you did in Step 1.
Click Block.
Under Text-align, click center.
If you wish to change the text, click Type.
You can change the color, or add bold (under Font-weight), and so forth.
Dreamweaver CS5/CS6 Copyright 2012 Mary L. Lanigan, Ph.D. Page 25 Last update: February 24, 2013
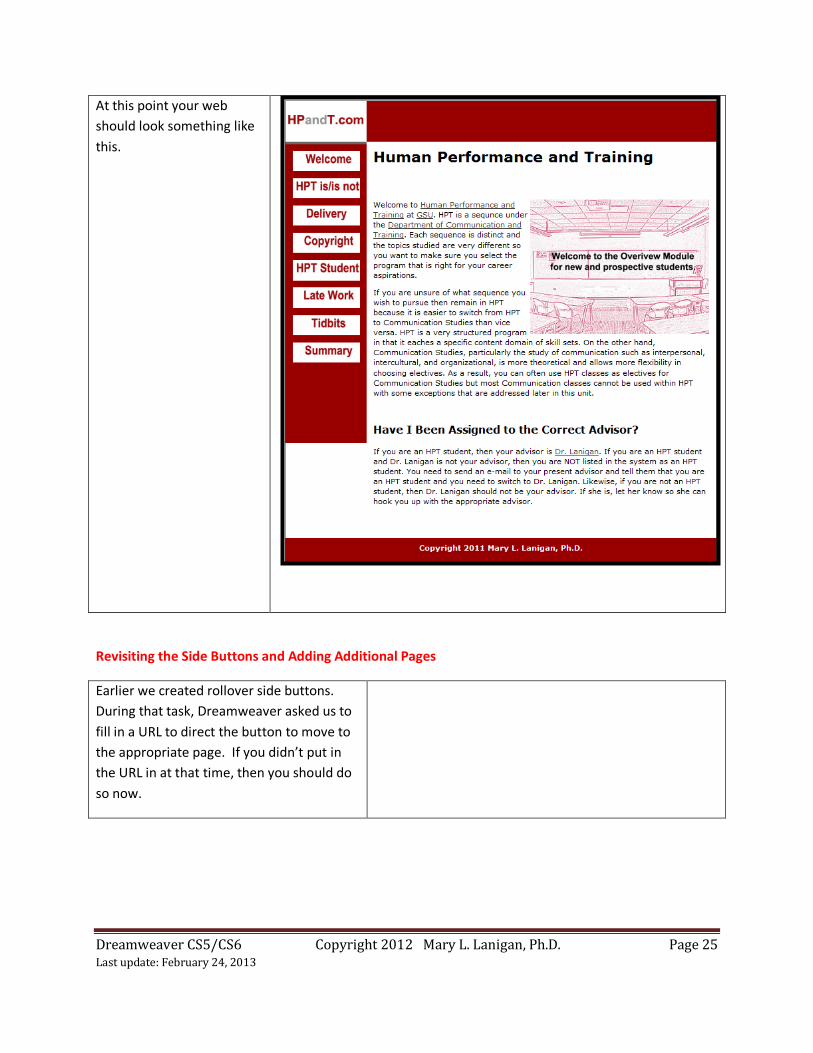
At this point your web should look something like this.
Revisiting the Side Buttons and Adding Additional Pages
Earlier we created rollover side buttons. During that task, Dreamweaver asked us to fill in a URL to direct the button to move to the appropriate page. If you didn’t put in the URL in at that time, then you should do so now.
Dreamweaver CS5/CS6 Copyright 2012 Mary L. Lanigan, Ph.D. Page 26 Last update: February 24, 2013
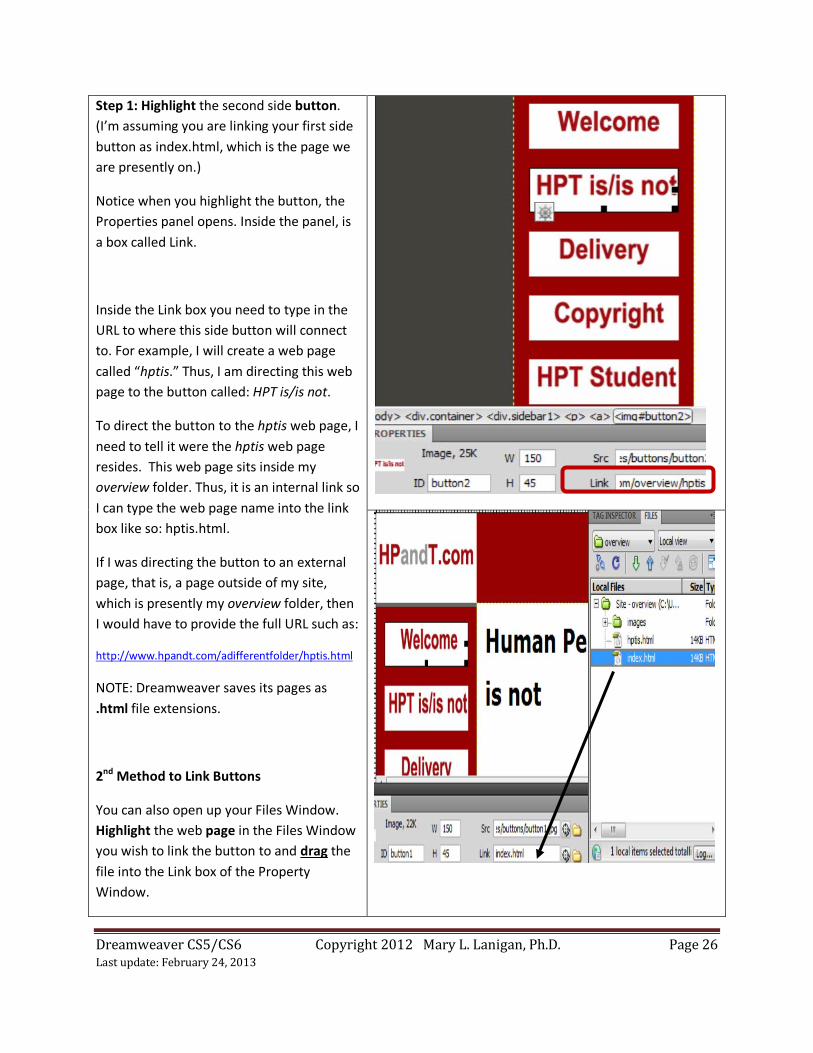
Step 1: Highlight the second side button. (I’m assuming you are linking your first side button as index.html, which is the page we are presently on.)
Notice when you highlight the button, the Properties panel opens. Inside the panel, is a box called Link.
Inside the Link box you need to type in the URL to where this side button will connect to. For example, I will create a web page called “hptis.” Thus, I am directing this web page to the button called: HPT is/is not.
To direct the button to the hptis web page, I need to tell it were the hptis web page resides. This web page sits inside my overview folder. Thus, it is an internal link so I can type the web page name into the link box like so: hptis.html.
If I was directing the button to an external page, that is, a page outside of my site, which is presently my overview folder, then I would have to provide the full URL such as:
http://www.hpandt.com/adifferentfolder/hptis.html
NOTE: Dreamweaver saves its pages as .html file extensions.
2nd Method to Link Buttons
You can also open up your Files Window. Highlight the web page in the Files Window you wish to link the button to and drag the file into the Link box of the Property Window.
Dreamweaver CS5/CS6 Copyright 2012 Mary L. Lanigan, Ph.D. Page 27 Last update: February 24, 2013
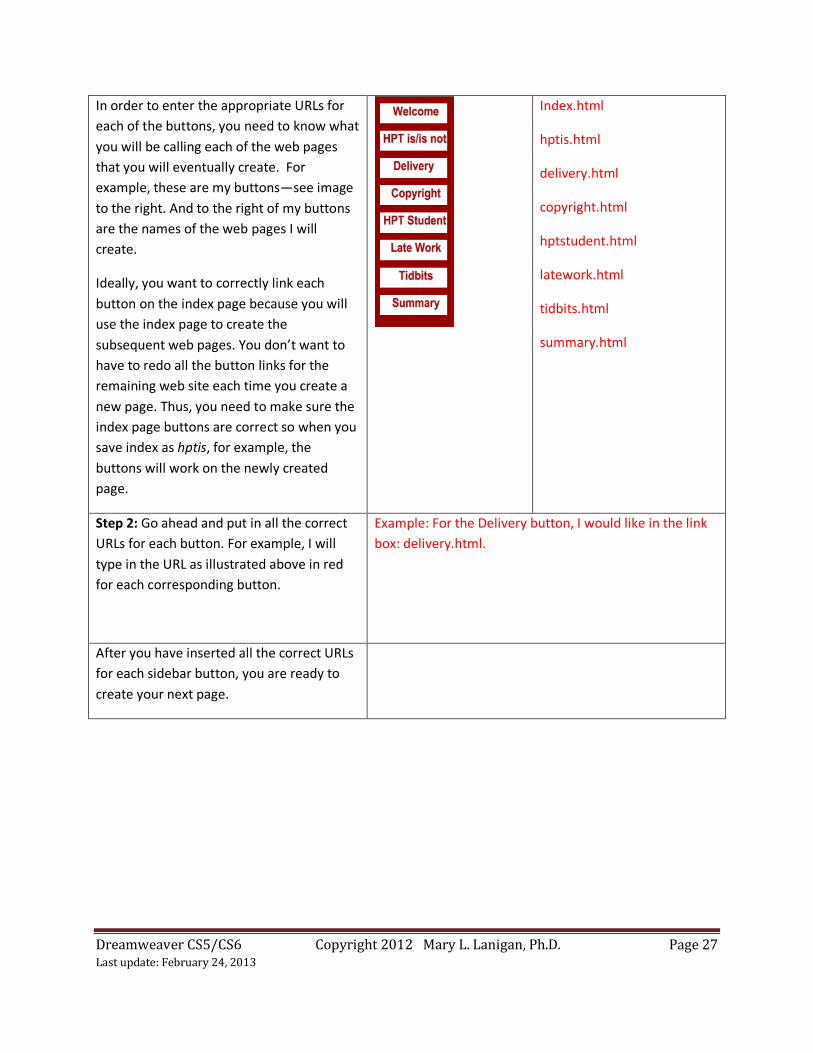
In order to enter the appropriate URLs for each of the buttons, you need to know what you will be calling each of the web pages that you will eventually create. For example, these are my buttons—see image to the right. And to the right of my buttons are the names of the web pages I will create.
Ideally, you want to correctly link each button on the index page because you will use the index page to create the subsequent web pages. You don’t want to have to redo all the button links for the remaining web site each time you create a new page. Thus, you need to make sure the index page buttons are correct so when you save index as hptis, for example, the buttons will work on the newly created page.
Index.html
hptis.html
delivery.html
copyright.html
hptstudent.html
latework.html
tidbits.html
summary.html
Step 2: Go ahead and put in all the correct URLs for each button. For example, I will type in the URL as illustrated above in red for each corresponding button.
Example: For the Delivery button, I would like in the link box: delivery.html.
After you have inserted all the correct URLs for each sidebar button, you are ready to create your next page.
Dreamweaver CS5/CS6 Copyright 2012 Mary L. Lanigan, Ph.D. Page 28 Last update: February 24, 2013
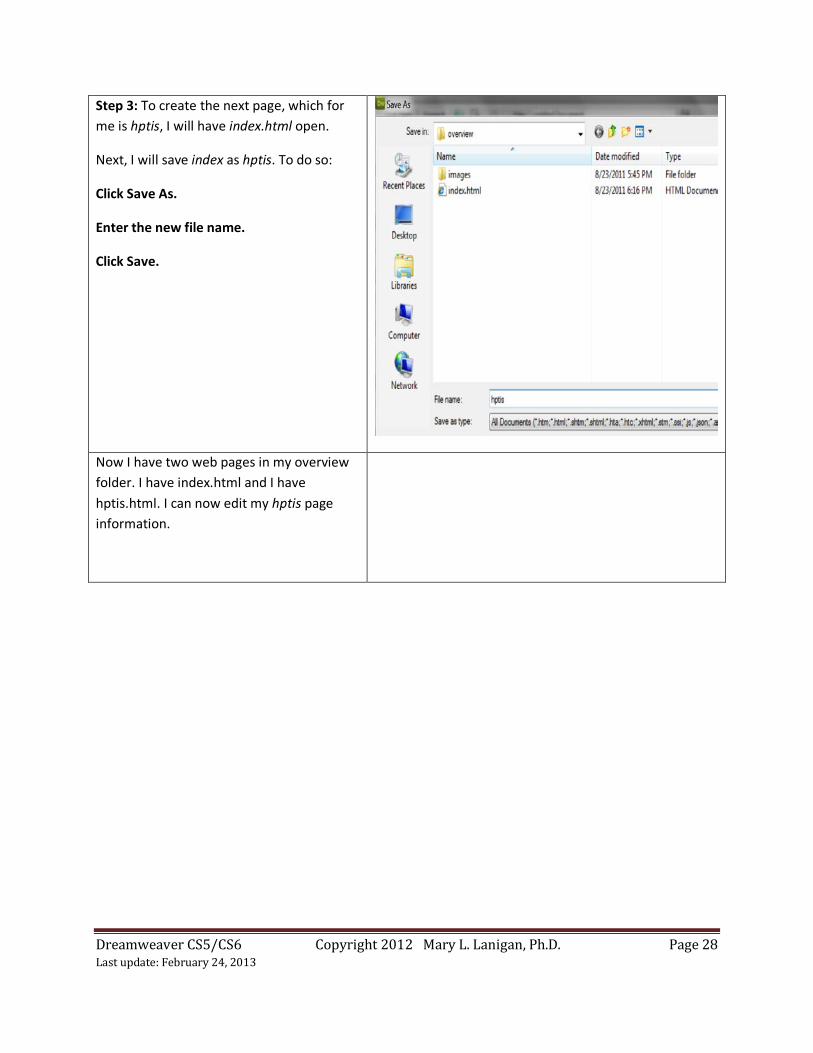
Step 3: To create the next page, which for me is hptis, I will have index.html open.
Next, I will save index as hptis. To do so:
Click Save As.
Enter the new file name.
Click Save.
Now I have two web pages in my overview folder. I have index.html and I have hptis.html. I can now edit my hptis page information.
Dreamweaver CS5/CS6 Copyright 2012 Mary L. Lanigan, Ph.D. Page 29 Last update: February 24, 2013
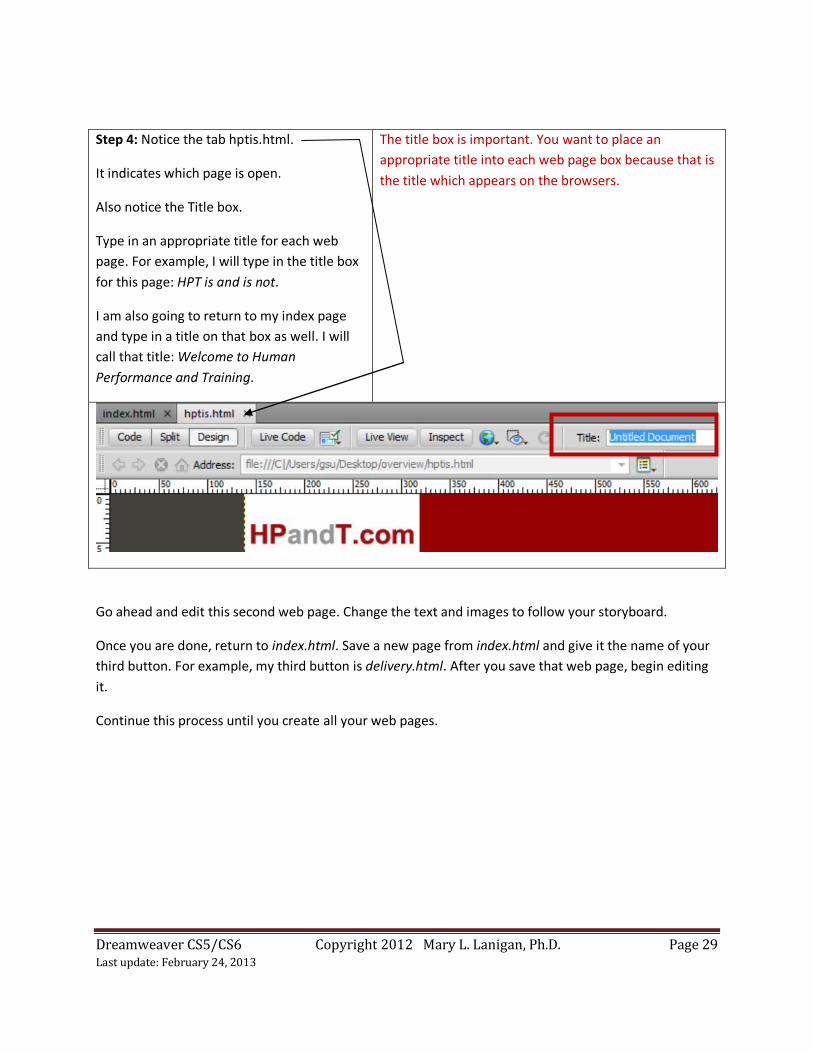
Step 4: Notice the tab hptis.html.
It indicates which page is open.
Also notice the Title box.
Type in an appropriate title for each web page. For example, I will type in the title box for this page: HPT is and is not.
I am also going to return to my index page and type in a title on that box as well. I will call that title: Welcome to Human Performance and Training.
The title box is important. You want to place an appropriate title into each web page box because that is the title which appears on the browsers.
Go ahead and edit this second web page. Change the text and images to follow your storyboard.
Once you are done, return to index.html. Save a new page from index.html and give it the name of your third button. For example, my third button is delivery.html. After you save that web page, begin editing it.
Continue this process until you create all your web pages.
Dreamweaver CS5/CS6 Copyright 2012 Mary L. Lanigan, Ph.D. Page 30 Last update: February 24, 2013
Adding forward and back buttons
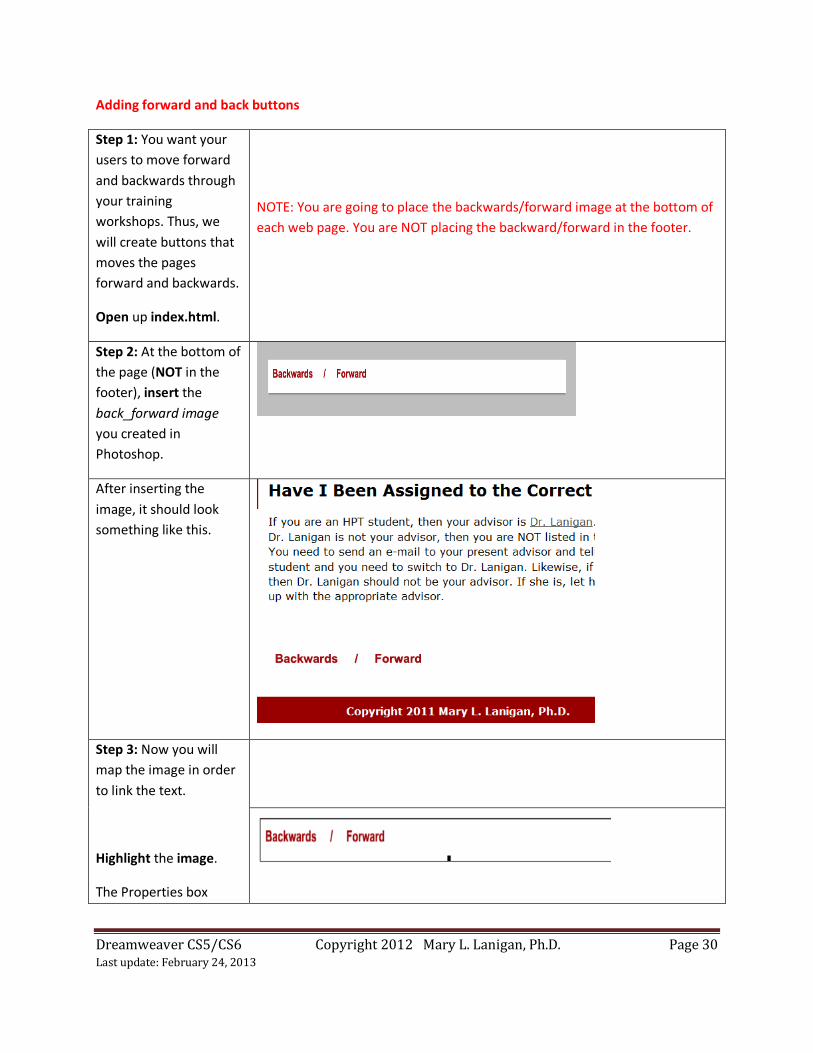
Step 1: You want your users to move forward and backwards through your training workshops. Thus, we will create buttons that moves the pages forward and backwards.
Open up index.html.
NOTE: You are going to place the backwards/forward image at the bottom of each web page. You are NOT placing the backward/forward in the footer.
Step 2: At the bottom of the page (NOT in the footer), insert the back_forward image you created in Photoshop.
After inserting the image, it should look something like this.
Step 3: Now you will map the image in order to link the text.
Highlight the image.
The Properties box
Dreamweaver CS5/CS6 Copyright 2012 Mary L. Lanigan, Ph.D. Page 31 Last update: February 24, 2013
opens.
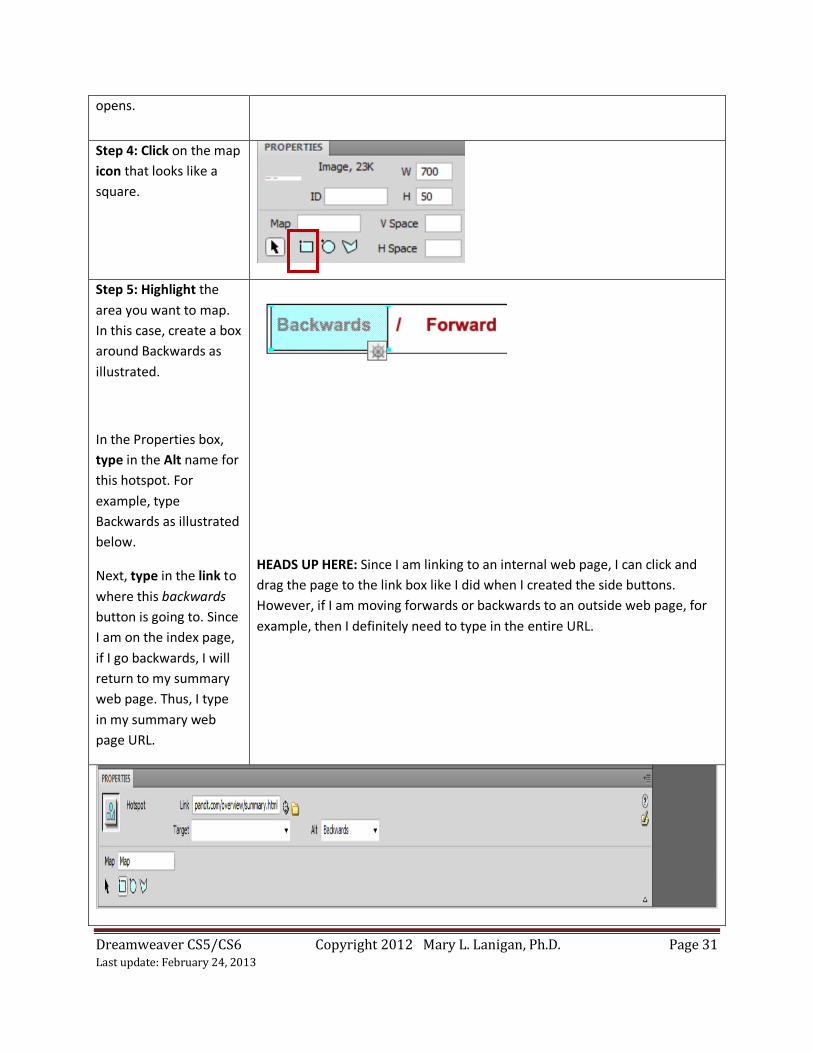
Step 4: Click on the map icon that looks like a square.
Step 5: Highlight the area you want to map. In this case, create a box around Backwards as illustrated.
In the Properties box, type in the Alt name for this hotspot. For example, type Backwards as illustrated below.
Next, type in the link to where this backwards button is going to. Since I am on the index page, if I go backwards, I will return to my summary web page. Thus, I type in my summary web page URL.
HEADS UP HERE: Since I am linking to an internal web page, I can click and drag the page to the link box like I did when I created the side buttons. However, if I am moving forwards or backwards to an outside web page, for example, then I definitely need to type in the entire URL.
Dreamweaver CS5/CS6 Copyright 2012 Mary L. Lanigan, Ph.D. Page 32 Last update: February 24, 2013
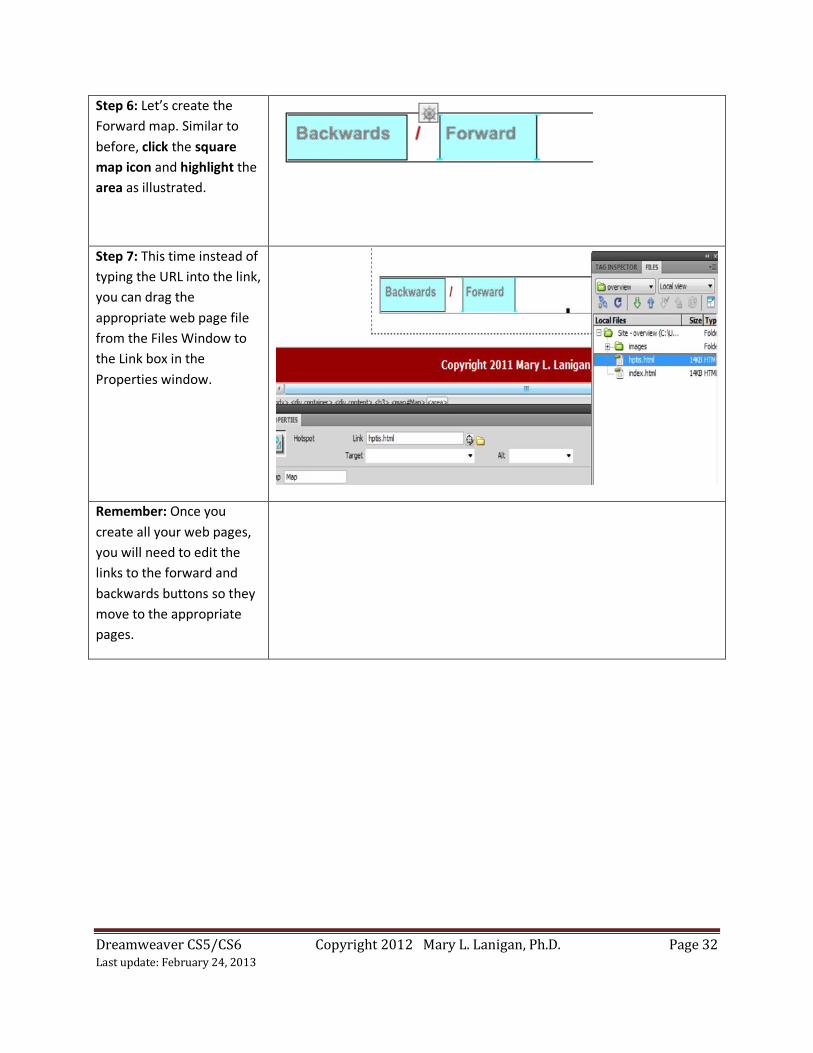
Step 6: Let’s create the Forward map. Similar to before, click the square map icon and highlight the area as illustrated.
Step 7: This time instead of typing the URL into the link, you can drag the appropriate web page file from the Files Window to the Link box in the Properties window.
Remember: Once you create all your web pages, you will need to edit the links to the forward and backwards buttons so they move to the appropriate pages.
Dreamweaver CS5/CS6 Copyright 2012 Mary L. Lanigan, Ph.D. Page 33 Last update: February 24, 2013
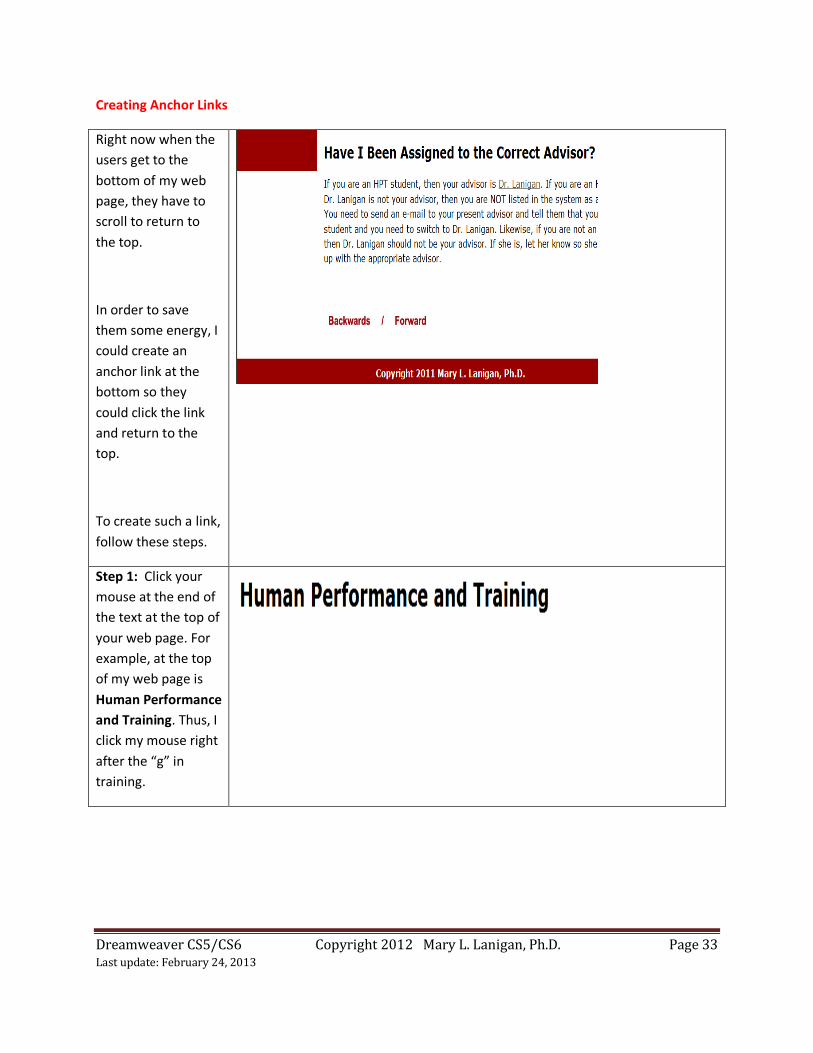
Creating Anchor Links
Right now when the users get to the bottom of my web page, they have to scroll to return to the top.
In order to save them some energy, I could create an anchor link at the bottom so they could click the link and return to the top.
To create such a link, follow these steps.
Step 1: Click your mouse at the end of the text at the top of your web page. For example, at the top of my web page is Human Performance and Training. Thus, I click my mouse right after the “g” in training.
Dreamweaver CS5/CS6 Copyright 2012 Mary L. Lanigan, Ph.D. Page 34 Last update: February 24, 2013
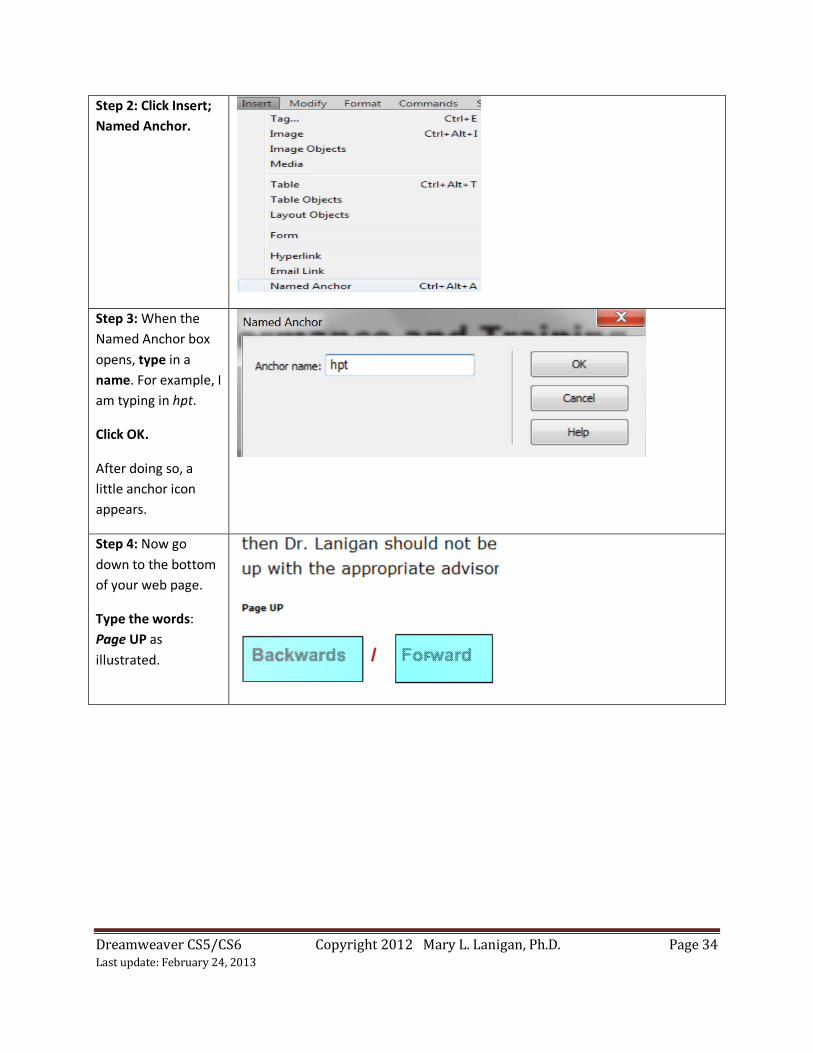
Step 2: Click Insert; Named Anchor.
Step 3: When the Named Anchor box opens, type in a name. For example, I am typing in hpt.
Click OK.
After doing so, a little anchor icon appears.
Step 4: Now go down to the bottom of your web page.
Type the words: Page UP as illustrated.
Dreamweaver CS5/CS6 Copyright 2012 Mary L. Lanigan, Ph.D. Page 35 Last update: February 24, 2013
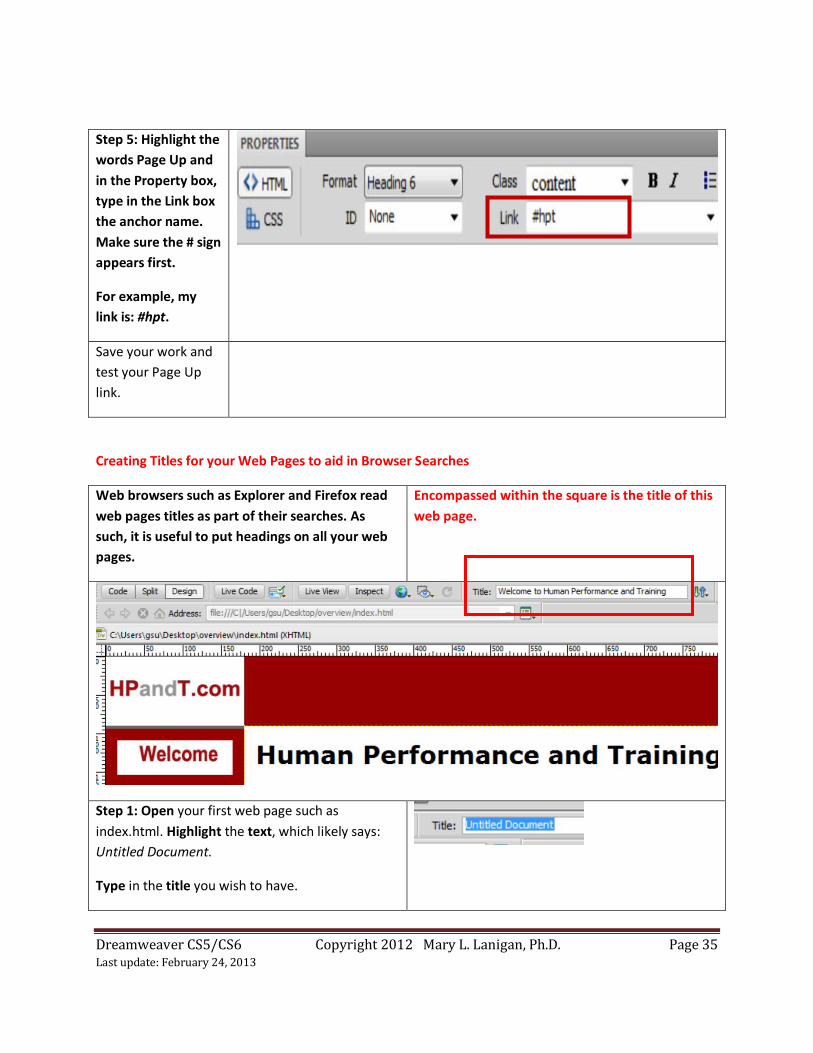
Step 5: Highlight the words Page Up and in the Property box, type in the Link box the anchor name. Make sure the # sign appears first.
For example, my link is: #hpt.
Save your work and test your Page Up link.
Creating Titles for your Web Pages to aid in Browser Searches
Web browsers such as Explorer and Firefox read web pages titles as part of their searches. As such, it is useful to put headings on all your web pages.
Encompassed within the square is the title of this web page.
Step 1: Open your first web page such as index.html. Highlight the text, which likely says: Untitled Document.
Type in the title you wish to have.
Dreamweaver CS5/CS6 Copyright 2012 Mary L. Lanigan, Ph.D. Page 36 Last update: February 24, 2013
Step 2: Enter titles for the remaining web pages contained within your web site. Each web page title should pertain either to the overall web site information or to the information on each page.
For example, I consistently used the same title for my web page. However, for another web site that I created, I used distinct titles for every web page. Each title related to the information on that page.
You have now learned the basics of creating a Dreamweaver page. Go ahead and complete your entire web site. After you have completed the final edits, go ahead and file transfer your site folder to the web server.