Embed Size (px)
Citation preview
Using Communications Management
Release 18.0
October 21, 2008
Datatel Colleague®
For last-minute updates and additional information about this manual, see AnswerNet page 4662.
Using Communications Management
© 2008 Datatel, Inc. All Rights Reserved
The information in this document is confidential and proprietary to and considered a trade secret of Datatel, Inc., and shall not be reproduced in whole or in part without the written authorization of Datatel, Inc. The information in this document is subject to change without notice.
Colleague, Benefactor, FrontView, and PowerView are registered trademarks of Datatel, Inc., in the United States and Canada. Other brand and product names are trademarks or registered trademarks of their respective holders.
Datatel, Inc.4375 Fair Lakes CourtFairfax, VA 22033(703) 968-9000(800) DATATELwww.datatel.com
Publication History
The contents list on the next page identifies the publication date of each section of your copy of this manual. See “How to Verify That Your Manual Is Current” below for instructions on how to make sure that you have the current version of the manual.
How to Verify That Your Manual Is Current
Take the following steps to ensure that all sections of your manual are current:
■ To make sure you have the current version of this manual for your release level, compare the date shown on the title page to the publication date for the Adobe Acrobat version of this manual on the Datatel Web site (www.datatel.com/documentation).
■ To make sure that your copy of the manual has been updated with all previous revisions, check that the date at the bottom of each page matches the corresponding date for that section in the contents list on the next page.
If you determine that one or more sections is outdated, we recommend that you download the entire manual from the Datatel Web site (www.datatel.com/documentation).
Tracking the History of Revisions
The contents list shows only the date of the latest revision of each section; it does not show a history of previous revisions or the reasons for revisions. Each update to this manual includes a memo describing the reasons for the update. If you want to track the history of revisions and the reasons for revisions, keep the update memos with your copy of this manual.
Using Communications Management, October 21, 2008 i© 2008 Datatel, Inc.

Publication History
1. Introduction1-1 About This Manual ..................................................................... April 25, 20061-7 About the Communications Management Module ..................... April 25, 20061-13 Overview of the Communications Management Module ........... April 25, 2006
2. Getting Started2-1 Communications Management Codes ....................................... April 25, 20062-9 Communications Management Parameters .............................. April 25, 2006
3. Outgoing Correspondence3-1 Defining Document Codes ....................................................October 21, 20083-7 Creating Documents .............................................................October 21, 20083-33 Assigning Documents to Individuals .......................................... April 25, 20063-37 Customizing Individual Documents ............................................ April 25, 2006
4. Incoming Correspondence4-1 Defining Communication Codes ...........................................October 21, 20084-5 Recording Incoming Correspondence ....................................... April 25, 2006
5. Document Tracks5-1 Defining Document Tracks ...................................................October 21, 20085-7 Assigning Document Tracks ...................................................... April 25, 2006
6. Correspondence Request Tracks6-1 Defining Correspondence Request Tracks ...........................October 21, 20086-7 Assigning Correspondence Request Tracks ............................. April 25, 2006
7. Correspondence Processing7-1 Processing Pending Correspondence ....................................... April 25, 2006
AppendixA-1 Worksheets ................................................................................ April 25, 2006
ii Using Communications Management, October 21, 2008© 2008 Datatel, Inc.
Table of Contents
List of Figures ................................................................................................................ ix
List of Tables .................................................................................................................xiii
1. IntroductionAbout This ManualWho Should Read This Manual ..................................................................1-1What This Manual Covers ...........................................................................1-1How This Manual is Organized ...................................................................1-2Where to Find More Information .................................................................1-4
About the Communications Management ModuleIn This Chapter ............................................................................................1-7Colleague ....................................................................................................1-8
The Student Application ........................................................................1-8Features of the Communications Management Module ...........................1-10Interfaces with Other Colleague Modules .................................................1-11Accessing Colleague and the Communications Management Module .....1-12
Overview of the Communications Management ModuleIn This Chapter ..........................................................................................1-13Communications Management Concepts .................................................1-14
Documents ..........................................................................................1-14Document Tracks ................................................................................1-14Communication Codes .......................................................................1-15Correspondence Request Codes .......................................................1-15Tracking Rules ....................................................................................1-15
Putting the Pieces Together ......................................................................1-16Linking Information Received with Information Being Sent .......................1-18
An Example ........................................................................................1-18Another Example ................................................................................1-19Examples Applied to a Prospect .........................................................1-21
Linking Information Received with Information Requested .......................1-24Entering Correspondence Information ......................................................1-26
Procedure for Creating a Communications Management Process .....1-27
Using Communications Management, October 21, 2008 iii© 2008 Datatel, Inc.
Table of Contents
2. Getting StartedCommunications Management CodesIn This Chapter ........................................................................................... 2-1Understanding Communications Management Codes ............................... 2-2
Codes and Office Security ................................................................... 2-3Document Codes ................................................................................. 2-3Communication Codes ......................................................................... 2-3Document Tracks ................................................................................. 2-4Correspondence Requests .................................................................. 2-4
Setup Codes Defined in the Communications Management Module ......... 2-5Correspondence Statuses .................................................................... 2-5Document Types .................................................................................. 2-6Person E-mail Types ............................................................................ 2-7
Codes Used in the Communications Management Module ........................ 2-8Office Codes ........................................................................................ 2-8
Communications Management ParametersIn This Chapter ........................................................................................... 2-9Understanding Communications Management Parameters ..................... 2-10
Default Word Processor Settings ....................................................... 2-10Mail Merge Setup Using PC-Based Word Processors ....................... 2-10Correspondence Actions .................................................................... 2-10Staff Setup ......................................................................................... 2-13
Defining Default Word Processor Settings ............................................... 2-14Defining Correspondence Actions ............................................................ 2-15
3. Outgoing CorrespondenceDefining Document CodesIn This Chapter ........................................................................................... 3-1Before You Begin ........................................................................................ 3-1Understanding Document Codes ................................................................ 3-2
Components of a Document Code ....................................................... 3-3Document Code Naming Conventions ....................................................... 3-5
Procedure for Defining a Document Code ........................................... 3-5
Creating DocumentsIn This Chapter ........................................................................................... 3-7Before You Begin ........................................................................................ 3-7Understanding Document Creation ............................................................ 3-8Building Custom Paragraphs ...................................................................... 3-9
Setting up a Bookmark Document ..................................................... 3-11Using Merge Fields in a Custom Paragraph ...................................... 3-13Assigning Custom Paragraphs ........................................................... 3-14
Assigning Document Paragraphs ............................................................. 3-15Setting Up Hardcopy Document Options .................................................. 3-17Setting Up E-Mail Document Options ....................................................... 3-18
Noteworthy Fields on the EMLD Form ............................................... 3-18
iv Using Communications Management, October 21, 2008© 2008 Datatel, Inc.
Table of Contents
Procedure for Setting Up E-Mail Document Options ..........................3-19Building a Document from Custom Paragraphs ........................................3-20
Procedure for Setting Up and Using Word Processors ......................3-21Using Virtual Fields and Pointers on the DFS Form ...........................3-28
Setting Up Joint Mailing ............................................................................3-30Noteworthy Fields on the JTML Form .................................................3-31Procedure for Setting Up Joint Mailing ...............................................3-32
Assigning Documents to IndividualsIn This Chapter ..........................................................................................3-33Before You Begin ......................................................................................3-33Understanding Document Assignment ......................................................3-34
Procedure for Assigning a Document to an Individual ........................3-36
Customizing Individual DocumentsIn This Chapter ..........................................................................................3-37Before You Begin ......................................................................................3-37Understanding Document Customization ..................................................3-38Listing All Pending Documents for an Individual .......................................3-39Locating the Particular Document .............................................................3-40Selecting a Particular Paragraph ..............................................................3-41
Procedure for Customizing an Individual Document ...........................3-42
4. Incoming CorrespondenceDefining Communication CodesIn This Chapter ............................................................................................4-1Before You Begin ........................................................................................4-1Understanding Communication Codes .......................................................4-2
Triggering Other Actions .......................................................................4-3Communication Code Naming Conventions .........................................4-4Procedure for Defining Communication Codes ....................................4-4
Recording Incoming CorrespondenceIn This Chapter ............................................................................................4-5Before You Begin ........................................................................................4-5Understanding Communication Code Assignment .....................................4-6
Statuses of Incoming Correspondence .................................................4-8Procedure for Recording Incoming Correspondence: Individual Mode 4-9Procedure for Recording Incoming Correspondence: Group Mode ...4-10
5. Document TracksDefining Document TracksIn This Chapter ............................................................................................5-1Before You Begin ........................................................................................5-1Understanding Document Tracks ................................................................5-2
Adding Documents to the Track ...........................................................5-3
Using Communications Management, October 21, 2008 v© 2008 Datatel, Inc.
Table of Contents
Scheduling Documents for Processing ................................................ 5-3Office Codes and Security ................................................................... 5-4Tracking Code Naming Conventions ................................................... 5-4Procedure for Defining a Document Track ........................................... 5-5
Assigning Document TracksIn This Chapter ........................................................................................... 5-7Before You Begin ........................................................................................ 5-7Understanding Document Track Assignment ............................................. 5-8
Track Assignment Actions .................................................................... 5-8Procedure for Assigning a Document Track: Individual Mode ............. 5-9Procedure for Assigning a Document Track: Group Mode ................ 5-10
6. Correspondence Request TracksDefining Correspondence Request TracksIn This Chapter ........................................................................................... 6-1Before You Begin ........................................................................................ 6-1Understanding Correspondence Request Tracks ....................................... 6-2
Required Communication Codes ......................................................... 6-3Rules .................................................................................................... 6-3Instance Actions ................................................................................... 6-3Assignment Actions .............................................................................. 6-4Follow-Up Actions ................................................................................ 6-4Correspondence Request Track Naming Conventions ........................ 6-4Procedure for Defining a Correspondence Request Track .................. 6-6
Assigning Correspondence Request TracksIn This Chapter ........................................................................................... 6-7Before You Begin ........................................................................................ 6-7Understanding Correspondence Request Track Assignment ..................... 6-8
Rules .................................................................................................... 6-8Track Assignment Actions .................................................................... 6-8Procedure for Assigning Correspondence Request Tracks: Individual
Mode .............................................................................................. 6-9Procedure for Assigning Correspondence Request Tracks: Group Mode
6-10
7. Correspondence ProcessingProcessing Pending CorrespondenceIn This Chapter ........................................................................................... 7-1Understanding Correspondence Processing .............................................. 7-2Batch Processing ........................................................................................ 7-3Building and Processing Letter Requests ................................................... 7-7
Noteworthy Fields on the PCEX Form ................................................. 7-8Correcting Errors and Customizing Correspondence .......................... 7-9Procedure for Processing Existing Correspondence ......................... 7-10
vi Using Communications Management, October 21, 2008© 2008 Datatel, Inc.
Table of Contents
Procedure for Building and Processing Correspondence in Single Step ...7-12
Processing from a Saved List .............................................................7-13Procedure for Clearing Errors .............................................................7-14
AppendixA. Worksheets
In This Appendix ........................................................................................ A-1Document Codes ....................................................................................... A-2Communication Codes ............................................................................... A-3Tracking Codes .......................................................................................... A-4Communication Codes ............................................................................... A-5Correspondence Requests ........................................................................ A-6Validation Code Tables .............................................................................. A-7
Index
Using Communications Management, October 21, 2008 vii© 2008 Datatel, Inc.
Table of Contents
viii Using Communications Management, October 21, 2008© 2008 Datatel, Inc.
List of Figures
1. IntroductionAbout This Manual
About the Communications Management ModuleFigure 1-1: Location of the Communications Management Module Within
Colleague and Core .......................................................... 1-9Figure 1-2: The Communications Management Module and Colleague.. 1-11
Overview of the Communications Management ModuleFigure 1-3: Example of the Flow of Information Through the Admissions and
Communications Management Modules ......................... 1-17Figure 1-4: Example of a Communication Code and a Document Track. 1-19Figure 1-5: Example of an Admission Tracking Rule Linking to a
Communications Code and Document Track.................. 1-20Figure 1-6: Example of a Prospect Inquiry Card ...................................... 1-21Figure 1-7: The Initial Entry of Prospect Information................................ 1-22Figure 1-8: Example Communications for an Individual........................... 1-23Figure 1-9: Entering the Correspondence Information............................. 1-26
2. Getting StartedCommunications Management Codes
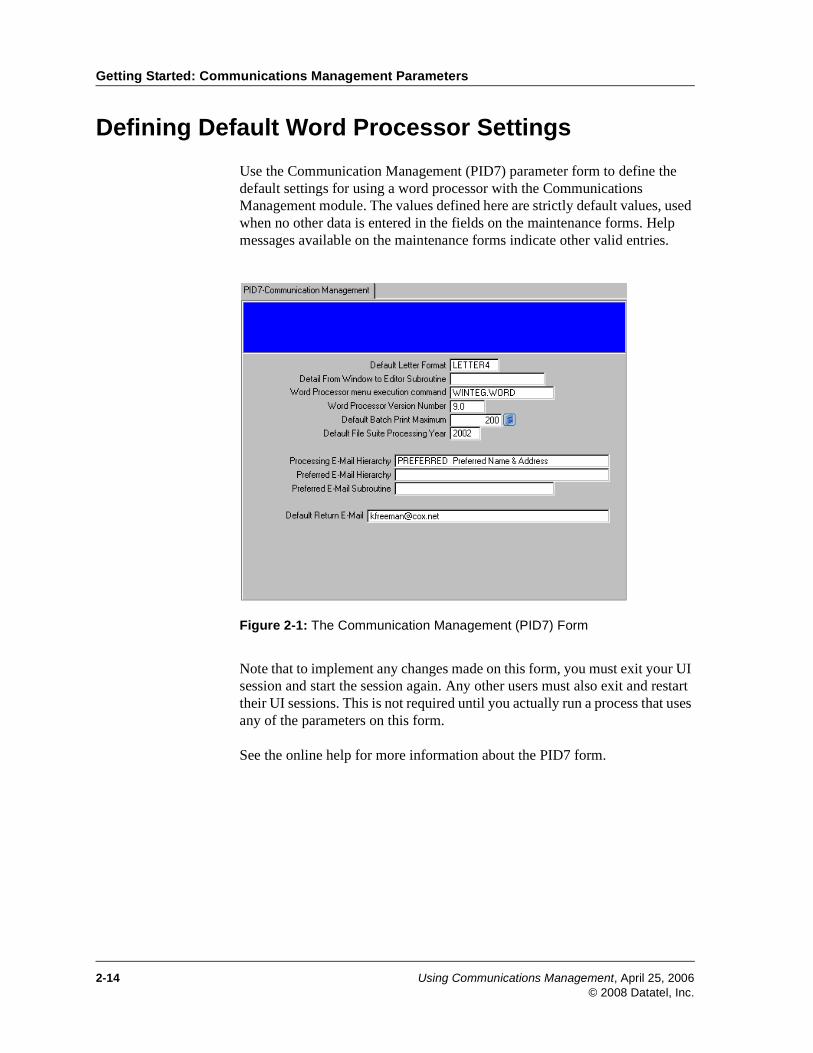
Communications Management ParametersFigure 2-1: The Communication Management (PID7) Form.................... 2-14
3. Outgoing CorrespondenceDefining Document CodesFigure 3-1: Document Codes (DOC) Form ................................................ 3-2
Creating DocumentsFigure 3-2: Define Custom Paragraphs (DPAR) Form............................... 3-9Figure 3-3: Document Paragraphs (DOCP) Form.................................... 3-15Figure 3-4: Hardcopy Document Options (HDCD) Form ......................... 3-17Figure 3-5: E-Mail Document Options (EMLD) Form ............................... 3-18Figure 3-6: Document Codes (DOC) Form .............................................. 3-20Figure 3-7: Document Codes (DOC) Form .............................................. 3-21
Using Communications Management, October 21, 2008 ix© 2008 Datatel, Inc.
List of Figures
Figure 3-8: Document File Setup (DFS) Form......................................... 3-22Figure 3-9: Word Processor Search Dialog Box...................................... 3-26Figure 3-10: Document File Setup (DFS) Form....................................... 3-28Figure 3-11: Joint Mailing (JTML) Form................................................... 3-30
Assigning Documents to IndividualsFigure 3-12: Individual Pending Corres (IPC) Form ................................ 3-34Figure 3-13: Assigning a Document to an Individual ............................... 3-35
Customizing Individual DocumentsFigure 3-14: Individual Pending Corres (IPC) Form ................................ 3-39Figure 3-15: Locating a Particular Pending Document ............................ 3-40Figure 3-16: Listing All Paragraphs in a Document ................................. 3-41
4. Incoming CorrespondenceDefining Communication CodesFigure 4-1: Communication Codes (CMC) Form ....................................... 4-2
Recording Incoming CorrespondenceFigure 4-2: The Communication Code Entry (CRI) Form .......................... 4-7Figure 4-3: The Group Communication Entry (CRG) Form....................... 4-7
5. Document TracksDefining Document TracksFigure 5-1: Tracking Codes (TRC) Form ................................................... 5-2
Assigning Document Tracks
6. Correspondence Request TracksDefining Correspondence Request TracksFigure 6-1: Correspondence Requests Definition (CRRD) Form .............. 6-2
Assigning Correspondence Request Tracks
7. Correspondence ProcessingProcessing Pending CorrespondenceFigure 7-1: View Pending Correspondence (VPC) Form........................... 7-2Figure 7-2: The Process Correspondence Batch (PCB) Form .................. 7-3Figure 7-3: The Process Corres. Print Options (PCBP) Form................... 7-4Figure 7-4: Express Corresp. Processing (PCEX) Form ........................... 7-7Figure 7-5: Document Merge Processing (DMP) Form ........................... 7-13Figure 7-6: Saved List Inquiry (SVI) Form ............................................... 7-14
x Using Communications Management, October 21, 2008© 2008 Datatel, Inc.
List of Figures
Figure 7-7: Saved List Inquiry Detail (SVID) Form................................... 7-15Figure 7-8: Name and Address Entry (NAE) Form .................................. 7-16Figure 7-9: Individual Pending Corres (IPC) Form................................... 7-17Figure 7-10: Individual Pending Corres Det (IPCD) Form........................ 7-18
A. AppendixWorksheets
Using Communications Management, October 21, 2008 xi© 2008 Datatel, Inc.
List of Figures
xii Using Communications Management, October 21, 2008© 2008 Datatel, Inc.
List of Tables
1. IntroductionAbout This ManualTable 1-1: Sources of Information for Using the Communications Management
Module................................................................................1-4Table 1-2: Additional Sources of Information about Communications
Management ......................................................................1-5
About the Communications Management Module
Overview of the Communications Management Module
2. Getting StartedCommunications Management CodesTable 2-1: Special Processing for Correspondence Status Codes ..............2-5Table 2-2: Datatel-supported Standard Document Types............................2-6
Communications Management ParametersTable 2-3: Standard Action Codes .............................................................2-12
3. Outgoing CorrespondenceDefining Document CodesTable 3-1: Information Needed Before You Define Document Codes .........3-1Table 3-2: Standard History Types...............................................................3-4Table 3-3: Example of Communication Management Code Naming
Convention .........................................................................3-5
Creating DocumentsTable 3-4: Information Needed Before You Create Documents...................3-7
Assigning Documents to IndividualsTable 3-5: Information Needed Before You Define Documents .................3-33
Customizing Individual Documents
Using Communications Management, October 21, 2008 xiii© 2008 Datatel, Inc.
List of Tables
Table 3-6: Information Needed Before You Can Customize Documents .. 3-37
4. Incoming CorrespondenceDefining Communication CodesTable 4-1: Information Needed Before You Define Communication Codes 4-1Table 4-2: Forms that Allow You to Detail to the CMC Form....................... 4-2Table 4-3: Detail Forms from the CMC Form .............................................. 4-3Table 4-4: Example of Communication Management Code Naming
Convention......................................................................... 4-4
Recording Incoming CorrespondenceTable 4-5: Information Needed Before You Assign Communication Codes 4-5Table 4-6: Forms Used to Assign Communication Codes .......................... 4-6Table 4-7: Status Codes for Incoming Correspondence ............................. 4-8
5. Document TracksDefining Document TracksTable 5-1: Information Needed Before You Define Document Tracks ........ 5-1Table 5-2: Forms that Allow You to Detail to the TRC Form ....................... 5-3Table 5-3: Detail Forms from the TRC Form............................................... 5-3Table 5-4: Example of Communication Code Naming Convention ............. 5-4
Assigning Document TracksTable 5-5: Information Needed Before You Assign Document Tracks ........ 5-7
6. Correspondence Request TracksDefining Correspondence Request TracksTable 6-1: Information Needed Before You Define Correspondence Request
Tracks ................................................................................ 6-1Table 6-2: Forms that Allow You to Detail to the CRRD Form .................... 6-2Table 6-3: Detail Forms from the CRRD Form............................................ 6-3Table 6-4: Example of Communication Management Code Naming
Convention......................................................................... 6-5
Assigning Correspondence Request TracksTable 6-5: Information Needed Before You Assign Correspondence Request
Tracks ................................................................................ 6-7
xiv Using Communications Management, October 21, 2008© 2008 Datatel, Inc.
List of Tables
7. Correspondence ProcessingProcessing Pending Correspondence
A. Appendix
WorksheetsTable A-1: Worksheets for Setting Up the Communications Management
Module............................................................................... A-1Table A-2: Document Codes Worksheet .................................................... A-2Table A-3: Communication Codes Worksheet............................................ A-3Table A-4: Tracking Codes Worksheet ....................................................... A-4Table A-5: Tracking Codes Worksheet ....................................................... A-4Table A-6: Communication Codes Worksheet............................................ A-5Table A-7: Correspondence Requests Worksheet ..................................... A-6Table A-8: Validation Code Tables Worksheet ........................................... A-7
Using Communications Management, October 21, 2008 xv© 2008 Datatel, Inc.

List of Tables
xvi Using Communications Management, October 21, 2008© 2008 Datatel, Inc.
Using Communications Management
1. Introduction

Introduction1
About This Manual April 25, 2006
Who Should Read This Manual
Anyone who is responsible for tracking correspondence between an office and students, prospects or financial aid applicants should read this manual. This group may include admissions, registrar, financial aid administrative staff and department chairs.
What This Manual Covers
This manual provides instructions for using Communications Management to handle outgoing and incoming correspondence, document tracks, correspondence request tracks, and correspondence processing.
Using Communications Management, April 25, 2006 1-1© 2008 Datatel, Inc.
Introduction: About This Manual
How This Manual is Organized
“Introduction” which you are reading now, provides information about this manual and its organization, and an introduction to the Communications Management module and where it fits in Datatel Colleague. This part also includes an overview chapter, which provides basic information on Communications Management concepts
“Getting Started” provides information on setting up codes for the Communications Management module and defining parameters. Also included are procedures for the following:
■ defining default word processor settings
■ defining correspondence actions
“Outgoing Correspondence” provides information on defining documents and assigning documents to individuals. Included are procedures for the following:
■ defining document codes
■ creating documents
■ assigning a document to an individual
■ customizing documents
“Incoming Correspondence” provides information on communication codes and incoming correspondence. Included are procedures for the following:
■ defining communication codes
■ recording incoming correspondence
“Document Tracks” provides information on document tracks. Included are procedures for the following:
■ adding documents to the track
■ scheduling documents for processing
■ tracking code naming convention
■ assigning document tracks
“Correspondence Request Tracks” provides information on defining and assigning correspondence request tracks. Included are procedures for the following:
■ defining a correspondence request track
■ assigning correspondence request tracks
1-2 Using Communications Management, April 25, 2006© 2008 Datatel, Inc.
How This Manual is Organized
“Correspondence Processing” provides information on processing pending correspondence. Included are procedures for the following:
■ batch processing
■ correcting errors and customizing correspondence
■ processing correspondence
The Appendices part contains worksheets to assist you in setting up the Communications Management module.
Using Communications Management, April 25, 2006 1-3© 2008 Datatel, Inc.
Introduction: About This Manual
Where to Find More Information
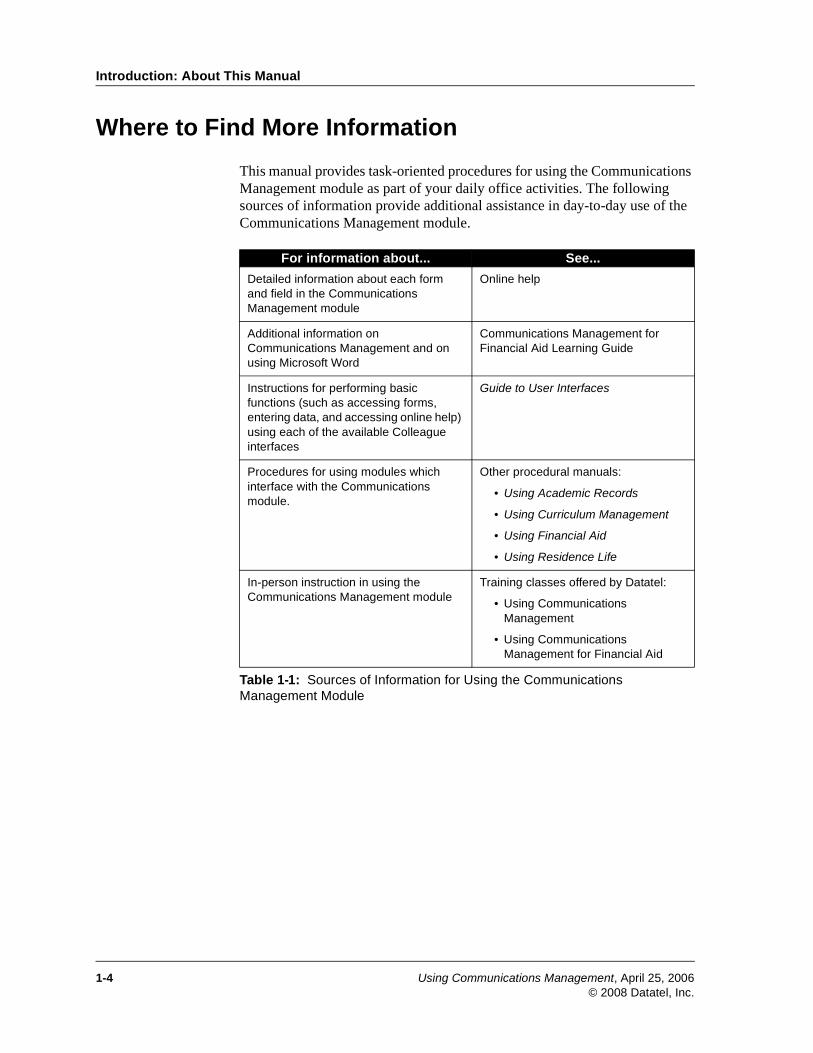
This manual provides task-oriented procedures for using the Communications Management module as part of your daily office activities. The following sources of information provide additional assistance in day-to-day use of the Communications Management module.
For information about... See...
Detailed information about each form and field in the Communications Management module
Online help
Additional information on Communications Management and on using Microsoft Word
Communications Management for Financial Aid Learning Guide
Instructions for performing basic functions (such as accessing forms, entering data, and accessing online help) using each of the available Colleague interfaces
Guide to User Interfaces
Procedures for using modules which interface with the Communications module.
Other procedural manuals:
• Using Academic Records
• Using Curriculum Management
• Using Financial Aid
• Using Residence Life
In-person instruction in using the Communications Management module
Training classes offered by Datatel:
• Using Communications Management
• Using Communications Management for Financial Aid
Table 1-1: Sources of Information for Using the Communications Management Module
1-4 Using Communications Management, April 25, 2006© 2008 Datatel, Inc.
Where to Find More Information
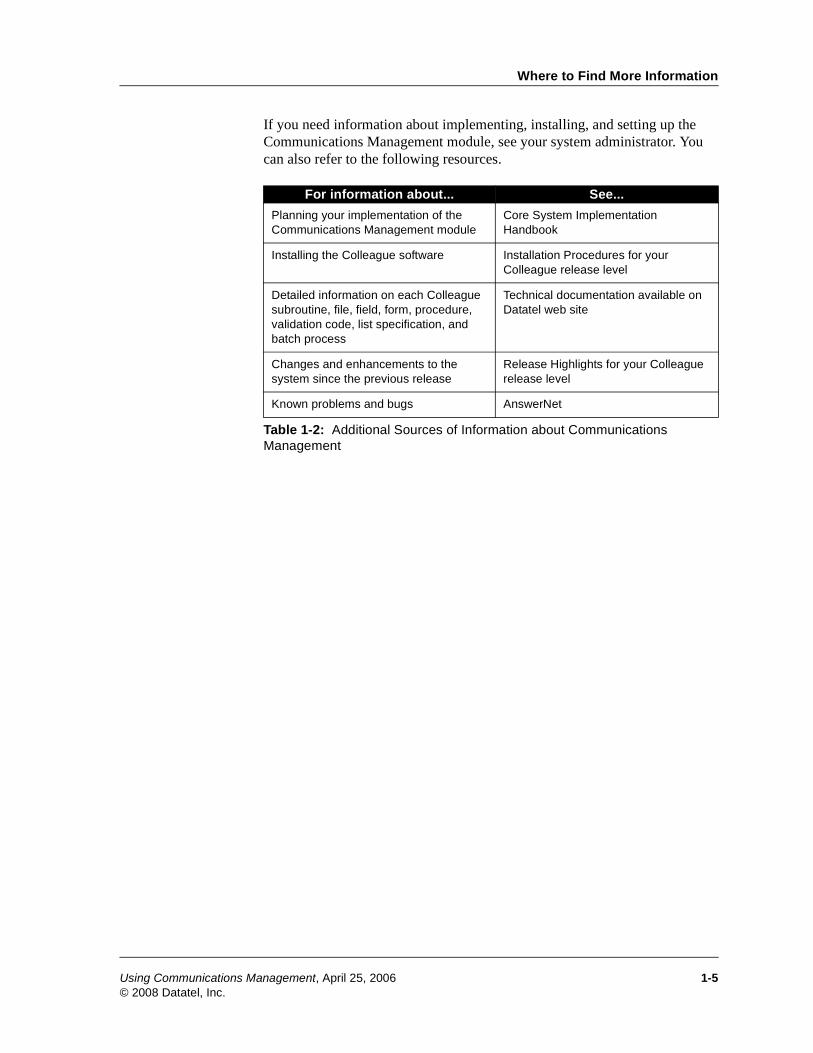
If you need information about implementing, installing, and setting up the Communications Management module, see your system administrator. You can also refer to the following resources.
For information about... See...
Planning your implementation of the Communications Management module
Core System Implementation Handbook
Installing the Colleague software Installation Procedures for your Colleague release level
Detailed information on each Colleague subroutine, file, field, form, procedure, validation code, list specification, and batch process
Technical documentation available on Datatel web site
Changes and enhancements to the system since the previous release
Release Highlights for your Colleague release level
Known problems and bugs AnswerNet
Table 1-2: Additional Sources of Information about Communications Management
Using Communications Management, April 25, 2006 1-5© 2008 Datatel, Inc.
Introduction: About This Manual
1-6 Using Communications Management, April 25, 2006© 2008 Datatel, Inc.
Introduction1
About the Communications Management Module April 25, 2006
In This Chapter
The Communications Management module is a part of Colleague’s Core application. The Communications Management module improves your institution’s ability to track correspondence, telephone calls, personal visits, and other contacts with individuals or organizations. This chapter provides the following:
■ a brief description of Colleague, focusing on the parts of Colleague which interact with the Communications Management module
■ a summary of the features of the Communications Management module
■ a description of the interfaces between the Communications Management module and other Colleague modules
■ information about accessing the Communications Management module
Using Communications Management, April 25, 2006 1-7© 2008 Datatel, Inc.
Introduction: About the Communications Management Module
Colleague
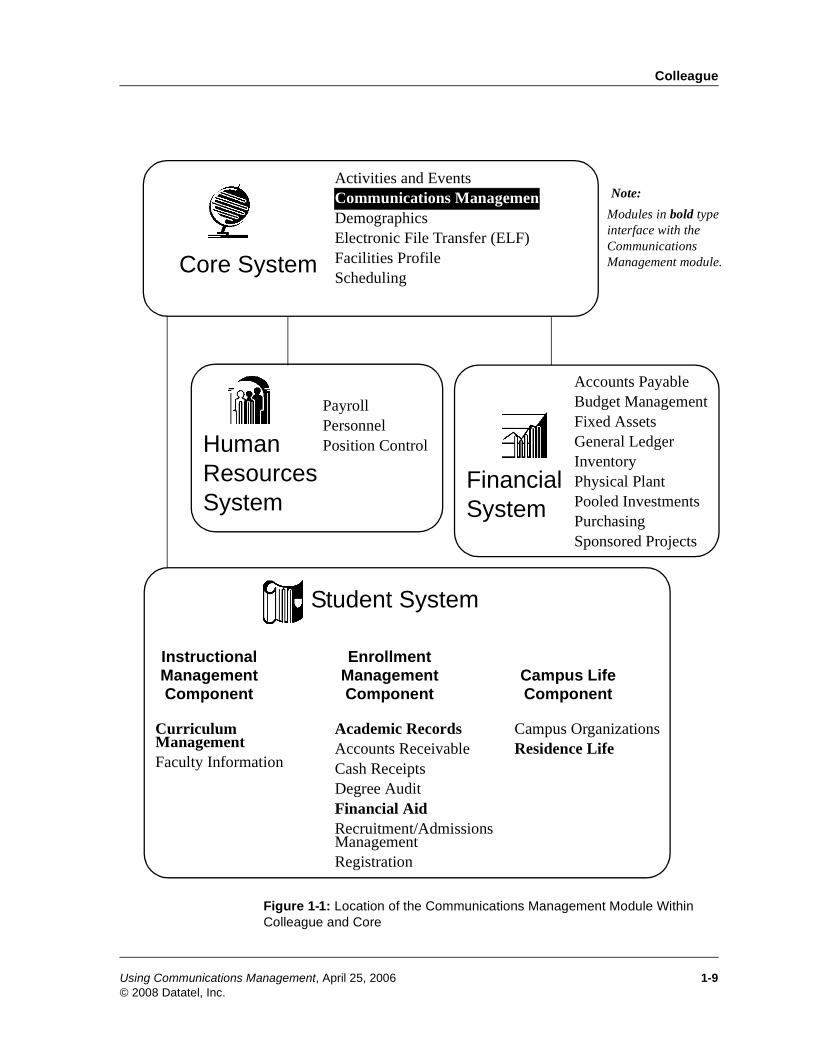
Colleague is Datatel’s administrative software solution, designed to support every aspect of an institution from student services and financial management to human resources. Figure 1-1 is an overview diagram of Colleague. Of Colleague’s four applications, two are important to the Communications Management module:
■ The Core application is at the center of Colleague, providing a central location for information and processing rules used throughout Colleague.
■ The Student application provides an automated administrative solution for all aspects of student services provided by your institution.
The two other Colleague applications, HR and Colleague Finance, have little interaction with the Communications Management module.
As shown in Figure 1-1, the Core application is divided into six modules, of which Communications Management is one. See “Interfaces with Other Colleague Modules” on page 1-11 for a description of the interfaces that interact with Communications Management.
The Student Application
As shown in Figure 1-1, the Student application is divided into three components (Instructional Management, Enrollment Management, and Campus Life), and then further divided into twelve modules. The following Student application modules interface with the Communications Management module: Academic Records, Curriculum Management, Financial Aid, and Residence Life. See “Interfaces with Other Colleague Modules” on page 1-11 for a description of those interfaces.See Getting Started With Colleague Student for a detailed description of the Student application and each of its components and modules.
1-8 Using Communications Management, April 25, 2006© 2008 Datatel, Inc.
Colleague
Figure 1-1: Location of the Communications Management Module Within Colleague and Core
Activities and EventsCommunications ManagementDemographicsElectronic File Transfer (ELF)Facilities ProfileScheduling
Campus OrganizationsResidence Life
Instructional Management Component
Enrollment Management Component
Note:
Modules in bold type interface with the Communications Management module.
Campus Life Component
Academic RecordsAccounts ReceivableCash ReceiptsDegree AuditFinancial AidRecruitment/Admissions ManagementRegistration
Curriculum ManagementFaculty Information
Student System
Human Resources System
Financial System
Core System
Payroll Personnel Position Control
Accounts Payable Budget ManagementFixed AssetsGeneral LedgerInventoryPhysical PlantPooled InvestmentsPurchasingSponsored Projects
Using Communications Management, April 25, 2006 1-9© 2008 Datatel, Inc.
Introduction: About the Communications Management Module
Features of the Communications Management Module
The Communications Management module improves your institution’s ability to track correspondence, telephone calls, personal visits, and other contacts with individuals or organizations. With the Communications Management module, you can:
■ manage and coordinate mailings from all areas of your institution
■ maintain a complete history of correspondence and other contacts with prospects, students, employees, and vendors
■ automatically alert students enrolled in a specific program when the degree requirements for that program are changed or updated
■ develop customized correspondence tracks, identifying specified mailing dates, expected return correspondence, and subsequent mailings
■ monitor the success of mailing campaigns
■ process large batches of correspondence quickly and easily, with personalized salutations and other variables within letters
■ track all incoming correspondence, noting received documentation and generating reminders for missing information
■ organize and control printing on host or PC-based word processors
■ interface with word processors and list processors
■ generate mass mailing lists based on data contained in Colleague or from outside sources
■ maximize your postal budget with bulk mail features
1-10 Using Communications Management, April 25, 2006© 2008 Datatel, Inc.
Interfaces with Other Colleague Modules
Interfaces with Other Colleague Modules
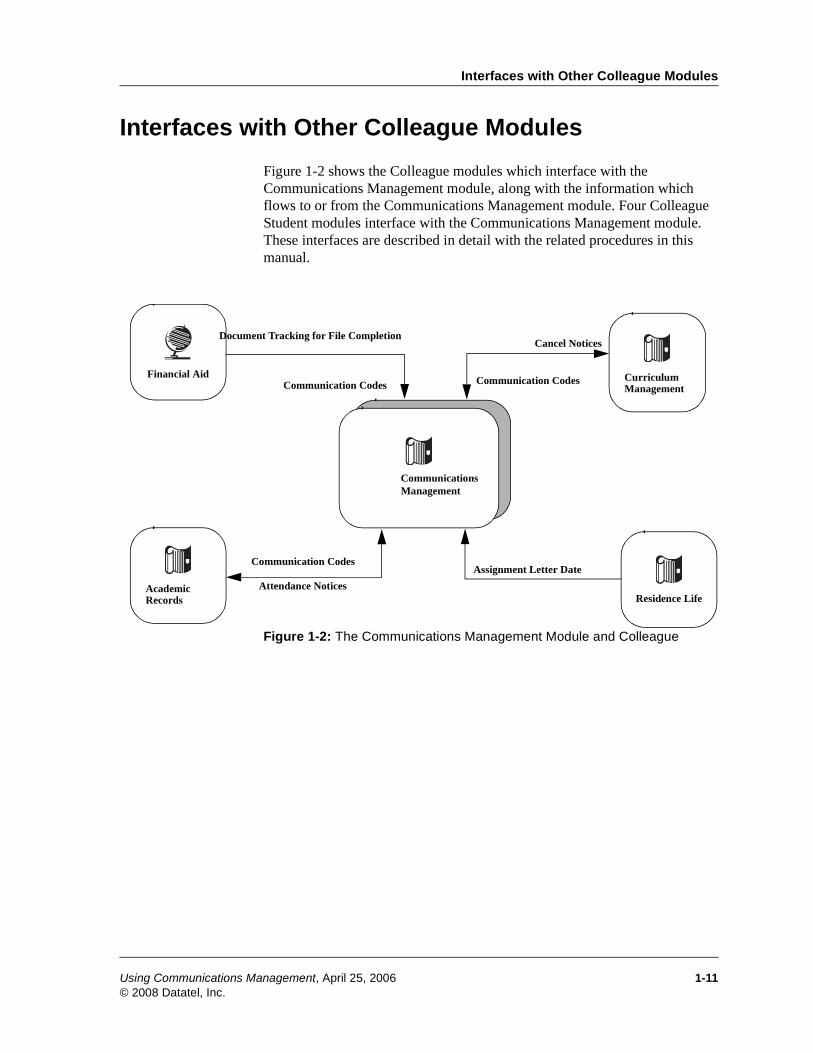
Figure 1-2 shows the Colleague modules which interface with the Communications Management module, along with the information which flows to or from the Communications Management module. Four Colleague Student modules interface with the Communications Management module. These interfaces are described in detail with the related procedures in this manual.
Figure 1-2: The Communications Management Module and Colleague
Communications
Financial Aid
Residence Life
CurriculumManagement
AcademicRecords
Communication Codes
Cancel Notices
Communication Codes
Communication CodesAssignment Letter Date
Document Tracking for File Completion
Management
Attendance Notices
Using Communications Management, April 25, 2006 1-11© 2008 Datatel, Inc.
Introduction: About the Communications Management Module
Accessing Colleague and the Communications Management Module
There are many ways to set up access to Colleague, and the setup at your institution may differ from that at another institution. Because of these differences, Datatel does not provide procedures for accessing Colleague. Your supervisor or system administrator should provide you with your Colleague login ID, password, and step-by-step instructions for accessing the system.
Once in Colleague, you can access forms in the Communications Management module. See Guide to User Interfaces for information about accessing a form and navigating around a form.
Note: Your system administrator can set up Colleague to restrict access to certain parts of the system for each user. If you find that you cannot access a form which you need to perform your work, see your supervisor or system administrator.
1-12 Using Communications Management, April 25, 2006© 2008 Datatel, Inc.
Introduction1
Overview of the Communications Management Module April 25, 2006
In This Chapter
This chapter provides an overview of the Communications Management module.
This chapter describes how Datatel University, a fictitious institution in Fairfax, Virginia, uses the Communications Management module to manage its communications between the admissions office and prospects and applicants. The descriptions in this chapter explain how the Communications Management module may be used for many different tasks but does not fully explain its functionality.
The examples presented in this chapter are based on admissions processes. These examples are for illustrative purposes only. You can use the Communications Management module with any other Colleague module. The term “client” refers to anyone with which you correspond or from whom you expect correspondence. For example, in Admissions, your clients are prospects and applicants; in Human Resources, your clients are employees.
Note: The examples in this chapter are intended to provide you with an idea of how you can manage the processes of communicating with prospects and applicants. Datatel University (DU), a traditional four-year institution, is used as the basis for these examples. Because all institutions differ in the way they handle the processes described in this chapter, the examples in this section represent general scenarios that you can customize to your specific needs.
Using Communications Management, April 25, 2006 1-13© 2008 Datatel, Inc.
Introduction: Overview of the Communications Management Module
Communications Management Concepts
To understand how Datatel University proceeded with its implementation of the Communications Management module, you must understand some of the basic Communications Management concepts.
Documents
All outgoing communications are referred to as documents. There are two types of documents:
■ letters or other written communications that you create as either word processing or ASCII text that you actually generate and print
■ “coded” documents that represent pre-printed communications such as brochures and catalogs that you do not generate
When you instruct Colleague to send a particular letter, you can also include an instruction to send a specific “coded” document, such as a brochure. You can also have Colleague keep track of each document that it sends to an individual.
See “Defining Document Codes” beginning on page 3-1 for more information about setting up your document codes.
Document Tracks
A document track is a group of document codes. For example, you might have a document track for prospects that includes each letter you send to prospects before you receive their admissions applications. In this track you can define when to send the first piece of correspondence, what makes up that piece of correspondence, and then when to send subsequent or follow-up pieces of correspondence. You can combine document tracks with communication codes to automate a great deal of the communications that you send and receive from your clients.
See “Defining Document Tracks” beginning on page 5-1 for more information about setting up your document tracks.
Note: The following is a high-level overview of some of the codes in the Communications Management module. Refer to the appropriate chapter of this manual for complete details on the codes describe below.
1-14 Using Communications Management, April 25, 2006© 2008 Datatel, Inc.
Communications Management Concepts
Communication Codes
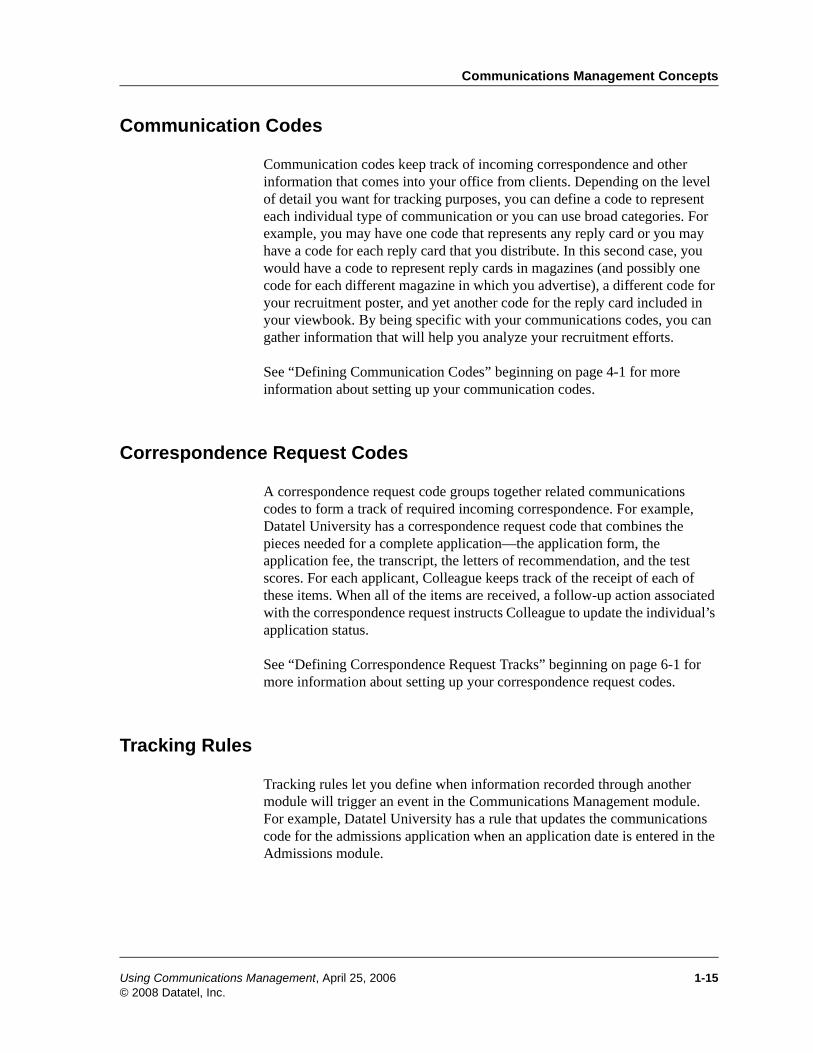
Communication codes keep track of incoming correspondence and other information that comes into your office from clients. Depending on the level of detail you want for tracking purposes, you can define a code to represent each individual type of communication or you can use broad categories. For example, you may have one code that represents any reply card or you may have a code for each reply card that you distribute. In this second case, you would have a code to represent reply cards in magazines (and possibly one code for each different magazine in which you advertise), a different code for your recruitment poster, and yet another code for the reply card included in your viewbook. By being specific with your communications codes, you can gather information that will help you analyze your recruitment efforts.
See “Defining Communication Codes” beginning on page 4-1 for more information about setting up your communication codes.
Correspondence Request Codes
A correspondence request code groups together related communications codes to form a track of required incoming correspondence. For example, Datatel University has a correspondence request code that combines the pieces needed for a complete application—the application form, the application fee, the transcript, the letters of recommendation, and the test scores. For each applicant, Colleague keeps track of the receipt of each of these items. When all of the items are received, a follow-up action associated with the correspondence request instructs Colleague to update the individual’s application status.
See “Defining Correspondence Request Tracks” beginning on page 6-1 for more information about setting up your correspondence request codes.
Tracking Rules
Tracking rules let you define when information recorded through another module will trigger an event in the Communications Management module. For example, Datatel University has a rule that updates the communications code for the admissions application when an application date is entered in the Admissions module.
Using Communications Management, April 25, 2006 1-15© 2008 Datatel, Inc.
Introduction: Overview of the Communications Management Module
Putting the Pieces Together
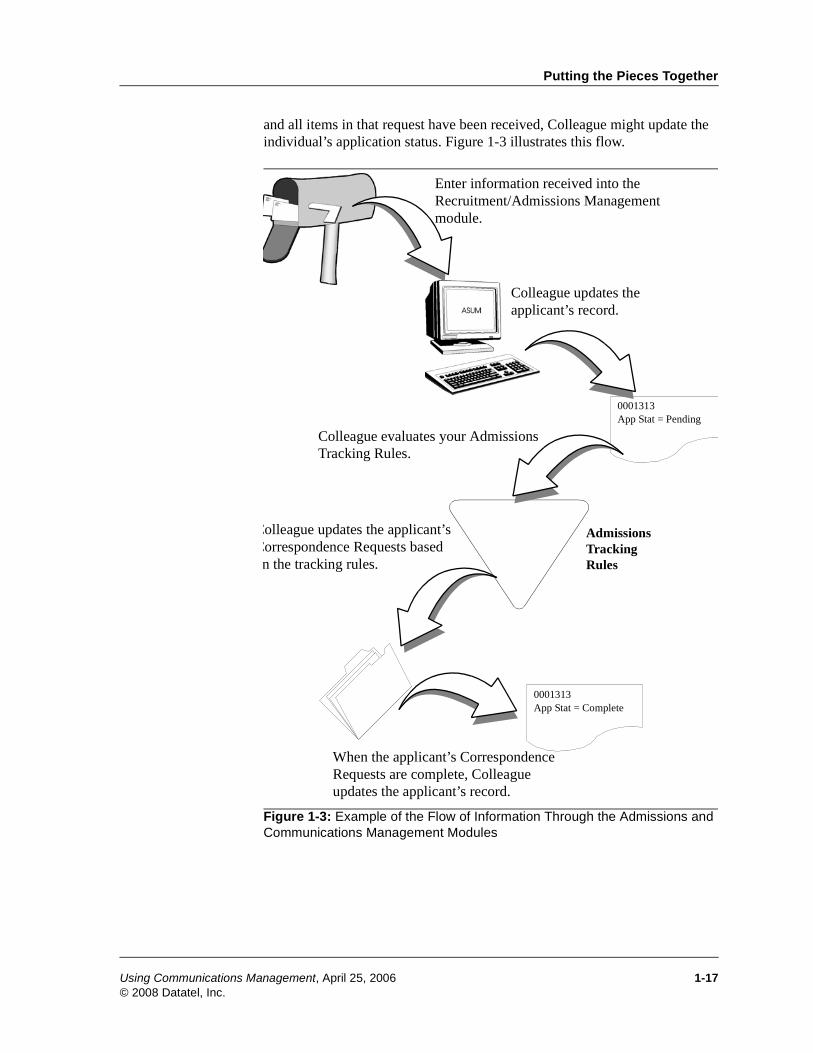
To understand the basic relationship between the pieces of the Communications Management module described above, consider the following example. You receive information from an individual. You record that information in the Recruitment/Admissions Management module (for example, on the Applicant Summary (ASUM) form). When you save the record, Colleague reads your admissions tracking rules. For each rule that is true, Colleague updates the communications code associated with the rule, changing the status to “received.” The “received” status triggers actions defined in the communications code, such as sending a document or assigning a correspondence request code. If a correspondence request code is assigned,
1-16 Using Communications Management, April 25, 2006© 2008 Datatel, Inc.
Putting the Pieces Together
and all items in that request have been received, Colleague might update the individual’s application status. Figure 1-3 illustrates this flow.
Figure 1-3: Example of the Flow of Information Through the Admissions and Communications Management Modules
0001313App Stat = Pending
Admissions Tracking Rules
0001313App Stat = Complete
Enter information received into the Recruitment/Admissions Management module.
Colleague updates the applicant’s record.
Colleague evaluates your Admissions Tracking Rules.
Colleague updates the applicant’s Correspondence Requests based on the tracking rules.
When the applicant’s Correspondence Requests are complete, Colleague updates the applicant’s record.
Using Communications Management, April 25, 2006 1-17© 2008 Datatel, Inc.
Introduction: Overview of the Communications Management Module
Linking Information Received with Information Being Sent
This section explains how Datatel University’s admissions office uses the Communications Management module to automate many of its communications with prospects. Communication during the prospect phase of DU’s recruitment cycle begins when the admissions office sends the initial introduction letters. The mailings to prospects who directly contacted the university is coordinated in part through the automation established between the Recruitment/Admissions Management module and the Communications Management module.
The admissions office uses a number of communication codes, documents, document tracks, and correspondence received codes to describe the information the office receives and sends to prospects and applicants.
An Example
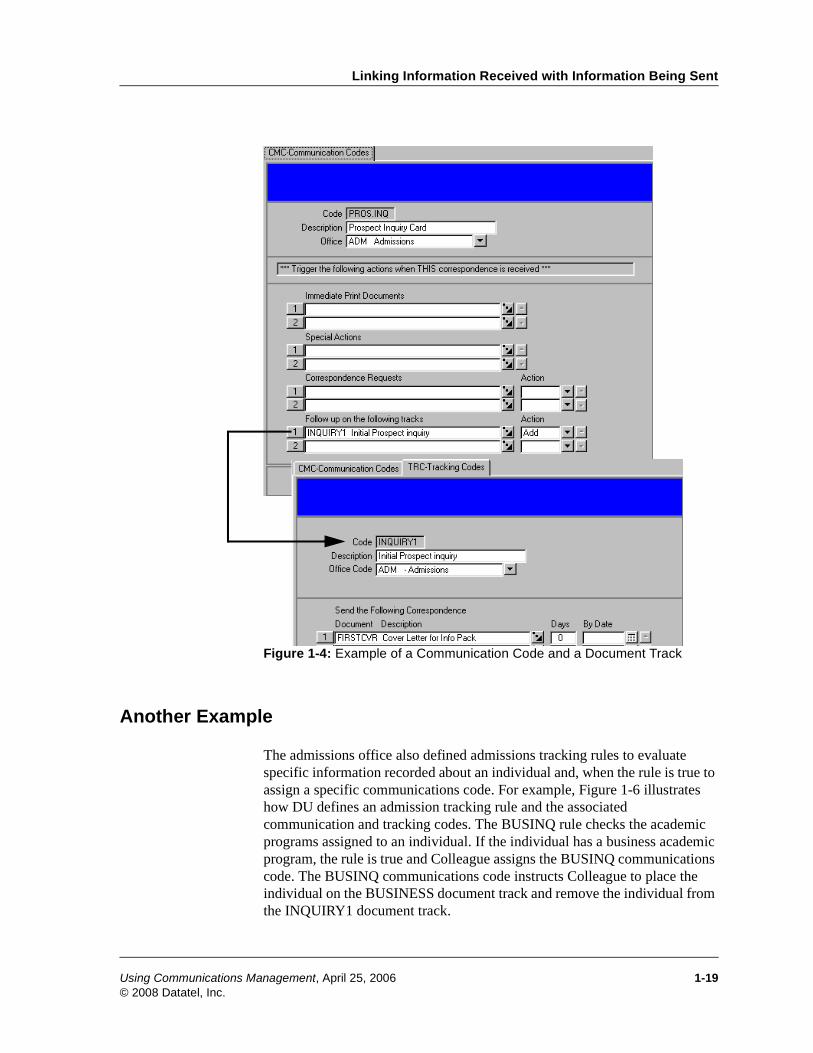
The PROS.INQ code is one of the communication codes the office uses. The PROS.INQ code indicates that the office received a prospect inquiry card from an individual. This code instructs Colleague to put the individual on a document track named INQUIRY1 when the admissions office receives the prospect inquiry card. The INQUIRY1 document track generates a welcome letter and a label for the university’s viewbook. Five days after sending the welcome letter, the INQUIRY1 track generates a follow-up letter (Figure 1-4).
1-18 Using Communications Management, April 25, 2006© 2008 Datatel, Inc.
Linking Information Received with Information Being Sent
Figure 1-4: Example of a Communication Code and a Document Track
Another Example
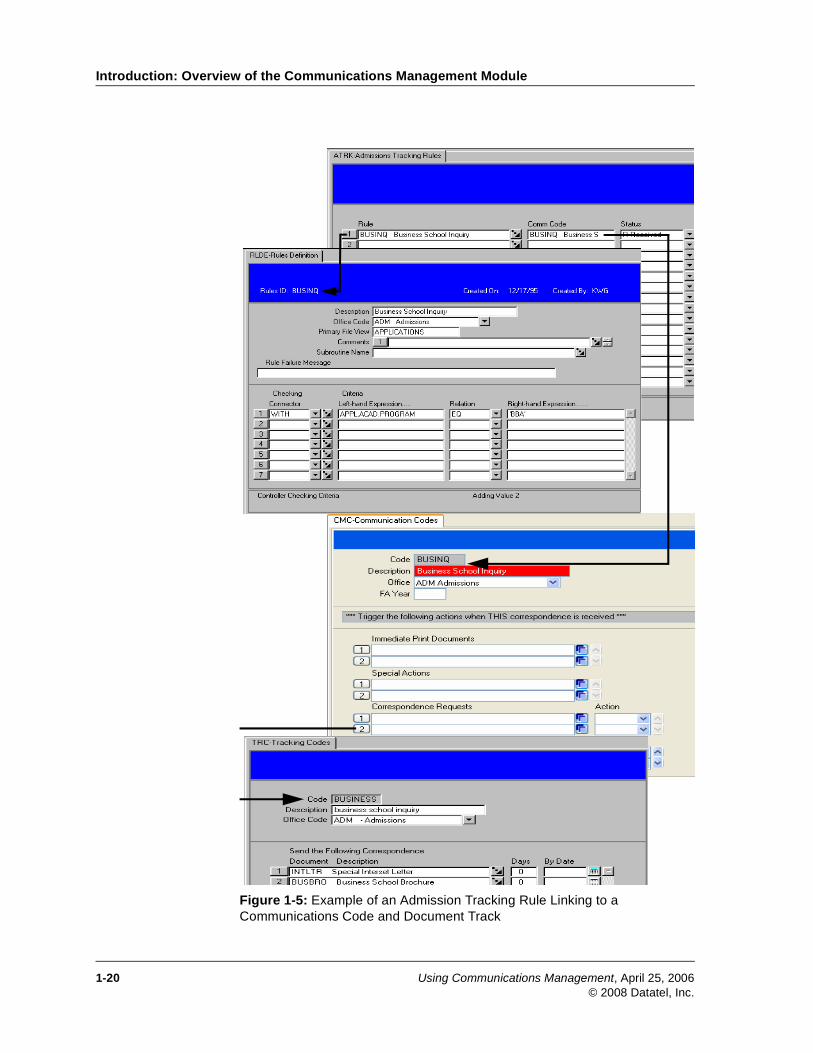
The admissions office also defined admissions tracking rules to evaluate specific information recorded about an individual and, when the rule is true to assign a specific communications code. For example, Figure 1-6 illustrates how DU defines an admission tracking rule and the associated communication and tracking codes. The BUSINQ rule checks the academic programs assigned to an individual. If the individual has a business academic program, the rule is true and Colleague assigns the BUSINQ communications code. The BUSINQ communications code instructs Colleague to place the individual on the BUSINESS document track and remove the individual from the INQUIRY1 document track.
Using Communications Management, April 25, 2006 1-19© 2008 Datatel, Inc.
Introduction: Overview of the Communications Management Module
Figure 1-5: Example of an Admission Tracking Rule Linking to a Communications Code and Document Track
1-20 Using Communications Management, April 25, 2006© 2008 Datatel, Inc.
Linking Information Received with Information Being Sent
Examples Applied to a Prospect
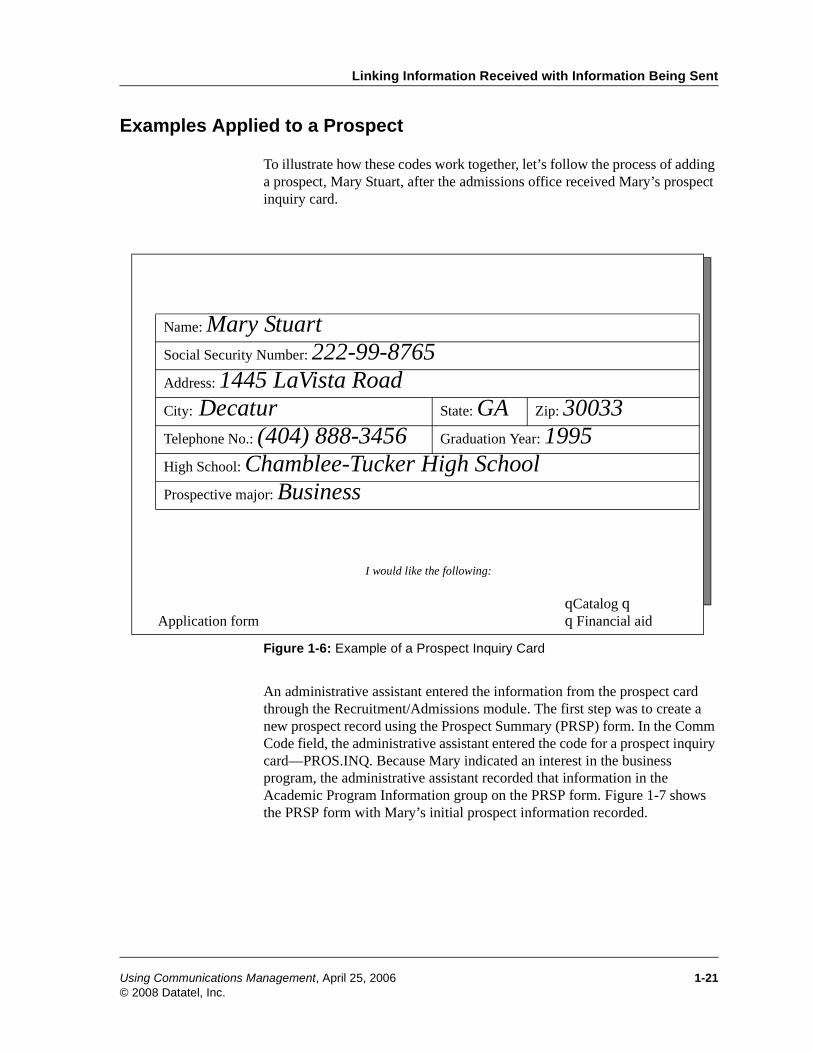
To illustrate how these codes work together, let’s follow the process of adding a prospect, Mary Stuart, after the admissions office received Mary’s prospect inquiry card.
Figure 1-6: Example of a Prospect Inquiry Card
An administrative assistant entered the information from the prospect card through the Recruitment/Admissions module. The first step was to create a new prospect record using the Prospect Summary (PRSP) form. In the Comm Code field, the administrative assistant entered the code for a prospect inquiry card—PROS.INQ. Because Mary indicated an interest in the business program, the administrative assistant recorded that information in the Academic Program Information group on the PRSP form. Figure 1-7 shows the PRSP form with Mary’s initial prospect information recorded.
I would like the following:
qCatalog q Application form q Financial aid
Name: Mary StuartSocial Security Number: 222-99-8765Address: 1445 LaVista RoadCity: Decatur State: GA Zip: 30033Telephone No.: (404) 888-3456 Graduation Year: 1995High School: Chamblee-Tucker High SchoolProspective major: Business
Using Communications Management, April 25, 2006 1-21© 2008 Datatel, Inc.
Introduction: Overview of the Communications Management Module
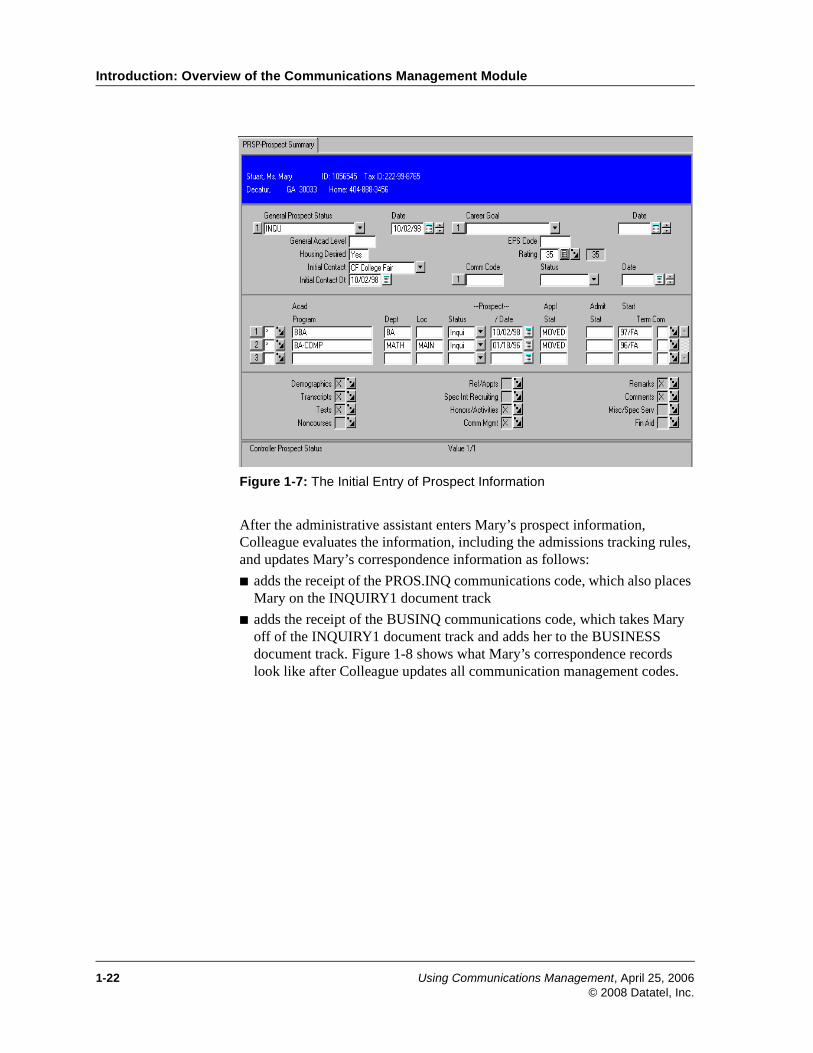
Figure 1-7: The Initial Entry of Prospect Information
After the administrative assistant enters Mary’s prospect information, Colleague evaluates the information, including the admissions tracking rules, and updates Mary’s correspondence information as follows:
■ adds the receipt of the PROS.INQ communications code, which also places Mary on the INQUIRY1 document track
■ adds the receipt of the BUSINQ communications code, which takes Mary off of the INQUIRY1 document track and adds her to the BUSINESS document track. Figure 1-8 shows what Mary’s correspondence records look like after Colleague updates all communication management codes.
1-22 Using Communications Management, April 25, 2006© 2008 Datatel, Inc.
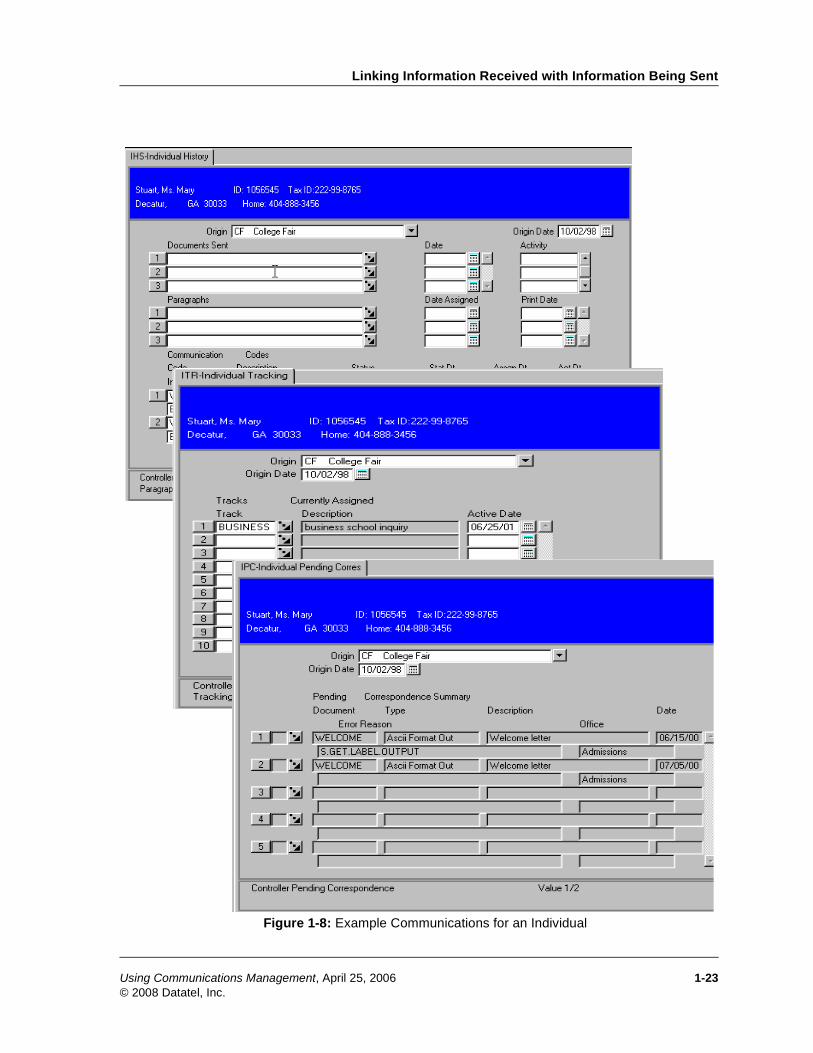
Linking Information Received with Information Being Sent
Figure 1-8: Example Communications for an Individual
Using Communications Management, April 25, 2006 1-23© 2008 Datatel, Inc.
Introduction: Overview of the Communications Management Module
Linking Information Received with Information Requested
Datatel University’s admissions office uses Colleague to keep track of when an individual sends the information required for a completed admissions application. When an applicant returns an admissions application during the Applicant Phase of the recruitment process, the admissions office focuses on receiving all the required documents from that applicant. Part of the office’s efforts includes sending periodic notices to the applicant that certain information is missing. Because of the volume of information received from all applicants, and because the timing of when the information is received varies for each applicant, the tracking aspects of the Communications Management module help the admissions office manage this phase of the recruitment process.
The admissions office defined a communication code for each item needed for a completed admissions application, as listed below:
■ SAT or ACT test scores (SCORES)
■ official transcripts (one for each type of transcript, such as HSTRANS and EXTRANS)
■ a letter of recommendation (RECOMMD)
■ the application fee (APPFEE)
■ a completed admissions application (APP)
In the definition of each communication code is the instruction to Colleague to add an individual to the ADMAPP correspondence request code when that item is received. The ADMAPP correspondence request track identifies all the items needed for a completed admissions application (from the list above). Colleague assigns the ADMAPP correspondence request code to an applicant when the admissions office receives any of the individual items that make up an admissions application.
To let Colleague know when any one of these items is received, the admissions office defined admissions tracking rules for some pieces of information in the application package and associated each rule with the corresponding communication code. For example, the admissions office created a tracking rule named ADMAPPL to use with the application form. This rule evaluates the application date to determine whether the application form was received. If the application date exists for an individual, Colleague assumes that the application form has been received. When the rule evaluates the application date and finds that it exists, it updates the APP communication code in the ADMAPP correspondence request track with a status of “Received” for the individual.
1-24 Using Communications Management, April 25, 2006© 2008 Datatel, Inc.
Linking Information Received with Information Requested
When the individual has been assigned to the ADMAPP correspondence request track, the individual communication codes listed in that track are assigned to that individual. Rather than using rules to automatically update the status of a communication code, the admissions office could manually update the tracks and communication codes assigned to an individual using the Individual Requests (IRQ) and Individual Requests by Track (IRT) forms. For example, if the admissions office received a letter of recommendation for an individual, they could manually record the receipt of the letter by accessing the individual’s list of requested correspondence on the IRT form (available as a detail form from the IRQ form) and changing the status for the RECOMMD communication code to “Received.”
The admissions office can further link pieces of communication to other tracks and actions by defining triggers that take place when a communications code is assigned or received from an individual. For example, when the admissions office receives an application from an individual and the status of the APP communications code is set to “Received,” the individual is automatically assigned to the ADMAPP correspondence request track (if the individual was not already assigned to it). This action also removes the individual from the INQUIRY1 document track (if it was previously assigned) and adds the individual to the APPREC document track (if it was not already assigned).
To complete this process, the ADMAPP correspondence request code includes a follow-up action that Colleague initiates when all the required items in the request code are recorded as received. This follow-up action instructs Colleague, through a special subroutine, to update the applicant’s application status to “Complete.” The admissions office uses the application status code to indicate that all the information for an admissions application has been received and that the admissions representative assigned to the applicant can review the application.
Using Communications Management, April 25, 2006 1-25© 2008 Datatel, Inc.

Introduction: Overview of the Communications Management Module
Entering Correspondence Information
Use the Communication Information (COM) form to change the default correspondence information for an individual, including mail name, address, e-mail, mail rules, and salutation.
Figure 1-9: Entering the Correspondence Information
Use of this form is not required. You can send correspondence to any individual on your system without entering data through the COM form. Any information changed on this form is used as the default for the individual, but can be changed for individual letter request records through the Individual Pending Corres (IPC) form.
1-26 Using Communications Management, April 25, 2006© 2008 Datatel, Inc.
Entering Correspondence Information
Procedure for Creating a Communications Management Process
This section provides some high-level steps to help you setup your Communications Management process for automating many of your communications tasks.
Step 1. Map the process.
Use flow charting and other techniques to “map out” the current process of communicating with clients. This process should not focus on any automated systems but should instead identify the general flow of information into and out of your office.
From the flow charts, you should be able to identify the
■ information that is sent out of your office
■ information that is received from clients
■ the action points within the process (for example, when the receipt of a piece of information results in an action taking place)
Step 2. Identify the outgoing and incoming communications.
From the flow charts, list each piece of outgoing and incoming communication. Be as specific as you need to accurately manage your processes as well as for information gathering that will help with analyzing your activities (for example, if you identify each individual advertisement instead of using one code for all advertisements, you can track responses to each and then identify which advertisements provided the most inquiries and eventual applicants.)
Step 3. Define your codes.
Define the codes for all of your outgoing and incoming communications.
See “Defining Document Codes” beginning on page 3-1 for more information about setting up your document codes.
See “Defining Communication Codes” beginning on page 4-1 for more information about setting up your communication codes.
Step 4. Set up groups of documents (outgoing communications) and correspondence requests (incoming communications) to effectively manage the communications processes.
Using Communications Management, April 25, 2006 1-27© 2008 Datatel, Inc.
Introduction: Overview of the Communications Management Module
Groups of documents automate processes by putting together a sequence of outgoing documents that Colleague will process automatically. Groups of communication request codes (incoming communications) let you identify what you expect from an individual and associate specific actions upon the receipt of each individual item or the complete group of items.
See “Defining Document Tracks” beginning on page 5-1 for more information about setting up your document tracks.
See “Defining Correspondence Request Tracks” beginning on page 6-1 for more information about setting up your correspondence request tracks.
Step 5. Set up the links between the incoming and outgoing communications.
The links between types of communications are the means of automating your processes. These links come in the form of rules, subroutines, and communication “triggers” and “actions.”
1-28 Using Communications Management, April 25, 2006© 2008 Datatel, Inc.
Using Communications Management
2. Getting Started

Getting Started2
Communications Management Codes April 25, 2006
In This Chapter
This chapter provides an overview of the correspondence and document codes you must create to represent your communications. It also discusses recommended naming conventions you can follow. Procedures for defining these major codes, such as document codes, communication codes, and correspondence request codes, are defined in separate chapters. The procedures for these codes are not included here because they are not simply defined once during implementation. You can create and use new correspondence and document codes at any time.
Descriptions and procedures for defining the Communications Management module’s setup codes are included in this chapter. Other chapters in this part include information on setting up other parameters needed to use the Communications Management module.
Using Communications Management, April 25, 2006 2-1© 2008 Datatel, Inc.
Getting Started: Communications Management Codes
Understanding Communications Management Codes
A code is a character or group of characters (alphabetic, numeric, or combined alpha and numeric) used to represent a piece, or pieces, of related information. Codes provide a short cut method for handling data because you can group together many pieces of information under one code and a simple one- or two-character abbreviation may represent a much larger body of information.
The information in codes can be as simple as a code to record that a housing application has been received from a student, or complex enough to indicate relationships between several items of information. For example, a code that indicates you have received documents necessary to assign tracks to a student.
Codes are also extremely helpful in standardizing data entry, providing the following advantages:
■ establish standard values for certain data elements, thereby ensuring consistent data entry
■ increase data entry efficiency and speed
■ limit the valid responses a user has for data entry
■ simplify data entry by storing several related pieces of information in a single code that can be added to a record in one step
■ provide consistent values, and descriptions of those values, on forms and in reports, thereby ensuring more accurate and meaningful reports.
2-2 Using Communications Management, April 25, 2006© 2008 Datatel, Inc.
Understanding Communications Management Codes
Codes and Office Security
Communications Management codes can be protected so that only users in specific offices can see or use them. For example, if you work in the Admissions office, you can define and use document codes that people in other offices cannot see or use. Likewise, other offices can define and use document codes that Admissions office users cannot see or use.
When creating Communications Management codes—such as document codes, communication codes, tracking codes, and correspondence request codes—you can assign an office to each code. When setting up your account, your system administrator assigns an office (or offices) to your security record. Colleague then compares the office assigned to the code with the office on your security record each time you attempt to use or display a code. If your assigned office does not match the office associated with the code, Colleague denies you access to the code.
Document Codes
Document codes are used to define the pieces of outgoing correspondence for your institution. These document codes store a profile of the document. The text of the document itself is stored as a separate file in the format used by your word processor.
See “Defining Document Codes” beginning on page 3-1 for more information on creating document codes.
Communication Codes
Communication codes identify pieces of incoming correspondence from an individual. When your institution receives a piece of correspondence from an individual, the code representing that piece of correspondence is recorded in the system for that individual. The receipt of a piece of correspondence from an individual can trigger other actions, such as updating an individual’s status, sending a piece of outgoing correspondence, or assigning the individual to a follow-up track.
See “Defining Communication Codes” beginning on page 4-1 for more information on defining communication codes.
Note: An office code is required when defining a document code.
Using Communications Management, April 25, 2006 2-3© 2008 Datatel, Inc.
Getting Started: Communications Management Codes
Document Tracks
Document tracks, also called follow-up tracks or tracking codes, identify groups of individual pieces of outgoing correspondence. A track is made up of the list of outgoing correspondence and the dates on which the correspondence should be processed.
See “Defining Document Tracks” beginning on page 5-1 for more information on defining document tracks.
Correspondence Requests
Correspondence requests are like document tracks, but they identify groups of required incoming correspondence (rather than outgoing correspondence). Correspondence requests are also called requirements tracks. A correspondence request is made up of the list of incoming correspondence (communication codes) and any special actions that should take place when all required correspondence is received.
See “Defining Correspondence Request Tracks” beginning on page 6-1 for more information on defining correspondence requests.
2-4 Using Communications Management, April 25, 2006© 2008 Datatel, Inc.
Setup Codes Defined in the Communications Management Module
Setup Codes Defined in the Communications Management Module
Your institution should define the following codes when setting up the Communications Management module:
Correspondence Statuses
Correspondence status codes work with communications codes (incoming correspondence) to define whether the piece of correspondence is received, waived, or incomplete for an individual. When used with correspondence request codes (requirements tracks), these status codes can trigger other actions, such as generating outgoing correspondence or updating a status flag.
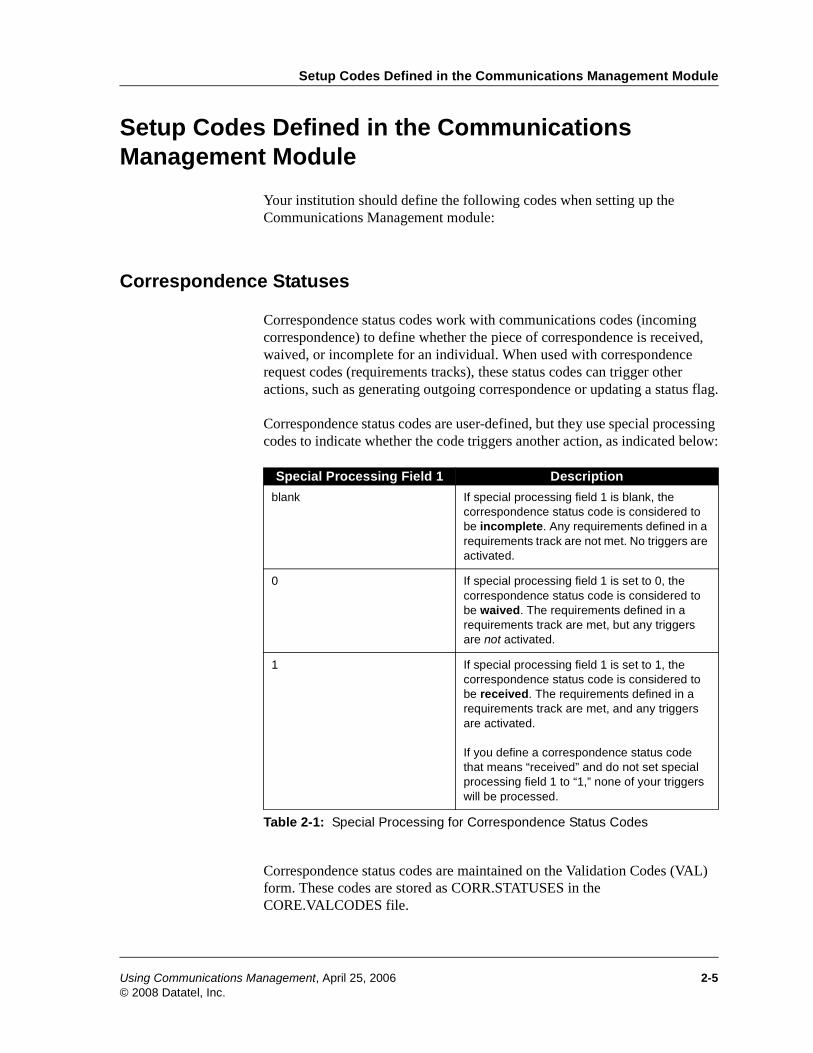
Correspondence status codes are user-defined, but they use special processing codes to indicate whether the code triggers another action, as indicated below:
Correspondence status codes are maintained on the Validation Codes (VAL) form. These codes are stored as CORR.STATUSES in the CORE.VALCODES file.
Special Processing Field 1 Description
blank If special processing field 1 is blank, the correspondence status code is considered to be incomplete. Any requirements defined in a requirements track are not met. No triggers are activated.
0 If special processing field 1 is set to 0, the correspondence status code is considered to be waived. The requirements defined in a requirements track are met, but any triggers are not activated.
1 If special processing field 1 is set to 1, the correspondence status code is considered to be received. The requirements defined in a requirements track are met, and any triggers are activated.
If you define a correspondence status code that means “received” and do not set special processing field 1 to “1,” none of your triggers will be processed.
Table 2-1: Special Processing for Correspondence Status Codes
Using Communications Management, April 25, 2006 2-5© 2008 Datatel, Inc.
Getting Started: Communications Management Codes
Document Types
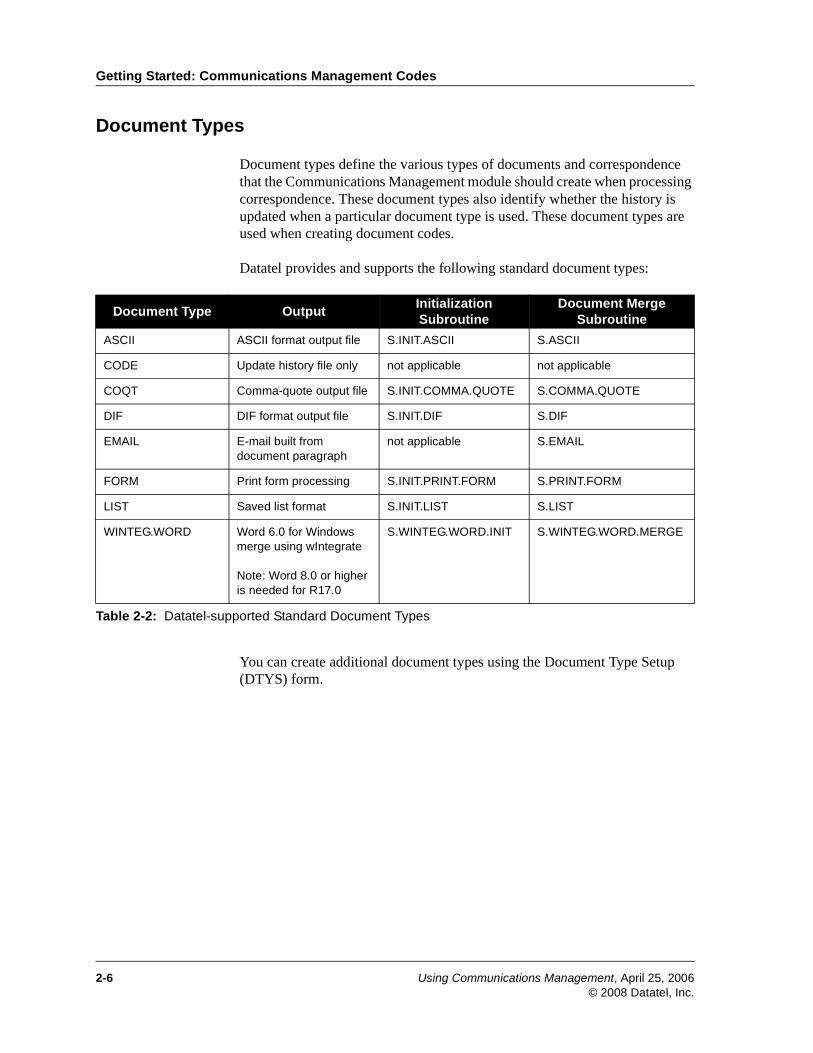
Document types define the various types of documents and correspondence that the Communications Management module should create when processing correspondence. These document types also identify whether the history is updated when a particular document type is used. These document types are used when creating document codes.
Datatel provides and supports the following standard document types:
You can create additional document types using the Document Type Setup (DTYS) form.
Document Type OutputInitialization Subroutine
Document Merge Subroutine
ASCII ASCII format output file S.INIT.ASCII S.ASCII
CODE Update history file only not applicable not applicable
COQT Comma-quote output file S.INIT.COMMA.QUOTE S.COMMA.QUOTE
DIF DIF format output file S.INIT.DIF S.DIF
EMAIL E-mail built from document paragraph
not applicable S.EMAIL
FORM Print form processing S.INIT.PRINT.FORM S.PRINT.FORM
LIST Saved list format S.INIT.LIST S.LIST
WINTEG.WORD Word 6.0 for Windows merge using wIntegrate
Note: Word 8.0 or higher is needed for R17.0
S.WINTEG.WORD.INIT S.WINTEG.WORD.MERGE
Table 2-2: Datatel-supported Standard Document Types
2-6 Using Communications Management, April 25, 2006© 2008 Datatel, Inc.
Setup Codes Defined in the Communications Management Module
Person E-mail Types
Person e-mail types define the types of different e-mail addresses used at your institution.
Person e-mail types are maintained on the Validation Codes (VAL) form. These codes are stored as PERSON.EMAIL.TYPES in the CORE.VALCODES file. Your institution may add others if needed.
Your institution must designate which e-mail type is used when processing in Communications Management. This is set up on the Communication Management (PID7) form using the “Processing E-Mail Hierarchy” field. E-mail types are specified in the person's e-mail address association using the Name and Address Entry (NAE) or the Person Addresses (ADR) form. The first e-mail address found with the earliest type specified in the hierarchy is used to send the communication.
Using Communications Management, April 25, 2006 2-7© 2008 Datatel, Inc.
Getting Started: Communications Management Codes
Codes Used in the Communications Management Module
The following codes are used in the Communications Management module. Your institution may have already set up these codes. If not, they must be defined before you can use the Communications Management module.
Office Codes
Office codes identify the office or offices that an individual staff member belongs to. The system uses the office code information associated with an individual staff member to identify whether that individual has access to office-specific information. For example, in the Communications Management module, office codes identify which offices can use specific document codes. Individuals who are not assigned to an office cannot use that office’s document codes. Use the Staff and Volunteers (SVM) form to assign an individual to an office.
Office codes are maintained on the Validation Codes (VAL) form. These codes are stored as OFFICE.CODES in the CORE.VALCODES file.
2-8 Using Communications Management, April 25, 2006© 2008 Datatel, Inc.
Getting Started2
Communications Management Parameters April 25, 2006
In This Chapter
This chapter provides information about the parameters that your institution must set up before using the Communications Management module.
Information about the codes used by the Communications Management module are included in the previous chapter.
Using Communications Management, April 25, 2006 2-9© 2008 Datatel, Inc.
Getting Started: Communications Management Parameters
Understanding Communications Management Parameters
This section discusses the parameters that you must set up before using the Communications Management module.
Default Word Processor Settings
The Communications Management module interfaces with text editors and word processors to let you compose correspondence, set up merge templates, and compose custom paragraphs. Before you can use your editor or word processor with the Communications Management module, you must define default parameters and settings on the Communications Management (PID7) parameter form.
Mail Merge Setup Using PC-Based Word Processors
You can use Microsoft Word as your word processor for mail merge letters if you have the following system configuration:
■ WINTEG.WORD documents — PC with Microsoft Word version 8.0 or greater connected to your host computer via a network, wIntegrate, and UI.
■ COQT documents — PC with Microsoft Word connected to your host computer via a network, wIntegrate or other FTP software
Correspondence Actions
In the Communications Management module, you can use subroutines to create correspondence actions that do the following:
■ update fields in other modules or databases
■ produce special reports or documents
■ send e-mail to another user on the system
2-10 Using Communications Management, April 25, 2006© 2008 Datatel, Inc.
Understanding Communications Management Parameters
You can use these actions during various processes in the Communications Management module, including the following situations:
■ when updating history or printing documents through the Process Corres. Batch (PCB) process.
■ when recording correspondence as received through the Communication Code Entry (CRI) form, the Group Communication Entry (CRG) form, or the Individual Requests (IRQ) form.
■ when a correspondence request is completed through the Communication Code Entry (CRI) form, the Selected Group Entry (CRG) form, or the Individual Requests (IRQ) form.
Correspondence actions include the following types:
■ CR - Corres Received
■ PA - Print Action
■ HA - History Action
■ IA - Instance Action
■ RC - Requests Completed
The correspondence action types specify the subroutine arguments to use. Use the Corres Actions Definition (CRAD) form to create and maintain actions associated with a correspondence.
Using Communications Management, April 25, 2006 2-11© 2008 Datatel, Inc.

Getting Started: Communications Management Parameters
Some standard correspondence actions are supplied with your software. These standard action codes include the following:
Action Description Type Subroutine
COLTRANS This action code looks at an individual’s institutions attended entries. When assigned a correspondence request, it produces a requirement for communications codes of the same type for all colleges and institutions attended.
IA S.COUNT.COLTRANS
FILECMPT This action code can be used to update financial aid files with the File Complete Flag when all required or waived communication codes are entered.
CR S.UPDT.FILE.CMPT
HSTRANS This action code looks at an individual’s institutions attended entries. When assigned a correspondence request, it produces a requirement for communications codes of the same type for all high schools attended.
IA S.COUNT.HSTRANS
LPTR This action code is used to print custom text fields when processing correspondence.
PA S.PRINT.LTREQ.CUSTOM
PCSMAILD This action code is used to update the DOC.PIECES.MAILED field when history is updated.
HA S.UPDT.PCSMAILD
UPDTAPPL This action code is used to update an admissions application LTREQ record with the list of applications, locations, programs, and academic levels.
CR S.UPDT.LTREQ.APPL
Table 2-3: Standard Action Codes
2-12 Using Communications Management, April 25, 2006© 2008 Datatel, Inc.
Understanding Communications Management Parameters
Staff Setup
To take advantage of many of the privacy and security features available within the system, all staff members using the software must be defined within the system both with PERSON records and with STAFF records. STAFF records associate your staff members with particular offices, privacy levels, correspondence, and address security.
Staff records are created for existing PERSON records on the Staff and Volunteers (SVM) form. See Using Demographics for procedures on adding staff records.
Using Communications Management, April 25, 2006 2-13© 2008 Datatel, Inc.
Getting Started: Communications Management Parameters
Defining Default Word Processor Settings
Use the Communication Management (PID7) parameter form to define the default settings for using a word processor with the Communications Management module. The values defined here are strictly default values, used when no other data is entered in the fields on the maintenance forms. Help messages available on the maintenance forms indicate other valid entries.
Figure 2-1: The Communication Management (PID7) Form
Note that to implement any changes made on this form, you must exit your UI session and start the session again. Any other users must also exit and restart their UI sessions. This is not required until you actually run a process that uses any of the parameters on this form.
See the online help for more information about the PID7 form.
2-14 Using Communications Management, April 25, 2006© 2008 Datatel, Inc.
Defining Correspondence Actions
Defining Correspondence Actions
Use the Corres Actions Definition (CRAD) form to create correspondence actions. Use the Datatel-provided correspondence actions as starting points to create customized actions if needed. See the online help for more information about the CRAD form.
Using Communications Management, April 25, 2006 2-15© 2008 Datatel, Inc.
Getting Started: Communications Management Parameters
2-16 Using Communications Management, April 25, 2006© 2008 Datatel, Inc.
Using Communications Management
3. Outgoing Correspondence

Outgoing Correspondence3
Defining Document Codes October 21, 2008
In This Chapter
This chapter provides an overview of document codes and the fields that are required on the Document Codes (DOC) form. This chapter also provides recommended naming conventions for your document codes and a brief procedure for defining document codes.
Procedures for defining other major codes, such as communication codes and correspondence request codes, are located in separate chapters.
Before You Begin
Before you define document codes you should complete the actions listed in Table 3-1.
Action Reference
Understand Communications Management concepts
“Overview of the Communications Management Module” beginning on page 1-13
Plan your document codes using the Document Codes worksheet
“Worksheets” beginning on page A-1
Table 3-1: Information Needed Before You Define Document Codes
Using Communications Management, October 21, 2008 3-1© 2008 Datatel, Inc.
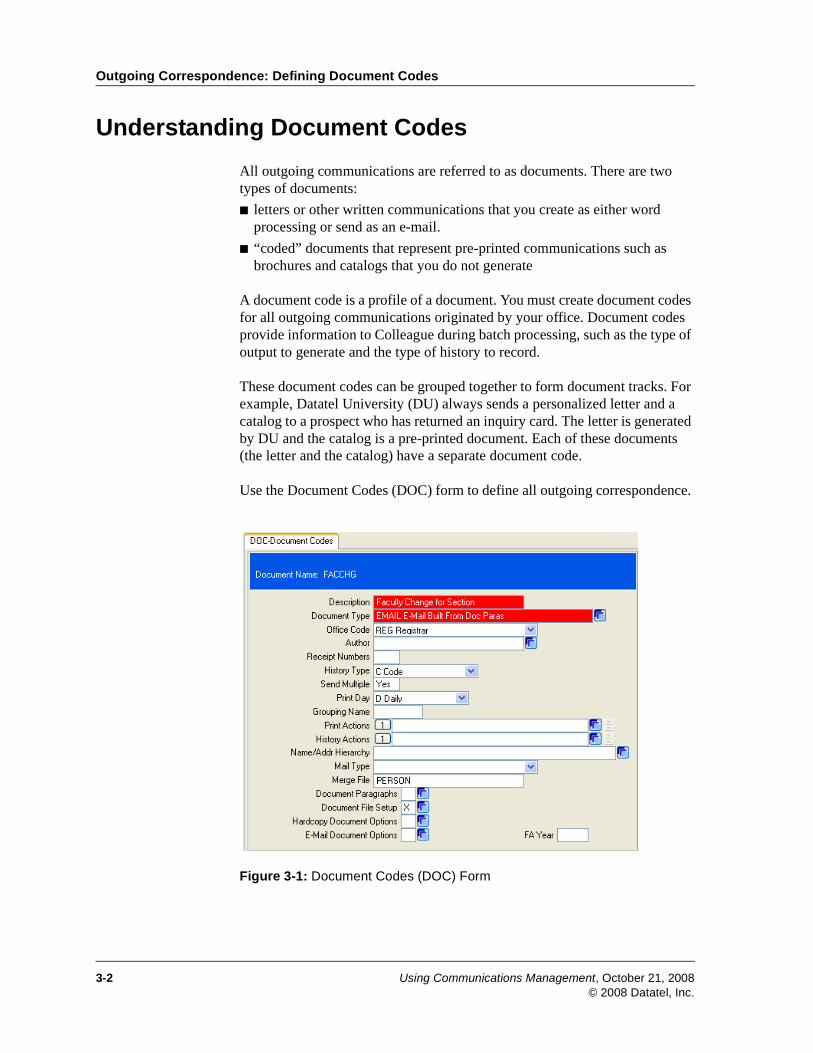
Outgoing Correspondence: Defining Document Codes
Understanding Document Codes
All outgoing communications are referred to as documents. There are two types of documents:
■ letters or other written communications that you create as either word processing or send as an e-mail.
■ “coded” documents that represent pre-printed communications such as brochures and catalogs that you do not generate
A document code is a profile of a document. You must create document codes for all outgoing communications originated by your office. Document codes provide information to Colleague during batch processing, such as the type of output to generate and the type of history to record.
These document codes can be grouped together to form document tracks. For example, Datatel University (DU) always sends a personalized letter and a catalog to a prospect who has returned an inquiry card. The letter is generated by DU and the catalog is a pre-printed document. Each of these documents (the letter and the catalog) have a separate document code.
Use the Document Codes (DOC) form to define all outgoing correspondence.
Figure 3-1: Document Codes (DOC) Form
3-2 Using Communications Management, October 21, 2008© 2008 Datatel, Inc.
Understanding Document Codes
Components of a Document Code
For all document codes you must define the following:
■ document type
■ office code
■ history type
For pre-printed material the setup of the document code is relatively simple and requires only these components be defined. For other documents generated by your office, the process includes other procedures. See “Creating Documents” beginning on page 3-7 for more information about creating documents.
These components are discussed in the following sections.
Document Type
The Document Type field is a required field. You must assign a document type to every document code you create. The document type indicates what type of document Colleague should create when processing correspondence. For example, if a document type may be an ASCII or an email document. See “Communications Management Codes” beginning on page 2-1 for more information about specific document types.
Office Codes
The Office Code field is a required field. You must assign an office code to every document code you create. The office code designates which office can use the document code. When creating a document code, you can only enter an office code to which you have access rights. Likewise, only users who have access rights to the office code you enter can display or use the document code.
Using Communications Management, October 21, 2008 3-3© 2008 Datatel, Inc.
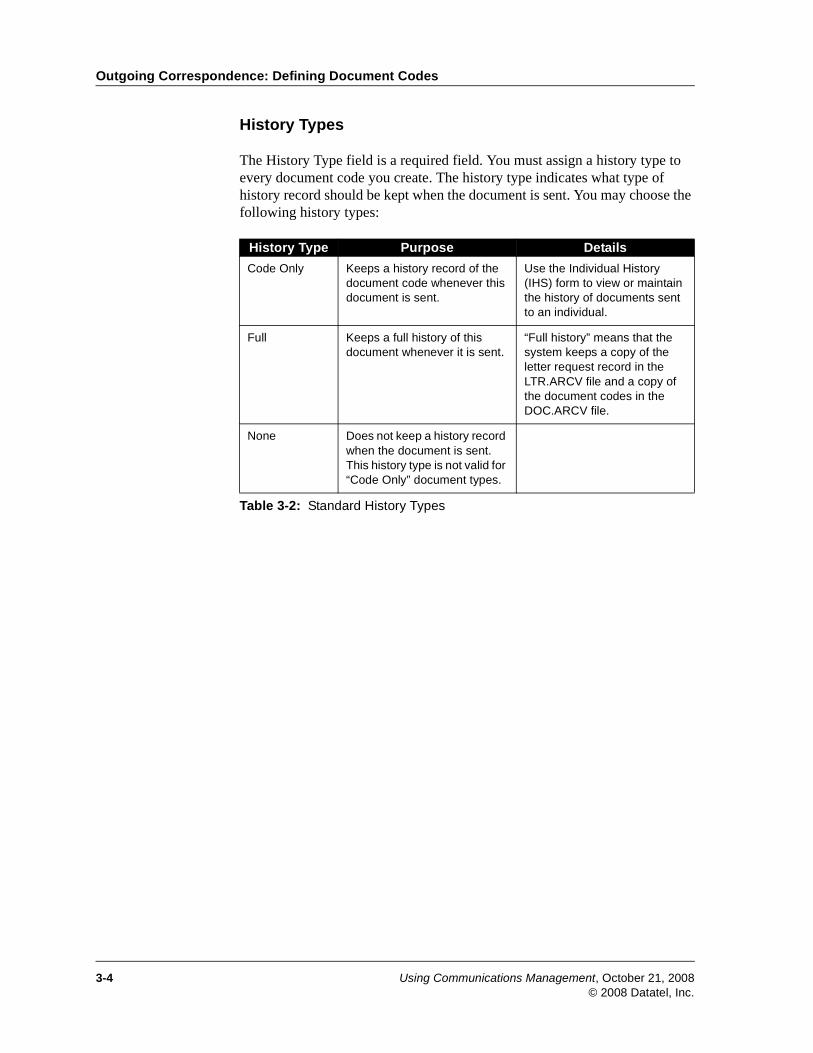
Outgoing Correspondence: Defining Document Codes
History Types
The History Type field is a required field. You must assign a history type to every document code you create. The history type indicates what type of history record should be kept when the document is sent. You may choose the following history types:
History Type Purpose Details
Code Only Keeps a history record of the document code whenever this document is sent.
Use the Individual History (IHS) form to view or maintain the history of documents sent to an individual.
Full Keeps a full history of this document whenever it is sent.
“Full history” means that the system keeps a copy of the letter request record in the LTR.ARCV file and a copy of the document codes in the DOC.ARCV file.
None Does not keep a history record when the document is sent. This history type is not valid for “Code Only” document types.
Table 3-2: Standard History Types
3-4 Using Communications Management, October 21, 2008© 2008 Datatel, Inc.
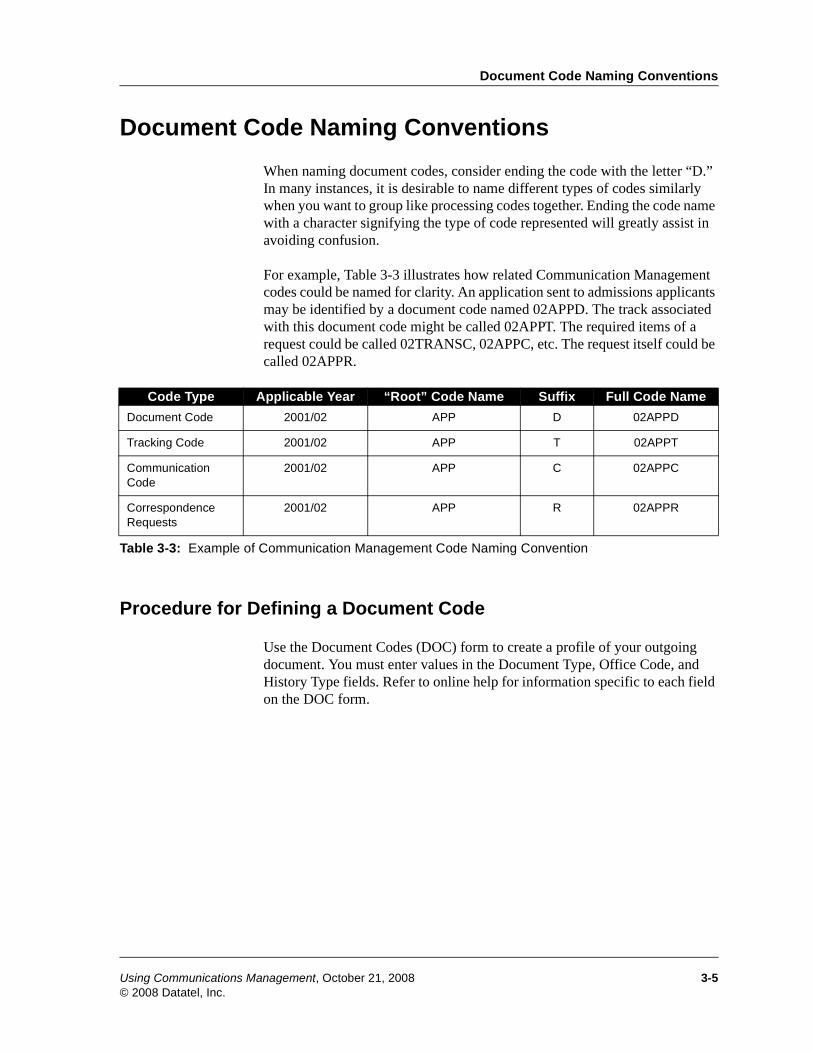
Document Code Naming Conventions
Document Code Naming Conventions
When naming document codes, consider ending the code with the letter “D.” In many instances, it is desirable to name different types of codes similarly when you want to group like processing codes together. Ending the code name with a character signifying the type of code represented will greatly assist in avoiding confusion.
For example, Table 3-3 illustrates how related Communication Management codes could be named for clarity. An application sent to admissions applicants may be identified by a document code named 02APPD. The track associated with this document code might be called 02APPT. The required items of a request could be called 02TRANSC, 02APPC, etc. The request itself could be called 02APPR.
Procedure for Defining a Document Code
Use the Document Codes (DOC) form to create a profile of your outgoing document. You must enter values in the Document Type, Office Code, and History Type fields. Refer to online help for information specific to each field on the DOC form.
Code Type Applicable Year “Root” Code Name Suffix Full Code Name
Document Code 2001/02 APP D 02APPD
Tracking Code 2001/02 APP T 02APPT
Communication Code
2001/02 APP C 02APPC
Correspondence Requests
2001/02 APP R 02APPR
Table 3-3: Example of Communication Management Code Naming Convention
Using Communications Management, October 21, 2008 3-5© 2008 Datatel, Inc.

Outgoing Correspondence: Defining Document Codes
3-6 Using Communications Management, October 21, 2008© 2008 Datatel, Inc.
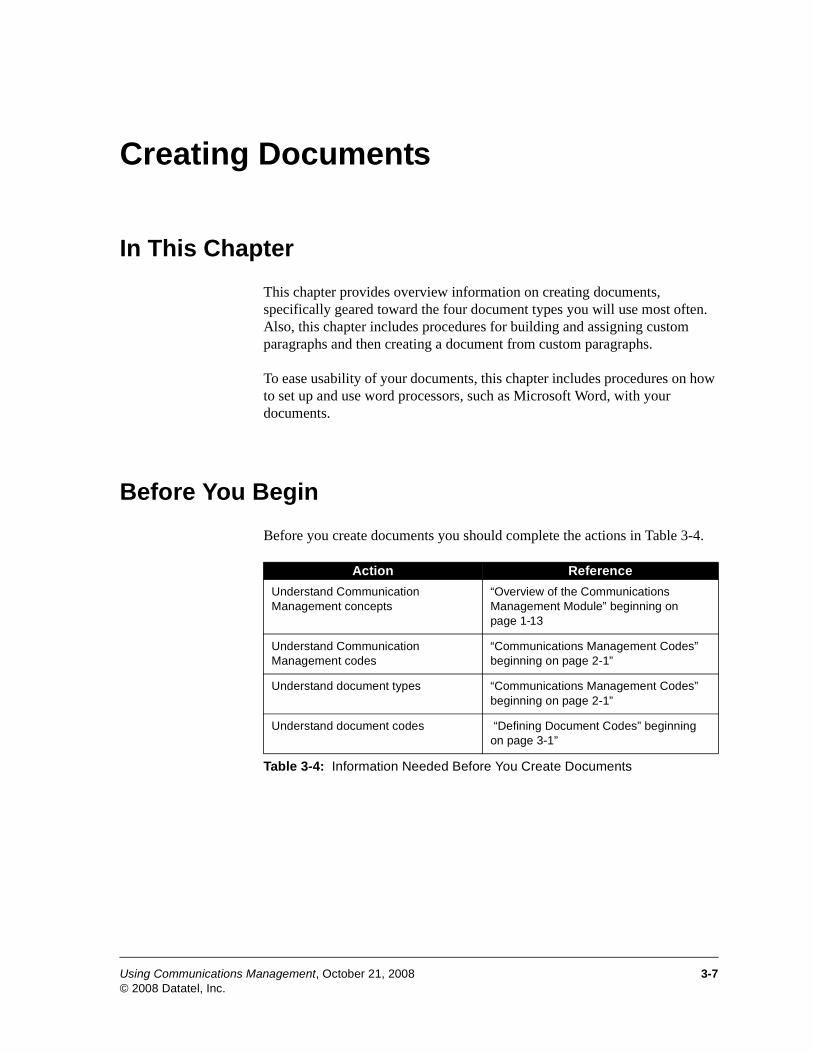
Outgoing Correspondence3Outgoing Correspondence3
Creating Documents October 21, 2008
In This Chapter
This chapter provides overview information on creating documents, specifically geared toward the four document types you will use most often. Also, this chapter includes procedures for building and assigning custom paragraphs and then creating a document from custom paragraphs.
To ease usability of your documents, this chapter includes procedures on how to set up and use word processors, such as Microsoft Word, with your documents.
Before You Begin
Before you create documents you should complete the actions in Table 3-4.
Action Reference
Understand Communication Management concepts
“Overview of the Communications Management Module” beginning on page 1-13
Understand Communication Management codes
“Communications Management Codes” beginning on page 2-1”
Understand document types “Communications Management Codes” beginning on page 2-1”
Understand document codes “Defining Document Codes” beginning on page 3-1”
Table 3-4: Information Needed Before You Create Documents
Using Communications Management, October 21, 2008 3-7© 2008 Datatel, Inc.
Outgoing Correspondence: Creating Documents
Understanding Document Creation
All outgoing correspondence must have a document code. Your pre-printed material, such as brochures and catalogs, have simple document codes. Colleague also allows you to create and send individual or group letters and e-mails. Colleague stores these documents in the Letter Request (LTREQ) file. Each record in the LTREQ file represents a single piece of correspondence assigned to a person. The LTREQ file allows you to use name and address hierarchy, personalized salutation and document paragraphs.
After creating a document you can assign it to an individual or a group of individuals. Then you can process the document in a batch process. See “Assigning Documents to Individuals” beginning on page 3-33 for more information about assigning documents to individuals. See “In This Chapter” beginning on page 7-1 for more information about processing a batch of documents.
Of the document types available in Communications Management, you will use the following four most often:
■ Code — Updates the history file only; generates no output file. This is used when you have no need to generate output, but you want to track that you sent information. A mass-produced letter sent with mailing labels would be a CODE type document.
■ COQT — Generates a comma-quote output file that can be downloaded to a word processor mail merge. If you are on Release 16 or Release 17 without UI, you will use this document type for word processing.
■ WINTEG.WORD — Used in combination with Microsoft Word (version 8 or higher), Colleague User Interface, and Colleague Release 17 to generate a comma-quote output file which is automatically merged with a Word document stored on Colleague to produce mail merged letters on Word. You can use this document type to produce personalized form letters, address labels, file labels, and worksheets.
■ EMAIL — Generates e-mail.
3-8 Using Communications Management, October 21, 2008© 2008 Datatel, Inc.
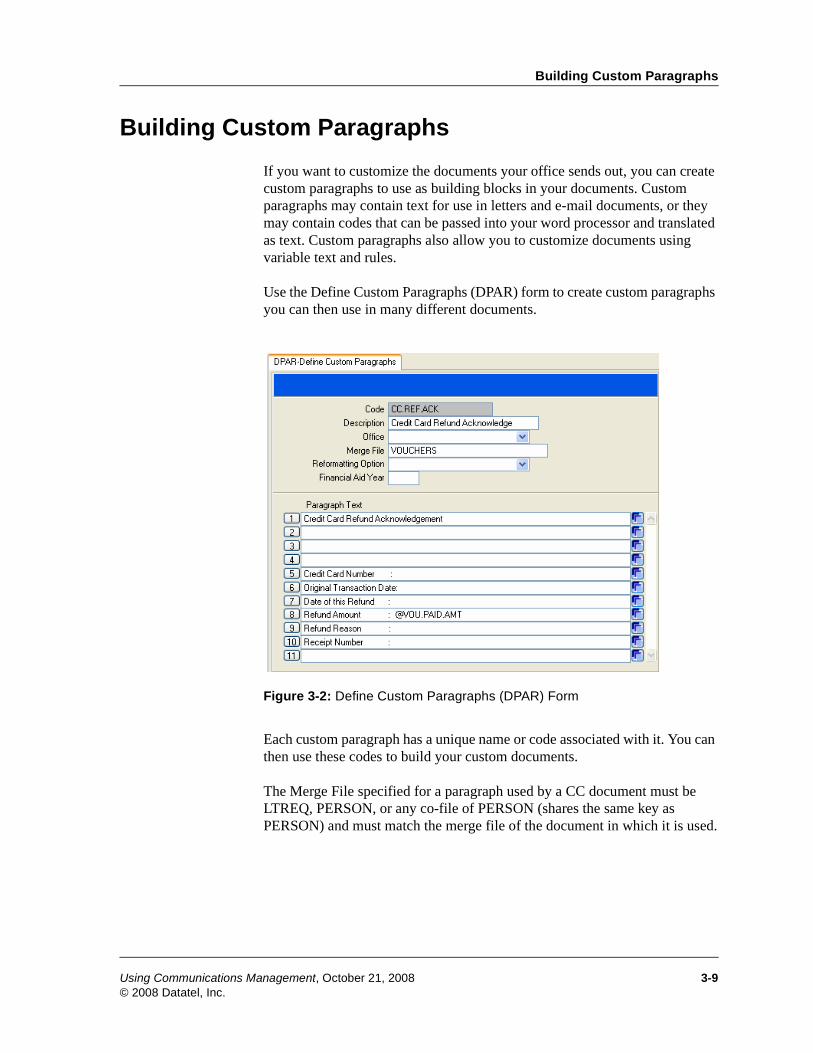
Building Custom Paragraphs
Building Custom Paragraphs
If you want to customize the documents your office sends out, you can create custom paragraphs to use as building blocks in your documents. Custom paragraphs may contain text for use in letters and e-mail documents, or they may contain codes that can be passed into your word processor and translated as text. Custom paragraphs also allow you to customize documents using variable text and rules.
Use the Define Custom Paragraphs (DPAR) form to create custom paragraphs you can then use in many different documents.
Figure 3-2: Define Custom Paragraphs (DPAR) Form
Each custom paragraph has a unique name or code associated with it. You can then use these codes to build your custom documents.
The Merge File specified for a paragraph used by a CC document must be LTREQ, PERSON, or any co-file of PERSON (shares the same key as PERSON) and must match the merge file of the document in which it is used.
Using Communications Management, October 21, 2008 3-9© 2008 Datatel, Inc.
Outgoing Correspondence: Creating Documents
You can indicate whether to recalculate the text wrapping in the custom paragraphs. Colleague will accordingly recalculate the paragraph text wrapping when paragraph data is merged. You can select from the following options:
■ R – Recalculate line breaks. Select this option to reformat to a 69 character line after the merge fields are replaced. The length of the text replacing the merge fields may vary between data records, resulting in lines that are too long or short. 69 characters is an appropriate width for word wrapping plain text e-mails. At this length the lines of the e-mail are unlikely to be broken up by subsequent word wrapping performed by some e-mail transport systems.
■ N – None - remove line breaks. Select this option to remove all line breaks from the paragraph after the merge fields are replaced with data to generate a single long line that can be formatted as appropriate by the word processor or e-mail server. However, blank lines in the original paragraph are retained, including those at the beginning or end of the paragraph. This option is most appropriate for paragraphs internal to a Word document. This option may also be appropriate for e-mail if outgoing e-mails are MIME encoded because MIME encoding causes e-mail line breaks to adjust to the width of the window size. Contact your e-mail system administrator to determine if this is a good option for your system.
■ K – Keep line breaks. Select this option if you want the paragraph's line breaks to remain just as you enter them, for instance for an e-mail or letter signature block. If you select this option, Colleague keeps the original line breaks even after merge fields are replaced with data. If you leave this field blank, this is the default option used.
The reformatting option you select on the DPAR form affects the number of values in the multivalued field LTREQ.CUSTOM[n], because each line break creates an additional value. You may need to increase the number in the Max Values field on the Document File Setup (DFS) form.
If the text is used in word processing, it is suggested that you limit text to one line and create a bulleted list. Text that exceeds one line can create formatting problems in the word processing mail merge document.
To create paragraphs with more text, it is suggested that you create a code paragraph. In this case, only the code is exported from Colleague. The Microsoft Word mail merge document translates this code into text by referencing a separate Word document (a bookmark document created in Word). For more information, see “Setting up a Bookmark Document”
Note: Any blank lines within the original paragraph will not be affected by the word wrapping.
3-10 Using Communications Management, October 21, 2008© 2008 Datatel, Inc.
Building Custom Paragraphs
beginning on page 3-11. Code paragraphs allow you to use word processing features in your text (for example, bold, underline, font changes, etc.). These features are not available for use with text paragraphs.
Also, if you use multiple lines of text, you will need to account for each line when setting Max Values on the Document File Setup (DFS) form.
For more information about the DPAR form, see the online help.
Setting up a Bookmark Document
To create a word processing bookmarked document to hold the text for Custom Code Paragraphs, you will use Microsoft Word. This bookmarked document will contain the paragraph text of your Code Paragraphs. Text in this document can be modified as needed throughout the year.
Step 1. Open a blank document.
a. Choose File > New > Blank Document
b. Click OK.
Step 2. Enter the text associated with each of your Code Paragraphs. Separate each paragraph by several hard returns. The paragraph text can be as long as necessary. The Bookmark Document can be multiple pages if necessary.
Note: See page 3-21 for information on DFS and page 3-24 for information on Max Values.
Technical Tip: If you want the paragraph text in the bookmark document indented from the text of the form letter, use the Style feature of Word. Both the bookmark document and the portion of the Form Letter where these paragraphs will be inserted must have the same Style indicated. See Word Help for more information on this feature.
Using Communications Management, October 21, 2008 3-11© 2008 Datatel, Inc.
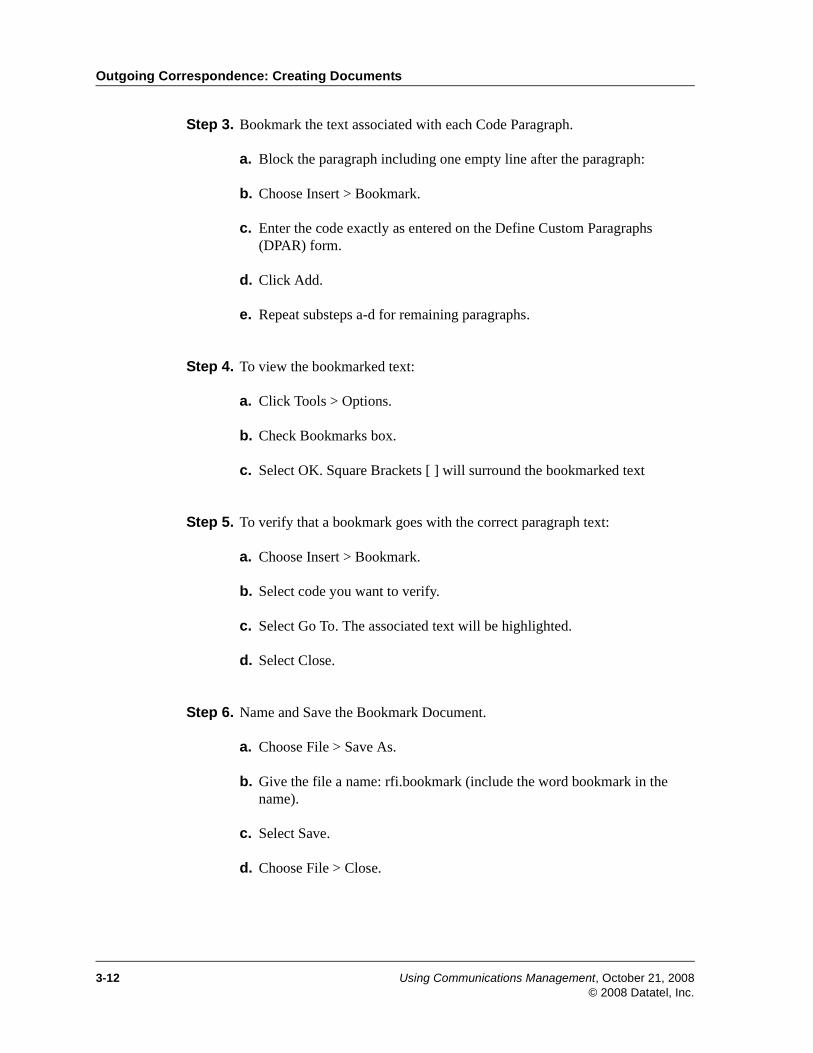
Outgoing Correspondence: Creating Documents
Step 3. Bookmark the text associated with each Code Paragraph.
a. Block the paragraph including one empty line after the paragraph:
b. Choose Insert > Bookmark.
c. Enter the code exactly as entered on the Define Custom Paragraphs (DPAR) form.
d. Click Add.
e. Repeat substeps a-d for remaining paragraphs.
Step 4. To view the bookmarked text:
a. Click Tools > Options.
b. Check Bookmarks box.
c. Select OK. Square Brackets [ ] will surround the bookmarked text
Step 5. To verify that a bookmark goes with the correct paragraph text:
a. Choose Insert > Bookmark.
b. Select code you want to verify.
c. Select Go To. The associated text will be highlighted.
d. Select Close.
Step 6. Name and Save the Bookmark Document.
a. Choose File > Save As.
b. Give the file a name: rfi.bookmark (include the word bookmark in the name).
c. Select Save.
d. Choose File > Close.
3-12 Using Communications Management, October 21, 2008© 2008 Datatel, Inc.
Building Custom Paragraphs
Using Merge Fields in a Custom Paragraph
Custom Paragraphs which contain merge fields are primarily used for e-mail documents. Data merging for documents which use a word processor is best defined on the Document File Setup (DFS) form. See “Procedure for Setting Up and Using Word Processors” beginning on page 3-21 for further information.
If you want to include merge fields in your paragraph, the fields must exist in the Merge File you specify for the custom paragraph. For each custom paragraph you can specify only one merge file to be used.
To include the merge field in the text, you’ll use a placeholder: @ followed by the field name. For example, you enter:
Dear @FIRST.NAME ,
When you process the document, the placeholder will be replaced with:
Dear James,
Note: If you enter merge fields here, you will have less control over formatting than with a word processor. Also, when you add the custom paragraph, you will be using up a position in the Custom Paragraphs table on the Document Paragraphs (DOCP) form. For these reasons, merge fields are more commonly used for e-mail documents.
Technical Tip: To include a field that does not already exist in the Merge file, you must first define it as a virtual field residing in the dictionary of the Merge file. For example, if you use LTREQ as the Merge file and need to merge into your paragraph a data element pointed to by the field LTREQ.SOURCE.KEYS, then you will first need to create a virtual field in LTREQ which uses the TRANS function to retrieve the desired data. Use the Define Computed Column (DCC) form to define virtual fields.
Note: You must leave a space after the field name to indicate that the field name has ended; for example: Dear @FIRST.NAME , If you do not leave a space, an error will occur. The extra space will not appear in the actual text sent to the individual.
Using Communications Management, October 21, 2008 3-13© 2008 Datatel, Inc.
Outgoing Correspondence: Creating Documents
Assigning Custom Paragraphs
After you have created your custom paragraphs, you can use them as building blocks in many different documents.
Note: You can also create custom paragraphs on the fly as you create your documents. However, Datatel suggests that it is easier to create the custom paragraphs first.
3-14 Using Communications Management, October 21, 2008© 2008 Datatel, Inc.

Assigning Document Paragraphs
Assigning Document Paragraphs
Use the Document Paragraphs (DOCP) form to indicate the paragraphs to be included in a document when a letter request is generated. You can access the DOCP form either by detailing from the Document Codes (DOC) form or directly from the menu.
Using this form you can specify the relative position of each paragraph and the rules associated with the paragraph. Through this form you can also indicate whether or not the paragraph should be recalculated when the letter request is generated and the document is processed. The DOCP form is displayed below.
Figure 3-3: Document Paragraphs (DOCP) Form
On DOCP enter N in the Recalculate Paragraphs field if you will want to customize individual letters after they are assigned to a specific person. Enter Y if you will not need to customize letters. See “Customizing Individual Documents” beginning on page 3-37 for more information about customizing individual letters.
Using Communications Management, October 21, 2008 3-15© 2008 Datatel, Inc.
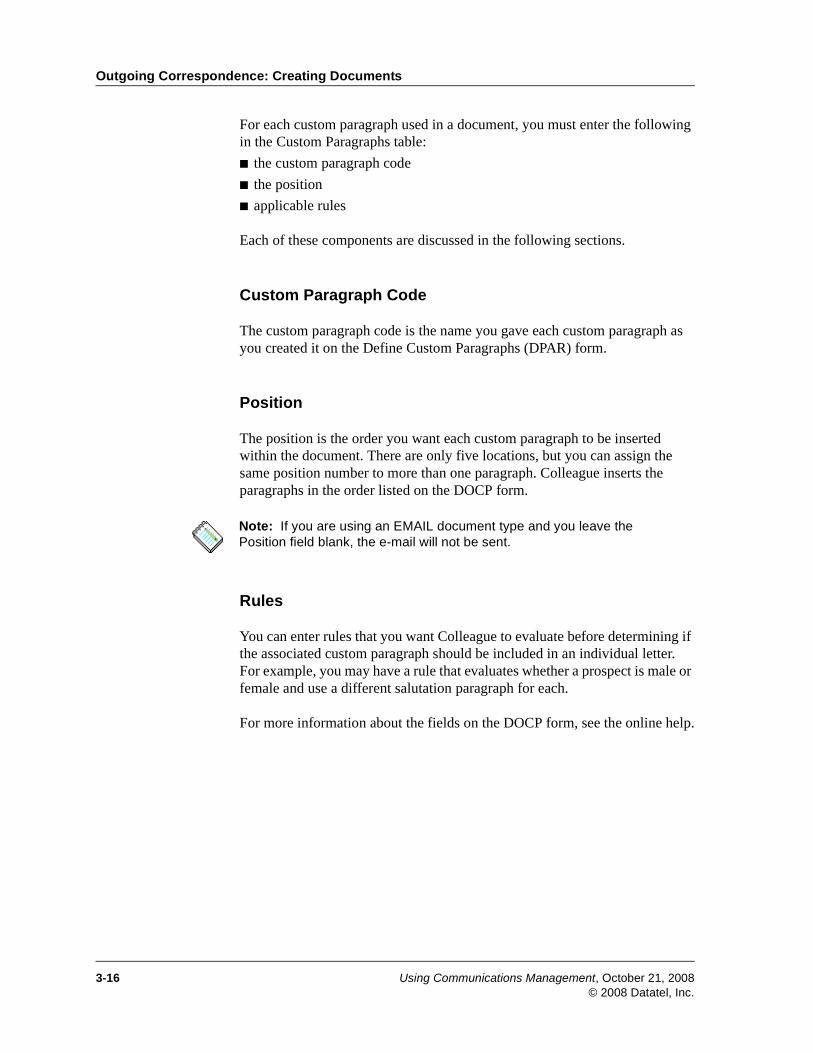
Outgoing Correspondence: Creating Documents
For each custom paragraph used in a document, you must enter the following in the Custom Paragraphs table:
■ the custom paragraph code
■ the position
■ applicable rules
Each of these components are discussed in the following sections.
Custom Paragraph Code
The custom paragraph code is the name you gave each custom paragraph as you created it on the Define Custom Paragraphs (DPAR) form.
Position
The position is the order you want each custom paragraph to be inserted within the document. There are only five locations, but you can assign the same position number to more than one paragraph. Colleague inserts the paragraphs in the order listed on the DOCP form.
Rules
You can enter rules that you want Colleague to evaluate before determining if the associated custom paragraph should be included in an individual letter. For example, you may have a rule that evaluates whether a prospect is male or female and use a different salutation paragraph for each.
For more information about the fields on the DOCP form, see the online help.
Note: If you are using an EMAIL document type and you leave the Position field blank, the e-mail will not be sent.
3-16 Using Communications Management, October 21, 2008© 2008 Datatel, Inc.
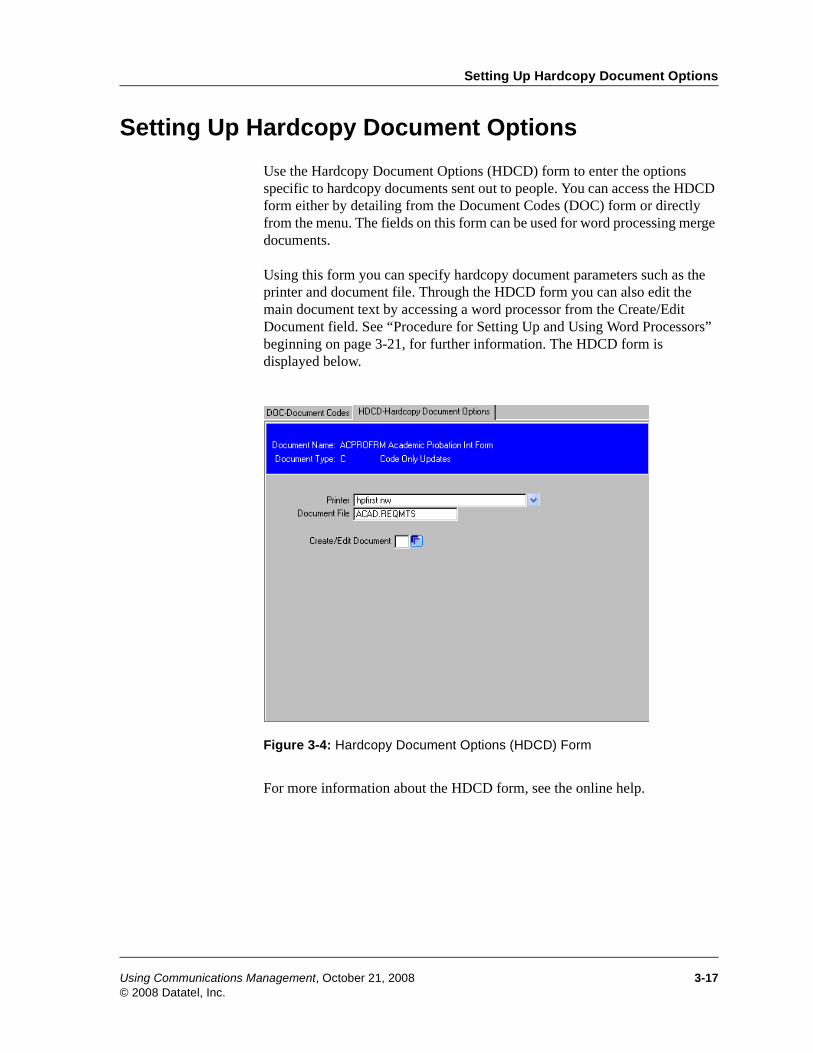
Setting Up Hardcopy Document Options
Setting Up Hardcopy Document Options
Use the Hardcopy Document Options (HDCD) form to enter the options specific to hardcopy documents sent out to people. You can access the HDCD form either by detailing from the Document Codes (DOC) form or directly from the menu. The fields on this form can be used for word processing merge documents.
Using this form you can specify hardcopy document parameters such as the printer and document file. Through the HDCD form you can also edit the main document text by accessing a word processor from the Create/Edit Document field. See “Procedure for Setting Up and Using Word Processors” beginning on page 3-21, for further information. The HDCD form is displayed below.
Figure 3-4: Hardcopy Document Options (HDCD) Form
For more information about the HDCD form, see the online help.
Using Communications Management, October 21, 2008 3-17© 2008 Datatel, Inc.
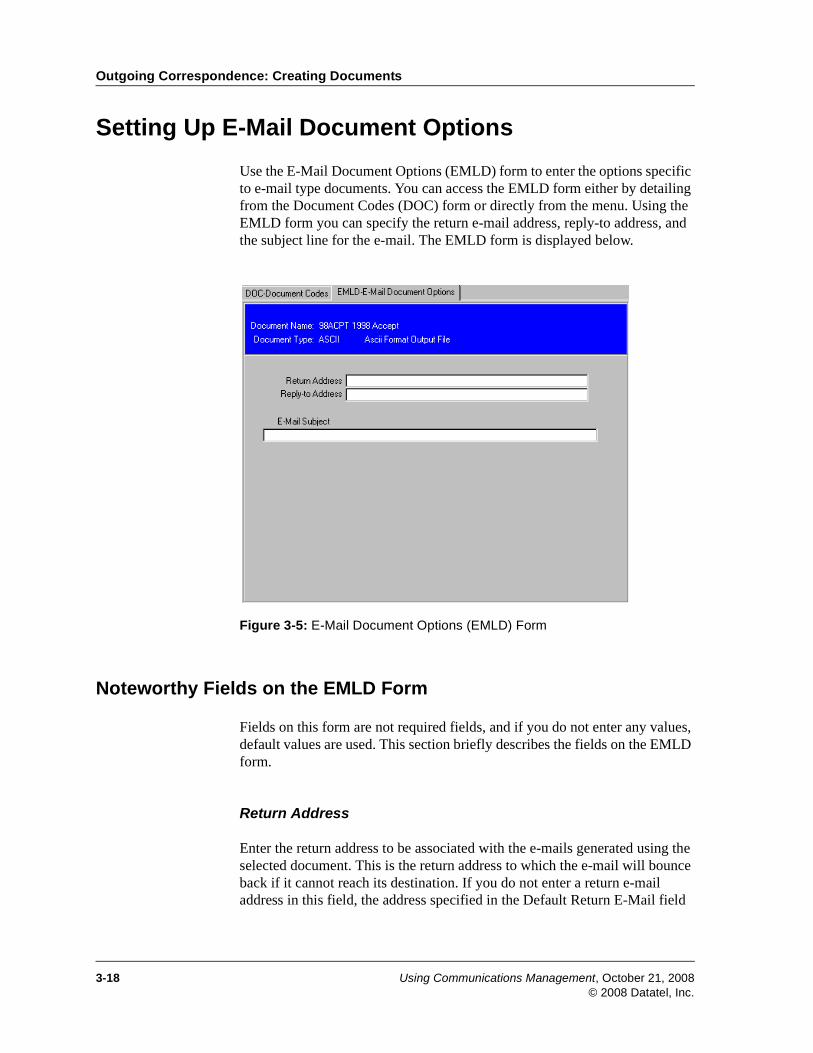
Outgoing Correspondence: Creating Documents
Setting Up E-Mail Document Options
Use the E-Mail Document Options (EMLD) form to enter the options specific to e-mail type documents. You can access the EMLD form either by detailing from the Document Codes (DOC) form or directly from the menu. Using the EMLD form you can specify the return e-mail address, reply-to address, and the subject line for the e-mail. The EMLD form is displayed below.
Figure 3-5: E-Mail Document Options (EMLD) Form
Noteworthy Fields on the EMLD Form
Fields on this form are not required fields, and if you do not enter any values, default values are used. This section briefly describes the fields on the EMLD form.
Return Address
Enter the return address to be associated with the e-mails generated using the selected document. This is the return address to which the e-mail will bounce back if it cannot reach its destination. If you do not enter a return e-mail address in this field, the address specified in the Default Return E-Mail field
3-18 Using Communications Management, October 21, 2008© 2008 Datatel, Inc.
Setting Up E-Mail Document Options
on the Communications Management (PID7) form is used. If no return e-mail address is specified on the PID7 form, Colleague uses the return address of the server from where the documents are sent.
Reply-to Address
Enter the address to which the recipients of the selected e-mail document can send their replies. If you do not specify an address in this field, Colleague uses the author’s e-mail address as determined by the e-mail hierarchy entered in the Processing E-Mail Hierarchy field on the PID7 form.
E-Mail Subject
Enter the subject line for the e-mails generated when the selected document is processed. If you do not enter a subject line, Colleague uses the document description as the default subject line for the e-mails.
Procedure for Setting Up E-Mail Document Options
Follow the steps below to specify the e-mail document options for the e-mails generated when the selected document is processed.
Step 1. Access the E-Mail Document Options (EMLD) form.
Step 2. Enter the return address, reply-to address, and the subject line, as required, for the e-mails generated by the selected document.
Step 3. Update out of the EMLD form.
For more information about the EMLD form, see the online help.
Note: The return address specified here may not work on all server configurations, though it works in general. You may need to handle the return address individually depending on your server. For example, in some cases of IBM AIX it is necessary to specify a parameter at the server level indicating the return address to use.
Using Communications Management, October 21, 2008 3-19© 2008 Datatel, Inc.
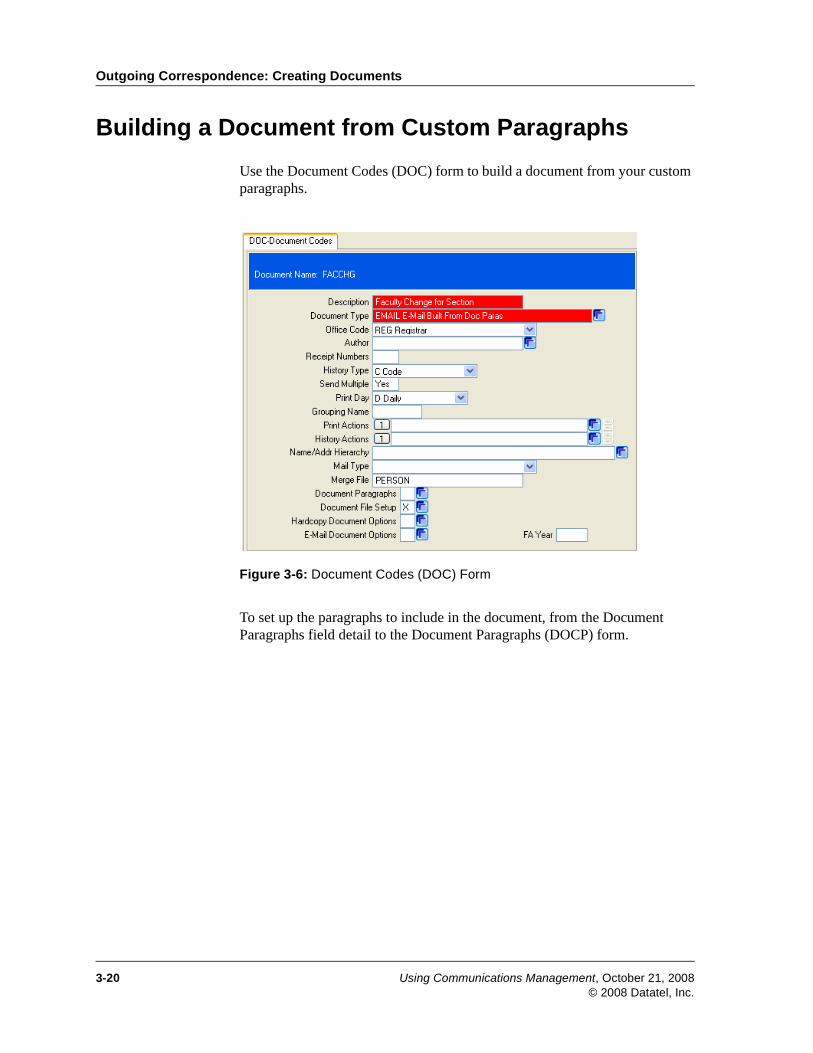
Outgoing Correspondence: Creating Documents
Building a Document from Custom Paragraphs
Use the Document Codes (DOC) form to build a document from your custom paragraphs.
Figure 3-6: Document Codes (DOC) Form
To set up the paragraphs to include in the document, from the Document Paragraphs field detail to the Document Paragraphs (DOCP) form.
3-20 Using Communications Management, October 21, 2008© 2008 Datatel, Inc.
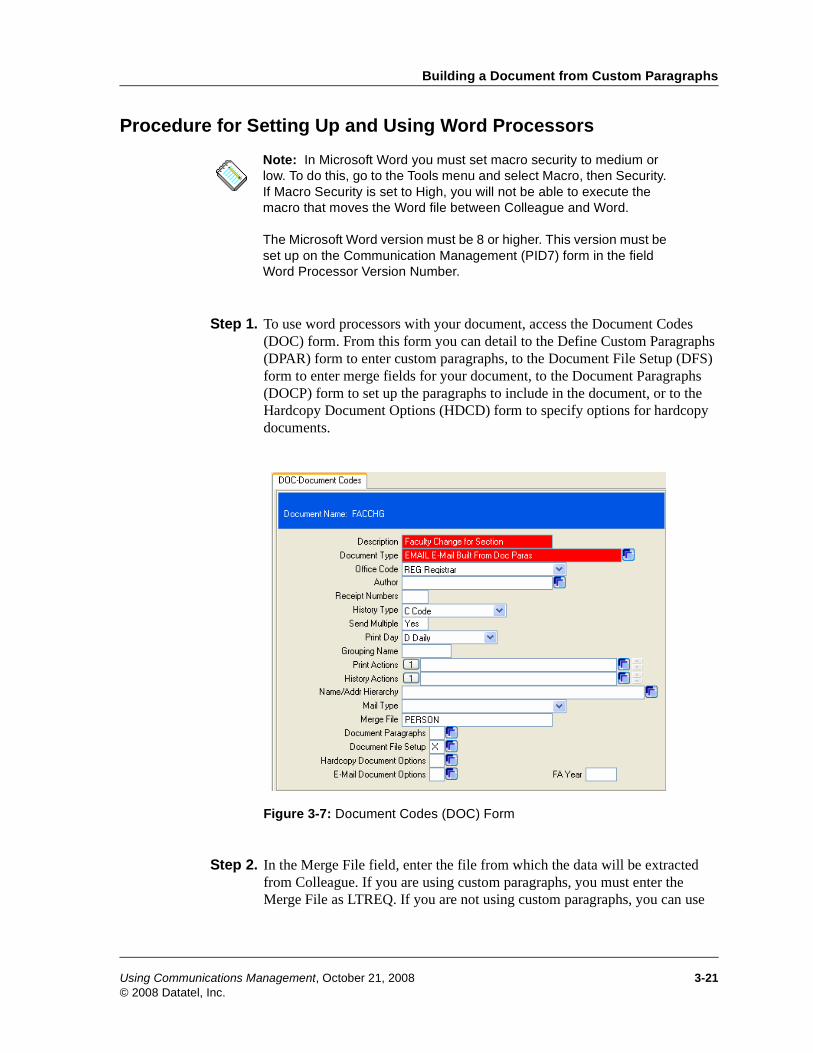
Building a Document from Custom Paragraphs
Procedure for Setting Up and Using Word Processors
Step 1. To use word processors with your document, access the Document Codes (DOC) form. From this form you can detail to the Define Custom Paragraphs (DPAR) form to enter custom paragraphs, to the Document File Setup (DFS) form to enter merge fields for your document, to the Document Paragraphs (DOCP) form to set up the paragraphs to include in the document, or to the Hardcopy Document Options (HDCD) form to specify options for hardcopy documents.
Figure 3-7: Document Codes (DOC) Form
Step 2. In the Merge File field, enter the file from which the data will be extracted from Colleague. If you are using custom paragraphs, you must enter the Merge File as LTREQ. If you are not using custom paragraphs, you can use
Note: In Microsoft Word you must set macro security to medium or low. To do this, go to the Tools menu and select Macro, then Security. If Macro Security is set to High, you will not be able to execute the macro that moves the Word file between Colleague and Word. The Microsoft Word version must be 8 or higher. This version must be set up on the Communication Management (PID7) form in the field Word Processor Version Number.
Using Communications Management, October 21, 2008 3-21© 2008 Datatel, Inc.
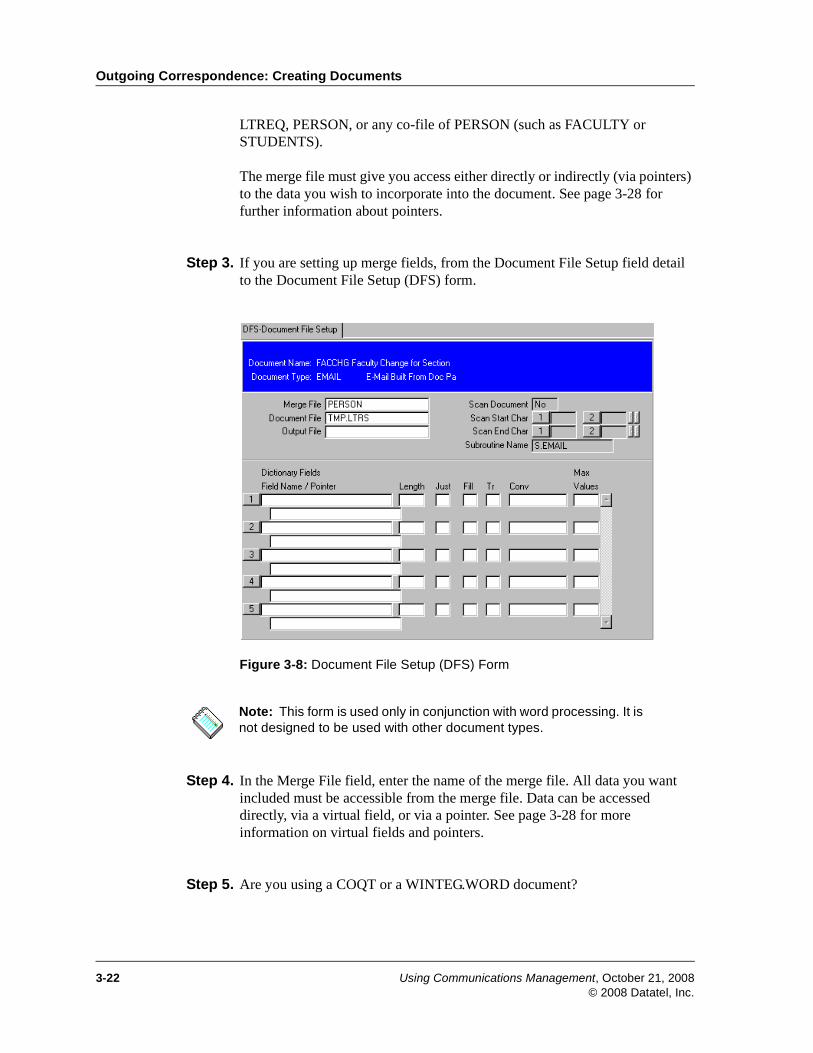
Outgoing Correspondence: Creating Documents
LTREQ, PERSON, or any co-file of PERSON (such as FACULTY or STUDENTS).
The merge file must give you access either directly or indirectly (via pointers) to the data you wish to incorporate into the document. See page 3-28 for further information about pointers.
Step 3. If you are setting up merge fields, from the Document File Setup field detail to the Document File Setup (DFS) form.
Figure 3-8: Document File Setup (DFS) Form
Step 4. In the Merge File field, enter the name of the merge file. All data you want included must be accessible from the merge file. Data can be accessed directly, via a virtual field, or via a pointer. See page 3-28 for more information on virtual fields and pointers.
Step 5. Are you using a COQT or a WINTEG.WORD document?
Note: This form is used only in conjunction with word processing. It is not designed to be used with other document types.
3-22 Using Communications Management, October 21, 2008© 2008 Datatel, Inc.
Building a Document from Custom Paragraphs
COQT. Leave the Document File field blank. The document will be created from Microsoft Word and stored on the hard drive or on a network drive rather than on the Colleague host.
WINTEG.WORD. Enter the Colleague directory in which this document’s associated Word document will be stored. Two directories are delivered specifically for this purpose: PC.LTRS and TMP.LTRS; however, you are not required to use these.
Step 6. Are you using a COQT or a WINTEG.WORD document?
COQT. Enter _HOLD_ in the Output File field. When the file is created by Colleague, it is held in the Output File until downloaded to the word processor. See page 7-11 for further information.
WINTEG.WORD. Leave the Output File field blank.
Step 7. In the Field Name field, enter the data fields you want in the document. For example, you can use name fields, address fields, or any other fields stored in the specified file.
Using Communications Management, October 21, 2008 3-23© 2008 Datatel, Inc.
Outgoing Correspondence: Creating Documents
Step 8. In the Max Values field, enter the maximum number of values to be transferred for a multi-valued field.
Step 9. Save at the DFS form to return to the DOC form.
Note: If you create text paragraphs on DPAR that consist of more than one line of text, you will need to account for each line when calculating Max Values. Max Values is used to indicate how many values (that is, how many custom paragraphs and/or text paragraph lines or codes) could be contained in the associated multivalued field. When processing the LTREQ.CUSTOM# multi-valued fields, Colleague inserts a blank field after each valid field. This means that when defining Max Values for Custom Paragraphs, you need to include twice the number of possible values. Failure to make Max Values high enough will cause you to lose data when the COQT file is created. Using WINTEG.WORD, Max Values can go up to 999 per field. For example: You create 10 custom paragraphs using text and associate them with Position 1. You determine that one individual could have up to 7 custom paragraphs. On Document File Setup (DFS), you enter the Field Name LTREQ.CUSTOM1. For the associated Max Values, you enter 14. Another example would be that you have defined 40 codes that the student could receive. These codes relate to a bookmark file in Word. You would need to have a max value of 40.
3-24 Using Communications Management, October 21, 2008© 2008 Datatel, Inc.
Building a Document from Custom Paragraphs
Step 10. Are you using a COQT or a WINTEG.WORD document?
COQT. Save at the DOC form and continue in Microsoft Word. You must create a header record in Word. To do this:
1. Open your form letter.
2. Access the Create Header Source window from the Tools menu by selecting Mail Merge, Get Data, Header Options, then Create.
3. Remove Word-delivered field names.
4. Enter field names in the order listed on the DFS form.
5. For each field on DFS that has a Max Value, create a field name for each number in Max Values.
6. Name and save the Header record.
7. Use Mail Merge to create a merge document from your form letter.
WINTEG.WORD. From the Hardcopy Document Options field detail to the Hardcopy Document Options (HDCD) form. Detail on the Create/Edit Document field to access Microsoft Word. Header records will be created from the data entered on DFS for WINTEG.WORD document types.
For WINTEG.WORD documents only, continue the next steps.
The first time you detail on the Create/Edit Document field, a dialog box displays as shown below, so you can navigate to the path of your word processor’s executable file.
Technical Tip: A Header record in Microsoft Word 2000 and Word 97 can contain up to 62 fields. If you have more than this, use a spreadsheet program such as Excel to create the Header record.
Note: For a WINTEG.WORD document type, the fields defined on DFS are used to build the data source for the merge ( header.doc in the c:\Datatel directory). All periods are removed and each field name is upper- or lower-cased for clarity. During a merge, the first record in the data source will be the field list (that is, header record).
Using Communications Management, October 21, 2008 3-25© 2008 Datatel, Inc.
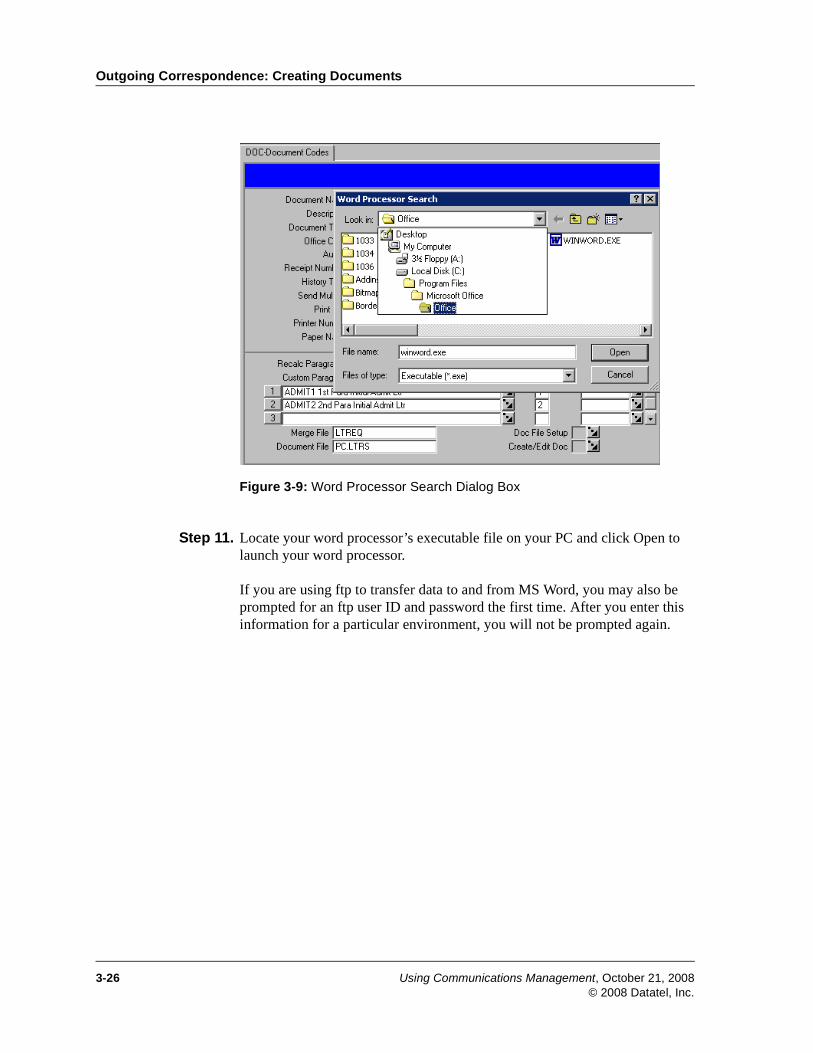
Outgoing Correspondence: Creating Documents
Figure 3-9: Word Processor Search Dialog Box
Step 11. Locate your word processor’s executable file on your PC and click Open to launch your word processor.
If you are using ftp to transfer data to and from MS Word, you may also be prompted for an ftp user ID and password the first time. After you enter this information for a particular environment, you will not be prompted again.
3-26 Using Communications Management, October 21, 2008© 2008 Datatel, Inc.
Building a Document from Custom Paragraphs
Microsoft Word will open with a document (c:\datatel\datatel.doc).
Step 12. When you click on the Insert Merge Fields button, you will see the header fields created from the fields you entered on the DFS form. Create your letter and add merge fields as desired.
If you are working with existing documents, then the document and header/data source definitions will be copied from the host system onto your PC. Some of the old formatted documents may not have the data source properly set up. Follow these steps to correct these documents:
a. Cut and paste the old document into a new document.
b. Close the original document (c:\datatel\datatel.doc) and save the new document as the original name.
c. Use the Mail Merge Helper to define your data source and save it as c:\datatel\header.doc. Remember, the data fields must be the same data fields you specified on the DFS form, only without periods.
Step 13. When you are finished, save the document. You are returned to Colleague.
Step 14. Update the Colleague DOC form.
Using Communications Management, October 21, 2008 3-27© 2008 Datatel, Inc.
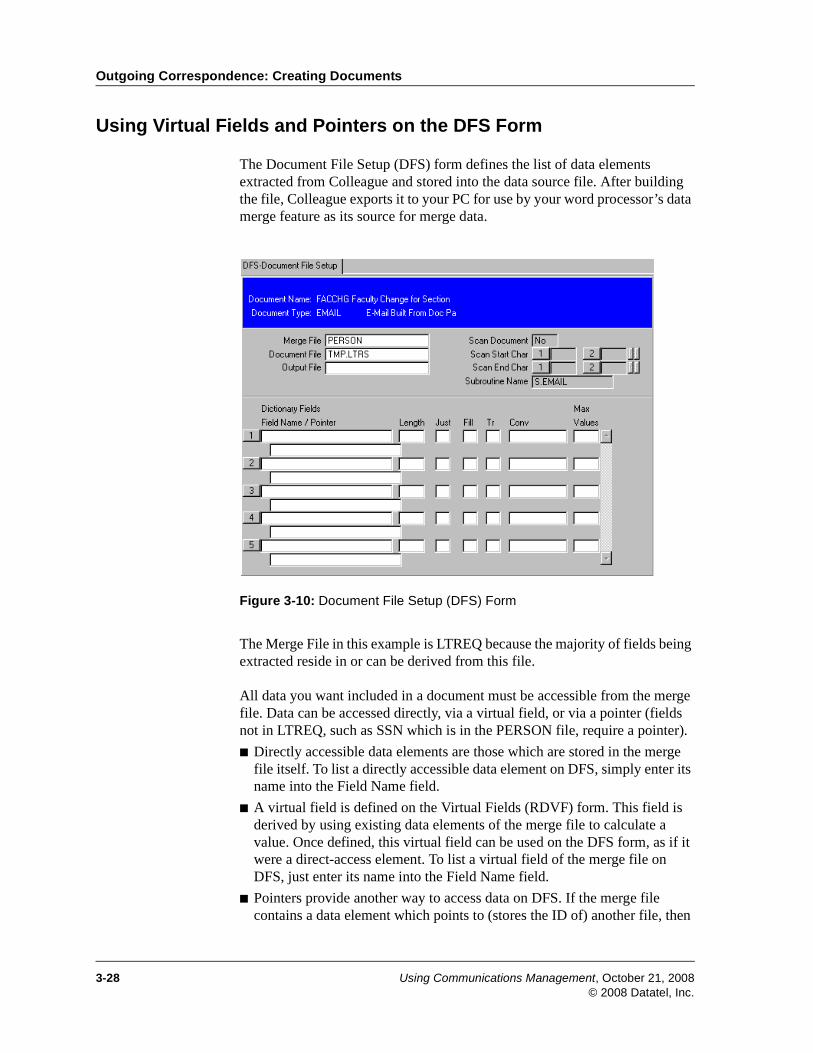
Outgoing Correspondence: Creating Documents
Using Virtual Fields and Pointers on the DFS Form
The Document File Setup (DFS) form defines the list of data elements extracted from Colleague and stored into the data source file. After building the file, Colleague exports it to your PC for use by your word processor’s data merge feature as its source for merge data.
Figure 3-10: Document File Setup (DFS) Form
The Merge File in this example is LTREQ because the majority of fields being extracted reside in or can be derived from this file.
All data you want included in a document must be accessible from the merge file. Data can be accessed directly, via a virtual field, or via a pointer (fields not in LTREQ, such as SSN which is in the PERSON file, require a pointer).
■ Directly accessible data elements are those which are stored in the merge file itself. To list a directly accessible data element on DFS, simply enter its name into the Field Name field.
■ A virtual field is defined on the Virtual Fields (RDVF) form. This field is derived by using existing data elements of the merge file to calculate a value. Once defined, this virtual field can be used on the DFS form, as if it were a direct-access element. To list a virtual field of the merge file on DFS, just enter its name into the Field Name field.
■ Pointers provide another way to access data on DFS. If the merge file contains a data element which points to (stores the ID of) another file, then
3-28 Using Communications Management, October 21, 2008© 2008 Datatel, Inc.
Building a Document from Custom Paragraphs
you can access any data element in the other file. For example, the LTREQ file contains a data element called LTREQ.PERSON. This data element is defined as a pointer to the PERSON file. So if your Merge File is LTREQ, DFS still allows you to access any field from the PERSON file.
LTREQ already contains many predefined pointers (such as LTREQ.PERSON). Therefore, when you enter a data element from the PERSON file in the Field Name field, the Pointer is defaulted in. If you enter a data element and no pointer defaults in, you will have to create a pointer to that file.
To create a pointer, you must first build a virtual field on the Virtual Fields (RDVF) form, then make the virtual field into a pointer on the Database Element Linkages (RDEL) form.
For example, suppose you have a custom application which uses a custom file called X.PERSON (keyed by field “X.ID”) which is a co-file of Colleague's PERSON file. Since X.PERSON is a co-file of PERSON, any field which stores a PERSON ID, by definition also stores an X.PERSON ID. This means that you can access the LTREQ.PERSON field on RDEL and add X.ID to its Secondary Pointer list. Once you've done this and filed RDEL, all fields from the X.PERSON file can then be referenced on DFS as fields pointed to by LTREQ.PERSON.
Technical Tip: You can tell what pointers are contained in a file by examining the file on the File Element Inquiry (RFEI) form. Also, you can tell what files a pointer points to by detailing from the RFEI form to the Database Element Linkages (RDEL) form. Note the names of the data elements given in the Secondary Pointer field. The name of the file that is keyed by a data element is usually the same as the data element name minus “.ID.”
Technical Tip: It is suggested that you do not make changes to existing pointers by adding fields to the Secondary Pointer field since if the field is re-delivered by Datatel, this custom change would be overwritten by the new release.
Note: The pointer field LTREQ.SOURCE.KEYS in the LTREQ file points to records in other files. The files being pointed to depends on the process which created the LTREQ record. The field LTREQ.SOURCE.KEYS is associated with LTREQ.SOURCE.FILES. Look at the contents of LTREQ.SOURCE.FILES to determine which file(s) are being pointed to.
Using Communications Management, October 21, 2008 3-29© 2008 Datatel, Inc.
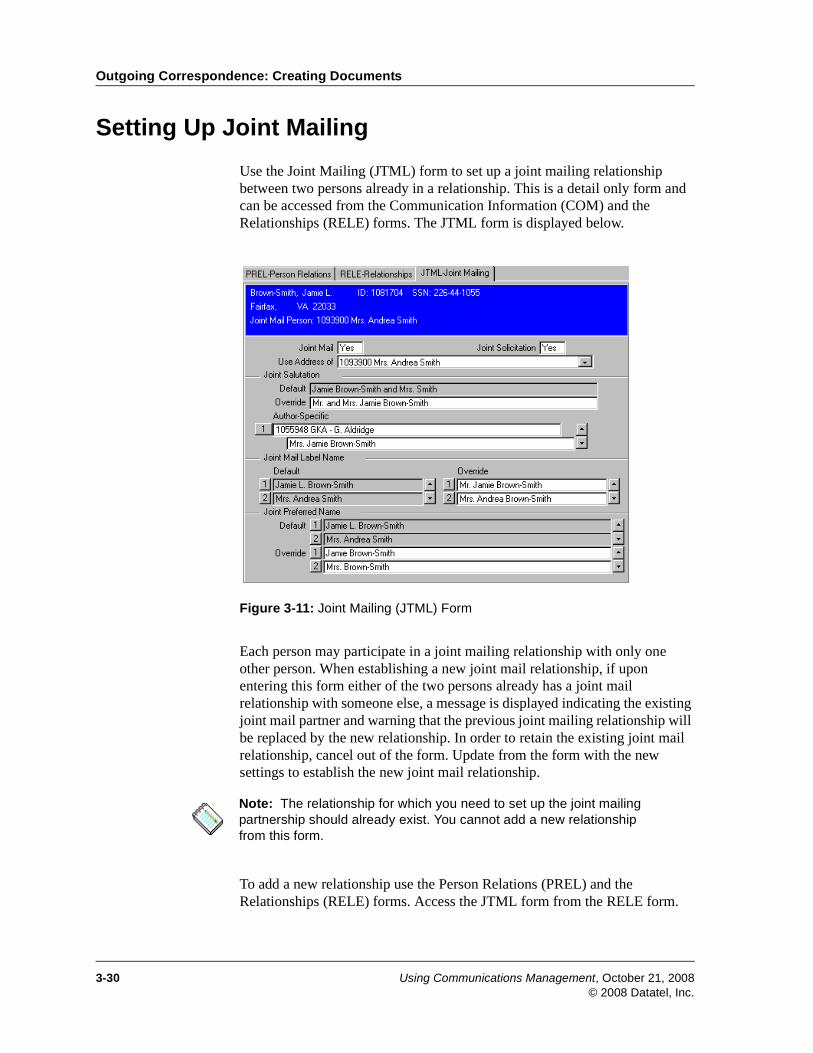
Outgoing Correspondence: Creating Documents
Setting Up Joint Mailing
Use the Joint Mailing (JTML) form to set up a joint mailing relationship between two persons already in a relationship. This is a detail only form and can be accessed from the Communication Information (COM) and the Relationships (RELE) forms. The JTML form is displayed below.
Figure 3-11: Joint Mailing (JTML) Form
Each person may participate in a joint mailing relationship with only one other person. When establishing a new joint mail relationship, if upon entering this form either of the two persons already has a joint mail relationship with someone else, a message is displayed indicating the existing joint mail partner and warning that the previous joint mailing relationship will be replaced by the new relationship. In order to retain the existing joint mail relationship, cancel out of the form. Update from the form with the new settings to establish the new joint mail relationship.
To add a new relationship use the Person Relations (PREL) and the Relationships (RELE) forms. Access the JTML form from the RELE form.
Note: The relationship for which you need to set up the joint mailing partnership should already exist. You cannot add a new relationship from this form.
3-30 Using Communications Management, October 21, 2008© 2008 Datatel, Inc.
Setting Up Joint Mailing
Noteworthy Fields on the JTML Form
Most of the fields on the JTML form have a default value, but allow for an override value. These fields display both the default and the override value. To return to using the default value, delete the associated override value. This section briefly describes some of the fields on the JTML form.
Use Address of
Select the person whose address is to be used for joint mailing or solicitation. In this field you can only enter a value that is either the ID of the person in the header or the ID of the related person. If you leave this field blank, the default value is used, which is the lesser of the two person IDs.
Author-Specific
Accepts author-specific joint salutation overrides. Using this field you may define a custom salutation for a staff member who needs to address this relationship in a unique or personal way. Use Staff LookUp to identify a staff member and then enter an associated joint salutation. After a custom salutation has been entered for a staff member, any document authored by that staff member for this joint relationship will use that custom salutation.
Joint Mail Label Name - Override
Accepts an override to the default joint mail label name.
Using Communications Management, October 21, 2008 3-31© 2008 Datatel, Inc.
Outgoing Correspondence: Creating Documents
Procedure for Setting Up Joint Mailing
Follow the steps below to set up a joint mailing relationship.
Step 1. Access the Joint Mailing (JTML) form.
Step 2. Indicate whether or not joint mail or the joint solicitation should be set up.
Step 3. Enter any other override values, as needed.
Step 4. Update out of the JTML form.
For more information about the JTML form, see the online help.
3-32 Using Communications Management, October 21, 2008© 2008 Datatel, Inc.
Outgoing Correspondence3
Assigning Documents to Individuals April 25, 2006
In This Chapter
This chapter provides an overview of and procedure for assigning documents to individuals so that only a specific person receives a particular document.
Before You Begin
Before you assign documents to individuals you should complete the actions listed in Table 3-5.
Action Reference
Understand Communications Management concepts
“Overview of the Communications Management Module” beginning on page 1-13
Define your document codes “Defining Document Codes” beginning on page 3-1
Create your own documents (optional) “Creating Documents” beginning on page 3-7
Table 3-5: Information Needed Before You Define Documents
Using Communications Management, April 25, 2006 3-33© 2008 Datatel, Inc.
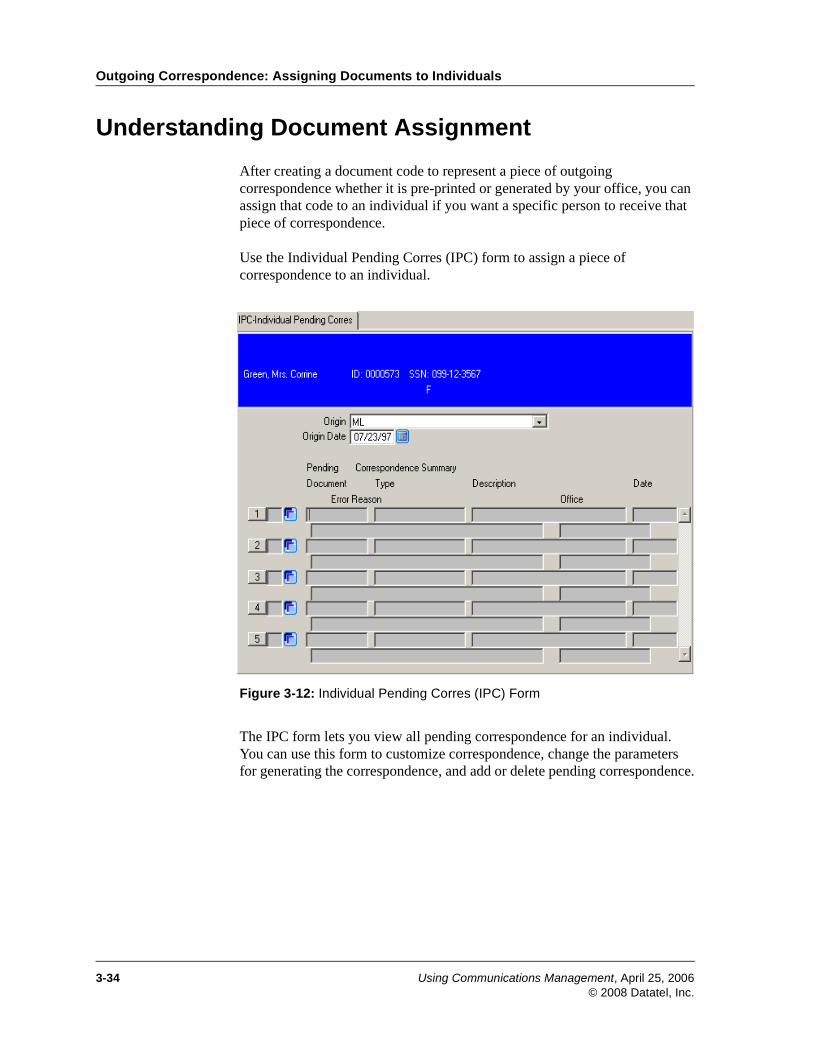
Outgoing Correspondence: Assigning Documents to Individuals
Understanding Document Assignment
After creating a document code to represent a piece of outgoing correspondence whether it is pre-printed or generated by your office, you can assign that code to an individual if you want a specific person to receive that piece of correspondence.
Use the Individual Pending Corres (IPC) form to assign a piece of correspondence to an individual.
Figure 3-12: Individual Pending Corres (IPC) Form
The IPC form lets you view all pending correspondence for an individual. You can use this form to customize correspondence, change the parameters for generating the correspondence, and add or delete pending correspondence.
3-34 Using Communications Management, April 25, 2006© 2008 Datatel, Inc.
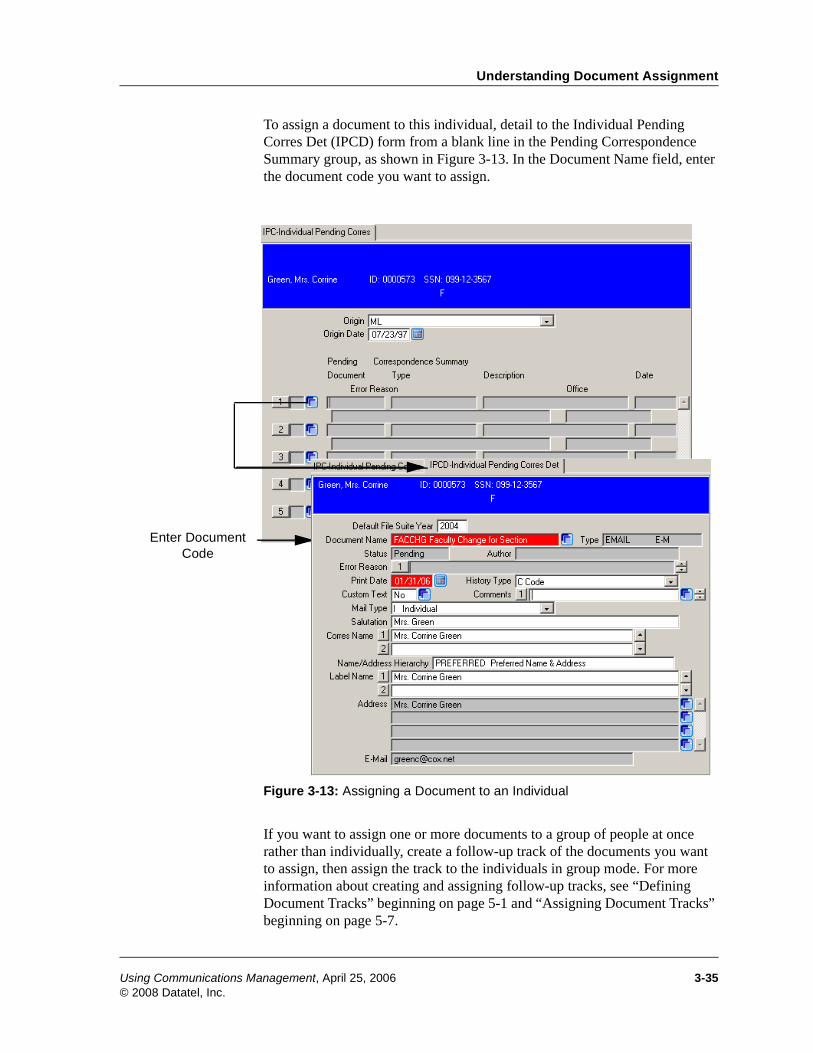
Understanding Document Assignment
To assign a document to this individual, detail to the Individual Pending Corres Det (IPCD) form from a blank line in the Pending Correspondence Summary group, as shown in Figure 3-13. In the Document Name field, enter the document code you want to assign.
Figure 3-13: Assigning a Document to an Individual
If you want to assign one or more documents to a group of people at once rather than individually, create a follow-up track of the documents you want to assign, then assign the track to the individuals in group mode. For more information about creating and assigning follow-up tracks, see “Defining Document Tracks” beginning on page 5-1 and “Assigning Document Tracks” beginning on page 5-7.
Enter Document Code
Using Communications Management, April 25, 2006 3-35© 2008 Datatel, Inc.
Outgoing Correspondence: Assigning Documents to Individuals
Procedure for Assigning a Document to an Individual
Complete the following steps to assign a document to an individual:
Step 1. Access the individual for whom you want to assign an outgoing document on the Individual Pending Corres (IPC) form.
The IPC form displays with all documents currently pending for this individual.
See the online help for more information about a specific field.
Step 2. In the Pending Correspondence Summary field, go to a blank line or insert a line.
You can also delete any existing pending correspondence in this list by deleting the document or replacing it with a new document.
Step 3. Detail to the Individual Pending Corres Det (IPCD) form.
The IPCD form displays.
Step 4. Go to the Document Name field. Enter a document code to assign that document to the individual.
You must also specify a print date for the document.
From the IPCD form, you can also add custom text, add a custom salutation, or change the address hierarchy for new or existing correspondence. Other details that you can enter on this form include correspondence name, label name, and mail type.
Step 5. Save the record.
This piece of correspondence remains pending until it is processed. See “Processing Pending Correspondence” beginning on page 7-1 for more information about processing your pending correspondence.
3-36 Using Communications Management, April 25, 2006© 2008 Datatel, Inc.
Outgoing Correspondence3
Customizing Individual Documents April 25, 2006
In This Chapter
This chapter provides an overview of and a procedure for customizing documents after they have been created and assigned to individuals.
Information for creating and assigning documents is included in the previous chapter.
Before You Begin
Before you can customize documents you should complete the actions in Table 3-6.
Action Reference
Understand document codes “Defining Document Codes” beginning on page 3-1
Understand creating documents “Creating Documents” beginning on page 3-7
Understand assigning documents to individuals
“Assigning Documents to Individuals” beginning on page 3-33
Table 3-6: Information Needed Before You Can Customize Documents
Using Communications Management, April 25, 2006 3-37© 2008 Datatel, Inc.

Outgoing Correspondence: Customizing Individual Documents
Understanding Document Customization
You can customize individual documents after you have created the document and assigned it to an individual (or group of individual). See “Creating Documents” beginning on page 3-7 for more information about creating your documents. See “Assigning Documents to Individuals” beginning on page 3-33 for more information about assigning the documents to individuals.
To customize individual documents, you must do the following:
1. access the list of all documents pending for an individual
2. locate the particular document you want to modify
3. select the particular paragraph you want to modify
These steps are discussed in the following sections.
Note: You can only customize a document if you have entered NO in the Recalculate Paragraphs field on the Document Paragraphs (DOCP) form when you created the document.
3-38 Using Communications Management, April 25, 2006© 2008 Datatel, Inc.
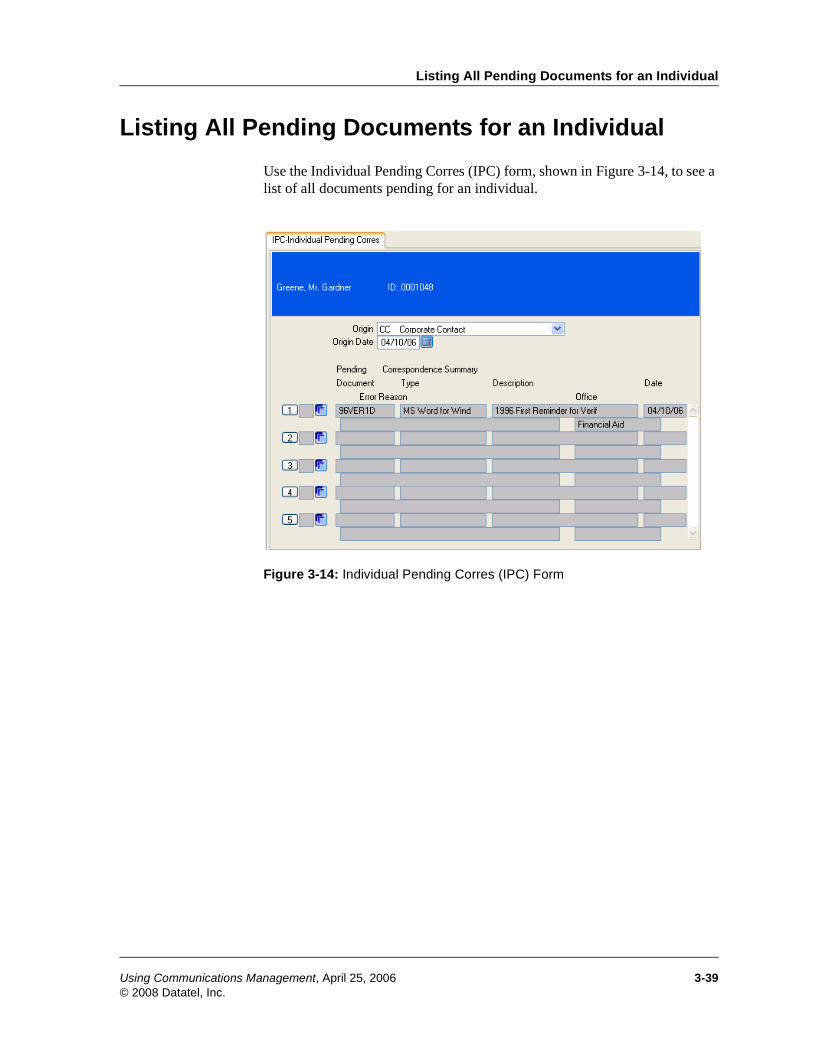
Listing All Pending Documents for an Individual
Listing All Pending Documents for an Individual
Use the Individual Pending Corres (IPC) form, shown in Figure 3-14, to see a list of all documents pending for an individual.
Figure 3-14: Individual Pending Corres (IPC) Form
Using Communications Management, April 25, 2006 3-39© 2008 Datatel, Inc.
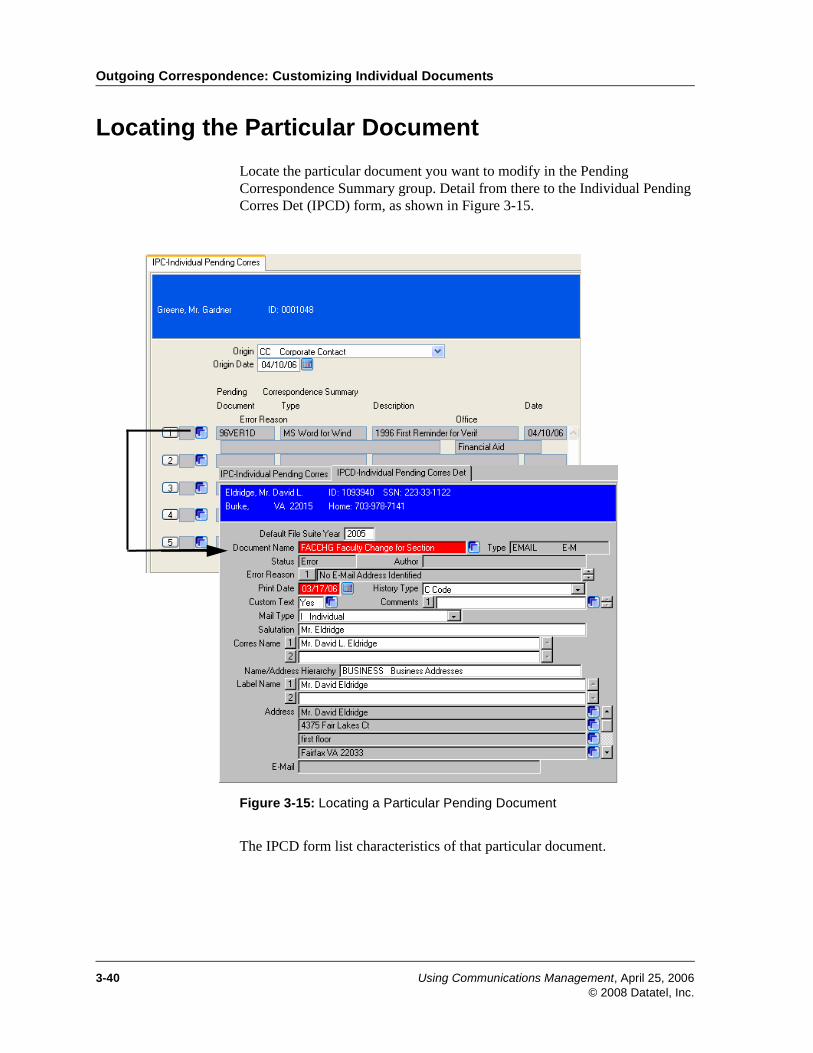
Outgoing Correspondence: Customizing Individual Documents
Locating the Particular Document
Locate the particular document you want to modify in the Pending Correspondence Summary group. Detail from there to the Individual Pending Corres Det (IPCD) form, as shown in Figure 3-15.
Figure 3-15: Locating a Particular Pending Document
The IPCD form list characteristics of that particular document.
3-40 Using Communications Management, April 25, 2006© 2008 Datatel, Inc.
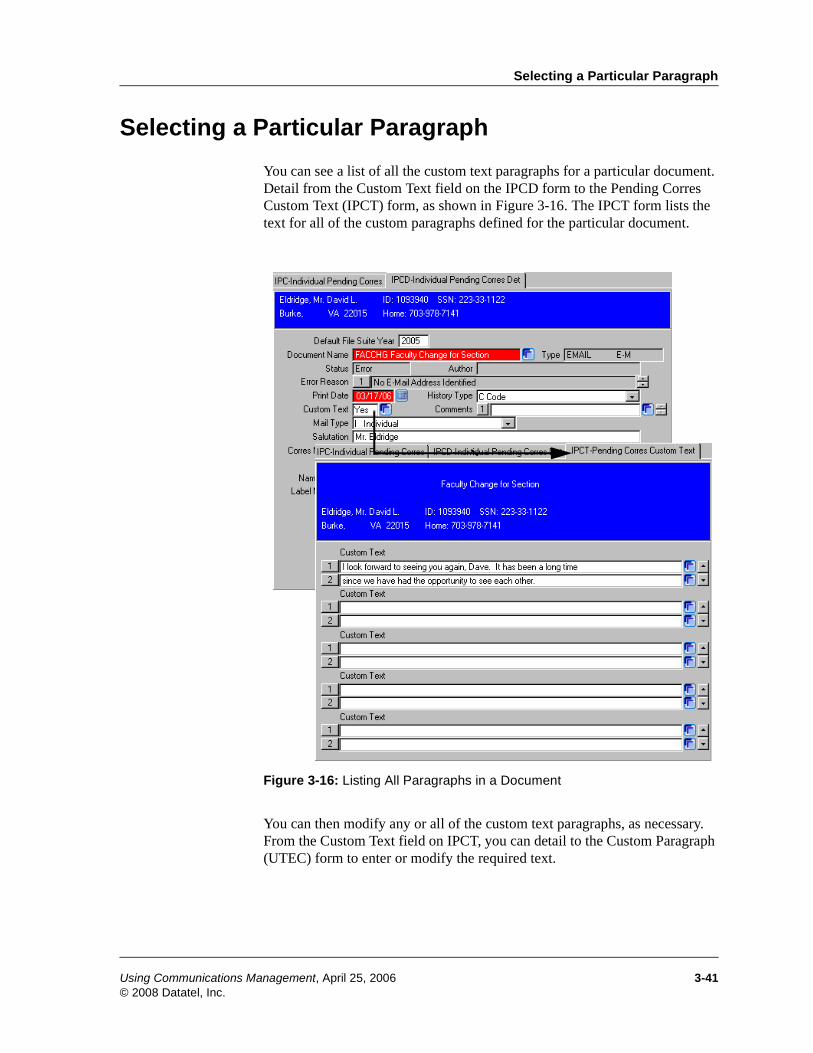
Selecting a Particular Paragraph
Selecting a Particular Paragraph
You can see a list of all the custom text paragraphs for a particular document. Detail from the Custom Text field on the IPCD form to the Pending Corres Custom Text (IPCT) form, as shown in Figure 3-16. The IPCT form lists the text for all of the custom paragraphs defined for the particular document.
Figure 3-16: Listing All Paragraphs in a Document
You can then modify any or all of the custom text paragraphs, as necessary. From the Custom Text field on IPCT, you can detail to the Custom Paragraph (UTEC) form to enter or modify the required text.
Using Communications Management, April 25, 2006 3-41© 2008 Datatel, Inc.
Outgoing Correspondence: Customizing Individual Documents
Procedure for Customizing an Individual Document
Complete the following steps to customize an individual document:
Step 1. Familiarize yourself with the customization process.
See “Understanding Document Customization” on page 3-38.
Step 2. Access the individual’s record using the Individual Pending Corres (IPC) form.
The IPC form displays with a list of all of the pending documents for the individual.
See “Listing All Pending Documents for an Individual” on page 3-39 for more information.
Step 3. Locate the particular document you want to customize.
Step 4. Detail to the Individual Pending Corres Det (IPCD) form.
The IPCD form displays with many of the document’s characteristics.
See “Locating the Particular Document” on page 3-40 for more information.
Step 5. Detail to the Pending Corres Custom Text (IPCT) form.
The IPCT form displays with all of the documents custom text paragraphs.
Step 6. Detail from the Custom Text filed.
See “Selecting a Particular Paragraph” on page 3-41 for more information.
3-42 Using Communications Management, April 25, 2006© 2008 Datatel, Inc.
Selecting a Particular Paragraph
Step 7. Select the paragraph you want to customize and modify it as necessary.
Repeat this step for as many of the custom paragraphs as you want to customize.
Step 8. Save out of all forms.
Using Communications Management, April 25, 2006 3-43© 2008 Datatel, Inc.
Outgoing Correspondence: Customizing Individual Documents
3-44 Using Communications Management, April 25, 2006© 2008 Datatel, Inc.
Using Communications Management
4. Incoming Correspondence

Incoming Correspondence4
Defining Communication Codes October 21, 2008
In This Chapter
This chapter provides overview information about communication codes and includes recommended naming conventions for communication codes. This chapter tells you how to define communication codes and also trigger other actions using communication codes when a piece of correspondence comes in from an individual.
Information about recording incoming correspondence, is provided in a subsequent chapter.
Before You Begin
Before you define communication codes you should complete the actions listed in Table 4-1.
Action Reference
Understand Communications Management concepts
“Overview of the Communications Management Module” beginning on page 1-13
Plan your communication codes using the Communication Codes worksheets
“Worksheets” beginning on page A-1
Table 4-1: Information Needed Before You Define Communication Codes
Using Communications Management, October 21, 2008 4-1© 2008 Datatel, Inc.
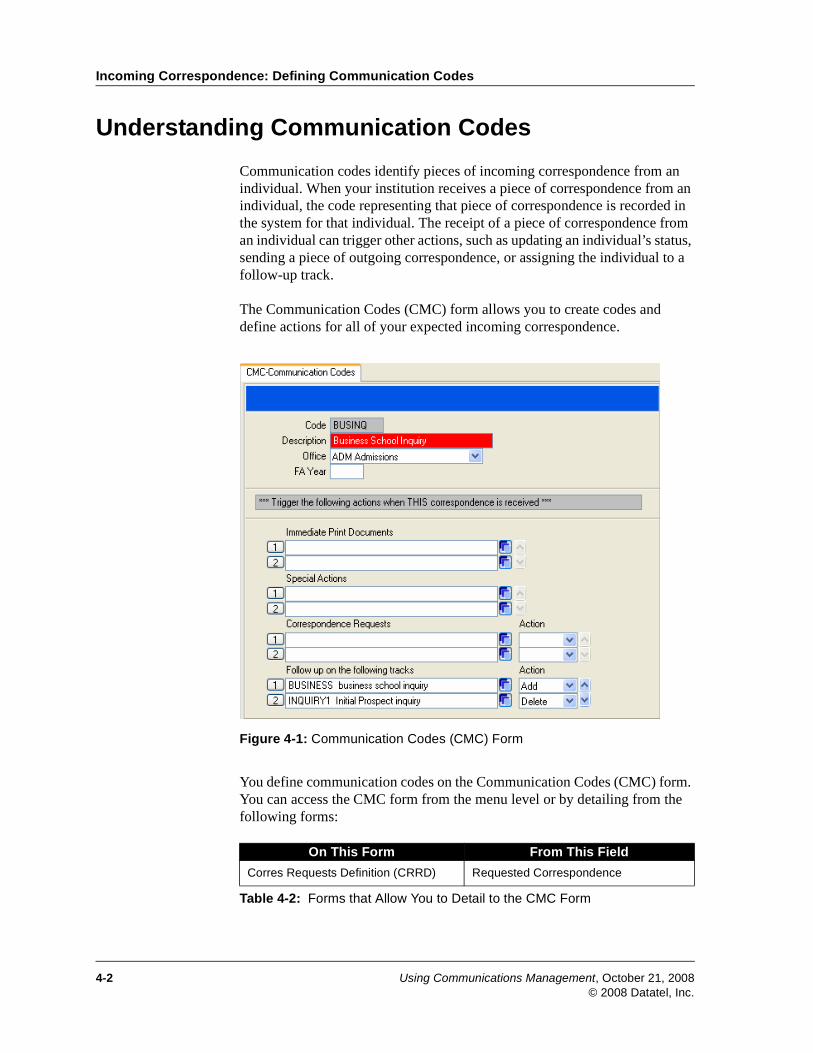
Incoming Correspondence: Defining Communication Codes
Understanding Communication Codes
Communication codes identify pieces of incoming correspondence from an individual. When your institution receives a piece of correspondence from an individual, the code representing that piece of correspondence is recorded in the system for that individual. The receipt of a piece of correspondence from an individual can trigger other actions, such as updating an individual’s status, sending a piece of outgoing correspondence, or assigning the individual to a follow-up track.
The Communication Codes (CMC) form allows you to create codes and define actions for all of your expected incoming correspondence.
Figure 4-1: Communication Codes (CMC) Form
You define communication codes on the Communication Codes (CMC) form. You can access the CMC form from the menu level or by detailing from the following forms:
On This Form From This Field
Corres Requests Definition (CRRD) Requested Correspondence
Table 4-2: Forms that Allow You to Detail to the CMC Form
4-2 Using Communications Management, October 21, 2008© 2008 Datatel, Inc.
Understanding Communication Codes
From the Communication Codes (CMC) form you can detail to the following forms:
Triggering Other Actions
You can define communication codes that trigger other actions when you record the receipt of a piece of communication from an individual. For example, if you create a communication code for the receipt of an undergraduate application fee, you can define several actions that occur when you record the receipt of that fee from an individual. In this situation, you could trigger the following actions:
■ send an acknowledgment letter to the individual by listing the document code for the acknowledgment letter as an immediate print document.
■ update the individual’s status using a special action subroutine.
■ add the individual to an undergraduate requirements track by listing the appropriate correspondence request code.
■ remove the individual from a prospect follow-up track and add them to an applicant follow-up track by specifying the appropriate follow-up track codes
These other actions can be simple or complex, depending on your institution’s requirements. Be sure to test your communication codes before using them in a live environment to make sure they yield the desired results.
From this field... Detail to...
Immediate Print Documents Document Codes (DOC)
Special Actions Corres Actions Definition (CRAD)
Correspondence Requests Corres Requests Definition (CRRD)
Follow up on the Following Tracks Tracking Codes (TRC)
Table 4-3: Detail Forms from the CMC Form
Using Communications Management, October 21, 2008 4-3© 2008 Datatel, Inc.
Incoming Correspondence: Defining Communication Codes
Communication Code Naming Conventions
When naming communication codes, consider ending the code with the letter “C.” In many instances, it is desirable to name different types of codes similarly when you want to group like processing codes together. Ending the code name with a character signifying the type of code represented will greatly assist in avoiding confusion.
For example, Table 4-4 illustrates how related Communication Management codes could be named for clarity. An application sent to admissions applicants may be called 02APPD. The track associated with this document might be called 02APPT. The required items of a request could be called 02TRANSC, 02APPC, etc. The request itself could be called 02APPR.
Procedure for Defining Communication Codes
Use the appropriate worksheets starting on page A-1 to plan the communication codes you want to create. Use the Communication Codes (CMC) form to create a profile of all expected incoming documents. Refer to online help for information specific to each field on the CMC form.
Code Type Applicable Year “Root” Code Name Suffix Full Code Name
Document Code 2001/02 APP D 02APPD
Tracking Code 2001/02 APP T 02APPT
Communication Code
2001/02 APP C 02APPC
Correspondence Requests
2001/02 APP R 02APPR
Table 4-4: Example of Communication Management Code Naming Convention
4-4 Using Communications Management, October 21, 2008© 2008 Datatel, Inc.
Incoming Correspondence4
Recording Incoming Correspondence April 25, 2006
In This Chapter
This chapter provides information for assigning communication codes and procedures for recording incoming correspondence for individuals and organizations.
Before You Begin
Before you record (or assign) incoming correspondence you should complete the actions in Table 4-5.
Action Reference
Understand Communications Management concepts
“Overview of the Communications Management Module” beginning on page 1-13
Define your Communication Codes “Defining Communication Codes” beginning on page 4-1
Table 4-5: Information Needed Before You Assign Communication Codes
Using Communications Management, April 25, 2006 4-5© 2008 Datatel, Inc.
Incoming Correspondence: Recording Incoming Correspondence
Understanding Communication Code Assignment
After you have created your communication codes, you can assign those codes to individuals in your system to record the receipt of incoming correspondence from the individual. For example, assume that you have created a communication code for an admissions application. When you receive an application from a prospective student, you would assign the code for the application to the individual’s record to indicate the fact that the prospect submitted an application.
Recording the receipt of a piece of correspondence or other information can trigger other actions for this individual, such as updating an individual’s status, sending a piece of outgoing correspondence, or assigning the individual to a follow-up track. These other actions are defined when the communication code is created. See “Defining Communication Codes” beginning on page 4-1 for more details about creating communication codes.
You can assign communication codes to individuals or to a group of individuals. Use Table 4-6 to determine which form to use when assign communication codes.
Use the Communication Code Entry (CRI) form to record correspondence received from an individual.
If you want to record correspondence from…
Use the… See…
an individual Communication Code Entry (CRI) form
Figure 4-2
a group of individuals Group Communication Entry (CRG) form
Figure 4-3
Table 4-6: Forms Used to Assign Communication Codes
4-6 Using Communications Management, April 25, 2006© 2008 Datatel, Inc.

Understanding Communication Code Assignment
Figure 4-2: The Communication Code Entry (CRI) Form
Use the Group Communication Entry (CRG) form to record correspondence received from a group of individuals.
Figure 4-3: The Group Communication Entry (CRG) Form
Using Communications Management, April 25, 2006 4-7© 2008 Datatel, Inc.
Incoming Correspondence: Recording Incoming Correspondence
Statuses of Incoming Correspondence
Correspondence statuses are user-defined, but they use special processing to indicate whether the code indicates that the correspondence is received, waived, or incomplete. See your system administrator if you do not know which codes use specific special processing. Use the following table to determine which code to use when you record the receipt of correspondence.
If... Then...
The piece of correspondence you received is complete and correct
Enter a “received” status code.
The individual does not have to submit a specific piece of correspondence
Enter a “waived” status code.
You entered a communication code for an individual by mistake
Enter a “waived” status code. You cannot delete communication codes after they have been assigned to an individual.
The piece of correspondence you received is incomplete or incorrect
Enter an “incomplete” status code.
Table 4-7: Status Codes for Incoming Correspondence
4-8 Using Communications Management, April 25, 2006© 2008 Datatel, Inc.
Understanding Communication Code Assignment
Procedure for Recording Incoming Correspondence: Individual Mode
Complete the following steps to record incoming correspondence from an individual.
Step 1. Access the Communication Code Entry (CRI) form.
Step 2. Select the default file suite year or enter another year.
Step 3. Access the record of the person for which you want to record incoming correspondence.
See the online help for more information about a specific field.
Step 4. Enter communication codes to record the pieces of correspondence received.
Step 5. For each communication code, define the status you want to set during processing (received, waived, or incomplete).
See page 2-1 for more information on correspondence status codes.
Step 6. Save the record.
When you save the record, the system updates the individual’s correspondence information and triggers any special actions.
Using Communications Management, April 25, 2006 4-9© 2008 Datatel, Inc.
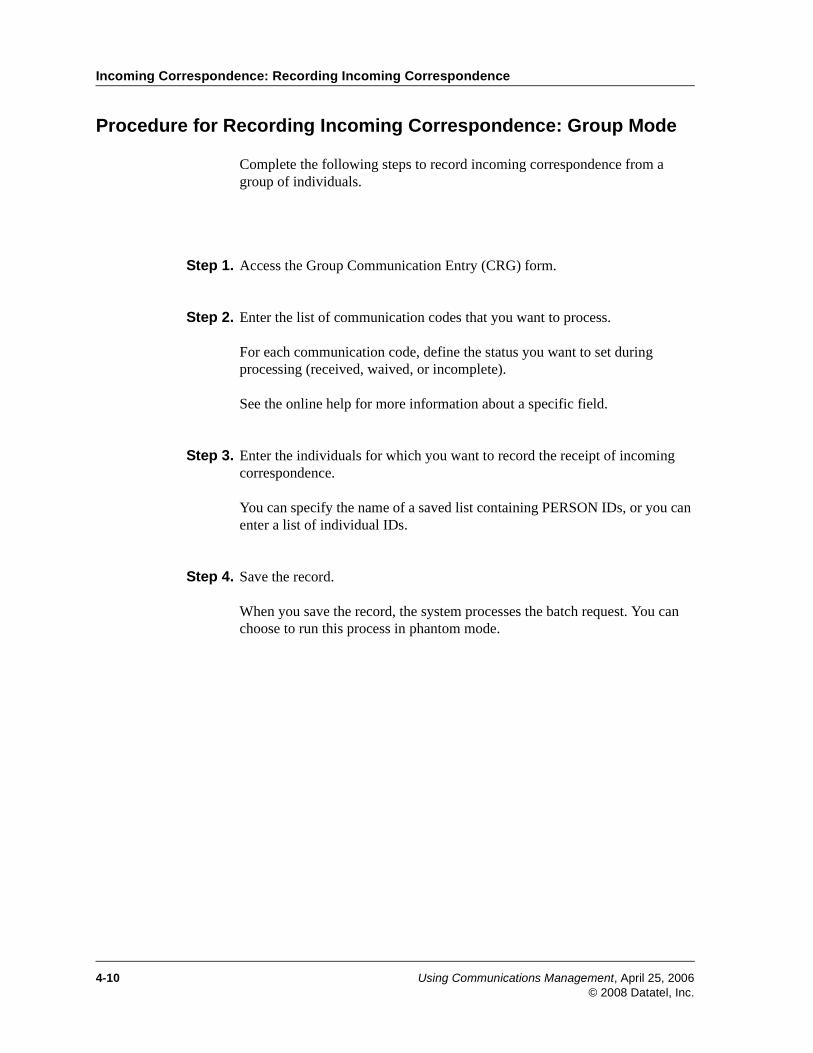
Incoming Correspondence: Recording Incoming Correspondence
Procedure for Recording Incoming Correspondence: Group Mode
Complete the following steps to record incoming correspondence from a group of individuals.
StepProcedure
Step 1. Access the Group Communication Entry (CRG) form.
Step 2. Enter the list of communication codes that you want to process.
For each communication code, define the status you want to set during processing (received, waived, or incomplete).
See the online help for more information about a specific field.
Step 3. Enter the individuals for which you want to record the receipt of incoming correspondence.
You can specify the name of a saved list containing PERSON IDs, or you can enter a list of individual IDs.
Step 4. Save the record.
When you save the record, the system processes the batch request. You can choose to run this process in phantom mode.
4-10 Using Communications Management, April 25, 2006© 2008 Datatel, Inc.
Using Communications Management
5. Document Tracks

Document Tracks5
Defining Document Tracks October 21, 2008
In This Chapter
This chapter provides information about document tracks and a procedure on how to define them. This chapter also provides recommended naming conventions for document tracks.
The next chapter provides instruction on how to assign document tracks to individuals or organizations in your database.
Before You Begin
Before you define document tracks you should complete the actions listed in Table 5-1.
Action Reference
Understand Communications Management concepts
“Overview of the Communications Management Module” beginning on page 1-13
Plan your tracking codes using the Tracking Codes worksheet
“Worksheets” beginning on page A-1
Create the document codes you want to use in your document tracks
“Defining Document Codes” beginning on page 3-1
Table 5-1: Information Needed Before You Define Document Tracks
Using Communications Management, October 21, 2008 5-1© 2008 Datatel, Inc.
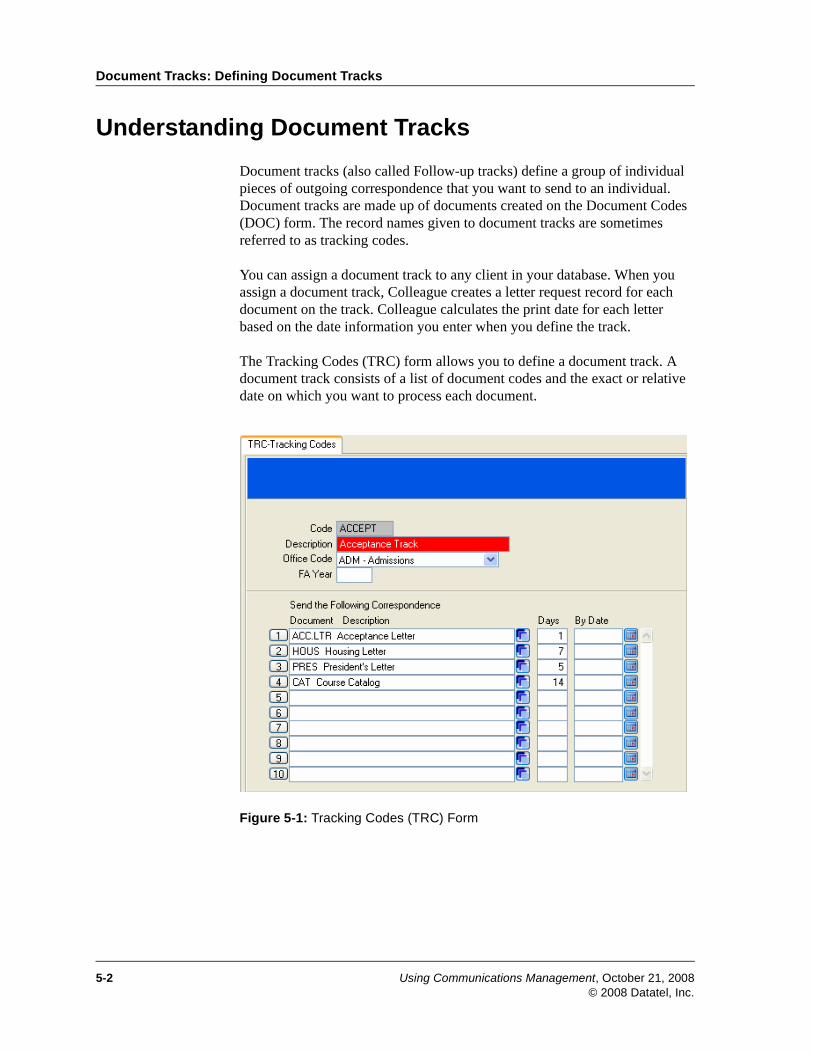
Document Tracks: Defining Document Tracks
Understanding Document Tracks
Document tracks (also called Follow-up tracks) define a group of individual pieces of outgoing correspondence that you want to send to an individual. Document tracks are made up of documents created on the Document Codes (DOC) form. The record names given to document tracks are sometimes referred to as tracking codes.
You can assign a document track to any client in your database. When you assign a document track, Colleague creates a letter request record for each document on the track. Colleague calculates the print date for each letter based on the date information you enter when you define the track.
The Tracking Codes (TRC) form allows you to define a document track. A document track consists of a list of document codes and the exact or relative date on which you want to process each document.
Figure 5-1: Tracking Codes (TRC) Form
5-2 Using Communications Management, October 21, 2008© 2008 Datatel, Inc.
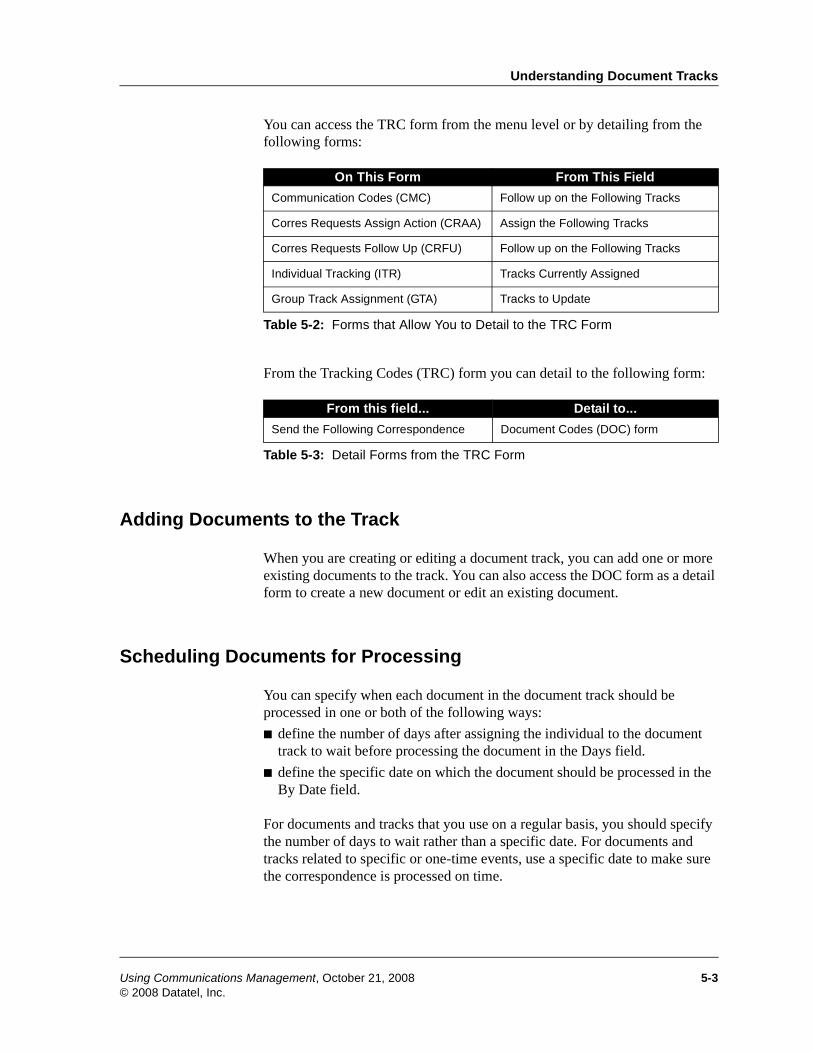
Understanding Document Tracks
You can access the TRC form from the menu level or by detailing from the following forms:
From the Tracking Codes (TRC) form you can detail to the following form:
Adding Documents to the Track
When you are creating or editing a document track, you can add one or more existing documents to the track. You can also access the DOC form as a detail form to create a new document or edit an existing document.
Scheduling Documents for Processing
You can specify when each document in the document track should be processed in one or both of the following ways:
■ define the number of days after assigning the individual to the document track to wait before processing the document in the Days field.
■ define the specific date on which the document should be processed in the By Date field.
For documents and tracks that you use on a regular basis, you should specify the number of days to wait rather than a specific date. For documents and tracks related to specific or one-time events, use a specific date to make sure the correspondence is processed on time.
On This Form From This Field
Communication Codes (CMC) Follow up on the Following Tracks
Corres Requests Assign Action (CRAA) Assign the Following Tracks
Corres Requests Follow Up (CRFU) Follow up on the Following Tracks
Individual Tracking (ITR) Tracks Currently Assigned
Group Track Assignment (GTA) Tracks to Update
Table 5-2: Forms that Allow You to Detail to the TRC Form
From this field... Detail to...
Send the Following Correspondence Document Codes (DOC) form
Table 5-3: Detail Forms from the TRC Form
Using Communications Management, October 21, 2008 5-3© 2008 Datatel, Inc.
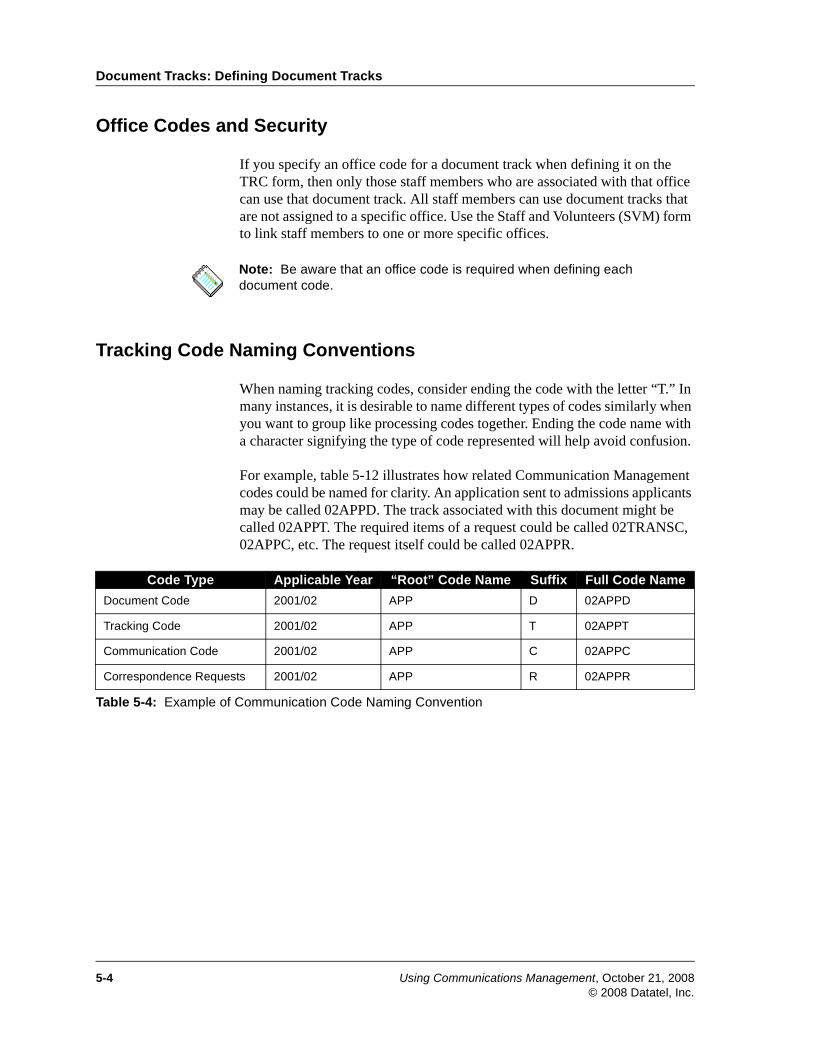
Document Tracks: Defining Document Tracks
Office Codes and Security
If you specify an office code for a document track when defining it on the TRC form, then only those staff members who are associated with that office can use that document track. All staff members can use document tracks that are not assigned to a specific office. Use the Staff and Volunteers (SVM) form to link staff members to one or more specific offices.
Tracking Code Naming Conventions
When naming tracking codes, consider ending the code with the letter “T.” In many instances, it is desirable to name different types of codes similarly when you want to group like processing codes together. Ending the code name with a character signifying the type of code represented will help avoid confusion.
For example, table 5-12 illustrates how related Communication Management codes could be named for clarity. An application sent to admissions applicants may be called 02APPD. The track associated with this document might be called 02APPT. The required items of a request could be called 02TRANSC, 02APPC, etc. The request itself could be called 02APPR.
Note: Be aware that an office code is required when defining each document code.
Code Type Applicable Year “Root” Code Name Suffix Full Code Name
Document Code 2001/02 APP D 02APPD
Tracking Code 2001/02 APP T 02APPT
Communication Code 2001/02 APP C 02APPC
Correspondence Requests 2001/02 APP R 02APPR
Table 5-4: Example of Communication Code Naming Convention
5-4 Using Communications Management, October 21, 2008© 2008 Datatel, Inc.
Understanding Document Tracks
Procedure for Defining a Document Track
Complete the following steps to define your document tracks:
Step 1. Access the Tracking Codes (TRC) form.
Step 2. Define the tracking code.
At the LookUp prompt, enter the new code name and choose (A) to add.
Enter the description and office code in the appropriate fields.
See the online help for more information about a specific field.
Step 3. Add documents to the track.
You can choose existing documents or create documents on the fly. If you want to create documents to add to the track, detail to the DOC form.
Step 4. Save the record.
Using Communications Management, October 21, 2008 5-5© 2008 Datatel, Inc.

Document Tracks: Defining Document Tracks
5-6 Using Communications Management, October 21, 2008© 2008 Datatel, Inc.
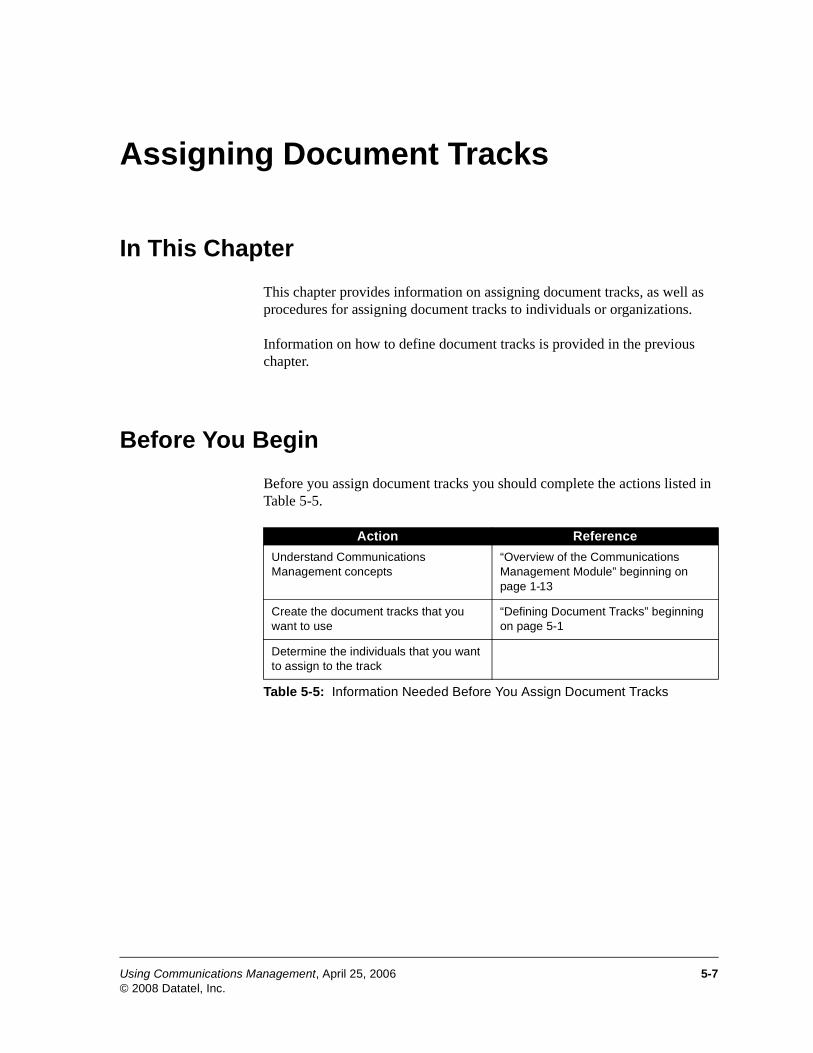
Document Tracks5
Assigning Document Tracks April 25, 2006
In This Chapter
This chapter provides information on assigning document tracks, as well as procedures for assigning document tracks to individuals or organizations.
Information on how to define document tracks is provided in the previous chapter.
Before You Begin
Before you assign document tracks you should complete the actions listed in Table 5-5.
Action Reference
Understand Communications Management concepts
“Overview of the Communications Management Module” beginning on page 1-13
Create the document tracks that you want to use
“Defining Document Tracks” beginning on page 5-1
Determine the individuals that you want to assign to the track
Table 5-5: Information Needed Before You Assign Document Tracks
Using Communications Management, April 25, 2006 5-7© 2008 Datatel, Inc.
Document Tracks: Assigning Document Tracks
Understanding Document Track Assignment
You can assign a document track to any individual or organization in your database. When you assign a document track, Colleague creates a letter request record for each document on the document track. Colleague calculates the print date for each letter based on the date information you enter when you define the track.
You can assign document tracks to individuals in many ways. The simplest way to assign tracks is to manually assign tracks in either individual or group mode. Other processes, such as recording the receipt of a piece of correspondence, can automatically add, remove, or reset a document track for an individual.
To assign or maintain tracks for individuals, use the Individual Tracking (ITR) form. To assign or maintain tracks for groups of individuals, use the Group Track Assignment (GTA) form.
Track Assignment Actions
When you are assigning document tracks in group mode, you must specify the action that you want to take place for each track, as follows:
■ Add - This action adds all individuals in the group to the associated track.
■ Delete - This action removes all individuals in the group from the associated track.
■ Reset - This action resets the associated track’s schedule of document processing for all individuals in the group.
Track assignment actions do not apply when assigning tracks individually using the ITR form.
5-8 Using Communications Management, April 25, 2006© 2008 Datatel, Inc.
Understanding Document Track Assignment
Procedure for Assigning a Document Track: Individual Mode
Complete the following steps to assign document tracks to an individual.
Step 1. Access the record for the individual to whom you want to assign the track.
For each document track, define the action you want to occur during processing (add, delete, or reset).
See the online help for more information about a specific field.
Step 2. Add one or more document tracks for this individual.
If there are any existing document tracks currently assigned to this individual, you can view or modify them on this form.
Step 3. Save the record.
When you save the record, the system assigns the track to the individual.
Using Communications Management, April 25, 2006 5-9© 2008 Datatel, Inc.

Document Tracks: Assigning Document Tracks
Procedure for Assigning a Document Track: Group Mode
Complete the following steps to assign document tracks to a group.
Step 1. Access the Group Track Assignment (GTA) form.
Step 2. Select the default file suite year or enter another year.
Step 3. Enter the list of document tracks that you want to process.
For each document track, define the action you want to occur during processing (add, delete, or reset).
See the online help for more information about a specific field.
Step 4. Define the individuals for which you want to process the document track assignments.
You can specify the name of a saved list containing PERSON IDs, or you can enter a list of individual IDs.
Step 5. Save the record.
When you save the record, the system processes the batch request. You can choose to run this process in phantom mode.
5-10 Using Communications Management, April 25, 2006© 2008 Datatel, Inc.
Using Communications Management
6. Correspondence Request Tracks

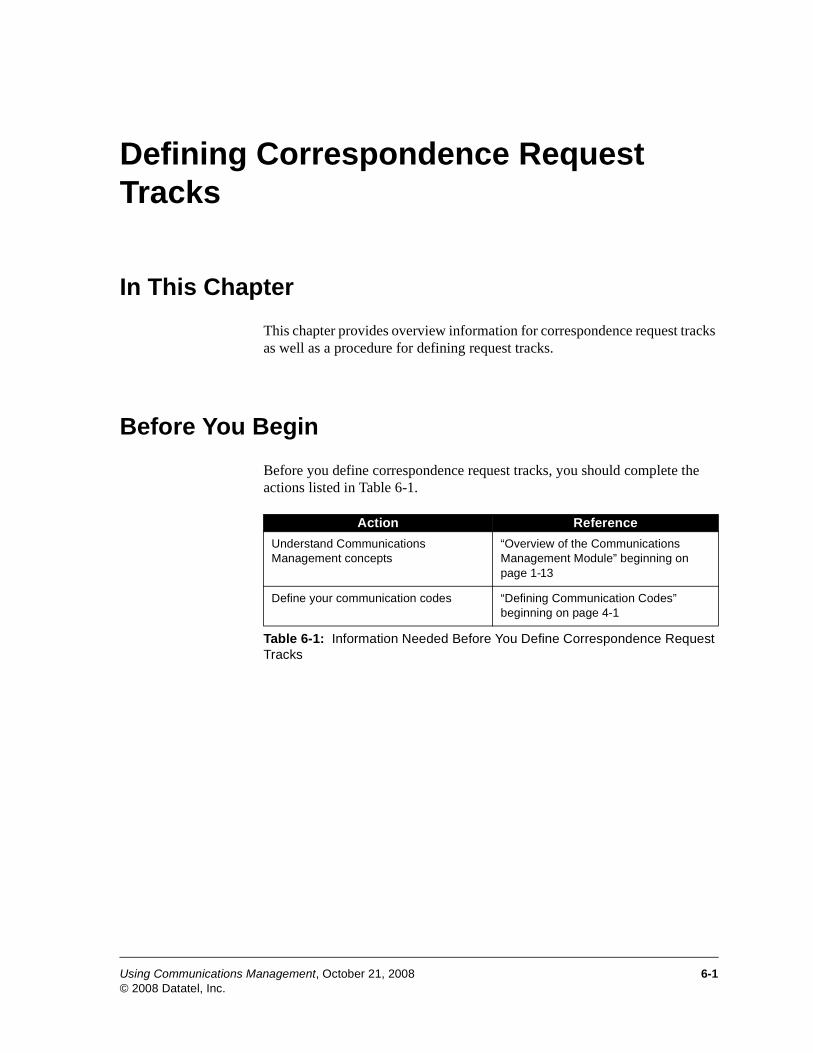
Correspondence Request Tracks6
Defining Correspondence Request Tracks October 21, 2008
In This Chapter
This chapter provides overview information for correspondence request tracks as well as a procedure for defining request tracks.
Before You Begin
Before you define correspondence request tracks, you should complete the actions listed in Table 6-1.
Action Reference
Understand Communications Management concepts
“Overview of the Communications Management Module” beginning on page 1-13
Define your communication codes “Defining Communication Codes” beginning on page 4-1
Table 6-1: Information Needed Before You Define Correspondence Request Tracks
Using Communications Management, October 21, 2008 6-1© 2008 Datatel, Inc.
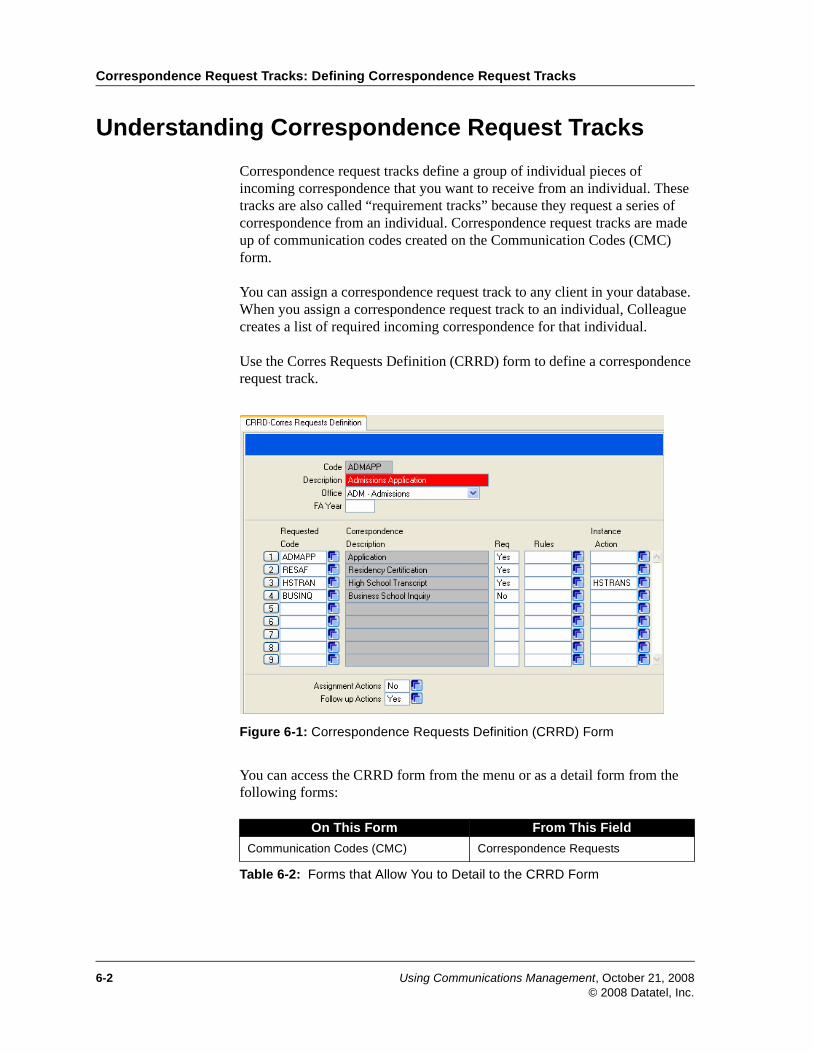
Correspondence Request Tracks: Defining Correspondence Request Tracks
Understanding Correspondence Request Tracks
Correspondence request tracks define a group of individual pieces of incoming correspondence that you want to receive from an individual. These tracks are also called “requirement tracks” because they request a series of correspondence from an individual. Correspondence request tracks are made up of communication codes created on the Communication Codes (CMC) form.
You can assign a correspondence request track to any client in your database. When you assign a correspondence request track to an individual, Colleague creates a list of required incoming correspondence for that individual.
Use the Corres Requests Definition (CRRD) form to define a correspondence request track.
Figure 6-1: Correspondence Requests Definition (CRRD) Form
You can access the CRRD form from the menu or as a detail form from the following forms:
On This Form From This Field
Communication Codes (CMC) Correspondence Requests
Table 6-2: Forms that Allow You to Detail to the CRRD Form
6-2 Using Communications Management, October 21, 2008© 2008 Datatel, Inc.
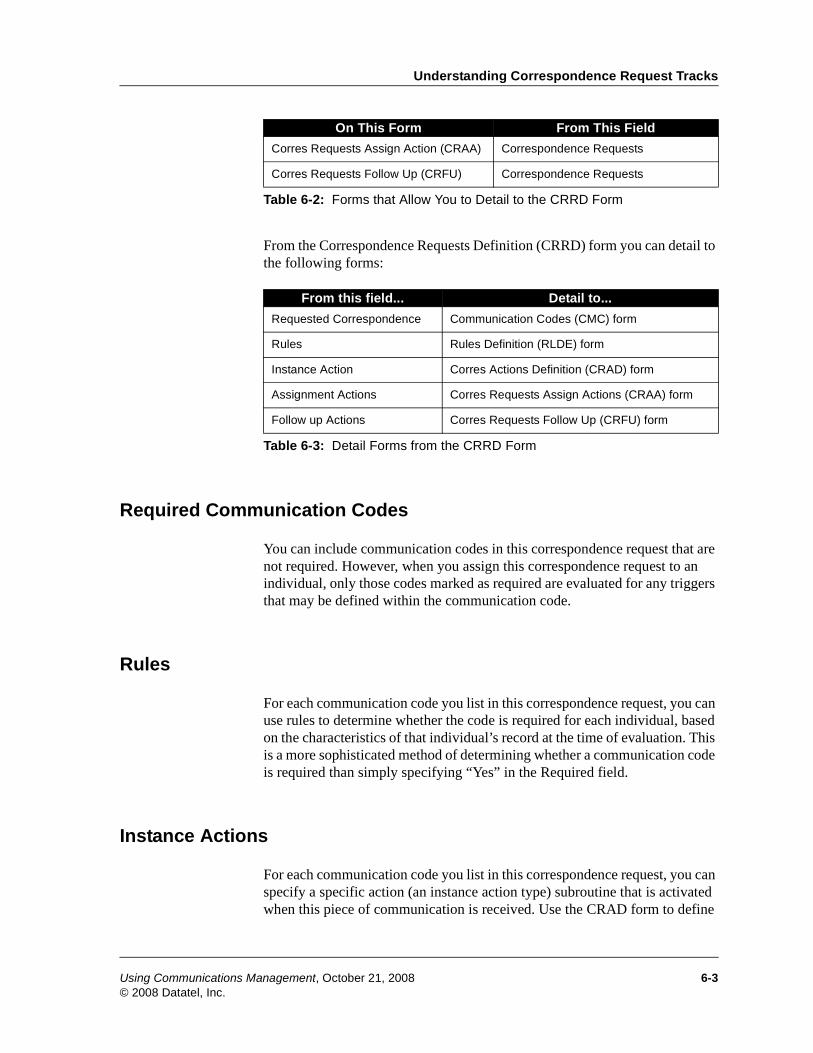
Understanding Correspondence Request Tracks
From the Correspondence Requests Definition (CRRD) form you can detail to the following forms:
Required Communication Codes
You can include communication codes in this correspondence request that are not required. However, when you assign this correspondence request to an individual, only those codes marked as required are evaluated for any triggers that may be defined within the communication code.
Rules
For each communication code you list in this correspondence request, you can use rules to determine whether the code is required for each individual, based on the characteristics of that individual’s record at the time of evaluation. This is a more sophisticated method of determining whether a communication code is required than simply specifying “Yes” in the Required field.
Instance Actions
For each communication code you list in this correspondence request, you can specify a specific action (an instance action type) subroutine that is activated when this piece of communication is received. Use the CRAD form to define
Corres Requests Assign Action (CRAA) Correspondence Requests
Corres Requests Follow Up (CRFU) Correspondence Requests
From this field... Detail to...
Requested Correspondence Communication Codes (CMC) form
Rules Rules Definition (RLDE) form
Instance Action Corres Actions Definition (CRAD) form
Assignment Actions Corres Requests Assign Actions (CRAA) form
Follow up Actions Corres Requests Follow Up (CRFU) form
Table 6-3: Detail Forms from the CRRD Form
On This Form From This Field
Table 6-2: Forms that Allow You to Detail to the CRRD Form
Using Communications Management, October 21, 2008 6-3© 2008 Datatel, Inc.
Correspondence Request Tracks: Defining Correspondence Request Tracks
correspondence actions. You can access the CRAD form as a detail form from the CRRD form. See “Communications Management Parameters” beginning on page 2-9 for more information about defining correspondence actions.
Assignment Actions
You can define assignment actions that should take place when this correspondence request is initially assigned to an individual. To define assignment actions, use the CRAA form. You can access the CRAA form as a detail form from the CRRD form.
Follow-Up Actions
You can define follow-up actions that should take place when all required pieces of communication in this correspondence request are fulfilled. To define follow-up actions, use the CRFU form. You can access the CRFU form as a detail form from the CRRD form.
Correspondence Request Track Naming Conventions
When naming correspondence request tracks, consider ending the end code with the letter “R.” In many instances, it is desirable to name different types of codes similarly when you want to group like processing codes together. Ending the code name with a character signifying the type of code represented will greatly assist in avoiding confusion.
6-4 Using Communications Management, October 21, 2008© 2008 Datatel, Inc.
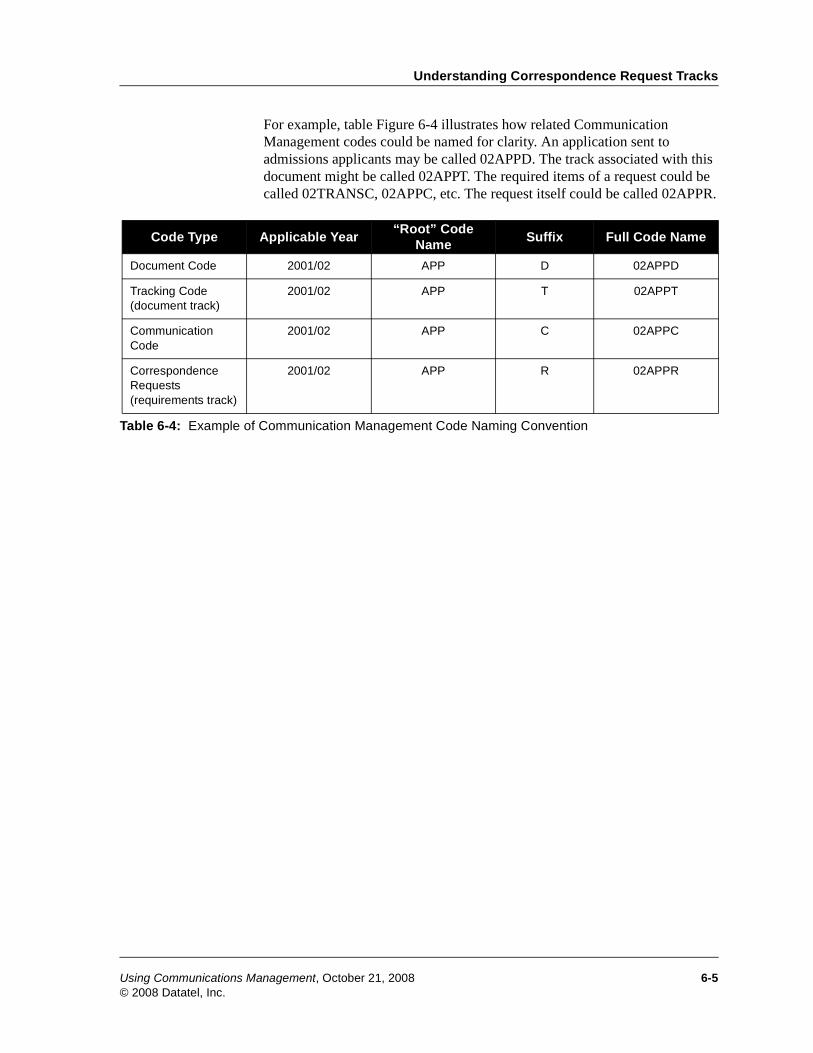
Understanding Correspondence Request Tracks
For example, table Figure 6-4 illustrates how related Communication Management codes could be named for clarity. An application sent to admissions applicants may be called 02APPD. The track associated with this document might be called 02APPT. The required items of a request could be called 02TRANSC, 02APPC, etc. The request itself could be called 02APPR.
Code Type Applicable Year“Root” Code
NameSuffix Full Code Name
Document Code 2001/02 APP D 02APPD
Tracking Code (document track)
2001/02 APP T 02APPT
Communication Code
2001/02 APP C 02APPC
Correspondence Requests (requirements track)
2001/02 APP R 02APPR
Table 6-4: Example of Communication Management Code Naming Convention
Using Communications Management, October 21, 2008 6-5© 2008 Datatel, Inc.
Correspondence Request Tracks: Defining Correspondence Request Tracks
Procedure for Defining a Correspondence Request Track
Step 1. Access the Corres Requests Definition (CRRD) form.
Step 2. Define the correspondence request track code.
At the LookUp prompt, enter the new code name and choose (A) to add.
Enter the description and office code in the appropriate fields. See the online help for more information about a specific field.
Step 3. Add communication codes to the correspondence request track.
You can choose existing communication codes or create new ones on the fly. To create new communication codes, detail to the CMC form.
To mark this communication code as required for this track, enter Y in the Required field for the code.
To use rules to determine when this code is required for an individual, enter an existing rule in the Rules field. To create and use a new rule, detail to the Rules Definition (RLDE) form.
To specify an instance action subroutine that is activated when this piece of correspondence is received, enter an existing instance action subroutine in the Instance Action field. To create and use a new subroutine, detail to the CRAD form.
For more information about creating communication codes, see page 4-1.
For more information about creating correspondence action subroutines, see page 2-7.
Step 4. Specify any follow-up or assignment actions for this correspondence request.
You can detail to the CRAA form to specify assignment actions.
You can detail to the CRFU form to specify follow-up actions.
Step 5. Save the record.
6-6 Using Communications Management, October 21, 2008© 2008 Datatel, Inc.
Correspondence Request Tracks6
Assigning Correspondence Request Tracks April 25, 2006
In This Chapter
This chapter provides overview information for assigning correspondence request tracks to a client in your database. In addition, this chapter provides procedures for assigning correspondence request tracks to an individual or a group.
Before You Begin
Before you assign correspondence request tracks (requirements tracks) you should complete the actions listed in Table 6-5.
Action Reference
Understand Communications Management concepts
“Overview of the Communications Management Module” beginning on page 1-13
Define your correspondence request tracks
“Defining Correspondence Request Tracks” beginning on page 6-1
Table 6-5: Information Needed Before You Assign Correspondence Request Tracks
Using Communications Management, April 25, 2006 6-7© 2008 Datatel, Inc.

Correspondence Request Tracks: Assigning Correspondence Request Tracks
Understanding Correspondence Request Track Assignment
Correspondence request tracks define a group of individual pieces of incoming correspondence that you want to receive from an individual. You can assign a correspondence request track to any client in your database. When you assign a correspondence request track to an individual, Colleague creates a list of required incoming correspondence for that individual.
You can assign correspondence request tracks individually or to groups of individuals.
Use the Individual Requests (IRQ) form to assign one or more correspondence request tracks to an individual. Use the Corres Request Assignment (CRA) form to assign correspondence request tracks in group mode.
Rules
When assigning correspondence request tracks in group mode, you can use rules to determine whether to process the assignment for an individual based on the characteristics of that individual’s record at the time of evaluation. This is a more sophisticated method of determining whether a track should be assigned to an individual.
Track Assignment Actions
When you assign correspondence request tracks in group mode, you must specify the action that you want to take place for each track, as follows:
■ Add - This action adds all individuals in the group to the associated track.
■ Delete - This action removes all individuals in the group from the associated track.
Note: You cannot choose the Reset option for assigning correspondence request tracks. This option applies only to document track assignment.
6-8 Using Communications Management, April 25, 2006© 2008 Datatel, Inc.
Understanding Correspondence Request Track Assignment
Procedure for Assigning Correspondence Request Tracks: Individual Mode
Complete the following steps to assign correspondence request tracks to an individual:
Step 1. Access the Individual for whom you want to assign a correspondence request track on the Individual Requests (IRQ) form.
See the online help for more information about a specific field.
Step 2. Select the default file suite year or enter another year.
Step 3. In the Correspondence Received Requests field, list the correspondence request tracks that you want to assign to this individual.
You can detail to the Individual Requests By Track (IRT) form to view the communication codes and triggers defined in a particular correspondence request track.
The IRQ form also displays any correspondence request tracks currently assigned to an individual. You can add to or modify this list as needed.
For procedures on creating correspondence request tracks, see 6-1.
Step 4. Save the record.
When you save the record, this individual is added to the listed correspondence request tracks.
Using Communications Management, April 25, 2006 6-9© 2008 Datatel, Inc.
Correspondence Request Tracks: Assigning Correspondence Request Tracks
Procedure for Assigning Correspondence Request Tracks: Group Mode
Complete the following steps to assign correspondence request tracks to a group:
Step 1. Access the Corres Request Assignment (CRA) form.
See the online help for more information about a specific field.
Select the default file suite year or enter another year.
Step 2. In the Rules field, specify or create any rules you want to use when assigning correspondence request tracks.
You can detail to the Rules Definition (RLDE) form to create rules.
If you list more than one rule here, you must define the association of the rules in the Rules Operator field.
Step 3. In the Correspondence Requests field, list the correspondence request tracks that you want to assign.
You can detail to the CRRD form to create new correspondence request tracks.
To add individuals to a correspondence request track, enter A in the Action field for the associated track. To remove individuals from a correspondence request track, enter D in the Action field for the associated track. You cannot reset a correspondence request track for individuals.
For more information about creating correspondence request tracks, see page 6-1.
Step 4. Specify the individuals that you want to assign to or remove from the correspondence request tracks listed.
You can specify a saved list of PERSON IDs or list individual PERSON IDs on this form.
Step 5. Save the record.
6-10 Using Communications Management, April 25, 2006© 2008 Datatel, Inc.
Understanding Correspondence Request Track Assignment
When you save the record, the individuals listed are automatically added to or removed from the correspondence request tracks, as specified.
You can view the correspondence request tracks currently assigned to an individual using the Individual Requests (IRQ) form.
Using Communications Management, April 25, 2006 6-11© 2008 Datatel, Inc.
Correspondence Request Tracks: Assigning Correspondence Request Tracks
6-12 Using Communications Management, April 25, 2006© 2008 Datatel, Inc.
Using Communications Management
7. Correspondence Processing

Correspondence Processing7
Processing Pending Correspondence April 25, 2006
In This Chapter
This chapter provides information on pending correspondence and procedures for viewing correspondence. This chapter also provides information on how to process and delete multiple pending correspondence.
In addition, this chapter provides information about express correspondence processing and clearing any errors that occurred while processing pending correspondence.
Using Communications Management, April 25, 2006 7-1© 2008 Datatel, Inc.
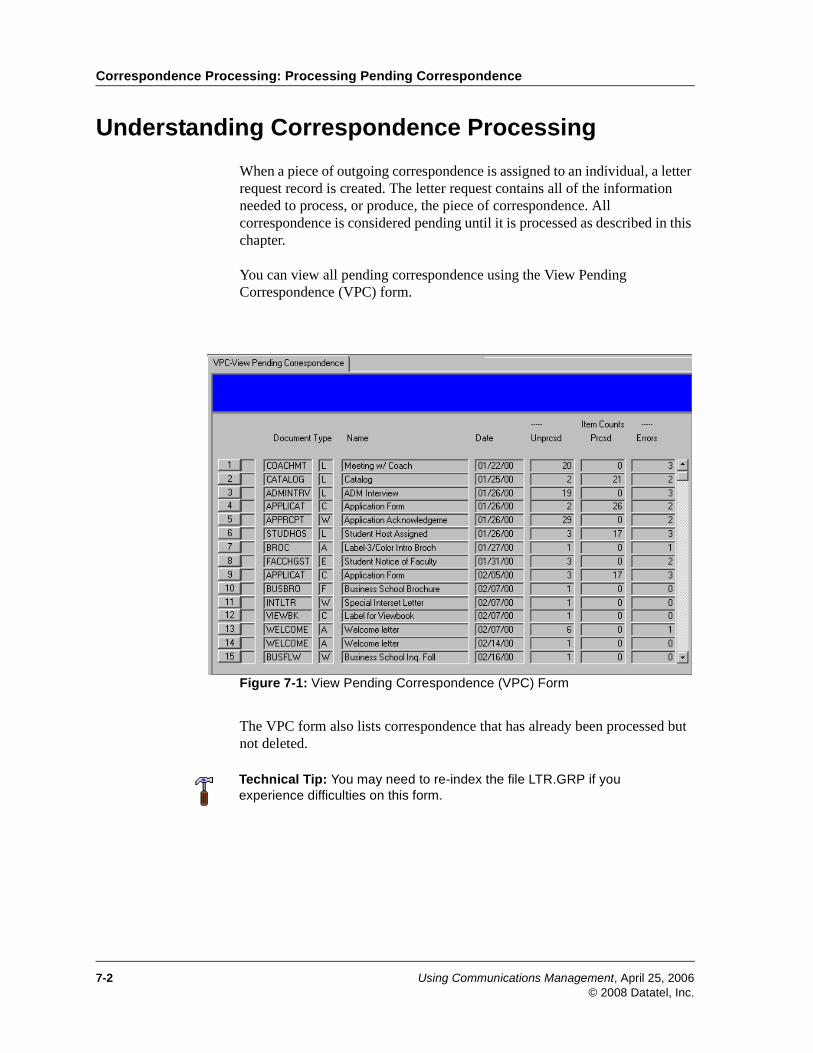
Correspondence Processing: Processing Pending Correspondence
Understanding Correspondence Processing
When a piece of outgoing correspondence is assigned to an individual, a letter request record is created. The letter request contains all of the information needed to process, or produce, the piece of correspondence. All correspondence is considered pending until it is processed as described in this chapter.
You can view all pending correspondence using the View Pending Correspondence (VPC) form.
Figure 7-1: View Pending Correspondence (VPC) Form
The VPC form also lists correspondence that has already been processed but not deleted.
Technical Tip: You may need to re-index the file LTR.GRP if you experience difficulties on this form.
7-2 Using Communications Management, April 25, 2006© 2008 Datatel, Inc.
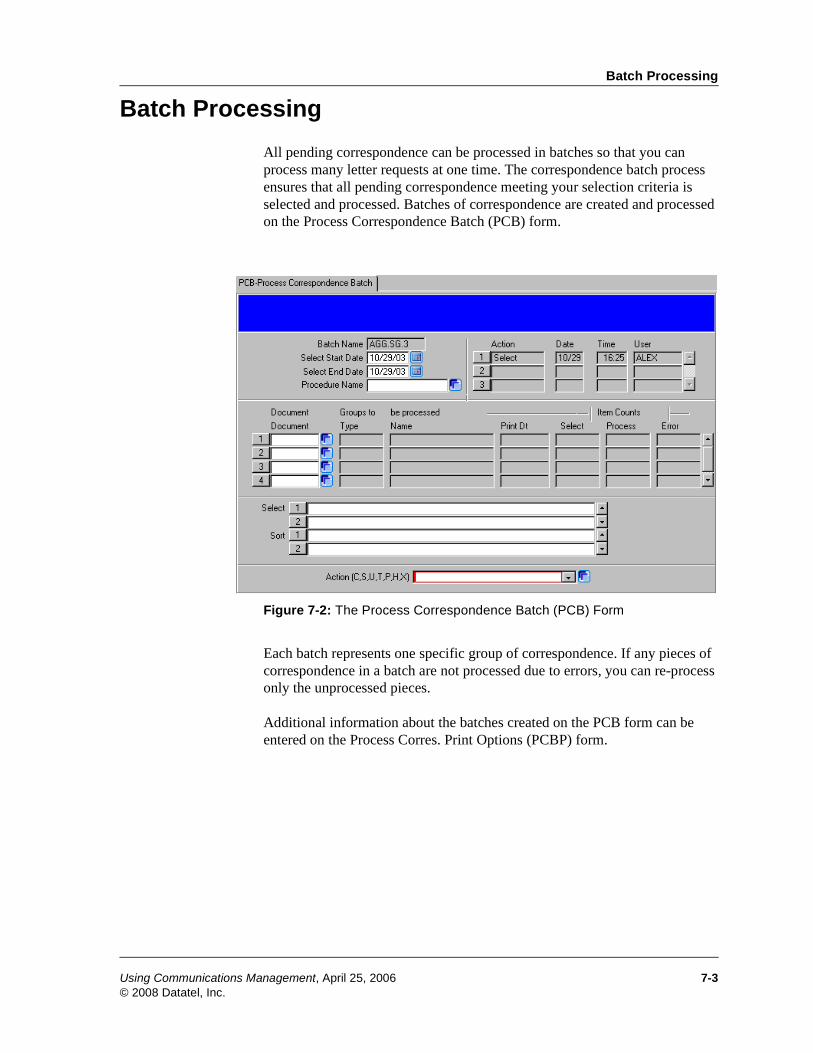
Batch Processing
Batch Processing
All pending correspondence can be processed in batches so that you can process many letter requests at one time. The correspondence batch process ensures that all pending correspondence meeting your selection criteria is selected and processed. Batches of correspondence are created and processed on the Process Correspondence Batch (PCB) form.
Figure 7-2: The Process Correspondence Batch (PCB) Form
Each batch represents one specific group of correspondence. If any pieces of correspondence in a batch are not processed due to errors, you can re-process only the unprocessed pieces.
Additional information about the batches created on the PCB form can be entered on the Process Corres. Print Options (PCBP) form.
Using Communications Management, April 25, 2006 7-3© 2008 Datatel, Inc.
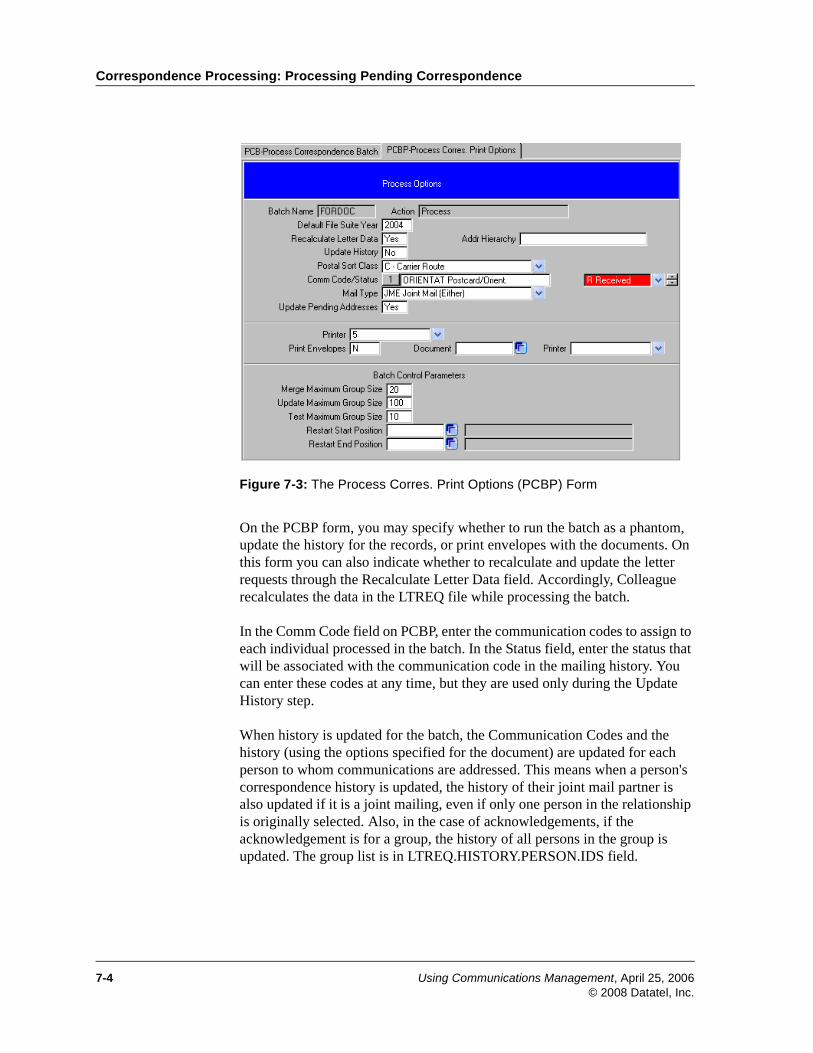
Correspondence Processing: Processing Pending Correspondence
Figure 7-3: The Process Corres. Print Options (PCBP) Form
On the PCBP form, you may specify whether to run the batch as a phantom, update the history for the records, or print envelopes with the documents. On this form you can also indicate whether to recalculate and update the letter requests through the Recalculate Letter Data field. Accordingly, Colleague recalculates the data in the LTREQ file while processing the batch.
In the Comm Code field on PCBP, enter the communication codes to assign to each individual processed in the batch. In the Status field, enter the status that will be associated with the communication code in the mailing history. You can enter these codes at any time, but they are used only during the Update History step.
When history is updated for the batch, the Communication Codes and the history (using the options specified for the document) are updated for each person to whom communications are addressed. This means when a person's correspondence history is updated, the history of their joint mail partner is also updated if it is a joint mailing, even if only one person in the relationship is originally selected. Also, in the case of acknowledgements, if the acknowledgement is for a group, the history of all persons in the group is updated. The group list is in LTREQ.HISTORY.PERSON.IDS field.
7-4 Using Communications Management, April 25, 2006© 2008 Datatel, Inc.
Batch Processing
The Mail Type field accepts a code for the mail type to determine how joint mail relationships in this batch should be processed. The default mail type in this field is I-Individual, but you can change it to enter a joint mail type such as JMB- Joint Mail (Both), JME-Joint Mail (Either), or JSB-Joint Solicit (Both). During correspondence processing, Colleague determines the required mail type from various sources in the following sequence:
1. From the letter request.
2. From the value in this field if no mail type can be determined from the letter request.
3. From the document if no mail type can be determined from the value in this field.
4. After checking all the above, if Colleague still cannot determine the mail type, it assigns “I” as the default mail type.
The Update Pending Addresses field on PCBP enables you to specify whether any pending addresses should be updated before processing the correspondence. If you enter Y, Colleague processes all pending addresses that are effective on or before the current date, and also updates any addresses in the database that have expired before the current date so that the document uses each person’s most current address. Colleague does not automatically update the addresses when the effective date arrives. Instead, a system administrator must run the Pending Address Update (PADU) process to update the pending addresses so that Colleague can use the updated addresses. This flag ensures that even if the PADU process is not run, all addresses on your system are current. For more information about the PCBP form, see the online help.
You can also create or process only pending letter requests for a particular document and print date through the Express Corresp. Processing (PCEX) form.
You can also delete multiple letter batches using the Batch Delete LTREQ Records (DLTR) process. The DLTR process is especially helpful if you assigned items for printing in error or if you process a letter batch with errors and you want to remove the erroneous LTREQ records instead of reprocessing them. After running the DLTR process, it might be necessary to rebuild any cross-references. All cross-references and indexes are correctly updated when the DLTR process deletes the LTREQ records.
You should run batches on a regular basis to ensure that all correspondence is processed and mailed promptly. Regular processing is particularly important if your institution generates a large volume of correspondence or uses correspondence request tracking, correspondence rules, or document tracking extensively.
Using Communications Management, April 25, 2006 7-5© 2008 Datatel, Inc.
Correspondence Processing: Processing Pending Correspondence
You can create templates for batches of correspondence that you process on a regular basis, such as acknowledgment letters. These templates store default values for batches so that you can create each individual batch easily and quickly. Use the Batch Procedure Definition (PBD) form to create batch templates.
7-6 Using Communications Management, April 25, 2006© 2008 Datatel, Inc.
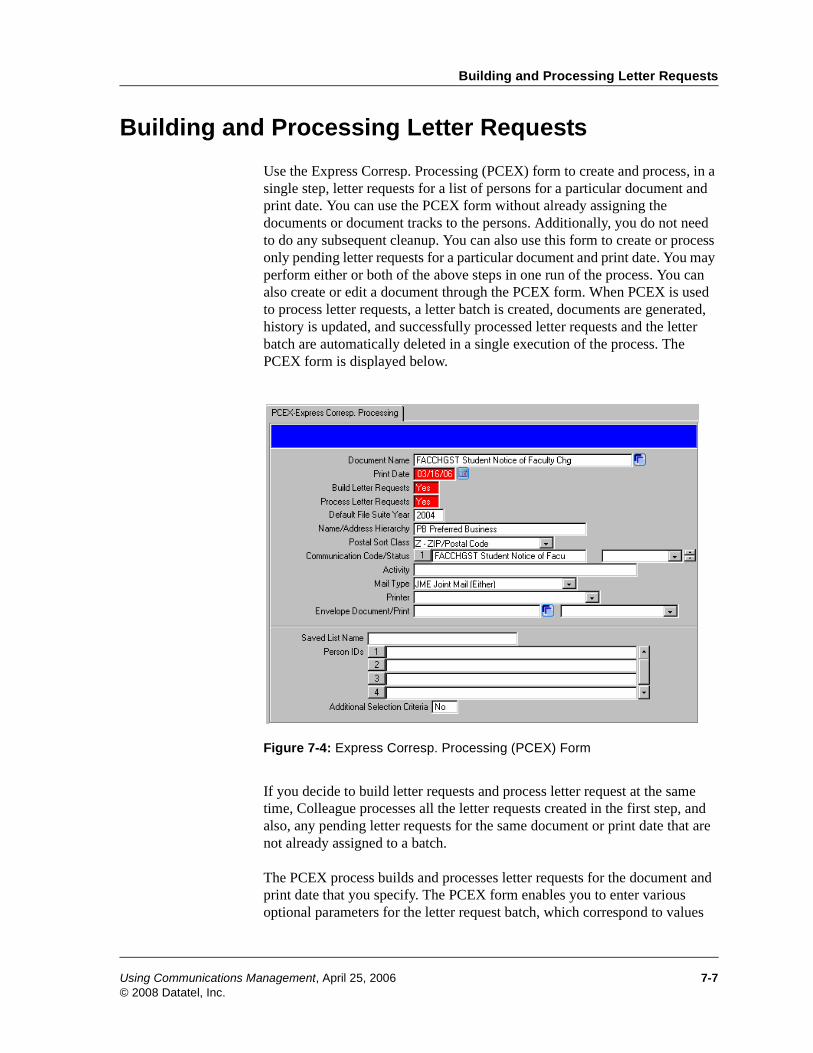
Building and Processing Letter Requests
Building and Processing Letter Requests
Use the Express Corresp. Processing (PCEX) form to create and process, in a single step, letter requests for a list of persons for a particular document and print date. You can use the PCEX form without already assigning the documents or document tracks to the persons. Additionally, you do not need to do any subsequent cleanup. You can also use this form to create or process only pending letter requests for a particular document and print date. You may perform either or both of the above steps in one run of the process. You can also create or edit a document through the PCEX form. When PCEX is used to process letter requests, a letter batch is created, documents are generated, history is updated, and successfully processed letter requests and the letter batch are automatically deleted in a single execution of the process. The PCEX form is displayed below.
Figure 7-4: Express Corresp. Processing (PCEX) Form
If you decide to build letter requests and process letter request at the same time, Colleague processes all the letter requests created in the first step, and also, any pending letter requests for the same document or print date that are not already assigned to a batch.
The PCEX process builds and processes letter requests for the document and print date that you specify. The PCEX form enables you to enter various optional parameters for the letter request batch, which correspond to values
Using Communications Management, April 25, 2006 7-7© 2008 Datatel, Inc.

Correspondence Processing: Processing Pending Correspondence
entered on the Process Correspondence Batch (PCB) and Process Corres. Print Options (PCBP) forms. While processing letter requests, the PCEX process creates the same type of correspondence batch as created by the PCB process.
Noteworthy Fields on the PCEX Form
Several fields on the PCEX form have default values based on the selected document, but you can override them. This section briefly describes some of the fields on the PCEX form.
Build Letter Requests
Enter a value to indicate whether to build the specified letter requests. If you enter Y, a letter request is built for all the persons included in the saved list, in the list of person IDs, or in the list of persons you specify with the additional selection criteria. Each letter request is built for the specified document and print date.
Process Letter Requests
Enter a value to indicate whether to process letter requests for the document and print date. If you enter Y, all letter requests for the specified document and print date are processed. If you entered Y in the Build Letter Requests field, the processing includes all the letter requests built, as well as any preexisting letter requests that qualify.
Activity
Enter a campaign or event to which this document is associated. If these letter requests are associated with a particular campaign, enter the campaign ID here.
Mail Type
Enter a code for the mail type to indicate whether the documents specified in the letter batch are to be mailed individually or jointly. The default mail type is I-Individual, but you can change it to enter a joint mail type of JMB- Joint Mail (Both), JME-Joint Mail (Either), JSE-Joint Solicit (Either), or JSB-Joint
7-8 Using Communications Management, April 25, 2006© 2008 Datatel, Inc.
Building and Processing Letter Requests
Solicit (Both). If you specify a joint mail type, but an individual being processed is not set up for joint mail, then that person will be mailed to individually.
Envelope Document/Print
Enter a document to print envelopes. You may select a document that will be processed along with the main document, to print envelopes for the main document. The envelope document specified here is merged with the same person or LTREQ record that is used with the main document. An envelope document group is printed as each main document group is processed.
For more information about the PCEX form, see the online help.
Correcting Errors and Customizing Correspondence
During batch processing, you may encounter errors with specific pieces of correspondence that you need to resolve before they can be processed. You can see the status of the batch process using the Pending Correspondence Detail Report (PCR). You may also want to customize specific pieces of correspondence. You can add custom text, add a custom salutation, or change the address type for a specific correspondence request using the Individual Pending Corres (IPC) form. If the process is not successful, you can complete processing of the temporary letter batch that is created by PCEX using the restart provisions provided on PCB.
Using Communications Management, April 25, 2006 7-9© 2008 Datatel, Inc.
Correspondence Processing: Processing Pending Correspondence
Procedure for Processing Existing Correspondence
Complete the following steps to process pending correspondence.
Step 1. Access the View Pending Correspondence (VPC) form to see the list of all correspondence requests that have not yet been processed.
See the online help for more information about a specific field.
Step 2. Run the Pending Correspondence Detail Report (PCR) to view the list of individuals that will be receiving each document.
You can list one or more document codes to include in the report.You can run this report for a specific time period. See the online help for more information about a specific field.
Step 3. Correct any errors shown on the report.
You can add custom text, add a custom salutation, or change the address type for a specific correspondence request using the Individual Pending Corres (IPC) form.
Step 4. Create a batch of all pieces of correspondence that you want to process together.
Use the Process Correspondence Batch (PCB) form to create a new batch or edit an existing one.
You can create batches based on document code, printer, paper type, or any other logical grouping.
Use the Batch Procedure Definition (BPD) form to create a general template to use when creating batches.
Note: Changes to custom text will be overwritten if you entered “Yes” in the Recalculate Paragraphs field on the DOCP form.
Note: You can use the Batch Delete LTREQ Records (DLTR) process to delete multiple letter batches.
7-10 Using Communications Management, April 25, 2006© 2008 Datatel, Inc.
Building and Processing Letter Requests
Step 5. To process the batch, from the PCB form, enter C in the Action field to count the letter request records to be processed.
Step 6. From the PCB form, enter P in the Action field to select the records and process the batch. Action S can be used to select a subset of the whole batch for processing.
Correct any errors and reprocess any unprocessed requests.
Run the Pending Correspondence Detail Report (PCR) to view details of any errors.
Repeat these processing steps until all errors are resolved.
Step 7. Create your printed documents, if necessary.
If any documents in the batch were a “W” document type, those documents were printed during batch processing.
Step 8. Update history for the correspondence in the batch, if necessary.
From the PCB form, enter H in the Action field to update the history of all processed correspondence in the batch. The document history for some documents may have been updated automatically during processing.
Use the Individual History (IHS) form to view the history of all documents sent to an individual.
Note: If you are using a COQT document type, use the Transfer PC File (TPF) to download the file from Colleague to the PC or network drive, then use Word’s Mail Merge Helper to combine the COQT file with the merge document on Word and print or save them to print at a later time. If you do not have access to TPF, you can use any FTP program to download the file.
Note: For e-mail, the author may receive an e-mail delivery confirmation report that the e-mail was not successfully sent; however, history is updated anyway.
Using Communications Management, April 25, 2006 7-11© 2008 Datatel, Inc.
Correspondence Processing: Processing Pending Correspondence
Step 9. Delete the batch by entering X in the Action field to delete the batch on the PCB form.
Deleting the batch saves disk space by removing saved lists and all completed letter request records. Make sure that all pieces of correspondence are processed before deleting the batch.
Procedure for Building and Processing Correspondence in Single Step
Follow the steps below to create or process correspondence in one step.
Step 1. Access the Express Corresp. Processing (PCEX) form.
Step 2. Enter the parameters for the letter request processing, as needed.
Indicate whether you want to build the letter requests and run the process in Update mode or Report-only mode. Enter any saved list names, or additional selection criteria, as needed.
Step 3. Update out of the PCEX form.
For more information about the PCEX form, see the online help.
7-12 Using Communications Management, April 25, 2006© 2008 Datatel, Inc.
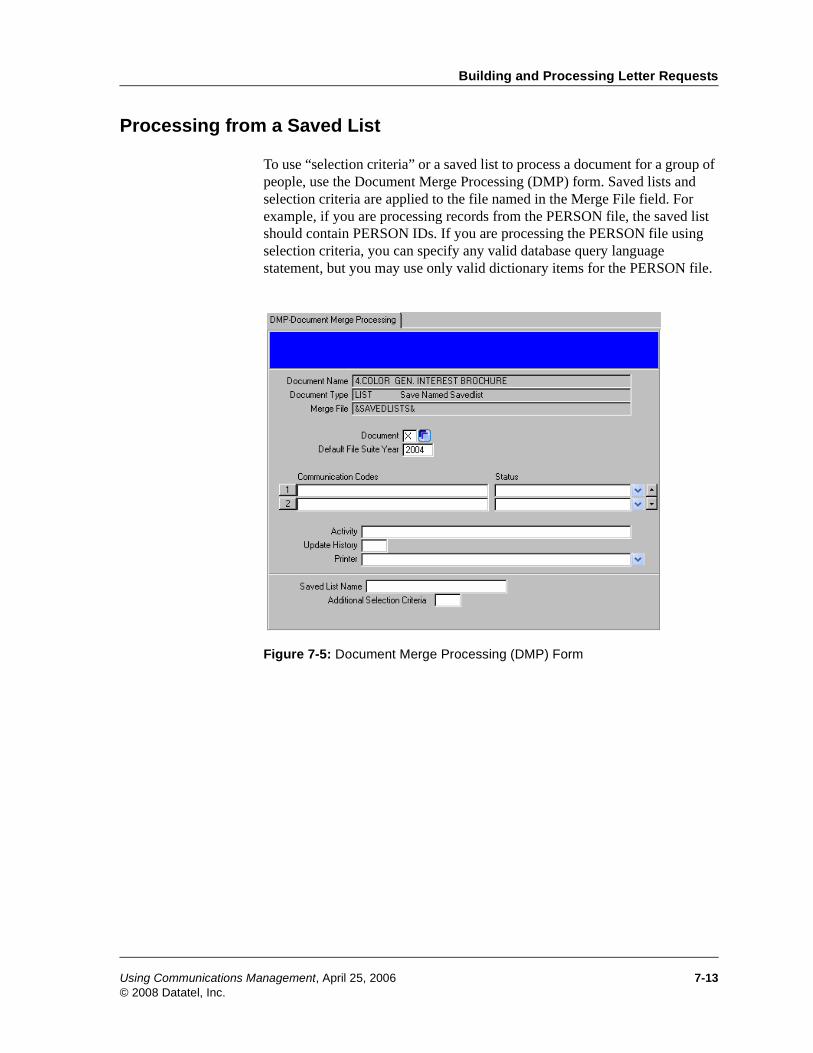
Building and Processing Letter Requests
Processing from a Saved List
To use “selection criteria” or a saved list to process a document for a group of people, use the Document Merge Processing (DMP) form. Saved lists and selection criteria are applied to the file named in the Merge File field. For example, if you are processing records from the PERSON file, the saved list should contain PERSON IDs. If you are processing the PERSON file using selection criteria, you can specify any valid database query language statement, but you may use only valid dictionary items for the PERSON file.
Figure 7-5: Document Merge Processing (DMP) Form
Using Communications Management, April 25, 2006 7-13© 2008 Datatel, Inc.
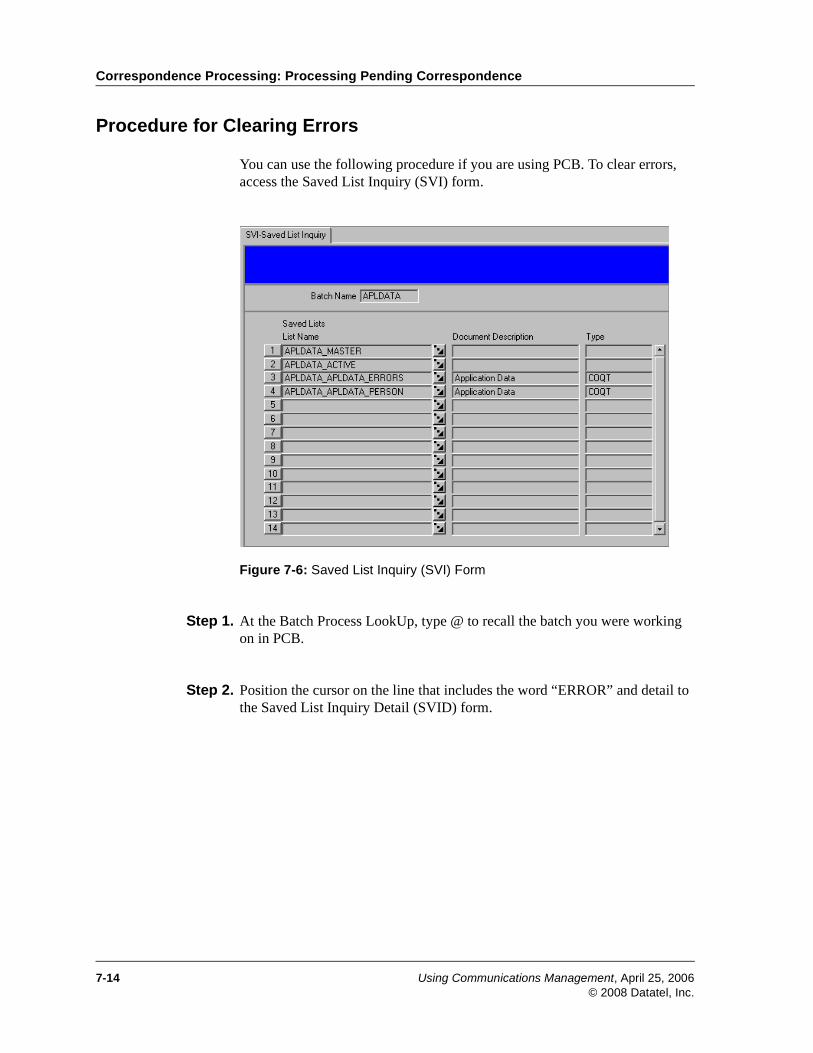
Correspondence Processing: Processing Pending Correspondence
Procedure for Clearing Errors
You can use the following procedure if you are using PCB. To clear errors, access the Saved List Inquiry (SVI) form.
Figure 7-6: Saved List Inquiry (SVI) Form
Step 1. At the Batch Process LookUp, type @ to recall the batch you were working on in PCB.
Step 2. Position the cursor on the line that includes the word “ERROR” and detail to the Saved List Inquiry Detail (SVID) form.
7-14 Using Communications Management, April 25, 2006© 2008 Datatel, Inc.
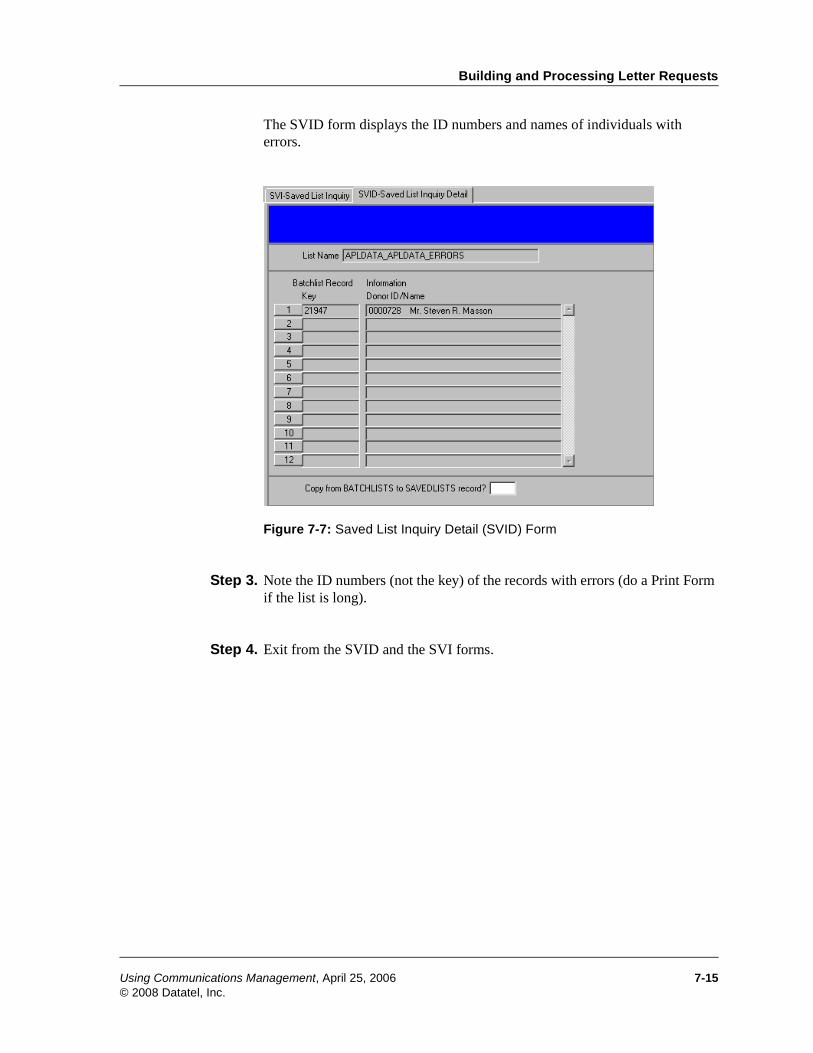
Building and Processing Letter Requests
The SVID form displays the ID numbers and names of individuals with errors.
Figure 7-7: Saved List Inquiry Detail (SVID) Form
Step 3. Note the ID numbers (not the key) of the records with errors (do a Print Form if the list is long).
Step 4. Exit from the SVID and the SVI forms.
Using Communications Management, April 25, 2006 7-15© 2008 Datatel, Inc.
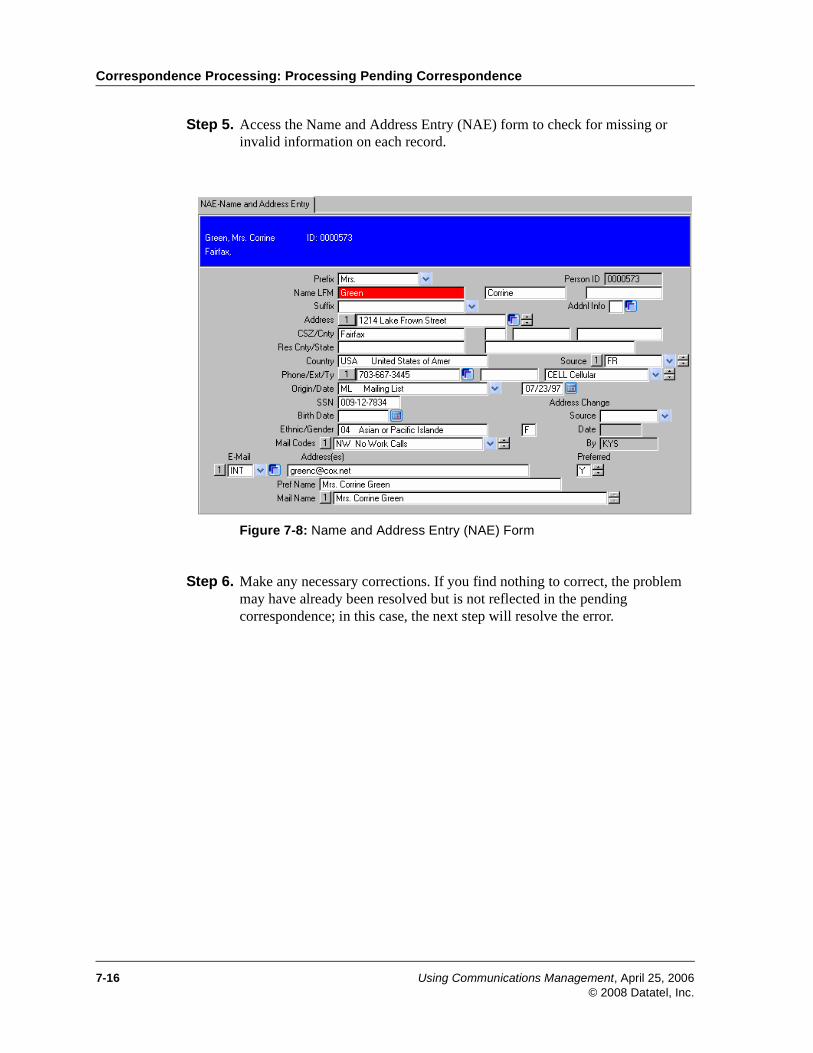
Correspondence Processing: Processing Pending Correspondence
Step 5. Access the Name and Address Entry (NAE) form to check for missing or invalid information on each record.
Figure 7-8: Name and Address Entry (NAE) Form
Step 6. Make any necessary corrections. If you find nothing to correct, the problem may have already been resolved but is not reflected in the pending correspondence; in this case, the next step will resolve the error.
7-16 Using Communications Management, April 25, 2006© 2008 Datatel, Inc.
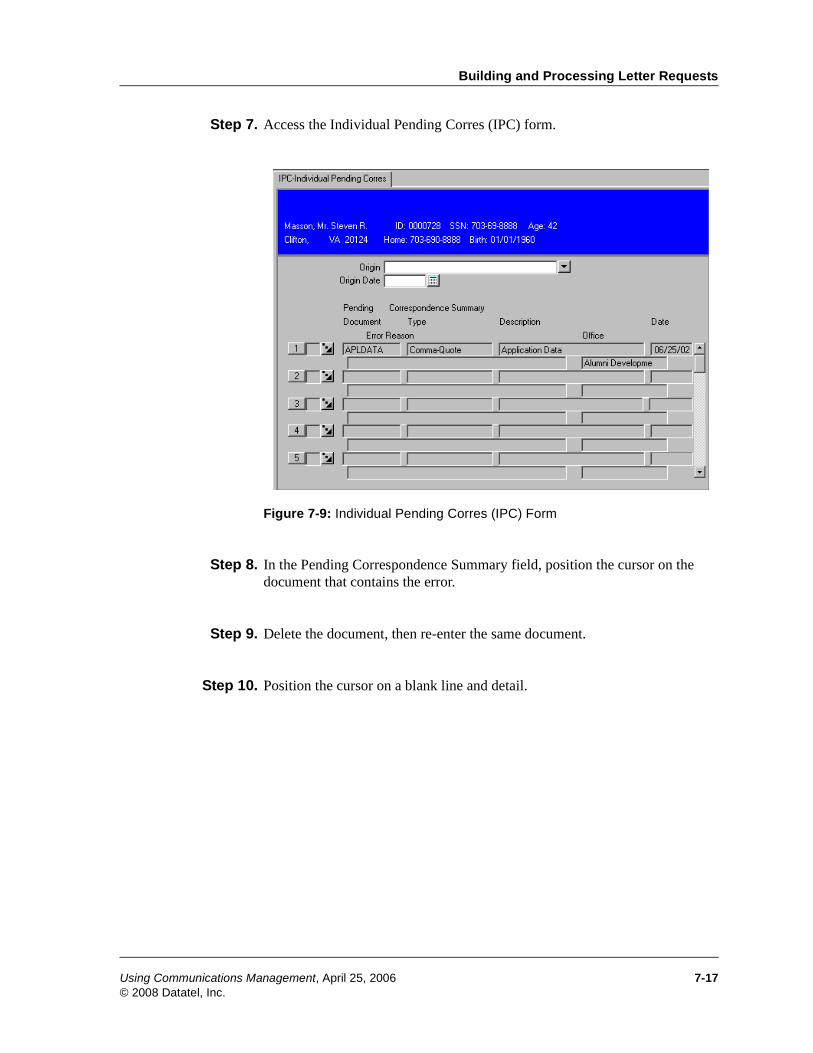
Building and Processing Letter Requests
Step 7. Access the Individual Pending Corres (IPC) form.
Figure 7-9: Individual Pending Corres (IPC) Form
Step 8. In the Pending Correspondence Summary field, position the cursor on the document that contains the error.
Step 9. Delete the document, then re-enter the same document.
Step 10. Position the cursor on a blank line and detail.
Using Communications Management, April 25, 2006 7-17© 2008 Datatel, Inc.
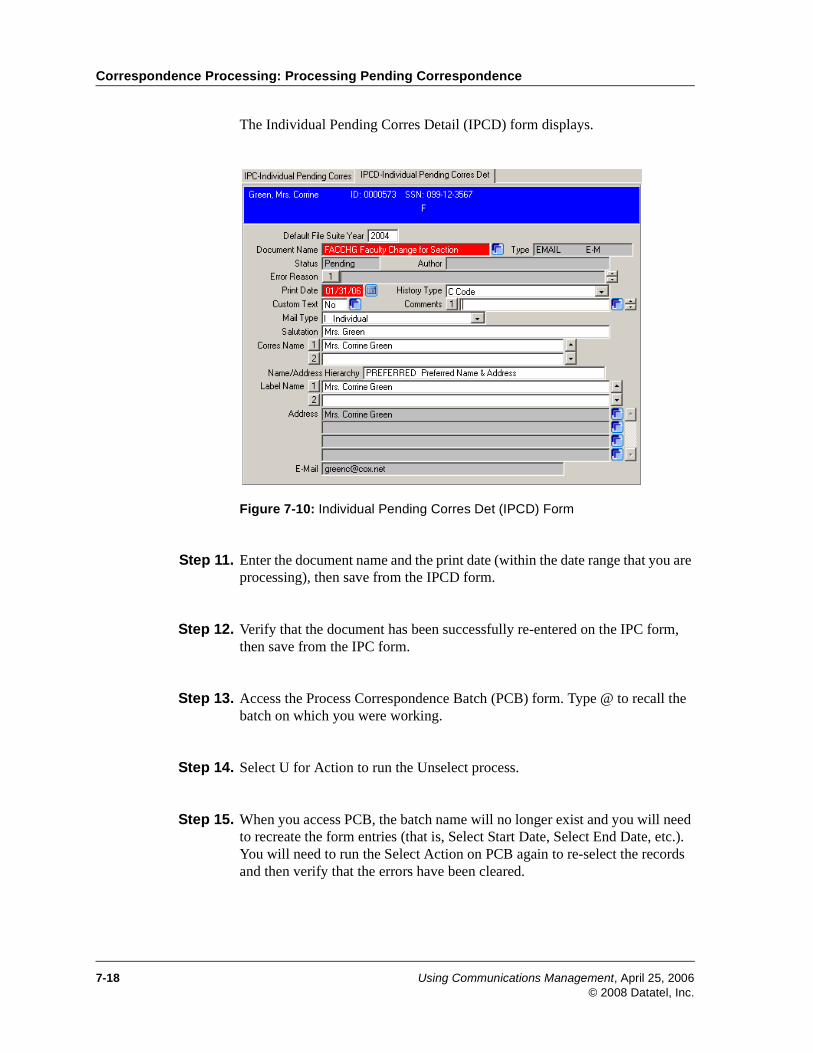
Correspondence Processing: Processing Pending Correspondence
The Individual Pending Corres Detail (IPCD) form displays.
Figure 7-10: Individual Pending Corres Det (IPCD) Form
Step 11. Enter the document name and the print date (within the date range that you are processing), then save from the IPCD form.
Step 12. Verify that the document has been successfully re-entered on the IPC form, then save from the IPC form.
Step 13. Access the Process Correspondence Batch (PCB) form. Type @ to recall the batch on which you were working.
Step 14. Select U for Action to run the Unselect process.
Step 15. When you access PCB, the batch name will no longer exist and you will need to recreate the form entries (that is, Select Start Date, Select End Date, etc.). You will need to run the Select Action on PCB again to re-select the records and then verify that the errors have been cleared.
7-18 Using Communications Management, April 25, 2006© 2008 Datatel, Inc.
Using Communications Management
Appendix

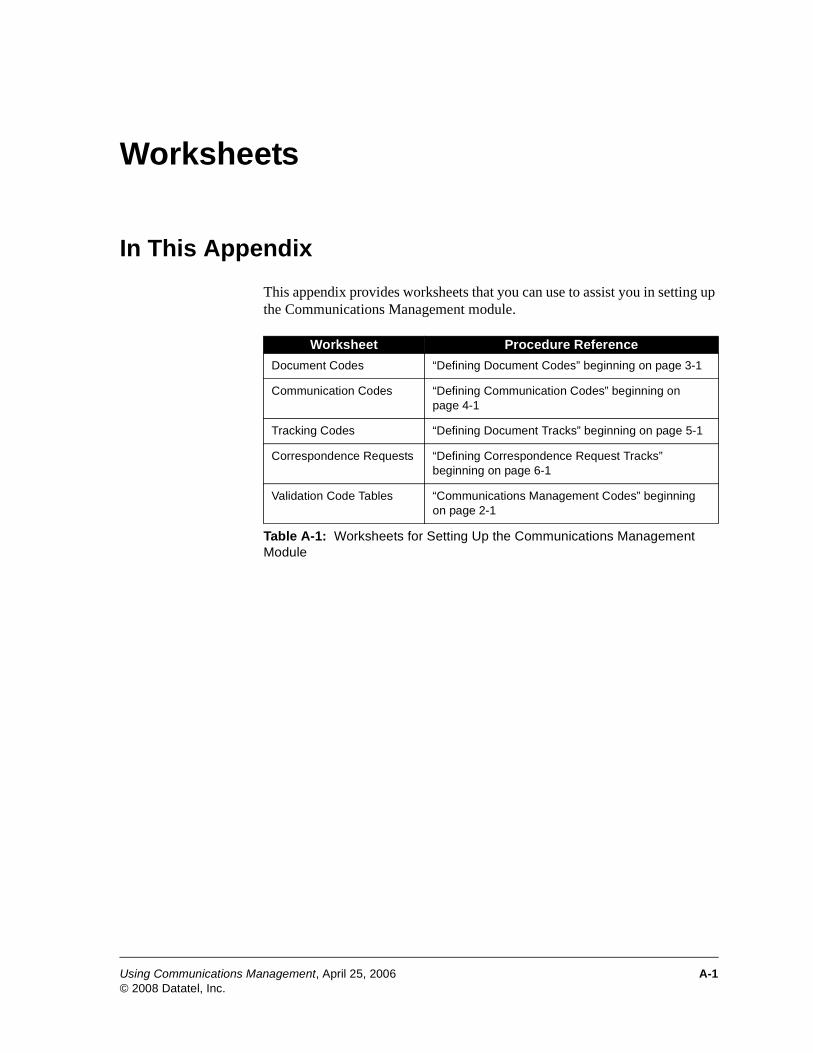
AppendixA
Worksheets April 25, 2006
In This Appendix
This appendix provides worksheets that you can use to assist you in setting up the Communications Management module.
Worksheet Procedure Reference
Document Codes “Defining Document Codes” beginning on page 3-1
Communication Codes “Defining Communication Codes” beginning on page 4-1
Tracking Codes “Defining Document Tracks” beginning on page 5-1
Correspondence Requests “Defining Correspondence Request Tracks” beginning on page 6-1
Validation Code Tables “Communications Management Codes” beginning on page 2-1
Table A-1: Worksheets for Setting Up the Communications Management Module
Using Communications Management, April 25, 2006 A-1© 2008 Datatel, Inc.
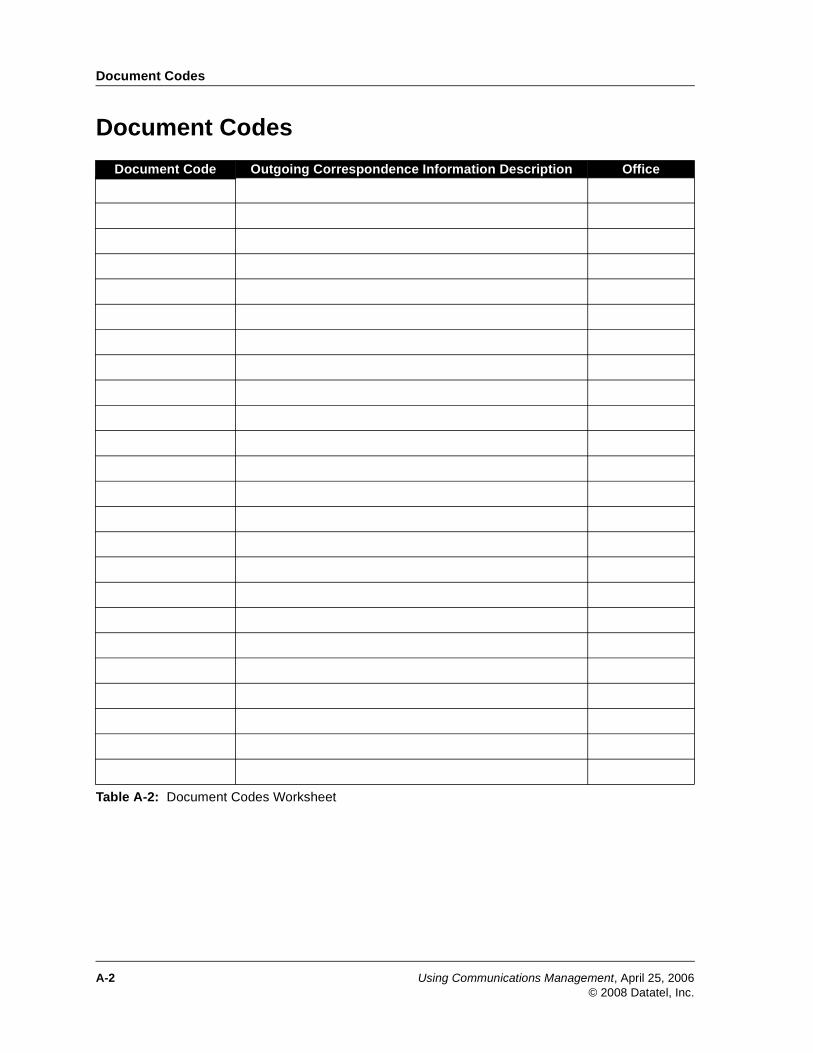
Document Codes
Document Codes
Document Code Outgoing Correspondence Information Description Office
Table A-2: Document Codes Worksheet
A-2 Using Communications Management, April 25, 2006© 2008 Datatel, Inc.
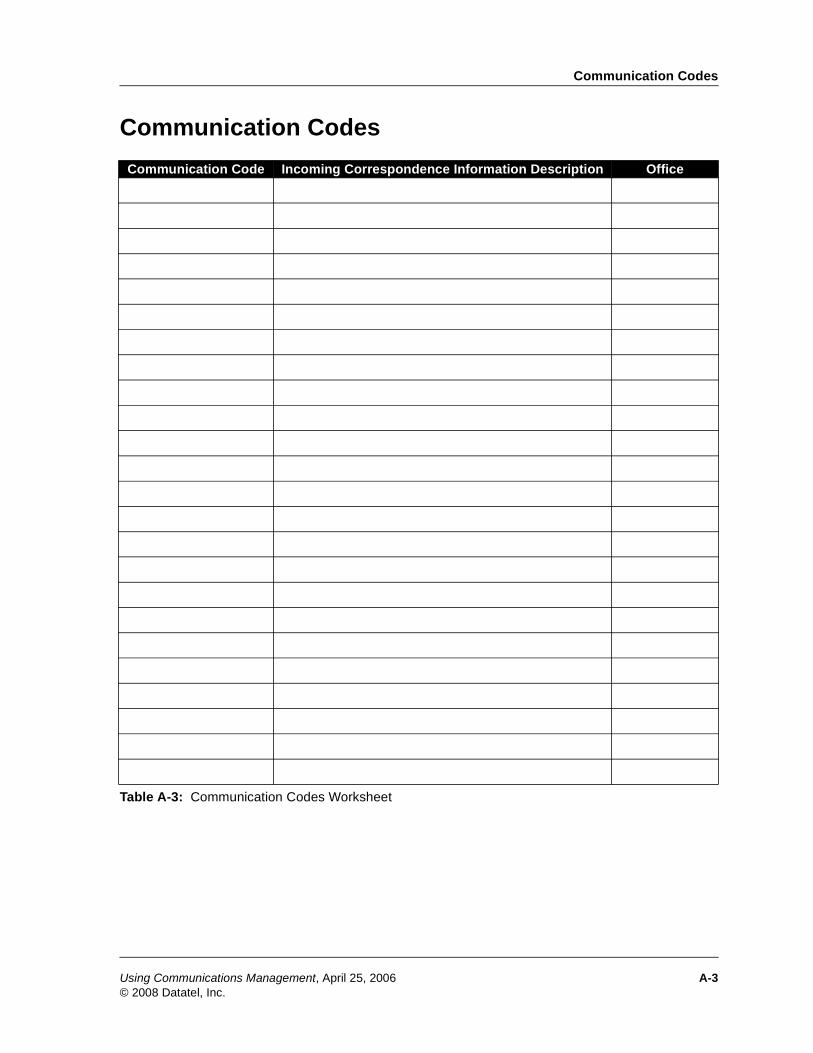
Communication Codes
Communication Codes
Communication Code Incoming Correspondence Information Description Office
Table A-3: Communication Codes Worksheet
Using Communications Management, April 25, 2006 A-3© 2008 Datatel, Inc.

Tracking Codes
Tracking Codes
Tracking Code: Office:
Documents Days By Date
Table A-4: Tracking Codes Worksheet
Tracking Code: Office:
Documents Days By Date
Table A-5: Tracking Codes Worksheet
A-4 Using Communications Management, April 25, 2006© 2008 Datatel, Inc.
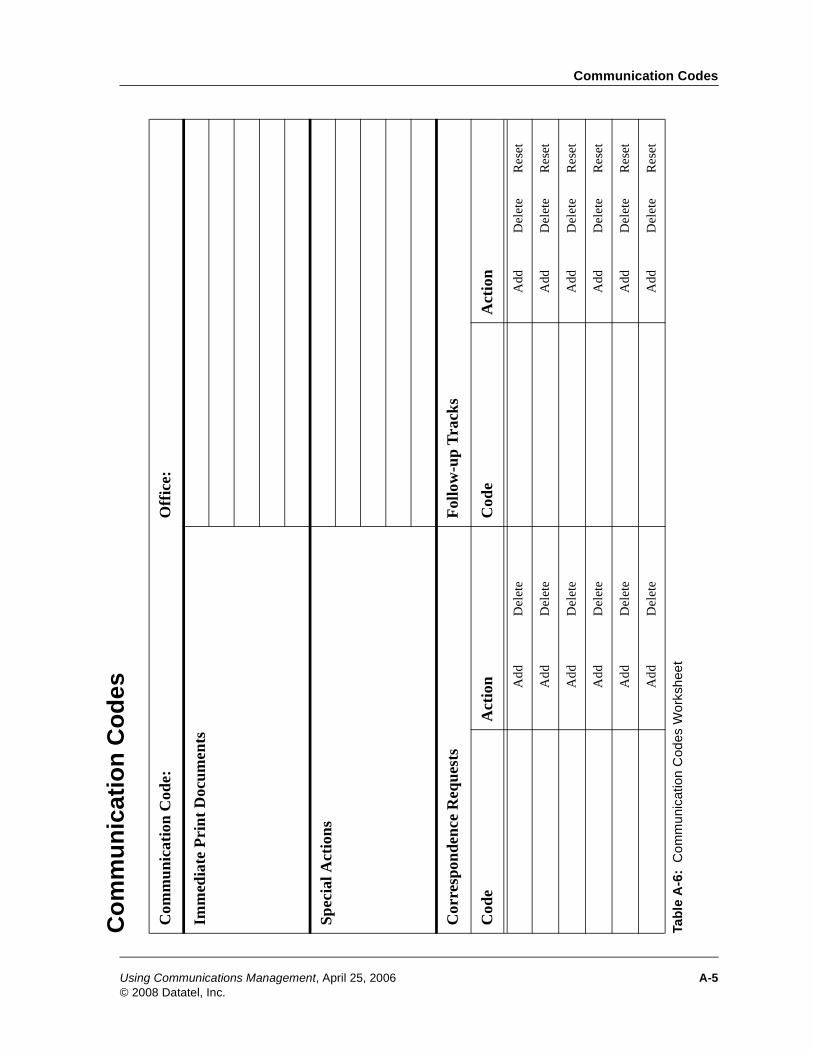
Communication Codes
Co
mm
un
icat
ion
Co
des
Com
mun
icat
ion
Cod
e:O
ffic
e:
Imm
edia
te P
rint
Doc
umen
ts
Spec
ial A
ctio
ns
Cor
resp
onde
nce
Req
uest
sF
ollo
w-u
p T
rack
s
Cod
eA
ctio
nC
ode
Act
ion
Add
Del
ete
Add
Del
ete
Res
et
Add
Del
ete
Add
Del
ete
Res
et
Add
Del
ete
Add
Del
ete
Res
et
Add
Del
ete
Add
Del
ete
Res
et
Add
Del
ete
Add
Del
ete
Res
et
Add
Del
ete
Add
Del
ete
Res
et
Tab
le A
-6:
Com
mun
icat
ion
Cod
es W
orks
heet
Using Communications Management, April 25, 2006 A-5© 2008 Datatel, Inc.
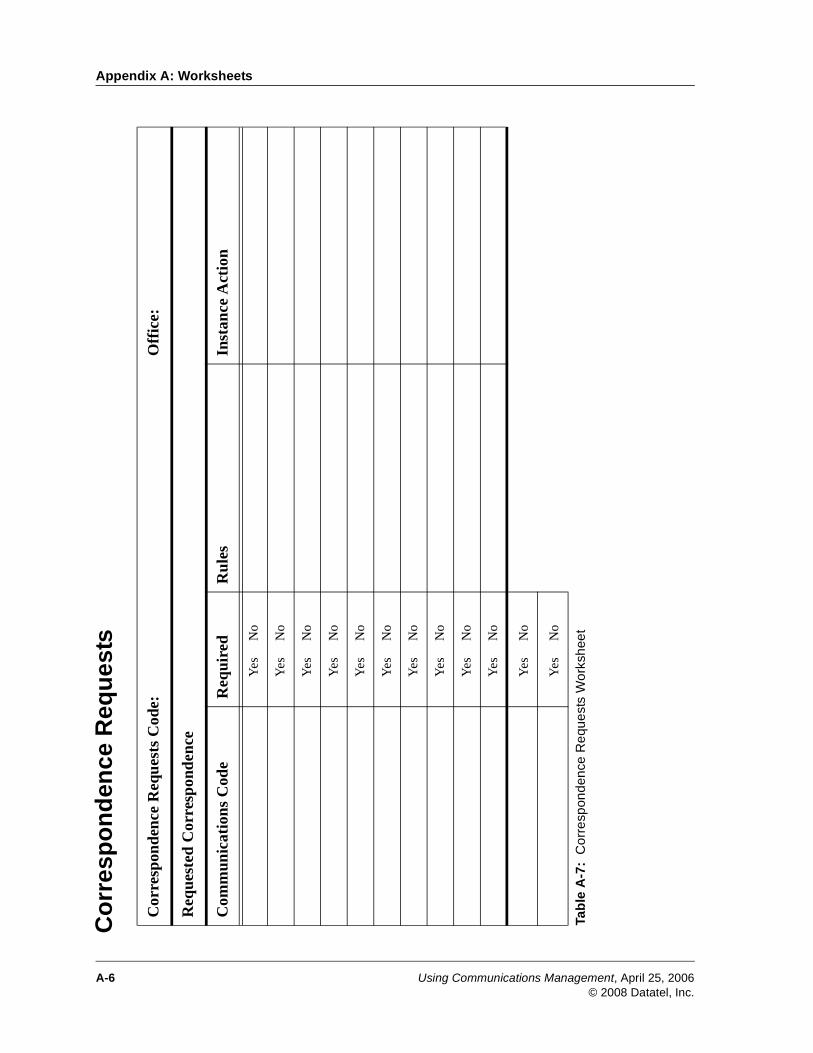
Appendix A: Worksheets
Co
rres
po
nd
ence
Req
ues
ts
Cor
resp
onde
nce
Req
uest
s C
ode:
Off
ice:
Req
uest
ed C
orre
spon
denc
e
Com
mun
icat
ions
Cod
eR
equi
red
Rul
esIn
stan
ce A
ctio
n
Yes
No
Yes
No
Yes
No
Yes
No
Yes
No
Yes
No
Yes
No
Yes
No
Yes
No
Yes
No
Ass
ign
men
t A
ctio
ns
Yes
No
Fo
llow
-up
Act
ion
sY
esN
o
Tab
le A
-7:
Cor
resp
onde
nce
Req
uest
s W
orks
heet
A-6 Using Communications Management, April 25, 2006© 2008 Datatel, Inc.
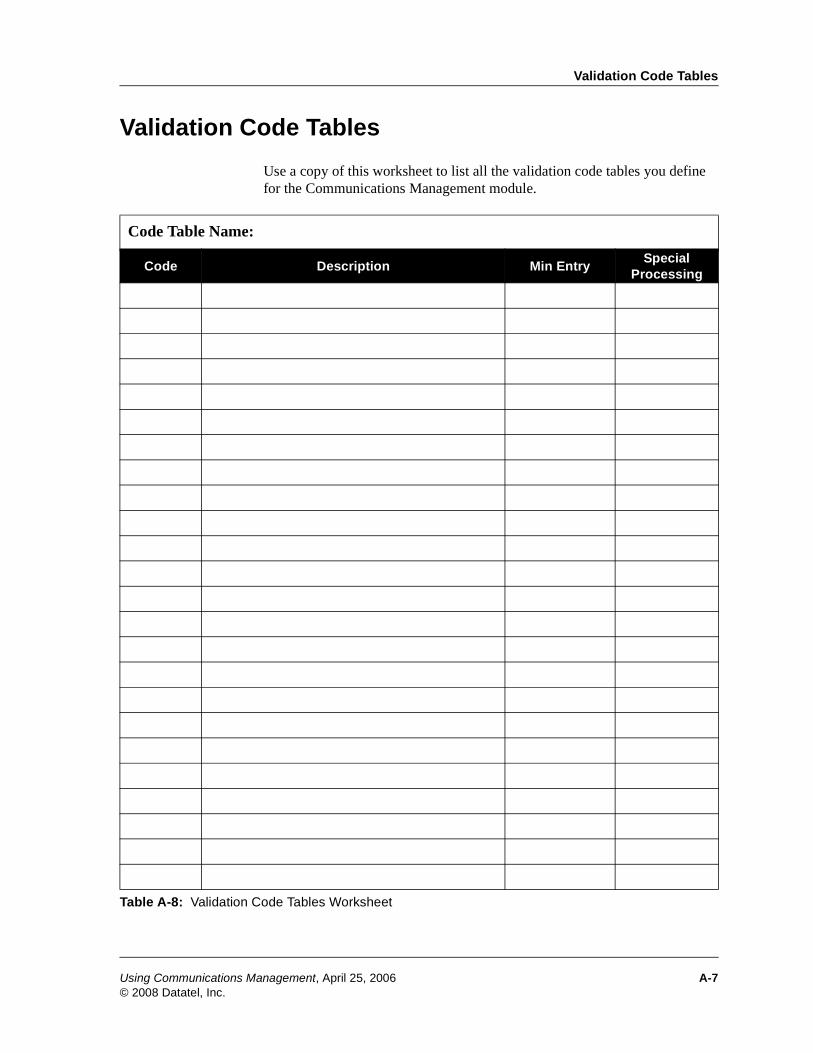
Validation Code Tables
Validation Code Tables
Use a copy of this worksheet to list all the validation code tables you define for the Communications Management module.
Code Table Name:
Code Description Min EntrySpecial
Processing
Table A-8: Validation Code Tables Worksheet
Using Communications Management, April 25, 2006 A-7© 2008 Datatel, Inc.

Validation Code Tables
A-8 Using Communications Management, April 25, 2006© 2008 Datatel, Inc.

Using Communications Management
Index

Index
AActions
assignment 6-4follow-up 6-4for track assignments 5-8instance 6-4, 6-6with correspondence request track assignment 6-8
Assigning a document trackfor groups 5-10for individuals 5-9
Assigning communication codes 4-6
Assigning correspondence request tracks 6-7for groups 6-10for individuals 6-9
Assigning document tracks 5-7
Assigning documents 3-34to an individual 3-36
Assignment actionscommunication codes 6-3
BBatch Procedure Definition (BPD) form 7-10
Bookmark document 3-11
BPD form 7-10
Building and Processing Letter Requests 7-12
CCMC form 1-18, 4-2, 5-3, 6-2
Code document type 3-8
Codesand office security 2-3Communications Management 2-2understanding 2-2
Using Communications Management, October 21, 2008© 2008 Datatel, Inc.
Codes, specific typescommunication codes 2-3
assigning 4-6procedure for defining 4-1, 4-4
correspondence requests 2-4correspondence statuses 2-5
where used 4-8document codes 2-3document tracks 2-4document types 2-6history types
where used 3-4office codes
defined 2-8where used 3-3
person e-mail types 2-7
COLTRANS correspondence action 2-12
COM form 1-26
Comma-quote files 3-8
Communication Code Entry (CRI) form 4-9
Communication codesassignment actions 6-3defined 1-15, 2-3instance actions 6-3naming conventions 4-4procedure for assigning
to a group 4-10to an individual 4-9
required 6-3rules 6-3
Communication Codes (CMC) form 1-18, 4-2, 5-3, 6-2
Communication Information (COM) form 1-26
Communication Management (PID7) form 2-14
Communications Managementconcepts 1-14module overview 1-13
Communications Management codesunderstanding 2-2
Communications Management processprocedure for creating 1-27
Index - 1
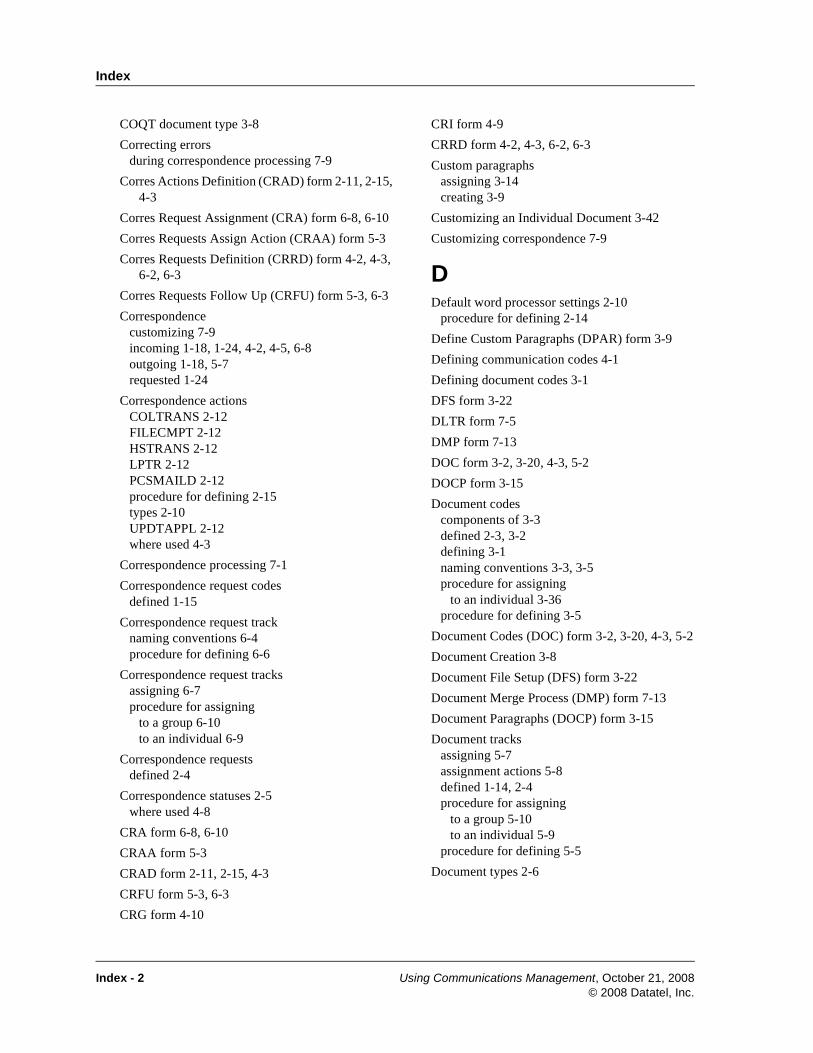
Index
COQT document type 3-8
Correcting errorsduring correspondence processing 7-9
Corres Actions Definition (CRAD) form 2-11, 2-15, 4-3
Corres Request Assignment (CRA) form 6-8, 6-10
Corres Requests Assign Action (CRAA) form 5-3
Corres Requests Definition (CRRD) form 4-2, 4-3, 6-2, 6-3
Corres Requests Follow Up (CRFU) form 5-3, 6-3
Correspondencecustomizing 7-9incoming 1-18, 1-24, 4-2, 4-5, 6-8outgoing 1-18, 5-7requested 1-24
Correspondence actionsCOLTRANS 2-12FILECMPT 2-12HSTRANS 2-12LPTR 2-12PCSMAILD 2-12procedure for defining 2-15types 2-10UPDTAPPL 2-12where used 4-3
Correspondence processing 7-1
Correspondence request codesdefined 1-15
Correspondence request tracknaming conventions 6-4procedure for defining 6-6
Correspondence request tracksassigning 6-7procedure for assigning
to a group 6-10to an individual 6-9
Correspondence requestsdefined 2-4
Correspondence statuses 2-5where used 4-8
CRA form 6-8, 6-10
CRAA form 5-3
CRAD form 2-11, 2-15, 4-3
CRFU form 5-3, 6-3
CRG form 4-10
Index - 2
CRI form 4-9
CRRD form 4-2, 4-3, 6-2, 6-3
Custom paragraphsassigning 3-14creating 3-9
Customizing an Individual Document 3-42
Customizing correspondence 7-9
DDefault word processor settings 2-10
procedure for defining 2-14
Define Custom Paragraphs (DPAR) form 3-9
Defining communication codes 4-1
Defining document codes 3-1
DFS form 3-22
DLTR form 7-5
DMP form 7-13
DOC form 3-2, 3-20, 4-3, 5-2
DOCP form 3-15
Document codescomponents of 3-3defined 2-3, 3-2defining 3-1naming conventions 3-3, 3-5procedure for assigning
to an individual 3-36procedure for defining 3-5
Document Codes (DOC) form 3-2, 3-20, 4-3, 5-2
Document Creation 3-8
Document File Setup (DFS) form 3-22
Document Merge Process (DMP) form 7-13
Document Paragraphs (DOCP) form 3-15
Document tracksassigning 5-7assignment actions 5-8defined 1-14, 2-4procedure for assigning
to a group 5-10to an individual 5-9
procedure for defining 5-5
Document types 2-6
Using Communications Management, October 21, 2008© 2008 Datatel, Inc.
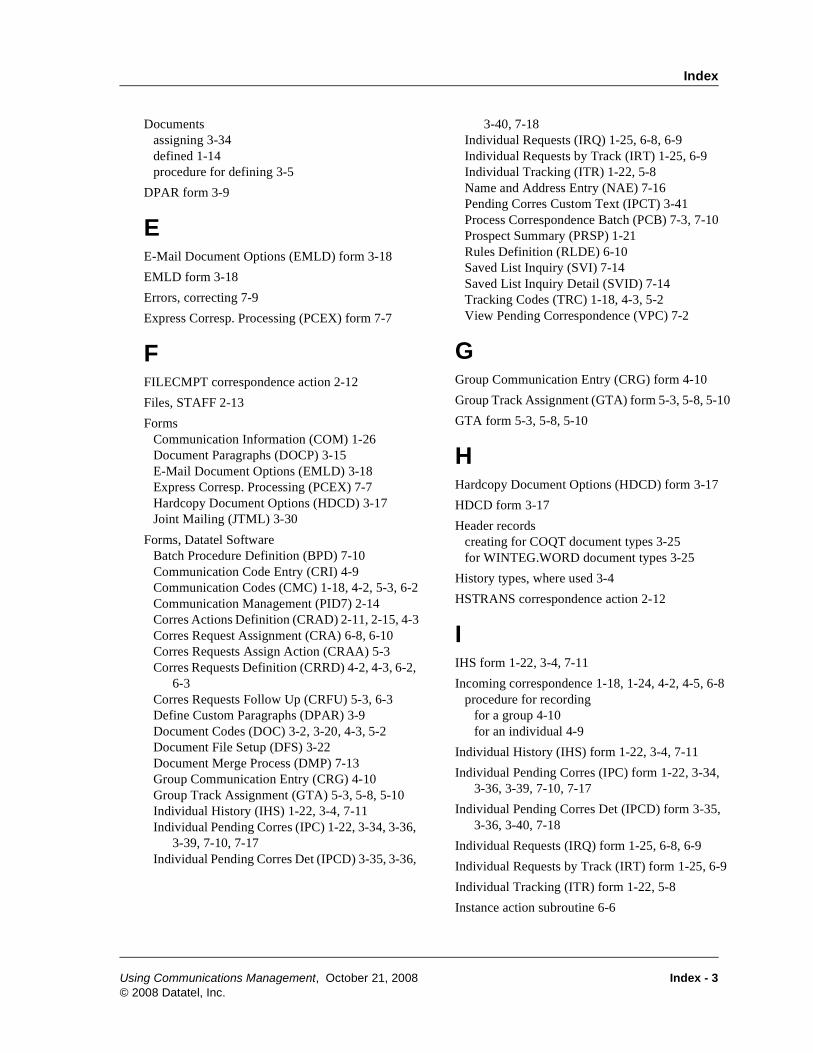
Index
Documentsassigning 3-34defined 1-14procedure for defining 3-5
DPAR form 3-9
EE-Mail Document Options (EMLD) form 3-18
EMLD form 3-18
Errors, correcting 7-9
Express Corresp. Processing (PCEX) form 7-7
FFILECMPT correspondence action 2-12
Files, STAFF 2-13
FormsCommunication Information (COM) 1-26Document Paragraphs (DOCP) 3-15E-Mail Document Options (EMLD) 3-18Express Corresp. Processing (PCEX) 7-7Hardcopy Document Options (HDCD) 3-17Joint Mailing (JTML) 3-30
Forms, Datatel SoftwareBatch Procedure Definition (BPD) 7-10Communication Code Entry (CRI) 4-9Communication Codes (CMC) 1-18, 4-2, 5-3, 6-2Communication Management (PID7) 2-14Corres Actions Definition (CRAD) 2-11, 2-15, 4-3Corres Request Assignment (CRA) 6-8, 6-10Corres Requests Assign Action (CRAA) 5-3Corres Requests Definition (CRRD) 4-2, 4-3, 6-2,
6-3Corres Requests Follow Up (CRFU) 5-3, 6-3Define Custom Paragraphs (DPAR) 3-9Document Codes (DOC) 3-2, 3-20, 4-3, 5-2Document File Setup (DFS) 3-22Document Merge Process (DMP) 7-13Group Communication Entry (CRG) 4-10Group Track Assignment (GTA) 5-3, 5-8, 5-10Individual History (IHS) 1-22, 3-4, 7-11Individual Pending Corres (IPC) 1-22, 3-34, 3-36,
3-39, 7-10, 7-17Individual Pending Corres Det (IPCD) 3-35, 3-36,
Using Communications Management, October 21, 2008© 2008 Datatel, Inc.
3-40, 7-18Individual Requests (IRQ) 1-25, 6-8, 6-9Individual Requests by Track (IRT) 1-25, 6-9Individual Tracking (ITR) 1-22, 5-8Name and Address Entry (NAE) 7-16Pending Corres Custom Text (IPCT) 3-41Process Correspondence Batch (PCB) 7-3, 7-10Prospect Summary (PRSP) 1-21Rules Definition (RLDE) 6-10Saved List Inquiry (SVI) 7-14Saved List Inquiry Detail (SVID) 7-14Tracking Codes (TRC) 1-18, 4-3, 5-2View Pending Correspondence (VPC) 7-2
GGroup Communication Entry (CRG) form 4-10
Group Track Assignment (GTA) form 5-3, 5-8, 5-10
GTA form 5-3, 5-8, 5-10
HHardcopy Document Options (HDCD) form 3-17
HDCD form 3-17
Header recordscreating for COQT document types 3-25for WINTEG.WORD document types 3-25
History types, where used 3-4
HSTRANS correspondence action 2-12
IIHS form 1-22, 3-4, 7-11
Incoming correspondence 1-18, 1-24, 4-2, 4-5, 6-8procedure for recording
for a group 4-10for an individual 4-9
Individual History (IHS) form 1-22, 3-4, 7-11
Individual Pending Corres (IPC) form 1-22, 3-34, 3-36, 3-39, 7-10, 7-17
Individual Pending Corres Det (IPCD) form 3-35, 3-36, 3-40, 7-18
Individual Requests (IRQ) form 1-25, 6-8, 6-9
Individual Requests by Track (IRT) form 1-25, 6-9
Individual Tracking (ITR) form 1-22, 5-8
Instance action subroutine 6-6
Index - 3
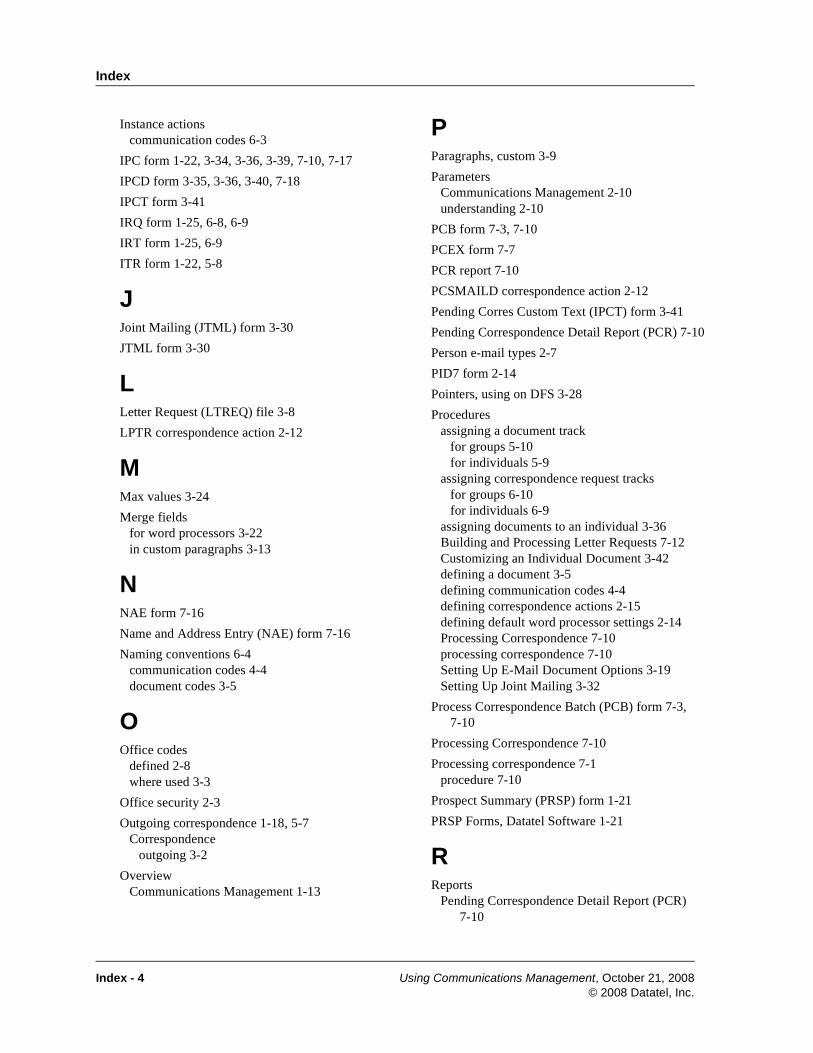
Index
Instance actionscommunication codes 6-3
IPC form 1-22, 3-34, 3-36, 3-39, 7-10, 7-17
IPCD form 3-35, 3-36, 3-40, 7-18
IPCT form 3-41
IRQ form 1-25, 6-8, 6-9
IRT form 1-25, 6-9
ITR form 1-22, 5-8
JJoint Mailing (JTML) form 3-30
JTML form 3-30
LLetter Request (LTREQ) file 3-8
LPTR correspondence action 2-12
MMax values 3-24
Merge fieldsfor word processors 3-22in custom paragraphs 3-13
NNAE form 7-16
Name and Address Entry (NAE) form 7-16
Naming conventions 6-4communication codes 4-4document codes 3-5
OOffice codes
defined 2-8where used 3-3
Office security 2-3
Outgoing correspondence 1-18, 5-7Correspondence
outgoing 3-2
OverviewCommunications Management 1-13
Index - 4
PParagraphs, custom 3-9
ParametersCommunications Management 2-10understanding 2-10
PCB form 7-3, 7-10
PCEX form 7-7
PCR report 7-10
PCSMAILD correspondence action 2-12
Pending Corres Custom Text (IPCT) form 3-41
Pending Correspondence Detail Report (PCR) 7-10
Person e-mail types 2-7
PID7 form 2-14
Pointers, using on DFS 3-28
Proceduresassigning a document track
for groups 5-10for individuals 5-9
assigning correspondence request tracksfor groups 6-10for individuals 6-9
assigning documents to an individual 3-36Building and Processing Letter Requests 7-12Customizing an Individual Document 3-42defining a document 3-5defining communication codes 4-4defining correspondence actions 2-15defining default word processor settings 2-14Processing Correspondence 7-10processing correspondence 7-10Setting Up E-Mail Document Options 3-19Setting Up Joint Mailing 3-32
Process Correspondence Batch (PCB) form 7-3, 7-10
Processing Correspondence 7-10
Processing correspondence 7-1procedure 7-10
Prospect Summary (PRSP) form 1-21
PRSP Forms, Datatel Software 1-21
RReports
Pending Correspondence Detail Report (PCR) 7-10
Using Communications Management, October 21, 2008© 2008 Datatel, Inc.
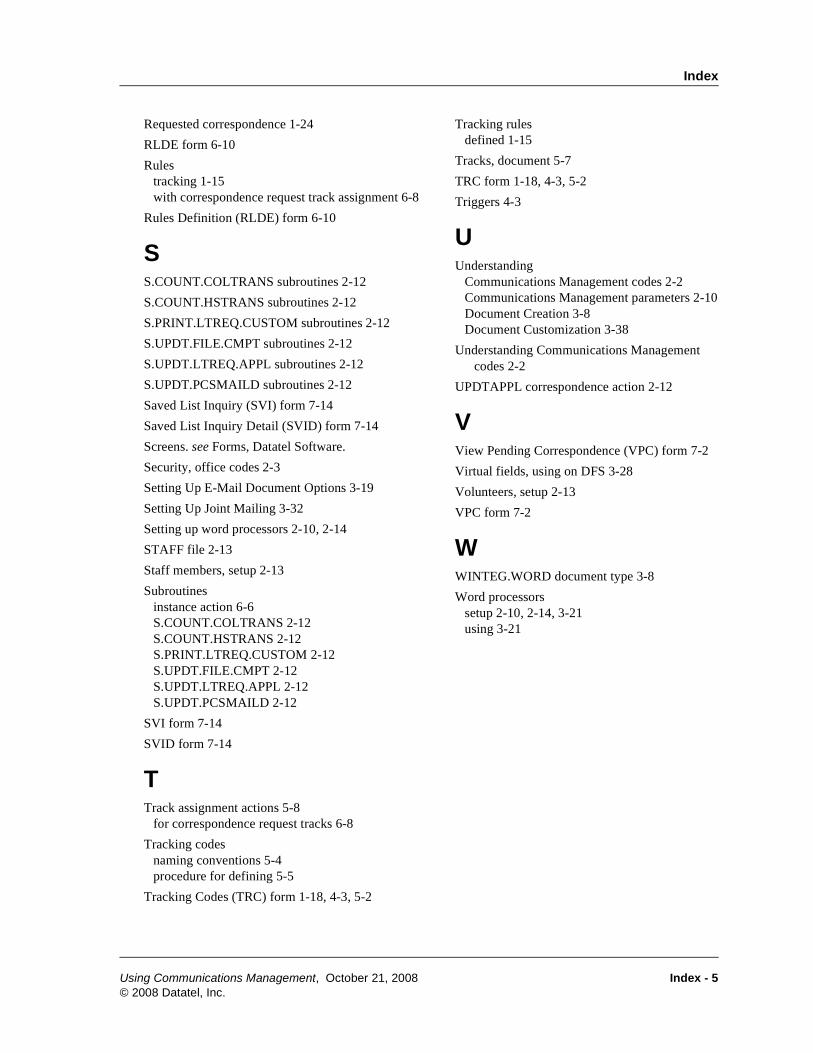
Index
Requested correspondence 1-24
RLDE form 6-10
Rulestracking 1-15with correspondence request track assignment 6-8
Rules Definition (RLDE) form 6-10
SS.COUNT.COLTRANS subroutines 2-12
S.COUNT.HSTRANS subroutines 2-12
S.PRINT.LTREQ.CUSTOM subroutines 2-12
S.UPDT.FILE.CMPT subroutines 2-12
S.UPDT.LTREQ.APPL subroutines 2-12
S.UPDT.PCSMAILD subroutines 2-12
Saved List Inquiry (SVI) form 7-14
Saved List Inquiry Detail (SVID) form 7-14
Screens. see Forms, Datatel Software.
Security, office codes 2-3
Setting Up E-Mail Document Options 3-19
Setting Up Joint Mailing 3-32
Setting up word processors 2-10, 2-14
STAFF file 2-13
Staff members, setup 2-13
Subroutinesinstance action 6-6S.COUNT.COLTRANS 2-12S.COUNT.HSTRANS 2-12S.PRINT.LTREQ.CUSTOM 2-12S.UPDT.FILE.CMPT 2-12S.UPDT.LTREQ.APPL 2-12S.UPDT.PCSMAILD 2-12
SVI form 7-14
SVID form 7-14
TTrack assignment actions 5-8
for correspondence request tracks 6-8
Tracking codesnaming conventions 5-4procedure for defining 5-5
Tracking Codes (TRC) form 1-18, 4-3, 5-2
Using Communications Management, October 21, 2008© 2008 Datatel, Inc.
Tracking rulesdefined 1-15
Tracks, document 5-7
TRC form 1-18, 4-3, 5-2
Triggers 4-3
UUnderstanding
Communications Management codes 2-2Communications Management parameters 2-10Document Creation 3-8Document Customization 3-38
Understanding Communications Management codes 2-2
UPDTAPPL correspondence action 2-12
VView Pending Correspondence (VPC) form 7-2
Virtual fields, using on DFS 3-28
Volunteers, setup 2-13
VPC form 7-2
WWINTEG.WORD document type 3-8
Word processorssetup 2-10, 2-14, 3-21using 3-21
Index - 5
Index
Index - 6
Using Communications Management, October 21, 2008© 2008 Datatel, Inc.