Embed Size (px)
Citation preview

Using Balances The primary method that you will use to measure the amounts of chemicals is to weigh them--that is, to determine their mass. To do this you use a balance. You'll be learning to use two balances: a standard laboratory balance and an analytical balance. General Rules for Using Balances Do not place chemicals directly on the balance pan unless they are inert (unreactive) and at room temperature. Containers, glassware, or pieces of metal can generally be put directly on the balance pan, but for most other chemicals, you need to use a container for the chemicals. (The containers, of course, are chemicals, but they are inert.) The reason for this rule is that many chemicals react with the balance pan. Some attract moisture and cause corrosion. Any residue that sticks to the pan can interfere with weighing. It could also contaminate any other chemicals weighed later in the same way. So, instead of weighing materials directly on the balance pan, always weigh the chemicals in or on something--a weighing dish, a beaker, or a piece of folded paper. When you do, remember to weigh the container first or adjust for its weight. Be careful not to spill any chemicals on or around the balance. If you do, clean up immediately! If for some reason your balance doesn't seem to be adjusted properly, let the instructor know. Don't just try to fix it yourself. Tell us, so we can deal with it and get it functioning properly. When you're finished with the balance, return the weights back to zero. Then it will be ready for the next person to use it. Choosing the Proper Instrument for Weighing All weighing in the chemistry laboratory is done with a balance. However, depending on the requirements of the experiment at hand, different balances may be used. Preparative work, such as measuring out a rough amount of an excess reagent, does not require a high level of accuracy. For example, if an experimental procedure calls for 1.0 grams of a reagent known to be in excess in the reaction, amounts of 0.9 or 1.1 grams are perfectly acceptable. For these purposes, a standard laboratory balance is used to obtain an initial, approximate mass that is within the range specified by the procedure. The sample's mass is then determined more accurately before being presented in a laboratory report. A top-loading standard laboratory balance is a relatively simple electronic device that measures the mass of an object to an uncertainty of ±0.02 grams, thus being suitable for preparative applications in the chemistry laboratory. In analytical work, such as precisely determining the mass of a lead salt precipitate meticulously isolated from an aqueous solution, an analytical balance should be used to

minimize uncertainty. An analytical balance is a highly sensitive instrument that is much more prone to errors from environmental conditions and requires much more careful operation than a top-loading balance. This balance measures an object's mass to an uncertainty of ±0.00002 grams and is used any time a very accurate mass determination is needed. Technique Notes for More Accurate Weighing Presented below are some general pointers to increase the accuracy of your mass measurements, no matter which balance you use.
Weigh objects at room temperature.
A warm or hot object will create a convection current in the air around the balance pan. This fluctuating force reduces the air pressure on the balance pan and can make it difficult to obtain a stable reading.
Weigh only dry objects.
Moisture can corrode the balance pan. Moisture evaporating from your sample can lead to unstable mass readings.
Use approximate amounts and then measure them accurately.
Approximate amounts should be weighed out on a top-loading balance and then weighed accurately on an analytical balance. For example, if the lab manual asks you to weigh out 0.8 grams of a material, a range of 0.7-0.9 grams as measured by an analytical balance is acceptable for the reaction. It would take much too long to weigh out exactly 0.8000 grams of the material. Instead, weigh your approximately measured out sample on an analytical balance to obtain its accurate mass. This mass, accurate to the nearest 0.1 mg, can be stated in your laboratory reports.
Use the same balance.
It is critical to always use the same balance especially if calculations require more than one mass measurement, as each device might be calibrated slightly differently.
Use weigh boats.
Weigh boats are containers used to prevent reagents from contacting the balance pan. They are made of polypropylene, a plastic that does not adsorb water. They are inexpensive and do not need to be handled with care. If one is torn or too dirty to be wiped clean, simply discard it.

Standard laboratory balance
A standard laboratory balance is used for preparative work where an error of ±0.02 g is acceptable. It is also often used for pre-weighing samples to determine the mass approximately. The exact mass is then determined using an analytical balance.
Place a weigh boat on the balance.
Press the TARE or ZERO button to get a reading of 0.00 g.

Measure out the sample
Record the value. If asked to weigh, say, 0.8 g, a range of 0.7 – 0.9 g is OK.
Analytical balance Analytical balances are highly sensitive instruments and provide very accurate mass measurements. However, this accuracy comes at a price: not only are they expensive, but analytical balances are also quite susceptible to environmental conditions that can affect the mass reading. The table on the next page outlines several events that can cause the mass reading to shift by several ten-thousandths of a gram or be unstable. The remedies for each problem are also shown on the next page.
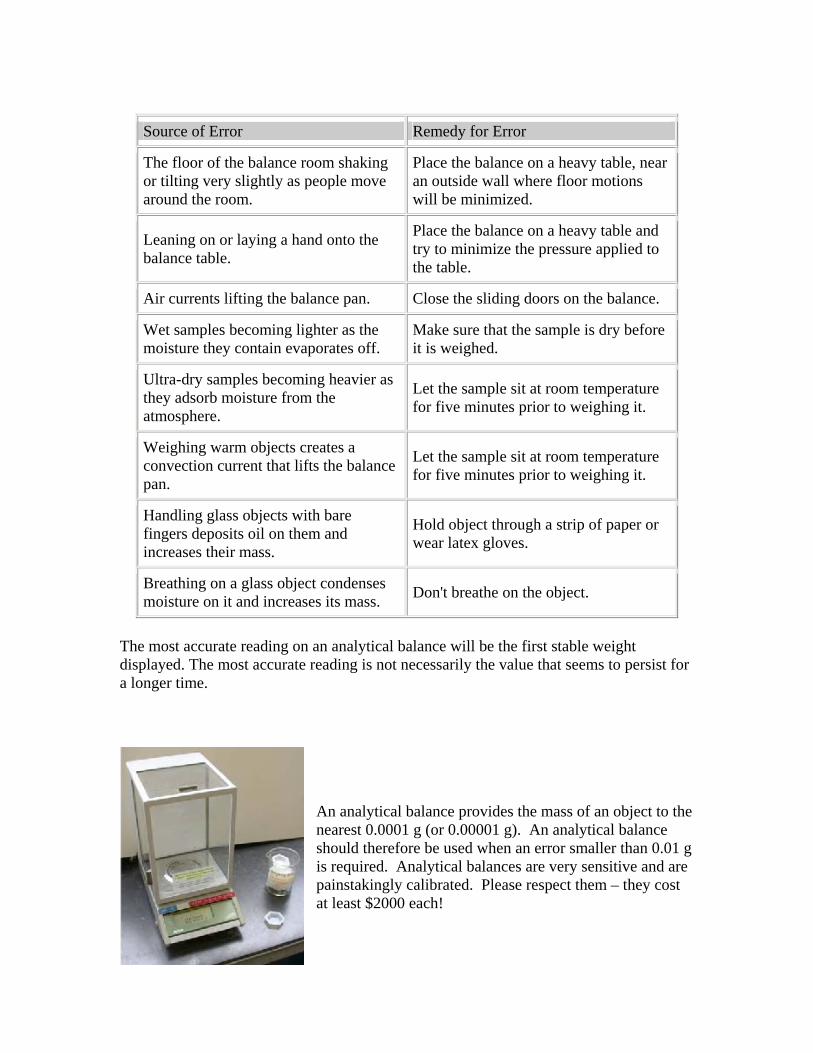
Source of Error Remedy for Error
The floor of the balance room shaking or tilting very slightly as people move around the room.
Place the balance on a heavy table, near an outside wall where floor motions will be minimized.
Leaning on or laying a hand onto the balance table.
Place the balance on a heavy table and try to minimize the pressure applied to the table.
Air currents lifting the balance pan. Close the sliding doors on the balance.
Wet samples becoming lighter as the moisture they contain evaporates off.
Make sure that the sample is dry before it is weighed.
Ultra-dry samples becoming heavier as they adsorb moisture from the atmosphere.
Let the sample sit at room temperature for five minutes prior to weighing it.
Weighing warm objects creates a convection current that lifts the balance pan.
Let the sample sit at room temperature for five minutes prior to weighing it.
Handling glass objects with bare fingers deposits oil on them and increases their mass.
Hold object through a strip of paper or wear latex gloves.
Breathing on a glass object condenses moisture on it and increases its mass. Don't breathe on the object.
The most accurate reading on an analytical balance will be the first stable weight displayed. The most accurate reading is not necessarily the value that seems to persist for a longer time.
An analytical balance provides the mass of an object to the nearest 0.0001 g (or 0.00001 g). An analytical balance should therefore be used when an error smaller than 0.01 g is required. Analytical balances are very sensitive and are painstakingly calibrated. Please respect them – they cost at least $2000 each!
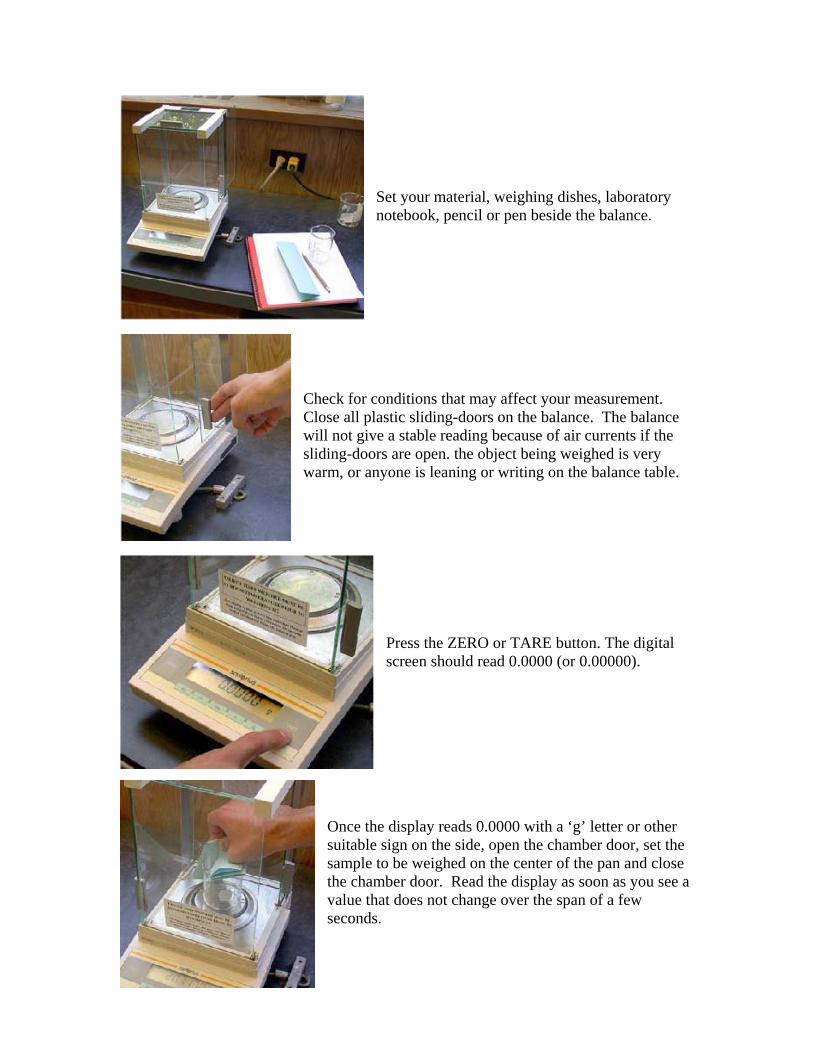
Set your material, weighing dishes, laboratory notebook, pencil or pen beside the balance.
Check for conditions that may affect your measurement. Close all plastic sliding-doors on the balance. The balance will not give a stable reading because of air currents if the sliding-doors are open. the object being weighed is very warm, or anyone is leaning or writing on the balance table.
Press the ZERO or TARE button. The digital screen should read 0.0000 (or 0.00000).
Once the display reads 0.0000 with a ‘g’ letter or other suitable sign on the side, open the chamber door, set the sample to be weighed on the center of the pan and close the chamber door. Read the display as soon as you see a value that does not change over the span of a few seconds.

Check that the obtained value was accurate. Remove the object from the pan and close the chamber door. If the display reads 0.0003 g (0.00003 g for more accurate balances) or higher, the zero level was significantly shifted during the weighing, and you need to repeat the previous two steps.
Weighing by difference Weighing by differences is a technique that is used when it is important to know the precise amount of a sample that has been delivered into a reaction mixture. For this purpose, it is insufficient to simply tare a weigh boat and accurately weigh the sample that has been transferred into it, because some of the sample inevitably sticks to the weigh boat and does not make it into the reaction beaker on a subsequent transfer. Weighing by differences tells you exactly how much of the sample made it out of the weigh boat.
Weighing by differences allows an exact mass reading of the amount of chemical present that has been transferred into a reaction vessel. A chemical is almost never transferred fully from one vessel to another as some may stick to the weigh boat.
Start by pre-weighing an approximate quantity of the chemical into a weigh boat using a standard analytical balance.

Set the analytical balance to 0.0000g.
Weigh the sample/weigh boat on the analytical balance and record the value.
Transfer the sample into a beaker.
Weigh the emptied weigh boat on the analytical balance, do not brush off any sample particles that are stuck to the emptied weigh boat. Record the mass of the emptied/dirty weigh boat.

The difference between the two analytical balance weighings will give the exact mass of the sample successfully transferred into the beaker.


Volumetric measurements of liquids
Volumetric measurements of liquids are made with measuring cylinders, burettes, or pipettes. The measuring cylinder is usually used to measure approximate volumes of liquids. Aqueous solutions wet the glass walls, forming a concave meniscus, the bottom of the meniscus is used to indicate the volume of the liquid. To avoid parallax error (caused by change of observational position), your eye should always be level with the meniscus when you are making a reading. The volume is estimated to one tenth of the smallest division. Measuring cylinders may be calibrated to contain (TC) or to deliver (TD). If it is calibrated to deliver, the cylinder actually contains slightly more than the volume read, thus compensating for the thin film of liquid left on the walls when the contents are poured out. Calibrated for inflow means the same as calibrated to contain, calibrated for outflow is the same is calibrated to deliver.
The proper method of reading a meniscus to avoid parallax error. The burette is used for more precise volumetric work and for titrations. If it is clean, the solution will leave an unbroken film when it drains; if drops of solution adhere to the inside of the burette, it should be cleaned with a special cleaning chemical (potassium dichromate dissolved in concentrated sulfuric acid) until it drains properly. Absolute cleanliness is important because the volume of a 25- or 50-mL burette can ordinarily be estimated to the nearest 0.01 mL and the error caused by a single drop adhering to the inside of a burette causes an error of about 0.05 mL. The presence of several drops would obviously result in poor measurement of the volume delivered. When filling a freshly cleaned burette with solution, add a 5- to 10-mL portion of the solution, being sure the stopcock is turned off, and tip and rotate the burette so that the solution rinses the walls of the burette completely. Repeat the procedure with at least two more fresh portions of solution; then fill the burette above the zero mark and clamp in a burette holder. Then open the stopcock wide to flush out any air bubbles between the stopcock and the tip of the burette. Next drain the burette below the zero mark and take an initial reading, being careful to avoid parallax error. The smallest division on a 25- or 50-mL burette is ordinarily 0.1 mL; estimate the volume to the nearest tenth of the smallest division, usually 0.01 mL. Burettes may have stopcocks made of glass, which must be periodically cleaned and lubricated. Teflon stopcocks ordinarily require no lubrication, but they may have to be cleaned if they are plugged, or adjusted if the tension nut is too tight or too lose.

Single volume pipettes are designed to deliver a single fixed volume of liquid very precisely. Graduated pipettes can be used for varying volumes, but they are not as precise as single volume pipettes. The graduation mark on single volume pipettes is located on the narrow part to assure precision. Pipettes are always calibrated to deliver the specified volume if they are handled in the prescribed manner. Pipettes are ordinarily calibrated at 20 or 25 °C. In very careful work, temperature corrections are necessary if the solution temperature is markedly different form the calibration temperature of the pipette. Fill the pipette by placing the tip in a flask of the solution and using a suction bulb to draw the liquid up past the calibration mark. Then slip off the bulb and, with the index finger, quickly seal the top of the pipette before the solution drops below the calibration mark. Wipe the outside of the pipette with tissue or clean towel, and then allow the liquid to flow out until the bottom of the meniscus is just at the calibration ring; to pick off the last drop adhering to the outside of the tip, touch the tip to the side of the flask. Then withdraw the pipette from the flask and hold it over the vessel into which the liquid is to be transferred. Allow the pipette to drain in a vertical position, with the tip against the side of the vessel. Allow 15 to 20 s for drainage after it appears that most of the liquid has drained out. The tip of the pipette will still contain some liquid. Ordinarily, this has been accounted for in the calibration and should not be blown out. Like the burette, the pipette must be scrupulously clean if precise results are to be obtained. If the pipette is still wet from cleaning, rinse with several portions of the solution to be pipetted.