Embed Size (px)
Citation preview
App Not e
USING AVID TRANSFER MANAGER/ENGINE VERSION 2.7.0 WITH FLIPFACTORY 7.4
Synopsis .................................................................................. 2
Installing Avid Interplay TransferManager Components..... 3Obtaining Interplay TransferManager Components.........................3Installing Interplay TransferManager Components ..........................3Copying the DLL to Interplay TransferManager Server ...................7Configuring the TransferManager Server ........................................8Sharing the Default FlipFactory Media Folder ...............................10Updating the FlipFactory License ..................................................10
Using Avid Interplay TransferManager Components......... 11Creating a Factory with an Interplay TransferManager Notify .......11
Copyright and Trademark Notice......................................... 15
October 2014 © 2014 Telestream, Inc. 143395
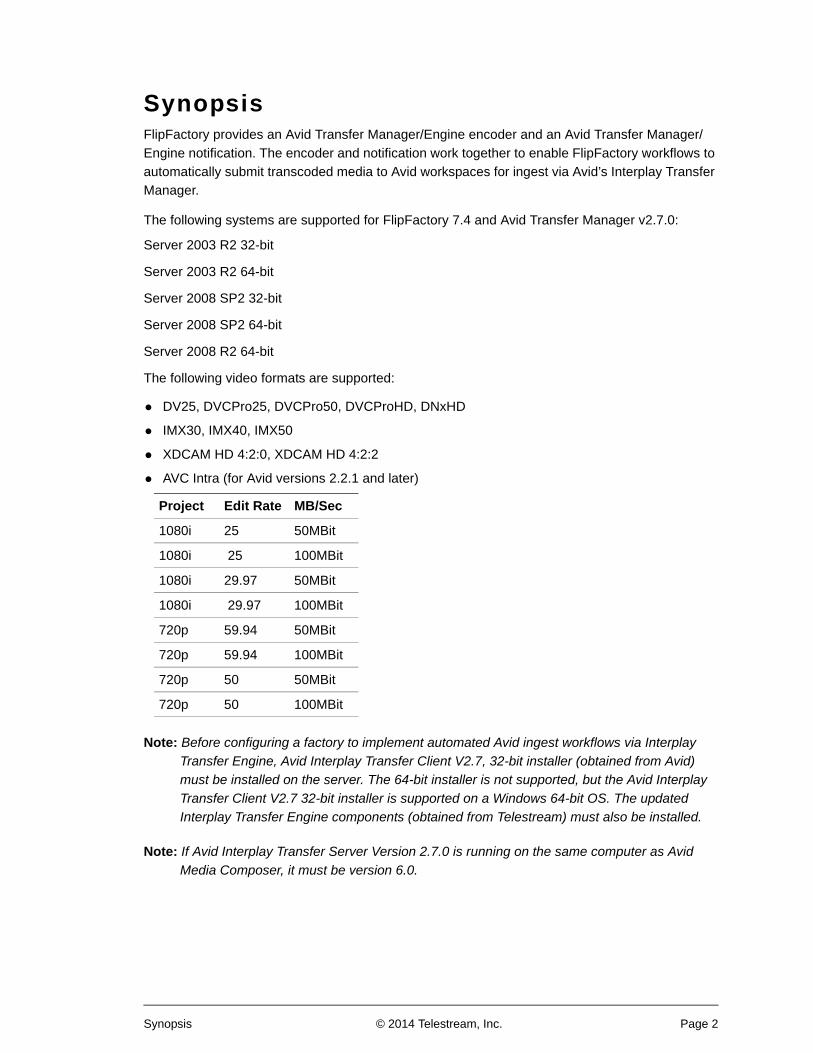
SynopsisFlipFactory provides an Avid Transfer Manager/Engine encoder and an Avid Transfer Manager/
Engine notification. The encoder and notification work together to enable FlipFactory workflows to
automatically submit transcoded media to Avid workspaces for ingest via Avid’s Interplay Transfer
Manager.
The following systems are supported for FlipFactory 7.4 and Avid Transfer Manager v2.7.0:
Server 2003 R2 32-bit
Server 2003 R2 64-bit
Server 2008 SP2 32-bit
Server 2008 SP2 64-bit
Server 2008 R2 64-bit
The following video formats are supported:
• DV25, DVCPro25, DVCPro50, DVCProHD, DNxHD
• IMX30, IMX40, IMX50
• XDCAM HD 4:2:0, XDCAM HD 4:2:2
• AVC Intra (for Avid versions 2.2.1 and later)
Note: Before configuring a factory to implement automated Avid ingest workflows via Interplay
Transfer Engine, Avid Interplay Transfer Client V2.7, 32-bit installer (obtained from Avid)
must be installed on the server. The 64-bit installer is not supported, but the Avid Interplay
Transfer Client V2.7 32-bit installer is supported on a Windows 64-bit OS. The updated
Interplay Transfer Engine components (obtained from Telestream) must also be installed.
Note: If Avid Interplay Transfer Server Version 2.7.0 is running on the same computer as Avid
Media Composer, it must be version 6.0.
Project Edit Rate MB/Sec
1080i 25 50MBit
1080i 25 100MBit
1080i 29.97 50MBit
1080i 29.97 100MBit
720p 59.94 50MBit
720p 59.94 100MBit
720p 50 50MBit
720p 50 100MBit
Synopsis © 2014 Telestream, Inc. Page 2

Installing Avid Interplay TransferManager Components
Note: Before installing the FlipFactory Avid Interplay TransferManager Components, you must obtain
and install Avid Interplay TransferManager Client. The Avid Client version must match the
appropriate FlipFactory version. For FlipFactory 7.4, the matching Avid Client version is 2.7.
Obtaining Interplay TransferManager ComponentsTo obtain the FlipFactory TransferManager Components installer:
1. Purchase a license from Telestream.
2. Log in to the Telestream Web site at: http://dynamic.telestream.net/downloads/downloads.asp.
3. Download Avid Interplay TransferManager Components for v2.7.
Installing Interplay TransferManager Components
Note: If a version of the FlipFactory TransferManager Interplay Components has already been
installed, you must uninstall it before proceeding with this new installation. If you do not first
uninstall the previous version you will receive the following message:
To install the Interplay TransferManager components, follow these steps:
1. Unzip the Avid Interplay TransferManager Components for V2.7. Zip file.
2. Run the TE Component Prerequisites installer (TE_Component_Prerequisites.msi) to install
all required DLL library files.
3. Run the FlipFactory.7.Interplay.TM.2.7.Update_V7.1.2.msi file (you can use the shortcut on
the desktop).
Installing Avid Interplay TransferManager Components © 2014 Telestream, Inc. Page 3
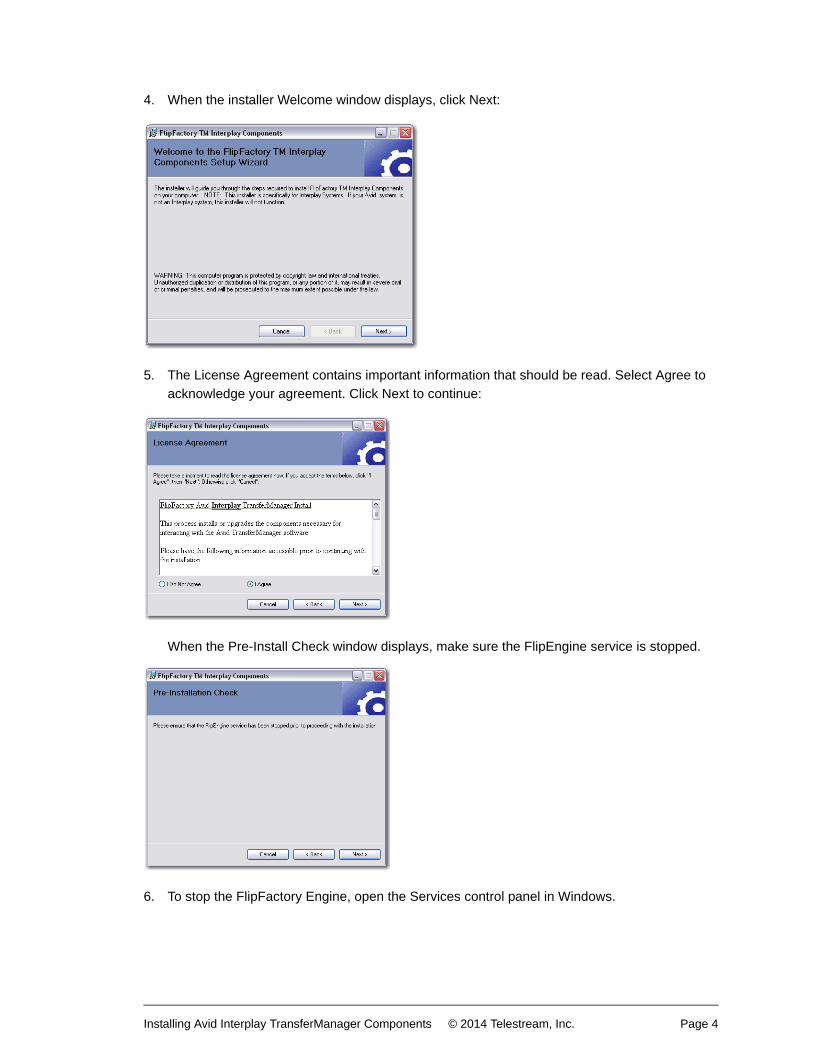
4. When the installer Welcome window displays, click Next:
5. The License Agreement contains important information that should be read. Select Agree to
acknowledge your agreement. Click Next to continue:
When the Pre-Install Check window displays, make sure the FlipEngine service is stopped.
6. To stop the FlipFactory Engine, open the Services control panel in Windows.
Installing Avid Interplay TransferManager Components © 2014 Telestream, Inc. Page 4
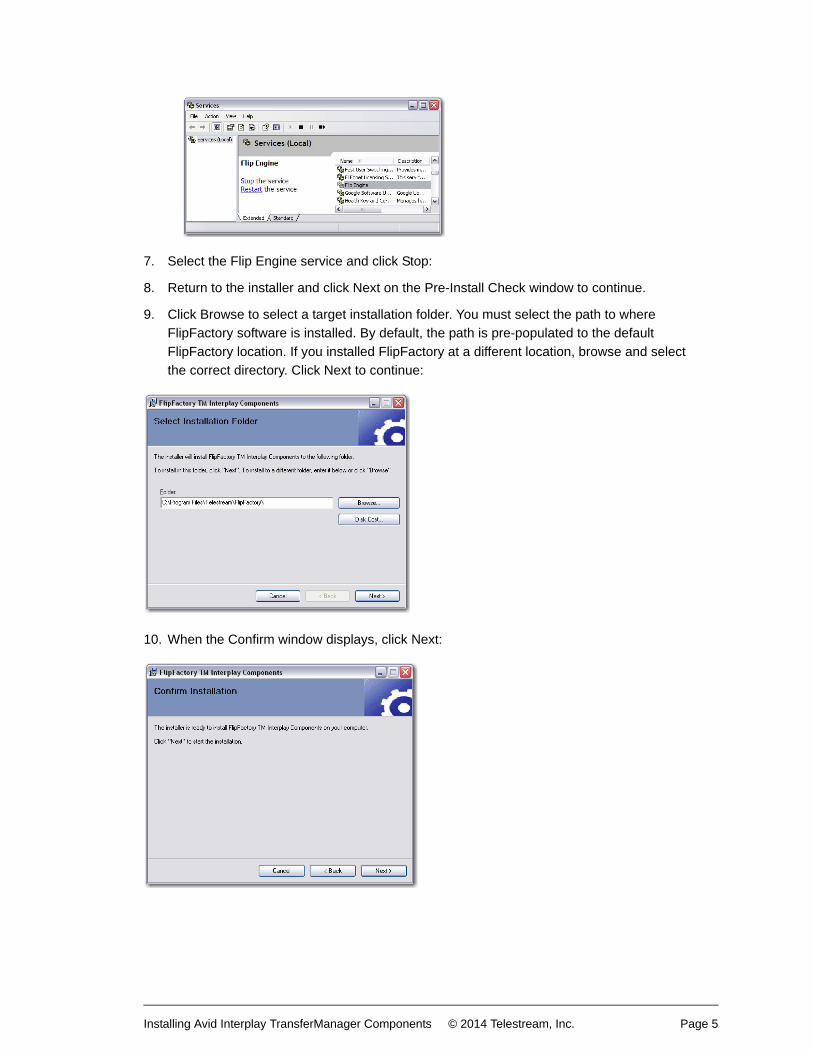
7. Select the Flip Engine service and click Stop:
8. Return to the installer and click Next on the Pre-Install Check window to continue.
9. Click Browse to select a target installation folder. You must select the path to where
FlipFactory software is installed. By default, the path is pre-populated to the default
FlipFactory location. If you installed FlipFactory at a different location, browse and select
the correct directory. Click Next to continue:
10. When the Confirm window displays, click Next:
Installing Avid Interplay TransferManager Components © 2014 Telestream, Inc. Page 5
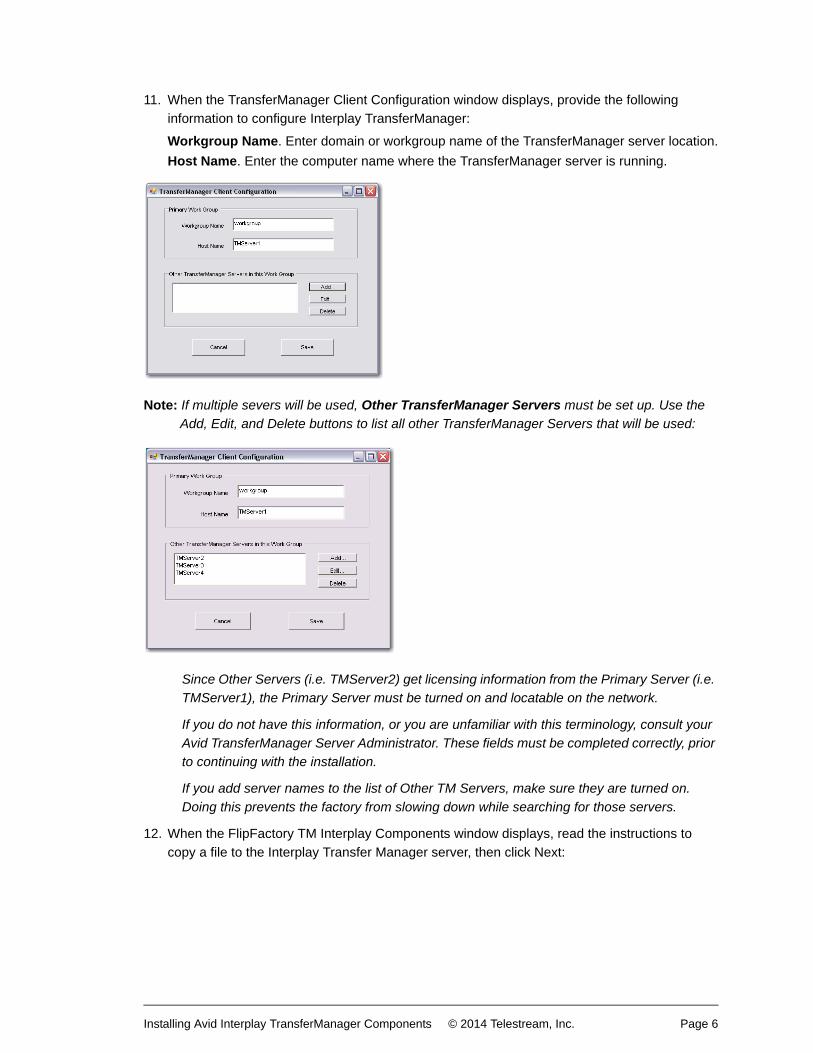
11. When the TransferManager Client Configuration window displays, provide the following
information to configure Interplay TransferManager:
Workgroup Name. Enter domain or workgroup name of the TransferManager server location.
Host Name. Enter the computer name where the TransferManager server is running.
Note: If multiple severs will be used, Other TransferManager Servers must be set up. Use the
Add, Edit, and Delete buttons to list all other TransferManager Servers that will be used:
Since Other Servers (i.e. TMServer2) get licensing information from the Primary Server (i.e.
TMServer1), the Primary Server must be turned on and locatable on the network.
If you do not have this information, or you are unfamiliar with this terminology, consult your
Avid TransferManager Server Administrator. These fields must be completed correctly, prior
to continuing with the installation.
If you add server names to the list of Other TM Servers, make sure they are turned on.
Doing this prevents the factory from slowing down while searching for those servers.
12. When the FlipFactory TM Interplay Components window displays, read the instructions to
copy a file to the Interplay Transfer Manager server, then click Next:
Installing Avid Interplay TransferManager Components © 2014 Telestream, Inc. Page 6
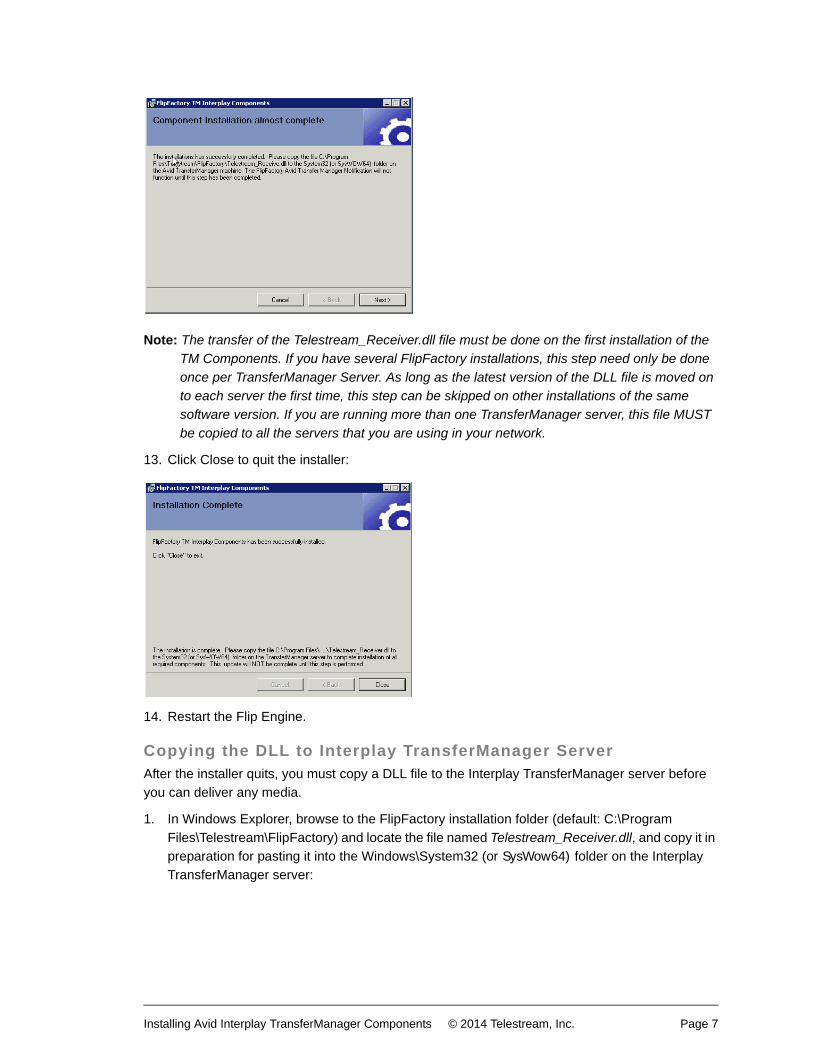
Note: The transfer of the Telestream_Receiver.dll file must be done on the first installation of the
TM Components. If you have several FlipFactory installations, this step need only be done
once per TransferManager Server. As long as the latest version of the DLL file is moved on
to each server the first time, this step can be skipped on other installations of the same
software version. If you are running more than one TransferManager server, this file MUST
be copied to all the servers that you are using in your network.
13. Click Close to quit the installer:
14. Restart the Flip Engine.
Copying the DLL to Interplay TransferManager ServerAfter the installer quits, you must copy a DLL file to the Interplay TransferManager server before
you can deliver any media.
1. In Windows Explorer, browse to the FlipFactory installation folder (default: C:\Program
Files\Telestream\FlipFactory) and locate the file named Telestream_Receiver.dll, and copy it in
preparation for pasting it into the Windows\System32 (or SysWow64) folder on the Interplay
TransferManager server:
Installing Avid Interplay TransferManager Components © 2014 Telestream, Inc. Page 7
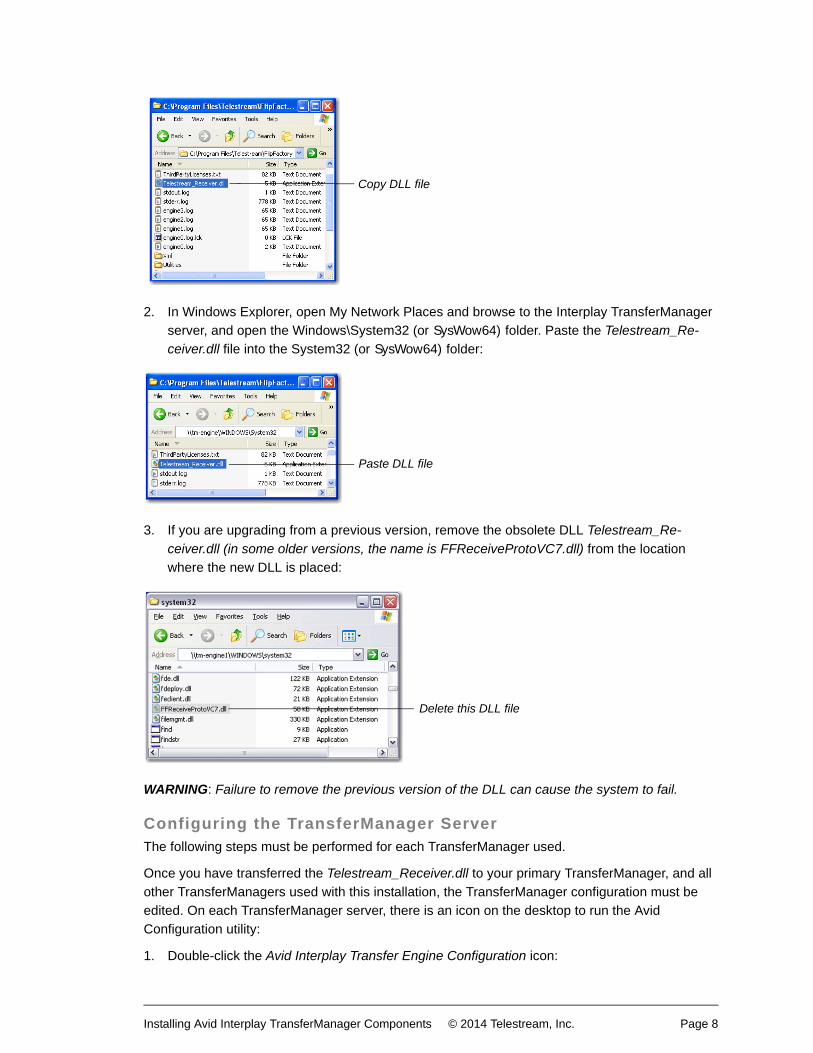
2. In Windows Explorer, open My Network Places and browse to the Interplay TransferManager
server, and open the Windows\System32 (or SysWow64) folder. Paste the Telestream_Re-
ceiver.dll file into the System32 (or SysWow64) folder:
3. If you are upgrading from a previous version, remove the obsolete DLL Telestream_Re-
ceiver.dll (in some older versions, the name is FFReceiveProtoVC7.dll) from the location
where the new DLL is placed:
WARNING: Failure to remove the previous version of the DLL can cause the system to fail.
Configuring the TransferManager ServerThe following steps must be performed for each TransferManager used.
Once you have transferred the Telestream_Receiver.dll to your primary TransferManager, and all
other TransferManagers used with this installation, the TransferManager configuration must be
edited. On each TransferManager server, there is an icon on the desktop to run the Avid
Configuration utility:
1. Double-click the Avid Interplay Transfer Engine Configuration icon:
Copy DLL file
Paste DLL file
Delete this DLL file
Installing Avid Interplay TransferManager Components © 2014 Telestream, Inc. Page 8
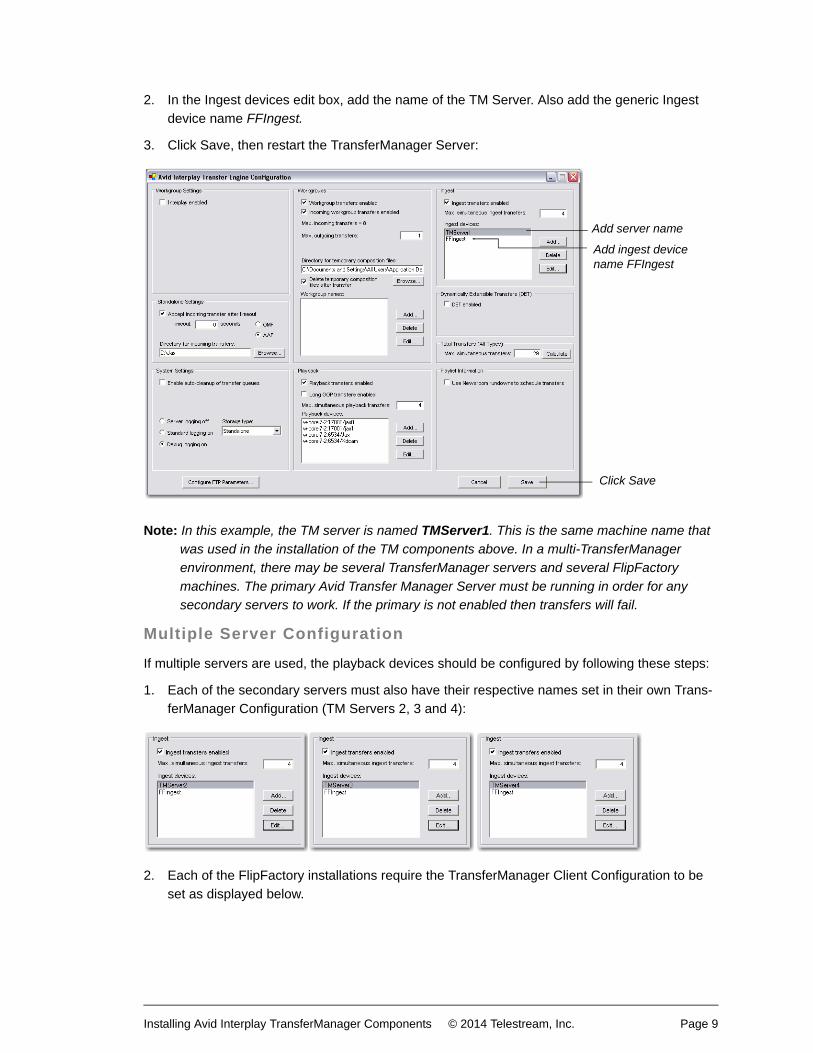
2. In the Ingest devices edit box, add the name of the TM Server. Also add the generic Ingest
device name FFIngest.
3. Click Save, then restart the TransferManager Server:
Note: In this example, the TM server is named TMServer1. This is the same machine name that
was used in the installation of the TM components above. In a multi-TransferManager
environment, there may be several TransferManager servers and several FlipFactory
machines. The primary Avid Transfer Manager Server must be running in order for any
secondary servers to work. If the primary is not enabled then transfers will fail.
Multiple Server Configuration
If multiple servers are used, the playback devices should be configured by following these steps:
1. Each of the secondary servers must also have their respective names set in their own Trans-
ferManager Configuration (TM Servers 2, 3 and 4):
2. Each of the FlipFactory installations require the TransferManager Client Configuration to be
set as displayed below.
Add server name
Add ingest device name FFIngest
Click Save
Installing Avid Interplay TransferManager Components © 2014 Telestream, Inc. Page 9
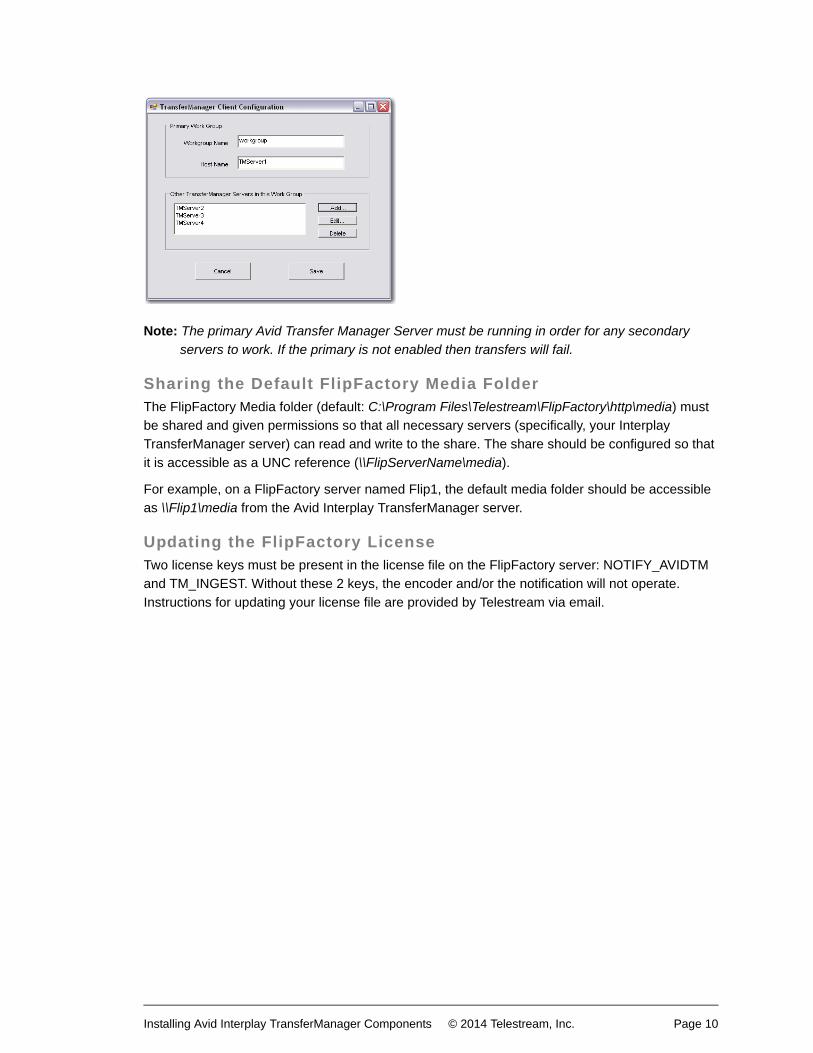
Note: The primary Avid Transfer Manager Server must be running in order for any secondary
servers to work. If the primary is not enabled then transfers will fail.
Sharing the Default FlipFactory Media FolderThe FlipFactory Media folder (default: C:\Program Files\Telestream\FlipFactory\http\media) must
be shared and given permissions so that all necessary servers (specifically, your Interplay
TransferManager server) can read and write to the share. The share should be configured so that
it is accessible as a UNC reference (\\FlipServerName\media).
For example, on a FlipFactory server named Flip1, the default media folder should be accessible
as \\Flip1\media from the Avid Interplay TransferManager server.
Updating the FlipFactory LicenseTwo license keys must be present in the license file on the FlipFactory server: NOTIFY_AVIDTM
and TM_INGEST. Without these 2 keys, the encoder and/or the notification will not operate.
Instructions for updating your license file are provided by Telestream via email.
Installing Avid Interplay TransferManager Components © 2014 Telestream, Inc. Page 10
Using Avid Interplay TransferManager ComponentsTo use the Interplay TransferManager Notify, you should create a factory in FlipFactory that:
• Transcodes media into the appropriate format
• Enables Interplay TransferManager Notify (which must be configured appropriately for your
workflow).
Note: This document assumes that you know how to create factories: enable and configure
monitors, products (encoders), and notifications. If you need help, consult the FlipFactory
User’s Guide.
The following topic describes generally how to create a factory that transcodes media destined for
an Avid system using Interplay TransferManager Notify, which you can use as an example.
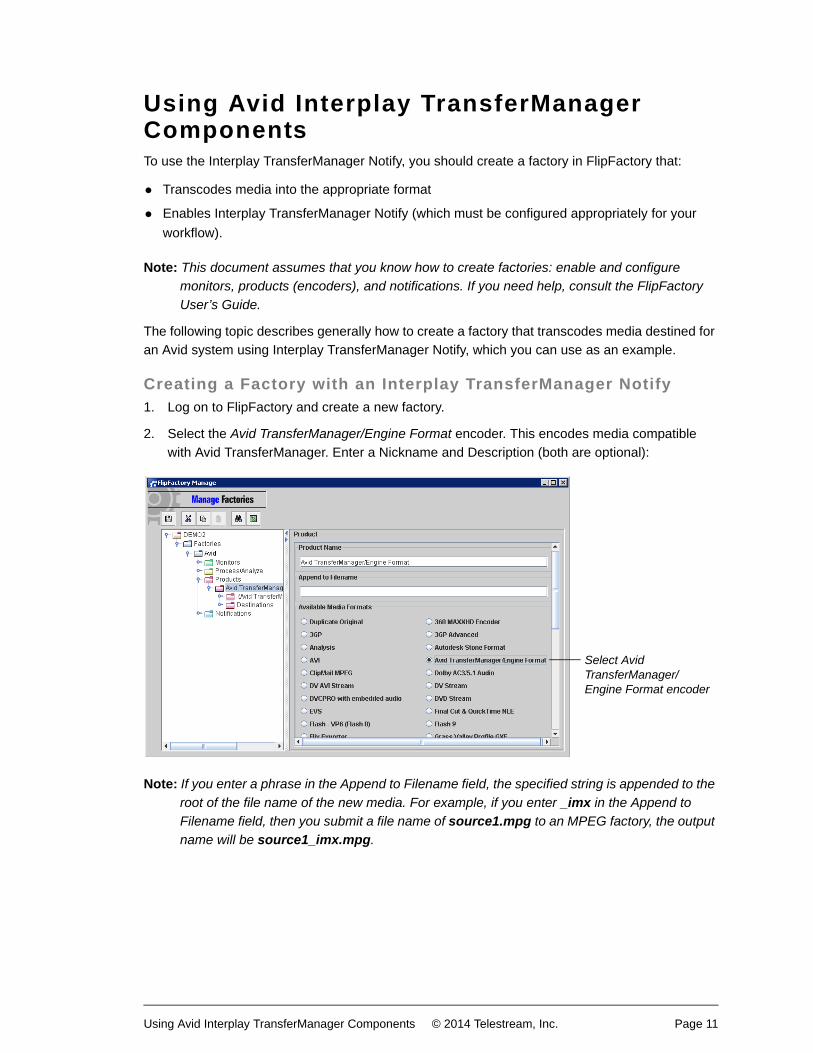
Creating a Factory with an Interplay TransferManager Notify1. Log on to FlipFactory and create a new factory.
2. Select the Avid TransferManager/Engine Format encoder. This encodes media compatible
with Avid TransferManager. Enter a Nickname and Description (both are optional):
Note: If you enter a phrase in the Append to Filename field, the specified string is appended to the
root of the file name of the new media. For example, if you enter _imx in the Append to
Filename field, then you submit a file name of source1.mpg to an MPEG factory, the output
name will be source1_imx.mpg.
Select Avid TransferManager/Engine Format encoder
Using Avid Interplay TransferManager Components © 2014 Telestream, Inc. Page 11
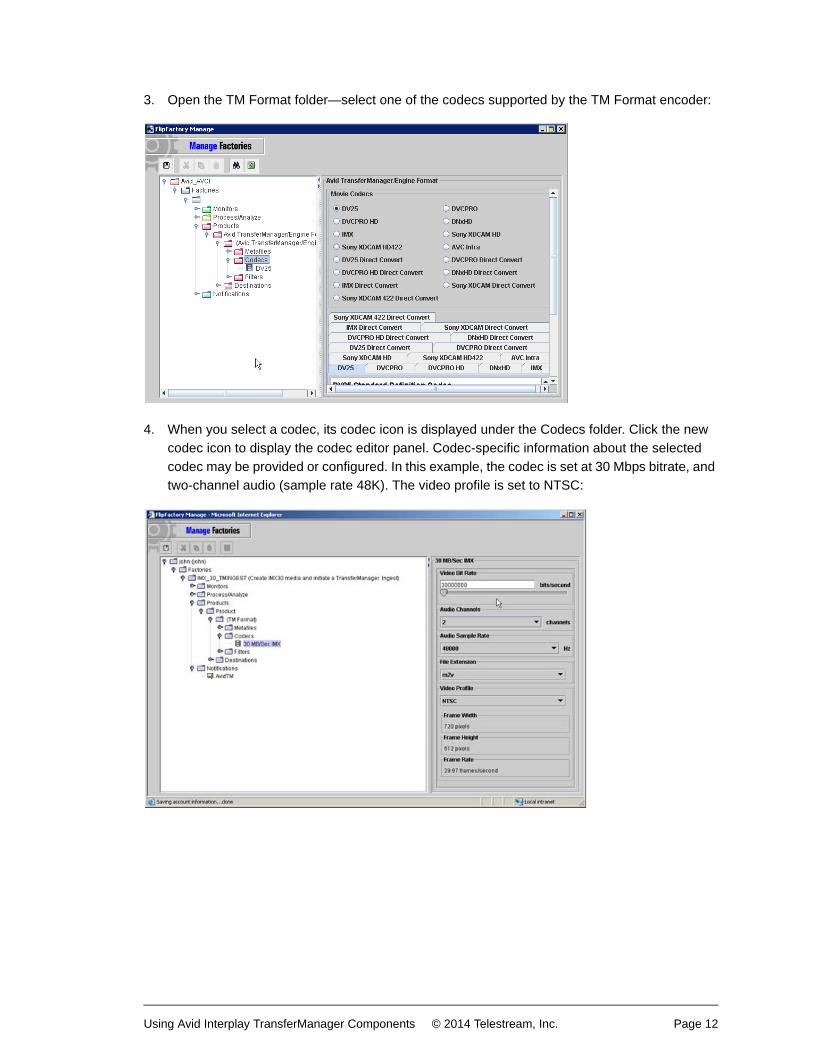
3. Open the TM Format folder—select one of the codecs supported by the TM Format encoder:
4. When you select a codec, its codec icon is displayed under the Codecs folder. Click the new
codec icon to display the codec editor panel. Codec-specific information about the selected
codec may be provided or configured. In this example, the codec is set at 30 Mbps bitrate, and
two-channel audio (sample rate 48K). The video profile is set to NTSC:
Using Avid Interplay TransferManager Components © 2014 Telestream, Inc. Page 12
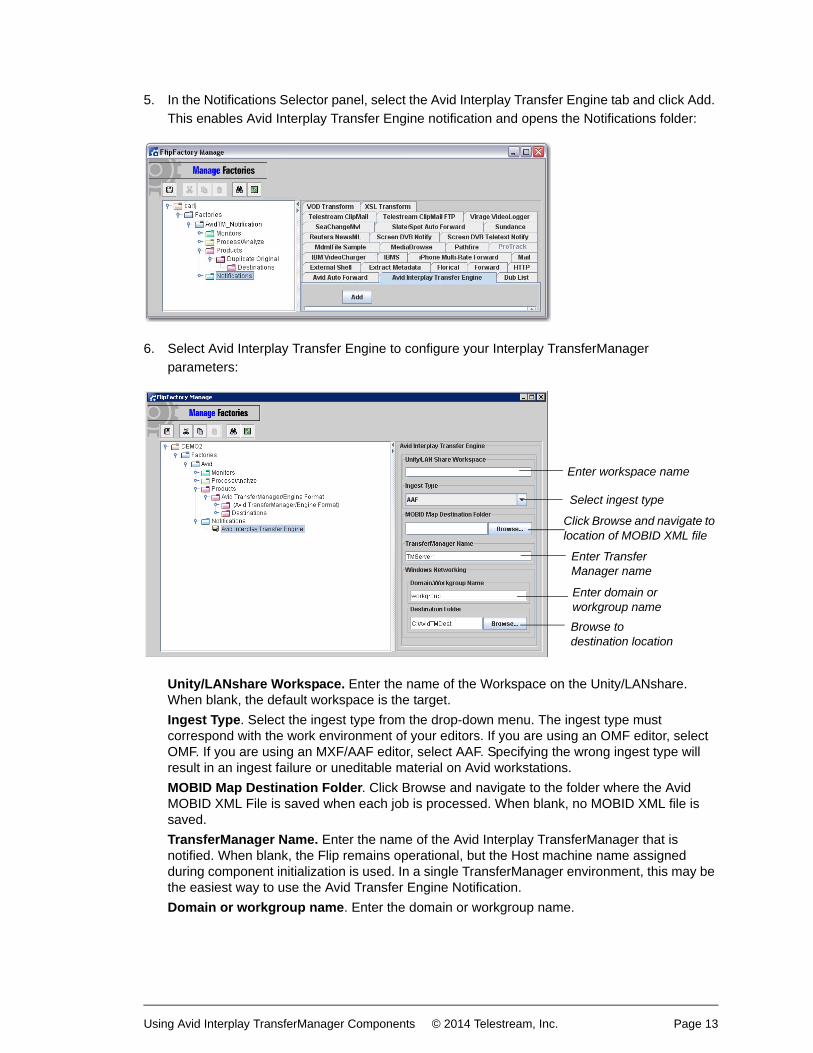
5. In the Notifications Selector panel, select the Avid Interplay Transfer Engine tab and click Add.
This enables Avid Interplay Transfer Engine notification and opens the Notifications folder:
6. Select Avid Interplay Transfer Engine to configure your Interplay TransferManager
parameters:
Unity/LANshare Workspace. Enter the name of the Workspace on the Unity/LANshare. When blank, the default workspace is the target.
Ingest Type. Select the ingest type from the drop-down menu. The ingest type must correspond with the work environment of your editors. If you are using an OMF editor, select OMF. If you are using an MXF/AAF editor, select AAF. Specifying the wrong ingest type will result in an ingest failure or uneditable material on Avid workstations.
MOBID Map Destination Folder. Click Browse and navigate to the folder where the Avid MOBID XML File is saved when each job is processed. When blank, no MOBID XML file is saved.
TransferManager Name. Enter the name of the Avid Interplay TransferManager that is notified. When blank, the Flip remains operational, but the Host machine name assigned during component initialization is used. In a single TransferManager environment, this may be the easiest way to use the Avid Transfer Engine Notification.
Domain or workgroup name. Enter the domain or workgroup name.
Enter workspace name
Select ingest type
Click Browse and navigate to location of MOBID XML file
Enter Transfer Manager name
Enter domain or workgroup name
Browse to destination location
Using Avid Interplay TransferManager Components © 2014 Telestream, Inc. Page 13
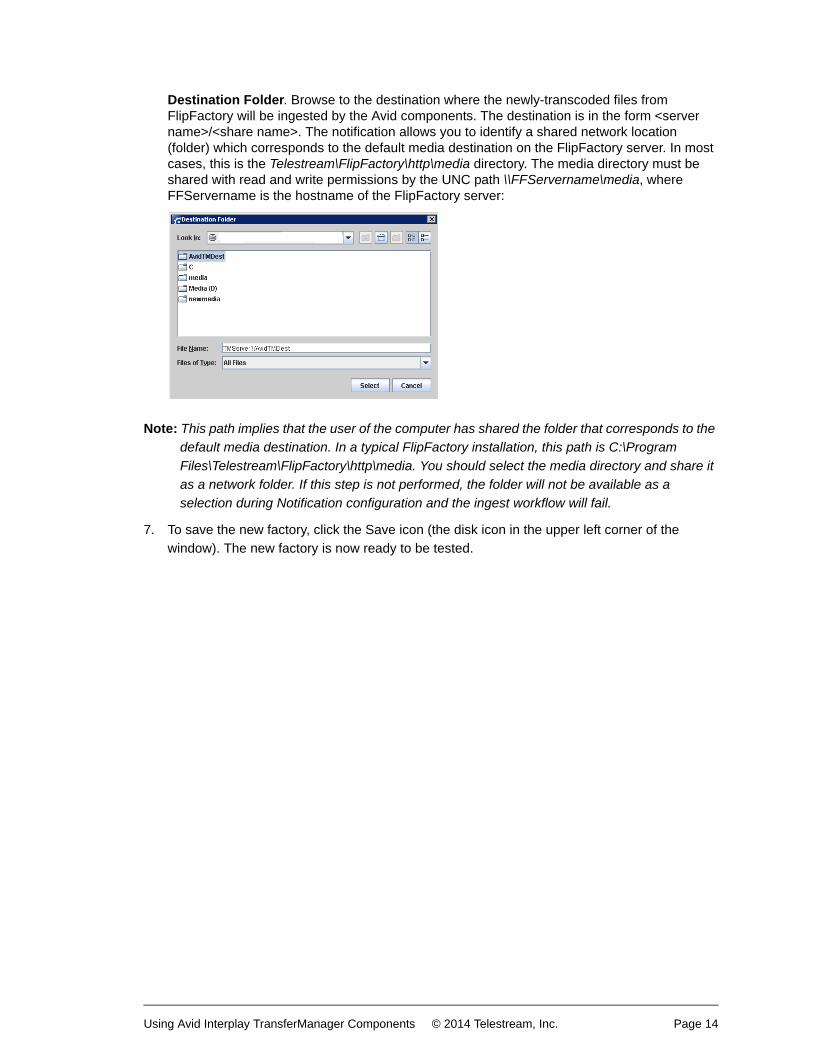
Destination Folder. Browse to the destination where the newly-transcoded files from FlipFactory will be ingested by the Avid components. The destination is in the form <server name>/<share name>. The notification allows you to identify a shared network location (folder) which corresponds to the default media destination on the FlipFactory server. In most cases, this is the Telestream\FlipFactory\http\media directory. The media directory must be shared with read and write permissions by the UNC path \\FFServername\media, where FFServername is the hostname of the FlipFactory server:
Note: This path implies that the user of the computer has shared the folder that corresponds to the
default media destination. In a typical FlipFactory installation, this path is C:\Program
Files\Telestream\FlipFactory\http\media. You should select the media directory and share it
as a network folder. If this step is not performed, the folder will not be available as a
selection during Notification configuration and the ingest workflow will fail.
7. To save the new factory, click the Save icon (the disk icon in the upper left corner of the
window). The new factory is now ready to be tested.
Using Avid Interplay TransferManager Components © 2014 Telestream, Inc. Page 14
Copyright and Trademark Notice©2014Telestream, Inc. All rights reserved. No part of this publication may be reproduced,
transmitted, transcribed, altered, or translated into any languages without written permission of
Telestream, Inc. Information and specifications in this document are subject to change without
notice and do not represent a commitment on the part of Telestream.
Telestream, Vantage, Flip4Mac, FlipFactory, Episode, ScreenFlow, Wirecast, GraphicsFactory,
MetaFlip, MotionResolve, and Split-and-Stitch are registered trademarks and Vantage, Pipeline,
Launch, and Videocue are trademarks of Telestream, Inc. All other trademarks are the property of
their respective owners.
Copyright and Trademark Notice © 2014 Telestream, Inc. Page 15