Embed Size (px)
Citation preview
Using ADAMS/Insight with ADAMS/Car
About This Guide 3
Introducing the Tutorial 5
Creating and Running an Experiment 15
Working with Results 29

Using ADAMS/Insight with ADAMS/Car
Copyright2
U.S. Government Restricted Rights: If the Software and Documentation are provided in connection with a government
contract, then they are provided with RESTRICTED RIGHTS. Use, duplication or disclosure is subject to restrictions
stated in paragraph (c)(1)(ii) of the Rights in Technical Data and Computer Software clause at 252.227-7013.
Mechanical Dynamics, Incorporated, 2301 Commonwealth Blvd., Ann Arbor, Michigan 48105.
The information in this document is furnished for informational use only, may be revised from time to time, and
should not be construed as a commitment by Mechanical Dynamics, Incorporated. Mechanical Dynamics,
Incorporated, assumes no responsibility or liability for any errors or inaccuracies that may appear in this document.
This document contains proprietary and copyrighted information. Mechanical Dynamics, Incorporated permits
licensees of ADAMS® software products to print out or copy this document or portions thereof solely for internal use
in connection with the licensed software. No part of this document may be copied for any other purpose or distributed
or translated into any other language without the prior written permission of Mechanical Dynamics, Incorporated.
©2000 by Mechanical Dynamics, Incorporated. All rights reserved. Printed in the United States of America.
ADAMS ® is a registered United States trademark of Mechanical Dynamics, Incorporated.
All other product names are trademarks of their respective companies.
Part number: 110INSTCR-01

Using ADAMS/Insight with ADAMS/Car
About This Guide3
About This Guide
Welcome to the Using ADAMS/Insight with ADAMS/Car TutorialThis tutorial guides you through the process of designing an ADAMS/CarTM experiment and evaluating the results using ADAMS/InsightTM.
What Is ADAMS/Insight?ADAMS/Insight is a stand-alone product that also works with ADAMS/ViewTM, ADAMS/EngineTM, ADAMS/CarTM, and ADAMS/PreTM. ADAMS/Insight lets you design sophisticated experiments for measuring the performance of your mechanical system model. It also provides a collection of statistical tools for analyzing the results of your experiments so that you can better understand how to refine and improve your model.
What You Need to KnowThis guide assumes you know how to use ADAMS/Car. We also assume that you are familiar with parametric modeling capabilities including creating, modifying, and using points and design variables. In addition, you should know how to specify design objectives. For information on ADAMS/Car or other MDI products, see the Road Map to ADAMS Documentation that comes with your online documentation set.
This guide also assumes that you have a moderate level of knowledge about experimental design or Design of Experiments (DOE) and that you have access to in-depth references on them.

Using ADAMS/Insight with ADAMS/Car
About This Guide4
1
Introducing the TutorialOverviewThis chapter introduces you to the tutorial and gets you started. The tutorial guides you through the process of using ADAMS/Insight with ADAMS/Car to investigate transient dynamic response of a vehicle front suspension model.
The sections in this tutorial are:
■ About the Tutorial, 6
■ Starting ADAMS/Car, 7
■ Creating the Model, 8
■ ADAMS/Insight Interface, 13
Using ADAMS/Insight with ADAMS/Car
Introducing the Tutorial6
About the TutorialIn this tutorial, you design an experiment and analyze results for a front suspension assembly. You’ll run the assembly through a number of simulations that you set up in an experiment; fit your data to a polynomial to determine which factors most affect performance of the assembly; and publish results to an HTML page that you can view with a Web browser.
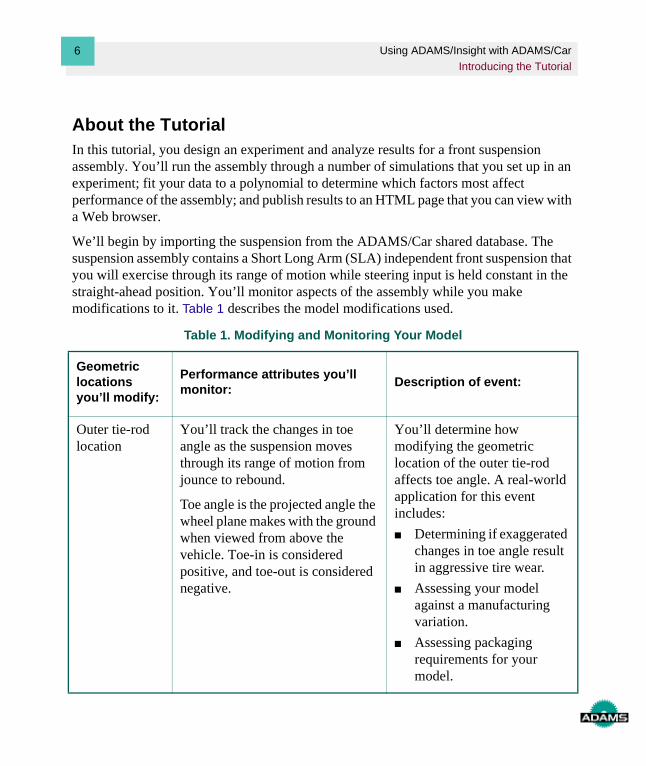
We’ll begin by importing the suspension from the ADAMS/Car shared database. The suspension assembly contains a Short Long Arm (SLA) independent front suspension that you will exercise through its range of motion while steering input is held constant in the straight-ahead position. You’ll monitor aspects of the assembly while you make modifications to it. Table 1 describes the model modifications used.
Table 1. Modifying and Monitoring Your Model
Geometric locations you’ll modify:
Performance attributes you’ll monitor:
Description of event:
Outer tie-rod location
You’ll track the changes in toe angle as the suspension moves through its range of motion from jounce to rebound.
Toe angle is the projected angle the wheel plane makes with the ground when viewed from above the vehicle. Toe-in is considered positive, and toe-out is considered negative.
You’ll determine how modifying the geometric location of the outer tie-rod affects toe angle. A real-world application for this event includes:
■ Determining if exaggerated changes in toe angle result in aggressive tire wear.
■ Assessing your model against a manufacturing variation.
■ Assessing packaging requirements for your model.
Using ADAMS/Insight with ADAMS/Car
Introducing the Tutorial7
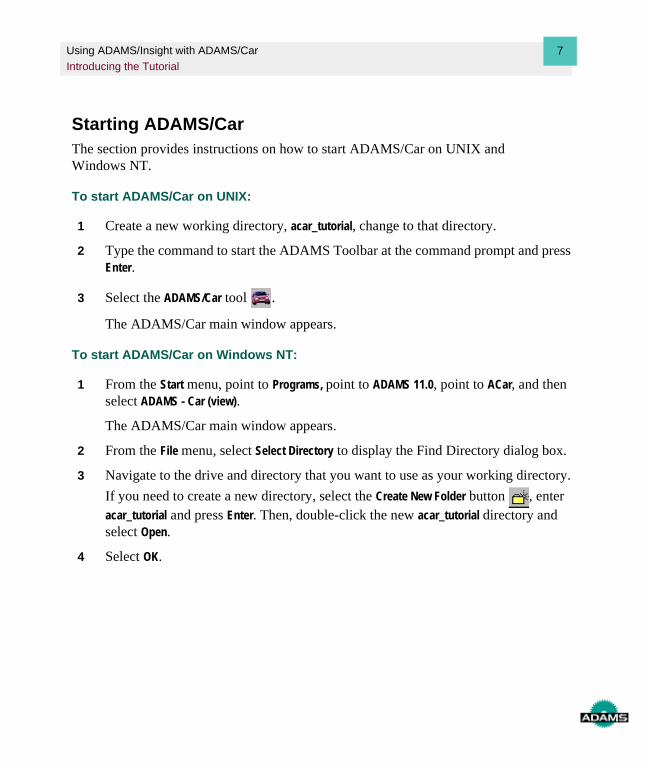
Starting ADAMS/CarThe section provides instructions on how to start ADAMS/Car on UNIX and Windows NT.
To start ADAMS/Car on UNIX:
1 Create a new working directory, acar_tutorial, change to that directory.
2 Type the command to start the ADAMS Toolbar at the command prompt and press Enter.
3 Select the ADAMS/Car tool .
The ADAMS/Car main window appears.
To start ADAMS/Car on Windows NT:
1 From the Start menu, point to Programs, point to ADAMS 11.0, point to ACar, and then select ADAMS - Car (view).
The ADAMS/Car main window appears.
2 From the File menu, select Select Directory to display the Find Directory dialog box.
3 Navigate to the drive and directory that you want to use as your working directory.
If you need to create a new directory, select the Create New Folder button , enter acar_tutorial and press Enter. Then, double-click the new acar_tutorial directory and select Open.
4 Select OK.
Using ADAMS/Insight with ADAMS/Car
Introducing the Tutorial8
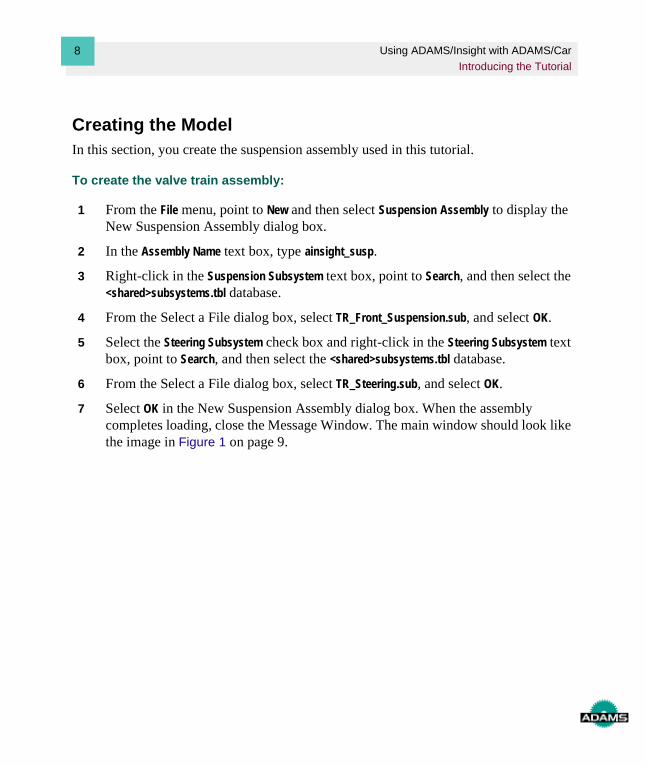
Creating the ModelIn this section, you create the suspension assembly used in this tutorial.
To create the valve train assembly:
1 From the File menu, point to New and then select Suspension Assembly to display the New Suspension Assembly dialog box.
2 In the Assembly Name text box, type ainsight_susp.
3 Right-click in the Suspension Subsystem text box, point to Search, and then select the <shared>subsystems.tbl database.
4 From the Select a File dialog box, select TR_Front_Suspension.sub, and select OK.
5 Select the Steering Subsystem check box and right-click in the Steering Subsystem text box, point to Search, and then select the <shared>subsystems.tbl database.
6 From the Select a File dialog box, select TR_Steering.sub, and select OK.
7 Select OK in the New Suspension Assembly dialog box. When the assembly completes loading, close the Message Window. The main window should look like the image in Figure 1 on page 9.

Using ADAMS/Insight with ADAMS/Car
Introducing the Tutorial9
Figure 1. Suspension Assembly
Using ADAMS/Insight with ADAMS/Car
Introducing the Tutorial10
Running a Simulation
Before you create your experiment, you’ll simulate the suspension model in ADAMS/Car to run a baseline parallel travel analysis. There are three important reasons to run a simulation before beginning your DOE analysis. They are:
■ Running a simulation sets up the assembly for the type of analysis you will perform in ADAMS/Insight. This is important because the topology of the assembly can change slightly depending on the type of analysis performed.
■ Running the simulation creates a simulation script that you use in the ADAMS/Insight experiment.
■ You need to determine whether or not you can analyze the assembly in its current configuration.
To simulate the model:
1 From the Simulate menu, point to Suspension Analysis and then select the Parallel Wheel Travel. This displays the Suspension Analysis: Parallel Travel dialog box.
2 The Suspension Assembly text box should say ainsight_susp. In the Output Prefix text box, enter baseline.
3 In the Number of Steps text box, enter 30.
4 In the Mode of Simulation option menu, select Interactive.
5 In the Bump Travel text box, enter 50.
6 In the Rebound Travel text box, enter -50.
7 Select OK to close the dialog box and begin the analysis. When the analysis has completed, close the Message Window.
Using ADAMS/Insight with ADAMS/Car
Introducing the Tutorial11
Creating a Design Objective in ADAMS/Car
In this section, you’ll create a design objective that will be used as a response within ADAMS/Insight. For more information about objective objects that you are using in this section, see Using Objective Objects in the guide, Refining Model Designs in ADAMS/View.
To create a design objective based on a request component:
1 From the main menu in ADAMS/Car, point to Simulate, point to DOE Interface, point to Design Objective, and then select New to display the Create Design Objective dialog box.
2 Modify the Name text box to: .ainsight_susp.toe_angle_objective.
3 Use the Definition by drop-down to select Existing Result Set Component (Request).
4 Right-click in the Result Set Comp text box, select Result_Set_Component, and then select Browse to display the Database Navigator. In the Database Navigator, expand toe_angle, select left, then and select OK.
Note: ADAMS/Car places the full object hierarchy as part of the name in the Result Set Comp. text box.
5 Use the Design Objectives value is the option menu to select maximum absolute value during simulation.
We are interested in the maximum value of the toe because this is the value that we want to minimize as a result of our experiments.
6 Select OK.
Using ADAMS/Insight with ADAMS/Car
Introducing the Tutorial12
Starting ADAMS/Insight
In this section, you’ll open ADAMS/Insight from ADAMS/Car and begin creating an experiment to measure the performance of a suspension model.
To start ADAMS/Insight from ADAMS/Car:
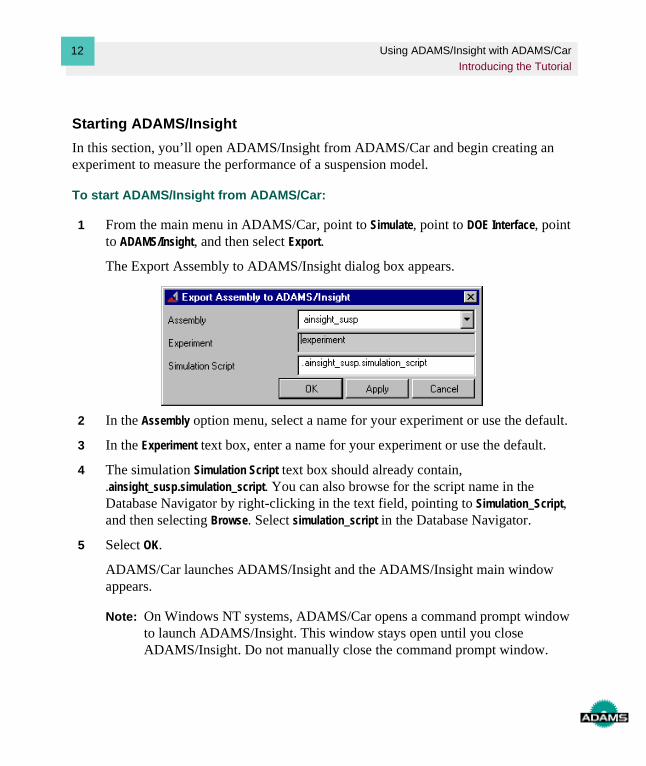
1 From the main menu in ADAMS/Car, point to Simulate, point to DOE Interface, point to ADAMS/Insight, and then select Export.
The Export Assembly to ADAMS/Insight dialog box appears.
2 In the Assembly option menu, select a name for your experiment or use the default.
3 In the Experiment text box, enter a name for your experiment or use the default.
4 The simulation Simulation Script text box should already contain, .ainsight_susp.simulation_script. You can also browse for the script name in the Database Navigator by right-clicking in the text field, pointing to Simulation_Script, and then selecting Browse. Select simulation_script in the Database Navigator.
5 Select OK.
ADAMS/Car launches ADAMS/Insight and the ADAMS/Insight main window appears.
Note: On Windows NT systems, ADAMS/Car opens a command prompt window to launch ADAMS/Insight. This window stays open until you close ADAMS/Insight. Do not manually close the command prompt window.
Using ADAMS/Insight with ADAMS/Car
Introducing the Tutorial13
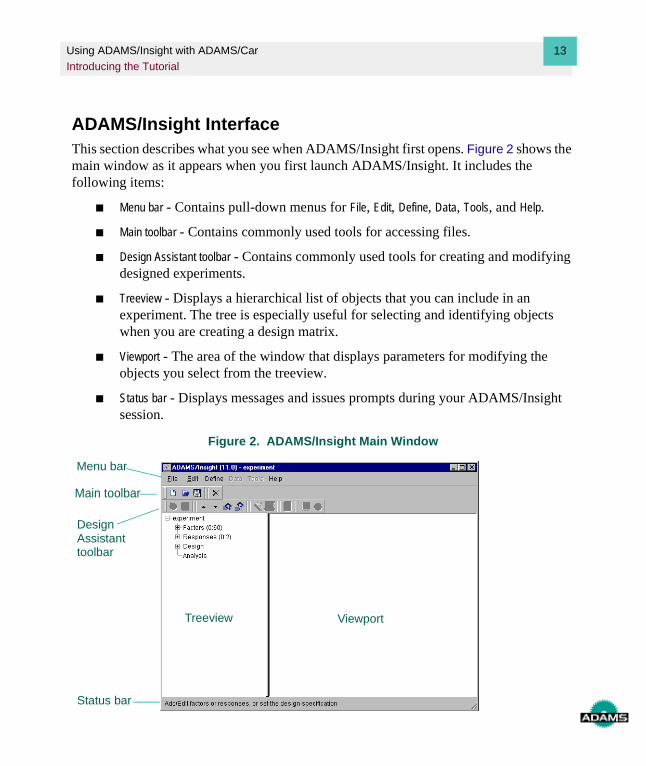
ADAMS/Insight InterfaceThis section describes what you see when ADAMS/Insight first opens. Figure 2 shows the main window as it appears when you first launch ADAMS/Insight. It includes the following items:
■ Menu bar - Contains pull-down menus for File, Edit, Define, Data, Tools, and Help.
■ Main toolbar - Contains commonly used tools for accessing files.
■ Design Assistant toolbar - Contains commonly used tools for creating and modifying designed experiments.
■ Treeview - Displays a hierarchical list of objects that you can include in an experiment. The tree is especially useful for selecting and identifying objects when you are creating a design matrix.
■ Viewport - The area of the window that displays parameters for modifying the objects you select from the treeview.
■ Status bar - Displays messages and issues prompts during your ADAMS/Insight session.
Figure 2. ADAMS/Insight Main Window
Menu bar
Main toolbar
DesignAssistanttoolbar
ViewportTreeview
Status bar
Using ADAMS/Insight with ADAMS/Car
Introducing the Tutorial14
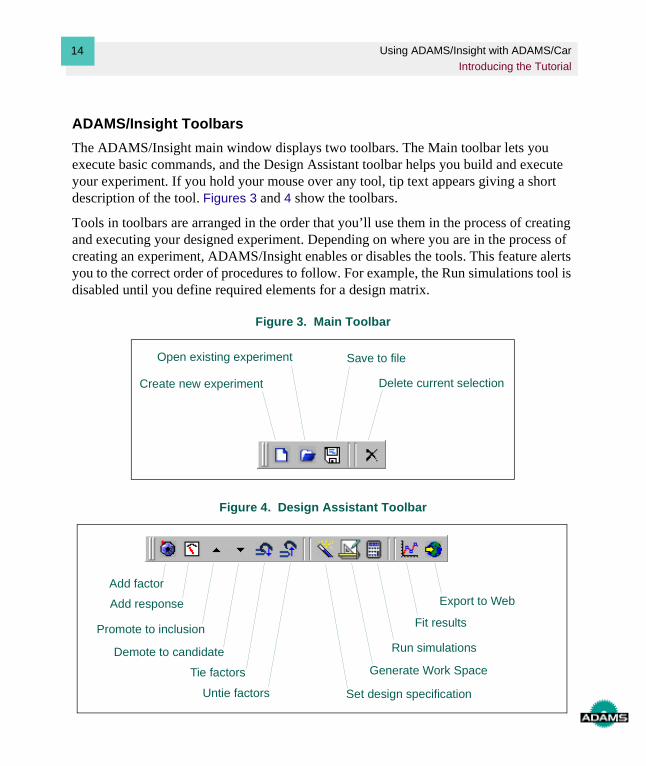
ADAMS/Insight Toolbars
The ADAMS/Insight main window displays two toolbars. The Main toolbar lets you execute basic commands, and the Design Assistant toolbar helps you build and execute your experiment. If you hold your mouse over any tool, tip text appears giving a short description of the tool. Figures 3 and 4 show the toolbars.
Tools in toolbars are arranged in the order that you’ll use them in the process of creating and executing your designed experiment. Depending on where you are in the process of creating an experiment, ADAMS/Insight enables or disables the tools. This feature alerts you to the correct order of procedures to follow. For example, the Run simulations tool is disabled until you define required elements for a design matrix.
Figure 3. Main Toolbar
Figure 4. Design Assistant Toolbar
Create new experiment
Open existing experiment Save to file
Delete current selection
Add factor
Add response
Promote to inclusion
Demote to candidate
Tie factors
Untie factors
Export to Web
Run simulations
Generate Work Space
Set design specification
Fit results
2
Creating and Running an ExperimentOverviewIn this chapter, you’ll create a design matrix and run a model through a number of simulations that you set up in the experiment.
The sections in this tutorial are:
■ Creating a Design Matrix, 16
■ Running Your Experiment, 28
Using ADAMS/Insight with ADAMS/Car
Creating and Running an Experiment16
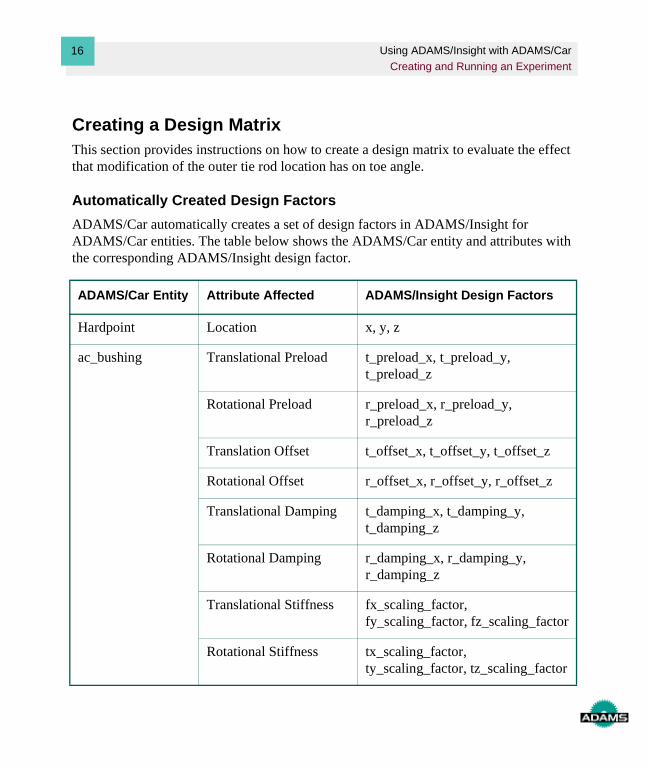
Creating a Design MatrixThis section provides instructions on how to create a design matrix to evaluate the effect that modification of the outer tie rod location has on toe angle.
Automatically Created Design Factors
ADAMS/Car automatically creates a set of design factors in ADAMS/Insight for ADAMS/Car entities. The table below shows the ADAMS/Car entity and attributes with the corresponding ADAMS/Insight design factor.
ADAMS/Car Entity Attribute Affected ADAMS/Insight Design Factors
Hardpoint Location x, y, z
ac_bushing Translational Preload t_preload_x, t_preload_y, t_preload_z
Rotational Preload r_preload_x, r_preload_y, r_preload_z
Translation Offset t_offset_x, t_offset_y, t_offset_z
Rotational Offset r_offset_x, r_offset_y, r_offset_z
Translational Damping t_damping_x, t_damping_y, t_damping_z
Rotational Damping r_damping_x, r_damping_y, r_damping_z
Translational Stiffness fx_scaling_factor, fy_scaling_factor, fz_scaling_factor
Rotational Stiffness tx_scaling_factor, ty_scaling_factor, tz_scaling_factor

Using ADAMS/Insight with ADAMS/Car
Creating and Running an Experiment17
Promoting Candidates
The first step required to creating your designed experiment is to select the factors that you want to include in your design matrix. You select factors from the Candidates list in the treeview, and then promote them to the Inclusions list. Promoting candidates to inclusions causes them to become part of your design matrix.
To promote factors from candidates to inclusions:
1 In the treeview, click the + in front of Factors. Factors expands to reveal Inclusions and Candidates.
2 Continue by expanding Candidates, ainsight_susp, TR_Front_Suspension, ground, and hpl_tierod_outer. Under hpl_tierod_outer, you’ll see a list of design variables that you can include in your design matrix.
ac_linear_bushing Translational Damping t_damping_x, t_damping_y, t_damping_z
Rotational Damping r_damping_x, r_damping_y, r_damping_z
Translational Stiffness fx_scaling_factor, fy_scaling_factor, fz_scaling_factor
Rotational Stiffness tx_scaling_factor, ty_scaling_factor, tz_scaling_factor
ac_spring Stiffness scale_factor
ac_linear_spring Stiffness stiffness
ac_damper Damping scale_factor
ac_linear_damper Damping damping
ADAMS/Car Entity Attribute Affected ADAMS/Insight Design Factors

Using ADAMS/Insight with ADAMS/Car
Creating and Running an Experiment18
3 Select the candidate, hpl_tierod_outer.x, and then move your cursor to the Design
Assistant toolbar and select the Promote to inclusion tool .
The candidate hpl_tierod_outer.x moves to the Inclusion list under Factors in the treeview.
Tip: To select more than one factor, hold the Ctrl key as you click. To promote the factors directly from the treeview, press the shortcut key F5.
4 Continue promoting the following factors:
■ hpl_tierod_outer.y
■ hpl_tierod_outer.z
The factors move from the Candidates to the Inclusions list.
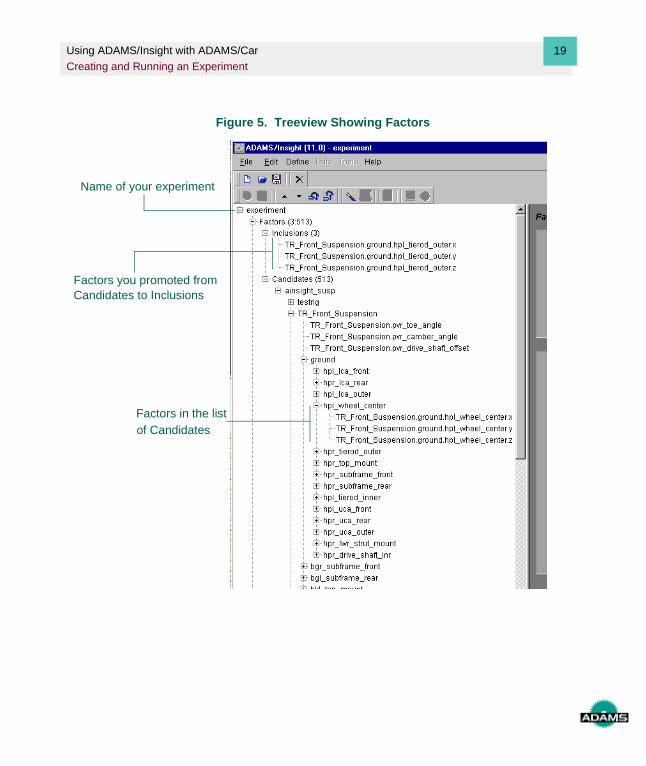
The factors appear in your treeview as shown in Figure 5.
Using ADAMS/Insight with ADAMS/Car
Creating and Running an Experiment19
Figure 5. Treeview Showing Factors
Factors you promoted fromCandidates to Inclusions
Factors in the listof Candidates
Name of your experiment
Using ADAMS/Insight with ADAMS/Car
Creating and Running an Experiment20
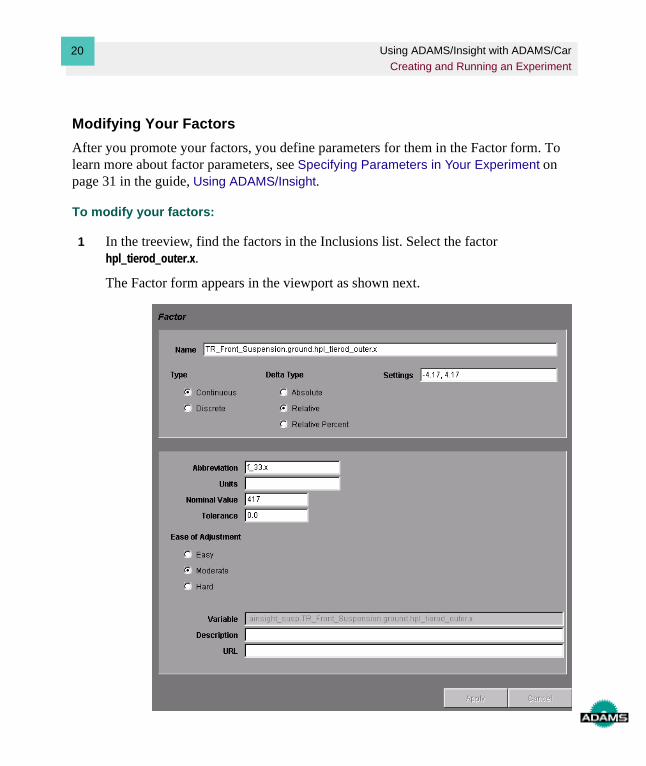
Modifying Your Factors
After you promote your factors, you define parameters for them in the Factor form. To learn more about factor parameters, see Specifying Parameters in Your Experiment on page 31 in the guide, Using ADAMS/Insight.
To modify your factors:
1 In the treeview, find the factors in the Inclusions list. Select the factor hpl_tierod_outer.x.
The Factor form appears in the viewport as shown next.
Using ADAMS/Insight with ADAMS/Car
Creating and Running an Experiment21
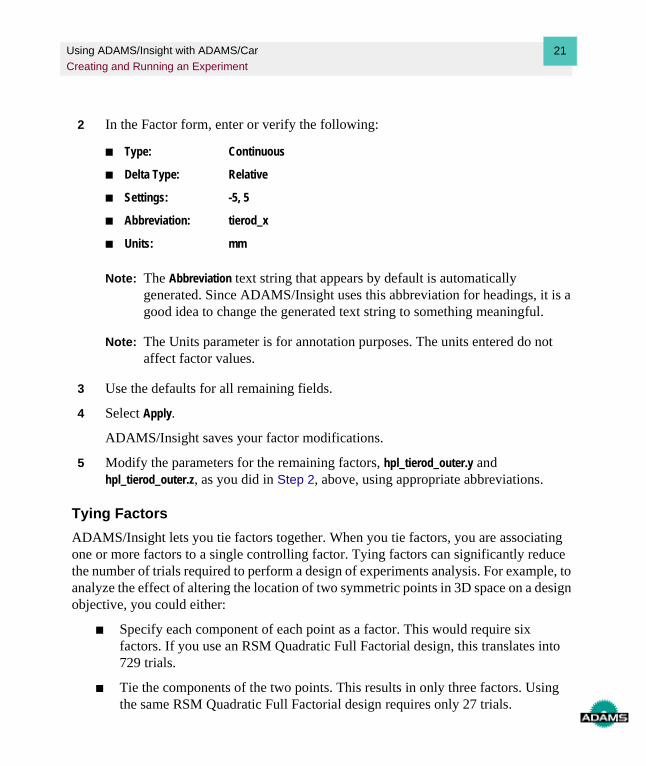
2 In the Factor form, enter or verify the following:
Note: The Abbreviation text string that appears by default is automatically generated. Since ADAMS/Insight uses this abbreviation for headings, it is a good idea to change the generated text string to something meaningful.
Note: The Units parameter is for annotation purposes. The units entered do not affect factor values.
3 Use the defaults for all remaining fields.
4 Select Apply.
ADAMS/Insight saves your factor modifications.
5 Modify the parameters for the remaining factors, hpl_tierod_outer.y and hpl_tierod_outer.z, as you did in Step 2, above, using appropriate abbreviations.
Tying Factors
ADAMS/Insight lets you tie factors together. When you tie factors, you are associating one or more factors to a single controlling factor. Tying factors can significantly reduce the number of trials required to perform a design of experiments analysis. For example, to analyze the effect of altering the location of two symmetric points in 3D space on a design objective, you could either:
■ Specify each component of each point as a factor. This would require six factors. If you use an RSM Quadratic Full Factorial design, this translates into 729 trials.
■ Tie the components of the two points. This results in only three factors. Using the same RSM Quadratic Full Factorial design requires only 27 trials.
■ Type: Continuous
■ Delta Type: Relative
■ Settings: -5, 5
■ Abbreviation: tierod_x
■ Units: mm
Using ADAMS/Insight with ADAMS/Car
Creating and Running an Experiment22
When you tie two factors together, ADAMS/Insight applies the following formula:
current factor value = current tie value * component factor nominal value
where:
■ current factor value is the value the component factor becomes during the current trial
■ current tie value is the value the tie assumes for the current trial
■ component factor nominal value is the value entered in the tie component factor form
Since tied factors may be symmetric, you often want one component to result in a positive value and the other a negative value. To accomplish this, enter the desired value in the tie form and use +1 or -1 as the nominal value for the appropriate component factors. For example, if you enter 300 as the tie nominal value and -1 as the nominal value of one component and +1 as the nominal value of the other component, the result is +300 and -300 when ADAMS/Insight enumerates the two factors.
Although the example in this tutorial doesn’t take advantage of tying factors, many real-life examples use tied factors to reduce the component matrix. Because this is such an important ADAMS/Insight capability, we’ll provide a general look at how you tie two factors in this section.
To tie factors:
1 Select two factors by holding the Ctrl key while you click the factors with your left
mouse button. Then select the Tie factors button . In the Factor Name text box, change the name to something meaningful, and select Apply.
2 Expand the tied factor and select each component factor. Change the Nominal Value text box to 1 or -1 as appropriate, and select Apply.

Using ADAMS/Insight with ADAMS/Car
Creating and Running an Experiment23
Promoting Responses
Now that you have finished promoting and modifying your factors, the next step is to promote your responses for the experiment.
To promote responses from candidates to inclusions:
1 In the treeview, click the + in front of Responses.
The levels nested under Responses expand to reveal Inclusions and Candidates.
Hint: You can click the minus (-) sign in front of Factors to collapse that section of the treeview and save screen space.
2 Continue expanding the levels under Candidates and ainsight_susp. Under ainsight_susp, you’ll see a list of responses that are potential candidates you can include in your design matrix.
3 Select and promote the toe_angle_objective just as you promoted the factors in Step 3 on page 18.
The response moves from the Candidates to the Inclusions list.
Modifying Responses
The modifications you’ll make to the responses are minor. You’ll add units and change one of the parameters. To learn more about response parameters, see Specifying Parameters in Your Experiment on page 31 in the guide, Using ADAMS/Insight.
To modify responses:
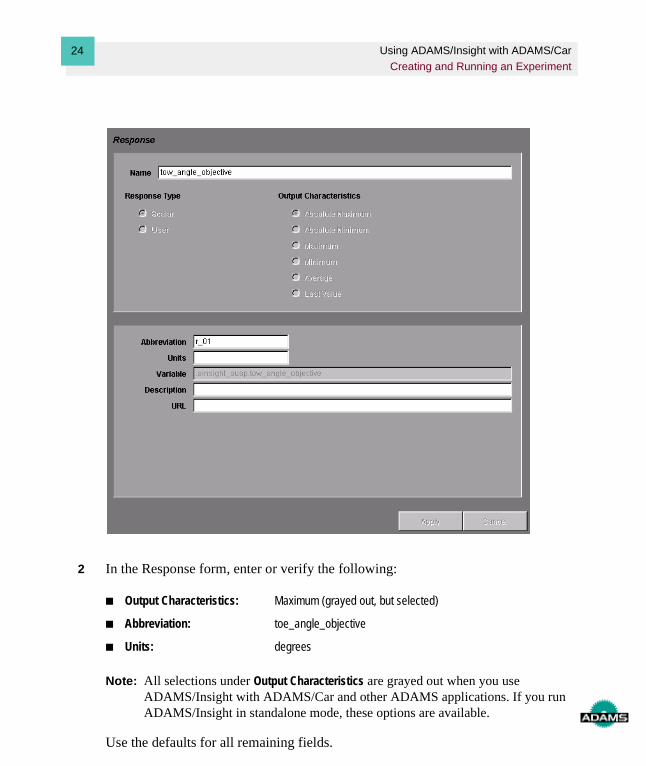
1 In the treeview, under Responses, in the Inclusions list, select the response, toe_angle_objective. The Response form appears, shown next, in the viewport.
Using ADAMS/Insight with ADAMS/Car
Creating and Running an Experiment24
2 In the Response form, enter or verify the following:
Note: All selections under Output Characteristics are grayed out when you use ADAMS/Insight with ADAMS/Car and other ADAMS applications. If you run ADAMS/Insight in standalone mode, these options are available.
Use the defaults for all remaining fields.
■ Output Characteristics: Maximum (grayed out, but selected)
■ Abbreviation: toe_angle_objective
■ Units: degrees
Using ADAMS/Insight with ADAMS/Car
Creating and Running an Experiment25
3 Select Apply.
ADAMS/Insight saves your response modifications.
Setting Design Specifications
In this section, you’ll set the design objective and design type for your experiment. To learn more about setting design specifications, see Design Specification on page 38 in the guide, Using ADAMS/Insight.
To specify your design objective:
1 In the Design assistant toolbar, select the Set design specification tool , or in the treeview, expand the levels under Design, and then select Specification. You can also select the Define menu, point to Experiment Design, and select Set Design Specification.
The Design Specification form appears in the viewport shown in Figure 6 on page 26.
Using ADAMS/Insight with ADAMS/Car
Creating and Running an Experiment26
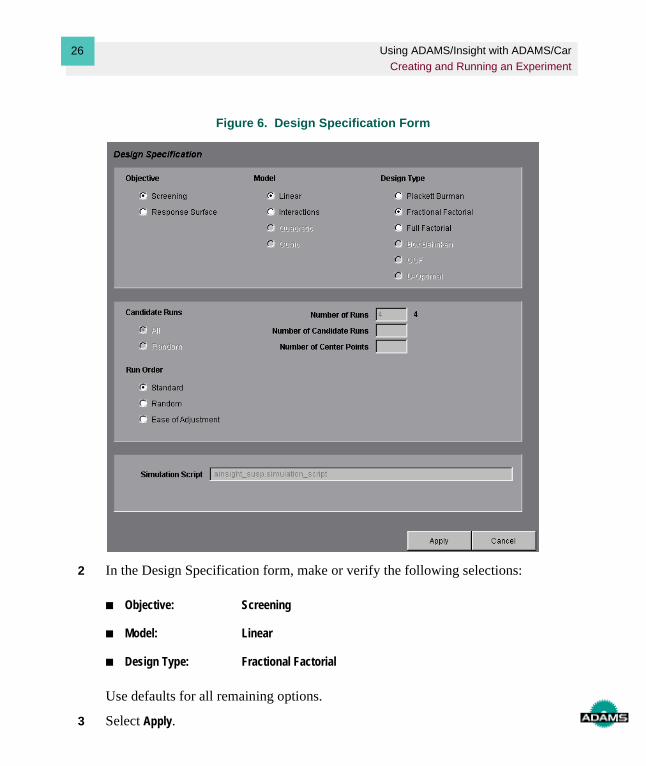
Figure 6. Design Specification Form
2 In the Design Specification form, make or verify the following selections:
Use defaults for all remaining options.
3 Select Apply.
■ Objective: Screening
■ Model: Linear
■ Design Type: Fractional Factorial
Using ADAMS/Insight with ADAMS/Car
Creating and Running an Experiment27
4 Select the Define menu, point to Experiment Design, and then select Create Design Space.
5 Select the Define menu, point to Experiment Design, and then select Create Work Space.
Note: Clicking the Generate Work Space tool in the Design Assistant toolbar performs Steps 4 and 5.
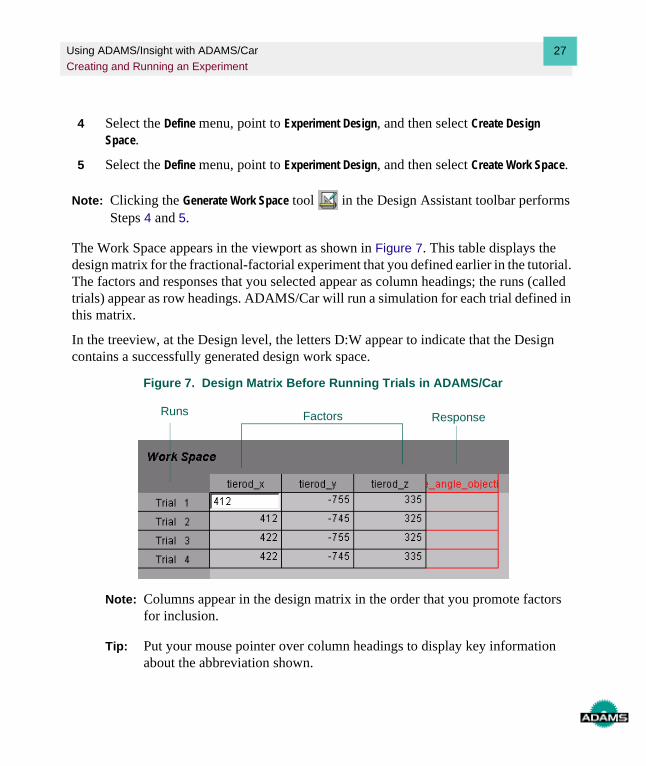
The Work Space appears in the viewport as shown in Figure 7. This table displays the design matrix for the fractional-factorial experiment that you defined earlier in the tutorial. The factors and responses that you selected appear as column headings; the runs (called trials) appear as row headings. ADAMS/Car will run a simulation for each trial defined in this matrix.
In the treeview, at the Design level, the letters D:W appear to indicate that the Design contains a successfully generated design work space.
Figure 7. Design Matrix Before Running Trials in ADAMS/Car
Note: Columns appear in the design matrix in the order that you promote factors for inclusion.
Tip: Put your mouse pointer over column headings to display key information about the abbreviation shown.
Runs Factors Response
Using ADAMS/Insight with ADAMS/Car
Creating and Running an Experiment28
Running Your ExperimentOnce you’ve verified the information in the Work Space, you’re ready to run the simulations.
To run the simulation:
■ In the Design Assistant toolbar, select the Run simulations tool . You can also select the Data menu, point to Simulation, point to Build-Run-Load, and then select All.
ADAMS/Car opens and runs the simulations defined by your experiment. The ADAMS/Car Status bar displays messages showing simulation progress. The Message window also appears and displays standard ADAMS/Solver messages, which you can ignore for this tutorial.
3
Working with ResultsOverviewThis chapter guides you through reviewing the results of your analysis; fitting your data to a polynomial to determine which factors most affect model performance; and publishing results to an HTML or SYLK file.
The sections in this tutorial are:
■ Reviewing Results, 30
■ Fitting Results, 31
■ Publishing Results, 33

Using ADAMS/Insight with ADAMS/Car
Working with Results30
Reviewing ResultsAfter ADAMS/Car completes the trials defined in your design matrix, you return to ADAMS/Insight interface to view the results.
To return to ADAMS/Insight:
1 From the main menu in ADAMS/Car, point to Simulate, point to DOE Interface, point to ADAMS/Insight, and then select Display.
The MDI Insight Display dialog box appears with the name of your current experiment.
2 Select OK.
ADAMS/Car hides and the ADAMS/Insight window opens.
To view your simulation results:
■ In the treeview, under Design, select Work Space.
Simulation results from ADAMS/Car appear in the design matrix as shown in Figure 8.
Figure 8. Design Matrix After Running Trials in ADAMS/Car
Runs Factors Response

Using ADAMS/Insight with ADAMS/Car
Working with Results31
Fitting ResultsNow that ADAMS/Car has completed the trials defined in your design matrix, you can use ADAMS/Insight to fit your results to a polynomial or a response surface. The purpose of fitting your results is to establish a relationship between the factors and responses that you selected for the design matrix. Fitting results includes a multiple regression. You will be able to investigate the parts of the regression in the Summary, located in the treeview under Analysis, after completing the following steps. For more information on this topic, see About Response Surfaces and Fitting Results on page 24 in the guide, Using ADAMS/Insight.
Note: The material in the following sections include statistical terms related to DOEs. For explanations of these terms, refer to the ADAMS/Insight Glossary through the Help menu. To learn how to use help options in ADAMS/Insight, see Getting Help on page 20 in the guide, Using ADAMS/Insight.
To fit your results:
■ From the Design Assistant toolbar, select the Fit results tool . You can also select
the Tools menu, and then select Fit New Model.
The Rules of Thumb summary table appears in the Viewport as shown in Figure 9. The responses you defined for your design matrix appear as column heading buttons in the Rules summary table. The results of the fit appear as row heading buttons.
Figure 9. Results Table with Rules of Thumb Summary of Fit
Response
Statistical informationabout fit
Using ADAMS/Insight with ADAMS/Car
Working with Results32
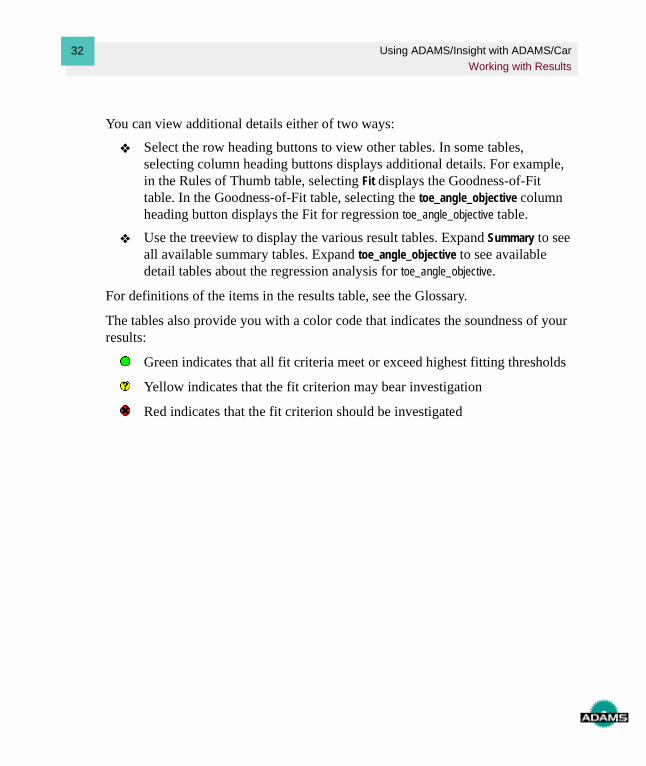
You can view additional details either of two ways:
❖ Select the row heading buttons to view other tables. In some tables, selecting column heading buttons displays additional details. For example, in the Rules of Thumb table, selecting Fit displays the Goodness-of-Fit table. In the Goodness-of-Fit table, selecting the toe_angle_objective column heading button displays the Fit for regression toe_angle_objective table.
❖ Use the treeview to display the various result tables. Expand Summary to see all available summary tables. Expand toe_angle_objective to see available detail tables about the regression analysis for toe_angle_objective.
For definitions of the items in the results table, see the Glossary.
The tables also provide you with a color code that indicates the soundness of your results:
Green indicates that all fit criteria meet or exceed highest fitting thresholds
Yellow indicates that the fit criterion may bear investigation
Red indicates that the fit criterion should be investigated
Using ADAMS/Insight with ADAMS/Car
Working with Results33
Publishing ResultsADAMS/Insight lets you save your files as either HTML or SYLK files. Once saved, you can use either a browser or spreadsheet program, such as Excel, to modify factors and see the effect on responses without performing full simulations.
To publish your results:
1 In the treeview, under Analysis, select Model_01, and then go to the Design Assistant
toolbar, and select the Export to Web tool . You can also select the Tools menu,
point to Export, and then select HTML Format.
The Save dialog box appears and prompts you to save your results as xxx.htm, where xxx is the name of your file.
2 Enter a name for your file and specify the path where you would like it to reside, and then select Save.
ADAMS/Insight saves your file in the directory that you specified.
3 Continue with the next section, Modifying Values Using a Web Browser on page 33, to learn how to view and use the results in the HTML file.
Modifying Values Using a Web Browser
Using the HTML page that you saved (see Step 1 through Step 3, above), you can modify the input factor values of your experiment and see the changes instantly reflected in the column that lists estimated responses. To learn more about making modifications to your experiment using an HTML or SYLK pages, see About Response Surfaces and Fitting Results on page 24 in the guide, Using ADAMS/Insight.
To modify your factors in an HTML page:
1 In a Web browser, open the HTML page you created for your experiment. Make certain the browser you use is able to read JavaScript.
The results of your experiment appear as shown in Figure 10 on page 34.
Using ADAMS/Insight with ADAMS/Car
Working with Results34
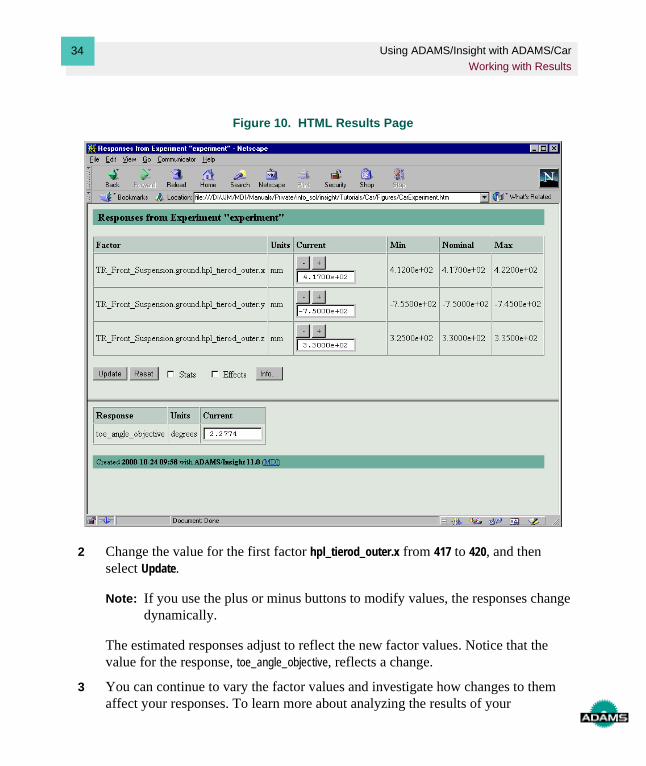
Figure 10. HTML Results Page
2 Change the value for the first factor hpl_tierod_outer.x from 417 to 420, and then select Update.
Note: If you use the plus or minus buttons to modify values, the responses change dynamically.
The estimated responses adjust to reflect the new factor values. Notice that the value for the response, toe_angle_objective, reflects a change.
3 You can continue to vary the factor values and investigate how changes to them affect your responses. To learn more about analyzing the results of your
Using ADAMS/Insight with ADAMS/Car
Working with Results35
experiment and publishing your results to HTML or SYLK pages, see Using Results on page 41 in the guide, Using ADAMS/Insight.
Additional Information on the Web Page
In addition to the basic factor and response information that appears when you first open the HTML file in your Web browser, you can view response statistics and response effects as a function of each factor. To view this information, use the check boxes below the list of factors. The check boxes are:
Contributions - This check box appears if you specified a non-zero tolerance for any factor. When present and selected, this check box displays the Tolerance Contributions table that provides the percent contribution of each factor to the tolerance of each response.
Stats - Displays R2, R2 adjusted, P, and R/V statistics for each response.
Effects - For each response, displays effects caused by varying each factor from its minimum to maximum value.
Info - This button displays a separate window that provides summary information about the DOE parameters for the current page. It also provides Web environment information that is valuable if you need to contact ADAMS technical support.
For more information on the controls and information provided by the HTML page, see Using HTML Results on page 42 in the guide, Using ADAMS/Insight.

Using ADAMS/Insight with ADAMS/Car
Working with Results36