Embed Size (px)
Citation preview

USER’S MANUAL
Project Group Assignment System
Pace University - Department of CSIS
August, 2004
Revision Sheet
Release No.
Date Revision Description
Rev. 1.0 8/17/04 User’s Manual first release

User’s Manual Authorization Memorandum
I have carefully assessed the User’s Manual for the Project Group Assignment System. This document has been completed in accordance with the requirements.
Please check the appropriate statement.
______ The document is accepted.
______ The document is accepted pending the changes noted.
______ The document is not accepted.
I fully accept the changes as needed improvements and authorize initiation of work to proceed. Based on my authority and judgment, the continued operation of this system is authorized.
______________________________________ ________________
Dr. Charles Tappert DateComputer Science & Information SystemsPace University, Goldstein Center, Room 325 861 Bedford Road, Pleasantville NY 10570-9913 914-773-3989, Secretary: x3396, Fax: x3533 E-Mail : : [email protected] http://www.csis.pace.edu/~ctappert
2

USER'S MANUAL
TABLE OF CONTENTS
Page #
1.0 GENERAL INFORMATION...................................................................................................4
1.1 System Overview.........................................................................................................41.2 Roles and User Access Modes....................................................................................51.3 Responsible organization.............................................................................................71.4 System Category..........................................................................................................71.5 Operational Status.......................................................................................................71.6 System Environment....................................................................................................81.7 Authorized use Permission..........................................................................................81.8 Project References.......................................................................................................81.9 Points of Contact..........................................................................................................8
2.0 SYSTEM SUMMARY............................................................................................................9
2.1 System Configuration...................................................................................................92.2 Data Flows.................................................................................................................102.3 User Access Levels....................................................................................................11
3.0 USING THE SYSTEM.........................................................................................................11
3.1 Student Access Mode................................................................................................113.1.0 Accessing the Home Page........................................................................................113.1.1a Logging In.................................................................................................................. 113.1.1b Registering a New Student........................................................................................123.1.2 Navigating from the Student Home Page..................................................................123.1.2.1 Taking the Student Survey........................................................................................133.1.2.2 Changing / Updating the Survey................................................................................153.1.2.3 Viewing Teams..........................................................................................................173.1.2.4 Logging Out......................................................................................................17
3.2 Administrator / Instructor Access Mode............................................................................18 3.2.0 Accessing the Home Page........................................................................................18 3.2.1 Logging In.................................................................................................................. 18
3.2.2 Navigating from the Administrator Home Page..........................................................183.2.3.1 Enrolling a Student....................................................................................................193.2.3.2 View Students...........................................................................................................213.2.3.3 Deleting a Student.....................................................................................................223.2.4.1 Entering a Client.......................................................................................................243.2.4.2 View Clients..............................................................................................................263.2.4.3 Deleting a Client........................................................................................................273.2.5.1 Entering a Project......................................................................................................293.2.5.2 View Projects............................................................................................................313.2.5.3 Deleting a Project......................................................................................................323.2.6 Creating Teams.........................................................................................................343.2.7 Viewing Teams..........................................................................................................343.2.8 Logging Out...............................................................................................................34
4.0 APPENDIX 1 : DATABASE SCHEMA AND ACCESS............................................................35 5.0 CONCLUSION AND SUGGESTED FUTURE ENHANCEMENTS..................................................51
3

1.0 GENERAL INFORMATION
1.1 System Overview
The Project Group Assignment System (hereby referred to as the "System") is a Web-based application developed on client/server architecture to automate the process of assigning groups to projects for the CS 631X, CS 615 and CS 616 Software Engineering Seminar courses. These courses and especially the Software Engineering Seminar, which is spread over 2 semesters, have clients who provide projects , and students that are distributed in various teams. These 4 entities form the base for the System, with its primary intention being to automate the creation, management and administration of these entities, with core focus on assignment of teams to projects.
The System is designed as a single point interface to administer the activities and attributes of the 4 primary entities, based on the user role and access permissions. The interface is a simple to use Graphical User Interface (GUI) displayed on a web browser. No former technical knowledge is needed to operate and use the System. The text, graphics, layout and flow of information and process are intuitive, and guide the user through the System. The Administrator is expected to have more knowledge of the principles and processes that guide this System, rather than the technicalities involved.
The System, based on Client/Server architecture, uses a thin-client (web browser) as the client, which makes it extremely fast and simple to use. Any web browser is capable of serving as the client, onto which the GUI is displayed. The preferred browser is Microsoft Internet Explorer 5.0 and above, though the System has similar functionality and appearance on Netscape Navigator 6.0 and above, and other browsers.
4

Fig 1 – Home Page
1.2 Roles and User Access Modes
The System operates on 2 roles -
- Administrator- Student
Based on the role of the user logging in, the system exposes different functionality. As an administrator, the user is allowed to perform the following major functions -
1. Student Administration - Enroll Students- View Students- Delete Students
2. Client Administration- Enter Clients- View Clients- Delete Clients
5

3. Project Administration- Enter Projects- View Projects- Delete Projects
4. Team Administration- Create Teams- View Teams
Fig 2 – Administrator Home Page – Administrators view this page after logging in
As a Student, the user is allowed to perform the following functions -
1. Student Survey- Enter Student Survey details
2. Change / Update Student Survey details based on- Project Preference- Availability Preference- Location Preference- Experience Preference
3. View Teams
6

Fig 3 – Student Home Page – Students view this page after logging in
While these are the primary functions that the System exposes to the user, it uses a proprietary algorithm internally to match and assign teams or groups to projects, based on various criteria.
1.3 Responsible Organization
The System is owned, operated and maintained by the Department of CSIS, at Pace University under the supervision and guidance of Dr.Charles Tappert.
1.4 System category
The System is a Major application - it performs clearly defined functions for which there is a readily identifiable security consideration and need
1.5 Operational status
The System is fully Operational, and is currently being used. With a few upgrades in the internal algorithm, the system will be ready to move on to the next version of release.
7

1.6 System environment
Both the Client and Server of the System operate on Windows based machines. Windows versions 2000 and above are the preferred Client Operating Systems, though the System is fully capable of performing equally well in Unix / Linux / Mac based machines with supporting web browsers (like Opera).
The preferred browser is Microsoft Internet Explorer 5.0 and above, though the System has similar functionality and appearance on Netscape Navigator 6.0 and above, and other browsers.
1.7 Project References
This document has been prepared with input and references from
1. Dr.Charles Tappert, System Owner and Project Mentor.
2. Naresh Trilok, Subject Matter Expert.
3. Aditya Chandra Prakash, Author of document.
1.8 Authorized Use Permission
This document is subject to use following guidelines set by Pace University, Department of CSIS at Pace University and Dr.Charles Tappert.
1.9 Points of ContactContact points for the System and any queries regarding this document -
1. Dr.Charles Tappert Computer Science & Information Systems Pace University, Goldstein Center, Room 325 861 Bedford Road, Pleasantville NY 10570-9913 914-773-3989, Secretary: x3396, Fax: x3533 E-Mail : : [email protected] Web : http://www.csis.pace.edu/~ctappert
2. Naresh Trilok [email protected]
3. Aditya Chandra Prakash [email protected]
8

2.0 SYSTEM SUMMARY
The System, as briefly described above is based on Client/Server Architecture, with a web browser serving as the most commonly used client. The server is maintained at the CSIS Department at Pace University, and Dr.Charles Tappert can be contacted regarding the current Server Administrator in case of server-related issues. These issues / topics are beyond the scope of this document.
Cold Fusion is the primary technology used for Client – Server communication, while extensive SQL and PL/SQL are used in the SQL Server based back-end for data retrieval and querying. HTML is the markup language with JavaScript as the client scripting language. The usage of these technologies makes the system robust, scalable and flexible to various client configurations.
2.1 System Configuration
Web-browsers like Internet Explorer and Netscape Navigator are the most commonly used clients, hence making their configuration independent of the System. The System is not dependant on personalized browser settings, and functions equally well on all browsers. Personalized settings such as client script enabling, setting of cookies etc have no impact on the System’s functioning.
In order to access the System, the minimal requirements are –
1. Windows 2000 and above / Linux / Unix based machine.2. 64 MB RAM.3. Web-Browser such as Microsoft’s Internet Explorer (Preferred), Netscape’s
Navigator or Communicator, Opera etc.4. Configured LAN / At least 56 kbps internet line / DSL / Cable / Other ISP.
No other plug-ins, third party tools, installations or Virtual Machines (VMs) are required to access the system.
9

2.2 Data Flows
The following diagram represents the flow of data / process for the Student access level
The following diagram represents the flow of Data / Process for Administrator (Instructor) Login
10
Login
Student
Take Student Survey
Allow System to process information and allocate
Projects / Clients based on Algorithms and
Information entered
Update / Change Survey
Login
Admin
Allow System to process information and allocate
Projects / Clients based on Algorithms and
Information entered

2.3 User Access Levels
The System currently has 2 User Access Levels –
1. Student2. Administrator
The System is capable to scale these roles to include more / edit existing roles and modify. Future roles to be included can be
1. Client2. Additional Instructors / Graduate Assistants
3.0 USING THE SYSTEM
This section is divided into two parts – Section 3.1 details the processes and instructions for the Student Access Level, while Section 3.2 deals with the Administrator level.
3.1 Student User Access Level
3.1.0 Accessing the System Home Page
In order to begin accessing the System as a Student, type in the following URL into the web browser :
http://utopia.csis.pace.edu/cs615/2002-2003/team13/Login.cfm
This brings up the System’s Home Page, which allows for one of the following 2 possible actions –
1. Enter the Email Address and Password to login (for already registered users)2. Register as a new user to gain access to the System.
3.1.1a Logging In (From the System Home page under section 3.1.0)
Once on the System Home Page, click on the Email Address text box, and enter the email address used during the registration process. In case the user is unable to recollect the Email Address, this can be checked from the confirmation email received after the registration process.
11

Next, enter the Password. Again, in case of non-recollection, refer to the email sent after registration.
The Check Box titled “Remember my Email Address for future logins” allows browsers to store the Email address, hence enabling only 1st time entry – for subsequent logins, the browser displays the previously used email address in this field. While this is a good option for Personal Computers, Shared or Public machine users should not check this option to protect privacy.
On entering the Email address and password, click the Submit button to continue with the Login Process. If the correct Email address and Password are supplied, the System displays the Student Home Page after successful login, otherwise displaying appropriate error messages. Follow instructions on these messages to login successfully.
3.1.1b Registering as a new Student (From the System Home page under section 3.1.0)
New Students / students new to the system can register by clicking on the register here link at the System Home Page. This brings up the Registration Page, where students can enter the following details
1. First Name2. Last Name3. Email Address 4. Password5. Password Confirmation6. Course ID
Once these fields have been entered and validated (valid email address, password matching etc), the System Home Page is displayed with the following message :
Profile successfully created. Please check your email for registration notification from administrator and login below
The User is now a registered Student, and can proceed to normal login as listed under Section 3.1.1a.
3.1.2 Navigating from the Student Home Page (After logging in under section 3.1.1a)
Once the Student is successfully logged-in, the Student Home Page is displayed, which allows the Student one of possible 4 options –
1. Take Student Survey2. Change / Update Survey3. View Teams4. Logout
12
Required Fields
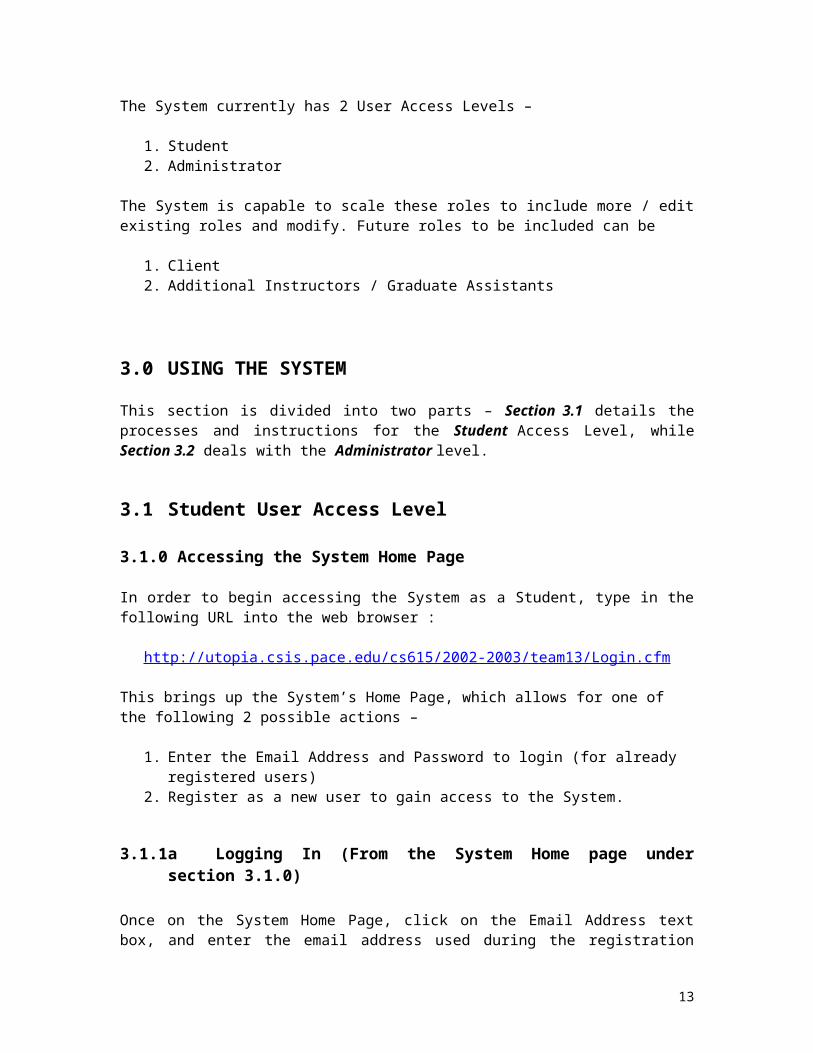
Fig 3.1.2 Student Home Page
3.1.2.1 Taking the Student Survey
Click on the Student Survey Link. This brings up the Survey Semester and Course Selection Page. In this page, all relevant courses that the Student has registered for are listed in the Drop down box titled Select Semester and Course. Select the appropriate course and semester from this list and click on the Enter button to continue.
13

Fig 3.1.2.a Select Semester and Course Page
Fig 3.1.2.b Preferences Page
From this screen, select the Project Preferences in the 5 Drop Down Boxes titles “Select your top 5 choices for a Project”.
14
Similarly, make selections for Availability, Location and Areas of Experience.All information on this page has to be unique – that is, each choice within a sub-section has to be unique for the system to function as expected. Otherwise, an error message is displayed, hence forcing the user to start over from the previous step. Each of the Project, Availability , Location and Areas of Experience choices are to be unique and cannot be repeated.
When all the information is entered, click on the Enter button to process the information. If there are any duplicate values, or any other errors, an error message is displayed, and the user is taken to the previous screen (Survey Semester & Course Selection Page).
Fig 3.1.2.c Error message on entering duplicate values
3.1.2.2 Changing / Updating the Student Survey
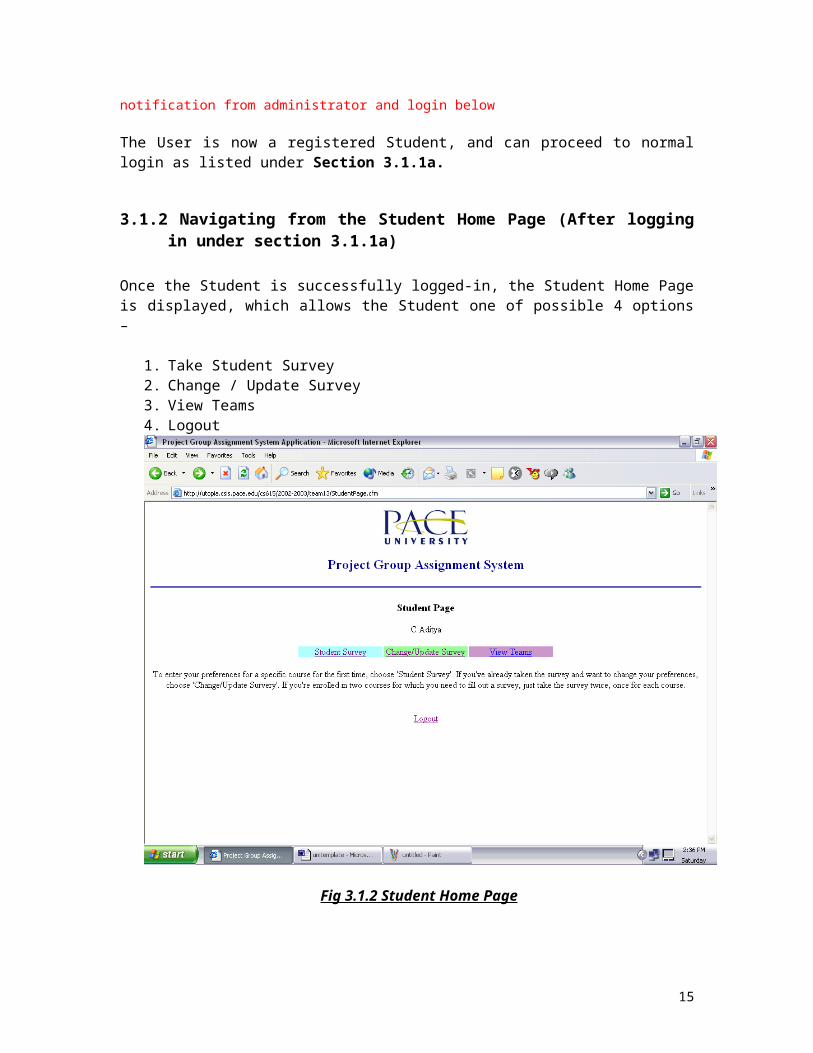
From the Student Home Page, click on the Change / Update Survey link. This brings up the Preference Update Page, which allows the user to navigate to a specific section of the survey to change / update the information. From here, the user can update either Project, Availability, Location or Experience preferences.
15

Fig 3.1.2.d Preference Update Page
On clicking on the Project Preference link on the above page, the following screen comes up allowing users to update Project preferences. The same rule of unique values applies again to all of these screens.
16

Fig 3.1.2.e Update Project Preference Page
Similarly, other preferences can be updated from the Preference Update Page.
3.1.2.3 Viewing Teams
From the Student Home Page, click on the View Teams link to view a list of teams assigned.
3.1.2.4 Logging Out
From the Student Home Page, click on the Logout link to logout and end the session. It is advisable to close the browser window to destroy all session / cookie information.
17

3.2 Administrator / Instructor Access Level
3.2.0 Accessing the System Home Page
In order to begin accessing the System as an Administrator / Instructor (Hereby referred to as the Administrator), type in the following URL into the web browser :
http://utopia.csis.pace.edu/cs615/2002-2003/team13/Login.cfm
This brings up the System’s Home Page, which allows the user to login as an administrator by entering the assigned Email Address and Password. Administrator rights are given at the database level, and new administrators / instructors cannot register through this system. In order to obtain administrative preferences, please contact the System Owner Dr.Charles Tappert at [email protected].
3.2.1 Logging In (From the System Home page under section 3.2.0)
Once on the System Home Page, click on the Email Address text box, and enter the email address used during the registration process. In case the user is unable to recollect the Email Address, this can be checked from the confirmation email received.
Next, enter the Password. Again, in case of non-recollection, refer to the email.
The Check Box titled “Remember my Email Address for future logins” allows browsers to store the Email address, hence enabling only 1st time entry – for subsequent logins, the browser displays the previously used email address in this field. While this is a good option for Personal Computers, Shared or Public machine users should not check this option to protect privacy.
On entering the Email address and password, click the Submit button to continue with the Login Process. If the correct Email address and Password are supplied, the System displays the Administrator Home Page after successful login, otherwise displaying appropriate error messages. Follow instructions on these messages to login successfully.
3.2.2 Navigating from the Administrator Home Page (After logging in under section 3.2.1)
Once the Administrator is successfully logged-in, the Administrator Home Page is displayed, which allows the Administrator one of possible 12 options –
1. Enroll Students2. View Students3. Delete Students
18
4. Enter Clients5. View Clients6. Delete Clients7. Enter Projects8. View Projects9. Delete Projects10. Create Teams11. View Teams12. Logout
The above options are grouped by categories – Manage Students, Manage Clients, Manage Projects and Manage Teams to make for easier navigation.
Fig 3.2.1 Administrator Home Page
3.2.3 Managing Students
3.2.3.1 Enroll Student
From the Administrator Home Page, click on the Enroll Student link under Manage Students. This brings up the Enroll Student page, which contains a Drop Down box of all students currently registered for courses of the Administrator currently logged in.
19

Fig 3.2.2 Enroll Student
The Administrator can choose a particular student from the list to enroll. Once a student is selected, the following message is displayed, asking for confirmation :
Are you sure you want to enroll this user into the System?
Click on the OK button if you are sure, or on the Cancel button to return to the page. Upon clicking OK, the following confirmation screen is displayed, indicating that the selected student has been added to the system.
20

Fig 3.2.3 Successful enrollment of student
Click OK on the message box to return to the Enroll Student page. Continue to enroll students from here or click on the Return to Professor’s Home Page link to return to the Administrator Home Page.
3.2.3.2 View Students
From the Administrator Home Page, click on the View Students link under Manage Students to display a summary of enrolled students.
21

Fig 3.2.4 View Students Page
3.2.3.3 Delete Student
From the Administrator Home Page, click on the Delete Student link under Manage Students. This brings up the Delete Student page, which contains a Drop Down box of all students currently registered and enrolled into the system of the Administrator currently logged in.
22

Fig 3.2.2 Delete Student
The Administrator can choose a particular student from the list to delete. Once a student is selected, the following message is displayed, asking for confirmation :
Are you sure?
Click on the OK button if you are sure, or on the Cancel button to return to the page. Upon clicking OK, the following confirmation screen is displayed, indicating that the selected student has been deleted from the system.
23

Fig 3.2.3 Successful deletion of student
Click Delete more Students to return to the Delete Student page. Continue to delete students from here or click on the Return to Instructor Page link to return to the Administrator Home Page.
3.2.4.1 Enter Clients
From the Administrator Home Page, click on the Enter Clients link under Manage Clients. This brings up the Add Client page as follows –
24

3.2.4.1 Add Client Page
Only the First Name field is mandatory here. Enter as much information about the client as available, and click on the Enter button to add the client to the database. This brings up a confirmation page, confirming that the client has been added to the database –
25

Fig 3.2.4.1b Client addition confirmation page
From here, Click on the Add More Clients to continue adding clients, or the View Clients link to view a list of existing clients, or the Return to Home Page link to return to the Administrator Home Page.
3.2.4.2 View Clients
From the Administrator Home Page, click on the View Clients link under Manage Clients to display a summary of existing clients.
26

Fig 3.2.4.2 View Clients Page
3.2.4.3 Delete Clients
From the Administrator Home Page, click on the Delete Clients link under Manage Clients. This brings up the Delete Clients page, which contains a Drop Down box of all clients currently registered into the system of the Administrator currently logged in.
27

Fig 3.2.4.3 Delete Client Page
From the list, select the name of the client to be deleted and click on the Delete Client button. Once a client is selected, the following message is displayed, asking for confirmation :
Are you sure?
Click on the OK button if you are sure, or on the Cancel button to return to the page. Upon clicking OK, the following confirmation screen is displayed, indicating that the selected client has been deleted from the system.
28

Fig 3.2.4.4 Successful deletion of client
Click Delete more Clients to return to the Delete Client page. Continue to delete clients from here or click on the Return to Instructor Page link to return to the Administrator Home Page.
3.2.5.1 Enter Project
From the Administrator Home Page, click on the Enter Project link under Manage Projects. This brings up the Enter Project page as follows -
29
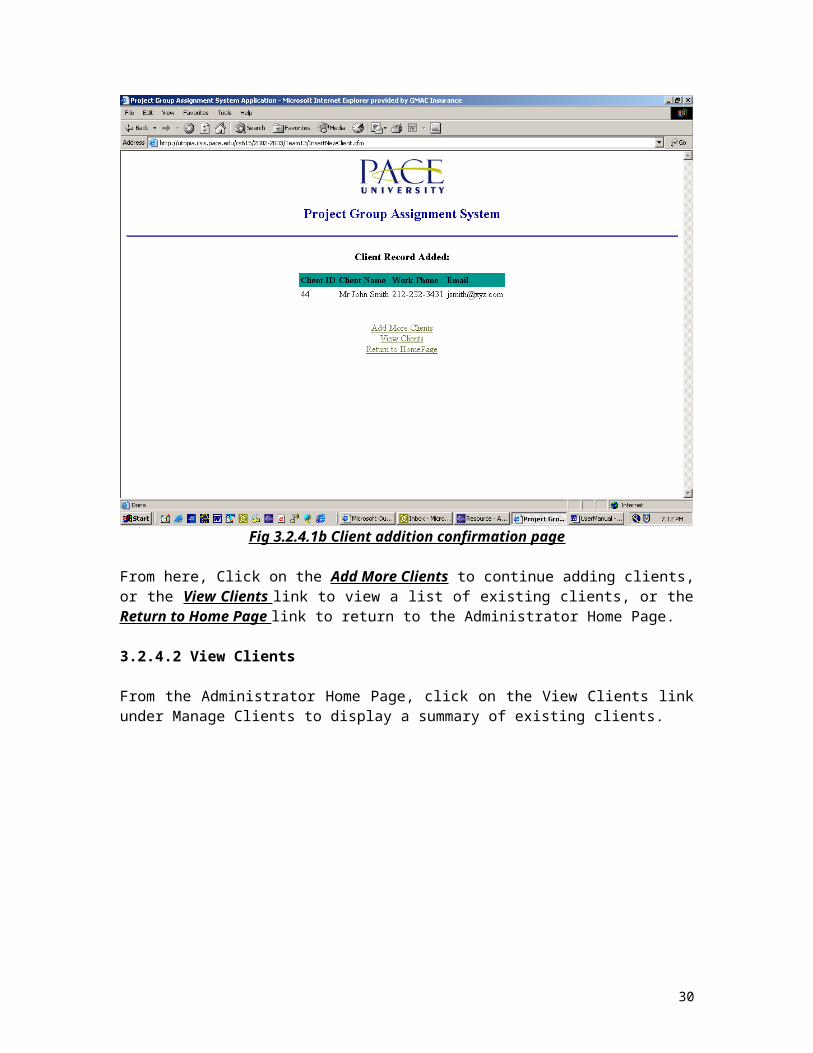
Fig 3.2.5.1 Add new Project
The only mandatory field on this page is the Course and Semester box. Choose from the drop down list to populate this field. It is important to note that the courses and semesters in this list are picked directly from the database, hence if a particular course or semester is not shown in this list, please contact the DBA to enter a new course / semester into the database.
Fill in the information on the page and click on the Enter button to add the project. Once successfully added, the following screen is displayed –
30

Fig 3.2.5.1b Successful addition of Project
Click on the Return to Professor’s Home Page link to return to the Administrator Home Page.
3.2.5.2 View Projects
From the Administrator Home Page, click on the View Projects link under Manage Projects to display a summary of Projects. The projects are grouped according to their respective courses / semesters and are displayed accordingly.
31

Fig 3.2.5.2 View Projects Page
3.2.5.3 Delete Project
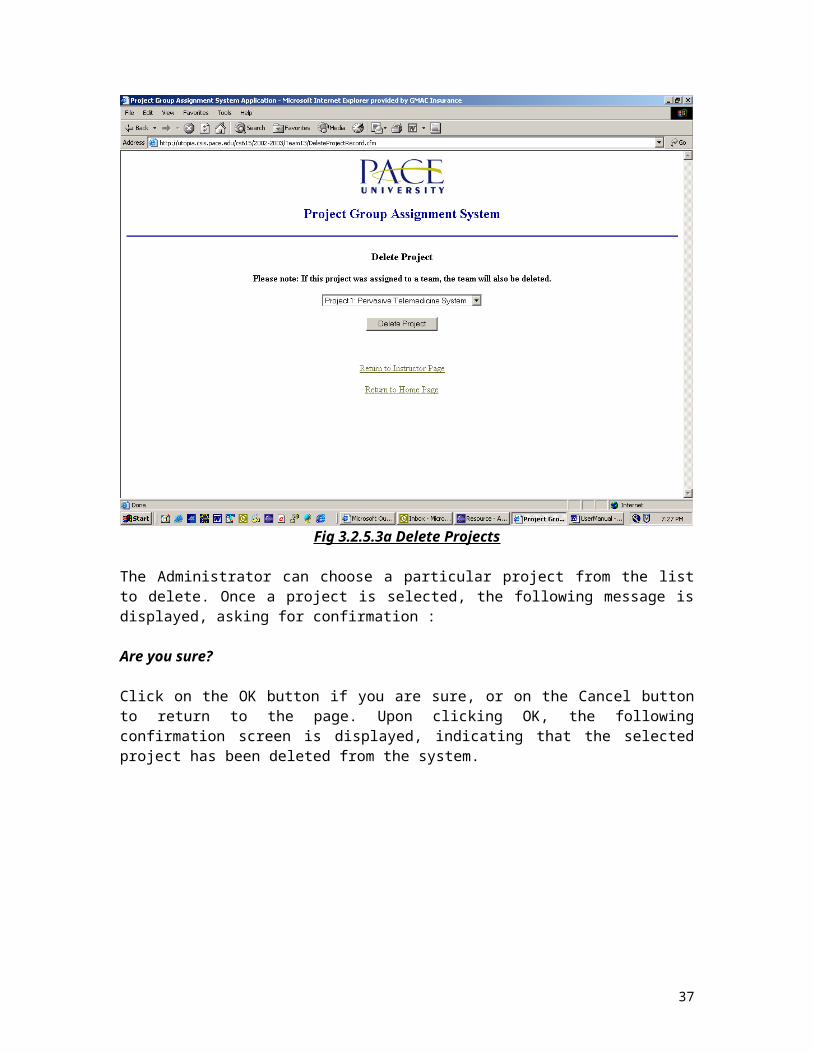
From the Administrator Home Page, click on the Delete Projects link under Manage Projects. This brings up the Delete Project page, which contains a Drop Down box of all projects currently registered into the system of the Administrator currently logged in.
32

Fig 3.2.5.3a Delete Projects
The Administrator can choose a particular project from the list to delete. Once a project is selected, the following message is displayed, asking for confirmation :
Are you sure?
Click on the OK button if you are sure, or on the Cancel button to return to the page. Upon clicking OK, the following confirmation screen is displayed, indicating that the selected project has been deleted from the system.
33

Fig 3.2.5.3b Successful deletion of project
Click Delete more Projects to return to the Delete Projects page. Continue to delete projects from here or click on the Return to Instructor Page link to return to the Administrator Home Page.
3.2.6 Create Teams
At the time of creation of this document, this section of the application was not functional due to technical problems. This section will be updated in the following semesters upon resolution of these issues.
3.2.7 View Teams
From the Administrator Home Page, click on the View Teams link under Manage Teams to display a summary of Teams. The teams are grouped according to their respective courses / semesters and are displayed accordingly.
3.2.8 Logging Out
From the Administrator Home Page, click on the Logout link to logout and end the session. It is advisable to close the browser window to destroy all session / cookie information.
34

Appendix 1 : Database Schema and Access
The System Database is located at http://utopia.csis.pace.edu/ and can be accessed via http://utopia.csis.pace.edu/phpmyadmin/. PHP MyAdmin provides the User Interface to access the database, and make changes to its schema and data. MyAdmin is a intuitive, easy-to-use interface that encapsulates the complexities of the database schema and SQL from the user. Currently, no username and password are required to gain access to the database.
On visiting http://utopia.csis.pace.edu/phpmyadmin/, the following screen comes up -
Fig 1 – PHPMyAdmin Welcome screen
From this screen, scroll down on the left pane that displays various databases to the database named “Team13”. This is the database for the System, and is illustrated in the following screen -
35
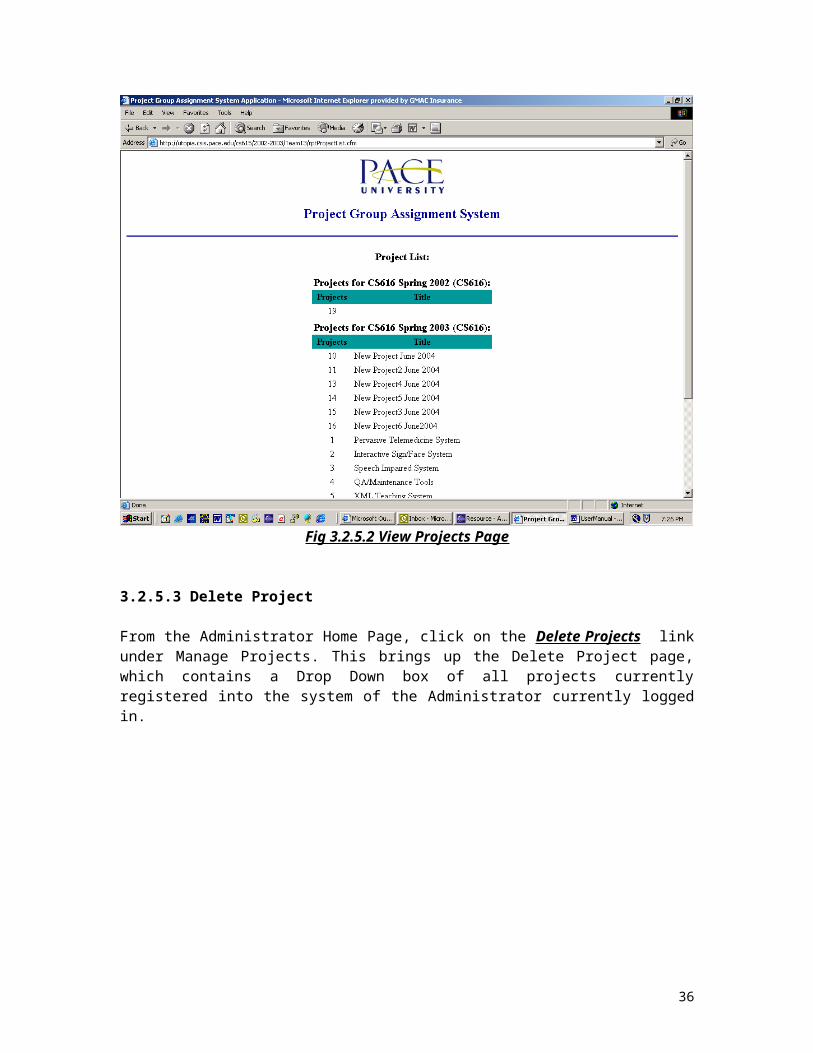
Fig 2 – Team 13 Database – Back-end for the System
The database consists of 12 tables listed below –
tblChoices – Holds the choices entered by the user for the survey. tblClient – Holds client details. tblCourse – Holds course related details. tblExperience – Holds experience details which are used in the survey. tblLocation - Holds location details which are used in the survey. tblParameters – Holds the names of parameters and their weight age to be used by the
algorithm. tblProjects – Holds project details. tblResults – Holds results of the algorithm runs. tblSemester – Holds names of semesters, associated courses and the year. tblState – Holds State names, also used in the survey tblTime – Holds Time Slots, used in the survey tblUser – Holds User details.
A Note about all tables – In order for the System to function normally, please leave at least 1 entry (1 row) in each table. This ensures no errors are generated while using the System.The following is a detailed description of what each table contains, and details on how to change / add data in these tables, and also explanation of their impact.
1. Table tblChoices
36
This table contains the actual choices entered by the user while taking the Student Survey. It contains a mapping of all their selected choices and their respective values. Here is the schema for this table –
Fig 3 – TblChoices Schema
The following is a data snap shot of this table –
Fig 4 – TblChoices Sample Data2. Table tblClient
37

This table houses the client details. When an administrator chooses to create a new client, all information pertinent to that client is stored in this table. The following are the schema and data shots of this table –
Fig 5 – tblClient Schema
Fig 6 – tblClient Data
3.Table tblCourse
38

This table holds Course and Semester Information. This information is used while adding a particular project to a course. Hence, to add new courses / semesters into the System, Insert a Row into this table with the relevant course, semester and year details. Here are the schema and data shots for this table -
Fig 7 – tblCourse Schema
39

Fig 8 – tblCourse Data
4. Table tblExperience
This table holds Experience information, which is used in the survey. If any further experience related information needs to be added to the survey, add the information to this table, and it will be reflected in the survey. Here are the schema and data shots -
40

Fig 9 – tblExperience Schema
Fig 10 – tblExperience Data
41

5. Table tblLocation
This table houses all the Location options provided to the user during the survey. If any more locations need to be added, or modified, this is the table to make changes in. Following are the schema and data shots -
Fig 11 – TblLocation Schema
Fig 12 – TblLocation Data
42

6. Table tblParameters
This table houses all the Parameters, and their weight age, which is internally used in the algorithm. This is the core table from the algorithm point of view. Any change to the algorithm might require a corresponding change to the data or possibly the schema of this table. For example, if the weight age structure needs to be re-organized, or another parameter needs to be introduced into the algorithm, this is the table that would require the change.
Following are the schema and data shots –
Fig 13 – TblParameters Schema
43

Fig 14 – TblParameters Data
7. Table tblProject
This table houses all the Project-related information. Any new project added is entered internally into this database. Any changes to the way projects are entered / associated need to be reflected in this table. Following are the schema and data shots -
Fig 14 – TblProject Schema
44

Fig 15 – TblProject Data
8. Table tblResults
This table contains the results of the algorithm runs – in a nutshell, the algorithm uses the various parameters from the tblParameters table, runs the code, and associates Users to particular Projects and Courses and stores them in this table. Following are the screen shots for this table -
Fig 16 – TblResults Schema
45

Fig 17 – TblResults Data
9. Table TblSemester
This table is not currently being used, and DOES NOT contain any data.
Fig 18 – TblSemester Schema
46

10. Table TblState
This table contains a list of states, also used during the student survey. To add / modify / remove a state, this is the table to be changed.
Fig 19 – TblState Schema
47

Fig 20 – TblState Data
11. Table TblTime
This table holds the time slots used during the Student Survey. If new time slots need to be added / modified / removed, this is the table to do so in.
Fig 21 – TblTime Schema
48

Fig 22 – TblTime Data
12. Table TblUser
This table contains all the user details when an administrator creates a new user (Student). This table is one of the key tables in the database, and if any more information needs to be stored about the users, changes need to be made to the schema of this table.
Fig 23 – TblUser Schema
49

Fig 24 – TblUser Data
50

Conclusion
The System is now configured to run for any Semester from Spring 2002 until Spring 2005 for the CS 615 and 616 courses under Dr.Charles Tappert. Any further courses / semesters can be added using the guidelines in this document. Application Code has been modified to accept these additions / modifications in the database schema as well.
Suggested Future Enhancements
1. The System can be tweaked to perform more efficiently in terms of the internal algorithm. The weight age mechanism can be revised, and more parameters can be added to the algorithm to better match student requirements.
2. A report page (rptChoices.cfm or similar) showing the details of all preferences of all students can be added to the System, and a sub-section (View Preferences) can be added at the Administrator Home Page. This will better assist the instructors to view student preferences from the User Interface itself.
3. The System may be migrated from Cold Fusion to Java, .NET or a more relevant and later technology architecture.
More enhancements / suggestions will be added as the System is used progressively in time.
51


![[PPT]TOTAL SAFETY TASK INSTRUCTION - HBRhoubrt.com/2005/documents/KBRITITSTIInstructions.ppt · Web viewRev. 01/11 KBR / ITI TOTAL SAFETY TASK INSTRUCTION Employee Involvement Given](https://img.pdfslide.us/doc/110x75/5b6c50927f8b9aa32b8b5c09/ppttotal-safety-task-instruction-web-viewrev-0111-kbr-iti-total-safety.jpg)