Embed Size (px)
Citation preview
1 PG-00850-001_v02 09/07/05
User’s Guide
CgFX Mel Tools for CgFX
Table of Contents
Mel Tools for CgFX..........................................................................................................5 1.1. Installing the Tools ................................................................................................ 5 1.2. Shelf Buttons and Mel Tools................................................................................... 6
1.2.1. CgEd ............................................................................................................. 6 1.2.2. cDbg ............................................................................................................. 6 1.2.3. Web .............................................................................................................. 6 1.2.4. CgKy ............................................................................................................. 7 1.2.5. tgwr .............................................................................................................. 7 1.2.6. TScn ............................................................................................................. 8 1.2.7. Conv ............................................................................................................. 9 1.2.8. ltCn............................................................................................................... 9 1.2.9. ReLd ........................................................................................................... 10 1.2.10. ctrl .......................................................................................................... 10 1.2.11. Win ......................................................................................................... 10 1.2.12. Sele ......................................................................................................... 11
1.3. Using the Conv Button ......................................................................................... 12 1.3.1. Restrictions .................................................................................................. 14 1.3.2. Rebuilding A Scene....................................................................................... 15
1.4. Mel Scripts .......................................................................................................... 16 1.4.1. UI Mel Functions .......................................................................................... 16 1.4.2. Base Mel functions,....................................................................................... 17
1.5. Contact Information............................................................................................. 18

Table of Contents
PG-00850-001_v02 3 09/07/05
List of Figures
Figure 1. CgFX Shelf .......................................................................................... 5 Figure 2. Tgwr .................................................................................................. 7 Figure 3. Tscn ................................................................................................... 8 Figure 4. ItCn Connections ................................................................................. 9 Figure 5. Sele Function .................................................................................... 11 Figure 6. Hypergraph....................................................................................... 13 Figure 7. Maya Shaded Display ......................................................................... 14
List of Tables
Table 1. Mel Scripts....................................................................................... 16 Table 2. Base Mel Functions........................................................................... 17


5 PG-00850-001_v02 09/07/05
Mel Tools for CgFX
The Maya Cg Plug-in provides the basic tools needed for the use of CgFX-based real-time shading in Maya 7.0. This document describes a few additional tools, written in Mel, that can make life easier and more-productive for animators, modelers, and shader developers.
1.1. Installing the Tools The .zip file contains two parts – a directory of Mel scripts, and files to put into your Maya prefs directory if you want to use the pre-built CgFX Maya Shelf UI.
Once unzipped, there will be two top-level directories, named Mel and prefs – place the contents of the Mel directory wherever you prefer to keep Mel scripts. A typical location for Windows users is My Documents\maya\scripts.
The files in prefs” can be dropped into your local prefs directory for Maya 7.0. Typically that will be My Documents\maya\7.0\prefs – make sure that the .bmp files go into the prefs\icons directory and the shelf_CgFX.mel script lands in prefs\shelves.
The tools should now be installed. When you start Maya, the CgFX shelf should be available in your shelf window, and typically looks like the one shown in Figure 1.
Figure 1. Buttons on the Maya CgFX shelf
If some of the shelf icons are gray, that means the icon images were not found—a completely harmless problem. You can select any image for the button – the ones shown here are a mix of those provided with the plugin and other images found in the standard Maya release under the following location: C:\Program Files\AliasWavefront\Maya7.0\extras\icons Even without the icon pictures, the tools and buttons are ready for use.
1.2. Shelf Buttons and Mel Tools
Each shelf button calls a single Mel script. These Mel scripts can be used either in shelf buttons or you can easily add them to home-grown UIs.
Most of the buttons are dependent on the Maya active selection and generally do the correct thing for selections of objects, shading groups, shaders, or polygon faces.
1.2.1. CgEd This button looks at the active selection, determines if any CgFX shaders are associated with that selection, and calls up a text editor for the first .cgfx shader found.
CgEd uses the Windows registry to determine which text editor to call. You can set your own preferences through Windows by opening any directory view and selecting “File Options...” from the “Tools” menu. Press the “File Types” tab to see and set your preference (For more info, see the documentation for Windows). The Mel author likes vim — http://www.vim.org/ — but you can use any text editor (say, Microsoft Visual Studio .NET, or even Microsoft Word).
CgEd is usually used in tandem with the ReLd button. Note that when you edit and save a shader, the changes are not automatically reloaded.
1.2.2. cDbg The cDbg button controls the “verbosity” of the other tools. When cDbg is pressed, a dialog box is displayed asking you to enable or disable Mel CgFX debugging. If debugging is enabled, a large number of descriptive messages are displayed in the script editor whenever the other tools are used.
1.2.3. Web The Web button displays a web browser and direct you to http://www.shadertech.com, which is a good source for updates, CgFX information, and new shaders.
Mel Tools for CgFX
PG-00850-001_v02 7 09/07/05
1.2.4. CgKy Looks at the current selection, and makes sure that all the “float” attributes of the currently-selected CgFX shaders are keyable (and thus appear in the Maya channel box).
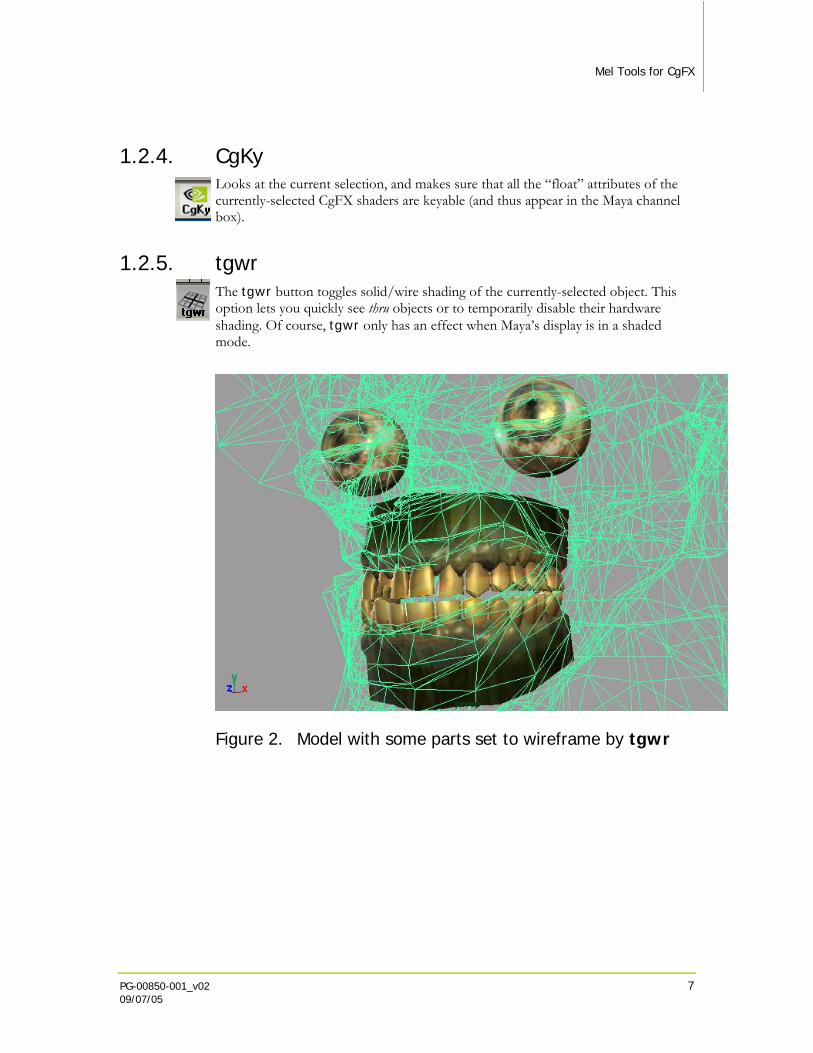
1.2.5. tgwr The tgwr button toggles solid/wire shading of the currently-selected object. This option lets you quickly see thru objects or to temporarily disable their hardware shading. Of course, tgwr only has an effect when Maya’s display is in a shaded mode.
Figure 2. Model with some parts set to wireframe by tgwr
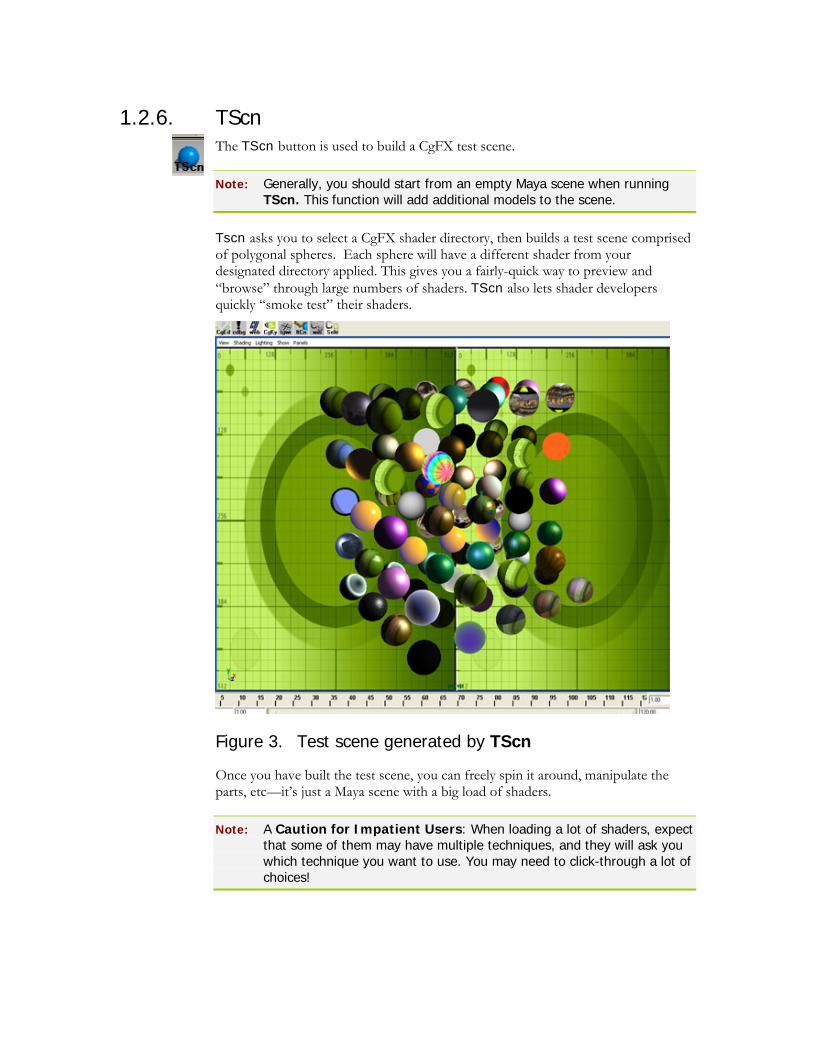
1.2.6. TScn The TScn button is used to build a CgFX test scene.
Note: Generally, you should start from an empty Maya scene when running TScn. This function will add additional models to the scene.
Tscn asks you to select a CgFX shader directory, then builds a test scene comprised of polygonal spheres. Each sphere will have a different shader from your designated directory applied. This gives you a fairly-quick way to preview and “browse” through large numbers of shaders. TScn also lets shader developers quickly “smoke test” their shaders.
Figure 3. Test scene generated by TScn
Once you have built the test scene, you can freely spin it around, manipulate the parts, etc—it’s just a Maya scene with a big load of shaders.
Note: A Caution for Impatient Users: When loading a lot of shaders, expect that some of them may have multiple techniques, and they will ask you which technique you want to use. You may need to click-through a lot of choices!

Mel Tools for CgFX
PG-00850-001_v02 9 09/07/05
1.2.7. Conv This large function can build simple CgFX proxies for your existing Maya shading nodes. It can work on just the active selection or the entire scene.
The Conv function makes it very easy to add CgFX appearances to any existing Maya scene. This ease-of-use comes with a handful of restrictions, so find the section 1.3 below for more info on Using the Conv Button.
1.2.8. ltCn The ItCn button is used to make additional light connections.
When a CgFX surface shader is connected to a light source position or direction, the colors and other light properties are normally not connected automatically. It is hard to guess just which properties might be supported for any given CgFX shader.
ltCn tries to make connections to these attributes by looking at existing position and direction connections, and then searching for “likely” attribute names in the selected CgFX shader(s).
Figure 4. Hypergraph window showing “bodyFX” connections created by the ltCn function
For example, if it finds a connection to lightPos1, it searches for likely color names such as lightColor1. If it finds such names, it automatically sets up Maya attribute connections to the light source. After that, to alter the light color of connected CgFX shader(s), just adjust the Maya light color in the usual way – the CgFX shaders update automatically.
In the example illustration, two light positions have already been created by hand – the positions are connected from the light sources’ transform nodes. What ltCn has done is to also automatically connect additional parameters, such as intensity and color, from the corresponding light shape nodes.
1.2.9. ReLd The ReLd function reloads CgFX shaders. It can reload the selected shader(s); all shaders in the scene; or all shaders that shared the same .cgfx files as the current selection (if any). Especially handy if you have been editing shaders via CgEd.
1.2.10. ctrl The ctrl function creates a rigging-style controller node – or uses any existing one, if it exists. Selecting some number of shaders (or meshes with shaders) and then hitting ctrl will result in the creation of a new curve object (the letter “c”) with attributes that match the attributes of the shader(s). Those (potentially shared) attributes will now be connected to the control node for easy animator control – just click the control node and manuipulate the connected shaders.
If you don’t want the script to create a control node, just create any node yourself – say, a locator – and make sure it is selected – last – along with the shaders before clicking ctrl.
Sometimes, the control node will have only one or two or even zero attributes after it’s been created. This can occur when either the selecter shader(s) simply don’t have any linkable attributes, or (more common) those attributes are already connected to some other nodes, such as the connections between Maya shaders and CgFX shaders that are automatically defined when using the Conv script.
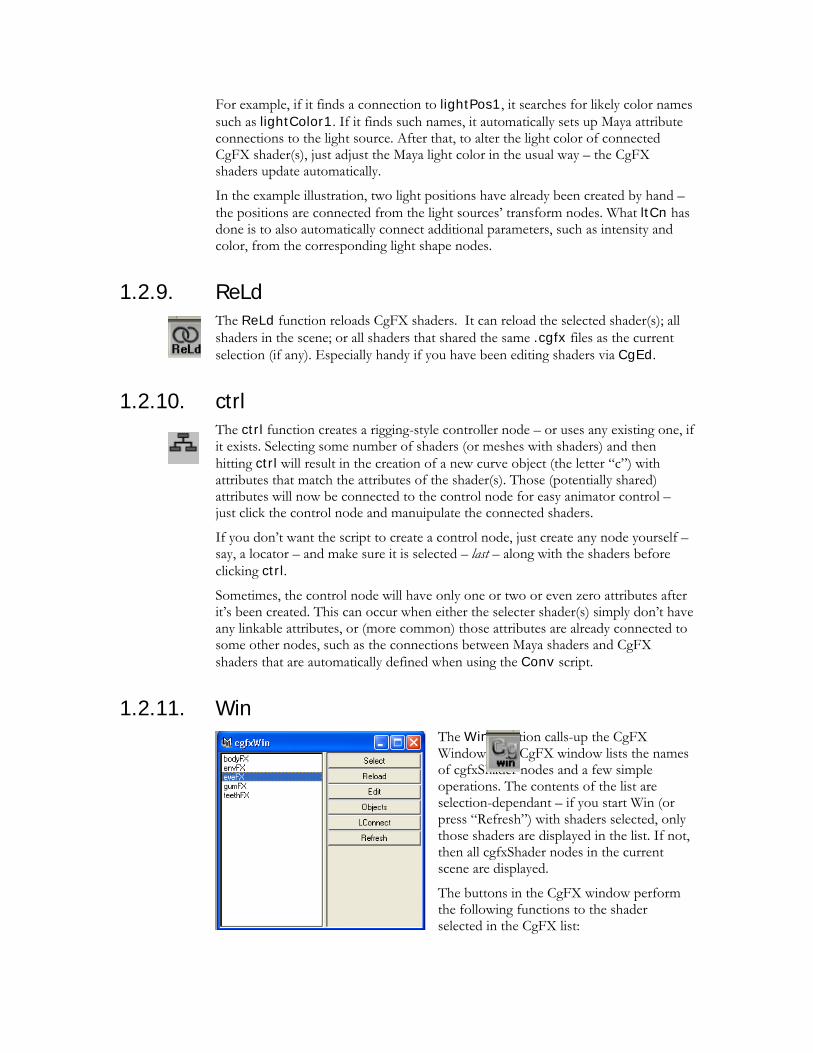
1.2.11. Win The Win function calls-up the CgFX Window. The CgFX window lists the names of cgfxShader nodes and a few simple operations. The contents of the list are selection-dependant – if you start Win (or press “Refresh”) with shaders selected, only those shaders are displayed in the list. If not, then all cgfxShader nodes in the current scene are displayed.
The buttons in the CgFX window perform the following functions to the shader selected in the CgFX list:
Mel Tools for CgFX
PG-00850-001_v02 11 09/07/05
Select: Same as the Sele shelf button
Reload: Same as the Attribute-Editor Reload button
Edit: Same as CgEd
Objects: Tries to identify and select objects that use the specified shader (not always dependable for complicated setups, but much improved for Maya 7.0)
LConnect: Same as ltCn
Refresh: Same as pressing Win again
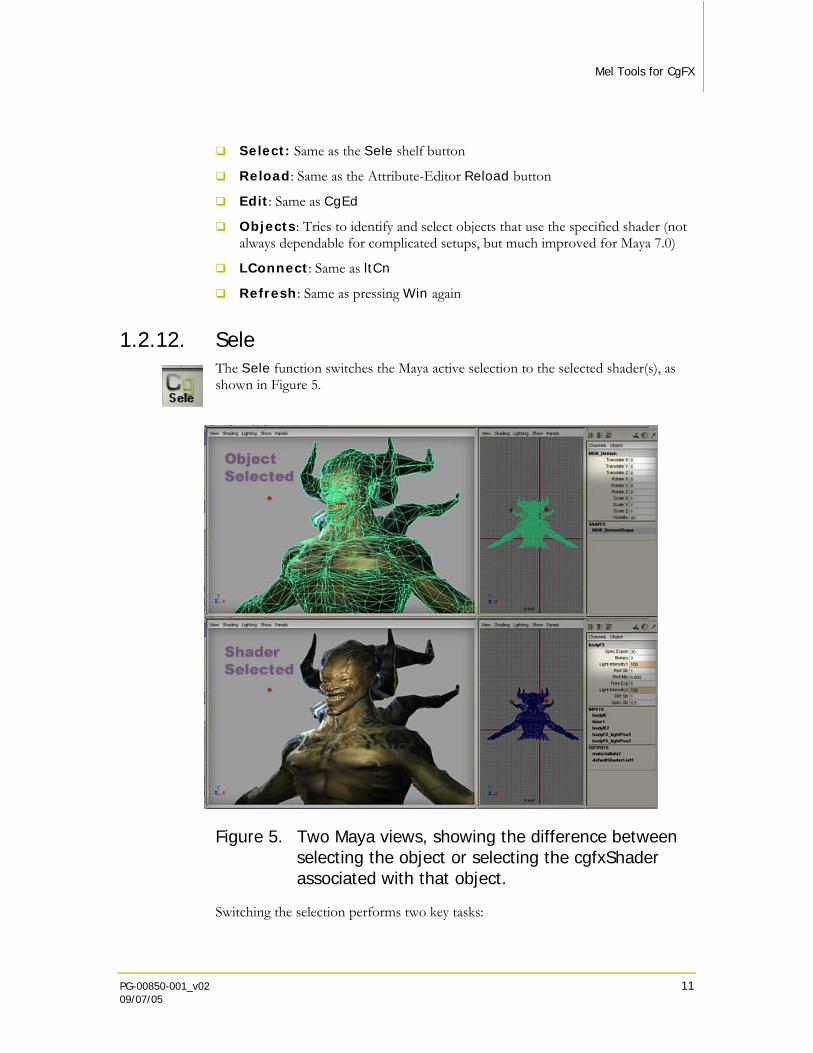
1.2.12. Sele The Sele function switches the Maya active selection to the selected shader(s), as shown in Figure 5.
Figure 5. Two Maya views, showing the difference between selecting the object or selecting the cgfxShader associated with that object.
Switching the selection performs two key tasks:
Removes the selected-object display wireframe from the shaded view, making it easier to see the shaded surface,
Loads the cgfxShader’s keyable attributes into the channel box (and/or Maya attribute editor) for easy editing.
1.3. Using the Conv Button The Conv function translates Maya appearances into CgFX appearances, then connects the CgFX and Maya appearances together so that you can still use the original Maya shaders in rendered views while seeing the CgFX-shaded versions in the Maya shaded view. The CgFX shaders created by Conv are a bit simplistic, but they can be useful for many purposes. Currently the script targets the arbfp1 profile.
Because the possible combinations of shaders, textures, and lights possible in Maya are near-infinite, Conv can’t translate all possible shaders. It does translate all the most common types, however (cases that often handle 98% of actual Maya use).
Side note: If the Maya materials use 2D textures, as of Maya 7.0 the texture nodes are directly accessable to CgFX – no more .DDS conversions are required (as they were in Maya 4.5).
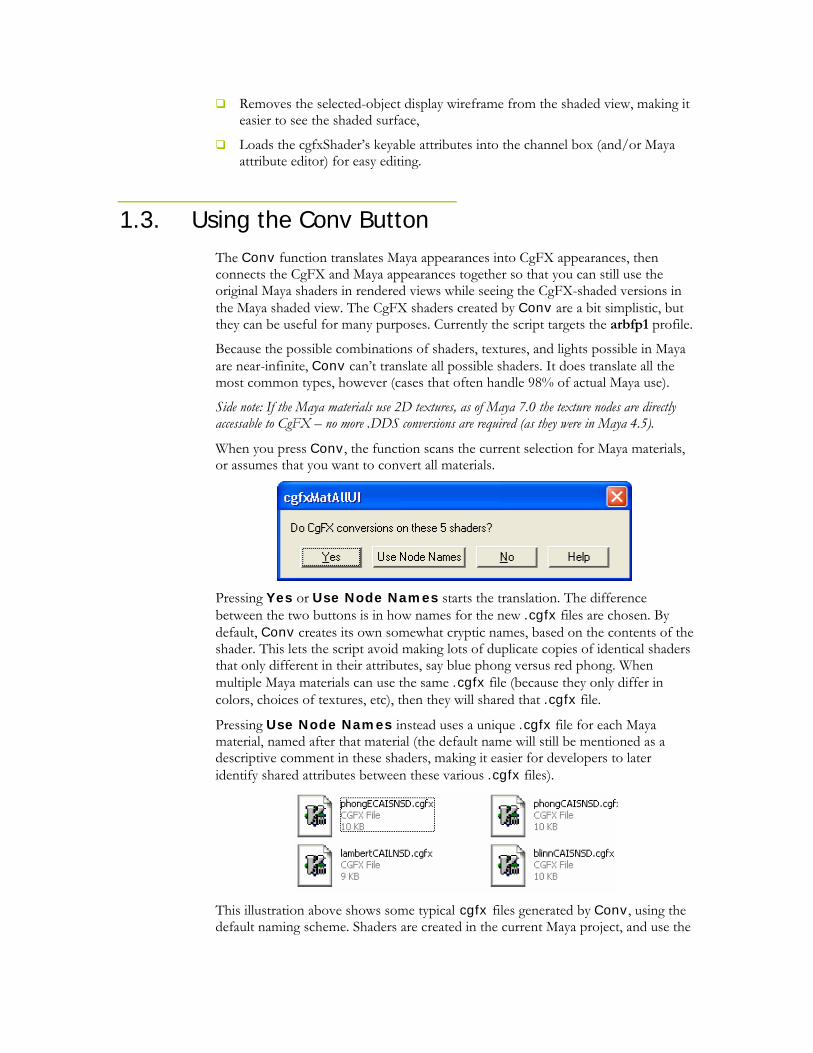
When you press Conv, the function scans the current selection for Maya materials, or assumes that you want to convert all materials.
Pressing Yes or Use Node Names starts the translation. The difference between the two buttons is in how names for the new .cgfx files are chosen. By default, Conv creates its own somewhat cryptic names, based on the contents of the shader. This lets the script avoid making lots of duplicate copies of identical shaders that only different in their attributes, say blue phong versus red phong. When multiple Maya materials can use the same .cgfx file (because they only differ in colors, choices of textures, etc), then they will shared that .cgfx file.
Pressing Use Node Names instead uses a unique .cgfx file for each Maya material, named after that material (the default name will still be mentioned as a descriptive comment in these shaders, making it easier for developers to later identify shared attributes between these various .cgfx files).
This illustration above shows some typical cgfx files generated by Conv, using the default naming scheme. Shaders are created in the current Maya project, and use the
Mel Tools for CgFX
PG-00850-001_v02 13 09/07/05
shaders directory (if any) specified by Maya’s File->Project->Edit… dialogue window.
If Maya materials are already bound to an existing cgfxShader node, no new connection or shader is generated. This protects any generations or editing you may have already done.
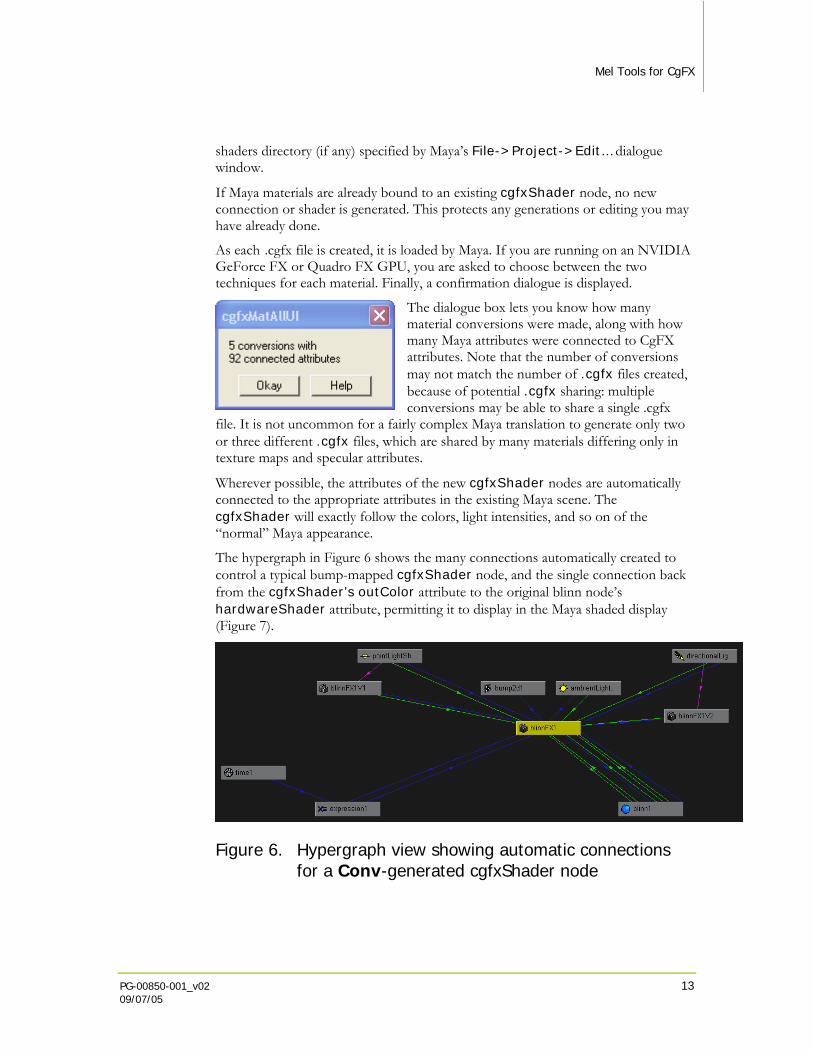
As each .cgfx file is created, it is loaded by Maya. If you are running on an NVIDIA GeForce FX or Quadro FX GPU, you are asked to choose between the two techniques for each material. Finally, a confirmation dialogue is displayed.
The dialogue box lets you know how many material conversions were made, along with how many Maya attributes were connected to CgFX attributes. Note that the number of conversions may not match the number of .cgfx files created, because of potential .cgfx sharing: multiple conversions may be able to share a single .cgfx
file. It is not uncommon for a fairly complex Maya translation to generate only two or three different .cgfx files, which are shared by many materials differing only in texture maps and specular attributes.
Wherever possible, the attributes of the new cgfxShader nodes are automatically connected to the appropriate attributes in the existing Maya scene. The cgfxShader will exactly follow the colors, light intensities, and so on of the “normal” Maya appearance.
The hypergraph in Figure 6 shows the many connections automatically created to control a typical bump-mapped cgfxShader node, and the single connection back from the cgfxShader’s outColor attribute to the original blinn node’s hardwareShader attribute, permitting it to display in the Maya shaded display (Figure 7).
Figure 6. Hypergraph view showing automatic connections for a Conv-generated cgfxShader node
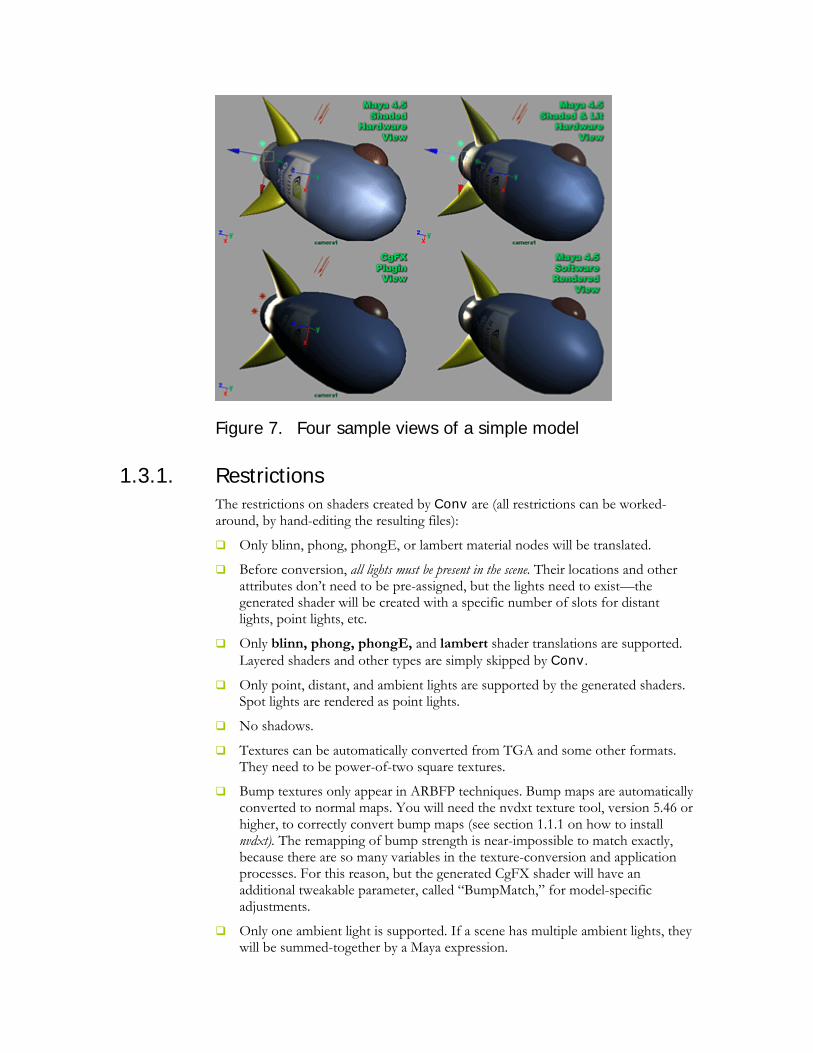
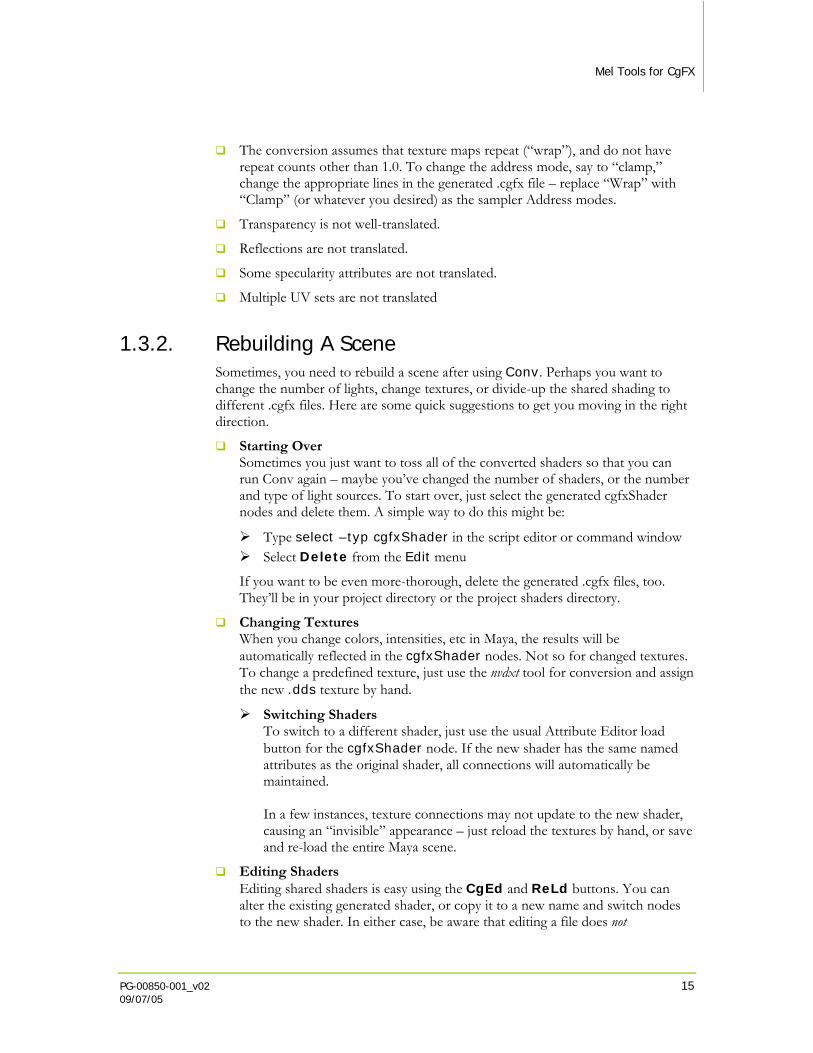
Figure 7. Four sample views of a simple model
1.3.1. Restrictions The restrictions on shaders created by Conv are (all restrictions can be worked-around, by hand-editing the resulting files):
Only blinn, phong, phongE, or lambert material nodes will be translated.
Before conversion, all lights must be present in the scene. Their locations and other attributes don’t need to be pre-assigned, but the lights need to exist—the generated shader will be created with a specific number of slots for distant lights, point lights, etc.
Only blinn, phong, phongE, and lambert shader translations are supported. Layered shaders and other types are simply skipped by Conv.
Only point, distant, and ambient lights are supported by the generated shaders. Spot lights are rendered as point lights.
No shadows.
Textures can be automatically converted from TGA and some other formats. They need to be power-of-two square textures.
Bump textures only appear in ARBFP techniques. Bump maps are automatically converted to normal maps. You will need the nvdxt texture tool, version 5.46 or higher, to correctly convert bump maps (see section 1.1.1 on how to install nvdxt). The remapping of bump strength is near-impossible to match exactly, because there are so many variables in the texture-conversion and application processes. For this reason, but the generated CgFX shader will have an additional tweakable parameter, called “BumpMatch,” for model-specific adjustments.
Only one ambient light is supported. If a scene has multiple ambient lights, they will be summed-together by a Maya expression.
Mel Tools for CgFX
PG-00850-001_v02 15 09/07/05
The conversion assumes that texture maps repeat (“wrap”), and do not have repeat counts other than 1.0. To change the address mode, say to “clamp,” change the appropriate lines in the generated .cgfx file – replace “Wrap” with “Clamp” (or whatever you desired) as the sampler Address modes.
Transparency is not well-translated.
Reflections are not translated.
Some specularity attributes are not translated.
Multiple UV sets are not translated
1.3.2. Rebuilding A Scene Sometimes, you need to rebuild a scene after using Conv. Perhaps you want to change the number of lights, change textures, or divide-up the shared shading to different .cgfx files. Here are some quick suggestions to get you moving in the right direction.
Starting Over Sometimes you just want to toss all of the converted shaders so that you can run Conv again – maybe you’ve changed the number of shaders, or the number and type of light sources. To start over, just select the generated cgfxShader nodes and delete them. A simple way to do this might be:
Type select –typ cgfxShader in the script editor or command window Select Delete from the Edit menu
If you want to be even more-thorough, delete the generated .cgfx files, too. They’ll be in your project directory or the project shaders directory.
Changing Textures When you change colors, intensities, etc in Maya, the results will be automatically reflected in the cgfxShader nodes. Not so for changed textures. To change a predefined texture, just use the nvdxt tool for conversion and assign the new .dds texture by hand.
Switching Shaders To switch to a different shader, just use the usual Attribute Editor load button for the cgfxShader node. If the new shader has the same named attributes as the original shader, all connections will automatically be maintained. In a few instances, texture connections may not update to the new shader, causing an “invisible” appearance – just reload the textures by hand, or save and re-load the entire Maya scene.
Editing Shaders Editing shared shaders is easy using the CgEd and ReLd buttons. You can alter the existing generated shader, or copy it to a new name and switch nodes to the new shader. In either case, be aware that editing a file does not
automatically load the results into Maya – you must explicitly re-load to get the new, edited shader. Likewise, reloading a single cgfxShader node, if the shader is shared, will not affect other cgfxShader nodes that use that shader, unless you use the multiple-load functions of the ReLd button.
1.4. Mel Scripts The following Mel scripts implement the button functions described above. In each case, the name of the Mel function matches the name of the .mel file, so that Maya can find the appropriate function automatically.
1.4.1. UI Mel Functions Table 1 lists the UI Mel functions that can be handily bound to Maya buttons, menus, shelves, etc.
Since these UI functions operate based on the active Maya selection, none of them have any input parameters.
Table 1. Mel Scripts
UI Function Button cgfxConnectLightAttrsUI.mel ltCn.
cgfxDebugUI.mel cDbg. cgfxEditUI.mel CgEd
cgfxKeyableUI.mel CgKy. cgfxMatAllUI.mel Conv.
cgfxReloadUI.mel ReLd
cgfxSelectUI.mel Sele. cgfxTestUI.mel TScn
cgfxWebUI.mel web cgfxWinUI.mel Win.
nvToggleWireSelUI.mel tgwr.
Mel Tools for CgFX
PG-00850-001_v02 17 09/07/05
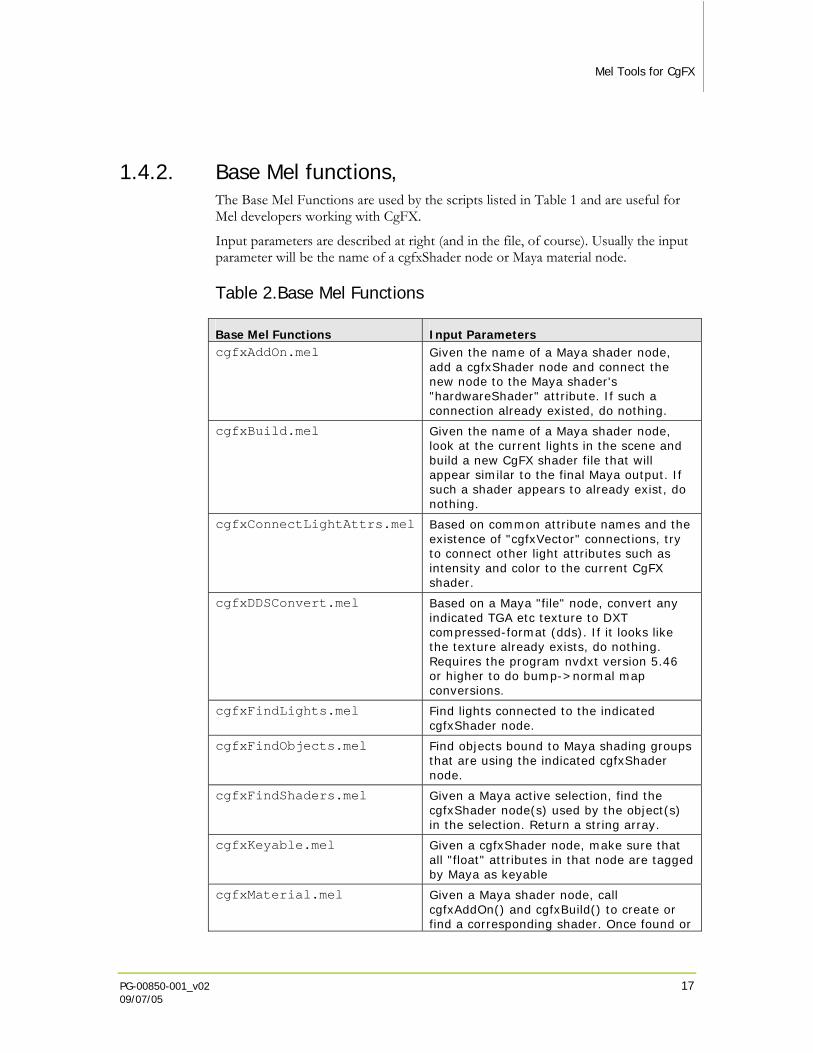
1.4.2. Base Mel functions, The Base Mel Functions are used by the scripts listed in Table 1 and are useful for Mel developers working with CgFX.
Input parameters are described at right (and in the file, of course). Usually the input parameter will be the name of a cgfxShader node or Maya material node.
Table 2.Base Mel Functions
Base Mel Functions Input Parameters cgfxAddOn.mel Given the name of a Maya shader node,
add a cgfxShader node and connect the new node to the Maya shader's "hardwareShader" attribute. If such a connection already existed, do nothing.
cgfxBuild.mel Given the name of a Maya shader node, look at the current lights in the scene and build a new CgFX shader file that will appear similar to the final Maya output. If such a shader appears to already exist, do nothing.
cgfxConnectLightAttrs.mel Based on common attribute names and the existence of "cgfxVector" connections, try to connect other light attributes such as intensity and color to the current CgFX shader.
cgfxDDSConvert.mel Based on a Maya "file" node, convert any indicated TGA etc texture to DXT compressed-format (dds). If it looks like the texture already exists, do nothing. Requires the program nvdxt version 5.46 or higher to do bump->normal map conversions.
cgfxFindLights.mel Find lights connected to the indicated cgfxShader node.
cgfxFindObjects.mel Find objects bound to Maya shading groups that are using the indicated cgfxShader node.
cgfxFindShaders.mel Given a Maya active selection, find the cgfxShader node(s) used by the object(s) in the selection. Return a string array.
cgfxKeyable.mel Given a cgfxShader node, make sure that all "float" attributes in that node are tagged by Maya as keyable
cgfxMaterial.mel Given a Maya shader node, call cgfxAddOn() and cgfxBuild() to create or find a corresponding shader. Once found or
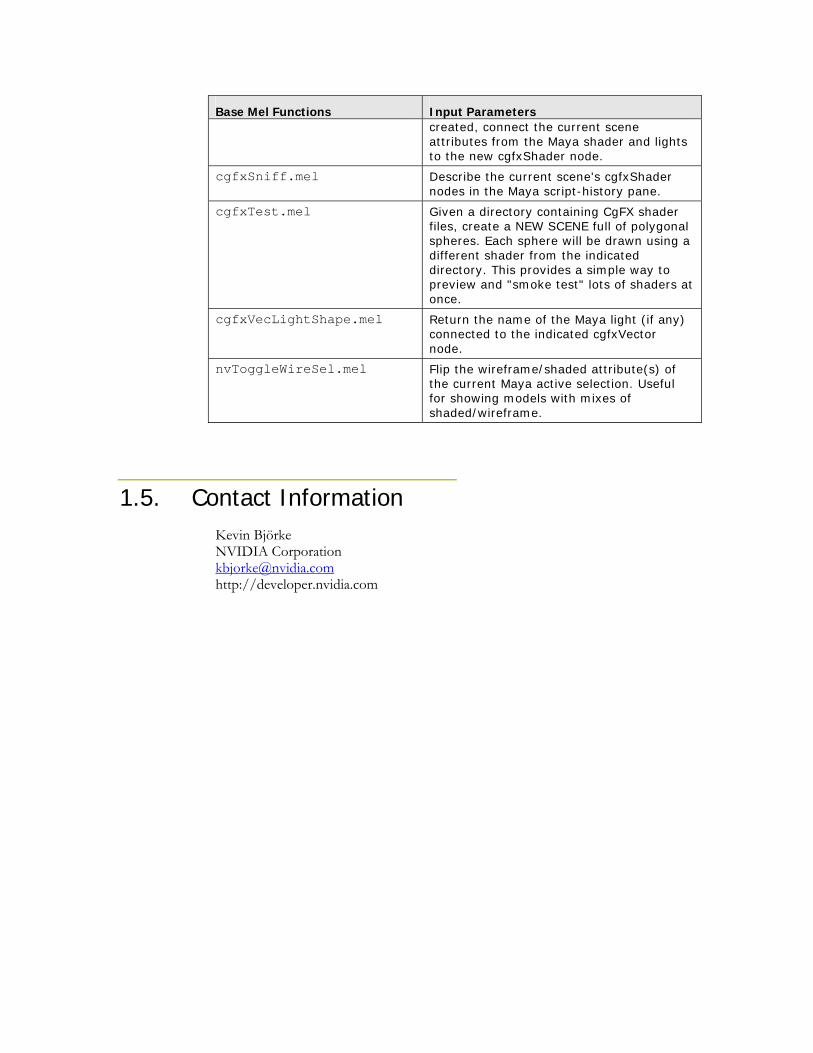
Base Mel Functions Input Parameters created, connect the current scene attributes from the Maya shader and lights to the new cgfxShader node.
cgfxSniff.mel Describe the current scene's cgfxShader nodes in the Maya script-history pane.
cgfxTest.mel Given a directory containing CgFX shader files, create a NEW SCENE full of polygonal spheres. Each sphere will be drawn using a different shader from the indicated directory. This provides a simple way to preview and "smoke test" lots of shaders at once.
cgfxVecLightShape.mel Return the name of the Maya light (if any) connected to the indicated cgfxVector node.
nvToggleWireSel.mel Flip the wireframe/shaded attribute(s) of the current Maya active selection. Useful for showing models with mixes of shaded/wireframe.
1.5. Contact Information Kevin Björke NVIDIA Corporation [email protected] http://developer.nvidia.com
NVIDIA Corporation 2701 San Tomas Expressway
Santa Clara, CA 95050 www.nvidia.com
Notice
ALL NVIDIA DESIGN SPECIFICATIONS, REFERENCE BOARDS, FILES, DRAWINGS, DIAGNOSTICS, LISTS, AND OTHER DOCUMENTS (TOGETHER AND SEPARATELY, “MATERIALS”) ARE BEING PROVIDED “AS IS." NVIDIA MAKES NO WARRANTIES, EXPRESSED, IMPLIED, STATUTORY, OR OTHERWISE WITH RESPECT TO THE MATERIALS, AND EXPRESSLY DISCLAIMS ALL IMPLIED WARRANTIES OF NONINFRINGEMENT, MERCHANTABILITY, AND FITNESS FOR A PARTICULAR PURPOSE.
Information furnished is believed to be accurate and reliable. However, NVIDIA Corporation assumes no responsibility for the consequences of use of such information or for any infringement of patents or other rights of third parties that may result from its use. No license is granted by implication or otherwise under any patent or patent rights of NVIDIA Corporation. Specifications mentioned in this publication are subject to change without notice. This publication supersedes and replaces all information previously supplied. NVIDIA Corporation products are not authorized for use as critical components in life support devices or systems without express written approval of NVIDIA Corporation.
Trademarks
NVIDIA, the NVIDIA logo, are registered trademarks of NVIDIA Corporation. Other company and product names may be trademarks of the respective companies with which they are associated.
Copyright
© 2005 by NVIDIA Corporation. All rights reserved