Embed Size (px)
Citation preview
© 2017 Mediachance
User's Guide
UltraSnap PRO
2
Contents
Chapter 1 Introduction1
Welcome1
What's new in version 41
Chapter 2 Ultra-Snap PRO2
Basics2
Types of capture3
Hot-Keys4
Advanced Export4
Multiple Documents5
Multiple Monitors6
Capture mode6
Set of Resize Tools9
History9
Editing10
Edit Mode10
Main Screen11
Basics12
Canvas Size and Color13
Standard Tools14
Text Object16
Shapes17
Bitmaps19
Bitmap Tracing20
Interractive Sharpen22
Place Inside23
Crop Tool25
Style Palettes26
Object Palettes28
Magnifier Object30
Other tools31
3
Contents
PDF Pages33
Tips and Tricks36
1 Chapter 1 Introduction
Introduction
Welcome
Our UltraSnap was originally written for the internal purpose, to speed up process of creating multimediapresentations, training, manuals and web pages and to simplify sending digital photos by e-mail. Becauseit -performed beyond any expectations we decided to make it available for public. There are thousands of uses for a smart screen capture around the office.
We use UltraSnap extensively for many years (this whole site and all images in our manuals use it) and thesoftware has been perfected over the time (the great benefit of using our own tools). It has at hand the toolsthat you need most and all workflow is streamlined without much -clicking around. Press Hot-key tocapture image, adjust the size, the sharpness, add drop shadow, add a text below the image...(see theflower picture). The best thing is that the effects are like a properties.
Once you set them you don't have to repeat these steps for the next image again! The next image youcapture will automatically have applied the resizing, sharpness and all effects. This is a huge time-saver fornumber of similar screen captures.
What's new in version 4
The version 3.x was probably the oldest and longest running workhorse in our office. But it was time for alarge scale update!
Works in Windows 10 and its new way of display scaling and monitor DPISaves all data in User spaceAdds multipage PDF export - a quick way to capture screenshots one after another and then save theresult as a PDF document.Numerous enhancements in the Editor Mode:o Color Wheel
o Transparency editing, pick transparency etc...
o Vector Tracing
o Many other enhancements
Improved capture from multiple monitors (ver.3 didn't like when the monitors had different resolutions)The trial version doesn't expire - instead it show small overlay on bottom of capture.Many other fixes and smaller additions.
2Chapter 1 Introduction
Introduction
Basics
UltraSnap PRO has two modes:
Capture modeEdit mode
The capture mode works like a clipboard pipe. Whatever you capture will automatically appear in theclipboard. The same apply if you change any settings in this mode including size, drop shadow, sharpeningetc...
The Edit mode is for adding multiple captures into the image, adding arrows, cursors, resizing object etc.
You can capture screen in both modes!
Minimize, Close, Exit
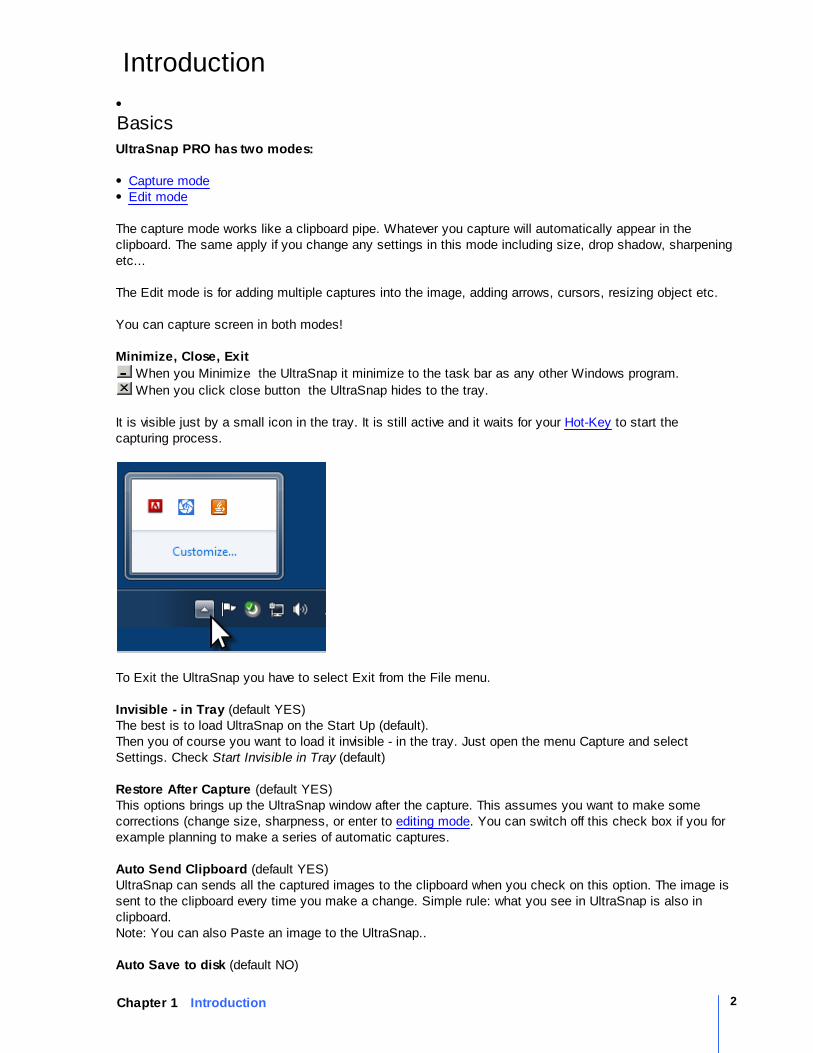
When you Minimize the UltraSnap it minimize to the task bar as any other Windows program.
When you click close button the UltraSnap hides to the tray.
It is visible just by a small icon in the tray. It is still active and it waits for your Hot-Key to start thecapturing process.
To Exit the UltraSnap you have to select Exit from the File menu.
Invisible - in Tray (default YES)The best is to load UltraSnap on the Start Up (default).Then you of course you want to load it invisible - in the tray. Just open the menu Capture and selectSettings. Check Start Invisible in Tray (default)
Restore After Capture (default YES)This options brings up the UltraSnap window after the capture. This assumes you want to make somecorrections (change size, sharpness, or enter to editing mode. You can switch off this check box if you forexample planning to make a series of automatic captures.
Auto Send Clipboard (default YES)UltraSnap can sends all the captured images to the clipboard when you check on this option. The image issent to the clipboard every time you make a change. Simple rule: what you see in UltraSnap is also inclipboard.Note: You can also Paste an image to the UltraSnap..
Auto Save to disk (default NO)
3 Chapter 2 Ultra-Snap PRO
Ultra-Snap PRO
UltraSnap can save automatically each capture to the new file if you use this option. You need to firstspecify the directory, file name and format. The name will increment automatically.
There is also a button called Save Now that is enabled when the Auto Save to disk is set to NO. This canbe used to quickly save current screen capture without any other input. It will automatically increment thename and save the capture in the previously selected format and folder.
Drag and Drop: Enable D&D to ExplorerYou can use the Drag and Drop feature to simply drag an image from UltraSnap to any other windowsprogram which supports Drag and Drop. For example you can drag it to Windows Explorer and it will createthe file right where you drag it. Or you can drag an image to the e-mail client to send it to your friends.
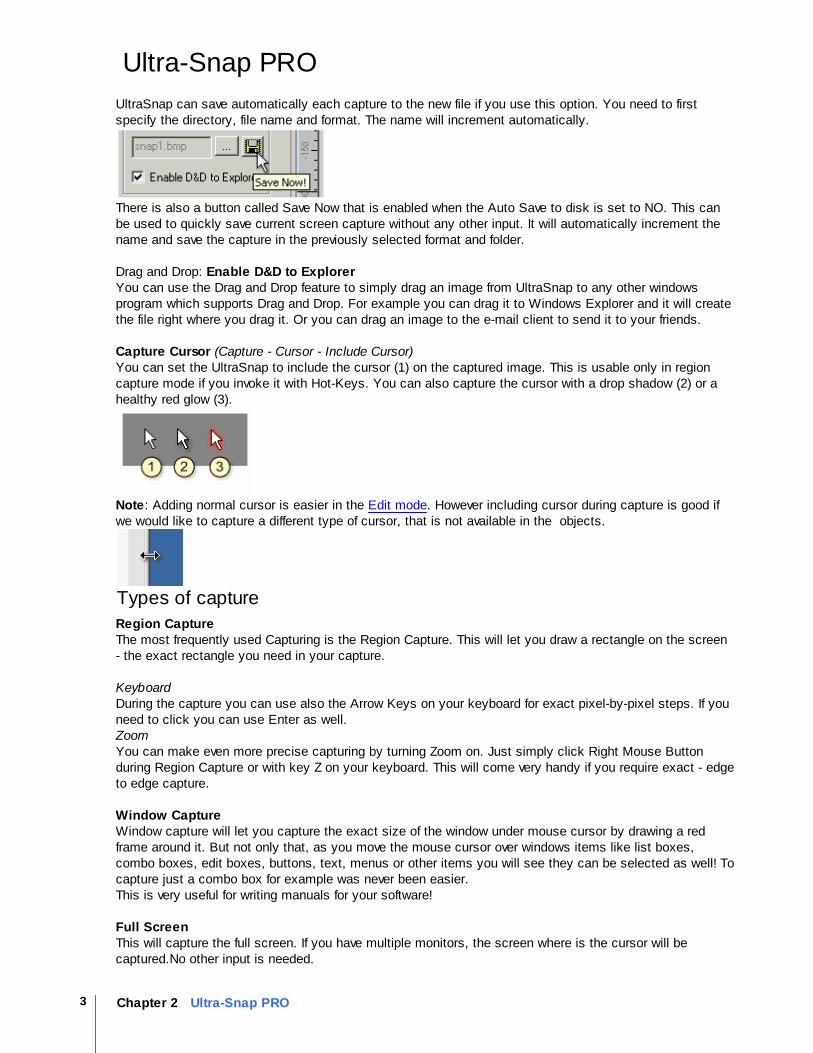
Capture Cursor (Capture - Cursor - Include Cursor)You can set the UltraSnap to include the cursor (1) on the captured image. This is usable only in regioncapture mode if you invoke it with Hot-Keys. You can also capture the cursor with a drop shadow (2) or ahealthy red glow (3).
Note: Adding normal cursor is easier in the Edit mode. However including cursor during capture is good ifwe would like to capture a different type of cursor, that is not available in the objects.
Types of capture
Region CaptureThe most frequently used Capturing is the Region Capture. This will let you draw a rectangle on the screen- the exact rectangle you need in your capture.
Keyboard During the capture you can use also the Arrow Keys on your keyboard for exact pixel-by-pixel steps. If youneed to click you can use Enter as well.ZoomYou can make even more precise capturing by turning Zoom on. Just simply click Right Mouse Buttonduring Region Capture or with key Z on your keyboard. This will come very handy if you require exact - edgeto edge capture.
Window CaptureWindow capture will let you capture the exact size of the window under mouse cursor by drawing a redframe around it. But not only that, as you move the mouse cursor over windows items like list boxes,combo boxes, edit boxes, buttons, text, menus or other items you will see they can be selected as well! Tocapture just a combo box for example was never been easier. This is very useful for writing manuals for your software!
Full ScreenThis will capture the full screen. If you have multiple monitors, the screen where is the cursor will becaptured.No other input is needed.
4Chapter 2 Ultra-Snap PRO
Ultra-Snap PRO
Repeat LastThis will capture the last region.
Hot-Keys
There are predefined system-wide Hot-Keys for each capture operation:
Capture Region Ctrl+1Capture Window Ctrl+2Capture Full Screen Ctrl+3Repeat Last Capture Ctrl+4
Any time you need to make a capture, just press the hot key combination.
Of course you can define your own Hot-Keys. In Menu Capture - open Hot-Keys item... The rest is simple,but make sure you don't put already used system-wide hot key by some other programs (like ICQ) or a Hot-Key which conflicts with shortcut in a program you planning to capture from (like MS Word) Therefore it is wise to use Hot-Keys that are combination of two or three keys, like Ctrl+Shift+R
Advanced Export
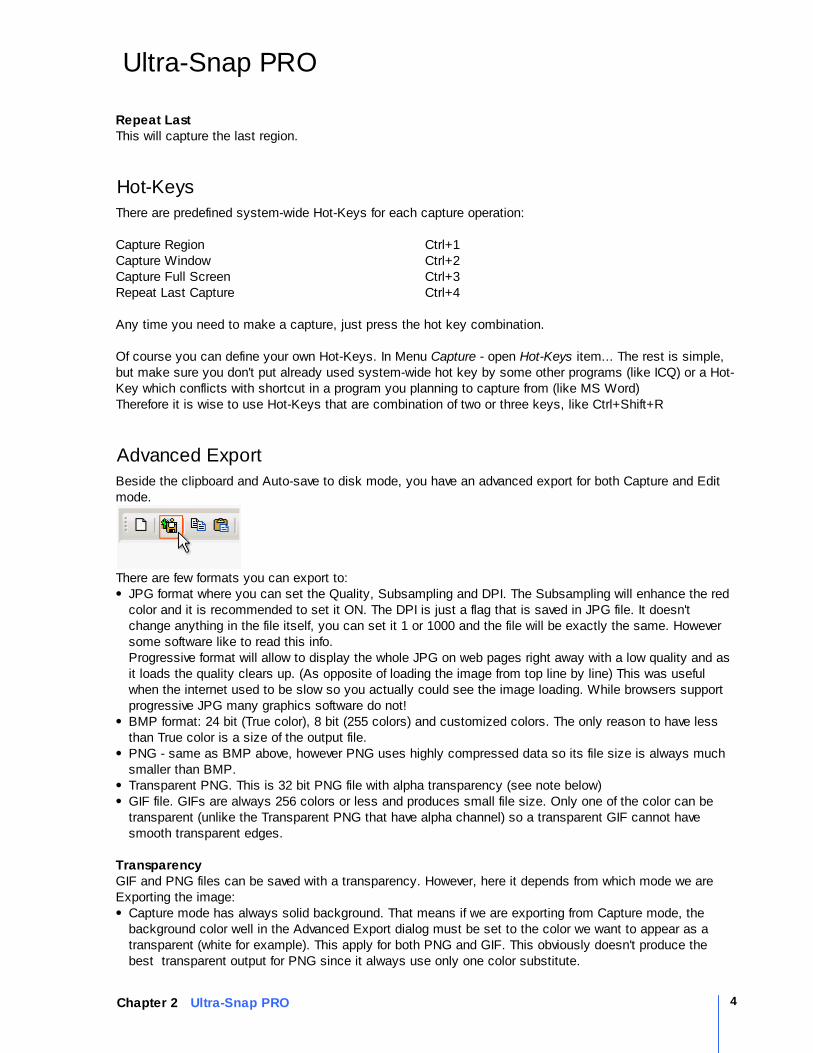
Beside the clipboard and Auto-save to disk mode, you have an advanced export for both Capture and Editmode.
There are few formats you can export to:JPG format where you can set the Quality, Subsampling and DPI. The Subsampling will enhance the redcolor and it is recommended to set it ON. The DPI is just a flag that is saved in JPG file. It doesn'tchange anything in the file itself, you can set it 1 or 1000 and the file will be exactly the same. Howeversome software like to read this info. Progressive format will allow to display the whole JPG on web pages right away with a low quality and asit loads the quality clears up. (As opposite of loading the image from top line by line) This was usefulwhen the internet used to be slow so you actually could see the image loading. While browsers supportprogressive JPG many graphics software do not!BMP format: 24 bit (True color), 8 bit (255 colors) and customized colors. The only reason to have lessthan True color is a size of the output file. PNG - same as BMP above, however PNG uses highly compressed data so its file size is always muchsmaller than BMP.Transparent PNG. This is 32 bit PNG file with alpha transparency (see note below)GIF file. GIFs are always 256 colors or less and produces small file size. Only one of the color can betransparent (unlike the Transparent PNG that have alpha channel) so a transparent GIF cannot havesmooth transparent edges.
TransparencyGIF and PNG files can be saved with a transparency. However, here it depends from which mode we areExporting the image:
Capture mode has always solid background. That means if we are exporting from Capture mode, thebackground color well in the Advanced Export dialog must be set to the color we want to appear as atransparent (white for example). This apply for both PNG and GIF. This obviously doesn't produce thebest transparent output for PNG since it always use only one color substitute.
5 Chapter 2 Ultra-Snap PRO
Ultra-Snap PRO
In Editing mode it is different. The Transparent PNG will simply understand the canvas as a transparent -regardless of what color it is or what is set in color well. PNG uses alpha channel, so the transparency iscontinuous. The GIF in Editing mode will also take the canvas as transparent. Here however GIF can substitute onlyone color as transparent. If background is white, then white will be transparent.
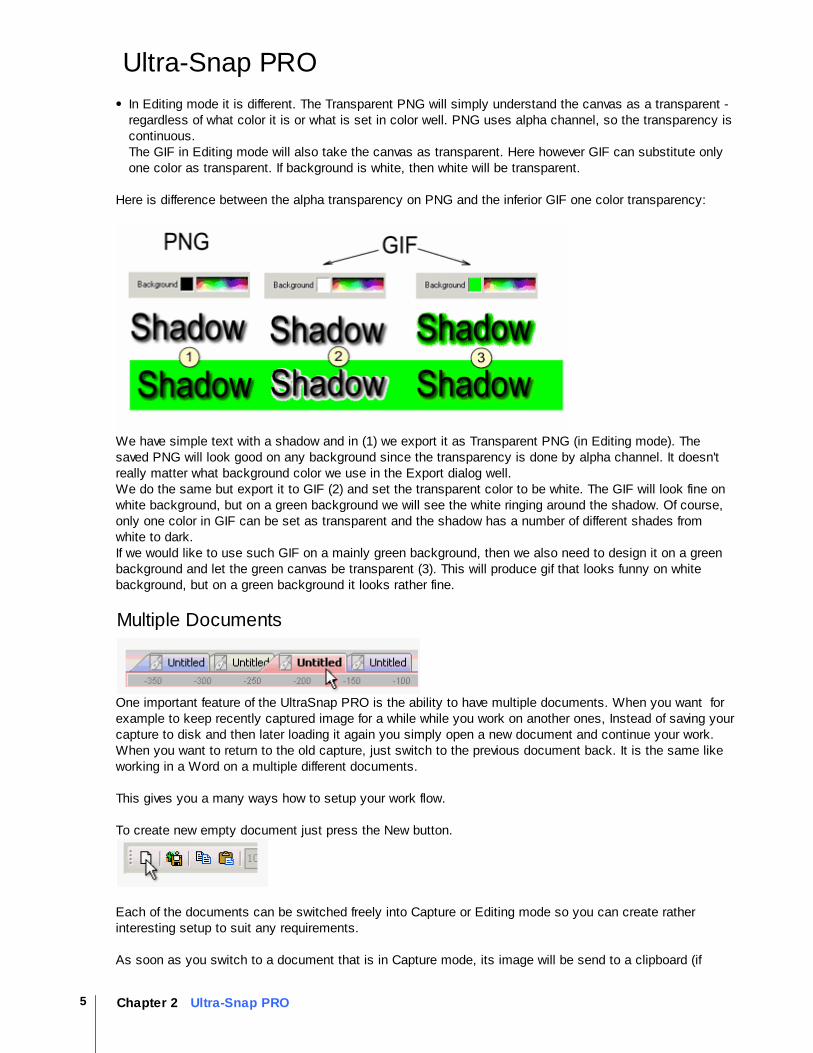
Here is difference between the alpha transparency on PNG and the inferior GIF one color transparency:
We have simple text with a shadow and in (1) we export it as Transparent PNG (in Editing mode). Thesaved PNG will look good on any background since the transparency is done by alpha channel. It doesn'treally matter what background color we use in the Export dialog well. We do the same but export it to GIF (2) and set the transparent color to be white. The GIF will look fine onwhite background, but on a green background we will see the white ringing around the shadow. Of course,only one color in GIF can be set as transparent and the shadow has a number of different shades fromwhite to dark.If we would like to use such GIF on a mainly green background, then we also need to design it on a greenbackground and let the green canvas be transparent (3). This will produce gif that looks funny on whitebackground, but on a green background it looks rather fine.
Multiple Documents
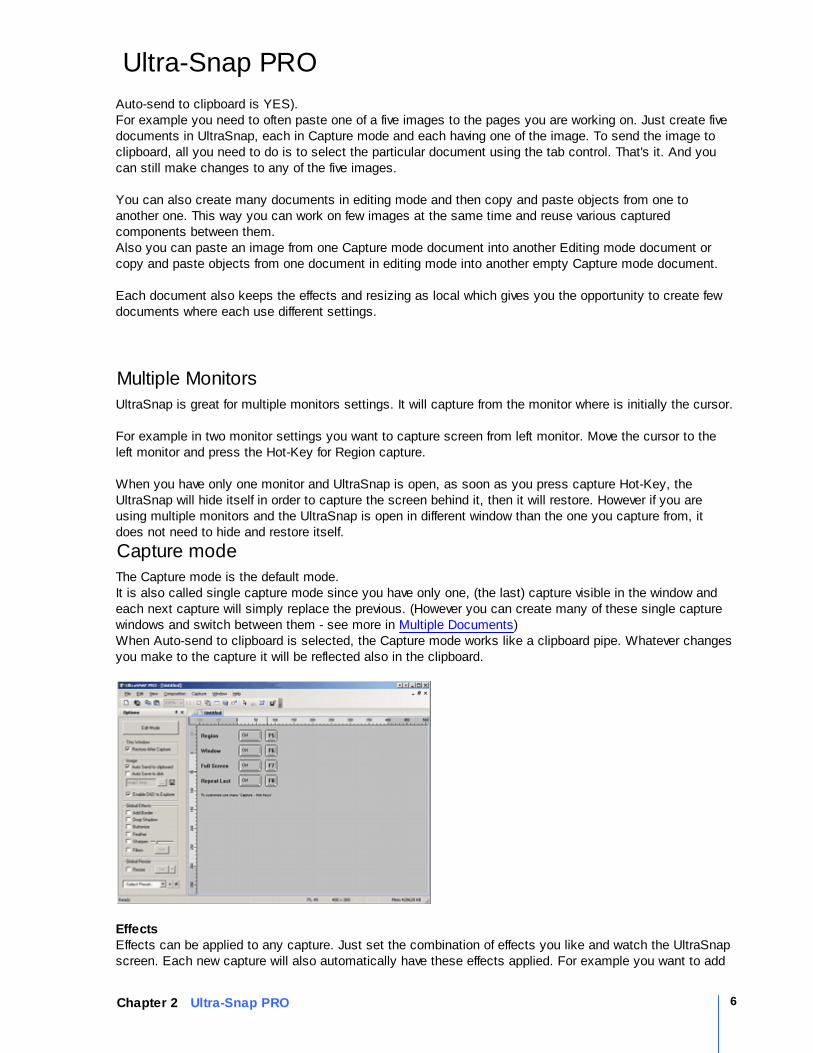
One important feature of the UltraSnap PRO is the ability to have multiple documents. When you want forexample to keep recently captured image for a while while you work on another ones, Instead of saving yourcapture to disk and then later loading it again you simply open a new document and continue your work.When you want to return to the old capture, just switch to the previous document back. It is the same likeworking in a Word on a multiple different documents.
This gives you a many ways how to setup your work flow.
To create new empty document just press the New button.
Each of the documents can be switched freely into Capture or Editing mode so you can create ratherinteresting setup to suit any requirements.
As soon as you switch to a document that is in Capture mode, its image will be send to a clipboard (if
6Chapter 2 Ultra-Snap PRO
Ultra-Snap PRO
Auto-send to clipboard is YES).For example you need to often paste one of a five images to the pages you are working on. Just create fivedocuments in UltraSnap, each in Capture mode and each having one of the image. To send the image toclipboard, all you need to do is to select the particular document using the tab control. That's it. And youcan still make changes to any of the five images.
You can also create many documents in editing mode and then copy and paste objects from one toanother one. This way you can work on few images at the same time and reuse various capturedcomponents between them.Also you can paste an image from one Capture mode document into another Editing mode document orcopy and paste objects from one document in editing mode into another empty Capture mode document.
Each document also keeps the effects and resizing as local which gives you the opportunity to create fewdocuments where each use different settings.
Multiple Monitors
UltraSnap is great for multiple monitors settings. It will capture from the monitor where is initially the cursor.
For example in two monitor settings you want to capture screen from left monitor. Move the cursor to theleft monitor and press the Hot-Key for Region capture.
When you have only one monitor and UltraSnap is open, as soon as you press capture Hot-Key, theUltraSnap will hide itself in order to capture the screen behind it, then it will restore. However if you areusing multiple monitors and the UltraSnap is open in different window than the one you capture from, itdoes not need to hide and restore itself.
Capture mode
The Capture mode is the default mode. It is also called single capture mode since you have only one, (the last) capture visible in the window andeach next capture will simply replace the previous. (However you can create many of these single capturewindows and switch between them - see more in Multiple Documents)When Auto-send to clipboard is selected, the Capture mode works like a clipboard pipe. Whatever changesyou make to the capture it will be reflected also in the clipboard.
EffectsEffects can be applied to any capture. Just set the combination of effects you like and watch the UltraSnapscreen. Each new capture will also automatically have these effects applied. For example you want to add
7 Chapter 2 Ultra-Snap PRO
Ultra-Snap PRO
to each capture border, drop shadow or sharpen it. This will be done automatically.Border - a thin black border around the imageDrop Shadow - a drop shadow behind the whole image (the image will be resized in order toaccommodate the new shadow)Buttonize - a bevel will be applied to the whole imageFeather - it will make the edges of the image transparentAuto Crop - this will crop the image to the its closest borders (for example removing a white border)
SharpenSharpening is important when you resize the image. Make sure you don't over-sharpen the image as itdoesn't look professional.
CrispSimilar to sharpness but it doesn't overpower the image (like creating halo around text). It increasesharpness of only very fine details and it is great to add crispness to resized photos or make small textmore readable..
Resize (3 sets)You can also let UltraSnap dynamically change the size of the image. Just click the Set button near theResize checkbox to open the Resize properties.In recent versions we added two resize options Resize A and Resize B which is great if you need to switchbetween two different sizes, like for example creating larger image and its thumbnail.
You can chose the way you want to resize the image:
Resize to XX% of original. If you set 75% for example all your captures will be resized to 75% of theoriginal.Maximum Width. If the image width is bigger than the maximum width the image will be resized to it. Theproportion of the image will of course stay the same. This way all your images will have maximumspecified width. If the captured image has smaller width, it will stay unchanged.Maximum Height. The same as for width but this time the Height is watched.Must fit into box. If the captured image is bigger in any direction than the specified Width and Height theimage will be resized so it always fit in that rectangle. (Proportions will stay the same of course). In otherway - it will never be bigger than the specified rectangle.Force resize to (Width and Height) -this will also change the proportions. The image will always beresized to that size.
Tip: It is always a good idea to use Sharpening if you resize image.
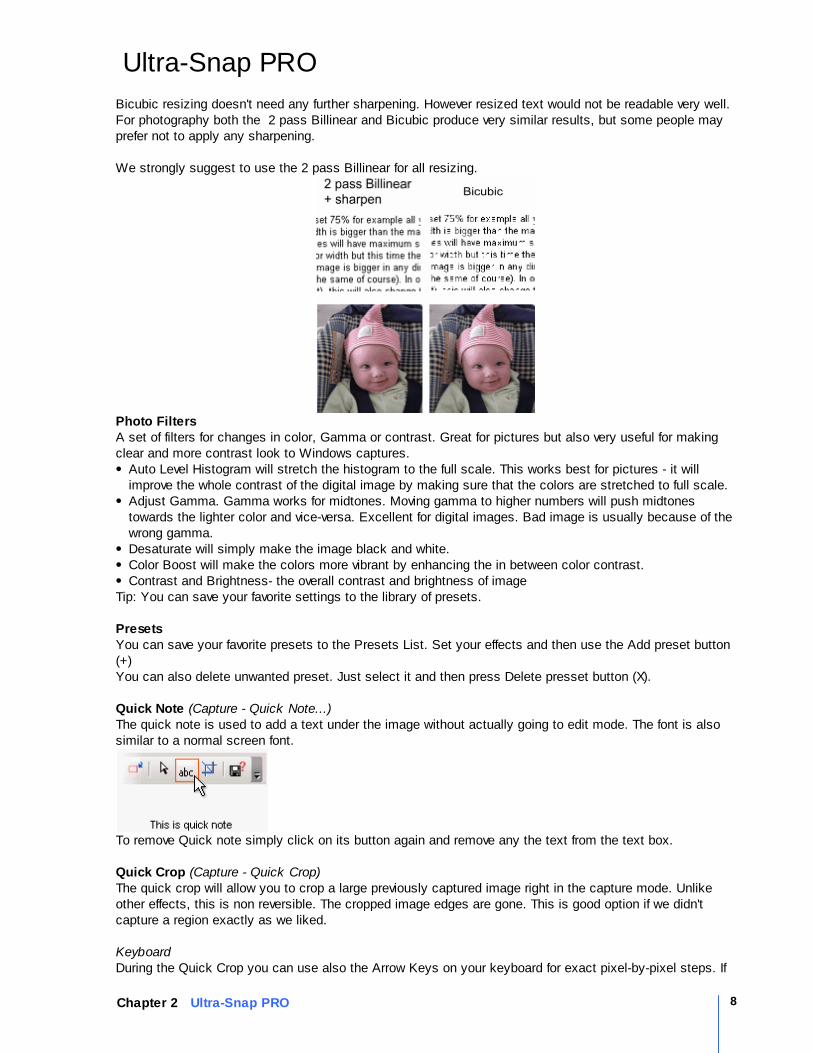
Filter: 2 pass Bilinear or Bicubic. 2 pass Bilinear is our special developed process for resizing images and it clearly outperforms any otherresizing methods. A further sharpening option must be applied on the resized image.
8Chapter 2 Ultra-Snap PRO
Ultra-Snap PRO
Bicubic resizing doesn't need any further sharpening. However resized text would not be readable very well.For photography both the 2 pass Billinear and Bicubic produce very similar results, but some people mayprefer not to apply any sharpening.
We strongly suggest to use the 2 pass Billinear for all resizing.
Photo FiltersA set of filters for changes in color, Gamma or contrast. Great for pictures but also very useful for makingclear and more contrast look to Windows captures.
Auto Level Histogram will stretch the histogram to the full scale. This works best for pictures - it willimprove the whole contrast of the digital image by making sure that the colors are stretched to full scale.Adjust Gamma. Gamma works for midtones. Moving gamma to higher numbers will push midtonestowards the lighter color and vice-versa. Excellent for digital images. Bad image is usually because of thewrong gamma.Desaturate will simply make the image black and white.Color Boost will make the colors more vibrant by enhancing the in between color contrast.Contrast and Brightness- the overall contrast and brightness of image
Tip: You can save your favorite settings to the library of presets.
PresetsYou can save your favorite presets to the Presets List. Set your effects and then use the Add preset button(+)You can also delete unwanted preset. Just select it and then press Delete presset button (X).
Quick Note (Capture - Quick Note...)The quick note is used to add a text under the image without actually going to edit mode. The font is alsosimilar to a normal screen font.
To remove Quick note simply click on its button again and remove any the text from the text box.
Quick Crop (Capture - Quick Crop)The quick crop will allow you to crop a large previously captured image right in the capture mode. Unlikeother effects, this is non reversible. The cropped image edges are gone. This is good option if we didn'tcapture a region exactly as we liked.
Keyboard During the Quick Crop you can use also the Arrow Keys on your keyboard for exact pixel-by-pixel steps. If
9 Chapter 2 Ultra-Snap PRO
Ultra-Snap PRO
you need to click you can use Enter as well.ZoomYou can make even more precise crop by turning Zoom on. Just simply click Right Mouse Button duringQuick Crop or with key Z on your keyboard. This will come very handy if you require exact - edge to edgecrop.
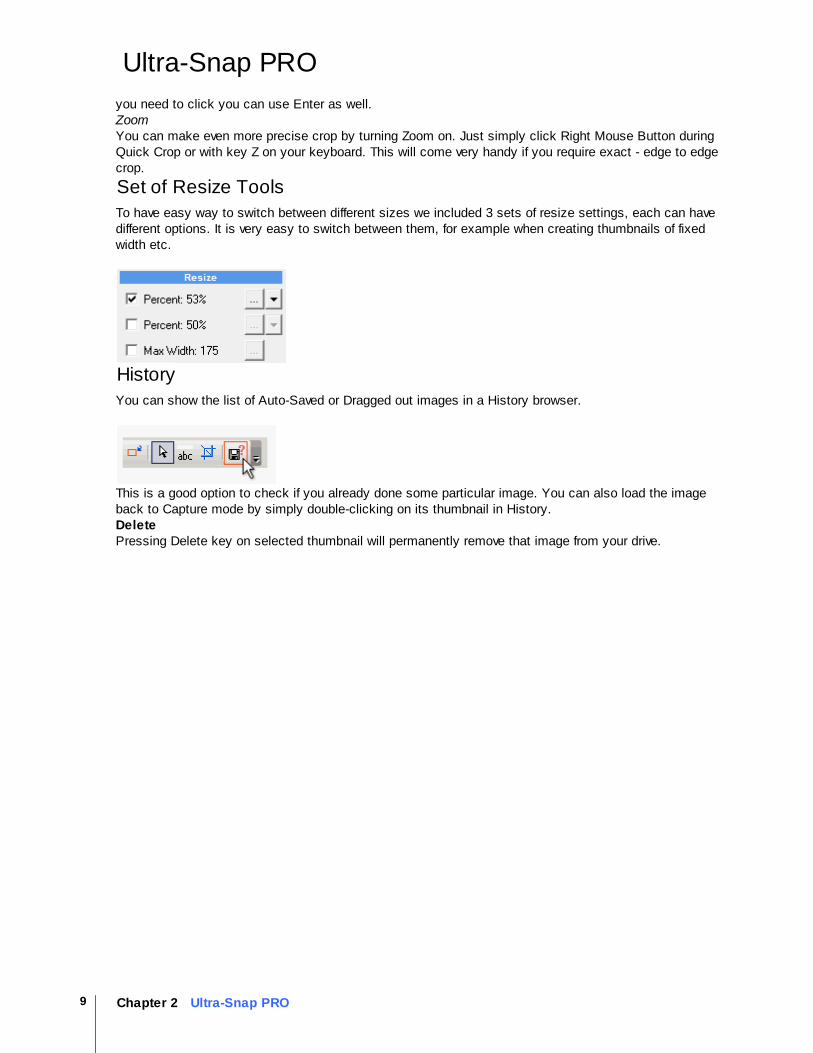
Set of Resize Tools
To have easy way to switch between different sizes we included 3 sets of resize settings, each can havedifferent options. It is very easy to switch between them, for example when creating thumbnails of fixedwidth etc.
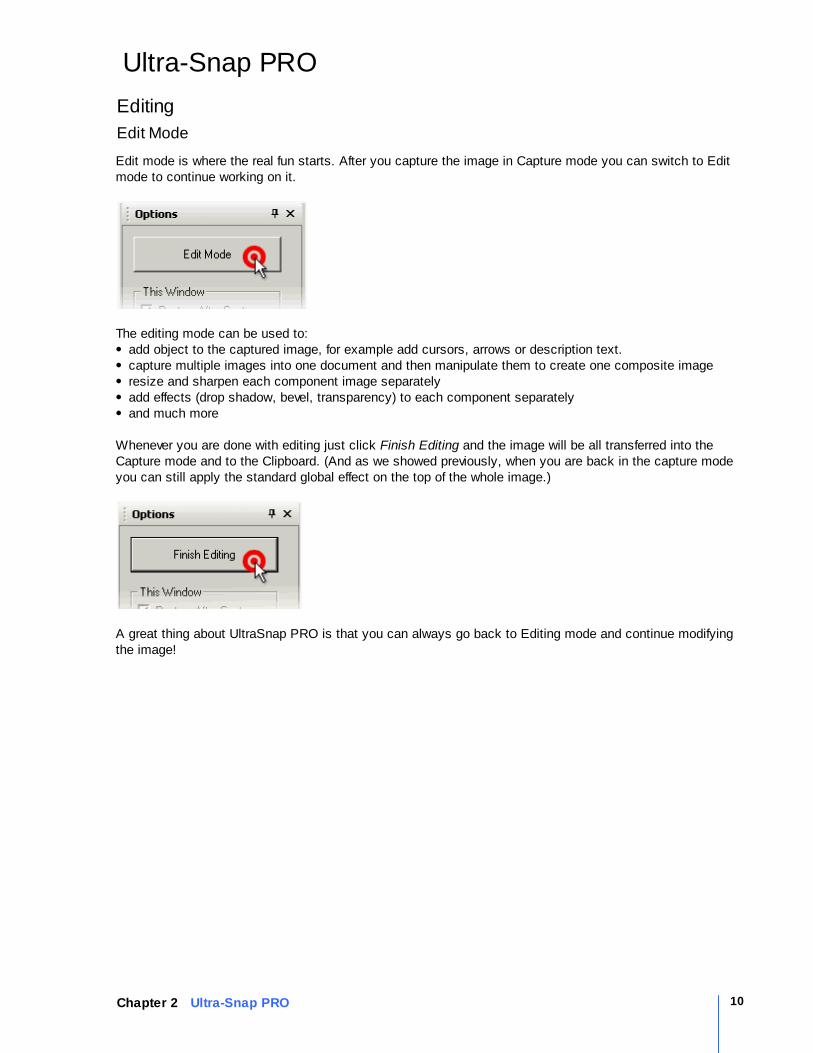
History
You can show the list of Auto-Saved or Dragged out images in a History browser.
This is a good option to check if you already done some particular image. You can also load the imageback to Capture mode by simply double-clicking on its thumbnail in History.DeletePressing Delete key on selected thumbnail will permanently remove that image from your drive.
10Chapter 2 Ultra-Snap PRO
Ultra-Snap PRO
Editing
Edit Mode
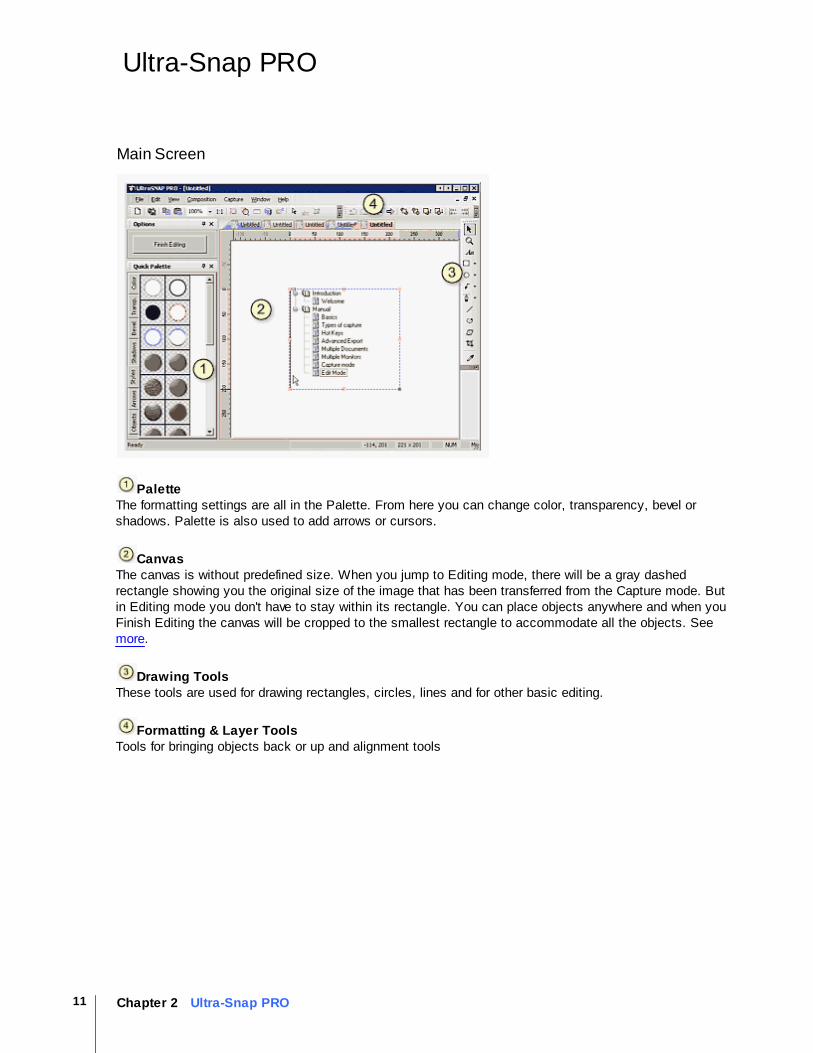
Edit mode is where the real fun starts. After you capture the image in Capture mode you can switch to Editmode to continue working on it.
The editing mode can be used to:add object to the captured image, for example add cursors, arrows or description text.capture multiple images into one document and then manipulate them to create one composite imageresize and sharpen each component image separatelyadd effects (drop shadow, bevel, transparency) to each component separatelyand much more
Whenever you are done with editing just click Finish Editing and the image will be all transferred into theCapture mode and to the Clipboard. (And as we showed previously, when you are back in the capture modeyou can still apply the standard global effect on the top of the whole image.)
A great thing about UltraSnap PRO is that you can always go back to Editing mode and continue modifyingthe image!
11 Chapter 2 Ultra-Snap PRO
Ultra-Snap PRO
Main Screen
PaletteThe formatting settings are all in the Palette. From here you can change color, transparency, bevel orshadows. Palette is also used to add arrows or cursors.
CanvasThe canvas is without predefined size. When you jump to Editing mode, there will be a gray dashedrectangle showing you the original size of the image that has been transferred from the Capture mode. Butin Editing mode you don't have to stay within its rectangle. You can place objects anywhere and when youFinish Editing the canvas will be cropped to the smallest rectangle to accommodate all the objects. See more.
Drawing ToolsThese tools are used for drawing rectangles, circles, lines and for other basic editing.
Formatting & Layer ToolsTools for bringing objects back or up and alignment tools
12Chapter 2 Ultra-Snap PRO
Ultra-Snap PRO
Basics
Select an Object
If you want to select, move or resize an object you use the Object Selector tool. With the Object Selector tool, you can select an object by clicking on the visible part of the object. You can resize the object by pulling on one of the 8 handles. The bottom right handle (in gray color) is forresizing in all directions, the other 7 handles always resize in their direction. (For example: the middle leftand right handle will resize only in the horizontal direction.)
Select more objects at the same timeOften, you would like to select more objects at the same time and then move, resize, or apply a command.To select two or more objects use one of these:
Click on the empty part of the canvas - where there is no object - hold down the mouse button and drag arectangle around the objects. Then release the button. You have to drag around the objects you want toselect. Only the objects, which are inside the rectangle, will be selected. Click on the object you want to select first: then hold down the SHIFT key and click on the secondobject. Repeat until all objects are selected. Click on first object name in Layer Bar, then hold SHIFT and continue selecting the objects.
To deselect all objects, click outside the selected area. To deselect only one object from the group ofselected objects, hold down the SHIFT key and click on a previously selected object.Tip: During multiple selections, look at the bottom of the screen (the status bar). The text will identify thenumber of objects you have selected.The Objects on screen will have a small number in the top left corner - this is the order on which youselected the objects.
Move Objects with ArrowsYou can move objects when you have the Object Selector tool selected, but when you have the Shape ToolSelected by default, you can't move the objects. If you want to move the object in Shape mode, hold the ALT key.You can move the object in pixel precision in almost any mode by pressing the Arrow keys on yourkeyboard. If you hold CTRL while you press the arrow key, you will move in increments defined by a grid.
GroupsGroups are logical selections in the main document. You don't get fewer objects, you just move all objectswith the group. Select two or more objects and press CTRL-G (or from the Menu: Object- Group). The grouphas a red border. You can move or resize grouped objects, and you can also change the parameters ofwhole group. To un-group a group, press CTRL-U (or from the menu: Object - Ungroup)Objects dragged from Arrows or Objects palette will be grouped if they have more than one object inside.(numbered bullet for example)
Change ColorThe color of the vector objects can be changed with the color palette or right click on the object and fromthe pop-up menu select Change Color or Color Pick.
13 Chapter 2 Ultra-Snap PRO
Ultra-Snap PRO
Canvas Size and Color
A canvas in editing mode is generally without a particular size because as soon as you go back to Capturemode the background will be resized to accommodate all the objects on canvas.The canvas size is by default set to the size of the captured image when we entered the Edit mode. This isindicated by the gray dashed rectangle on canvas. Again, it doesn't limit you, you can place objectsanywhere inside or outside this rectangle.
However there are cases when we may think about the size of canvas.zooming out will reveal objects only inside the canvasthe scroll bars are calculated from the size of the canvasthe magnifier effect works only inside the canvas
If because the above you feel the need to resize canvas you can do it by using menu Composition Editor-Trim Canvas or simply clicking Finish Editing button and then clicking back Edit mode.
Canvas Color.You can change the canvas color in menu Composition Editor - Canvas Color.
14Chapter 2 Ultra-Snap PRO
Ultra-Snap PRO
Standard Tools
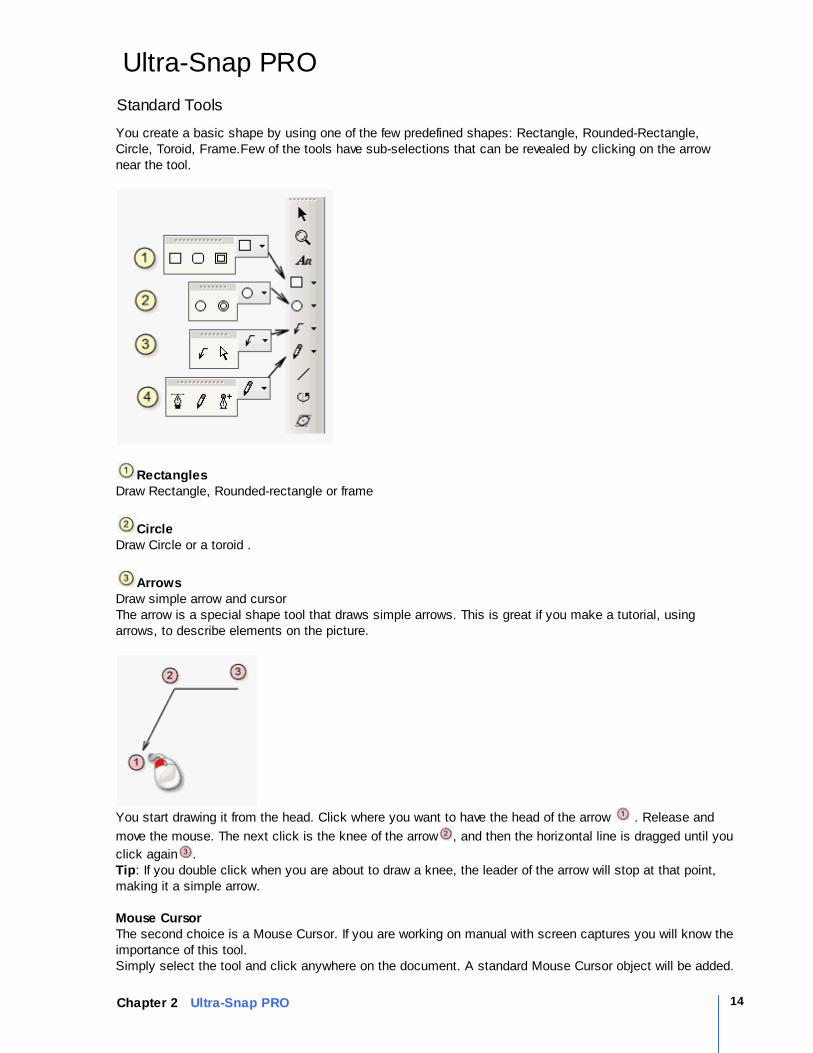
You create a basic shape by using one of the few predefined shapes: Rectangle, Rounded-Rectangle,Circle, Toroid, Frame.Few of the tools have sub-selections that can be revealed by clicking on the arrownear the tool.
RectanglesDraw Rectangle, Rounded-rectangle or frame
CircleDraw Circle or a toroid .
ArrowsDraw simple arrow and cursorThe arrow is a special shape tool that draws simple arrows. This is great if you make a tutorial, usingarrows, to describe elements on the picture.
You start drawing it from the head. Click where you want to have the head of the arrow . Release and
move the mouse. The next click is the knee of the arrow , and then the horizontal line is dragged until you
click again . Tip: If you double click when you are about to draw a knee, the leader of the arrow will stop at that point,making it a simple arrow.
Mouse CursorThe second choice is a Mouse Cursor. If you are working on manual with screen captures you will know theimportance of this tool.Simply select the tool and click anywhere on the document. A standard Mouse Cursor object will be added.
15 Chapter 2 Ultra-Snap PRO
Ultra-Snap PRO
You can hold CTRL to draw Mouse Cursor with shadow (great to enhance the appearance of it) You can
always remove or adjust the shadow with the Shadow Palette.
Shape toolsWith these tools you can create new shapes - paths. You have few optional methods for drawing a Pathfrom scratch.
The Line Tool for (drawing paths with non-curved sides) Pencil (for drawing free paths) and the Curve Tool(Bezier Curve)
Curve Tool. With this tool you can create lines and Path paths by drawing Path points. Select the Curve tool andclick where you want to have the start point. If you release the mouse button right after the click, you willdraw straight lines. If you hold the button and move the mouse, you will draw symmetrical Path points. Tostop drawing the Path, use one of the following: a) Double click on the point where you want to finish. b)Click with the Right mouse button on the point where you want to finish. c) Move the mouse over the startpoint and click - this will create the object as a closed path. Pencil ToolWith the Pencil you can draw a free path. Select the Pencil tool and click where you want the start point.Do not release the mouse button, just drag the mouse and release the mouse button at the end of yourdesired path.You can create open or closed Paths. While you are drawing, move the mouse back to the Start pointand you will see the mouse cursor change to the black arrow with a square. If you release the mousecursor at that point, the Path will be closed - creating a filled shape.Add point to existing path With the Add Point to Path you can add a point in an existing path. With this tool you have to click onthe edge of the object, on the exact spot where you would like to have a new point. By holding the buttonand dragging the mouse, you will expand the Path handles from that point.
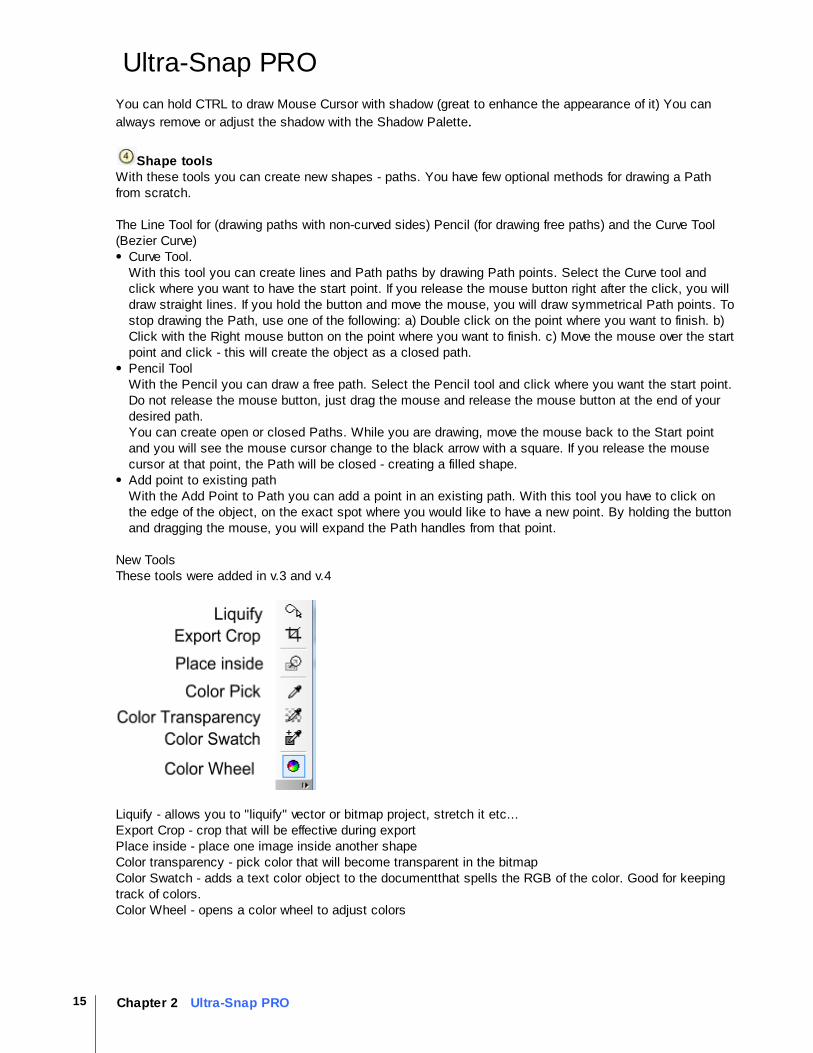
New ToolsThese tools were added in v.3 and v.4
Liquify - allows you to "liquify" vector or bitmap project, stretch it etc...Export Crop - crop that will be effective during exportPlace inside - place one image inside another shapeColor transparency - pick color that will become transparent in the bitmapColor Swatch - adds a text color object to the documentthat spells the RGB of the color. Good for keepingtrack of colors.Color Wheel - opens a color wheel to adjust colors
16Chapter 2 Ultra-Snap PRO
Ultra-Snap PRO
Text Object
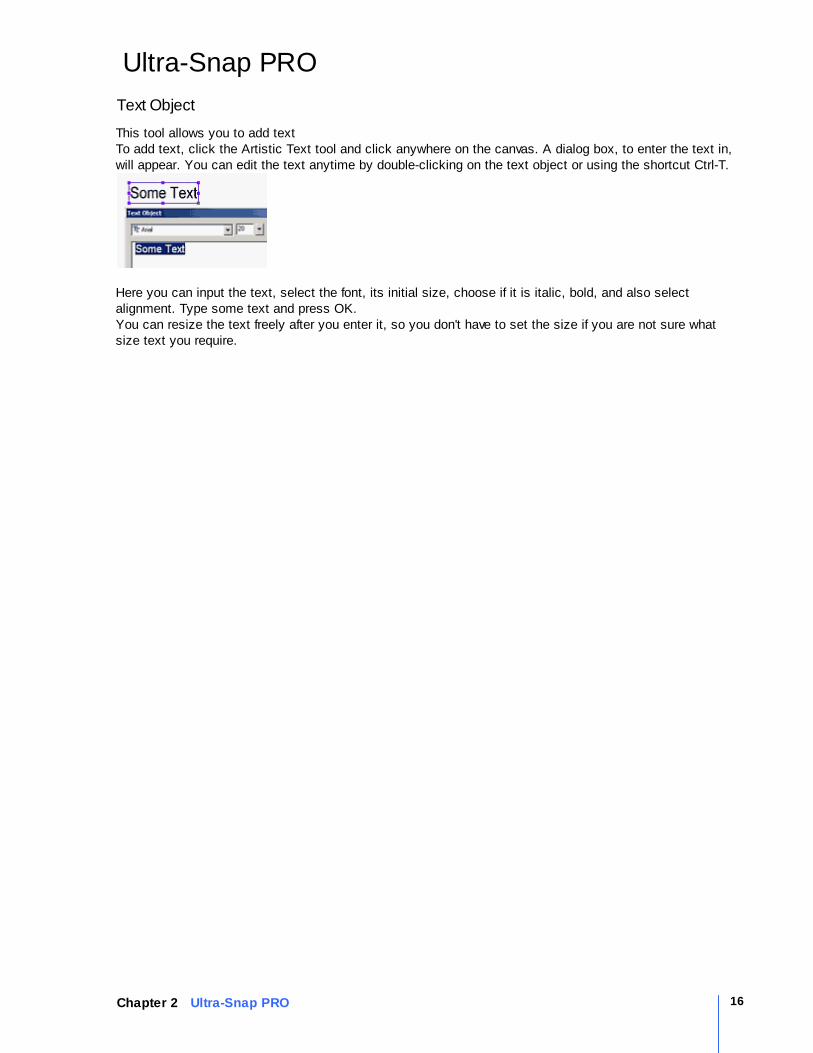
This tool allows you to add textTo add text, click the Artistic Text tool and click anywhere on the canvas. A dialog box, to enter the text in,will appear. You can edit the text anytime by double-clicking on the text object or using the shortcut Ctrl-T.
Here you can input the text, select the font, its initial size, choose if it is italic, bold, and also selectalignment. Type some text and press OK.You can resize the text freely after you enter it, so you don't have to set the size if you are not sure whatsize text you require.
17 Chapter 2 Ultra-Snap PRO
Ultra-Snap PRO
Shapes
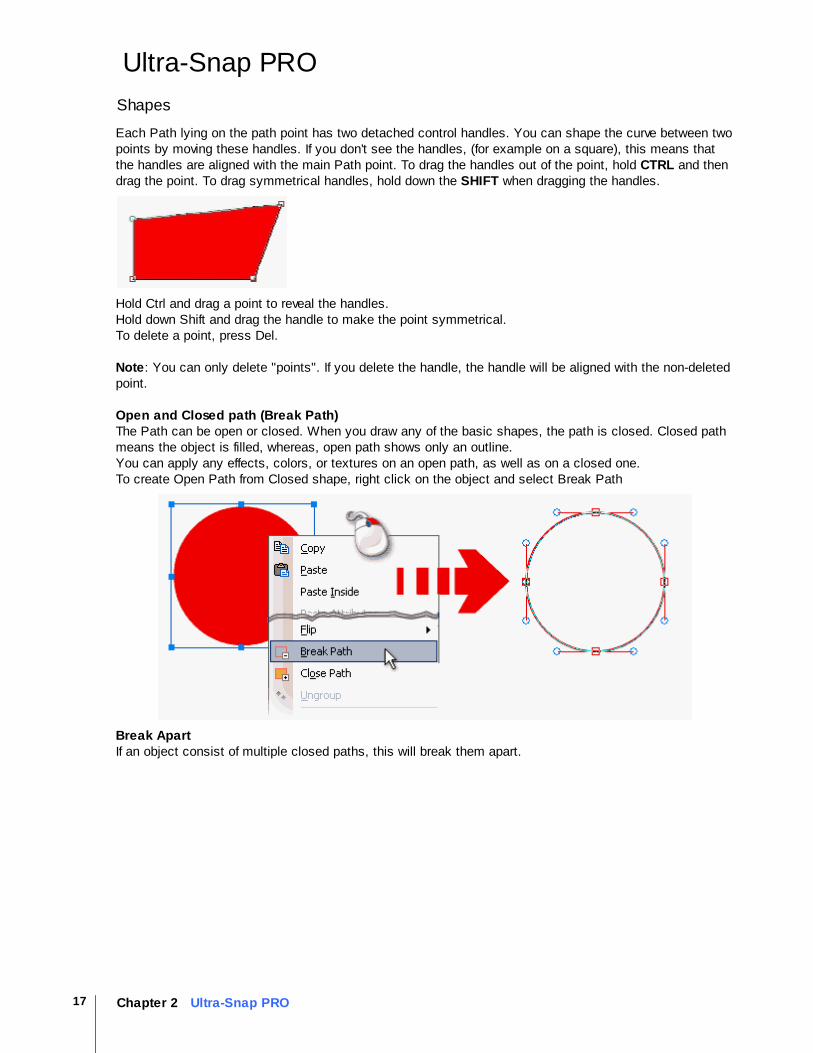
Each Path lying on the path point has two detached control handles. You can shape the curve between twopoints by moving these handles. If you don't see the handles, (for example on a square), this means thatthe handles are aligned with the main Path point. To drag the handles out of the point, hold CTRL and thendrag the point. To drag symmetrical handles, hold down the SHIFT when dragging the handles.
Hold Ctrl and drag a point to reveal the handles.Hold down Shift and drag the handle to make the point symmetrical.To delete a point, press Del.
Note: You can only delete "points". If you delete the handle, the handle will be aligned with the non-deletedpoint.
Open and Closed path (Break Path)The Path can be open or closed. When you draw any of the basic shapes, the path is closed. Closed pathmeans the object is filled, whereas, open path shows only an outline. You can apply any effects, colors, or textures on an open path, as well as on a closed one. To create Open Path from Closed shape, right click on the object and select Break Path
Break ApartIf an object consist of multiple closed paths, this will break them apart.
18Chapter 2 Ultra-Snap PRO
Ultra-Snap PRO
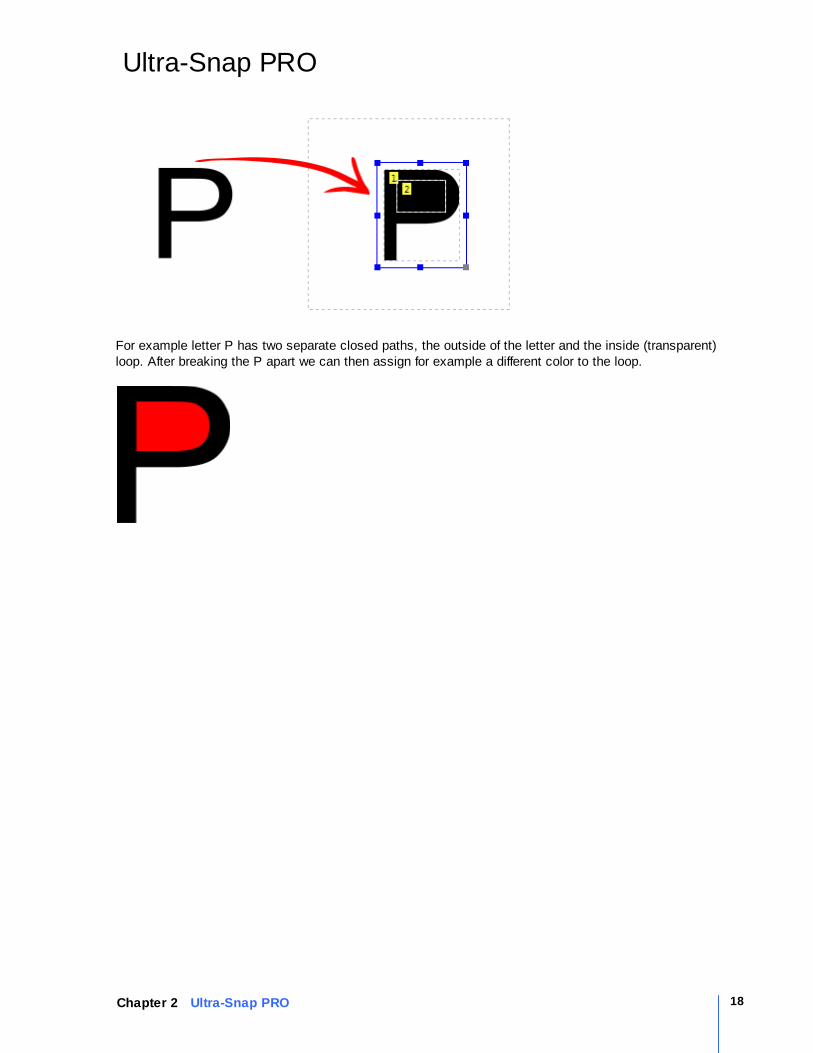
For example letter P has two separate closed paths, the outside of the letter and the inside (transparent)loop. After breaking the P apart we can then assign for example a different color to the loop.
19 Chapter 2 Ultra-Snap PRO
Ultra-Snap PRO
Bitmaps
Any screen capture will be considered a bitmap.There is a huge amount of tools dedicated to the bitmap adjustments.
You have multiple bitmap editing tools such as Hue/Saturation, Brightness/Contrast, Levels and also manyeffects such as blur or art filters in the Tweak option.
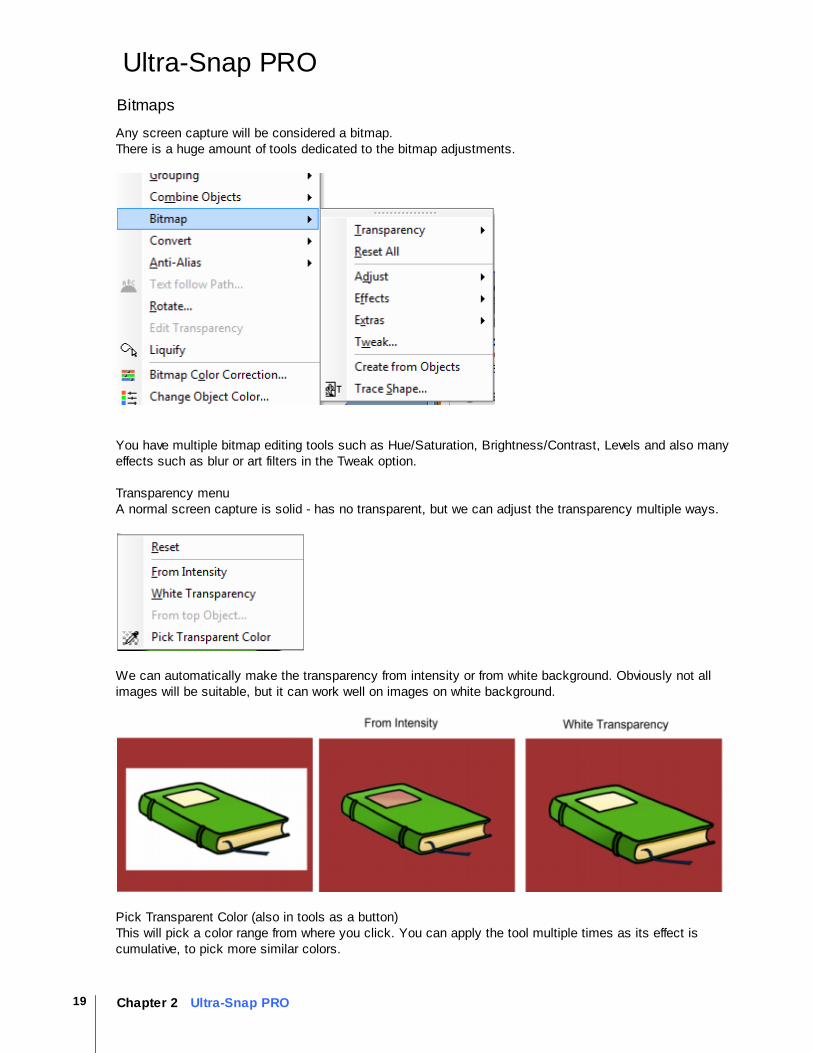
Transparency menuA normal screen capture is solid - has no transparent, but we can adjust the transparency multiple ways.
We can automatically make the transparency from intensity or from white background. Obviously not allimages will be suitable, but it can work well on images on white background.
Pick Transparent Color (also in tools as a button)This will pick a color range from where you click. You can apply the tool multiple times as its effect iscumulative, to pick more similar colors.
20Chapter 2 Ultra-Snap PRO
Ultra-Snap PRO
Reset - will reset the transparency
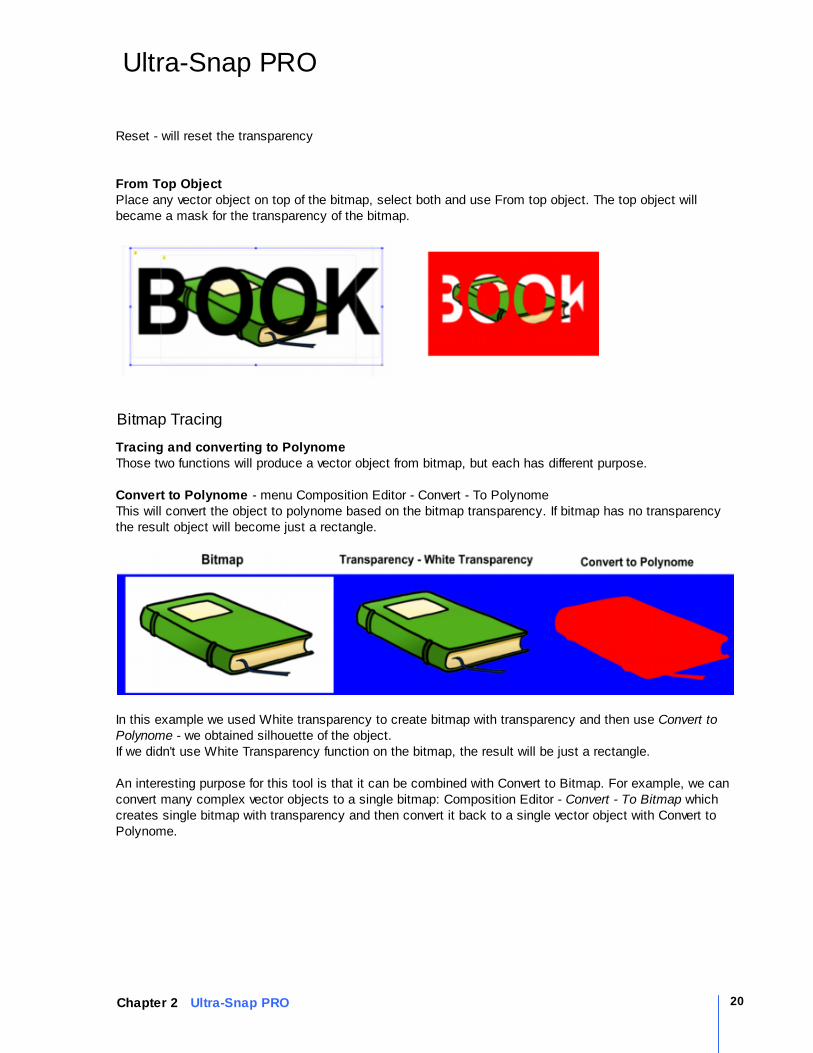
From Top Object Place any vector object on top of the bitmap, select both and use From top object. The top object willbecame a mask for the transparency of the bitmap.
Bitmap Tracing
Tracing and converting to PolynomeThose two functions will produce a vector object from bitmap, but each has different purpose.
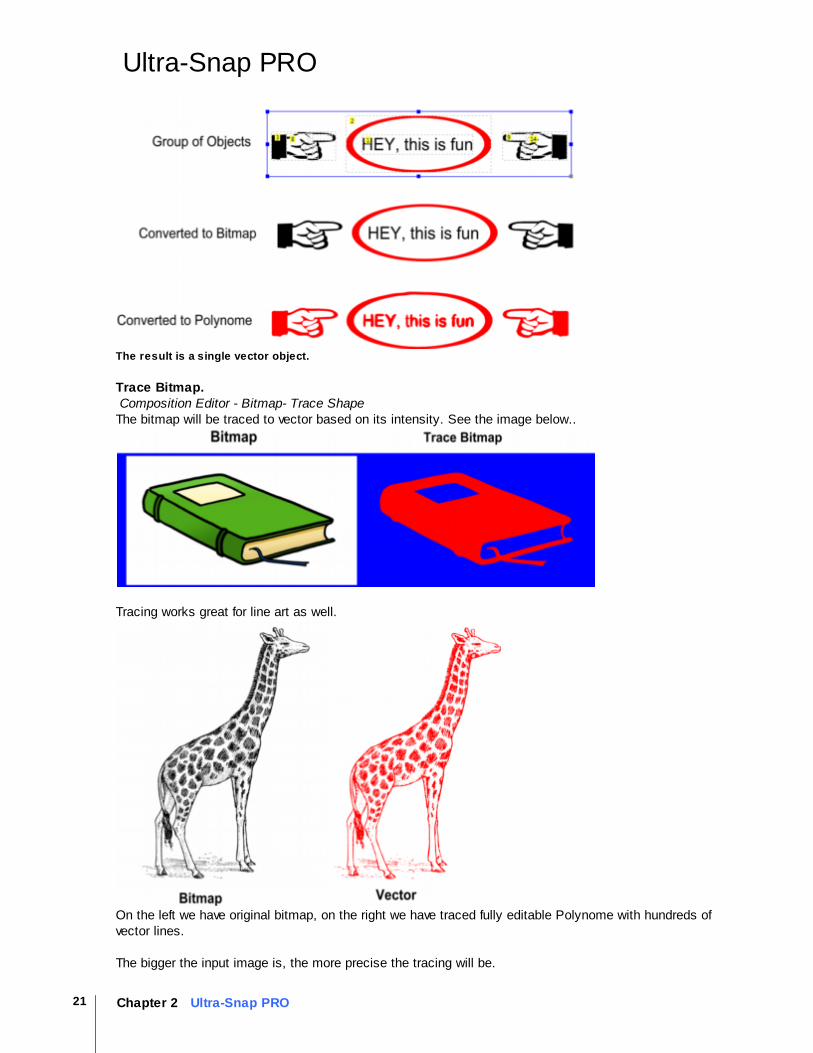
Convert to Polynome - menu Composition Editor - Convert - To PolynomeThis will convert the object to polynome based on the bitmap transparency. If bitmap has no transparencythe result object will become just a rectangle.
In this example we used White transparency to create bitmap with transparency and then use Convert toPolynome - we obtained silhouette of the object. If we didn't use White Transparency function on the bitmap, the result will be just a rectangle.
An interesting purpose for this tool is that it can be combined with Convert to Bitmap. For example, we canconvert many complex vector objects to a single bitmap: Composition Editor - Convert - To Bitmap whichcreates single bitmap with transparency and then convert it back to a single vector object with Convert toPolynome.
21 Chapter 2 Ultra-Snap PRO
Ultra-Snap PRO
The result is a single vector object.
Trace Bitmap. Composition Editor - Bitmap- Trace ShapeThe bitmap will be traced to vector based on its intensity. See the image below..
Tracing works great for line art as well.
On the left we have original bitmap, on the right we have traced fully editable Polynome with hundreds ofvector lines.
The bigger the input image is, the more precise the tracing will be.
22Chapter 2 Ultra-Snap PRO
Ultra-Snap PRO
Interractive Sharpen
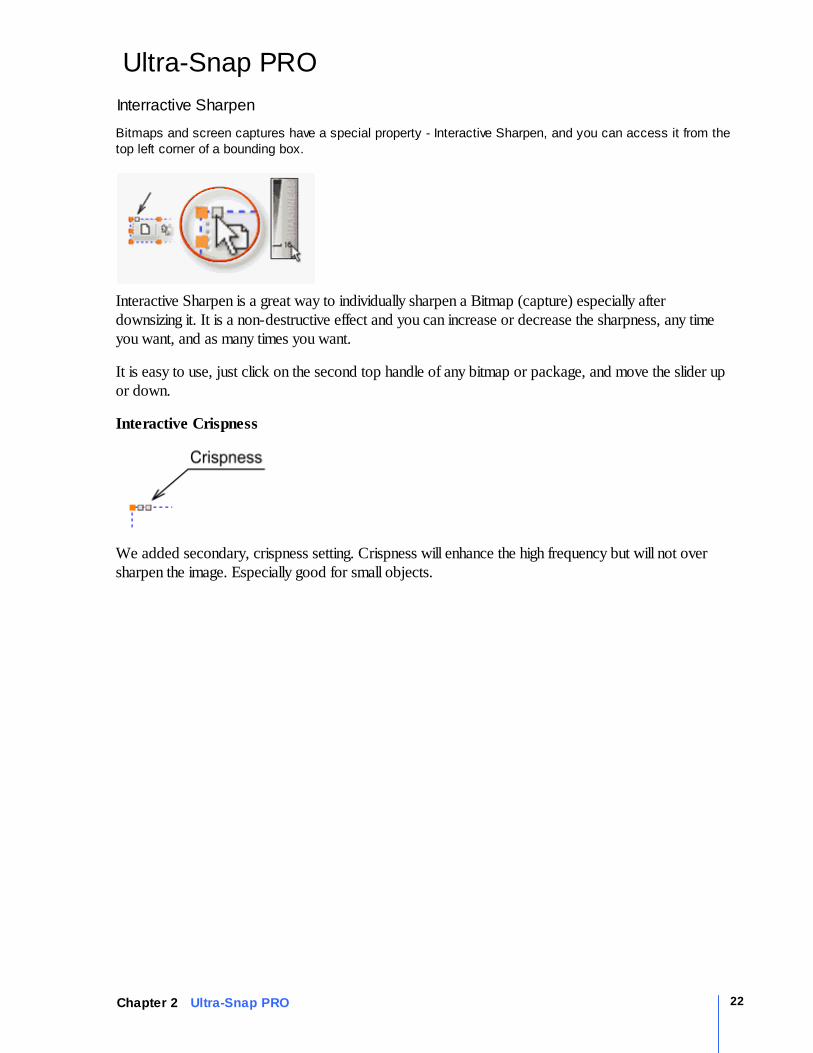
Bitmaps and screen captures have a special property - Interactive Sharpen, and you can access it from thetop left corner of a bounding box.
Interactive Sharpen is a great way to individually sharpen a Bitmap (capture) especially afterdownsizing it. It is a non-destructive effect and you can increase or decrease the sharpness, any timeyou want, and as many times you want.
It is easy to use, just click on the second top handle of any bitmap or package, and move the slider upor down.
Interactive Crispness
We added secondary, crispness setting. Crispness will enhance the high frequency but will not oversharpen the image. Especially good for small objects.
23 Chapter 2 Ultra-Snap PRO
Ultra-Snap PRO
Place Inside
Place inside could be one of the really nifty tools to combine two or multiple objects.
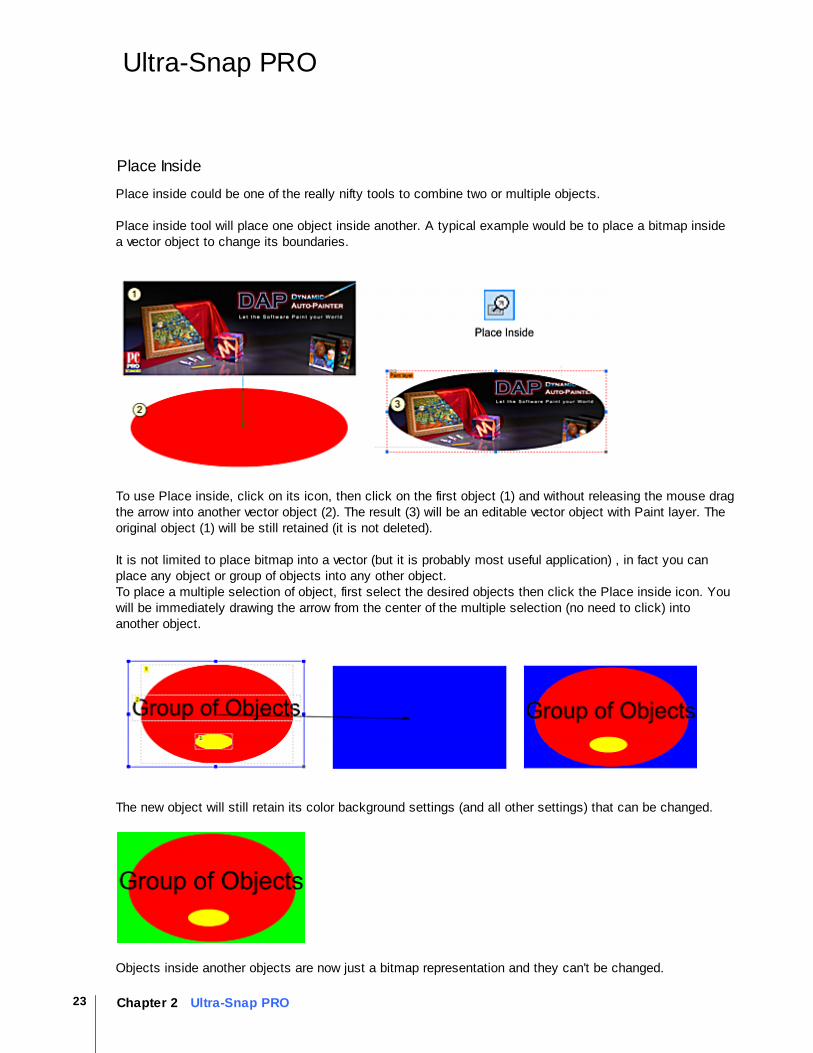
Place inside tool will place one object inside another. A typical example would be to place a bitmap insidea vector object to change its boundaries.
To use Place inside, click on its icon, then click on the first object (1) and without releasing the mouse dragthe arrow into another vector object (2). The result (3) will be an editable vector object with Paint layer. Theoriginal object (1) will be still retained (it is not deleted).
It is not limited to place bitmap into a vector (but it is probably most useful application) , in fact you canplace any object or group of objects into any other object.To place a multiple selection of object, first select the desired objects then click the Place inside icon. Youwill be immediately drawing the arrow from the center of the multiple selection (no need to click) intoanother object.
The new object will still retain its color background settings (and all other settings) that can be changed.
Objects inside another objects are now just a bitmap representation and they can't be changed.
24Chapter 2 Ultra-Snap PRO
Ultra-Snap PRO
Place Inside and NPR.If we change NPR it will affect only the result object, not the image that was placed inside the object.
If you need objects inside to have NPR, apply it before Place Inside, then apply another NPR to resultobject.
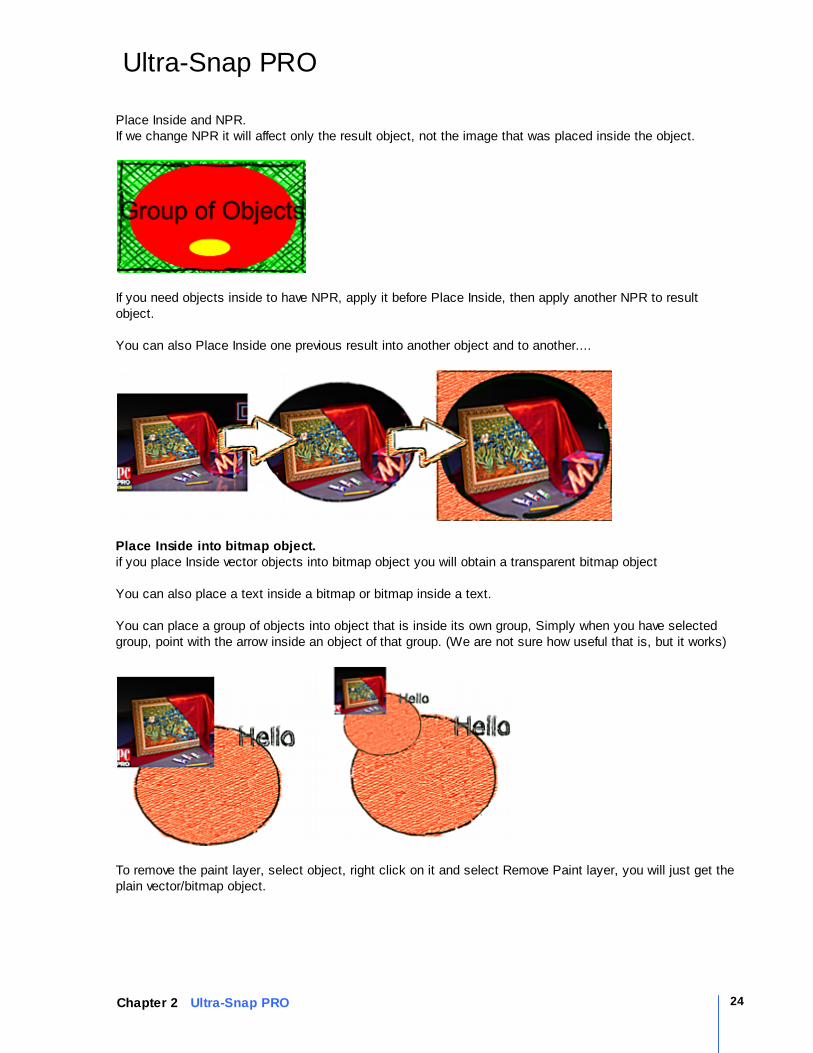
You can also Place Inside one previous result into another object and to another....
Place Inside into bitmap object.if you place Inside vector objects into bitmap object you will obtain a transparent bitmap object
You can also place a text inside a bitmap or bitmap inside a text.
You can place a group of objects into object that is inside its own group, Simply when you have selectedgroup, point with the arrow inside an object of that group. (We are not sure how useful that is, but it works)
To remove the paint layer, select object, right click on it and select Remove Paint layer, you will just get theplain vector/bitmap object.
25 Chapter 2 Ultra-Snap PRO
Ultra-Snap PRO
Crop Tool
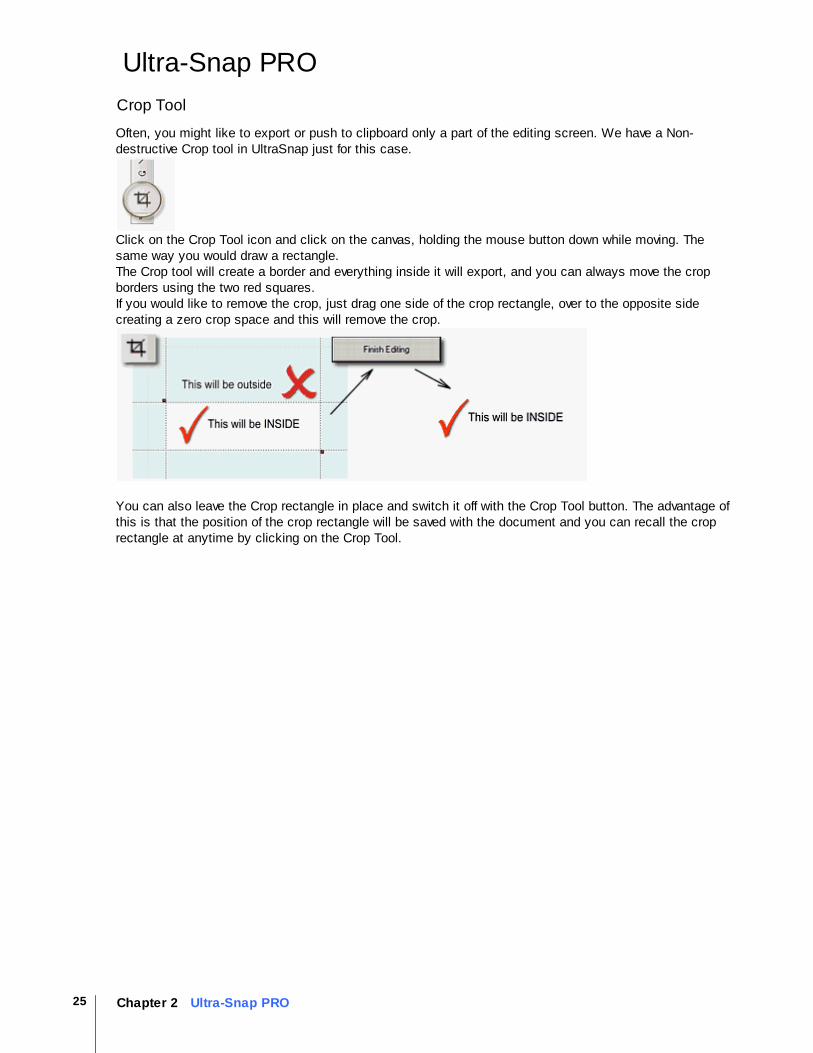
Often, you might like to export or push to clipboard only a part of the editing screen. We have a Non-destructive Crop tool in UltraSnap just for this case.
Click on the Crop Tool icon and click on the canvas, holding the mouse button down while moving. Thesame way you would draw a rectangle.The Crop tool will create a border and everything inside it will export, and you can always move the cropborders using the two red squares. If you would like to remove the crop, just drag one side of the crop rectangle, over to the opposite sidecreating a zero crop space and this will remove the crop.
You can also leave the Crop rectangle in place and switch it off with the Crop Tool button. The advantage ofthis is that the position of the crop rectangle will be saved with the document and you can recall the croprectangle at anytime by clicking on the Crop Tool.
26Chapter 2 Ultra-Snap PRO
Ultra-Snap PRO
Style Palettes
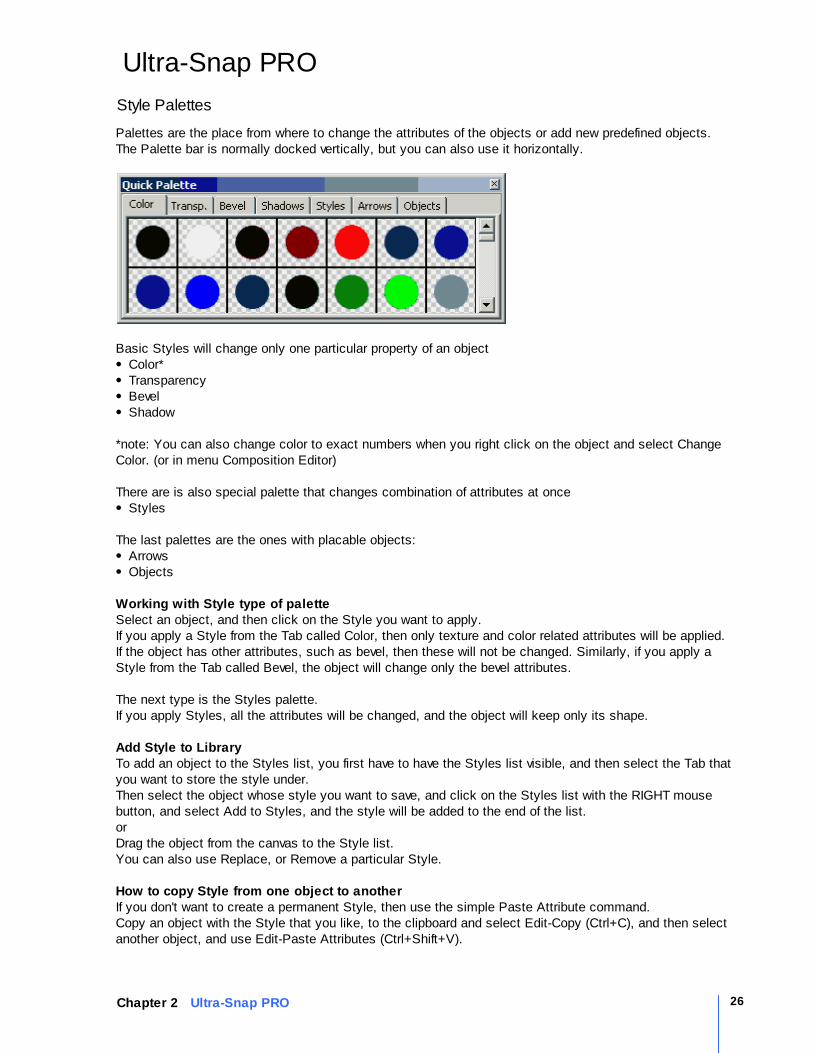
Palettes are the place from where to change the attributes of the objects or add new predefined objects.The Palette bar is normally docked vertically, but you can also use it horizontally.
Basic Styles will change only one particular property of an objectColor*TransparencyBevelShadow
*note: You can also change color to exact numbers when you right click on the object and select ChangeColor. (or in menu Composition Editor)
There are is also special palette that changes combination of attributes at onceStyles
The last palettes are the ones with placable objects:ArrowsObjects
Working with Style type of paletteSelect an object, and then click on the Style you want to apply.If you apply a Style from the Tab called Color, then only texture and color related attributes will be applied.If the object has other attributes, such as bevel, then these will not be changed. Similarly, if you apply aStyle from the Tab called Bevel, the object will change only the bevel attributes.
The next type is the Styles palette. If you apply Styles, all the attributes will be changed, and the object will keep only its shape.
Add Style to LibraryTo add an object to the Styles list, you first have to have the Styles list visible, and then select the Tab thatyou want to store the style under. Then select the object whose style you want to save, and click on the Styles list with the RIGHT mousebutton, and select Add to Styles, and the style will be added to the end of the list.orDrag the object from the canvas to the Style list.You can also use Replace, or Remove a particular Style.
How to copy Style from one object to anotherIf you don't want to create a permanent Style, then use the simple Paste Attribute command.Copy an object with the Style that you like, to the clipboard and select Edit-Copy (Ctrl+C), and then selectanother object, and use Edit-Paste Attributes (Ctrl+Shift+V).
27 Chapter 2 Ultra-Snap PRO
Ultra-Snap PRO
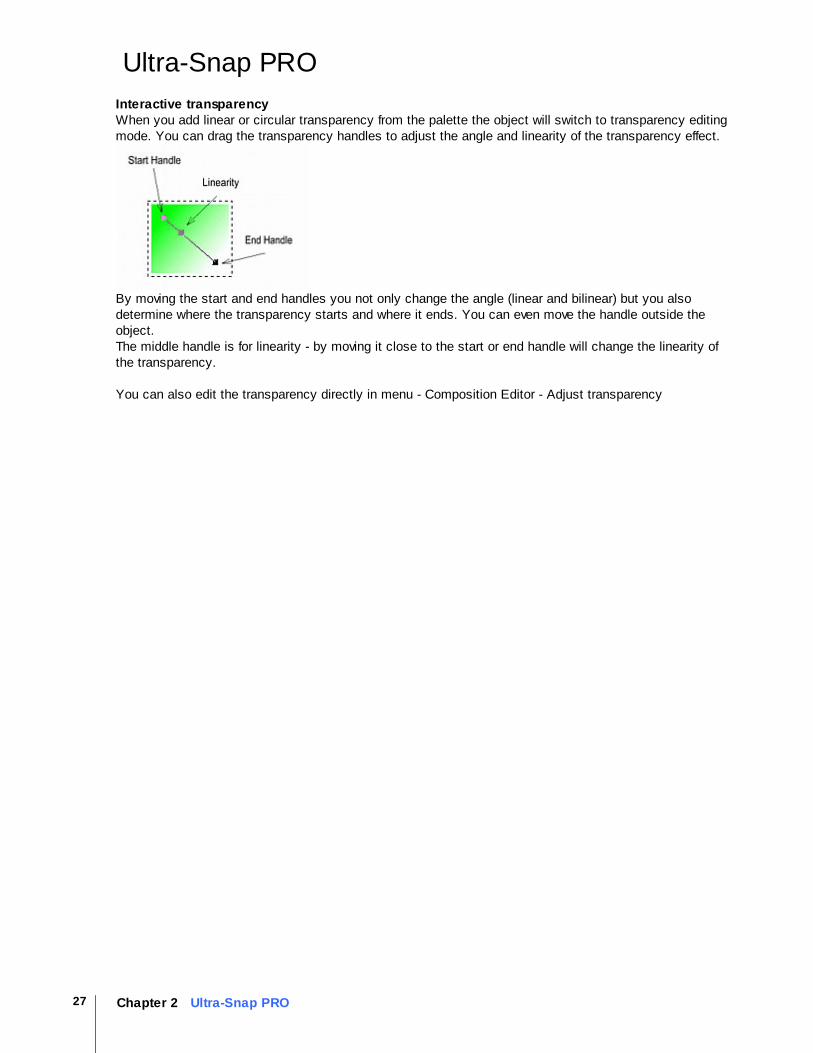
Interactive transparencyWhen you add linear or circular transparency from the palette the object will switch to transparency editingmode. You can drag the transparency handles to adjust the angle and linearity of the transparency effect.
By moving the start and end handles you not only change the angle (linear and bilinear) but you alsodetermine where the transparency starts and where it ends. You can even move the handle outside theobject.The middle handle is for linearity - by moving it close to the start or end handle will change the linearity ofthe transparency.
You can also edit the transparency directly in menu - Composition Editor - Adjust transparency
28Chapter 2 Ultra-Snap PRO
Ultra-Snap PRO
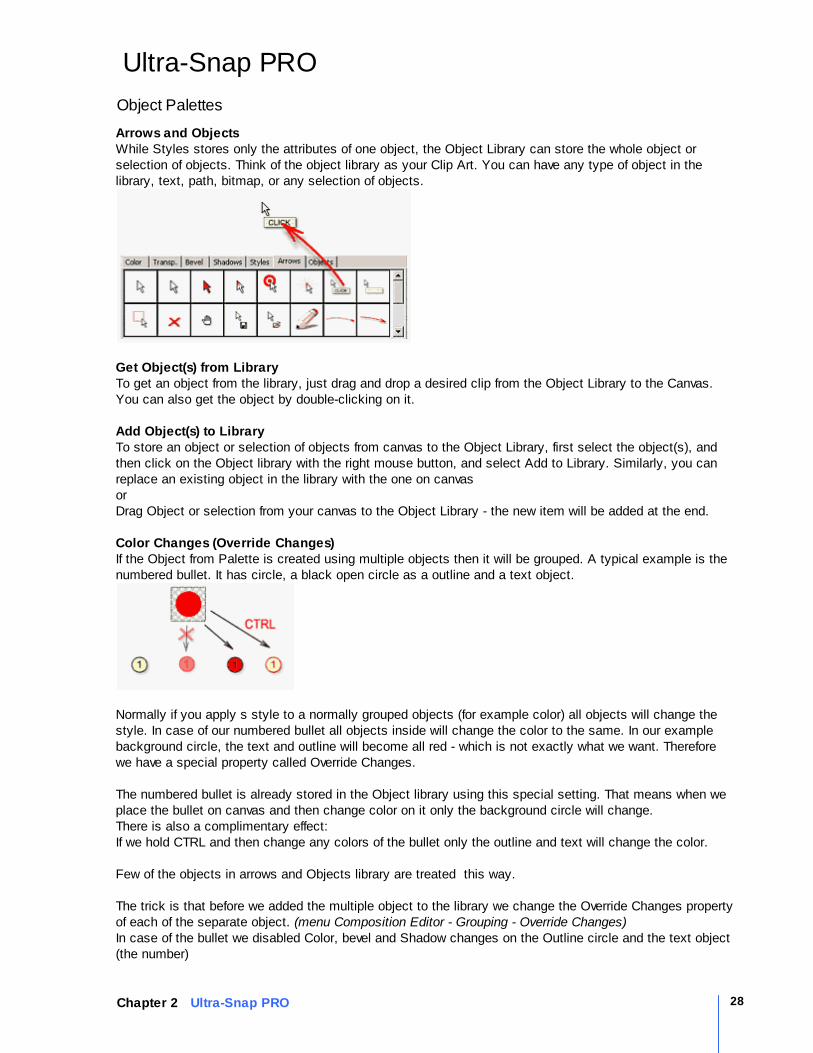
Object Palettes
Arrows and ObjectsWhile Styles stores only the attributes of one object, the Object Library can store the whole object orselection of objects. Think of the object library as your Clip Art. You can have any type of object in thelibrary, text, path, bitmap, or any selection of objects.
Get Object(s) from LibraryTo get an object from the library, just drag and drop a desired clip from the Object Library to the Canvas.You can also get the object by double-clicking on it.
Add Object(s) to LibraryTo store an object or selection of objects from canvas to the Object Library, first select the object(s), andthen click on the Object library with the right mouse button, and select Add to Library. Similarly, you canreplace an existing object in the library with the one on canvas orDrag Object or selection from your canvas to the Object Library - the new item will be added at the end.
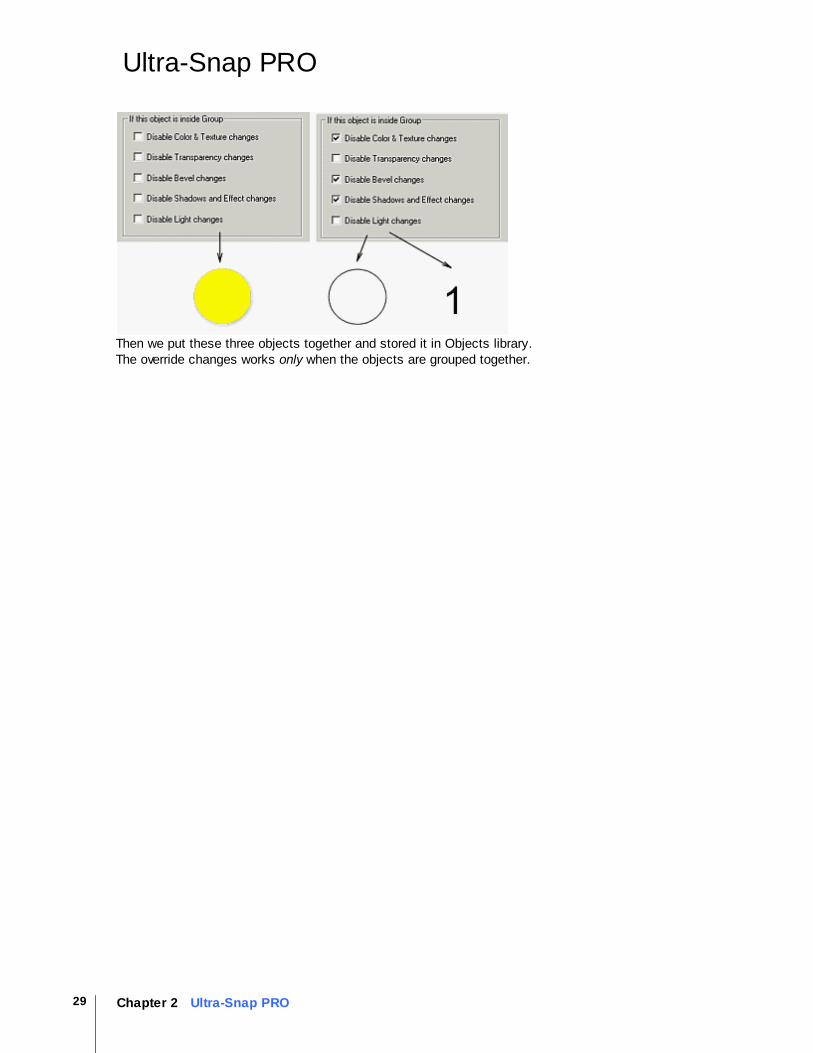
Color Changes (Override Changes)If the Object from Palette is created using multiple objects then it will be grouped. A typical example is thenumbered bullet. It has circle, a black open circle as a outline and a text object.
Normally if you apply s style to a normally grouped objects (for example color) all objects will change thestyle. In case of our numbered bullet all objects inside will change the color to the same. In our examplebackground circle, the text and outline will become all red - which is not exactly what we want. Thereforewe have a special property called Override Changes.
The numbered bullet is already stored in the Object library using this special setting. That means when weplace the bullet on canvas and then change color on it only the background circle will change. There is also a complimentary effect:If we hold CTRL and then change any colors of the bullet only the outline and text will change the color.
Few of the objects in arrows and Objects library are treated this way.
The trick is that before we added the multiple object to the library we change the Override Changes propertyof each of the separate object. (menu Composition Editor - Grouping - Override Changes)In case of the bullet we disabled Color, bevel and Shadow changes on the Outline circle and the text object(the number)
29 Chapter 2 Ultra-Snap PRO
Ultra-Snap PRO
Then we put these three objects together and stored it in Objects library.The override changes works only when the objects are grouped together.
30Chapter 2 Ultra-Snap PRO
Ultra-Snap PRO
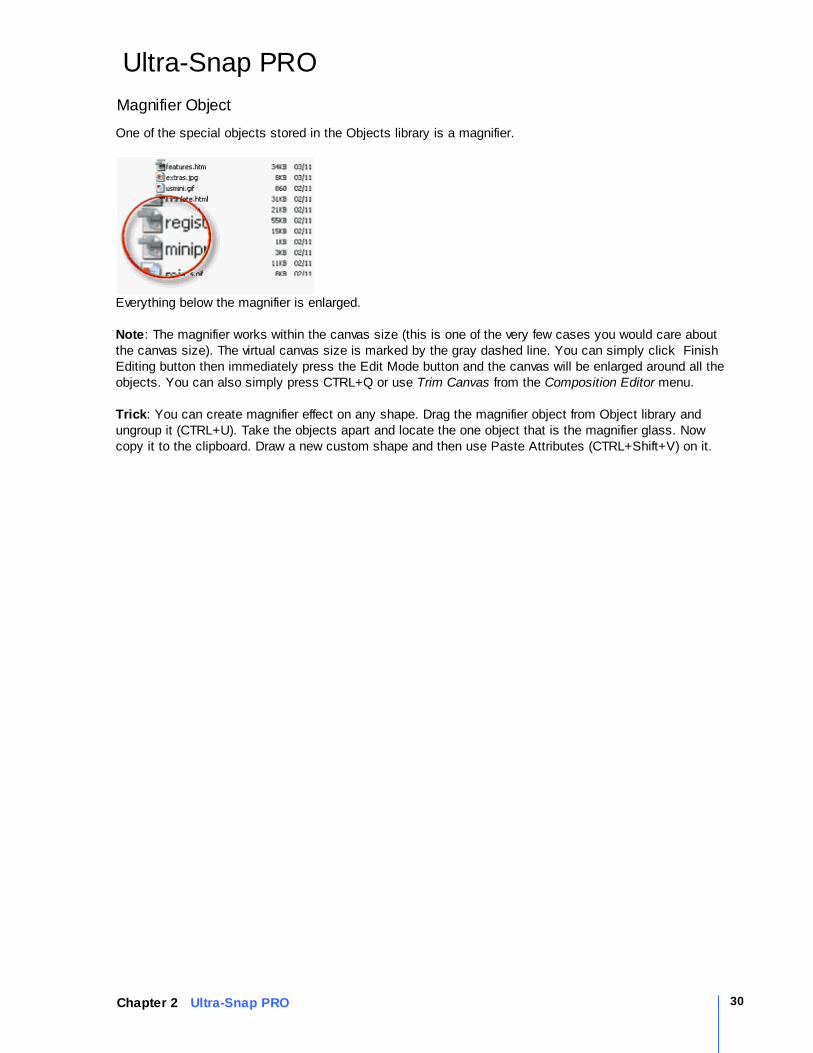
Magnifier Object
One of the special objects stored in the Objects library is a magnifier.
Everything below the magnifier is enlarged.
Note: The magnifier works within the canvas size (this is one of the very few cases you would care aboutthe canvas size). The virtual canvas size is marked by the gray dashed line. You can simply click FinishEditing button then immediately press the Edit Mode button and the canvas will be enlarged around all theobjects. You can also simply press CTRL+Q or use Trim Canvas from the Composition Editor menu.
Trick: You can create magnifier effect on any shape. Drag the magnifier object from Object library andungroup it (CTRL+U). Take the objects apart and locate the one object that is the magnifier glass. Nowcopy it to the clipboard. Draw a new custom shape and then use Paste Attributes (CTRL+Shift+V) on it.
31 Chapter 2 Ultra-Snap PRO
Ultra-Snap PRO
Other tools
Arrange objectsEach object you put on the canvas is on its own layer and you can see it because top objects cover thebottom ones. You can move the objects between layers, bringing the object back or forward, moving the object to thebottom or to the very top.
The first two arrows select the previous or next object. Great if you can't select an object from behindanother one. The other 4 buttons that move the object in layers are
On the top of allOn the bottom Move one layer up Move one layer down
Align and Flip ObjectsYou can align multiple objects or flip an object along vertical or horizontal axis.
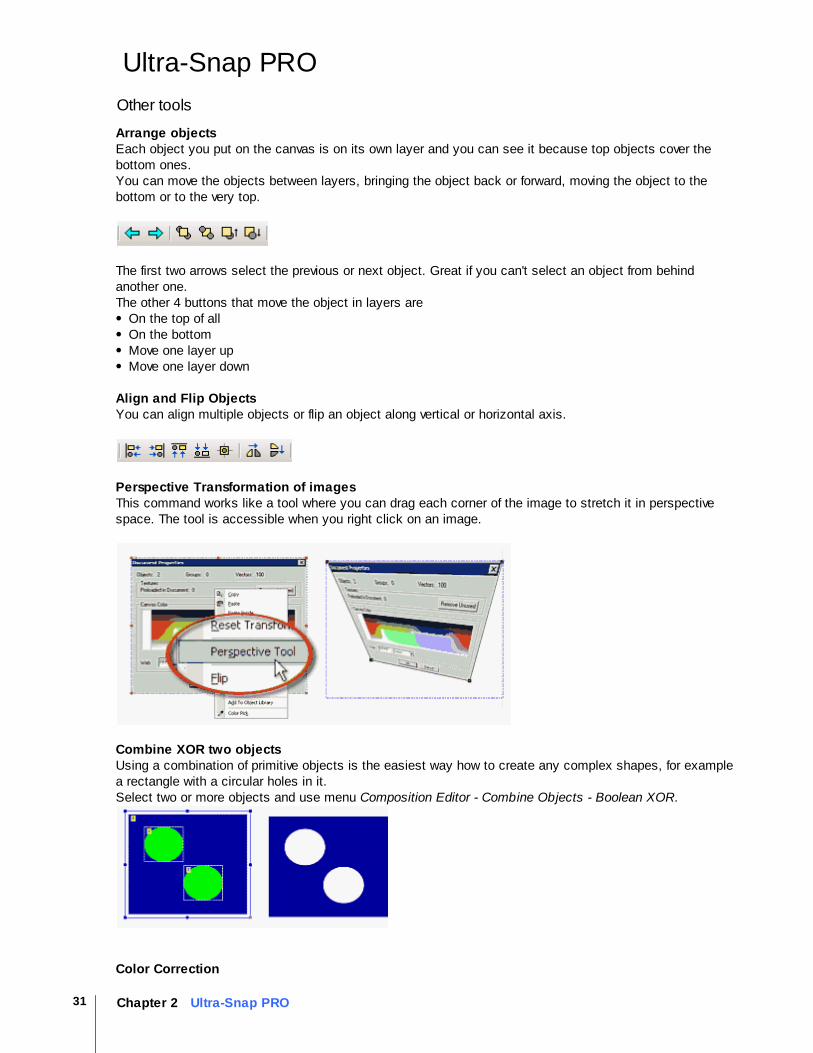
Perspective Transformation of imagesThis command works like a tool where you can drag each corner of the image to stretch it in perspectivespace. The tool is accessible when you right click on an image.
Combine XOR two objectsUsing a combination of primitive objects is the easiest way how to create any complex shapes, for examplea rectangle with a circular holes in it.Select two or more objects and use menu Composition Editor - Combine Objects - Boolean XOR.
Color Correction
32Chapter 2 Ultra-Snap PRO
Ultra-Snap PRO
Any object color can be adjusted in a non-destructive way, with the Color Correction.Similar to the Interactive Sharpen, this is non-destructive, and you can adjust it or remove it any time youwant.
You can switch Color Correction into 2 types: RGB and HSL.
When you are working with RGB, you are adjusting gamma of the particular primary color. This isgood to tone up photos.
In HSL mode you are working similar way as with the Hue, Saturatiion and Lightness option in Bitmapmenu. You can change colors of the Object, change saturation, desaturate, make it lighter, darker orcolorize it in one tone. This is very powerful tool because it takes from you the need to adjust texturesand colors if you need to see different color variation of the object.
The colorize option is active only in HSL mode. This will make the image in one color tone determinedby the Hue Slider.
Note: Color Correction is Non-Destructive tool. That means you can not only apply it but alsoremove it or change it any time later, even on a bitmap images.

33 Chapter 2 Ultra-Snap PRO
Ultra-Snap PRO
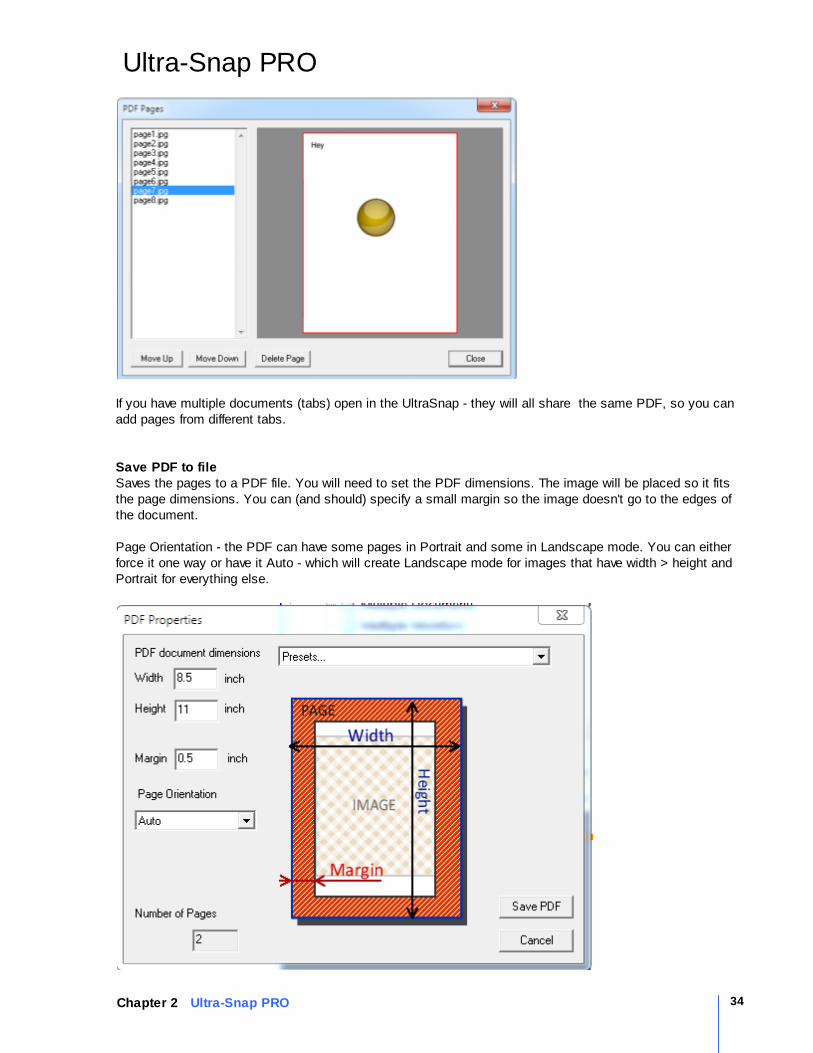
PDF Pages
The version 4 brought tools for multi-page PDF export, which was added as most of the tools for internalpurpose at mediachance office. This is a simple, but effective tool to create a PDF file from some of thescreen captures, such as documents, web pages etc...or even from scratch.
Menu - PDF
Anytime you have captured something in Capture mode or you are in the Editor mode, you can press Addto PDF button (Add current View as page in PDF)and that view will be added as a page in PDF.
The page doesn't have to be a screen capture. just switch to editor and draw some text, shapes etc andAdd to PDF. Great for creating title pages.
When you have all pages collected, press Save PDF to File.
Start new PDF FileStarts a new PDF file - all previous pages will be deleted.
Add current View as Page in PDF - Add to PDF button Adds the current view in Capture or Editor mode to the PDF as a new page. To speedup work-flow, there isno confirmation feedback, just a little sound beep. The status bar will then show how many pages are nowin the PDF.
Manage pagesLet's you see, delete and re-arrange the pages added to the PDF.
34Chapter 2 Ultra-Snap PRO
Ultra-Snap PRO
If you have multiple documents (tabs) open in the UltraSnap - they will all share the same PDF, so you canadd pages from different tabs.
Save PDF to fileSaves the pages to a PDF file. You will need to set the PDF dimensions. The image will be placed so it fitsthe page dimensions. You can (and should) specify a small margin so the image doesn't go to the edges ofthe document.
Page Orientation - the PDF can have some pages in Portrait and some in Landscape mode. You can eitherforce it one way or have it Auto - which will create Landscape mode for images that have width > height andPortrait for everything else.
35 Chapter 2 Ultra-Snap PRO
Ultra-Snap PRO
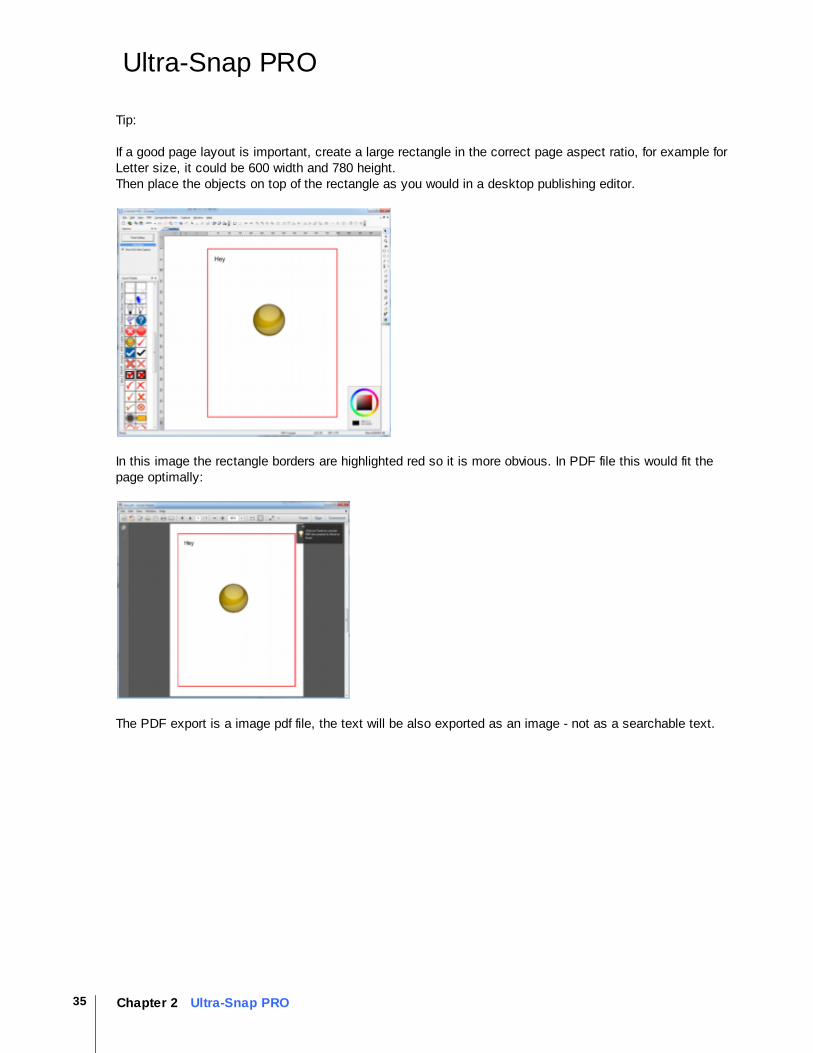
Tip:
If a good page layout is important, create a large rectangle in the correct page aspect ratio, for example forLetter size, it could be 600 width and 780 height.Then place the objects on top of the rectangle as you would in a desktop publishing editor.
In this image the rectangle borders are highlighted red so it is more obvious. In PDF file this would fit thepage optimally:
The PDF export is a image pdf file, the text will be also exported as an image - not as a searchable text.

36Chapter 2 Ultra-Snap PRO
Ultra-Snap PRO
Tips and Tricks
The UltraSnap allows for many neat tricks while working with screen captures. Particularly when you openfew documents.
If you want to permanently crop a screen capture in Editing mode you can copy it to a new documentand crop it there, then paste it back. In edit mode, select object press CTRL+C (copy) and then clickNew document, then press CTRL+V (paste), Click Finish Editing and then Quick Crop. After you aredone paste the new object back in the first Editing document. You can do that with multiple objects.You can also use the Interactive Crop in editing mode to mark part of the image, switch to Capture mode(Finish Editing) and then again switch to Editing mode. Now press CTRL+V (paste) and the markedimage will appear as new object.You can start working in Editing mode right from empty document.You don't have to capture anything,just press Edit mode.You can copy and paste object or multiple objects between two documents, both in editing modeYou can use Copy as Bitmap on multiple objects in Edit mode. The selection will be stored in clipboardas one single combined image and you can then paste it in a web editor or word document. You caneven paste it back in the editor as a new image.You can create magnifier effect on any shape. Drag the magnifier object from Object library and ungroupit. Take the objects apart and locate the object that is the magnifier glass. Now copy it to the clipboard.Draw a new custom shape and then use Paste Attributes (CTRL+Shift+V) on it.If you want to "erase" part of the screen capture, just draw a rectangle over it and set it as white so itlooks like the backgroundYou can save the whole editable project for future and then any time open it back - menu File-Open/SavedocumentTo apply multiple fading effects (for example on long toolbar where both ends fade out) you can use thecopy as bitmap trick and linear transparency. Set first linear transparency, then Copy as Bitmap theobject, Delete the object and Paste. Now apply next linear transparency to the pasted object.Use the Drag and Drop from Capture mode to Explorer or to any other software that accepts files. Forexample you can directly drag image from UltraSnap to e-mail client and it will be added as attachment.
© © 2017 Mediachance.
All rights reserved.
Product and company names mentioned in this
manual may be trademarks or registered
trademarks of their respective companies.
Mention of third-party products is for
informational purposes only and constitutes
neither an endorsement nor a recommendation.
The author assumes no responsibility w ith
regard to the performance or use of these
products. All understandings, agreements, or
w arranties, if any, take place directly betw een
the vendors and the prospective users. Every
effort has been made to ensure that the
information in this manual is accurate. The author
is not responsible for printing or clerical errors.
The product described in this manual
incorporates copyright protection technology that
is protected by
method claims of certain U.S. patents and other
intellectual property rights.

38
Index
Ind
ex
AAdd current View as Page in PDF 33
Add Style 26
Align and Flip Objects 31
Arrange objects 31
Arrows 14
Arrows and Objects 28
Auto Save to disk 2
Auto Send Clipboard 2
BBreak Apart 17
Break Path 17
CCanvas Size and Color 13
Capture Cursor 2
Capture mode 6
Circle 14
Color Correction 31
Combine XOR two objects 31
Convert - To Bitmap 20
Convert - To Polynome 20
Crisp 6
Crispness 22
Crop Tool 25
DDocuments 5
Drawing Tools 11
EEdit Mode 10
Export 4
FFilter 6
From Top Object 19
Full Screen 3
GGroups 12
HHistory 9
IInteractive transparency 26
MMagnifier Object 30
Minimize 2
Move Objects 12
Multiple Monitors 6
PPaint layer 23
Palettes 28
Perspective Transformation of images 31
Pick Transparent Color 19
Place Inside 23
Presets 6
QQuick Crop 6
RRectangles 14
Region Capture 3
Repeat Last 3
Resize 6
Restore After Capture 2
SSave PDF to file 33
Select an Object 12
Shape tools 14
Shapes 17
Sharpen 6
39
Index
Ind
ex
Standard Tools 14
Start new PDF File 33
Style Palettes 26
TText 16
Trace Shape 20
Transparency 4, 19
WWindow Capture 3