Embed Size (px)
Citation preview

Copyright © 2012 Thane International, Inc.
MADE IN CHINA
Distributed by:
Thane International, Inc.La Quinta, CA 92253, U.S.A.www.thane.com
Thane Direct Canada Inc. Mississauga, ON L4W 5M6, Canada www.thane.ca
Thane Direct UK Ltd.WC2A 3LHwww.thanedirect.co.uk
Danoz Direct Pty LtdAlexandria, SydneyNSW 2015, Australiawww.danozdirect.com.au
H2O STEAMFX ENG GEN KB R3 130117
MODEL No. KB-009A
USER’S GUIDE

Thane Direct and its affiliated companies assume no liability for personal injury or property damage resulting from the misuse of the H2O SteamFX™ handheld steamer, including the failure to comply with the instructions contained in this User’s Guide or provided by the manufacturer or distributor of the treated surface.
Note: This unit has been tested and may contain traces of water inside the water tank.
I M P O R T A N T S A F E T Y I N F O R M A T I O NREAD ALL INSTRUCTIONS BEFORE USING THIS STEAM CLEANER.
CONTENTS
INTRODUCTION TO THE H2O SteamFX™ HANDHELD STEAMER .............................................................................................. 2
IMPORTANT SAFEGUARDS ............................................................................................................................................................. 3
KEY FEATURES .................................................................................................................................................................................. 4
OPTIONAL ACCESSORIES ................................................................................................................................................................. 4
INSTRUCTIONS FOR ASSEMBLY ...................................................................................................................................................... 5
INSTRUCTIONS FOR USAGE ............................................................................................................................................................. 5
AFTER USE ......................................................................................................................................................................................... 5
OPTIONAL ACCESSORY USE............................................................................................................................................................ 6
CLEANING AND MAINTENANCE .................................................................................................................................................... 7
TROUBLESHOOTING GUIDE ............................................................................................................................................................ 7
TIPS..................................................................................................................................................................................................... 7
WARRANTY ...................................................................................................................................................................................... 8
INTRODUCTION TO THE H2O SteamFX™ HANDHELD STEAMER
- It is normal to hear a pulsing noise during use, indicating that the steamer is producing steam. - There may be some minor “spitting” of water mixed with the steam, this is normal .
The H2O SteamFX™ handheld steamer has a high degree of cleaning and degreasing power on a wide variety of surfaces. The steam emitted from the tip helps remove dirt, grease and grime. Since the H2O SteamFX™ uses ordinary tap water without additives, it is environmentally friendly.
Never direct steam towards humans, animals or plants, or other objects unable to withstand high temperature. Avoid skin contact with the steam jet. The high temperature may cause serious physical injury including burns. Do not use the steamer on cold glass because the steam may cause the glass to break or crack.
IMPORTANT!
CAUTION!
NOTES
2

NOTESPLEASE READ ALL PRODUCT INSTRUCTIONS CAREFULLY. FAILURE TO FOLLOW THE PRODUCT INSTRUCTIONS WILL VOID YOUR ANY WARRANTY.
USE YOUR H2O SteamFX™ HANDHELD STEAMER ONLY AS DIRECTED IN THIS MANUAL AND ONLY WITH THE MANUFACTURER’S RECOMMENDED ACCESSORIES. USE OF ATTACHMENTS OR ACCESSORIES NOT PROVIDED OR SOLD BY THE MANUFACTURER OR BY AUTHORIZED RESELLERS MAY CAUSE FIRE, ELECTRIC SHOCK OR INJURY.
AS WITH ANY ELECTRICAL APPLIANCE, BASIC PRECAUTIONS SHOULD ALWAYS BE OBSERVED WHEN USING THIS PRODUCT, INCLUDING THE FOLLOWING:
1. Verify that the main voltage indicated on the Rating Plate on this appliance corresponds with the voltage of your electrical outlet.2. In order to protect against risk of electric shock, only plug this appliance into properly grounded outlets.3. This appliance is designed for household use only. Do not use outdoors. Commercial use of the H2O SteamFX™ voids the manufacturer’s warranty.4. Do not leave the H2O SteamFX™ unattended while plugged in. 5. Close attention is necessary when used near children, pets or plants. Never direct steam towards people, animals or plants,
as hot steam emission may cause scalding.6. Do not allow the H2O SteamFX™ to be used as a toy. Children should be supervised to ensure that they do not play with this appliance.7. This appliance is not intended for use by persons with physical, sensory or mental impairments unless they are instructed and supervised during use by an able and experienced adult responsible for their safety.8. Do not handle the plug or the H2O SteamFX™ with wet hands or operate without shoes. Do not immerse the H2O Steam Effect™ in water or other liquids. The liquid or steam should not be directed towards equipment containing electrical components, such as the interior of ovens. 9. Do not use this appliance with a damaged cord or plug. If it is not working as it should, or if it has been dropped, damaged, left outdoors, or immersed in water, return it to the distributor. If the supply cord is damaged, it must be replaced by the manufacturer or a qualified repair facility to avoid hazard.10. Never force the plug into an outlet or pull or carry the unit by the cord. Do not use the cord as a handle, close a door on the cord or pull the cord around sharp edges or corners. Keep the cord away from heated surfaces.11. Do not use extension cords or outlets with inadequate current-carrying capacity, and in order to avoid circuit overload, do
not operate another appliance on the same socket (circuit) as the H2O SteamFX™.12. To disconnect the H2O SteamFX™, release the steam switch; then remove the plug from the outlet. 13. Unplug the unit after each use or before servicing. In order to safely unplug the unit, grasp the plug and gently pull. Do not unplug the unit by pulling on the cord.14. Do not insert any objects into steam openings in the unit or use it with its steam opening blocked.15. Store your H2O SteamFX™ indoors in a cool and dry place. Never leave the H2O SteamFX™ outdoors.16. Keep your work area well lit and use extra caution when using on stairs.17. Do not use the unit without water in the Water Tank.18. Stop using the H2O SteamFX™ if you observe water leakage, and contact a qualified technician.19. Never put hot water or liquids such as alcohol-based or detergent products into the Water Tank. This will make operation
unsafe and damage the unit. 20. Always keep the steam opening clear of any obstructions. Avoid placing the steam opening on soft surfaces to avoid blocking the flow of steam. Keep the steam opening free from lint, hair and other potential obstructions to ensure proper steam flow.21. Do not use the H2O SteamFX™ in spaces that are exposed to flammable, explosive or toxic vapor such as paint thinner
or oil-based paint.22. Do not use on leather, wax-polished furniture or floors, unsealed hardwood or parquet floors, synthetic fabrics, velvet or
other delicate steam-sensitive materials.23. Do not use this appliance for space heating purposes or place it on or near hot surfaces such as a hot gas or electric burner, or in a heated oven.24. Do not use this appliance for other than its intended use.
IMPORTANT SAFEGUARDS
3
! WARNING
SAVE THESE INSTRUCTIONS

KEY FEATURES
4
1. Steam Switch 2. Handle3. Water Tank Cap 4. Power Cord5. Water Tank (225ml/7.5oz)6. Indicator Light7. Locking System8. Steam Outlet9. Jet Nozzle10. Measuring Cup11. Cleaning Pin
1
2
3
4
5
6
7
8
9
10
11
OPTIONAL ACCESSORIES
1. Extension Hose 2. Window Cleaning Tool3. Window Cleaning Coral Cloth 4. Microfiber Scrubbing Cloth for Window Cleaning Tool5. Garment Steaming Cloth 6. Duster with Coral Cloth7. Long Steam Lazer™8. Bendable Jet Nozzle9. Round Brush (Metal) 10. Round Brush (Nylon) 11. Microfiber Cloth for Nylon Brush
1 5
6 7
2 3 4
8 9 10 11
NOTES
INSTRUCTION FOR ASSEMBLY
58
WARRANTY
ONE YEAR LIMITED WARRANTYH2O SteamFX™
The H2O SteamFX™ is warranted, to the original owner, for one (1) year from the date of purchase against defects in material and workmanship under normal use and service. Should your H2O SteamFX™ prove defective within one (1) year from date of purchase, please contact customer service immediately at the number provided below.
Please package your H2O SteamFX™ carefully to avoid damage in transit. Under this warranty, Thane Direct will repair or replace any unit found to be defective. This warranty is effective only if the product is purchased and operated in the USA. This warranty extends only to personal use and does not extend to any product that has been used in a manner for which it is not intended. There are no warranties other than that expressly set forth herein. This warranty is not transferable.
Thane Direct is not responsible or liable for indirect, special or consequential damages arising out of or in connection with the use or performance of this product or other damages with respect to any economic loss, loss of property, loss of revenues or profits, loss of enjoyment or use, costs of removal, installation, other consequential damages of whatsoever nature, failure to follow instructions or warnings in this User’s Guide or use of the product in a manner for which it was not designed.
THIS WARRANTY DOES NOT APPLY TO THE FOLLOWING:
1. Damage due to accident, misuse, abuse or vandalism.2. Improper or inadequate maintenance.3. Unauthorized modification.4. Damage in return transit.5. Normal wear of parts (wear & tear that occurs over time and with use) including chips, scratches, abrasions, discoloration or fading.6. Repairs made by an unauthorized service technician.
TO OBTAIN SERVICE: The original purchaser should immediately contact our customer service representatives at 1-888-788-2808 and depending on the extent of the service requested, the purchaser shall have the obligations and responsibility to:
• Pay for all service and parts not covered by the warranty.• Prepay the shipping and handling.• Carefully package the product using adequate padding material to prevent damage in transit. The original container is ideal for this purpose.• Include in the package: the owner’s name, address, telephone number, and a detailed description of the problem.• Provide the proof of purchase, which includes date of purchase.• Send via Insured* Parcel Post or courier to: Thane Direct.• Or otherwise as instructed by customer service.
FOR ANY INQUIRES, PLEASE CONTACT THANE DIRECT CUSTOMER SERVICEAT THIS TOLL FREE NUMBER 1-888-788-2808
*Thane Direct is NOT responsible for any non-insured items lost in transit
1. Unplug Power Cord from the electrical outlet and allow the appliance to cool down. 2. Always empty the Water Tank at the end of each use. 3. Wipe all surfaces of the appliance with a soft cloth. 4. Store in a protected and dry area.
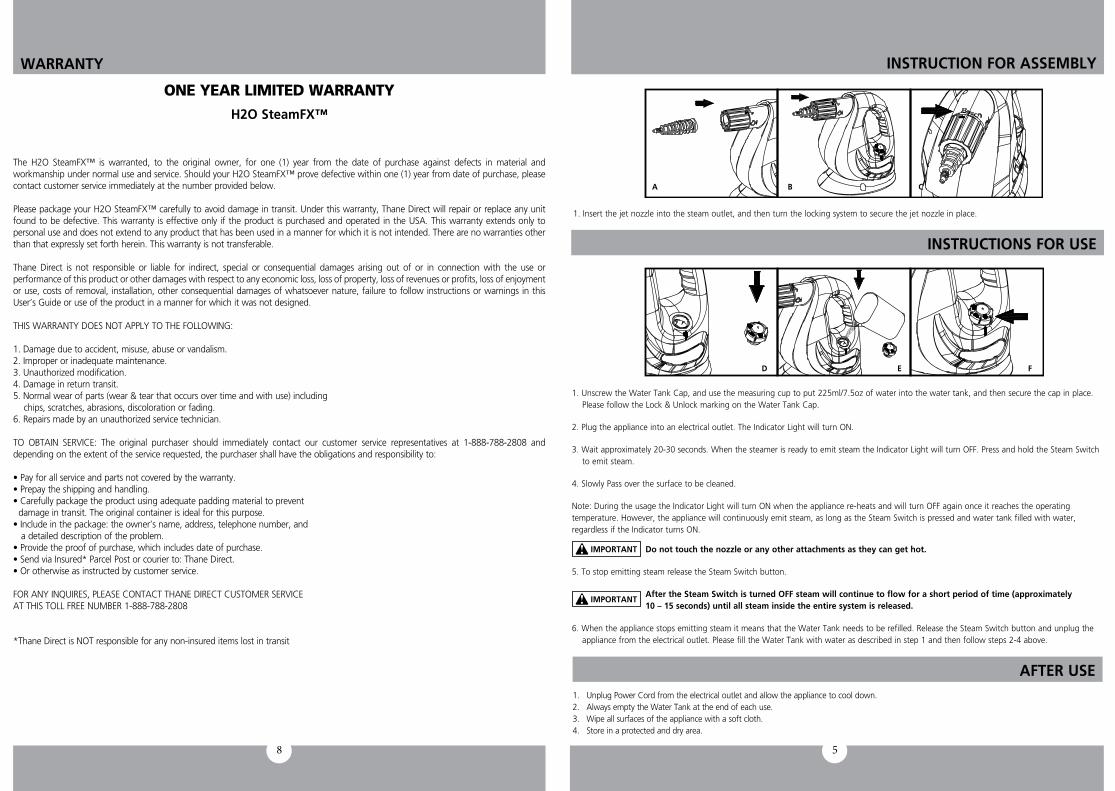
1. Insert the jet nozzle into the steam outlet, and then turn the locking system to secure the jet nozzle in place.
AFTER USE
1. Unscrew the Water Tank Cap, and use the measuring cup to put 225ml/7.5oz of water into the water tank, and then secure the cap in place. Please follow the Lock & Unlock marking on the Water Tank Cap. 2. Plug the appliance into an electrical outlet. The Indicator Light will turn ON. 3. Wait approximately 20-30 seconds. When the steamer is ready to emit steam the Indicator Light will turn OFF. Press and hold the Steam Switch to emit steam. 4. Slowly Pass over the surface to be cleaned. Note: During the usage the Indicator Light will turn ON when the appliance re-heats and will turn OFF again once it reaches the operating temperature. However, the appliance will continuously emit steam, as long as the Steam Switch is pressed and water tank filled with water, regardless if the Indicator turns ON. Do not touch the nozzle or any other attachments as they can get hot. 5. To stop emitting steam release the Steam Switch button. After the Steam Switch is turned OFF steam will continue to flow for a short period of time (approximately 10 – 15 seconds) until all steam inside the entire system is released. 6. When the appliance stops emitting steam it means that the Water Tank needs to be refilled. Release the Steam Switch button and unplug the appliance from the electrical outlet. Please fill the Water Tank with water as described in step 1 and then follow steps 2-4 above.
INSTRUCTIONS FOR USE
IMPORTANT!
IMPORTANT!
D E F
A B C

DISCONNECT THE UNIT FROM THE POWER OUTLET DURING CLEANING AND MAINTENANCE. DO NOT IMMERSE THE H2O SteamFX™ HANDHELD STEAMER IN WATER.
Cleaning procedure to remove lime scaleIf your H2O SteamFX™ begins to produce steam slower than usual or stops producing steam you may need to remove lime scale. It is necessary to remove lime scale on a regular basis, every 25 times you use a full tank of water or once a month, especially in areas with hard water. To remove lime scale from your H2O SteamFX™, please follow these procedures:
Using the Cleaning PinSwirl and push the pin up and down the small hole of the steam outlet. Ensure that all scale debris have been removed from the steam outlet before reassembling any attachment.
Using a cleaning solution1. Prepare a solution of 1/3 white vinegar and 2/3 water and add to the Water Tank.2. Ensure that steam released is aimed away from or any surrounding objects. Plug the appliance into a properly grounded electrical outlet, turn it ON and allow the unit to produce steam until the vinegar/water solution is used up.3. Repeat the above procedure as many times as necessary until a normal steam flow is achieved.4. Fill the Water Tank with fresh water and rinse out.5. Fill the Water Tank with fresh water again, and release steam through the system until the Water Tank is empty.6. Perform a test cleaning on a suitable isolated area after each lime scale removal to ensure that there is no debris left in the system.
CLEANING AND MAINTENANCE
7
To clean calcium deposits building up inside the Water Tank: Add 1-2 tablespoons of white vinegar to a full Water Tank, close the Water Tank cap and shake the contents. DO NOT TURN THE APPLIANCE ON. Let the unit sit for a few hours. Empty the Water Tank and rinse with clean water until it rinses clear.
Cleaning blocked steamer accessories: Due to the high mineral content of water in some areas, some calcium buildup might develop inside the tip of the Straight Nozzle. To clean it, we recommend using a spray lubricant. Spray a small burst or two of the lubricant inside the tip of the Straight Nozzle. After spraying the lubricant, fill the steamer with water and run a continuous jet of steam through the affected accessory for several minutes to remove the deposit. WE RECOMMEND PERFORMING THIS PROCEDURE IN A PROTECTED AND WELL-VENTILATED AREA.
Problem SolutionPossible Cause
The unit does not power on
Reduced steam or no steam
Steam escapes from
connections
The unit is not plugged in or turned ON Make sure the unit is plugged into a properly grounded outlet and the steam switch is pressed
Attachment is improperly connected Unplug the unit, allow it to cool down, detach the accessories and reattach them properly
Debris or obstructions at the connection points Remove the accessory and check and clean connection points
Blocked Steam Nozzle Clean the Nozzle
Water Tank is empty Fill Water Tank
Lime scale deposit Follow cleaning procedure to remove lime scale
TROUBLESHOOTING GUIDE
Remember to remove lime-scale at least once a month, especially in areas with hard water.
Please follow instructions provided in this User’s Guide.
Use filtered or distillated water for better performance.
IMPORTANT!
WARING!
TIPS
6
OPTIONAL ACCESSORY USAGE
GARMENT STEAMING CLOTHTo steam a garment, place item of clothing on a hanger and steam the garment directly. Slowly slide the Garment Steamer Head vertically over the garment to smooth the fabric and remove wrinkles and odors.
Install the Garment Steaming Cloth or microfiber scrubbing cloth over the Window Cleaning tool.
Some fabrics like leather, suede, and velvet may not be suitable for steaming. Please refer to the manufacturer’s care label.
Curtains and draperies can be steamed while hanging.
Black Tag
Tagsideback
Part and Usage Assembly Tips/Caution
EXTENSION HOSEThis 75cm/30” Extension Hose is designed for use with the following attachments: - Window Cleaning Tool- Duster- Long Steam Lazer™
Insert the designated end of the Extension Hose into the designated hole in the Main Unit and then turn the locking system.
Make sure the Extension Hose is securely locked into place before use. When in use, keep the Extension Hose away from your body and avoid touching the hose as it can get hot.
Do not pull the Extension Hose with excessive force, as it might cause damage and result in a steam leak.
WINDOW CLEANING TOOLAttached to the Extension Hose and in combination with one of the available cleaning cloths or scraper, use this tool for window cleaning, garment steaming, wallpaper removal, etc.
Align the lock button on the Extension Hose with the designated hole on the Window Cleaning Tool Frame and push in the Extension Hose until it locks in place.Install cleaning cloth of your choice onto the Window Cleaning Tool.
WINDOW CLEANING CORAL CLOTHUse it to clean windows, mirrors and glass.
Install the Coral Cloth over the Window Cleaning Tool. Do not cover the squeegee blade or scraper when installing the cleaning cloth. Make sure to attach the cloth to all hooks on the Cleaning Tool Frame to avoid slipping from the frame during use.
Do not use steam on frozen windows.
Be careful when using the steamer on glass, as the glass may break.
Hooks front
NYLON BRUSHThe round nylon brush is great for cleaning smooth hard surfaces, such as toilets, sinks, and kitchen counters, etc. It can be used with soap or detergent to clean dirty areas.
Metal/nylon brush can be attached to any of the steam nozzles.
Attach the round metal/nylon brush by screwing onto the threaded end of the Jet Nozzle or Long Steam Lazer™.
Use different color brushes for particular cleaning areas (kitchen, bathroom, etc.)
MICROFIBER CLOTH FOR NYLON BRUSHUse when you want to pick up the dirt loosened by the steam.
METAL BRUSHCan be used on hard surfaces that are not pron to scratches, i.e. car rims, BBQ, etc.
Place the Microfiber cloth onto the nylon brush.
LONG STEAM LAZER™Easier to clean hard to reach areas (behind the cabinets, behind the toilet, hard to reach coners, etc.).
Attach the Long Steam Lazer™ to the Extension Hose by aligning the lock button on the Extension Hose with the designated hole on the Long Steam Lazer™ tool and push until it locks in place.Attached to the Extension Hose, the Long Steam Lazer™ can be used by itself or with the Round Brush (Nylon). Remove the end cap before installing the Round Brush (Nylon).
DUSTER WITH CORAL CLOTH Slowly pass over surface to be cleaned. The absorbent Coral Cloth picks up the dirt loosened by the steam.
Install the Coral Cloth into the Duster frame and attach the Duster to the Extension Hose.
MICROFIBER SCRUBBING CLOTHRemoves more dust and dirt with less effort. Effective in cleaning stubborn smudges or spills.
Hooks
BENDABLE JET NOZZLE Cleans tight corners and hidden places.
Screw the Bendable Jet Nozzle onto the Long Steam Lazer™. Remove the black plastic cap from the top of the Long Steam Lazer™. Replace the plastic cap after attaching the Bendable Jet Nozzle.