Embed Size (px)
Citation preview

User's Guide
SecuX Crypto Hardware Wallet
Overview SecuX Wallet (the device) is for securing your crypto assets in a safe place and providing you with an easy way to receive, send and manage these crypto assets. To make the device work, you need to initialize the device first and then connect to the SecuXcess wallet interface or mobile app (for iOS devices) for further applications.
The user’s manual contains the following sections: 1. Unboxing 2. Device initialization 3. Introduction to the main menu of the device 4. Connect the device to the host 5. How to operate the SecuXcess interface 6. Introduction to SecuXcess app
1. Unboxing ● Anti-tamper labels To make sure your package has NOT been opened during transportation. Please do check carefully the anti-tamper labels on the packaging box and USB port of the device below are intact.
● Package contents
Each package comes with the following items: ■ SecuX Wallet Device ■ USB cable (USB Type-C or Micro-B) ■ Wallet Pouch ■ Quick Start Guide ■ Recovery Sheets (2pcs)
2. Device Initialization When the device leaves the factory, there is no private key pre-set in the device. You will be asked to generate your own unique private key or restore an existing private key (using recovery words) during device initialization. If you are not asked to create a pin and generate recover words when you first power on the device, please contact us via [email protected] for further assistance.
Step 1: Charge the device (V20/W20 only) Charge the device by connecting the device to a USB power adapter via the supplied USB cable. For the 1st time charging, it is suggested to charge for at least 2 hours.
Step 2: Set your personal device PIN Please set your personal PIN (4-8 digits). This PIN will be required whenever you use the device.

For security reasons, the device will reset after 5 failed attempts to enter the PIN. If you fail to enter the correct PIN 5 times, the device will be completely reset. To restore your accounts, please refer to step 4 to use the recovery words to restore them.
Step 3: Set the device name There is a default device name when it leaves the factory. You can rename it (1-13 capital or small English letters) if you like.
Step 4: Create or recover wallet The SecuX wallet is fully compatible with Bitcoin Improvement Proposal (BIP) standards such as BIP32, BIP39, BIP44 and BIP49 and allows the generated private key to be restored using a set of 12, 18 or 24 recovery words.
There are two options for the device configuration: ● Configure as a new wallet The device will randomly generate a list of 24 recovery words which are unique to you. Please
write them down sequentially on the recovery sheet and keep it in a safe place. If the device is reset, damaged, lost or stolen, you can use these 24 recovery words to restore your crypto assets (accounts) to any SecuX wallet or other BIP standard compatible wallets.
● Restore from an existing wallet. The SecuX wallet can restore the crypto assets from other BIP standard compatible wallet by
sequentially entering its 12, 18 or 24 recovery words. Please have your existing recovery words ready for the next step.
WARNING: Recovery words can be used to gain access to your funds. Keep them safe and protect them against theft, loss or damage. If your recovery words are lost or stolen, transfer your assets to another wallet immediately.
WARNING: Do not store your recovery words in digital format, such as in cloud storage, email, digital photos, etc. Digital storage of recovery words makes them vulnerable to hacking.
Step 6: Generate the private key The device will then generate the private key based on the recovery words, which will be securely stored inside the device's secure element chip.
Once the device has been initialized successfully, the device will switch to regular operation mode allowing you to turn on Bluetooth function (for SecuX V20/W20 only), view your accounts or change device and security settings.
3. Introduction to the Main Menu of the Device The main menu provides access to Bluetooth settings, account information, device settings and security settings functions. Note: To view the FCC info, go to Device Setting > About > Regulation
● Bluetooth (for V20/W20 only) You need to turn on the Bluetooth function to connect to a Bluetooth-ready host
such as a laptop PC or mobile phone. A random one-time password (OTP) will appear as soon as the host attempts to pair
with the device. Please enter this OTP number on the host accordingly.
Note: ■ When the Bluetooth function is turned on, the main menu is locked until
the Bluetooth function is turned off. ■ The Bluetooth function will be automatically turned off if there is no pairing
action within 5 minutes.
● Account Information The device always stores the latest balance of each account, allowing you to view
the account balance information when the device is offline. Update the wallet by connecting it to the SecuXcess interface if you receive funds.
● Device Settings ■ Idle Time to Power Off (for V20/W20 only) This function helps save battery power by turning off the power when the
device is idle for more than the set time period. Please note that the device will be always powered on when it is connected to a
power source.
■ Device Name
You can view the current device name and edit it (1-13 capital or small English letter)
if you like.
■ About ◆ Firmware Version It shows the current firmware versions of the Secure Element (SE) and the
device MCU. You may need this information for firmware upgrades or technical support later on.
◆ Regulation From here, you can find the regulation information like FCC or CE
information. ● Security Settings
■ Idle Time before Logout For increased security, the device will automatically log out when the device is
idle over the set idle time. You will be asked to enter your PIN to log in to your device again.
Note that you can also manually log out and close the display by quickly pressing the power button.
■ Change PIN Code You may change the device PIN at all times, which was set during device
initialization.
■ Reset to Factory Setting

All the preference settings including PIN, device name and the private key will be wiped when you confirm to reset the device. Before performing this operation, make sure you have access to the 24 recovery words you wrote down during device initialization so that you can restore your crypto assets on the device or other compatible crypto wallets in the future.
■ Create a Hidden Wallet The SecuX Hardware Wallet allows you to create a hidden wallet for plausible deniability, enhancing your safety and privacy.
Follow the steps below to create your hidden wallet. Step 1: Set a PIN (4-8 digits); it must be different from the device PIN Step 2: Re-enter the PIN you set Step 3: Set a pass-phrase (up to 99 characters)
● Battery Indicator The battery indicator is only available on V20 and W20 with embedded rechargeable
battery.
● The device is fully charged.
The battery level is around 75% full.
The battery level is low and should be recharged.
The battery level is extremely low. Please recharge the device immediately.
4. Connect the device to the host and SecuXcess Wallet interface The instructions below will illustrate how to connect the device to your host device and the SecuXcess wallet.
● Connect to the host device using USB
❶ Connect to the host via the supplied USB cable
❷ Access the SecuXcess web interface (https://wallet.secuxtech.com) on the host
❸ On the SecuXcess splash page, select the USB icon, choose your SecuX Wallet and click Connect
to open the SecuXcess main menu.
● Connect to a host device using Bluetooth (except iOS devices)
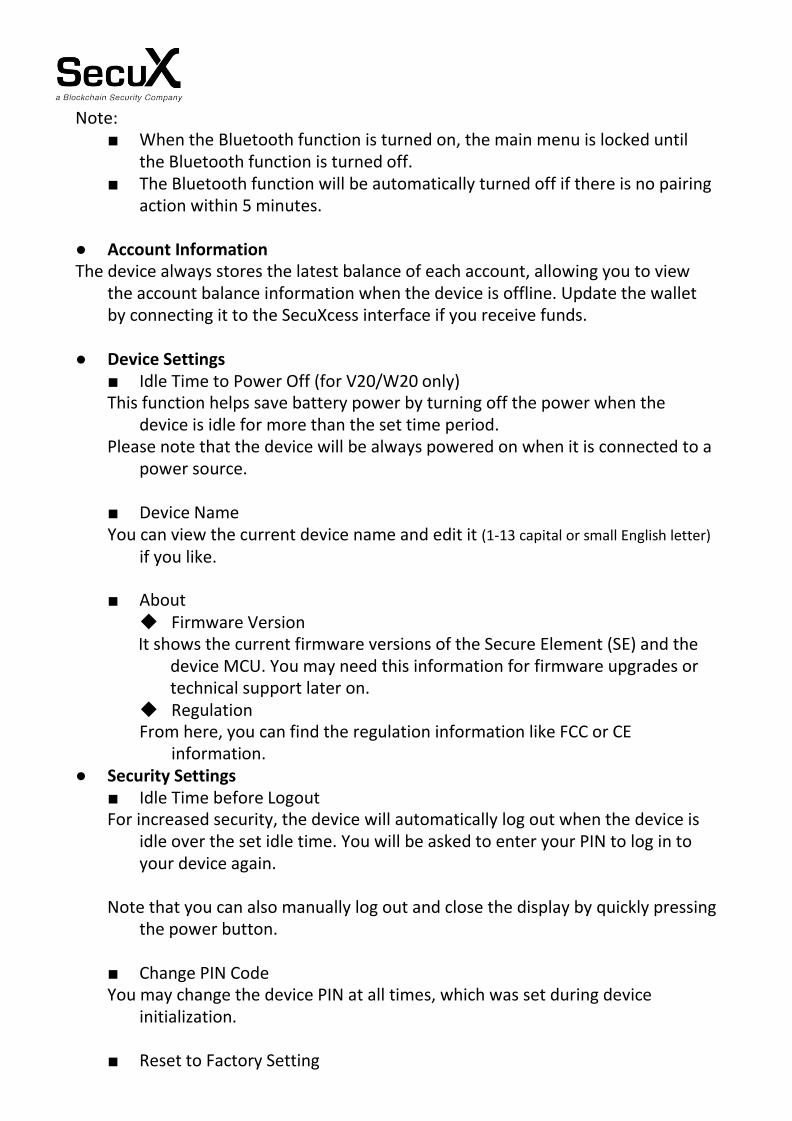
❶ Enable Bluetooth on SecuX wallet and the host
❷ Access the SecuXcess interface app (https://wallet.secuxtech.com) on the host
❸ On SecuXcess interface page, select Bluetooth icon and your SecuX wallet, then click Pair.
❹ Enter the one time password shown on the device display and click Confirm
● Connect to iOS devices using Bluetooth
❶ Download the SecuXcess app from the App Store.
❷ Enable Bluetooth for both SecuX wallet and iOS device
❸ Activate the SecuXcess app and select your SecuX wallet from the Bluetooth search list to link.
❹ Enter One Time Password shown on the device display.
Now you are ready to use SecuX wallet to manage your crypto assets. If you have any further questions, please visit www.secuxtech.com/support/ or send us an email ([email protected]).
5. How to Operate SecuXcess Wallet Web App
5-1 Launch SecuXcess Wallet Web App
On your connected host, launch SecuXcess Wallet interface by accessing the URL https://wallet.secuxtech.com or by clicking My Wallet on the SecuX official website.

5-2 Select how to connect to your wallet Connect your SecuX wallet via USB and choose your device to link with your device.
For Bluetooth users, connect your SecuX wallet via Bluetooth and enter the OTP number displayed on your device.
5-3 Select the crypto asset from the supported coin list

5-4 Create a new account
Before making any transaction (send or receive coins), you need to have an opened account of the selected coin.
If there is no opened account, you need to create a new account first.
Click Add Account
Enter account name and click OK
Account portfolio
The opened account(s) will be listed in the account portfolio of each coin. Then you can manage the account
portfolio by editing the account name, deleting an account, creating a new account or updating account
balance from Blockchain.

5-5 Manage Account portfolio
(1) Edit account name
Click to edit the selected account name and then click .
(2) Delete account You can click the to delete the selected account. But if this account has ever made any transaction before (even the balance amount is ZERO) or contained any token, this account always cannot be deleted.
(3) Add new account
Click icon and you can create one more account to the account portfolio for the selected coin. But if there is one opened account of the selected coin WITHOUT any transaction history, no any new account can be created.
(4) Add ERC-20 tokens to Ethereum accounts To add ERC-20 tokens into accounts, you need to have the opened Ethereum accounts first. Follow the steps below to add ERC-20 tokens Click an Ethereum account from Account Portfolio

Click to open ERC-20 Tokens window.
To add a new ERC-20 tokens, select the token name from the pull down list or input the token name and click
Add. The new token will be listed in your token list. You also can click to delete the token. Click X to close to return to Account Portfolio page.
(5) Update account balance
Click icon to update the account balance from Blockchain ledger It may take longer time for more accounts and longer transaction history.
(6) Receive coins Select the coin type. Select the receiving account from Account Portfolio Click Receive to get receiving address
Click Yes from the device if the address matched.

Make copy and pass it to the sending party.
(7) Send coins Select the coin type Select the account to debit from Account Portfolio Follow the steps below to complete the transaction process
Step 1: Enter the recipient address, amount and network fee. Then click
The QR code icon is to turn on the host camera to capture QR code of recipient address.
The higher network fee will increase higher priority of this transaction.
Step2: Verify the transaction by clicking Yes on the device if matched.
Step 3: Confirm the transaction details by clicking Send or click Cancel to abort this transaction.
Step 4: Report the transaction result
(8) View transaction history
Select the coin type and then select an account from Account Portfolio
You will find the transaction list and transaction basic information like The date/time of the transaction, the
amount from which address was received, or the amount to which address it was sent. You also can click each
transaction to view the transaction details including the token type from the Blockchain.

5-6 Update the device firmware
Click from right upper corner to open device firmware update page.
From General tab, you can find the firmware version numbers of Security Element (SE) and MCU.
Only there is an updated firmware version released and then you need to make firmware updated. If there is a new firmware release or your device firmware is not the most updated one, you will receive a firmware update notice when connecting to SecuXcess web APP. To update the firmware, click the Updates tab and follow the steps to complete the update process. To avoid unintended interruptions or interference, the update process only supports USB connection.

Appendix Federal Communications Commission Statement
This device complies with Part 15 of the FCC Rules. Operation is subject to the following two conditions: • This device may not cause harmful interference. • This device must accept any interference received, including interference that may cause undesired operation. This equipment has been tested and found to comply with the limits for a class B digital device, pursuant to part 15 of the FCC Rules. These limits are designed to provide reasonable protection against harmful interference in a residential installation.
This equipment generates, uses and can radiate radio frequency energy and, if not installed and used in accordance with the instructions, may cause harmful interference to radio communications. However, there is no guarantee that interference will not occur in a particular installation. If this equipment does cause harmful interference to radio or television reception, which can be determined by turning the equipment off and on, the user is encouraged to try to correct the interference by one or more of the following measures:
• Reorient or relocate the receiving antenna. • Increase the separation between the equipment and receiver. • Connect the equipment into an outlet on a circuit different from that to which the receiver is connected. • Consult the dealer or an experienced radio/TV technician for help
WARNING! Any changes or modifications not expressly approved by the party responsible for compliance could void the user’s authority to operate the equipment.
Prohibition of Co-location This device and its antenna(s) must not be co-located or operating in conjunction with any other antenna or transmitter.
IMPORTANT NOTE: Radiation Exposure Statement: This equipment complies with FCC radiation exposure limits set forth for an uncontrolled environment. End users must follow the specific operating instructions for satisfying RF exposure compliance. To maintain compliance with FCC exposure compliance requirement, please follow operation instructions as documented in this manual.
WARNING! This equipment must be installed and operated in accordance with provided instructions and the antenna(s) used for this transmitter must be installed to provide a separation distance of at least 20 cm from all persons and must not be co-located or operating in conjunction with any other antenna or transmitter.


![Formless: A User's Guide, [excerpt] A User's Guide to Entropy](https://img.pdfslide.us/doc/110x75/586b77ce1a28ab9c7d8bebd4/formless-a-users-guide-excerpt-a-users-guide-to-entropy-.jpg)