Embed Size (px)
Citation preview

©2010 CHARGE Anywhere, LLC. All trademarks, service marks, and trade names referenced in this material are the property of their respective owners.
CHARGE Anywhere® Designed For Use with QuickBooks®
User’s Guide Part I
Table of Contents INTRODUCTION .................................................................................................................. 2
PART I: INSTALLATION ...................................................................................................... 4
IMPORTANT GUIDELINES ..........................................................................................4 INSTALLING SERVER AND PLUG-IN ............................................................................5 GRANTING ACCESS TO THE PAYMENT SOLUTION ..................................................... 21 IMPORTANT NOTES ................................................................................................ 48 SETUP .................................................................................................................. 68
PART III: APPENDIXES ................................................................................................... 107
APPENDIX A: RUNNING THE PLUG-IN ON A DIFFERENT COMPANY FILE .................... 108 APPENDIX B: UN-INSTALLATION ........................................................................... 109 APPENDIX C: REGISTERING QBFC8.DLL .............................................................. 110

2
Introduction
This document describes the features and functionality of Payment Application plug-in.
Part I: Installation of the document describes the operations that need to be performed in order to install the application and it contains three chapters: Important Guidelines – before installing the application, please read these guidelines Installation – it will assist you with installing the server and the plug-in Granting Access to Payment Application Application – it shows how to grant access to the application in QuickBooks Setup – gives you details about the initial settings;
Part II: Current Plug-in Features deals with the description of the main application features.
Current Plug-in Features chapter can be divided into four parts (A->D) (Part II can be found in
a separate document):
A. Necessary operations before using the plug-in
Before using the plug-in, you must consider the first two sub-chapters:
Important Notes – we strongly advise you to read these notes before running the plug-in;
B. Using the plug-in
Payment Application supposes two main operations:
1. Processing transactions in QuickBooks – you will find details about this operation in the
next three sub-chapters ( Processing Transactions in QuickBooks ):
Process Sale
- gives you step-by-step instructions on how to process a single or multiple
invoices/sales receipts, and to create payments in QuickBooks;
- you can process sale with both types of payment: credit card and ACH payment.
Process Void
- explains how you can select payments or/and sales receipts already created in
QuickBooks to be voided;
- you can process void with both types of payment: credit card and ACH payment.
Process Return – presents how you may process return payments or/and sales receipts and
create checks in QuickBooks;
3
Refunds – presents how you may create credit card and ACH refund memos
Bill Presentment
– presents how you may create a custom presentment for an invoice and send
it to the client by e-mail.
2. Importing transactions from gateway to QuickBooks – see Import Transactions (it
shows you how to import transactions created outside of QuickBooks).
3. Additional operations
Additionally, the user can:
i. print the credit card receipts for one or several payments or sales receipts – see Print Credit
Card Receipts
ii. create a report of all Customers whose credit cards expire in the selected date range – see Display Credit Card Reports
C. Transaction Manager
You will find out how to view the transactions made on the Gateway - see Transaction
Manager.
D. Dealing with errors
During the main operations, error cases can occur – you can analyze these cases and see how
you can operate with locked/pending transactions in the three sub-chapters of Error Handling:
Error Handling: Process Sale, Void and Return
Error Handling: Import Transactions
Error Handling: Bill Presentments
Pending Transactions
E. Information about Payment Application In About Payment Application you will be given details about the version of the application. Part III: Appendixes (it can be found in a separate document)
There are three Appendixes: Appendix A – Running the plug-in on a different company file;
Appendix B – Uninstalling the plug-in;
Appendix C – Registering QBFC8.dl

4
Part I: Installation
The Installation chapter contains the following sub-chapters: 1. Important Guidelines 2. Installing Server and Plug-in 3. Granting Access to the Payment Solution Application
4.
Setup
Important Guidelines
Backup your QuickBooks Company file(s) periodically. This will prevent your company file from being damaged by any possible undetected errors.
Administrator rights are required on the machine to install and test the application.
If your QuickBooks company file requires login on opening QuickBooks for the first time, after the installation of the plug-in, make sure to login to
QuickBooks as Administrator (you need to do this only once, immediately after the plug-in was installed). On subsequent logins, you can use any other QuickBooks accounts.
The plug-in requires QuickBooks Redistributable Package 8.0 and Microsoft .Net Framework 2.0. In case you don’t have any of these components installed on your
computer, the installer will assist you with downloading and installing them.

5
Installing Server and Plug-in NOTE: Close QuickBooks before installing the server and the plug-in.
After installing the prerequisites, you need to install the main application. In the
screen that appears click on Next to start the installation.
6
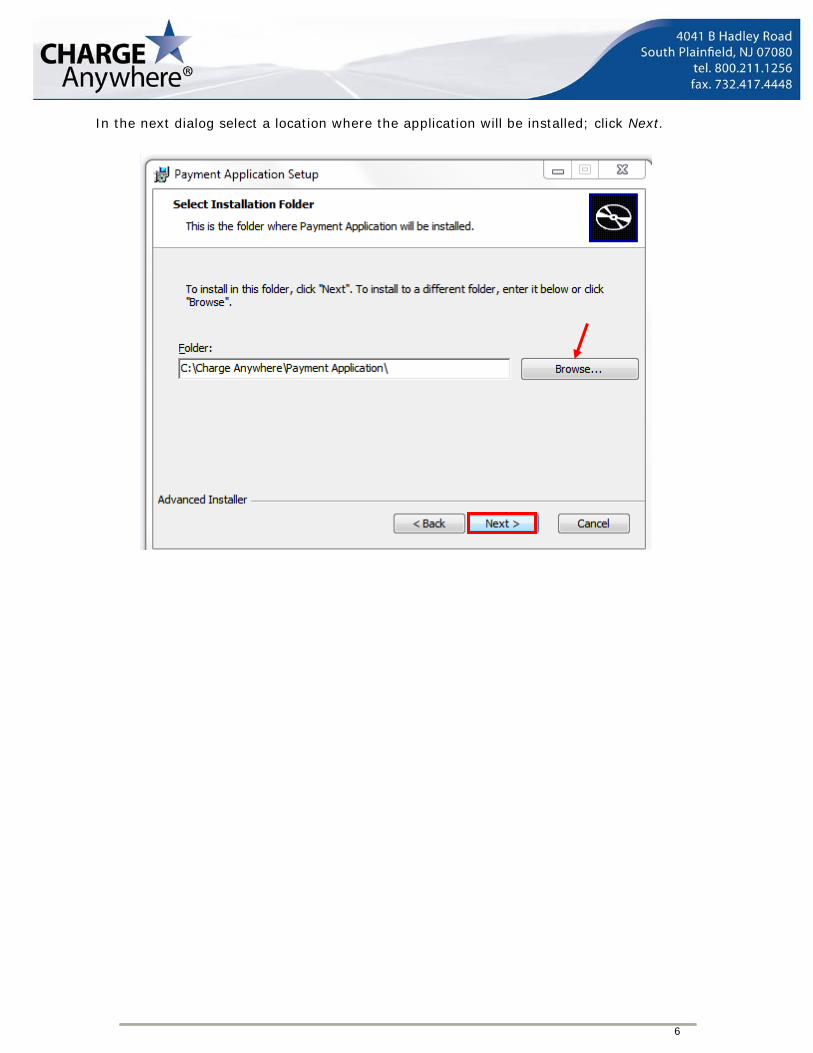
In the next dialog select a location where the application will be installed; click Next.

7
By default the application will be installed in C:\Program Files\Payment Application\Payment Application
If you want to install the application in a different folder, click the Browse button (see above); select a new location from the Look in drop-down list and click OK:

8
Next click Install:
A progress bar window will inform you about the status of installation; this step may take several moments:

9
A new screen will appear. Read carefully the instructions and after closing QuickBooks on all computers select Next.
QuickBooks Company File represents the file that contains the accounting records for your company. QuickBooks Program File
represents the file that runs the QuickBooks application.

10
Select Configuration There are three options
1. Payment Application previously installed 2. Payment Application at first installed (one computer) 3. Payment Application at first installation (multiple computers)
Payment Application previously installed
If the application was previously installed on your computer(s) you need to select the
Yes option. After selecting the option, choose Server Location by clicking on button.

11
In the Open dialog screen select the server and press on Open.
Once the server is selected press on Next to proceed further.

12

13
Read the instructions posted on the screen for allowing QuickBooks access and press on
Finish to end the setup.
Print Install Instructions
If you need to print installation instructions click on the Print Installation Instructions
link
in the closing page of the installer. In the newly opened window select the printer and
press on OK.

14
Payment Application at first installation (one computer) If you didn’t have the application installed on any of your computers and you plan to
install the application only on one computer, click on Next to go to the following step.

15
Read the instructions posted on the screen for allowing QuickBooks access and press on
Finish to end the setup.
Print Install Instructions
If you need to print installation instructions click on the Print Installation Instructions
link
in the closing page of the installer. In the newly opened window select the printer and
press on OK.

16
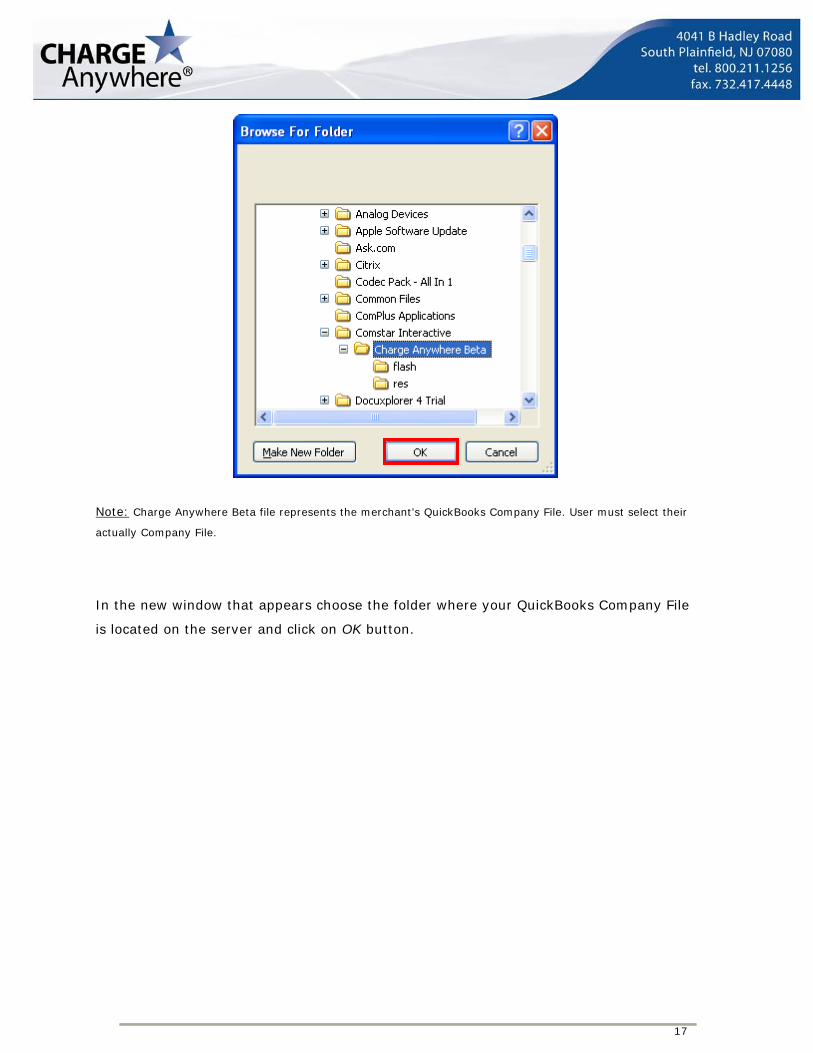
Payment Application at first installation (multiple computers) If you plan to install the application on more that one computer and is the first setup of
the application, you need to select the folder for placing the server, accessing Server
Location by clicking on button.
17
Note:
Charge Anywhere Beta file represents the merchant’s QuickBooks Company File. User must select their
actually Company File.
In the new window that appears choose the folder where your QuickBooks Company File
is located on the server and click on OK button.

18
To go to the next stage of the application, click on Next.
19
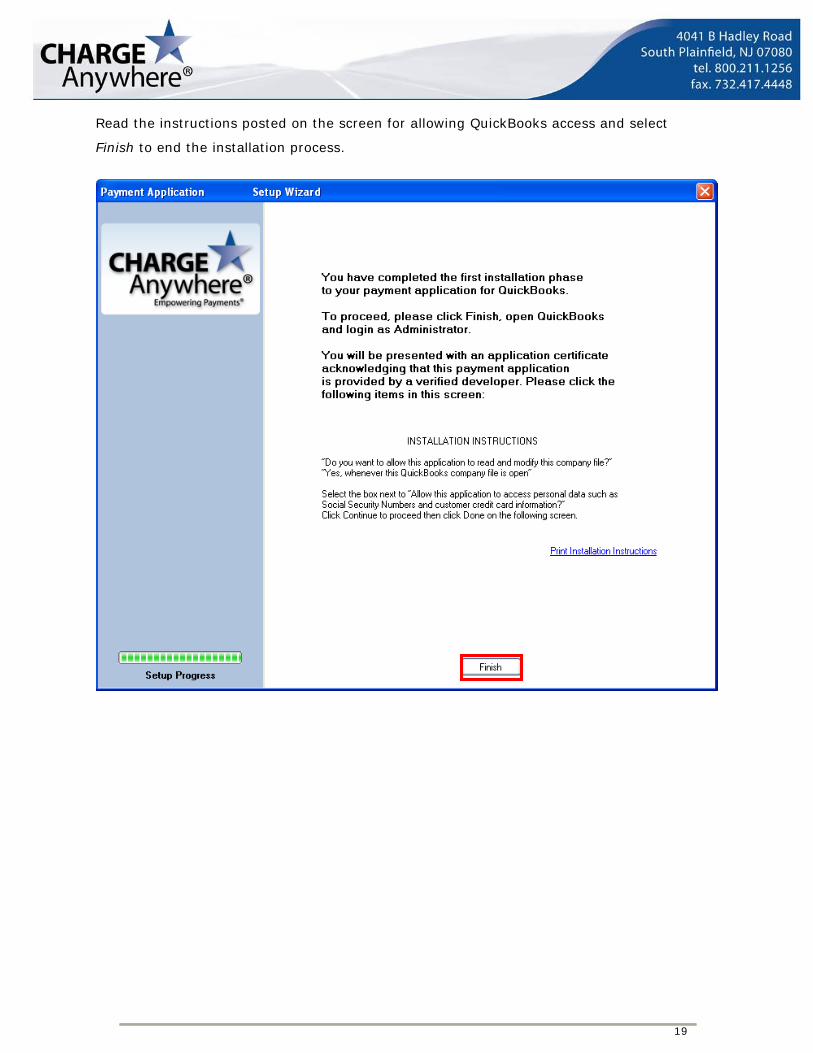
Read the instructions posted on the screen for allowing QuickBooks access and select
Finish to end the installation process.

20
Click on Close to complete and close the installation wizard. Click View Tutorial to see a
demonstration of the Payment Application.

21
Granting Access to the Payment Solution
Granting access to the Payment Application in QuickBooks requires the following operations:
NOTE: If you are using Windows Vista, before opening QuickBooks for the first time after installing the plug-in, right-click the QuickBooks icon and select Run as administrator:
This operation is necessary only when running the plug-in in QuickBooks for the first time.
Launch QuickBooks and in the window that will be displayed, select Yes, whenever this QuickBooks company file is open:

22
Also check Allow this application to access personal data such as Social Security Numbers and customer credit card information. Next, click Continue. Next, click Done:
NOTE: If you are not prompted with the above messages and if you are using Microsoft Windows 2003 Server, it is likely that you will need to register QBFC8.dll. For more details, please refer to Appendix D.

23
Payment Application Registration (with Multi Merchant) The next stage for completing the settings for the application is to register the company. You can do it in the Payment Application Registration page. Provide the software registration key which has been sent by e-mail upon registration, phone number and company ID (if you register a multi merchant company) and click on Register button.
If the registration was successful the following message will be displayed:
Press on OK to close it.

24
NOTE: If the company has already a registered company ID can use it when creating a new company or can opt for a new company ID.

25
When the client has one or more multi merchant companies and wants to have only one company he/she must unregister all multi merchant companies. If the multi merchant companies have the same company ID is required only one unregister operation.
A message will prompt you. Click on OK button to close it.

26
From the new screen that appears select Next to go to the subsequent step.

27
Enter Company Information
In this page you need to complete the form with the company’s data.
A) Here you can enter: - Company Name - Street Address - City - State - Postal Code - Phone
B) Receipt Trailer - the text entered here will appear on the Receipt Preview form C) Receipt Preview – allows the user to see in label format data entered in A section.
To go to the next stage, click on Next.
B
C
A
28
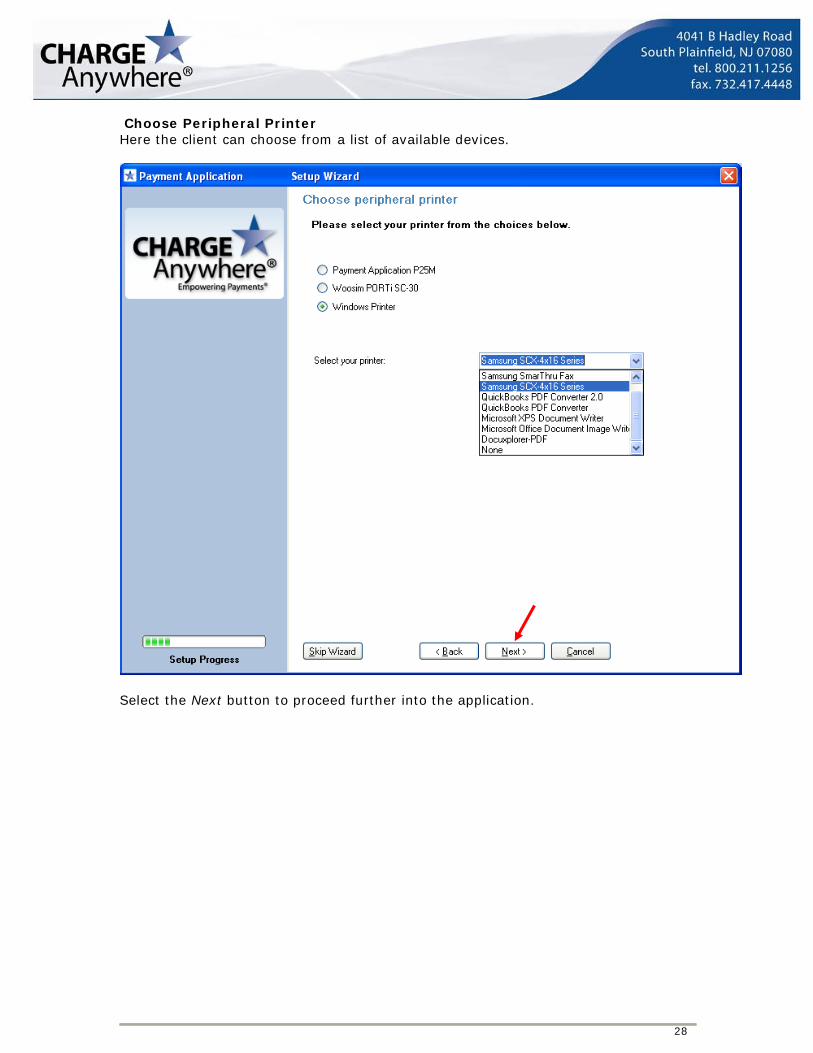
Choose Peripheral Printer Here the client can choose from a list of available devices.
Select the Next button to proceed further into the application.
29
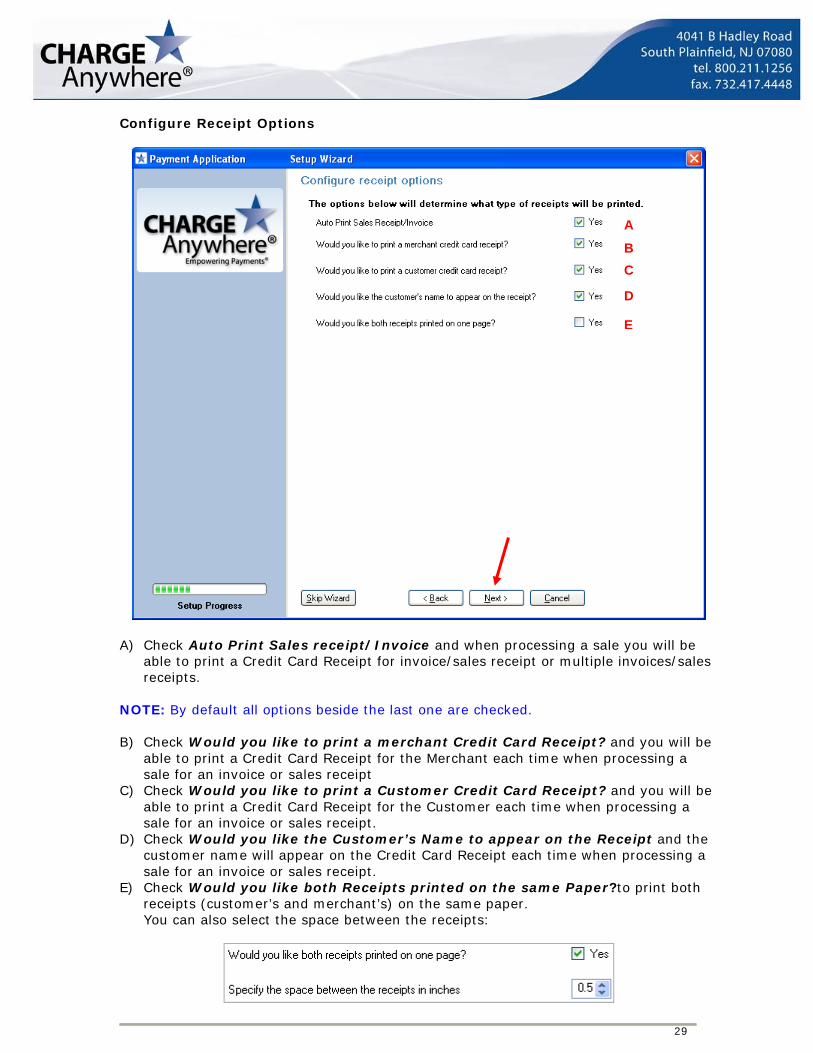
Configure Receipt Options
A) Check Auto Print Sales receipt/Invoice and when processing a sale you will be
able to print a Credit Card Receipt for invoice/sales receipt or multiple invoices/sales receipts.
NOTE: By default all options beside the last one are checked. B) Check Would you like to print a merchant Credit Card Receipt? and you will be
able to print a Credit Card Receipt for the Merchant each time when processing a sale for an invoice or sales receipt
C) Check Would you like to print a Customer Credit Card Receipt? and you will be able to print a Credit Card Receipt for the Customer each time when processing a sale for an invoice or sales receipt.
D) Check Would you like the Customer’s Name to appear on the Receipt and the customer name will appear on the Credit Card Receipt each time when processing a sale for an invoice or sales receipt.
E) Check Would you like both Receipts printed on the same Paper?to print both receipts (customer’s and merchant’s) on the same paper.
You can also select the space between the receipts:
A
B C
D
E

30
In order to access the following stage, select the Next button.
Configure Magnetic Card Reader
This option will be used to configure the magnetic card reader device, if one is connected.
Click on Next to go to the Configure pinpad device page.

31
Configure Pinpad Device
This option will be used to configure the pinpad reader device, if one is connected.
Press on Next to go to the Configure signature capture device stage.

32
Configure signature capture Device
This option will be used to configure the configure signature capture device, if one is connected.
To access the subsequent page select Next.

33
QuickBooks Default Information
In this section the user sets the default customer.
A) Complete all fields with the required data.
To add customer’s name, choose the button. This action will determine the Customer Filter window to open, where you can enter the customers by certain filters.
A
B

34
Check a Name Filter, enter 11 in the Name Filter field and click Search.

35
Double click on 111-Payment Application under Customer Name to set this as the default customer.
Note:
We suggest using 111-Payment Application as the default customer. Transactions that are not linked to invoices or specific customers will automatically be allocated to this default customer.

36
B) Types of QuickBooks Transactions Choose the type of QuickBooks transaction you would like to record for imported Sale
Select the type of QuickBooks transaction you would like to record for Quick Sale
: Create Receive Payment or Create Sales receipt
NOTE: • If you are using any version of QuickBooks 2005, Create Sales receipt option
will not be enabled. • Remember that by default Create Receive Payment is selected.
Choose the type of QuickBooks transaction you would like to record for imported Sale
Sales receipt Item Select a Sales receipt Item for processing a sales receipt in Quick Sale or
Imported Sale.
This option is available only if you have previously selected Create Sales receipt when choosing the type of QuickBooks transaction you would like to record for Quick Sale or/and for Imported Sale.

37
Sales Receipt Approval Code The Approval Code is received only after the transaction has been sent to the gateway. Depending on the selected option (see Memo/ New Line) the mode of displaying information will differ. In order to go to the following stage press on Next. Configure Transaction Options
In this page you can: a. Automatically synchronize the encrypted database upon adding/modifying
QuickBooks Customers
By selecting this option, when creating or modifying a Customer, the synchronization with the encrypted database will be done automatically. NOTE:
• All the data will be updated in the database, except the credit card and ACH numbers. Thus, when making a transaction for that particular Customer, you will need to re-enter the credit card or ACH information into the Customer profile.
• If you don’t select this option, see Note9 or Note10.
A
B
C
D
E

38
b. Automatically request to process payment upon saving Receive Payment/Sales receipt
By selecting this option, when manually creating a Sales receipt or a Receive Payment, you will be automatically asked to process payment. c. Allow Duplicate Transactions By checking this option you will be able to process duplicate transactions. d. Automatically Import Transactions This feature allows the user to import transactions that were created on the website. In order to enable this section you need to tick the Automatically Import check box. The Automatically Import section is divided in:
Frequency – here is set the rate of recurrence for the import of transactions from the website
Start Time This represents the time range in which transactions are imported
into QB. End Time
Notifications – in this area the user can select between three options, namely:
Do not notify – case in which no notification (success or failed) will be displayed. Notify upon completion of import - the user will receive notification for all the transactions imported Notify for Failed Imports – a notification will be shown only for failed to import transactions.
e) Do you charge sales taxes? option is documented in Setup, under Transaction Options.

39
Bill Presentment Bill Presentment is an add-on service and this set-up menu will only appear in the Set-up Wizard if Bill Presentment was added to the account prior to registration.
A
C
B

40
A. Invoice Configuration – in this area of Bill Presentment the user configures a custom design for the PDF document that will be sent to the client.
If you want to add a logo to the document you can do so by pressing on the Load Logo. In the newly appeared Open dialog window choose the image and click on Open. The desired image should appear in the Company Logo preview screen.
If the image size exceeds or is less than 415 X 225 a warning message will prompt you.
Click OK.

41
If you want to see how the PDF documents looks before sending it to the client, you need to click on PDF Preview button. The document will open in a new window.

42
Preview of Bill Presentment
The invoice sent contains a link which, if accessed, will redirect the client to the Payment Application site where he/she can pay the invoice.

43
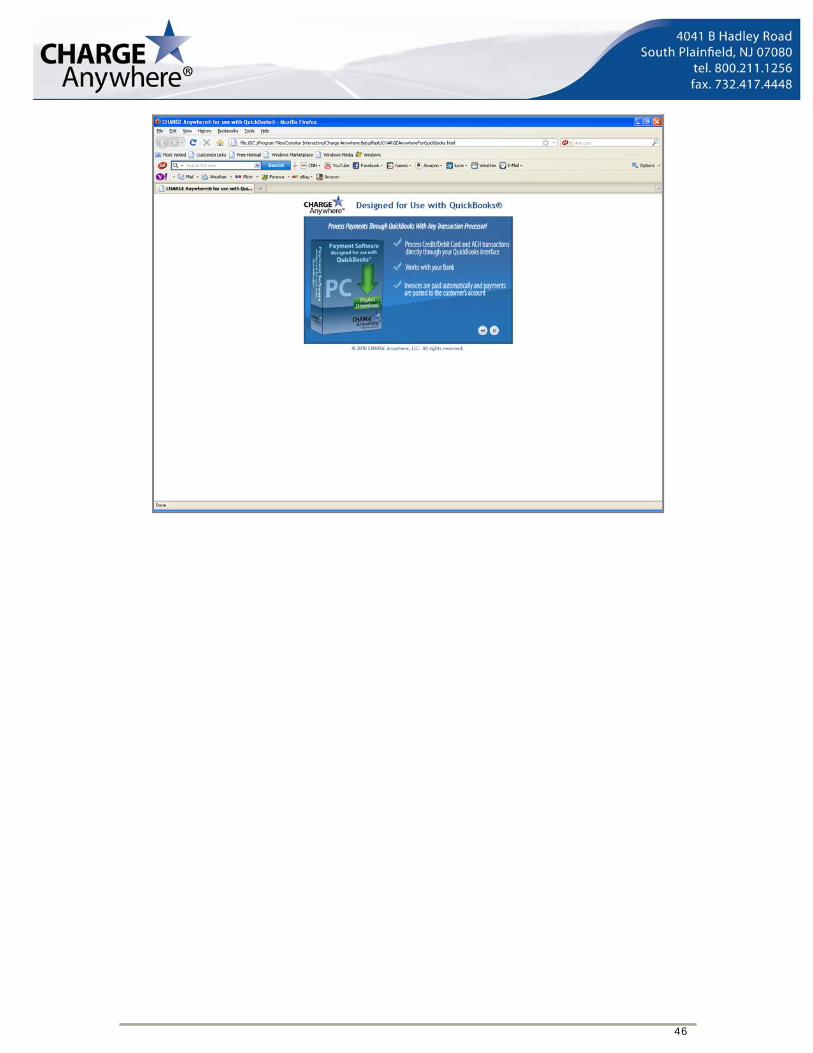
Payment Application Website

44
B. E-mail configurations functionality gives the possibility to the user to configure the settings for e-mails he will send to customers.
Subject: represents the title of the e-mail Custom Text: stands for the content that will appear in the body of the e-mail. C. E-mail from Address - gives the user the possibility to create custom settings for
e-mail sending.
Default Configuration The e-mail will be sent using the Payment Application’s server. Custom Configuration The client was granted the right to use his own/her e-mail server. The user has to provide the e-mail server, port, username and password.
45
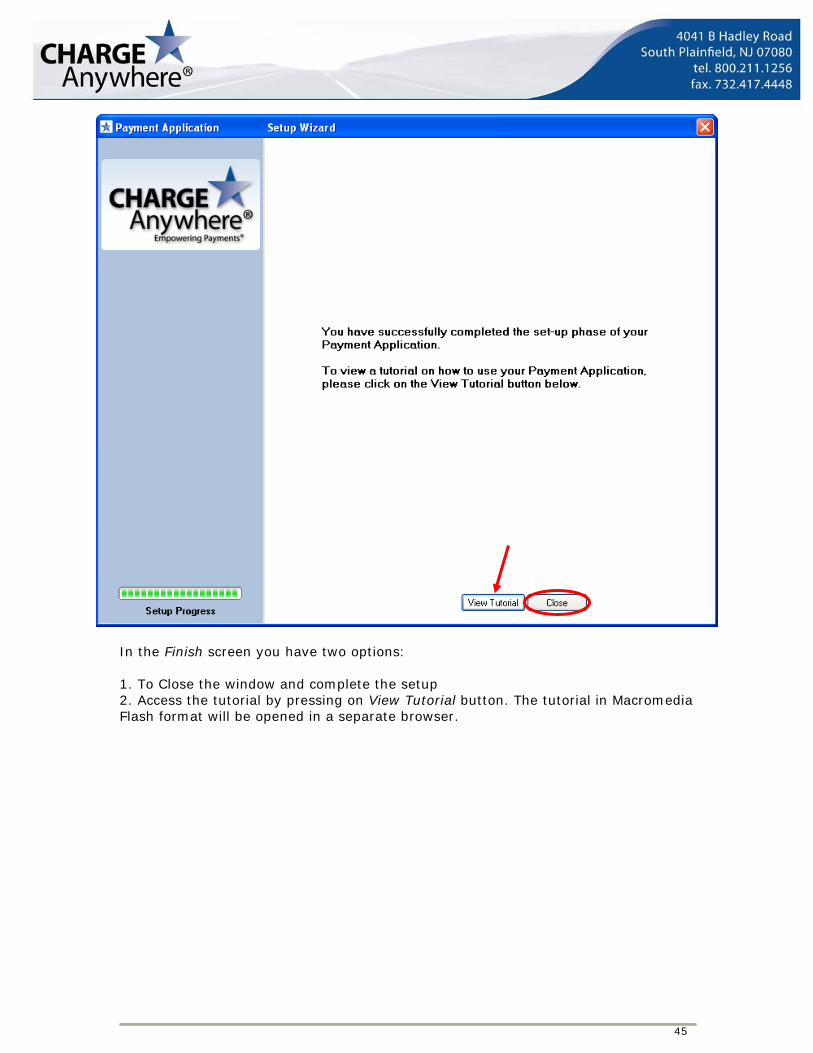
In the Finish screen you have two options: 1. To Close the window and complete the setup 2. Access the tutorial by pressing on View Tutorial button. The tutorial in Macromedia Flash format will be opened in a separate browser.
46

47
A new set of sub-menus will be created under Company->CHARGE Anywhere:

48
Important Notes Before running Payment Application application, you need to consider the following:
1. Sales receipts for QuickBooks 2005 If you are using any version of QuickBooks 2005, you CANNOT process any sale, void or return for Sales receipts. 2. Allow application to access personal information Before using the plug-in, you need to allow the application to access personal information. In case you did not check Allow this application to access personal data such as Social Security Numbers and customer credit card information when installing the plug-in, go to Edit->Preferences, then select Integrated Applications->Company Preferences and click the Properties button:
In the newly-displayed window, check Allow this application to access Social Security Numbers, customer credit card information, and other personal data:

49
3. Enable Sale Rep field on invoice If you want to specify a Sale Rep when creating invoices in QuickBooks, you need to select a template that has Sale Rep field. As an example, from Template combo-box, select Intuit Product Invoice:

50
You can enable the Sale Rep field for any type of invoice. To do this, go to Lists -> Templates and double-click a template:
In the new window click the Additional Customization button:

51
Select Make a Copy:
Select the Header tab and check the Screen and Print boxes next to the REP field:

52
When checking the Print box the following message might appear – the added field overlaps the existing fields. Click Continue to adjust the fields:
Then, click Layout Designer (see above in the Additional Customization window). Move Rep field so that it doesn’t overlap anymore any other field; click OK:

53
Click OK:
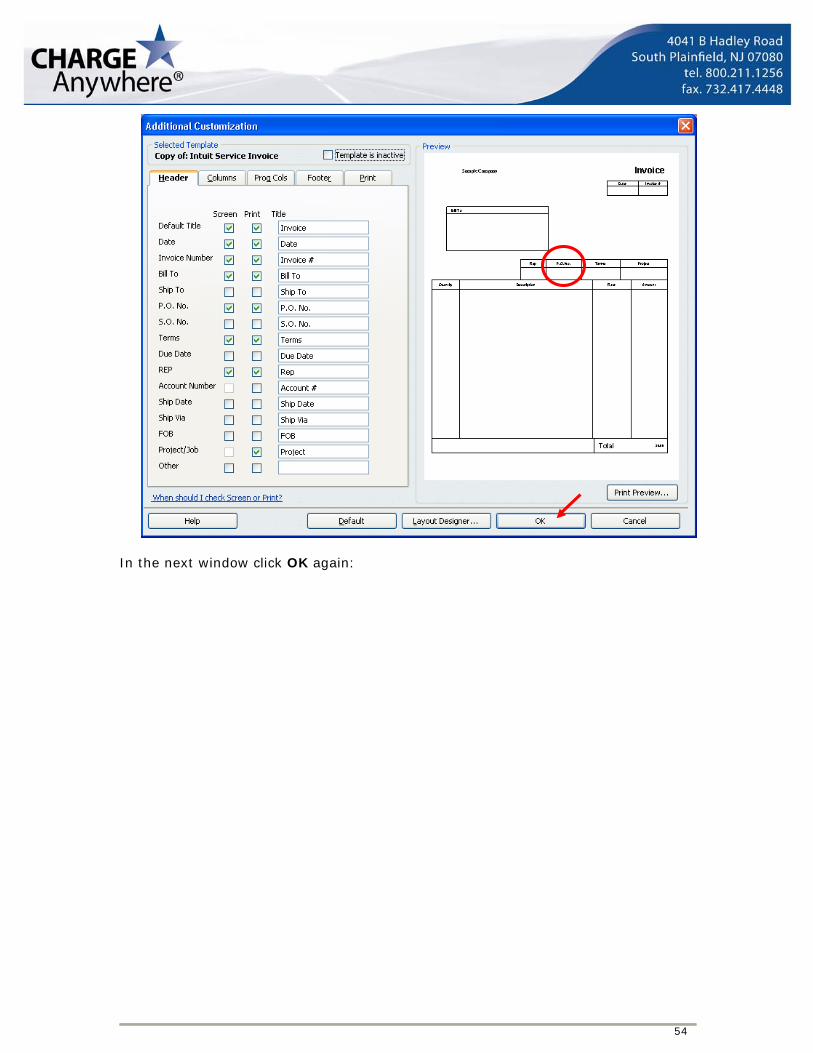
54
In the next window click OK again:

55
The Rep field will appear on the customized template:

56
4. Set up default information Prior to using the plug-in, you need to set up default information for Customer, Accounts Receivable and Bank Account. Therefore, you must create at least one Bank Account and one Accounts Receivable Account. 5. Introduce all data in Setup Before processing a transaction, enter all the required information in Setup; otherwise, the next message will prompt you:
6. Process failed transactions In case there are transactions that were processed successfully on the Gateway, but failed to be processed in QuickBooks, then, when you open QuickBooks, you will be asked if you want to review these transactions:

57
If you answer: NO: the transactions will remain unprocessed in QuickBooks. YES: the Pending Transactions window will open:
For more details, please refer to Pending Transactions Menu. 7. Display progress dialog We are displaying a progress dialog when reading QuickBooks as this operation is time consuming. For example, while retrieving Customers from QuickBooks, the following progress dialog window will be displayed:

58
8. Invoice, sales receipt or payment in edit state You CANNOT process any transaction if you have an invoice, sales receipt or payment in the edit state (‘edit state’ means modifying any field in that particular invoice, sales receipt or payment). 9. Introduce/Modify Customer credit card information When introducing a new Customer…. To introduce credit card information for a Customer, open a Customer profile (go to Customers -> Customer Center) and click the Payment Info tab:
You will be asked to confirm the credit card information:

59
If you don’t enter any credit card information, later on when processing a transaction, you will be prompted to introduce the credit card data:

60
You will NOT be asked to confirm the credit card information if you have previously selected Automatically synchronize the encrypted database upon adding/modifying QuickBooks Customers in Setup/Transaction Options. But, if you DON’T confirm the credit card information, you will NOT be able to process any transaction.
When modifying/updating a Customer… When you modify the existing Customer data from QuickBooks, you will also be asked if you want to update the customer’s credit card information in the encrypted database:

61
If clicking No, all the information except the credit card number will be updated in the encrypted database. If clicking Yes, you will need to re-enter the Credit Card information into the Customer profile:
You will be informed about a successful update:
You will NOT be asked to confirm the credit card information if you have previously selected Automatically synchronize the encrypted database upon adding/modifying QuickBooks Customers in Setup/Transaction Options. But, if you have modified credit card information, you must confirm the credit card number; otherwise, you will NOT be able to process any transaction. When you process a transaction and introduce new or different payment information, you will be prompted with the following message:

62
If clicking Yes, all the newly-entered payment information will be updated both in QuickBooks and in the database. If clicking No, all the newly-entered payment information will NOT be updated in QuickBooks and in the database.
10. Introduce/Modify Customer ACH information When introducing a new Customer…. To introduce ACH information for a Customer, open a Customer profile (go to Customers -> Customer Center) and click the Address Info tab for the address and the Additional Info tab for the routing and bank account numbers:

63
You will be asked to confirm the ACH information:

64
If you don’t enter any ACH information, later on when processing a transaction, you will be prompted to introduce the ACH data:

65
You need to enter the following data:
- Address - City - State - Zip Code - Routing Number - Bank Account Number
If the above fields are not completed, then the following message will prompt you:

66
You will NOT be asked to confirm the ACH information if you have previously selected Automatically synchronize the encrypted database upon adding/modifying QuickBooks Customers in Setup/Transaction Options. But, if you DON’T confirm the ACH information, you will NOT be able to process any transaction. When modifying/updating a Customer… When you modify the existing data from QuickBooks, you will be asked if you want to update the customer’s ACH information in the encrypted database:
If clicking No, all the information except the ACH numbers will be updated in the encrypted database. If clicking Yes, you will need to re-enter the ACH information into the Customer profile:

67
You will be informed about a successful update:
You will NOT be asked to confirm the ACH information if you have previously selected Automatically synchronize the encrypted database upon adding/modifying QuickBooks Customers in Setup/Transaction Options. But, if you have modified ACH information, you must confirm the ACH numbers; otherwise, you will NOT be able to process any transaction. When you process a transaction and introduce new or different payment information, you will be prompted with the following message:
If clicking Yes, all the newly-entered payment information will be updated both in QuickBooks and in the database. If clicking No, all the newly-entered payment information will NOT be updated in QuickBooks and in the database.

68
Setup
First you need to make the initial settings. Thus, go to Company-> CHARGE Anywhere >Setup:
When accessing the Setup menu for the first time for a new QuickBooks company, you will need to synchronize the QuickBooks company file with the encrypted
database:
You will be informed when the synchronization process is completed:
The Setup window will open:

69
You need to fill in all the fields and click OK. Note: In the case of network versions (starting from version 2.8.0), all users will have the same Merchant ID for a QuickBooks company file; the rest of the parameters may differ. The Setup window has five tabs:
1. Account Info
2. Trans Options
3. Default Info
4. Print Options
5. Bill Present
6. Customer Import

70
1. Account Information: With Multi Merchant Selected

71
a) Software License Key, Phone Number fields Introduce the Software License Key and the Phone Number, and then click the Register button:

72
Click OK to continue
Note:
If you need to unregister the Payment Application, the Register key will be replaced by Unregister

73
2. Transaction Options
A
F
B
C
G
H
D
E

74
At this tab you can: a. Automatically synchronize the encrypted database upon adding/modifying QuickBooks Customers
By selecting this option, when creating or modifying a Customer, the synchronization with the encrypted database will be done automatically. NOTE:
• All the data will be updated in the database, except the credit card and ACH numbers. Thus, when making a transaction for that particular Customer, you will need to re-enter the credit card or ACH information into the Customer profile.
• If you don’t select this option, see Note9 or Note10.
b. Automatically request to process payment upon saving Receive Payment/Sales receipt By selecting this option, when manually creating a Sales receipt or a Receive Payment, you will be automatically asked to process payment. c. Allow Duplicate Transactions By checking this option you will be able to process duplicate transactions. d. Do Not Import Transactions from Gateway This option is available only if Automatically Import Transactions is unchecked. If marked, Do Not Import Transactions from Gateway feature doesn’t allow the user to manually import a transaction.
75
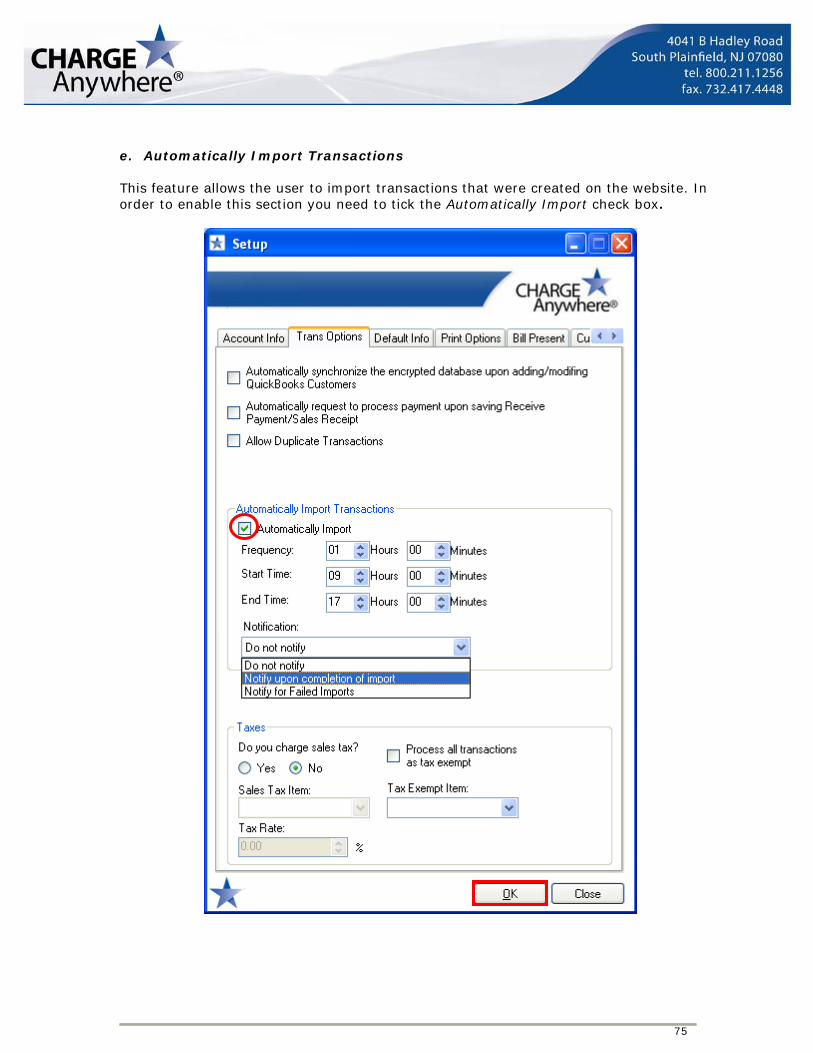
e. Automatically Import Transactions This feature allows the user to import transactions that were created on the website. In order to enable this section you need to tick the Automatically Import check box.

76
The Automatically Import section is divided in:
Frequency – here is set the rate of recurrence for the import of transactions from the website
Start Time they represent the time range in which transactions are imported
into QB. End Time
Notifications – in this area the user can select between three options, namely:
Do not notify – case in which no notification (success or failed) will be displayed. Notify upon completion of import - the user will receive notification for all the transactions imported Notify for Failed Imports – a notification will be shown only for failed to import transactions.
After completing the fields select OK button. In the case below we have chosen Notify upon completion of report. Here is the notification message received:
Press on the Close button.

77
f. Sale Tax Item and Tax Rate Select Yes if you want to charge sale taxes to a sales receipt or payment only when processing a Quick Sale. The Sale Tax Item and Tax Rate combo-box will be enabled if you have chosen the Yes check box:
The sale tax item will have the value entered in the Tax Rate field (see h – Tax Rate).
NOTE: If you have chosen Yes, when calculating the sale tax, the plug-in will NOT take into account the tax rate introduced in QuickBooks for the selected sales tax item:
But the tax rate introduced in the Tax Rate field in Setup (see h – Tax Rate). The tax rate will be applied to the sales tax item previously selected. The tax rate will also appear in the Quick Sale form and can be edited:

78
On the sales receipt the tax rate will appear separately, under the Sale Tax Item selected in Setup:

79
On the payment the tax rate will be included in the total amount:

80
g. Process all transactions as tax exempt This option is available only when making a Quick Sale for a sales receipt or a payment. If Process all transactions as tax exempt is checked in Setup, the Tax Exempt will also be selected in Quick Sale form:

81
h. Tax Exempt Item The Tax Exempt Item can be applied to an invoice or sales receipt when processing a sale, and to a sales receipt when processing a return. NOTE: If the Tax Exempt Item selected in Setup is the same with the tax item from invoice or sales receipt, then the tax item from invoice or sales receipt will be considered as exempted:

82
Tax Exempt Item in Setup
Tax Item from invoice

83
In the case of a single invoice or sales receipt, the Tax Exempt check box will appear as checked in the Sale form:
In the case of several invoices/sales receipts, if the Tax Exempt Item from Setup coincides with the tax item from the invoice or sales receipt, then the tax item from the invoice/sales receipt will be automatically considered as exempted.

84
3. QB Default Information
B
C
D
A
E
F
G
H

85
Here the user has to: a) Select a Customer – see a) b) Select a Bank Account
c) Select an Accounts Receivable Account
d) Select a Customer Number Field – see d)
e) Options
f) Options
g) Sales Receipt Item
h) Sales Receipt Approval Code a) You can enter Customers (a) by clicking one of the two buttons:
- if you click this button while editing a customer, then that particular customer will be transferred in the QB Default Information field.
NOTE: In order for this operation to succeed, you need to edit a Customer first and then open the Setup window. Also the customer must have the CC Info filled in.
- by clicking this button you can enter the customers by certain filters. Thus, a Customer Filter window will open:

86
Check a Name Filter and click Search. There will be displayed only the customers that have credit card information in QuickBooks or whose credit card information has been updated in the database:
Double-click a customer and his/her data will automatically be displayed in Setup. d) The Customer Number Field will be sent to the Gateway. You can choose the
Customer Number to be taken from Customer Name, Company Name, Account Number, Bank Account Number or Routing Number.
By default, the Account Number will be selected. e) Choose the type of QuickBooks transaction you would like to record for
imported Sale Select the type of QuickBooks transaction you would like to record for Imported Sale: Create Receive Payment or Create Sales receipt NOTE:
• If you are using any version of QuickBooks 2005, Create Sales receipt option will not be enabled.

87
• Remember that by default Create Receive Payment is selected. f) Choose the type of QuickBooks transaction you would like to record for
imported Sale Select the type of QuickBooks transaction you would like to record for Imported Sale: Create Receive Payment or Create Sales receipt NOTE:
• If you are using any version of QuickBooks 2005, Create Sales receipt option will not be enabled.
• Remember that by default Create Receive Payment is selected. g) Sales receipt Item Select a Sales receipt Item for processing a sales receipt in Quick Sale or Imported Sale. This option is available only if you have previously selected Create Sales receipt when choosing the type of QuickBooks transaction you would like to record for Quick Sale (see e) or/and for Imported Sale (see f). h) Sales Receipt Approval Code The Approval Code is received only after the transaction has been sent to the gateway. Depending on the category of the Approval Code chosen (see Memo/ New Line) the mode of displaying information will differ.

88
Memo For the Sales Receipt created with Memo option the approval code will be displayed in the memo field. In order to create a memo for the Sales Receipt Approval Code choose Memo from the drop-down menu and click on OK button.
See below how the final result will be shown in QB.

89

90
New Line In the New Line the information will appear on the Sales Receipt in a separate line in the transaction. In order to create a new line for the Sales Receipt Approval Code choose New Line from the drop-down menu and click on OK button.
Here is how the final result will be presented in QB.

91
NOTE
• Depending on the type of payment (credit card or ACH) the information will contain Approval Code number and credit card number (for credit card payments) or Approval Code, Routing number, and Bank account number (for ACH payments). The information will be presented in truncated manner.

92
4. Print Options
At this tab you can select the printing options for credit card receipts when processing a sale. You need to: a) Complete the Credit Card Receipt Header The printing form for the credit card will contain the company information entered here. In case that there is no company information introduced here, the printing form will take the information about company from Company -> Company Information.
A
B C
D E F G H
I

93
Here you can enter: - Company Name - Street Address - City - State - Postal Code - Phone b) By clicking Peripheral Devices you can configure the devices for card swiper,
printer, pinpad and signature capture:
NOTE: To purchase any peripheral devices, please contact your merchant service provider or Payment Application. c) Select the Default Printer. d) Check Auto Print Sales receipt/Invoice and when processing a sale you will be
able to print a Credit Card Receipt for invoice/sales receipt or multiple invoices/sales receipts.
NOTE: By default Auto Print Sales receipt/Invoice is checked. In this case To be printed check-box will be selected in each invoice or sales receipt:
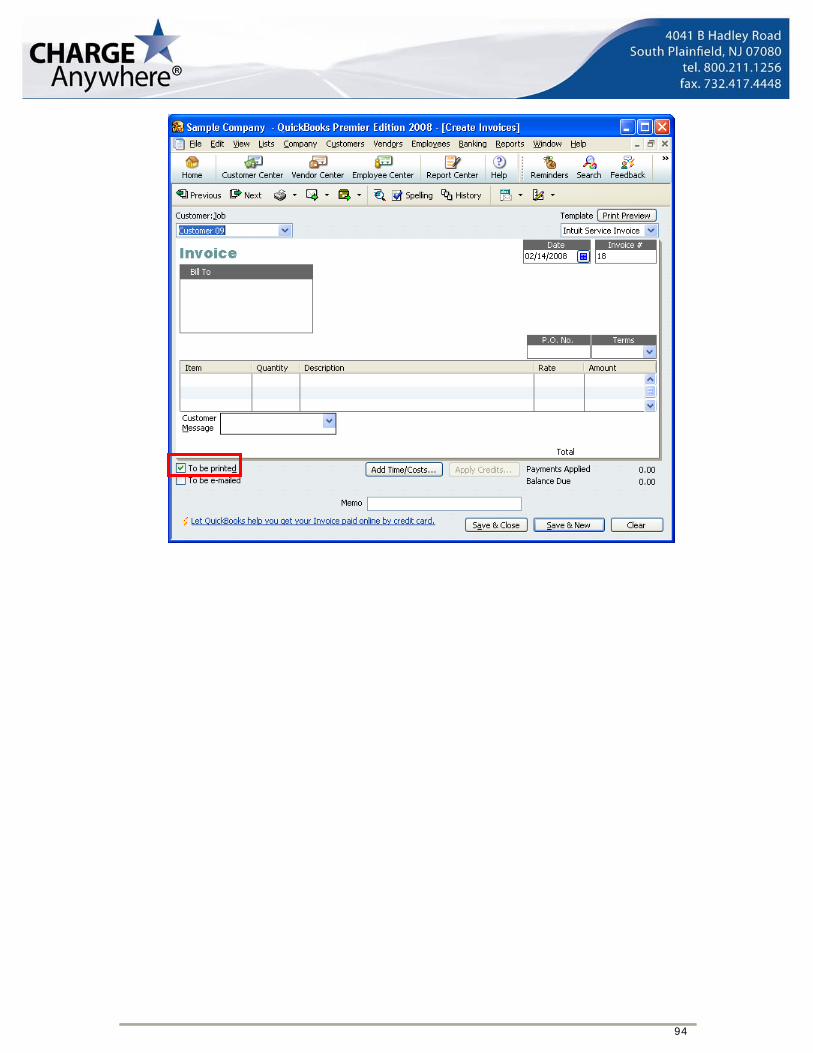
94
95
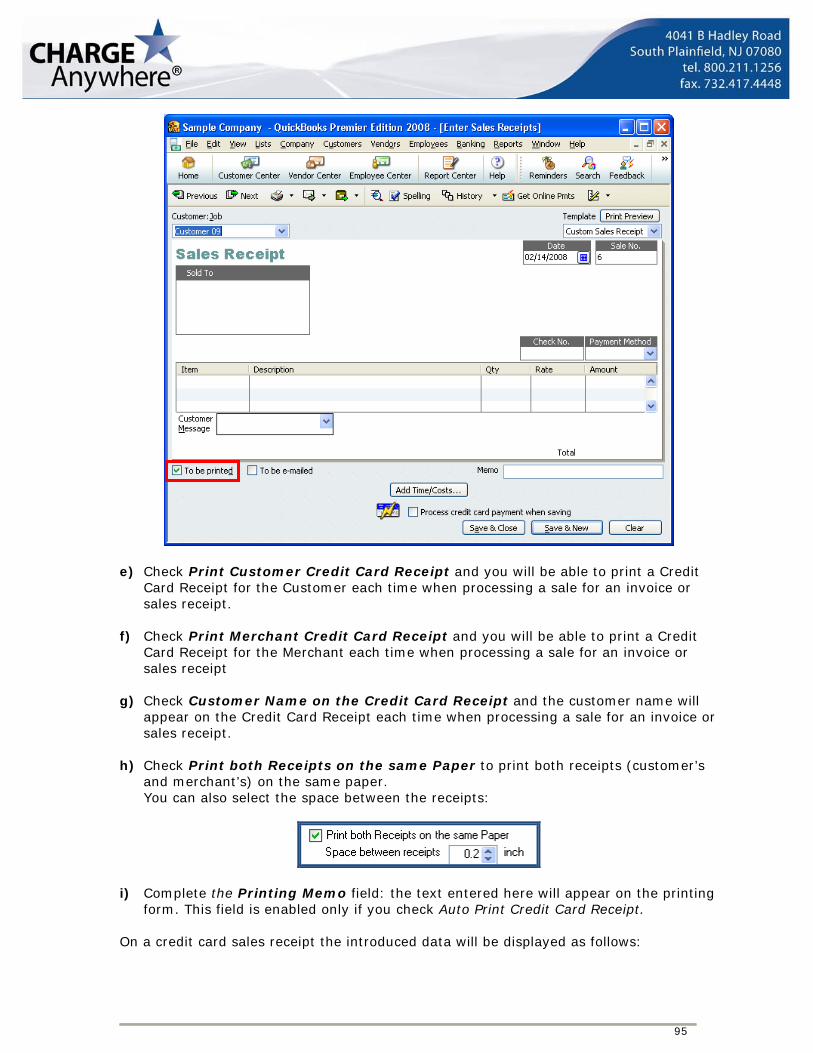
e) Check Print Customer Credit Card Receipt and you will be able to print a Credit Card Receipt for the Customer each time when processing a sale for an invoice or sales receipt.
f) Check Print Merchant Credit Card Receipt and you will be able to print a Credit
Card Receipt for the Merchant each time when processing a sale for an invoice or sales receipt
g) Check Customer Name on the Credit Card Receipt and the customer name will
appear on the Credit Card Receipt each time when processing a sale for an invoice or sales receipt.
h) Check Print both Receipts on the same Paper to print both receipts (customer’s
and merchant’s) on the same paper. You can also select the space between the receipts:
i) Complete the Printing Memo field: the text entered here will appear on the printing form. This field is enabled only if you check Auto Print Credit Card Receipt.
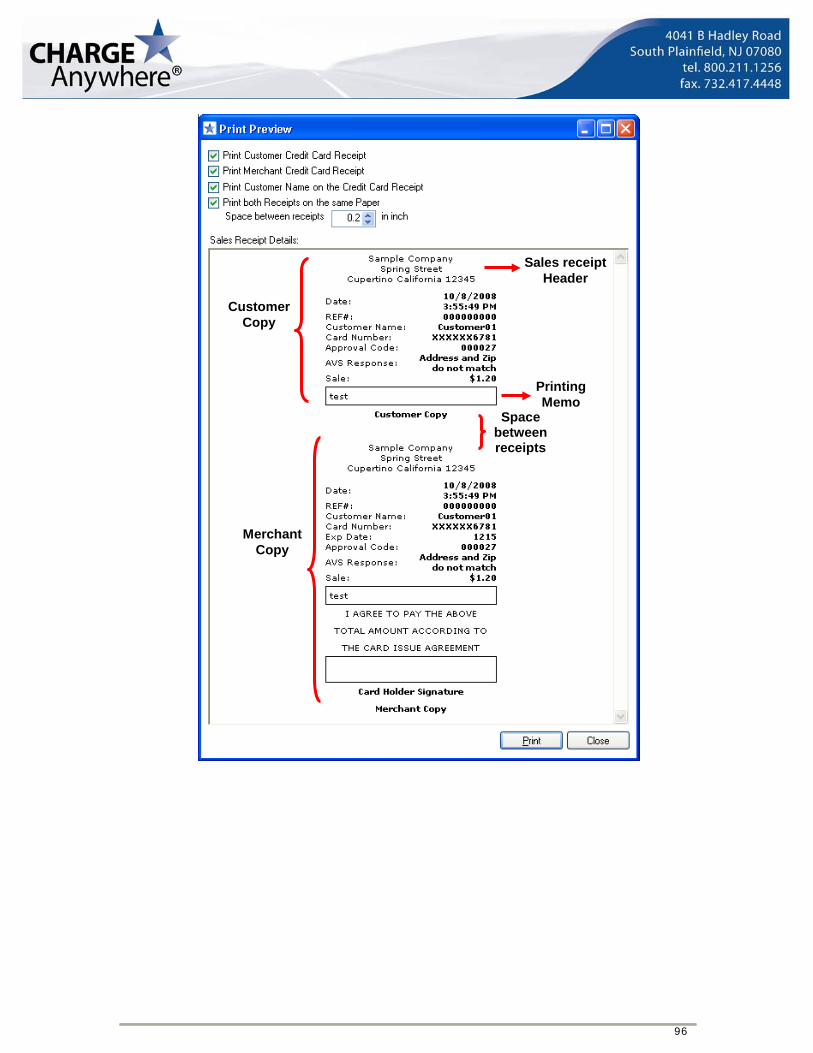
On a credit card sales receipt the introduced data will be displayed as follows:
96
Customer Copy
Merchant Copy
Sales receipt Header
Printing Memo
Space between receipts

97
5. Bill Present
For details please refer to Bill Presentment from the Setup Wizard section.

98
6. Customer Import This element of the application can be used to generate a header for a document, which will be used to import details in the CHARGE Anywhere application.

99
Import for Credit Card In order to create the document for a customer with credit card payment details click on Generate CC CSV button.
Choose the place where to keep the csv file and click on Save.

100
In the message screen that will prompt you press on OK.
101
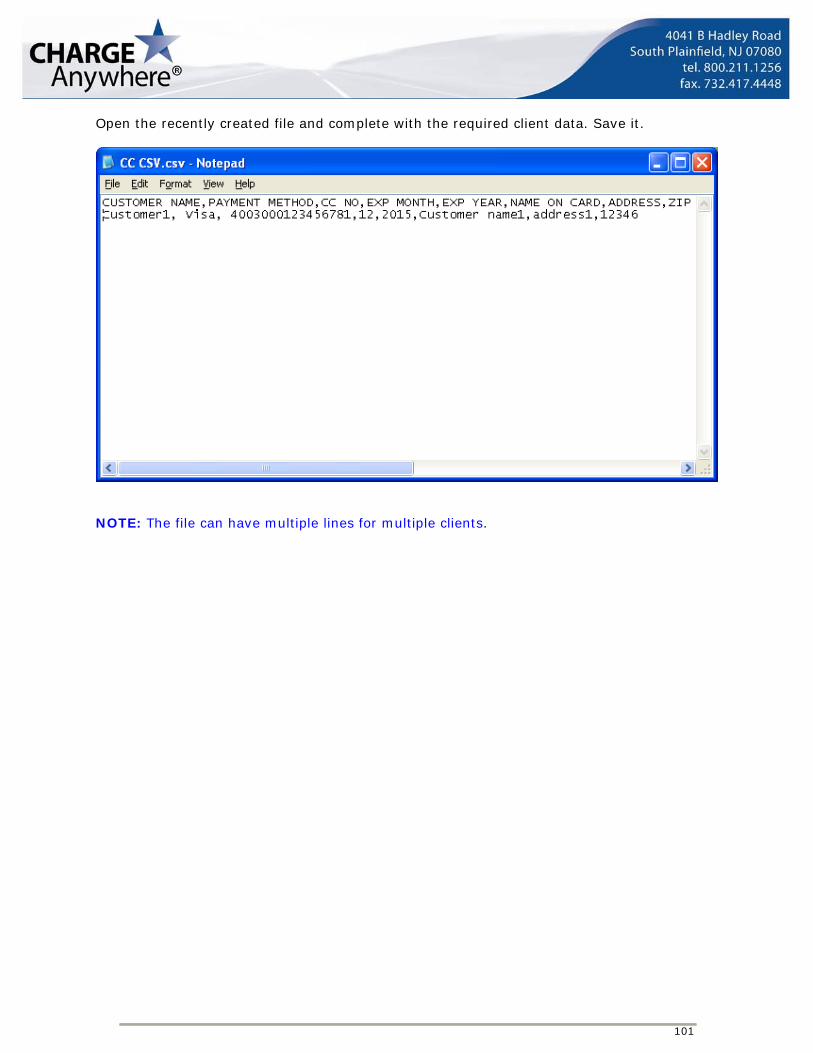
Open the recently created file and complete with the required client data. Save it.
NOTE: The file can have multiple lines for multiple clients.

102
To import the csv file go in Setup -> Customer Import-> Import CC Info.
Select the file from the screen and click on Open.

103

104
Wait a moment until the plug-in imports the new client information into QuickBooks. After successfully importing the data click on Close.
The customer should appear in QuickBooks.

105

106
Import with ACH The steps for this operation are similar with the ones described at Import for Credit Card, the only difference being that instead of Credit Card details you need to introduce ACH details.

107
Part III: Appendixes
There are four Appendixes: Appendix A – Running the plug-in on a different company file;
Appendix B – Uninstalling the plug-in;
Appendix C – Registering QBFC8.dll

108
Appendix A: Running the Plug-in on a Different Company File
You may need to install and run the application for a different company file. To do so, you need to grant the plug-in access to the company file you use. In order to perform this operation, go to Edit->Preferences, then select Integrated Applications->Company Preferences and make sure that the Allow Access column is checked as shown in the picture:

109
Appendix B: Un-installation
How to uninstall the Payment Application To uninstall the Plug-in from your computer:
• Go to Start > Control Panel > Add/Remove Programs, select Payment Application and click Remove. Follow the on-screen instructions when prompted; or
• Go to All Programs -> Payment Application -> Uninstall

©2008 CHARGE Anywhere, LLC. All trademarks, service marks, and trade names referenced in this material are the property of their respective owners.
Appendix C: Registering QBFC8.dll To register QBFC8.dll, follow the steps: 1. Open the Run window; you can do this either - by going to Start -> All Programs -> Run:
Or - by typing Win+R combination keys. 2. The Run window will open:
3. In the Open field enter the following text:
regsvr32 "[Program Files Folder]\Common Files\Intuit\QuickBooks\qbfc8.dll"

111
Assuming your [Program Files Folder] is at C:\Program Files, you’ll need to enter regsvr32 "C:\Program Files\Common Files\Intuit\QuickBooks\qbfc8.dll"
Click OK.
4. If the registration is successful, you will be prompted with the following message:

112