Embed Size (px)
Citation preview
StovesFreestanding Electric UK Part No 083138503 Date 11/06/2013
Users Guide & InstallationHandbook
3.010
CONTENTS & INTRODUCTION
CONTENTS
• SAFETY
• USING THE PRODUCT
• CLEANING
• INSTALLATION INSTRUCTIONS
• TECHNICAL DATA
• CUSTOMER CARE
INTRODUCTION
Thank you for buying this British-built appliance from us.
This guide book is designed to help you through each step of owning your new cooker, from installation to use. Please read it carefully before you start using your product, as we have endeavored to answer as many questions as possible, and provide you with as much support as we can.
If,however,youshouldfindsomethingmissing, or not covered, please contact our Customer Care team. Their number is located on the back page of this book.
For customers outside the UK and Northern Ireland, please contact your local supplier.
When you dial this number you will hear a recorded message and be given a number of options. This indicates that your call has been accepted and is being held in a queue. Calls are answered in strict rotation as our Customer care representatives become available.
Alternatively, general information, spares and service information is available from our website. The address is located on the back page of this book.
WARRANTY
Your new appliance comes with our 12-month guarantee, protecting you against electrical and mechanical breakdown. To register your appliance please call 0844 481 0182, complete the registration form included or register online at the web address located on the back page of this book.
For full terms & conditions of the manu-facturer’s guarantee, refer to the website on the back of this book.
In addition, you may wish to purchase anextendedwarranty.Aleafletexplaining how to do this is included with your appliance.
Our policy is one of constant development and improvement, therefore we cannot guarantee the strict accuracy of all of our illustrations and specifications-changesmayhavebeenmade subsequent to publishing.
SAFETY
5.120
BEFORE USING THE PRODUCT
Make sure that you have removed all packaging and wrapping. Some of the items inside this appliance may have ad-ditional wrapping.It is advised that you turn the ovens and/or grill on for a short while. This will burn off any residues left from manufacturing. There may be a smell which accompanies this process - but this is nothing to worry about and is harmless.It is recommended that you wash the oven shelves, baking tray, grill pan and grillpantrivetbeforetheirfirstuseinhotsoapy water. This will remove the protec-tive oil coating.
WARNING! - The appliance and its accessible parts become hot during use. Care should be taken to avoid touching heating elements. Children less than 8 years of age shall be kept away unless continously supervised.This appliance can be used by children aged from 8 years and above and persons with reduced physical sensory or mental capabilities or lack of experience and knowledge if they have
been given supervision or instruction concerning the use of the appliance in a safe way and understand the hazards involved. Children shall not play with the appliance. Cleaning and user maintenance shall not be made by children without supervision. WARNING! - Unattended cooking on a hob with fat or oil can be dangerous and may resultinfire.NEVER try to extinguish afirewithwater,butswitch off the appliance andthencovertheflamewith a lid or damp cloth.WARNING! - Danger of fire:Donotstoreitemson the cooking surfaces. WARNING! - Servicing should be carried out only by authorised personnel.
SAFETY
5.120
WARNING! - The appliance must never be disconnected from the mains supply during use, as this will seriously affect the safety and performance, particularly in relation to surface temperatures becoming hot and gas operated parts not working efficiently.Thecoolingfan(iffitted)isdesignedto run on after the control knob has been switched off.WARNING! - Do not spray aerosols in the vicinity of this appliance while it is in operation.WARNING! - Do not storeoruseflammableliquids or items in the vicinity of this appliance.WARNING! - Do not modify this appliance.
WARNING! - Do not use harsh abrasive cleaners or sharpmetal scrapers to clean the oven door glass since they can scratch the surface, which mayresult in shattering of the glass.WARNING! - Do not operate the appliancewithout the glass panel correctlyfitted.WARNING! - There is a risk of electric shock, so always make sure you have turned off and unplugged your appliance beforestarting. Always allow the product to cool down before you change a bulb.WARNING! - Accessible parts may become hot when the grill is in use. children should be kept
SAFETY
5.120
away.WARNING! - Never place food, or dishes on the base of the main oven, the element is here and it will cause over heating.WARNING! - Do not modify the outer panels of this appliance in any way.WARNING! - This appliance must be earthed.WARNING! - The top element gets extremely hot when in use, so take care to avoid touching it.WARNING - If the sur-face is cracked, broken or shattered, switch off the appliance to avoid the possibility of electric shock and call for a ser-vice engineer’s visit.
Caution: This appliance is for cooking purposes
only. It must not be used for other purposes, for example room heating.
GENERAL OVEN/GRILLDo
• Always take care when removing food from the oven as the area around the cavity may be hot.
• Always use oven gloves when han-dling any utensils that have been in the oven as they will be hot.
• Always make sure that the oven shelves are resting in the correct po-sition between two runners. Do not place the oven shelves on top of the highest runner, as this is not stable and can lead to spillage or injury.
• Always use the Minute Minder (if fitted)ifyouareleavingtheovenunattended - this reduces the risk of food burning.
Do Not
• Never place items on the door while it is open.
• Never wrap foil around the oven shelvesorallowfoiltoblocktheflue.
• Never drape tea towels near the oven whileitison;thiswillcauseafirehazard.
• Never pull heavy items, such as tur-keys or large joints of meat, out from the oven on the shelf, as they may overbalance and fall.
• Never use this appliance to heat any-thing other than food items and do not use it for heating the room.
• Do not spray aerosols in the vicinity
SAFETY
5.120
of this appliance while it is in opera-tion.
• Donotstoreoruseflammableliquidsor items in the vicinity of this appli-ance.
• Do not modify this appliance.
ELECTRIC HOB
GENERAL
Do
• Always ensure that pan bases are dryandflatbeforeusingthemonthehob.
• Always position pans over the centre of the heat zone, and turn the handles to a safe position so they cannot be knocked or grabbed.
• Always use pans which are no smaller than100mm(4”),ornolargerthan250mm(10”).
• Always match the size of pan to the size heat zone – do not use large pans on small zones or vice versa.
• Always lift pans onto and off the hob, rather than sliding them across the surface, to avoid marks and scratches.
• If the appliance has solidplate ele-ments, prime and season your hob beforeusingitforthefirsttime-seethe Care & Cleaning section.
Do Not
• If the appliance has a glass hobtop, never drag pans across the ceramic surface as this will lead to scratches and damage.
• Never use double pans, rim-based pans, old or misshapen pans, or anypanthatisnotstableonaflatsurface.
• Never leave cooking fat, or oil, unat-tended.
• Never use commercial simmering aids, or heat diffusers, as they create excessive heat and can damage the surface of the hob.
• Never use the hob for any other purpose than cooking food.
• Plastic cooking utensils can melt if they come into contact with a warm hob. Never leave them close to, or on top of the hob.
• Never leave any cook zone on with-out a pan covering it. This causes a firehazard.
• Never use the hob surface as a chopping board or food preparation area, as this may lead to it becoming damaged.
• Never put metal cooking utensils, cutlery, knives or other metal objects on the hob. They could become hot if they are near a cooking area which is in use.
• Never leave pans overhanging the edge of the hob. The surface of the hob is smooth. If pans are knocked they may move on the hob top.
• If the appliance has solidplate ele-ments, never leave pan lids or deco-rative covers on top of the elements as any trapped moisture will lead to corrosion.
• Never stare at the halogen elements (iffitted).Thismayimpairyourvi-sion.
• Never leave aluminium foil on the hobtop,itreflectsheatbackintothe element which leads to damage. Never heat up a sealed tin of food on the hob, as it may explode.
SAFETY
5.120
FIRE SAFETY ADVICE
Mostkitchenfiresoccurwhenpeoplearedistracted or leave things unattended, so remember:
If you’re called away from the cooker - by the phone or someone at the door, either take pans off the heat, or switch off your hob.
Don’t let yourself be distracted while cooking.
Ifyoudohaveafireinthekitchen,don’ttake any risks - get everyone out of your home and call the Fire Brigade.
If a pan catches fire:
• Do not move it - it is likely to be extremely hot.
• Turn off the heat if it’s safe to do so - but never lean over a pan to reach the controls.
• Ifyouhaveafireblanket,putitoverthe pan.
• Ifyouhaveputthefireout,leavethepan to cool completely.
Deep-fat frying presents more dan-gers in your kitchen.
• Neverfillachippan(orotherdeep-fatfryer)morethanone-thirdfullofoil
• Donotuseafireextinguisheronapan of oil - the force of the extin-guishercanspreadthefireandcre-ateafireball.
If you have an electrical fire in the kitchen:
• Pull the plug out, or switch off the power at the fuse box - this may be enoughtostopthefireimmediately
• Smotherthefirewithafireblanket,or use a dry powder or carbon diox-ide extinguisher
• Remember:neverusewateronanelectricalorcookingoilfire.
USING THE HOB - ELECTRIC (CERAMIC)
Warnings
• Do not use the ceramic hob if the glass surface is cracked, as electrical parts are directly beneath. Switch off the appliance at the sup-ply to prevent electric shock and contact your supplier.
• The hob surface remains hot after use.
• DO NOT TOUCH.Using Rotary Controls
• Select the element you wish to use, place the pan on and turn the control knob to the power setting you wish to use.
• To switch off, turn the selected con-trol knob to the ‘off’ position.
Notes on use
• The power settings on the hob do not indicate any set temperature and cannot be used to judge one element against another.
• During cooking, the elements will cycle on and off. This is to prevent the hob from overheating.
• Pans should not be allowed to come into contact with coloured trims dur-ing use as this may cause discoloura-tion of the surface
Hot Hob Warning
(if fitted)
The surface of the hob gets hot inuse.Yourhobmayhave:
•Theword“hot”writtenonit,as a cautionary note that the surface will become hot during use.
•Theword“hot”writtenonit, with the addition of a light beneath it. This light will il-luminate when any element is used and remains lit for a while after all elements have been switched off to show that the surface may still be hot to touch.
USING THE GRILL - ELECTRIC
Caution: Accessible parts may be hot when the grill is used - young children should be kept away.
A grill pan handle can be purchased as an optional extra from our spares department quoting the part numbers below.
Handle - 082283705
Handle grip - 082469100
Complete grillpan pack - 012635666
Contact details can be found on the customer care page.
If cleaning the grill pan when it is hot, use oven gloves to move it.
Food for grilling should be positioned centrally on the trivet.
Using the grill
Important: The grill door must be fully open when the grill is used.
Open the grill door. Turn the control knob to the required setting. For best cooking results, we recommend that you preheat the dual grill for 3 minutes and the single grill for 5 minutes.
For grilling small quantities of food, the centre(economy)grillcanbeusedwiththe grill trivet inverted. For large quan-tites of food, the full grill can be used.
Push the grill pan towards the back of the shelf, to position it under the grill.
The speed of grilling can be controlled by adjusting the grill setting or by selecting a higher or lower shelf position. For toast-ing, and for grilling foods such as bacon, sausages or steaks, use a higher shelf position. For thicker foods such as chops or chicken joint pieces, use a middle to low shelf position.
The grill trivet, inside the grill pan, can be inverted to give a high or low position, or it may be removed.
To switch off, turn the control knob to the off position.
Using aluminium foil Using aluminium foil to cover the grill pan, or putting items wrapped in foil under the grillcreatesafirehazard.
The cooling fan
When the grill is switched on, the cool-ing fan comes on to keep the fascia and control knobs cool during grilling. The fan may continue to operate for a period after the grill has been switched off.
During use the fan may cycle on and off, this is normal.
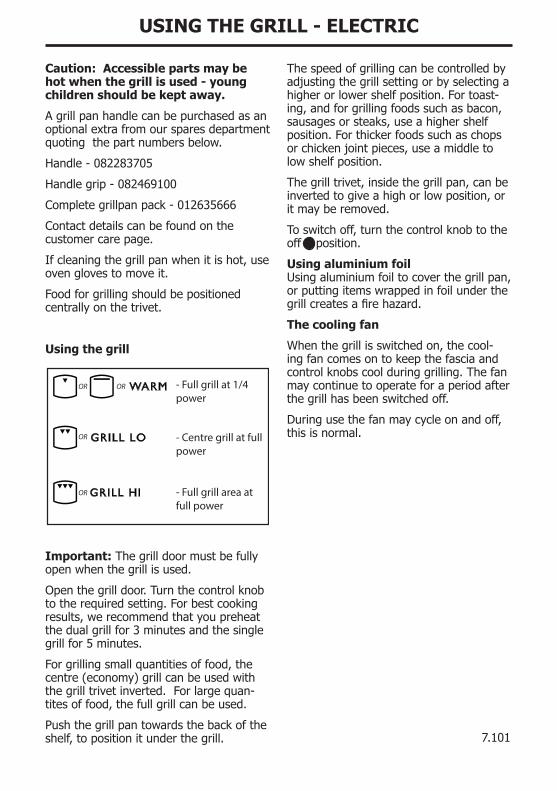
- Full grill at 1/4power
- Centre grill at fullpower
- Full grill area atfull power
OR OR
OR
OR
7.101
8.100
USING THE TOP OVEN - ELECTRIC (if fitted)
When you are cooking keep children away from the vicinity of the oven.
Caution: The top element gets extremely hot when in use, so take extra care to avoid touch-ing it.The top oven is a conventional oven.
Note:Thetopovenisnotcontrolledbytheprogrammer(iffitted).
To turn on the top oven
Turn the temperature control knob until the required temperature is selected.
The red thermostat indicator will come on until the selected temperature is reached, and then go off; it will turn on and off periodically as the thermostat operates to maintain the selected temperature.
To switch off, return the top oven control knob to the off position.
Important: Never put items directly on the base of the oven, or cover the oven base with foil, as this may cause the ele-ment to overheat. Always position items on the shelf.
The cooling fan
When the top oven is switched on, you will hear the cooling fan come on - this keeps the fascia and control knobs of the appliance cool during cooking. The fan may continue to operate for a period after the oven control has been switched off.
Preheating
The oven must be preheated when cook-ing frozen or chilled foods, and we rec-ommend preheating for yeast mixtures, batters,soufflés,andwhiskedsponges.
Preheat the oven until the indicator light switchesoffforthefirsttime,thiswilltake up to 15 minutes depending on the temperature selected.
If you are not preheating the oven, the cooking times in the following guide may need to be extended, as they are based on a preheated oven.
Shelf positions
There are either 3 or 4 shelf positions, depending on which model you have purchased. These are counted from the bottom of the oven upwards, so shelf position 1 is the lowest.
When cooking frozen or chilled food, use the highest possible shelf position, while allowing some clearance between the food and the top element.
The oven shelf must be positioned with the up-stand at the rear of the oven and facing up. Position baking trays and roast-ing tins on the middle of the shelves, and leave one clear shelf position between shelves, to allow for circulation of heat.
When using the top oven
As part of the cooking process, hot air is expelled through a vent at the top of the oven(s).Whenopeningtheovendoor,care should be taken to avoid any possible contact with potentially hot air, since this may cause discomfort to people with sen-sitive skin. We recommend that you hold the underneath of the oven door handle.
8.100
USING THE TOP OVEN - ELECTRIC (if fitted)
TOP OVEN BAKING GUIDE
Cooking times
These times are based on cooking in a preheated oven.
These cooking times are approximate, because the size and type of cooking dish willinfluencetimeaspersonalprefer-ences.
Shelf positions
As a general guide, when cooking frozen or chilled food, use the highest pos-sible shelf position, while allowing some clearance between the food and the top element. Follow the instructions given on packaging.
Item Temperature
(°C)
Shelf
Position
Approximate cooking time
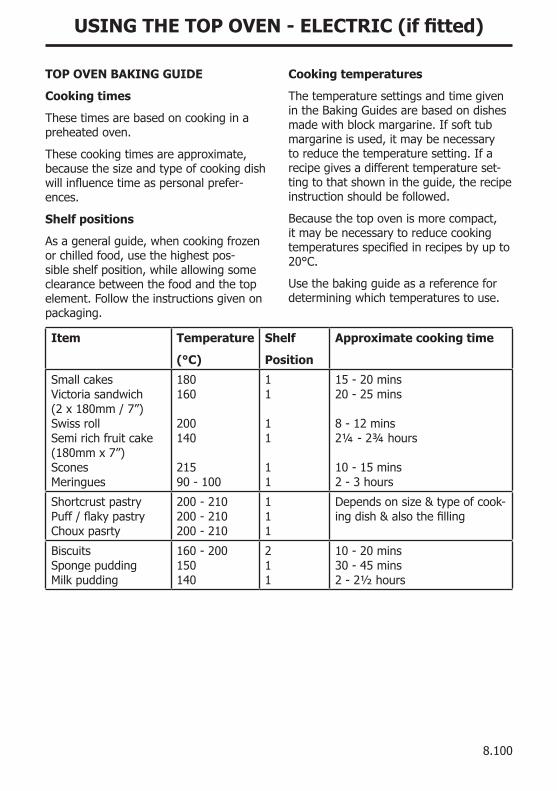
Small cakesVictoria sandwich(2x180mm/7”)Swiss rollSemi rich fruit cake(180mmx7”)SconesMeringues
180160
200140
21590 - 100
11
11
11
15 - 20 mins20 - 25 mins
8 - 12 mins2¼ - 2¾ hours
10 - 15 mins2 - 3 hours
Shortcrust pastryPuff/flakypastryChoux pasrty
200 - 210200 - 210200 - 210
111
Depends on size & type of cook-ingdish&alsothefilling
BiscuitsSponge puddingMilk pudding
160 - 200150140
211
10 - 20 mins30 - 45 mins2 - 2½ hours
Cooking temperatures
The temperature settings and time given in the Baking Guides are based on dishes made with block margarine. If soft tub margarine is used, it may be necessary to reduce the temperature setting. If a recipe gives a different temperature set-ting to that shown in the guide, the recipe instruction should be followed.
Because the top oven is more compact, it may be necessary to reduce cooking temperaturesspecifiedinrecipesbyupto20°C.
Use the baking guide as a reference for determining which temperatures to use.
9.100
USING THE MAIN OVEN - ELECTRIC
Accessible parts may be hot when the oven is used. Young children should be kept away.
To switch on the oven
Turntheovencontrolknob(s)totherequired setting.
Theredthermostatindicator(iffitted)willcome on until the selected temperature is reached and then go off; it will turn on and off periodically as the thermostat operates to maintain the selected tem-perature.
To switch off, return the control knob to the off position.
When using the oven
As part of the cooking process, hot air is expelled through a vent in the oven. When opening the oven door, care should be taken to avoid any possible contact with potentially hot air, since this may cause discomfort to people with sensitive skin. We recommend that you hold the underneath of the oven door handle.
PREHEATING
Fanned oven
When cooking sensitive items such as souffleandYorkshirepuddingsor,whencooking bread, we recommend that the oven is preheated until the neon switches offforthefirsttime.Foranyothertypesof cooking, a preheat may not be re-quired.
Conventional oven
Preheating is always required
Manual Operation (fanned only)
The programmer must be set to manual operation before the main oven can be used.IfA(Auto)isontheprogrammerdisplay, return the oven to manual by pressing the up and down buttons simul-taneously Any programme which has been set is cancelled.
The cooling fan
The cooling fan may operate when the main oven is on and may continue to op-erate for a period after the oven has been switched off.
OVEN FURNITURE
Oven shelves
The oven shelf must be positioned with the upstand at the rear of the oven and facing upwards.
Position baking trays and roasting tins on the middle of the shelves.
Baking tray and roasting tins
For best cooked results and even brown-ing, the recommended size baking trays and roasting tins that should be used are as follows;
Baking tray 350mm x 250mm
This size of baking tray will hold up to 12 small cakes.
Roasting tin 370mm x 320mm
We recommend that you use good quality cookware. Poor quality trays and tins may warp when heated, leading to uneven baking results.
9.100
USING THE MAIN OVEN - ELECTRIC
Slow cooking ( Setting or 100°C)
• Make sure that frozen foods are thor-oughly thawed before cooking.
• Do not slow cook joints of meat or poultry weighing more than 2¼kg/4½lb.
• Preheat the oven to 170°C and cook for 30 minutes, then adjust the oven control to or 100°C (slow cook setting)fortheremainderofthecooking time.
• Slow cooking times will be about 3 times as long as conventional cooking times.
• Do not open the oven door unneces-sarily during slow cooking, as this will result in heat loss at low tempera-tures.
• Alwaysusedisheswithtightlyfittinglids.Torectifybadlyfittinglids,placefoil over the dish underneath the lid.
Aluminium foil
Use foil only to cover food or cooking dishes, using foil to cover the shelves or ovenbasecreatesafirehazard.
Cooking with a fanned oven
As this is a high efficiency oven, you may notice the emission of steam from the oven when the door is opened. Please take care when opening the door.
If you are used to cooking with a conven-tionalovenyouwillfindanumberofdif-ferences to cooking with a fan oven which willrequireadifferentapproach:
There are no zones of heat in a fan oven as the convection fan at the back of the oven ensures an even temperature throughout the oven.
This makes it ideal for batch baking - eg; when planning a party as all the items will be cooked within the same length of time.
Foods are cooked at a lower temperature than a conventional oven, so conven-tional recipe temperature may have to be reduced. Please refer to the conversion chart.
Preheating is generally not necessary as a fan oven warms up quickly.
Thereisnoflavourtransferenceinafanoven, which means you can cook strong smellingfoodssuchasfishatthesametime as mild foods - eg; milk puddings.
When batch baking foods that will rise during cooking - eg; bread - always ensure that enough space has been left between the shelves to allow for the rise.
Notes:
When 2 or more shelves are being used, it may be necessary to increase the cooking time slightly.
Because the 2 oven shelves are wider than in many ovens, it is possible to cook 2 items per shelf - eg; 2 victoria sand-wiches or 2 casseroles.
Although you need to keep in mind the points ‘To help the air circulate freely’ with careful choice of dishes and tins, it is possible to cook a complete meal, and perhaps something else for the freezer, in the oven at the same time.
When roasting meats, you will notice that fat splashing is reduced, which is due in part to the lower oven temperatures, and will help keep cleaning of the oven to a minimum.
Because a fan oven has an even tem-perature throughout the oven, there is no need to follow the shelf positions given in the baking guide.
9.100
USING THE MAIN OVEN - ELECTRIC
There is no need to interchange dishes onto different shelves part way through cooking, as with a conventional oven.
To help the air circulate freely
Position the shelves evenly within the oven and maintain a clearance from the oven roof and base.
If more than one cooking dish or bak-ing tray is to be used on a shelf, leave a gap of at least 25mm between the items themselves and the oven interior.
Defrosting and cooling in the main oven
To defrost frozen foods, turn the main oven control to the defrost position, place the food in the centre of the oven and close the door.
To cool foods after cooking prior to refrig-erating or freezing, turn the main oven control to the defrost position and open the door.
Defrosting times
Smallorthinpiecesoffrozenfishormeat-eg;fishfilets,prawns&mincewilltakeapproximately 1 - 2 hours.
Placing the food in a single layer will reduce the thawing time.
A medium sized casserole or stew will take approximately 3 - 4 hours.
A 1½kg/3lb oven ready chicken will take approximately 5 hours, remove the giblets as soon as possible.
Be safe
Do not defrost stuffed poultry using this method.
Do not defrost larger joints of meat and poultry over 2kg/4lb using this method.
Never place uncooked food for defrosting next to cooked food which is to be cooled, as this can lead to cross contamination.
Defrostingmeat,poultry,andfishcanbeaccelerated using this method but make sure they are completely thawed before cooking thoroughly. Place meat and poul-try on a trivet in a meat tin.
MAIN OVEN BAKING GUIDE
Cooking times & temperatures
The temperature settings and times given in the baking guide are based on dishes made with block margarine. If soft tub margarine is used it may be necessary to reduce the temperature setting.
Allow enough space between shelves for food that will rise during cooking.
Do not place items on the oven base as this will prevent air circulating freely.

9.100
USING THE MAIN OVEN - ELECTRIC
Note:Thisisahighefficiencyoven,there-fore some adjustment will have to be made to conventional cooking tempera-tures. The table below shows conven-tionalcookingtemperatures,‘A’efficiencytemperatures and gas marks. For opti-mum results,
conventional temperatures need to be convertedto‘A’efficiencytemperatures.
For example, an item which would nor-mally cook at a conventional temperature of 180 °C, will now cook at the ‘A’ ef-ficiencytemperatureof160°C.
Conventional temperature
(°C)
‘A’ Efficiency Oven
(°C)
Gas Mark
100110130140150160
180-190200220230250
100110120130140150160170180190200
1/41/41/2123
4-56789
Food Type Temperature settings (°C)
TimeApprox.
ShelfPosition
Cakes
Small cakesVictoria sandwichSemi rich fruit cakeChristmas cake
Conv
190180150150
Fanned
160160125125
15 - 2520 - 302.5HRS - 3HRS2.5HRS - 3HRS
2 - 4322
PuddingsBread and butter pud-dingFruit crumble
170200
150175
45 - 1hr40 - 1hr
33
MiscellaneousYorkshirepudding:largesmallShortcrust pastry
220220200
200200180
40 - 4815 - 20
Depends on filling
4 - 54 - 54 - 5
9.100
USING THE MAIN OVEN - ELECTRIC
Traditional fruit cakes
It should be remembered that ovens can vary over time, therefore cooking times canvary,makingitdifficulttobeprecisewhen baking fruit cakes.
It is necessary therefore, to test the cake beforeremovalfromtheoven.Useafinewarmed skewer inserted into the centre of the cake. If the skewer comes out clean, then the cake is cooked.
• Follow the temperatures suggested in the recipe and then adjust accord-ingly to the conversion table.
• Do not attempt to make Christmas cakes larger than the oven can cope with, you should allow at least 25mm (1”)spacebetweentheovenwallsand the tin.
• Always follow the temperatures rec-ommended in the recipe.
• To protect a very rich fruit cake dur-ing cooking, tie 2 layers of brown paper around the tin.
• We recommend that the cake tin is not stood on layers of brown paper, as this can hinder effective circulation of air.
• Do not use soft tub margarine for richfruitcakes,unlessspecifiedinthe recipe.
• Always use the correct size and shape of tin for the recipe quantities.
Roast turkey
Roasting turkey involves cooking two different types of meat - the delicate light breast meat, which must not be allowed to dry out, and the darker leg meat, which takes longer to cook.
The turkey must be roasted long enough for the legs to cook, so frequent bast-ing is necessary. The breast meat can be covered once browned.
• Always make sure that the turkey is completely thawed and that the gib-lets are removed before cooking.
• Turkey should be roasted at 160°C -180°C(fanned)or180°C-200°C(conventional)for20minutesper450g(1lb),plus20minutes,unlesspackaging advises otherwise.
• The turkey can be open roasted, breast side down, for half of the cook time, and then turned over for the remainder of the cooking time.
• If the turkey is stuffed, add 5 minutes per450g(1lb)tothecookingtime.
• If roasting turkey covered with foil, add5minutesper450g(1lb)tothecooking time.
To test if the turkey is cooked, push a fineskewerintothethickestpartofthethigh. If the juices run clear, the turkey is cooked. If the juices are still pink, the turkey will need longer cooking.
9.100
USING THE MAIN OVEN - ELECTRIC
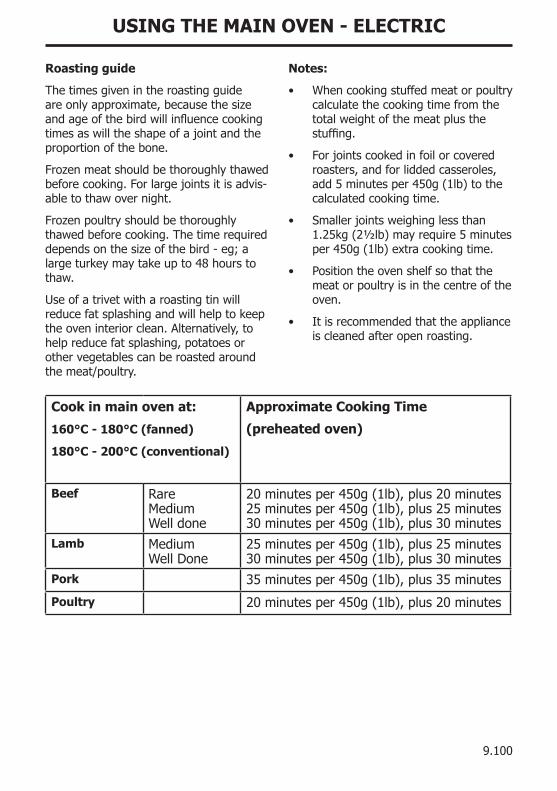
Roasting guide
The times given in the roasting guide are only approximate, because the size andageofthebirdwillinfluencecookingtimes as will the shape of a joint and the proportion of the bone.
Frozen meat should be thoroughly thawed before cooking. For large joints it is advis-able to thaw over night.
Frozen poultry should be thoroughly thawed before cooking. The time required depends on the size of the bird - eg; a large turkey may take up to 48 hours to thaw.
Use of a trivet with a roasting tin will reduce fat splashing and will help to keep the oven interior clean. Alternatively, to help reduce fat splashing, potatoes or other vegetables can be roasted around the meat/poultry.
Notes:
• When cooking stuffed meat or poultry calculate the cooking time from the total weight of the meat plus the stuffing.
• For joints cooked in foil or covered roasters, and for lidded casseroles, add5minutesper450g(1lb)tothecalculated cooking time.
• Smaller joints weighing less than 1.25kg(2½lb)mayrequire5minutesper450g(1lb)extracookingtime.
• Position the oven shelf so that the meat or poultry is in the centre of the oven.
• It is recommended that the appliance is cleaned after open roasting.
Cook in main oven at:
160°C - 180°C (fanned)
180°C - 200°C (conventional)
Approximate Cooking Time
(preheated oven)
Beef RareMediumWell done
20minutesper450g(1lb),plus20minutes25minutesper450g(1lb),plus25minutes30minutesper450g(1lb),plus30minutes
Lamb MediumWell Done
25minutesper450g(1lb),plus25minutes30minutesper450g(1lb),plus30minutes
Pork 35minutesper450g(1lb),plus35minutes
Poultry 20minutesper450g(1lb),plus20minutes
11.100
THE ALTERNATIVE PROGRAMMERS
There are two types of programmer cov-ered in this section - push button & touch control. Both programmers have the same symbol variants & functions but may vary in their method of operation.
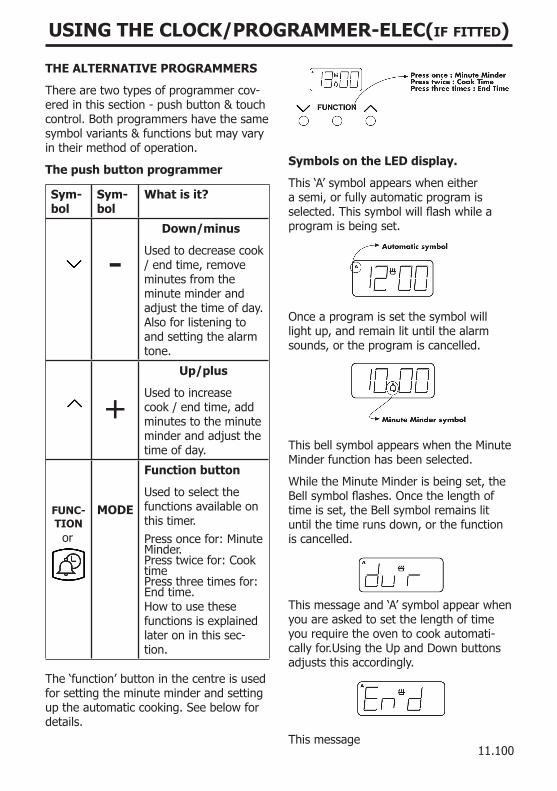
The push button programmer
Sym-bol
Sym-bol
What is it?
- Down/minus
Used to decrease cook / end time, remove minutes from the minute minder and adjust the time of day. Also for listening to and setting the alarm tone.
+ Up/plus
Used to increase cook / end time, add minutes to the minute minder and adjust the time of day.
FUNC-TION or
MODE
Function button
Used to select the functions available on this timer.Pressoncefor:MinuteMinder.Presstwicefor:CooktimePressthreetimesfor:End time.How to use these functions is explained later on in this sec-tion.
The ‘function’ button in the centre is used for setting the minute minder and setting up the automatic cooking. See below for details.
Symbols on the LED display.
This ‘A’ symbol appears when either a semi, or fully automatic program is selected.Thissymbolwillflashwhileaprogram is being set.
Once a program is set the symbol will light up, and remain lit until the alarm sounds, or the program is cancelled.
This bell symbol appears when the Minute Minder function has been selected.
While the Minute Minder is being set, the Bellsymbolflashes.Oncethelengthoftime is set, the Bell symbol remains lit until the time runs down, or the function is cancelled.
This message and ‘A’ symbol appear when you are asked to set the length of time you require the oven to cook automati-cally for.Using the Up and Down buttons adjusts this accordingly.
This message
USING THE CLOCK/PROGRAMMER-ELEC(if fitted)
11.100
and ‘A’ symbol appear when you are asked to enter in an end time, or when you would like the oven to switch itself off.
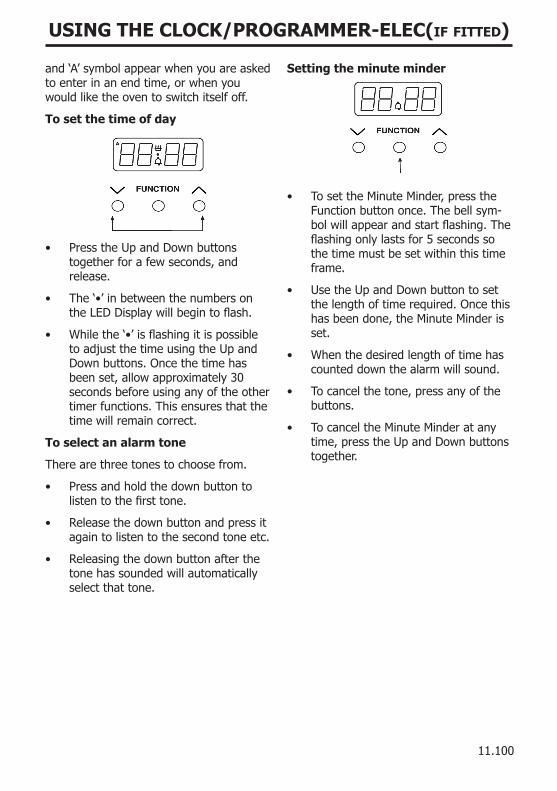
To set the time of day
• Press the Up and Down buttons together for a few seconds, and release.
• The‘•’inbetweenthenumbersontheLEDDisplaywillbegintoflash.
• Whilethe‘•’isflashingitispossibleto adjust the time using the Up and Down buttons. Once the time has been set, allow approximately 30 seconds before using any of the other timer functions. This ensures that the time will remain correct.
To select an alarm tone
There are three tones to choose from.
• Press and hold the down button to listentothefirsttone.
• Release the down button and press it again to listen to the second tone etc.
• Releasing the down button after the tone has sounded will automatically select that tone.
Setting the minute minder
• To set the Minute Minder, press the Function button once. The bell sym-bolwillappearandstartflashing.Theflashingonlylastsfor5secondssothe time must be set within this time frame.
• Use the Up and Down button to set the length of time required. Once this has been done, the Minute Minder is set.
• When the desired length of time has counted down the alarm will sound.
• To cancel the tone, press any of the buttons.
• To cancel the Minute Minder at any time, press the Up and Down buttons together.
USING THE CLOCK/PROGRAMMER-ELEC(if fitted)
11.100
Semi-automatic cooking
There are two types of semi automatic cooking available on this appliance.
The oven must be switched on, and in use to use either of these functions success-fully.
The Duration method allows you to set the ovenforaspecificlengthoftime.Ifadishneeded 2 hours to cook, then it would be possible for you to set the oven to turn off 2 hours later. This allows you to be sure that your food will be cooked for a set length of time and no longer.
The End Time method allows you to enter aspecifictimewhenyouwouldliketheoven to switch off. If you wish to leave the oven unattended, then it offers peace of mind that the oven will have turned itself off at the set time.
However, once the program is set then it cannot be adjusted. Extra time cannot be added, nor can the end time be extended.
To cancel the semi automatic programs, press both the Up and Down buttons together. This can be done at any time during the cooking process. Then if neces-sary, re program.
For the instructions on how to use both of these functions, please see the following page.
Fully automatic cooking
This function incorporates both a duration and an end time and is meant to be used when you wish to delay the start time.
Werecommendthatthefirstfewtimesthis function is used you are in the house, this will familiarise you with your oven and prevents food from being over cooked or under cooked.
Care must be taken when selecting foods for this function, it is not recommended for certain food items which may spoil, or are sensitive to being left.
It is also advisable to set the end time to be as close to your return as possible to prevent food being left standing.
USING THE CLOCK/PROGRAMMER-ELEC(if fitted)
11.100
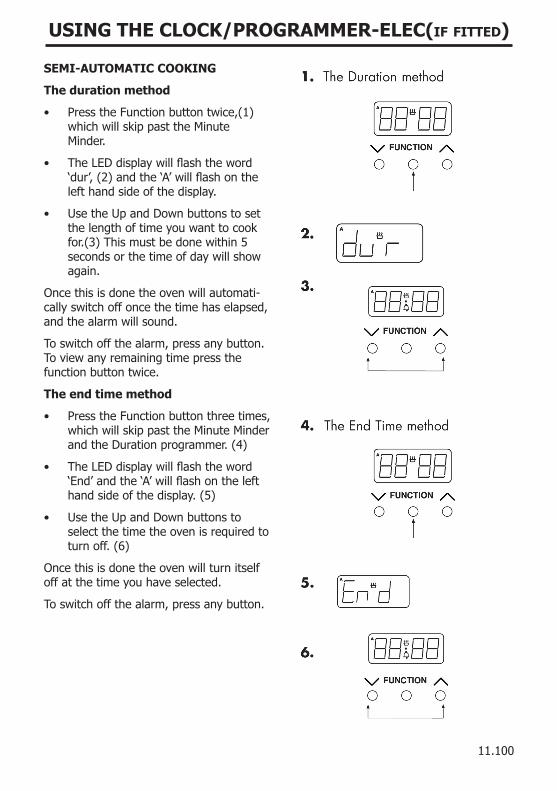
SEMI-AUTOMATIC COOKING
The duration method
• PresstheFunctionbuttontwice,(1)which will skip past the Minute Minder.
• TheLEDdisplaywillflashtheword‘dur’,(2)andthe‘A’willflashontheleft hand side of the display.
• Use the Up and Down buttons to set the length of time you want to cook for.(3)Thismustbedonewithin5seconds or the time of day will show again.
Once this is done the oven will automati-cally switch off once the time has elapsed, and the alarm will sound.
To switch off the alarm, press any button. To view any remaining time press the function button twice.
The end time method
• Press the Function button three times, which will skip past the Minute Minder andtheDurationprogrammer.(4)
• TheLEDdisplaywillflashtheword‘End’andthe‘A’willflashonthelefthandsideofthedisplay.(5)
• Use the Up and Down buttons to select the time the oven is required to turnoff.(6)
Once this is done the oven will turn itself off at the time you have selected.
To switch off the alarm, press any button.
USING THE CLOCK/PROGRAMMER-ELEC(if fitted)
11.100
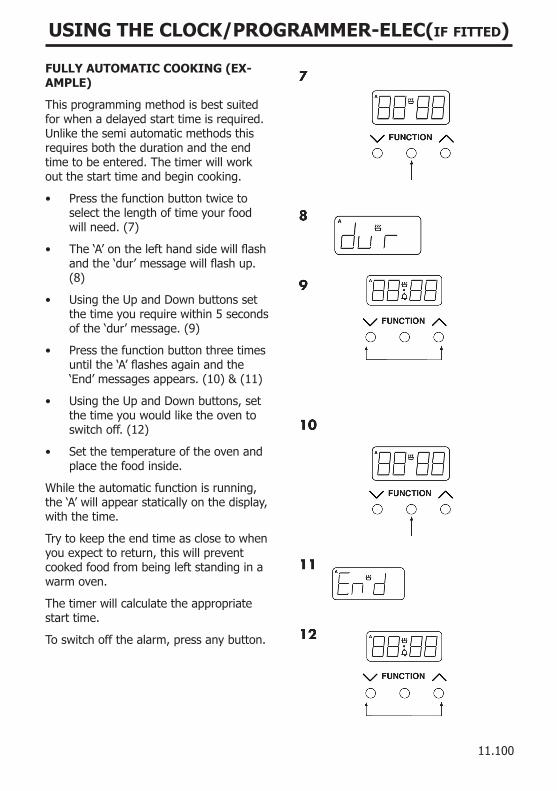
FULLY AUTOMATIC COOKING (EX-AMPLE)
This programming method is best suited for when a delayed start time is required. Unlike the semi automatic methods this requires both the duration and the end time to be entered. The timer will work out the start time and begin cooking.
• Press the function button twice to select the length of time your food willneed.(7)
• The‘A’onthelefthandsidewillflashandthe‘dur’messagewillflashup.(8)
• Using the Up and Down buttons set the time you require within 5 seconds ofthe‘dur’message.(9)
• Press the function button three times untilthe‘A’flashesagainandthe‘End’messagesappears.(10)&(11)
• Using the Up and Down buttons, set the time you would like the oven to switchoff.(12)
• Set the temperature of the oven and place the food inside.
While the automatic function is running, the ‘A’ will appear statically on the display, with the time.
Try to keep the end time as close to when you expect to return, this will prevent cooked food from being left standing in a warm oven.
The timer will calculate the appropriate start time.
To switch off the alarm, press any button.
USING THE CLOCK/PROGRAMMER-ELEC(if fitted)
11.100
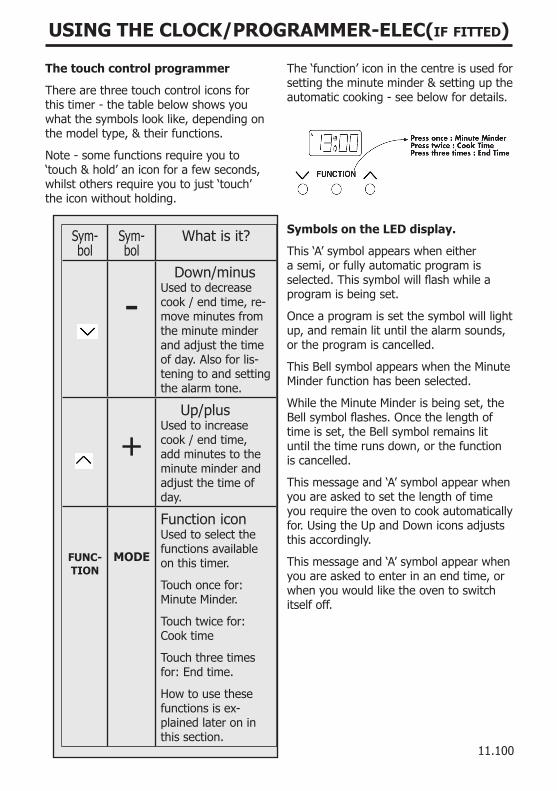
The touch control programmer
There are three touch control icons for this timer - the table below shows you what the symbols look like, depending on the model type, & their functions.
Note - some functions require you to ‘touch & hold’ an icon for a few seconds, whilst others require you to just ‘touch’ the icon without holding.
Sym-bol
Sym-bol
What is it?
- Down/minusUsed to decrease cook / end time, re-move minutes from the minute minder and adjust the time of day. Also for lis-tening to and setting the alarm tone.
+ Up/plusUsed to increase cook / end time, add minutes to the minute minder and adjust the time of day.
FUNC-TION
MODE
Function iconUsed to select the functions available on this timer.
Touchoncefor:Minute Minder.
Touchtwicefor:Cook time
Touch three times for:Endtime.
How to use these functions is ex-plained later on in this section.
The ‘function’ icon in the centre is used for setting the minute minder & setting up the automatic cooking - see below for details.
Symbols on the LED display.
This ‘A’ symbol appears when either a semi, or fully automatic program is selected.Thissymbolwillflashwhileaprogram is being set.
Once a program is set the symbol will light up, and remain lit until the alarm sounds, or the program is cancelled.
This Bell symbol appears when the Minute Minder function has been selected.
While the Minute Minder is being set, the Bellsymbolflashes.Oncethelengthoftime is set, the Bell symbol remains lit until the time runs down, or the function is cancelled.
This message and ‘A’ symbol appear when you are asked to set the length of time you require the oven to cook automatically for. Using the Up and Down icons adjusts this accordingly.
This message and ‘A’ symbol appear when you are asked to enter in an end time, or when you would like the oven to switch itself off.
USING THE CLOCK/PROGRAMMER-ELEC(if fitted)

11.100
Setting the time of day
Touch&holdthecentre(function)iconforafewsecondsuntilthe●symbolbetweenthenumbersontheLEDdisplayflashes.
Whilethe●symbolisflashing,youcanadjust the time of day by touching the plus&minusicons.Pleasenote:thehours& minutes adjust quickly.
Important - once the time of day has been set, allow approximately 30 seconds before using any of the other programmer functions. This ensures that the time of day will remain correct.
Setting an alarm tone
Touch & hold the plus & minus icons simultaneouslyuntilthe●symbolflashes& you hear a beep - then touch the centre (function)icon.
Touch the minus icon to select the tone.
You can change the tone by repeatedly touching the minus icon - there are three tones to choose from.
Setting the minute minder
To set the minute minder, touch & hold the centre(function)iconuntilthebellsymbolappears&beginstoflash.Important-theflashingwilllastforapproximatelyfiveseconds, so any setting must be carried out within this time frame.
Touch the plus & minus icons to set the length of time required. Once this has been done, the minute minder is set.
When the desired length of time has counted down, the alarm will sound. To cancel the tone, touch & hold any of the icons.
To cancel the minute minder at any time, touch & hold the plus & minus icons together.
Semi-automatic cooking
Method 1 - duration (switch off after set time period):
Touch&holdthecentre(function)icon;thebellwillflash&youwillhearabeep.Touchthecentre(function)iconagain- this will skip past the minute minder function.
Thedisplaywillflashtheword‘dur’&the‘A’willflashonthelefthandofthedisplay.
Use the plus & minus icons to set the length of time you want to cook for. The flashingwilllastforapproximatelyfiveseconds, so the setting must be done within this time frame or the time of day will show again.
Once the duration has been set, the oven will automatically switch off. When the set time has elapsed the alarm will sound. To switch the alarm off, touch any icon.
To view any remaining time, touch & hold thecentre(function)icon&touchagain.
To cancel the semi-automatic programme at any time, touch the plus & minus icons together.
Method 2 - end time (switch off at a set end time):
Touch&holdthecentre(function)icon;thebellwillflash&youwillhearabeep.Touchthecentre(function)iconagain- twice - this will skip past the minute minder & duration functions.
Thedisplaywillflashtheword‘End’&the‘A’willflashonthelefthandofthedisplay.
USING THE CLOCK/PROGRAMMER-ELEC(if fitted)
11.100
Use the plus & minus icons to select the time the oven is required to switch off.
Once this is done the oven will switch itself off at the pre-selected time. To turn the alarm off, touch any icon.
To cancel the semi-automatic programme at any time, touch the plus & minus icons together.
Fully automatic cooking
This function allows the cooker to switch on & off automatically. It requires both the duration & the end time to be entered. The timer will work out the start time & begin cooking.
Touch&holdthecentre(function)icon;thebellwillflash&youwillhearabeep.Touchthecentre(function)iconagain- this will skip past the minute minder function.
Thedisplaywillflashtheword‘dur’&the‘A’willflashonthelefthandofthedisplay.
Use the plus & minus icons to set the length of time you want to cook for. The flashingwilllastforapproximatelyfiveseconds, so the setting must be done within this time frame or the time of day will show again.
Touchthecentre(function)iconagain-this skips past the minute minder & dura-tion functions.
Thedisplaywillflashtheword‘End’&the‘A’willflashonthelefthandofthedisplay.
Use the plus & minus icons to select the time the oven is required to switch off.
Set the temperature of the oven & place the food inside. The timer will calculate the start time.
When this is done the oven will turn itself off at the time you have selected. To switch off the alarm, touch any icon.
To cancel the automatic programme at any time, touch the plus & minus icons together.
USING THE CLOCK/PROGRAMMER-ELEC(if fitted)
CLEANING
12.000
General
• It is important to clean the product regularly as a build up of fat can af-fect its performance or damage it and may invalidate your guarantee.
• Always switch off your appliance and allow it to cool down before you clean any part of it.
• Do not use undiluted bleaches, products containing chlorides, wire wool or abrasive cleaners on alu-minium, stainless steel, or plastic/painted parts as they can damage the appliance. Nylon pads can also be unsuitable.
• Take extra care when cleaning over symbols on fascia panels. Excessive cleaning can lead to the symbols fading.
• Ifyourproductisfittedwithstainlesssteel cladded stips. You may notice a small white residue on the outer edges, this can be removed with a non abrasive wipe.
Painted & Plastic parts• Only use a clean cloth wrung out in
hot soapy water. • Do not use abrasive cleaners, wire or
nylon cleaning pads on these parts.Stainless steel & Aluminium surfaces• Only use a clean cloth wrung out in
hot soapy water, and dry with a soft cloth.
• Stubborn marks can be removed us-ing a stainless steel cleaner. Supplies can be purchased from the Customer Care Centre.
• Sharp objects can mark the surface of stainless steel, but will become less noticeable with time.
• Wipe any spillage immediately, taking care to avoid burning your hands
• Some foods are corrosive eg; vinegar, fruit juices and especially salt - they can mark or damage the metal if they are left on the surface.
• Baby oil can be used to restore stain-lesssteelfinishes-butonlyuseafew drops. Don’t use cooking oils as they can contain salts, which will damage the metal.
• Do not use steam cleaners.Enamel surfaces & parts
• Clean with warm, soapy water and a clean cloth.
• If larger splashes of fat do not readily disappear, you can use a mild cream cleaner to remove them. More stub-born marks can be removed using a soapfilledpad.
• Rinse well and dry with a soft clean towel or cloth.
• Do not use steam cleaners.
Glass parts
WARNING:- Do not use harsh abrasive cleaners or sharp metal scrapers to clean the oven door glass since they can scratch the surface, which may result in shattering of the glass.• Only use a clean cloth wrung out in
hot soapy water, or a specialist glass cleaner.
Rinse away any excess cleaner and dry with a soft cloth.
Chrome plated parts
• Useamoistsoapfilledpad,orplacein a dishwasher
CLEANING
12.100
REMOVING OVEN PARTS FOR CLEANING
Inner Door Glass (glass doors only)
• The inner door glass panel can be removed for cleaning but it must be replaced the right way up. If there is any writing on the glass, you must be able to read it clearly when the cavity doors are open.
• Always make sure that the glass is pushed fully into the Stop position.
• To remove the glass panel, open the door wide, hold the top and bottom edges and slide out.
• Warning: Do not operate the appliance without the glasspanelcorrectlyfitted.
• For your safety, glass door panels are made of toughened glass. This en-sures that, in the unlikely event that a panel breaks, it does so into small fragments to minimise the risk of in-jury. Please take care when handling, using or cleaning all glass panels, as any damage to the surfaces or edges may result in the glass breaking without warning or apparent cause at a later date. Should any glass panel be damaged, we strongly recommend
that it is replaced immediately.
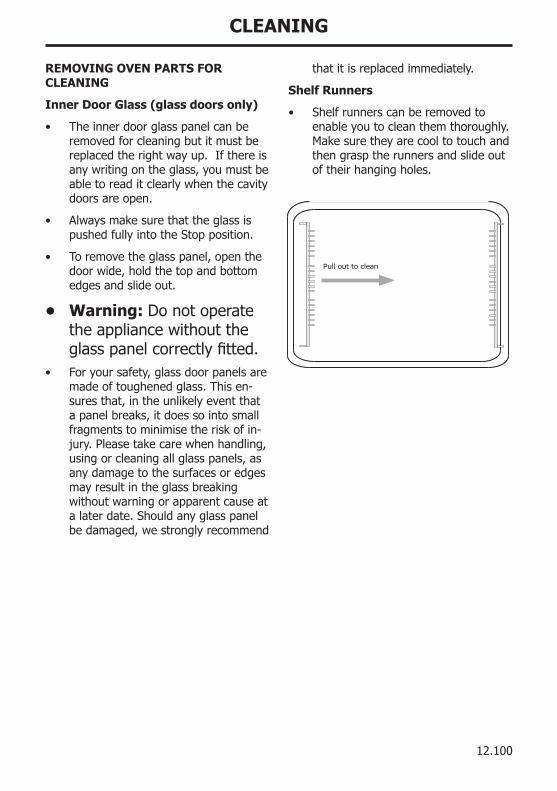
Shelf Runners
• Shelf runners can be removed to enable you to clean them thoroughly. Make sure they are cool to touch and then grasp the runners and slide out of their hanging holes.
Pull out to clean

CLEANING
TELESCOPIC SHELVING SYSTEM (if fitted)
• In addition to the traditional shelving fittedinyourappliance,thetele-scopicshelvingsystemisfittedinthemost commonly used location in your cavity.
• The shelves with the telescopic system are easier to pull out than traditional shelving, which means the oven door stays open for a shorter period of time. The smooth action also reduces the likelihood of fat, or food, spillage, and gives you extra security.
• You do not have to use the telescopic shelves all of the time. You can place the shelves in the traditional positions if you would like more choice.
• The telescopic shelves remove easily from the runner for re-positioning or cleaning, but we recommend that you reposition your shelving before cooking, and remove the shelving for cleaning when the shelves are cold to prevent burning yourself.
To remove the telescopic shelves
• Make sure the shelf is cool enough to touch.
• Push the oven shelf back into the cavity, until it hits the stop position.
• Grasp the shelf bars in the centre, and lift the back of the shelf clear of the stop position.
• You can then lift the front of the shelf clear of the retaining tabs.
To replace the telescopic shelves
• Make sure the oven runners are pushed all the way back into the cavity.
• Tilt the shelf and make sure the front of the shelf is against the stop posi-tion.
• Carefully place the shelf back onto therunnerandsnapinplacefirmly.
• Make sure the back of the self is inside the retaining tabs and slide it in and out of the oven to make sure it works correctly.
1. Grasp andlift shelf bars
2. Lift shelfclear
Note: Make sure the shelf isunclipped from the retainingtabs before removal.
Make sure the shelfis firmly pressed againstthe stop position atback of the oven cavity
CLEANING
12.210
ELECTRIC HOB
Ceramic glass hobs
• The ceramic hob top can be cleaned using a clean, damp cloth or kitchen paper. Do not use a used dishcloth orspongeastheycanleaveafilmofdetergent on the surface which can lead to discoloration. Please ensure that the elements are cooled fully to avoid steam burns.
• You can use a specialist ceramic cleaner to restore the surface, but use sparingly to avoid coating the hob top too thickly. Too much cream cleaner will lead to discolouration. Use a dry, clean cloth to polish the surface.
• For stubborn marks, a specialist hob scraper can be used.
• Do not use steam cleaners or high-pressure cleaning equipment.
• Regular cleaning will prevent any salts or minerals from accumulating on your hob and discolouring the glass.
• Wipe any spillage as soon as pos-sible.
• Clean the hob top as regularly as possible, this will prevent any build upofgreasewhichmaybeafirehazard.
Solid plate hobs
• Prime and Season - this helps main-tainthefinishoftheelements.
• Use a damp, clean cloth to wipe the solid plate, making sure that you follow the circular grooves and avoid damaging the red spots. Make sure that you allow the hotplate to dry before use by switching on the ele-ments at a low heat.
• You can restore the hotplates by us-ing a solid plate cleaner but take care to avoid the red spots on elements.
• Toprime:Switchoneachelementinturn for a short while (with no pan on it)atamedium-highsetting.Thiswill harden and burn off the coating.
• Toseason:Heattheelementfor30seconds at a medium setting then switch off. Use a minimum amount of unsalted vegetable oil, on a dry cloth or paper towel, and apply a thin coat of oil to the element surface. Wipe off the excess and heat the ele-ment for one minute.
INSTALLATION
Moving the cookerPlease note that the weight of this appli-anceisapproximately60kg(unpacked).Take care if the appliance needs to be lifted during installation - always use an appropriate method of lifting.
Do not attempt to move the cooker by pulling on the doors or handles. Open the door and grasp the frame of the cooker, taking care that the door does not shut onyourfingers.
Take care to avoid damage to soft or unevenfloorcoveringswhenmovingtheappliance.Somecushionedvinylfloorcoverings may not be designed to with-stand sliding appliances without marking or damage.
Important:Ensurethatyourouteallmains cables well clear of any adjacent heat source.
ClearancesThiscookermaybefittedflushtobaseunits. However, for models with side opening doors, we recommend a side clearance of 60mm between the cooker and any side wall to allow the door to be opened fully.
The cooker should not be placed on a base.
No shelf or overhang or cooker hood shall be closer than a minimum of 650mm, but check with cooker hood manufacturer’s recommendations.
Whilst every care is taken to eliminate burrs and raw edges from this product, please take care when handling - we recommend the use of protective gloves during installation.
The cooker must have a side clearance above hob level of 90mm up to a height of 400mm.
DimensionsAll sizes are nominal, and some varia-tion is to be expected. The ‘depth’ of the cooker, as given below, is to the front of the door and excluding knobs and handles.
Depth: 600mm
Width: 500/550/600mm
Height(adjustable):900-915mm
Levelling the cookerThere are four adjustable feet on the base of the cooker. Turn the feet by hand to adjust the height of the cooker.
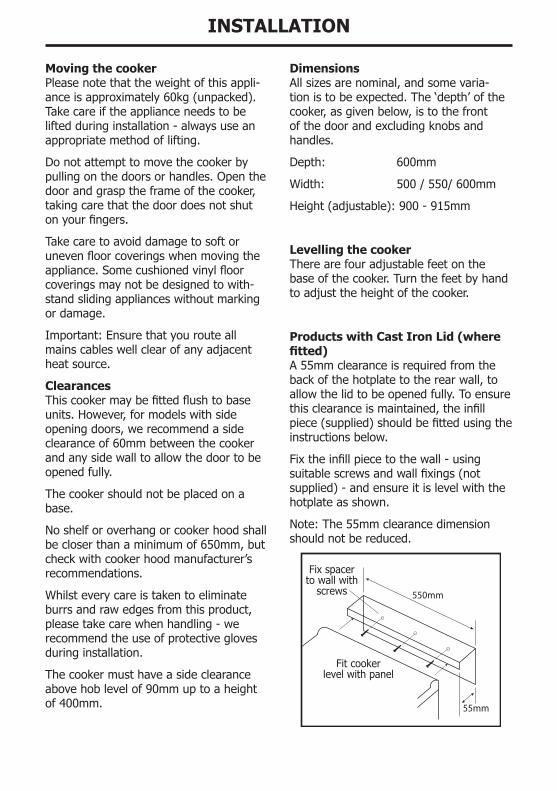
Products with Cast Iron Lid (where fitted)A 55mm clearance is required from the back of the hotplate to the rear wall, to allow the lid to be opened fully. To ensure thisclearanceismaintained,theinfillpiece(supplied)shouldbefittedusingtheinstructions below.
Fixtheinfillpiecetothewall-usingsuitablescrewsandwallfixings(notsupplied)-andensureitislevelwiththehotplate as shown.
Note:The55mmclearancedimensionshould not be reduced.
550mm
55mm
INSTALLATION
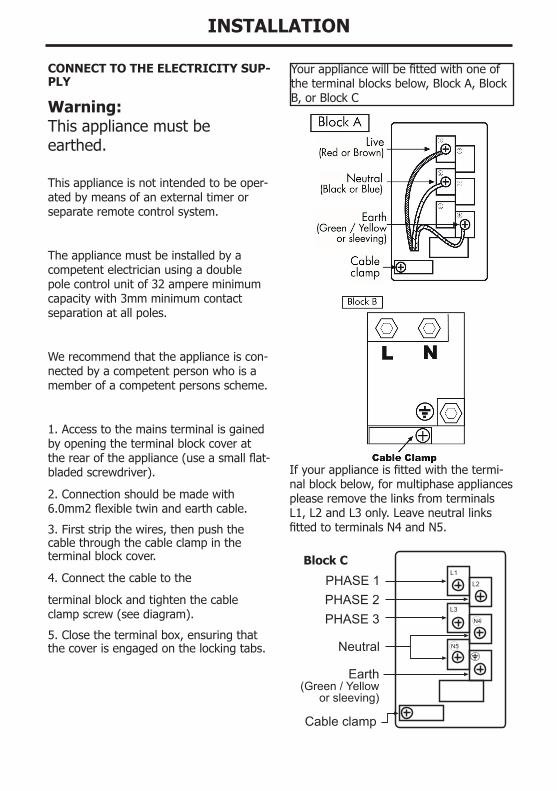
CONNECT TO THE ELECTRICITY SUP-PLY
Warning: This appliance must be earthed.
This appliance is not intended to be oper-ated by means of an external timer or separate remote control system.
The appliance must be installed by a competent electrician using a double pole control unit of 32 ampere minimum capacity with 3mm minimum contact separation at all poles.
We recommend that the appliance is con-nected by a competent person who is a member of a competent persons scheme.
1. Access to the mains terminal is gained by opening the terminal block cover at therearoftheappliance(useasmallflat-bladedscrewdriver).
2. Connection should be made with 6.0mm2flexibletwinandearthcable.
3. First strip the wires, then push the cable through the cable clamp in the terminal block cover.
4. Connect the cable to the
terminal block and tighten the cable clampscrew(seediagram).
5. Close the terminal box, ensuring that the cover is engaged on the locking tabs.
Yourappliancewillbefittedwithoneofthe terminal blocks below, Block A, Block B, or Block C
Ifyourapplianceisfittedwiththetermi-nal block below, for multiphase appliances please remove the links from terminals L1, L2 and L3 only. Leave neutral links fittedtoterminalsN4andN5.
L1
Cable clamp
Earth(Green / Yellow
or sleeving)
PHASE 1
Neutral
N4
L2
L3PHASE 2PHASE 3
N5
Block C
TECHNICAL DATA
ELECTRIC PRODUCTS
Electrical supply/load
220 - 240V ~ 50Hz
• Load 9000-10700W with Ceramic Hoplate.
• Load 9140 - 10880W with Solid Hotplate
• Load 11320-12100W with Induction Hotplate.
Countries of destination GB - Great Britain, IE -Ireland, Germany DE
Warning: This appliance must be earthed.
Databadge is located at the bottom of the front frame, behind the door.
CUSTOMER CARE
15.010
FAQs
What parts of the appliance can be washed in a dishwasher?
• Any enamelled parts such as the grill-pan can be cleaned in a dishwasher, as can oven shelves and shelf guides.
What parts must NOT be cleaned in a dishwasher?
• Parts such as burner skirts and caps, control knobs and any cast iron items must not be cleaned in a dishwasher, they should be cleaned with hot soapy water and a nylon brush once they are cool enough.
There’s been a power failure and the product won’t work.
• Switch off the electricity supply.
• When the power returns switch the electricity supply back on and re-set any programmer/clock to the correct time of day.
My oven is a single combined oven and grill - can I use both functions together?
• No. You can only use one or the other.
Why is there condensation on the doors?
• Condensation is caused by hot, moist air meeting a cooler surface (i.e. the ovendoor).Youcannotalwayspre-vent it, but you can minimise it when ithappensbydoingthefollowing:
• Pre-heat the oven at a high tempera-ture before putting food in the oven, and cover the food you are cooking wherever possible.
• Whenever you can, cook wet foods at higher temperatures.
• Don’t leave food in the oven to cool down.
• Automatic cooking will normally pro-
duce condensation when the oven is cooling down with food inside.
Should the cooling fan continue to run once the appliance has been switched off?
• Yes. This is to make sure that you can always touch the control knobs to make temperature adjustments, and turn your appliance off.
What is a Multifunction oven?
• A multifunction oven combines a va-riety of features, which are explained fullyearlierinthisbook(iffitted),itallowsyoumoreflexibilitywhencooking.
The neon on my appliance keeps going out and coming back on again - is this right?
• Yes.Inmostcasestheneon(iffitted)will cycle on and off to show that oven is maintaining your temperature choice.
Call Customer Care for a Service Engineer’s visit if:
• Youfindthattheovenbecomeshot-ter at a particular temperature - the thermostat may need replacing.
• The cooling fan fails to work.
CUSTOMER CARE
15.030
CUSTOMER CARE WEB SHOP
Having purchased a superior cooker, hob or hood from us, you’ll naturally want to keep it looking great. And who better to help you care for it than the manufac-turer?
We offer an extensive range of accesso-ries, components and cleaning products which, will instantly give your cooker a good as new look.
In addition to the list of our most popular products below, we also have an exciting
range of Bake ware and Cookware essen-tials including Roasting Pans, Cake Tins and Non-Stick Cooking Liners.
For all enquires, please visit our Web Shop at www.gdhaonline.co.uk or call the Spares Sales Team on 0844 815 3745. For countries outside the UK, please contact your local service agent.
Product De-scription Where used Purpose
Ceramic Hob Cleaner
All Ceramic glass hobs including Induction
Enables easier cleaning of your ceramic hob. Prevents build up of mineral deposits. Best used with Ceramic Hob Scraper Kit. 300ml bottle.
Ceramic Hob Scraper kit
All Ceramic glass hobs including Induction
Ideal for removing cooked on marks from ceramic glass hobs Best used with Ceramic Hob Cleaner
Sealed Hotplate Conditioner
All sealed/solid plate hobs
Restoresthesleekmattblackfinishtosolidhotplates
Multipurpose Kitchen Cleaner
General kitchen cleaner
Excellent multipurpose cleaner, For use around the kitchen. 500ml bottle.
Oven Cleaner All cooking appli-ances.
Cuts through grease & burnt on grime. 500ml bottle
Restor-A-Cloth All cooking appli-ances.
Chemical free cleaning cloth Ideal for clean-ing & polishing glass & stainless steel
Stainless Steel Cleaner
All stainless steel parts
Oil based cleaner. Perfect for removing stub-born & greasy marks. 300ml bottle.
Rectangular car-bonfilters Cooker Hoods
Newfilters,helptomaintainefficientcookerhood operation and keep your Kitchen odour free
Round Carbon Filters Cooker Hoods
Newfilters,helptomaintainefficientcookerhood operation and keep your Kitchen odour free
CUSTOMER CARE
15.040
CUSTOMER CARE
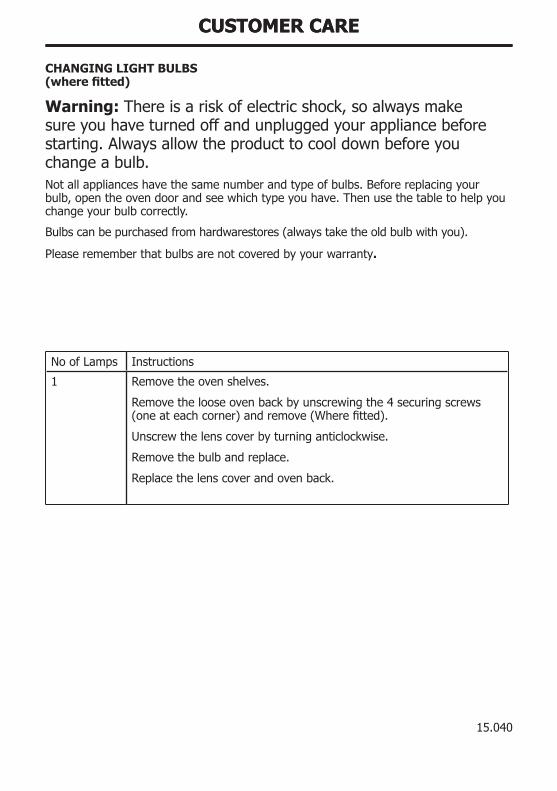
CHANGING LIGHT BULBS (where fitted)
Warning: There is a risk of electric shock, so always make sure you have turned off and unplugged your appliance before starting. Always allow the product to cool down before you change a bulb.Not all appliances have the same number and type of bulbs. Before replacing your bulb, open the oven door and see which type you have. Then use the table to help you change your bulb correctly.
Bulbscanbepurchasedfromhardwarestores(alwaystaketheoldbulbwithyou).
Please remember that bulbs are not covered by your warranty.
No of Lamps Instructions
1 Remove the oven shelves.
Remove the loose oven back by unscrewing the 4 securing screws (oneateachcorner)andremove(Wherefitted).
Unscrew the lens cover by turning anticlockwise.
Remove the bulb and replace.
Replace the lens cover and oven back.
CUSTOMER CARECUSTOMER CARE
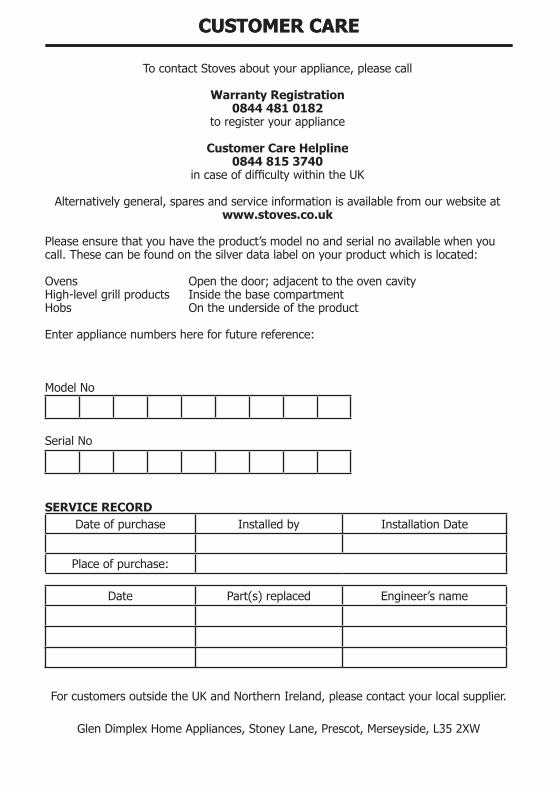
To contact Stoves about your appliance, please call
Warranty Registration0844 481 0182
to register your appliance
Customer Care Helpline0844 815 3740
incaseofdifficultywithintheUK
Alternatively general, spares and service information is available from our website atwww.stoves.co.uk
Please ensure that you have the product’s model no and serial no available when you call.Thesecanbefoundonthesilverdatalabelonyourproductwhichislocated:
Ovens Open the door; adjacent to the oven cavityHigh-level grill products Inside the base compartmentHobs On the underside of the product
Enterappliancenumbershereforfuturereference:
Model No
Serial No
SERVICE RECORDDate of purchase Installed by Installation Date
Placeofpurchase:
Date Part(s)replaced Engineer’s name
For customers outside the UK and Northern Ireland, please contact your local supplier.
Glen Dimplex Home Appliances, Stoney Lane, Prescot, Merseyside, L35 2XW