Embed Size (px)
Citation preview

U S E R ’ S G U I D E F O R T H E
KNIFE & TOOLSHARPENER MK.2
• WARNING! To reduce the risk of injury, the user must read and understand this instruction manual before using product. Save these instructions for future reference.
SCAN TO WATCH VIDEO INSTRUCTIONS
W S K T S 2

THANK YOU!
Thank you for purchasing a Work Sharp Knife & Tool Sharpener. As the CEO, and 4th generation to lead our family’s company I am excited that you have put your trust in our company and products. Darex is filled with exceptional people who have each done their part to get this product in your hands. Our mission is that you are left surprised and delighted by your experience and I hope we have delivered.
At Darex, we strive to make every sharpening experience easy, fast, and effective. I am confident you will find the performance and precision you expect in this high quality sharpening system. With this breakthrough approach to sharpening, you can now sharpen your tools much faster. It will work every time.
If you have questions, suggestions, or need help with your WORK SHARP® unit, please contact us. Our customer service representatives are here to help. We support what we build and we appreciate hearing from you!
Though we believe operating your WORK SHARP® will be intuitive, please read this User’s Guide to ensure you achieve the superior results you desire. We have included some sharpening tips you may find handy. Please visit our website at www.worksharptools.com.
There you will find:
• Demonstrations of all operations with the sights and sounds leading to successful knife sharpening
• Downloadable copies of this User’s Guide• Warranty registration• Service and contact numbers
Thank you again for buying a WORK SHARP® Knife & Tool Sharpener. Enjoy its performance. Work Smart, WORK SHARP®!
MATTHEW BERNARDCEO, Darex, LLCMaker of Work Sharp®, Drill Doctor® and Darex®
MATTHEW BERNARD

SAFETY INFORMATION . . . . . . . . . . . . . . . . . . . . . . . . . . . . . . . . . . . . . . . . . . . . . . . . . 4
THE ANATOMY OF A KNIFE . . . . . . . . . . . . . . . . . . . . . . . . . . . . . . . . . . . . . . . . . . . . . . . 8
GETTING TO KNOW YOUR KNIFE & TOOL SHARPENER . . . . . . . . . . . . . . . . . . . . . . . . . . . . 9
SETTING UP YOUR SHARPENER . . . . . . . . . . . . . . . . . . . . . . . . . . . . . . . . . . . . . . . . . . 10
BEST TECHNIQUES / TROUBLE SHOOTING . . . . . . . . . . . . . . . . . . . . . . . . . . . . . . . . . . . 13
SHARPENING KITCHEN KNIVES . . . . . . . . . . . . . . . . . . . . . . . . . . . . . . . . . . . . . . . . . . 14
SHARPENING OUTDOOR KNIVES . . . . . . . . . . . . . . . . . . . . . . . . . . . . . . . . . . . . . . . . . . 16
SHARPENING SERRATED KNIVES . . . . . . . . . . . . . . . . . . . . . . . . . . . . . . . . . . . . . . . . . 18
SHARPENING KNIVES WITH PARTIAL SERRATIONS . . . . . . . . . . . . . . . . . . . . . . . . . . . . . 19
SHARPENING GUT HOOKS . . . . . . . . . . . . . . . . . . . . . . . . . . . . . . . . . . . . . . . . . . . . . . 20
SHARPENING SINGLE-BEVEL KNIVES . . . . . . . . . . . . . . . . . . . . . . . . . . . . . . . . . . . . . . 21
SHARPENING SCISSORS . . . . . . . . . . . . . . . . . . . . . . . . . . . . . . . . . . . . . . . . . . . . . . . 22
SHARPENING EDGED TOOLS . . . . . . . . . . . . . . . . . . . . . . . . . . . . . . . . . . . . . . . . . . . . . 23
SHARPENING CUTTING TOOLS . . . . . . . . . . . . . . . . . . . . . . . . . . . . . . . . . . . . . . . . . . . 24
SHARPENING MOWER BLADES . . . . . . . . . . . . . . . . . . . . . . . . . . . . . . . . . . . . . . . . . . . 25
GRINDING, POLISHING, DEBURRING . . . . . . . . . . . . . . . . . . . . . . . . . . . . . . . . . . . . . . . 26
WARRANTY . . . . . . . . . . . . . . . . . . . . . . . . . . . . . . . . . . . . . . . . . . . . . . . . . . . . . . . . 27
TABLE OF CONTENTS
PLEASE LEAVE A REVIEW ON AMAZON, WORKSHARPTOOLS .COM OR WHEREVER YOU PURCHASED YOUR PRODUCT
4 | S A F E T Y I N F O R M A T I O N
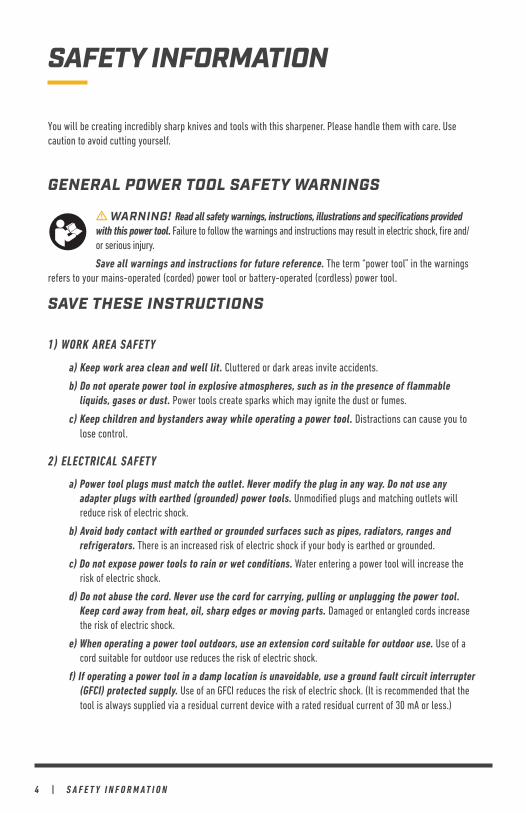
You will be creating incredibly sharp knives and tools with this sharpener. Please handle them with care. Use caution to avoid cutting yourself.
GENERAL POWER TOOL SAFETY WARNINGS
• WARNING! Read all safety warnings, instructions, illustrations and specifications provided with this power tool . Failure to follow the warnings and instructions may result in electric shock, fire and/or serious injury.
Save all warnings and instructions for future reference. The term “power tool” in the warnings refers to your mains-operated (corded) power tool or battery-operated (cordless) power tool.
SAVE THESE INSTRUCTIONS
1) WORK AREA SAFETY
a) Keep work area clean and well lit . Cluttered or dark areas invite accidents.
b) Do not operate power tool in explosive atmospheres, such as in the presence of flammable liquids, gases or dust . Power tools create sparks which may ignite the dust or fumes.
c) Keep children and bystanders away while operating a power tool . Distractions can cause you to lose control.
2) ELECTRICAL SAFETY
a) Power tool plugs must match the outlet. Never modify the plug in any way. Do not use any adapter plugs with earthed (grounded) power tools . Unmodified plugs and matching outlets will reduce risk of electric shock.
b) Avoid body contact with earthed or grounded surfaces such as pipes, radiators, ranges and refrigerators . There is an increased risk of electric shock if your body is earthed or grounded.
c) Do not expose power tools to rain or wet conditions . Water entering a power tool will increase the risk of electric shock.
d) Do not abuse the cord. Never use the cord for carrying, pulling or unplugging the power tool. Keep cord away from heat, oil, sharp edges or moving parts. Damaged or entangled cords increase the risk of electric shock.
e) When operating a power tool outdoors, use an extension cord suitable for outdoor use . Use of a cord suitable for outdoor use reduces the risk of electric shock.
f) If operating a power tool in a damp location is unavoidable, use a ground fault circuit interrupter (GFCI) protected supply . Use of an GFCI reduces the risk of electric shock. (It is recommended that the tool is always supplied via a residual current device with a rated residual current of 30 mA or less.)
SAFETY INFORMATION
S A F E T Y I N F O R M A T I O N | 5
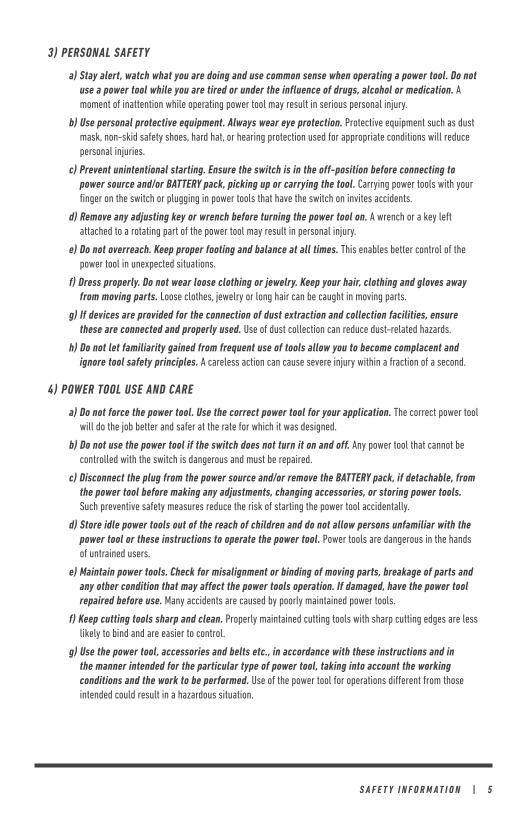
3) PERSONAL SAFETY
a) Stay alert, watch what you are doing and use common sense when operating a power tool. Do not use a power tool while you are tired or under the influence of drugs, alcohol or medication. A moment of inattention while operating power tool may result in serious personal injury.
b) Use personal protective equipment. Always wear eye protection. Protective equipment such as dust mask, non-skid safety shoes, hard hat, or hearing protection used for appropriate conditions will reduce personal injuries.
c) Prevent unintentional starting. Ensure the switch is in the off-position before connecting to power source and/or BATTERY pack, picking up or carrying the tool . Carrying power tools with your finger on the switch or plugging in power tools that have the switch on invites accidents.
d) Remove any adjusting key or wrench before turning the power tool on. A wrench or a key left attached to a rotating part of the power tool may result in personal injury.
e) Do not overreach. Keep proper footing and balance at all times. This enables better control of the power tool in unexpected situations.
f) Dress properly. Do not wear loose clothing or jewelry. Keep your hair, clothing and gloves away from moving parts. Loose clothes, jewelry or long hair can be caught in moving parts.
g) If devices are provided for the connection of dust extraction and collection facilities, ensure these are connected and properly used . Use of dust collection can reduce dust-related hazards.
h) Do not let familiarity gained from frequent use of tools allow you to become complacent and ignore tool safety principles . A careless action can cause severe injury within a fraction of a second.
4) POWER TOOL USE AND CARE
a) Do not force the power tool . Use the correct power tool for your application . The correct power tool will do the job better and safer at the rate for which it was designed.
b) Do not use the power tool if the switch does not turn it on and off . Any power tool that cannot be controlled with the switch is dangerous and must be repaired.
c) Disconnect the plug from the power source and/or remove the BATTERY pack, if detachable, from the power tool before making any adjustments, changing accessories, or storing power tools. Such preventive safety measures reduce the risk of starting the power tool accidentally.
d) Store idle power tools out of the reach of children and do not allow persons unfamiliar with the power tool or these instructions to operate the power tool . Power tools are dangerous in the hands of untrained users.
e) Maintain power tools. Check for misalignment or binding of moving parts, breakage of parts and any other condition that may affect the power tools operation. If damaged, have the power tool repaired before use . Many accidents are caused by poorly maintained power tools.
f) Keep cutting tools sharp and clean . Properly maintained cutting tools with sharp cutting edges are less likely to bind and are easier to control.
g) Use the power tool, accessories and belts etc ., in accordance with these instructions and in the manner intended for the particular type of power tool, taking into account the working conditions and the work to be performed. Use of the power tool for operations different from those intended could result in a hazardous situation.

6 | S A F E T Y I N F O R M A T I O N
h) Keep handles and grasping surfaces dry, clean and free from oil and grease. Slippery handles and grasping surfaces do not allow for safe handling and control of the tool in unexpected situations. Hold the power tool by insulated gripping surfaces, because the sanding surface may contact its own cord. Cutting a “live” wire may make exposed metal parts of the power tool “live” and could give the operator an electric shock.
5) SERVICE
a) Have your power tool serviced by a qualified repair person using only identical replacement parts . This will ensure that the safety of the power tool is maintained.
b) Do not dispose of electrical products with household waste . Waste electrical products should not be disposed of with household waste. Please recycle where facilities exist. Check with your local authority or retailer for recycling advice.
c) To replace a damaged power supply cord (Type Y), your power tool must be returned to the Service Center.
BELT SANDER SAFETY RULES
• WARNING: Hold the power tool by insulated gripping surfaces, because the sanding surface may contact its own cord . Cutting a "live" wire may make exposed metal parts of the power tool "live" and could give the operator an electric shock.
• WARNING: ALWAYS use proper safety glasses . Everyday eyeglasses are NOT safety glasses. Also use face or dust mask if operation is dusty. ALWAYS WEAR CERTIFIED SAFETY EQUIPMENT .
• WARNING: Use of this tool can generate and/or disperse dust, which may cause serious and permanent respiratory or other injury. Always use NIOSH/ OSHA approved respiratory protection appropriate for the dust exposure. Direct particles away from face and body.
• CAUTION: Wear appropriate hearing protection during use. Under some conditions and duration of use, noise from this product may contribute to hearing loss.
• Always hold tool firmly.
• Use clamps or another practical way to secure and support the work piece to a stable platform.Holding the work by hand or against your body leaves it unstable and may lead to loss of control.
• Avoid prolonged contact with dust from power sanding, sawing, grinding, drilling, and other construction activities. Wear protective clothing and wash exposed areas with soap and water. Allowing dust to get into your mouth, eyes, or lie on the skin may promote absorption of harmful chemicals.
• Do NOT energize tool unless the sharpening cassette is firmly engaged in either the sharpening or grinding position .
DAREX,LLCMail .............................................. 210 E. Hersey St. Ashland OR 97520 USAPhone ........................................... 1 (800) 597-6170Fax .................................................1 (541) 552-1377E-mail ......................................... [email protected] ..............................................www.worksharptools.com
S A F E T Y I N F O R M A T I O N | 7
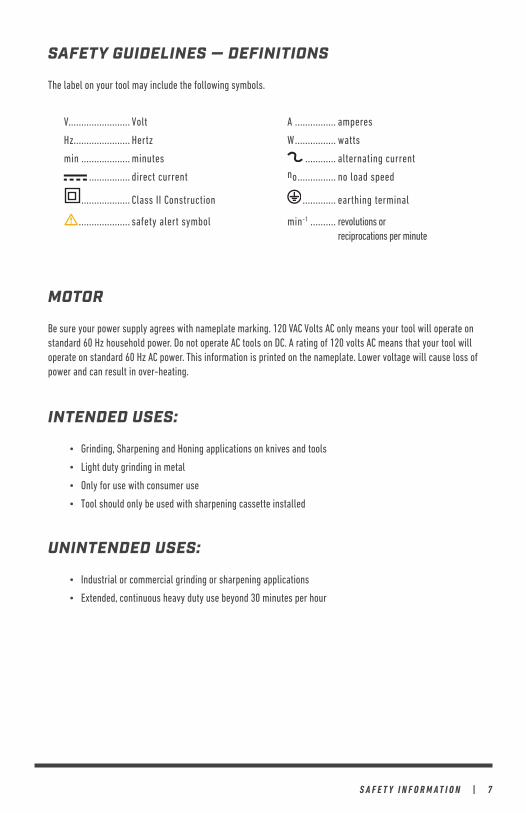
SAFETY GUIDELINES — DEFINITIONS
The label on your tool may include the following symbols.
V........................ Volt A ................ amperes
Hz...................... Hertz W ................ watts
min ................... minutes ............ alternating current
................ direct current no ............... no load speed
................... Class II Construction ............. earthing terminal
• .................... safety alert symbol min-1 .......... revolutions or .................................. reciprocations per minute
MOTOR
Be sure your power supply agrees with nameplate marking. 120 VAC Volts AC only means your tool will operate on standard 60 Hz household power. Do not operate AC tools on DC. A rating of 120 volts AC means that your tool will operate on standard 60 Hz AC power. This information is printed on the nameplate. Lower voltage will cause loss of power and can result in over-heating.
INTENDED USES:
• Grinding, Sharpening and Honing applications on knives and tools
• Light duty grinding in metal
• Only for use with consumer use
• Tool should only be used with sharpening cassette installed
UNINTENDED USES:
• Industrial or commercial grinding or sharpening applications
• Extended, continuous heavy duty use beyond 30 minutes per hour
8 | T H E A N A T O M Y O F A K N I F E
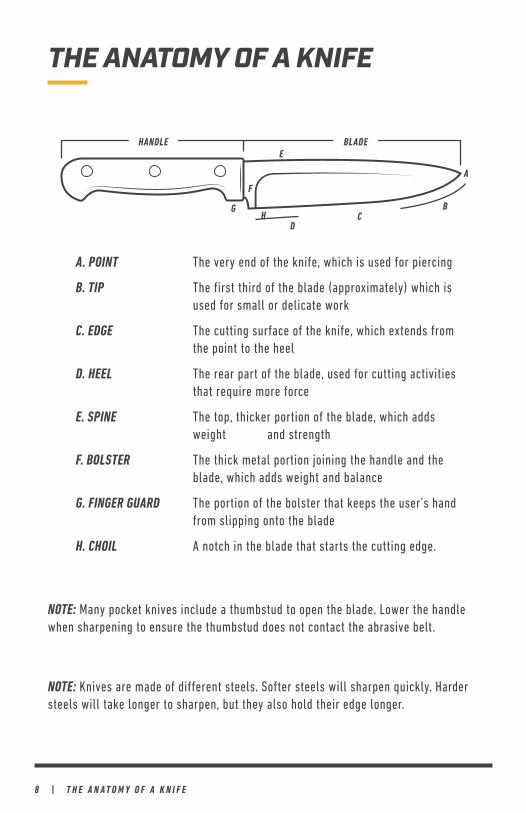
THE ANATOMY OF A KNIFE
A . POINT The very end of the knife, which is used for piercing
B . TIP The first third of the blade (approximately) which is used for small or delicate work
C . EDGE The cutting surface of the knife, which extends from the point to the heel
D . HEEL The rear part of the blade, used for cutting activities that require more force
E . SPINE The top, thicker portion of the blade, which adds weight and strength
F . BOLSTER The thick metal portion joining the handle and the blade, which adds weight and balance
G . FINGER GUARD The portion of the bolster that keeps the user’s hand from slipping onto the blade
H . CHOIL A notch in the blade that starts the cutting edge.
NOTE: Knives are made of different steels. Softer steels will sharpen quickly. Harder steels will take longer to sharpen, but they also hold their edge longer.
HANDLE
A
E
CG
HB
F
D
BLADE
NOTE: Many pocket knives include a thumbstud to open the blade. Lower the handle when sharpening to ensure the thumbstud does not contact the abrasive belt.
G E T T I N G T O K N O W Y O U R K N I F E & T O O L S H A R P E N E R | 9
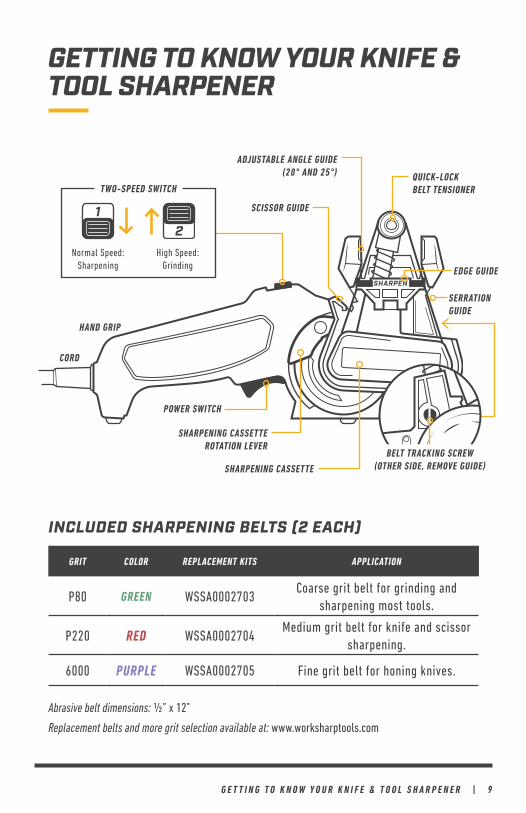
GETTING TO KNOW YOUR KNIFE & TOOL SHARPENER
INCLUDED SHARPENING BELTS (2 EACH)
Abrasive belt dimensions: ½” x 12”
Replacement belts and more grit selection available at: www.worksharptools.com
GRIT COLOR REPLACEMENT KITS APPLICATION
P80 GREEN WSSA0002703Coarse grit belt for grinding and
sharpening most tools.
P220 RED WSSA0002704Medium grit belt for knife and scissor
sharpening.
6000 PURPLE WSSA0002705 Fine grit belt for honing knives.
ADJUSTABLE ANGLE GUIDE(20° AND 25°) QUICK-LOCK
BELT TENSIONER
EDGE GUIDE
SERRATION GUIDE
SCISSOR GUIDE
SHARPENING CASSETTE
SHARPENING CASSETTE ROTATION LEVER
CORD
HAND GRIP
POWER SWITCH
Normal Speed:Sharpening
High Speed:Grinding
TWO-SPEED SWITCH
BELT TRACKING SCREW(OTHER SIDE, REMOVE GUIDE)
1 0 | S E T T I N G U P Y O U R S H A R P E N E R
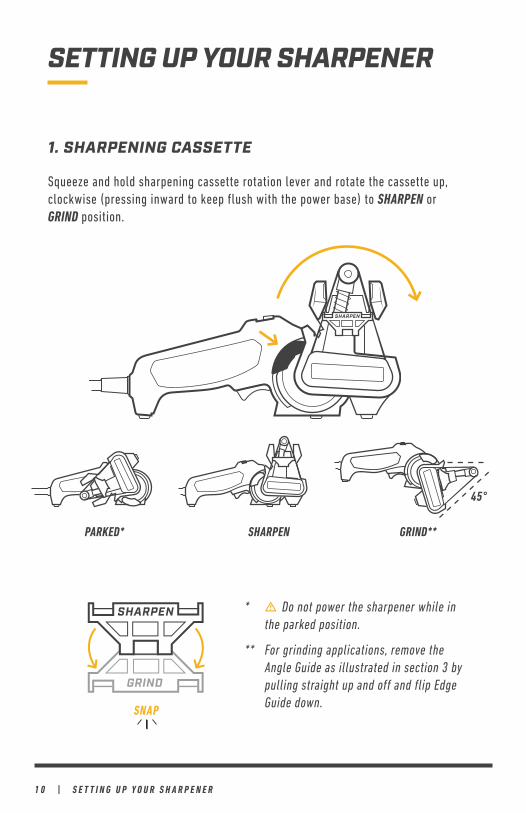
SHARPENPARKED* GRIND**
45°
1. SHARPENING CASSETTE
Squeeze and hold sharpening cassette rotation lever and rotate the cassette up, clockwise (pressing inward to keep flush with the power base) to SHARPEN or GRIND position.
* • Do not power the sharpener while in the parked position.
** For grinding applications, remove the Angle Guide as illustrated in section 3 by pulling straight up and off and flip Edge Guide down.
SETTING UP YOUR SHARPENER
SNAPSNAP
S E T T I N G U P Y O U R S H A R P E N E R | 1 1
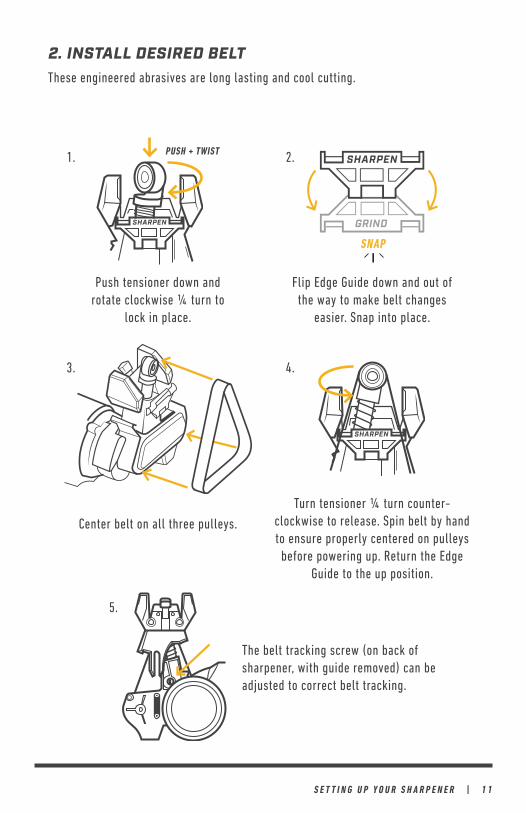
These engineered abrasives are long lasting and cool cutting.
Center belt on all three pulleys.
Turn tensioner ¼ turn counter-clockwise to release. Spin belt by hand to ensure properly centered on pulleys
before powering up. Return the Edge Guide to the up position.
Push tensioner down and rotate clockwise ¼ turn to
lock in place.
Flip Edge Guide down and out of the way to make belt changes
easier. Snap into place.
2. INSTALL DESIRED BELT
PUSH + TWIST
SNAPSNAP
The belt tracking screw (on back of sharpener, with guide removed) can be adjusted to correct belt tracking.
1.
3.
5.
2.
4.
1 2 | S E T T I N G U P Y O U R S H A R P E N E R
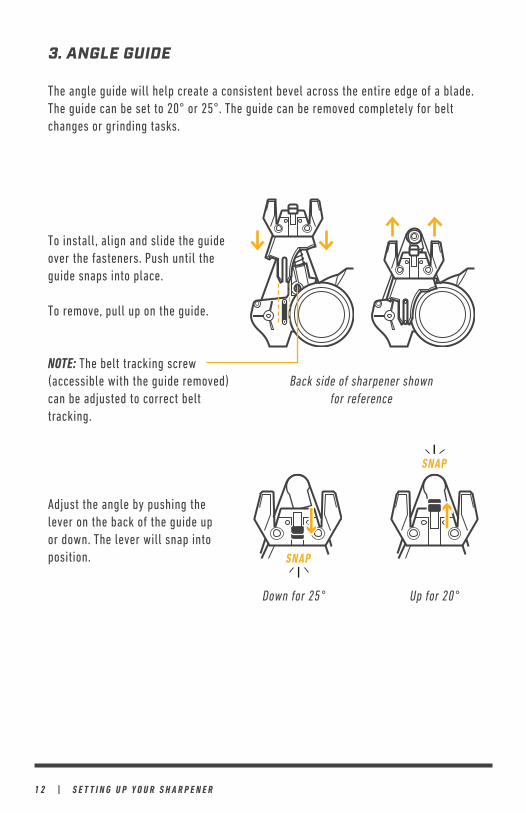
The angle guide will help create a consistent bevel across the entire edge of a blade. The guide can be set to 20° or 25°. The guide can be removed completely for belt changes or grinding tasks.
3. ANGLE GUIDE
To install, align and slide the guide over the fasteners. Push until the guide snaps into place.
To remove, pull up on the guide.
Adjust the angle by pushing the lever on the back of the guide up or down. The lever will snap into position.
Down for 25°
Back side of sharpener shown for reference
Up for 20°
SNAPSNAP
SNAPSNAP
NOTE: The belt tracking screw (accessible with the guide removed) can be adjusted to correct belt tracking.
B E S T T E C H N I Q U E S | 1 3
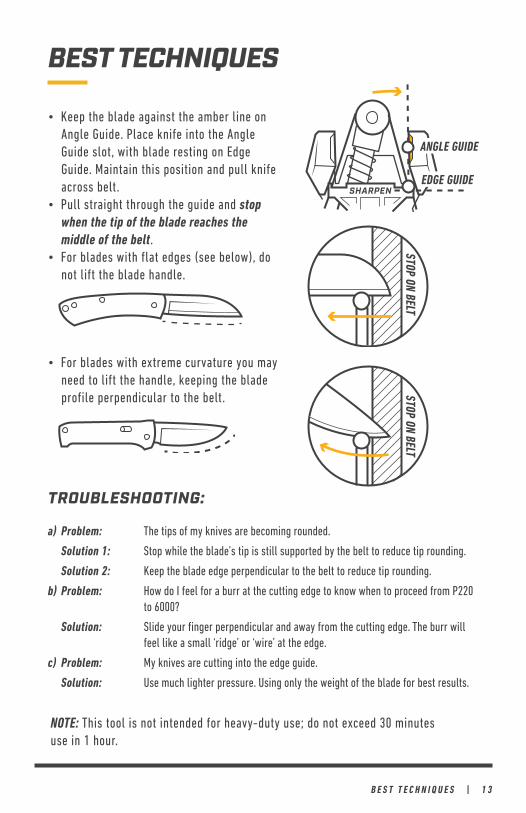
TROUBLESHOOTING:
a) Problem: The tips of my knives are becoming rounded.
Solution 1: Stop while the blade’s tip is still supported by the belt to reduce tip rounding.
Solution 2: Keep the blade edge perpendicular to the belt to reduce tip rounding.
b) Problem: How do I feel for a burr at the cutting edge to know when to proceed from P220 to 6000?
Solution: Slide your finger perpendicular and away from the cutting edge. The burr will feel like a small ‘ridge’ or ‘wire’ at the edge.
c) Problem: My knives are cutting into the edge guide.
Solution: Use much lighter pressure. Using only the weight of the blade for best results.
STOP ON BELT
ANGLE GUIDE
EDGE GUIDE
• Keep the blade against the amber line on Angle Guide. Place knife into the Angle Guide slot, with blade resting on Edge Guide. Maintain this position and pull knife across belt.
• Pull straight through the guide and stop when the tip of the blade reaches the middle of the belt.
• For blades with flat edges (see below), do not lift the blade handle.
• For blades with extreme curvature you may need to lift the handle, keeping the blade profile perpendicular to the belt. STOP ON BELT
NOTE: This tool is not intended for heavy-duty use; do not exceed 30 minutes use in 1 hour.
BEST TECHNIQUES
1 4 | S H A R P E N I N G K I T C H E N K N I V E S
NON-SERRATED KNIVES ONLY
SHARPENING KITCHEN KNIVES
SET UP
STEP 1
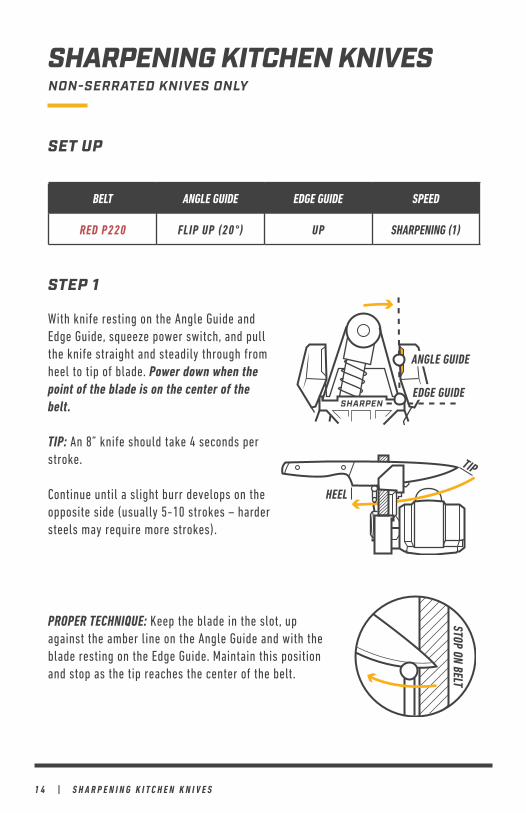
With knife resting on the Angle Guide and Edge Guide, squeeze power switch, and pull the knife straight and steadily through from heel to tip of blade. Power down when the point of the blade is on the center of the belt .
TIP: An 8” knife should take 4 seconds per stroke.
Continue until a slight burr develops on the opposite side (usually 5-10 strokes – harder steels may require more strokes).
PROPER TECHNIQUE: Keep the blade in the slot, up against the amber line on the Angle Guide and with the blade resting on the Edge Guide. Maintain this position and stop as the tip reaches the center of the belt.
HEEL
TIP
BELT ANGLE GUIDE EDGE GUIDE SPEED
RED P220 FLIP UP (20°) UP SHARPENING (1)
ANGLE GUIDE
EDGE GUIDE
STOP ON BELT
S H A R P E N I N G K I T C H E N K N I V E S | 1 5
ALTERNATE
LEFT SIDE
SHARPEN
P220 RED × 10
6000 PURPLE × 10
RE-SHARPEN
P220 RED × 2 - 6
6000 PURPLE × 10
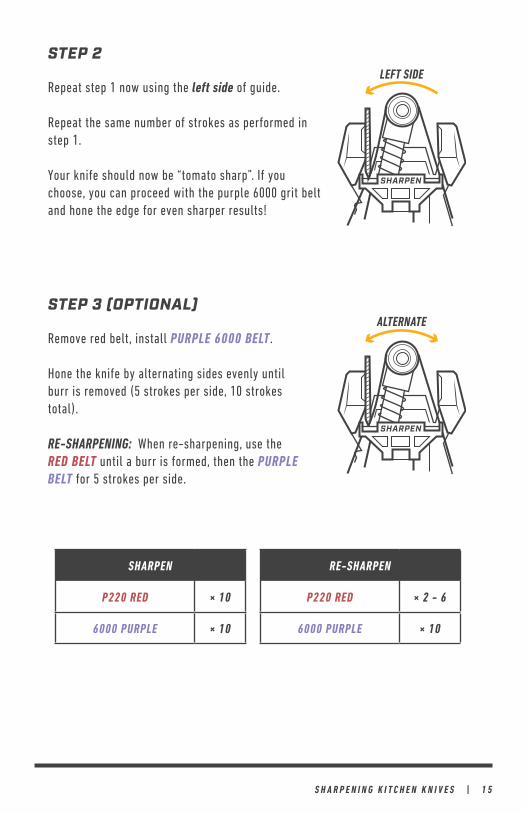
STEP 3 (OPTIONAL)
Remove red belt, install PURPLE 6000 BELT.
Hone the knife by alternating sides evenly until burr is removed (5 strokes per side, 10 strokes total).
RE-SHARPENING: When re-sharpening, use the RED BELT until a burr is formed, then the PURPLE BELT for 5 strokes per side.
STEP 2
Repeat step 1 now using the left side of guide.
Repeat the same number of strokes as performed in step 1.
Your knife should now be “tomato sharp”. If you choose, you can proceed with the purple 6000 grit belt and hone the edge for even sharper results!
1 6 | S H A R P E N I N G O U T D O O R K N I V E S
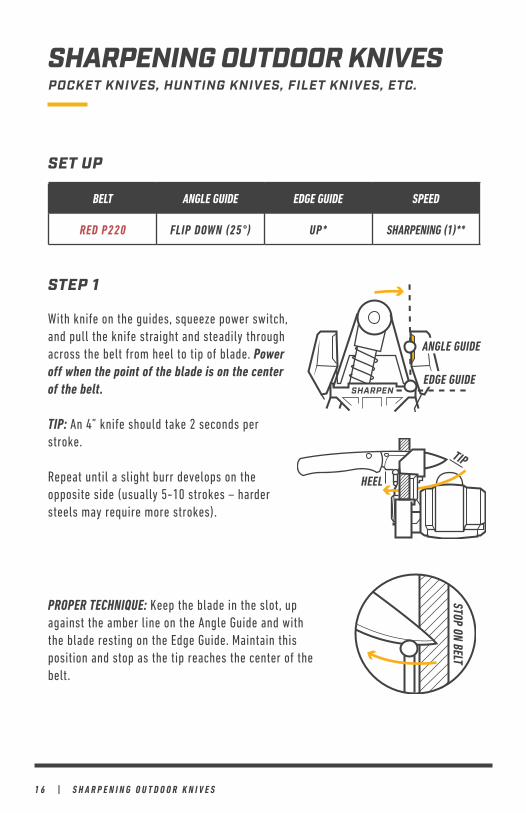
SHARPENING OUTDOOR KNIVESPOCKET KNIVES, HUNTING KNIVES, FILET KNIVES, ETC.
SET UP
BELT ANGLE GUIDE EDGE GUIDE SPEED
RED P220 FLIP DOWN (25°) UP* SHARPENING (1)**
STEP 1
With knife on the guides, squeeze power switch, and pull the knife straight and steadily through across the belt from heel to tip of blade. Power off when the point of the blade is on the center of the belt .
TIP: An 4” knife should take 2 seconds per stroke.
Repeat until a slight burr develops on the opposite side (usually 5-10 strokes – harder steels may require more strokes).
PROPER TECHNIQUE: Keep the blade in the slot, up against the amber line on the Angle Guide and with the blade resting on the Edge Guide. Maintain this position and stop as the tip reaches the center of the belt.
HEEL
TIP
ANGLE GUIDE
EDGE GUIDE
STOP ON BELT
S H A R P E N I N G O U T D O O R K N I V E S | 1 7
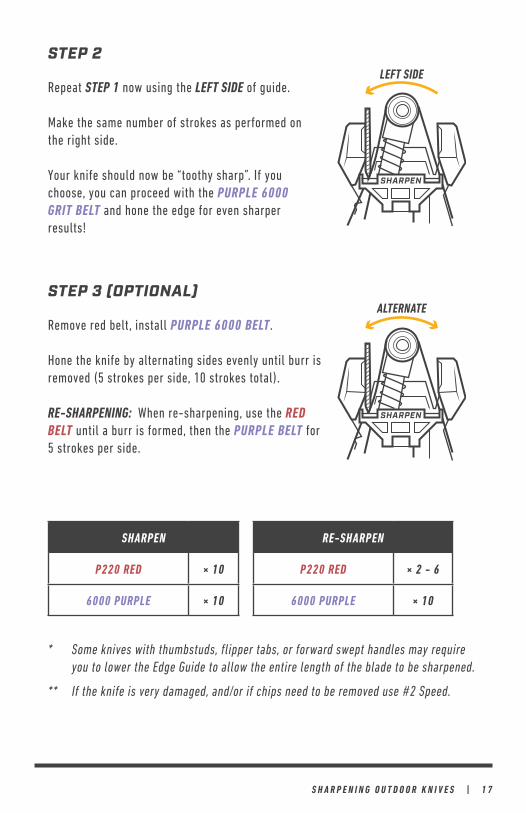
SHARPEN
P220 RED × 10
6000 PURPLE × 10
RE-SHARPEN
P220 RED × 2 - 6
6000 PURPLE × 10
ALTERNATE
LEFT SIDE
* Some knives with thumbstuds, flipper tabs, or forward swept handles may require you to lower the Edge Guide to allow the entire length of the blade to be sharpened.
** If the knife is very damaged, and/or if chips need to be removed use #2 Speed.
STEP 3 (OPTIONAL)
Remove red belt, install PURPLE 6000 BELT.
Hone the knife by alternating sides evenly until burr is removed (5 strokes per side, 10 strokes total).
RE-SHARPENING: When re-sharpening, use the RED BELT until a burr is formed, then the PURPLE BELT for 5 strokes per side.
STEP 2
Repeat STEP 1 now using the LEFT SIDE of guide.
Make the same number of strokes as performed on the right side.
Your knife should now be “toothy sharp”. If you choose, you can proceed with the PURPLE 6000 GRIT BELT and hone the edge for even sharper results!
1 8 | S H A R P E N I N G S E R R A T E D K N I V E S
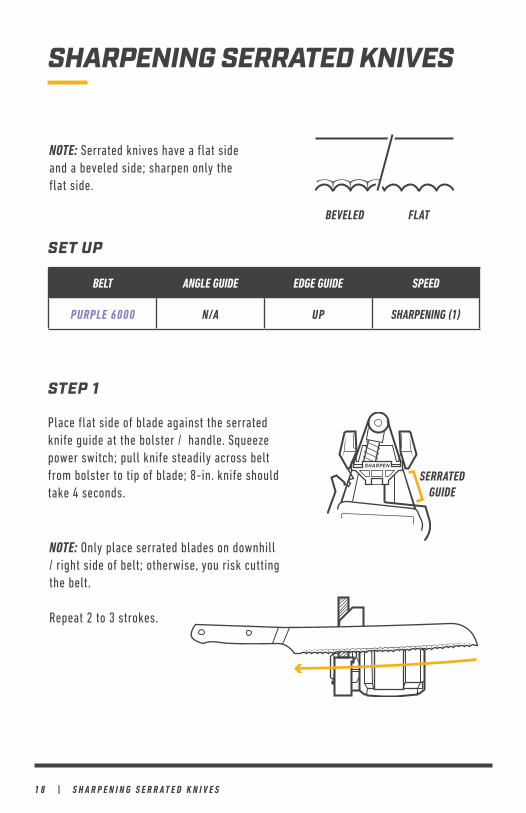
NOTE: Only place serrated blades on downhill / right side of belt; otherwise, you risk cutting the belt.
Repeat 2 to 3 strokes.
STEP 1
Place flat side of blade against the serrated knife guide at the bolster / handle. Squeeze power switch; pull knife steadily across belt from bolster to tip of blade; 8-in. knife should take 4 seconds.
NOTE: Serrated knives have a flat side and a beveled side; sharpen only the flat side.
SHARPENING SERRATED KNIVES
BEVELED FLAT
SET UP
BELT ANGLE GUIDE EDGE GUIDE SPEED
PURPLE 6000 N/A UP SHARPENING (1)
SERRATED GUIDE

S H A R P E N I N G K N I V E S W I T H P A R T I A L S E R R A T I O N S | 1 9
STEP 2
Follow the SHARPENING SERRATED KNIVES instructions on the serrated portion of the blade using the serrated knife guide.
SHARPENING KNIVES WITH PARTIAL SERRATIONS
STEP 1
Follow the SHARPENING OUTDOOR KNIVES instructions on the standard portion of the blade using the Angle Guide set at 25°.
SERRATEDSTANDARD
2 0 | S H A R P E N I N G G U T H O O K S
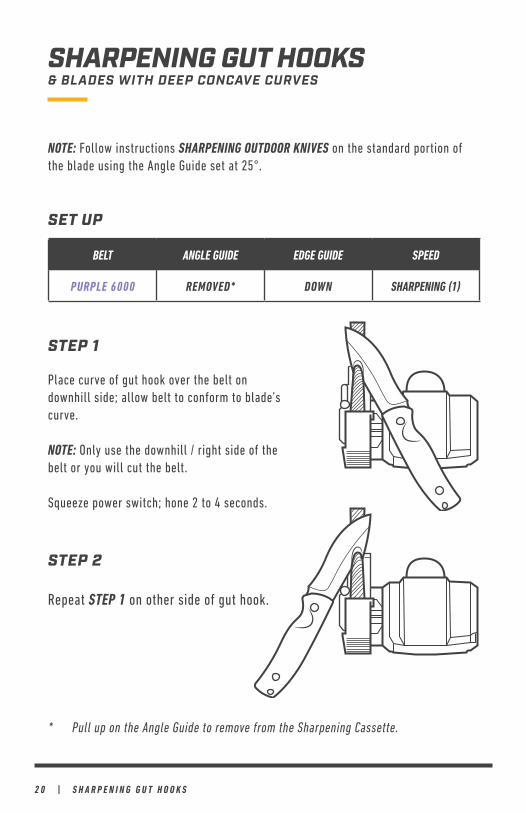
SHARPENING GUT HOOKS& BLADES WITH DEEP CONCAVE CURVES
STEP 1
Place curve of gut hook over the belt on downhill side; allow belt to conform to blade’s curve.
NOTE: Only use the downhill / right side of the belt or you will cut the belt.
Squeeze power switch; hone 2 to 4 seconds.
STEP 2
Repeat STEP 1 on other side of gut hook.
SET UP
BELT ANGLE GUIDE EDGE GUIDE SPEED
PURPLE 6000 REMOVED* DOWN SHARPENING (1)
NOTE: Follow instructions SHARPENING OUTDOOR KNIVES on the standard portion of the blade using the Angle Guide set at 25°.
* Pull up on the Angle Guide to remove from the Sharpening Cassette.
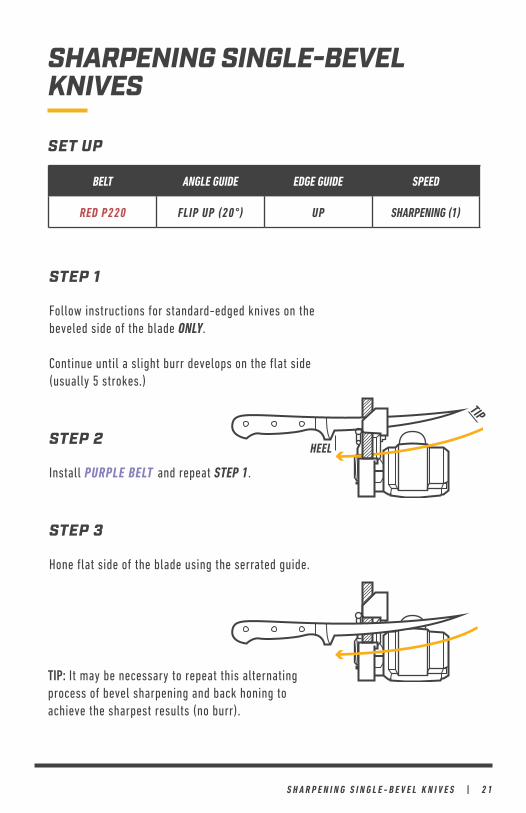
S H A R P E N I N G S I N G L E - B E V E L K N I V E S | 2 1
STEP 1
Follow instructions for standard-edged knives on the beveled side of the blade ONLY.
Continue until a slight burr develops on the flat side (usually 5 strokes.)
STEP 2
Install PURPLE BELT and repeat STEP 1.
STEP 3
Hone flat side of the blade using the serrated guide.
TIP: It may be necessary to repeat this alternating process of bevel sharpening and back honing to achieve the sharpest results (no burr).
SHARPENING SINGLE-BEVEL KNIVES
SET UP
BELT ANGLE GUIDE EDGE GUIDE SPEED
RED P220 FLIP UP (20°) UP SHARPENING (1)
HEEL
TIP
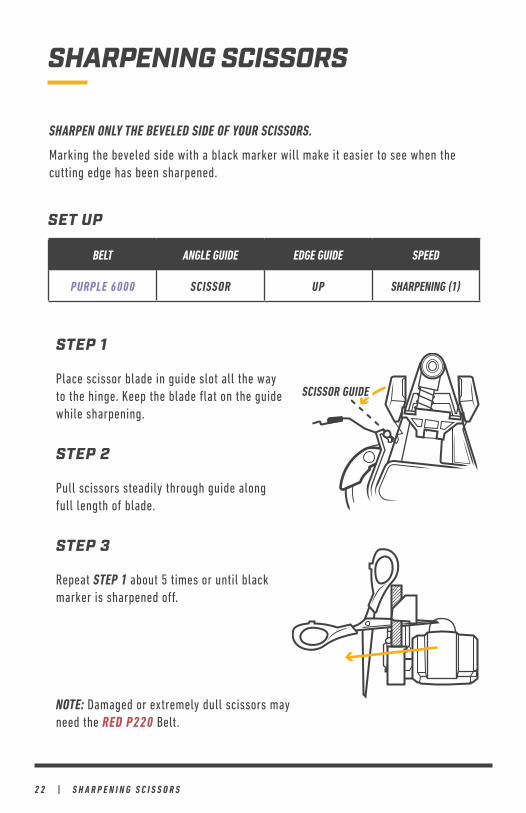
2 2 | S H A R P E N I N G S C I S S O R S
SHARPEN ONLY THE BEVELED SIDE OF YOUR SCISSORS .
Marking the beveled side with a black marker will make it easier to see when the cutting edge has been sharpened.
SHARPENING SCISSORS
SET UP
BELT ANGLE GUIDE EDGE GUIDE SPEED
PURPLE 6000 SCISSOR UP SHARPENING (1)
STEP 1
Place scissor blade in guide slot all the way to the hinge. Keep the blade flat on the guide while sharpening.
STEP 2
Pull scissors steadily through guide along full length of blade.
STEP 3
Repeat STEP 1 about 5 times or until black marker is sharpened off.
SCISSOR GUIDE
NOTE: Damaged or extremely dull scissors may need the RED P220 Belt.
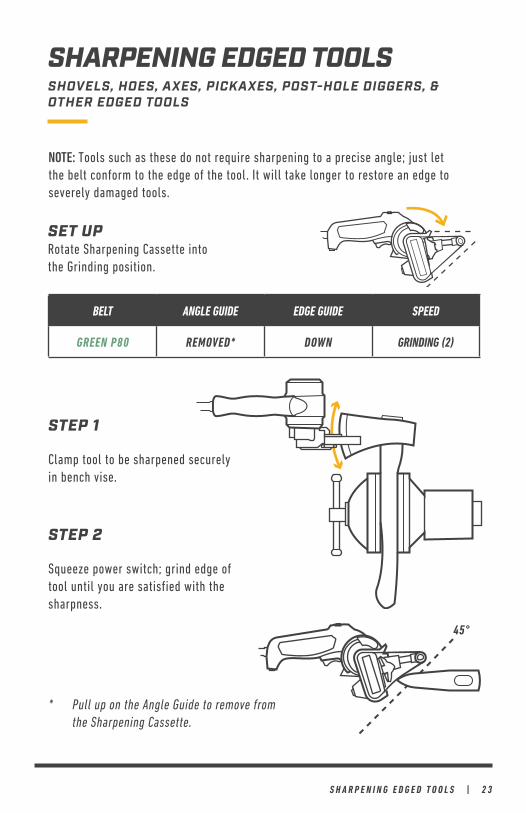
S H A R P E N I N G E D G E D T O O L S | 2 3
NOTE: Tools such as these do not require sharpening to a precise angle; just let the belt conform to the edge of the tool. It will take longer to restore an edge to severely damaged tools.
SHARPENING EDGED TOOLS
SET UPRotate Sharpening Cassette into the Grinding position.
BELT ANGLE GUIDE EDGE GUIDE SPEED
GREEN P80 REMOVED* DOWN GRINDING (2)
SHOVELS, HOES, AXES, PICKAXES, POST-HOLE DIGGERS, & OTHER EDGED TOOLS
STEP 1
Clamp tool to be sharpened securely in bench vise.
STEP 2
Squeeze power switch; grind edge of tool until you are satisfied with the sharpness.
45°
* Pull up on the Angle Guide to remove from the Sharpening Cassette.
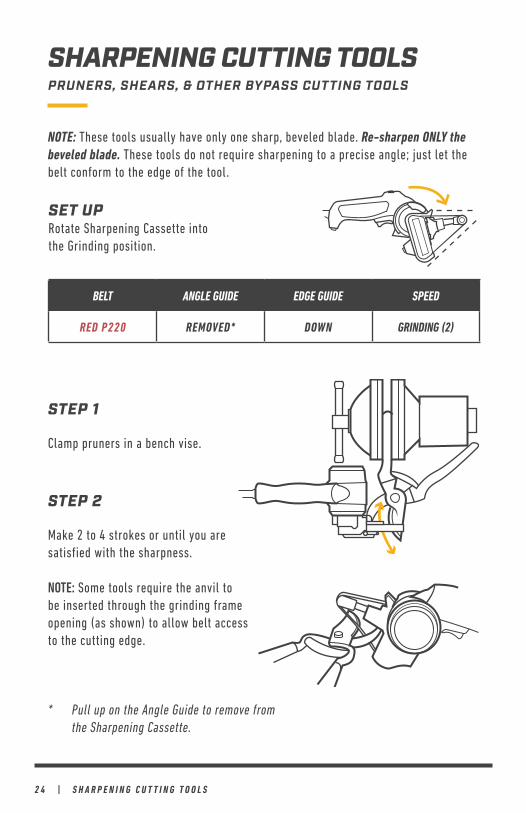
2 4 | S H A R P E N I N G C U T T I N G T O O L S
NOTE: These tools usually have only one sharp, beveled blade. Re-sharpen ONLY the beveled blade. These tools do not require sharpening to a precise angle; just let the belt conform to the edge of the tool.
STEP 1
Clamp pruners in a bench vise.
STEP 2
Make 2 to 4 strokes or until you are satisfied with the sharpness.
NOTE: Some tools require the anvil to be inserted through the grinding frame opening (as shown) to allow belt access to the cutting edge.
SHARPENING CUTTING TOOLSPRUNERS, SHEARS, & OTHER BYPASS CUTTING TOOLS
BELT ANGLE GUIDE EDGE GUIDE SPEED
RED P220 REMOVED* DOWN GRINDING (2)
* Pull up on the Angle Guide to remove from the Sharpening Cassette.
SET UPRotate Sharpening Cassette into the Grinding position.
S H A R P E N I N G M O W E R B L A D E S | 2 5
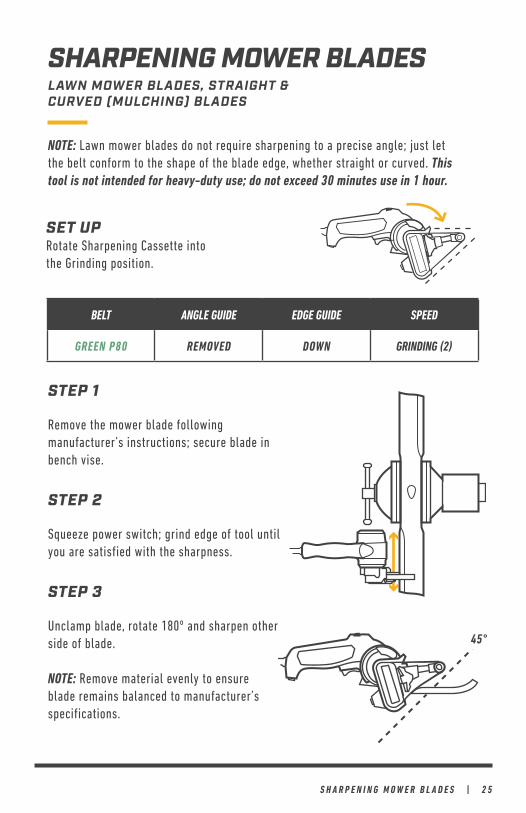
SHARPENING MOWER BLADES
NOTE: Lawn mower blades do not require sharpening to a precise angle; just let the belt conform to the shape of the blade edge, whether straight or curved. This tool is not intended for heavy-duty use; do not exceed 30 minutes use in 1 hour.
STEP 1
Remove the mower blade following manufacturer’s instructions; secure blade in bench vise.
STEP 2
Squeeze power switch; grind edge of tool until you are satisfied with the sharpness.
STEP 3
Unclamp blade, rotate 180º and sharpen other side of blade.
NOTE: Remove material evenly to ensure blade remains balanced to manufacturer’s specifications.
BELT ANGLE GUIDE EDGE GUIDE SPEED
GREEN P80 REMOVED DOWN GRINDING (2)
LAWN MOWER BLADES, STRAIGHT & CURVED (MULCHING) BLADES
45°
SET UPRotate Sharpening Cassette into the Grinding position.
2 6 | G R I N D I N G , P O L I S H I N G , D E B U R R I N G
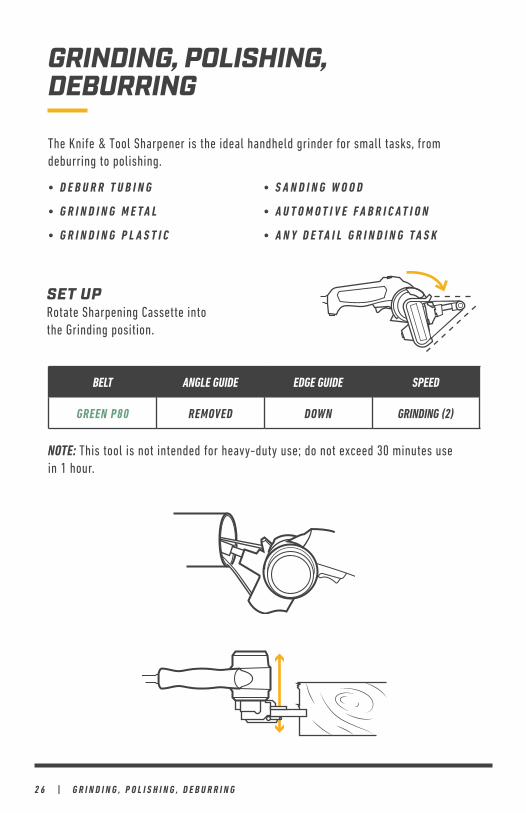
GRINDING, POLISHING, DEBURRING
• D E B U R R T U B I N G
• G R I N D I N G M E T A L
• G R I N D I N G P L A S T I C
• S A N D I N G W O O D
• A U T O M O T I V E F A B R I C A T I O N
• A N Y D E T A I L G R I N D I N G T A S K
The Knife & Tool Sharpener is the ideal handheld grinder for small tasks, from deburring to polishing.
BELT ANGLE GUIDE EDGE GUIDE SPEED
GREEN P80 REMOVED DOWN GRINDING (2)
NOTE: This tool is not intended for heavy-duty use; do not exceed 30 minutes use in 1 hour.
SET UPRotate Sharpening Cassette into the Grinding position.

W A R R A N T Y | 2 7
WARRANTY
This sharpener is covered by Work Sharp’s 3-year warranty. We stand behind and support our products – contact us if you need assistance, parts, or service. Warranty for consumer not industrial or commercial use, excludes abrasives.
Register your warranty online at www.worksharptools.com.
SHARPENING CASSETTE ROMOVAL POSITION: The sharpening cassette should only be removed for warranty purposes as instructed by a Work Sharp customer service techician.
SHARPENING NOTES
KNIFE / TOOL NOTES

DAREX LLC210 E Hersey St.
Ashland OR 97520USA
Phone: 1 (800) 597-6170Fax: 1 (541) 552-1377Email: [email protected]
Visit: Worksharptools.com
PP0004574 Rev 1 11/20
WORK SHARP® is a registered trademark of Darex, LLC