Embed Size (px)
Citation preview
User’s Guide for PHOEBE data capture software on the Psion Workabout
Prepared by Bio-Met Ltd, 9 Stansfield close, Headington, Oxford. For enquiries email: [email protected], fax 00 44 1865 760 780 or telephone 00 44 1865 761 112.
Introduction PHOEBE is a program that is designed for the Psion Workabout handheld computer specifically to meet the needs of data capture in field operations for forest management. This includes inventory, stock survey, tree and log measurements, log tracking using barcoded tags, stock taking and inventories in log yards and mills, and product tracking using tags. The main benefits of the system are a considerable reduction in the bottlenecks, costs, and errors associated with processing data on paper forms. It also fills the criteria for tracking chain of custody of wood products back to a sustainably managed forest for certification to Forestry Stewardship Council standards, using barcoded tags.
The Psion Workabout
General
The Psion Workabout comes in a variety of models depending on the type of barcode scanner, if any, and the amount of memory. The model illustrated and described here is the Psion Workabout 2MB Scanner MX, which has a laser barcode scanner and 2 MB of internal memory. All models have slots for two Solid State Disks (SSDs). The battery power is supplied by a rechargeable pack (NiMh or NiCd), which can be replaced by AA batteries in an emergency, and a small Lithium battery that maintains memory while the battery pack is being replaced. The battery pack has a service life of about 2 years. If fully charged, the Psion can work for 2-3 days, depending on the amount of scanning work done. For inventory and stock survey work where no barcoding is involved, the model can be purchased without the scanner. The unit is specified to IP54, which means that it is splash and dust proof and resistant to dropping up to 1 m on concrete. Experience has shown that it is an excellent instrument for forestry use, especially in the tropics.
The screen
The Workabout screen comprises 240 wide by 100 high pixels in black or grey. There is a backlight activated by the ¤ key, which turns itself off after a few seconds. There are several built-in fonts of different sizes, but with the PHOEBE software, the screen form is limited to about 4 rows of 32 characters each.
The keyboard
The keyboard comprises a number of standard keys which produce printable characters as may be expected, for example A-Z, 0-9, etc. There are also several kinds of control keys, which are shown in Table 1 below. The key label shows what is actually printed on the key. The Name is the
Phoebe field guide Revised 12-Apr-2000
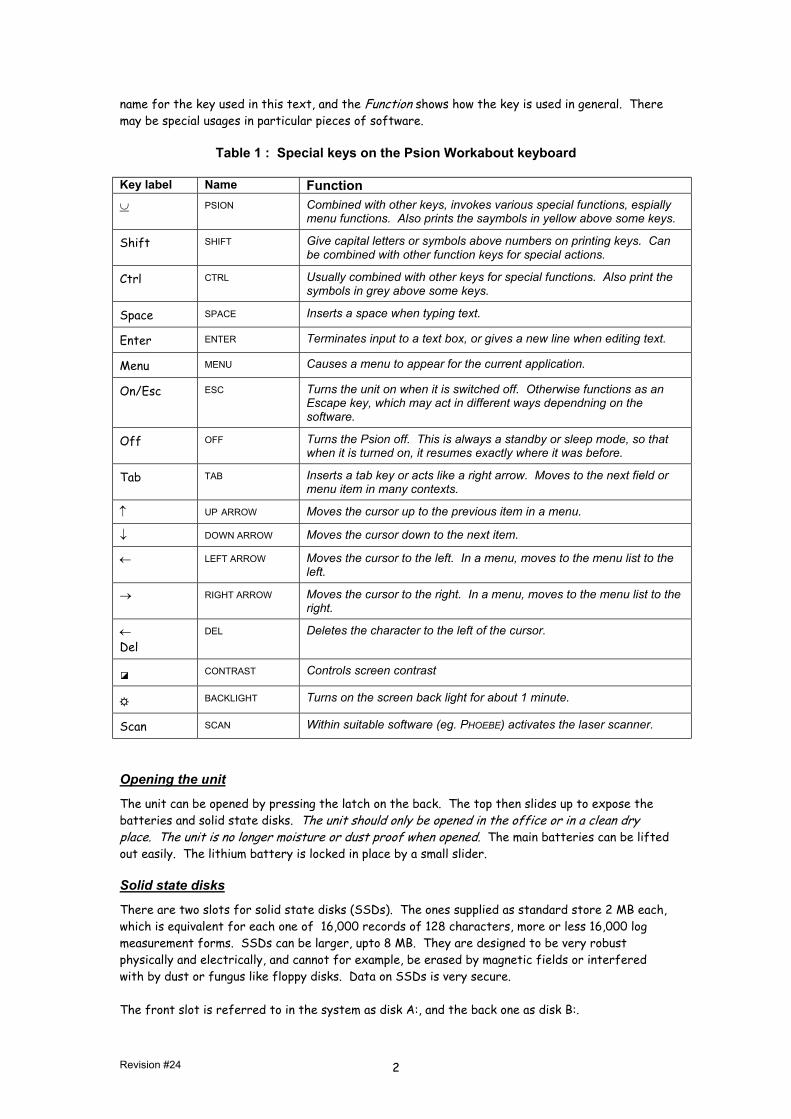
name for the key used in this text, and the Function shows how the key is used in general. There may be special usages in particular pieces of software.
Table 1 : Special keys on the Psion Workabout keyboard Key label Name Function ∪ PSION Combined with other keys, invokes various special functions, espially
menu functions. Also prints the saymbols in yellow above some keys.
Shift SHIFT Give capital letters or symbols above numbers on printing keys. Can be combined with other function keys for special actions.
Ctrl CTRL Usually combined with other keys for special functions. Also print the symbols in grey above some keys.
Space SPACE Inserts a space when typing text.
Enter ENTER Terminates input to a text box, or gives a new line when editing text.
Menu MENU Causes a menu to appear for the current application.
On/Esc ESC Turns the unit on when it is switched off. Otherwise functions as an Escape key, which may act in different ways dependning on the software.
Off OFF Turns the Psion off. This is always a standby or sleep mode, so that when it is turned on, it resumes exactly where it was before.
Tab TAB Inserts a tab key or acts like a right arrow. Moves to the next field or menu item in many contexts.
↑ UP ARROW Moves the cursor up to the previous item in a menu.
↓ DOWN ARROW Moves the cursor down to the next item.
← LEFT ARROW Moves the cursor to the left. In a menu, moves to the menu list to the left.
→ RIGHT ARROW Moves the cursor to the right. In a menu, moves to the menu list to the right.
← Del
DEL Deletes the character to the left of the cursor.
◪ CONTRAST Controls screen contrast
☼ BACKLIGHT Turns on the screen back light for about 1 minute.
Scan SCAN Within suitable software (eg. PHOEBE) activates the laser scanner.
Opening the unit
The unit can be opened by pressing the latch on the back. The top then slides up to expose the batteries and solid state disks. The unit should only be opened in the office or in a clean dry place. The unit is no longer moisture or dust proof when opened. The main batteries can be lifted out easily. The lithium battery is locked in place by a small slider.
Solid state disks
There are two slots for solid state disks (SSDs). The ones supplied as standard store 2 MB each, which is equivalent for each one of 16,000 records of 128 characters, more or less 16,000 log measurement forms. SSDs can be larger, upto 8 MB. They are designed to be very robust physically and electrically, and cannot for example, be erased by magnetic fields or interfered with by dust or fungus like floppy disks. Data on SSDs is very secure. The front slot is referred to in the system as disk A:, and the back one as disk B:.
Revision #24 2
Memory
The Workabout MX has 2 MB of built-in memory. This is configured as 512K of memory for the running programs, and 1.5 MB as a RAM Disk. This memory is not erased with ordinary system resets, but can be erased by a master reset. It should therefore not be used for permanent files. The internal RAM drive has the designation M: for file specifications.
Processor
The processor is an 80C86-compatible16-bit NEC V30MX running at 28 MHz.
Interfaces
There are two interfaces at the base of the Psion. The one on the left is a standard 9 pin RS232 interface which can be connected to a PC via a standard null modem cable. The one on the right is known as a LIF (Low Insertion Force) socket, and connects to the charger. The LIF is also a serial interface, but uses a different type of connector. It is designed for frequent connection and disconnection. In the LINK program discussed later, the left hand socket is called A, and the right hand one C.
Scanner
The laser scanner mounted on top of the unit can read most common types of barcode and automatically decode it (eg. Code 128, Interleave 2/5, EAN, UPC, etc.). However the scanner is controlled by software, and a suitable program must be running for it to work. There is a demonstration program on the system screen which can be used to test the scanner. It will be found that barcodes can usually be read at a distance of 70-100 cm, and from a variety of angles. Note that looking directly into the laser beam can cause eye damage! Do not look into the scanner or point the beam directly at another person’s eyes. Never allow children to play with the unit.
Built-in software
Operating system
The system has several built in programs and an operating system called EPOC. EPOC has two basic interfaces. One is a command processor which accepts typed commands very similar to MS-DOS, and the other is a menu-driven system.
System reset
The system can be reset by pressing the PSION-CTRL-DEL keys at the same time. When a reset occurs, any running programs will be cancelled. Note however that there is no loss of memory. After a reset, if the system has been configured for PHOEBE, it will start automatically. If PHOEBE is not loaded or properly configured, a standard system screen will appear.
Entering the command processor
The command processor can be started after a reset by pressing MENU and select Command processor from the menu, or by directly entering PSION-C. The following commands (among others) can commonly be used in a manner similar to DOS.
Revision #24 3
Zooming the text screen
The PSION-Z key will change the text size, cycling from largest to smallest. If you are to use the Psion in the field, you should be able to comfortably read the smallest text size without resorting to special reading glasses, as the PHOEBE software uses this small text.
The system screen
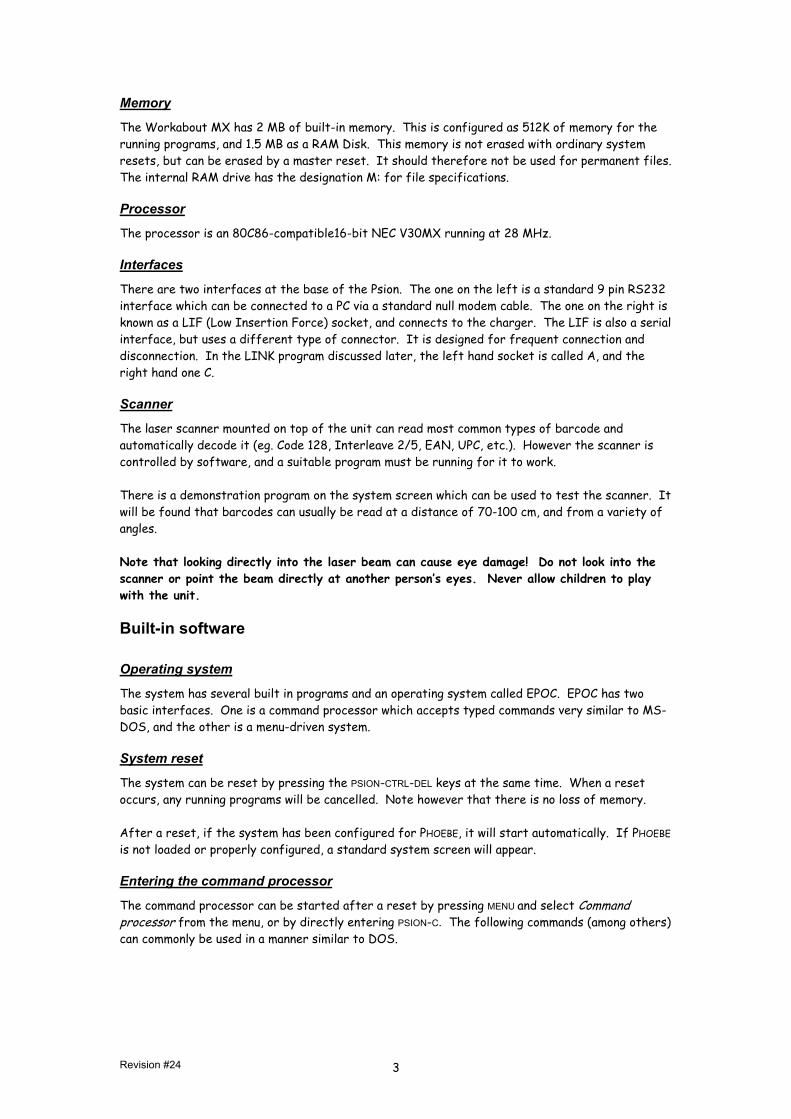
The system screen provides a graphical and menu interface which may be more convenient than the command processor. It also allows access to installed applications or programs. The system screen appears after using the EXIT command or PSION-X in the command processor mode.
Table 2 Some commands available at the command prompt
Command Function CD Change directory. Notye however that unlike DOS, when changing to the root
directory, there must be a space following the CD. That is, CD \ will work, whereas CD\ will not.
DIR List files. Wildcards can be used, such as *.BTF, to list only files with extension .BTF.
COPY Copy one file to another, or copy files from one directory to another location.
filename Runs the program in filename. Executable files will have extensions .BTF (batch file), .OPO, .OPA (OPL files), .IMG (binary files), .APP (applications). The extension does not need to be given.
HELP Brings up a list of commands. HELP followed by the command name gives further information on each command.
EDIT Starts a small text editor which can be used to edit batch files or any other kind of text file, including, for example, lists of coded notes for PHOEBE.
The menu key brings up various options in the system screen. Selecting one of the icons will start a program. The built in applications include: • Data. This is a useful database, for example for names and addresses.
• Calculator. This allows the Psion to be used as an expensive calculator.
• Sheet. This is a simple spreadsheet program.
• Comms. This is a terminal emulation program with various file transfer protocols.
• DemMan. This is the Demo Manager. There is one useful program in this, which is the scanner demonstration. It can be used to test the scanner.
• Program. This starts the OPL programming environment. We will discuss OPL programming later.
• Install[A] This program appears if new SSDs, and is for compatibility with some older Psion handhelds. It can be deleted by re-formatting the SSD.
• Listed under each application are file names of data files for the application. These built-in applications are of little practical value for the forestry user, although the Data application is helpful for names and addresses or similar information. The barcode scanner demo is useful for testing the scanner.
Revision #24 4
Viewing the directory
In the command processor, the DIR command can be used to view directories, but this is a little tedious for exploring the system. From the system screen, PSION-SHIFT-* will bring up a more graphical display of the directories and files which can be navigated using the arrow keys.
Multitasking and task switching
Although EPOC shares many concepts with DOS, it is in fact a basically different operating system. EPOC is a multi-tasking system, and several programs, or processes, can run at the same time. This is similar to the way Windows 95 works. The key PSION-TAB switches between tasks.
The LINK software
The link software is important when connecting a Psion to a PC either directly, or through the charging unit. The RCOM utility or ODE system on the PC make use of this link to transfer files. The link is started by pressing PSION-L from the system screen, or typing LINK in the command processor. A four-line dialog will appear, similar to the following:
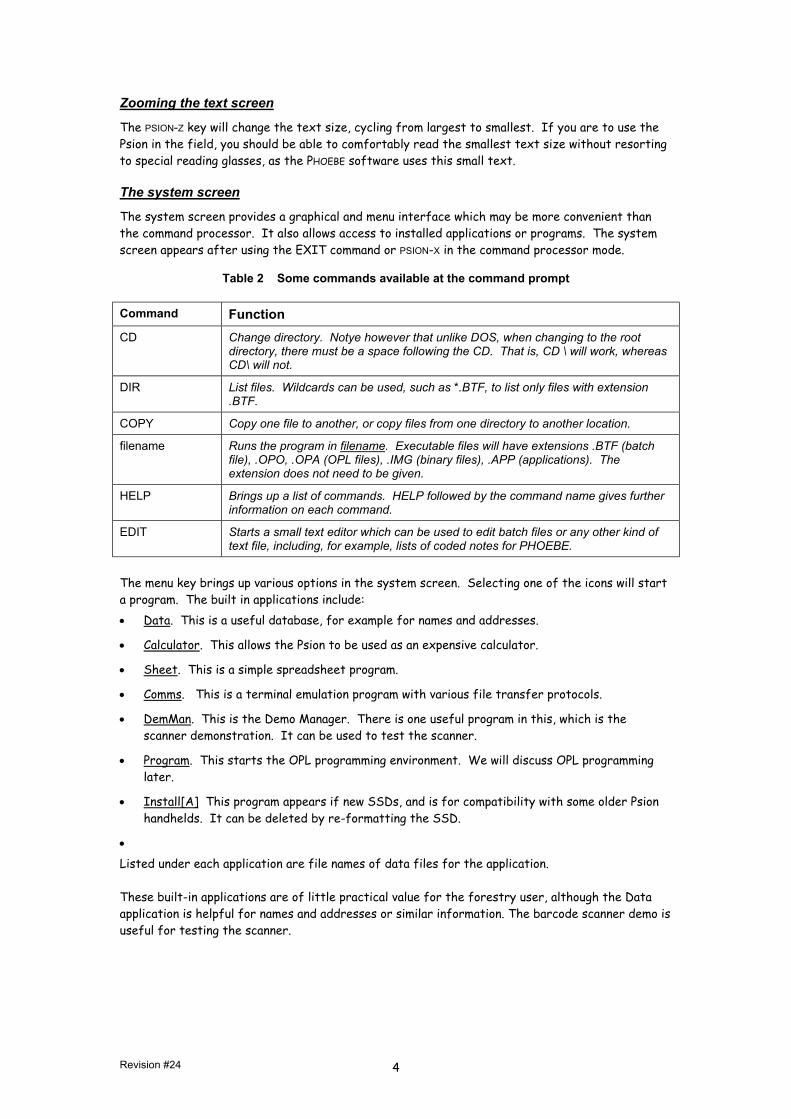
Remote Link Set ON
Baud Rate Set to 19200
Port Set to C if using the charger, or A if using the direct serial connection.
Parameters Leave blank
The arrow keys are used to select items and change the options. The ESC key closes the window but leaves the link active. The LINK process must be running in order to transfer files to a PC. Once it has been turned on, it will normally remain on unless the system is reset with PSION-CTRL-DEL. It may be necessary to change the port (from A to C or vice versa) depending on how the cable is connected, but normally the charger is used, so C is the preferred setting.
File names and specifications
Files are specified in a way similar to DOS. File names can be up to 8 letters, and are followed by an extension or 3 letters which indicates the common types of file. The common extensions relevant to PHOEBE are:
.BTF Batch file – text file containing commands.
.OPO Compiled OPL programme.
.DEF PHOEBE form definition.
.LST PHOEBE look-up list
.DAT PHOEBE data.
.DYL Library file for a program. Directory names similarly can be up to 8 letters or numbers. The drive may be M:, A: or B: for either the internal drive, the top or bottom SSD. Unlike DOS, the drive may be further preceded by a location, which may be either LOC:: or REM::, indicating that the file is on the local or remote computer. The remote computer would normally be a hooked-up PC. The location can be left off, but it will appear in some directory listings or when using RCOM.
Revision #24 5

The AUTOEXEC file
When the Psion is reset, via the PSION-CTRL-DEL key, or after a new battery is inserted, then it will try and run a file called AUTOEXEC, with possible extensions .BTF, .OPO, .APP, etc, in fact any executable extension. It will make a determined search for this file on all drives and several possible directories. Units supplied by Bio-Met with the PHOEBE software are configured with a batch file in the base directory M: called AUTOEXEC.BTF which will automatically start PHOEBE.
Setting date and time
The Psion contains an in-built clock. It may need to be re-set if both batteries or removed or the master reset key combination is used to clear the RAM disk. PHOEBE will test the clock and ask that it be set if the recorded date is before 1st December 1999, which indicates that the clock was reset. From the system screen, press PSION-T to display the clock. The time and date should be edited if they are not correct. The arrow keys move around the various fields, and correct values can be typed in. The screen is closed with ESC or ENTER. ESC will not save changes, whilst ENTER does so.
PHOEBE PHOEBE is a name derived from the letters FB, short for Forest Biometrics. It is a computer program designed for forestry applications, but can be used for any situation which employs suitable forms. PHOEBE is a program written is OPL (Organizer Programming Language). This is a BASIC-like language developed by Psion for their hand-held organizers and field computers. PHOEBE is designed to process data that can be entered on relatively simple forms, which might include sample plot measurements, stock surveys, log measurements, tree volume sampling, and similar tasks. The form is specified in a simple text file. There are various options to control how the data is entered in each field, or column of the form. Data can be looked up from a list, entered directly, it may be optional or obligatory, numeric or text, or it may be scanned by the barcode reader. Fields can also be calculated from other fields, as for example, for volume. PHOEBE can test specified fields to check that they are properly unique, to avoid double entry of the same data. The data that is entered is stored directly on an SSD. The format is a text file compatible with the FoxPro or Dbase SDF (System Data Format). Such files can be appended directly to database files using a single FoxPro command.
Starting PHOEBE PHOEBE should be configured to start automatically. If it does not, go to the command processor and type P, followed by the ENTER key. Phoebe will test the system clock as soon as it starts, and refuse to run if the date appears incorrect. It is necessary to set the clock, as noted above, before the program will run. This should only be necessary if the master reset has been done or a battery change has occurred.
Entering the PIN When PHOEBE starts, a small dialog will appear which requests a PIN. The PIN is different for each Psion, and is a 4-digit number that is advised when the machine is supplied. It can also be calculated from the unit’s serial number. For further information if the PIN is lost, contact Bio-Met.
Revision #24 6
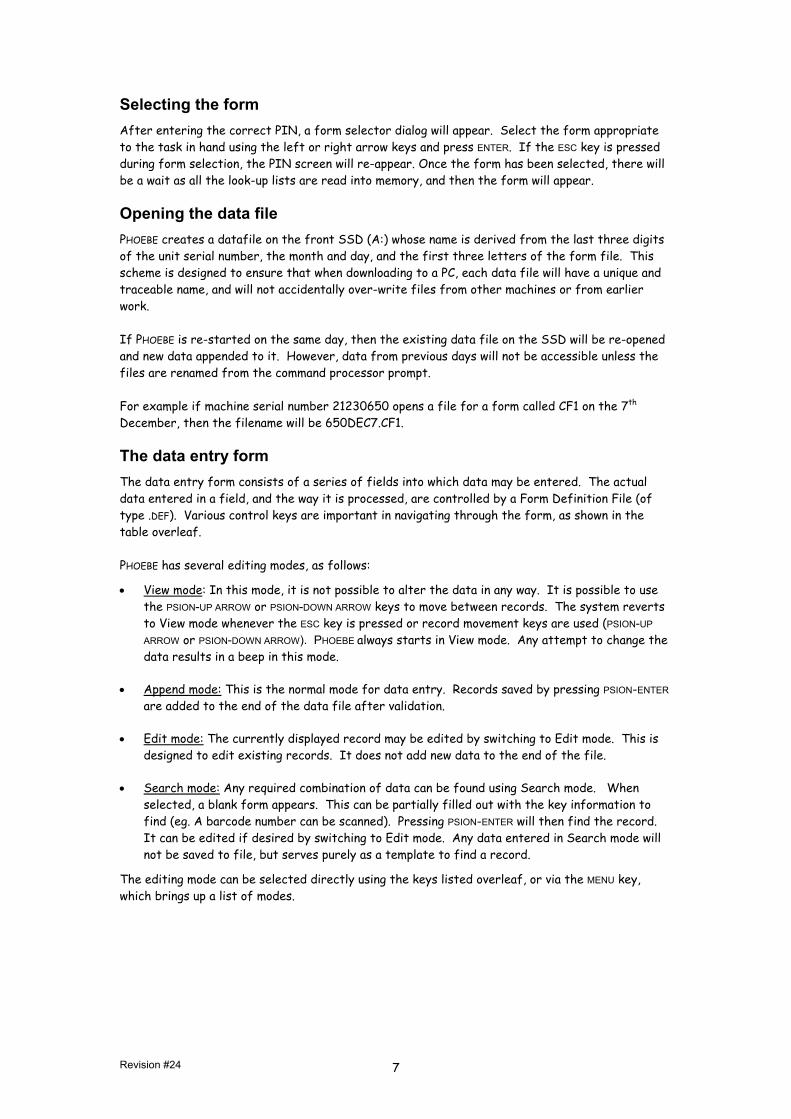
Selecting the form After entering the correct PIN, a form selector dialog will appear. Select the form appropriate to the task in hand using the left or right arrow keys and press ENTER. If the ESC key is pressed during form selection, the PIN screen will re-appear. Once the form has been selected, there will be a wait as all the look-up lists are read into memory, and then the form will appear.
Opening the data file PHOEBE creates a datafile on the front SSD (A:) whose name is derived from the last three digits of the unit serial number, the month and day, and the first three letters of the form file. This scheme is designed to ensure that when downloading to a PC, each data file will have a unique and traceable name, and will not accidentally over-write files from other machines or from earlier work. If PHOEBE is re-started on the same day, then the existing data file on the SSD will be re-opened and new data appended to it. However, data from previous days will not be accessible unless the files are renamed from the command processor prompt. For example if machine serial number 21230650 opens a file for a form called CF1 on the 7th December, then the filename will be 650DEC7.CF1.
The data entry form The data entry form consists of a series of fields into which data may be entered. The actual data entered in a field, and the way it is processed, are controlled by a Form Definition File (of type .DEF). Various control keys are important in navigating through the form, as shown in the table overleaf. PHOEBE has several editing modes, as follows:
• View mode: In this mode, it is not possible to alter the data in any way. It is possible to use the PSION-UP ARROW or PSION-DOWN ARROW keys to move between records. The system reverts to View mode whenever the ESC key is pressed or record movement keys are used (PSION-UP
ARROW or PSION-DOWN ARROW). PHOEBE always starts in View mode. Any attempt to change the data results in a beep in this mode.
• Append mode: This is the normal mode for data entry. Records saved by pressing PSION-ENTER are added to the end of the data file after validation.
• Edit mode: The currently displayed record may be edited by switching to Edit mode. This is designed to edit existing records. It does not add new data to the end of the file.
• Search mode: Any required combination of data can be found using Search mode. When selected, a blank form appears. This can be partially filled out with the key information to find (eg. A barcode number can be scanned). Pressing PSION-ENTER will then find the record. It can be edited if desired by switching to Edit mode. Any data entered in Search mode will not be saved to file, but serves purely as a template to find a record.
The editing mode can be selected directly using the keys listed overleaf, or via the MENU key, which brings up a list of modes.
Revision #24 7
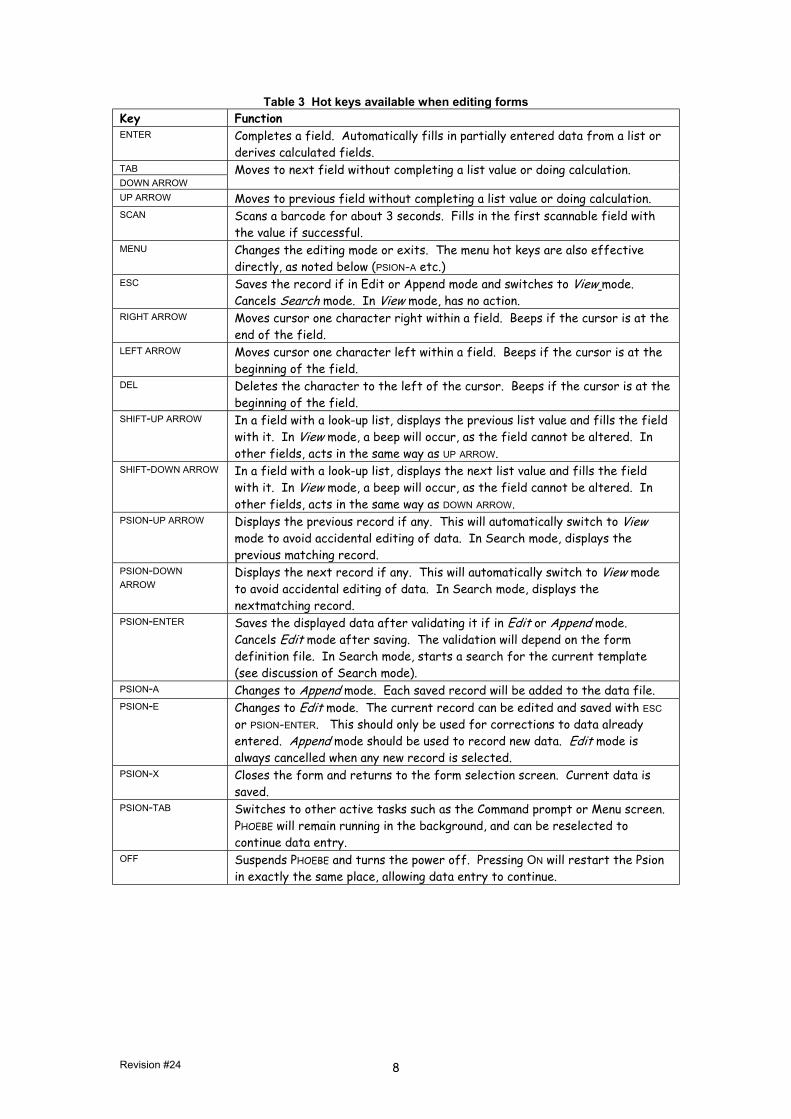
Table 3 Hot keys available when editing forms Key Function ENTER Completes a field. Automatically fills in partially entered data from a list or
derives calculated fields. TAB DOWN ARROW
Moves to next field without completing a list value or doing calculation.
UP ARROW Moves to previous field without completing a list value or doing calculation. SCAN Scans a barcode for about 3 seconds. Fills in the first scannable field with
the value if successful. MENU Changes the editing mode or exits. The menu hot keys are also effective
directly, as noted below (PSION-A etc.) ESC Saves the record if in Edit or Append mode and switches to View mode.
Cancels Search mode. In View mode, has no action. RIGHT ARROW Moves cursor one character right within a field. Beeps if the cursor is at the
end of the field. LEFT ARROW Moves cursor one character left within a field. Beeps if the cursor is at the
beginning of the field. DEL Deletes the character to the left of the cursor. Beeps if the cursor is at the
beginning of the field. SHIFT-UP ARROW In a field with a look-up list, displays the previous list value and fills the field
with it. In View mode, a beep will occur, as the field cannot be altered. In other fields, acts in the same way as UP ARROW.
SHIFT-DOWN ARROW In a field with a look-up list, displays the next list value and fills the field with it. In View mode, a beep will occur, as the field cannot be altered. In other fields, acts in the same way as DOWN ARROW.
PSION-UP ARROW Displays the previous record if any. This will automatically switch to View mode to avoid accidental editing of data. In Search mode, displays the previous matching record.
PSION-DOWN ARROW
Displays the next record if any. This will automatically switch to View mode to avoid accidental editing of data. In Search mode, displays the nextmatching record.
PSION-ENTER Saves the displayed data after validating it if in Edit or Append mode. Cancels Edit mode after saving. The validation will depend on the form definition file. In Search mode, starts a search for the current template (see discussion of Search mode).
PSION-A Changes to Append mode. Each saved record will be added to the data file. PSION-E Changes to Edit mode. The current record can be edited and saved with ESC
or PSION-ENTER. This should only be used for corrections to data already entered. Append mode should be used to record new data. Edit mode is always cancelled when any new record is selected.
PSION-X Closes the form and returns to the form selection screen. Current data is saved.
PSION-TAB Switches to other active tasks such as the Command prompt or Menu screen. PHOEBE will remain running in the background, and can be reselected to continue data entry.
OFF Suspends PHOEBE and turns the power off. Pressing ON will restart the Psion in exactly the same place, allowing data entry to continue.
Revision #24 8
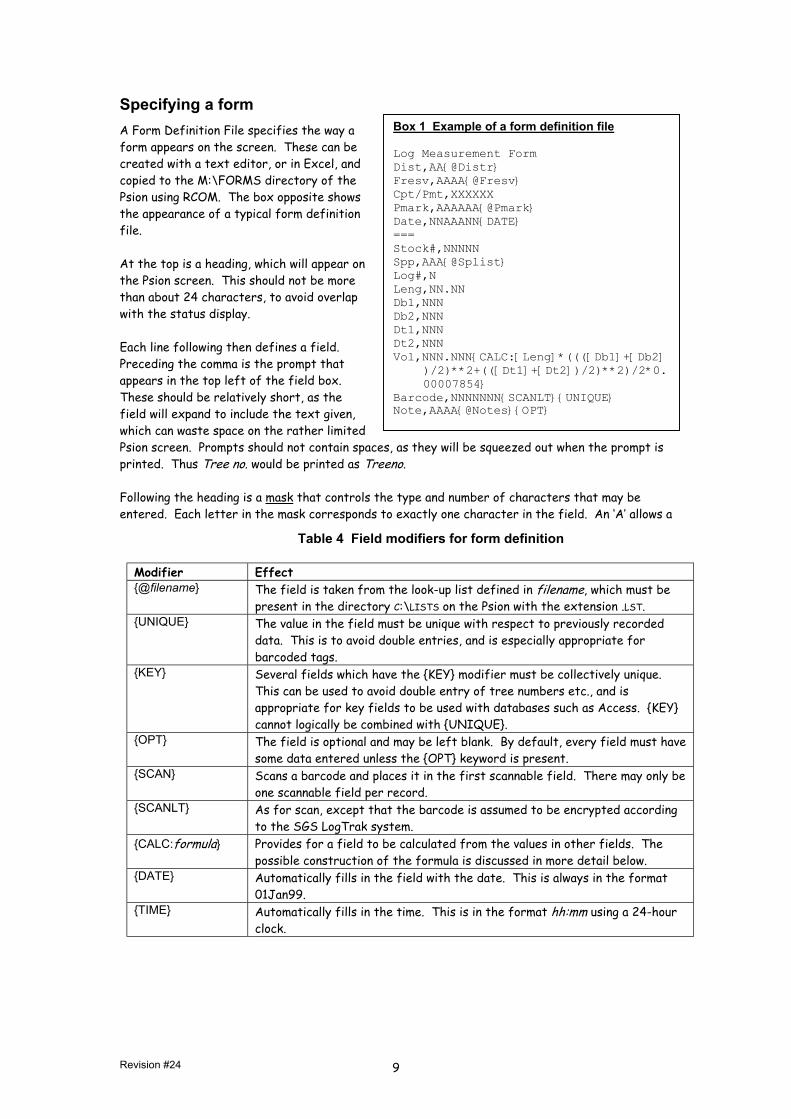
Specifying a form A Form Definition File specifies the way a form appears on the screen. These can be created with a text editor, or in Excel, and copied to the M:\FORMS directory of the Psion using RCOM. The box opposite shows the appearance of a typical form definition file. At the top is a heading, which will appear on the Psion screen. This should not be more than about 24 characters, to avoid overlap with the status display. Each line following then defines a field. Preceding the comma is the prompt that appears in the top left of the field box. These should be relatively short, as the field will expand to include the text given, which can waste space on the rather limited Psion screen. Prompts should not contain spaces, as they will be squeezed out when the prompt is printed. Thus Tree no. would be printed as Treeno.
Box 1 Example of a form definition file Log Measurement Form Dist,AA{@Distr} Fresv,AAAA{@Fresv} Cpt/Pmt,XXXXXX Pmark,AAAAAA{@Pmark} Date,NNAAANN{DATE} === Stock#,NNNNN Spp,AAA{@Splist} Log#,N Leng,NN.NN Db1,NNN Db2,NNN Dt1,NNN Dt2,NNN Vol,NNN.NNN{CALC:[Leng]*((([Db1]+[Db2]
)/2)**2+(([Dt1]+[Dt2])/2)**2)/2*0.00007854}
Barcode,NNNNNNN{SCANLT}{UNIQUE} Note,AAAA{@Notes}{OPT}
Following the heading is a mask that controls the type and number of characters that may be entered. Each letter in the mask corresponds to exactly one character in the field. An ‘A’ allows a
Table 4 Field modifiers for form definition Modifier Effect {@filename} The field is taken from the look-up list defined in filename, which must be
present in the directory C:\LISTS on the Psion with the extension .LST. {UNIQUE} The value in the field must be unique with respect to previously recorded
data. This is to avoid double entries, and is especially appropriate for barcoded tags.
{KEY} Several fields which have the {KEY} modifier must be collectively unique. This can be used to avoid double entry of tree numbers etc., and is appropriate for key fields to be used with databases such as Access. {KEY} cannot logically be combined with {UNIQUE}.
{OPT} The field is optional and may be left blank. By default, every field must have some data entered unless the {OPT} keyword is present.
{SCAN} Scans a barcode and places it in the first scannable field. There may only be one scannable field per record.
{SCANLT} As for scan, except that the barcode is assumed to be encrypted according to the SGS LogTrak system.
{CALC:formula} Provides for a field to be calculated from the values in other fields. The possible construction of the formula is discussed in more detail below.
{DATE} Automatically fills in the field with the date. This is always in the format 01Jan99.
{TIME} Automatically fills in the time. This is in the format hh:mm using a 24-hour clock.
Revision #24 9
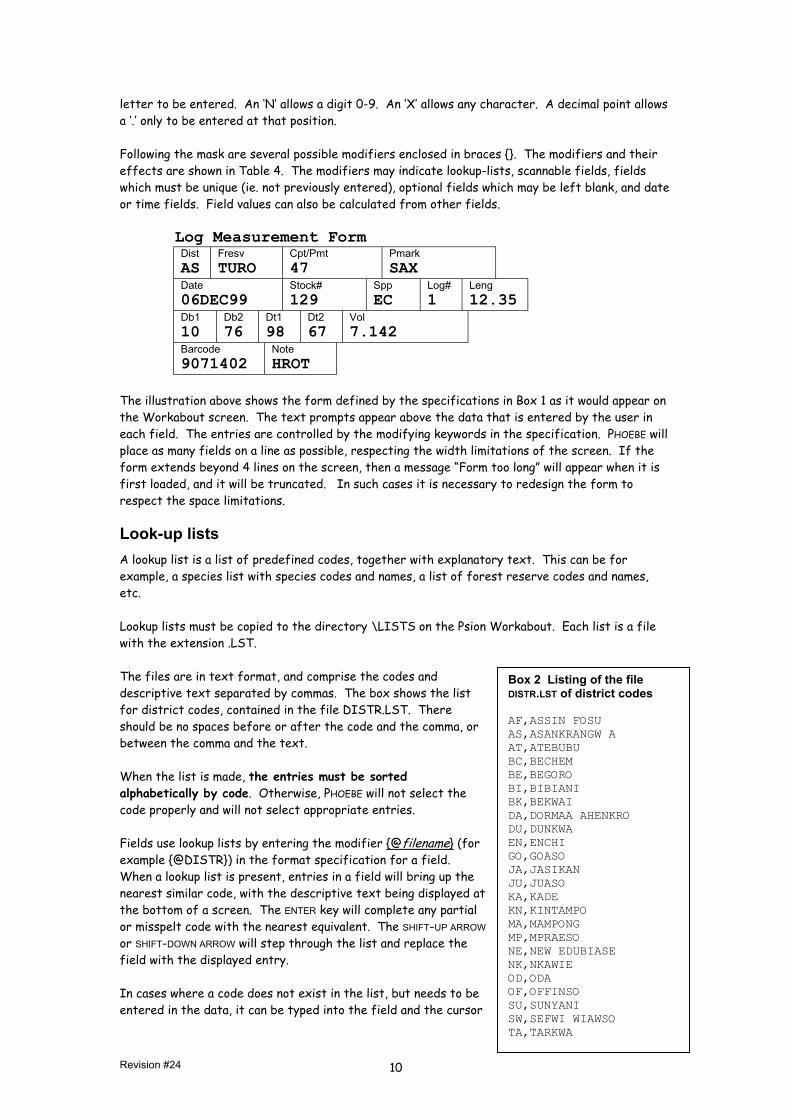
letter to be entered. An ‘N’ allows a digit 0-9. An ‘X’ allows any character. A decimal point allows a ‘.’ only to be entered at that position. Following the mask are several possible modifiers enclosed in braces {}. The modifiers and their effects are shown in Table 4. The modifiers may indicate lookup-lists, scannable fields, fields which must be unique (ie. not previously entered), optional fields which may be left blank, and date or time fields. Field values can also be calculated from other fields. Log Measurement Form
Dist AS
Fresv TURO
Cpt/47
Pmt PmarkSAX
Date 06DEC99
Stock#129
Spp EC
Lo1
g# Leng 12.35
Db1 10
Db276
Dt1 98
Dt2 67
Vol 7.142
Barcode 9071402
Note HROT
The illustration above shows the form defined by the specifications in Box 1 as it would appear on the Workabout screen. The text prompts appear above the data that is entered by the user in each field. The entries are controlled by the modifying keywords in the specification. PHOEBE will place as many fields on a line as possible, respecting the width limitations of the screen. If the form extends beyond 4 lines on the screen, then a message “Form too long” will appear when it is first loaded, and it will be truncated. In such cases it is necessary to redesign the form to respect the space limitations.
Look-up lists A lookup list is a list of predefined codes, together with explanatory text. This can be for example, a species list with species codes and names, a list of forest reserve codes and names, etc. Lookup lists must be copied to the directory \LISTS on the Psion Workabout. Each list is a file with the extension .LST. The files are in text format, and comprise the codes and descriptive text separated by commas. The box shows the list for district codes, contained in the file DISTR.LST. There should be no spaces before or after the code and the comma, or between the comma and the text. When the list is made, the entries must be sorted alphabetically by code. Otherwise, PHOEBE will not select the code properly and will not select appropriate entries. Fields use lookup lists by entering the modifier {@filename} (for example {@DISTR}) in the format specification for a field. When a lookup list is present, entries in a field will bring up the nearest similar code, with the descriptive text being displayed at the bottom of a screen. The ENTER key will complete any partial or misspelt code with the nearest equivalent. The SHIFT-UP ARROW or SHIFT-DOWN ARROW will step through the list and replace the field with the displayed entry. In cases where a code does not exist in the list, but needs to be entered in the data, it can be typed into the field and the cursor
Revision #24 10
Box 2 Listing of the file DISTR.LST of district codes AF,ASSIN FOSU AS,ASANKRANGW A AT,ATEBUBU BC,BECHEM BE,BEGORO BI,BIBIANI BK,BEKWAI DA,DORMAA AHENKRO DU,DUNKWA EN,ENCHI GO,GOASO JA,JASIKAN JU,JUASO KA,KADE KN,KINTAMPO MA,MAMPONG MP,MPRAESO NE,NEW EDUBIASE NK,NKAWIE OD,ODA OF,OFFINSO SU,SUNYANI SW,SEFWI WIAWSO TA,TARKWA
moved to the next field with TAB or DOWN ARROW. These do not adjust the entry from the list. Only the ENTER key does the automatic adjustment. There are three common ways to create a list: 1. With a text editor such as Word, Notepad or the Psion Edit command. This method is
suitable for short lists.
2. By extracting fields from a database in FoxPro. In this case, the COPY TO command should be used with the following syntax: COPY TO C:\PSION\LISTS\file.LST FIELDS code, text DELIMITED where file is the filename of the list, and code and text are the field names of the code and descriptive text, respectively. The file must be in USE and INDEXed on the code field before applying the COPY TO command. The resulting output will be an ASCII (text) file, but all the data will be enclosed in quotes. It is necessary to edit the file using Word or Wordpad to remove these quotes. The search and replace command should be used to replace all the quotes by nothing. The resulting file can then be saved again in Text Only format and is ready for transfer to the Psion.
3. By saving data from an Excel worksheet as a CSV (comma separated value) file. The worksheet should set up to contain two columns. The first is the code, and the second the text. There should be no headings or any other data on the sheet. The data should be sorted by the code column, and the width of the columns adjusted to the minimum that will show all the data. The Save As option is then used with the type being selected as CSV. The output directory should be C:\PSION\LISTS and the filename given as an MS-DOS name enclosed in quotes with the extension .LST. This output file should be directly useable, but Excel will insert quotes around text if it contains a comma or some other special characters, so a check should be made with a text editor before copying the file to the Psion. The Excel file C:\PSION\LISTS\LISTS.XLS shows how all the lists that were uploaded onto the Psions were created by re-formatting and sorting database files supplied by the Forestry Department.
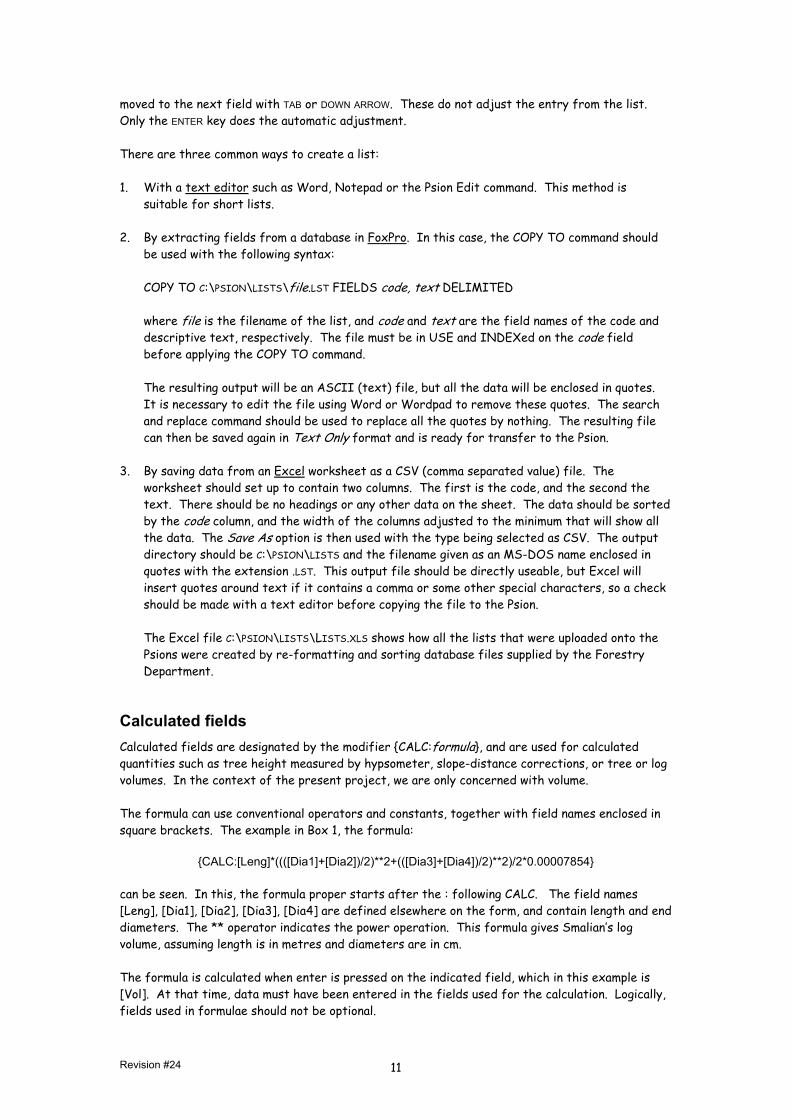
Calculated fields Calculated fields are designated by the modifier {CALC:formula}, and are used for calculated quantities such as tree height measured by hypsometer, slope-distance corrections, or tree or log volumes. In the context of the present project, we are only concerned with volume. The formula can use conventional operators and constants, together with field names enclosed in square brackets. The example in Box 1, the formula:
{CALC:[Leng]*((([Dia1]+[Dia2])/2)**2+(([Dia3]+[Dia4])/2)**2)/2*0.00007854} can be seen. In this, the formula proper starts after the : following CALC. The field names [Leng], [Dia1], [Dia2], [Dia3], [Dia4] are defined elsewhere on the form, and contain length and end diameters. The ** operator indicates the power operation. This formula gives Smalian’s log volume, assuming length is in metres and diameters are in cm. The formula is calculated when enter is pressed on the indicated field, which in this example is [Vol]. At that time, data must have been entered in the fields used for the calculation. Logically, fields used in formulae should not be optional.
Revision #24 11
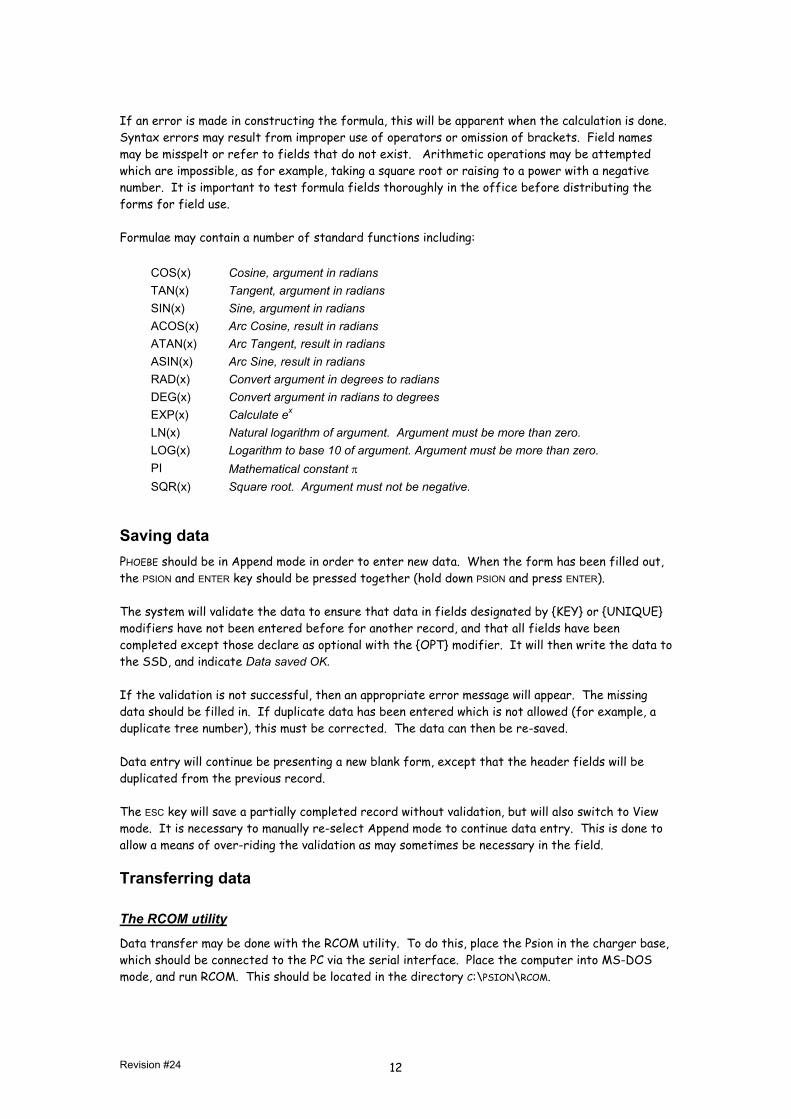
If an error is made in constructing the formula, this will be apparent when the calculation is done. Syntax errors may result from improper use of operators or omission of brackets. Field names may be misspelt or refer to fields that do not exist. Arithmetic operations may be attempted which are impossible, as for example, taking a square root or raising to a power with a negative number. It is important to test formula fields thoroughly in the office before distributing the forms for field use. Formulae may contain a number of standard functions including:
COS(x) Cosine, argument in radians TAN(x) Tangent, argument in radians SIN(x) Sine, argument in radians ACOS(x) Arc Cosine, result in radians ATAN(x) Arc Tangent, result in radians ASIN(x) Arc Sine, result in radians RAD(x) Convert argument in degrees to radians DEG(x) Convert argument in radians to degrees EXP(x) Calculate ex LN(x) Natural logarithm of argument. Argument must be more than zero. LOG(x) Logarithm to base 10 of argument. Argument must be more than zero. PI Mathematical constant π SQR(x) Square root. Argument must not be negative.
Saving data PHOEBE should be in Append mode in order to enter new data. When the form has been filled out, the PSION and ENTER key should be pressed together (hold down PSION and press ENTER). The system will validate the data to ensure that data in fields designated by {KEY} or {UNIQUE} modifiers have not been entered before for another record, and that all fields have been completed except those declare as optional with the {OPT} modifier. It will then write the data to the SSD, and indicate Data saved OK. If the validation is not successful, then an appropriate error message will appear. The missing data should be filled in. If duplicate data has been entered which is not allowed (for example, a duplicate tree number), this must be corrected. The data can then be re-saved. Data entry will continue be presenting a new blank form, except that the header fields will be duplicated from the previous record. The ESC key will save a partially completed record without validation, but will also switch to View mode. It is necessary to manually re-select Append mode to continue data entry. This is done to allow a means of over-riding the validation as may sometimes be necessary in the field.
Transferring data
The RCOM utility
Data transfer may be done with the RCOM utility. To do this, place the Psion in the charger base, which should be connected to the PC via the serial interface. Place the computer into MS-DOS mode, and run RCOM. This should be located in the directory C:\PSION\RCOM.
Revision #24 12
Configuring the serial interface
The serial interface must be correctly configured for RCOM to run. By default, RCOM uses the COM1: interface at 19200 baud, with no parity, 8 data bits and 1 stop bit. If different computers are set up with RCOM, then a different interface port may be required, for example COM2:. Changes to the interface parameters can be made by editing the file RCOM.INI. In some cases a MOUSE may be using COM1: which may be the only available port. In this case, the mouse must be removed to connect the Psion cable, and the Mouse driver also removed from the AUTOEXEC.BAT file that is called when DOS is started. On the Psion computer, the LINK utility must have also been set to use a baud rate of 19200.
Selection of connecting port
The Psion has two ports at its base. Normally, on the charger, the C port is used, with the cable connected to the serial port at the back of the charger. It is also possible to connect the cable to the A port directly, without attaching the Psion to the charger. In this case the LINK utility must be set to use the A port. Normally it should be using the C port.
Starting RCOM
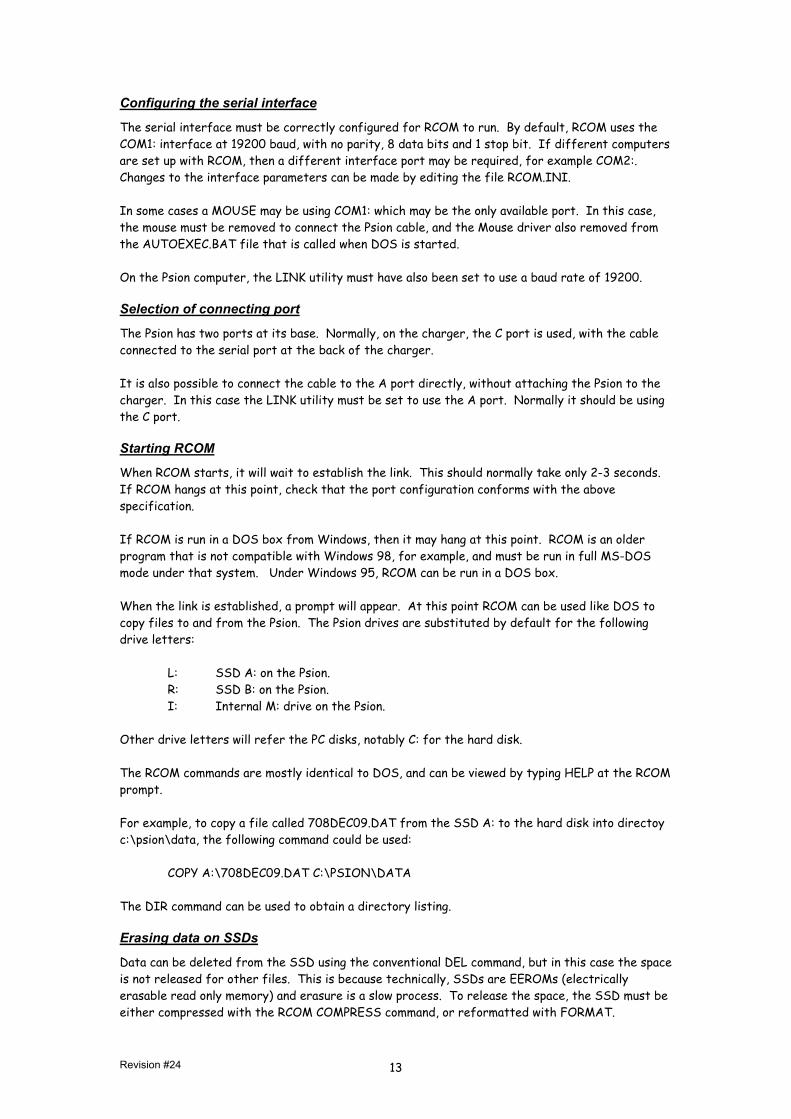
When RCOM starts, it will wait to establish the link. This should normally take only 2-3 seconds. If RCOM hangs at this point, check that the port configuration conforms with the above specification. If RCOM is run in a DOS box from Windows, then it may hang at this point. RCOM is an older program that is not compatible with Windows 98, for example, and must be run in full MS-DOS mode under that system. Under Windows 95, RCOM can be run in a DOS box. When the link is established, a prompt will appear. At this point RCOM can be used like DOS to copy files to and from the Psion. The Psion drives are substituted by default for the following drive letters:
L: SSD A: on the Psion. R: SSD B: on the Psion. I: Internal M: drive on the Psion.
Other drive letters will refer the PC disks, notably C: for the hard disk. The RCOM commands are mostly identical to DOS, and can be viewed by typing HELP at the RCOM prompt. For example, to copy a file called 708DEC09.DAT from the SSD A: to the hard disk into directoy c:\psion\data, the following command could be used:
COPY A:\708DEC09.DAT C:\PSION\DATA
The DIR command can be used to obtain a directory listing.
Erasing data on SSDs
Data can be deleted from the SSD using the conventional DEL command, but in this case the space is not released for other files. This is because technically, SSDs are EEROMs (electrically erasable read only memory) and erasure is a slow process. To release the space, the SSD must be either compressed with the RCOM COMPRESS command, or reformatted with FORMAT.
Revision #24 13
PHOEBE data files do not need to be erased each time the file is downloaded. It may be convenient to keep several days or weeks work on the SSD. Data is always appended, and PHOEBE has no mechanism for deleting data, so it cannot be lost.
Uploading data to a database
PHOEBE data can be most easily processed by using the SDF format in Foxpro or Dbase. Provided a compatible file structure has been created, the PHOEBE data can be appended directly using the APPEND FROM filename TYPE SDF command. Each field in the DBF file should have a width corresponding to the number of characters allowed in the PHOEBE form definition file. In addition, an extra field of one character width must always be appended. This will normally be blank, but is to allow for features that may be included in later versions of PHOEBE. An example of a form definition and corresponding FoxPro file structure are shown in Appendix 1.
The PsiWin file manager
RCOM is relatively primitive, and does not work well with Windows. The PsiWin software package provides a Windows Explorer-like graphical interface and is fully Windows 98 compatible. This software can be provided as an optional item to replace the use of RCOM and simplifies file transfers in a Windows environment.
The configuration of PHOEBE
Workabout configuration
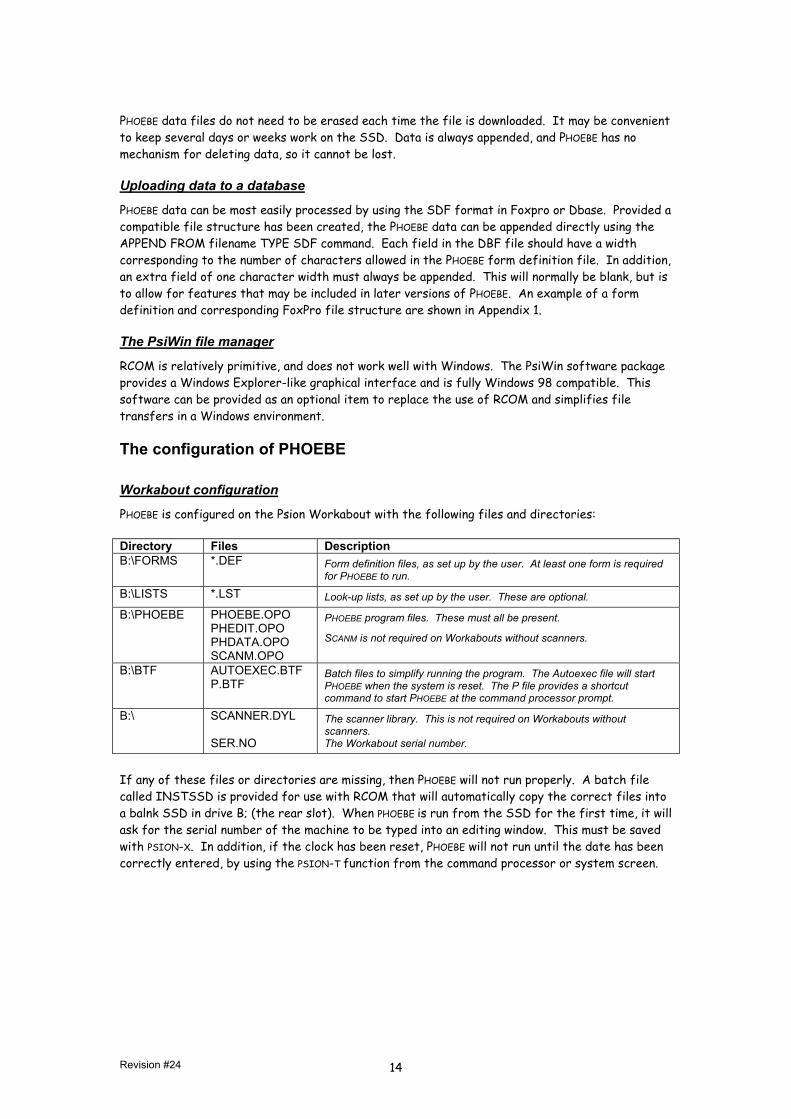
PHOEBE is configured on the Psion Workabout with the following files and directories: Directory Files Description B:\FORMS *.DEF Form definition files, as set up by the user. At least one form is required
for PHOEBE to run.
B:\LISTS *.LST Look-up lists, as set up by the user. These are optional.
B:\PHOEBE PHOEBE.OPO PHEDIT.OPO PHDATA.OPO SCANM.OPO
PHOEBE program files. These must all be present.
SCANM is not required on Workabouts without scanners.
B:\BTF AUTOEXEC.BTF P.BTF
Batch files to simplify running the program. The Autoexec file will start PHOEBE when the system is reset. The P file provides a shortcut command to start PHOEBE at the command processor prompt.
B:\ SCANNER.DYL SER.NO
The scanner library. This is not required on Workabouts without scanners. The Workabout serial number.
If any of these files or directories are missing, then PHOEBE will not run properly. A batch file called INSTSSD is provided for use with RCOM that will automatically copy the correct files into a balnk SSD in drive B; (the rear slot). When PHOEBE is run from the SSD for the first time, it will ask for the serial number of the machine to be typed into an editing window. This must be saved with PSION-X. In addition, if the clock has been reset, PHOEBE will not run until the date has been correctly entered, by using the PSION-T function from the command processor or system screen.
Revision #24 14
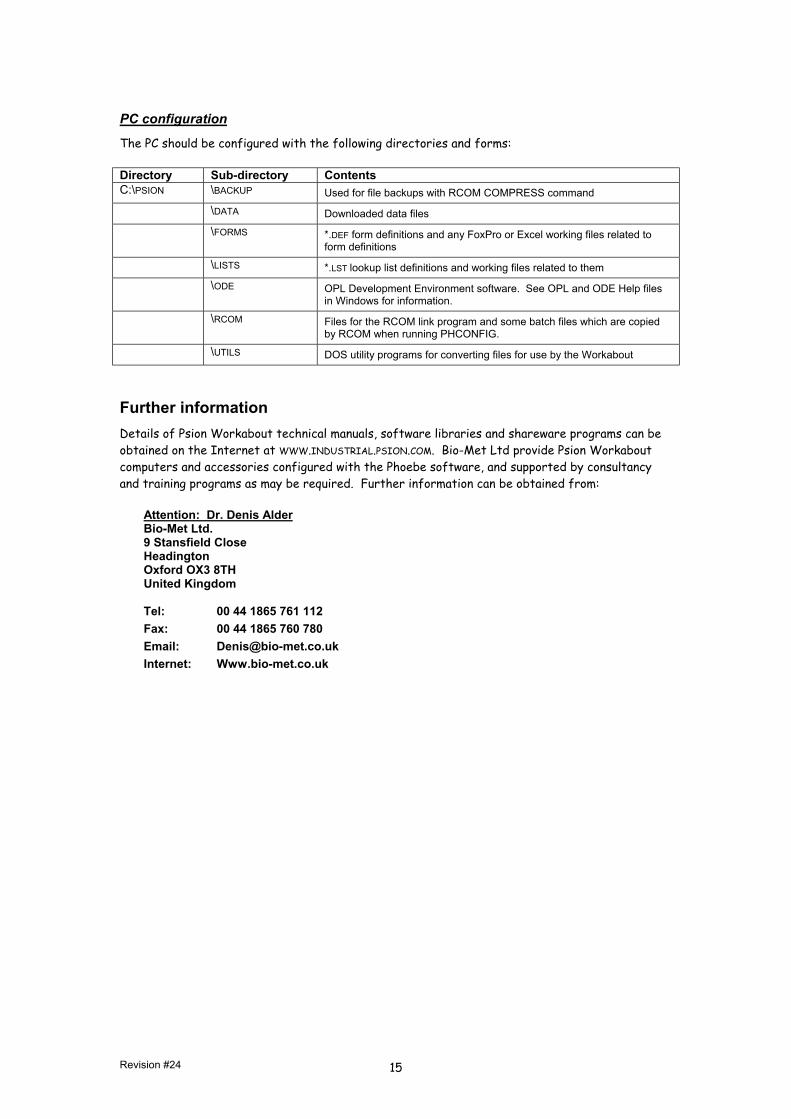
PC configuration
The PC should be configured with the following directories and forms: Directory Sub-directory Contents C:\PSION \BACKUP Used for file backups with RCOM COMPRESS command
\DATA Downloaded data files
\FORMS *.DEF form definitions and any FoxPro or Excel working files related to form definitions
\LISTS *.LST lookup list definitions and working files related to them
\ODE OPL Development Environment software. See OPL and ODE Help files in Windows for information.
\RCOM Files for the RCOM link program and some batch files which are copied by RCOM when running PHCONFIG.
\UTILS DOS utility programs for converting files for use by the Workabout
Further information Details of Psion Workabout technical manuals, software libraries and shareware programs can be obtained on the Internet at WWW.INDUSTRIAL.PSION.COM. Bio-Met Ltd provide Psion Workabout computers and accessories configured with the Phoebe software, and supported by consultancy and training programs as may be required. Further information can be obtained from:
Attention: Dr. Denis Alder Bio-Met Ltd. 9 Stansfield Close Headington Oxford OX3 8TH United Kingdom Tel: 00 44 1865 761 112 Fax: 00 44 1865 760 780 Email: [email protected] Internet: Www.bio-met.co.uk
Revision #24 15
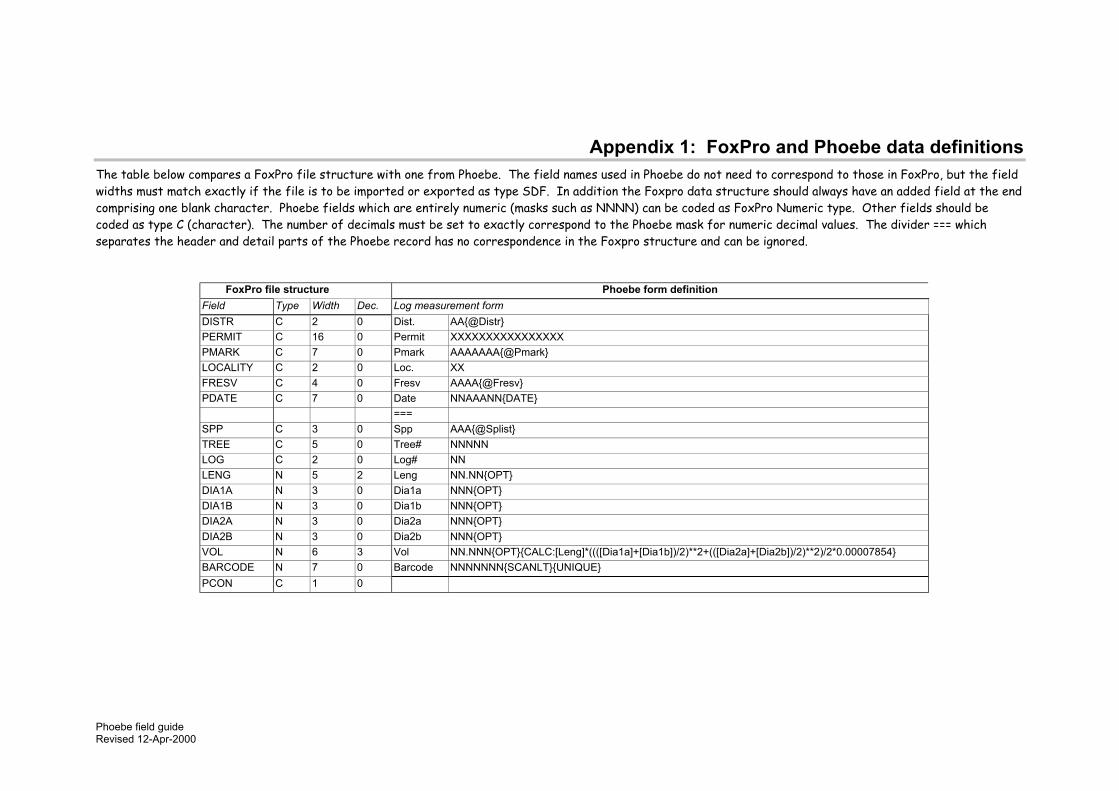
Appendix 1: FoxPro and Phoebe data definitions The table below compares a FoxPro file structure with one from Phoebe. The field names used in Phoebe do not need to correspond to those in FoxPro, but the field widths must match exactly if the f ys have an added field at the end comprising one blank character. Ph pe. Other fields should be coded as type C (character). The n lues. The divider === which separates the header and detail pa
FoxPro file sField TypDISTR CPERMIT CPMARK CLOCALITY CFRESV C PDATE C
SPP C TREE CLOG CLENG NDIA1A NDIA1B NDIA2A NDIA2B NVOL N 0.00007854} BARCODE NPCON C
Phoebe field guide Revised 12-Apr-2000
ile is to be imported or exported as type SDF. In addition the Foxpro data structure should alwaoebe fields which are entirely numeric (masks such as NNNN) can be coded as FoxPro Numeric tyumber of decimals must be set to exactly correspond to the Phoebe mask for numeric decimal varts of the Phoebe record has no correspondence in the Foxpro structure and can be ignored.
tructure Phoebe form definition e Width Dec. Log measurement form
2 0 Dist. AA{@Distr} 16 0 Permit XXXXXXXXXXXXXXXX
7 0 Pmark AAAAAAA{@Pmark} 2 0 Loc. XX 4 0 Fresv AAAA{@Fresv} 7 0 Date NNAAANN{DATE}
=== 3 0 Spp AAA{@Splist} 5 0 Tree# NNNNN 2 0 Log# NN 5 2 Leng NN.NN{OPT} 3 0 Dia1a NNN{OPT} 3 0 Dia1b NNN{OPT} 3 0 Dia2a NNN{OPT} 3 0 Dia2b NNN{OPT} 6 3 Vol NN.NNN{OPT}{CALC:[Leng]*((([Dia1a]+[Dia1b])/2)**2+(([Dia2a]+[Dia2b])/2)**2)/2* 7 0 Barcode NNNNNNN{SCANLT}{UNIQUE} 1 0
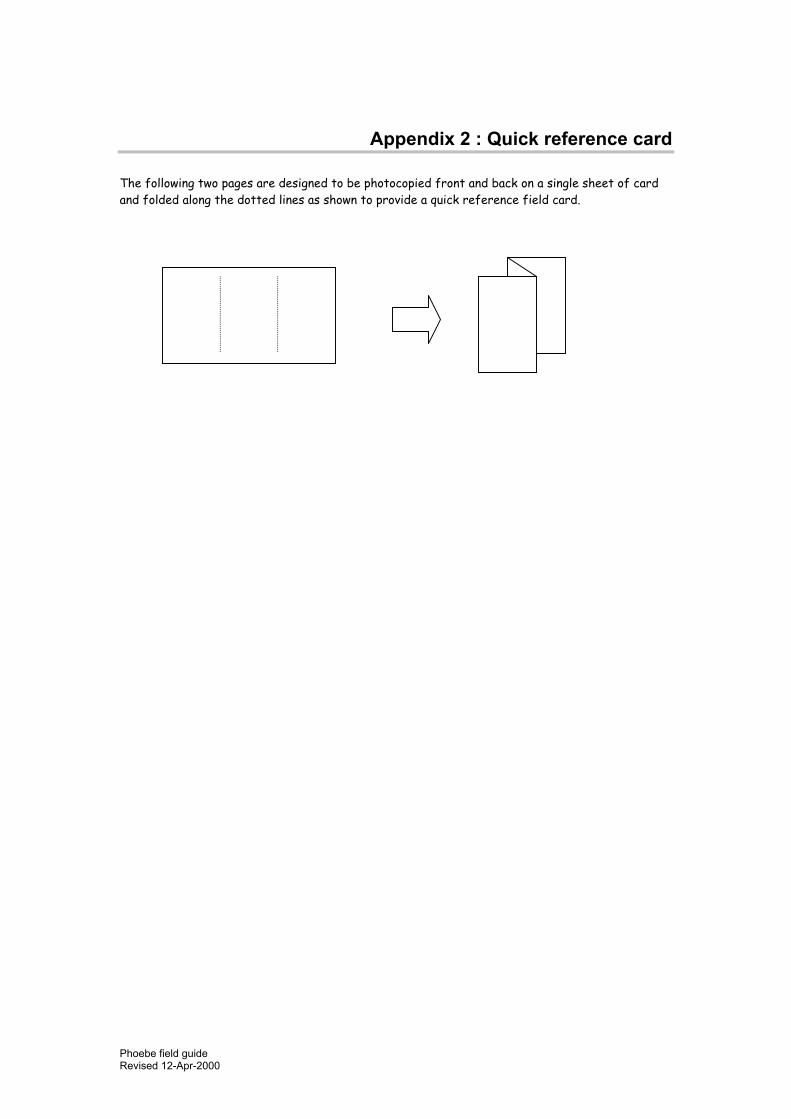
Appendix 2 : Quick reference card The following two pages are designed to be photocopied front and back on a single sheet of card and folded along the dotted lines as shown to provide a quick reference field card.
Phoebe field guide Revised 12-Apr-2000
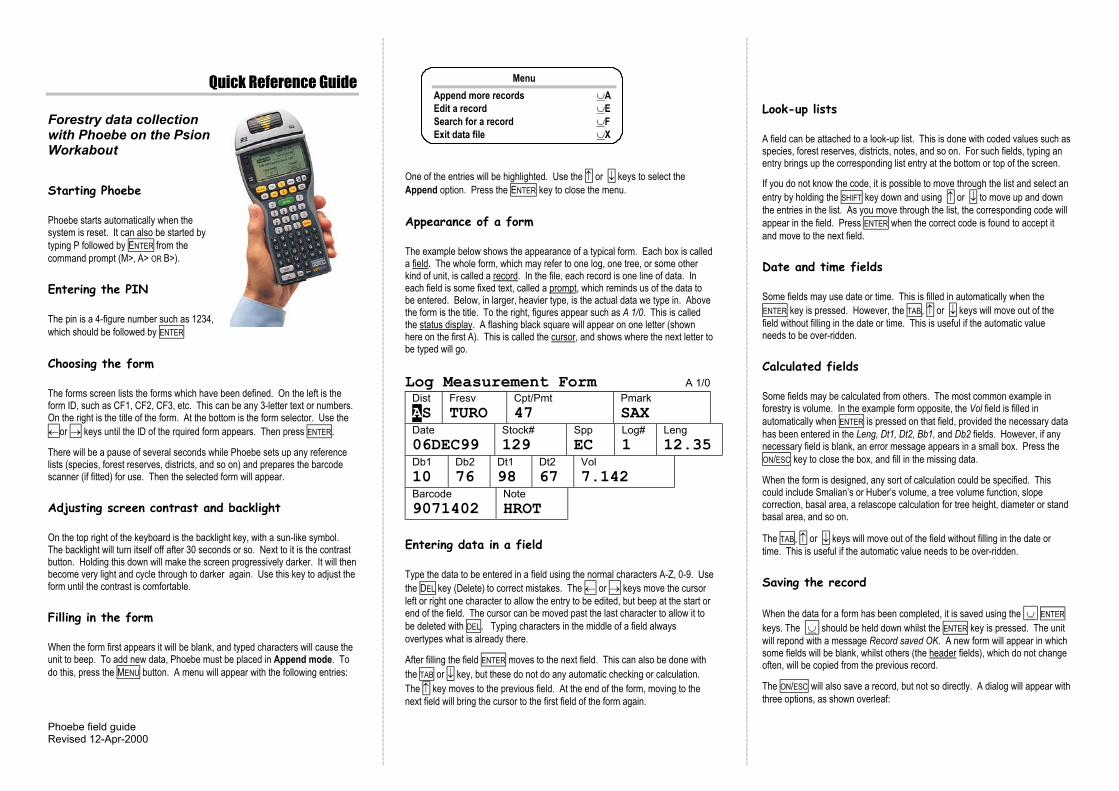
Quick Reference Guide
Forestry data collection with Phoebe on the Psion Workabout
Starting Phoebe
Phoebe starts automatically when the system is reset. It can also be started by typing P followed by ENTER from the command prompt (M>, A> OR B>).
Entering the PIN
The pin is a 4-figure number such as 1234, which should be followed by ENTER
Choosing the form
The forms screen lists the forms which have been defined. On the left is the form ID, such as CF1, CF2, CF3, etc. This can be any 3-letter text or numbers. On the right is the title of the form. At the bottom is the form selector. Use the ←or → keys until the ID of the rquired form appears. Then press ENTER.
There will be a pause of several seconds while Phoebe sets up any reference lists (species, forest reserves, districts, and so on) and prepares the barcode scanner (if fitted) for use. Then the selected form will appear.
Adjusting screen contrast and backlight
On the top right of the keyboard is the backlight key, with a sun-like symbol. The backlight will turn itself off after 30 seconds or so. Next to it is the contrast button. Holding this down will make the screen progressively darker. It will then become very light and cycle through to darker again. Use this key to adjust the form until the contrast is comfortable.
Filling in the form
When the form first appears it will be blank, and typed characters will cause the unit to beep. To add new data, Phoebe must be placed in Append mode. To do this, press the MENU button. A menu will appear with the following entries:
Menu Append more records ∪A Edit a record ∪E Search for a record ∪F Exit data file ∪X
One of the entries will be highlighted. Use the ↑ or ↓ keys to select the Append option. Press the ENTER key to close the menu.
Appearance of a form
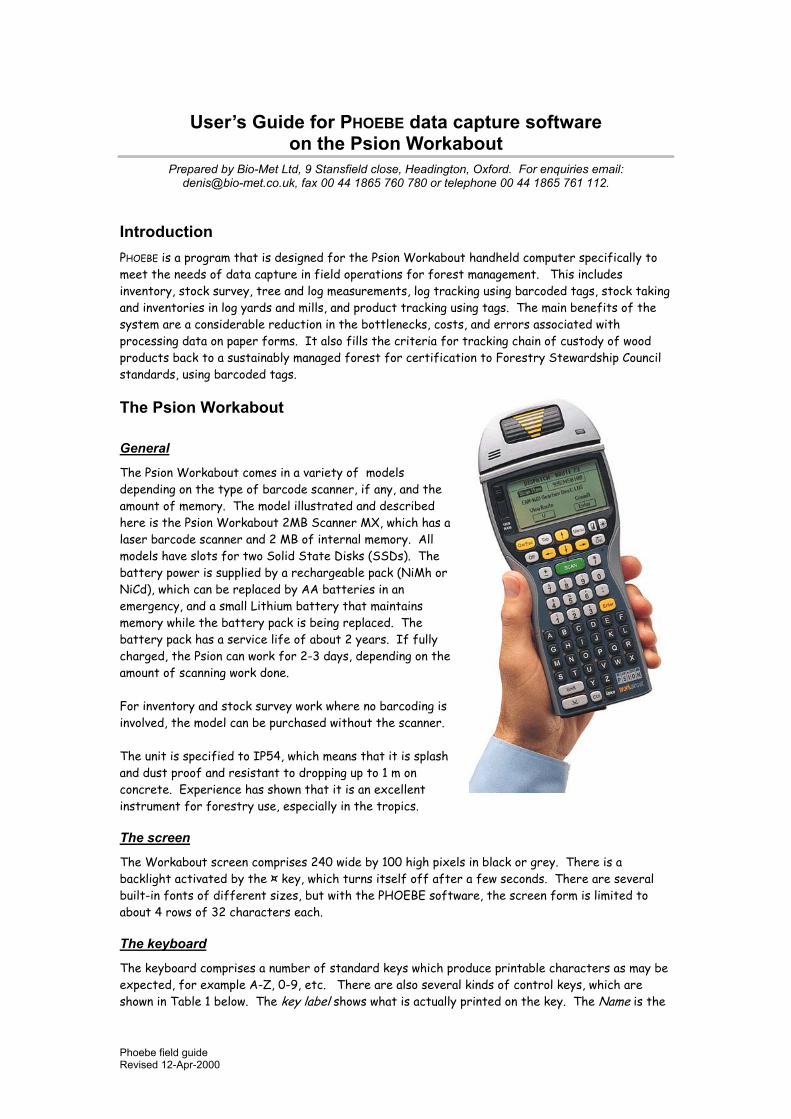
The example below shows the appearance of a typical form. Each box is called a field. The whole form, which may refer to one log, one tree, or some other kind of unit, is called a record. In the file, each record is one line of data. In each field is some fixed text, called a prompt, which reminds us of the data to be entered. Below, in larger, heavier type, is the actual data we type in. Above the form is the title. To the right, figures appear such as A 1/0. This is called the status display. A flashing black square will appear on one letter (shown here on the first A). This is called the cursor, and shows where the next letter to be typed will go. Log Measurement Form A 1/0
Dist AS
Fresv TURO
Cpt/Pmt 47
Pmark SAX
Date 06DEC99
Stock# 129
Spp EC
Log# 1
Leng 12.35
Db1 10
Db2 76
Dt1 98
Dt2 67
Vol 7.142
Barcode 9071402
Note HROT
Entering data in a field
Type the data to be entered in a field using the normal characters A-Z, 0-9. Use the DEL key (Delete) to correct mistakes. The ← or → keys move the cursor left or right one character to allow the entry to be edited, but beep at the start or end of the field. The cursor can be moved past the last character to allow it to be deleted with DEL. Typing characters in the middle of a field always overtypes what is already there.
After filling the field ENTER moves to the next field. This can also be done with the TAB or ↓ key, but these do not do any automatic checking or calculation. The ↑ key moves to the previous field. At the end of the form, moving to the next field will bring the cursor to the first field of the form again.
Look-up lists
A field can be attached to a look-up list. This is done with coded values such as species, forest reserves, districts, notes, and so on. For such fields, typing an entry brings up the corresponding list entry at the bottom or top of the screen.
If you do not know the code, it is possible to move through the list and select an entry by holding the SHIFT key down and using ↑ or ↓ to move up and down the entries in the list. As you move through the list, the corresponding code will appear in the field. Press ENTER when the correct code is found to accept it and move to the next field.
Date and time fields
Some fields may use date or time. This is filled in automatically when the ENTER key is pressed. However, the TAB, ↑ or ↓ keys will move out of the field without filling in the date or time. This is useful if the automatic value needs to be over-ridden.
Calculated fields
Some fields may be calculated from others. The most common example in forestry is volume. In the example form opposite, the Vol field is filled in automatically when ENTER is pressed on that field, provided the necessary data has been entered in the Leng, Dt1, Dt2, Bb1, and Db2 fields. However, if any necessary field is blank, an error message appears in a small box. Press the ON/ESC key to close the box, and fill in the missing data.
When the form is designed, any sort of calculation could be specified. This could include Smalian’s or Huber’s volume, a tree volume function, slope correction, basal area, a relascope calculation for tree height, diameter or stand basal area, and so on.
The TAB, ↑ or ↓ keys will move out of the field without filling in the date or time. This is useful if the automatic value needs to be over-ridden.
Saving the record
When the data for a form has been completed, it is saved using the ∪ ENTER keys. The ∪ should be held down whilst the ENTER key is pressed. The unit will repond with a message Record saved OK. A new form will appear in which some fields will be blank, whilst others (the header fields), which do not change often, will be copied from the previous record.
Phoebe field guide Revised 12-Apr-2000
The ON/ESC will also save a record, but not so directly. A dialog will appear with three options, as shown overleaf:
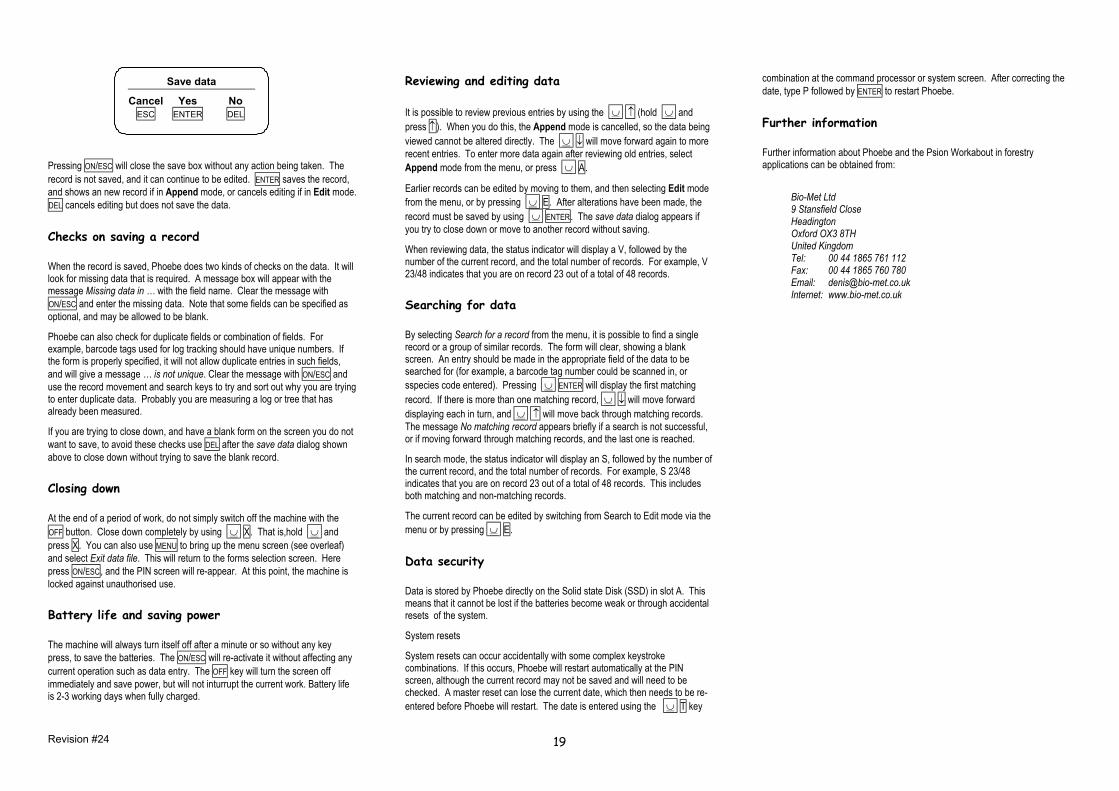
Pressing ON/ESC will close the save box without any action being taken. The record is not saved, and it can continue to be edited. ENTER saves the record, and shows an new record if in Append mode, or cancels editing if in Edit mode. DEL cancels editing but does not save the data.
Checks on saving a record
When the record is saved, Phoebe does two kinds of checks on the data. It will look for missing data that is required. A message box will appear with the message Missing data in … with the field name. Clear the message with ON/ESC and enter the missing data. Note that some fields can be specified as optional, and may be allowed to be blank.
Phoebe can also check for duplicate fields or combination of fields. For example, barcode tags used for log tracking should have unique numbers. If the form is properly specified, it will not allow duplicate entries in such fields, and will give a message … is not unique. Clear the message with ON/ESC and use the record movement and search keys to try and sort out why you are trying to enter duplicate data. Probably you are measuring a log or tree that has already been measured.
If you are trying to close down, and have a blank form on the screen you do not want to save, to avoid these checks use DEL after the save data dialog shown above to close down without trying to save the blank record.
Closing down
At the end of a period of work, do not simply switch off the machine with the OFF button. Close down completely by using ∪ X. That is,hold ∪ and press X. You can also use MENU to bring up the menu screen (see overleaf) and select Exit data file. This will return to the forms selection screen. Here press ON/ESC, and the PIN screen will re-appear. At this point, the machine is locked against unauthorised use.
Battery life and saving power
The machine will always turn itself off after a minute or so without any key press, to save the batteries. The ON/ESC will re-activate it without affecting any current operation such as data entry. The OFF key will turn the screen off immediately and save power, but will not inturrupt the current work. Battery life is 2-3 working days when fully charged.
Reviewing and editing data
It is possible to review previous entries by using the ∪ ↑ (hold ∪ and press ↑). When you do this, the Append mode is cancelled, so the data being viewed cannot be altered directly. The ∪ ↓ will move forward again to more recent entries. To enter more data again after reviewing old entries, select Append mode from the menu, or press ∪ A.
Earlier records can be edited by moving to them, and then selecting Edit mode from the menu, or by pressing ∪ E. After alterations have been made, the record must be saved by using ∪ ENTER. The save data dialog appears if you try to close down or move to another record without saving.
When reviewing data, the status indicator will display a V, followed by the number of the current record, and the total number of records. For example, V 23/48 indicates that you are on record 23 out of a total of 48 records.
Searching for data
By selecting Search for a record from the menu, it is possible to find a single record or a group of similar records. The form will clear, showing a blank screen. An entry should be made in the appropriate field of the data to be searched for (for example, a barcode tag number could be scanned in, or sspecies code entered). Pressing ∪ ENTER will display the first matching record. If there is more than one matching record, ∪ ↓ will move forward displaying each in turn, and ∪ ↑ will move back through matching records. The message No matching record appears briefly if a search is not successful, or if moving forward through matching records, and the last one is reached.
In search mode, the status indicator will display an S, followed by the number of the current record, and the total number of records. For example, S 23/48 indicates that you are on record 23 out of a total of 48 records. This includes both matching and non-matching records.
The current record can be edited by switching from Search to Edit mode via the menu or by pressing ∪ E.
Data security
Data is stored by Phoebe directly on the Solid state Disk (SSD) in slot A. This means that it cannot be lost if the batteries become weak or through accidental resets of the system.
System resets
System resets can occur accidentally with some complex keystroke combinations. If this occurs, Phoebe will restart automatically at the PIN screen, although the current record may not be saved and will need to be checked. A master reset can lose the current date, which then needs to be re-entered before Phoebe will restart. The date is entered using the ∪ T key
combination at the command processor or system screen. After correcting the date, type P followed by ENTER to restart Phoebe.
Save data
Cancel Yes No ESC ENTER DEL
Further information
Further information about Phoebe and the Psion Workabout in forestry applications can be obtained from:
Bio-Met Ltd 9 Stansfield Close Headington Oxford OX3 8TH United Kingdom Tel: 00 44 1865 761 112 Fax: 00 44 1865 760 780 Email: [email protected] Internet: www.bio-met.co.uk
Revision #24 19