Embed Size (px)
Citation preview

USER MANUAL
Email: [email protected] web: www.magicmirror.me Tel: 01344-989 804
Table of Contents
1.0 Overview .................................................................................................................................. 4 1.1 Hardware ............................................................................................................................. 4
1.1.1 Equipment ....................................................................................................................... 4 1.1.2 Dimension and Space Requirement ................................................................................ 7 1.1.3 Weight ............................................................................................................................ 7
2.0 Control Panel ........................................................................................................................... 8 2.1 Control Panel Overview ...................................................................................................... 8 2.2 Log In to Control Panel ...................................................................................................... 8 2.3 Health Check ....................................................................................................................... 8
2.3.1 Health Check Status ........................................................................................................ 8 2.3.2 History Log of Selected Store ........................................................................................ 9
2.4 Usage Log ........................................................................................................................... 10 2.4.1 Usage Log Statistic Info ............................................................................................... 10 2.4.2 Download Usage Log ................................................................................................... 10
3.0 Asset Customization in Directory ........................................................................................ 12 3.1 Overview ............................................................................................................................ 12 3.2 Asset Customization for Photo Booth .............................................................................. 13
3.2.1 How to Customize Photo Frame? ................................................................................. 14 3.2.2 How to Customize Logo on Thank You Page? ............................................................ 18 3.2.3 How to Customize Photo Slideshow during Idle Mode? ............................................. 19 3.2.4 How to Customize the Instruction Video during Idle Mode? ...................................... 19 3.2.5 How to Customize Promotional or Marketing Video during Idle Mode? .................... 21 3.2.6 How to Customize the Screen UI? ............................................................................... 22
3.3 Assets Customization for Virtual Dressing ..................................................................... 23 3.3.1 How to Customize Garment Images? ........................................................................... 24 3.3.2 How to Update Products Information? ......................................................................... 26 3.3.3 How to Customize Photo Frame? ................................................................................. 28 3.3.4 How to Customize UI Assets? ...................................................................................... 28
3.4 Assets Customization in Game module ........................................................................... 29 3.4.1 How to Customize Photo Frame? ................................................................................. 29 3.4.2 How to Customize Game Objects? ............................................................................... 30 3.4.3 How to Customize Score UI? ....................................................................................... 31 3.4.4 How to Add in Special Effect? ..................................................................................... 33 3.4.5 How to Customize Game Rules? .................................................................................. 34 3.4.6 How to Customize Font Colour for Game? .................................................................. 37 3.4.7 How to Test Game? ...................................................................................................... 39
3.5 How to Customize Sharing Text? .................................................................................... 39 3.6 How to Remove or View Testing User Photos? .............................................................. 41

USER MANUAL
Email: [email protected] web: www.magicmirror.me Tel: 01344-989 804
3.7 How to View Users Photos? .............................................................................................. 42
4.0 Installation ............................................................................................................................. 44 4.1 Hardware Installation Options ........................................................................................ 44
4.1.1 Mobile unit with caster wheel ...................................................................................... 44 4.1.2 Flush mount unit ........................................................................................................... 45
4.2 Installation Guide for Flush Mount Option .................................................................... 46
5.0 Operation ............................................................................................................................... 47 5.1 Start Magic Mirror application ..................................................................................... 47 5.2 Switch between different modules ................................................................................. 47 5.3 Close Magic Mirror application ..................................................................................... 48 5.4 Adjust Camera Settings .................................................................................................... 49 5.5 Magic Mirror Cleaning Guides ...................................................................................... 49
6.0 Troubleshooting and Support Guides ............................................................................. 50 6.1 QR Code Support ............................................................................................................ 50 6.2 Hardware Failure ............................................................................................................ 50
6.2.1 Camera ....................................................................................................................... 51 6.2.2 Printer ........................................................................................................................ 51 6.2.3 Kinect ......................................................................................................................... 53 6.2.4 Touch screen .............................................................................................................. 54 6.2.5 Auto Startup the module .............................................................................................. 59 6.2.6 Internet Connection ................................................................................................... 60 6.2.7 Mirror Screen hanged. ............................................................................................... 60
7.0 System Integration ................................................................................................................ 61 7.1 RFID Integration ............................................................................................................... 61 7.2 EPOS or E-Commerce Integration .................................................................................. 61 7.3 Stock Availability Integration .......................................................................................... 62 7.4 CRM Information Capture Integration .......................................................................... 62
8.0 Warranty ............................................................................................................................... 64 8.1 Limited Warranty ............................................................................................................. 64 8.2 What we will do ................................................................................................................. 64

USER MANUAL
Email: [email protected] web: www.magicmirror.me Tel: 01344-989 804
1.0 Overview Magic Mirror is an interactive mirror with integrated hardware and software that benefits you in multiple ways with the different customizable modules incorporated. It is a one box solution that can serve as a data collection method, promotional and brand building tool and also an attention catcher tool. The mirror is incorporated with the body sensor and it fully utilizes the body movement sensing feature through the different modules. It also features studio quality camera and studio flash for high quality photo capturing in a high resolution display. Using the touch screen function, you are able to have an interactive communication with the mirror. 200-240V power point socket or an Ethernet socket is required for Magic Mirror to function.
1.1 Hardware Magic Mirror is a one box solution where all of the components are packed together in the mirror. It is space efficient as it only requires minimal storage place. For detail information on the dimensions for Magic Mirror, please refer to section 1.1.2.
1.1.1 Equipment The equipments used are as follows:
PC Packaged with 3rd generation Intel® Core i3-3220 processor to ensure a smooth running of all functions of Magic Mirror. It also comes with dedicated Graphic Card that allows clear display of different modules of Magic Mirror.
· System Memory : Up to 8GB 1333MHz Dual channel DOR3 SDRAM · Discret : Nvidia GeForce GT620, 1GB, DDR3 (ML117, DVI + HDMI) · Primary Storage : 500GB – 2.0TB 7200 RPM SATA Hard Drive, All Hard Drives have 3.0Gb/s interface & utilize NCQ · Power Consumption : 60-200W
Touch Screen Features a high speed of response of 13m sec through 4mm thick glass that ensure a responsive experience. The 19.1 inch touch screen allows you to interactively communicate with Magic Mirror such as entering email to receive the captured photos.
· Touch Area : 364mm × 290mm · Power Consumption : 20W (approx.)

USER MANUAL
Email: [email protected] web: www.magicmirror.me Tel: 01344-989 804
Response Visual Unit Equipped to make response through gesture control on a high screen resolution display of 1920 x 1080. It is equipped for the full functionality of Magic Mirror’s different modules such as responding with the body movements shown on screen to allow the virtual dressing accurately superimpose on your body.
· Brightness : 450cd/m2 · Diagonal Size : 40” widescreen · Contrast Ratio : 3000:1 · Pixel Pitch : 0.461 (H) × 0.461 (V) · Power consumption : 163–212W
Body Sensor Equipped to identify full body movements of user to ensure the full functionality of Magic Mirror especially in providing an interactive experience for user.
· Connectivity : V2.0 · Sensor : 3 – 0 depth sensors, RGB camera · Output : USB cable
Professional DSLR Camera Features ability to capture studio quality photos up to 12.2 megapixels. This allows the captured photos to have high clarity and good quality.
· Image Processor : DIGIC 4 · Lens : 18-55mm, Telephoto Zoom · Focal Length : Equivalent to 1.6× the focal length of the lens · Focusing : 9AF points (f/5.6 cross type at centre), Predictive AF up to 10m · Eyepoint : 21mm (from eyepiece lens center)
Studio Flash With ability to provide proper lightning for good photos taking under different conditions. It is equipped especially for condition where there is insufficient lightning. It ensures photo quality to be good and consistent under different lightning conditions.
· Flash Duration : 1/1800 sec · Recycling Time : 1 sec · Flash Output : 200W · Fan Cooled : Yes

USER MANUAL
Email: [email protected] web: www.magicmirror.me Tel: 01344-989 804
Kiosk Receipt Printer Equipped for ability to print out vouchers or product slips through a direct thermal paper printing using thermal sensitive media. It is to support Magic Mirror’s function of giving out vouchers when user achieved certain status such as being a high-scorer of Magic Mirror’s games or allowing users to print out the product info of their wish list into a product slip and bring home. This product slip serves as a ‘reminder’ for users about their wish list and encourage return visit.
· Resolution : 8 dots/mm (203 dpi) · Present Speed : 300 mm/s (11.81 inches/sec) · Maximum Print Width : 80 mm = 640 pixels · Output Rating : 24.0 Volts. 2.92 Amps · Max Output Power : 70 Watts typical
Cabinet A vandal-resistant metal cabinet with minimalist design that can be wall mounted or freestanding. The mirror cabinet comes in two standard colors:
- High gloss black finishing: high end fashion retail stores to match with in store design - High gloss white finishing: to match with white walls, fit in as many customers
The cabinet is customizable with any colors. Beside, you can “re-decorate” the Magic Mirror to suit for your theme environment by sticking the laminate Vinyl printing on top of it. There are two options of installing the mirror cabinet; freestanding (a mobile unit with caster wheels) and flush mount into the wall. There are lockable doors at the back of the cabinet for the equipment access.
Mirror A 6mm Tempered Glass or also known as a Toughened Safety Glass. It has been processed by controlled thermal or chemical treatments to increase its strength compared with normal glass to ensure additional safety Magic Mirror.

USER MANUAL
Email: [email protected] web: www.magicmirror.me Tel: 01344-989 804
1.1.2 Dimension and Space Requirement The dimensions for Magic Mirror are shown as follows:
The space requirement for Magic Mirror is 1650 mm (W) X 2100(H) X 1800(D). The ideal distance for the kinect gesture control is 1550mm from the mirror.
1.1.3 Weight The weight of Magic Mirror is approximately 150kg.

USER MANUAL
Email: [email protected] web: www.magicmirror.me Tel: 01344-989 804
2.0 Control Panel
2.1 Control Panel Overview The control panel is the administration portion of Magic Mirror which allows users to manage and update the content inside Magic Mirror and update the latest version to multiple mirrors which are located at different places anytime, from any networked location. Customer data, photos taken or usage statistics are also accessible and downloadable from the control panel. Besides, health check system in Magic Mirror enables you to view the health status of every Magic Mirror units, so that you are able to troubleshoot immediately when problems occur.
2.2 Log In to Control Panel Log in to Magic Mirror control panel to manage all your Magic Mirror units. 1. Key in http://controlpanel.magicmirror.me/Account/Login?ReturnUrl=%2f in your web browser. 2. Enter your Username and Password to log in.
2.3 Health Check Magic Mirror health check system is performed everyday automatically, checking the health status of each Magic Mirror unit from different locations.
2.3.1 Health Check Status 1. Select Report which is under Health Check.
Note: There are several reasons for a Magic Mirror to be defined as Failed under the health check result.
1. Magic Mirror is disconnected from the Internet. 2. Equipments inside the Magic Mirror not working properly. E.g. camera, printer, flash gun, PC, kinect sensor, etc.

USER MANUAL
Email: [email protected] web: www.magicmirror.me Tel: 01344-989 804
2.3.2 History Log of Selected Store To diagnose the issue of a Magic Mirror under ‘Failed’ status, you can access to its history log which lists down the daily health check result of the particular Magic Mirror to see when does the error occurs.
1. Click on the Magic Mirror name that you wish to view the history log. 2. Select Email or Print to email or print out the history log of the selected Magic Mirror.

USER MANUAL
Email: [email protected] web: www.magicmirror.me Tel: 01344-989 804
2.4 Usage Log Each usage of Magic Mirror will be recorded and saved in a usage log. It is a downloadable log file describing the usages statistics of a particular module in a Magic Mirror unit.
2.4.1 Usage Log Statistic Info In the Usage Log, you are able to harvest user data information like name of users, email address, phone number, Facebook ID, Twitter ID, number of users take photo, number of users sent email, number of users win voucher, etc.
2.4.2 Download Usage Log 1. Select Usage which is under Usage Log. 2. Select a Magic Mirror unit from the drop down menu. 3. Click on Download next to the usage log file to download it.

USER MANUAL
Email: [email protected] web: www.magicmirror.me Tel: 01344-989 804
Note: Alternatively, you can view usage log in Drive C:
File Location: C:\\MMLogfile\MagicMirrorLog_CompanyName_Full.csv

USER MANUAL
Email: [email protected] web: www.magicmirror.me Tel: 01344-989 804
3.0 Asset Customization in Directory
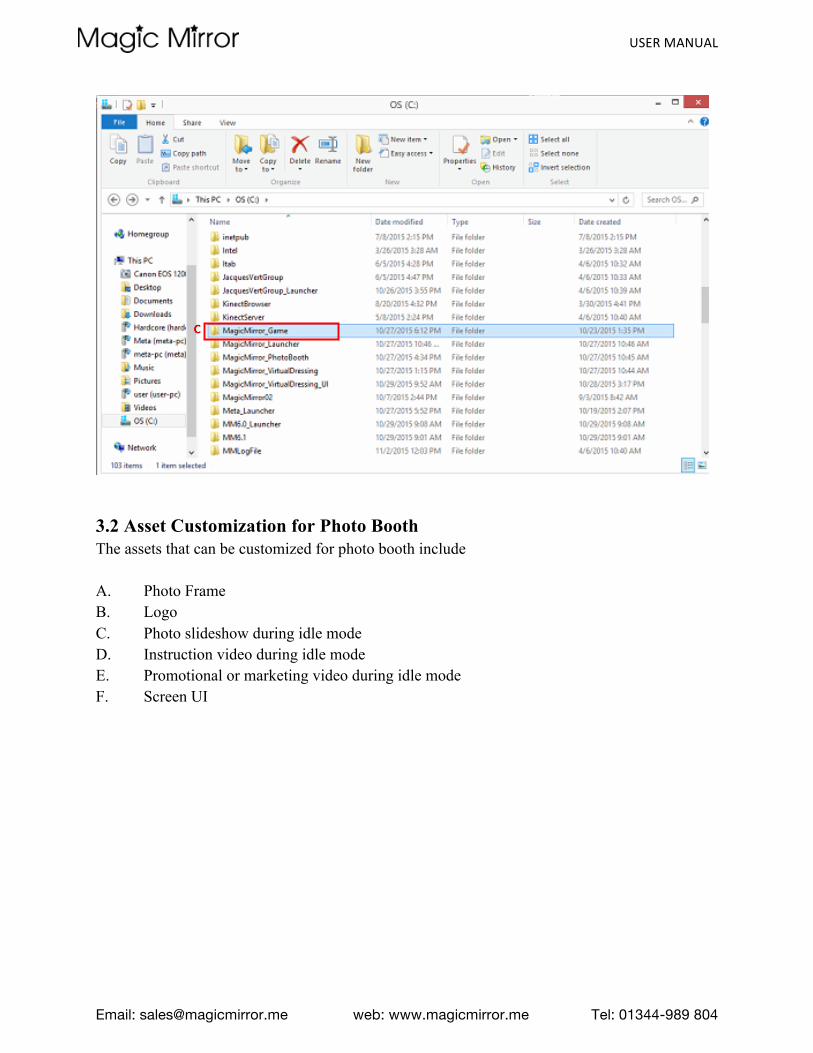
3.1 Overview Magic Mirror asset customization can be done through directory in the local PC. You can find the modules in Drive C:\. A. CompanyName_Photobooth B. CompanyName_VirtualDressing C. CompanyName_Game
Note: You will only see the modules which have been integrated with your Magic Mirror.
USER MANUAL
Email: [email protected] web: www.magicmirror.me Tel: 01344-989 804
3.2 Asset Customization for Photo Booth The assets that can be customized for photo booth include A. Photo Frame B. Logo C. Photo slideshow during idle mode D. Instruction video during idle mode E. Promotional or marketing video during idle mode F. Screen UI

USER MANUAL
Email: [email protected] web: www.magicmirror.me Tel: 01344-989 804
3.2.1 How to Customize Photo Frame? After take photo, photo will be processed and added with the photo frame which is designed to suit retailer’s brand image or marketing purposes. To replace photo frame from directory, please follow the following steps:
1. Go to C:\\CompanyName_PhotoBooth\FilterMedia\EffectBackground88 2. Replace imgFrame.png with your photo frame

USER MANUAL
Email: [email protected] web: www.magicmirror.me Tel: 01344-989 804
Note: 1. Please make sure the filename of the photo frame is imgFrame.png. 2. Photo frames need to be in PNG format, with invisible background and in the dimension
of 1400 width x 2100 length (portrait) or 2100 width x 1400 length (landscape).
A. How to Adjust Frame Size and Photo Placement? To adjust frame size and photo placement, please follow the following steps:
1. Go to C:\\CompanyName_PhotoBooth\FilterMedia\EffectBackground88 2. Right click on the frames.json, edit with Notepad++ or other available programs. 3. Adjust the “x” and “y” values for the photo position.
Note: 1. The size for 4R photo is 1400x2100pixel (Portrait); 2100x1400pixel (Landscape). 2. The photo size needs to be smaller than the frame size so that it is display inside the
frame.

USER MANUAL
Email: [email protected] web: www.magicmirror.me Tel: 01344-989 804
B. How to Change Photo Frame File Name in JSON file? To change photo frame file name, please follow the following steps:
1. Go to C:\\CompanyName_PhotoBooth\FilterMedia\EffectBackground88
2. Change img.Frame.png to preferred file name. 3. Make amendment in frames.json. Right click on the frames.json, edit with Notepad++ or
other available programs.
Photo position when x=0, y=0
Photo position after x and y values are adjusted

USER MANUAL
Email: [email protected] web: www.magicmirror.me Tel: 01344-989 804
4. Replace the text imgFrame.png to NewFileName.png

USER MANUAL
Email: [email protected] web: www.magicmirror.me Tel: 01344-989 804
3.2.2 How to Customize Logo on Thank You Page?
To customize logo on thank you page, please follow the following steps: 1. Go to C:\\CompanyName_PhotoBooth\assets\logo
2. Replace Logo.png with your own logo
Note: 1. Please make sure the filename of the logo is Logo.png. 2. Logo needs to be in PNG format, with invisible background, and with minimum dimension of 500 width x 500 length.
USER MANUAL
Email: [email protected] web: www.magicmirror.me Tel: 01344-989 804
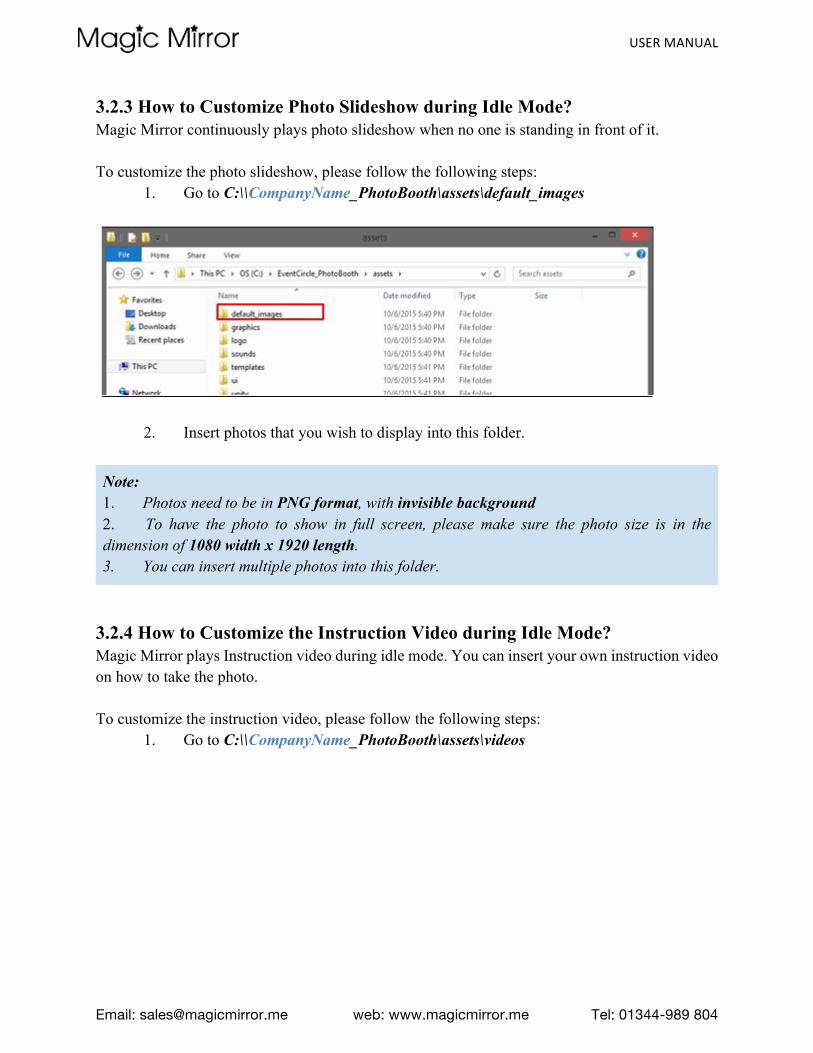
3.2.3 How to Customize Photo Slideshow during Idle Mode? Magic Mirror continuously plays photo slideshow when no one is standing in front of it. To customize the photo slideshow, please follow the following steps:
1. Go to C:\\CompanyName_PhotoBooth\assets\default_images
2. Insert photos that you wish to display into this folder.
Note: 1. Photos need to be in PNG format, with invisible background 2. To have the photo to show in full screen, please make sure the photo size is in the dimension of 1080 width x 1920 length. 3. You can insert multiple photos into this folder.
3.2.4 How to Customize the Instruction Video during Idle Mode? Magic Mirror plays Instruction video during idle mode. You can insert your own instruction video on how to take the photo. To customize the instruction video, please follow the following steps:
1. Go to C:\\CompanyName_PhotoBooth\assets\videos

USER MANUAL
Email: [email protected] web: www.magicmirror.me Tel: 01344-989 804
2. Replace Instruction.avi with your own video
Note: 1. Please make sure the filename of the video is Instruction.avi. 2. Video need to be in AVI format, based on the 9 : 16 (width : height) proportion.
USER MANUAL
Email: [email protected] web: www.magicmirror.me Tel: 01344-989 804
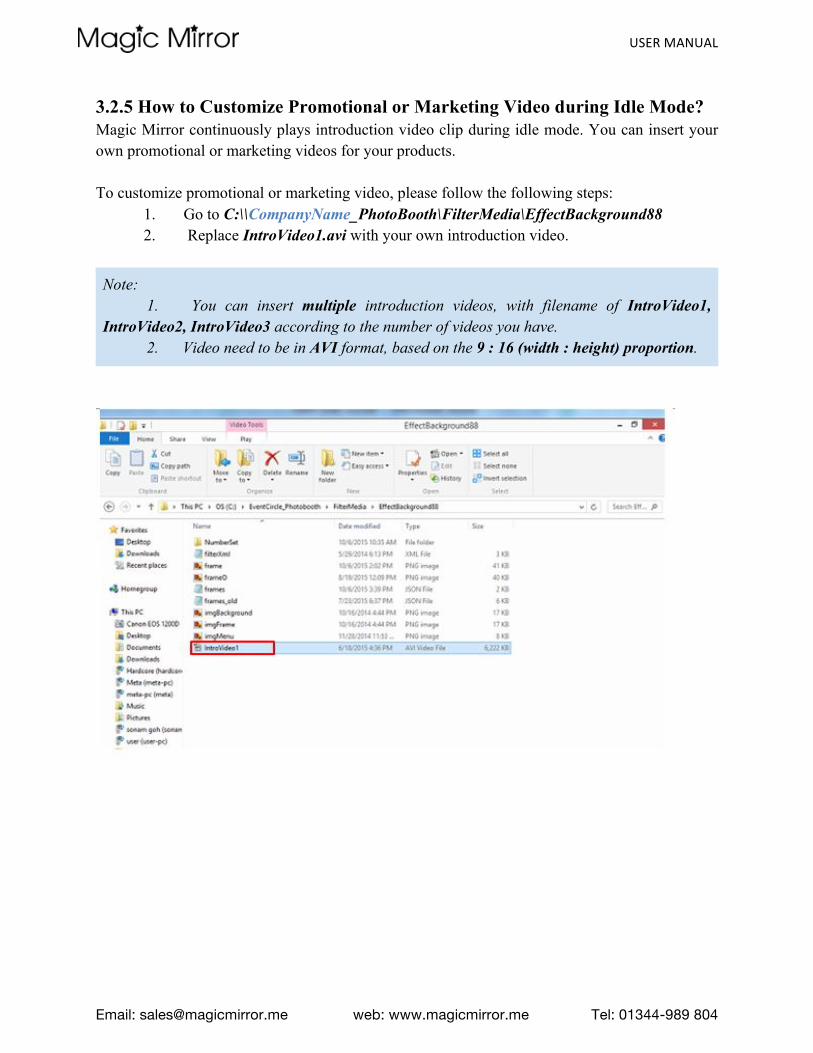
3.2.5 How to Customize Promotional or Marketing Video during Idle Mode? Magic Mirror continuously plays introduction video clip during idle mode. You can insert your own promotional or marketing videos for your products. To customize promotional or marketing video, please follow the following steps:
1. Go to C:\\CompanyName_PhotoBooth\FilterMedia\EffectBackground88 2. Replace IntroVideo1.avi with your own introduction video.
Note: 1. You can insert multiple introduction videos, with filename of IntroVideo1, IntroVideo2, IntroVideo3 according to the number of videos you have. 2. Video need to be in AVI format, based on the 9 : 16 (width : height) proportion.

USER MANUAL
Email: [email protected] web: www.magicmirror.me Tel: 01344-989 804
3.2.6 How to Customize the Screen UI? UI assets are the graphics that will display on the screen when someone is using the MagicMirror. To customize the UI assets, please follow the following steps:
1. Go to C:\\CompanyName_PhotoBooth\assets\graphics
2. Replace the original files with your own UI assets
Note: 1. Please make sure the filename of the UI assets are same with the original filename. (e.g. FONT_1.png) 2. UI assets need to be in PNG format, with invisible background, and is recommended to have similar size with the original files.

USER MANUAL
Email: [email protected] web: www.magicmirror.me Tel: 01344-989 804
3.3 Assets Customization for Virtual Dressing
The assets that can be customized for photo booth include: A. Garment images B. Products Information C. Photo Frame D. UI Assets

USER MANUAL
Email: [email protected] web: www.magicmirror.me Tel: 01344-989 804
3.3.1 How to Customize Garment Images? Garment images are the garments that will be displayed on the MagicMirror when users browse the collection.
Garment image on MagicMirror Screen To customize garment image, please follow the following steps:
1. Go to C:\\CompanyName_VirtualDressing\images

USER MANUAL
Email: [email protected] web: www.magicmirror.me Tel: 01344-989 804
2. Add in the garment images into the images folder
Note: 1. Garments images should be in PNG format with invisible background, and with
dimension of 1200 width x 2700 length. 2. Placement of clothes within image must be according to a provided mannequin image
(please download from http://www.magicmirror.me/MM_assets_download.html), the image should be facing front without any angle distortion. Please zoom in the shoulder part of the mannequin image and adjust the clothes images to exactly align with the shoulder of the mannequin. This is to optimize the accuracy when users virtually try-on the dresses on Magic Mirror.

USER MANUAL
Email: [email protected] web: www.magicmirror.me Tel: 01344-989 804
3.3.2 How to Update Products Information? Product information will be displayed on Magic Mirror when users browse the collection and also on the printed product slip. Product information are required for shoppers to browse products (showing details such as product name, price, and sizes, etc.)
Product info on MagicMirror Screen To update products information, please follow the following steps:
1. Go to C:\\CompanyName_VirtualDressing\CSV 2. Open Product.csv with Microsoft Excel or any other available program
3. Please fill in the details accordingly in the provided product info sheet for all the products which you are going to include in the Magic Mirror.
1. ID 2. Item Name : The name of products

USER MANUAL
Email: [email protected] web: www.magicmirror.me Tel: 01344-989 804
3. File Path : The name of the product image file (e.g. DenimShorts.png). ‘File Path’ column to link the product info with the matching product image. 4. Description : Please make sure that the name of description is same with the item name. 5. Price : in number format. If you do not want to show the price, please put ‘0’. 6. Website : put in the product URL of ecommerce site.

USER MANUAL
Email: [email protected] web: www.magicmirror.me Tel: 01344-989 804
3.3.3 How to Customize Photo Frame? To customize photo frame, please follow the following steps:
1. Go to C:\\CompanyName_VirtualDressing\FilterMedia\EffectBackground1
2. Please refer to section 3.2.1 for the steps on photo frame customization. 3.3.4 How to Customize UI Assets? To customize UI Assets, please follow the following steps:
1. Go to C:\\CompanyName_VirtualDressing\assets
2. Please refer to section 3.2.2 for the steps on UI assets customization.

USER MANUAL
Email: [email protected] web: www.magicmirror.me Tel: 01344-989 804
3.4 Assets Customization in Game module The assets that can be customized for photo booth include: A. Photo Frame B. Game Objects C. Score UI D. Game Rules E. Font Colour 3.4.1 How to Customize Photo Frame? Photo frame is the frame that displayed after users finish playing the game and take photo.
Photo Frame for Game To customize photo frame, please follow the following steps:
1. Go to C:\\CompanyName_Game\FilterMedia\EffectBackground1 2. Replace ImgFrame.png with your own image frame.
Note: 1. Please make sure the filename of the photo frame is ImgFrame.png
USER MANUAL
Email: [email protected] web: www.magicmirror.me Tel: 01344-989 804
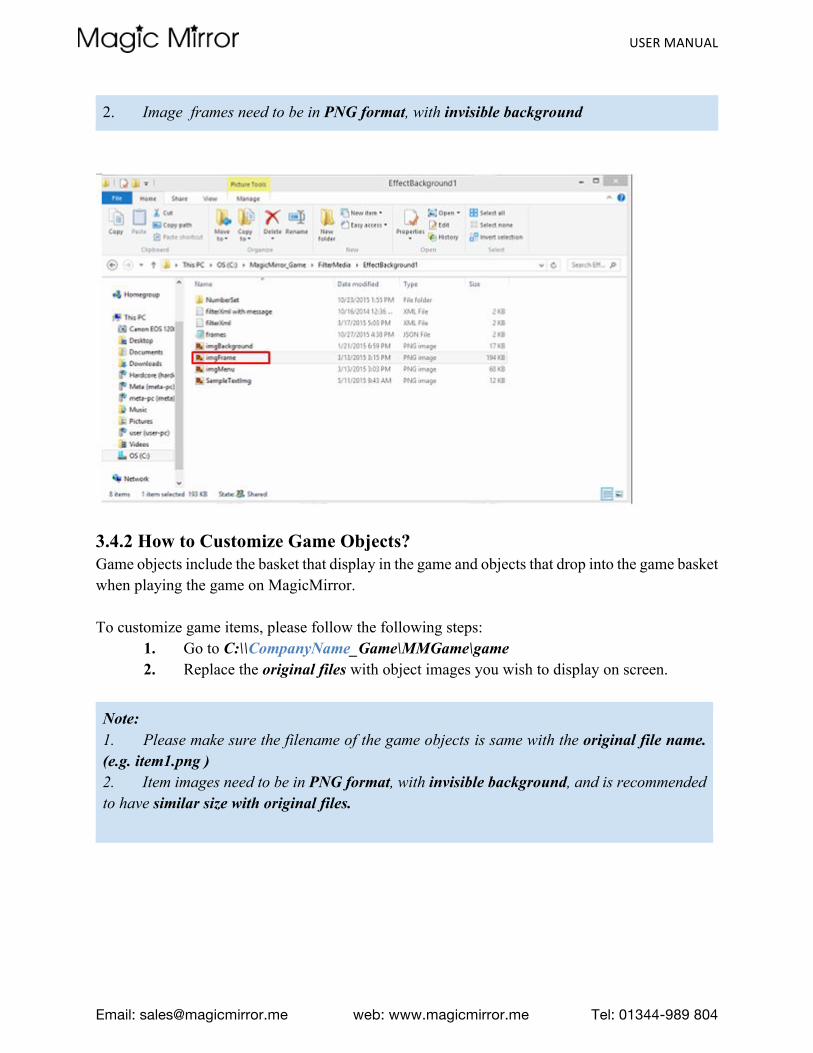
2. Image frames need to be in PNG format, with invisible background
3.4.2 How to Customize Game Objects? Game objects include the basket that display in the game and objects that drop into the game basket when playing the game on MagicMirror. To customize game items, please follow the following steps:
1. Go to C:\\CompanyName_Game\MMGame\game 2. Replace the original files with object images you wish to display on screen.
Note: 1. Please make sure the filename of the game objects is same with the original file name. (e.g. item1.png ) 2. Item images need to be in PNG format, with invisible background, and is recommended to have similar size with original files.

USER MANUAL
Email: [email protected] web: www.magicmirror.me Tel: 01344-989 804
3.4.3 How to Customize Score UI? A. How to Insert Number Set Images? You can customize the score UI by replacing the original files with preferred number set images. To customize the score UI, please follow the following steps:
1. Go to C:\\CompanyName_Game\FilterMedia\EffectBackground01\NumberSet
2. Replace 0.png to 9.png with your own preferred number set images.

USER MANUAL
Email: [email protected] web: www.magicmirror.me Tel: 01344-989 804
Note: 1. Please make sure the filename of the Number set is same with the original file name. (e.g. 0.png) 2. Number set images need to be in PNG format, with invisible background 3. Recommended size for each digit is 150 width x 150 length pixel
B. How to Adjust Score Position on the Frame? The score acquired will be displayed on the screen after users finish playing the game. To adjust the score position, please follow the following steps:
1. Go to C:\\CompanyName_Game\FilterMedia\EffectBackground1 2. Right click on frames.json, edit with Notepad ++ or other available programs. 3. Adjust “x” and “y” values to customize the score position on the frame.

USER MANUAL
Email: [email protected] web: www.magicmirror.me Tel: 01344-989 804
3.4.4 How to Add in Special Effect? During festivals or special events, you can insert special effect to be displayed on the background when users playing games. For example, you can insert the snow effect during Christmas.
Snow Effect for Game To insert special effect, please follow the following steps:
1. Go to C:\\CompanyName_Game\MMGame\game 2. Replace sceneEffect.png with your own special effect image.
Note: 1. Please make sure the filename of the image is sceneEffect.png 2. The special effect image needs to be in PNG format, with invisible background

USER MANUAL
Email: [email protected] web: www.magicmirror.me Tel: 01344-989 804
3.4.5 How to Customize Game Rules?
A. How to Customize Acquired Score for Game Objects? You can set different scores for different objects which the users catch into the basket. To customize the acquired score, please follow the following steps:
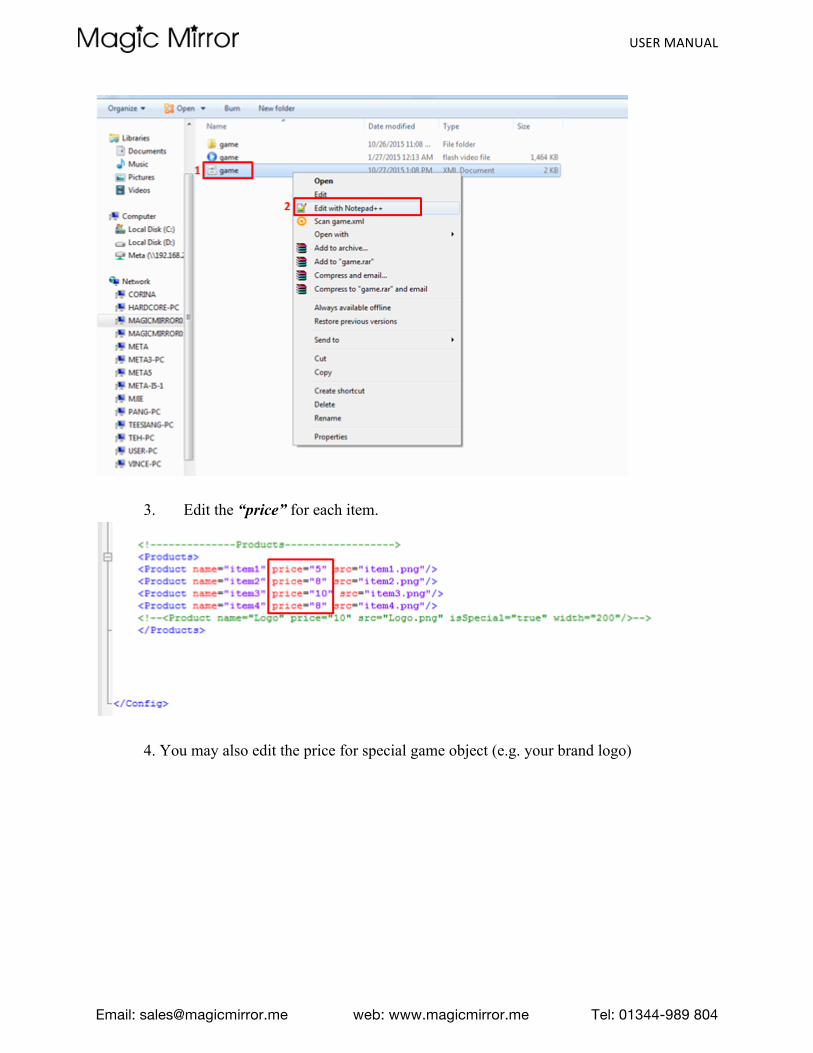
1. Go to C:\\CompanyName_Game\MMGame 2. Right click on game.xml, edit with Notepad ++ or other available program.
USER MANUAL
Email: [email protected] web: www.magicmirror.me Tel: 01344-989 804
3. Edit the “price” for each item.
4. You may also edit the price for special game object (e.g. your brand logo)

USER MANUAL
Email: [email protected] web: www.magicmirror.me Tel: 01344-989 804
Note: You can make the acquired score for each item multiple by three by adding ‘isSpecial=”true”’ after each item’s code.
B. How to Customize Game Duration? The default setting for game duration is 30 seconds. You can customize the game duration according to your preferred length. To customize the game duration, please follow the following steps:
1. Go to C:\\CompanyName_Game\MMGame 2. Right click on game.xml, edit with Notepad ++ or other available program. 3. Replace the “30” under the <Application> with your preferred game duration.
Note: 1. The duration is in terms of seconds.

USER MANUAL
Email: [email protected] web: www.magicmirror.me Tel: 01344-989 804
3.4.6 How to Customize Font Colour for Game?
Game in MagicMirror
1. Go to C:\\CompanyName_Game\MMGame\game 2. Right click on game.xml, edit with Notepad++ or other available program, and replace the text under <UI>

USER MANUAL
Email: [email protected] web: www.magicmirror.me Tel: 01344-989 804
Note:
1. For black colour font, please type in 0 x ffffff 0 x 00000 0 x 00000
2. For white colour font, please type in 0 x 00000 0 x ffffff 0 x ffffff
USER MANUAL
Email: [email protected] web: www.magicmirror.me Tel: 01344-989 804
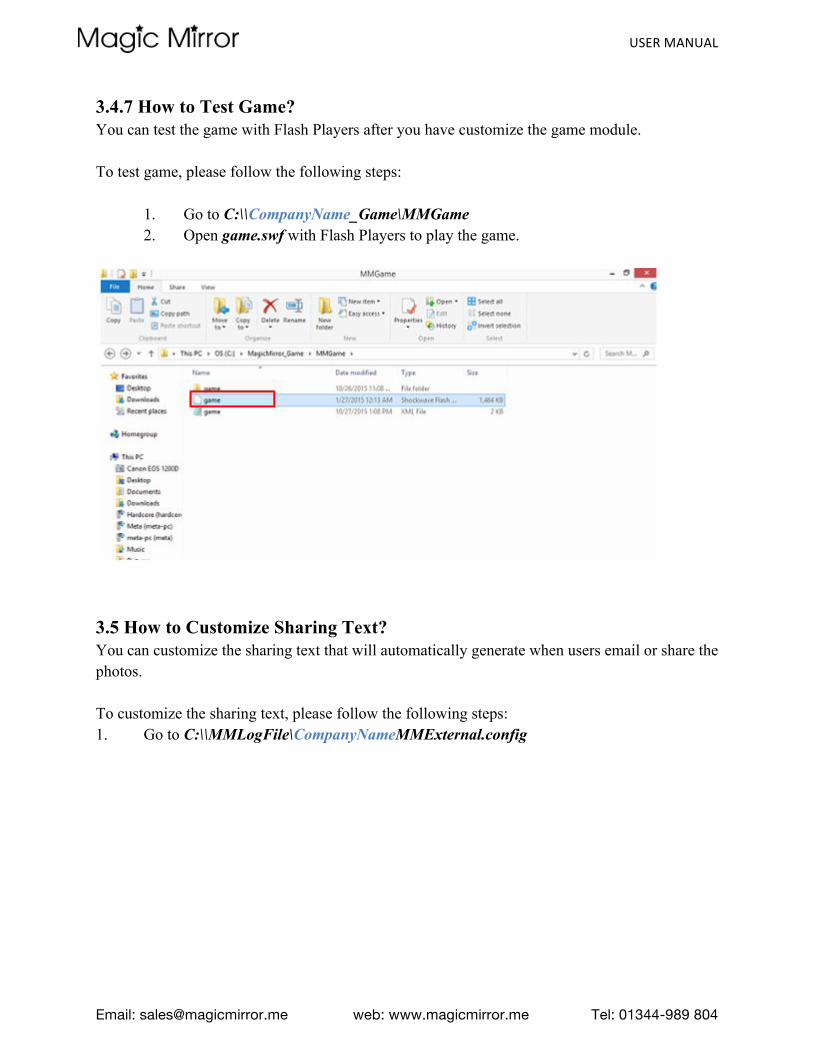
3.4.7 How to Test Game? You can test the game with Flash Players after you have customize the game module. To test game, please follow the following steps:
1. Go to C:\\CompanyName_Game\MMGame 2. Open game.swf with Flash Players to play the game.
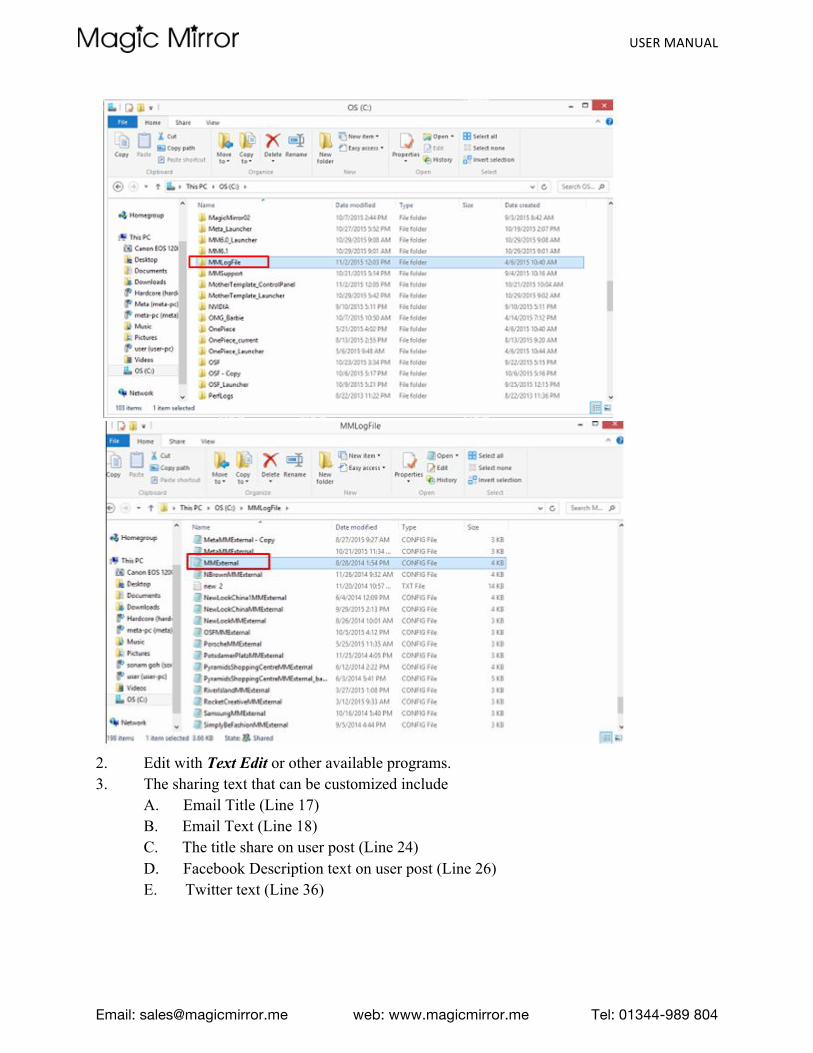
3.5 How to Customize Sharing Text? You can customize the sharing text that will automatically generate when users email or share the photos. To customize the sharing text, please follow the following steps: 1. Go to C:\\MMLogFile\CompanyNameMMExternal.config
USER MANUAL
Email: [email protected] web: www.magicmirror.me Tel: 01344-989 804
2. Edit with Text Edit or other available programs. 3. The sharing text that can be customized include
A. Email Title (Line 17) B. Email Text (Line 18) C. The title share on user post (Line 24) D. Facebook Description text on user post (Line 26) E. Twitter text (Line 36)

USER MANUAL
Email: [email protected] web: www.magicmirror.me Tel: 01344-989 804
Note: 1. Sharing text for Twitter should not more than 100 character including space
3.6 How to Remove or View Testing User Photos? All testing photo will be stored in the Temp folder, you may need to delete it before the event start to avoid them to appear on the screen during the event. To delete or view testing user photo, please follow the following steps:
1. Go to Drive C, double click on Any Module (PhotoBooth, VirtualDressing or Game), and double click on Temp folder.
2. To delete the testing images, you can choose to delete the whole folder or selected images. 3. You may backup the photo before deleting it.
USER MANUAL
Email: [email protected] web: www.magicmirror.me Tel: 01344-989 804
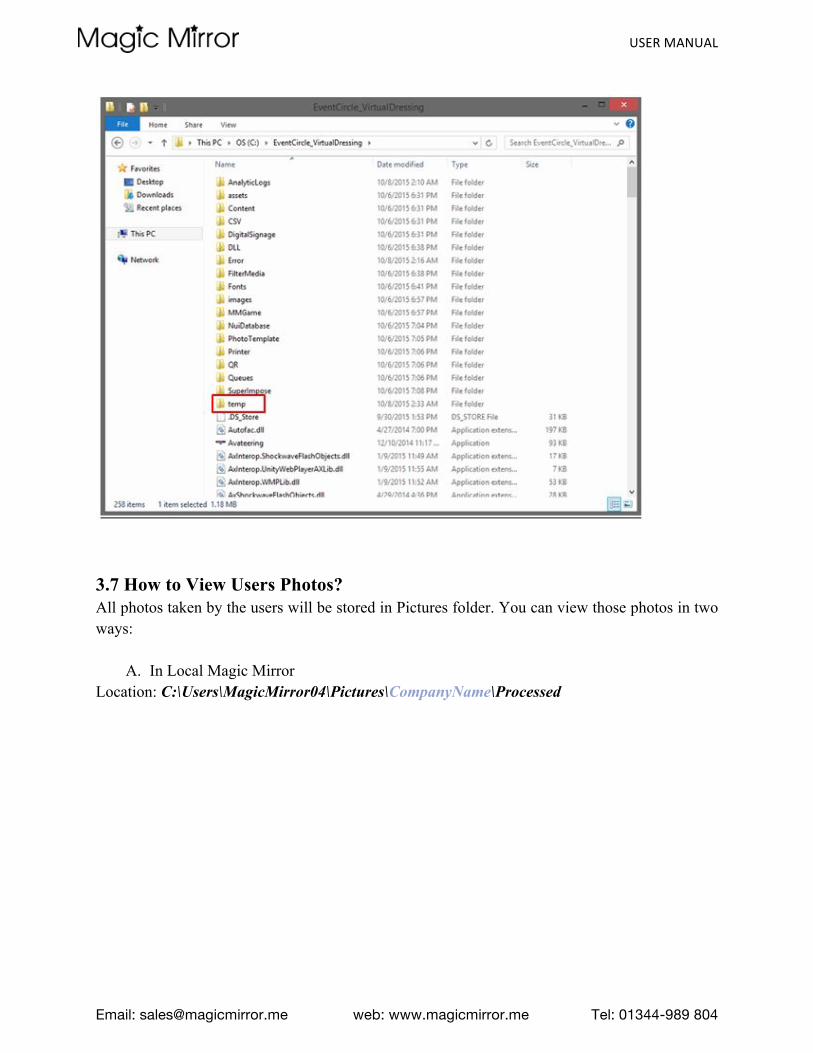
3.7 How to View Users Photos? All photos taken by the users will be stored in Pictures folder. You can view those photos in two ways:
A. In Local Magic Mirror
Location: C:\Users\MagicMirror04\Pictures\CompanyName\Processed

USER MANUAL
Email: [email protected] web: www.magicmirror.me Tel: 01344-989 804
B. In Magic Mirror Server 1. Go to http://controlpanel.retailcam.co.uk/Account/Login 2. Enter username and password
Note: Your username and password will be given by Magic Mirror Team, please contact us if you do not have it.

USER MANUAL
Email: [email protected] web: www.magicmirror.me Tel: 01344-989 804
4.0 Installation 4.1 Hardware Installation Options The installation for Magic Mirror is very easy and straightforward. It is ready to plug and play as the mirror will be pre-configured before shipping out to the stores. Magic Mirror installation only requires an Ethernet socket (to connect the mirror to the Internet) and a power cable socket (for the power supply). It is run on 200 - 240V power voltage. A power converter can be used if the power voltage of your country is not compatible.
There are 2 options for Magic Mirror installation, which are i. mobile unit with caster wheels ii. flush mount unit
4.1.1 Mobile unit with caster wheel This option allows you to reposition Magic Mirror easily with the caster wheel. It features high flexibility and mobility. The back door access that is lockable enables you to access to the inner components of Magic Mirror whenever required.

USER MANUAL
Email: [email protected] web: www.magicmirror.me Tel: 01344-989 804
4.1.2 Flush mount unit Flush mount unit allows you to better fit the Magic Mirror with your store’s interior by flush mounting the mirror into a wall or a cubicle that make it look like a normal mirror in your store. An optional plinth base can be included in the flush mount unit as opposed to the usual base with the caster wheel. Magic Mirror can be flush mounted to wall using metal L brackets. There is also a back door in flush mount unit for your store staff to access the equipments inside the mirror cabinet and it is lockable.
There are 3 options to flush mount Magic Mirror, which are:
Option 1: Flush mount Magic Mirror on a separate room or a cubicle. In this option, the back door will be removed due to limited space so the inner parts of Magic Mirror will be accessed from the sides
Option 2: Flush mount Magic Mirror to one of the fitting room. This way of installation requires minimal floor space. It reserves the back door for access to the equipments of Magic Mirror whenever needed. Only rare occasional access required, so the back doors can be locked and the fitting room can be used as normal.
Option 3: This way of installation is similar to option 2. The difference is that instead of using the default metal back door of Magic Mirror, you can customize the back door material to fit with the furnishing of your fitting room.

USER MANUAL
Email: [email protected] web: www.magicmirror.me Tel: 01344-989 804
4.2 Installation Guide for Flush Mount Option The step by step installation guide for Magic Mirror upon arrival at your store is shown as follows:
Note: 1. It is advisable to place Magic Mirror at location that is not nearby heater and at location that
has 200-‐240V power point socket and network cable socket at the bottom back of Magic Mirror for the ease of Magic Mirror’s power cable and network cable plug in.
2. It is advisable to place at location that enables you to access it from the back, not just for ventilation purpose, but also for situations such as replacing faulty components and rebooting Magic Mirror when needed.
3. It is advisable to secure Magic Mirror with metal L brackets or other methods when you chose to install Magic Mirror using flush mount option.
1. Handle the box carefully and unbox it nearby location that you wish to install Magic Mirror.
2. Carry Magic Mirror out of the box.
3. Put Magic Mirror to stand on side.
4. Put Magic Mirror to stand upright and lift it to the wall and secure it on the wall securely.
5. Lastly, plug in the power cable and network cable or on your Wi-Fi for Magic Mirror to function.
USER MANUAL
Email: [email protected] web: www.magicmirror.me Tel: 01344-989 804
5.0 Operation Magic Mirror will be preset to turn on and shut down automatically at the scheduled time. Once the mirror is turned on, the default Magic Mirror application will also start automatically. The time is normally scheduled based on the opening time and the closing time of your store or event. However, you can also start or close the Magic Mirror application at any point of time.
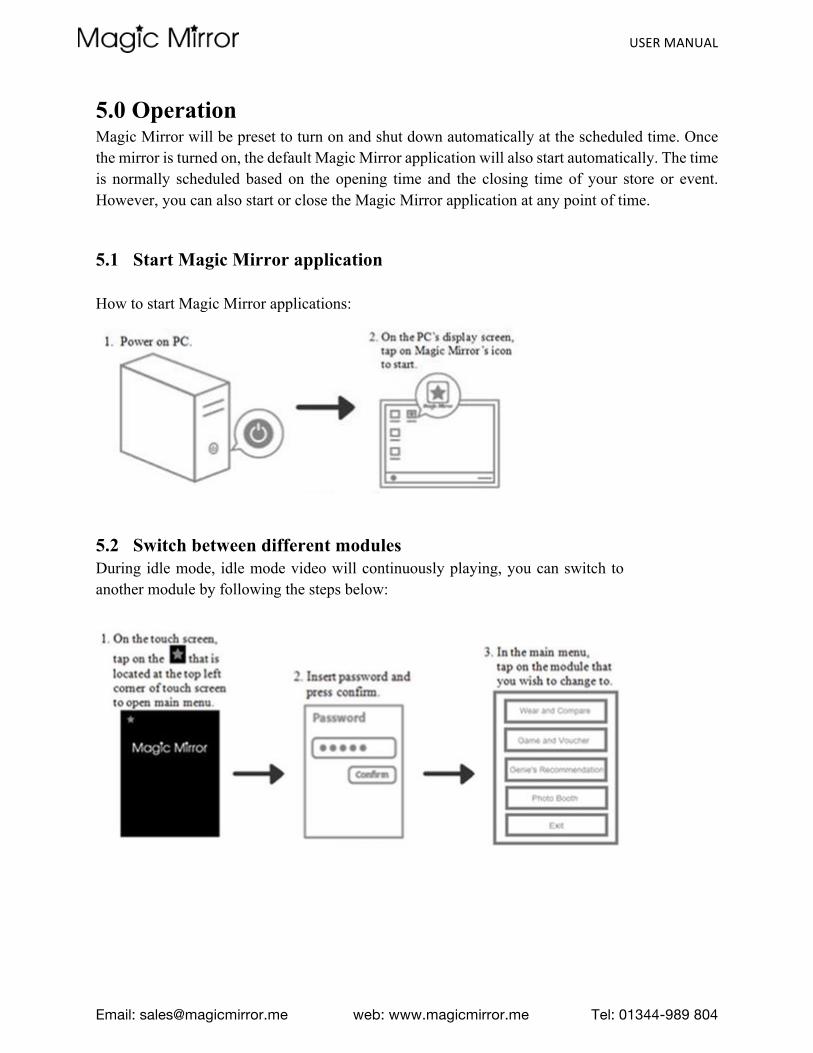
5.1 Start Magic Mirror application How to start Magic Mirror applications:
5.2 Switch between different modules During idle mode, idle mode video will continuously playing, you can switch to another module by following the steps below:
USER MANUAL
Email: [email protected] web: www.magicmirror.me Tel: 01344-989 804
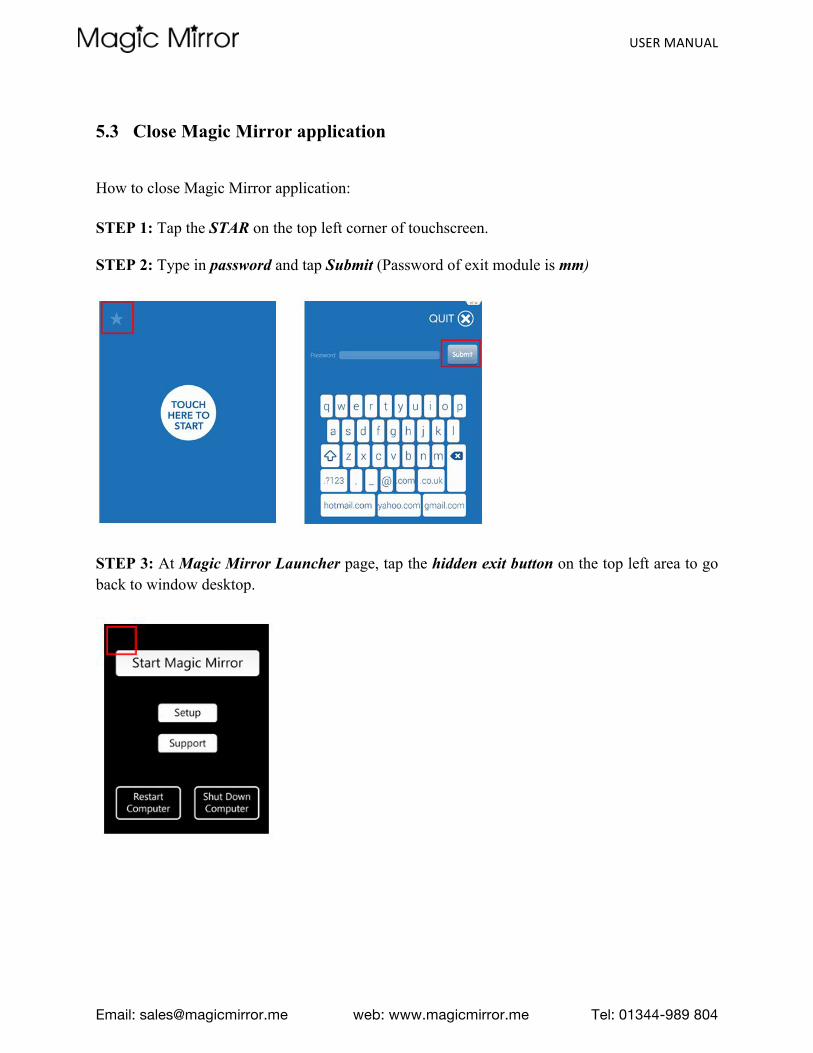
5.3 Close Magic Mirror application
How to close Magic Mirror application:
STEP 1: Tap the STAR on the top left corner of touchscreen.
STEP 2: Type in password and tap Submit (Password of exit module is mm)
STEP 3: At Magic Mirror Launcher page, tap the hidden exit button on the top left area to go back to window desktop.

USER MANUAL
Email: [email protected] web: www.magicmirror.me Tel: 01344-989 804
5.4 Adjust Camera Settings
STEP 1: Tap [Setup] on Magic Mirror Launcher. STEP 2: Tap [Step 1: Camera] STEP 3: Adjust the settings, test and save.
5.5 Magic Mirror Cleaning Guides

USER MANUAL
Email: [email protected] web: www.magicmirror.me Tel: 01344-989 804
6.0 Troubleshooting and Support Guides
6.1 QR Code Support
6.2 Hardware Failure
What should I do if the mirror faces technical problems or other relevant issues?
There is a support QR code sticker has stacked at the side door of Magic Mirror. Client can scan on the QR code via mobile phone and they will be directed to our support web page with a list of commonly faced problems together with the solutions. There is also a support contact number and email provided on the sticker where client can contact us for support.
System Health Check
Magic Mirror is incorporated with a system health check module which will run automatically on a regular basis to check on the equipment. If there is any problem detected, there will be an error notification at the bottom part of the Touch Screen.

USER MANUAL
Email: [email protected] web: www.magicmirror.me Tel: 01344-989 804
6.2.1 Camera What should I do if camera is not functioning? 1. Check and make sure the power of camera is turned on. 2. Unplug the power cable and plug in again. 3. If the power is on but the battery power is depleted, then it might because of the power cable is not functioning. 4. Reboot the Magic Mirror by power off the main switch of Magic Mirror, wait for 2-3 mins, and power on again.
6.2.2 Printer What should I do if printer is not working? 1. Check and make sure the power of printer is turned on. 2. Unplug the power cable and plug in again. 3. Reboot the Magic Mirror by power off the main switch of Magic Mirror, wait for 2-3 mins, and power on again. If the printer is still not working after rebooting, it might be due to the following reasons: A. Paper Out: Refill with a new paper roll or place the paper roll properly.
1. Turn the new media roll 2. Tear off a full turn of the media from the roll. 3. Loading process works best with the cut as a square, straight edge. Cut the paper in a suitable angle.
Note: If the media is not cut square and the operator does not have the ability to cut or tear a straight edge, then the printer can fail to load the media or even cause a media jam. The media should not make contact with the platen roller before the sensor detects the media.
4. Loading media:

USER MANUAL
Email: [email protected] web: www.magicmirror.me Tel: 01344-989 804
Note: Please use this loading method to load media for normal operations.
C. Printer Bin Full: Remove the printed receipt/voucher from the printer presenter.
C. Paper Jams: Clearing the printhead and presenter. 1. Clearing the Printhead:
Note: 1. Printhead becomes hot while printing. To protect from damaging the
printhead and risk of personal injury, avoid touching the printhead. 2. Always disable printer power by unplugging the printer from the kiosk power supply or
turning off the printer and/or kiosk power.
a. Carefully cut the media at the rear of the printer. b. Open the printhead. c. Remove and discard the damaged media. d. Close the printhead and reload the media using the Automated Media Loading method. 2. Clearing the Presenter: a. Open the presenter. b. Remove and discard the damaged media.
Automated Media Loading
The media is detected when it is inserted into empty media input slot at the rear of the printer. The printer will then start turning the platen (drive) roller when the leading edge of the media passes over the media sensor.
Then the printer will feed, cut, and eject a blank receipt and go to a ready state (solid green status indicator).
USER MANUAL
Email: [email protected] web: www.magicmirror.me Tel: 01344-989 804
c. Close the presenter securely. D. Printer Disconnect: Reconnect to host computer.
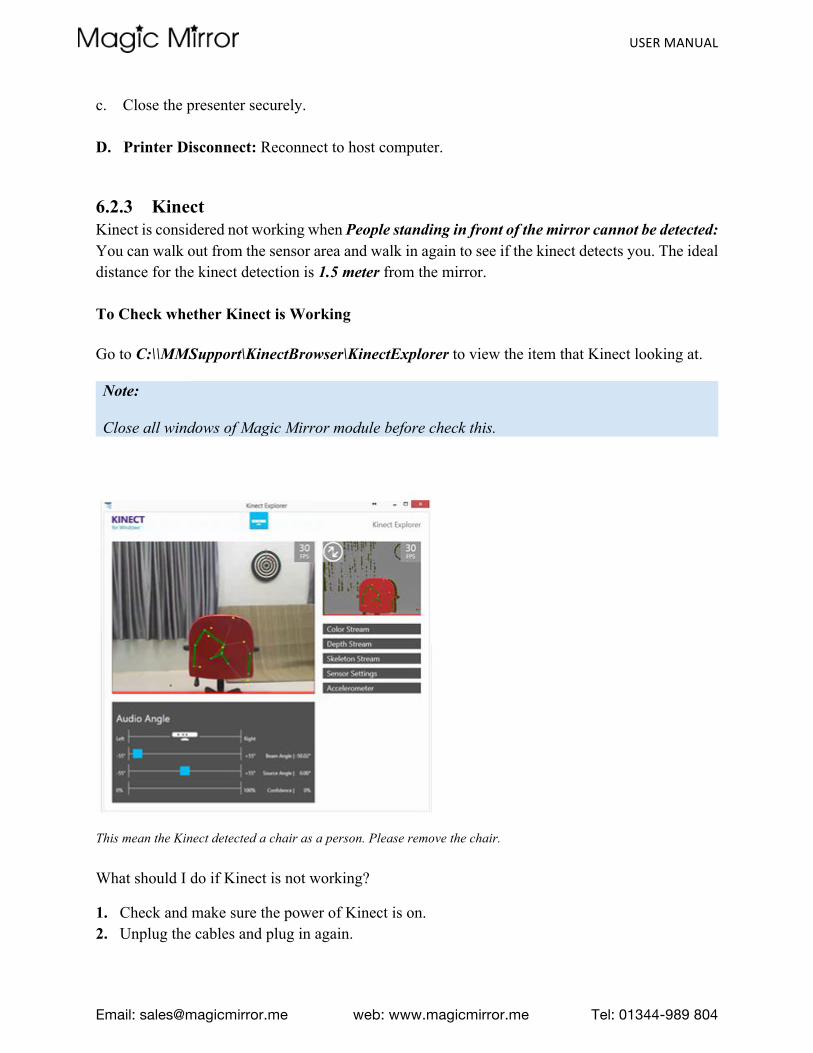
6.2.3 Kinect Kinect is considered not working when People standing in front of the mirror cannot be detected: You can walk out from the sensor area and walk in again to see if the kinect detects you. The ideal distance for the kinect detection is 1.5 meter from the mirror. To Check whether Kinect is Working
Go to C:\\MMSupport\KinectBrowser\KinectExplorer to view the item that Kinect looking at.
Note:
Close all windows of Magic Mirror module before check this.
This mean the Kinect detected a chair as a person. Please remove the chair. What should I do if Kinect is not working?
1. Check and make sure the power of Kinect is on. 2. Unplug the cables and plug in again.

USER MANUAL
Email: [email protected] web: www.magicmirror.me Tel: 01344-989 804
3. Reboot the Magic Mirror by power off the main switch of Magic Mirror, wait for 2-3 minutes, and power on again. Please make sure you switch on the PC in Magic Mirror.
6.2.4 Touch screen
What should I do if the touch screen is not accurate / over sensitive?
STEP 1: Exit all Magic Mirror modules and go back to Desktop STEP 2: Go to C:\MMSupport\ZyConfig_Tool_02.03.25_04.03.18 STEP 3: Find ZyConfig, the ZyConfig Configuration Tool STEP 4: Right click and select Run as administrator
STEP 5: Click Yes if windows come with this prompt

USER MANUAL
Email: [email protected] web: www.magicmirror.me Tel: 01344-989 804
STEP 6: Go to Manual Setup, press ‘Controller Options’
Note: Please make sure the Number of Touches is 1.
STEP 7: On Manual Setup, press ‘Sensitivity’ The best setting is

USER MANUAL
Email: [email protected] web: www.magicmirror.me Tel: 01344-989 804
Coarse Sensitivity: 3 Activation Threshold: 35 Deactivation Threshold: 35 You could adjust your setting with this reference.
STEP 8: Go to Manual Setup, press ‘Test Sensor’
You can test whether it’s touch screen hardware or software which affect the sensitivity

USER MANUAL
Email: [email protected] web: www.magicmirror.me Tel: 01344-989 804
STEP 9: Press or Touch the screen here and there to make sure all the lines are detecting your action (to make sure that every signal are working)

USER MANUAL
Email: [email protected] web: www.magicmirror.me Tel: 01344-989 804
STEP 10: If the lines are not responding to your action, it means that the touch glass, mirror film, or touch screen hardware are affecting the sensitivity. Please call or email [email protected] for further assistance. STEP 11: Press Esc to exit STEP 12: If everything is fine, please go to Install Wizard and press Touch Test
You can test whether it is inverted or not stable (Press Esc to exit)
STEP 13: If it is inverted, go to Manual Setup, press Axis Options

USER MANUAL
Email: [email protected] web: www.magicmirror.me Tel: 01344-989 804
6.2.5 Auto Startup the module To setup auto start module when MagicMirror power on, please follow the following steps:
STEP 1: Copy shortcut that placed on your Desktop. STEP 2: Go to C:\Users\AppData Go to Drive C > Click Users > your Mirror User Name > type “\AppData” on the directory > and tap “Enter”. You will see Local, LocalLow and Roaming in AppData folder. Click Roaming > Microsoft > Windows > Start Menu > Programs > Startup Location: C:\Users\MagicMirrorName\AppData\Roaming\Microsoft\Windows\Start Menu\Programs\Startup

USER MANUAL
Email: [email protected] web: www.magicmirror.me Tel: 01344-989 804
STEP 3: Done
6.2.6 Internet Connection What should I do if the mirror is not connected to Internet? 1. Check your internet router. 2. Contact your internet service provider if the Internet connection is not available.
6.2.7 Mirror Screen hanged.
What should I do if the mirror screen is hanged? 1. Switch off the main power 2. Wait for 5 minutes and turn on the main switch again.

USER MANUAL
Email: [email protected] web: www.magicmirror.me Tel: 01344-989 804
7.0 System Integration Magic Mirror is built on a truly flexible Service-Oriented Architecture (SOA) foundation. By implementing the Web Service that conforms to the published Web Services Description Language (WSDL), Magic Mirror can be easily integrated to your business environment to provide seamless customer experience and help to market your products. By applying this open framework, Magic Mirror can work with what you already have in place and improve integration with lower cost and quicker deployments.
7.1 RFID Integration RFID integration functions by enabling detections of garments with RFID tags that are moving towards Magic Mirror within the distance of 50cm. This integration enhances customer experience as information detected by the RFID receiver are shown on Magic Mirror and customer is able to make modifications instantly on Magic Mirror and directly make purchase on Magic Mirror. Note : Please refer to RFID Integration API Document for more detail information on RFID Integration.
7.2 EPOS or E-Commerce Integration EPOS or E-Commerce integration functions by enabling the direct purchasing option on Magic Mirror through an API or Web Service call. A QR code translated from transaction ID will be generated for customer as a proof of purchase that has a successful transaction on Magic Mirror.
Note: Please refer to Magic Mirror API Document for more detail information on EPOS or E-Commerce Integration.

USER MANUAL
Email: [email protected] web: www.magicmirror.me Tel: 01344-989 804
7.3 Stock Availability Integration Stock Availability integration functions by allowing you to show all of your products on the database of Magic Mirror so that your customers can access to the stock availability of their interested products on Magic Mirror. This also enables them to know which branches to go to if the current branch is out of stock.
Note: Please refer to Magic Mirror API Document for more detail information on Stock Availability Integration.
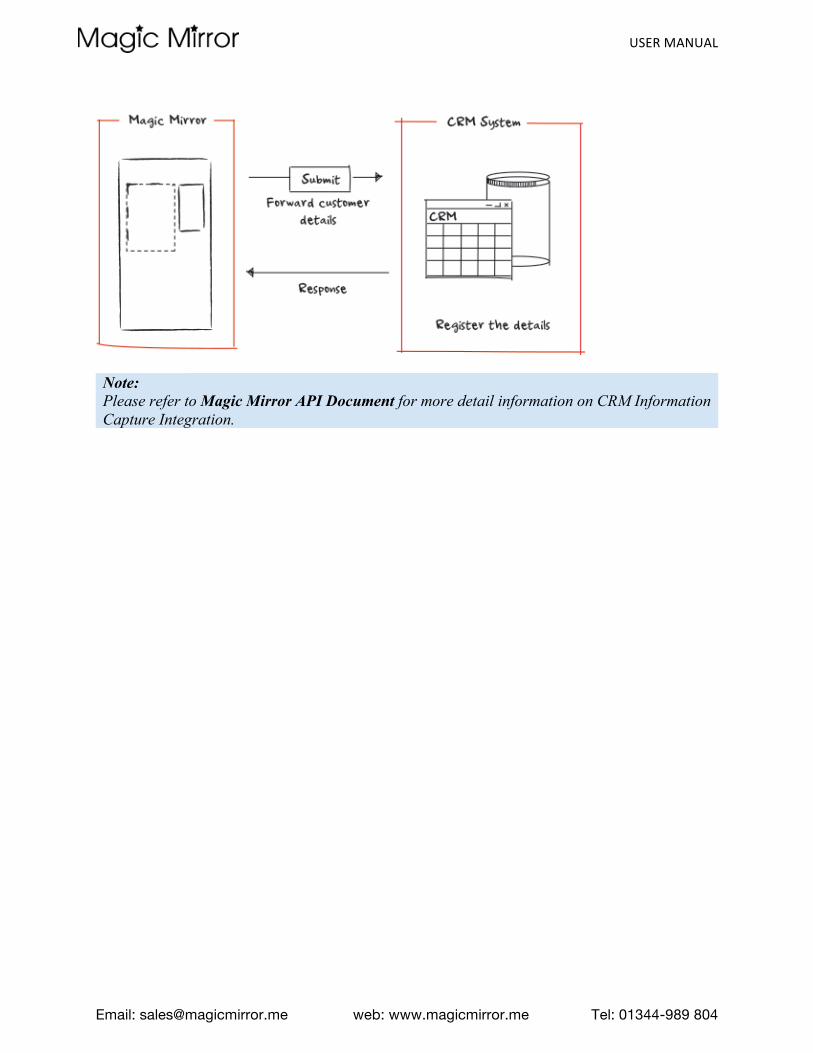
7.4 CRM Information Capture Integration CRM Information Capture Integration is done by having both ways integration of customer data collected through Magic Mirror with your CRM system through an API or Web Service call.
USER MANUAL
Email: [email protected] web: www.magicmirror.me Tel: 01344-989 804
Note: Please refer to Magic Mirror API Document for more detail information on CRM Information Capture Integration.
USER MANUAL
Email: [email protected] web: www.magicmirror.me Tel: 01344-989 804
8.0 Warranty 8.1 Limited Warranty Magic Mirror warrants the original purchaser of Magic Mirror that the Magic Mirror’s hardware are free from defects and conform to Magic Mirror’s published product specifications when delivered to your doorstep. Magic Mirror provides a one (1) year limited warranty on all of the Magic Mirror’s hardware for no charge. The warranty will start immediately on the day of purchase.
8.2 What we will do In the event of defective hardware within the warranty period, you are required to contact Magic Mirror support service immediately. You may directly contact Magic Mirror via phone or email. The contact details are shown as follows:
• Support Hours: 9.00 a.m. To 5.00 p.m. on Monday to Friday • Telephone Support Lines : 01344988681 or 01344988650 • Email : [email protected]
Magic Mirror support service will do a problem diagnose session with you over the phone and also through remote connect support if required as you contact with Magic Mirror. The problem diagnose session is to identify the problem and may require you to reboot the equipment. If the problem is not solved over the phone and through remote connect support, Magic Mirror will make arrangement with you to collect the faulty equipment and send back to manufacturer for repair or for replacement with a new unit if it is certified as faulty. Arrangement will be done by Magic Mirror to replace the repaired or new unit in the mirror cabinet. Magic Mirror will also provide support service on the installation of the repaired or new equipment when required. Subsequently, in the event of defective hardware after the warranty period, you may also request for help from Magic Mirror support service with additional fees charges on the replacement of the faulty parts.