Embed Size (px)
Citation preview
User guide V 1.0

Main menu Top controls
14-‐12-‐11 2 iVigilo Smartcam Pro User guide V 1.0
Switch between front or back camera of device
Turn alerts on or off. If button is RED, it means alerts are
on. If button is RED BLINKING it means that detection will soon start.
Turn Face detection mode ON / OFF. When ON, iVigilo
Smartcam Pro looks for faces in the camera signal.
Turn Motion detection ON/OFF. When ON, iVigilo Smartcam Pro looks for
motion in the camera signal.

Main menu Bottom controls
14-‐12-‐11 3 iVigilo Smartcam Pro User guide V 1.0
Slider to define the alert threshold. If the red indicator passes this slider, an alert will
be triggered.
Button to enter the Settings menu. Individual functions of iVigilo Smartcam Pro can be
defined here. Button to enter the iVigilo Glimpse menu for access to
support, rating and iVigilo news.
URL to access the live camera signal. The topline is
for the local network address. The bottom line will show the external (Internet)
address if the router supports port forward.
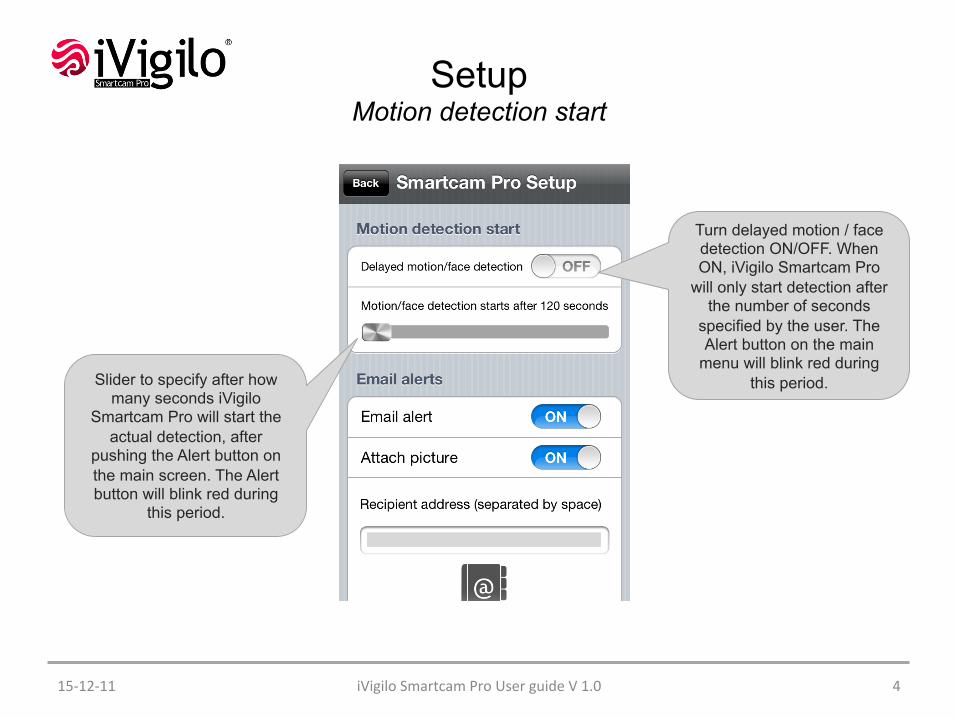
Setup Motion detection start
15-‐12-‐11 4 iVigilo Smartcam Pro User guide V 1.0
Turn delayed motion / face detection ON/OFF. When ON, iVigilo Smartcam Pro
will only start detection after the number of seconds
specified by the user. The Alert button on the main
menu will blink red during this period. Slider to specify after how
many seconds iVigilo Smartcam Pro will start the
actual detection, after pushing the Alert button on the main screen. The Alert button will blink red during
this period.

Setup Email alerts
15-‐12-‐11 5 iVigilo Smartcam Pro User guide V 1.0
Choose Email addresses out of the iPhone address book. All contacts will be displayed.
Only contacts with a valid Email address can be
chosen. Enter the advanced Email settings submenu, to specify
mail server etc.
The Email addresses of the receivers of the alert mails
can be specified here. Multiple recipients can be specified, separated by a
blank.
Attach picture ON/OFF. When ON, the actual picture of the alert will be attached to the
Email.
Turn Email alerts ON/OFF. When ON, alerts will be send
via Email.

Setup - Email alerts Advanced settings
14-‐12-‐11 6 iVigilo Smartcam Pro User guide V 1.0
Specify the address of your SMTP mail server here.
The example here shows the address for the GMail mail
server. Specify the port for your
outgoing mail server here. The example shows the port number for the GMail mail
service.
Your username to access the mail server account.
If your mail server requires authentication, turn this ON.
If your mail server requires TLS encryption, turn this ON.
Your password to access the mail server account.

Setup Twitter alerts – Store in camera roll
14-‐12-‐11 7 iVigilo Smartcam Pro User guide V 1.0
Turn Twitter alerts ON/OFF. When ON, alerts will be send
via Tweets.
Attach picture ON/OFF. When ON, the actual picture of the alert will be attached to the
Tweet.
Choose which of your Twitter accounts will tweet the alert.
Include the URL of the live camera signal in the tweet.
Turn “Store cameraroll ON/OFF. When ON, the alert
pictures will be automatically stored in your device’s
camera roll.
Note: In case you choose to attach pictures to your
tweets, be aware who will receive your alert tweets
and how often.

Setup - Twitter alerts Twitter accounts
15-‐12-‐11 8 iVigilo Smartcam Pro User guide V 1.0
Turn each account ON/OFF from which you will tweet the alerts. The Twitter accounts
are setup in the Settings section of your device.
Note: In case you choose to attach pictures to your
tweets, be aware who will receive your alert tweets
and how often.

Setup – Motion event Alert setup – Time interval between alerts
14-‐12-‐11 9 iVigilo Smartcam Pro User guide V 1.0
In this menu you can choose with which frequency you will
receive various alerts.
Slider to specify after how many seconds a new alert Email will be send during a
motion event.
Slider to specify after how many seconds a new alert
picture will be stored during a motion event.
Slider to specify after how many seconds a new alert Tweet will be send during a
motion event.

Setup – Motion event Alert setup – Limits per hour
14-‐12-‐11 10 iVigilo Smartcam Pro User guide V 1.0
In this menu you can specify if you want hourly limitations on
alerts send or stored. Turn hourly limits ON/OFF. When ON the amount of
alerts per hour will be limited.
Slider to specify a maximum number of Tweets that will be
send per hour.
Slider to specify a maximum number of mails that will be
send per hour. .
Slider to specify a maximum number of images that will be
stored per hour.

Setup – Camera Camera setup
14-‐12-‐11 11 iVigilo Smartcam Pro User guide V 1.0
Choose the resolution for the broadcast signal. On older
devices it is recommended to use the “Low” setting. Turn flash ON/OFF. When ON
the device flash can be used to provide extra light.
Turn screenblank ON/OFF. When ON, the screen of your device will turn black after the number of seconds chosen.
Slider to a number of seconds after which the device screen
will turn black.

Setup – Webcam Administrator webpage
15-‐12-‐11 12 iVigilo Smartcam Pro User guide V 1.0
Specify the username for the administrator website.
In the menu you set details for the Administrator webpage
of Smartcam Pro.
Local network address at which the Administrator
webpage can be found. Type this address into any
browser and you will see the live stream and can control
from remote certain functions of Smartcam Pro.
Specify the password for the Administrator website.
External (Internet) address at which the Administrator
webpage can be found. Type this address into any
browser and you will see the live stream and can control
from remote certain functions of Smartcam Pro.

Setup – Webcam Public webpage
15-‐12-‐11 13 iVigilo Smartcam Pro User guide V 1.0
Specify the username for the Public website.
In this menu you set details for the Public webpage of
Smartcam Pro.
Local network address at which the Public webpage
can be found. Type this address into any browser and you will see the live stream.
Specify the password for the Public website.
External (Internet) address at which the Public webpage
can be found. Type this address into any browser and you will see the live stream.
Turn protection ON/OFF. When ON, the public website
will require user-id and password.

Setup – Webcam Router & Web
15-‐12-‐11 14 iVigilo Smartcam Pro User guide V 1.0
In this menu you specify the portforwarding settings for
Smartcam Pro.
In order to access the camera stream from the
Internet, this function need to be turned on. You also
need to be in a network with a router which supports
portforwarding.
Status information regarding the port forwarding can be
found here.
Turn Portforwarding ON/OFF. When ON, Smartcam
Pro will try to identify a router on the network and define the port from which
Smartcam Pro can be accessed through the
Internet. This will work with most modern routers.
This field specifies the port number at which Smartcam Pro can be reached. Can be
set manually or will be automatically provided by the
built-in port forwarding routines.