Embed Size (px)
Citation preview

USER’S MANUAL
HD Terrestrial Receiver
STRONG TECHNOLOGIES PTY LTD.60 WEDGEWOOD ROAD, HALLAM, VICTORIA 3803
PH: +61 3 8795 7990 FAX: +61 3 8795 7991
TECHNICAL SUPPORT: 1 800 820 030
STRONG & CO. (FAR EAST), LTD.P. O. BOX 85, YOKOHAMA, KANAGAWA-KEN
JAPAN 231-91 FAX : +81 45 651 1842
Website : www.strong-technologies.com
E-mail : [email protected]
Strong Technologies Pty Ltd., 2008
E109000257A

1
1. Introduction ........................................................................................................... 21.1 Overview1.2 Main Features
2. Safety/Precautions ............................................................................................... 32.1 Safety2.2 Precautions
3. Points to Check before Use ................................................................................. 53.1 Accessories
4. Controls/Functions .............................................................................................. 64.1 Front Panel4.2 Rear Panel4.3 Remote controller4.4 Front Display
5. How to Connect .................................................................................................. 11
6. Operation ............................................................................................................. 126.1 Getting Started6.2 System Setting6.3 Channels6.4 Electronic Program Guide6.5 Games6.6 USB Menu6.7 System Information6.8 PVR
7. Troubleshooting ................................................................................................. 46
8. Specifications ..................................................................................................... 47
Contents

2 3
Thank you for purchasing this Strong Digital Terrestrial Television Receiver.This product has been manufactured in accordance with strict quality control proceduresand is fully compliant with Australian specifications.Your new receiver will enable you to experience superior picture and sound quality,widescreen images, extra channels plus a variety of new features.
For a complete list of all of our digital terrestrial television receivers and satellitereceivers, please go to our website: www.strong-technologies.comFor general enquiries, please email us at [email protected] technical assistance, please call our Technical Support Help Line on 1800 820 030
Introduction
1.1 Overview
Compliant MPEG-II/ MPEG-IV/ H.264.Output resolution 576i, 576p, 720p, 1080i1 HDMI outputOn-screen display with true color full resolution.Enhanced 16 favorite channel groups.Powerful channel control by favorites, lock, skip, move and delete function.Channel sort by alphabet, transponder and CAS.Multilingual GUI (OSG & Menu): English, Spanish, Portuguese, French, German, Italian,Turkish, Arabic, Persian, Russian, Greek, Netherlandic.Installation wizardExtended EPG and program reservation on EPG.Captions & Teletext Last channel memory function.Total 10,000 channels programmable.USB2.0 PVR Ready via external HDD or USB Flash Drive(memory stick) with Timeshift, Record& Playback functionsDolby digital audio output (S/PDIF)S-VideoComponent output (YPbPr)Various games Software & channel database upgrade via RS-232C: PC to STB/ STB to PC.Receiver lock / Install lock / Channel lock / Lock channel confirm.Zoom in function on pause / live channelMultipicture display.High speed software upgrade via USB 2.0MP3 play and JPEG viewer
Manufactured under license from Dolby Laboratories.“Dolby” and the double-D Symbol are trademarks of Dolby Laboratories.
1.2 Main Features
�
Be sure to read this user's manual beforestarting the operation of the unit.
�
Do not touch the power cord with wethands as it may cause electric shock.
�
Never open the cover. It is verydangerous to touch the inside of theunit due to possible electric shock.
�
Place the unit in a well ventilated andno-heat environment.
�
When you do not use this unit for along time, make sure that power cordis pulled out from the outlet. Also donot use a damaged power cord as itmay cause fire or electric shock.
�
A professional installation is required. If reception is interrupted, contactyour local service centre.
Safety/Precautions
2.1 Safety

4 5
When installing the unit
2.2 Precautions
�
Install the unit horizontally. An uneveninstallation may cause the unit to bedamaged.
�
Do not put heavy items such as a TVset on the unit. That may damagethe unit.
Do not leave the unit where thewater drops or splashes.
Do not put water holding items suchas vases on the unit.
�
Do not install the unit: Where it is subject to vibrations Where it is exposed to direct sunlightWhere there is humidityWhere the temperature is too high or too low.Where there is no ventilation
�
Moving the unit to a hot area from acold one will cause condensation.Do not operate the unit for one or twohours or until it has dried completely.
User's manual : 1
User's manual
Remote control : 1
Batteries (AAA type) : 2
Power Cord : 1
If any of the above-listedaccessories is missing, contactyour sales representative.
The accessories below are included with this receiver:
Points to Check before Use
3.1 Accessories
The mains plug is used as the disconnect device.The disconnect device shall remain readily operable.
Component(Y/Pb/Pr) Cable : 1
RCA Cable : 1
6 7
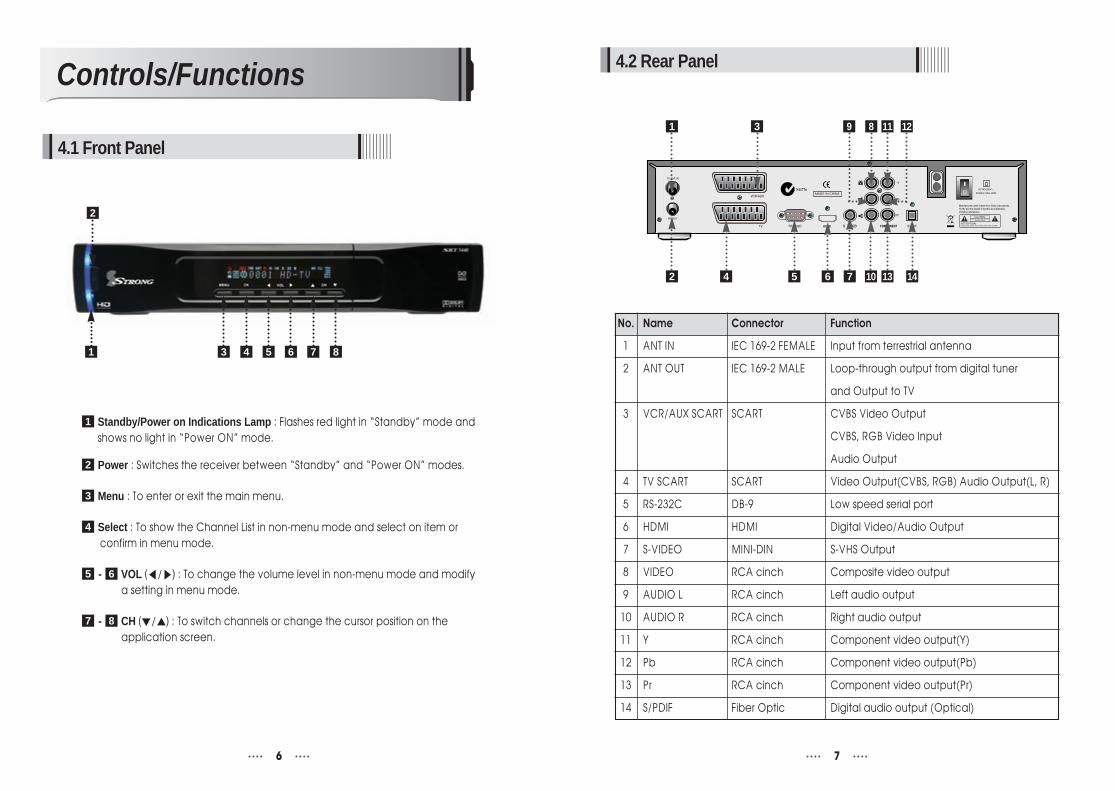
Controls/Functions
4.1 Front Panel
4.2 Rear Panel
Standby/Power on Indications Lamp : Flashes red light in “Standby” mode andshows no light in “Power ON” mode.
Power : Switches the receiver between “Standby” and “Power ON” modes.
Menu : To enter or exit the main menu.
Select : To show the Channel List in non-menu mode and select on item orconfirm in menu mode.
- VOL : To change the volume level in non-menu mode and modifya setting in menu mode.
- CH : To switch channels or change the cursor position on theapplication screen.
87
65
4
3
2
1
No. Name Connector Function
1 ANT IN IEC 169-2 FEMALE Input from terrestrial antenna
2 ANT OUT IEC 169-2 MALE Loop-through output from digital tuner
and Output to TV
3 VCR/AUX SCART SCART CVBS Video Output
CVBS, RGB Video Input
Audio Output
4 TV SCART SCART Video Output(CVBS, RGB) Audio Output(L, R)
5 RS-232C DB-9 Low speed serial port
6 HDMI HDMI Digital Video/Audio Output
7 S-VIDEO MINI-DIN S-VHS Output
8 VIDEO RCA cinch Composite video output
9 AUDIO L RCA cinch Left audio output
10 AUDIO R RCA cinch Right audio output
11 Y RCA cinch Component video output(Y)
12 Pb RCA cinch Component video output(Pb)
13 Pr RCA cinch Component video output(Pr)
14 S/PDIF Fiber Optic Digital audio output (Optical)
2
1 3 89 11 12
1 3 4 5 6 7 8
2 4 5 6 7 10 13 14

8 9
4.3 Remote controller 4.3 Remote controller
POWER : To turn the receiver On/Off.
STAND BY : Just turn the receiver off.
TV/RADIO : To switch between TV andRadio.
MUTE : To turn the sound On/Off.
TEXT : To show the teletext contents ifteletext is transmitted. Used for specialfunctions in menu mode.
SUBTITLE : To turn closed captions on oroff.
AUDIO : To show the Multi-languageaudio track, the stereo-mono mode andsubtitle information. Used for specialfunctions in menu mode.
MOSAIC : To display multiple pictures.
SLEEP : To set the STB off after minutes.
FREEZE : To pause the video. Pressagain to resume the video.
ZOOM : To zoom In/Out.
GUIDE : To show the TV/Radio programguide.
INFO : To show information about thecurrent program. Press twice to showdetail.
RECALL : To move to the previouschannel. Used for special functions inmenu mode.
GROUP : To change the channelgroups(Satellites or favorite groups).
MENU : To enter or exit the main menu.
EXIT : To exit from the present menu andmove to the previous menu.
- Vol Up & Down : To change thevolume level in non-menu mode.
1918
17
16
15
14
13
12
11
10
9
8
7
6
5
4
3
2
1 - Double arrow Up/Down : To move tothe next or previous page whenmany pages are available.
- Up & Down : To switch channels innon-menu mode and move thecursor up/down in menu mode.
- Left & Right : To change the volumelevel in non-menu mode and modify asetting in menu mode.
OK : To show the Channel List in non-menumode and select an item or confirm inmenu mode.
FILELIST : To display the filelist.
PLAY : Play Content.
STOP : Stop Playback.
RWD : Playback in rewind mode.
PAUSE : Pause playback.
FWD : Playback in forward mode.
ADVANCE : Go to live channel.
REC : Start recording.
SLOW : Playback in slow mode.
- Color Key : Select the option such asView List, Select Disk, Rename.
Numeric Keys (0-9) : To enter numericalsettings (such as channel numbers)directly.
V.FORMAT : To switch the resolution ofvideo output.
Wide : To select a TV aspect ratio with PanScan or Letter-Box(4:3) (Full screen or Pillarbox(16:9).
42
41
40
3936
35
34
33
32
31
30
29
28
27
26
2524
2322
2120
1
5 7
8 11
12 1516
18
19
17
4
2
10
1413
3
6
9
24
22
23272830
36
41
40
3133
37
202521
29
32
39
42
35
26
34
38

1 Indicates Power (On/Off) mode
2 Lights when the current channel is recording
3 Lights when Time-Shift Mode is set to enable
4 Lights when Time-Shift Mode is set to enable
5 Lights when a timer setting in standby mode
6 Lights when the signal is HD
7 Lights when USB devices is connected
8 Indicates the current channel is set to Lock mode
9 Lights when the current chanel is Dolby audio format
10 Lights when the current sound is set to Off
11 Ligths when Mp3 player is enabled
12 Lights when loop mode is setting in Mp3 player
13 Lights when the current channel is Radio mode
14 Lights when the current channel is TV mode
15 Lights when the signal comes in via TV Antenna
16 Indicates when the current playback mode in file list
17Lights when Media & Recorded file is playing and revolving on
the outer circle
18 Indicates the resolution of video ouput
19 Indicates the Progressive or interlaced scanning mode
11
How to Connect4.4 Front Display
Connect your terrestrial antenna to terrestrial antenna input
Connect the Video and Audio of the TV to Video and Audio: connect the red and whiteconnectors to Audio R and Audio L, and the yellow connector to Video
When available, you may instead connect the Component Video of your TV toComponent Video for best quality: connect the Y, Pb and Pr of your TV to Y,Pb and Prrespectively
3
2
1
10
1 2 3 4 5 6 7 8 9 10 11 12
1413 16 17 181915

13
6.1 Getting Started
Through this function, the receiver searches for all the available channels and savesthem in memory.
Auto Scan <Figure 6.1.2>
Once you have chosen the on-screen display language, the Auto Scan windowappears: You can now scan for the digital TV channels and radio stations available inyour area.
For the Search Type, select All Channel, FTA Only or TV Only.
You can select an option by pressing or on the remote control until the optionyou want is displayed. You can also display the list options by pressing the redbutton on the remote control. You can highlight an option in this list and press toselect it.
Note : FTA stands for “Free To Air”. All Channels will scan for TV channels and radiostations.
For Network Search, select ON to find the most channels available.
Press on the remote control to begin the scan.<Figure 6.1.2>
A list of channels and stations found is progressively displayed on the screen. Thescan is complete when the Auto Scan window re-appears.<Figure 6.1.3>
When the scan is complete, press EXIT on the remote control to begin watching achannel.
VOLVOL
2) Terrestrial Scan
<Figure 6.1.2> <Figure 6.1.3>
12
Operation
6.1 Getting Started
Turn on your TV and receiver.
The pop-up menu for language selection will appear.<Figure 6.1.1>Select one language and press to proceed.
After your receiver is powered on, proceed with installation as follows :
1) Menu Language Setting
<Figure 6.1.1>

15
6.1 Getting Started
You can use / to navigate between channels until you find the channel youwant.
If you know the channel number, you can enter it with the NUMERIC buttons andwait 2 seconds until the channel is changed.
If you know the channel name or channel frequency or CAS, you can press todisplay the channel list <Figure 6.1.6>
CHCH
3) Channel Selection
<Figure 6.1.6>
In the right side of screen, detailed information about the selected channel will bedisplayed. (Frequency, Bandwidth, Channel Name)
You can use the following buttons to navigate between channels:
- / : Moves one channel up/ down.
- / : Moves one page up / one page down.
- RED : Shows all channels in the current group.
- GREEN : Shows all channels sorted alphabetically.
- YELLOW : Shows all channels sorted by Channel Name and Frequency.
- BLUE : Shows all channels sorted by CAS system.
Press when the selection bar is positioned on the desired channel.
VOLVOL
CHCH
14
6.1 Getting Started
PID Scan PID Scan is an advanced form of scan that will pick up the services that eachbroadcaster provides within their broadcast signal. If you know the broadcaster’s PID,you can enter it manually; however, normal auto scan and manual scan will firstlydetect the broadcaster and then implement the PID information automatically.
Manual Scan <Figure 6.1.4>
Select the channel number you want to search for select the channel number bypressing or on the remote control, or specify a frequency by entering thefrequency with the number keys. <Figure 6.1.5>
For the Bandwidth choose either 7 MHz or 8 MHz.
For the Search Type, select All Channel, FTA Only or TV Only.
For Network Search, select ON to find the most channels available.The strength and quality of the signal from the selected channel is shown by theLevel and Quality indicators near the bottom of the screen.
Press to begin the scan.
VOLVOL
<Figure 6.1.4> <Figure 6.1.5>

1716
6.1 Getting Started
Multi Picture Display <Figure 6.1.7>
You can press to display multiple pictures; you can choose the number of picturessuch as 1X2, 2X2, 2X3 or 3X3.
ZOOM
You can press to zoom in the video.
Press the PAUSE button and press . You can zoom in sections of Freezed Video<Figure 6.1.8>
While watching a program, press . You can zoom in sections of playing video.<Figure 6.1.9>
To cancel the freeze status, please release the zoom status.
<Figure 6.1.7>
<Figure 6.1.8> <Figure 6.1.9>
6.1 Getting Started
4) Other Functions of the Remote Control Volume Control
While watching a program, press or or to control the volume.
You can press the MUTE button to remove the sound of the program: the muteicon will be displayed. Press the MUTE button again to turn the sound back on.
Channel Information
You can press the INFO button to display the information banner for a few seconds.
If you then press the INFO button again, a detailed banner will be displayed.
TV/ RADIO switching
You can press this key to change from a TV channel to a Radio channel or vice versa.
RECALL
Press to return to the previous channel.
Audio
Press to adjust the subtitle and/or audio status of the current channel:
- Audio Mode : Select between, Stereo Mono-Left Mono-Right
- Audio Track : Select between tracks available in this program
- Audio Level : Select between, High Medium Low
Note : These subtitle and audio parameters are workable only when the desiredchannel supports these functions.
TEXT
The Teletext service is a text data service sometimes available from the ServiceProvider.
FREEZE
You can press this key to freeze the video. Press it again to resume the video.
GROUP
When watching TV or listening to Radio, you can press this button to view the list offavorite channel groups.
Only registered favorite groups are displayed.
VOLVOL

1918
Closed captions <Figure 6.1.10>
Closed captions are the spoken words displayed on the screen. This option isespecially suited to the hard-of-hearing.
Press CAPTION button on the remote control.
Set the Caption option to ON.
Press .
SLEEP <Figure 6.1.11>
You can set the your receiver to turn off after a few minutes. Press to set the sleeptimer.
- To cancel the sleep timer, please press until you set time as “0 min”. (Disable, 10, 20, 30, 60, 100, 120 Minutes)
V.FORMAT <Figure 6.1.12>
You can press to change the video resoultion Select between, 1080i 720p 576p 576i
WIDE <Figure 6.1.13>
You can press to change the TV aspect ratio.
- 4:3 : Pan-Scan or Letter-Box
-16:9 : Full-Screen or Pillar-Box
6.1 Getting Started 6.1 Getting Started
<Figure 6.1.10> <Figure 6.1.11>
<Figure 6.1.12> <Figure 6.1.13>

2120
This submenu allows you to specify the audio/video output. <Figure 6.2.2>
- Audio Language : Set the default audio language when selecting a channel.
- Subtitle Language : Set the default subtitle language.
- SCART : Select the scart video output. (CVBS / RGB)
- Screen Format : Select the screen format. (16:9 / 4:3)
- Display Format : Select the TV aspect ratio(Letter Box/Pan Scan, Full Screen/Pillar Box)
- Video Format : Select the video format.(1080i, 720p, 576p and 576i)
- SPDIF : Select the Audio output type (Dolby/PCM)
2) A/V Output Settings
6.2 System Setting
<Figure 6.2.2>
6.2 System Setting
This submenu allows you to set your local time, wake up time, wake up channel and sleeptime. <Figure 6.2.1>
- GMT Usage : Set this ON for the local time to be determined by adjusting the timedifference with the GMT (Greenwich Meantime) according to your location.
- Current Date : If GMT Usage is OFF, you can modify the date by pressing .
- Current Time : If GMT Usage is OFF, you can modify the time using the NUMERIC buttons.
- Local Offset : If GMT Usage is ON, Local time is GMT time + Local Offset.
- Daylight Saving : Select the period during which daylight saving is in force.
- Wake Up Mode : Select the wake up frequency. (Off/Once/Daily/Mon~Fri)
- Wake Up Time : Set the wake up time using the NUMERIC buttons.
- Wake Up Channel : Press to set the wake up channel.
- Sleep Mode : Select the Sleep frequency. (Off/Once/Daily/Mon~Fri)
- Sleep Time : Set the sleep time using the NUMERIC buttons.
1) Time Settings
<Figure 6.2.1>

2322
This submenu allows you to set password options and to lock or unlock access to menus(Note: PIN code and password are the same). <Figure 6.2.4>
- Receiver Lock : Set ON to require entering a PIN code at powering on.
- Install Lock : Set ON to require entering a PIN code to access the installation menu.
- Channel Lock : Set ON to require entering a PIN code to access the channels menu.
- Lock Channel Confirm : Set ON to require entering a PIN code to access a lockedchannel.
- Age Limit : Set to prevent children or unauthorized people from watching programs.Select among (No Block/Block All/Block G & Above/Block PG &Above/Block M & Above/Block MA & Above/Block AV & Above/Block R &Above). When program information (age limit) is available frombroadcaster and this age limit exceeds the selection, a PIN code isrequired to access the channel/program.
- Current Password : To change your password, first enter your current password.
- New Password : Enter the new password that you want to set.
- Verify Password : Enter the new password again for confirmation.
Note : The default password is ‘0000’.
4) Security Settings
6.2 System Setting
<Figure 6.2.4>
This submenu allows you to set the menu language, OSD transparency and Informationand Volume timeouts. <Figure 6.2.3>
- Menu Language : Select the desired language for the menu.
- Transparency : Set the OSD transparency of the menu. (1% ~ 100%)
- Information Timeout : Select the display duration of the information banner. (1, 2, 3, 5or 10 seconds)
- Volume Timeout : Select the display duration of the volume box. (1, 2, 3, 5 or 10 seconds)
3) OSD Settings
<Figure 6.2.3>
6.2 System Setting

2524
This submenu allows you to use a calculator on the screen. <Figure 6.2.6>
- You can switch between Hex (Hexadecimal) and Dec (Decimal) basis for arithmeticwith the RED button of the remote control unit.
- Use the Numerical and the / / buttons on the remote control unit. VOLVOL
6) Calculator
<Figure 6.2.6>
This submenu allows you to transfer the software from a receiver to another receiver. Youcan select and transfer Firmware/ Channel Data. <Figure 6.2.7>
- Firmware : Transfer the firmware of a receiver to another receiver.
- Channel Data : Transfer the channel data of a receiver to another receiver.
7) Data Transfer
<Figure 6.2.7>
6.2 System Setting
This submenu allows you to restore the factory set values (useful when encounteringproblems after changing settings). <Figure 6.2.5>
- Delete Radio Channels : Erase all radio channels in the database.
- Delete Scramble Channels : Erase all scramble channels in the database.
- Delete All Channels : Erase all channels.
- Factory Set : Erase all channels and restore the factory default settings.
5) Database Reset
<Figure 6.2.5>
6.2 System Setting
2726
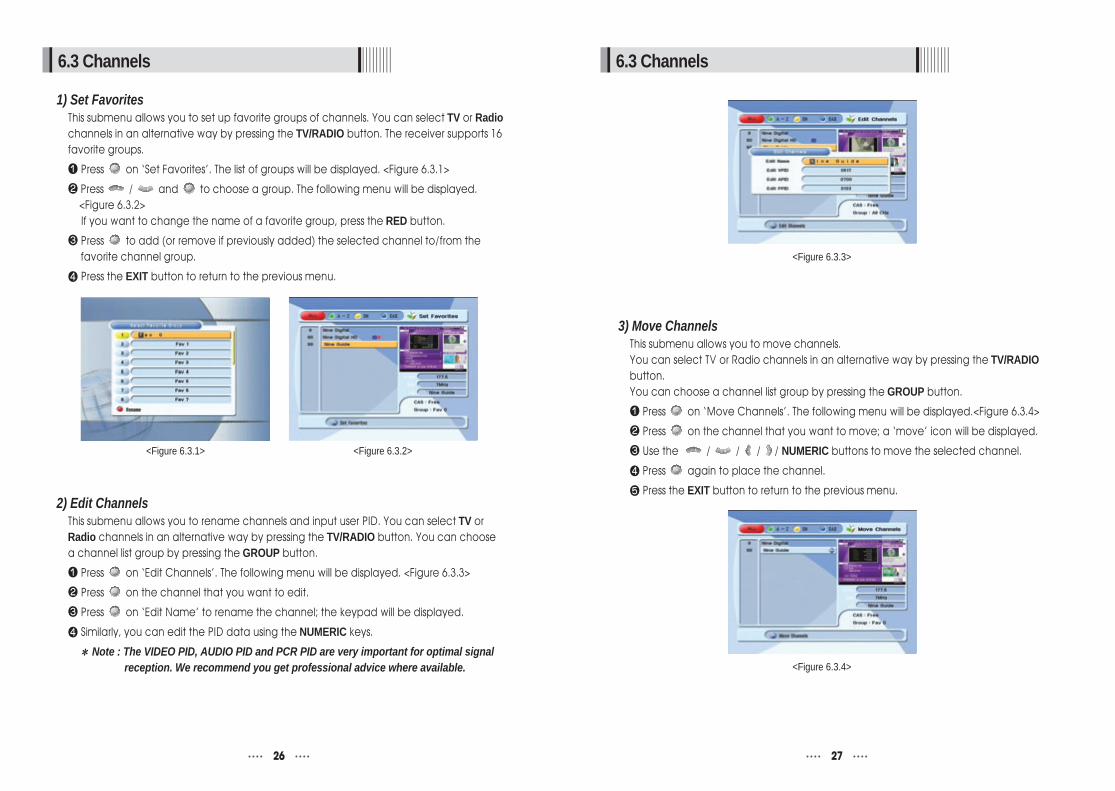
6.3 Channels
<Figure 6.3.3>
This submenu allows you to move channels.You can select TV or Radio channels in an alternative way by pressing the TV/RADIObutton.You can choose a channel list group by pressing the GROUP button.
Press on ‘Move Channels’. The following menu will be displayed.<Figure 6.3.4>
Press on the channel that you want to move; a ‘move’ icon will be displayed.
Use the / / / / NUMERIC buttons to move the selected channel.
Press again to place the channel.
Press the EXIT button to return to the previous menu.
VOLVOL
CHCH
3) Move Channels
<Figure 6.3.4>
6.3 Channels
This submenu allows you to set up favorite groups of channels. You can select TV or Radio channels in an alternative way by pressing the TV/RADIO button. The receiver supports 16favorite groups.
Press on ‘Set Favorites’. The list of groups will be displayed. <Figure 6.3.1>
Press / and to choose a group. The following menu will be displayed.<Figure 6.3.2> If you want to change the name of a favorite group, press the RED button.
Press to add (or remove if previously added) the selected channel to/from thefavorite channel group.
Press the EXIT button to return to the previous menu.
CHCH
1) Set Favorites
<Figure 6.3.1> <Figure 6.3.2>
This submenu allows you to rename channels and input user PID. You can select TV orRadio channels in an alternative way by pressing the TV/RADIO button. You can choosea channel list group by pressing the GROUP button.
Press on ‘Edit Channels’. The following menu will be displayed. <Figure 6.3.3>
Press on the channel that you want to edit.
Press on ‘Edit Name’ to rename the channel; the keypad will be displayed.
Similarly, you can edit the PID data using the NUMERIC keys.
Note : The VIDEO PID, AUDIO PID and PCR PID are very important for optimal signalreception. We recommend you get professional advice where available.
2) Edit Channels

2928
<Figure 6.3.6>
This submenu allows you to skip channels. Once a channel is set to be skipped, it will bewhenever you navigate channels using / in non-menu mode. You can select TVor Radio channels in an alternative way by pressing the TV/RADIO button. You canchoose a channel list group by pressing the GROUP button.
Note : You can still access a ‘skipped’ channel if you enter its number using theNUMERIC buttons in non-menu mode.
Press on ‘Skip Channels’. The following menu will be displayed.<Figure 6.3.6>
Press on the channel that you want to skip/un-skip; the skip icon will be displayed /removed.
Press the EXIT button to return to the previous menu.
CHCH
5) Skip Channels
6.3 Channels
This submenu allows you to lock channels to control access to them. Once a channel islocked, you will be asked to enter a password whenever you try to watch it. You canselect TV or Radio channels in an alternative way by pressing the TV/RADIO button. Youcan choose a channel list group by pressing the GROUP button.
If you set ‘Lock Channel Confirm’ (refer to <6.2>security setting) to OFF, you will notbe asked to enter a password even if the channel is locked.
Press on ‘Lock Channels’. The following menu will be displayed. <Figure 6.3.5>
Press on the channel that you want to lock/unlock; the lock icon will bedisplayed/removed.
Press the EXIT button to return to the previous menu.
4) Lock Channels
<Figure 6.3.5>
6.3 Channels

3130
6.4 Electronic Program Guide
This submenu allows you to access the electronic program guide when available.
Press the GUIDE button to display the guide menu. <Figure 6.4.1>
Press / to see the previous/next guide.
Press / / / to select another channel. <Figure 6.4.1>
Press to watch the selected channel and access its EPG data.
If you press in the right side of the screen (Event display list). - If the current time EPG is selected, you will return to the previous menu and get signal
from the selected channel.- If a future time (next) EPG is selected, the selected program will be reserved and the
event color will change.
You can select TV or Radio channels by pressing the TV/RADIO button
You can choose a channel list group by pressing the GROUP button.
You can access the timer menu by pressing the RED button. <Figure 6.4.2>
CHCH
VOLVOL
1) EPG
This sub menu allows you to set the on/off time of your receiver.
This submenu allows you to set on/off times of your receiver. To display the timer menu,press the RED button while in the guide menu. <Figure 6.4.2>
Press to select a timer’s parameter.
Press / to change the parameter.
- Timer No : Select the timer that you want to modify. (1- 8)
- State : Select the timer frequency. (off/once/daily/Mon~Fri/weekly)
- Date : Press to display a Calendar pop-up; Select a date
- Start Time : Input the time for your receiver power-on; use the NUMERIC buttons
- End Time : Input the time for your receiver power-off; use the NUMERIC buttons
- Channel : Press to display a Channel list pop-up; Select a channel
CHCH
2) Timer
6) Delete ChannelsThis submenu allows you to delete channels. You can select TV or Radio channels in analternative way by pressing the TV/RADIO button. You can choose a channel list groupby pressing the GROUP button.
Note : Be careful! If you delete a channel, you will not be able to access it again untilyou rescan.
Press on ‘Delete Channels’. The following menu will be displayed. <Figure 6.3.7>
Press on the channel that you want to set/unset for deletion; the delete icon willbe displayed/removed.
Press the INFO button to delete all channels in the current list; you will be asked toenter your password.
Press the EXIT button to return to the previous menu and confirm deletion.
<Figure 6.3.7>
6.3 Channels

3332
Press on ‘Tetris’. The following menu will be displayed. <Figure 6.5.1>
You can choose a skill level using / .
Press to start the game <Figure 6.5.2>, or press the EXIT button to return to theprevious menu.
Press to rotate a block.
Press / to move a block.
Press to drop a block.
You can see the next block in the top-right small window.
Press the EXIT button to quit the game.
CH
VOLVOL
VOLVOL
1) Tetris
<Figure 6.5.1> <Figure 6.5.2>
6.5 Games
2) SokobanHow to play Sokoban: you have to push the balls to their correct positions. The balls canonly be pushed, never pulled, so you have to be careful not to push them into a cornerwhere you can’t get them out from. You can only push one ball at a time.
Press on ‘Sokoban’. The following menu will be displayed. <Figure 6.5.3>
You can choose a skill level using / .
Press to start the game <Figure 6.5.4>, or press the EXIT button to return to theprevious menu.
Press / / / to move.
Press the RED button to undo the previous move. You can undo only one step.
Press the GREEN button to restart the game.
Press the YELLOW/BLUE buttons to jump to the previous/ next level. You can jumponly between completed levels.
Press the EXIT button to quit the game.
VOLVOL
CHCH
VOLVOL
<Figure 6.4.3> <Figure 6.4.4>
- Record : For Record, select ON.
To set another timer, press and then <Figure 6.4.3>, <Figure 6.4.4>; otherwisepress EXIT.
VOL
CH
6.4 Electronic Program Guide
<Figure 6.4.1> <Figure 6.4.2>

3534
This submenu allows you to play various MP3 files, view JPG files or download a newsoftware by connecting your USB flash drive.
1) MP3 menu
Select the MP3 file you want to play back by using / , in the file list. <Figure 6.6.1>
Press the EXIT button to hide the file list. You can then select an option using / ,
. <Figure 6.6.2>
You can then change the volume by pressing / .
Press on to display the MP3 file list.
Press on to display information about the selected MP3 file.
- FILELIST : Shows/Hides the MP3 file list
- INFO : Shows information about the MP3 file you selected.
- YELLOW : Choose the Hard disk volume or usb device with USB hub.
VOLVOL
VOLVOL
CHCH
6.6 USB Menu
<Figure 6.6.1> <Figure 6.6.2>
6.5 Games
<Figure 6.5.3> <Figure 6.5.4>
Press on ‘Snake’. The following menu will be displayed. <Figure 6.5.5>
You can choose a skill level using / .
Press to start the game <Figure 6.5.6>, or press the EXIT button to return to theprevious menu.
Press / / / to move.
Pass through the GREEN icon to increase your score; the length of the snakeincreases.
Pass through the RED icon to decrease the snake’s length.
Avoid the BLACK icons. If you hit a BLACK icon (block), the game ends.
Press the EXIT button to quit the game.
VOLVOL
CHCH
VOLVOL
3) Snake
<Figure 6.5.5> <Figure 6.5.6>

3736
6.6 USB Menu
4) Management
- Disk Information : Choose the Hard disk volume or usb device with USB hub. You canview a information of usb devices (Total Size, Used Size, Free Size)<Fig 6.6.5>
- Chek Disk : Choose the Hard disk volume or usb device with USB hub. You can checkthe usb devices. <Fig 6.6.6>
- Format Disk : You can format the usb devices. <Fig 6.6.7>
Warning : All data will be lost to the disk.
<Figure 6.6.7>
<Figure 6.6.5> <Figure 6.6.6>
6.6 USB Menu
2) JPG menu
Press / to select a picture. <Figure 6.6.3>
Press to show the picture you want to display.
- RED : Sets the time interval between slides.
- GREEN : Selects slide show.
- YELLOW : Choose the Hard disk volume or usb device with USB hub.
- FILELIST : Shows/Hides the JPEG file list.
3) Data Transfer menu
Select the software you want to download by using / in the list <Figure 6.6.4>
Press to start software downloading
- YELLOW : Choose the Hard disk volume or usb device with USB hub.
- RED : Upload it does a Channel list.
- FILELIST : Shows/Hides the JPEG file list
Warning : Please do not switch off your receiver before software downloading iscompleted.
CHCH
CHCH
<Figure 6.6.3>
<Figure 6.6.4>

39
6.8 PVR
File Playback
Press to show the file list. Select the file you want to play back by using /
, .Press . In the right side of screen, detailed information about the selected file willbe displayed. (Recorded Date/Time, Used size, Free Size) <Figure 6.8.1>
- To see a full screen, press once more. And then the following time-bar willappear. <Figure 6.8.2>
CH
CH
1) File List
<Figure 6.8.1> <Figure 6.8.2>
38
6.7 System Information
You can check the current information about your receiver such as receiver modelname, S/W (software) version, H/W (hardware) version, manufacturing date, etc. <Figure 6.7.1>
Note : This information is useful to download new software and/or repair the receiver.
<Figure 6.7.1>

41
6.8 PVR
You can operate the trick mode while you are playing the recording files. These functionsare available in playback mode or time-shift mode powerfully.
PLAY
This button will display a time- banner. If you want to show the play list while playingthe file by using .
PAUSE
This button will pause the playing file until you play again with or . <Figure6.8.4>
ADVANCE
- If the time-shift mode is enabled, You can press to jump the live program.
- If the playback mode is enabled, You can press to stop the current playing fileand then jumping the live program.
FF(Fast Forward)
- When playing the file, you can press to adjusting the playing speed.<Figure6.8.5>
- The speed will change to x2, x4 and x8.
2) Trick Mode
<Figure 6.8.4> <Figure 6.8.5>
40
GROUP
Select between, File Mode Dir Mode
ADVANCE
Shows all sorted files. Select between, Sort by name Sort by time.
Edit Menu
You will be asked to enter a password whenever you try to enter it. Press . The pop-up menu for selection will appear<Figure 6.8.3>.
Select the item that you want to edit, and set its parameters as desired
Normal Mode : Press on the file that you can see the preview of a selected file.
Lock Mode : Press on the file that you want to lock/unlock.
Delete Mode : Press on the file that you want to delete.
Rename Mode : Press on the file that you can change a filename.
If you set ‘Channel Lock’ (refer to <Figure 6.2.4>security setting) to OFF, you willnot be asked to enter a password even if the channel is locked.
6.8 PVR
<Figure 6.8.3>
4342
6.8 PVR
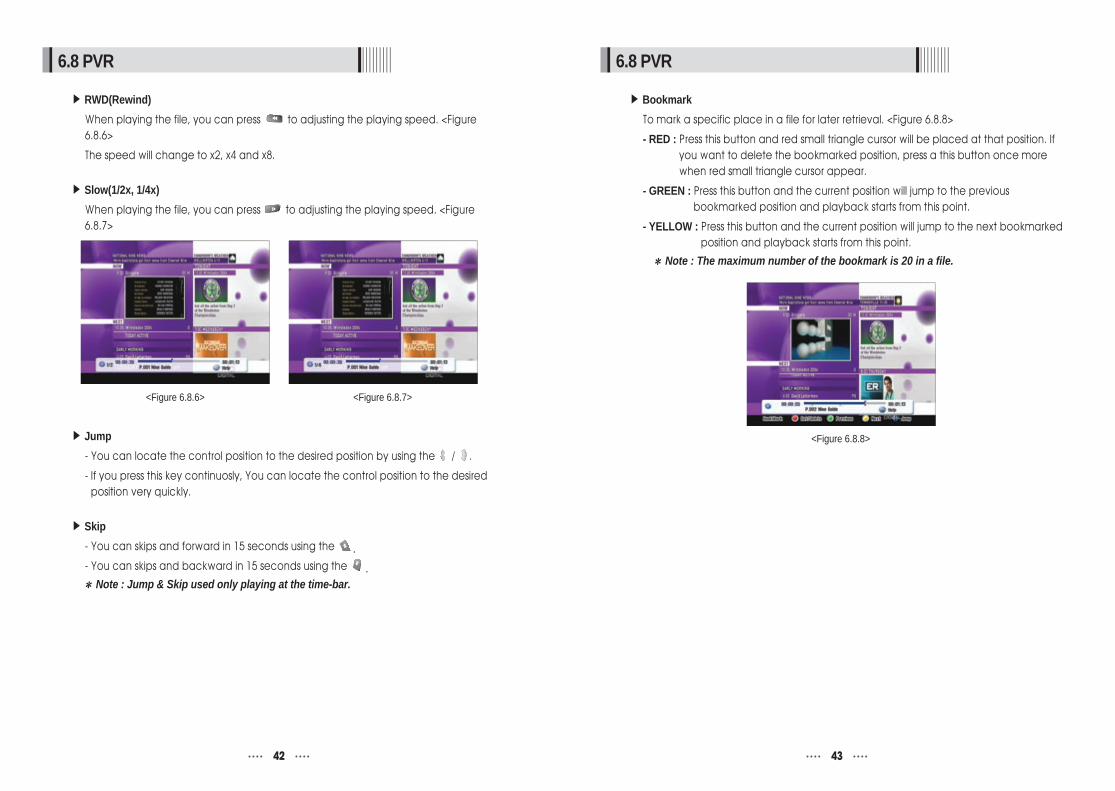
Bookmark
To mark a specific place in a file for later retrieval. <Figure 6.8.8>
- RED : Press this button and red small triangle cursor will be placed at that position. Ifyou want to delete the bookmarked position, press a this button once morewhen red small triangle cursor appear.
- GREEN : Press this button and the current position will jump to the previousbookmarked position and playback starts from this point.
- YELLOW : Press this button and the current position will jump to the next bookmarkedposition and playback starts from this point.
Note : The maximum number of the bookmark is 20 in a file.
<Figure 6.8.8>
6.8 PVR
RWD(Rewind)
When playing the file, you can press to adjusting the playing speed. <Figure6.8.6>
The speed will change to x2, x4 and x8.
Slow(1/2x, 1/4x)
When playing the file, you can press to adjusting the playing speed. <Figure6.8.7>
<Figure 6.8.6> <Figure 6.8.7>
Jump
- You can locate the control position to the desired position by using the / .
- If you press this key continuosly, You can locate the control position to the desiredposition very quickly.
Skip
- You can skips and forward in 15 seconds using the
- You can skips and backward in 15 seconds using the
Note : Jump & Skip used only playing at the time-bar.

4544
6.8 PVR
This function is availabe when usb device is connected. You can choose a channel torecord the Program Guide menu by using . (Refer to 6.4 Electric Program Guide,2)Timer)
5) Timer Recording
If you want to pause and resume live TV channel, press PAUSE button. The defaulttime of Time-Shift is 30 min in your STB.<Fig 6.8.11>
If you want to resume live TV channel, press PLAY button. <Figure 6.8.12>
The trick-mode operations are provided. If you want to jump to live channel, pleasepress .
6) Time Shift
<Figure 6.8.11> <Figure 6.8.12>
6.8 PVR
You can record a current channel by using . If you then press , a time-bannerwill be displayed.<Figure 6.8.9>
Press once more. The following picture shows that you can select item when yourecord a current channel. <Figure 6.8.10>
- Channel : It shows a current channel.
- Name : It shows a current recording name.
- Duration : You can change the duration of recording time by using the / . Andcurrent recorded time appear.
- Stop : If you stop the recording, Press .
Note : 1. Do not remove the USB device while recording a program.
2. You can’t change to another channel while recording a program.
4) Instant Recording
<Figure 6.8.9> <Figure 6.8.10>

4746
Specifications
IEC 169-2, Female
IEC 169-2, Male
170 ~ 230 MHz, 470 ~ 862MHz
75 Ohms Nominal
7,8MHz(-78dBm~-25dBm) switchable by software
7,8MHz(-3dB) switchable by software
OFDM
2k and 8k hierarchical/non-hierarchical
1/2, 2/3, 3/4, 5/6, 7/8
1/4, 1/8, 1/16, 1/32
32bit processor (266MHz)
32Mbyte X 4
8Mbyte
256Kbit
MPEG-2, MPEG-4, H.264
up to 15M bits/s
576i, 576p, 720p, 1080i
PAL
4:3,16:9
Mono, Stereo, Joint Stereo
32, 44.1 and 48 KHz
9pin D-sub male, Max 115K bps
NEC-IR
up to 7 Meter
DC 5V Max 500mA
Fully DVB compliant
Input connector
Loop-through out
Frequency range
Input impedance
Signal level
IF Bandwidth
Waveform
Carrier Mode
Code Rate
Guard Interval
Processor
DDR SDRAM
FLASH
EEPROM
MPEG 2
Data Rate
Resolution
Video format
Aspec Ratio
DVB compliant
MPEG 1 layer 1 &2
Type
Sampling rates
Connector
Code
Operating condition
USB Supply
System capabilities
TERRESTRIAL
System capabilities
Tuner
& Channel Decoder
System resource
Video decoder
Teletext
MPEG Audio
Serial data interface
Remote control
USB
Problem
The LED light on the frontpanel does not light.
No Picture or sound.
Black-and-white screen or V-Hold.
The remote controlleris not working.
Troubleshooting
There may be various reasons for the abnormal operation of the unit. Therefore, if the unitdoes not work properly, check it according to the procedures shown in the table below:
Remedy
Connect the power cord properlyinto the power socket.
Connect the two terminalscorrectly with RCA,SCART or HDMI cable(s).
Connect the antenna cablecorrectly.
Adjust the direction of theantenna.
Check the cable connections, the antenna and other equipmentconnected between the antennaand the receiver, or adjust theantenna.
Type the setting values correctly.
Use a TV of the same mode.
Connect a NTSC/PAL converterbetween the receiver and the TV.
Change the batteries.
Switch off the light.
Aim the remote control at thereceiver.
Possible causes
The AC power cord isdisconnected.
Wrong connection of thevideo/audio output to theTV input terminal.
Wrong connection of thesatellite antenna cable.
Wrong direction of theterrestial antenna.
No signal or weak signal.
Wrong setting of channelinformation in the MENUscreen.
Your TV mode (PAL/NTSC)is different from the satellitebroadcasting mode.
Batteries are exhausted.
Fluorescent light is interferingwith the remote controller.
Remote controller isincorrectly aimed.

48
max 40W
100V ~ 250V
50Hz ~ 60Hz
Video output(CVBS, RGB)
Loop-through RGB output
Audio Out(L, R)
Video Out(CVBS)
Video In(CVBS, RGB)
Audio Out(L, R)
1 X RCA cinch
2 X RCA cinch
3 X RCA cinch
9pin D-sub
IEC 169 - 2
IEC 169 - 2
Fiber Optic
Digital Video/Audio Output
Mini-Din
Power consumption
Supply voltage
Supply frequency
TV SCART
VCR SCART
Video
Audio L/R
Component(Y/Pb/Pr)
Serial data
Terrestrial ant input
Terrestrial ant output
S/PDIF
HDMI
S-VIDEO
Power supply
Rear Panel
connectors
335 X 58.5 X 247(mm)
3 Kg
Size (W X H X D)
Weight (Net)
PhysicalSpecification