Embed Size (px)
Citation preview

User’s Manual
UsersManual-WithTraslations-110316-01.indd 1 11-03-18 11:30 AM

Front (diagram 1): » Up/Down, Left/Right menu button » SD/SDHC card slot » Scan button » Photo/Film selection switch » Power status LED » Film/Slide holder insertion slot
FrontDiagram 1
BackDiagram 2
Back (diagram 2): » DC power » USB 2.0 port » AV TV port
Film/Slide holder insertion slotPower status LED
Scan buttonUp/Down, Left/Right
SD card slotPhoto/Film selection switch
AV TV Port USB 2.0 port
DC power
EN
GLIS
H
1
PACKAGE CONTENT » Scanner unit » User’s manual » USB 2.0 cable » Printer cable » A/C adapter (5V, 1A, DC) » One film strip holder » One mounted slide holder
SCANNER COMPONENTS
(Additional holders available for purchase)
User’s Manual
UsersManual-WithTraslations-110316-01.indd 1 11-03-18 11:30 AM
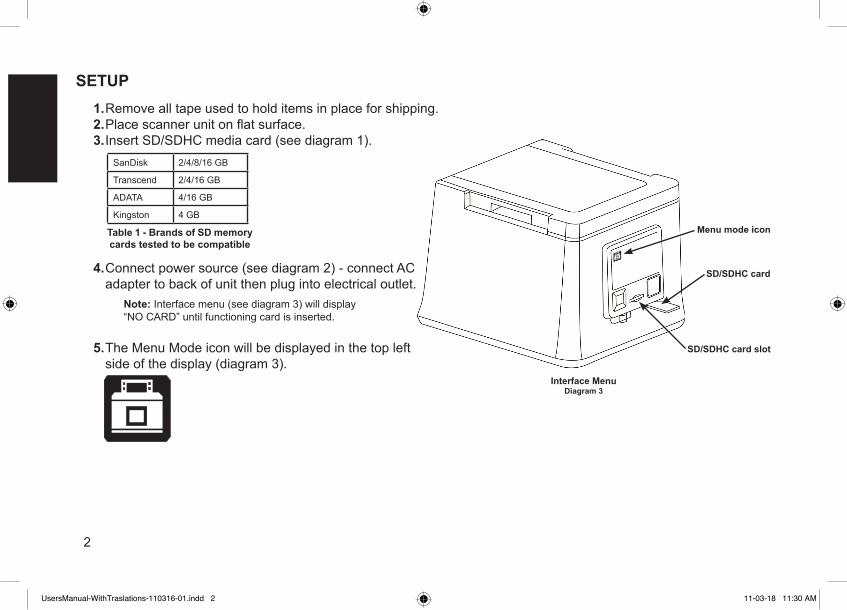
1. Remove all tape used to hold items in place for shipping.2. Place scanner unit on flat surface.3. Insert SD/SDHC media card (see diagram 1).
4. Connect power source (see diagram 2) - connect AC adapter to back of unit then plug into electrical outlet.
5. The Menu Mode icon will be displayed in the top left side of the display (diagram 3).
SETUP
Table 1 - Brands of SD memory cards tested to be compatible
Interface MenuDiagram 3
Note: Interface menu (see diagram 3) will display “NO CARD” until functioning card is inserted.
Menu mode icon
SD/SDHC card
SD/SDHC card slot
EN
GLI
SH
2
SanDisk 2/4/8/16 GB
Transcend 2/4/16 GB
ADATA 4/16 GB
Kingston 4 GB
UsersManual-WithTraslations-110316-01.indd 2 11-03-18 11:30 AM

SCANNING PHOTOS1. Slide the switch on the front of the scanner to PHOTO
(diagram 4).2. Lift scanner lid, place photo face down on scanner glass.
Do not remove white film scanner cover.3. Position photo towards the arrow on the bottom right of scanning
area.4. Close scanner lid.5. Enter the Image Size:
6. Press Scan button (diagram 4), green LED will flash and “CAPTURING” will be displayed on the preview screen.
Scanning of the photo is now complete.
Open scanner lidDiagram 4
a. Press OK to display scanning options menu icons (diagram 4).
b. Press the right arrow once to choose image size settings.c. Press the Up/Down arrows to highlight the desired size,
press OK. The preview display will indicate the area of the photo that will be scanned with a yellow frame based on the select size.
Green LED
OK button
Switch to PHOTO
Scan button
EN
GLIS
H
3
UsersManual-WithTraslations-110316-01.indd 3 11-03-18 11:30 AM
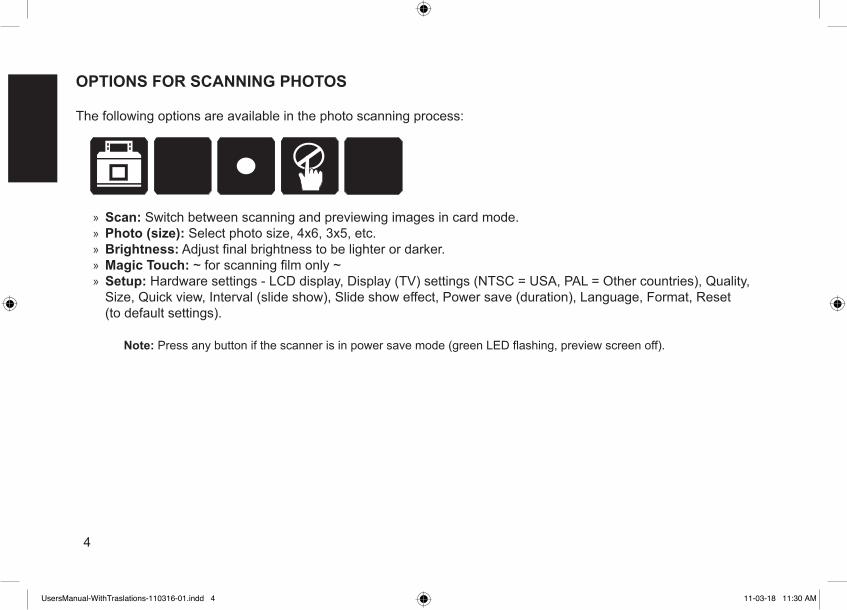
» Scan: Switch between scanning and previewing images in card mode. » Photo (size): Select photo size, 4x6, 3x5, etc. » Brightness: Adjust final brightness to be lighter or darker. » Magic Touch: ~ for scanning film only ~ » Setup: Hardware settings - LCD display, Display (TV) settings (NTSC = USA, PAL = Other countries), Quality, Size, Quick view, Interval (slide show), Slide show effect, Power save (duration), Language, Format, Reset (to default settings).
Note: Press any button if the scanner is in power save mode (green LED flashing, preview screen off).
The following options are available in the photo scanning process:
OPTIONS FOR SCANNING PHOTOS
EN
GLI
SH
4
UsersManual-WithTraslations-110316-01.indd 4 11-03-18 11:30 AM

SCANNING FILM STRIPS AND MOUNTED SLIDES
White scanner coverDiagram 6
1. Slide the switch on the front of the scanner to FILM (diagram 5).
(continued)
Photo/Film selection switch
2. Open the scanner lid and remove the white film scanner cover by pressing down on the two tabs (diagram 6). Keep the cover for scanning photos.
3. Close the scanner lid.
Diagram 5
4. Load negatives into holder:
EN
GLIS
H
5
UsersManual-WithTraslations-110316-01.indd 5 11-03-18 11:30 AM
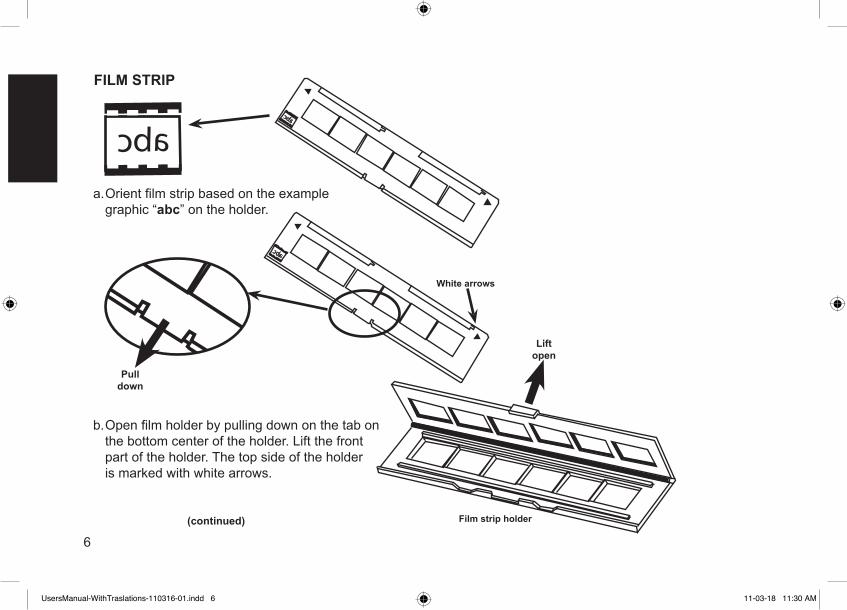
b. Open film holder by pulling down on the tab on the bottom center of the holder. Lift the front part of the holder. The top side of the holder is marked with white arrows.
Film strip holder
a. Orient film strip based on the example graphic “abc” on the holder.
FILM STRIP
abc
abc
abc
Pulldown
White arrows
Liftopen
(continued)
EN
GLI
SH
6
UsersManual-WithTraslations-110316-01.indd 6 11-03-18 11:30 AM

c. Insert the orientated film negative into the holder between the horizontal guides. Carefully line up the dividers on the film negative with the dividers on the holder.
d. Close the holder and push the tab to the closed position.
abc
Push to closed position
Horizontal guides Dividers
EN
GLIS
H
7
UsersManual-WithTraslations-110316-01.indd 7 11-03-18 11:30 AM

MOUNTED SLIDES
a. Orient slides based on the example graphic “abc” on the holder.b. Insert mounted slides into the holder.
abcabc
(continued)
POIncorrect Correct
EN
GLI
SH
8
UsersManual-WithTraslations-110316-01.indd 8 11-03-18 11:30 AM

5. Insert the holder into the scanner (diagram 7) with the white arrows on the holder matching the white arrows on the scanner, the film image will appear on the scanner preview screen.
6. Center the film holder. The image will appear centered on the preview screen.7. Select the SCAN button to scan and save the image file to the memory card, the green LED will
flash and “CAPTURING” will be displayed on the preview screen.
Scanning a single slide is now complete.
Insert slide holderDiagram 7
abcInsert holder
Preview screen
Green LED
OK button
Scan button
EN
GLIS
H
9
UsersManual-WithTraslations-110316-01.indd 9 11-03-18 11:30 AM
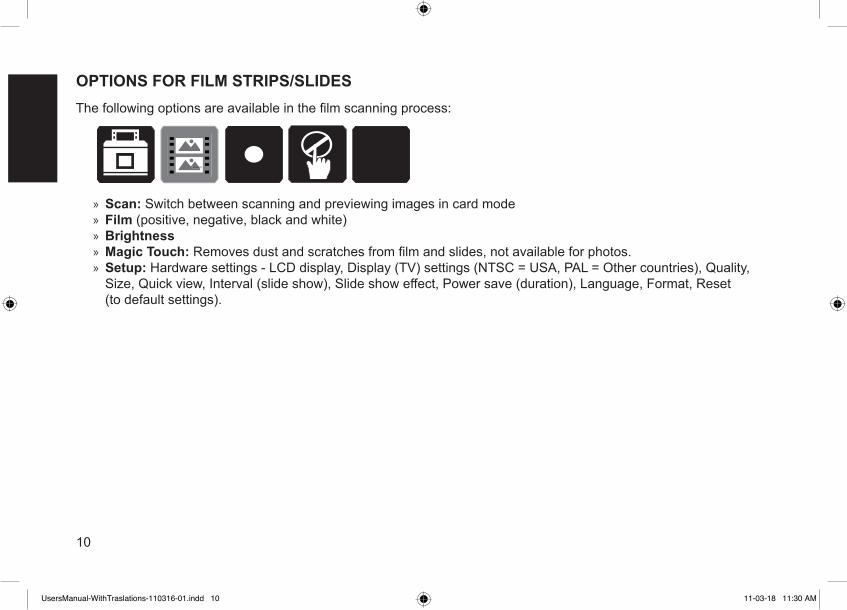
The following options are available in the film scanning process:
» Scan: Switch between scanning and previewing images in card mode » Film (positive, negative, black and white) » Brightness » Magic Touch: Removes dust and scratches from film and slides, not available for photos. » Setup: Hardware settings - LCD display, Display (TV) settings (NTSC = USA, PAL = Other countries), Quality, Size, Quick view, Interval (slide show), Slide show effect, Power save (duration), Language, Format, Reset (to default settings).
OPTIONS FOR FILM STRIPS/SLIDES
EN
GLI
SH
10
UsersManual-WithTraslations-110316-01.indd 10 11-03-18 11:30 AM
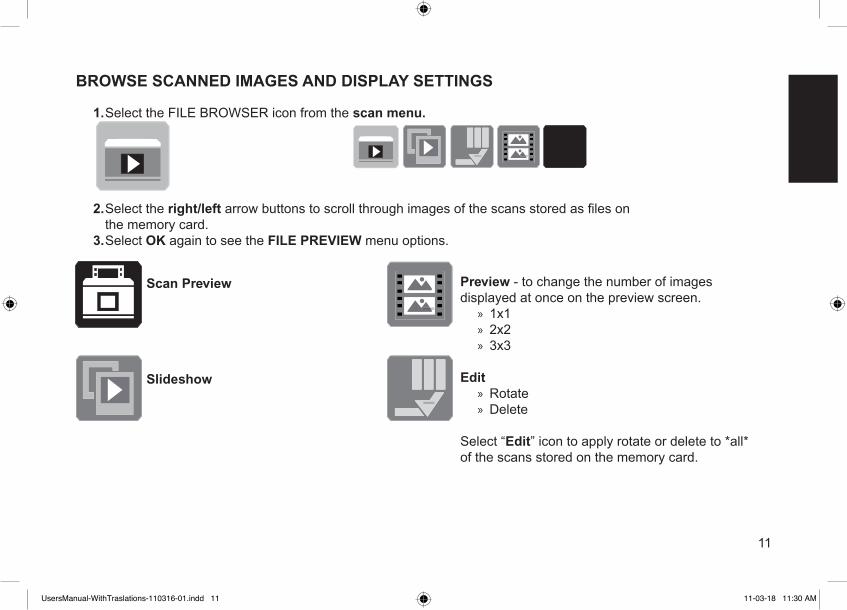
1. Select the FILE BROWSER icon from the scan menu.
2. Select the right/left arrow buttons to scroll through images of the scans stored as files on the memory card.
3. Select OK again to see the FILE PREVIEW menu options.
BROWSE SCANNED IMAGES AND DISPLAY SETTINGS
Scan Preview
Slideshow
Preview - to change the number of images displayed at once on the preview screen.
» 1x1 » 2x2 » 3x3
Edit » Rotate » Delete
Select “Edit” icon to apply rotate or delete to *all* of the scans stored on the memory card.
EN
GLIS
H
11
UsersManual-WithTraslations-110316-01.indd 11 11-03-18 11:30 AM

SETUP MENU
Available from both the SCAN PREVIEW and FILE PREVIEW menu.
» LCD: Dark / Normal / Bright » Display: NTSC / PAL » Quality: S. Fine / Fine / Normal » Size: 12M / 9M / 5M / 1M » Q. View: 1 Sec / 2 Sec / 3 Sec / Off » Interval: 2 Sec / 3 Sec / 5 Sec / 10 Sec » SS Effect (Slide Show): Effect 1 / Effect 2 / Effect 3 / Effect 4 / Effect 5 / Mix / Off » PWR Save (Power Save): 1 Min / 3 Min / 5 Min 10 Min / Off » Language: English / Nederlands / Français / Deutsch / Italiano / Español / etc. » Format: Yes / No » Reset: Yes / No
SCAN PREVIEW
FILE PREVIEW
EN
GLI
SH
12
UsersManual-WithTraslations-110316-01.indd 12 11-03-18 11:30 AM
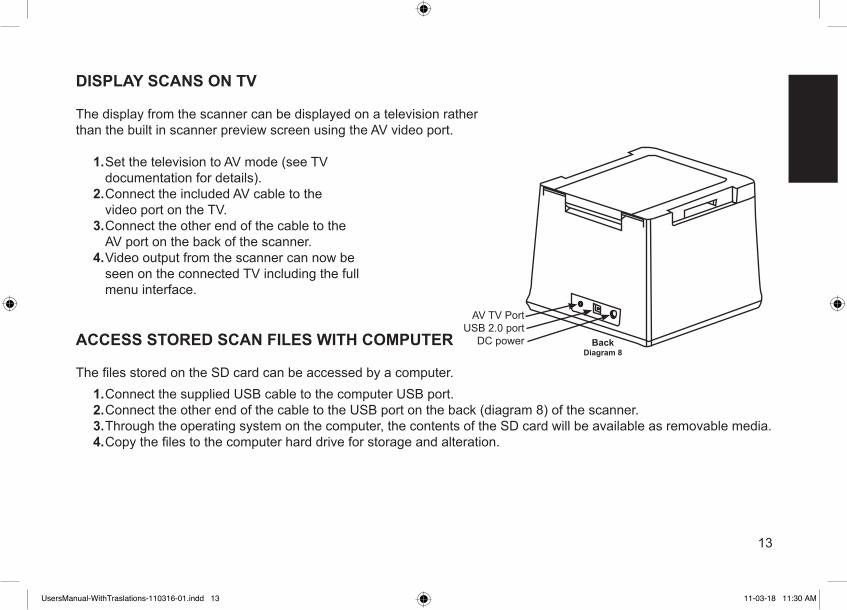
The display from the scanner can be displayed on a television rather than the built in scanner preview screen using the AV video port.
1. Set the television to AV mode (see TV documentation for details).
2. Connect the included AV cable to the video port on the TV.
3. Connect the other end of the cable to the AV port on the back of the scanner.
4. Video output from the scanner can now be seen on the connected TV including the full menu interface.
ACCESS STORED SCAN FILES WITH COMPUTER
The files stored on the SD card can be accessed by a computer.
DISPLAY SCANS ON TV
1. Connect the supplied USB cable to the computer USB port.2. Connect the other end of the cable to the USB port on the back (diagram 8) of the scanner.3. Through the operating system on the computer, the contents of the SD card will be available as removable media.4. Copy the files to the computer hard drive for storage and alteration.
AV TV Port USB 2.0 port
DC power BackDiagram 8
EN
GLIS
H
13
UsersManual-WithTraslations-110316-01.indd 13 11-03-18 11:30 AM


![Image Scanner Getting Started€¦ · ROM via Windows Explorer or [Computer]. 5 Installing the Scanner Install the scanner in the following procedure. 1. Place the scanner at its](https://img.pdfslide.us/doc/110x75/5eade280f43d9162015806b4/image-scanner-getting-started-rom-via-windows-explorer-or-computer-5-installing.jpg)