Embed Size (px)
Citation preview
Controls Indoor
SpaceWise DT
User manual
2 Philips
Table of Contents
1. Philips SpaceWise wireless technology DT introduction 3
2. Sensor coverage area 4
3. Philips Field App download and usage instructions 5
4. Optional pre-commissioning
4a. How to populate "Dwell Time" feature 6-7
5. Commissioning 8-19
5a. Install the luminaires and plan wireless groups 8
5b. How to point the phone for IR commissioning 9
5c. Grouping 10-12
5d. Configuring sensor parameters 13
5e. Save a profile for reference 14
5f. Quick light level setting 15
5g. Configuring scenes 16-17
5h. Reset network 18
5i. Reset parameters 18
5j. Change Zigbee channel 19
5k. Installer test 19
6. Energy reporting – beta version 20
7. Troubleshooting tips/system messages 21
8. FAQs 22
9. Disclaimer 23
10. Technical 23
3
SpaceWise
wireless
technology DT
User manual
Philips luminaires with SpaceWise wireless technology
DT are stand-alone LED lighting systems with integrated
occupancy sensing and daylight harvesting, designed
specifically for office spaces. Automated dimming
behaviors are activated after installation using an
Android phone and Philips Field App to create groups
and connect wireless switches.
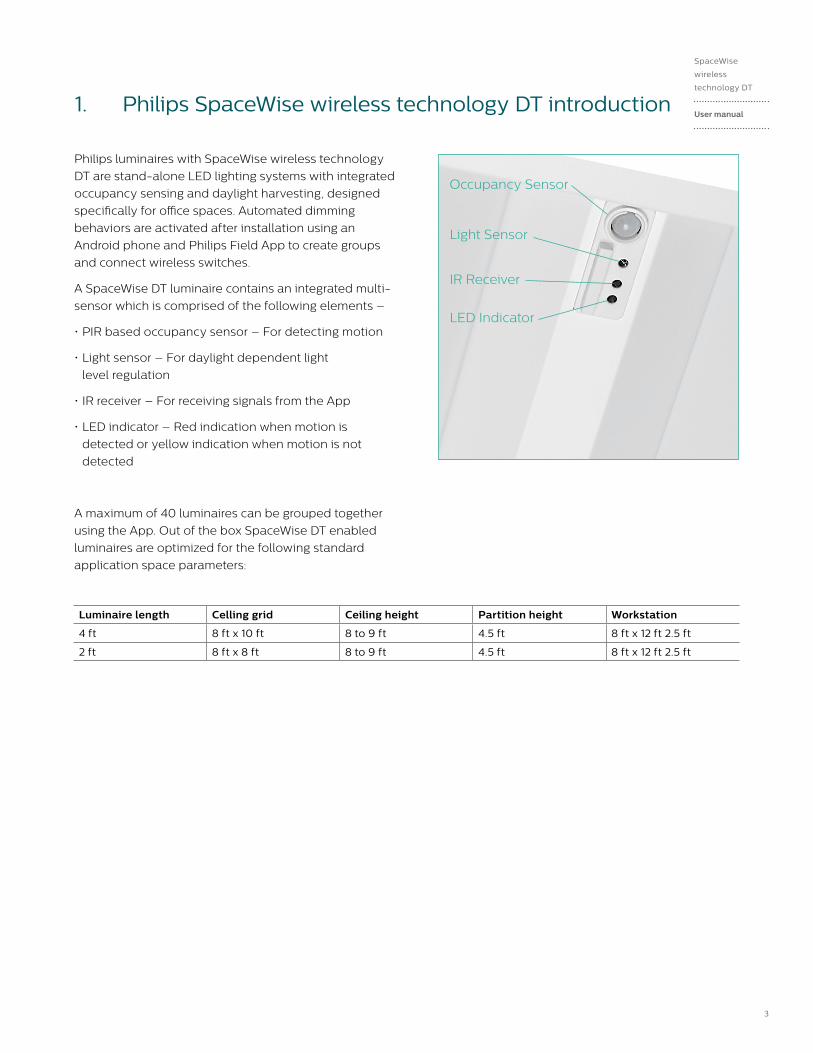
A SpaceWise DT luminaire contains an integrated multi-
sensor which is comprised of the following elements –
• PIR based occupancy sensor – For detecting motion
• Light sensor – For daylight dependent light
level regulation
• IR receiver – For receiving signals from the App
• LED indicator – Red indication when motion is
detected or yellow indication when motion is not
detected
A maximum of 40 luminaires can be grouped together
using the App. Out of the box SpaceWise DT enabled
luminaires are optimized for the following standard
application space parameters:
Light Sensor
Occupancy Sensor
IR Receiver
LED Indicator
1. Philips SpaceWise wireless technology DT introduction
Luminaire length Celling grid Ceiling height Partition height Workstation
4 ft 8 ft x 10 ft 8 to 9 ft 4.5 ft 8 ft x 12 ft 2.5 ft
2 ft 8 ft x 8 ft 8 to 9 ft 4.5 ft 8 ft x 12 ft 2.5 ft
4 Philips
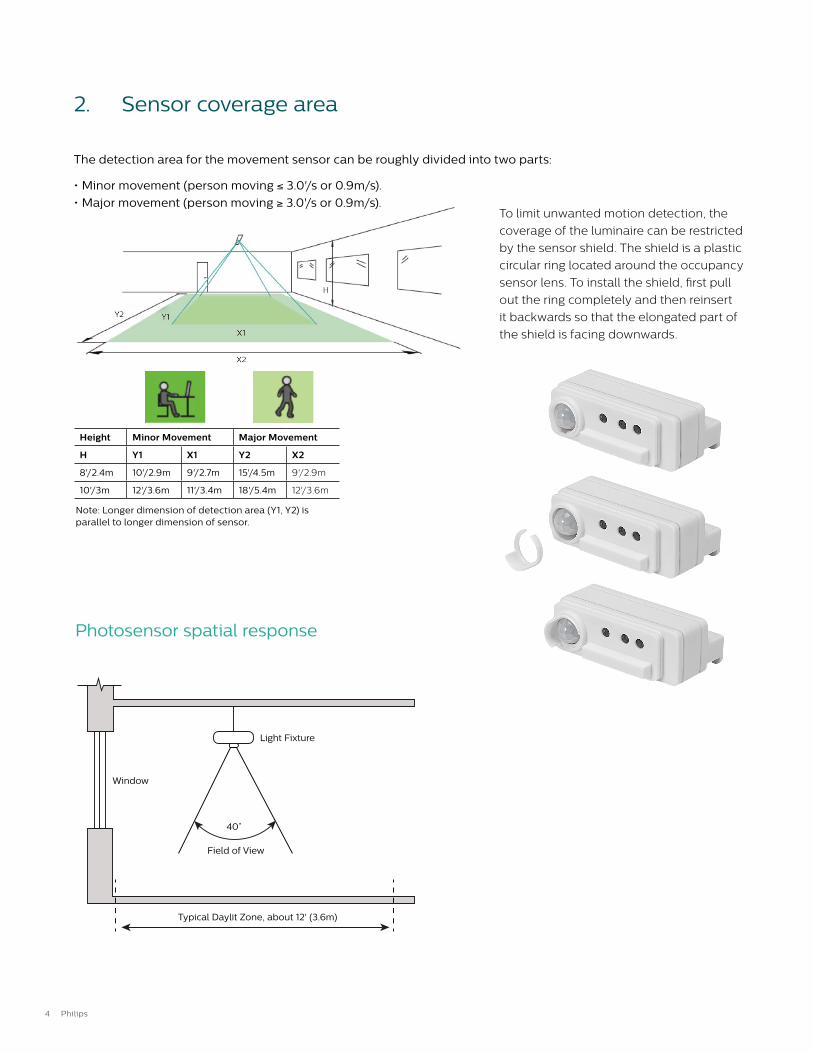
Note: Longer dimension of detection area (Y1, Y2) is parallel to longer dimension of sensor.
Height Minor Movement Major Movement
H Y1 X1 Y2 X2
8'/2.4m 10'/2.9m 9'/2.7m 15'/4.5m 9'/2.9m
10'/3m 12'/3.6m 11'/3.4m 18'/5.4m 12'/3.6m
To limit unwanted motion detection, the
coverage of the luminaire can be restricted
by the sensor shield. The shield is a plastic
circular ring located around the occupancy
sensor lens. To install the shield, first pull
out the ring completely and then reinsert
it backwards so that the elongated part of
the shield is facing downwards.
2. Sensor coverage area
The detection area for the movement sensor can be roughly divided into two parts:
• Minor movement (person moving ≤ 3.0'/s or 0.9m/s).
• Major movement (person moving ≥ 3.0'/s or 0.9m/s).
Window
Light Fixture
Field of View
40˚
Typical Daylit Zone, about 12' (3.6m)
Photosensor spatial response
5
SpaceWise
wireless
technology DT
User manual
There are two application modes within the Philips Field App for configuring EasySense and
SpaceWise DT. These modes are EasySense NFC and EasySense IR. The EasySense IR mode can be
used to commission (group) luminaires and add wireless switches to the group, while the EasySense
NFC mode can be used to read out sensor parameters.
3. Philips Field App download and usage instructions
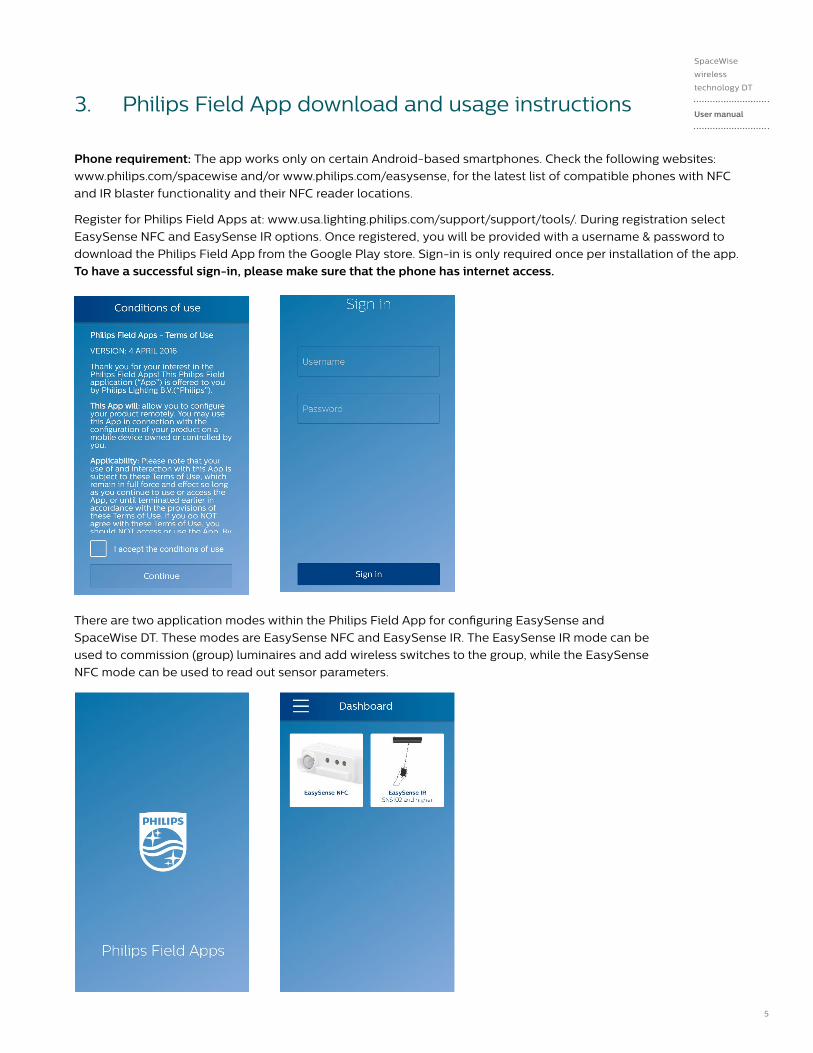
Phone requirement: The app works only on certain Android-based smartphones. Check the following websites:
www.philips.com/spacewise and/or www.philips.com/easysense, for the latest list of compatible phones with NFC
and IR blaster functionality and their NFC reader locations.
Register for Philips Field Apps at: www.usa.lighting.philips.com/support/support/tools/. During registration select
EasySense NFC and EasySense IR options. Once registered, you will be provided with a username & password to
download the Philips Field App from the Google Play store. Sign-in is only required once per installation of the app.
To have a successful sign-in, please make sure that the phone has internet access.
6 Philips
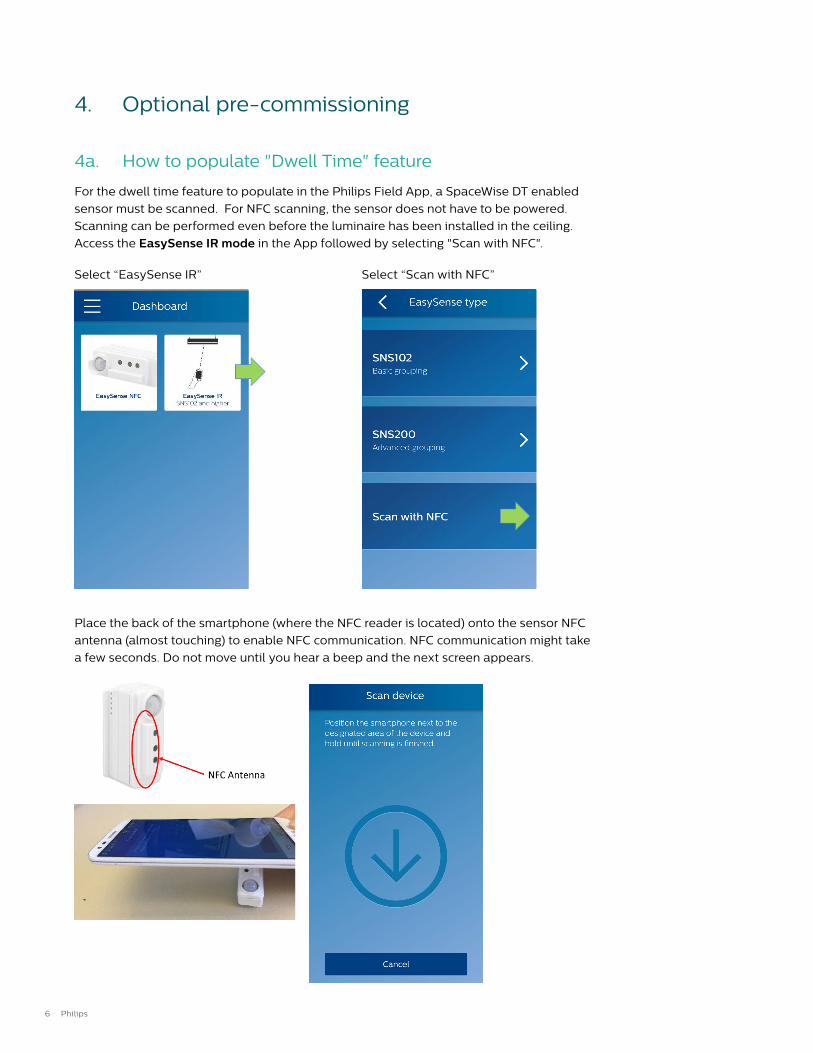
Place the back of the smartphone (where the NFC reader is located) onto the sensor NFC
antenna (almost touching) to enable NFC communication. NFC communication might take
a few seconds. Do not move until you hear a beep and the next screen appears.
Select “Scan with NFC”Select “EasySense IR”
4a. How to populate "Dwell Time" feature
For the dwell time feature to populate in the Philips Field App, a SpaceWise DT enabled
sensor must be scanned. For NFC scanning, the sensor does not have to be powered.
Scanning can be performed even before the luminaire has been installed in the ceiling.
Access the EasySense IR mode in the App followed by selecting "Scan with NFC".
4. Optional pre-commissioning
7
SpaceWise
wireless
technology DT
User manual
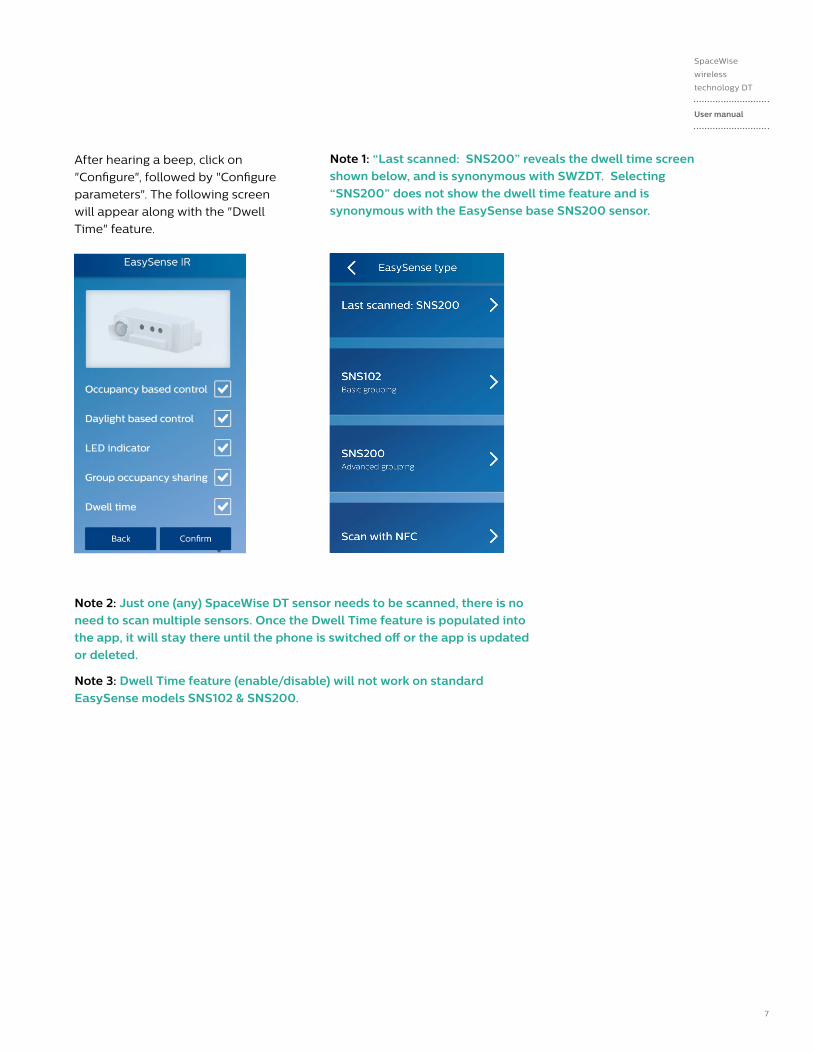
After hearing a beep, click on
"Configure", followed by "Configure
parameters". The following screen
will appear along with the "Dwell
Time" feature.
Note 1: “Last scanned: SNS200” reveals the dwell time screen shown below, and is synonymous with SWZDT. Selecting “SNS200” does not show the dwell time feature and is synonymous with the EasySense base SNS200 sensor.
Note 2: Just one (any) SpaceWise DT sensor needs to be scanned, there is no need to scan multiple sensors. Once the Dwell Time feature is populated into the app, it will stay there until the phone is switched off or the app is updated or deleted.
Note 3: Dwell Time feature (enable/disable) will not work on standard EasySense models SNS102 & SNS200.

8 Philips
5a. Install the luminaires and plan wireless groups
5. Commissioning
Determine luminaire orientation
Plan luminaire wireless groupsLuminaire
Luminaire
Luminaire
Luminaire
Luminaire
Luminaire
Luminaire
Luminaire
Ensure sensor is facing away from window.
Ensure sensors from adjacent luminaires are not positioned next to one another.
Install luminaires per manufacturer installation instructions.
When configuring open plan offices with SpaceWise DT, large groups of 30-40 luminaires are recommended to maintain the lighting aesthetics of the space. Smaller groups may turn off more frequently than desired.
Group 1
Group 1 Group 2
9
SpaceWise
wireless
technology DT
User manual
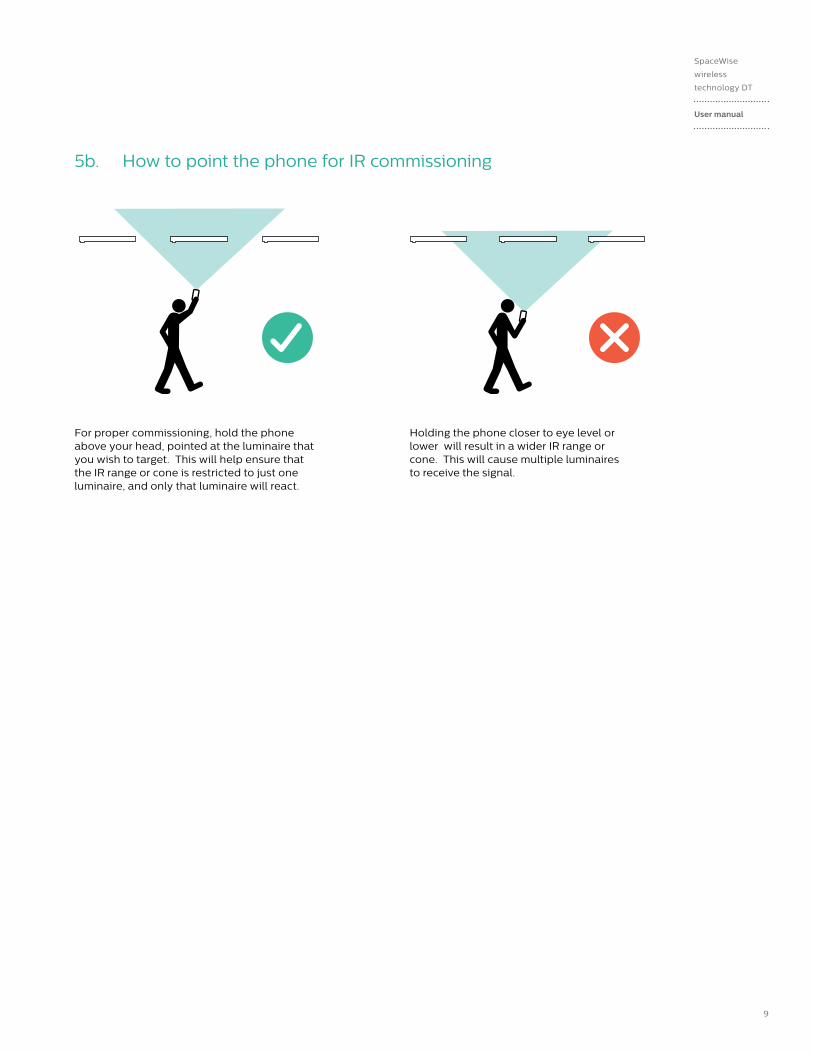
5b. How to point the phone for IR commissioning
For proper commissioning, hold the phone above your head, pointed at the luminaire that you wish to target. This will help ensure that the IR range or cone is restricted to just one luminaire, and only that luminaire will react.
Holding the phone closer to eye level or lower will result in a wider IR range or cone. This will cause multiple luminaires to receive the signal.
10 Philips
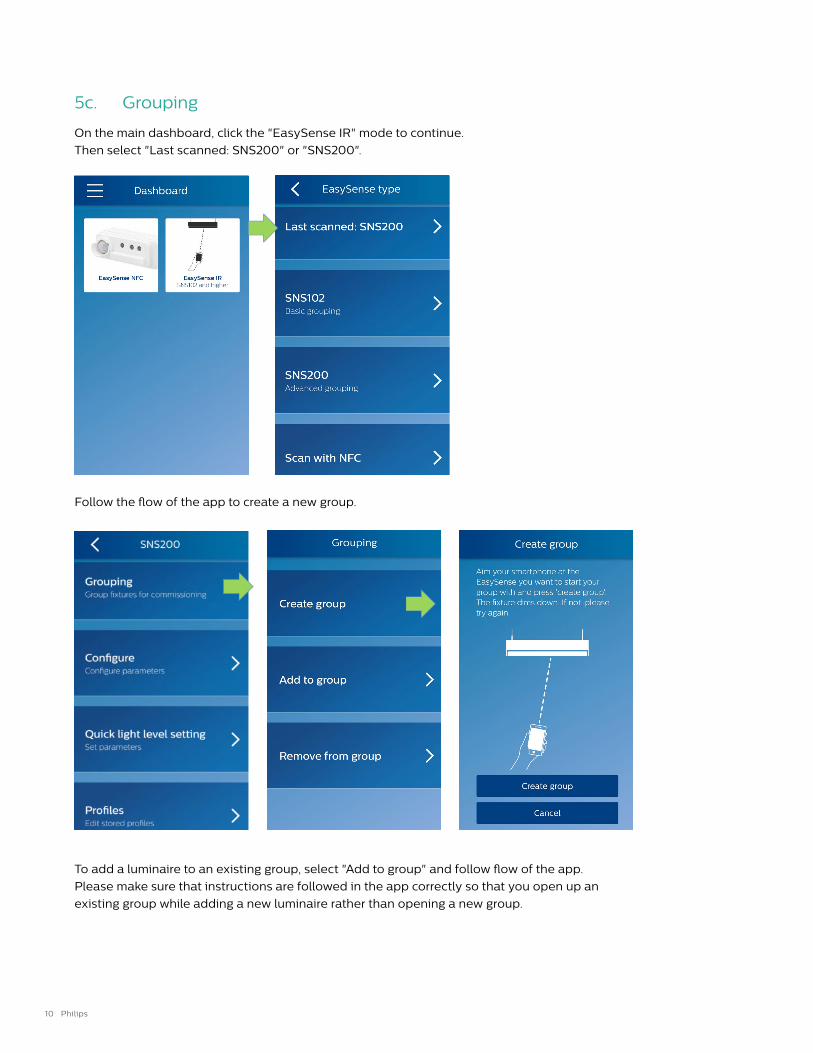
Follow the flow of the app to create a new group.
To add a luminaire to an existing group, select "Add to group" and follow flow of the app.
Please make sure that instructions are followed in the app correctly so that you open up an
existing group while adding a new luminaire rather than opening a new group.
5c. Grouping
On the main dashboard, click the "EasySense IR" mode to continue.
Then select "Last scanned: SNS200" or "SNS200".
11
SpaceWise
wireless
technology DT
User manual
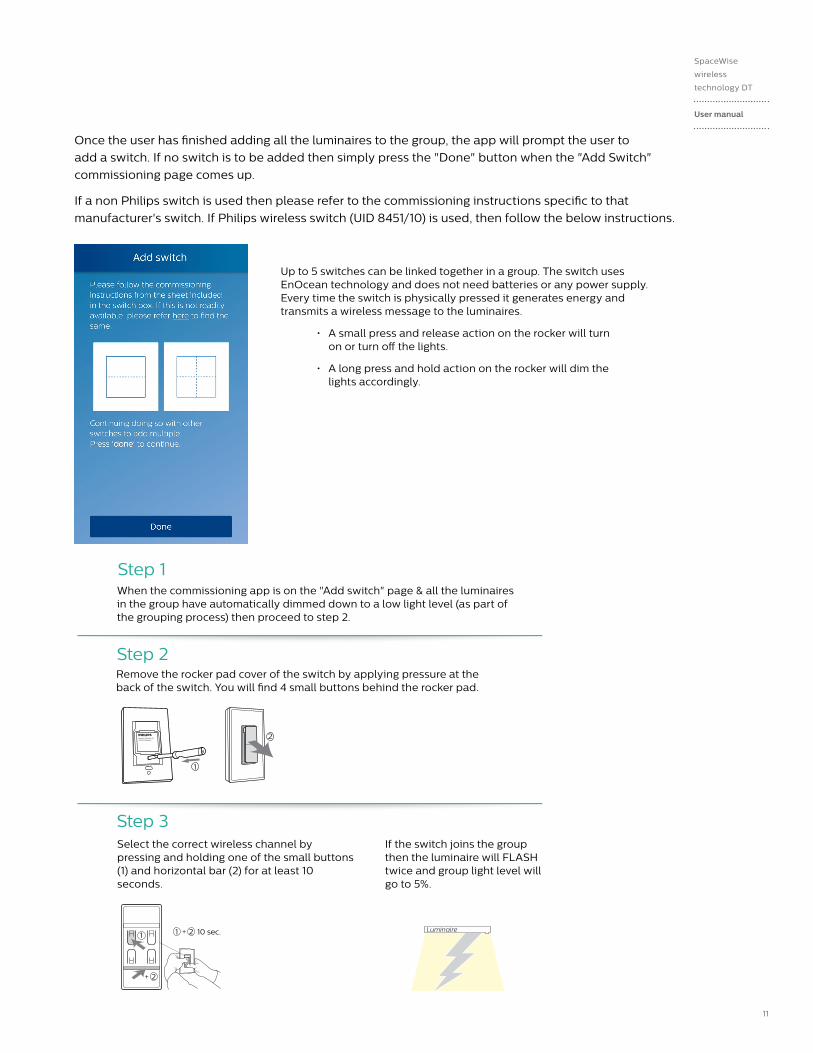
Once the user has finished adding all the luminaires to the group, the app will prompt the user to
add a switch. If no switch is to be added then simply press the "Done" button when the "Add Switch"
commissioning page comes up.
If a non Philips switch is used then please refer to the commissioning instructions specific to that
manufacturer's switch. If Philips wireless switch (UID 8451/10) is used, then follow the below instructions.
Up to 5 switches can be linked together in a group. The switch uses EnOcean technology and does not need batteries or any power supply. Every time the switch is physically pressed it generates energy and transmits a wireless message to the luminaires.
• A small press and release action on the rocker will turn on or turn off the lights.
• A long press and hold action on the rocker will dim the lights accordingly.
Step 1
Step 2
Step 3
Remove the rocker pad cover of the switch by applying pressure at the back of the switch. You will find 4 small buttons behind the rocker pad.
click click = energy
Model: UID84x1/10 9137 003 64x03
2
1
10 sec.
+ 2
1 1 + 2
10 sec.
Test
10 sec.
2
1
+ + 2
1
10 sec.
or or
10 sec.+ 2
1
10 sec.
10 sec.10 sec.
oror oror
click click = energy
Model: UID84x1/10 9137 003 64x03
2
1
10 sec.
+ 2
1 1 + 2
10 sec.
Test
10 sec.
2
1
+ + 2
1
10 sec.
or or
10 sec.+ 2
1
10 sec.
10 sec.10 sec.
oror oror
If the switch joins the group then the luminaire will FLASH twice and group light level will go to 5%.
Select the correct wireless channel by pressing and holding one of the small buttons (1) and horizontal bar (2) for at least 10 seconds.
Luminaire
Luminaire
Luminaire
Luminaire
Luminaire
Luminaire
Luminaire
Luminaire
Luminaire
Luminaire
Luminaire
Luminaire Group
When the commissioning app is on the "Add switch" page & all the luminaires in the group have automatically dimmed down to a low light level (as part of the grouping process) then proceed to step 2.
12 Philips
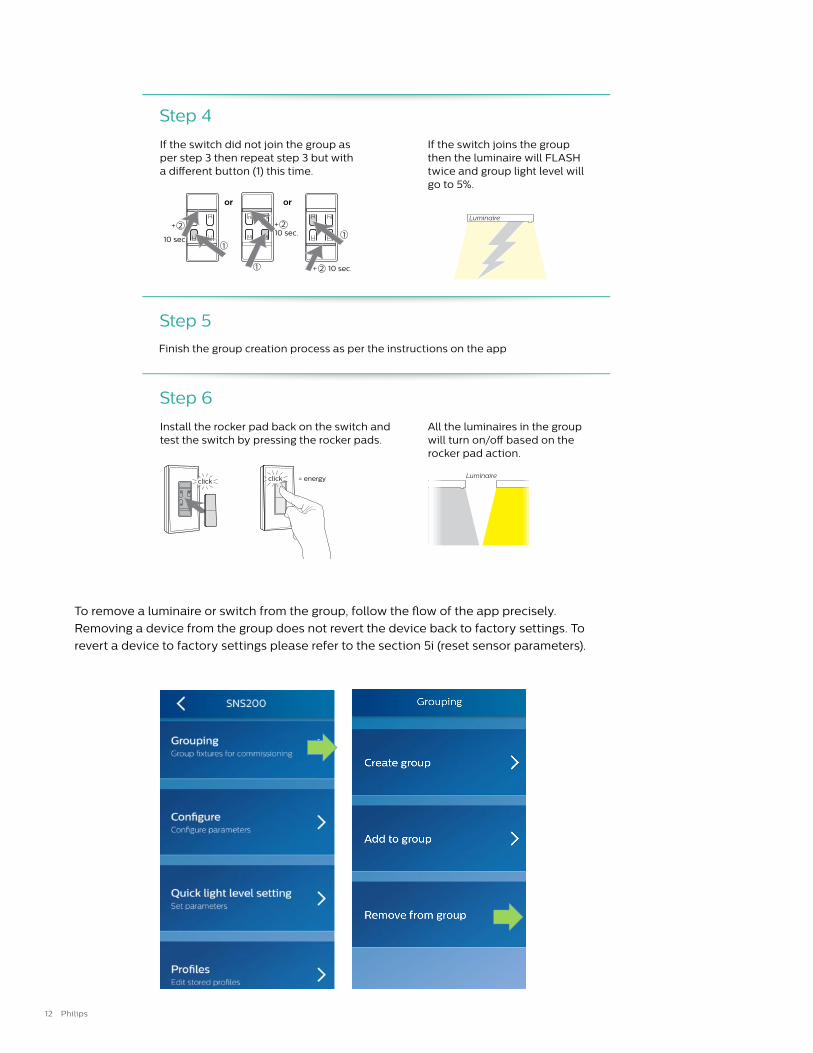
Step 5
Step 4
Finish the group creation process as per the instructions on the app
click click = energy
Model: UID84x1/10 9137 003 64x03
2
1
10 sec.
+ 2
1 1 + 2
10 sec.
Test
10 sec.
2
1
+ + 2
1
10 sec.
or or
10 sec.+ 2
1
10 sec.
10 sec.10 sec.
oror oror
If the switch joins the group then the luminaire will FLASH twice and group light level will go to 5%.
If the switch did not join the group as per step 3 then repeat step 3 but with a different button (1) this time.
Luminaire
Luminaire
Luminaire
Luminaire
Luminaire
Luminaire
Luminaire
Luminaire
Luminaire
Luminaire
Luminaire
Luminaire Group
Step 6
click click = energy
Model: UID84x1/10 9137 003 64x03
2
1
10 sec.
+ 2
1 1 + 2
10 sec.
Test
10 sec.
2
1
+ + 2
1
10 sec.
or or
10 sec.+ 2
1
10 sec.
10 sec.10 sec.
oror oror
All the luminaires in the group will turn on/off based on the rocker pad action.
Install the rocker pad back on the switch and test the switch by pressing the rocker pads.
Luminaire
Luminaire
Luminaire
Luminaire
Luminaire
Luminaire
Luminaire
Luminaire
Luminaire
Luminaire
Luminaire
Luminaire Group
To remove a luminaire or switch from the group, follow the flow of the app precisely.
Removing a device from the group does not revert the device back to factory settings. To
revert a device to factory settings please refer to the section 5i (reset sensor parameters).

13
SpaceWise
wireless
technology DT
User manual5d. Configuring sensor parameters
The sensor parameters that can be configured are listed below:
Once all parameters have been set, select confirm &
either save these parameters as a profile for future
reference as per the instructions in section 5e or users
can skip the saving profile option and push these
settings on a single fixture or the entire group.
• Occupancy based control (Enable/Disable)
• Daylight based light control (Enable/Disable)
• LED indicator (Enable/Disable)
• Occupancy mode: Auto-on/off, Manual-on/off or Manual-on/auto-off.
• Field task level: Maximum trim level of power level of the fixture.
• Dwell time: (Enable/Disable) A cross check mechanism which allows lights to ramp up to task level only when occupants are dwelling in the space. Any passing by motion will be ignored. Disabling dwell time will cause the lights to instantly ramp up. Dwell time will only populate in the app if SpaceWise DT sensor has been scanned as per the instructions in section 4a.
• Eco-on level: The light level at which the fixtures will automatically ramp up when presence is detected in the Auto ON mode or the turn ON level when the switch is tapped in the Manual ON mode. Eco-on level cannot be more than the the field task level.
• Background light level: The light level to which the fixture(s) dim down after hold time has been elapsed.
• Hold time: The time for which lights remain at high level (after vacancy has been detected) before dimming to background level.
• Prolong time: The time for which lights remain at the background level before turning off .
• Grace fading time: Fade time when lights dim from high level to background level .
• Group light behavior: Light output of luminaires within the group that detect vacancy. By default luminaires that detect vacancy within the group are configured to dim to background light level. If all the luminaires within the group should always be at the same light level irrespective of occupancy pattern then configure this setting to "Field task level".

14 Philips
5e. Save a profile for reference
After confirming the sensor parameters, the app will prompt the user to save these parameters with a
"Profile name" and "Location". Enter a profile name & location that best resonates with the project. This
saves a profile for future use and stores the data from the scanned sensor in the Philips Lighting database,
in the future it will be possible to request reports of various data. For similar installations and projects,
users can quickly recall this profile from the app and execute it on new luminaires.
Note: Executing profile will only configure sensor parameters, it will not automatically create groups or add a new luminaire to an existing group.
To use a saved profile, go to "Profile" from the main menu, select the desired profile and program sensors.
Users can also edit/delete profiles by clicking "edit" on the top right corner.
IMPORTANT: It is critical that you
enter detailed location information
whenever you program the sensor.
The information in this 40-character
field will be used to extract your data
from the database. It is not possible
to extract your information without
detailed location data. You may choose
to opt out from sending information to
this database by selecting Preferences
from the main menu and unchecking
the "Upload configuration data"
checkbox. Click for "Preferences."
15
SpaceWise
wireless
technology DT
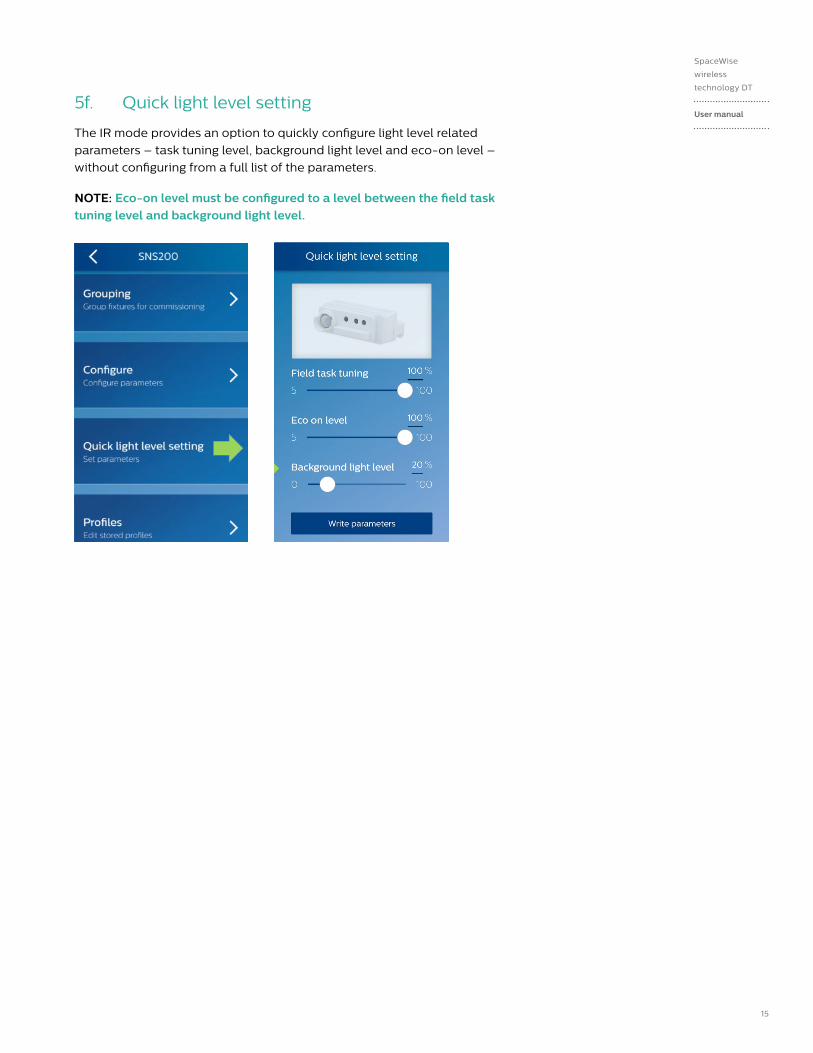
User manual5f. Quick light level setting
The IR mode provides an option to quickly configure light level related
parameters – task tuning level, background light level and eco-on level –
without configuring from a full list of the parameters.
NOTE: Eco-on level must be configured to a level between the field task tuning level and background light level.
16 Philips
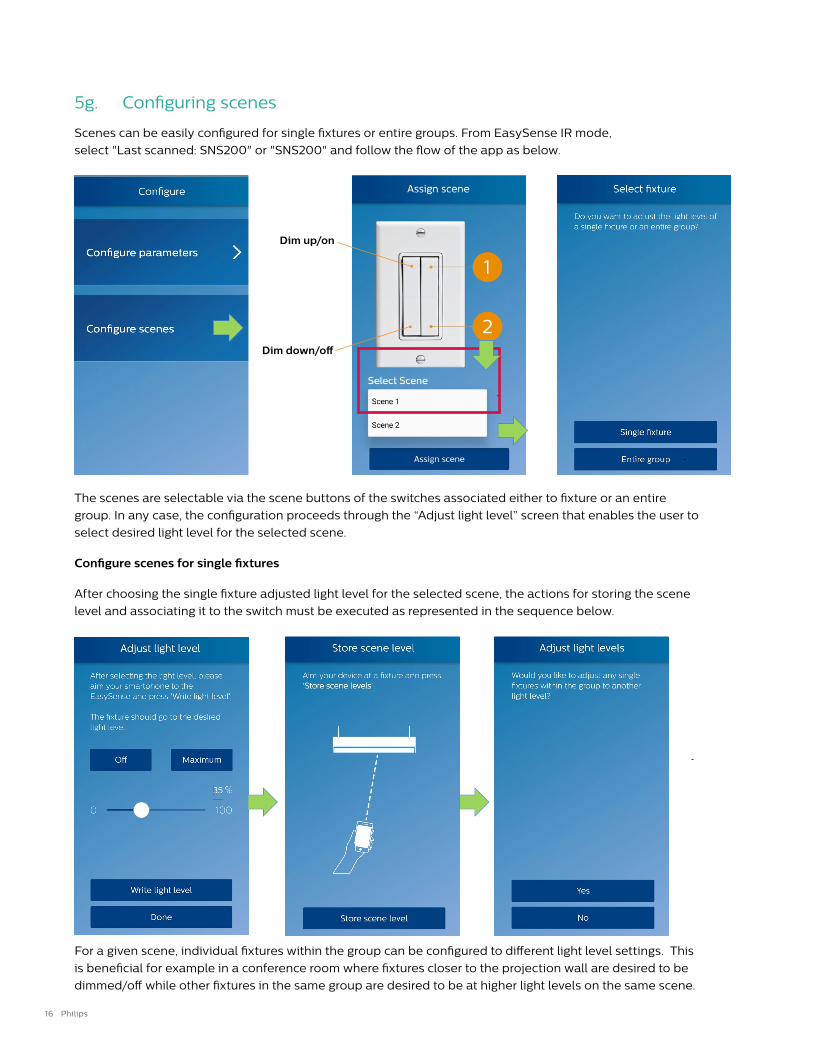
5g. Configuring scenes
Scenes can be easily configured for single fixtures or entire groups. From EasySense IR mode,
select "Last scanned: SNS200" or "SNS200" and follow the flow of the app as below.
The scenes are selectable via the scene buttons of the switches associated either to fixture or an entire
group. In any case, the configuration proceeds through the “Adjust light level” screen that enables the user to
select desired light level for the selected scene.
Configure scenes for single fixtures
After choosing the single fixture adjusted light level for the selected scene, the actions for storing the scene
level and associating it to the switch must be executed as represented in the sequence below.
For a given scene, individual fixtures within the group can be configured to different light level settings. This
is beneficial for example in a conference room where fixtures closer to the projection wall are desired to be
dimmed/off while other fixtures in the same group are desired to be at higher light levels on the same scene.
Dim up/on
Dim down/off
17
SpaceWise
wireless
technology DT
User manual
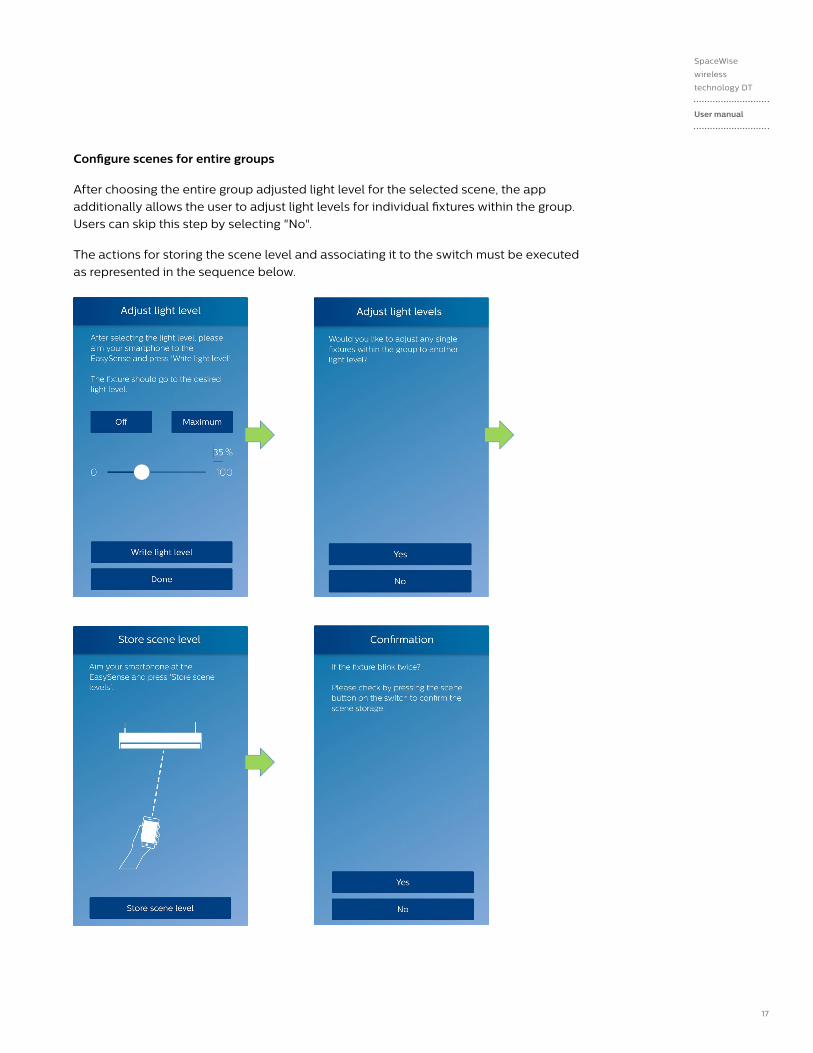
Configure scenes for entire groups
After choosing the entire group adjusted light level for the selected scene, the app
additionally allows the user to adjust light levels for individual fixtures within the group.
Users can skip this step by selecting "No".
The actions for storing the scene level and associating it to the switch must be executed
as represented in the sequence below.
18 Philips
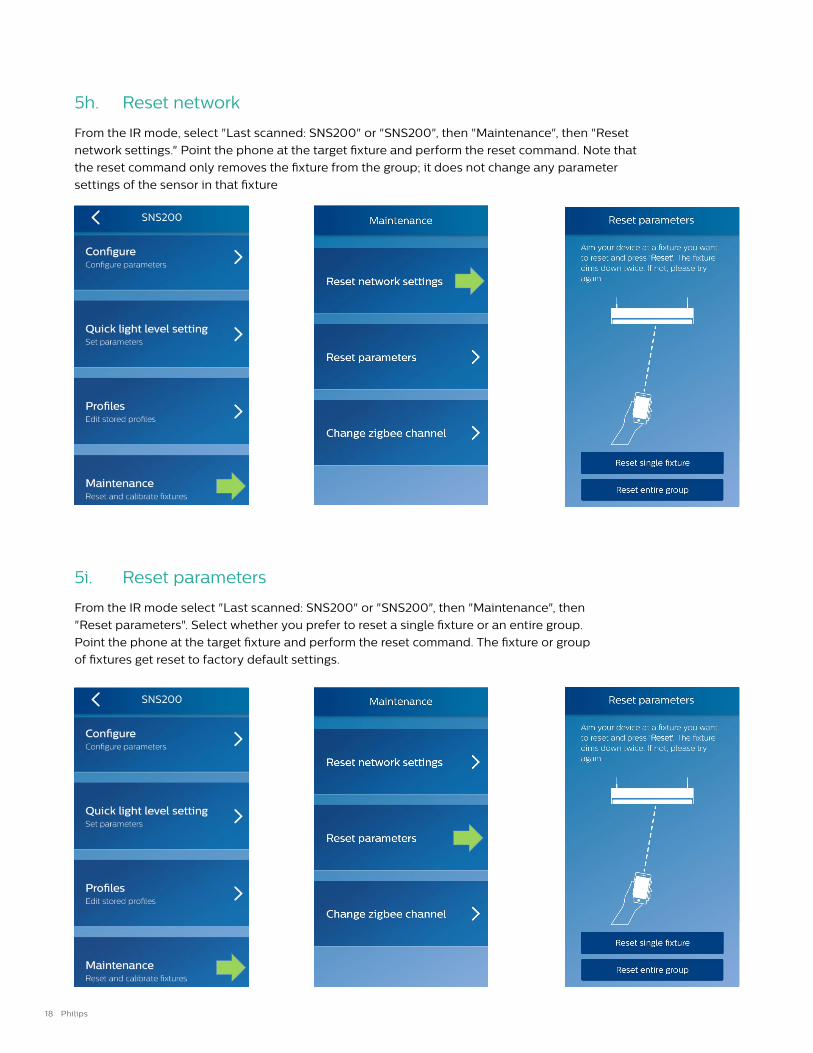
5i. Reset parameters
From the IR mode select "Last scanned: SNS200" or "SNS200", then "Maintenance", then
"Reset parameters". Select whether you prefer to reset a single fixture or an entire group.
Point the phone at the target fixture and perform the reset command. The fixture or group
of fixtures get reset to factory default settings.
5h. Reset network
From the IR mode, select "Last scanned: SNS200" or "SNS200", then "Maintenance", then "Reset
network settings." Point the phone at the target fixture and perform the reset command. Note that
the reset command only removes the fixture from the group; it does not change any parameter
settings of the sensor in that fixture
19
SpaceWise
wireless
technology DT
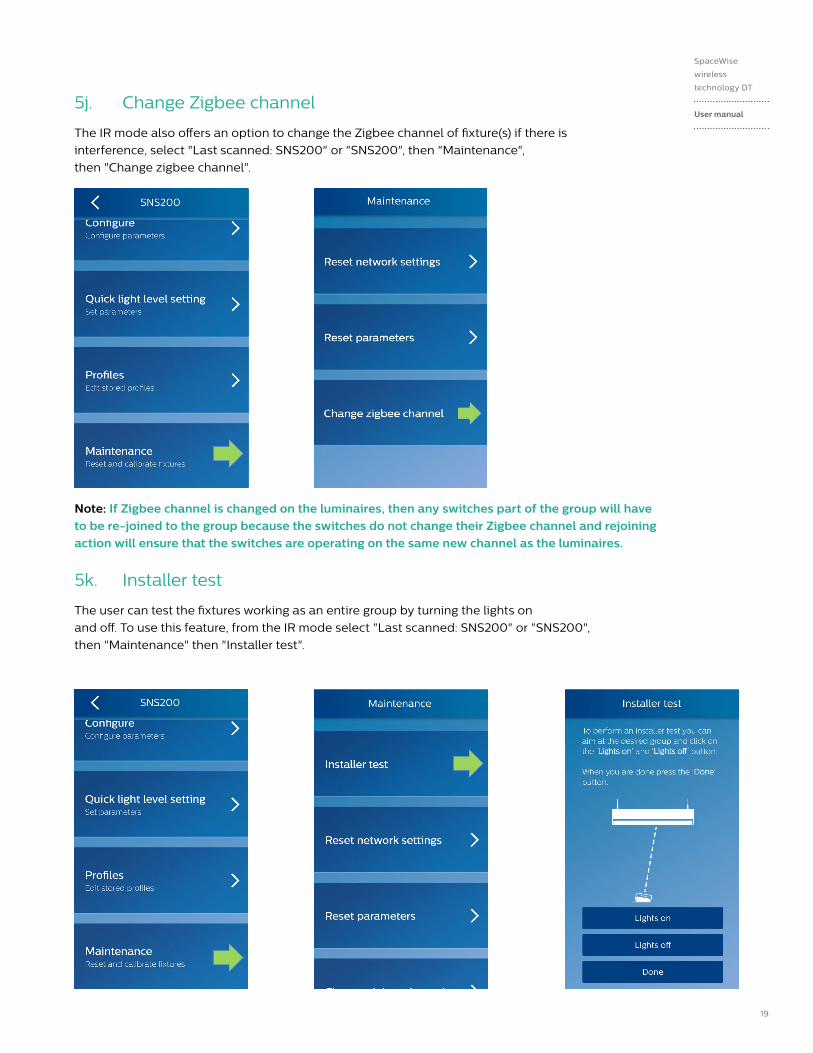
User manual5j. Change Zigbee channel
The IR mode also offers an option to change the Zigbee channel of fixture(s) if there is
interference, select "Last scanned: SNS200" or "SNS200", then "Maintenance",
then "Change zigbee channel".
5k. Installer test
The user can test the fixtures working as an entire group by turning the lights on
and off. To use this feature, from the IR mode select "Last scanned: SNS200" or "SNS200",
then "Maintenance" then "Installer test".
Note: If Zigbee channel is changed on the luminaires, then any switches part of the group will have to be re-joined to the group because the switches do not change their Zigbee channel and rejoining action will ensure that the switches are operating on the same new channel as the luminaires.
20 Philips
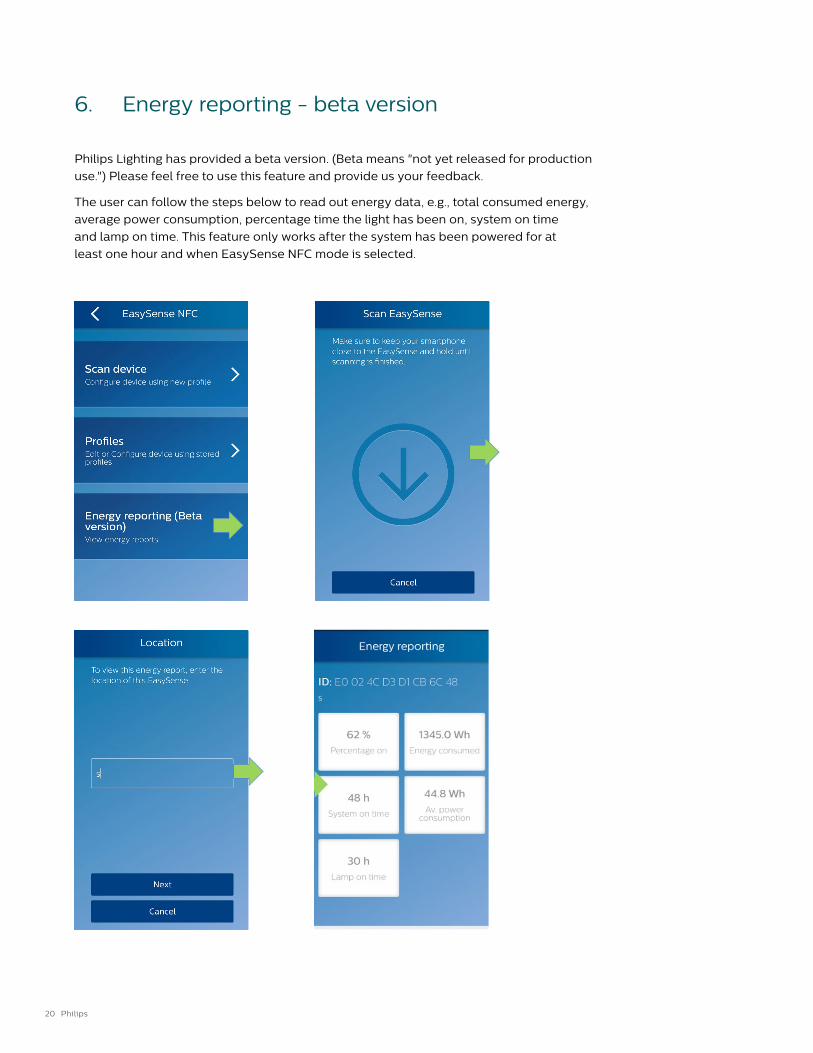
Philips Lighting has provided a beta version. (Beta means "not yet released for production
use.") Please feel free to use this feature and provide us your feedback.
The user can follow the steps below to read out energy data, e.g., total consumed energy,
average power consumption, percentage time the light has been on, system on time
and lamp on time. This feature only works after the system has been powered for at
least one hour and when EasySense NFC mode is selected.
6. Energy reporting - beta version
21
SpaceWise
wireless
technology DT
User manual
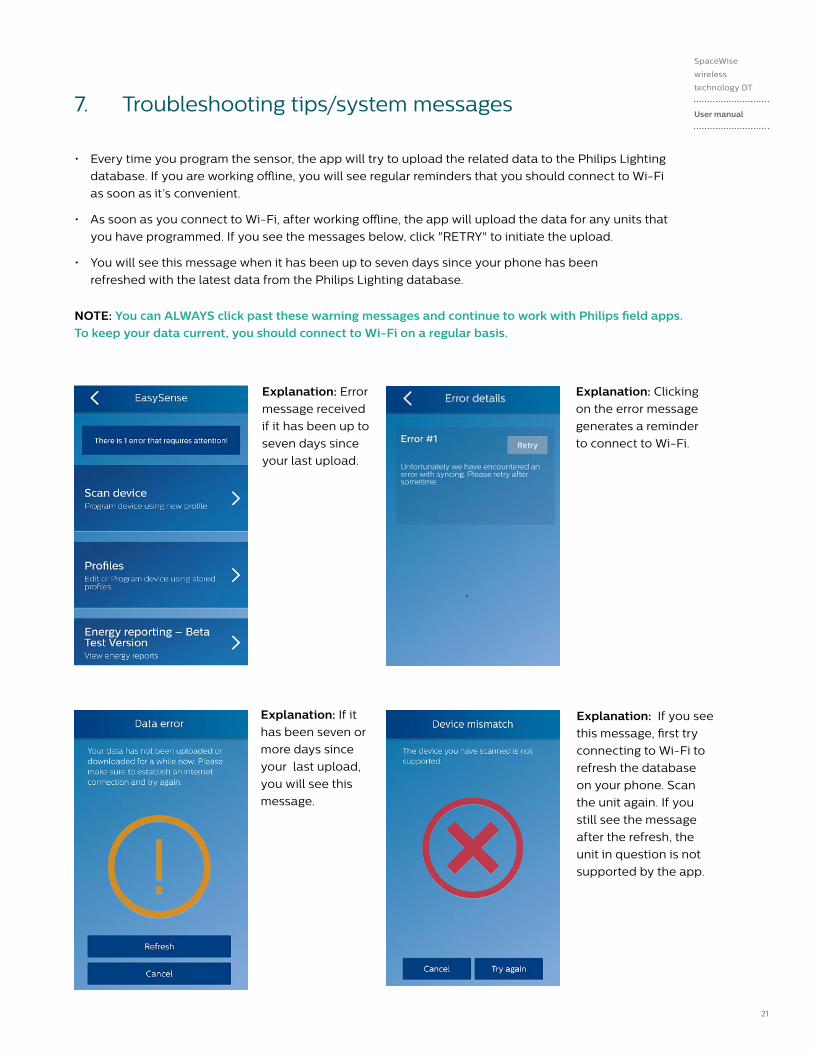
• Every time you program the sensor, the app will try to upload the related data to the Philips Lighting
database. If you are working offline, you will see regular reminders that you should connect to Wi-Fi
as soon as it’s convenient.
• As soon as you connect to Wi-Fi, after working offline, the app will upload the data for any units that
you have programmed. If you see the messages below, click "RETRY" to initiate the upload.
• You will see this message when it has been up to seven days since your phone has been
refreshed with the latest data from the Philips Lighting database.
Explanation: Error
message received
if it has been up to
seven days since
your last upload.
Explanation: Clicking
on the error message
generates a reminder
to connect to Wi-Fi.
Explanation: If it has been seven or
more days since
your last upload,
you will see this
message.
Explanation: If you see
this message, first try
connecting to Wi-Fi to
refresh the database
on your phone. Scan
the unit again. If you
still see the message
after the refresh, the
unit in question is not
supported by the app.
NOTE: You can ALWAYS click past these warning messages and continue to work with Philips field apps. To keep your data current, you should connect to Wi-Fi on a regular basis.
7. Troubleshooting tips/system messages
22 Philips
8. FAQs
Q. What protocol and frequency do the SpaceWise DT luminaires operate on?
A. SpaceWise DT luminaires use ZigBee 2.4 GHz frequency to communicate in a mesh network topology.
Q. How many SpaceWise DT groups can be created on a project and what is the maximum limit on the total number of devices within a SpaceWise DT group?
A. Infinite number of SpaceWise groups can be created on a project. Within a group, up to 40 sensors and up to 5
switches can be linked together.
Q. Do the SpaceWise DT luminaires forget their settings after power is lost or interrupted?
A. No, all settings are retained as long as the luminaires have not been factory reset or there has been
a hardware failure.
Q. Why do the lights momentarily ramp up and dim down after the SpaceWise DT luminaires experience a power interruption?
A. Upon power cycle, SpaceWise DT luminaires undergo a daylight calibration sequence for few seconds.
During the sequence the SpaceWise DT luminaires alter their light levels to determine the contribution
of any ambient light.
Q. Can NFC mechanism be used to create SpaceWise DT groups ?
A. No, grouping can only be achieved with IR functionality. NFC is used to read & write only individual
sensor parameters.
Q. What is the recommended distance between two SpaceWise DT luminaires?
A. Standard grid spacing must be maintained between luminaires. It is recommended to keep the distance as
short as possible but it can be extended up to 30 ft. if other physical parameters of the space are conducive
for wireless transmission.
Q. Dwell Time feature is not showing up within the configure settings page of the App.
A. Please update the App to the latest version and make sure you have read the sensor settings by selecting the
EasySense IR mode followed by “Scan with NFC”. Scanning the sensor with EasySense NFC mode will not
populate the app with the Dwell Time feature.
23
SpaceWise
wireless
technology DT
User manual9. Disclaimer
10. Technical
FCC Compliance Statement
The luminaire complies with the part 15 of the FCC rules. Operation is subject to the
following two conditions:
• This luminaire may not cause harmful interference, and
• This luminaire must accept any interference received, including interference that may cause
undesired operation
Any changes or modification not expressly approved by Philips could void the user’s
authority to operate this equipment. This product is intended for commercial use only.
Warranty
A detailed product warranty statement can be found on the Philips website
www.philips.com/warranties
Technical Support
For technical support on this product contact 1-800-372-3331 and select the
controls prompt option.
The information in this guide is accurate at the time of writing. This guide is provided “as is” without
expressed or implied warranty of any kind. Neither Philips nor its agents assume any liability for
inaccuracies in this guide or losses incurred by use or misuse of the information in this guide.
Philips will not be liable for any indirect, special, incidental or consequential damages (including
damages for loss of business, loss of profits or the like), whether based on breach of contract, tort
(including negligence), product liability or otherwise, even if Philips or its representatives have been
advised of the possibility of such damages.

© 2017 Philips Lighting Holding B.V. All rights reserved. Philips reserves the right to make changes in specifications and/or to discontinue any product at any time without notice or obligation and will not be liable for any consequences resulting from the use of this publication.
PLt-17062UM 09/17 www.philips.com/SpaceWise
Philips LightingNorth America Corporation200 Franklin Square Drive Somerset, NJ 08873Tel. 855-486-2216
Philips Lighting Canada Ltd.281 Hillmount Rd, Markham, ON, Canada L6C 2S3Tel. 800-668-9008