Embed Size (px)
Citation preview

PolyM
User Manualwww.xils-lab.com

Table of Contents
1 INTRODUCTION................................................................................................................................................3
2 FEATURES..........................................................................................................................................................4
3 INSTALLATION.................................................................................................................................................5
3.1 ELICENSER DRIVERS..........................................................................................................................................53.2 ILOK DRIVERS ..................................................................................................................................................53.3 WINDOWS (XP, VISTA, WINDOWS 7,8,10)......................................................................................................63.4 MAC (OSX 10.7 AND LATER)...........................................................................................................................7
4 USING THE POLYM..........................................................................................................................................8
4.1 USING THE POLYM TOOLS BAR..........................................................................................................................84.2 ADJUSTING THE INSTRUMENTS PARAMETERS.......................................................................................................84.3 USING THE POLYM...........................................................................................................................................9
4.3.1 The PolyM Audio Flow ...........................................................................................................................94.3.2 Keyboard Split and limits......................................................................................................................104.3.3 The Level Control .................................................................................................................................104.3.4 The Pitch Tuning, Oscillator Range, Lock and Frequency Modulation...............................................114.3.5 Waveform Mixing and Square Shape ...................................................................................................124.3.6 Loudness Contour .................................................................................................................................134.3.7 Polyphonic Filter and Envelope ...........................................................................................................144.3.8 24db Voltage Controlled Filter ............................................................................................................154.3.9 Resonators ............................................................................................................................................154.3.10 Predefined presets ..............................................................................................................................16
4.4 THE ADVANCED SETTINGS PANEL ...................................................................................................................164.4.1 Modulations ..........................................................................................................................................164.4.2 Reverb ...................................................................................................................................................184.4.3 Phaser ...................................................................................................................................................194.4.4 Delay .....................................................................................................................................................19
5 PRESET MANAGEMENT...............................................................................................................................19
5.1 MAIN TOOLBAR..............................................................................................................................................195.2 PRESET MENU..................................................................................................................................................205.3 SORT MENUS...................................................................................................................................................21
5.3.1 Sorting Menu: Additional Functions ....................................................................................................225.4 A/B COMPARISON............................................................................................................................................22
6 OPTION MENU.................................................................................................................................................23
6.1.1 Main.......................................................................................................................................................236.1.2 Display...................................................................................................................................................236.1.3 Misc.......................................................................................................................................................23
7 SPECIAL TIPS..................................................................................................................................................25
7.1.1 CPU-Load..............................................................................................................................................257.1.2 Performance-Tips..................................................................................................................................25
8 CREDITS............................................................................................................................................................26

1 Introduction
Thank you for choosing the PolyM!
The PolyM is a virtual instrument based on the architecture of one of the coolest vintage instruments out there.
The PolyM can bring you back some years ago when sound was so important for the great artists who began the electronic music, such as Keith Emerson, Gary Numan, Herbie Hancock, Kraftwerk …..
But the PolyM offers much more than a string machine or Organ like synthesizer. Thanks to its huge modulation possibilities, to the possibility to tweak the internal filter parameters and despite some musical limitations brought by the Top Octave Divider oscillators (see below), it is a full-featured synthesizer while keeping the character of the original machine.
We at XILS-lab do our best to create authentic recreations of the great synthesizers we emulate and then take it even further. What can be done with today’s computers allows us to take these emulations beyond what was feasible when these products were first created. Our goal is to be true to the original in sound and modulation routings and then add features that were just not previously possible.
If you have not yet developed your skills as a sound designer, we have included a lot of presets from famous sound designers and artists. So you can fuel your synthesizer or robot voices dreams as soon as you load the PolyM into your DAW.
Please enjoy this very powerful sound creation tool. We love what we do and we want you to get the most enjoyment you possibly can from our labors. We want to hear from you.
So “like” us on Facebook http://www.facebook.com/XILSLabs and join in the conversation

2 Features
The PolyM offers:
Two finely tweaked and emulated Top Octave Divider oscillators, providing up to 71 voices of polyphony.
One MODE section (8 dedicated specific filters). One RES section (3 parametric filter banks). One VCF section (a Voltage Controlled self oscillating 24 db zero-delay filter). A simple but nice sounding reverb. Analog-like resonant phaser. A full featured delay (with tempo synchronization) Access to a lot of parameters which were not accessible in the hardware version All parameters are MIDI controllable
The PolyM is available in the following formats:
Mac OSX 10.7 and later: VST, Audio Unit, AAX Windows 10, 8, 7, XP and Vista: VST, RTAS (Pro Tools 7.0 and later), AAX
AAX
Minimum system requirements: 1 Gigabyte of RAM and a 2 GHz processor.
The PolyM is a plug-in and is not available as a standalone application
Notice: The screen resolution must be set at least to 1024 pixels width.

3 Installation
XILS-Lab offers you the choice of using eLicense or iLok. This first section describes the process for authorization for eLicense.
3.1 eLicenser drivers
The PolyM uses an eLicenser dongle. You must have this dongle connected to a USB port on your computerto make the PolyM work.
Important : Please take care of your dongle: you need it to run the PolyM and it carries your license!
Please Note: Even if you have already installed the eLicenser drivers for a previous product, please install thelatest version of the eLicenser License Control.
To download the latest eLicenser Control Center (eLC), please go to:
http://www.elicenser.net/en/latest_downloads.html
You need a PolyM Activation Code to load your license onto the dongle:
First, plug your dongle into a USB port of your computer. Then launch the License Control Center. Launch theEnter authorization code. Enter your Activation Code in the reserved field, and press Next.
Wait for the license to be downloaded and then check to see if the license is correctly loaded on the donglein the main section of the License Control Center.
3.2 iLok drivers
With the iLok version of the PolyM, you need to plug an iLok USB key into your computer or use the so-called “soft-location”, authorizing your computer.
After downloading and installing the latest PACE drivers, please launch it, login with you ilok.com account.Select “License->Redeem Activation Code” and submit your iLok code. Drag and drop the created license onto a destination icon (either your computer or an iLok device)
To download the latest PACE drivers, please go to:http://www.ilok.com/download-ilok-software.html
3.3 Windows (XP, VISTA, Windows 7,8,10)
To install the PolyM on Windows, launch the PolyM installer file Please download the latest version from theXILS-lab website.
http://www.xils-lab.com/pages/PolyM_Download-Installer.html
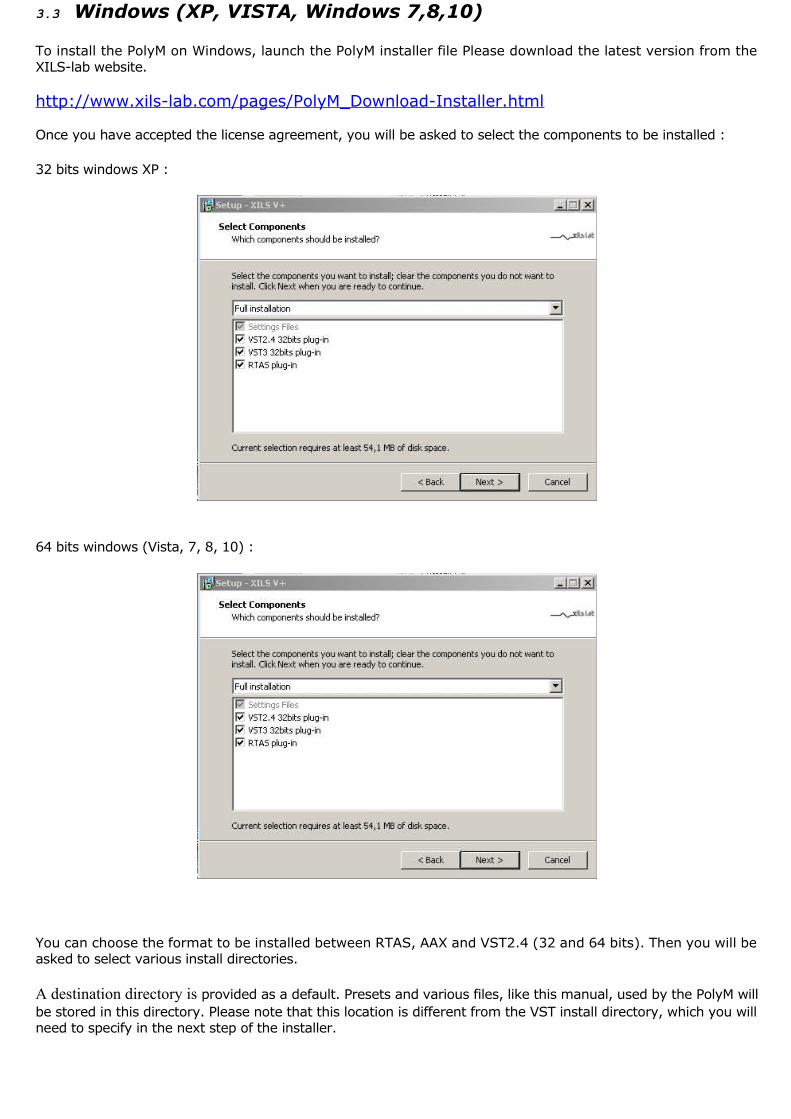
Once you have accepted the license agreement, you will be asked to select the components to be installed :
32 bits windows XP :
64 bits windows (Vista, 7, 8, 10) :
You can choose the format to be installed between RTAS, AAX and VST2.4 (32 and 64 bits). Then you will beasked to select various install directories.
A destination directory is provided as a default. Presets and various files, like this manual, used by the PolyM willbe stored in this directory. Please note that this location is different from the VST install directory, which you willneed to specify in the next step of the installer.

Once the installation directory is specified, you will be asked to select the VST plug-in directory, with a suggesteddefault location. Make sure that the path for the 32 bits plug-in differs than for the 64 bits plug-in (as the defaultpath does)
Important notice : be sure to use a folder write enable and owned by the user (do not use “c:/program files”for instance). Otherwise you will have to run your music application with “administrator rights”.
The RTAS plug-in and its table control management Pro-Tools are directly copied into the following directory:C:\Program Files\Common Files\Digidesign\DAE\Plug-Ins
3.4 Mac (OSX 10.7 and later)
To install the PolyM on a computer equipped with Mac OSX 10.7 or later, download the latest version of either theiLok or eLicensor versions from the XILS-lab website to make sure you have the latest version of the software.
http://www.xils-lab.com/pages/PolyM_Download-Installer.html
Then launch the install program, PolyM.pkg, and follow the instructions.Notice: the install program will ask you for your system password.
Just after selecting the drive where the PolyM will be installed, you can choose which components to be copiedby clicking on “customize” and selecting or unselecting them :
The various files of the PolyM will be copied into the following directories:
Library/Application Support/XILS-lab/PolyMLibrary/Application Support/Digidesign/Plug-InsLibrary/Application Support/Avid/Audio/Plug-InsLibrary/Audio/Plug-Ins/ComponentsLibrary/Audio/Plug-Ins/VSTLibrary/Application Support/Documentation/XILS-lab/PolyM
And for the user preset and various option :
..users/username/Library/Preferences/XILS-lab/PolyM
4 Using the PolyM
4.1 Using the PolyM tools bar
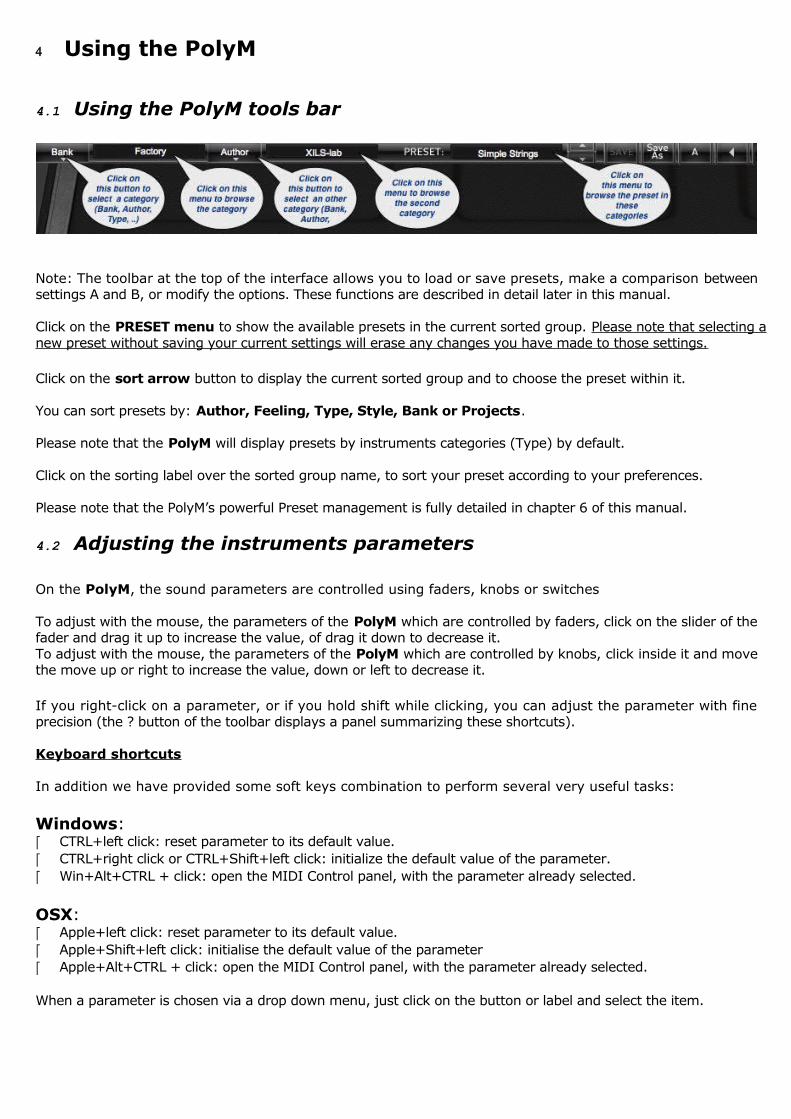
Note: The toolbar at the top of the interface allows you to load or save presets, make a comparison betweensettings A and B, or modify the options. These functions are described in detail later in this manual.
Click on the PRESET menu to show the available presets in the current sorted group. Please note that selecting anew preset without saving your current settings will erase any changes you have made to those settings.
Click on the sort arrow button to display the current sorted group and to choose the preset within it.
You can sort presets by: Author, Feeling, Type, Style, Bank or Projects.
Please note that the PolyM will display presets by instruments categories (Type) by default.
Click on the sorting label over the sorted group name, to sort your preset according to your preferences.
Please note that the PolyM’s powerful Preset management is fully detailed in chapter 6 of this manual.
4.2 Adjusting the instruments parameters
On the PolyM, the sound parameters are controlled using faders, knobs or switches
To adjust with the mouse, the parameters of the PolyM which are controlled by faders, click on the slider of thefader and drag it up to increase the value, of drag it down to decrease it.To adjust with the mouse, the parameters of the PolyM which are controlled by knobs, click inside it and movethe move up or right to increase the value, down or left to decrease it.
If you right-click on a parameter, or if you hold shift while clicking, you can adjust the parameter with fineprecision (the ? button of the toolbar displays a panel summarizing these shortcuts).
Keyboard shortcuts
In addition we have provided some soft keys combination to perform several very useful tasks:
Windows: CTRL+left click: reset parameter to its default value. CTRL+right click or CTRL+Shift+left click: initialize the default value of the parameter. Win+Alt+CTRL + click: open the MIDI Control panel, with the parameter already selected.
OSX: Apple+left click: reset parameter to its default value. Apple+Shift+left click: initialise the default value of the parameter Apple+Alt+CTRL + click: open the MIDI Control panel, with the parameter already selected.
When a parameter is chosen via a drop down menu, just click on the button or label and select the item.

4.3 Using the PolyM
The PolyM instrument is a wonderful synthesizer featuring two top octave divider oscillators and three filterbanks, for creating amazing strings, voices, brass, basses or other esoteric sounds.
Inserting the PolyM Inst or the PolyM in your Instrument track will allow you to use these two features.
4.3.1 The PolyM Audio Flow
Having in mind the PolyM audio flow will help you to better understand its parameters, especially those whichare affecting each individual note (called polyphonic) and those which are global to all the notes calledmonophonic)
The PolyM is divided into three sections: the Top Octave Divider oscillators, the Mixer and the Filter banks.
The top octave divider oscillator is generating the corresponding wave form (square or saw) for each playednote from a single oscillator. This explains why the pitch can be only controlled globally.
Each note has its own filter, envelope generators (one for the level, the other for the filter), pulse widthcontrol and mixer.
Mixing the output of each note gives the so called DIRECT output. This output is then used for feeding thethree additional filter sections. Only the 24db Ladder filter, associated with a single envelope generator, canbe controlled by the keyboard (in a monophonic mode)
Additional effects (Phaser, Reverb, Delay) are applied after mixing all these audio paths

4.3.2 Keyboard Split and limits
Several of PolyM's features are depending on thekeyboard split fader. This fader can be moved alongthe keyboard and all the notes below are part ofthe “lower” keyboard, all the notes above are partof the “upper” keyboard.
Some parameters are not dependant upon this splitpoint, but on the octave the note is played (seebelow the Shape Mod and the Octave Balance) .Hence, the keyboard is divided in three parts,Octave 1-2, Octave 3-4 and Octave 5-6
For reducing the CPU, you can limit the PolyMpolyphony.
By default up to 71 notes are available, butchanging the lower or the higher limit note, thanksto the two menus below the keyboard can reducethe polyphony, hence the needed CPU.
You can't go below E0 or above E6 which are thelimits of the original model.
Any Midi note above or below these limits won'thave any effect
4.3.3 The Level Control
Once the PolyM is launched, an init preset “Simple Strings” is selected which you can immediately play with.For adapting the level of the various sections, locate the MASTER GAIN CONTROLS section
GEN : This is the general level control. It controlsthe level of the PolyM at the very end, after all thetreatments and effects have been applied.
DIRECT : This parameter controls the level of theDIRECT output, the sound which has not beenmodified by any of the three filter banks.
MODE : This parameter controls the level of theMODE output, the sound which has been modifiedby the MODE filter bank (explained hereafter)
RES : This parameter controls the level of theMODE output, the sound which has been modifiedby the RES filter bank (explained hereafter)
VCF : This parameter controls the level of the VCFoutput, the sound which has been modified by theVCF, 24db Voltage Controlled self-oscillating filter(explained hereafter)
Clicking on the label will mute the correspondingoutput (see the second picture)
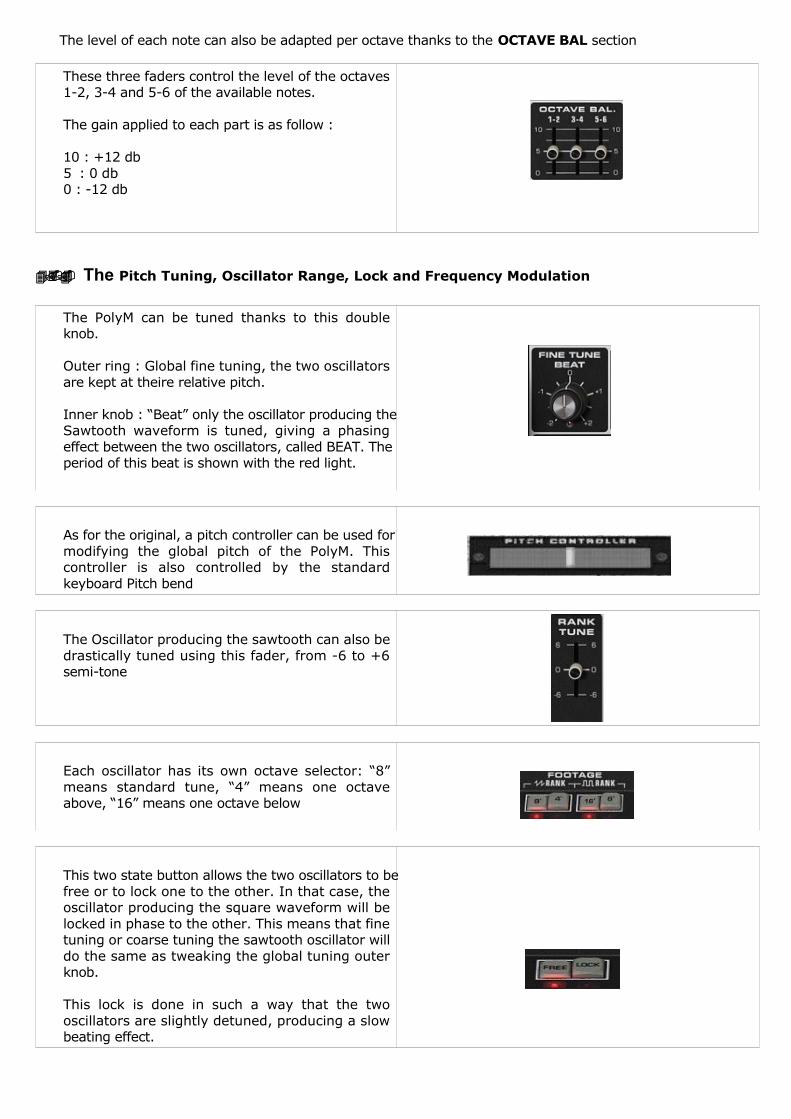
The level of each note can also be adapted per octave thanks to the OCTAVE BAL section
These three faders control the level of the octaves1-2, 3-4 and 5-6 of the available notes.
The gain applied to each part is as follow :
10 : +12 db5 : 0 db0 : -12 db
4.3.4 The Pitch Tuning, Oscillator Range, Lock and Frequency Modulation
The PolyM can be tuned thanks to this doubleknob.
Outer ring : Global fine tuning, the two oscillatorsare kept at theire relative pitch.
Inner knob : “Beat” only the oscillator producing theSawtooth waveform is tuned, giving a phasingeffect between the two oscillators, called BEAT. Theperiod of this beat is shown with the red light.
As for the original, a pitch controller can be used formodifying the global pitch of the PolyM. Thiscontroller is also controlled by the standardkeyboard Pitch bend
The Oscillator producing the sawtooth can also bedrastically tuned using this fader, from -6 to +6semi-tone
Each oscillator has its own octave selector: “8”means standard tune, “4” means one octaveabove, “16” means one octave below
This two state button allows the two oscillators to befree or to lock one to the other. In that case, theoscillator producing the square waveform will belocked in phase to the other. This means that finetuning or coarse tuning the sawtooth oscillator willdo the same as tweaking the global tuning outerknob.
This lock is done in such a way that the twooscillators are slightly detuned, producing a slowbeating effect.
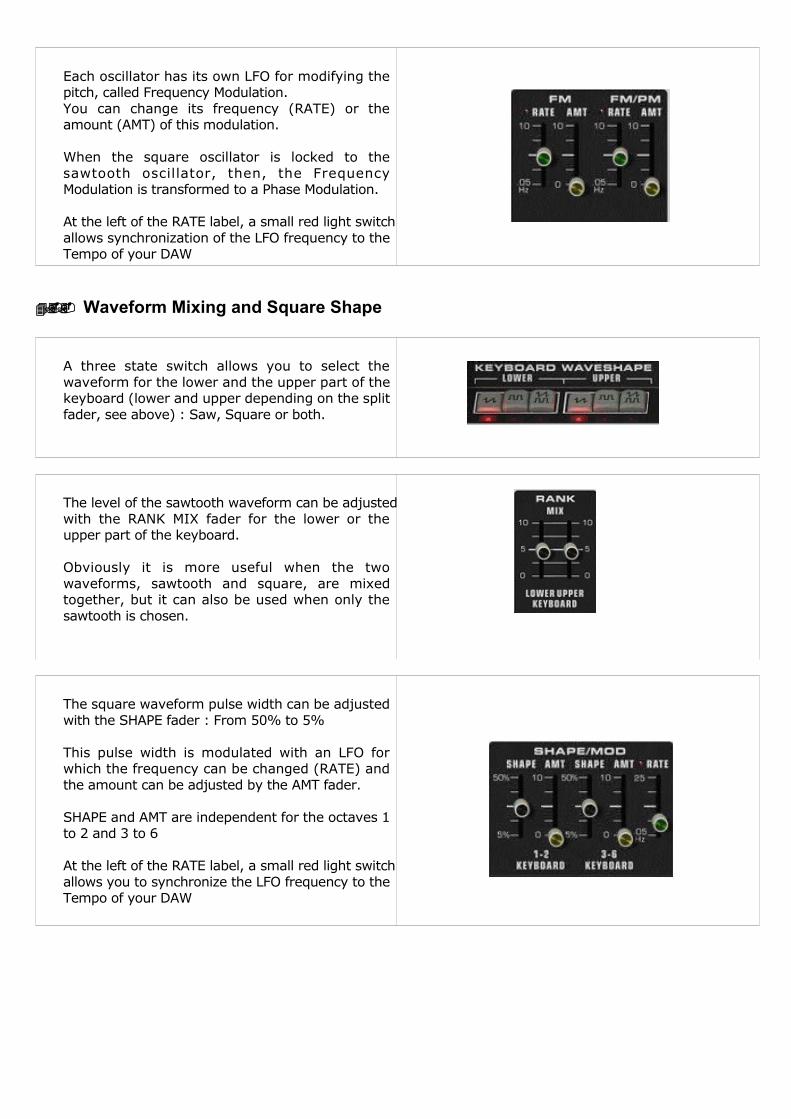
Each oscillator has its own LFO for modifying thepitch, called Frequency Modulation.You can change its frequency (RATE) or theamount (AMT) of this modulation.
When the square oscillator is locked to thesawtooth oscillator, then, the FrequencyModulation is transformed to a Phase Modulation.
At the left of the RATE label, a small red light switchallows synchronization of the LFO frequency to theTempo of your DAW
4.3.5 Waveform Mixing and Square Shape
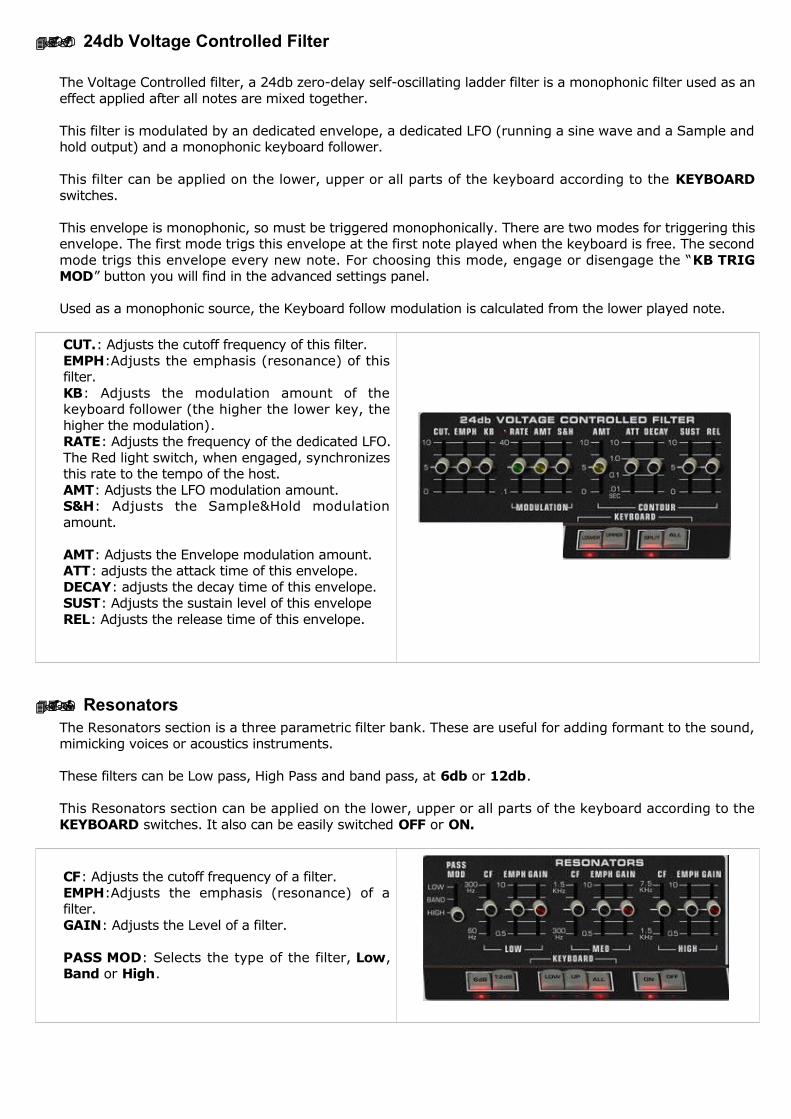
A three state switch allows you to select thewaveform for the lower and the upper part of thekeyboard (lower and upper depending on the splitfader, see above) : Saw, Square or both.
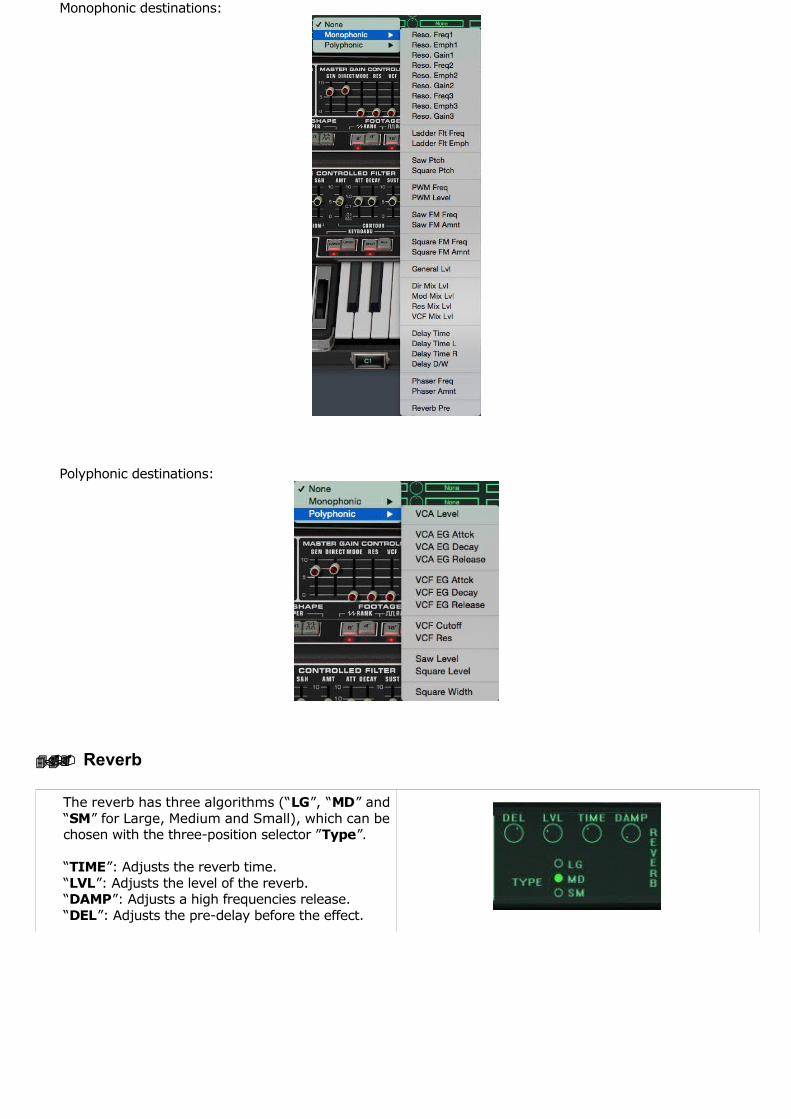
The level of the sawtooth waveform can be adjustedwith the RANK MIX fader for the lower or theupper part of the keyboard.
Obviously it is more useful when the twowaveforms, sawtooth and square, are mixedtogether, but it can also be used when only thesawtooth is chosen.
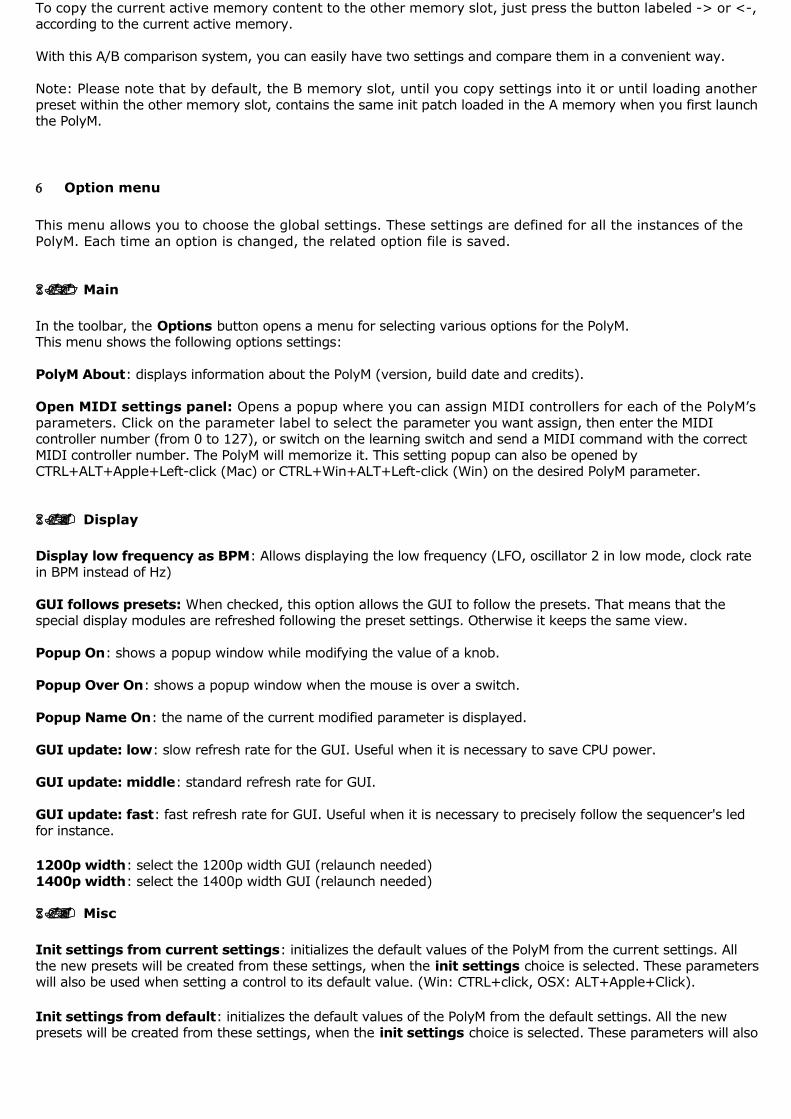
The square waveform pulse width can be adjustedwith the SHAPE fader : From 50% to 5%
This pulse width is modulated with an LFO forwhich the frequency can be changed (RATE) andthe amount can be adjusted by the AMT fader.
SHAPE and AMT are independent for the octaves 1to 2 and 3 to 6
At the left of the RATE label, a small red light switchallows you to synchronize the LFO frequency to theTempo of your DAW

4.3.6 Loudness Contour
The Loudness contour is the other name of the Voltage Controlled Amplifier Envelope. These envelopeparameters are applied to each envelope generator which controls the waveform mixer of every note.There are two modes for these envelopes, the standard ADSR and the Legacy
This switch allows you to select the Legacy modeor the ADSR mode used for the VCA envelopegenerator.
This switch allows you to use the Decay parameteras a release time, in LOCK position, or to switch offthe note with a small release time (whatever theDecay parameter value) in MAN position.
Note : This switch is only used in the Legacyenvelope case.
The legacy envelope is a very unusual envelope generator, which is working with a high frequency oscillatorand a single capacitor instead of the standard three capacitors ADSR. In this mode, the Decay is alwaysactivated, continuously discharging the capacitor. Hence, in some settings, the attack and decay parametercan have an action on the whole level.
For a short explanation : The smaller is the Pulse the longer the capacitor is loaded hence the longer theattack. The Higher the pulse the higher the sustain and finally the higher the Dynamic pulse, the strongerthe dynamic effect.
This legacy envelope structure was used for simplifying the hardware design, but it's also fully part of thespecific sound which explains why we finally emulated it, even its somehow clumsy results.
In case you select the Legacy Envelope, you willsee the following faders :DYN : Adjusts how the velocity will change theenvelope
ATTACK : Adjusts the attack time
DECAY : Adjusts the decay time (independentlyfor the lower and the upper part of the keyboard)
SUSTAIN : Adjusts the Sustain level

In case you select the ADSR Envelope, you will seethe following faders :
DYN : Adjusts how the velocity will change theenvelope
ATTACK : Adjusts the attack time
DECAY : Adjusts the decay time (independentlyfor the lower and the upper part of the keyboard)
SUSTAIN : Adjusts the Sustain level
RELEASE : A d j u s t s t h e r e l e a s e t i m e(independently for the lower and the upper part ofthe keyboard)
4.3.7 Polyphonic Filter and Envelope
Each available note has its own filter and corresponding ADSR envelope. Unlike its model, the PolyM offersusers access to the filter internal parameters. This filter has a 12db slope and can be a Low Pass, High Passand Band pass type.
CUT. : Adjust the cutoff frequency of the filterEMPH.: Adjust the emphasis (resonance) of thefilterAMT : Adjust the modulation amount of thededicated envelopeKB : Adjust the modulation amount of theKeyboard follower (the higher the key, the higherthe modulation)KEYBOARD : Allows to enable or disable this filterfor a part of the keyboard. This is useful whenusing the 24db mono filter
All the parameters of the Filter's dedicated envelope can be adjusted :
ATT : Adjust the Attack time of this envelopeDEC: Adjust the Decay time of this envelopeSUST: Adjust the Sustain level of this envelopeREL: Adjust Release time of this envelopeFILTER TYPE : select the type of he filter (LowPass, Band Pass, High Pass)
4.3.8 24db Voltage Controlled Filter
The Voltage Controlled filter, a 24db zero-delay self-oscillating ladder filter is a monophonic filter used as aneffect applied after all notes are mixed together.
This filter is modulated by an dedicated envelope, a dedicated LFO (running a sine wave and a Sample andhold output) and a monophonic keyboard follower.
This filter can be applied on the lower, upper or all parts of the keyboard according to the KEYBOARDswitches.
This envelope is monophonic, so must be triggered monophonically. There are two modes for triggering thisenvelope. The first mode trigs this envelope at the first note played when the keyboard is free. The secondmode trigs this envelope every new note. For choosing this mode, engage or disengage the “KB TRIGMOD” button you will find in the advanced settings panel.
Used as a monophonic source, the Keyboard follow modulation is calculated from the lower played note.
CUT.: Adjusts the cutoff frequency of this filter.EMPH:Adjusts the emphasis (resonance) of thisfilter.KB: Adjusts the modulation amount of thekeyboard follower (the higher the lower key, thehigher the modulation).RATE: Adjusts the frequency of the dedicated LFO.The Red light switch, when engaged, synchronizesthis rate to the tempo of the host.AMT: Adjusts the LFO modulation amount.S&H: Adjusts the Sample&Hold modulationamount.
AMT: Adjusts the Envelope modulation amount.ATT: adjusts the attack time of this envelope.DECAY: adjusts the decay time of this envelope.SUST: Adjusts the sustain level of this envelopeREL: Adjusts the release time of this envelope.
4.3.9 Resonators The Resonators section is a three parametric filter bank. These are useful for adding formant to the sound,mimicking voices or acoustics instruments.
These filters can be Low pass, High Pass and band pass, at 6db or 12db.
This Resonators section can be applied on the lower, upper or all parts of the keyboard according to theKEYBOARD switches. It also can be easily switched OFF or ON.
CF: Adjusts the cutoff frequency of a filter.EMPH:Adjusts the emphasis (resonance) of afilter.GAIN: Adjusts the Level of a filter.
PASS MOD: Selects the type of the filter, Low,Band or High.

4.3.10Predefined presets
Following its model, the PolyM offers 9 predefined sounds you can load thanks to the blue buttons section.
These buttons also select the internal filter of the “MODE” filter bank (see below). If you click on one of thebuttons, the “MODE” filter bank is chosen accordingly, meaning the “STRING” filter for the button1, the“PIANO” filter for the button 2 and so on.
The dot button (“OFF”) must be disengaged for the preset to be loaded. When engaged, only the “MODE”filter is changed.
When the dot button is disengaged, clicking on a number will load the corresponding sound, modifying apart of the PolyM : Only the Part producing the “DIRECT” sound of the front panel is modified. All the otherparts and effects are untouched.
4.4 The Advanced settings panel
Clicking on the “screen” icon would opens the Advance settings panel where you can tweak the Modulationand add effects
4.4.1 Modulations
Opening the advanced settings panel, you will find a part dedicated to the modulations. 3 slots are dedicatedto standard keyboard sources (Foot or AfterTouch, Modulation Wheel and Velocity) and 6 modulation nodes.

For each of the 6 modulation nodes and the 3 Keyboard Destinations, you can chose the source by clicking inthe source display, the destination, by clicking in the destination display and the amount of the modulationby turning the knob AMNT.
The modulation sources and destinations are grouped in Monophonic and Polyphonic behaviour. Amonophonic source can modulate both monophonic and polyphonic destinations. A Polyphonic source canonly modulate a Polyphonic destination. A Monophonic destination can be only modulated by a Monophonicsource.
So depending on the cases, some choices are enabled or not (More choices will be available in furtherversions)
Note : “Foot/After” and “Mod. Wheel” are monophonic sources, “Velocity” is a polyphonic source. In theoption menu, it is possible to choose only “Foot”, only “Aftertouch” or both Midi messages for controlling thissource of modulation.
These modulation possibilities offer a wide range of new sounds the original hardware model can't achieve.From tiny changes for giving more vibe to huge effects, the PolyM sound possibilities are far away fromthose you can find in a simple string or organ-like synthesizer machine.
KB TRIG MOD : select how the 24db Ladder mono filter is triggered by the keyboard. When engaged, it'striggered every new note. When disengaged, it will only re-trigger once all keys are released.
VCF DRIVE : Set the input level of the VCF 24db Ladder filter, then adds more distortion and lessresonance.
Monophonic sources:
Polyphonic sources:
Monophonic destinations:
Polyphonic destinations:
4.4.2 Reverb
The reverb has three algorithms (“LG”, “MD” and“SM” for Large, Medium and Small), which can bechosen with the three-position selector ”Type”.
“TIME”: Adjusts the reverb time.“LVL”: Adjusts the level of the reverb.“DAMP”: Adjusts a high frequencies release.“DEL”: Adjusts the pre-delay before the effect.

4.4.3 Phaser
The phaser is a fine emulation of an analog phaser, providing all its internal parameters to allow a widerange of sounds.
“D/W”: Increases or decreases the effect.“SPEED”: Adjusts the speed of the modulation.“AMT”: Adjusts the amount of the modulation (thewidth of the frequency sweep)“Sweep”: Adjusts the frequency around which themodulation occurs to be set.“WIDTH”: sets the differences between the leftand the right channel.“RES”: Adjusts the level of the internal feedback,allowing increasing or decreasing the level of theharmonics swept by the phaser.“BO”: A Boost switch allowing to overload thephaser internal amplifier when engaged.
4.4.4 Delay
“D/W”: Increases or decreases the effect.“TIME”: Adjusts the delay time (left or right).“FEED”: Adjusts the amount of the feedback (leftor right)“SY”: Synchronizes the time to the host's Tempo.
5 Preset Management
5.1 Main Toolbar
In the toolbar you can find two buttons, displaying the category name (Bank, Author, Type, Style, Feeling orProject), which open the sort management menus.
The two first text fields show the current sorting group and the third shows the current preset.
Clicking on the arrow on the left of the category or preset names opens the corresponding menus.
Note: When a parameter is modified, the name of the preset is followed by a *, indicating that the currentsettings of the PolyM no longer matches the stored preset.
When you want to save a modified preset, click on the Save or Save As button.
In order to prevent you from erasing them, the Factory presets cannot be modified. When you edit a Factorypreset, the Save button will be grayed, and you will have to use the Save As function to save it in another bank.
If you edit any other preset than a Factory one, the Save and Save As function will both be available.
The main difference is that the Save function will save the preset under its current name, and with its currenttags, overwriting the previous incarnation of the preset, while the Save As function opens a dialog box where youcan modify the name of the preset, the bank in which it will be stored, and all its tags
The settings of the PolyM are then saved in the currently displayed preset, and the * disappears. Click on theSave As button to save this preset with another name and/or to other sorting groups.

5.2 Preset menu
Click the Preset arrow button to open the preset menu. Here you can choose and load another preset from thecurrent sort groups into the PolyM.
In this menu, other actions are also available:
Delete Preset: use this to delete the current preset (a popup confirmation window appears). This option is onlyavailable if the current preset is not a factory one.Export Preset: Use this function to export the current preset in an external file (.epsx format). This file can beimported later as a new bank. It always makes sense to back up your presets on external media.
Open preset Information (or click on SAVE AS): opens the following preset information window where thename and all other information related to the current preset can be displayed or changed.
In this window you can modify the Name of the preset, specify the Bank in which the preset will be saved, andalso enter information in the other fields:
AUTHOR (Your name, mostly used by Sound Designers for factory presets), Type (Category of the instrument like Keys, Leads, Basses, etc.) Style (Musical Genre), Feeling (Cold, warm, soft) and finally Project (My Song, My_Live_Project).
You can also see its creation date and the last update date.
To modify a preset name, click in the preset field and enter the new preset name this will also save all thecurrent settings.
To change presets information, click on the display, this will open a menu where you can select one of the existing items.
Note: You can add a new item in any category, and therefore create custom banks, custom styles, Projects, categories of instruments etc.
To add a new item in any field, select “New….”. Which appears at the bottom of the list.
Note (You may have to browse until the end of the list in order to select “new” depending on its length.)
A Pop Up window opens when you can enter the new name. The current preset will then be associated to this new item.
Note: Please be aware that creating too many categories can also have its drawbacks, making browsing gofrom difficult and painful to nearly impossible. Should you create around 200 different custom instrument categories, it would become very difficult to browse the library using the Style sorting.
Once you have filled all the desired/required fields:

SAVE AS: Will save the current preset in the chosen Bank, with its new (or unchanged) Name, and taggedwith all the fields you filled in.
MOVE TO: Allows saving the current preset in another location. This is handy to gather a lot of presets into a single location, or User Bank, which you can export in a single file containing all the presets you created or edited for a given project.
CANCEL: Will just cancel all operations and return to the standard PolyM GUI.
5.3 Sort menus
The sorting menus are unique and a powerful tool. Allowing you to perform sophisticated tasks, such as displaying the preset list organized in a variety of different ways:
All the Basses of your Sound Library All the Basses tagged with a given musical genre All the Pads made by given Sound Designers All instruments for a musical genre like Electronica, or Funk All instruments that were recently imported in a bank (like additional sound-sets from Xils-Lab or 3rd
party vendors)
There are indeed a lot of possibilities, and we’re confident that you’ll find the best way to customize it to your personal needs.
In order to perform such selections, all you have to do is to select an item in the first sort menu. This represents the first and main criteria for the search engine.
AUTHOR (Your name, or a Sound Designer name for factory presets), Type (Category of the instrument like Keys, Leads, Basses, etc) Style (Musical Genre), Feeling (Cold, warm, soft) and finally Project (My Song, My_Live_Project). ALL (this item is not used for sorting the preset)
These primary results can then also be filtered according to second criteria. Which can be chosen from a similar list in the secondary sort menu.
Sometimes a picture is better than a lot of text, so you’ll find below an example where you can find out how to select all the basses designed by a given Sound Designer.
Please note that, once you are familiar with this system, you can also perform some operations in a single click,by using the Sub Groups to choose a preset:

In the above picture the primary sort menu is used to browse the different banks. Then in a factory bank, theauthor Xils-Lab is selected, and finally the Preset strings_glide_video. In this example the preset is selected in asingle click operation, and the presets available in the preset list will be all the Xils-Lab presets available in theentire Factory Sound Library.
Click on the row of the sorting button to open the menu used to manage this sorting group (or sub group). Hereyou can directly select and load any preset from any group or subgroup.
5.3.1 Sorting Menu: Additional Functions In this menu, other actions are also available:
Delete: deletes all of the presets of the current group that are not factory ones. IMPORTANT: Use this functionwith care: If the bank does not contain any factory presets, ALL PRESETS IN THIS BANK WILL BE PERMANENTLYDELETED.
Rename: modifies the current group name. Selecting this choice will open a window where the new name willbe entered.
Use Factory: enables or disables the display of factory presets.
Sort By: This function sorts the presets according to bank, author, project, or shows all presets (Bank Name,Author Name, Project Name, All Presets). The preset menu will show presets of the same category (sameauthor, same project or same bank).
Export Bank: This function exports a bank in the PolyM’s proprietary cross platform format, (Mac and PC). Theselected bank (i.e. the bank which contains the currently active preset) will be exported to a user specifiedlocation on your hard drive.
Import Bank: This Function allows you to browse your hard drives to select a file and imports a PolyM bank.
These two choices are not available from the second sort menu.
This menu provides also the possibility to change the size of the interface. This feature is the same that theone provided in the Option menu.
5.4 A/B comparison
You can store two different settings at the same time and instantly switch from one to the other to comparetheir settings. These two settings are stored in the A and B memories.
When you launch the PolyM, the default-activated memory is A. When you load or modify a preset, this memory –A- is also modified in real time according to your edits. You can switch to B memory by clicking on the B button.
To copy the current active memory content to the other memory slot, just press the button labeled -> or <-,according to the current active memory.
With this A/B comparison system, you can easily have two settings and compare them in a convenient way.
Note: Please note that by default, the B memory slot, until you copy settings into it or until loading anotherpreset within the other memory slot, contains the same init patch loaded in the A memory when you first launchthe PolyM.
6 Option menu
This menu allows you to choose the global settings. These settings are defined for all the instances of the PolyM. Each time an option is changed, the related option file is saved.
6.1.1 Main
In the toolbar, the Options button opens a menu for selecting various options for the PolyM.This menu shows the following options settings:
PolyM About: displays information about the PolyM (version, build date and credits).
Open MIDI settings panel: Opens a popup where you can assign MIDI controllers for each of the PolyM’sparameters. Click on the parameter label to select the parameter you want assign, then enter the MIDIcontroller number (from 0 to 127), or switch on the learning switch and send a MIDI command with the correctMIDI controller number. The PolyM will memorize it. This setting popup can also be opened byCTRL+ALT+Apple+Left-click (Mac) or CTRL+Win+ALT+Left-click (Win) on the desired PolyM parameter.
6.1.2 Display
Display low frequency as BPM: Allows displaying the low frequency (LFO, oscillator 2 in low mode, clock ratein BPM instead of Hz)
GUI follows presets: When checked, this option allows the GUI to follow the presets. That means that thespecial display modules are refreshed following the preset settings. Otherwise it keeps the same view.
Popup On: shows a popup window while modifying the value of a knob.
Popup Over On: shows a popup window when the mouse is over a switch.
Popup Name On: the name of the current modified parameter is displayed.
GUI update: low: slow refresh rate for the GUI. Useful when it is necessary to save CPU power.
GUI update: middle: standard refresh rate for GUI.
GUI update: fast: fast refresh rate for GUI. Useful when it is necessary to precisely follow the sequencer's ledfor instance.
1200p width: select the 1200p width GUI (relaunch needed)1400p width: select the 1400p width GUI (relaunch needed)
6.1.3 Misc
Init settings from current settings: initializes the default values of the PolyM from the current settings. Allthe new presets will be created from these settings, when the init settings choice is selected. These parameterswill also be used when setting a control to its default value. (Win: CTRL+click, OSX: ALT+Apple+Click).
Init settings from default: initializes the default values of the PolyM from the default settings. All the newpresets will be created from these settings, when the init settings choice is selected. These parameters will also

be used when setting a control to its default value. (Win: CTRL+click, OSX: ALT+Apple+Click).
Wheel Incr: 0.01: parameter increment of 0.01 when using the mouse wheel.
Wheel Incr: 0.05: parameter increment of 0.05 when using the mouse wheel.
Wheel Incr: 0.1: parameter increment of 0.1 when using the mouse wheel.
Sustain Pedal Close: Select how the sustain pedal must be used, close is activated in this case.Sustain Pedal Open: Select how the sustain pedal must be used, open is activated in this case.
Only Foot: Select how the Foot/After modulation slot will respond to Midi Message. In this case, it will respondonly to Foot (04) Midi messages .Only After: Select how the Foot/After modulation slot will respond to Midi Message. In this case, it will respondonly to Aftertouch (13) Midi messages .Foot&After: Select how the Foot/After modulation slot will respond to Midi Message. In this case, it will respondto Foot (04) and Aftertouch (13) Midi messages .

7 Special tips
7.1.1 CPU-Load
As the design of the PolyM (T.O.D, filters, effects) has been done to be as close to the original as possible,it can be quite heavy on the CPU.
This is especially true, if you use the PolyM on older computers or along with other high-quality plugins.
Here are some tips to make the most of it - in other words: "have your cake and eat it too" ;-)
Using the "disable device" feature through VST-automation.Due to the T.O.D. design, PolyM requires some CPU-resources; even if produces no sound at a certain point in time.So it might be worth turning off the device when not needed in a track. You should do so not by only muting the track it 'sits in', but by disabling PolyM itself apart from when it is actually needed.This can be done using VST-automation, but the way it works is dependent on how your DAW provides the feature.Be sure not to temporarily disable PolyM before any sustaining notes have ended.
Using PolyM's Limit keyboardBy using the low and high keyboard limits, you can reduce easily the number of available voices. This way,calculation can be reduced. This is especially useful when using the PolyM as a Bass or lead instrument played around an octave.
7.1.2 Performance-Tips
Making a "supersaw"-patchIn order to get an even broader sound, you may want to use 2 instances of PolyM and detune one slightly by setting the Global pitch amount just a bit up or down to any desired value. If you use only the Strings for this you get a kind of sound that sometimes is referred to as "supersaw". The possibility to set one of the PolyM's an octave up or down as well may also come inquite handy here.

8 Credits
Thanks to the artists and musicians who really helped us during the PolyM development:Mathias Brüssel, Vic Emersion, Paul Barret, Nori Ubukata, Kelvin Ford, Simon Ball, Greg Cole, Ingo Weidnerand many others
The presets were done by:Nori Ubukata, Kelvin Ford, Soundsdivine (Simon Ball), Empty Vessel (Greg Cole), Vic Emerson, Adam Borseti, Xavier Oudin.
Graphics and 3-D renderingYannick Bonnefoy
The graphical user interface was created by: Xavier Oudin
This manual was written by Xavier Oudin
And proofread and corrected by:Empty Vessel (Greg Cole)
The plug-in design, algorithm and Digital Signal Processing was done by:Xavier Oudin
Modules licenses:The Top Octave Divider Oscillator, the Mode filters, the Resonators Filters, the Analog Legacy Envelope, arelicensed by Xavier Oudin to XILS-lab for exclusive use in the PolyM virtual synthesizer.