Embed Size (px)
Citation preview
1
USER MANUAL
Ver 2.00

2
Thank you for your interest in our product. We promise to dedicate our best efforts to provide you with quality products and services. If you have any inquiries or need technical support, please ask for help via e-mail at [email protected] and we will assist you as soon as we can. The Ultrascan-B User Manual will provide an overview of the main features, diagnostic menus and how to operate our device. Please make sure you read this manual before proceeding.
3
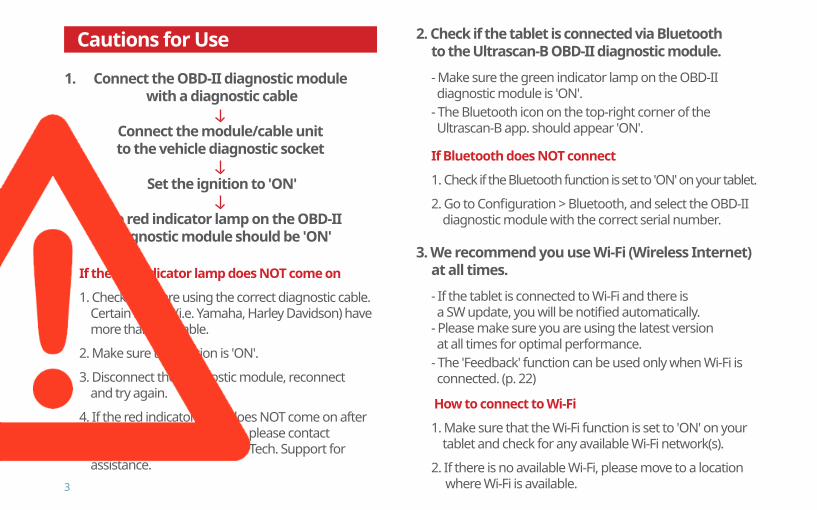
Connect the OBD-II diagnostic module with a diagnostic cable
Connect the module/cable unit to the vehicle diagnostic socket
Set the ignition to 'ON'
The red indicator lamp on the OBD-II diagnostic module should be 'ON'
If the red indicator lamp does NOT come on
1. Check if you are using the correct diagnostic cable. Certain brands (i.e. Yamaha, Harley Davidson) have more than one cable.
2. Make sure the ignition is 'ON'.
3. Disconnect the diagnostic module, reconnect and try again.
4. If the red indicator lamp does NOT come on after following the 3 steps above, please contact your dealer or SkyAutoNet’s Tech. Support for assistance.
2. Check if the tablet is connected via Bluetooth to the Ultrascan-B OBD-II diagnostic module.
- Make sure the green indicator lamp on the OBD-IIdiagnostic module is 'ON'.
- The Bluetooth icon on the top-right corner of the Ultrascan-B app. should appear 'ON'.
If Bluetooth does NOT connect
1. Check if the Bluetooth function is set to 'ON' on your tablet.
2. Go to Configuration > Bluetooth, and select the OBD-II diagnostic module with the correct serial number.
3. We recommend you use Wi-Fi (Wireless Internet) at all times.
- If the tablet is connected to Wi-Fi and there is a SW update, you will be notified automatically.
- Please make sure you are using the latest version at all times for optimal performance.
- The 'Feedback' function can be used only when Wi-Fi is connected. (p. 22)
How to connect to Wi-Fi
1. Make sure that the Wi-Fi function is set to 'ON' on your tablet and check for any available Wi-Fi network(s).
2. If there is no available Wi-Fi, please move to a location where Wi-Fi is available.
Cautions for Use
1.

4
1. Tablet (Android)
2. Ultrascan-B OBD-II diagnostic module
3. Product Case
4. Tablet Case
5. Warranty Certificate
6. Touch Pen
7. User Manual (Please refer to the 'User Manual' feature in 'Configuration').
8. Diagnostic Cables for each Brand
Ultrascan-B Product Components (1/4)
Ultrascan-B OBD-II diagnostic module

5
[Caution!]Please note that the diagnostic cables included in your product may vary from those indicated in the 'User Manual.'
BMW 10-pin Honda 4-pin Kawasaki 4-pin / 6-pinKYMCO 3-pinSuzuki 6-pinYamaha 1-pin (OBD-I protocol)Yamaha 4-pin (ABS)Yamaha 3-pin (Engine)Piaggio 3-pinKTM 6-pin
Ducati 4-pinVespa 3-pinAEON 6-pinTGB 6-pin (Four wheeler only)PGO 6-pinSYM 3-pinAprilia 3-pin (A Type - Rectangular)Aprilia 3-pin (B Type - Semicircular)Dalim 4-pinHarley-Davidson 4-pin / 6-pin
Ultrascan-B Product Components (2/4)
6
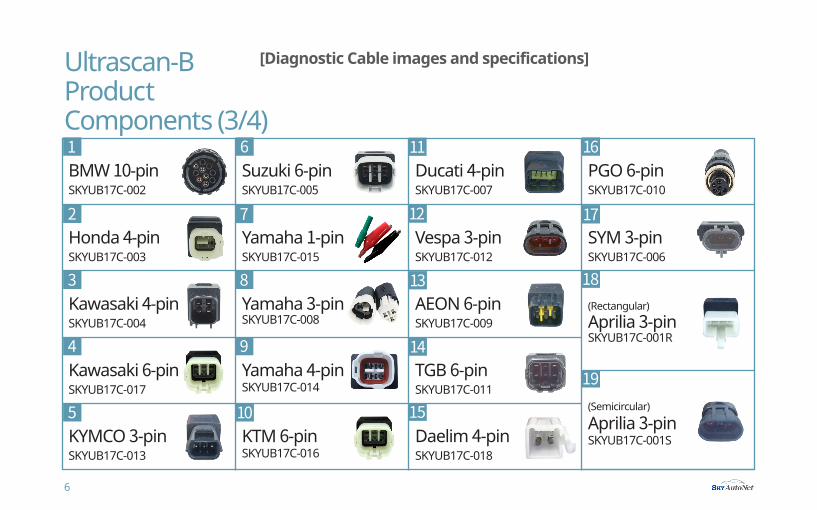
BMW 10-pinSKYUB17C-002
Suzuki 6-pinSKYUB17C-005
PGO 6-pinSKYUB17C-010
Ducati 4-pinSKYUB17C-007
SYM 3-pinSKYUB17C-006
Yamaha 1-pinSKYUB17C-015
Honda 4-pinSKYUB17C-003
Vespa 3-pinSKYUB17C-012
TGB 6-pinSKYUB17C-011
Yamaha 4-pinSKYUB17C-014
(Semicircular)
Aprilia 3-pinSKYUB17C-001SKYMCO 3-pin
SKYUB17C-013Daelim 4-pinSKYUB17C-018
KTM 6-pinSKYUB17C-016
Yamaha 3-pinSKYUB17C-008
Kawasaki 4-pinSKYUB17C-004
Kawasaki 6-pinSKYUB17C-017
AEON 6-pinSKYUB17C-009
(Rectangular)Aprilia 3-pinSKYUB17C-001R
Ultrascan-B Product Components (3/4)
[Diagnostic Cable images and specifications]
7
8
9
2
3
4
5
6
10
11
12
16
13
17
14
18
15
19
1

7
Classification information is marked on the sleeve of each diagnostic cable. For example, 'SKYAP-003' is printed on the 'Aprilia 3-pin' cable, which is also the unique ID.
[Diagnostic Cable classification example: Aprilia 3-pin]
Suzuki 6-pin cable Kawasaki 4-pin cable
Ultrascan-B Product Components (4/4)
Aprilia 3-pin 'Rectangular' cableInstrument Panel Diagnosis for partial models
Aprilia 3-pin 'Semicircular' cableUsed for Engine, ABS, Suspension, Ignition, Gearbox, CLF etc.

8
Ultrascan-B
Getting Started
1. Press the power button [Image 1] and the company logo [Image 2] will appear. The main screen will appear shortly after.
2. Locate the Ultrascan-B application icon [Image 3]as shown in [Image 4].
[Image 4][Image 3]
[Image 2][Image 1]
[Reinstalling the Ultrascan-B Application]If the application is accidentally deleted or the tablet needs to be initialized, please contact your dealer or SkyAutoNet’s Tech. Support for assistance.
9
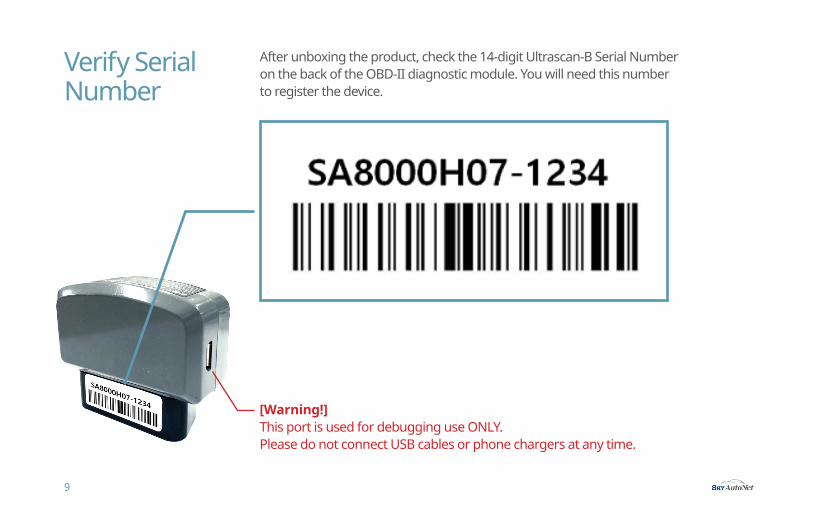
After unboxing the product, check the 14-digit Ultrascan-B Serial Number on the back of the OBD-II diagnostic module. You will need this number to register the device.
Verify Serial Number
[Warning!] This port is used for debugging use ONLY. Please do not connect USB cables or phone chargers at any time.
10
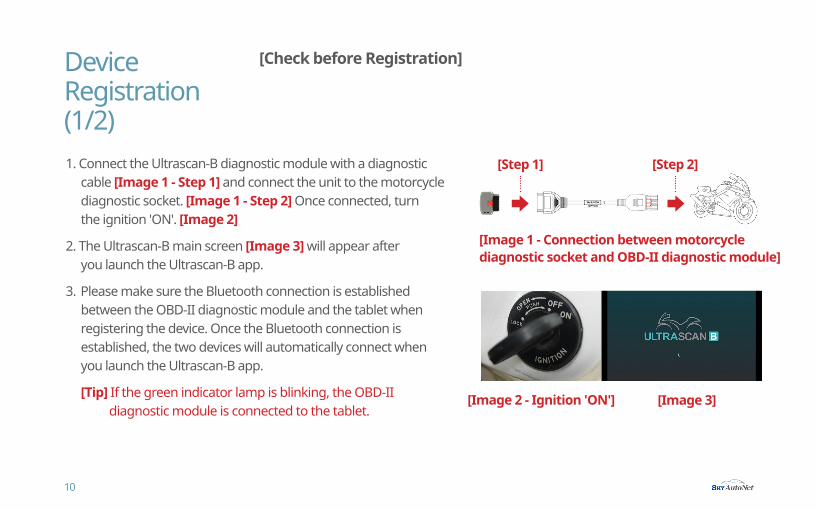
1. Connect the Ultrascan-B diagnostic module with a diagnostic cable [Image 1 - Step 1] and connect the unit to the motorcycle diagnostic socket. [Image 1 - Step 2] Once connected, turn the ignition 'ON'. [Image 2]
2. The Ultrascan-B main screen [Image 3] will appear after you launch the Ultrascan-B app.
3. Please make sure the Bluetooth connection is established between the OBD-II diagnostic module and the tablet when registering the device. Once the Bluetooth connection is established, the two devices will automatically connect when you launch the Ultrascan-B app.
[Tip] If the green indicator lamp is blinking, the OBD-IIdiagnostic module is connected to the tablet.
[Image 3][Image 2 - Ignition 'ON']
Device Registration(1/2)
[Check before Registration]
[Image 1 - Connection between motorcycle diagnostic socket and OBD-II diagnostic module]
[Step 1] [Step 2]
11
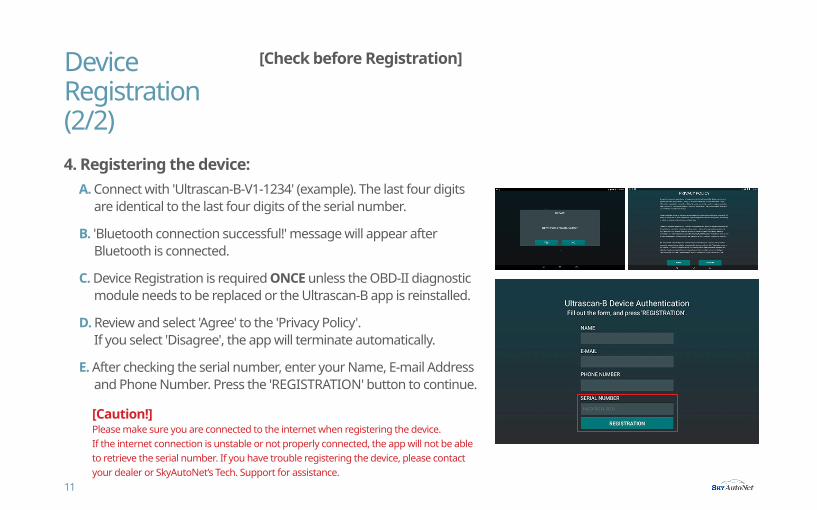
4. Registering the device:A. Connect with 'Ultrascan-B-V1-1234' (example). The last four digits
are identical to the last four digits of the serial number.
C. Device Registration is required ONCE unless the OBD-II diagnosticmodule needs to be replaced or the Ultrascan-B app is reinstalled.
E. After checking the serial number, enter your Name, E-mail Address and Phone Number. Press the 'REGISTRATION' button to continue.
[Caution!]Please make sure you are connected to the internet when registering the device. If the internet connection is unstable or not properly connected, the app will not be able to retrieve the serial number. If you have trouble registering the device, please contact your dealer or SkyAutoNet’s Tech. Support for assistance.
D. Review and select 'Agree' to the 'Privacy Policy'. If you select 'Disagree', the app will terminate automatically.
B. 'Bluetooth connection successful!' message will appear afterBluetooth is connected.
[Check before Registration]Device Registration(2/2)

12
[e.g.] BMW S1000R 2015 MY
[BMW 10-pin]
Diagnostics Operations(1/6)
[DTC(s) & Sensor Data]After connecting the OBD-II diagnostic module to the diagnostic cable, connect the unit to the motorcycle diagnostic socket.
13
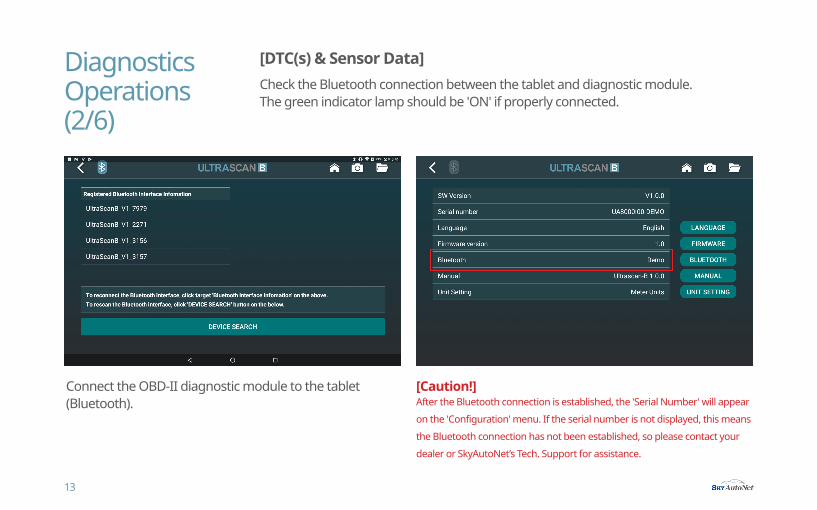
[Caution!]After the Bluetooth connection is established, the 'Serial Number' will appear on the 'Configuration' menu. If the serial number is not displayed, this meansthe Bluetooth connection has not been established, so please contact your dealer or SkyAutoNet’s Tech. Support for assistance.
Connect the OBD-II diagnostic module to the tablet (Bluetooth).
Diagnostics Operations(2/6)
[DTC(s) & Sensor Data]Check the Bluetooth connection between the tablet and diagnostic module. The green indicator lamp should be 'ON' if properly connected.
14
Diagnostics Operations(3/6)
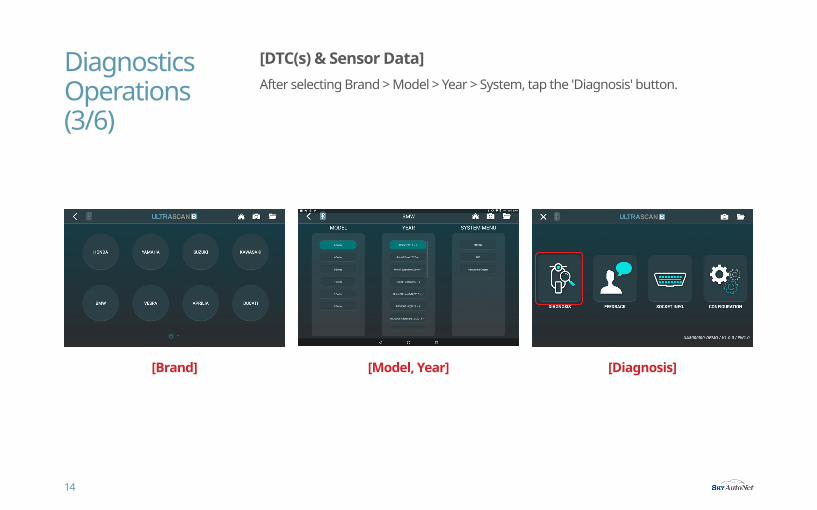
[DTC(s) & Sensor Data]After selecting Brand > Model > Year > System, tap the 'Diagnosis' button.
[Brand] [Model, Year] [Diagnosis]

15
[Diagnosis Menu]
[Live Sensor Data]
[Engine Speed Graph]
[DTC(s) Information]
Diagnostics Operations(4/6)
[DTC(s) & Sensor Data]Scan and erase DTC(s) and check live sensor data through 'Diagnosis' menu.

16
'Actuation' is a function test for various vehicle systems controlled by the ECUs.Tap 'Start' to begin and 'Stop' to terminate the 'Actuation' function.
[Actuation]Diagnostics Operations(5/6)

17
'Special Functions' are used to 'Reset' vehicle data or 'Code' certain vehicles.
[Special Functions]Diagnostics Operations(6/6)
[Idle CO Adjust]
[ABV Reset]

18
Language SelectionSelect desired language.
Software VersionVerify the current Software version.
User InformationUser information provided when registering the device.
User ManualProvide an overview of the main features, diagnostic menus and how to operate the device and app.
OS VersionVerify the current OS version.
Serial NumberOBD-II diagnostic module Serial Number.
BluetoothDisplay the connection status between the OBD-II diagnostic module and tablet.
[Configuration Menu]AdditionalFunctions (1/9)
You may change language settings, refer to the user manual, and check program versions.
19
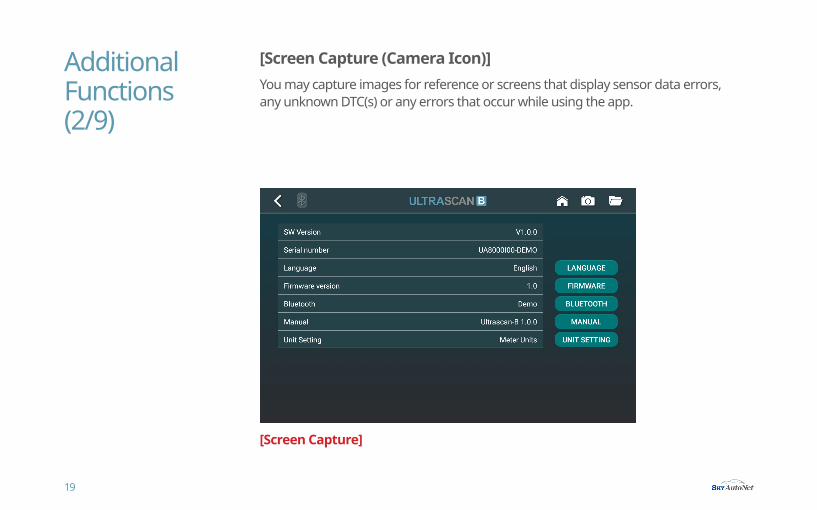
You may capture images for reference or screens that display sensor data errors, any unknown DTC(s) or any errors that occur while using the app.
[Screen Capture (Camera Icon)]
[Screen Capture]
AdditionalFunctions (2/9)

20
All captured images are saved in this folder automatically. You may browse all the captured images by clicking the 'Folder' icon and send the images through the 'Feedback' function if necessary.
[Saved Images (Folder Icon)]AdditionalFunctions (3/9)
[Saved Images Folder]

21
[Print Function]
Files saved using the 'Screen Capture' function can be found in the 'Gallery' folder.
Select and image and tap the 3 dots on the top-right corner of the screen.
Tap 'Print' to print the file.
[Caution!]Please make sure there is a working printer nearby that is connected to your tablet to print files.
AdditionalFunctions (4/9)
You may print the images saved in the 'Gallery' folder.
22
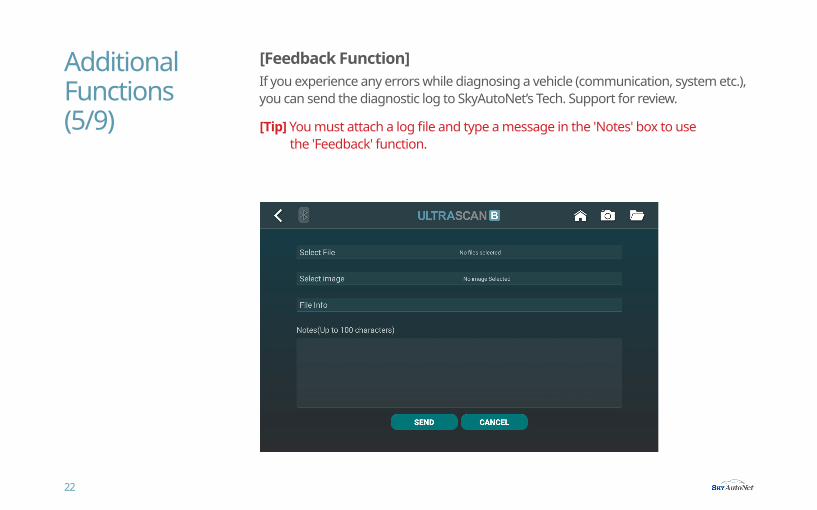
[Feedback Function]If you experience any errors while diagnosing a vehicle (communication, system etc.), you can send the diagnostic log to SkyAutoNet’s Tech. Support for review.
AdditionalFunctions (5/9) [Tip] You must attach a log file and type a message in the 'Notes' box to use
the 'Feedback' function.

23
[Diagnostic Socket Location Information]This function provides information regarding the diagnostic socket location for each brand/model. Due to stricter emission laws and regulations, many brands provide OBD-II 16-pin diagnostic sockets to meet EURO 4 standards. [Image 1]
[Caution!] Diagnostic Socket Location Information may NOT be available for some brands/models.
[YAMAHA N-MAX Model Diagnostic Socket]
[Image 1 - SYM ‘ZET14’ Model EURO 4 Socket]
AdditionalFunctions (6/9)

24
[SW Update & Application Installation]A notification for the latest SW update will appear automatically when connected to Wi-Fi. Please refer to the images below and proceed with the SW update. If you experience problems while updating the SW, please contact your dealer or SkyAutoNet’s Tech. Support for assistance.
After the installation is complete, please restart the app. The new software version can be verified in the 'Configuration' menu.
[Ultrascan-B 1.1.0 Version] [Ultrascan-B Installation Guide]Install the new software as shown above.
AdditionalFunctions (7/9)
25
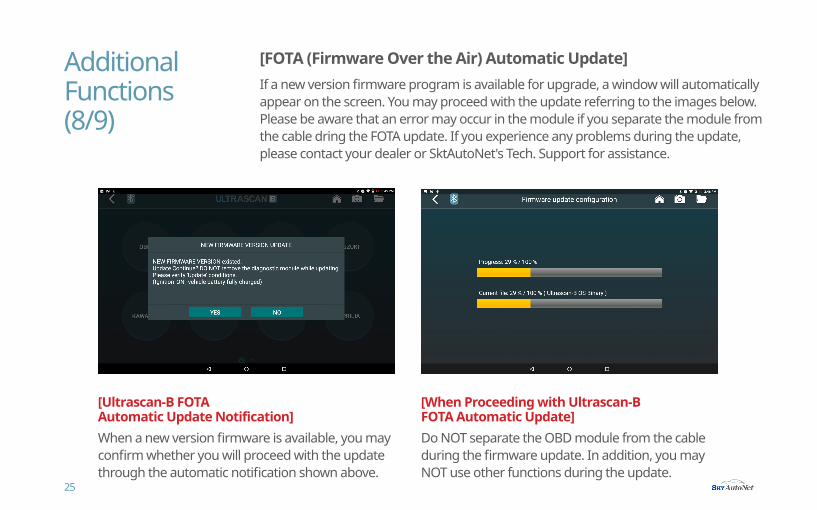
[FOTA (Firmware Over the Air) Automatic Update]If a new version firmware program is available for upgrade, a window will automatically appear on the screen. You may proceed with the update referring to the images below. Please be aware that an error may occur in the module if you separate the module from the cable dring the FOTA update. If you experience any problems during the update, please contact your dealer or SktAutoNet's Tech. Support for assistance.
Do NOT separate the OBD module from the cable during the firmware update. In addition, you may NOT use other functions during the update.
[Ultrascan-B FOTA Automatic Update Notification]
[When Proceeding with Ultrascan-B FOTA Automatic Update]
When a new version firmware is available, you may confirm whether you will proceed with the update through the automatic notification shown above.
AdditionalFunctions (8/9)

26[Warranty Certificate Sample]
[Warranty Certificate]The 'Warranty Certificate' is needed for warranty claims and repair. Please make sure you keep this certificate. If you lose the certificate, please contact your dealer. The certificate can be replaced ONCE after a purchasing the device. Please take note that certain restrictions may apply if you make a warranty claim without providing the certificate.
AdditionalFunctions (9/9)