Embed Size (px)
Citation preview
USER MANUAL
SANA JUICER EUJ-828

02
04
06
07
08
10
12
13
14
15
16
18
19
20
22
Safety precautions
Parts and accessories
How to disassemble the juicing chamber
How to prepare produce; Strainer types
How to assemble for juicing
How to assemble for making ice cream
How to attach the juicing chamber to the body
How to use : For juicing and ice cream
How to use control lever by mode
How to use control lever by ingredients
How to clean
Precautions while juicing
If the auger stops during juicing
Before requesting a repair
Product specifications
01 Read the instructions carefully before using.02 Keep these instructions somewhere easily accessible.03 Use only with 230-240 V AC power supply.04 Design and product development may be upgraded without notice. 05 Any quality improvements are subject to change without notice.
EUJ-828 ( For Household Use Only / Warranty Included )
CONTENTS
02Safety precautions
• Do not plug or unplug with wet hands. It may cause electric shock or injury.
• Only use 230 - 240V AC power. Incorrect voltage may cause electric shock or fire. Motor damage can occur with incorrect voltage.
• Plug in the power cord correctly and push it firmly in a power outlet. Failure to do so may cause an electric shock or a fire.
• If the power cord is damaged, it may only be replaced by an authorized service person. Using a damaged power cord can result in electric shock or fire.
• Do not disassemble, attempt to repair, or alter the appliance in any way. Do not insert anything into gaps or holes in the base. It may cause a fire, electric shock or failure. For technical support, contact the authorized local Customer Service Center.
• Do not use if the plug is not fully attached to the power cord. It may cause electric shock, fire or injury.
• Do not get the base unit wet. Be careful not to let any liquids or other substances get into the power switch on the appliance. Do not operate the power switch with wet hands. It may cause an electric shock or fire.
• The power cord must be plugged into a grounded outlet. Do not ground it on a gas pipe, plastic water pipe, telephone wire, etc. It could cause electric shock, fire, malfunction, or explosion.
• Never disassemble the juicer during operation. Never insert fingers or foreign objects such as forks, spoons, or chopsticks into the feeding tube, pulp outlet, or juice outlet while the juicer is operating. It may cause injury, accident, or failure.
• Do not let children operate this juicer. Appliances can be used by persons with reduced physical, sensory or mental capabilities or lack of experience and knowledge only if they have been given supervision or instruction concerning use of the appliance in a safe way and if they understand the hazards involved.
• Do not operate unless the hopper is properly locked in place. Failure to do so may cause an injury or damage the appliance.
• If a gas leak is detected, do not plug in the appliance. Open a window to ventilate fully and immediately. Failure to do so may cause injury or appliance failure.
03Safety precautions• If the auger stops rotating while juicing, press [REV] button and hold for 2-3 seconds. Release the button and wait for the auger to completely stop, then press [ON] button again. If the juicer is overloaded and continues to stop, the parts may become damaged and performance may be reduced due to overheating of the motor. If the problem continues, immediately stop the appliance and contact the local Customer Care Center.
• Do not attempt to move or disassemble the juicer while it is operating. It can cause an injury or appliance failure. Switch off and unplug the juicer before performing these actions.
• When using the appliance, be careful that any neckties, long necklaces, scarves, etc. do not get caught in the juicer. It can cause injury, appliance failure or damage.
• Only operate the appliance on a flat and stable surface.• Do not operate the appliance for more than 30 minutes at a time. Let it cool down for 5 minutes after every 30 minutes of use. Failure to do so may cause damage to the motor.
• When placing ingredients into the feeding tube, only use the pusher provided.Using any other objects can severely damage the juicer or cause personal injury.
• Do not drop or strike the appliance with heavy objects. It may cause electric shock, fire or damage.
• If the appliance gives off an unpleasant smell, emits smoke, or overheats, stop using immediately and contact the local Customer Service Center. It is natural for any new appliance to have a smell at first, but this will disappear naturally over time.
• Always unplug the appliance after use, before disassembling or cleaning. When unplugging the power cord, make sure to hold the power plug. Pulling on the cord to unplug may cause electric shock or fire.
• Do not wash at high temperatures of 80C (176F) or higher. Do not put any juicer parts in a dishwasher. It may cause failure or parts to become deformed.
• When moving the appliance, make sure to grip it by the bottom of the base using both hands. Do not move it by holding the hopper. Failure to do so could cause the juicer to fall resulting in damage or injury.
• Do not use this appliance for commercial purposes. Forcing an excessive quantity of ingredients into the hopper may damage the juicer.
04
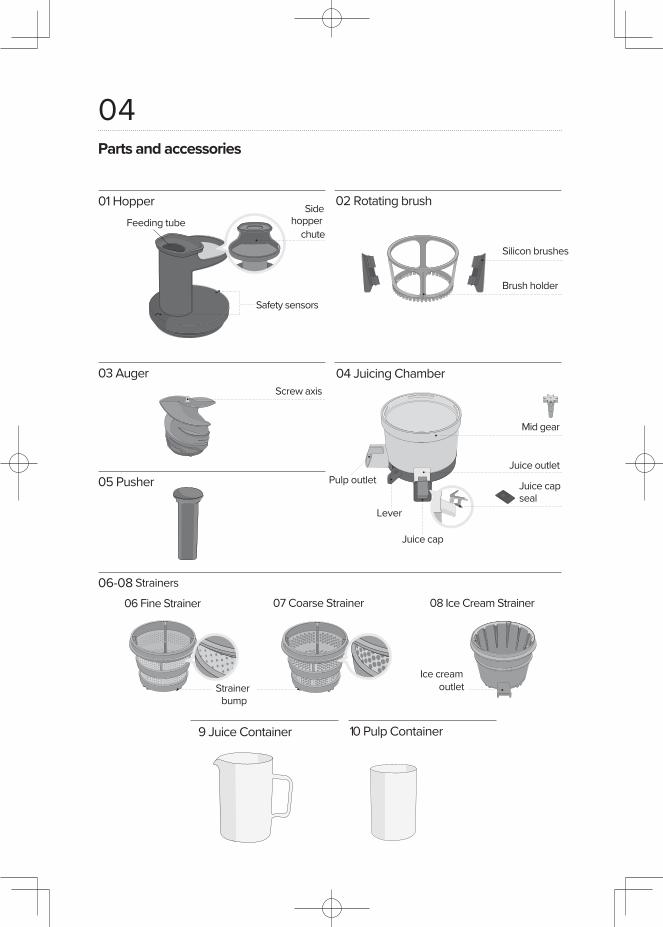
05 Pusher
03 Auger
9 Juice Container 10 Pulp Container
Screw axis
02 Rotating brush
Silicon brushes
Side
hopper
Brush holder
06-08 Strainers
04 Juicing Chamber
Juice outlet
Mid gear
Pulp outlet
Lever
Juice cap
Juice cap
seal
01 HopperFeeding tube
Safety sensors
Ice creamoutlet
06 Fine Strainer 07 Coarse Strainer 08 Ice Cream Strainer
Strainerbump
Parts and accessories
chute
05
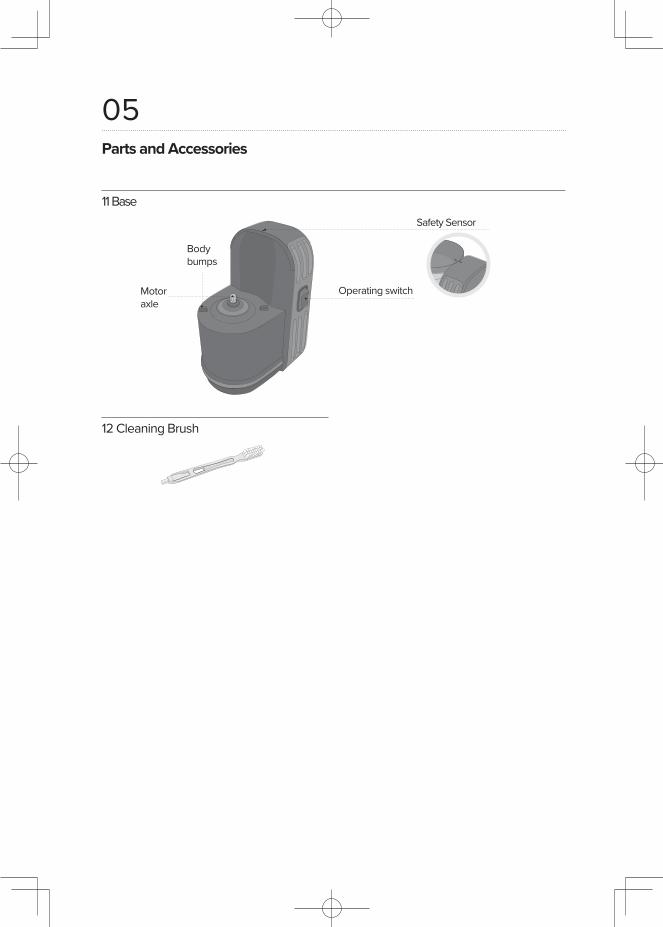
12 Cleaning Brush
Operating switchMotoraxle
Safety Sensor
11 Base
Bodybumps
Parts and Accessories
06
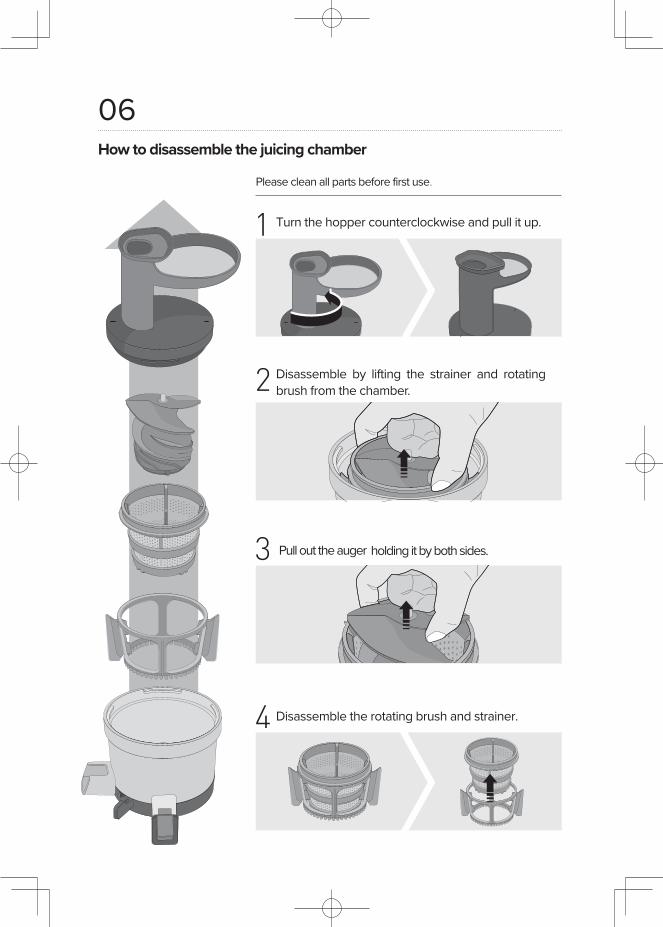
Please clean all parts before first use.
Turn the hopper counterclockwise and pull it up.
Disassemble by lifting the strainer and rotating brush from the chamber.
Disassemble the rotating brush and strainer.
Pull out the auger holding it by both sides.
How to disassemble the juicing chamber
07
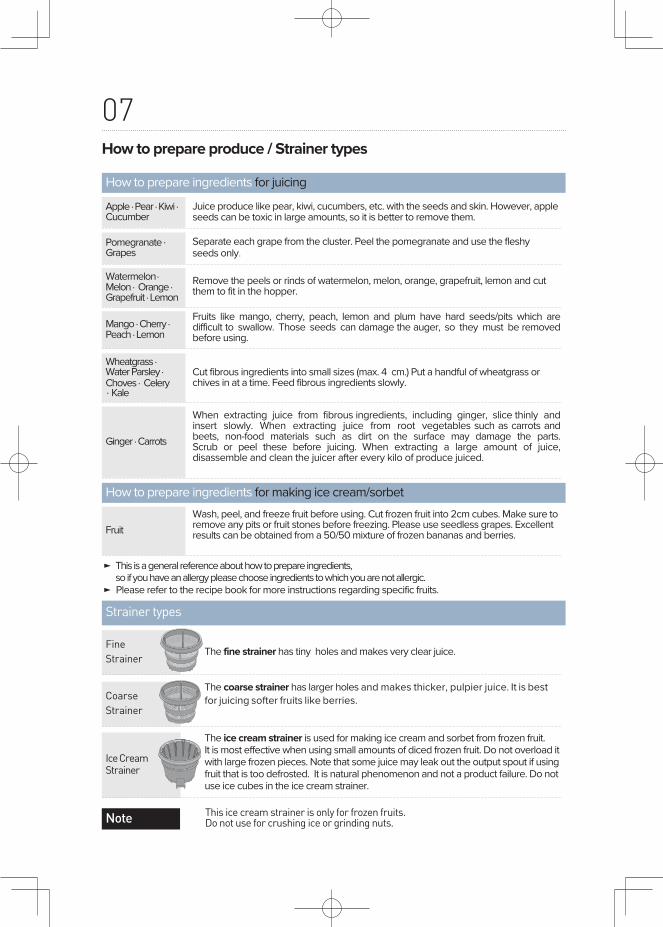
The ice cream strainer is used for making ice cream and sorbet from frozen fruit.It is most effective when using small amounts of diced frozen fruit. Do not overload it with large frozen pieces. Note that some juice may leak out the output spout if using fruit that is too defrosted. It is natural phenomenon and not a product failure. Do not use ice cubes in the ice cream strainer.
Juice produce like pear, kiwi, cucumbers, etc. with the seeds and skin. However, apple seeds can be toxic in large amounts, so it is better to remove them.
Separate each grape from the cluster. Peel the pomegranate and use the fleshy seeds only.
Remove the peels or rinds of watermelon, melon, orange, grapefruit, lemon and cut them to fit in the hopper.
Fruits like mango, cherry, peach, lemon and plum have hard seeds/pits which are difficult to swallow. Those seeds can damage the auger, so they must be removed before using.
Cut fibrous ingredients into small sizes (max. 4 cm.) Put a handful of wheatgrass or chives in at a time. Feed fibrous ingredients slowly.
Wash, peel, and freeze fruit before using. Cut frozen fruit into 2cm cubes. Make sure to remove any pits or fruit stones before freezing. Please use seedless grapes. Excellent results can be obtained from a 50/50 mixture of frozen bananas and berries.
When extracting juice from fibrous ingredients, including ginger, slice thinly and insert slowly. When extracting juice from root vegetables such as carrots and beets, non-food materials such as dirt on the surface may damage the parts. Scrub or peel these before juicing. When extracting a large amount of juice, disassemble and clean the juicer after every kilo of produce juiced.
Strainer types
► This is a general reference about how to prepare ingredients, so if you have an allergy please choose ingredients to which you are not allergic.
► Please refer to the recipe book for more instructions regarding specific fruits.
The fine strainer has tiny holes and makes very clear juice.
Apple · Pear · Kiwi · Cucumber
Watermelon · Melon · Orange · Grapefruit · Lemon
Mango · Cherry · Peach · Lemon
Wheatgrass · Water Parsley · Choves · Celery · Kale
Fine
Strainer
Coarse
Strainer
Ice CreamStrainer
Fruit
Ginger · Carrots
Pomegranate · Grapes
How to prepare ingredients for juicing
How to prepare ingredients for making ice cream/sorbet
This ice cream strainer is only for frozen fruits. Do not use for crushing ice or grinding nuts.Note
The coarse strainer has larger holes and makes thicker, pulpier juice. It is best for juicing softer fruits like berries.
How to prepare produce / Strainer types

08
2STEP
Assemble the strainer and spinning brush as shown in the picture.
Insert the auger into the strainer.
1STEP
How to assemble for juicing
09
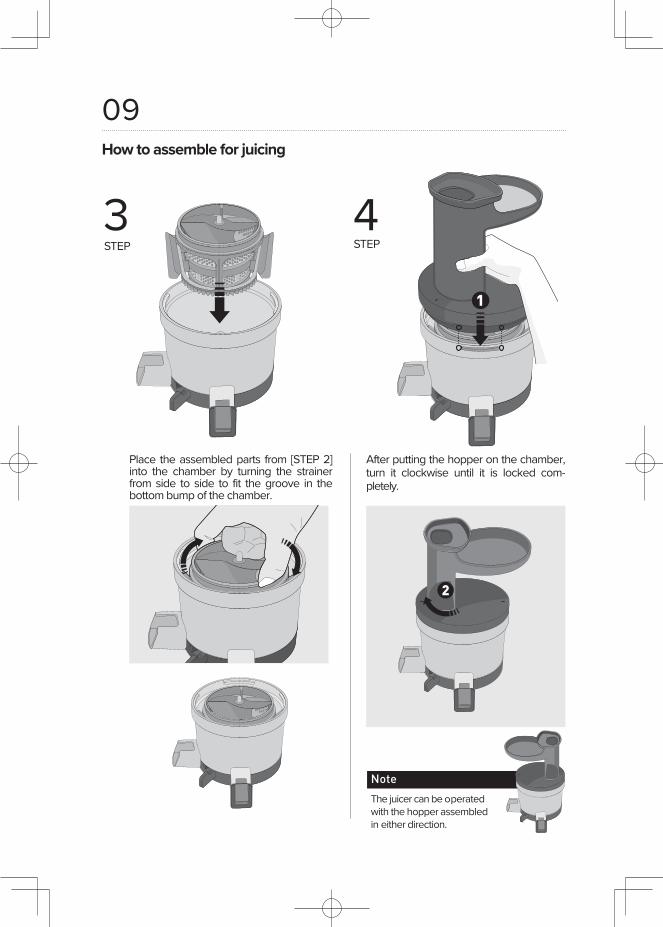
After putting the hopper on the chamber, turn it clockwise until it is locked com-pletely.
The juicer can be operated with the hopper assembled in either direction.
Place the assembled parts from [STEP 2] into the chamber by turning the strainer from side to side to fit the groove in the bottom bump of the chamber.
3STEP
4STEP
How to assemble for juicing
Note

10
Note
The rotating brush isn't needed for
making ice cream .
2STEP
Insert the ice cream strainer into the chamber. Align the ice cream outlet with the juice chamber outlet.
Insert the auger into the ice cream strainer and turn it from side to side until it fits in.
1STEP
How to assemble for making ice cream
Juice outlet
Ice Cream Outlet
11
Note
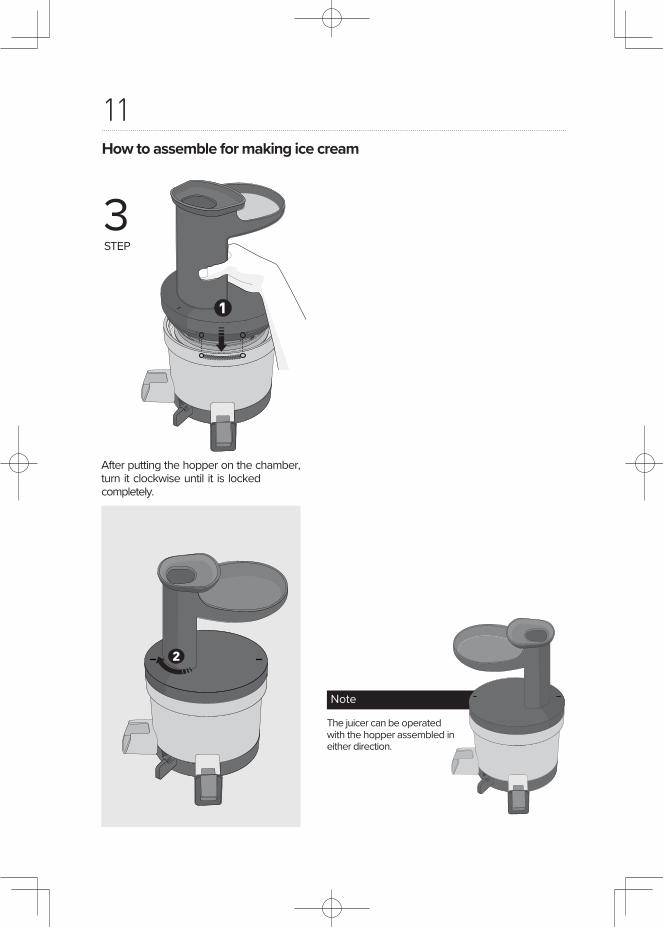
After putting the hopper on the chamber, turn it clockwise until it is lockedcompletely.
3STEP
How to assemble for making ice cream
The juicer can be operated with the hopper assembled in either direction.
12
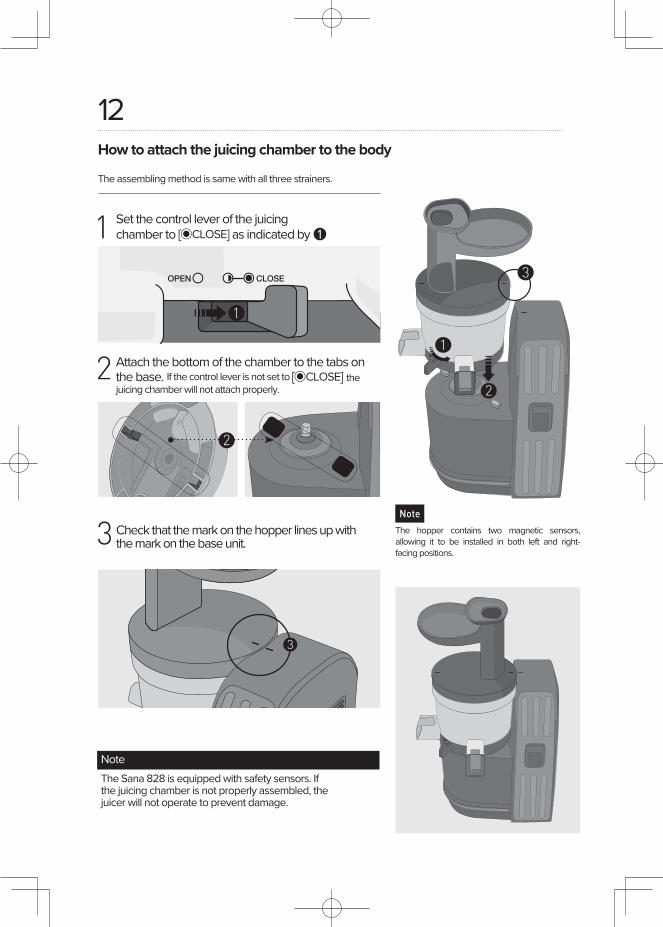
Set the control lever of the juicing chamber to [CLOSE] as indicated by 1
Attach the bottom of the chamber to the tabs on the base. If the control lever is not set to [CLOSE] the juicing chamber will not attach properly.
Check that the mark on the hopper lines up with the mark on the base unit.
How to attach the juicing chamber to the body
The assembling method is same with all three strainers.
NoteThe Sana 828 is equipped with safety sensors. If the juicing chamber is not properly assembled, the juicer will not operate to prevent damage.
Note
The hopper contains two magnetic sensors, allowing it to be installed in both left and right-facing positions.
13
정회전
작동스위치 정회전
역회전
off(정지) 정지
ON
REV
[ON]ON
[REV]Reverse
Stop
작동스위치 정회전
역회전
ON
REV
[ON] ON
[REV] Reverse
Pusher
Upper hopper
chute
Side hopper
chute
Press
1
3
5
2
4
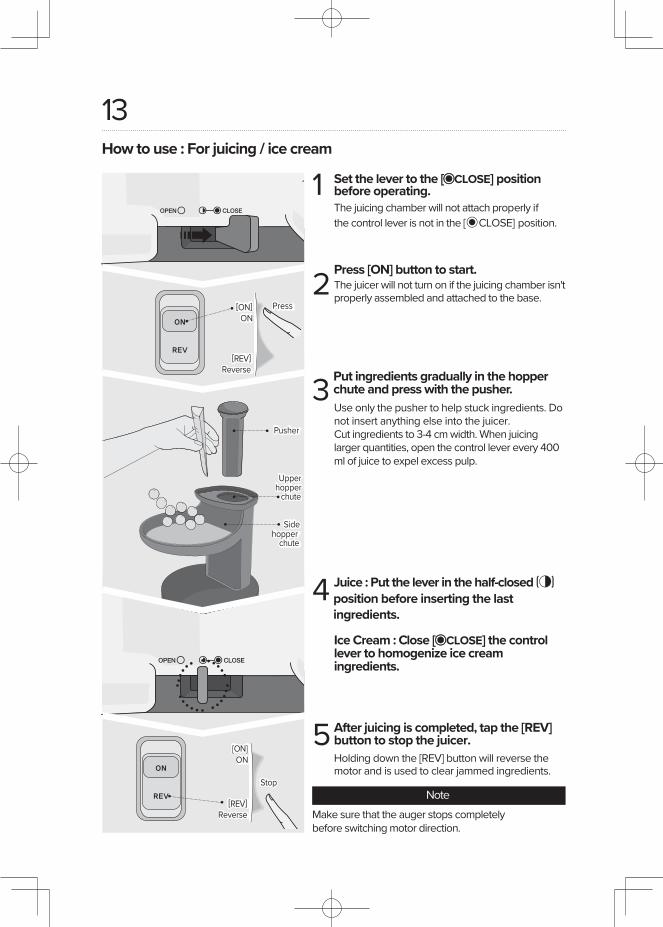
How to use : For juicing / ice cream
NoteMake sure that the auger stops completely before switching motor direction.
Set the lever to the [CLOSE] position before operating.The juicing chamber will not attach properly ifthe control lever is not in the [CLOSE] position.
Press [ON] button to start.The juicer will not turn on if the juicing chamber isn't properly assembled and attached to the base.
Put ingredients gradually in the hopper chute and press with the pusher.Use only the pusher to help stuck ingredients. Do not insert anything else into the juicer.Cut ingredients to 3-4 cm width. When juicing larger quantities, open the control lever every 400 ml of juice to expel excess pulp.
Juice : Put the lever in the half-closed (◑)position before inserting the last ingredients.
Ice Cream : Close [CLOSE] the control lever to homogenize ice cream ingredients.
After juicing is completed, tap the [REV] button to stop the juicer.Holding down the [REV] button will reverse the motor and is used to clear jammed ingredients.
14
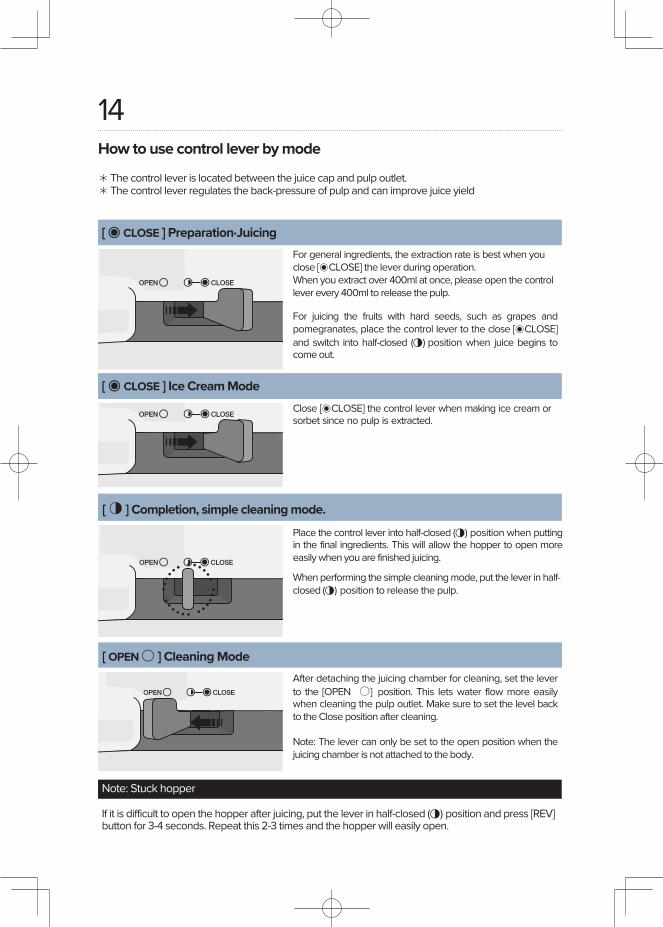
After detaching the juicing chamber for cleaning, set the lever to the [OPEN ◯] position. This lets water flow more easily when cleaning the pulp outlet. Make sure to set the level back to the Close position after cleaning.
Note: The lever can only be set to the open position when the juicing chamber is not attached to the body.
[ OPEN ◯ ] Cleaning Mode
Close [CLOSE] the control lever when making ice cream or sorbet since no pulp is extracted.
[ CLOSE ] Ice Cream Mode
[ CLOSE ] Preparation·JuicingFor general ingredients, the extraction rate is best when you close [CLOSE] the lever during operation. When you extract over 400ml at once, please open the control lever every 400ml to release the pulp.
For juicing the fruits with hard seeds, such as grapes and pomegranates, place the control lever to the close [CLOSE] and switch into half-closed (◑) position when juice begins to come out.
Place the control lever into half-closed (◑) position when putting in the final ingredients. This will allow the hopper to open more easily when you are finished juicing.
When performing the simple cleaning mode, put the lever in half-closed (◑) position to release the pulp.
How to use control lever by mode The control lever is located between the juice cap and pulp outlet. The control lever regulates the back-pressure of pulp and can improve juice yield
Note: Stuck hopper
If it is difficult to open the hopper after juicing, put the lever in half-closed (◑) position and press [REV] button for 3-4 seconds. Repeat this 2-3 times and the hopper will easily open.
[ ◑ ] Completion, simple cleaning mode.

15
Use the control lever according to the characteristics of each ingredient to make a more delicious juice. When you extract over 400ml at once, please open the control lever every 400ml to release the pulp. The hopper can’t be opened during juicing or it may cause damage when the pressure in the chamber increases.
Apple, Pear, Melon, Watermelon, Strawberry, Blueberry, Orange, Grapefruit, Lemon, Mango, Plum, Peach, Cherry, Persimmon, Pineapple, Wheat-Grass, Parsley, Celery, Dandelion, Carrot, Ginger, Potato, Beet, Tomato, Paprika, Broccoli, Cauliflower, Cabbage, Kale, Spinach, Sweet Potato, Pumpkin, Corn
Grapes, pomegranate, kiwi, tomato, blackberry, raspberry, etc.
Banana, strawberry, blueberry, etc.
Put the control lever in the [ CLOSE ] position.
Put the control lever in the [ CLOSE ] position.
When extraction is almost finished, place the control lever into the half-open [◑] position.
When juice starts to come out, place the control lever to the [◑] half-open position.
1. Set the control lever to the [ CLOSE]position.
Ingredients
Ingredients with seeds
Mixing with milk
How to use control lever according to ingredients
Note
16
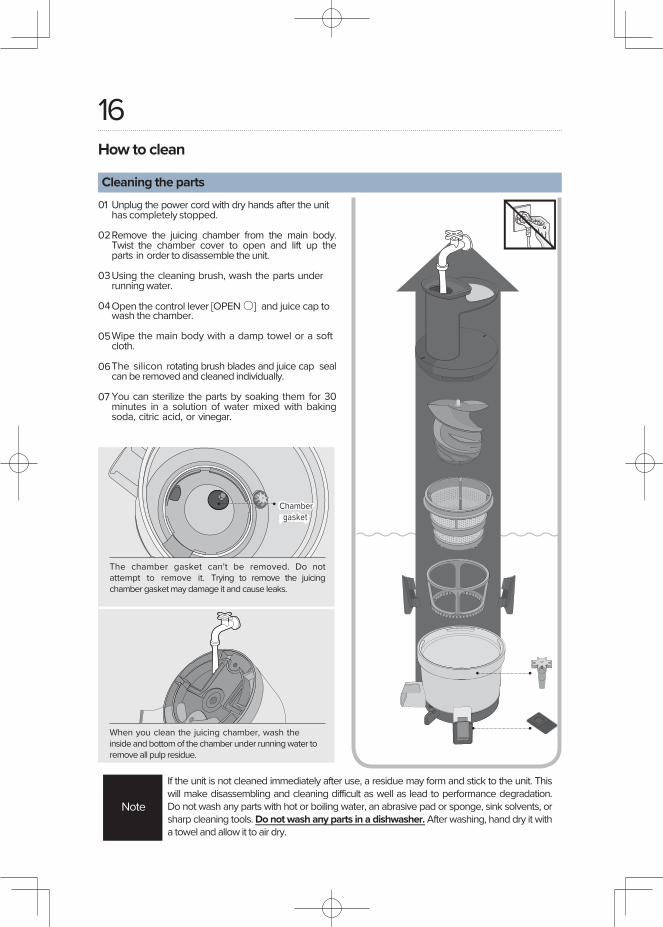
Cleaning the parts
When you clean the juicing chamber, wash the inside and bottom of the chamber under running water to remove all pulp residue.
The chamber gasket can't be removed. Do not attempt to remove it. Trying to remove the juicing chamber gasket may damage it and cause leaks.
How to clean
Unplug the power cord with dry hands after the unit has completely stopped.
Remove the juicing chamber from the main body. Twist the chamber cover to open and lift up the parts in order to disassemble the unit.
Using the cleaning brush, wash the parts under running water.
Open the control lever [OPEN ◯] and juice cap to wash the chamber.
Wipe the main body with a damp towel or a soft cloth.
The silicon rotating brush blades and juice cap seal can be removed and cleaned individually.
You can sterilize the parts by soaking them for 30 minutes in a solution of water mixed with baking soda, citric acid, or vinegar.
01
02
03
04
05
06
07
If the unit is not cleaned immediately after use, a residue may form and stick to the unit. This will make disassembling and cleaning difficult as well as lead to performance degradation. Do not wash any parts with hot or boiling water, an abrasive pad or sponge, sink solvents, or sharp cleaning tools. Do not wash any parts in a dishwasher. After washing, hand dry it with a towel and allow it to air dry.
Note
Chamber gasket
17
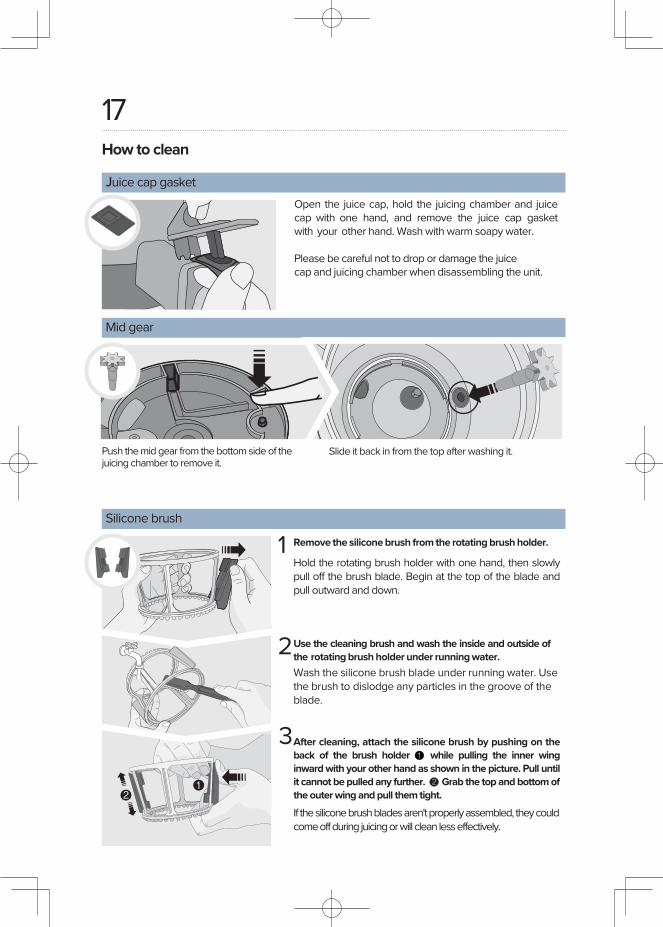
Silicone brush
1
2
3
Open the juice cap, hold the juicing chamber and juice cap with one hand, and remove the juice cap gasket with your other hand. Wash with warm soapy water.
Please be careful not to drop or damage the juicecap and juicing chamber when disassembling the unit.
Push the mid gear from the bottom side of the juicing chamber to remove it.
Slide it back in from the top after washing it.
Juice cap gasket
Mid gear
How to clean
Remove the silicone brush from the rotating brush holder.
Hold the rotating brush holder with one hand, then slowly pull off the brush blade. Begin at the top of the blade and pull outward and down.
Use the cleaning brush and wash the inside and outside of the rotating brush holder under running water.Wash the silicone brush blade under running water. Use the brush to dislodge any particles in the groove of the blade.
After cleaning, attach the silicone brush by pushing on the back of the brush holder ❶ while pulling the inner wing inward with your other hand as shown in the picture. Pull until it cannot be pulled any further. ❷ Grab the top and bottom of the outer wing and pull them tight. If the silicone brush blades aren't properly assembled, they could come off during juicing or will clean less effectively.
❶ ❷
18
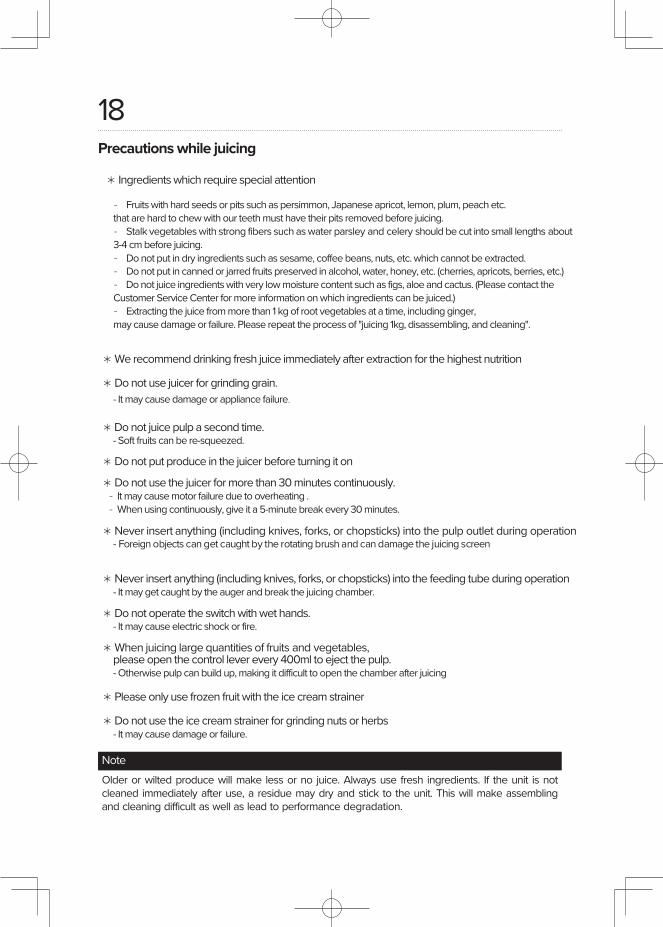
Ingredients which require special attention
- Fruits with hard seeds or pits such as persimmon, Japanese apricot, lemon, plum, peach etc. that are hard to chew with our teeth must have their pits removed before juicing.- Stalk vegetables with strong fibers such as water parsley and celery should be cut into small lengths about 3-4 cm before juicing.- Do not put in dry ingredients such as sesame, coffee beans, nuts, etc. which cannot be extracted.- Do not put in canned or jarred fruits preserved in alcohol, water, honey, etc. (cherries, apricots, berries, etc.)- Do not juice ingredients with very low moisture content such as figs, aloe and cactus. (Please contact the Customer Service Center for more information on which ingredients can be juiced.)- Extracting the juice from more than 1 kg of root vegetables at a time, including ginger, may cause damage or failure. Please repeat the process of "juicing 1kg, disassembling, and cleaning".
We recommend drinking fresh juice immediately after extraction for the highest nutrition
Do not use juicer for grinding grain.- It may cause damage or appliance failure.
Do not juice pulp a second time.- Soft fruits can be re-squeezed.
Do not put produce in the juicer before turning it on
Do not use the juicer for more than 30 minutes continuously.- It may cause motor failure due to overheating .- When using continuously, give it a 5-minute break every 30 minutes.
Never insert anything (including knives, forks, or chopsticks) into the pulp outlet during operation- Foreign objects can get caught by the rotating brush and can damage the juicing screen
Never insert anything (including knives, forks, or chopsticks) into the feeding tube during operation - It may get caught by the auger and break the juicing chamber.
Do not operate the switch with wet hands.- It may cause electric shock or fire.
When juicing large quantities of fruits and vegetables,please open the control lever every 400ml to eject the pulp.- Otherwise pulp can build up, making it difficult to open the chamber after juicing
Please only use frozen fruit with the ice cream strainer
Do not use the ice cream strainer for grinding nuts or herbs- It may cause damage or failure.
Precautions while juicing
NoteOlder or wilted produce will make less or no juice. Always use fresh ingredients. If the unit is not cleaned immediately after use, a residue may dry and stick to the unit. This will make assembling and cleaning difficult as well as lead to performance degradation.

19
[ON]On
[REV]Reverse
[REV]OFF
[ON]On
When you switch the juicer to [REV], the auger does not stop immediately. Do not switch the juicer to operate in the opposite direction until the auger’s movement has completely stopped. Once the rotation stops completely, you may switch to operate in either direction.
►The juicer may stop if ingredients are forced in or inserted too quickly.►Always insert ingredients slowly and let the juicer self feed.
Note
[REV]Reverse
If the auger stops during juicing
Caution when using operating switch
Press [REV] for 3 - 5 seconds to release pressure from the auger. Repeat if necessary.Reverse is a function that turns the auger in the opposite direction. Reverse rotation operates only while holding the switch in [REV] position, and shuts off when the switch is released.
Press [ON] after the auger stops completely to continue juicing in the forward direction.Before reversing directions, make sure that the auger stops completely.
1
2
NoteIf the auger still won’t turn after following the above directions, unplug the power cord, disassemble the juicer, clean the parts, and try again.
20
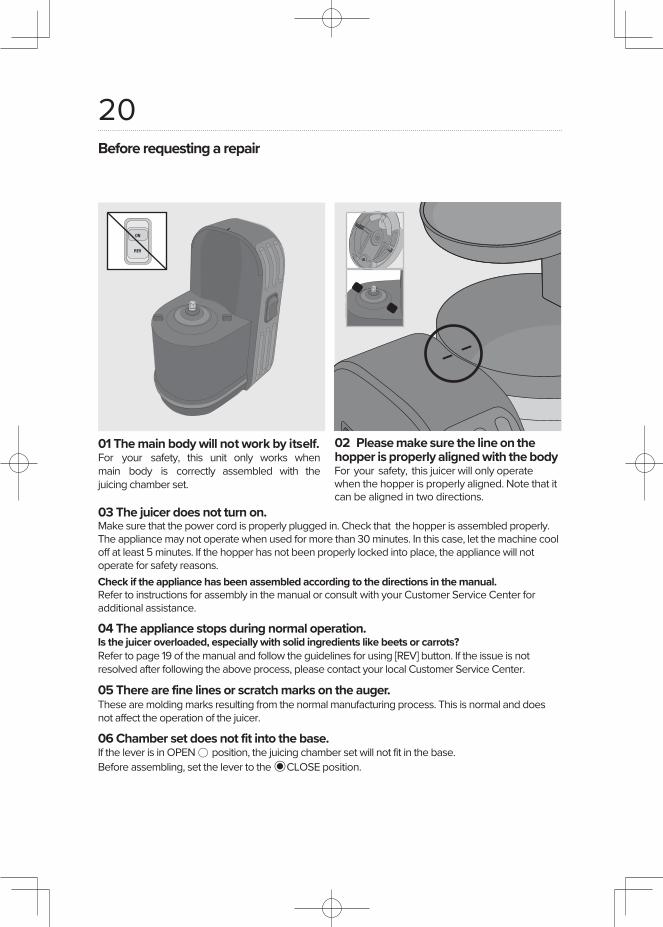
Make sure that the power cord is properly plugged in. Check that the hopper is assembled properly. The appliance may not operate when used for more than 30 minutes. In this case, let the machine cool off at least 5 minutes. If the hopper has not been properly locked into place, the appliance will not operate for safety reasons. Check if the appliance has been assembled according to the directions in the manual.Refer to instructions for assembly in the manual or consult with your Customer Service Center for additional assistance.
04 The appliance stops during normal operation.Is the juicer overloaded, especially with solid ingredients like beets or carrots?Refer to page 19 of the manual and follow the guidelines for using [REV] button. If the issue is not resolved after following the above process, please contact your local Customer Service Center.
05 There are fine lines or scratch marks on the auger.These are molding marks resulting from the normal manufacturing process. This is normal and does not affect the operation of the juicer.
06 Chamber set does not fit into the base.If the lever is in OPEN ◯ position, the juicing chamber set will not fit in the base. Before assembling, set the lever to the CLOSE position.
01 The main body will not work by itself.For your safety, this unit only works when main body is correctly assembled with the juicing chamber set.
03 The juicer does not turn on.
02 Please make sure the line on the hopper is properly aligned with the bodyFor your safety, this juicer will only operate when the hopper is properly aligned. Note that it can be aligned in two directions.
Before requesting a repair
21
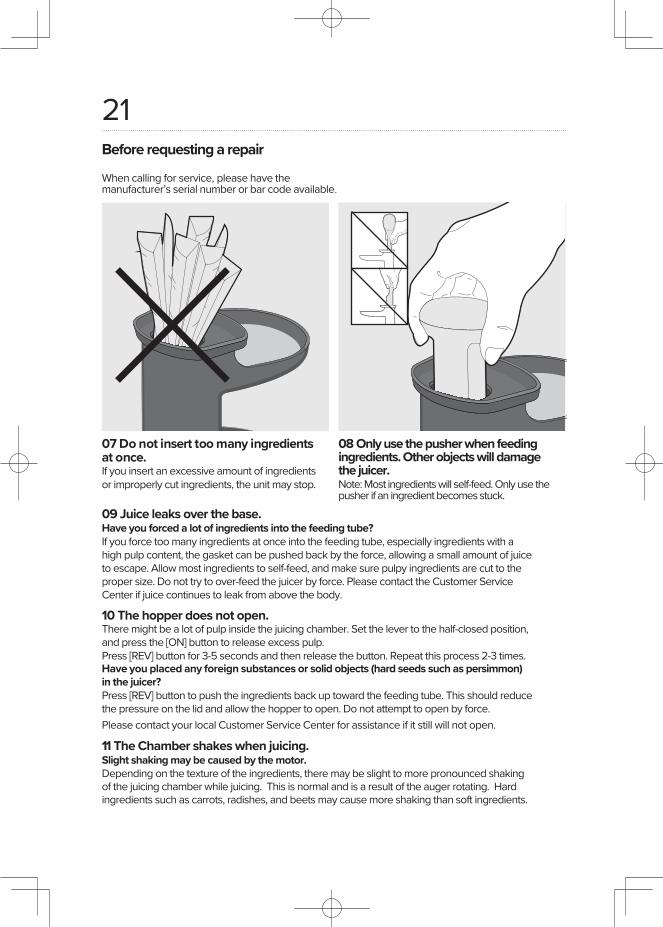
Have you forced a lot of ingredients into the feeding tube?If you force too many ingredients at once into the feeding tube, especially ingredients with a high pulp content, the gasket can be pushed back by the force, allowing a small amount of juice to escape. Allow most ingredients to self-feed, and make sure pulpy ingredients are cut to the proper size. Do not try to over-feed the juicer by force. Please contact the Customer Service Center if juice continues to leak from above the body.
10 The hopper does not open.There might be a lot of pulp inside the juicing chamber. Set the lever to the half-closed position, and press the [ON] button to release excess pulp. Press [REV] button for 3-5 seconds and then release the button. Repeat this process 2-3 times. Have you placed any foreign substances or solid objects (hard seeds such as persimmon) in the juicer?Press [REV] button to push the ingredients back up toward the feeding tube. This should reduce the pressure on the lid and allow the hopper to open. Do not attempt to open by force. Please contact your local Customer Service Center for assistance if it still will not open.
11 The Chamber shakes when juicing.Slight shaking may be caused by the motor.Depending on the texture of the ingredients, there may be slight to more pronounced shaking of the juicing chamber while juicing. This is normal and is a result of the auger rotating. Hard ingredients such as carrots, radishes, and beets may cause more shaking than soft ingredients.
08 Only use the pusher when feeding ingredients. Other objects will damage the juicer.Note: Most ingredients will self-feed. Only use the pusher if an ingredient becomes stuck.
07 Do not insert too many ingredients at once.If you insert an excessive amount of ingredients or improperly cut ingredients, the unit may stop.
09 Juice leaks over the base.
Before requesting a repairWhen calling for service, please have the manufacturer’s serial number or bar code available.
22Product Specifications / Warranty
Product Name
Model Name
Rated Voltage
Rated Frequency
RPM
Sana Slow Juicer
EUJ-828
230-240 V
50 Hz
150 W
43 rpm
Cord Length
Motor
Fuse
Weight
Rated Operating Time
1.4 m
250 V 5 A
6.5 kg
30 minutes
Width 252 mm
Length 211 mm
Height 430 mm
Single-phase induction motor
Product Specifications
External DimensionsRated Power Consumption

www.sanaproducts.eu
The future of your healthy kitchen.
4DC010680_V.01