Embed Size (px)
Citation preview
Version 1.0. Released on 22.08.2016
User Manual of iMMS for System Administrator of Stores Department
Integrated Materials Management System (iMMS)
P a g e | 2 User Manual of iMMS for System Administrator of Stores Department
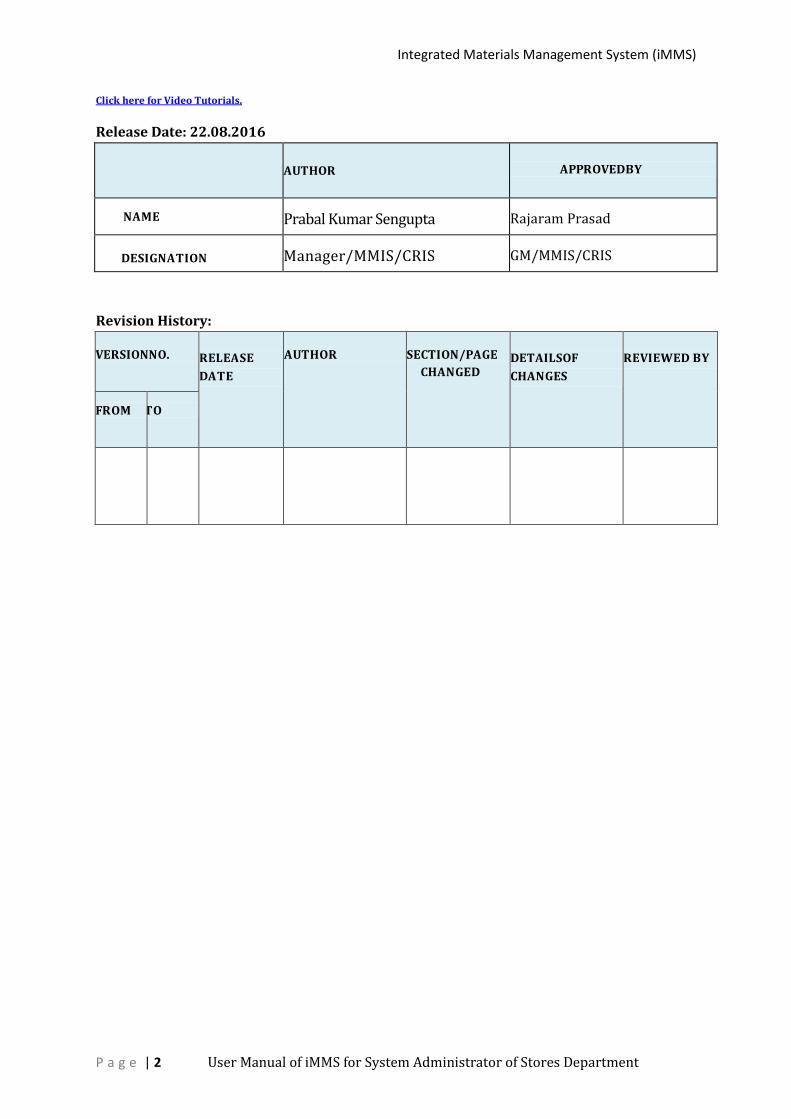
Click here for Video Tutorials.
Release Date: 22.08.2016
AUTHOR
APPROVEDBY
NAME Prabal Kumar Sengupta Rajaram Prasad
DESIGNATION Manager/MMIS/CRIS GM/MMIS/CRIS
Revision History: VERSIONNO.
RELEASE
DATE
AUTHOR
SECTION/PAGE
CHANGED
DETAILSOF
CHANGES
REVIEWED BY
FROM
TTO
Integrated Materials Management System (iMMS)
P a g e | 3 User Manual of iMMS for System Administrator of Stores Department
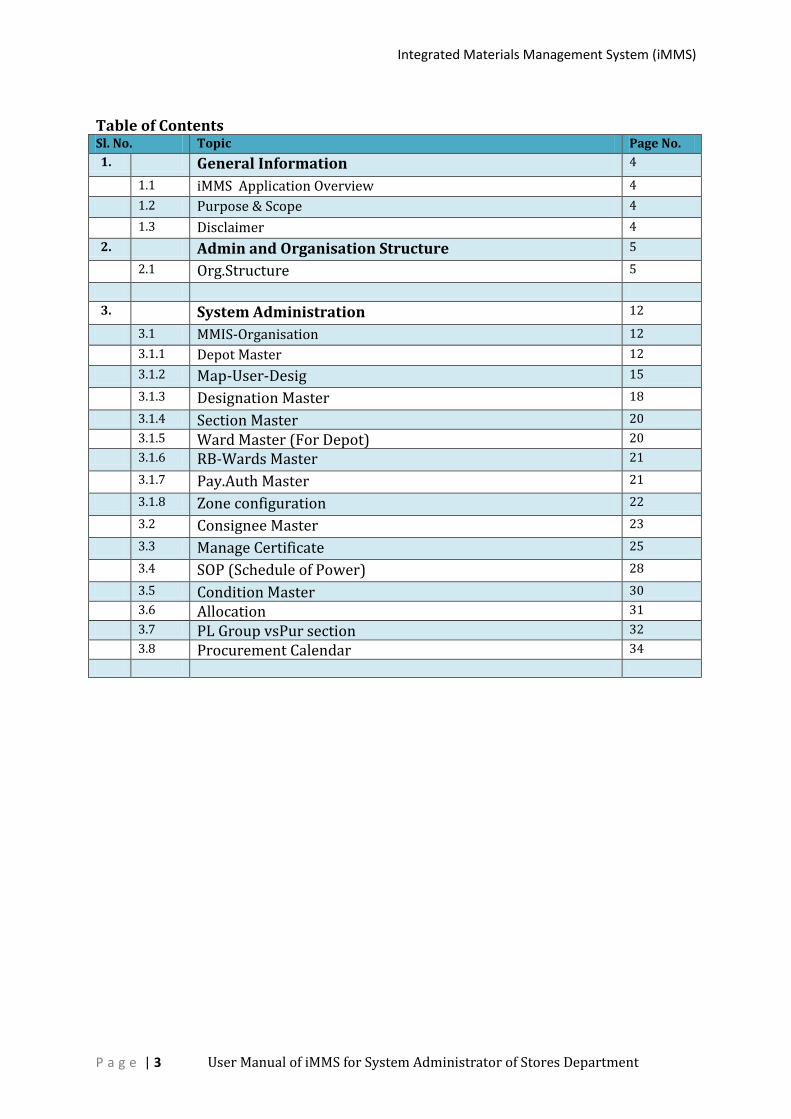
Table of Contents Sl. No. Topic Page No.
1. General Information 4
1.1 iMMS Application Overview 4
1.2 Purpose & Scope 4
1.3 Disclaimer 4
2. Admin and Organisation Structure 5
2.1 Org.Structure 5
3. System Administration 12
3.1 MMIS-Organisation 12
3.1.1 Depot Master 12
3.1.2 Map-User-Desig 15
3.1.3 Designation Master 18
3.1.4 Section Master 20
3.1.5 Ward Master (For Depot) 20
3.1.6 RB-Wards Master 21
3.1.7 Pay.Auth Master 21
3.1.8 Zone configuration 22
3.2 Consignee Master 23
3.3 Manage Certificate 25
3.4 SOP (Schedule of Power) 28
3.5 Condition Master 30
3.6 Allocation 31
3.7 PL Group vsPur section 32
3.8 Procurement Calendar 34
Integrated Materials Management System (iMMS)
P a g e | 4 User Manual of iMMS for System Administrator of Stores Department
1.0 General Information:
1.1 Application Overview:
Integrated Materials Management System (IMMS) is the Application Software for
Materials Management Department of Indian Railways for online activities for
Procurement of Goods by Headquarters/Stocking Depots, Receipt and Issue of
materials at Stocking Depots and Sale of Materials using E-Tendering, E-Auction and
Reverse Auction of Indian Railways E-Procurement System (IREPS). The application
allows users to capture or generate data at various levels of the Materials Management
process in a secure manner using various security features like digital signature,
digital encryption certificate for encryption and decryption of data etc. The application
can be accessed with valid user ID and Password in combination with a Digital Signing
Certificate. The application is divided in different work areas depending upon the
nature of activity viz. HQ Module, Depot Module, Auction Sale Module,
PurchaseModule for Depot/Division etc. to manage the administration portion of
these modules, one System Administrator is nominated by zonal railways who is
responsible for managing the iMMS System Administration related activities. This
document describes processes related to iMMS System Administration only.
1.2 Purpose & Scope:
Purpose of this document is to guide the SYSADMS of iMMS on how to operate the Application. This manual will help them to familiarize with various forms/pages and processes provided in the application for Materials Management functions.
1.3 Disclaimer:
iMMS software is continuously being upgraded and the Pages/ Forms shown or referred to in this manual may be subject to changes. Please keep themselves updated with the
latest changes, by referring to the latest versions of user manuals available on the website, and by taking note of the messages sent by the IREPS administrator from time to time. Data shown in the manual is form testing purpose only and no logical decision should be taken based on the data shown in the forms and queries.
Though every care has been taken to describe the features/ process of the application
accurately, some errors may have crept in inadvertently. In case of any doubt/
discrepancy please contact SYSADM of iMMS at CRIS immediately.
Integrated Materials Management System (iMMS)
P a g e | 5 User Manual of iMMS for System Administrator of Stores Department
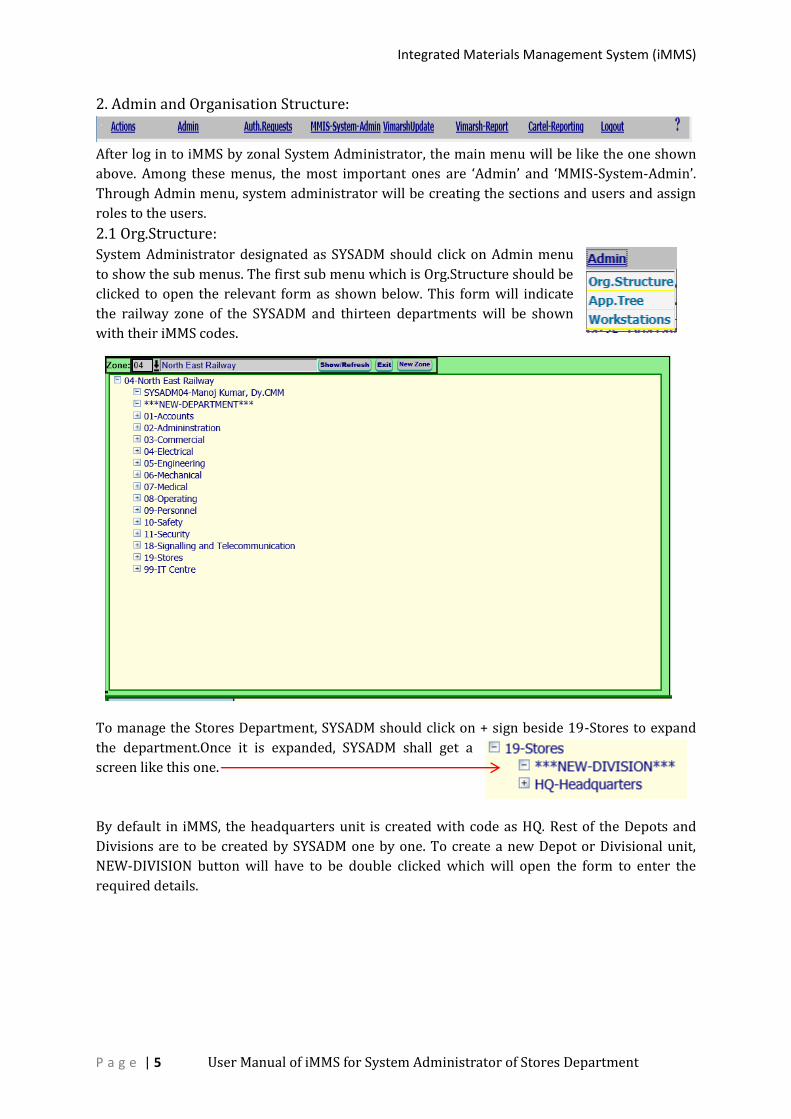
2. Admin and Organisation Structure:
After log in to iMMS by zonal System Administrator, the main menu will be like the one shown
above. Among these menus, the most important ones are ‘Admin’ and ‘MMIS-System-Admin’.
Through Admin menu, system administrator will be creating the sections and users and assign
roles to the users.
2.1 Org.Structure:
System Administrator designated as SYSADM should click on Admin menu
to show the sub menus. The first sub menu which is Org.Structure should be
clicked to open the relevant form as shown below. This form will indicate
the railway zone of the SYSADM and thirteen departments will be shown
with their iMMS codes.
To manage the Stores Department, SYSADM should click on + sign beside 19-Stores to expand
the department.Once it is expanded, SYSADM shall get a
screen like this one.
By default in iMMS, the headquarters unit is created with code as HQ. Rest of the Depots and
Divisions are to be created by SYSADM one by one. To create a new Depot or Divisional unit,
NEW-DIVISION button will have to be double clicked which will open the form to enter the
required details.
Integrated Materials Management System (iMMS)
P a g e | 6 User Manual of iMMS for System Administrator of Stores Department
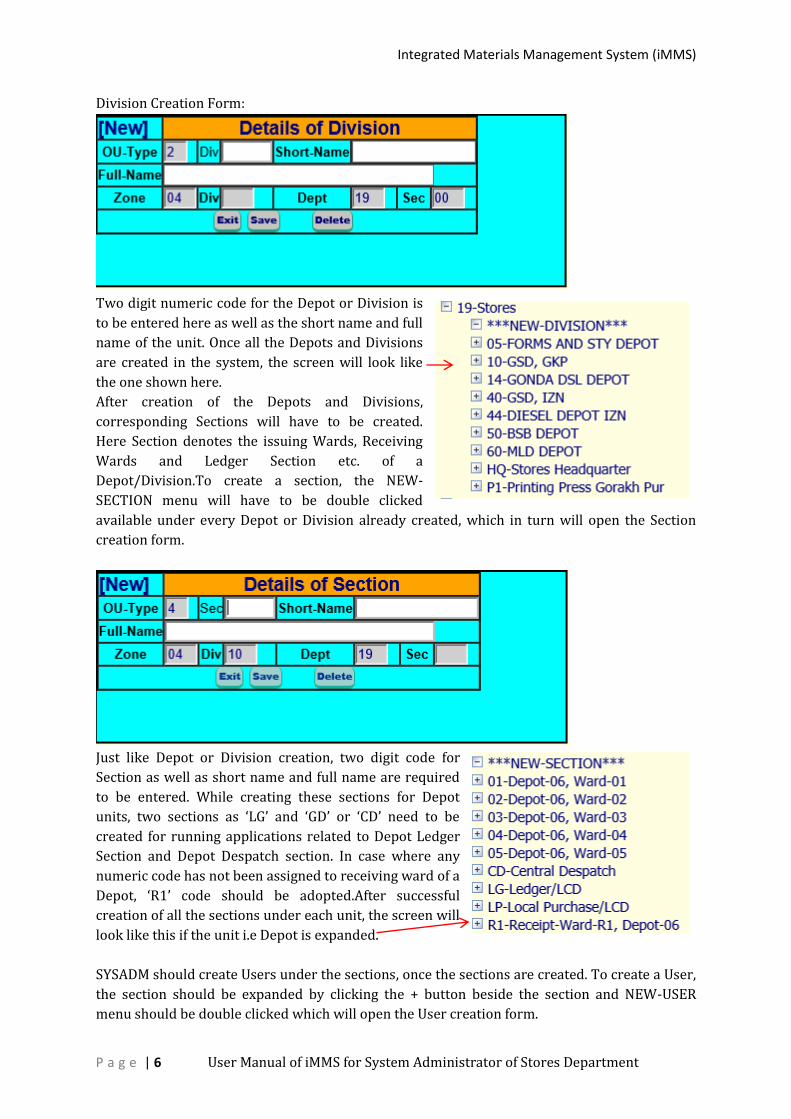
Division Creation Form:
Two digit numeric code for the Depot or Division is
to be entered here as well as the short name and full
name of the unit. Once all the Depots and Divisions
are created in the system, the screen will look like
the one shown here.
After creation of the Depots and Divisions,
corresponding Sections will have to be created.
Here Section denotes the issuing Wards, Receiving
Wards and Ledger Section etc. of a
Depot/Division.To create a section, the NEW-
SECTION menu will have to be double clicked
available under every Depot or Division already created, which in turn will open the Section
creation form.
Just like Depot or Division creation, two digit code for
Section as well as short name and full name are required
to be entered. While creating these sections for Depot
units, two sections as ‘LG’ and ‘GD’ or ‘CD’ need to be
created for running applications related to Depot Ledger
Section and Depot Despatch section. In case where any
numeric code has not been assigned to receiving ward of a
Depot, ‘R1’ code should be adopted.After successful
creation of all the sections under each unit, the screen will
look like this if the unit i.e Depot is expanded.
SYSADM should create Users under the sections, once the sections are created. To create a User,
the section should be expanded by clicking the + button beside the section and NEW-USER
menu should be double clicked which will open the User creation form.
Integrated Materials Management System (iMMS)
P a g e | 7 User Manual of iMMS for System Administrator of Stores Department
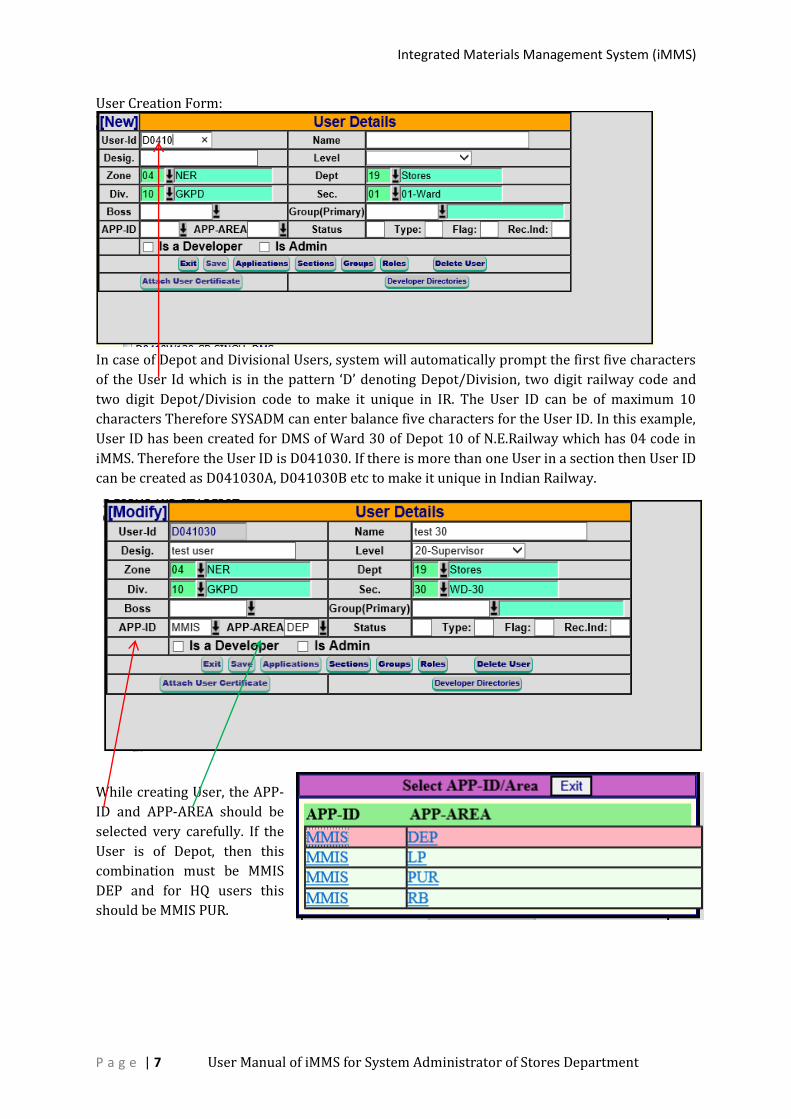
User Creation Form:
In case of Depot and Divisional Users, system will automatically prompt the first five characters
of the User Id which is in the pattern ‘D’ denoting Depot/Division, two digit railway code and
two digit Depot/Division code to make it unique in IR. The User ID can be of maximum 10
characters Therefore SYSADM can enter balance five characters for the User ID. In this example,
User ID has been created for DMS of Ward 30 of Depot 10 of N.E.Railway which has 04 code in
iMMS. Therefore the User ID is D041030. If there is more than one User in a section then User ID
can be created as D041030A, D041030B etc to make it unique in Indian Railway.
While creating User, the APP-
ID and APP-AREA should be
selected very carefully. If the
User is of Depot, then this
combination must be MMIS
DEP and for HQ users this
should be MMIS PUR.
Integrated Materials Management System (iMMS)
P a g e | 8 User Manual of iMMS for System Administrator of Stores Department
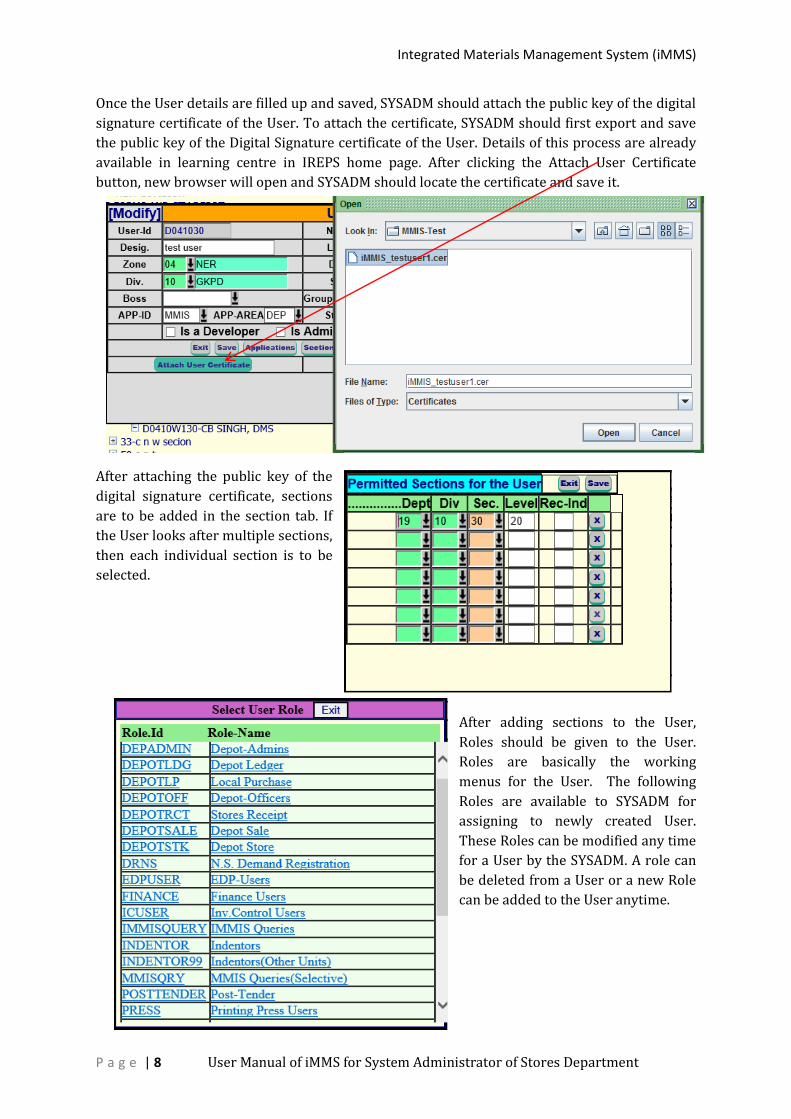
Once the User details are filled up and saved, SYSADM should attach the public key of the digital
signature certificate of the User. To attach the certificate, SYSADM should first export and save
the public key of the Digital Signature certificate of the User. Details of this process are already
available in learning centre in IREPS home page. After clicking the Attach User Certificate
button, new browser will open and SYSADM should locate the certificate and save it.
After attaching the public key of the
digital signature certificate, sections
are to be added in the section tab. If
the User looks after multiple sections,
then each individual section is to be
selected.
After adding sections to the User,
Roles should be given to the User.
Roles are basically the working
menus for the User. The following
Roles are available to SYSADM for
assigning to newly created User.
These Roles can be modified any time
for a User by the SYSADM. A role can
be deleted from a User or a new Role
can be added to the User anytime.
Integrated Materials Management System (iMMS)
P a g e | 9 User Manual of iMMS for System Administrator of Stores Department
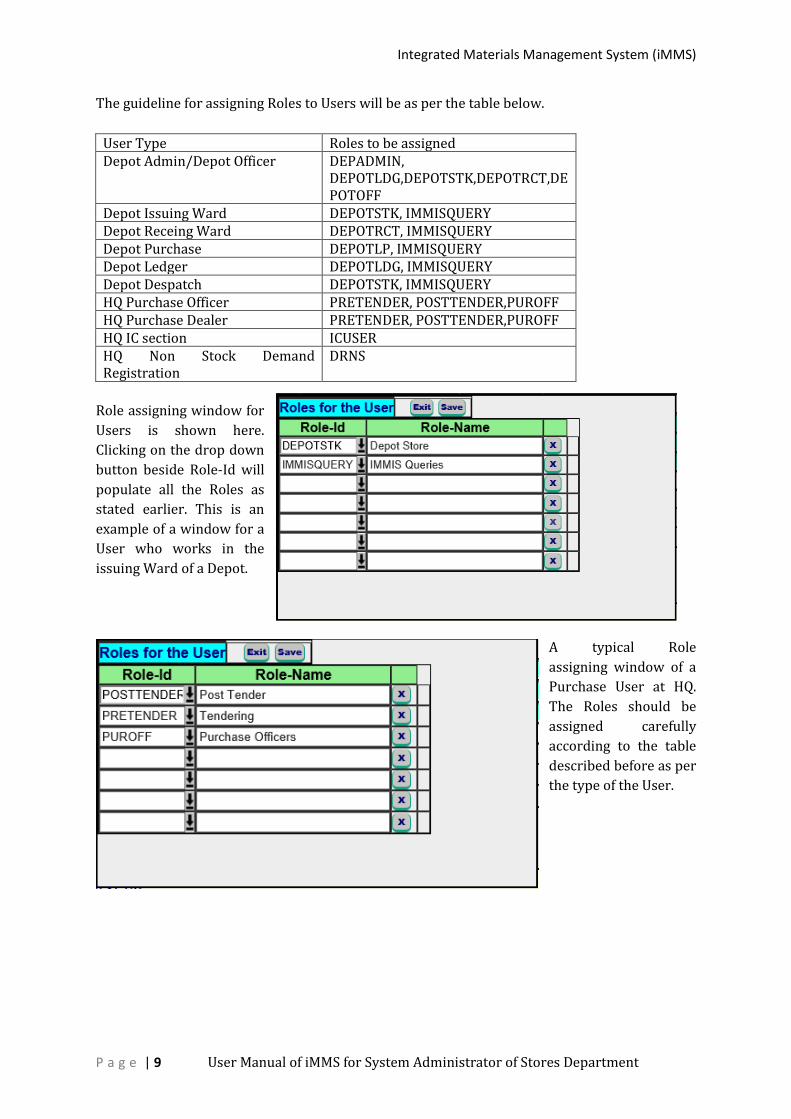
The guideline for assigning Roles to Users will be as per the table below.
User Type Roles to be assigned Depot Admin/Depot Officer DEPADMIN,
DEPOTLDG,DEPOTSTK,DEPOTRCT,DEPOTOFF
Depot Issuing Ward DEPOTSTK, IMMISQUERY Depot Receing Ward DEPOTRCT, IMMISQUERY Depot Purchase DEPOTLP, IMMISQUERY Depot Ledger DEPOTLDG, IMMISQUERY Depot Despatch DEPOTSTK, IMMISQUERY HQ Purchase Officer PRETENDER, POSTTENDER,PUROFF HQ Purchase Dealer PRETENDER, POSTTENDER,PUROFF HQ IC section ICUSER HQ Non Stock Demand Registration
DRNS
Role assigning window for
Users is shown here.
Clicking on the drop down
button beside Role-Id will
populate all the Roles as
stated earlier. This is an
example of a window for a
User who works in the
issuing Ward of a Depot.
A typical Role
assigning window of a
Purchase User at HQ.
The Roles should be
assigned carefully
according to the table
described before as per
the type of the User.
Integrated Materials Management System (iMMS)
P a g e | 10 User Manual of iMMS for System Administrator of Stores Department
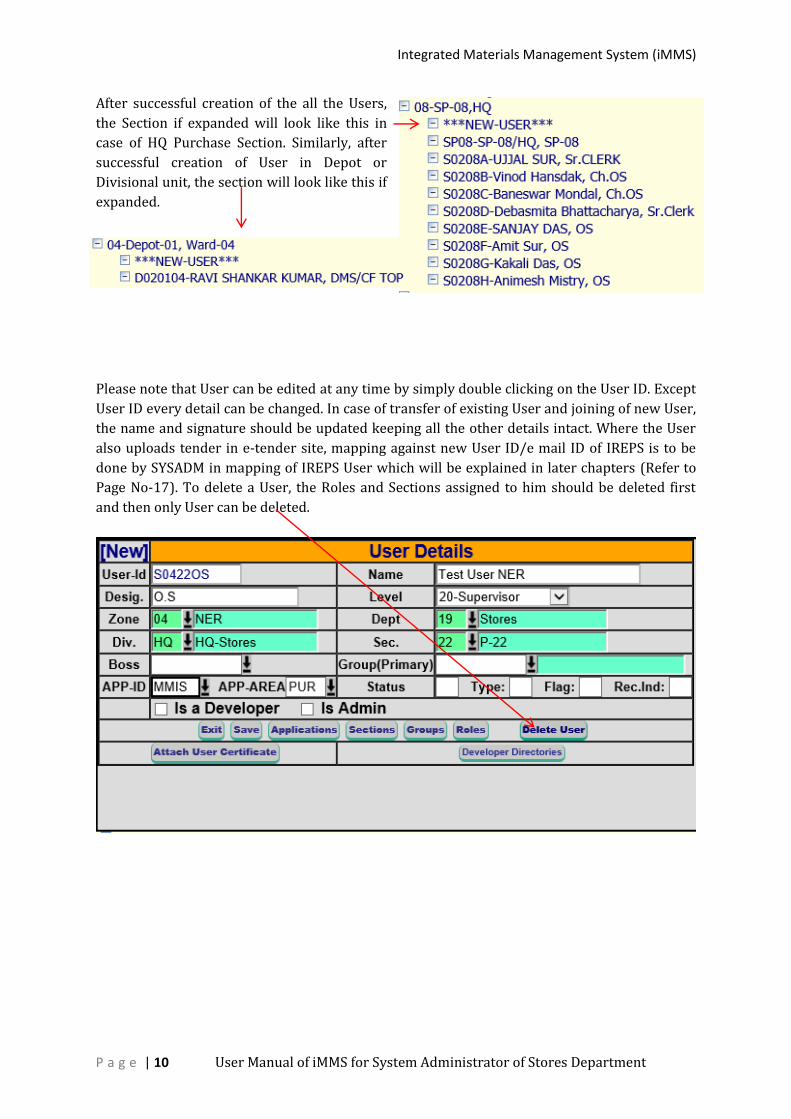
After successful creation of the all the Users,
the Section if expanded will look like this in
case of HQ Purchase Section. Similarly, after
successful creation of User in Depot or
Divisional unit, the section will look like this if
expanded.
Please note that User can be edited at any time by simply double clicking on the User ID. Except
User ID every detail can be changed. In case of transfer of existing User and joining of new User,
the name and signature should be updated keeping all the other details intact. Where the User
also uploads tender in e-tender site, mapping against new User ID/e mail ID of IREPS is to be
done by SYSADM in mapping of IREPS User which will be explained in later chapters (Refer to
Page No-17). To delete a User, the Roles and Sections assigned to him should be deleted first
and then only User can be deleted.
Integrated Materials Management System (iMMS)
P a g e | 11 User Manual of iMMS for System Administrator of Stores Department
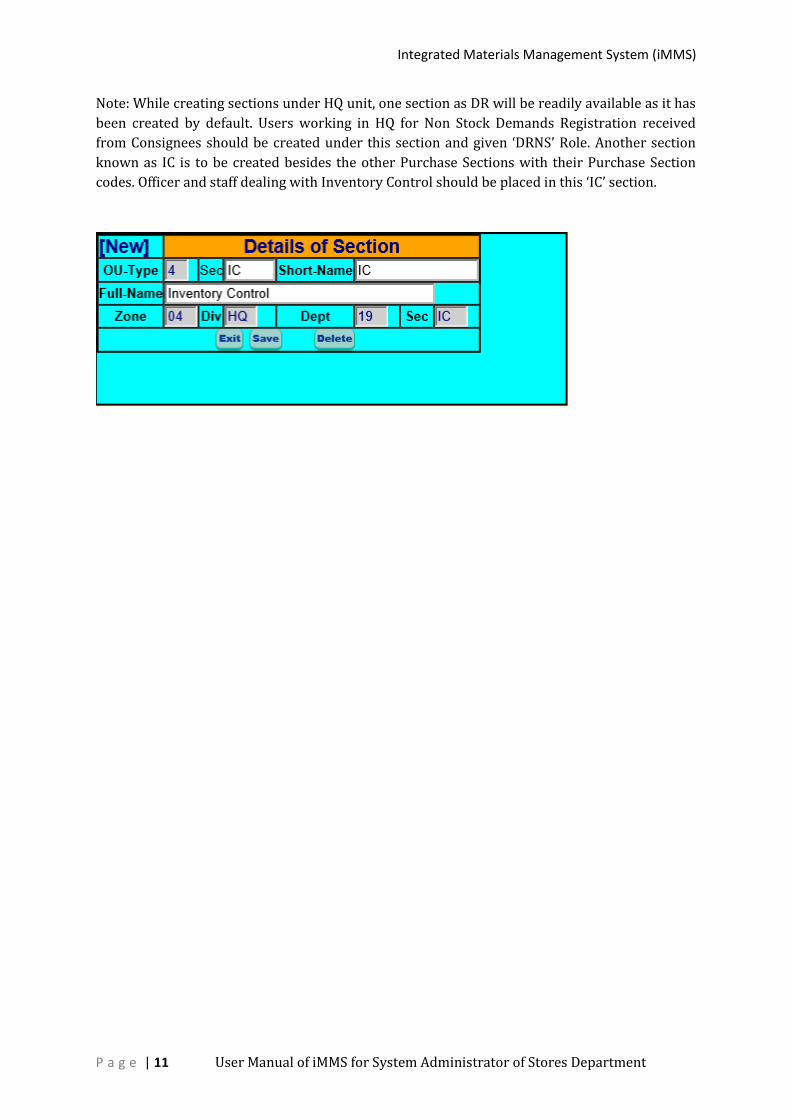
Note: While creating sections under HQ unit, one section as DR will be readily available as it has
been created by default. Users working in HQ for Non Stock Demands Registration received
from Consignees should be created under this section and given ‘DRNS’ Role. Another section
known as IC is to be created besides the other Purchase Sections with their Purchase Section
codes. Officer and staff dealing with Inventory Control should be placed in this ‘IC’ section.

Integrated Materials Management System (iMMS)
P a g e | 12 User Manual of iMMS for System Administrator of Stores Department
3. System-Administration:
SYSADM will get this submenu when clicked on MMIS-System-
Admin menu. Please keep in mind that successful configuration of
each and every form available under this menu is must for
successful running of all the modules of iMMS in zonal railways.
Therefore, working of each individual form is explained here
sequentially according to the requirement of the system.
3.1.MMIS-Organisation:
3.1.1.Depot Master:
This form is required to capture all the details of the particular unit like HQ , Depot or Division.
All the fields like name of the Depot, address, Depot officer should be filled carefully. Please note
that in case of inter railway Purchase Order in iMMS, these name are populated. For purchase by
Depots and Divisions, Tender opening time and Tender closing time must be given for
controlling e-Tender and manual Tenders for Depots/Divisions. Some of the fields in this form
like Tr.YYMM, all fields with Seq No will be disabled. These fields are to be filled up by SYSADM
of CRIS while starting Depot Module of iMMS in consultation with zonal SYSADM.
Before IREPS mapping, we should learn something about the structures of iMMS and IREPS
which will make the mapping very clear. Whenever, zonal SYSADM creates a Depot, section and
User in iMMS, the same activities are to be carried out in IREPS by EPS Admin at CRIS for which
requests are sent by SYSADM of zonal railway to EPS admin at CRIS. Accordingly, there will be

Integrated Materials Management System (iMMS)
P a g e | 13 User Manual of iMMS for System Administrator of Stores Department
two parallel organisations in iMMS and IREPS created by SYSADM of zonal railway and EPS
Admin of CRIS respectively.
Sr.No iMMS (Naming pattern)
IREPS (Naming Pattern)
1. Division Department 2. Section Section 3. User User Name
Therefore, one to one mapping is required and only then IREPS will know who is trying to
access the e-Tendering site from iMMSand will allow the iMMS user to upload Tender and do
other activities in iMMS. For this mapping, SYSADM should click on the drop down beside IREPS
Depot Code and all the Departments in IREPS of that railway will be shown. Please note that in
IREPS system Tendering units are known as Department. SYSADM should select the Department
of IREPS very carefully as selection of wrong department of IREPS will lead to totally wrong
mapping and may lead to wrong Tender uploading.
Selection of IREPS Department from the drop down as shown here.
For
Depot/Divisional
purchases, IREPS
section code is
also to be
mapped here. Once the unit is mapped in IREPS, then clicking on drop down against the IREPS
Section Code will populate the sections available in IREPS against that unit. Please note that this
Section code mapping is not required to be done here for HQ Purchase Sections as there will be
multiple sections in both in iMMS as well as in IREPS. That activity will be done through section
form for HQ. After completion of this mapping, Purchase Section Code of Depot/Division will
Integrated Materials Management System (iMMS)
P a g e | 14 User Manual of iMMS for System Administrator of Stores Department
have to be entered in the Pur.Sec field. This Pur.Sec will be first two digits of the Tender number
for Depots and Divisions in iMMS. Therefore, care should be taken to enter this code.
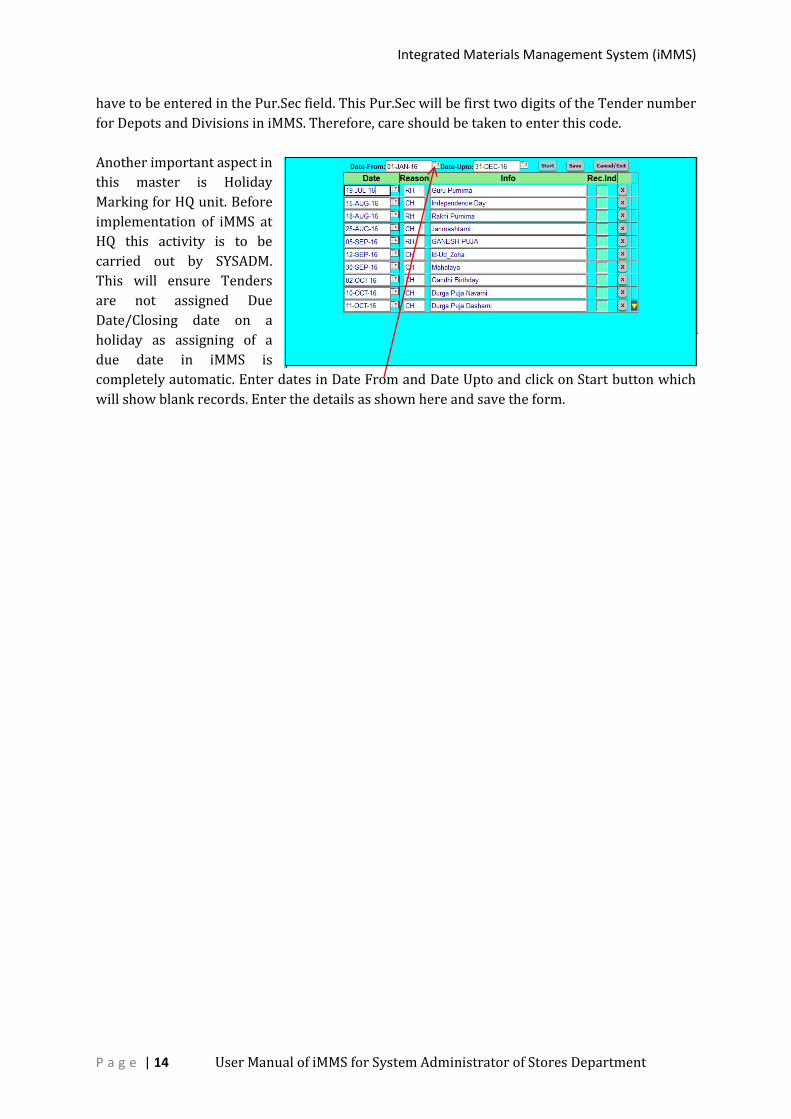
Another important aspect in
this master is Holiday
Marking for HQ unit. Before
implementation of iMMS at
HQ this activity is to be
carried out by SYSADM.
This will ensure Tenders
are not assigned Due
Date/Closing date on a
holiday as assigning of a
due date in iMMS is
completely automatic. Enter dates in Date From and Date Upto and click on Start button which
will show blank records. Enter the details as shown here and save the form.
Integrated Materials Management System (iMMS)
P a g e | 15 User Manual of iMMS for System Administrator of Stores Department
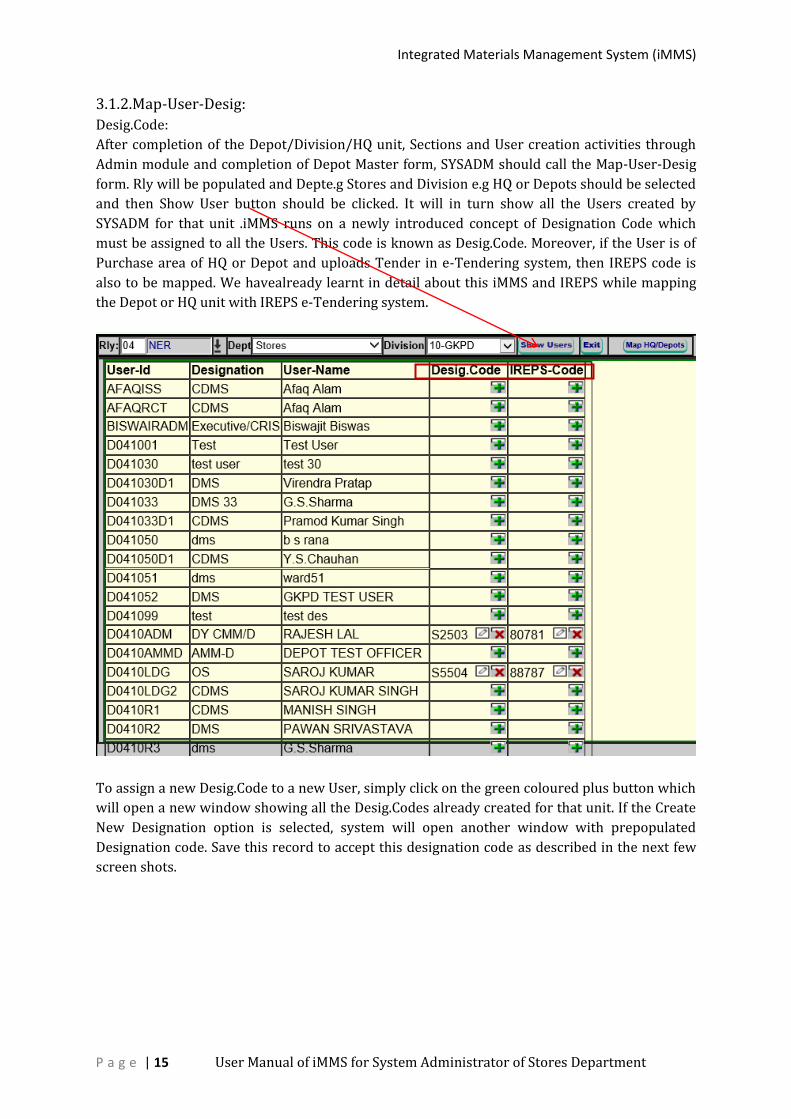
3.1.2.Map-User-Desig:
Desig.Code:
After completion of the Depot/Division/HQ unit, Sections and User creation activities through
Admin module and completion of Depot Master form, SYSADM should call the Map-User-Desig
form. Rly will be populated and Depte.g Stores and Division e.g HQ or Depots should be selected
and then Show User button should be clicked. It will in turn show all the Users created by
SYSADM for that unit .iMMS runs on a newly introduced concept of Designation Code which
must be assigned to all the Users. This code is known as Desig.Code. Moreover, if the User is of
Purchase area of HQ or Depot and uploads Tender in e-Tendering system, then IREPS code is
also to be mapped. We havealready learnt in detail about this iMMS and IREPS while mapping
the Depot or HQ unit with IREPS e-Tendering system.
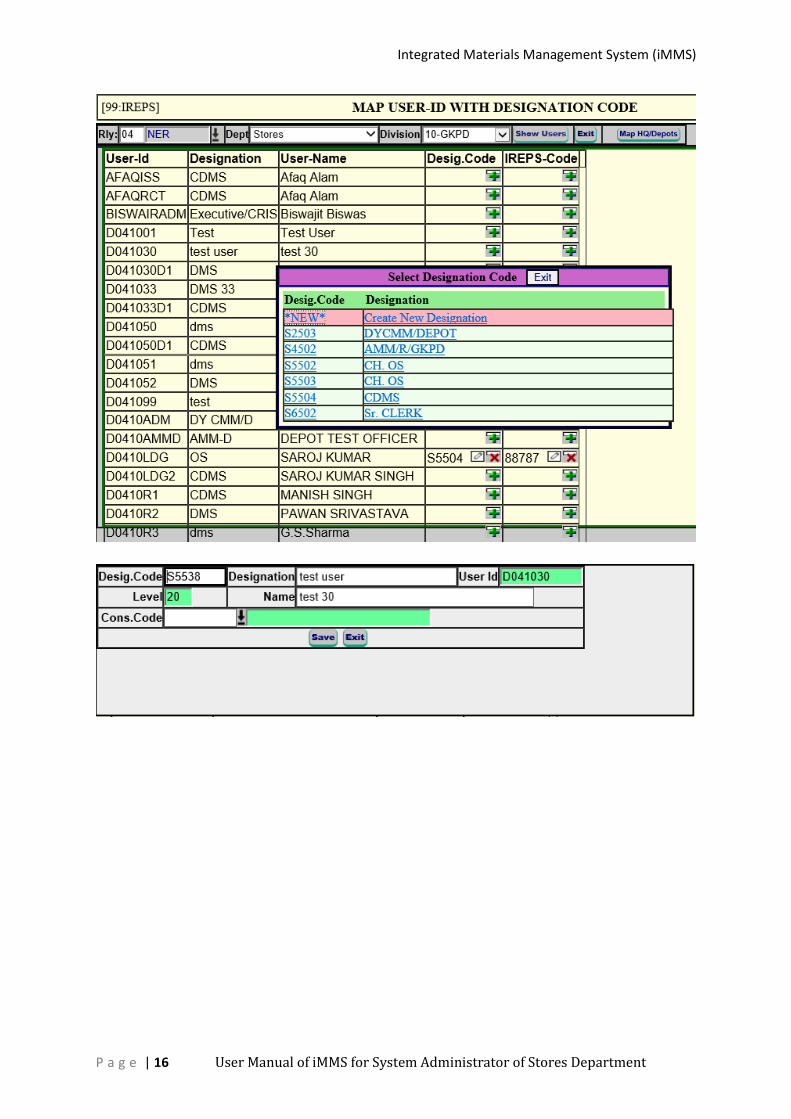
To assign a new Desig.Code to a new User, simply click on the green coloured plus button which
will open a new window showing all the Desig.Codes already created for that unit. If the Create
New Designation option is selected, system will open another window with prepopulated
Designation code. Save this record to accept this designation code as described in the next few
screen shots.
Integrated Materials Management System (iMMS)
P a g e | 16 User Manual of iMMS for System Administrator of Stores Department
Integrated Materials Management System (iMMS)
P a g e | 17 User Manual of iMMS for System Administrator of Stores Department
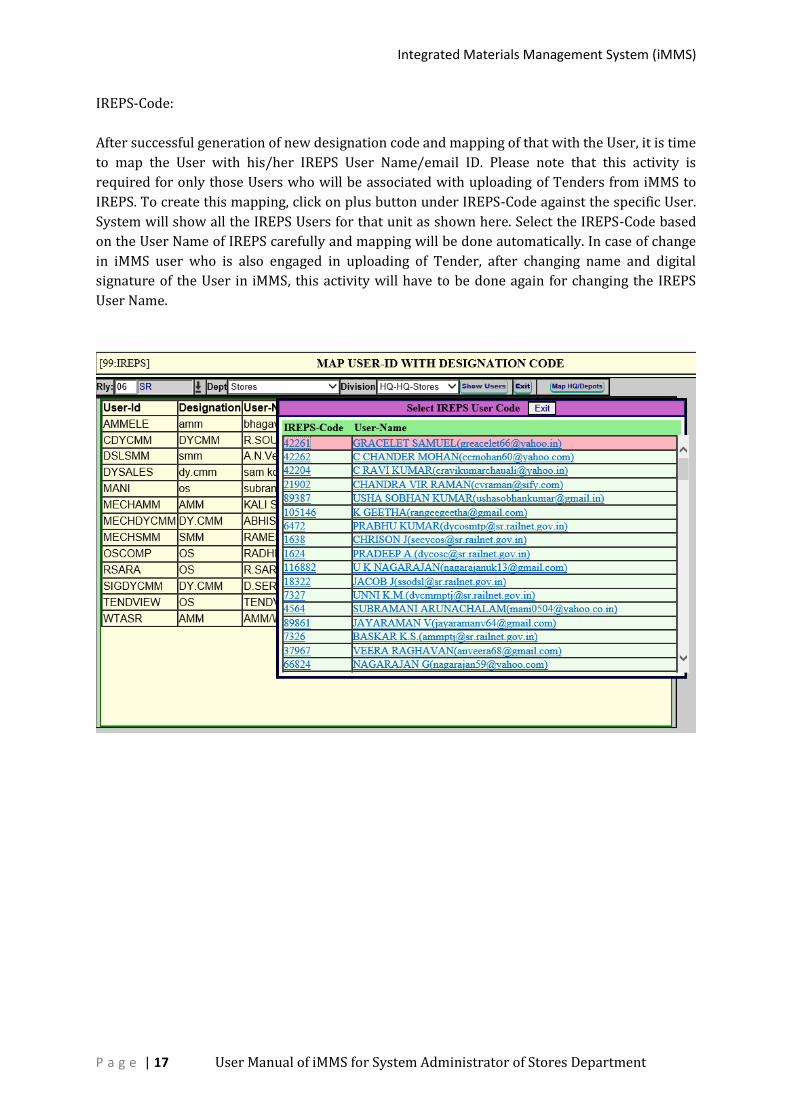
IREPS-Code:
After successful generation of new designation code and mapping of that with the User, it is time
to map the User with his/her IREPS User Name/email ID. Please note that this activity is
required for only those Users who will be associated with uploading of Tenders from iMMS to
IREPS. To create this mapping, click on plus button under IREPS-Code against the specific User.
System will show all the IREPS Users for that unit as shown here. Select the IREPS-Code based
on the User Name of IREPS carefully and mapping will be done automatically. In case of change
in iMMS user who is also engaged in uploading of Tender, after changing name and digital
signature of the User in iMMS, this activity will have to be done again for changing the IREPS
User Name.

Integrated Materials Management System (iMMS)
P a g e | 18 User Manual of iMMS for System Administrator of Stores Department
3.1.3.Designation Master:
After successful mapping of Designation Code and IREPS Code, SYSADM should open
Designation Master Form to complete the activities related to User. To open the form click on
MMIS-Organisation sub menu and this will open the form with multiple tabs. Please click on
Designations tab which will open the designation master form.
In this designation master first select the unit form HQ/Depot from the drop down button
whose designations are to be updated. Once the unit is selected all the designation codes will be
shown in the left pane as shown here.
Integrated Materials Management System (iMMS)
P a g e | 19 User Manual of iMMS for System Administrator of Stores Department
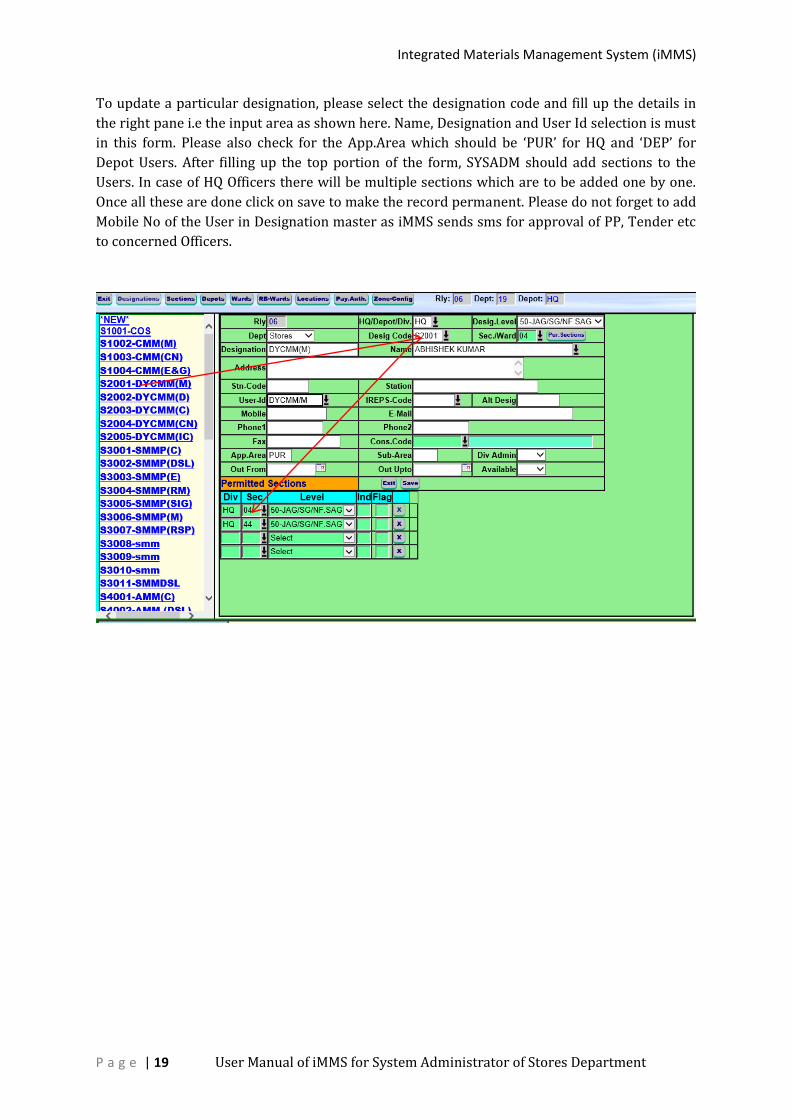
To update a particular designation, please select the designation code and fill up the details in
the right pane i.e the input area as shown here. Name, Designation and User Id selection is must
in this form. Please also check for the App.Area which should be ‘PUR’ for HQ and ‘DEP’ for
Depot Users. After filling up the top portion of the form, SYSADM should add sections to the
Users. In case of HQ Officers there will be multiple sections which are to be added one by one.
Once all these are done click on save to make the record permanent. Please do not forget to add
Mobile No of the User in Designation master as iMMS sends sms for approval of PP, Tender etc
to concerned Officers.
Integrated Materials Management System (iMMS)
P a g e | 20 User Manual of iMMS for System Administrator of Stores Department
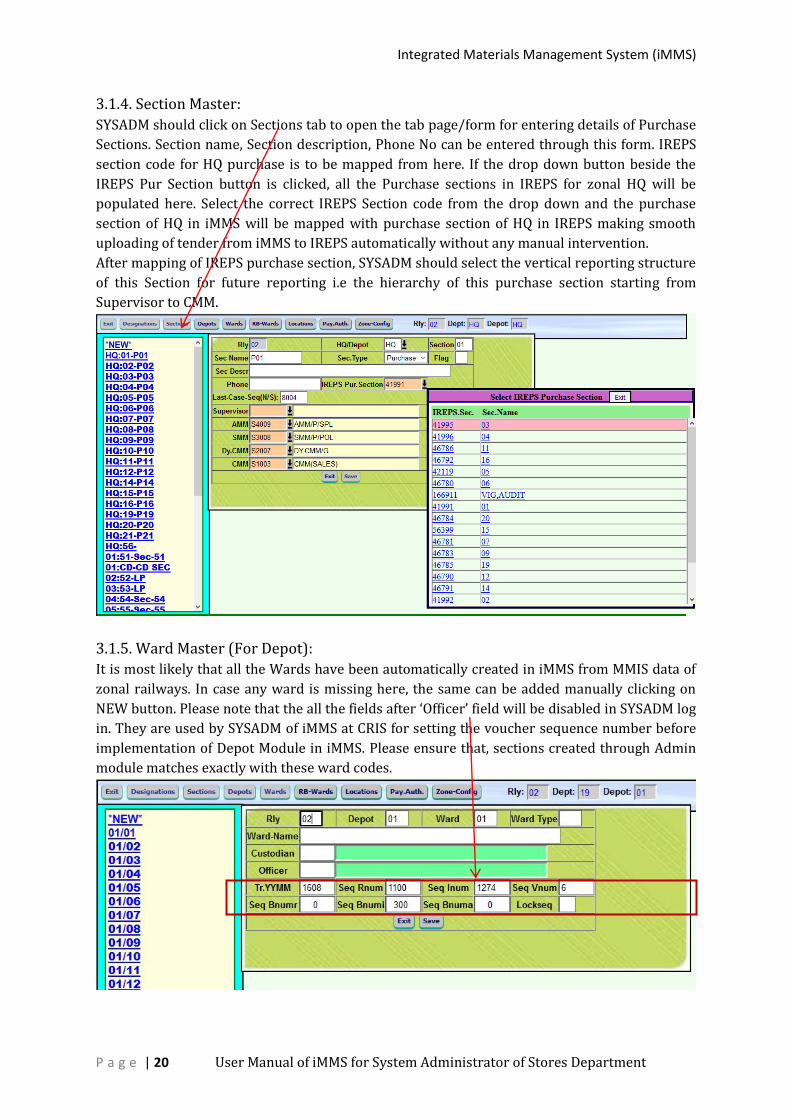
3.1.4. Section Master:
SYSADM should click on Sections tab to open the tab page/form for entering details of Purchase
Sections. Section name, Section description, Phone No can be entered through this form. IREPS
section code for HQ purchase is to be mapped from here. If the drop down button beside the
IREPS Pur Section button is clicked, all the Purchase sections in IREPS for zonal HQ will be
populated here. Select the correct IREPS Section code from the drop down and the purchase
section of HQ in iMMS will be mapped with purchase section of HQ in IREPS making smooth
uploading of tender from iMMS to IREPS automatically without any manual intervention.
After mapping of IREPS purchase section, SYSADM should select the vertical reporting structure
of this Section for future reporting i.e the hierarchy of this purchase section starting from
Supervisor to CMM.
3.1.5. Ward Master (For Depot):
It is most likely that all the Wards have been automatically created in iMMS from MMIS data of
zonal railways. In case any ward is missing here, the same can be added manually clicking on
NEW button. Please note that the all the fields after ‘Officer’ field will be disabled in SYSADM log
in. They are used by SYSADM of iMMS at CRIS for setting the voucher sequence number before
implementation of Depot Module in iMMS. Please ensure that, sections created through Admin
module matches exactly with these ward codes.
Integrated Materials Management System (iMMS)
P a g e | 21 User Manual of iMMS for System Administrator of Stores Department
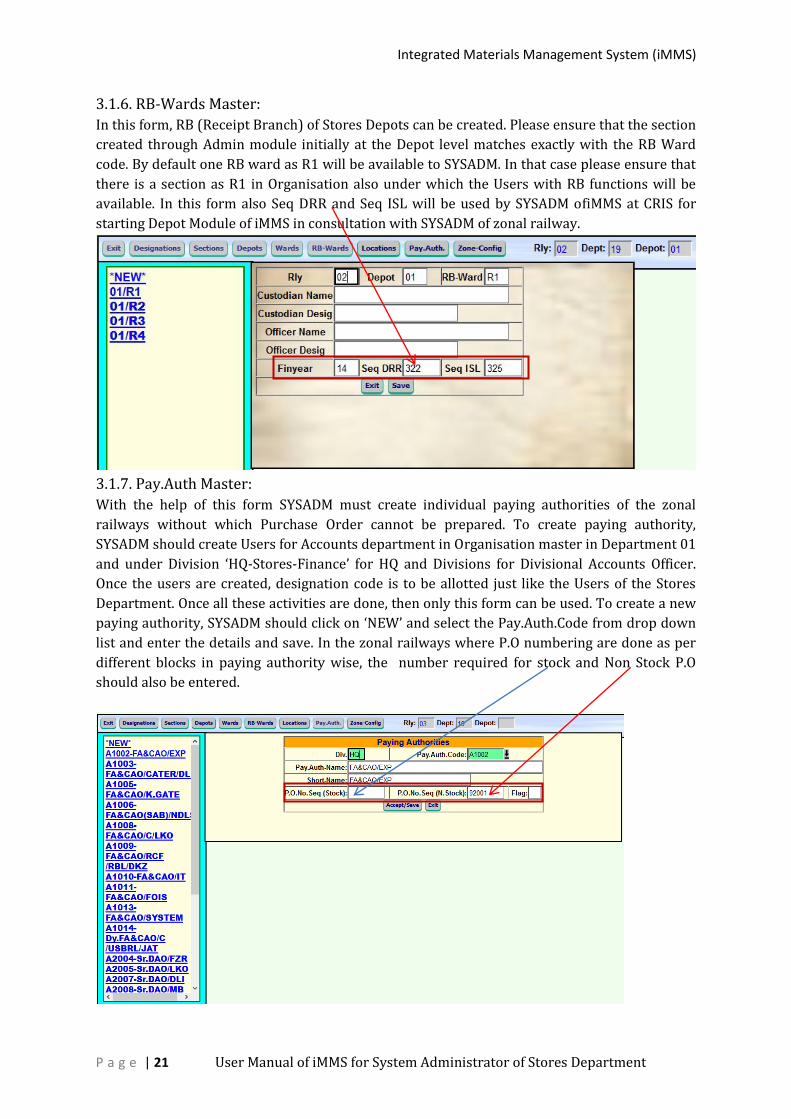
3.1.6. RB-Wards Master:
In this form, RB (Receipt Branch) of Stores Depots can be created. Please ensure that the section
created through Admin module initially at the Depot level matches exactly with the RB Ward
code. By default one RB ward as R1 will be available to SYSADM. In that case please ensure that
there is a section as R1 in Organisation also under which the Users with RB functions will be
available. In this form also Seq DRR and Seq ISL will be used by SYSADM ofiMMS at CRIS for
starting Depot Module of iMMS in consultation with SYSADM of zonal railway.
3.1.7. Pay.Auth Master:
With the help of this form SYSADM must create individual paying authorities of the zonal
railways without which Purchase Order cannot be prepared. To create paying authority,
SYSADM should create Users for Accounts department in Organisation master in Department 01
and under Division ‘HQ-Stores-Finance’ for HQ and Divisions for Divisional Accounts Officer.
Once the users are created, designation code is to be allotted just like the Users of the Stores
Department. Once all these activities are done, then only this form can be used. To create a new
paying authority, SYSADM should click on ‘NEW’ and select the Pay.Auth.Code from drop down
list and enter the details and save. In the zonal railways where P.O numbering are done as per
different blocks in paying authority wise, the number required for stock and Non Stock P.O
should also be entered.
Integrated Materials Management System (iMMS)
P a g e | 22 User Manual of iMMS for System Administrator of Stores Department
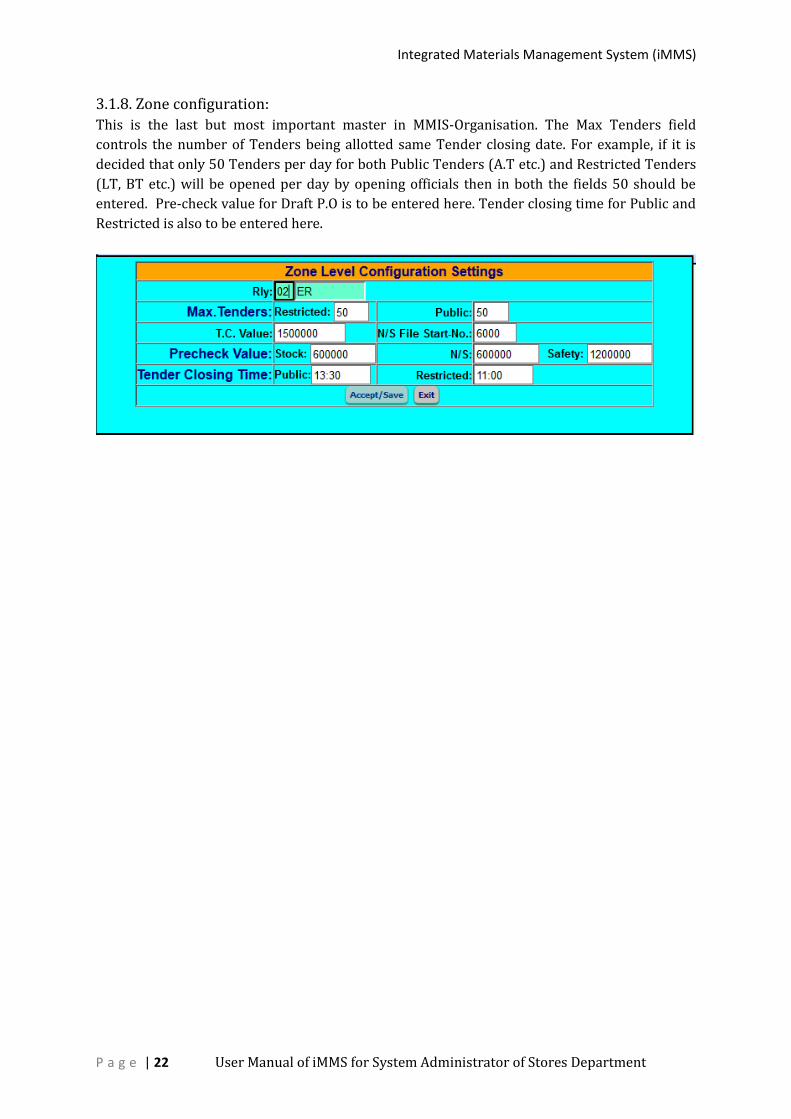
3.1.8. Zone configuration:
This is the last but most important master in MMIS-Organisation. The Max Tenders field
controls the number of Tenders being allotted same Tender closing date. For example, if it is
decided that only 50 Tenders per day for both Public Tenders (A.T etc.) and Restricted Tenders
(LT, BT etc.) will be opened per day by opening officials then in both the fields 50 should be
entered. Pre-check value for Draft P.O is to be entered here. Tender closing time for Public and
Restricted is also to be entered here.
Integrated Materials Management System (iMMS)
P a g e | 23 User Manual of iMMS for System Administrator of Stores Department
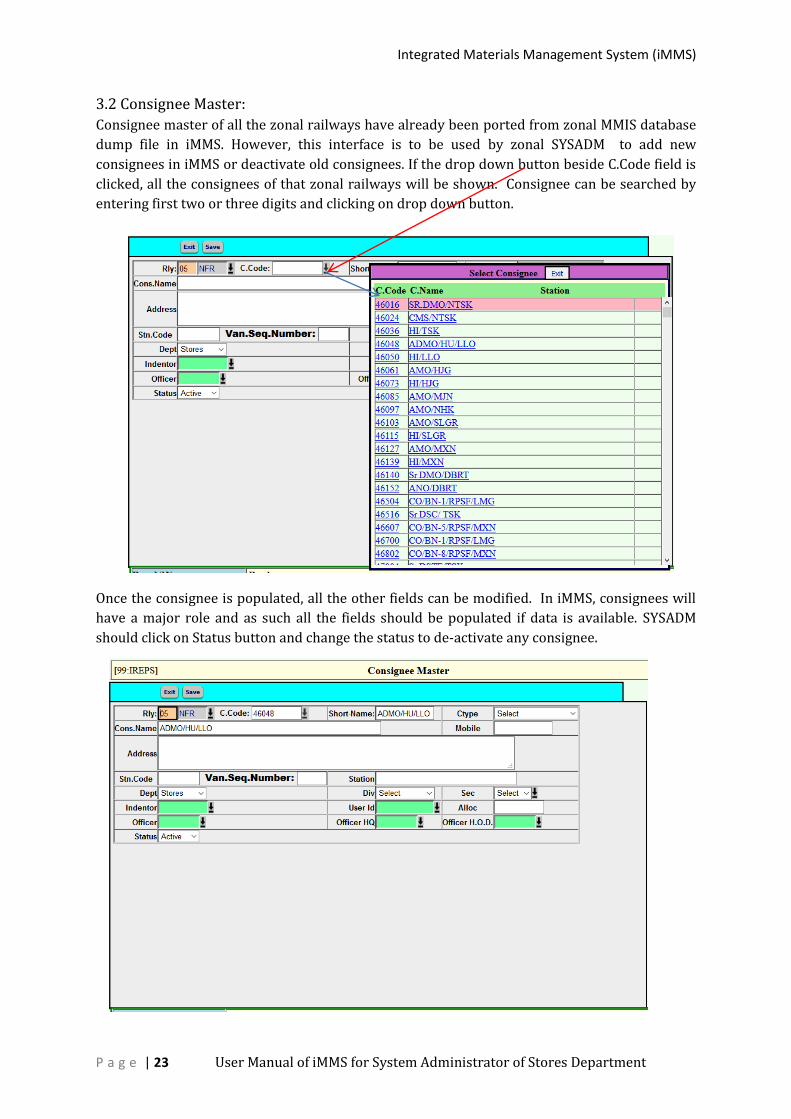
3.2 Consignee Master:
Consignee master of all the zonal railways have already been ported from zonal MMIS database
dump file in iMMS. However, this interface is to be used by zonal SYSADM to add new
consignees in iMMS or deactivate old consignees. If the drop down button beside C.Code field is
clicked, all the consignees of that zonal railways will be shown. Consignee can be searched by
entering first two or three digits and clicking on drop down button.
Once the consignee is populated, all the other fields can be modified. In iMMS, consignees will
have a major role and as such all the fields should be populated if data is available. SYSADM
should click on Status button and change the status to de-activate any consignee.
Integrated Materials Management System (iMMS)
P a g e | 24 User Manual of iMMS for System Administrator of Stores Department
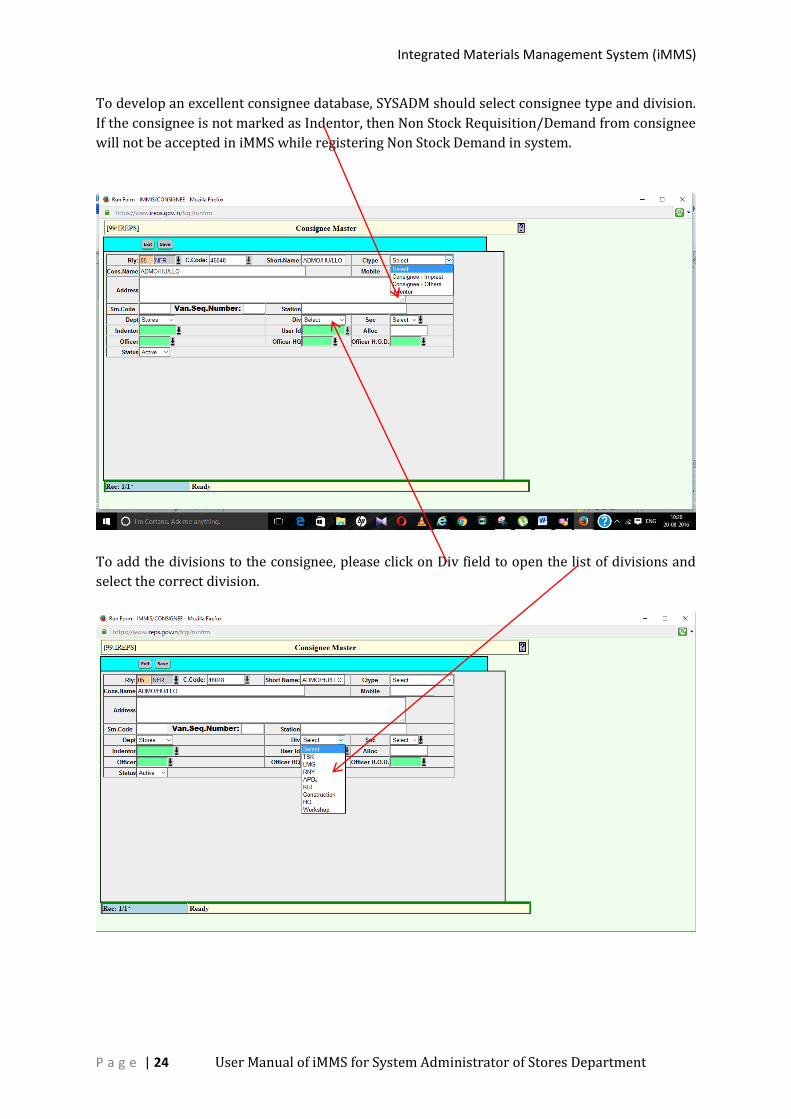
To develop an excellent consignee database, SYSADM should select consignee type and division.
If the consignee is not marked as Indentor, then Non Stock Requisition/Demand from consignee
will not be accepted in iMMS while registering Non Stock Demand in system.
To add the divisions to the consignee, please click on Div field to open the list of divisions and
select the correct division.
Integrated Materials Management System (iMMS)
P a g e | 25 User Manual of iMMS for System Administrator of Stores Department
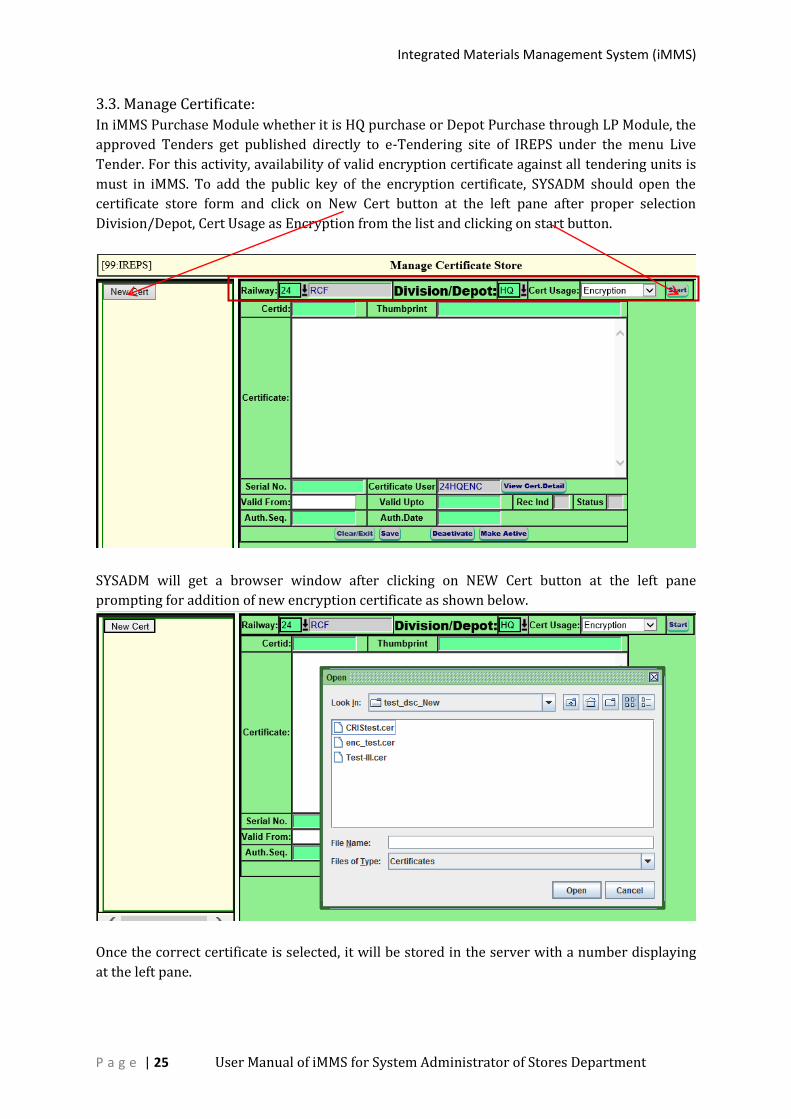
3.3. Manage Certificate:
In iMMS Purchase Module whether it is HQ purchase or Depot Purchase through LP Module, the
approved Tenders get published directly to e-Tendering site of IREPS under the menu Live
Tender. For this activity, availability of valid encryption certificate against all tendering units is
must in iMMS. To add the public key of the encryption certificate, SYSADM should open the
certificate store form and click on New Cert button at the left pane after proper selection
Division/Depot, Cert Usage as Encryption from the list and clicking on start button.
SYSADM will get a browser window after clicking on NEW Cert button at the left pane
prompting for addition of new encryption certificate as shown below.
Once the correct certificate is selected, it will be stored in the server with a number displaying
at the left pane.
Integrated Materials Management System (iMMS)
P a g e | 26 User Manual of iMMS for System Administrator of Stores Department
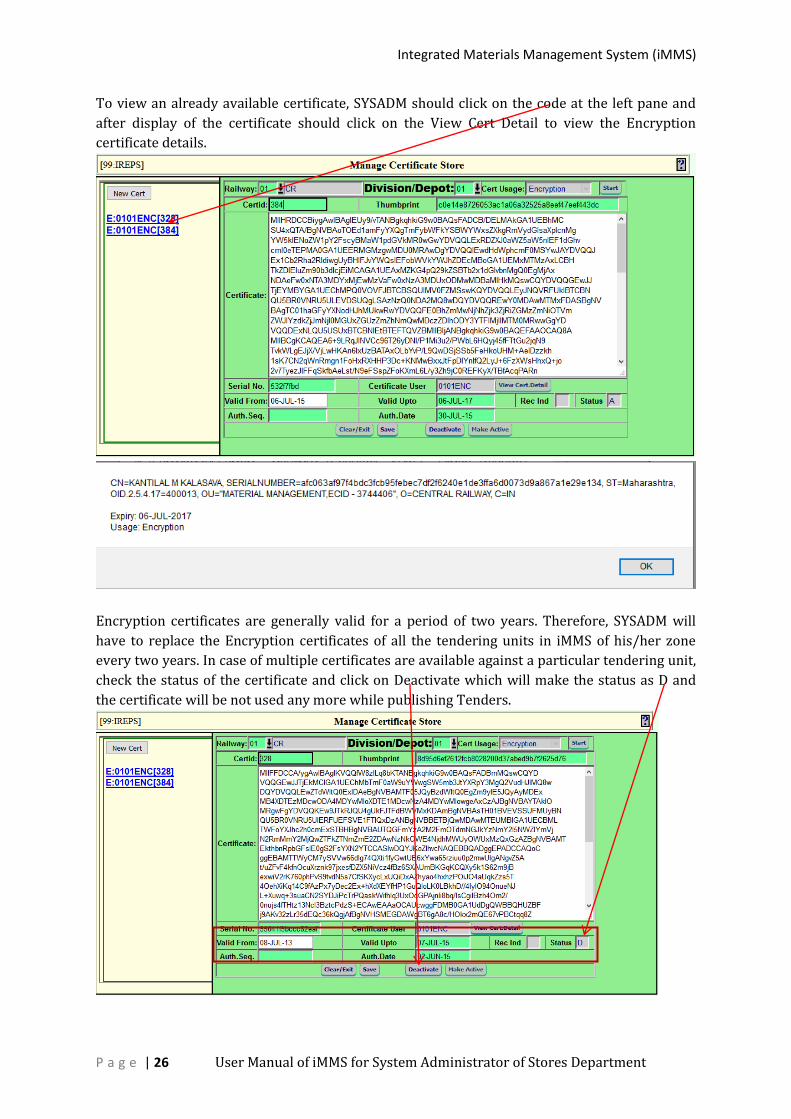
To view an already available certificate, SYSADM should click on the code at the left pane and
after display of the certificate should click on the View Cert Detail to view the Encryption
certificate details.
Encryption certificates are generally valid for a period of two years. Therefore, SYSADM will
have to replace the Encryption certificates of all the tendering units in iMMS of his/her zone
every two years. In case of multiple certificates are available against a particular tendering unit,
check the status of the certificate and click on Deactivate which will make the status as D and
the certificate will be not used any more while publishing Tenders.

Integrated Materials Management System (iMMS)
P a g e | 27 User Manual of iMMS for System Administrator of Stores Department
Once the old certificate it deactivated, SYSADM should add the new certificate which is similar
to first time certificate addition procedure except the alert as shown below.
After Clicking on
OK button,
SYSADM will get
this alert and once
the New Cert
button is clicked it
will open the
browser window
for selecting the
public key of the encryption certificate.
Integrated Materials Management System (iMMS)
P a g e | 28 User Manual of iMMS for System Administrator of Stores Department
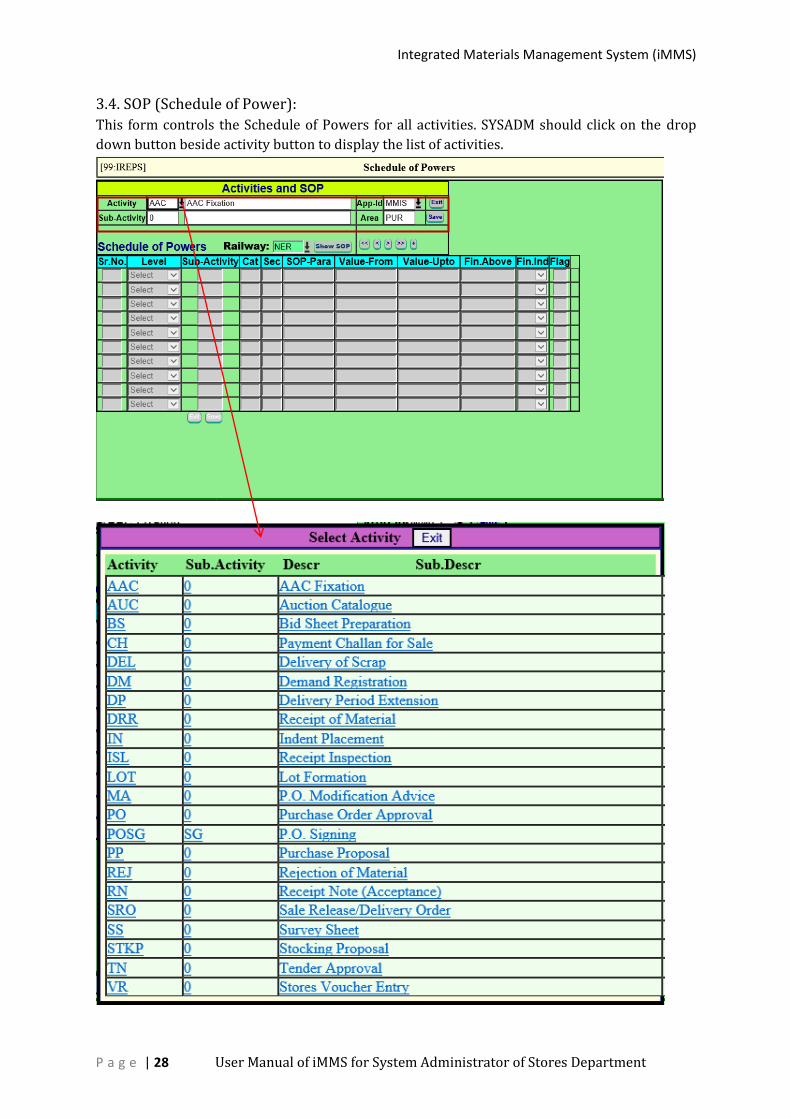
3.4. SOP (Schedule of Power):
This form controls the Schedule of Powers for all activities. SYSADM should click on the drop
down button beside activity button to display the list of activities.
Integrated Materials Management System (iMMS)
P a g e | 29 User Manual of iMMS for System Administrator of Stores Department
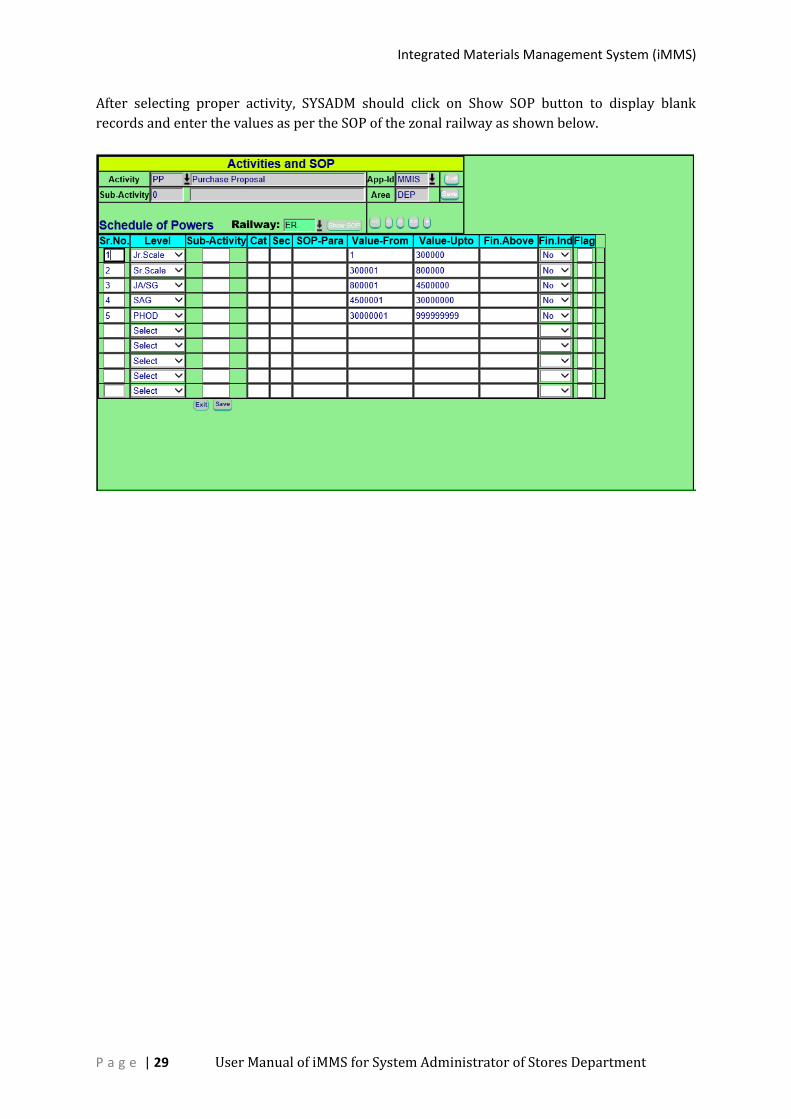
After selecting proper activity, SYSADM should click on Show SOP button to display blank
records and enter the values as per the SOP of the zonal railway as shown below.
Integrated Materials Management System (iMMS)
P a g e | 30 User Manual of iMMS for System Administrator of Stores Department
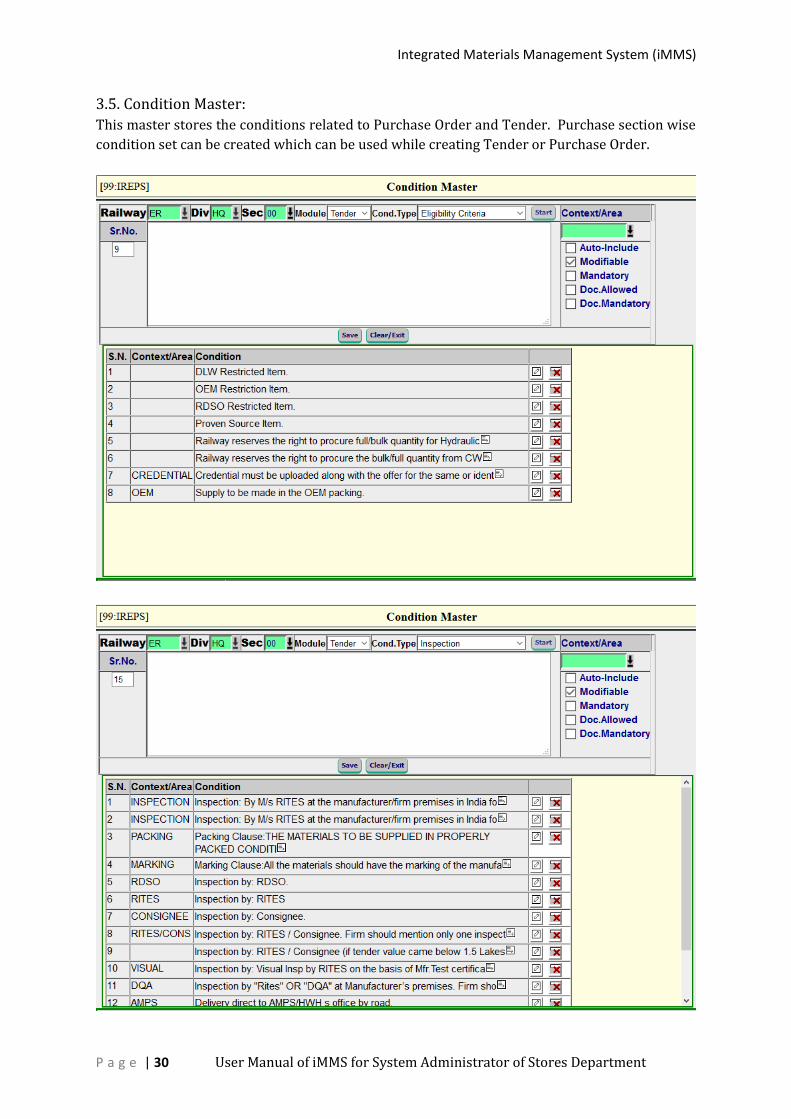
3.5. Condition Master:
This master stores the conditions related to Purchase Order and Tender. Purchase section wise
condition set can be created which can be used while creating Tender or Purchase Order.
Integrated Materials Management System (iMMS)
P a g e | 31 User Manual of iMMS for System Administrator of Stores Department
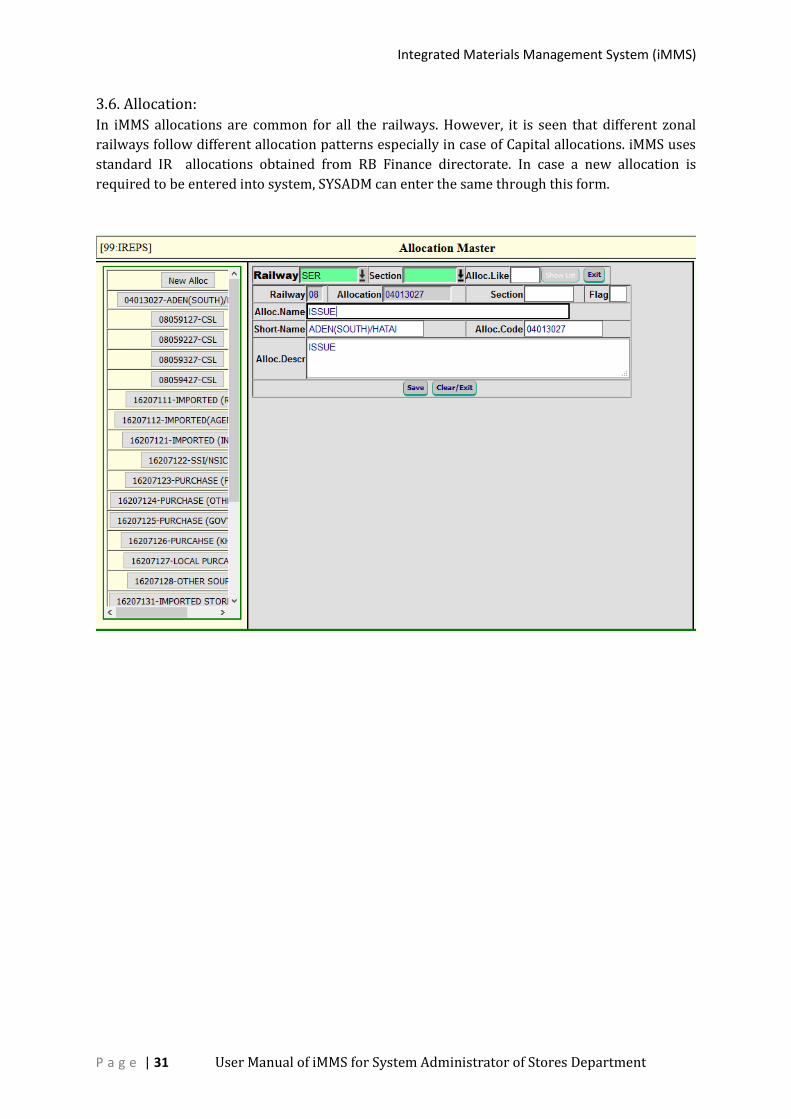
3.6. Allocation:
In iMMS allocations are common for all the railways. However, it is seen that different zonal
railways follow different allocation patterns especially in case of Capital allocations. iMMS uses
standard IR allocations obtained from RB Finance directorate. In case a new allocation is
required to be entered into system, SYSADM can enter the same through this form.
Integrated Materials Management System (iMMS)
P a g e | 32 User Manual of iMMS for System Administrator of Stores Department
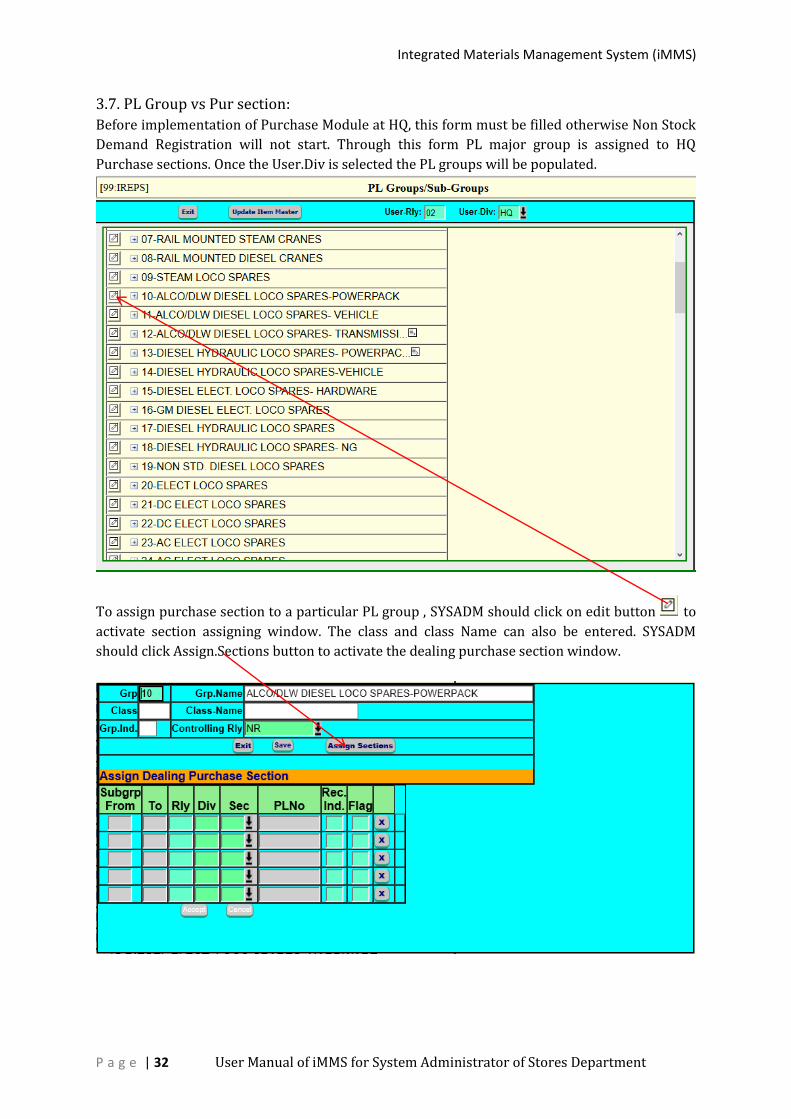
3.7. PL Group vs Pur section:
Before implementation of Purchase Module at HQ, this form must be filled otherwise Non Stock
Demand Registration will not start. Through this form PL major group is assigned to HQ
Purchase sections. Once the User.Div is selected the PL groups will be populated.
To assign purchase section to a particular PL group , SYSADM should click on edit button to
activate section assigning window. The class and class Name can also be entered. SYSADM
should click Assign.Sections button to activate the dealing purchase section window.
Integrated Materials Management System (iMMS)
P a g e | 33 User Manual of iMMS for System Administrator of Stores Department
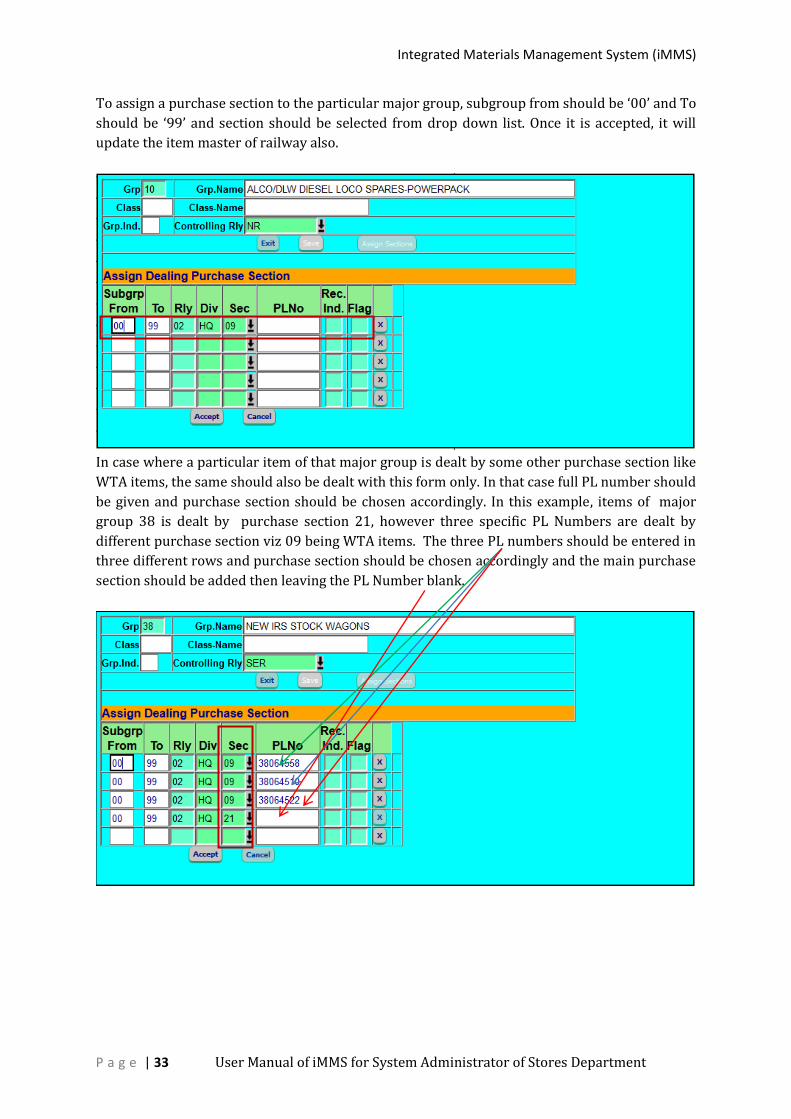
To assign a purchase section to the particular major group, subgroup from should be ‘00’ and To
should be ‘99’ and section should be selected from drop down list. Once it is accepted, it will
update the item master of railway also.
In case where a particular item of that major group is dealt by some other purchase section like
WTA items, the same should also be dealt with this form only. In that case full PL number should
be given and purchase section should be chosen accordingly. In this example, items of major
group 38 is dealt by purchase section 21, however three specific PL Numbers are dealt by
different purchase section viz 09 being WTA items. The three PL numbers should be entered in
three different rows and purchase section should be chosen accordingly and the main purchase
section should be added then leaving the PL Number blank.
Integrated Materials Management System (iMMS)
P a g e | 34 User Manual of iMMS for System Administrator of Stores Department
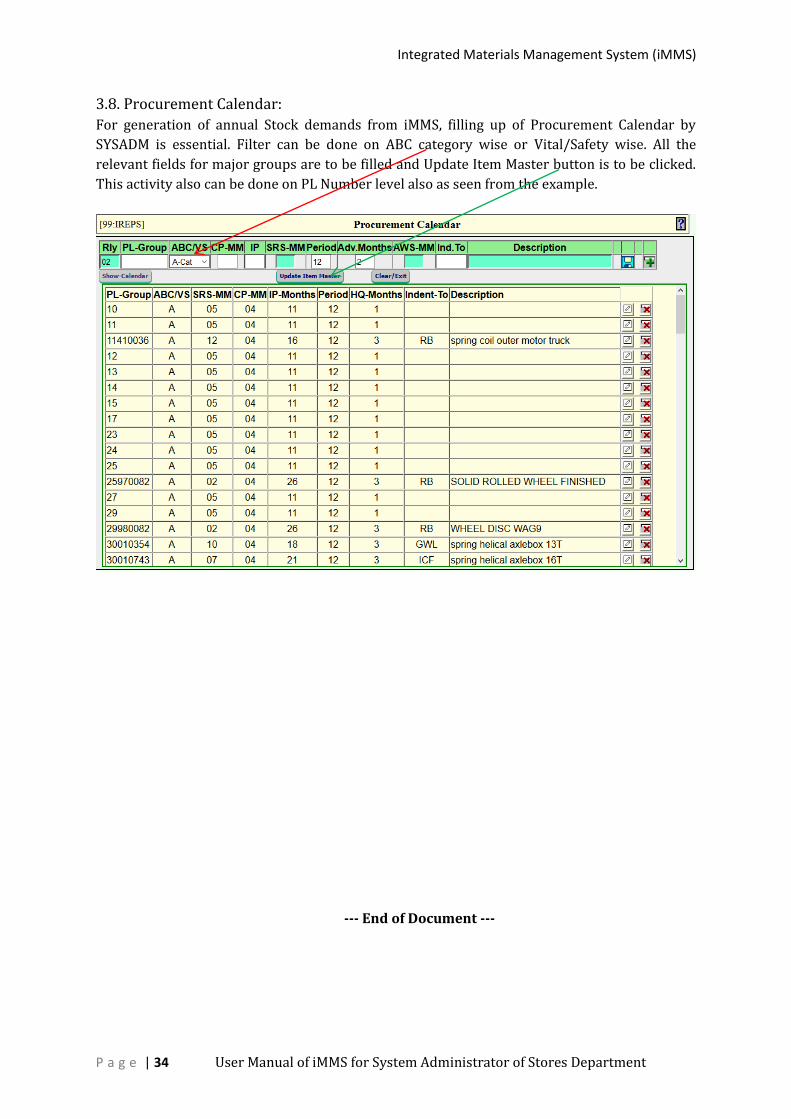
3.8. Procurement Calendar:
For generation of annual Stock demands from iMMS, filling up of Procurement Calendar by
SYSADM is essential. Filter can be done on ABC category wise or Vital/Safety wise. All the
relevant fields for major groups are to be filled and Update Item Master button is to be clicked.
This activity also can be done on PL Number level also as seen from the example.
--- End of Document ---