Embed Size (px)
Citation preview
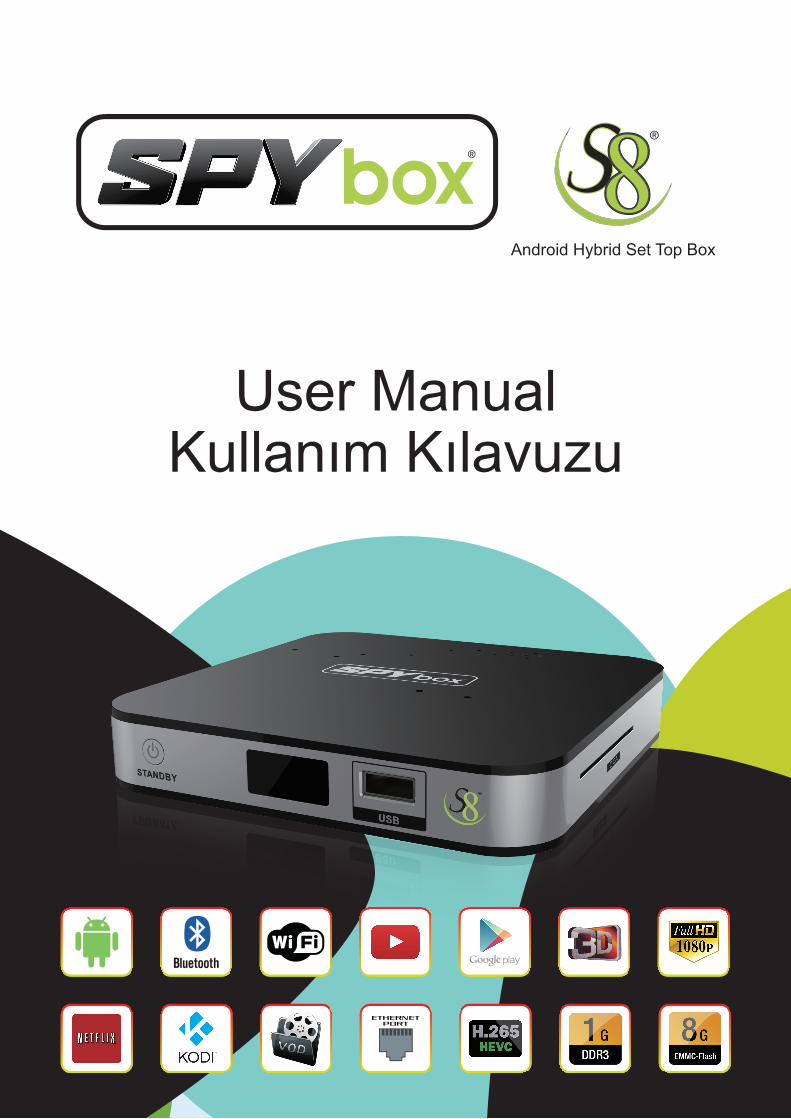
Android Hybrid Set Top Box
User ManualKullanım Kılavuzu

CONTENTS
CONTENTS ............................................................................................................................................ 1
1 SAFE CAUTION ................................................................................................................................. 3
2 UNPACKING AND SETUP HARDWARE ....................................................................................... 5
2.1 FRONT PANEL ................................................................................................................................. 5
2.2 REAR PANEL ................................................................................................................................... 5
2.3 TOP/RIGHT/LEFT VIEW .................................................................................................................. 5
2.4 HARDWARE INSTALLATION ............................................................................................................. 6
3 REMOTE CONTROL ......................................................................................................................... 7
4 SOFTWARE INSTALLATION ........................................................................................................... 9
4.1 FIRST INSTALLATION GUIDE .......................................................................................................... 9
4.2 SEARCH SATELLITE TV .................................................................................................................. 9
5 WATCHING LIVE TV .................................................................................................................... 10
5.1 DTV MENU .................................................................................................................................. 11
5.2 PVR (PERSONAL VIDEO RECORD) ............................................................................................. 11
5.3 TIME-SHIFT .................................................................................................................................. 13
5.4 EPG (ELECTRONIC PROGRAM GUIDE) ....................................................................................... 13
5.5 TIMER ........................................................................................................................................... 15
5.6 CHANNEL MANAGER .................................................................................................................... 15
5.7 DTV SETTINGS MENU ................................................................................................................. 16
1

5.8 INSTALLATION .............................................................................................................................. 17
6 ENTERTAINMENT ON ANDROID MEDIA BOX ......................................................................... 18
6.1 INSTALL APP FROM GOOGLE PLAY STORE ................................................................................ 18
6.2 INSTALL APP FROM EXTERNAL USB/SD CARD STORAGE ......................................................... 19
6.3 INSTALL APP FROM TV APP STORE .......................................................................................... 20
6.4 CUSTOMIZE YOUR LAUNCHER ...................................................................................................... 20
6.5 CHANGE DEFAULT THEME ............................................................................................................ 21
6.6 MIRACAST/AIRPLAY/DLNA ......................................................................................................... 22
7 SYSTEM SETTINGS AND UPGRADE ......................................................................................... 23
7.1 SYSTEM SETTINGS ...................................................................................................................... 23
7.2 SYSTEM UPGRADE ....................................................................................................................... 24
8 TROUBLESHOOTING ..................................................................................................................... 26
8.1 NO SIGNAL ON THE HDTV ........................................................................................................... 26
8.2 CANNOT TURN ON YOUR MEDIA BOX. .......................................................................................... 26
8.3 CANNOT CONNECT TO NETWORK ................................................................................................ 26
8.4 SOME HDTV CAN NOT DISPLAY THE ENTIRE PICTURE ................................................................ 27
8.5 THE REMOTE CONTROL DOES NOT WORK ................................................................................... 27
8.6 NO PICTURE OR SOUND ............................................................................................................... 27
2

1 Safe Caution NOTICE: To prevent fire and electric shock, do not expose this receiver to
rain or moisture. In order to avoid any possible risk of electric shock, never
attempt to open the unit. In case of the unit breaking down, repair of the unit
should be carried out by qualified technicians. No part of this unit should be repaired by users.
WARNING!
Presence of live parts inside the unit! Do not open. Risk of electric shock! No part should
be repaired by users.
The maintenance of the receiver should be carried out exclusively by qualified persons.
If the power cord is damaged, it must be replaced or repaired by the manufacturer, its
after-sales service, qualified electrician or persons of similar qualification in order to avoid
possible danger.
The product must be installed in accordance with national regulations.
The used batteries must be disposed of safely. Throw them in appropriate rubbish bins in
order to protect the environment.
Proper Installation
Place the receiver on a flat, firm and stable surface. Do not put it on a carpet or rug.
Do not place the receiver on top of another device, such as an amplifier. This may lead to
overheating.
Do not put anything above the unit (for example, CDs or magazines).
Sufficient Ventilation
Place the receiver in a well-ventilated location to prevent accumulation of internal heat.
3

Allow a gap of at least 10cm to the rear and the top of the unit, as well as a space of 5cm
to both sides to avoid overheating.
Do not obstruct any ventilation openings with items such as newspapers, tablecloths,
curtains, etc.
Protecting the Receiver from High Temperatures, Humidity, Water and Dust
The receiver should not be exposed to dripping water or splashing.
No objects filled with liquids, such as vases, shall be placed on the unit.
Do not place any objects that might damage your unit near it (e.g. liquid filled objects or
candles).
Do not place any source of flames such as lit candles on the receiver.
Electricity Supply
Please unplug the receiver in case of prolonged non-use.
If the power cord is damaged, it must be replaced or repaired by the manufacturer, its
after-sales service, qualified electrician or similar qualifications to those to avoid possible
danger.
The plug must remain readily accessible after the installation of the product.
4

2 Unpacking and setup hardware
The pictures shows what our product looks like and how to setup the hardware.
2.1 Front panel
2.2 Rear panel
2.3 Top/Right/Left view
NOTICE: The pictures are for references only; please make the object as the standard.
5

2.4 Hardware installation
As shown, connect the interfaces on the television with the corresponding interfaces on
the product (such as connect the product with TV sets through the HDMI cable), then after
the power is connected, turn on the switch and you can use the product.
NOTICE: The picture is for references only, please make the object as the standard.
6

3 Remote control
7

NOTICE: The picture is for references only, please make the object as the standard.
8

4 Software Installation
Notes: The default password is 0000 for this media box.
All the Instructions and pictures here are for reference only, please make the product you
have as the standard and refer to the actual items.
4.1 First Installation Guide
First installation guide helps you to choose prefer menu language, HDMI output resolution,
screen size and configure internet connection through Ethernet or Wi-Fi.
4.2 Search satellite TV
DTV First Installation helps you to search satellite TV/Radio channel manually, load
backup channel list from USB/SD card storage or load channel list from internet. We
advise you download the TV/Radio channel list from internet automatic and you could
watching TV immediately. Please contact customer service center for help if you have
any question when search TV/Radio channel list manually.
9

5 Watching Live TV
Enjoy TV after search TV channel. Uses the VOL+/VOL- button to control the volume
output. Uses the CH+/CH- to change the channel.
Press OK button to show channel list and choose channel. You could Sort channel by
alphabet, FTA(Free To Air)/CAS(Scrambled), HD/SD etc... You could also find channel
quickly or filter channel by group in channel list.
10

5.1 DTV Menu
Press MENU button to display DTV menu for more option. You could choose subtitle,
audio track, turn on TELETEXT, add channel to Favorites group etc...
5.2 PVR (Personal Video Record)
The media box support instant PVR, timer PVR and EPG booking PVR. Please configure
the storage device in DTV settings before start PVR. You could record your prefer live TV
11

program to external USB storage and playback anytime anywhere. Press REC button
again to open menu for change default recording duration. You could also change the
default recording duration in DTV settings menu. See chapter 6.4.
The user could manage recorded files; you can delete the files you’ve recorded by
pressing the RED key.
12
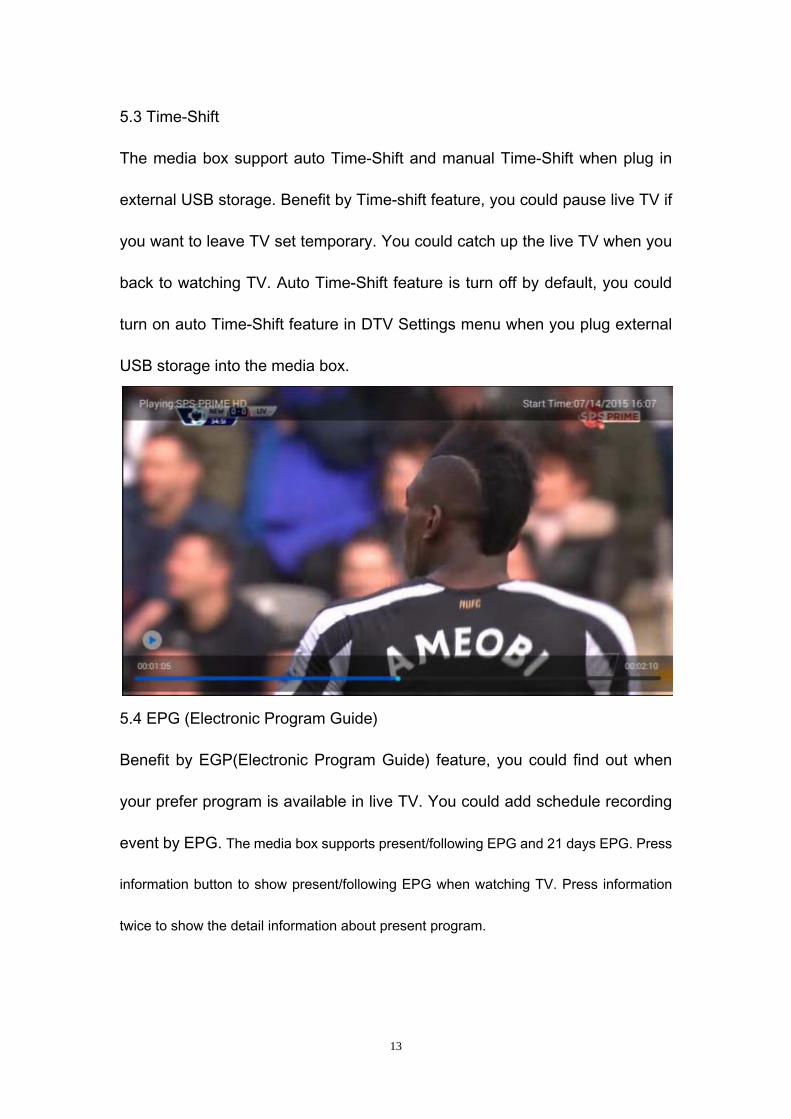
5.3 Time-Shift
The media box support auto Time-Shift and manual Time-Shift when plug in
external USB storage. Benefit by Time-shift feature, you could pause live TV if
you want to leave TV set temporary. You could catch up the live TV when you
back to watching TV. Auto Time-Shift feature is turn off by default, you could
turn on auto Time-Shift feature in DTV Settings menu when you plug external
USB storage into the media box.
5.4 EPG (Electronic Program Guide)
Benefit by EGP(Electronic Program Guide) feature, you could find out when
your prefer program is available in live TV. You could add schedule recording
event by EPG. The media box supports present/following EPG and 21 days EPG. Press
information button to show present/following EPG when watching TV. Press information
twice to show the detail information about present program.
13

Press the EPG button to show the 21 days EPG menu. Press Left/Right, Up/Down key to
look for EPG in the next 21 days, press blue button to reserve play program or record
program. Press OK key to get detail information of the program. You could also change
multilingual EPG by press Yellow button if multilingual EPG are available from operator.
14

5.5 Timer
Media box could helps you to record your prefer program automatic anytime with timer
feature. You can choose what time to start recording and the duration time. Before this, of
course, you must ensure your USB/SD card/ hard drive is connected to the Box and its
storage capacity would be sufficient to store the recorded TV programs.
5.6 Channel Manager
Channel manager support delete channel, move channel, hide channel, lock/unlock
channel and rename channel. You could add your prefer TV/Radio channel to variety
favorites group. The default password of channel manager is 0000. All channel manage
operation are available in on one page.
15
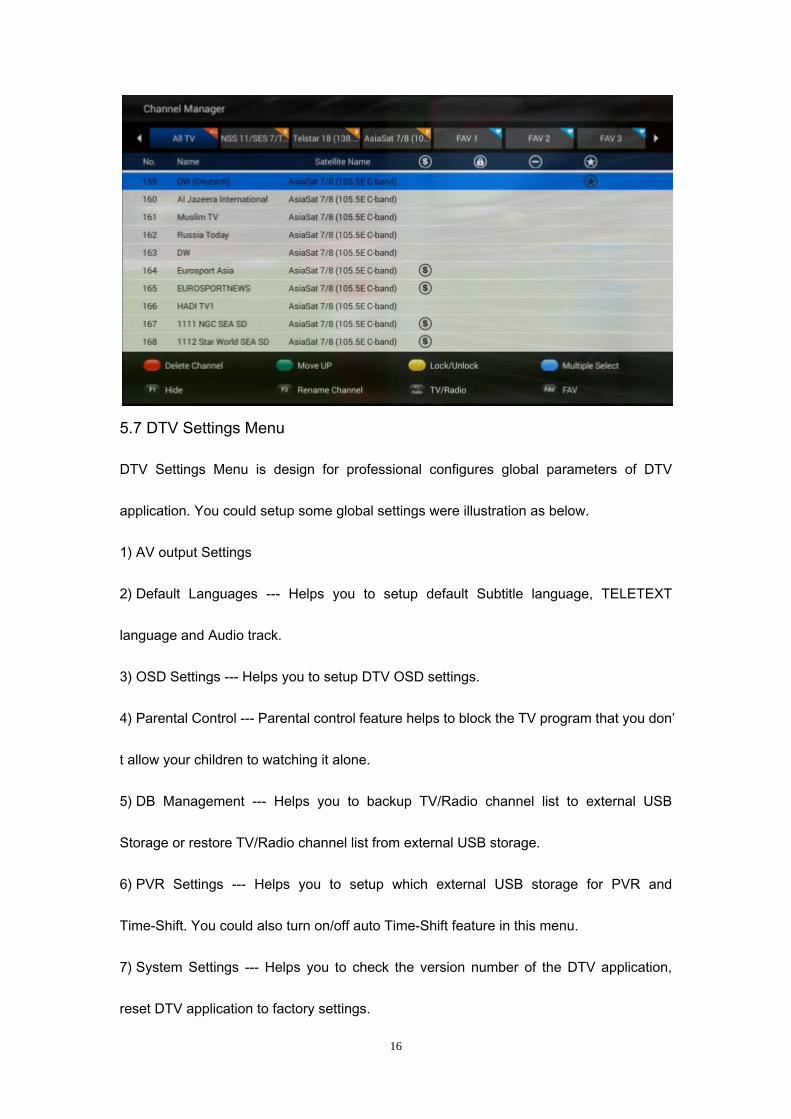
5.7 DTV Settings Menu
DTV Settings Menu is design for professional configures global parameters of DTV
application. You could setup some global settings were illustration as below.
1) AV output Settings
2) Default Languages --- Helps you to setup default Subtitle language, TELETEXT
language and Audio track.
3) OSD Settings --- Helps you to setup DTV OSD settings.
4) Parental Control --- Parental control feature helps to block the TV program that you don’
t allow your children to watching it alone.
5) DB Management --- Helps you to backup TV/Radio channel list to external USB
Storage or restore TV/Radio channel list from external USB storage.
6) PVR Settings --- Helps you to setup which external USB storage for PVR and
Time-Shift. You could also turn on/off auto Time-Shift feature in this menu.
7) System Settings --- Helps you to check the version number of the DTV application,
reset DTV application to factory settings.
16

5.8 Installation
Installation feature in DTV menu helps professional search TV/Radio channel manually
with connect the media box to antenna. You could configure LNB Frequency, 0/22 KHz,
ToneBurst, DisEqC1.0/1.1/1.2, Motor, USALS, Uni-cable etc … Search TV/Radio
channel by manually with variety filter such as fast scan, All TP, Blind scan, single TP,
single TP+NIT, only FTA, only TV or Radio etc...
17

6 Entertainment on Android Media Box
Thanks to the power full Android platform, the media box convert your TV set to smart
screen. You could enjoy more entertainment on your TV set such as watching YouTube
video on your TV set, video chat with your friends on TV set, browse news, social network
APP by connect Air mouse and play games on your TV set by connect Android compatible
game-pad to the media box. Please contact customer service or access to our website to
get more information about compatible accessories.
6.1 Install APP from Google Play Store
Press Home button to show home page and go to All APPs menu to launch Google Play
Store.
Login to the Google Play Store with your account and then you could install your prefer
APP for entertainment on your TV set.
18

6.2 Install APP from external USB/SD Card storage
Download APP install file(*.apk) on the computer and copy to USB/SD card storage. Plug
USB/SD Card storage in to the media box and press Home button to show launcher. You
could choose install APP from USB/SD card storage with AppInstaller or FileBrowser in All
APP list.
Launch FileBrowser to choose USB/SD card storage and browse APK file, press OK
button to install it.
19
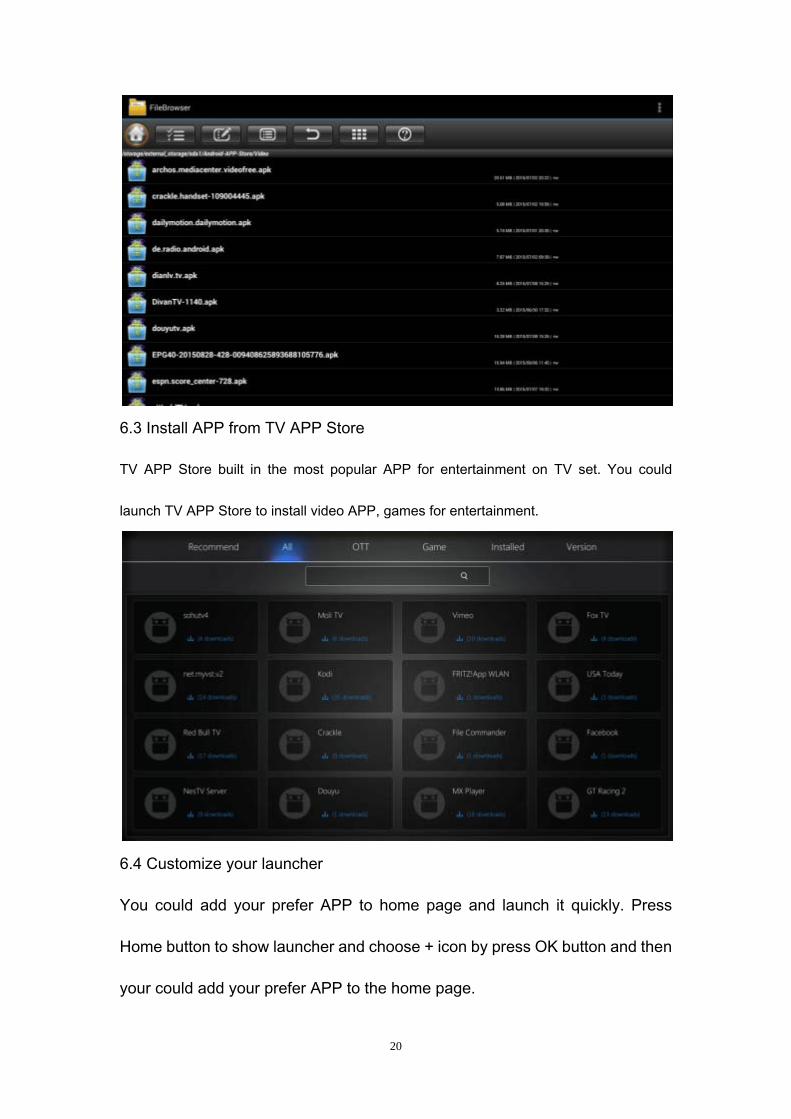
6.3 Install APP from TV APP Store
TV APP Store built in the most popular APP for entertainment on TV set. You could
launch TV APP Store to install video APP, games for entertainment.
6.4 Customize your launcher
You could add your prefer APP to home page and launch it quickly. Press
Home button to show launcher and choose + icon by press OK button and then
your could add your prefer APP to the home page.
20

You could delete APP shortcut from home page or uninstall the APP by press
menu button when you move the cursor to the APP shortcut icon.
6.5 Change default theme
Go to System menu and choose My theme to change default theme..
21

6.6 Miracast/Airplay/DLNA
The media box support Miracast/Airplay/DLNA, means you could share your Android
Phone/iPhone screen to the TV set or share video/music/picture from your Android
Phone/iPhone, Android Pad/iPad to the TV set through media box. Launch S Link to start
Miracast receiver and mirroring your Android Phone/Pad screen to the TV set. Compatible
Miracast smart phone are Google Nexus Phone, LG Android smart phone, HTC Android
smart phone, Sony Android smart phone etc...
22

Download and install AirPin from Google Play Store on the media box to receive
iPhone/iPad Airplay mirroring and DLNA from all DLNA compatible APP.
7 System Settings and upgrade
System settings and upgrade helps you to setup the media box in advance settings such
as video/audio output, network connection, Bluetooth etc...
7.1 System Settings
You could open system settings menu from Launcher by choose Settings icon and press
OK button. You could setup Network, Bluetooth, Video/Audio output, Language etc...
23

Choose More Settings to open Android system settings for advance settings. Although the
media box supply System settings for configure it in advance settings mode, we don’t
recommend the user configure the media box without skillful master.
7.2 System upgrade
Media box could be upgraded through USB/SD card storage and OTA. You might see
online update notification on the home page when new software available on internet.
24
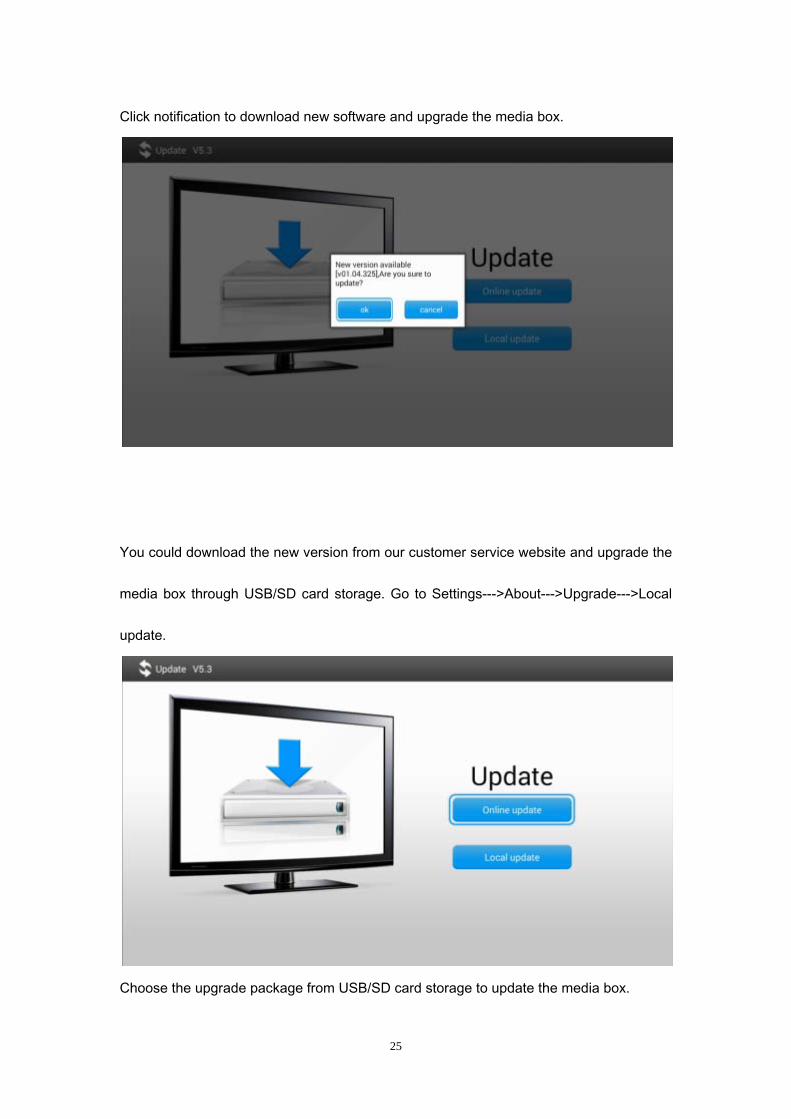
Click notification to download new software and upgrade the media box.
You could download the new version from our customer service website and upgrade the
media box through USB/SD card storage. Go to Settings--->About--->Upgrade--->Local
update.
Choose the upgrade package from USB/SD card storage to update the media box.
25

8 Troubleshooting
8.1 No signal on the HDTV
Check if the HDMI cable is securely connected.
Check if you have selected the correct HDMI input on your HDTV.
Check the antenna cable, replace the cable, or connect the cable to the receiver tightly.
Set the values of the tuner parameters correctly in the installation menu.
Check the antenna connections.
8.2 Cannot turn on your media box.
Check if the power connector has completely plugged into the DC socket of your TV.
Check if the power supply is stable.
8.3 Cannot connect to network
Make sure the network cable is securely connected and he Ethernet work well.
Make sure Wi-Fi network is connected and the security key for the encrypted network is
correct.
26

Make sure you select the correct IP address settings.
8.4 Some HDTV can not display the entire picture
Setup the screen ratio on your HDTV as automatic.
On your HDTV, go to Menu >Screen >Press arrow buttons to select the ratio type >
Choose automatically display the entire screen.
8.5 The remote control does not work
Make sure the batteries are good and they are inserted correctly in the remote control.
Make sure no objects block the path between the remote control and the signal sensor
area on the product.
Make sure the distance between the remote control and the box is no more than 5 meters.
Check the batteries for power, and if exhausted replace the batteries in the remote
control.
8.6 No picture or sound
Check if the Audio/ Video output connection from the product to TV correctly.
Press the MUTE button Turn TV on.
27

9. Specification
Hardware Chipset Amlogic S805-B RAM DDR3 1GB Flash EMMC 8GB Tuner Demodulator Mode QPSK,8PSK Frequency Range 950~2150MHz RF Input Connector F-Female Video
Video Decoding H.265 HEVC [email protected] up to 1080P@60fps H.264 AVC [email protected] up to 1080P@60fps H.264 MVC up to 1080P@60fps MPEG-4 ASP@L5 up to 1080P@60fps AVS Jizhun Profile up to 1080P@60fps MPEG-2 MP@HL up to 1080P@60fps MPEG-1 MP@HL up to 1080P@60fps RealVideo 8/9/10 up to 1080P@60fps WebM up to VGA
Video File Format Support *.mkv, *.wmv,*.mpg,*.mpeg,*.dat,*avi,*.mov,*.iso,*.mp4,*.rm,*.jpg,*.bmp,*gif etc…
Video Output CVBS(video format @ 576i or 480p) HDMI 1.4b (video format default @ Auto), Support HDCP2.0
Aspect Ratio 4:3 16:9 Video resolution 1080p/i 720p 576i 480p Audio
Audio Decoding Dolby Digital/Digital Plus, DTS, WMA, WMA Pro,WMV,MEPG,AAC,HE-AAC,OGG,OGA,FLAC,ALAC,Ape,M4A,RM,MPEG-1 layer1/2, MPEG-2 Layer II
Audio mode Mono/Stereo/Left/Right PVR Function Record Instant Record and Timer Record
EPG Timer Record Timeshift Support Timeshift on/off setting in Menu PVR Operation Play/Pause/Stop/Step
Fast Forward/Fast Backward 2/4/8/16/32 File System Support NTFS, FAT32, EXT3, EXT4 PVR Manager Delete recorded file Power DC Input Range 12V 1.5A
28

29
Power Consumption
Maximum 18W
Interface Left Panel 3*USB ,SD Slot Right Panel CA Slot Rear Panel Tuner In, Optical SPDIF, Ethernet Port, HDMI Out, DC IN Front Panel
STANDBY,1*USB,IR
Accessories RCU
IR RCU,RF RCU
User’s Manual HDMI Cable 1 DC Adaptor 1 Physical Features Operating Temperature
0℃-40℃
Storage Temperature
-10℃-65℃
Size(WxDxH)in mm
Weight

Kullanım Kılavuzu
1
İÇİNDEKİLER
İÇİNDEKİLER
1 LÜTFEN DIKKAT .............................................................................................................. 2
2 PAKET’DEN ÇIKARMA VE KURULUM ................................................................................. 3
2.1 ÖN PANEL ......................................................................................................................................... 3 2.2 ARKA PANEL ................................................................................................................................... 3 2.3 ÜST/SAĞ/SOL GÖRÜNÜM .......................................................................................................... 3 2.4 KURULUM ......................................................................................................................................... 4
3 UZAKTAN KUMANDA ....................................................................................................... 5
4 YAZILIM KURULUMU ....................................................................................................... 7
4.1 İLK KURULUM EKRANI ............................................................................................................... 7 4.2 KANAL ARAMA ............................................................................................................................... 7
5 TV İZLEME.......................................................................................................................... 8
5.1 DTV MENÜ ......................................................................................................................................... 9 5.2 PVR ..................................................................................................................................................... 9 5.3 TIME-SHIFT ....................................................................................................................................... 10 5.4 EPG (ELEKTRONİK PROGRAM REHBERİ) ........................................................................ 11 5.5 ZAMAN ............................................................................................................................................. 12 5.6 KANAL DÜZENLEYİCİ ................................................................................................................ 12 5.7 DTV AYARLAR MENÜSÜ ............................................................................................................ 13 5.8 KURULUM ....................................................................................................................................... 14
6 ANDROID UYGULAMALAR ........................................................................................... 14
6.1 GOOGLE PLAY STORE UYGULAMA YÜKLEME ........................................................................ 15 6.2 HARİCİ USB/SD KART BİRİMİNDEN APK YÜKLEME ................................................... 16 6.3 TV MARKET UYGULAMASI ...................................................................................................... 17 6.4 KİŞİYE ÖZEL UYGULAMA ......................................................................................................... 17 6.5 VARSAYILAN ARAYÜZ DEĞİŞTİRME .................................................................................... 18 6.6 MIRACAST/AIRPLAY/DLNA .......................................................................................................... 18
7 SİSTEM AYARLARI VE GÜNCELLEME ......................................................................... 19
7.1 SİSTEM AYARLARI ....................................................................................................................... 19 7.2 SİSTEM GÜNCELLEME .............................................................................................................. 21
8 SORUN GİDERME ............................................................................................................ 22
8.1 TV DE GÖRÜNTÜ YOK ................................................................................................................ 22 8.2 SMART KUTU AÇILMIYOR. ....................................................................................................... 22 8.3 İNTERNET BAĞLANTISI YOK ................................................................................................. 22 8.4 BAZI KANALLARDA GÖRÜNTÜ SORUNU VAR.................................................................. 22 8.5 UZAKTAN KUMANDA ÇALIŞMIYOR ..................................................................................... 22 8.6 VİDEO VAR SES YOK .................................................................................................................... 22

2
1 Lütfen Dikkat
Yangın ve elektrik çarpmasını önlemek için yağmur veya neme smart cihazı maruz bırakmayın: DİKKAT Elektrik çarpması olası riskinden kaçınmak amacıyla üniteyi açmaya çalışmayın .Onarım kalifiye teknisyenler tarafından yapılmalıdır. Bu ünitenin bölümleri kullanıcılar tarafından tamir edilemez
UYARI! ➢ Smart cihazın içi açılarak kullanıcılar tarafından tamir edilmemelidir ➢ Smart cihazın tamiratı yetkili kişiler tarafından yapılmalıdır ➢ Güç kablosu hasar görürse, bu üretici tarafından değiştirilebilir veya tamir edilmelidir. ➢ Ürün, yerel yönetmeliklere uygun olarak monte edilmelidir. ➢ Kullanılmış ve bitmiş piller güvenli bir şekilde imha edilmelidir. Çevreyi korumak için
uygun çöp bidonları atılmalıdır. Doğru Montaj ➢ Düz, sağlam ve sabit bir yüzeye alıcıyı yerleştirin. Bir halı veya kilim üzerine koymayın. ➢ Başka bir cihazın, üstüne smart cihazı koymayın. Bu aşırı ısınmaya neden olabilir. ➢ Ünite üzerinde herhangi bir şey koymayın.(örneğin, CD veya dergi gibi) Yeterli havalandırma ➢ Smart cihazınızı iyi havalandırılan bir yerde kullanın ,alıcı iç ısı birikimini önlemek
için. ➢ Gazete, masa örtüsü, perde,gibi öğeler ile smart cihazın üzerini kapatmayın Yüksek Sıcaklık, Nem, Su ve Toz ‘dan koruma ➢ Smart alıcınız su ve sıçramasına maruz edilmemelidir. ➢ Çiçek vazosu gibi sıvıyla dolu nesneler, ünite üzerinde konulmamalıdır. ➢ Cihazınızı zarar verebilecek herhangi bir nesne koymayın (örneğin sıvı mumlar ve
yanıcı maddeler) Elektrik Tasarrufu ➢ Uzun süreli kullanım olmayacak durumunda alıcının fişini çekiniz.

3
2 Ürün görsel bilgisi 2.1 Ön panel
2.2 Arka Panel
2.3 Üst / Sağ / Sol görünüm
UYARI:Resimler sadece referans içindir.
4
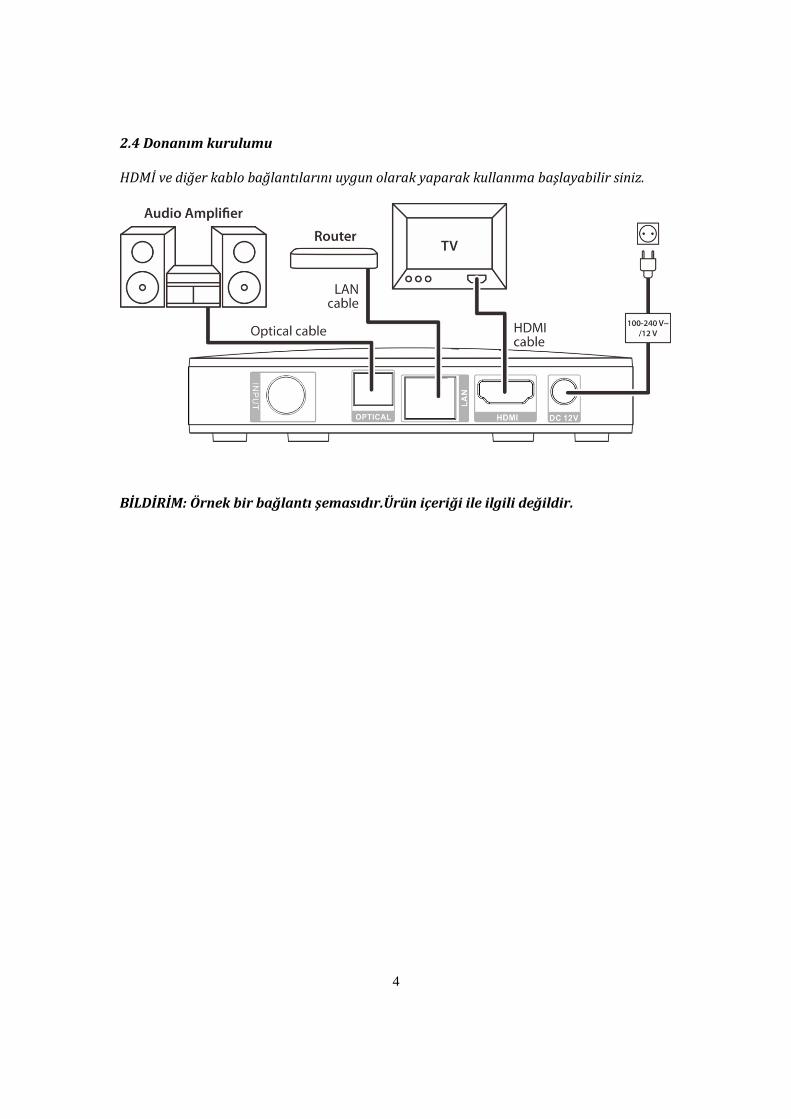
2.4 Donanım kurulumu HDMİ ve diğer kablo bağlantılarını uygun olarak yaparak kullanıma başlayabilir siniz.
BİLDİRİM: Örnek bir bağlantı şemasıdır.Ürün içeriği ile ilgili değildir.
5
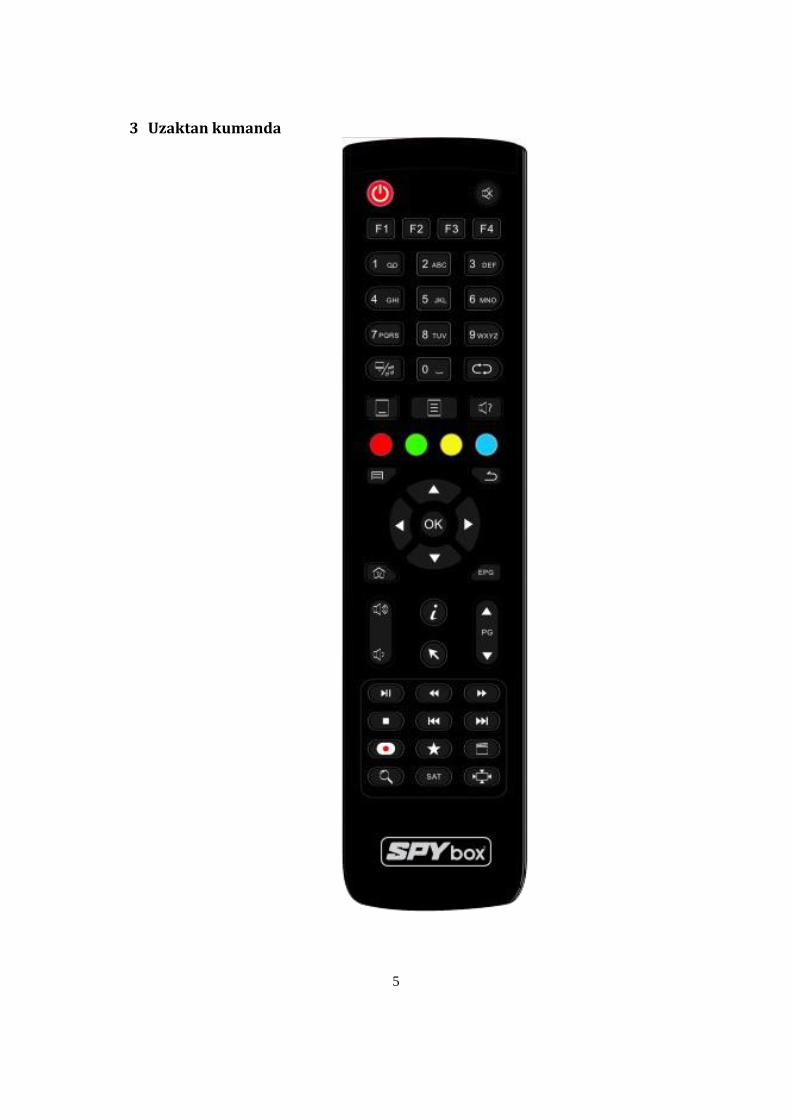
3 Uzaktan kumanda

6
UYARI:.. Resim sadece standart kumanda görselidir.

7
4 Yazılım Kurulumu Smart cihazınızda güncel son yazılım yüklü olarak gelecektir.Sonraki güncellemeler üretici tarafından sağlandıkça yükseltme menüsü bölümünden yayınlanacaktır. Güncelleme sonrasında menü ve kullanımlarda farklılık olabilir. 4.1 İlk Kurulum Ekranı İlk kurulum kılavuzu menüyü tercih seçmek için dil seçimi , HDMI çıkış çözünürlüğü, ekran boyutu ve Ethernet veya Wi-Fi üzerinden internet bağlantısı yapılandırmak için size yardımcı olacaktır.
4.2 Tv kanalı aramak
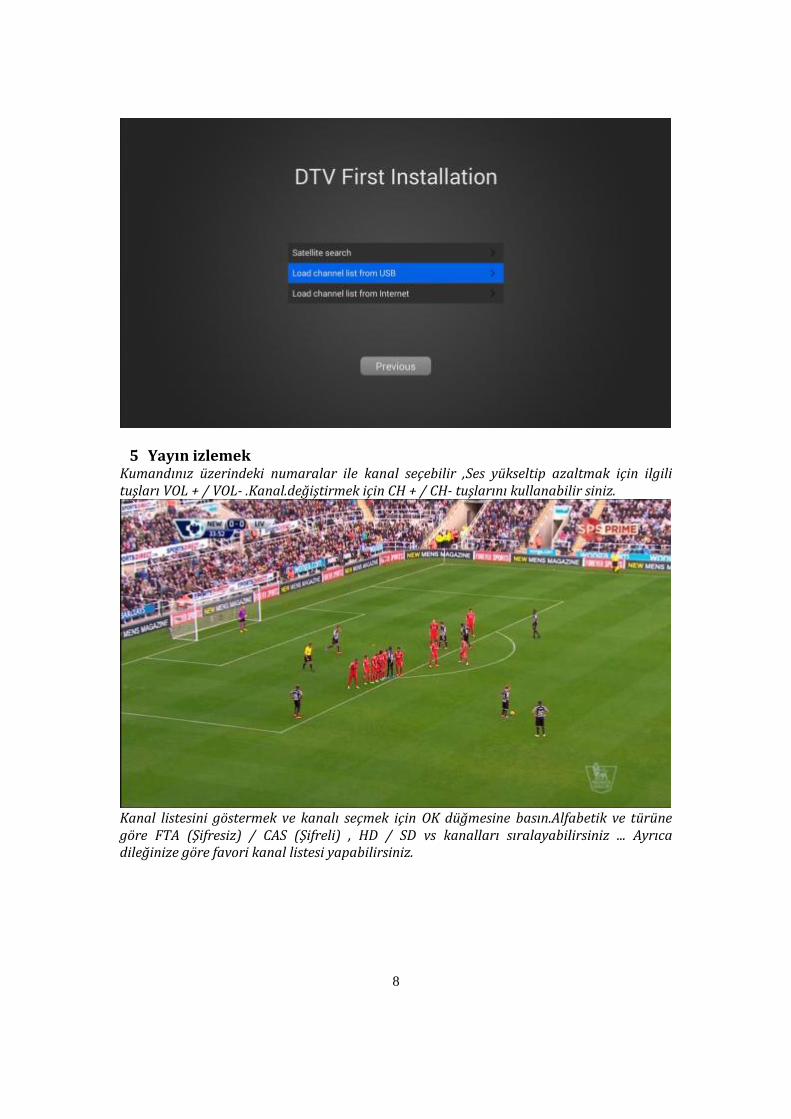
DTV İlk Kurulum.Diler seniz kanal araması yapabilir,usb ve internet üzerinden kanal güncellemesi gerçekleştirebilirsiniz. İlk dil olarak kurulumda Türkçe seçili gelmektedir.
8
5 Yayın izlemek Kumandınız üzerindeki numaralar ile kanal seçebilir ,Ses yükseltip azaltmak için ilgili tuşları VOL + / VOL- .Kanal.değiştirmek için CH + / CH- tuşlarını kullanabilir siniz.
Kanal listesini göstermek ve kanalı seçmek için OK düğmesine basın.Alfabetik ve türüne göre FTA (Şifresiz) / CAS (Şifreli) , HD / SD vs kanalları sıralayabilirsiniz ... Ayrıca dileğinize göre favori kanal listesi yapabilirsiniz.

9
5.1 DTV Menü DTV görüntülemek için ‘’MENU’’ tuşuna basınız.Teletex,Epg vb bir çok özelliğe buradan ulaşabilirsiniz.
5.2 PVR Zamanlayıcı PVR ve EPG rezervasyon. DTV ayarlarında depolama aygıtını yapılandırın.Kayıt yapabilmek için ürüne öncelikle USB bağlantısından depolama ayğıtı takılmalıdır. REC düğmesine basarak kayıt işlemini başlatabilirsiniz. Ayrıca DTV ayarları menüsünde varsayılan kayıt süresini değiştirilebilir. Bölüm 6.4 Bkz.

10
Kayıtlı dosyalarınızı bu bölümden yönetebilirsiniz.
5.3 Time Shift Usb depolama aygıt bağlantısı yaptığınızda bu özellik aktif olacaktır.Amacı her hangi bir program izlerken belli zaman aralığını sürekli kayıt altında tutar ve size geri gelip tekrar izleme olanağı sağlar.
11
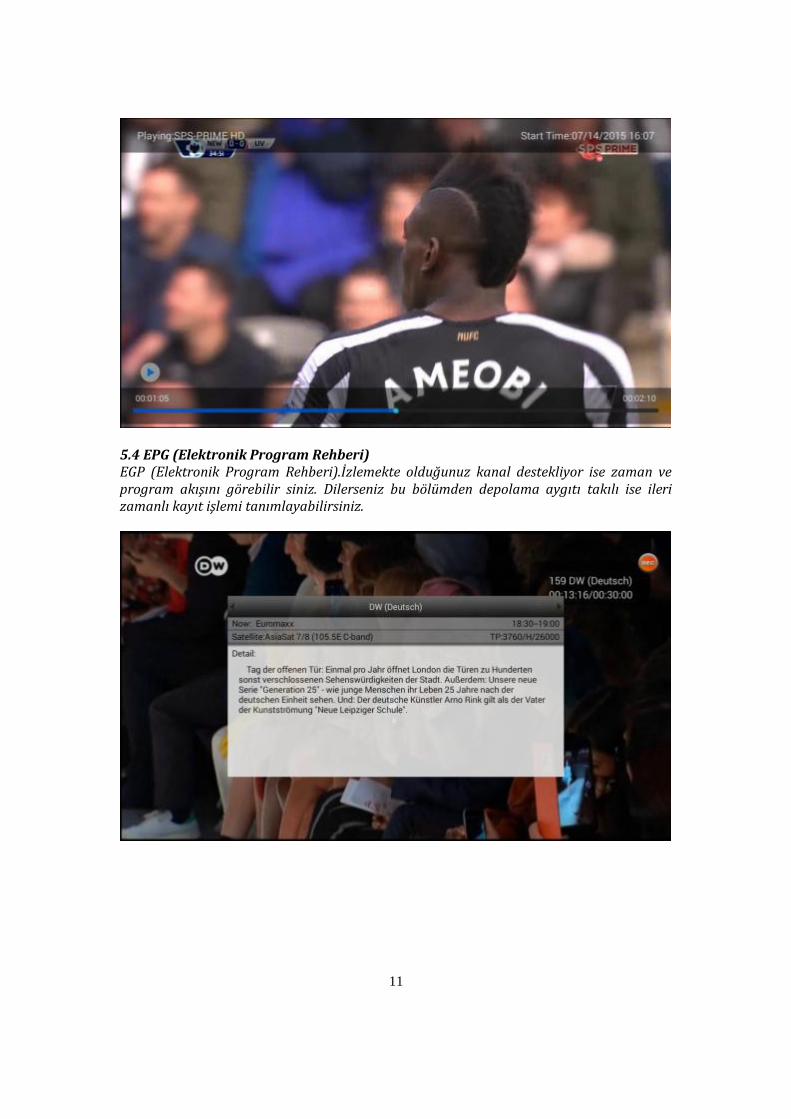
5.4 EPG (Elektronik Program Rehberi) EGP (Elektronik Program Rehberi).İzlemekte olduğunuz kanal destekliyor ise zaman ve program akışını görebilir siniz. Dilerseniz bu bölümden depolama aygıtı takılı ise ileri zamanlı kayıt işlemi tanımlayabilirsiniz.

12
5.5 Zaman seçimi Epg listesinden seçmiş olduğunuz bir programı yayını başladığında kayı için tanımlayabilirsiniz.
5.6 Kanal Düzenleyici Kanal Düzenleyici, kanal silmek, kanal taşıma, kanal gizlemek , kilit / kanal kilidini ve kanal yeniden adlandırın. Favoriler grubuna TV / Radyo kanalı ekleyebilirsiniz. Kanal yöneticisi varsayılan parola ‘’ 0000’’dır.

13
5.7 DTV Ayarları Menüsü DTV Ayarları Menüsü profesyonel tasarım DTV uygulamasının parametrelerini yapılandıra bilir siniz. 1) AV çıkışı Varsayılan 2) Ayarlar,kurulum,varsayılan Altyazı dili, TELETEXT dili ve Audio dil seçimi size yardımcı olur 3) OSD kurulum DTV OSD ayarlarında size yardımcı olur. 4) Ebeveyn kontrol özelliğini istemediğiniz yayınları şifrelemek için kullanabilirsiniz. 5) DB Yönetimi menüsü harici USB Bellek’e kanal listenizi yedek almak,yeniden yüklemek için size yardımcı olur. 6) PVR Ayarları,Bu bölümden time shift açık, kapalı ve kayıt ayarlarını yapabilirsiniz.. 7) Sistem menüsünden fabrika ayarları gibi gerekli olan durumlarda kullanacağınız bölümlere ulaşabilirsiniz.

14
5.8 DTV Kurulum menüsünde sabit,diseqC 1.0,1.1,Motor 1.2 ve Usals ayarlarını yapabilirsiniz.Nıt arama,Çoklu arama gibi fonksiyonları kullanabilirsiniz.
6 Uygulamalar Uygulamalar bölümüne girerek mevcut ve dilerseniz market üzerinden sayısız yeni uygulamaları kurarak smart kutunuzun içeriğini zenginleştirebilirsiniz. Haber, sosyal ağ , YouTube video, sesli ve video chat ,Android uyumlu oyunlar sizi bekliyor.Uyumlu aksesuarlar hakkında daha ayrıntılı bilgi almak için web sitemizi ziyaret edebilir veya müşteri hizmetleri ile irtibata geçiniz.

15
6.1 Google Play Store Kurulumu ve Uygulama indirme Ana menü tuşuna basınız ,Uygulamalar bölümü altında Google Play Store uygulamasını seçiniz.
Google Play Store'a giriş için g-mail adresiniz ve şifrenizi giriniz.Yüzlerce uygulamanın olduğu bu marketden ürününüz ile uyumlu uygulamaları indirerek kullanabilirsiniz.
16
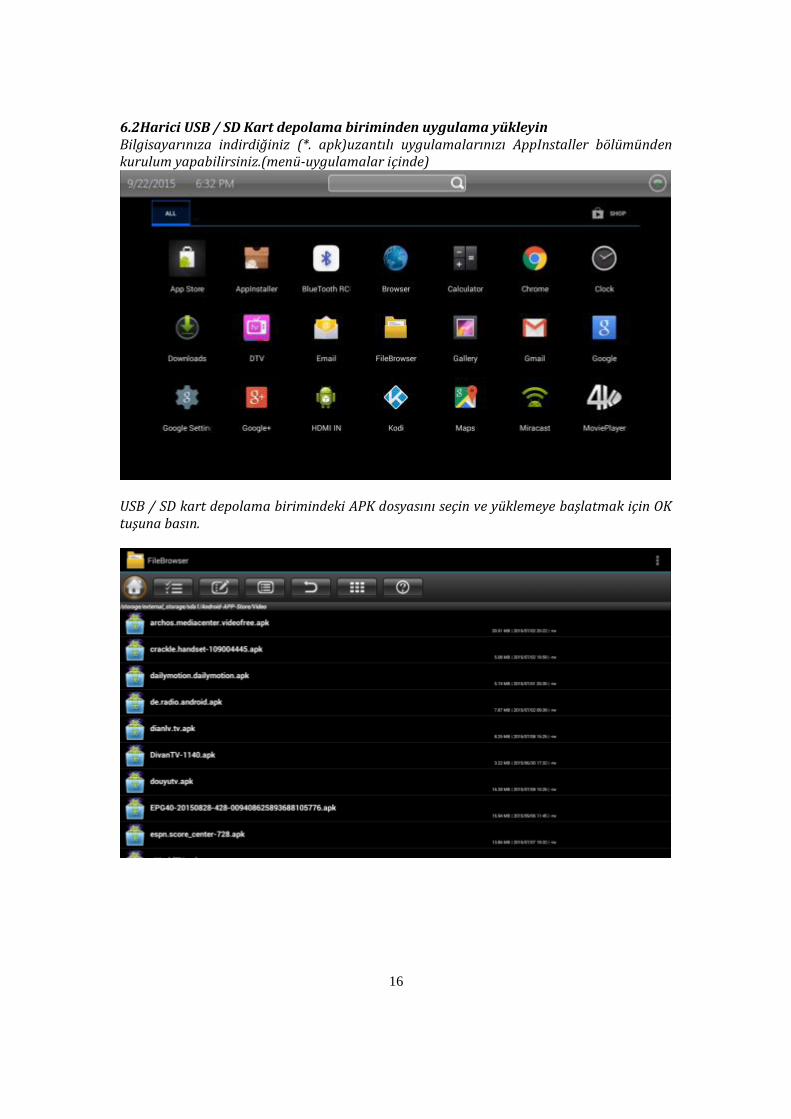
6.2Harici USB / SD Kart depolama biriminden uygulama yükleyin Bilgisayarınıza indirdiğiniz (*. apk)uzantılı uygulamalarınızı AppInstaller bölümünden kurulum yapabilirsiniz.(menü-uygulamalar içinde)
USB / SD kart depolama birimindeki APK dosyasını seçin ve yüklemeye başlatmak için OK tuşuna basın.
17
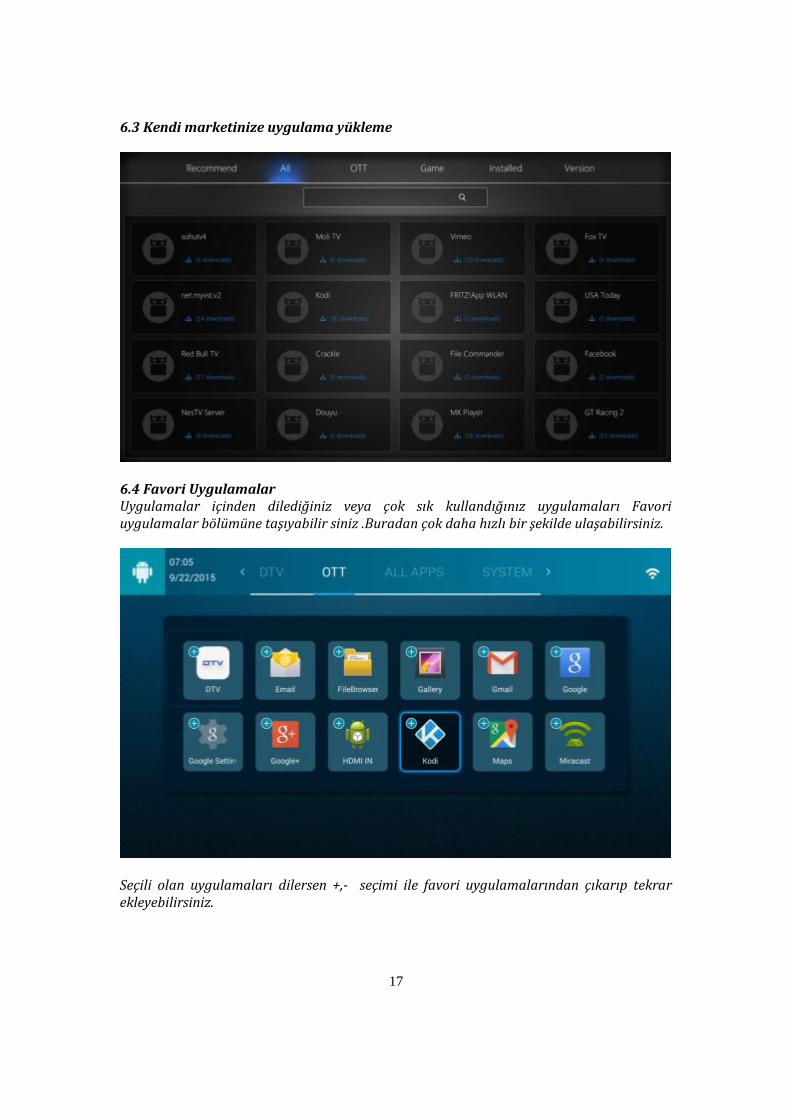
6.3 Kendi marketinize uygulama yükleme
6.4 Favori Uygulamalar Uygulamalar içinden dilediğiniz veya çok sık kullandığınız uygulamaları Favori uygulamalar bölümüne taşıyabilir siniz .Buradan çok daha hızlı bir şekilde ulaşabilirsiniz.
Seçili olan uygulamaları dilersen +,- seçimi ile favori uygulamalarından çıkarıp tekrar ekleyebilirsiniz.

18
6.5 Varsayılan tema değiştirme Menü /Sistem bölümünden My theme uygulaması ile farklı tema seçimi yapabilir siniz.
6.6 Miracast / Airplay / DLNA Miracast / Airplay / DLNA, Size Android Telefon / iPhone ile ekranınızı paylaşabilirsiniz. Medya kutusu aracılığıyla belirlenen TV'ye Android Telefon / iPhone, Android Pad / iPad kablosuz bağlantı ile TV’nizde video / müzik / resim paylaşabilirsiniz. Bu işlem için Uyumlu Miracast akıllı telefon Google Nexus Telefonu, LG Android akıllı telefon, HTC Android akıllı telefon Sony Android akıllı telefon vb ...

19
iPhone / iPad Airplay ve DLNA dosya paylaşım ve almak için medya kutusu Google Play Store'dan yükleyin AirPin DLNA uyumlu APP.
7 Sistem Ayarları Sistem ayarları kurulum, video, ses çıkışı, ağ bağlantısı, Bluetooth vb ...ayarlarınızı yapılandırmanız gereken bölümüdür. Ayarlarınızı buradan kontrol edebilir güncelleyebilirsiniz. 7.1 Sistem Ayarları Menü-Kurulum-Sistem bölümünden ulaşabilirsiniz.

20
İleri ayarlar ve Android sistem ayarlarını açmak için Gelişmiş Ayarlar seçin. Gelişmiş ayarları modunda yapılandırırken lütfen dikkatli olunuz.Bura da sistemin çalışmasını sağlayan dosyalar korunmalıdır.

21
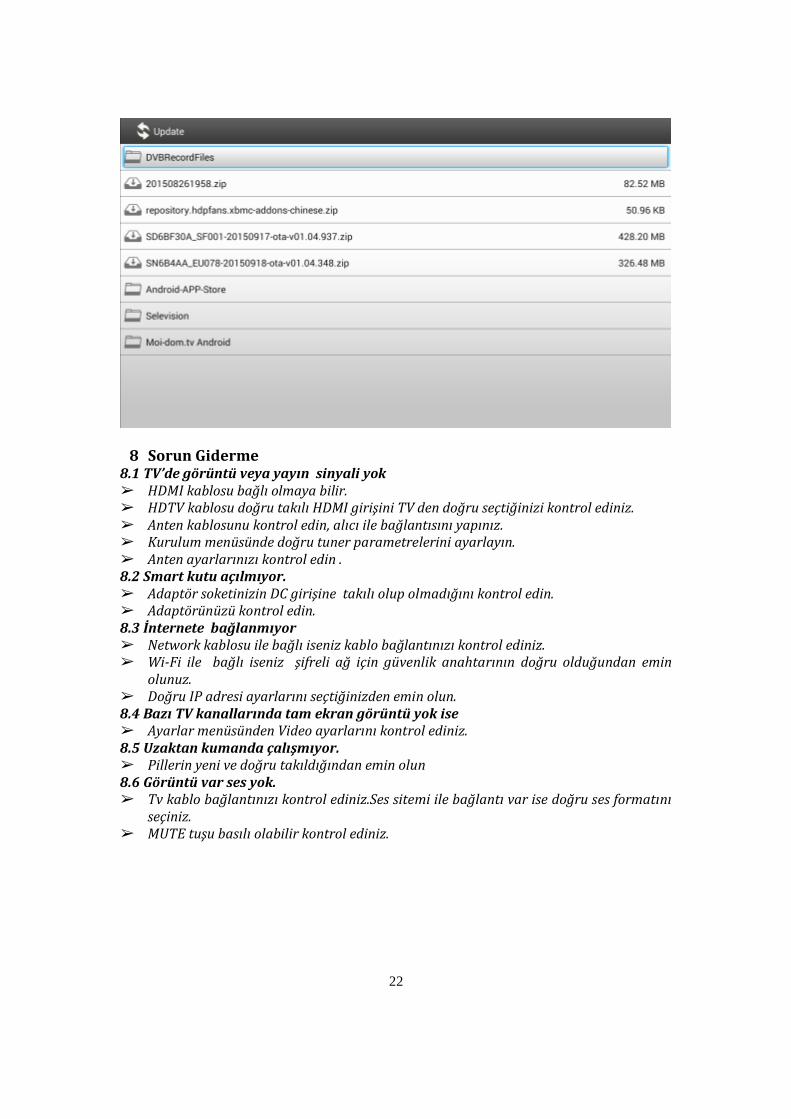
7.2 Yazılım Yükseltme Smart cihazınız USB / SD kart depolama ve internet üzerinden yükseltilebilir. İnternet üzerinde online güncelleme bildirimi görürseniz güncelleme işlemini başlatabilirsiniz. Gerekli olan durumlarda satıcı size USB ile yükleme yapmanız içinde yazılım paylaşımı yapacaktır.
Yazılımı USB üzerinden yükleme yapacaksanız Yerel güncelleme bölümü seçilmelidir.Ayrıntılı destek için lütfen satıcınız ile görüşünüz.
22
8 Sorun Giderme 8.1 TV’de görüntü veya yayın sinyali yok ➢ HDMI kablosu bağlı olmaya bilir. ➢ HDTV kablosu doğru takılı HDMI girişini TV den doğru seçtiğinizi kontrol ediniz. ➢ Anten kablosunu kontrol edin, alıcı ile bağlantısını yapınız. ➢ Kurulum menüsünde doğru tuner parametrelerini ayarlayın. ➢ Anten ayarlarınızı kontrol edin . 8.2 Smart kutu açılmıyor. ➢ Adaptör soketinizin DC girişine takılı olup olmadığını kontrol edin. ➢ Adaptörünüzü kontrol edin. 8.3 İnternete bağlanmıyor ➢ Network kablosu ile bağlı iseniz kablo bağlantınızı kontrol ediniz. ➢ Wi-Fi ile bağlı iseniz şifreli ağ için güvenlik anahtarının doğru olduğundan emin
olunuz. ➢ Doğru IP adresi ayarlarını seçtiğinizden emin olun. 8.4 Bazı TV kanallarında tam ekran görüntü yok ise ➢ Ayarlar menüsünden Video ayarlarını kontrol ediniz. 8.5 Uzaktan kumanda çalışmıyor. ➢ Pillerin yeni ve doğru takıldığından emin olun 8.6 Görüntü var ses yok. ➢ Tv kablo bağlantınızı kontrol ediniz.Ses sitemi ile bağlantı var ise doğru ses formatını
seçiniz. ➢ MUTE tuşu basılı olabilir kontrol ediniz.

23
9. Donanım Özellikleri Donanım
Chipset Amlogic S805-B
RAM DDR3 1GB
Flash EMMC 8GB
Tuner
Demodulator Mode
QPSK,8PSK
Frequency Range 950~2150MHz
RF Input Connector
F-Female
Video
Video Decoding H.265 HEVC [email protected] up to 1080P@60fps H.264 AVC [email protected] up to 1080P@60fps H.264 MVC up to 1080P@60fps MPEG-4 ASP@L5 up to 1080P@60fps AVS Jizhun Profile up to 1080P@60fps MPEG-2 MP@HL up to 1080P@60fps MPEG-1 MP@HL up to 1080P@60fps RealVideo 8/9/10 up to 1080P@60fps WebM up to VGA
Video File Format Support *.mkv, *.wmv,*.mpg,*.mpeg,*.dat,*avi,*.mov,*.iso,*.mp4,*.rm,*.jpg,*.bmp,*gif etc…
Video Output CVBS(video format @ 576i or 480p)
HDMI 1.4b (video format default @ Auto), Support HDCP2.0
Aspect Ratio 4:3 16:9
Video resolution 1080p/i 720p 576i 480p
Audio
Audio Decoding Dolby Digital/Digital Plus, DTS, WMA, WMA Pro,WMV,MEPG,AAC,HE-AAC,OGG,OGA,FLAC,ALAC,Ape,M4A,RM,MPEG-1 layer1/2, MPEG-2 Layer II
Audio mode Mono/Stereo/Left/Right
PVR Function
Record Instant Record and Timer Record
EPG Timer Record
Timeshift Support Timeshift on/off setting in Menu
PVR Operation Play/Pause/Stop/Step
Fast Forward/Fast Backward 2/4/8/16/32
File System Support NTFS, FAT32, EXT3, EXT4
PVR Manager Delete recorded file
Power
DC Input Range 12V 1.5A
Power Maximum 18W

24
Consumption
Interface
Left Panel 3*USB ,SD Slot
Right Panel CA Slot
Rear Panel Tuner In, Optical SPDIF, Ethernet Port, HDMI Out, DC IN
Front Panel STANDBY,1*USB,IR
Accessories
RCU IR RCU,RF RCU
User’s Manual
HDMI Cable 1
DC Adaptor 1
Physical Features
Operating Temperature
0℃-40℃
Storage Temperature
-10℃-65℃
Size(WxDxH)in mm
Weight
GARANTİ BELGESİ
Üretici veya İthalatçı Firmanın: Unvanı: Adresi: Telefonu: Faks: e-posta: Yetkilinin İmzası: Firmanın Kaşesi:
Satıcı Firmanın: Unvanı: Adresi: Telefonu: Faks: e-posta: Fatura Tarih ve Sayısı: Teslim Tarihi ve Yeri: Yetkilinin İmzası: Firmanın Kaşesi:
Malın Cinsi: Markası: Modeli:
Garanti Süresi: Azami Tamir Süresi: Bandrol ve Seri No:
Garanti Şartları

25
Garanti süresi, malın teslim tarihinden başlar ve 2 yıldır Malın bütün parçaları dahil olmak üzere tamamı firmamızın garantisi kapsamındadır. Malın garanti süresi içinde arızalanması durumunda, tamirde geçen süre garanti süresine eklenir. Malın tamiri en fazla 20 iş günüdür. Bu süre, malın servis istasyonuna,servis istasyonunun olmaması durumunda, malın satıcısı, bayii, acenteliği, ithalatçısı veya imalatçısından birisine bildirim tarihinden itibaren başlar. Malın garanti süresi gerek malzeme ve işçilik, gerekse montaj hatalarından dolayı arızalanması halinde, işçilik masrafı, değiştirilen parça bedeli yada başka herhangi bir ad altında hiçbir ücret talep etmeksizin tamiri yapılacaktır. Tüketici onarım hakkını kullanmasına rağmen malın: a - Tüketiciye teslim edildiği tarihten itibaren belirlenen garanti süresi içinde kalmak kaydıyla 1 yıl içerisinde; aynı arızanın ikiden fazla tekrarlanması veya farklı arızaların dörtten fazla meydana gelmesi veya belirtilen garanti süresi içinde farklı arızaların toplamının altıdan fazla olması unsurlarının yanı sıra bu arızaların maldan yararlanmamayı sürekli kılması. b - Tamiri için gereken azami sürenin aşılması; c - Firmanın servis istasyonun, mevcut olmaması halinde sırasıyla, satıcısı, bayii, acentesi, temsilciliği ithalatçı veya imalatçı - üreticisinden birisinin düzenleyeceği raporla arızanın tamirinin mümkün bulunmadığının belirlenmesi, durumlarında, tüketici malın ücretsiz değiştirmesini, bedel iadesi veya malın ayıp oranında bedel indirimi talep edebilir. Malın kullanma kılavuzunda yer alan hususlara aykırı kullanmasından kaynaklanan arızalar garanti kapsamı dışındadır.


![Untitled-1 [] · 0,05 - 8 bar Ağırlık Ip Kasa Net:4,50 kg Brüt:5,50 kg 54 Lazer Kesim DKP Sac Paket İçeriği 220 V Elektrik Kablosu Kullanım Kılavuzu Kullanım Cd Garanti](https://img.pdfslide.us/doc/110x75/5f5c36a0d48f0f28c40ddcb7/untitled-1-005-8-bar-arlk-ip-kasa-net450-kg-brt550-kg-54-lazer.jpg)

![GC3800 series [03923] v3 Hi-res · ID Buku Petunjuk Pengguna TR Kullanım kılavuzu KK Пайдаланушы нұсқаулығы PL Instrukcja obsługi CS Příručka pro uživatele](https://img.pdfslide.us/doc/110x75/5e14de4950ec9444177a67be/gc3800-series-03923-v3-hi-res-id-buku-petunjuk-pengguna-tr-kullanm-klavuzu.jpg)