Embed Size (px)
Citation preview
English 1
11-1017-43DVW01-2
user manual
3D Video Wizard
3DVW01/3DVW01A
© 2011 Cellnorth Electronics Corp.
The software of this converter may be updated in the future. For information
about any available updates and the latest Operating Instructions, please visit
www.3dVideoWizard.com/support

English 2
WARNING
To reduce the risk of fire or electric shock, do not expose this apparatus to rain or moisture.
To avoid electrical shock, do not open the cabinet. Refer servicing to qualified personnel only.
The AC power cord must be changed only at a qualified service shop.
Batteries or batteries installed apparatus shall not be exposed to excessive heat such as
sunshine, fire or the like.
Do not attempt to disassemble the device.
Refer servicing to qualified personnel only.
CAUTION
• To prevent fire or shock hazard, do not place objects filled with liquids,
such as vases, on the apparatus.
• Install this unit so that the DC Adapter can be unplugged from the wall
socket immediately in the event of trouble.
FCC WARNING You are cautioned that any changes or modifications not expressly approved in this manual
Operation is subject to the following two conditions; (1) this device may not cause
interference, and (2) this device must accept any interference received, including
interference that may cause undesired operation of the device.
This symbol is intended to alert the user to the presence of
uninsulated “dangerous voltage” within the product’s enclosure that
may be of sufficient magnitude to constitute a risk of electric shock
to persons.
This symbol is intended to alert the user to the presence of
important operating and maintenance (servicing) instructions in
the literature accompanying the appliance.

English 3
could void your authority to operate this equipment.
This transmitter must not be co-located or operating in conjunction with any other antenna
or transmitter.
This equipment has been tested and found to comply with the limits for a Class B digital
device, pursuant to Part 15 of the FCC Rules. These limits are designed to provide
reasonable protection against harmful interference in a residential installation. This
equipment generates, uses, and can radiate radio frequency energy and, if not installed and
used in accordance with the instructions, may cause harmful interference to radio
communications. However, there is no guarantee that interference will not occur in a
particular installation. If this equipment does cause harmful interference to radio or
television reception, which can be determined by turning the equipment off and on, the user
is encouraged to try to correct the interference by one or more of the following measures: –
Reorient or relocate the receiving antenna. – Increase the separation between the equipment
and receiver. – Connect the equipment into an outlet on a circuit different from that to
which the receiver is connected. – Consult the dealer or an experienced radio/TV technician
for help.
FCC Radiation Exposure Statement:
This equipment complies with FCC radiation exposure limits set forth for an uncontrolled
environment and meets the FCC radio frequency (RF) Exposure Guidelines in Supplement
C to OET65. This equipment should be installed and operated keeping the radiator at least
20cm or more away from person’s body (excluding extremities: hands, wrists, feet and
ankles).
Important Safety Instructions 1) Read these instructions.
2) Keep these instructions.
3) Heed all warnings.
4) Follow all instructions.
5) Do not use this apparatus near water.
6) Clean only with dry cloth.
7) Do not block any ventilation openings. Install in accordance with the
manufacturer’s instructions.
8) Do not install near any heat sources such as radiators, heat registers,
stoves, or other apparatus (including amplifiers) that produce heat.
9) Do not defeat the safety purpose of the polarized or grounding-type
plug. A polarized plug has two blades with one wider than the other.
grounding type plug has two blades and a third grounding prong.
The wide blade or the third prong is provided for your safety. If the
provided plug does not fit into your outlet, consult an electrician for
replacement of the obsolete outlet.
10) Protect the power cord from being walked on or pinched particularly
at plugs, convenience receptacles, and the point where they exit from
the apparatus.
11) Only use attachments/accessories specified by the manufacturer.
12) Unplug this apparatus during lightning storms or when unused for

English 4
long periods of time.
13) Refer all servicing to qualified service personnel. Servicing is
required when the apparatus has been damaged in any way, such as
power-supply cord or plug is damaged, liquid has been spilled or
objects have fallen into the apparatus, the apparatus has been exposed
to rain or moisture, does not operate normally, or has been dropped.
Owner’s Record
The model and serial numbers are located at the rear of the unit. Record the serial number in the
space provided below. Refer to them whenever you call for service regarding this product.
Model No.______________________________________________
Serial No._______________________________________________
For customers in the USA & Canada
If this product is not working properly, please contact our Customer Service Center at 1-214-
275-5700 or write to us at: Customer Service 8311 Eastpoint Dr. #400, Dallas, Texas 75227.
Precautions This equipment has been tested and found to comply with the limits set out in the EMC Directive using a connection cable shorter than 3 meters.
On placement • Place the converter in a location with adequate ventilation to prevent heat build-up in the converter. • Do not place the converter on a soft surface such as a rug that might block the ventilation holes. • Do not install this converter in a confined space, such as a bookshelf or similar unit. • Do not place the converter in a location near heat sources, or in a place subject to direct sunlight, excessive dust, or mechanical shock. • Do not place the converter outdoors, in vehicles, on ships, or on other vessels. • Do not place metal objects in front of the front panel. It may limit reception of radio waves. • Do not place the converter in a place where medical equipment is in use. It may cause a malfunction of medical instruments. • Do not place heavy or unstable objects on the converter. • Disconnect the DC power cord and all other cables from the converter when you move the converter.
On power sources • The converter is not disconnected from the AC power source as long
English 5
as it is connected to the wall outlet, even if the converter itself has been turned off. • Disconnect the converter from the wall outlet if you are not going to use the converter for a long time. To disconnect the DC Adapter, grasp the adapter and unplug from wall outlet. • Observe following points to prevent the DC power cord being damaged. Do not use the DC power cord if it is damaged, as doing so may result in an electric shock or fire. – Do not pinch the DC power cord between the converter and wall, shelf, etc. – Do not put anything heavy on the DC power cord or pull on the DC power cord itself.
On cleaning Clean the cabinet, panel, and controls with a soft cloth. Do not use any type of abrasive pad, scouring powder or solvent such as alcohol or benzene. On replacement of parts In the events that this converter is repaired, repaired parts may be collected for reuse or recycling purposes.
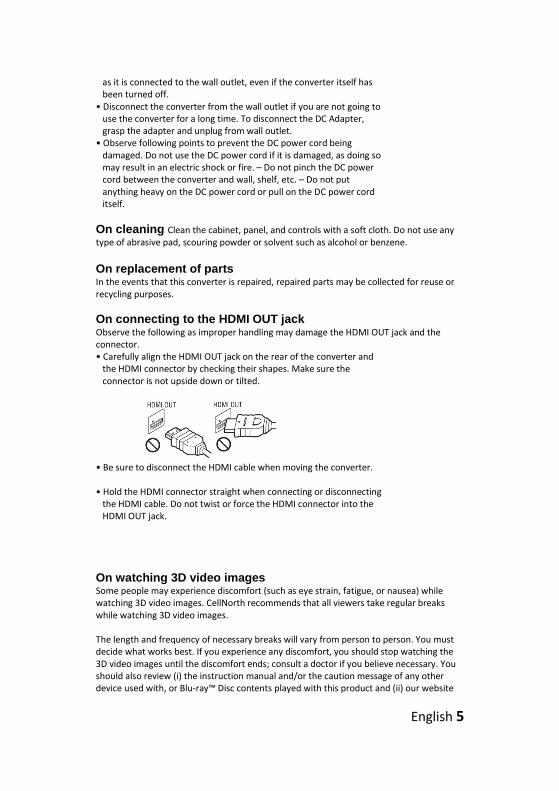
On connecting to the HDMI OUT jack Observe the following as improper handling may damage the HDMI OUT jack and the connector. • Carefully align the HDMI OUT jack on the rear of the converter and the HDMI connector by checking their shapes. Make sure the connector is not upside down or tilted.
• Be sure to disconnect the HDMI cable when moving the converter. • Hold the HDMI connector straight when connecting or disconnecting the HDMI cable. Do not twist or force the HDMI connector into the HDMI OUT jack.
On watching 3D video images Some people may experience discomfort (such as eye strain, fatigue, or nausea) while watching 3D video images. CellNorth recommends that all viewers take regular breaks while watching 3D video images. The length and frequency of necessary breaks will vary from person to person. You must decide what works best. If you experience any discomfort, you should stop watching the 3D video images until the discomfort ends; consult a doctor if you believe necessary. You should also review (i) the instruction manual and/or the caution message of any other device used with, or Blu-ray™ Disc contents played with this product and (ii) our website

English 6
(www.3Dvideowizard.com/support) for the latest information. The vision of young children (especially those under six years old) is still under development. Consult your doctor (such as a pediatrician or eye doctor) before allowing young children to watch 3D video images. Adults should supervise young children to ensure they follow the recommendations listed above.
English 7
Contents 2 WARNING 4 Precautions 9 Guide to Parts and Controls 9 What’s in the Box? 11 Front Panel 12 Back Panel 12 Side Panel 13 Remote Control 14 Easy Setup 15 3D Mode Operating Instructions 15 3D Compatible Devices 16 Playing 3D Content 17 Locating the 2D/3D Mode Buttons 18 Playing Undetected 3D Content 18 2D Mode Operating Instructions 18 2D Compatible Devices 19 Playing 2D Content in 3D 20 2D Mode Options 21 Operating Multiple Sources 21 Locating the Source Selection Buttons
English 8
22 Firmware Updates 22 Locating the Firmware USB Service Port 23 Updating Firmware Version 24 Trouble Shooting
26 Appendix A Compatible Devices
27 Appendix B Supported Resolutions
30 Warranty
English 9
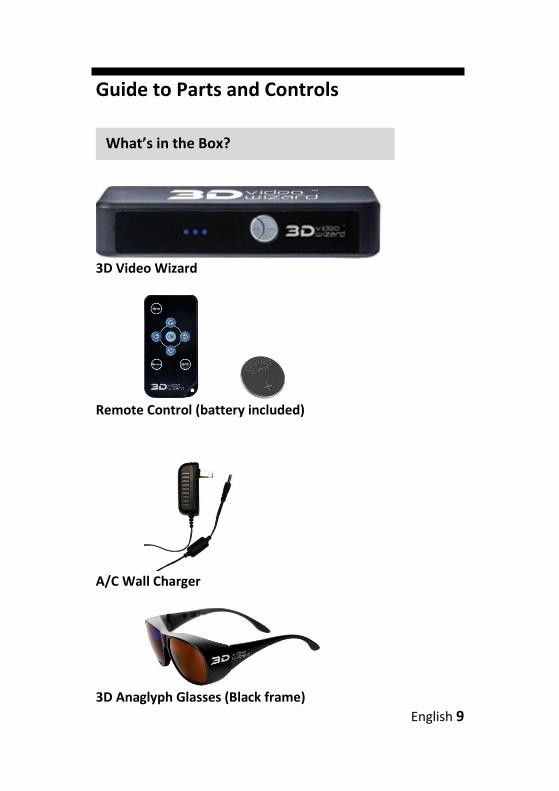
Guide to Parts and Controls
3D Video Wizard
Remote Control (battery included)
A/C Wall Charger
3D Anaglyph Glasses (Black frame)
What’s in the Box?
English 10
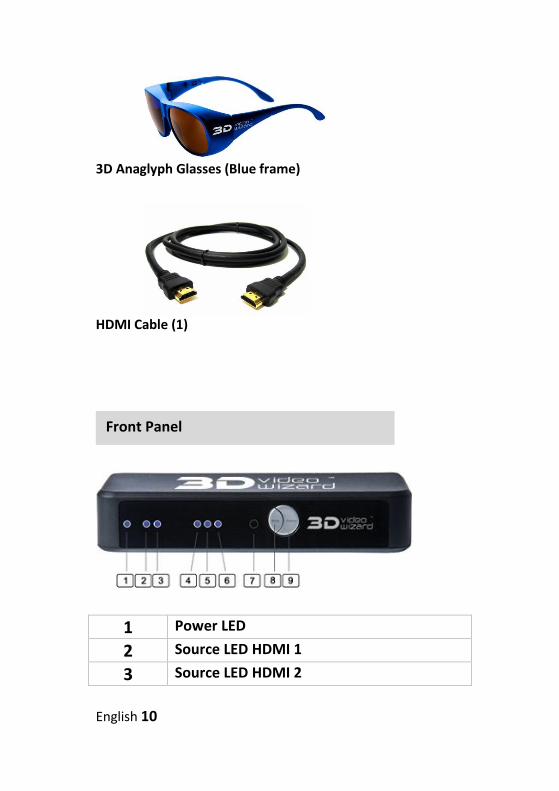
3D Anaglyph Glasses (Blue frame)
HDMI Cable (1)
1 Power LED 2 Source LED HDMI 1 3 Source LED HDMI 2
Front Panel
English 11
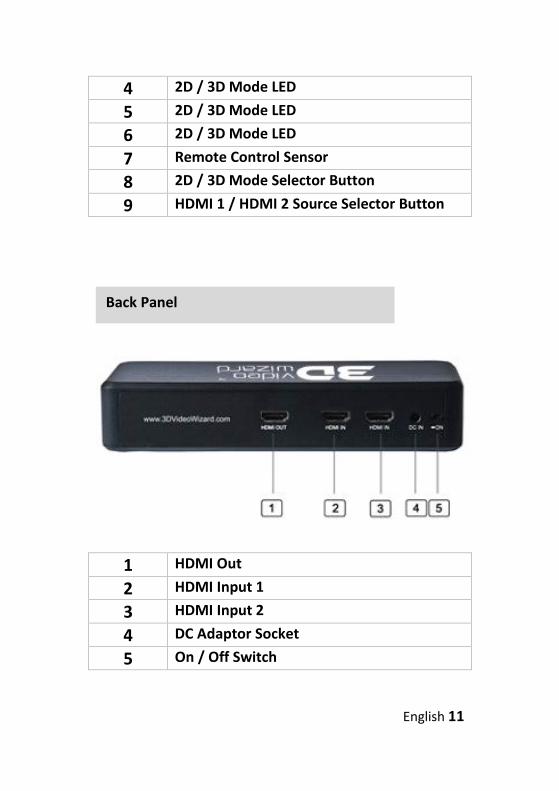
4 2D / 3D Mode LED 5 2D / 3D Mode LED 6 2D / 3D Mode LED 7 Remote Control Sensor 8 2D / 3D Mode Selector Button 9 HDMI 1 / HDMI 2 Source Selector Button
1 HDMI Out 2 HDMI Input 1 3 HDMI Input 2 4 DC Adaptor Socket 5 On / Off Switch
Back Panel
English 12
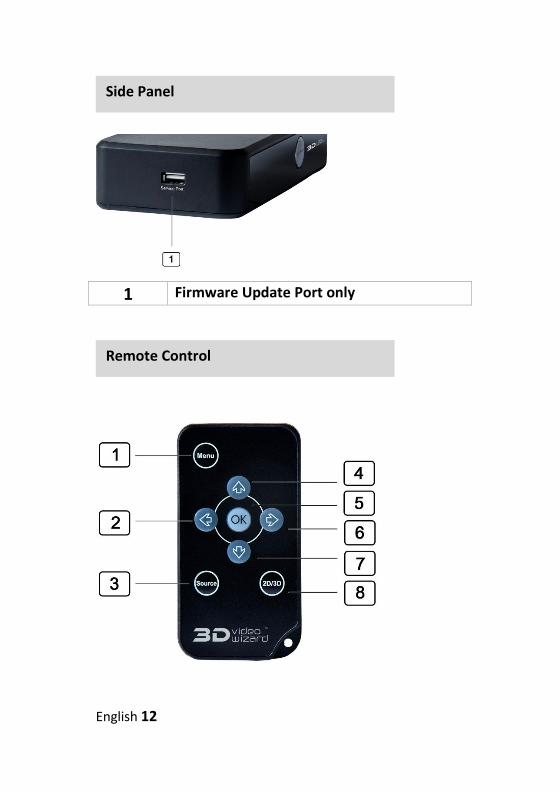
1 Firmware Update Port only
Side Panel
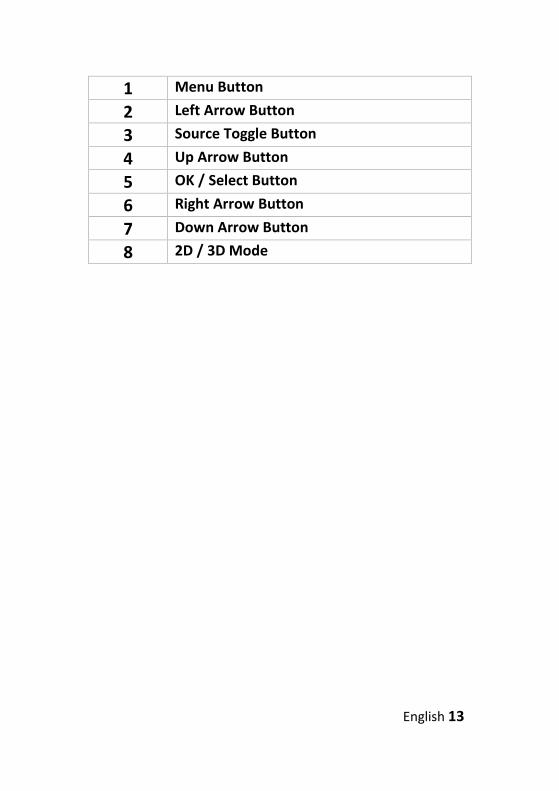
Remote Control
English 13
1 Menu Button 2 Left Arrow Button 3 Source Toggle Button 4 Up Arrow Button 5 OK / Select Button 6 Right Arrow Button 7 Down Arrow Button 8 2D / 3D Mode
English 14
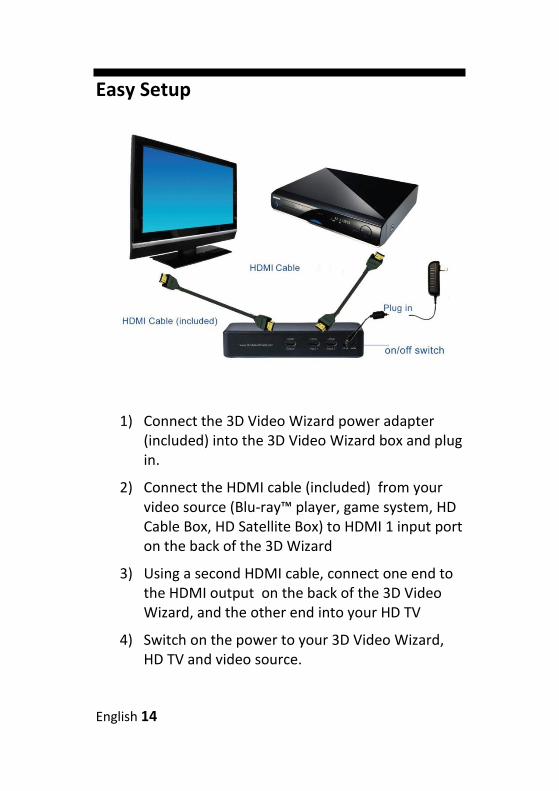
Easy Setup
1) Connect the 3D Video Wizard power adapter (included) into the 3D Video Wizard box and plug in.
2) Connect the HDMI cable (included) from your video source (Blu-ray™ player, game system, HD Cable Box, HD Satellite Box) to HDMI 1 input port on the back of the 3D Wizard
3) Using a second HDMI cable, connect one end to the HDMI output on the back of the 3D Video Wizard, and the other end into your HD TV
4) Switch on the power to your 3D Video Wizard, HD TV and video source.

English 15
5) Set the TV to display the HDMI Input you plugged into in step 3.
6) You will see the image from the video source device on the TV.
7) Switch through available modes by pressing the mode button on the front panel or the 2D/3D button on the remote control.
8) Put on your colored 3D glasses to experience the 3D effect.
3D Mode Operating Instructions All the functions of the 3D Video Wizard can be controlled using either the remote control or 2 buttons on the 3D Video Wizard (the Source Button and the Mode Button).
The 3D Video Wizard supports the following types of 3D content players with HDMI Connections:
3D Blu-ray™ Players Xbox 360 PlayStation 3 Cable / Satellite Boxes
3D Compatible Devices
English 16
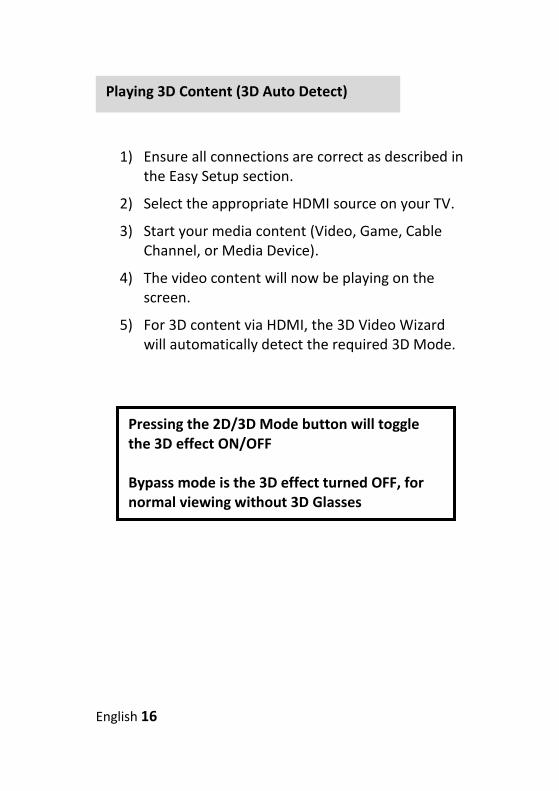
1) Ensure all connections are correct as described in the Easy Setup section.
2) Select the appropriate HDMI source on your TV.
3) Start your media content (Video, Game, Cable Channel, or Media Device).
4) The video content will now be playing on the screen.
5) For 3D content via HDMI, the 3D Video Wizard will automatically detect the required 3D Mode.
Playing 3D Content (3D Auto Detect)
Pressing the 2D/3D Mode button will toggle the 3D effect ON/OFF Bypass mode is the 3D effect turned OFF, for normal viewing without 3D Glasses
English 17
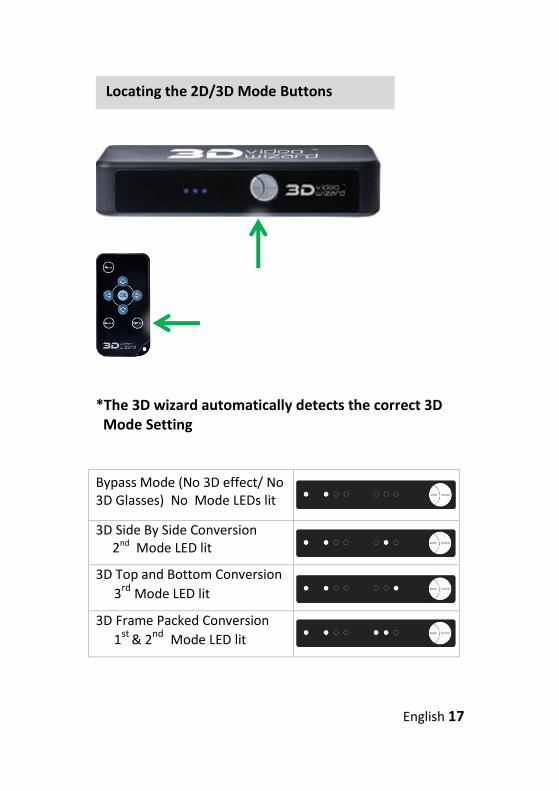
*The 3D wizard automatically detects the correct 3D Mode Setting
Bypass Mode (No 3D effect/ No 3D Glasses) No Mode LEDs lit
3D Side By Side Conversion 2nd Mode LED lit
3D Top and Bottom Conversion 3rd Mode LED lit
3D Frame Packed Conversion 1st
& 2nd Mode LED lit
Locating the 2D/3D Mode Buttons
English 18
In this case the 3D Content may not be fully HDMI compliant, the 3D Video Wizard will be unable to detect the 3D format. Follow the 2D Mode Operating instructions below to manually choose the correct 3D setting.
2D Mode Operating Instructions
All the functions of the 3D Video Wizard can be controlled using either the remote control or 2 buttons on the 3D Video Wizard (the Source Button and the Mode Button).
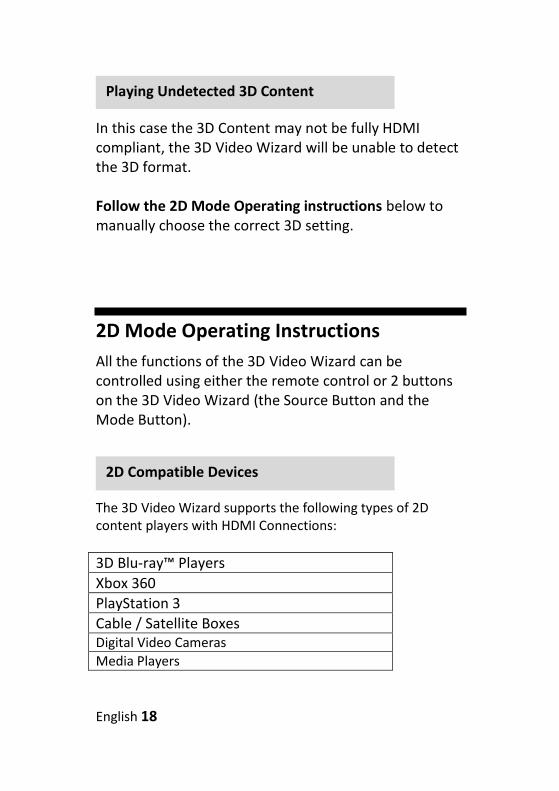
The 3D Video Wizard supports the following types of 2D content players with HDMI Connections:
3D Blu-ray™ Players Xbox 360 PlayStation 3 Cable / Satellite Boxes Digital Video Cameras Media Players
Playing Undetected 3D Content
2D Compatible Devices
English 19
1) Ensure all connections are correct as described in the Easy Setup section.
2) Select the appropriate HDMI source on your TV.
3) Start your media content (Video, Game, Cable Channel, or Media Device).
4) The video content will now be playing on the screen.
5) For HDMI compliant 3D content, the 3D Video Wizard will automatically detects the required 3D Mode.
6)
Playing 2D Content in 3D
Pressing the 2D/3D Mode button will toggle between modes. Bypass mode is the 3D effect turned OFF, for normal viewing without 3D Glasses
English 20
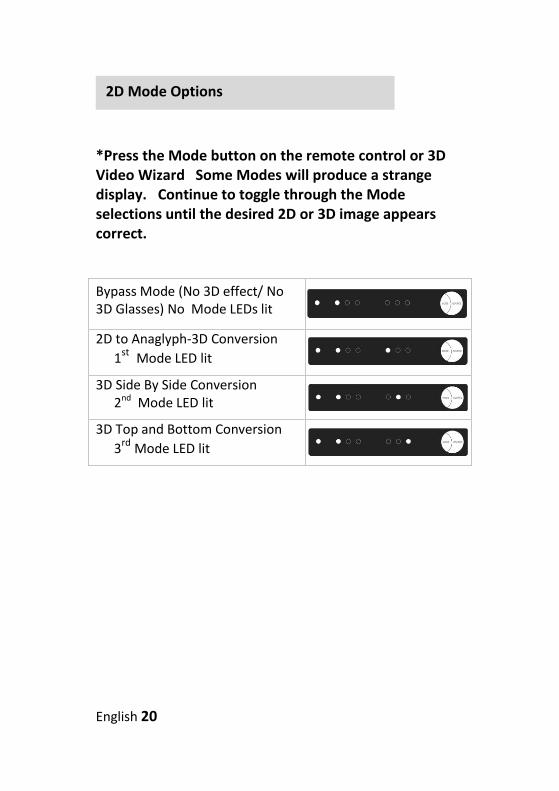
*Press the Mode button on the remote control or 3D Video Wizard Some Modes will produce a strange display. Continue to toggle through the Mode selections until the desired 2D or 3D image appears correct.
Bypass Mode (No 3D effect/ No 3D Glasses) No Mode LEDs lit
2D to Anaglyph-3D Conversion 1st Mode LED lit
3D Side By Side Conversion 2nd Mode LED lit
3D Top and Bottom Conversion
3rd Mode LED lit
2D Mode Options

English 21
Operating Multiple Sources
1) Follow the Easy Setup instructions; plugging your second source into the HDMI Input 2 port.
2) Press the Source button on the 3D Video Wizard or remote control to toggle between HDMI Input Source 1 and 2.
Locating the Source Selection Buttons
English 22
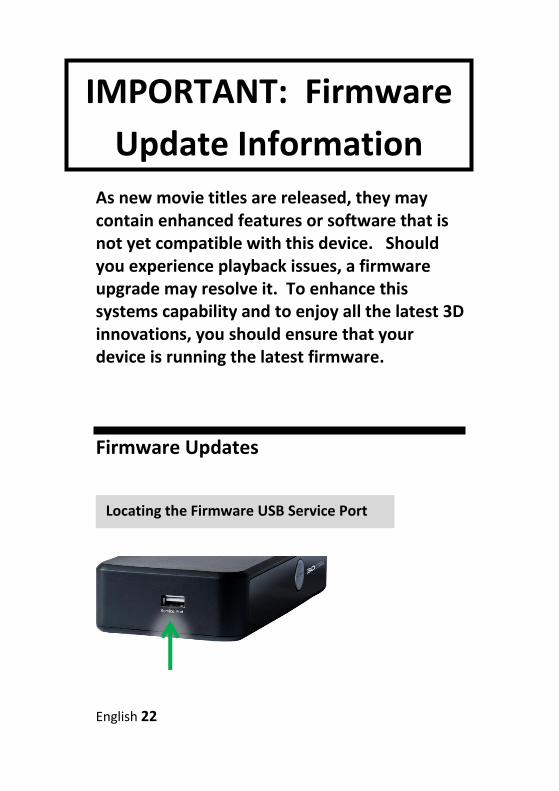
As new movie titles are released, they may contain enhanced features or software that is not yet compatible with this device. Should you experience playback issues, a firmware upgrade may resolve it. To enhance this systems capability and to enjoy all the latest 3D innovations, you should ensure that your device is running the latest firmware.
Firmware Updates
Locating the Firmware USB Service Port
IMPORTANT: Firmware
Update Information

English 23
WARNING: Do Not Unplug the Power Cable
from the 3D Video Wizard during the upgrade
procedure, as this can corrupt the software.
1) Using the remote control, click the MENU button and select Version.
2) Read the firmware version. Download the latest firmware (UPD file) from www.3Dvideowizard.com/support and copy to a USB flash drive.
3) Plug the flash drive into the USB service port.
4) Wait for the first 6 lights on the front panel to remain lit. The update process takes up to 15 seconds.
5) Remove the USB drive. The 3D Video Wizard will not operate until the USB drive is removed from the Service Port.
Updating Firmware Version
English 24
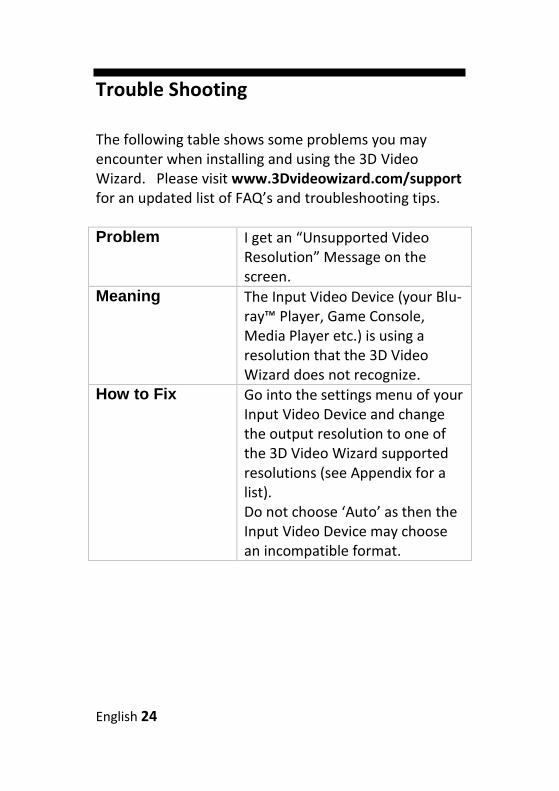
Trouble Shooting
The following table shows some problems you may encounter when installing and using the 3D Video Wizard. Please visit www.3Dvideowizard.com/support
for an updated list of FAQ’s and troubleshooting tips. Problem I get an “Unsupported Video
Resolution” Message on the screen.
Meaning The Input Video Device (your Blu-ray™ Player, Game Console, Media Player etc.) is using a resolution that the 3D Video Wizard does not recognize.
How to Fix Go into the settings menu of your Input Video Device and change the output resolution to one of the 3D Video Wizard supported resolutions (see Appendix for a list). Do not choose ‘Auto’ as then the Input Video Device may choose an incompatible format.

English 25
Problem After Power‐Up all the LEDs stay lit and do not change.
Meaning There is a fault in the 3D Video Wizard
How to Fix Visit us online for support: www.3Dvideowizard.com/support
Problem After I do a USB Upgrade, the
correct LEDs are lit but nothing happens.
Meaning Normal Functionality cannot resume until the USB Key is removed.
How to Fix Remove the USB Key.

English 26
Appendix A Compatible Devices
The 3D Video Wizard is compatible with most major 2D and 3D input video devices with HDMI connections.
Compatible 3D Devices Compatible 2D Devices
3D Blu-ray™ Players 2D/3D Blu-ray™ Players Xbox 360 Xbox 360 PlayStation 3 PlayStation 3 Cable / Satellite Boxes Cable / Satellite Boxes
Media Players
English 27
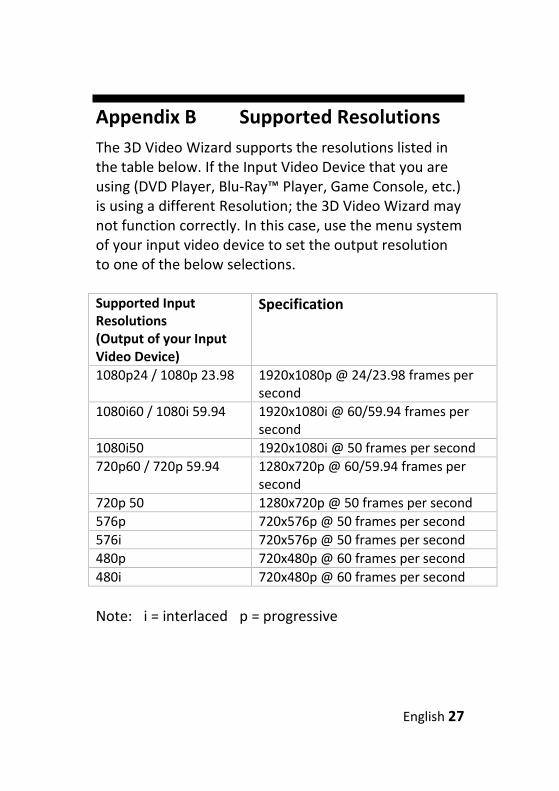
Appendix B Supported Resolutions
The 3D Video Wizard supports the resolutions listed in the table below. If the Input Video Device that you are using (DVD Player, Blu‐Ray™ Player, Game Console, etc.) is using a different Resolution; the 3D Video Wizard may not function correctly. In this case, use the menu system of your input video device to set the output resolution to one of the below selections. Supported Input Resolutions (Output of your Input Video Device)
Specification
1080p24 / 1080p 23.98 1920x1080p @ 24/23.98 frames per second
1080i60 / 1080i 59.94 1920x1080i @ 60/59.94 frames per second
1080i50 1920x1080i @ 50 frames per second
720p60 / 720p 59.94 1280x720p @ 60/59.94 frames per second
720p 50 1280x720p @ 50 frames per second
576p 720x576p @ 50 frames per second
576i 720x576p @ 50 frames per second
480p 720x480p @ 60 frames per second
480i 720x480p @ 60 frames per second
Note: i = interlaced p = progressive
English 28
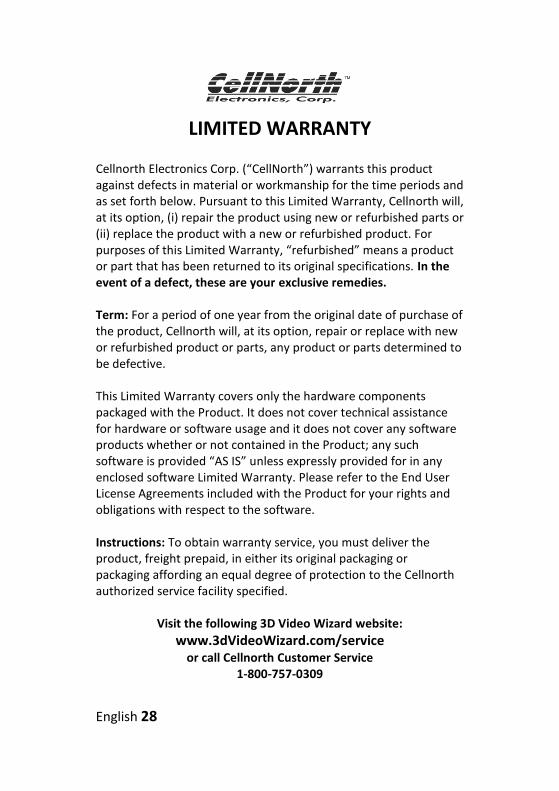
LIMITED WARRANTY Cellnorth Electronics Corp. (“CellNorth”) warrants this product against defects in material or workmanship for the time periods and as set forth below. Pursuant to this Limited Warranty, Cellnorth will, at its option, (i) repair the product using new or refurbished parts or (ii) replace the product with a new or refurbished product. For purposes of this Limited Warranty, “refurbished” means a product or part that has been returned to its original specifications. In the event of a defect, these are your exclusive remedies. Term: For a period of one year from the original date of purchase of the product, Cellnorth will, at its option, repair or replace with new or refurbished product or parts, any product or parts determined to be defective. This Limited Warranty covers only the hardware components packaged with the Product. It does not cover technical assistance for hardware or software usage and it does not cover any software products whether or not contained in the Product; any such software is provided “AS IS” unless expressly provided for in any enclosed software Limited Warranty. Please refer to the End User License Agreements included with the Product for your rights and obligations with respect to the software. Instructions: To obtain warranty service, you must deliver the product, freight prepaid, in either its original packaging or packaging affording an equal degree of protection to the Cellnorth authorized service facility specified.
Visit the following 3D Video Wizard website:
www.3dVideoWizard.com/service
or call Cellnorth Customer Service 1-800-757-0309
English 29
Repair / Replacement Warranty: This Limited Warranty shall apply to any repair, replacement part or replacement product for the remainder of the original Limited Warranty period or for ninety (90) days, whichever is longer. Any parts or product replaced under this Limited Warranty will become the property of Cellnorth. This Limited Warranty only covers product issues caused by defects in material or workmanship during ordinary consumer use; it does not cover product issues caused by any other reason, including but not limited to product issues due to commercial use, acts of God, misuse, limitations of technology, or modification of or to any part of the Cellnorth product. This Limited Warranty does not cover Cellnorth products sold AS IS or WITH ALL FAULTS or consumables (such as fuses or batteries). This Limited Warranty is invalid if the factory-applied serial number has been altered or removed from the product. .This Limited Warranty is valid only in the United States. LIMITATION ON DAMAGES: CELLNORTH SHALL NOT BE LIABLE FOR ANY INCIDENTAL OR CONSEQUENTIAL DAMAGES FOR BREACH OF ANY EXPRESS OR IMPLIED WARRANTY ON THIS PRODUCT. DURATION OF IMPLIED WARRANTIES: EXCEPT TO THE EXTENT PROHIBITED BY APPLICABLE LAW, ANY IMPLIED WARRANTY OF MERCHANTABILITY OR FITNESS FOR A PARTICULAR PURPOSE ON THIS PRODUCT IS LIMITED IN DURATION TO THE DURATION OF THIS WARRANTY. Some states do not allow the exclusion or limitation of incidental or consequential damages, or allow limitations on how long an implied warranty lasts, so the above limitations or exclusions may not apply to you. This Limited Warranty gives you specific legal rights and you may have other rights which vary from state to state.
English 30
QUESTIONS OR COMMENTS?
COUNTRY In the U.S.
CALL 1-800-757-0309
ONLINE www.3dVideoWizard.com
WRITE
Cellnorth Electronics Corp. 8311 Eastpoint Dr. #400 Dallas, Texas 75227
The Cellnorth logo, Cellnorth, the 3D Video Wizard logo, and 3D Video Wizard are all registered trademarks of Cellnorth Electronics Corp. All other trademarks are the property of their respective owners.
© 2011 Cellnorth Electronics Corp. Printed in China


![Welcome [images-na.ssl-images-amazon.com]](https://img.pdfslide.us/doc/110x75/6203f9a89fab5114bb31a72c/welcome-images-nassl-images-.jpg)