Embed Size (px)
Citation preview
Ender 3 Series 3D PrinterUser Manual
◆ This Manual is for the Ender 3 Series of 3D printers.◆ Select the correct input voltage to match your local mains
(230V or 115V) ◆ Because of software/hardware upgrades and model
differences, new revisions may not be listed in this guide. ◆ Detailed instructions for use are available on the TF card.

Notes1. Do not use the printer in other wrong ways to avoid personal injury or property damage.2. Do not place the printer near any heat source or flammable or explosive objects. We
suggest placing it in a well-ventilated, low-dust environment.3. Do not expose the printer to violent vibration or any unstable environment, as this may
cause poor print quality. 4. Before using experimental or exotic filaments, we suggest using standard filaments such as
ABS or PLA to calibrate and test the machine.5. Do not use any other power cable except the one supplied. Always use the three-pin plug .6. Do not touch the nozzle or printing surface during operation as they may be hot. Keep
hands away from machine while in use to avoid burns or personal injury.7. Do not wear gloves or loose clothing when operating the printer. Such cloths may become
tangled in the printers moving parts leading to burns, personal injury, or printer damage.8. When cleaning debris from the printer hotend, always use the provided tools. Do not touch
the nozzle directly when heated. This can cause personal injury.9. Clean the printer frequently. Always turn the power off when cleaning, and wipe with a dry
cloth to clean dust, adhered printing plastics or any other material from the frame, guide rails, or wheels . Use glass cleaner or isopropyl alcohol to clean the print surface before every print for consistent results.
10.Children under the age of 10, should not use the printer without any supervision.

Preface
1. Introduction ...……………………………12. Screen Information …………………………23. Loading Filament ….……………………34. Bed Leveling ..…….……………………4
Contents
Dear Customers:Thank you for choosing our products. For the best experience, please read the instructions before operating the Printer. Our 3D team is always ready to provide you with assistance. Please contact us via the phone number or e-mail address provided at the end when you encounter any problem with the Printer.For a better experience in using our product, you may learn how to use the Printer in the following ways: 1. Learning from the instructions and videos that come with your TF card. 2. Visit our official website at www.creality3d.cn. You will find relevant software/hardware information, contact details and operation and maintenance instructions on the website.
5. Software Instal lat ion . .………………56. Preparing to Print……………………67. Trouble-Shooting ……………………78. Circuit Wiring Diagram …………………8
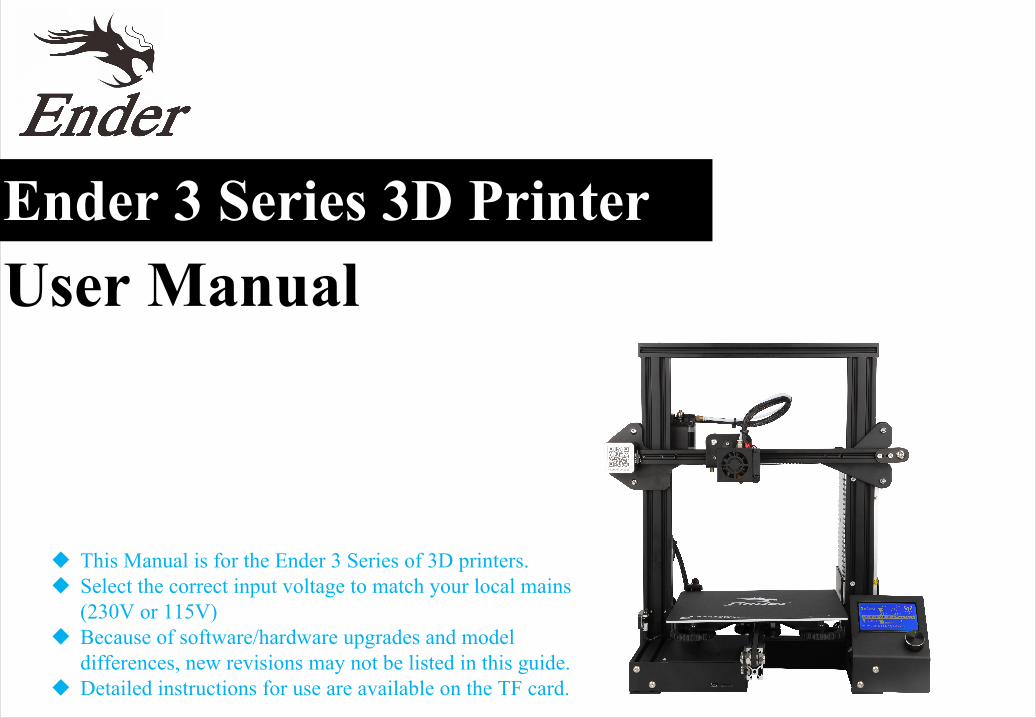
1. Introduction
1
1. Control Box2. TF Slot and USB Port3. Print Surface4. Control Knob
5. Display6. Nozzle Assembly7. Spool Holder8. Extruder (E) Stepper
9. Power10. Y Limit Switch11. Y Stepper 12. Coupling
13. Z Stepper 14. Z Limit Switch15. X Limit Switch16. X Stepper
6
5
21
4
3
16
15
7
8
14
9
13
10
11
12

2. Screen Infromation
2
Information Displayed Set temperature of the Nozzle
Current temperature of the Nozzle
Set temperature of the Hot Bed
Current temperature of the Hot Bed
Part Cooling Fan Speed
Current location of the nozzle
Print time
Print progress
Prompt message
Print speed
Model
Push:OK/Enter Sub MenuTurn:Change Option/Value
Screen Options
Menu Sub Menu Explanation↑Info Screen↑ ↑main↑ Return
Prepare→
Disable Steppers Moving X Y Z axis by your hands
Auto Home Return to the origin
Preheat PLA
Preheat ABS
Cooldown Close and cooldown the nozzle
Move Axis→ Moving X Y Z axis or Extruder by given value
Control→Temperature→
Heat the nozzle and the bed or change fan speed by given value
Restore Failsafe Restore factory setting
No card/Print from SD Select the printing model
Init.SD-Card/Change SD-Card
Printing
Tune→
Speed Change Printing Speed by given value
Nozzle Change the temperature by given value
Bed Change the temperature by given value
Fan Speed Change Fan Speed by given value
Flow Change filament flow by given value
Change filament
Pause print
Stop print

3. Loading Filament
3
1. PreheatMethod 1
Method 2
2. Feeding
Press and hold the extruder lever then insert 1.75mm filament through the small hole of the extruder. Continue feeding until you see filament out of the nozzle.
Tip:Replacing the Filament1、Cutting filament near the Extruder and slowly feed new filament
until the new filament get into the PTFE tube.
2、Preheating the nozzle,Press and hold the extruder, extract the
filament, then feed the new filament.

4. Bed Leveling
4
1. Prepare →Auto Home. Wait for the nozzle to move to the left/front of the platform.
2. Prepare→Disable Steppers
3. Move the nozzle to the front/left leveling screw and adjust the platform height by turning the knob underneath. Use a piece of A4 paper (standard printer paper) to assist with the adjustment, making sure that the nozzle lightly scratches the paper.4. Complete the adjustment on all 4 corners5. Repeat above steps 1-2 times if necessary.
1 2
34

5. Software Installation
5
1. Double click to install the software.
3. Select language→Next→Select your machine→Next→Finish.
2、Double click to open the software.

6. Preparing to Print
6
1.Slicing
2.Printing
Insert the TF card→ Int. SD-Card → Print from SD→Select the file to be printed.
Open the software→Load→Select the file→Wait for slicing to finish ,and save the gcode file to TF card.

7. Trouble shooting
7
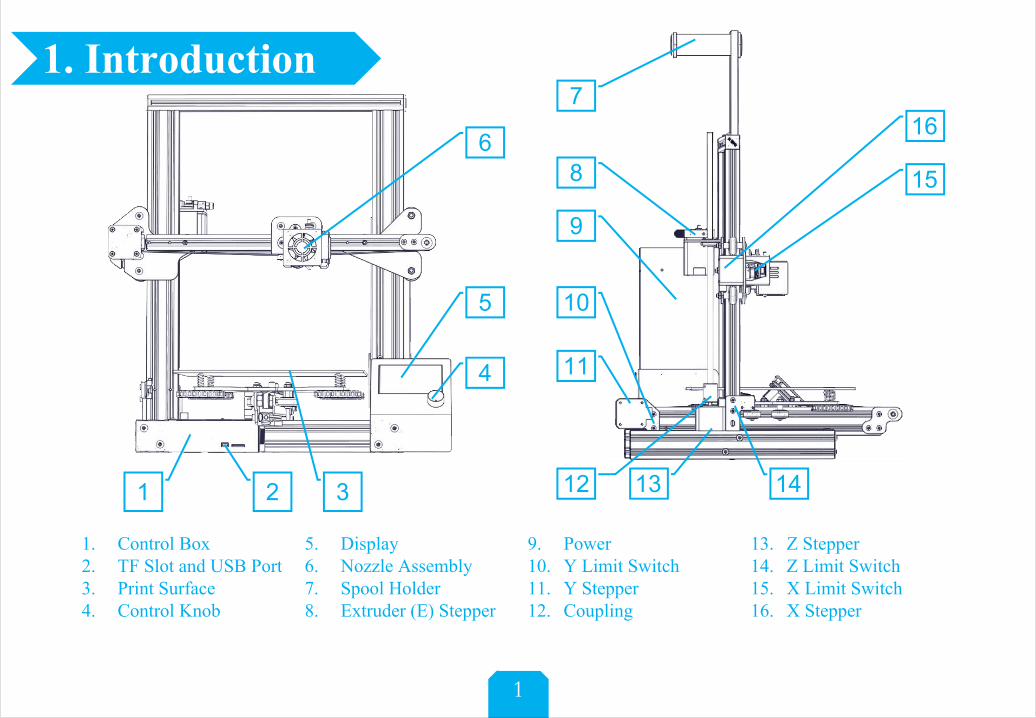
8. Circuit Wiring Diagram
8

SHENZHEN CREALITY 3D TECHNOLOGY CO., LTD.12/F, Block 3, JinChengYuan, Huafan Road, Tongsheng Community, Dalang, Longhua District, Shenzhen, China, 518109 Official Website: www.creality3d.cnTel: +86 755-2105 9455E-mail: [email protected] [email protected]


![Fabrikator II mini Manual op - HobbyKing · Manual Extrusion Speed- Manual Retraction Speed- Printer Shape Scripts Advanced 2000 100 190 [mm/min] [mm/min] [mm's] [mm's] [mm] Z min:](https://img.pdfslide.us/doc/110x75/5f5fe5a3c581bc25c65d0880/fabrikator-ii-mini-manual-op-hobbyking-manual-extrusion-speed-manual-retraction.jpg)