Embed Size (px)
Citation preview

ARTURIA – Farfisa V – USER MANUAL 1
USER MANUAL

ARTURIA – Farfisa V – USER MANUAL 2
Direction
Frédéric Brun Kevin Molcard
Development
Samuel Limier (project manager)
Theo Niessink (lead)
Stefano D'Angelo
Baptiste Aubry
Corentin Comte
Baptiste Le Goff
Pierre-Lin Laneyrie
Valentin Lepetit
Germain Marzin
Mathieu Nocenti
Pierre Pfister
Benjamin Renard
Design
Glen Darcey
Shaun Ellwood
Sebastien Rochard
Gregory Vezon
Morgan Perrier
Sound Design
Jean-Baptiste Arthus
Boele Gerkes
Theo Niessink
Jean-Michel Blanchet
Stephane Schott
Manual
Hollin Jones
Special Thanks
Alejandro Cajica
Chuck Capsis
Denis Efendic
Ben Eggehorn
David Farmer
Ruary Galbraith
Jeff Haler
Dennis Hurwitz
Clif Johnston
Koshdukai
Joop van der Linden
Sergio Martinez
Shaba Martinez
Miguel Moreno
Ken Flux Pierce
Daniel Saban
Carlos Tejeda
Scot Todd-Coates
Chad Wagner
© ARTURIA S.A. – 1999-2016 – All rights reserved.
11, Chemin de la Dhuy
38240 Meylan
FRANCE
http://www.arturia.com

ARTURIA – Farfisa V – USER MANUAL 3
Table of contents
1 INTRODUCTION .................................................................... 5
1.1 What is Farfisa V? ................................................................................................. 5
1.2 History of the original instrument ........................................................................ 5
1.3 Appearances in popular music ......................................................................... 6
1.3.1 Famous Farfisa users and songs:..................................................................... 7
1.4 What does Farfisa V add to the original? .......................................................... 8
2 ACTIVATION AND FIRST START ............................................ 9
2.1 Register and Activate ......................................................................................... 9
2.2 Initial setup ........................................................................................................... 9
2.2.1 2.2.1 Audio and MIDI settings : Windows ....................................................... 9
2.2.2 Audio and MIDI settings: Mac OS X ............................................................. 11
2.2.3 Using Farfisa V in plug-in mode .................................................................... 12
3 USER INTERFACE ................................................................. 14
3.1 The virtual keyboard ......................................................................................... 14
3.2 Toolbar ............................................................................................................... 15
3.2.1 3.2.1 Save Preset ............................................................................................ 16
3.2.2 Save Preset As… ............................................................................................ 16
3.2.3 Import preset.................................................................................................. 16
3.2.4 Export preset .................................................................................................. 17
3.2.5 Export bank .................................................................................................... 18
3.2.6 Resize window options .................................................................................. 18
3.2.7 3.2.7 Audio settings ........................................................................................ 19
3.2.8 3.2.8 Preset browsing quick look................................................................... 19
3.2.9 Open and Close Advanced section ........................................................... 20
3.2.10 MIDI Learn assignment .............................................................................. 21
3.2.11 MIDI controller configuration .................................................................... 23
3.2.12 The lower toolbar ....................................................................................... 24
3.3 The Preset Browser ............................................................................................. 25
3.3.1 Searching presets .......................................................................................... 25
3.3.2 Filtering using tags ......................................................................................... 26
3.3.3 The Preset Info section .................................................................................. 27
3.3.4 The second preset view ................................................................................ 28
3.3.1 Playlists ............................................................................................................ 29

ARTURIA – Farfisa V – USER MANUAL 4
3.4 Front panel ......................................................................................................... 31
3.4.1 The treble section .......................................................................................... 31
3.4.2 The percussion and repeat controls ............................................................ 32
3.4.3 The tremolo control ....................................................................................... 33
3.4.4 3.4.4 Reverb and vibrato controls ................................................................ 33
3.4.5 The Bass Manual section ............................................................................... 34
3.5 Inside the case .................................................................................................. 35
3.5.1 The Voice Tune section ................................................................................. 36
3.5.2 The bass tone section.................................................................................... 36
3.5.3 Noise control .................................................................................................. 37
3.5.4 Voice mode ................................................................................................... 37
3.5.5 The Envelope section .................................................................................... 38
3.5.6 The User Wave section .................................................................................. 38
3.5.7 Master volume and EQ ................................................................................. 39
3.5.8 Reverb type ................................................................................................... 40
3.5.9 The Knee Lever section ................................................................................. 41
3.6 The amp and effects ........................................................................................ 42
3.6.1 How this section works................................................................................... 42
3.6.2 The amp ......................................................................................................... 43
3.6.3 The flanger ..................................................................................................... 44
3.6.4 The phaser ...................................................................................................... 45
3.6.5 Chorus pedal ................................................................................................. 45
3.6.6 Analog Delay pedal ...................................................................................... 46
3.6.7 Overdrive pedal ............................................................................................ 47
3.6.8 The Swell pedal .............................................................................................. 47
4 END USER LICENSE AGREEMENT ...................................... 48

ARTURIA – Farfisa V – USER MANUAL 5
1 INTRODUCTION
Congratulations on purchasing our virtual organ, Farfisa V. We are confident
that it will give you many hours of playing and producing pleasure.
Farfisa V is the newest addition to our extensive family of instruments that
recreate hard-to-find classic keyboards and synths. In addition to bringing the
authentic and instantly recognizable sound of the Farfisa to your studio, we
have added some 21st century features that were never available in the
original!
The instrument upon which this virtual model is based was a staple of popular
music from its creation in the late 1960s and remains popular today for its
unique character. Since finding and maintaining a real Farfisa is both difficult
and costly, we’re confident Farfisa V will bring you all of the benefits with none
of the hassle!
1.1 What is Farfisa V?
The Farfisa V is a software version of the classic Farfisa Compact Deluxe organ.
The Farfisa sound was wider ranging than the main competitor of its time, the
Vox Continental thanks to having more bass waveforms and an expanded
percussion and vibrato section.
Developed using an original hardware organ for reference, Farfisa V
accurately simulates the original circuits and sound of the famous Compact
series. It runs both as a standalone instrument on Windows and Mac OS X and
as a plug-in in all major formats inside your DAW. It has easy MIDI learn
functionality for hands-on control of many of its parameters and in plug-in
mode supports automation for greater creative control.
1.2 History of the original instrument
Farfisa is an Italian electronics manufacturer and in fact makes all kinds of
products, even if it’s best known for the electronic organs it created in the
1960s and 1970s. They predated commercially affordable synthesizers but
offered a different sound and a far more portable form factor than Hammonds
and other tonewheel organs which were fairly impractical for many bands to
transport.
As a result, combo organs like the Farfisa series came to shape much of the
popular music of the period. Here was an instrument that had a distinctive and
powerful sound and was also very flexible in terms of the way you could alter
its settings to get different tones. Best of all, you could actually take it to gigs
without too much trouble, which wasn’t true of many keyboard instruments at
the time.

ARTURIA – Farfisa V – USER MANUAL 6
The Farfisa Compact series had four models that appeared between 1964 and
1969. The Mini Compact was the smallest, and the Combo Compact came in
two different versions. The Compact Deluxe – the model recreated by the
Farfisa V – added significant features and the Compact Duo had dual
keyboards.
Among the notable features of the Compact Deluxe were:
Two inferior octaves on the keyboard, one black / white and one grey /
white that could be switched to extend the range of the bass notes
Independent percussion controls for both bass and treble manuals
16' Bass, Strings
8' Flute, Oboe, Trumpet, String
4' Flute, Piccolo, Strings
2-2/3' with independent brilliant tab
4 vibrato settings
Tube preamp (2 12AX7s) and real spring reverb
2 reverb settings
Multi-Tone Booster
Swell pedal and knee control for Multi-Tone Booster
There were a number of things that made the Farfisa popular and gave it a
unique sound.
A rudimentary envelope that allowed for and attack and decay that
went beyond the typical organ sound.
The addition of a note repeat function which gave it almost a square
wave tremolo type of effect similar to the sound of the Who’s “Teenage
Wasteland” keyboard part.
The tone boosters gave it a grungy sound that made it great for the 80’s
New Wave bands.
The softer attack made it popular with the indie electro bands and indie
rock bands in recent years.
The knee lever was a type of global filter that added a manual wah type
of effect.
The overall sound is almost more top octave synth like than organ like.
1.3 Appearances in popular music
The Farfisa sound was well suited to the harder-edged garage bands and
psychedelic acts that first adopted it. Again, its portability was a big factor in
the kinds of bands that first started to use it. It was the kind of organ that studios

ARTURIA – Farfisa V – USER MANUAL 7
and rehearsal rooms would have on hand and as a result, came to be used
on more and more productions.
Before too long the Farfisa had grown rapidly in popularity and quite quickly
outgrew its niche in 60s garage bands. In fact, it spread into rock and pop and
then electronic music, partly because of the unavailability or unaffordability of
polysynths at the time, and the fact that the Farfisa could be made to sound
more like a synth than an organ. It remains popular today, though the age
and scarcity of real hardware models plus the cost of maintaining them means
that it’s rare to see one in the flesh.
1.3.1 Famous Farfisa users and songs:
1.3.1.1 1960s
Sam the Sham “Wooly Bully”
The Swingin' Medallions "Double Shot (Of My Baby's Love)
Percy Sledge “When a man loves a woman”
Strawberry Alarm Clock "Incents And Peppermints"
1.3.1.2 1970s
Jean Michel Jarre
Sun Ra
Pink Floyd (many albums up to Dark Side of the Moon)
Kraftwerk
Tangerine Dream
Sly and the Family Stone
Van Der Graaf Generator
Led Zeppelin “Dancing Days”
Herbie Hancock
Elton John “Crocodile Rock”
Steve Reich "Four Organs"
1.3.1.3 1980s
Blondie
B-52’s
Squeeze
Talking Heads
Simple Minds
REM
Fleshtones
1.3.1.4 1990s
Green Day
Inspiral Carpets

ARTURIA – Farfisa V – USER MANUAL 8
1.3.1.5 2000s
The Moons
Stereolab
Tara Busch
Paul Weller
Lords of Altamont
Caesars
1.4 What does Farfisa V add to the original?
Recreating an instrument in software allows us to add more advanced
features, while of course remaining true to the original hardware! But there are
a number of features in Farfisa V that you wouldn’t find on a hardware Farfisa.
A special USER position that allows the user to create an additive
waveform or use the sliders to create a new waveshape based on the
graphic look of the sliders.
We have modeled the built-in spring reverb and add other reverb IRs as
well.
We have added effects units
o Analog Delay
o Chorus
o Phaser
o Flanger
o Overdrive
Easily accessible individual voice tuning
Paraphonic/Polyphonic mode
Attack/release envelopes for upper and lower keyboards to expand the
sound palette.
Bass section waveforms selector
Bass section tone control
Tremolo sync
Repeat sync

ARTURIA – Farfisa V – USER MANUAL 9
2 ACTIVATION AND FIRST START
Farfisa V works on computers equipped with Windows 7 or later and Mac OS X
10.8 or later. You can use the stand-alone version or use Farfisa V as an Audio
Units, AAX, VST2 or VST3 instrument.
2.1 Register and Activate
Once Farfisa V has been installed, the next step is to register the software.
The registration process will require you to enter the serial number and the
unlock code you received with the product.
In order to proceed, go to this web page and follow the instructions:
http://www.arturia.com/register
Note: If you don’t have an Arturia account yet, you will need to create one.
The process is quick, but it does require that you can access your email address
during the registration process.
Once you have acquired an Arturia account you will be able to register the
product.
2.2 Initial setup
2.2.1 2.2.1 Audio and MIDI settings : Windows
At the top left of the Farfisa V application is a pull-down menu. It contains
various setup options. Initially you will need to go to the menu and choose the
Audio Settings option to get sound and MIDI flowing in and out.

ARTURIA – Farfisa V – USER MANUAL 10
Farfisa V main menu
You will then see the Audio MIDI settings window. This works in the same way
on both Windows and Mac OS X, although the names of the devices available
to you will depend on the hardware that you are using.
Audio and MIDI settings window

ARTURIA – Farfisa V – USER MANUAL 11
Starting from the top you have the following options
Device lets you choose which audio driver you want to use to route
sound out of the instrument. This might be your computer’s own driver
like Windows Audio, or an ASIO driver. The name of your hardware
interface may appear in this field.
Output Channels lets you select which of the available outputs will be
used to route audio out. If you only have two outputs, only two will
appear as options. If you have more than two you can select a specific
pair of outputs.
The Buffer Size menu lets you select the size of the audio buffer your
computer uses to calculate sound. A smaller buffer means lower latency
between pressing a key and hearing the note. A larger buffer means a
lower CPU load as the computer has more time to think, but can result
in a small latency. Find the optimum buffer size for your system. A fast,
modern computer should easily be able to operate at 256 or 128 sample
buffer size without creating pops or clicks in the sound. If you are getting
clicks, try raising the buffer a little. The latency is displayed on the right
hand side of this menu.
The Sample Rate menu lets you set the sample rate at which audio is
sent out of the instrument. The options here will depend on the capability
of your audio interface hardware though even most computers’ own
hardware can operate at up to 48kHz which is perfectly fine. Higher
sample rates use more CPU power so unless you have a good reason to
go up to 96kHz, then 44.1 or 48 are usually fine. The Show Control Panel
button here will jump to the system control panel for whatever audio
device is selected.
Play Test Tone helps you to troubleshoot audio issues by checking that
sound can be heard through the correct device.
Your connected MIDI devices will appear in the MIDI Devices area. Click
the check box to accept MIDI from the device you want to use to trigger
the instrument. In standalone mode, Farfisa V listens for all MIDI channels
so there’s no need to specify a channel. You can specify more than one
MIDI device at once.
2.2.2 Audio and MIDI settings: Mac OS X
The process is very similar to setting up for Windows and the menu is accessed
in the same way. The difference here is that OS X uses CoreAudio to handle
audio routing and within that, your audio device will be available in the
second dropdown menu. Apart from that, the options work the same way as
described above in the Windows section.

ARTURIA – Farfisa V – USER MANUAL 12
2.2.3 Using Farfisa V in plug-in mode
Farfisa V comes in VST, AU and AAX plug-in formats for use in all major DAW
software like Cubase, Logic, Pro Tools and so on. You can load it as a plug-in
instrument and its interface and settings work in the same way as in standalone
mode, with a couple of differences.
The instrument will now sync to your DAW’s host tempo, where tempo is
a factor like in the tremolo and repeat controls, if you activate the Sync
buttons on the organ.

ARTURIA – Farfisa V – USER MANUAL 13
You can automate numerous parameters using your DAW’s automation
system.
You can use more than one instance of Farfisa V in a DAW project. In
standalone mode you can only use one at once.
You can route Farfisa V’s audio outputs more creatively inside your DAW
using the DAW’s own audio routing system.

ARTURIA – Farfisa V – USER MANUAL 14
3 USER INTERFACE
Farfisa V has many great features, and in this chapter we’ll make sure you know
what each one does. We think you’ll be amazed at how quickly Farfisa V
provides you with sounds that are inspiring and perfect for all sorts of projects.
It’s also really easy to work with: just a few tweaks here and there and suddenly
you’re in a new world of sound. That will always be the main focus of every
Arturia product: unleashing your creativity while remaining easy to use.
3.1 The virtual keyboard
The virtual keyboard allows you to play a sound without the need for an
external MIDI device. Simply click on a virtual key to hear the currently selected
sound. You can also drag the cursor across the keys to hear a glissando.
The Farfisa is actually velocity sensitive, but in a very particular way. It uses the
velocity to vary the speed at which the different key contacts make. There are
5 key contacts for each key (16', 8', 4', 2⅔', percussion). When you press a key
very slowly you should be able to (almost) hear the individual key contacts
make.
Farfisa V keyboard
The keyboard is divided into sections. The white treble keys always play the
upper register. The Black keys on the left hand side can play the bass and the
grey keys can be set to either extend the treble or bass ranges.
With the Bass section switched off, the upper register plays across all available
keys. You can see this mode is active when none of the small red lights on the
keyboard are lit.

ARTURIA – Farfisa V – USER MANUAL 15
If you switch the bass section on using the Bass On / Off switch, the black keys
now play the bass tones. The lights show that the bass section is active.
If you switch the Grey Keys Sel switch from Treble to Bass, the grey keys are
assigned to extend the range of the bass keys to a second octave. You can
tell this is active because the first and third red lights now show the range of
the bass part. This gives you more freedom to play bass notes, at the cost of
removing the lower part of the treble range.
The octave selection lights
3.2 Toolbar
The toolbar that runs along the top edge of the instrument both in standalone
and plug-in mode provides access to many useful features. Let’s look at them
in detail. The first seven of these options can be found by clicking on the Farfisa
V section at the very top left hand corner of the instrument window.

ARTURIA – Farfisa V – USER MANUAL 16
3.2.1 Save Preset
The first option lets you save a preset. If you select this, you are presented with
a window where you can enter information about the preset. As well as
naming it you can enter the author name, select a bank and type and select
some tags that describe the sound. This information can be read by the preset
browser and is useful for searching presets later. You can also enter freeform
text comments in the Comments field which is handy for providing a more
detailed description.
The Save Preset window
3.2.2 Save Preset As…
This works in the same way as the Save command, but lets you save a copy of
the preset instead of saving over the original. It’s useful for creating variations
on patches but still keeping individual copies of each one.
3.2.3 Import preset
This command lets you import a preset file. Presets are stored in the .farx format.
ARTURIA – Farfisa V – USER MANUAL 17
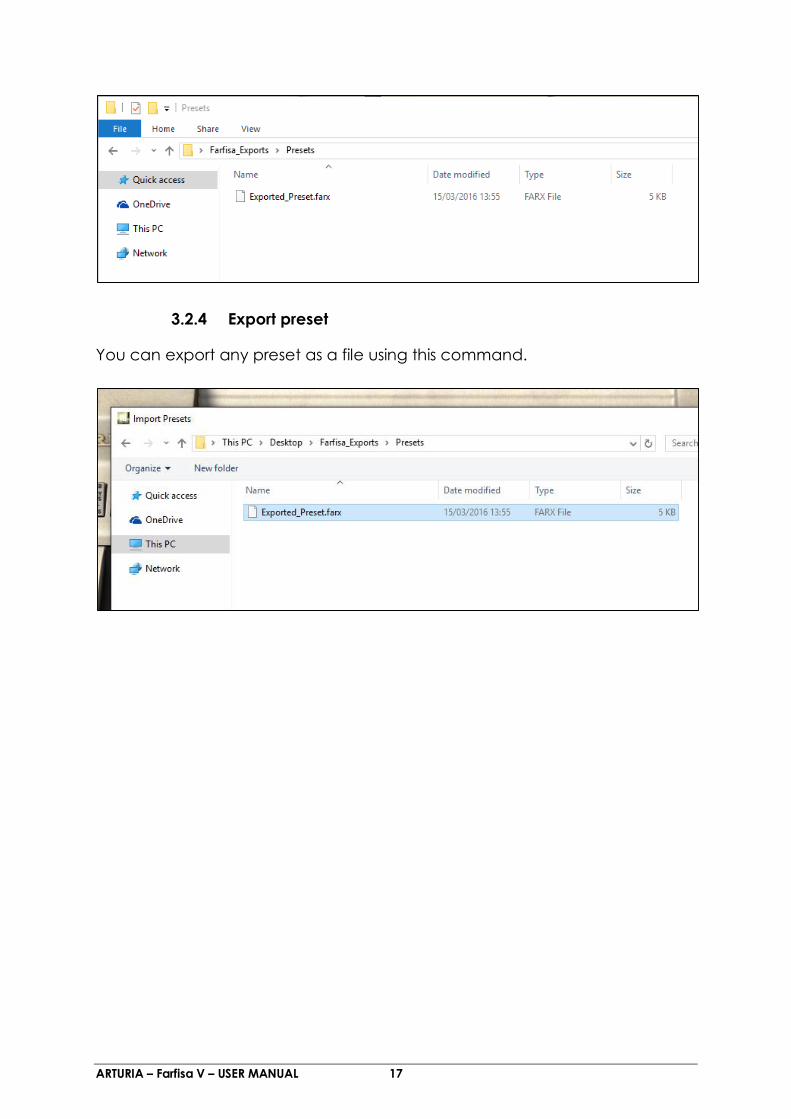
3.2.4 Export preset
You can export any preset as a file using this command.

ARTURIA – Farfisa V – USER MANUAL 18
3.2.5 Export bank
This option can be used to export the entire bank of sounds from the instrument
which is useful for backing up or sharing presets.
3.2.6 Resize window options
Farfisa V’s window can be resized from 60% to 200% of its original size without
any visual artefacting. On a smaller screen such as a laptop you might want
to reduce the interface size so it doesn’t dominate the display. On a larger
screen or a second monitor you can increase its size to get a better view of the
controls. The controls all work the same at any zoom level but the smaller ones
can be harder to see if you have shrunk the window down.

ARTURIA – Farfisa V – USER MANUAL 19
The Resize Window menu
3.2.7 3.2.7 Audio settings
Here you manage the way the instrument transmits sound and receives MIDI.
See section 2.2 of the manual for full details on this.
3.2.8 3.2.8 Preset browsing quick look
The Preset browser is invoked by clicking on the browser button which contains
four vertical lines. See section 3.3 of the manual for full details on this. The All
Types, name field and left / right arrows in the toolbar all deal with preset
selection.

ARTURIA – Farfisa V – USER MANUAL 20
The Preset Browser
3.2.9 Open and Close Advanced section
The Advanced section can be revealed by clicking on the button showing two
downward pointing arrows at the right of the toolbar. This lets you access the
more advanced features of the instrument like tuning of individual notes, user
waves and envelopes. See section 3.5 of the manual for more detail on these
controls. Click this button once to reveal the inside of the organ and again to
hide it. You can also click once on the closed lid of the organ to open it, and
then on the button to close it.
ARTURIA – Farfisa V – USER MANUAL 21
3.2.10 MIDI Learn assignment
The MIDI plug icon at the right hand end of the toolbar places the instrument
into MIDI learn mode. Parameters that can be assigned to MIDI controls will be
shown in purple and the idea is that you map physical MIDI dials, faders or
pedals from your hardware units like Beatstep or Keystep to specific
destinations inside the instrument. A typical example might be to map a real
expression pedal to the virtual swell pedal, or buttons on a controller to the
tone select switches so you can change the sound from your hardware
keyboard.
If you click on a purple area, you’ll put that control into learning mode. Move
a physical dial or fader and the target goes red to show that a link has been
made between the hardware control and the software parameter. There’s a
popup window that displays which two things are being linked and a button
to unassign the two from each other.
There’s also a minimum and maximum value slider that you can use to restrict
the parameter change range to something other than 0%-100%. For example,
you might want the amp’s master volume to be controllable via hardware
from 30% to 90%. If you made this setting (Min set to 0.30 and Max set to 0.90),
your physical dial would not alter the volume any lower than 30% or any higher
than 90% no matter how far you turned it. This is very useful for making sure you
can’t accidentally make the sound too quiet or too loud when performing.
In the case of switches which only have two positions (up or down) you can
still use minimum and maximum values in the MIDI learn popup window, but in
this case the behavior is a little different.
It's about what values the controller sends and whether those are high or low
enough to trigger the state change in a switch - which is always 0.5 or in the
case of the three stage switch, 0.33/0.33/0.33 (or near enough). You can set
the minimum and maximum values of the hardware MIDI control but whether
it affects the software parameter depends on whether it crosses the threshold
required to make the change.
Let's take an example. We want to control a 2-position switch with a hardware
fader. The fader value goes from 0.0 to 1.0 and the switch state will always
change when 0.5 is crossed.
The min value in the MIDI learn window corresponds with the value that will be
sent (from the controller to the engine) when the fader is at its min position
(same goes for the max value).
To explain this you can try these 5 use cases:

ARTURIA – Farfisa V – USER MANUAL 22
Set min value to 0.0 and max value to 0.49 the switch cannot be
switched on because the 0.5 value can never be crossed
Set min value to 0.51 and max value to 1.0 the switch cannot be
switched off because the 0.5 value can never be crossed
Set min value to 0.0 and max value to 1.0 the switch state changes
when the fader crosses its central position
Set min value to 0.49 and max value to 1.0 the switch state changes
when the fader is very low
Set min value to 0.0 and max value to 0.51 the switch state changes
when the fader is very high
The same goes for the three-stage switches, where instead of 0.5 being the
state change value, it is divided into three thirds.
MIDI Learn mode
The final option in this window is a button labelled “Is relative”. If you switch this
on for any MIDI assignment, the movement you make with the physical control
(such as a knob) will pick up the software parameter at its current setting and
change it from there rather than being an “absolute” control and snapping it
back to zero as soon as you start to move it. This can be a good idea when
assigning controls to things like volume or effect pedal controls, since you
won’t usually want them to jump massively out of their current setting as soon
as you start to modify them.

ARTURIA – Farfisa V – USER MANUAL 23
3.2.10.1 Reserved MIDI CC numbers
Certain MIDI Continuous Controller (MIDI CC) numbers are reserved and
cannot be reassigned to other controls. These are:
Ctrl All Notes Off (CC #123)
PitchBend
AfterTouch
All other MIDI CC numbers may be used to control any assignable parameter
in Farfisa V.
3.2.11 MIDI controller configuration
There’s a small arrow at the far right hand side of the toolbar that deals with
MIDI controller configurations. This allows you to manage different sets of MIDI
maps that you may have set up for controlling the instrument’s parameters
from MIDI hardware. You can copy the current MIDI assignment setup or
delete it, import a configuration file or export the currently active one. This can
be used to quickly set up different hardware MIDI keyboards or controllers with
Farfisa V without having to build all the assignments from scratch each time
you swap hardware.

ARTURIA – Farfisa V – USER MANUAL 24
3.2.12 The lower toolbar
At the right hand side of the lower toolbar are two small items. The Panic button
can be pressed to reset all MIDI signal in the event of stuck notes, and stop
sounds being generated. The CPU meter is used to monitor how much of your
computer’s CPU is being used by the instrument.
At the left hand side of the lower toolbar you will see a readout showing the
value or state of whatever control you are modifying.

ARTURIA – Farfisa V – USER MANUAL 25
Displaying the current control’s value
3.3 The Preset Browser
The preset browser is how you search, load and manage sounds in Farfisa V. It
has a couple of different views but they all access the same banks of presets.
Click on the browser button (three lines and a slanted line) to access the
search view.
The Preset Browser button
3.3.1 Searching presets
The Search screen has a number of sections. By clicking on the Search field at
the top left you can quickly enter any search term to filter the preset list by
patch name. The Results column is updated to show the results of your search.
Press the X button in the search field to clear the search.

ARTURIA – Farfisa V – USER MANUAL 26
3.3.2 Filtering using tags
You can also search using different tags. So for example by clicking on the
Lead and Organ options in the Types field you can show only presets that
match those tags. The tag fields can be shown or hidden by using the small
down arrow buttons in their title fields. Results columns can be sorted by
clicking the same arrow button in their own section.
You can use multiple search fields to perform narrower searches. So by
entering a text search and also specifying type, bank and characteristics
options you could see only the presets that match those exact criteria.
Deselect any tag in any area to remove that criteria and widen the search
without having to go back and start again. Using “Ctrl + click” (Windows) or
“Cmd + click” (Mac) will allow you to select multiple elements in the same
area.

ARTURIA – Farfisa V – USER MANUAL 27
The second Results column can be switched to show Type, Sound Designer,
Favourite or Bank tags depending on how you like to search. Click on its options
menu button just next to its sort arrow.
3.3.3 The Preset Info section
The Preset Info column on the right of the search field shows you information
about any preset. If you want to make changes to a factory preset such as
changing its name, adding comments or tags, you have to re-save it as a user
preset using the Save As command in the main menu. When you have done

ARTURIA – Farfisa V – USER MANUAL 28
this, the Info section will gain Edit and Delete buttons that you can use to
change the information stored inside the preset. Factory presets can’t be
overwritten.
3.3.4 The second preset view
The menu next to the Search menu shows you a different view. The first option
in this menu is called Filter and will hold a record of whatever you have
currently searched for in the Search field. So if you searched for Jazz in the
main search area, those results will appear here.

ARTURIA – Farfisa V – USER MANUAL 29
Selecting the All Types option in this column on the other hand will provide a
list of all patches. The Categories shown beneath group sounds based on their
Type like keys, pads, bass and so on.
Clicking on the name field in the centre of the toolbar will show you a list of all
available presets and will also change based on what you have entered in the
Search field. So again if you have searched for “jazz”, this shortcut menu will
only show you patches that match that tag. The left and right arrows in the
toolbar cycle up and down through the preset list : either the full list, or the
filtered list if you have entered a search term.
3.3.1 Playlists
In the lower left corner of the Preset Browser window is a feature titled Playlists.
This is used to collect presets into different groups for different purposes, such
as a set list for a particular performance or a batch of presets related to a
particular studio project.
3.3.1.1 Add a playlist
To create a playlist, click the plus sign at the bottom:
Give the playlist a name and it will appear in the Playlists menu. You can
rename the playlist at any time; just click the pencil icon at the end of its row.

ARTURIA – Farfisa V – USER MANUAL 30
3.3.1.2 Add a preset
You can use all of the options in the Search window to locate the presets you
want to have in your playlist. Once you have found the right preset, click and
drag it onto the playlist name.
Click and drag from the Search Results list onto one of the playlists
To view the contents of a playlist, click on the playlist name.
3.3.1.3 Re-order the presets
Presets may be reorganized within a playlist. For example, to move a preset
from slot 2 to slot 4, drag and drop the preset to the desired location.
This will move the preset into the new location.
3.3.1.4 Remove a preset
To delete a preset from a playlist, click the x at the end of the preset row.
Click the X to remove a preset from a playlist
3.3.1.5 Delete a playlist
To delete a playlist, click the x directly to the right of the playlist name.
Click the X to delete a playlist.

ARTURIA – Farfisa V – USER MANUAL 31
3.4 Front panel
The front panel of Farfisa V is where you make settings to control how the
keyboard generates sound and how its effects operate. The virtual instrument
is modelled on a mix of the original Compact Deluxe and Compact Duo
models in terms of its front panel, and has some additional features that can
be found by opening the Advanced section.
Using the original schematics we first created a mathematical model of the
raw tone generators (oscillators, dividers), the voice filters (Multi-Tone Booster,
treble, bass), the built-in effects (vibrato, repeat/percussion, tremolo), and the
preamps (including noise/mains hum). We then compared this with the real
deal (our own Farfisa Compact Duo, as well as audio recordings from several
other models), and adjusted the model somewhat to make it "more vintage".
We also recorded an IR (impulse response) of the spring reverb of our Compact
Duo so the end result is incredibly authentic.
3.4.1 The treble section
The Treble section
The white voices tabs are like the stops on a pipe organ and have two
functions.
1. Select one or more pitches (16', 8', 4', 2⅔) for each key.
2. Select the filters (Flute, Strings, etc.) to send the pitches through.
The more switches you activate, the more harmonically rich and full the
generated sound will be. Conversely, using fewer pitches results in a sound
that’s more stripped-back. You can also turn these switches on or off during
playback either physically or using MIDI controllers to change the sound of the
organ on the fly. This is a common technique used by players of real organs
who know which voices to bring in and out to make different sounds, say for
the verse and chorus of a song for example. With a bit of practice, you will
figure this out too!
If you select Bass 16 and Strings 4, then both 16’ and 4’ pitches are sent through
the Bass and the Strings voice filters. Note that the filters are not isolated so they

ARTURIA – Farfisa V – USER MANUAL 32
interact a lot, hence each combination will sound slightly different (e.g. Flute
8 + Strings 8 will not sound exactly like Flute 4 + Strings 4).
The Bass 16 and Flute 8/4 voices (the “round tones”) are based on the MTB
voices, while the other white tab voices (the “sharp tones”) have their own,
global voice filter circuitry.
The Brilliant tab makes the white 2-2/3’ tab brighter. Without the white 2-2/3’
tab the Brilliant tab is ignored.
The Multi Tone Booster section
The Multi-Tone Booster (MTB) selects between Multi-Tone Booster (green tabs)
or treble voices (white tabs). In MTB mode you can select the pitches for each
key (16', 8', 4', 2⅔; these are pipe organ lengths). You can use the Knee Lever
to mix in high frequencies, or enable All Booster to mix in as much high-
frequency content as possible (i.e. as if the Knee Lever is at 100%). In Multi-Tone
Booster mode each octave has its own series of low-pass filters. If you are not
getting any sound from the organ and your audio I/O is correctly set up, check
that it’s not the case that all of your tone switches are off.
3.4.2 The percussion and repeat controls
Just as on the original Compact Deluxe you are able to control the percussion
and repeat characteristics of the way the organ generates sound. The controls
work like this:
Repeat On/Off (the left hand switch) –enables or disables the repeat
function.
Repeat Sync – allows for having tremolo match your host computer
tempo. Press the red light to activate or deactivate this. In non-sync
mode the repeat rate dial operates in Hz not note values.
ARTURIA – Farfisa V – USER MANUAL 33
Repeat rate dial – The rate knob can be set between 2 whole notes, 1 whole
note, half note, ¼ triplet, ¼ note, 1/8 triplet, 1/8th, 1/16 triplet, 1/16 values.
Repeat/Percuss mode chooses either the REPEAT or the PERCUSS mode
for the upper keyboard.
Percuss envelope – allows the user to create longer or shorter decay
times on the percuss section.
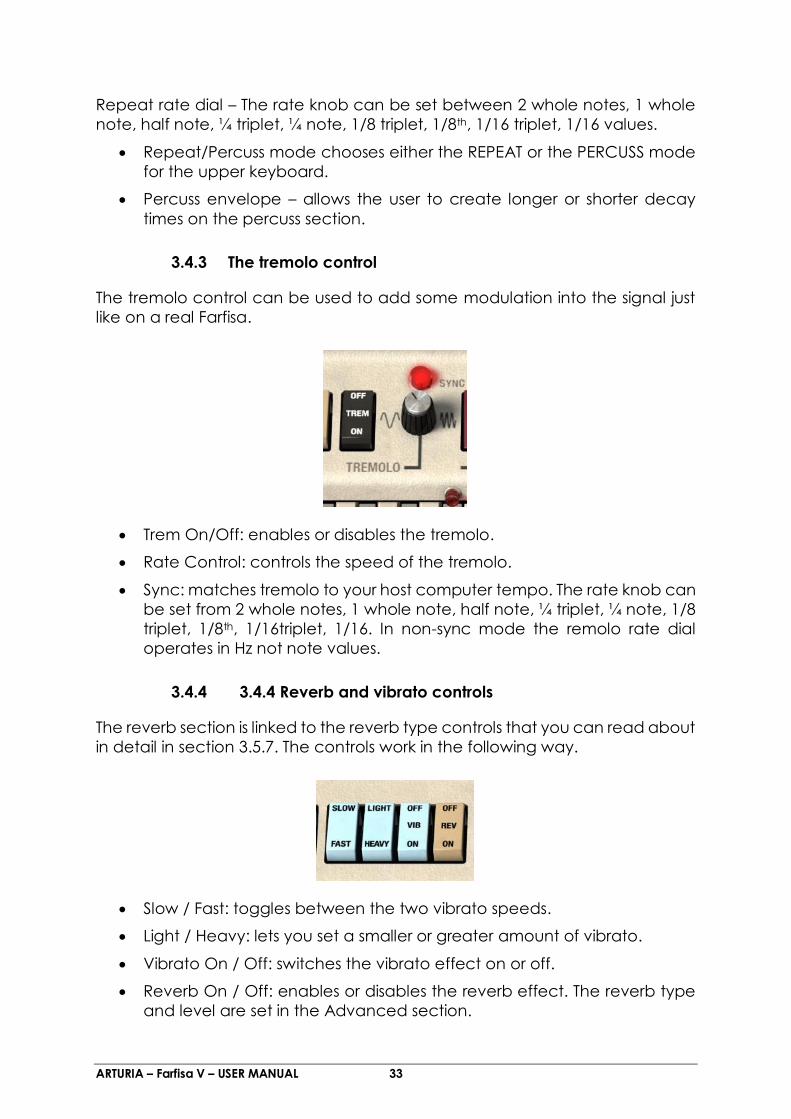
3.4.3 The tremolo control
The tremolo control can be used to add some modulation into the signal just
like on a real Farfisa.
Trem On/Off: enables or disables the tremolo.
Rate Control: controls the speed of the tremolo.
Sync: matches tremolo to your host computer tempo. The rate knob can
be set from 2 whole notes, 1 whole note, half note, ¼ triplet, ¼ note, 1/8
triplet, 1/8th, 1/16triplet, 1/16. In non-sync mode the remolo rate dial
operates in Hz not note values.
3.4.4 3.4.4 Reverb and vibrato controls
The reverb section is linked to the reverb type controls that you can read about
in detail in section 3.5.7. The controls work in the following way.
Slow / Fast: toggles between the two vibrato speeds.
Light / Heavy: lets you set a smaller or greater amount of vibrato.
Vibrato On / Off: switches the vibrato effect on or off.
Reverb On / Off: enables or disables the reverb effect. The reverb type
and level are set in the Advanced section.

ARTURIA – Farfisa V – USER MANUAL 34
3.4.5 The Bass Manual section
One of the great things about the Compact Deluxe is that it contains bass and
treble sections in the same instrument, meaning you can play both parts from
a single keyboard if you like. Or you can disable the bass section and play the
upper register across the whole keyboard. The bass tones can be used instead
of having a bass guitar player since they can be made to sound big and
heavy, or they can be used as a secondary organ part to add weight to the
overall organ part. You can make detailed bass settings in the Advanced
section: see section 3.5.2 for more on this.
Starting from the left hand side the controls are as follows:
The Bass Manual control lets you set the level of the bass part. Turned all
the way to the right its volume is zero and to the left, it is at maximum
volume. This is a useful control because the bass part has a different
character to the treble and so you may not want them to be at the same
volume. This control is a good candidate for mapping to a hardware
MIDI controller so you can alter it from your MIDI keyboard during
performance.
The Grey Keys Sel button has two positions. In the upper position it is set
to Treble. This means that the grey keys on the keyboard will operate the
treble notes and not the bass notes, extending the range of the treble
part. The third octave light (the one to the furthest right) will go out and
the other two will be lit, showing that only the lowest octave is set to
trigger the bass notes.
In the Bass position, this switch causes the grey notes to play the bass
tones, and the middle red light will go out to show that the black and
grey notes are now assigned to the bass part – two octaves. Again you
may want to assign a MIDI control to this switch as it can help you to
dynamically reassign zones of the keyboard while performing.
Bass On / Off simply lets you activate or deactivate the whole bass
section. When deactivated, the treble section occupies the whole
keyboard range.

ARTURIA – Farfisa V – USER MANUAL 35
Bass Sharp / Soft changes the decay on the bass section to either a
sharper or softer character.
Perc On / Off turns the percussive attack of the bass section on or off.
The Long / Short switch toggles between a shorter or longer percussive
element to the bass tone.
3.5 Inside the case
The Advanced section can be accessed by clicking on the Advanced button
or by clicking on the organ’s cream coloured hood area.
Click to open the Advanced section
It provides some controls that were extremely hard to access on the original
hardware instrument like tuning controls for individual notes, and also features
that were not available such as:
A special USER position that allows the user to create an additive
waveform or use the sliders to create a new waveshape based on the
graphic look of the sliders.
Additional reverb impulse responses.
Paraphonic/Polyphonic mode.
Attack/release envelopes for upper and lower keyboards to expand the
sound palette.
Bass section waveforms selector.
Bass section tone control.
Tremolo sync.
Repeat sync.

ARTURIA – Farfisa V – USER MANUAL 36
The Advanced section
3.5.1 The Voice Tune section
The Farfisa has 12 independent master oscillators, which each drive 5 dividers,
plus there’s 1 extra divider for the low “C” note, so there are a total of
(1+5)*12+1=73 frequencies being generated all the time (even more in Farfisa
V, because of its extended key range). This system of oscillators and dividers
also accounts for the fact that the same notes in different octaves (e.g. all “C”
notes) are phase-locked.
You can use these controls to individually tune any of the 12 oscillators. You
can reset any one to its central position by double clicking on it. If you reset all
12 tuning pots to 0 cents, then Farfisa V will be tuned to exactly A4=440 Hz
equal temperament although this is not representative of the sound of a real
Farfisa. As such, many of the organ templates feature certain notes that are
tuned slightly off centre, giving it that classic organ sound. These controls can
be mapped to a MIDI controller to let you tweak note tuning in realtime.
3.5.2 The bass tone section
The Bass Tone section expands on the original Farfisa by letting you select and
modify different bass waves.

ARTURIA – Farfisa V – USER MANUAL 37
The Bass Wave dial allows selection of seven different bass waveforms:0. The
original Farfisa waveform as generated by the tone generators (i.e. the same
waveform as in the treble section when User Wave is off).
1. Saw - Sawtooth wave.
2. Sync - Hard-sync sawtooth wave.
3. Mod - Modified square wave.
4. Square - Square wave.
5. Pulse - Pulse wave (15% duty cycle).
6. Additive - Additive user wave.
7. Shape - Shape user wave.
The Bass Tone icons represent the moon (dark i.e. 20 Hz) and the sun (bright i.e.
20000 Hz). When the Bass Tone is at bright/20000 Hz this bypasses the 24 dB bass
tone ladder filter. When the Bass Tone is at any other value (including 20
Hz/dark) this sets the filter to the selected cutoff.
The Reso section lets you change the resonance of the tone filter.
3.5.3 Noise control
The Noise Level dial lets you add a variable amount of noise to the output. At maximum setting this simulates a high degree of electrical buzz and hum.
3.5.4 Voice mode
When AR Env (attack / release envelope) is on the Voice Mode switch lets you
toggle between two modes:
Polyphonic: Each key has its own attack and release envelope, just like
on a true polyphonic synth.
Paraphonic: Each key still has its own release envelope, but the attack
envelope is now global, and it won’t retrigger until all (treble) keys have
been released. This is more or less like some string synths (e.g. the ARP
Solina / Arturia Solina V).

ARTURIA – Farfisa V – USER MANUAL 38
Note that this applies only to the treble voices (green/white tabs on the right),
not the bass. The bass does have attack, but only up to 3 ms (so you can still
use it to prevent pops/clicks). The bass doesn’t affect the global paraphonic
envelope at all. The idea behind this is to be able to play hard bass notes
combined with slow treble chords such as pads/strings for more flexibility.
When AR Env is off the Voice Mode switch is ignored.
3.5.5 The Envelope section
By switching the attack / release switch on you activate the AR Env section.
You will then be able to create a slower or faster attack and release setting
using the two dials.
With faster attack (dial turned to the left), the sound comes in more quickly
and has a sharper fee. With slower attack the sound takes a little time to fade
in, which is better for string and pad style sounds.
A lower release value (dial turned to the left) means the sound stops being
generated almost as soon as you release a note. Turned to the right, the
release is slower and the note sill sustain and fade out over time. Again this is
better for pad or string style sounds.
3.5.6 The User Wave section
This is something that’s a special addition in the software version of the Farfisa,
a way for you to draw in your own waveform to use for generating sound.
The User Wave switch lets you choose between
Off: The original Farfisa Compact waveform, which is like a blend
between a sawtooth and a pulse wave and which is slightly different for
each note (i.e. oscillator/divider output). In this mode the sliders do
nothing (unless you have selected Additive/Shape for the bass).
Additive: In Additive mode you can mix harmonics (sine waves) using
the 48 sliders. If you use only the first few you will get classic tonewheel
ARTURIA – Farfisa V – USER MANUAL 39
organ-like sounds (because its drawbars also mix in harmonics/sine
waves). As you mix in more harmonics you will get increasingly harsher
sounds. Note that to hear all harmonics you will have to select a voice
filter that passes lots of high frequencies, e.g. All Booster or the Strings
voices.
Shape: In Shape mode you can use the 48 sliders to freely draw a
waveform (see e.g. the Templates > Square Wave preset). In
Additive/Shape mode the waveform is the same for all notes (although
its output level does still vary per note), so it’s much more like a synth.
Note that when you switch User Wave modes the sliders are saved, i.e. if you
draw a nice shape while in Shape mode, and then temporarily switch to
Additive mode, and then switch back to Shape again, your shape will still be
there.
Also note that the bass can also use the Additive/Shape waveforms. However,
the bass doesn’t have its own set of User Wave sliders, so it reuses the treble
User Wave sliders.
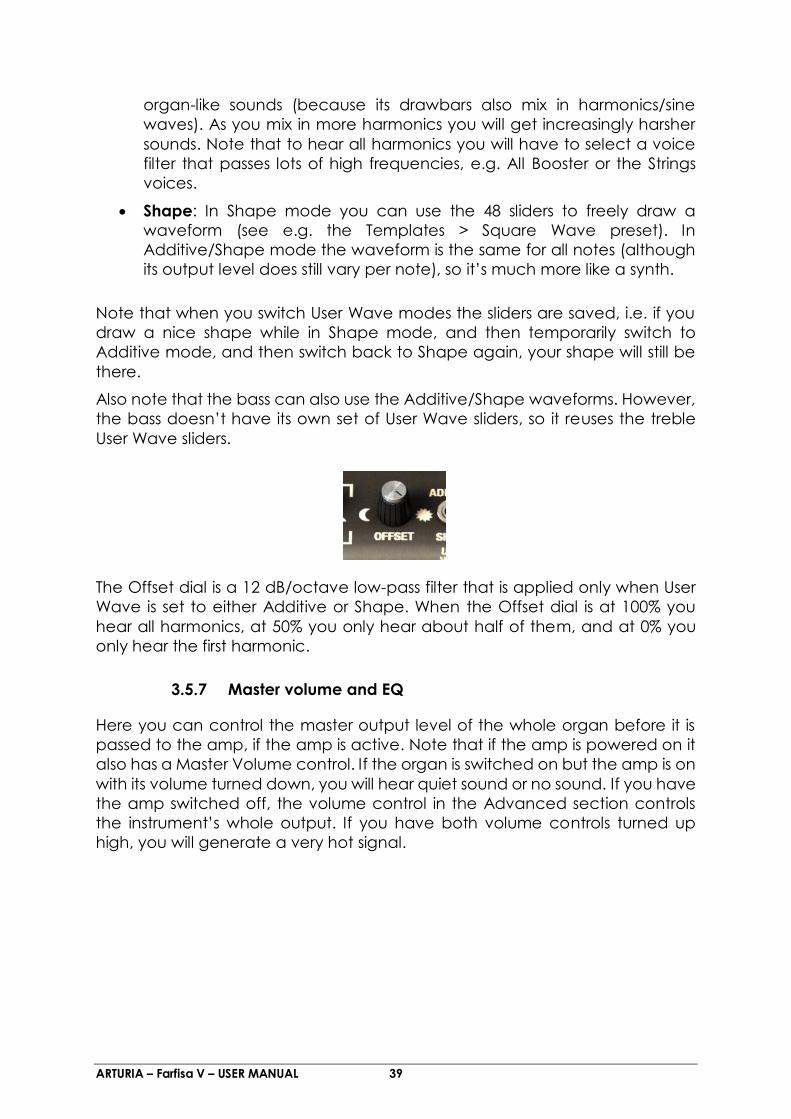
The Offset dial is a 12 dB/octave low-pass filter that is applied only when User
Wave is set to either Additive or Shape. When the Offset dial is at 100% you
hear all harmonics, at 50% you only hear about half of them, and at 0% you
only hear the first harmonic.
3.5.7 Master volume and EQ
Here you can control the master output level of the whole organ before it is
passed to the amp, if the amp is active. Note that if the amp is powered on it
also has a Master Volume control. If the organ is switched on but the amp is on
with its volume turned down, you will hear quiet sound or no sound. If you have
the amp switched off, the volume control in the Advanced section controls
the instrument’s whole output. If you have both volume controls turned up
high, you will generate a very hot signal.

ARTURIA – Farfisa V – USER MANUAL 40
The Bass and Treble dials work to shape the organ’s output. Use them to add
or remove bass or treble frequencies from the sound. The reverb dial controls
the amount of reverb applied to the signal. All the way to the left, the signal is
dry and turned all the way to the right, 100% of the reverb is being applied.
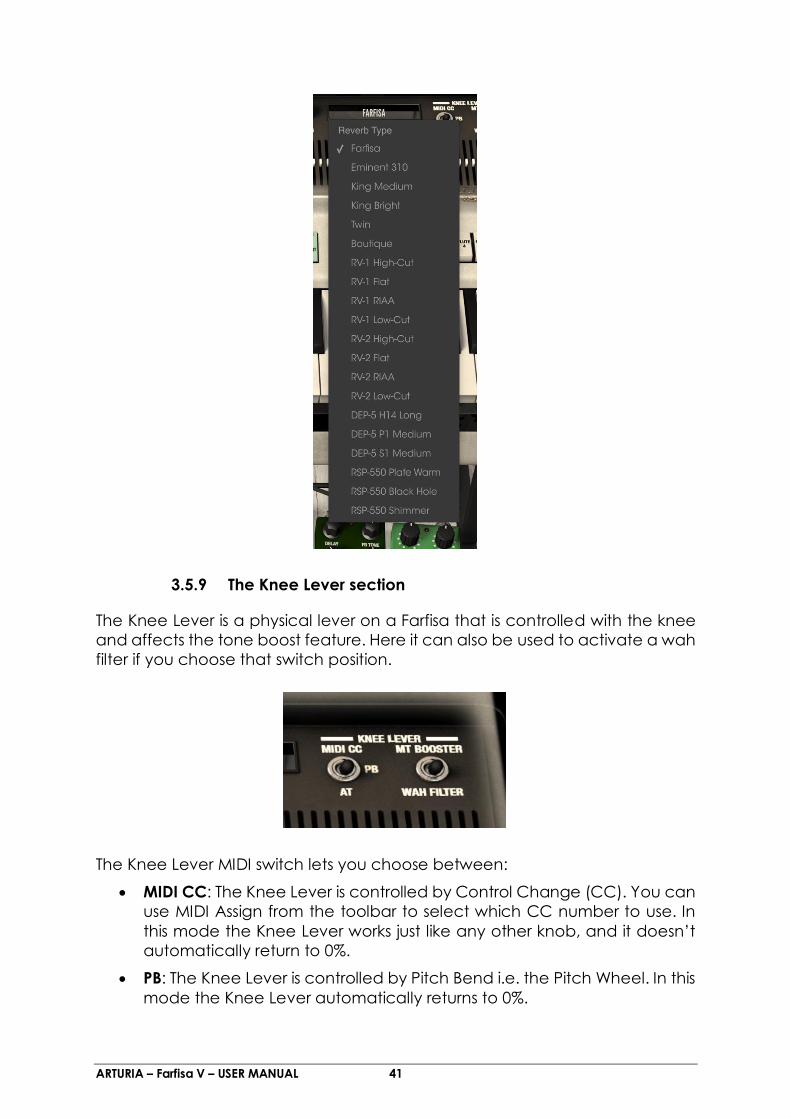
3.5.8 Reverb type
In the Advanced section you can access different kinds of reverb types. Click
on this menu option to select one and then use the reverb level dial as well as
the reverb on / off switch on the front panel to manage its behaviour. The
models of reverb are:
Farfisa - Farfisa Compact Duo F/AR spring reverb.
Eminent 310 - Eminent 310 Unique organ spring reverb.
King Medium/Bright - Danelectro DSR-1 Spring King spring reverb.
Twin - Fender Twin Reverb guitar amp spring reverb.
Boutique - Boutique guitar amp spring reverb.
RV-1 - Furman RV-1 spring reverb.
RV-2 - Two Furman RV-1 spring reverbs in a stereo configuration.
DEP-5 - Roland DEP-5 digital effects processor.
RSP-550 - Roland RSP-550 stereo signal processor.
ARTURIA – Farfisa V – USER MANUAL 41
3.5.9 The Knee Lever section
The Knee Lever is a physical lever on a Farfisa that is controlled with the knee
and affects the tone boost feature. Here it can also be used to activate a wah
filter if you choose that switch position.
The Knee Lever MIDI switch lets you choose between:
MIDI CC: The Knee Lever is controlled by Control Change (CC). You can
use MIDI Assign from the toolbar to select which CC number to use. In
this mode the Knee Lever works just like any other knob, and it doesn’t
automatically return to 0%.
PB: The Knee Lever is controlled by Pitch Bend i.e. the Pitch Wheel. In this
mode the Knee Lever automatically returns to 0%.

ARTURIA – Farfisa V – USER MANUAL 42
AT: The Knee Lever is controlled by Channel Aftertouch. Again it
automatically returns to 0%.
Note that the position of the Knee Lever in MIDI CC mode is saved when
switching Knee Lever MIDI modes.
The Knee Lever Wah switch lets you toggle between:
MTB: When the Multi-Tone Booster (MTB) tab is activated the Knee Lever
can be used to mix in high frequencies.
Wah: The Knee Lever no longer controls the MTB frequency mix, but can
be used as a wah.
Note that in MTB mode the Knee Lever only affect the MTB voices (green tabs),
not the other treble voices (white tabs), and also not the bass. In Wah mode
the Knee Lever affects all treble voices (green and white tabs), but again not
the bass.
3.6 The amp and effects
3.6.1 How this section works
The original Farfisa like many organs was often played through a guitar amp
and / or guitar effects to enhance its sound and provide a harder or more
psychedelic edge. The effects come between the organ and the guitar amp
in Farfisa V and when the effects and amp are all switched off, what you hear
is the pure output of the organ.
When you activate any of the effects or the amp, they begin to process the
sound. You can swap the order of any of the effects by clicking on their name
text and choosing a new model to go into that slot.

ARTURIA – Farfisa V – USER MANUAL 43
Note that when you do this the pedal will swap positions. So if you swap an
Overdrive for a Chorus in slot 2, the Overdrive will take the position the Chorus
pedal was just in. All five pedals must be present in the pedalboard, though
none of them has to be active. There is no option to have an empty pedal slot.
The effect pedals are taken from Arturia’s other vintage keyboard models.
Switch any effect on by pressing its virtual footswitch. All effects, the amp and
swell pedal can be MIDI controlled by using MIDI learn mode.
3.6.2 The amp
The amp is based around a Fender Twin and can be switched off to leave
either the output of the organ or the organ plus effects, or switched on to lend
a more vintage, amped sound to the signal.
Starting from right and moving left the controls are as follows:
The Power switch activates or deactivates the amp.

ARTURIA – Farfisa V – USER MANUAL 44
The Master Volume knob acts as a volume control for the output of the
whole instrument when the amp is switched on.
The Treble, Middle and Bass dials let you sculpt the EQ of the amp’s
output just like on a real guitar amp.
The Volume dial acts as a channel volume control.
The Bright switch can be used to add more presence and brightness to
the sound. It is only active at low volumes.
The Axis switch lets you alter the virtual microphone between On Axis,
which gives a more direct sound with the mic pointing straight at the
amp, and Off Axis which uses a mic pointed at an angle which gives a
slightly less direct character.
3.6.3 The flanger
Flanging works by mixing two identical signals together, one signal delayed by
a small and gradually changing period. This produces a swept comb filter
effect. Here, the controls are:
Flanger Rate
Delay amount
Effect Depth
Resonance

ARTURIA – Farfisa V – USER MANUAL 45
3.6.4 The phaser
Phasing is the psychedelic sweeping effect that was popular in the 1960s and
70s and adds a sense of movement and swirling to the sound. It works
particularly well on organ sounds like Farfisa. The controls are:
Modulation Rate
Feedback amount
Phaser depth
Stereo spread
3.6.5 Chorus pedal

ARTURIA – Farfisa V – USER MANUAL 46
Chorus works by adding a second voice to the signal and in the process
making it harmonically richer and adding a sense of movement. The controls
are:
A three-position chorus type switch
Stereo Chorus Rate
Stereo Width
Rate
Delay amount
Chorus Amount
Dry / Wet Mix
3.6.6 Analog Delay pedal
Delay is a great effect to use on organs as it can really increase the sense of
depth and space without becoming “splashy” and adding to much air and
high end like reverbs sometimes do. The controls are:
Delay Rate
Delay Feedback Tone
Feedback Amount
Dry / Wet Mix
LFO Rate
LFO Depth

ARTURIA – Farfisa V – USER MANUAL 47
3.6.7 Overdrive pedal
Overdrive is great for adding drive, crunch and grit to organ sounds. The
controls are:
Drive Amount
Output Level
Drive Tone
3.6.8 The Swell pedal
The swell pedal is pre-amplified and connected directly to the organ. It
controls the volume of the organ before sound is passed to the effects pedals
or the amplifier. It acts as a volume pedal for changing the volume during
performance. As such it’s a perfect candidate for MIDI assigning to a real
hardware expression or volume pedal so you can get a much more authentic
playing experience when triggering Farfisa V from your MIDI keyboard.

ARTURIA – Farfisa V – USER MANUAL 48
4 END USER LICENSE AGREEMENT
1. General
1.1 In consideration of payment of the Licensee fee, which is a portion of the
price you paid, Arturia, as Licensor, grants to you (hereinafter termed
“Licensee”) a nonexclusive right for the use of software including related
media, documentation (for example program descriptions, manuals) and
other documents and materials manufactured by Arturia SA ("Product(s)").
All intellectual property rights in the software belong to Arturia SA (hereinafter:
“Arturia”).
1.2 The following editions of the Product are available: “Demo”, “Standard”,
“EDU” and “NFR”. Whilst each edition equips the User with the same software,
the editions vary as regards both the scope of functions activated in the
Product, and the rights of use granted under this EULA.
1.3 By installing the software on your computer you agree to these terms and
conditions. If you do not approve these terms and conditions, you must not
install this software.
1.4 If you do not approve these terms and conditions, please return the
complete Product (including all written matter, packaging and similar
material) to the dealer from whom it was originally bought within 14 (fourteen)
days after the day of purchase. For purchases from the Arturia Online Store,
please contact Arturia on the internet website:
www.arturia.com/support/askforhelp/purchase.
1.5 Arturia reserves all rights not expressly granted in the EULA.
2. Right of use
2.1 The Product is protected by copyright. The Licensee may not lease, loan or
sub-license the software. The Licensee is not authorized to modify the software.
2.2 Owning any product provided to the Licensee as “Standard” version grants the
Licensee a non-exclusive right to use the Product in perpetuity including
commercial purposes. The Licensee can activate the Product on up to five
computers, as long as only one installation is used at any given time. The
Licensee must register the Product to Arturia to get access to client support,
and to activate his Product. (An internet connection is required to register and
activate the Product, either on the computer on which the Product is installed,
either on another device able to exchange files with the computer on which
the Product is installed). Owning a license of the Products entitles the Licensee
to get access to the future updates of this Product.
2.3 Any Products provided to you as "NFR" (Not For Resale) version grants the
Licensee a non-exclusive right to use the Product for a limited period of time.
The Product shall only be used for demonstration, testing and evaluation
purposes. NFR Products must not be used for commercial purposes, and must

ARTURIA – Farfisa V – USER MANUAL 49
not be resold or transferred. The Licensee can activate the Product on up to
five computers, as long as only one installation is used at any given time. The
Licensee must register the Product to Arturia to get access to client support,
and to activate his Product. (An internet connection is required to register and
activate the Product, either on the computer on which the Product is installed,
either on another device able to exchange files with the computer on which
the Product is installed). NFR Products are exempt from update, upgrade or
crossgrade offers, and cannot be purchased with or exchanged for vouchers
or coupons. Furthermore, as an owner of a NFR Product, you are not entitled
to any vouchers that ship with the standard version of the Product.
2.4 Any Products labelled or otherwise provided to you as an “Educational”
version grants the Licensee a non-exclusive right to use the Product in
perpetuity. The Product shall only be used by students or those working in
educational institutions. This definition includes students, faculty, staff and
administration attending and / or working at an educational institutional
facility: private / public schools, colleges, universities and similar. These
Products must not be used for commercial purposes, and must not be resold
or transferred. The Licensee can activate the Product on up to five computers,
as long as only one installation is used at any given time. The Licensee must
register the Product to Arturia to get access to client support, and to activate
his Product. (An internet connection is required to register and activate the
Product, either on the computer on which the Product is installed, either on
another device able to exchange files with the computer on which the
Product is installed). These Products are exempt from upgrade or crossgrade
offers, and cannot be purchased with or exchanged for vouchers or coupons.
Furthermore, as an owner of an educational Product, you are not entitled to
any vouchers that ship with the standard version of the Product.
2.5 Any Products labelled or otherwise provided to you as a “Demo” version
grants the Licensee a right to use the Product only for demonstration and
evaluation purposes. These Products must not be used for commercial
purposes, and must not be resold or transferred. These Products are exempt
from upgrade or crossgrade offers, and cannot be exchanged for vouchers or
coupons.
3. No Unbundling
Bundles (product bundles are an association of software and hardware or
software-only products) can only be resold / transferred as a whole. The
individual components of a bundle must not be resold / transferred separately.
4. Resell
4.1 Renting or lending the licensed Software to a third party is expressly
forbidden. Apart from that and if not provided otherwise within this EULA.
4.2 Except if otherwise stated within this EULA, Licensee may resell the software
to a third party or transfer the software permanently free of charge, provided

ARTURIA – Farfisa V – USER MANUAL 50
the third party agrees in writing with this EULA and Licensee ceases all use of
the software, completely removes all installed copies of the software from his
computers and – if the software was not purchased via download – deletes or
transfers the original media delivered with the software to the third party. In
addition, Licensee is required to de-register the purchased software with
Arturia (more information available on www.arturia.com).
5. In case a sound library is part of the purchased Product the following shall
apply in addition to the EULA
The provided samples, instruments and presets can be used for commercial or
non-commercial music and audio Productions without the prior permission
from Arturia under the terms of this Agreement. The usage of this Product (in
particular samples, instruments and presets) for the creation of a sound library
or as a sound library for any kind of synthesizer, virtual instrument, sample library,
sample-based Product or other musical instrument is strictly prohibited.
Individual samples, sound sets or audio loops may not be distributed
(commercially or otherwise) standalone. Furthermore, these samples, sound
sets or audio may not be repackaged in whole or in part as audio samples,
sound libraries or sound effects.
6. Data Protection
Arturia attaches great importance to compliance with legislation on data
protection. The User data collected are used exclusively for performing its
contractual obligations. No data is passed on to third parties. Further
information can be obtained from our Privacy Policy at
www.arturia.com/privacy.
7. Limited Warranty
Arturia warrants that the physical media on which the software is provided is
free from defects in materials and workmanship under normal use for a period
of thirty (30) days from the date of purchase. The Licensee’s invoice shall be
evidence of the date of purchase. Any implied warranties on the software are
limited to thirty (30) days from the date of purchase. Some states do not allow
limitations on duration of an implied warranty, so the above limitation may not
apply to the Licensee in this case. All programs and accompanying materials
are provided “as is”.
8. No Liability for Consequential Damages
Neither Arturia nor anyone else involved in the creation, production, or delivery
of this Product shall be liable for any direct, indirect, consequential, or
incidental damages arising out of the use of, or inability to use this Product
(including without limitation, damages for loss of business profits, business

ARTURIA – Farfisa V – USER MANUAL 51
interruption, loss of business information and the like) even if Arturia was
previously advised of the possibility of such damages. Some states do not allow
limitations on the length of an implied warranty or the exclusion or limitation of
incidental or consequential damages, so the above limitation or exclusions
may not apply to the Licensee in this case. This warranty gives the Licensee
specific legal rights, and the Licensee may also have other rights which vary
from state to state.
Sample rate converter designed by Aleksey Vaneev of Voxengo


![1.3.1.3 Lab - Mapping the Internet[2] Cmd](https://img.pdfslide.us/doc/110x75/55cf857a550346484b8e6d3d/1313-lab-mapping-the-internet2-cmd.jpg)