Embed Size (px)
Citation preview
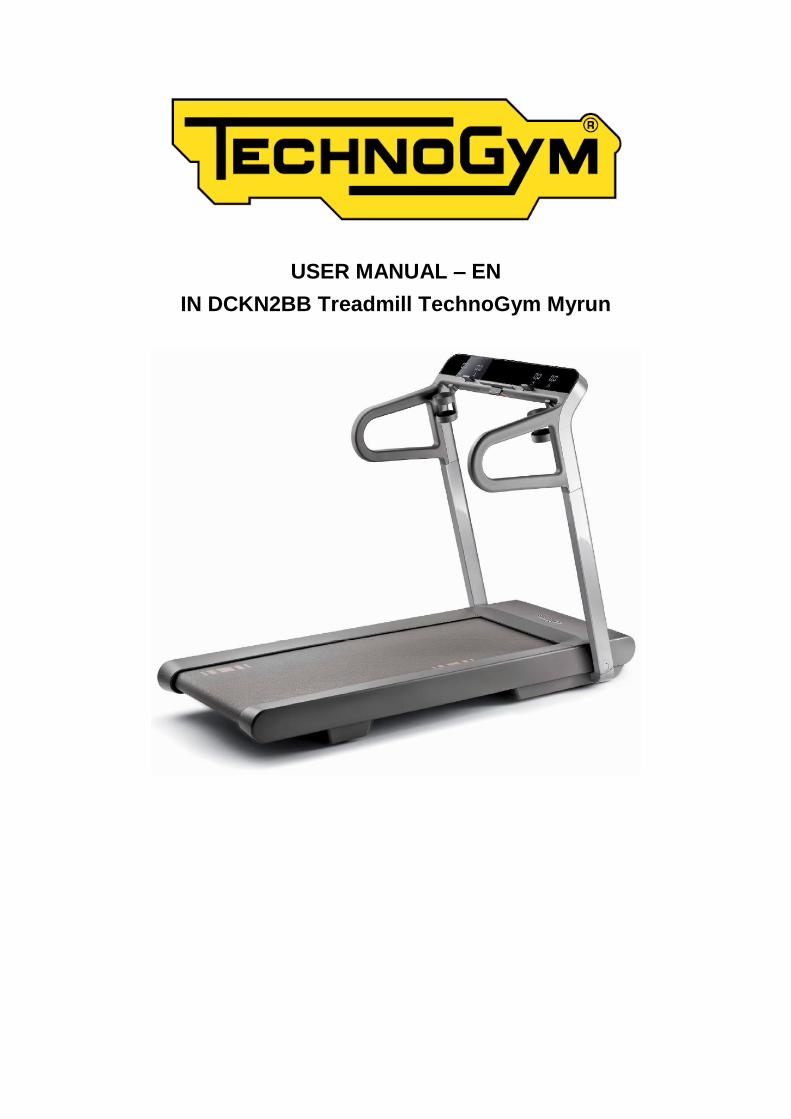
USER MANUAL – EN
IN DCKN2BB Treadmill TechnoGym Myrun
2
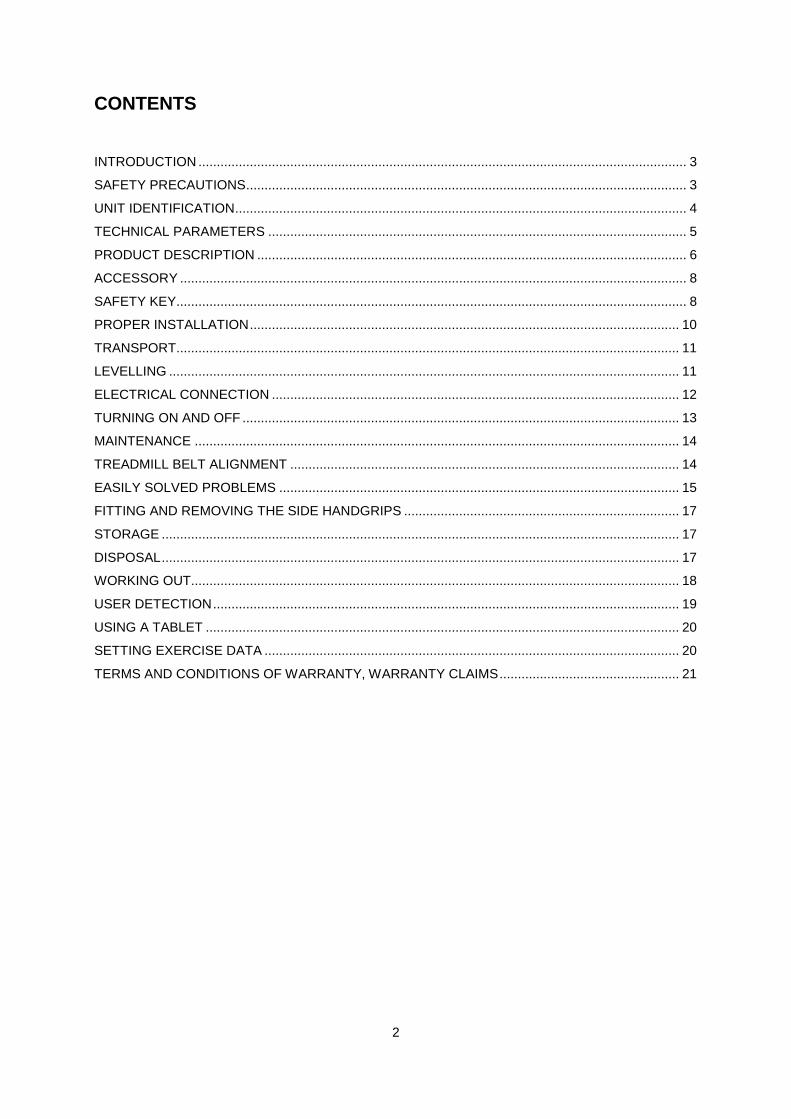
CONTENTS
INTRODUCTION ..................................................................................................................................... 3
SAFETY PRECAUTIONS ........................................................................................................................ 3
UNIT IDENTIFICATION ........................................................................................................................... 4
TECHNICAL PARAMETERS .................................................................................................................. 5
PRODUCT DESCRIPTION ..................................................................................................................... 6
ACCESSORY .......................................................................................................................................... 8
SAFETY KEY........................................................................................................................................... 8
PROPER INSTALLATION ..................................................................................................................... 10
TRANSPORT......................................................................................................................................... 11
LEVELLING ........................................................................................................................................... 11
ELECTRICAL CONNECTION ............................................................................................................... 12
TURNING ON AND OFF ....................................................................................................................... 13
MAINTENANCE .................................................................................................................................... 14
TREADMILL BELT ALIGNMENT .......................................................................................................... 14
EASILY SOLVED PROBLEMS ............................................................................................................. 15
FITTING AND REMOVING THE SIDE HANDGRIPS ........................................................................... 17
STORAGE ............................................................................................................................................. 17
DISPOSAL ............................................................................................................................................. 17
WORKING OUT..................................................................................................................................... 18
USER DETECTION ............................................................................................................................... 19
USING A TABLET ................................................................................................................................. 20
SETTING EXERCISE DATA ................................................................................................................. 20
TERMS AND CONDITIONS OF WARRANTY, WARRANTY CLAIMS ................................................. 21
3
INTRODUCTION
Always consult a qualified and licensed medical professional or healthcare practitioner before beginning any nutritional or diet regime and any stretching or training programme. Remember that it is always good practice to make full inquiries and find out about possible effects that actions and choices you make may have on your health.
SAFETY PRECAUTIONS
This product is intended for home using.
Read this manual carefully before first using and keep it for future reference.
Follow basic precautions if you use an electrical appliance.
Place it only on a flat, solid and clean surface.
To reduce the risk of an electric shock, always unplug the unit from the electrical outlet immediately after using and before cleaning or performing any maintenance procedures.
To reduce the risk of burns, fire, electric shock or personal injury, observe all warnings and precautions.
Don’t left it unattended when plugged in. Unplug the unit from the power outlet when not in use, before cleaning it and before installing or removing electrical parts.
Keep children away from this device. It is not a toy. Don’t let children being unsupervised near this device. Keep it away from pets.
Disabled people or people with some impairment, sensory or mental disorder may use this device only under supervision of an adult and responsible person.
Use this device only for intended purpose.
Regularly check this device for damage or wearing. Damaged or worn parts must be replaced immediately.
Never use damaged device.
Protect it from water, liquids and high humidity to avoid an electric shock.
Don’t use the cord or cable as a handle.
Don’t put it on heated surface and keep it away from heat sources.
Keep your hands away from moving parts.
Don’t put any objects on the frame, belt and control panel.
Don’t insert any objects into sockets and compartments.
Don’t use it outdoors. Protect it from raining, direct sunlight, wind etc. Don’t wash it with a water jet.
To disconnect power, turn all controls to the off position and then remove the plug from the outlet.
Don’t repair it yourself. Contact the service.
Use only a properly grounded outlet.
Don’t use it in an environment with aerosol in air or in an environment with lack of oxygen.
Don’t use unapproved accessory. Use only original parts.
Don’t to any unapproved modification.
No adjustable part should protrude to limit user movements.
For better safety keep a clearance of min. 0.6 m between this device and other objects.
4
Ask your physician for advice before starting any workout.
If you feel faintly, stop immediately. Ask your physician before starting any workout again. People with certain diseases may use it only under supervision of a medicine doctor with special qualification.
Make sure that you have the correct position before starting exercising.
Plan your exercising reasonably and don’t overrate your possibilities. Incorrect exercising can cause serious injury.
Wear appropriate clothes. Avoid too loose clothes which should be easily caught. Always wear sports shoes. Keep garments and towels away from moving parts.
Other people must keep a safe distance if this device is on.
Assemble it properly and check it before each using. Don’t use this device if it doesn’t work properly.
There are some areas with higher possible risk of an injury. Please, pay attention. Don’t crush your hands or legs.
Producer has no responsibility for damages or injuries occurring through unauthorized maintenance, misuse, accident, negligence, improper assembly or installation in rusty environment, improper modification without authorization or incorrect controlling etc.
Weight limit: 140 kg
Category: HB (according to EN957 norm) suitable for home using.
WARNING! The heart rate frequency monitoring (only if available) may not be completely accurate. Overexertion during training can lead to a serious injury or even death. If you start to feel faint, stop the exercise immediately.
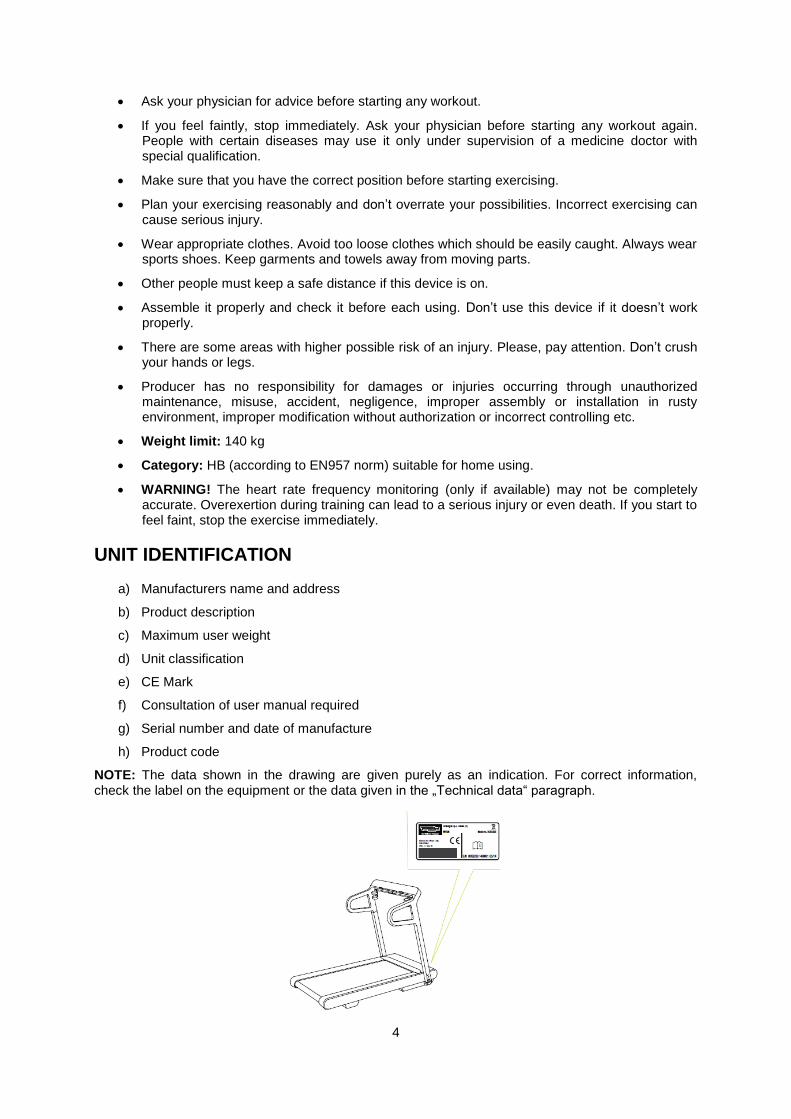
UNIT IDENTIFICATION
a) Manufacturers name and address
b) Product description
c) Maximum user weight
d) Unit classification
e) CE Mark
f) Consultation of user manual required
g) Serial number and date of manufacture
h) Product code
NOTE: The data shown in the drawing are given purely as an indication. For correct information, check the label on the equipment or the data given in the „Technical data“ paragraph.
5
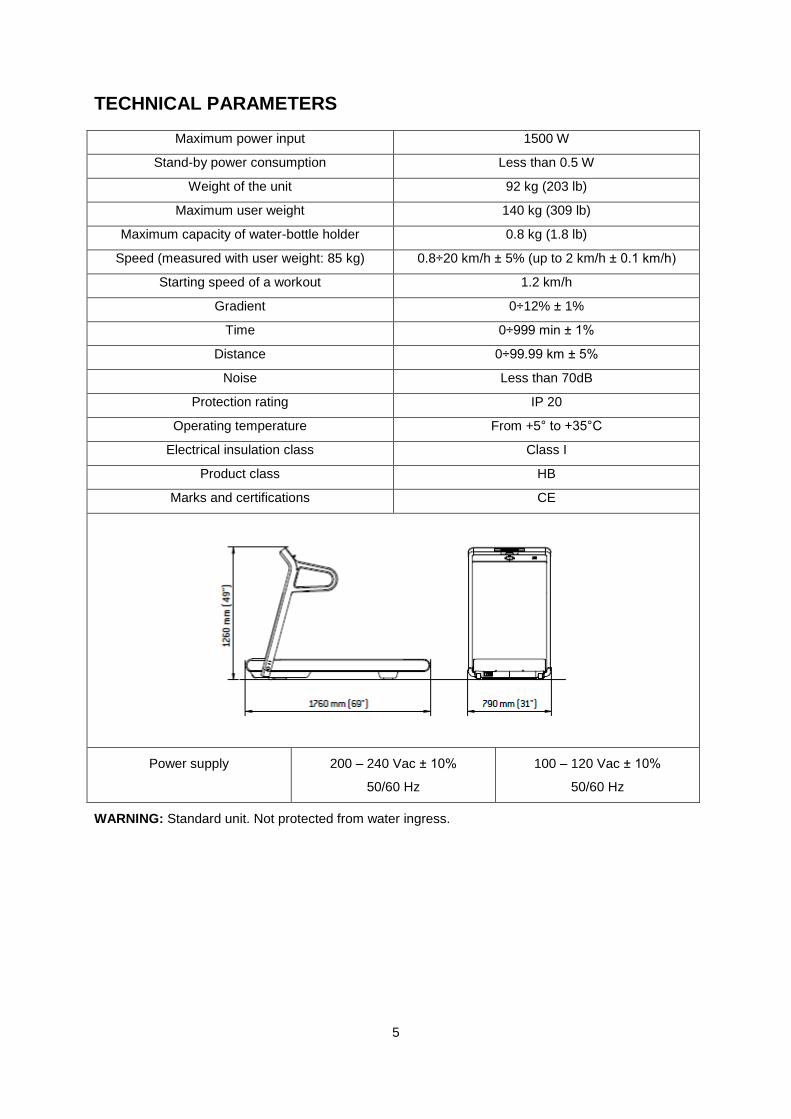
TECHNICAL PARAMETERS
Maximum power input 1500 W
Stand-by power consumption Less than 0.5 W
Weight of the unit 92 kg (203 lb)
Maximum user weight 140 kg (309 lb)
Maximum capacity of water-bottle holder 0.8 kg (1.8 lb)
Speed (measured with user weight: 85 kg) 0.8÷20 km/h ± 5% (up to 2 km/h ± 0.1 km/h)
Starting speed of a workout 1.2 km/h
Gradient 0÷12% ± 1%
Time 0÷999 min ± 1%
Distance 0÷99.99 km ± 5%
Noise Less than 70dB
Protection rating IP 20
Operating temperature From +5° to +35°C
Electrical insulation class Class I
Product class HB
Marks and certifications CE
Power supply 200 – 240 Vac ± 10%
50/60 Hz
100 – 120 Vac ± 10%
50/60 Hz
WARNING: Standard unit. Not protected from water ingress.
6
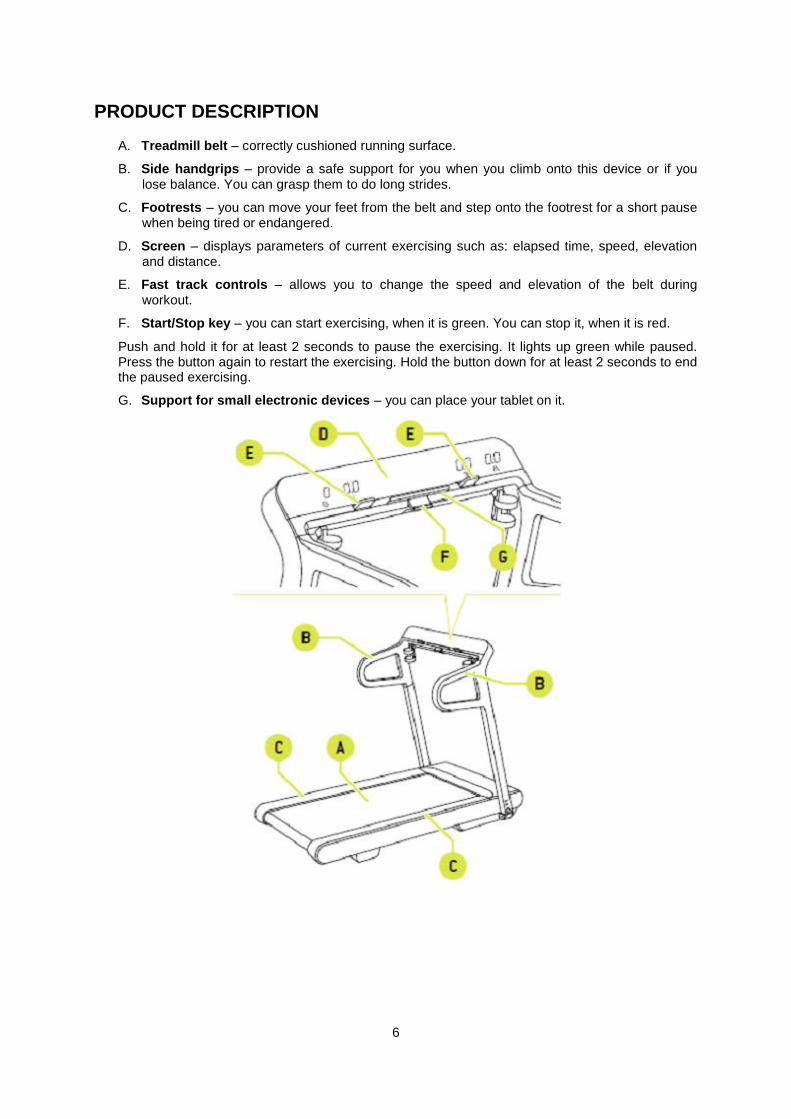
PRODUCT DESCRIPTION
A. Treadmill belt – correctly cushioned running surface.
B. Side handgrips – provide a safe support for you when you climb onto this device or if you lose balance. You can grasp them to do long strides.
C. Footrests – you can move your feet from the belt and step onto the footrest for a short pause when being tired or endangered.
D. Screen – displays parameters of current exercising such as: elapsed time, speed, elevation and distance.
E. Fast track controls – allows you to change the speed and elevation of the belt during workout.
F. Start/Stop key – you can start exercising, when it is green. You can stop it, when it is red.
Push and hold it for at least 2 seconds to pause the exercising. It lights up green while paused. Press the button again to restart the exercising. Hold the button down for at least 2 seconds to end the paused exercising.
G. Support for small electronic devices – you can place your tablet on it.
7
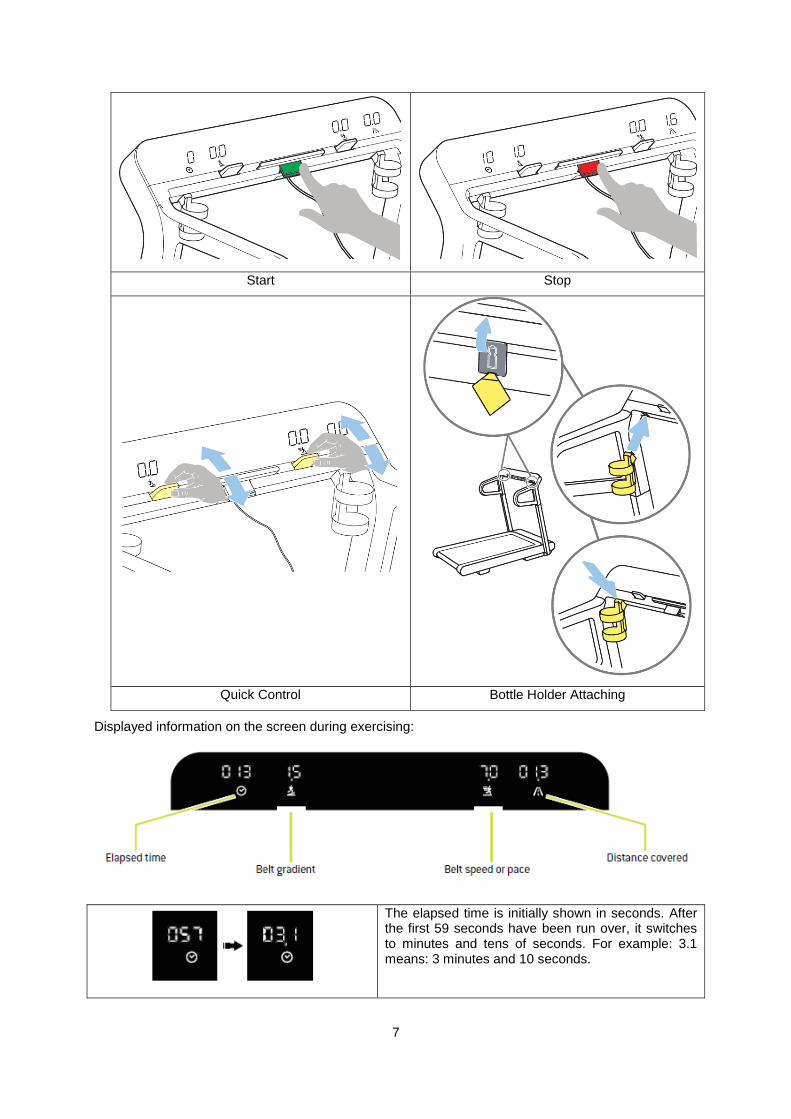
Start Stop
Quick Control Bottle Holder Attaching
Displayed information on the screen during exercising:
The elapsed time is initially shown in seconds. After the first 59 seconds have been run over, it switches to minutes and tens of seconds. For example: 3.1 means: 3 minutes and 10 seconds.
8
The belt gradient is shown as a percentage.
Depending on the setting, it displays either the speed or the pace of the belt. The speed is displayed in kilometres per hour (km/h) or in miles per hour (mph). It depends on setting. The pace is displayed in minutes per kilometer (min/km) or in minutes per mile (min/mi), depending on the setting (more in the section “Setting the exercise data“).
The distance is initially displayed in meters. After the first 99 meters have gone over, it displays in kilometres. It is possible to change it to displaying in miles setting (more in the section “Setting the exercise data“).
ACCESSORY
To this product belong following accessories which included:
1) Spanner for assembly
2) Important safety instructions
3) Guarantee certificate and statement of conformity
4) Power cable
5) Cleaning cloth
6) Levelling spanner
7) Tool for removing the panels for adjustment access
8) Water bottle holder
SAFETY KEY
A. Magnetic stop device (safety key)
It is located under the Start/Stop key. By pulling it out you can immediately stop this device in an emergency.
9
B. Clip
The clip is connected to the safety key through a cord. It must be attached to your dress to protect you from falling if you are too far from the screen or drop back towards the belt edge. In some danger situation, the key will be pulled away to stop device operation without having to use any control key. You must insert the safety key back to the socket to restore operation. To do it, wind the cord in the direction as shown in the picture.
WARNING:
Check that the safety key (stop device) works properly before each training and don’t forget to attach the clip to your clothes.
Remove the safety key (A) from the socket to prevent this device from unauthorized using.
10
C. Main switch
Using it you can switch this device ON and OFF. It also protects the electrical parts from overvoltage. The circuit breaker opens to protect the internal electronical parts.
NOTE: Following symbol indicates moving parts. These areas must be maintained only by an expert.
PROPER INSTALLATION
This product must be installed in specific conditions to assure safe, comfortable and effective using. Before placing this device consider following points:
Temperature between +10°C and +25°C.
Sufficient ventilation to assure humidity level between 20% and 70% (when equipment works).
Adequate lighting for pleasant relaxing conditions.
A clearance of 2 x 1 m for higher safety.
Place it only on a flat, solid and stable surface without vibrations. The surface must be solid enough to bear the device and user weight.
WARNING:
1. The installation must comply with all stability requirements according to the legislation and laws.

11
2. Protect it from direct sunlight.
3. Don’t install it near water or in places with higher humidity.
4. We recommend to use a dedicated power-supply circuit. This should be fitted with a combined MCB/RCD with following characteristics:
Type C10, if the main voltage is 200-240 Vac
Type C16, if the main voltage is 100-120 Vac
If it is not possible to connect it to dedicated power supply circuit with this specification, ask an electrician for advice.
TRANSPORT
Transport it very carefully, because it could get unstable and turn over.
Check that this device is level during transport.
This product has two fixed front wheels for easy transport.
Lift slightly the sides and push it forwards or backwards to transport it.
At least two people are required for safe transport.
If it is impossible to use these wheels, because of surface unevenness etc., use standard lifting and transport equipment.
LEVELLING
This device must be level before using.
If one of these two stands (A or B) doesn’t touch the ground, the stand (foot) A must be adjusted using the provided spanner.
Insert the tool (C) into the hole and open the panel (D).
Loosen the lock nut (E).
Screw or unscrew the stand (foot) A until the both stands (feet) touch the floor.
Tighten the lock nut (E) and complete adjustment.
Close panel (D).
12
ELECTRICAL CONNECTION
Before connecting the unit to the mains power supply, ensure that the electrical installation complies with current regulations. Check the mains power supply specifications on the unit’s identification plate.
The wall socket must be located in a place where the unit may be easily and safely plugged in and unplugged.
When plugging in, the main switch on the unit must be in the off position.
Check the state of the power cable periodically.
First plug the power cable into the unit’s slot and then into the wall socket.
The unit must be earthed. If the unit malfunctions or breaks down, earthing provides a minimal resistance path for electric current, thus reducing the risk of electric shock. The unit is equipped with a cable that includes an earth wire and an earthing plug. The plug must be connected to an appropriate, properly installed socket and earthed in accordance with all local rules and ordinances.
WARNING
The power supply socket must be earthed. If not, an earth connection must be installed by a qualified electrician before connecting the unit to the electricity mains.
Improper connection of the earth wire may result in a risk of an electrical shock. Check with a qualified electrician or serviceman if you are in doubt as to whether the product is properly earthed. Do not modify the plug provided with the unit; if it does not fit the socket, have a suitable socket installed by a qualified technician.
13
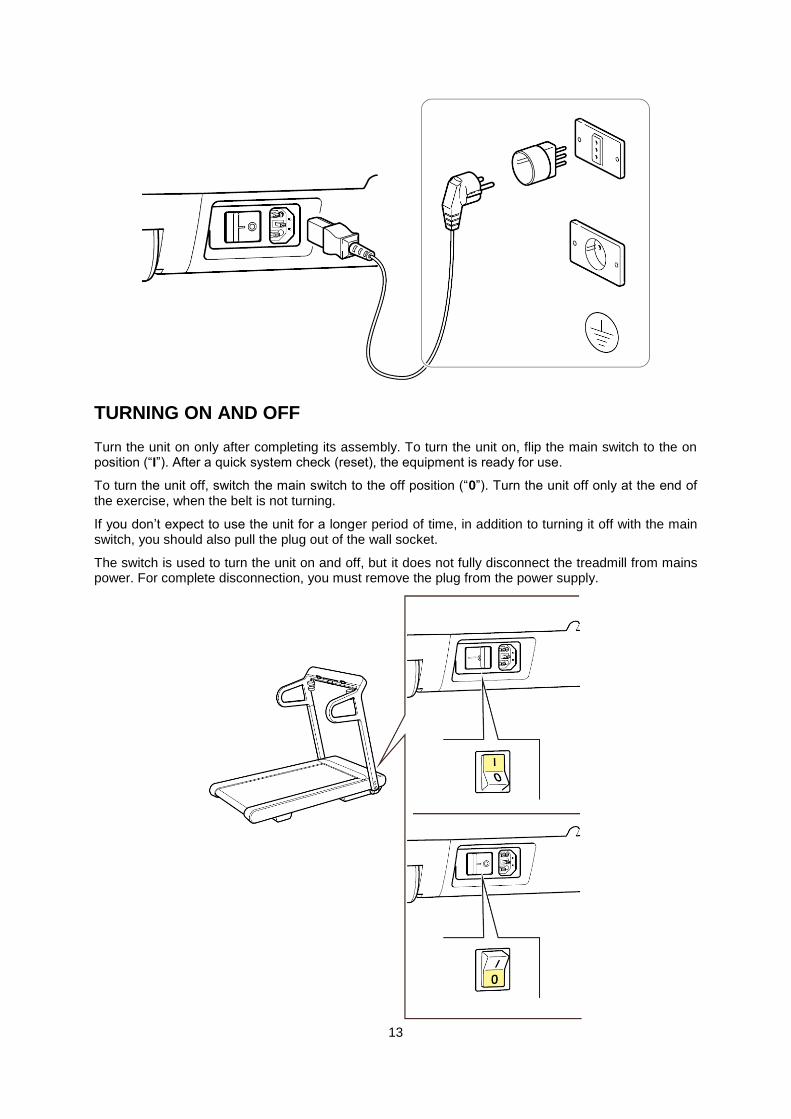
TURNING ON AND OFF
Turn the unit on only after completing its assembly. To turn the unit on, flip the main switch to the on position (“I”). After a quick system check (reset), the equipment is ready for use.
To turn the unit off, switch the main switch to the off position (“0”). Turn the unit off only at the end of the exercise, when the belt is not turning.
If you don’t expect to use the unit for a longer period of time, in addition to turning it off with the main switch, you should also pull the plug out of the wall socket.
The switch is used to turn the unit on and off, but it does not fully disconnect the treadmill from mains power. For complete disconnection, you must remove the plug from the power supply.

14
Even if the main switch is on, the unit will enter stand-by mode if it remains unused for more than 10 minutes. In stand-by mode, the display is turned off. All you need to do to restart all functions is to stand in front of the display, where the two presence detectors (A) are located.
The product complies with the ERP Directive 2009/125/CE on low energy consumption; consumption in stand-by mode is less than 0.5 W.
MAINTENANCE
The safety of the equipment is assured only on the condition that it is carefully inspected every two weeks for any signs of damage or wear. Replace the defective and worn components immediately or remove the equipment from service.
Call the technical support service for instructions or any maintenance operations not described in this manual.
The unit should be always kept clean and free of dust, in accordance with standard hygiene and sanitary practices.
To clean the control panel, proceed as follows:
Turn the unit off by moving the mains switch to position “0”.
Unplug the power cable from the wall socket.
Clean the control panel with a damp, yet not wet cloth.
Clean the treadmill completely every week:
When the unit is turned off, clean the external parts with a damp sponge.
Set the running surface at maximum inclination level and use a vacuum cleaner to clean the underside of the unit.
Clean the running surface with a brush with nylon bristles or a clean synthetic broom, while the belt is turning with no one using it.
Do not use chemicals or solvents. Do not use abrasive products on polished parts.
Make sure you do not rub too hard on the control panel.
TREADMILL BELT ALIGNMENT
When the belt is running, it must be centrally aligned in relation to the frame. If the running belt tends to move either to the right or the left, it must be centred.
1. Open the cover flap (A) while the belt is stopped.
2. Start the belt at the speed of 3 km/h.
3. Turn the adjustment screw (B) located at the rear of the equipment, until the belt is centred.
4. The outer edge (C) of the logo on the belt must remain within the marks (D) on the casing.
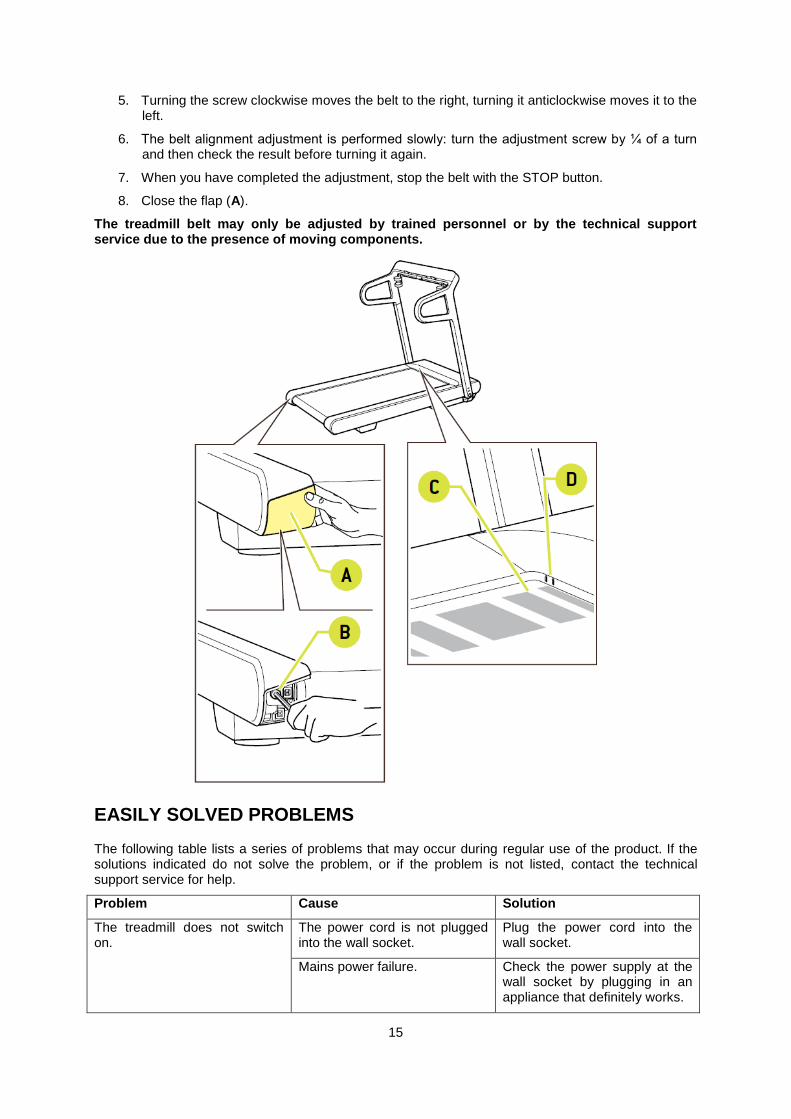
15
5. Turning the screw clockwise moves the belt to the right, turning it anticlockwise moves it to the left.
6. The belt alignment adjustment is performed slowly: turn the adjustment screw by ¼ of a turn and then check the result before turning it again.
7. When you have completed the adjustment, stop the belt with the STOP button.
8. Close the flap (A).
The treadmill belt may only be adjusted by trained personnel or by the technical support service due to the presence of moving components.
EASILY SOLVED PROBLEMS
The following table lists a series of problems that may occur during regular use of the product. If the solutions indicated do not solve the problem, or if the problem is not listed, contact the technical support service for help.
Problem Cause Solution
The treadmill does not switch on.
The power cord is not plugged into the wall socket.
Plug the power cord into the wall socket.
Mains power failure. Check the power supply at the wall socket by plugging in an appliance that definitely works.
16
Power cord is damaged. Contact the technical support service.
The power cord is not connected to the unit.
Connect the power cord to the unit.
The main switch is off. Turn on the main switch.
The main switch often turns itself off.
Contact the technical support service.
The treadmill is too noisy. The treadmill is not properly levelled.
Adjust the position and level with the rear adjustment foot.
The treadmill is not centred. Align the treadmill as described in the paragraph “Aligning the treadmill”.
Incorrect or unreliable data. The treadmill is next to a source of radio interference (i.e. electrical appliances).
Move the treadmill elsewhere or move the electrical appliances.
The side handgrips do not stay in place.
The handgrip anchor level is not fully raised.
Remove the handgrips and refit them onto the frame.
The treadmill is blocked, with the screen off and with the red light of the start button steadily on.
The software update has not been completed.
Position the tablet on the control panel.
Start the MYRUN app.
Connect to the treadmill.
Wait for the update to complete.
The power supply trips out. The mains electrical system may not be suitable.
Check that the characteristics of the mains electrical system meet the given requirements.
The upper part of the unit does not seem stable.
Screws (A) are not tightened sufficiently.
Tighten screws (A) until the unit is stable.
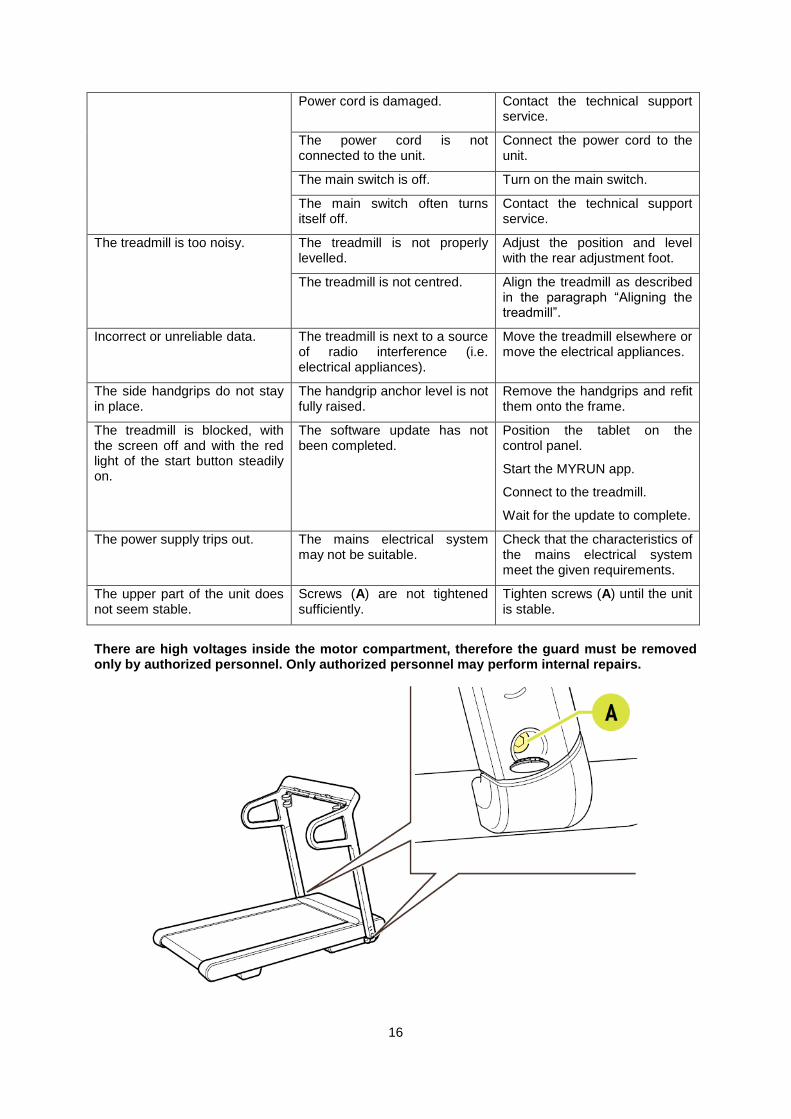
There are high voltages inside the motor compartment, therefore the guard must be removed only by authorized personnel. Only authorized personnel may perform internal repairs.
17
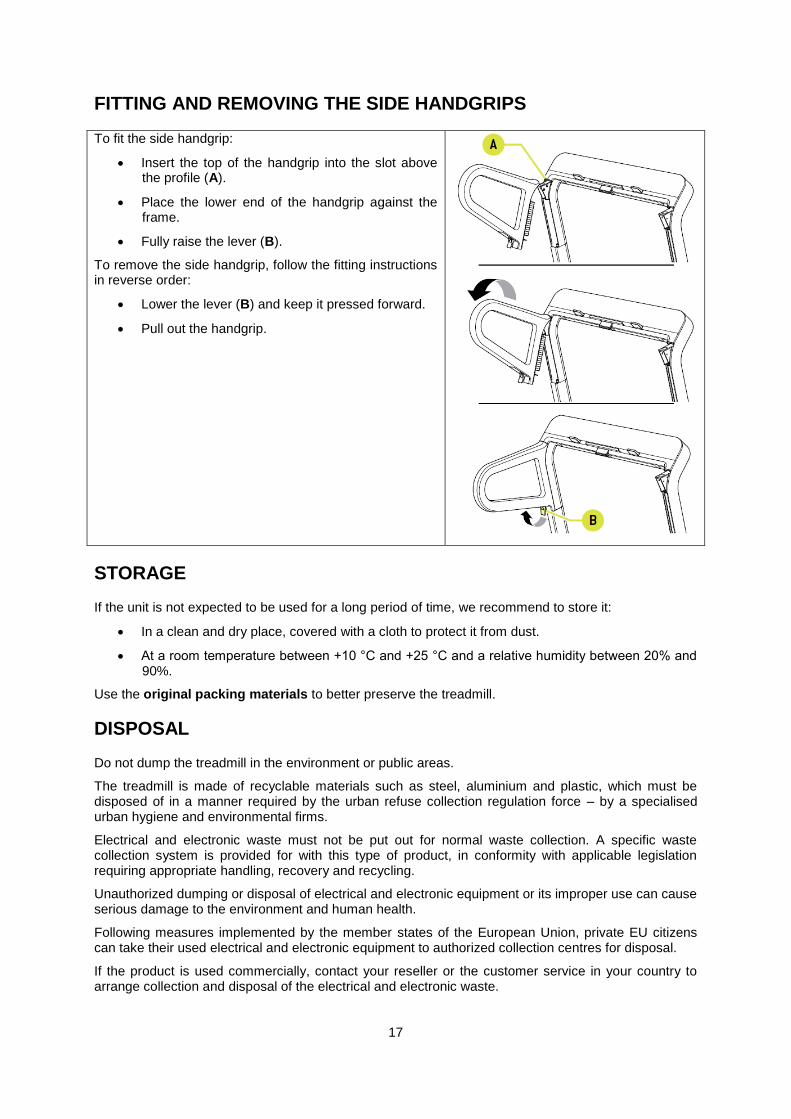
FITTING AND REMOVING THE SIDE HANDGRIPS
To fit the side handgrip:
Insert the top of the handgrip into the slot above the profile (A).
Place the lower end of the handgrip against the frame.
Fully raise the lever (B).
To remove the side handgrip, follow the fitting instructions in reverse order:
Lower the lever (B) and keep it pressed forward.
Pull out the handgrip.
STORAGE
If the unit is not expected to be used for a long period of time, we recommend to store it:
In a clean and dry place, covered with a cloth to protect it from dust.
At a room temperature between +10 °C and +25 °C and a relative humidity between 20% and 90%.
Use the original packing materials to better preserve the treadmill.
DISPOSAL
Do not dump the treadmill in the environment or public areas.
The treadmill is made of recyclable materials such as steel, aluminium and plastic, which must be disposed of in a manner required by the urban refuse collection regulation force – by a specialised urban hygiene and environmental firms.
Electrical and electronic waste must not be put out for normal waste collection. A specific waste collection system is provided for with this type of product, in conformity with applicable legislation requiring appropriate handling, recovery and recycling.
Unauthorized dumping or disposal of electrical and electronic equipment or its improper use can cause serious damage to the environment and human health.
Following measures implemented by the member states of the European Union, private EU citizens can take their used electrical and electronic equipment to authorized collection centres for disposal.
If the product is used commercially, contact your reseller or the customer service in your country to arrange collection and disposal of the electrical and electronic waste.
18
Contact the local authorities for disposal of electrical or electronic waste in countries outside the European Union.
WORKING OUT
MYRUN TECHNOGYM simulates walking and running, aerobic activities that can be performed at various levels of intensity and are useful for joint and cardiovascular rehabilitation exercises. The range of users this treadmill is suitable for is therefore broad and diversified – from professional athletes, to those who want to focus on cardio training, to those who wish to improve and maintain their physical fitness.
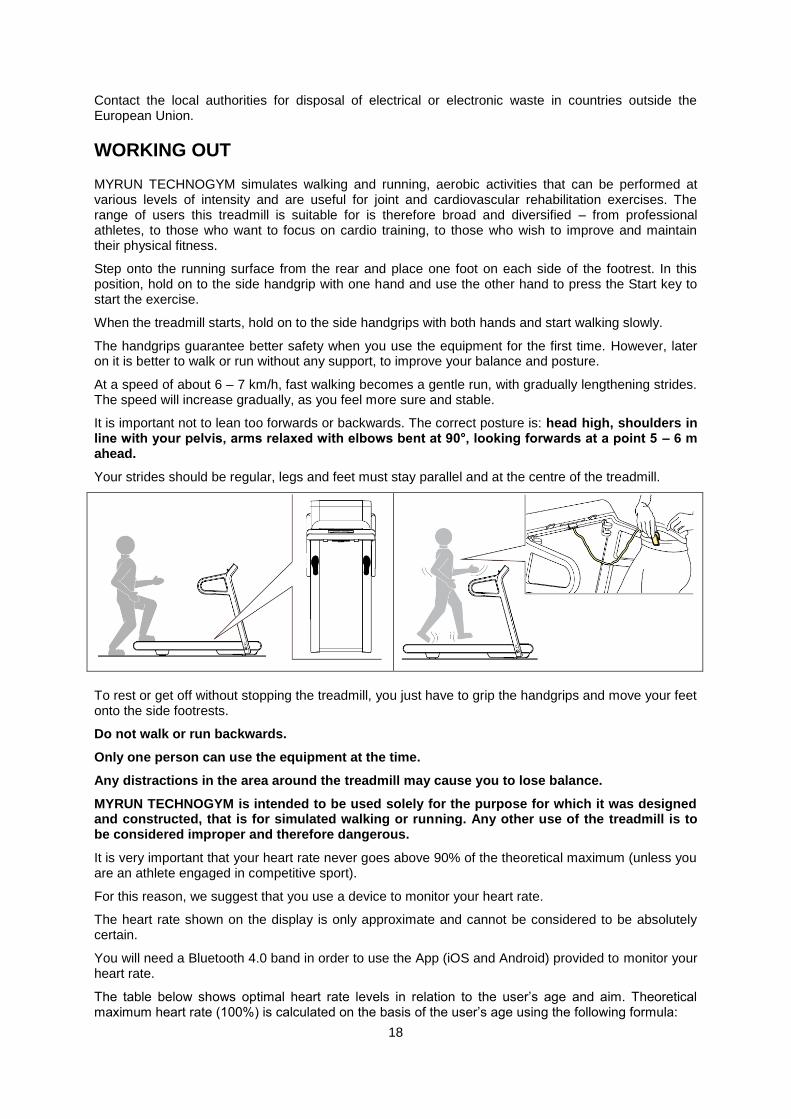
Step onto the running surface from the rear and place one foot on each side of the footrest. In this position, hold on to the side handgrip with one hand and use the other hand to press the Start key to start the exercise.
When the treadmill starts, hold on to the side handgrips with both hands and start walking slowly.
The handgrips guarantee better safety when you use the equipment for the first time. However, later on it is better to walk or run without any support, to improve your balance and posture.
At a speed of about 6 – 7 km/h, fast walking becomes a gentle run, with gradually lengthening strides. The speed will increase gradually, as you feel more sure and stable.
It is important not to lean too forwards or backwards. The correct posture is: head high, shoulders in line with your pelvis, arms relaxed with elbows bent at 90°, looking forwards at a point 5 – 6 m ahead.
Your strides should be regular, legs and feet must stay parallel and at the centre of the treadmill.
To rest or get off without stopping the treadmill, you just have to grip the handgrips and move your feet onto the side footrests.
Do not walk or run backwards.
Only one person can use the equipment at the time.
Any distractions in the area around the treadmill may cause you to lose balance.
MYRUN TECHNOGYM is intended to be used solely for the purpose for which it was designed and constructed, that is for simulated walking or running. Any other use of the treadmill is to be considered improper and therefore dangerous.
It is very important that your heart rate never goes above 90% of the theoretical maximum (unless you are an athlete engaged in competitive sport).
For this reason, we suggest that you use a device to monitor your heart rate.
The heart rate shown on the display is only approximate and cannot be considered to be absolutely certain.
You will need a Bluetooth 4.0 band in order to use the App (iOS and Android) provided to monitor your heart rate.
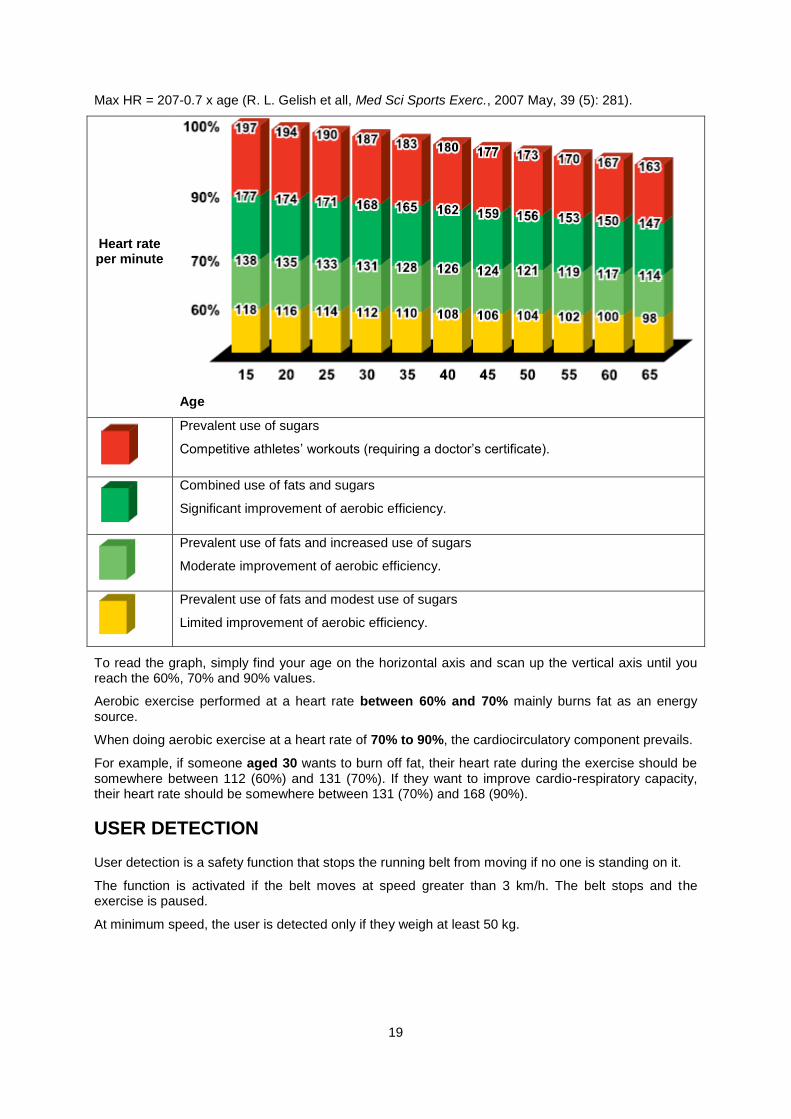
The table below shows optimal heart rate levels in relation to the user’s age and aim. Theoretical maximum heart rate (100%) is calculated on the basis of the user’s age using the following formula:
19
Max HR = 207-0.7 x age (R. L. Gelish et all, Med Sci Sports Exerc., 2007 May, 39 (5): 281).
Heart rate per minute
Age
Prevalent use of sugars
Competitive athletes’ workouts (requiring a doctor’s certificate).
Combined use of fats and sugars
Significant improvement of aerobic efficiency.
Prevalent use of fats and increased use of sugars
Moderate improvement of aerobic efficiency.
Prevalent use of fats and modest use of sugars
Limited improvement of aerobic efficiency.
To read the graph, simply find your age on the horizontal axis and scan up the vertical axis until you reach the 60%, 70% and 90% values.
Aerobic exercise performed at a heart rate between 60% and 70% mainly burns fat as an energy source.
When doing aerobic exercise at a heart rate of 70% to 90%, the cardiocirculatory component prevails.
For example, if someone aged 30 wants to burn off fat, their heart rate during the exercise should be somewhere between 112 (60%) and 131 (70%). If they want to improve cardio-respiratory capacity, their heart rate should be somewhere between 131 (70%) and 168 (90%).
USER DETECTION
User detection is a safety function that stops the running belt from moving if no one is standing on it.
The function is activated if the belt moves at speed greater than 3 km/h. The belt stops and the exercise is paused.
At minimum speed, the user is detected only if they weigh at least 50 kg.
20
USING A TABLET
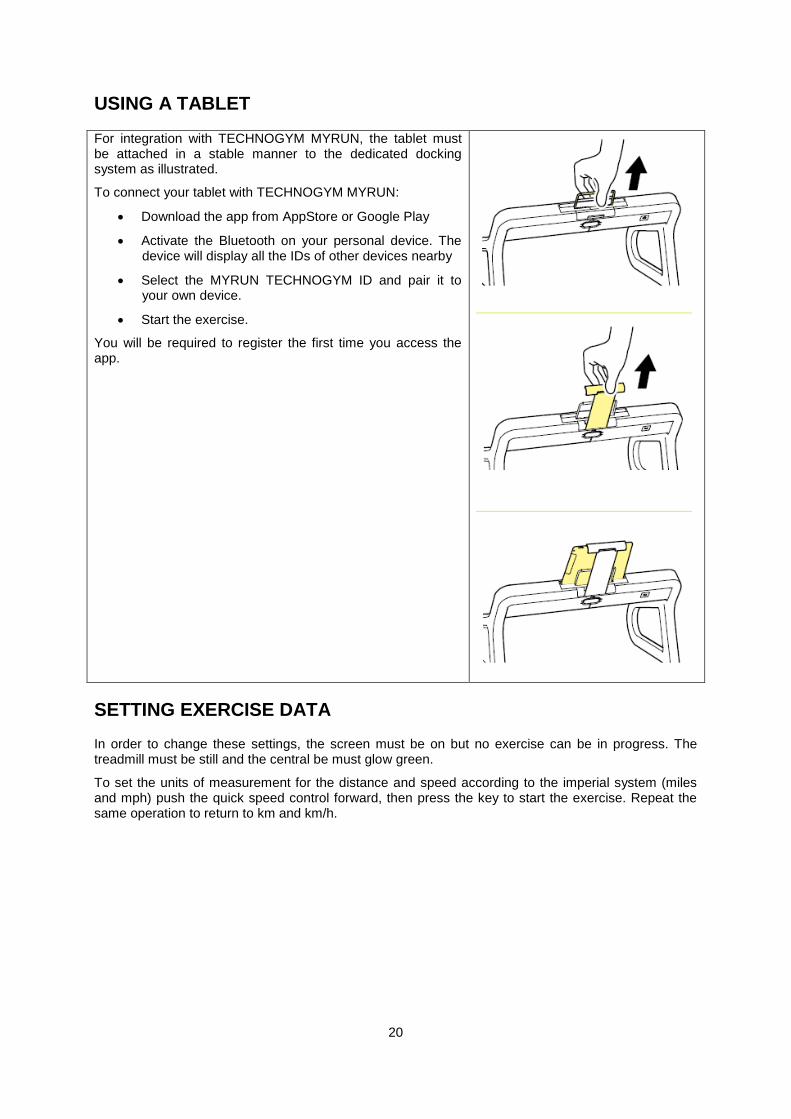
For integration with TECHNOGYM MYRUN, the tablet must be attached in a stable manner to the dedicated docking system as illustrated.
To connect your tablet with TECHNOGYM MYRUN:
Download the app from AppStore or Google Play
Activate the Bluetooth on your personal device. The device will display all the IDs of other devices nearby
Select the MYRUN TECHNOGYM ID and pair it to your own device.
Start the exercise.
You will be required to register the first time you access the app.
SETTING EXERCISE DATA
In order to change these settings, the screen must be on but no exercise can be in progress. The treadmill must be still and the central be must glow green.
To set the units of measurement for the distance and speed according to the imperial system (miles and mph) push the quick speed control forward, then press the key to start the exercise. Repeat the same operation to return to km and km/h.

21
When switching from kilometres to miles, the value “0.5” will be displayed as confirmation.
When switching from miles to kilometres, the value “0.8” will be displayed as conformation.
To display your pace instead of your speed, pull the quick speed control towards you, then press the key to start the exercise. Repeat to display your speed again.
When switching from km/h to min/km, the value “75.0” is displayed.
When switching from mph to min/mi, the value “120” is displayed.
When switching from min/km to km/h, the value “0.8” is displayed.
When switching from min/mi to mph, the value “0.5” is displayed.
TERMS AND CONDITIONS OF WARRANTY, WARRANTY CLAIMS
General Conditions of Warranty and Definition of Terms
All Warranty Conditions stated hereunder determine Warranty Coverage and Warranty Claim Procedure. Conditions of Warranty and Warranty Claims are governed by Act No. 40/1964 Coll. Civil Code, Act No. 513/1991 Coll., Commercial Code, and Act No. 634/1992 Coll., Consumer Protection Act, as amended, also in cases that are not specified by these Warranty rules.
The seller is SEVEN SPORT s.r.o. with its registered office in Borivojova Street 35/878, Prague 13000, Company Registration Number: 26847264, registered in the Trade Register at Regional Court in Prague, Section C, Insert No. 116888.

22
According to valid legal regulations it depends whether the Buyer is the End Customer or not.
“The Buyer who is the End Customer” or simply the “End Customer” is the legal entity that does not conclude and execute the Contract in order to run or promote his own trade or business activities.
“The Buyer who is not the End Customer” is a Businessman that buys Goods or uses services for the purpose of using the Goods or services for his own business activities. The Buyer conforms to the General Purchase Agreement and business conditions to the extent specified in the Commercial Code.
These Conditions of Warranty and Warranty Claims are an integral part of every Purchase Agreement made between the Seller and the Buyer. All Warranty Conditions are valid and binding, unless otherwise specified in the Purchase Agreement, in the Amendment to this Contract or in another written agreement.
Warranty Conditions
Warranty Period
The Seller provides the Buyer a 24 months Warranty for Goods Quality, unless otherwise specified in the Certificate of Warranty, Invoice, Bill of Delivery or other documents related to the Goods. The legal warranty period provided to the Consumer is not affected.
By the Warranty for Goods Quality, the Seller guarantees that the delivered Goods shall be, for a certain period of time, suitable for regular or contracted use, and that the Goods shall maintain its regular or contracted features.
The Warranty does not cover defects resulting from (if applicable):
User’s fault, i.e. product damage caused by unqualified repair work, improper assembly, insufficient insertion of seat post into frame, insufficient tightening of pedals and cranks
Improper maintenance
Mechanical damages
Regular use (e.g. wearing out of rubber and plastic parts, moving mechanisms, joints etc.)
Unavoidable event, natural disaster
Adjustments made by unqualified person
Improper maintenance, improper placement, damages caused by low or high temperature, water, inappropriate pressure, shocks, intentional changes in design or construction etc.
Warranty Claim Procedure
The Buyer is obliged to check the Goods delivered by the Seller immediately after taking the responsibility for the Goods and its damages, i.e. immediately after its delivery. The Buyer must check the Goods so that he discovers all the defects that can be discovered by such check.
When making a Warranty Claim the Buyer is obliged, on request of the Seller, to prove the purchase and validity of the claim by the Invoice or Bill of Delivery that includes the product’s serial number, or eventually by the documents without the serial number. If the Buyer does not prove the validity of the Warranty Claim by these documents, the Seller has the right to reject the Warranty Claim.
If the Buyer gives notice of a defect that is not covered by the Warranty (e.g. in the case that the Warranty Conditions were not fulfilled or in the case of reporting the defect by mistake etc.), the Seller is eligible to require a compensation for all the costs arising from the repair. The cost shall be calculated according to the valid price list of services and transport costs.
If the Seller finds out (by testing) that the product is not damaged, the Warranty Claim is not accepted. The Seller reserves the right to claim a compensation for costs arising from the false Warranty Claim.
In case the Buyer makes a claim about the Goods that is legally covered by the Warranty provided by the Seller, the Seller shall fix the reported defects by means of repair or by the exchange of the damaged part or product for a new one. Based on the agreement of the Buyer, the Seller has the right to exchange the defected Goods for a fully compatible Goods of the same or better technical characteristics. The Seller is entitled to choose the form of the Warranty Claim Procedures described in this paragraph.
23
The Seller shall settle the Warranty Claim within 30 days after the delivery of the defective Goods, unless a longer period has been agreed upon. The day when the repaired or exchanged Goods is handed over to the Buyer is considered to be the day of the Warranty Claim settlement. When the Seller is not able to settle the Warranty Claim within the agreed period due to the specific nature of the Goods defect, he and the Buyer shall make an agreement about an alternative solution. In case such agreement is not made, the Seller is obliged to provide the Buyer with a financial compensation in the form of a refund.
SEVEN SPORT s.r.o.
Registered Office: Borivojova 35/878, 130 00 Praha 3, Czech Republic
Headquarters: Delnicka 957, 749 01 Vitkov, Czech Republic
Warranty & Service Centre: Cermenska 486, 749 01 Vitkov, Czech Republic
CRN: 26847264
VAT ID: CZ26847264
Phone: +420 556 300 970
E-mail: [email protected]
Web: www.insportline.cz
SK
INSPORTLINE s.r.o.
Headquarters, Warranty & Service centre: Elektricna 6471, 911 01 Trencin, Slovakia
CRN: 36311723
VAT ID: SK2020177082
Phone: +421(0)326 526 701
E-mail: [email protected]
Web: www.insportline.sk
Date of Sale: Stamp and Signature of Seller: