Embed Size (px)
Citation preview
Double Reeds
v. 1 .4
User Manual
2
Table of Contents
Before you start 3 Licensing 3 Product Description 3 System Requirements 4 Supported formats 4 Operating systems 4 CPU load 4 Stand-alone mode 5 Hardware Requirements 5
Audio 5 MIDI 5 The Instrument and its controls 6 Main Instrument GUI (Graphical User Interface) 6 Main Controls vs. articulations 8 GUI Parameter Controls 8 Main Page 9 Options page 11 MIDI CC Mapping Options 12 Advanced Parameters 12 Microtuning 13 Microtuning using the mouse 14 Microtuning using the Keyswitches 15 Saving Microtuning settings 16 Keyswitches 17 Updates 17 License Key Recovery 17 Technical Support 18

3
Before you start Even though these instruments are easy and intuitive to play, getting excellent results requires some practice and experience. Please read this User Manual carefully. It contains very important information which will help you to achieve best results in a much shorter time. Listen also to the demos and have a closer look at the demo MIDI file(s) available on our homepage www.samplemodeling.com. The demo MIDI files clearly show how the instrument is played and which parameters are most important for a realistic performance.
Note: the MIDI note naming convention we are using is based on the Yamaha standard: the middle C is C3, corresponding to the MIDI note number 60.
Licensing We provide two license keys. How to use them is the customer's choice. One can elect to install the instrument on two different systems, if both belong to him and are not used simultaneously. Or, one can spare one license for a future installation. Each license key activates both instruments belonging to the product. Please note that operating system or hard drive changes do not affect instrument activation. However, major hardware upgrades or installation of the instrument on a new computer require a new activation. In this case, deactivation of a previous license is required in order to free the license for a new installation. This is easily accomplished by sending us a deactivation request per e-mail. Sharing unused license keys is strictly forbidden. Please note that all license keys are personalized, and that your email address will be displayed on the instrument GUI (Graphical User Interface).
Product description The Double Reeds can really be PLAYED in realtime by shaping the sound like a real oboe, or english horn, or a bassoon player does. They work on any up-to-date computer (see System Requirements), within any suitable host like a sequencer (Cubase, Logic, etc.), DAW (Digital Audio Workstation) or a free host application (see below). They use Stefano Lucato's proprietary SWAM (Synchronous Wavelength Acoustic Modeling) technology, providing the exceptional playability and realism which characterize all Samplemodeling instruments. It’s not a sample player, using pre-recorded articulations, but a complex virtual instrument, capable of shaping almost any kind of articulations and phrases in realtime. It can be played using any MIDI device like a keyboard, breath or wind controller. (However, it’s essential to provide the suitable control using appropriate MIDI devices, as described in this manual). Direct programming in a sequencer (without any MIDI devices) is also possible.
4
Note: Like a real instrument or other Samplemodeling instruments, and differently from any conventional sample library, the Double Reeds allows continuous transition across the dynamics (from pp to ff), free from any phasing artifacts. To accomplish this, a suitable continuous physical MIDI controller (such as an expression or volume pedal (CC11 or CC7), a breath or a wind controller (CC2)) is absolutely necessary. WITHOUT THIS CONTROLLER THE INSTRUMENT WILL NOT WORK, displaying the warning “Expression controller not received. Please move your expression controller.” Other physical MIDI controllers, like sliders, knobs or a modwheel, though not recommended, can be used for this purpose. Please refer to other sections of this manual for further details.
System Requirements Supported Plugin Formats PC: VST 32/64 bit AAX 32/64 bit Mac: AU 32/64 bit VST 32/64 bit AAX 32/64 bit
Required operating systems PC: Windows 7, 8 or XP, 32/64 bit Mac: Intel only, Mac OS X 10.6 – 10.8 – 10.9
CPU load The realism and expressiveness of the Double Reeds is demanding in terms of CPU load. It needs an up-to-date computer with at least 1,6 GHz Core2Duo CPU. Less powerful systems may also prove satisfactory, but may require larger buffer sizes, involving higher latencies
Note: This may not represent a real problem though. Using the freeze feature or bouncing the single MIDI tracks to audio is a useful remedy.
5
Stand-alone mode If you are a PC user and do not have any host application being capable of running VST or AU plugins (like a sequencer, DAW or another audio application), you can install a free host application like the excellent SaviHost by Hermann Seib, or Cantabile Lite. Other VST Hosts, albeit not necessarily free, can be found for example at http://www.kvraudio.com/get.php Mac users may use the Garage Band belonging to the system. Important note: Garage Band supports only 32 bit plugins, so the 32 bit version of the instrument must be installed. The 64 bit version will not work.
Hardware Requirements
Audio Interface (Sound Card) A good quality audio interface (USB, FireWire, PCI) with suitable low latency drivers (like ASIO for the PC) is required. The allowed buffer size is 64 - 2048 samples. Recommended settings are 256 samples, or 512 samples (higher latency, but less CPU load).
MIDI devices The Double Reeds (like any other virtual instrument) can be successfully used without any additional hardware (except the audio interface) by drawing the controller curves and programming the notes directly in the host sequencer. However, a much more “human” and interactive configuration is recommended – especially for realtime playing - using external MIDI devices:
- A MIDI keyboard with at least 5 octaves, Modwheel & Pitchbend, connected to the computer via USB or an external MIDI interface, equipped with a set of physical continuous MIDI controllers (usually knobs or sliders) to control effects like overblow, subharmonic, growl, etc.
- An Expression pedal, controlling the dynamics via CC11. Although the dynamics can be
controlled by any other physical controller (knob, slider), a pedal is highly recommended. As an alternative, a breath controller, like Yamaha BC3, can be used. A pedal or a breath controller is highly recommended.
- Woodwind or brass players may prefer a wind controller like Yamaha WX or Akai EWI (USB or
4000S); both provide excellent results.
6
The Instrument and its controls
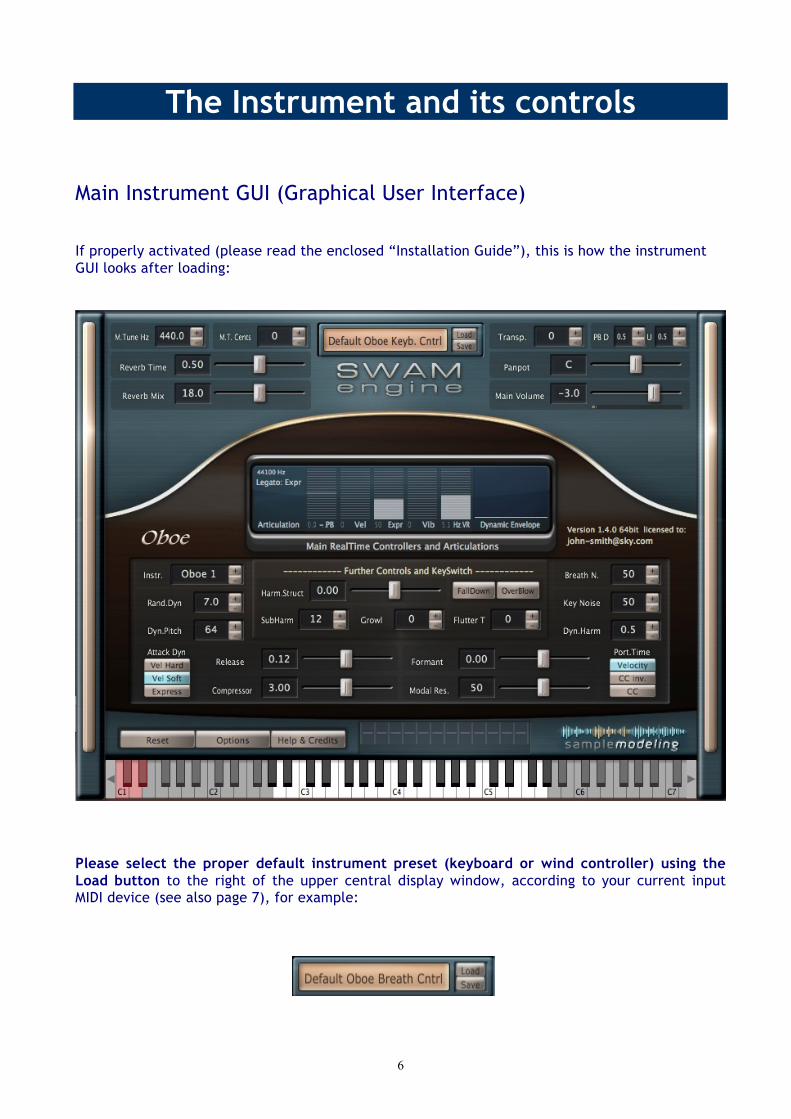
Main Instrument GUI (Graphical User Interface) If properly activated (please read the enclosed “Installation Guide”), this is how the instrument GUI looks after loading:
Please select the proper default instrument preset (keyboard or wind controller) using the Load button to the right of the upper central display window, according to your current input MIDI device (see also page 7), for example:
7
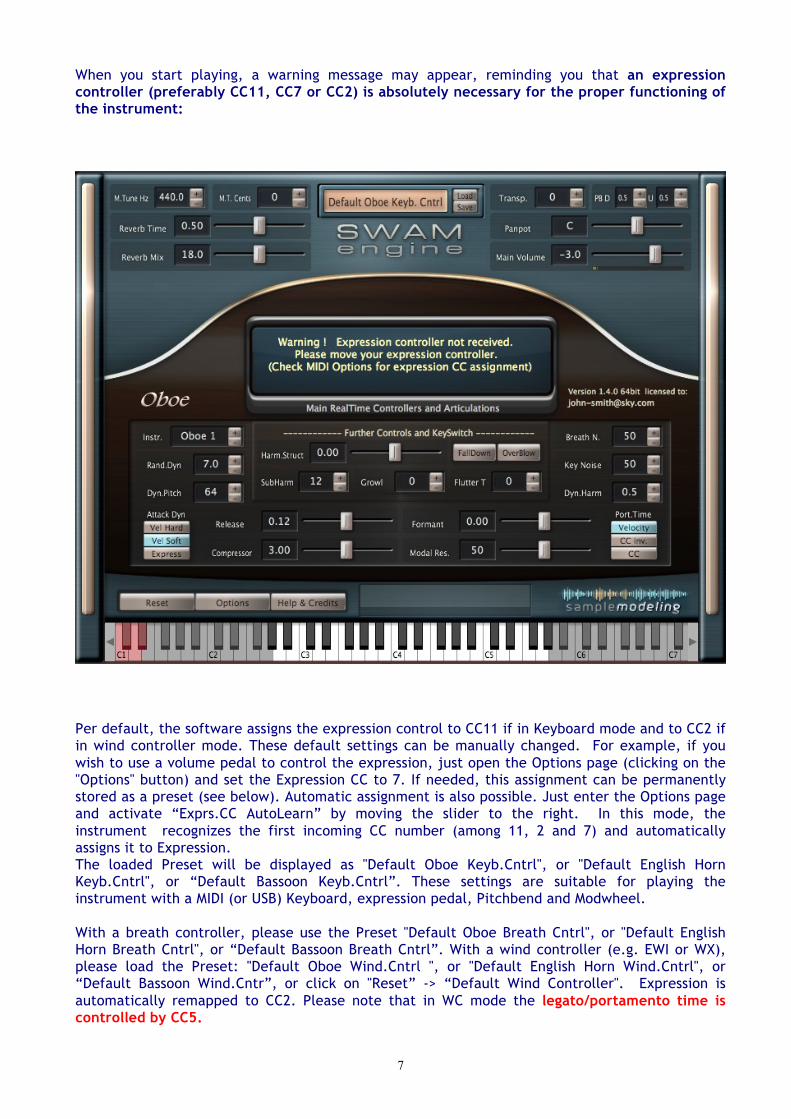
When you start playing, a warning message may appear, reminding you that an expression controller (preferably CC11, CC7 or CC2) is absolutely necessary for the proper functioning of the instrument:
Per default, the software assigns the expression control to CC11 if in Keyboard mode and to CC2 if in wind controller mode. These default settings can be manually changed. For example, if you wish to use a volume pedal to control the expression, just open the Options page (clicking on the "Options" button) and set the Expression CC to 7. If needed, this assignment can be permanently stored as a preset (see below). Automatic assignment is also possible. Just enter the Options page and activate “Exprs.CC AutoLearn” by moving the slider to the right. In this mode, the instrument recognizes the first incoming CC number (among 11, 2 and 7) and automatically assigns it to Expression. The loaded Preset will be displayed as "Default Oboe Keyb.Cntrl", or "Default English Horn Keyb.Cntrl", or “Default Bassoon Keyb.Cntrl”. These settings are suitable for playing the instrument with a MIDI (or USB) Keyboard, expression pedal, Pitchbend and Modwheel. With a breath controller, please use the Preset "Default Oboe Breath Cntrl", or "Default English Horn Breath Cntrl", or “Default Bassoon Breath Cntrl”. With a wind controller (e.g. EWI or WX), please load the Preset: "Default Oboe Wind.Cntrl ", or "Default English Horn Wind.Cntrl", or “Default Bassoon Wind.Cntr”, or click on "Reset” -> “Default Wind Controller". Expression is automatically remapped to CC2. Please note that in WC mode the legato/portamento time is controlled by CC5.
8
Main Controls vs. articulations Velocity controls: - Initial Attack (for detached notes) - Portamento Time (for Legato, if Port.Time Button is set to Velocity) Expression (CC11, CC2, CC7 or other CCs set on the OPTIONS page) controls the Dynamics (from pp to ff) ModWheel (CC1) controls Vibrato intensity CC19 controls Vibrato Rate PitchBend controls the pitch. The Pitchbend range (downwards - upwards, in semitones) can be directly set by the user on the main GUI (see page 9). Staccato, “SemiLegato”, and Legato Articulations are managed by a special algorithm which takes into account : - Note Velocity - Interval between the notes (semitones). - Time between Note-Off and subsequent Note-On GUI Parameter Controls There are three types of Controls on the Main Instrument GUI enabling a convenient data entry: - Sliders - +/- Buttons - Switches Sliders Set the desired value either by - dragging the Slider (while holding the left mouse button) or - acting on the slider with the mouse wheel +/- Buttons The values can be set in 3 different ways : - Clicking on “+” and “-“ - Acting with the mouse wheel on the label (small steps), or on the +/- buttons (larger steps) - Dragging the mouse vertically after clicking on the displayed value Double-clicking on the slider or on the number displayed aside the +/- button reloads the previously saved or default settings.
9
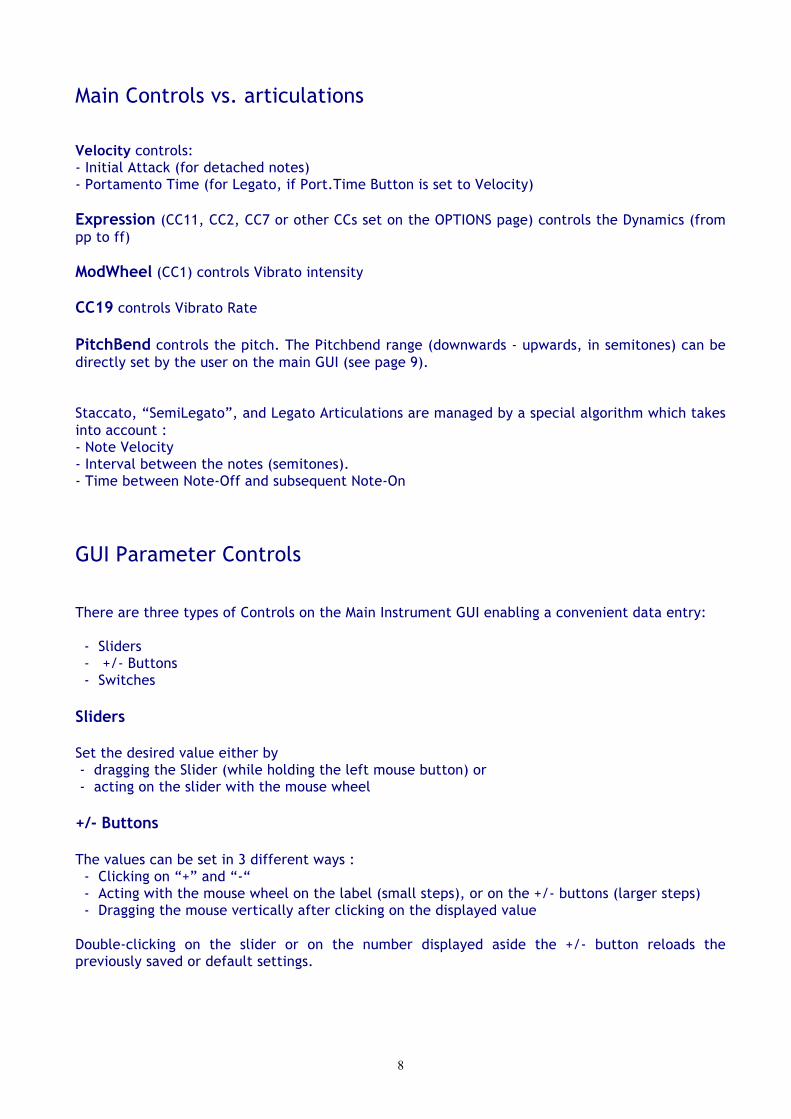
MAIN page
Load & Save *: Loads and saves instrument settings (Paths – see below) M.Tune Hz : Master Tune frequency in Hz M.T.Cents : Master Tune in Cents (Linked to M.Tune Hz, A3 = 440Hz) Reverb Time : Reverb Duration Reverb Mix : Reverb Amount (if set to 0, the Reverb is bypassed, saving CPU ) Right-click to assign it to CC91 Transp : Instrument Transpose (Key Switches are not transposed); current instrument
range indicated on the virtual keyboard (black & white keys) follows the transposition. If the transposition makes the range instrument overlap with the KeySwitches, the system warns the user and forces the KeySwitches position to the first non-overlapping octave below the instrument lowest note.
PB D .. U .. : Pitch Bend Range; can be set for bending Down and Up independently (in semitones) Panpot : Panning between L and R (see also Pan Type on the OPTIONS page)
10
Right-click to assign it to CC10 Main Volume : Instrument output level (in dB). Right-click to assign it to CC7 Instr. : Changes the instrument timbre (corresponding to different instruments or
microphone placements) Rand.Dyn : Controls random modulation of dynamics and pitch Dyn.Pitch : Amount of Pitch Modulation while changing the dynamics. Also controlled by
CC8 Attack Dyn : Changes the attack behavior, assigning it to: 1. velocity (linear response,
“Hard”), 2. Velocity (non-linear response, “soft”), and directly to Expression Harm.Struct : Spectral characteristics of the instrument (balance between odd and even
harmonics) FallDown : Clicking on this button triggers a fall. This effect is assigned also to the Key
Switch C1. Assigning to a CC is also possible (see OPTIONS page) OverBlow : Clicking on it creates overblow. Also assigned to the Key Switch D1
(momentary) and D#1 (latch), as well as to the sustain pedal (CC64) SubHarm : SubHarmonic intensity, also controlled by CC20. Growl : Growl intensity, also controlled by CC21. For a “cleaner” sound should this be
set to zero. Flutter T : Flutter Tongue intensity, also controlled by CC23 Breath N. : Breath Noise intensity, also controlled by CC25 Key Noise : Key Noise intensity, also controlled by CC9 Dyn.Harm : Amount of Harmonics and SubHarmonics modulation during Attacks and
Dynamics changes Release : Release Time on Note-Off Compressor : Audio Compression; controls the overall dynamic range from pp to ff Formant : Changes the Formants, hence the timbre of the instrument Modal Res. : Intensity of Instrument Pipe Modal Resonance Port.Time : Selects the source of the portamento time control. The legato/portamento
time can be controlled by: Velocity (default), CC (large values = long portamento time) or CC inverted (small values = long portamento time)
Reset : Resets the engine and reloads the default or previously saved parameters Options : Opens Midi CC Remapper and Advanced Parameter Settings (see below) Help & Credits : Opens Help and Credits page
11
* Load & Save paths are: Windows, VST or AAX plugins: <Program Files>/Samplemodeling/SWAM/DoubleReeds/Contrabassoon/Presets <Program Files>/Samplemodeling/SWAM/DoubleReeds/Bassoon/Presets <Program Files>/Samplemodeling/SWAM/DoubleReeds/EnglishHorn/Presets <Program Files>/Samplemodeling/SWAM/DoubleReeds/Oboe/Presets Mac, AU, VST or AAX plugins: <HD>/Users/Shared/Samplemodeling/SWAM/DoubleReeds/Contrabassoon/Presets <HD>/Users/Shared/Samplemodeling/SWAM/DoubleReeds/Bassoon/Presets <HD>/Users/Shared/Samplemodeling/SWAM/DoubleReeds/EnglishHorn/Presets <HD>/Users/Shared/Samplemodeling/SWAM/DoubleReeds/Oboe/Presets
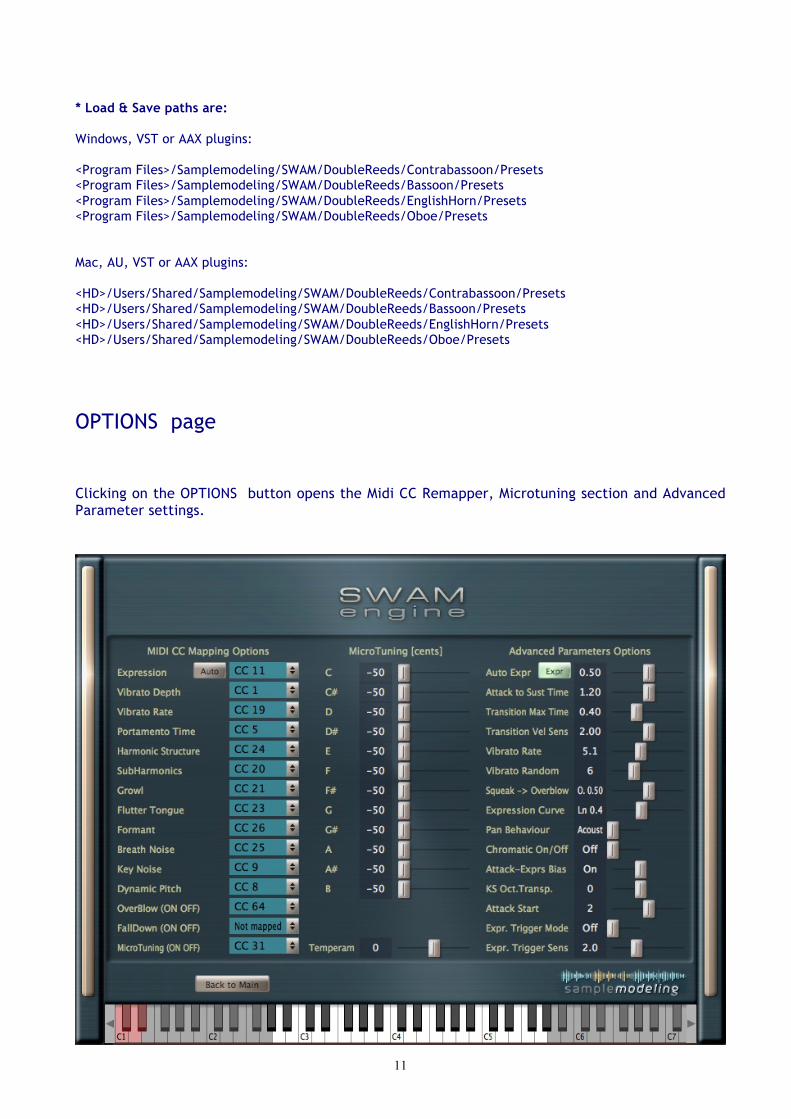
OPTIONS page Clicking on the OPTIONS button opens the Midi CC Remapper, Microtuning section and Advanced Parameter settings.
12
MIDI CC Mapping Options MIDI CC remapper allows to remap all the control parameters to any MIDI CC according to your needs. Note: OverBlow and FallDown have only On (CC>64) and Off status (CC<64) Advanced Parameters Auto Expr : activates two different types of legato: “Expr” and “Gliss” Expr straight legato (no portamento) Gliss legato with portamento. The current mode is indicated in the status
window on the Main GUI
Note: transition (legato) time is controlled by velocity (or CC5, if in wind controller mode). The velocity response can be set by the slider “Transition Vel Sens”. The maximal transition time can be set by the slider “Transition Max Time” (see below)
Attack to Sust Time : Affects the velocity-dependent duration of the transition from attack
to sustain. Transition Max Time : Maximum duration of portamento, i.e. the duration of a
legato/portamento transition played at the lowest velocity. Transition Vel Sens : Controls the relationship between velocity and portamento duration
(only if the Port.Time button on the Main Instrument GUI is set to velocity)
Vibrato Rate : Vibrato Rate (also controlled by CC19) Vibrato Rand : Random modulation of Vibrato Squeak -> Overblow: Crossfade between a brief squeak on attack (“S”), or a longer
Overblow (“O”), if Overblow is triggered by a CC (CC Default: Sus Pedal). Not active if the Overblow is triggered by the Keyswitch (D1 or D#1, see below)
Expression Curve : To cope with linear or logarithmic expression controllers (e.g. pedal)
and optimize the overall expression controller curve Pan Behavior : Selects the pan behavior of the instrument vs. reverb (“Acoustic”:
pan does not affect the reverb; “Balance”: pan affects both the instrument and the reverb)
Chromatic On/Off : Activates an automatic chromatic scale during slow portamentos on
larger intervals.
13
Attack-Exprs Bias : modifies the Attack vs. Velocity curves, depending on Expression (disabled in wind controller mode).
ExprsCC AutoLearn : Enables or disables AutoLearn, i.e. the automatic detection of the
incoming Expression CC KS Oct.Transp. : KeySwitch Octave Transposition; “0” starts from the default position
(depending on the instrument), “-12” starts 1 octave lower. The Contrabassoon can shift the KeySwitches position to “-24” Trying to move the KeySwitches in a position where an overlapping with the real notes occours, the system will force the position to the first non-overlapping octave below the instrument lower note. See also “Keyswitches” below.
Attack Start : progresively cuts the attack for more immediate attack response.
Only if set to “0” the complete original attack will be played. Expr. Trigger Mode : triggers note-on & off when the expression controller overcomes or
goes below a certain threshold. Very important feature if playing a breath controller: like in the real instrument, the pressed key only determines the (initial) note which will be played, but does not trigger it. The note is only played when blowing into the BC device, and stops when air pressure drops down. Note: choosing the breath controller preset on the instrument preset menu automatically activates this mode and sets the expression to CC2.
Expr. Trigger Sens: sensitivity adjustment of the attack response when Expression Trigger
Mode is active (see above). Back to Main : Returns to the Main GUI
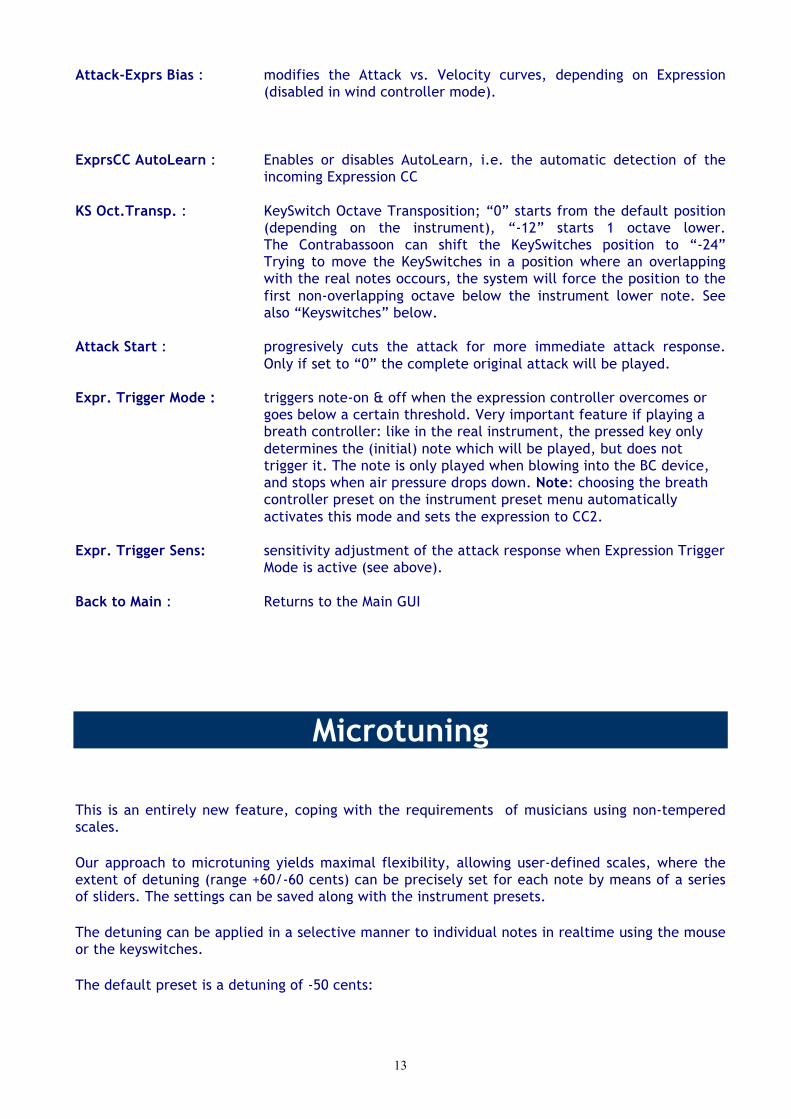
Microtuning
This is an entirely new feature, coping with the requirements of musicians using non-tempered scales.
Our approach to microtuning yields maximal flexibility, allowing user-defined scales, where the extent of detuning (range +60/-60 cents) can be precisely set for each note by means of a series of sliders. The settings can be saved along with the instrument presets.
The detuning can be applied in a selective manner to individual notes in realtime using the mouse or the keyswitches.
The default preset is a detuning of -50 cents:
14
Per default, the detuning is set, but not yet applied to any note. To apply the detuning, one can choose between two methods:
1. Acting with the mouse on the instrument GUI 2. “On the fly”, using Keyswitches.
The “Temperament” slider, if set higher than zero, applies a kind of “spread intonation”:
- it does not influence the pitch in the middle of the instrument; - the higher the pitch, the more upward detuning is applied; - the lower the pitch, the more downward detuning is applied.
That means that the overall intonation of the instrument can be additionally “spaced apart” for some special effects.
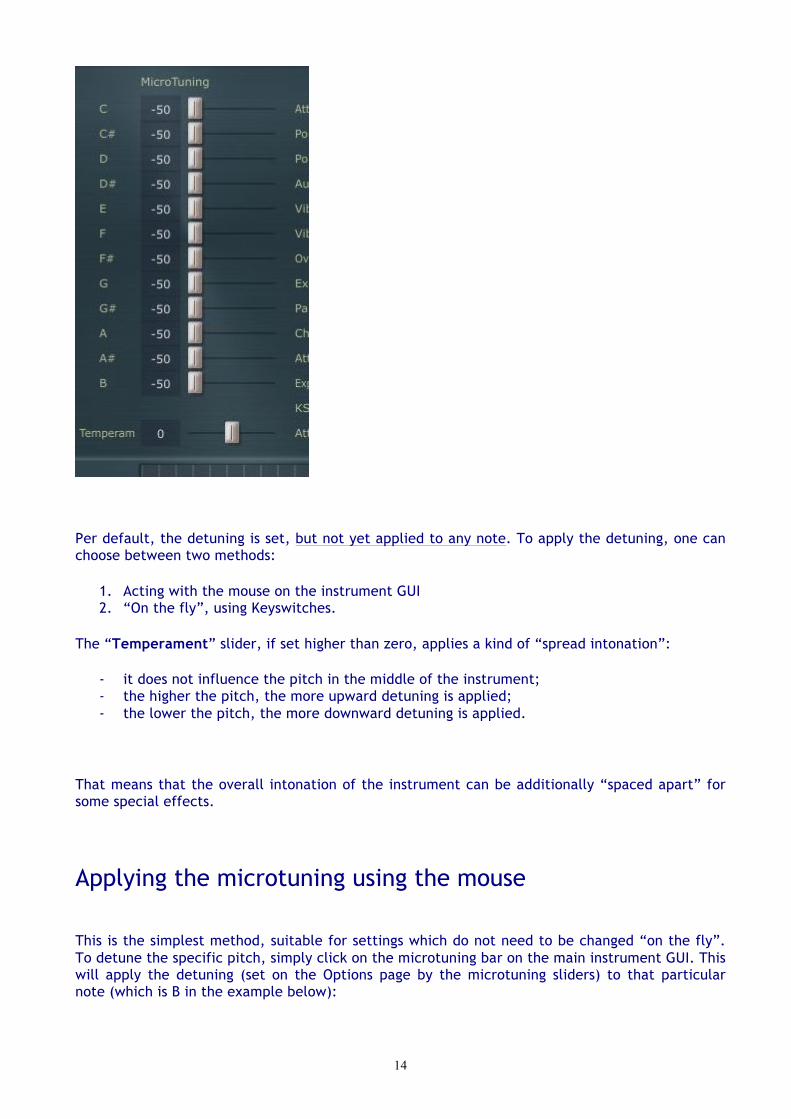
Applying the microtuning using the mouse
This is the simplest method, suitable for settings which do not need to be changed “on the fly”. To detune the specific pitch, simply click on the microtuning bar on the main instrument GUI. This will apply the detuning (set on the Options page by the microtuning sliders) to that particular note (which is B in the example below):
15
Clicking on the bargraph again will switch the detuning off.
Double-click anywhere in the bargraph area will switch the detuning of all the notes off.
Please note that the above works only on the main instrument page.
Applying the microtuning using the keyswitches
To apply microtuning to some notes using the keyswitches, one has to enter the Select Note Mode (SNM – see below), and press the appropriate keyswitches corresponding to the notes which must be detuned. For example, pressing the E1-keyswitch applies the detuning to all E notes.
How to enter the Select Note Mode (SNM)
The SNM is activated by sending a suitable CC value above 64. Which CC to use is the choice of the user: go to the Option page and enter the desired CC number in the field “MicroTuning (ON OFF)”. Entering “64” will define the sustain pedal, which is most suitable for this task. Pressing and holding down the pedal switches SNM on and highlights the keyswitches (in blue).
Note: CC64 (sus pedal) is, per default, assigned to Overblow (see OPTIONS page, field “Overblow (ON OFF))”. If using the sus pedal for Microtuning, the Overblow must be assigned to another controller, or to none, since it can be also controlled by the keyswitch D1.
How to detune selected notes
1. Enter the Select Note Mode (SNM) by pressing and holding down the sus pedal (or send a value greater than 64 via the CC you have assigned to the Microtuning); the Keyswitches turn blue.
2. Press the Keyswitches (even simultaneously) corresponding to the notes you want to detune. The detuned notes will be displayed by the microtuning bargraphs on the Main GUI (see “microtuning using the mouse” above)
3. Exit SNM by releasing the sus pedal (or send a value below 64 via the CC you´ve assigned for this task).
16
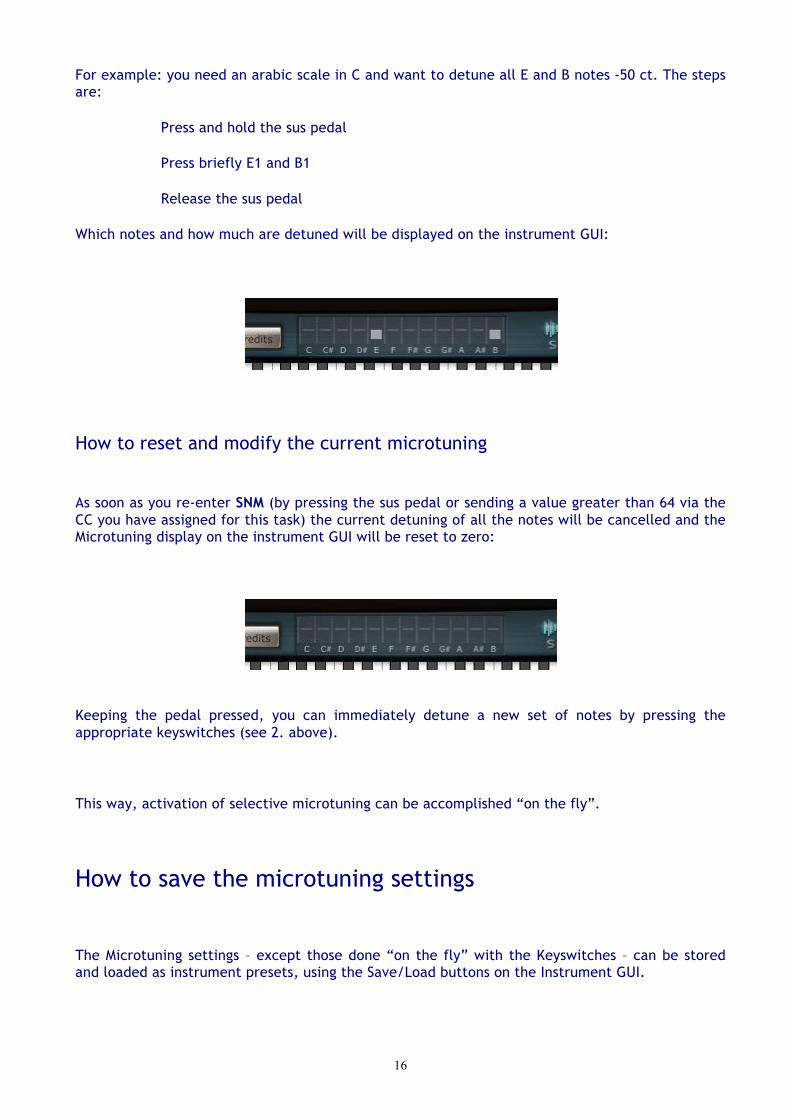
For example: you need an arabic scale in C and want to detune all E and B notes -50 ct. The steps are:
Press and hold the sus pedal
Press briefly E1 and B1
Release the sus pedal
Which notes and how much are detuned will be displayed on the instrument GUI:
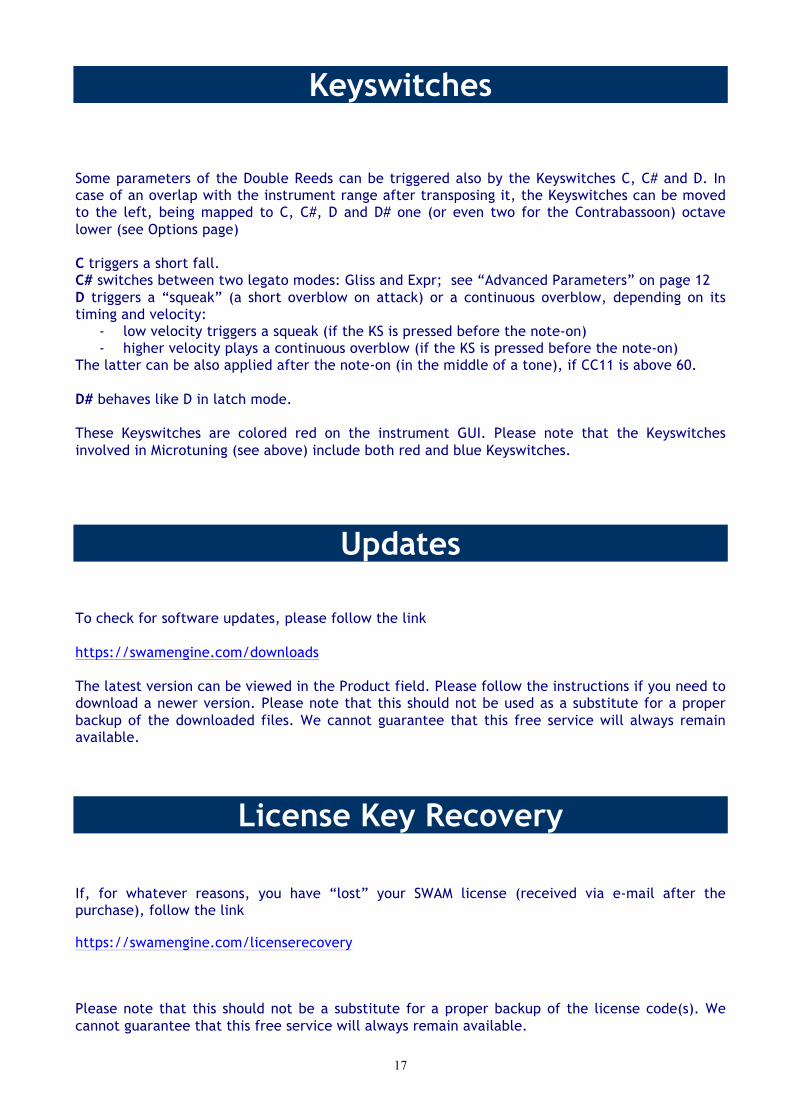
How to reset and modify the current microtuning
As soon as you re-enter SNM (by pressing the sus pedal or sending a value greater than 64 via the CC you have assigned for this task) the current detuning of all the notes will be cancelled and the Microtuning display on the instrument GUI will be reset to zero:
Keeping the pedal pressed, you can immediately detune a new set of notes by pressing the appropriate keyswitches (see 2. above).
This way, activation of selective microtuning can be accomplished “on the fly”.
How to save the microtuning settings
The Microtuning settings – except those done “on the fly” with the Keyswitches – can be stored and loaded as instrument presets, using the Save/Load buttons on the Instrument GUI.
17
Keyswitches Some parameters of the Double Reeds can be triggered also by the Keyswitches C, C# and D. In case of an overlap with the instrument range after transposing it, the Keyswitches can be moved to the left, being mapped to C, C#, D and D# one (or even two for the Contrabassoon) octave lower (see Options page) C triggers a short fall. C# switches between two legato modes: Gliss and Expr; see “Advanced Parameters” on page 12 D triggers a “squeak” (a short overblow on attack) or a continuous overblow, depending on its timing and velocity:
- low velocity triggers a squeak (if the KS is pressed before the note-on) - higher velocity plays a continuous overblow (if the KS is pressed before the note-on)
The latter can be also applied after the note-on (in the middle of a tone), if CC11 is above 60. D# behaves like D in latch mode. These Keyswitches are colored red on the instrument GUI. Please note that the Keyswitches involved in Microtuning (see above) include both red and blue Keyswitches.
Updates
To check for software updates, please follow the link https://swamengine.com/downloads The latest version can be viewed in the Product field. Please follow the instructions if you need to download a newer version. Please note that this should not be used as a substitute for a proper backup of the downloaded files. We cannot guarantee that this free service will always remain available.
License Key Recovery If, for whatever reasons, you have “lost” your SWAM license (received via e-mail after the purchase), follow the link https://swamengine.com/licenserecovery Please note that this should not be a substitute for a proper backup of the license code(s). We cannot guarantee that this free service will always remain available.
18
Technical Support Before requesting technical support, please make sure that you have carefully read the User Manual and the pertinent FAQ on our website: www.samplemodeling.com/en/faq.php (select “Swam-based instruments” on the top) You will find there the appropriate answer to the most questions quickly. Our Forum might also be a valuable source of technical information: http://www.samplemodeling.com/forum In case you still need a support, our first line customer care will be provided via email : [email protected] or via our Contact page: http://www.samplemodeling.com/en/contact.php
Note: please write your email address carefully - it’s not possible to reply to a misspelled address!
More specific, technical questions should be addressed to: http://www.swamengine.com/contact/ When asking for a technical support, please do not forget to provide as much system information as possible, including computer, OS, audio interface, host application, software version, etc. If the problem can be demonstrated, a MIDI and/or an audio file is usually very helpful.
* * *
Copyright © 2012 Giorgio Tommasini & Peter Siedlaczek All rights reserved.