Embed Size (px)
Citation preview
1
User Manual
Contents Configure GPS Tracker (via SMS commands) .......................................................................................... 2
Create User Account ............................................................................................................................... 2
Workspace Overview .............................................................................................................................. 3
Settings.................................................................................................................................................... 7
Dashboard ............................................................................................................................................... 8
Reports .................................................................................................................................................... 8
Tasks ...................................................................................................................................................... 12
DTC (Diagnostic Trouble Codes) ............................................................................................................ 13
Maintenance ......................................................................................................................................... 13
Object control ....................................................................................................................................... 14
Image gallery ......................................................................................................................................... 18
Chat ....................................................................................................................................................... 19
Billing / Subscriptions ............................................................................................................................ 20
Please note: iTrack Live is a professional tracking platform and designed to
be compatible with a wide range of GPS trackers. The features and
capabilities of each type of tracker will vary from model to model so you will
likely find that some functions within the software will not be compatible
with your device.

2
Configure GPS Tracker (via SMS commands) Before you can use your iTrack GPS tracker on iTrack Live you will need to configure the
device by sending the following SMS commands:
➢ begin123456
➢ adminip123456 213.136.81.111 10200
➢ apn123456 payandgo.o2.co.uk (see table below for correct APN code)
➢ gprs123456 (this turns on GPRS mode)
➢ fix060s***n123456 (this tells the device to upload data every 60 seconds)
MOBILE NETWORK PROVIDER APN CODE
O2 (PAYG) payandgo.o2.co.uk
O2 (Pay Monthly) mobile.o2.co.uk
T-Mobile uk.general.t-mobile.uk
Orange / EE everywhere
Vodafone (Pay Monthly) wap.vodafone.co.uk
Vodafone (PAYG) pp.vodafone.co.uk
Tesco Mobile prepay.tesco-mobile.com
Virgin Mobile goto.virginmobile.uk
GiffGaff giffgaff.com
Create User Account
➢ Visit www.itracklivetracking.com
➢ Click ‘create account’
➢ Enter your e-mail address – this will be your username
➢ An email will be sent to you with a temporary password
➢ Return to login page and enter username & password (you can change the password in the settings once logged in)
3
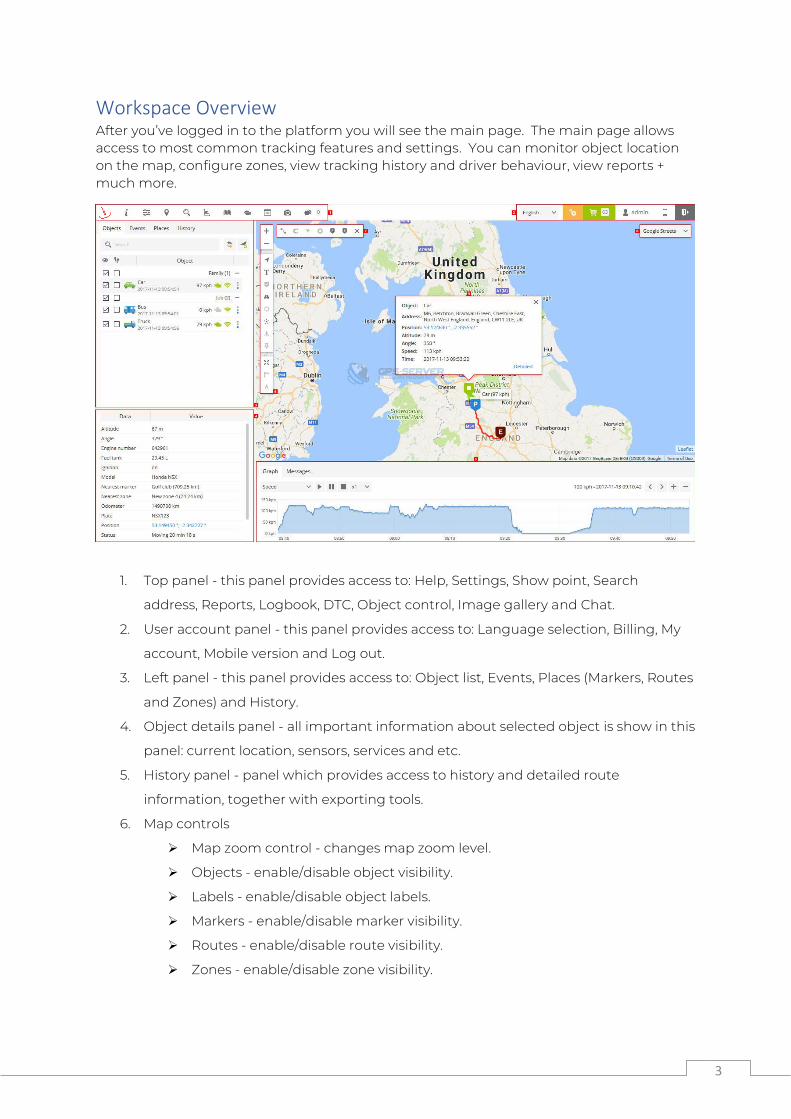
Workspace Overview After you’ve logged in to the platform you will see the main page. The main page allows
access to most common tracking features and settings. You can monitor object location
on the map, configure zones, view tracking history and driver behaviour, view reports +
much more.
1. Top panel - this panel provides access to: Help, Settings, Show point, Search
address, Reports, Logbook, DTC, Object control, Image gallery and Chat.
2. User account panel - this panel provides access to: Language selection, Billing, My
account, Mobile version and Log out.
3. Left panel - this panel provides access to: Object list, Events, Places (Markers, Routes
and Zones) and History.
4. Object details panel - all important information about selected object is show in this
panel: current location, sensors, services and etc.
5. History panel - panel which provides access to history and detailed route
information, together with exporting tools.
6. Map controls
➢ Map zoom control - changes map zoom level.
➢ Objects - enable/disable object visibility.
➢ Labels - enable/disable object labels.
➢ Markers - enable/disable marker visibility.
➢ Routes - enable/disable route visibility.
➢ Zones - enable/disable zone visibility.

4
➢ Clusters - useful feature for those who has large number of objects and
markers. Clusters split markers and objects into groups, which
according to map zoom level will reveal content inside of it.
➢ Street view - enable/disable street view.
➢ Live traffic - shows status of traffic on map (available only with Google Maps).
➢ Fit objects on map - sets map zoom level to fit all objects.
➢ Ruler - measures distance between points.
➢ Measure area - measures area.
7. Route controls - enable/disable loaded history route features.
8. Maps - allows to change currently used map: OSM, Google, Bing, Mapbox, Yandex or
any other custom TMS or WMS maps.
9. Object details - the most important information about selected object is show in
this popup: current location, sensors, services and etc.
Top panel
Top panel is used to quickly access sections (Settings, Reports and Object control, Chat and
other).
1. About - allows user to check which version of software you are currently using.
2. Help - redirects to this manual.
3. Settings - settings menu allows to add new objects, events and etc.
4. Dashboard - common statistics.
5. Show point - focus map on entered coordinates.
6. Search address - helpful and easy to use tool for searching address on map.
7. Reports - allows to create various reports.
8. Tasks - manage tasks, useful feature for drivers.
9. RFID and iButton logbook - review RFID and iButton activity.
10. DTC - diagnostic trouble codes.
11. Maintenance - manage all available maintenance records.
12. Object control - allows to send SMS and GPRS commands to GPS device.
13. Image gallery - allows to receive images with location from GPS devices.
14. Chat - allows to send and receive text messages from supported devices. Currently
works with Android GPS tracker app.

5
Left panel
Objects list tab allows to view available objects, find them on map, view object route history
and edit object settings.
1. Objects tab - view current objects status.
2. Events tab - history of events can be viewed (overspeending, entering or leaving
zones and etc.).
3. Places tab - allows to create, edit and delete zones and markers.
4. History tab - view history, create reports, export them to various formats etc.
5. Search - allows to find objects by name.
6. Reload - reloads objects list.
7. Add object - allows to add new object.
8. Visibility checkbox - turns on or off objects visibility on map.
9. Follow checkbox - centers marked object in the middle of the screen every time
GPS device has refreshed its position, if multiple objects selected - map zooms the
way that all of them remain visible.
10. Object information - object name, date and time of last received location.
11. Speed indicator - shows current object speed.
12. Ignition (ACC) indicator - shows ignition state. Ignition (ACC) sensor should be
configured in order to use this feature.
13. GPRS indicator - shows GPRS and GPS status.
➢ Grey icon - no GPRS and GPS.
➢ Orange icon - no GPS signal.
➢ Green icon - GPRS and GPS are OK.
14. Quick access - allows to see object history, control objects using commands and
edit object settings.
6
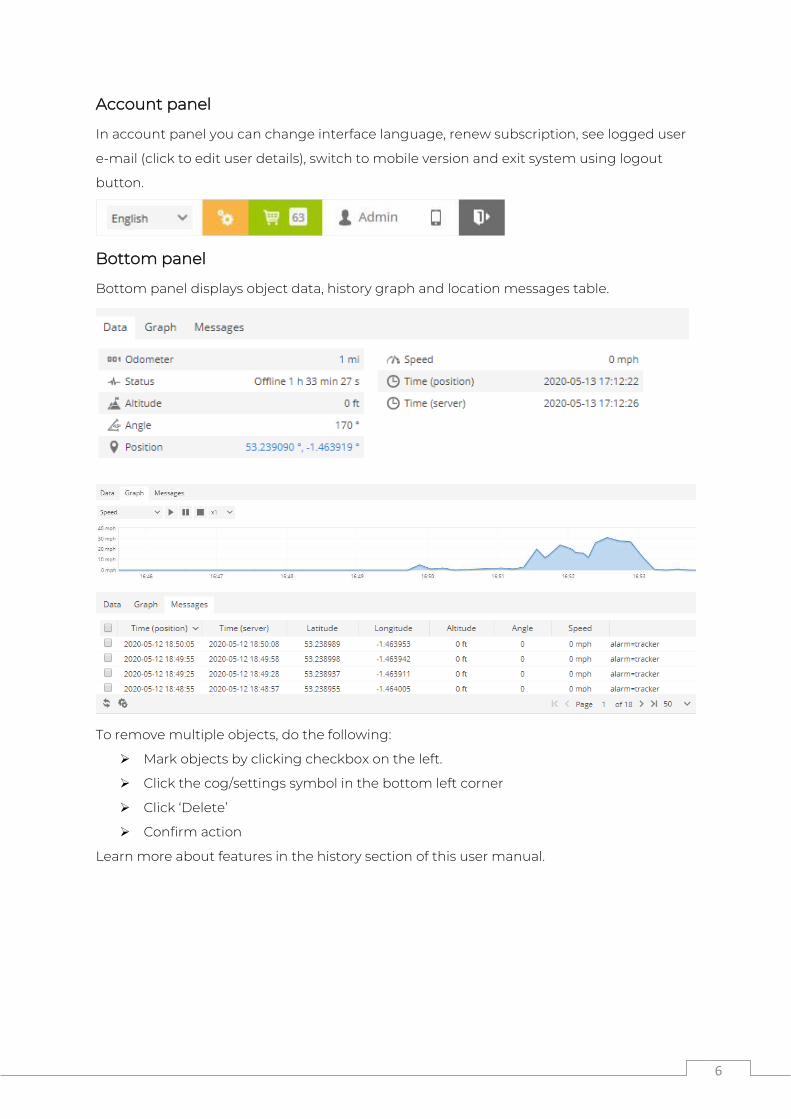
Account panel
In account panel you can change interface language, renew subscription, see logged user
e-mail (click to edit user details), switch to mobile version and exit system using logout
button.
Bottom panel
Bottom panel displays object data, history graph and location messages table.
To remove multiple objects, do the following:
➢ Mark objects by clicking checkbox on the left.
➢ Click the cog/settings symbol in the bottom left corner
➢ Click ‘Delete’
➢ Confirm action
Learn more about features in the history section of this user manual.
7
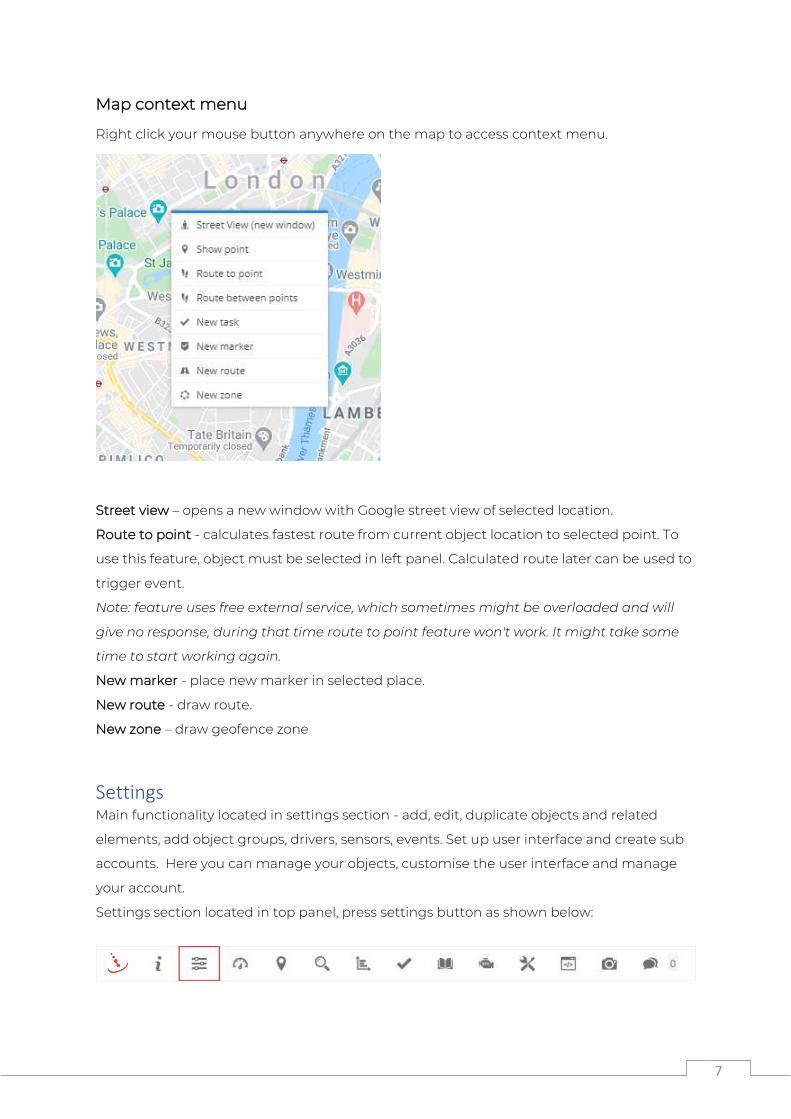
Map context menu
Right click your mouse button anywhere on the map to access context menu.
Street view – opens a new window with Google street view of selected location.
Route to point - calculates fastest route from current object location to selected point. To
use this feature, object must be selected in left panel. Calculated route later can be used to
trigger event.
Note: feature uses free external service, which sometimes might be overloaded and will
give no response, during that time route to point feature won't work. It might take some
time to start working again.
New marker - place new marker in selected place.
New route - draw route.
New zone – draw geofence zone
Settings Main functionality located in settings section - add, edit, duplicate objects and related
elements, add object groups, drivers, sensors, events. Set up user interface and create sub
accounts. Here you can manage your objects, customise the user interface and manage
your account.
Settings section located in top panel, press settings button as shown below:
8
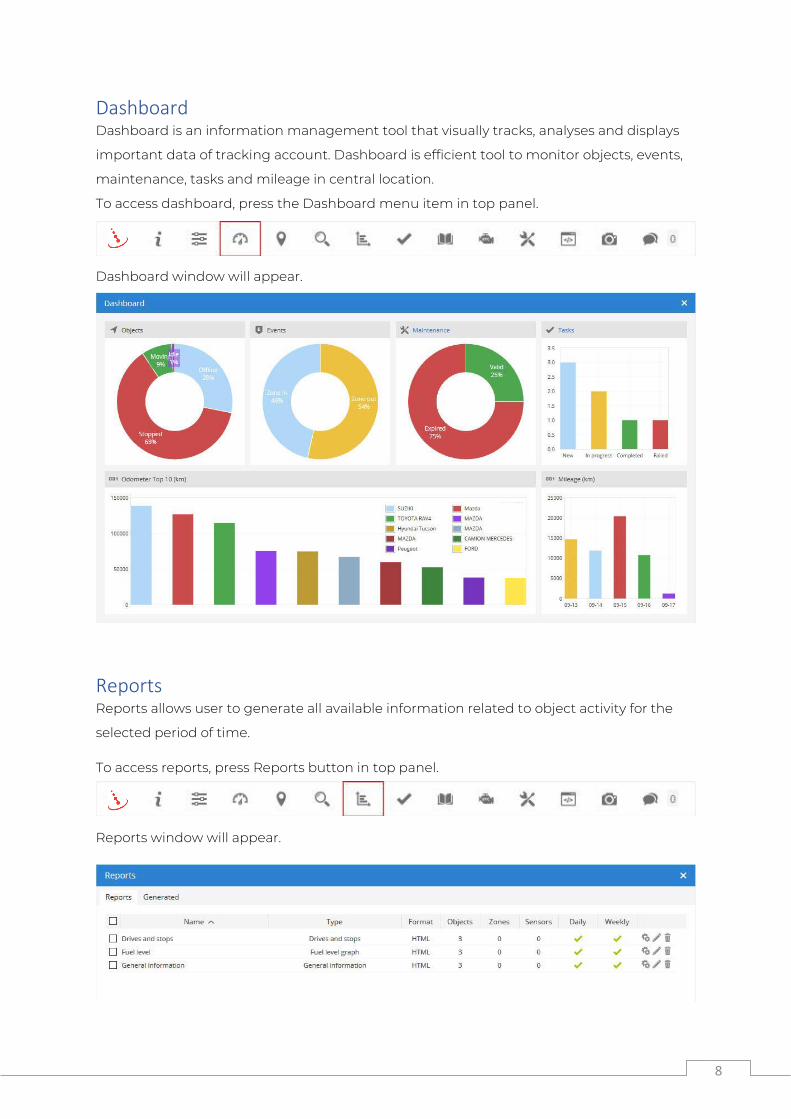
Dashboard Dashboard is an information management tool that visually tracks, analyses and displays
important data of tracking account. Dashboard is efficient tool to monitor objects, events,
maintenance, tasks and mileage in central location.
To access dashboard, press the Dashboard menu item in top panel.
Dashboard window will appear.
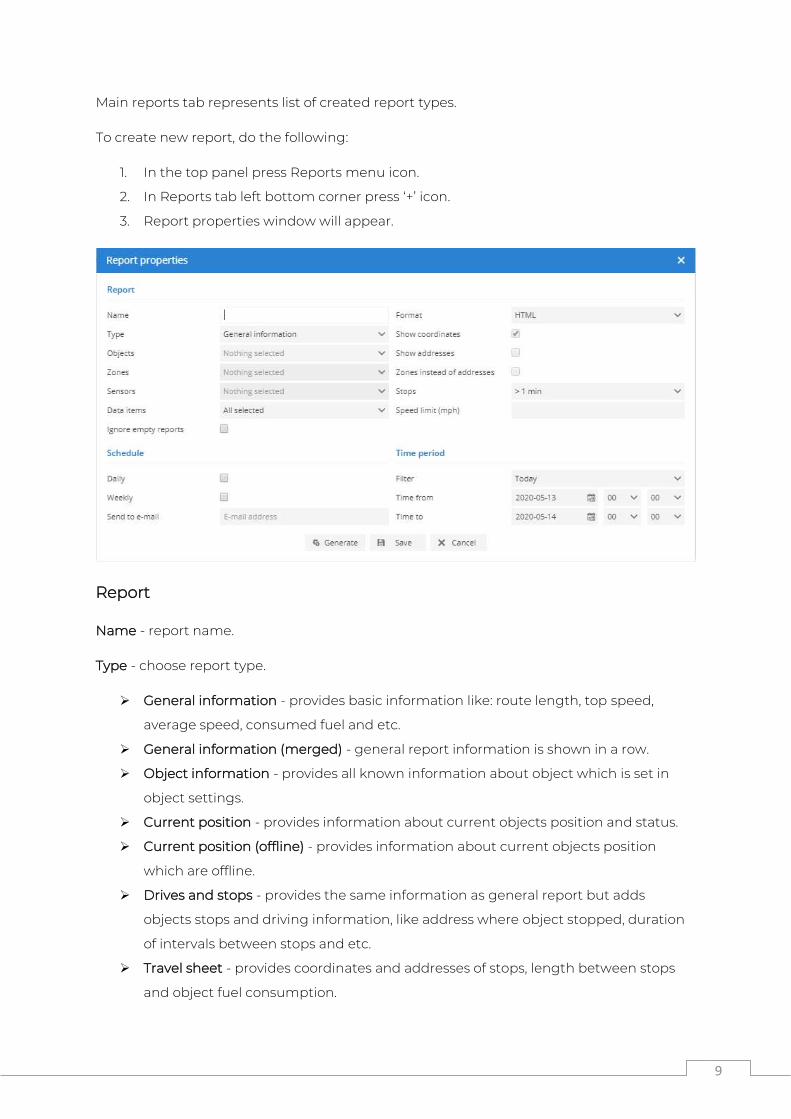
Reports Reports allows user to generate all available information related to object activity for the
selected period of time.
To access reports, press Reports button in top panel.
Reports window will appear.
9
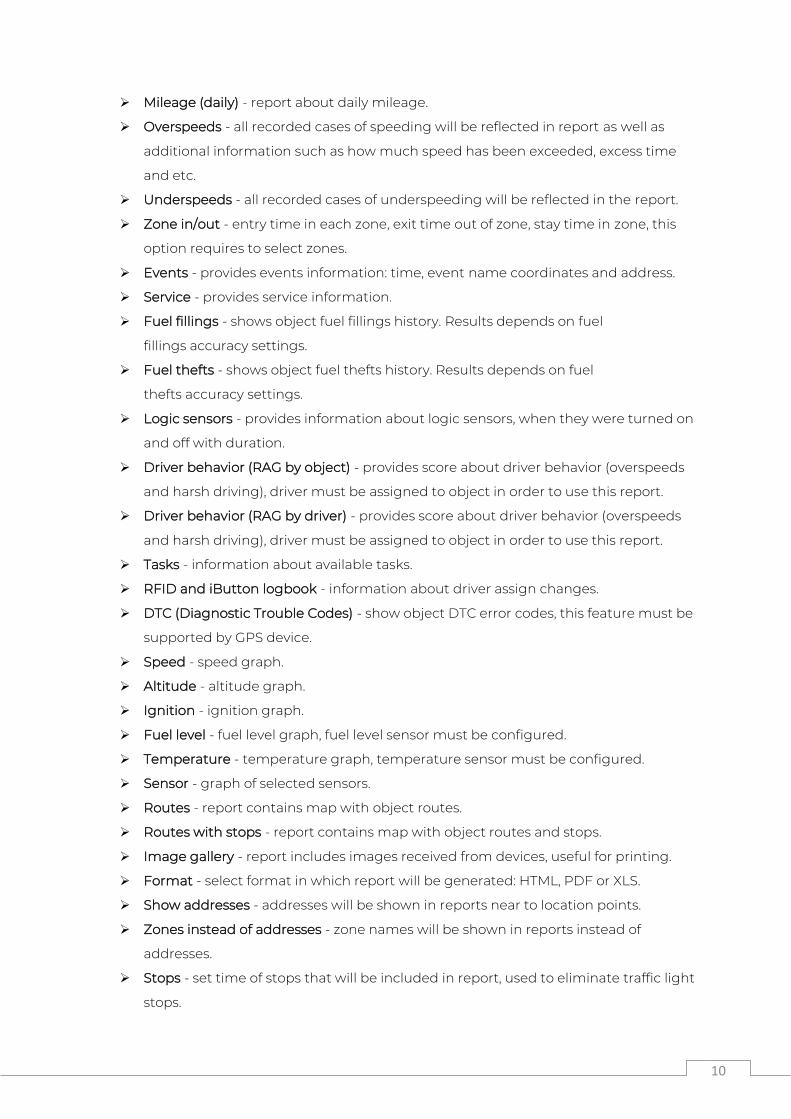
Main reports tab represents list of created report types.
To create new report, do the following:
1. In the top panel press Reports menu icon.
2. In Reports tab left bottom corner press ‘+’ icon.
3. Report properties window will appear.
Report
Name - report name.
Type - choose report type.
➢ General information - provides basic information like: route length, top speed,
average speed, consumed fuel and etc.
➢ General information (merged) - general report information is shown in a row.
➢ Object information - provides all known information about object which is set in
object settings.
➢ Current position - provides information about current objects position and status.
➢ Current position (offline) - provides information about current objects position
which are offline.
➢ Drives and stops - provides the same information as general report but adds
objects stops and driving information, like address where object stopped, duration
of intervals between stops and etc.
➢ Travel sheet - provides coordinates and addresses of stops, length between stops
and object fuel consumption.
10
➢ Mileage (daily) - report about daily mileage.
➢ Overspeeds - all recorded cases of speeding will be reflected in report as well as
additional information such as how much speed has been exceeded, excess time
and etc.
➢ Underspeeds - all recorded cases of underspeeding will be reflected in the report.
➢ Zone in/out - entry time in each zone, exit time out of zone, stay time in zone, this
option requires to select zones.
➢ Events - provides events information: time, event name coordinates and address.
➢ Service - provides service information.
➢ Fuel fillings - shows object fuel fillings history. Results depends on fuel
fillings accuracy settings.
➢ Fuel thefts - shows object fuel thefts history. Results depends on fuel
thefts accuracy settings.
➢ Logic sensors - provides information about logic sensors, when they were turned on
and off with duration.
➢ Driver behavior (RAG by object) - provides score about driver behavior (overspeeds
and harsh driving), driver must be assigned to object in order to use this report.
➢ Driver behavior (RAG by driver) - provides score about driver behavior (overspeeds
and harsh driving), driver must be assigned to object in order to use this report.
➢ Tasks - information about available tasks.
➢ RFID and iButton logbook - information about driver assign changes.
➢ DTC (Diagnostic Trouble Codes) - show object DTC error codes, this feature must be
supported by GPS device.
➢ Speed - speed graph.
➢ Altitude - altitude graph.
➢ Ignition - ignition graph.
➢ Fuel level - fuel level graph, fuel level sensor must be configured.
➢ Temperature - temperature graph, temperature sensor must be configured.
➢ Sensor - graph of selected sensors.
➢ Routes - report contains map with object routes.
➢ Routes with stops - report contains map with object routes and stops.
➢ Image gallery - report includes images received from devices, useful for printing.
➢ Format - select format in which report will be generated: HTML, PDF or XLS.
➢ Show addresses - addresses will be shown in reports near to location points.
➢ Zones instead of addresses - zone names will be shown in reports instead of
addresses.
➢ Stops - set time of stops that will be included in report, used to eliminate traffic light
stops.
11
➢ Speed limit (kph) - set speed limit for Overspeed and Underspeed reports.
Schedule
➢ Daily - reports will be sent daily for previous day.
➢ Weekly - reports will be sent weekly, every Monday for previous week.
➢ Send to e-mail - enter e-mail addresses separated by comma to send reports to.
Time period
➢ Filter - simple way to set time period of report.
➢ Time from/ Time to - precise way to set time period of report.
Objects
Select object or objects for which you want to create report. Hold "Ctrl" key for multiple
selection. Availability of data depends on chosen report type.
Zones
This option allows to select zones whose details will be seen in report. Zone selection is
available only if report type Zone in/out is chosen. Hold "Ctrl" key for multiple selection.
Sensors
Choose sensors which will be displayed in report. Hold "Ctrl" key for multiple selection.
Data items
Choose data items which will be displayed in report. Hold "Ctrl" key for multiple selection.
Availability of data depends on chosen report type.
Generated reports
Generated reports section displays all reports which were generated, and provides fast
access to open them again without need to generate them again.
12
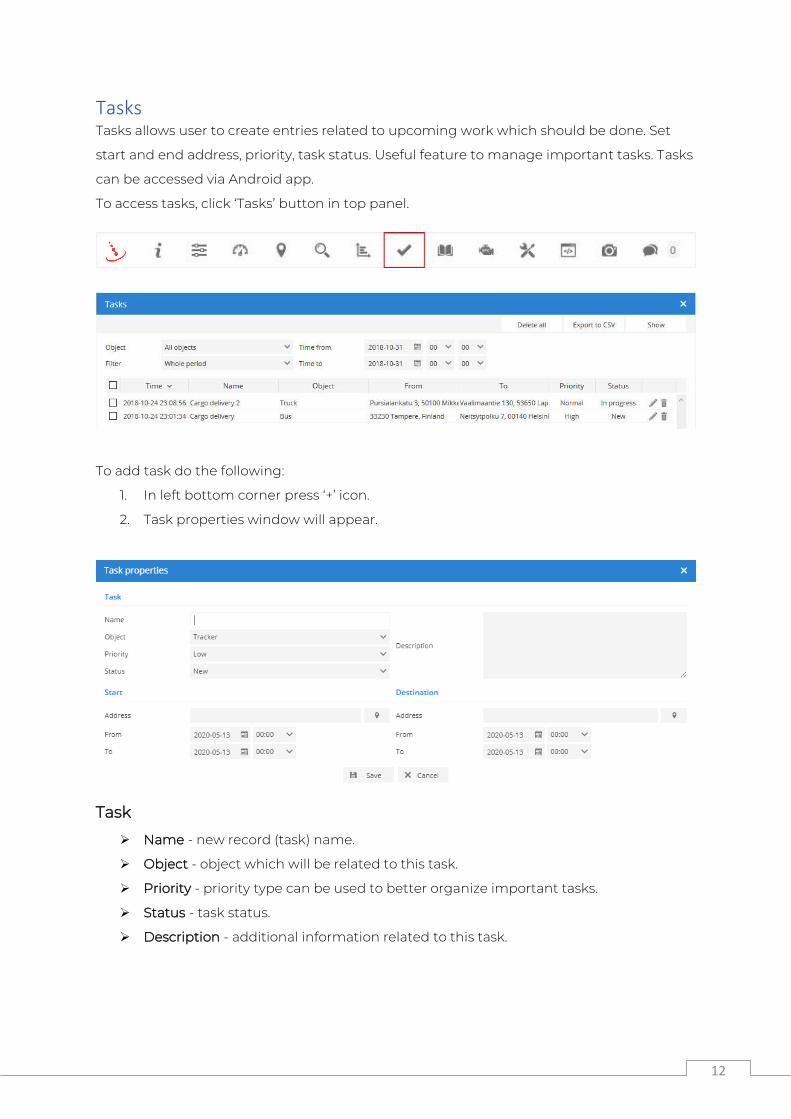
Tasks Tasks allows user to create entries related to upcoming work which should be done. Set
start and end address, priority, task status. Useful feature to manage important tasks. Tasks
can be accessed via Android app.
To access tasks, click ‘Tasks’ button in top panel.
To add task do the following:
1. In left bottom corner press ‘+’ icon.
2. Task properties window will appear.
Task
➢ Name - new record (task) name.
➢ Object - object which will be related to this task.
➢ Priority - priority type can be used to better organize important tasks.
➢ Status - task status.
➢ Description - additional information related to this task.
13
Route start
➢ Address - start address where task begins.
➢ From/To - date and time interval when task should be started.
Route end
➢ Address - end address where task ends.
➢ From/To - date and time interval when task should be ended.
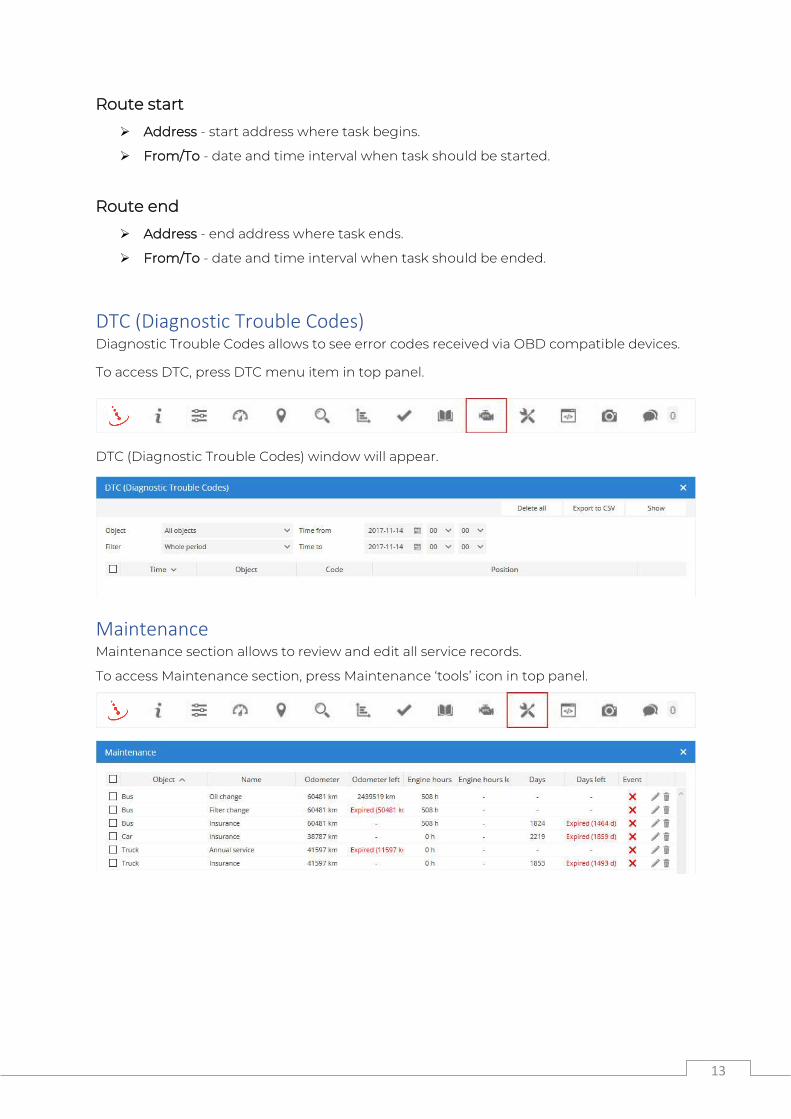
DTC (Diagnostic Trouble Codes) Diagnostic Trouble Codes allows to see error codes received via OBD compatible devices.
To access DTC, press DTC menu item in top panel.
DTC (Diagnostic Trouble Codes) window will appear.
Maintenance Maintenance section allows to review and edit all service records.
To access Maintenance section, press Maintenance ‘tools’ icon in top panel.

14
Object control This section allows to send commands to object GPS device to perform some actions.
To access Object control, press Object control menu item in top panel.
Object control window will appear.
Note: read GPS device user manual to get all available GPRS commands. Make sure in
which way your device receives commands (via SMS or GPRS). SMS gateway must be
configured in order to send commands via SMS.
➢ Object - choose object which you want to control using commands.
➢ Template - choose predefined command template.
➢ Command - command can be sent directly without need to create template (\r\n
allowed after string, example: my_command \r\n).
➢ Send - send command to GPS device.
Important! New command must be added in template section to appear in templates list.
15
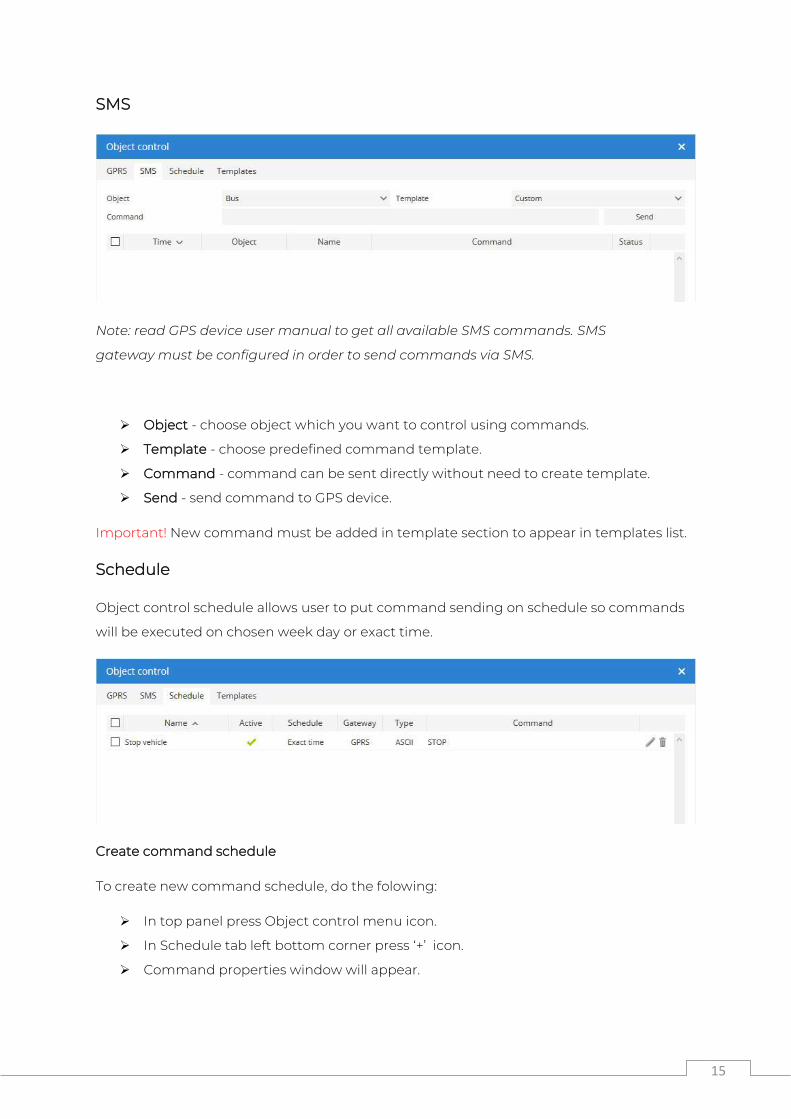
SMS
Note: read GPS device user manual to get all available SMS commands. SMS
gateway must be configured in order to send commands via SMS.
➢ Object - choose object which you want to control using commands.
➢ Template - choose predefined command template.
➢ Command - command can be sent directly without need to create template.
➢ Send - send command to GPS device.
Important! New command must be added in template section to appear in templates list.
Schedule
Object control schedule allows user to put command sending on schedule so commands
will be executed on chosen week day or exact time.
Create command schedule
To create new command schedule, do the folowing:
➢ In top panel press Object control menu icon.
➢ In Schedule tab left bottom corner press ‘+’ icon.
➢ Command properties window will appear.
16
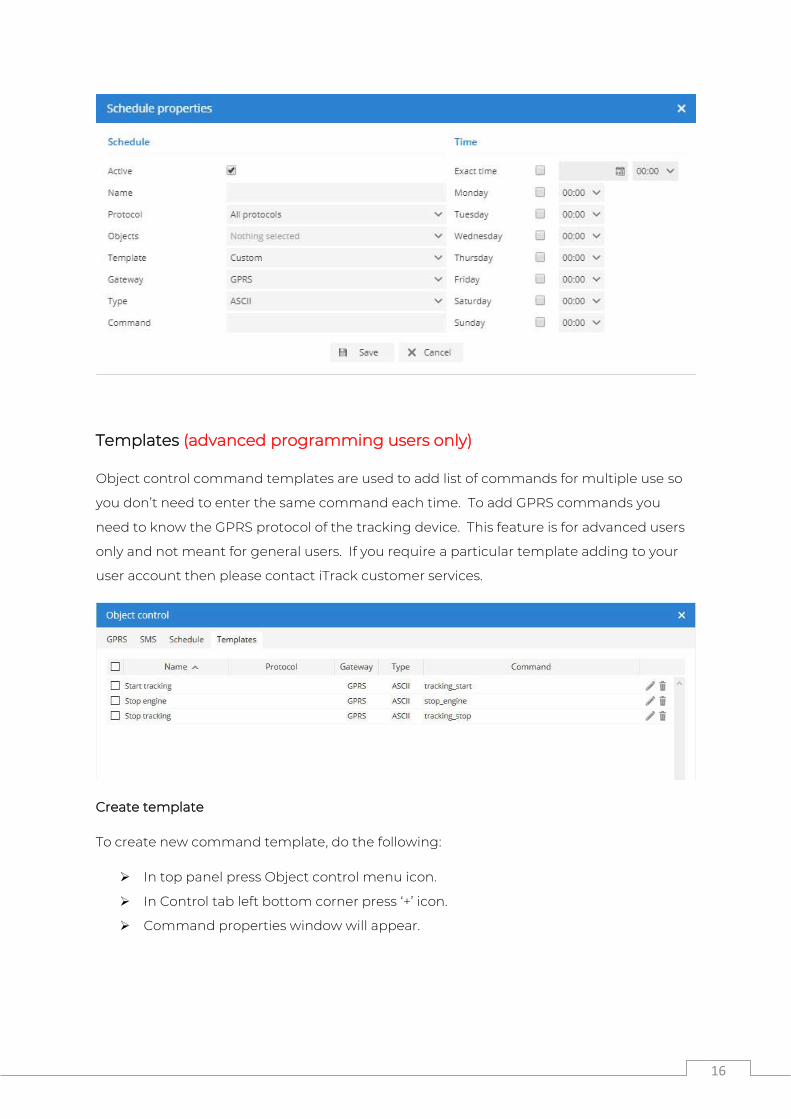
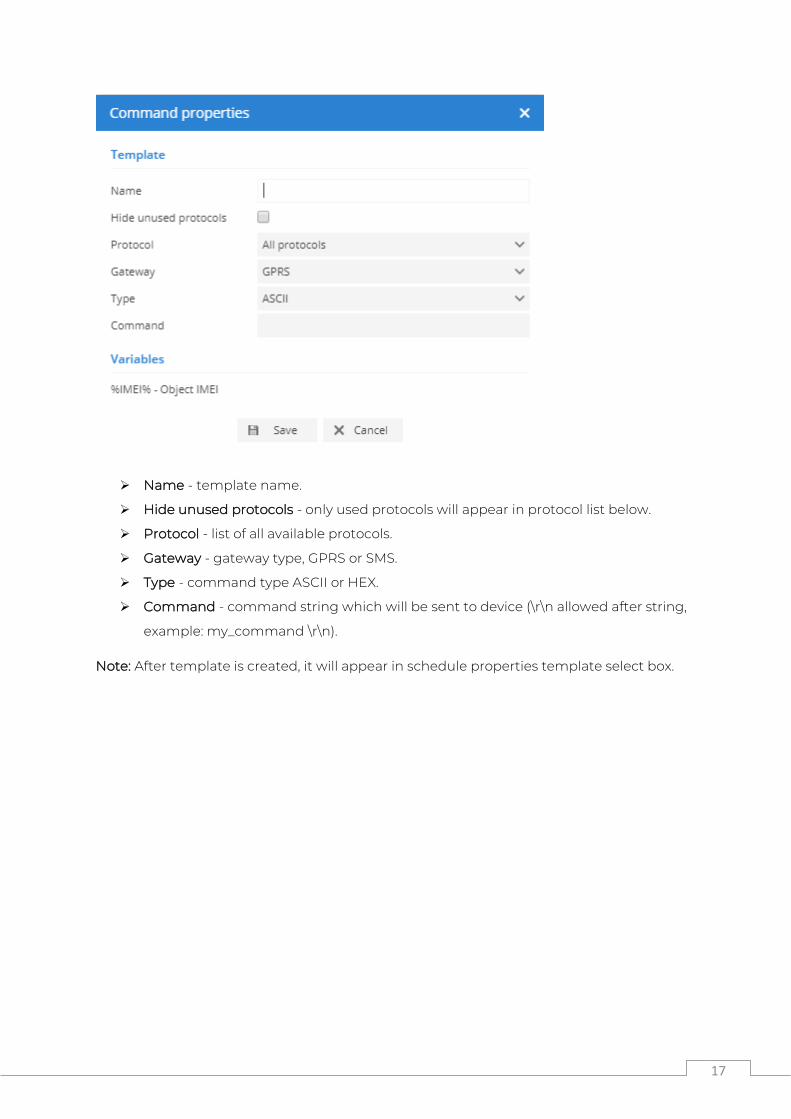
Templates (advanced programming users only)
Object control command templates are used to add list of commands for multiple use so
you don’t need to enter the same command each time. To add GPRS commands you
need to know the GPRS protocol of the tracking device. This feature is for advanced users
only and not meant for general users. If you require a particular template adding to your
user account then please contact iTrack customer services.
Create template
To create new command template, do the following:
➢ In top panel press Object control menu icon.
➢ In Control tab left bottom corner press ‘+’ icon.
➢ Command properties window will appear.
17
➢ Name - template name.
➢ Hide unused protocols - only used protocols will appear in protocol list below.
➢ Protocol - list of all available protocols.
➢ Gateway - gateway type, GPRS or SMS.
➢ Type - command type ASCII or HEX.
➢ Command - command string which will be sent to device (\r\n allowed after string,
example: my_command \r\n).
Note: After template is created, it will appear in schedule properties template select box.
18
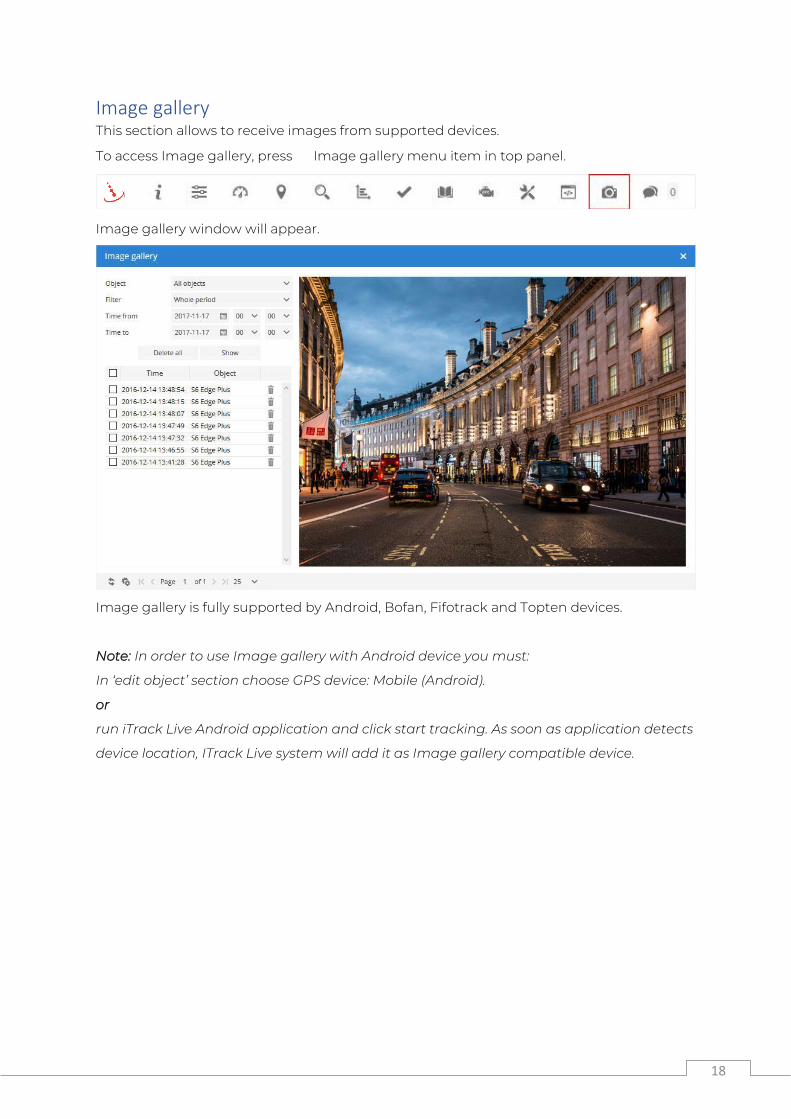
Image gallery This section allows to receive images from supported devices.
To access Image gallery, press Image gallery menu item in top panel.
Image gallery window will appear.
Image gallery is fully supported by Android, Bofan, Fifotrack and Topten devices.
Note: In order to use Image gallery with Android device you must:
In ‘edit object’ section choose GPS device: Mobile (Android).
or
run iTrack Live Android application and click start tracking. As soon as application detects
device location, ITrack Live system will add it as Image gallery compatible device.
19
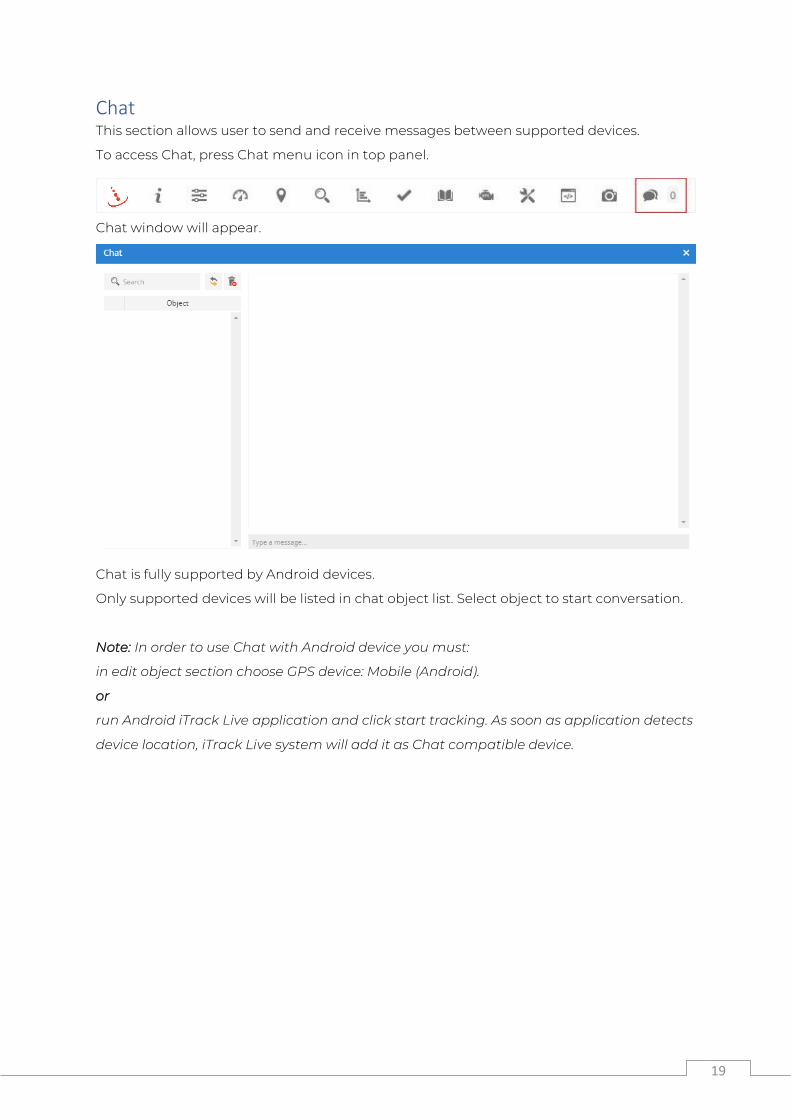
Chat This section allows user to send and receive messages between supported devices.
To access Chat, press Chat menu icon in top panel.
Chat window will appear.
Chat is fully supported by Android devices.
Only supported devices will be listed in chat object list. Select object to start conversation.
Note: In order to use Chat with Android device you must:
in edit object section choose GPS device: Mobile (Android).
or
run Android iTrack Live application and click start tracking. As soon as application detects
device location, iTrack Live system will add it as Chat compatible device.

20
Billing / Subscriptions Billing section allows user to order subscription to iTrack Live and activate objects.
To access Billing, press the Billing menu ‘basket’ icon in account panel.
Billing window will appear. Billing section represents all purchased plans.
Purchase plan
To purchase new billing plan, do the following:
1. In account panel press Billing menu ‘basket’ icon.
2. In billing window left bottom corner press ‘+’ icon in the bottom left corner.
3. Purchase plan window will appear.
4. Press purchase ‘basket’ icon of chosen plan.
Note: Purchased plan will be automatically added to your account within 5 minutes.

21
Activate objects
To activate objects, do the following:
1. In account panel press Billing ‘basket’ menu icon.
2. On available plan press ‘spanner’ Use plan icon.
3. Billing plan window will appear.
4. Mark object which should be activated by clicking checkbox on the left.
5. Press the ‘tick’ Activate button at the top right corner.
As soon as purchased plan is assigned to your account, licenses can be used at any time -
they won't expire. Object will be active one year starting from activation date.
If after particular period of time activated object is no longer needed, you can delete it
safely. License won't be lost, it will be automatically brought back to billing section,
including the remaining period.