Embed Size (px)
Citation preview

1
User Manual
D2G Item No.: DGKTCH43BK
Material Description: Indoor Landscape IR Touch Digital Kiosk
Scan QR code to visit the product page:

2
Contents
Features ...................................................................................................................................... 3
Safety Warnings and Precautions .................................................................................................. 3
Installation and Connection .......................................................................................................... 7
Packing List ...............................................................................................................................7
Interfaces .................................................................................................................................7
Steps of Installation .................................................................................................................. 8
Remote Control ............................................................................................................................. 9
Description of Basic Operation .....................................................................................................10
Power on/Standby .................................................................................................................. 10
About Home Screen.................................................................................................................10
Description of Wallpaper Switch .............................................................................................. 11
File Manager ...........................................................................................................................11
Local Settings .......................................................................................................................... 12
Status of Menu bar ................................................................................................................. 14
Slide Show APP Introduction ...................................................................................................... 15
Technical Specifications .............................................................................................................. 21
Cleaning and maintenance.......................................................................................................... 24
Troubleshooting ......................................................................................................................... 23
Names and Contents of Toxic and Hazardous Substances or Elements in the Product ................... 25

3
Features
1. Embedded with Android 5.1 smart operating system and unique UI design, bringing you a moreconvenient operation and better visual experience.
2. Massive Internet application downloads support such functions as chatting, searching, learning,shopping, and reading; e-mail system supports sync sending and receiving.
3. Support USB mouse and keyboard, realizing easy manipulation like a computer.
4. Built-in Wi-Fi module, high capacity memory and high capacity cache, making it smoother to watch1080P HD movies and play big games.
5. High-quality LCD screen as the display, no flicker, low radiation, greatly reducing eye fatigue,eye protection, high brightness, high contrast, and wide viewing angle; ultra-fast response timegreatly reduces ghosting of fast moving images.
6. Progressive image processing and industry-leading motion compensation technology improve theflickering and blurring in the edges of motion picture.
7. Dynamic contrast technology can significantly improve the clarity and contrast of various screens.
8. Multi-channel USB interfaces, supporting HD media streaming.
9. Ultra-thin narrow bezel design.
Safety Warnings and Precautions
Thank you for purchasing the high-performance multi-functional LED backlight Digital Signage of our
Company. It is a very valuable product, which will give you a better visual experience. We have considered
the factors to ensure personal safety in product design, and have tested rigorously at the factory. However,
improper installation and use may result in electric shock and fire. In order to ensure safety use, extend the
life of the product and ensure the best performance of the machine, please read the following provisions
and labels carefully before using the product and conscientiously observe the following safety precautions.
Operating Instructions for Digital Signage
Note: Before using the product, please read the instructions carefully!
Do not attempt to disassemble this product. If the product does
not work properly, please contact your local dealer or the company.

4
Keep the instructions properly for reference.
Warning: May cause personal injury or death Caution: May cause damage or property loss
The operation is prohibited The operation must be executed
In the following cases
Power outage or instable voltage.
Abnormal sound or smell from the unit.
AC power cord is damaged.
Digital Signage is damaged due to drop, knock
or impact.
Any liquid or foreign matters fall into the
enclosure.
Turn off the Digital Signage immediately, pull out
the plug from the power outlet, and ask the
authorized personnel for maintenance timely.
If coal gas or other flammable gas leaks, do not pull out the plug of the LCD Digital Signage or other
electrical appliances; instead, turn off the gas valve immediately, and open the doors and windows quickly.
Do not use power supply other than AC 110V, 50Hz.
Cut off the power supply before connecting or disconnecting any cables.
Do not place the Digital Signage on any instable positions, or else it may be damaged or cause
fire.
Do not place the Digital Signage in the positions such as:
1.The environment subject to direct strong sunlight, moisture, extreme temperature or too
much dust;
2.The environment with flammable or explosive materials;
3.The environment with flammable or corrosive gases;
Do not use damaged or inappropriate power outlets, and ensure that the plugs and outlets
contact properly.
Warning

5
Do not let dust or metal deposits adhere to the plugs and outlets.
Do not damage the power cords:
1.Do not modify the power cords;
2.Do not place heavy objects on the power cords;
3.Keep the power cords away from heat source;
4.Do not pull the cord to remove the plug.
Do not connect too many plugs to one outlet in parallel, or else it may cause fire due to
excessive power consumption.
Do not approach the Digital Signage with open flame (e.g. a lighted candle), or else it may cause
electric shock or fire.
Do not put water filled container on the Digital Signage to avoid electric shock and fire due to
water drops or splashing.
Do not put any sharp objects, metal or liquid into the vents or let them touch the signal
terminals to avoid short circuit, product damage, and electric shock.
The openings in the enclosure are designed for ventilation and cooling, to ensure long time
reliable running of components inside the enclosure and prevent overheating. Do not block the
openings when place the unit.
Do not touch the plugs with wet fingers, or else it will cause electric shock.
Do not use the Digital Signage in stormy weather, especially when there is lightning; instead,
please disconnect the power and antenna plugs to avoid lightning strike.
Do not disassemble the Digital Signage without permission, or else it may cause electric shock or
fire. Please ask qualified technician for repair.

6
Do not let children climb onto the Digital Signage.
Keep the small parts away from children to prevent them from swallowing.
If the Digital Signage won’t be used for a long time, please turn it off and pull out the power plug.
To adjust the position or angle of the Digital Signage, please disconnect all power cords and move
slowly to avoid falling.
Do not scratch or knock the LCD with hard object, or twist and squeeze the LCD.
Do not turn on the unit immediately when it is moved from a place with low temperature to high
temperature, or else it will cause condensation and malfunction.
Before cleaning the Digital Signage, please pull out the power plug; wipe with soft cloth; do not use
industrial chemicals; prevent foreign matters from entering the machine. Improper cleaning (such as
cleaning solution, water) may damage the product, erase the printed information, and even cause
damage of the components if fluid flows in, resulting in machine failure.
If the unit displays the same screen for a long time or the moving picture has fixed text or icon, it will
leave ghosting on the screen and won’t disappear when the unit is turned off; it is normal and isn't
covered by the warranty.
The power of the Digital Signage can be cut off by pulling out the plug.
If the LCD screen ruptures and the liquid splashes on the skin, please rinse for 15 minutes with clean
water immediately, and consult your doctor.
To carry the Digital Signage with hands, please grab the corners and hold the bottom; do not apply
pressure on the panel.
Use the Digital Signage properly: Use in proper lighting conditions; insufficient lighting or long time
watching will impair your eyesight.
When the plug or coupler is used as disconnection device, it should be easy to operate the device.
Insert the plug into the outlet properly, or else it may cause sparks and fire.
The technical specifications printed herein and on the packaging are subject to change without prior
notice. The Manual may be slightly different from actual operation, and the latter is applicable.
Caution
7
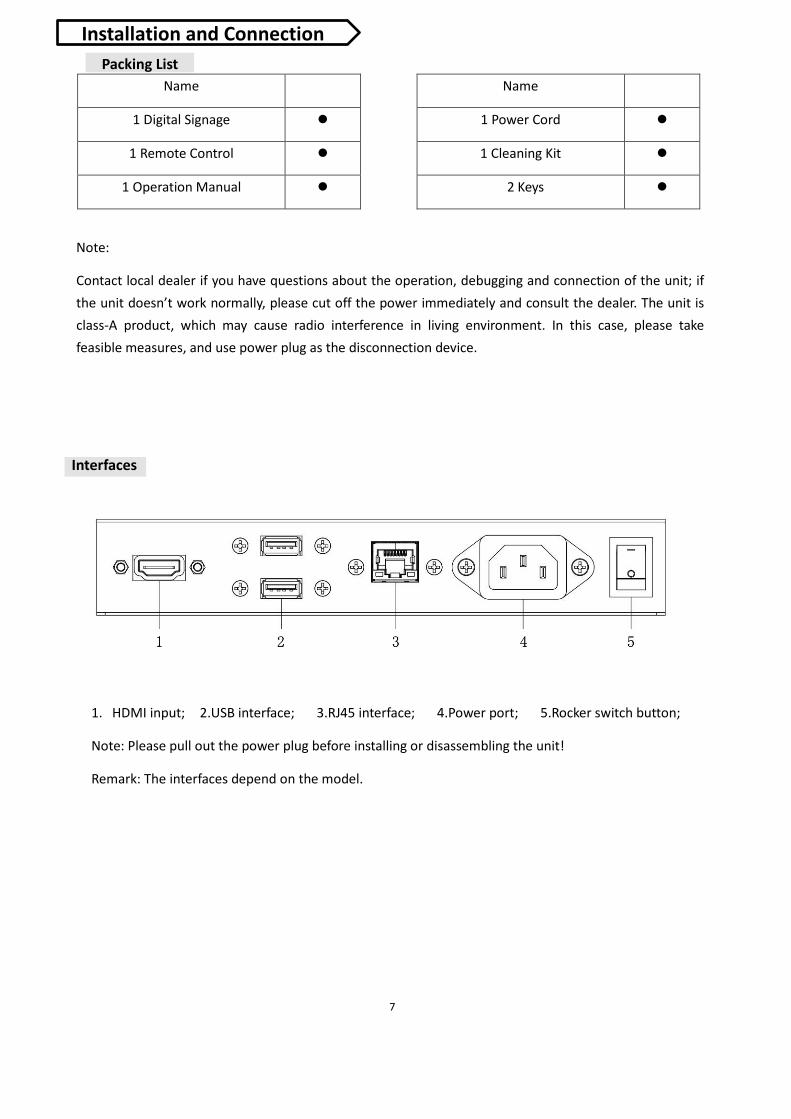
Name Name
1 Digital Signage 1 Power Cord
1 Remote Control 1 Cleaning Kit
1 Operation Manual 2 Keys
Note:
Contact local dealer if you have questions about the operation, debugging and connection of the unit; if the unit doesn’t work normally, please cut off the power immediately and consult the dealer. The unit is class-A product, which may cause radio interference in living environment. In this case, please take feasible measures, and use power plug as the disconnection device.
Interfaces
1. HDMI input; 2.USB interface; 3.RJ45 interface; 4.Power port; 5.Rocker switch button;
Note: Please pull out the power plug before installing or disassembling the unit!
Remark: The interfaces depend on the model.
Installation and Connection Packing List

8
(Fig. 1) (Fig. 2)
(Fig. 3) (Fig. 4)
1. Remove the wooden frame as shown in Fig. 2;
2. Lift out the unit ,then remove EPE as shown in Fig. 3;
Steps of Installation

Remote Control
Installing batteries for the remote control: Remove the battery cover, and insert two AAA batteries (1.5V). Ensure that the battery polarity matches the “+”/“-” marks in the battery compartment of the remote control. Precautions for using the remote control: Aim the remote control at the receiver window. Do not place any object between the remote
control and the receiver window to avoid interference with the normal operation. Keep the remote control away from violent vibration. In addition, do not set or place the
remote control in direct sunlight, or else the remote control may be deformed by heat. The remote control may be invalid when the receiver window of the unit is in direct sunlight or
strong lighting; in this case, please adjust the angle of the lighting or the unit, or approach thereceiver window to use it.
The distance of remote control will be shortened if the battery voltage is insufficient; in thiscase, please replace with new batteries; if the remote control won’t be used for a long time orthe batteries are run out, please take out the batteries to avoid corrosion due to batteryleakage, which will damage the remote control.
Do not use batteries of different types or mix new batteries with old ones. Always replace thebatteries in pairs.
Do not put the batteries in fire, or charge or disassemble them, or charge, short circuit,disassemble, heat or burn used batteries. Please dispose of waste batteries in accordance withlocal environmental regulations. Do not expose the batteries in overheated environments suchas sunlight and fire.
Description of remote control buttons
Note: Press the SETUP button in the main interface to call out the OSD menu. After exiting the playback mode by pressing the STOP button, the playback will start according to the schedule next time. Remark: The real appearance of the remote control may be different from the picture, please refer to the actual product.
Button Function
POWER ( ) Power switch
MENU To show the main menu
SETUP To set up OSD menu
SOURCE To show the Source menu
/ Play programs; confirm selection
▲ To move the cursor up
▼ To move the cursor down
◄ To move the cursor left
► To move the cursor right
Previous program
Next program
Stop playing and return to the main interface
Mute
Turn up the volume
Turn down the volume
HDMI Select HDMI device as the source
VGA Select VGA device as the source
9
Back
Description of Basic Operation
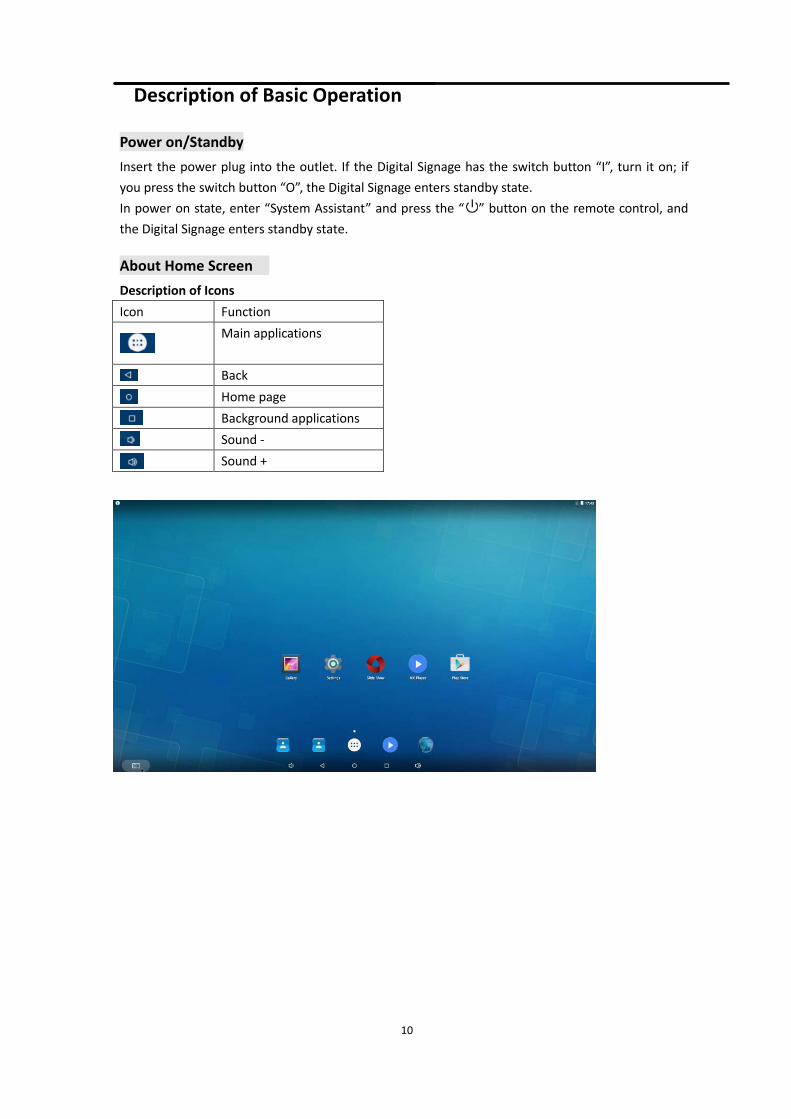
Power on/Standby Insert the power plug into the outlet. If the Digital Signage has the switch button “I”, turn it on; if you press the switch button “O”, the Digital Signage enters standby state. In power on state, enter “System Assistant” and press the “ ” button on the remote control, and the Digital Signage enters standby state.
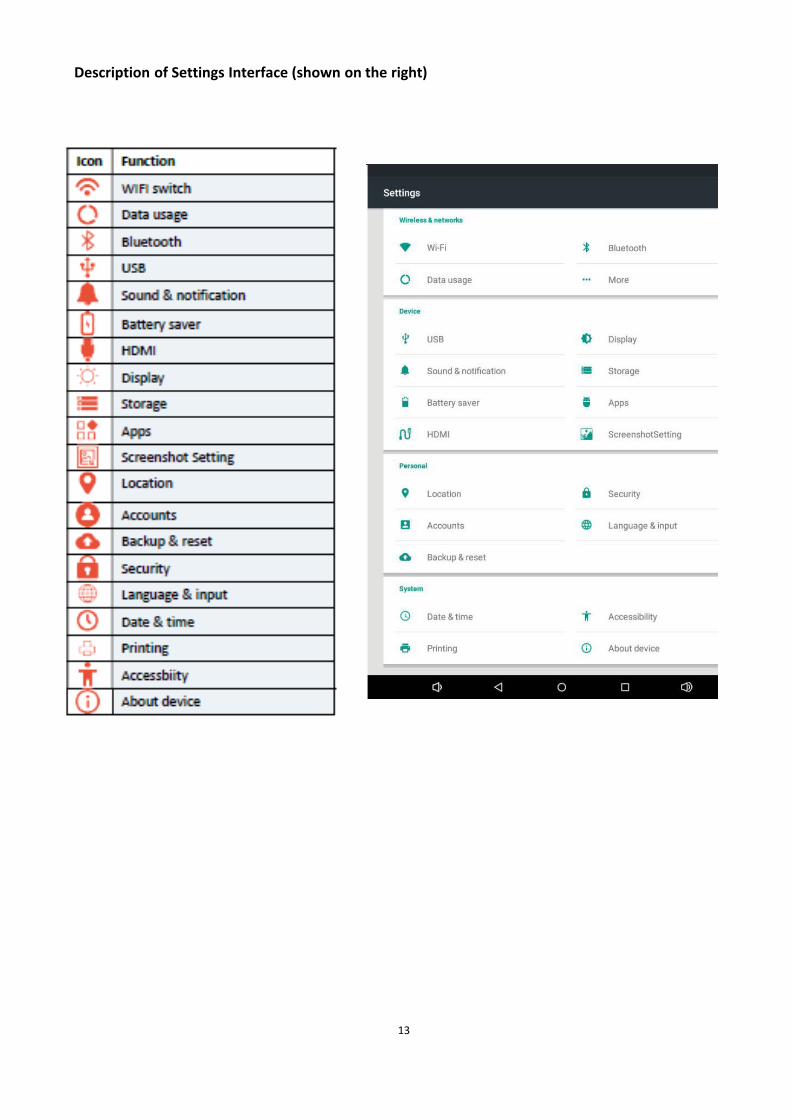
About Home Screen Description of Icons Icon Function
Main applications
Back Home page Background applications Sound - Sound +
10
Description of Basic Operation
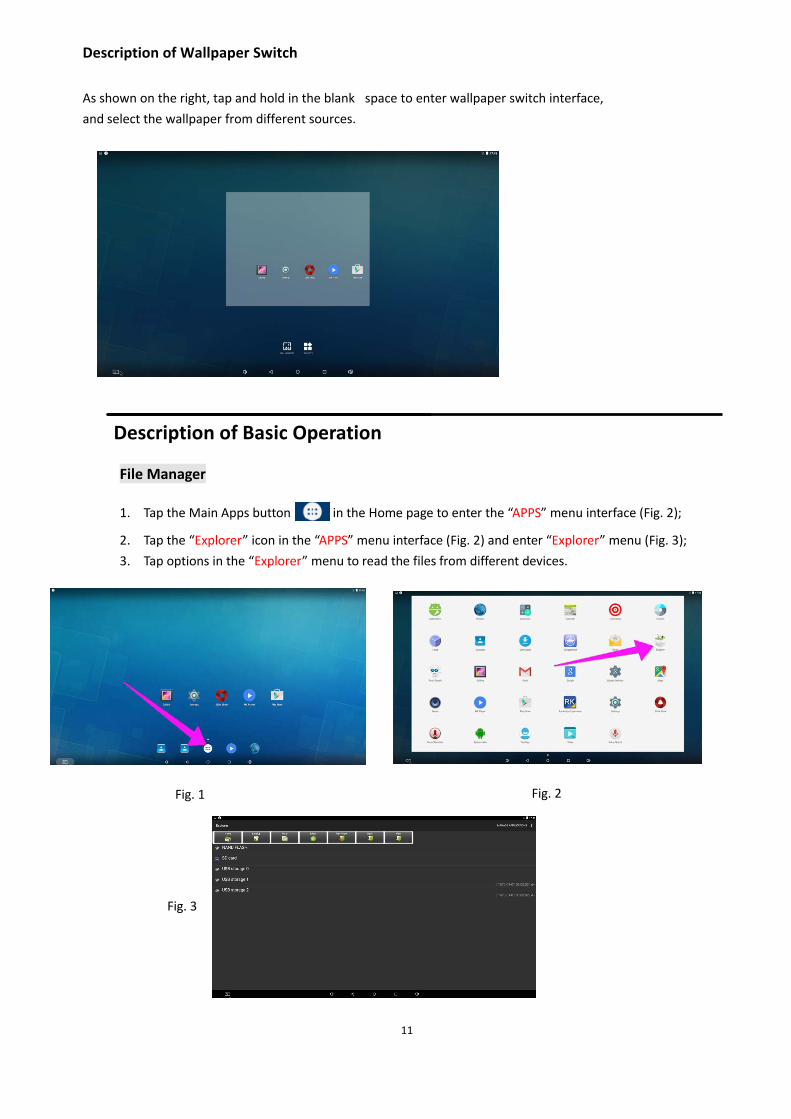
File Manager
1. Tap the Main Apps button in the Home page to enter the “APPS” menu interface (Fig. 2);
2. Tap the “Explorer” icon in the “APPS” menu interface (Fig. 2) and enter “Explorer” menu (Fig. 3);3. Tap options in the “Explorer” menu to read the files from different devices.
Fig. 1 Fig. 2
Fig. 3
11
Description of Wallpaper Switch
As shown on the right, tap and hold in the blank space to enter wallpaper switch interface, and select the wallpaper from different sources.

erface (shown on the right)
12
Description of Settings I
Fig. 1
Fig. 2
Fig. 3
Local Settings
1. Tap the Main Apps button
2. Tap the “Settings” icon in the “APPS” menu interface (Fig. 2) and enter “Wi-Fi” menu (Fig. 3);3. Tap options in the “Wi-Fi” menu and set up different options.
in the Home page to enter the “APPS” menu interface (Fig. 2);
13
Description of Settings Interface (shown on the right)

Fig. 2
Fig. 3
Fig. 1
1. Step1: Click the setting (Fig. 1)2. Step2: At the setting menu click the display menu (Fig. 2)3. Step3: At the display setting menu unselect the display navigation check
box (Fig. 3)
Status of Menu bar
14

15
Slide Show APP Introduction How to upload media files : Step1: Open the Android launcher screen and click the explorer app
Step2: Go to the USB storage menu click the USB storage button

Step3: At the USB storage menu select the media files which you want to copy to the media folder click the edit button, the pop menu will show then click the Copy button
Step4: Click HOME button and go to the NAND FLASH menu you will see the media folder, open it
16

Step5: At the media folder click the edit button at the top of the screen the pop menu will show and click the Paste command button the files will start copy to the media folder
Step6: Exit the Explorer app and go to the launcher screen run the Slide Show app to display the media files
17

18
Step 7: Select the time you would like each picture to be on the screen for by dragging the bar to the
desired time. Select how you would like the images to display. Select the desired transition effect between
pictures.
Step 8:Select Play and your slide show will begin playing

19
How to Delete the media files: Step1: Open the Android launcher screen and click the explorer app
Step2: Click home button and go to the NAND FLASH menu you will see the media folder open it

Step3: At the media folder select the media files which you want to delete and click the edit button at the top of the screen the pop menu will show and click the Delete command button the files will be deleted
20

Technical Specifications
Model Parameters Panel LCD size 43"
LCD supplier LG Panel model LD430EUE-FHB1 Light source LED backlight Resolution 1920*1080 (pixels)
Brightness (typ.)/(min) 450cd/m2 (typ.) Contrast (typ.) 1100:1 (typ.) Response (ms) 12ms (typ.)
Pixel pitch 0.4902(H) mm * 0.4902(V) mm Refresh rate 60Hz
Viewing angle 178° (H)/178° (V) Life 30,000hrs (min)
Color saturation 68% Viewable area 963.6(H) mm * 567.9(V) mm Chromaticness 16.7M
Scheme Rockchip RK3288 Power supply Voltage 100V~240V, 50-60Hz
Power Consumption ≤100W Standby power (Watt) TBD
Environment Operating temperature (°C) 0~40°C Storage temperature (°C) -10~60°C
Storage humidity 10~60% RH Non-condensing Operating humidity 20~85% RH Non-condensing
Maximum operating time (hrs/day) 18 hours Functions Operating system Android 5.1.1
Processor RK3288, quad-core RAM 2G
Built-in memory 8G Decoding resolution 1080P FHD compatible
Playback mode Support loop, inter-cut, timer, shim, etc. Compatible network Ethernet, 3G, 4G
Touch support Non-TouchSupported Video Files AVI, MPEG4, WMV, MKV, FLV, MP4, MOV
Supported Photo Files JPG, JPEG, BMP, PNG, GIF Audio output, supported files Left and right audio channel, MP3
RTC (real-time clock) Yes Schedule power on/off Yes
System update USB compatible App installation Support download and installation
I/O interfaces TF N/A21

Ethernet 1 (RJ45)HDMI 1VGA N/A
Headset N/AUSB2.0 2
SIM N/AStructure Net weight 52kg
Gross weight Unit dimensions (W*D*H)
Package dimensions (W*D*H)
Shell material Aluminum profile/sheet metal Shell color Black
Language OSD English
22
90kg1025*514*1117mm
~963.6*14*567.9mm
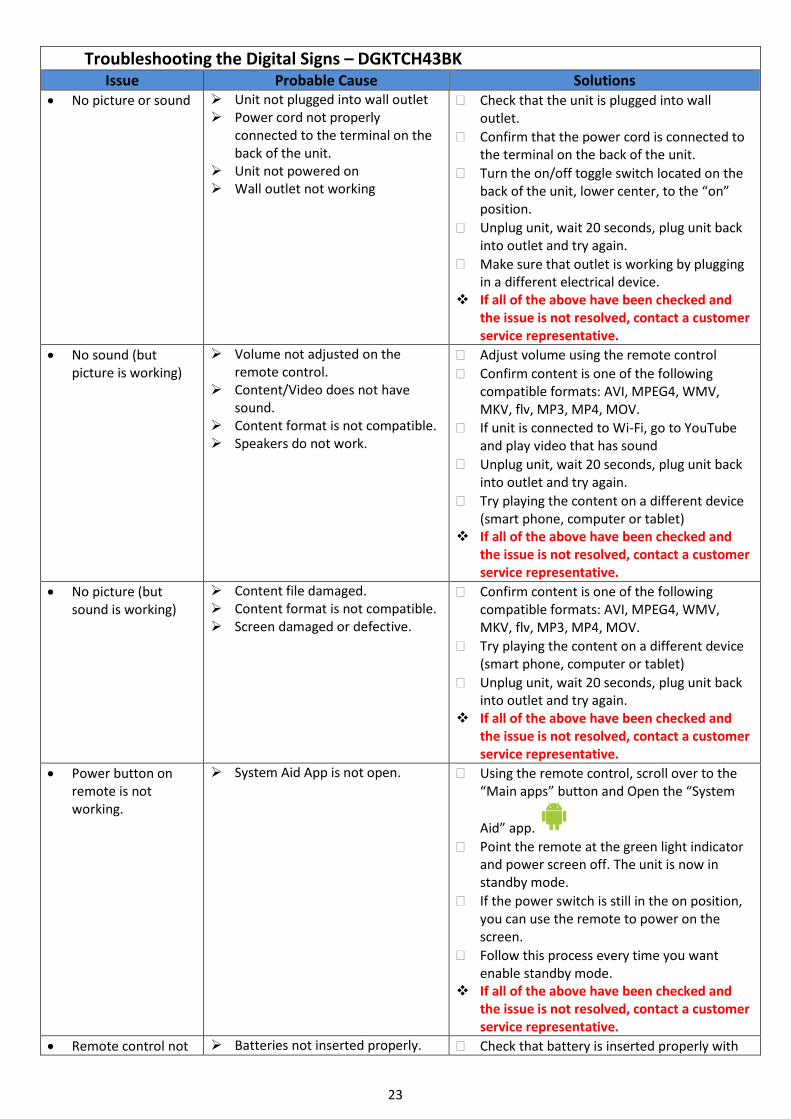
Troubleshooting the Digital Signs – DGKTCH43BK Issue Probable Cause Solutions
No picture or sound Unit not plugged into wall outlet Power cord not properly
connected to the terminal on theback of the unit.
Unit not powered on Wall outlet not working
Check that the unit is plugged into walloutlet.
Confirm that the power cord is connected tothe terminal on the back of the unit.
Turn the on/off toggle switch located on theback of the unit, lower center, to the “on”position.
Unplug unit, wait 20 seconds, plug unit backinto outlet and try again.
Make sure that outlet is working by pluggingin a different electrical device.
If all of the above have been checked andthe issue is not resolved, contact a customerservice representative.
No sound (but picture is working)
Volume not adjusted on theremote control.
Content/Video does not havesound.
Content format is not compatible. Speakers do not work.
Adjust volume using the remote control
Confirm content is one of the followingcompatible formats: AVI, MPEG4, WMV,MKV, flv, MP3, MP4, MOV.
If unit is connected to Wi-Fi, go to YouTubeand play video that has sound
Unplug unit, wait 20 seconds, plug unit backinto outlet and try again.
Try playing the content on a different device(smart phone, computer or tablet)
If all of the above have been checked andthe issue is not resolved, contact a customerservice representative.
No picture (but sound is working)
Content file damaged. Content format is not compatible. Screen damaged or defective.
Confirm content is one of the followingcompatible formats: AVI, MPEG4, WMV,MKV, flv, MP3, MP4, MOV.
Try playing the content on a different device(smart phone, computer or tablet)
Unplug unit, wait 20 seconds, plug unit backinto outlet and try again.
If all of the above have been checked andthe issue is not resolved, contact a customerservice representative.
Power button on remote is notworking.
System Aid App is not open. Using the remote control, scroll over to the“Main apps” button and Open the “System
Aid” app.
Point the remote at the green light indicatorand power screen off. The unit is now instandby mode.
If the power switch is still in the on position,you can use the remote to power on thescreen.
Follow this process every time you wantenable standby mode.
If all of the above have been checked andthe issue is not resolved, contact a customerservice representative.
Remote control not Batteries not inserted properly. Check that battery is inserted properly with
23

working Batteries are dead. Standing too close or too far from
the unit.
positive and negative orientation.
Insert new batteries.
Stand within 1 foot of the front of the unitand point the remote directly at the unit.
If all of the above have been checked andthe issue is not resolved, contact a customerservice representative.
No Wi-Fi signal Wi-Fi is not turned on in productsettings.
Wi-Fi is not connected to anetwork
Low or no signal from the router Antenna is missing or not pointed
upward. Damaged PC board
Check that Wi-Fi is turned on in settings.o Click the settings icon from the
Android home screen. o Click “Wi-Fi”.o Click the on/off icon in the upper
right hand corner to turn on Wi-Fi.
o “On” will appear on the upper lefthand side.
o Then select your Wi-Fi network
Confirm that the antenna is in place andpointed upward.
Check that other devices are receiving thesignal.
o If other devices are not receiving theWi-Fi signal, please contact yourinternet service provider.
Unplug or reset the router and wait for 20seconds. Restart the router and check.
If all of the above have been checked andthe issue is not resolved, contact a customerservice representative.
Parts missing or Damaged
Parts missed duringmanufacturing. (No charge for replacements)
Parts lost or damaged by thecustomer. (There is charge forreplacements)
Contact a customer service representative.
Having problems with installing software or getting content to play
Did you purchase theDisplayIt!Xpress software from Displays2go?
Did the customer purchase ordownloaded another 3rd partysoftware onto the product?
If you purchased DisplayIt!Xpress softwarefrom Displays2go or from Best Wave directly,please contact Best Wave atsupport@bestwave. com or (480)368-8900ext. 2
If you purchased or downloaded another 3rd
party software onto the product, pleasecontact the 3rd party software company’scustomer support for assistance.
Cleaning & Maintenance
1. Avoid strong vibration or impact on the product.
2. Keep the product dry to avoid possible damage by moisture.
3. Don’t place the product under direct sunlight which may shorten the service life of the screen.
4. Clean screen and product using glass cleaner and provided cleaning kit.
5. If the product will not be used for a long time, pull out the power cord.
24

Names and Contents of Toxic and Hazardous Substances or
Elements in the Product Names and Contents of Toxic and Hazardous Substances or Elements in the Product
Part name Toxic and hazardous substances or elements Pb Hg Cd Cr6+ PBB PBDE
Display O O O O O Shell O O O O × × Circuit board assembly * O O O O O Wires O O O O O O Metal parts O O O O O O Packaging materials* O O O O O O Remote control O O O O O Speaker O O O O O Accessories* O O O O O O *: Circuit board assembly includes PCB and the electronic elements thereof;
Packaging materials include packaging box, styrofoam, etc.; Other accessories include instruction manual.
O: the content of the toxic and hazardous substances or elements in the part is lower than the limit specified in GB/T 26572-2011 standard. X: the content of the toxic and hazardous substances or elements in the part is higher than the limit specified in GB/T 26572-2011 standard. The table shows that the machine contains harmful substances inside. The data is provided by material suppliers and verified by the company according to the material type. Some materials contain harmful substances that can’t be replaced in present technology. We are dedicated to improving this.
The EFUP of the product is ten years. The pollution control label is shown on the right.
The EFUP is valid only when the user operates in the normal conditions specified in the manual herein.
Waste Electrical and Electronic Products Recycling and Disposal Regulations To protect the earth, if you do not need this product or its service life expires, please abide by the Waste Electrical and Electronic Products Recycling and Disposal Regulations and send it to qualified local manufacture for recycling.
This Manual is for reference only and is subject to change without prior notice.
25