Embed Size (px)
Citation preview

PFC_EDU: Food Computer User Interface (the “UI”)
Connect to your EDU, connect to the internet, register and get growing!

Have you completed your build?Are you ready to connect to the Food Computer User Interface (UI)? By the end of these instructions, you’ll be able to use a Climate Recipe to grow plants in your Personal Food Computer (PFC_EDU).
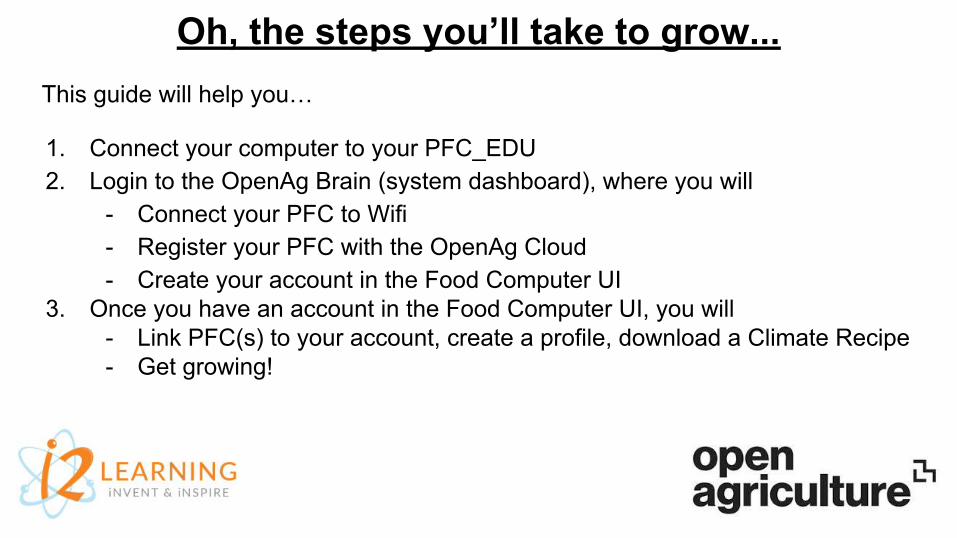
Oh, the steps you’ll take to grow...This guide will help you…
1. Connect your computer to your PFC_EDU2. Login to the OpenAg Brain (system dashboard), where you will
- Connect your PFC to Wifi- Register your PFC with the OpenAg Cloud - Create your account in the Food Computer UI
3. Once you have an account in the Food Computer UI, you will - Link PFC(s) to your account, create a profile, download a Climate Recipe- Get growing!

1. Make sure your PFC_EDU is plugged into an electrical outlet.2. Look for the Serial Number (S/N) sticker on the Central Nervous System
(CNS) on the top of the PFC_EDU. The CNS is the green electronics board. The sticker says S/N: EDU-X-XXX.
STEP 1 | Connect your computer to your PFC
You’ll use that WIFI code to connect your
computer to the BeagleBone on the
PFC_EDU in the next step.

STEP 1 | Connect your computer to your PFC3. Connect your computer to the BeagleBone that will be in your available Wifi networks (BeagleBone-XXXX). The password for the BeagleBone is “BeagleBone.” Unique, we know.
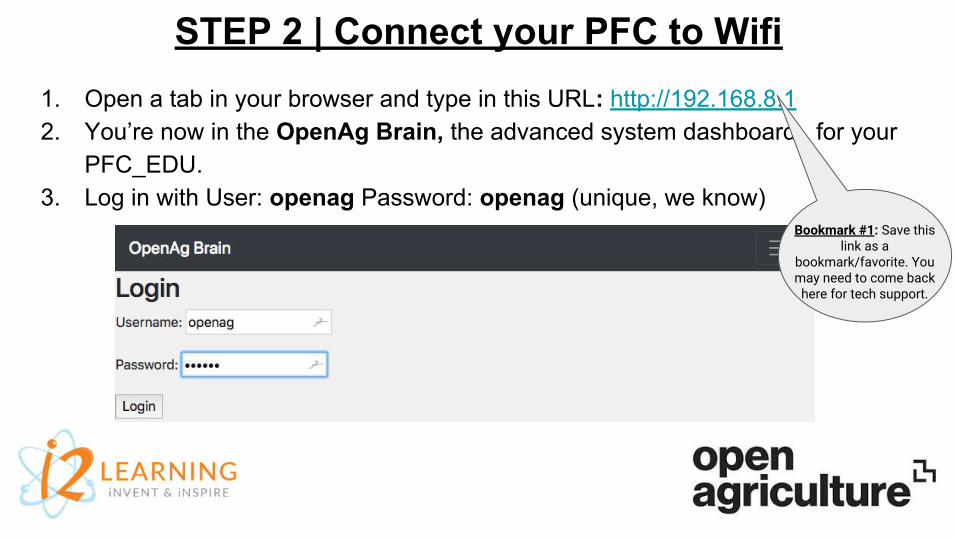
STEP 2 | Connect your PFC to Wifi 1. Open a tab in your browser and type in this URL: http://192.168.8.12. You’re now in the OpenAg Brain, the advanced system dashboard for your
PFC_EDU.3. Log in with User: openag Password: openag (unique, we know)
Bookmark #1: Save this link as a
bookmark/favorite. You may need to come back
here for tech support.

4. Once logged in, you should automatically be sent to the Connect page, under the Provision dropdown (ignore other OpenAg Brain tabs for now).
STEP 2 | Connect your PFC to Wifi
If you are not automatically sent to
the Connect page, then manually click on Connect under the
Provision dropdown.
You may need help from your IT
professional to connect using the Advanced wireless
network configuration page.

5. Under Networking, select your local Wifi from the list, and type its password.
6. Click the Join Wifi button. Wait a minute or so for the Status to show Connected. Your PFC_EDU is now connected to the internet in your local Wifi!
STEP 2 | Connect your PFC to Wifi
Note your Device IP and your Remotely Accessible Link.
You will only need this information when requesting
tech support.

STEP 3 | Register your PFC in the OpenAg CloudYou computer is connected to the PFC_EDU, the PFC is connected to the internet, now you need to register your PFC_EDU in the OpenAg Cloud.
1. Click the link next to “Web UI.” This will open a new tab, where you’ll create an account in our browser-based Food Computer User Interface, and register your PFC in the OpenAg Cloud.
The OpenAg Cloud is how all the PFCs communicate with each other & with the Open Phenome - where Climate Recipes are created and
stored.

STEP 4 | Create an Account in the Food Computer UI
*Your username - or Farmer Name - will be shown as a hashtag
when you post on Twitter from the Food
Computer UI, so choose wisely!
1. You should be on a new tab, at the Food Computer UI login page. The URL is https://openag-v1.appspot.com. Click Create an Account (below the login button).
2. Create a Farmer Name* (username), password, add your email, & your organization’s name. You’ll complete the rest of your profile later.
Bookmark #2: Save this link as a
bookmark/favorite. It’s Food Computer UI for easy access:

Once you’ve created an account, a pop-up dialog will the appear. This is where you connect your PFC with your UI account.
1. Give your PFC_EDU a name (this will appear on Twitter and the Forum), any device description you’d like, and make sure PFC_EDU is selected for Device Type.
2. Click Register Device.
STEP 5 | Connect your PFC to your UI Account
Device # should be
pre-populated.

STEP 6 | Using the Food Computer UI1. On your computer, go to your Wifi selection, and reconnect your computer back to your local Wifi (not the BeagleBone Wifi).
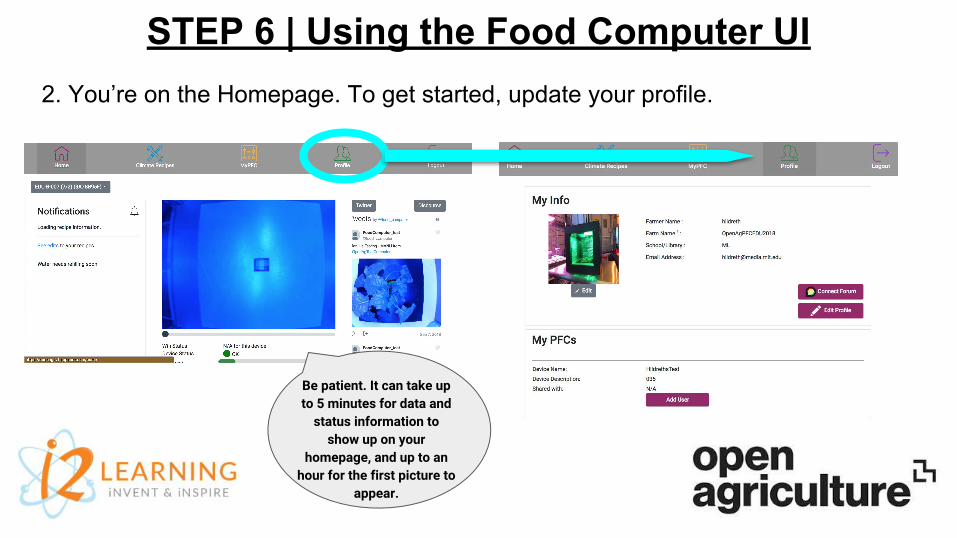
2. You’re on the Homepage. To get started, update your profile.
STEP 6 | Using the Food Computer UI
Be patient. It can take up to 5 minutes for data and
status information to show up on your
homepage, and up to an hour for the first picture to
appear.
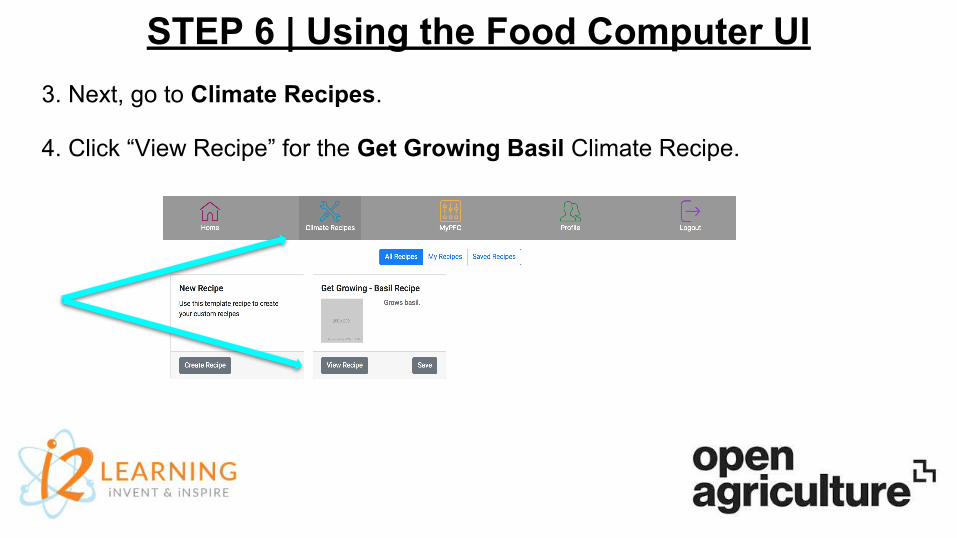
STEP 6 | Using the Food Computer UI3. Next, go to Climate Recipes.
4. Click “View Recipe” for the Get Growing Basil Climate Recipe.
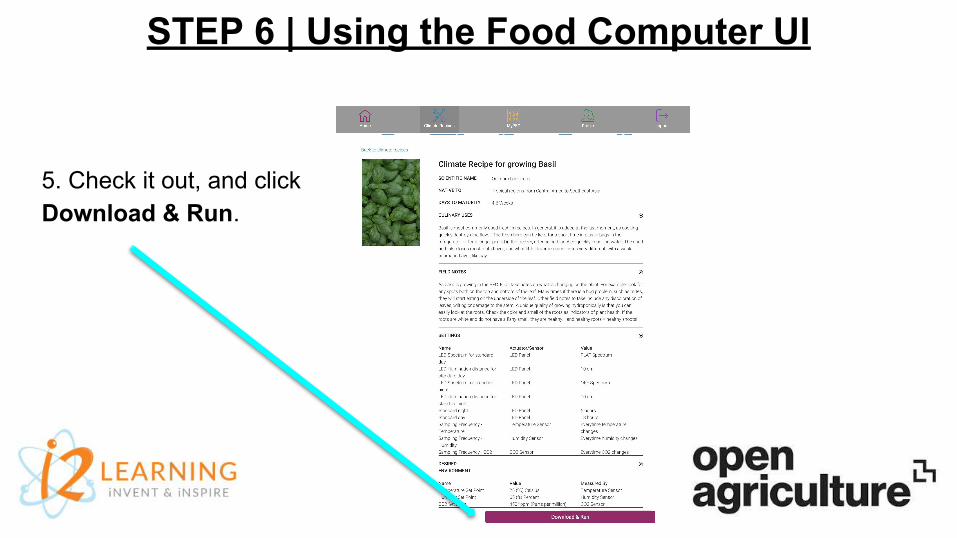
5. Check it out, and click Download & Run.
STEP 6 | Using the Food Computer UI
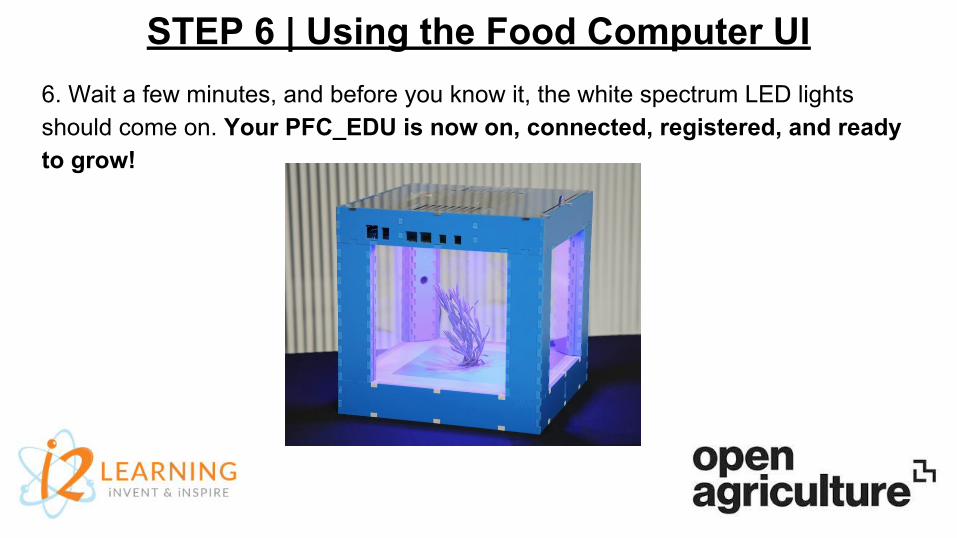
STEP 6 | Using the Food Computer UI6. Wait a few minutes, and before you know it, the white spectrum LED lights should come on. Your PFC_EDU is now on, connected, registered, and ready to grow!