Embed Size (px)
Citation preview
Cycle Count
Cycle counting is used to keep the Warehouse Management (WM) system inventory and physical inventory in sync.
Physical Inventory or Physical Count are typically performed once a year to verify all inventory in the building. Cycle counting is used to perform maintenance of the inventory between the physical counts. This keeps the host perpetual inventory correct through Perpetual Inventory Transactions (PIX).
Cycle counting involves counting small areas of the distribution center periodically. Unlike physical count, cycle counting does not require freezing locations, so normal operations can continue.
Updates to the perpetual inventory can be made in two ways.
- Immediate update after the user finishes the countImmediate updates to the WM inventory are made to the appropriate files, and PIX transactions are created to update the host perpetual inventory.
- Delayed update can be delayed until it has been reviewed and then processed at a later time. Within each area the cycle count options can be set up to delay the update to inventory and have the transaction written off to the Cycle Count file in an 'Unprocessed' status for review. This is controlled by one parameter in each cycle count option. Using this setting, the cycle counts performed can be reviewed at a later date for inaccuracies and then either processed or rejected based on the review.
System Initiated, System Directed Cycle Counts
WM has the ability to use cycle count task scheduling functionality to proactively maintain all the locations in all the warehouses.
There are mainly 2 things those need to be configured to enable to scheduled/planned cycle count – Rule and a Trigger to enforce the rule.
WM may create cycle count rules using the fixed terminal option that define the frequency of cycle counting for a set of SKUs or location based on the volatility of the SKU. Use WM Option ‘Maintain Cycle Count Task Rules’ to create the rule. Each rule can be associated with one location type:

Here, you may specify the range of location or SKU to apply the rule to:
DC manager usually configure high flowing/important customer/ high value SKU’s or Aisles having such SKU’s here.
Every rule is tied to a trigger code which triggers that rule:
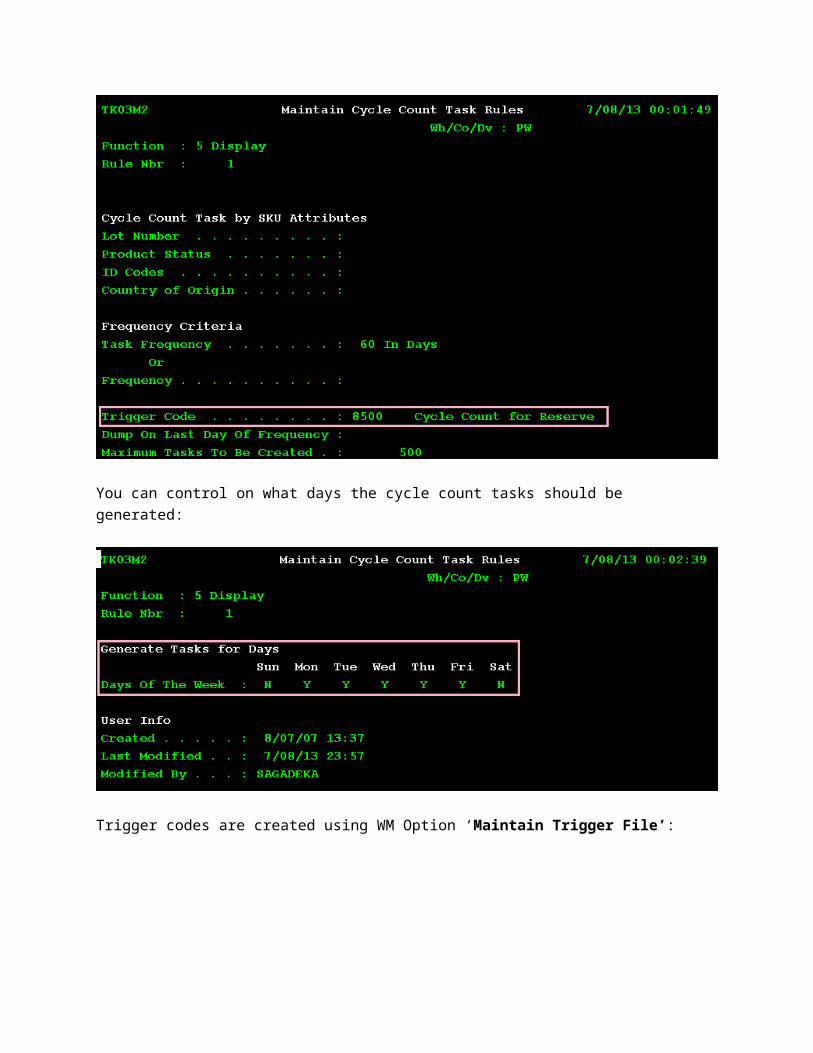
You can control on what days the cycle count tasks should be generated:
Trigger codes are created using WM Option ‘Maintain Trigger File’:

Personnel may use trigger based cycle counting to monitor for shortages from active locations. A cycle count task is generated if a shortage is reported during pulling or picking. Pre-defined events are set up in WM using fixed station option. WM generates cycle count tasks for the events that are active.
System Initiated:
Whenever the inventory drops below 5% of maximum inventory, a cycle count task is generated. For example, the maximum inventory is 100, we wave and case pick on an order which cause the inventory to drop below 5, a cycle count task will be generated. This is a trigger.

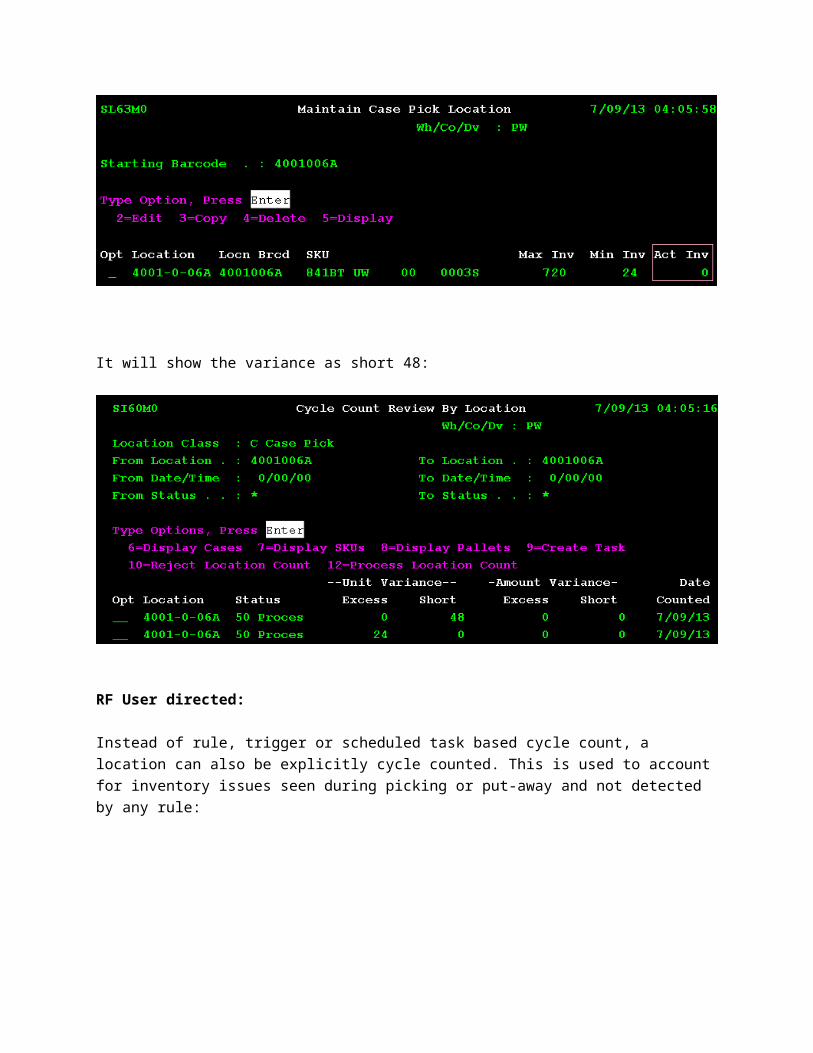
Illustration of cycle count:We will use our case pick location 4001006A for cycle count:
Use WM Option ‘Create Cycle count tasks’:
Or WM Option ‘Create Cycle Count Task By Loc’:

The cycle count task is created:
Create a tasking group CYC (INT paths are not required):
Define the eligibility criteria for INT 27:

RF:
It prompts for the location we had set up for cycle count:
It will prompt for the case number. We can derive the case number based on location code using WM option ‘Work with cases’:

It asks for quantity and number of cases:
If user finds 2 cases:

The variance is applied and actual inventory for that location shows 48 (one more case):
The variance report shows 24 as excess quantity:
If I scan 0 as ‘Nbr IP’, it will change the actual inventory to 0:
It will show the variance as short 48:

RF User directed:
Instead of rule, trigger or scheduled task based cycle count, a location can also be explicitly cycle counted. This is used to account for inventory issues seen during picking or put-away and not detected by any rule:
Use WM Option ‘Cyc Count Cs-Pk’:
The actual Inventory now again changes to 24:

Cycle Count an active location:
The active location has many cases with first case quantity as 2:
Use the WM Option ‘Cyc Count Active’:

This time it will ask for loose quantity and not IP/Case quantity:
Now, if you complete the cycle count, the quantity on the case will change from 2 to 3. Will anything else happen?
All the other cases are gone!
You need to be careful while cycle counting in production. All that is there in the location is necessary to be counted! They are now in status consumed (95).

USER INITIATED USER DIRECTED CYCLE COUNTS
This section describes the individual RF options that can be used to cycle count specific locations. A WM report exists that lists locations not counted since a specified date. This report can be used as the basis for selecting the active or reserve locations to be cycle counted.
USER INITIATED USER DIRECTED CYCLE COUNT OF RESERVE LOCATION
Step 1: Select the option for “Cyc Cnt Reserve” from RF Inbound menu. This option will be used for cycle counting a user selected reserve location.
Step 2: The system will prompt for the reserve location to be cycle counted. Type the location or scan the location barcode in the “Brcd” field.
Step 3: WM will display the reserve location and prompt for the number of cases. Count and type the number of LPN(s) in the location and press ENTER.

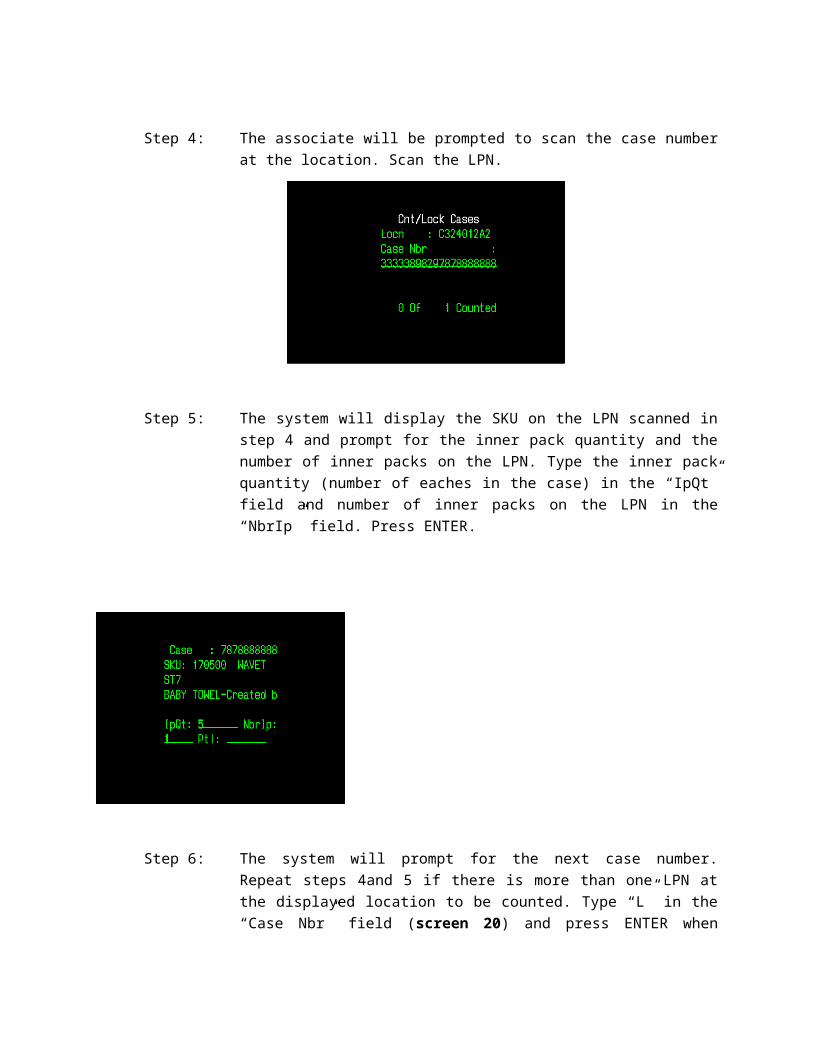
Step 4: The associate will be prompted to scan the case number at the location. Scan the LPN.
Step 5: The system will display the SKU on the LPN scanned in step 4 and prompt for the inner pack quantity and the number of inner packs on the LPN. Type the inner pack quantity (number of eaches in the case) in the “IpQt” field and number of inner packs on the LPN in the “NbrIp” field. Press ENTER.

Step 6: The system will prompt for the next case number. Repeat steps 4and 5 if there is more than one LPN at the displayed location to be counted. Type “L” in the “Case Nbr” field (screen 20) and press ENTER when there are no more LPN’s to be counted at the displayed location.
Note: 1) If the count is the same as expected, the system prompt for the barcode of the next reserve location to be cycle counted. Repeat steps 2-5 to cycle count additional reserve location or type “E” and press ENTER when prompted for the barcode (screen 21) to return to the RF Inbound menu.
2) If the count is different than what was expected, the system will display the message “Diff exist, Recount” (screen 22) and prompt the associate to count the cases again. The option field on screen 22 has a “Y” (Yes) by default. Press ENTER to recount. If discrepancies exist between the scanned inventory and systematic inventory, then two consecutive counts are required for an update. Repeat steps 4 and 5 twice to recount the inventory at the displayed location.

Physical Inventory
Physical Inventory is the process of stopping operations so inventory physically within the Distribution Center can be fully and accurately counted to correct current system records. Host systems are updated and reconciled with the full and accurate inventory position. This standard operating procedure assumes the physical inventory count is conducted using a single count comparison method and RF scanners for the counting.
Conducting a physical inventory within PKMS involves:
Freezing Locations within PKMS to get a beginning snapshot of current inventory Counting each type of inventory within the DC Reconciling Counts Resolving Variances Booking Counted Inventory Updating Host Systems
Counts are created by freezing location ranges within the warehouse. Users are assigned the location ranges to count using either paper count sheets or RF counting options. Once counts are completed via RF or entered from paper count sheets, variances are reconciled and resolved by warehouse section (Physical Inventory Codes). Resolved counts are booked to update PKMS records by warehouse section.
This is usually done during holidays (Christmas/New Year) and code freeze.
Reserve locations
- Reserve location ranges are frozen to form counting sections. Each section is assigned a counting team.
- The count team uses RF scanners to record the inventory physically found in the location. Counting team members apply a colored above the LPN to indicate the LPN has been counted.
- Once all counts for a counting section are completed, the variance report for the counting section is run to identify recounts.
- Once all variances are resolved or accepted, the counting section is ready to be booked.
Active locations- Active locations are counted using paper count sheets (optional to count using RF). - Active locations ranges are frozen to form counting sections. Each section is assigned a counting
team. - The count team records the inventory physically found in the location on the count sheet. Once
all counts on the count sheet have been completed, the sheet is turned in to data entry. Data entry uses the count sheet to record the count in PKMS.
- Once all counts for a counting section are completed, the variance report for the counting section is run to identify recounts. Once all variances are resolved or accepted, the counting section is ready to be booked.

Facility Preparation
In order to conduct a full accounting of inventory in the facility the DC must prepare the stock physically and prepare system records. The following are prerequisites for conducting the count:
All “Un-Received” trailers are left in the yard. Verify all receipts. DC must verify all inbound shipments. Use Work with ASNs to verify
all in process shipments. Status “10” LPNs – Status “10” (In process) should be addressed. All LPNs (Cases) on
record must be located in a valid reserve location. “Putaway Pending” LPNs – All LPNs must be located in a valid reserve location and the
“PP” lock code removed. Status “65” Pulled LPNs are reconciled and addressed prior to count. Status “65” LPNs
are pulled LPNs indicating an incomplete task or packing assignment. These must be resolved prior to conducting a physical count.
All cartons must be in status “85” Invoiced or “99” Cancelled. All cartons must be reconciled prior to conducting a physical count.
All VAS items must be reconciled and shipped prior to conducting the physical count. All Tasks must be in status “90” verified or “91” cancelled. All tasks must be reconciled
prior to conducting a physical count. All Active Back stock must be placed into the active location or packed out and returned
to reserve locations prior to conducting a physical count. All packing locations must be clear of all product in PKMS. All scrapped returns must be scrapped and discarded prior to conducting the physical
count. All “In Process” Work orders must be verified and closed prior to conducting the
physical count. All “Return to Stock” items in returns must be put-away prior to conducting the physical
count. All Mispick Returns must be processed and put-away prior to conducting the physical
count. All Transfers must be completed, closed, and put-away prior to conducting the physical
count. All Damages removed from inventory and discarded appropriately prior to conducting
the physical count. All re-packaging projects complete and put-away to stock prior to conducting the
physical count. All items on quality hold resolved and put-away or returned to vendor prior to
conducting the physical count. Prepare teams to facilitate counting

Users also have an ability to physical count only a particular type of location instead of entire warehouse:
Capture beginning inventory snapshot (Optional):
Based on the type of inventory that is being physical counted, it is always advisable to take the backup of the master inventory file before starting the PI process. For example, for reserve inventory we will back-up the ILLOCN00 file and for active/case-pick inventory, we will back up the ACLOCN00 file.
In this session, we will focus on PI process for active locations:

Freeze locations:Freezing locations make sure that no inventory transactions happening in the DC can accidently update the actual inventory in the DC. Locations are frozen by Sections of the warehouse to facilitate management and control of the counting process.
Select Option 1 (Freeze Active Inventory):
Report Address: Enter Printer. Optional to leave blank to create spool file and print later.
Physical Inventory Code: Enter Physical Inventory Code for desired warehouse section.
From Location / To Location: Enter first location in range to count and last location in range to count.
Restrict to Single Level Posn: Enter “N” No and “N” No to create count sections for all locations within the location range.
Number of Counts: Enter 1. Single counts are done against each location. Counts are compared to beginning inventory snapshot to identify variances for reconciliation.
List Frozen Records: Enter “Y” Creates a report of locations included in the counting section.
SKU Inventory Count Frequency: Enter * for all. This flag looks at active location setup. It’s a way to freeze inventory for a portion of the SKUs within the range. For Physical Inventory all SKUs and all SKU locations must be counted.

Freeze Locations with no SKU assigned: Enter “Y”
Perform Counts:Counts can be performed on RF units or on paper count sheets.
Counts for Active Locations can be performed using paper count sheets or RF Data collections units. For counting active locations using paper count sheets, the following process is followed:
Print Active count recording sheet:

Enter Printer for the Count SheetsEnter Beginning Physical Inventory Code (Counting Section)Enter Ending Physical Inventory Code (Counting Section)
Navigate to Spool files to release count sheets to the printer.Note: Counts are performed and recorded on the count sheet. Count sheet are turned into a designated entry station to key into PKMS.

Data Entry the counts from sheets into the system:
Enter From Inventory Code (Counting Section)Enter To Inventory Code (Counting Section)Enter Group by Location Level: ‘7’ to list all locations in the counting section.
Press <Enter> to display locations and enter counts.

Enter Total Units counted in section. The individual counts entered for the counting section must total to the value entered in this field. Enter counts where SKU matches assigned SKU expected for the active location.
Complete count entry for entire counting section.
SKU is found in the active location, but not seen in the system at that location:
SKUs found in an active location where they are not assigned need to be resolved in a couple of ways. Using Work with Active Inventory, identify the current active location assigned to the SKU. If the SKU is in a location that has already been counted but not booked, then the product is physically placed in the location and the count is adjusted for the assigned active location by entering the count sheet again for the counting section.
If the counting section has already been booked (variances cleared, adjustments applied) then the inventory is recorded on a manual log to be cycle counted into location after the physical inventory is concluded and reconciled to host systems.
SKU is defined in the system but not physically present in the active location:
Simply, scan the count as 0
RF PI COUNT ACTIVE
Select Phys Cnt Active from RF Menu

Enter Count Inventory Code and Count Seq (1)
Scan first location to count
Validate SKU and Enter Qty. Press <Tab> and Enter “C”. (Any difference in counted quantity to system quantity will be posted as a variance for recount)
Enter “C” and Press <Enter> to complete the count for the Location

If the location is empty and the SKU is assigned in the system, simply scan ‘C’:
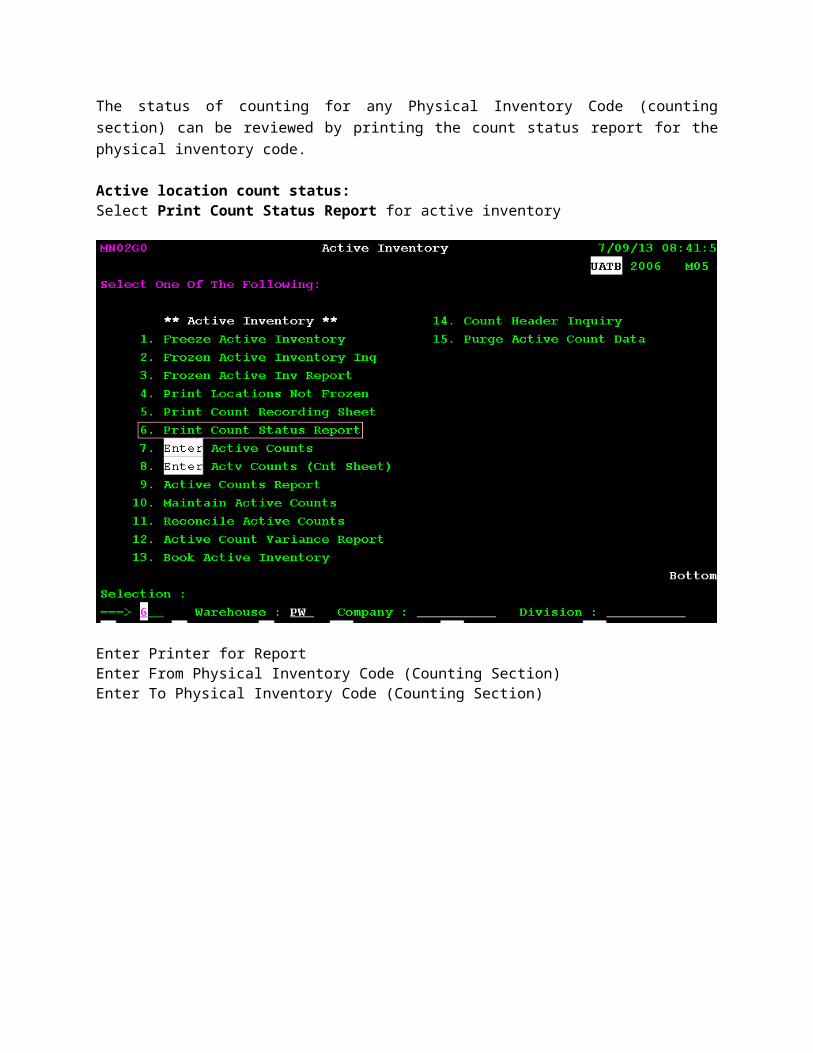
Monitor Count Status:The status of counting for any Physical Inventory Code (counting section) can be reviewed by printing the count status report for the physical inventory code.
Active location count status:Select Print Count Status Report for active inventory

Enter Printer for ReportEnter From Physical Inventory Code (Counting Section)Enter To Physical Inventory Code (Counting Section)
Note: Multiple Sections can be printed as the same time but must be in sequence. To print multiple counting sections enter a range of Physical Inventory Codes

Print Variance ReportsAfter all counts are performed for a physical inventory code (counting section), a variance report is run to identify recounts needed. PKMS does validate if all counts have been performed.
Active Inventory variance report:
Enter Printer Address for ReportEnter From Physical Inventory Code (Counting Section IE: CD501A)Enter To Physical Inventory Code

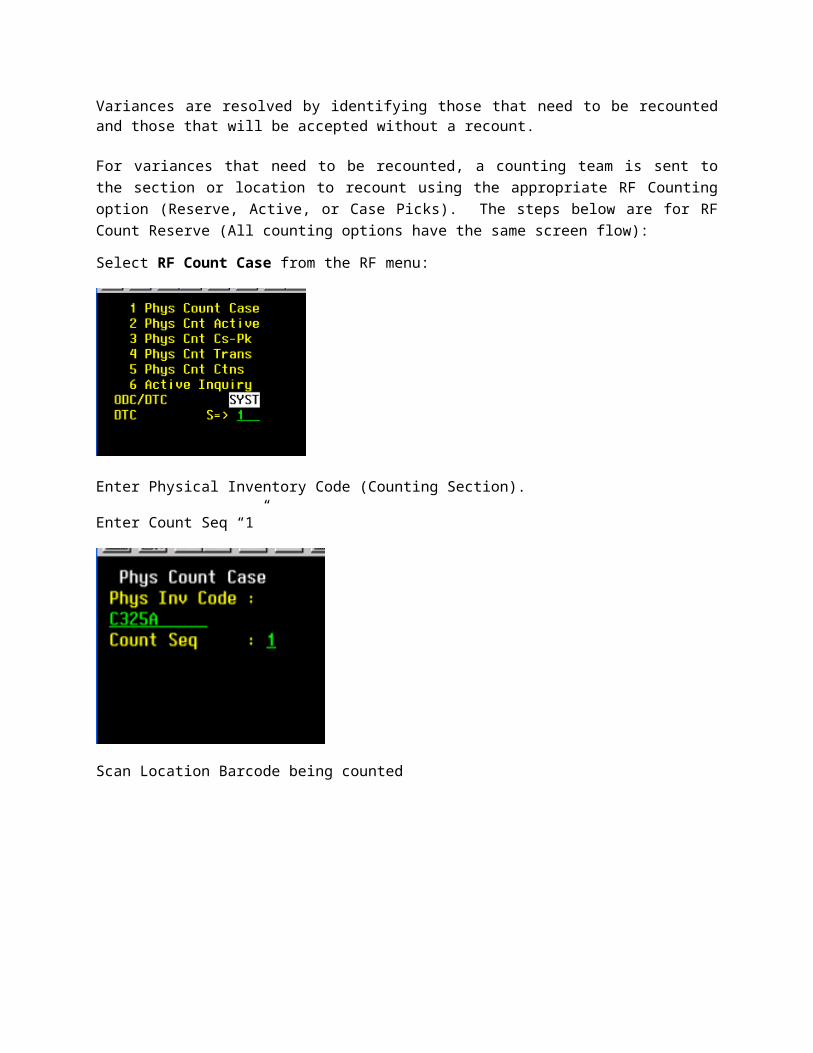
Resolve VariancesVariances are resolved by identifying those that need to be recounted and those that will be accepted without a recount.
For variances that need to be recounted, a counting team is sent to the section or location to recount using the appropriate RF Counting option (Reserve, Active, or Case Picks). The steps below are for RF Count Reserve (All counting options have the same screen flow):
Select RF Count Case from the RF menu:
Enter Physical Inventory Code (Counting Section).
Enter Count Seq “1”
Scan Location Barcode being counted
Enter “T” to recount the location
Scan LPN

Enter Inner PackEnter Number of Inner PacksEnter Partial Inner Pack Qty
Press <Enter> to accept the count for the LPNScan Next LPN and repeat steps 7 – 9 or Enter “C” and press <Enter> to complete the count for the location.
Book Inventory:
Once variances are confirmed and recounts completed, the counted inventory can be updated in PKMS using the Book Inventory process. Book Inventory makes updates to PKMS only. PIX records that are created as part of the booking process are not processed to the host.
Book Active inventory counts:

Enter Printer for ReportEnter From Physical Inventory Code (Counting Section)Enter To Physical Inventory Code (Counting Section
Press <F16> to confirm. This runs the booking process and produces final variance reports.
Capture ending inventory snapshot:Based on the type of inventory that is being physical counted, it is always advisable to take the backup of the master inventory file even after ending the PI process. For example, for reserve inventory we will back-up the ILLOCN00 file and for active/case-pick inventory, we will back up the ACLOCN00 file.
Purge PI Data:After the PI process is complete, Option ‘Purge Active Count Data’ can be used to delete the data from the system: