Embed Size (px)
Citation preview
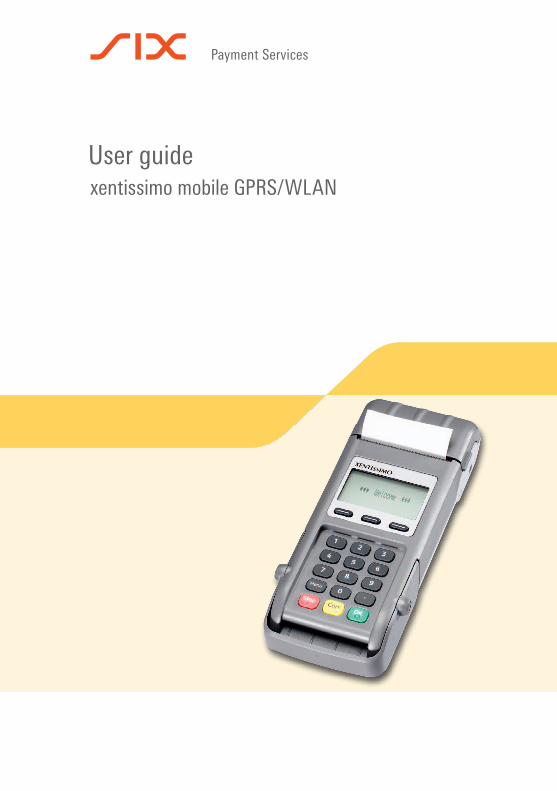
User guidexentissimo mobile GPRS/WLAN
2
1 Security requirements 31.1 Electromagnetic compatibility 31.2 Where wireless technologies are used 31.3 CE declaration of conformity 4
2 Product info 52.1 Terminal overview 52.2 Display symbols 62.3 Loading station: table/wall installation and clip holder 82.4 Changing the rechargeable battery/Installing SIM cards 92.5 Abbreviations/Information 102.6 GSM/GPRS 112.7 WLAN 122.8 Stand-by operation 122.9 Payment procedure with ep2 132.10 Technical information 13
3 Start-up 143.1 Installation 143.2 Setup 15
4 Menu tree (illustration) 164.1 Main menu 164.2 Transactions 17
5 Functions 185.1 Cashier: purchase 185.2 Cashier: manual recording of the card data 195.3 Customer handling: card without PIN 205.4 Customer handling: card with PIN 21
6 Methods of payment 226.1 Purchase authorised per telephone 226.2 Reversal 236.3 Credit 246.4 Reservation/Purchase reservation 256.5 Tip/Cash advance 266.6 Mail order/Other transactions 27
7 Balances 287.1 Start user shift/end user shift, daily closing, data transmission 28
8 Queries (totals), settings 29
9 Maintenance and handling 309.1 Printer settings 309.2 Care and maintenance 319.3 Services 329.4 Identifying and solving errors 339.5 Changing the paper roll 34
Table of contents
3
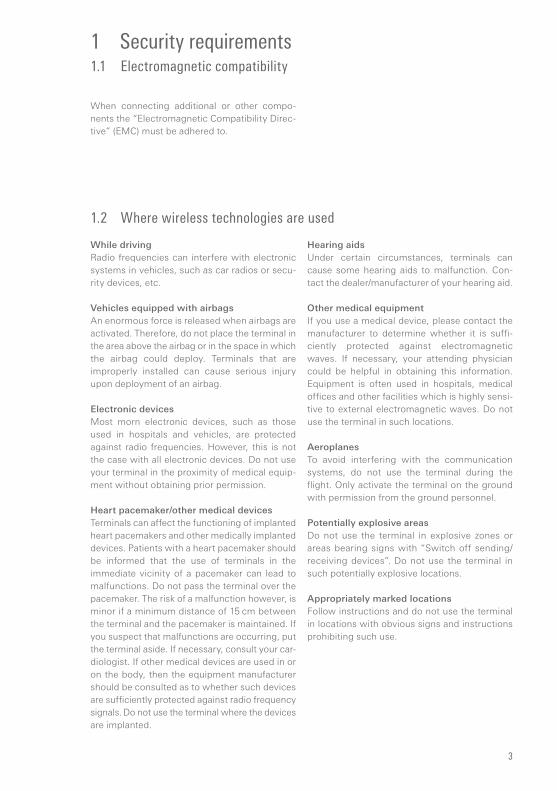
1 Security requirements1.1 Electromagnetic compatibility
When connecting additional or other compo-nents the “Electromagnetic Compatibility Direc-tive” (EMC) must be adhered to.
Hearing aidsUnder certain circumstances, terminals can cause some hearing aids to malfunction. Con-tact the dealer/manufacturer of your hearing aid.
Other medical equipmentIf you use a medical device, please contact the manufacturer to determine whether it is suffi-ciently protected against electromagnetic waves. If necessary, your attending physician could be helpful in obtaining this information. Equipment is often used in hospitals, medical offices and other facilities which is highly sensi-tive to external electromagnetic waves. Do not use the terminal in such locations.
AeroplanesTo avoid interfering with the communication systems, do not use the terminal during the flight. Only activate the terminal on the ground with permission from the ground personnel.
Potentially explosive areasDo not use the terminal in explosive zones or areas bearing signs with “Switch off sending/ receiving devices”. Do not use the terminal in such potentially explosive locations.
Appropriately marked locationsFollow instructions and do not use the terminal in locations with obvious signs and instructions prohibiting such use.
While driving Radio frequencies can interfere with electronic systems in vehicles, such as car radios or secu-rity devices, etc.
Vehicles equipped with airbagsAn enormous force is released when airbags are activated. Therefore, do not place the terminal in the area above the airbag or in the space in which the airbag could deploy. Terminals that are improperly installed can cause serious injury upon deployment of an airbag.
Electronic devicesMost morn electronic devices, such as those used in hospitals and vehicles, are protected against radio frequencies. However, this is not the case with all electronic devices. Do not use your terminal in the proximity of medical equip-ment without obtaining prior permission.
Heart pacemaker/other medical devicesTerminals can affect the functioning of implanted heart pacemakers and other medically implanted devices. Patients with a heart pacemaker should be informed that the use of terminals in the immediate vicinity of a pacemaker can lead to malfunctions. Do not pass the terminal over the pacemaker. The risk of a malfunction however, is minor if a minimum distance of 15 cm between the terminal and the pacemaker is maintained. If you suspect that malfunctions are occurring, put the terminal aside. If necessary, consult your car-diologist. If other medical devices are used in or on the body, then the equipment manufacturer should be consulted as to whether such devices are sufficiently protected against radio frequency signals. Do not use the terminal where the devices are implanted.
1.2 Where wireless technologies are used
4
The CE declaration of conformity is found on the SIX Payment Services homepage at: www.six-payment-services.com
Every effort has been made to ensure that the information in this document is complete and exact at the date of printing. Further developments in the field of electronic payment traffic and technological progress could result in changes that might deviate from the description in this user guide.
Consequently, SIX Payment Services Ltd accepts no responsi-bility for the information provided in the operating instructions being current, complete or correct. Further more, to the extent permitted under the relevant legal provisions, SIX Payment Services Ltd accepts no responsibility in connection with the operating instructions.
The menu navigation on the terminal has been designed to be self-explanatory, making this document necessary only in case of emergency.
The latest version of the user guide, together with any updates, can be found on our homepage at: www.six-payment-services.com
1.3 CE declaration of conformity
5
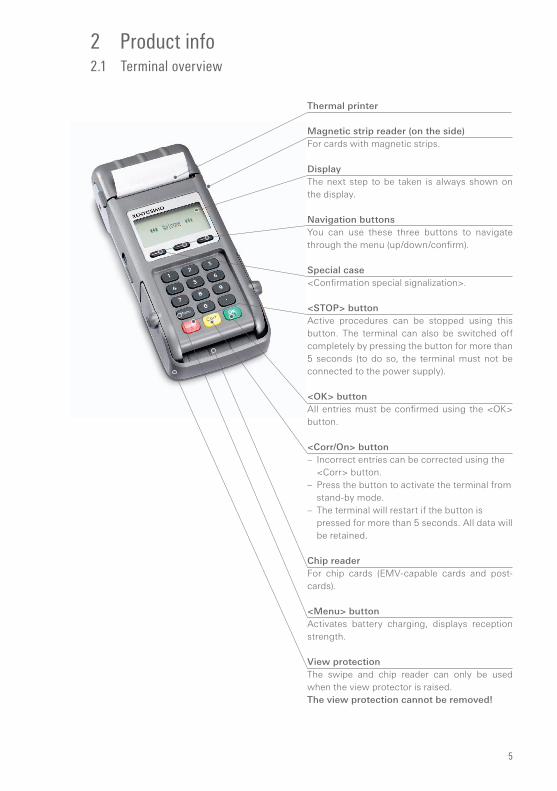
2 Product info2.1 Terminal overview
Thermal printer
Magnetic strip reader (on the side) For cards with magnetic strips.
DisplayThe next step to be taken is always shown on the display.
Navigation buttonsYou can use these three buttons to navigate through the menu (up/down/confirm).
Special case<Confirmation special signalization>.
<STOP> buttonActive procedures can be stopped using this button. The terminal can also be switched off completely by pressing the button for more than 5 seconds (to do so, the terminal must not be connected to the power supply).
<OK> buttonAll entries must be confirmed using the <OK> button.
<Corr/On> button– Incorrect entries can be corrected using the
<Corr> button.– Press the button to activate the terminal from
stand-by mode.– The terminal will restart if the button is
pressed for more than 5 seconds. All data will be retained.
Chip readerFor chip cards (EMV-capable cards and post-cards).
<Menu> buttonActivates battery charging, displays reception strength.
View protectionThe swipe and chip reader can only be used when the view protector is raised. The view protection cannot be removed!
6
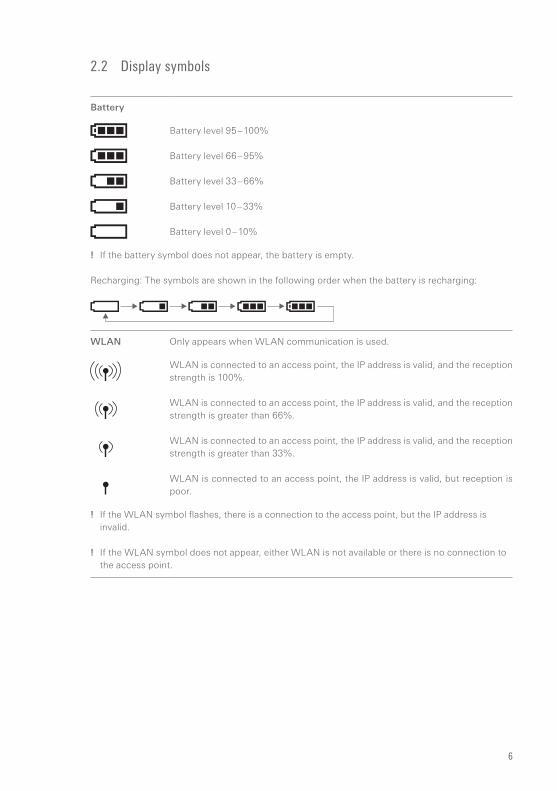
2.2 Display symbols
Battery
Battery level 95 – 100%
Battery level 66 – 95%
Battery level 33 – 66%
Battery level 10 – 33%
Battery level 0 – 10%
! If the battery symbol does not appear, the battery is empty.
Recharging: The symbols are shown in the following order when the battery is recharging:
WLAN Only appears when WLAN communication is used.
WLAN is connected to an access point, the IP address is valid, and the reception strength is 100%.
WLAN is connected to an access point, the IP address is valid, and the reception strength is greater than 66%.
WLAN is connected to an access point, the IP address is valid, and the reception strength is greater than 33%.
WLAN is connected to an access point, the IP address is valid, but reception is poor.
! If the WLAN symbol flashes, there is a connection to the access point, but the IP address is invalid.
! If the WLAN symbol does not appear, either WLAN is not available or there is no connection to the access point.

7
GSM/GPRSReception strength
Only appears when GPRS communication is used.
There is a connection to the network and the reception strength is 100%.
There is a connection to the network and the reception strength is greater than 80%.
There is a connection to the network and the reception strength is greater than 60%.
There is a connection to the network and the reception strength is greater than 40%.
There is a connection to the network and the reception strength is greater than 20%.
! If the GSM/GPRS symbol does not appear, GSM/GPRS is not assigned to a network or reception is too poor to set up a connection.
The reception strength is supplemented by one of the two symbols shown below.
GSM is in use, GPRS is not available/in use.
! If the GSM/GPRS symbol flashes, it is in use but offline.
GSM/GPRS is in use (GPRS mode).
! If no supplementary symbol appears, GSM/GPRS is not available.
GSM/GPRSData transmission
This symbol always appears together with a communication symbol. It shows that a transaction is running.
This symbol appears with either the Ethernet or the WLAN symbol. It shows that a secure connection is active.
8
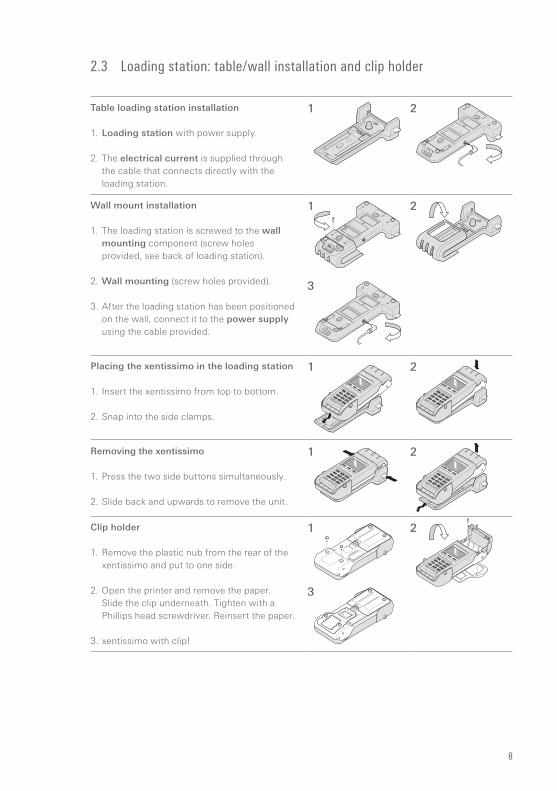
Table loading station installation
1. Loading station with power supply.
2. The electrical current is supplied through the cable that connects directly with the loading station.
1 2
Wall mount installation
1. The loading station is screwed to the wall mounting component (screw holes provided, see back of loading station).
2. Wall mounting (screw holes provided).
3. After the loading station has been positioned on the wall, connect it to the power supply using the cable provided.
1
3
2
Placing the xentissimo in the loading station
1. Insert the xentissimo from top to bottom.
2. Snap into the side clamps.
1 2
Removing the xentissimo
1. Press the two side buttons simultaneously.
2. Slide back and upwards to remove the unit.
1 2
Clip holder
1. Remove the plastic nub from the rear of the xentissimo and put to one side.
2. Open the printer and remove the paper. Slide the clip underneath. Tighten with a Phillips head screwdriver. Reinsert the paper.
3. xentissimo with clip!
1
3
2
2.3 Loading station: table/wall installation and clip holder
9
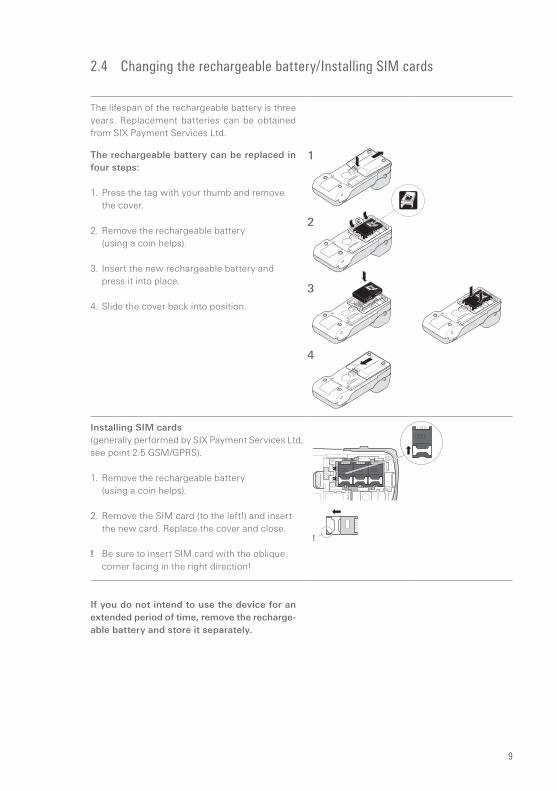
The lifespan of the rechargeable battery is three years. Replacement batteries can be obtained from SIX Payment Services Ltd.
The rechargeable battery can be replaced in four steps:
1. Press the tag with your thumb and remove the cover.
2. Remove the rechargeable battery (using a coin helps).
3. Insert the new rechargeable battery and press it into place.
4. Slide the cover back into position.
1
2
3
4
Installing SIM cards (generally performed by SIX Payment Services Ltd, see point 2.5 GSM/GPRS).
1. Remove the rechargeable battery (using a coin helps).
2. Remove the SIM card (to the left!) and insert the new card. Replace the cover and close.
! Be sure to insert SIM card with the oblique corner facing in the right direction!
If you do not intend to use the device for an extended period of time, remove the recharge-able battery and store it separately.
2.4 Changing the rechargeable battery/Installing SIM cards
10
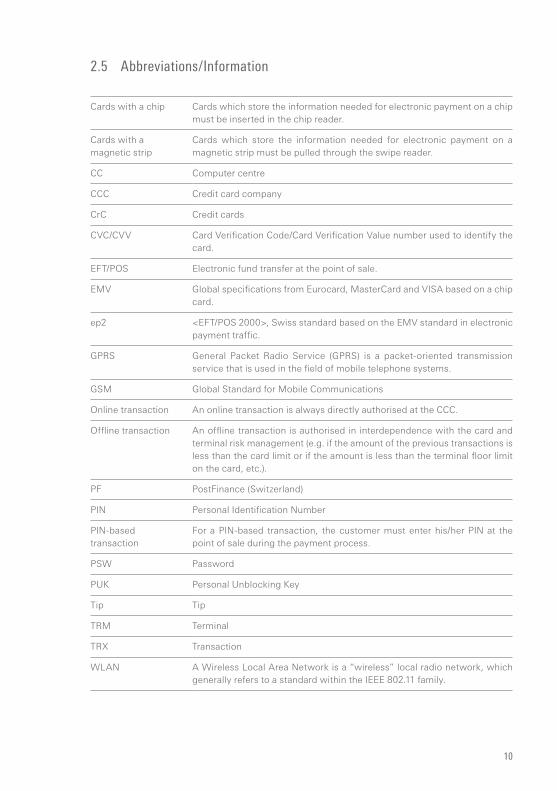
Cards with a chip Cards which store the information needed for electronic payment on a chip must be inserted in the chip reader.
Cards with a magnetic strip
Cards which store the information needed for electronic payment on a magnetic strip must be pulled through the swipe reader.
CC Computer centre
CCC Credit card company
CrC Credit cards
CVC/CVV Card Verification Code /Card Verification Value number used to identify the card.
EFT/POS Electronic fund transfer at the point of sale.
EMV Global specifications from Eurocard, MasterCard and VISA based on a chip card.
ep2 <EFT/POS 2000>, Swiss standard based on the EMV standard in electronic payment traffic.
GPRS General Packet Radio Service (GPRS) is a packet-oriented transmission service that is used in the field of mobile telephone systems.
GSM Global Standard for Mobile Communications
Online transaction An online transaction is always directly authorised at the CCC.
Offline transaction An offline transaction is authorised in interdependence with the card and terminal risk management (e.g. if the amount of the previous transactions is less than the card limit or if the amount is less than the terminal floor limit on the card, etc.).
PF PostFinance (Switzerland)
PIN Personal Identification Number
PIN-based transaction
For a PIN-based transaction, the customer must enter his/her PIN at the point of sale during the payment process.
PSW Password
PUK Personal Unblocking Key
Tip Tip
TRM Terminal
TRX Transaction
WLAN A Wireless Local Area Network is a “wireless” local radio network, which generally refers to a standard within the IEEE 802.11 family.
2.5 Abbreviations/Information
11
This function requires a GSM subscription with data functionality.
The PIN/PUK must usually only be entered once. This is done during the production phase of the terminal. Keep your PIN and PUK for your GSM subscription handy in case of a malfunction.
– The reception signal can vary greatly, depending on the GSM provider and usage environment. It is possible that the signal
may be weakened to the point that commu-nications are impossible in cellars, houses with thick walls or steel walls. If there is no reception, you must change your location. The battery charge level can be checked by pressing the <Menu> button. The terminal must be switched on to do so.
– Communications while in motion (in trains, cars, boats, etc.) can become instable and lead to a broken connection.
2.6 GSM/GPRS
12
Several tips for working with a WLAN terminal:
– Please read the installation instructions delivered with the terminal.
– Have your network infrastructure installed and tested in advance by a qualified IT specialist.
– Keep the SSID and the keys for the radio link in a secure location. Make sure that you have this data to hand in the event of technical problems.
– The terminal uses the radio standard 811.11b (11 Mbps).
– We recommend that you inspect the location before installing the terminal. Determine where the terminal functions in your building and where the radio signal is limited.
– The power of radio links can be effect by weather. The signal reception may therefore vary. You can display the current reception level by pressing the <Menu> button.
– The useful range of the terminal can be extended with the installation of additional access points. Ask the person in charge of your network.
2.7 WLAN
The terminal is always ready for operation if it is connected to the power supply (transformer or loading station). If the terminal is to be used in mobile mode on battery power, then it will
auto matically switch to stand-by mode if not used for 60 seconds to preserve the battery. Make the terminal operational again by press-ing the <Corr/On> button.
2.8 Stand-by operation
13
The payment process at the point of sale is stan-dardised for all cards with ep2. A variety of card types are in cir culation today. Many card issuers intend to provide their customers with EMV chip cards in the coming years.
– Cards for which the card information is only present on the magnetic strip must be pulled through the swipe reader.
– Cards with a chip must be inserted in the chip card reader.
– If a chip card is pulled through a swipe reader, the customer is prompted to insert it in the chip reader.
– If a card with a magnetic strip is inserted in a chip reader, the message “Card unknown” is displayed. The customer must pull the card through the swipe reader.
Payment functionsep2 offers a full range of transaction modes and functions. The transactions activated on your terminal are determined by the settings in the service centre as global parameters and by the individual card processors.
e.g. Tip:This transaction type is often used in the hotel and restaurant industry. In the retail business, however, it is unnecessary.
– Depending on the payment function and credit card processor, different minimum/maximum amounts, day limits, etc. can be defined.
– Functions are described in general in this document. Please note that some transaction modes and functions may be inactive on your device.
Caution for offline transactions!Offline transactions are stored in the security section of your terminal and submitted to the card processor by means of the daily closing. This can be carried out manually by the terminal operator or automatically.
Should the security section of the device be defective, intentionally damaged or stolen, the stored transactions will be lost.
For this reason, we recommend that you:– Meticulously retain all sales slips.– Carry out a daily closing every day or more
often.– Always carry out a daily closing before
making installation changes, etc.– Always carry out a daily closing for antici-
pated longer absences from the business.– A closing must be carried out for seasonal
operations, at the end of the season.
2.9 Payment procedure with ep2
Operating temperature–10 °C to 50 °C
Humidity (not condensing)20% to 95%
Power supply220–240 VAC 50 Hz/105 mA
2.10 Technical information
14
First initialisationThe terminal is provided to you in a non-config-ured state and must be configured to be opera-ble. Please read the configuration sheet deliv-ered with the device. It contains all specific data for your terminal. The terminal configuration pro-cedure is described in detail in the configuration sheet. Initialisation requires several minutes. Wait until the terminal displays the welcome message.
Subsequent initialisationShould it be necessary to re-initialise a device for any reason, proceed as outlined on page 15.
3 Start-up3.1 Installation
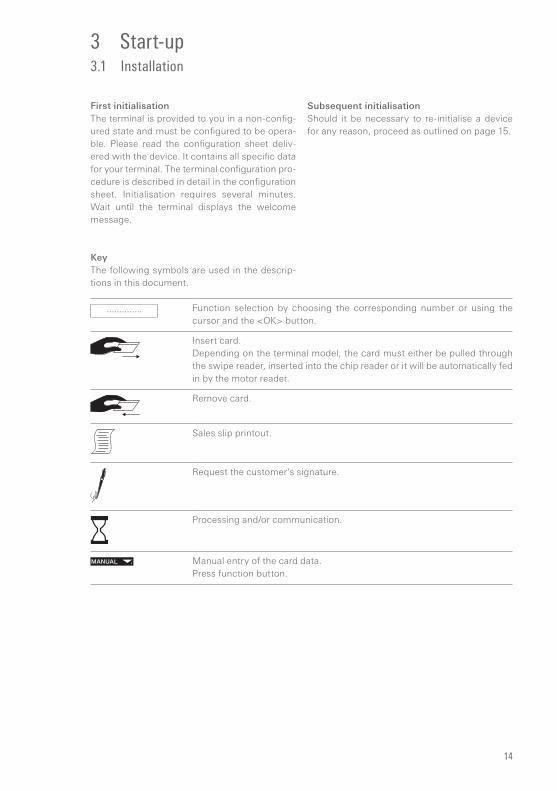
Key The following symbols are used in the descrip-tions in this document.
.............. Function selection by choosing the corresponding number or using the cursor and the <OK> button.
Insert card. Depending on the terminal model, the card must either be pulled through the swipe reader, inserted into the chip reader or it will be automatically fed in by the motor reader.
Remove card.
Sales slip printout.
Request the customer’s signature.
Processing and/or communication.
Manual entry of the card data.Press function button.

15
3.2 Setup
<STOP> <5> Setup → Password is requested You can enter the terminal’s main menu using the <STOP> button. Select the <Setup> function <5>. The following terminal-specific functions can be carried out.The following functions require a password.
<STOP> <5> <1> ConfigurationThe terminal calls the service centre and obtains the latest configuration parameters in the event that they have changed.
<STOP> <5> <2> InitialisationYou can re-initialise individual or all card providers.
<STOP> <5> <3> SW updateThe terminal calls the service host and downloads the latest software version, if one exists. The software download may require several minutes. Please be patient and do not unplug the terminal.
<STOP> <5> <4> Trm resetThis function is only available to the service technicians and is password-protected.
<STOP> <5> <5> InfoThe terminal ID and the current software version are displayed.
<STOP> <5> <6> Print configThe current configuration can be printed out. → Please note that the detailed printout may require a great deal of paper.
<STOP> <5> <7> Print error logThe error messages log can be printed out.→ We recommend that you use this function only if prompted to do so by our hotline.
<STOP> <5> <8> Print hardware infoThis function is only available to service technicians and is password-protected. <STOP> <5> <9> SystemThis function is only available to the service technicians, and we recommend that you only use the function if requested to do so by our hotline.
16
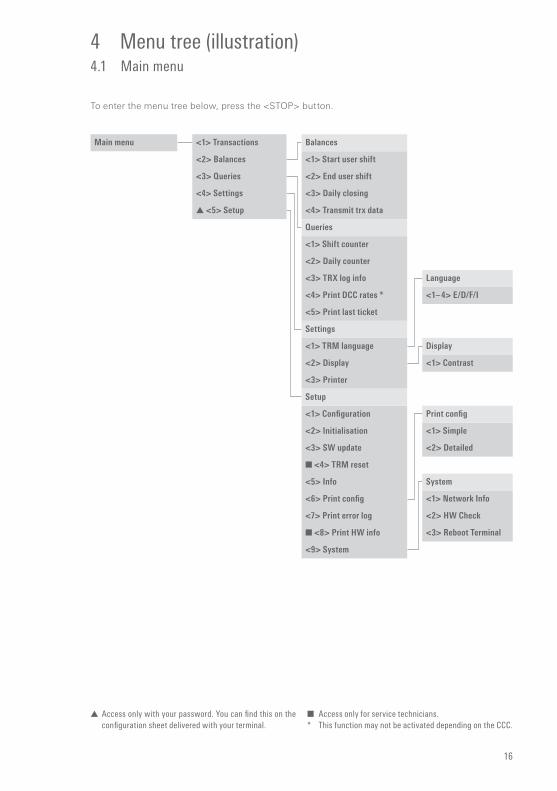
To enter the menu tree below, press the <STOP> button.
Main menu <1> Transactions
<2> Balances
<3> Queries
<4> Settings
▲ <5> Setup
Language
<1– 4> E/D/F/I
Display
<1> Contrast
Print config
<1> Simple
<2> Detailed
System
<1> Network Info
<2> HW Check
<3> Reboot Terminal
Balances
<1> Start user shift
<2> End user shift
<3> Daily closing
<4> Transmit trx data
Queries
<1> Shift counter
<2> Daily counter
<3> TRX log info
<4> Print DCC rates *
<5> Print last ticket
Settings
<1> TRM language
<2> Display
<3> Printer
Setup
<1> Configuration
<2> Initialisation
<3> SW update
■ <4> TRM reset
<5> Info
<6> Print config
<7> Print error log
■ <8> Print HW info
<9> System
▲ Access only with your password. You can find this on the configuration sheet delivered with your terminal.
4 Menu tree (illustration)4.1 Main menu
■ Access only for service technicians.* This function may not be activated depending on the CCC.
17
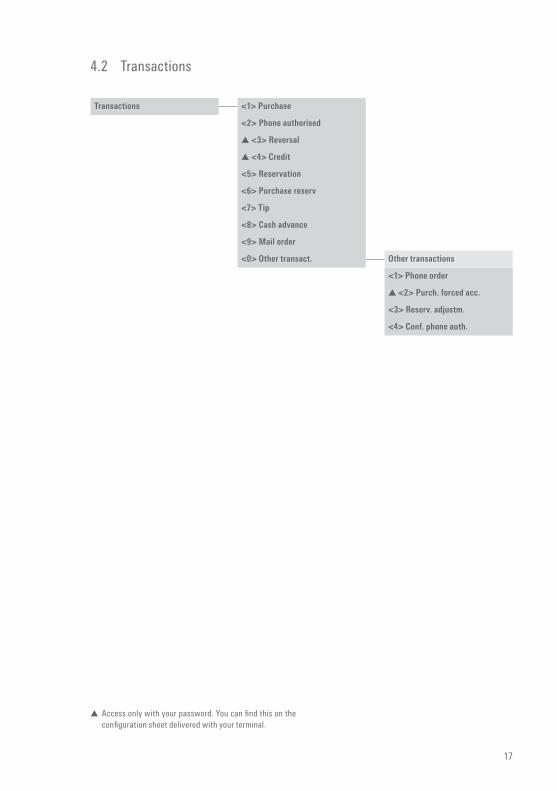
4.2 Transactions
▲ Access only with your password. You can find this on the configuration sheet delivered with your terminal.
Transactions <1> Purchase
<2> Phone authorised
▲ <3> Reversal
▲ <4> Credit
<5> Reservation
<6> Purchase reserv
<7> Tip
<8> Cash advance
<9> Mail order
<0> Other transact. Other transactions
<1> Phone order
▲ <2> Purch. forced acc.
<3> Reserv. adjustm.
<4> Conf. phone auth.
18
Company ExamplEExamplE strEEt 88
1234 ExamplE
DD.mm.YYYY HH.mm.ss
purchaseprocessing company
xxxx 123456 1234 2Expiry date: mm.YY
trm-Id: 12345678akt-Id: 00000001aID: a99999999999trx. ref-No: 99999999999trx. seq-Nr.: 12345aut. Code: 123456EpF: aBC123aBC123aBCTotal-EFT USD: 123.45
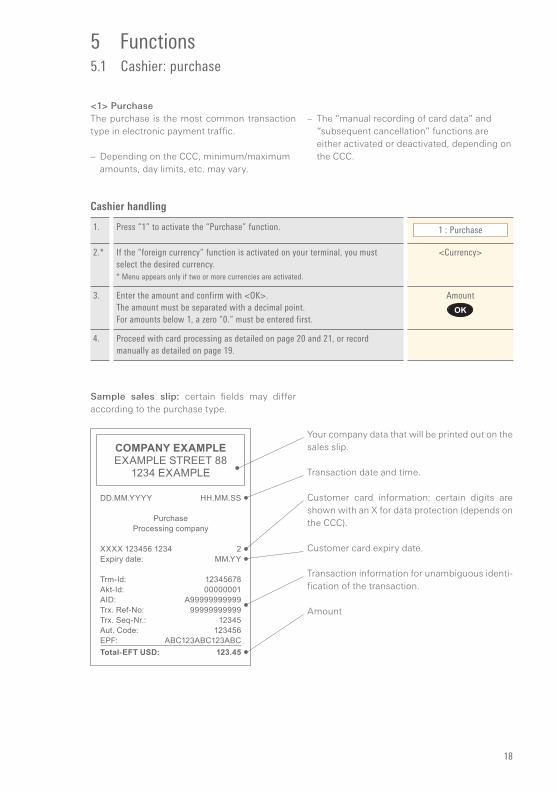
5 Functions5.1 Cashier: purchase
<1> PurchaseThe purchase is the most common transaction type in electronic payment traffic.
– Depending on the CCC, minimum/maximum amounts, day limits, etc. may vary.
– The “manual recording of card data” and “sub sequent cancellation” functions are either activated or deactivated, depending on the CCC.
Sample sales slip: certain fields may differ according to the purchase type.
Your company data that will be printed out on the sales slip.
Transaction date and time.
Customer card information: certain digits are shown with an X for data protection (depends on the CCC).
Customer card expiry date.
Transaction information for unambiguous identi-fication of the transaction.
Amount
Cashier handling
1. Press “1” to activate the “Purchase” function. 1 : Purchase
2.* If the “foreign currency” function is activated on your terminal, you must select the desired currency.* Menu appears only if two or more currencies are activated.
<Currency>
3. Enter the amount and confirm with <OK>.The amount must be separated with a decimal point. For amounts below 1, a zero “0.” must be entered first.
Amount
4. Proceed with card processing as detailed on page 20 and 21, or record manually as detailed on page 19.

19
5.2 Cashier: manual recording of the card data
Example:
Credit card
5404 3521 4589 503809-09
John Example
Reverse side of card
1234 567
Manual recording of the card dataShould a credit card be unreadable, the card data can be recorded manually.
To do so, you need the card number, the expiry date, and for newer cards, the CVC/CVV (Card Verification Code/Card Verification Value). This
3-digit code is printed on the reverse side of the card (the last three numbers).
After you have chosen the transaction mode and confirmed this by pressing <OK>, manual record-ing can be activated using the corresponding function button.
Card number
Expiry date
CVC2/CVV2
Cashier handling
1.* If the “foreign currency” function is activated on your terminal, you must select the desired currency.* Menu appears only if two or more currencies are activated.
<Currency>
2. Enter the amount and confirm with <OK>.The amount must be separated with a decimal point. For amounts below 1, a zero “0.” must be entered first.
Amount
3. Press the “Manual” button for manual recording.
4. Enter the card number and press <OK>. Card number
5. Enter the card expiry date and confirm with <OK>. Expiry date
6. Enter the CVC2 respectively CVV2 and confirm with <OK>.Tip! For cards without a CVC, press <OK> without entering the CVC.
CVC2/CVV2 if present
7. Payment is recorded and authorised online, if this function is activated.
8. A sales slip is printed out.The sales slip must be signed by the customer.
9. If a copy is desired → press 1. If no copy is desired → press 2. If no button is pressed, the copy will be automatically printed out after 10 seconds.
1 : Copy
or
2 : No copy
20
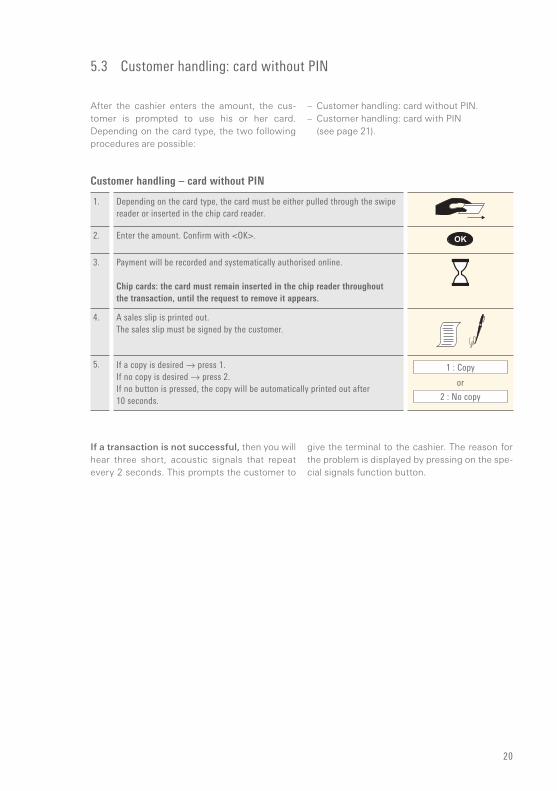
5.3 Customer handling: card without PIN
After the cashier enters the amount, the cus-tomer is prompted to use his or her card. Depending on the card type, the two following procedures are possible:
– Customer handling: card without PIN.– Customer handling: card with PIN
(see page 21).
If a transaction is not successful, then you will hear three short, acoustic signals that repeat every 2 seconds. This prompts the customer to
give the terminal to the cashier. The reason for the problem is displayed by pressing on the spe-cial signals function button.
Customer handling – card without PIN
1. Depending on the card type, the card must be either pulled through the swipe reader or inserted in the chip card reader.
2. Enter the amount. Confirm with <OK>.
3. Payment will be recorded and systematically authorised online.
Chip cards: the card must remain inserted in the chip reader throughout the transaction, until the request to remove it appears.
4. A sales slip is printed out.The sales slip must be signed by the customer.
5. If a copy is desired → press 1. If no copy is desired → press 2. If no button is pressed, the copy will be automatically printed out after 10 seconds.
1 : Copy
or
2 : No copy
21
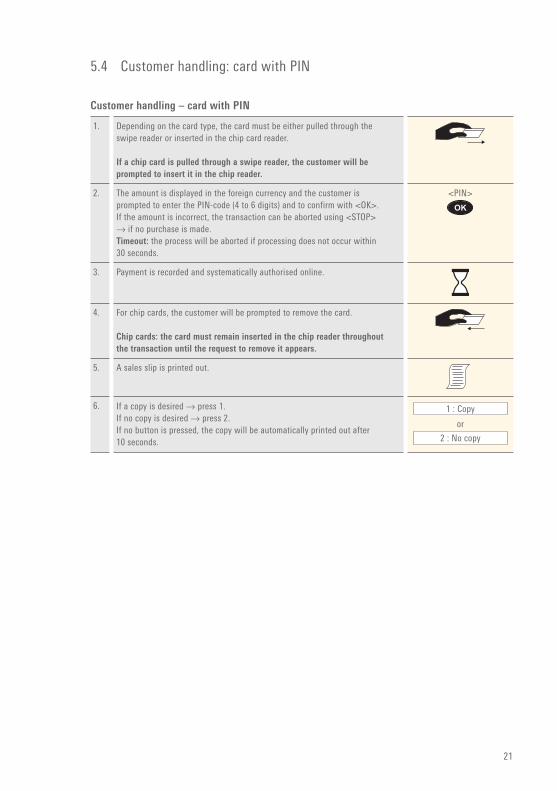
5.4 Customer handling: card with PIN
Customer handling – card with PIN
1. Depending on the card type, the card must be either pulled through the swipe reader or inserted in the chip card reader.
If a chip card is pulled through a swipe reader, the customer will be prompted to insert it in the chip reader.
2. The amount is displayed in the foreign currency and the customer is prompted to enter the PIN-code (4 to 6 digits) and to confirm with <OK>. If the amount is incorrect, the transaction can be aborted using <STOP> → if no purchase is made.Timeout: the process will be aborted if processing does not occur within 30 seconds.
<PIN>
3. Payment is recorded and systematically authorised online.
4. For chip cards, the customer will be prompted to remove the card.
Chip cards: the card must remain inserted in the chip reader throughout the transaction until the request to remove it appears.
5. A sales slip is printed out.
6. If a copy is desired → press 1. If no copy is desired → press 2. If no button is pressed, the copy will be automatically printed out after 10 seconds.
1 : Copy
or
2 : No copy
22
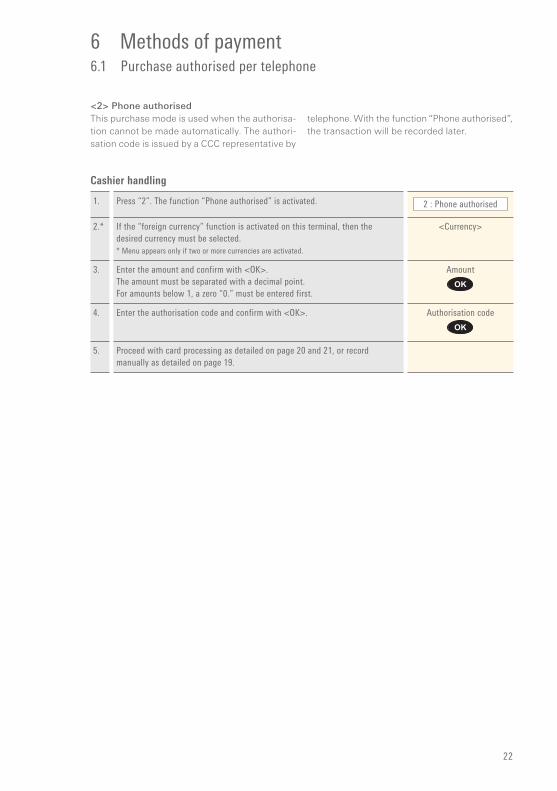
6 Methods of payment6.1 Purchase authorised per telephone
<2> Phone authorisedThis purchase mode is used when the authorisa-tion cannot be made automatically. The authori-sation code is issued by a CCC representative by
telephone. With the function “Phone authorised”, the transaction will be recorded later.
Cashier handling
1. Press “2”. The function “Phone authorised” is activated. 2 : Phone authorised
2.* If the “foreign currency” function is activated on this terminal, then the desired currency must be selected.* Menu appears only if two or more currencies are activated.
<Currency>
3. Enter the amount and confirm with <OK>.The amount must be separated with a decimal point. For amounts below 1, a zero “0.” must be entered first.
Amount
4. Enter the authorisation code and confirm with <OK>. Authorisation code
5. Proceed with card processing as detailed on page 20 and 21, or record manually as detailed on page 19.
23
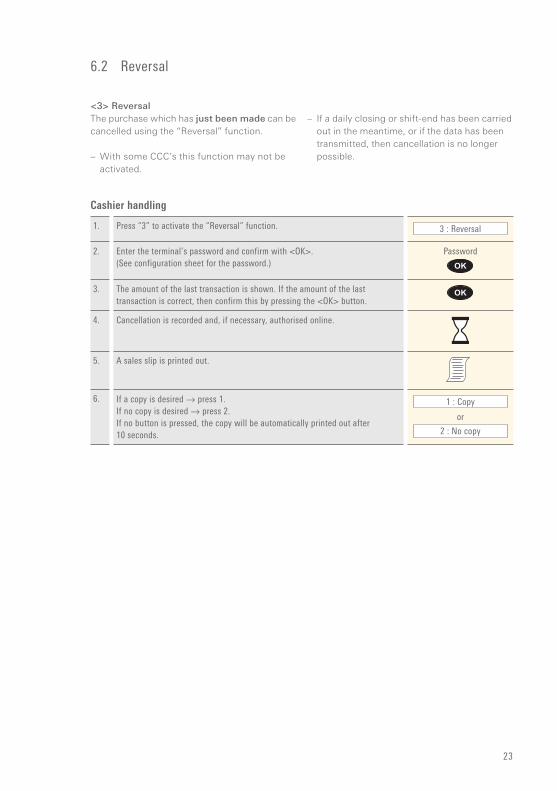
<3> ReversalThe purchase which has just been made can be cancelled using the “Reversal” function.
– With some CCC’s this function may not be activated.
– If a daily closing or shift-end has been carried out in the meantime, or if the data has been transmitted, then cancellation is no longer possible.
6.2 Reversal
Cashier handling
1. Press “3” to activate the “Reversal” function. 3 : Reversal
2. Enter the terminal’s password and confirm with <OK>.(See configuration sheet for the password.)
Password
3. The amount of the last transaction is shown. If the amount of the last transaction is correct, then confirm this by pressing the <OK> button.
4. Cancellation is recorded and, if necessary, authorised online.
5. A sales slip is printed out.
6. If a copy is desired → press 1. If no copy is desired → press 2. If no button is pressed, the copy will be automatically printed out after 10 seconds.
1 : Copy
or
2 : No copy
24
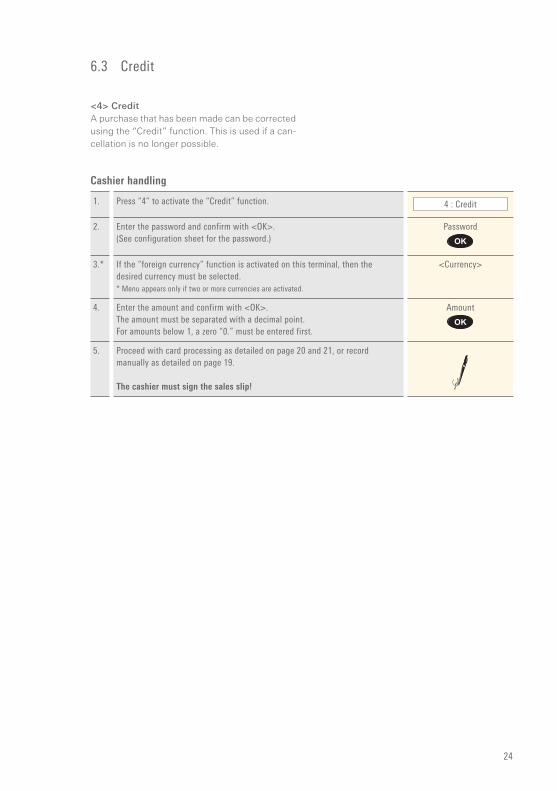
6.3 Credit
<4> CreditA purchase that has been made can be corrected using the “Credit” function. This is used if a can-cellation is no longer possible.
Cashier handling
1. Press “4” to activate the “Credit” function. 4 : Credit
2. Enter the password and confirm with <OK>.(See configuration sheet for the password.)
Password
3.* If the “foreign currency” function is activated on this terminal, then the desired currency must be selected.* Menu appears only if two or more currencies are activated.
<Currency>
4. Enter the amount and confirm with <OK>.The amount must be separated with a decimal point. For amounts below 1, a zero “0.” must be entered first.
Amount
5. Proceed with card processing as detailed on page 20 and 21, or record manually as detailed on page 19.
The cashier must sign the sales slip!
25
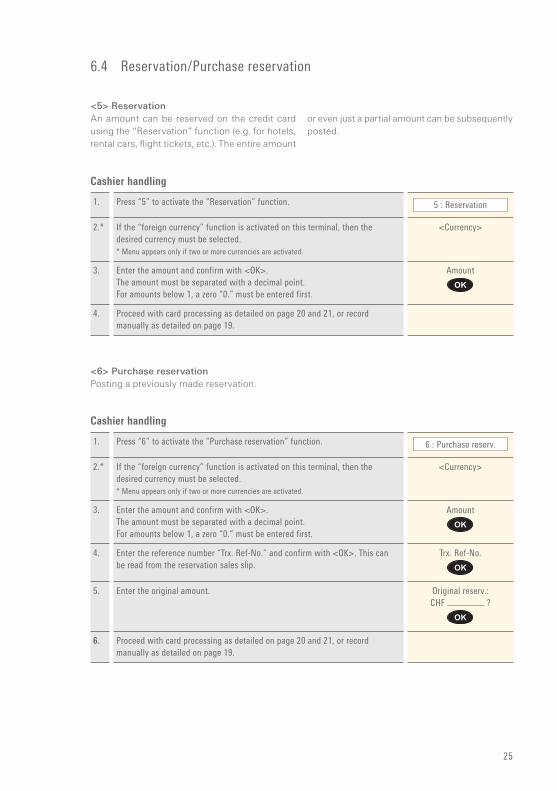
6.4 Reservation/Purchase reservation
<5> ReservationAn amount can be reserved on the credit card using the “Reservation” function (e.g. for hotels, rental cars, flight tickets, etc.). The entire amount
or even just a partial amount can be subsequently posted.
<6> Purchase reservationPosting a previously made reservation.
Cashier handling
1. Press “6” to activate the “Purchase reservation” function. 6 : Purchase reserv.
2.* If the “foreign currency” function is activated on this terminal, then the desired currency must be selected.* Menu appears only if two or more currencies are activated.
<Currency>
3. Enter the amount and confirm with <OK>.The amount must be separated with a decimal point. For amounts below 1, a zero “0.” must be entered first.
Amount
4. Enter the reference number “Trx. Ref-No.” and confirm with <OK>. This can be read from the reservation sales slip.
Trx. Ref-No.
5. Enter the original amount. Original reserv.:CHF ?
6. Proceed with card processing as detailed on page 20 and 21, or record manually as detailed on page 19.
Cashier handling
1. Press “5” to activate the “Reservation” function. 5 : Reservation
2.* If the “foreign currency” function is activated on this terminal, then the desired currency must be selected.* Menu appears only if two or more currencies are activated.
<Currency>
3. Enter the amount and confirm with <OK>.The amount must be separated with a decimal point. For amounts below 1, a zero “0.” must be entered first.
Amount
4. Proceed with card processing as detailed on page 20 and 21, or record manually as detailed on page 19.
26
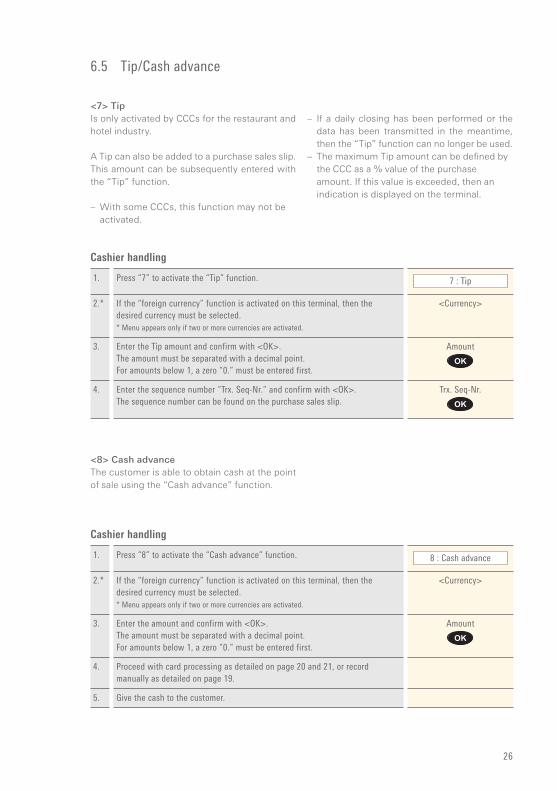
6.5 Tip/Cash advance
<7> TipIs only activated by CCCs for the restaurant and hotel industry.
A Tip can also be added to a purchase sales slip. This amount can be subsequently entered with the “Tip” function. – With some CCCs, this function may not be
activated.
– If a daily closing has been performed or the data has been transmitted in the meantime, then the “Tip” function can no longer be used.
– The maximum Tip amount can be defined by the CCC as a % value of the purchase amount. If this value is exceeded, then an indication is displayed on the terminal.
<8> Cash advanceThe customer is able to obtain cash at the point of sale using the “Cash advance” function.
Cashier handling
1. Press “7” to activate the “Tip” function. 7 : Tip
2.* If the “foreign currency” function is activated on this terminal, then the desired currency must be selected.* Menu appears only if two or more currencies are activated.
<Currency>
3. Enter the Tip amount and confirm with <OK>.The amount must be separated with a decimal point. For amounts below 1, a zero “0.” must be entered first.
Amount
4. Enter the sequence number “Trx. Seq-Nr.” and confirm with <OK>.The sequence number can be found on the purchase sales slip.
Trx. Seq-Nr.
Cashier handling
1. Press “8” to activate the “Cash advance” function. 8 : Cash advance
2.* If the “foreign currency” function is activated on this terminal, then the desired currency must be selected.* Menu appears only if two or more currencies are activated.
<Currency>
3. Enter the amount and confirm with <OK>.The amount must be separated with a decimal point. For amounts below 1, a zero “0.” must be entered first.
Amount
4. Proceed with card processing as detailed on page 20 and 21, or record manually as detailed on page 19.
5. Give the cash to the customer.
27
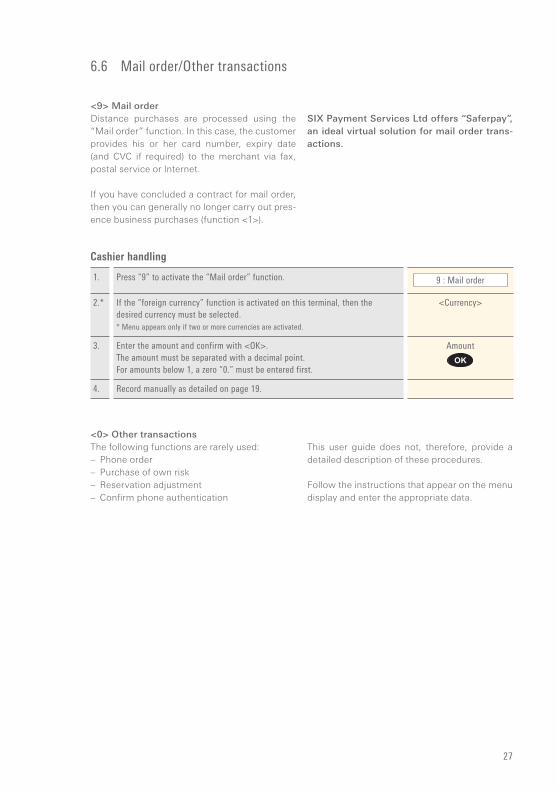
6.6 Mail order/Other transactions
<9> Mail orderDistance purchases are processed using the “Mail order” function. In this case, the customer provides his or her card number, expiry date (and CVC if required) to the merchant via fax, postal service or Internet.
If you have concluded a contract for mail order, then you can generally no longer carry out pres-ence business purchases (function <1>).
SIX Payment Services Ltd offers “Saferpay”, an ideal virtual solution for mail order trans-actions.
<0> Other transactionsThe following functions are rarely used: – Phone order– Purchase of own risk– Reservation adjustment– Confirm phone authentication
This user guide does not, therefore, provide a detailed description of these procedures.
Follow the instructions that appear on the menu display and enter the appropriate data.
Cashier handling
1. Press “9” to activate the “Mail order” function. 9 : Mail order
2.* If the “foreign currency” function is activated on this terminal, then the desired currency must be selected.* Menu appears only if two or more currencies are activated.
<Currency>
3. Enter the amount and confirm with <OK>.The amount must be separated with a decimal point. For amounts below 1, a zero “0.” must be entered first.
Amount
4. Record manually as detailed on page 19.
28
7 Balances7.1 Start user shift/end user shift, daily closing, data transmission
<STOP> <2> BalancesYou can enter the terminal’s main menu using the <STOP> button. Select the “Balances” function <2>. You then have the following options:
<STOP> <2> <1> Start user shift (o)You can start a user shift autonomously when you begin working. If you attempt to make a trans-action after the end of a shift or daily closing, then the terminal automatically starts a new shift.
<STOP> <2> <2> End user shift (o)With the “End user shift” function you end the current shift. Delivery of the transactions is carried out automatically. The daily closing, however, remains open.
→ No further cancellations can be made after a shift end.→ No further tips can be recorded after a shift end.
<STOP> <2> <3> Daily closing (m)With the “Daily closing” function, all transactions that have been made are delivered to the card processors and completed. All amounts are credited to you upon the daily closing. A daily closing should be carried out at least once a day – preferably after the establishment has closed.The day and shift counter is set to “0”.
→ No further cancellations can be made after a daily closing.→ No further tips can be recorded after a daily closing.
<STOP> <2> <4> Transmit trx data (o)With the “Transmit trx data” function, all transactions that have been conducted and stored in the terminal are transmitted. This function should always be used if a large number of transactions has been made.
→ No further cancellations can be made after a “Transmit trx data”.→ No further tips can be recorded after a “Transmit trx data”.
o = Optional: You can use this function according to your requirements.m = Mandatory
29
8 Queries (totals), settings
<STOP> <3> QueriesYou can enter the terminal’s main menu using the <STOP> button. Select the “Queries” function <3>. You then have the following options:
<STOP> <3> <1> Shift counterThe current status of the active shift is printed out.
<STOP> <3> <2> Daily counterThe current status since the last daily closing is printed out.
<STOP> <3> <3> TRX log infoThe current status of transactions since the last data transmission is listed.
<STOP> <3> <5> Print last ticket A copy of the last sales slip is printed out.
<STOP> <4> SettingsYou can enter the terminal’s main menu using the <STOP> button. Select the “Settings” function <4>. You then have the following options:
<STOP> <4> <1> TRM languageThe terminal language can be adjusted.
This language setting is only applicable until the next service call. During the service call, the service host’s language setting will be reactivated. If you prefer a permanent adjustment of the language setting, then this can be set by calling our hotline.The customer language corresponds to the card’s language code.
<STOP> <4> <2> DisplayYou can set the contrast of the display screen with this function.Once you have selected the contrast function, the contrast can be set using the function buttons directly below the display screen. As soon as the contrast is set, it must be confirmed with <OK>.
30
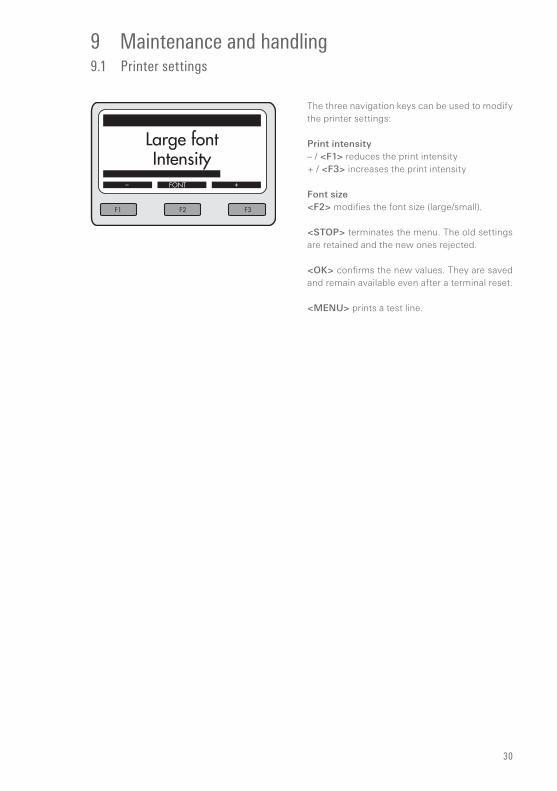
9 Maintenance and handling9.1 Printer settings
The three navigation keys can be used to modify the printer settings:
Print intensity– / <F1> reduces the print intensity+ / <F3> increases the print intensity
Font size<F2> modifies the font size (large/small).
<STOP> terminates the menu. The old settings are retained and the new ones rejected.
<OK> confirms the new values. They are saved and remain available even after a terminal reset.
<MENU> prints a test line.
31
9.2 Care and maintenance
– Keep the product, its parts and accessories out of the reach of small children.
– Handle the device carefully and keep it in a clean, dust-free location.
– Do not place the device in a location with extremely low or high temperatures. Do not place the device in the proximity of burning candles, cigarettes, cigars, open fires, direct sunlight, etc.
– Do not drop, throw or bend the device. Careless handling can cause product damage or loss of the saved transactions.
– Do not paint the device.– Do not attempt to open the device. Improper
handling can cause damage or loss of the saved transactions. Only persons authorised by SIX Payment Services Ltd can carry out maintenance work.
– Do not use any accessories with this product that are not SIX Payment Services Ltd original accessories. The guarantee does not apply to errors caused by use of non-original accessories.
– Do not use any corrosive chemicals, cleans-ers or cleaning agents to clean the device. Clean the device using a soft, lint-free moist cloth with mild soap. The display protector is made of plastic.
– Cleaning the card reader: To ensure perfect operation, it is important to clean the card reader regularly using a cleaning card. You are recommended to clean the terminal when-ever read problems occur, but at least once a month. To do so, you should use damp clean-ing cards which you pull through the card reader five to ten times on each side. You can order cleaning cards from our online store at www.six-payment-services.com/shop
– Printer: Open the printer cover and clean the print head with a fine brush. Never use fluids or cleaning agents!
32
Service packages– A 70-person team competently provides you
with support services per telephone 365 days a year, 7 days a week and 24 hours a day in 4 languages (German, French, Italian and English).
– The technical team in the workshop tests both new payment terminals before they are delivered and defective payment terminals to make sure they function smoothly after they have been repaired.
– More than 30 service technicians are active throughout Switzerland commissioning payment terminals as well as providing sup-port and maintenance.
Activation and introductionOne of the two following service packages is needed for the activation of your payment ter-minal:– Activation service package– On-site service package
Terminal operation and troubleshootingOne of the four following service packages is needed for the operation of your payment ter-minal:– Light service package – Comfort service package– Pro service package– Pro+ service package
9.3 Services
33
Status display and tool
1. Display messages must be confirmed using the <OK> button.
All display messages on the terminal must be confirmed with <OK>.
2. Display message: Use swipe reader. A magnetic strip-based card has been inserted in the chip reader.
3. Display message: Please use whip reader. A chip-based card has been pulled through the swipe reader.
4. Special signal consisting of 3 short acoustic signals in a row.
These must be confirmed by the cashier using the special signalling function button.
9.4 Identifying and solving errors
No displayIf the terminal is not placed on the loading sta-tion, it automatically switches to stand-by mode after 60 seconds. By pressing the <Corr/On> button the operation mode will be reactivated.
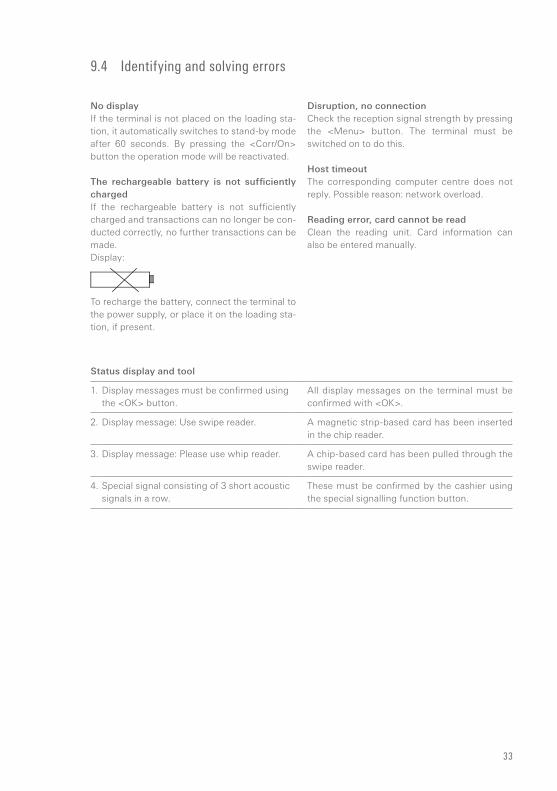
The rechargeable battery is not sufficiently charged If the rechargeable battery is not sufficiently charged and transactions can no longer be con-ducted correctly, no further transactions can be made.Display:
To recharge the battery, connect the terminal to the power supply, or place it on the loading sta-tion, if present.
Disruption, no connectionCheck the reception signal strength by pressing the <Menu> button. The terminal must be switched on to do this.
Host timeoutThe corresponding computer centre does not reply. Possible reason: network overload.
Reading error, card cannot be readClean the reading unit. Card information can also be entered manually.
34
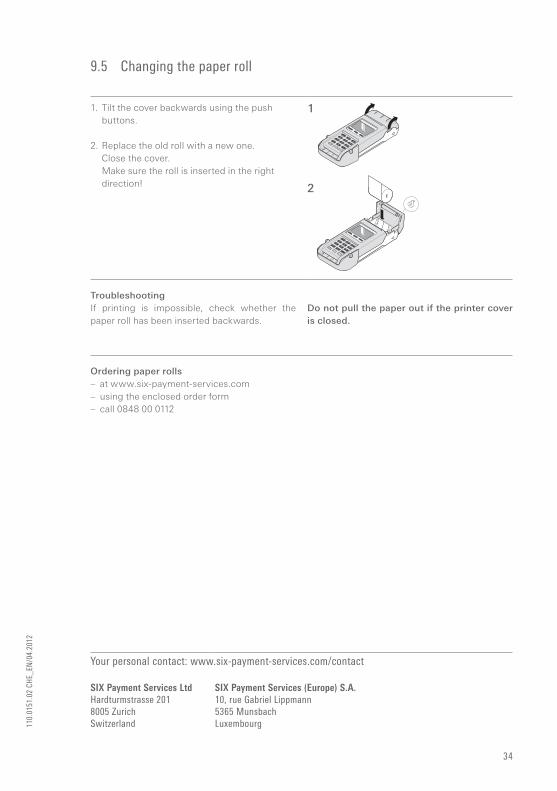
1. Tilt the cover backwards using the push buttons.
2. Replace the old roll with a new one. Close the cover.
Make sure the roll is inserted in the right direction!
1
2
9.5 Changing the paper roll
TroubleshootingIf printing is impossible, check whether the paper roll has been inserted backwards.
Ordering paper rolls– at www.six-payment-services.com– using the enclosed order form– call 0848 00 0112
Do not pull the paper out if the printer cover is closed.
Your personal contact: www.six-payment-services.com/contact
SIX Payment Services LtdHardturmstrasse 2018005 ZurichSwitzerland
SIX Payment Services (Europe) S.A.10, rue Gabriel Lippmann5365 MunsbachLuxembourg11
0.01
51.0
2 CH
E_EN
/04.
2012