Embed Size (px)
Citation preview

User Guide to eVA RequisitionsDepartment of Procurement Services
Updated April 2018

eVA Introduction
This manual will serve as a step-by-step instructional guide on how to place an order through the Commonwealth of Virginia’s internet based marketplace, eVA.
eVA is Old Dominion University’s Sole
Procurement Tool:
2
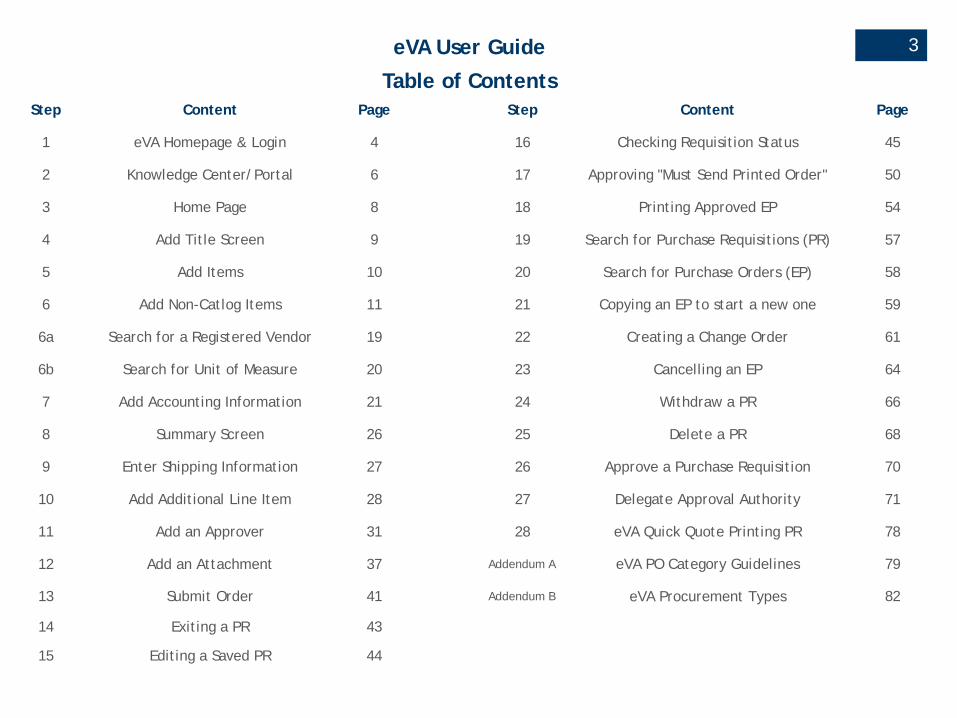
3eVA User Guide
Table of ContentsStep Content Page Step Content Page
1 eVA Homepage & Login 4 16 Checking Requisition Status 45
2 Knowledge Center/Portal 6 17 Approving "Must Send Printed Order" 50
3 Home Page 8 18 Printing Approved EP 54
4 Add Title Screen 9 19 Search for Purchase Requisitions (PR) 57
5 Add Items 10 20 Search for Purchase Orders (EP) 58
6 Add Non-Catlog Items 11 21 Copying an EP to start a new one 59
6a Search for a Registered Vendor 19 22 Creating a Change Order 61
6b Search for Unit of Measure 20 23 Cancelling an EP 64
7 Add Accounting Information 21 24 Withdraw a PR 66
8 Summary Screen 26 25 Delete a PR 68
9 Enter Shipping Information 27 26 Approve a Purchase Requisition 70
10 Add Additional Line Item 28 27 Delegate Approval Authority 71
11 Add an Approver 31 28 eVA Quick Quote Printing PR 78
12 Add an Attachment 37 Addendum A eVA PO Category Guidelines 79
13 Submit Order 41 Addendum B eVA Procurement Types 82
14 Exiting a PR 43
15 Editing a Saved PR 44

Step 1: eVA Homepage & Login1. Go to http://www.eva.virginia.gov/
2. Click Buyer Login.
3. Enter your eVA User ID, Password and click login OR click on the green Log In button to login with your Midas ID.
4

Step 1: eVA Homepage & Login (continued)
4. Select Old Dominion University.5. You are then taken to the ODU network login page.6. Enter your Midas ID and Password.
5

6
On Friday, May 25th what we currently call the Buyer Portal / Knowledge Center will have a brand new look with new features. The new buyer portal will provide quicker actions and will show a snapshot of various summary information.
Step 2: Knowledge Center/Portal

Step 2: Knowledge Center/Portal
1. After logging into eVA you will be taken to the Buyer Portal. Click, “Go To” on the top left-hand side.
2. In the Go To dropdown menu, click on eMall/eForms.
3. Everything within eMall / eForms will work and look the same way as it does currently.
7
Hint: You can come back to this page from anywhere in eVA by clicking the button.
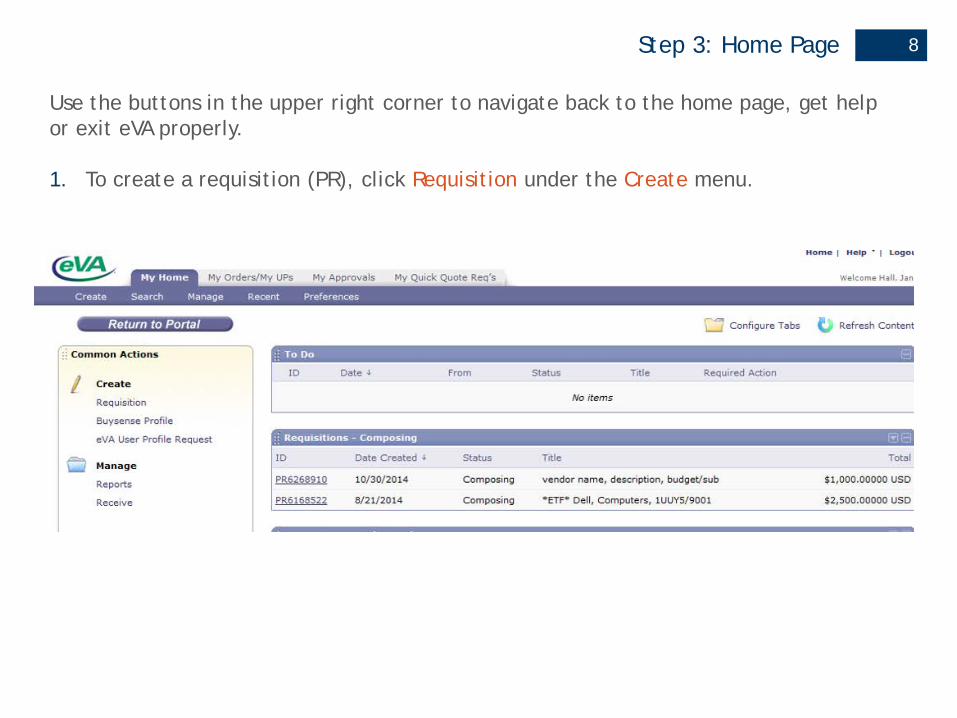
Step 3: Home Page
Use the buttons in the upper right corner to navigate back to the home page, get help or exit eVA properly.
1. To create a requisition (PR), click Requisition under the Create menu.
8

Step 4: Add Title Screen
1. The requisition Title should be in the following format: Vendor Name, brief description, budget code, sub account code. (If this is a pre-payment or ETF order then that should be noted before the vendor name).
2. Fiscal Year will default to current fiscal year.
3. PO Category will not default you must click ‘search for more’ and select the appropriate PO Category from the list (see Addendum A, slide 84 for PO Category Guidelines)
4. Procurement Transaction Type will not default you must click ‘search for more’ and select the appropriate Procurement Type. (see Addendum B, slides 85-86)
5. Check the Equipment Trust Fund box if you are purchasing ETF equipment.
6. Check the Quick Quote Requested box if you are requesting a Quick Quote be issued by Procurement Services.
7. Click Next to navigate to the next screen.
9
Hint: The ‘On Behalf Of’ and ‘Entity Code’ fields automatically populate based on your user profile. Do not change these defaults.

Step 5: Add Items
1. To add items to your requisition, click the Create Non-Catalog Item button.
10

Step 6: Add Non-Catalog Items
1. Enter the Full Description to include Model #, Manufacturer Name, Color, Instructions, etc. as applicable.
2. Choose the NIGP Commodity Code.
eVA will retain a list of recently used commodity codes.
To search and select a new commodity code choose ‘search for more’ from the drop down and you will be taken to the ‘Choose Value for NIGP Commodity Code’ screen shown on the next page.
11
Hint: All ETF orders should have one line item per ETF authorization number. If there are several components to the system (ex. AudioVisual System, Projector Screen, warranty) the requestor should enter them all in one line item. Be sure the ETF number is referencedin the line item description. Please refer to the ETF Process Guidelines on the Procurement Services Website.

Step 6: Add Non-Catalog Items (continued)
3. Enter a general description of the item you want to purchase. Click search.
4. Click the select button for the result which most closely matches your purchase.
12

Step 6: Add Non-Catalog Items (continued)
5. Choose Supplier from the drop down box.
eVA will retain a list of recently used vendors.
You may choose ‘search for more’ to search for a vendor. If you choose ‘search for more’ from the Supplier drop down you will be taken to the ‘Choose Value for Supplier’ shown on the next page.
13
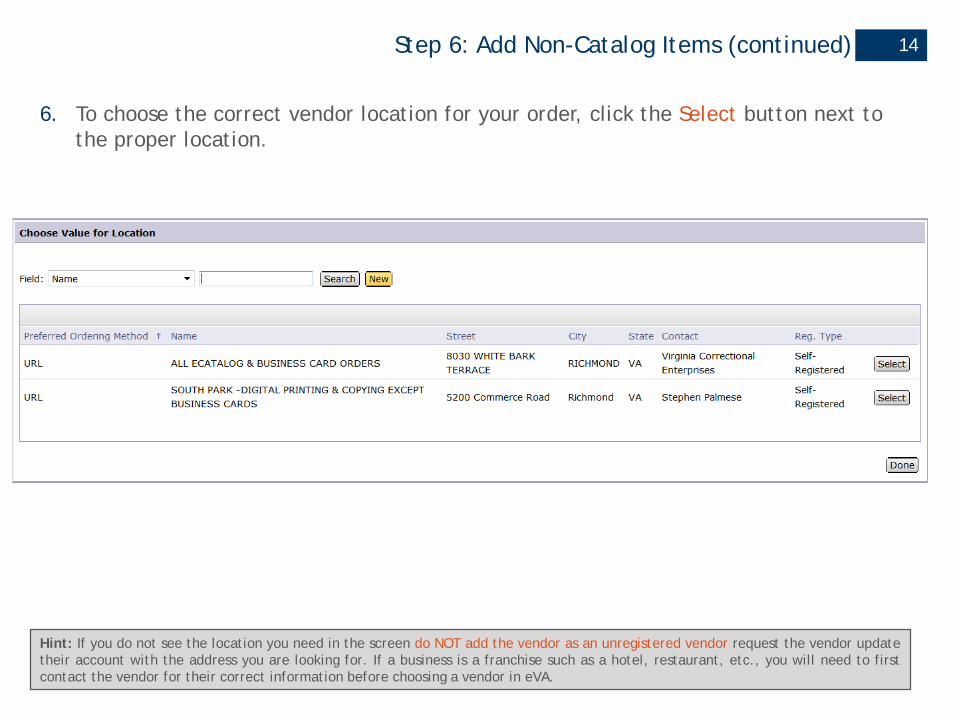
Step 6: Add Non-Catalog Items (continued) 14
6. To choose the correct vendor location for your order, click the Select button next to the proper location.
Hint: If you do not see the location you need in the screen do NOT add the vendor as an unregistered vendor request the vendor updatetheir account with the address you are looking for. If a business is a franchise such as a hotel, restaurant, etc., you will need to firstcontact the vendor for their correct information before choosing a vendor in eVA.
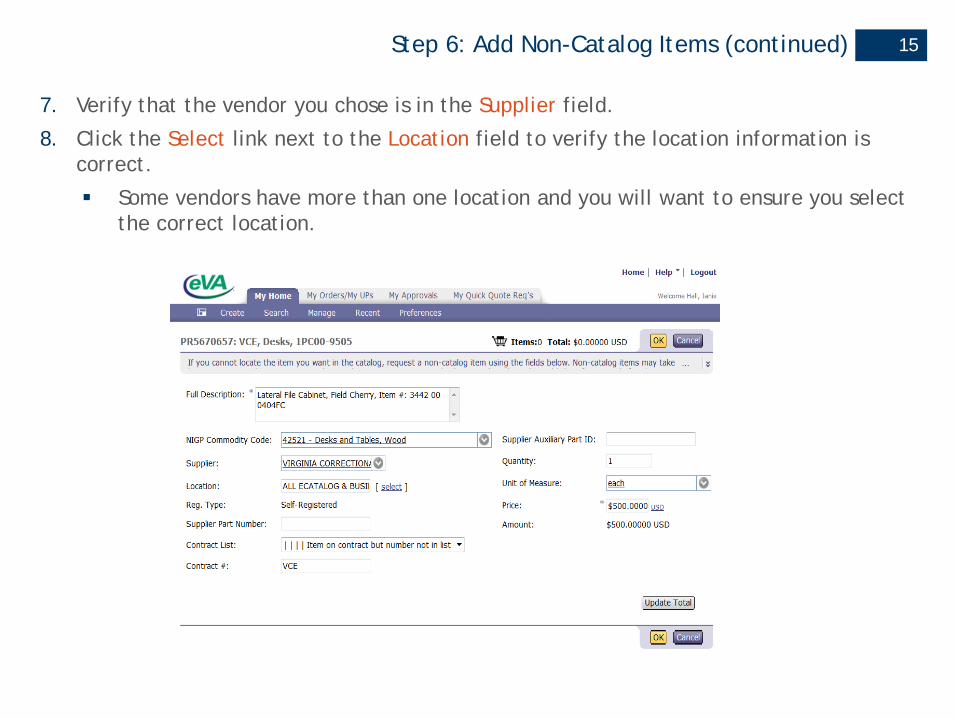
Step 6: Add Non-Catalog Items (continued)
7. Verify that the vendor you chose is in the Supplier field.
8. Click the Select link next to the Location field to verify the location information is correct.
Some vendors have more than one location and you will want to ensure you select the correct location.
15

Step 6: Add Non-Catalog Item (continued)
9. Verify that the location you just selected populates in the Locationfield.
10. Select from the Contract List drop down menu the contract for the selected vendor, ‘Item on Contract but number not on list’ or ‘Not on Contract’.
11. If you select ‘Item on contract but number not in list’ then must enter the contract number in the Contract # field.
16
Hint: Visit the Procurement Services website contract page for links to ODU, VASCUPP and State Contract information. http://www.odu.edu/facultystaff/university-business/purchasing/contracts
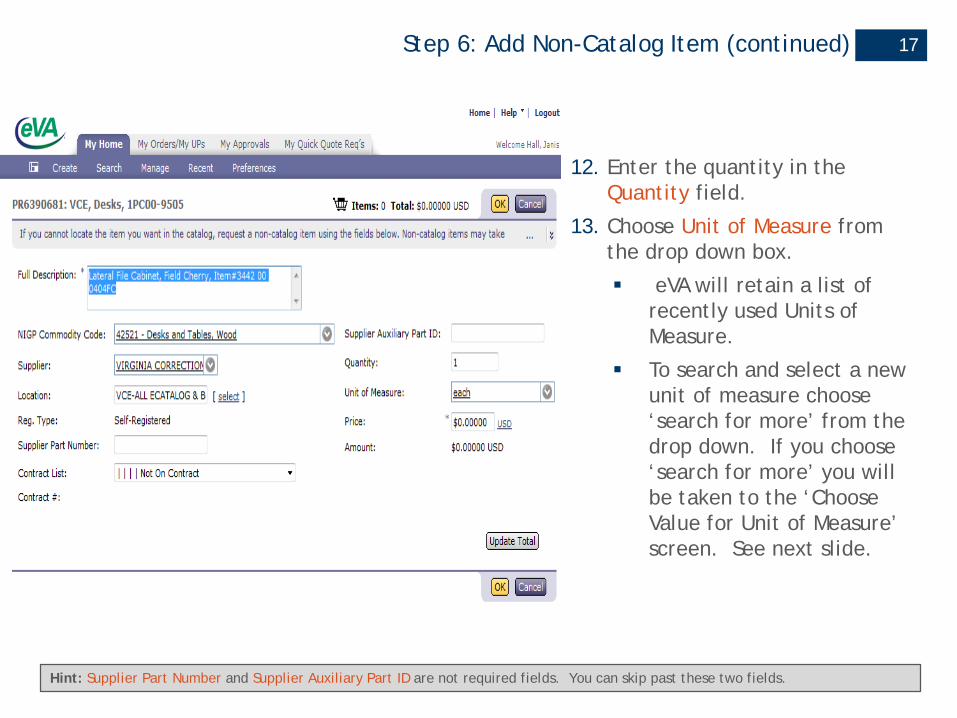
Step 6: Add Non-Catalog Item (continued)
12. Enter the quantity in the Quantity field.
13. Choose Unit of Measure from the drop down box.
eVA will retain a list of recently used Units of Measure.
To search and select a new unit of measure choose ‘search for more’ from the drop down. If you choose ‘search for more’ you will be taken to the ‘Choose Value for Unit of Measure’ screen. See next slide.
17
Hint: Supplier Part Number and Supplier Auxiliary Part ID are not required fields. You can skip past these two fields.

Step 6: Add Non-Catalog Item (continued)
14. Verify that the Unit of Measure you just chose is correct.
15. Enter the Price of each unit.
16. Click Update Total.
Verify that your totals add up with your quotes from the vendor.
17. Click OK to save this item and move forward.
18
Hint: Your work is not saved until you click OK . If you navigate away from this page or if you leave your workstation and are ‘timed out’ of eVA before you click OK your work on this page will NOT be saved.
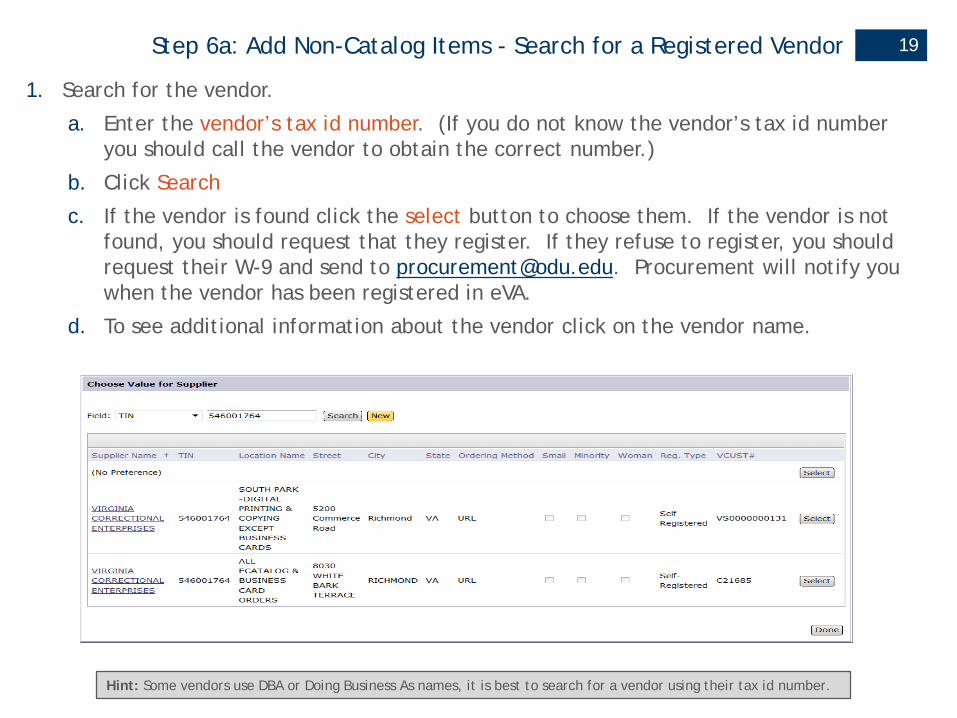
Step 6a: Add Non-Catalog Items - Search for a Registered Vendor
1. Search for the vendor.
a. Enter the vendor’s tax id number. (If you do not know the vendor’s tax id number you should call the vendor to obtain the correct number.)
b. Click Search
c. If the vendor is found click the select button to choose them. If the vendor is not found, you should request that they register. If they refuse to register, you should request their W-9 and send to [email protected]. Procurement will notify you when the vendor has been registered in eVA.
d. To see additional information about the vendor click on the vendor name.
19
Hint: Some vendors use DBA or Doing Business As names, it is best to search for a vendor using their tax id number.
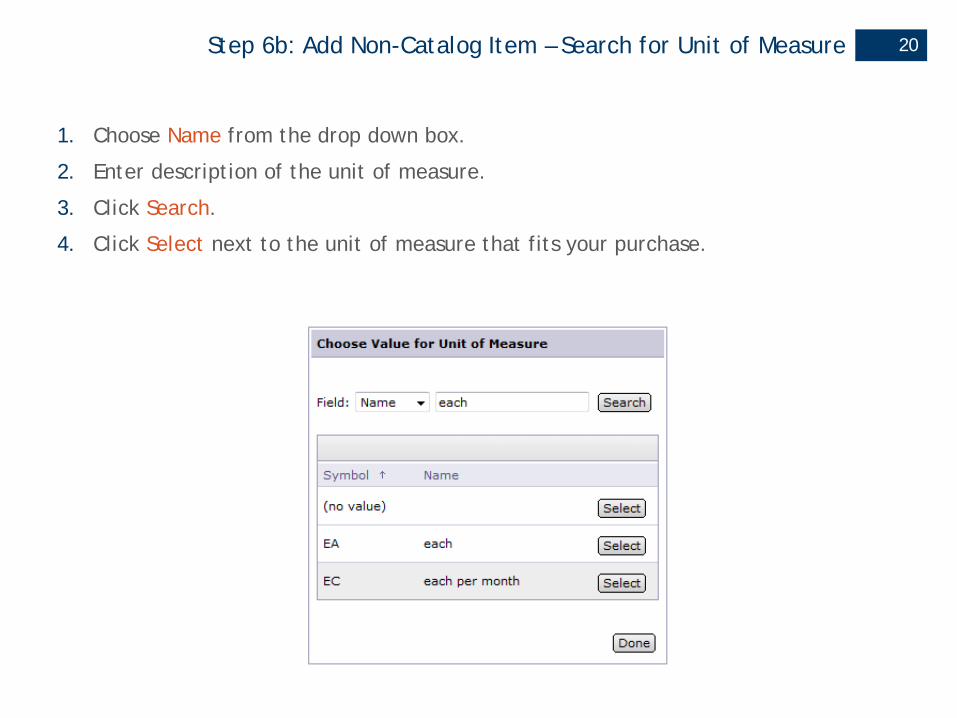
Step 6b: Add Non-Catalog Item – Search for Unit of Measure
1. Choose Name from the drop down box.
2. Enter description of the unit of measure.
3. Click Search.
4. Click Select next to the unit of measure that fits your purchase.
20
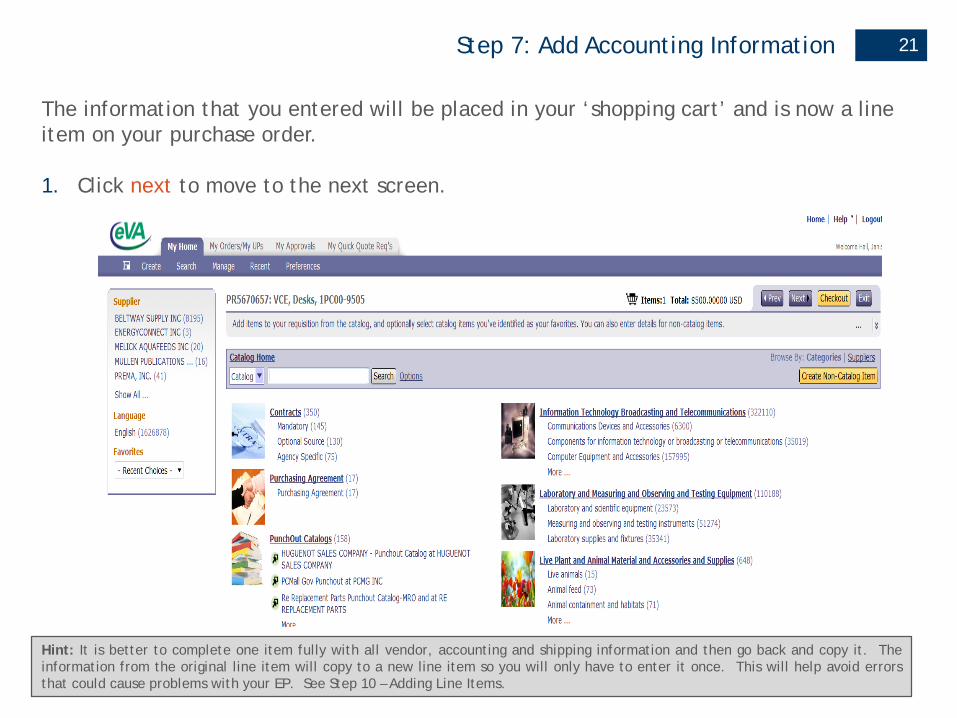
Step 7: Add Accounting Information
The information that you entered will be placed in your ‘shopping cart’ and is now a line item on your purchase order.
1. Click next to move to the next screen.
21
Hint: It is better to complete one item fully with all vendor, accounting and shipping information and then go back and copy it. Theinformation from the original line item will copy to a new line item so you will only have to enter it once. This will help avoid errorsthat could cause problems with your EP. See Step 10 – Adding Line Items.

Step 7: Add Accounting Information (continued)
2. To add budget and sub-account codes to your order, click Edit.
22

Step 7: Add Accounting Information (continued)
3. Enter the Budget Code and Sub Account.
4. If this purchase will be split between more than one budget code click on Split Accounting. Otherwise click on OK to save.
23
Hint: It is essential that you enter the correct budget and sub account codes for ALL ETF items and for ALL items over $5,000 whichmust be tagged as fixed assets. If you need a listing of sub account codes you will find them on the Budget Office website.
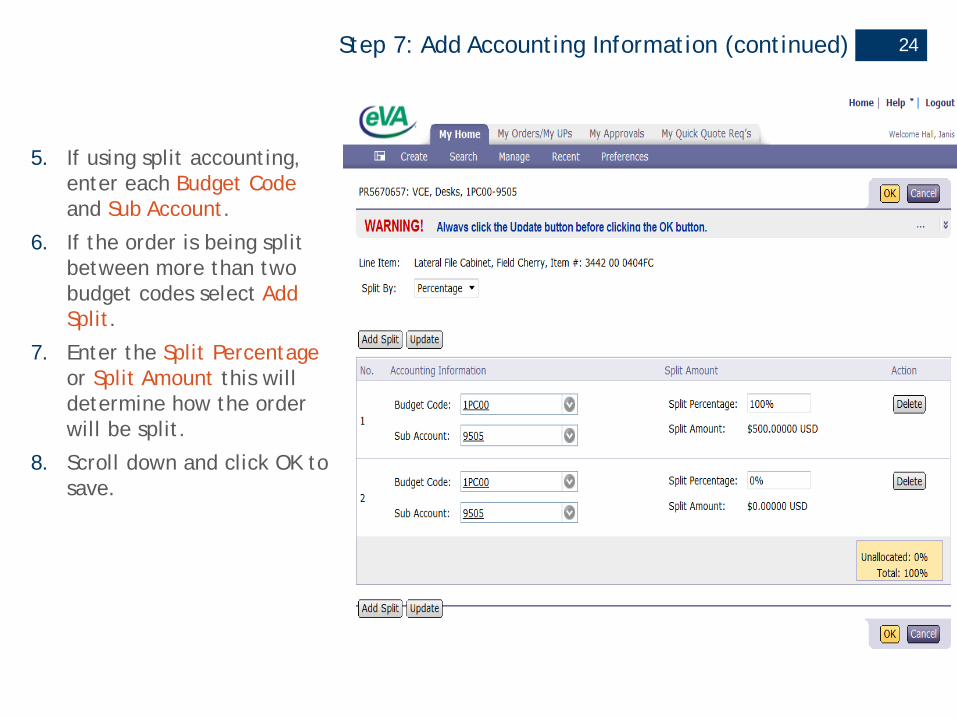
24Step 7: Add Accounting Information (continued)
5. If using split accounting, enter each Budget Code and Sub Account.
6. If the order is being split between more than two budget codes select Add Split.
7. Enter the Split Percentage or Split Amount this will determine how the order will be split.
8. Scroll down and click OK to save.
Step 7: Add Accounting Information (continued)
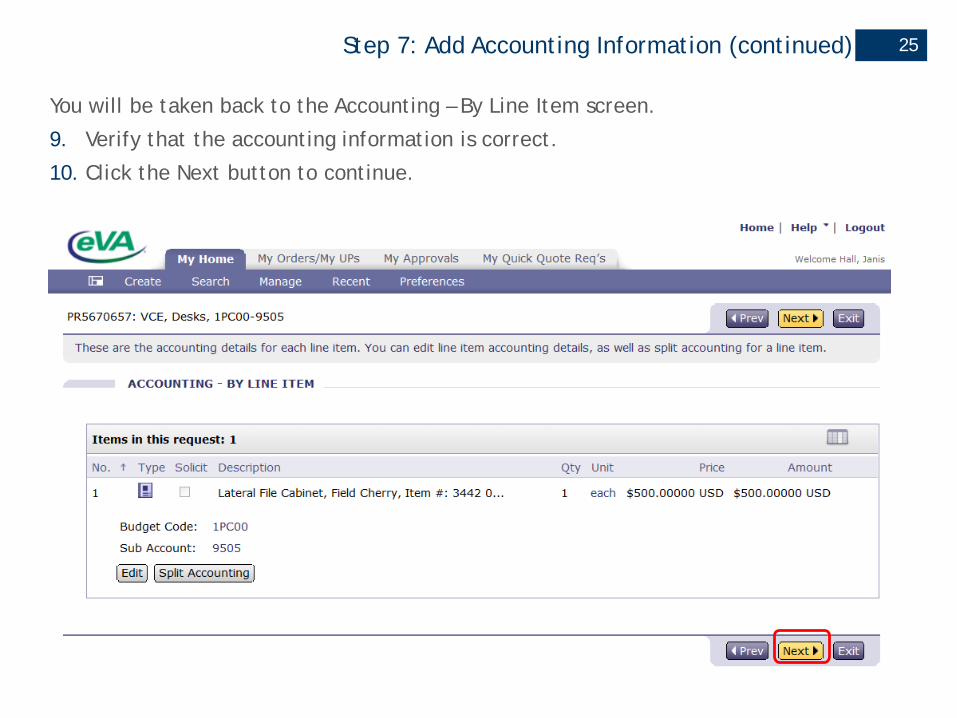
You will be taken back to the Accounting – By Line Item screen.
9. Verify that the accounting information is correct.
10. Click the Next button to continue.
25

Step 8: Summary Screen
Additional line items, comments, shipping information and/or an approvers can be added. Once you have completed the requisition you can submit for approval.
26
Step 9: Enter Shipping Information
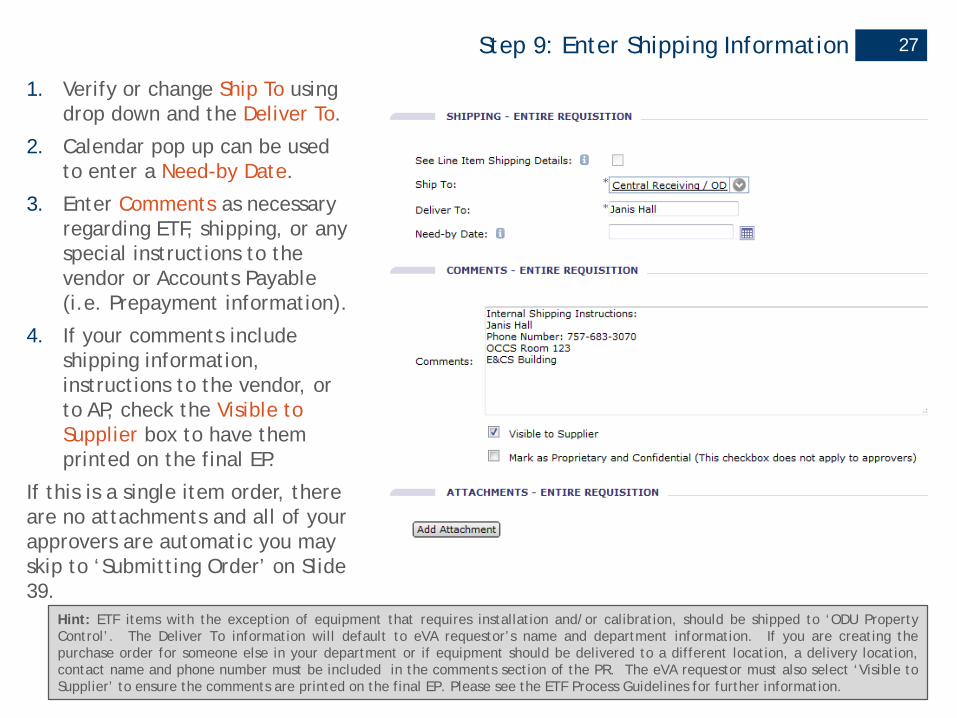
1. Verify or change Ship To using drop down and the Deliver To.
2. Calendar pop up can be used to enter a Need-by Date.
3. Enter Comments as necessary regarding ETF, shipping, or any special instructions to the vendor or Accounts Payable (i.e. Prepayment information).
4. If your comments include shipping information, instructions to the vendor, or to AP, check the Visible to Supplier box to have them printed on the final EP.
If this is a single item order, there are no attachments and all of your approvers are automatic you may skip to ‘Submitting Order’ on Slide 39.
27
Hint: ETF items with the exception of equipment that requires installation and/or calibration, should be shipped to ‘ODU PropertyControl’. The Deliver To information will default to eVA requestor’s name and department information. If you are creating thepurchase order for someone else in your department or if equipment should be delivered to a different location, a delivery location,contact name and phone number must be included in the comments section of the PR. The eVA requestor must also select ‘Visible toSupplier’ to ensure the comments are printed on the final EP. Please see the ETF Process Guidelines for further information.

Step 10: Add Additional Line Item
1. To add another line item, click the check box next to the existing line item.
2. Click Copy to create a duplicate line item.
28
Hint: All vendor information on each line item must match perfectly or eVA will create multiple EP’s from one PR. You should alwayscopy line items within an order so that you do not make an error and accidentally create multiple orders .
Step 10: Add Additional Line Item (continued)
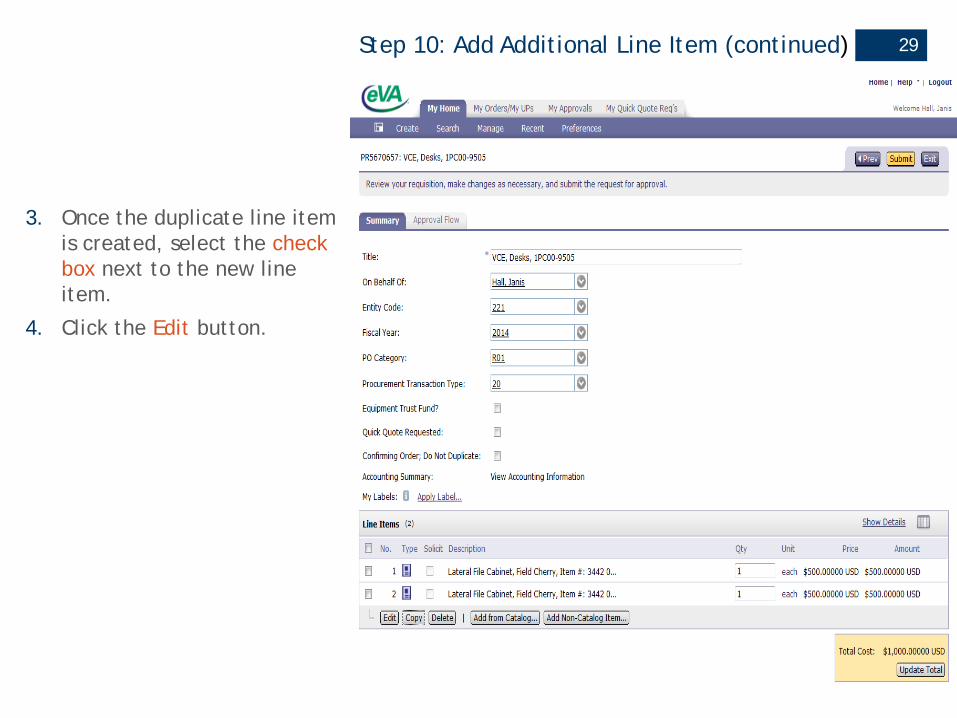
3. Once the duplicate line item is created, select the check box next to the new line item.
4. Click the Edit button.
29

Step 10: Add Additional Line Item (continued)
5. Enter Description for new item.
6. Change Quantity, Unit of Measure, Price and Commodity Code as needed.
7. You should NOT make any changes to the Supplier and Location since the information has been prefilled from the previous line item, any changes will result in multiple EP’s being created as the system reads any differences as a different vendor.
8. Click OK to save changes.
30

Step 11: Add an Approver
1. From the checkout screen, click the Approval Flow tab.
31
Hint: Your authority line is added into eVA when your profile is created and is changed as necessary if your budget unit director, etc. changes. Some transactions will automatically have approvers added based on type, (ex. exempt transactions will automatically require Procurement Services approval) or dollar value. You also can add other approvers as necessary.

Step 11: Add an Approver (continued)
The current approval flow will already be shown. You only have to add approvers not already in the flow who want to sign off on the transaction.
2. Click the Add Approver button.
32
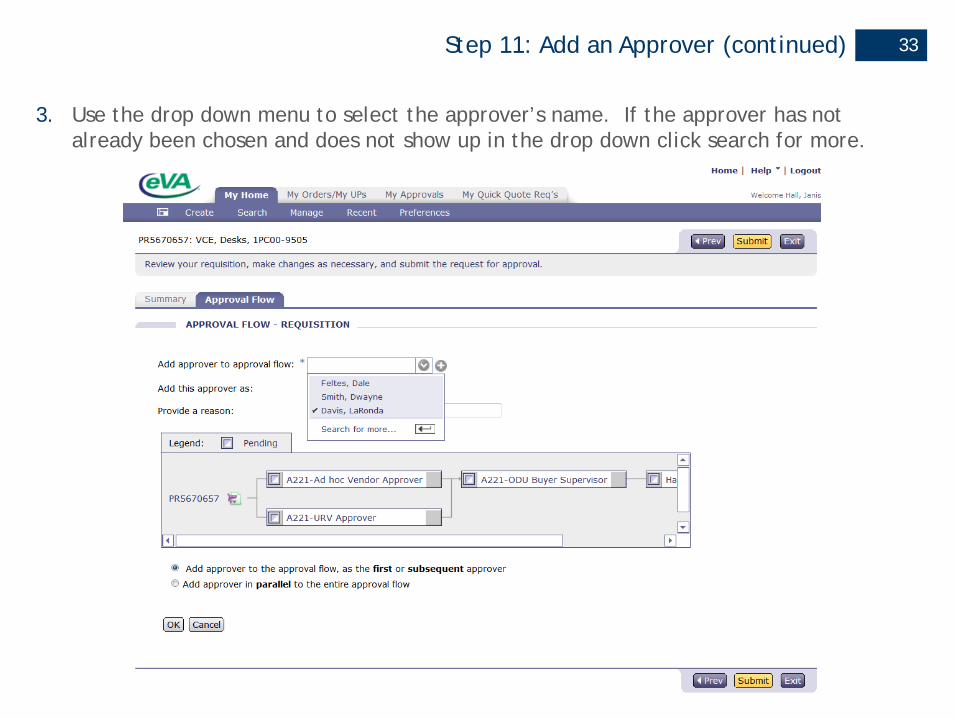
Step 11: Add an Approver (continued)
3. Use the drop down menu to select the approver’s name. If the approver has not already been chosen and does not show up in the drop down click search for more.
33
Step 11: Add an Approver (continued)
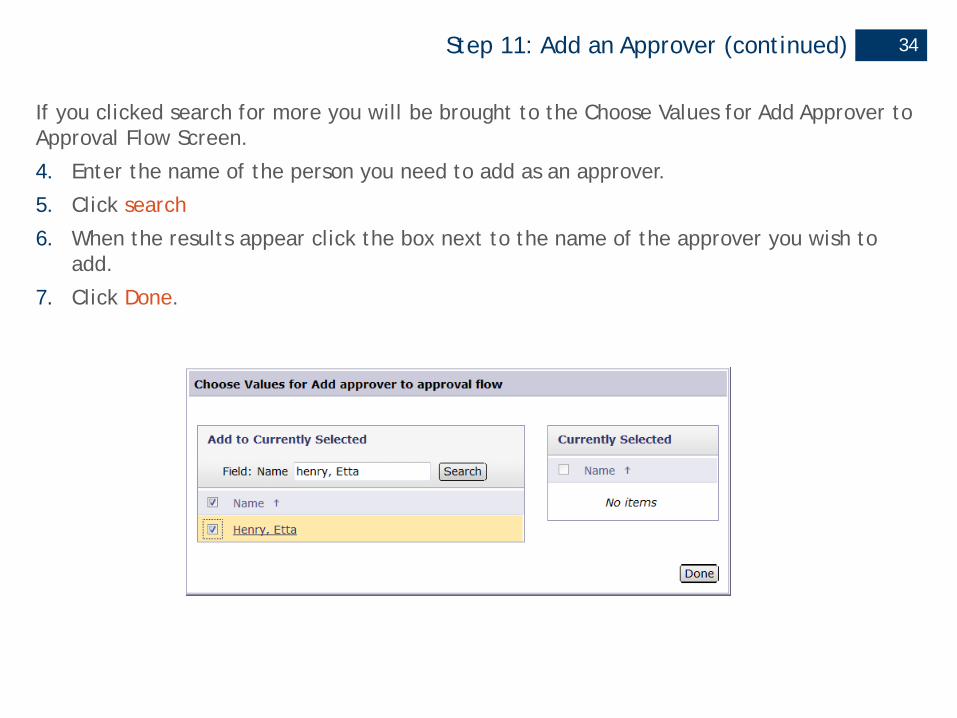
If you clicked search for more you will be brought to the Choose Values for Add Approver to Approval Flow Screen.
4. Enter the name of the person you need to add as an approver.
5. Click search
6. When the results appear click the box next to the name of the approver you wish to add.
7. Click Done.
34
Step 11: Add an Approver (continued)
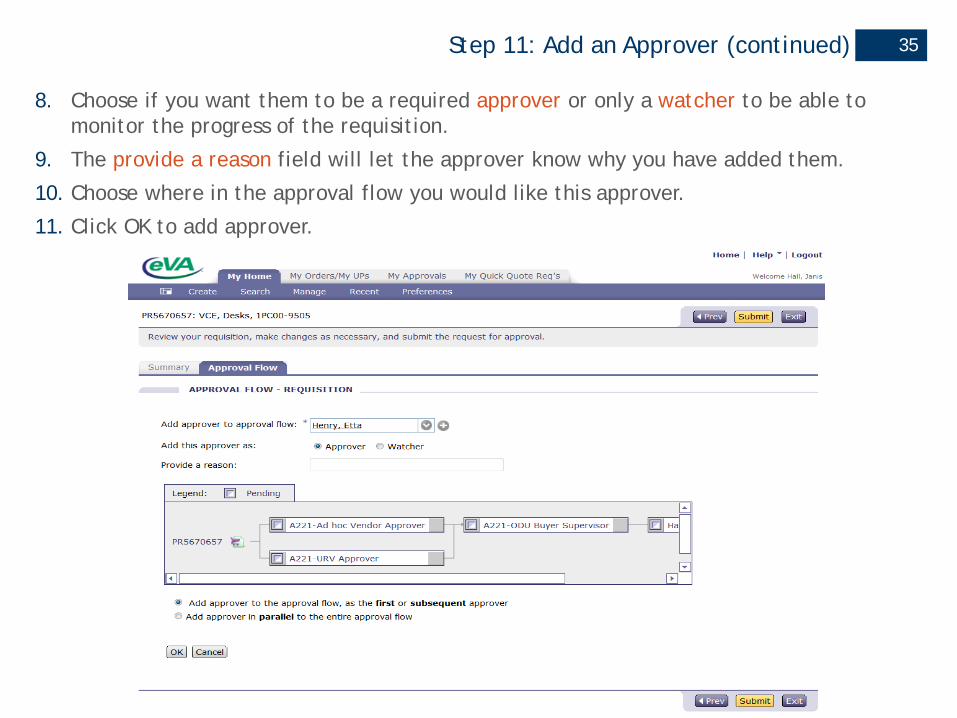
8. Choose if you want them to be a required approver or only a watcher to be able to monitor the progress of the requisition.
9. The provide a reason field will let the approver know why you have added them.
10. Choose where in the approval flow you would like this approver.
11. Click OK to add approver.
35

Step 11: Add an Approver (continued)
When you have completed adding an approver you can go back to the Summary Screen, add another approver or submit PR for approval.
12. Verify the approver was added in the proper position in the approval flow.
36
Step 12: Add an attachment
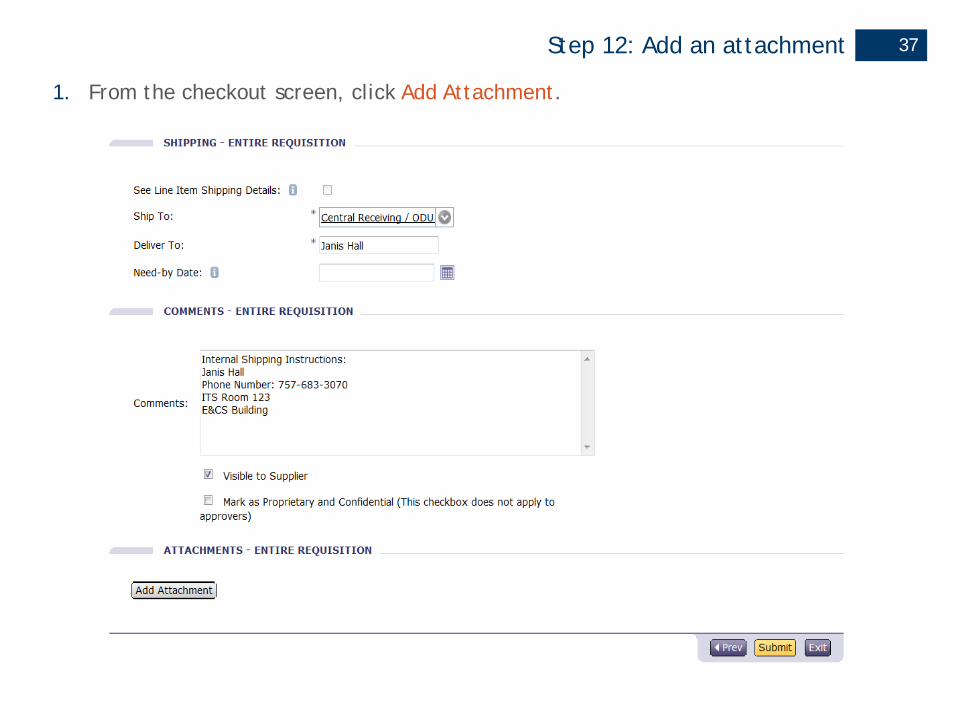
1. From the checkout screen, click Add Attachment.
37
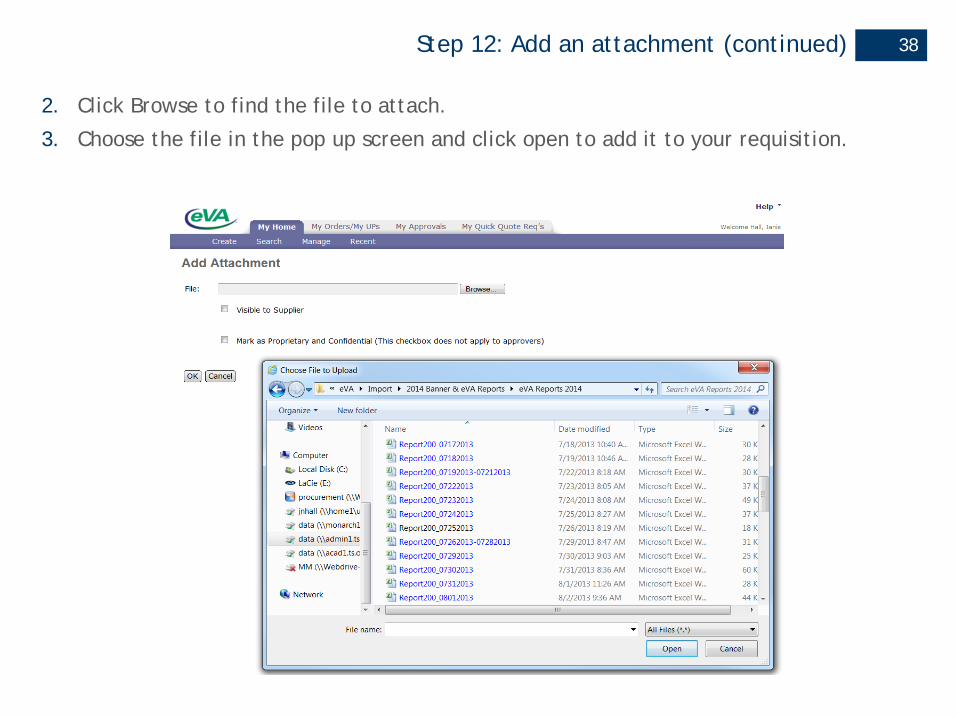
Step 12: Add an attachment (continued)
2. Click Browse to find the file to attach.
3. Choose the file in the pop up screen and click open to add it to your requisition.
38

Step 12: Add an attachment (continued)
4. File name will be in the File field, click OK to finish.
39
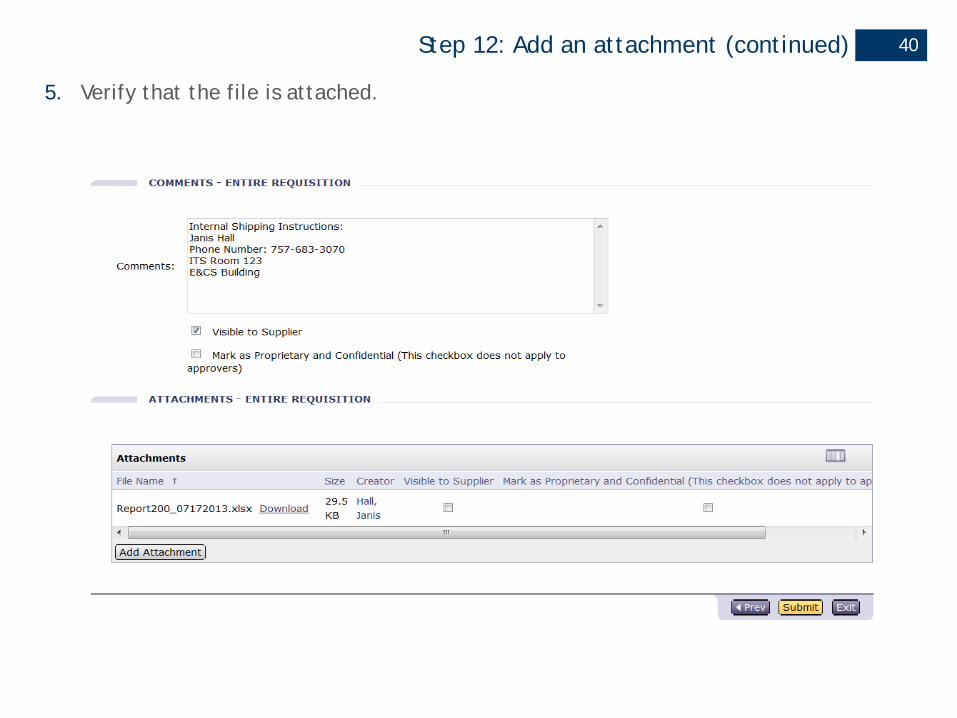
Step 12: Add an attachment (continued)
5. Verify that the file is attached.
40

Step 13: Submit Order
1. Verify that all your information entered is correct and click Submit.
41

Step 13: Submit Order (continued)
Once you have submitted your purchase requisition you will be shown a confirmation screen where you may choose from the available options or log out of eVA. If you have not already, make a note of your PR number for future reference.
42
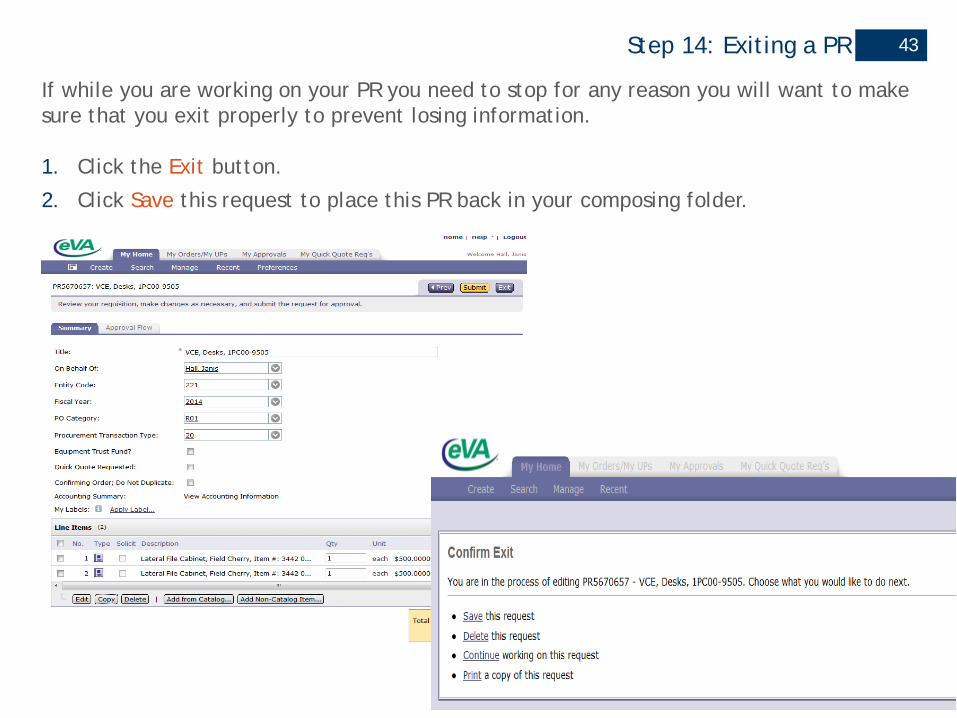
Step 14: Exiting a PR 43
If while you are working on your PR you need to stop for any reason you will want to make sure that you exit properly to prevent losing information.
1. Click the Exit button.
2. Click Save this request to place this PR back in your composing folder.
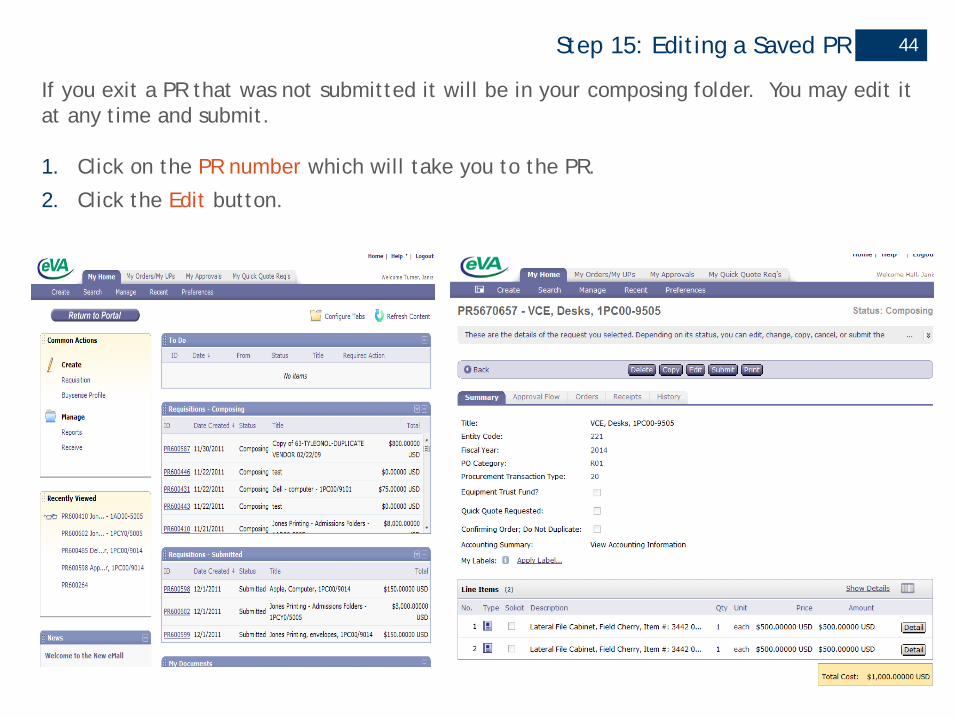
Step 15: Editing a Saved PR
If you exit a PR that was not submitted it will be in your composing folder. You may edit it at any time and submit.
1. Click on the PR number which will take you to the PR.
2. Click the Edit button.
44

Step 16: Checking Requisition Status
The Dashboard will display windows that give quick access to Requisitions by Status, Approvals and Orders.
45
Approvals are shown in the To Do window.
Requisitions are shown by status in individual windows.
ALL documents are shown in the My Documents window.

Step 16: Checking Requisition Status (continued) 46
1. Click on the PR number to view the PR.

Step 16: Checking Requisition Status (continued)
You can view, withdraw, edit or print your PR from this screen as well as check the document history and where it is in the approval flow.
2. Click on the Approval Flow tab.
47
Hint: To edit from this screen you will use the same procedures as editing from another screen but you will have to resubmit the PR oncethe edits are complete.

Step 16: Checking Requisition Status (continued)
3. Use the scroll bar to view the entire approval flow path.
4. Click on the approval title to see who is in the approval and is able to approve this PR.
48
Step 16: Checking Requisition Status (continued)
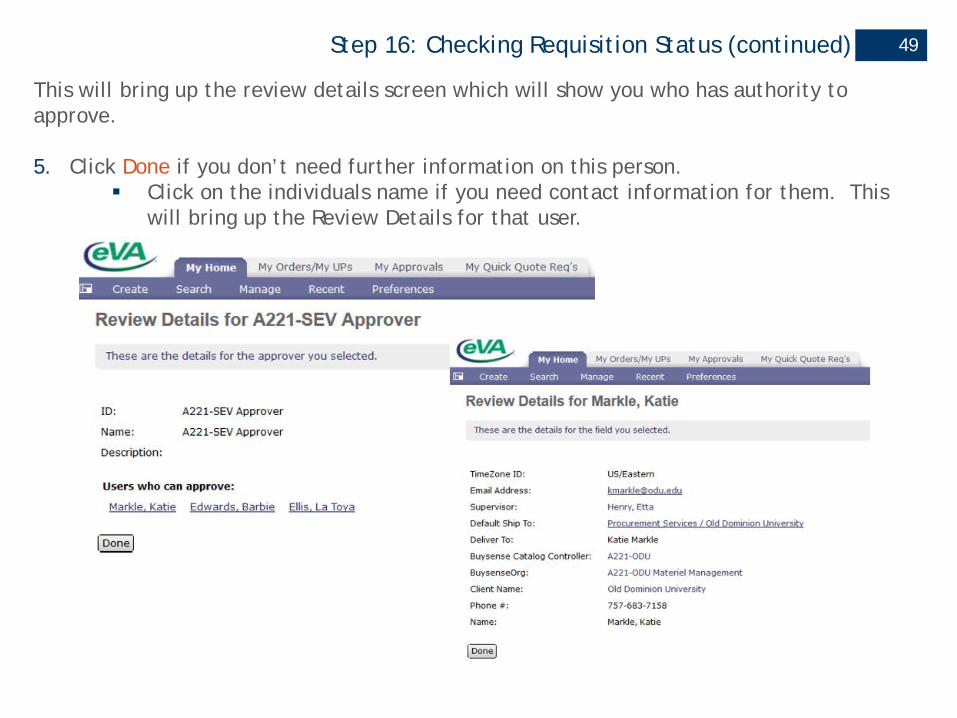
This will bring up the review details screen which will show you who has authority to approve.
5. Click Done if you don’t need further information on this person. Click on the individuals name if you need contact information for them. This
will bring up the Review Details for that user.
49

Step 17: Approving ‘Must Send Printed Order’ 50
If a vendor does not accept electronic EP’s you will receive an e-mail indicating that you will need to approve the PR in order to complete the EP.
1. To log into eVA click on the corresponding open option for the eMall.
2. To log into the approver website or mobile app, click on the corresponding openoption for a mobile device.

Step 17: Approving ‘Must Send Printed Order’ (continued) 51
The request you need to print will be under the To Do window. This PR will require your approval.
3. Click the PR number you need to print and approve.
Step 17: Approving ‘Must Send Printed Order’ (continued) 52
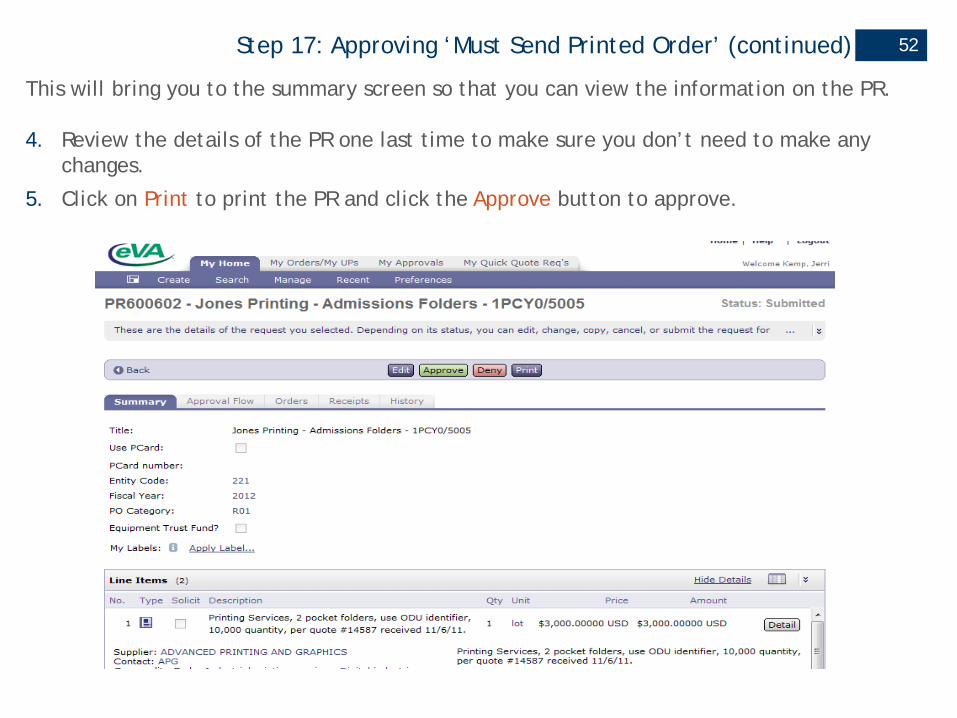
This will bring you to the summary screen so that you can view the information on the PR.
4. Review the details of the PR one last time to make sure you don’t need to make any changes.
5. Click on Print to print the PR and click the Approve button to approve.
Step 17: Approving ‘Must Send Printed Order’ (continued) 53
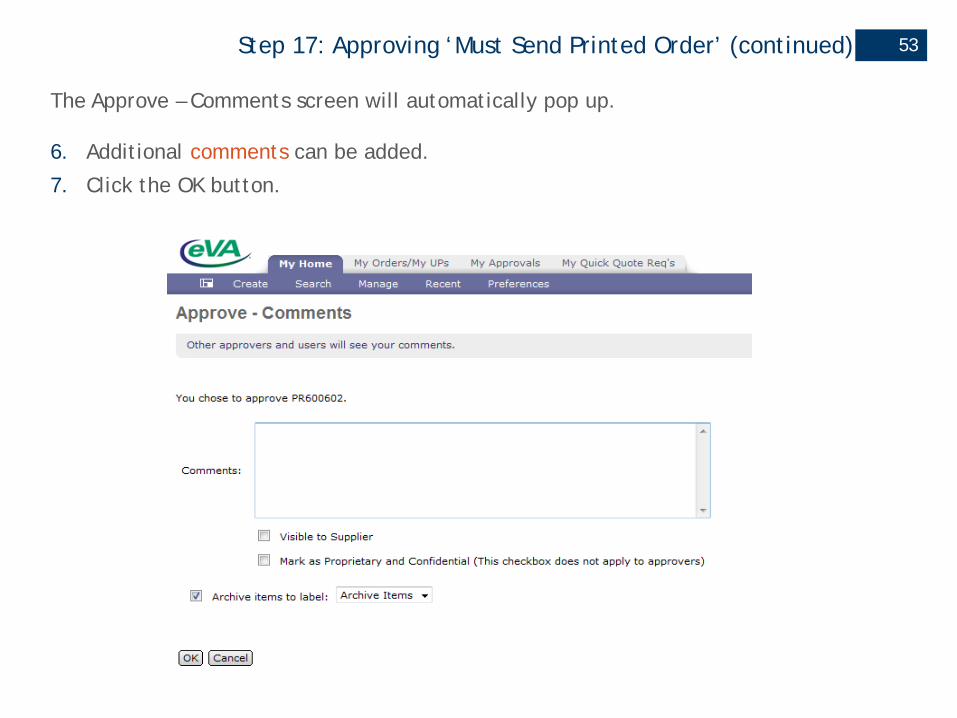
The Approve – Comments screen will automatically pop up.
6. Additional comments can be added.
7. Click the OK button.
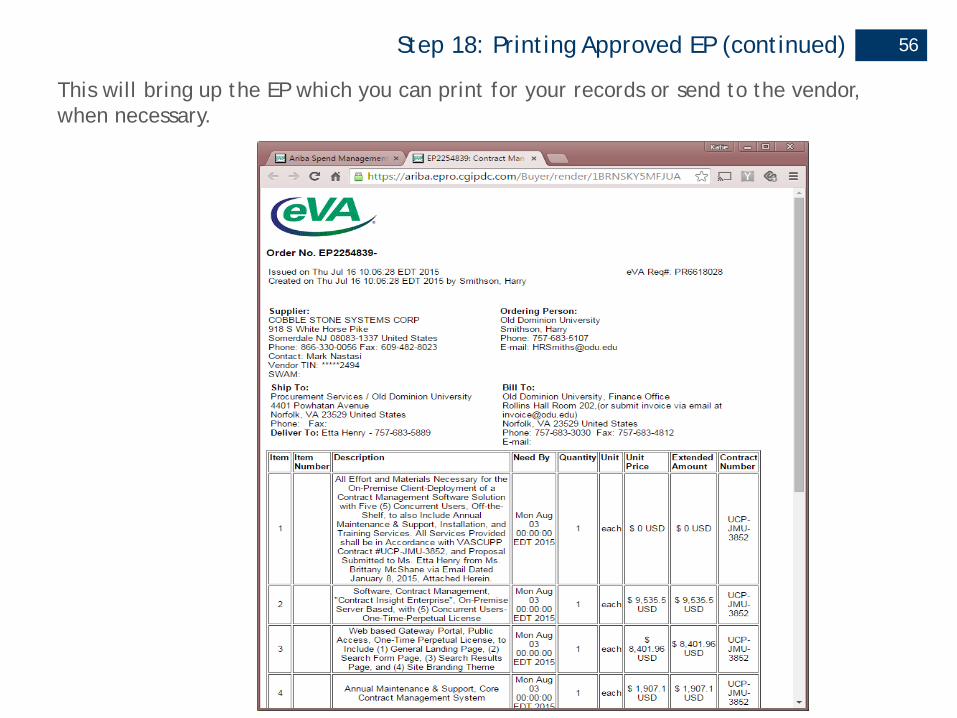
Step 18: Printing Approved EP
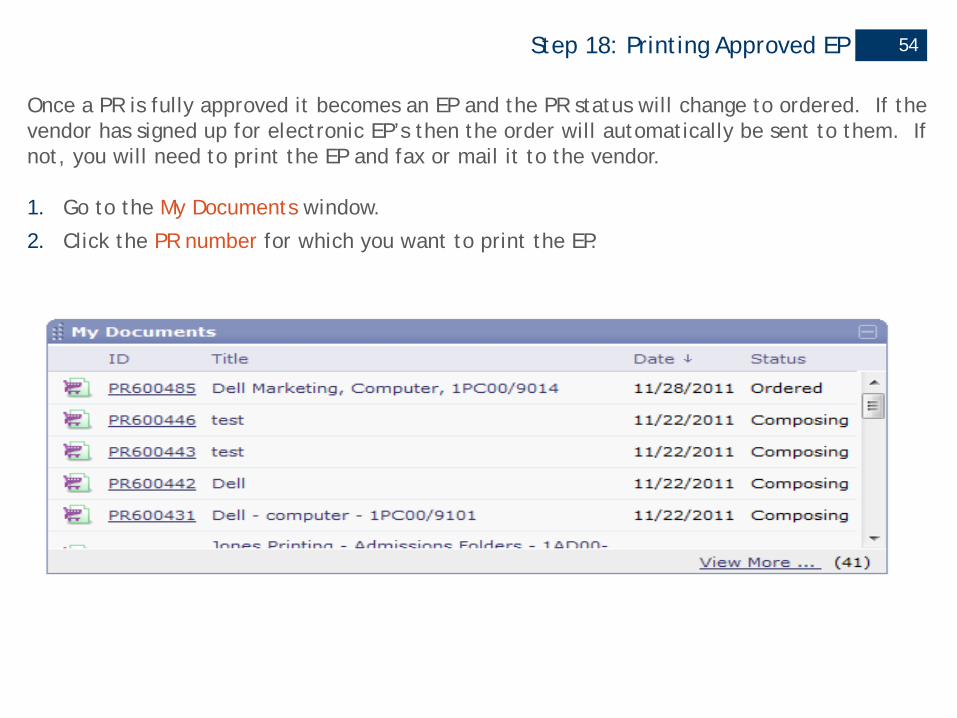
Once a PR is fully approved it becomes an EP and the PR status will change to ordered. If the vendor has signed up for electronic EP’s then the order will automatically be sent to them. If not, you will need to print the EP and fax or mail it to the vendor.
1. Go to the My Documents window.
2. Click the PR number for which you want to print the EP.
54

Step 18: Printing Approved EP (continued) 55
3. Click on the EP number under the Line Items section. This will bring up the EP.
4. Click on the Print button.
Step 18: Printing Approved EP (continued) 56
This will bring up the EP which you can print for your records or send to the vendor, when necessary.

57Step 19: Search for Purchase Requisitions (PR)
1. Click Search
2. From the drop down select Requisition to search by PR number.
3. Enter the PR number in the ID field.
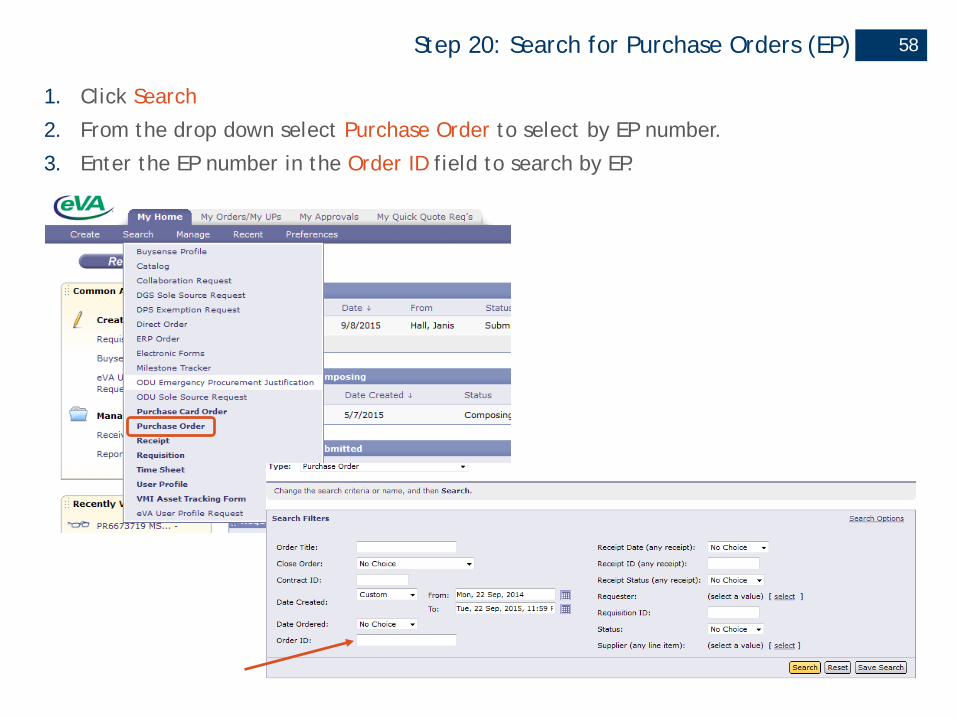
58Step 20: Search for Purchase Orders (EP)
1. Click Search
2. From the drop down select Purchase Order to select by EP number.
3. Enter the EP number in the Order ID field to search by EP.
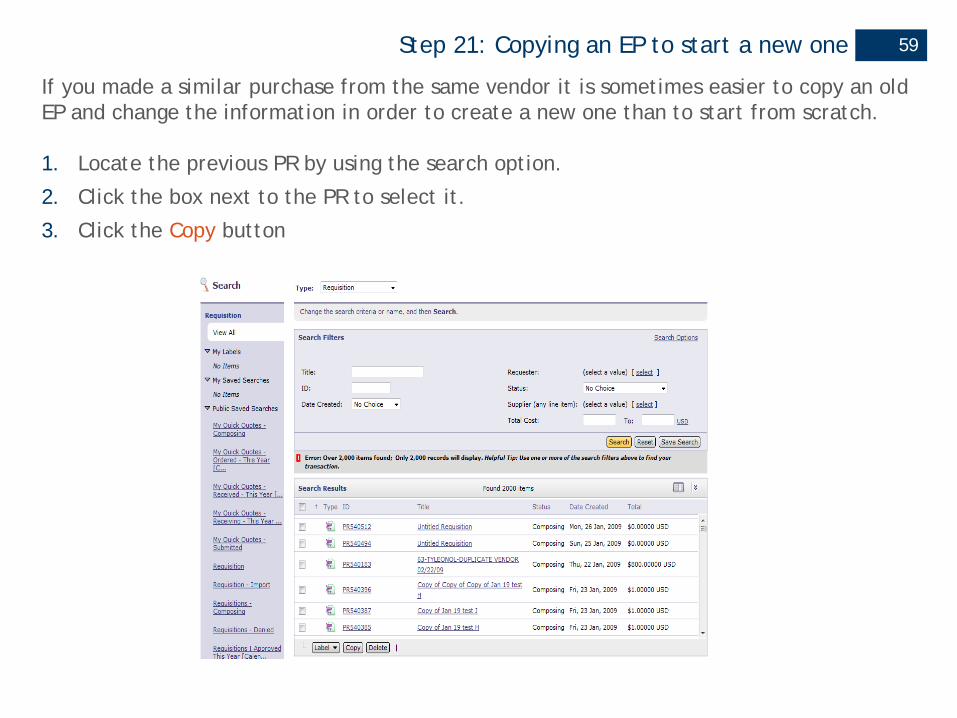
Step 21: Copying an EP to start a new one
If you made a similar purchase from the same vendor it is sometimes easier to copy an old EP and change the information in order to create a new one than to start from scratch.
1. Locate the previous PR by using the search option.
2. Click the box next to the PR to select it.
3. Click the Copy button
59
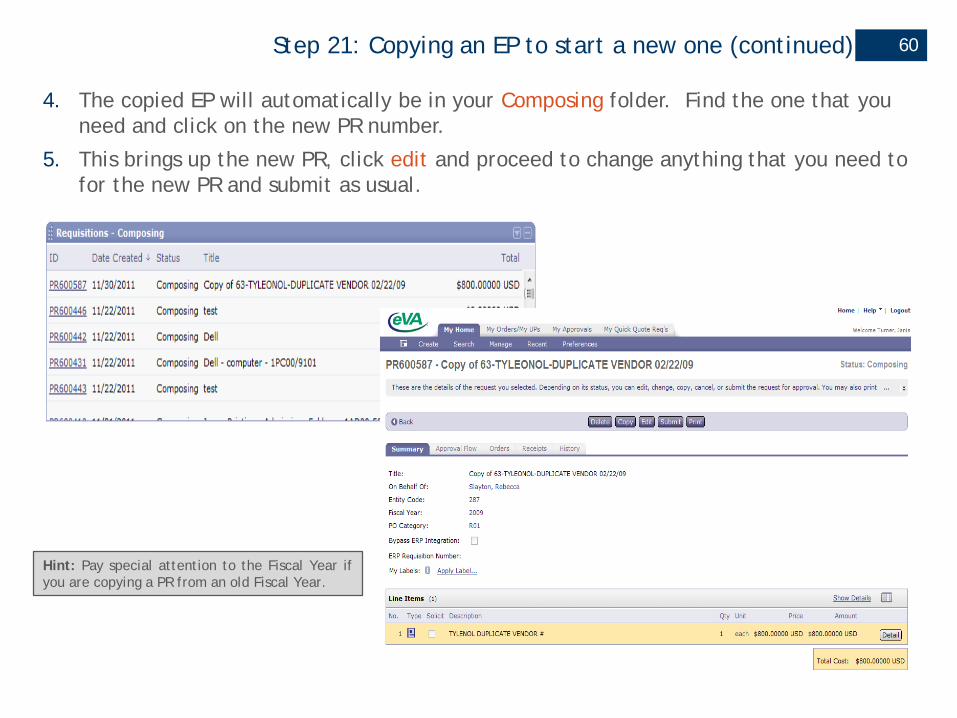
Step 21: Copying an EP to start a new one (continued)
4. The copied EP will automatically be in your Composing folder. Find the one that you need and click on the new PR number.
5. This brings up the new PR, click edit and proceed to change anything that you need to for the new PR and submit as usual.
60
Hint: Pay special attention to the Fiscal Year ifyou are copying a PR from an old Fiscal Year.

Step 22: Creating a Change Order
If you need to add something to an order or if you need to fix quantity or price you do this by creating a change order.
1. Locate the ‘ordered’ PR in your My Documents window, or by searching for it by the PR number.
2. Click the PR number to open it.
61
Hint: You can only complete a change order to an ‘ordered’ PR. Only the original requestor can create a change order.
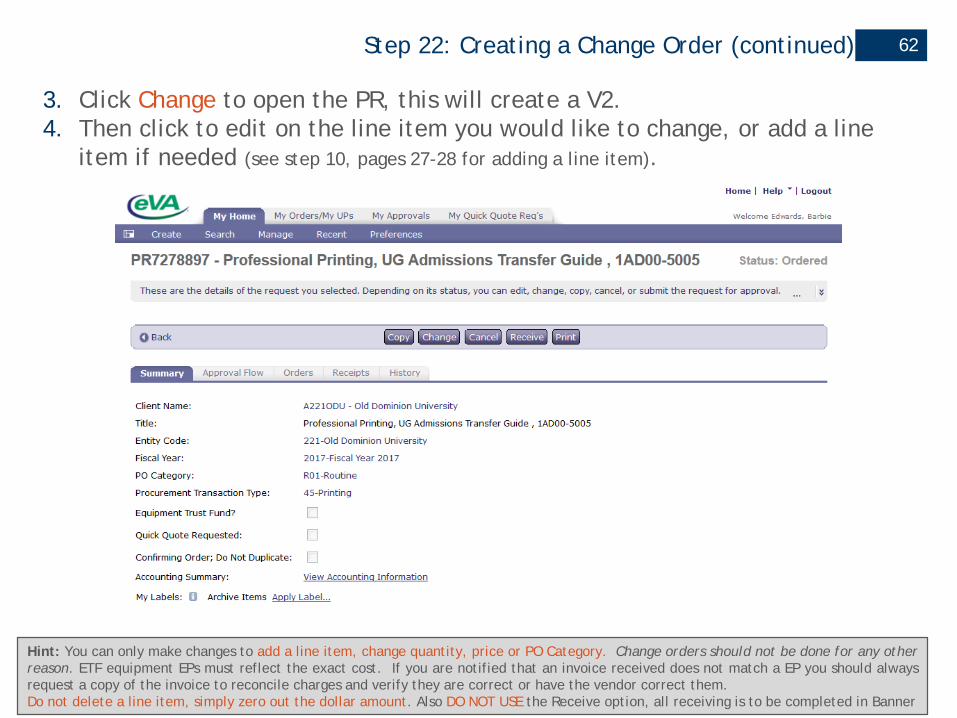
Step 22: Creating a Change Order (continued) 62
3. Click Change to open the PR, this will create a V2.4. Then click to edit on the line item you would like to change, or add a line
item if needed (see step 10, pages 27-28 for adding a line item).
Hint: You can only make changes to add a line item, change quantity, price or PO Category. Change orders should not be done for any otherreason. ETF equipment EPs must reflect the exact cost. If you are notified that an invoice received does not match a EP you should alwaysrequest a copy of the invoice to reconcile charges and verify they are correct or have the vendor correct them.Do not delete a line item, simply zero out the dollar amount. Also DO NOT USE the Receive option, all receiving is to be completed in Banner

Step 22: Creating a Change Order (continued) 63
5. Make a note in the comments field indicating the change number, exact change made and how it affects the EP. Then submit change order for approval.
Hint: Change orders will be noted as versions of the original PR and EP for instance the first change order is issued as Version 2 and will benoted as V2 in eVA. You should reference the version number V2, V3, etc. in your comments.
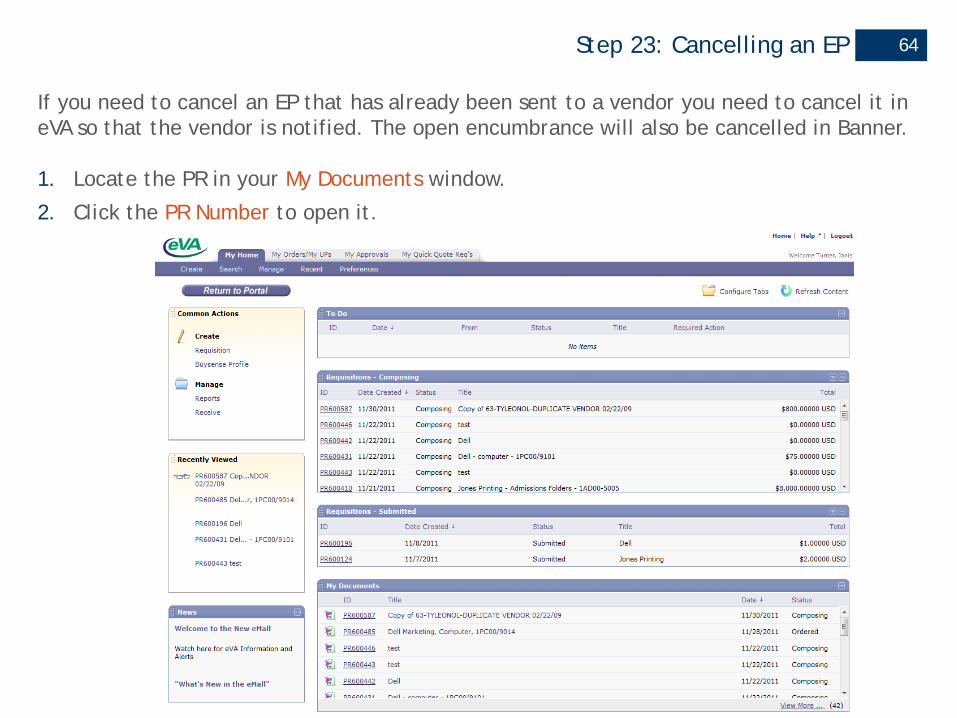
Step 23: Cancelling an EP
If you need to cancel an EP that has already been sent to a vendor you need to cancel it in eVA so that the vendor is notified. The open encumbrance will also be cancelled in Banner.
1. Locate the PR in your My Documents window.
2. Click the PR Number to open it.
64

Step 23: Cancelling a EP (continued) 65
3. Click Cancel
4. After clicking cancel, you will be given the option to include comments. You should include the reason for the cancellation.
Hint: Do NOT cancel EP’s which have had payments made against them. This can be verified in Banner on the FGIENCD screen. If youneed to cancel an order after a vendor has been paid a credit must be in Banner before cancelling the EP in eVA. Also DO NOT select theReceive option, all receiving is to be completed in Banner.
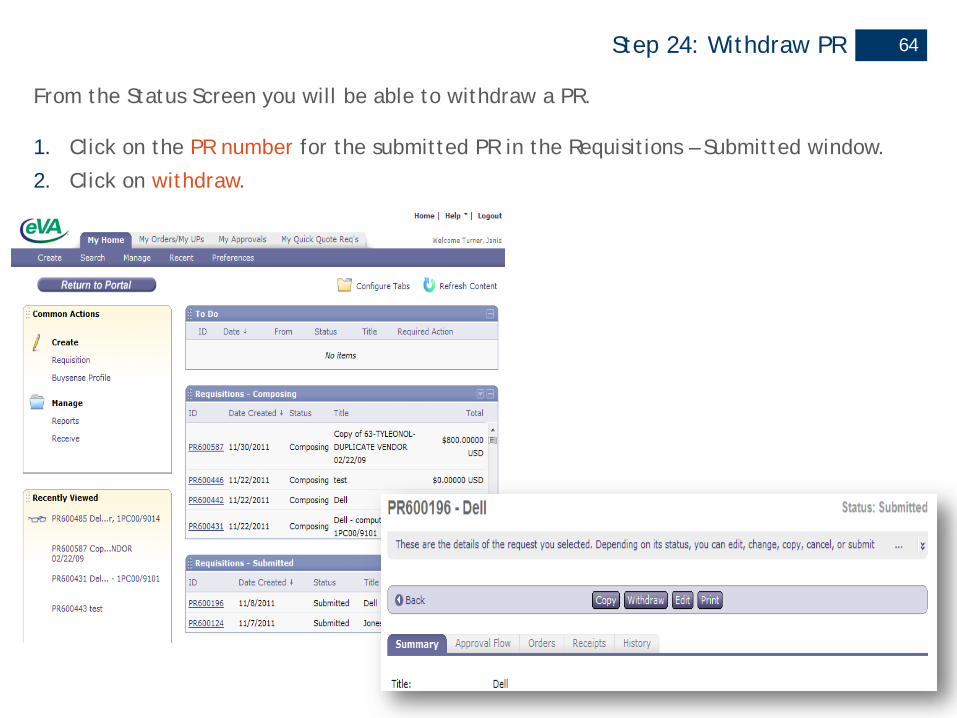
Step 24: Withdraw PR
From the Status Screen you will be able to withdraw a PR.
1. Click on the PR number for the submitted PR in the Requisitions – Submitted window.
2. Click on withdraw.
66
64

Step 24: Withdraw PR (continued)
This will take you to the Request Withdrawn screen where you can choose what to do with this PR. If you choose not to edit this PR or view it now it will remain in your Composing window until you edit and submit or delete it.
67
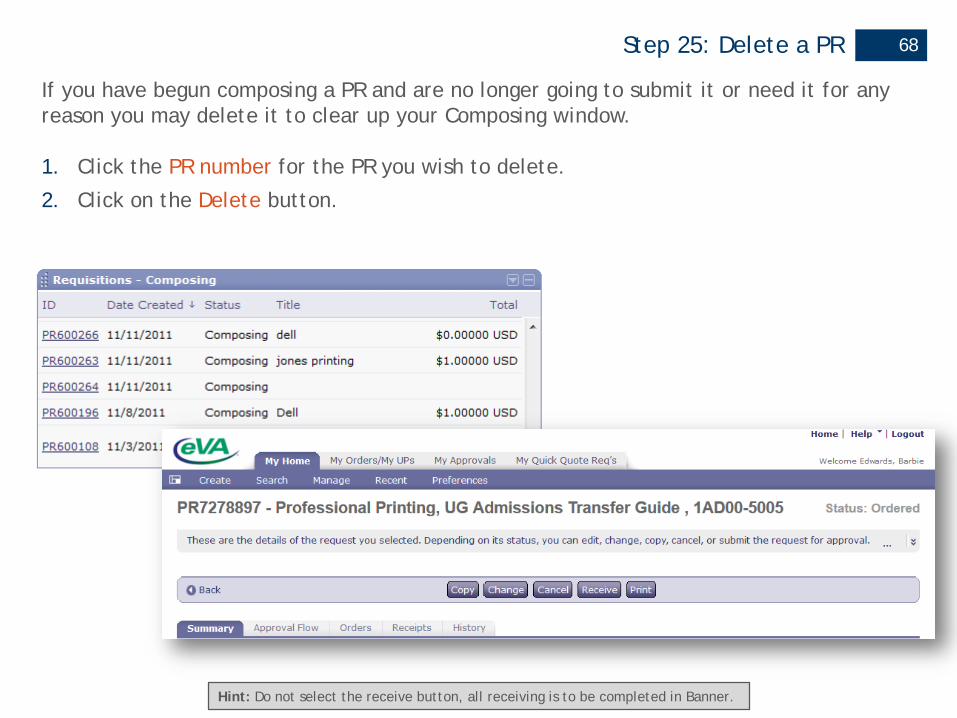
Step 25: Delete a PR
If you have begun composing a PR and are no longer going to submit it or need it for any reason you may delete it to clear up your Composing window.
1. Click the PR number for the PR you wish to delete.
2. Click on the Delete button.
68
Hint: Do not select the receive button, all receiving is to be completed in Banner.
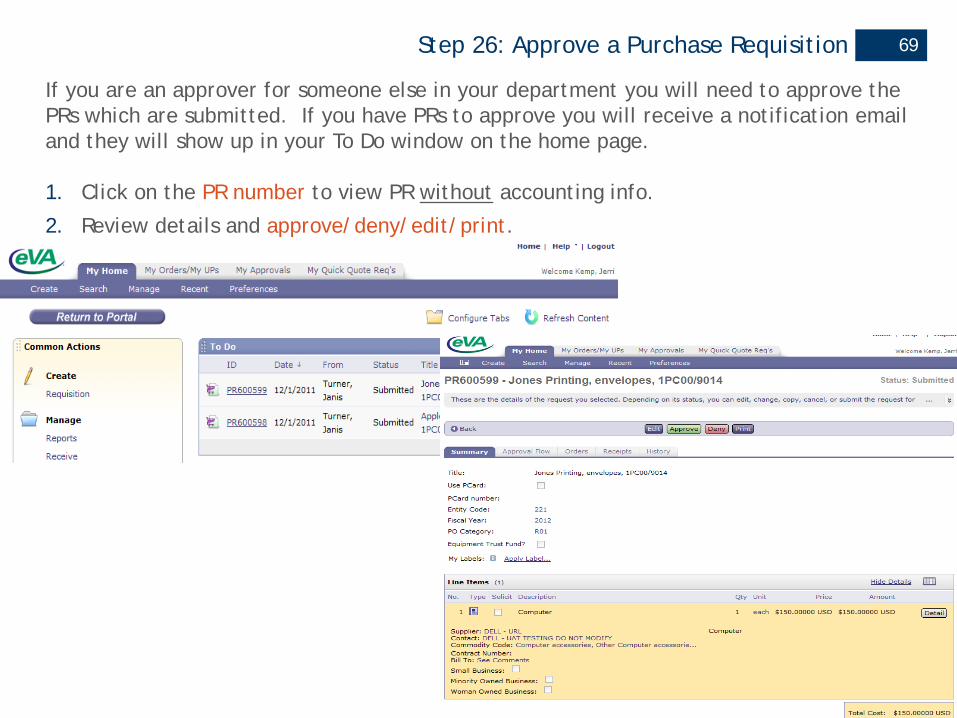
Step 26: Approve a Purchase Requisition
If you are an approver for someone else in your department you will need to approve the PRs which are submitted. If you have PRs to approve you will receive a notification email and they will show up in your To Do window on the home page.
1. Click on the PR number to view PR without accounting info.
2. Review details and approve/deny/edit/print.
69

Step 26: Approve a Purchase Requisition (continued) 70
1. Click on Approve to view PR with accounting info.2. Review details and approve/deny/edit/print.
Hint: It is your responsibility as an approver to ensure that the PR is correctly submitted. You need to review each part of the PR tomake sure that it complies with purchasing policies and procedures before approving it.

Step 27: Delegate Approval Authority – Approvers Only
1. If you will be away from the office and need PRs approved while you are gone, click on the Preferences link on the home page.
2. Click on Delegate authority.
71
Hint: eVA users may only delegate their authority to approve requisitions, the system will not allow you to delegate your ability to createPR’s. You should delegate your authority to someone in your department who has the same or greater purchasing authority as you.
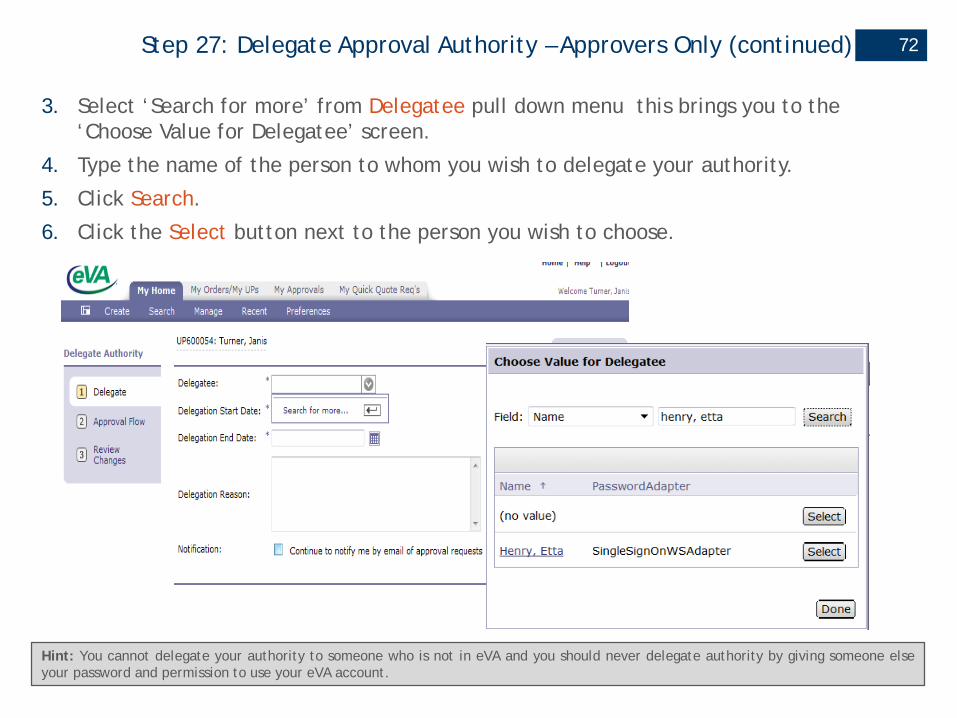
Step 27: Delegate Approval Authority – Approvers Only (continued)
3. Select ‘Search for more’ from Delegatee pull down menu this brings you to the ‘Choose Value for Delegatee’ screen.
4. Type the name of the person to whom you wish to delegate your authority.
5. Click Search.
6. Click the Select button next to the person you wish to choose.
72
Hint: You cannot delegate your authority to someone who is not in eVA and you should never delegate authority by giving someone elseyour password and permission to use your eVA account.

Step 27: Delegate Approval Authority - Approvers Only (continued)
7. Choose the Delegation Start and End Dates from the pop out calendar.
73
Hint: Delegation authority ends at midnight on the date in the ‘Delegation End Date’ field. Be aware of this as you are choosing your datesof delegation.

Step 27: Delegate Approval Authority - Approvers Only (continued)
8. Indicate a reason for the delegation of authority.
9. Check the Notification box to receive notifications of approval requests so that you will know what they have approved in your absence.
10. Click Next
74
Step 27: Delegate Approval Authority - Approvers Only (continued)
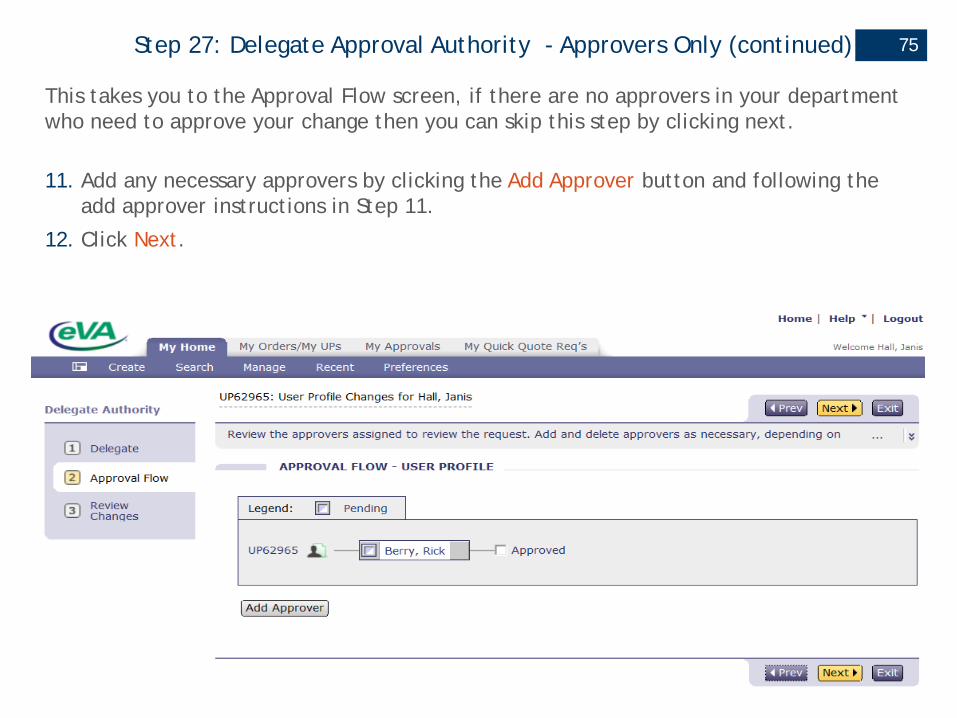
This takes you to the Approval Flow screen, if there are no approvers in your department who need to approve your change then you can skip this step by clicking next.
11. Add any necessary approvers by clicking the Add Approver button and following the add approver instructions in Step 11.
12. Click Next.
75

Step 27: Delegate Approval Authority – Approvers Only (continued)
13. Review the Review Changes screen to ensure that you have correctly entered your delegation wishes.
14. Click Submit.
76

Step 27: Delegate Approval Authority - Approvers Only (continued) 77
Your Profile Change Request will now be submitted to the ODU eVA Supervisor for approval. You will receive an email when it has been approved. You can also check the status of this request in the My Documents window on the home page.
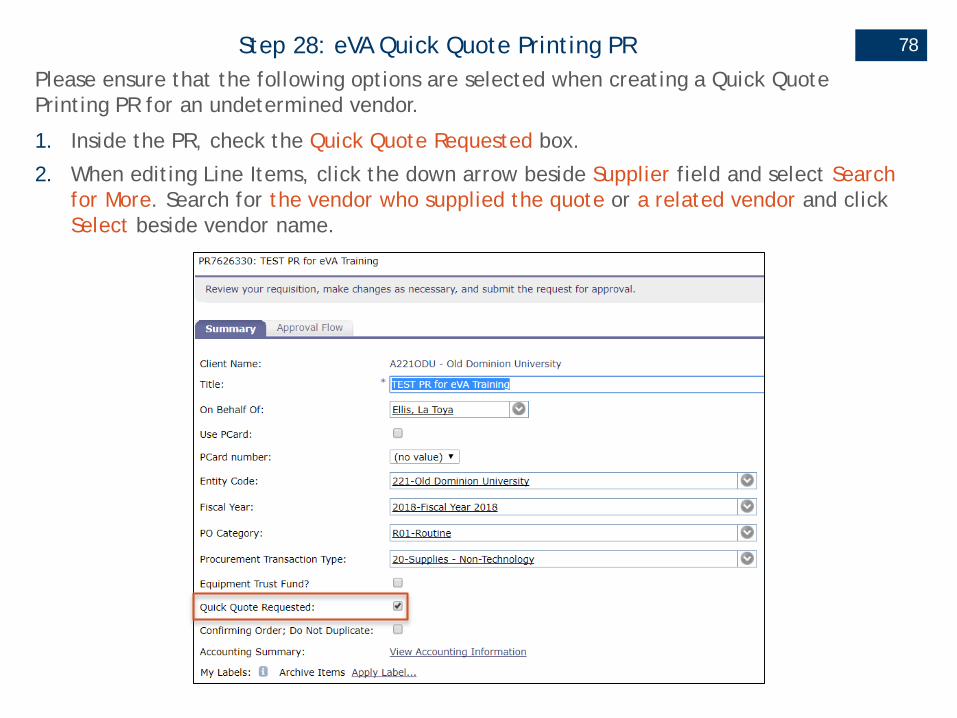
78Step 28: eVA Quick Quote Printing PR
1. Inside the PR, check the Quick Quote Requested box.
2. When editing Line Items, click the down arrow beside Supplier field and select Search for More. Search for the vendor who supplied the quote or a related vendor and click Select beside vendor name.
Please ensure that the following options are selected when creating a Quick Quote Printing PR for an undetermined vendor.

Addendum A: eVA PO Category Guidelines 79
eVA PO Category and Exceptions and Exemptions GuidelinesRevised: June 2010, October 2012, January 2013, December 2014, May 2015, July 2015
All eVA Purchase Orders require the entry of a purchase order (PO) category. Purchase order categories are entered on the ‘Add Title’ screen of the eVA purchase requisition in the PO Category field. A guide to the appropriate use of PO Categories is listed below.
R01 - Routine: Should be used for all purchases with the exception of the exempt categories orders.S01 - Sole Source: Should only be used for sole source purchases greater than $10,000.E01 - Emergency: Should only be used for emergency purchases.X02 - APSPM Exclusion Exempt: Should be used for purchases for one of the eVA exempt categories listed below.
Exempt Category ListThe following may be processed using the Small Purchase Form (PA01), Purchasing Card up to Cardholder’s Limit or eVA by issuing an eVA purchase order with an X02 PO Category:1. Purchases made using the DPS statewide contract for Express Delivery Services.
Example: United Parcel Services – contract #910262. Purchases made by a university employee or agent while located in another country and the required
goods/services are purchased from a vendor located in that country and the purchased goods/services will be used in the country where they are purchased.
3. Advertisements such as newspapers, magazines, journals, radio, television, etc.4. Professional organizational membership dues and training classes sponsored by the professional organizations
when payment is made directly to the professional organization sponsoring the training classes. (Vice President approval is required for processing organizational membership dues. This is a paper process with manual routing required.)
5. Conference registrations6. Accreditation fees and academic testing services 7. Individual or group travel and lodging (All lodging must be entered in eVA. PCard cannot be used). Group travel
over $50,000 should be entered as R01. 8. Surplus property
Addendum A: eVA PO Category Guidelines (continued) 80
9. Exhibition rental fees for exhibitions of historical artifacts or original works of art. (The rental fee may include charges other than the rental of the exhibition, such as transportation costs.)
10.Goods or personal services for direct use by the recipients of programs specified in the Code of Virginia §2.2-4345, if the procurement is made for an individual recipient. Contracts and/or spot purchases for the bulk procurement of goods or services for the use of recipients shall not be exempted.
11.Medical (Health Care) Services when the service is provided by a hospital or an individual licensed and authorized by law to engage in the prevention, diagnosis, or treatment of human illness, injury, or physical disability, mental health, mental retardation, substance abuse, or emotional condition. Contracts and purchase orders between the agency or institution and temporary service providers or independent laboratory testing companies are not exempt from purchasing through eVA.
12.Purchases made using the DPS authorized multi-state drug contract13.Revenue contracts, e.g., scrap, recycling or contracts with $0 payment made by the Commonwealth such as
contracted out bookstore services, Food service operations.Examples:Aramark – FIN 231354443 for on campus dinning and cateringAramark – FIN 231664232 for food service operations for the Ted Constant Convocation CenterFollett Higher Education GroupUnder Armour- FIN 521990078
14.Government-to-government purchases; other than purchases from mandatory sources (VCE is not considered exempt. VCE should be entered as R01.)
15.Individuals providing instructional services in conjunction with a contract between an institution of higher education, including community colleges, and a local business or industry for non-credit workforce development classes to be provided by the institution of higher education.
16.Purchases made via closed loop systems or automated inventory control systems for items for resale (Drugs only POs)
17.Intercollegiate athletic event entrance and related fees (e.g., tournament entrance fees)
Addendum A: eVA PO Category Guidelines (continued) 81
The following prepayment transactions may be exempt from processing in eVA:1. Honoraria2. Entertainment - speakers, lecturers, musicians, performing artists 3. Intercollegiate athletic game referees, officials, and umpires, etc.Notes:
a. If vendor is an Individual, the Independent Personal Services Certification (IPSC) form and associated process must be followed.
b. If vendor is a Company, the use of the Standard Engagement Agreement (SEA) will support scope of services and payment authorization request.
The following may be exempt from processing in eVA and should be processed via a Payment Document/Memo Only:1. Real estate leases2. Purchases from public auctions (non-electronic)3. Contracts with commercial fisherman for replenishment, research and stock assessment activities4. Financing when goods/services procured from one source are being financed by another (i.e., third party)
source. The financing exclusion does not apply to lease purchases.5. Business and/or financial transactions to which public procurement regulations do not apply. Examples include
debt service payments, Medicare and Medicaid payments, and child support payments.6. Award of grants by agencies and institutions to public bodies or tax exempt non-profit charitable organizations.
This exception does not apply to the expenditure of grant funds by agencies and institutions for the purchase of goods and/or services (see APSPM 13.8e).
7. Public utilities (electric, natural gas, water, sewer)8. Local funds owned by trust-agent organizations (e.g., student organizations). These funds are non-state and are
not owned and controlled by the university. The university’s sole responsibility is writing checks out of a local account maintained on behalf of the organization that owns the funds. This exclusion does not include Auxiliary Enterprises.
Addendum B: eVA Procurement Types 82
The following Procurement Types are for use on the ‘Title Screen’ of ALL requisitions and will be a required field. The Procurement Transaction Type should be selected to best fit the overall purchase on your requisition. There will be situations where requisitions include a mix of products and services, in these cases we need to determine the ‘over all’ purchase or usethe 50% Rule.
50% rule: The deciding factor is where the majority of the cost is expended on the product itself or on the services related tomaking the product functional. Whenever the estimated cost of materials, equipment, or supplies amounts to 50% or more, it
is not considered a service.
10: Equipment - Non-Technology: Procurements not meeting the technology equipment description that are not used up except through depreciation or wear and tear. Items would typically include: furniture, vehicles, machinery and other similar types of large objects. Agencies should use the 50% rule in determining whether procurements of equipment including labor for installation or servicing would be categorized as equipment or service.
15: Equipment – Technology: Procurements of technology equipment that are not used up except through depreciation or wear and tear. Items would typically include: computers, peripherals, etc.
20: Supplies - Non-Technology: Procurements not meeting the technology supplies description that would include all types of consumables such as: food, clothing, fuel, medical supplies, athletic supplies, office supplies, replacement parts, hardware supplies, printer supplies, etc.
25: Supplies - Technology: Procurements of technology supplies that would typically include: software, replacement parts, consumables, etc.
30: Non-Professional Services - Non-Technology: Procurements of activities performed by independent contractors not found under the description for technology or professional services that do not consist primarily of the acquisition of equipment or materials, or the rental of equipment, materials and supplies. Items would typically include: maintenance agreements, custodial services, grounds maintenance, banking/collection services, advertising/public relations, security services, food service, vending, hauling/moving/transportation, conference facilities, insurance, and rental of equipment with operators. Agencies should use the 50% to determine the type of procurement (service or equipment).
Addendum B: eVA Procurement Types (continued) 83
35: Non-Professional Services – Technology: Procurements of activities performed by independent contractors not found under the description for non-technology or professional services that do not consist primarily of the acquisition of equipment or materials, or the rental of equipment, materials and supplies. Items would typically include: maintenance agreements, consulting services, trainers, etc.
40: Professional Services: As defined by the VPPA means work performed by an independent contractor within the scope of the practices of: accounting, actuarial services, architecture, land surveying, landscape architecture, law, dentistry, medicine, optometry, pharmacy, professional engineering and the services of an economist procured by the State Corporation Commission. These are the only services that use the transaction type of Professional Service.
45: Printing: Procurements of printing services and products.
50: Construction: Procurements of buildings, altering, repairing, improving or demolishing any structure or building. Draining, dredging, excavation, grading or similar work upon real property. Typically might include: door repair or replacement, roof replacement, renovations of any kind, mine reclamation, site grading, etc.
55: Highway Construction: Procurements of highway construction, services, maintenance and repair.
60: Real Property: Procurements of the lease of office space, purchase/sale of land, appraisals/broker services, etc.
65: Surplus: Procurements of surplus property.
70: PPEA/PPTA: Procurements using the Public-Private Educational Facilities Infrastructure Act or Public-Private Transportation Act
75: ARRA: Procurements utilizing the American Recovery and Reinvestment Act.
80: Cooperative Procurement: procurements associated with a cooperative.
85: Non-Procurement or Other: an expense or other non-procurement type transaction.
90: Grant Opportunity: a Procurement associated with a grant.