Embed Size (px)
Citation preview

For other languages visit:www.profoto.com
User guideProfoto A1X

A1X
AirT
TL
2
www.profoto.com

A1X
AirT
TL
3
www.profoto.com
Congratulations on your new Profoto product!
Regardless if you chose a new flash or a new light shaping tool, know that almost half a century’s worth of experience was put into its making.
If the years have taught us one thing, it is to never neglect a single detail. We only put our name on a product in which we have the fullest confidence. Before shipping, every one of our products passes an extensive and strict testing program. Unless it complies with the specified performance, quality and safety, it is a no-go.
As a result, we are confident that your new Profoto product will stay with you for years and help you grow as a photographer. But getting the product is only the beginning of that journey. Using it for light shaping is the real adventure. That is why we take pride in providing you with such a wide assortment of light shaping tools, allowing you to shape the light in any way you can imagine.
The almost infinite possibilities might seem bewildering at first, but we’re certain you will soon get the hang of it.
I encourage you to sign up for our newsletter or visit Profoto stories, www.profoto.com/profoto-stories, to learn more about shaping light from photographers who are sharing their stories about how Profoto Light Shaping Tools help them to create outstanding images.
Enjoy your Profoto product!
Conny Dufgran, founder

A1X
AirT
TL
4
www.profoto.com
General safety instructionsSafety Precautions!Do not operate the equipment before studying the instruction manual and these safety instructions. Make sure that Profoto Safety Instructions is always accompanied the equipment! Profoto products are intended for indoor conditions use. Do not place or use the equipment where it can be exposed to moisture, extreme electromagnetic fields, or in areas with flammable gases or dust! Do not expose the equipment to dripping or splashing. Do not place any objects filled with liquids, such as vases, on or near the equipment. Do not expose the equipment to hasty temperature changes in humid conditions as this could lead to condensation water in the unit. Do not connect this equipment to flash equipment from other brands. Front lens shall be changed if it has become visibly damaged to such an extent that their effectiveness is impaired, for example by cracks or deep scratches. Equipment must only be serviced, modified or repaired by authorized and competent service personnel
WARNING – Electrical Shock Hazard – High Voltage!Do not open or disassemble flashes, generators or lamp heads! Equipment operates with high voltage. Generator capacitors are electrically charged for a considerable length of time after being turned off, even with the battery removed. Batteries (battery pack or batteries installed) shall not be exposed to excessive heat such as direct sunlight, fire, or the like.
Caution – Burn Hazard – Hot Parts!If front lens cracks, it must be replaced before re-use of the equipment. Do not touch front lens during operation it may reach high temperature.
Note about RF!This equipment makes use of the radio spectrum and emits radio frequency energy. Make sure the device is operated according to local regulations. The frequency spectrum this device is using is shared with other users. Interference cannot be ruled out. Due to varying regulations and limits on radio transmissions Profoto’s A1X has a power output setting. Some countries does not allow use of the full power mode PO, please refer to your country specific section in the user guide to see the maximum allowed power setting allowed by national regulations. Please note that reducing the power output will affect the range of the device. Regulations change from time to time, so please make sure you are using the latest firmware and instructions to ensure compliance with rules and regulations. These can be downloaded free from profoto.com.
Laser radiationCLASS 1
LASER PRODUCT
IEC 60825-1, Edition 2.0 (2007-03). Wavelength at room temperature: 660 nm. Power through 7 mm aperture at 100 mm distance in front of the exit window of the autofocus assist unit at room temperature: < 300 µW. Complies with 21 CFR 1040.10 and 1040.11 except for deviations pursuant to Laser Notice No. 50, dated June 24, 2007.
Caution: Do not remove, disassemble or manipulate the laser auto focus assist light. Failure to comply with this caution might lead to possible exposure to hazardous laser radiation.
Final DisposalWhen the product reach end of service, do not dispose of it with your other household waste. Equipment contains battery, electrical and electronic components that could be harmful to the environment. Equipment may be returned to Profoto distributors free of charge for recycling. Follow local legislation for disposal of batteries, electrical and electronic components, respectively.
EN

A1X
AirT
TL
5
www.profoto.com
一般安全须知安全注意事项!在使用本设备之前,请仔细阅读说明手册,熟悉安全规范。请确保《 Profoto 安全说明》总是与设备放在一起!Profoto 产品专为室内使用环境而打造。不要在潮湿、强电磁场或者有易燃气体或灰尘的地方放置或使用该设备!不要将设备暴露在滴水或溅水环境中。不要在设备上或设备附近放置任何装有液体的物体,例如花瓶。不要将设备暴露在温度快速变化的潮湿条件下,因为在这种情况下元件中会形成冷凝水。不要将此设备与其它品牌的闪光设备进行连接。如果镜头罩出现裂纹或深刮痕等会影响其使用效果的明显损坏,应进行更换。 设备的维护、改装或修理只能由本公司授权许可的维护人员执行
警告-触电危险-高压!不要打开或拆卸闪光灯、电源箱和灯头!设备使用高压电。电源箱电容器在关闭后一段时间内仍带电。电池(安装的电池组或电池)不可暴露于过高的热量中,如阳光直射、火源等。
注意-烧伤危险-高温部件!如果镜头罩出现裂纹,必须先更换,然后才能再次使用设备。操作过程中请勿触摸镜头罩,因为镜头罩可能温度变高。
有关射频的注意事项!本设备使用射频频谱并放射射频能量。在将本装置集成到系统中时,请多加注意。确保遵循本文件中所有的规范,尤其是涉及操作温度和电源电压范围的说明。确保本装置根据当地的规定进行操作。本装置使用的射频频谱与其他使用者共享。不能排除干扰。
激光辐射 CLASS 1
LASER PRODUCT
IEC 60825-1,2.0 版 (2007-03)。室温条件下的波长:660 nm。室温条件下自动对焦辅助装置出射窗前方 100 mm 距离处的 7 mm 光圈功率:< 300 µW。除偏差遵照 2007 年 6 月 24 日颁布的 Laser Notice No. 50 的规定之外,符合 21 CFR 1040.10 和 1040.11 的规定。
注意:请勿拆卸、拆解或操纵激光自动对焦辅助灯。不遵守本注意警告可能导致暴露于危险的激光辐射。
回收处理产品达到使用期限后,请勿将其与其他生活垃圾一同处理。设备含有可能对环境有害的电池、电气和电子元件。废弃设备可免费返还 Profoto 经销商回收。请遵守当地法规分别处理电池、电气和电子元件。
CN

A1X
AirT
TL
6
www.profoto.com
Allgemeine SicherheitsanweisungenSicherheitsvorkehrungen!Verwenden Sie dieses Gerät nicht, bevor Sie das Bedienungshandbuch und die beiliegenden Sicherheitshinweise gelesen haben. Stellen Sie sicher, dass die Profoto-Sicherheitshinweise immer dem Gerät beiliegen! Die Produkte von Profoto sind für den Gebrauch in Innenräumen bestimmt. Verwahren oder verwenden Sie das Gerät nicht an Orten, an denen es Feuchtigkeit oder starken elektromagnetischen Feldern ausgesetzt ist, oder in Bereichen mit entzündlichen Gasen oder Staub! Das Gerät darf nicht mit Tropf- oder Spritzwasser in Berührung kommen. In der Nähe des Geräts dürfen sich keine mit Flüssigkeit gefüllten Objekte wie z.B Vasen befinden. In feuchten Umgebungen muss das Gerät vor plötzlichen Temperaturschwankungen geschützt werden, um Kondenswasserbildung im Gerät zu verhindern. Das Gerät darf nicht mit Blitzköpfen anderer Marken betrieben werden. Die Frontlinse ist auszutauschen, wenn sie sichtbare Beschädigungen (z. B. Brüche oder tiefe Risse) aufweist, die ihre Funktionsfähigkeit einschränken. Das Gerät darf nur von autorisiertem und qualifiziertem Wartungspersonal gewartet, modifiziert oder repariert werden.
WARNUNG – Gefahr von Stromschlägen – Hochspannung!Blitzgeräte, Generatoren und Blitzköpfe dürfen nicht geöffnet oder demontiert werden! Das Gerät wird mit Hochspannung betrieben. Die Kondensatoren des Generators sind auch nach dem Ausschalten für eine gewisse Zeit elektrisch geladen. Batterien im Gerät (Akkus oder Trockenbatterien) dürfen nicht über längere Zeit übermäßiger Hitze, wie z. B. direktem Sonnenlicht, Feuer o. Ä., ausgesetzt werden.
ACHTUNG – Verbrennungsgefahr – Heiße Teile!Wenn die Frontlinse Risse aufweist, muss sie vor der Weiterverwendung des Geräts ausgetauscht werden. Berühren Sie die Frontlinse nicht während des Betriebs. Sie kann sehr heiß werden.
Anmerkung zu FunkfrequenzenDieses Gerät verwendet Funkfrequenzen und gibt Hochfrequenzenergie ab. Bei Integration des Geräts in Systeme sollte man äußerste Vorsicht walten lassen. Stellen Sie sicher, dass alle Bestimmungen dieses Dokuments eingehalten werden, insbesondere diejenigen, die die Betriebstemperatur und den Versorgungsspannungsbereich betreffen. Stellen Sie sicher, dass das Gerät gemäß den lokalen Bestimmungen betrieben wird. Die von diesem Gerät verwendete Funkfrequenz wird mit anderen Anwendern geteilt. Störungen sind nicht auszuschließen.
Laserstrahlung CLASS 1
LASER PRODUCT
IEC 60825-1, Ausgabe 2.0 (2007-03). Wellenlänge bei Raumtemperatur: 660 nm. Leistung durch 7-mm-Öffnung bei 100 mm Entfernung vor dem Austrittsfenster des Autofokushilfslichts bei Zimmertemperatur: < 300 µW. Entspricht 21 CFR 1040.10 und 1040.11 mit Ausnahme der Abweichungen gemäß Laserhinweis Nr. 50 vom 24. Juni 2007.
Achtung: Entfernen, zerlegen oder manipulieren Sie das Laser-Autofokushilfslicht nicht. Bei Nichtbeachtung dieses Warnhinweises besteht die Gefahr, dass Sie sich gefährlicher Laserstrahlung aussetzen.
EntsorgungWenn das Produkt das Ende der Nutzungsdauer erreicht hat, entsorgen Sie es nicht mit Ihrem sonstigen Hausmüll. Das Gerät enthält Batterien, elektrische und elektronische Komponenten, die umweltschädlich sein können. Profoto-Händler nehmen Ihr Gerät kostenfrei entgegen und führen es der Wiederverwertung zu. Befolgen Sie die lokale Gesetzgebung für die Entsorgung von Batterien bzw. elektrischen und elektronischen Komponenten..
DE
A1X
AirT
TL
7
www.profoto.com
Instrucciones generales de seguridad¡Precauciones de seguridad!No haga funcionar el equipo antes de haber leído el manual de instrucciones y la información de seguridad que lo acompaña. Asegúrese de que el equipo siempre vaya acompañado de las instrucciones de seguridad de Profoto. Los productos Profoto están destinados a ser utilizados en espacios interiores. No sitúe ni utilice el equipo en lugares donde pueda estar expuesto a humedad, campos electromagnéticos extremos o áreas con gases inflamables o suciedad. No exponga el equipo a goteos o salpicaduras. No coloque objetos que contengan líquidos, como floreros, sobre el equipo ni cerca del mismo. No exponga el equipo a cambios bruscos de temperatura en condiciones de humedad, ya que podría producirse condensación de agua en la unidad. No conecte este equipo a equipos de flash de otras marcas. La lente frontal debe sustituirse si presenta daños visibles hasta el punto que se vea afectada su efectividad; por ejemplo, si presenta grietas o arañazos profundos. El equipo solo debe ser revisado, modificado o reparado por personal de servicio competente y autorizado
ADVERTENCIA: riesgo de descarga eléctrica, alta tensión.No abra ni desmonte los flashes, los generadores ni los focos. El equipo funciona con alta tensión. Los condensadores del generador permanecen cargados eléctricamente durante un periodo de tiempo considerable una vez apagado el aparato. Las pilas (batería o pilas instaladas) no deben estar expuestas a un calor excesivo, como luz solar directa, fuego o similar.
¡Precaución – Peligro de quemaduras – Piezas calientes!Si la lente frontal se agrieta, deberá reemplazarla antes de volver a utilizar el equipo. No toque la lente frontal durante el uso ya que puede alcanzar una temperatura alta.
¡Nota sobre RF!Este equipo utiliza el espectro de radio y emite energía de radiofrecuencia. Debe prestarse especial atención cuando el dispositivo esté integrado en sistemas. Asegúrese de seguir todas las especificaciones incluidas en este documento, especialmente las relativas a temperatura de funcionamiento y rango de tensión de alimentación. Asegúrese de que el dispositivo se utilice de conformidad con la normativa local. El espectro de frecuencia que utiliza este dispositivo es compartido con otros usuarios. No se puede excluir la posibilidad de interferencia.
Radiación láser CLASS 1
LASER PRODUCT
IEC 60825-1, Edición 2.0 (2007-03). Longitud de onda a temperatura ambiente: 660 nm. Potencia a través de un diafragma de 7 mm a 100 mm de distancia delante de la ventana de salida de unidad auxiliar de enfoque automático a temperatura ambiente: < 300 µW. Cumple con 21 CFR 1040.10 y 1040.11 salvo en los casos previstos en Laser Notice No. 50, fecha 24 de junio de 2007.
Precaución: No quite, desmonte ni manipule la luz auxiliar de enfoque automático del láser. Si no cumple con esta recomendación podría exponerse a una radiación láser peligrosa.
Eliminación finalCuando el producto llegue al final de su vida útil, no lo deseche junto con los demás residuos domésticos. El equipo contiene baterías, componentes eléctricos y electrónicos que pueden ser perjudiciales para el medio ambiente. Puede devolver el equipo de forma gratuita a un distribuidor de Profoto para su reciclaje. Siga la legislación local para la eliminación de pilas, componentes eléctricos y electrónicos, respectivamente.
ES
A1X
AirT
TL
8
www.profoto.com
Instructions générales de sécuritéPrécautions de sécurité !Ne faites pas fonctionner l'équipement avant d'avoir étudié le manuel d'utilisation et les consignes de sécurité qui l'accompagnent. Assurez-vous que l'équipement est toujours accompagné des consignes de sécurité Profoto. Les produits Profoto sont destinés à un usage en intérieur. L'équipement ne doit pas être exposé, qu'il soit en fonctionnement ou non, à l'humidité, à des champs électromagnétiques extrêmes ou à des zones contenant des gaz inflammables ou de la poussière ! N'exposez pas l'équipement à un égouttement ou à des éclaboussures. Ne placez aucun objet rempli de liquide, tel que des vases, sur l'équipement ou à proximité de celui-ci. N'exposez pas l'équipement à des changements rapides de température dans des conditions d'humidité, car cela pourrait entraîner la formation d'eau de condensation dans l'unité. Ne connectez pas cet équipement à un équipement de flashes d'une autre marque. La lentille frontale doit être changée si elle est visiblement endommagée à un point tel que son efficacité est compromise, par exemple par des craquelures ou des rayures profondes. L'équipement ne doit être entretenu, modifié ou réparé que par un personnel de service compétent et autorisé !
AVERTISSEMENT – Risque d'électrocution – Haute tension !N'ouvrez pas et ne démontez pas les flashes, les générateurs ainsi que les torches ! L'équipement fonctionne sous haute tension. La charge électrique des condensateurs du générateur dure très longtemps après la mise hors tension. Les piles (bloc-piles ou piles installé(es)) ne doivent pas être exposées à une chaleur excessive telle que l'ensoleillement direct, le feu ou autres.
Attention – Risque de brûlures – Pièces chaudes !Si la lentille frontale semble se fissurer, elle doit être remplacée avant toute réutilisation de l’équipement. Ne touchez pas la lentille frontale pendant le fonctionnement car elle peut atteindre une température élevée.
Note concernant la radiofréquence :Cet équipement utilise le spectre des radiofréquences et émet de l'énergie de radiofréquence. Il convient d'appliquer les précautions appropriées lorsque le dispositif est intégré dans des systèmes. Assurez-vous que toutes les spécifications de ce document sont respectées, en particulier celles qui concernent la température de fonctionnement et la gamme de tension d'alimentation. Assurez-vous que le dispositif fonctionne conformément à la réglementation locale. Le spectre de fréquences que ce dispositif utilise est partagé avec d'autres utilisateurs. Un brouillage ne peut être exclu.
Rayonnement laser CLASS 1
LASER PRODUCT
IEC 60825-1, Edition 2.0 (2007-03). Longueur d’onde à température ambiante : 660 nm. Alimentation à travers l’ouverture de 7 mm à 100 mm de distance devant la fenêtre de sortie de l’assistant de mise au point automatique à température ambiante : < 300 µW. Conforme aux normes 21 CFR 1040.10 et 1040.11, à l'exception des cas divergents énumérés dans le document « Laser Notice No. 50 » du 24 juin 2007.
Attention : Ne retirez, ne désassemblez et ne manipulez pas la source de lumière laser de l’assistant de mise au point automatique. Le non-respect de cette consigne est susceptible de vous exposer à un rayonnement laser dangereux.
Élimination finaleLorsque le produit atteint la fin de sa durée de service, ne le jetez pas dans vos ordures ménagères. L’équipement contient une batterie ainsi que des composants électriques et électroniques susceptibles de nuire à l’environnement. L’équipement peut être retourné à un distributeur Profoto pour un recyclage gratuit. Respectez la législation locale relative à l’élimination des batteries et des composants électriques et électroniques respectivement.
FR

A1X
AirT
TL
9
www.profoto.com
Istruzioni di sicurezza generaliPrecauzioni di sicurezza!Non azionare l'attrezzatura prima di aver studiato il manuale d'istruzione e le precauzioni di sicurezza che lo corredano. Accertarsi che l'attrezzatura sia sempre accompagnata dalle istruzioni di sicurezza Profoto! I prodotti Profoto sono destinati a un uso in ambienti interni! Non posizionare o utilizzare l'attrezzatura in luoghi umidi, soggetti a forti campi elettromagnetici o in aree polverose o esposte a gas infiammabili! Non esporre l’attrezzatura a gocciolamento o schizzi d’acqua. Non collocare oggetti contenenti liquido, come ad esempio vasi, sopra o nei pressi dell'attrezzatura. Non esporre l'attrezzatura a brusche variazioni di temperatura e umidità, poiché questa condizione potrebbe generare la formazione di condensa nell'unità. Non collegare questa attrezzatura ad attrezzature di altre marche. La lente anteriore deve essere sostituita se visibilmente danneggiata al punto che la sua funzione ne risulta compromessa, per esempio se sono presenti incrinature o graffi profondi. L'attrezzatura deve essere manutenuta, modificata e riparata solo da personale autorizzato e competente.
ATTENZIONE – Pericolo di scossa elettrica – Alta tensione!Non aprire o smontare i flash, i generatori o i corpi-lampada! L'attrezzatura funziona con l'alta tensione. I condensatori del generatore sono carichi elettricamente per un lungo periodo di tempo dopo lo spegnimento. Le batterie (pacco batterie o batterie installate) non devono essere esposte a calore eccessivo come luce solare diretta, fiamme o simili.
Attenzione - Rischio di ustioni - Parti surriscaldate!In caso di incrinatura della lente anteriore, è necessario sostituirla prima di riutilizzare l'attrezzatura. Non toccare la lente anteriore mentre l'attrezzatura è in funzione: potrebbe raggiungere temperature elevate.
Nota relativa a RF!Questa attrezzatura utilizza lo spettro radio ed emette energia di frequenza radio. È necessario prestare la dovuta attenzione quando il dispositivo viene integrato in sistemi. Accertarsi di rispettare tutte le specifiche contenute nella presente documentazione, specialmente quelle relative alla temperatura operativa e all'intervallo della tensione di alimentazione. Accertarsi che il dispositivo sia azionato secondo la normativa locale. Lo spettro di frequenza utilizzato da questo dispositivo è condiviso con altri utenti. È impossibile impedire le interferenze.
Radiazioni laserCLASS 1
LASER PRODUCT
IEC 60825-1, Versione 2.0 (2007-03). Lunghezza d'onda a temperatura ambiente: 660 nm. Potenza attraverso un'apertura di 7 mm a 100 mm di distanza davanti alla finestra di uscita dell'unità di assistenza all'autofocus a temperatura ambiente: < 300 µW. Conforme a 21 CFR 1040.10 e 1040.11 salvo variazioni ai sensi dell'Avviso sui Laser n. 50 del 24 giugno 2007.
Attenzione: Non rimuovere, smontare o manipolare la luce di assistenza all'autofocus laser. Il mancato rispetto di questa avvertenza può comportare la potenziale esposizione a radiazioni laser pericolose.
Smaltimento finaleAl termine della propria vita utile, il prodotto non deve essere smaltito insieme ai normali rifiuti domestici. L’apparecchiatura contiene batterie, componenti elettrici ed elettronici che potrebbero essere dannosi per l’ambiente. L’apparecchiatura può essere restituita gratuitamente ai distributori Profoto per lo smaltimento. Per lo smaltimento delle batterie, dei componenti elettrici ed elettronici, attenersi alle normative locali.
IT

A1X
AirT
TL
10
www.profoto.com
安全に関する一般的な注意事項安全注意事項製品を使用する前に、取扱説明書および安全のための注意事項をよくお読みください。本書は必ず製品と共に保管してください。プロフォト製品は屋内での使用を目的としています。湿気、強い電磁場、可燃性ガスや粉塵が存在する環境では、製品の保管や使用を避けてください。製品を水没させたり、水滴のかかる場所で使用したりしないでください。花瓶など、水の入った容器を装置の上や近くに置かないでください。湿度の高い環境下では、極端な温度変化を避けてください。製品内部に結露が生じる可能性があります。製品を他社製ストロボやスタジオライトに接続しないでください。前面レンズにひび割れや深い傷など、目に見える破損があり正常に動作しない場合は、使用を中止して正常な製品と交換してください。 製品は専門の技術者のみが修理、改造、修理できます。
注意:高電圧による感電の危険性スタジオライト、ジェネレーターやフラッシュヘッドの蓋を開けたり、分解したりしないでください。製品は高電圧で動作します。ジェネレーターのコンデンサは、電源を切った後も長時間帯電し続けます。バッテリー(バッテリーパックまたは個別電池・バッテリー)を直射日光や火などの熱源にさらさないでください。
注意:高温部品によるやけどの危険性前面レンズに亀裂がある場合は、製品を再使用する前に必ず交換してください。使用中は前面レンズに触れないでください。高温になる可能性があります。
RF についての注意事項製品は無線通信時に特定の無線周波帯を使用します。製品を照明セットで使用する場合は、適切な注意が必要です。本書に記載された仕様、特に動作温度と供給電圧範囲に関する仕様には必ず従ってください。製品は必ず現地の規制に基づいて使用してください。製品が使用する周波数帯は他の装置も使用します。電波干渉を完全に排除することはできません。
レーザー照射 CLASS 1
LASER PRODUCT
IEC 60825-1、Edition 2.0(2007-03)を参照してください。室温下の光波長:660 nm。AF アシストユニット出口窓から 100 mm 離れた 7 mm の開口を通る、室温下の光エネルギー:300 µW 未満。2007 年 6 月 24 日付けの Laser Notice No. 50 に従った偏差を除き、21 CFR 1040.10 および 1040.11 に準拠。
危険:AF 補助光用のレーザー装置を取り外したり、分解したり、改造したりしないでください。危険なレーザー光にさらされる可能性があります。
最終処分製品が使用期限に達した場合は、他の家庭用ごみといっしょに処分しないでください。本製品は環境に有害な可能性のあるバッテリー、電気・電子部品を含んでいます。Profoto販売店にご返却いただければ、無料でリサイクルできます。バッテリー、電気・電子部品の処分に関しては各地の法令に従ってください。
JP

A1X
AirT
TL
11
www.profoto.com
일반 안전 지침안전 주의사항!설명서와 동봉된 안전 지침을 숙지하기 전에 장비를 작동하지 마십시오. Profoto 안전 지침이 장비와 함께 있는지 항상 확인하십시오. Profoto 제품은 실내에서 사용하기 위한 것입니다. 수분, 극단적인 전자기장에 노출될 수 있는 장소나 가연성 가스 또는 분진이 있는 공간에 장비를 두거나 사용하지 마십시오! 장비에 물방울이 떨어지거나 튀지 않도록 하십시오. 꽃병 등 액체가 든 물체를 장비 위나 근처에 두지 마십시오. 장비를 습한 상태에서 온도 변화가 심한 환경에 노출시키지 마십시오. 이렇게 하면 장치에 물방울이 맺힐 수 있습니다. 이 장비를 다른 브랜드의 플래시 장비에 연결하지 마십시오. 육안으로 보았을 때 균열 또는 깊은 상처 등 효과가 떨어질 정도로 유리 커버가 손상된 경우 전방 렌즈를 교체해야 합니다. 실력 있는 공인 정비 직원만 장비를 정비, 수정, 수선해야 합니다.
경고 - 감전 위험 - 고압!플래시, 발전기 또는 램프 헤드를 열거나 분해하지 마십시오! 장비는 고압에서 작동됩니다. 발전기 커패시터는 전원을 차단한 후에도 상당 시간 전기가 흐릅니다. 배터리(설치된 배터리 팩 또는 배터리)를 직사광선, 화염 등의 과도한 열에 노출시키면 안 됩니다.
주의 - 화상 위험 - 고열 부품!전방 렌즈에 균열이 생긴 경우, 장비를 다시 사용하기 전에 교체해야 합니다. 작동 중 고온에 도달할 수 있으므로 전방 렌즈를 만지지 마십시오.
RF 주의사항!이 장비는 무선 주파수대를 이용하며 무선 주파수 에너지가 방출됩니다. 장치를 시스템에 통합할 때 적절한 주의가 필요합니다. 본 문서의 모든 사양을 준수했는지 확인하십시오. 특히 작동 온도 및 공급 전압 범위와 관련된 내용은 중요합니다. 현지 규제에 따라 장치를 작동하십시오. 이 장치에서 사용하는 주파수대를 다른 사용자도 사용합니다. 간섭을 배제시킬 수 없습니다.
레이저 방출 CLASS 1
LASER PRODUCT
IEC 60825-1, 버전 2.0 (2007-03). 실온에서 파장: 660 nm. 실온에서 자동 초점 지원 장치의 배출 창 앞, 100 mm 거리에서 7 mm 조리개를 통한 출력: < 300 µW. 레이저 고지 50(2007년 6월 24일 기준)에 따른 편차를 제외하고, 21 CFR 1040.10 및 1040.11을 준수합니다.
주의: 레이저 자동 초점 지원 조명 장치를 제거, 분해 또는 조작하지 마십시오. 이 주의 사항을 준수하지 않으면 폭발이 발생하거나 위험한 레이저 방출을 초래할 수 있습니다.
최종 폐기제품의 사용 기간이 만료된 경우, 다른 가정용 쓰레기와 함께 폐기하지 마시기 바랍니다. 장비에는 환경에 유해할 수 있는 배터리, 전기 및 전자 부품이 포함되어 있습니다. 재활용을 위해 장비를 Profoto 유통업체에 무료로 반품할 수 있습니다. 배터리, 전기 및 전자부품은 모두 국가별 규정에 맞게 처분해주시기 바랍니다.
KO
A1X
AirT
TL
12
www.profoto.com
Общие указания по технике безопасностиМеры безопасности!Перед началом работы с оборудованием необходимо изучить руководство по эксплуатации и инструкции по технике безопасности. Удостоверьтесь в том, что инструкции по технике безопасности Profoto прилагаются к оборудованию! Продукция Profoto предназначена для применения в помещениях. Запрещается размещать и использовать оборудование в местах с повышенной влажностью, чрезмерными электромагнитными полями или в присутствии взрывоопасных газов и пыли! Не следует допускать намокания оборудования или попадания на него брызг. Не следует размещать какие-либо емкости с жидкостью (например, вазы) на оборудовании или вблизи него. Оборудование не должно подвергаться резким перепадам температуры в условиях повышенной влажности, поскольку это может привести к образованию конденсата внутри прибора. Запрещается подключать данное оборудование к импульсному оборудованию других производителей. Переднюю линзу необходимо заменять в случае видимых повреждений, из-за которых снижается эффективность, например при наличии трещин или глубоких царапин. Обслуживание, модификация и ремонт оборудования должны осуществляться только уполномоченными и компетентными сервисными специалистами.
ВНИМАНИЕ! Опасность поражения электрическим током. Высокое напряжение!Запрещается вскрывать и разбирать вспышку, генератор и импульсную лампу! Во время работы оборудование находится под высоким напряжением. Конденсаторы генератора сохраняют заряд в течение длительного времени после отключения генератора. Батареи (аккумулятор и установленные батареи) не должны подвергаться чрезмерному тепловому воздействию (прямой солнечный свет, огонь и т. д.)
Осторожно! Опасность ожога. Горячие детали!Если передняя линза треснула, ее необходимо заменить перед дальнейшим использованием оборудования. Во время работы с продуктом не прикасайтесь к передней линзе, так как она может сильно нагреваться.Примечание об использовании радиочастот!Данное оборудование использует радиоспектр и испускает энергию радиоизлучения. Необходимо принять меры предосторожности при интеграции устройства в различные системы. Убедитесь, что выполняются все требования настоящего документа, в особенности в отношении рабочей температуры и номинального напряжения. Убедитесь, что устройство эксплуатируется в соответствии с местными правилами. Спектр частот, на котором работает данное устройство, используется и другими пользователями. Радиопомехи не исключаются.
Лазерное излучение CLASS 1
LASER PRODUCT
Соответствует классу 1 лазерной безопасности. Товары класса 1 абсолютно безвредны при условии нормального использование.
Утилизациякоторые могут нанести вред окружающей среде. Оборудование может быть бесплатно возвращено дистрибьюторам Profoto с целью его утилизации. При утилизации аккумулятора, электрических и электронных компонентов соблюдайте местное законодательство.
RU
A1X
AirT
TL
13
www.profoto.com
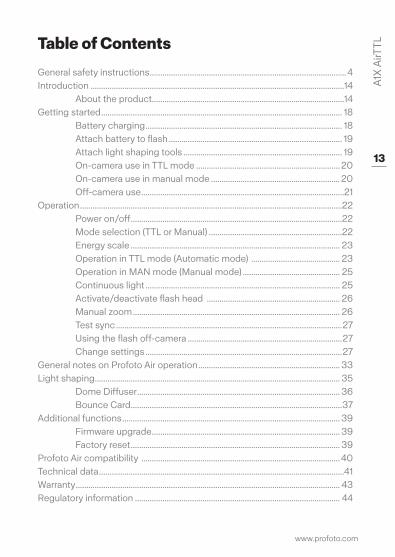
Table of Contents
General safety instructions .............................................................................................4Introduction ........................................................................................................................14
About the product...........................................................................................14Getting started .................................................................................................................. 18
Battery charging ............................................................................................. 18Attach battery to flash .................................................................................. 19Attach light shaping tools ........................................................................... 19On-camera use in TTL mode .................................................................... 20On-camera use in manual mode ............................................................. 20Off-camera use ................................................................................................21
Operation ............................................................................................................................22Power on/off ....................................................................................................22Mode selection (TTL or Manual) ...............................................................22Energy scale ................................................................................................... 23Operation in TTL mode (Automatic mode) .......................................... 23Operation in MAN mode (Manual mode) .............................................. 25Continuous light ............................................................................................ 25Activate/deactivate flash head ............................................................... 26Manual zoom .................................................................................................. 26Test sync ...........................................................................................................27Using the flash off-camera .........................................................................27Change settings .............................................................................................27
General notes on Profoto Air operation ................................................................... 33Light shaping .................................................................................................................... 35
Dome Diffuser ................................................................................................ 36Bounce Card ....................................................................................................37
Additional functions ....................................................................................................... 39Firmware upgrade ......................................................................................... 39Factory reset ................................................................................................... 39
Profoto Air compatibility ..............................................................................................40Technical data ....................................................................................................................41Warranty ............................................................................................................................. 43Regulatory information ................................................................................................. 44

A1X
AirT
TL
14
www.profoto.com
IntroductionAbout the productWe have designed the A1X to be the world’s smallest studio light.
It is designed to provide a beautiful light with great light shaping capabilities and also being incredible easy to use.
We have made the head round to create a circular and natural light pattern. We have a soft and even light fall off that makes it easy to control and set the light creatively. In addition to that we have a range of dedicated Light Shaping Tools that are easily clicked on with a magnetic mount.
The A1X has also AirTTL Remote and receiver built-in, which means it will automatically communicate with other freestanding Profoto lights wirelessly and it can also be used off-camera. This makes it easy to grow in a system and grow with light shaping.
A1X
AirT
TL
15
www.profoto.com
12
3
4
5
6
7
8
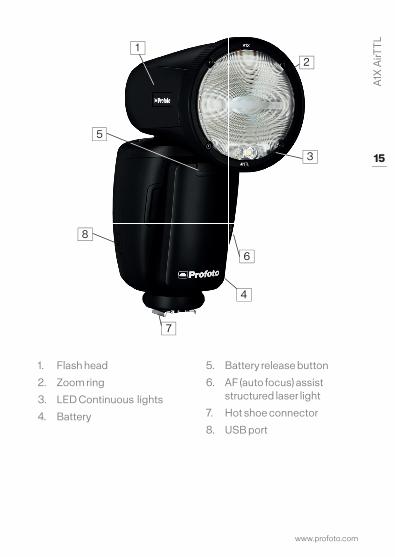
1. Flash head
2. Zoom ring
3. LED Continuous lights
4. Battery
5. Battery release button
6. AF (auto focus) assist structured laser light
7. Hot shoe connector
8. USB port
A1X
AirT
TL
16
www.profoto.com
9
11
12
1314
15
10
16
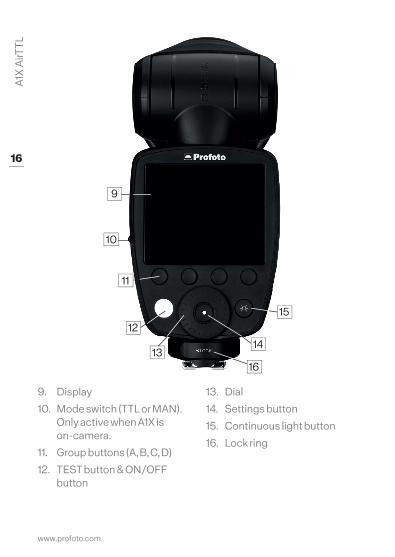
9. Display
10. Mode switch (TTL or MAN). Only active when A1X is on-camera.
11. Group buttons (A, B, C, D)
12. TEST button & ON/OFF button
13. Dial
14. Settings button
15. Continuous light button
16. Lock ring
A1X
AirT
TL
17
www.profoto.com
17
18
2022
24
19
21
23
25
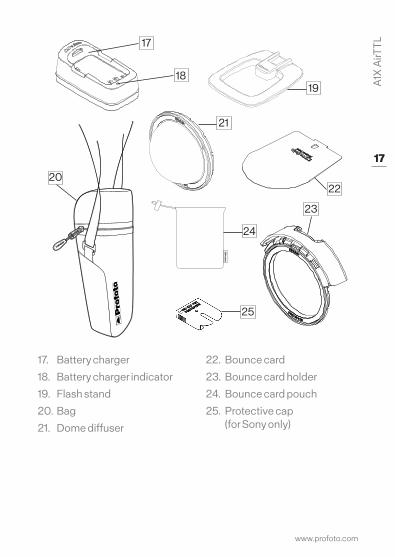
17. Battery charger
18. Battery charger indicator
19. Flash stand
20. Bag
21. Dome diffuser
22. Bounce card
23. Bounce card holder
24. Bounce card pouch
25. Protective cap (for Sony only)

A1X
AirT
TL
18
www.profoto.com
Getting startedBattery chargingFor optimal performance, the battery should be fully charged prior to usage. The battery can be charged from any charge level. For increased life-time, do not leave the battery uncharged for a long time.
Charge the battery:1. Push the battery release button [5] and remove the battery from
the flash. This can be done while the A1X is mounted on the camera.
2. Connect the battery to battery charger [17]
3. Connect the battery charger to mains power.
4. Check that the charge indicator [18] is continuously orange, indicating that charging is in progress.
5. When the charging is completed, the charge indicator [18] is green.
Note:If the battery is deeply discharged, the charging time can be longer than specified in section Technical data.Battery blinking orange indicates battery error. Contact your local Profoto dealer for support.
The charger mains cable and plug serve as the disconnect device from mains power. When charging is done, always disconnect the charger from the mains outlet by pulling the plug, not the cable.
The socket outlet should be in close proximity to the equipment and should be easily accessible.

A1X
AirT
TL
19
www.profoto.com
Attach battery to flashConnect the bottom part of the battery to the flash and then press it in place until you hear a ”click”.
Attach light shaping toolsThe dedicated light shaping tools are easy and quick to attach. Just snap them in place in front of the flash lens until you hear a ”click”. To remove them, just pull them off.
A1X
AirT
TL
20
www.profoto.com
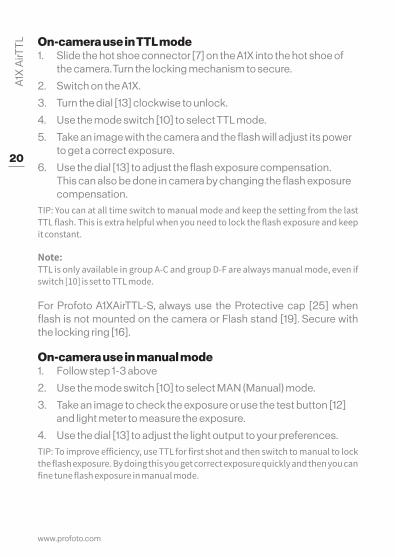
On-camera use in TTL mode1. Slide the hot shoe connector [7] on the A1X into the hot shoe of
the camera. Turn the locking mechanism to secure.
2. Switch on the A1X.
3. Turn the dial [13] clockwise to unlock.
4. Use the mode switch [10] to select TTL mode.
5. Take an image with the camera and the flash will adjust its power to get a correct exposure.
6. Use the dial [13] to adjust the flash exposure compensation. This can also be done in camera by changing the flash exposure compensation.
TIP: You can at all time switch to manual mode and keep the setting from the last TTL flash. This is extra helpful when you need to lock the flash exposure and keep it constant.
Note:TTL is only available in group A-C and group D-F are always manual mode, even if switch [10] is set to TTL mode.
For Profoto A1XAirTTL-S, always use the Protective cap [25] when flash is not mounted on the camera or Flash stand [19]. Secure with the locking ring [16].
On-camera use in manual mode1. Follow step 1-3 above
2. Use the mode switch [10] to select MAN (Manual) mode.
3. Take an image to check the exposure or use the test button [12] and light meter to measure the exposure.
4. Use the dial [13] to adjust the light output to your preferences.
TIP: To improve efficiency, use TTL for first shot and then switch to manual to lock the flash exposure. By doing this you get correct exposure quickly and then you can fine tune flash exposure in manual mode.

A1X
AirT
TL
21
www.profoto.com
Off-camera useThis describes how to operate an A1X unit off-camera and with an A1X unit on camera as transmitting unit. When A1X is used off-camera together with an Air Remote on camera, please see instruction manual for Air Remote how to adjust the flash from on-camera position. 1. Switch on the A1X.
2. Turn the dial [13] clockwise to unlock.
3. Turn on Air and select the same radio channel on the A1X unit as on the transmitting unit on the camera.
4. Select a group for the A1X flash.
5. Take an image to check the exposure or use the test button [12] and light meter to measure the exposure in manual mode.
6. Adjust overall flash exposure compensation with dial [13] or in camera menu.
7. To adjust an individual light, select the group on the group buttons [11] you like to adjust on the transmitting unit and adjust energy by rotating the dial [13]. This can both be done in TTL- and manual mode.
8. In manual mode, the energy setting can also be done on each unit individually.
Note:When A1X is used as off-camera unit, the TTL/MAN switch [10] will be overridden. The switch is only valid for triggering an A1X mounted on the camera.

A1X
AirT
TL
22
www.profoto.com
OperationMounted in the camera hot shoe, the A1X unit acts both as an on-camera flash and as a wireless extension of your camera to your Profoto off-camera flashes, combining TTL (Through-The-Lens) exposure control with the option to manually adjust and sync your Profoto flashes.
Power on/off• Push the ON/OFF button [12] to switch on the A1X.
• Push and hold the ON/OFF button [12] to switch off the A1X.
When the A1X is switched off, the current settings (except for TTL) are stored and will apply when the unit is switched on again.
To save battery, the A1X automatically enters standby mode after a period of inactivity (selectable via the standby setting) and switches off completely after 90 minutes. These functions can be deactivated via the standby setting.
In this automatically entered standby mode, the display [9] and test button [12] are switched off. To return to operational mode, push any of the A1X buttons or use the camera.
Note:When the standby and auto power off functions are deactivated, the battery will drain in approx. 8 hours of inactive use.
Mode selection (TTL or Manual)Use the mode switch [10] to select TTL or or MAN mode. The mode switch is only active for the on-camera unit. When the A1X is used off-camera, the function of the switch is disabled and the on-camera unit will dictate to all off-camera units if TTL or manual mode is used.• TTL mode: The camera dictates the light output of the flashes.
The relation between the energy levels for group A-C and flash exposure compensation can be set up from the A1X.
• MAN mode: The light output for group A, B, C and D can be controlled manually from the A1X.
Note:By pressing a group twice all groups will be selected and highlighted. All settings done will now apply to all groups A, B, C, D, E and F.

A1X
AirT
TL
23
www.profoto.com
Energy scaleThe A1X unit has a relative f-stop scale to indicate the energy level. Full energy, 100% is always shown as 10. Decreasing 1-fstop means reducing the energy to half, hence energy 9.0 is 50% of total energy.
Energy can be adjusted in 0.1 f-stop increments.
Operation in TTL mode (Automatic mode) Adjustment of energy level relationsIn TTL mode the camera dictates the light output of the flashes. If more than one light is used the relationship between the energy levels of group A, B and C can be adjusted. This can, for example, be used to achieve more light on one side of the object.1. Press the A, B or C group button [11] to select the corresponding
group.
2. When a group is selected, do one or more of the following:
• Use the dial [13] to set the relative light output for the selected group, in relation to the other groups. The relations can be set to +/- 2 f-stops for each group A, B or C.
• Press button [15] to turn on/off the continuous light in the selected group.
• Press and hold the group button [11] to turn on/off the lamp heads in the selected group.
• The display automatically returns to the main menu after a few seconds.
Note:If flashes without Profoto AirTTL support are used in combination with Profoto AirTTL flashes in TTL mode, the flash outputs of the non-TTL flashes are added to the total flash exposure. Such flashes can for instance be used to manually set the exposure on the background.
If a Profoto AirTTL compatible flash is set to group D, E or F, it will be synchronized but not part of the TTL calculation. The flash outputs of these flashes are added to the total flash exposure and can for instance be used to manually set the exposure on the background.

A1X
AirT
TL
24
www.profoto.com
Flash exposure compensationAs an alternative to the flash exposure compensation function in the camera, the A1X can be used to compensate the total flash exposure when in TTL mode.
Use the dial [13] to adjust the flash exposure compensation ±3.0 f-stops. In TTL mode the energy will be set automatically for each flash. The value will be shown in the display.
The energy relation between the groups is shown adjacent each group.
Note! In TTL mode the numbers only show the relation between the groups. The absolute flash exposure is set by the flash exposure compensation, either in the flash or in the camera.

A1X
AirT
TL
25
www.profoto.com
Operation in MAN mode (Manual mode)With the A1X set to MAN mode, the light output for the groups A, B, C, and D can be adjusted manually. • Select group(s) by doing one of the following:
• Press the A, B, C, or D group button [11] to select the corresponding group.
• To select all groups, press one of the group buttons [11] twice. When all groups are selected, the A1X will also control the lights in group E and F (selected on the flash).
• When a group is selected, do one or more of the following:• Use the dial [13] to adjust the light output for the group.
The adjustment always starts from the current light output setting (displayed as 0.0 above the group indicator) and the adjustment value (e.g. +1.2) is momentarily shown above the group indicator.
• Press button [15] to turn on/off the continuous light in the selected group.
• Press and hold the group button [11] to turn on/off the flashes in the selected group.
• The display automatically returns to the main menu after a few seconds.
Note:If a light output cannot be set by the flash because it is outside its energy range, the A1X beeps to signal that the command was not executed. The light output of all flashes in the selected group then remains unchanged.
Continuous lightTo turn on the continuous light on A1X, press button [15].
To turn on continuous light on a specific group, first select a group and then press button [15].
When the A1X continuous light is on, a white dot is displayed to the right on the display and/or on the different groups.

A1X
AirT
TL
26
www.profoto.com
Activate/deactivate flash head The flash head can be deactivated without turning off the power of the A1X unit. This is used when the A1X should work as a remote control for off-camera flashes but no flash itself.
Press and hold the Continuous light button [15] to turn on/off the A1X lamp head.
Note:The A1X flash head can also be activated/deactivated in the settings menu.
Manual zoomThe beam angle from the flash can be adjusted at any time to match your preferences. You can for example narrow the light to highlight part of the image.
Rotate the Zoom ring [2] on the flash head clockwise or counter clockwise to change the beam angle.
Zoom ring
A1X
AirT
TL
27
www.profoto.com
Test syncTo test the flash or take meter readings with a light meter the test button will fire a flash on the A1X unit. If Air is activated it will also fire test flashes on all flashes on the selected channel.
Press the test button [12] to manually transmit a sync signal and fire the flash.
Using the flash off-cameraThe A1X unit is easy to use also as an off-camera flash unit as it has a built in radio transceiver (AirTTL). The transmitting unit in the camera hot shoe can be either an A1X unit or an Air Remote.1. On the transmitting unit in the camera hot shoe, enable Air and
set channel.
2. On the off-camera unit, enable Air and set channel to the same as on the transmitting unit.
Change settingsAll settings are easily accessed in the settings menu.
For detailed information about the different settings, see the sub-sequent sections.1. Push the settings button [14] to display the settings menu.
2. Turn the dial [13] to select (highlight) a setting.
3. Press the settings button [14] to display the options menu for the selected setting.
4. Turn the dial [13] to change the setting option.
5. Press the settings button [14] to choose option and return to the settings menu.
6. Select the left arrow at the top of the settings menu to return to the main menu, or press any other button.

A1X
AirT
TL
28
www.profoto.com
Continuous lightThe continuous light is a constant light source positioned in the flash head. The angle of the light (light spread) will follow the zoom setting on the flash. Use the continuous light to analyze shadows or as a help to position your subject in relation to the flash.
The setting is used to select how the A1X continuous light intensity should correspond with the flash light output.
There are four setting options:
• MIN: The lamp gets the half intensity, regardless of the selected energy level (light output).
• MAX: The lamp gets the maximum intensity, regardless of the selected energy level (light output).
• PROP: The light intensity is automatically adjusted to be proportional to the selected light output (energy level).
• FLICKER FREE: The lamp gets the maximum intensity regardless of zoom setting.
Ready SignalReady signaling is used to indicate when the A1X flash is fully recycled.
There are four ready signaling options: • BEEP: The unit beeps when it is ready to flash again after
recharging. This option will also enable key sound.
• DIM: The continuous light turns off after flashing and turns on when the unit is ready to flash again.
• BEEP DIM: The continuous light turns off after flashing. The light turns on and the unit beeps when it is ready to flash again.
• OFF: No ready signal.
The test button light [12] always comes off after flashing and comes on again when the A1X flash is fully recycled.
A1X
AirT
TL
29
www.profoto.com
Control SoundsThe setting can be ON or OFF to enable/disable tactile sounds for Dial and buttons.
Sync For the Canon and Nikon variants there are three sync options:• 1ST: The flashes fire when the first shutter curtain is fully open.
• 2ND: The flashes fire just before the second curtain starts traveling.
• X-SYNC: Maximizes frame rates per second in continuous shooting. Except for the sync signal, all communication between the flash and the camera is disabled. This means that the flash only operates in manual mode.
The sync setting compatibility varies depending on the camera model. Refer to the camera’s user guide for compatibility and how to change the sync settings.• Canon: You can select the sync setting both in the camera and on
the flash unit. The selected sync setting (1st and 2nd) is shown in the top of the display [9].
• Nikon: The sync settings can only be made in the camera. The selected sync setting (1st and 2nd) is shown in the top of the display [9]
• Sony: The sync settings (1st and 2nd) can only be made in the camera, if supported. X-sync is not available. There is no sync menu in the A1X unit.
The A1X for Canon and for Nikon can be used on other camera brands in X-sync mode, if the camera has a hot shoe with a centrally positioned sync contact. This is standard for most cameras today. In X-sync mode, the camera is a fully manual flash without TTL or Hi-S compatibility. Other A1X functions controlled from the camera are also disabled.

A1X
AirT
TL
30
www.profoto.com
Hi-S BoostHi-S enables shooting with flash at a faster shutter speed than the fastest external flash sync speed (X-sync) of the camera, all the way down to 1/8000s (may differ between camera models). This option can be extremely useful to limit the influence of ambient light when shooting in bright conditions.
• ON: Uses full capacity of the A1X in Hi-S. May give a more uneven light.
• OFF: Lowers the maximum light output in Hi-S.
Hi-S is controlled by the camera’s shutter speed. The A1X unit will automatically switch to Hi-S when the camera demands it.
Air GroupThe group setting (A-F) applies to the A1X flash.
The selected group is shown in the top of the display [9].
Air ChannelThe air channel setting applies to the A1X control unit and the A1X flash.
The selected channel is shown in the top of the display [9].
AirThe Air setting is used to activate/deactivate the built-in Profoto Air transceiver.• ON: The A1X can be used to trigger and/or control Profoto Air
flash units and generators, including the A1X flash.
• OFF: The A1X can only be used to control the A1X flash, and can’t be controlled from other remotes or flashe.
HeadThe head setting is used to activate/deactivate the A1X flash head. By doing this the flash will not fire when it receives a sync signal. This function works both on -and off-camera.

A1X
AirT
TL
31
www.profoto.com
BacklightThe backlight of the display [9] has an impact on the battery time.
There are three backlight options:• MIN
• MEDIUM
• MAX
StandbyThere are three standby options:• 2 MIN: Standby mode is entered after 2 minutes of inactivity.
• 30 MIN: Standby mode is entered after 30 minutes of inactivity.
• OFF: Standby mode is disabled. This setting also disables the auto power off function.
If the Standby timer is active, there is a corresponding Auto Power Off timer set to 90 minutes.
ZoomThe zoom (beam angle) setting applies to the A1X flash.
The following zoom options are available:• MANUAL: The beam angle is adjusted manually, by turning the
zoom ring [2].
• AUTO: The beam angle of the A1X flash light will automatically follow the zooming on the camera.
• The beam angle of the A1X flash can be set to different beam angles, from wide to narrow.
NoteIf a light shaping tool is attached to A1X, the beam angle will be different

A1X
AirT
TL
32
www.profoto.com
AF assistThe AF (autofocus) assist setting activates or deactivates the AF assist. The AF assist light works with a structured laser light which is harmless to the eyes.• OFF: Deactivates the AF assist
• AUTO: The camera activates the AF assist automatically when needed
• ON: Activates the AF assist so that it is always on.
AboutDisplays hardware variant and current firmware installed on A1X. Reset button will set A1X to factory default settings.
A1X
AirT
TL
33
www.profoto.com
General notes on Profoto Air operationThe Profoto Air channels use specific frequencies in the 2.4 GHz band and have an operating range of up to 300 meters (1000ft). The frequencies are evenly distributed over the entire frequency band. Since each channel uses a different radio frequency, it is possible to select a channel without interference from other photographers using Profoto Air, WLAN/Bluetooth devices, or other radio equipment operating on the 2.4 GHz frequency band.• Maintain line of sight between Profoto Air units whenever
possible.
• When hiding the flash from view, try to not hide it behind or against metal or water-filled objects as this will affect the radio range.

A1X
AirT
TL
34
www.profoto.com

A1X
AirT
TL
35
www.profoto.com
Light shapingThe A1X flash creates a round and even light spread in all zoom positions. In addition, there are specially designed light shaping tools for the A1X that can modify the light quality in various ways.
When A1X is used on camera it can automatically follow the zoom setting on the lens. For creative freedom the beam angle can also be set manually, either in the menu or by rotating the zoom ring [2]. When the zoom ring [2] is used the beam angle setting will automatically go to manual mode. The current beam angle setting is shown in the top of the display [9].
The zoom setting on the flash corresponds approximately to the following focal length coverage for a 35mm camera.
Beam angle setting Focal length coverage
A1X without accessories
105 mm
80 mm
60 mm
45 mm
32 mm

A1X
AirT
TL
36
www.profoto.com
Dome DiffuserThe Dome Diffuser attaches to the A1X unit with the built in magnetic mount. The light quality will be diffused and spread omni directional.
Note:The Dome Diffuser can also be stacked together with other light shaping tools. For example the optional Gel can be used in combination with the Dome Diffuser.

A1X
AirT
TL
37
www.profoto.com
Bounce CardThe Bounce Card attaches in the same way as the Dome Diffuser with a magnetic mount. The application is similar to the Dome Diffuser but will provide a more directional light quality.
To attach the Bounce Card to its holder, squeeze the sides of the Bounce card slightly and then push it firmly into the holder until the card locks in place.
In most cases the flash is directed against a bouncing surface and the bounce card is directed against the subject.
Note:The Bounce Card can also be stacked together with other light shaping tools. For example the optional gel can be used in combination with the Bounce Card.

A1X
AirT
TL
38
www.profoto.com

A1X
AirT
TL
39
www.profoto.com
Additional functionsFirmware upgradeWe recommend that you look for firmware upgrades before you start using your new A1X.
To access the latest free upgrades; create your personal account on profoto.com/myprofoto. Once you have an account you can also choose to register your products and be sure you get noticed when new upgrades are released.
Upgrade of firmware is made via the USB port [8] on the A1X, following the instructions provided in the upgrade application downloaded from profoto.com/myprofoto. You can always contact your local dealer or distributor for professional service.
Check current firmware version: 1. Switch on the A1X.
2. Push settings button [14] and then to second page in the menu.
3. Select ABOUT by pressing settings button [14]
Factory resetTo reset all settings to default:1. Switch on the A1X.
2. Push settings button [14] and then to second page in the menu.
3. Select VERSION by pressing settings button [14]
4. Push the rightmost group button [11] to select RESET.

A1X
AirT
TL
40
www.profoto.com
Profoto Air compatibility • The Profoto A1X AirTTL-C is specifically designed for Canon
cameras that use Canon’s E-TTL II metering system.
• The Profoto A1X AirTTL-N is specifically designed for Nikon cameras that use Nikon’s i-TTL metering system.
• The Profoto A1X AirTTL-S is specifically designed for Sony cameras that use Sony’s TTL metering system.
• Some camera models may not be supported or have limited functionality. Check profoto.com for the latest information on camera support.
• The Profoto A1X AirTTL operates with Profoto flash units and generators, with built-in Profoto Air functionality according to the table below.
• The Profoto A1X AirTTL can also be used to trigger the Air Remote and Air Sync Profoto Air transceivers.
• The Profoto A1X AirTTL flash can also be triggered and controlled by other Profoto Air transceivers.
• The Profoto A1X AirTTL-C is not compatible with Canon Speedlites or other non-Profoto flashes.
• The Profoto A1X AirTTL-N is not compatible with Nikon Speedlights or other non-Profoto flashes.
• The Profoto A1X AirTTL-S is not compatible with Sony Speedlites or other non-Profoto flashes.
• The Profoto A1X AirTTL is not compatible with any 3rd party radio triggering systems.
Air labeling on Profoto flash
Enabled features on Profoto A1X AirTTL
Manual sync Remote control TTL HSS
AirTTL X X X X
Air X X
AirS X

A1X
AirT
TL
41
www.profoto.com
Technical dataSpecifications
Frequency band 2.4GHz (2404 to 2479.3 MHz)
No of frequency channels 20 (1-20)
Radio Power Output Maximum 19.9 dBm1
No of groups per channel TTL operation: 3 (A-C) Manual operation: 6 (A-F)
Operation modes TTL, Manual
Camera TTL compatibility A1X AirTTL-C - Canon E-TTL IIA1X AirTTL-N - Nikon i-TTLA1X AirTTL-S - Sony TTL
Sync modes 1st curtain, 2nd curtain, Hi-S (HSS/ Auto FP), X-Sync
Camera mount/Connectors Hot shoe mount for Canon/Nikon/Sony
USB micro-B connector for firm-ware upgrades
Range Up to 300 m (1000 ft.) for normal triggering (free line of sight in open space)2
Up to 100 m (330 ft.) for remote control and TTL
Flash energy 76Ws
Flash energy range 9 f-stops (2-10)
Flash recycling time 0.05 – 1.0 seconds
Flash duration 1/20,000 - 1/800
1. Output power varies with setting in the A1X.2. Actual range will vary due to site layout, surrounding materials and other
radio transmissions.
A1X
AirT
TL
42
www.profoto.com
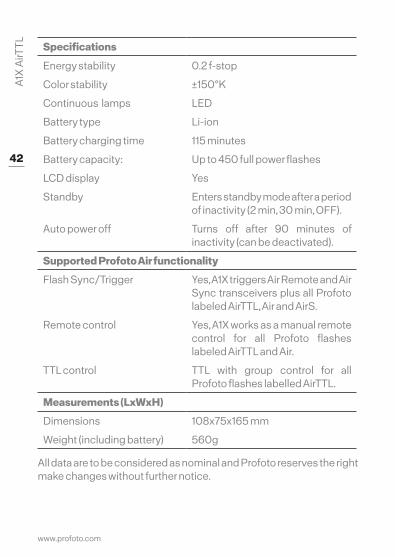
Specifications
Energy stability 0.2 f-stop
Color stability ±150°K
Continuous lamps LED
Battery type Li-ion
Battery charging time 115 minutes
Battery capacity: Up to 450 full power flashes
LCD display Yes
Standby Enters standby mode after a period of inactivity (2 min, 30 min, OFF).
Auto power off Turns off after 90 minutes of inactivity (can be deactivated).
Supported Profoto Air functionality
Flash Sync/Trigger Yes, A1X triggers Air Remote and Air Sync transceivers plus all Profoto labeled AirTTL, Air and AirS.
Remote control Yes, A1X works as a manual remote control for all Profoto flashes labeled AirTTL and Air.
TTL control TTL with group control for all Profoto flashes labelled AirTTL.
Measurements (LxWxH)
Dimensions 108x75x165 mm
Weight (including battery) 560g
All data are to be considered as nominal and Profoto reserves the right make changes without further notice.

A1X
AirT
TL
43
www.profoto.com
WarrantyAll Profoto generators and heads are individually tested before they leave the company and guaranteed for a period of two years (local deviations may apply) with the exception of flash tubes, glass covers, Continuous light/modeling lamps and cables. Profoto is not responsible for technical malfunctions created by improper use or accessories made by other companies. If you have any technical problems please get in contact with an authorized Profoto service station.

A1X
AirT
TL
44
www.profoto.com
Regulatory informationWorld-wide Usage of Radio SpectrumThe Profoto Air system operates on the license-free 2.4GHz ISM band for SRD (Short Range Devices). This band may be used in most parts of the world. Regional restrictions may apply.
Note:Refer to national regulations for the region where the Profoto A1X AirTTL shall be operated and make sure that they are followed.
EU Declaration of ConformityHereby, Profoto AB declares that the radio equipment type Profoto A1X AirTTL is in compliance with Directive 2014/53/EU.
The full text of the EU declaration of conformity is available at the following internet address: http://media.profoto.com/DoC
RF PowerIn order to remain compliant with national regulations and restrictions, please use the following RF POWER settings while operating your A1X in these countries. Please note that these are subject to change and you may find updated information available for download at Profoto.com
COUNTRY CHANNEL RF POWER
USA/Canada CH 1 - 7, 9-20 P1
USA/Canada CH 8 P4
EU (and EES) CH1-20 P1
South Korea CH1-20 P5
China, Taiwan CH1-20 P3
To enter the RF SETTING menu, go to SETTINGS, hold down the B button, and tap the C button.

A1X
AirT
TL
45
www.profoto.com
Unites States and CanadaF.C.C. and Industry CanadaCompliance Statement (Part 15.19) This device complies with Part 15 of FCC rules and RSS-210 of Industry Canada. Operation is subject to the following two conditions: 1. this device may not cause harmful interference and,
2. this device must accept any interference received, including interference that may cause undesired operation.
Warning (Part 15.21) Changes or modifications not expressly approved by the party responsible for compliance could void the user’s authority to operate the equipment.
FCC Radio Frequency ExposureWARNING: The Profoto A1X device radiates radio frequency energy at a level below the United States FCC radio frequency exposure limits. Nevertheless, this device should be used in such a manner that the potential for human contact during normal operation is minimized. For hand held operation, this device has been tested and meets FCC RF exposure guidelines when the device is positioned a minimum of 1.0 cm from the body. For on camera mounted operation, this device has been tested and meets FCC RF exposure guidelines when the device is positioned a minimum of 2.0 cm from the head.
Ce dispositif est conforme aux normes RSS-210 d’Industrie Canada. L’utilisation de ce dispositif est autorisée seulement aux conditions suivantes :1. il ne doit pas produire de brouillage et
2. l’utilisateur du dispositif doit être prêt à accepter tout brouillage radioélectrique reçu, même si ce brouillage est susceptible de compromettre le fonctionnement du dispositif.
The term ‘IC’ before the certification/registration number only signifies that the Industry Canada technical specifications were met.
Les lettres ‘IC’ n’ont aucune autre signification ni aucun autre but que d’identifier ce qui suit comme le numéro de certification/d’enregistrement d’Industrie Canada.

A1X
AirT
TL
46
www.profoto.com
IC RF Exposure limitsThe Profoto A1X device complies with the IC RSS-102 radiation exposure limits set forth for an uncontrolled environment. For hand held operation, this device has been tested and meets IC RF exposure limits when the device is positioned a minimum of 1.0 cm from the body. For on camera mounted operation, this device has been tested and meets IC RF exposure limits when the device is position a minimum of 2.0 cm from the head.
Limites d’exposition RF ICLe dispositif Profoto A1X est conforme aux limites sur l’exposition aux rayonnements IC RSS-102 définies pour un environnement non contrôlé. En mode manuel, ce dispositif a été testé et respecte les limites d’exposition IC RF lorsque ce dernier est placé à au moins 1 cm du corps. Pour un fonctionnement sur caméra, ce dispositif a été testé et respecte les limites d’exposition RF IC lorsque ce dernier est positionné à au moins 2 cm de la tête
Profoto AB Transmitter / Receiver MODEL: Profoto A1AirTTL and Profoto A1XAirTTLPRODUCT NO: PCA5501-0000, PCA5502-0000, PCA5506-0000, PCA1382-0000 and PCA1381-0000
FCC ID: W4G-RMI6IC: 8167A-RMI6Product of Sweden

A1X
AirT
TL
47
www.profoto.com
JapanThe module has been granted modular approval for sale and operation in Japan.
特定無線設備の種類
Classification of specified radio equipment:
Article 2, Clause 1, Item 19
2.4 GHz Wide Band Low Power Data Communication
上記のとおり、電波法第 38条の 24第 1項の規定に基づく認証を行ったも のであることを証する。
This is to certify that the above-mentioned certification by type has been granted in accordance with the provisions of Article 38-24, Paragraph 1 of the Radio Law.
R202-LSF011
A1X
AirT
TL
48
www.profoto.com
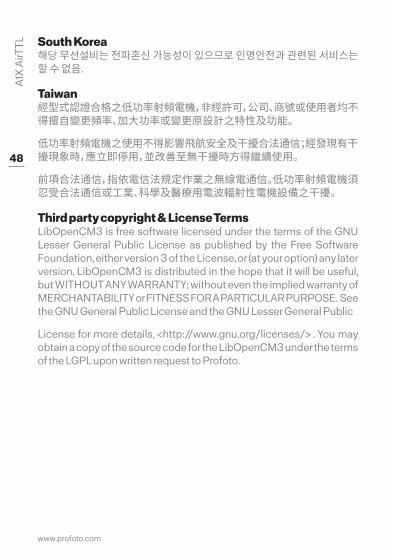
South Korea해당 무선설비는 전파혼신 가능성이 있으므로 인명안전과 관련된 서비스는 할 수 없음.
Taiwan經型式認證合格之低功率射頻電機,非經許可,公司、商號或使用者均不得擅自變更頻率、加大功率或變更原設計之特性及功能。
低功率射頻電機之使用不得影響飛航安全及干擾合法通信;經發現有干擾現象時,應立即停用,並改善至無干擾時方得繼續使用。
前項合法通信,指依電信法規定作業之無線電通信。低功率射頻電機須忍受合法通信或工業、科學及醫療用電波輻射性電機設備之干擾。
Third party copyright & License TermsLibOpenCM3 is free software licensed under the terms of the GNU Lesser General Public License as published by the Free Software Foundation, either version 3 of the License, or (at your option) any later version. LibOpenCM3 is distributed in the hope that it will be useful, but WITHOUT ANY WARRANTY; without even the implied warranty of MERCHANTABILITY or FITNESS FOR A PARTICULAR PURPOSE. See the GNU General Public License and the GNU Lesser General Public
License for more details, <http://www.gnu.org/licenses/> . You may obtain a copy of the source code for the LibOpenCM3 under the terms of the LGPL upon written request to Profoto.

A1X
AirT
TL
49
www.profoto.com
Dec
emb
er 2
018
.
Tech
nica
l dat
a an
d p
rod
uct i
nfo
rmat
ion
are
sub
ject
to c
hang
e w
itho
ut n
otic
e.
Profoto ABSweden
+46 (0) 8 447 53 [email protected]