Embed Size (px)
Citation preview
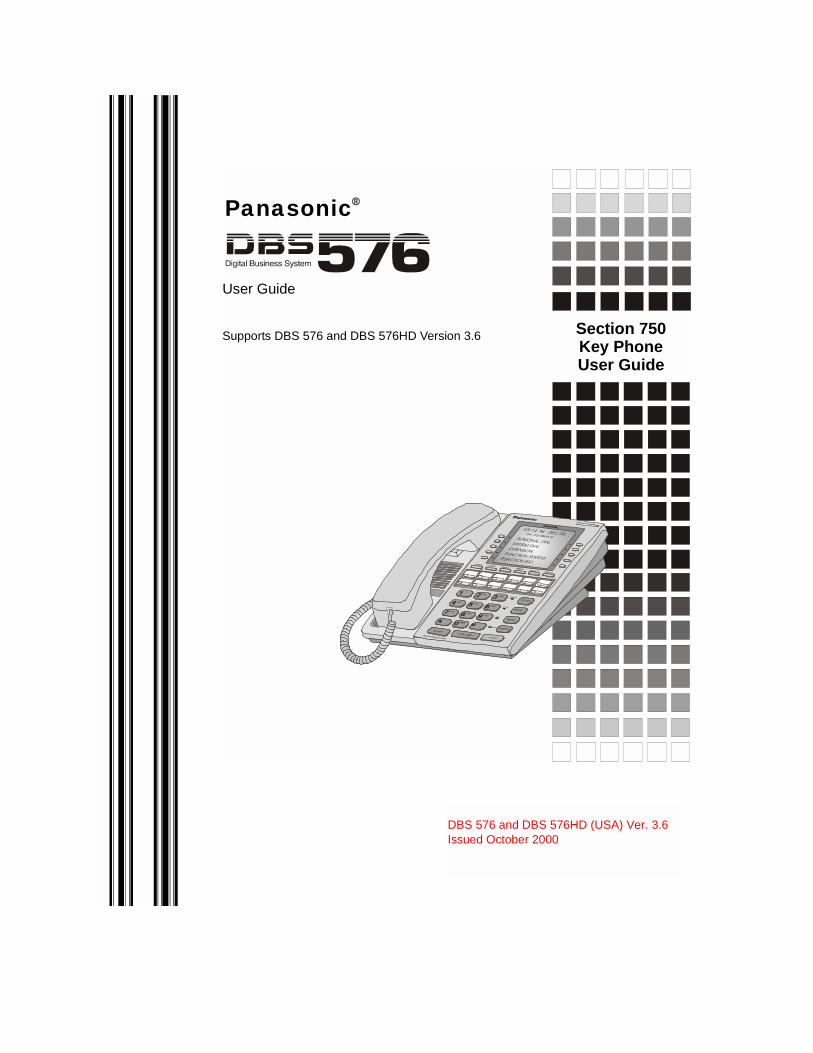
Section 750Key PhoneUser Guide
Panasonic
aUser Guide
Supports DBS 576 and DBS 576HD Version 3.6
DBS 576 and DBS 576HD (USA) Ver. 3.6Issued October 2000
2
The contents of this manual are subject to change without notice and do not constitute a commitment on the part of Panasonic Telecommunication Systems Company (PTSC). Every effort has been made to ensure the accuracy of this document. However, due to ongoing product improvements and revisions, Panasonic cannot guarantee the accuracy of printed material after the date of publication nor can it accept responsibility for errors or omissions. Panasonic will update and revise this document as needed.
The software and hardware described in this document may be used or copied only in accordance with the terms of the license pertaining to said software or hardware.
Reproduction, publication, or duplication of this manual, or any part thereof, in any manner, mechanically electronically, or photographically is prohibited without permission of the Panasonic Telecommunication Systems Company (PTSC).
© Copyright 2000 by Panasonic Telecommunication Systems Company (PTSC).
All rights reserved.
CONTENTS
Preface.............................................................................. 7How to Use This Manual .......................................................... 7What This Manual Contains ..................................................... 7Notation Used ........................................................................... 8For More Information ............................................................... 8
Understanding Your Phone ............................................ 9Non-Display Phones ................................................................. 9Small-Display Phones ............................................................... 11
Changing the Default Display............................................... 13Understanding Display Information...................................... 13Using Variable Mode ............................................................ 14
Large-Display Phones ............................................................... 15Changing the Default Display............................................... 17Understanding Display Information...................................... 18
Setting Up Your Phone.................................................... 21Adjusting Volume and Display Settings................................... 21Setting Up Flexible Function Keys........................................... 22Setting Up One-touch Keys ...................................................... 23Setting Up Speed Dialing.......................................................... 25
Assigning and Deleting PSD Numbers ................................. 25Assigning SSD Numbers ...................................................... 28Linking System Speed Dial Numbers ................................... 28Assigning and Deleting Names for PSD Numbers ............... 29
Setting User Maintenance Functions ........................................ 33About User Programming ..................................................... 34To Enter User Maintenance Mode: ....................................... 35
Placing Outside Calls ...................................................... 49Accessing an Outside Line........................................................ 49Using Account Codes ............................................................... 50
Non-verified Account Codes ................................................ 50Verified Account Codes........................................................ 51
Redialing Outside Numbers ...................................................... 51 Using Speed Dialing ................................................................ 52
Dialing Speed Dial Numbers ............................................... 52Checking Speed Dial Numbers ............................................. 54
3
Handling Incoming Calls................................................. 57Answering Calls........................................................................ 57Using Call Hold ........................................................................ 58Transferring Calls ..................................................................... 59
Supervised Transfers............................................................. 59Unsupervised Transfers......................................................... 60
Using Call Pickup ..................................................................... 61Extension Group Pickup ....................................................... 61Extension Direct Pickup........................................................ 62Trunk Group Pickup.............................................................. 62Trunk Direct Pickup.............................................................. 62
Using Call Park ......................................................................... 63 Communicating Within Your Office ............................... 65
Calling Other Extensions .......................................................... 65Switching Between Tone and Voice Calling ........................ 66
Using Paging ............................................................................. 67Answering a Page (Meet-Me Answer).................................. 67
Answering a Page with Universal Night Answer ..................... 68Making Announcements to Busy Extensions ........................... 68
Answering an Announcement............................................... 69Transferring Calls with an Announcement ........................... 69
Using Call Forwarding.............................................................. 69Using Camp-on (Call Waiting) ................................................. 72Using Message Waiting/Callback............................................. 74Using Do-Not-Disturb .............................................................. 75Using Absence Messages.......................................................... 76Locking Your Extension ........................................................... 78
Using Additional Features .............................................. 81Using the Mute Key .................................................................. 81Using Off-Hook Monitor .......................................................... 82Using Handsfree Answerback and Handsfree Operation ......... 82Using Voice Recognition .......................................................... 83Using the Flash Feature ............................................................ 83Making Conference Calls ......................................................... 83Controlling Background Music................................................. 84Using Timed Reminders ........................................................... 85
4

Using Caller ID ......................................................................... 85Caller ID Call Log................................................................. 85Call Log Operation for a Small-display Phones ................... 86Call Log Format for the Large-Display Phone ..................... 87
Walking TRS Class of Service ................................................. 88Using Directory Numbers ......................................................... 89Using Zip Mode ........................................................................ 92Room Monitoring...................................................................... 92Silent monitor............................................................................ 93
5

6
PREFACEThe Key Telephone User Guide is for anyone who uses a Panasonic 44-Series digital telephone in conjunction with the Panasonic DBS 576. The DBS 576 and DBS 576HD are telephone systems that provides you with a powerful set of features for handling calls.
This manual provides an overview of the following digital phones and offers detailed information about using the features provided by the DBS 576 and DBS 576HD:
• VB-44210 - 16 key standard phone• VB-44220 - 22 key standard phone• VB-44223 - 22 key small-display speakerphone• VB-44224 - 22 key small-display speakerphone (voice recognition compatible)• VB-44225 - 22 key large-display speakerphone• VB-44230 - 34 key standard phone• VB-44233 - 34 key small-display speakerphone
HOW TO USE THIS MANUALWe recommend that you read the entire manual before using your digital phone, in order to get a clear idea of its capabilities.
WHAT THIS MANUAL CONTAINSThis manual contains the following chapters:
• Chapter 1, “Understanding Your Phone” - Describes features of Panasonic digital telephones.
• Chapter 2, “Setting Up Your Phone” - Provides procedures for setting up telephone features such as Flexible Function (FF) keys.
• Chapter 3, “Placing Outside Calls” - Provides procedures for making outside calls.
• Chapter 4, “Handling Incoming Calls” - Provides several procedures for answering calls.
• Chapter 5, “Communicating Within Your Office” - Provides procedures for handling internal calls.
• Chapter 6, “Using Additional Features” - Provides procedures for using additional features.
• Appendix A, “Dial Code List.” - Provides a list of dial codes used for programming FF keys.
576-36-750 DBS 576 (USA), issued October 2000 7
Preface
• Appendix B, “Customized PSD Bin Numbers.” - Provides a table for documenting or tracking your personalized list of speed dial numbers.
NOTATION USEDThis user guide uses the following conventions:
• References to chapters and sections are enclosed in quotation marks and include the title and page number. For example: “Setting Up Flexible Function Keys” on page 22.
• References to information you are to enter or dial are printed in boldface, mixed-case characters. For example: Enter 73*.
• References to the telephone keypad are printed in bold, uppercase characters. For example: Press the HOLD key.
FOR MORE INFORMATIONFor more information about features available with the Panasonic DBS 576 and DBS 576HD system and digital phones, contact your system administrator or dealer, or refer to the Panasonic publication Section 700: Feature Operation.
8 DBS 576 (USA), issued October 2000 576-36-750
1. UNDERSTANDING YOUR PHONEThe following information in this chapter will familiarize you with your Panasonic digital phone and enable you to effectively use its call-handling features:
• Non-Display Phones (page 9)
• Small-Display Phones (page 11)
• Large-Display Phones (page 15)
• Using Variable Mode (page 14)
• Changing the Default Display (pages 13 and 17)
• Understanding Display Information (pages 13 and 18).
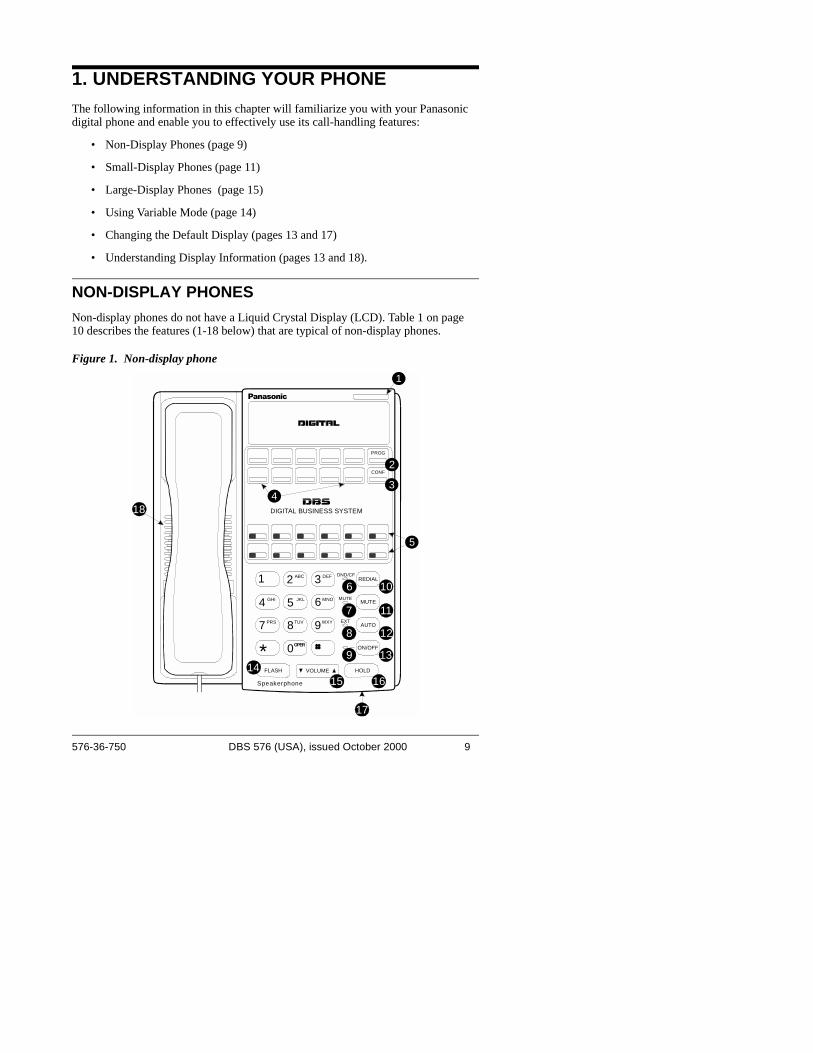
NON-DISPLAY PHONESNon-display phones do not have a Liquid Crystal Display (LCD). Table 1 on page 10 describes the features (1-18 below) that are typical of non-display phones.
Figure 1. Non-display phone1
DND/CFABC
JKL
TUV
OPER
GHI
PRS
DEF
MNO
WXY
MUTE
EXT
REDIAL
PROG
CONF
MUTE
AUTO
ON/OFF
FLASH
Speakerphone
VOLUME HOLD
DIGITAL BUSINESS SYSTEM
1
4
7
*
2
5
8
0
3
6
9
10
5
43
2
11
12
13
18
17
6
7
8
914
15 16
576-36-750 DBS 576 (USA), issued October 2000 9
1. Understanding Your Phone
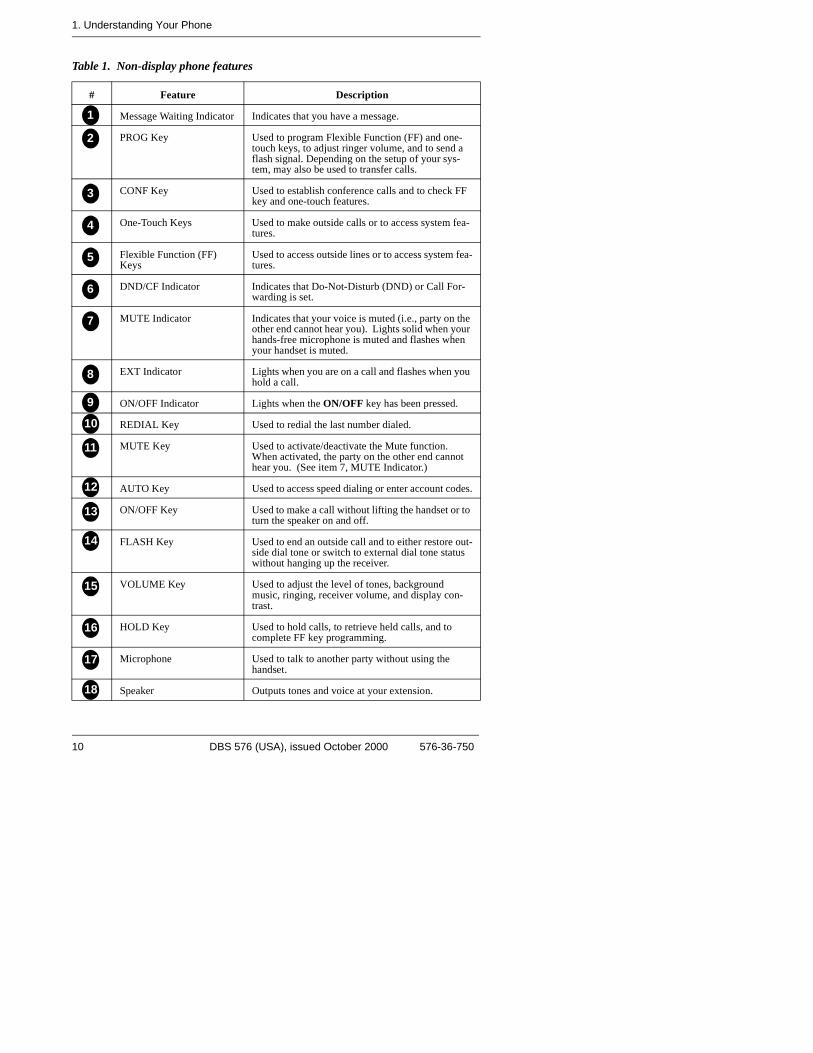
Table 1. Non-display phone features
# Feature Description
Message Waiting Indicator Indicates that you have a message.
PROG Key Used to program Flexible Function (FF) and one-touch keys, to adjust ringer volume, and to send a flash signal. Depending on the setup of your sys-tem, may also be used to transfer calls.
CONF Key Used to establish conference calls and to check FF key and one-touch features.
One-Touch Keys Used to make outside calls or to access system fea-tures.
Flexible Function (FF) Keys
Used to access outside lines or to access system fea-tures.
DND/CF Indicator Indicates that Do-Not-Disturb (DND) or Call For-warding is set.
MUTE Indicator Indicates that your voice is muted (i.e., party on the other end cannot hear you). Lights solid when your hands-free microphone is muted and flashes when your handset is muted.
EXT Indicator Lights when you are on a call and flashes when you hold a call.
ON/OFF Indicator Lights when the ON/OFF key has been pressed.
REDIAL Key Used to redial the last number dialed.
MUTE Key Used to activate/deactivate the Mute function. When activated, the party on the other end cannot hear you. (See item 7, MUTE Indicator.)
AUTO Key Used to access speed dialing or enter account codes.
ON/OFF Key Used to make a call without lifting the handset or to turn the speaker on and off.
FLASH Key Used to end an outside call and to either restore out-side dial tone or switch to external dial tone status without hanging up the receiver.
VOLUME Key Used to adjust the level of tones, background music, ringing, receiver volume, and display con-trast.
HOLD Key Used to hold calls, to retrieve held calls, and to complete FF key programming.
Microphone Used to talk to another party without using the handset.
Speaker Outputs tones and voice at your extension.
1
2
3
4
5
6
7
8
910
11
12
13
14
15
16
17
18
10 DBS 576 (USA), issued October 2000 576-36-750
1. Understanding Your Phone
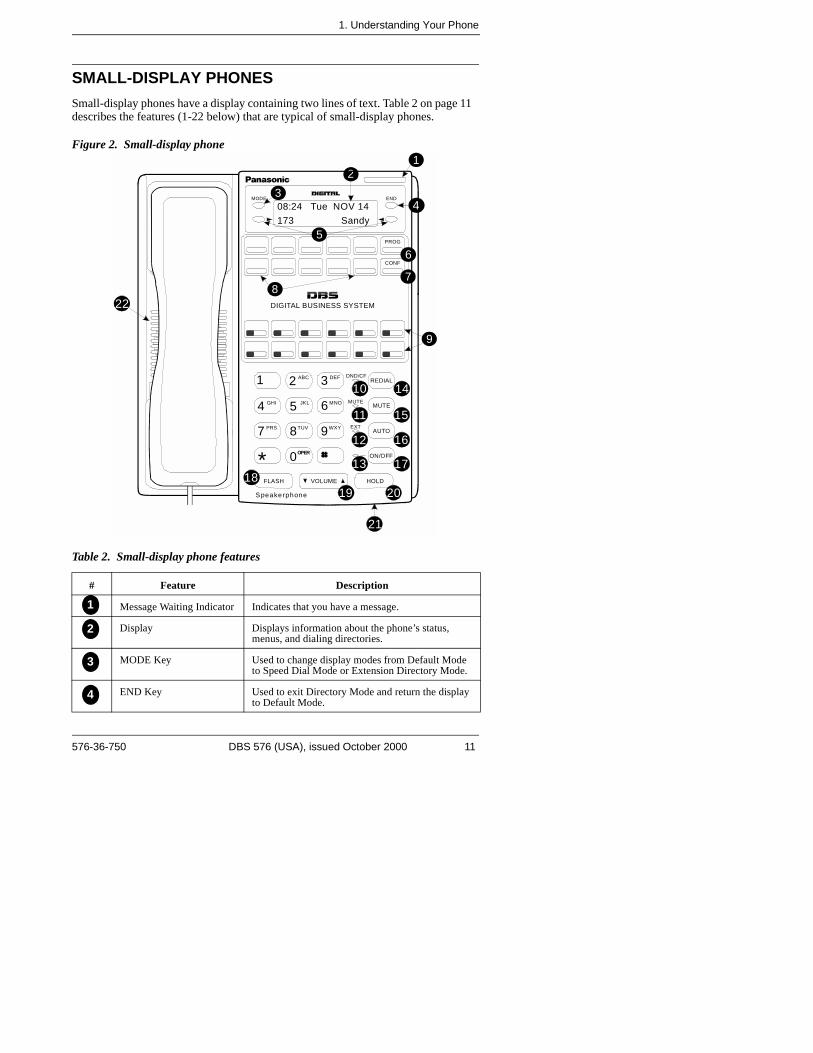
SMALL-DISPLAY PHONESSmall-display phones have a display containing two lines of text. Table 2 on page 11 describes the features (1-22 below) that are typical of small-display phones.
Figure 2. Small-display phone
Table 2. Small-display phone features
# Feature Description
Message Waiting Indicator Indicates that you have a message.
Display Displays information about the phone’s status, menus, and dialing directories.
MODE Key Used to change display modes from Default Mode to Speed Dial Mode or Extension Directory Mode.
END Key Used to exit Directory Mode and return the display to Default Mode.
1
ENDMODE
DND/CFABC
JKL
TUV
OPER
GHI
PRS
DEF
MNO
WXY
MUTE
EXT
REDIAL
PROG
CONF
MUTE
AUTO
ON/OFF
FLASH
Speakerphone
VOLUME HOLD
DIGITAL BUSINESS SYSTEM
1
4
7
*
2
5
8
0
3
6
9
14
9
87
6
5
43
2
15
16
17
22
21
08:24 Tue NOV 14173 Sandy
10
11
12
1318
19 20
1
2
3
4
576-36-750 DBS 576 (USA), issued October 2000 11
1. Understanding Your Phone
Note: * and # keys are used to scroll through SSD’s, PSD’s, and extensions.
Soft Keys Used to select speed dial directories or numbers.
PROG Key Used to program Flexible Function (FF) and one-touch keys, to adjust ringer volume, and to send a flash signal. Depending on the setup of your sys-tem, may also be used to transfer calls.
CONF Key Used to establish conference calls and to check FF key and one-touch features.
One-Touch Keys Used to make outside calls or to access system fea-tures.
Flexible Function (FF) Keys
Used to access outside lines or to access system fea-tures.
DND/CF Indicator Indicates that Do-Not-Disturb (DND) or Call For-warding is set.
MUTE Indicator Indicates that your voice is muted (i.e., party on the other end cannot hear you). Lights solid when your hands-free microphone is muted and flashes when your handset is muted.
EXT Indicator Lights when you are on a call and flashes when you hold a call.
ON/OFF Indicator Lights when the ON/OFF key has been pressed.
REDIAL Key Used to redial the last number dialed.
MUTE Key Used to activate/deactivate the Mute function. When activated, the party on the other end cannot hear you. (See item 11, MUTE Indicator.)
AUTO Key Used to access speed dialing or enter account codes.
ON/OFF Key Used to make a call without lifting the handset or to turn the speaker on and off.
FLASH Key Used to end an outside call and to either restore out-side dial tone or switch to external dial tone status without hanging up the receiver.
VOLUME Key Used to adjust the level of tones, background music, ringing, receiver volume, and display con-trast.
HOLD Key Used to hold calls, to retrieve held calls, and to complete FF key programming.
Microphone Used to talk to another party without using the handset.
Speaker Outputs tones and voice at your extension.
# Feature Description
5
6
7
8
9
10
11
12
1314
15
16
17
18
19
20
21
22
12 DBS 576 (USA), issued October 2000 576-36-750
1. Understanding Your Phone
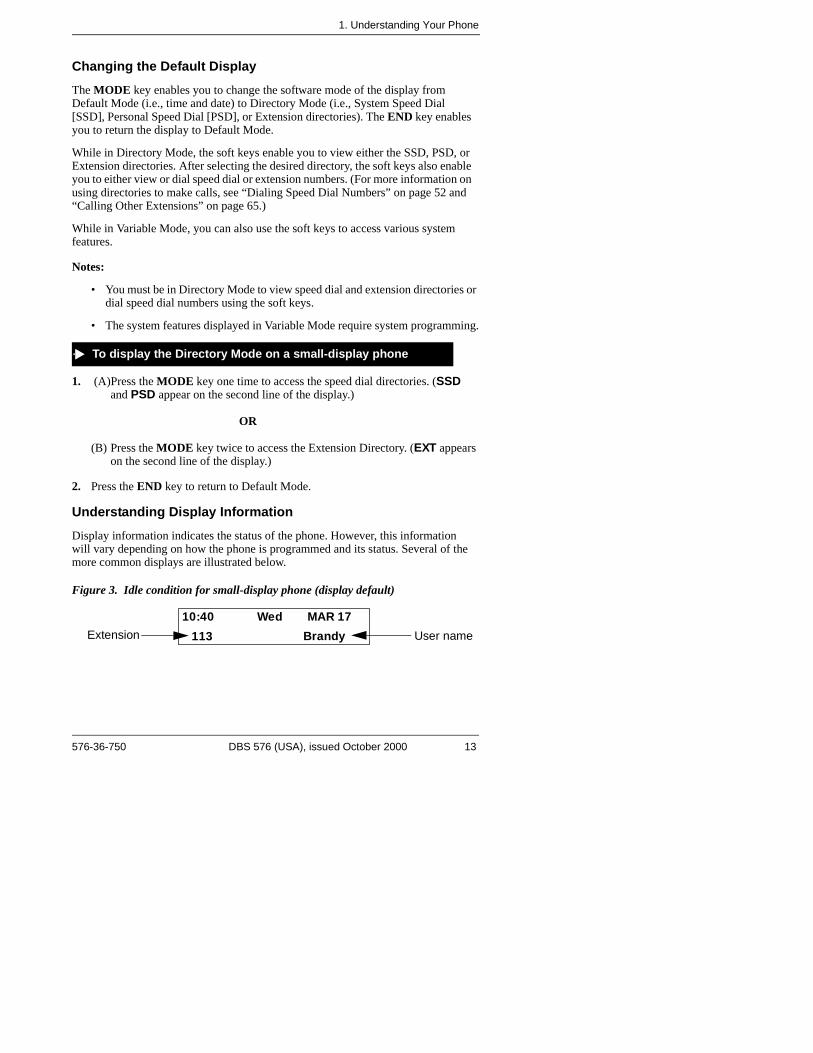
Changing the Default DisplayThe MODE key enables you to change the software mode of the display from Default Mode (i.e., time and date) to Directory Mode (i.e., System Speed Dial [SSD], Personal Speed Dial [PSD], or Extension directories). The END key enables you to return the display to Default Mode.
While in Directory Mode, the soft keys enable you to view either the SSD, PSD, or Extension directories. After selecting the desired directory, the soft keys also enable you to either view or dial speed dial or extension numbers. (For more information on using directories to make calls, see “Dialing Speed Dial Numbers” on page 52 and “Calling Other Extensions” on page 65.)
While in Variable Mode, you can also use the soft keys to access various system features.
Notes:
• You must be in Directory Mode to view speed dial and extension directories or dial speed dial numbers using the soft keys.
• The system features displayed in Variable Mode require system programming.
1. (A)Press the MODE key one time to access the speed dial directories. (SSDand PSD appear on the second line of the display.)
OR
(B) Press the MODE key twice to access the Extension Directory. (EXT appears on the second line of the display.)
2. Press the END key to return to Default Mode.
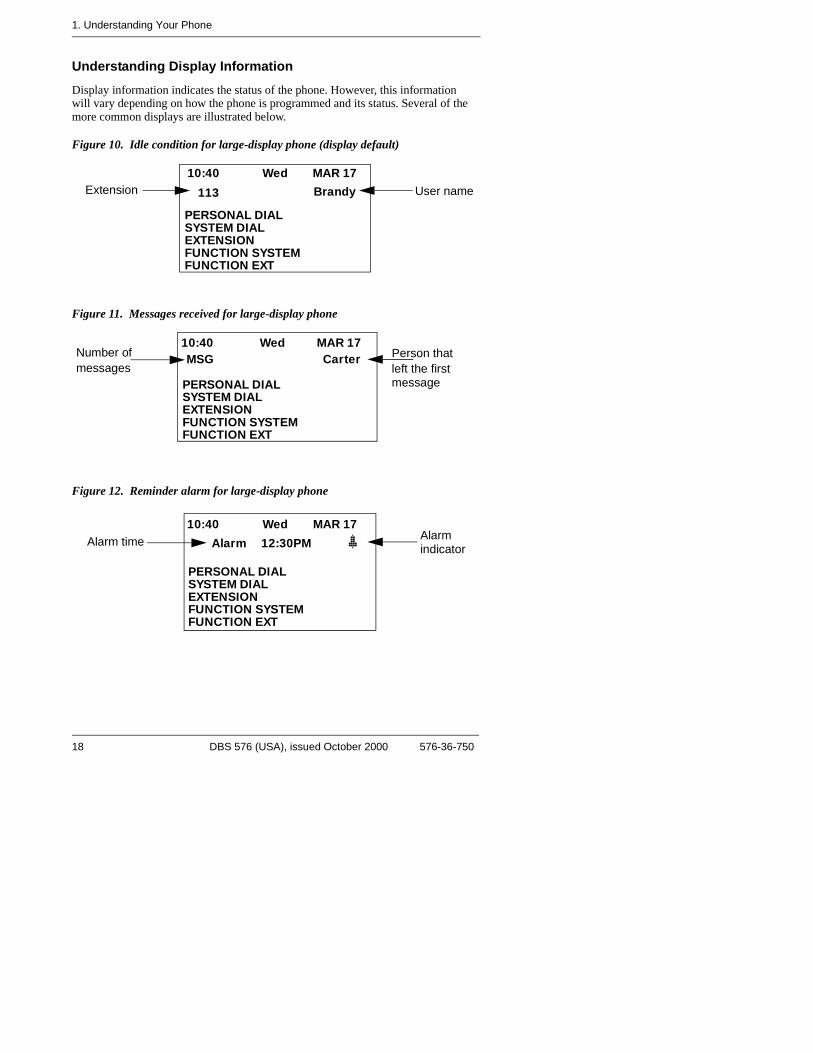
Understanding Display InformationDisplay information indicates the status of the phone. However, this information will vary depending on how the phone is programmed and its status. Several of the more common displays are illustrated below.
Figure 3. Idle condition for small-display phone (display default)
To display the Directory Mode on a small-display phone
10:40 Wed MAR 17
113 Extension User name Brandy
576-36-750 DBS 576 (USA), issued October 2000 13
1. Understanding Your Phone
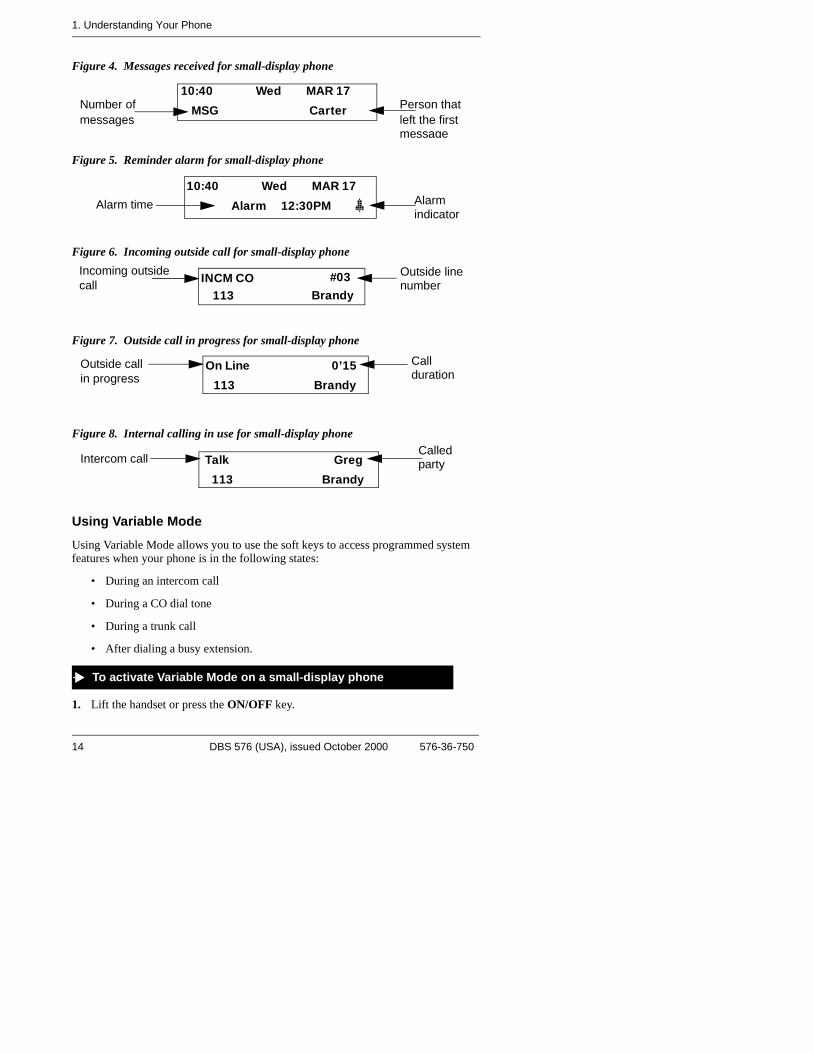
Figure 4. Messages received for small-display phone
Figure 5. Reminder alarm for small-display phone
Figure 6. Incoming outside call for small-display phone
Figure 7. Outside call in progress for small-display phone
Figure 8. Internal calling in use for small-display phone
Using Variable ModeUsing Variable Mode allows you to use the soft keys to access programmed system features when your phone is in the following states:
• During an intercom call
• During a CO dial tone
• During a trunk call
• After dialing a busy extension.
1. Lift the handset or press the ON/OFF key.
10:40 Wed MAR 17
MSG CarterNumber of messages
Person thatleft the firstmessage
10:40 Wed MAR 17
Alarm 12:30PMAlarm time Alarm indicator
INCM CO #03Incoming outsidecall
Outside line number
113 Brandy
On Line
113 Brandy
0’15Outside callin progress
Callduration
Talk
113 Brandy
GregIntercom callCalledparty
To activate Variable Mode on a small-display phone
14 DBS 576 (USA), issued October 2000 576-36-750
1. Understanding Your Phone
2. Press the Variable Mode Key.
3. Replace the handset or press the ON/OFF key.
1. After turning Variable Mode on, the display will reflect the programmed features during an intercom call, CO dial tone, trunk call, or after dialing a busy extension.
2. Press the > or < key next to the desired feature.
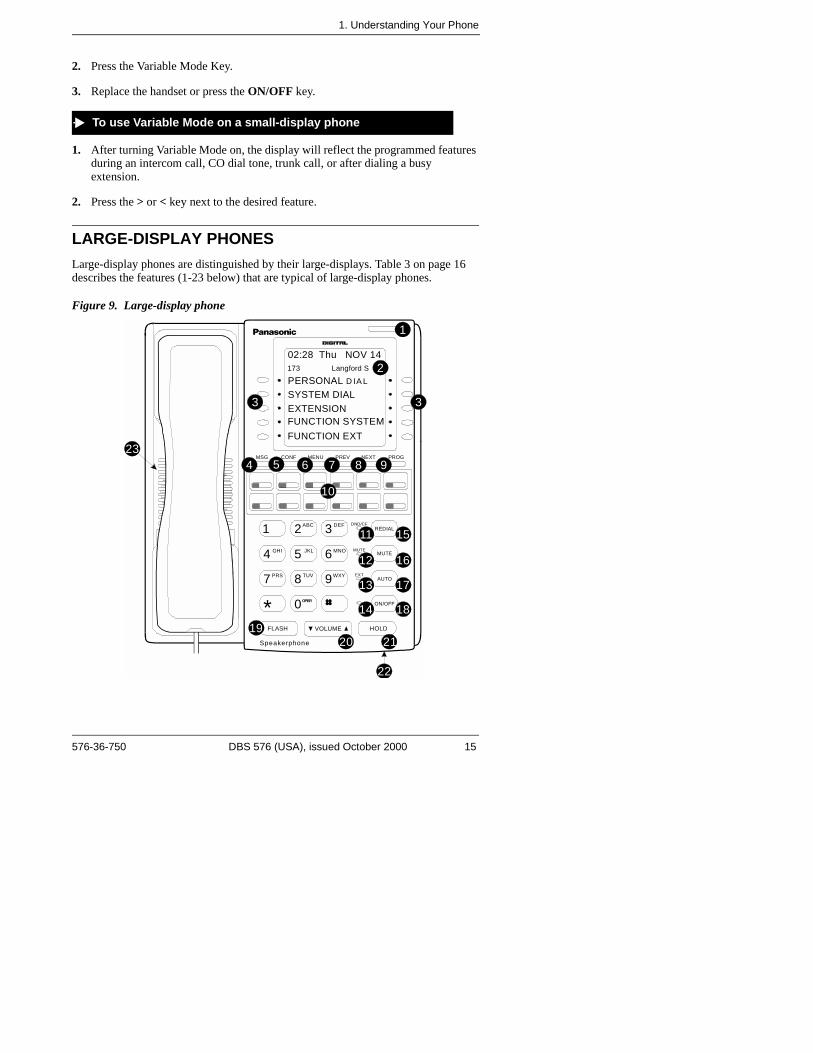
LARGE-DISPLAY PHONESLarge-display phones are distinguished by their large-displays. Table 3 on page 16 describes the features (1-23 below) that are typical of large-display phones.
Figure 9. Large-display phone
To use Variable Mode on a small-display phone
DND/CFABC
JKL
TUV
OPER
GHI
PRS
DEF
MNO
WXY
MUTE
EXT
REDIAL
CONF MENU PREV NEXT PROGMSG
MUTE
AUTO
ON/OFF
FLASH
Speakerphone
VOLUME HOLD
1
4
7
*
2
5
8
0
3
6
9
02:28 Thu NOV 14
PERSONAL D IA LSYSTEM DIALEXTENSIONFUNCTION SYSTEM
10
11
12
13
14
15
16
17
18
21
22
2019
987654
33
2
1
23FUNCTION EXT
173 Langford S
576-36-750 DBS 576 (USA), issued October 2000 15
1. Understanding Your Phone
Table 3. Large-display phone features
# Feature Description
Message Waiting Indicator Indicates that you have a message.
Display Displays information about the phone’s status, menus, and dialing directories.
Soft Keys Used to select menus, directories, speed dial num-bers, and to access call-handling features.
MSG Key Used for Auto-CallBack to a telephone which has left a text message or to access voice messages.
CONF Key Used to establish conference calls and to check Flexible Function (FF) and one-touch key settings.
MENU Key Used to return to the default Main Menu screen which contains the following items:
• Personal Dial• System Dial• Extension• Function System• Function Ext
PREV Key Used to return to the previous screen.
NEXT Key Used to advance to the next screen.
PROG Key Used to program FF and one-touch keys, to adjust ringer volume and to send a flash signal. Depending on the setup of your system, may also be used to transfer calls.
Flexible Function (FF) Keys
Used to access outside lines or to access system fea-tures.
DND/CF Indicator Indicates that Do-Not-Disturb (DND) or Call For-warding is set.
MUTE Indicator Indicates that your voice is muted (i.e., party on the other end cannot hear you). Lights solid when your hands-free microphone is muted and flashes when your handset is muted.
EXT Indicator Lights when you are on a call and flashes when you hold a call.
ON/OFF Indicator Lights when the ON/OFF key has been pressed.
REDIAL Key Used to redial the last number dialed.
MUTE Key Used to activate/deactivate the Mute function. When activated, the party on the other end cannot hear you. (See item 12, MUTE Indicator.)
AUTO Key Used to access speed dialing or enter account codes.
1
2
3
4
5
6
7
8
9
10
11
12
13
1415
16
17
16 DBS 576 (USA), issued October 2000 576-36-750

1. Understanding Your Phone
Changing the Default DisplayThe ten soft keys located alongside the display on a large-display phone allow you to change the software mode of the display. Instead of displaying the Main Menu (Default Mode) for instance, you can set your phone to display one of the following directories or menus:
• Personal Dial - Allows you to program, view, or dial PSD numbers using the soft keys.
• System Dial - Allows you to view or dial SSD numbers using the soft keys.
• Extension - Allows you to view or dial other extensions using the soft keys.
• Function System - Allows you to access most key telephone features, such as Call Forwarding, Do-Not-Disturb (DND), Microphone Mute, Background Music, Call Pickup, Account Codes, etc.
• Function Extension - Allows you to assign frequently used phone features for easy access. Most items found under the Function System Menu can be assigned to the Function Extension Menu in any order you desire.
1. Press the soft key to the left of the desired directory or menu. (The selected directory or menu of feature displays.)
2. Press the MENU key to return to the Main Menu.
Note: Menus are programmable or customizable per extension. Therefore, the actual menu that displays depends on your system configuration.
ON/OFF Key Used to make a call without lifting the handset or to turn the speaker on and off.
FLASH Key Used to end an outside call and to either restore out-side dial tone or switch to external dial tone status without hanging up the receiver.
VOLUME Key Used to adjust level of tones, background music, ringing, receiver volume, and display contrast.
HOLD Key Used to hold calls, to retrieve held calls, and to complete FF key programming.
Microphone Used to talk to another party without using the handset.
Speaker Outputs tones and voice at your extension.
# Feature Description
18
19
20
21
22
23
To display a directory or menu on a large-display phone
576-36-750 DBS 576 (USA), issued October 2000 17
1. Understanding Your Phone
Understanding Display InformationDisplay information indicates the status of the phone. However, this information will vary depending on how the phone is programmed and its status. Several of the more common displays are illustrated below.
Figure 10. Idle condition for large-display phone (display default)
Figure 11. Messages received for large-display phone
Figure 12. Reminder alarm for large-display phone
10:40 Wed MAR 17
113 Brandy
PERSONAL DIAL
User name Extension
SYSTEM DIALEXTENSIONFUNCTION SYSTEMFUNCTION EXT
10:40 Wed MAR 17MSG Carter Person that
left the firstmessage
Number of messages
PERSONAL DIALSYSTEM DIALEXTENSIONFUNCTION SYSTEMFUNCTION EXT
10:40 Wed MAR 17
Alarm 12:30PM Alarm indicatorAlarm time
PERSONAL DIALSYSTEM DIALEXTENSIONFUNCTION SYSTEMFUNCTION EXT
18 DBS 576 (USA), issued October 2000 576-36-750
1. Understanding Your Phone
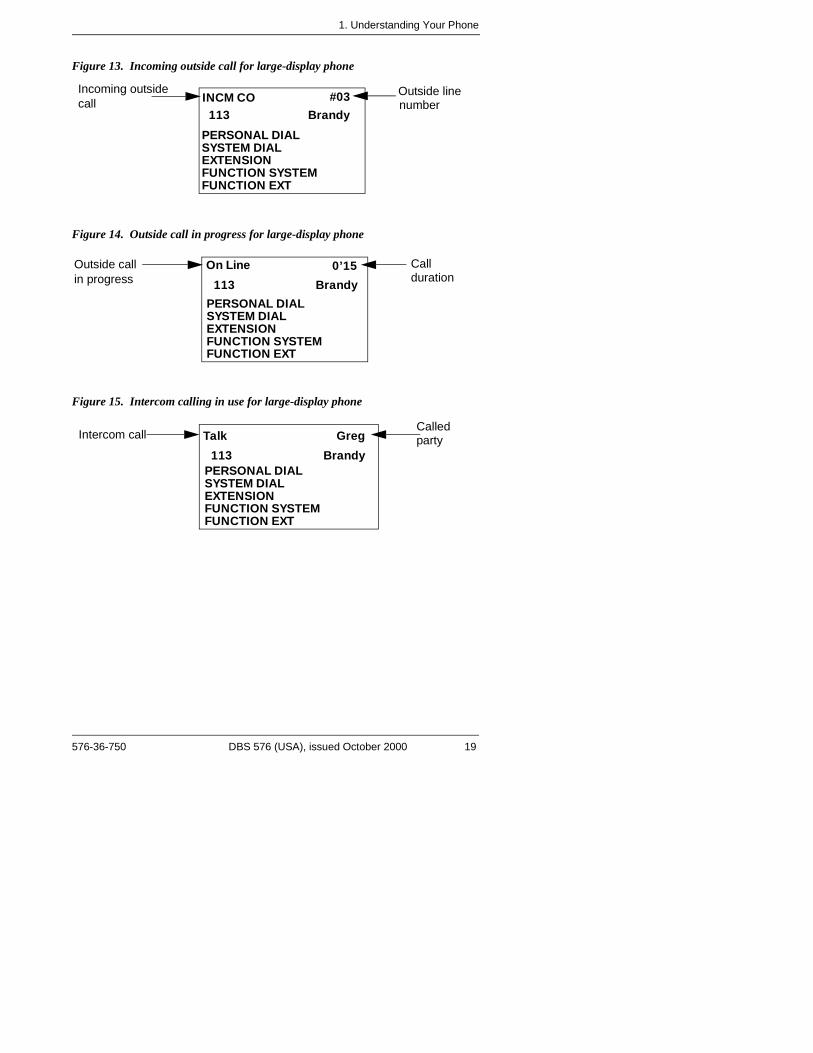
Figure 13. Incoming outside call for large-display phone
Figure 14. Outside call in progress for large-display phone
Figure 15. Intercom calling in use for large-display phone
INCM CO #03 Outside line number
113 Brandy
Incoming outsidecall
PERSONAL DIALSYSTEM DIALEXTENSIONFUNCTION SYSTEMFUNCTION EXT
113 Brandy
On Line 0’15Outside callin progress
Callduration
PERSONAL DIALSYSTEM DIALEXTENSIONFUNCTION SYSTEMFUNCTION EXT
Talk
113 Brandy
GregIntercom call Calledparty
PERSONAL DIALSYSTEM DIALEXTENSIONFUNCTION SYSTEMFUNCTION EXT
576-36-750 DBS 576 (USA), issued October 2000 19
1. Understanding Your Phone
This page intentionally left blank.
20 DBS 576 (USA), issued October 2000 576-36-750

2. SETTING UP YOUR PHONEYou can use the procedures in this chapter to customize your phone for the following:
• Adjusting Volume and Display Settings (page 21)
• Setting Up Flexible Function Keys (page 22)
• Setting Up One-touch Keys (page 23)
• Setting Up Speed Dialing (page 25)
• Assigning and Deleting Personal Speed Dial (PSD) Numbers (page 25)
• Linking System Speed Dial Numbers (page 28)
• Assigning and Deleting Names for PSD Numbers (page 29)
• Setting User Maintenance Functions (page 33)
ADJUSTING VOLUME AND DISPLAY SETTINGSYou can adjust the volume or display of the following by pressing theVOLUME key:
• Intercom and incoming ringer
• Handset
• Speaker
• Display contrast of your phone.
1. Press the VOLUME key:
a. During ringing to adjust the intercom or incoming ring tone.
b. During a call to adjust the handset or speaker volume.
1. Press the ON/OFF key.
2. Press the PROG key.
3. Enter 9, then 1 to adjust the incoming ring tone. (The phone produces a tone.)
To adjust the volume of your phone while it is in use
To adjust the ringer volume of your phone while it is idle
576-36-750 DBS 576 (USA), issued October 2000 21
2. Setting Up Your Phone
OR
Enter 9, then 2 to adjust the intercom ring tone. (The phone produces a tone.)
4. Press the VOLUME key.
5. Press the ON/OFF key.
Note: This task requires a display phone.
1. While the phone is idle, press the # key.
2. Press the VOLUME key several times as needed.
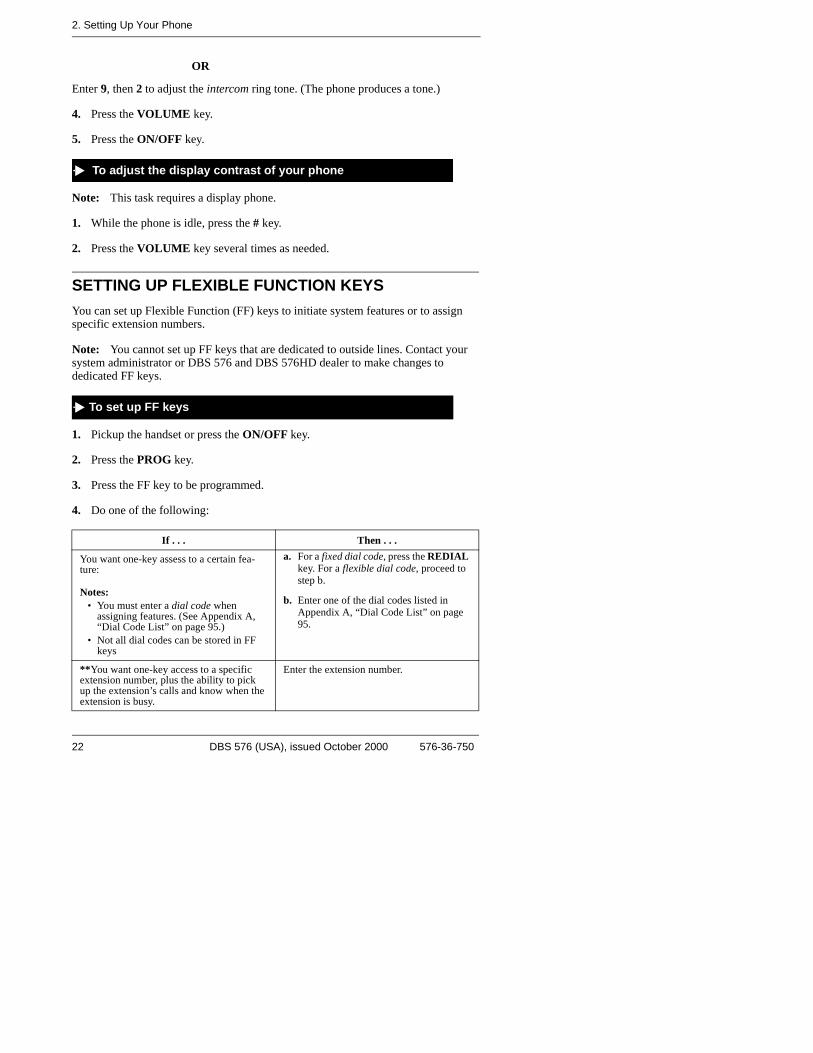
SETTING UP FLEXIBLE FUNCTION KEYSYou can set up Flexible Function (FF) keys to initiate system features or to assign specific extension numbers.
Note: You cannot set up FF keys that are dedicated to outside lines. Contact your system administrator or DBS 576 and DBS 576HD dealer to make changes to dedicated FF keys.
1. Pickup the handset or press the ON/OFF key.
2. Press the PROG key.
3. Press the FF key to be programmed.
4. Do one of the following:
If . . . Then . . .
You want one-key assess to a certain fea-ture:
Notes:• You must enter a dial code when
assigning features. (See Appendix A, “Dial Code List” on page 95.)
• Not all dial codes can be stored in FF keys
a. For a fixed dial code, press the REDIAL key. For a flexible dial code, proceed to step b.
b. Enter one of the dial codes listed in Appendix A, “Dial Code List” on page 95.
**You want one-key access to a specific extension number, plus the ability to pick up the extension’s calls and know when the extension is busy.
Enter the extension number.
To adjust the display contrast of your phone
To set up FF keys
22 DBS 576 (USA), issued October 2000 576-36-750
2. Setting Up Your Phone
5. Press the HOLD key.
6. Repeat steps 2-5 to program additional keys.
7. Replace the handset or press the ON/OFF key.
1. Pick up the handset or press the ON/OFF key.
2. Press the PROG key.
3. Press the desired FF key.
4. Press the HOLD key.
5. Replace the handset or press the ON/OFF key.
Note: This task requires a display phone.
1. Pick up the handset or press the ON/OFF key.
2. Press the CONF key.
3. Press the FF key. The assigned function appears on the display.
4. Replace the handset or press the ON/OFF key.
SETTING UP ONE-TOUCH KEYSYou can set up one-touch keys on a non-display or small-display phone to store phone numbers, speed dial numbers, or feature access codes.
1. Pickup the handset or press the ON/OFF key.
2. Press the PROG key.
3. Press the one-touch key to be programmed.
**If you assign an extension number to an FF key, the FF key will light red when the exten-sion is busy. It will light green when Do-Not-Disturb (DND) or Call Forwarding is set. In addition, you can pick up a call that is ringing or on hold at the extension by simply pressing the FF key when it is flashing.
If . . . Then . . .
To clear an FF key’s programming
To check the FF key’s setup
To program a one-touch key for an outside phone number
576-36-750 DBS 576 (USA), issued October 2000 23
2. Setting Up Your Phone
4. Dial the phone number to be stored.
5. Press the HOLD key.
6. Replace the handset or press the ON/OFF key.
1. Pickup the handset or press the ON/OFF key.
2. Press the PROG key.
3. Press the one-touch key to be programmed.
4. Press the AUTO key.
5. Enter the SSD bin number to be programmed.
6. Press the HOLD key.
7. Replace the handset or press the ON/OFF key.
Note: **When the system is set up for MCO Code level, one-touch keys automatically dial an outside line. (MCO Code level requires system programming.)
1. Pickup the handset or press the ON/OFF key.
2. Press the PROG key.
3. Press the one-touch key to be programmed.
4. **If the feature functions at the MCO Code level, press AUTO * #.
5. Enter the desired feature code or extension number.
6. Press the HOLD key.
7. Replace the handset or press the ON/OFF key.
Note: This task requires a display phone.
1. Pickup the handset or press the ON/OFF key.
2. Press the CONF key.
To assign an SSD number to a one-touch key
To assign a feature code or extension number to a one-touch key
To check a programmed one-touch key
24 DBS 576 (USA), issued October 2000 576-36-750

2. Setting Up Your Phone
3. Press the one-touch key to be checked. (Programmed data appears on the display.)
4. Replace the handset or press the ON/OFF key.
SETTING UP SPEED DIALINGYou can set up the following speed dial features using your phone’s one-touch or soft keys:
• Speed dial numbers
• Speed dial linking
• Speed dial names.
Assigning and Deleting PSD NumbersYou can assign frequently called numbers (or System Speed Dial [SSD] numbers) to your phone’s one-touch or soft keys. These keys are preprogrammed to correspond to specific PSD codes or bins. You store your PSD numbers in these bins. When you press a one-touch or soft key containing a PSD number, the PSD bin associated with that key is accessed and the speed dial number is dialed.
You can assign up to 10 PSD numbers to the one-touch keys on a non-display or small-display phone (PSD bins 80-89) and up to 20 PSD numbers to the soft keys on a large-display phone (PSD bins 80-99).
When in the PSD Directory Mode, you can view the PSD bin numbers on the display. On a small-display phone, two bins are displayed at a time. To display the next two bins, press the # key. To display the previous two bins, press the * key. On a large-display phone, 10 PSD bins are displayed at a time. To display the next 10 bins, press the NEXT key. To display the previous 10 bins, press the PREV key.
For a list of corresponding PSD bin numbers and one-touch or soft keys, see Figure 16 and Table 4 on page 26.
Notes:
• On a small-display phone, you must be in the PSD Directory Mode to assign, access, or view numbers in PSD bins 90-99. On a non-display phone, you access or assign numbers to PSD bins 90-99 by pressing the AUTO key and entering the PSD bin number. (To review the PSD numbers on non-display phones, refer to your customized list of PSD numbers in Appendix B “Customized PSD Bin Numbers” on page 101.)
• Until you assign a name or string of characters to a PSD number, the PSD bin number will display when you press the one-touch or soft key. For more information, see “Assigning and Deleting Names for PSD Numbers” on page 29.
576-36-750 DBS 576 (USA), issued October 2000 25
2. Setting Up Your Phone
• You can check PSD numbers or names that have been assigned to one-touch or soft keys. For more information, see “Checking Speed Dial Numbers” on page 54.
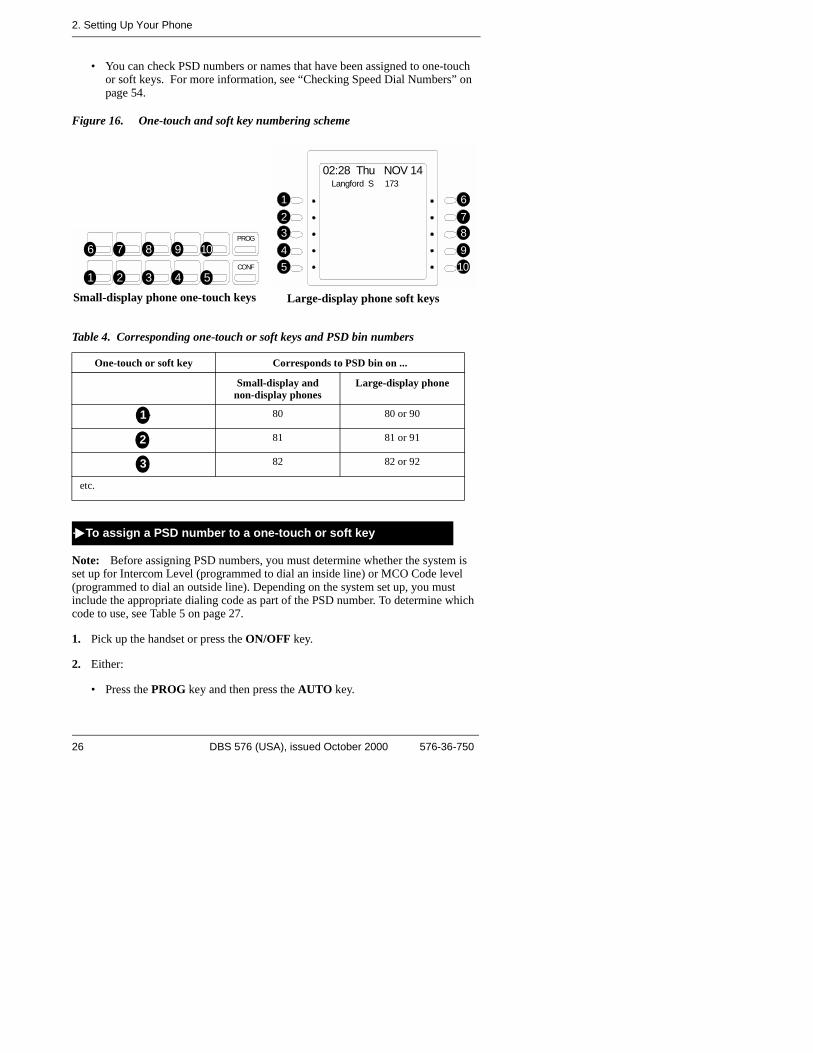
Figure 16. One-touch and soft key numbering scheme
Table 4. Corresponding one-touch or soft keys and PSD bin numbers
Note: Before assigning PSD numbers, you must determine whether the system is set up for Intercom Level (programmed to dial an inside line) or MCO Code level (programmed to dial an outside line). Depending on the system set up, you must include the appropriate dialing code as part of the PSD number. To determine which code to use, see Table 5 on page 27.
1. Pick up the handset or press the ON/OFF key.
2. Either:
• Press the PROG key and then press the AUTO key.
One-touch or soft key Corresponds to PSD bin on ...
Small-display and
non-display phonesLarge-display phone
80 80 or 90
81 81 or 91
82 82 or 92
etc.
3
109876
54
21
02:28 Thu NOV 14Langford S 173
PROG
CONF
2 3
109876
541
Large-display phone soft keysSmall-display phone one-touch keys
1
2
3
To assign a PSD number to a one-touch or soft key
26 DBS 576 (USA), issued October 2000 576-36-750
2. Setting Up Your Phone
OR
• Enter the Speed Dial Set/Clear code (default = 710).
3. Enter the PSD bin number (80-99).
4. Enter the phone number you want to be speed-dialed (maximum length = 16 characters). Remember to include the Intercom Level or MCO Code level code depending on how the system is set up. (Refer to the following table.)
Table 5. Characters allowed when assigning PSD numbers
5. Press the HOLD key.
6. Replace the handset or press the ON/OFF key.
Note: When deleting a PSD number from a non-display phone, be sure to record the change in your personalized list of PSD numbers. (See Appendix B, “Customized PSD Bin Numbers” on page 101.)
To insert a . . . Enter/Press...
Digit or character 0, 1-9, *, #
Intercom Level* AUTO * #
MCO Code** AUTO * 0
Pause REDIAL
DP - DTMF Code AUTO * *
SSD Code AUTONN(N)
Hyphen (-) (Appears when the number is dialed or checked, but not during programming)
PROG
Display Number (Start/Stop) *** AUTO * 2
DTMF Conversion After the Other Party Answers AUTO * 3 (Version 2.5 and higher)
Hyphen (-) (Appears when the number is dialed or checked, but not during programming.)
* Indicates that the digits that follow are either a feature access code or extension number. (Do not include if system is set for Intercom Level.)
** Indicates that the digits that follow are for an outside number. (Do not include if system is set for CO Level.)
** Indicates that the enclosed digits should not be displayed during dialing. Must pre-cede and follow the digits that you do not want displayed. Example: AUTO*2 555-4143 AUTO*2
To delete a PSD number assigned to a one-touch or soft key
576-36-750 DBS 576 (USA), issued October 2000 27
2. Setting Up Your Phone
1. Pick up the handset or press the ON/OFF key.
2. Either:
• Press the PROG key and then press the AUTO key.
OR
• Enter the Speed Dial Set/Clear code (default = 710).
3. Enter the PSD bin number (80-99).
4. Press the HOLD key.
5. Replace the handset or press the ON/OFF key.
Assigning SSD Numbers
Note: SSD numbers require system programming.
SSD numbers are numbers that are frequently called by many different individuals at your location; such as a branch or corporate office, a package delivery service, or a travel agent. SSD numbers must be programmed from the attendant’s phone. Once programmed, they are available for everyone to use.
A maximum of 80 or 800 SSD numbers are allowed, depending on the system. In an 80 SSD number system, SSD numbers are stored in bins 00-79. In an 800 SSD system, SSD numbers are stored in bins 000-799. You dial SSD numbers by entering the appropriate bin number or by using one-touch or soft keys. For more information, see “Dialing Speed Dial Numbers” on page 52.
Note: To dial an SSD number using the one-touch keys on a non-display or small-display phone, you must first assign the SSD number to a PSD bin number. For more information, see “Assigning and Deleting PSD Numbers” on page 25.
Linking System Speed Dial NumbersTo handle phone numbers longer than 25 characters, you can link up to six SSD numbers in one PSD bin. You can then dial the entire number (each SSD number contained in the chain) by pressing the programmed PSD key or by entering the speed dial bin number.
Notes:
• Before linking multiple SSD numbers to a PSD bin, the SSD bins must already have been programmed with the appropriate speed dial information. (This requires system programming.)
• If numbers do not appear on the display (00-79 or 000-799) when you use SSD codes, your extension is not programmed to display that data.
To link speed dial numbers to a PSD bin
28 DBS 576 (USA), issued October 2000 576-36-750
2. Setting Up Your Phone
1. Pick up the handset or press the ON/OFF key.
2. Either:
• Press the PROG key and then press the AUTO key.
OR
• Enter the Speed Dial Set/Clear code (default = 710).
3. Press the soft or one-touch key (for the PSD bin [80-99]) to be programmed.
4. Press the AUTO key.
5. Enter the SSD bin number that contains the first part of the number to be dialed. (If a pause is required, press the REDIAL key.)
6. Repeat steps 4-5 (up to 5 more times) for each remaining SSD number to be linked.
7. Press the HOLD key when you are finished.
8. Replace the handset or press the ON/OFF key.
1. If necessary, select the trunk group (9, 81-84) to access an outside line. (Normally the trunk is selected by the speed dial numbers.)
2. Press the PSD key.
Assigning and Deleting Names for PSD NumbersAfter assigning a PSD number to a one-touch or soft key, you can assign a name to the key (e.g., “Home,” “John,” etc.). You can then view the assigned PSD name when you are in the PSD Directory mode.
Note: You need to know the PSD bin number for PSD number in order to assign a name to it. To determine the bin number, see “Checking Speed Dial Numbers” on page 54.
Note: This task requires a display phone.
1. Pick up the handset or press the ON/OFF key.
2. Press the PROG key.
3. Press the * key.
To use a PSD key that links multiple speed dial numbers
To assign a name to a PSD number
576-36-750 DBS 576 (USA), issued October 2000 29
2. Setting Up Your Phone
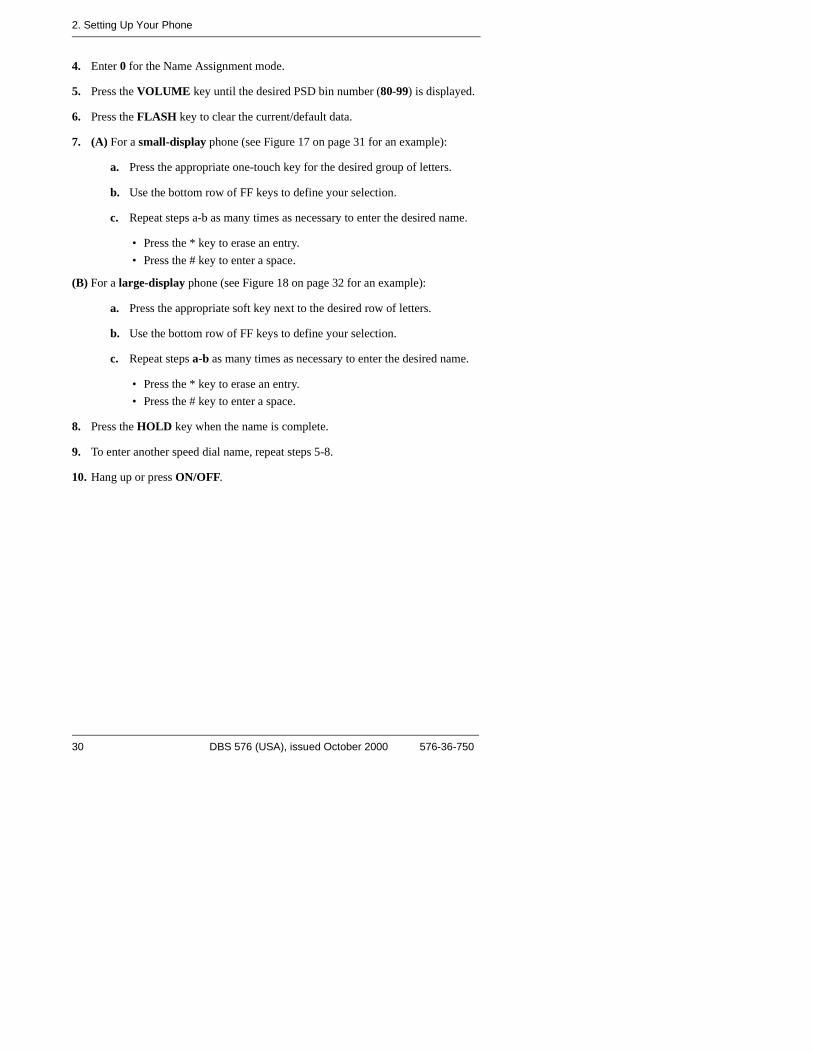
4. Enter 0 for the Name Assignment mode.
5. Press the VOLUME key until the desired PSD bin number (80-99) is displayed.
6. Press the FLASH key to clear the current/default data.
7. (A) For a small-display phone (see Figure 17 on page 31 for an example):
a. Press the appropriate one-touch key for the desired group of letters.
b. Use the bottom row of FF keys to define your selection.
c. Repeat steps a-b as many times as necessary to enter the desired name.
• Press the * key to erase an entry.• Press the # key to enter a space.
(B) For a large-display phone (see Figure 18 on page 32 for an example):
a. Press the appropriate soft key next to the desired row of letters.
b. Use the bottom row of FF keys to define your selection.
c. Repeat steps a-b as many times as necessary to enter the desired name.
• Press the * key to erase an entry.• Press the # key to enter a space.
8. Press the HOLD key when the name is complete.
9. To enter another speed dial name, repeat steps 5-8.
10. Hang up or press ON/OFF.
30 DBS 576 (USA), issued October 2000 576-36-750
2. Setting Up Your Phone
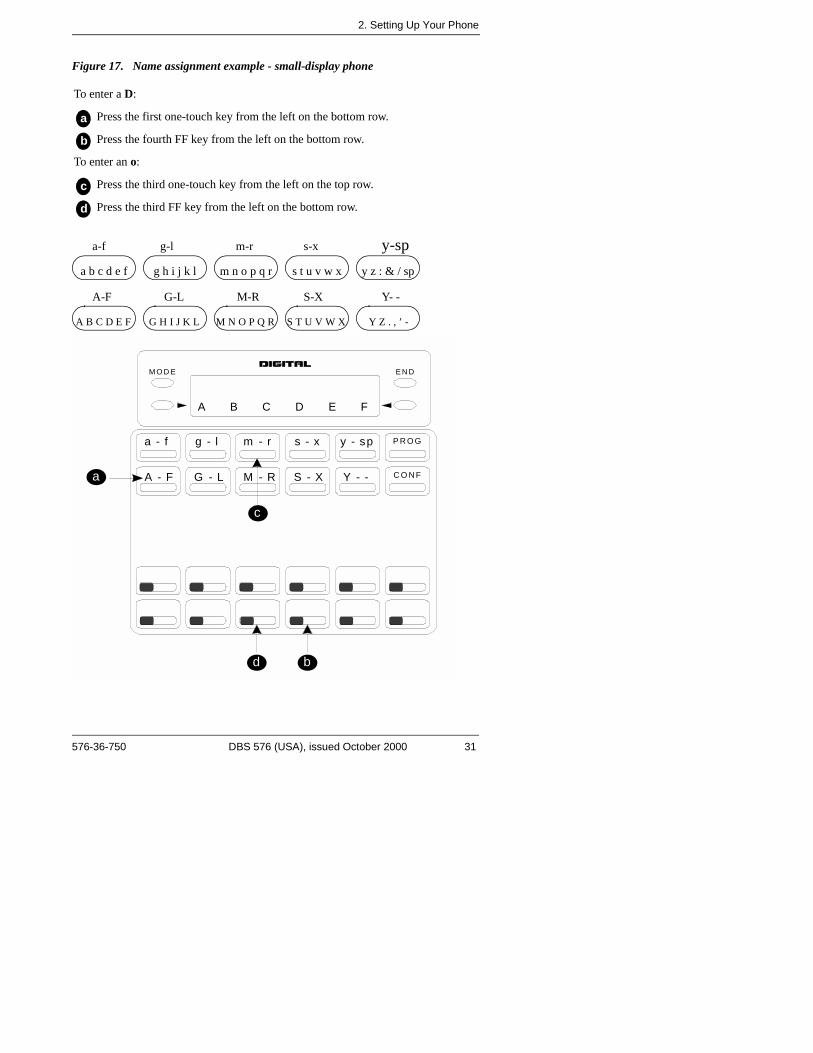
Figure 17. Name assignment example - small-display phone
To enter a D:
Press the first one-touch key from the left on the bottom row.
Press the fourth FF key from the left on the bottom row.
To enter an o:
Press the third one-touch key from the left on the top row.
Press the third FF key from the left on the bottom row.
a
b
c
d
G H I J K L M N O P Q R S T U V W XA B C D E F Y Z . , ’ -
a b c d e f g h i j k l m n o p q r s t u v w x y z : & / sp
a-f m-r g-l s-x y-sp
A-F M-R G-L S-X Y- -
E N DM O D E
P R O G
C O N F
b
a
A B C D E F
a - f g - l m - r s - x y - sp
A - F G - L M - R S - X Y - -
c
d
576-36-750 DBS 576 (USA), issued October 2000 31
2. Setting Up Your Phone
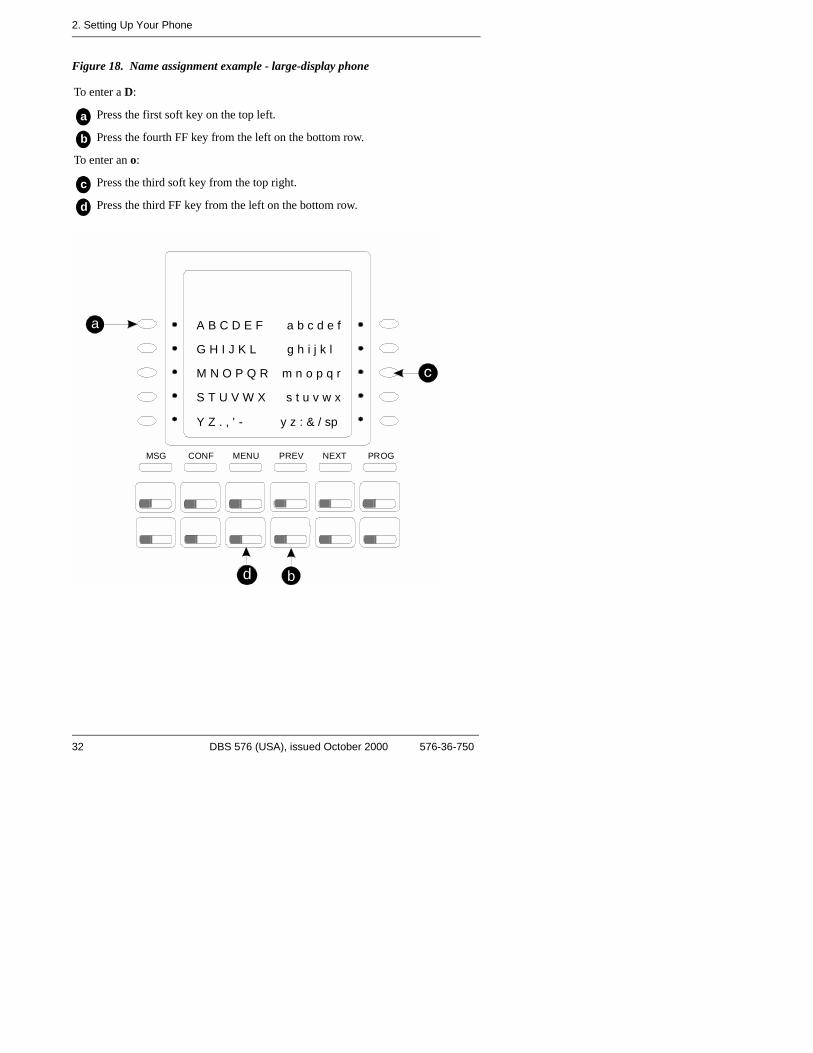
Figure 18. Name assignment example - large-display phone
To enter a D:
Press the first soft key on the top left.
Press the fourth FF key from the left on the bottom row.
To enter an o:
Press the third soft key from the top right.
Press the third FF key from the left on the bottom row.
a
b
c
d
CONF MENU PREV NEXT PROGMSG
3
A B C D E F a b c d e f
G H I J K L g h i j k l
S T U V W X s t u v w x
Y Z . , ' - y z : & / sp
M N O P Q R m n o p q r
a
bd
32 DBS 576 (USA), issued October 2000 576-36-750
2. Setting Up Your Phone
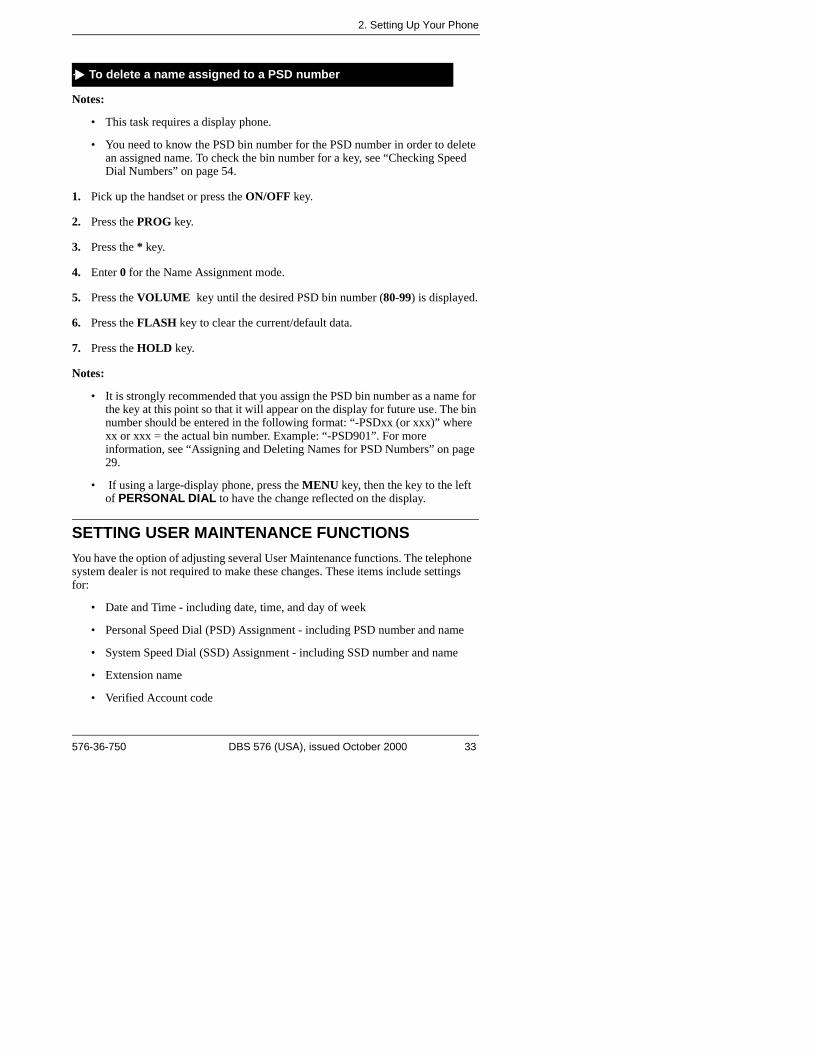
Notes:
• This task requires a display phone.
• You need to know the PSD bin number for the PSD number in order to delete an assigned name. To check the bin number for a key, see “Checking Speed Dial Numbers” on page 54.
1. Pick up the handset or press the ON/OFF key.
2. Press the PROG key.
3. Press the * key.
4. Enter 0 for the Name Assignment mode.
5. Press the VOLUME key until the desired PSD bin number (80-99) is displayed.
6. Press the FLASH key to clear the current/default data.
7. Press the HOLD key.
Notes:
• It is strongly recommended that you assign the PSD bin number as a name for the key at this point so that it will appear on the display for future use. The bin number should be entered in the following format: “-PSDxx (or xxx)” where xx or xxx = the actual bin number. Example: “-PSD901”. For more information, see “Assigning and Deleting Names for PSD Numbers” on page 29.
• If using a large-display phone, press the MENU key, then the key to the left of PERSONAL DIAL to have the change reflected on the display.
SETTING USER MAINTENANCE FUNCTIONSYou have the option of adjusting several User Maintenance functions. The telephone system dealer is not required to make these changes. These items include settings for:
• Date and Time - including date, time, and day of week
• Personal Speed Dial (PSD) Assignment - including PSD number and name
• System Speed Dial (SSD) Assignment - including SSD number and name
• Extension name
• Verified Account code
To delete a name assigned to a PSD number
576-36-750 DBS 576 (USA), issued October 2000 33
2. Setting Up Your Phone
• Call Forward ID code
• Message Key ID code
• Walking Toll Restriction Service (TRS) Code
• TRF of CFID
• CID Logging Ext
• Send Text Messages
• Text Message Replies
• Absence Messages
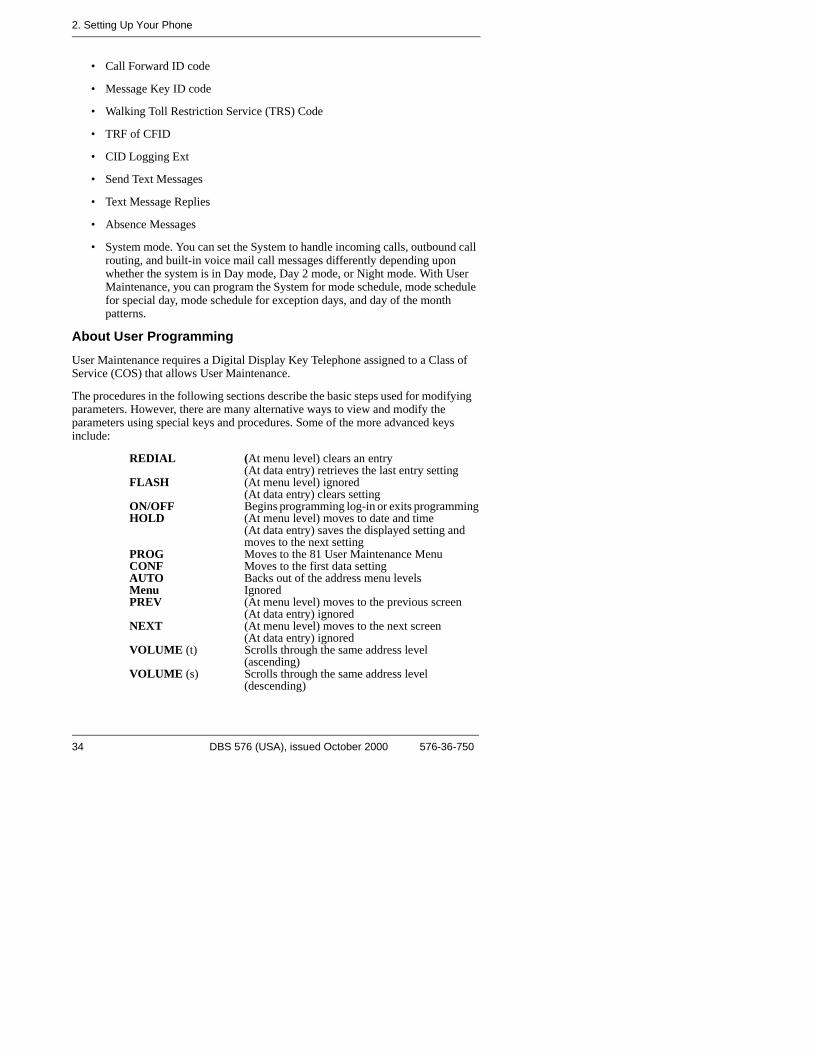
• System mode. You can set the System to handle incoming calls, outbound call routing, and built-in voice mail call messages differently depending upon whether the system is in Day mode, Day 2 mode, or Night mode. With User Maintenance, you can program the System for mode schedule, mode schedule for special day, mode schedule for exception days, and day of the month patterns.
About User ProgrammingUser Maintenance requires a Digital Display Key Telephone assigned to a Class of Service (COS) that allows User Maintenance.
The procedures in the following sections describe the basic steps used for modifying parameters. However, there are many alternative ways to view and modify the parameters using special keys and procedures. Some of the more advanced keys include:
REDIAL (At menu level) clears an entry(At data entry) retrieves the last entry setting
FLASH (At menu level) ignored(At data entry) clears setting
ON/OFF Begins programming log-in or exits programmingHOLD (At menu level) moves to date and time
(At data entry) saves the displayed setting and moves to the next setting
PROG Moves to the 81 User Maintenance MenuCONF Moves to the first data settingAUTO Backs out of the address menu levelsMenu IgnoredPREV (At menu level) moves to the previous screen
(At data entry) ignoredNEXT (At menu level) moves to the next screen
(At data entry) ignoredVOLUME (t) Scrolls through the same address level
(ascending)VOLUME (s) Scrolls through the same address level
(descending)
34 DBS 576 (USA), issued October 2000 576-36-750
2. Setting Up Your Phone
FF1 Moves to Personal Speed Dial (PSD) Assignment menu
FF2 Moves to System Speed Dial (SSD) Assignment menu
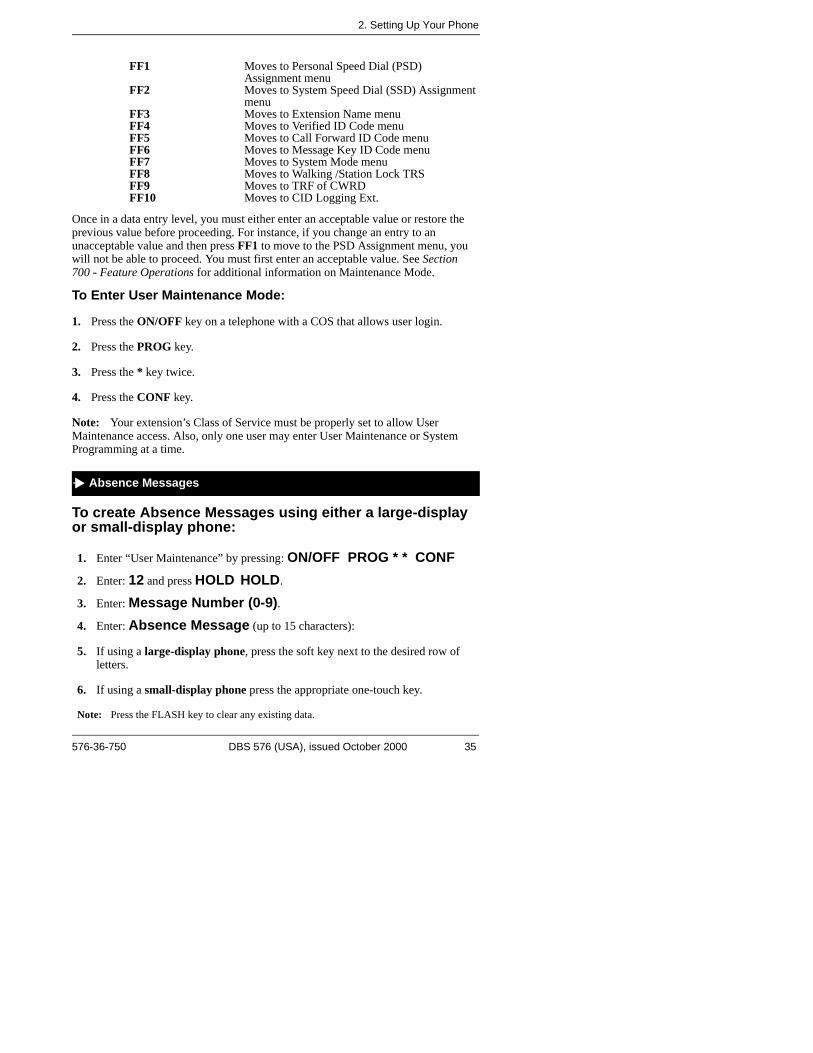
FF3 Moves to Extension Name menuFF4 Moves to Verified ID Code menuFF5 Moves to Call Forward ID Code menuFF6 Moves to Message Key ID Code menuFF7 Moves to System Mode menuFF8 Moves to Walking /Station Lock TRSFF9 Moves to TRF of CWRDFF10 Moves to CID Logging Ext.
Once in a data entry level, you must either enter an acceptable value or restore the previous value before proceeding. For instance, if you change an entry to an unacceptable value and then press FF1 to move to the PSD Assignment menu, you will not be able to proceed. You must first enter an acceptable value. See Section 700 - Feature Operations for additional information on Maintenance Mode.
To Enter User Maintenance Mode:
1. Press the ON/OFF key on a telephone with a COS that allows user login.
2. Press the PROG key.
3. Press the * key twice.
4. Press the CONF key.
Note: Your extension’s Class of Service must be properly set to allow User Maintenance access. Also, only one user may enter User Maintenance or System Programming at a time.
To create Absence Messages using either a large-display or small-display phone:
1. Enter “User Maintenance” by pressing: ON/OFF PROG * * CONF
2. Enter: 12 and press HOLD HOLD.
3. Enter: Message Number (0-9).4. Enter: Absence Message (up to 15 characters):
5. If using a large-display phone, press the soft key next to the desired row of letters.
6. If using a small-display phone press the appropriate one-touch key.
Note: Press the FLASH key to clear any existing data.
Absence Messages
576-36-750 DBS 576 (USA), issued October 2000 35
2. Setting Up Your Phone
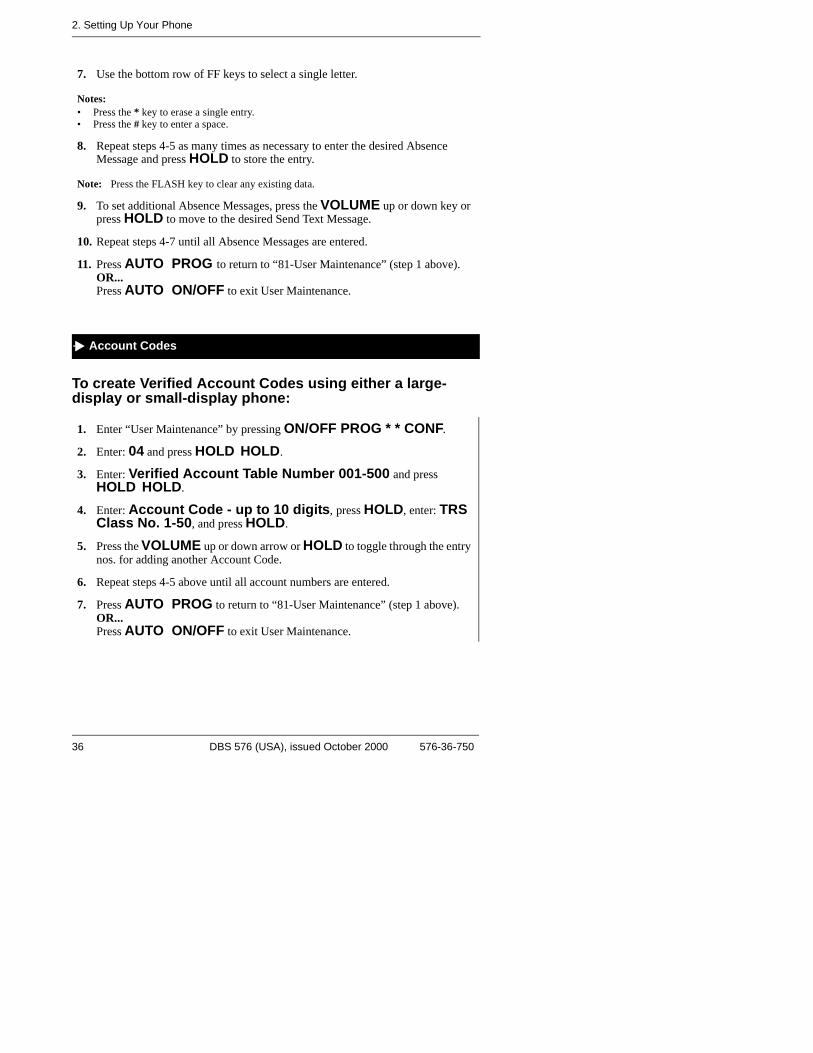
To create Verified Account Codes using either a large-display or small-display phone:
7. Use the bottom row of FF keys to select a single letter.
Notes:• Press the * key to erase a single entry.• Press the # key to enter a space.
8. Repeat steps 4-5 as many times as necessary to enter the desired Absence Message and press HOLD to store the entry.
Note: Press the FLASH key to clear any existing data.
9. To set additional Absence Messages, press the VOLUME up or down key or press HOLD to move to the desired Send Text Message.
10. Repeat steps 4-7 until all Absence Messages are entered.
11. Press AUTO PROG to return to “81-User Maintenance” (step 1 above).OR...Press AUTO ON/OFF to exit User Maintenance.
1. Enter “User Maintenance” by pressing ON/OFF PROG * * CONF.
2. Enter: 04 and press HOLD HOLD.
3. Enter: Verified Account Table Number 001-500 and press HOLD HOLD.
4. Enter: Account Code - up to 10 digits, press HOLD, enter: TRS Class No. 1-50, and press HOLD.
5. Press the VOLUME up or down arrow or HOLD to toggle through the entry nos. for adding another Account Code.
6. Repeat steps 4-5 above until all account numbers are entered.
7. Press AUTO PROG to return to “81-User Maintenance” (step 1 above).OR...Press AUTO ON/OFF to exit User Maintenance.
Account Codes
36 DBS 576 (USA), issued October 2000 576-36-750
2. Setting Up Your Phone
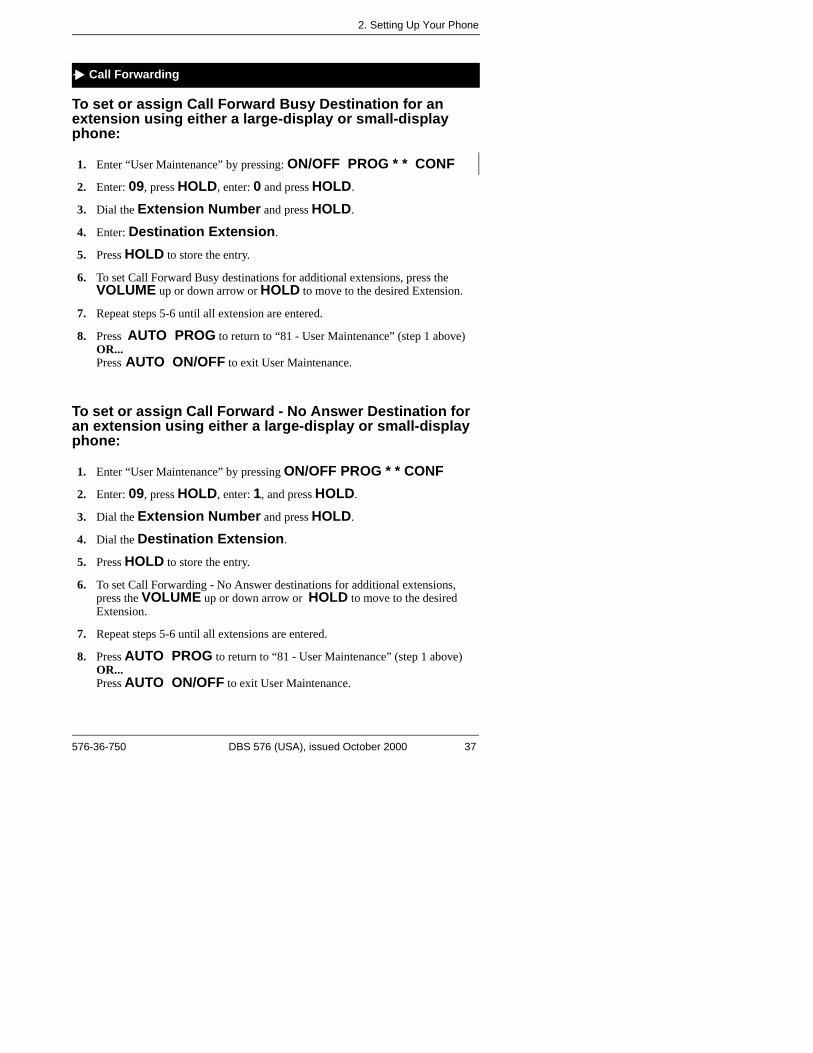
To set or assign Call Forward Busy Destination for an extension using either a large-display or small-display phone:
To set or assign Call Forward - No Answer Destination for an extension using either a large-display or small-display phone:
1. Enter “User Maintenance” by pressing: ON/OFF PROG * * CONF
2. Enter: 09, press HOLD, enter: 0 and press HOLD.
3. Dial the Extension Number and press HOLD.
4. Enter: Destination Extension.
5. Press HOLD to store the entry.
6. To set Call Forward Busy destinations for additional extensions, press the VOLUME up or down arrow or HOLD to move to the desired Extension.
7. Repeat steps 5-6 until all extension are entered.
8. Press AUTO PROG to return to “81 - User Maintenance” (step 1 above)OR...Press AUTO ON/OFF to exit User Maintenance.
1. Enter “User Maintenance” by pressing ON/OFF PROG * * CONF 2. Enter: 09, press HOLD, enter: 1, and press HOLD.
3. Dial the Extension Number and press HOLD.
4. Dial the Destination Extension.
5. Press HOLD to store the entry.
6. To set Call Forwarding - No Answer destinations for additional extensions, press the VOLUME up or down arrow or HOLD to move to the desired Extension.
7. Repeat steps 5-6 until all extensions are entered.
8. Press AUTO PROG to return to “81 - User Maintenance” (step 1 above)OR...Press AUTO ON/OFF to exit User Maintenance.
Call Forwarding
576-36-750 DBS 576 (USA), issued October 2000 37
2. Setting Up Your Phone
To set or assign Caller ID Logging for an extension using either a large-display or small-display phone:
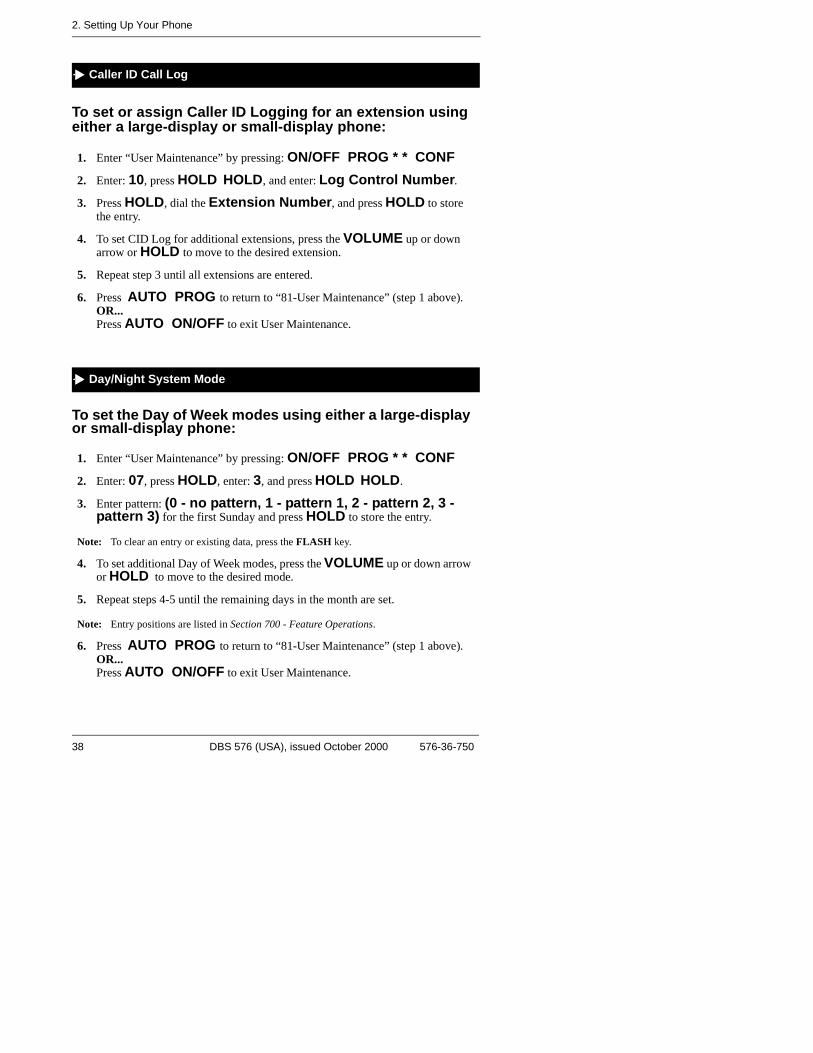
To set the Day of Week modes using either a large-display or small-display phone:
1. Enter “User Maintenance” by pressing: ON/OFF PROG * * CONF
2. Enter: 10, press HOLD HOLD, and enter: Log Control Number.
3. Press HOLD, dial the Extension Number, and press HOLD to store the entry.
4. To set CID Log for additional extensions, press the VOLUME up or down arrow or HOLD to move to the desired extension.
5. Repeat step 3 until all extensions are entered.
6. Press AUTO PROG to return to “81-User Maintenance” (step 1 above).OR...Press AUTO ON/OFF to exit User Maintenance.
1. Enter “User Maintenance” by pressing: ON/OFF PROG * * CONF
2. Enter: 07, press HOLD, enter: 3, and press HOLD HOLD.
3. Enter pattern: (0 - no pattern, 1 - pattern 1, 2 - pattern 2, 3 - pattern 3) for the first Sunday and press HOLD to store the entry.
Note: To clear an entry or existing data, press the FLASH key.
4. To set additional Day of Week modes, press the VOLUME up or down arrow or HOLD to move to the desired mode.
5. Repeat steps 4-5 until the remaining days in the month are set.
Note: Entry positions are listed in Section 700 - Feature Operations.
6. Press AUTO PROG to return to “81-User Maintenance” (step 1 above).OR...Press AUTO ON/OFF to exit User Maintenance.
Caller ID Call Log
Day/Night System Mode
38 DBS 576 (USA), issued October 2000 576-36-750
2. Setting Up Your Phone
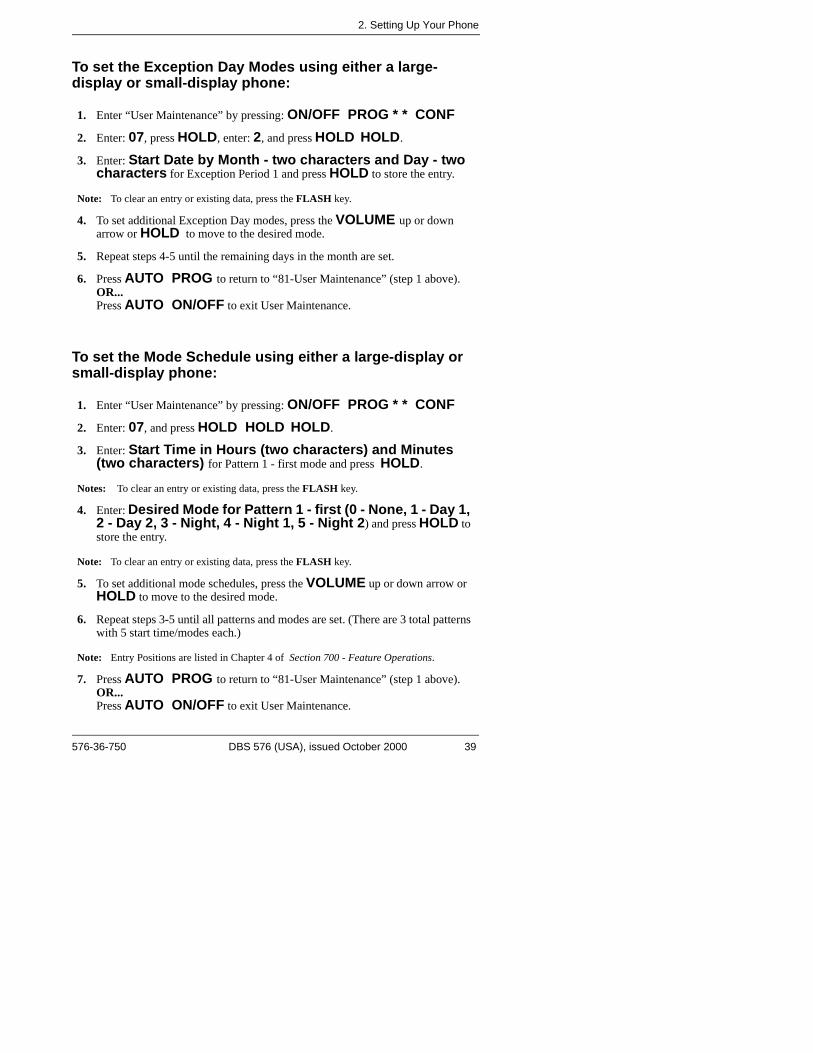
To set the Exception Day Modes using either a large-display or small-display phone:
To set the Mode Schedule using either a large-display or small-display phone:
1. Enter “User Maintenance” by pressing: ON/OFF PROG * * CONF
2. Enter: 07, press HOLD, enter: 2, and press HOLD HOLD.
3. Enter: Start Date by Month - two characters and Day - two characters for Exception Period 1 and press HOLD to store the entry.
Note: To clear an entry or existing data, press the FLASH key.
4. To set additional Exception Day modes, press the VOLUME up or down arrow or HOLD to move to the desired mode.
5. Repeat steps 4-5 until the remaining days in the month are set.
6. Press AUTO PROG to return to “81-User Maintenance” (step 1 above).OR...Press AUTO ON/OFF to exit User Maintenance.
1. Enter “User Maintenance” by pressing: ON/OFF PROG * * CONF
2. Enter: 07, and press HOLD HOLD HOLD.
3. Enter: Start Time in Hours (two characters) and Minutes (two characters) for Pattern 1 - first mode and press HOLD.
Notes: To clear an entry or existing data, press the FLASH key.
4. Enter: Desired Mode for Pattern 1 - first (0 - None, 1 - Day 1, 2 - Day 2, 3 - Night, 4 - Night 1, 5 - Night 2) and press HOLD to store the entry.
Note: To clear an entry or existing data, press the FLASH key.
5. To set additional mode schedules, press the VOLUME up or down arrow or HOLD to move to the desired mode.
6. Repeat steps 3-5 until all patterns and modes are set. (There are 3 total patterns with 5 start time/modes each.)
Note: Entry Positions are listed in Chapter 4 of Section 700 - Feature Operations.
7. Press AUTO PROG to return to “81-User Maintenance” (step 1 above).OR...Press AUTO ON/OFF to exit User Maintenance.
576-36-750 DBS 576 (USA), issued October 2000 39
2. Setting Up Your Phone
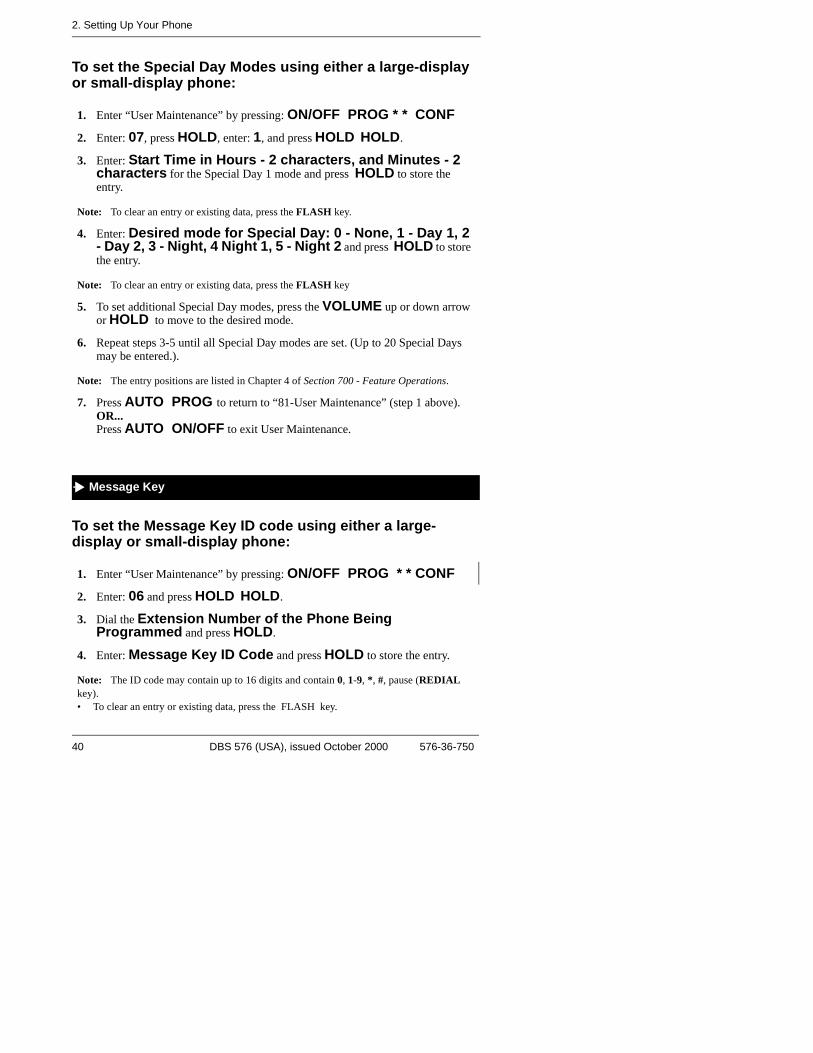
To set the Special Day Modes using either a large-display or small-display phone:
To set the Message Key ID code using either a large-display or small-display phone:
1. Enter “User Maintenance” by pressing: ON/OFF PROG * * CONF
2. Enter: 07, press HOLD, enter: 1, and press HOLD HOLD.
3. Enter: Start Time in Hours - 2 characters, and Minutes - 2 characters for the Special Day 1 mode and press HOLD to store the entry.
Note: To clear an entry or existing data, press the FLASH key.
4. Enter: Desired mode for Special Day: 0 - None, 1 - Day 1, 2 - Day 2, 3 - Night, 4 Night 1, 5 - Night 2 and press HOLD to store the entry.
Note: To clear an entry or existing data, press the FLASH key
5. To set additional Special Day modes, press the VOLUME up or down arrow or HOLD to move to the desired mode.
6. Repeat steps 3-5 until all Special Day modes are set. (Up to 20 Special Days may be entered.).
Note: The entry positions are listed in Chapter 4 of Section 700 - Feature Operations.
7. Press AUTO PROG to return to “81-User Maintenance” (step 1 above).OR...Press AUTO ON/OFF to exit User Maintenance.
1. Enter “User Maintenance” by pressing: ON/OFF PROG * * CONF
2. Enter: 06 and press HOLD HOLD.
3. Dial the Extension Number of the Phone Being Programmed and press HOLD.
4. Enter: Message Key ID Code and press HOLD to store the entry.
Note: The ID code may contain up to 16 digits and contain 0, 1-9, *, #, pause (REDIAL key). • To clear an entry or existing data, press the FLASH key.
Message Key
40 DBS 576 (USA), issued October 2000 576-36-750
2. Setting Up Your Phone
To set extension names using either a large-display or small-display phone:
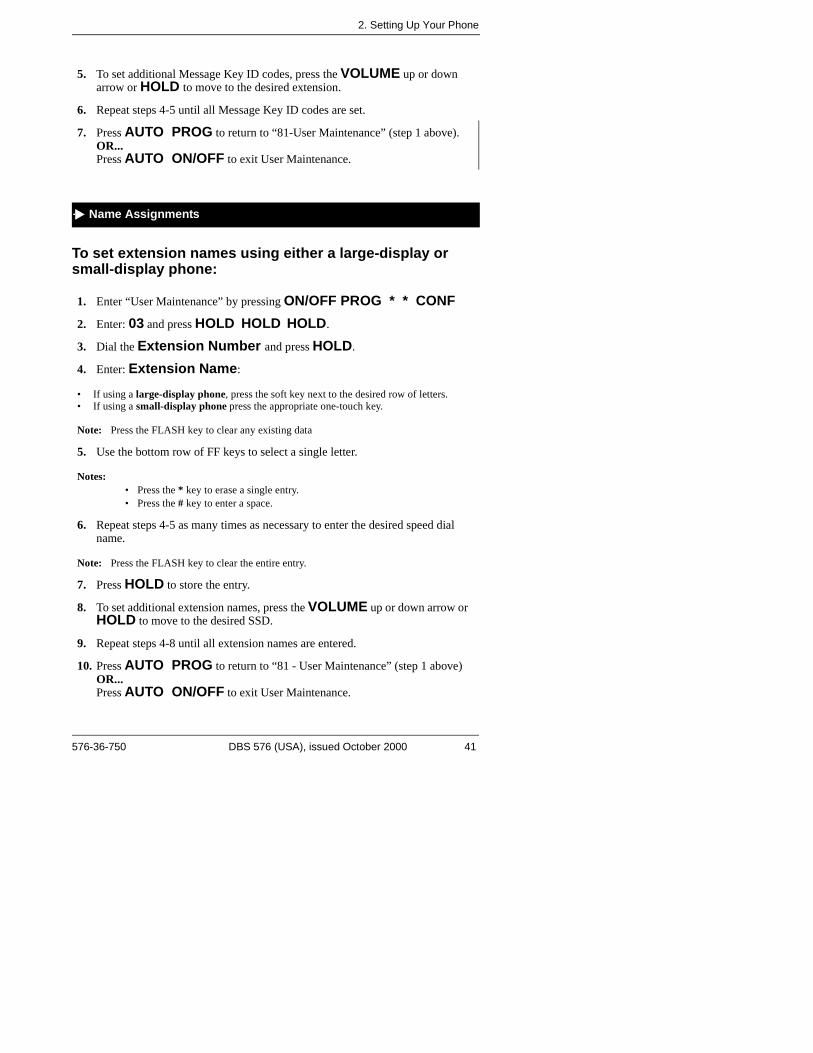
5. To set additional Message Key ID codes, press the VOLUME up or down arrow or HOLD to move to the desired extension.
6. Repeat steps 4-5 until all Message Key ID codes are set.
7. Press AUTO PROG to return to “81-User Maintenance” (step 1 above).OR...Press AUTO ON/OFF to exit User Maintenance.
1. Enter “User Maintenance” by pressing ON/OFF PROG * * CONF 2. Enter: 03 and press HOLD HOLD HOLD.
3. Dial the Extension Number and press HOLD.
4. Enter: Extension Name:
• If using a large-display phone, press the soft key next to the desired row of letters. • If using a small-display phone press the appropriate one-touch key.
Note: Press the FLASH key to clear any existing data
5. Use the bottom row of FF keys to select a single letter.
Notes:• Press the * key to erase a single entry.• Press the # key to enter a space.
6. Repeat steps 4-5 as many times as necessary to enter the desired speed dial name.
Note: Press the FLASH key to clear the entire entry.
7. Press HOLD to store the entry.
8. To set additional extension names, press the VOLUME up or down arrow or HOLD to move to the desired SSD.
9. Repeat steps 4-8 until all extension names are entered.
10. Press AUTO PROG to return to “81 - User Maintenance” (step 1 above)OR...Press AUTO ON/OFF to exit User Maintenance.
Name Assignments
576-36-750 DBS 576 (USA), issued October 2000 41
2. Setting Up Your Phone
To create Send Text Messages using either a large-display or small-display phone:
1. Enter “User Maintenance” by pressing: ON/OFF PROG * * CONF.
2. Enter: 11, press HOLD, enter: 0, and press HOLD.
3. Press HOLD, enter: Message Number (0-9), and press HOLD.
4. Enter: Text Message (up to 15 characters):• If using a large-display phone, press the soft key next to the desired row of letters.• If using a small-display phone press the appropriate one-touch key.
Note: Press the FLASH key to clear any existing data.
5. Use the bottom row of FF keys to select a single letter.
Notes:• Press the * key to erase a single entry.• Press the # key to enter a space.
6. Repeat steps 4-5 as many times as necessary to enter the desired Text Message and press HOLD to store the entry.
Note: Press the FLASH key to clear any existing data.
7. To set additional text messages, press the VOLUME up or down key or press HOLD to move to the desired Send Text Message.
8. Repeat steps 4-7 until all Send Text Messages are entered.
9. Press AUTO PROG to return to “81-User Maintenance” (step 1 above).OR...Press AUTO ON/OFF to exit User Maintenance.
Send Text Messages
42 DBS 576 (USA), issued October 2000 576-36-750
2. Setting Up Your Phone
To set or assign PSD numbers using either a large-display or small-display phone:
To set or assign SSD numbers using either a large-display or small-display phone:
1. Enter “User Maintenance” by pressing: ON/OFF PROG * * CONF.
2. Enter: 01 and press HOLD HOLD HOLD.
3. Dial the Extension Number and press HOLD.
4. Enter: PSD Bin Number (80-99) and press HOLD.
5. Enter: PSD Digits to be dialed and press HOLD to store the entry.
Note: To clear an entry or existing data, press the FLASH key.
6. To set additional PSD numbers, press the VOLUME up or down key or HOLD to move to the desired PSD bin number.
7. Repeat steps 5-6 until all PSD numbers are entered.
8. Press AUTO PROG to return to “81-User Maintenance” (step 1 above).OR...Press AUTO ON/OFF to exit User Maintenance.
1. Enter “User Maintenance” by pressing: ON/OFF PROG * * CONF.
2. Enter: 02 and press HOLD HOLD HOLD.
3. Enter: SSD Bin Number (00-79 or 000-799) and press HOLD.
4. Enter: SSD Digits to be dialed and press HOLD to store the entry.
Note: Press the FLASH key to clear an entry or any existing data.
5. To set additional SSD numbers, press the VOLUME up or down key or HOLD to move to the desired SSD.
6. Repeat steps 4-5 until all SSDs are entered.
7. Press AUTO PROG to return to “81-User Maintenance” (step 1 above).OR...Press AUTO ON/OFF to exit User Maintenance.
Speed Dial
576-36-750 DBS 576 (USA), issued October 2000 43
2. Setting Up Your Phone
To create SSD indexes using either a large-display or small-display phone:
To change the system date, time, and day:
1. Enter “User Maintenance” by pressing: ON/OFF PROG * * CONF.
2. Enter: 02, press HOLD, enter: 2, and press HOLD HOLD.
3. Enter: SSD Index Number (1-2) and press HOLD.
4. Enter: SSD Index Name:
• If using a large-display phone, press the soft key next to the desired row of letters.
• If using a small-display phone press the appropriate one-touch key.
Note: Press the FLASH key to clear any existing data.
5. Use the bottom row of FF keys to select a single letter.
Notes:• Press the * key to erase a single entry.• Press the # key to enter a space.
6. Repeat steps 4-5 as many times as necessary to enter the desired SSD name.
Note: Press the FLASH key to clear the entire entry.
7. Press HOLD to store the entry.
8. To set additional SSD index names, press the VOLUME up or down key or HOLD to move to the desired SSD.
9. Repeat steps 6-9 until all SSD indexes are entered.
10. Press AUTO PROG to return to “81-User Maintenance” (step 1 above).OR...Press AUTO ON/OFF to exit User Maintenance.
1. Enter “User Maintenance” by pressing: ON/OFF PROG * * CONF.
2. Enter: 000 and press HOLD.
System Clock: Date/Time/Day
44 DBS 576 (USA), issued October 2000 576-36-750

2. Setting Up Your Phone
To create Text Message Replies using either a large-display or small-display phone:
3. Enter: The Year (two characters), Month (two characters), and Day (two characters) and press HOLD.
Note: Press the FLASH key to clear any existing data.
4. Enter: The Hour (two characters) and Minute (two characters) and press HOLD.
Note: Press the FLASH key to clear any existing data.
5. Enter: The Day of Week where:1 = Mon, 2 = Tues., 3 = Wed., 4 = Thurs., 5 = Fri., 6 = Sat., 0 = Sunand press HOLD to store the entry.
Note: Press the FLASH key to clear any existing data.
6. Press AUTO PROG to return to “81-User Maintenance” (step 1 above).OR...Press AUTO ON/OFF to exit User Maintenance.
1. Enter “User Maintenance” by pressing: ON/OFF PROG * * CONF.
2. Enter: 11, press HOLD, enter: 1, and press HOLD.
3. Press HOLD, enter: Message Number (0-9), and press HOLD.
4. Enter: Text Message (up to 15 characters):• If using a large-display phone, press the soft key next to the desired row of letters.• If using a small-display phone press the appropriate one-touch key.
Note: Press the FLASH key to clear any existing data.
5. Use the bottom row of FF keys to select a single letter.
Notes:• Press the * key to erase a single entry.• Press the # key to enter a space.
6. Repeat steps 4-5 as many times as necessary to enter the desired Text Message and press HOLD to store the entry.
Note: Press the FLASH key to clear any existing data.
Text Message Replies
576-36-750 DBS 576 (USA), issued October 2000 45
2. Setting Up Your Phone
To set the Call Forward ID code using either a large-display or small-display phone:
To set Walking TRS codes using either a large-display or small-display phone:
7. To set additional text messages, press the VOLUME up or down key or press HOLD to move to the desired Reply Text Message.
8. Repeat steps 4-7 until all Reply Text Messages are entered.
9. Press AUTO PROG to return to “81-User Maintenance” (step 1 above).OR...Press AUTO ON/OFF to exit User Maintenance.
1. Enter “User Maintenance” by pressing: ON/OFF PROG * * CONF.
2. Enter: 05 HOLD HOLD.
3. Dial the Extension Number and press HOLD.
4. Enter: Call Forward ID Code and press HOLD to store the entry.
Notes:• The ID code may contain up to 16 digits and contain 0, 1-9, *, #, pause (REDIAL key).• To clear an entry or any existing data, press the FLASH key.
5. To set additional additional Call Forward ID Codes, press the VOLUME up or down arrow or HOLD to move to the desired SSD.
6. Repeat steps 4-5 until all SSD indexes are entered.
7. Press AUTO PROG to return to “81-User Maintenance” (step 1 above).OR...Press AUTO ON/OFF to exit User Maintenance.
1. Enter “User Maintenance” by pressing: ON/OFF PROG * * CONF. 2. Enter: 08 and press HOLD HOLD.
Voice Mail: Set Call-Forward ID Codes
Walking TRS Class of Service
46 DBS 576 (USA), issued October 2000 576-36-750
2. Setting Up Your Phone
3. Dial the Extension Number and press HOLD.
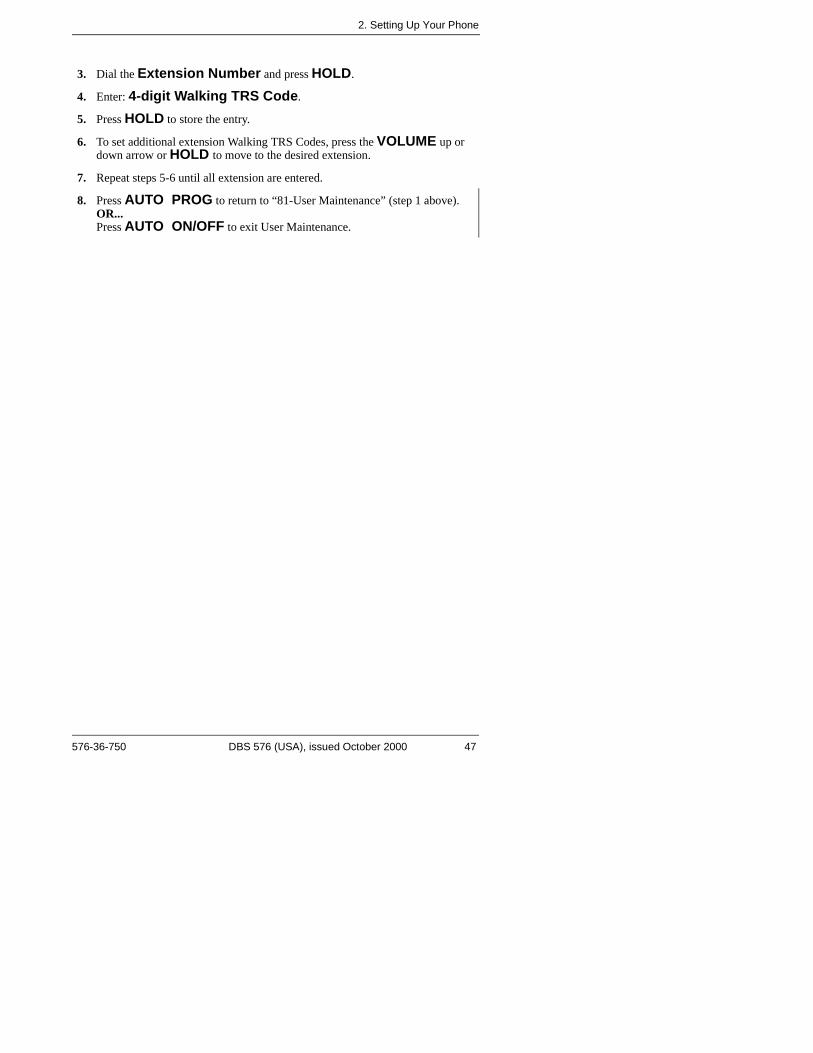
4. Enter: 4-digit Walking TRS Code.
5. Press HOLD to store the entry.
6. To set additional extension Walking TRS Codes, press the VOLUME up or down arrow or HOLD to move to the desired extension.
7. Repeat steps 5-6 until all extension are entered.
8. Press AUTO PROG to return to “81-User Maintenance” (step 1 above).OR...Press AUTO ON/OFF to exit User Maintenance.
576-36-750 DBS 576 (USA), issued October 2000 47
2. Setting Up Your Phone
48 DBS 576 (USA), issued October 2000 576-36-750
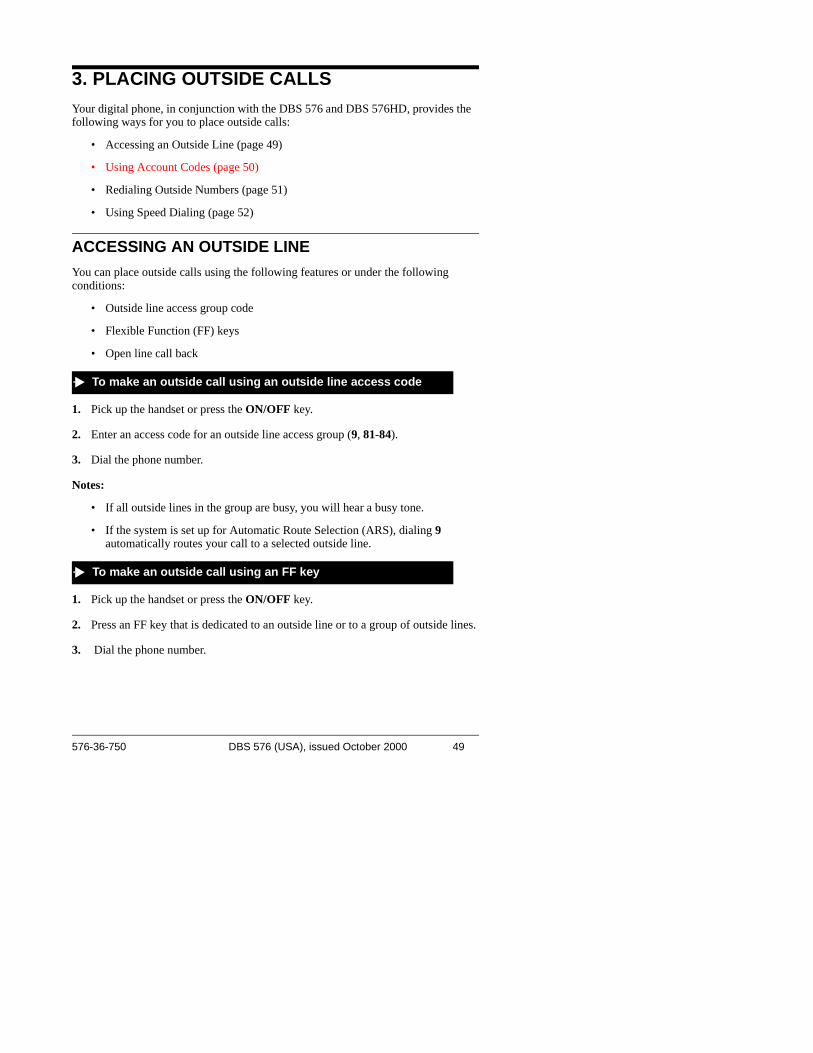
3. PLACING OUTSIDE CALLSYour digital phone, in conjunction with the DBS 576 and DBS 576HD, provides the following ways for you to place outside calls:
• Accessing an Outside Line (page 49)
• Using Account Codes (page 50)
• Redialing Outside Numbers (page 51)
• Using Speed Dialing (page 52)
ACCESSING AN OUTSIDE LINE You can place outside calls using the following features or under the following conditions:
• Outside line access group code
• Flexible Function (FF) keys
• Open line call back
1. Pick up the handset or press the ON/OFF key.
2. Enter an access code for an outside line access group (9, 81-84).
3. Dial the phone number.
Notes:
• If all outside lines in the group are busy, you will hear a busy tone.
• If the system is set up for Automatic Route Selection (ARS), dialing 9 automatically routes your call to a selected outside line.
1. Pick up the handset or press the ON/OFF key.
2. Press an FF key that is dedicated to an outside line or to a group of outside lines.
3. Dial the phone number.
To make an outside call using an outside line access code
To make an outside call using an FF key
576-36-750 DBS 576 (USA), issued October 2000 49
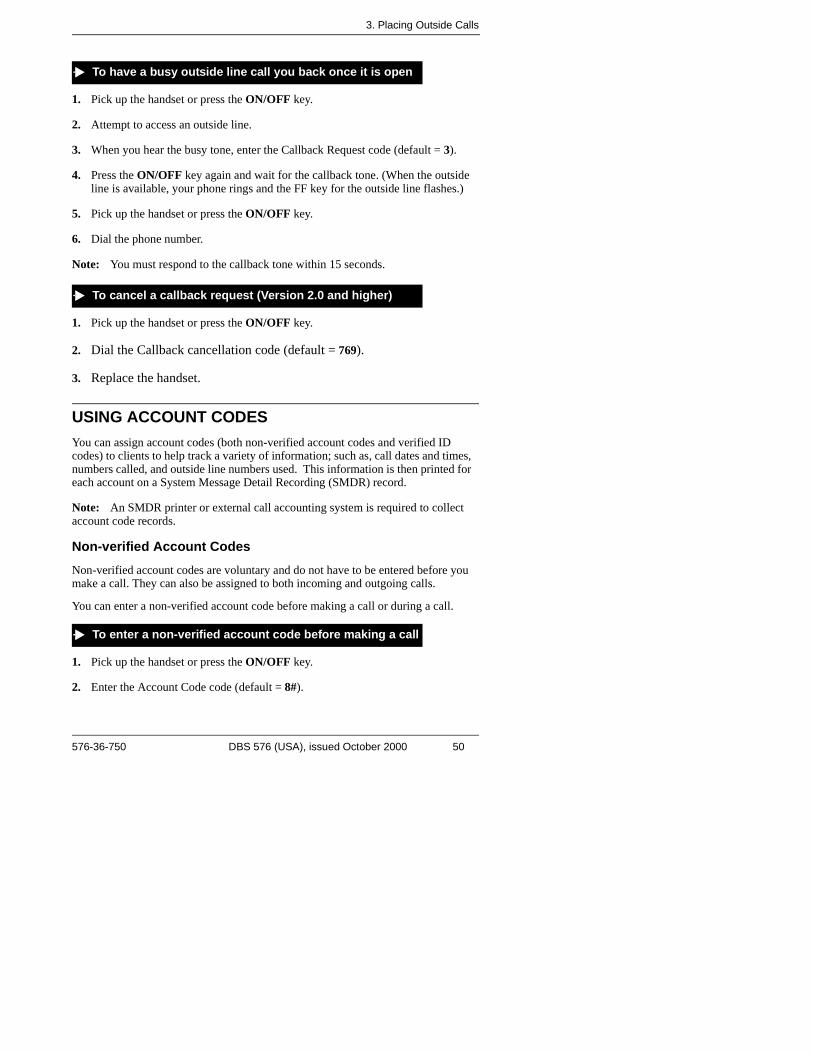
3. Placing Outside Calls
1. Pick up the handset or press the ON/OFF key.
2. Attempt to access an outside line.
3. When you hear the busy tone, enter the Callback Request code (default = 3).
4. Press the ON/OFF key again and wait for the callback tone. (When the outside line is available, your phone rings and the FF key for the outside line flashes.)
5. Pick up the handset or press the ON/OFF key.
6. Dial the phone number.
Note: You must respond to the callback tone within 15 seconds.
1. Pick up the handset or press the ON/OFF key.
2. Dial the Callback cancellation code (default = 769).
3. Replace the handset.
USING ACCOUNT CODESYou can assign account codes (both non-verified account codes and verified ID codes) to clients to help track a variety of information; such as, call dates and times, numbers called, and outside line numbers used. This information is then printed for each account on a System Message Detail Recording (SMDR) record.
Note: An SMDR printer or external call accounting system is required to collect account code records.
Non-verified Account CodesNon-verified account codes are voluntary and do not have to be entered before you make a call. They can also be assigned to both incoming and outgoing calls.
You can enter a non-verified account code before making a call or during a call.
1. Pick up the handset or press the ON/OFF key.
2. Enter the Account Code code (default = 8#).
To have a busy outside line call you back once it is open
To cancel a callback request (Version 2.0 and higher)
To enter a non-verified account code before making a call
576-36-750 DBS 576 (USA), issued October 2000 50
3. Placing Outside Calls
3. Enter the Account Code (up to 4 digits or up to 10 digits, depending on the setting).
4. Press the # key.
5. Dial 9 or press an FF key that is dedicated to an outside line.
6. Dial the phone number.
1. During a call, press the AUTO key.
2. Press the # key.
3. Enter the Account Code (up to 4 digits or up to 10 digits, depending on the setting).
4. Press the # key.
Verified Account CodesVerified ID codes are required by extensions that have restrictions on placing outgoing calls (i.e., a specific code is required to place an outgoing call).
1. Pick up the handset or press the ON/OFF key.
2. Enter the Verified Account ID feature access code (default = 8#).
3. Enter the Verified Account code. The entered code may be up to 4 digits or up to 10 digits, depending on the setting.
4. Press the # key.
5. Dial 9 or press an FF key that is dedicated to an outside line.
6. Dial the phone number.
REDIALING OUTSIDE NUMBERSYou can use the REDIAL key to redial the last number dialed or to redial a busy number.
1. Pick up the handset or press the ON/OFF key.
To enter a non-verified account code during a call
To make an outside call that requires an account code
To redial the last number dialed
576-36-750 DBS 576 (USA), issued October 2000 51
3. Placing Outside Calls
2. Access an outside line.
3. Press the REDIAL key. (The phone displays and dials the last outside number dialed.)
Note: The system will continue to redial the busy number until you hang up the phone, the called party answers the call, or a maximum of 15 redial attempts is made.
1. Pickup the handset or press the ON/OFF key.
2. Access an outside line.
3. Dial the phone number.
4. After hearing the busy tone, press the REDIAL key. (The phone continues to dial the busy number until the caller answers or the redial timer times out.)
1. Replace the handset or press the ON/OFF key.
USING SPEED DIALINGAfter PSD numbers and SSD numbers have been assigned, you can quickly dial the number by pressing the appropriate one-touch or soft key or by entering the appropriate speed dial bin number. You can also check and see what PSD and SSD number or name is assigned to specific one-touch or soft keys.
Notes:
• For information on deleting PSD numbers, see “Assigning and Deleting PSD Numbers” on page 25.
• You cannot delete SSD numbers assigned to one-touch or soft keys. These numbers are programmed from the attendant’s phone.
Dialing Speed Dial NumbersYou can dial speed dial numbers by using preassigned one-touch keys on non-display or small-display phones, using soft keys and speed dial directories, or by entering speed dial bin numbers.
1. Pickup the handset or press the ON/OFF key.
2. If necessary, access an outside line.
To automatically redial a busy number
To cancel automatic repeat dialing
To dial a speed dial number by pressing a one-touch key
576-36-750 DBS 576 (USA), issued October 2000 52
3. Placing Outside Calls
3. Press the desired one-touch key.
1. Press the MODE key one time. (SSD and PSD appear on the second line of the display.)
2. Press the soft key next to SSD or PSD. (The first two speed dial entries appear on the second line of the display.)
3. Scroll through the speed dial directory until the desired speed dial entry is displayed. (To display the next two entries, press the # key. To display the previous two entries, press the * key.)
4. Pick up the handset or press the ON/OFF key.
5. If necessary, access an outside line.
6. Press the soft key next to the desired speed dial entry to initiate dialing.
1. From the Main Menu, press the soft key to the left of SYSTEM DIAL or PERSONAL DIAL. (In the PSD directory, the first 10 speed dial entries are displayed. In the SSD directory, 10 alphabetical entries are displayed.)
2. For the PSD directory, proceed to step 3.
For the SSD directory, press the soft key to the left of the desired group of letters to display the first five speed dial entries.
3. Scroll through the speed dial directory until the desired speed dial entry is displayed. (To scroll forward in either directory, press the NEXT key. To scroll backwards in either directory, press the PREV key.)
4. Pick up the handset or press the ON/OFF key.
5. If necessary, access an outside line.
6. Press the soft key next to the desired speed dial entry to initiate dialing.
To dial a speed dial number using the soft keys on a small-display phone
To dial a speed dial number using the soft keys on a large-display phone
576-36-750 DBS 576 (USA), issued October 2000 53
3. Placing Outside Calls
Note: You must know the PSD or SSD bin number for the number to be dialed to perform this task. For information on determining speed dial numbers, see “Checking Speed Dial Numbers” on page 54.
1. Pick up the handset or press the ON/OFF key.
2. If necessary, access an outside line.
3. Press the AUTO key.
4. Enter the appropriate three digit speed dial bin number (PSD bins 80-99 or SSD bins 00-79 or 000-799).
Checking Speed Dial NumbersAfter speed dial numbers have been assigned, you can check to see what number has been programmed by using soft keys or by entering the speed dial bin number.
Note: The following tasks require a display phone. To check speed dial numbers on a non-display phone, see Appendix B, “Customized PSD Bin Numbers” on page 101 for your personalized list of speed dial numbers.
1. Press the MODE key one time. (SSD and PSD appear on the second line of the display.)
2. Press the soft key next to SSD or PSD. (The first two speed dial entries appear on the second line of the display.)
3. Scroll through the speed dial directory until the desired speed dial bin entry is displayed. (To display the next two entries, press the # key. To display the previous two entries, press the * key.)
4. Pick up the handset or press the ON/OFF key.
5. Press the CONF key.
6. Press the soft key next to the speed dial entry. (The speed dial number appears on the display.)
To dial a speed dial number by entering the speed dial bin number
To check a speed dial number using the soft keys on a small-display phone
54 DBS 576 (USA), issued October 2000 576-36-750
3. Placing Outside Calls
1. From the Main Menu, press the soft key to the left of SYSTEM DIAL or PERSONAL DIAL. (In the PSD directory, the first 10 speed dial entries are displayed. In the SSD directory, 10 alphabetical entries are displayed.)
2. For the PSD directory, proceed to step 3.
For the SSD directory, press the soft key to the left of the desired group of letters to display the first five speed dial entries.
3. Scroll through the speed dial directory until the desired speed dial entry is displayed. (To scroll forward in either directory, press the NEXT key. To scroll backwards in either directory, press the PREV key.)
4. Pick up the handset or press the ON/OFF key.
5. Press the CONF key.
6. Press the soft key next to the speed dial entry. (The speed dial number appears on the first line of the display. The speed dial bin number appears on the second line of the display, along with any name that has been assigned to the speed dial number.)
1. Pick up the handset or press the ON/OFF key.
2. Press the CONF key.
3. Press the AUTO key.
4. Enter the appropriate PSD bin number (80-99) or SSD bin number (00-79 or 000-799). (The speed dial number appears on the first line of the display. The speed dial bin number appears on the second line of the display, along with any name that has been assigned to the speed dial number.)
To check a speed dial number using the soft keys on a large-display phone
To check speed dial entries by entering the speed dial bin number
576-36-750 DBS 576 (USA), issued October 2000 55
3. Placing Outside Calls
This page intentionally left blank.
56 DBS 576 (USA), issued October 2000 576-36-750
4. HANDLING INCOMING CALLSYou can handle calls that reach your phone in a variety of ways:
• Answer Calls (page 57)
• Use Call Hold (page 58)
• Transfer Calls (page 59)
• Using Call Pickup (page 61)
• Using Call Park (page 63)
ANSWERING CALLSYou can answer various types of calls using the following procedure:
1. Pick up the handset or press the ON/OFF key.
2. Do one of the following:
3. Complete the call, and replace the handset or press the ON/OFF key.
To answer . . . Do the following . . .
A call ringing at someone else’s phone
a. Press the flashing FF key.
OR
a. Enter the Direct Call Pickup Set code (default = 704).
b. Dial the number of the ringing extension.
A call ringing a phone within your call pickup group
Enter the All Calls Pickup Set code (default = 701).
An external call ringing a phone within your call pickup group
Enter the External Call Pickup Set code (default = 702).
A call ringing outside your call pickup group
a. Enter the Specified Group Pickup Set code (default = 703).
b. Enter the number of the call pickup group (01-72) where the phone is ringing.
To answer a call
576-36-750 DBS 576 (USA), issued October 2000 57
4. Handling Incoming Calls
USING CALL HOLDDepending on the set up of your system, you can put one or more calls on hold and retrieve those calls using the HOLD key or a designated Floating Hold key.
Notes:
• The Floating Hold feature assigns a Floating Hold number (001-576 for DBS 576) (001-096 for DBS 576HD) to a specific FF key. By placing a call on hold using the Floating Hold key, you can retrieve the call from any phone that has an FF key that is assigned the same Floating Hold number or by simply entering the Floating Hold number.
• Floating Hold requires system programming.
• The EXT indicator flashes when you hold an internal call or an outside line that is not assigned to an FF key.
• If you do not pick up a held call in a certain period of time, you will hear a tone indicating that the call is still waiting.
1. While on a call, press the HOLD key or the Floating Hold FF key.
1. While on a call, press the HOLD key to put the first call on hold.
2. Press the FF key that is flashing green to answer the second call.
3. Press the HOLD key to put the second call on hold.
4. Press the FF key that is flashing green to return to the first call.
To retrieve a call . . . Do . . .
From the extension that placed the call on hold
Press the FF key that is flashing green.
OR
Press the HOLD key (if no FF key is flashing).
To place a call on hold
To use Broker’s Hold and toggle between two calls
To retrieve a call placed on hold, do one of the following:
58 DBS 576 (USA), issued October 2000 576-36-750
4. Handling Incoming Calls
Note: The number of floating hold orbits available may very depending on the Station/Floating Park Hold Pickup setting (FF1-0-02-0025). The station/park pickup access code can set to *9 (default) or 733. The floating hold pickup access code (*9) operates as follows:
TRANSFERRING CALLSYou can transfer a call to an open extension, a busy extension, or an outside line. These transfers can be either supervised or unsupervised.
Note: If a transferred call is not answered within a specified time, the call rings again at the extension that transferred it.
Supervised TransfersIn a supervised transfer, you announce the call before transferring it. This allows you to give the recipient information about the call.
1. While on a call, press the HOLD key.
From a different extension than the one that placed the call on hold
Press the FF key that is flashing red.
From Floating Hold (also known as Station Park Pick Up)
a. Press the Floating Hold FF key.
OR
a. Enter the Floating Hold Answer code (default = *9).
b. Enter the Floating Hold orbit number (001-576[CPC-288/576], 10-96 [CPC-96, HS, HM] or 001-099 [CPC-288/576] or 01-09 [CPC-96, HS, HM]. See the note below.
System Size Virtual Line Number and Operation
96 01-09 Floating Hold pick up10-96: Station Park Hold pick up purpose
Above 96 (DBS 576 only)
001-099 Floating Hold pick up100-576: Station Park Hold pick up purpose
To retrieve a call . . . Do . . .
To supervise the transfer of a call to another extension or an outside number
576-36-750 DBS 576 (USA), issued October 2000 59
4. Handling Incoming Calls
2. Either dial the extension number or the outside line number to which the call will be transferred.
3. When the recipient answers, announce the call.
4. Complete the call by doing one of the following:
a. If On-hook Transfer is enabled for your extension, replace the handset or press the ON/OFF key.
b. If On-hook Transfer is disabled for your extension, press the PROG key.
Note: On-hook Transfer requires system programming.
Unsupervised TransfersIn an unsupervised transfer, you do not announce the call to the person receiving the transfer. You hang up before the recipient answers the call.
1. While on a call, press the HOLD key.
2. Either dial the extension number or the outside line number to which the call will be transferred.
3. Complete the call by doing one of the following:
a. If On-hook Transfer is enabled for your extension, replace the handset or press the ON/OFF key.
b. If On-hook Transfer is disabled for your extension, press the PROG key.
Note: On-hook Transfer requires system programming.
1. While on a call, press the HOLD key.
2. Dial the extension number to which the call will be transferred.
3. If your extension does not have Auto Camp-on activated, enter the Camp-on (Call Waiting) Set code (default = 2). Otherwise proceed to step 4.
4. Complete the call by doing one of the following:
a. If On-hook Transfer is enabled for your extension, replace the handset or press the ON/OFF key.
To transfer a call to another extension or an outside number without supervising the call
To transfer a call to a busy extension
60 DBS 576 (USA), issued October 2000 576-36-750

4. Handling Incoming Calls
b. If On-hook Transfer is disabled for your extension, press the PROG key.
Note: On-hook Transfer requires system programming.
USING CALL PICKUPThe System allows the following types of Call Pickup:
• Extension Group Pickup
• Extension Direct Pickup
• Trunk Group Pickup
• Trunk Direct Pickup
Extension Group PickupExtension Group Pickup allows you to pick up a direct ringing call (within your extension pickup group or in a different extension pickup group) without having to dial the number of the ringing extension.
Three types of Extension Group Pickup are available:
• Call Pickup-All Calls: you can pick up a direct call ringing anywhere within your own extension group.
• Call Pickup-External Calls: You can pick up only direct external calls ringing within your own extension group.
• Specified Group Pickup: You can pick up a call ringing to an extension in another extension group.
1. Lift the handset or press the ON/OFF key.
2. Enter the Extension Group Pickup- All Calls code (default = 701).
3. Complete the call and replace handset or press the ON/OFF key.
1. Lift the handset and press the ON/OFF key.
2. Enter the Extension Group Pickup-External Calls code (default = 702).
3. Complete the call and replace the handset or press the ON/OFF key.
To use Extension Group Pickup All Calls
To use Extension Group Pickup External Calls
576-36-750 DBS 576 (USA), issued October 2000 61

4. Handling Incoming Calls
1. Lift the handset or press the ON/OFF key.
2. Enter the Specified Group Pickup access code (default = 703).
3. Enter the number of the Call Pickup Group (01-72) where the call is ringing.
4. Complete the call and replace the handset or press the ON/OFF key.
Extension Direct PickupExtension Direct Pickup allows you to answer a call to another extension by dialing the number of the ringing extension.
1. Lift the handset or press the ON/OFF key.
2. Enter the Extension Direct Call Pickup code (default = 704).
3. Dial the number of the ringing extension.
4. Complete the call and replace the handset or press the ON/OFF key.
Trunk Group PickupTrunk Group Pickup allows you to answer calls ringing to any extension within your own MCO incoming trunk group.
1. Lift the handset or press the ON/OFF key.
2. Enter the Trunk Group Pickup code (default = 709).
3. Complete the call and replace the handset or press the ON/OFF key.
Trunk Direct PickupTrunk Direct Pickup allows you to answer calls ringing on a specific trunk number.
1. Lift the handset or press the ON/OFF key.
2. Enter the Trunk Direct Pickup code (default = *0).
3. Dial the number of the ringing trunk.
To use Specified Group Pickup All Calls
To use Extension Direct Pickup
To use Trunk Group Pickup
To use Trunk Direct Pickup
62 DBS 576 (USA), issued October 2000 576-36-750
4. Handling Incoming Calls
4. Complete the call and replace the handset or press the ON/OFF key.
USING CALL PARKYou can use the Call Park function to transfer a call, even if you cannot locate the intended recipient of the call.
There are two ways for an extension to park a call on the DBS. One way is to park the call at the receiving extension and to retrieve the call at another extension by dialing the park answer code plus the parking extension number. The other way is to park the call at another extension and dial the park transfer answer code at the other extension to retrieve the call.
1. While on a call, press the HOLD key.
2. Enter Call Park access code (default = 771) or press the PARK HOLD key.
3. If necessary, page the party that needs to receive the call.
1. Lift the handset or press the ON/OFF key.
2. Enter the Call Park Answer/Other Extension access code (default = 773).
OR
Enter the Call Park/Floating Hold Answer feature access code (default = *9).
3. Dial the number of the extension that parked the call.
1. While on a call, press the HOLD key.
2. Enter the Call Park Transfer access code (default = 774) followed by the extension number to receive the parked call.
OR
Press the BLF Key.
1. At the extension with the transferred park call, lift the handset or press the ON/OFF key.
To park a call on this extension
To retrieve a call parked at another extension
To park a call at another extension
To retrieve a call parked on this extension
576-36-750 DBS 576 (USA), issued October 2000 63
4. Handling Incoming Calls
2. Enter the Call Park Answer/Self Access Code (default = 772).
3. If necessary, page the party that needs to retrieve the call.
64 DBS 576 (USA), issued October 2000 576-36-750

5. COMMUNICATING WITHIN YOUR OFFICEThe DBS 576 and DBS 576HD provide a variety of ways to handle calls within your office:
• Calling Other Extensions (page 65)
• Switching Between Tone and Voice Calling (page 66)
• Using Paging (page 67)
• Answering a Page with Universal Night Answer (page 68)
• Making Announcements to Busy Extensions (page 68 )
• Using Call Forwarding (page 69)
• Using Camp-on (Call Waiting) (page 72)
• Using Message Waiting/Callback (page 74)
• Using Do-Not-Disturb (page 75)
• Using Absence Messages (page 76)
• Locking Your Extension (page 78)
CALLING OTHER EXTENSIONSYou can call other extensions by entering the extension number or by using the soft keys and Extension Directory. While making a call, you can also specify whether to use tone calling or voice calling.
1. Pick up the handset or press the ON/OFF key.
2. Dial the desired extension or dial 0 for the operator.
1. Press the MODE key twice. (EXT appears on the second line of the display.)
2. Press the soft key next to EXT. (The first two extension entries appear on the second line of the display.)
To call another extension by entering the extension number
To call another extension using the soft keys on a small-display phone
576-36-750 DBS 576 (USA), issued October 2000 65
5. Communicating Within Your Office
3. Scroll through the directory until the desired extension entry is displayed. (To display the next two entries, press the # key. To display the previous two entries, press the * key.)
4. Pick up the handset or press the ON/OFF key.
5. Press the soft key next to the desired extension entry to initiate dialing.
1. From the Main Menu, press the soft key to the left of EXTENSION. (10 alphabetical entries are displayed.)
2. Press the soft key to the left of the desired group of letters to display the first five extension entries.
3. Scroll through the extension directory until the desired extension entry is displayed. (To scroll forward, press the NEXT key. To scroll backwards, press the PREV key.)
4. To scroll forward in the directory, press the NEXT key. To scroll backwards in the directory, press the PREV key.
5. Pick up the handset or press the ON/OFF key.
6. Press the soft key next to the desired extension entry to initiate dialing.
Switching Between Tone and Voice CallingYou can call another extension using tone calling or voice calling. Tone calling sends a ringing tone to the called extension, where voice calling performs like an intercom call and connects immediately without ringing the extension. (If desired, the called party can answer a voice call without lifting the handset.)
System programming determines the default calling mode; however, you can switch between tone and voice calling by entering 1.
1. Lift the handset or press the ON/OFF key.
2. Dial the extension number.
3. If your phone is set for tone calling and you want to make a voice call, enter 1. (Or if your phone is set for voice calling and you want to make a tone call, enter 1.)
4. Speak when the call is answered.
5. Replace the handset or press the ON/OFF key.
To call another extension using the soft keys on a large-display phone
To switch between tone to voice calling
66 DBS 576 (USA), issued October 2000 576-36-750
5. Communicating Within Your Office
USING PAGINGYou can make both internal and external pages and announcements. Internal pages are made via the key telephone speakers and external pages are made through the speakers of an external paging system connected to the DBS 576 or DBS 576HD system. When you issue a page, you specify a paging group so that your announcement is heard only on the phones that are members of that group.
You can answer a page from any extension using the Meet-Me Answer feature.
Note: You can belong to more than one paging group.
1. Pick up the handset or press the ON/OFF key.
2. Enter the Page Group code (default = #).
3. Enter the number of the desired page group (0-9).
4. Make your announcement.
5. Do one of the following:
Answering a Page (Meet-Me Answer)You can answer a page from any extension using the Meet-Me Answer feature.
1. Pick up the handset or press the ON/OFF key.
2. Enter the Meet-Me Answer code (default = ##). (You are connected to the party trying to reach you.)
If . . . Then . . .
You want to end the page Replace the handset or press the ON/OFF key.
Note: To avoid an abrupt “hang-up” sound, press the FLASH key before replacing the handset.
You want to get a response from some-one answering the page at an extension
Do not hang up; wait for the paged party to answer.
To page another party or make an announcement
To answer a page using Meet-Me Answer
576-36-750 DBS 576 (USA), issued October 2000 67
5. Communicating Within Your Office
ANSWERING A PAGE WITH UNIVERSAL NIGHT ANSWERDuring night mode, Universal Night Answer (UNA) sends incoming calls for selected trunks to ring external paging speakers. UNA calls can be picked up from any extension, provided the extension’s COS allows UNA answer.
This feature can also be programmed so that incoming calls ring on both external paging speakers and at extensions with CO/MCO appearances on FF keys (Key Tele-phones only).
1. Pick up the handset or press the ON/OFF key.
2. Enter the UNA to Page Pickup code (default = 705).
1. Pick up the handset or press the ON/OFF key.
2. Press the assigned FF or UNA key.
MAKING ANNOUNCEMENTS TO BUSY EXTENSIONSNote: This feature requires system programming or a specific DBS 576 or DBS 576HD configuration, and may not be available. For information, see your system administrator or dealer.
This feature (also known as Off-Hook Voice Announce [OHVA]) allows you to make an announcement to a busy extension.
If party you called is using a digital key telephone, the announcement is heard only by the called party, not by the other party he or she is talking to. If, however, the party you called is using a single-line telephone, both the called party and the party he or she is talking to will hear the announcement.
1. Pick up the handset or press ON/OFF.
2. Dial the extension number.
3. Press 8 if you hear the busy tone.
To answer a UNA call
To answer a UNA call using the assigned FF key
To make an announcement
68 DBS 576 (USA), issued October 2000 576-36-750
5. Communicating Within Your Office
4. Make your announcement. (Your voice is heard on the extension, not on the other line.)
Answering an AnnouncementTo answer an announcement, you can use the OHVA Split key to speak to the announcing party or you may send a text message.
The OHVA Split key is an FF key that has been assigned to the OHVA function. The OHVA function is typically used in situations where the extension user must handle more than one call. The Split key must be set up by the system administrator or dealer.
1. While on a call, press the OHVA Split key.
2. Speak with the announcing party.
3. Press the OHVA Split key to return to the original call.
Transferring Calls with an Announcement
Note: This feature requires system programming or a specific DBS 576 or DBS 576HD configuration, and may not be available. For information, see your system administrator or dealer.
1. While remaining on the line with the original party, press the HOLD key.
2. Dial the extension number.
3. When you hear a busy tone, press 8.
4. Make your announcement.
5. When you are connected to the called party, replace the handset or press the ON/OFF key.
USING CALL FORWARDINGYou can send or forward your calls to another extension, an outside line, or to voice mail from either your extension or from an alternate extension.
Notes:
• Any outside number used for Call Forwarding must already be programmed into system speed dialing.
To speak to the announcing party
To transfer a call while making an announcement
576-36-750 DBS 576 (USA), issued October 2000 69
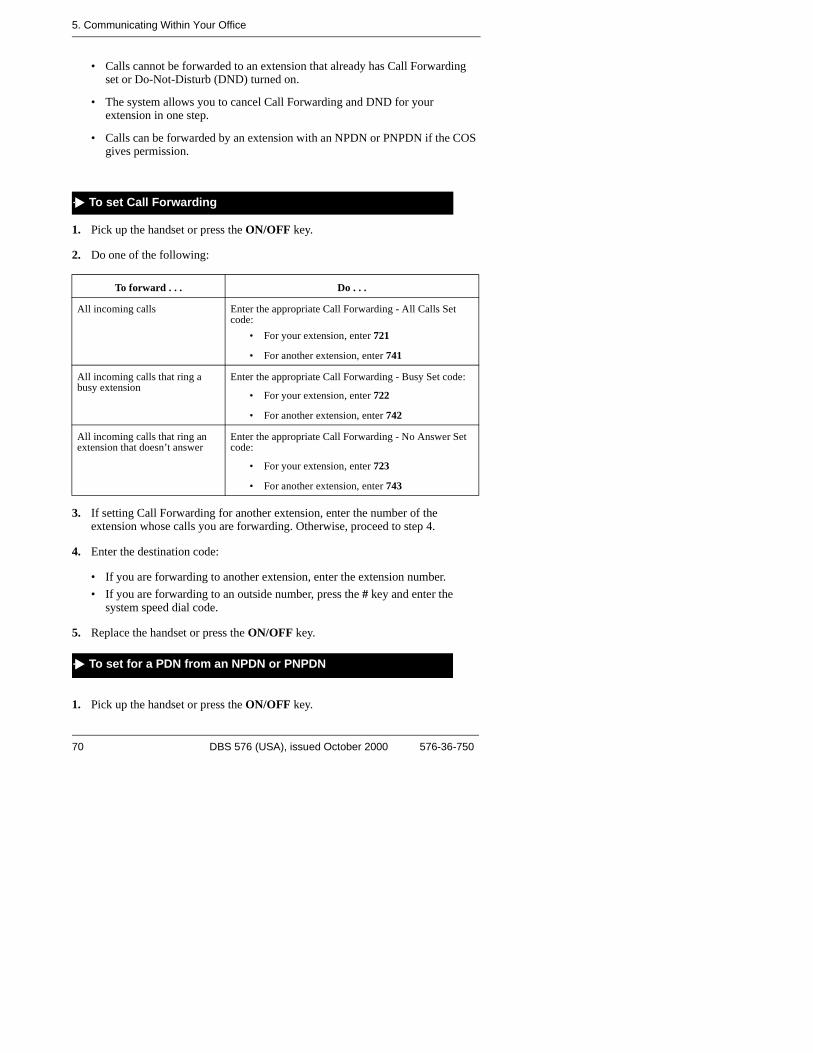
5. Communicating Within Your Office
• Calls cannot be forwarded to an extension that already has Call Forwarding set or Do-Not-Disturb (DND) turned on.
• The system allows you to cancel Call Forwarding and DND for your extension in one step.
• Calls can be forwarded by an extension with an NPDN or PNPDN if the COS gives permission.
1. Pick up the handset or press the ON/OFF key.
2. Do one of the following:
3. If setting Call Forwarding for another extension, enter the number of the extension whose calls you are forwarding. Otherwise, proceed to step 4.
4. Enter the destination code:
• If you are forwarding to another extension, enter the extension number.• If you are forwarding to an outside number, press the # key and enter the
system speed dial code.
5. Replace the handset or press the ON/OFF key.
1. Pick up the handset or press the ON/OFF key.
To forward . . . Do . . .
All incoming calls Enter the appropriate Call Forwarding - All Calls Set code:
• For your extension, enter 721
• For another extension, enter 741
All incoming calls that ring a busy extension
Enter the appropriate Call Forwarding - Busy Set code:
• For your extension, enter 722
• For another extension, enter 742
All incoming calls that ring an extension that doesn’t answer
Enter the appropriate Call Forwarding - No Answer Set code:
• For your extension, enter 723
• For another extension, enter 743
To set Call Forwarding
To set for a PDN from an NPDN or PNPDN
70 DBS 576 (USA), issued October 2000 576-36-750
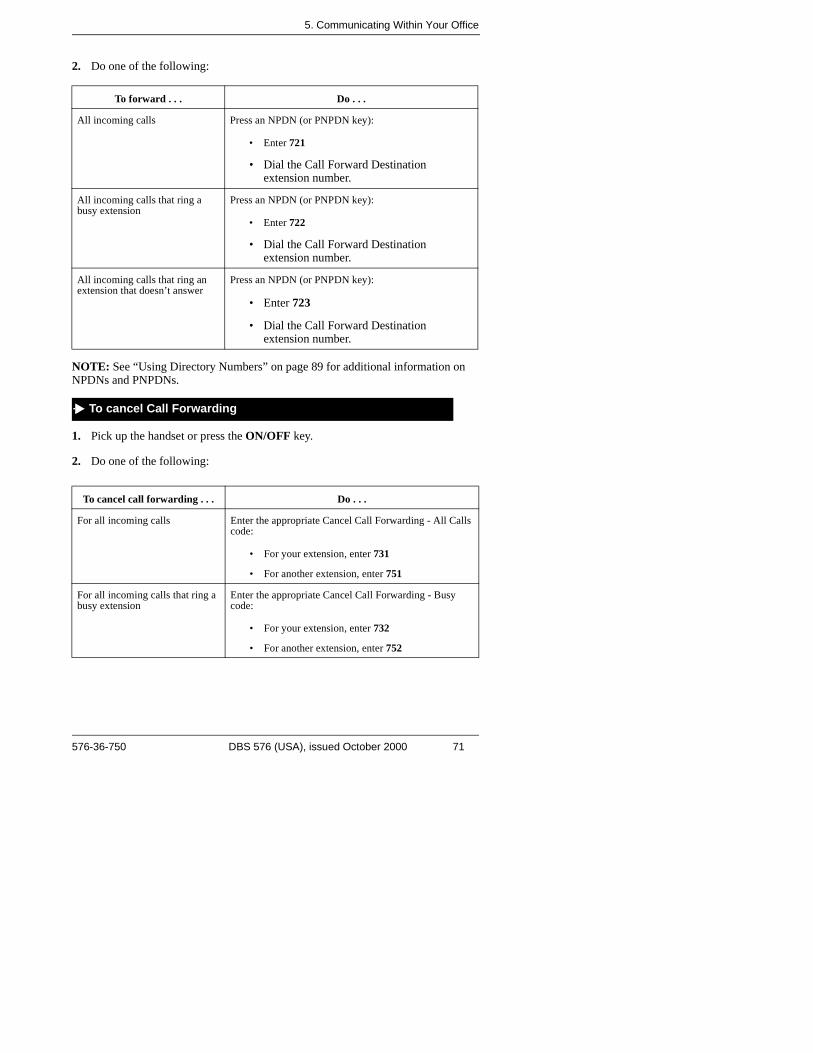
5. Communicating Within Your Office
2. Do one of the following:
NOTE: See “Using Directory Numbers” on page 89 for additional information on NPDNs and PNPDNs.
1. Pick up the handset or press the ON/OFF key.
2. Do one of the following:
To forward . . . Do . . .
All incoming calls Press an NPDN (or PNPDN key):
• Enter 721
• Dial the Call Forward Destination extension number.
All incoming calls that ring a busy extension
Press an NPDN (or PNPDN key):
• Enter 722
• Dial the Call Forward Destination extension number.
All incoming calls that ring an extension that doesn’t answer
Press an NPDN (or PNPDN key):
• Enter 723
• Dial the Call Forward Destination extension number.
To cancel call forwarding . . . Do . . .
For all incoming calls Enter the appropriate Cancel Call Forwarding - All Calls code:
• For your extension, enter 731
• For another extension, enter 751
For all incoming calls that ring a busy extension
Enter the appropriate Cancel Call Forwarding - Busy code:
• For your extension, enter 732
• For another extension, enter 752
To cancel Call Forwarding
576-36-750 DBS 576 (USA), issued October 2000 71
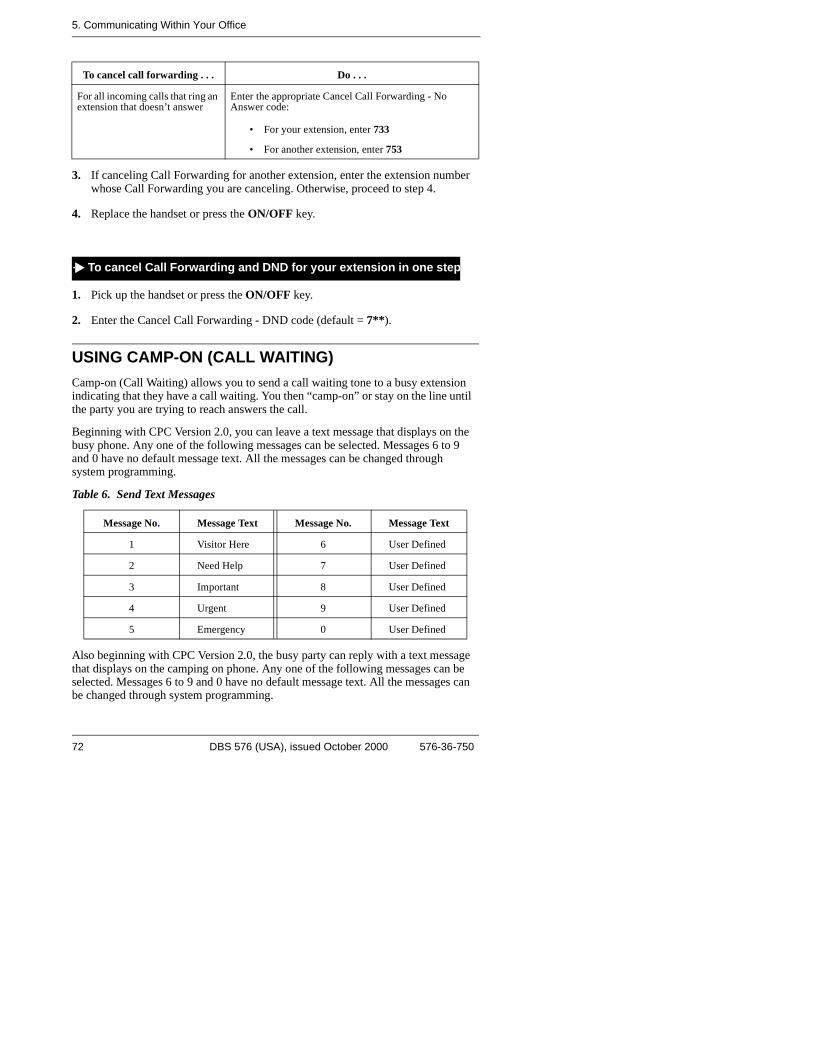
5. Communicating Within Your Office
3. If canceling Call Forwarding for another extension, enter the extension number whose Call Forwarding you are canceling. Otherwise, proceed to step 4.
4. Replace the handset or press the ON/OFF key.
1. Pick up the handset or press the ON/OFF key.
2. Enter the Cancel Call Forwarding - DND code (default = 7**).
USING CAMP-ON (CALL WAITING)Camp-on (Call Waiting) allows you to send a call waiting tone to a busy extension indicating that they have a call waiting. You then “camp-on” or stay on the line until the party you are trying to reach answers the call.
Beginning with CPC Version 2.0, you can leave a text message that displays on the busy phone. Any one of the following messages can be selected. Messages 6 to 9 and 0 have no default message text. All the messages can be changed through system programming.
Table 6. Send Text Messages
Also beginning with CPC Version 2.0, the busy party can reply with a text message that displays on the camping on phone. Any one of the following messages can be selected. Messages 6 to 9 and 0 have no default message text. All the messages can be changed through system programming.
For all incoming calls that ring an extension that doesn’t answer
Enter the appropriate Cancel Call Forwarding - No Answer code:
• For your extension, enter 733
• For another extension, enter 753
Message No. Message Text Message No. Message Text
1 Visitor Here 6 User Defined
2 Need Help 7 User Defined
3 Important 8 User Defined
4 Urgent 9 User Defined
5 Emergency 0 User Defined
To cancel call forwarding . . . Do . . .
To cancel Call Forwarding and DND for your extension in one step
72 DBS 576 (USA), issued October 2000 576-36-750
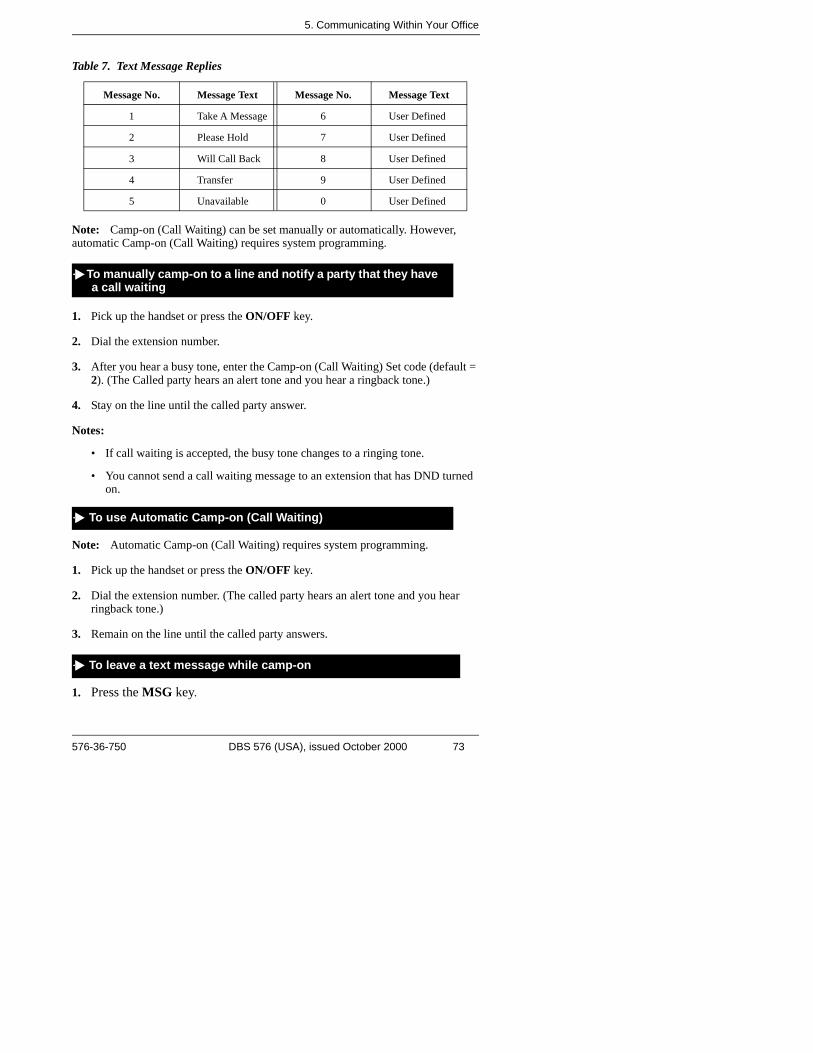
5. Communicating Within Your Office
Table 7. Text Message Replies
Note: Camp-on (Call Waiting) can be set manually or automatically. However, automatic Camp-on (Call Waiting) requires system programming.
1. Pick up the handset or press the ON/OFF key.
2. Dial the extension number.
3. After you hear a busy tone, enter the Camp-on (Call Waiting) Set code (default = 2). (The Called party hears an alert tone and you hear a ringback tone.)
4. Stay on the line until the called party answer.
Notes:
• If call waiting is accepted, the busy tone changes to a ringing tone.
• You cannot send a call waiting message to an extension that has DND turned on.
Note: Automatic Camp-on (Call Waiting) requires system programming.
1. Pick up the handset or press the ON/OFF key.
2. Dial the extension number. (The called party hears an alert tone and you hear ringback tone.)
3. Remain on the line until the called party answers.
1. Press the MSG key.
Message No. Message Text Message No. Message Text
1 Take A Message 6 User Defined
2 Please Hold 7 User Defined
3 Will Call Back 8 User Defined
4 Transfer 9 User Defined
5 Unavailable 0 User Defined
To manually camp-on to a line and notify a party that they have a call waiting
To use Automatic Camp-on (Call Waiting)
To leave a text message while camp-on
576-36-750 DBS 576 (USA), issued October 2000 73
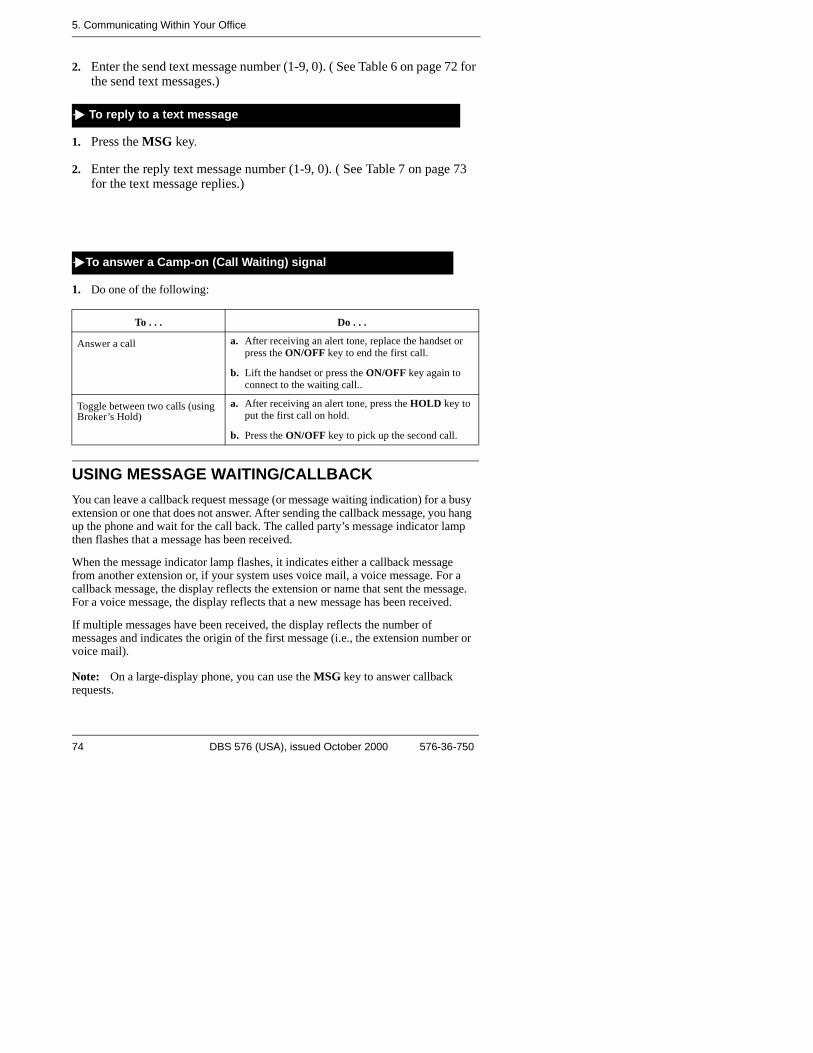
5. Communicating Within Your Office
2. Enter the send text message number (1-9, 0). ( See Table 6 on page 72 for the send text messages.)
1. Press the MSG key.
2. Enter the reply text message number (1-9, 0). ( See Table 7 on page 73 for the text message replies.)
1. Do one of the following:
USING MESSAGE WAITING/CALLBACK You can leave a callback request message (or message waiting indication) for a busy extension or one that does not answer. After sending the callback message, you hang up the phone and wait for the call back. The called party’s message indicator lamp then flashes that a message has been received.
When the message indicator lamp flashes, it indicates either a callback message from another extension or, if your system uses voice mail, a voice message. For a callback message, the display reflects the extension or name that sent the message. For a voice message, the display reflects that a new message has been received.
If multiple messages have been received, the display reflects the number of messages and indicates the origin of the first message (i.e., the extension number or voice mail).
Note: On a large-display phone, you can use the MSG key to answer callback requests.
To . . . Do . . .
Answer a call a. After receiving an alert tone, replace the handset or press the ON/OFF key to end the first call.
b. Lift the handset or press the ON/OFF key again to connect to the waiting call..
Toggle between two calls (using Broker’s Hold)
a. After receiving an alert tone, press the HOLD key to put the first call on hold.
b. Press the ON/OFF key to pick up the second call.
To reply to a text message
To answer a Camp-on (Call Waiting) signal
74 DBS 576 (USA), issued October 2000 576-36-750
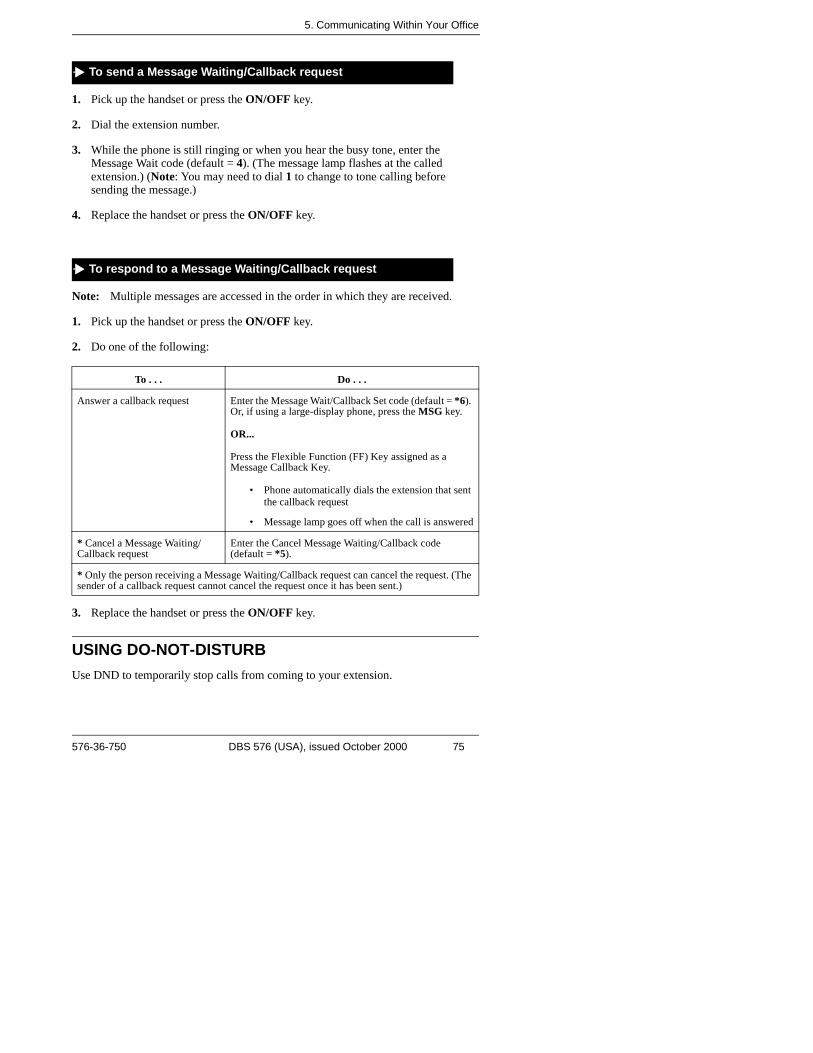
5. Communicating Within Your Office
1. Pick up the handset or press the ON/OFF key.
2. Dial the extension number.
3. While the phone is still ringing or when you hear the busy tone, enter the Message Wait code (default = 4). (The message lamp flashes at the called extension.) (Note: You may need to dial 1 to change to tone calling before sending the message.)
4. Replace the handset or press the ON/OFF key.
Note: Multiple messages are accessed in the order in which they are received.
1. Pick up the handset or press the ON/OFF key.
2. Do one of the following:
3. Replace the handset or press the ON/OFF key.
USING DO-NOT-DISTURBUse DND to temporarily stop calls from coming to your extension.
To . . . Do . . .
Answer a callback request Enter the Message Wait/Callback Set code (default = *6). Or, if using a large-display phone, press the MSG key.
OR...
Press the Flexible Function (FF) Key assigned as a Message Callback Key.
• Phone automatically dials the extension that sent the callback request
• Message lamp goes off when the call is answered
* Cancel a Message Waiting/Callback request
Enter the Cancel Message Waiting/Callback code (default = *5).
* Only the person receiving a Message Waiting/Callback request can cancel the request. (The sender of a callback request cannot cancel the request once it has been sent.)
To send a Message Waiting/Callback request
To respond to a Message Waiting/Callback request
576-36-750 DBS 576 (USA), issued October 2000 75
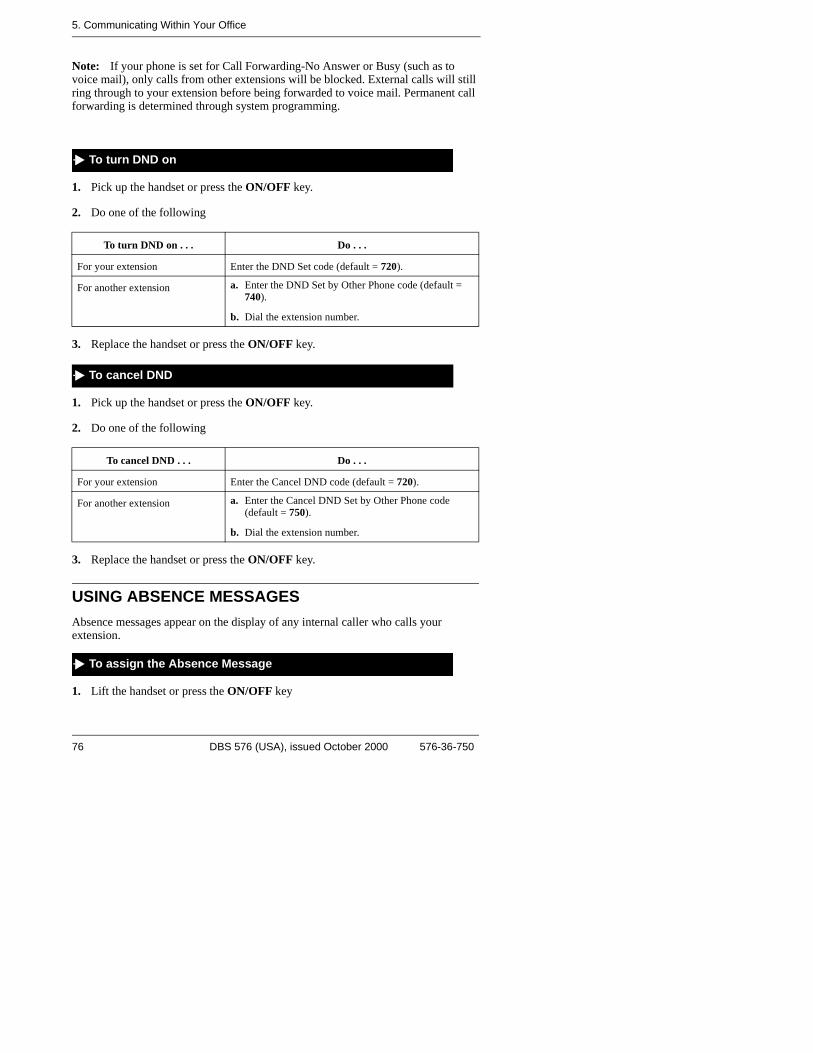
5. Communicating Within Your Office
Note: If your phone is set for Call Forwarding-No Answer or Busy (such as to voice mail), only calls from other extensions will be blocked. External calls will still ring through to your extension before being forwarded to voice mail. Permanent call forwarding is determined through system programming.
1. Pick up the handset or press the ON/OFF key.
2. Do one of the following
3. Replace the handset or press the ON/OFF key.
1. Pick up the handset or press the ON/OFF key.
2. Do one of the following
3. Replace the handset or press the ON/OFF key.
USING ABSENCE MESSAGESAbsence messages appear on the display of any internal caller who calls your extension.
1. Lift the handset or press the ON/OFF key
To turn DND on . . . Do . . .
For your extension Enter the DND Set code (default = 720).
For another extension a. Enter the DND Set by Other Phone code (default = 740).
b. Dial the extension number.
To cancel DND . . . Do . . .
For your extension Enter the Cancel DND code (default = 720).
For another extension a. Enter the Cancel DND Set by Other Phone code (default = 750).
b. Dial the extension number.
To turn DND on
To cancel DND
To assign the Absence Message
76 DBS 576 (USA), issued October 2000 576-36-750
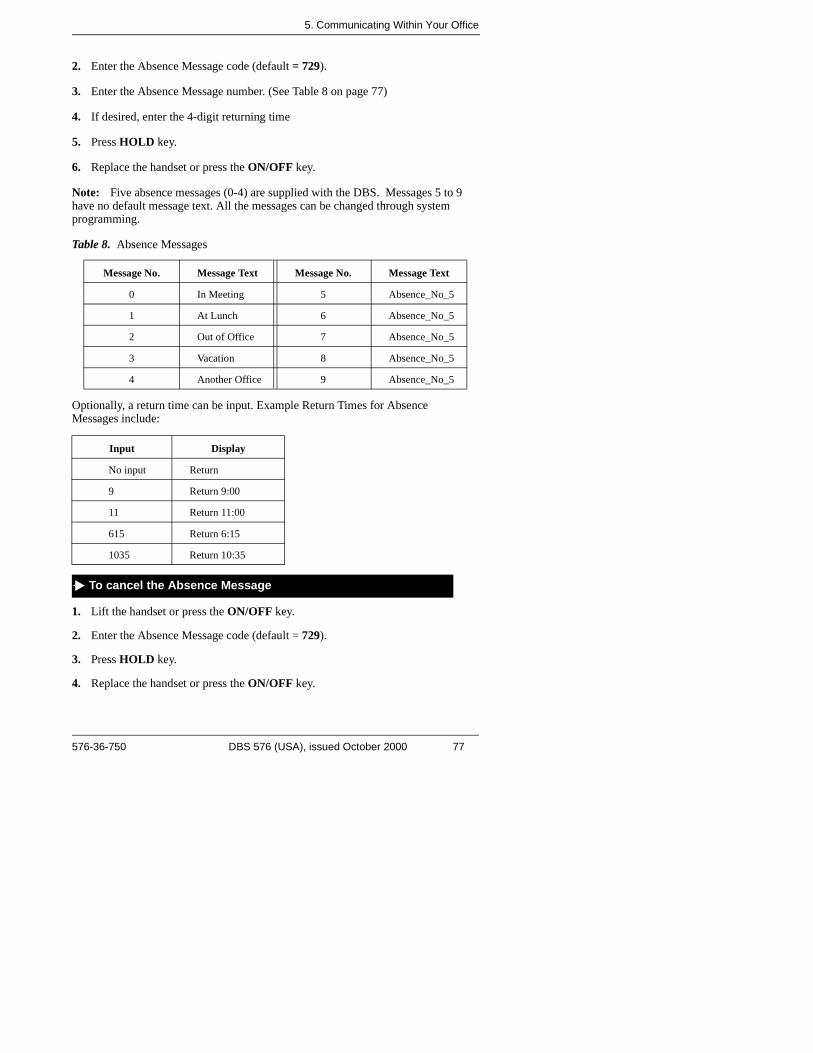
5. Communicating Within Your Office
2. Enter the Absence Message code (default = 729).
3. Enter the Absence Message number. (See Table 8 on page 77)
4. If desired, enter the 4-digit returning time
5. Press HOLD key.
6. Replace the handset or press the ON/OFF key.
Note: Five absence messages (0-4) are supplied with the DBS. Messages 5 to 9 have no default message text. All the messages can be changed through system programming.
Table 8. Absence Messages
Optionally, a return time can be input. Example Return Times for Absence Messages include:
1. Lift the handset or press the ON/OFF key.
2. Enter the Absence Message code (default = 729).
3. Press HOLD key.
4. Replace the handset or press the ON/OFF key.
Message No. Message Text Message No. Message Text
0 In Meeting 5 Absence_No_5
1 At Lunch 6 Absence_No_5
2 Out of Office 7 Absence_No_5
3 Vacation 8 Absence_No_5
4 Another Office 9 Absence_No_5
Input Display
No input Return
9 Return 9:00
11 Return 11:00
615 Return 6:15
1035 Return 10:35
To cancel the Absence Message
576-36-750 DBS 576 (USA), issued October 2000 77
5. Communicating Within Your Office
LOCKING YOUR EXTENSIONUse the Station Lockout feature to limit use of your phone by others when you are away from your telephone. When the Station Lockout feature is in use, the Toll Restriction Service (TRS) Class of your telephone is changed. Anyone using your telephone is limited to the calling abilities defined by this Lockout TRS Class.
In addition, with the appropriate COS, you can set or cancel Station Lockout for other telephones.
1. Lift the handset or press the ON/OFF key.
2. Dial the Station Lockout Set feature code (default = 746).
3. Replace the handset or press the ON/OFF key.
1. Lift the handset or press the ON/OFF key.
2. Dial the Station Lockout Cancel feature code (default = 746).
3. Dial the Walking TRS/Station Lockout security code.
4. Replace the handset or press the ON/OFF key.
1. Lift the handset or press the ON/OFF key.
2. Dial the Station Lockout Set for Another Extension feature code (default = 747).
3. Dial the extension number to activate station lockout.
4. Replace the handset or press the ON/OFF key.
1. Lift the handset or press the ON/OFF key.
2. Dial the Station Lockout Cancel for Another Extension feature code (default = 748).
3. Dial the extension number to activate station lockout.
4. Dial the Walking TRS/Station Lockout security code.
5. Replace the handset or press the ON/OFF key.
To activate the Station Lockout feature
To cancel the Station Lockout feature
To activate the Station Lockout feature for another extension
To cancel the Station Lockout feature for another extension
78 DBS 576 (USA), issued October 2000 576-36-750
5. Communicating Within Your Office
1. Lift the handset or press the ON/OFF key.
2. Dial the Station Lockout Security Code change code (default = 749).
3. Dial the current Walking TRS/Station Lockout security code.
4. Dial the new Walking TRS/Station Lockout security code.
5. Replace the handset or press the ON/OFF key.
To change the Walking TRS/Station Lockout security code
576-36-750 DBS 576 (USA), issued October 2000 79
5. Communicating Within Your Office
80 DBS 576 (USA), issued October 2000 576-36-750
6. USING ADDITIONAL FEATURESThe DBS 576 and DBS 576HD provide a variety of additional features that you can use in your daily work:
• Mute or MUTE Key (page 81)
• Off-Hook Monitor (page 82)
• Handsfree Answerback and Operation (page 82)
• Voice Recognition (page 83)
• Flash Feature (page 83)
• Conference Calls (page 83)
• Background Music (page 84)
• Timed Reminders (page 85)
• Caller ID (page 85)
• Waking Class of Service (88)
• Using Directory Numbers (page 89)
• Using Zip Mode (page 92)
• Room Monitoring (page 92)
• Silent Monitor (page 93)
USING THE MUTE KEYYou can use the MUTE key on your phone or an FF key assigned as a Mute key to mute the handset or microphone so that the party on the other end cannot hear you. (The Mute indicator flashes when using handset mute and lights steadily when the microphone is muted.)
Note: To use handset mute, you must assign an FF key as a Mute key.
1. Pick up the handset or press the ON/OFF key.
2. Dial the desired number.
3. To mute your conversation:
• Using the handset mute, press the Mute FF key.
To block outgoing audio using the Mute key
576-36-750 DBS 576 (USA), issued October 2000 81
6. Using Additional Features
• Using the microphone mute, press the MUTE key.
4. To turn the mute function off:
• Using the handset mute, press the Mute FF key.• Using the microphone mute, press the MUTE key.
USING OFF-HOOK MONITOROff-Hook Monitor allows you to play a called or calling party’s voice through the speaker on your phone, even if you are using the handset. This allows a third party to hear both sides of a conversation.
Note: Off-Hook Monitor does not activate your phone’s microphone. The party at the other end will hear only audio transmitted through your handset.
1. During a handset call, press the ON/OFF key. (The other party is audible through the speaker, but the handset is mute.)
2. Press the ON/OFF key again, to take the caller back off speaker and continue the call through the handset.
USING HANDSFREE ANSWERBACK AND HANDSFREE OPERATIONYou can answer intercom calls as well as access all available system features without lifting the handset.
Note: To answer intercom calls without lifting the handset, the system must be programmed for Voice Calling. You must press 1 during a call to switch from Tone Calling to Voice Calling. (For more information, see Using Voice Recognition below.)
1. When the intercom call arrives, make sure the MUTE LED is off. (If it is lit, press the MUTE key to turn it off.)
2. Speak into the microphone to answer the call.
1. Press the ON/OFF key.
To put a call on speaker
To answer calls without lifting the handset
To use system features without lifting the handset
82 DBS 576 (USA), issued October 2000 576-36-750
6. Using Additional Features
USING VOICE RECOGNITIONWith the installation of additional hardware, you can use verbal commands to dial extensions, speed dial numbers, and access various phone features.
Note: This feature requires system programming and addition hardware (VB-44224 Telephone and VM-44101 Voice Recognition Adaptor). For more information, see your system administrator or dealer.
USING THE FLASH FEATUREYou can send a signal to your phone to release an outside line by pressing the FLASH key or the PROG key. Once you press either key, your phone will either reseize the same outside line or switch to extension dial tone status.
Note: This feature requires system programming. For more information, see your system administrator or dealer.
MAKING CONFERENCE CALLSYou can use your phone to create conference calls that include up to three parties. (With the installation of an optional 8-party conference card, you can include up to eight parties.)
Notes:
• When no optional conference card is installed, the System supports the following types of 3-party conference calls:
• 3 extensions• 2 extensions and 1 outside line• 1 extension and 2 outside lines
• When the optional 8-party conference card is installed, the System supports any combination of conference calls, except all outside lines.
The Version 2.0 software release allows any combination of extensions and CO lines be in the conference as long as the original extension is in the conference and the total number of parties does not exceed 8. With Version 2.0 software, only one operation is used to establish and add to a conference. You simply have to place the current call on hold, dial the next party and press the CONF key. No different operation or access code is required to add additional parties to the call.
1. While on a call, press the HOLD key or the outside line key you are using.
2. If adding an outside party, press a vacant CO key or dial a trunk access code.
To establish a conference call
576-36-750 DBS 576 (USA), issued October 2000 83
6. Using Additional Features
3. Dial the number of the party you want to add to the call.
4. Press the CONF key when your call is answered. (You are connected to the called party.)
5. To add another party repeat steps 1-4.
6. For 3-party Conference Call Only:
To release a conference member, press PROG + 1 to release conference member 1 or press PROG + 2 to release conference member 2, etc.
Note: The conference member numbers are shown on the display.
7. To drop out of the conference call, hang up.
1. While on a call, press the CONF + 1 (2) to have a private conversation with the CNF 1 (2) party as shown on the display.
2. To reestablish the conference, press CONF.
1. During an conference with more than 3 parties, press CONF + (n) (where n is the number 1-8 for the conference parties) to individually select a conference party.
2. If you did not select the conference party that is giving busy tone, re-enter the conference by pressing CONF.
3. If you selected the conference party that is giving busy tone, hang up and then go off-hook again and press CONF to re-enter the conference call.
Note: If the originating party hangs up, all conference calls will be terminated.
1. Hang up or press the FLASH key or the ON/OFF key.
CONTROLLING BACKGROUND MUSICIf your system is set up with a music source, you can play music over the speaker of your phone. (If Music On Hold is provided with your system, callers will automatically hear music when you place them on hold.)
To establish a two party private conversation from a 3-party conference
To remove a busy tone (hang up) from an 8-party conference
To drop out of a conference call
84 DBS 576 (USA), issued October 2000 576-36-750
6. Using Additional Features
1. Pick up the handset or press the ON/OFF key.
2. Enter the Background Music code (default = *30).
3. Replace the handset or press the ON/OFF key.
Note: On a large-display phone, you can turn background music on or off by pressing the BGM soft key while in the Function System menu.
USING TIMED REMINDERSYou can program your phone to act as an alarm clock and alert you at a designated time with an audible tone.
1. Pick up the handset or press the ON/OFF key.
2. Enter the Timed Reminder Set code (default = *31).
3. Enter the time, in 24 hour format, you want the timed reminder (alarm) to sound. (For example, 0100 = 1:00 am, 1300 = 1:00 pm)
4. Replace the handset or press the ON/OFF key.
1. Pick up the handset or press the ON/OFF key.
2. Enter the Cancel Timed Reminder code (default = *39).
3. Replace the handset or press the ON/OFF key.
USING CALLER IDCaller ID information is displayed on the second line of an LCD display when an incoming call is received during conversation. If a second incoming call is from another extension, the LCD displays the extension name or number.
Caller ID Call Log
Note: This feature requires system programming or a specific DBS configuration, and may not be available. For information, see your system administrator or DBS dealer.
To turn background music on or off
To set a timed reminder (reminder alarm)
To cancel a timed reminder
576-36-750 DBS 576 (USA), issued October 2000 85
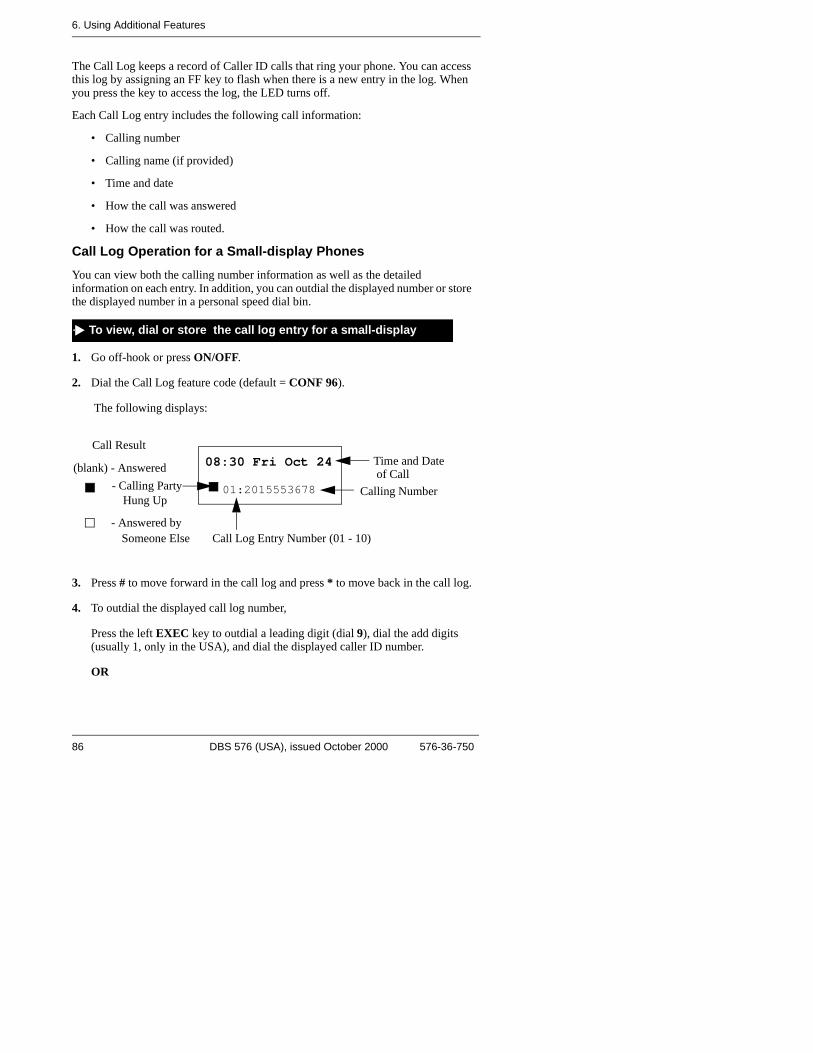
6. Using Additional Features
The Call Log keeps a record of Caller ID calls that ring your phone. You can access this log by assigning an FF key to flash when there is a new entry in the log. When you press the key to access the log, the LED turns off.
Each Call Log entry includes the following call information:
• Calling number
• Calling name (if provided)
• Time and date
• How the call was answered
• How the call was routed.
Call Log Operation for a Small-display PhonesYou can view both the calling number information as well as the detailed information on each entry. In addition, you can outdial the displayed number or store the displayed number in a personal speed dial bin.
1. Go off-hook or press ON/OFF.
2. Dial the Call Log feature code (default = CONF 96).
The following displays:
3. Press # to move forward in the call log and press * to move back in the call log.
4. To outdial the displayed call log number,
Press the left EXEC key to outdial a leading digit (dial 9), dial the add digits (usually 1, only in the USA), and dial the displayed caller ID number.
OR
To view, dial or store the call log entry for a small-display
08:30 Fri Oct 24
01:2015553678 Calling Number
Call Log Entry Number (01 - 10)
Call Result
(blank) - Answered- Calling Party
Hung Up
- Answered bySomeone Else
Time and Date of Call
86 DBS 576 (USA), issued October 2000 576-36-750
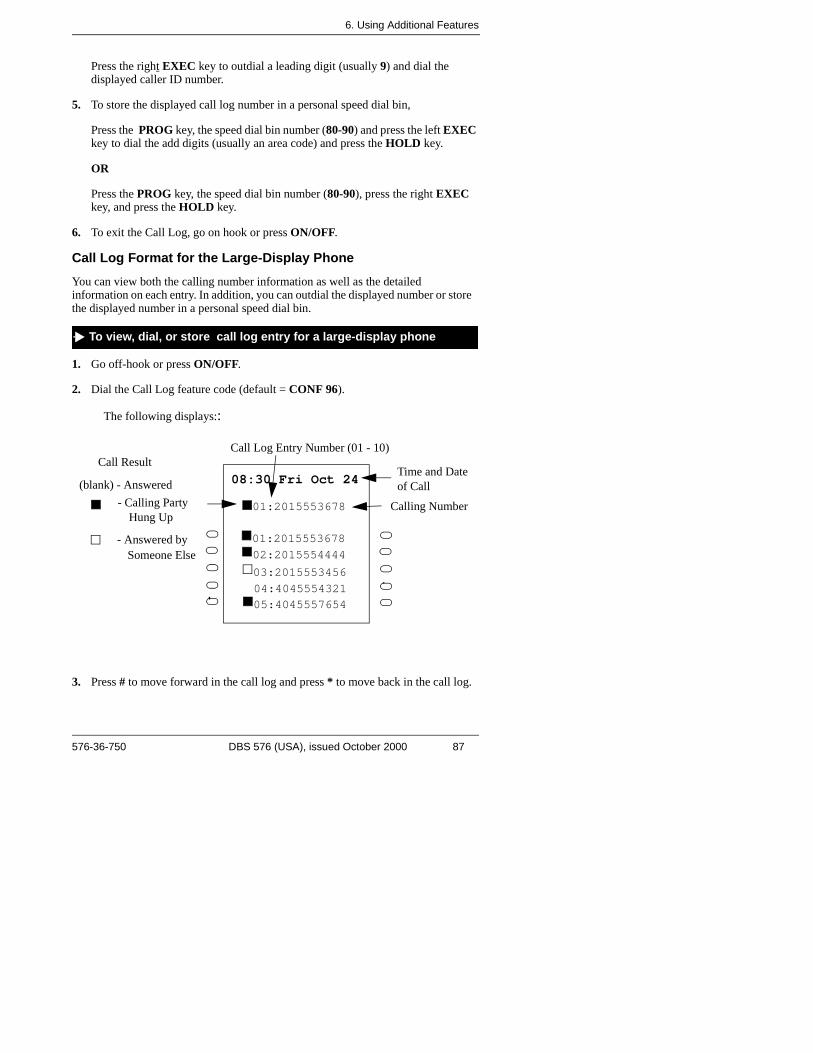
6. Using Additional Features
Press the right EXEC key to outdial a leading digit (usually 9) and dial the displayed caller ID number.
5. To store the displayed call log number in a personal speed dial bin,
Press the PROG key, the speed dial bin number (80-90) and press the left EXEC key to dial the add digits (usually an area code) and press the HOLD key.
OR
Press the PROG key, the speed dial bin number (80-90), press the right EXEC key, and press the HOLD key.
6. To exit the Call Log, go on hook or press ON/OFF.
Call Log Format for the Large-Display Phone You can view both the calling number information as well as the detailed information on each entry. In addition, you can outdial the displayed number or store the displayed number in a personal speed dial bin.
1. Go off-hook or press ON/OFF.
2. Dial the Call Log feature code (default = CONF 96).
The following displays::
3. Press # to move forward in the call log and press * to move back in the call log.
To view, dial, or store call log entry for a large-display phone
08:30 Fri Oct 24
01:2015553678 Calling Number
Call Result
(blank) - Answered- Calling Party
Hung Up
- Answered bySomeone Else
Call Log Entry Number (01 - 10)
01:2015553678 02:2015554444 03:2015553456 04:4045554321 05:4045557654
Time and Dateof Call
576-36-750 DBS 576 (USA), issued October 2000 87
6. Using Additional Features
4. Press NEXT to view the next 5 calls and PREV to view the previous 5 calls.
5. To outdial the displayed call log number,
Press the left soft key to outdial a leading digit (dial 9) dial add digits (usually 1 in the USA), and dial the displayed caller ID number.
OR
Press the right soft key to outdial a leading digit (dial 9) and dial the displayed caller ID number.
6. To store the displayed call log number in a personal speed dial bin,
Press the PROG key, the speed dial bin number (80-90), and press the left soft key to dial the add digits (usually an area code) and press the HOLD key.
OR
Press the PROG key, the speed dial bin number (80-90), press the right soft key and press HOLD.
7. To exit the Call Log, go on hook or press ON/OFF.
WALKING TRS CLASS OF SERVICE Walking Toll Restriction Service (TRS) Class of Service (COS) allows you to use your own calling privileges at another phone. For example, you may be allowed to make long-distance calls from your phone, but a phone in your company’s warehouse may be restricted from long-distance calls.
To make long-distance calls from the restricted phone, you can go to that phone and enter a Walking TRS COS code before dialing the number.
Notes:• Before using this feature, a Walking TRS COS must be assigned for your
phone by the system administrator or dealer. • The same Walking TRS COS code may be used by more than one extension.
1. From an extension other than your own, pick up the handset or press the ON/OFF key.
2. Enter the Walking TRS COS access code (default = 87).
3. Dial your extension number.
4. Enter your Walking TRS COS code.
To use a Walking TRS COS code
88 DBS 576 (USA), issued October 2000 576-36-750
6. Using Additional Features
5. Press the # key.
6. Access an outside line.
7. Dial the phone number.
The Walking TRS COS will remain in effect until you hang up.
USING DIRECTORY NUMBERSA Directory Number (DN) allows extension numbers to be used on a key basis. The same DN may be assigned to multiple keys on the same telephone and to keys on other telephones.
When a telephone’s extension number is assigned to a key on the same telephone, it is considered a Primary Directory Number (PDN). Up to three appearances of the PDN may be assigned to keys on a key telephone. This allows for multiple calls on the same Directory Number.
When a DN is assigned to an FF key on another telephone, it is considered a Non-Primary Directory Number (NPDN). Up to three NPDN appearances of the same DN may be assigned to keys on a telephone. This allows calls to the DN to appear on multiple telephones. The calls ring in on a specified basis - immediate, delayed, or no-ring.
A telephone may only have one PDN (on up to three keys) but may have multiple NPDNs with up to three appearances of any one NPDN.
576-36-750 DBS 576 (USA), issued October 2000 89
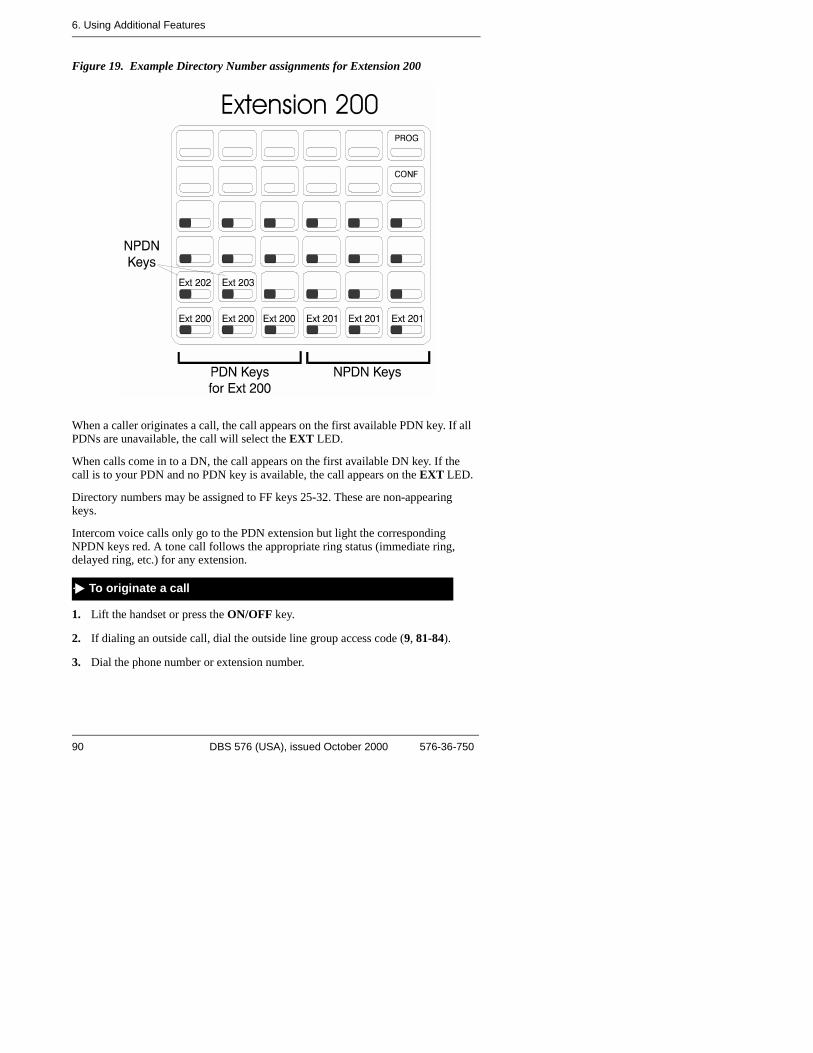
6. Using Additional Features
Figure 19. Example Directory Number assignments for Extension 200
When a caller originates a call, the call appears on the first available PDN key. If all PDNs are unavailable, the call will select the EXT LED.
When calls come in to a DN, the call appears on the first available DN key. If the call is to your PDN and no PDN key is available, the call appears on the EXT LED.
Directory numbers may be assigned to FF keys 25-32. These are non-appearing keys.
Intercom voice calls only go to the PDN extension but light the corresponding NPDN keys red. A tone call follows the appropriate ring status (immediate ring, delayed ring, etc.) for any extension.
1. Lift the handset or press the ON/OFF key.
2. If dialing an outside call, dial the outside line group access code (9, 81-84).
3. Dial the phone number or extension number.
To originate a call
90 DBS 576 (USA), issued October 2000 576-36-750
6. Using Additional Features
1. If ringing, go off-hook or press the green blinking PDN or NPDN key.
If not ringing, press the red blinking PDN or NPDN key.
1. Lift the handset or press the ON/OFF key.
2. Press the desired NPDN key.
3. If dialing an outside call, dial the outside line group access code (9, 81-84).
4. Dial the phone number or extension number.
1. Lift the handset or press the ON/OFF key.
2. Press the desired NPDN key.
1. Lift the handset or press the ON/OFF key.
2. Dial the Direct Call to PDN access code (default = 766) or press the Direct Call to PDN key.
3. Dial the extension number.
1. Place the current call on hold.
2. Dial the Direct Call to PDN access code (default = 766) or press the Direct Call to PDN key.
3. Dial the extension number.
4. If desired, wait until the PDN Extension answers and introduce the call.
5. Hang up.
To receive a call to a directory number (PDN or NPDN)
To originate a call using a non-primary directory number
To receive a call using a non-primary directory number
To call a primary directory number extension (NPDNs not called)
To transfer a call to the primary directory number extension (NPDNs not called)
576-36-750 DBS 576 (USA), issued October 2000 91

6. Using Additional Features
USING ZIP MODEThe Zip mode feature (CPC version 2.5 or higher) automatically answers calls when you are operating a Key Telephone in headset mode.
1. Press the ON/OFF key.
2. Press the PROG key and dial 80.
OR
Press the ZIP key.
3. Press the ON/OFF key.
ROOM MONITORINGThis feature allows you to monitor the sounds in a room from another extension or room. To activate Room Monitoring, the monitored extension mut enable the Room Monitor feature before the monitoring extension can listen to the sounds in the room.
Placing the monitored extension back on-hook, or pressing ON/OFF or FLASH will cancel the monitored mode.
Action Result
Dial the monitored extension access code (default = 775)
OR...
Press an FF key assigned with the monitored access code
You will hear a confirmation tone after the monitored extension has enabled the Room Monitor feature. (If the monitored extension has an LCD display, a confirmation message will also be shown.
To enter or cancel Zip mode
1. To set up a monitored extension
92 DBS 576 (USA), issued October 2000 576-36-750
6. Using Additional Features
Placing the monitoring extension back on-hook, or pressing ON/OFF or FLASH will cancel the monitoring mode.
SILENT MONITOR
The Silent Monitor feature allows an ACD supervisor to monitor a call between an ACD agent and a caller without the knowledge of either party. (See CAUTION, above.) If necessary, the ACD supervisor can initiate a three-way call by barging into the call.
Action Result
Dial the monitoring extension access code (default = 776).
OR...
Press an FF key assigned the monitored access code and the extension number of the moni-tored extension.
OR...
While the handset is on-hook, press an FF key assigned to the Room Monitor followed by the monitored extension number.
The monitoring extension enters the monitoring mode.
The monitoring extension will automatically enter the monitoring mode.
CAUTION – When using the ACD “Silent Monitor” feature, in some states it is illegal (or civilly actionable) to monitor telephone communications without giving prior warning to all participants. These laws do not make the Silent Monitor feature on a telephone system illegal. Before activating this feature, please check applicable state and federal laws.
1. To set up the monitoring extension
576-36-750 DBS 576 (USA), issued October 2000 93
6. Using Additional Features
Note:The Silent Monitor key is disabled when the extension assigned to that key is idle, dialing, or ringing.
• Only one supervisor can initiate Silent Monitor on an individual extension at any given time.
• A supervisor cannot initiate Silent Monitoring on an extension when that extension is on a conference call.
Action Result
Press ON/OFF + 768 + Extension number you want to monitorOR...
Press the FF key assigned as a Silent Monitor Key + Extension number you want to monitorOR...
Press only the Silent Monitor Key if the FF key has been preprogrammed to monitor a specific extension number. You do not need to enter the extension number.
The Silent Monitor feature is active, and the extension is being monitored. (The Silent Monitor key flashes green when Silent Monitor is active.)
FF Key Color Definition Possible Operation
Clear Cannot monitor None
Solid Red Able to monitor Press Silent Monitor key
Flashing Green Not monitoring On-hook or CONF
1. To initiate Silent Monitor
1. Silent Monitor Key Color Definitions
94 DBS 576 (USA), issued October 2000 576-36-750
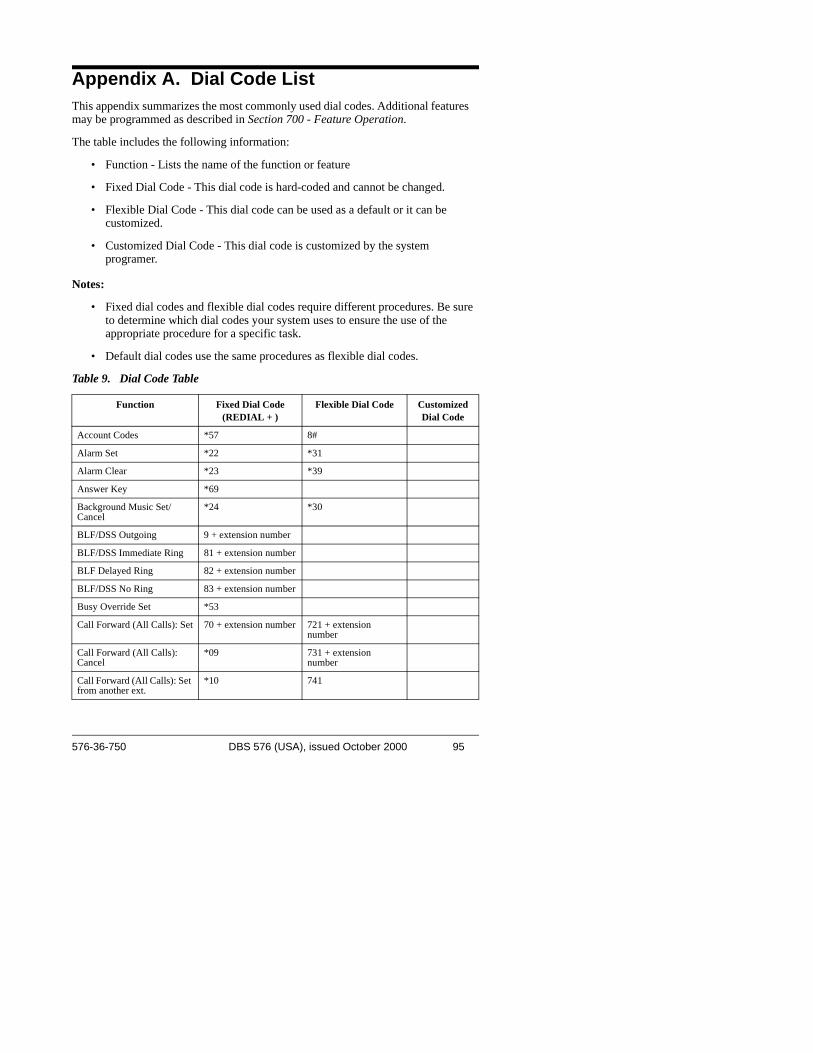
Appendix A. Dial Code ListThis appendix summarizes the most commonly used dial codes. Additional features may be programmed as described in Section 700 - Feature Operation.
The table includes the following information:
• Function - Lists the name of the function or feature
• Fixed Dial Code - This dial code is hard-coded and cannot be changed.
• Flexible Dial Code - This dial code can be used as a default or it can be customized.
• Customized Dial Code - This dial code is customized by the system programer.
Notes:
• Fixed dial codes and flexible dial codes require different procedures. Be sure to determine which dial codes your system uses to ensure the use of the appropriate procedure for a specific task.
• Default dial codes use the same procedures as flexible dial codes.
Table 9. Dial Code Table
Function Fixed Dial Code(REDIAL + )
Flexible Dial Code Customized Dial Code
Account Codes *57 8#
Alarm Set *22 *31
Alarm Clear *23 *39
Answer Key *69
Background Music Set/Cancel
*24 *30
BLF/DSS Outgoing 9 + extension number
BLF/DSS Immediate Ring 81 + extension number
BLF Delayed Ring 82 + extension number
BLF/DSS No Ring 83 + extension number
Busy Override Set *53
Call Forward (All Calls): Set 70 + extension number 721 + extension number
Call Forward (All Calls): Cancel
*09 731 + extension number
Call Forward (All Calls): Set from another ext.
*10 741
576-36-750 DBS 576 (USA), issued October 2000 95
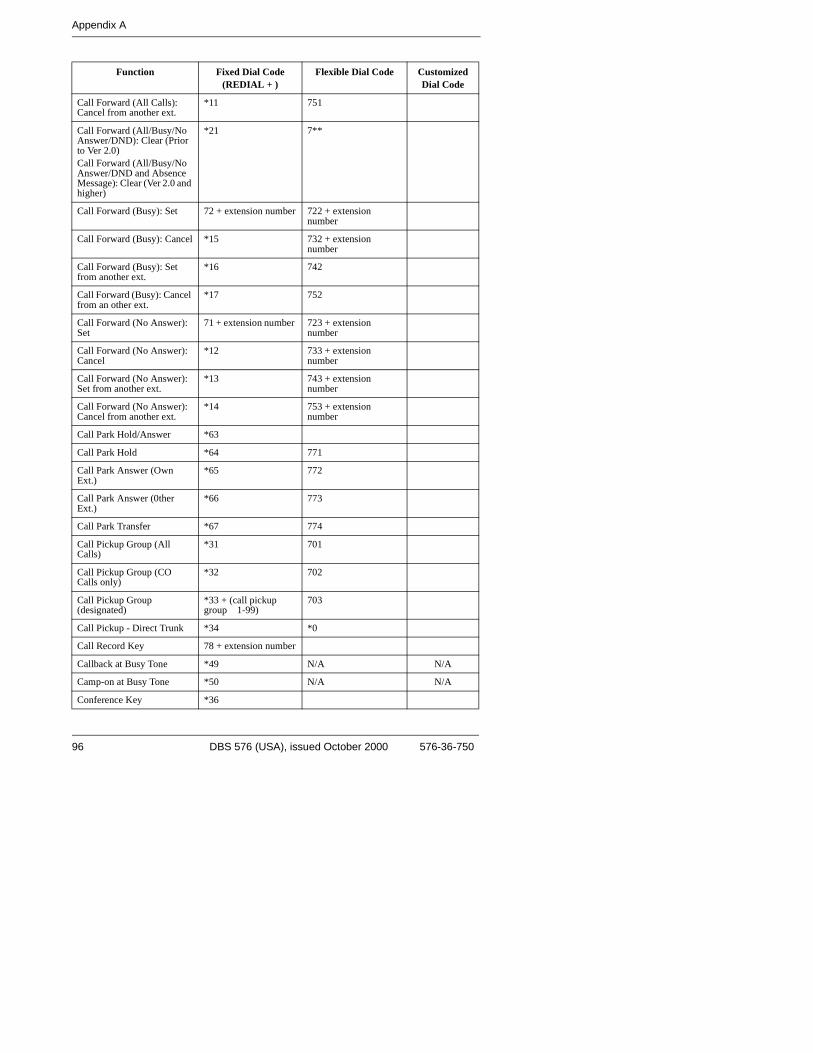
Appendix A
Call Forward (All Calls): Cancel from another ext.
*11 751
Call Forward (All/Busy/No Answer/DND): Clear (Prior to Ver 2.0)Call Forward (All/Busy/No Answer/DND and Absence Message): Clear (Ver 2.0 and higher)
*21 7**
Call Forward (Busy): Set 72 + extension number 722 + extension number
Call Forward (Busy): Cancel *15 732 + extension number
Call Forward (Busy): Set from another ext.
*16 742
Call Forward (Busy): Cancel from an other ext.
*17 752
Call Forward (No Answer): Set
71 + extension number 723 + extension number
Call Forward (No Answer): Cancel
*12 733 + extension number
Call Forward (No Answer): Set from another ext.
*13 743 + extension number
Call Forward (No Answer): Cancel from another ext.
*14 753 + extension number
Call Park Hold/Answer *63
Call Park Hold *64 771
Call Park Answer (Own Ext.)
*65 772
Call Park Answer (0ther Ext.)
*66 773
Call Park Transfer *67 774
Call Pickup Group (All Calls)
*31 701
Call Pickup Group (CO Calls only)
*32 702
Call Pickup Group (designated)
*33 + (call pickup group 1-99)
703
Call Pickup - Direct Trunk *34 *0
Call Record Key 78 + extension number
Callback at Busy Tone *49 N/A N/A
Camp-on at Busy Tone *50 N/A N/A
Conference Key *36
Function Fixed Dial Code(REDIAL + )
Flexible Dial Code Customized Dial Code
96 DBS 576 (USA), issued October 2000 576-36-750
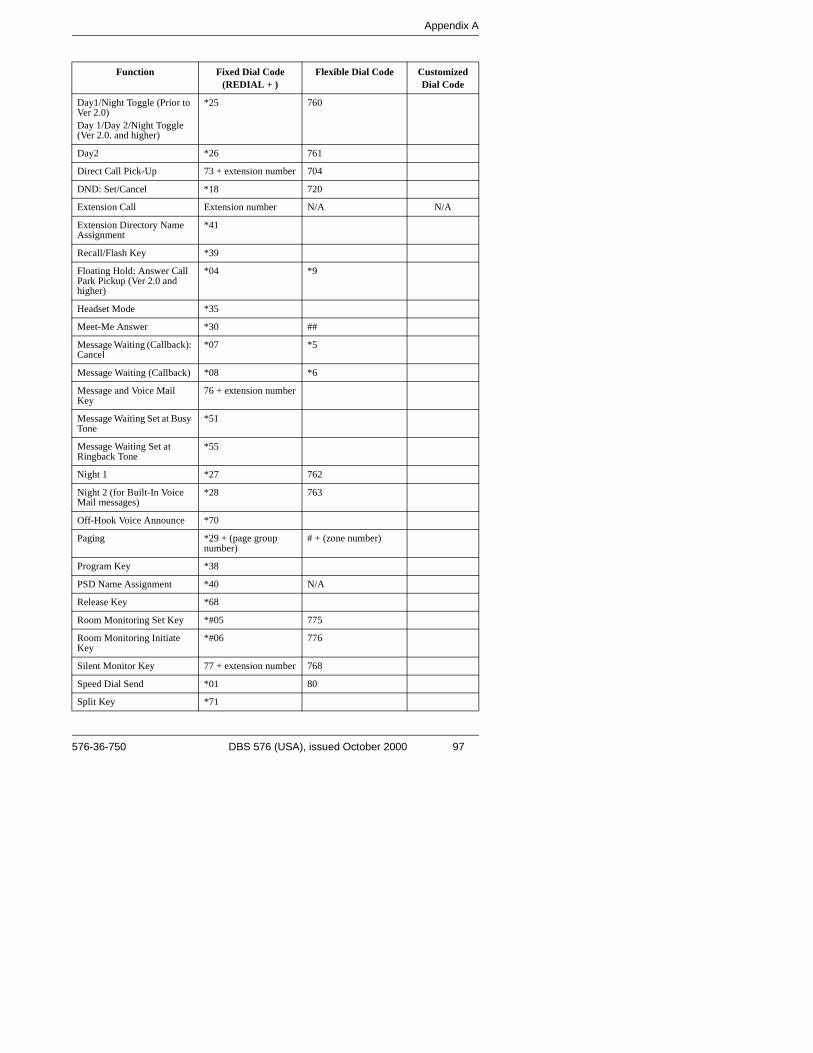
Appendix A
Day1/Night Toggle (Prior to Ver 2.0)Day 1/Day 2/Night Toggle (Ver 2.0. and higher)
*25 760
Day2 *26 761
Direct Call Pick-Up 73 + extension number 704
DND: Set/Cancel *18 720
Extension Call Extension number N/A N/A
Extension Directory Name Assignment
*41
Recall/Flash Key *39
Floating Hold: Answer Call Park Pickup (Ver 2.0 and higher)
*04 *9
Headset Mode *35
Meet-Me Answer *30 ##
Message Waiting (Callback): Cancel
*07 *5
Message Waiting (Callback) *08 *6
Message and Voice Mail Key
76 + extension number
Message Waiting Set at Busy Tone
*51
Message Waiting Set at Ringback Tone
*55
Night 1 *27 762
Night 2 (for Built-In Voice Mail messages)
*28 763
Off-Hook Voice Announce *70
Paging *29 + (page group number)
# + (zone number)
Program Key *38
PSD Name Assignment *40 N/A
Release Key *68
Room Monitoring Set Key *#05 775
Room Monitoring Initiate Key
*#06 776
Silent Monitor Key 77 + extension number 768
Speed Dial Send *01 80
Split Key *71
Function Fixed Dial Code(REDIAL + )
Flexible Dial Code Customized Dial Code
576-36-750 DBS 576 (USA), issued October 2000 97
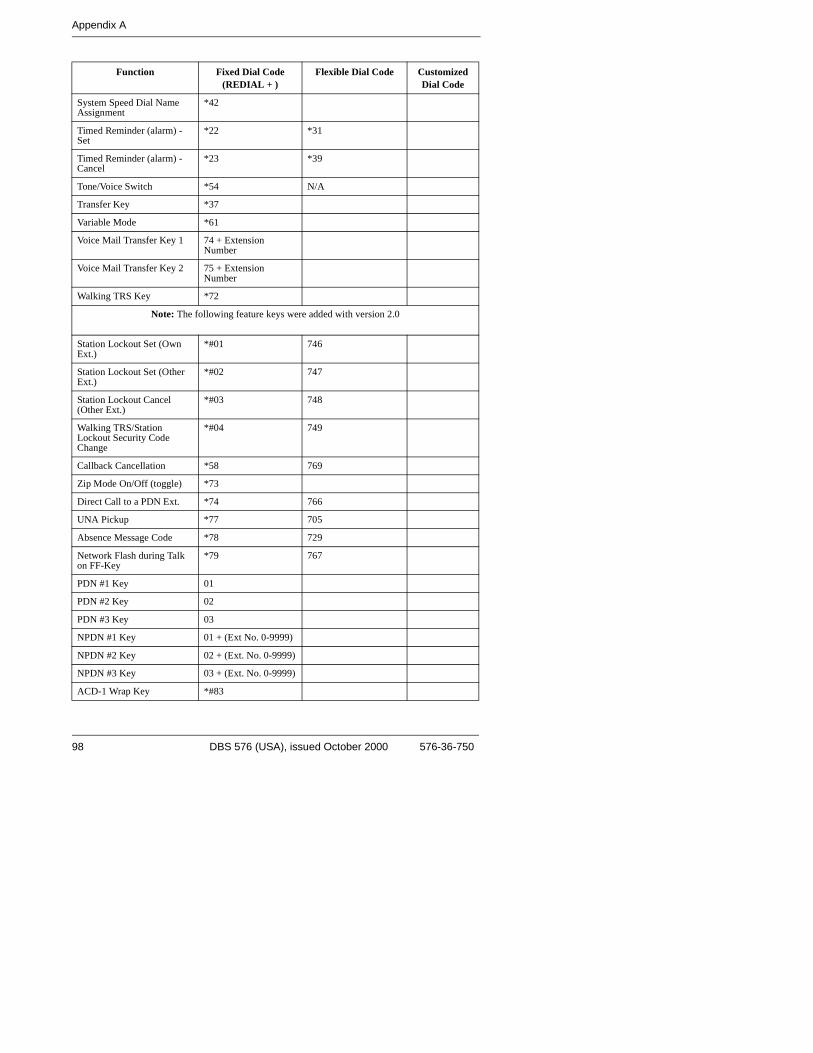
Appendix A
System Speed Dial Name Assignment
*42
Timed Reminder (alarm) - Set
*22 *31
Timed Reminder (alarm) - Cancel
*23 *39
Tone/Voice Switch *54 N/A
Transfer Key *37
Variable Mode *61
Voice Mail Transfer Key 1 74 + Extension Number
Voice Mail Transfer Key 2 75 + Extension Number
Walking TRS Key *72
Note: The following feature keys were added with version 2.0
Station Lockout Set (Own Ext.)
*#01 746
Station Lockout Set (Other Ext.)
*#02 747
Station Lockout Cancel (Other Ext.)
*#03 748
Walking TRS/Station Lockout Security Code Change
*#04 749
Callback Cancellation *58 769
Zip Mode On/Off (toggle) *73
Direct Call to a PDN Ext. *74 766
UNA Pickup *77 705
Absence Message Code *78 729
Network Flash during Talk on FF-Key
*79 767
PDN #1 Key 01
PDN #2 Key 02
PDN #3 Key 03
NPDN #1 Key 01 + (Ext No. 0-9999)
NPDN #2 Key 02 + (Ext. No. 0-9999)
NPDN #3 Key 03 + (Ext. No. 0-9999)
ACD-1 Wrap Key *#83
Function Fixed Dial Code(REDIAL + )
Flexible Dial Code Customized Dial Code
98 DBS 576 (USA), issued October 2000 576-36-750
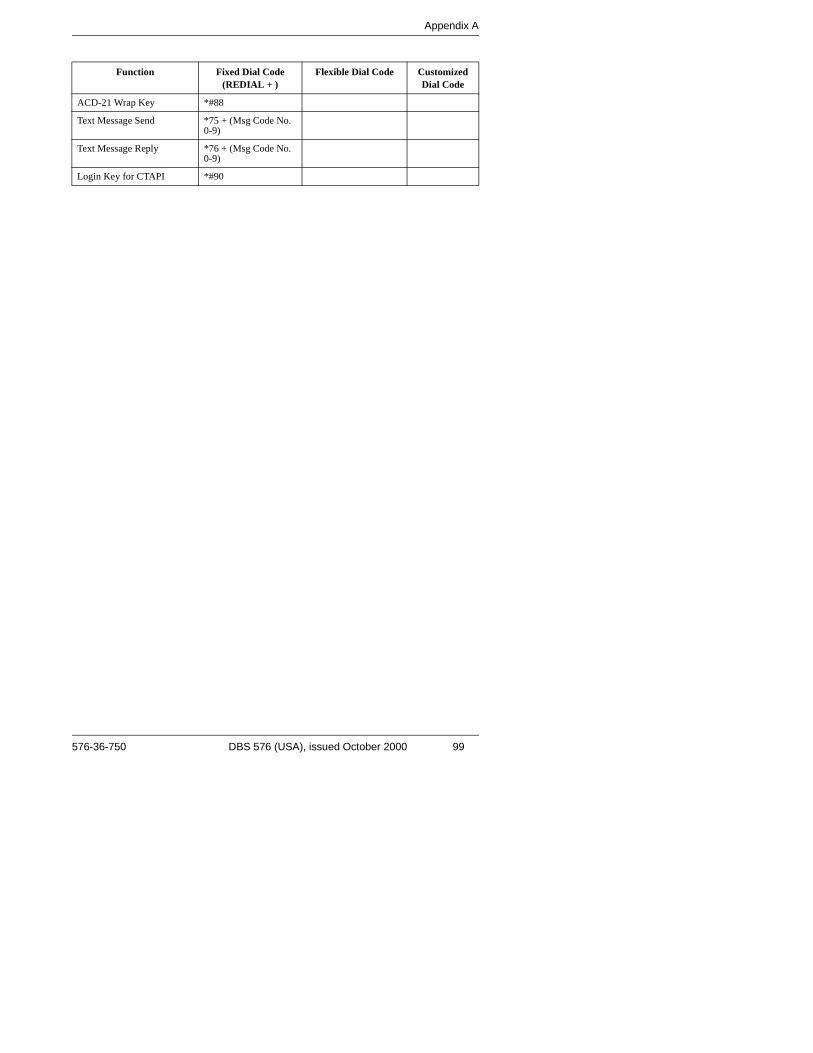
Appendix A
ACD-21 Wrap Key *#88
Text Message Send *75 + (Msg Code No. 0-9)
Text Message Reply *76 + (Msg Code No. 0-9)
Login Key for CTAPI *#90
Function Fixed Dial Code(REDIAL + )
Flexible Dial Code Customized Dial Code
576-36-750 DBS 576 (USA), issued October 2000 99
Appendix A
100 DBS 576 (USA), issued October 2000 576-36-750
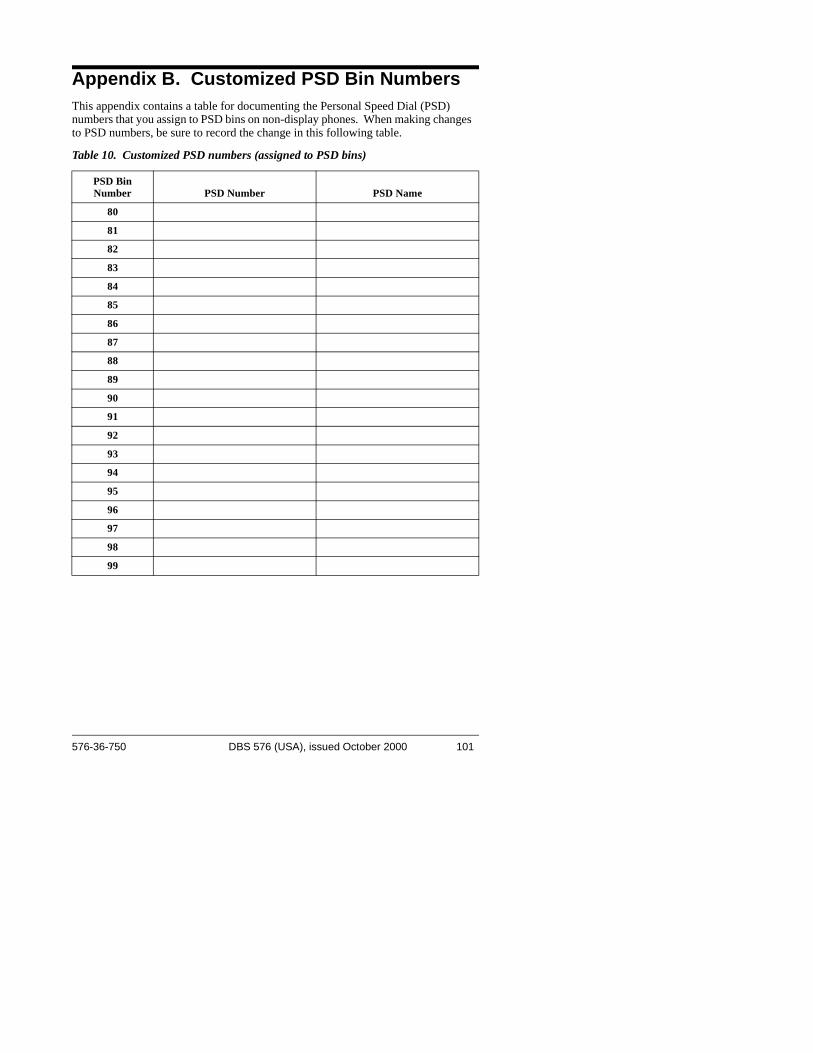
Appendix B. Customized PSD Bin NumbersThis appendix contains a table for documenting the Personal Speed Dial (PSD) numbers that you assign to PSD bins on non-display phones. When making changes to PSD numbers, be sure to record the change in this following table.
Table 10. Customized PSD numbers (assigned to PSD bins)
PSD Bin Number PSD Number PSD Name
80
81
82
83
84
85
86
87
88
89
90
91
92
93
94
95
96
97
98
99
576-36-750 DBS 576 (USA), issued October 2000 101
Appendix B
This page intentionally left blank.
102 DBS 576 (USA), issued October 2000 576-36-750